

Page 1
Carrier
Owner's
Handbook
Model 51FP
Easy to follow
instructions for
storting and operating
your new...
Electronic Control
Room Air
Conditioner
® Carrier Corporation 1^1
Form 0M51 -79
Page 2

The New Carrier Electronic Control
Room Air Conditioner Puts Spee'd
And Simplicity At Your Fingertip!
Your new Carrier roonn air condirioner feorures on omozing control panel
rhor gives you instant, electronic operating response to your fingertip
commonds. It even remembers your particular comfort commands!
When you touch the control pods, according to the simple directions
in this manual, o slight beep tone will signal that your command has
registered and your new Carrier unit will obey your wish. But, before
you do anything.. .
FIRST, FOLLOW THESE INITIAL STEPS
1Read and become completely familiar with this
Owner's Handbook and separate Installation In
structions booklet before installing and operating
your unit.
2 After unit is removed from carton, instoll it where
you want it, making sure yau use the correct electricol outlet.
3. Once installed, you con hove cooling imme
diately, before beginning your programming
operations. Go oheod. Turn it on and enjoy instant
cooling os you reod this monuol. Take your time
reoding. You should understand these instructions
thoroughly for efficient operation.
4. Plug unit in Floshing 8'swill
^ oppeor.
5. Moke sure bottom slide
lever is positioned oil the
woy over to the right on
COOL.
6. Be sure top lever for oir
exchange control is positioned in the middle on
SHUT.
7. Fon will begin to operate immediately
8 In 3 minutes, compressot will begin to operote
and cooling begins. Corrier provides this quick
stort-up feoture to give you medium cooling right
owoy while you become familiar with your unit's
operating procedures. The 3-minute deloy also
provides compressor protection.
STOP! DON'T TOUCH ANY OF THE OTHEP> CONTROLS.
WHILE YOUR UNIT IS COOLING INITIALLY, READ THIS
HANDBOOK. AT THIS POINT, WINDOW DISPLAY IS STILL
SHOWING FLASHING 8's.
mmm' ~ ^
CHECK LIST OF DO'S AND DONTS
1. Read instructions carefully
2. Be sure air conditioner sleeve is firmly onchored.
Once in place, check for looseness ond rocking.
3. Use the cotrect outlet type. Consult yout Catrier
dealer and Installation Instructions fot correct
type. It should be wired according to locol elec
tric codes. It should be o 3-prong, grounded,
115-volt or 230/208-volt (depending upon
model), a-c outlet.
4. To ovoid shock or injury, use only a grounded
receptacle.
5. Do not use a plug odapter.
6. If you must use on extension cord, consult your
Carrier deoler for the right size ond plug type.
7. To protect your worronty, ond for safety, do not
altet the power cord or plug.
8. Use only time-deloy fuses or circuit breakers.
9. Avoid running your oir conditioner neor any
thing fiammobie.
10. Lift ond hondle unit corefully, ovoiding ony shatp
edges Obtoin ossistonce when lifting.
11. If you use an outside ait conditioner cover during
off-season, be sure to remove cover during cool
ing season. Don't run air conditioner with outside
cover on.
12. Touching control padswith sharp objects (pencils,
utensils, fingernails, etc.) may domoge or scratch
pods. Use only your fingertip for touching
control pads.
Page 3

Operating Your Air
Conditioner
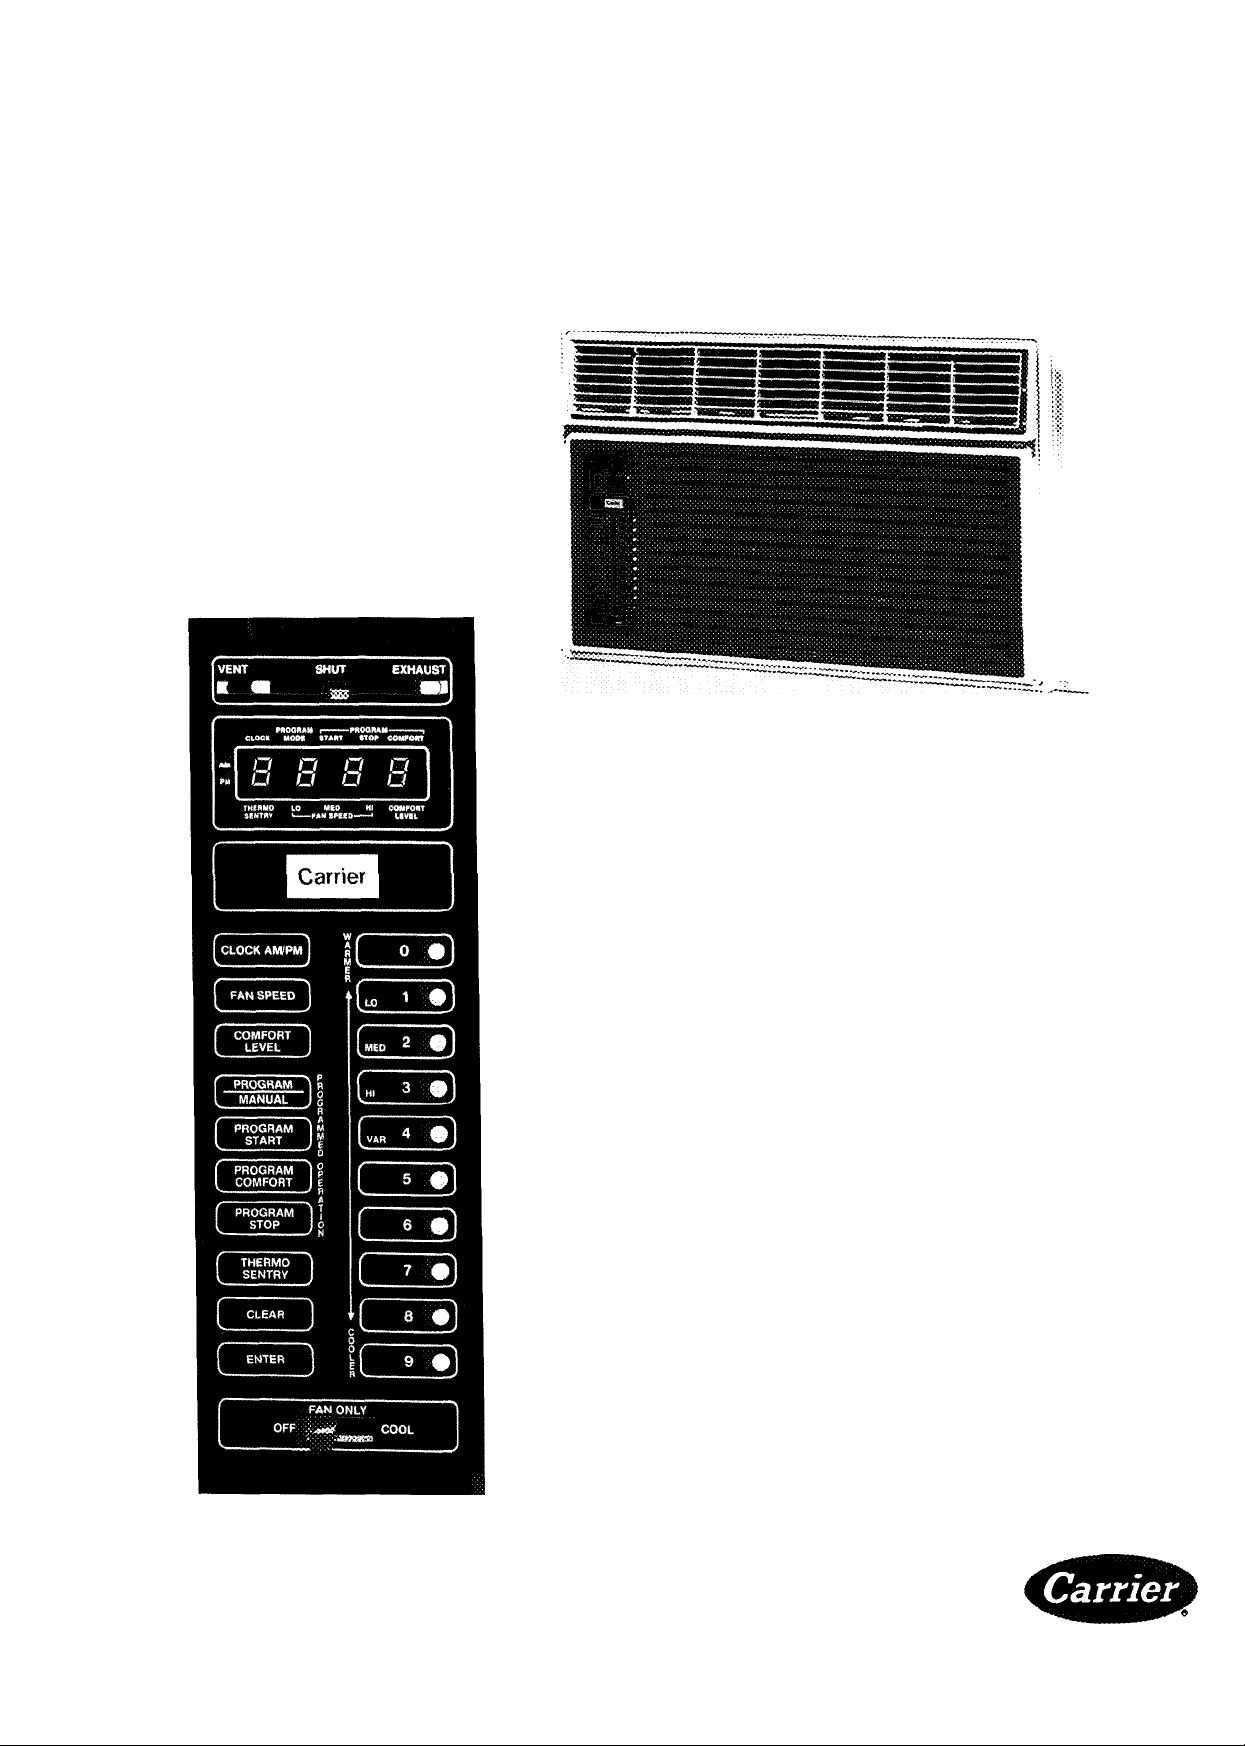
WINDOW DISPLAY
The vYindow display gives you
The rime of day. Also, small ' Lj
marker lights lighr up in rhe
windaw display To show you
whor settings hove been progrommed. For instance,
if you set fan speed for HI, o small orrow morker will
oppeor in the window display over rhe word HI.
How To Set Clock
Now that unit is plugged in, figure 8's ore flashing ond
initial cooling hos started os described in opening
section of this hondbook (page 2, Initial Steps), set
your dock first
1 Touch pod Ir should olreody be in AM
mode. Check morker light in window disploy or
AM or PM. If you wont rhe PM mode, touch
pod ogoin. Note rhe morker light chong-
ing to PM. With each touch of p^l^^pod. you
will chonge mode from AM to PM or vice verso.
NOTE. With each touch of ony pod, you will heor
o slight beep, indicating your touch has recorded
If you do not hear beep, touch again!
...
3 --y-'
Air Exchange Gjniroi
VE^П■ brings in fresh, ourcioof oir.
SHUT ciraJares cooied, indoor oir.
EXHAUST expeis stole oír.
Window Display
Sxjws rime of day.
Shews seleced setrings.
Sets dock and AM or RM
Sets fon speed — lO. MED. Hi or VARIABLE.
Selects cooling levels
Seieaor numerols for clock, ton ond
comfort settings
Progromming controis
Avvoy-from-home controller.
Adjusts — resets.
Enters commands
Seieaor switch — OF, FAJ^ ONLY. COOL
See specific operoting instructions irsside for individuoi
seleoor pods. .
2 When you touch , floshing 8's disoppeor
ond ^ 2:00 AM appears in window display.
3 A morker lighr will blink under CLOCK in window
display While marker lighr is blinking, insert correct
time You hove 10 seconds between eoch touch
If you do not moke next touch within 10 seconds,
you must begin ogoin.
EXAMPLE: For 6:45, touch 'J, jjpOj ,
4. Touch jiiisilSliiiiiii AAorker light, under CLOCK in
window disploy, stops blinking. Time is entered.
NOTES: 1. Clock does nor ser seconds. 2. To erose
rime, touch S Touches!■ Time dis-
oppeors from screen. Touch to keep time off
screen Although time remains off screen, time is
memorized To check time, touch Time is
displayed for 10 seconds, then disappears. 3. To bring
time bock to screen, touch , touch
FAN SPEED
There ore 3 fan speeds, LO (1), MED (2) and HI (3).
Fan speed effects amount ond speed of cooling. HI
gives more cooling, etc.
Fan speed con also be set ot VAR (4). In VAR, fan
operates otoll 3 speeds intermittently, depending on
Page 4

Operating Your Air
Conditioner (cont)
whor speed the air conditioner is colling for ot the
time If room is hot, fan adjusts to HI (3). If room tem
perature is moderate, fan shifts to MED (2) If room is
cool, fan shifts to LO (1 ). VAR also provides o lower
sound level when cooling requirements ore reduced
To Set Fan Speed
Touch
oppeors in window disploy.
Initially, number 4 will appear
In window display. Marker
lights appear above each fon speed (LO, MED, HI),
until you select the specific speed you wont. If you do
not select o specific fan speed within 10 seconds, time
of doywill return to windowdisploy and you will hove
to start ogoin, and fon speed will remain os it was
before you touched
EXAMPLE. For medium fan speed, touch
Within
oppeors in window display for 10 seconds with
marker light blinking over MED position. Touch
10 seconds, touch . Number 2
Time dis-
r before the 10 seconds expire Number 2
disoppeors after 10 seconds, time of day returns and
marker light remoins lit ot MED position. Eon speed
2 is now set.
NOTE: If you progrom VAR (4). follow instructions os
in obove exomple Touch í
touch , "
speed positions (LO, MED, HI). Number 4 oppeors in
window display and disoppeors in 10 seconds with
time of day returning. As unit operotes, marker light
shifts between oil 3 fon speed positions to indicóte
wtiich speed is being colled for by unit
..........
Morker lights appear over oil 3 fon
touch M
COMFORT LEVEL
To select your comfort level:
1. TouchInitially,
the number 5 will appear
in the window display (this
merely indicotes on over
age comfort level os you prepare to select o speci
fic comfort level). A blinking marker light appears
above COMFORT LEVEL in the window display.
You hove 10 seconds to select the comfort level
you wont. If you miss the 10 seconds, time of doy
will return to the window display and you will hove
to touch ogoin
2. Within the 10-second period, touch o comfort
level number, 0 - 9, for the comfort level you wont.
0 for least cooling, 9 for most cooling
------
EXAMPLE. If you wont com
fort level 7, touch
Number 7 oppeors in the
window display, marker
light continues blinking over COMFORT LEVEL
in window display.
3. Touch to set your comfort level The
number 7 disappears in 10 seconds, and time of
day returns to window display. Marker light, above
COMFORT LEVEL in window display, stops blinking
and remains lit to show o comfort level is set.
NOTE: If you inadvertently touch more than one
number, only the lost number touched is re
corded Remember, o beep sounds after every
recorded touch. If o beep does not sound, you
must touch again
If you wont to change the comfort level, touch
, touch the new comfort level desired.
oil within 10 seconds of each
touch. If you do not select o new number after
is touched, unit outomoticolly returns to
its previous setting.
If you wont to check which comfort level is pro
grammed, just touch The comfort level
number appears in the window display for 10
seconds. Number then disappears and time of
day returns to window display Comfort level, fan
speed, etc., con be checked at any time using the
obove instructions
AUTOMATIC PROGRAMMING
You con operate your Carrier Electronic
Control Room Air Conditioner either mon-
uolly (os previously described), or AUTO-
AAATICALLY.When operating outomoticolly,
the unit con be progrommed to turn off
and on ot Q different cooling level for o
particular period of the day. For automatic operation,
you use the set of four Progrom Control pods.
NOTE: Your Carrier Electronic Control unit has been
designed to accommodate a maximum of two pro
grommed comfort settings within o 24-hour period
Check the examples below
Example 1: Temperature Up — Leave for work.
Temperature Down — Before return. Unit switches to
warmer comfort level when you leave for work, then
switches bock outomatically to o cooler level before
you return from work.
Example 2; Unit Off — Leave for work. Unit On — Be
fore return. Unit shuts off completely when you leave
Page 5

for work, then comes on again outomoricolly or your
preferred cooling level when you rerurn from work
Example 3: Temperature Up — Leave for work.
Temperature Down — When fomily member returns
during day. Unit goes to warmer comfort level when
family leaves for work and school, then goes to o
cooler level when o member returns. This level re
mains day and night until unit ogoin switches to the
lower cooling level.
Operation for Example 1 :
PROGIWA
STOP^’
PROGRAM
y^START
i 'I Low cooling period
Hi cooling period.
A. To set time you wont unit
to go to warmer comfort
level:
1. Touch |. Time disappears for 10 seconds, ond morker light flashes under PRO
GRAM START in windaw display
2. Touch time numbers, such os 7 - 3 - 0 for 7:30.
Each touch must be made within 10 seconds.
Numbers oppeor in window display
3. Check arrow morker light for AM or PM. If PM
is lit, touch ogoin to switch to AM if
desired, ond vice versa.
4. Touch
B. Now, set for the warmer comfort level you want
while nobody is ot home.
1 Touch Keep the 10-second rule in
mind between touches.
2. Touch warmer comfort level number de
sired. Numbers range from 0 - 9. The lower the
level, the more energy is soved.
3 Touch
C. Now, set the time you want your preferred cool
ing level to begin again.
NOTES.
• The PROGRAM MODE marker light tells you progrommed operation is in effect.
• If you touch PROGRAM/MANUAL again, the PRO
GRAM MODE morker light goes out ond unit
returns to manual operation.
• To check the commands you hove programmed,
simply touch its corresponding pod. The command
and its blinking marker oppears in the window dis-
ploy for 10 seconds. The commond then dis-
appeors and time of doy reoppeors.
Operation for Example 2:
A. To set time you wont unit to go off, follow the
some directions os in Example 1 for setting Pro
gram Start time.
B. Now, program unit to outomatically shut off. This
con be achieved by touching then
C. Now, progrom for unit to go on ogoin ot your
desired time and comfort level. Follow some
directions os in Exomple 1 for setting Program
Stop time.
Operation for Example 3:
This operation is identicol to Exomple 1 with o slight
difference in the PROGRAM STOP time. This example
merely demonstrates thot you con set your unit to
automatically return to higher cooling level when
other fomily members might need it eorlier in the
day. Keep in mind thot only two cooling levels con be
reoched in outomotic programming, o high pre
ferred cooling level and o lower-cooling, energy
saving level.
Unit is now set to go off or to o different cooling level
ot o preset time. This is the progrom you get doy-to-
doy, unless.. .
1. You clear the program to enter o new program.
2. You temporarily switch to monuol for o porticulor
reoson.
3. You unplug your power cord or hove o power
failure (progrom must be reset).
NOTE: For outomotic programming, you need not
follow the exoct sequence os stoted obove. If you
wish to chonge o portion of your program without
resetting the entire program, you moy do so.
■1 • Touch
2. Touch time numbers, such os 4 - 0 - 0 for 4:00.
3. Check orrow morker light for AM or PM. If AM
is on, touch ogoin to switch to PM, or
vice verso.
^ Touch
5. Finally, touchto begin outomotic
operotion as you hove commonded.
To chonge from outomotic program to manual, touch
. This interrupts your outomotic program
until you ore reody to restore automatic. To end
monuol and go bock to outomotic, touch
ogoin Unit returns to originol outomotic progrom.
To change program to o new program, follow
some directions os shown above for automatic
programming.
Page 6

Operating Your Air
Conditioner (cont)
THERMO SENTRY
This pod lets you save energy, yet maintain a com
fortable temperature for pets while you ore tem
porarily owoy from home Thermo Sentry keeps
room temperature from getting too high.
Touch
lights up above THERMO SEN- ,
TRY in window diSploy. Air con- ' '
ditioner outomoticolly goes to
lowest cooling level (0). Eon goes to HI when com
pressor is operating and LO when compressor is off
This provides enough cooling for pets ond at the
some time soves energy
To end Thermo Sentry, touch QQQin, or touch
ating mode.
..........
Arrow morker ' •'"
Either touch returns unit to original oper
Operating Tips
FAN ONLY
Slide lever to FAN ONLY to shut '
down cooling and provide fan -................" ~.
use only Clock also runs. Slide lever to OFF to shut
everything off except clock.
Keep lever on COOL whenever cooling is needed
ond to operate oil other functions. Your Corrier
Electronic Control unit is designed to memorize your
commands. Therefore, if you switched to o FAN ONLY
or OFF position and wish to return to your originol
programmed mode, simply slide lever to COOL.
.......
........................
AIR CONTROL
Slide iever to VENT to bring in
fresh, outdoor oir. Slide lever
to SHUT to close vent and circulote cooled, indoor oir.
Slide lever to EXHAUST to expel stole oir from indoors.
If EE oppeors in clock window dis
play, on error has been mode
Touch CLEAR ond stort ogoin
After touching o control pod,
morker lights blink in window dis
play next to your selection for
seconds. The marker lights remoin
on after ENTER is touched. If TO
seconds elopse before you press
ENTER, you must start over.
Vocotioning? Away for o week
end? Slide bottom lever to OFF
when no cooling is required. When
you return, slide to COOL to restore
originol settings No need to reset.
Settings you select show in window
disploy for TO seconds öfter you
touch ENTER. Then time returns.
To check ony setting, touch its con
trol pod. Setting oppeors briefly in
window disploy — then disoppeors.
If floshing 8's oppeor öfter unit has
been programmed, there was o
power shutdown and power is
bock on. You must reset oil controls.
If oir conditioner goes off ond there
is no window display light, check
cord, electrical outlet ond fuse. Use
o time-deloy fuse or circuit breaker
of proper size
10
V /
If room is too cold, set comfort
control to o lower number and fan
speed to o lower level
If room is too worm, set comfort
control ond fan speed higher.
If cool oir is blowing uncomfortably,
adjust louvers.
The more people in the room, the Q
more cooling is needed ^
If oir conditioner stops, but clock is
running, be sure bottom slide lever
is on COOL. Check programming
control settings to moke sure oil
were set properly.
If oir conditioner is running but not
cooling, the comfort setting may
not be set properly Tty increosing
the cooling comfort level Check
fon setting. Check to be sure there
is no oir blockoge oround unit from
furniture, drapes, etc.
If there ore no floshing 8's when
you first turn unit on, check fuse or
circuit breoker
•x
'•‘X.
reiSiicTs:
#
Page 7

De Economy Wise
These economy rips con help maximize comforr ond
reduce power consumption.
• Set your cooling level or the setting consistent with
the comfort level and economy you desire Once
you hove determined the most economical com
fort setting, leave the setting alone.
• Keep the filter cleon! Normally, cleaning every
30 days is sufficient, but the filter is very efficient in
removing airborne particles, and inspection may
indicate the need for more frequent cleaning
• Use drapes, shades, Venetian blinds, awnings, etc,
to prevent direct sunlight from hearing the raom.
Do not obstruct front of unit.
• Stort your unit before outside temperature,
caaKing heat, ar gatherings of people moke the
room uncomfortoble This ovoids the initiol period
of discomfort while the unit lowers the temperoture and humidity to your desired level.
AIR DIRECTION
An air discharge grille is locoted near the top of your
room air conditioner to direct air for gentle, droft-free
cooling Tip the grille for upward or horizontal oirflow
Two levers protruding thru grille allow movement of
louvers to the left or right
As on optional feoture for installations mounted
high on a wall, the discharge grille may be inverted
to direct cool air downward. See directions in the
Installotion Instructions or osk your Corrier dealer
about the proper procedure.
Cleaning and
Maintenance
(Turn air conditioner off and remove plug from wall
receptacle.)
Clogged filters con result in reduced cooling, inter
mittent operotion, ice buildup on indoor (evoporotor) coil, or blown fuses. Take o few minutes each
month (more often if needed) to inspect unit filter
ond clean os required.
1 Press down on top corners of grille ond pull out-
word. Lift grille from bottom retoining clips.
2 Remove filter from plostic pins in bock of the grille
Vocuum or wash filter in warm woter Shake filter
vigorously to remove excess woter and reploce
on plastic pins (be sure the filter completely covers
the foce of the grille).
3. Set grille on retoining clips and push top of grille
firmly onto cabinet
Coil — Cleon cooling coil gently with vacuum
cleaner. Use a soft cleaning brush attachment. If you
do not hove this type of vocuum, use o soft bond
brush or cloth.
WMNiNG; Coil fins ore ^Torp, Be careful not to
injure ycwrself v^Ue deoning coil. do nor '
saofch or bend coil fins.
Cleon electronic control panel, grille and cabinet
periodicolly to keep your unit looking like new by
using o soft doth, dampened with water or o mild
detergent solution
WAITING; Before using o damp deoning doth,
checfs to be sure unit Is unplugged.
NOTE: When unit is unplugged, and plugged in again
öfter deoning, floshing 8’s appear in the disploy. Unit
must then be completely reprogrommed os de
scribed in this booklet.
Condensation on grille moy occur on humid days
when the unit is first started. Keep doors ond windows
closed during operation and the moisture should
quickly evoporote. On exceptionally hot or humid
doys, you moy notice water dripping from the reor of
the unit This is normal and merely meons the room
air conditioner is doing its job — cooling ond dehumidifying the room. If water drips into the areo
being cooled, check to be sure unit is mounted level
(or pitched slightly to the rear).
Page 8

Cleaning and
Maintenance (cent)
SERVICE CHECKS YOU CAN EASILY PERFORM YOURSELF
You may find that if your Carrier room oir conditioner
foils ro start or cool properly, the problem is minor and
con be handled quickly without o servicemen To
save yourself on unnecessary service call, refer to the
troubleshooting chort below
PROBLEM
Ur>iidc»e$fioi
start
Unit (Joes not
cool property
Ice or frost forms
on indoew coiit
*lf fuse blows or circuit breaker trips a second time, do not attempt to start unit
again Contact your Carrier dealer for assistance
fWhen outdoor temperature is approximately 55 F or below, indoor coil frosting
may occur
Check periodically — A qualified service technician
should check your unit periodically far normal opera
tion, ond clean and lubricate all parts as required
You should also know that liquid refrigerant passing
thru the system and the sound of the compressor
CAUSE 1 SOLUTION
1. Blown fuse
2. Circuit breaker tripped
3. Unitcordunpiugged
1. f ilter dirty
2. improper setting
3. Exhaustopen
1 Lowoutside
temperature
2 Filter dirty
1 Replaceoniyonce.'
1 Reset onty once ■
1 Replug into wait receptacle.
1 Clean filter.
1 Reset todesiredcooling setting.
! Close exhaust
i Operate FAN without cooling
1 until ice disappears.
1 Clean filter.
storting ore all normal. These sounds merely mean
thot the unit is monitoring room temperature ond
conditioning the air os needed
If your unit still foils to operate properly öfter you
complete oil of the owner's service checks, contoct
your Carrier deoler or the outhorized service center
he recommends.
If still not sotisfied, contoct the Corrier distributor
serving your area.
Next, you may write Carrier Air Conditioning Com
pany, Consumer Relations Department, P.O. Box
4Ö0Ö, Syracuse, N Y 13221.
Should you still feel your problem is unresolved
öfter contacting Carrier, you moy request third party
orbitrotion. AAACAP, a group of independent con
sumer experts voicing views at the highest leveis of
the mojor opplionce industry, provides this service.
Write: Mojor Applionce Consumer Action Ponel
20 North Wocker Drive
Chicago, Illinois 60606
Store your name, address ond telephone number;
model ond serial numbers of oir conditioner; date
purchased ond from whom (include oddress);
servicing agent's name; locotion of air conditioner
and cleor description of problem ond service
required.
Warranty Information
A 5-year Worronty certificate is included with the unit.
Warronty coverage becomes effective on the date
of sale. Therefore, it is a good idea to keep your bill
of sole ond worronty In o sofe ploce wih your Owner's
Handbook.
rzx
i—n
y
*To find model and serial num
bers, remove decororive fronr
grille ond refer to nomeplore
locored os shown
1
^
______________
D
■
Record here and retain the information your servicemon needs to know obout your unit.
Dealer's Nome_______________________________
Address
____________________________________
Telephone.
Purchase Dote.
Model No.*
Serial No.*
___
___
t.
Form OM51-79 New Printed in U S A 11-81
PC 131
Catalog No 535-11 7
 Loading...