

Page 1
Single Duct Air Terminal Zone Controller
VAV Fan Terminal Zone Controller
Secondary Terminal Zone Controller
Installation, Start-Up and
Configuration Instructions
Part Numbers 33ZCFANTRM, 33ZCVAVTRM, 33ZCSECTRM
CONTENTS
Page
SAFETY CONSIDERATIONS
GENERAL
INSTALLATION
General
Zone Controller Hardware
Field-Supplied Hardware
• SPACE TEMPERATURE SENSOR
• PRIMARY AIR TEMPERATURE SENSOR
• SUPPLY AIR TEMPERATURE (SAT) SENSOR
• RELATIVE HUMIDITY SENSOR
• INDOOR AIR QUALITY (CO
Mount Zone Controller
• LOCATION
• MOUNTING
Connect the Power Transformer
Connect Airflow Pickups
Install Sensors
• SPACE TEMPERATURE SENSOR INSTALLATION
• PRIMARY AIR TEMPERATURE SENSOR
INSTALLATION
• SUPPLY AIR TEMPERATURE (SAT) SENSOR
INSTALLATION
• INDOOR AIR QUALITY SENSOR INSTALLATION
• HUMIDITY SENSOR (WALL-MOUNTED)
INSTALLATION
Remote Occupancy Contact
Connect the Outputs
Modulating Baseboard Hydronic Heating
Connect the CCN Communication Bus
• COMMUNICATION BUS WIRE SPECIFICATIONS
• CONNECTION TO THE COMMUNICATION BUS
START-UP
Perform System Check-Out
Network Addressing
Initial Operation and Test
Airflow Check
Fan and Heat Configuration and Test
CONFIGURATION
Points Display Screen
Modify Controller Configuration
• ALARM LIMIT CONFIGURATION SCREEN
• CONTROLLER IDENTIFICATION SCREEN
• HOLIDAY CONFIGURATION SCREENS
• LINKAGE COORDINATOR CONFIGURATION
SCREEN
• OCCUPANCY CONFIGURATION SCREEN
• SET POINT SCREEN
. . . . . . . . . . . . . . . . . . . . . . . . . . . . . . . . . . . . . . . . 2
. . . . . . . . . . . . . . . . . . . . . . . . . . . . . . . . 2-29
. . . . . . . . . . . . . . . . . . . . . . . . . . . . . . . . . . . . . . . . . . 2
. . . . . . . . . . . . . . . . . . . . . . . . . . . . . . . . . . 19
. . . . . . . . . . . . . . . . . . . . . . . . . . . . 26
. . . . . . . . . . . . . . . . . . . . . . . . . . . . . . . . . . . . 29-31
. . . . . . . . . . . . . . . . . . . . . . . . . . . . . 30
. . . . . . . . . . . . . . . . . . . . . . . . . . . . . . . . . . . 30
. . . . . . . . . . . . . . . . . . . . . . . . . . . . 31-50
. . . . . . . . . . . . . . . . . . . . . . 1
. . . . . . . . . . . . . . . . . . . . . . . . 2
. . . . . . . . . . . . . . . . . . . . . . . . . 2
) SENSOR
2
. . . . . . . . . . . . . . . . . . . . . . . . . . . 4
. . . . . . . . . . . . . . . . . . . . . . . . . 7
. . . . . . . . . . . . . . . . . . . . . . . . 30
. . . . . . . . . . . . . . . . . . . . . . . . . . . 31
. . . . . . . . . . . . . . . . . . 7
. . . . . . . . . . . . . . . . . . . . . 26
. . . . . . . . 26
. . . . . . . . . . 26
. . . . . . . . . . . . . . . . . . . . . 29
. . . . . . . . . . . . 30
. . . . . . . . . . . . . . . . . 32
Service Configuration Selection Screen
• AIRFLOW SERVICE CONFIGURATION SCREEN
• TERMINAL SERVICE CONFIGURATION SCREEN
• OPTIONS SERVICE CONFIGURATION SCREEN
• SECONDARY DAMPER SERVICE
CONFIGURATION SCREEN
Maintenance Table Menu Screen
• LINKAGE MAINTENANCE TABLE
• OCCUPANCY MAINTENANCE TABLE
• ZONE AIR BALANCE/COMMISSIONING TABLE
• ZONE MAINTENANCE TABLE
. . . . . . . . . . . . . . . . 43
. . . . . . . . . 37
SAFETY CONSIDERATIONS
SAFETY NOTE
Air-handling equipment will provide safe and reliable
service when operated within design specifications. The
equipment should be operated and serviced only by
authorized personnel who have a thorough knowledge
of system operation, safety devices and emergency
procedures.
Good judgement should be used in applying any manufacturer’s instructions to avoid injury to personnel or damage to equipment and property.
Disconnect all power to the unit before performing maintenance or servic e. Unit may automati cally start if pow er is
not disconnected. Electrical shock and personal injury
could result.
If it is necessary to remove and dispose of mercury contactors in electric heat secti on, follow al l local, sta te, and federal laws regarding disposal of equipment containing
hazardous materials.
Manufacturer reserves the right to discontinue, or change at any time, specifications or designs without notice and without incurring obligations.
Book 1 4
Ta b 1 1 a 1 3 a
PC 111 Catalog No. 533-355 Printed in U.S.A. Form 33ZC-1SI Pg 1 303 11-99 Replaces: New
Page 2

GENERAL
The zone controller is a single duct, fan powered, Variable
Air Volume (VAV) terminal control with a factory-integrated
controller and actuator. The zone controller maintains precise
temperature control in the sp ace by operating the terminal f an
and regulating the flow of conditioned air into the space. Buildings with diverse loading conditions can be supported by controlling reheat or supplemental heat.
The VAV Fan Terminal Zone Controller (33ZCFANTRM)
provides dedicated control functions for series fan or parallel
fan powered terminals, single duct terminals with 3 stages of
heat, or as a primary controller for dual duct or zone pressure
control applications.
The Single Duct Air Terminal Zone Controller
(33ZCVAVTRM) provides dedicated control functions for single duct terminals with modulating heat or up to 2 stages of
heat.
When the VAV Fan Terminal Zone Controller is used in
conjunction with a secondary terminal and the 33ZCSECTRM
secondary terminal zone controller, either dual duct or zone
pressurization applications can be supported.
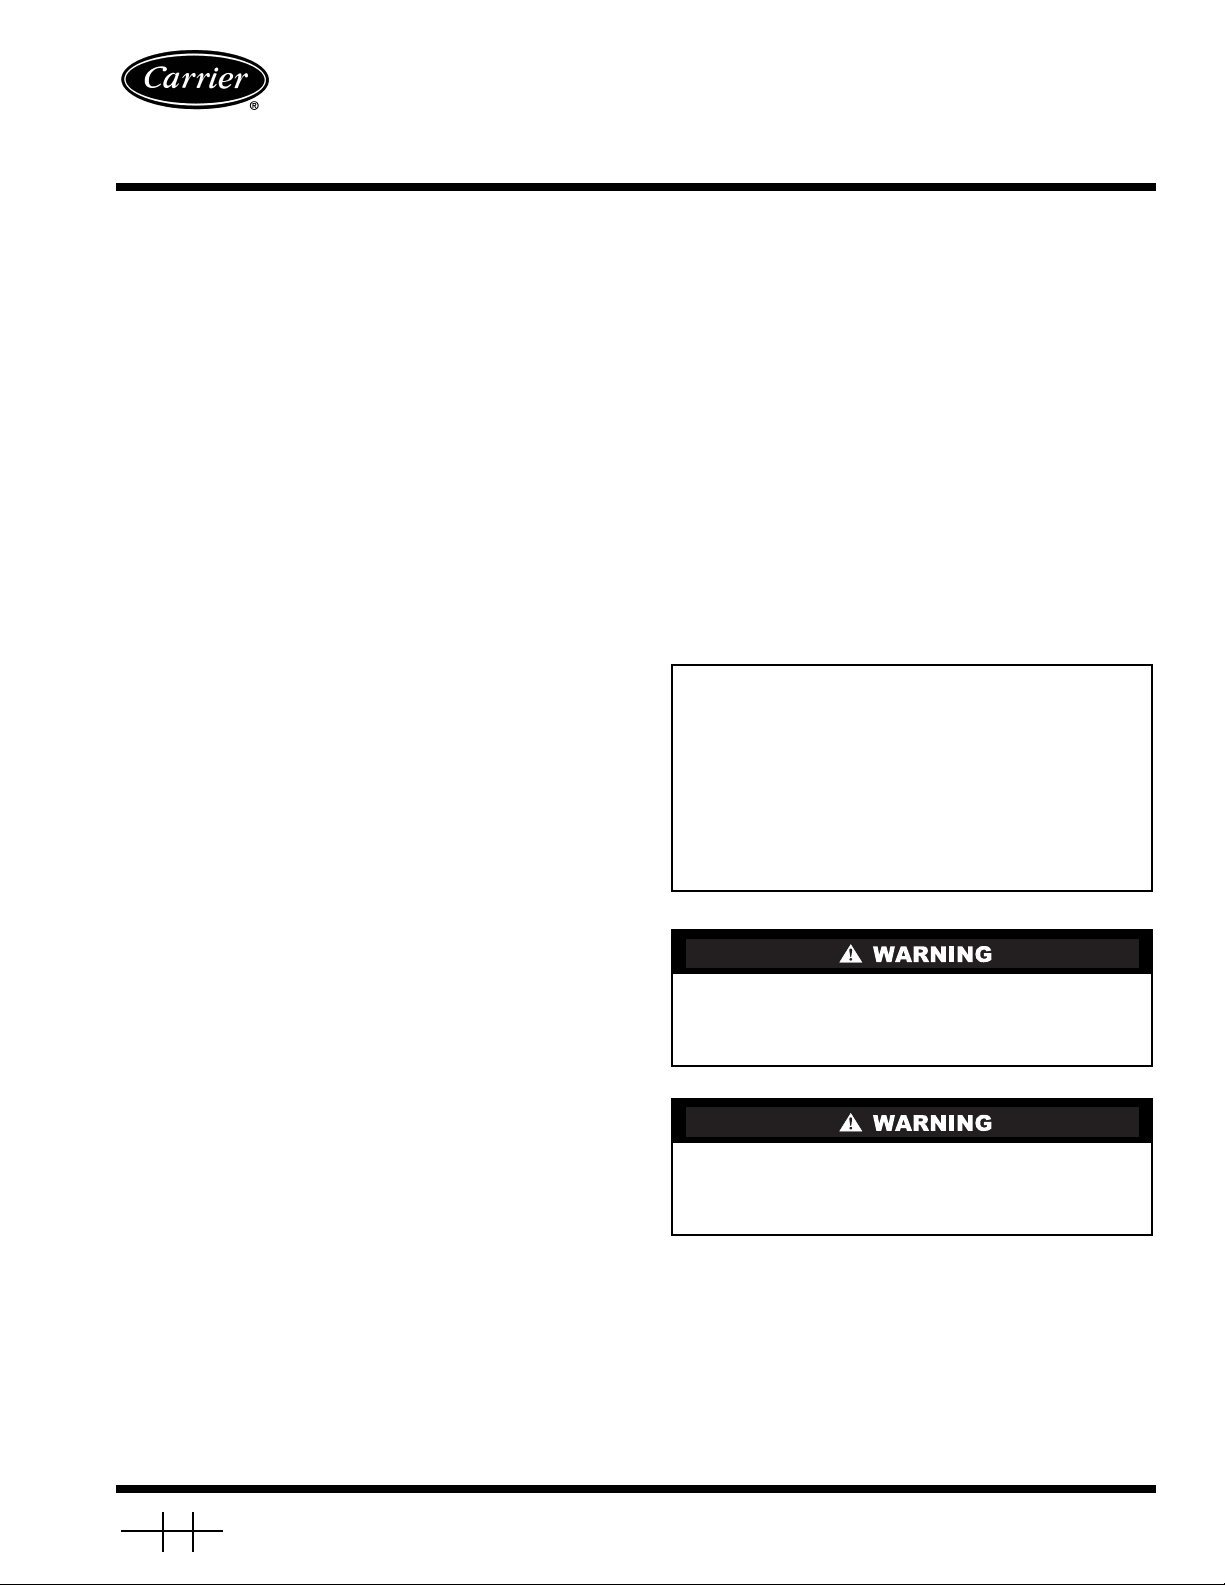
Carrier’s Linkage system is an integrated combination of
Carrier Comfort Network (CCN) controllers for use with Single Duct air terminals and VAV Fan Powered terminals. The
Single Duct air terminal and VAV Fan terminal zone controllers are part of the Carrier ComfortID system.
Devices manufactured by Carrier which have Product Integrated Controls on the same communication bus as the zone
controller, air handlers (such as the 39L,T), or large rooftop
units do not require an external controller to function as part of
a Carrier linkage system. These air handlers or large rooftop
units feature factory-installed Product Integrated Control (PIC)
controllers that are directly compatible wi th the system. Consult your local Carrier representative for the complete list of
compatible air handlers. The Comfort System AirManager
(CSAM) or the CC6400 supports linkage for non-Carrier devices or air handlers. Figure 1 shows an example of a Carrier
linkage system.
INSTALLATION
General —
direct digital control (DDC) controller for variable air volum e
(VAV) air terminals. It can be retrofitted on units manufactured
by Carrier or other manufacturers to provide pressureindependent VAV control.
Each zone controller has the ability to function as a linkage
coordinator for systems with up to 128 zones. As a linkage coordinator, a zone controller will retrieve and provide system information to the air handling equipment and other zone controllers. A zone controller can function as a stand alone device
by installing a primary supply air sensor.
The zone controller monitors differential pressure from an
airflow pickup (or a pair of pickups) mounted on the terminal
box. It compares the resulting signal to an airflow set point in
order to provide pressure-independent control of the air passing
through the terminal.
The zone controller is connected to a wall-mounted, fieldsupplied, space temperature sensor (SPT) in order to monitor
zone temperature changes and satisfy zone demand.
On stand-alone applications or applications with heat, the
zone controller must be connected to a field-supplied supply air
temperature (SAT) sensor to monitor the temperature of the air
delivered by the air terminal.
Carrier’s Network Service T ool can be connected to the system at the SPT sensor if CCN communication wiring is run to
The zone controller is a microprocessor-based
the SPT sensor. The Network Service Tool can be used to adjust set points, set operating parameters, and fully configure the
zone controller or any device on the system.
Zone Controller Hardware —
The zone controller
consists of the following hardware:
• terminal control module
• torque-limiting damper actuator
• airflow transducer (velocity sensor)
• plastic enclosure
• one no. 8 x
1
/2-in. sheet metal screw (to prevent zone
controller rotation)
NOTE: A filter is not provided for the airflow transducer.
For installations on systems with a high degree of impurities, an air filter can be purchased and installed on the transducer high pressure pickup.
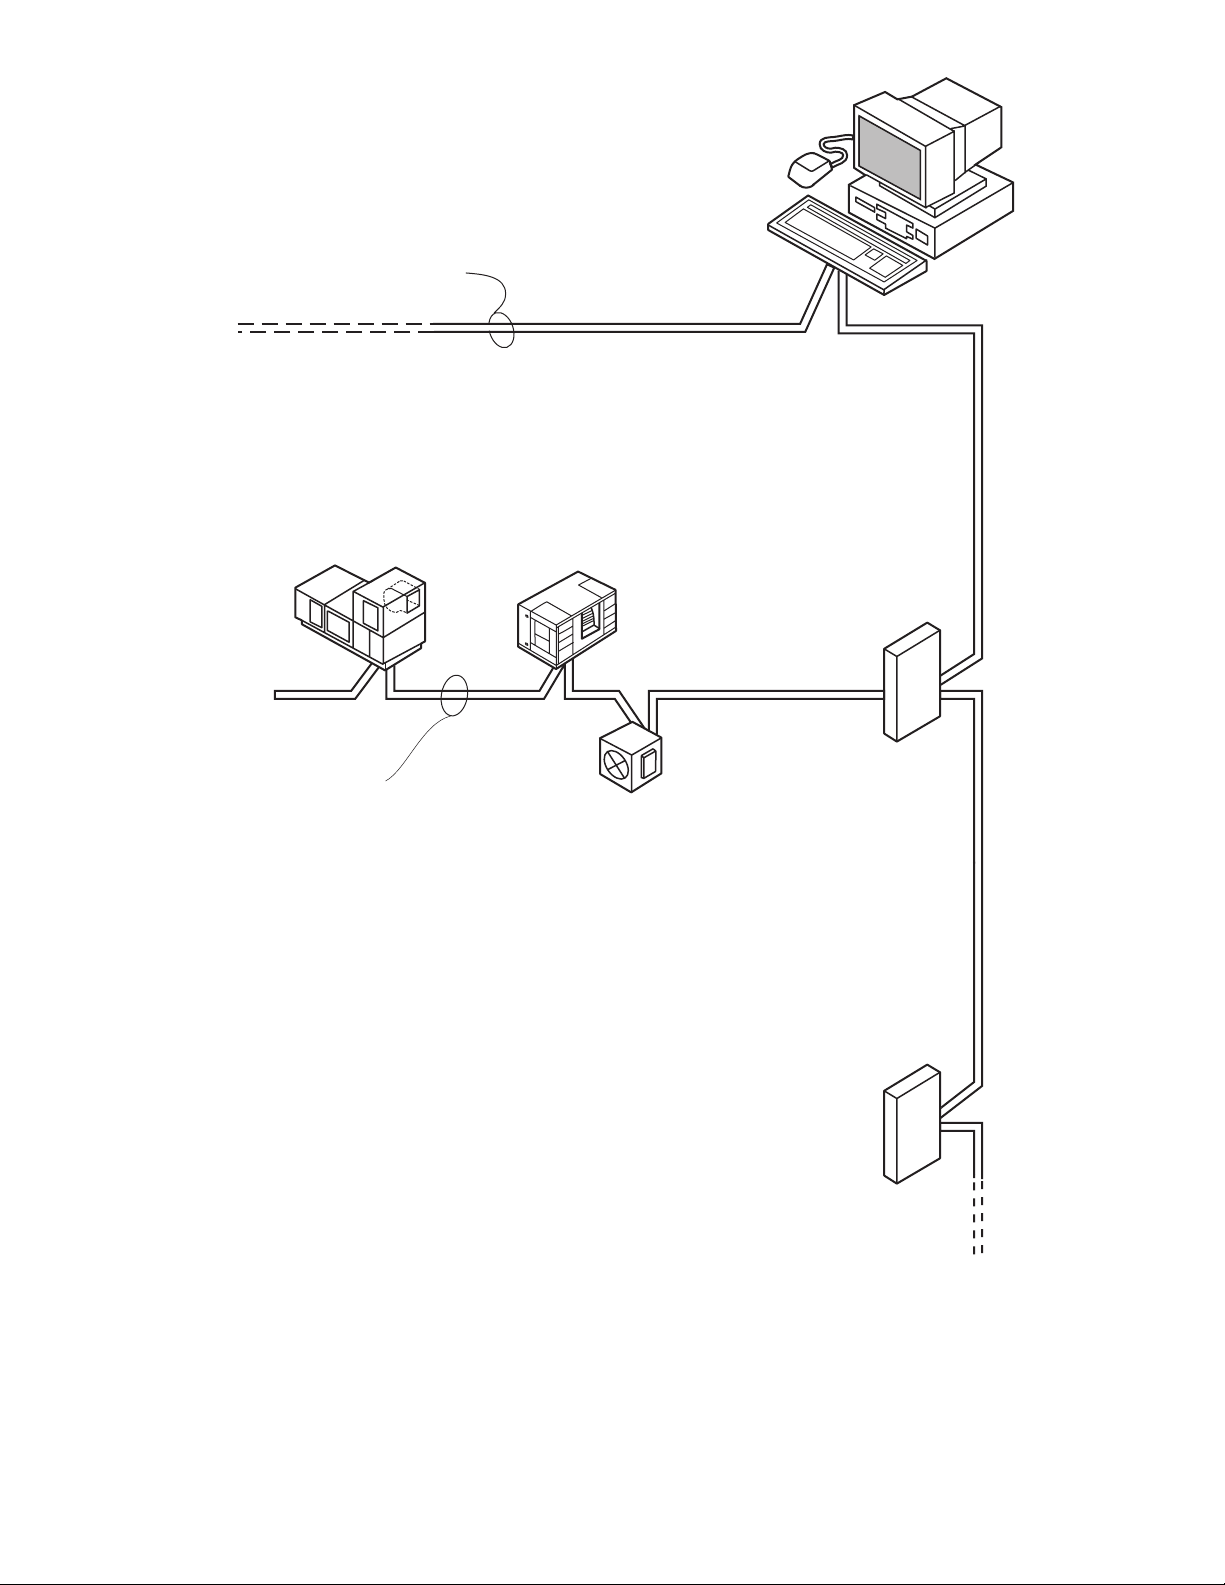
Figure 2 shows the zone controller physical details.
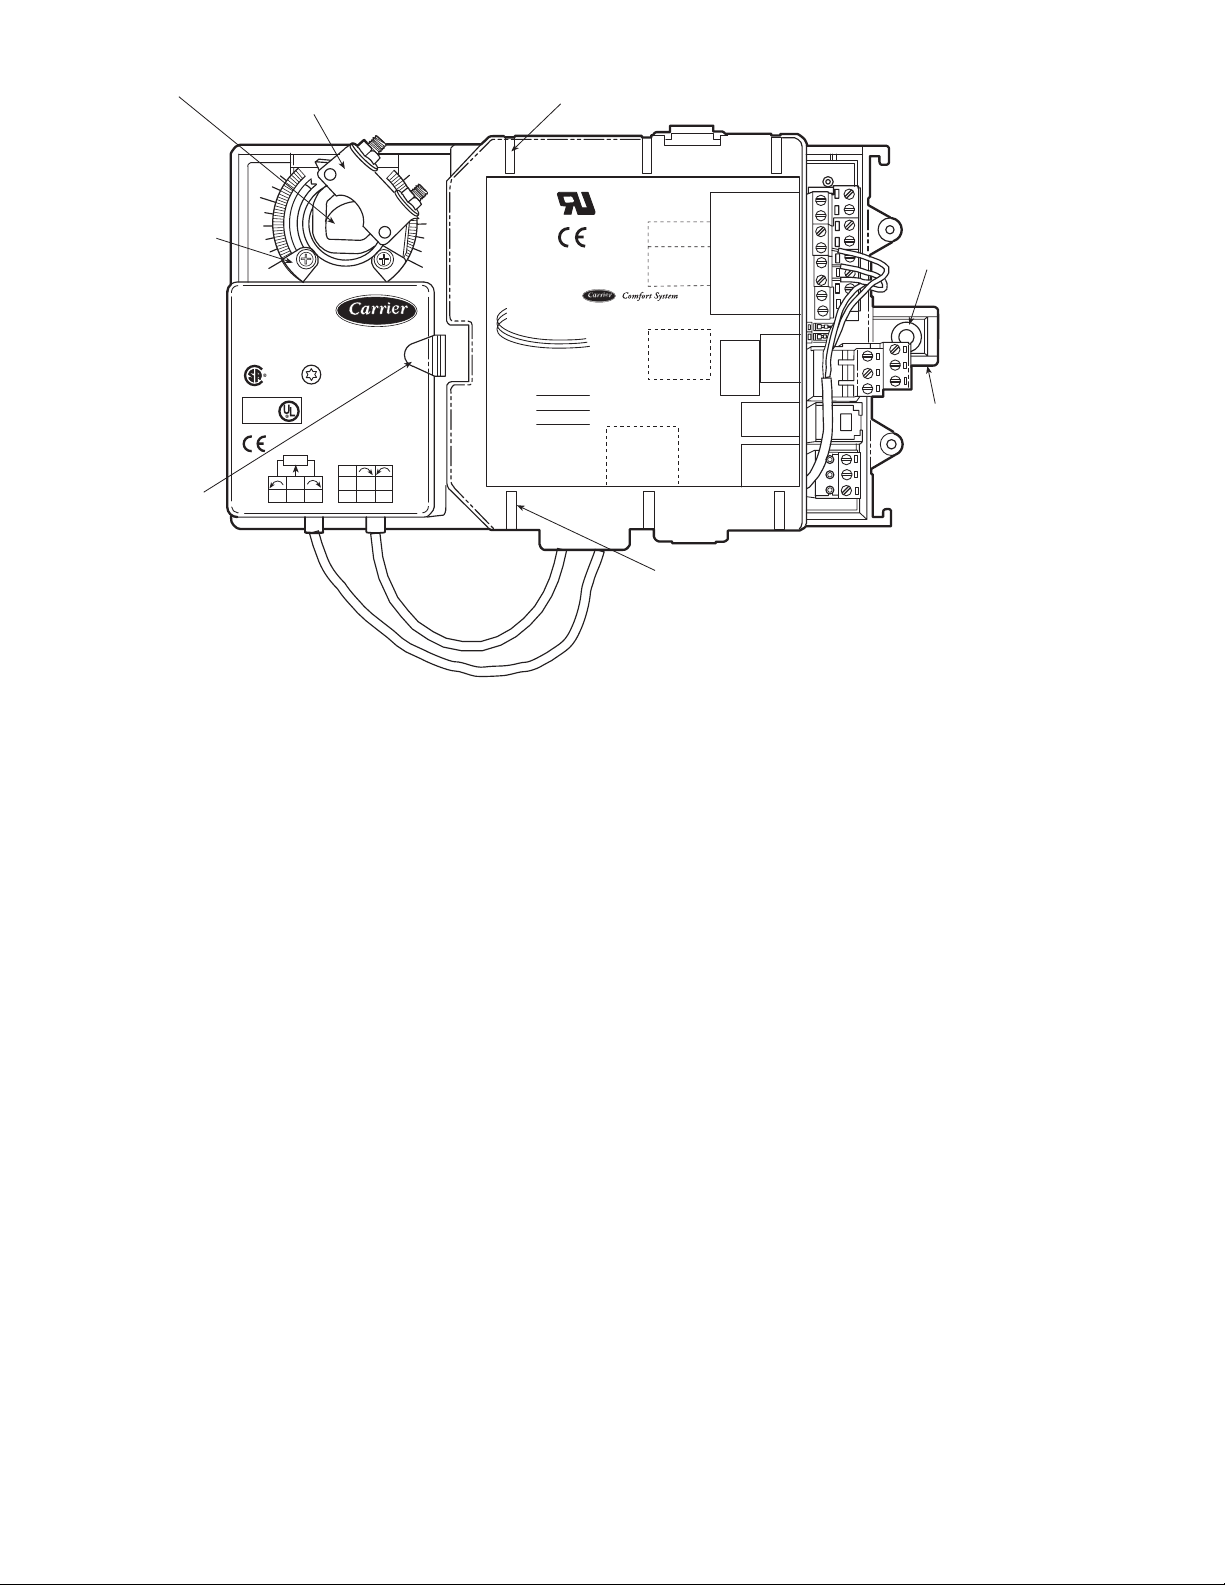
Figures 3-5 show the 3 different types of zone controllers.
Field-Supplied Hardware —
Each zone controller requires the following field-supplied components to complete its
installation :
• air terminal unit
• space temperature sensor
• transformer — 24 vac, 40 va
• two no. 10 x
sensor to duct, if required)
• two no. 6-32 x
1
/2-in. sheet metal screws (to secure SAT
5
/8-in. screws (to mount SPT sensor base
to electrical box)
• contactors (if required for fan or electric heat)
• supply air temperature sensor (required for terminal with
ducted heat)
• indoor air quality sensor (if required)
• relative humidity sensor (if required)
• one SPST (for each stage of electric heat, not required
for Carrier fan terminals)
• valve and actuator for hot water heat (if required)
• delta pressure airflow pickup
NOTE: When selecting an airflow pickup, it is the
designer's responsibility to select a sensor that provides the
desired ou tput at the design airflow.
•wire
• polyethylene tubing (for pressure pickup)
• bushings ( re qu ire d wh en m o un tin g SAT sensor in a duct
6-in. or less in diameter)
• primary air temperature sensor (if required)
SPACE TEMPERATURE SE NSOR — Each zone control-
ler requires a field-supplied Carrier space temperature sensor.
There are two sensors available for this application:
• 33ZCT55SPT, Space Temperature Sensor with Override
Button
• 33ZCT56SPT, Space Temperature Sensor with Override
Button and Set Point Adjustment
PRIMARY AIR TEMPERATURE SENSOR — A fieldsupplied, primary air temperature (PAT) sensor (part number
33ZCSENPAT) is used on a zone controller which is functioning as a Linkage Coordinator for a non CCN/Linkage compatible air source.
SUPPLY AIR TEMPERATURE (SAT) SENSOR — On
stand-alone applications or applications with ducted heat, the
zone controller must be connected to a field-supplied supply air
temperature (SAT) sensor (part number 33ZCSENSAT) to
monitor the temperature of the air delivered by the air terminal.
The zone controller will maintain the air temperature below the
maximum air temperature in ducted heating applications.
2
Page 3
CCN PRIMARY BUS (BUS 0)
CCN
SYSTEM
MONITORING
SOFTWARE
FULLY
COMPATIBLE
AIR HANDLER
SECONDARY BUS
CC6400 OR CSAM
EQUIPPED
NON-CCN
AIR HANDLER
BRIDGE
(RECOMMENDED)
COMFORTID
EQUIPPED
AIR TERMINAL
(1 OF UP TO 128)
ADDRESSED
SEQUENTIALLY
LEGEND
CCN —
CSAM —
Carrier Comfort Network
Comfort System
Air
Manager
COLLECTION
DATA
OPTION
Fig. 1 — Typical Carrier Linkage System
3
Page 4
DAMPER
SHAFT
ACTUATOR
CLAMP
ASSEMBLY
LOW PRESSURE
TUBING ROUTING
LOW
MECHANICAL
STOP
1
®
3
ZONE Controller
3art Number: 33ZCFANTRM
S/N:
Bus#:
Element#:
Unit#:
HIGH
ACTUATOR
RELEASE
BUTTON
0
HF23BJ042
Made in Switzerland
by Belimo Automation
LR 92800
NEMA 2
LISTED
94D5
TENP IND &
REG. EQUIP.
Class 2 Supply
yel
→
35 in-lb (4 Nm)
80...110s
24VAC/DC
50/60 Hz
3VA 2W
5K
COM
WIP
1
2
red wht
ora
blk
blu
Fig. 2 — Zone Controller Physical Details (33ZCFANTRM Shown)
RELATIVE HUMIDITY SENSOR — The
33AMSENRHS000 relative humidity sensor is required for
zone humidity control (dehumidification).
NOTE: The relative humidity sensor and CO
sensor cannot
2
be used on the same zone controller.
INDOOR AIR QUALITY (CO
) SENSOR — An indoor air
2
quality sensor is required for optional demand control ventilation. The CGCDXSEN002A00 CO2 Sensor is an indoor,
wall mounted sensor with an LED display. The
CGCDXSEN003A00 CO
Sensor is an indoor, wall mounted
2
sensor without display .
NOTE: The relative humidity sensor and CO
sensor cannot
2
be used on the same zone controller.
Mount Zone Controller
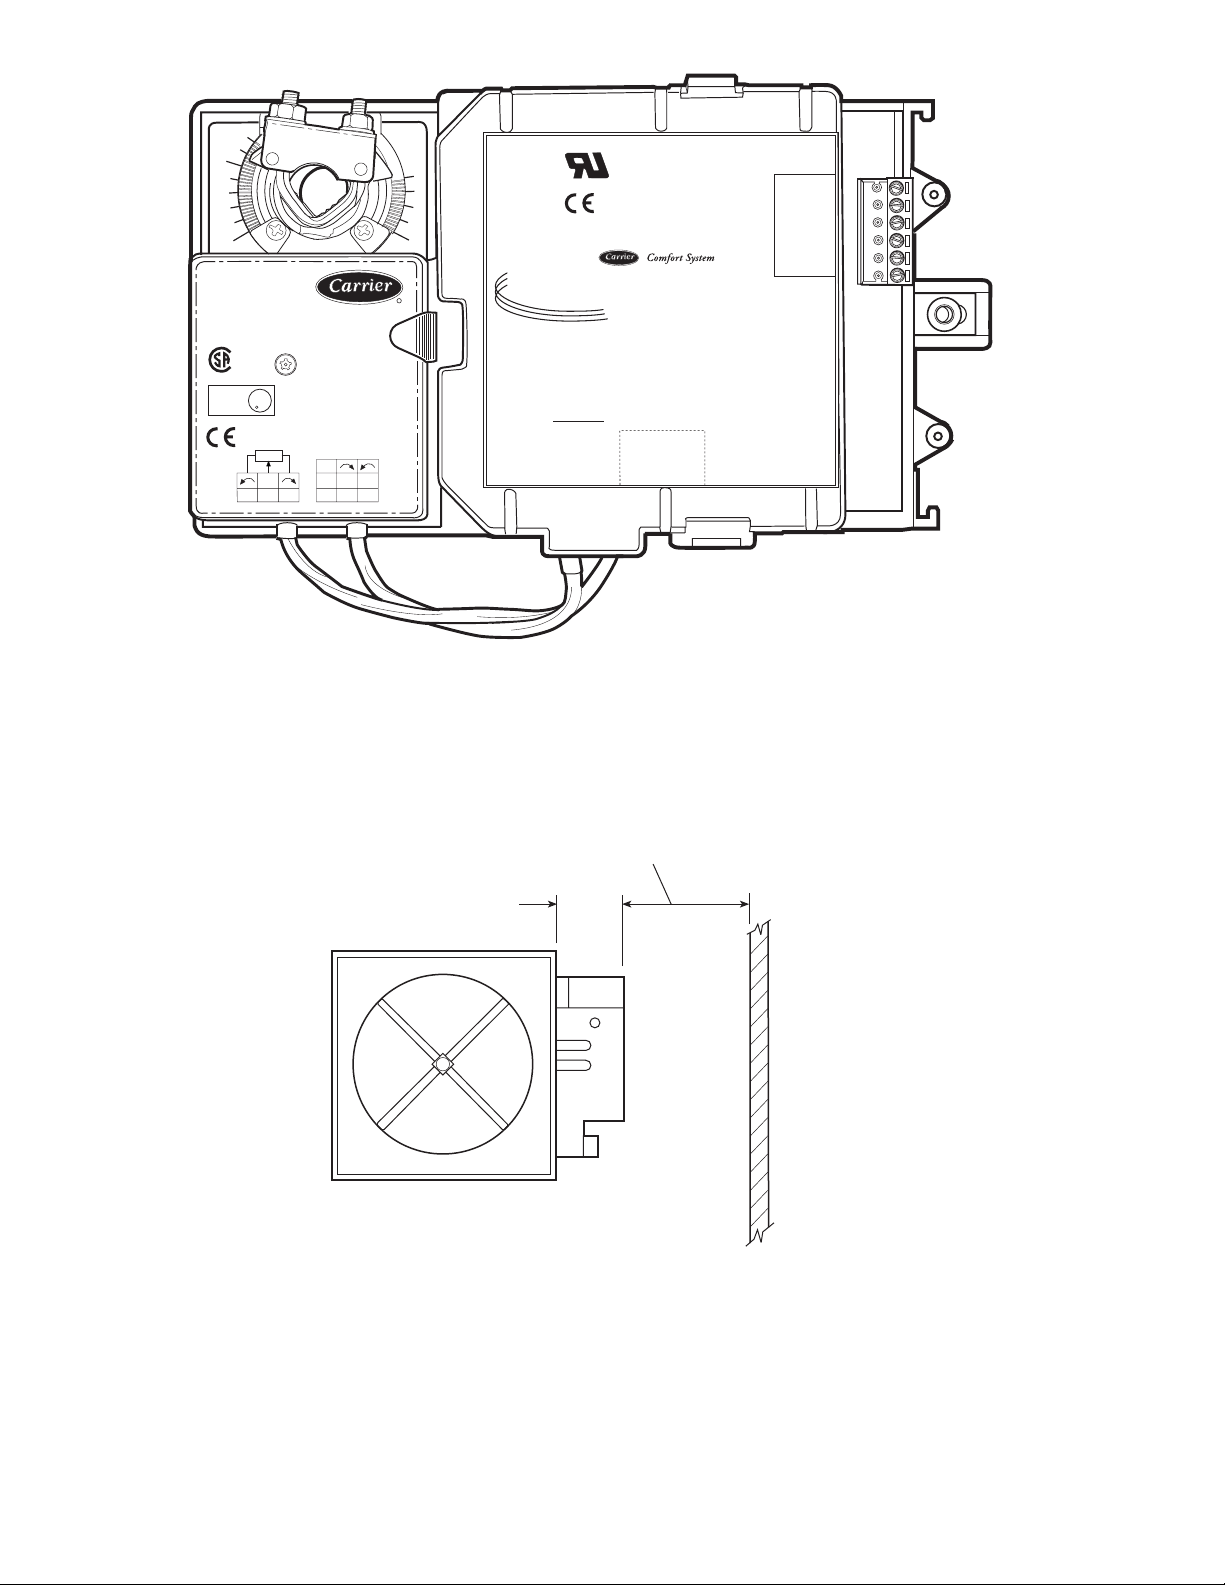
LOCA TIO N — The zone controller must be mounted on the
air terminal’s damper actuator shaft. For service access, there
should be at least 12 in. of clearance between the front of the
zone controller and adjacent surfaces. Refer to Fig. 6.
MOUNTING — Perform the following steps to mount the
zone controller:
1. Visually inspect the damper and determine the direction in which the damper shaft moves to open the
damper — clockwise (CW) or counterclockwise
(CCW). Refer to Fig. 7.
If the damper rotates CCW to open, it does not require
any configuration changes.
If the damper rotates CW to open, then the damper
actuator logic must be reversed. This is done in the
software when performing system start-up and damper
calibration test. Do not attempt to change damper rotation by changing wiring. This will upset the damper
position feedback potentiometer readings.
2. Rotate the damper shaft to the fully closed position.
Note direction of rotation.
15
US
C
1
J6
2
1
J7
3
®
1
J8
3
J6
1
CCW
COMCWHEAT1
24VAC
FAN AC
FAN
24VAC
N/A
HEAT3
CW
COM
COW
SEC DMP
6
HEAT2
RH/IAQ
SECFLOW
J4
DMPPOS
1
1
3
GND
+10V
GND
TEST
GND
CCN
J2A
1
3
+
J1
G
-
J3
+24V
SPT
GND
SAT
T56
GND
PAT
REMOTE
1
LEN
J2B
3
SRVC
+
24VAC
16
GROMMET
2
+
G
-
ANTIROTATION
TAB
-
G
NOTE: Actuator clamp accepts dampers
HIGH
PRESSURE
TUBING
ROUTING
shafts with the following characteristics:
Round —
Square —
1
/4-in. to 5/8-in.
(6 to 16 mm)
1
/4-in. to 7/16-in.
(6 to 11 mm)
Damper shaft must be a minimum of 1.5-in.
(38 mm) long.
3. Press the release button on the actuator and rotate the
clamp in the same direction that was required to close
the damper in Step 2.
4. Press the release button on the actuator and rotate the
actuator back one position grad uat i on. Releas e t he b utton and lock the actuator in this position.
5. Mount the zone controller to the terminal by sliding
the damper shaft through the actuator clamp assembly.
Secure the zone controller to the duct by installing
the screw provided through the gromm et in the antirotation tab. Be sure the floating grommet is in the
center of the slot. Failure to center the grommet may
cause the actuator to stick or bind.
6. Tighten the actuator clamp assembly to the damper
shaft. Secure by tightening the two 10-mm nuts.
7. If the damper has less than 90 degrees of travel
between the fully open and fully closed positions, then
a mechanical stop must be set on the actuator. The
mechanical stop prevents the damper from opening
past the maximum damper position. To set the
mechanical stop, perform the following procedure:
a. Press the actuator release button and rotate the
damper to the fully open position.
b. Using a Phillips screwdriver, loosen the appropri-
ate stop clamp screw.
c. Move the stop clamp screw so that it contacts the
edge of the cam on the actuator. Secure the stop
clamp screw in this position by tightening the
screw.
8. Verify that the damper opens and closes. Press the
actuator release button and rotate the damper. Verify
that the damper does not rotate past the fully open
position. Release the button and lock the damper in the
fully open position.
801
4
Page 5

—
0
HF23BJ042
Made in Switzerland
by Belimo Automation
LR 92800
NEMA 2
LISTED
94D5
TENP IND &
REG. EQUIP.
Class 2 Supply
5K
WIP
yel
blu
ora
35 in-lb (4 Nm)
80...110s
24VAC/DC
50/60 Hz
3VA 2W
COM
1
2
red wht
blk
15
LOW
1
®
ZONE Controller
Part Number: 33ZCFANTRM
S/N:
Bus#:
Element#:
Unit#:
US
C
1
J6
2
1
J7
3
®
1
J8
3
SEC DMP
J6
3
HIGH
1
CCW
COMCWHEAT1
24VAC
HEAT2
FAN AC
FAN
24VAC
N/A
HEAT3
CW
COM
COW
6
RH/IAQ
GND
SECFLOW
+10V
J4
DMPPOS
GND
TEST
GND
1
1
CCN
J2A
3
1
3
+
G
-
J1
+24V
SPT
GND
SAT
T56
GND
PAT
REMOTE
1
3
J3
24VAC
LEN
J2B
16
2
+
G
-
SRVC
+
-
G
0
HF23BJ042
Made in Switzerland
by Belimo Automation
LR 92800
NEMA 2
LISTED
94D5
TENP IND &
REG. EQUIP.
Class 2 Supply
5K
WIP
yel
blu
ora
35 in-lb (4 Nm)
80...110s
24VAC/DC
50/60 Hz
3VA 2W
COM
1
2
red wht
blk
→
Fig. 3 — VAV Fan Terminal Zone Controller
LOW
US
C
1
®
®
3
ZONE Controller
Part Number: 33ZCVAVTRM
S/N:
Bus#:
Element#:
Unit#:
HIGH
1
CCW
J6
COMCWHEAT1
24VAC
HEAT2
6
15
RH/IAQ
GND
SECFLOW
+10V
J4
DMPPOS
GND
TEST
GND
1
1
CCN
J2A
3
1
3
+
G
-
J1
+24V
SPT
GND
SAT
T56
GND
PAT
REMOTE
1
3
J3
24VAC
LEN
J2B
16
2
+
G
-
SRVC
+
-
G
→
Fig. 4 — Single Duct Air Terminal Zone Controller
5
801
Page 6
0
HF23BJ042
Made in Switzerland
by Belimo Automation
LR 92800
NEMA 2
LISTED
94D5
U
TEMP. IND. &
L
REG. EQUIP.
Class 2 Supply
5K
WIP
blu
yel
ora
LOW
1
®
C
US
®
ZONE Controller
35 in-lb (4 Nm)
80...110s
Part Number: 33ZCSECTRM
S/N:
24VAC/DC
50/60Hz
3VA 2W
COM
3
2
1
wht
red
blk
Fig. 5 — Secondary Terminal Zone Controller
Unit#:
HIGH
J2
CCW
COMCWN/A
1
N/A
N/A
6
GND
D
FLOW
OUT
TPUT
+10V
OV
J1
CW
COM
MMON
CCW
1
CW
J1
6
ALLOW 12” CLEARANCE FOR SERVICE
ACCESS TO CONTROL BOX
3” REF.
ZONE
CONTROLLER
END VIEW INLET
Fig. 6 — Service Clearance for Zone Controller Mounting
6
Page 7
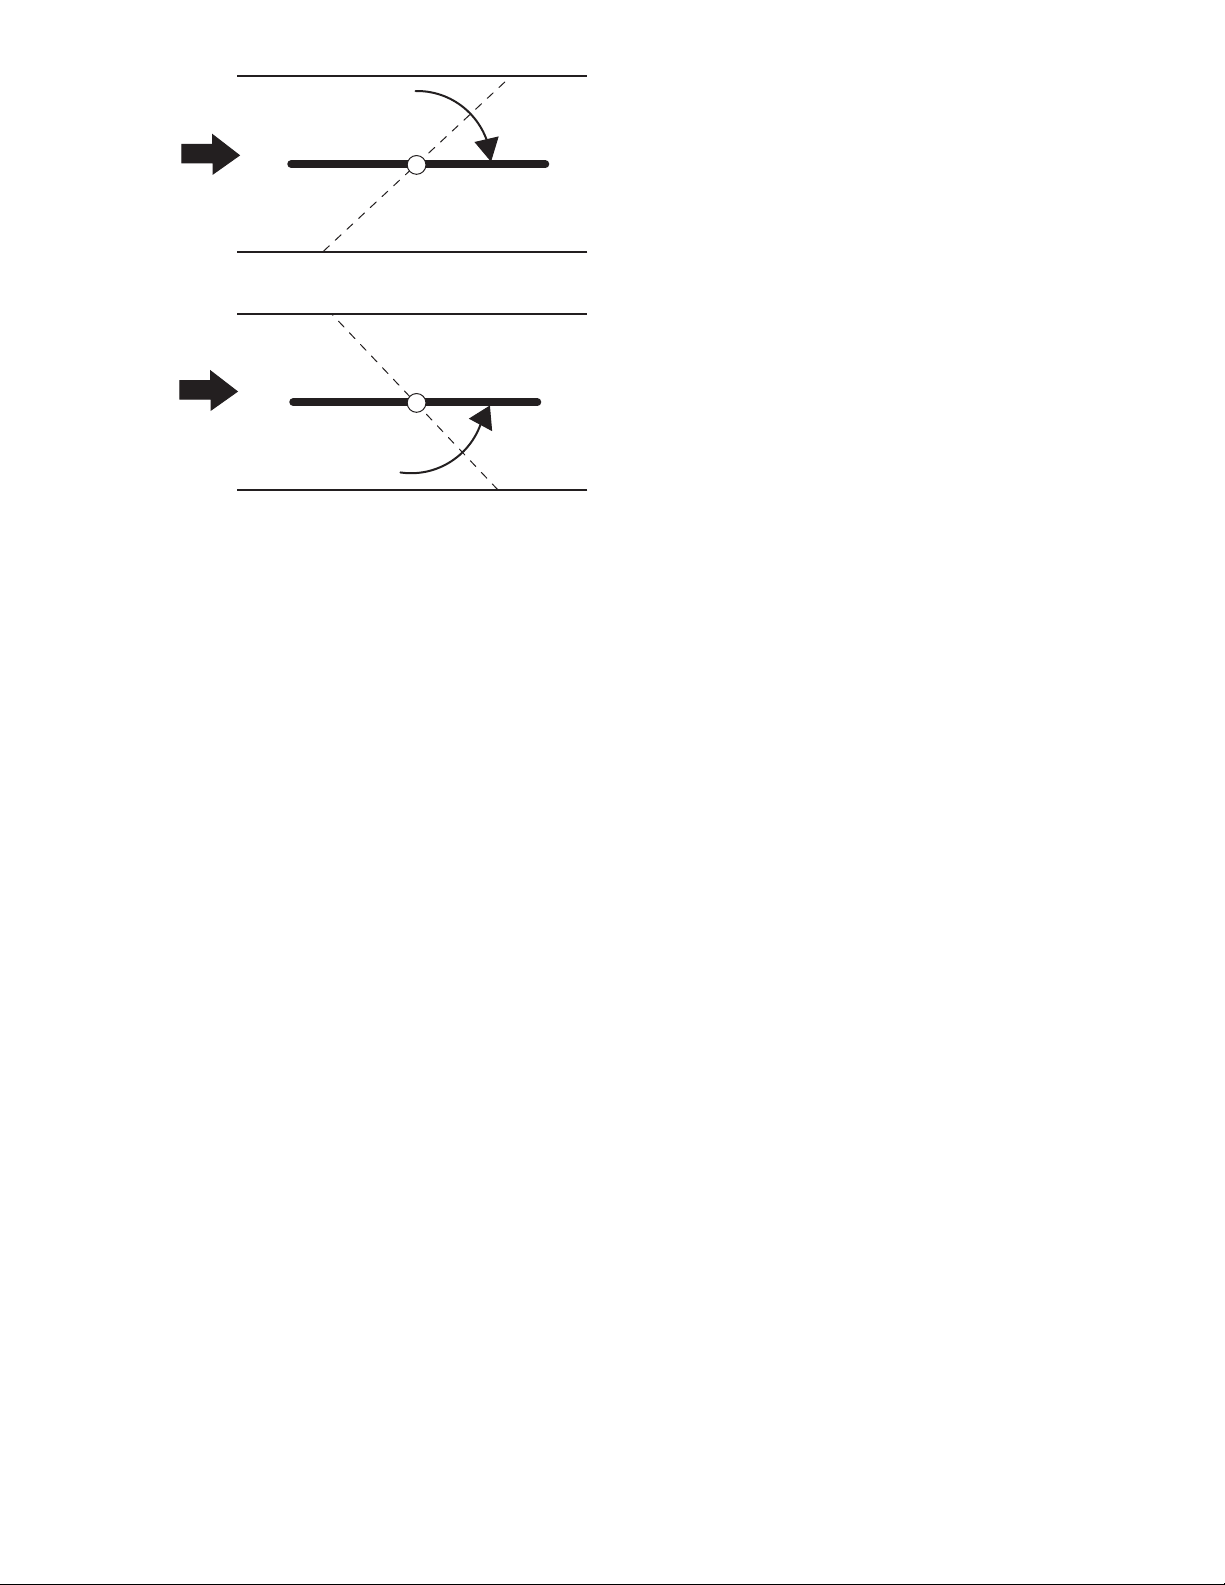
AIR
FLOW
CW TO OPEN, CCW TO CLOSE
AIR
FLOW
CCW TO OPEN, CW TO CLOSE
Fig. 7 — Damper Configuration
Connect the Power Transformer —
An individual,
field-supplied, 24 vac power transformer is recommended for
each zone controller. If multiple zone controllers are powered
from one power transformer (100 va maximum for UL [Underwriters’ Laboratories] Class 2 conformance), maintain polarity
on the power input terminals. All transformer secondaries are
required to be grounded. Use only stranded copper conductors
for all wiring to the zone controller. Wiring connections must
be made in accordance with NEC (Nati onal Electrical Code)
and local codes. Ground the transformer at the transformer location. Provide an 18-gage, green, chassis ground wire at the
terminal.
The power supply is 24 vac ± 10% at 40 va (50/60 Hz).
For 33ZCVAVTRM zone controllers, the power requirement sizing allows for accessory water valves and for electric
heat contactor(s). Water valves are limited to 15 va on both
two-position and modulating hot water. The electric heat contactor(s) are limited to 10 va (holding) each.
For 33ZCFANTRM zone controllers, the power requirement sizing allows for accessory water valves and for the fan
contactor. Water valves are limited to 8 va on both two-position
and modulating hot water. The fan contactor is limited to
11 va (holding).
NOTE: If a water valve or electric heat contactor exceeds
these limits, or external contactors are required for electric
heat, then it is recommended a 60 va transformer be used.
The maximum rating for any output is 20 va.
NOTE: Do not run sensor or communication wiring in the
same conduit with line-voltage wiring.
NOTE: An accessory conduit box (part no. 33ZCCONBOX) is
available for conduit wiring connections to the zone controller.
Perform the following steps to connect the power
transformer:
1. Install the field-supplied transformer in an electrical
enclosure that conforms to NEC and local codes.
2. Connect 24 vac from the transformer as shown in the
applicable wiring diagram (Fig. 8A-J).
Connect Airflow Pickups —
The zone controller determines velocity pressure by obtaining the difference between
high and low duct pressure from two airflow pickups. The
pickups are connected to barb fittings on the zone controller
1
with
/4-in. polyethylene tubing. All piping for this purpose
must conform to local codes.
Figure 9 indicates the positions of the two barb fittings.
Perform the following steps to install and connect the air-
flow pickups:
1. Select a location on the air handler’s supply air duct
where the airflow pickups will be installed. The location should be one where there are at least three duct
diameters of straight duct upstream of the pickups. If
this requirement is not met, stable airflow measurements may not be possible.
2. Mount the field-supplied airflow pickup(s) in the duct,
following the manufacturer' s directions. Two individual pickups may be used, one for high pressure airflow
and one for low pressure airflow . A dual pickup, which
combines the two functions, may also be used. When
using individual pickups, make sure that the one for
high pressure airflow faces upstream, in the direction
the air is coming from, and the one for low pressure
airflow faces downstream, in the direction the air is
going to.
3. Use field-supplied
1
/4-in. tubing (rated for the application) to connect the high pressure airflow pickup to
barb fitting P1 on the pressure transd ucer. At the zone
controller, the P1 fitting is on the side with the filter
installed. Be careful to avoid sharp bends in the tubing,
because malfunctions may occur if the tubing is bent
too sharply. Use at least 2 ft of tubing for reading
stability.
1
4. Use field-supplied
/4-in. tubing (rated for the application) to connect the low pressure airflow pickup to
barb fitting P2 on the pressure transducer. Be careful to
avoid sharp bends in the tubing, because malfunctions
may occur if the tubing is bent too sharply. Use at least
2 feet of tubing for stability.
7
Page 8
Voltage
Line
+24V
SPT
SPT
RH/IAQ
GND
SAT
GND
SECFLOW
TRAN
comunications
comunications
Not used
CCN
PAT
T56
GND
SAT
+10V
Y
Bl
DMPPOS
GND
REMOTE
N/A
GND
Or
R
(+)
W
(GND)
B
(-)
24 VAC
CCN
HEAT2HEAT1 24VAC
GROUND
TRANSFORMER
TERMINAL
GROUND
Low
10
80...110s
35 in-lb(4Nm)
Automation
Switzerland
Made in
By Belimo
HF23BJ042
50/60Hz
24VAC/DC
Hi
2W
3VA
com
RBW
Wht
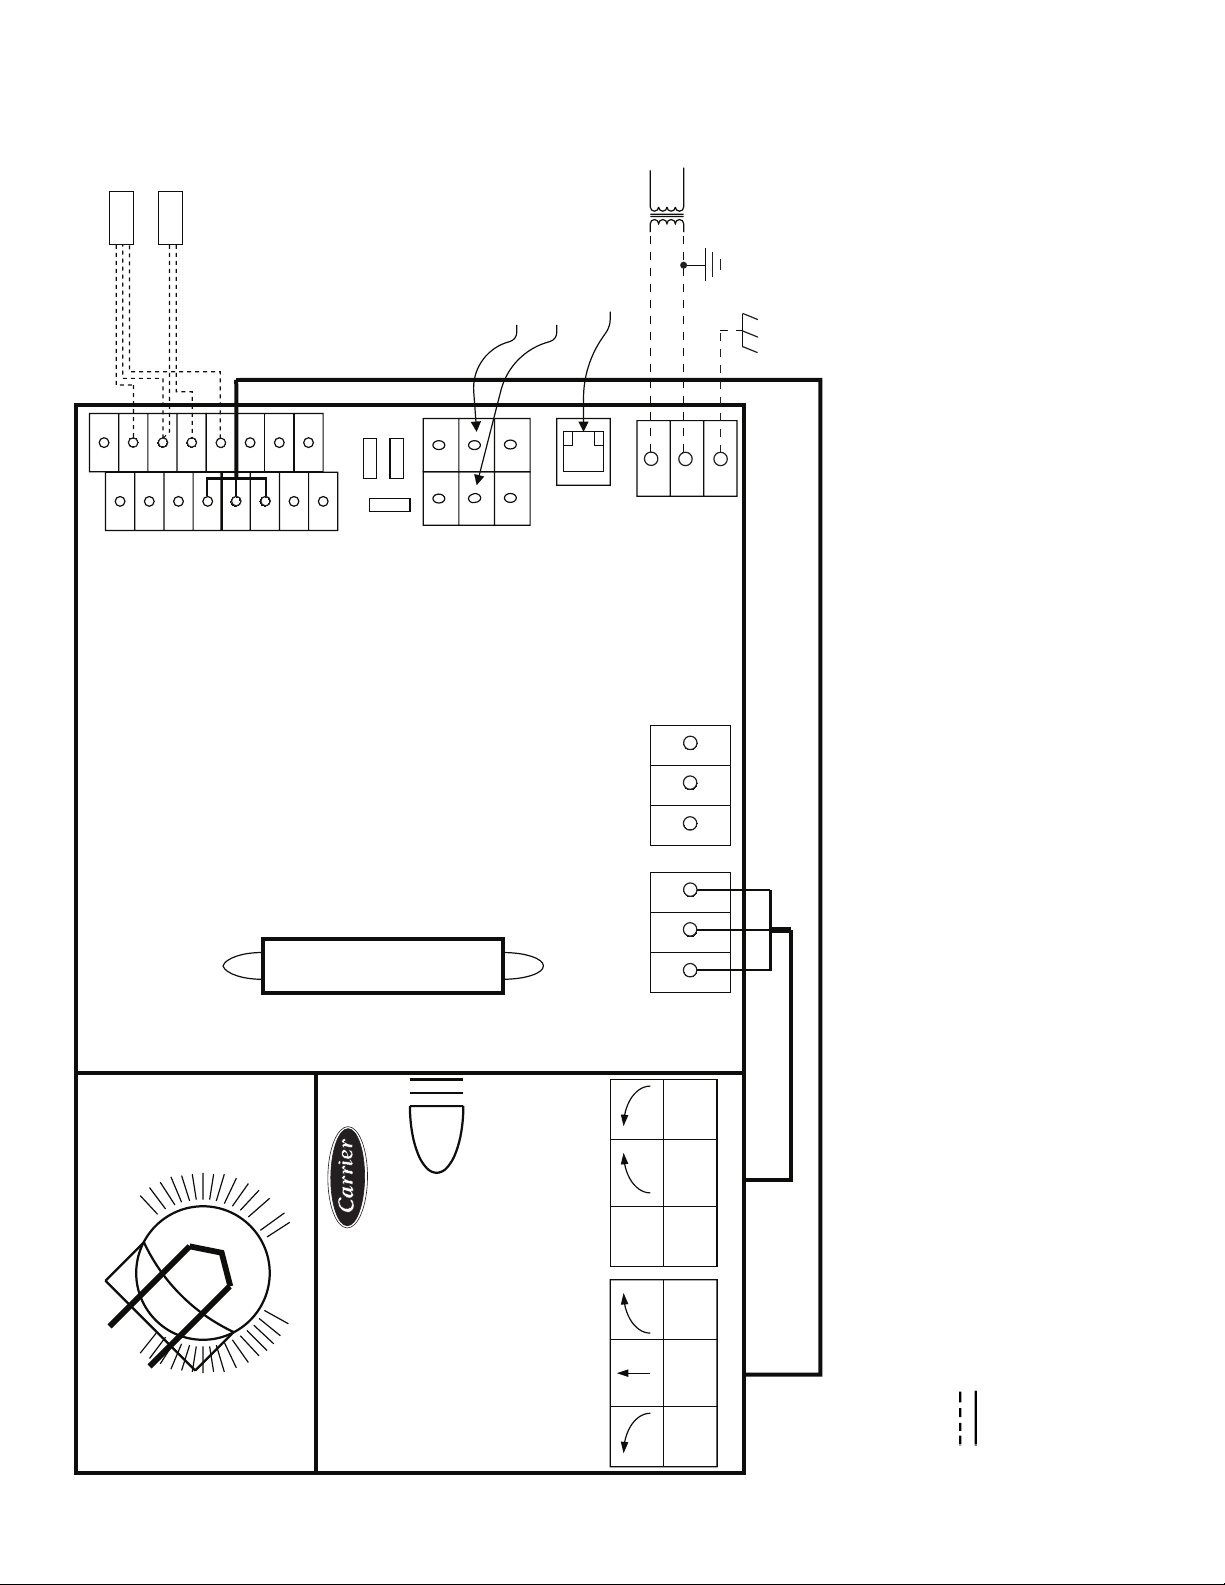
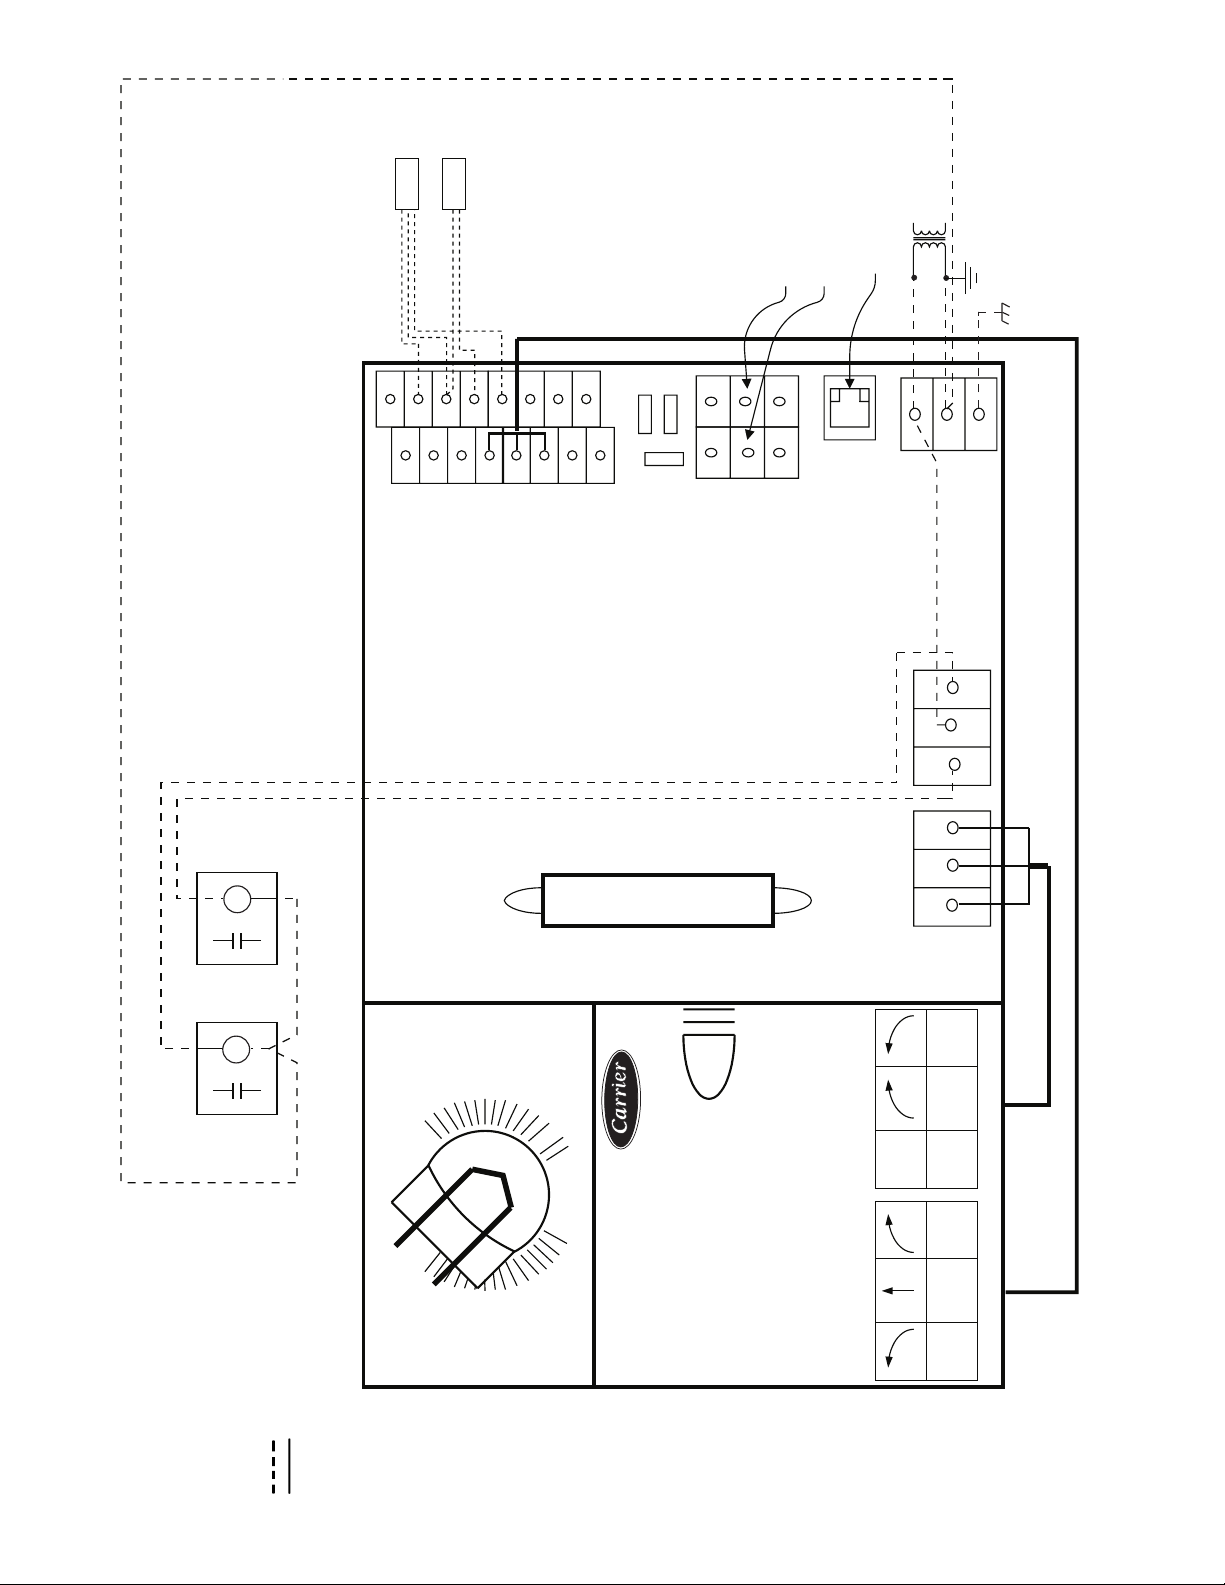
Fig. 8A — Zone Controller Wiring — Single Duct Air Terminal, Cooling Only
RedBlk
Ora
BluYel
Carrier Comfort Network
CCN —
LEGEND
Supply-Air Temperature Sensor
Space Temperature Sensor
SAT —
SPT —
Transformer
Field Wiring
Factory Wiring
TRAN —
→
303
8
Page 9
SPT
Voltage
Line
SAT
comunications
comunications
CCN
CCN
Not used
24 VAC
TRAN
GROUND
TRANSFORMER
TERMINAL
GROUND
HWV
+24V
SPT
RH/IAQ
GND
GND
SECFLOW
SAT
+10V
Low
T56
Y
GND
GND
Bl
DMPPOS
PAT
REMOTE
N/A
GND
Or
R
(+)
W
(GND)
B
(-)
HEAT2HEAT1 24VAC
RBW
Hi
LEGEND
WhtRedBlk
80...110s
10
35 in-lb(4Nm)
50/60Hz
24VAC/DC
2W
3VA
com
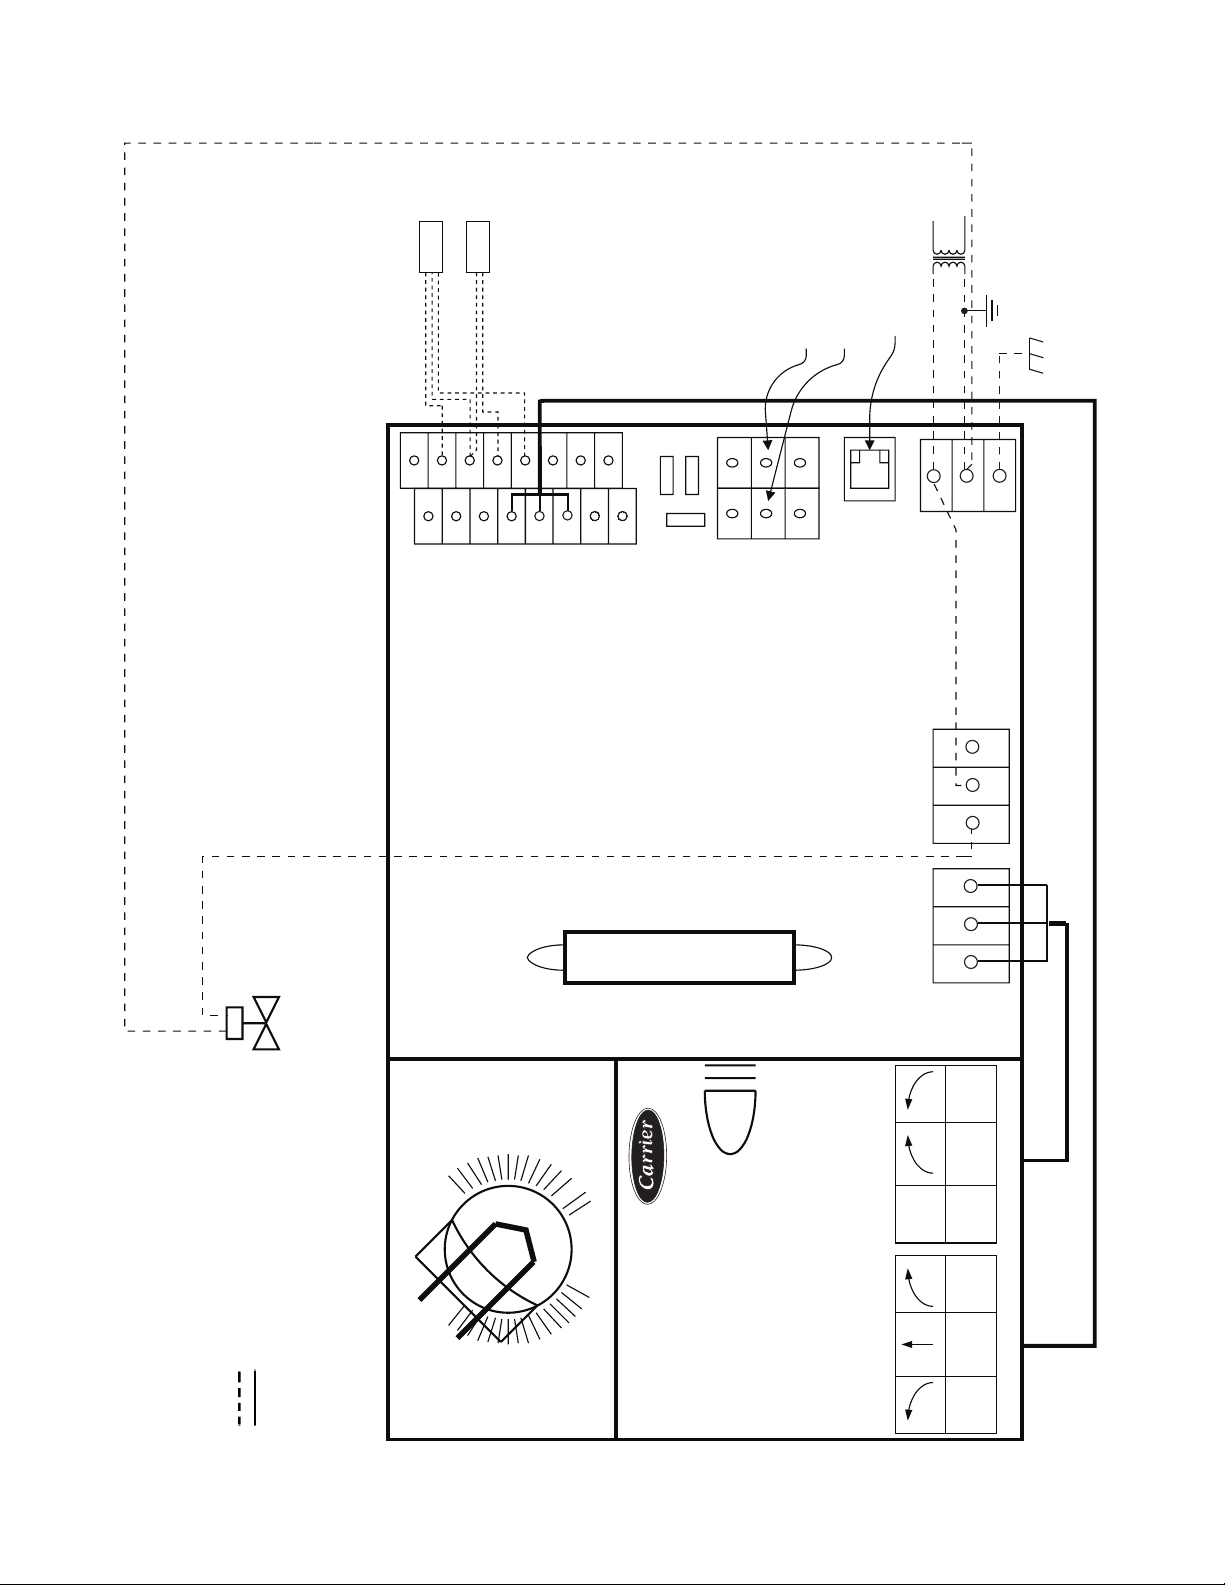
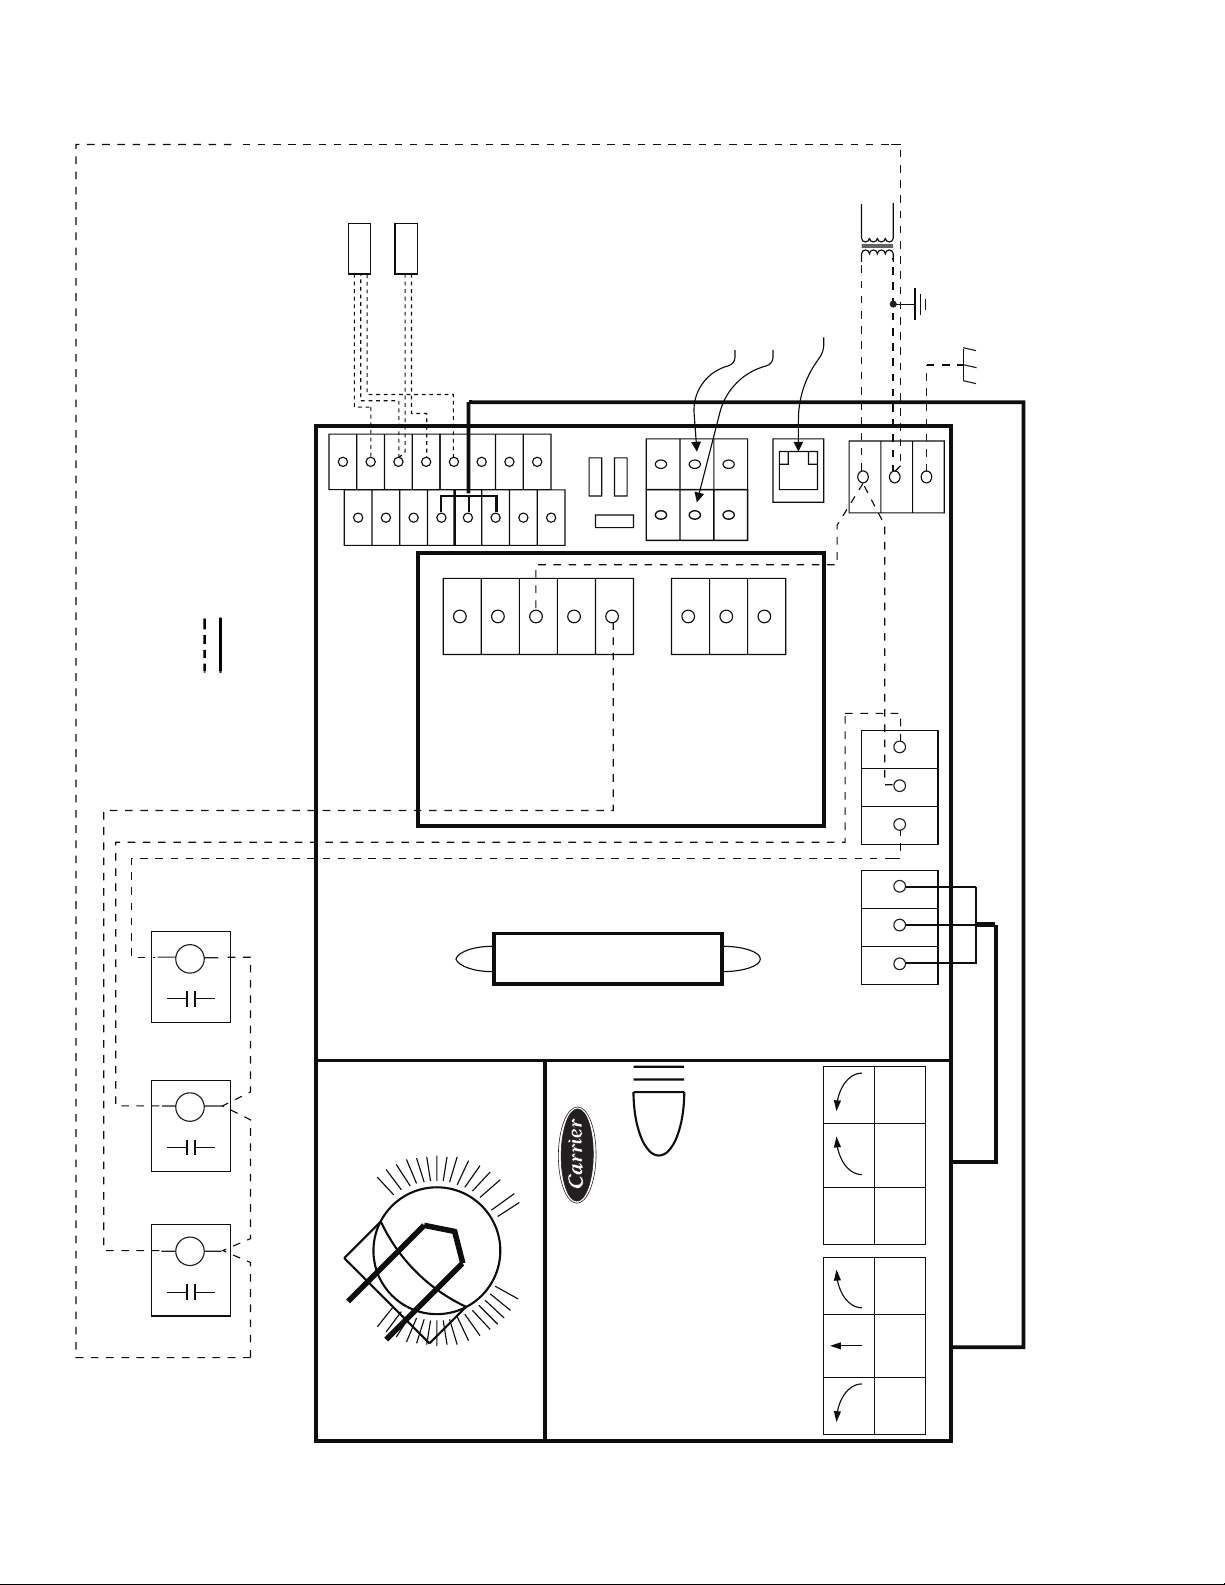
Fig. 8B — Zone Controller Wiring — Single Duct Air Terminal, Two-Position Hot Water Heat
→
Ora
Carrier Comfort Network
Hot Water Valve
Supply-Air Temperature Sensor
Space Temperature Sensor
Transformer
Field Wiring
Factory Wiring
CCN —
HWV —
SAT —
SPT —
TRAN —
be used.
*Normally open or normally closed valve may
Automation
Switzerland
Made in
By Belimo
HF23BJ042
9
BluYel
303
Page 10
SPT
Voltage
Line
SAT
comunications
comunications
CCN
CCN
Not used
TRAN
24 VAC
GROUND
TRANSFORMER
GROUND
TERMINAL
CL
OP
COM
HWV
+24V
SPT
RH/IAQ
GND
GND
SECFLOW
SAT
+10V
Low
T56
Y
GND
GND
Bl
DMPPOS
PAT
REMOTE
N/A
GND
Or
R
(+)
W
(GND)
B
(-)
HEAT2HEAT1 24VAC
RBW
Hi
303
WhtRedBlk
80...110s
10
35 in-lb(4Nm)
50/60Hz
24VAC/DC
2W
3VA
com
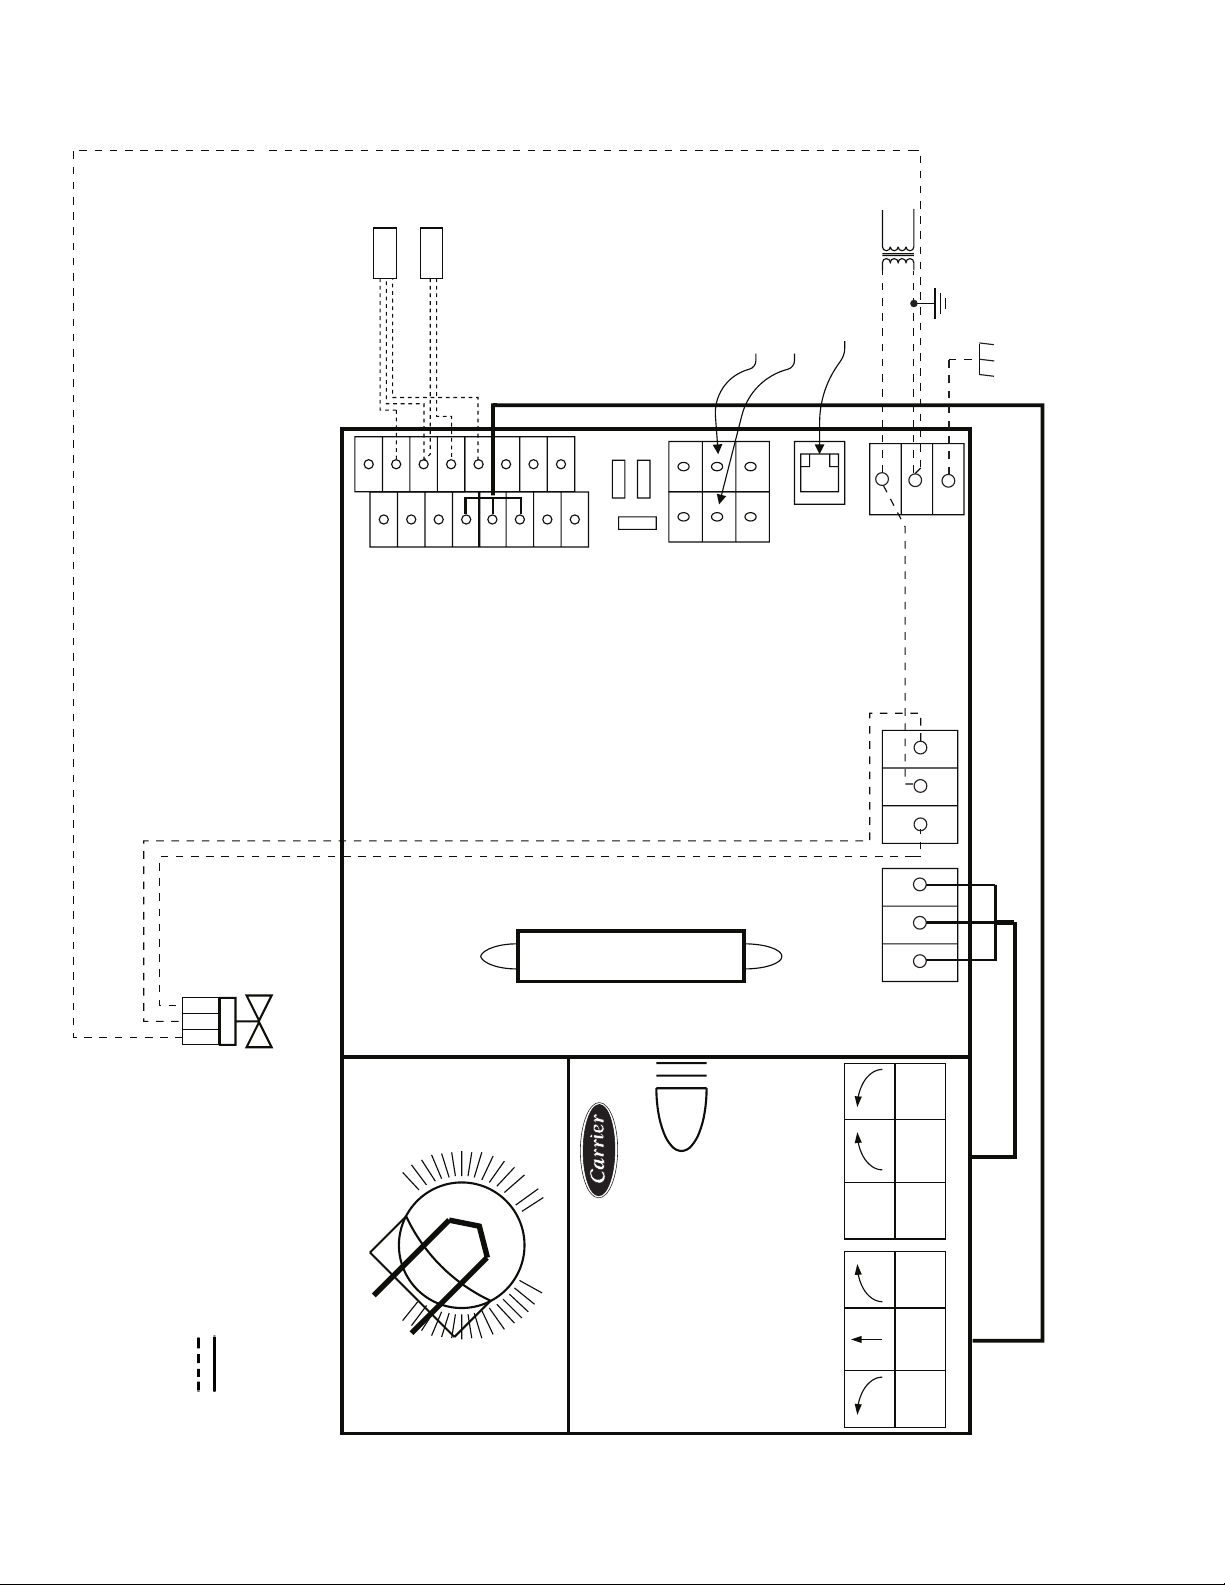
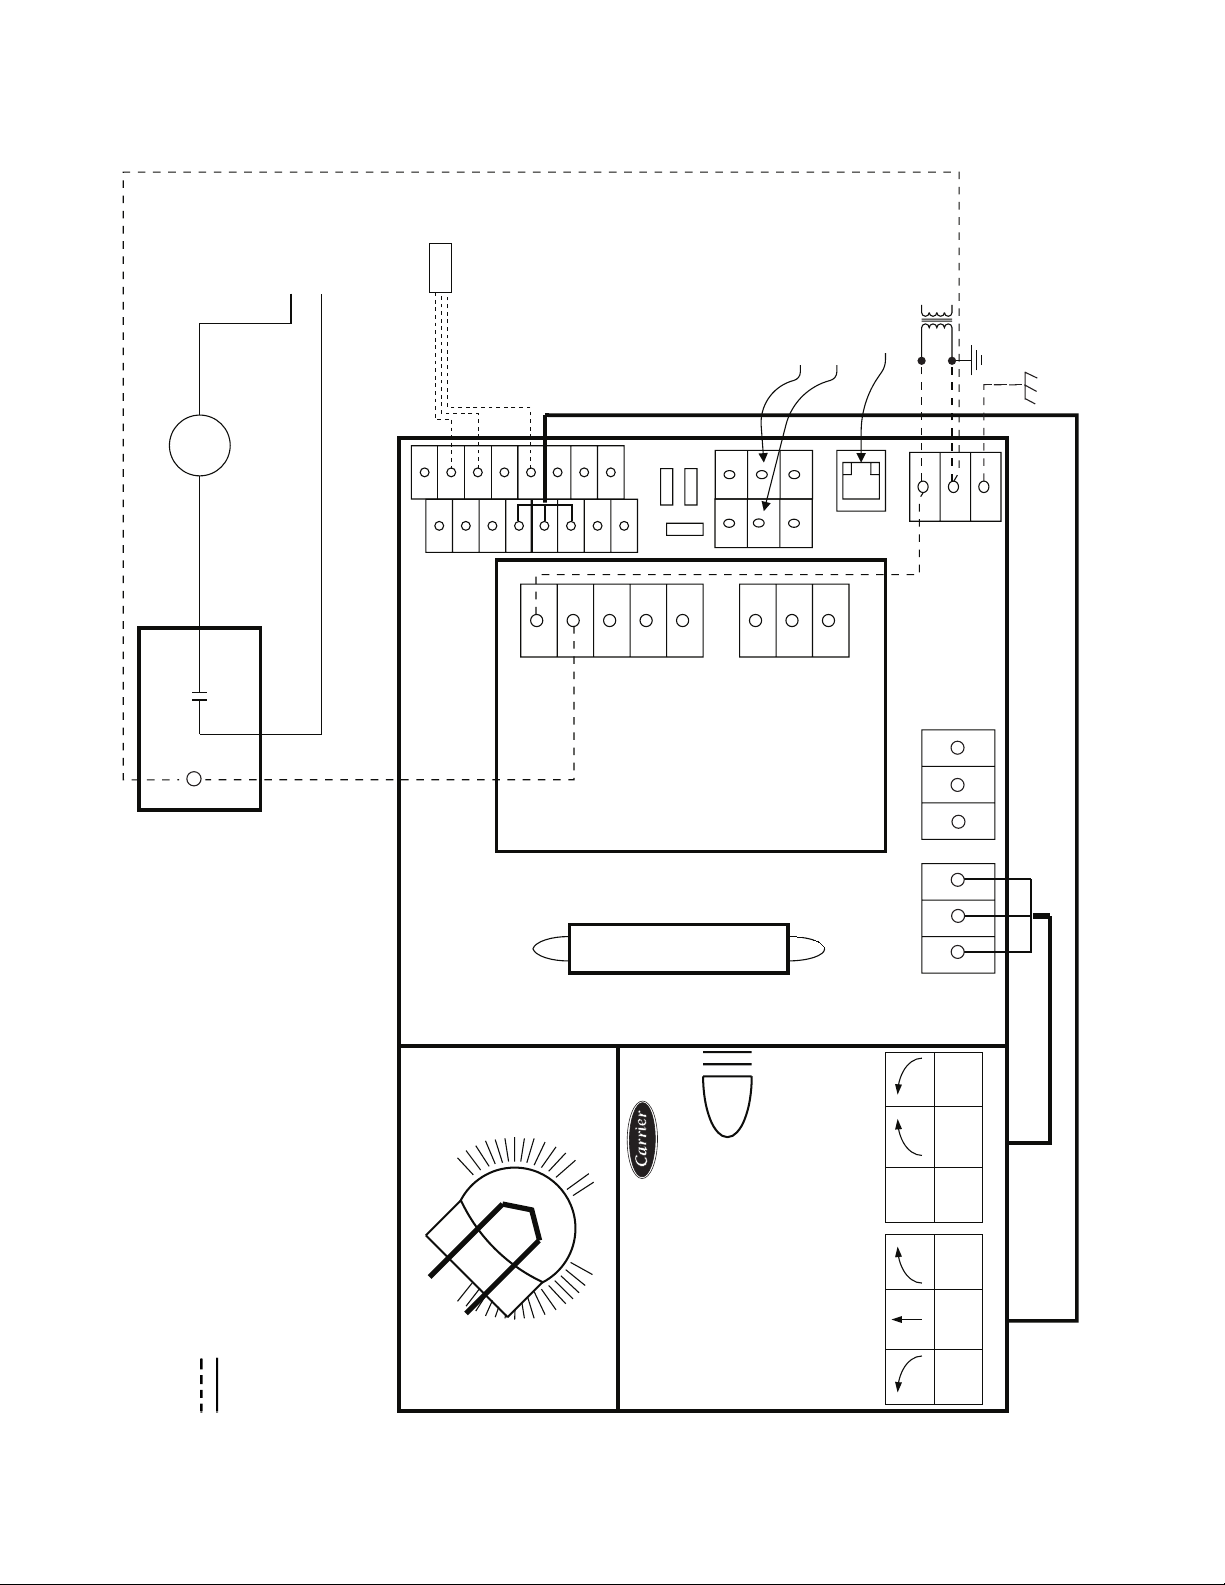
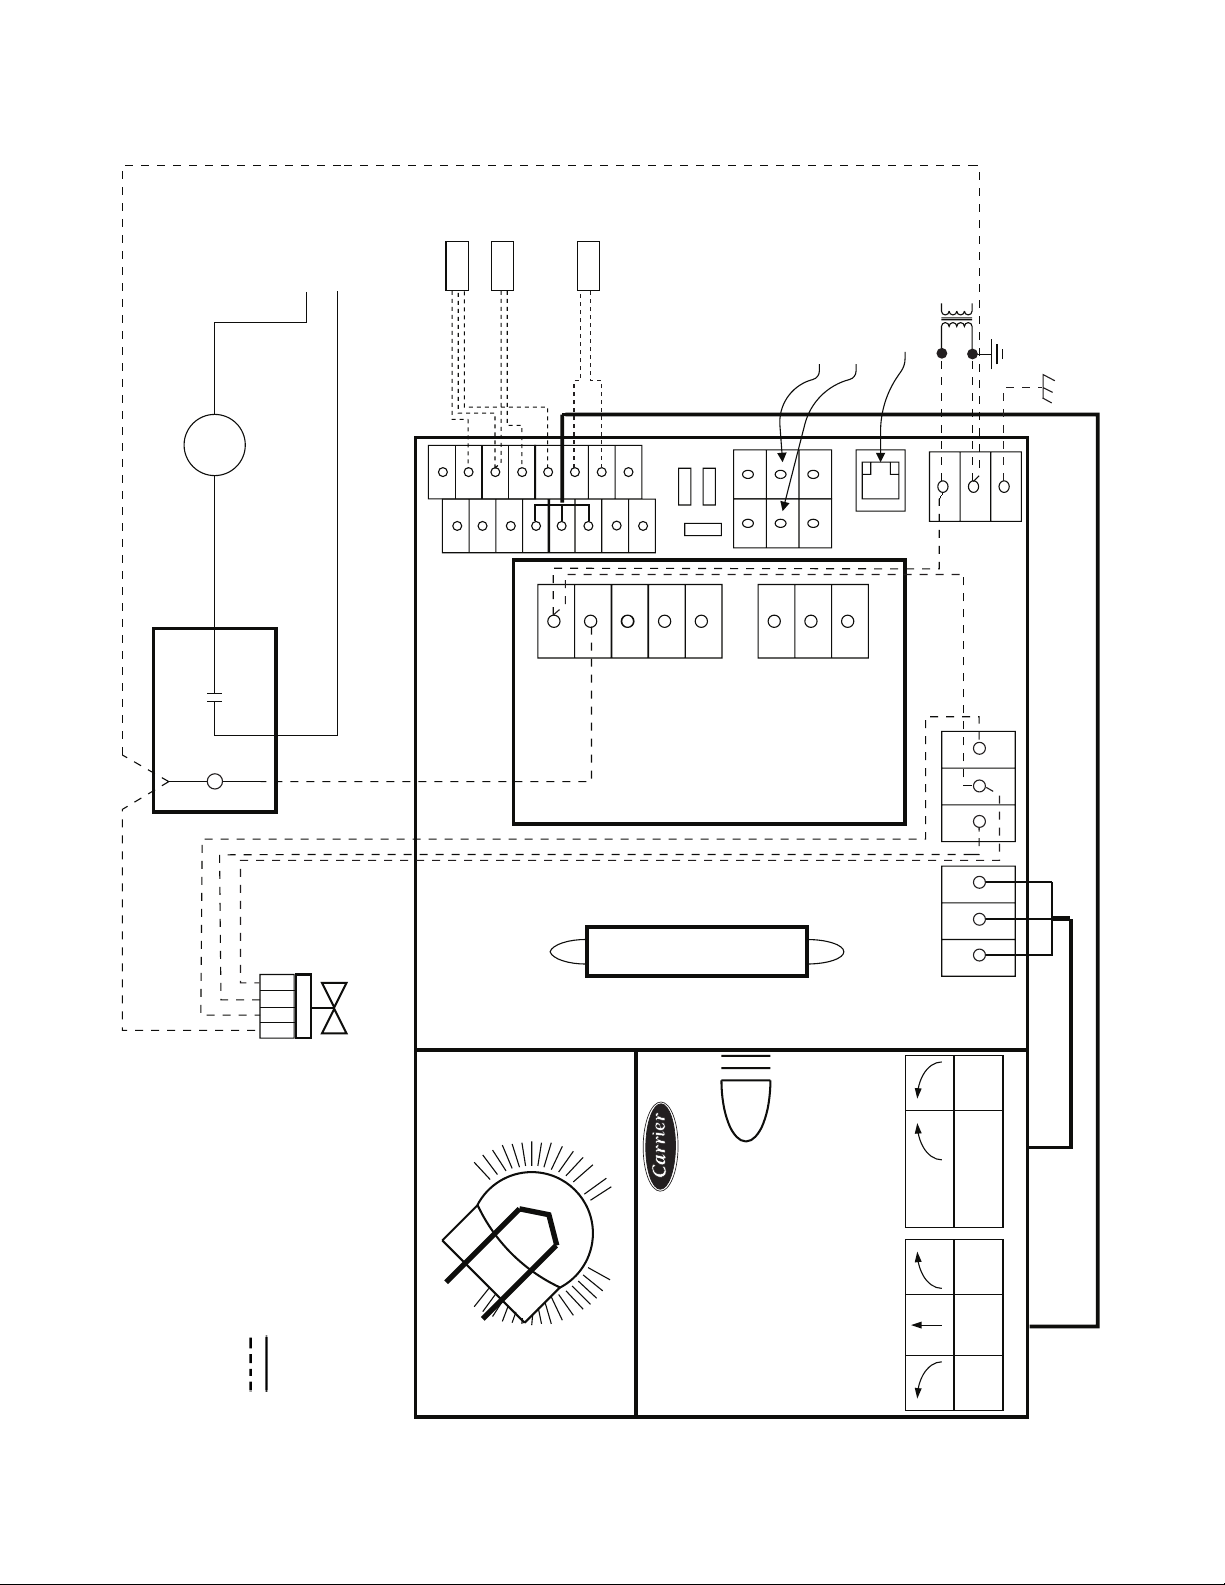
Fig. 8C — Zone Controller Wiring — Single Duct Air Terminal, Modulating Hot Water Heat
→
Ora
Transformer
Field Wiring
Fac tory W irin g
Space Temperature Sensor
Supply-Air Temperature Sensor
Hot Water Valve
Carrier Comfort Network
Automation
Switzerland
*Required for some spring return modulating
valves.
TRAN —
SPT —
SAT —
HWV —
CCN —
LEGEND
Made in
By Belimo
HF23BJ042
BluYe l
10
Page 11
SPT
SAT
Line
Voltage
+24V
SPT
RH/IAQ
GND
GND
SECFLOW
comunications
CCN
comunications
Not Used
CCN
PAT
T56
SAT
+10V
Y
GND
GND
Bl
DMPPOS
REMOTE
N/A
GND
Or
R
(+)
W
(GND)
B
(–)
TRAN
GROUND
24 VAC
HEAT2HEAT1 24VAC
RBW
TRANSFORMER
GROUND
TERMINAL
Low
H2 H1
Hi
WhtRedBlk
2W
80...110s
10
35 in-lb(4Nm)
50/60Hz
24VAC/DC
3VA
com
OraBluYel
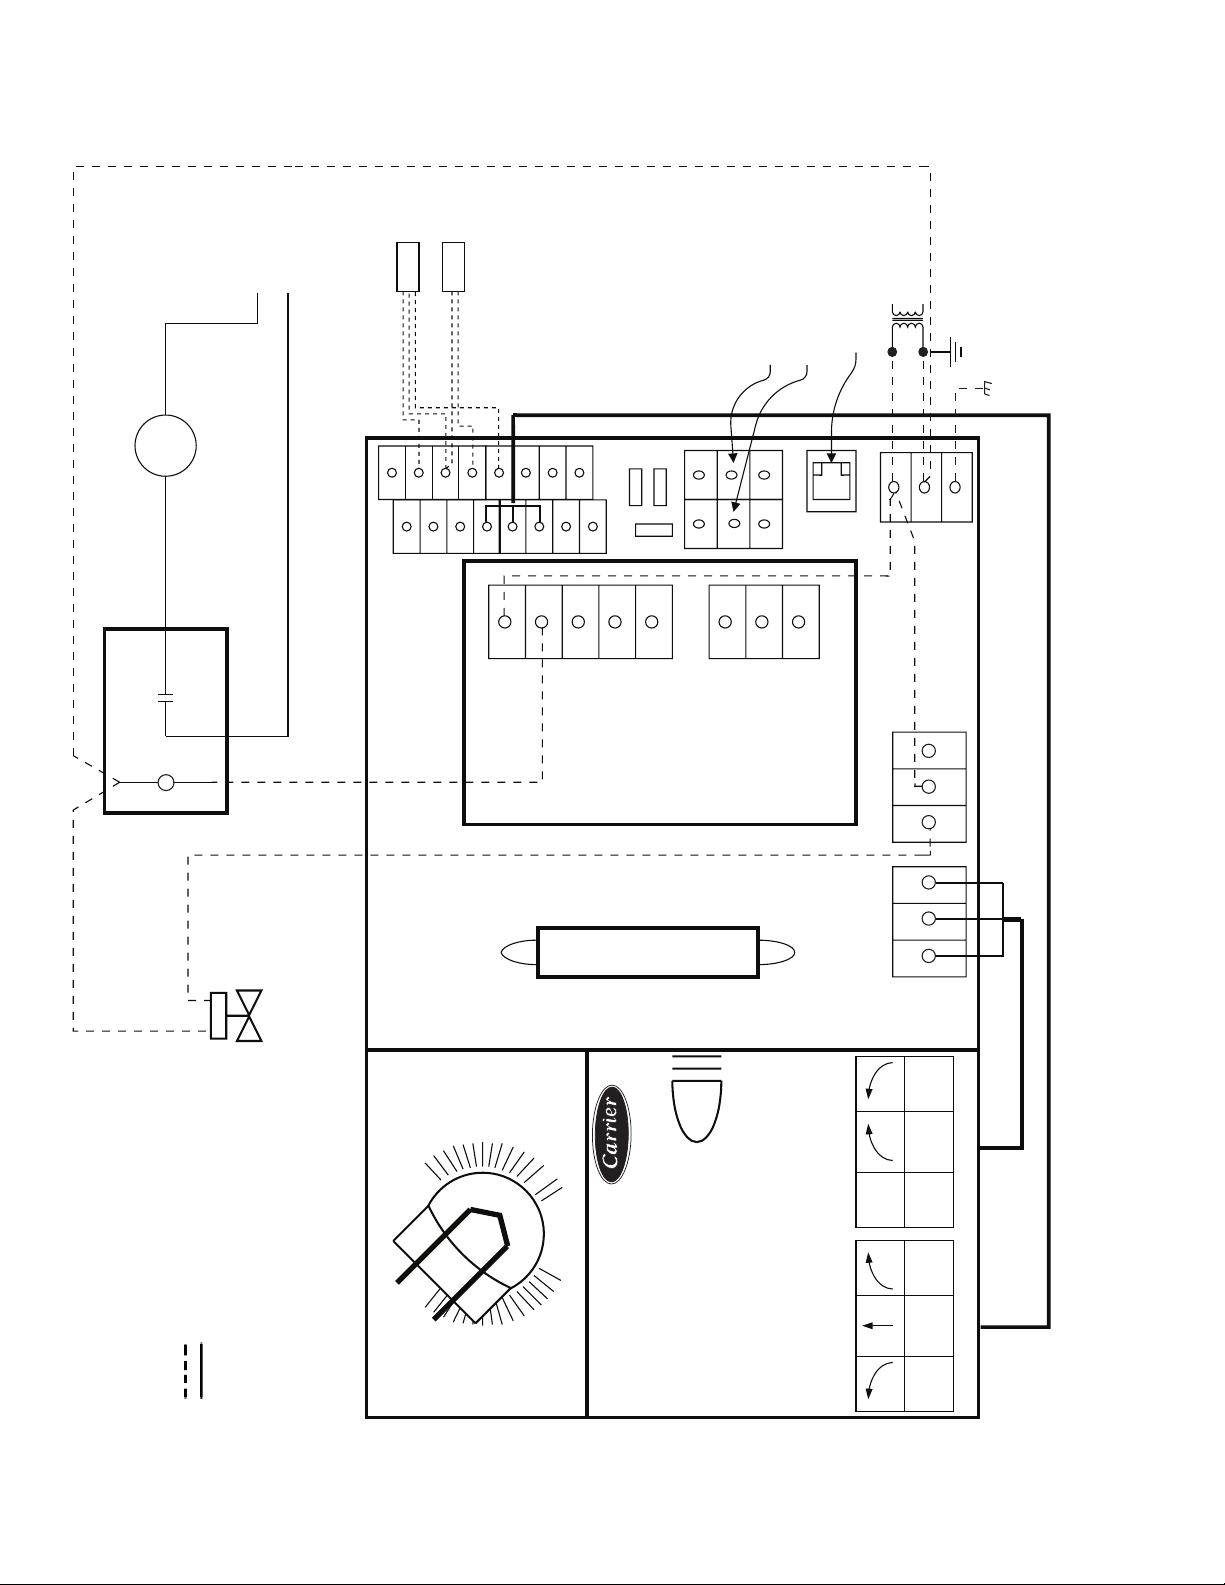
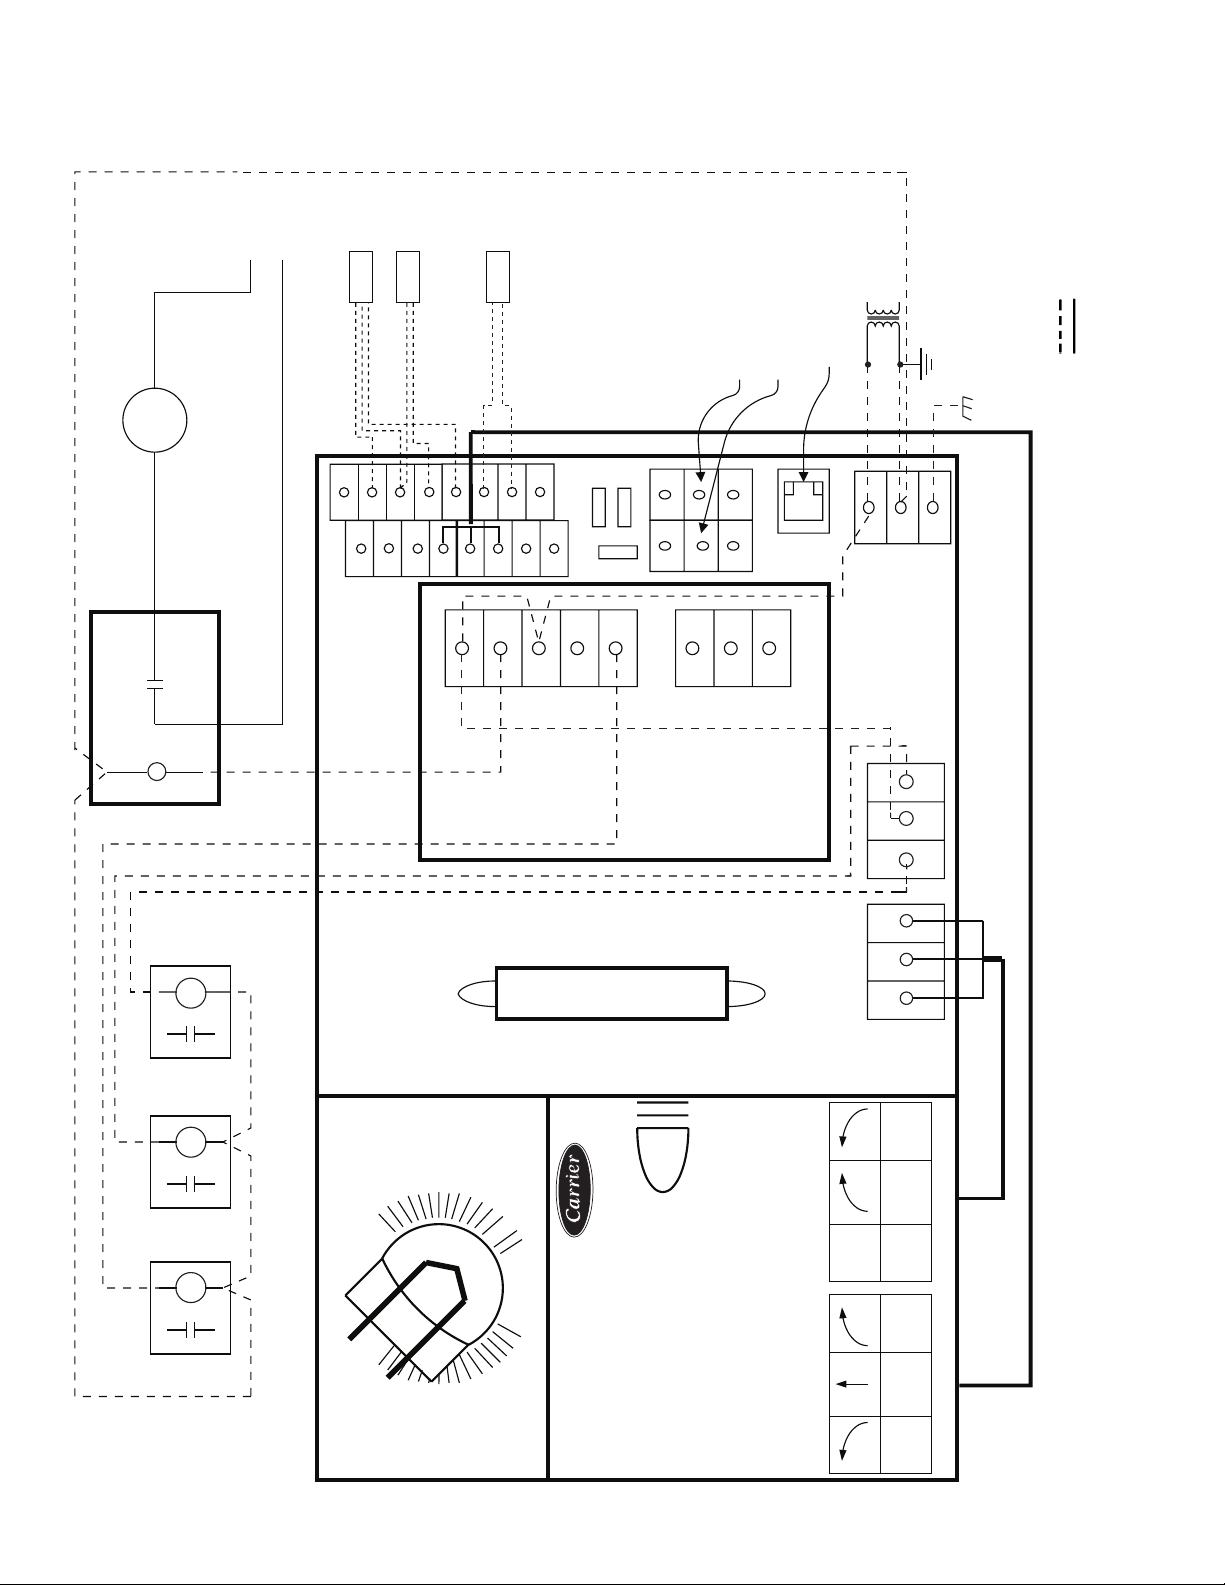
Fig. 8D — Zone Controller Wiring — Single Duct Air Terminal, Staged Electric Heat (2 Stages)
→
Made in
By Belimo
Automation
Switzerland
HF23BJ042
Carrier Comfort Network
Heater Relay
Hot Water Valve
Supply-Air Temperature Sensor
Space Temperature Sensor
Transformer
Field Wiring
Factory Wiring
CCN —
H —
HWV —
SAT —
SPT —
LEGEND
TRAN —
11
801
Page 12
Voltage
Line
SAT
SPT
comunications
comunications
CCN
CCN
Not used
T56
SAT
SPT
GND
+24V
GND
RH/IAQ
Carrier Comfort Network
Heater Relay
Supply-Air Temperature Sensor
Space Temperature Sensor
Transformer
Field Wiring
Fac tory W irin g
CCN —
H —
SAT —
SPT —
LEGEND
TRAN —
NOTE: The VAV fan terminal zone controller is used on single duct air
terminals with 3 stages of electric heat.
+10V
Y
SECFLOW
Bl
DMPPOS
FAN AC
GND
GND
FAN
PAT
REMOTE
N/A
GND
Or
Used
24 VAC
Not
R
R
Heat3
CW
B
W
B
W
COM
CCW
Second
Damper
TRAN
24 VAC
HEAT2HEAT1 24VAC
GROUND
TRANSFORMER
GROUND
TERMINAL
RBW
Low
Hi
WhtRedBlk
80...110s
10
H3 H2 H1
35 in-lb(4Nm)
50/60Hz
24VAC/DC
2W
3VA
com
Fig. 8E — Zone Controller Wiring — Single Duct Air Terminals, Staged Electric Heat (3-Stage)
→
Ora
Automation
Switzerland
Made in
By Belimo
HF23BJ042
BluYel
303
12
Page 13
Line
Voltage
SPT
Line
Voltage
Fan
Contactor
M
Fan Motor
+24V
SPT
RH/IAQ
GND
GND
SECFLOW
comunications
Not Used
T56
SAT
+10V
Y
GND
Bl
DMPPOS
FAN
AC
GND
FAN
PAT
REMOTE
N/A
GND
Or
24 VAC
Not
Used
R
(+)
Heat3
CW
W
B
(GND)
COM
Second
(–)
CCW
Damper
CCN
comunications
CCN
TRAN
GROUND
TRANSFORMER
24 VAC
GROUND
TERMINAL
HEAT2HEAT1 24VAC
RBW
Carrier Comfort Network
CCN —
LEGEND
Space Temperature Sensor
Transformer
Field Wiring
Factory Wiring
SPT —
TRAN —
Low
10
80...110s
35 in-lb(4Nm)
Automation
Switzerland
Made in
By Belimo
HF23BJ042
50/60Hz
24VAC/DC
Hi
2W
3VA
com
WhtRedBlk
Fig. 8F — Zone Controller Wiring — Fan Powered Terminals, Cooling Only
→
OraBluYel
13
801
Page 14
M
Fan Motor
Line
Voltage
+24V
SPT
SPT
GND
SAT
Not Used
comunications
CCN
SAT
T56
GND
PAT
REMOTE
B
W
R
Line
comunications
CCN
24 VAC
Voltage
TRAN
GROUND
TRANSFORMER
GROUND
TERMINAL
Fan Contactor
HWV
RH/IAQ
GND
+10V
SECFLOW
Y
DMPPOS
FAN AC
Low
N/A
GND
GND
Bl
Or
FAN
24 VAC
Not Used
(+)
Heat3
CW
(GND)
(-)
COM
Second
CCW
Damper
HEAT2HEAT1 24VAC
RBW
Hi
WhtRedBlk
LEGEND
801
80...110s
10
Carrier Comfort Network
Hot Water Valve
Supply-Air Temperature Sensor
Space Temperature Sensor
Transformer
Field Wiring
Factory Wiring
CCN —
HWV —
SAT —
SPT —
TRAN —
35 in-lb(4Nm)
Automation
Switzerland
Made in
By Belimo
HF23BJ042
50/60Hz
24VAC/DC
3VA
com
OraBluYe l
Fig. 8G — Zone Controller Wiring — Fan Powered Terminals, Two-Position Hot Water Heat
→
14
2W
Page 15
Line
Voltage
SPT
SAT
PAT*
Line
Voltage
M
Fan Motor
Fan Contactor
+24V
SPT
RH/IAQ
GND
GND
SECFLOW
comunications
comunications
CCN
CCW
CCN
Not Used
T56
FAN A C
GND
Bl
DMPPOS
GND
FAN
PAT
REMOTE
N/A
GND
Or
24 VAC
Not
Used
R
(+)
Heat3
CW
W
(GND)
B
(-)
COM
Second
Damper
SAT
+10V
Y
TRAN
GROUND
TRANSFORMER
24 VAC
GROUND
TERMINAL
HEAT2HEAT1 24VAC
RBW
LEGEND
Hi
24V*
COM
Low
OP
CL
HWV
WhtRedBlk
2W
80...110s
10
Transformer
Field Wiring
Factory Wiring
Space Temperature Sensor
Supply-Air Temperature Sensor
Primary Air Temperature Sensor
Hot Water Valve
Carrier Comfort Network
TRAN —
SPT —
SAT —
PAT —
HWV —
CCN —
*Required only on Linkage master if on a non-compatible air source.
35 in-lb(4Nm)
Automation
Switzerland
Made in
By Belimo
HF23BJ042
50/60Hz
24VAC/DC
3VA
com
OraBluYe l
Fig. 8H — Zone Controller Wiring — Fan Powered Terminals, Modulating Hot Water Heat
→
15
801
Page 16
M
Fan Motor
Line
Voltage
SPT
Field Wiring
SAT
PAT*
Line
Voltage
Factory Wiring
TRAN
comunications
Not Used
CCN
CCN
comunications
24 VAC
CCN — Carrier Comfort Network
H — Heater Relay
LEGEND
GROUND
TRANSFORMER
GROUND
TERMINAL
PAT — Primary Air Temperature Sensor
SAT — Supply-Air Temperature Sensor
SPT — Space Temperature Sensor
TRAN — Transformer
Fan Contactor
+24V
SPT
RH/IAQ
GND
GND
SECFLOW
SAT
Low
+10V
Y
T56
DMPPOS
FAN AC
GND
Bl
GND
FAN
Or
PAT
REMOTE
N/A
24 VAC
GND
Not Used
Heat3
B
W
R
CW
(GND)
(-)
COM
Second
CCW
Damper
HEAT2HEAT1 24VAC
RBW
(+)
Hi
801
WhtRedBlk
Fig. 8I — Zone Controller Wiring — Fan Powered Terminals, Staged Electric Heat
80...110s
10
35 in-lb(4Nm)
50/60Hz
24VAC/DC
3VA
com
2W
H3 H2 H1
OraBluYel
Automation
Switzerland
Made in
HF23BJ042
By Belimo
→
*Required only on Linkage master if on a non-compatible air source.
16
Page 17

SPT
Not Used
CCN
comunications
CCN
comunications
LINE
VOLTAGE
24 VAC
TRAN
TRANSFORMER
GROUND
TERMINAL
GROUND
PRIMARY DAMPER — 33ZCFANTRM
+24V
SPT
RH/IAQ
GND
GND
SECFLOW
SAT
+10V
Low
T56
Y
DMPPOS
FAN AC
GND
Bl
GND
FAN
PAT
Or
REMOTE
N/A
24 VAC
GND
Not Used
Heat3
R
(+)
Second
Damper
CW
W
(GND)
B
(-)
COM
CCW
Hi
SHIELD
HEAT2HEAT1 24VAC
RBW
SHIELDED (CCN-TYPE) CABLE
10
80...110s
35 in-lb(4Nm)
Automation
Switzerland
Made in
By Belimo
HF23BJ042
17
50/60Hz
24VAC/DC
2W
3VA
com
WhtRedBlk
OraBluYe l
LEGEND
Carrier Comfort Network
CCN —
Space Temperature Sensor
Transformer
SPT —
TRAN —
Field Wiring
Fig. 8J — Zone Controller Wiring — Dual Duct Applications
→
Factory Wiring
303
Page 18

GND
+10V
SECFLOW
CW
GND
CCW
Transformer
Field Wiring
Factory Wiring
Space Temperature Sensor
Carrier Comfort Network
TRAN —
SPT —
CCN —
LEGEND
Or
Bl
Y
RBW
SECONDARY DAMPER — 33ZCSECTRM
Low
10
80...110s
35 in-lb(4Nm)
Automation
Switzerland
Made in
By Belimo
HF23BJ042
50/60Hz
24VAC/DC
Hi
2W
3VA
com
WhtRedBlk
OraBluYe l
Fig. 8J — Zone Controller Wiring — Dual Duct Applications (cont)
18
Page 19

→
Install Sensors
SPACE TEMPERATURE SENSOR INSTALLATION —
A space temperature sensor must be installed for each zone
controller. There are three types of SPT sensors available from
Carrier: the 33ZCT55SPT space temperature sensor with timed
override button, the 33ZCT56SPT space temperature sensor
with timed override button and set point adjustment and t he
33ZCT58SP T with liquid crystal display. See Fig. 10.
The space temperature sensor is used to meas ure the building interior temperature and should be located on an interior
building wall. The sensor wall plate accommodates the NEMA
standard 2 x 4 junction box. The sensor can be mounted directly on the wall surface if accpectable by local codes.
Do not mount the sensor in drafty locations such as near air
conditioining or heating ducts, over heat sources such as baseboard heaters, radiators, or directly above wall mounted l ighting dimmers. Do not mount the sensor near a window which
may be opened, near a wall corner, or a door. Sensors mounted
in these areas will have inaccurate and erratic sensor readings.
The sensor should be mounted approximately 5 ft from the
floor, in an area representing the average temperature in the
space. Allow at least 4 ft between the sensor and any corner
and mount the sensor at least 2 ft from an open doorway.
Install the sensor as follows (see Fig. 11):
1. Locate the two Allen type screws at the bottom of the
sensor.
2. Turn the two screws clockwise to release the cover
from the sensor wall mounting plate.
3. Lift the cover from the bottom and then release it from
the top fasteners.
4. Feed the wires from the electrical box through the
opening in the center of the sensor mounting plate.
5. Using two no. 6-32 x 1 mounting screws (provided
with the sensor), secure the sensor to the electrical box.
6. Use 20 gage wire to connect the sensor to the controller. The wire is suitable for distances of up to 500 ft.
Use a three-conductor shielded cable for the sensor
and set point adjustment connections. The standard
CCN communication cable may be used. If the set
point adjustment (slidebar) is not required, then an
unshielded, 18 or 20 gage, two-conductor, twisted pair
cable may be used.
The CCN network service jack requires a separate,
shielded CCN communication cable. Always use separate cables for CCN communication and sensor wiring. (Refer to Fig. 12 for wire terminations.)
7. Replace the cover by inserting the cover at the top of
the mounting plate first, then swing the cover down
over the lower portion. Rotate the two Allen head
screws counterclockwise until the cover is secured to
the mounting plate and locked in position.
8. For more sensor information, see Table 1 for thermistor resistance vs temperature values.
NOTE: Clean sensor with damp cloth only. Do not use
solvents.
Wiring the Space Temperature Sensor
(33ZCT55SPT and
33ZCT56SP T) — To wire the sensor, perform the following
(see Fig. 12 and 13):
1. Identify which cable is for the sensor wiring.
2. Strip back the jacket from the cables for at least
3-inches. Strip
1
/4-in. of insulation from each conductor. Cut the shield and drain wire from the sensor end
of the cable.
3. Connect the sensor cable as follows:
a. Connect one wire from the cable (RED) to the
SPT terminal on the controller. Connect the other
end of the wire to the left terminal on the SEN terminal block of the sensor.
b. Connect another wire from the cable (BLACK) to
the GND terminal on the controller. Connect the
other end of t h e w i re to the rem ain i ng op e n t erm i nal on the SEN terminal block.
c. On 33ZCT56SPT thermostats, connect the re-
maining wire (WHITE/CLR) to the T56 terminal
on the controller. Connect the other end of the
wire to the right most terminal on the SET terminal block.
d. In the control box, install a No. 6 ring type crimp
lug on the shield drain wire. Install this lug under
the mounting screw in the upper right corner of
the controller (just above terminal T1).
e. On 33ZCT56SPT thermostats install a jumper
between the two center terminals (right SEN and
left SET).
→
Wiring the Space T emperature Sensor (33ZCT58SPT)
T58 space temperature sensor is wired differently than other
conventional sensors. The T58 sends all its sensor information
through the CCN bus to the zone controller that is is associated
with. The SPT sensor wiring connections are not used. The T58
sensor does not need to be directly wired to the zone controller.
The T58 sensor may be powered by a separate 24-V AC power supply or may be connected to the J1 24 VAC power terminals on the zone controller. Be sure that the polarity of the power
supply connections are consistent. For multiple devices wired to
the same power supply, all positive (+) and negative (–) terminals should be wired in the same polarity.
Wire the T58 sensor to the CCN. Connect the CCN + terminal to the RED signal wire (CCN+). Connect the CCN – terminal to the BLACK signal wire (CCN–). Connect the GND
terminal to the WHITE/CLEAR signal wire (Ground). Refer to
the T58 sensor Installation Instructions for more information
on installing and wiring the sensor.
IMPORTANT: The T58 sensor must be configured with
the bus address and device type of the zone controller
before it will broadcast temperature to the zone control-
ler. Refer to the T58 sensor Installation Instructions for
more information on configuring the sensor.
Wiring the CCN Network Communication Service Jack
See Fig. 12, 13, and 14. To wire the service jack, perform the
following:
1. Strip back the jacket from the CCN communication
cable(s) for at least 3 inches. Strip
1
/4-in. of insulation
from each conductor. R emove the shield and separate
the drain wire from the cable. Twist together all the
shield drain wires and fasten them together us ing an
closed end crimp lug or a wire nut. Tape off any
exposed bare wire to prevent shorting.
2. Connect the CCN + signal wire(s) (RED) to
Ter minal 5.
3. Connect the CCN – signal wire(s) (BLACK) to
Ter minal 2.
4. Connect the CCN GND signal wire(s) (WHITE/CLR)
to Terminal 4.
— The
—
19
801
Page 20

LOW PRESSURE
TUBING
L
H
NOTE: Minimum length of tubing is 2 ft.
0
HF23BJ042
Made in Switzerland
by Belimo Automation
LR 92800
NEMA 2
LISTED
94D5
TEMP. IND. &
REG. EQUIP.
Class 2 Supply
yel
U
L
5K
WIP
ora
blu
35 in-lb (4 Nm)
80...110s
24VAC/DC
50/60Hz
3VA 2W
COM
2
1
red
blk
1
3
wht
HIGH PRESSURE
TUBING
Fig. 9 — Airflow Pickup Installation
Cool
Warm
Fig. 10 — Space Temperature Sensor
(P/N 33ZCT56SPT Shown)
NOTE: Dimensions are in inches.
Fig. 11 — Space Temperature Sensor and Wall
Mounted Humidity Sensor Mounting
20
Page 21

SW1
2
3
45
61
SW1
SEN
SET
Cool Warm
WHT
(T56)
BLK (GND)
RED (SPT)
RED(+)
WHT(GND)
BLK(-)
CCN COM
SENSOR WIRING
JUMPER
TERMINALS
AS SHOWN
2
3
SEN
45
61
RED(+)
WHT(GND)
BLK(-)
CCN COM
BLK (GND)
RED (SPT)
Fig. 12 — Space Temperature Sensor Wiring
(33ZCT55SPT)
Table 1 — Thermistor Resistance vs Temperature Values for Space Temperature Sensor, Return-Air
Temperature Sensor, and Supply-Air Temperature Sensor
TEMP
(C)
–40 –40 335,651
–35 –31 242,195
–30 –22 176,683
–25 –13 130,243
–20 –4 96,974
–15 5 72,895
–10 14 55,298
–5 23 42,315
0 32 32,651
5 41 25,395
10 50 19,903
15 59 15,714
20 68 12,494
25 77 10,000
30 86 8,056
35 95 6,530
40 104 5,325
45 113 4,367
50 122 3,601
55 131 2,985
60 140 2,487
65 149 2,082
70 158 1,752
SENSOR WIRING
TEMP
(F)
Fig. 13 — Space Temperature Sensor Wiring
(33ZCT56SPT)
RESISTANCE
(Ohms)
21
Page 22

Wiring when distance between zone controller and space temperature sensor is 100 feet or less
CCN COMM BUS
3 COND COMM CABLE (TYP)
2 COND TWISTED
CABLE OR 3 COND
CABLE (TEMP
SENSOR WIRING) (TYP)
100 FT. MAXIMUM
AIR TERMINAL
UNIT (TYP)
ZONE
CONTROLLER
(TYP)
Warm
Cool
SPACE
TEMPERATURE
SENSOR
Wiring when distance between zone controller and space temperature sensor is greater than 100 feet
CCN COMM BUS
2 COND TWISTED
CABLE OR 3 COND
CABLE (TEMP
SENSOR WIRING) (TYP)
AIR TERMINAL
UNIT (TYP)
ZONE
CONTROLLER
(TYP)
Warm
Cool
SPACE
TEMPERATURE
SENSOR
Fig. 14 — Communication Bus Wiring to Zone Controller
DISTANCE GREATER
THAN 100 FT.
Warm
Cool
Warm
Cool
Before wiring the CCN connection, refer to the Connect to
the CCN Communication Bus section on page 26, for communication bus wiring and cable selection. The cable selected
must be identical to the CCN communication bus wire used for
the entire network.
The other end of the communication bus cable must be connected to the remainder of the CCN communication bus. If the
cable is installed as a T-tap into the bus, the cable length cannot
exceed 100 ft. Wire the CCN service jack of the sensor in a
daisy chain arrangement with other equipment. Refer to the
Connect to the CCN Communication Bus section, page 26, for
more details.
22
Page 23

PRIMARY AIR TEMPERATURE SENSOR INSTALLATION — A primary air temperature (PAT) sensor is used on a
zone controller which is functioning as a Linkage Coordinator
for a non CCN/Linkage compatible air source. The part number is 33ZCSENP AT. See Fig. 15.
When used on a zone controller, try to select a zone controller which will al low in stalla tion of the PAT sensor in the mai n
trunk, as close to the air source as possible. See Fig. 16.
SUPPLY AIR TEMPERATURE (SAT) SENSOR INSTALLATION — On terminals with heat, the SAT sensor is required. The SAT must be installed in the duct downstream
from the air terminal. The SAT sensor is also sometimes called
a duct temperature (DT) sensor. The part number is
33ZCSENSAT.
The SAT sensor probe is 6 inches in length. The tip of the
probe must not touch the inside of the duct. Use field-supplied
bushings as spacers when mounting the probe in a duct that is
6 in. or less in diameter.
If the unit is a cooling only unit, the SAT is not required.
Fig. 15 — Primary Air Temperature Sensor
(Part Number 33ZCSENPAT)
Fig. 16 — Primary Air Temperature Sensor
Installation (Unit Discharge Location)
If the unit is equipped with electric reheat, e nsure that the
sensor is installed at least 2 ft downstream of the electric heater.
See Fig. 17 for the sensor location in this application.
If the unit has an octopus connected directly at the discharge, install the sensor in the octopus. If the unit has an electric heater, the two foot minimum distance between the sensor
and the heater must be maintained. See Fig. 17 for the sensor
location in this application.
Disconnect electrical power before wiring the zone controller. Electrical shock, personal injury, or damage to the zone
controller can result.
Do not run sensor or relay wires in the same conduit or raceway with Class 1 AC or DC service wiring. Do not abrade, cut,
or nick the outer jacket of the cable. Do not pull or draw cable
with a force that may harm the physical or electrical properties.
A void splices in any control wiring.
Perform the following steps to connect the SAT sensor to
the zone controller:
1. Locate the opening in the control box. Pass the sensor
probe through the hole.
2. Drill or punch a
1
/4-in. hole in the duct downstream of
the unit, at a location that conforms to the requirements shown i n Fig. 17.
3. Use two field-supplied, self-drilling screws to secure
the sensor probe to the duct. Use field-supplied bushings as spacers when installing the sensor probe in a
duct 6 in. or less in diameter.
Perform the following steps if state or local code requires
the use of conduit, or if your installation requires a cable length
of more than 8 ft:
1. Remove the center knockout from a field-supplied 4 x
2-in. junction box and secure the junction box to the
duct at the location selected for the sensor probe.
2. Drill a
the junction box.
3. Connect a
1
/2-in. hole in the duct through the opening in
1
/2-in. nominal field-supplied conduit
between the zone controller enclosure and the junction
box.
4. Pass the sensor probe wires through the conduit and
insert the probe in the duct. Use field-supplied bushings as spacers when installing the sensor probe in a
duct 6 in. or less in diameter.
5. Secure the probe to the duct with two field-supplied
self-drilling screws.
6. If you are extending cable length beyond 8 ft, use plenum rated, 20 AWG, twisted pair wire.
7. Connect the sensor leads to the zone controller’s wiring harness terminal board at the terminals labeled
SAT and GND.
8. Neatly bundle and secure excess wire.
INDOOR AIR QUALITY SENSOR INSTALLATION —
→
The indoor air quality (IAQ) sensor accessory monitors carbon
dioxide levels. This information is used to modify the position
of the outdoor air dampers to admit more outdoor air as
required to provide the desired ventilation rate. Two types of
sensors are supplied. The wall sensor can be used to monitor
the conditioned air space; the duct sensor monitors the return
air duct. Both wall and duct sensors use infrared technology to
measure the levels of CO
present in the air. The wall sensor is
2
available with or without an LCD readout to display the CO
level in ppm. See Fig. 18.
The sensor part number is 33ZCSENCO2. To mount the
sensor, refer to the installation instructions shipped with the accessory kit.
2
23
800
Page 24

2 FT. MIN.
UNIT WITH ELECTRIC REHEAT
PRIMARY
AIR INLET
AIR
TERMINAL
UNIT
ZC
UNIT WITH OCTOPUS
AIR
TERMINAL
UNIT
ZC
The CO
PRIMARY
AIR INLET
Zone Controller
ZC —
→
→
Fig. 17 — Supply Air Temperature Probe (Part No. 33ZCSENSAT) Locations
→ →
sensors (33ZCSENCO2) factory set for a range of
2
0 to 2000 ppm and a linear voltage output of 0 to 10 vdc.
Figure 19 shows ventilation rates for various CO
set points
2
when outside air with a typical CO2 level of 350 ppm is used.
Refer to the instructions supplied with the CO
sensor for elec-
2
trical requirements and terminal locations. The zone controller
requires 24 vac 25 va transformer to provide power to the
sensor.
5.625
(14.3)
5
(12.7)
HEAT
HEAT
SAT
2 FT. MIN.
OCTOPUS
SAT
T o convert the CO
sensor into a duct-mounted CO2 sensor,
2
the duct-mounted aspirator (33ZCASPCO2) will need to be
purchased.
To accurately monitor the quality of the air in the conditioned air space, locate the sensor near the return air grille so it
senses the concentration of CO
leaving the space. T he sensor
2
should be mounted in a location to avoid direct breath contact.
Do not mount the space sensor in drafty areas such as near
supply ducts, open windows, fans, or over heat sources. Allow
at least 3 ft between the sensor and any corner. A void mounting
the sensor where it is influenced by the supply air; the sensor
gives inaccurate readings if the supply air is blown directly
onto the sensor or if the supply air does not have a chance to
mix with the room air before it is drawn into the return air
stream.
To accurately monitor the quality of the air in the return air
duct, locate the sensor at least 6 in. upstream or 15 in. downstream of a 90 degree turn in the duct. The downstream location is preferred. Mount the sensor in the center of the duct.
3.25
(8.3)
1.125
(2.9)
Fig. 18 — Indoor Air Quality (CO2) Sensor
(33ZCSENCO2)
303
0.25
(0.8)
IMPORTANT: If the sensor is mounted in the return air
duct, readjust the mixed-air dampers to allow a small
amount of air to flow past the return air damper whenever the mixing box is fully open to the outside air. If the
damper is not properly adjusted to provide this minimum airflow, the sensor may not detect the indoor-air
quality during the economizer cycle.
24
Page 25

Fig. 19 — Ventilation Rated Based on
*
CO2 Set Point
Indoor Air Quality Sensor Wiring
— To wire the sensors
after they are mounted in the conditioned air space and return
air duct, see Fig. 20 and the instructions shipped with the se nsors. For each sensor, use two 2-conductor 18 AWG twistedpair cables (unshielded) to connect the separate isolated 24 vac
power source to the sensor and to connect the sensor to the control board terminals. To connect the sensor to the control board,
identify the positive (+) PIN-8 and ground (GND) PIN-7 terminals on the sensor and connect the positive terminal to terminal
RH/IAQ and connect the ground terminal to terminal GND.
HUMIDITY SENSOR (WALL-MOUNTED) INSTALLATION — The accessory space humidity sensor is installed on
an interior wall t o measu re th e rela tive humidi ty of the air within the occupied space. See Fig. 21.
The use of a standard 2- x 4-in. electrical box to accommodate the wiring is recommended for installation. The sensor can
be mounted directly on the wall, if acceptable by local codes.
If the sensor is installed directly on a wall surface, install the
humidity sensor using 2 screws and 2 hollow wall anchors
(field-supplied); do not overtighten screws. See Fig. 11.
Do NOT clean or touch the sensing element with chemical
solvents; they can permanently damage the sensor.
The sensor must be mounted vertically on the wall. The
Carrier logo should be oriented correctly when the sensor is
properly mounted.
DO NOT mount the sensor in drafty areas such as near heating or air-conditioning ducts, open windows, fans, or over heat
sources such as baseboard heaters, radiators, or wall-mounted
light dimmers. Sensors mounted in those areas will produce inaccurate readings.
Avoid corner locations. Allow at least 4 ft between the sensor and any corner. Airflow near corners tends to be reduced,
resulting in erratic sensor readings.
Sensor should be vertically mounted approximately 5 ft up
from the floor, beside the space temperature sensor.
For distances up to 500 feet, use a 3-conductor, 18 or 20
AWG cable. A CCN communication cable can be used,
although the shield is not required. The shield must be removed
from the sensor end of the cable if this cable is used. See
Fig. 22 for wiring details.
The power for the sensor is provided by the control board.
The board provides 24 vdc for the sensor. No additional power
source is required.
T o wire the sensor , perform the following:
1. At the sensor, remove 4-in. of jacket from the cable.
1
Strip
/4-in. of insulation from each conductor. Route
the cable through the wire clearance opening in the
center of the sensor. See Fig. 22.
2. Connect the RED wire to the sensor screw terminal
marked (+).
3. Install one lead from the resistor (supplied with the
sensor) and the WHITE wire, into the sensor screw terminal marked (–). After tightening the screw terminal,
test the connection by pulling gently on the resistor
lead.
4. Connect the remaining lead from the resistor to the
BLACK wire and secure using a closed end type crimp
connector or wire nut.
5. Using electrical tape, insulate any exposed resistor
lead to prevent shorting.
6. At the control box, remove the jacket from the cable
and route the RED conductor over to the left side of
the control board. Route the remaining conductors to
the right side of the control board.
RH/IAQ
GND
21
24 VAC
87
SEPARATE
ISOLATED
POWER
SUPPLY
REQUIRED
(24 VAC, 25 VA
MINIMUM)
LINE
VOLTAGE
0
HF23BJ042
Made in Switzerland
by Belimo Automation
LR 92800
NEMA 2
LISTED
94D5
U
TEMP. IND. &
L
REG. EQUIP.
Class 2 Supply
5K
WIP
blu
yel
ora
35 in-lb (4 Nm)
80...110s
24VAC/DC
50/60Hz
3VA 2W
COM
2
1
red
blk
1
3
wht
Do not connect to the same transformer that supplies power to the zone controller.
→
Fig. 20 — Indoor Air Quality Sensor Wiring
25
303
Page 26

Fig. 21 — Wall Mounted Relative Humidity Sensor
(P/N 33AMSENRHS000)
7. Strip
1
/4-in. of insulation from each conductor
and equip each with a
1
/4-in. female quick connect
terminal.
8. Connect the RED wire to terminal +24v on the control
board.
9. Connect the BLACK wire to terminal GND on the
control board.
10. Connect the WHITE/CLEAR wire to terminal
RH/IAQ on the control board.
11. Connect shield to ground (if shielded wire is used).
→
Remote Occupancy Contact —
The remote occupancy input (J4 pin 2) has the capability to be connected to a
normally open or normally closed occupancy dry contact. Wire
the dry contact as show in Fig. 23 between J4 Pin 2 and
24 VAC J1 Pin 1. The 24 VAC necessary to supply the
ComfortID™ Controller remote occupancy contact input shall
be supplied using the existing ComfortID Controller.
Connect the Outputs —
Wire the zone controller’s
outputs (fan, staged heat, valves) as shown in the applicable
wiring diagrams in Fig. 8A-J.
Modulating Baseboard Hydronic Heating —
stall the water valve on the leaving water end of the baseboad
heater. See Fig. 24. Observe the fluid flow direction when
mounting the valve. Be sure to properly heat sink the valve and
direct the flame away from th e actuator and val ve body when
sweating the va lve connect ions. Insta ll the leav ing water te mperature sensor (33ZCSENCHG) on the hydronic heating coil
as shown. The sensor accommodates nominal copper pipe
1
from
/2 to 1-in. (OD sizes from 5/8 to 1.125 in.). It should be
secured to the pipe with the clamp supplied. If piping is larger
than 1-in. nominal size, a field-supplied clamp must be used.
Use fiberglass pipe insulation to insulate the sensor assembly.
Refer to Fig. 8C and 8H to wire the modulating water valve
and the sensor to the zone controller. Connect the leaving water
temperature sensor to the controller using the wiring connections shown for the SAT sensor. (NOTE: The leaving water
temperature sensor replaces the SA T sensor in this application.)
Use 18 or 20 AWG wire for all connections. The water valve
actuator housing may be used as a junction box if the leaving
water temperature sensor cable is not long enough and the sensor cable must be extended to reach the controller.
For modulating hydronic heating applications, the default
configuration must be changed to properly control the valve.
In-
Refer to the service configuration table and set the Heating
Loop parameters as follows:
Proportional Gain = 20.0
Integral Gain = 0.5
Derivative Gain = 0.0
Start Value = 102.0
Also, set the Ducted Heat decision to YES and set the Maximum Duct Temperature decision equal to the design (maximum) boiler water temperature minus 20 degrees, but not
greater than 200 degrees F.
Connect the CCN Communication Bus —
The
zone controllers connect to the bus in a daisy chain arrangement. The zone controller may be installe d on a pri mary CCN
bus or on a secondary bus from the primary CCN bus. Connecting to a secondary bus is recommended.
At 9,600 baud, the number of controllers is limited to 128
zones maximum, with a limit of 8 systems (Linkage Coordinator configured for at least 2 zones). Bus length may not exceed
4000-ft, with no more than 60 devices on any 1000-f t section.
Optically isolated RS-485 repeaters are required every 1000 ft.
At 19,200 and 38,400 baud, the number of controllers
is limited to 128 maximum, with no limit on the number of
Linkage Coordinators. Bus length may not exceed 1000 ft.
The first zone controller in a network connects directly to
the bridge and the others are wired sequentially in a daisy chain
fashion. Refer to Fig. 25 for an illustration of CCN Communication Bus wiring.
The CCN Communication Bus also connects to the zone
controller space temperature sensor. Refer to the Install the
Sensors section for sensor wiring instructions.
COMMUNICATION BUS WIRE SPECIFICATIONS —
The Carrier Comfort Network (CCN) Communication Bus
wiring is field-supplied and field-installed. It consists of
shielded three-conductor cable with drain (ground) wire. T he
cable selected must be identical to the CCN Com munication
Bus wire used for the entire network. See Table 2 for recommended cable.
Table 2 — Recommended Cables
MANUFACTURER CABLE PART NO.
Alpha
American
Belden
Columbia
NOTE: Conductors and drain wire must be at least 20 AWG
(American Wire Gage), stranded, and tinned copper. Individual conductors must be insulated with PVC, PVC/nylon, vinyl, teflon, or
polyethylene. An aluminum/polyester 100% foil shield and an outer
jacket of PVC, PVC/nylon, chrome vinyl, or Teflon with a minimum
operating temperature range of –20° C to 60° C is required.
2413 or 5463
A22503
8772
02525
CONNECTION TO THE COMMUNICATION BUS
1. Strip the ends of the red, white, and black conductors
of the communication bus cable.
2. Connect one end of the communication bus cable to
the bridge communication port labeled COMM2 (if
connecting on a secondary bus).
When connecting the communication bus cable, a
color code system for the entire network is recommended to simplify installation and checkout. See
Table 3 for the recommended color code.
Table 3 — Color Code Recommendations
SIGNAL TYPE
+
Ground
–
CCN BUS WIRE
COLOR
Red 1
White 2
Black 3
PLUG PIN
NUMBER
801
26
Page 27

3. Connect the other end of the communication bus cable
to the terminal block labeled CCN in the zone controller of the first air terminal. Following the co lor code
in Table 3, connect the Red (+) wire to Terminal 1.
Connect the White (ground) wire to Terminal 2. Connect the Black (–) wire to Terminal 3.
4. Connect additional zone controllers in a daisy chain
fashion, following the color coded wiring scheme in
Table 3. Refer to Fig. 25.
NOTE: The communication bus drain wires (shield) must
be tied together at each zone controller. If the communication bus is entirely within one building, the resulting continuous shield must be connected to ground at only one single
point. If the communication bus cable exits from one building and enters another building, connect the shields to
ground at a lightning suppressor in each building where the
cable enters or exits (one point only).
3 CONDUCTOR
20 AWG CABLE
RED
+
-
RH/IAQ
WHITE
BLACK
SHIELD
(IF USED)
499
RESISTOR
(SUPPLIED
W/SENSOR)
HUMIDITY SENSOR
0
HF23BJ042
Made in Switzerland
by Belimo Automation
LR 92800
NEMA 2
LISTED
94D5
U
TEMP. IND. &
L
REG. EQUIP.
Class 2 Supply
WIP
blu
yel
GND
+24V
1
35 in-lb (4 Nm)
80...110s
24VAC/DC
50/60Hz
3VA 2W
5K
COM
3
2
1
ora
wht
red
blk
Fig. 22 — Humidity Sensor Wiring
27
Page 28

FIELD-SUPPLIED
DRY CONTACT SWITCH
comunications
Not used
CCN
Voltage
Line
comunications
24 VAC
CCN
TRAN
TRANSFORMER
GROUND
TERMINAL
GROUND
+24V
SPT
RH/IAQ
GND
GND
SECFLOW
SAT
T56
+10V
Y
Low
GND
GND
Bl
DMPPOS
PAT
N/A
GND
Or
R
(+)
W
(GND)
B
(-)
HEAT2HEAT1 24VAC
RBW
Fig. 23 — Remote Occupancy Wiring
Hi
→
303
10
80...110s
35 in-lb(4Nm)
Automation
Switzerland
Made in
By Belimo
HF23BJ042
50/60Hz
24VAC/DC
2W
3VA
28
com
Wht
RedBlk
Ora
BluYel
LEGEND
Carrier Comfort Network
Supply-Air Temperature Sensor
Space Temperature Sensor
Transformer
Field Wiring
Factory Wiring
CCN —
SAT —
SPT —
TRAN —
Page 29

33ZCSENCHG
(SENSOR)
1
2
CCN
DRAIN WIRE (TYP)
BLK (TYP)
WHT (TYP)
RED (TYP)
3
ZC
(TYP)
FLOW
→
Fig. 24 — Typical Water Valve and Sensor Installation
2
3
1
CCN
1/2” TUBE
3/4” TUBE
1” TUBE
1000 FT. MAXIMUM
2
1
CCN
3
1
2
CCN
GND
2
3
3
1
4
COMM 2
AIR TERMINAL
UNIT (TYP)
LEGEND
CCN —
ZC —
Carrier Comfort Network
Zone Controller
Fig. 25 — Communication Bus Wiring
START-UP
Use the Carrier network communication software to start up
and configure the zone controller.
All set-up and set point configurations are factory-set and
field-adjustable.
®
Changes can be made using the ComfortWORKS
software, ComfortVIEW™ software, or Network Service Tool.
The Network Service Tool is a portable interface device that allows the user to change system set-up and set points from a
zone sensor or terminal control module. During start-up, the
Carrier software can also be used to verify communication
with each zone controller.
For specific operating instructions, refer to the literature
provided with the software.
Perform System Check-Out
1. Check correctness and tightness of all power and communication connections.
2. Check that all air terminals, ductwork, and zone controllers are properly installed and set according to
installation instructions and job requirements.
BRIDGE
(RECOMMENDED)
3. Check that all air duct connections are tight.
4. At the air terminals, check fan and system controls for
proper operation. Verify that actuator screws are properly tightened.
5. At the air terminals, check electrical system and connections of any optional electric reheat coil. If hot
water reheat is used, check piping and valves against
job drawings.
6. At the air terminals, make sure that all balancing
dampers at box outlets are in the fully open position.
7. If using an air handler with field-installed controls,
make sure controls and sensors h ave been installed and
wired per manufacturer installati on inst ru ct ions .
8. At air handlers, verify that the motor starter and, if
applicable, the Hand/Off/Auto (HOA) switch are
installed and wired.
NOTE: The HOA switch must be in the Off position.
29
800
Page 30

9. Check to be sure the area around the air handler(s) is
clear of construction dirt and debris.
10. Check that final filters are installed in the air handler(s). Dust and debris can adversely affect system
operation.
11. Verify that the zone controller and the air handler controls are properly connected to the CCN bus.
Before starting the air source fan, make sure that dampe rs
at the system’s air terminals are not fully closed. Starting
the fan with dampers closed will result in da mage to the
system ductwork.
12. Remember to utilize good duct design and to provide
sufficient straight duct at the inlet of the box. A minimum of three times the inlet size is recommended.
Network Addressing —
when all the zone controllers are installed and powered, and the
SPT sensors are wired and functioning properly. This method
can be used if no addresses have been set previously. The address of an individual zone controller may be set by using the
address search function on the Service Tool software when it is
directly connected to the service port of the zone controller and
the CCN bus is disconnected. This is the standard method of
setting the address.
Addresses may also be set using the Service Tool Address
Search Function if the zone controller is isolated from the CCN
bus.
Each zone controller will default to an address of 0, 140
when its application software is initially loaded. Since multiple
controllers will be on the same bus, a unique address must be
assigned to each controller before the system can operate properly. The assignment of controller addresses will be performed
through software by using the Address Search function of the
Network Service Tool, as follows:
1. The software recognizes that the Zone Controller's address, stored in the zone controller memory, has not been
written yet (this will be true when the unit is first powered
up on the job, or after a jumper-initiated reset).
2. Press the override button on the SPT (terminals J4-14 and
J4-12 are shorted) for 1 to 10 seconds.
3. The zone controller address changes from 0, 140 to 239,
→
239 for a period of 15 minutes.
4. Use Network Service Tool to change the address from
239, 239 to a valid system address within 15 minutes.
NOTE: If the address is not changed from 239, 239 to
a valid system address within 15 m inutes, the controller will revert to address 0, 140 and use of the override
button will cause the address function to repeat. The
operator MUST actively set the address even if the
final desired address is 0, 140.
Initial Operation and Test —
procedure:
1. Apply 24 vac power to the control.
2. Connect the service tool to the phone jack service port
of the controller.
3. Using the service tool, upload the controller from
address assigned in Network Addressing section
above.
4. From the Terminal Service Configuration screen,
properly configure the damper type and inlet size. If a
round inlet is used, then enter the size directly in the
Inlet Diameter decision. If a square, rectangular, or
Use the following method
Perform the following
elliptical damper inlet is supplied, then enter th e inlet
size in square inches in the Inlet Area decision.
5. If the terminal damper closes in the CW direction, then
no adjustment is required. Otherwise, locate the
damper direction configuration decision (CW Rotation) and toggle the value to OP EN by usin g th e space
bar. This configuration decision is also located on the
Terminal Service Configuration screen.
6. After entering the area and rotation direction, verify
operation of the damper. From the service tool Diagnostic, Maintenance Screen, select the Zone Air
Balance/Commissioning Table and force the Commissioning Mode point to Enable. Then select the
Damper/Transducer Cal point and force this point to
Enable. The controller automatically tests the actuator
by fully closing the damper.
It checks the fully closed position to determine if the
control was properly mounted. It then opens the
damper. The control scales the actual actuator travel
range used to a 0 to 100% open value. Finally the control will close the damper, test, and zero the pressure
transducer. When completed, the control automatically
removes the force from the Damper/Transducer Cal
point. If a failure occurs at any point during the testing,
the Auto-Calibration point at the bottom of the s creen
will indicate ALARM and the test will be aborted.
7. The actuator stroke has now been calibrated for the
proper rotation.
Airflow Check —
has been performed, the terminal is ready for an airflow check.
To perform airflow check, make sure Terminal Type, Prim ary
Inlet Size, and Pro be Multiplier settings on the Terminal Service Configuration screen are configured. If all of the terminals
were installed with the dampers open, it is acceptable to start
the fan at this time. If it becomes difficult for the air source to
provide the necessary static pressure for airflow testing, it may
be necessary to calibrate the damper transducer for a majority
of terminals and check temperatures and set points to be sure
most will be contro ll ing to le ss th an ma xi mum CFM wh e n the
air source is started.
When the system fan is running and the static pressure is
fairly stable access the Zone Air Balance/Commissioning table
and force the Commissioning Mode Point to Enable. The system is now ready to enable maximum CFM a nd check if the
airflow controls correctly with the maximum CFM set point.
Read the Zone Air Balance/Commissioning table section on
page 47 which describes the Zone Air Balance/Commissioning
table and what adjustments can be made from this screen. If the
maximum airflow function is working properly, the user can
stop here and leave the rest of the airflow calibration for the air
balance contractor.
If working with the air balance contractor, proceed with the
minimum airflow calibration at this time. If this terminal is fan
powered or the terminal was instal led with heat, and the heat
configuration was already performed, continue with the fan
and heat test while the Zone Air Balance/Commissioning table
is still being displayed.
Fan and Heat Configuration and Test —
form the following procedure to configure and test the fan and
heat:
1. Display the Terminal Service Configuration screen to
make sure the proper T ermin al Type and Heat Type are
configured. See the Configuration section to answer
questions about the individual configurations.
2. From the Diagnostics Maintenance Screen select the
Zone Air Balance/Commissioning table.
3. Force the Commissioning Mode to Enable.
After the damper transducer calibration
Per-
501
30
Page 31

4. If the terminal is a parallel or series powered fan box,
force the Fan Override to Enable. If the damper is open
it may have to be repositioned to the proper position
depending on the box type. Damper percent change
will be displayed. After the damper is positioned correctly, the fan relay should energize and the fan should
run for a few seconds.
5. Make sure the fan runs and the Fan Override decision
returns to disabled to ensure the fan is wired correctly
for proper operation.
6. Force the Heating Override to Enable. If the unit is a
single duct unit, this must be done with the primary
terminal at reheat set point. The damper will modulate
to maintain the terminal reheat CFM. The heat outputs
will be commanded to provide maximum heat. If the
unit is a fan powered terminal, the fan must be on.
NOTE: The CFM settings can be found under service configuration in the table AIRFLOW.
CONFIGURATION
The following sections describe the computer configuration
screens which are used to configure the zone controller. The
screens shown may be displayed differently when using different Carrier software.
Points Display Screen —
allows the user to view the stat us of the air termi nal controlle r
points. See Tabl e 4.
TERMINAL MODE — The terminal mode is determine d by
the equipment mode as reported by linkage and spac e requirements determined by space temperature and set points. The
ZEROCAL and COMMISS modes are the result of the activating the commissioning maintenance table to perform terminal
testing and commissioning.
T erminal Mode: Display Units ASCII
Default V alue COOL
Display Range HEAT, COOL, VENT,
FAN AND VENT, DEHUMID, WARMUP, REHEAT, PRESSURE, EVAC, OFF,
ZEROCAL, C OM MISS
Network Access Read only
The Points Display screen
TERMINAL TYPE — Terminal type is the confirmation of
the terminal type configuration in the SERVCONF Service
Config table.
T erminal Type: Display Units ASCII
Default value SINGLDUCT
Display Range SINGLDUCT, PAR
F AN , S ER FAN, DUALDUCT
Network Access Read only
→
CONTROLLING SETPOINT — Controlling Setpoint will
display either the heating master reference or the cooling master reference depending upon what mode the terminal is in. The
display will default to the heating master reference and display
the last controlling master reference when in ne ither heating
nor cooling.
Controlling
Setpoint Display Units F (C)
Default V alue: –40
Display Range: –40 to 245
Network Access: Read only
SPACE TEMPERATURE — Space temperature from 10 kΩ
thermistor (Type III) located in the space.
Space
T emperature: Display Units F (C)
Default Value -40.0
Display Range -40.0 to 245.0
Network Access Read/W rite
PRIMARY AIRFLOW — Volume of primary air calculated
for pressure reading from the velocity pressure pickup probe
located in the input collar of the air terminal.
Primary Airflow: Display Units cfm
Default V alue 0
Display Range 0 to 9999
Network Access Read/Write
PRIMARY DAMPER POSITION — Damper position percent range of rotation determined by the transducer calibration
procedure. The zone controller is designed be used on dampers
with any range of rotation.
Primary Damper
Position: Display Units % open
Default V alue 0
Display Range 0 to 100
Network Access Read only
DESCRIPTION DEFAULT POINT NAME
Terminal Mode
Ter min a l Type
Controlling Setpoint
Space Temperature
Primary Airflow
Primary Damper Position
Supply Air Temperature
Local Heating Capacity
Terminal Fan
Relative Humidity
Air Quality (ppm)
Secondary Airflow
Primary Air Temperature
Heat
→
Tabl e 4 — Points Display Screen
COOL MODE
SINGLDUCT TYPE
-40.0 F CNTSP
-40.0 F SPT
0 cfm PRIFLO
100 % DMPPOS
0.0 F SAT
0 % HCAP
Off FAN
0 % RH RH
0 ppm AQ
0 cfm SECFLO
0.0 F PATEMP
Dsable HEAT
31
801
Page 32

SUPPLY AIR TEMPERATURE — Temperature of the air
leaving the zone controller downstream of any ducted heat
source. Measured by a 10 kΩ thermistor (Type III). This temperature is used to control the maximum discharge air to the
space when local heat is active. The sensor is not required or
recommended for cooling only terminals. If supply air temperature display is required by specification, on a cooling only
box, a heat type other than zero must be configured. This
will have no adverse affect on the operation of a cooling only
terminal.
Supply
Air Temperature: Display Units F (C)
Default V alue 0.0
Display Range -40.0 to 245.0
Network Access Read/Write
LOCAL HEATING CAPACITY — When local heat at the
terminal is enabled the percent of heat being delivered is determined by the following formula for modulating (floating point)
type heat:
% Capacity = [(SA T - SPT)/(Maximum Duct Temp – SPT )]
The percent of heat delivered is deter mined by the follow-
ing for two-position hot water or staged electric heat:
% Output Capacity = (# of active stages/Total stages) * 100
Local Heating
Capacity: Display Units % output capacity
Default V alue 0
Display range 0 to 100
Network Access Read only
TERMINAL FAN — The commanded output for the terminal
fan on a fan powered terminal.
T erminal Fan: Display Units Discrete ASCII
Default V alue Off
Display Range Off/On
Network Access Read/Write
RELATIVE HUMIDITY — Space Relative Humidity reading from the optional relative humidity sensor. Used by Humidity control function if configured.
Relative
Humidity: Display Units % RH
Default V alue 0
Display Range 0 to 100
Network Access Read/Write
AIR QUALITY — Indoor air quality reading from a CO
sen-
2
sor installed in the space. Used by Air Quality control function
if configured.
Air Quality (ppm):Display units None shown (parts per
million implied)
Default V alue 0
Display range 0 to 5000
Network Access Read/Write
SECONDARY AIRFLOW — Airflow reading from the secondary pressure transducer, supplied with the secondary actuator, intended for dual duct and pressure control applications.
Secondary
Airflow: Display Units cfm
Default V alue 0
Display Range 0 to 9999
Network Access Read/Write
PRIMARY AIR TEMPERATURE — Primary air temperature from sensor (10 kΩ, Type III), located in main trunk of
ductwork for supply air provided by the air-handling equipment. Used for linkage coordination.
Primary Air
T emperature: Display Units F (C)
Default V alue 0.0
Display Range -40.0 to 245.0
Network Access Read/W rite
HEAT ENABLE/DISABLE — Provides enable/disable
function for local heat at the terminal. When enabled the Local
heat capacity function will run to operate the terminal heat.
Heat Display: Display Units Discrete ASCII
Default Value Dsable
Display Range Dsabe/Enable
Network Access Read/Write
Modify Controller Configuration —
In Service
T ool software, select the desired zone controller and access the
Modify Controller Configuration Menu screen. This configuration screen is also displayed under CONFIGURE when using
ComfortWORKS
®
and ComfortVIEW™ software.
The Modify Controller Configuration Menu screen is used
to access the Alarm Limit Configuration screen, Controller
Identification screen, Holiday Configuration screen, Linkage
Coordinator Configuration screen, Occupancy Configuration
screen, and Set Point scre en.
ALARM LIMIT CONFIGURATION SCREEN — The
Alarm Limit Configuration screen is used to configure the
alarm settings for the zone controller. See T able 5.
DESCRIPTION DEFAULT POINT NAME
Alarm Routing Control
Re-Alarm Time
SPT Occupied Hysteresis
Unoccupied SPT
Low Limit
High Limit
Occupied RH
Low Limit
High Limit
Unoccupied RH
Low Limit
High Limit
Air Quality
Low Limit
High limit
High Velocity Pressure
801
→
Table 5 — Alarm Limit Configuration Screen
00000000 ROUTING
0RETIME
5.0 F SPTHYS
40 F
99 F
10 %
99 %
0 %
100 %
250 ppm
1200 ppm
1.2 in. wg HIGHVP
32
LOWLIM
HIGHLIM
LOWLIM
HIGHLIM
LOWLIM
HIGHLIM
LOWLIM
HIGHLIM
Page 33

Alarm Routing Control
— This decision indicates which
CCN system software or devices will receive and process
alarms sent by the zone controller. This decision consists of
eight digits each can be set to zero or one. A setting of 1 indicates alarms should be sent to this device. A setting of zero disables alarm processing for that device. Currently the corresponding digits are configured for the following devices: first
digit - user interface software; second digit - autodial gateway
or Tel ink; fourth digit - alarm printer interface module; digits 3,
and 5 through 8 - unused.
Alarm Routing
Control: Range 00000000 to 11111111
Default Value 00000000
Re-Alarm Time
— This decision is used to configure the number of minutes the zone controller will wait before an alarm
condition which has not been corrected will be re-transmitted
on the communications network. Re-alarming of an alarm condition will continue until the condition no longer exists.
Alarm Re-Alarm
Time: Units Minutes
Range 0 to 1440
Default Value 0 (Disabled)
Space Temperature Occupied Hysteresis
— This configuration defines the range above the occupied high set point and below the occupied low set point that the space temperature must
exceed for an alarm condition to exist during occupied hours.
Space Temperature
Occupied
Hysteresis: Units delta F (delta C)
Range 0.0 to 99.9
Default V alue 5.0
Unoccupied Space Temperature Low Limit
— This configuration defines the lowest temperature that the unoccupied space
can be before an alarm is generated.
Unoccupied Space
T emperature
Low Limit: Units F (C)
Range 0 to 255 F
Default V alue 40
Unoccupied Space Temperature High Limit
— This configuration defines the highest temperature that the unoccupied
space can be before an alarm is generated.
Unoccupied Space
T emperature
High Limit: Units F (C)
Range 0 to 255 F
Default V alue 99
Occupied Humidity Low Limit
— This configuration defines
the lowest humidity that the occupied space c an be before an
alarm is generated.
Occupied Humidity
Low Limit: Units % humidity
Range 0 to 100%
Default V alue 10
Occupied Humidity High Limit
— This configuration defines the highest humidity that the occupied space can be before an alarm is generated.
Occupied Humidity
High Limit: Units % humidity
Range 0 to 100%
Default V alue 99
→
Unoccupied Humidity Low Limit
— This configuration defines the lowest humidity that the unoccupied space can be
before an alarm is generated.
Unoccupied
Humidity Low
Limit: Units % humidity
Range 0 to 100%
Default V alue 0
→
Unoccupied Humidity High Limit
— This configuration defines the highest humidity that the unoccupied space can be
before an alarm is genenerated.
Unoccupied
Humidity High
Limit: Units % humidity
Range 0 to 100%
Default Value 100
Indoor Air Quality Low Limit
— This configuration defines
the lowest CO2 level that the occupied space can have before
an alarm is generated.
Indoor Air Quality
Low Limit: Units PPM (implied)
Range 0 to 5000
Default Value 250
Indoor Air Quality High Limit
the highest CO
level that the occupied space can have before
2
— This configuration defines
an alarm is generated.
Indoor Air Quality
High Limit: Units PPM
Range 0 to 5000 PPM
Default Value 1200
High Velocity Pressure
— This configuration defines the
maximum velocity pressure the zone controller should see at
the pickup mounted in the inlet of the terminal. This is also
used by the zone controller to calculate the maximum CFM the
terminal will b e able to c ontrol to using the t erminal inlet siz e
configured in the service configuration table.
High Velocity
Pressure: Units in. wg
Range 0.0 to 2.0 in. wg
Default V alue 1.2
CONTROLLER IDENTIFICATION SCREEN — The controller identification screen displays the device information for
the zone controller.
HOLIDAY CONFIGURATION SCREENS — The zone
controller has configuration screens for up to 12 different holiday schedules. Highlight the holiday name on the screen and
press enter to configure the holiday schedule. A separate screen
is used to ENTER the Holiday schedule.
Start Month
— The start month is the month in which the holiday starts. Months are represented by numbers with 1 representing January, 2 February, up to 12.
Start Month: Range 1 to 12
Default V alue 1
Start Day
— The start day is the day on which the holiday will
start.
Start Day: Range 1 to 31
Default V alue 1
Duration
— Length of time, in days, that the holiday will last.
Duration: Range 0 to 365
Default V alue 0
33
801
Page 34

LINKAGE COORDINATOR CONFIGURATION
SCREEN — The Linkage Coordinator Configuration screen
allows the user to set the linkage coordinator configuration settings. See Tabl e 6.
Linkage Master Zone
— This decision defines if the zone
controller will function as a Linkage Coordinator (Linkage
Master) for itself and other zones.
If the zone controller is to use a supply air sensor for standalone operation, this configuration must be configured to No
and the number of Zones to 1.
If the zone controller will use its primary air sensor to determine the air handler mode for a number of zone controllers,
configure this configuration to Yes, input the number of zones,
and leave the air source decisions at the default values of zero.
If this zone controller will communicate linkage information with an air source, configure this configuration to Y es. The
number of zones must be configured and the address of the air
source entered.
Linkage
Master Zone: Range Yes/No
Default V alue No
Number of Zones
— This decision defines the number of zone
controllers (including itself) for the Linkage Coordinator to
scan and include as part of the average temperature, set point s,
and occupancy information to the air source. The address of the
zone controller functioning as a Linkage Coordinator must be
larger than the number of zones configured. The z one controller will scan addresses less than its own, including information
for as many zones as are configured. Other zone controller configured as linkage coordinators will also be included, so it is
possible to have zones scanned by more than one linkage coordinator. Therefore care must be taken in addressing to prevent
overlapping systems, unless overlapping systems is necessary.
In large buildings the use of bridges and multiple busses is recommended to improve communication and provide system
differentiation.
Number of
Zones: Range 1 to 128
Default V alue 1
Air Source Bus and Element Number
— The Air Source Bus
and Element Number configurations define the address of t he
air source providing conditioned air to the zones c ontrolled by
the linkage coordinator. If the address is left at zero, the Linkage coordinator will look for a primary air sensor to determine
the equipment mode. If no primary air sensor is installed, or the
sensor fails, the Linkage Coordinator will default the air source
mode to Cooling.
Air Source
Bus Number: Range 0 to 240
Default V alue 0
Air Source
Element Number: 0 to 240
Default V alue 0
Static Pressure Reset
— Air systems designed with diversity
(airflow required with all zones at maxi mum cfm exceeds design capacity of air handler) are capable of providing enough
CFM to all zones on days when conditions meet the demand at
design static. At other times, the air system does not require the
design static to meet the load requirements.
Static pressure reset allows the static pressure set point on
the air source to be reset w henever t he system l oad is reduc ed
from the design maximum. The zone controller will then monitor damper positions. When the system dampers are modulating at lower damper positions due to the higher static, the static
pressure will the n b e re se t to a lower value a llowing the damp ers to open more. This allows the system to automati cally make
adjustments to the static pressure and optimize performance of
the fan which will reduce energy consumption.
The linkage coordinator monitors the position of all dampers in its system. When any zone’s maximum damper position
reaches the Reset Maximum Damper Position, the linkage coordinator will reduce the value of the reset variable.
The Maximum Damper Position and Static Pressure Reset
values can be viewed on the Linkage maintenance screen.
NOTE: The static pressure set point configured in the air
source should be the desired maximum (zero reset) static
pressure.
→
DESCRIPTION DEFAULT POINT NAME
Zone Linkage
Linkage Master Zone
Number of Zones
Air Source Bus Number
Air Source Element Number
Static Pressure Reset
Reset Minimum Damper Position
Reset Maximum Damper Position
Maximum Reset
SP Reset Variable Name
CCN Linkage Data
CCN Variable Name
CCN Function Configuration
Data Transfer Rate
CCN Output Point
Destination Bus Number
Destination Element Number
Temperature Sensor Grouping
Temperature Sensor Mode
Temperature Sensor Configuration
Broadcast Device ID
Table 6 — Linkage Coordinator Configuration Screen
No MZENA
1 NSYSTZ
0 ASBUSN
0 ASELEMN
50 % MINDP
80 % MAXDP
0.0 in. wg SPMAX
(blank) SPRVAR
(blank) CCNVAR
3 CCNFUNC
1 0 m i nu te s DATA R ATE
(blank) CCNOUTP
0DESTBUSN
0DESTELEN
1 BRD_RECV
1SENSCFG
1 BRDDEVID
801
34
Page 35

Reset Minimum
Damper Position: Units %
Reset Maximum
Damper Position: Units %
Maximum Reset: Units in. wg
Static Pressure Reset
Variable Name: Units ASCII (8 characters)
*To use Static Pressure Reset with a Comfort System
AirManager, configure the variable name to SPRESET .
Currently, to make use of the static reset information, a custom program must be written in a Comfort Controller to read
the reset value and change the set point of the static pressure
control in the air source. Use this configuration to create a variable name (Static Pressure Reset Value). See the application
manual for information about creating this custom program.
The Comfort System AirManager™ control has an internal
SPRESET variable which functions to accept the stat ic pressure reset value from the linkage coordinator (refer to the Air
Manager manual for configuration setup).
→
CCN Linkage Data
Linkage master has the ability to poll its slaves and collect the
high, low or average value of any variable within its slaves.
Once the high, low or average is det ermined, the master can
then transfer that value to a configured bus number, element
number and point name. Typically this feature is used to determine a system’s highest indoor air quality reading.
In order to utilize this feature the CCN V ariable Name being
collected from the slaves must be supplied. The data transfer
rate must be specified and whether the high, low, or average
value is being determined. After the value has been determined, a valid point name and CCN address to transfer the
value to must be entered.
CCN Variable
Name: Units ASCII (8 Characters)
CCN Function
Config: Units none
Data Transfer
Rate: Units minutes
CCN Output
Point: Units ASCII (8 Characters)
Destination Bus
Number: Units none
Destination
Element Number: Units none
Range 0 to 99
Default V alue 50
Range 0 to 99
Default V alue 80
Range 0.0 to 5.0
Default V alue 0.0
Range A-Z,0-9
Default V alue *
— A zone controller configured as a
Range A-Z, 0-9
Default Value (blank)
Range 0 = none, 1 = average,
2 = low, 3 = high
Default V alue 3
Range 1-15
Default V alue 10
Range A-Z, 0-9
Default Value (blank)
Range 0-239
Default V alue 0
Range 0-239 (0 = disabled)
Default V alue 0
→
Temp Sensor Grouping
the capability to broadcast the associated space temperature
sensor’s data or listen to another controller’s sensor data over
the network. All controllers sharing the same sensor must be
installed on the same CCN bus.
There are three configuration decisions that must be configured in order to share sensors. The Temp Sensor Mode is used
to specify if a controller will use its own local sensor, broadcast
its local sensor, or listed to another controller’s sensor broad-
cast. The Temp Sensor Config is used to specify if the controller is sharging the space temperature information only or the
space temperature and temperature offset slidebar information.
The Broadcast Device ID decision is used to specify which
controller number a zone will listen for when configured to
receive another controller’s broadcast.
Temp Sensor
Mode: Units none
Temp Sensor
Config: Units none
Broadcast
Device ID: Units None
OCCUPANCY CONFIGURATION SCREEN — The Occupancy Configuration screen is used to set the occupied
schedule. See Table 7.
Manual Override Hours
sion is used to command a timed override by entering the number of hours the override will be in effect.
If the occupancy schedule is occupied when this number is
downloaded, the current occupancy period will be extended by
the number of hours downloaded.
If the current occupancy period is unoccupied when the occupancy override is initiated, the mode will change to occupied
for the duration of the number of hours downloaded.
If the occupancy override will end after the start of the next
occupancy period, the mode will transition from occupancy
override to occupied without becoming unoccupied, and the
occupancy override timer will be reset.
An active occupancy override or a pending occupancy override may be canceled by downloading a zero to this configuration. Once a number other than zero has been downloaded to
this configuration any subsequent downloads of any value other than zero will be ignored by the zone controller.
Manual Override
Hours: Units hours
Occupancy Scheduling
occupancy programming is broken into eight separate pe riods.
For each period the scheduling, the active days of the week,
occupied start time, and occupied stop time needs to be
configured.
Day of W eek
corresponding to the seven days of the week and a holiday
field in the following order: Monday, Tuesday, Wednesday,
Thursday, Friday, Saturday, Sunday, Holiday. A separate configuration screen is used.
— This configuration consists of eight fields
— Each ComfortID™ controller has
Range 1 = Local Sensor,
2 = Broadcast, 3 = Listen
Default V alue 1
Range 1 = SPT, 2 = SPT and
offset
Default V alue 1
Range 1-239
Default V alue 1
— The Manual Override Hours deci-
Range 0 to 4
Default V alue 0
— For flexibility of scheduling, the
35
801
Page 36

DESCRIPTION DEFAULT POINT NAME
Manual Override Hours
Period 1: Day of Week
Period 1: Occupied From
Period 1: Occupied To
Period 2: Day of Week
Period 2: Occupied From
Period 2: Occupied To
Period 3: Day of Week
Period 3: Occupied From
Period 3: Occupied To
Period 4: Day of Week
Period 4: Occupied From
Period 4: Occupied To
Period 5: Day of Week
Period 5: Occupied From
Period 5: Occupied To
Period 6: Day of Week
Period 6: Occupied From
Period 6: Occupied To
Period 7: Day of Week
Period 7: Occupied From
Period 7: Occupied To
Period 8: Day of Week
Period 8: Occupied From
Period 8: Occupied To
Table 7 — Occupancy Schedule Information Screen
0OVRD
11111111 DOW1
00:00 OCC1
24:00 UNOCC1
00000000 DOW2
00:00 OCC2
24:00 UNOCC2
00000000 DOW3
00:00 OCC3
24:00 UNOCC3
00000000 DOW4
00:00 OCC4
24:00 UNOCC4
00000000 DOW5
00:00 OCC5
24:00 UNOCC5
00000000 DOW6
00:00 OCC6
24:00 UNOCC6
00000000 DOW7
00:00 OCC7
24:00 UNOCC7
00000000 DOW8
00:00 OCC8
24:00 UNOCC8
If a 1 is configured in the corresponding place for a certain
day of the week, the related “Occupied from” and “Occupied
to” times for that period will take effect on that day of the
week. If a 1 is placed in the holiday field the related times will
take effect on a day configured as a holiday. A zero means the
schedule period will not apply to that day.
Period (1-8):
Day of W eek: Range 0 or 1
Default Values 11111111 for period 1,
00000000 for periods 2-8.
Occupied From
— This field is used to configure the hour and
minute, in military time, when the mode for the zone controller
becomes occupied.
Period (1-8):
Occupied from: Units Hours: Minutes
Range 00:00 to 24:00
Default Value 00:00
Occupied To
— This field is used to configure the hour and
minute, in military time, when the occupied mode for th e zone
controller becomes unoccupied.
Period (1-8):
Occupied from: Units Hours: Minutes
Range 00:00 to 24:00
Default Value 24:00
SET POINT SCREEN — The Set Point screen is used to
modify the zone controller set points. See Table 8.
Occupied Heat
— The Occupied Heat set point is used to configure the heating set point for the zone controller during Occupied mode.
Occupied Heat: Units F (C)
Range 40.0 to 90.0
Default Value 70.0
Occupied Cool
— The Occupied Cool set point is used to configure the cooling set point for the zone controller during Occupied mode.
Occupied Cool: Units F (C)
Range 45.0 to 99.9
Default Value 74.0
Unoccupied Heat
— The Unoccupied Heat set point is used to
configure the heating set point for the zone controller during
Unoccupied mode.
Unoccupied Heat: Units F (C)
Range 40.0 to 90.0
Default Value 55.0
Unoccupied Cool
— The Unoccupied Cool set point is used to
configure the cooling set point for the zone controller during
Unoccupied mode.
Unoccupied Cool: Units F (C)
Range 45.0 to 99.9
Default Value 90.0
→
Occupied High Humidity
— The Occupied High Humidity
set point is used to configure the humidity set point for the zone
controller if optional zone humidity control (dehumidification)
is used.
Occupied High Humidity: Units % Humidity
Range 0.0 to 100.0
Default Value 60.0
→
Unoccupied High Humidity
— The unoccupied high humidity set point is used to configure the unoccupied humidity set
point for the zone controller if optional zone humidity control
(dehumidification) is used.
Unoccupied
High Humidity: Units % humidity
Range 0 to 100
Default Value 100
1001
36
Page 37

Air Quality
— The Air Quality set point is used to configure
the IAQ set point for the zone controller if optional controlled
ventilation support is used.
Air Quality Units none shown (ppm
(ppm): implied)
Range 0 to 5000
Default Value 850
Delta Airflow
— The Delta Airf low set point is used to configure the Delta Airflow set point for the zone controller if the
zone pressure control option is used. If a negative pressure is
desired, configure the value as a positive delta.
Delta Airflow: Units cfm
Range -9999 to 9999
Default V alue 0
Service Configuration Selection Screen —
The
Service Configuration Selection screen is a menu of Service
screens which can be accessed by the user. The following
screens are available: Airflow Service Configuration, T erminal
Service Configuration, Option Service Configuration, and Secondary Damper Service Configuration.
AIRFLOW SERVICE CONFIGURATION SCREEN —
The Airflow Service Configuration Table is used to configure
the pressure independent and backup pressure dependent set
points. See Tabl e 9.
Pressure Independent
— Pressure Independent (PI) set points
should be configured for pressure independent operation
applications.
Cool Minimum (PI)
— This configuration is the minimum
airflow the ter minal will control t o when the equipme nt is in
Cooling mode (or Fan Only mode) or free cooling. The space
requirements for cooling must be at a minimum, or the terminal
is a fan powered terminal and the s pace requirements are for
heat.
Cool Minimum: Units CFM
Range 0 to 9999 (Limited by
the High V elocity pressure limit alarm)
Default V alue 0
Cool Maxi mum (PI)
— This configuration is the maximum
airflow the ter minal will control t o when the equipme nt is in
Cooling mode (or Fan Only mode) or free cooling and the
space requirements for cooling are at a maximum.
Cool Maximum: Units CFM
Range 0 to 9999 (Limited by
the High V elocity pressure limit alarm)
Default Value 4000
Terminal Reheat (PI)
— This configuration is for single duct
units with ducted reheat. The desired airflow is configured at
which the reheat will provide optimum performance. This value is compared to the Minimum Cool value and the greater of
the two values is used to determine the airflow set point.
T erminal Reheat: Units CFM
Range 0 to 9999 (Limited by
the High V elocity pressure limit alarm)
Default V alue 0
DESCRIPTION DEFAULT POINT NAME
Set Points
Occupied Heat
Occupied Cool
Unoccupied Heat
Unoccupied Cool
Occupied HIgh Humidity
Unoccupied High Humidity
Air Quality (ppm)
Delta Airflow
DESCRIPTION DEFAULT POINT NAME
Pressure Independent
Cool Minimum
Cool Maximum
Terminal Reheat
Heat Minimum
Heat Maximum
Parallel Fan On
Dual Duct CV Airflow
Pressure Dependent
Cool Minimum Position
Cool Maximum Position
Reheat Minimum Position
Heat Minimum Positon
Heat Maximum Position
Deadband Percent
→
Table 8 — Set Point Screen
70.0 F OHSP
74.0 F OCSP
55.0 F UHSP
90.0 F UCSP
60.0 % ORHH
100 % URHH
850 ppm AQSP
0 cfm DCFM
Table 9 — Airflow Service Configuration Screen
0 cfm COOLMIN
4000 cfm COOLMAX
0 cfm REHEAT
0 cfm HEATMIN
4000 cfm HEATMAX
0 cfm FNONCFM
4000 cfm DDCVFLOW
0 % CMINPOS
100 % CMAXPOS
0 % REMINPOS
0 % HMINPOS
100 % HMAXPOS
12.5 % DB_PCT
37
1001
Page 38

Heat Minimum (PI)
airflow the terminal will control to when the equipment mode
is Warm-Up or Heat. If the terminal is not configured for VAV
central heating this is the only airflow the terminal will control
to for these equipment modes.
Heat Minimum: Units CFM
Heat Maximum (PI)
ure the maximum airflow at which the zone controller will operate if VAV central heat i s conf igured t o yes. If the equipment
mode is heat or warm-up, and the demand in the space is for
heat, the zone controller will calculate the proper airflow needed to achieve space temperature set point (operating between
the Heat Min and Heat Max).
Heat Maximum: Units CFM
Parallel Fan On (PI)
the primary airflow setting below which a parallel fan terminal
should energize its fan. The setting should be used to allow a
low volume of primary airflow to be better diffused into the
space.
Parallel Fan On: Units CFM
Dual Duct CV Airflow (PI)
Dual Duct, constant volume, total airflow set point.
Dual Duct
Airflow: Units CFM
Pressure Dependent
should be configured for backup pressure dependent operation,
if an operating problem with the pressure transducer occurs.
IMPORTANT: Pressure dependent settings are
included for use only in the event of a pressure transducer failure. The inclusion of these configuration settings does not indicate that Carrier is endorsing this
product for pressure dependent operation. In the case
of a pressure sensor failure, the zone controller will
broadcast a pressure sensor failure message on the
CCN bus. These configurations may be used by a service technician to put the terminal in pr essure dependent mode until the zone controller can be replaced.
Cool Minimum Position (PD)
minimum damper position the terminal will control to when
the equipment mode is Cooling (or Fan Only), or fr ee cooling
and the space requirements for cooling are at a minimum.
Cool Minimum
Position: Units %
Cool Maximum Position (PD)
maximum damper position the terminal will control to when
the equipment mode is cooling (or fan only), or free cooling
and the space requirements for cooling are at a maximum.
Cool Maximum
Position: Units %
— This configuration is the minimum
Range 0 to 9999 (Limited by
the High V elocity pressure limit alarm)
Default V alue 0
— This configuration is used to config-
Range 0 to 9999 (Limited by
the High V elocity pressure limit alarm)
Default Value 4000
— This configuration is used to define
Range 0 to 9999 (Limited by
the High V elocity pressure limit alarm)
Default V alue 0
— This configuration defines the
Range 0 to 9999 (Limited by
the High V elocity pressure limit alarm)
Default Value 4000
— Pressure Dependent (PD) set points
— This configuration is the
Range 0 to 100
Default V alue 0
— This configuration is the
Range 0 to 100
Default Value 100
Reheat Minimum Position (PD)
single duct units with ducted reheat. Configure the desired
damper position at which the reheat will provide optimum performance. This value is com p ared to the Minimum Cool value
and the greater of the two values is used to determine the
damper position.
Reheat Minimum
Position: Units %
Heat Minimum Position (PD)
Minimum damper position the terminal will control to when
the equipment mode is Warm-Up or Heat. If the terminal is not
configured for VAV central heating this is the only position the
terminal will control to for these equipment modes.
Heat Minimum
Position: Units %
Heat Maximum Position (PD)
to configure the maximum damper position at which the zone
controller will operate if VAV central heat is configured to yes.
If the equipment mode is Heat or Warm-Up and the demand in
the space is for heat the zone controller will calculate the proper damper position needed to achieve space temperature set
point, operating between the Heat Min and Heat Max.
Heat Maximum
Position: Units %
Deadband Percent
the Deadband Percent that the airflow will operate with.
Deadband
Percent: Units %
TERMINAL SERVICE CONFIGURATION SCREEN —
The Terminal Service Configuration screen lists the main configuration settings for the air terminal controller. See Ta ble 10.
Ter minal Type
terminal type that the zone controller is installed on. A 1 is for
Single Duct te rminals, a 2 is for Parallel Fa n terminals, a 3 is
for Series Fan terminals, and a 4 is for Dual Duct applications.
T erminal Type: Range 1 to 4
Primary Inlet Size
used to input the inlet diameter of t he terminal if used with a
round inlet. The Inlet Area configuration is used for oval or
rectangular inlets. The zone controller will use the larger value
for CFM calculations if both values are configured.
NOTE: Carrier sizes 12, 14, and 16 are oval.
Primary Inlet Size
(Inlet Diameter): Units Inches
Inlet Area — The Inlet Area configuration is used if the termi-
nal has an oval or rectangular inlet. The Primary Inlet Size
configuration is used for round inlets. The zone c ontroller will
use the larger value for CFM calculations if both values are
configured.
Inlet Area: Units Square Inches
Range 0 to 100
Default V alue 0
Range 0 to 100
Default V alue 0
Range 0 to 100
Default Value 100
— This configuration is used to configure
Range 0.0 to 100.0
Default Value 12.5
— This configuration is used to indicate the
Default V alue 1
— The Primary Inlet Size configuration is
Range 3.0 to 24.0
Default V alue 6.0
Range 0.0 to 500.0
Default V alue 0.0
— This configuration is for
— This configuration is the
— This configuration is used
38
Page 39

COOLING
Terminal Type
Primary Inlet Size
Inlet Diameter
Inlet Area
Probe Multiplier
Calibration Gain
Offset
Damper
Proportional Gain
Integral Gain
Derivative Gain
Starting Value
CW Rotation
Pressure Independent
HEATING
Heat Type
VAV Central Heating
Heating
Proportional Gain
Integral Gain
Derivative Gain
Starting Value
Ducted Heat
Maximum Temperature
Number of Electric Heat Stages
Heat On Delay
Fan Off Delay
2-Position Heat Logic
SPT Trim
SAT Trim
Remote Contact Configuration
DESCRIPTION DEFAULT POINT NAME
Table 10 — Terminal Service Configuration Screen
1 TERMTYPE
6.0 in.
0.0 in.
2.443 PMF
1.000 CAL_GAIN
0 cfm OFFSET
30.0
5.0
0.0
20 %
Close DMPDIR
Ye s P R E S I N D
0 HEATTYPE
Ye s C E N H E AT
8.0
3.0
0.0
80 F
Yes DUCTHEAT
110 F MAXTEMP
1STAGES
2HONDEL
2 FNOFFD
Normal HEATYPE
0.0 F SPTTRIM
0.0 F SATTRIM
Close RMTCFG
RNDSZ
SQA
KP
KI
KD
STARTVAL
KP
KI
KD
STARTVAL
Probe Mu ltipl i er — This configuration is used to input a factor
→
for the velocit y pressure probe insta lled in the terminal inlet.
Most inlet probes will have some aerodynamic characteristics
that will affect the differential pressure output from the probe.
The formula used by the ComfortID™ controller for calculating the airflow (cfm) is based on measuring velocity with a
Pitot tube probe. A PMF (Pitot measurement factor) is required
in the calculation for different probes. Because various probe
characteristics are different, the PMF is used to determine the
correct airflow based on the type of probe installed. The PMF
will compensate for the difference between Pitot-type probes
and the actual probe installed.
The default PMF value of 2.273 is the correct va lue to use
when the zone controller is used with a Carrier probe in a
Carrier air terminal. For terminals and probes supplied by other
manufacturers, the PMF must be calculated and entered into
the zone controller configuration in order t o correct ly mea sure
airflow.
T o determine the correct PMF value, there are several methods depending on the data supplied by the terminal manufacturer. The manufacturer may supply a “K factor” or may sup-
ply a chart of velocity pressure vs. airflow for the terminal. The
K factor is the actual airflow velocity at a velocity pressure
reading of 1 in. wg for the probe. This value is in ft/min and
can be used to calculate the PMF. When the K factor is entered
into the following equation, it is compared to the value of 4005,
which is the K factor for a Pitot tube probe:
PMF = (4005/K F ACT OR)
2
If a chart is supplied by the manufacturer instead of the K
factor, then the K factor can be calculat ed from the chart using
the following formula:
K FA CTOR = (cfm at 1-in. wg)/(duct area ft
2
)
As an example, an air terminal with an 8-in. round inlet is
used. The terminal manufacturer has provided an airflow chart
that gives an airflow value of 820 cfm at a velocity pressure
reading of 1 in. wg. To determine the PMF for the terminal:
1. Determine duct area.
radius of duct = diameter of duct/2
radius = 8-in./2-in.
radius = 4-in.
Area of circular duct = Πr
Area = 3.14159 x 4
Area = 3.14159 x 16
Area = 50.26-in.
Area must be in ft
2
2
50.26-in.2/(144-ft2) = 0.34906 ft
2
2
2
2. Determine K factor.
K factor = (820 cfm/0.34906 ft2)
K factor = 2349 fpm
3. Determine PMF.
PMF = (4005 fpm/2349 fpm)
2
PMF = 2.907
Another way to determine the probe constant for a probe
without documentation is to measure the velocity pressure with
a Magnahelic gage. Open the damper and adjust the static pressure or open the damper until you have one inch of velocity
pressure on the Magnahelic gage. Measure the total CFM of air
being delivered. The CFM just measured divided by the inlet
area in square feet should equal the K factor for the formula.
Now use the K factor that was empirically derived to determine
the probe multiplier.
Probe Multiplier: Range 0.250 to 9.999
Default Value 2.443
Calibration Gain
— Air terminal testing by industry standards
is done with straight duct, upstream of the terminal. Since some
applications do not get installed in this manner, the actual airflow from the terminal at balancing may not equal the reading
from the zone controller.
39
303
Page 40

The calibration gain is used for the fine tuning adjustments
which might need to be made to the air flow calculation. This
number is calculated automatically by the zone controller after
input to the air balance maintenance screen, or it can be input
manually at this screen. For ease of use it is recommended to
use the Air Balan ce Ma inten ance s cree n to de termin e thi s number. The Air Balancing Maintenance screen will cause the value to be updated during the balancing procedure.
If the Calibration Gain must be configured manually, it is
determined as a percentage up or down that the CFM indicated
will be offset. A number of .95 will cause the maximum airflow calculated to be reduced to 95% of the value. A Calibration Gain of 1.00 will cause no change. A number of 1.05
would cause readings to become 5% higher.
The Calibration Gain is adjusted on the Air Balance Maintenance screen when performing the Maximum Airflow calibra tion and will have the greatest effect on the airflow at maximum CFM. Any error in reading at minimum airflow is adjusted by calculating the Offset configuration value. After
performing the air balance using the Air Balance Maintenance
screen it is a good idea to upload and save the Calibration Gain
and Offset values.
Calibration Gain: Range 0.000 to 9.999
Offset
— The Offset configuration is included for precision
applications where the minimum airflow is critical and not zero. This configuration indicates the amount of CFM the transducer is off by, at minimum airflow, during the minimum airflow test on the air balance screen. This configuration should
not be used to zero the airflow transducer since an aut o zero
test is included on the air balance screen and is also automatically performed each time the equipment fan is disabled (or
every 72 hours for systems which run the fan continuously).
After performing the air balance testing using the Air Balance
Maintenance screen it is a good idea to upload a nd save the
Calibration gain and Offset values. The cfm will be offset by
the value entered in th e Minimum Cfm va riable and will zero
at the value enter ed i n the Ma xim um C fm var iab le. Th ere wi ll
be a linear relationship between the two set points.
Offset: Units cfm
Damper Loop Parameters
define how the terminal will respond to deviations in measured
CFM in order to control to the airflow set point.
The Proportional Gain is calculated each time the airflow is
compared to the active airflow set point . As the error from set
point goes to zero, the proportional term will also go to zero.
The Integral Gain is a running summation of all integral
terms since the loop started. This has the effect of trimming off
any offset from the set point which might occur, if only the proportional term existed. Normally a proportional loop with no
integral term would require frequent adjustments of the starting
value to eliminate the offset as static pressure and other conditions change.
The Derivative Gain is not needed. The Derivative Gain
would tend to nullify large changes in the Proportional Gain for
dampened response. These large changes in the Proportional
Gain do not tend to happen for this type of control.
Damper Loop Parameters
Proportional Gain:Range 00.0 to 99.9
Integral Gain: Range 00.0 to 99.0
Derivative Gain: Range 00.0
Default Value 1.000
Range -250 to 250
Default V alue 0
— The loop gains and start value
Default Value 30.0
Default V alue 5.0
Default V alue 0.0
Start Value: Units %
Range 0 to 100
Default V alue 20
Clockwise Rotation
what effect a clockwise rotation of the actuator will have on the
damper. If the actuator rotates clockwise to closed position, the
configuration should be set to Close. If the actuator rotates
clockwise to open, the configuration should be set to open.
This configuration is used to change the rotation of the actuator
so that the damper transducer calibration will w ork properly.
The actuator does not have to be re-installed nor any switches
changed to reverse the action.
Clockwise
Rotation: Range Close/Open
Pressure Independent
minal will function in the pressure independent or pressure dependent mode.
NOTE: Pressure dependent mode should only be used in an
emergency, if the pressure sensor is not functioning.
Pressure
Independent: Range No/Yes
→
Heat Type
heat installed on the terminal. A 0 is equal to None. A 1 is
equal to Modulating/VAV. A 2 is equ al to Two Positio n. A 3 is
equal to staged Electric. A 4 is equal to Modulating/CV.
Heat Type: Range 0 to 4
VAV Central Heatin g
tion is used if the air source has the ability to provide heat and
the terminal is required to modulate, using the heat minimum
and heat maximum airflows, when the air source is in the heat
mode. If this variable is set to No, the terminal will use its
available local heat to heat the zone at all times.
VAV Cen tra l
Heating: Range No/Y es
Heating Loop Parameters
value define how the terminal will respond to deviations in
measured space temperature in order to control to the heat set
point.
temperature is compared to the heat set point. As the error
from set point goes to zero, the Proportional Gain will also go
to zero.
terms since the loop started. This has the affect of trimming off
any offset from set point which might occur if only the Proportional Gain existed. Normally a proportional loop with no Integral Gain would require frequent adjustments of the starting
value to eliminate the offset as loading conditions on the room
change.
fy large changes in the Proportional Gain for dampened
response.
Heating Loop Parameters
Proportional Gain: Range 00.0 to 99.9
Integral Gain: Range 00.0 to 99.0
Derivative Gain: Range 00.0
— This configuration is used to define the type of
The Proportional Gain is calculated each time the space
The Integral Gain is a running summation of all integral
The Derivative Gain is not needed. This term tends to nulli-
— This configuration is used to define
Default V alue Close
— This configuration defines if the ter-
Default V alue Yes
Default V alue 0
— The VAV Central Heating configura-
Default V alue Yes
— The heating loop gains and start
Default V alue 8.0
Default V alue 3.0
Default V alue 0.0
801
40
Page 41

Start Value: Units F (C)
Range 40 to 125
Default V alue 80
Ducted Heat
— The Ducted Heat configuration is used to configure the terminal for ducted heat. If a local heat sourc e is in
the duct and requires airflow to provide heat, set the Ducted
Heat configuration for yes.
Ducted Heat Range No/Yes
Default V alue Yes
Maximum Duct Temperature
— This configuration is used to
configure the maximum supply-air temperature desirable for
heating the space. This will cause the heat to be modul ated or
cycled using this value as the maximum t emperat ure of th e air
to be supplied.
Maximum Duct
T emperature: Units F (C)
Range 40 to 200
Default Value 110
Number of Electric Stages
— This configuration is used to
define the number of stages of electric hea t controlled by the
zone controller.
Number of
Electric Stages: Range 1 to 3
Default V alue 1
Heat On Delay
— The Heat On Delay configuration is used to
define a delay from the time a paral lel terminal fan is started
until the heat is activated.
Heat On Delay: Units minutes
Range 1 to 60
Default V alue 2
Fan Off Delay
— The Fan Off Delay configuration is used to
define a delay time. The delay time is from when the heat is deactivated (in a parallel terminal) until the parall el fan is deac tivated. This allows the fan to circulate air and remove the residual heat from the heat source.
Fan Off Delay: Units minutes
Range 1 to 15
Default V alue 2
Two-Position Heat Logic
— This configuration is used for
controlling a normally closed or normally open valve for hot
water. Use normal logic if the valve is normally closed. Use inverted logic if the valve is normally open.
T wo Position
Heat Logic: Range Normal/Invert
Default Value Normal
Space Temperature Trim
— This configuration is used to trim
a space sensor which might need ca libration. For example, if
the temperature displayed is two degrees above the value measured with calibrated test equipment, input a value of –2.0.
Space Temperature
Trim: Units delta F (delta C)
Range –9.9 to 9.9
Default V alue 0.0
Supply Air Temperature Trim
— This configuration is used
to trim a supply air sensor which might need calibration. For
example, if the temperature displayed is two degrees above the
value measured with calibrated test equipment, input a value of
–2.0.
Supply Air T emperature
Trim: Units delta F (delta C)
Range –9.9 to 9.9
Default V alue 0.0
Remote Contact Config
→
— The remote timeclock contact input can be configured as a normally open or normally closed
contact. When the timeclock input is ‘On’ the zone will follow
it’s local occupancy schedule. When the timeclock input is
‘Off’ the zone will be forced into unoccupied state.
Remote Contact
Config: Range Close/Open
Default V alue Close
OPTIONS SERVICE CONFIGURATION SCREEN —
The Options Service Configuration screen is used to configure
the service options of the air terminal controller. See T able 1 1.
Occupancy Schedule Number
— The Occupancy Schedule
Number defines what Occupancy schedule the zone controller
will use. Occupancy Schedule 64 is a local schedule. Occupancy Schedules 65 to 99 are global schedules.
Occupancy Schedule
Number: Range 64 to 99
Default V alue 64
Global Schedule Master
— The Global Schedule Master configuration allows the Occupancy Schedule to be used as a Global Schedule Master (Occupancy Schedules 65-99).
Global Schedule
Master: Range No/Yes
Default V alue No
Occupancy Schedule Number
Global Schedule Master
Override
Broadcast Acknowledge
Set Point Group Number
Global Set Point Master
Maximum Offset Adjust
Control Options
Humidity
Proportional Gain
Integral Gain
Maximum Output Value
Air Quality
Proportional Gain
Integral Gain
Maximum Output Value
AQ Low Voltage
AQ High Voltage
AQ Low Reference
AQ High Reference
DESCRIPTION DEFAULT POINT NAME
Table 11 — Options Service Configuration Screen
64 SCH
No GSM
00:00 OVR
No BCACK
0SETT
No GSTM
2 F LIMT
0CTLOPT
1.5
0.30
100.0 cfm
0.10
0.03
100.0 cfm
0.0 AQINLO
10.0 AQINHI
0 ppm AQLO
2000 ppm AQHI
41
KP
KI
MAXOUT
KP
KI
MAXOUT
801
Page 42

Override
— The Override parameter is used to configure the
number of hours and minutes the override will be in effect. The
user initiates override by pressing the override button on the
space temperature sensor. This will cause the schedule to enter
into the Occupied mode. If global scheduling is used, all zones
using the global schedule will enter Occupied mode. Pushing
the override button during Occupied mode will have no effect.
If the occupancy override is due to end after the start of the
next occupancy period, the mode will transition from occupancy override to occupied without becoming unoccupied, and the
occupancy override timer will be reset.
NOTE: If using the tenant billing function, the override
hours set point must be configured between 1 and 3 hours.
Override: Units Hours: Minutes
Range 00:00 to 24:00
Default Value 00:00
Broadcast Acknowledger
— This configuration defines if the
zone controller will be used to acknowledge broadcast messages on the CCN bus. One broadcast acknowledger is required
per bus, including secondary busses created by the use of a
bridge.
Broadcast
Acknowledger: Range No/Yes
Default V alue No
Set Point Group Number
— The Set Point Group Number is
used to define the current zone controller as a part of a group of
zone controllers which share the same set points. All zone controllers with the same Set Point Group Number will have the
same set points. The set points are broadcast to the group by the
zone controller defined by the Global Set Point Master configuration. A value of 0 is a local schedule. V alues 1 to 16 are used
for global scheduling.
Set Point
Group Number: Range 0 to 16
Default V alue 0
Global Set Point Master
— This configuration defines if the
current zone controller will broadcast its set point values to the
other zone controllers which are made part of the same group
by configuring the Set Point Group Number.
Global Set Point
Master: Range No/Yes
Default V alue No
Maximum Offset Adjustment
— This configuration determines the maximum amount that the set point will be biased
(up or down), by adjusting the slide bar on the space temperature sensor (if installed).
Maximum Offset
Adjustment: Units delta F (delta C)
Range 0 to 15
Default V alue 2
Control Options
— The Control Options configuration determines whether the zone controller will use a humidity sensor or
an indoor air quality sensor. A configuration of 0 means no
sensors are used. A configuration of 1 means a Humidity Sensor is used. A configuration of 2 means an IAQ Sensor is used.
Control Options: Range 0 to 2
Default V alue 0
Humidity Control
— These configuration values define the
calculation parameters for determining the airflow needed to
correct a high humidity problem in the space. The Maximum
Output Value is measured in percentage of nominal terminal
cfm.
Proportional
Gain: Range 0.0 to 9.9
Default V alue 1.5
Integral Gain: Range 0.00 to 9.99
Default V alue 0.30
Maximum Output
Value: Range 0.0 to 100.0% (max cool
cfm)
Default Value 100.0
Indoor Air Quality Control
— These configuration values define the calculation parameters for determining the airflow
needed to correct a high incidence of air pollution contaminants in the space, such as CO
. The Maximum Output V alue is
2
measured in percentage of nominal terminal cfm.
Proportional Gain:Range 0.00 to 9.99
Default V alue 0.10
Integral Gain: Range 0.00 to 9.99
Default V alue 0.03
Maximum Output
Value: Range 0.0 to 100.0% (max cool
cfm)
Default Value 100.0
→
IAQ Sensor Low Voltage
— This configuration defines the
lowest voltage which should be read from the air quality
sensor.
IAQ Sensor
Low Voltage: Range 00.0 to 10.0
Default V alue 0.0
IAQ Sensor High Voltage
— This configuration defines the
highest voltage which should be read from the air quality sensor.
IAQ Sensor
High Voltage: Range 00.0 to 10.0
Default Value 10.0
IAQ Low Reference
— This configuration defines the value
in parts per million which correlate to the low voltage reading
from the air quality sensor.
IAQ Low
Reference: Units ppm (parts per million)
Range 0 to 5000
Default V alue 0
IAQ High Reference
— This confi guration defines the value
in parts per million which correlate to the high voltage reading
from the air quality sensor.
IAQ High
Reference: Units ppm (parts per million)
Range 0 to 5000
Default Value 2000
SECONDARY DAMPER SERVICE CONFIGURATION
SCREEN — The Secondary Damper Service Configuration
screen is used to configure the secondary damper settings. See
Table 12.
Zone Pressure Control
— The Zone Pressure Control configuration determines whether the primary and secondary controllers will be configured for zone pressure control.
Zone Pressure
Control: Range Dsable/Enable
Default V alue Dsable
Dual Duct Type
— The Dual Duct Type setting configures the
secondary controller for the correct dual duct type. A value of 0
configures the type to None. A value of 1 configures the type to
Second Inlet (Hot Deck). A value of 2 configures the duct to
T otal Probe (terminal outlet).
Dual Duct Type: Range 0 to 2
Default V alue 0
800
42
Page 43

Zone Pressure Control
Dual Duct Type
Secondary Duct Size
Inlet Diameter
Inlet Area
Probe Multiplier
Calibration Gain
Offset
CW Rotation
DESCRIPTION DEFAULT POINT NAME
Tab l e 1 2 — Secondary Damper Service Configuration Screen
Dsable ZPCNTL
0 DDTYPE
6.0 in.
0.0 sq. in.
2.443 SPMF
1.000 CAL_GAIN
0 cfm SOFFSET
Close DMPDIR
SRNDSZ
SSQA
Secondary Duct Size
— The Secondary Duct Size setting is
used to input the inlet diameter of the terminal, if used with a
round inlet. The Inlet Area configuration is used for oval or
rectangular inlets. The zone controller will use the larger value
for CFM calculations if both values are configured.
Secondary Duct Size
(Inlet Diameter): Units Inches
Range 3.0 to 24.0
Default V alue 6.0
Inlet Area — The Inlet Area configuration is used if the termi-
nal has an oval or rectangular inlet. The Primary Inlet Size
configuration is used for round inlets. The zone c ontroller will
use the larger value for CFM calculations if both values are
configured.
Inlet Area: Units Square Inches
Range 0.0 to 500.0
Default V alue 0.0
Probe Multiplier
— This configuration is used to input a factor for the velocity pressure probe characteristics installed in
the inlet. All averaging probes will have some aerodynamic
characteristics which will ampli fy the pressure difference read
at the inlet of the terminal. The de fault of 2.443 is the correct
value to use if the probe is a Carrier probe in a 35 or 45 Series
terminal.
The formula for calculating velocity using an Ideal probe is:
Velocity = 4005* SQRT (Velocity Pressure)
Most manufactures will provide a probe constant for the
probe supplied. For example, Velocity = 2213*SQRT(Velocity
Pressure). To calculate the number to input in this decision
(Probe Multiplier) use the formula. (4005/2213)
2
= 3.3. So you
would use 3.3 in place of 2.443 for a probe with a probe constant of 2213.
An easy way to determine the probe constant for a probe
without documentation is to measure the velocity pressure with
a Magnahelic gage. Open the damper and adjust the static pressure until you have one inch of velocity pressure on the Magnahelic gage. Measure the total CFM of air being produced. The
CFM just measured divided by the inlet area in feet should
equal the probe constant for the formula. Velocity = (CFM just
measured/inlet area) * SQRT (1.0). Now use the constant that
was empirically derived to determine the probe multiplier
(4005/(CFM at 1.0 Inch/Inlet area))
2
= Probe Multip lie r.
Probe Multiplier: Range 0.250 to 9.999
Default Value 2.443
Calibration Gain
— Air terminal testing by industry standards
is done with straight duct, upstream of the terminal. Since most
applications do not get installed in this manner, the actual airflow from the terminal at balancing may not equal the readin g
from the zone controller.
The calibration gain is used for the fine tuning adjustments
which might need to be made to the airflow calculation.
If the Calibration Gain must be configured manually. It is
determined as a percentage up or down that the CFM indicated
will be offset. A number of .95 will cause the maximum airflow calculated to be reduced to 95% of the value. A Calibration Gain of 1.00 will cause no change. A number of 1.05
would cause readings to become 5% higher.
Any error in reading at minimum airflow is adjusted by cal-
culating the Offset configuration value.
Calibration Gain: Range 0.000 to 9.999
Default Value 1.000
Offset
— The Offset configuration is included for precision
applications where the minimum airflow is critical and not
zero. The cfm will be offset by the value entered in the Minimum Cfm variable and will zero at the value ent ered in the
Maximum Cfm variable. There will be a linear relationship between the two set points.
Offset: Units cfm
Range –250 to 250
Default V alue 0
Clockwise Rotation
— This configuration is used to define
what effect a clockwise rotation of the actuator will have on the
damper. If the actuator rotates clockwise to closed position, the
configuration should be set to Close. If the actuator rotates
clockwise to open, the configuration should be set to open.
This configuration is used to change the rotation of the actuator
so that the damper transducer calibration will w ork properly.
The actuator does not have to be reinstalled nor any switches
changed to reverse the action.
Clockwise
Rotation: Range Close/Open
Default V alue Close
Maintenance Table Menu Screen —
The Maintenance Table Menu screen allows the user to select one of 4
available maintenance tables: the Linkage Maintenance Table,
the Occupancy Maintenance Table, the Zone Air Balance
T able, and the Zone Maintenance Table.
LINKAGE MAINTENANCE TABLE — The Linkage
Maintenance table is used to view the zone linkage variables.
See Tabl e 13.
→
Air Source Bus Number
— This variable will display the bus
number of the air source that the zone controller will be communicating Linkage to, if this zone is the Linkage Master .
Air Source
Bus Number: Range 0 to 239
Default V alue 0
Network Access None
→
Air Source Element Number
— This var i a b le w il l d i sp l ay the
Element Address of the Air Source that the zone controller
will be communicating Linkage to, if this zone is the Linkage
Master.
Air Source
Element Number: Display Range 1 to 239
Default V alue 0
Network Access None
43
501
Page 44

Master Zone Element Number
the element address of the zone which is the Linkage Master.
Master Zone
Element Number: Display Range 1 to 239
Default V alue 0
Network Access Read only
Operating Mode
erating mode of the air source, if Linkage is available, or the
mode determined by the Linkage Master using the primary ai r
sensor, if available. If the primary air sensor has failed or was
not installed, the Linkage master will assume the default mode
of cooling.
Operating Mode: Display Range COOLING, HEATING,
Air Source Supply Temperature
supply temperature reading of the air source.
Air Source Supply
T emperature: Units F (C)
Start Bias Time
in minutes, calculated by the air source. The Start Bias Time is
calculated to bring the temperature up or down to the set point
under the optimum start routine. This value will be sent to all
associated zones for optimum start of zone controllers. This
function is supported by all Carrier equipment which perform
linkage.
Start Bias Time: Display Units minutes
Average Occupied Heat Set Point
the weighted average of the occupied heat set point, calculated
by the linkage coordinator, from the information received from
polling its associated zones. The set points are weighted by the
maximum airflow capacities of the zone controllers scanned by
the linkage coordinator.
A verage Occupied
Heat Set Point: Display Units F (C)
Average Occupied Cool Set Point
the weighted average of the occupied cool set point, calculated
by the linkage coordinator, from the information received from
polling its associated zones. The set points are weighted by the
maximum airflow capacities of the zone controllers scanned by
the linkage coordinator.
A verage Occupied
Cool Set Point: Display Units F (C)
Average Unoccupied Heat Set Point
the weighted average of the unoccupied heat set point, calculated by the linkage coordinator, from the information received
from polling its associated zones. The set points are weighted
by the maximum airflow capacities of the zone controllers
scanned by the linkage coordinator .
A verage Unoccupied
Heat Set Poin t: Display Units F (C)
— This variable will display the c urrent op-
WARM-UP, FREECOOL, PRESSURE,
EVAC, OFF
Default V alue OFF
Network Access Read only
Display Range -40 to 245
Default V alue 0
Network Access None
— This variable displays the Start Bias Time,
Display range 0 to 185
Default V alue 0
Network Access None
Display Range 0.0 to 99.9
Default V alue 0.0
Network Access None
Display Range 0.0 to 99.9
Default V alue 0.0
Network Access None
Display Range 0.0 to 99.9
Default V alue 0.0
Network Access None
— This vari able will display
— This variable displays the
— This variable displays
— This variable displays
—This variable displays
Average Unoccupied Cool Set Point
plays the weighted average of the unoccupied cool set point,
calculated by the linkage coordinator, from the information received from polling its associated zones. The set points are
weighted by the maximum airflow capacities of the zone controllers scanned by the linkage coordinator.
A verage Occupied
Cool Set Point: Display Units F (C)
Display Range 0.0 to 99.9
Default V alue 0.0
Network Access None
Average Zone Temperature
weighted average of the space temperatures, collect ed by the
linkage coordinator, from polling its associated zones. The
temperatures are weighted by the maximum airflow capaciti es
of the zone controllers scanned by the linkage coordinator.
A verage Zone
T emperature: Display Units F (C)
Display Range 0.0 to 99.9
Default V alue 0.0
Network Access Read Only
Average Occupied Zone Temperature
plays the weighted average of the space temp eratures of occupied zones, collected by the linkage coordinator, from polling
its associated zones. The temperatures are weighted by the
maximum airflow capacities of the zone controllers scanned by
the linkage coordinator.
A verage Occupied
Zone Temperature:D isplay Units F (C)
→
Composite CCN Value
or average of the CCN variable collected from each zone as
configured in the Linkage Coordinator Configuration Screen.
The value is sent to th e CCN address and variable specified
within that configuration table.
Composite
CCN Value: Display Range 0-65535
Occupancy Status
least one of the associated zone controllers (that are being
scanned) is in the occupied mode.
Occupancy Status:Display Range 0 or 1 (1 = occupied)
Next Occupied Day
the next associated zone is schedule d to change from unoc cupied to occupied mode. This point is read in conjunction with
the next occupied time to allow the user to know the next time
and day when a zone will become occupied.
Next Occupied
Day: Display Range MON, TUE, WED,
Next Occupied Time
when the next associated zone is scheduled to change from unoccupied to occupied mode. This point is read in conj unction
with the next occupied day to allow t he user to know the next
time and day when a zone will become occupied.
Next Occupied
Time: Display Range 00:00 to 24:00
Display Range 0.0 to 99.9
Default V alue 0.0
Network Access Read Only
Default V alue 0
Network Access Read Only
— This variable displays a “1” when at
Default V alue 0
Network Access Read only
— This variable displays the day when
Default Value No display (Blank)
Network Access None
Default V alue 0:00
Network Access None
— This variable displays the
— This vari able displays the hig h, low
— This variable displays the time of day
— This variable dis-
— This variable dis-
THU, FRI, SAT , SUN
801
44
Page 45

DESCRIPTION DEFAULT POINT NAME
Air Source Bus Number
Air Source Element Number
Master Zone Element Number
Operating Mode
Air Source Supply Temperature
Start Bias Time
Average Occupied Heat Set Point
Average Occupied Cool Set Point
Average Unoccupied Heat Set Point
Average Unoccupied Cool Set Point
Average Zone Temperature
Average Occupied Zone Temperature
Composite CCN Value
Occupancy Status
Next Occupied Day
Next Occupied Time
Next Unoccupied Day
Next Unoccupied Time
Previous Unoccupied Day
Previous Unoccupied Time
Maximum Damper Position
Static Pressure Reset
Pressure Decrease Value
Pressure Increase Value
→
Table 13 — Linkage Maintenance Screen
0 ASBUSNUM
0 ASDEVADR
0MZDEVADR
OFF ASOPMODE
0 F ASTEMP
0 minutes STRTBIAS
0.0 F AOHS
0.0 F AOCS
0.0 F AUHS
0.0 F AUCS
0.0 F AZT
0.0 F AOZT
0 CCCNVAL
0 OCCSTAT
(blank) NXTOCCD
00:00 NXTOCCT
(blank) NXTUNOD
00:00 NXTUNOT
(blank) PREVUNOD
00:00 PRVUNOT
0.0 % MAXDMPOS
0.0 in. wg PRESVAL
0.000 in. wg PRESDECR
0.000 in. wg PRESINCR
Next Unoccupied Day
— This variable displays the day when
the next associated zone is scheduled to change from occupied
to unoccupied mode. This point is read in conjunction with the
next unoccupied time to allow the user to know the next time
and day when a zone will become unoccupied.
Next Unoccupied
Day: Display Range MON, TUE, WED,
THU, FRI, SAT , SUN
Default Value No display (Blank)
Network Access None
Next Unoccupied Time
— This variable displays the time of
day when the next associated zone is scheduled to change from
occupied to unoccupied mode. This point is read in conjunction
with the next unoccupied day to allow the user to know the
next time and day when a zone will become unoccupied.
Next Unoccupied
Time: Display Range 00:00 to 24:00
Default Value 0:00
Network Access None
Previous Unoccupied Day
— This variable displays the day
when the last associated zone changed from occupied to unoccupied mode. This point is read in conjunction with the previous unoccupied time to allow the user to know the last time and
day when a zone became unoccupied.
Previous Unoccupied
Day: Display Range MON, TUE, WED,
THU, FRI, SAT , SUN
Default Value No display (Blank)
Network Access None
Previous Unoccupied Time
— This variable displays the time
of day when the last associated zone changed from occupied to
unoccupied mode. This point is read in conjunction with the
previous unoccupied day to allow the user to know the last time
and day when a zone became unoccupied.
Previous Unoccupied
Time: Display Range 00:00 to 24:00
Default Value 0:00
Network Access None
Maximum Damper Position
— This variable displays the
damper position of the zone controller in the system with the
damper in the most open position. This is used by the linkage
coordinator to calculate the static pressure reset.
Maximum Damper
Position: Display Units % (open)
Display Range 0.0 to 100.0
Default V alue 0.0
Network Access Read/Write
Static Pressure Reset
— This variable displays the current
static pressure reset calculated, using the maximum damper position and the configuration information from the linkage configuration table.
Static Pressur e
Reset: Display Units in. wg
Display Range 0.0 to 5.0
Default V alue 0.0
Network Access Read/Write
Pressure Decrease Value
— If the maximum damper position
in the system goes below the minimum configuration setting,
the linkage coordinator will calculate an amount that the static
pressure should be decreased. This is used to open the system
dampers more so that they will modulate between their minimum and maximum settings.
This number is rounded to the nearest tenth of an inch and
will be added to the static pressure reset value unless the static
pressure reset value has reached maximum reset.
Pressure Decrease
Value: Display Units in. wg
Display Range 0.000 to 5.000
Default Value 0.000
Network Access Read/Write
Pressure Increase Value
— If the ma ximum damper position
in the system goes above the maximum configuration setting,
the linkage coordinator will calculate an amount that the static
pressure should be increased. This is used to close the system
dampers more so that they will modulate between their minimum and maximum settings.
45
801
Page 46

This number is rounded to the nearest tenth of an inch and
will be subtracted to the static pressure reset value unless the
static pressure reset value has reached zero.
Pressure Increase
Value: Display Un its in. wg
Display Range 0.000 to 5.000
Default Value 0.000
Network Access Read/Write
OCCUPANCY MAINTENANC E TABLE — The Occupancy Maintenance table is used to view the occupancy set
points. See Tabl e 14.
Mode
— This variable displays the current occupied mode for
the zone controller. If the zone controller is following its own
local schedu le, thi s is the r esult o f the lo cal sche dule st atus. If
the zone controller is configured to follow a global schedule,
this point displays the mode last received from a global schedule broadcast.
Mode: Display Range 0 or 1 (1 = occupied)
Default V alue 0
Network Access None
Current Occupied Period
— If the zone controller is configured to determine occupancy locally, this variable will display
the current period determining occupancy.
Current Occupied
Period: Display Range 1 to 8
Default V alue 0
Network Access None
Override in Progress
— If an occupancy override is in
progress, this variable will display a yes.
Override In
Progress: Display Range Yes /No
Default V alue No
Network Access None
Override Duration
— This variable displays the number of
minutes remaining for an occupancy override which is in
effect. If the number of override hours was downloaded, the
value will be converted to minutes.
Override
Duration: Display Units minutes
Display Range 0 to 1440
Default V alue 0
Network Access None
Occupied Start Time
— This variable displays the time that
the current occupied mode began. If the current mode is unoccupied or the zone controller is following a global schedule, the
value displayed by this point will be 0:00.
Occupied Start
Time: Display Range 00:00 to 23:59
Default Value 0:00
Network Access None
Unoccupied Start Time
— This variable displays the time that
the current occupied mode will end (the beginning of the next
unoccupied mode). If the current mode is unoccupied or the
zone controller is following a global schedule, the va lue displayed by this point will be 0:00.
Unoccupied Start
Time: Display Range 00:00 to 24:00
Default V alue 0:00
Network Access None
Next Occupied Day
— This variable displays the day when
the next occupied period is scheduled to begin. This point is
read in conjunction with the next occupied time to allow the
user to know the next time and day when the next occupied period will occur. If the zone controller is following a global
schedule this point will remain at default.
NOTE: If the current mode is occupied, this point makes reference to the next occupied period and, in most cases, may not
be the same as the current occupied start time.
Next Occupied
Day: Display Range MON, TUE, WED,
THU, FRI, SAT , SUN
Default Value No display (Blank)
Network Access None
→
Next Occupied Time
— This variable displays the time of day
when the next occupied period will occur. This point is read in
conjunction with the next occupied day to allow the user to
know the next time and day when the zone will become occupied. If the zone controller is following a global schedule this
point will remain at default.
NOTE: If the current mode is occupied, this point makes
reference to the next occupied period and, in most cases,
may not be the same as the current occupied start time.
Next Occupied
Time: Display Range 00:00 to 24:00
Default V alue 0:00
Network Access None
Next Unoccupied Day
→
— This variable displays the day when
the next unoccupied period is scheduled to begin. This point is
read in conjunction with the next unoccupied time to allow the
user to know the next time and day when the zone will become
unoccupied. If the zone controller is following a global schedule this point will remain at default.
NOTE: If the current mode is unoccupied, this point makes
reference to the next unoccupied period and, in most cases,
may not be the same as the current unoccupied start time.
Next Unoccupied
Day: Display Range MON, TUE, WED,
THU, FRI, SAT , SUN
Default Value No display (Blank)
Network Access None
DESCRIPTION DEFAULT POINT NAME
Mode
Current Occupied Period
Override in Progress
Override Duration
Occupied Start Time
Unoccupied Start Time
Next Occupied Day
Next Occupied Time
Next Unoccupied Day
Next Unoccupied Time
Last Unoccupied Day
Last Unoccupied Time
501
Table 1 4 — Occupancy Maintenance Screen
0MODE
0PERIOD
No OVERLAST
0 OVERDURA
00:00 OCCSTART
00:00 UNSTART
(blank) NXTOCCD
00:00 NXTOCCT
(blank) NXTUNOD
00:00 NXTUNOT
(blank) PRVUNOD
00:00 PRVUNOT
46
Page 47

→
Next Unoccupied Time
day when the next unoccupied period is scheduled to begin.
This point is read in conjunction with the next unoccupied day
to allow the user to know the next time and day when the zone
will become unoccupied. If the zone controller is following a
global schedule this point will remain at default.
NOTE: If the current mode is unoccupied, this point makes
reference to the next unoccupied period and, in most cases,
may not be the same as the current unoccupied start time.
Next Unoccupied
Time: Display Range 00:00 to 24:00
→
Last Unoccupied Day
when the zone changed from occupied t o unoccupied mode.
This point is read in conjunction with the last unoccupied time
to allow the user to know the last time and day when the zone
became unoccupied. If the zone controller is following a global
schedule this point will remain at default.
Last Unoccupied
Day: Display Range MON, TUE, WED,
→
Last Unoccupied Time
of day when the zone changed from occupied to unoccupied
mode. This point is read in conjunction with the last unoccupied day to allow the user to know the last time and day when a
zone became unoccupied. If the zone controller is following a
global schedule this point will remain at default.
Last Unoccupied
Time: Display Range 00:00 to 24:00
ZONE AIR BALANCE/COMMISSIONING TABLE —
The Zone Air Balance/Commissioning T abl e is used t o display
the air balance variables. See Table 15.
Commissioning Mode
controller into the commissioning mode. Force this point to enable. The zone controller will be ready to accept a command to
perform the tests and functions on this screen.
NOTE: Commissioning mode will automatically be disabled after one hour.
Commissioning
Mode: Display Range Dsable/Enable
Damper Actuator/Transducer Calibration
Actuator Transducer calibration is t he first calibration which
should be performed on a newly installed actuator. The zone
controller will command the actuator to close and read the
feedback potentiometer to determine the zero position of t he
damper. It will then command the damper to fully open. The
zone controller will read the potentiometer to determine the
maximum open position. Damper positions from closed to
maximum open will be scaled to read 0 to 100% for the damper position.
The zone controller will then close the damper and open it
once more to zero calibrate the airflow sensor. The entire
calibration procedure can take up to 3 minutes. If the damper
fails the test or the airflow calibration is unable to be com pleted, the Auto-Calibration point will indicate an Alarm.
Damper Actuator
Transducer
Calibration: Display Range Dsable/Enable
— This variable displays the time of
Default Value 0:00
Network Access None
— This variable displays the last day
THU, FRI, SAT , SUN
Default Value No display (Blank)
Network Access None
— This variable displays the last time
Default Value 0:00
Network Access None
— This variable is used to put the zone
Default Value Dsable
Network Access Read /Write
— The Damper
Default Value Dsable
Network Access Read /Write
Maximum Cooling Airflow Calibration
Maximum Cooling Airflow Calibration, the Maximum Cooling Airflow from the set point schedule will be made the Airflow CFM Set Point. The zone controller will modulate the
damper to control to this set point. The actual ai rflow, damper
position, and velocity pressure readings will be displayed.
If the set point is not correct, it may be changed from this
screen by forcing the airflow set point to the desired value. The
value will be writ te n to th e se t p oin t sche d u le in th e Ma xim um
Cool CFM set point, and the zone controller will begin to control to the new value.
The airflow can be measured using test and balance equipment and compared to the actual reading on the screen. If the
value measured requires adjustment to the value on t h e screen,
force the value on the sc reen to the value measured. T he zone
controller will take the value and calculate a new calibration
gain which will be shown at the bottom of the screen. The new
value will be a u toma ti cal ly load ed i nto t he Se rv ice Con fi gur ation table.
Maximum Cooling
Airflow
Calibration: Display Range Dsable/Enable
Minimum Cooling Airflow Calibration
imum Cooling Airflow Calibration will cause the airflow CFM
set point to change to the Minimum Cooling set point. The actual airflow, damper position, and velocity pressure readings
will be displayed.
If the set point is not correct, it may be changed from this
screen by forcing the Airflow set point to the desired value.
The value will be written to the set point schedule in the Minimum Cool CFM set point, and the zone controller will begin to
control to the new value.
The airflow can be measured using test and balance equipment and compared to the actual reading on the screen. If the
value measured requires adjustment to the value on t h e screen,
force the value on the sc reen to the value measured. T he zone
controller will take the value and calculate a new offset.
The Offset configuration is included for precision applications where the minimum airflow is critical and not zero. The
Offset configuration should not be used to zero the airflow
transducer since an auto zero test is included in the normal
function of the zone controller and is automatically performed
each time the equipment fan is disabled (or every 72 hours for
systems which run the fan continuously). After performing air
balance testing using the Air Balance Maintenance screen, it is
a good idea to upload and save the Airflow set points, Calibration Gain, and Offset values.
Minimum Cooling
Airflow
Calibration: Display Range Dsable/Enable
Fan Override
ries and parallel fan powered terminals. Enabling this point will
cause the terminal fan to run until this point is disabled or the
commissioning mode is ended.
Fan Override: Display Range Dsable/Enable
Default Value Dsable
Network Access Read /Write
Default Value Dsable
Network Access Read /Write
— This variable can be used to test the fan on se-
Default Value Dsable
Network Access Read /Write
— By enabling the
— Enabling the Min-
47
501
Page 48

Commissioning Mode
DESCRIPTION DEFAULT POINT NAME
Damper/Transducer Calibration
Maximum Cooling
Minimum Cooling
Heating Override
Fan Override
CFM Set Point
Actual Airflow
Primary Damper Position
Measured Velocity Pressure
Supply Air Temperature
Auto-Calibration
Calibration Gain
→
Table 15 — Zone Air Balance/Commissioning Table
Dsable CMODE
Dsable CALIBRAT
Dsable MAXCOOL
Dsable MINCOOL
Dsable HEATOVER
Dsable FANOVER
0 cfm COMCFM
0 cfm AIRFLOW
100 % DMPPOS
0.000 in. wg MVP
0.0 F SAT
Normal CAL
1.000 CAL_GAIN
Heating Override
— This variable can be used to test the heat
outputs. Enabling this variable will cause the heat to be modulated or staged to full heat until this point is disabled or the
force released. Ducted reheat operation will be controlled so as
not to exceed the configured maximum duct temperature. The
supply-air temperature is included on this screen to verify that
the heat is operating.
Heating Override: Display Range Dsable/Enable
Default Value Dsable
Network Access Read /Write
Airflow CFM Set Point
— This vari able displays the current
airflow set point that the zone controller is controlling to. During the calibration tests this value can be forced, whic h will
change the set point configuration for the value being tested.
Airflow CFM
Set Point: Display Units CFM
Display Range 0 to 9999 (Limited by
velocity pressure transducer high alarm
limit)
Default V alue 0
Network Access Read /Write
Actual Airflow Display
— This variable shows the actual airflow being measured, based on the inlet size configured. D uring the Maximum and Minimum Cooling Airflow calibration
tests this valu e c an b e for c ed, w hic h will cor rec t t he mu l tipl ie r
or offset used to calculate the airflow.
Actual Airflow: Display Units CFM
Display Range 0 to 9999 (Limited by
velocity pressure transducer high alarm
limit)
Default V alue 0
Network Access Read /Write
Primary Damper Position
— This variable displays the current damper position. During CFM Balancing, this variable is
used to display the position of the damper. This value can
be used to see if the damper is fully open and the system air is
sufficient.
Primary Damper
Position: Display Units % (open)
Display Range 0 to 100
Default Value 100
Network Access Read Only
Measured Velocity Pressure
— This variable displays the
measured velocity pressure, which is used to check accuracy
during test and balancing of the terminal. If the pressure
appears to be much different than that measured with a Magnahelic gage, the transducer can be forced to recalibrate its zero
by enabling the Damper/Transducer Calibration.
Measured V elocity
Pressure: Display Units in. wg
Display Range 0.000 to 2.000 (Limited
by velocity pressure transducer high alarm
limit)
Default Value 0.000
Network Access Read Only
Supply-Air Temperature
— This variable displays the supplyair temperature for ease of verifying the heat operation during
the heat test.
Supply-Air
T emperature: Display Units F (C)
Display Range -40.0 to 245.0
Default V alue 0.0
Network Access Read /Write
Auto-Calibration
— This variable will displa y “Nor m a l” if the
actuator and airflow transducer calibrat ions are successful. If
damper or transducer calibration was not successful, this point
will display “Alarm” and the zone controller will broadcast the
appropriate alarm (if configured to transmit alarms).
Auto-Calibration: Display Range Normal/Alarm
Default V alue Normal
Network Access Read Only
Calibration Gain
— Air terminal testing by industry standards
is done with straight duct, upstream of the terminal. Since most
applications are not installed in this manner, the actual airflow
from the terminal, at balancing, may not equal the reading from
the zone controller.
The Calibration Gain is used for making fine tuning adjustments to the airflow calculation. This number is calcul ated automatically by the zone controller after input to the air balance
maintenance screen. The Calibra tion Gain can also be entered
manually in the service configuration CONFIG screen.
A number of .95 entered into the Calibration Gain variable
will cause the maximum airflow to be reduced to 95% of the
calculated value. A number of 1.05 would c ause readings to
become 5% higher. The Calibration Gain is adjusted on the Air
Balance maintenance screen when performing the Maximum
Airflow Calibration and will have the greatest affect on the airflow at maximum CFM.
After performing the air balance procedure using the air balance maintenance screen, it is recommended to upload and
save the Airflow Configuration, Calibration Gain, and Offset
settings.
Calibration Gain: Display Range 0.000 to 9.999
Default Value 1.000
Network Access Read Only
501
48
Page 49

ZONE MAINTENANCE TABLE — The Zone Maintenance
table is used to display zone set points and variables. See
T able 16.
Occupied
— This variable indicates if the zone controller is
operating in the occupied mode.
Occupied: Display Range No/Yes
Default V alue No
Network Access Read Only
→
Linkage Slave
— This variable displays if air source linkage is
in effect.
Linkage Slave: Display Range No/Yes
Default V alue No
Network Access Read Only
Linkage Master
— This variable displays if this zone control-
ler is functioning as a linkage master.
Linkage Master: Display Range No/Yes
Default V alue No
Network Access Read Only
Timed Override in Effect
— This variable indicates if a timed
override is in effect.
Timed Override
in Effect: Display Range No/Yes
Default V alue No
Network Access Read Only
Set Point Offset (T-56)
— This variable displays the degrees
of offset when using a 33ZCT56SPT space temperature sensor
with set point adjustment. The slidebar on the sensor will adjust
the desired temperature in that zone, up or down, w hen it is
moved. The Set Point Offset (T-56) variable can disable set
point offset (set to 0).
Set Point
Offset (T-56): Display Units delta F (delta C)
Display Range 0.0 to 15.0
Default V alue 0.0
Network Access Read Only
Cool Master Reference
— This variable displays the cooling
master reference from the set point schedule. This should be
the occupied cool set point when the zone is in occupied
mode or the unoccupied cool set point when the zone is in
unoccupied mode. This variable will display any space temperature sensor slidebar offset that is being applied.
Cool Master
Reference: Display Units F (C)
Display Range 45.0 to 99.9
Default Value 90.0
Network Access Read/Write
Primary Damper Airflow Reference
— This variable dis-
plays the current controlling airflow set point.
Primary Damper
Airflow Display Units CFM
Reference: Display Range 0 to 9999 (Limited by
velocity pressure transducer high alarm
limit)
Default V alue 0
Network Access Read /Write
Primary Damper Position
— This variable displays the cur-
rent damper position.
Primary Damper
Position: Display Units % (open)
Display Range 0 to 100
Default Value 100
Network Access Read/Write
Secondary Damper Airflow Reference
— This variable displays the current controlling airflow set point for the secondary
damper.
Secondary Damper
Airflow Display Units CFM
Reference: Display Range 0 to 9999 (Limited by
velocity pressure transducer high alarm
limit)
Default V alue 0
Network Access Read /Write
Heat Enable
— This variable displays the demand for heat in
the space. The space tem perature must be below the appropriate heat set point.
Heat Enable: Display Range Dsable/Enable
Default Value Dsable
Network Access Read Only
DESCRIPTION DEFAULT POINT NAME
Occupied
Linkage Slave
Linkage Master
Timed Override in Effect
Set Point Offset (T-56)
Cool Master Reference
PI Primary Damper Reference
PD Primary Damper Reference
Secondary Damper Reference
Heat Enable
Heat Master Reference
Heat Submaster Reference
Temperature Control Airflow
Relative Humidity Airflow
Air Quality Airflow
Cooling in Effect
Heating in Effect
RH in Effect
AQ in Effect
Unoccupied Dehumidification
Cooling Energy
Heating Energy
→
Table 1 6 — Zone Maintenance Table
No ZONEOCC
No DAVCTL
No LINKMAST
No TIMOV
0.0 F T56OFF
90.0 F CCMR
0 cfm PISMR
100 % PDSMR
0 cfm SDSMR
Dsable HEATENA
55.0 F HCMR
0 F HSMR
100 % TCA
0 % RHA
0 % AQA
Yes COOLFLAG
No HEATFLAG
No RHFLAG
No AQFLAG
No UNOCCDH
0 Btu COOLBTUS
0 Btu HEATBTUS
49
801
Page 50

Heat Master Reference
heat set point if occupied, or the unoccupied heat set point if
unoccupied. This variable will display any space temperature
sensor slidebar offset that is being applied.
Heat Master
Reference: Display Units F (C)
Heat Submaster Reference
displays the desired supply air temperature calculated to heat
the space. This is a result of the heating PID loop calculation.
Heat Submaster
Reference: Display Units F (C)
Temperature Control Airflow
airflow set point determined from the temperature loop calculation. The zone controller compares the Temperature, Relative
Humidity, and Air Quality loop. The greatest of the three will
become the primary damper airflow reference.
T emperature
Control Airflow: Display Units %
Relative Humidity Control Airflow
plays the airflow set point determined from the relative
humidity loop calculation. The zone controller compa res the
Temperature, Relative Humidity, and Air Quality loop. The
greatest of the three will become the primary dampe r airflow
reference.
Relative Humidity
Control Airflow: Display Units %
Air Quality Control Airflow
flow set point determined from the air quality loop calculation.
The zone controller compares the Temperature, Relative
Humidity, and Air Quality loop. The greatest of the three will
become the primary damper airflow reference.
Air Quality
Control Airflow: Display Units %
— This point displays the occupied
Display Range 40.0 to 90.0
Default Value 55.0
Network Access Read/Write
— If heat is enabled, this variable
Display Range 0 to 240
Default V alue 0
Network Access Read/Write
— This variable displays the
Display Range 0 to 100
Default Value 100
Network Access Read Only
— This variable dis-
Display Range 0 to 100
Default V alue 0
Network Access Read Only
— This variable displays the air-
Display Range 0 to 100
Default V alue 0
Network Access Read Only
Cooling in Effect
in the Cooling mode and if the terminal is using the cooling airflow set points.
Cooling In Effect: Display Range No/Yes
Heating in Effect
in the Heat mode and if the terminal is using the he ating airflow set points.
Heating In Effect: Display Range No/Yes
Relative Humidity Control in Effect
cates if the relative humidity control is active.
Relative Humidity
Control In Effect: Display Range No/Yes
Air Quality Control in Effect
air quality control is active.
Air Quality
Control In Effect: Display Range No/Yes
→
Unoccupied Dehumidification
unoccupied dehumidification control is in effect.
Unoccupied
Dehumidification: Display Range Ye s/No
Cooling Energy
mary air source cooling BTUs being provided to the space by
the terminal. A CCN compatible air source or PAT sensor on a
linkage master is required.
Cooling Energy: Display Units Btu
Heating Energy
air source heating BTUs being provided to the space by the terminal. This value will not include zone level heating. A CCN
compatible air source or PAT sensor on a linkage master is
required.
Heating Energy: Display Units Btu
— This variable displays if the air source is
Default V alue Yes
Network Access Read Only
— This variable dis plays if the air sourc e is
Default V alue No
Network Access Read Only
— This variable indi-
Default V alue No
Network Access Read Only
— This variable indicates if the
Default V alue No
Network Access Read Only
— This variable indicates if
Default V alue No
Network Access Read Only
— This variable displays the amount of pri-
Display Range 0 to 999999
Default V alue 0
Network Access Read Only
— This point displays the amount of primary
Display Range 0 to 999999
Default V alue 0
Network Access Read Only
801
50
Page 51

Page 52

Copyright 1999 Carrier Corporation
Manufacturer reserves the right to discontinue, or change at any time, specifications or designs without notice and without incurring obligations.
Book 1 4
Ta b 1 1 a 1 3 a
PC 111 Catalog No. 533-355 Printed in U.S.A. Form 33ZC-1SI Pg 52 303 11-99 Replaces: New
 Loading...