

Page 1
Ducted fans must always be vented to the outdoors.
If this unit is to be installed over a tub or shower, it must be
marked as appropriate for the application and be connected to
a GFCI (Ground Fault Circuit Interrupter) - protected branch circuit.
Never place a switch where it can be reached from a tub or
shower.
This unit must be grounded.
CEILING VENTILATOR
VCDK005C, VCDK008C,
VCDK009C, VCDK010C, VCDK015C
READ AND SAVE THESE INSTRUCTIONS
WARNING
WARNING
CAUTION
TO REDUCE THE RISK OF FIRE, ELECTRICAL SHOCK, OR INJURY
TO PERSONS, OBSERVE THE FOLLOWING:
1.
2.
3.
4.
5.
Use this unit only in the manner intended by the manufacturer.
If you have questions, contact the manufacturer at the address
or telephone number listed in this warranty.
Before servicing or cleaning unit, switch power off at service
panel and lock the service disconnecting means to prevent
power from being switched on accidentally. When the service
disconnecting means cannot be locked, securely fasten a
prominent warning device, such as a tag, to the service panel.
Installation work and electrical wiring must be done by a qualified person(s) in accordance with all applicable codes and standards, including fire-rated construction codes and standards.
Sufficient air is needed for proper combustion and exhausting
of gases through the flue (chimney) of fuel burning equipment
to prevent backdrafting. Follow the heating equipment manufacturer’s guideline and safety standards such as those published by the National Fire Protection Association (NFPA)m and
the American Society for Heating, Refrigeration and Air
Conditioning Engineers (ASHRAE), and the local code authorities.
When cutting or drilling into wall or ceiling, do not damage electrical wiring or other hidden utilities.
6.
7.
8.
9.
For general ventilation use only. Do not use to exhaust hazardous or explosive materials and vapors.
To avoid motor bearing damage and noisy and/or unbalanced
impellers, keep drywall spray, construction dust, etc. off power
unit.
Please read specification label on product for further information and requirements.
1.
2.
3.
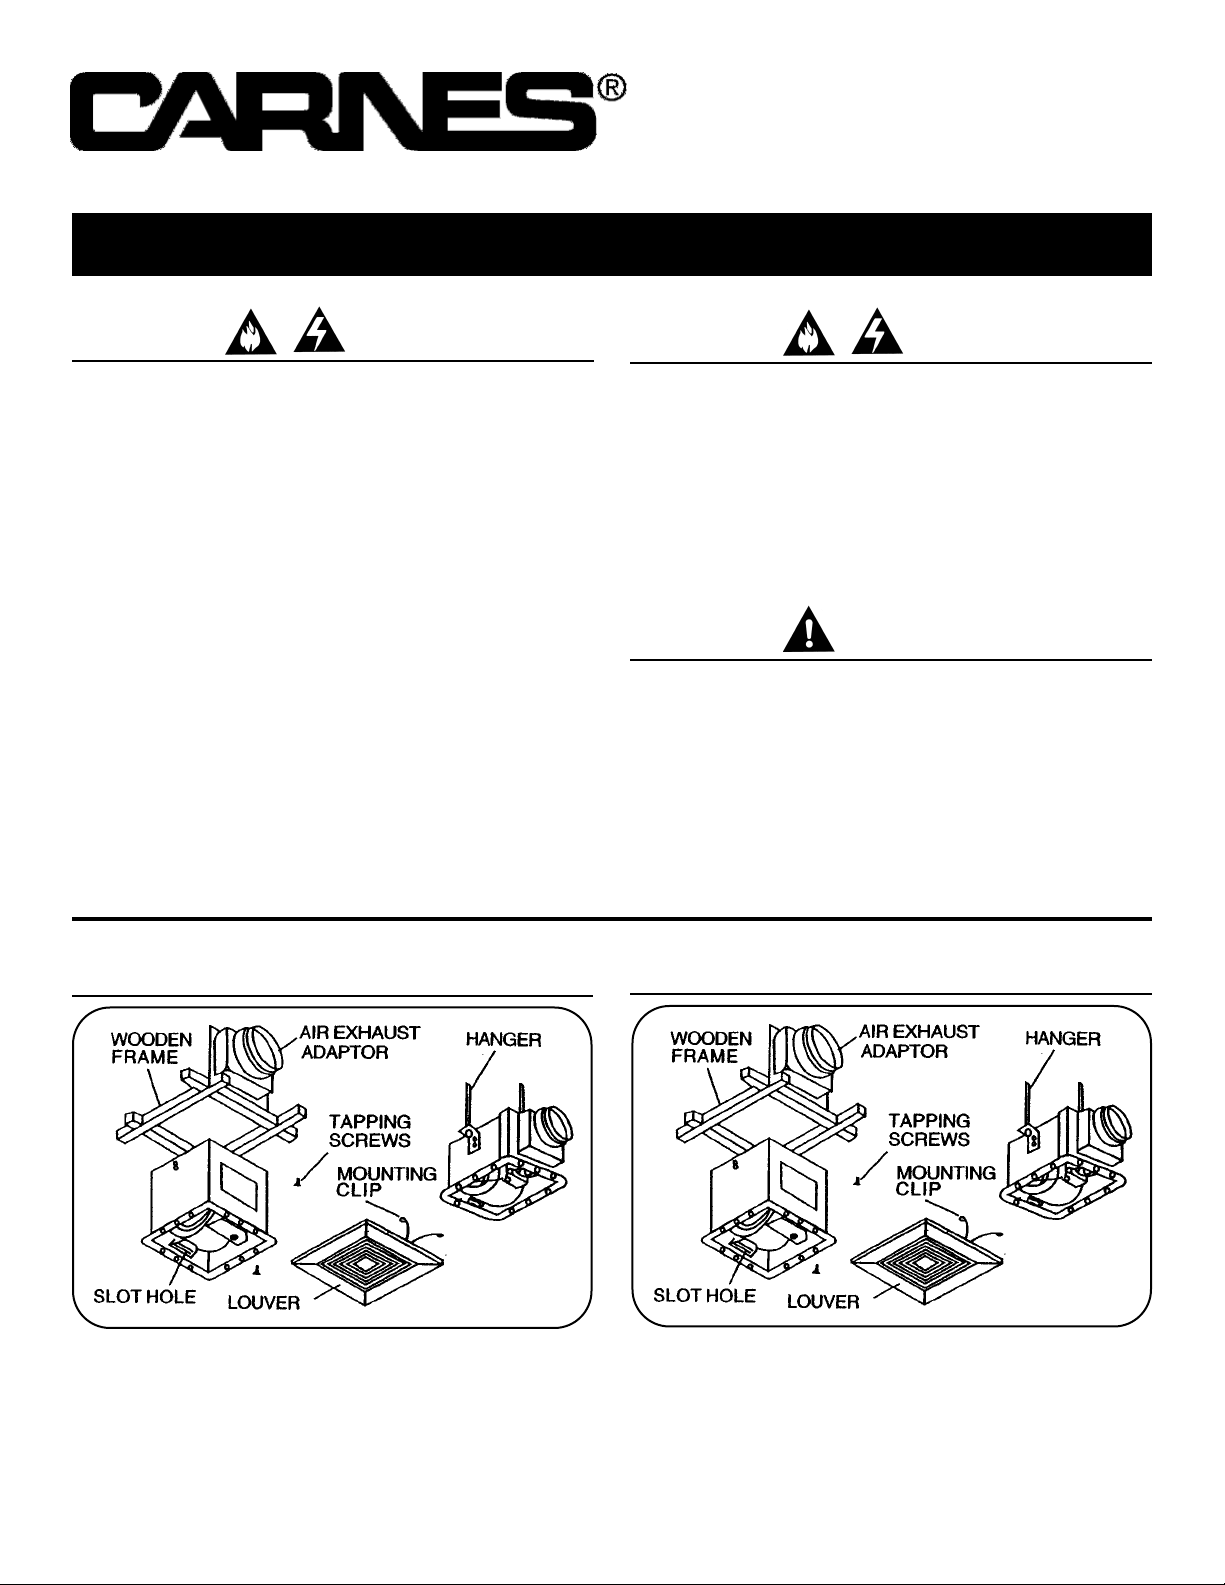
TYPICAL INSTALLATIONS
TYPICAL INSTALLATIONS
VCDK005C, VCDK008C, VCDK009C VCDK010C &VCDK015C
Installer: Leave this manual with the homeowner.
Homeowner: Use and Care Information on Page 4
FORM 11221
Page 2
Page 2
INSTALLATION OF HOUSING
Rough Opening Unit Dimensions
Model:
Length x Width Length x Width x Height
VCDK005C 7” L x 7” W 6-3/4” L x 6-3/4 W x 7-1/4 H
17.8cm L x 17.8cm W 17cm L x 17cm x 18.5cm H
VCDK008C 9-1/4” L x 9-1/4” W 9-1/2” L x 9-1/2” W x 6-3/4” H
VCDK009C 23.4cm L x 23.4cm 22.8cm L x 22.8cm x 17cm H
VCDK010C 10-1/2” L x 10-1/2” L 10-1/4” L x 10-1/4” W x 8-3/4” H
27cm L x 27cm W 26cm L x 26cm x 22.3cm H
VCDK015C 10-1/2” L x 10-1/2” L 10-1/4” L x 10-1/4” W x 8-3/4” H
27cm L x 27cm W 26cm L x 26cm x 22.3cm H
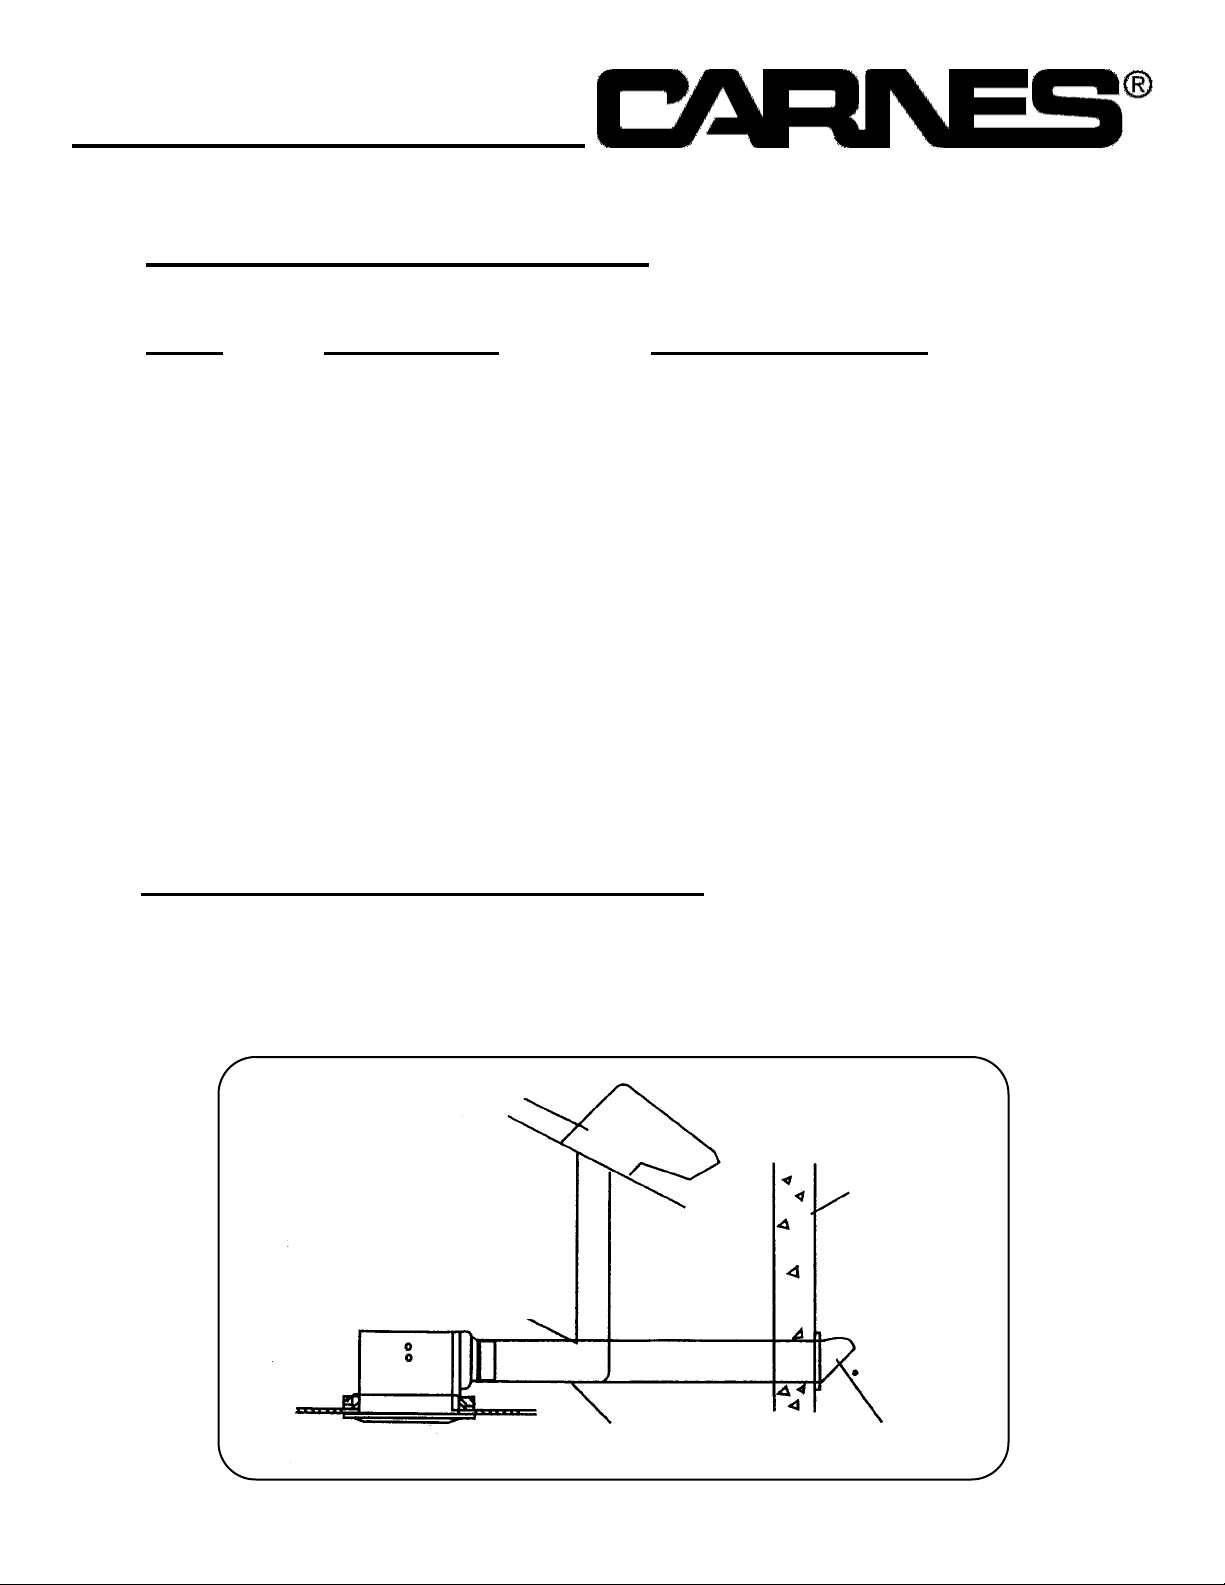
DUCT SIZES FOR CEILING VENTILATORS
4” ROUND VCDK005C, VCDK008C, VCDK009C
6” ROUND VCDK010C, VCDK015C
Note: Sheet Metal Duct is recommended.
HORIZONTAL AND
HORIZONTAL TO
VERTICAL DISCHARE
ROOF CURB
INDOOR
OUTDOOR
WALL
WALL CAP
90° ELBOW
FAN IN CEILING
4” or 5” ROUND DUCT
Page 3
Page 3
INSTALLATION INSTRUCTION
NEW CONSTRUCTION:
1. Choose the location of your fan in the ceiling. For best possible performance.
use the shortest duct run and a minimum number of elbows.
2. Remove the grille from the fan before proceeding.
3. Position mounting brackets against joist so that the bottom edge of the
housing will be flush with the finished ceiling. If necessary, frame the unit
to insure rigid support when in the ceiling and to minimize vibration. If
needed, use the hanger brackets provided with your ceiling fan.
4. Secure the fan to the ceiling with the screws provided.
5. For the louver to fit properly, the flange of the housing must be leveled to the
soffit level of the ceiling.
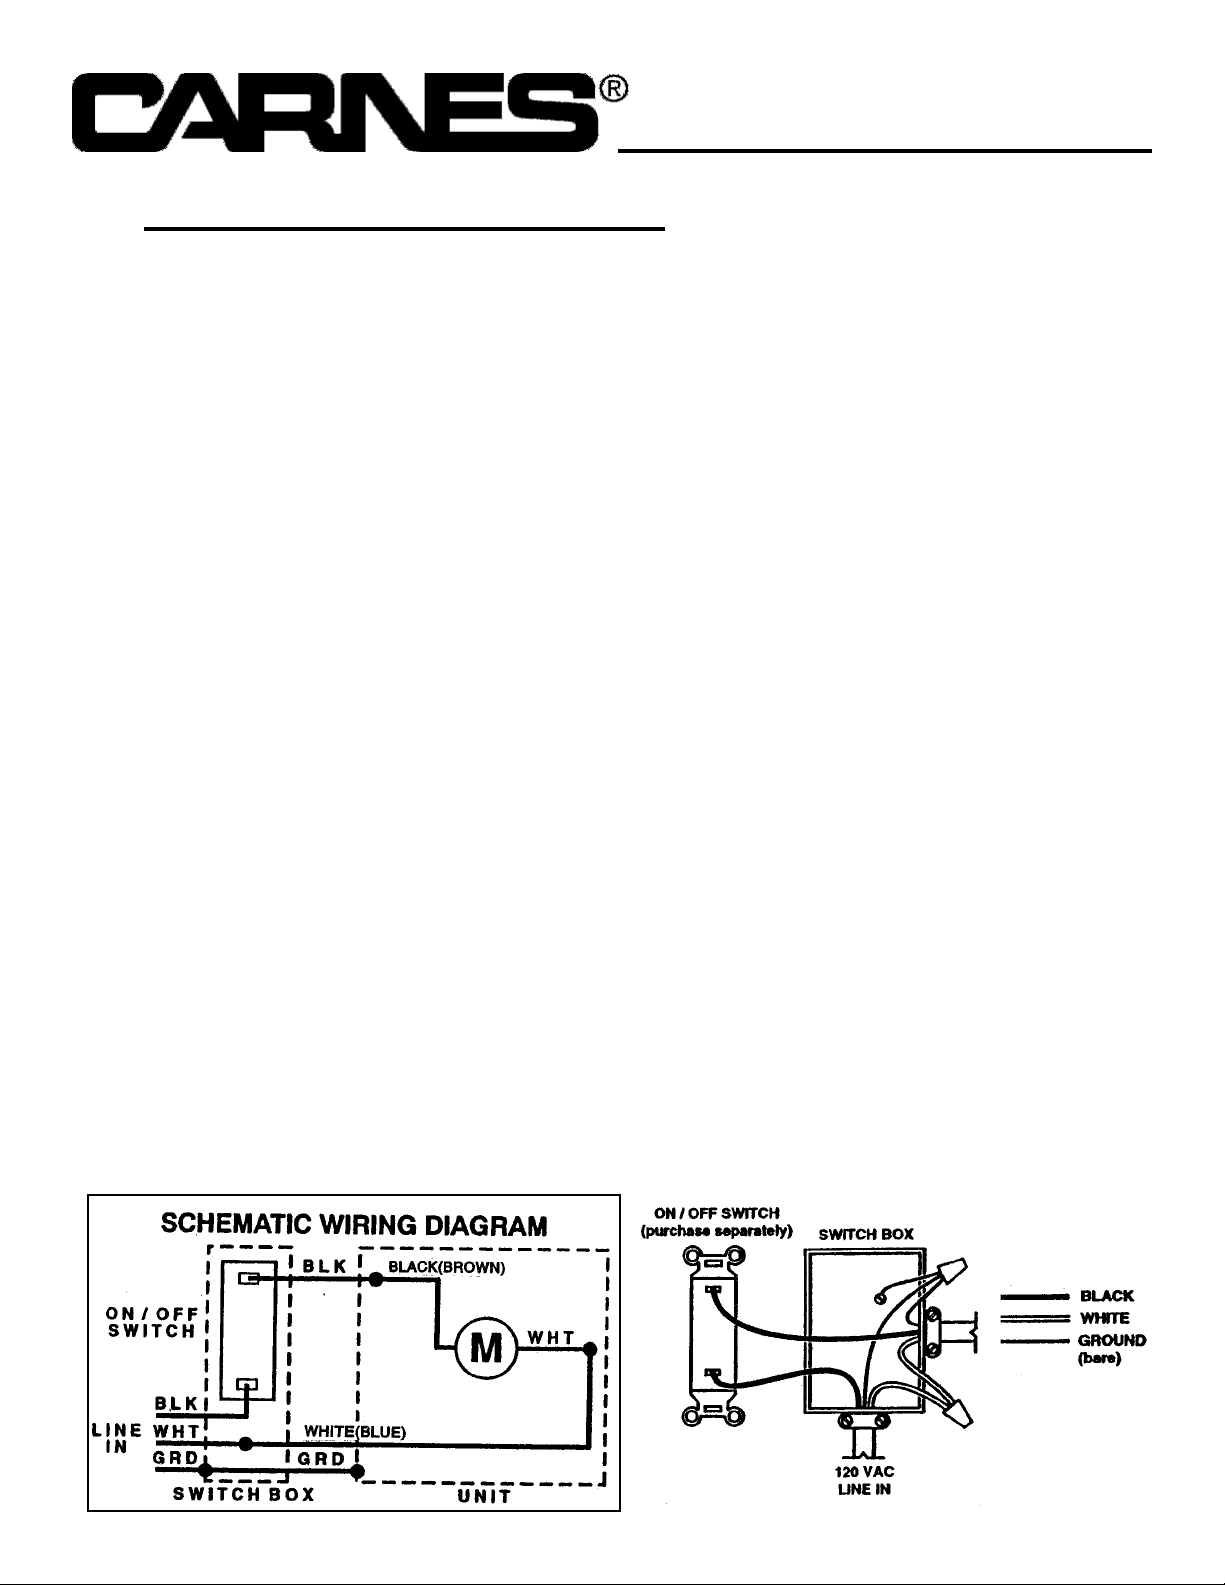
6. Connect the wiring as demonstrated in the below diagram.
7. Replace louver on fan.
8. Turn on the power and test fan.
EXISTING CONSTRUCTION:
1. Remove the grille from the fan before proceeding.
2. Choose location for your fan in the ceiling. For best possible performance,
use the shortest possible duct run and minimum number of elbows.
3. Locate ceiling joist from below and trace outline of housing, (side without the
flange) on the ceiling. One side tight against joist.
4. Set housing aside and cut ceiling opening slightly larger than marked.
5. Remove Air Exhaust Adapter from unit and mount unit in ceiling.
6. Install housing in the ceiling using the screws provided. Make sure to
position housing so that the air exhaust adapter is parallel to the joist.
7. Proceed to the attic and connect the exhaust adapter, wiring and ducting.
(Metal is advised) See Diagram on Page 2.
8. Wire the unit to the switch. Turn on power and test.
Page 4
Page 4
USE AND CARE
WARNING: DISCONNECT ELECTRICAL POWER SUPPLY AND LOCKOUT
SERVICE PANEL BEFORE CLEANING OR SERVICING THIS UNIT.
The motor is permanently lubricated. Do not oil or disassemble motor.
TO CLEAN GRILLE
CAUTION: Plastic parts can be cleaned with mild, soapy water (use a mild detergent, such as dishwashing liquid) and
dried with a soft cloth. Do not use abrasive cloth, steel wool pads, or scouring powders.
TO CLEAN FAN ASSEMBLY
Unplug fan assembly. To remove motor plate: Find the single tab on the motor plate. Push up near motor plate tab while
pushing out on side of housing. Or insert straight-blade screwdriver into slot in housing and twist screwdriver. Gently vacuum fan, motor and interior of housing. METAL AND ELECTRICAL PARTS SHOULD NEVER BE IMMERSED IN
WATER.
WARRANTIES:
One (1) Year Warranty
Carnes Company warrants products manufactured by it and supplied hereunder to be free from
defects in materials and workmanship under normal use and proper maintenance for a period
of twelve months from date of shipment. If within such period any products shall be provided
to Carnes’ reasonable satisfaction to be defective, such products shall be repaired or replaced
at Carnes’ option. Carnes Company obligation and Buyer’s exclusive remedy hereunder shall
be limited to such repair and replacement shall be conditioned upon Carnes Company receiving written notice of any alleged defects no later than 10 days after its discovery within the warranty period and at Carnes’ option, the return of such products to Carnes f. o. b. factory, when
such is feasible. Carnes reserves the right to satisfy its warranty obligation in full by reimbursing Buyer for all payments it makes hereunder, and the Buyer shall thereupon return the products of Carnes. Carnes shall have the right to remedy such defects.
THE FOREGOING WARRANTIES ARE EXCLUSIVE AND IN LIEU OF ALL OTHER
EXPRESS AND IMPLIED WARRANTIES (EXCEPT TITLE) INCLUDING BUT NOT LIMITED
TO IMPLIED WARRANTIES OF MERCHANTABILITY, FITNESS FOR A PARTICULAR PURPOSE, PERFORMANCE, OR OTHERWISE, and in on event shall Carnes be liable for claims
(based upon breach of express or implied warranty, negligence, product liability, or otherwise)
for any other damages, whether direct, immediate, incidental, foreseeable, consequential, or
special.
SERVING THE HVAC INDUSTRY SINCE 1939
CARNES COMPANY Phone: 608.845.6411
P. O. Box 930040 Fax: 608.845.6470
448 South Main Street EMail: [email protected]
Verona, WI 53593-0040 Web: www.carnes.com
 Loading...