

CARNES Comfort Control User Manual
User Manual
Form 17001
Rev A Nov 2014
Remote Thermostat
Comfort Control
LED indicator
Link switch
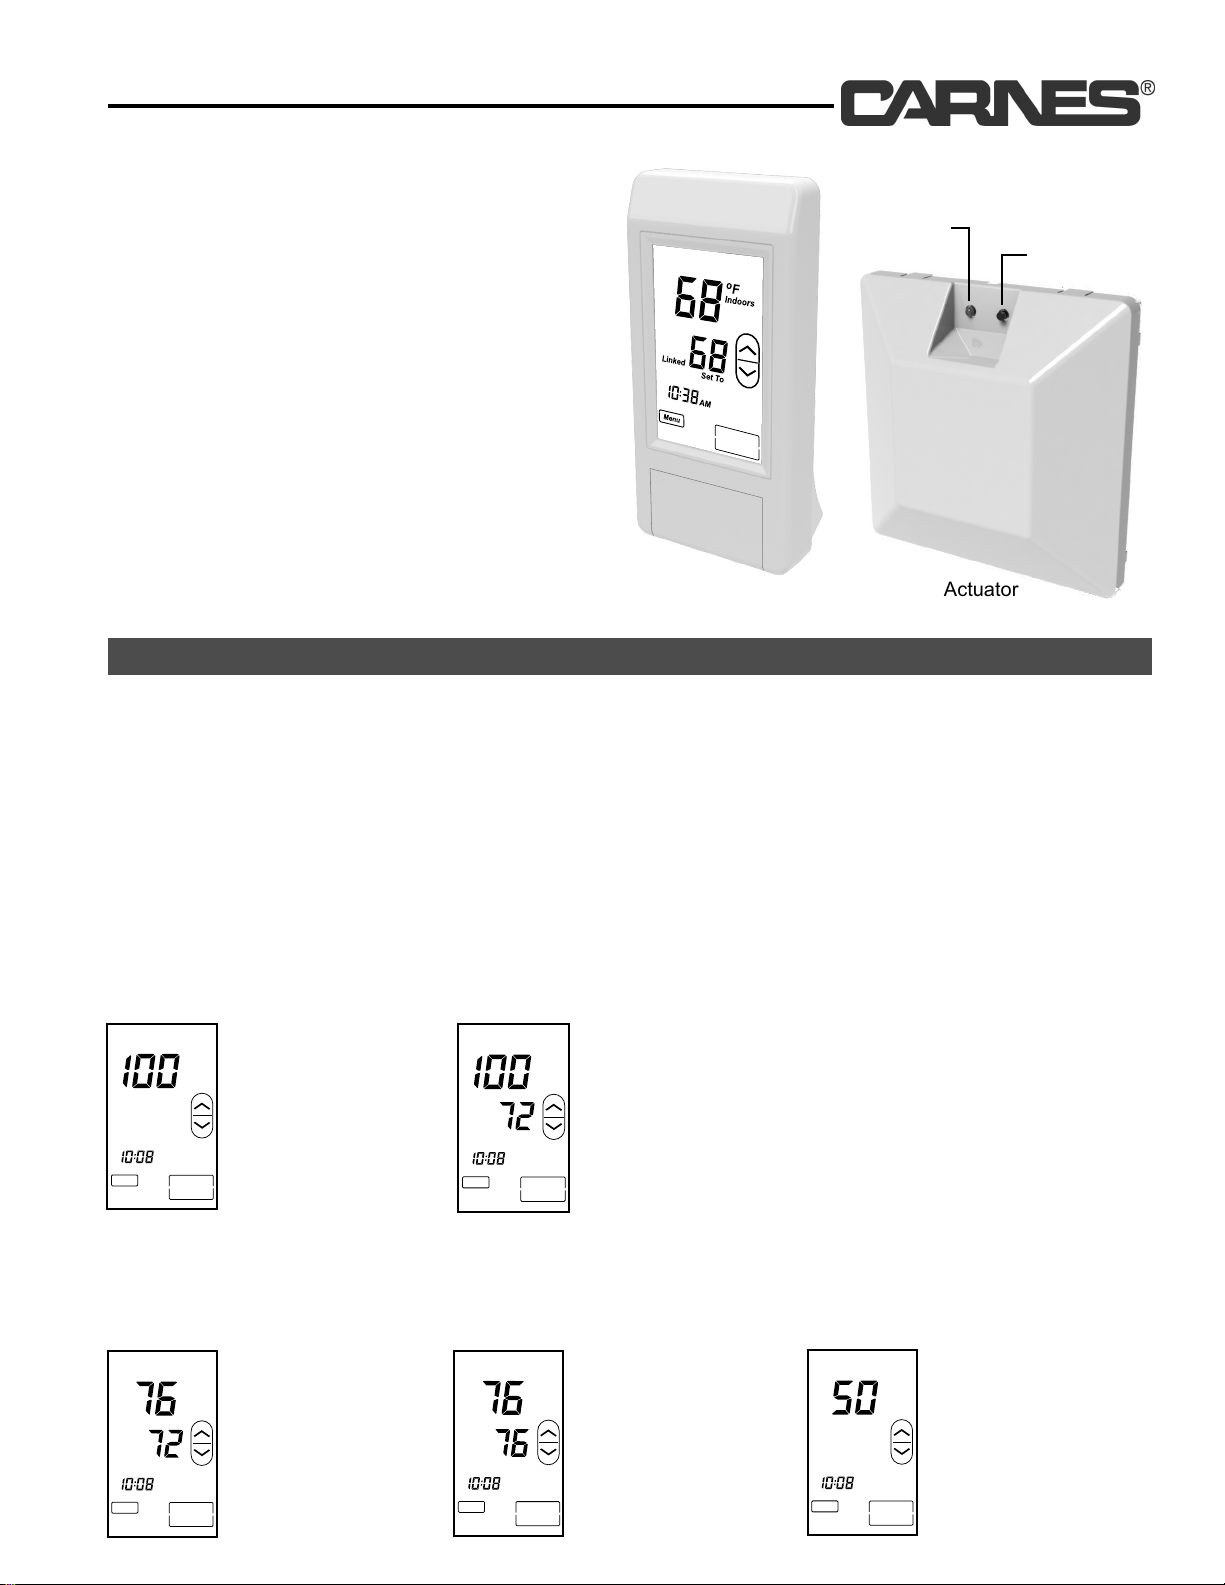
The Remote Thermostat Comfort Control is a
touch screen control that operates either as a
remote control or a thermostat to control airflow
into a space. The Remote Thermostat is battery
powered and communicates wirelessly to the
actuator using the FCC ISM 915MHz band.
Remote
The Remote Thermostat can be placed on a table
in a space or permanently attached to a wall.
Remote/Thermostat
Actuator
Operating Modes
The Remote Thermostat can be operated in either Remote Control Mode or Thermostat Mode. For best
performance, operate in one mode - don’t repeatedly switch between modes.
Important!
Some systems may have controls that set certain limits, such as the discharge air temperature. Check with your
installer to see which mode, Remote Control or Thermostat, is best suited for your system.
Remote Control Mode
In remote control mode, airflow is controlled by the user and can be adjusted from 100%, fully open, to 0%, fully closed. The user
simply pushes the UP or DOWN key to control the amount of airflow into the space.
Linked
Menu
Airflow displayed
%
Heat
Tu
AM
Remote
Heat
Linked
Tu
AM
Menu
Airflow and temperature
displayed
%
Remote
Thermostat Mode
In thermostat mode, airflow is controlled by the set point and room temperature, and whether the system is in heating or cooling. A
schedule can be programmed into the thermostat to control airflow for daytime and night time, or for days off.
Night / Off Mode.
%
Thermostat sets the
damper to the Night
Time / Off Airflow
setting.
Schedule
Thermostat
Menu
Hold Mode.
o
F
Thermostat controls
Indoors
airflow.
Schedule Mode.
o
F
Thermostat controls
Indoors
airflow and switches
between day or night
edLink
Set To
Tu
Hold
AM
Thermostat
Linked
Menu
Set To
Tu
AM
Day
mode depending on the
schedule and the time of
Schedule
day.
Thermostat
Linked
Menu
Tu
AM
Nite
LCD Touchscreen
Important!
The remote thermostat has been designed for long battery life and will “sleep” when not in use to
maintain battery life. A moderate touch is recommended to “wake up” the remote thermostat. A
moderate, steady touch is recommended to operate the keys. Pressing hard will not make the thermostat
respond faster and may damage the LCD touchscreen.
Remote Control Operation
After the Remote Thermostat and Actuator have been linked,
tested and installed by the installer, the Remote Thermostat is
ready for use. In Remote Control Operation, the airflow is
easily controlled by the user. The user presses the UP key to
increase airflow or presses the DOWN key to decrease
airflow. The airflow can be adjusted from 100% - the damper
is fully open, to 0% - the damper is fully closed, or anywhere
in between.
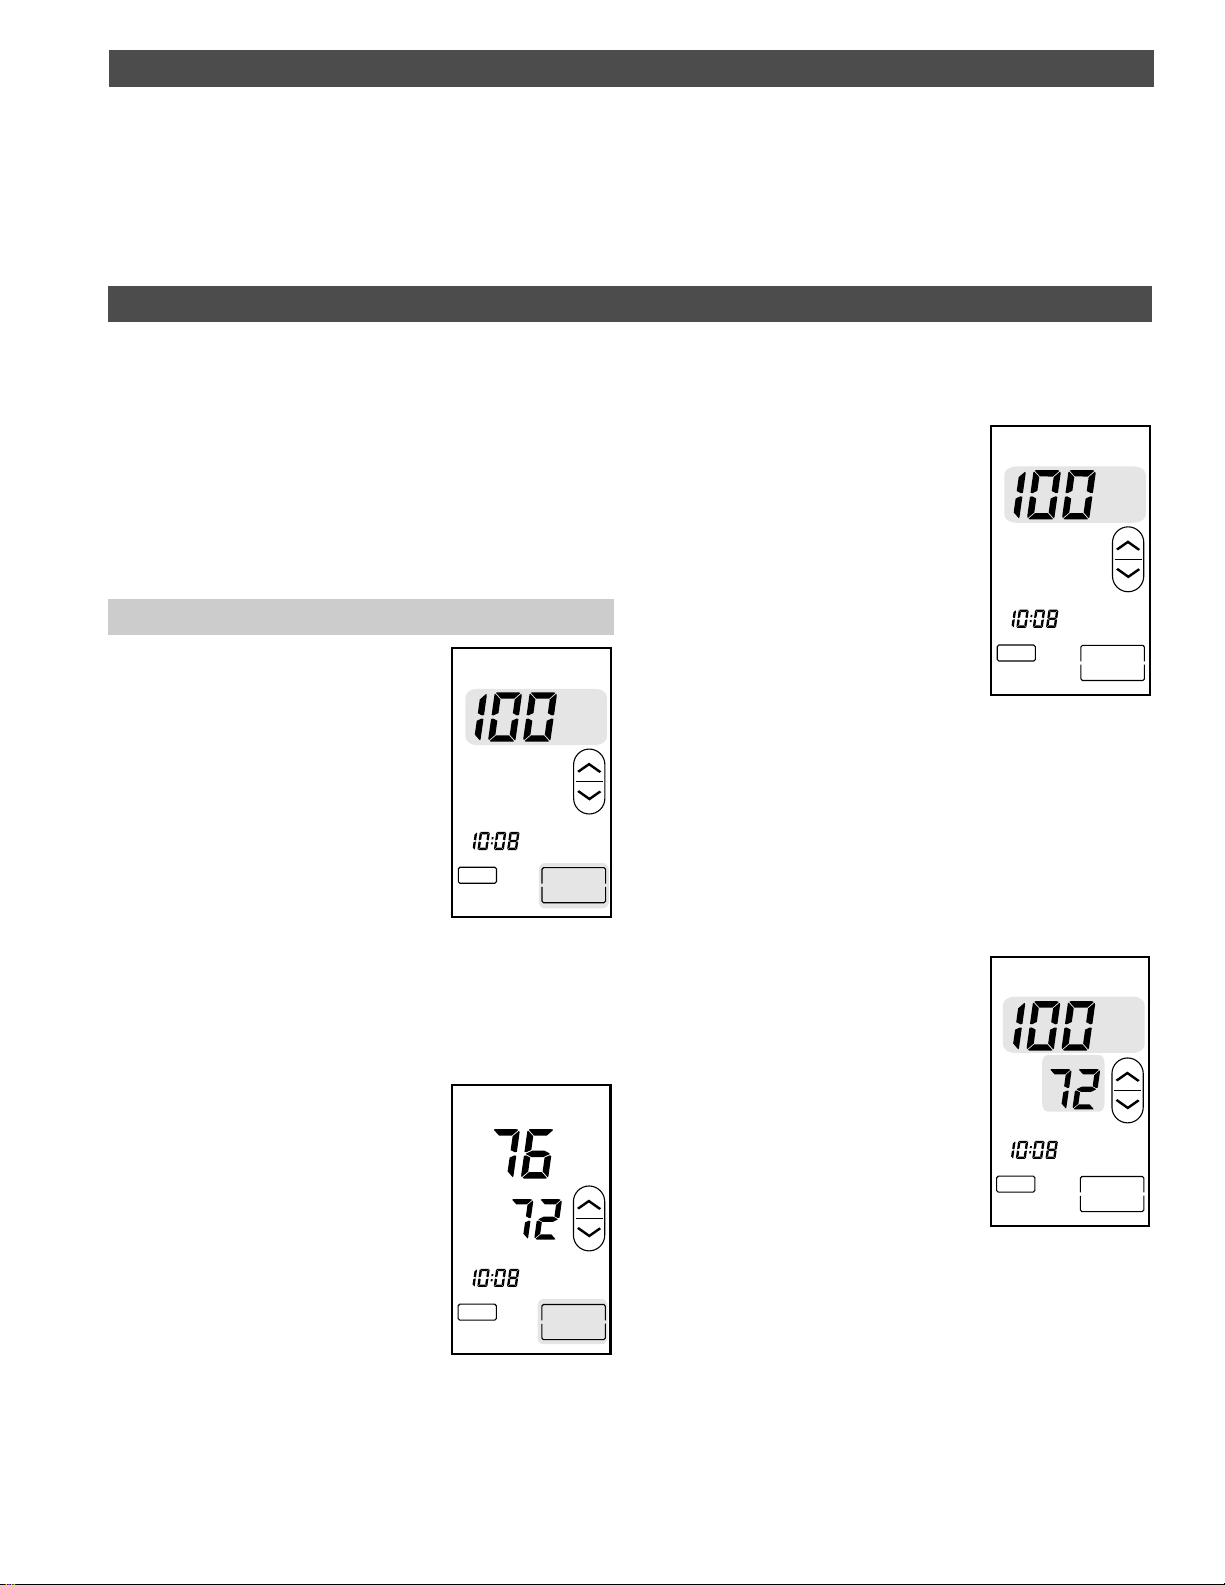
Remote Control Mode
Make sure the Remote Thermostat is in
Remote Control Mode as shown in the
image.
The display indicates Remote (shown in grey)
and displays airflow instead of temperature
(shown in grey).
Heat
Linked
Tu
Menu
%
AM
Remote
Remote Control - Airflow Displayed
This Remote Control shows only airflow displayed (shown in grey).
1.
Press the UP/DOWN keys to change the
damper position and airflow.
%
The damper can be adjusted from 100%,
fully open, to 0%, fully closed, or a position
Heat
in between.
Linked
Tu
AM
Menu
Remote
Remote Control - Airflow & Indoor
Temperature Displayed
This Remote Control shows airflow and temperature displayed
(shown in grey). See Option 7 to turn on temperature in the display.
Changing to Remote Control Mode
If the Remote Thermostat is in Thermostat Mode, as shown in the
image, change to Remote Control Mode.
1.
Press and hold the THERMOSTAT Key
(shown in grey). The key will change to
Remote as shown in the previous image
and airflow will be displayed instead of
temperature.
edLink
Tu
Menu
Set To
AM
o
F
Indoors
Hold
Thermostat
1.
Press the UP/DOWN keys to change the
damper position and airflow.
The damper can be adjusted from 100%,
fully open, to 0%, fully closed, or a position
in between.
Linked
Tu
Menu
%
Heat
AM
Remote
2
Thermostat Operation
In Thermostat mode, the Remote Thermostat automatically
controls the amount of airflow using the room temperature,
set point temperature and whether the system is in heating
or cooling.
The Remote Thermostat is preprogrammed with a seven day
schedule that the user can modify to a custom schedule. The
thermostat will adjust the amount of airflow depending on
the time and day of the week.
Thermostat Modes
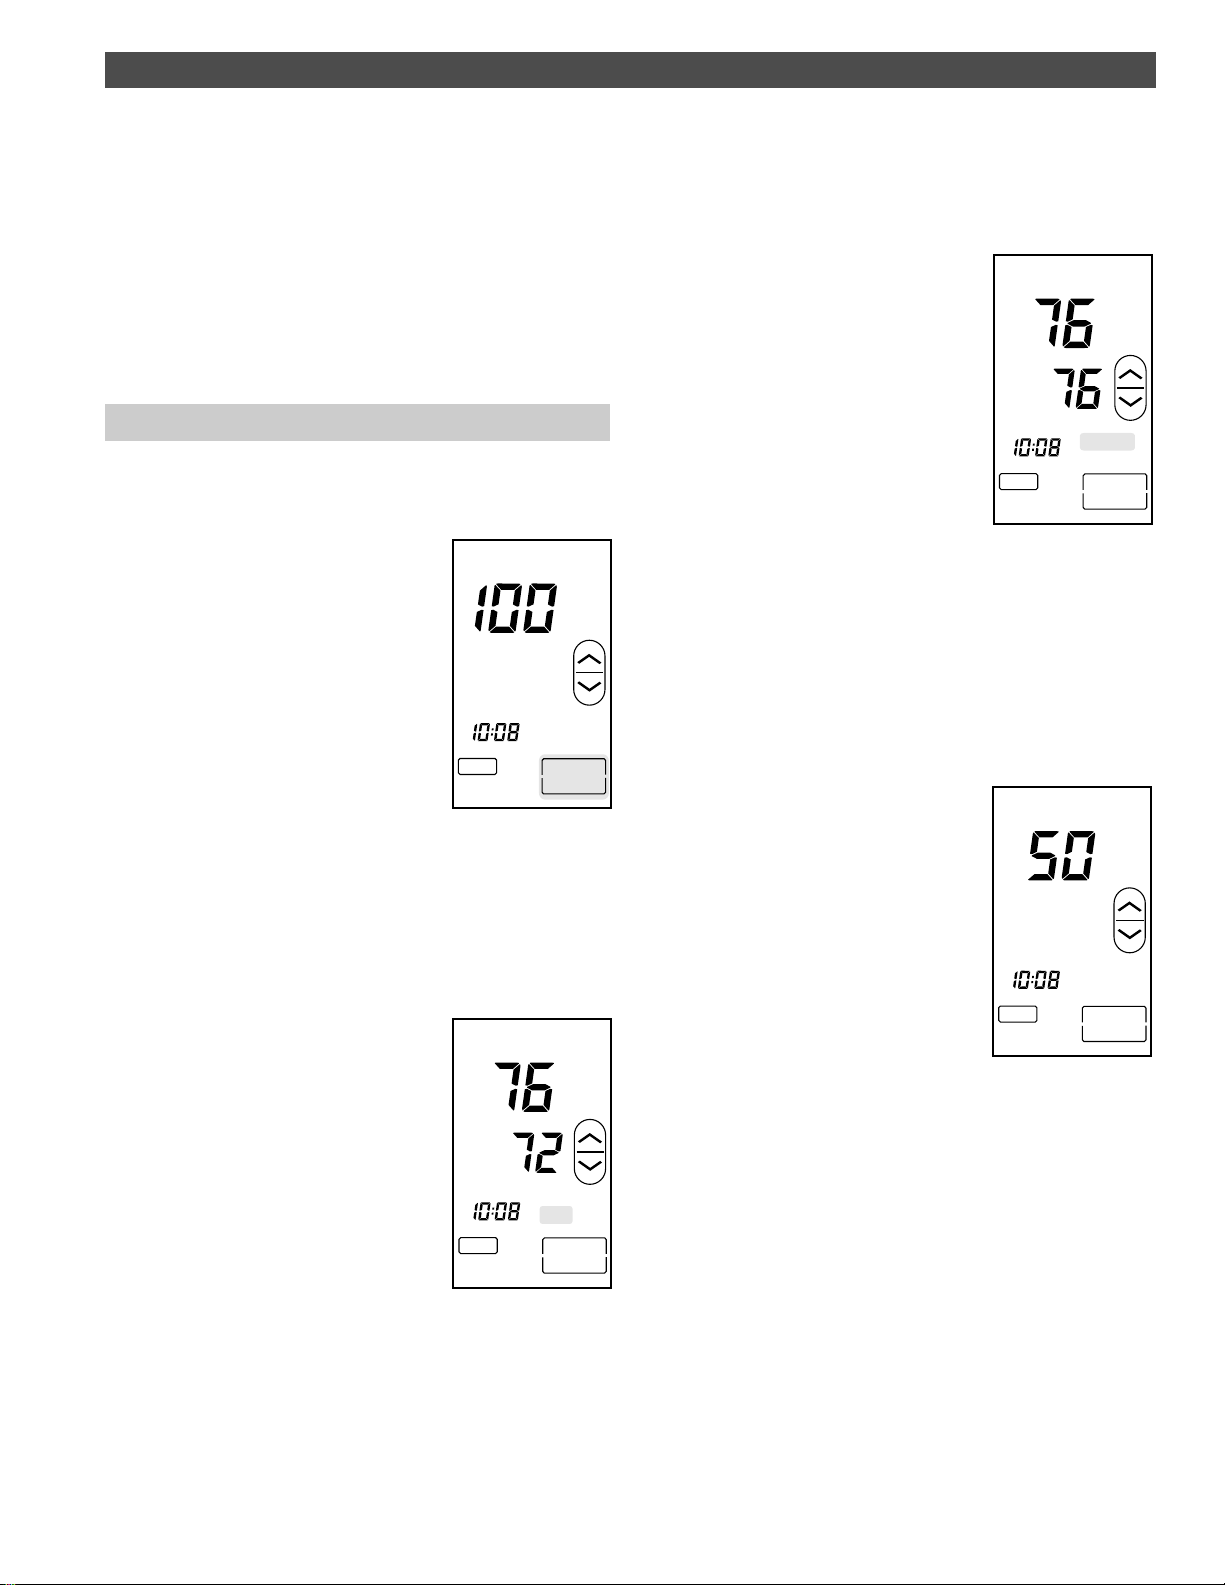
Changing to Thermostat Mode
The Remote Thermostat is shown in the Remote Control mode.
1.
Press and hold the REMOTE Key (shown
in grey). The key will change to
Thermostat as shown below.
Heat
Linked
Tu
Menu
%
AM
Remote
Thermostat Schedule Mode
In the Schedule Mode, the thermostat controls airflow using the
Indoor temperature and the setpoint temperature set by the user.
The thermostat will follow the default schedule or the schedule set
by the user.
Press the UP/DOWN keys to set the
1.
temperature. The thermostat will adjust
the airflow to reach the setpoint
temperature.
To select Hold Mode, press and hold the
2.
SCHEDULE key (shown in grey).
Linked
Tu
Day
Menu
Heat
AM
Set To
Schedule
Thermostat
o
F
Indoors
Thermostat Night Mode
In the Night Mode, the thermostat sets the damper to the Nighttime
position set in Option 5. The factory default is 50%. The thermostat
will go into Night mode at the time set in the schedule. The factory
default is 9:00 PM.
To change the temperature in night
1.
mode, use the UP/DOWN keys to set the
desired temperature.
%
Thermostat Hold Mode
In the Hold Mode, the thermostat controls airflow using the Indoor
temperature and the setpoint temperature set by the user. The
schedule feature is not used in the Hold Mode.
Press the UP/DOWN keys to set the
1.
desired temperature. The thermostat
will adjust the airflow to reach the
setpoint temperature.
2. To select Schedule Mode, press and
hold the HOLD key (shown in grey).
edLink
Tu
Menu
Heat
AM
Set To
Hold
Thermostat
o
F
Indoors
Linked
Tu
Menu
AM
Nite
Schedule
Thermostat
3
 Loading...