

Page 1

WM5-96
Smart Power Quality Analyzer
Instruction manual
Page 2

Page 3

ARMPowered
PRG
measures
SS
R
!
R
A
L
WM5-96
SmartPowerQuality Analyzer
Class0.2 A/V
Thank you for choosing our products
WM5-96
Smart Power Quality Analyzer
WM5 96:
• High accuracy (class 0.2 A/V);
• High calculation performances (ARM®technology) for a
fast analysis of the signal (FFT up to the 63
• high connection capabilities (RS485 115.2 kbps, RS232,
front optical port).
rd
harmonics);
WM5 96 is the state-of-the-art tecnological answer to your
needs of power quality analysis.
eover, you can count on a ISO9001/VISION 2000
Mor
certified company structure, an experience of many years
and a wide-spread presence both in Europe and all over
the world. All this in order to guarantee the customer with
top-quality service and the best products.
a
Welcome in Carlo Gavazzi and our compliments for your
choice. You can evaluate the complete range of our prod-
ucts on the CARLO GAVAZZI web-site:
www.carlogavazzi.com/ac
CARLO GAVAZZI
Automation Components
Page 4

2
ntroduction
I
Index
WM5-96 Instruction Manual
M5 96 philosophy, ARM tecnology . . . . . . . . . . . . . . . . . . . . . . . .4
W
Optical and communication port . . . . . . . . . . . . . . . . . . . . . . . . . . .4
Becoming aquainted with WM5
Programming WM5 96
Front panel description . . . . . . . . . . . . . . . . . . . . . . . . . . . . . . . . . .5
ain measuring page “00” . . . . . . . . . . . . . . . . . . . . . . . . . . . . . . . .5
M
Adjustment of display contrast . . . . . . . . . . . . . . . . . . . . . . . . . . . .5
nstantaneous variables measurements . . . . . . . . . . . . . . . . . . . . . .6
I
THD measurements . . . . . . . . . . . . . . . . . . . . . . . . . . . . . . . . . . . . .6
Digital input status . . . . . . . . . . . . . . . . . . . . . . . . . . . . . . . . . . . . . .7
Digital output status . . . . . . . . . . . . . . . . . . . . . . . . . . . . . . . . . . . . .7
Energy meters pages . . . . . . . . . . . . . . . . . . . . . . . . . . . . . . . . . . . .7
Logged events page . . . . . . . . . . . . . . . . . . . . . . . . . . . . . . . . . . . . .8
Alarm status page . . . . . . . . . . . . . . . . . . . . . . . . . . . . . . . . . . . . . .8
Info pages . . . . . . . . . . . . . . . . . . . . . . . . . . . . . . . . . . . . . . . . . . . . .9
Programming keypad . . . . . . . . . . . . . . . . . . . . . . . . . . . . . . . . . . .11
Resets . . . . . . . . . . . . . . . . . . . . . . . . . . . . . . . . . . . . . . . . . . . . . . .11
Access to programming . . . . . . . . . . . . . . . . . . . . . . . . . . . . . . . . .11
Change password . . . . . . . . . . . . . . . . . . . . . . . . . . . . . . . . . . . . .12
Modules . . . . . . . . . . . . . . . . . . . . . . . . . . . . . . . . . . . . . . . . . . . . .12
System . . . . . . . . . . . . . . . . . . . . . . . . . . . . . . . . . . . . . . . . . . . . . .13
CT ratio . . . . . . . . . . . . . . . . . . . . . . . . . . . . . . . . . . . . . . . . . . . . . .13
VT ratio . . . . . . . . . . . . . . . . . . . . . . . . . . . . . . . . . . . . . . . . . . . . . .13
DMD/AVG calculation . . . . . . . . . . . . . . . . . . . . . . . . . . . . . . . . . . .14
Installed power . . . . . . . . . . . . . . . . . . . . . . . . . . . . . . . . . . . . . . . .15
Meters menu . . . . . . . . . . . . . . . . . . . . . . . . . . . . . . . . . . . . . . . . .16
Programming example of the tariff parameters . . . . . . . . . . . . . .18
Display page . . . . . . . . . . . . . . . . . . . . . . . . . . . . . . . . . . . . . . . . . .20
Digital inputs . . . . . . . . . . . . . . . . . . . . . . . . . . . . . . . . . . . . . . . . . .21
Digital outputs . . . . . . . . . . . . . . . . . . . . . . . . . . . . . . . . . . . . . . . .22
Alarm . . . . . . . . . . . . . . . . . . . . . . . . . . . . . . . . . . . . . . . . . . . . . . .24
Logic and alarm parameters . . . . . . . . . . . . . . . . . . . . . . . . . . . . .25
Examples of alarm parameters pr
Events selection . . . . . . . . . . . . . . . . . . . . . . . . . . . . . . . . . . . . . . .28
Analog outputs . . . . . . . . . . . . . . . . . . . . . . . . . . . . . . . . . . . . . . . .29
Programming example of the analog outputs . . . . . . . . . . . . . . . .30
Serial outputs . . . . . . . . . . . . . . . . . . . . . . . . . . . . . . . . . . . . . . . . .31
Optical port . . . . . . . . . . . . . . . . . . . . . . . . . . . . . . . . . . . . . . . . . . .32
Ethernet port . . . . . . . . . . . . . . . . . . . . . . . . . . . . . . . . . . . . . . . . .33
Digital filter
Digital filter programming examples . . . . . . . . . . . . . . . . . . . . . . .34
Clock . . . . . . . . . . . . . . . . . . . . . . . . . . . . . . . . . . . . . . . . . . . . . . .36
Language
Serial number and Meter Info. . . . . . . . . . . . . . . . . . . . . . . . . . . . .37
Keypad lock, lock of acces to programming and reset menu . . . . . . . . .37
. . . . . . . . . . . . . . . . . . . . . . . . . . . . . . . . . . . . . . . . . . .33
. . . . . . . . . . . . . . . . . . . . . . . . . . . . . . . . . . . . . . . . . . . .37
ogramming
. . . . . . . . . . . . . . . .
26
Layout and list of modules
Lay-out and list of modules . . . . . . . . . . . . . . . . . . . . . . . . . . . . .38
Page 5

WM5-96 Instruction Manual
Index
3
Installation
Wiring diagrams
Technical specifications
Panel cut-out and dimensions . . . . . . . . . . . . . . . . . . . . . . . . . . . .39
Fixing, removing the modules and mounting the instrument to the
panel . . . . . . . . . . . . . . . . . . . . . . . . . . . . . . . . . . . . . . . . . . . . . . . .39
Sealing the instrument . . . . . . . . . . . . . . . . . . . . . . . . . . . . . . . . . .39
-phase, 2-wire input connections (1P) . . . . . . . . . . . . . . . . . . . . .40
1
2-phase, 3-wire input connections (2P) . . . . . . . . . . . . . . . . . . . . .40
3-phase, 3 and 4-wire input connections - balanced load (3P) . .40
3-phase, 3-wire input connections - unbalanced load (3P) . . . . . .41
3-phase, 3-wire ARON input connections (3P) . . . . . . . . . . . . . . .41
3-phase, 4-wire input connections, unbalanced load (3P+N) . . . .41
Power supply, analogue and digital output modules . . . . . . . . . . .42
Digital inputs . . . . . . . . . . . . . . . . . . . . . . . . . . . . . . . . . . . . . . . . . .42
RS485 serial port (AR1034 9600bps, AR2040 115200bps)
Input specifications . . . . . . . . . . . . . . . . . . . . . . . . . . . . . . . . . . . .43
Output specifications . . . . . . . . . . . . . . . . . . . . . . . . . . . . . . . . . . .44
Software functions . . . . . . . . . . . . . . . . . . . . . . . . . . . . . . . . . . . . .45
Wm5Soft parameter programming and variable reading software . . .45
Time period management . . . . . . . . . . . . . . . . . . . . . . . . . . . . . . .46
Harmonic distortion analysis . . . . . . . . . . . . . . . . . . . . . . . . . . . . .46
General specifications . . . . . . . . . . . . . . . . . . . . . . . . . . . . . . . . . .47
Supply specifications . . . . . . . . . . . . . . . . . . . . . . . . . . . . . . . . . . .47
Revenue approval Settings . . . . . . . . . . . . . . . . . . . . . . . . . . . . . .47
Function description . . . . . . . . . . . . . . . . . . . . . . . . . . . . . . . . . . . .48
Insulation between inputs and outputs . . . . . . . . . . . . . . . . . . . . .48
Accuracy . . . . . . . . . . . . . . . . . . . . . . . . . . . . . . . . . . . . . . . . . . . . .49
Used calculation formulas . . . . . . . . . . . . . . . . . . . . . . . . . . . . . . .49
List of the variables that can be connected to . . . . . . . . . . . . . . .50
. . . . . .42
Page 6

4
We suggest you to keep the original packing
n case it is necessary to return the
i
instrument to our Technical Service
Department. In order to achieve the
best results with your instrument, we
recommend you to read this instruction man-
al carefully. If the instrument is used in a
u
manner not specified by the producer, the
rotection provided by the instrument may be
p
impaired. Maintenance: to keep the instrument clean, use a slightly damp cloth; do not
use any abrasives or solvents. We recommend to disconnect the instrument before
cleaning it.
WM5 96 philosophy, ARM®technology
Introduction
WM5-96 Instruction Manual
his symbol indicates a particularly important sub-
T
ject or information.
This symbol indicates that more details are given
n the current subject.
o
This symbol indicates a suggestion for the user.
WM5 96 is a brand new instrument with a high level of performances
and connection capability. Actually, WM5 96 is a synergy of digital
components that, coordinated by an ARM
to perform class 0.2 measurements for current and voltage, the management of 3 serial ports, 8 analogue outputs, 12 digital inputs, 16
alarms and a complete and functional management of the energy
meters tariffs. The ARM®-based microprocessors are used in the upto-date technology such as the palmtop computers: this makes of
WM596 a real computer at the service of the electrical parameters
analysis and of the electrical tariff management, even the more complex one.
®
processor, allows the user
Optical port and communication
WM5 thanks to its great flexibility
allows to set in the menu (pls see
the relevant section) also the modules being installed in the base (display module). In order to make the programming of the
modules easier, it is advisable to note the
identification code (ex. AO2050) and the relevant installation slots (A, B, etc.): we suggest
to fill in the special module on the last page of
this manual.
The front optical port allows a fast and practical communication
between PC and instrument. Thanks to the WM5Soft software it’ll be
possible to read the measurements and programm the instrument
even if the latter is already installed on the electrical board.
Basic instrument,
display.
Modules
Page 7

WM5-96 Instruction Manual
ARMPowered
P
RG
m
easures
SS
R
!
R
A
L
WM5-96
SmartPowerQuality Analyzer
Class0.2 A/V
Front Panel Description
2
4
3
Becoming acquainted with WM5 96
1
When switched on, the alarm LED will be active (blinking for a vir-
ual alarm, fixed light for a real alarm).
t
2
1
5
Graphic display.
3
This key allows the user to access programming (only page 00) or
the details of the measurement.
4
Keys allowing the user to scroll the measuring pages, display the
details relating to the measurements: dmM=dmd maximum value,
dmd=avg value, max=maximum value, min=minimum value. In the
page relating to the meters it’s possible to read the value of the
energy counted per month (JAN...DEC), per tariff (T01...T12) and
per phase (L1, L2, L3). The contemporaneous pressure of these
keys also allows the adjustment of the display
5
Optical communication port (standard ANSI).
5
Main measuring page “00”
a b
c
2
1
2a
3 4
When the instrument is switched on, the operating system will be
loaded; this implies a short waiting time (during this phase the
display shows a sand glass which will stop moving only when the
loading phase is completed). Then, the instrument will start measur-
d
d1
ing and will display the window on the left. This page, called "P00"
page, is the only page which can be configured by the user who can
choose, by means of the programming, which variables are to be displayed in the 3 sections
(a, b, c) (see “display page” in the program-
ming menu). The (d) section indicates the consumption of the measured energy (kWh and kvarh), a graphical indicator (d1) allows a quick
reading of the % value relating to the active system power being used
with reference to the installed power value previously set in the instrument. In the other measuring pages, the variable type displayed in the
four sections (a, b, c, d) is pre-established and cannot be modified.
The display of the lower part of the display is common to all measuring pages.
1
Shows the displayed measuring page, the displayed number will
incr
ease or decr
2
Shows the sequence of the phase rotation L1-L2-L3 or L3-L2-L1
ease depending on the displayed page.
(2a).
3
Shows the current tariff (T01, T02, T03, T04...T12) of the energy
meters.
4
Shows the current time (only if this function has been enabled).
Adjustment of display contrast
To have a clear reading in every condition of visibility, properly adjust
the display contrast. Press the “ ” keys contemporaneously: the
contrast starts increasing; release the keys when the display contrast
has been properly adjusted.
Page 8

6
easurements of instantaneous variables
M
a b
c
1
2
3
Becoming acquainted with WM5 96
d
WM5-96 Instruction Manual
The various measuring pages of WM5 96 display the necessary infor-
ation for the quality analysis of the network. To scroll (1) the measur-
m
ing pages, use the “ ” keys; to display the details of the measures,
press the “S” key; to scroll the available details, use the “ ” keys
(3); to exit the details displaying phase, press the “S” key.
he details for the instantaneous variables are the following:
T
dmM= maximum dmd value,
dmd= dmd value,
max= maximum value,
min= minimum value.
For any information on the meaning of “dmd”, see page 14.
Reset of details. Keeping the “S” key pressed for approx. 2 seconds,
it’s possible to reset each variable of the selected detail (dmM, dmd,
max, min). The instrument displays a message confirming the user he
has entered the reset mode: choose “YES” by means of the “ ”
keys , confirm with the “S” key and then select the variable you want
to reset by means of the “ ” keys, then press “S” to proceed with
the reset; to exit the reset mode, keep the “S” key pressed for at least
2 seconds.
THD Measurements
a
b
c
1
d
e
2
Thanks to the powerful calculation capabilities of the ARM® technologies, WM5 96 allows an accurate analysis of the harmonics up to the
63rd.
a
Voltage or current value referred to the relevant measured phase.
(V1, V2, V3, A1, A2, A3).
b
Total harmonic distorsion expressed as a percentage value.
c
Histogram of the harmonics. To display the details of the harmonics, press the “S” key
(2).
An arrow is displayed on the horizontal axis of the graph to identify the
harmonics being examined. To scroll the harmonics one by one, use
the “ ” keys (2).
d
Harmonic order (from h1 to h 63), for single phase and the relevant
absolute voltage or current value.
e
Harmonic order (from h1 to h63), the detected conventional sign
(-,o,+) and its relevant value expressed as a percentage.
f
f
Phase angle between the fundamental and the voltage and current
harmonic of the same order: angle between 0° and 90° and
between 270° and 360° corresponds to a generated harmonic, an
angle between 90° and 180° and between 180° and 270° corresponds to an imported harmonic.
The phase angle (f) between the fundamental and the voltage and current
harmonic of the same or
der will be displayed
only if the measurements are taken in a threephase system with neutral.
To exit the display of measurement details, press the “S” key.
t
Note: The display of histograms is available only up to the 50
h
harmonic (h50). For the other harmonics from h51 to h63 only the numeric values are available.
Page 9

WM5-96 Instruction Manual
igital input status
D
a
b
Becoming acquainted with WM5 96
This page displays the status of the digital inputs (b) (0, 1, 2) corresponding to each slot (a). The “ ” symbol will be shown on the right
f a close contact, while the “ ” symbol will be shown on the right of
o
an open contact, if the digital input is set as “Totalizer” the symbol
“ “ will be displayed.
It’s possible to display the values of the cofigurated totalizer (GAS,
Water...) by keeping the “S” key pressed, and scroll the details by
keeping the “ ” keys pressed.
To exit the display of the measurement details press the “s” key.
7
Digital output status
b
a
Energy meter page
a
b
c
d
1
This page displays the status of the digital outputs (b) (0, 1, 2, 3)
corrsponding to each slot (a). If the contact or contacts are ON, the “ ”
symbol will be displayed. If the contact or contacts are OFF, the “ ”
symbol will be displayed. If the digital output is set as “pulse output”,
then the symbol “
“ will be displayed. The detail function is not avail-
able in this page.
This page displays the imported kWh (a), exported kWh (b), imported
kvarh (c) and exported kvarh (d) energy meters. It’s possible to enter
the details of the meters by keeping the “S” key pressed (2), and scroll
the details by keeping the “ ” keys pressed (3).
The countings of the energies can be scrolled divided by:
month (JAN...DEC),
tariff (T01...T12),
phase (L1, L2, L3).
2
3
o enter the details of the meters
T
starting fr
om the division by phase,
press the “ ” key first, to start
om the division by month, pr
fr
key first.
To exit the display of the measurement details press the “s” key.
ess the “ ”
Page 10
8
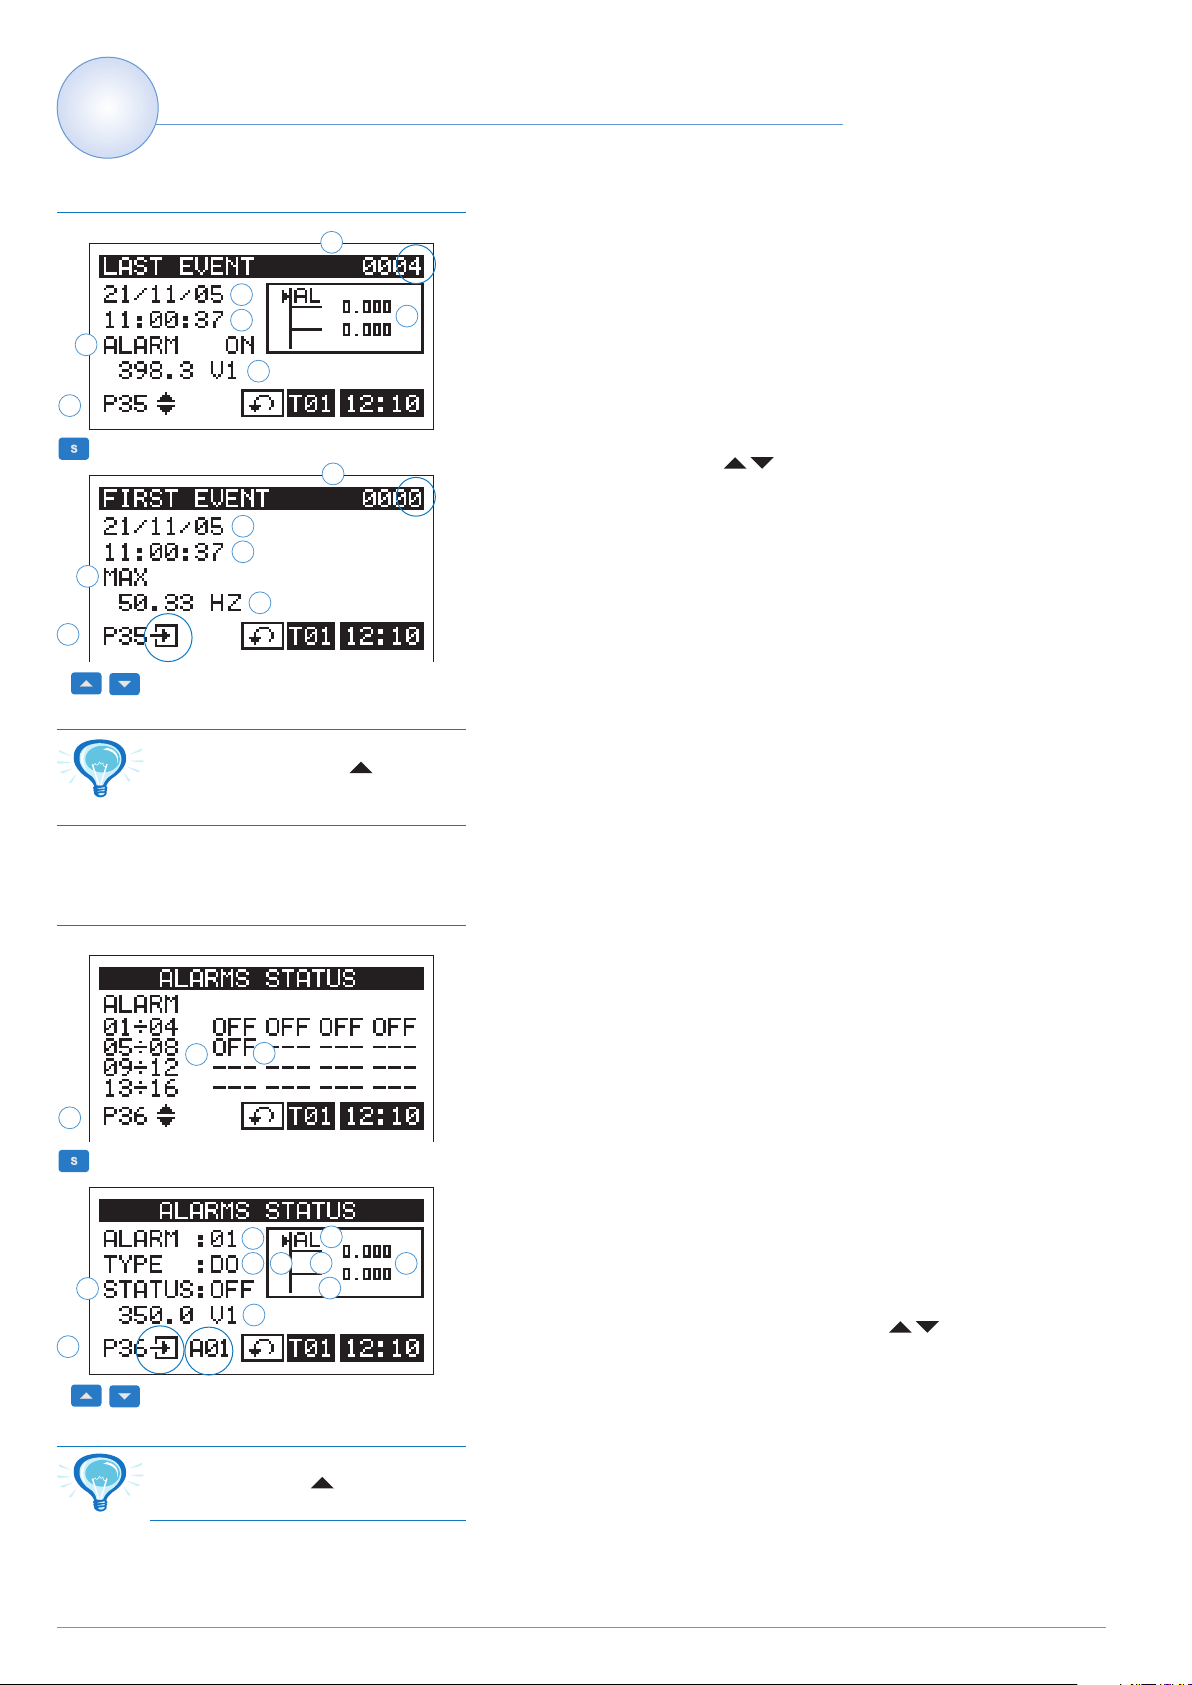
ogged events page
L
d
1
Becoming acquainted with WM5 96
WM5-96 Instruction Manual
hanks to the great logging capability of WM5 96, it’s possible to log
a
T
a great number of events and manage their displaying, one by one.
The page always displays the last logged event which is given a pro-
b
c
e
f
gressive number (a). The page is complete with all the important information relevant to the logged event: date (b), time (c), type of event
alarm, min, max, etc.) (d), variable relevant to the event (e). Should the
(
alarm refer to an alarm, a window (f) summing up all the set-point
nformation (see also following paragraph “alarm status page”).
i
To display all the logged events one by one, press the “S” (2) key, and
a
scroll the events with the “ ”.keys.
d
2
To display the first logged event,
press, first press the “ “ key.
Alarm status page
a
b
c
e
To exit the detailed display of the events, press the “S” key.
Thanks to this page, it’s possible to have the complete control of the
set alarms: ON if enabled, OFF if disabled. For the alarms which are
not enabled, the display shows two horizontal hiphens. The column
under the “ALARM” indication identifies the alarm group, for example
esents the gr
b
01 to 04 r
their status indicated on the right.
epr
oup of the first 4 alarms (from 1 to 4) and
1
Press the “S” key to display the details (2) of each set alarm (c) (from
1 to 16):
the values of the programmed set points (e),
the alarm type (d): UP alarm if the “AL” symbol is in the (d1) position
as shwon in the figur
c
d
g
h
2
d1
d2
f
d3
e
is in the (d2) position or DOWN alarm if the “AL” symbol is in the (d3)
position. Moreover, the display shows the alarm status (g) which can
be ON or OFF and the value of the alarm variable
To go from one alarm to the other, use the “ ” keys. To exit the
display of the alarm status press the “S” key.
e on the right, WINDOW alarm if the “AL” symbol
(h).
Further information on the alarms and the set-point adjustment is
given in the “alarms programming” section of this manual.
To display the details of the 01
alarm, press the “ ” key first.
Page 11

WM5-96 Instruction Manual
nfo pages
I
METER INFORMATION
TANDARDS:
S
kWh: EN62053-22 CL.0,5
kvarh: EN62053-23 CL.2
P37
1
METER INFORMATION
TEST OUTPUT CONSTANT:
OPTICAL: kWh+, TOT
1.000 Wh/PULSE
OUT C0: kWh+ TOT
1.000Wh/PULSE
Becoming acquainted with WM5 96
he last pages in the “display” mode show the main information relat-
T
ing to the programming of the instrument. These data are also available when the instrument is completely sealed.
a
b
The first of the 4 pages (1) only the standards to which the instrument
refers (a, b) are displayed.
n the 2nd page (2) the output specifications of the (infrared light) opti-
I
cal port and open-collector output (C0) are displayed if these are used
o retransmit the energy.
t
In the 3rd page (3) the following data are displayed: system measurement (a) the example figure shows the 3 phase 4 wire symbol, CT and
PT ratio selected (c, d) and the DMD time selected (e).
In the 4th page (4) the following data are displayed: serial number of
the instrument (a), production year (b), firmware release (c), measuring
input specifications, (d).
9
P38
2
METER INFORMATION
SYSTEM
CT RA
TIO
PT RATIO 1.000
DMD TIME 15 min
P39
3
METER INFORMA
SN
YEAR 2008
BI3230033001P
b
REV 2.1.5.0 (AV5)
INPUT 3x230 (400)V
5 (10)A, 50/60Hz
a
1.000
c
d
e
TION
a
c
d
P40
4
Page 12

Page 13

WM5-96 Instruction Manual
rogramming keypad
P
1 2 3
Programming WM5 96
11
The “S” (1) key is used to enter programming, confirm the selected or
odified data and go back to the previous data if pressed for at least
m
2 seconds. The “ ” keys at N. 6 are used to scroll the menus and
modify the selected values/data. To modify the values proceed as follows: the “ ” (2) key increases in a cyclical way the selected digit
rom 0 to 9, to move to the next digit, use the “ ” (3) key, also in this
f
case the system is cyclical.
Example, enter the value 213: starting situation 000, press “ ” twice
to increase the number up to 2, then press “ ” to go on to the next
digit (on the right); the instrument displays 200, press “ ” once to
increase the number to 1, then press “ ” to go on to the next digit
(on the right); the instrument displays 210, press “ ” three times to
increase the digit to 3, press “S” to confirm the value. If you do not
want to confirm the value, but only to modifiy it, press the “ ” key.
Resets
PASS ?
Access to programming
PASS ?
1
0000
123...
0000
Measure
> 2s
Measure
> 2s
By means of a single command and only from the “P00” page, you
can carry out the reset of all the min. and max. values, the dmd and
dmd max values, the reset of all the logged events and of the alarms
with latch. To carry out this reset command you have to enter some
numeric codes: press the “S” key, the instrument displays the “ ”
PASS?
indication. Enter by means of the “ ” keys the following numeric
codes depending on the reset you want to carry out.
5784= reset of all the minimum and maximum values;
5785= reset of all the “dmd” and “dmM” (dmd max) values;
7239= reset of all the “events”;
9288= reset of the alarms with latch.
To access the programming menus from the measuring and display
phase, press the “S” key (only from the “P00” page), when the password “PASS?” is requested, enter the correct PASSWORD value by
means of the “ ” keys, then confirm by pressing the “S” key
again. If the PASSWORD is correct (for all instruments the PASS value
when they leave the factory is “0”), the instrument will enter the main
menu.
To cancel the choice and go back to the measuring mode, press the
“S” key for at least 2 seconds.
**********MMAAIINN MMEENNUU*********
CHANGE P
MODULES
SYSTEM
2
CT RATIO
RREEVV.. 11..44..22..66 ((AAVV55)
d
a
ASSWORD
b
e
Measure
*
c
)
> 2s
a
Menu title.
b
Menu.
c
Scroll bar.
d
Firmware revision of the instrument.
e
ype of measuring analogue output being mounted on the instru-
T
ment.
Page 14

12
Programming WM5 96
WM5-96 Instruction Manual
Change password
******MMAAIINN MMEENNUU*****
CHANGE PASSWORD
MODULES
SYSTEM
T RATIO
1
2
C
RREEVV.. 11..44..22..66 ((AAVV55)
******MMAAIINN MMEENNUU*****
HANGE PASSWORD
C
ODULES
M
NUOVA PASS ?
YSTEMA
S
m
in
CT RAGIO ORTO TA
max
RREEVV.. 11..44..22..66 ((AAVV55)
ma
Confer
Modules
******MMAAIINN MMEENNUU*****
CHANGE PASSWORD
MODULES
SYSTEM
1
2
CT RATIO
RREEVV.. 11..44..22..66 ((AAVV55)
MMOODDUULLEESS CCOONNFFIIGGUURRAATTIIOON
SLOT A
SLOT B
SLOT C
AAOO22005500 ((AA00,, AA11)
AANNAALLOOGG OOUUTTPPUUTT 00--2200mmA
This function allows the user to modify the PASS value with a new
alue (from 0 to 1000). Press the “S” key and when the instruments
Measure
*
v
requires a new PASS (2) enter the desired value by means of the “
” keys and confirm the new value with the “S” key. The instrument
> 2s
goes back to the main menu.
)
a
The instrument shows the maximum and minimum limit of the
Go back
*
000
0
000
0
a
1000
)
123...
*
> 2s
Measure
value available for the password.
The WM5 96 does not support the automatic acknowledgment of the
installed modules, therefore this information must be entered using
> 2s
the “MODULES” menu. Choose by means of the “ ” keys the
modules menu, press “S” to confirm and then select by the “ ”
)
keys the relevant slot A, B, C, D or E (where slot A is the first on the
top right, watching it from the front of the instrument, and slot E refers
to the central housing). Confirm the highlighted slot with the “S” key
Go back
N
)
A
and then select the code of the module (the code is written on the
module itself): the instrument will also display a brief description of
the selected code. The code of the module is placed on the side label
> 2s
of the module itself.
o confirm the code of the selected module,
T
press the “S” key.
A
N
Go back
> 2s
MMOODDUULLEESS CCOONNFFIIGGUURRAATTIIOON
AO1059
AO2051
AO2050
3
AAOO22005500 ((AA00,, AA11)
AANNAALLOOGG OOUUTTPPUUTT 00--2200mmA
Confirm
)
Page 15

WM5-96 Instruction Manual
ystem
S
********** MMAAIINN MMEENNUU *********
HANGE PASSWORD
C
MODULES
SYSTEM
T RATIO
1
C
RREEVV.. 11..44..22..66 ((AAVV55)
)
Measure
*
Programming WM5 96
his function allows the user to select the type of electrical system
T
choosing among:
1- single phase 2 wires (1-PHASE 2-WIRE),
> 2s
2- dual phase 3 wires (2-PHASE 3-WIRE),
3- three phase 3 wires and 1 CT balanced load (3-PH 3W+1CT BAL.),
hree phase 3 wires unbalanced load (3-PH 3W UNBAL.),
4-t
5- three phase 4 wires unbalanced load (3-PH 4W UNBAL.).
13
2
CT ratio
1
2
Confir
********** MMAAIINN MMEENNUU *********
HANGE PASSWORD
C
1-PHASE 2-WIRE
MODULES
-PHASE 3-WIRE
2
SYSTEMA
-PH 3W+1CT BAL.
3
T RATIO TA
C
3-PH 3W UNBAL
RREEVV.. 11..44..22..66 ((AAVV55)
Confirm
******MMAAIINN MMEENNUU*****
HANGE PASSWORD
C
ODULES
M
YSTEM
S
CT RATIO
RREEVV.. 11..44..22..66 ((AAVV55)
******MMAAIINN MMEENNUU*****
CHANGE PASSWORD
MODULES
SYSTEMA
CT RATIOORTO TA
RREEVV.. 11..44..22..66 ((AAVV55)
m
RAPP
min
max
A ?
. T
1.000
0.100
a
6000
123...
Choose by means of the “ ” key the SYSTEM function (1), press
the “S” key to confirm, then select by means of the “ ” keys the
desired system (2) and confirm the selection with the “S” key.
> 2s
)
Go back
*
This function allows the user to select the value of the CT ratio (pri-
Measure
*
mary/secondary ratio of the current transformer being used). Example:
if the CT primary (current transformer) has a current of 300A and the
secondary a current of 5A, the CT ratio corresponds to 60 (obtained
> 2s
using the following calculation: 300/5). Choose the CT RATIO function
)
(1) by means of the “ ” keys and confirm the selection with the
“S” key. Then select the desired value by means of the “ ” keys
(2) and confirm the value with “S”.
Go back
*
> 2s
)
a
The instrument displays the maximum and the minimum value
available for the CT ratio.
VT ratio
1
2
Confir
******MMAAIINN MMEENNUU*****
MODULES
SYSTEM
CT RATIO
VT-PT RATIO
RREEVV.. 11..44..22..66 ((AAVV55)
******MMAAIINN MMEENNUU*****
MODULES
SYSTEM
CT RATIO ORTO TA
VT-PT RATIOORTO TA
RREEVV.. 11..44..22..66 ((AAVV55)
m
VT RA
min
max
TIO ?
a
123...
*
*
1.000
1.000
6000
)
)
Measure
> 2s
Go back
> 2s
This function allows you to select the value of the VT-PT ratio (primary/secondary ratio of the voltage transformer being used).
Example: if the primary of the connected VT (voltage transformer) is
20kV and the secondary is 100V, then the VT-PT ratio corresponds to
200 (obtained carrying out the following calculation: 20000/100).
Choose the VT-PT RATIO function (1) by means of the “ ” key and
confirm the selection with “S”. Then select by means of the “ ”
key the desired value (2) and confirm the value with the “S” key.
a
The instrument displays the maximum and minimum value available for the VT-PT ratio.
Page 16

14
MD/AVG calculation
D
**********MMAAIINN MMEENNUU*********
SYSTEM
T RATIO
C
VT-PT RATIO
MD/AVG. CALCUL.
1
2
3
D
RREEVV.. 11..44..22..66 ((AAVV55)
******DDEEMMAANNDD//AAVVEERRAAGGEE*****
******DDEEMMAANNDD//AAVVEERRAAGGEE*****
Confirm
Programming WM5 96
TYPE
IME
T
SYNC
IPO
T
IXED
F
TEMPO
SLIDE
SINCRONISM
)
*
*
*
Measure
> 2s
Go back
> 2s
Go back
> 2s
WM5-96 Instruction Manual
his function allows the user to select the calculation method of the
T
DMD/AVG value of the selected variable. To access these functions
select DMD/AVG CALCUL. from the main menu by means of the “
” keys and confirm the selection with “S” (1).
TYPE (2): select the type of calculation mode to be used for the
MD/AVG calculation: FIXED or SLIDE (3). Select the desired type (3)
D
by means of the “ ” keys and confirm with “S”.
IME(4): select the time interval for the DMD/AVG calculation (5, 10,
T
15, 20, 30, 60 minutes). Select the desired time (5) by means of the
“ ” keys and confirm with “S”.
Where:
Pmax is the maximum
power,
Pc is the contractual
power,
t1 is the selected time
period for the calculation of the A
value.
VG/DMD
FIXED SELECTION: if, for example, a time interval of 15 minutes has
been selected, the instrument will calculate the AVD/DMD value of the
measured variable and updates its value every 15 minutes.
******DDEEMMAANNDD//AAVVEERRAAGGEE*****
TYPE
TIME
SYNC
4
*
Go back
> 2s
SLIDING SELECTION: if for example a time interval of 15 minutes has
******DDEEMMAANNDD//AAVVEERRAAGGEE*****
TIPO
5 min
TEMPO
10 min
SINCRONISMO
15 min
5
Confirm
20 min
*
Go back
been selected, the instrument calculates the AVG/DMD value and
updates its value at the beginning after the first 15 values and then
after every minute, thus generating a window whose width is of 15
> 2s
minutes and that moves forward every minute.
SYNCHRONISM (6): select the synchronization mode, that is the
method that controls the calculation method of the average/demand
according to the selected time. Select the type of desired synchronism
(7) by means of the “ ” keys and confirm with “S”.
******DDEEMMAANNDD//AAVVEERRAAGGEE*****
TYPE
TIME
SYNC
6
*
Go back
OFF (7)
instrument on.
CLOCK (7): the synchronization starts as soon as the first selected
> 2s
integration time multiple expir
time at 10 minutes and the current time at 10:25, the synchronization
: the synchronization calculation starts when you switch the
es. Example: by setting the integration
will start at 10:30.
CONTACT (7): the synchronization starts at the status modification
(from ON to OFF or from OFF to ON) of one of the digital inputs pro-
******DDEEMMAANNDD//AAVVEERRAAGGEE*****
TIPO
OFF
TEMPO
CLOCK
SINCRONISMO
ACT
CONT
7
*
Go back
grammed such as SYNCHRONIZATION or TARIFF (see “DIGITAL
INPUTS”). A consequent status change produces the reset and then
> 2s
again the starting up of the synchr
onization.
Confir
m
Page 17

WM5-96 Instruction Manual
nstalled power
I
Programming WM5 96
15
This menu allows you to set a power value (installed power) that, in the
measuring phase, will represent 100% of the graph indicator “W%”
present in the “P00” page (in the fourth quadrant).
> 2s
Select INS. POWER ? (1) by means of the “ ” keys and confirm
with the “S” key. Then enter the full scale value by means of the “
)
*
Measure
********** MMAAIINN MMEENNUU *********
CT RATIO
T-PT RATIO
V
DMD/AVG CALCUL.
NSTALLED POWER
1
I
RREEVV.. 11..44..22..66 ((AAVV55)
” keys and confirm with “S”.
a
The instrument shows the maximum and minimum limit of the
value available for the full scale of the W% graph.
)
*
Go back
> 2s
********** MMAAIINN MMEENNUU *********
T RATIO
C
T-PT RATIO
V
I
NS. POWER ?
MD/AVG CALCUL.
D
m
in
INSTALLED POWER
m
2
RREEVV.. 11..44..22..66 ((AAVV55)
Confirm
a
ax
9999MW
123...
000 W
1
000 W
1
Page 18

16
eters Menu
M
1
Programming WM5 96
********** MMAAIINN MMEENNUU *********
T-PT RATIO
V
MD/AVG CALCUL.
D
INSTALLED POWER
ETERS
M
RREEVV.. 11..44..22..66 ((AAVV55)
)
Measure
*
WM5-96 Instruction Manual
his menu allows the user to select/set all the parameters of the ener-
T
gy meters. From the main menu, select METERS by means of the “
” keys and confirm with the “S” key to enter the METERS menu.
Then choose by means of the “ ” keys if entering the program-
> 2s
ming of the TARIFF (2) or entering the “ENERGY RESET” menu to
eset the meters (16); confirm the selection with S”.
r
ARIFF(3): the instrument identifies two operating modes.
T
**********MMEETTEERRSS MMEENNUU*********
TARIFF
NERGY RESET
E
TOTALIZER RESET
2
**********MMEETTEERRSS MMEENNUU*********
TARIFF
Y CLOCK
B
NERGY RESET
E
BY DIG. INPUTS
TOTALIZER RESET
3
*
*
Go Back
> 2s
Go Back
> 2s
BY DIG. INPUTS (by digital inputs) (3): the instrument manages the
tariff changes by means of the status changes of the digital inputs programmed as TARIFF (see the section dedicated to the digital inputs).
Select BY DIG. INPUTS by means of the “ ” keys and confirm
with the “S” key.
BY CLOCK (3)
: the instrument manages the tariffs by means of the
clock integrated in the RS232 serial module. Select BY CLOCK by
means of the “ ” keys and confirm with the “S” key, then set the
following additional parameters:
WEEK TYPE (4): set the WEEK TYPE where for each day you can
select if it’s to be considered a working day or a holiday. The setting
of the week type is very useful to simplify the following programming
of the periods.
TTIIMMEE PPEERRIIOODD SSEELLEECCTTIIOON
WEEK TYPE
PERIODS
DEFAULT TARIFF
4
N
Go Back
Select WEEK TYPE with the “ ” keys and confirm with the “S”
key: you enter the window with the list of days (5), select the desired
day with the “ ” keys and confirm with the “S” key, then choose
> 2s
by means of the “ ” keys if the day is to be considered as a (W)
WORKING day or as a (H) HOLIDAY (6), and confirm with the “S” key.
Proceed as above described with the remaining days. To conclude the
operation and go back to step number (4), press the “S” for at least 2
seconds.
TTIIMMEE PPEERRIIOODD SSEELLEECCTTIIOON
SETTIMANA TIPO
MONDA
PERIODI
TUESDA
TARIFFA DEFAULT
WEDNESDAY (W)
5
THURSDAY (W)
(W)
Y
(W)
Y
N
Go Back
> 2s
TTIIMMEE PPEERRIIOODD SSEELLEECCTTIIOON
SETTIMANA TIPO
LUNEDI (W)
PERIODI
(W) WORKING
TEDI
MAR
TARIFFA DEFAULT
(H) HOLIDAY
MERCOLEDI (W)
6
Confirm
THURSDAY (W)
(W)
N
Go Back
> 2s
Warning: for the management of the tariffs with the “BY CLOCK”
option, when counting the ener
gy with WM5, the AR1039 (RS232 +
RTC) option is to be installed. The tariff management “BY CLOCK” is
however possible also without this module, but in this case the
“CLOCK” function, instead of the “METERS” function is to be select
ed, and then the subfunction “WITHOUT BACKUP”: in this case,
-
remember that if, for any reason, the instrument is switched off, the
current DATE and TIME will not be stored. These data will have to be
set again every time the instrument is switched on.
Page 19

WM5-96 Instruction Manual
Programming WM5 96
17
TTIIMMEE PPEERRIIOODD SSEELLEECCTTIIOON
WEEK TYPE
ERIODS
P
DEFAULT TARIFF
7
N
Go back
PERIODS (7): set the periods to which the tariffs are to be coupled. It’s
ossible to divide each day into up to 24 periods. Up to 100 lines of
p
period selection can be entered. Select PERIODS by means of the
> 2s
“ ” keys and confirm with the “S” key: a table (8) will be displayed which will be empty at the beginning and where the various
programmed periods are to be entered. To set the START TIME of the
eriod (9), press the “S” key; then, by means of the “ ” keys,
p
time day
8
9
-- -- --/-- --/-- --
time day
-- -- --/-- --/-- --
START TIME ?
W H T
W H T
0
123...
0
Go back
Go back
select the time from 00 (00 AM) to 23 (11 PM); press “S” to confirm the
elected time and go to the setting of the “END TIME”: select the
s
desired time by means of the “ ” keys, then press “S”.
> 2s
Afterwards, set the START DATE of the period by means of the “
” keys and confirm with the “S” key, then set the END DATE of the
period by means of the “S” keys and confirm with “S”. Once the time
data have been set, the instrument will display a window (10) from
> 2s
which the period type can be selected, that is either WORKING, HOLIDAY or ALL (the ALL selection will not make any difference between
WORKING day and HOLIDA
Y, that is the default TARIFF will be
applied): select the desired mode by means of the “ ” keys and
END TIME ?
01
123...
confirm with “S”. As last setting, choose the TARIFF (11) to be coupled
to the period, use the “ ” keys to select the desired tariff from 1
to 12 and confirm with the “S” key (up to 12 tariff if the management
S
TART TIME ?
0
123...
0/00
is carried out by means of internal clock, up to 4 tariffs if the management is carried out by means of the digital inputs).
A new line (12) relevant to the period which has just been programmed
END TIME ?
time day
10
-- -- --/-- --/-- --
WORKING
HOLIDAY
ALL
00/00
123...
W H T
Go back
> 2s
will be added to the table: it’ll be possible to add up to 99 further lines.
The following options (13) are also possible:
INSERT: enter a new line (new period); follow the instructions given
from step (9) to step (11).
MODIFY: modify an existing period. Select the period to be modified
by means of the “ ” keys, press the “S” key to display the rele-
Go back
time day
1
1
-- -- --/-- --/-- --
TARIFF ?
time day
00 01 01/01 01/01 01
W H T
1
123...
Go back
W H T
vant window (13), then choose MODIFY by means of the “ ” keys
and confirm the choice with the “S” key. Afterwards follow the setting
procedure as described from step (9) to step (11).
> 2s
DELETE: delete an existing period. Select the period to delete with the
“ ” keys, press the “S” key to display the relevant window (13)
then choose DELETE by means of the “ ” keys and confirm with
the “S” key. Before deleting the period, the instrument displays the fol-
> 2s
lowing message: PAY ATTENTION, CURRENT LINE WILL BE DELETED!!!! WILL YOU CONTINUE? Choose YES to execute the command
12
line : 001
or NO to cancel the deleting.
DELETE ALL: delete all the existing periods. Press the “S” key to dis-
time day
INSERT
00 01 01/01 01/01 01
MODIFY
DELETE
13
DELETE ALL
line : 001
W H T
Go back
play the r
the “ ” and confirm with the “S” key. Before deleting all the periods, the instrument displays the following message: PAY ATTENTION,
> 2s
ALL LINES WILL BE DELETED!!! WILL YOU CONTINUE? Choose YES
to execute the command or NO to cancel the deleting.
elevant window (13), then choose DELETE ALL by means of
Page 20

18
Programming WM5 96
WM5-96 Instruction Manual
TTIIMMEE PPEERRIIOODD SSEELLEECCTTIIOON
EEK TYPE
W
PERIODS
EFAULT TARIFF
D
14
N
Go back
DEFAULT TARIFF (14): it is the tariff (from 1 to 12) which will be cou-
led to the meters if no other programming is made or for the days
p
(periods) set as non-working. Select DEFAULT TARIFF with the “
> 2s
” keys and confirm with the “S” key. Then set by means of the “
” keys the tariff (15) that will be set as DEFAULT TARIFF, and confirm
with “S”.
TTIIMMEE PPEERRIIOODD SSEELLEECCTTIIOON
EEK TYPE
W
PERIODS
T
ARIFF ?
EFAULT TARIFF
D
1
N
Go back
ENERGY RESET (16): reset the ENERGY METERS choosing among:
OTAL, PARTIAL: resets all energy meters, both total and partial.
T
TOTAL +: resets the total meters of imported energy.
> 2s
TOTAL -: resets the total meters of exported energy.
PARTIAL +: resets the partial meters of imported energy.
15
Confirm
123...
PARTIAL -: resets the partial meters of exported energy. To reset the
meters, select ENERGY RESET from the METERS MENU (16) by
means of the “ ” keys and confirm with “S”; then select the type
of RESET to be carried out by means of the “ ” keys and confirm
**********MMEETTEERRSS MMEENNUU*********
ARIFF
T
ENERGY RESET
OTALIZER RESET
T
6
1
********RREESSEETT MMEETTEERRSS*******
TOTAL, PARTIAL
TOTAL +
TOTAL PARTIAL +
17
PARTIAL -
Confirm
*
*
Go back
> 2s
Go back
> 2s
with “S”. Befor
e carrying out the selected reset, the instrument displays
the following message: PAY ATTENTION, THE SELECTED METERS
WILL BE RESET! WILL YOU CONTINUE?: choose YES to proceed with
the reset or NO to cancel it.
TOTALIZER RESET (18): reset the TOTALIZERS choosing among:
**********MMEETTEERRSS MMEENNUU*********
TARIFF
ENERGY RESET
TOTALIZER RESET
*
Measure
> 2s
ALL TOTALIZER (19): reset all the totalizers.
The other strings identify the totalizers set before that you want to
reset individually (GAS, HOT H2O, COLD H2O, REMOTE HEATING).
To reset the totalizers, select TOTALIZER RESET from the METERS
18
MENU (20) by means of the “ ” keys and confirm with “S”; then
select the type of RESET to be carried out by means of the “
”
keys and confirm with “S”. Before carrying out the selected reset, the
******RREESSEETT TTOOTTAALLIIZZEERR*****
ALIZER
ALL TOT
(C1) REMOTE
(C2) REMOTE
19
20
(C3) GAS
******RREESSEETT TTOOTTAALLIIZZEERR*****
PPAAYY AATTTTEENNTTIIOONN,, TTHHE
ALL TOTALIZER
SSEELLEECCTTEEDD TTOOTTAALLIIZZEERRS
(C1) REMOTE
WWIILLLL BBEE RREESSEETT!
(C2) REMOTE
WWIILLLL YYOOUU CCOONNTTIINNUUEE?
(C3) GAS
NNO
O
m
Confir
!
YYEES
Go back
*
Go back
*
E
S
?
S
instrument displays the following message: PAY ATTENTION, THE
SELECTED TOT
choose YES to proceed with the reset or NO to cancel it.
> 2s
> 2s
ALIZERS WILL BE RESET! WILL YOU CONTINUE?:
Page 21

WM5-96 Instruction Manual
rogramming example of the tariff
P
parameters
In the “time periods” table you have
at least 100 selection rows available.
Programming WM5 96
19
Let’s for example take into consideration the following tariff plan
decided by the energy supplier for December.
The working week is from Monday to Friday, while the weekend is
made by Saturday and Sunday. During the working days there are two
different tariffs with the following time periods: TARIFF 4 (T4) from 8
m to 5 pm, and TARIFF 3 from 5 pm to 8 am., while during the week
a
end there is only one time period and therefore a single TARIFF (T2).
The first thing to do is to program the week type (4 - 6), the working
days will be indicated as follows: Monday (W), Tuesday (W),
Wednesday (W), Thursday (W), Friday (W). While the weekend
(Holidays) will be indicated as: Saturday (H), Sunday (H). As a consequence, the time periods relating to the working weeks will be divided
into the following lines (8 - 13):
First line: START TIME = 00, END TIME = 8, START DATE = 01/12,
END DATE = 31/12, then select “WORKING” and TARIFF “3”.
Second line: START TIME = 8, END TIME = 17, START DATE = 01/12,
END DATE = 31/12, then select “WORKING” and TARIFF “4”.
Third line: START TIME = 17, END TIME = 24, START DATE = 01/12, END
DATE = 31/12, then select “WORKING” and TARIFF“3”. Moreover, a 4th
line will be necessary to identify the NON-WORKING days other than the
week end (Saturday and Sunday): for example December 25th and 26th.
Fourth line: START TIME = 00, END TIME = 24, START DATE = 25/12,
END DATE = 26/12, then select “HOLIDAY” and TARIFF “2”.
time day
00 08 01/12 31/12 03
08 17 01/12 31/12 04
17 24 01/12 31/12 03
00 24 25/12 26/12 02
line : 004
ENERGY SUPPLIER SETTING WM5
Month Week Time Type
om
fr
Y
MONDA
DECEMBER
to
FRIDAY
W H T
from 8
to 17
from 17
to 8
Working
The periods are now programmed and the instrument will display the
window on the left.
The periods programmed as above only refer to the month of
December, therefore it’s necessary to set a tariff referring to the
remaining time period, which will be referred to as “T1”. In this case
you can refer to the default tariff (14) set as TARIFF “1”, so that the
instrument will automatically r
gramming is pr
Selected
Tariff
4 00 08 01/12 31/12 W 3
3
Start time End time Start date End date Type Tariff
esent.
8 17 01/12 31/12 W 4
17 24 01/12 31/12 W 3
efer to TARIFF “T1” when no other pro-
Rest of the
year
fr
toSUNDA
All H24 -- 1 Default tarif
H24 Holiday 2 00 24 25/12 26/12 H 2
Y
Y
TURDA
om SA
f 1
Page 22

20
isplay Page
D
D
I
M
1
RREEVV.. 11..44..22..66 ((AAVV55)
Programming WM5 96
**********MMAAIINN MMEENNUU*********
MD/AVG CALCUL.
NSTALLED POWER
ETERS
DISPLAY PAGE
)
*
Measure
> 2s
WM5-96 Instruction Manual
This function allows the user to select the variables to be displayed on
age 00. Choose the DISPLAY PAGE function (1) by means of the “
p
keys and confirm with “S”, then by means of the “ ” keys
”
select the display line where the selected variable (2) is to be displayed
and press “S”. Afterwards select the variable to be displayed by
means of the “ ” keys among those displayed by the instrument
(3) and confirm with “S”.
NOTE: only the page “00” can be free configured.
2dmd
*
*
Go back
> 2s
Go back
> 2s
************MMAAIINN PPAAGGEE***********
W
1dmd
2
************MMAAIINN PPAAGGEE***********
3
Confirm
w3dmd
W1dmd W2dmd
W3dmd
W
Page 23

WM5-96 Instruction Manual
igital Inputs
D
************MMAAIINN MMEENNUU***********
NSTALLED POWER
I
ETERS
M
ISPLAY PAGE
D
1
2
3
DIGITAL INPUTS
RREEVV.. 11..44..22..66 ((AAVV55)
******DDIIGGIITTAALL IINNPPUUTTSS*****
N C1
I
IN C2
N C3
I
E
RREEMMOOTTE
******DDIIGGIITTAALL IINNPPUUTTSS*****
NG. C1
I
REMOTE
ING. C2
SYNC
NG. C3
I
RIFF LSb
TA
O
TARIFF MSb
RREEMMOOTTO
OTALIZER
T
)
*
*
*
Measure
> 2s
Go back
> 2s
Go back
> 2s
Programming WM5 96
his function allows the operating modes selection of the digital
T
nputs. Choose the function DIGITAL INPUTS (1) by means of the “
i
21
” keys and confirm with the “S” key. (2) Select the digital input (ex.:
A1=digital input 1 of slot A) by means of the “ ” keys, the instrument displays the function of the selected input (the inputs are set on
REMOTE as default), press “S” to confirm the selected digital input. (3)
From the list, select the operating mode to be coupled to the selected
digital input by means of the “ ” keys, the functions are:
REMOTE (3): the status of the digital inputs is displayed from the
instrument and retrasmitted (if requested) by the serial communication.
SYNC (SYNCHRONISM) (3): synchronises the calculation of the
“dmd” power by means of an external signal.
TARIFF LSb and MSb (3): This function allows the digital inputs to
control the tariffs in the energy metering. The combination of the input
status manages the tariff change as specified in the table (18-1). If only
the “MSb” (one digital input only) is selected, then the energy metering is possible with a maximum of 2 tariffs: the tariff change will only
be possible between tariff 1 and tariff 3. If only the “LSb” is selected,
then the tariff change occurs only between tariff 1 and tariff 2. The use
of both digital inputs (MSb + LSb) allows the management of tariffs 1,
2, 3 and 4. Press “S” to confirm the selection. Proceed, if necessary,
with the configuration of the other digital inputs.
4
GAS
4a
HOT H2O
COLD H2O
REMOTE HEAT
m3/PULSE
4c
min
max
******TTOOTTAALLIIZZEERR MMEENNUU*****
TYPE
ENG. UNIT
PULSES
4b
m3
Gal
Lit
dm3
Lit
10000s
0.001
1000s
s
dm3
Ft3
kWh
*
Go back
> 2s
MSb LSb
off off
off on
on off
on on
(18-1)
Tariff
1
2
3
4
TOTALIZERS (3): This function allows the digital inputs to totalize the
gas, water (hot or cold) and the remote heating. From the totalizer
menu select: TYPE (4), to choose what the instrument has to totalize
(4a) GAS, HOT H2O (hot water), COLD H2O (cold water) or REMOTE
HEAT: in this case the WM5 counts the hot water by the digital input
ough an exter
thr
nal water counter but on the display the r
elevant value
is reported in “kWh”.
ENG. UNIT (4b), to choose the correct engeegniring unit (4b) to
associate to the totalizer selected befor
e.
PULSES (4c), to set the pulse weigth (4c), that is for each input pulse
the totalizer increases in the chosen value.
Weight of pulse
selected: 10.
Input
pulse
0 10 20 30 ...
Page 24

22
igital outputs
D
************MMAAIINN MMEENNUU***********
ETERS
M
ISPLAY PAGE
D
IGITAL INPUTS
D
1
2
3
DIGITAL OUTPUTS
RREEVV.. 11..44..22..66 ((AAVV55)
******DDIIGGIITTAALL OOUUTTPPUUTTSS*****
AALLAARRMM
D
NND
******DDIIGGIITTAALL OOUUTTPPUUTTSS*****
AALLAARRMM
D
NND
Programming WM5 96
his function allows the selected function to be coupled to the select-
T
ed digital output: pulse, alarm, remote control. Select the DIGITAL
OUTPUT function (1) by means of the “ ” keys and confirm with
“S”. (2) Select the digital output (ex.: D0=digital output 0 of slot D) by
> 2s
means of the “ ” keys, the instrument displays the function of the
elected output (a), press “S” to confirm the selected digital output (3)
s
select the operating mode to be coupled to the selected digital output
y means of the “ ” keys. The functions are the following:
b
PULSE (3): the measured energy is retransmitted by the digital output
by means of pulses. Choose the PULSE function by means of the “
” keys and confirm with “S”. Then select the type of energy to be
retransmitted: select ENERGY TYPE by means of the “ ” keys
> 2s
and confirm with “S”, the instrument displays the list of energies (4a),
(kWh +, kWh-, kvarh +, kvarh-): select the desired energy by means of
the “ ” keys and confirm with the “S” key: for each energy it’s
possible to r
from T1 to T12 (4b), choose the desired energy detail by means of the
“
” keys and confirm with the “S” key. At the end of the procedure, the value of the pulse associated to the energy measured by the
instrument is to be decided, that is the number of pulses generated by
> 2s
the digital output for each measured kWh+ (or kWh- or kvarh+ or
kvarh-). Choose PULSES (4) by means of the “ ” keys and confirm with the “S” key, then (4c) set the desired value of the pulses by
means of the “ ” keys, confirm the value with the “S” key.
UT D0
O
UT D1
O
UT D2
O
a
NG. C1
I
PULSE
ING. C2
LARM
A
ING. C3
EMOTE CONTR.
R
)
*
*
*
Measure
Go back
Go back
WM5-96 Instruction Manual
etransmit the total energy metering (TOT) or the tariffs
4
PULSE /kWh
min
max
4c
********PPUULLSSEE MMEENNUU*******
ENERGY TYPE
PULSES
.0000
1
0.0010
10000
123...
4a
4b
*
kWh +
kWh kvarh +
kvarh -
TOT
L1
L2
L3
Page 25

WM5-96 Instruction Manual
******DDIIGGIITTAALL OOUUTTPPUUTTSS*****
NG. C1
I
ULSE
P
ING. C2
a
5
ALARM
ING. C3
EMOTE CONTR.
R
M
5
6
AALLAARRM
D
NND
******DDIIGGIITTAALL OOUUTTPPUUTTSS*****
UT D0
O
OUT D1
OUT D2
M
AALLAARRM
D
NND
Programming WM5 96
LARM(5): the digital output is enabled only if the expected alarm
A
23
status occurs. Select the ALARM function by means of the “ ”
*
keys and confirm with the “S” keys (5a).Then select “ND” (normally
de-energized relay) or “NE” (normally energized relay) (5b) by means
of the “ ” keys. To program the values of the set-points refer to
he “alarm” menu.
t
REMOTE CONTR. (5): the digital output can be enabled by means of a
ommand sent by means of serial port. Select the REMOTE CONTR. func-
c
tion by means of the “ ” keys, then press the “S” key to confirm.
D
N
b
5
NE
Proceed, if necessary, with the configuration of the other digital outputs (6).
*
The digital outputs highlighted in the
below mentioned table, ar
e subject to
a self test that implies their brief activation when the instrument is switched on.
Their use as pulse outputs is ther
efore not
recommended.
Code Description Slot A Slot B Slot C Slot D
AO1058 1 r
elay output
A0 B0 C0 D0
AO1059 1 open coll. output A0 B0 C0 D0
AO1035 2 relay outputs A0 A1 B0 B1 C0 C1 D0 D1
AO1036 2 open coll. outputs A0 A1 B0 B1 C0 C1 D0 D1
AO1037 4 open coll. outputs A1 A2 A3 A4 B1 B2 B3 B4 C1 C2 C3 C4 D1 D2 D3 D4
(19-1)
Page 26

24
larm
A
**********MMAAIINN MMEENNUU*********
ISPLAY PAGE
D
IGITAL INPUTS
D
DIGITAL OUTPUTS
LARMS
1
2
3
3a
4
4a 4c 4b
5
SET 2 ?
min
max
5a
A
RREEVV.. 11..44..22..66 ((AAVV55)
**********AALLAARRMMSS MMEENNUU*********
ALARM 01 (OFF)
A
A
ALARM 04 (ON)
ALARM 05 (ON)
**********AALLAARRMMSS MMEENNUU*********
AALLAARRMM:: 001
EENNAABBLLEE:: OOFFF
OFF
ON
**********AALLAARRMMSS MMEENNUU*********
AALLAARRMM:: 001
LLAATTCCHH:: OOFFF
OFF
ON
**********AALLAARRMMSS MMEENNUU*********
AALLAARRMM:: 001
DDEELLAAYY OONN 22:: 00..00000
Programming WM5 96
LARM 02 (ON)
LARM 03 (ON)
ENABLE
ARIABLE
V
YPE
T
UP
3b
DO
IN
OUT
LA
DISABLE
SET 1
SET 1 ?
min
max
SET 2
OUT
DELAY ON
0.0000.
-9999G
9999G
DELAY ON ?
min
max
1
TCH
1
F
1
a
F
3c
9.0000.
-9999G
9999G
0
5b
00000s
00000s
255
00s
*
)
*
*
V1
A1
W1
var1
*
*
OUT D0
OUT D3
NONE-FFT
5c
Measure
> 2s
Go back
> 2s
OFF
ON
WM5-96 Instruction Manual
his function allows you to set the alarm parameters. The instrument is
T
able to manage up to 16 alarms (real or virtual). Select the ALARMS function (1) by means of the “ ” keys and confirm with “S”. Then select
the alarm to be programmed (2) by means of the “ ” keys and confirm with the “S” key, then set the following parameters:
ENABLE (3): enable (ON) or disable (OFF) the alarm; the instrument dis-
lay the existing programming (a). Select the ENABLE function (3) by
p
means of the “ ” keys and confirm with the “S” key. Then select ON
(3a) to enable or OFF (3a) to disable the alarm by means of the “ ”
keys, then confirm with the “S” key.
VARIABLE (3): set the variable to be coupled to the alarm. Select the VARI-
ABLE submenu (3) by means of the “ ” keys and confirm with the “S”
key. Then select the variable to be coupled to an alarm (the list of variables
depends on the selected system) (3c) by means of the “ ” keys, then
select with the “S” key
.
TYPE (3): set the operating mode of the alarm. UP: up alarm, the alarm
will be enabled if the measured value exceeds the set-point. DO: down
alarm, the alarm will be enabled if the measured value goes below the set
point. IN: internal window alarm, the alarm will be activated if the value is
brtween the two set points. OUT: the alarm will be activated if the value
is outside the two set points. See details on next page “Logic and alarm
parameters”. Choose the TYPE (3) function by means of the “ ” and
confirm with “S”. Then, select by means of the “ ” keys the desired
alarm mode (3b) and confirm with “S”.
LATCH (4): set the latch function. The alarm will remain ON even if the
cause that has generated it is not present any more. The alarm can be
reset only manually after the user has noticed it. Choose the LATCH function by means of the “ ” keys and confirm with “S”. Then select ON
(4a) by means of the “ ” keys to enable the latch or OFF (4a) to dis-
able it, then confirm with “S”.
DISABLE: set the DISABLE function. When the instrument is switched
on, the first alarm condition will be ignored (useful also in case of DOWN
alarm). Choose the DISABLE function by means of the “ ” keys and
confirm with “S”. Then select ON
to enable it or OFF
(4b)
(4b) to disable
it by means of the “ ” keys and confirm with “S”.
SET 1 (Set point 1) (4): set the first alarm set point of the variable. Choose
SET 1 (4c) by means of the “ ” keys and confirm with “S”. Then set
the value by means of the “ ” keys and confirm with “S”.
SET 2 (5): set the second alarm set point of the variable. Choose SET 2
(5a) by means of the “ ” keys and confirm with “S”. Then set the
value by means of the “
” keys, then confirm with “S”.
OUT (5): select the output to be enabled in case of alarm. The list will dis-
play all the outputs that in the menu “Digital outputs” have been set as
“alarm”. Choose the OUT function by means of the “
” keys and
confirm with “S”. NONE-FFT, virtual alarm with trigger function for signal FFT analysis. The analysis relevant to the 10s that precede the
alarm event will be stored (FIFO) and available for the remote downloading by means of a specific software PowerSoft.Then select by
means of the “ ” keys the desired output (5b) then confirm with “S”.
DELAY ON (5): set a delay on activation of the alarm. Choose the function DELA
Y ON by means of the “ ” keys and confirm with “S”.
Then set the value in seconds (5c) by means of the “ ” keys quindi
confermare con “S”.
Y OFF
DELA
Y OFF function by means of the “ ” keys and confirm with “S”.
DELA
Afterwar
ds set its value in seconds
: set a delay on deactivation of the alarm. Choose the
(6)
by means of the “
(6a)
” keys
then confirm it with “S”.
Page 27

WM5-96 Instruction Manual
8
8
**********AALLAARRMMSS MMEENNUU*********
ELAY ON
D
DELAY OFF
UNCTION
F
6
AALLAARRMM:: 001
DDEELLAAYY OOFFFF:: 00 s
DELAY OFF ?
6a
m
in
max
1
0000s
0
0000s
0
5500s
2
Logic and alarm parameters
Programming WM5 96
25
FUNCTION (6): set its OR or AND logic. Choose FUNCTION by means
f the “ ” keys and confirm with “S”. Afterwards select by the
*
o
“ ” keys the logic function to be coupled to the OR (6b) or AND
(6b) alarm, then confirm with “S”. See details in “Logic and alarm
parameters”. Proceed, if necessary, with the configuration of the other
s
alarms (up to a maximum of 16 alarms).
To exit the menu “digital outputs” keep the “S” key pressed for at least 2
econds.
s
OR
6b
ND
A
Each symbol includes all
the settings described in
the “alarm” paragraph and
listed on the right:
ET 1
S
SET 2
UP alarm
SET 1
SET 2
Example of AND/OR logic alarm:
AND OR
A: AND
B: AND
C: AND
- Enable.
- Variable
- Type
- Latch
- Disable
DOWN alarm
- Set 1
- Set 2
- OUT
- Delay on. Delay off.
- Function (and/or)
SET 1
SET 2
In-window alarm
Alarm is on when the value
SET 1 and SET 2
A: OR
B: OR
C: OR
is between
A, B, C... up to 16 locks to
control parameters.
SET 1
SET 2
function enabling
m
Alar
Ext. window alarm with
disabling at power on
Alarm is on when value
exceeds SET 1
or goes below SET 2
A: OR
B: OR
C: AND
D: AND
OR+AND
A: AND
A: AND
B: AND
B: AND
C: AND
C: AND
A: OR
B: OR
C: OR
A: OR
B: OR
C: OR
A: OR
B: OR
C: AND
A: OR
B: OR
C: AND
D: AND
D: AND
Page 28

26
xample of alarm parameters
E
Programming WM5 96
programming
WM5-96 Instruction Manual
The enabling of an alarm is required when the system voltage VL1-N
exceeds or is below the range 215V - 235VAC. The external window
alarm is selected so that the output is enabled when the measured
value exceeds 235V or is below 215V.
235V
15V
2
nabling
E
300kW
295kW
e suggest you to use a delay of a
W
few seconds when disabling the
alarms in or
der to avoid the conse
quence of a switching on and off of the output
and the subsequent damaging of the contacts
due to fluctuations of the measur
ed signal
with a value close to the selected alarm setpoints.
Here below you will find the recommended programming:
Enabling of one of the 16 alarms (alarm example 01 ON)
-
- Choose the variable to be monitored: VL1-N= V1
- Choose the type of desired alarm: OUT
- Choose if the latch is to be enabled or not: OFF
- Choose if enabling or not the disabling of the first alarm status from
the switching on of the instrument: ON.
- Set set-point 1: Set 1 = 235V
- Set set-point 2: Set 2 = 215V
Choose to which digital output the alarm you are programming is to
be addressed (the “C0” digital output is to be previously enabled to
the “alarm” function; in the same menu it’s possible to select the
desired type of output: “ND or NE”).
- Should a DELAY ON (delay on activation) be required, set the
desired number of seconds: “5 seconds”.
- Should a DELAY OFF (delay on deactivation) be required, set the
desired number of seconds: “5 seconds”
- Choose the kind of logic with which the alarm is to be treated: “OR”
(see examples of logic alarm: AND/OR).
The disconnection of a load when a set value of absorbed power is
required. For example when 300kW are exceeded, the alarm occurs
and a set load is disconnected. An UP alarm is selected. Below you’ll
find the recommended programming:
- Enabling of one of the 16 alarms (example: alarm 02 ON).
- Choose the variable to be monitored: W system (W∑)
ed alarm: “UP”
Choose the type of r
-
equir
- Choose if the latch is to be enabled or not:“OFF”
- Choose if the disabling of the first alarm status from the switching of
the instrument is to be enabled or not: “OFF”
- Set set-point 1: Set 1 = 300kW
- Set set-point 2: Set 2 = 295kW
- Choose to which digital output the alarm you are programming is to
be addr
essed: “D0” (the “D0” digital output is to be previously
enabled to the “alarm” function; in the same menu it’s possible to
select the desired type of output: “ND or NE”).
Should a DELAY ON (delay on activation) be required, set the
desired number of seconds: “5 seconds”.
- Should a DELAY OFF (delay on deactivation) be required, set the
desired number of seconds: “5 seconds”
- Choose the kind of logic with which the alarm is to be treated: “OR”
(see examples of logic alarm: AND/OR).
Page 29

WM5-96 Instruction Manual
Alarm 01
Programming WM5 96
The instrument is able to manage 2 types of alarms:
1. Real alarm = when the alarm is connected to a digital output
(relay output or open collector output). The activation of a real
alarm causes the switching at fixed light of the “AL” LED on the
ront of the instrument.
f
2. Virtual alarm = when the alarm is not connected to any output. The
ctivation of a virtual alarm causes the switching at blinking light of the
a
“AL” LED. In case a virtual alarm and a real alarm occur at the same
time, the latter has the prevalence over the control of the above mentioned LED (therefore it will be ON with a fixed light). By exploiting the
OR and AND functions, it’s possible to connect together more than
one virtual alarm and direct them together to one digital output (relay
output or open collector output). In any case the limit of 16 programmable alarms will still be valid.
27
Alarm 02
The above drawing explains the operation of the alarms
described in the example. Having the “OR function been chosen for both the alarms, the operation of the digital output can
be r
epresented by two contacts in parallel. The enabling of
only one of the two alarms will enable also the digital output.
Page 30

28
Events selection
************MMAAIINN MMEENNUU***********
IGITAL INPUTS
D
IGITAL OUTPUTS
D
ALARMS
VENTS SELEC.
1
2
2a
2b
2c
E
RREEVV.. 11..44..22..66 ((AAVV55)
EEVVEENNTTSS SSEELLEECCTTIIOONN MMEENNU
ALARMS
IN
M
AX
M
DMD MAX
DIG. INPUTS
********AALLAARRMM EEVVEENNTTSS*******
ALARM 01 (OFF)
LARM 02 (ON)
A
ALARM 03 (ON)
ALARM 04 (ON)
ALARM 05 (ON)
V1 (OFF)
v2 (ON)
V3 (ON)
VL (ON)
V12 (ON)
REMOTE (OFF)
SYNC (ON)
ARIFF (ON)
T
Programming WM5 96
his sub-menu allows the user to select which events are to be
T
stamped. Choose the function EVENTS SELEC. (1) by means of the
)
*
U
*
Measure
Measure
Go back
Go back
Go back
“ ” keys and confirm with “S”. Afterwards proceed as follows:
ALARMS (2): select if the alarm events are to be stamped. Choose
alarms by means of the “ ” keys and confirm with “S”, then ,
> 2s
larm by alarm by means of the “ ” keys, decide whether the
a
stamping is to be enabled “ON” or disabled “OFF”, by pressing the
S” key.
“
MIN, MAX, DMD MAX (2): select whether to store the minimum, maximum and dmd values for each variable measured by the instrument.
Select the minimum, maximum or dmd maximum by means of the “
” keys and confirm with “S”, then select, variable by variable if the
> 2s
storing is to be carried out (2b), choose by means of the “ ” keys
the desired variable and decide whether to enable the storing “ON” or
disable the storing “OFF” by pressing the “S” key.
DIG. INPUTS (2)
: select whether to store the status variables of the
digital inputs. Choose DIG. INPUTS by means of the “ ” keys and
confirm with “S”, then select one by one the digital inputs of which the
storing is required (2c), choose by means of the “ ” keys the type
of digital inputs (remote, synchronism, tariff), then confirm whether to
> 2s
enable the storing “ON” or disable it “OFF” by pressing the “S” key.
DIG. OUTPUTS (3): select whether to store the status variations of the
digital outputs or not. Select the digital outputs by means of the “ ”
keys and confirm with “S”, then confirm whether to enable the storing
“ON” or disable it “OFF” by pressing the “S” key.
RESET (3): select whether the resets which have been carried out are
to be stored or not. Choose RESET by means of the “ ” keys,
then select which resets are to be stored (3b), by means of the “ ”
> 2s
keys and select whether to enable the storing “ON” or disable it “OFF”
by pressing the “S” key.
> 2s
WM5-96 Instruction Manual
EEVVEENNTTSS SSEELLEECCTTIIOONN MMEENNU
MAX
DMD MAX
DIG. INPUTS
DIG. OUTPUTS
3
3a
3b
RESET
REMOTE
TOT. PAR. (OFF)
TOTAL + (ON)
TOTAL - (ON)
PARTIAL + (ON)
PARTIAL - (ON)
PARTIAL + (OFF)
PARTIAL - (ON)
MIN - MAX
DMD MAX
LATCH (ON)
TOT
(OFF)
ALIZERS
(ON)
(ON)
(ON)
U
Go back
> 2s
Go back
> 2s
Go back
> 2s
Page 31

WM5-96 Instruction Manual
Analog outputs
************MMAAIINN MMEENNUU***********
IGITAL OUTPUTS
D
ALARMS
EVENTS SELEC.
NALOG OUTPUTS
1
2
3
V1
A1
W1
var1
A
RREEVV.. 11..44..22..66 ((AAVV55)
****AANNAALLOOGG OOUUTTPPUUTT MMEENNUU*
OUT A0
UT A1
O
UT B
O
OUT B1
OUT C0
****AANNAALLOOGG OOUUTTPPUUTT MMEENNUU*
V
MIN OUT
MAX OUT
OOUUTT AA0
VVAARRIIAABBLLEE:: VV1
3a
MAX OUT ?
min
max
0
ARIABLE
0
3c
1
M
IN OUT ?
m
in
max
0.0000.
-9999G
9999G
Programming WM5 96
29
This submenu allows the programming of the analog outputs (0-20mA,
-10V, -5/+5mA). Select the function ANALOG OUTPUTS (1) by means
0
f the “ ” and confirm with “S”. Then select the output to be pro-
o
*
Measure
grammed by means of the “ ” keys (2) and confirm with “S”;
> 2s
afterwards set the following parameters:
VARIABLE (3): select the variable to be retransmitted by means of the
)
analog output. Choose the function “VARIABLE” (3) by means of the
“ ” keys and confirm pressing the “S” key. Then select by the “
” keys the variable to be retransmitted (the list of the variables
*
depends on the selected system) (3a) then confirm with “S”.
MIN OUT (3): set the value expressed as % of the output range (020mA, 0-10V, -5/+5mA) to be coupled to the minimum measured
value. The instrument displays also the maximum and minimum value
which can be set (min, max). Select the function “MIN OUT” by means
of the “ ” keys and confirm with “S”. Then set the value (3b) by
means of the “ ” keys and confirm with “S”.
MAX OUT (3): select
the value expressed as % of the output range (0-20mA, 0-10V, -
*
5/+5mA) to be coupled to the maximum measured value. The also
instrument displays the maximum and minimum value which can be
set (min, max). Select the MAX OUT function by means of the “ ”
keys and confirm with “S”. Afterwards set the value (3c) by means of the
a
“ ” keys and confirm with “S”.
MIN IN (4): minimum value of the variable input range to which the
“MIN OUT” value, retransmitted by the analog output, will be coupled.
The instrument also displays the maximum and minimum value which
3b
0.0000.
-9999G
9999G
can be set (min, max) . Choose the function “MIN IN” by means of the
“ ” keys and confirm with “S”. Then set the value (4a) by means
of the “ ” keys, then confirm with “S”.
MAX IN (4): maximum value of the variable input range to which the
“MAX OUT” value, retransmitted by the analog output, will be coupled.
The instrument also displays the maximum and minimum value which
can be set (min, max). Choose the MIN IN function by means of the
“
” and confirm with “S”. Then set the value (4b) by means of the
“ ” keys and confirm with “S”.
4
MAX IN ?
min
max
****AANNAALLOOGG OOUUTTPPUUTT MMEENNUU*
MAX OUT
MIN IN
MAX IN
0
OOUUTT AA0
MMAAXX IINN:: 00..00000
4b
0.0000.
-9999G
9999G
0
4a
MIN IN ?
min
max
a
*
0.0000.
-9999G
9999G
The instrument can manage the following analog outputs combinations:
Max n. 8 0-10VDC outputs; Max n.8
5/+5mADC outputs. Any combination of the
two above mentioned types considering that
each module manages up to 2 outputs. Max
n.4 0/20mADC outputs. Max n.4 0/20mADC
outputs + max n.4 0-10VDC outputs.
Proceed, if possible, with the configuration of the other analog outputs
(up to a maximum of 8 outputs). To exit the menu “analog outputs”,
keep the “S” key pressed for at least 2 seconds.
Page 32

30
Programming examples of the analog
outputs
Programming WM5 96
WM5-96 Instruction Manual
ower retransmission by means of a 0-20mA analog output.
P
It’s necessary to measure a consumed power up to 100kW and
retransmit this value by means of a signal from 4 to 20 mA: the module to be used is AO2050 (2x from 0 to 20mA), the instrument is to be
programmed as follows:
VARIABLE: W∑ (system active power).
MIN OUT: 20.0% means 4 mA the calculation to be carried out is the fol-
lowing: (100*minimum output) / fullscale output =100*4mA/ 20mA=20%.
MAX OUT: 100.0% means 20mA, the calculation to be carried out is:
(100*maximum output) / fullscale output = 100*20mA/20mA= 100.
MIN IN: 0,0k; the multiple k,M,G can be selected on the instrument
according to the chosen VT and CT values.
MAX IN: 100.0k; the k, M, G multiples can be selected on the instrument according to the selected VT and CT values.
Transmission of active consumed and generated power by means
of -5/+5mA analog output.
It’s necessary to measure both the consumed active power up to
100kW and the generated active power up to -100kW and retransmit
this value by means of a signal from -5 to +5mA: the module to be
used is AO2052 (2x from -5/+5mA), the instrument is to be programmed as follows:
VARIABLE: W∑ (system active power).
MIN OUT: -100% means -5mA, the calculation to be carried out is:
(100*minimum output)/ fullscale output= 100*5mA/-5mA=-100%.
MAX OUT: 100,0% means 20mA, the calculation to be carried out is:
(100*max output)/ fullscale output= 100*5mA/5mA= +100%.
MIN IN: -100,0k; the multiples k,M and G can be selected on the
instrument on the basis of the VT and CT values.
MAX IN: 100,0k; the multiples K, M and G can be selected on the
instrument depending on the VT and CT values being selected.
Retransmission of the POWER FACTOR (PF) by means of the
0-20mA analog output.
It’s necessary to retransmit the whole range of the admitted values for
the PF with a signal from 0 to 20mA. Particular attention must be paid
to the value of the PF variable which may vary from C0,001 and L0,000
(for each phase): these values will be retransmitted and will then correspond to 0 and 20 mA. When the PF will have a value equal to 1,
being in the middle between C0,001 and L0,000, the value of the output will correspond to the middle of the scale, that is 10mA. As a consequence, the instrument will have to be programmed as follows:
VARIABLE: PF L1 (or L2 or L3 or PF∑).
MIN OUT:0,0%.
MAX OUT: 100,0%.
MIN IN: C0,001 (the C symbol shows a CAP
MAX IN: L0,001 (the L symbol shows an INDUCTIVE value). L0,001
has been chosen as minimum value to be set in order to avoid any
undesirable swifting of the r
epeated outputs.
ACITIVE value).
Page 33

WM5-96 Instruction Manual
erial outputs
S
************MMAAIINN MMEENNUU***********
LARMS
A
EVENTS SELEC.
NALOG OUTPUTS
A
ERIAL OUTPUT
1
2
S
RREEVV.. 11..44..22..66 ((AAVV55)
************MMAAIINN MMEENNUU***********
S232
R
RS485
PTICAL
O
MMOODDBBUUSS:: 99660000,,88,,NN,,1
PARITY
2a
O PARITY
N
2b
ODD PA
EVEN PA
RITY
RITY
*
Measure
Programming WM5 96
his function allows the user to set the RS232 and RS485 serial ports
T
as well as the optical port. Choose the SERIAL OUTPUT function (1)
31
by means of the “ ” keys and confirm with “S”. Then choose the
serial port to be set and the instrument will synthetically display the
> 2s
previously set parameters (a).
S232(2): set the parameters of the RS232 serial port (AR1039 mod-
)
R
ule), if present, then select RS232 by means of the “ ” keys and
onfirm with “S”, select the type of parity to be used (2a, 2b) with the
c
“ ” keys and confirm the selection with the “S” key.
RS485 (2): set the communication parameters of the RS485 serial port
*
Go back
(AR1034 module, max 9600 bps, AR2040 max, 115,2kbps), if present;
> 2s
select it by means of the “ ” keys and confirm with the “S” key.
1
a
Then select the following:
ADDRESS (3): select the serial address to be given to the instrument
(from 1 to 247). Enter the desired address (3a) by means of the “ ”
keys and confirm with the “S” key
.
BAUD RATE (3): select the baud rate of the serial port. Select the
desired baud rate value (3b) by means of the “ ” keys and confirm with the “S” key.
PARITY (3): select the type of parity of the serial port (3c) by means of
the “ ” keys and confirm with the “S” key.
OPTICAL (2): set the parameters of the front optical port (see next
paragraph “Optical port”).
3
ADDRESS ?
min
max
3a
ADDRESS
BAUD RATE
PARITY
1.0000.
00000
1
247000
123...
NO PARITY
3c
ODD PARITY
EVEN PARITY
3b
To exit the various menus and submenus, keep the “S” key pressed
for at least 2 seconds.
9600
19200
38400
115200
Page 34

32
ARMPowered
PRG
measures
S
S
R
!
R
A
L
WM5-96
SmartPowerQuality Analyzer
Class0.2 A/V
ptical port
O
Programming WM5 96
WM5-96 Instruction Manual
he serial optical port (d) transmits the data by means of an infrared
T
device (e-b). The connection (c) to the PC through the relevant magnetic connector (a) is made by means of a USB port (f) or 232 serial
port (depending on the model being used): the user will then be able
a
b
c
d
e
to read, transmit or receive information on the WM5 programming (the
M5Soft software can be purchased on request).
W
The optical port makes it also possible to retransmit the energy meter-
ng by means of pulses . In this case the light generated by the opti-
i
cal port is not visible because it’s within the infrared spectrum. Set the
desired type of use of the optical port (energy transmission by means
of pulses or MODBUS or ANSI serial communication) before using it.
Follow steps
f
(2) by means of the “ ” keys and confirm with “S”. Afterwards,
select the type of protocol/communication mode (4) to be used:
(1) and (2) on the previous page, then select “OPTICAL”
ANSI (4): standard ANSI serial communication protocol. Choose the
ANSI function by means of the “ ” keys and confirm with “S”.
MODBUS (4): MODBUS serial communication protocol. Choose the
MODBUS function by means of the “ ” keys and confirm with
“S”. Then set the relevant parameters such as baud rate and parity,
see steps (3b) and (3c) on the previous page.
PULSE (4): the port will be enabled for the energy retransmission.
Select the PULSE function by means of the “ ” keys and confirm
with “S”. Then select the energy type to be retransmitted (5), select
ENERGY TYPE by means of the “ ” keys and confirm with “S”.
********SSEERRIIAALL MMEENNUU*******
RS232
ANSI
RS485
MODBUS
OTTICA
PULSE
I
4
AANNSSI
*
The instrument will display the list of available energies (5a) (kWh+,
kWh-, kvarh+, kvarh-) (5a); select the desired energy by means of the
“ ” keys and confirm with the “S” key: for each energy it’s possible to choose if r
etransmitting the total ener
gy metering (TOT) or by
tariff from T1 to T12 (5b), choose the desired energy detail by means
of the “ ” keys and confirm with “S”. Finally, set the value of the
pulse related to the measured energy, that is the number of pulses
generated for each measured kWh+ (or kWh- or kvarh+ or kvarh-).
****OOPPTTIICCAALL OOUUTT MMEENNUU***
ENERGY TYPE
PULSES
*
Choose PULSE (5) by means of the “ ” keys and confirm with
“S”, then (5c) set the desired pulse value and confirm it by means of
the “S” key
.
5
PULSE/kWh
min
max
5c
123...
1.0000
0.001
10000
0
Note: set the optical port in the MODBUS mode before using it related to the serial communication softwar
kWh +
kWh kvarh +
5a
kvarh -
TOT
L1
L2
5b
L3
e “Wm5Soft”.
Page 35

WM5-96 Instruction Manual
Ethernet Port
**********MMAAIINN MMEENNUU*********
VENTS SELEC.
E
ANALOG OUTPUTS
ERIAL OUTPUT
S
THERNET PORT
1
2
E
RREEVV.. 11..44..22..66 ((AAVV55)
********EETTHHEERRNNEETT MMEENNUU*******
P ADDRESS
I
ATEWAY
G
MODBUS TCP/IP
I
P
92. 168. 2. 122
2a
1
MASK
255. 255. 255. 0
123...
)
*
*
Measure
> 2s
Go back
> 2s
Go back
> 2s
Programming WM5 96
his function allows the user to set the Ethernet port. Choose the
T
33
ETHERNET PORT function (1) by means of the “ ” keys and confirm with “S”.
IP ADDRESS (2): set the IP parameters. Select IP ADDRESS by
means of the “ ” keys and confirm with “S”. Then select IP (IP
ddress) or MASK (netmask) by means of the “ ” keys and con-
a
firm with “S”. Set the value (2a) by means of the “ ” keys, where
he “ ” key increases the value and the “ ” key switches to the fol-
t
lowing number. Confirm with “S”.
GATEWAY (2): set the IP gateway parameters. Select GATEWAY by
means of the “ ” keys and confirm with “S”. Set the value (2b) by
means of the “ ” keys, where the “ ” key increases the value
and the “ ” key switches to the following number. Confirm with “S”.
MODBUS TCP/IP (2): to modify the default port of the Ethernet port
(502), select MODBUS TCP/IP by means of the “ ” keys and confirm with “S”. Set the value
(2b), from 1 to 65535, by means of the
“ ” keys and confirm with “S”.
To exit the various menus and submenus, keep the “S” key pressed
for at least 2 seconds.
PORT ?
m
c
2
m
GW IP
2b
000. 000. 0. 000
Digital filter
**********MMAAIINN MMEENNUU*********
EVENT SELEC.
ANALOG OUTPUTS
SERIAL OUTPUT
1
2
FIL
RREEVV.. 11..44..22..66 ((AAVV55)
**********MMAAIINN MMEENNUU*********
RANGE
COEFFICIENT
in
ax
TER
123...
123...
0.
5020
100000
655350
Go back
> 2s
*
)
*
Measure
> 2s
Go back
> 2s
Thanks to the digital filter, it’s possible to stabilize the measurements
which ar
e too instable when displaying the r
elevant values.
By means of the “ ” keys, select FILTER and confirm with “S”. Select
the function to be set from the various submenus with the “ ” keys
and confirm with “S”:
RANGE (3): set the operating range of the digital filter. The value is
expressed as a %. By means of the “ ” keys select RANGE and
confirm with “S”, then set the value as a percentage by means of the
“
” keys and confirm the value with the “S” key.
COEFFICIENT (4): set the filtering coefficient of the instantaneous
measures. By increasing the value, also the stability and the settling
time of the measur
es are increased. Select COEFFICIENT by means of
the “ ” keys and confirm with the “S” key, then set the value by
means of the “ ” keys and confirm the new value with the “S” key.
RANGE
3
Confirm
4
Confir
min
max
COEFFICIENT
min
max
m
1,000%
0.100%
100.0%
123...
4,000%
1.100%
255.0%
123...
Page 36

34
igital filter programming
D
Examples
Programming WM5 96
WM5-96 Instruction Manual
Example 1
How to stabilize the value of the VL-N variable displayed on the
isplay, fluctuating from 222V and 228V.
d
The parameters of the digital filter have to be programmed as follows:
ANGE:the variable has fluctuations within the mean value whose
R
amplitude is equal to ±0,75% of the full scale rated value of the variable itself (obtained by the following calculation: (228-222)/ 2= ±3V,
then ±3*100/400V= ±0,75% where 400V is the phase-neutral rated
value of an AV5 input). The “range” parameter, representing the action
range of the digital filter, is to be programmed to a value which must
be slightly higher than the percentage amplitude of the fluctuation: ex.
1.0%.
COEFFICIENT:if the new value measur
the action range of the filter, the new displayed value is obtained by
adding algebrically the previous value to the variation divided by the
filtering coefficient. As a consequence, a value higher than this coefficient implies a longer settling time and therefore a better stability. You
generally obtain the best result by setting the filtering coefficient to a
value equal to at least 10 times the range parameter value.
In the following example: 1,0*10=10, the stability of the filtering coefficient can be improved by increasing the filtering coefficient, the
admitted values are included within 1 and 255.
ed by the instrument is within
Example 2
How to stabilize the value of the displayed System Active Power
), fluctuating between 300kW and 320kW (the load is connect-
(W∑
ed to the instrument by means of a 300/5A CT and a direct measure of the voltage).
The parameters of the digital filter must be programmed as follows:
RANGE: the variable has fluctuations within the mean value whose
2,78% of the full scale rated value of this vari
amplitude is equal to
able. This value is obtained by the following calculation: (320-300)/ 2=
±10kW, then ±10*100/360kW= ±2,78%, where 360kW is the rated
value of the System Active Power of an AV5 input, at the above mentioned CT and VT ratios and obtained by means of the following formula: (320-300)/ 2= ±10kW, then ±10*100/360kW= ±2,78%, where
360kW is the rated value of the System Active Power of an AV5 input
at the above mentioned CT and VT ratios and obtained by means of
the following formula: “VLN * VT * IN * CT * 3” where VLN = rated input
voltage (400V for the AV5 input), VT= primary/secondary ratio of the
voltage transformer being used, IN = rated curr
input), CT = primary/secondary ratio of the voltage transformer being
used (in this example “400*1*5*60*3=360kW).
The RANGE parameter, representing the digital filtering coefficient
action range, is to be programmed to a value which must be slightly
higher than the percentage of the fluctuation: ex. 3.0%.
COEFFICIENT: if the new value acquired by the instrument is within the filtering action range, the new displayed value is obtained by adding algebrically
the previous value to the variation divided by the filtering coefficient. As a consequence, a value higher than this coefficient implies an higher settling time
e a better stability
and ther
setting the filtering coef
the range parameters. In the example: 3.0*10=30. In or
bility you can incr
ed within 1 and 255.
efor
±
ent (5A for the AV5 type
Generally speaking the best r
.
ficient to a value equal to at least 10 times the value of
ease the filtering coef
ficient, the admitted values ar
esult is obtained
der to impr
ove the sta
e includ
-
-
-
Page 37

WM5-96 Instruction Manual
Programming WM5 96
Example 3.
It’s necessary to stabilize the value of the displayed variable AL 1
phase current 1), fluctuating within 470V and 486V.
(
To be able to manage the alarm function and following activation and
eactivation of the relay, this value is not to be subject to continuous
d
fluctuations. In this example we have considered using a 500/5A CT.
The paramters of the digital filter is to be programmed as follows:
RANGE: the variable has fluctuations within the mean value whose
amplitude is equal to ±1,60% of the full scale rated value of this variable (obtained by means of the calculation: (486-470)/ 2= ±8A, then
±8*100/500V= ±1,60% where 500A is the value referred to the primary
of the transformer being used). The “range” parameter, which represents the action range of the digital filter
value slightly higher than the pourcentage amplitude of the fluctuation:
for example 2.0%.
COEFFICIENT: if the new value acquired by the instrument is within
the filtering action range, the new displayed value is calculated algebrically adding to the previous value the variation divided by the filtering coefficient. As a consequence, a higher value of this coefficient
implies a higher settling time and therefore a better stability. Generally
speaking, the best result is obtained setting the filtering coefficient at
a value equal to at least 10 times the value of the range parameter. In
the example: 2.0*10=20. To improve the stability you can increase the
filtering coefficient, the admitted values are within 1 and 255.
, is to be programmed to a
35
Page 38

lock
C
1
2
3
DATE
3d
36
Programming WM5 96
************MMAAIINN MMEENNUU***********
ANALOG OUTPUTS
ERIAL OUTPUT
S
ILTER
F
LOCK
C
3a
)
EUROPE
USA
RREEVV.. 11..44..22..66 ((AAVV55)
**********CCLLOOCCKK MMEENNUU*********
ONE
N
WITHOUT BACKUP
ITH BACKUP
W
********CCLLOOCCKK AADDJJUUSSTT*******
URO/USA
E
TIME ZONE
DATE
TIME
2200//0066//0066 0088::2288::2266 AAM
12/31/06
123...
AFRICA
AMERICA
3b
ANTARCTICA
ARCTIC
ADAK
ANCHORAGE
3c
ANGUILLA
ANTIGUA
*
*
*
M
Measure
> 2s
Go back
> 2s
WM5-96 Instruction Manual
In the clock menu the clock functions can be set. Choose the CLOCK (1) func-
ion by means of the “ ” keys and confirm with “S”. The instrument dis-
t
plays three functioning modes.
NONE (2): WM5 is not supplied with a clock, therefore it will not be possible
to manage the tariffs by means of TIME/CALENDAR (all functions which are
linked to the presence of the clock will be deactivated). Choose the function
NONE by means of the “ “ keys and press the “S” key to confirm.
ITHOUT BACKUP(2): WM5 will be able to manage date and time but, in
W
case of power supply failure, it will not store neither time nor date. When the
nstrument will be switched on again, the correct date and time will have to be
i
set again. Select the WITHOUT BACKUP function by means of the “ ”
eys and confirm with “S”.
k
WITH BACKUP (2): WM5 is supplied with a clock and the correct date and
time will be stored also in case of power failure. Select the function “WITH
BACKUP” by means of the “ ” keys and confirm with “S”. The function
“WITH BACKUP” can be selected only if the AR1039 module is used. Then
all the information necessary to the clock are to be set.
EURO/USA (3)
: set the time format as 24h european (00:00) or 12h american
(12:00 AM). Select the EURO/USA function by means of the “ ” keys and
confirm with “S”. Select EUROPE (3a), to set the time format as 24h, or choose
USA (3a), to set the time format as 12h.
TIME ZONE (3): set the time zone related to the place where WM5 is installed,
choose the correct time zone (3b) by means of the “ ” zone and confirm
with “S”. Then select by means of the “ ” keys the correct country (3c)
and confirm with “S”.
DATE (3): set the current date, choose the DATE function by means of the “
” keys and confirm with “S”. Then select the date by means of the “ ” keys ,
set the date (3d) and confirm with “S”.
TIME (4): set the current time, select the TIME function by means of the “ ”
keys and confirm with “S”. Then set the time (4a) by means of the “ ” keys
and confirm with the “S” key.
SYNC (4): enables or disables the synchronism of the clock with the digital
inputs enabled as SYNC, the clock at each synchronization pulse will set to
the multiple of the integration time nearer to the current time. Choose the
SYNC function by means of the “ “ keys and confirm with “S”. Then, by
means of the “ ” keys, choose OFF (4b) to disable the synchronism or
(4b) to enable it and confirm with “S”.
ON
******CCLLOOCCKK AADDJJUUSSTT*****
TIME ZONE
TE
DA
TIME
SYNC
4
4a
2200//0066//0066 0088::2288::2266 AAM
TIME
10:04 PM
123...
*
M
OFF
4b
ON
The backup of the time is only possible
with the AR1039 module being installed.
Page 39

WM5-96 Instruction Manual
anguage
L
**********MMAAIINN MMEENNUU*********
SERIAL OUTPUT
ILTER
F
CLOCK
ANGUAGE
1
L
RREEVV.. 11..44..22..66 ((AAVV55)
)
*
Measure
> 2s
Programming WM5 96
37
This function allows to set the language to be displayed by WM5. Choose the
ANGUAGE function (1) by means of the “ ” keys and confirm with “S”.
L
Then select the desired language by means of the “ ” keys and confirm
ith “S”.
w
**********MMAAIINN MMEENNUU*********
USCITA SERIALE
NGLISH
E
ILTRO
F
ITALIANO
LOCK
C
EUTSCH
D
LANGUAGE
RANCAIS
2
Confirm
F
RREEVV.. 11..44..22..66 ((AAVV55)
Serial number and
Meter Info.
**********MMAAIINN MMEENNUU*********
LOCK
C
ANGUAGE
L
SERIAL NUMBER
1
2
METER INFO.
RREEVV.. 11..44..22..66 ((AAVV55)
527 70000 T 0017
EN
CAN
ANSI
)
)
*
*
Go back
2s
>
Measure
> 2s
Selecting the SERIAL NUMBER function, the instrument displays the serial number of the instrument. Select the function SERIAL NUMBER (1) by
means of the “ ” keys and confirm with “S”.
Selecting the METER INFORMATION function, the instrument displays
the information relevant to the reference standard used by the instrument. Select the function METER INFORMATION (1) by means of the
“ ” keys and confirm with “S”. Choose the desired standard by
means of the “ ” keys and confirm with “S”.
Note: the selected standard is displayed in the Info pages too.
Keypad lock, lock of access to programming and reset menu
a
By turning the screwdriver anticlockwise to the end-of-stroke of the
relevant trimmer, as shown in the figure on the left (a), it’s possible to
lock the access to the programming of the instrument both from keypad and from serial communication. Moreover, after locking the keypad it will not be possible to carry out the reset commands any more.
However, it will be still possible to scroll all the display pages and the
relevant details.
Page 40

38
Description Ch Part No. Legend
Model
Layout and list of modules
WM5-96 Instruction Manual
WM5 96 AV53 H XX XX XX XX XX
WM5-96 with optical port
AD2001
ANSI C12.18 type
1
3
3
4
2
1
1
2
2
2
3
3
4
2
1
1
2
2
2
1
1
AD2000
AQ2030
AQ2031
AP1021
AP1020
AR1061
AQ1038
AQ1042
AO1037
AO1036
AO1059
AO1058
AO2050
AO2051
AO2052
AQ1038
AQ1042
AO1037
AO1036
AO1059
AO1058
AO2050
AO2051
AO2052
AR1034
AR2040
WM5-96 without optical port
(Range code + system) measuring inputs
400/690VL-L 1/5A (10A)
120/208VL-L 1/5A (10A)
Power supply
18-60VAC/DC Power supply
90-260V
None
Ethernet/Internet port
Digital inputs
Digital inputs + aux
Open collector output
Open collector output
Open collector output
Relay output
Analogue output 20mADC
Analogue output 10VDC
Analogue output +/-5mA
None
Digital inputs
Digital inputs + aux
Open collector output
Open collector output
Open collector output
Relay output
Analogue output 20mADC
Analogue output 10VDC
Analogue output +/-5mA
RS485 9600bps
RS485 115200bps
AC/DC Power supply
SLOT
A
B
SLOT
WM5 96
WM5 96
AV5.3
AV6.3
H
XX
E2
D1
D2
O4
O2
O1
R1
B1
W1
B2
XX
D1
D2
O4
O2
O1
R1
B1
W1
B2
S1
S2
L
Examples of which modules to order for:
WM5-96 AV53 H B1 S1 R2 O2 SX
Material Code
WM5 96
AV53 measuring inputs (400/690VL-L)
90-260VAC/DC power supply
20mA analogue output (2 channels)
RS485 serial port at 9600 bps
Relay output (2 channels)
Open collector output (2 channels)
RS232 serial port +RTC
AD2001
AQ2030
AP1020
AO2050
AR1034
AO1035
AO1036
AR1039
None
Digital inputs
Digital inputs + aux
Open collector output
Open collector output
Open collector output
Relay output
Relay output
Analogue output 10VDC
Analogue output +/-5mA
None
Digital inputs
Digital inputs + aux
Open collector output
Open collector output
Open collector output
Relay output
Relay output
Analogue output 10VDC
Analogue output +/-5mA
Utility grade with optical port
RS232 + RTC (utility grade)
Revenue approval. An “instrument setting” form must be pr
erly filled in by the user
RS232+RTC + “XU” option
RS232 + R
out optical port.
TC (utility grade) with-
.
op-
3
3
4
2
1
1
2
2
2
3
3
4
2
1
1
2
2
2
1
1
1
AQ1038
AQ1042
AO1037
AO1036
AO1059
AO1058
AO1035
AO2051
AO2052
AQ1038
AQ1042
AO1037
AO1036
AO1059
AO1058
AO1035
AO2051
AO2052
AR1039
AR1039
AR1039
T
O
SL
C
OT
SL
D
OPTIONS
T
O
SL
E
XX
D1
D2
O4
O2
O1
R1
R2
W1
B2
XX
D1
D2
O4
O2
O1
R1
R2
W1
B2
XX
SX
XU
SU
YY
SY
ower supply
P
ABCD
E
Measuring
input
(range+
system)
Page 41

Installing
WM5-96 Instruction Manual
Panel cut-out and dimensions
5mm
24mm
Fixing, removing the modules and mounting the instrument to the panel
39
2
1
3
4
1
5
a
c
b
b
Mounting and removing the modules: the different modules (input, output and power supply) have been designed
to be plugged in the available slots. T
o know in which slots they are to be mounted, r
efer to the table on the left. For
a correct assembling of the instrument, first plug the modules into the relevant slots, then as last operation plug in the
central module which can also be a blind module or an RS232 serial communication module. This module also locks
emove the modules use a screwdriver with a flattened tip and move the
the other modules in the r
elevant slots. T
o r
two fixing tabs to the side (1); then remove the central module from its slot by pressing your thumb towards points (2)
. Finally extract the central module.
(5)
and
Panel mounting: insert the instrument (holding its front side) into the panel and fasten it (from the back) by fixing the
two lateral brackets being supplied (a) to the appropriate location (b), and then locking them by means of the two
screws supplied with the instrument (c).
Sealing the instrument
c
a b
The special sealing kit, made by two plastic “cuneiform” devices (c) is
supplied with the instrument; these two devices will have to be inserted as shown in the figur
e on the left
as indicated by the pointer
(b)
.
(a), then the seal is to be placed
Page 42

40
L1
L2
L3
2
9
10
1
8
L1L1
NN
L3L3
L2L2
U
1
1
3
3 55
22
44 66
I
I
L1L1
L2L2
L3L3
8
8 77 1010
99
1
692
345
87
10
L1
N
271
8
10
9
L1
L2
N
271
8
4
3
9
Wiring diagrams
1-phase, 2-wire input connections, (1P)
WM5-96 Instruction Manual
Fig. 1 Fig. 2
Direct connection CT connection
2-phase, 3-wire input connections (2P)
Fig. 4 Fig. 5
Fig. 3
CT and VT connection
Direct connection
CT connection
3-phase, 3 and 4-wire input connections - Balanced load (3P)
Fig. 6 Fig. 7
ect connection (3-wir
Dir
e system)
CT and VT connection (3-wire system)
Fig. 8
CT and VT connection (4-wire system)
Page 43

L1
L2
L3
2
9
10
1
3
4
5
6
8
L1L1
NN
L3L3
L2L2
U
11
33 55
22
44 66
II
L1L1
L2L2
L3L3
88 77 1010
99
1
692
345
87
10
L1
L2
L3
N
2
9
10
7
1
3
4
5
6
8
Wiring diagrams
WM5-96 Instruction Manual
3-phase, 3-wire input connections - unbalanced load (3P)
41
Fig. 9 Fig. 11
Direct connection (3-wire system)
CT connection (3-wire system)
3-phase, 3-wire ARON input connections (3P)
Fig. 12 Fig. 13
Fig. 10
CT and VT connection (3-wire system)
ARON connection (3-wir
e system)
ARON and VT connection (3-wire system)
3-phase, 4-wire input connections - unbalanced load (3P+N)
Fig. 14
Direct connection (4-wire system)
CT connection (4-wire system)
Fig. 15 Fig. 16
CT and VT connection (4-wir
e system)
Page 44

42
L
N
-
+
F
Wiring diagrams
Power supply, analogue and digital output modules
WM5-96 Instruction Manual
A2
A1
AO1058.
1 relay output
Digital inputs
AP1020.
AP1021.
Power supply.
F= 1.25 A T
AO1035.
2 relay outputs
AO2050.
2 analogue outputs
0-20mA DC.
AO2052.
2 analogue outputs
-5/+5mA DC.
AO2051.
2 analogue outputs
10V DC.
AO1037. 4 open collector outputs. This wiring
diagram is also valid for the open collector modules with 1 or 2 outputs. The load resistances
(Rc) must be designed so that the close contact
current is lower than 100mA; the VDC voltage
must be lower than or equal to 30VDC.
AQ1042.
Connection by means of
NPN transistors.
Connection by means of
AQ1042.
PNP transistors.
RS485 serial port (AR1034 9600bps, AR2040 115200bps)
b
T
a
TER
CONVER
SERIAL
e connection.
2-wir
nected in parallel
Termination of the serial port (T): it’s carried out only on the last
instrument of the network, by means of a jumper between (Rx+) and
(T).
b
T
a
TER
SERIAL
CONVER
4-wire connection. Other WM5-96 (a)
lected in parallel (b). Serial RS485-RS232 converter.
erminatio of the serial port
T
instrument of the network, by means of a jumper between (Rx+) and
(T).
AQ1042.
Connection by means of
contacts.
Other WM5-96
. Serial RS485-RS232 converter.
(b)
(a) provided with RS485 are con-
ovided with RS485 ar
pr
(T): it is carried out
AQ1038.
Connection by
means of contacts.
e col
only on the last
-
Page 45

WM5-96 Instruction Manual
Input Specifications
Technical specifications
43
Number of analogue inputs
Current 1 (1-phase; system code: 3)
3 (3-phase; system code: 3)
oltage 1 (1-phase; system code: 3)
V
4 (3-phase; system code: 3)
Digital inputs (on request) Up to 12
Q1038 No. of inputs: 3 (voltage-free)
A
Purpose “dmd” measurements
synchronisation.
Tariff selection: energy.
Contact status reading.
lock synchronisation.
Contact measuring current
AQ1042
C
<8mA/ 17.5 to 25VDC
Number of inputs: 3 +
excitation
output
Purpose “dmd” measurements
synchronisation.
Tariff selection: energy.
Contact status reading.
Clock synchronisation.
Excitation output 16V<+Aux<24VDC Max15mA
Contact measuring current
15mA
Common characteristics
Close contact resistance Max 1kΩ
Open contact resistance Min 100kΩ
Insulation see “Insulation between
inputs and outputs” table
Accuracy
(display, RS232, RS485)
In: 5A, If.s.: 10A
Un: see voltage ranges below
Current (AL1, AL2, AL3) from 0.05In to Imax:
(@20°C ±5°C, R.H. ≤75%)
±(0.2%RDG+2DGT)
from 0.01In to 0.05In:
±(0.5%RDG+2DGT)
Current (A
oltage
V
) ±0.5% RDG (0.2 to 2 In)
n
V5:
A
range
range AV6: 120/208V
from 40 to 100 Hz
5°C, R.H.≤75%)
±
C
°
(@20
400/690V
V
: from 185 V to 460 V
L-N
V
: from 320 V to 800 V
L-L
±(0.2%RDG+1DGT)
V
: fr
L-N
V
: from 78 V to 250 V
L-L
±(0.2%RDG+1DGT)
AC
L-L
AC
L-L
om 45 V to 145 V
Includes also: fr
equency,
power supply and output
load influences.
Frequency
±
440 Hz)
(40 to
RDG
0.1%
Active power and 0.05In to Imax, PF 1:
apparent power ±(0.5%RDG+1DGT)
(@ 20°C ± 5°C, R.H. ≤ 75%) 0.01In to 0.05In, PF 1:
±(1%RDG+1DGT)
0.1In to Imax, PF 0.5L,
PF 0.8C:
(0.6%RDG+1DGT)
±
0.02In to 0.1In, PF 0.5L,
(1%RDG+1DGT)
PF 0.8C:
±
Reactive power
(@ 20°C ± 5°C, R.H. ≤ 75%) 0.1In to Imax, sen
ϕ 0.5L/C:
±(2%RDG+1DGT)
0.05In ÷ 0.1In, sen
ϕ 0.5L/C:
±(2.5%RDG+1DGT)
Imax, sen
÷
0.05In
ϕ 1:
±(2%RDG+1DGT) 0.02In to
0.05In, sen
ϕ 1:
±(2.5%RDG+1DGT)
nergies
E
@ 20°C ± 5°C, R.H. ≤ 75%) Active: class 0.5 according
(
to
EN62053-22, ANSI C12.20
Reactive: class 2 according
to EN62053-23, ANSI C12.1
In: 5A, Imax: 10A
0.1In: 500mA,
Start-up current: 5mA Un:
400/690V
n:
U
Harmonic distortion 1% FS (FS: 100%)
(@ 20°C ± 5°C, R.H. ≤ 75%)
fase: ±2°; Imin: 5mA
Imax: 15Ap; Umin: 30V
Umax: 500Vp
emperature drift
T
200ppm/°C (A/V), ≤300ppm/°C
≤
20/208V
1
L
-L
(AV5)
L-L
AV6)
(
RMS
RMS
(all other measurements)
Sampling rate
6400
7680
samples/s
samples/s
@ 50Hz
@ 60Hz
Display Graph LCD, backlighted
(128x64 dots). Re a d-out f or
instantaneous variables:
4x4 digit
Total energies: 4x9 digit;
Partial energies: 4x9 digit
Display refresh time 100ms
Max. and min. indication Max. 9999 (999,999,999),
Min. -9999 (–999,999,999)
Front LED Red
Blinking light in case of virtual alarm. Fixed light in
case of digital output activation (alarm)
Measurements Current, voltage, power,
gy, power factor
ener
, frequency, harmonic distortion
(see “Display pages”). TRMS
measurement of a distorted
wave (voltage/current).
Coupling type Direct
est factor < 3, max 10A peak
Cr
Input impedance
400/690V
120/208V
Current ≤ 0.01Ω
(AV5) 1.77 MΩ ±5%
L-L
L-L
V6)
(A
885 k
Ω ±
5%
Frequency 40 to 440 Hz
Overload (maximum values)
Permanent: voltage/current AV5: 460V
AV6: 145V
For 500ms: voltage/current AV5: 800V
AV6: 240V
, 800VLL/10A
LN
, 250VLL/10A
LN
, 1380VLL/36A
LN
, 416VLL/36A
LN
;
;
Page 46

44
Technical specifications
Output specifications
WM5-96 Instruction Manual
Analogue outputs (on request)
Number of outputs Fino a 8 (max 4 x 20mA + 4
Accu racy (@ 25°C ±5°C, R.H. ≤60%) ±0.1%FS (20mA o 10VCC)
ange 0 ÷ 20mA o 0 ÷ 10 VCC o
R
Scaling factor: Programmable within the
Response time
Ripple
Total temperature drift ≤ 500 ppm/°C
Load : 20 mADC ≤ 350 Ω
Insulation see “insulation between
Optical communication port According to ANSI C12.18
RS422/RS485 port (on request) Multidrop
Connections 2 or 4 wires, max. distance
Protocol MODBUS RTU /JBUS,
Data (bidir
Stored energy (EEPROM)
Data format
Baud rate
Insulation see “Insulation between
RS232 port (on request) Bidirectional (static and
Connections 3 wires, max. distance 15m,
Data format
Baud-rate 9.6k bit/s
Protocol MODBUS RTU /JBUS
Other data as for RS422/485
10 VDC ≥ 10kΩ
±5 mA ≤ 1400Ω
ectional)
Dynamic (reading only) All display variables (see
Static (writing only)
x 10VDC o 4 x 20mA o 8 x
10VDC o 8 x ±5mA)
±0.3%FS (±5mA), FS=10mA
5mA
±
whole range of retransmission; it allows the retransmission management of all
values from: 0 and 20 mA, 0
and 10VDC, or -5mA and
+5mA
400 ms typical
(filter excluded)
≤ 1% (according to
IEC 60688-1,
inputs and outputs” table
bidirectional (static and
dynamic variables)
1000m, termination directly
on the module .
Addresses:
from 1 to 247, selectable
by key-pad.
also the table “List of the
variables that can be con
nected to”...)
All configuration parameters,
reset of energy, activation of
digital output
kWh/kvarh
1-start bit, 8-data bit, no
parity/even parity,
odd parity
9.6k, 19.2k, 38.4k, 115.2k bit/s
selectable bauds
inputs and outputs” table
dynamic variables)
1-start bit, 8-data bit, no
parity, even parity,
odd parity, 1 stop bit
EN 60688-1)
max. 999.999.999
, 1 stop bit
Ethernet/Internet port
Protocols Modbus TCP
IP configuration Static IP
TCP port Selectable (default 502)
Client connections Max 5 simultaneously
Connections RJ45 10/100 BaseTX
igital outputs (on request)
D
ulse type
P
Number of outputs Up to 16
Type
Pulse duration
Alarm type
Number of outputs
Alarm modes Up alarm, down alarm, in
Set-point adjustment from 0 to 100% of the
Hysteresis from 0 to full scale
On-time delay 0 to 255s
Output status Selectable; normally
esponse time
Min. r
Note The 16 digital outputs
-
Static (digital) outputs (on request)
Purpose For pulse outputs or for
Signal V
Relay (digital) outputs (on request)
Purpose
Output type Relay SPDT
Insulation
Electrical life ≥10
Mechanical life ≥30x10
≥ 100ms, < 120msec (ON),
Programmable from 0.001 to
1000 pulses per kWh/kvarh
(total and partial)
utputs connectable to the
O
total and/or partial energy
meters (Wh/varh)
100ms (OFF)
according to EN62053-31
up to 16, independent
window alarm, out window
alarm. All of them can be
used with start up deactivation function and/or latch.
All the alarms can be connected to all variables (see
the table “List of the variables that can be connected to”).
electrical scale
de-energised and normally
energised
≤200ms, filters excluded,
Set-point on-time delay: “0 s”
can also work as
combination of pulse
outputs and alarm
outputs.
alarm outputs
1.2 VDC/ max. 100 mA
ON
V
30 VDC max.
OFF
Insulation
between inputs and outputs” table
For alarm outputs or for pulse
outputs
AC 1-8A, 250VAC
DC 12-5A, 24VDC
AC 15-2.5A, 250VAC
DC 13-2.5A, 24VDC
Insulation between
see “
inputs and outputs
5
operations (@ 8A,
, PF1)
250V
6
operations
see “
Insulation
” table
Page 47

WM5-96 Instruction Manual
Software functions
Technical Specifications
45
Password Numeric code of max 4
1st level Password “0”: no protection
2nd level Password from 1 to 1000:
System selection
ystem 1 1-phase (2 wires)
S
System 2, unbalanced 2-phase (3 wires)
System 3, balanced 3-phase (3 wires+1CT)
System 3, unbalanced 3-phase (3 wires)
Transformer ratio CT up to 60 kA (6000 max)
Filters
Filter operating range 0.1 to 100% of the input
Filtering coefficient 1 to 255
Filter action
Alarms
Working mode “OR” or “AND” or
digits from 0 to 1000;
2 protection levels of
the programming data
ll data are protected.
a
3-phase (4 wires)
VT (PT) up to 600 kV
(6000 max)
electrical scale.
Display, alarms, serial outputs
(fundamental variables:
V, A, W and their derived ones).
“OR+AND” functions (see
“Alarm parameter and
logic” page).
Freely programmable on up
to 16 alarms. The alarms
can be connected to any
variables available in the
table “List of the variables
that can be connected to”
Reset By means of the key-pad or
ata stamping
D
ype of data Alarm, min, max, digital
T
Number of events Up to 10.000
Data management type FIFO
Data storage type Data flash
Displaying 4 variables per page
Energy meters Up to 28 pages depending
Stored events 10,000 events.
Display language Selectable:
of the configuration software,
it is possible to reset the
following data:
- all the min, max, dmd,
md-max values.
d
total and partial counters.
-
latch alarms.
-
- all the events.
input status, digital output
status as remote control,
resets. All events are stored
with date (dd:MM:yy) and
hour (hh:mm:ss) reference
1 page that can be laid out
by the user
Up to 36 pages
on the selected tariff mode.
Displaying of the consumed
energy of the previous 12
months.
English, Italian, French,
German, Spanish
Wm5Soft parameter programming and variable reading software
Wm5Soft Multi-language software
(Italian, English, Fr
German, Spanish) for
variable reading,
instrument calibration and
parameters programming
The program runs under
Windows XP/Vista
Working mode
Three different working
modes can be selected:
- management of local
ench,
.
Data Storing In pre-formatted XLS files
ransfer
Data T
RS232 (MODBUS);
- management of local
optical port (MODBUS);
- management of a local
RS485 network (MODBUS);
(Excel data base).
Manual or automatic at
programmable timings.
Page 48

46
Technical specifications
Time period management
eters
M
otal 4 (9-digit)
T
artial and multitariff 48 (9-digit)
P
Tariffs Up to 12
ime periods
T
umber of periods U p to 24 per da y
N
ulse output
P
Energy meter recording Consumption history by
Up to 100 different days per
year
onnectable to total and/or
C
artial meters (multitariff)
p
recording of the monthly
energy meters (12 previous
months). Recording of
total and partial energy
meters.
Energy meter recording
(EEPROM)
Max.999.999.999kWh/kvarh.
WM5-96 Instruction Manual
Energy Meters
Total energy meters 4 (+kWh, +kvarh, -kWh, -kvarh)
Monthly energy meters 48 (energy meters for
Partial energy meters 16 (using digital inputs:
It is possible to divide each
nergy meter here above listed
e
n 3 additional energy meters
i
1 for each phase “L1-L2-L3”)
(
each month: “+kWh, +kvarh,
-kWh, -kvarh”)
max 4 tariffs).
48 (using the internal clock:
ax 12 tariffs)
m
Harmonic distortion analysis
Analysis principle FFT
Harmonic measurement
Current Up to the 63rdharmonic
Voltage Up to the 63
Type of harmonics THD (VL1 and VL1-N)
Harmonic phase angle The instrument measur
THD odd (V
THD even (V
The same for the other phases:
L2, L3.
THD (A
THD odd (A
THD even (A
The same for the other phases:
L2, L3.
angle between the single harmonic of “V” and the single
harmonic of “I” of the same
. Accor
der
or
of the electrical angle, it is
possible to know if the distortion is absorbed or generated.
d
r
harmonic
L1 and VL1-N)
and V
L1
L1)
L1)
L1)
ding to the value
L1-N)
es the
Note: if the system has 3
wires the angle cannot be
measured.
Harmonic details The harmonic contents is dis-
played as a graph showing
the whole harmonic spectrum. This value is also given
as a numerical information:
THD % / RMS value
THD even % / RMS value
THD odd% / RMS value
single harmonics in % /
RMS value
System The harmonic distortion
can be measured in singlephase, 3-wire or 4-wire
systems.
Tw: 0.02 sec@50Hz without filter
Page 49

WM5-96 Instruction Manual
General Specifications
Technical Specifications
47
perating
O
temperature (R.H. < 90% non-condensing)
Limit range of operating temp. -20° to +55°C (-4° to 131°F)
Storage -30° to +60°C (-22° to 140°F)
temperature (R.H. < 90% non-condensing)
Installation category III
Pollution degree 2
Altitude up to 2000m (6560 feet) above
nsulation reference voltage
I
Dielectric str
Noise Rejection
CMRR 100 dB, 48 to 62 Hz
EMC
Emissions EN61000-6-3, EN60688
ength
10° to +45°C (14° to 113°F)
-
(R.H. <90% non-condensing)
ea-level
s
00 V
3
4k
residential environment,
commerce and light industry
ANSI/IEEE C37.90-1989
(surge, withstand and fast
transient test)
o ground (AV5 input)
R
t
MS
VAC
RMS
(for 1 min)
Supply Specifications
ulse voltage (1.2/50µs)
P
Safety standards IEC60664, IEC61010-1
Measurement standards IEC60688, EN60688,
ANSI C12.20, ANSI C12.1
Approvals CE, cURus and CSA
Connections 5(6) A Screw-type
Housing
Dimensions 96x96x140 mm
Material ABS,
Protection degree Front: IP65 / NEMA 4x
Weight Approx. 600 g
N61000-4-5
E
N60664, EN61010-1
E
EN62053-22, EN62053-23,
s
max. 2.5 mm2 wir
(2x 1.5mm
max screw tightening
torque: 0.5Nm
self-extinguishing: UL 94 V-0
(packing included)
e
2
);
AC/DC voltage 90 to 260V (standard)
18 to 60V (on request)
Power consumption ≤ 30VA/12W (90 to 260V)
≤ 20VA/12W (18 to 60V)
Revenue Approval Settings
• The access to the programming parameters via front key pad and/or serial communication ports is locked.
• The front key pad (up and down keys) allows the displaying of the variables only, while the communication ports allows the
transmission of the variables only
• A proper “instrument settings” form must be filled up by the user before equipment supplying.
• WM5-96 is supplied with the desired modules plugged and sealed in the proper slots.
• WM5-96 fulfils: the ANSI/IEEE C12.20-1998 requirements;
the CAN3-C17-M84 requir
and can be certified according to:
C12.20-1998, class 0.5 (independent labs);
AE-0924 Industry Canada Approval.
.
ements;
Page 50

48
Technical Specifications
Function Description
Input and output scaling capability.
orking of the analogue outputs (y) versus input variables (x)
W
WM5-96 Instruction Manual
Figure A
The sign of measured quantity and output quantity re-
ains the same. The output
m
quantity is proportional to the
measured quantity.
Figure B
The sign of measured quantity and output quantity
changes simultaneously. The
output quantity is proportional to the measur
ed quantity.
Figure C
The sign of measured quantity and output quantity remains the same. On the
range X0...X1, the output
quantity is zero. The range
X1...X2 is delineated on the
entire output range Y0 =
Y1...Y2 and thus pr
esented in
strongly expanded form.
0 50 A 100 A
0 10 mA 20 mA
-100 kW 0 100 kW
-5 mA 0 + 5 mA
80 V 100 V 120 V
0
mA
5
10 mA
Figure D
The sign of measured quantity and output quantity remains the same. With the
measured quantity being
zero, the output quantity
already has the value
Y1 = 0.2 Y2.
ive zero output.
L
Figure E
The sign of the measured
quantity changes but the one
of the output quantity
remains the same. The output quantity steadily increases from value X1 to value X2
of the measured quantity.
Figure F
The sign of the measured
quantity remains the same,
the one of the output quantity
changes as the measured
quantity leaves range X0...X1
and passes to range X1...X2
and vice versa.
0 50 A 100 A
4 12 mA 20 mA
-100 kW 0 100 kW
0 10 mA 20 mA
0 50 A 100 A
- 5 mA 0 + 5 mA
Insulation between inputs and outputs
Meas. /digital
inputs
Meas. /digital
inputs
Relay output
Open collector
Analogue out.
10V, 20mA
Analogue out.
±5mA
AR1034
AR2040
AR1039
90-260VAC/DC
18-60VAC/DC
- 4kV 4kV 2kV 2kV 4kV 2kV 4kV 4kV 4kV
4kV 4kV (*) 4kV 4kV 4kV 4kV 4kV 4kV 4kV 4kV
4kV 4kV 4kV (*) 4kV 4kV 4kV 4kV 4kV 4kV 4kV
2kV 4kV 4kV 4kV (*) 4kV 4kV 4kV 4kV 4kV 4kV
2kV 4kV 4kV 4kV 200V (**) 4kV 4kV 4kV 4kV 4kV
4kV 4kV 4kV 4kV 4kV - - 4kV 4kV 4kV
2kV 4kV 4kV 4kV 4kV - - 4kV 4kV 4kV
4kV 4kV 4kV 4kV 4kV 4kV 4kV - 4kV 4kV
4kV 4kV 4kV 4kV 4kV 4kV 4kV 4kV - -
4kV 4kV 4kV 4kV 4kV 4kV 4kV 4kV - -
NOTE: In case of fault of first insulation the current from the measuring inputs to the ground is lower than 2 mA.
(*) The given insulation is granted among outputs plugged in dif
e non insulation among the outputs.
efor
ther
Relay
output
Open
colllector
Analogue out.
10V, 20mA
Analogue out.
±5mA
fer
AR1034 AR2040 AR1039 90-260V
ent slots. The modules equipped with two or four outputs have
(**) Insulation between the 2 outputs of the same module is 200V for 1 min.
AC/DC
18-60V
AC/DC
Page 51

WM5-96 Instruction Manual
å
-
=
LLL L
LL
V
VV
ASY
)(
minm ax
å
-
=
LN
LNLN
LN
V
VV
ASY
)(
minmax
Accuracy
Technical Specifications
49
0.5%
Error
or C0.8
+1%
PF=1 PF=L0.5
+1.0%
+
Class 0.5
1%
-0.5%
-1.0%
PF=1
PF=L0.5
or C0.8
sinϕ=1
+2.5%
2%
+
Error
0.05A
(0.01In)
0.1A
(0.02In)
0.25A
(0.05In)
0.5A
(0.1In)
5A (In)
5A (In)
-
10A (Imax)
10A (Imax)
Class 2
-2%
-2.5%
kWh, accuracy (RDG) depending on the current
lass 0.5 accuracy limits (active energy) EN62053-21
C
5(10A) start-up current: 5mA.
kvarh, accuracy (RDG) depending on the curr
ent
Class 2 accuracy limits (reactive energy) EN62053-23
5(10A) start-up current: 5mA.
ϕ=1
sin
sin
ϕ=0.5
0.1A
(0.02In)
0.25A
(0.05In)
0.25A
(0.05In)
0.5A
(0.1In)
Used calculation formulas
Phase variables
Instantaneous effective voltage
Instantaneous active power
Instantaneous power factor
Instantaneous effective current
Instantaneous apparent power
Instantaneous r
eactive power
5A (In)
5A (In)
System variables
Equivalent thr
Voltage asymmetry
ee-phase r
Thr
Neutral current
An =
ee-phase active power
Thr
ee-phase appar
Thr
10A (Imax)
10A (Imax)
ee-phase voltage
eactive power
A
L1+AL2+AL3
ent power
Three-phase power factor
(TPF)
Energy metering
Where:
i= considered phase (L1, L2 or L3)
P= active power; Q= reactive power;
t1, t2=starting and ending time points
of consumption recording; n= time
unit;∆t= time interval between two
successive power measurements;
n1, n2= starting and ending discrete
time points of power recording
Page 52

50
Technical Specifications
WM5-96 Instruction Manual
List of the variables that can be connected to:
Analogue outputs (all listed variables with the only exception of energies), alarm outputs (all listed variables with the only
exception of energies), pulse outputs (only energies), communication (all listed variables).
No. 1-phase 2-ph. 3-wire 3-ph. 4-wire 3-ph. 3-wire 3-ph. 4-wire Notes
1 V L1 x x x o x
2 V L2 o x x o x
3 V L3 o o x o x
4 V L-N sys o x x o x Sys = system =
5 V L1-2 o x x x x
6 V L2-3 o o x x x
7 V L3-1 o o x x x
8 V L-L sys o o x x x Sys = system =
9A L1xxxxx
10 A L2 o x x x x
11 A L3 o o x x x
12 An o x x o x An=neutral current
13 W L1 x x x x x
14 W L2 o x x x x
15 W L3 o o x x x
W sys o x x x x
16
17 var L1 x x x x x
18 var L2 o x x x x
19 var L3 o o x x x
20 var sys o x x x x Sys = system =
21 VA L1 x x x x x
22 VA L2 oxxxx
23 VA L3 o o x x x
24 VA sys o x x x x Sys = system =
25 PF L1 x x x x x
26 PF L2 o x x x x
27 PF L3 o o x x x
28 PF s ys o x x x x Sys = system=
29 Hz x x x xx
30 ASY VL-N o x x o x Asymmetry of phase-neutral
31 ASY VL-L o o x x x Asymmetry of phase-phase
32 THD V1 xxxox
33 THD V2 o x x o x
34 THD V3 o o x o x
35 THD V1-2 o x x x x
36 THD V2-3 o o x x x
THD V3-1
37
38 THD A1 x x x x x
39 THD A2 o x x x x
40 THD A3 o o x x x
41 THDo V1 x x x o x
42 THDo V2
43 THDo V3 o o x o x
THDo V1-2 o
44
45 THDo V2-3 o o x x x
46 THDo V3-1
47 THDo A1 x x x x x
48 THDo A2 o x x x x
49 THDo A3 o o x x x
50 THDe V1 x x x o x
51 THDe V2 o x x o x
THDe V3
52
53 THDe V1-2 o x x x x
54 THDe V2-3 o
55
THDe V3-1 o o x x x
56 THDe A1 x x x x x
THDe A2
57
58 THDe A3 o o x x x
Phase seq.
59
system system bal. (1 CT) unbal. sys. unbal. sys.
o
o
o
ooxox
oxxxx
o
o
xxox
x
o
o
o x x x Phase sequence
xxx
xxx
x
xxx
x
x
Σ
Σ
Σ
Σ
Σ
Σ
Σ
Σ
Σ
Σ
(x) = available (o) = not available
Page 53

A
RMPowered
PRG
m
easures
SS
R
!
R
AL
WM5-96
SmartPowerQualityAnalyzer
Class0.2A/V
®
WM5-96, ARM
Powered
Customer’s data:
Serial number WM5 96:
Note:
WM5-96 User’s Page
Slot A
Empty
AQ1038
AQ1042
AO1037
AO1036
AO1059
AO1058
AO2050
AO2051
AO2052
Slot B
Empty
AQ1038
AQ1042
AO1037
AO1036
AO1059
AO1058
AO2050
AO2051
AO2052
AR1034
AR2040
Slot C
Empty
AQ1038
AQ1042
AO1037
AO1036
AO1059
AO1058
AO1035
AO2051
AO2052
Slot D
Empty
AQ1038
AQ1042
AO1037
AO1036
AO1059
AO1058
AO1035
AO2051
AO2052
Slot E
Empty
AR1039
Power supply
AP1021
AP1020
Measuring inputs
AQ2030
AQ2031
Page 54

Page 55

OUR SALES NETWORK IN EUROPE
A
USTRIA - Carlo Gavazzi GmbH
K
etzergasse 374, A-1230 Wien
T
el: +43 1 888 4112
Fax: +43 1 889 10 53
o
ffice@carlogavazzi.at
BELGIUM - Carlo Gavazzi NV/SA
Schaarbeeklei 213/3, B-1800 Vilvoorde
T
el: +32 2 257 4120
F
ax: +32 2 257 41 25
sales@carlogavazzi.be
D
ENMARK - Carlo Gavazzi Handel A/S
Over Hadstenvej 42, DK-8370 Hadsten
Tel: +45 89 60 6100
F
ax: +45 86 98 15 30
handel@gavazzi.dk
FINLAND - Carlo Gavazzi OY AB
Petaksentie 2-4, FI-00630 Helsinki
T
el: +358 9 756 2000
F
ax: +358 9 756 20010
m
yynti@carlogavazzi.fi
F
RANCE - Carlo Gavazzi Sarl
Z
ac de Paris Nord II, 69, rue de la Belle
E
toile, F-95956 Roissy CDG Cedex
Tel: +33 1 49 38 98 60
F
ax: +33 1 48 63 27 43
f
rench.team@carlogavazzi.fr
GERMANY - Carlo Gavazzi GmbH
R
udolf-Diesel-Strasse 23,
D
-64331 Weiterstadt
Tel: +49 6151 81000
F
ax: +49 6151 81 00 40
k
ontakt@carlogavazzi.de
GREAT BRITAIN - Carlo Gavazzi UK Ltd
7
Springlakes Industrial Estate,
D
eadbrook Lane, Hants GU12 4UH,
GB-Aldershot
T
el: +44 1 252 339600
F
ax: +44 1 252 326 799
sales@carlogavazzi.co.uk
OUR SALES NETWORK IN NORTH AMERICA
U
SA - Carlo Gavazzi Inc.
7
50 Hastings Lane,
USA-Buffalo Grove, IL 60089
Tel: +1 847 465 6100
Fax: +1 847 465 7373
s
ales@carlogavazzi.com
,
C
ANADA - Carlo Gavazzi Inc.
2
660 Meadowvale Boulevard,
CDN-Mississauga Ontario L5N 6M6,
Tel: +1 905 542 0979
Fax: +1 905 542 22 48
g
avazzi@carlogavazzi.com
I
TALY - Carlo Gavazzi SpA
V
ia Milano 13, I-20020 Lainate
T
el: +39 02 931 761
Fax: +39 02 931 763 01
i
nfo@gavazziacbu.it
NETHERLANDS - Carlo Gavazzi BV
Wijkermeerweg 23,
N
L-1948 NT Beverwijk
T
el: +31 251 22 9345
Fax: +31 251 22 60 55
i
nfo@carlogavazzi.nl
NORWAY - Carlo Gavazzi AS
Melkeveien 13, N-3919 Porsgrunn
T
el: +47 35 93 0800
F
ax: +47 35 93 08 01
gavazzi@carlogavazzi.no
P
ORTUGAL - Carlo Gavazzi Lda
Rua dos Jerónimos 38-B,
P
-1400-212 Lisboa
T
el: +351 21 361 7060
Fax: +351 21 362 13 73
carlogavazzi@carlogavazzi.pt
C
ANADA - Carlo Gavazzi LTEE
3
777 Boulevard du Tricentenaire
Montreal, Quebec H1B 5W3
Tel: +1 514 644 2544
Fax: +1 514 644 2808
g
avazzi@carlogavazzi.com
S
PAIN - Carlo Gavazzi SA
A
vda. Iparraguirre, 80-82,
E
-48940 Leioa (Bizkaia)
Tel: +34 94 480 4037
F
ax: +34 94 480 10 61
g
avazzi@carlogavazzi-sa.es
SWEDEN - Carlo Gavazzi AB
N
attvindsgatan 1, S-65221 Karlstad
T
el: +46 54 85 1125
Fax: +46 54 85 11 77
g
avazzi@carlogavazzi.se
SWITZERLAND - Carlo Gavazzi AG
Verkauf Schweiz/Vente Suisse
S
umpfstrasse 32,
C
H-632 Steinhausen
Tel: +41 41 747 4535
F
ax: +41 41 740 45 40
v
erkauf_vente@carlogavazzi.ch
OUR SALES NETWORK IN ASIA AND PACIFIC
SINGAPORE - Carlo Gavazzi Automation
Singapore Pte. Ltd.
N
o. 178 Paya Lebar Road
#04-01/05 409030 Singapore
Tel: +65 67 466 990
Fax: +65 67 461 980
MALAYSIA - Gavazzi Automation
Sdn Bhd.
5
4, Jalan Rugbi 13/30,
Tadisma Business Park Seksyen13
40100 Shah Alam, Selangor
Tel: +60 3 55 121162
Fax: + 60 3 55 126098
OUR PRODUCTION SITES
Carlo Gavazzi Industri A/S
Hadsten -
DENMARK
Tel: +45 89 60 6100
Carlo Gavazzi Industri
Kaunas -
LITHUANIA
el: +370 3732 8227
T
Carlo Gavazzi Ltd
Zejtun - MALTA
Tel: +356 23 601 100
Carlo Gavazzi Automation
(Kunshan) Co., Ltd.
Kunshan -
CHINA
Tel: +86 512 5763 9300
HEADQUARTERS
Carlo Gavazzi Automation SpA
Via Milano, 13 - I-20020
Lainate (MI) Tel: +39 02 93 76
info@gavazzi-automation.com
www
ITALY
.carlogavazzi.com/ac
CARLO GAVAZZI
Automation Components
CHINA - Carlo Gavazzi Automation
(China) Co. Ltd.
N
o. 1001 Shangbu Middle Road,
Futian, Shenzhen
Tel: +86 755 83699500
Fax: +86 755 83699300
Carlo Gavazzi Contr
ITALY
Belluno Tel: +39 0437 931 000
ols SpA
HONG KONG - Carlo Gavazzi Automation
Hong Kong Ltd.
U
nit 3 12/F Crown Industrial Bldg.,
106 How Ming St., Kowloon,
Hong Kong
Tel: +852 23041228
Fax: +852 23443689
SAIET Elettr
Castel Maggiore (BO) Tel: +39 051 417 8811
onica SpA
Further information on www.carlogavazzi.com/ac
ITALY
 Loading...