

Page 1

Micro Diary
Operating Manual
Page 2

1
CONTENTS
INTRODUCTION ........................................................... 3
INDICATIONS FOR USE................................................. 5
TARGET POPULATION .................................................. 5
ENVIRONMENT OF USE ............................................... 5
ENVIROMENT CONDITION OF USE .............................. 6
CONTRAINDICATION, WARNINGS AND CAUTIONS. ..... 6
CONTRAINDICATIONS ..................................................... 6
CAUTI ON: ................................................................... 7
PA CKA GE CO NT ENTS ................................................... 8
CONFIGURATION ......................................................... 9
OPERATION ............................................................... 11
SP I R O M E T R Y RE C O R D I N G ............................................... 11
SYMPTOM SC O R E E N T R Y ................................................ 14
MENU OPTIONS .......................................................... 18
1 PC CONNECTION ...................................................... 19
2 MESSAGE LOG ......................................................... 19
3 TRAINING BLOW ....................................................... 19
4 SE R I A L NU M B E R ....................................................... 19
5 UNIT ID ................................................................. 19
6 RE C O R D CO U N T ....................................................... 19
7 CA L I B R A T I O N CHECK ................................................. 20
8 TELEPHONE LO G ....................................................... 20
MAINTENANCE .......................................................... 20
BATTE RY MANAGEMENT ................................................. 20
BATTERY REPLACEMENT ................................................. 21
CALIBRATION CHECK .................................................... 21
CLEANING THE TRANSDUCER .......................................... 22
SERVICING ................................................................. 23
TROUBLE SHOOTING INFORM AT I ON......................... 23
ELECTROMAGNETIC COMPATIBILITY (EMC) .............. 24
Page 3

2
CONSUMABLES & SUPPORT I N G P R O D U C T S .............. 24
SPECIFICATION OF THE MICRO DIARY ....................... 25
SYMBOLS ................................................................... 26
CUSTOMER CONTACT INFORMATION ....................... 27
UK CUSTOMERS ONLY ................................................... 27
INTERNATIONAL CUSTOMERS ONLY ................................... 27
Page 4

3
Introduction
The Micro Diary spirometer is a compact, battery
operated, and fully portable data recording spirometer
designed specifically to collect FEV1, PEF, FVC or F E V6,
and symptom scores in epidemiological studies and drug
trials.
The Micro Diary connects to a PC for configuration and
uploading of stored data using the Micro Diary System
Windows™ based software. This software allows the unit
to be easily customised for a particular trial and includes
many built in safeguards to ensure the integrity of the
accumulated data.
The unit can be configured to take spirometry readings
and symptom scores, entered either numerically, on an
analogue scale, or from a scroll down list of responses.
The results are stored together with the time and date of
testing. Various identifiers such as trial centre, unit
number, and description are also stored.
Different sequences of questions and spirometry tests may
be configured for 4 individual time zones. Each sequence
is activated by the subject turning the unit on, within the
relevant time zone, or by answering an option al alar m.
After completing a sequence the unit turns off
automatically. Having completed a time zone sequence, a
supplementary sequence will be activated if the unit is
turned on again within the time zone or between zones.
Note that once a time zone sequence has been completed,
Page 5

4
the sequence cannot be repeated until the following day.
During a sequence the last spirometry test or
questionnaire response can be erased by pressing ‘del’.
The recorded tests can be uploaded to a computer for
future analysis or printing, via a USB interface.
The spirometer uses the C a r e F u s i o n Digital Volume
Transducer, an extremely stable form of volume
transducer, which measures expired air directly at B.T.P.S
(Body Temperature and Pressure with Saturated water
vapour) thus avoiding the inaccuracies of temperature
corrections. This transducer is insensitive to the effects of
condensation and temperature and avoids the need for
individual calibration prior to performing a test.
Page 6

5
Indications for Use
The Micro Diary Spirometer is used in pulmonary function
testing to measure the volume of gas moving in or out of
a patient's lungs. Specifically, the Micro Diary Spirometer
measures the following lung function parameters: FEV1,
FVC, FEV6, an d PEF. The device also records the test data
for later review and has the ability to transfer these
records to a compatible computer.
Target Population
The device can be used on patients who require lung
function measurements. It can be utilized for patients
from 4 years and older, providing that they are able to
follow the medical practitioner’s instructions.
Environment of Use
The environment of use is the hospital or a doctor’s or
medical practitioner’s office or clinic or the patient’s home.
Page 7

6
Environment
Please observe the following precautions:
• Avoid exposing the Micro Diary to direct sunlight.
• Avoid operating the spirometer in dusty conditions or
near to heating appliances or radiators
• Do not keep the spirometer in a damp or expose it to
extreme temperatures
• Operate the equipment under normal enviromental
temperatures which are defined in this manual (see
section “Specification of the Micro Diary”)
• The transducer should not be hold towards a strong
light source during operation of the spirometer.
Contraindications, Warnings and
Cautions.
Contraindications
• Acute disorders affecting test performance (e.g
Vomiting , nausea, vertigo)
• Recent eye surgery (increases in intraocular
pressure during spirometry)
• Oral or facial pain exacerbated by a mouthpiece
Page 8
7
Caution:
CAUTION: Read the manual before use
WARNING: The instrument is not suitable for use in
the presence of explosive or flammable gases,
flammable anaesthetic mixtures or in oxygen rich
environments.
CAUTION: Mouthpieces are single patient use. If used
on more than one patient there is a risk of cross-
infection. Repeat use may degrade materials and lead
to an incorrect measurement.
PLEASE NOTE: The product you have
purchased should not be disposed of as
unsorted waste. Please utilise your local
WEEE collection facilities for the disposal of this
product.
Page 9
8
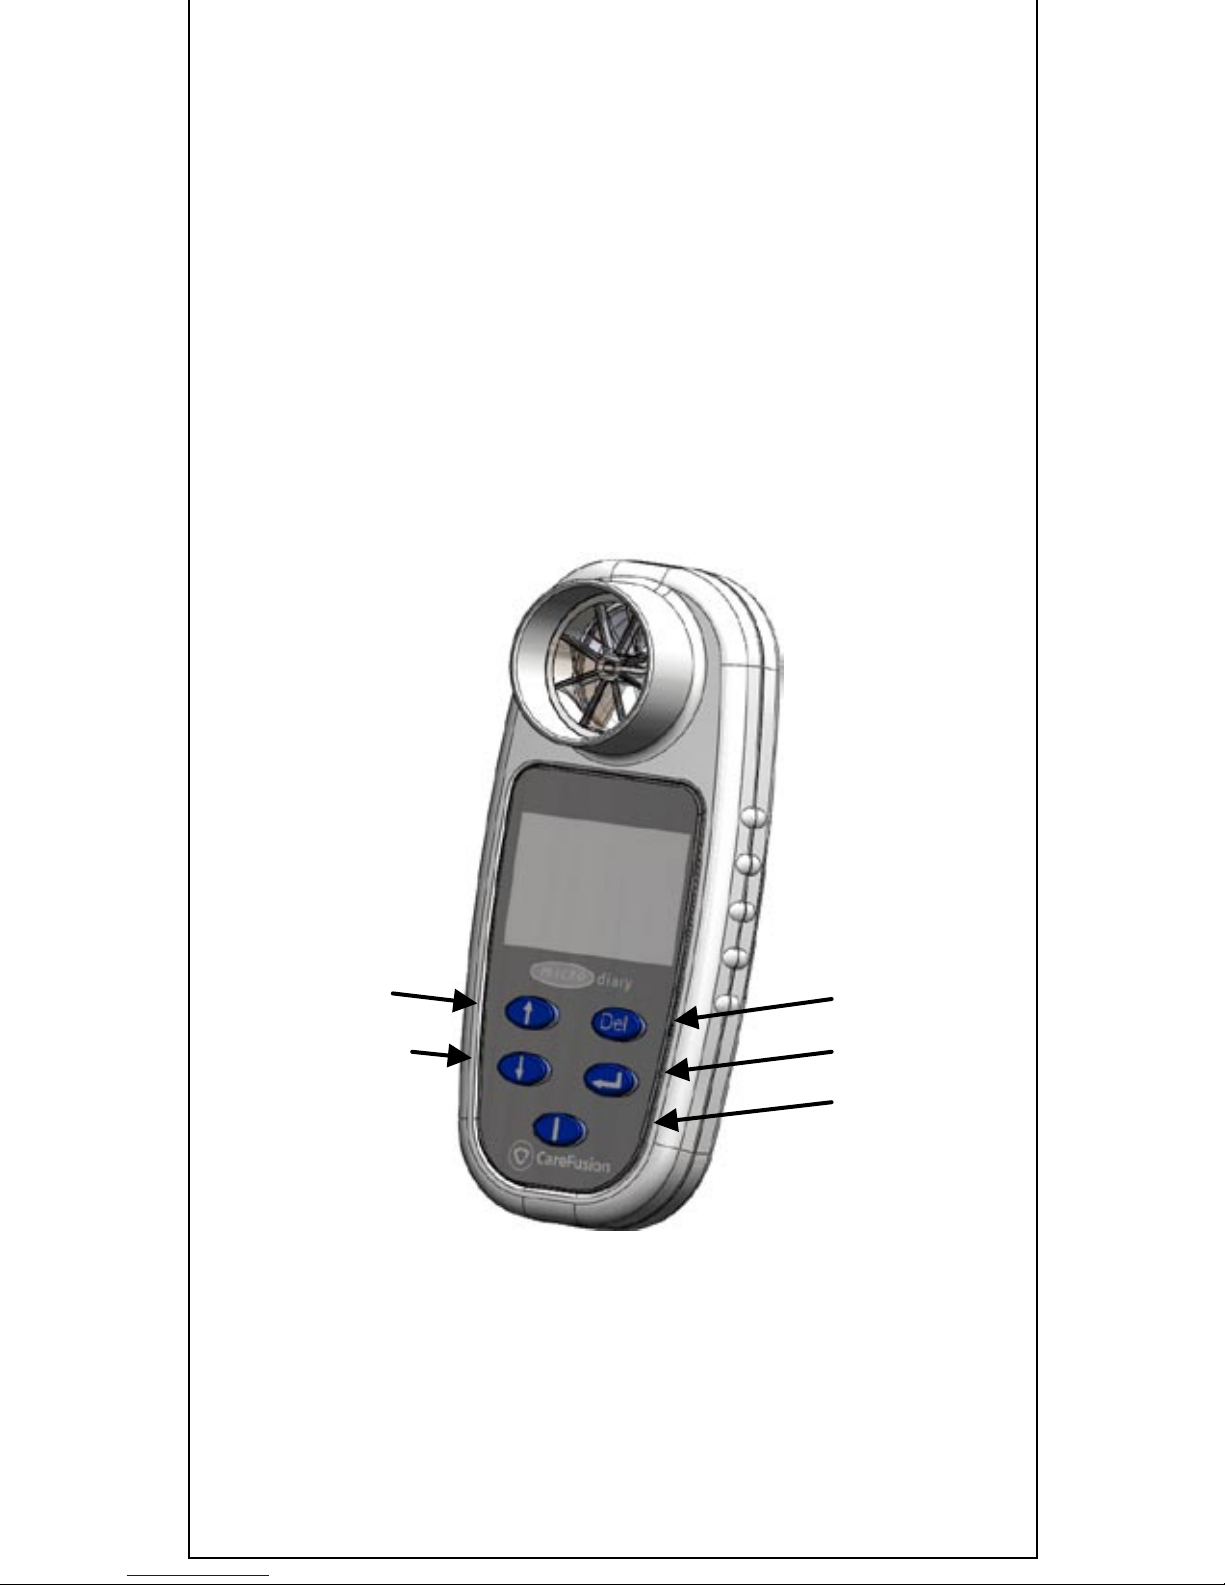
Package Contents
The Micro Diary is packaged in a convenient carrying case
and comes complete with the following items (Fig.1):
1. Micro Diary microcomputer unit.
2. Ca reFu sion Digital Volume Transducer.
3. Lithium coin cell, CR2450
4. USB cabl e
Figure 1: The Micro Diary
Delete
Enter
On
Scroll down
Scroll up
Page 10

9
Configuration
Before using the Micro Diary the required sequence of
questions and spirometry tests must be defined using the
PC software (Please see Help files on software for
guidance ). Micro Diary PC Software may be downloaded
using the link:
http://www.micromedical.co.uk/update/download.asp
(The PC Software is intended for use by Clinicians
and Trial co-ordinators only).
Once defined, the sequence can be loaded into the Micro
Diary. This can be done with a direct connection to a USB
port of the PC: plug the unit into a USB port on the PC,
using the cable provided, and turn the unit on with the
‘enter’ key depressed to display the operations menu.
Once the operations menu is displayed, release the ‘enter’
key. Scroll to option 1, PC Connection, using the up and
down keys and then press ‘enter’ (the other options are
described in section Menu Options). From the PC
software, download the program to the unit and switch off
by pressing ‘del’.
The Micro Diary is now ready to perform the defined
sequence of questions when the unit is turned on. The
subject is instructed to complete the sequence of
questions and spirometry tests. Once complete, the unit
will turn off automatically.
If the subject turns the unit on but leaves the unit before
completing the sequence, the unit will automatically turn
Page 11

10
off after several minutes. Data collected on a partially
completed sequence will not be stored and the subject
must turn the unit on again and complete the whole
sequence before the results are stored.
If an alarm is set then the unit will turn on automatically
at the required time, sound an audible alarm, and display:
The subject should then press ‘enter’ to initiate the
sequence. If no response is given the unit will turn itself
off after a few minutes (configurable) and repeat the
alarm every 11 minutes (configurable) until the end of the
time zone.
When turned on, the subject will be requested to perform
a spirometry manoeuvre or to enter the answer to
questions in the order specified in the program.
In order to familiarise the subject with the spirometry
manoeuvre a test may be performed without the results
being stored. To do this, turn the unit on in the ‘options’
menu, as described above. Then scroll to option 3, training
Blow and press ‘enter’. A spirometry manoeuvre will be
requested as outlined in the next section. Pressing ‘del’
will return the unit to the options menu.
Page 12

11
Operation
Spirometry Recording
When taking a spirometry measurement the following will
be di splay e d :
The subject should then perform a spirometry manoeuvre
using a clean mouthpiece connected to the transducer.
After completion the display will show the results together
with a spirometry manoeuvre quality check:
Page 13

12
The results and quality checks displayed to the user may
be configured with the PC software. The software may
also be configured to automatically reject any manoeuvre
that fails any of the quality checks. The unit will ‘beep’
once at the end of the manoeuvre or three times if an
alarm has been set and the result is below the acceptable
level. The arrow at the bottom right of the screen
indicates that the ‘down’ arrow key may be used to obtain
more results. Using the ‘down’ arrow key will di spl a y t h e
flow/volume curve, if configured by the PC software:
Page 14

13
The Quality checks can result either in discarding the blow
or not. See the Quality Assurance Options page from the
help files.
When an acceptable test has been performed, pressing
‘enter’ will move on to the next test or symptom score
entry and save the spirometry results. When performing a
series of tests it is possible to configure the unit to record
only the best blow.
The unit may also be configured to alarm when the
spirometry manoeuvre is below a set value or below a set
percentage of the recorded best effort. When a
manoeuvre is below the required level an alarm will sound
continuously and the display will flash the reading, which
has triggered the alarm.
If for any reason the subject is not satisfied with their
effort, pressing ‘del’ will cause the test to be repeated and
the results will not be stored until ‘enter’ is pressed.
Repeatedly pressing ‘del’ will erase, in turn, all the tests
performed and may be used to erase a whole sequence if,
for example, the subject decides that they are not able to
complete a set of tests at that time.
Please note that the results to be displayed, and stored,
are individually selected by the program. It is therefore
possible, for example, to store FEV1 and FVC but display
no results if a blind study is to be undertaken. In this
case the Micro Diary will move on to the next question or
spirometry test immediately after the test is performed
unless the effort is below the minimum requirement in
Page 15

14
which case the alarm will sound and the display will flash
the reading that triggered the alarm.
Symptom Score entry
Numerical data and responses to questions may be
entered in five different ways.
Question with Numeric Answer:
The question is displayed at the top of the screen and the
default response is shown flashing below. Note that when
an ‘up or ‘down’ key is first used, the default number
stops flashing. Subsequent use increments the number up
or down.
In order to avoid the possibility of the subject si m pl y
pressing ‘enter’ repeatedly to accept all default values in a
series of questions, the ‘enter’ key is only recognised after
an ‘up’ or ‘down’ key is used at least once.
Question with Decimal Numeric Answer:
Page 16

15
The display shows the question number with the default
response (set by the PC software) to one decimal place.
The subject adjusts the response, as described above, and
then presses ‘enter’. Note that it is not possible to enter
the default value whist the display is flashing. Pressing
the ‘up’ or ‘down’ once will stop the flashing and
subsequent use will increment or decrement the value.
This feature ensures that the subject actively reviews the
value and does not repeatedly press ‘enter’ for a sequence
of questions in order to save time.
Question with Short Written Answer:
When this type of question is displayed the user uses the
‘up’ and ‘down’ arrow keys to select the correct response
and then presses ‘enter’. If there are more answers than
can be displayed on the screen, an arrow w i l l b e displayed
to indicate that further answers are available. As before,
Page 17

16
the default response flashes until the ‘up’ or ‘down’ arrow
keys are first used.
Question with Long Written Answer:
Page 18

17
When the answers are too long to fit on one line, paged
responses may be used. Using the ‘up’ and ‘down’ keys
will scroll between the programmed responses. Pressing
the ‘enter’ key will select the required response.
Question with Analogue Scale Response:
Question requiring an answer on an analogue displ ay c a n
also be displayed. The user uses the ‘up’ and ‘down’
arrows to move the solid bar to the right and left. When
the required level is displayed press ‘enter’ to store the
result.
Page 19

18
Menu Options
To obtain the options menu hold down the ‘enter’ key,
turn the unit on, and when the sounder is heard release
the ‘enter’ key.
Use the up and down arrow keys to select the required
option and then press enter.
Select option 9, Exit, when you have finished using the
options.
Page 20

19
1 PC Connection
When this option is used connect the Diary unit to a PC
running the software supplied to a USB port using the
cable supplied. The Diary is then controlled by the PC in
order to upload saved data or to reprogram the unit.
2 Message Log
The feature is not used in the Diary system.
3 Training Blow
Use this option to allow the user to familiarise themselves
with performing a spirometry test. None of the tests
performed in this mode of operation will be stored.
4 Serial Number
Use this option to identify the serial number of the unit.
5 Unit ID
Use this option to display the programmed Unit ID and the
Full ID. These identifiers, loaded into the Diary at the
time of programming.
6 Record Count
A record count and the percentage of memory used is
av ail a ble with this option.
Page 21

20
7 Calibration Check
Use this option to perform a calibration check. A
calibration syringe will be required.
8 Telephone Log
This function is not used in the Micro Diary.
Maintenance
Battery Management
The Diary is powered by a 3 Volt Lithium coin cell
accessed via a slide cover on the rear of the instrument.
When the battery is low a warning icon will be displayed
and the battery should be replaced:
The recorded data is stored in non-volatile memory and no
data will be lost when the battery expires. It is
recommended that the battery is replaced at the
commencement of each new study.
Page 22

21
Battery replacement
For access to the battery first remove the battery cover by
sliding sideways as indicated
Disassembly
Prise out the old coin cell
using a suitable, nonmetallic implement
Assembly
Replace the battery paying particular attention to its
orientation. The part number etched on its outer face
should be uppermost and visible when the battery is
inserted.
Press until clicked into pl a ce
Slide the battery cover back into place.
Calibration Check
The Micro Diary is calibrated to read in litres at body
temperature, barometric pressure saturated with water
vapour (BTPS).
The calibration should remain stable indefinitely, unless
the transducer is physically damaged, and the unit should
not require re-calibration. However, to ensure the correct
functioning of the unit we do recommend that a calibration
check is performed periodically.
Page 23

22
To perform a calibration check turn the unit on with the
‘enter’ key pressed and select ‘Calibration Check’ from the
menu options, see section Menu Options
Connect a 3L syringe to the Micro Diary with the minimum
of adapters and the syringe volume should be injected into
the transducer evenly, without pausing.
A 3 Litre Syringe is available from Care Fusi on as
Cat.No.36-SM2125
If, after checking, the unit appears to require recalibration then please refer to your supplier for service.
Cleaning the Transducer
The transducer requires no routine maintenance or
servicing. However, if you wish to sterilise or clean the
transducer it may be removed by means of the following
procedure:
1. Remove the transducer by gently pushing out from
the rear of the instrument.
2. The transducer may now be immersed in warm
soapy water for routine cleaning or immersed in cold
sterilising solutions e.g. Perasafe for a period not
exceeding 15 minutes. (Alcohol and chloride
solutions should be avoided.) After
cleaning/sterilising, the transducer should be rinsed
in distilled water and dried.
3. Re-assemble the transducer.
Page 24

23
Servicing
If your unit requires service or repair please contact your
nearest service dept. See the Customer Contact
Information section for more details.
Trouble Shooting Information
Should you encounter problems operating your
spirometer, please consult the table below:
Problem
Possible
Cause
Solution
Micro Diary cannot
be switched on
Batteries are
flat
Change the
batteries
Every time you
switch the
instrument on the
time is shown as
00:00
The internal
battery of
Micro Diary is
defective
Contact
your dealer.
Micro Diary is
outside of % when
conducting the
calibration check
There are
leaks in the
syringe or
connections
Check the
syringe and
connections
for leaks
Page 25

24
Electromagnetic Compatibility
(EMC)
Changes or modifications to the Micro Diary spirometer
that are not expressly approved by Carefusion can cause
EMC issues with this or other equipment. The device is
designed and tested to comply with applicable regulation
regarding EMC and needs to be installed and put into
service as per interference exceeding levels specified in EN
50082-1:1992
WARNING: use of portable phones or other radio
frequency (RF) emitting equipment near the system may
cause unexpected or adverse operation
WARNING: No modification to this device is allowed.
Consumables & Supporting
Products
Cat. No.
Description
36-CAB1098
USB A cable for MD03 PC connection.
36-PSA2200
Mouthpieces
36-SSC5000A
PeraSafe Sterilising Powder 81g
(to make up 5 litres of solution)
36-VOL2104
Nose C l i ps (pack of 5)
36-SM2125
3 Litre Calibration Syringe
36-TDX1050
CareFusion Digital Volume Transducer
Page 26

25
Specification of the Micro Diary
Measurements:
Forced Vital Capacity (FVC)
or Forced Expired Volume in
6 seconds (FEV6)
Forced Expired Volume in 1
second (FEV1)
Peak Expiratory Flow rate
(PEF)
Accuracy:
Meets the accuracy
requirements of the ATS/ERS
Standardisation of Lung
Function Testing:
Standardisation of
Spirometry - 2005
Storage Capacity:
Typically > 1 year of data
recording.
Display:
64 x 100 pixel LCD
Transducer Type:
CareFusion Uni-Directional
Digital Volume.
Resolution:
10ml
Volume Range:
0 to 8 litres.
Power supply:
CR2450 Lithium coin cell.
Backup battery life:
>10 years
Main Battery Life:
Approximately 24 hours of
continuous use.
Dimension s :
130 X 57 X 37mm.
Weight:
100g
Operating Temperature/
Humi dity:
0 to +40 °C / 30% to 90%
RH
Storage Temperature/
Humi dity:
-20 to + 70 °C / 10% to
90% RH
Page 27

26
Symbols
Type B device
0086
In accordance with Directive 93/42/EEC
Disposal in compliance with WEEE
Consult the instructions for use
Date of manufacture
Manufacturer
Serial Number
(Rx only) : Federal U.S. law restricts this device to sale by
or on the order of a physician
 Loading...