

Page 1
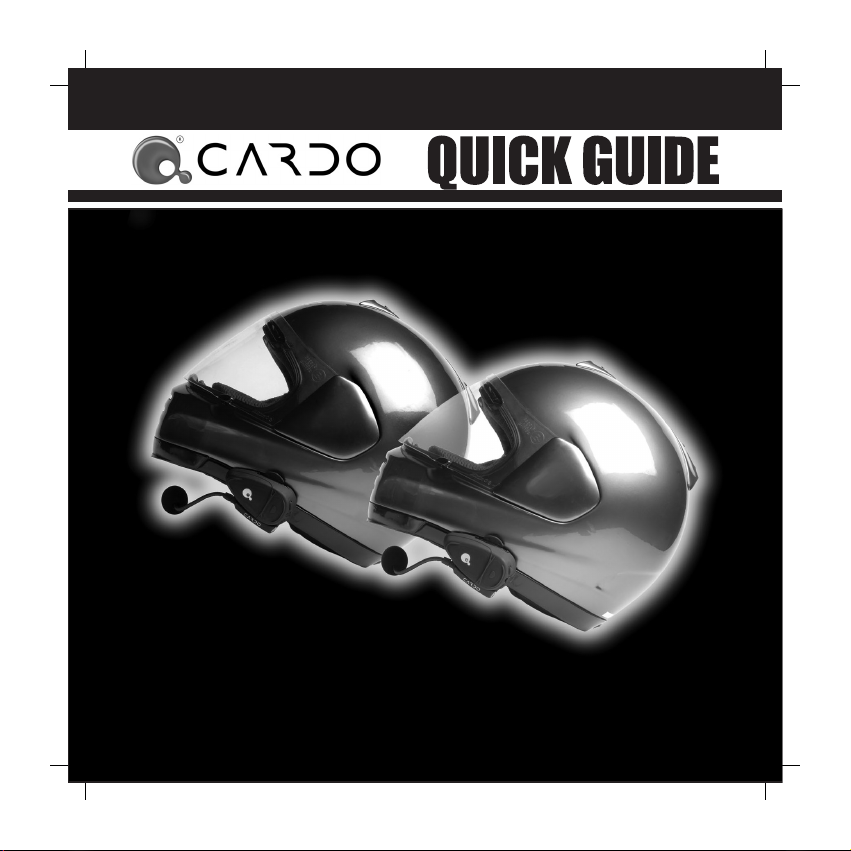
CARDO SYSTEMS INC.
scala-rider TeamSet
TM
Page 2
INTRODUCTION
This Quick Guide will get you started
using the scala-rider TeamSet. For more
detailed information, including safety
precautions, please download the
User Manual from our website at
www.cardowireless.com. Before
using the scala-rider TeamSet, please
familiarize yourself with the Bluetooth
®
functionality of your cellular phone.
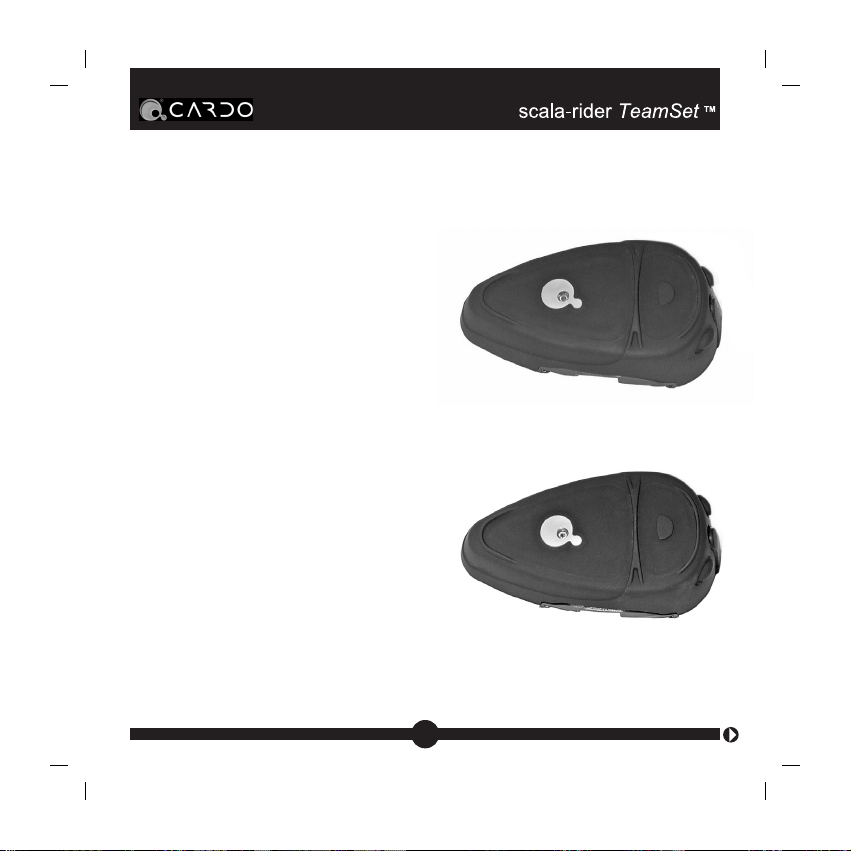
The retail box of the scala-rider TeamSet
contains two headset units: One device
for the driver and a second device for
the passenger.
The driver unit (yellow logo) includes a
Bluetooth module that connects with a
Bluetooth phone, and an intercom module
to communicate with the passenger.
The passenger unit (green logo) contains
only an intercom module that allows
communication with the driver. The
passenger unit cannot connect to a phone.
2
Driver unit (yellow logo)
(with BT and Intercom capabilities)
Passenger unit (green logo)
(with Intercom capability only)
Page 3
COMPONENTS
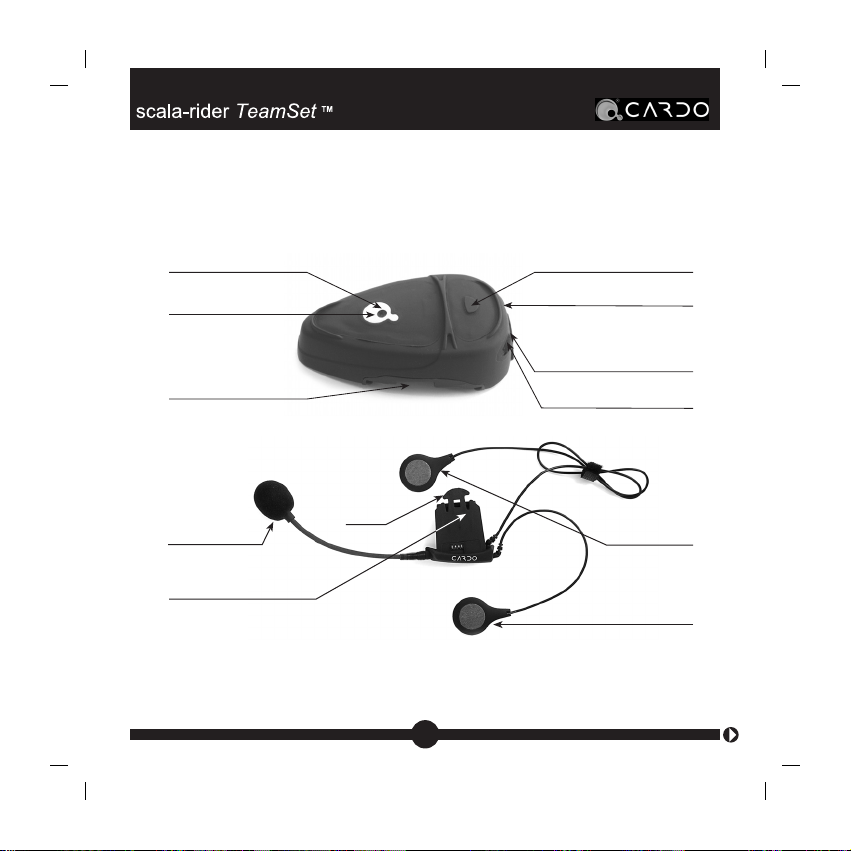
Control Button
Status Light
Sliding Panel
Tab
Microphone
Sliding Plate
Intercom Button
Volume Up
Charging Jack
(Here shown with
closed cover tongue)
Volume Down
Right speaker
(long cord)
Left speaker
(short cord)
One headset for the driver and one headset for the passenger.
NOTE: The use of two speakers may be illegal in certain
jurisdictions. Please check the local regulations and act accordingly.
3
Page 4

IMPORTANT
The scala-rider TeamSet is a water-resistant device, designed for use
under moderate rain or snow conditions. However, the headset is not
waterproof and should not be used under severe weather conditions.
The cover tongue protecting the Charging Jack should be kept tightly
closed at all times to prevent moisture from entering the device.
BEFORE USING (CHARGING THE HEADSET)
Make sure that both headsets are fully charged for at least 5 hours
before initial use.
1. Connect the wall charger to the headset’s Charging Jack (located
between the two Volume buttons).
2. While charging, the red Status Light illuminates (it may take up to 15
seconds until the red Status Light illuminates). When charging is
complete the Status Light will turn off.
GENERAL INSTRUCTIONS
All headset functions are controlled either by:
• Pressing the Control or Intercom Button either for a short period of less
than a second or a long period of over three seconds
Or
• Short pressing the volume up and volume down buttons.
4
Page 5
TURNING THE DRIVER HEADSET ON FOR THE FIRST TIME
The driver unit (yellow logo): The driver unit permits two communication
modes:
• Mobile Phone connections with third parties
• Intercom connection with the passenger
In order for the headset to work with your cellular phone, they must first
recognize each other. This process is called “pairing”, and only needs
to be performed once for each phone.
1. Turn on your phone and make sure its Bluetooth function is activated.
2. With the headset turned off, press and hold the Control Button for ten
seconds until the red and blue Status Lights begin flashing.
3. Search for Bluetooth devices on your phone by following the phone’s
instructions.
4. After a few seconds the phone will list the scala-rider TeamSet as
a discovered device. Select it and follow your phone’s instructions to
accept the pairing.
5. When prompted enter 0000 (four zeros) as your PIN or passkey.
6. Your phone will confirm that pairing has succeeded.
Note: If pairing is not completed within two minutes the headset will
return to Standby mode.
Your headset can pair with up to eight phones, and will automatically
connect to the last phone connected to the headset.
5
Page 6

The Passenger Unit (green logo): This unit is solely intended for intercom
connection with the driver and it cannot initiate or receive a phone call.
To turn on the Passenger Unit, press the Control Button until the blue
Status Light illuminates.
NOTE: The Driver and Passenger Units are already factory-synchronized
for Intercom communication with each other, and do not require any
synchronization by you.
SYNCHRONIZING INTERCOM BETWEEN THE PASSENGER AND
DRIVER HEADSETS
The two headset units (Driver and Passenger units) are supplied factory
synchronized for Intercom communication with each other. Therefore,
you do not need to perform the synchronization between these devices.
However, if you have purchased these units separately and not in the
TeamSet Retail box, you need to synchronize the devices yourself by
proceeding as follows:
1. Simultaneously press and hold the Intercom Buttons of both devices for
at least 10 seconds while watching the Status Light on the Passenger unit.
2. Once the Status Light on the Passenger unit lights steady red, wait three
seconds and then release both Intercom Buttons.
3. If successful, the steady red Status light on the Passenger unit will switch
to a steady blue light for a few seconds, then begin flashing blue. Your
two headsets are now synchronized for Intercom communication.
4. If the synchronization has failed, the steady red Status light on the
Passenger unit will turn off without switching to steady blue for a few
seconds, and you must repeat the synchronization procedure.
6
Page 7
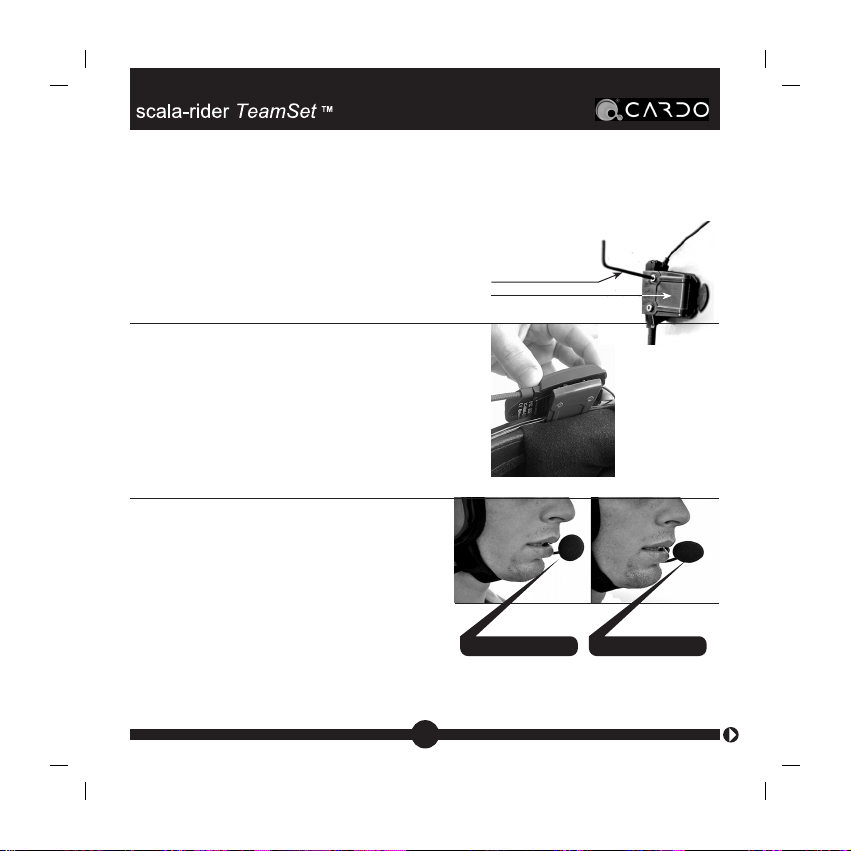
ATTACHING THE SCALA-RIDER UNITS TO YOUR HELMETS
Perform this procedure for both the driver and passenger helmets.
1. Use the enclosed Allen Wrench to
loosen the two screws on the Back
Plate.
Allen Wrench
Back Plate
2. Slide the Back Plate between the
internal padding and the external
shell of the helmet. (If the external
shell is too thick, use the supplied
plastic Extension Pad by loosening
the screws and fitting the extention
pad between the Back Plate and the
main body of the clamp).
3. Adjust the clamp’s location so that
the microphone is located in front of
your mouth, and then tighten the
screws. Attach the speakers to the
Velcro inside your helmet opposite
your ears (short speaker cord for left
ear & long speaker cord for right ear),
or use the supplied Velcro pad.
CORRECT
INCORRECT
NOTE: The microphone must be positioned vertically and
not horizontally.
7
Page 8

4. Slide the headset downwards along
the sliding panel until a clicking sound
indicates that the headset is locked
in place.
REMOVING THE HEADSET FROM THE HELMET
Your headset can be removed for charging and storage by pressing
your finger gently against the tab and sliding the headset up with the
other hand.
We recommend that you store your headset in the enclosed carrying
pouch when not in use.
Press here to
remove
8
Page 9
DRIVER’S UNIT FUNCTIONS
DESIRED RESULT: REQUIRED ACTION:
GENERAL FUNCTIONS
Turn on the headset Press the Control Button steadily for at least 6 seconds
Turn off the headset Press the Control Button steadily for at least 3 seconds
Increase the volume Short press the Volume Up Button.
Decrease the volume Short press the Volume Down Button.
Answer a call Short press the Control Button or speak loudly any word
Reject a call Short press the Intercom Button or remain silent for 15
Terminate a call Long press the Intercom Button. For some mobile phones
Voice Dial During standby, short press the Control Button and state
Redial During standby, long press the Intercom Button
Enable/Disable voice Long press the volume up and down buttons
command feature simultaneously until you hear a beep. The default status
PHONE FUNCTIONS
of your choice.
seconds.
you may need to press the Control Button to end the call.
the name of the person you wish to call. This feature is
supported only by mobile phones that support the Voice
Dial feature.
is voice command enabled.
9
Page 10

DRIVER’S UNIT FUNCTIONS (continued)
DESIRED RESULT: REQUIRED ACTION:
INTERCOM FUNCTIONS
Start using the intercom During standby, start speaking loudly to activate the
Terminate the operation Stop speaking. The audio connection will be terminated
of intercom within 25 seconds.
Conference Call (add During an active phone call, tap the Intercom Button.
passenger to an active
call)
End Conference Call During a conference call, tap the Intercom Button.
(release passenger
from a conference call)
intercom
PASSENGER’S UNIT FUNCTIONS
DESIRED RESULT: REQUIRED ACTION:
Turn on the headset Press the Control Button steadily for at least 3 seconds
Turn off the headset Press the Control Button steadily for at least 3 seconds
Start using the intercom During standby, start speaking loudly to activate the
Terminate operation Stop speaking. The audio connection will be terminated
of intercom within 25 seconds.
Enable/disable During standby, short press the Control Button.
Always On Intercom One tone = Always On intercom.
Increase intercom volume Short press Volume Up Button
Decrease intercom volume Short press Volume Down Button
intercom
Two tones = Voice Controlled (VOX) intercom
10
Page 11

DRIVER’S UNIT STATUS LIGHTS
The Driver Headset uses the following Status Lights to display its current
state:
Status Light Status
None Headset is off
Alternating Red/blue flashes Pairing mode
1 blue flash every 3 seconds Standby – No call is in progress
2 blue flashes every 3 seconds Call being initiated or in progress
1 red flash every 3 seconds Battery is low
2 red flashes every 3 seconds Call being initiated or in progress and battery
Steady red Headset is being charged
is low
PASSENGER’S UNIT STATUS LIGHTS
The Passenger Headset uses the following Status Lights to display
its current state:
Status Light Status
None Headset is off
One blue flash every 3 seconds Headset is on
Steady red Headset is being charged
11
Page 12

AUDIO TONES
With the exception of the actions below, all other actions are followed
by a single tone to confirm that the headset has accepted the command.
Action Tone
Enable/Disable Always On One tone = Always On intercom
intercom Two tones = Voice Controlled (VOX) intercom
Intercom on other side is 2 beeps to alert you that the other side is not
not enabled or off and you available
start speaking
TROUBLESHOOTING
Problem Action
Phone-Related Problems (Driver Unit with Bluetooth Phone)
Unsuccessful Bluetooth Pairing 1. If listed, delete scala-rider from your paired
I cannot hear stereo sound The two speakers provide only dual mono signals.
Can’t answer calls or perform 1. Make sure that the scala-rider headset is turned
voice dialing by pressing the ON and in standby mode with the blue Status
Control Button Light slowly flashing.
device list of your phone.
2. Turn off the phone and headset.
3. Remove the battery from the phone, then place
the battery back in the phone.
4. Repeat the pairing process as described above.
2. Verify that the Bluetooth function on your phone
is set to ON.
12
Page 13

3. Verify that the scala-rider headset is the paired
headset to your phone.
4. Reconnect the phone and headset by short
pressing the Control Button on the headset, or
connecting them manually by using your
phone’s menu.
5. Check the definitions and settings on your
phone.
6. Repeat the pairing process as described in
TURNING THE DRIVER HEADSET ON FOR
Cannot terminate calls using Your phone supports only the Bluetooth headset
the intercom button profile and not the handsfree profile. Therefore
Can’t answer phone calls 1. Make sure that you speak the word loudly after
using the Voice Command prompting
(VC) feature. 2. Close the helmet visor.
I cannot perform redial 1. Make sure that the call list on your phone is
THE FIRST TIME, page 5.
you must use the Control button to answer or
terminate calls.
3. Make sure that the VC feature is activated (see
Driver’s Unit Functions, page 9)
4. The VC feature works well while driving up to
70 km/h or 44 mph with a 3/4 helmet and up to
120 km/h or 75 mph with a closed full faced
helmet. High-end helmets may get better results.
not empty.
2. The Redial feature works only with mobile
phones that also support the Bluetooth
handsfree profile. Check whether your phone
supports this profile.
13
Page 14

Battery does not provide at 1. Make sure your scala-rider headset is fully
least five hours of talk time charged. Charging time is up to 5 hours for an
I’m trying to reject incoming 1. Make sure the VC feature is enabled
calls by remaining silent, but 2. Reject feature works only with mobile phones
the phone continues to ring. that support Bluetooth hands-free profile. Make
Red Status Light does not 1. Make sure the Charging Jack is firmly plugged
light steady when charger into the headset and wait 5 seconds
is connected. 2. Disconnect the Charging Jack wait a few
I hear crackling noises 1. Possibly caused by nearby interference. If you
Sound deteriorates when the Some mobile phones emit weaker Bluetooth
phone is in my back pocket. signals than others, resulting in reduced sound
empty battery. When the headset is connected
to the charger and it is fully charged, the red
Status Light turns off.
2. You may have inadvertently left the
Always-On Intercom on.
sure your mobile phone supports this profile.
seconds and plug it back in.
3. When the headset is fully charged the red light
turns off.
have a GSM phone and your headset is too
close to phone, noises may be heard.
2. Headset and mobile phone are more than 30
ft. (10 m) apart or there are major obstacles
(such as concrete walls) between the headset
and mobile phone.
quality, especially when the phone is close to your
body. Suggestion: Move the phone to your breast
14
Page 15

pocket or at least to a front pocket on the same
The party I am speaking to 1. Close helmet cover under high speed conditions.
complains about insufficient 2. Make sure the microphone is in front of your
audio quality mouth. The microphone should be positioned
Intercom-Related Problems (driver/passenger)
Cannot initiate conversation 1. Try speaking louder.
with other party 2. Make sure the microphone is located in the
(driver/passenger) correct place as described in this guide
I keep hearing the speaker 1. If you drive with an open face helmet at 60
even though no-one is km/h (37 mph) or use a closed helmet above
speaking (audio connection 110km/h (68 mph), the wind noise may activate
is not released). the intercom connection between passenger
When I receive an incoming This is normal behavior. The driver may choose
call, the intercom disconnects to bring the passenger into a conference call by
side you wear your headset.
vertically as described on page 7.
3. Make sure that intercom is not disabled in both
driver and passenger units. (To toggle Intercom
operation, tap the intercom button. You will
hear one beep when enabled; two beeps means
that the intercom is disabled.)
and driver.
2. You can disable the intercom by following the
instructions shown above.
3. Make sure the microphone is placed at the
correct location as described in this guide
short pressing the Intercom Button.
15
Page 16

PLEASE NOTE: THE USE OF THIS PRODUCT IS AT YOUR SOLE RISK AND MAY BE
ILLEGAL IN CERTAIN JURISDICTIONS. ALL WAIVER PROVISIONS CONTAINED IN THE
COMPREHENSIVE USER MANUAL APPLY. IF YOU ARE UNWILLING TO ACCEPT ANY
OF THE SAID WAIVER CONDITIONS YOU MAY RETURN THE PRODUCT FOR A FULL
REFUND ACCORDING TO COMPANY POLICY TERMS.
SUPPORT
For additional information visit our website at
www.cardowireless.com, or call us at:
Toll-free USA: 1-800 488-0363
Europe: +49 89 450-36819
Developed and Manufactured by:
www.cardowireless.com
QGTS_027_0566
 Loading...