

Page 1

G9 / G9 PowerSet
™
User Guide
Page 2
CONTENTS
1. INTRODUCTION ..............................................3
2. CHARGING THE SCALA RIDER ................................5
3. CARDO COMMUNITY® PLATFORM AND “ONE+8” INTERCOM ..5
4. GETTING STARTED ...........................................6
4.1 GENERAL FUNCTIONS .........................................6
4.2 STATUS LI GH TS ...............................................6
4.3 AUDIO SOURCES AND PRIORITIES ............................6
4.4 VOICE COMMAND. . . . . . . . . . . . . . . . . . . . . . . . . . . . . . . . . . . . . . . . . . . . . 7
4.5 SETTINGS CUSTOMIZATION ...................................7
5. INTERCOM CONFIGURATION ................................8
5.1 “ONE+8” INTERCOM TOGGLING MODE .......................9
5.1a CONFIGURING YOUR G9 BUDDY NAME ...................9
5.1b PAIRIN G WITH A “ONE+8” I NTERCOM BUD DY . . . . . . . . . . . . . 9
5.1c PAIRED DEVICE INDICATION .............................9
5.2 INTERCOM CONFERENCE MODE .............................10
5.2a TWOWAY INTERCOM ..................................10
5.2b THREEWAY INTERCOM .................................11
5.2c FOURWAY INTERCOM ..................................11
5.3 CLICKTOLINK® INTERCOM MODE ..........................12
6. USING THE INTERCOM ......................................12
6.1 MAKING 2WAY INTERCOM CALLS ...........................12
6.2 MAKING 3WAY INTERCOM CALLS ...........................13
6.3 MAKING 4WAY INTERCOM CALLS ...........................13
6.4 USING CLICKTOLINK INTERCOM ...........................13
6.5 RECEIVING INTERCOM CALLS ................................14
6.6 BUSY SIGNAL ................................................14
6.7 GROUP SIGNAL ..............................................14
6.8 VOICE CONNECT VOX ......................................14
7. PAIRING AND USING A MOBILE PHONE, GPS OR
MP3 PLAYER ...............................................15
7.1 MOBILE PHONE ..............................................15
7.1a PAIRING A MOBILE PHONE ..............................15
7.1b MAKING AND RECEIVING PHONE CALLS ................15
7.1c HOT DIAL ...............................................16
7.2 PAIRING A GPS DEVICE .......................................16
7.3 MUSIC STREAMING VIA A2DP ................................16
7.4 MUSIC VIA THE AUX ..........................................17
8. FM RADIO .................................................17
8.1 GENERAL FUNCTIONS .......................................17
8.2 RADIO TUNING ..............................................17
8.3 AUTOMATIC RADIO TUNING .................................18
8.4 RDS RADIO DATA SYSTEM ..................................18
9. TROUBLESHOOTING ......................................18
10. S UP PO RT ..................................................18
11. N OTICES ...................................................19
IMPORTANT:
This is version 2.0 of the User Manual. Please note, that our manual is
periodically updated on the Cardo website to include the ver y latest
features and functions of your new scala rider G9.
Please visit www.cardosystems.com/download/manuals to check
if the manual you are holding is the most updated version and to
download the manual in your preferred language.
2
| scala rider
2
| scala rider
®
®
G9 / G9 PowerSet
G9 / G9 PowerSet
Page 3
1. INTRODUCTION
English
Thank you for choosing the scala rider G9® Bluetooth®
communication and entertainment system for motorcycle helmets.
This manual will help you set up, congure and operate it.
If you have purchased the G9 PowerSet™, your retail box contains
two factory-paired scala rider G9 units.
Among others, the scala rider G9 oers the following key features:
INTERCOM OPTIONS
• Intercom Conference mode between 2, 3 or 4 riders at a range of
up to 1 mile /1.6 km*
• Click-to-Link® Intercom: For spontaneous connection with other
scala rider users nearby
• “One+8” Intercom Toggling with 8 additional buddies
MULTIPLE DEVICE CONNECTIVITY
• Bluetooth Mobile phone / GPS device
• Wireless MP3 connectivity via A2DP - cable option also provided
ENTERTAINMENT OPTIONS
• Wireless music streaming via devices supporting Bluetooth Stereo
A2DP and AVRCP proles.
• MP3 Players (non-Bluetooth) via cable
• Built-in FM Radio with 6 station presets and automatic tuning
CARDO COMMUNITY®
• Download software upgrades, enhancements and new features
• Set up your “One+8” Intercom buddies
• Create, nd and join riding tours
• Customize your G9 settings
ADVANCED TECHNOLOGY
➤ Voice Command and VOX technology:
• Make / Receive mobile calls by voice command
• Make / Receive intercom calls by voice command
➤ AGC technology (Automatic Gain Control), allowing the
automatic adjustment of volume according to ambient noise
and driving speed. You can also control the volume level
manually. AGC sensitivity levels can be customized to suit your
personal preferences
➤ VOX technology and Voice Command for safe and hands-
free operation of key functions. VOX sensitivity levels can be
customized to suit your personal preferences
➤ PLC software (Packet Loss Concealment) for real-time
compensation of audio losses in challenging environments.
➤ Advanced software updates via PC/Mac
➤ Spoken status announcements, so that you always know to
whom or to what device you are connected
➤ Volume Per Mode: Volume is set and saved at dierent levels for
each audio source
We wish you a great scala rider G9 experience and encourage you
to write us at support@cardosystems.com with any questions,
suggestions or comments you may have.
* Under tough environmental conditions (dense forest, narrow buildings, heavy
trac), intercom range will be reduced. Once conditions improve, the range will
increase again.
scala rider® G9 / G9 PowerSet |
scala rider® G9 / G9 PowerSet |
3
3
Page 4
CONTENTS OF RETAIL BOX
NOTE: If you purchased the scala rider G9 PowerSet, your Retail
Box will include two sets of each component listed below.
Corded Microphone
Replacement
Mic sponges
*
G9 Audio Kit
Noise canceli ng
sealed omn i
microphone
Interchangeable
exible boom
(Corded mic also
provided)
scala rider G9 Unit
Volume Down / Re wind (V-)
Mobile button (MB)
Volume Up / For ward (V+)
Channe l A / MP3
• Connect to Ri der A
• MP3 Button
Sliding
Panel
Flip-up Antenna
Voice Comma nd
(VC)
“One+8” Interco m
Channe l B / FM
• Connect to Ri der B
• FM Radio
Two
speakers
MP3 Jack
(back)
Silicone Cover
• Charging
jack
• Software
download
port
Alcohol
Pad
Wall charger p lug
USB cable
Velc ro Pads
Glue plates
Installation Guide
Allen wrench
Alcohol pad
MP3 cable
Carry pouch
Speaker booster pads
* The large micr ophone sponge is recomme nded for use with open helm ets
4
| scala rider
4
| scala rider
®
®
G9 / G9 PowerSet
G9 / G9 PowerSet
Page 5
2. CHARGING THE SCALA RIDER
Make sure that your scala rider is fully charged for at least 4 hours
before initial use.
Charging with the wall charger is faster than via a computer USB
port.
• RED LED ON – Charging • RED LED OFF – Charging complete
Battery
Check
IMPORTANT:
In Standby, press “V+” for 2 seconds.
• BLUE = Full • PURPLE = Half • RED = Almost empt y
The scala rider is certied as waterproof and dustproof (IP67).
However, when in use, the USB silicone cover should be kept
tightly closed to prevent moisture from entering the unit.
3. CARDO COMMUNITY PLATFORM AND “ONE+8” INTERCOM
The Cardo Community is one of the most remarkable and groundbreaking features of the scala rider G9.
Visit http://community.cardosystems.com in order to get the
following features:
• “One+8” Intercom: The scala rider G9 allows Intercom toggling
with up to 8 other individual riders.
• Download and install the latest software upgrades
• Congure your own Buddy name (alias) for the “One+8” Intercom
mode and personalize the settings of your G9 through your PC /
Mac*
• Find your friends and add them to your “One+8” Buddy list
• Create and join tours and invite your friends
*Minimum Requirements: Windows® XP™ / Mac OS X 10.5
English
scala rider® G9 / G9 PowerSet |
scala rider® G9 / G9 PowerSet |
5
5
Page 6
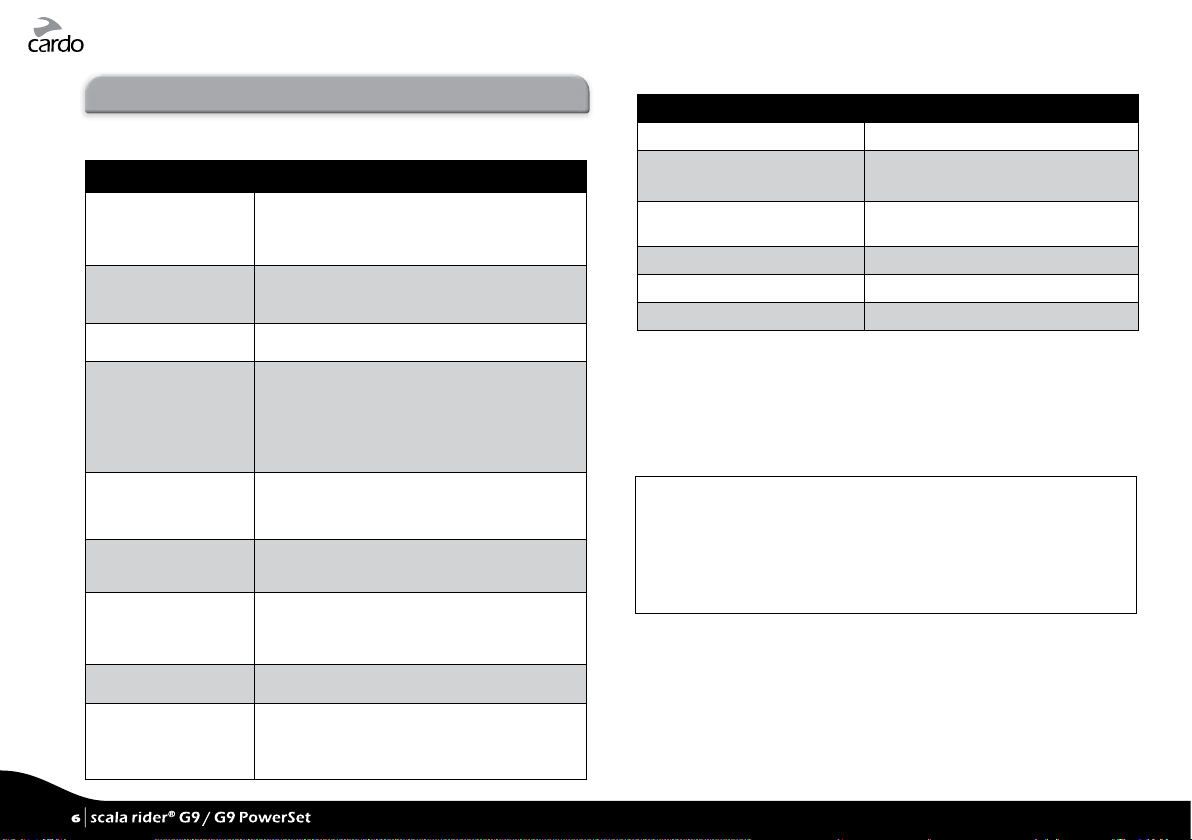
4. GETTING STARTED
4.1 GENERAL FUNCTIONS
GENERAL FUNCTIONS
Power ON / OFF Press “MB” for 2 seconds
Volume Tap “V+” or “V-” to adjust and s et volume of
Mute Tap “V+” and “V-” simultaneously
Battery level
indicator
Voice Menu Press “A” and “B” simultaneously for 2 seconds
Hear Your Buddy
Name
Paired Device
Indication
Group Signal Tap “VC” twice
Enable / Disable Vox
(For Intercom calls
only)
• ON: 3 BLUE ashes + ascending tone
• OFF: 3 RED ashes + ascending tone
current audio source
Press “V+” for 2 seconds
• Blue LED = Full charge
• Purple LED = Half charge
• Red LED = Almost empty
and follow the spoken instructions
In Standby, tap “VC” and “B” simultaneously
Press “VC” for 5 seconds
If “One+8” Buddies are within range, purple
LEDs ash for 2 seconds
Press “V+” and “V-” simultaneously for 2 seconds
• Enabled: Blue ash for 2 seconds
• Disabled: Red ash for 2 seconds
4.2 STATUS LIGHTS
LED Indication Status
None scala rider is OFF
1 BLUE ash every 3 seconds Standby mode
No active audio sources
2 BLUE ashes every 3
seconds
1 RED ash every 3 seconds Standby mode – Battery is low
2 RED ashes every 3 seconds Active mode – Battery is low
Solid RED Charging
Active mode – Call in progress / music
or other audio source is ON
4.3 AUDIO SOURCES AND PRIORITIES
If two connected audio sources try to play audio simultaneously,
your scala rider G9 automatically determines which audio
source to play through the speakers based on the priority of the
connected devices.
Higher Priority
Lower Priority
1. Mobile Phone or GPS instructions
2. Intercom/”One+8”/Click-to-Link
3. A2DP (Stereo Bluetooth) audio
4. FM Radio (Built-in)
5. AUX (for corded connection i.e. Music Players)
*GPS instruc tions from Smartphon e GPS Apps are
prioritized like A2DP audio
*
For example:
• Incoming mobile phone calls interrupt ongoing intercom calls
• Incoming intercom calls will interrupt ongoing A2DP music
• Click-to-Link, Intercom and “One+8” calls have the same priority:
Click-to-Link requests will not interrupt any type of Intercom call in
progress, and vice-versa
6
| scala rider
6
| scala rider
®
®
G9 / G9 PowerSet
G9 / G9 PowerSet
Page 7
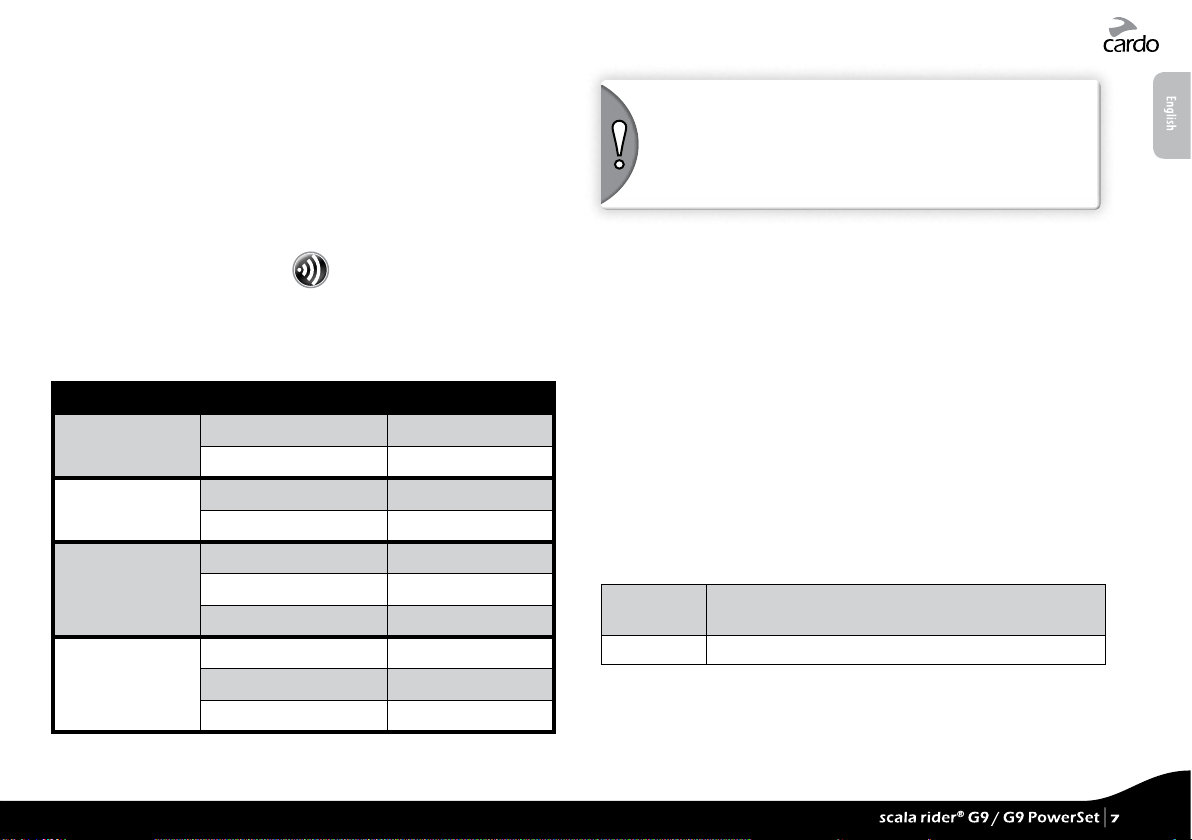
4.4 VOICE COMMAND
The G9 allows you to perform certain actions by simply using your
voice. Using advanced Voice Recognition, you can control the G9
completely handsfree.
The default Voice Command language is English. Other languages
can be selected via the Cardo Community platform including
German, French, Italian and Spanish (see section 3).
Throughout this manual, features which are available via Voice
Command are marked with the
icon.
1. In Standby Mode (no call in progress), tap “VC” or speak any
word loudly to activate VOX
2. Speak a Voice Command from the table below:
Current Mode Desired Action Say this:
Standby / FM /
A2DP / AUX
Standby
FM Radio
A2DP Music
“One+8” Intercom Call* <<G9 Buddy Name>>*
Intercom call with A or B “Call Intercom”
Start A2DP “Music ON”
Turn on FM “Radio ON”
Turn o FM “Radio OFF ”
Next Station Preset “Next Station”
Previous Station Preset “Previous Station”
Stop / Pause A2DP “Music OFF”
Ne xt Track “N ext Track”
Previous Track “Previous Track”
NOTE: Voice Command performance may vary based on
environmental conditions including driving speed, helmet type and
ambient noise.
For improved performance of the Voice Command feature, minimize
wind impact on the microphone by using the large microphone
sponge and closing the visor.
4.5 SETTINGS CUSTOMIZATION
Your G9 oers various customizable settings, allowing you to
personalize it according to your preferences. Among these
settings, you can:
• Enable/Disable Spoken Status Announcements, i.e. informing
you about the respective connectivity status, like if you are in
mobile phone or intercom mode, and conrm changes of such
modes. By default the feature is ON.
• Set custom AGC and VOX sensitivity levels suited to your
specic riding style and conditions.
G9 settings can be customized in two ways:
• Via the Cardo Community (see Section 3)
• Via the Voice Menu and the buttons on your G9. The menu is
available in several languages.
Enter Menu
In Standby, press “A” and “B” simultaneously for
2 seconds
Exit Menu
Wait to exit
English
*see Section 5.1 for details
scala rider® G9 / G9 PowerSet |
scala rider® G9 / G9 PowerSet |
7
7
Page 8

5. INTERCOM CONFIGURATION
The scala rider G9 allows Bike-to-Bike full duplex intercom
communication at a range of up to 1 mile / 1.6 km (subject to
terrain) with antenna open and within line of sight.
Open the antenna for
maximum range
Pairing with another scala rider G9
To chat with another scala rider device via Intercom, rst pair the
scala rider G9 to the second device. Pairing is a one-time process.
Once paired, the two units will automatically recognize each
other whenever it is within range.
NOTE: If you have purchased the G9 PowerSet, the retail package
contains two factory-paired units congured to communicate via
their Channel A buttons.
Intercom Compatibility
Your scala rider G9 is compatible with all scala rider intercom
models for intercom calls. In addition, it is also compatible with
the Schuberth SRC-System™. Intercom range with other models is
limited to the distance of the device with the shorter range.
For instructions on how to pair with other scala rider models,
please visit www.cardosystems.com/compatibility.
Intercom communication is possible using one of the three
Intercom modes:
Section
5.1
“One+8” Intercom
Toggling Mode
t
n
I
9
G
s
u
o
e
n
a
t
n
o
p
S
k
n
i
L
-
o
t
-
k
c
i
l
C
“
O
n
(scala rider G9 only)
Section
5.2
Intercom Conference
Mode (all scala rider
models)*
Section
5.3
Click-to-Link
(compatible scala rider
models)
o
c
r
e
m
o
c
r
e
t
n
I
e
+
8
”
I
n
t
e
m
O
p
t
i
o
4
W
o
T
m
o
c
r
n
a
g
s
y
I
n
t
e
r
c
o
m
C
o
n
f
e
r
e
n
c
i
n
g
g
n
i
l
g
2-way Intercom conversations
within a group of up to eight other
“One+8” Buddies
Intercom Conferencing (2-way,
3-way and 4-way) (Channel “A”
and “B”)
1-on-1 spontaneous intercom
conversations with random
scala rider users near you who are
not already paired to your G9
8
| scala rider
8
| scala rider
®
®
G9 / G9 PowerSet
G9 / G9 PowerSet
Page 9

5.1 “ONE+8” INTERCOM TOGGLING MODE
Pair with up to 8 other G9 devices (“One+8” Buddies) and
connect with one at a time by pronouncing their name.
5.1a CONFIGURING YOUR G9 BUDDY NAME
“One+8” Intercom Toggling allows you to connect to a “O ne+8”
Buddy by simply saying the Bu ddy Name they assigned to their G9.
IMPORTANT! Before using “One+8” Intercom, you should assign
your G9 device(s) a Buddy Name, so that other “One+8” participants
can call you by this name.
If you change your G9 Buddy Name, you must Flash Pair again with
your “One+8” Buddies for their G9 to receive your new Buddy Name.
CLICK !
3. If Flash-Pairing was successful, a purple light appears for
2 seconds.
English
Visit the Cardo Community to assign your G9 device’s Buddy Name.
See Section 3 for more details.
Until you assign a Buddy Name to your G9, it will be known by its
generic “One+8” Buddy name, “scala rider”.
To hear the name you have chosen for your G9:
Hear Your Buddy
Name
In Standby, tap “VC” and “B” simultaneously.
You will hear the Buddy name of your G9
through the speakers.
5.1b PAIRING WITH A “ONE+8” INTERCOM BUDDY
Flash-Pairing™
Use Flash-Pairing to add a new “One+8” Buddy within
seconds.
1. Remove both G9 units from their Audio Kits and check they are
in Standby Mode (slow single blue ashing).
2. Bump the two G9 units gently against each other and hold them
side by side.
NOTE: If your scala rider G9 already has a full list of 8 paired
“One+8” Intercom Buddies, pairing another buddy will replace the
buddy that you have not spoken to for the longest time.
Pairing Online – Cardo Community®
You can nd your friends and add them to your “One+8” Buddy list
via the Cardo Community website at:
http://community.cardosystems.com
5.1c PAIRED DEVICE INDICATION
You can see which G9 units within a range of 60ft./20m are your
“One+8” Intercom Buddies.
1. Press “VC” for 5 seconds.
2. If your G9 and another nearby G9 are paired as “One+8” Buddies,
the LEDs on both units will turn PURPLE for 2 seconds.
3. If they aren’t paired as “One+8” Buddies, pair them in seconds
using Flash-Pairing (see Section 5.1b).
scala rider® G9 / G9 PowerSet |
scala rider® G9 / G9 PowerSet |
9
9
Page 10

5.2 INTERCOM CONFERENCE MODE
Start multi-party conversations using the Channel A and B buttons
on your G9. This mode is suitable for 2, 3 or 4-way calls.
Pairing between scala rider G9s can be done either via
Flash-Pairing (see below) or by manually pairing A and B as
described in the following sections.
INTERCOM CHANNELS AND PAIRING LED INDICATION
CHANNEL PAIRING BUTTON LED INDICATORS
“A” Channel “A” BUT TON Rapid RED ashing
“B” Channel “B” BUTTON Rapid BLUE ashing
5.2a TWOWAY INTERCOM
If you have purchased the G9 PowerSet, both units are factorypaired and congured to communicate via their respective
Channel “A” Buttons. If for any reason you have to pair them
again, OR if you purchased a single scala rider G9 and wish to
pair with a second unit to make Intercom calls, proceed as follows:
4. Within 5 seconds of tapping a Channel button, bump the two G9
units gently against each other and hold them side by side.
CLICK !
5. If Flash-Pairing was successful, a purp le light appears for 2 seconds.
METHOD 2: Manual Pairing with Channel A / B buttons
☛
1. Check that both G9s are ON and in Standby mode (single BLUE
ash every 3 seconds).
2. Choose a channel to pair the G9 unit (Channel “A” or “B”).
NOTE: Selecting a Channel that is already in use will override the
existing paired device on that Channel with the newly paired device.
METHOD 1: Flash-Pairing with Channel A / B buttons
1. Remove two G9 units from the Audio Kits and verify
they are in Standby Mode (slow single blue ashing).
2. Tap the Channel button (“A” or “B”) on the rst G9 unit and the
LED begins ashing.
3. Tap the Channel button (“A” or “B”) on the second G9 unit and
the LED begins ashing.
NOTE: Selec ting a Channel that is already in use will ove rride the
existing paired d evice on that Channel with the newly- paired device.
®
10
| scala rider
10
| scala rider
®
G9 / G9 PowerSet
G9 / G9 PowerSet
3. Press the chosen Channel Button (“A” or “B”) on the rst G9 for at
least 5 seconds until the BLUE or RED LED be gins ashing rapidly,
indicating it is in Intercom Pairing mode (see t able in section 5.2).
4. Immediately repeat Steps 2-3 for the second G9 unit . Both units
will now be in Intercom Pairing mode.
5. After a few seconds, both G9s will show a solid light for
2 seconds, indicating that they are paired, connected and
ready to use.
NOTE: If Pairing is not completed within two minutes, the G9 will
return to Standby mode.
Page 11

5.2b THREEWAY INTERCOM
If you purchased the scala rider G9 PowerSet, both units are
factory-paired and congured to communicate via their respective
Channel “A” Buttons. To pair a third scala rider G9 use Channel “B”.
To set up three-way intercom conference mode proceed as
follows:
Use Channel “A”
Use Channel “B”
5.2c FOURWAY INTERCOM
To set up four-way intercom conference mode proceed as follows:
English
Rider 2
Rider 1
Rider 3
Rider “1” is paired to Rider “2” and also to Rider “3”.
PAIRING THREE SCALA RIDER G9 UNITS
1. Rider 1 pairs their device to Rider 2 using Channel “A” as
described in section 5.2a.
2. Rider 1 pairs their device to Rider 3 using Channel “B” as
described in section 5.2a.
The Three-Way Conference Intercom Pairing is now complete and
ready to use.
IMPORTANT: Three-Way Conference Mode Considerations
During a 3-Way Intercom Conference call with 2 other participants,
Rider 1 will not be able to receive mobile phone calls or GPS
navigation instruc tions as long as the call is in progress.
In this conguration the two passengers (numbered 2 and 4) are
each using two Bluetooth connections:
Passenger 2 is paired to Rider 1 and to Passenger 4
Passenger 4 is paired to Rider 3 and to Passenger 2
PAIRING FOUR SCALA RIDER G9 UNITS
1. Pair R ider 1 to Passenger 2 using Channel “A” (see 5. 2a).
2. Pair R ider 3 to Passenger 4 using Channel “A” (see 5. 2a).
3. Pair Passenger 2 to Passenger 4 using Channel “B” (see 5.2a).
The Four-Way Pairing is complete and ready to use.
IMPORTANT: Four-Way Conference Mode Considerations
During a 4-Way Intercom cal l, the two passengers who maintain t wo
active connections simultaneously will not be able to receive mobile
phone calls or GPS instruc tions as long as the conference call is in
progress.
scala rider® G9 / G9 PowerSet |
scala rider® G9 / G9 PowerSet |
11
11
Page 12

5.3 CLICKTOLINK INTERCOM MODE
Click-to-Link is a spontaneous, “social” feature of your G9.
Use Click-to-Link to instantly initiate 1-on-1 intercom calls
with other scala rider users near you, without those users
already being paired to you. Think of it as a private Bike-to-Bike
channel that you can set up on-the-go with other scala rider users
that you see along the way.
The Click-to-Link feature can be disabled on your G9 ee ctively blocking
any attempt by a third part y to send a Click-to-Link request to you. S ee
section 6.4 for details of how to use Click-to-Link.
6. USING THE INTERCOM
6.1 MAKING 2WAY INTERCOM CALLS
There are two ways to start an intercom call with devices that are
paired to your scala rider G9.
OPTION 1: Voice Connect (VOX) Intercom Call
Use this for either “One+8” Intercom or 2-way Intercom
Calls (Channel “A” or “B”)
1. Speak any word loudly into the microphone to open the
Intercom channel.
2. When you hear the Voice Command tone, say
• the name of a ”One+8” Intercom Buddy i.e. “John Smith”
• or say “Call Intercom” to start an intercom call with Rider A and
/ or Rider B (subject to who is present)
NOTE: VOX Intercom call with only Rider A or Rider B will end
automatically after 30 seconds of silence.
:
OPTION 2: Manual Mode
☛
Voice Command button
“One+8“ Intercom
Channel A button
Connect to Rider A
Channel B button
Connect to Rider B
Use this to start an Intercom call with either:
• ”RIDER A” – tap “A”
• ”RIDER B” – tap “B”
• “One+8” Intercom Buddy – See table below
To end a call tap the respective button again.
“One+8” Intercom
SAY THE NAME:
a. Tap “VC”
b. Speak the
name of
the “One+8”
Intercom
Buddy
CHOOSE THE NAME (from your Buddy List):
a. Press “VC” for 2 seconds
b. The G9 plays the names of all pre-paired
“One+8” Intercom buddies.
c. Once you hear the name of the Buddy
OR
you wish to call, tap the Voice Command
button or speak any word loudly into the
microphone.
To cancel “One+8” Buddy List playback:
Press “VC” for 2 seconds.
12
| scala rider
12
| scala rider
®
®
G9 / G9 PowerSet
G9 / G9 PowerSet
Page 13

NOTE: Voice Command performance may vary based on
environmental conditions including driving speed, helmet type
and ambient noise.
For improved performance of the Voice Command feature,
minimize the wind impact on the microphone by using the large
microphone sponge and closing the visor.
6.2 MAKING 3WAY INTERCOM CALLS
To start an Intercom Conference Call with Channel “A” and “B”:
OPTION 1: Voice Connect VOX
1. Speak any word loudly into the microphone to open the
Intercom channel.
2. When you hear the Voice Command tone, say
: “Call Intercom” to
make an intercom call with Rider A and Rider B.
OPTION 2: Manual Mode
☛
1. Add Channel “A”: Tap “A”
2. Add Channel “B”: Tap “B”
If you are already in an Intercom Call with Rider A or B, you can add
another rider (A or B) by tapping the respective button, or another
rider can join the intercom call in the same way.
To end Intercom Call press the respective Channel “A” or “B” Button.
NOTE: 3 and 4 -way intercom calls can only be made using Channe l “A”
and Channel “B”.
6.3 MAKING 4WAY INTERCOM CALLS
Once you have successfully paired the four G9s as described in
5.2c. proceed as follows:
1. Make sure all four G9s are in Standby mode.
2. Passenger 2 should tap “B” to call Passenger 4. Wait until audio
is heard on both G9s.
3. Rider 1 should tap “A” to call Passenger 2.
4. Rider 3 should tap “A” to call Passenger 4.
Now the 4-way Intercom conference mode is established.
6.4 USING CLICKTOLINK INTERCOM
If you want to… Perform this action:
Start a CTL call request
(search lasts up to 10 sec.)
End a CTL call /
Cancel a CTL call request
Accept a CTL call When hearing the CTL ringtone:
Reject a CTL call While hearing the CTL ringtone:
Enable/Disable CTL
(Disabled by default)
Double tap “A”
Tap “A”
Tap “A” or say any word loudly to answer
by VOX
Remain silent until the ring tone stops
Via the Voice Menu or Cardo Community
If other scala rider users are nearby, your next Click-to-Link call
may randomly connect to any of them.
English
scala rider® G9 / G9 PowerSet |
scala rider® G9 / G9 PowerSet |
13
13
Page 14

6.5 RECEIVING INTERCOM CALLS
If another paired scala rider G9 tries calling you via Intercom, the
call will begin almost instantly.
6.6 BUSY SIGNAL
When attempting to establish an Intercom call with another device
that is already busy, a busy signal will be heard. The G9 is busy
while on a phone call, intercom call with Channels “A” and “B”,
“One+8” intercom call or Click-to-Link call.
6.7 GROUP SIGNAL
Send an instant message to all paired G9s within a range of
up to 350 m / 1,150 ft. The recipients will hear a “Signal!”
voice announcement. To reach a maximum number of riders, the
message is automatically forwarded to all paired G9s within the
recipient’s range. In this manner the total range is extended to up
to 1 km / 3,280 ft.
Send a Group Signal Double tap “ VC”
6.8 VOICE CONNECT VOX
The G9 oers VOX technology for safe and hands-free
operation of some key functions.
In the Cardo Community you can set VOX to either start an
intercom call or activate the Voice Command.
VOX Activation Speak any word loudly into the microphone
Answer a
phone call
Reject a
phone call
VOX Sensitivity
(Default: Medium)
VOX Ope ration
Mode
Enable/Disable
VOX
(For Intercom/ Voice
Command only)
Speak any word loudly into the microphone
(e.g. “hello”).
Remain silent for about 15 seconds
Adjust via the Voice Menu or the Cardo Community.
High: Use this setting if it is dicult to activate VOX
Low: Use this setting if it is too easy to activate VOX
VOX can be set to activate the Voice Command
(default) or to start an Intercom Call via the
Cardo Community
Press “V+” and “V-” simultaneously for 2 seconds
• Enable: Blue ash for 2 seconds
• Disable: Red ash for 2 seconds
14
| scala rider
14
| scala rider
NOTE: The transfer of wireless signals is subject to multiple external
factors. Therefore, users may use but should not rely on the Group
Signal for emergency purposes.
®
®
G9 / G9 PowerSet
G9 / G9 PowerSet
Page 15

7. PAIRING AND USING A MOBILE PHONE, GPS OR MP3 PLAYER
To connect your scala rider G9 to a Bluetooth device you must
rst pair them. Pairing is a one-time process. Once paired, the
Bluetooth device and the scala rider G9 will automatically
recognize each other whenever they are within range (10m / 33ft).
Your scala rider G9 oers Multiple Device Connectivity (“MDC”) :
➤ Intercom with up to 10 other scala rider G9 units (Rider A, Rider
B, and “One+8” Buddies)
➤ Bluetooth Mobile Phone / GPS device
➤ Bluetooth A2DP Music Player
7.1 MOBILE PHONE
• Make and receive calls
• Listen to Music via A2DP (with compatible phones)
7.1a PAIRING A MOBILE PHONE
If using both a Bluetooth GPS and Mobile Phone, pair the mobile
phone to the GPS device. See Section 7.2
1. Turn on your mobile phone and make sure the Bluetooth
function is activated.
2. Check the G9 is in Standby (single BLUE ash every 3 seconds).
3. Press “MB” for at least 6 seconds. The G9 will rst ash RED.
Continue to hold the button until the RED and BLUE lights begin
rapidly alternating.
4. Search for Bluetooth devices on your phone by following the
phone’s instructions. Consult your phone’s User Manual for
more information.
5. After a few seconds the phone will list “scala rider G9” as a
discovered device. Select it.
6. If prompted for a PIN or Passkey, enter 0000 (four zeros).
7. The phone will conrm that pairing has succeeded and the
scala rider G9 will begin ashing slowly in BLUE.
NOTES:
• If Pairing is not completed within 2 minutes, the scala rider G9 will
return to Standby mode.
• N ot all Bluetooth mobile phones can broadcast Bluetooth Stereo
music (A2DP), even if the phone has an MP3 player function. Consult
your mobile phone’s User Manual for more information.
• Af ter pairing, you may need to tap the Mobile Button to connect the
scala rider G9 to the phone.
7.1b MAKING AND RECEIVING PHONE CALLS
Answer a call Tap “MB” or speak any word loudly to
Reject a call Remain silent for 15 seconds, or press “MB”
End a call Tap “MB”
Voice Dial* (if supported
by mobile phone)
Redial* Double tap “MB”
Hot Dial Double tap “B”
INTERCOM CONFERENCE MODE
Add/Remove Channel “A”
to/from a call
Add/Remove Channel “B”
to/from a call
*This feature is not available during intercom or mobile calls
answer by VOX
for 2 seconds
Tap “MB” and follow the prompt from the
mobile
Tap “A” while on a phone call
Tap “B” while on a phone call
English
scala rider® G9 / G9 PowerSet |
scala rider® G9 / G9 PowerSet |
15
15
Page 16

7.1c HOT DIAL
Call a pre-pro grammed phone number automatically at the push of
a button.
1. Congure your G9’s Hot Dial number via the Cardo Community at
http://community.cardosystems.com (see Section 3)
2. To call your Hot Dial number, double tap “B”.
7.2 PAIRING A GPS DEVICE
NOTES:
• Not all Bluetooth GPS devices allow connections to Bluetooth
audio devices. Please consult your GPS User Manual for more
information.
• If Pairing is not completed within 2 minutes, the scala rider G9 will
return to Standby mode.
1. Turn on your GPS.
2. Check the G9 is in Standby (single BLUE ash every 3 seconds).
3. Press “V+” for at least 5 seconds, until the PURPLE light begins
ashing rapidly.
4. Search for Bluetooth devices on the GPS device by following the
instructions in the GPS User Manual.
5. Once your GPS lists the scala rider G9 as a discovered device,
select it.
6. If prompted for a PIN or Passkey, enter 0000 (four zeros).
7. Your GPS will conrm that pairing has succeede d and the scala rider G9
will begin ashing slowly in BLUE.
IMPORTANT: If you wish to use a mobile phone and GPS device with
the scala rider G9, pair the mobile phone directly to the GPS device.
7.3 MUSIC STREAMING VIA A2DP
NOTE: The scala rider G9 can also receive audio via
the enclosed cable from non-Bluetooth MP3 Players or
audio sources as described in section 7.4.
1. Turn on the Music Player and make sure that Bluetooth function
is activated.
2. In Standby, press “MB” for 6 seconds. The G9 will rst ash RED.
Continue to hold the button until the RED and BLUE lights begin
rapidly alternating.
3. Search for Bluetooth device on the Music Player by following the
device’s instructions.
4. Once your Music Player lists the “scala rider G9” as a discovered
device, select it.
5. If prompted for a PIN or Passkey, enter 0000 (four zeros).
6. The Music Player may conrm that pairing has succeeded, and
the scala rider G9 will begin ashing slowly in BLUE.
NOTE: If Pairing is not comple ted within 2 minutes, the G9 will
return to Standby mode.
Available only on AVRCP compatible Bluetooth audio sources
Play Press “A” for 2 seconds
Pause/Stop Press “A” for 2 seconds
Next Track Press “ V+” for 2 seconds
Previous Track* Press “V-” for 2 seconds
*With some phones you may need to repeat this action
16
| scala rider
16
| scala rider
®
®
G9 / G9 PowerSet
G9 / G9 PowerSet
Page 17

SWITCHING BETWEEN A2DP AUDIO SOURCES
If a Music Player is paired, the scala rider G9 will use it as the
default A2DP audio source.
1. Stop the music playback from the current device.
2. Start music playback from the other device.
7.4 MUSIC VIA THE AUX
The AUX is used to connect a non-Bluetooth audio source with a
3.5 mm / ⁄” stereo jack using the enclosed cable.
AUX
1. Check the G9 is in Standby (single BLUE ash every 3 seconds).
2. Connect the MP3 cable to the Music Player’s jack and insert the
other end of the cable into the AUX.
To listen to music from a cable-connected device, operate the
Music Player using its buttons as usual (FF/REW/ PLAY/PAUSE).
8. FM RADIO
Your scala rider includes a built-in FM radio with a
6 Preset memory and RDS (Radio Data System).
8.1 GENERAL FUNCTIONS
Turn on Radio In standby, press “B” for 2 seconds
Turn o Radio Press “B” for 2 seconds
Next Station With radio on, press “V+” for 2 seconds
Previous Station With radio on, press “V-” for 2 seconds
Preset stations can be saved via the Cardo Community or directly
from your G9.
1. Turn on the Radio.
2. Select a Preset number you wish to set (Preset 1 – 6) by tapping
“B” until the desired Preset is heard.
3. Find an FM station to save using Seek or Scan (see 8.2 RADIO
TUNING).
8.2 RADIO TUNING
Seek and Save: (Find the next FM station)
1. Press “ V+” or “V-” for 2 seconds.
• “V+” searches upwards (higher frequency) for a station
• “V-” searches downwards (lower frequency) for a station
2. Tap “B” within 20 seconds of nding the FM station to save it as
the current Preset.
Scan and Save: Scan through FM stations
1. Press “ V+” for 5 seconds. The G9 will search upwards (higher
frequency) for a station. When a station is found, it can be heard
for a few seconds.
English
scala rider® G9 / G9 PowerSet |
scala rider® G9 / G9 PowerSet |
17
17
Page 18

2. To stop the scan on this station: Tap “V+”.
3. Tap “B” within 20 seconds of nding the FM station to save it as
the current Preset.
4. To continue scan: Wait for the next station to be found.
NOTE: During Scan, tap “B” to fast save the current FM station as
the current Preset
8.3 AUTOMATIC RADIO TUNING
This feature makes nding new stati ons fast and easy by automatically
creating a temporar y list of 6 “on-the-go” radio st ations.
1. With the radio on, press “V-” for 5 seconds.
2. Your G9 will search upwards (higher frequency) from the current
station and store the next 6 FM stations it discovers as “on the
go” stations.
3. If desired, repeat from Step 2 to store the next 6 FM stations as
“on the go” stations.
NOTE: These 6 temporary “on the go” stations cannot be saved
and do not replace the FM Presets you may have saved.
Turning o your G9 will clear the Automatic Radio Tuning stations
and restore the FM Presets.
8.4 RDS RADIO DATA SYSTEM
RDS allows your scala rider to automatically retune to the
strongest frequency available for the FM station you are listening
to when the signal becomes too weak.
RDS ON/OFF
(Default: O)
With Radio ON, press “V+” and “V-” simultaneously
for 2 seconds
9. TROUBLESHOOTING
Reboot If your scala rider stops responding, reset it by turning
Reset Pairing
(Deletes all
paired devices)
it o and then on again (press “MB” for 2 seconds
1. In Standby, press “MB” for 6 secs until LED ashes
RED/BLUE.
2. Press “V+” for 2 seconds until LED ashes 5 times in
PURPLE.
10. SUPPORT
For additional information:
www.cardosystems.com
support@cardosystems.com
USA and Canada: 1-800-488-0363
International: +49 89 450 36819
IMPORTANT
MULTINATIONAL COM MERCE COMPANIES AND O NLINE AUCTION WE BSITES ARE NOT
AUTHORIZE D TO SELL CARDO PRO DUCTS AND PURCH ASES FROM SUCH SIT ES ARE AT YOUR OWN
RISK. TO REC EIVE WARRANTY O R CUSTOMER SERVICE , YOU MUST SUBMIT ORIG INAL RECEIPTS
FROM AUTHORIZED CARDO DEALERS.
PRODU CTS THAT WE RE IMPOR TED FROM N ORTH AME RICA MUS T BE SERVIC ED IN THE USA .
)
.
18
| scala rider
18
| scala rider
®
®
G9 / G9 PowerSet
G9 / G9 PowerSet
Page 19

11. NOTICES
Federal Communications Commission (FCC) Statement
15. 21
You are caut ioned that cha nges or modi cations not e xpressly ap proved by the par t responsi ble
for comp liance could voi d the user’s auth ority to ope rate the equi pment.
15.10 5(b)
This equ ipment has be en tested an d found to comp ly with the lim its for a Clas s B digital dev ice,
pursuant to part 15 of the FCC rules. These limits are designed to provide reasonable protection against
harmful interference in a residential installation. This equipment generates, uses and can radiate radio
frequ ency energ y and, if not ins talled and u sed in accord ance with the i nstruct ions, may cau se harmful
interference to radio communications. However, there is no guarantee that interference will not occur
in a part icular ins tallation. I f this equipm ent does cau se harmful i nterfer ence to radio or t elevision
recept ion, which ca n be determin ed by turnin g the equipme nt o and on, the u ser is encour aged to try
to corre ct the inter ference by o ne or more of th e following m easures:
• Reorie nt or relocate t he receivin g antenna.
• Increa se the separat ion betwee n the equipme nt and receiver.
• Conn ect the equ ipment into an ou tlet on a circu it dierent f rom that to whi ch the receive r is
connected.
• Consult t he dealer or an ex perienced r adio/TV te chnician for h elp.
Operation is subject to the following two conditions:
1) this device m ay not cause int erference a nd
2) this d evice must acc ept any inter ference, incl uding inter ference that ma y cause undes ired
operation of the device.
FCC RF Radiation Exposure Statement:
This equ ipment compli es with FCC/I C radiation ex posure limi ts set fort h for an uncont rolled
environ ment. End user s must follow t he specic o perating ins tructio ns for satisf ying RF exp osure
complia nce. The antenna u sed for this tr ansmitter m ust not trans mit simultan eously with
any other a ntenna or trans mitter, except i n accordance wi th FCC/IC mult i-transmi tter produc t
procedures.
Industry Canada (IC)
This devi ce complies wi th Industr y Canada licen ce-exempt R SS standard (s). Operation is su bject to
the following two conditions:
1) this device m ay not cause int erference a nd
2) this d evice must acc ept any inter ference, incl uding inter ference that ma y cause undes ired
operation of the device.
IC RF Radiation Exposure Statement:
This equ ipment compli es with the RSS -102 exemption fro m routine RF ex posure evalu ation for use
in an uncontrolled environment.
European CE Notice
Your Cardo p roduct (the “P roduct ”) is in confor mity with th e following es sential req uirements
of Counci l Directiv e 1999/5/EC (referre d to as R&TTE Direc tive): Artic les 3.1a, 3.1.b and 3.2. Th e
Produc t is manufac tured in acco rdance with An nex II of the above d irective.
Declaration of Conformity (DOC)
The Prod uct is comp liant with a nd adopts t he Bluetooth® Specicat ion 2.1 and has succe ssfully
passed a ll interop erabilit y tests t hat are spec ied in the Bluetooth® specication. However,
interoperability between the device and other Bluetooth®-enabled products is not guaranteed.
Copyright
The conte nts of this User G uide, includ ing all text, i llustratio ns and drawing s are the exclus ive
intelle ctual prop erty of Car do Systems, Inc . (the “Company ”) and are prote cted by copyr ight
laws. The y are not in the pub lic domain. Any p artial or tot al reproduc tion, trans lation and or
dissem ination, with out the prior w ritten aut horizatio n by the Company ar e strictl y prohibite d.
Any right s not expres sly granted he rein are rese rved.
IMPORTANT SAFETY AND WARRANTY INFORMATION –
WAIVER AND GENERAL RELEASE
WARNING:
Cardo Sys tems Inc., (“Car do” or the “Company ”) noties y ou that your comp lete and undivi ded
attention is required when using a communication device (the “Product”) while riding. Failure
to avoid potentially hazardous situations could result in accident resulting in serious injury or
death.
Cardo ad vises you to ta ke all necessar y precaut ions and remai n alert to the tr ac, weather a nd all
road con ditions. It is b est to stop away f rom trac pr ior to activ ating or deac tivating the P roduct
or initia ting or recei ving any calls.
Do not perform pairing, linking or similar operations while riding. All publications are intended to
address technical capabilities and should not be construed as encouraging the operation of Cardo’s
Produc ts in any m anner tha t is unsaf e or proh ibited b y law.
English
scala rider® G9 / G9 PowerSet |
scala rider® G9 / G9 PowerSet |
19
19
Page 20

Exerci se all due caut ion while using t his Produc t and obey all app licable tra c laws. Always r ide
and use th e Product in a s afe manner. Do not b ecome distr acted by the Pr oduct whil e riding on a
vehicle. When riding, always consider road, trac, terrain and other conditions to maximize safety.
Do not ope rate the Produ ct if it becom es unsafe to do s o.
In some re gions or sta tes, the use of m obile commun ications sy stems is pro hibited or re stricte d.
Check al l laws and regul ations that ap ply to your reg ion before u sing the Produ ct and be mind ful
that comp liance with al l laws and regul ations is the u ser’s respon sibility. Use t he Produc t in motion
only whe re and in the mann er that such dev ices are per mitted by app licable law. The P roduct
should no t be used in cont ravention o f local, stat e or federal law s and regulat ions. Please c heck
federa l, state and lo cal laws and re gulations be fore using yo ur Cardo Prod uct.
No part of the body should come in contact with the antenna during operation of the equipment.
Use Produ ct only wh ere safe, an d avoid usage a t gas stati ons, fuel de pots or aro und explo sives. Use
with hea ring aids an d medical de vices only a fter con sulting a phy sician or sp ecialist . Make sure to
instal l and mount th e Product i n a stable ma nner.
HEALTH WARNINGS:
Hearing Loss
Audio dev ices can caus e hearing loss . Employ care an d avoid exposu re to excessiv e volume levels
that may dam age or impair he aring or lead to h earing loss. Pe rmanent hear ing loss may occ ur if
Produc ts are used at h igh volume for p rolonged pe riods of time.
RF Signals
Most electronic equipment is shielded from RF signals. However, certain electronic equipment
may not be sh ielded agains t the RF signals e manating fr om your wirele ss equipment .
Pacemakers
The Healt h Industr y Manufa cturer s Associ ation reco mmends tha t a minimum se paration o f about
six inch es (or 16 cm) to be maint ained bet ween a mobil e phone or wir eless dev ice and a pacem aker
to avoid pot ential inte rferen ce with the pa cemaker. Be sur e not to inter fere wit h the func tionalit y
of personal medical devices.
Hearing Aids
Some dev ices may in terfe re with ce rtai n hearin g aids. In th e event of su ch inter fere nce, you sho uld
consult your hearing aid manufacturer to discuss alternatives.
Other Medical Devices
If you use an y other perso nal medical d evice, consult t he manufac turer of your de vice and/ or you r
physici an to determin e if it is adequat ely shielded f rom interf erence caus ed by extern al RF energy.
Your physic ian may be able to as sist you in obta ining this inf ormation.
LIMITED WARRANTY
Subjec t to the applic able laws and re gulations in yo ur jurisdic tion, your Pro duct is cover ed by a
Two-Year Limit ed product w arranty f rom the date of or iginal purcha se. Please ret ain the retai l
sales re ceipt and your r egistrati on data for pro of of purchas e.
Subjec t to the afore mentioned, C ardo hereby r epresent s that this Pro duct is warr anted to be fr ee
from de fects in ma terials or wor kmanship (p roof of purch ase and regis tration re quired). Wit hin
the subje ct period , Cardo will, at i ts sole opti on, repair or r eplace any comp onents that f ail in
normal u se. Such repai rs or replace ments will be m ade at no charg e to the custom er for part s or
labor, prov ided that the c ustomer sha ll be responsi ble for any shi pping cost. T his warrant y does
not cover f ailures due to a buse, misuse , accident or un authorize d alteration o r repairs.
This Pro duct is intend ed to be used onl y as a communica tion and enter tainment d evice and shoul d
not be use d in any locatio n or jurisdic tion where i ts use is prohi bited.
The warr anties and r emedies con tained her ein are exclu sive and in lieu o f all other war ranties
expre ss, implied o r statuto ry, includin g any liabilit y arising un der any warr anty of merc hantibili ty
or tnes s for a part icular pur pose, stat utory or ot herwise t hat Cardo sp ecicall y disclaims . This
warran ty gives you s pecic le gal rights w hich may var y from stat e to state or f rom jurisd iction to
jurisd iction. C ardo makes no o ther warra nties expr ess or impli ed beyond tho se stated s pecica lly
herein. T his warran ty is exte nded by Card o solely to the o riginal pu rchaser and i s not assigna ble
or transferable to others. Cardo assumes no obligation or liability for additions or modications to
this war ranty unle ss made in wri ting and sig ned by an ocer of t he company.
Batte ries are warr anted only if th e battery c apacity f alls below 50% of r ated capaci ty or if the
battery develops leakage.
IMPORTANT: Do not store your P roduct w ithout c harging i t from tim e to time for p eriods in
excess of s ix months , as this may ca use irre versibl e damage to th e capaci ty of
your bat tery. Your war ranty w ill not cover s uch event s.
This warranty also becomes void if:
a. any o f the seals on the c ase or batte ry are broken o r Product or b attery sh ow signs of tamp ering,
b. the b attery is u sed in equipm ent other than t he equipment f or which it was i ntended.
c. the Pro duct is used i n contraventi on of its inten ded purpos e
d. the Product was purchased from online auctions
Cardo assumes no responsibility resulting from the use of non-Cardo components or products
in conjun ction with it s Products , and specica lly the use of thir d party char gers or Bluetooth®
devices . Furthermo re, Cardo is not re sponsible for a ny damage to any par t of the Produc t
result ing from the use o f ancillary eq uipment not fu rnished by Card o which is atta ched to or
used in connection with the Product.
20
| scala rider
20
| scala rider
®
®
G9 / G9 PowerSet
G9 / G9 PowerSet
Page 21

Not covered by the warranty:
1. Def ects or dama ge resulting f rom the use of t his Product i n other than its n ormal and cus tomary
manner.
2. Defec ts or damage f rom misuse, acci dent or neglec t.
3. Def ects cause d by improper op eration, maint enance, install ation, adjust ment or modic ation
of any kind (i ncl. long-ter m storage with out periodic c harging of the b attery).
4. Produc ts opened, di sassemble d or repaired by no n-authorize d parties.
5. Defe cts or damag e due to exposure t o excessive temp eratures, ad verse weather c onditions,
exter nal impact s or spills of food o r liquid.
6. All pl astic surf aces and all other e xternally e xposed par ts that are scra tched or damage d after
purchase.
Disclaimer of Warranty
The device and its accessories are provided “as is ” and “as available” without warranty of any
kind beyond those assumed in the enc losed manual.
LIMITATION OF LIABILITY
In no event sh all Cardo be liable f or any incidental, special, ind irect, punit ive, exemplary or
consequential damages, whethe r resulting fro m the use, misuse, or inability to u se this product
or from defects in the produc t, or for any damage s whatsoever res ulting from the u se of the
product, whether based on breach of contract, tort (including negligence), product liability
or other wise even if advised of the pos sibility of such damages. You ack nowledge and agr ee
that the li mitations set forth above are fundamen tal elements of this agreeme nt to which you
consent a nd without which the produc t would not be provi ded to you absent suc h limitations.
Some states do not allow certain exclusions of incidental o r consequential damages, so the
above limi tations may not apply to you.
Cardo re tains the exclu sive right to rep air or replace (wit h a new or newly-re furbished
replace ment Product) t he device or sof tware or give a r efund of the pur chase price at i ts sole
discre tion. SUCH REMEDY SH ALL BE YOUR SOLE AND EXC LUSIVE REMEDY FOR ANY BR EACH OF
WARRANTY.
Warranty Service
To obtain war ranty ser vice, your Pro duct must be r egistered . Register on line at:
www.cardosystems.com/registration. Please pre sent the Prod uct, along wi th your regis tration
number, bil l of sale (receipt) a t any authoriz ed Service Ce nter or at the sto re from whic h you have
purchased the Product.
To obtain war ranty ser vice, contac t Cardo’s prod uct suppor t and obtain an R MA trackin g number,
or conta ct your local C ardo author ized dealer. Shi p securely wi th a copy of the ori ginal sales r eceipt
which is r equired as pr oof of purchas e for warrant y repairs . The RMA track ing number sho uld be
writ ten on the outsi de of the packa ge. Send the Pro duct freig ht charges pr epaid, to the Ca rdo
addres s as directe d by Cardo.
Online Auction Purchases: Online auction conrmations are not accepted for warranty verication.
To obtain war ranty ser vice, an origi nal or copy of the s ales receipt f rom the orig inal retaile r is
required. Cardo will not replace missing components from online auction sites.
Other ma nufactur ers: Cardo is n ot responsib le for and exp ressly disc laims any respo nsibility f or
how Card o Products a re used or misus ed arising ou t of use with pro ducts, se rvices or in formation
of other vendors.
WAIVER AND GENERAL RELEASE
By using t he Product, y ou will waive sub stantial le gal rights in cluding the ri ght to sue. Pleas e read
the foll owing caref ully before u sing the Produ ct.
By using t he Product, y ou are irrevoc ably releas ing, indemnif ying from a ny liability, lo ss, claim
and expe nse (includi ng attorney s fees) and hold ing Cardo harm less for any bo dily injurie s, harm or
death as we ll as losses or da mages in good s, to any vehicles i ncluding you r own, or to any prop erty
or asset t hat belong to yo u or to third par ties, any of whi ch may result fr om using the Pr oduct
under any circumstances or conditions and irrespective of jurisdiction.
1. You, your heir s, legal repr esentati ves, succes sors or ass igns, hereby v oluntari ly and foreve r
releas e, discharge , indemnif y and hold har mless Car do from any and a ll litigati on, claims, de bts,
demands , actions a nd liabilit y which may ar ise, direc tly or indir ectly, fro m using the Pro duct
for any dis tress, pa in, suerin g, discomf ort, loss, i njury, deat h, damages to or i n respec t to any
perso n or proper ty however c aused, WHE THER ARISING FRO M THE NEGLIGENC E OR OTHERWISE,
and whic h may hereaf ter accrue to y ou on some fu ture date as a re sult of said u se, to the full est
exten t permitt ed by law.
2. You fully un derstan d and assume th e risks in us ing the Produ ct, inclu ding risk of ne gligent ac ts or
omissio ns by others . All risks f or operatin g the Produc t are assum ed solely by th e user of the Pr oduct.
3. You conrm th at you are phys ically cap able to use the P roduct an d that you have no m edical
condit ions or need s that may infr inge upon you r abilitie s to do so in a safe m anner. You furt her
conrm t hat you will not c onsume any alc ohol that may a ect your a lertnes s or any mindalterin g substanc e, and will not c arry, use or co nsume thes e substanc es before o r during the us e
of the Product.
4. You fully ac knowledge o ur warnings an d understa nd that:
(a) risk s exist in usi ng the Produc t while in tra c, including b ut not limited t o injury or ill ness,
strain s, fractu res, partia l and/or total pa ralysis, deat h or other ailme nts that could c ause
serious disability;
English
scala rider® G9 / G9 PowerSet |
scala rider® G9 / G9 PowerSet |
21
21
Page 22

(b) the se risks may b e caused by the ne gligence of th e manufact urers or its a gents or any th ird
party involved in the Product;
(c) these ri sks and danger s may arise fr om foreseea ble or unfore seeable cau ses.
You hereby as sume all r isks an d dange rs and al l respo nsibil ity fo r any loss es and/or d amage s, whet her
cause d in whole o r in par t by the ne gligen ce or oth er condu ct of ot hers, i nclud ing Card o.
5. By us ing the Produc t, you conrm t hat you have read t his release of li ability and f ully
understand and accept its terms and conditions.
www.cardosystems.com
22
| scala rider
22
| scala rider
®
®
G9 / G9 PowerSet
G9 / G9 PowerSet
 Loading...