

User’s Guide
This manual describes the setup and operating procedures for the
WU10 Wi-Fi unit for the Canon imageFORMULA DR series.
To use this device, read this manual together with the instructions for
the scanner to be connected.
Procedures and Example Screens
This manual describes operations using Windows 7 and Mac OS 10.7
(Lion) as examples. For operations that are identical between
Windows and Mac OS X, this manual uses images from Windows as
examples.
Trademarks
● Canon and the Canon logo are registered trademarks of Canon Inc.
in the United States and may also be trademarks or registered
trademarks in other countries.
● imageFORMULA is a trademark of CANON ELECTRONICS INC.
● Microsoft, Windows, and Windows Vista are registered trademarks
of Microsoft Corporation in the United States and other countries.
● Mac OS is a registered trademark of Apple Inc. in the United States
and other countries.
● Wi-Fi, Wi-Fi Alliance, the Wi-Fi CERTIFIED logo and the Wi-Fi
Protected Setup logo are registered trademarks of the Wi-Fi
Alliance.
● Wi-Fi CERTIFIED, WPA, WPA2 and Wi-Fi Protected Setup are
trademarks of the Wi-Fi Alliance.
● “WPS” in the settings, onscreen displays and in this manual
denotes Wi-Fi Protected Setup.
● Other product and company names herein may be the trademarks
of their respective owners.
Table of Contents
Safety Precautions ............................................................. 2
About This Product ............................................................ 4
Setup.................................................................................... 6
About Wi-Fi Connections................................................... 9
Connecting using the AP Mode....................................... 10
Connecting using WPS .................................................... 14
Connecting by Manual Setting ........................................ 18
Other Operations .............................................................. 24
Accessing the Web Configuration Page......................... 27
Troubleshooting ............................................................... 40
Specifications ................................................................... 41
Software License .............................................................. 43

Safety Precautions
About wireless communication
functions
This device incorporates wireless communication functions. The radio
waves used for wireless communication functions can affect medical
and other devices, which could cause serious accidents. Do not use
the wireless communication functions in the following conditions.
● Do not use the wireless communication functions if you have a heart
pacemaker. The radio waves may affect pacemaker operation.
● Do not use the wireless communication functions near persons
using medical devices like heart pacemakers. The radio waves may
affect pacemaker and similar devices’ operation. Contact the
appropriate medical institution before use.
● Do not use the wireless communication functions inside medical
institutions such as hospitals, or near electronic medical equipment.
The radio waves may affect electronic medical equipment. Consult
with any medical institution before using it inside their facilities.
● Do not use the wireless communication functions inside aircraft.
The radio waves may affect precision equipment in the aircraft, and
could cause a malfunction resulting in serious accident.
● Do not use the wireless communication functions near
automatically controlled devices such as fire alarms. The radio
waves may affect such devices and could cause a malfunction
resulting in accident.
● When using the wireless communication functions, keep this device
at least 20 cm from your body.
About the radio waves
This device operates in the 2.4 GHz frequency band (2.400 to 2.4835
GHz). Other users of these frequencies include products such as
microwave ovens, scientific and medical devices, similar Wi-Fi
stations, wireless intercom radio equipment for mobile device
identification used in industrial production lines (requiring licensing),
specific low-power radio stations that do not require licenses, amateur
radio stations and others (all afterwards called “other stations”). When
using, be aware of the following.
1. Before using this device, check whether other stations are
operating.
2. If radio frequency interference occurs between this device and
other stations, immediately relocate the device or stop using it (stop
transmitting).
After stopping, consult with your retailer or with our sales staff
regarding measures to avoid interference (e.g., partitioned
installation).
3. Otherwise, if troubles occur from radio frequency interference by
this device to other stations, consult with your retailer or our sales
staff.
European Union (and EEA) only.
This symbol indicates that this product is not to be
disposed of with your household waste, according to
the WEEE Directive (2002/96/EC) and your national
law. This product should be handed over to a
designated collection point, e.g., on an authorized
one-for-one basis when you buy a new similar product or to an
authorized collection site for recycling waste electrical and
electronic equipment (EEE). Improper handling of this type of
waste could have a possible negative impact on the environment
and human health due to potentially hazardous substances that
are generally associated with EEE. At the same time, your
cooperation in the correct disposal of this product will contribute
to the effective usage of natural resources. For more information
about where you can drop off your waste equipment for recycling,
please contact your local city office, waste authority, approved
WEEE scheme or your household waste disposal service. For
more information regarding return and recycling of WEEE
products, please visit www.canon-europe.com/environment
(EEA: Norway, Iceland and Liechtenstein)
.
2

Regional availability and limitations
Three versions of this product are provided for compliance with the various international wireless laws. The regions of availability for each version
are as follows. Please note that each version may be used only in its applicable country/region. For regions not included in the following list, contact
customer service.
Version Name Product Code Applicable Country/Region Wireless LAN Standard Corresponding Channels
WU10 JP 6910B001 Japan
WU10 USA 6910B002 United States, Canada
Austria, Belgium, Bulgaria, Cyprus, Czech
Republic, Denmark, Estonia, Finland,
France, Germany, Greece, Hungary,
WU10 OTHERS 6910B003
* Outdoor use is prohibited in Italy.
Ireland, Italy*, Latvia, Lithuania,
Luxembourg, Malta, Netherlands, Poland,
Portugal, Romania, Slovakia, Slovenia,
Spain, Sweden, United Kingdom, Iceland,
Liechtenstein, Norway, Switzerland, Turkey
IEEE 802.11b/g/n
Channels 1 to 13
(2.412 to 2.472 GHz)
Channels 1 to 11
(2.412 to 2.462 GHz)
Channels 1 to 13
(2.412 to 2.472 GHz)
About the battery
The LP-E10 battery pack is included with this device. See the included
LP-E10 Battery Pack Users Guide for battery handling information.
Please take note of the following differences when reading the Users
Guide.
● Please read “LC-E10 Battery Charger” and “Camera” as applicable
to this device.
● Please ignore the information about “How to best use the battery
and charger” in the camera’s users guide, as that description is not
applicable to this device.
3
About This Product
This device enables wireless connection of computers to a scanner
via Wi-Fi. The Wi-Fi functions of this device are compatible with IEEE
802.11b/g/n (2.4 GHz) to support wireless scanning for computers
when it is connected to a scanner via USB cable.
By connecting this device to an access point in a network
environment, it can be used by any computer in the same network.
The device is very simple to connect if the access point supports WPS
(Wi-Fi Protected Setup).
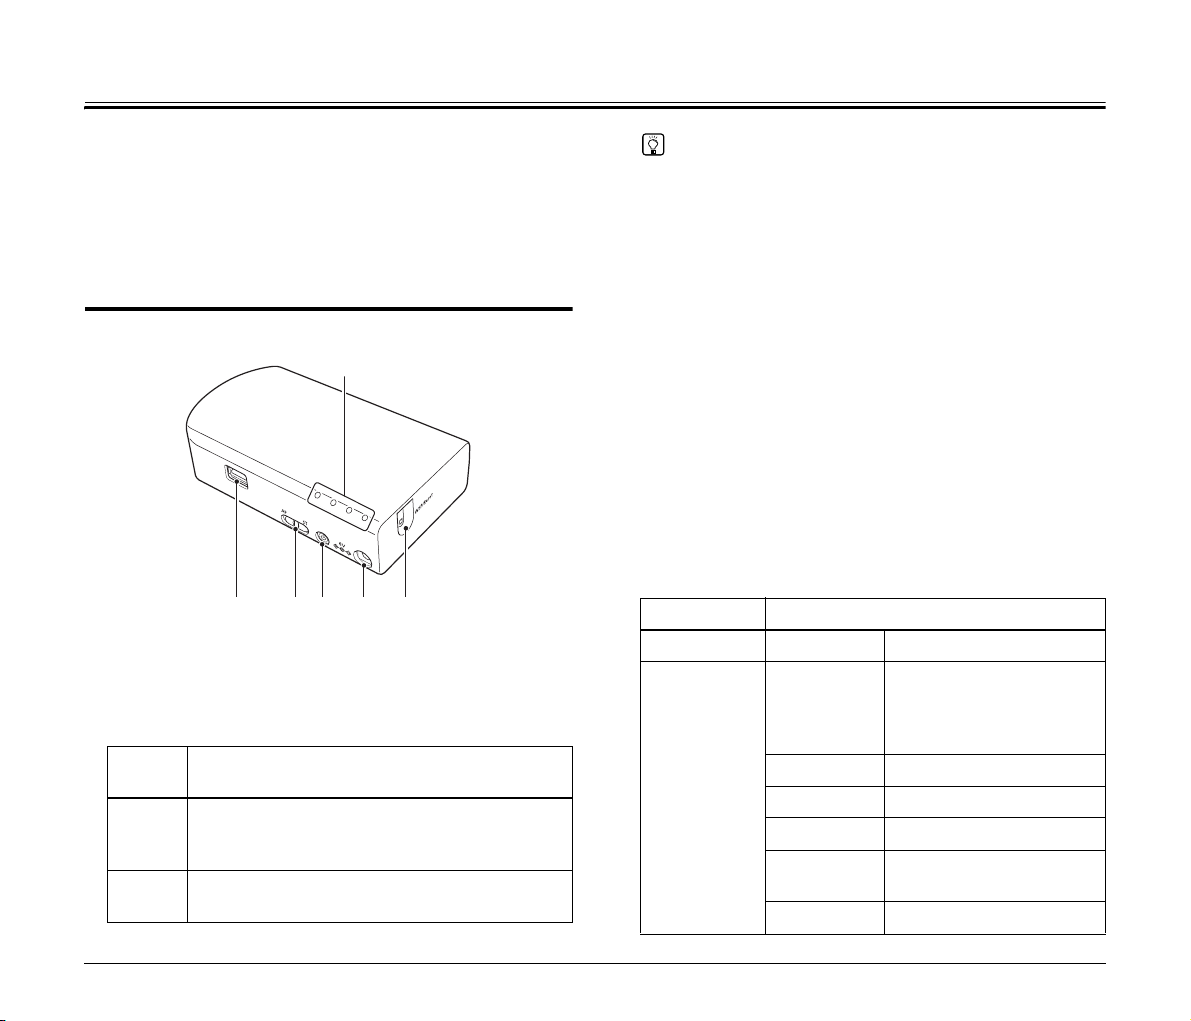
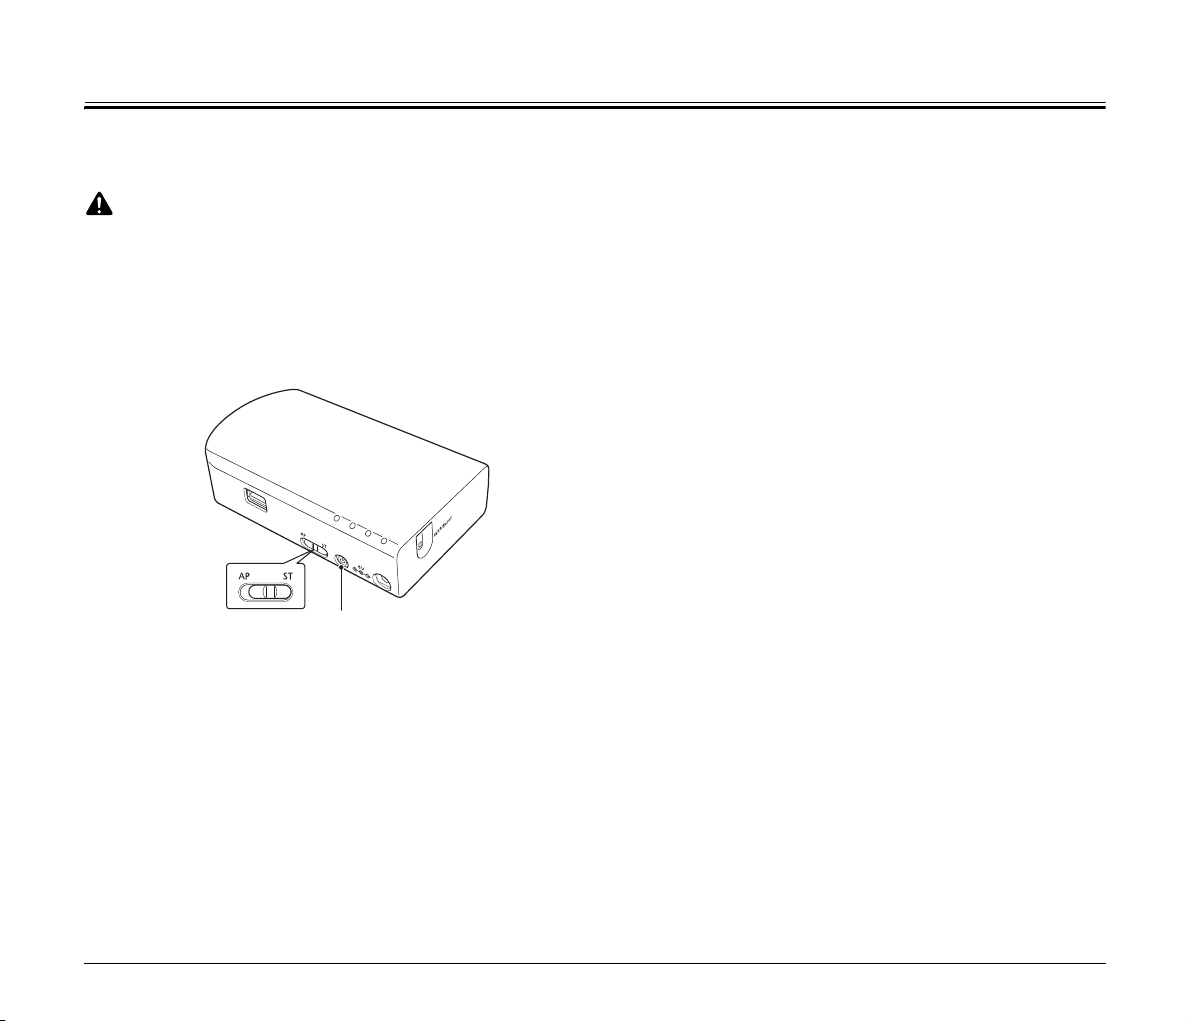
Names of Parts
F
A B C D E
A USB Connector
Connect this device to the scanner using the USB cable supplied
with the scanner.
B Mode Switch
Selects the device’s network mode.
Switch
Position
AP
ST
Description
Selects the AP mode. Use when wirelessly
connecting a computer one-to-one to the scanner
via this device.
Selects the Station mode. Use when connecting this
device to an access point.
Hint
The network mode must be selected before turning on the device.
If you change the position of the mode switch while the device is
turned on, the selection will not take effect until it is turned off and
back on.
C Power Button
Turns on this device. The power lamp lights blue and the scanner
connected via USB cable to this device also turns on.
When the device’s power is on, press and hold this button to turn it
(and the power lamp) off. The scanner connected to the device
also turns off.
D Power Connector
Connect the supplied AC adapter here.
E WPS/RESET Button
Press to connect with a WPS-compatible access point, or to
initialize the device.
Holding this button while turning on the device resets it to the
factory default settings.
F Lamp
The following lamps indicate the device state.
Lamp Meaning
STATUS Blinking green Transferring data
AP mode*: Wireless LAN
working
Station mode*: connecting to
the access point
(Station mode only)
Searching for an access point
CONNECTION
Lit (green)
Lit (red) Initializing setup
Blinking green WPS executing
Blinking red WPS Error
Blinking
orange
Unlit Wireless LAN stopping
4

Lamp Meaning
Lit (green)
Lit (orange)
(Battery Lamp)
(Power Lamp)
* One of two network modes of the scanner. Change the mode
depending on the device that will be connected via Wi-Fi. For
details, see p. 9.
Lit (red) Charging malfunction
Blinking green
Blinking red
Lit (blue) Power on
Unlit Power off
Remaining battery charge
high
Remaining battery charge
low
Charging (remaining battery
charge high)
Charging (Remaining battery
charge low)
5
Setup
Software Installation
To use the device’s Wi-Fi functions, the Scanner Wireless Connection
Utility on the Setup disc must be installed on a computer.
System requirements
Supported operating systems: Windows XP Professional (32- and
64-bit)
Windows XP Home Edition (32-bit)
Windows Vista (32- and 64-bit)
Windows 7 (32- and 64-bit)
Mac OS X 10.5 to 10.7
Supported wireless standards: IEEE 802.11b/g/n
Supported scanners
This unit supports the following scanners (as of October 2012).
Scanner Firmware version
DR-150 2.05 or later
DR-150M 2.04 or later
DR-P215 1.10 or later
An update is required for firmware versions earlier than the above. For
details on how to acquire the latest firmware and the latest information
on supported models, visit the Canon support website.
CaptureOnTouch Mobile is required to use the scanner with smart
devices (smart phones, tablets, etc.). For details on acquiring and
using this software, visit the Canon support page.
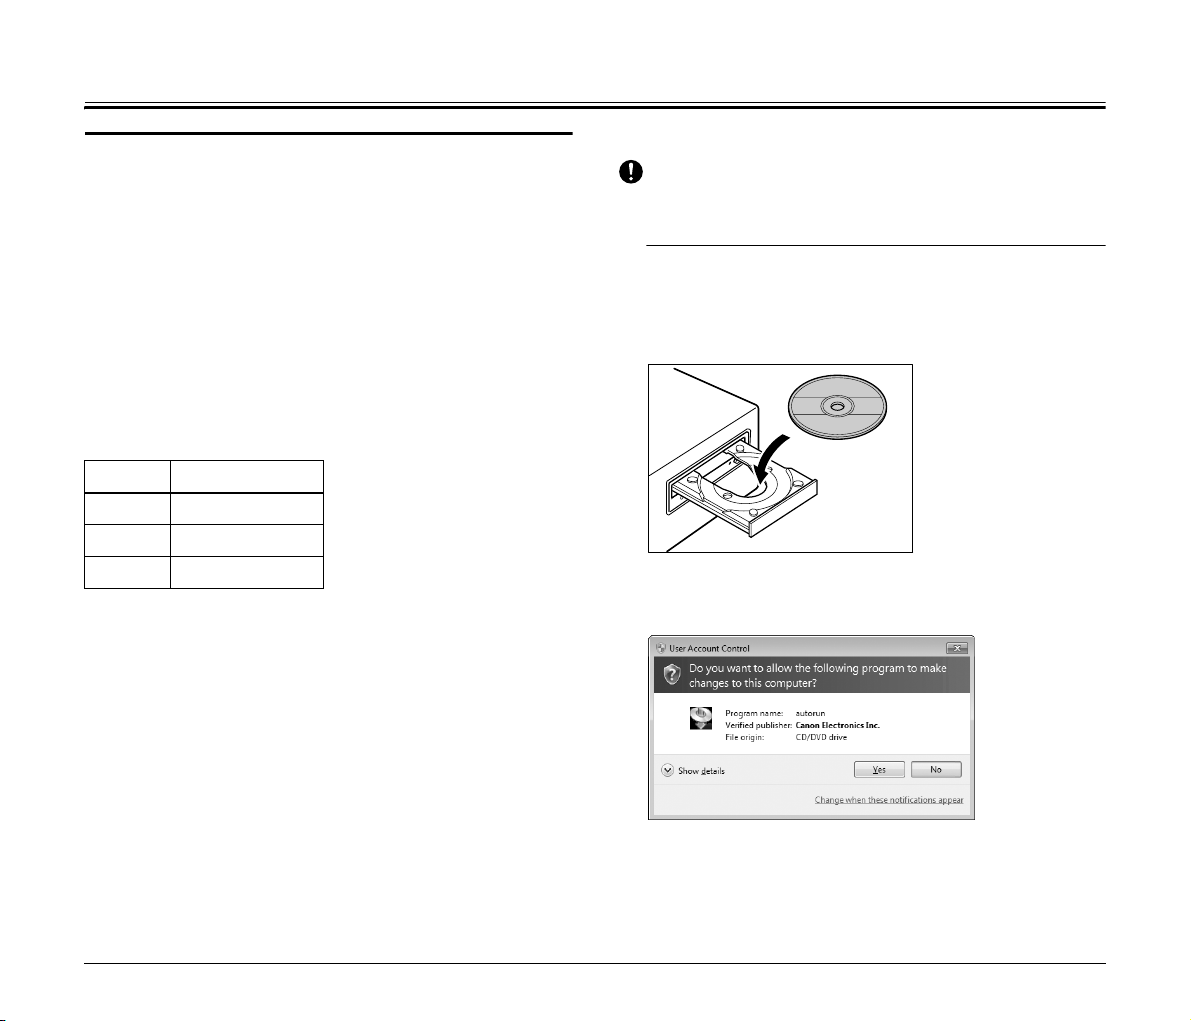
Windows installation
IMPORTANT
• Log on to Windows as an Administrator.
• Close all other applications before installing the software.
1
Insert the software setup disc into the CD drive of the
computer.
The setup menu automatically starts up when you insert the disc
into the drive. (If the menu does not start up, execute Setup.exe
from the disc.)
With Windows 7/Vista
When the [User Account Control] screen appears, click [Yes] or
[Allow].
6
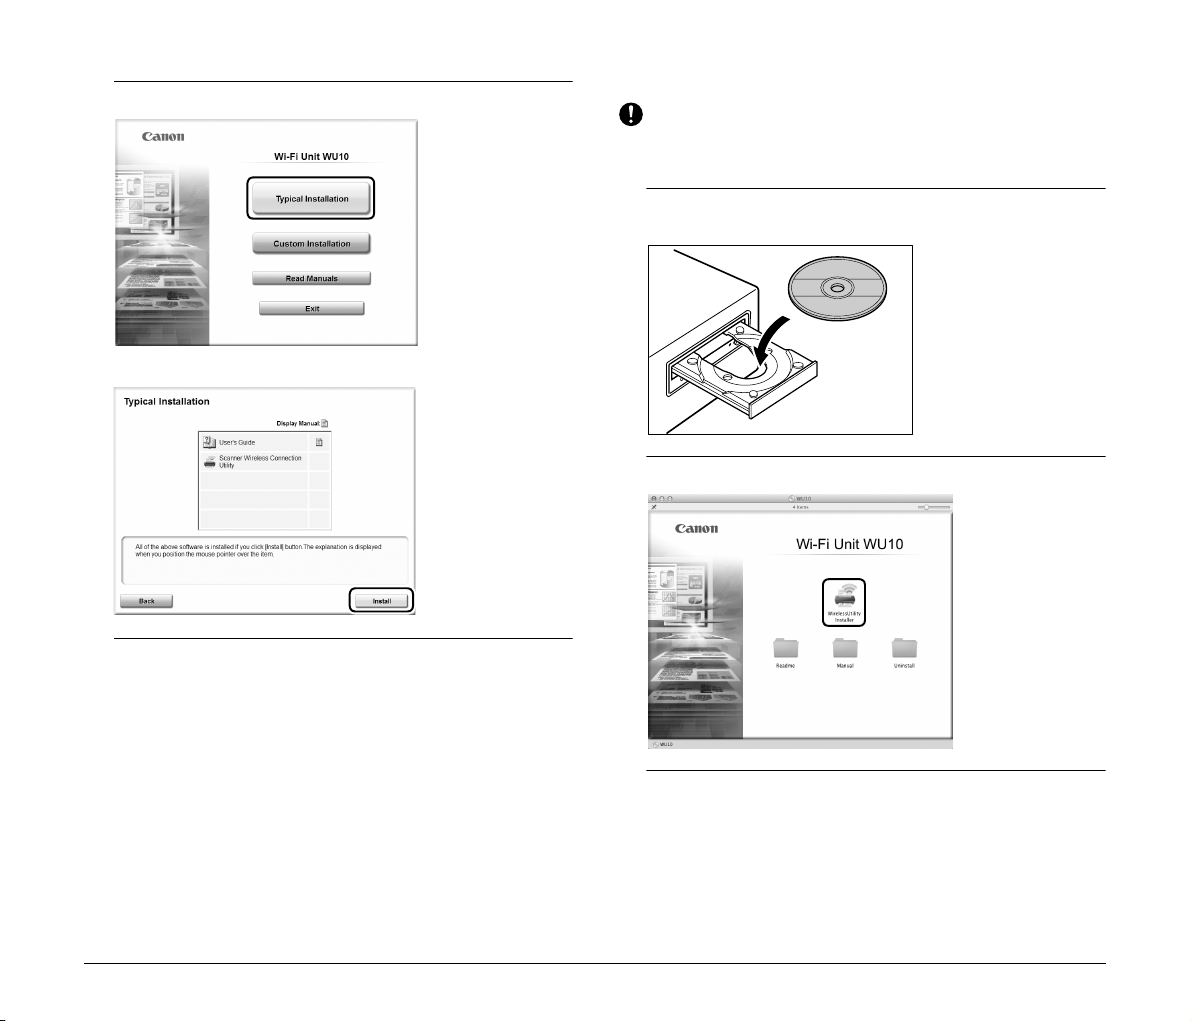
2
Click [Typical Installation].
3
Click [Install].
4
Follow the onscreen instructions to complete the
installation.
Installing on Mac OS X
IMPORTANT
• Log on to Windows as an Administrator.
• Close all other applications before installing the software.
1
Insert the software setup disc into the CD drive of the
computer.
2
Double click [WirelessUtilityInstaller].
3
Follow the onscreen instructions to complete the
software installation.
7
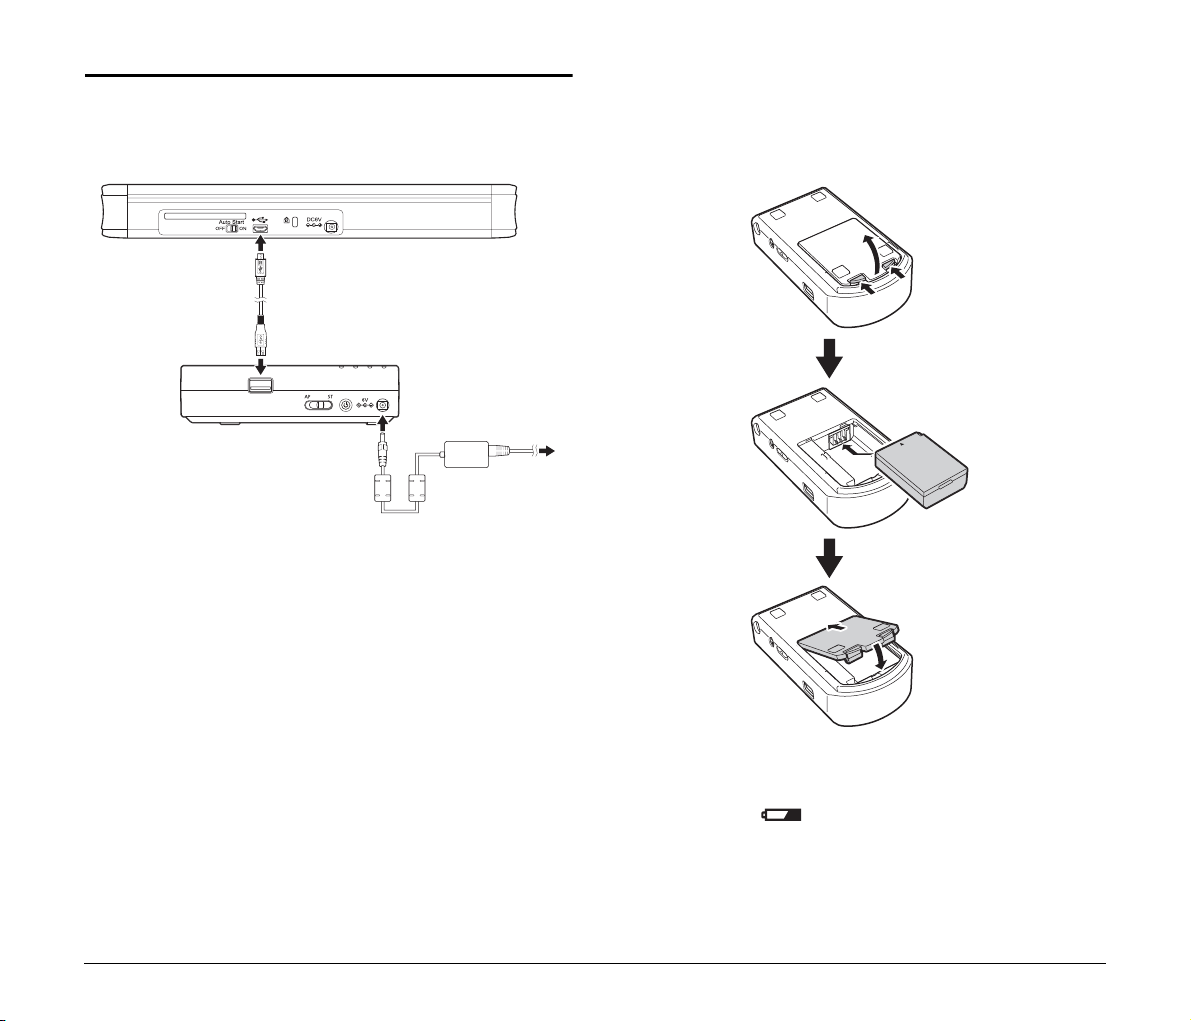
Connecting to the scanner
Connect this device to the scanner using the USB cable supplied with
the scanner.
Also connect this device to an outlet using the supplied AC adapter.
Using the Battery
Use the battery supplied with this device to install it with the scanner
where no nearby outlet is available.
Inserting the battery
Battery charging
The battery is charged when the device is connected to an outlet with
the AC adapter.
While charging, the (battery) lamp blinks green or yellow. The
lamp turns off when charging is finished. At room temperature, full
charging takes about 2.5 hours.
8
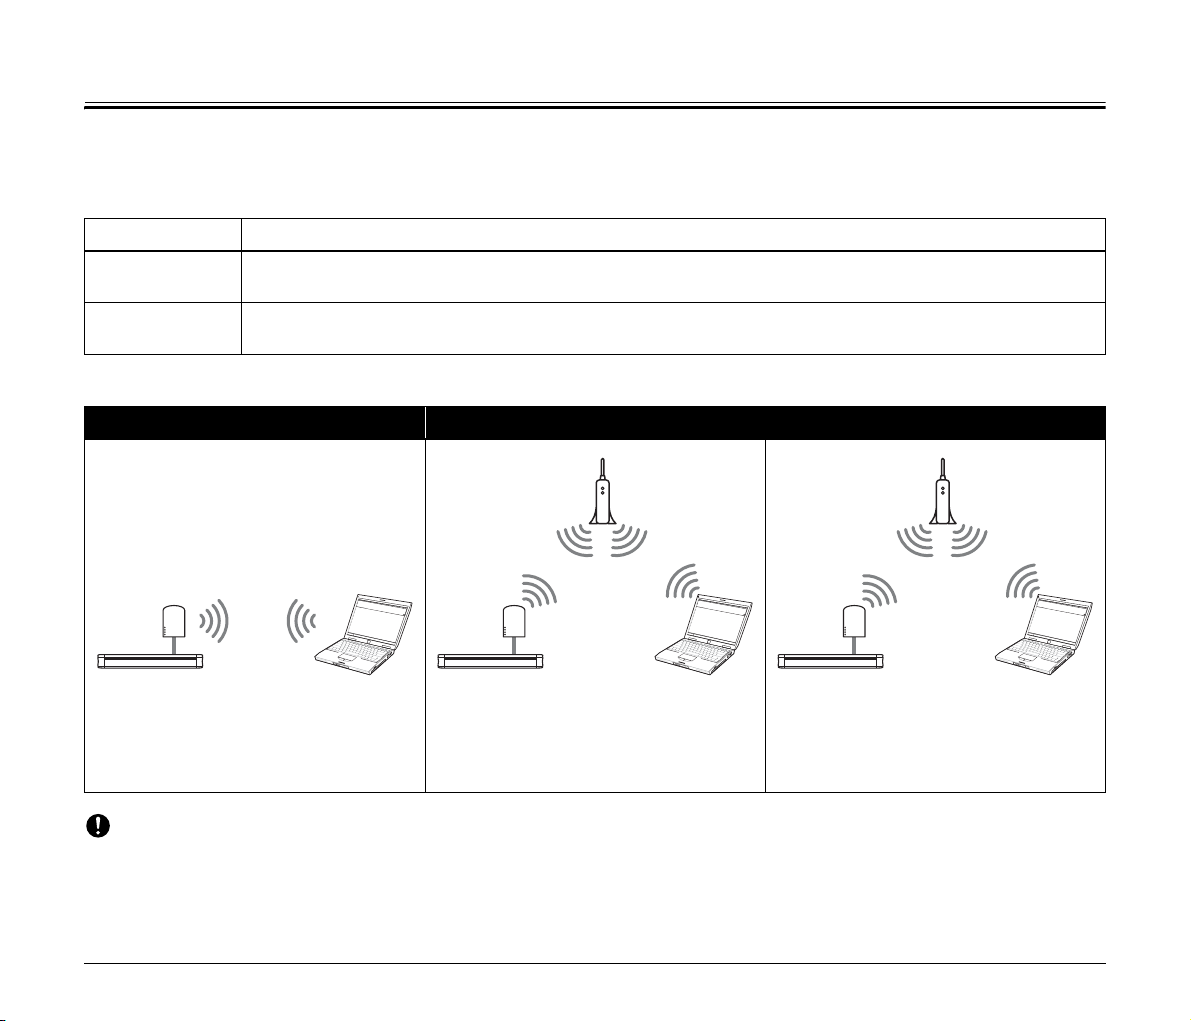
About Wi-Fi Connections
Connect the device to an access point or directly to a computer according to the network environment.
Network modes
Depending on the device that will be connected to the scanner via Wi-Fi, you can change the network mode of the scanner as follows.
Network mode Description
AP mode
Station mode
Connection Metshod
1-to-1 connection (AP mode connection) Connecting via a wireless access point (station mode connection)
The scanner operates without another wireless access point. A 1-to-1 connection can be established between the
scanner and the computer.
The scanner operates as a wireless device. In this mode, a separate wireless access point device is necessary for the
scanner to connect to the computer.
Using WPS
WPS-equipped
access point
Search for the device and connect to it using
your computer’s wireless connections feature.
See “Connecting using the AP Mode” (p. 10)
IMPORTANT
• The scanner can be shared with multiple computers on the same network via the access point, although only one can connect to the scanner
at a time.
• When using a Wi-Fi connection, scanning is slower than with the USB connection.
If the wireless access point is WPScompatible, connection to the device can be
made using the WPS feature.
See “Connecting using WPS” (p. 14)
Setting manually
If the wireless access point is not WPScompatible, make the device’s network
settings manually as required by your network
configuration.
See
“Connecting by Manual Setting” (p. 18)
9
Connecting using the AP Mode
To connect one-to-one with a wireless LAN-equipped computer, set this device to the AP mode. The AP mode is the factory-default setting for this
device, so unless the mode has been changed, use the following procedure to search and connect to the computer.
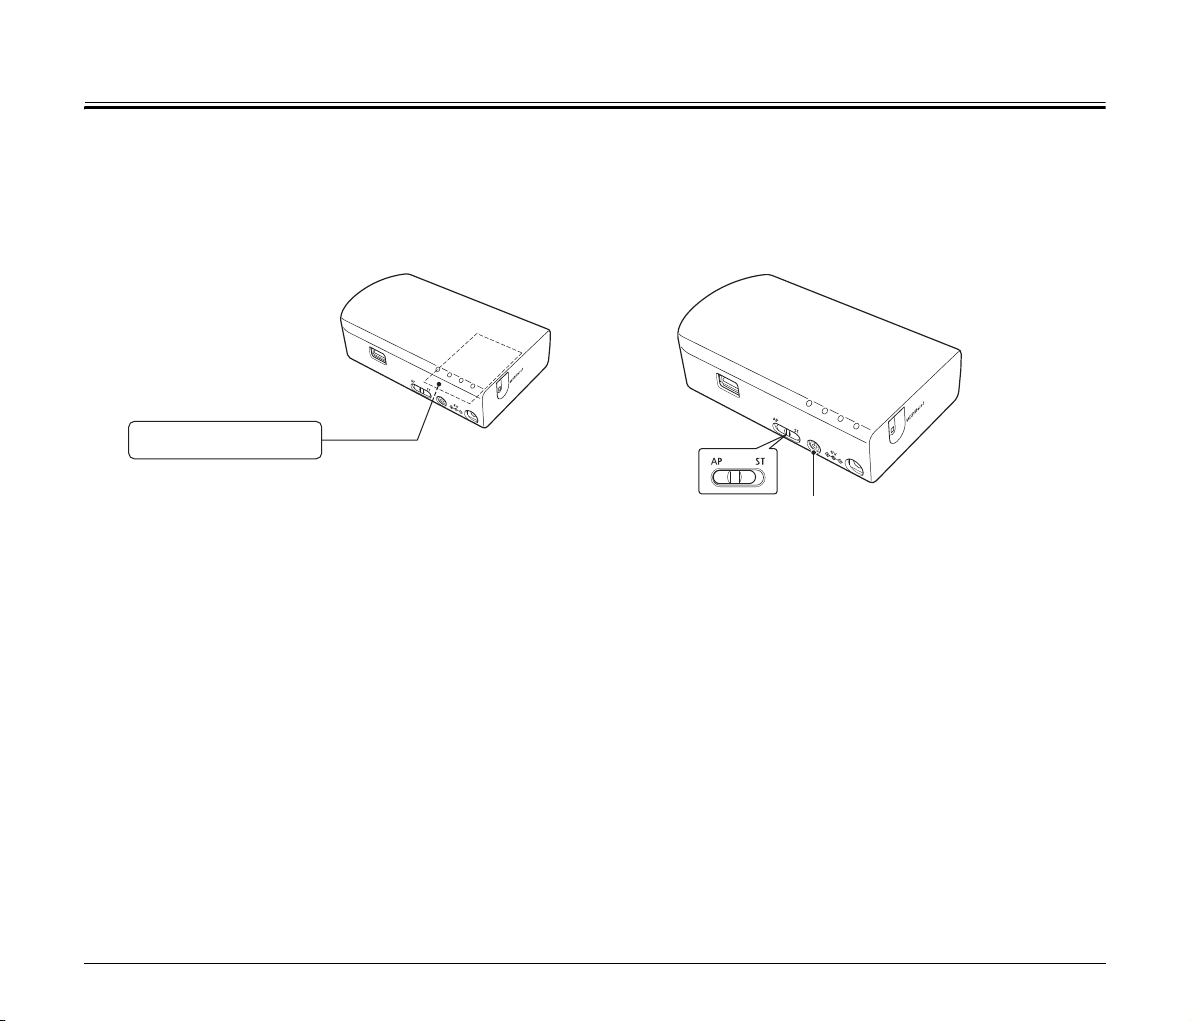
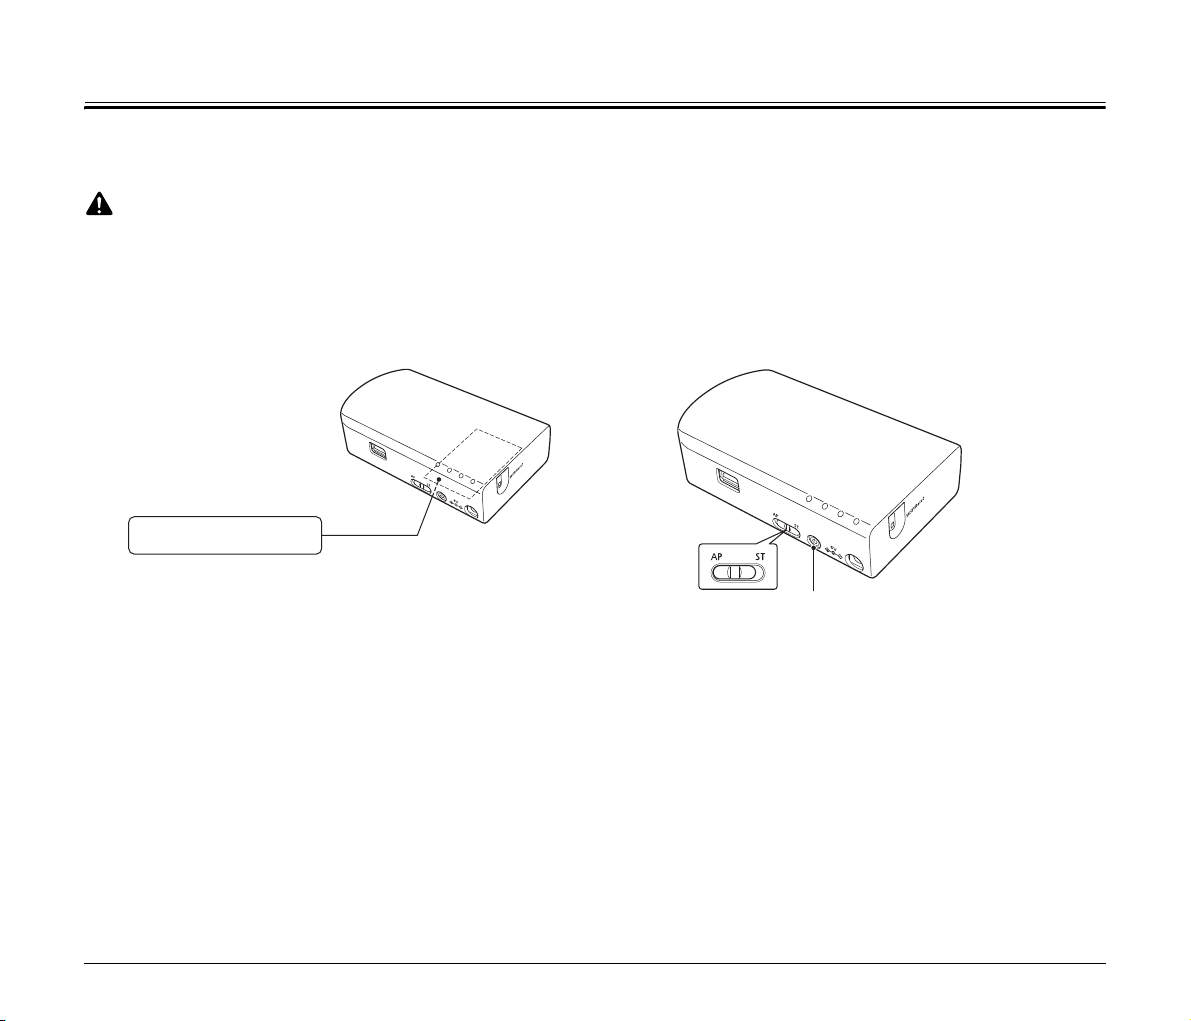
1
Check the SSID of this device.
The SSID is printed on the device’s bottom label.
SSID: WU10-XXXXXXX
2
Slide the mode switch to the “AP” side, press the
power button to turn the device on.
Power button
10

3
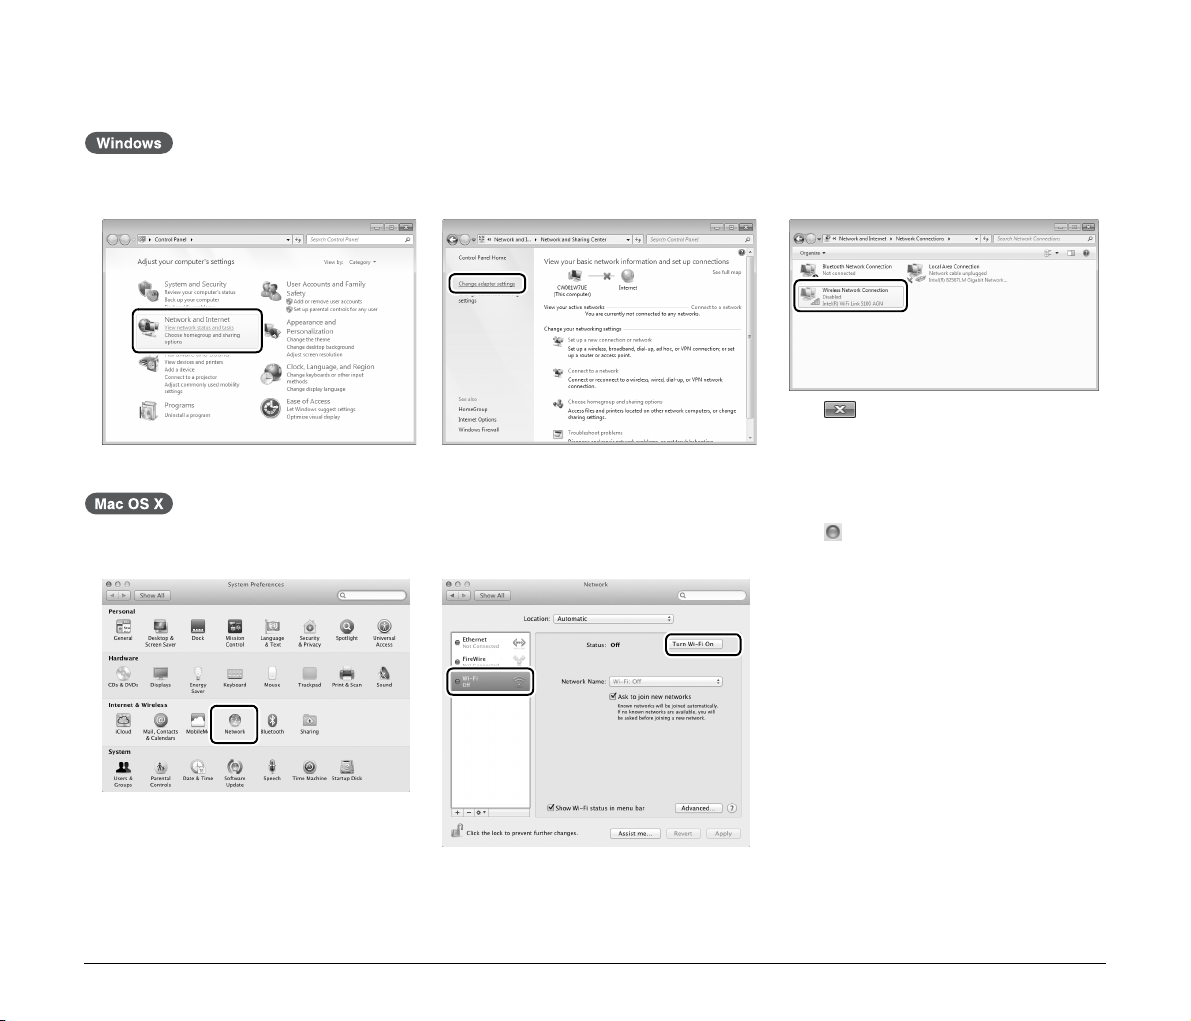
Enable the wireless LAN function of the computer.
This step is not necessary if the wireless LAN function is already enabled. ➔ Skip to step 4.
A Click the Start button - [Control Panel] -
[View network status and tasks].
A Click the Apple menu - [System
Preferences] - [Network].
B Click [Change adapter settings]. C If the [Wireless Network Connection] icon is
[Disabled], double-click the icon.
D Click to close the settings screen.
B Click [Wi-Fi], then click the [Turn Wi-Fi On]
button.
C Click to close the settings screen.
11

4
Search for the wireless network, and establish Wi-Fi connection with the device.
A Click the icon in the taskbar to display a
list of available wireless networks.
C Enter “canonwu10” for the security key in the screen that appears, then click [OK]. B Enter “canonwu10” for the password, then
B Select the SSID from step 1 in the list, then
click [Connect].
A Click the icon, then select the SSID
from step 1 in the list.
click [Join].
12
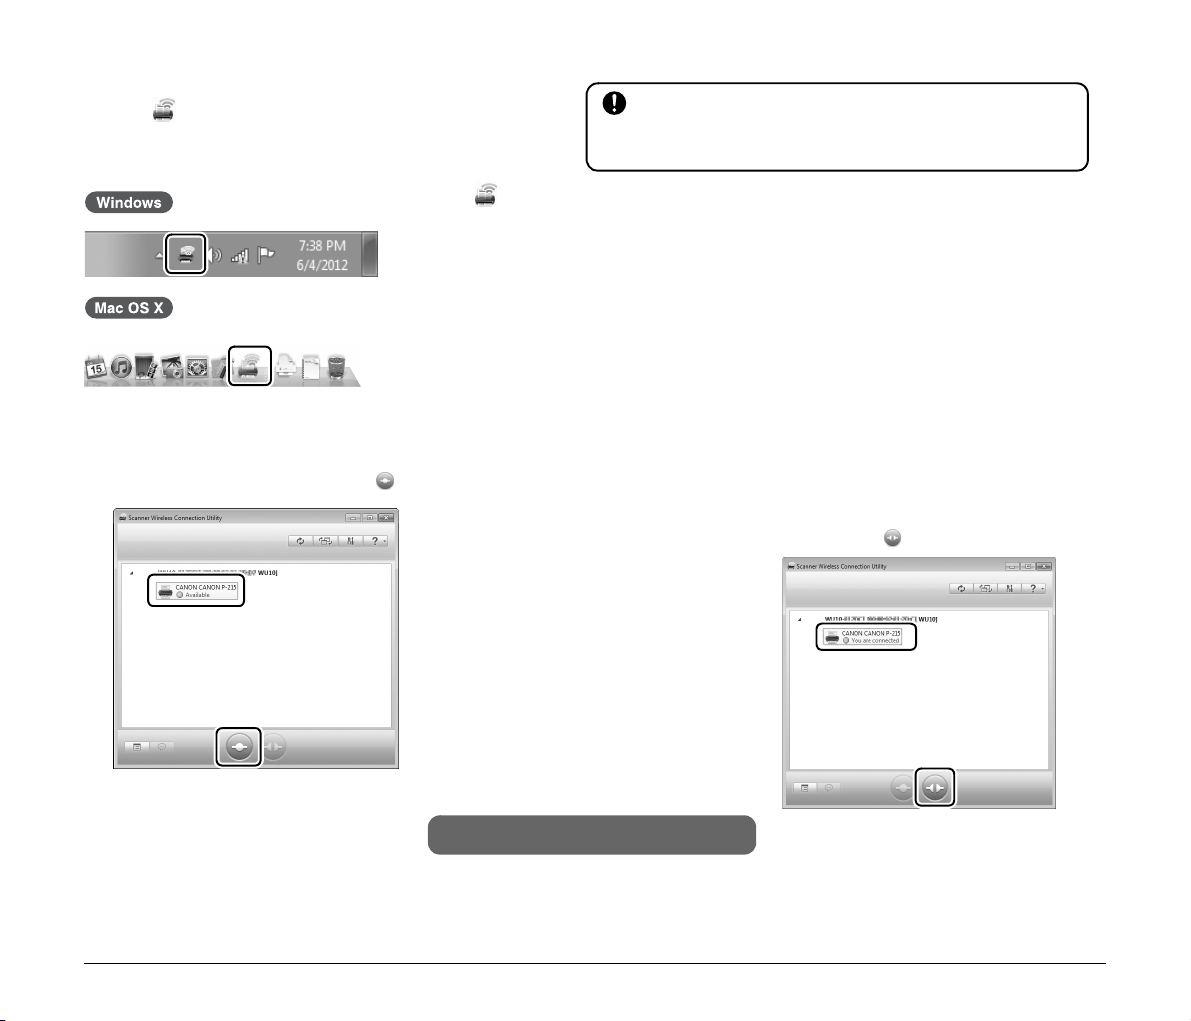
5
Start the Scanner Wireless Connection Utility.
Click the in the task bar or Dock.
IMPORTANT
If the scanner wireless connection utility is not installed on the
computer, install it by referring to the P. 6.
If the does not appear in the task bar or Dock
Windows:
Click the Start button – [All Programs] – [Scanner Wireless Connection Utility] – [Scanner
Wireless Connection Utility] in that order.
Mac OS X:
Select the system drive (such as [Macintosh HD]) – [Applications] in the Finder, then doubleclick [Scanner Wireless Connection Utility].
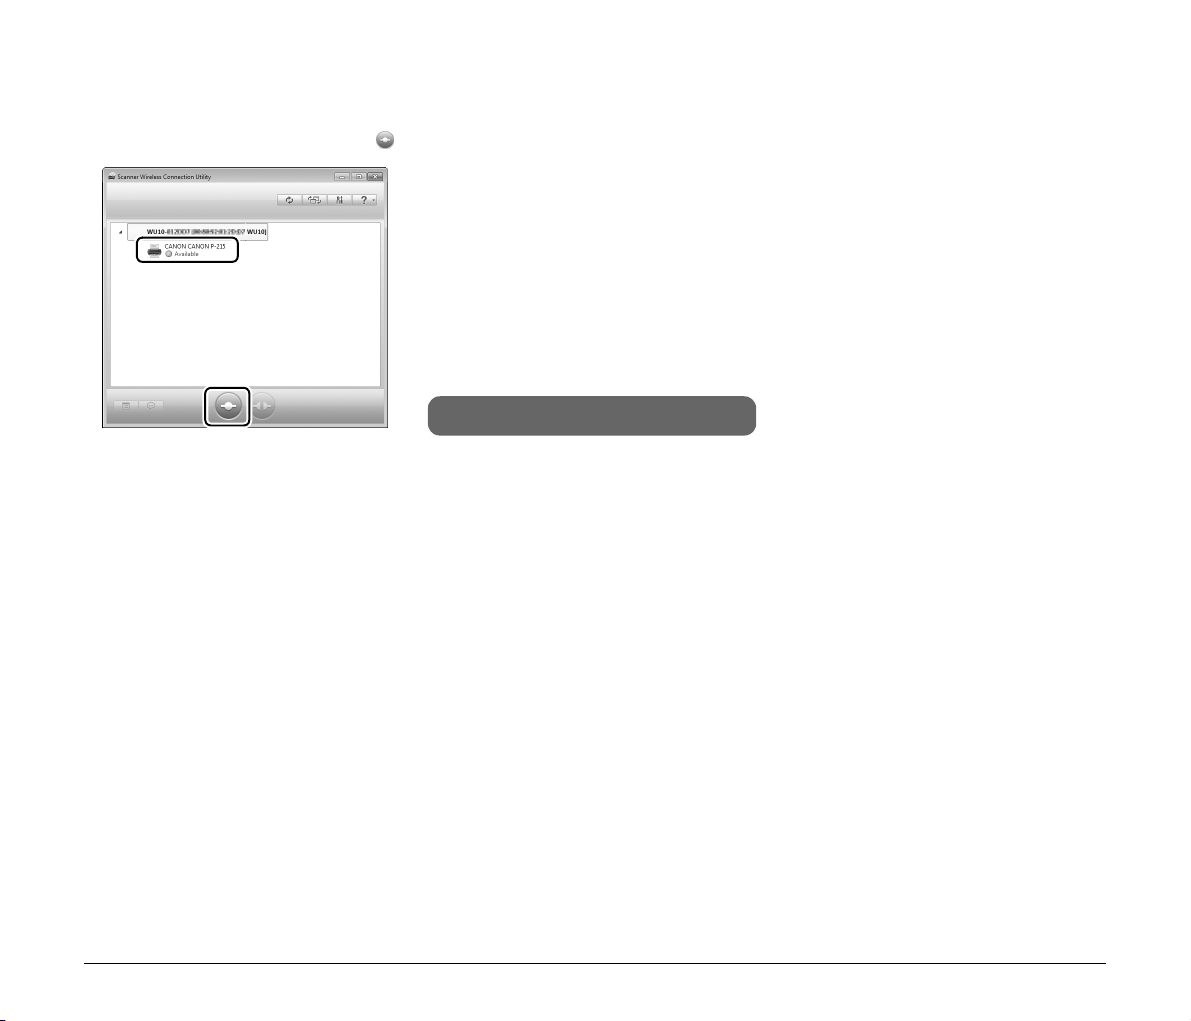
6
Verify whether the device can properly connect to the computer. Using this device with another
Click this device in the list, then click .
If connection is properly established, “You are
connected” appears for the device in the list.
computer or smart device
A Click on the device in the device list from the
scanner wireless connection utility, and
then click the button.
This completes configuration.
B Follow steps 3 to 6 to reconnect the device
to the desired computer or smart device.
13
Connecting using WPS
Using WPS, this device can connect to an existing wireless network having a WPS-equipped access point. The network mode of this device is set
to AP mode under factory default settings and must be switched to Station mode before using the WPS function.
CAUTION
• Even a WPS-equipped access point may have WPS disabled. Ensure WPS is enabled.
• If the access point is using security settings (such as MAC address filtering), change the settings to allow connection to this device.
• To ensure good Wi-Fi communications, perform this procedure with the scanner initially located close to the access point.
1
Slide the mode switch to the “ST” side, press the
power button to turn the device on.
Power button
14
2
Enable the wireless LAN function of the computer.
This step is not necessary if the wireless LAN function is already enabled. ➔ Skip to step 3.
A Click the Start button - [Control Panel] -
[View network status and tasks].
A Click the Apple menu - [System
Preferences] - [Network].
B Click [Change adapter settings]. C If the [Wireless Network Connection] icon is
[Disabled], double-click the icon.
D Click to close the settings screen.
B Click [Wi-Fi], then click the [Turn Wi-Fi On]
button.
C Click to close the settings screen.
15
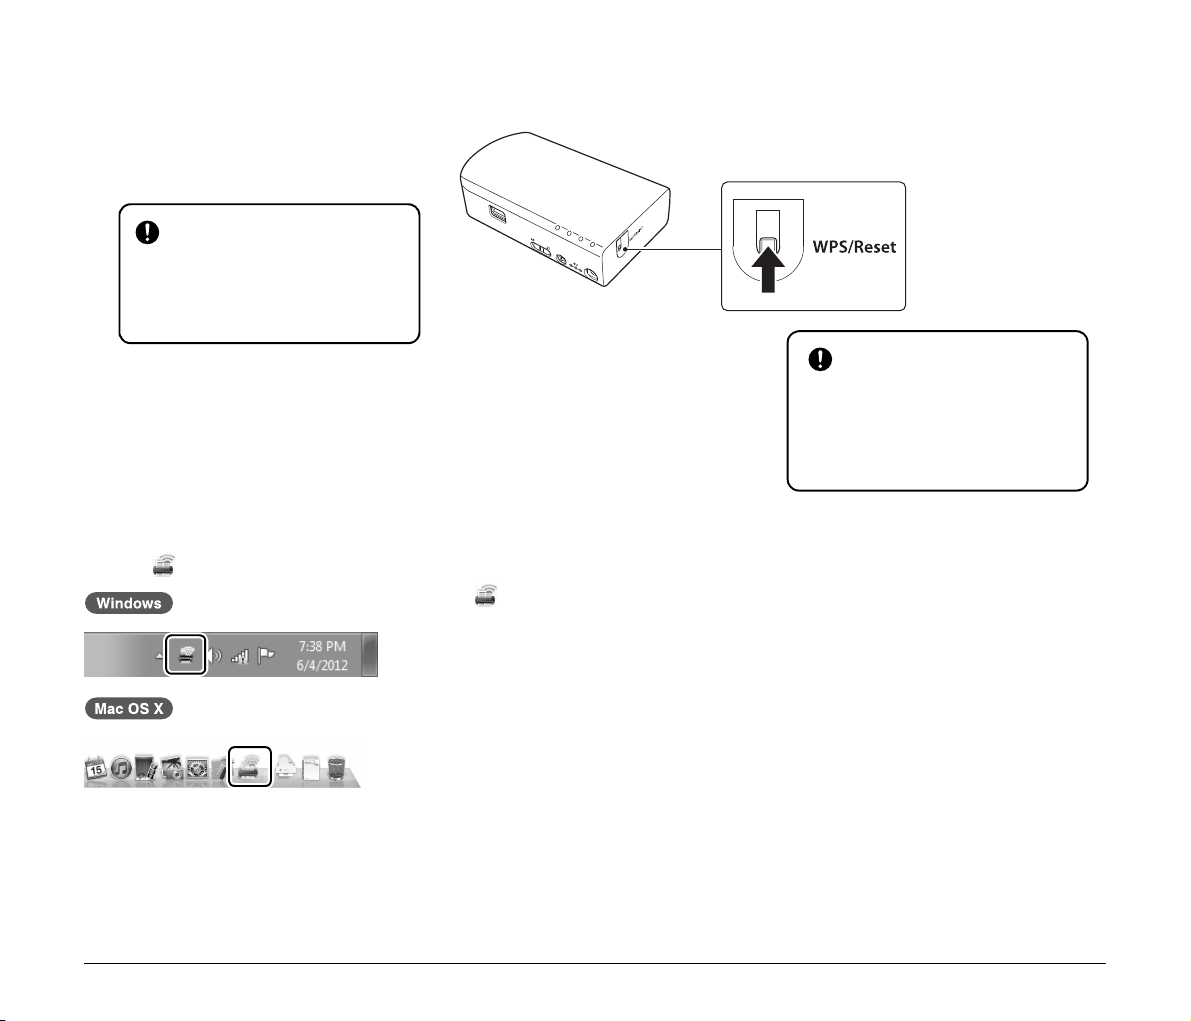
3
Press the WPS button on the
access point to activate the
4
Press and hold this device’s WPS/RESET button until the CONNECTION
lamp blinks green (about 3 to 10 seconds).
connection-waiting state.
See the instructions for your access point.
IMPORTANT
This device cannot connect if the
connection-waiting state is activated
on multiple access points at the same
time.
5
Start the Scanner Wireless Connection Utility.
Click the in the task bar or Dock.
This device begins communicating with the
connection-waiting access point to
automatically configure the required Wi-Fi
settings. When the setting are configured,
the CONNECTION lamp lights steadily
(green).
If the does not appear in the task bar or Dock
Windows:
Click the Start button – [All Programs] – [Scanner Wireless Connection Utility] – [Scanner
Wireless Connection Utility] in that order.
IMPORTANT
• Allow some time for the required WiFi settings to be configured.
• If the Wi-Fi connection fails, the
CONNECTION lamp lights red. Try
again from step 3.
16
Mac OS X:
Select the system drive (such as [Macintosh HD]) – [Applications] in the Finder, then doubleclick [Scanner Wireless Connection Utility].
6
Use the Scanner Wireless Connection Utility to verify whether the device can properly connect to the
computer.
Click this device in the list, then click .
If connection is properly established, “You are
connected” appears for the device in the list.
This completes configuration.
17
Connecting by Manual Setting
To connect this device to a computer via an access point that does not support WPS, change the network mode of the device to AP mode, and
configure the device’s network settings to suit the network environment.
CAUTION
• If the access point is using security settings (such as MAC address filtering), change the settings to allow connection to this device.
• To ensure good Wi-Fi communications, perform this procedure with the scanner initially located close to the access point.
1
Check the SSID of this device.
The SSID is printed on the device’s bottom label.
SSID: WU10-XXXXXXX
2
Slide the mode switch to the “AP” side, press the
power button to turn the device on.
Power button
18
 Loading...