

WP-DC48
COPY
COPY
COPY
COPY
COPY
COPY
COPY
COPY
PRINTED IN JAPAN
CDI-M496-010 IMPRIMÉ AU JAPON
CANON INC.
30-2, Shimomaruko 3-chome, Ohta-ku, Tokyo 146-8501, Japan
CANON EUROPA N.V.
Bovenkerkerweg 59-61, 1185 XB Amstelveen, The Netherlands
© CANON INC. 2012
日本語
カメラ本体の使用方法については、カメラに付属の使用説明書をお読みください。
•
ご使用前に必ず本紙をお読みください。
•
本紙は、将来いつでも使用できるように大切に保管してください。
•
はじめにお読みください
必ず事前に正常に動作するか、水漏れはないかを確認してください。水漏れを確認するには、カメラを入れずに、ケースを
閉じ、水中に約 15cm の深さまで沈め、3 分ほど放置してください。水漏れが起きたときは、修理受付窓口へお持ちください。
安全上のご注意
ご使用の前に「安全上のご注意」をよくお読みの上、製品を正しくお使いください。
•
ここに示した注意事項は、あなたや他の人々への危害や損害を未然に防止するためのものです。
•
警告
ケースを使ったあとは、必ずカメラを取り出す。
カメラを入れたまま、直射日光のあたる場所や高温になるところに放置しておくと、発火や破裂などの原因になることが
あります。
注意
水漏れが確認されたときは、ただちに電源を切る。
火災や感電の原因となります。ケース内部とカメラの水分を十分に拭き取り、至急、お近くの修理受付窓口にご相談
ください。
注意
結露に注意する。
短い時間で寒暖の差が大きい場所へ移動すると、ケース内部に水滴がつき ( 結露 )、故障の原因となります。結露した
ときは、ケースからカメラを取り出し、ケースとカメラについた水滴を乾いたやわらかい布で拭き取り、十分乾燥
させてください。
以下の行為は、水漏れの原因となります。
カメラにストラップを付けたままケースに入れない。
•
防水パッキン(黄色のゴム部分)に水道水を勢いよく当てない。
•
防水パッキンに傷を付けたり、ゴミなどを挟み込まない。
•
分解や改造をしない。
•
以下の場所で使用・保管しない。
水深 40m を超える水中
•
40ºC を超える気温または水温になるところ
•
以下の場所で保管しない。
直射日光のあたるところ
•
湿気やホコリの多いところ
•
ナフタリンなど防虫剤のあるところ
•
以下の行為は、変形するなど、故障の原因になります。
ケースを投げたり、落としたりしない。
•
死亡または重傷を負う可能性がある内容です
傷害を負う可能性がある内容です
物的損害を負う可能性がある内容です
キヤノンデジタルカメラウォータープルーフケース
防水性能
•
IEC/JIS保護等級「IPX8」相当
•
水深:40m 以内
English
Refer to the Camera User Guide for details on how to use the camera.
•
Make sure you read this guide before using the Waterproof Case.
•
Store this guide safely so that you can use it in the future.
•
Read This First
Before you use the Waterproof Case, make sure it is functioning correctly and does not leak. To check for leaks, close
the camera case before putting the camera in, and hold it under water at an approximate depth of 15 cm (5.9 in.) for
about three minutes. If it leaks, contact a Canon Customer Support Help Desk.
Safety Precautions
Before using the Waterproof Case, ensure that you read the safety precautions below. Always ensure that the
•
Waterproof Case is operated correctly.
The safety precautions noted on the following pages are intended to prevent injuries to yourself and other persons,
•
or damage to the equipment.
Warning
Be sure to remove the camera after using the Waterproof Case.
Leaving the camera in the Waterproof Case and placing it in direct sunlight or other places subject to high temperatures
may result in fi re, or cause the case to burst.
Caution
Immediately turn off the camera if the Waterproof Case leaks.
Leaks could result in fi re or electrical shock. Thoroughly wipe the Waterproof Case interior and the camera dry and
contact a Canon Customer Support Help Desk.
Caution
Be careful of condensation.
Moving the Waterproof Case rapidly between hot and cold temperatures may cause condensation (water droplets)
to form on its internal surfaces. If this occurs, stop using the camera as the condensation may cause a malfunction.
Remove the camera, and wipe off the condensation from the case and camera with a soft, dry cloth so that it is
completely dry.
The following actions could cause leaks:
Do not insert the camera with the strap attached.
•
Do not spray the waterproof seal (yellow) with tap-water.
•
Do not damage the waterproof seal, or allow dirt to accumulate between the waterproof seal and the case.
•
Do not disassemble or modify the Waterproof Case.
•
Avoid using or storing the Waterproof Case in the following places:
Depths exceeding 40 meters (130 ft.).
•
Places subject to temperatures above 40 °C (104 °F).
•
Avoid placing, or storing the Waterproof Case in the following places:
Places subject to strong sunlight.
•
Humid or dusty areas.
•
Near substances such as napthalene or insecticides.
•
The following actions may warp the case and cause malfunctions.
Do not drop or throw the Waterproof Case.
•
Waterproof Capability
Meets IEC/JIS protection rating “IPX8” equivalent
•
For use within a depth of 40 m (130 ft.)
•
CANON DIGITAL CAMERA WATERPROOF CASE
Denotes the possibility of serious injury or death.
Denotes the possibility of injury.
Denotes the possibility of damage to the Waterproof Case and camera.
Deutsch
Anleitungen zur Verwendung der Kamera fi nden Sie im Kamera-Benutzerhandbuch.
•
Lesen Sie sich dieses Handbuch gut durch, bevor Sie das Unterwassergehäuse verwenden.
•
Bewahren Sie dieses Handbuch zur späteren Verwendung sicher auf.
•
Bitte zuerst lesen
Stellen Sie vor dem Gebrauch des Unterwassergehäuses sicher, dass es ordnungsgemäß funktioniert und kein Leck hat. Zur
Prüfung auf Lecks schließen Sie das Kameragehäuse, bevor Sie die Kamera einsetzen, und halten es etwa drei Minuten lang in
einer Tiefe von ca. 15 cm unter Wasser. Falls es eine undichte Stelle aufweist, wenden Sie sich an den Canon-Kundendienst.
Sicherheitsvorkehrungen
Lesen Sie die im Folgenden beschriebenen Sicherheitsvorkehrungen vor der Verwendung des Unterwassergehäuses gut
•
durch. Achten Sie stets darauf, dass das Unterwassergehäuse ordnungsgemäß verwendet wird.
Die auf den folgenden Seiten erläuterten Sicherheitsvorkehrungen sollen verhindern, dass Sie selbst oder andere Personen
•
zu Schaden kommen oder Schäden am Gerät entstehen.
Warnhinweis
Denken Sie daran, die Kamera nach dem Gebrauch des Unterwassergehäuses aus dem Gehäuse herauszunehmen.
Wenn die Kamera im Unterwassergehäuse verbleibt und direkter Sonneneinstrahlung oder hohen Temperaturen ausgesetzt
wird, kann sich ein Brand entwickeln oder das Gehäuse bersten.
Vorsicht
Schalten Sie die Kamera sofort aus, falls das Unterwassergehäuse Lecks aufweist.
Lecks könnten Feuer oder einen elektrischen Schlag zur Folge haben. Wischen Sie das Innere des Unterwassergehäuses und
die Kamera gründlich trocken, und wenden Sie sich an den Canon-Kundendienst.
Vorsicht
Achten Sie auf die Bildung von Kondenswasser.
Schneller Wechsel des Unterwassergehäuses zwischen hohen und niedrigen Temperaturen kann Kondensation (Wassertropfen)
auf seinen Innenfl ächen verursachen. Falls dies geschieht, stellen Sie die Verwendung der Kamera ein, da Kondensation zu
Fehlfunktionen führen kann. Entnehmen Sie die Kamera, und wischen Sie die Kondensationsfeuchtigkeit mit einem weichen,
trockenen Tuch von Gehäuse und Kamera ab, bis diese vollständig trocken sind.
Durch Nichtbeachtung der folgenden Anweisungen könnten Lecks verursacht werden:
Vergewissern Sie sich, dass die Schlaufe von der Kamera entfernt ist, bevor Sie sie in das Gehäuse einsetzen.
•
Spritzen Sie den Dichtungsring (gelb) nicht mit Leitungswasser ab.
•
Beschädigen Sie den Dichtungsring nicht, und sorgen Sie dafür, dass sich kein Schmutz zwischen Dichtungsring und
•
Gehäuse ansammeln kann.
Zerlegen oder verändern Sie das Unterwassergehäuse nicht.
•
Verwenden oder lagern Sie das Unterwassergehäuse nach Möglichkeit nicht in folgenden Umgebungen:
Wassertiefen von mehr als 40 Meter.
•
Umgebungen mit Temperaturen über 40 °C.
•
Bewahren Sie das Unterwassergehäuse nach Möglichkeit nicht in folgenden Umgebungen auf:
Umgebungen mit starker Sonneneinstrahlung.
•
Feuchte oder staubige Umgebungen.
•
In der Nähe von chemischen Substanzen wie Naphthalin oder Insektiziden.
•
Die Nichtbeachtung der folgenden Anweisungen könnte ein Verbiegen des Gehäuses und Fehlfunktionen zur Folge haben.
Werfen Sie das Unterwassergehäuse nicht, und lassen Sie es nicht fallen.
•
UNTERWASSERGEHÄUSE FÜR CANON DIGITALKAMERA
Weist auf die Möglichkeit von schweren Verletzungen oder Tod hin.
Weist auf die Möglichkeit von Verletzungen hin.
Weist auf die Möglichkeit von Schäden an Unterwassergehäuse und Kamera hin.
Wasserdichtfähigkeit
Entspricht dem IEC/JIS-Schutzgrad „IPX8“
•
Für den Einsatz bis zu einer Tiefe von 40 m
•
Español
Consulte la Guía del usuario de la cámara para obtener las instrucciones sobre cómo usar la cámara.
•
Asegúrese de leer esta guía antes de utilizar el estuche impermeable.
•
Guarde esta guía en un lugar seguro de modo que la pueda utilizar en el futuro.
•
Lea esta sección antes de empezar
Antes de utilizar el estuche impermeable, cerciórese de que funciona correctamente y de que no se infiltra agua. Para
comprobar que no hay infi ltraciones, cierre el estuche antes de introducir la cámara y sumérjalo en agua a una profundidad de
unos 15 cm (5,9 pulgadas) durante unos tres minutos. Si se infi ltra agua, póngase en contacto con el Servicio de asistencia al
cliente de Canon.
Precauciones de seguridad
Antes de comenzar a utilizar el estuche impermeable, asegúrese de leer las precauciones de seguridad que se describen a
•
continuación. Asegúrese siempre de que el estuche impermeable se utiliza correctamente.
Las precauciones de seguridad que se indican en las páginas siguientes tienen como misión evitar lesiones tanto al usuario
•
como a las demás personas y daños en el equipo.
Advertencia
Asegúrese de extraer la cámara después de usar el estuche impermeable.
Dejar la cámara en el estuche impermeable y colocarla directamente bajo el sol o en cualquier otro lugar que pueda estar
sometida a altas temperaturas podría provocar un incendio o que estallara el estuche.
Precaución
Si el estuche impermeable tuviera infi ltraciones, apague inmediatamente la cámara.
Las infiltraciones podrían provocar un incendio o descargas eléctricas. Seque completamente el interior del estuche
impermeable y la cámara y póngase en contacto con el Servicio de asistencia al cliente de Canon.
Precaución
Preste atención a la condensación.
El traslado rápido del estuche impermeable entre lugares con temperaturas altas y bajas puede producir condensación (gotas
de agua) en sus superfi cies internas. Si ocurre esto, deje de usar la cámara, ya que la condensación puede provocar un mal
funcionamiento. Extraiga la cámara y limpie la condensación del estuche y de la cámara con un trapo suave y seco hasta que
estén completamente secos.
Las acciones siguientes podrían provocar infi ltraciones:
No introduzca la cámara con la correa montada.
•
No rocíe la junta hermética (amarilla) con agua corriente.
•
No dañe la junta hermética ni permita que la suciedad se acumule entre la misma y el estuche.
•
No desarme ni modifi que el estuche impermeable.
•
Evite utilizar, colocar o almacenar el estuche impermeable en los lugares siguientes:
Profundidades superiores a 40 metros (130 pies).
•
Donde esté expuesta a temperaturas superiores a 40 ºC (104 ºF).
•
Evite colocar o almacenar el estuche impermeable en los lugares siguientes:
Donde quede expuesta a la luz solar intensa.
•
En zonas húmedas o polvorientas.
•
Cerca de sustancias tales como naftalina o insecticidas.
•
Las acciones siguientes podrían deformar el estuche y provocar fallos en el funcionamiento.
No deje caer ni lance el estuche impermeable.
•
ESTUCHE IMPERMEABLE PARA CÁMARA DIGITAL CANON
Indica el riesgo de lesiones graves o de muerte.
Indica el riesgo de lesiones.
Indica la posibilidad de daños al estuche impermeable o a la cámara.
Capacidad de impermeabilidad
Cumple la evaluación de protección de IEC/JIS equivalente a “IPX8”
•
Para utilizarse a una profundidad de 40 m (130 pies)
•
Français
Pour en savoir plus sur l’utilisation de l’appareil photo, consultez le Guide d’utilisation de l’appareil photo.
•
Prenez soin de lire ce guide avant d’utiliser le boîtier étanche.
•
Rangez-le dans un endroit sûr pour toute référence ultérieure.
•
À lire en priorité
Avant d’utiliser ce boîtier étanche, assurez-vous qu’il fonctionne correctement et qu’il n’y a pas d’infi ltration d’eau. Pour cette
vérifi cation, fermez le boîtier avant d’y installer l’appareil photo et tenez-le sous l’eau à une profondeur de 15 cm (5,9 pouces)
pendant environ trois minutes. En cas de fuite, contactez le service clientèle Canon.
Précautions de sécurité
Avant d’utiliser le boîtier étanche, veuillez lire attentivement les précautions de sécurité exposées ci-après. Veillez à toujours
•
utiliser le boîtier étanche de manière appropriée.
Les précautions de sécurité reprises aux pages suivantes ont pour but d’éviter tout risque de dommages corporels et
•
matériels.
Avertissement
Assurez-vous de bien retirer l’appareil photo après avoir utilisé le boîtier étanche.
Le fait de laisser le boîtier étanche contenant l’appareil photo sous la lumière directe du soleil ou dans un endroit où la
température est élevée peut entraîner un incendie ou l’explosion du boîtier.
Attention
Si le boîtier étanche présente une infi ltration d’eau, éteignez immédiatement l’appareil photo.
Une infi ltration risque d’occasionner un incendie ou une décharge électrique. Essuyez l’intérieur du boîtier étanche et l’appareil
photo jusqu’à ce qu’ils soient secs et contactez le service clientèle Canon.
Attention
Soyez attentif à la présence de condensation.
Déplacer trop rapidement le boîtier étanche d’un endroit chaud vers un endroit froid peut entraîner la formation de condensation
(gouttelettes d’eau) sur les surfaces intérieures, susceptible de nuire au fonctionnement. Cessez d’utiliser l’appareil photo si
vous décelez de la condensation. Retirez l’appareil photo et essuyez la condensation du boîtier et de l’appareil avec un chiffon
doux et sec jusqu’à ce qu’ils soient complètement secs.
Les actions suivantes peuvent provoquer des infi ltrations :
Ne placez pas l’appareil photo dans le boîtier avec la dragonne.
•
Ne vaporisez pas d’eau du robinet sur le joint d’étanchéité (jaune).
•
Prenez soin de ne pas abîmer le joint d’étanchéité et veillez à ne pas laisser de saletés se déposer entre le joint et le boîtier.
•
Ne démontez pas et ne modifi ez pas le boîtier étanche.
•
Évitez d’utiliser ou de ranger le boîtier étanche dans les lieux suivants :
Profondeur supérieure à 40 mètres (130 pieds).
•
Endroits susceptibles d’atteindre des températures supérieures à 40 °C (104 °F).
•
Évitez de déposer ou de ranger le boîtier étanche dans les lieux suivants :
Endroits directement exposés aux rayons du soleil.
•
Endroits humides ou poussiéreux.
•
À proximité de substances comme de la naphtaline ou des insecticides.
•
Les actions suivantes pourraient déformer le boîtier et provoquer un dysfonctionnement.
Ne faites pas tomber et ne jetez pas le boîtier étanche.
•
BOÎTIER ÉTANCHE POUR APPAREIL PHOTO NUMÉRIQUE CANON
Indique un risque de blessure grave ou de mort.
Indique un risque de blessure.
Indique un risque de dommages au niveau du boîtier étanche et l’appareil photo.
Capacité d’étanchéité à l’eau
Conforme à la protection IEC/JIS de classe équivalente à “IPX8”
•
Pour utiliser à une profondeur de 40 mètres (130 pieds) maximum
•
Italiano
Per informazioni dettagliate sull’utilizzo della fotocamera, consultare la Guida dell’utente della fotocamera.
•
Leggere con attenzione la presente guida prima di utilizzare la custodia subacquea.
•
Conservare la guida in un luogo sicuro per riferimento futuro.
•
Informazioni preliminari
Prima di utilizzare la custodia subacquea, assicurarsi che funzioni correttamente e che non vi siano infi ltrazioni d’acqua. A tale
scopo, chiudere la custodia prima di inserirvi la fotocamera e tenerla sott’acqua a una profondità di circa 15 centimetri per circa
tre minuti. In caso di infi ltrazioni di acqua, contattare l’Help Desk del Supporto Clienti Canon.
Precauzioni per la sicurezza
Prima di utilizzare la custodia subacquea, leggere attentamente le precauzioni per la sicurezza riportate di seguito. Accertarsi
•
sempre che la custodia subacquea sia utilizzata in modo corretto.
Le precauzioni per la sicurezza contenute nelle seguenti pagine vengono fornite per evitare incidenti alle persone o danni
•
all’apparecchiatura.
Avvertenza
Dopo avere utilizzato la custodia subacquea, assicurarsi di rimuovere la fotocamera.
Se la fotocamera viene lasciata all’interno della custodia subacquea e viene posizionata in un luogo esposto alla luce solare o
in altri luoghi soggetti ad alte temperature, si potrebbero verifi care incendi o esplosioni della custodia.
Attenzione
In caso di infi ltrazioni della custodia subacquea, spegnere immediatamente la fotocamera.
Le fuoriuscite potrebbero provocare incendi o scosse elettriche. Asciugare accuratamente l’interno della custodia subacquea e
la fotocamera, quindi contattare l’Help Desk del Supporto Clienti Canon.
Attenzione
Prestare attenzione alla formazione di condensa.
Il repentino spostamento della custodia subacquea da un luogo caldo a uno freddo può causare la formazione di condensa (gocce
d’acqua) sulle superfi ci interne. In questo caso, interrompere l’utilizzo della fotocamera poiché la condensa potrebbe causare
malfunzionamenti. Rimuovere la fotocamera, quindi asciugare completamente la condensa dalla custodia e dalla fotocamera
con un panno morbido e asciutto.
Le azioni riportate di seguito potrebbero causare infi ltrazioni:
Non inserire la fotocamera quando è collegata la cinghietta.
•
Non spruzzare acqua di rubinetto sulla guarnizione impermeabile (giallo).
•
Non danneggiare la guarnizione impermeabile e accertarsi che non si accumuli sporcizia fra la guarnizione e la custodia.
•
Non smontare né modifi care la custodia subacquea.
•
Evitare di utilizzare e di conservare la custodia subacquea nei seguenti luoghi:
Profondità superiori a 40 metri.
•
Luoghi esposti a temperature superiori a 40 °C.
•
Evitare di posizionare e di conservare la custodia subacquea nei seguenti luoghi:
Luoghi esposti a luce del sole intensa.
•
Ambienti umidi o polverosi.
•
In prossimità di sostanze quali naftalina o insetticidi.
•
Le azioni riportate di seguito possono deformare la custodia e causare malfunzionamenti.
Non lasciare cadere né lanciare la custodia subacquea.
•
CUSTODIA SUBACQUEA PER FOTOCAMERA DIGITALE CANON
Indica la possibilità di lesioni gravi o di morte.
Indica la possibilità di lesioni.
Indica la possibilità di danni alla custodia subacquea e alla fotocamera.
Proprietà di resistenza all’acqua
Conforme alla classe di protezione IEC/JIS “IPX8” equivalente
•
Da utilizzarsi entro il limite di profondità di 40 m
•
Русский
Подробные сведения по работе с камерой см. в Руководстве пользователя камеры.
•
Перед использованием водонепроницаемого футляра обязательно ознакомьтесь с данным Руководством.
•
Уберите это Руководство в надежное место для последующего использования.
•
Прочитайте это в первую очередь
Перед использованием водонепроницаемого футляра убедитесь, что он правильно работает и не течет. Для проверки
на течь закройте футляр, не устанавливая в него камеру, и подержите его под водой на глубине приблизительно 15 см
около 3 мин. В случае протечки обратитесь в службу поддержки клиентов компании Canon.
Меры предосторожности
Перед использованием водонепроницаемого футляра обязательно прочтите приведенные ниже правила техники
•
безопасности. Строго следите за соблюдением правил надлежащего обращения с водонепроницаемым футляром.
Рассматриваемые на последующих страницах меры предосторожности позволят исключить нанесение травм Вам и
•
другим людям, а также избежать повреждение оборудования.
Предостережение
После использования водонепроницаемого футляра обязательно извлекайте из него камеру.
Если оставить камеру в водонепроницаемом футляре под прямыми солнечными лучами или в других местах с высокой
температурой, это может привести к возгоранию или взрыву футляра.
Предупреждение
Если водонепроницаемый футляр начал протекать, немедленно выключите камеру.
Протечки могут привести к возгоранию или поражению электрическим током. Тщательно досуха протрите камеру и
внутренние поверхности водонепроницаемого футляра, затем обратитесь в службу поддержки клиентов компании
Canon.
Предупреждение
Избегайте конденсации.
Быстрое перемещение водонепроницаемого футляра из зоны высокой температуры в зону низкой температуры и
наоборот может привести к образованию конденсата (капель воды) на внутренних поверхностях. В таком случае
прекратите пользоваться камерой, так как конденсация может привести к неполадкам. Извлеките камеру и досуха
протрите футляр и камеру мягкой сухой тканью.
Указанные ниже действия могут привести к протечкам.
Не устанавливайте камеру с закрепленным на ней ремнем.
•
Не брызгайте на водонепроницаемую прокладку (желтую) водой из-под крана.
•
Не допускайте повреждения водонепроницаемой прокладки, а также накопления грязи между водонепроницаемой
•
прокладкой и корпусом.
Не разбирайте водонепроницаемый футляр и не вносите изменения в его конструкцию.
•
Не используйте и не храните водонепроницаемый футляр в следующих местах:
на глубине свыше 40 м;
•
в местах, в которых температура превышает 40°C.
•
Не оставляйте и не храните водонепроницаемый футляр в следующих местах:
под яркими солнечными лучами;
•
во влажных и пыльных местах;
•
рядом с такими веществами, как нафталин или инсектициды.
•
Указанные ниже действия могут привести к деформации футляра и неполадкам в его работе.
Не допускайте падения водонепроницаемого футляра и не бросайте его.
•
ВОДОНЕПРОНИЦАЕМЫЙ ФУТЛЯР ДЛЯ ЦИФРОВОГО
ФОТОАППАРАТА CANON
Указывает на возможность серьезной травмы, вплоть до смертельного
исхода.
Указывает на возможность травмы.
Указывает на возможность повреждения водонепроницаемого футляра и
камеры.
Степень водонепроницаемости
Удовлетворяет требованиям, эквивалентным уровню защиты «IPX8» стандарта IEC/JIS
•
Для использования на глубине до 40 м
•
中文
有关相机的使用方法,请参考相机
•
佳能数码相机防水套使用说明书
附带的使用说明书。
在使用本产品之前,请务必先仔细
•
阅读本使用说明书。
请务必妥善保管好本书,以便日后
•
能随时查阅。请在充分理解内容的
基础上,正确使用。
请先阅读本文
使用前,请务必检查本防水套是否
能正常操作或有无漏水。请先不要
放入相机,关闭防水套,然后将其
浸入水深约 15 cm 的水中 3 分钟左右,
以检查其是否漏水。如果漏水,请
与佳能热线中心联系。
安全注意事项
使用防水套前,请务必阅读以下安
•
全注意事项。请务必保证正确使用
防水套。
这里指出的安全注意事项旨在防止
•
您自己及他人受到伤害,或防止器
材受到损坏。
警 告
表示可能造成严重的人身
伤害或死亡。
用完防水套后,请务必取出相机。
将装有相机的防水套放在阳光直射
的地方或高温处
,可能会导致起火
或使防水套破裂。
注 意
表示可能造成人身伤害。
如果防水套漏水,请立即关闭电源。
否则可能会导致着火或触电。请彻
底擦干防水套内部和相机,并迅速
与佳能热线中心联系。
注意
表示可能造成器材损坏。
结露现象。
短时间内在温 差很大的场所间移动可
能会使防水套的内表面出现结露( 小
水 珠 ),导致故障。如果发生结露现象,
请从防水套中取出相机并且用柔软的
干布擦去防水套和相机上的水珠,等
水气完全蒸发以后再使用。
以下行为可能会导致防水套漏水。
请勿将系有腕带的相机装入防水套。
•
请勿用过强的自来水流冲洗防水封
•
条 ( 黄色橡胶部分 )。
请勿损坏防水封条,或者让灰尘等
•
污物积聚在防水封条和防水套之间。
请勿拆卸或改装防水套。
•
请勿在以下场所使用、放置或存放
防水套。
水深超过 40 m 的水中。
•
气温或水温超过 40 ℃的地方。
•
请勿在以下场所放置或存放防水套。
强烈阳光照射的地方。
•
潮湿或多尘的地方。
•
放置有卫生球等防虫剂的地方。
•
以下行为可能会导致防水套变形,造
成故障。
请勿投掷或摔落防水套。
•
防水性能
符合 IEC/JIS 防水保护规格,相当
•
于“IPX8”。
适用于不超过 40 m 的水深。
•
FOR P.R.C. ON LY
进 口 商 : 佳能 ( 中国 ) 有限公司
进口商地址 : 北京市东城区金宝街 89 号金宝大厦 15 层邮编
原产地: 请参照保修卡、产品包装箱或产品机身上的标示
初 版 : 2 0 12 .7
100005
日本語
COPY
COPY
COPY
COPY
COPY
COPY
COPY
COPY
English Deutsch Español Français Italiano Русский
中文
1
2
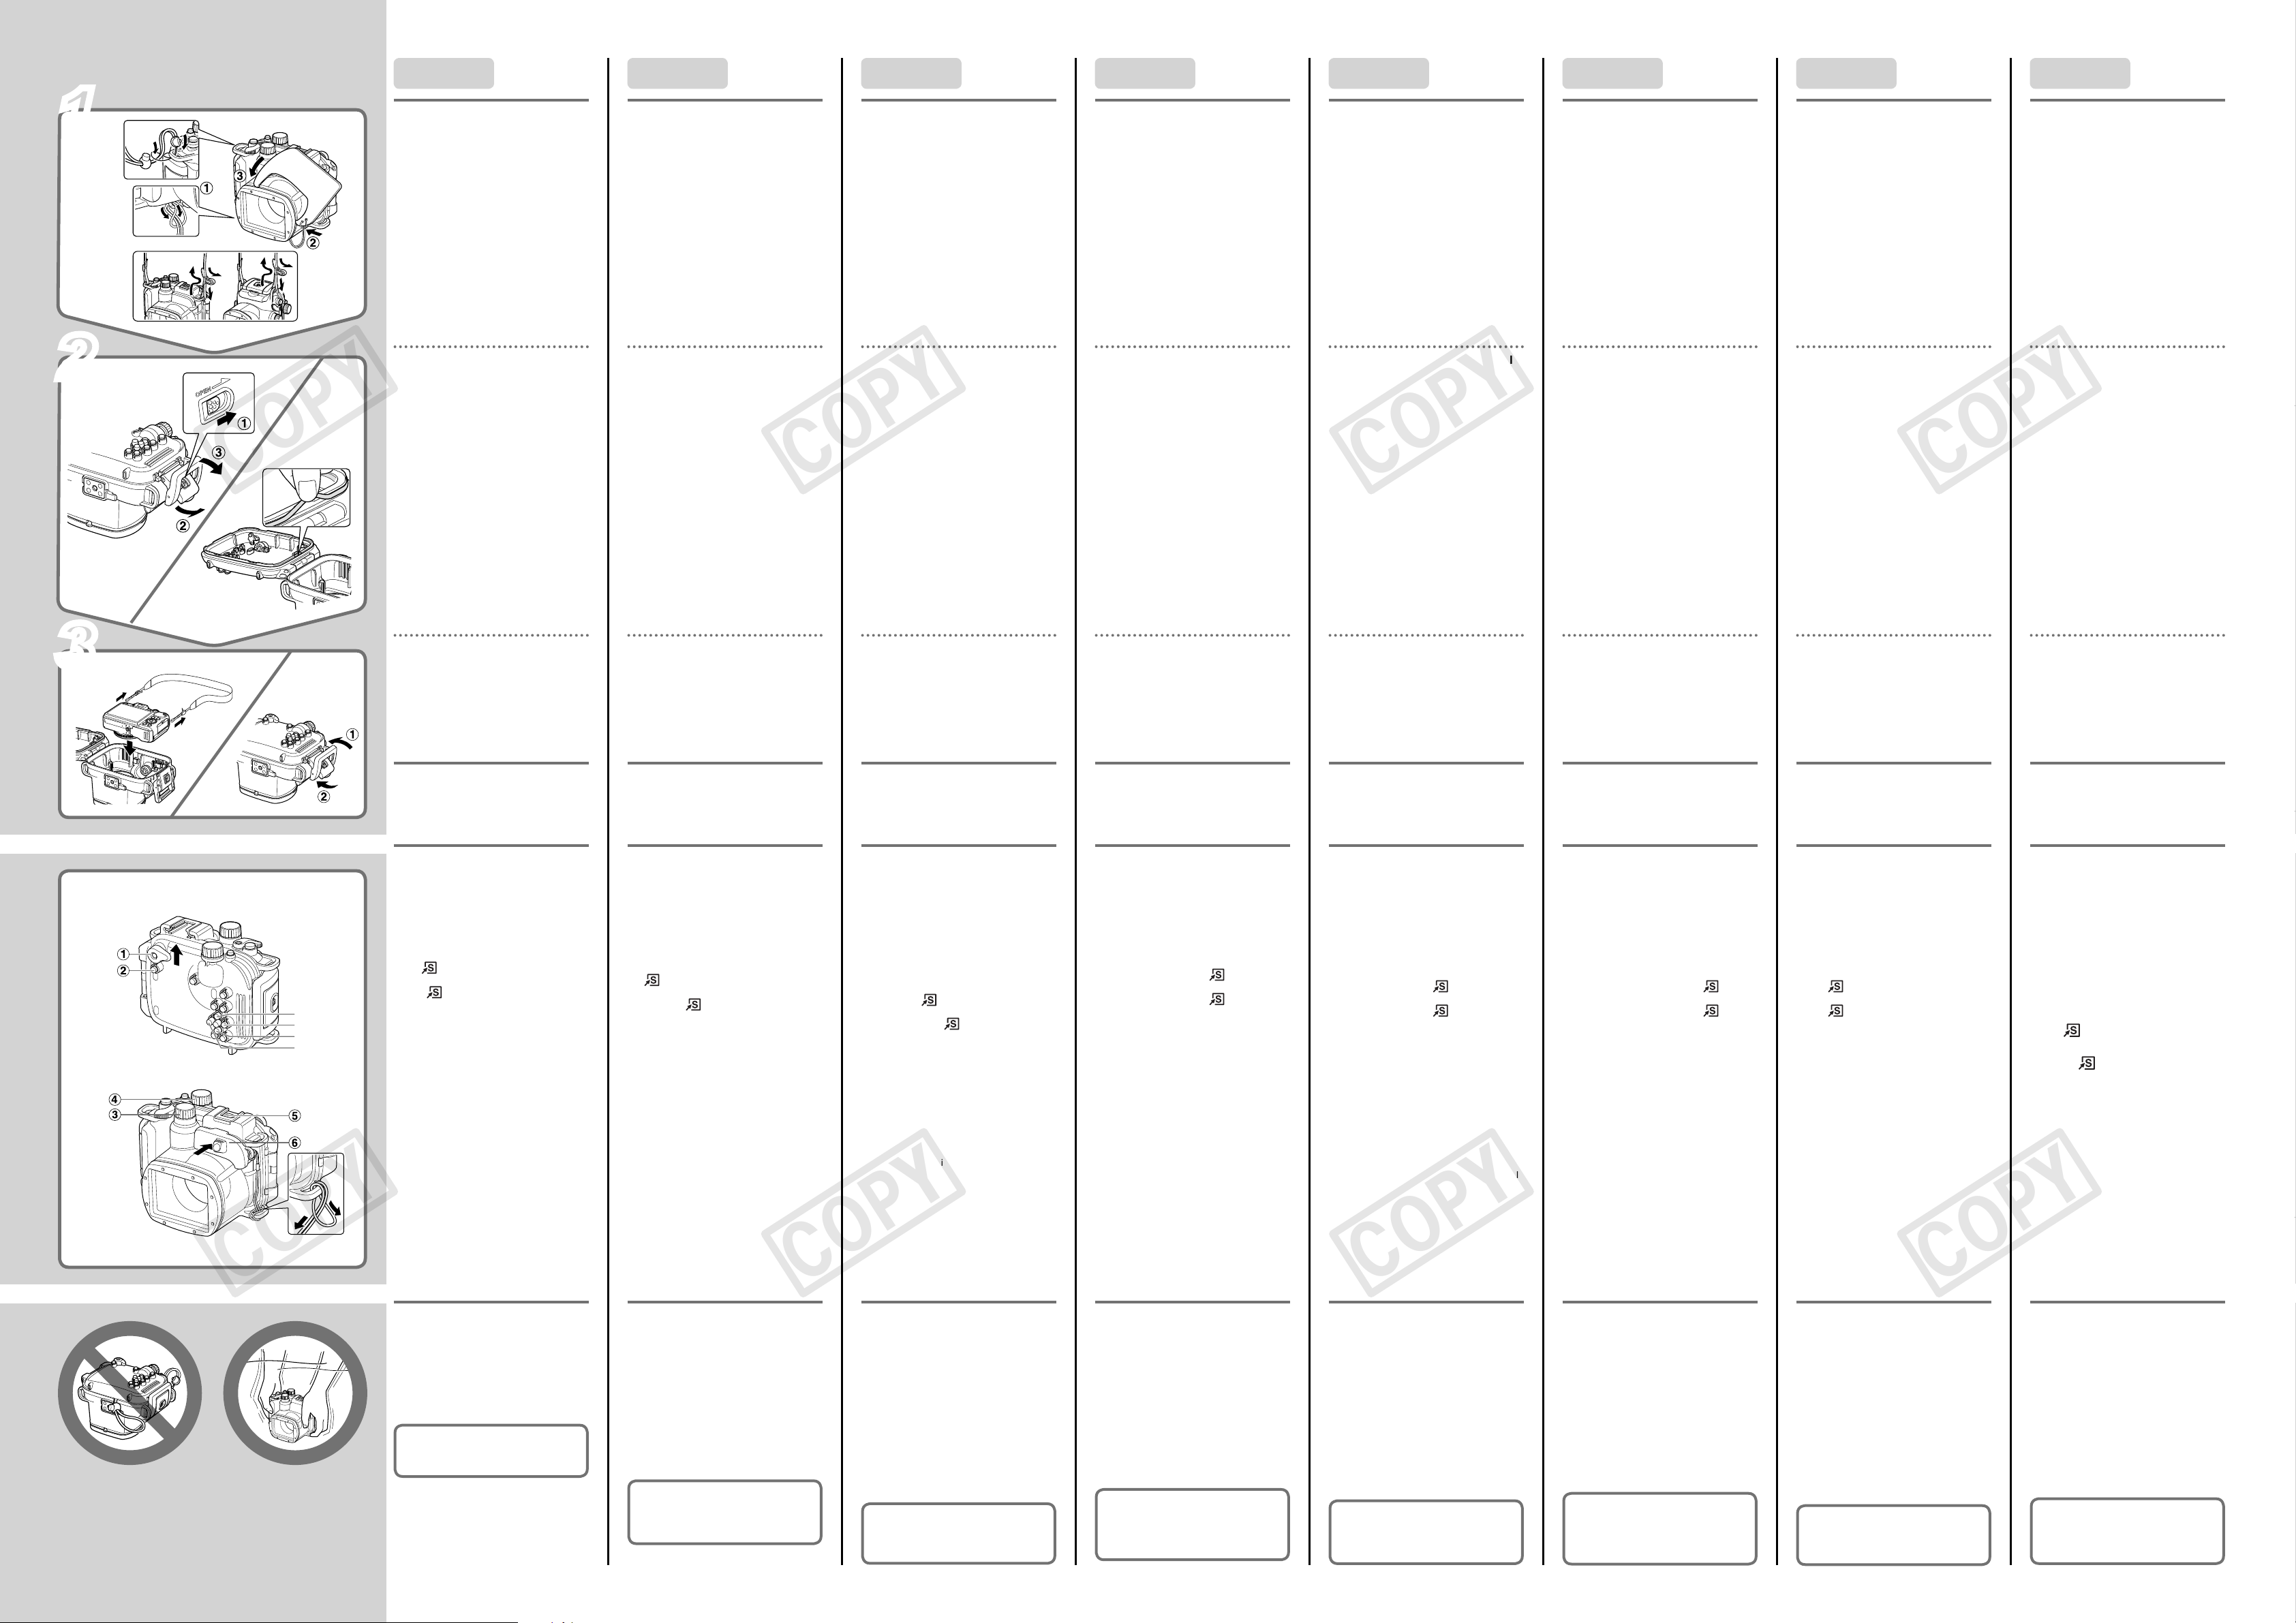
ケースに付属のストラップと拡散板
を取り付ける
ケースに付属のストラップ以 外は 取り付け
ないでください。
水中では、必ずネックストラップを取り
外して、リストストラップをお 使いくださ い。
ネックストラップをお使いになると、首に
巻きつくなど、思わぬけがや事故の恐れが
あり ます。
拡散 板の表面に傷 を付けないでください。
ストロボ光が正しく拡散できなくなること
が あります。
被写体 が近す ぎると、拡 散 板 の効果 を 十
分に得られないことがあります。
ケースを開き、防水パッキンにシリ
コング リースを 塗 る
1. 図のように、防水 パッキンを取り外し
ます。
爪を立てたり、無理に引っ張らないで
ください。
2.溝のゴミを綿棒などで拭き取ります。
3. 指にグリースを少量( 米 粒1粒 程 度 )取り、
防水パッキン全体に均一に塗ります。
4. 溝 に 取り 付 けます。
よじ れ な い よ うに注 意してください。
防水性能を維持するために、1年に1 度
は防水パッキンの交換をおすすめします。
修理 受付窓口にご相談ください。
Attach the strap and diffusion
plate included with the case.
Do not attach any straps except for the
ones included with the Waterproof Case.
Remove the neck strap and attach the
wrist strap before using theWaterproof
Case underwater. Using the neck strap
may cause it to become wrapped around
the neck and result in strangulation or
other injuries.
Do not scratch the surface of the diffusion
plate as this may prevent light from the
fl ash from being properly diffused.
The effectiveness of the diffusion plate
may be impaired if the subject is too close
to the camera.
Open the case, and apply silicon
grease to the waterproof seal.
1. Remove the waterproof seal as shown.
Do not dig your fi ngernails into the seal,
or pull on it forcibly.
2. Using a cotton swab, wipe off any
debris in the mounting groove.
3. Apply a small amount (droplet) of grease
to your fingertip, and evenly coat the
entire surface of the waterproof seal.
4. Place the waterproof seal back in the
seal mounting groove.
Take care not to twist it.
To ensure that the case remains watertight,
you should replace the seal once a year.
Please contact a Canon Customer Support
Help Desk for replacement seals.
Befestigen Sie die im Lieferumfang
des Gehäuses enthaltene Schlaufe
und Streuscheibe.
Benutzen Sie nur die im Lieferumfang des
Unterwassergehäuses enthaltenen Schlaufen.
Nehmen Sie den Trageriemen ab, und
bringen Sie die Handschlaufe an, bevor Sie
das Unterwassergehäuse unter Wasser
verwenden. Bei der Verwendung des
Trageriemens besteht die Gefahr, dass sich
der Riemen am Hals verheddert und zu
Strangulation oder anderen Verletzungen führt.
Vermeiden Sie Kratzer auf der Oberfläche
der Streuscheibe, da dies die gleichmäßige
Streuung des Blitzlichts verringert.
Die Effektivität der Streuscheibe kann
beeinträchtigt werden, wenn sich das Motiv zu
nah an der Kamera befi ndet.
Öffnen Sie das Gehäuse und tragen Sie
Silikon-Paste auf den Dichtungsring auf.
1. Entfernen Sie den Dichtungsring, wie in
der Abbildung gezeigt.
Drücken Sie nicht Ihre Fingernägel in den
Dichtungsring hinein, und ziehen Sie nicht
gewaltsam am Dichtungsring.
2. Entfernen Sie Ablagerungen mit einem
Wattestäbchen aus der Nut.
3. Geben Sie etwas (einen Tropfen)
Silikon-Paste auf Ihre Fingerspitze, und
überziehen Sie die gesamte Oberfl äche des
Dichtungsrings gleichmäßig mit der Paste.
4. Setzen Sie den Dichtungsring wieder
ordnungsgemäß in die Nut ein.
Achten Sie darauf, dass er dabei nicht
verdreht wird.
Damit das Kameragehäuse auch wasserdicht
bleibt, sollten Sie den Dichtungsring einmal pro
Jahr auswechseln.
Wenden Sie sich an Ihren Canon-Kundendienst,
um Ersatz-Dichtungsringe zu erhalten.
Monte la correa y la placa de
difusión incluidas con el estuche.
No monte ninguna correa, excepto las que se
incluyen en el estuche impermeable.
Extraiga la correa para el cuello y coloque la
correa de muñeca antes de utilizar el estuche
impermeable bajo el agua. El uso de la correa
para el cuello puede hacer que se quede
enganchado alrededor del mismo y producir
una estrangulación o cualquier otra lesión.
No raye la superfi cie de la placa de difusión,
ya que esto podría evitar que la luz del fl ash
se difundiese adecuadamente.
La efectividad de la placa de difusión puede
reducirse si el motivo está demasiado cerca
de la cámara.
Abra el estuche y aplique grasa de
silicona a la junta hermética.
1. Retire la junta hermética tal como se
muestra.
No clave las uñas en la junta ni tire de ella
con fuerza.
2. Con la ayuda de un bastoncillo de
algodón, retire cualquier sustancia extraña
que se encuentre en la ranura de montaje.
3. Aplique una pequeña cantidad (una gota)
de grasa en la punta del dedo y recubra
uniformemente toda la superficie de la
junta hermética.
4. Vuelva a colocar la junta hermética en la
ranura de montaje de la junta.
Tenga cuidado de no retorcerla.
Para asegurar la estanqueidad del estuche,
se recomienda reemplazar anualmente la
junta hermética.
Póngase en contacto con el Servicio de
asistencia al cliente de Canon para obtener la
junta hermética.
Fixez la dragonne et la plaque de
diffusion fournies avec le boîtier.
N’utilisez pas de dragonnes autres que celles
fournies avec le boîtier étanche.
Enlevez la courroie et fi xez la dragonne avant
d’utiliser le boîtier étanche sous l’eau. La
courroie pourrait s’enrouler autour du cou et
présenter ainsi un risque d’étranglement ou
de blessure autre.
Veillez à ne pas rayer la surface de la plaque
de diffusion au risque d’empêcher le flash
d’être diffusé correctement.
L’effi cacité de la plaque de diffusion peut être
réduite si le sujet est trop proche de l’appareil.
Ouvrez le boîtier et appliquez de la
graisse au silicone sur le joint
d’étanchéité.
1.
Retirez le joint d’étanchéité comme illustré.
Veillez à ne pas enfoncer vos ongles dans
le joint et à ne pas tirer trop fort dessus.
2. À l’aide d’un coton-tige, enlevez les corps
étrangers présents dans la rainure de
montage du joint.
3. Déposez une goutte de graisse sur votre
doigt et enduisez toute la surface du joint
d’étanchéité de manière uniforme.
4. Réinsérez le joint d’étanchéité dans la
rainure prévue pour l’accueillir.
Prenez soin de ne pas le tordre.
Pour garantir l’étanchéité du boîtier, il est
recommandé de remplacer le joint une fois
par an.
Pour le remplacement du joint, contactez le
service clientèle Canon.
Collegare la cinghietta e il diffusore
in dotazione con la fotocamera.
Non collegare cinghiette diverse da quelle
fornite con la custodia subacquea.
Prima di utilizzare la custodia subacquea
sott’acqua, rimuovere la cinghia tracolla e
collegare la cinghietta da polso. La cinghia
tracolla utilizzata in queste condizioni
potrebbe causare soffocamento o altre lesioni.
Non graffiare la superficie del diffusore,
poiché ciò potrebbe impedire alla luce del
flash di diffondersi correttamente. L’efficacia
del diffusore
potrebbe risultare comunque ridotta se il
soggetto è troppo vicino alla fotocamera.
Aprire la custodia e applicare
grasso al silicone alla guarnizione
impermeabile.
1. Rimuovere la guarnizione impermeabile
come mostrato.
Non inserirvi le unghie né estrarla con
forza.
2. Rimuovere eventuali residui presenti
nella scanalatura di avvitamento con un
batuffolo di cotone.
3. Applicare una goccia di grasso sulla punta
delle dita e spalmarla uniformemente
su tutta la superficie della guarnizione
impermeabile.
4. Riposizionare la guarnizione impermeabile
nella relativa scanalatura di avvitamento.
Prestare attenzione a non piegarla.
Per garantire l’impermeabilità della custodia,
sostituire la guarnizione una volta all’anno.
Per informazioni sulle guarnizioni sostitutive,
contattare l’Help Desk del Supporto Clienti
Canon.
Закрепите ремень и установите
рассеивающую пластину, входящие
в комплект поставки футляра.
Не закрепляйте никаких других
ремней, кроме входящих в комплект
водонепроницаемого футляра.
Перед использованием водонепроницаемого
футляра под водой снимите шейный ремень
и закрепите ремень для запястья. При
использовании шейного ремня, учтите, что
он может обмотаться вокруг шеи и вызвать
удушение или привести к другим травмам.
Оберегайте поверхность рассеивающей
пластины от царапин, так как они могут
привести к неправильному рассеиванию
света вспышки.
Если объект расположен слишком близко
к камере, эффективность рассеивающей
пластины может снизиться.
Откройте футляр и нанесите
силиконовую смазку на
водонепроницаемую прокладку.
1. Снимите водонепроницаемую
прокладку, как показано на рисунке.
Не прищипывайте водонепроницаемую
прокладку ногтями и не тяните ее с силой.
2. Ватной палочкой удалите из монтажной
канавки всю грязь.
3. Нанесите небольшое количество (каплю)
смазки на кончик пальца и равномерно
покройте смазкой всю поверхность
водонепроницаемой прокладки.
4. Установите водонепроницаемую
прокладку обратно в монтажную канавку.
Следите, чтобы прокладка не
перекручивалась.
Для поддержания водонепроницаемости
футляра необходимо заменять прокладку
один раз в год.
За запасными прокладками обращайтесь в
службу поддержки клиентов компании Canon.
安装防水套附送的相机带
和闪光扩散板。
请只安装防水套附带的腕带。
在水下使用防水套之前,请取
下背带,然后系上腕带。使用
背带可能会导致其缠绕在颈
部,从而导致窒息或其他伤害。
请勿刮擦闪光扩散板表面。否
则可能会阻碍闪光灯的光线正
确扩散。
如果被摄体过于接近相机,则
闪光扩散板的效果可能会被削
弱。
打开 防 水 套, 将硅润滑脂
涂在防水封条上。
1. 如图所示,将防水封条取出。
请勿用指甲挑起,或强行拉
伸防水封条。
2. 请使用棉签擦除安装凹槽内
的所有碎屑。
3. 用手指沾上少许( 一小滴 )
润滑脂,然后将润滑脂均匀
地涂满整个防水封条表面。
4. 将防水封条装回安装凹槽内。
请注意不要扭曲。
为保证防水套的防水性能,建
议每年更换一次防水封条。
更换时,请与佳能热线中心联系。
3
ケースにカメラを入れて、ケースを
閉じる
カメラのストラップを取り外して、バッテリー
とカードが入っていることを確認してく
ださい。
ウェイト W W-DC1(別売)の推奨
装着枚数:
海水時:2枚
淡水時:2枚
内蔵ストロボを使う
ストロボを使うときは、レバー(①)を上
に動かします。
Insert the camera into the case,
then close it.
Remove the strap from the camera, and
make sure the battery and memory card
are inserted.
Number of Separately Sold
Waterproof Case Weights (WWDC1) Recommended Mounting:
When in sea water: 2 weights
When in fresh water: 2 weights
Using the Built-in Flash
When using the fl ash, move the lever (①) up.
Using the 7 (Control) Dial and
(コントローラーホイール)や
7
(電子ダイヤル)を使う
z
7やz
操作方法と異なります。
-7:
r
-z: ボタン(②)を押しながらoか
o
r
p
q
p
モードダイヤルと露出補正ダイヤル
を使う
モードダイヤル(③)を回します。
露出 補正ダイヤル(④)を 回します。
の使い かた は、 カメラ 本体 での
ボタン(②)を押しながらqか
を押します。
を押します。
市販の水中用外部ストロボを使う
アクセサリーシュー(⑤)に市販の水中用
外部ストロボを取り付けます。光ケーブル
を使うときは、留め具(⑥)を図のように
カチ ッと音 が するまで押し込 んで取り付 け
たあと、光ケーブルを留め具に差し込みま
す。外部ストロボや光ケーブルの取り付け
かたは、それぞ れの使用説明書を参照し
てください。
(Front) Dial
z
Use of the 7 dial and the z dial with the
waterproof case differs slightly from that of
the camera itself.
- 7: Press the qr buttons while pressing
the
button (②).
- z: Press the op buttons while
pressing the button (②).
Using the Mode Dial and the
Exposure Compensation Dial
Turn the mode dial (③).
Turn the exposure compensation dial (④).
Using the External Underwater
Flash (commercially available)
Attach the external underwater flash
(commercially available) to the cold shoe (⑤).
When using the optical fi ber cable, attach the
covering attachment (
as shown, and insert the optical fi ber cable
into the hole. Please read the corresponding
manuals for details on how to attach the
external fl ash and optical fi ber cable.
) with a click sound
⑥
Setzen Sie die Kamera in das Gehäuse
ein. Schließen Sie das Gehäuse.
Entfernen Sie die Schlaufe von der Kamera,
und stellen Sie sicher, dass sich der Akku und
eine Speicherkarte in der Kamera befi nden.
Empfohlene Anzahl der gesondert
erhältlichen Gewichte (WW-DC1)
für das Unterwassergehäuse:
Im Meerwasser: 2 Gewichte
Im Süßwasser: 2 Gewichte
Verwenden des eingebauten
Blitzes
Bewegen Sie den Regler (①) bei Verwendung
des Blitzes nach oben.
Verwenden der Wahlräder 7 (EinstellungsWahlrad) und
Die Verwendung der Wahlräder 7 und z mit
dem Unterwassergehäuse weicht leicht von der
Verwendung der Wahlräder der Kamera ab.
-
: Drücken Sie gleichzeitig die Tasten qr
7
und die Taste
: Drücken Sie gleichzeitig die Tasten
-
z
und die Taste
op
Verwenden des Modus-Wahlrads und des
Wahlrads für die Belichtungskorrektur
Drehen Sie das Modus-Wahlrad (③).
Drehen Sie das Wahlrad für die
Belichtungskorrektur (④).
Verwenden des externen UnterwasserBlitzgeräts (im Handel erhältlich)
Bringen Sie das externe Unterwasser-Blitzgerät
(im Handel erhältlich) am Zubehörschuh an
(⑤). Wenn Sie das Glasfaserkabel verwenden,
bringen Sie den Abdeckungsaufsatz (⑥) wie
dargestellt an, so dass er hörbar einrastet, und
führen Sie das Glasfaserkabel in die Öffnung
ein. Einzelheiten zum Anbringen des externen
Blitzgeräts und des Glasfaserkabels fi nden Sie
in den zugehörigen Handbüchern.
(Wahlrad vorne)
z
(②).
(②).
Inserte la cámara en el estuche y
ciérrelo.
Retire la correa de la cámara y asegúrese
de que la batería y la tarjeta de memoria se
encuentran insertadas.
Número de lastres para estuche
impermeable (WW-DC1, se venden
aparte) que se recomienda montar:
En agua del mar: 2 lastres
En agua dulce: 2 lastres
Uso del fl ash integrado
Cuando use el fl ash, levante la palanca (①).
Uso del dial 7 (control) y del dial
(delantero)
z
El uso del dial 7 y del dial z con el estuche
impermeable es ligeramente diferente al de la
propia cámara.
-
: Pulse los botones qr a la vez que
7
mantiene pulsado el botón
: Pulse los botones op a la vez que
-
z
mantiene pulsado el botón
Uso del dial de modo y del dial de
compensación de exposición
Gire el dial de modo (③).
Gire el dial de compensación de exposición
(④).
Uso del fl ash subacuático externo
(disponible en el mercado)
Sujete el fl ash subacuático externo (disponible
en el mercado) a la zapata (⑤). Cuando use
el cable de fibra óptica, monte la cubierta de
conexión (⑥) como se muestra hasta que
haga clic e introduzca el cable de fi bra óptica
en el orifi cio. Consulte los detalles sobre cómo
sujetar el flash externo y el cable de fibra
óptica en los correspondientes manuales.
(②).
(②).
Insérez l’appareil photo dans le
boîtier et fermez-le.
Retirez la dragonne et vérifi ez que la batterie
et la carte mémoire sont insérées dans
l’appareil photo.
Nombre de poids vendus séparément
pour ce boîtier étanche (WW-DC1) et
recommandés pour le montage :
Dans l’eau de mer : 2 poids
Dans l’eau douce : 2 poids
Utilisation du fl ash intégré
Lorsque vous utilisez le flash, déplacez le
levier vers le haut (①).
Utilisation de la molette (de sélection)
et de la molette (avant)
7
L’utilisation des molettes 7 et z avec le
boîtier étanche est légèrement différente de
celle de l’appareil photo.
-
: Appuyez sur les touches qr en même
7
temps que sur la touche
: Appuyez sur les touches op en même
-
z
temps que sur la touche
Utilisation de la molette de
sélection et de la molette de
compensation de l’exposition
Tournez la molette modes (③).
Tournez la molette de compensation de
l’exposition (④).
Utilisation du fl ash externe sous-
marin (disponible dans le commerce)
Attachez le fl ash externe sous-marin (disponible
dans le commerce) à la griffe (⑤). Lorsque
vous utilisez le câble en fi bres optiques, fi xez le
couvercle (⑥) jusqu’au déclic comme indiqué,
puis insérez le câble en fibres optiques dans
l’orifice. Lisez les manuels correspondants
pour savoir comment attacher le fl ash externe
et le câble en fi bres optiques.
z
(②).
(②).
Inserire la fotocamera nella
custodia e chiuderla.
Rimuovere la cinghietta dalla fotocamera
e assicurarsi che la batteria e la scheda di
memoria siano inserite.
Numero consigliato di pesi per
custodia subacquea (WW-DC1)
venduti separatamente:
In acqua di mare: 2 pesi
In acqua dolce: 2 pesi
Utilizzo del fl ash incorporato
Quando si utilizza il fl ash, spostare la leva (①)
verso l’alto.
Utilizzo della ghiera di controllo 7
e della ghiera anteriore
L’utilizzo della ghiera di controllo 7 e della ghiera
anteriore
leggermente da quello della fotocamera.
- 7: Premere i pulsanti qr e premere
contemporaneamente il pulsante
-
z
contemporaneamente il pulsante
Utilizzo della ghiera di selezione e
della ghiera della compensazione
dell’esposizione
Ruotare la ghiera di selezione (③).
Ruotare le ghiera della compensazione
dell’esposizione (④).
Utilizzo del fl ash esterno subacqueo
(disponibile in commercio)
Collegare il fl ash esterno subacqueo (disponibile
in commercio) alla slitta (⑤). Se si utilizza un
cavo in fibra ottica, collegare l’accessorio di
copertura (⑥) con uno scatto come illustrato,
quindi inserire il cavo in fibra ottica nel foro.
Consultare i relativi manuali per informazioni
dettagliate su come collegare il fl ash esterno e il
cavo in fi bra ottica.
con la custodia subacquea differisce
z
: Premere i pulsanti op e premere
z
(②).
(②).
Установите камеру в футляр,
затем закройте его.
Снимите ремень с камеры и убедитесь, что
установлены карта памяти и аккумулятор.
Рекомендуемое количество
грузов для водонепрони цаемого
футляра (WW-DC1):
В морской воде: 2 груза
В пресной воде: 2 груза
Использование встроенной вспышки
При использовании вспышки переместите
рычаг (①) вверх.
Использование диска 7 (диск
управления) и диска
Использование диска 7 и диска z на
водонепроницаемом футляре несколько
отличается от их использования на самой камере.
- 7: Нажимайте кнопки qr при нажатой
кнопке
кнопке
Использование диска установки режима
и диска компенсации экспозиции
Поворачивайте диск установки режима (③).
Поворачивайте диск компенсации
экспозиции (④).
Использование внешней
подводной вспышки
Установите внешнюю подводную вспышку
(имеется в продаже) на холодный башмак
(⑤). При использовании волоконно-
оптического кабеля установите крышку (⑥)
до щелчка, как показано на рисунке, а затем
введите волоконно-оптический кабель
в отверстие. Подробные сведения об
установке внешней вспышки и оптического
кабеля см. в соответствующих руководствах.
(②).
: Нажимайте кнопки op при нажатой
z
(②).
(передний диск)
z
将相机放入防水套后,关
闭防水套。
从相机上摘掉腕带,并确认已
安装电池及存储卡。
配重器 WW-DC1( 选购 ) 建
议安装数目:
海水时:2 个
淡水时:2 个
使用内置闪光灯
使用闪光灯时,请将变焦杆
) 向上移动。
(
①
使用7(控制 ) 转盘和
(电子)转盘
z
安装防水套后,7转盘和
转盘的使用方法与相机机
z
身上的相应转盘略有不同。
- 7:按下
按下
按钮 (②)。
- z:按下
时按下
按钮 (②)。
按钮的同时
qr
按钮的同
op
使用模式转盘和曝光补偿
转盘
转动模式转盘 (③)。
转动曝光补偿转盘 (④)。
使用外接水下闪光灯 ( 市售 )
将外接水下闪光灯 ( 市售 ) 安
装到冷靴 (⑤) 上。使用光缆
时,请按照图示安装覆盖附件
(⑥) 直到发出咔嚓声,然后
将光缆插入孔中。有关外接闪
光灯和光缆安装方法的详细信
息,请阅读相关手册。
ケースにストラップやゴミをはさみ
こまない
水漏れの原因となります。
使い終わったら、ケースを閉じて真
水でよく洗う
お手入れが不十分だと、ケースに塩分など
が残り、故障の原 因となります。
使用 後は、ケースについているゴミや
砂、頭髪などを取り除いてからカメラ
を取り出してください。
When closing the case, make
sure that the strap is not caught
in the waterproof seal, and that
the seal is free of debris.
Failing to do so could cause leaks.
After using the case, close it, and
thoroughly wash it with clean
water.
If the case is not sufficiently cleaned and
maintained, salt deposits may not be
removed, which could lead to malfunctions.
After using the Waterproof case,
please make sure to remove any dirt,
sand, hair or other debris from the
case before removing the camera.
Stellen Sie beim Schließen des
Gehäuses sicher, dass sich die
Schlaufe nicht im Dichtungsring
verfängt und der Dichtungsring frei
von Fremdkörpern ist.
Hierdurch könnten Lecks verursacht werden.
Wird das Gehäuse nicht mehr
benötigt, schließen Sie es und spülen
es gründlich mit sauberem Wasser ab.
Wenn das Gehäuse nicht entsprechend
gereinigt und gepflegt wird, können
Salzuablagerungen unter Umständen nicht
mehr beseitigt werden. Dies beeinträchtigt die
Funktionsweise der Kamera.
Säubern Sie das Unterwassergehäuse
nach der Verwendung von Schmutz, Sand,
Haaren und anderen Fremdkörpern, bevor
Sie die Kamera entnehmen.
Al cerrar el estuche, asegúrese de
que la correa no queda atrapada
en la junta hermética y de que el
cierre no tiene restos de suciedad.
Si no sigue estas indicaciones, podrían
producirse infi ltraciones.
Después de utilizar el estuche,
ciérrelo y lávelo minuciosamente
con agua limpia.
Si se descuidan la limpieza y el
mantenimiento, podrían quedar depósitos de
sal y causar un mal funcionamiento.
Después de usar el estuche impermeable,
asegúrese de eliminar todo resto de
suciedad, arena, pelo o cualquier otro
resto del estuche antes de sacar la
cámara.
Lorsque vous fermez le boîtier,
assurez-vous que la dragonne
n’est pas coincée dans le joint
d’étanchéité et qu’il n’y a pas de
corps étrangers sur le joint.
Le non-respect de ces instructions pourrait
provoquer des infi ltrations.
Après utilisation du boîtier,
fermez-le et lavez-le soigneusement
avec de l’eau propre.
Si le boîtier n’est pas correctement nettoyé
et entretenu, des dépôts de sel risquent
de subsister, ce qui pourrait provoquer des
dysfonctionnements.
Après avoir utilisé le boîtier étanche,
éliminez les saletés, le sable, les
cheveux ou autres particules du boîtier
avant de sortir l’appareil photo.
Quando si chiude la custodia, assicurarsi
che la cinghietta non si incastri nella
guarnizione impermeabile e che non siano
presenti particelle estranee sulla guarnizione.
In caso contrario, si potrebbero causare
infi ltrazioni.
Dopo avere utilizzato la custodia,
chiuderla e lavarla accuratamente
con acqua dolce.
Se la custodia non viene pulita in modo
adeguato, potrebbe non essere possibile
rimuovere i depositi di sale, con conseguente
rischio di malfunzionamento.
Dopo aver utilizzato la custodia
subacquea, assicurarsi di eliminare
eventuali residui di sporcizia, sabbia,
capelli o altre particelle estranee prima di
rimuovere la fotocamera.
Закрывая футляр, убедитесь,
что ремень не защемился в
водонепроницаемой прокладке
и что на прокладке нет
посторонних частиц.
Невыполнение этого требования может
привести к протечкам.
После использования футляра
закройте его и тщательно
промойте чистой водой.
Недостаточная чистка и ненадлежащий
уход за футляром могут привести к
отложению остатков соли и, в результате, к
неполадкам в работе.
После использования водонепроницаемого
футляра перед извлечением камеры
обязательно очистите футляр от грязи,
песка, волос и другого мусора.
关闭防水套时,请确认防
水 套 未夹 住 腕 带, 并 确 保
防水封条上未粘附灰尘。
否则可能会导致防水套漏水。
使用完防水套后将其关闭,
并用清洁的水彻底清洗。
如果未能充分清洁和保养防水
套,可能无法去除盐渍,并可
能由此引发故障。
使用后,请在清除防水套上
粘附的灰尘、沙粒、毛发等
杂物后再取出相机。
 Loading...