

Page 1
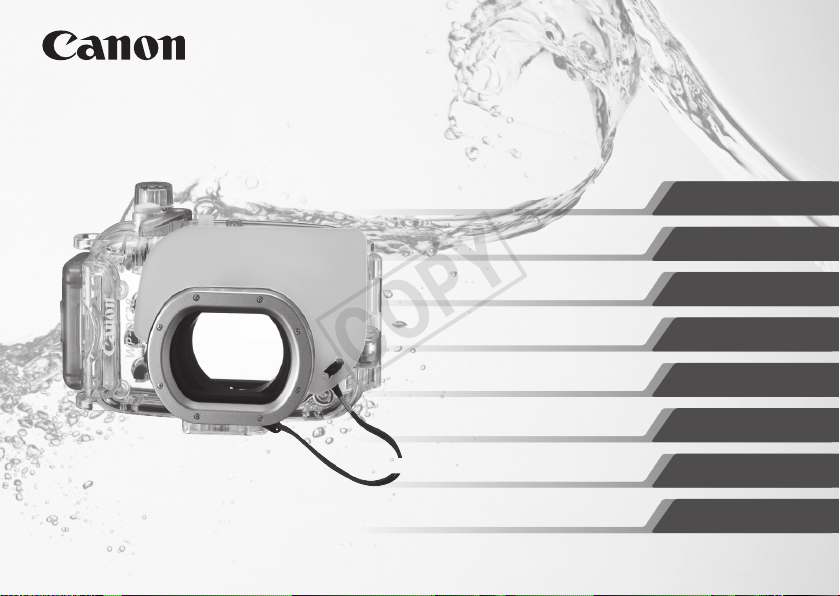
WP-DC38
COPY
Руководство пользователя
数码相机防水套 使用说明书
ユーザーガイド
User Guide
Benutzerhandbuch
Guía del usuario
Guide d'utilisation
Guida dell'utente
日本語
ENGLISH
DEUTSCH
ESPAÑOL
FRANÇAIS
ITALIANO
РУССКИЙ
中文
Page 2

日本語
COPY
ご使用前に必ずこのウォータープルーフケースユー•
ザーガイドをお読みください。
将来いつでも使用できるように大切に保管してく•
ださい。
付属品の確認
お使いになる前に、以下のものが入っていることを
確認してください。万一、不足のものがありましたら、
お買い求めの販売店にご連絡ください。
□ ウ ォ ー タ ー プ ル ーフ ケ ース
□ ネック ストラップ
□ リストストラップ
□ 拡散板
□ 防 水 パッ キン 用 シ リコ ン グリース
□ ユーザー ガ イド(本 書)
□ 保証書
別売アクセ サリー
キヤノンウォータープルーフケース•
ウェイト W W - D C 1
水中でケースが浮かないようにするためのおもりです。
ウェイトの推奨装着枚数は、主な仕様(p.12)でご
確認ください。また、取り付け方法は、ウェイトの取
扱説明書をご覧ください。
はじめにお読みください
必ず事 前に正常に動 作するか、水漏れは ないかを確
認してください。水漏れを確認するには、カメラを入
れずに、ケースを閉じ、水中に約 15cm の深さまで
沈め、3 分ほど放置してください。水漏れが起きた
ときは、修理受付窓口へお持ちください。
このガイドにつ い て
内容の一部または全部を無断で転載することは、•
禁 止されて い ます。
内容に関しては、将来予告なく変更することがあ•
りま す。
イラストや画 面表 示は、実 際と一 部異 なることが•
あり ます。
このケースを使用した結果については、上記にか•
かわらず責任を負いかねますので、ご了承くださ
い。
カメラに付属の使用説明書もよくお読みください。•
• :注 意 事 項 を 示 して います。
• :上手に使うためのヒントを示しています。
カメラ で 使 えるメモリ ーカ ード のこ とを「カード」•
と表 記して い ま す。
1
Page 3
安全上のご注意
COPY
ご使用の前に「安全上のご注意」をよくお読みの上、•
製品を正しくお使いください。
ここに示した注意事項は、あなたや他の人々への•
危害や損害を未然に防止するためのものです。
警告
注意 傷害を負う可能性がある内容です。
注意 物的損害を追う可能性がある内容です。
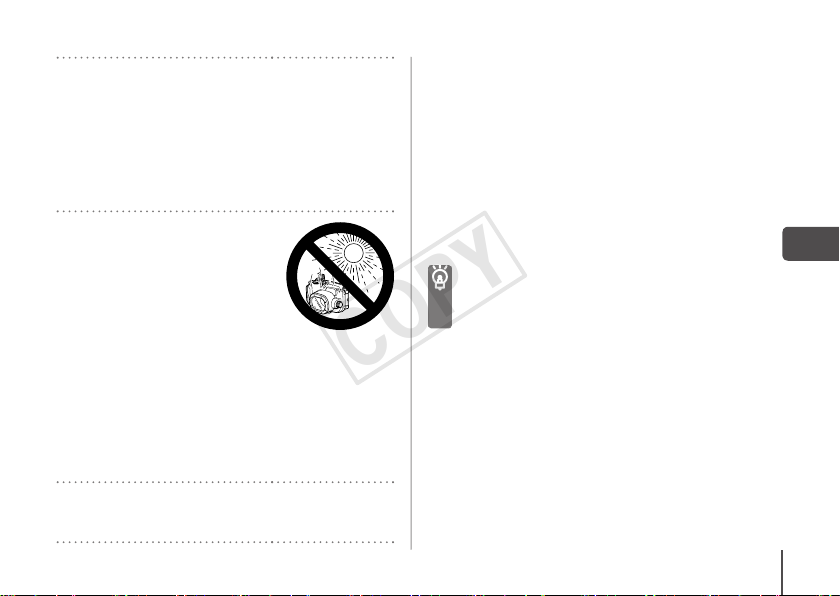
ケースを使ったあとは、必ずカメラを取り出す。
カメラを入れたまま、直射日光のあたる場所や高温
になるところに放置しておくと、発火や破裂などの原
因になる ことが あ りま す。
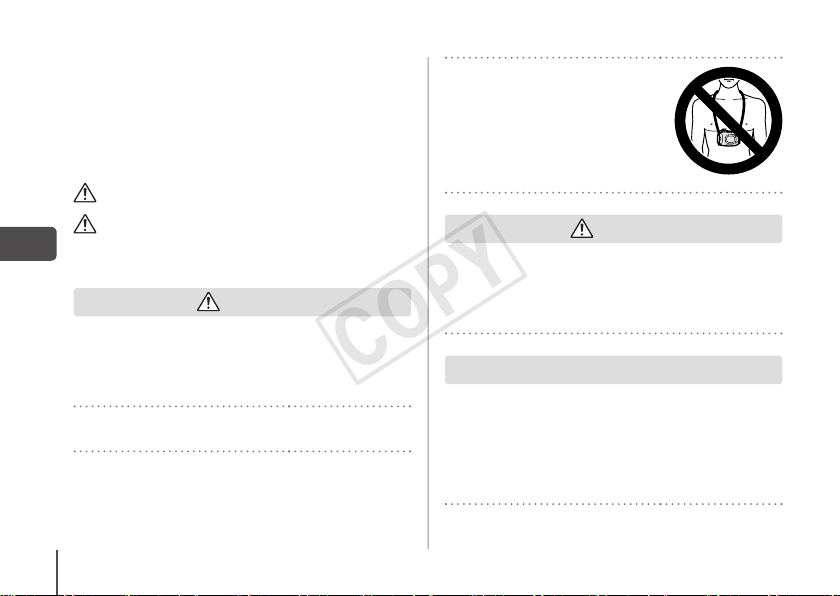
浮き袋代わりに使わない。
水中では、必ずネックストラップ
を外して、リストスト ラップを 使 う。
ネック ストラップ をお 使 い に なる
と、首に巻 きつくなど、思わ ぬけ
がや事 故の 恐れがあります。
2
死亡または重傷を負う可能性がある内
容です。
警告
注意
水漏れが 確認されたときは、ただちに電源を切る。
火災や感電の原因となります。ケース内部とカメラの
水分を十 分に拭き取り、至急、お近くの修理受付窓
口にご相談ください。
注意
結露に注意する。
短い時間で寒暖の差が大きい場所へ移動すると、ケース
内部に水滴がつき( 結露 )、故障の原因となります。
結露したときは、ケースからカメラを取り出し、ケース
とカメラについた水滴を乾いたやわらかい布で拭き
取り、十分乾燥させてください。
カメラに ストラップ を 付け たま まケースに入れない 。•
水中でボタンやレバーを必要以 上に強く押さない。•
防水パッキンに水道水を勢いよく当てない。•
防水パッキンに傷を付けたり、ゴミなどを挟み込ま•
ない。
分解や改造をしない。•
上記の行為は、水漏れの原因となります。
Page 4
以下の場所で使 用・保管しない。
COPY
水深 40m を超える水中•
40 度を超える気温または水温•
にな ると ころ
以下の 場所 で保 管しない。
直 射日 光 の あたるところ•
湿 気や ホ コリの 多 いところ•
ナフタリンなど防虫剤 のあるところ•
ケースを投げ たり、落 としたりしない。
上記の行為は、変 形するなど、故 障 の 原 因とな りま す。
付属のシリコングリース以外のオイル、薬品などは使
わない。
ケースの強度 を損なうことがあります。
防水パッキンについて
防水パッキンにゴミなどが付いていると、水漏れ•
の原因となります。髪 の毛一本、また微小な砂 粒
一個が挟まっているだけで水漏れすることがあり
ます。
防水パッキンの傷やひび割れが見つかったときは、•
ただちに使用をやめ、修理受付窓口へお持ちくだ
さい。有 償 で 新 しい防水 パッ キンと 交 換 します。
防水パッキンの変形を防いだり、防水効果を保つ•
ため、ケースを開いた状態で保管してください。
防水 パッキンに ホコリや 傷を 付け ない ように保管•
してください。
防水性能を維持するために、1 年に1度は防水
パッ キン の 交 換 を お す すめ します。
修理受付窓口で、有償にて交換させていただ•
きます。
なお、シリコングリースも修理受付窓口で販売
して おり ます。
3
Page 5
各部のなまえ
COPY
ストラップ 取り 付 け部
シャッター ボタン
ズームレバー
電源ボタン
コントローラーリング 機能 切り換えボタン
ロッ ク 解 除 ス イッチ
バックル
レンズ窓
三脚 ねじ穴
コント ロー ラ ーリン グ
拡散板
4
モード ダイヤル
(
ショートカット)/c(イージープリント)ボタン
(
再生)ボタン
1
b
(露出補正)/
( ス ト ロ ボ )/rボタン
h
FUNC./SET(ファンクション / セット)ボタン
m
(マクロ)/f(マニュアルフォーカス)/qボタン
e
Q
(セ ルフタイマー)/a(1 画像 消去)/pボタン
(ディスプレイ)ボタン
l
(メニュー)ボタン
n
(
d
ジャン プ )/oボタン
Page 6
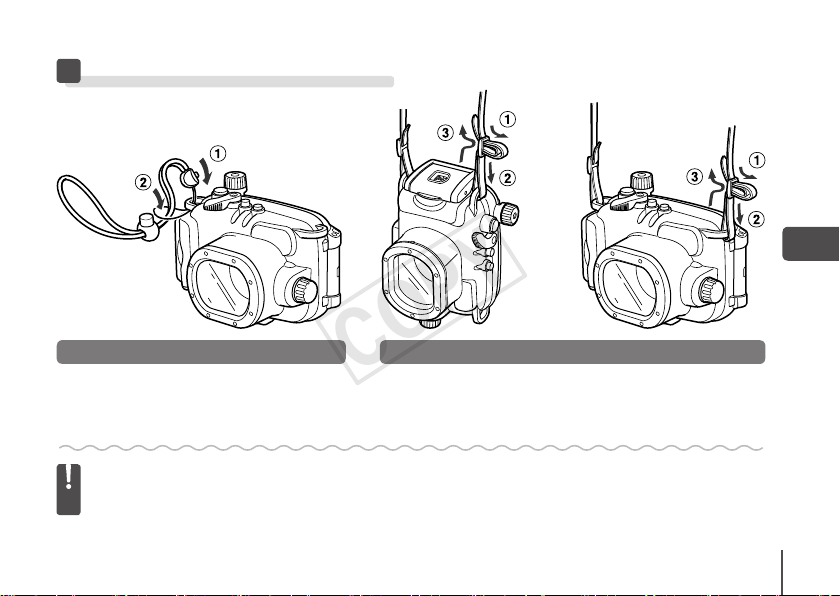
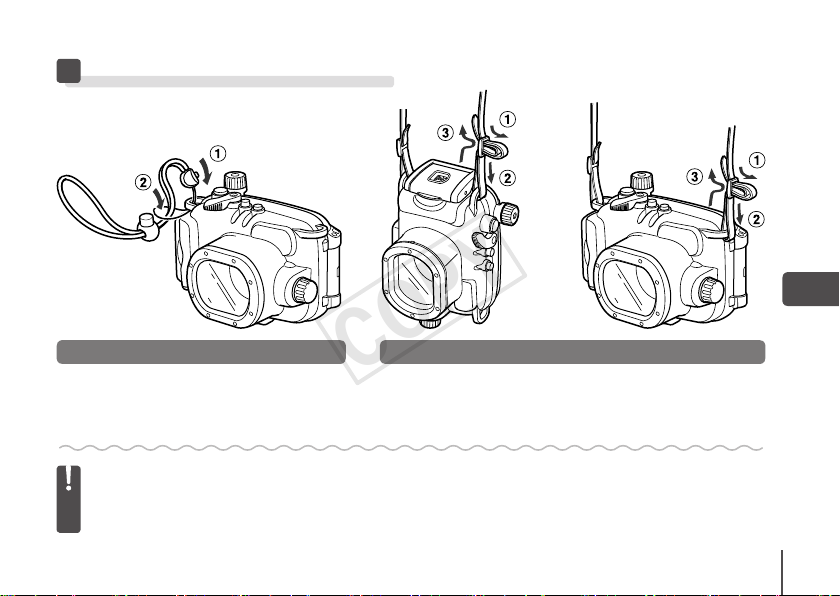
準備
COPY
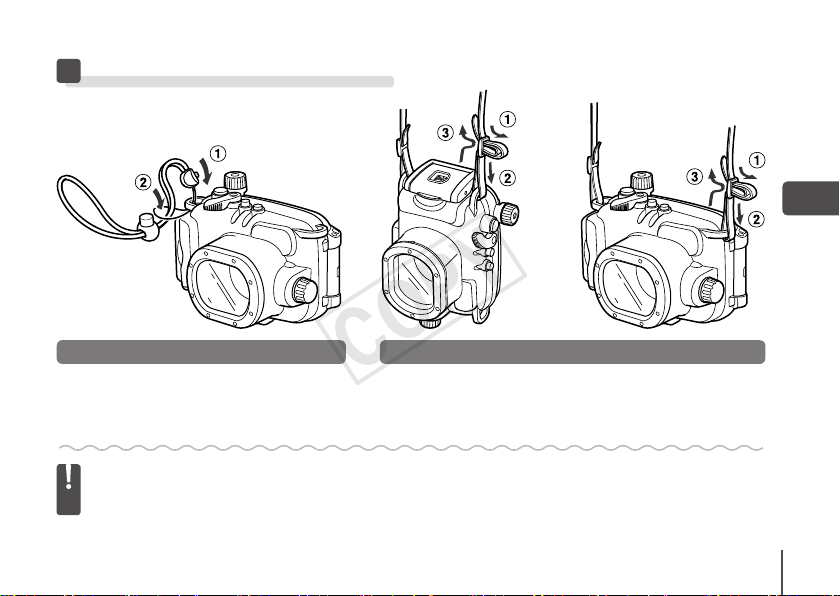
リストスト ラップ ネックストラップ
ストラップを取り付け、長さを調節します。
1
水中では 、 必ず ネックストラップ を 外 して、リストストラ ップ を お使いく ださい 。 ネックストラ ップ をお使•
いになると、首に巻きつくなど、思わぬけがや事故の恐れがあります。
ケースに付属のストラップ以外は取り付けないでください。•
5
Page 7
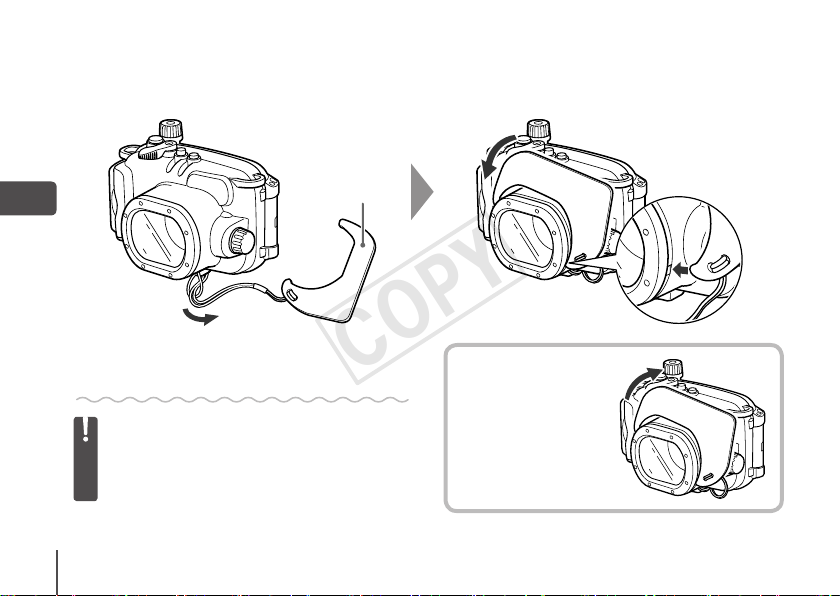
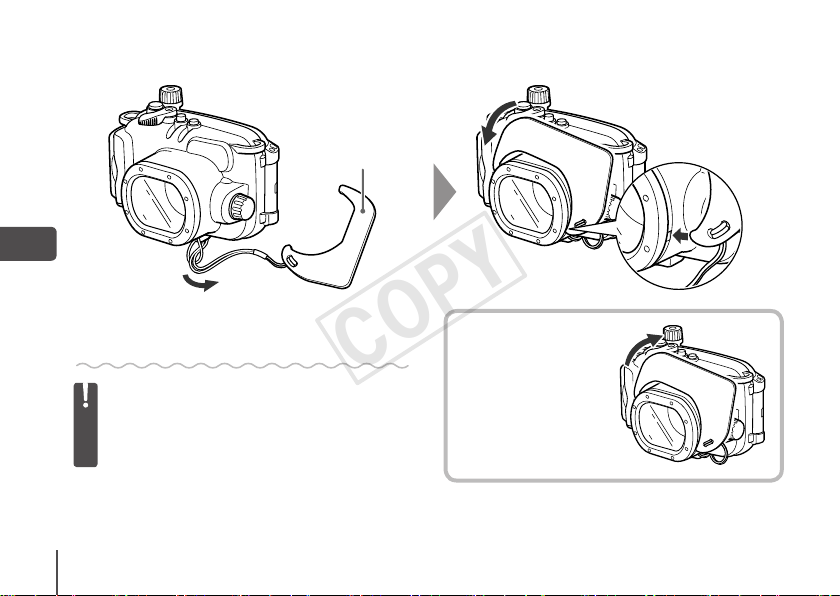
拡散板
COPY
拡散板を取り付けます。
2
拡散板の表面に傷を付けないでください。ス•
トロボ光が正しく拡散できなくなることがあ
りま す。
被写体が近すぎると、拡散板の効果を 十分 に•
得ら れ な い ことが あ りま す。
6
取り外しかた
拡散板を持ち上げて
取り 外しま す。
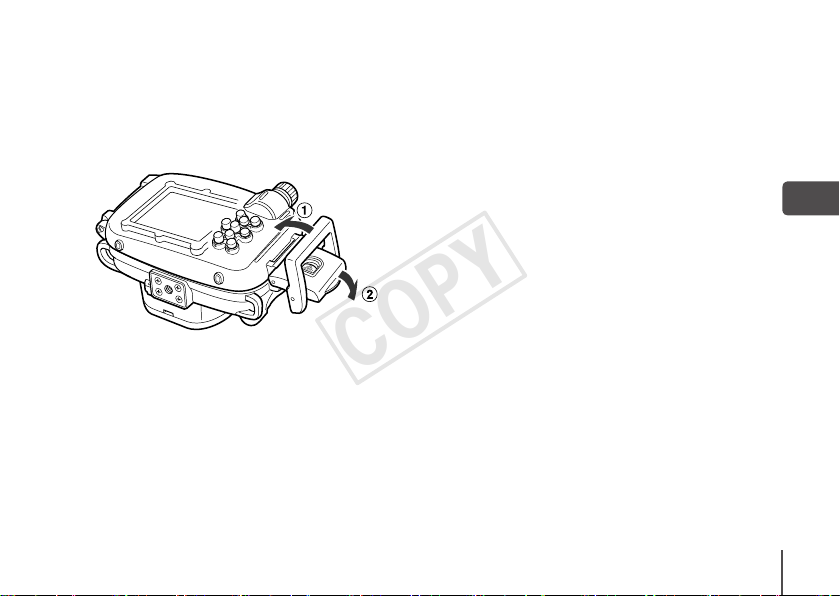
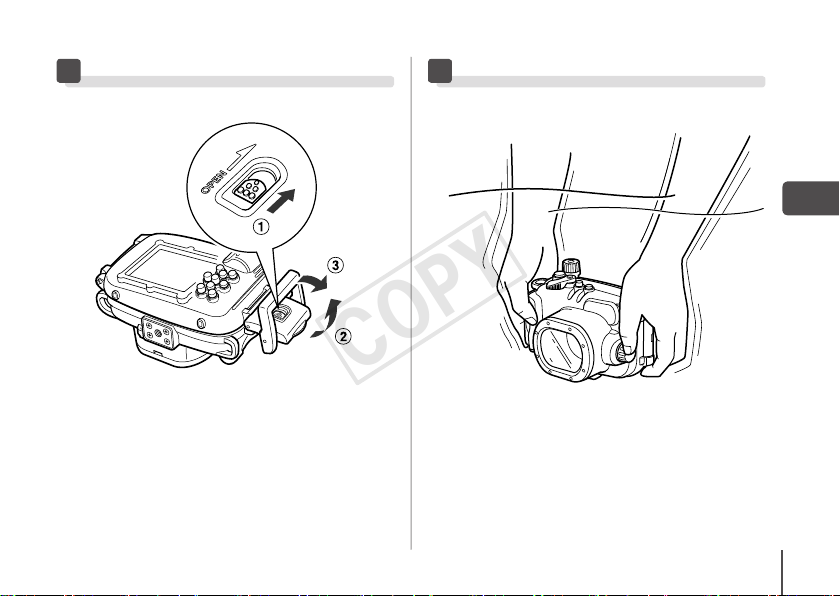
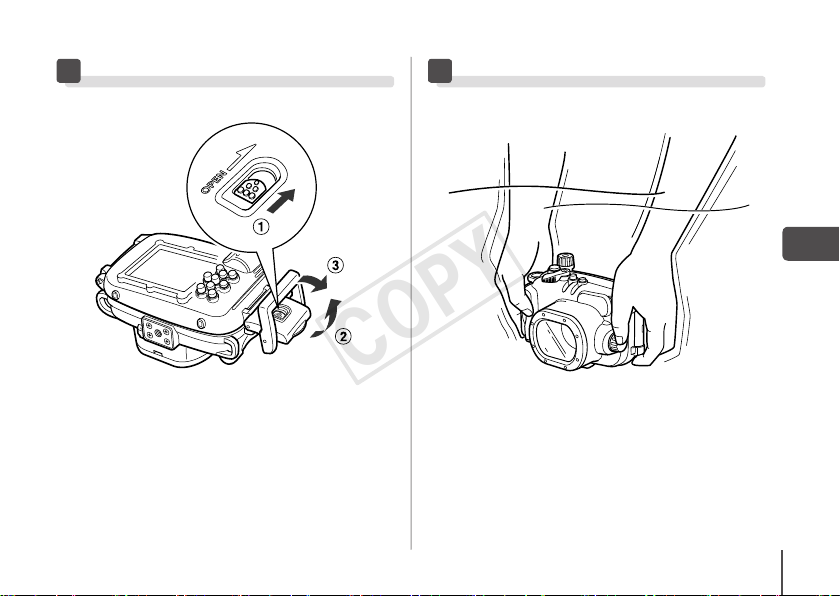
Page 8
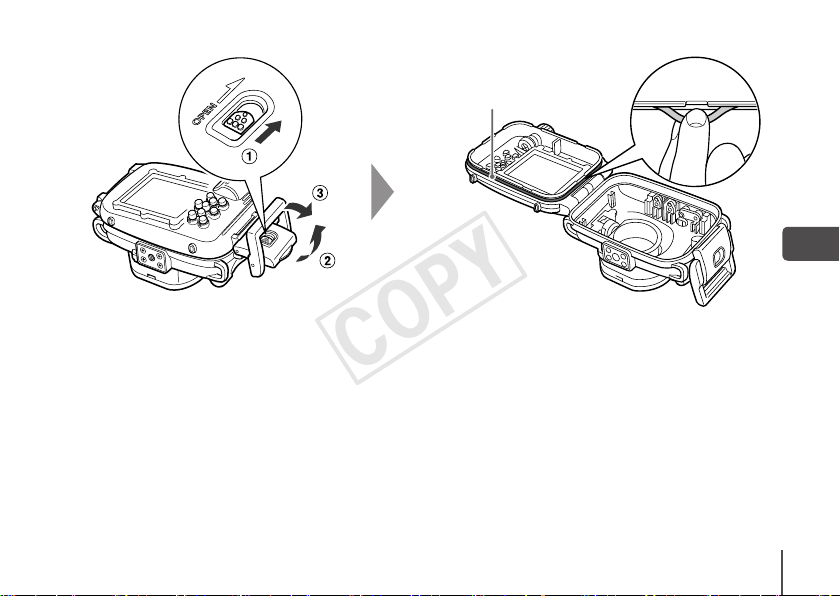
防水パッキン
COPY
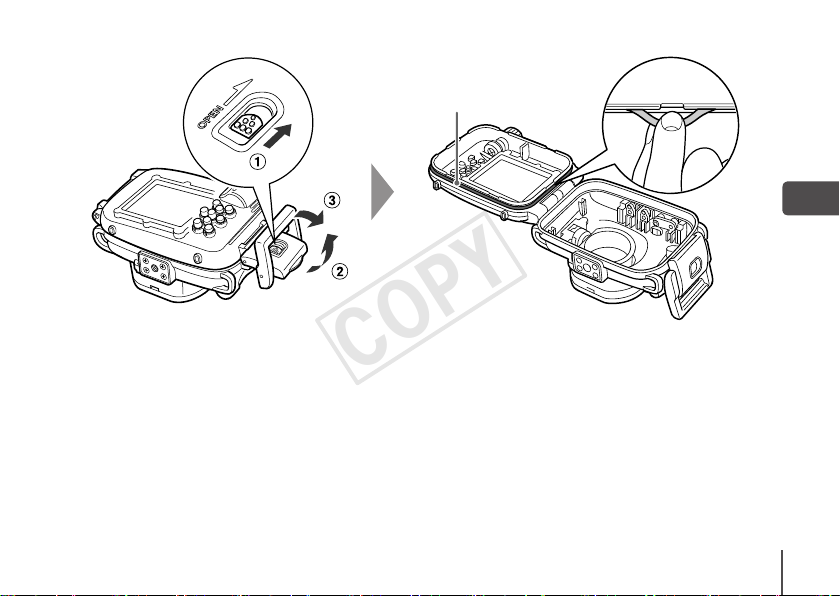
バックルを 外してケースを開きます。
3
くもり止 め(市販)をお使いになるときは、•
レンズ窓の内側のみにお使いください。く
もり止めを塗る際には、乾いたやわらかい
布をお使いください。くもり止めがレンズ
窓の内側以外に付着したときは、ケースの
劣化をまねく恐れがありますので、すぐに
拭き取ってください。
防水 パッキンにシリコングリースを塗ります。
4
図のように、防水 パッキン を 取り外 します。
1 .
爪を立てたり、無理に引っ張らないで•
ください。
溝 のゴミ を 綿 棒 な ど で 拭 き 取りま す。
2 .
指 にグリ ースを少量(米粒1粒程度)取り、
3 .
防水パッキン全体に均一に塗ります。
溝に取り付けます。
4 .
よじれないように注意してくだ さい 。•
7
Page 9
カメラを準備します
COPY
カード
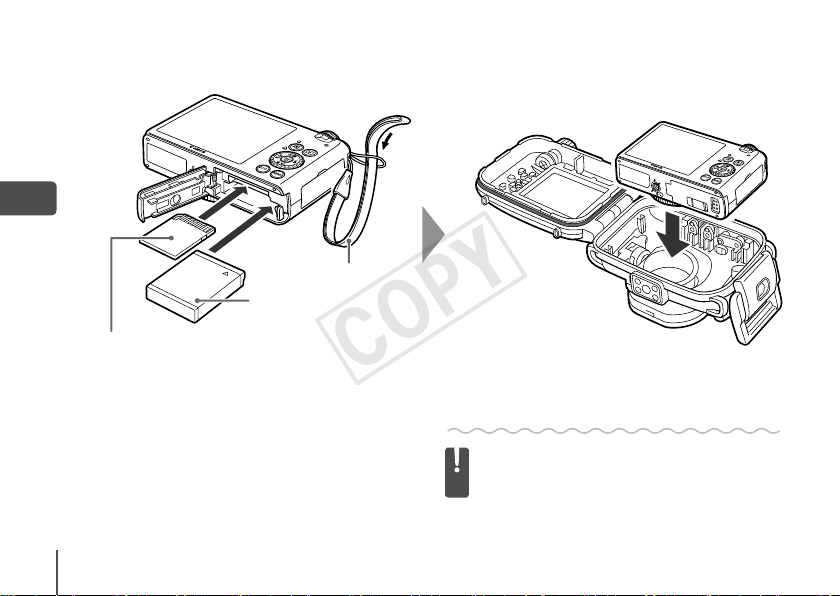
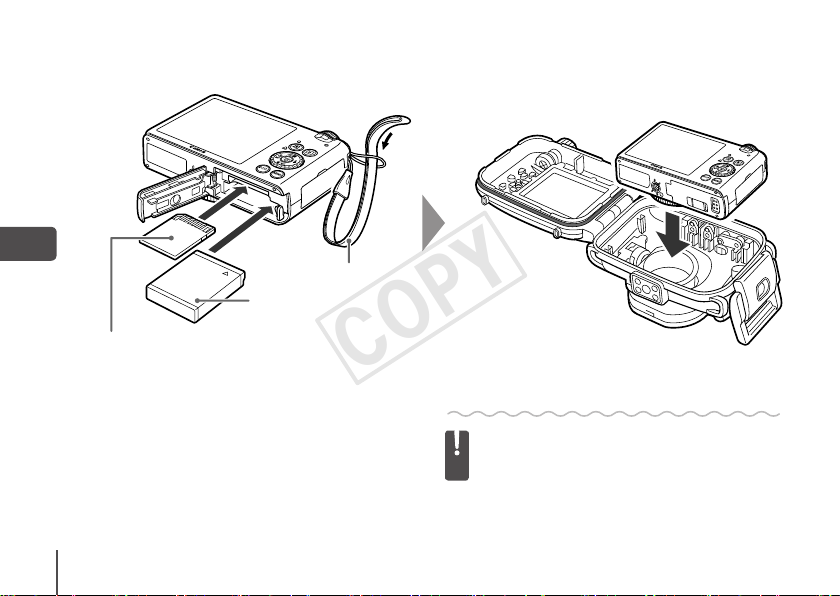
カメラのストラップをはずし、バッテリーと
カードが入っていることを確認します。
5
バッテリー の 型 番およびバッテリーと カー•
ドの入れかたは、カメラに付属の使用説明
書をご覧ください。
十分に 充電さ れたバッテリーをお使いく•
ださい。
カードの撮影可能 枚数をご確認ください。•
8
ケースにカメラを入れます
ストラップ
バッテリー
ケースにカメラを入れます。
6
潮風の当たらないところで行ってください。•
レンズ窓が汚れたときは、乾いた布で軽く拭•
き取ってください。
Page 10
ケースを閉じます。
COPY
7
防水パッキンにゴミなどが付いていないこ•
とをよく確認してください。
バックルがしっかりロックされて いること•
を確認してください。
9
Page 11
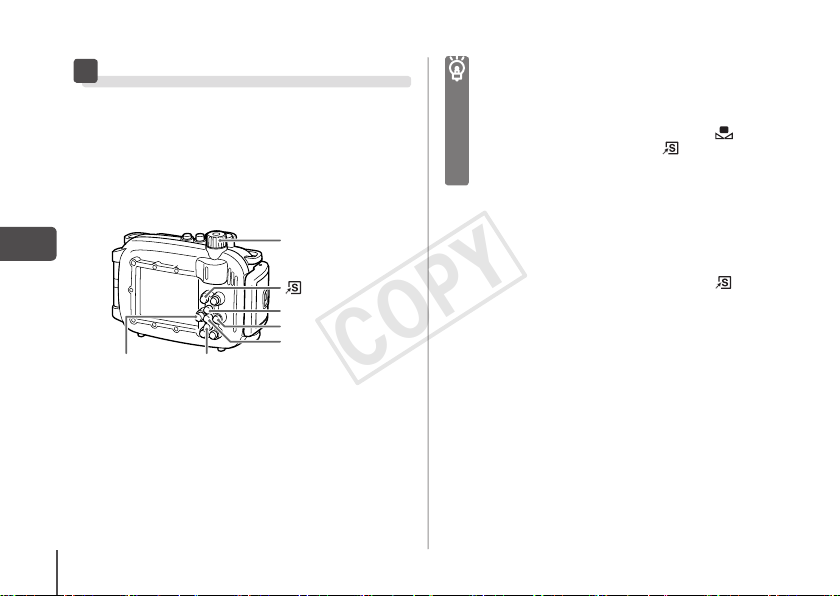
カメラを使う
COPY
カメラ の操作方法 は 、カメラに付 属 の 使 用 説明書
をご覧ください。
水中モードの紹介
水中で撮影するときは、[S] モードに すると、 青
みをおさえた自然な色合いで撮影できます。
モード ダイヤル
ボタン
ボタン
o
ボタン
r
ボタン
m
q
ボタン
ボタン
p
水中で [•
にして撮 影す ると きは、
ホワイトバランスを [S]( 水中 ) に 設 定する
ことをお す す めし ま す。
• ボタンに [ ](マニュアルホワイトバランス)
を登録しておくと、
データを取り込むことができます。シーンに
応じてホワイトバランスを調整したいときに、
おすすめします。
]、[G]、[M]、[B]、[D] モ ード
E
ボタンを押すだけで白
Â
メニューで
コントローラーホイールを使う
コントローラーホイールの使いかたは、カメラ本
体での操作方法と異なります。
• ボタンを押しな がらqかrを押します。
10
モードダイヤルを
K
にします。
1
m
を押したあとopを押 して [I]を選び
ます。
2
を押 して [S] を選 び、mを押し ま す。
qかr
3
Page 12
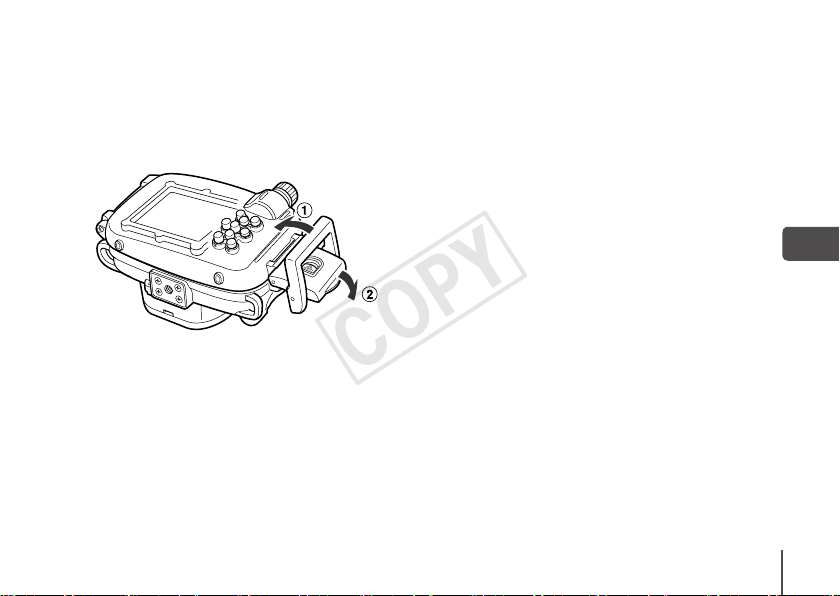
カメラを取り出す お手入れ
COPY
使用後は必ずお手入れをしてください。
ケースに付いている水 滴を 十分に拭き取ります。
1
ケースに付いているゴミや砂、頭髪などは•
取り除いてください。また、真水でよく洗
い流して、塩分な ど が 残らな い ようにして
ください。
ケースを 開 け て、カメラを取り出します。
2
ケースを閉じます。
1
ケース内部は、水洗いしないで乾いた布で•
拭いてください。
真水でよく洗い、乾いたやわらかい布で水分
を十分に拭き取ります。
2
海での使用後は、真水に数時間浸して塩•
分を落としてください。
11
Page 13

主な仕様
COPY
防水性能: IEC/JIS保護等 級「IPX8」相当、
防水構造: パッキン(O リング圧 着 式)
本 体 材 質: ポ リカ ーボ ネ ート
カメラ 動 作 温 度:
大 き さ: 140.6×91.5×85.1mm
体 積 : 約 630cm
質 量 : 約 385g
ウェイト W W - D C1(別売)の推奨装着枚数:
*拡散板を含む
記載データはすべて当社試験基準によります。•
製品の仕様、および外観の一部を予告なく変更す•
るこ と が あり ます。
防水パッキンについて
防水性能を維持するためのパッキンの保有期限は
製品の製造打切り後 7 年間です。
※ 無償保証 期間経 過後の保守サービス ( 防水パッキン
12
の交換は除く ) は行っておりません。
水深:40m 以内
0〜40℃
(突起部を除く)
(ウォータープルーフケースのみ*)
海水時:2 枚
淡水時:1 枚
3
Page 14

English
COPY
Make sure you read this guide before using the •
Waterproof Case.
Store this guide safely so that you can use it in the •
future.
Checking the Package Contents
Check if the following items are included in your
Waterproof Case package. If anything is missing, contact
the retailer from which you purchased the Waterproof
Case.
Waterproof Case
Neck Strap
Wrist Strap
Diffusion Plate
Silicon Grease for the Waterproof Seal
User Guide (this guide)
Separately Sold Accessories
Canon Waterproof Case Weight WW-DC1•
When taking pictures underwater, these weights prevent
the Waterproof Case from floating. Please refer to
Specifications (p. 12) for the number of recommended
weights to be attached. For information on attaching the
weights, please refer to the user guide supplied with the
weights.
Read This First
Before you use the Waterproof Case, make sure it is
functioning correctly and does not leak. To check for
leaks, close the camera case before putting the camera
in, and hold it under water at an approximate depth of 15
cm (5.9 in.) for about three minutes. If it leaks, contact a
Canon Customer Support Help Desk.
Disclaimer
Reprinting, transmitting, or storing in a retrieval system •
any part of this guide without the permission of Canon
is prohibited.
Canon reser ves the right to change the contents of this •
guide at any time without prior notice.
Illustrations and screenshots in this guide may differ •
slightly from the actual equipment.
Canon Inc., its subsidaries and affiliates, and •
distributors of the Waterproof Case are not liable for
any damages due to misuse of the case.
Please also carefully read the • Camera User Guide
supplied with your camera.
• : Things you should be careful about.
• : Hints for getting more out of your Waterproof
Case.
The various types of memory cards that can be used in •
the camera are collectively referred to as memory cards
in this guide.
1
Page 15
Safety Precautions
COPY
Before using the Waterproof Case, please ensure that you •
read the safety precautions below. Always ensure that the
Waterproof Case is operated correctly.
The safety precautions noted on the following pages are •
intended to prevent injuries to yourself and other persons,
or damage to the equipment.
Warning
Caution Denotes the possibility of injury.
Caution
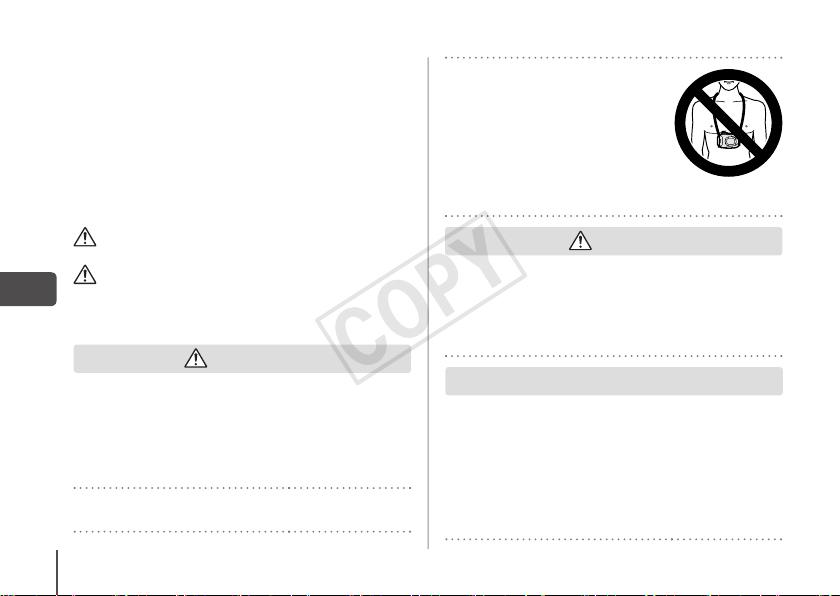
Be sure to remove the camera after using the
Waterproof Case.
Leaving the camera in the Waterproof Case and placing it in
direct sunlight or other places subject to high temperatures
may result in fire, or cause the case to burst.
Do not use the Waterproof Case as a personal flotation
device (such as a life preserver).
2
Denotes the possibility of serious injury or
death.
Denotes the possibility of damage to the
Waterproof Case and camera.
Warning
Do not use the neck strap under
water.
Remove the neck strap and attach
the wrist strap before using the
Waterproof Case underwater. Using
the neck strap may cause it to become
wrapped around the neck and result in
strangulation or other injuries.
Caution
Immediately turn off the camera if the Waterproof Case
leaks.
Leaks could result in fire or electrical shock. Thoroughly wipe
the Waterproof Case interior and the camera dry and contact
a Canon Customer Support Help Desk.
Caution
Be careful of condensation.
Moving the Waterproof Case rapidly between hot and cold
temperatures may cause condensation (water droplets) to
form on its internal surfaces. If this occurs, stop using the
camera as the condensation may cause a malfunction. Remove
the camera, and wipe off the condensation from the case and
camera with a soft, dry cloth so that it is completely dr y.
Page 16
Do not insert the camera with the strap attached.•
COPY
Do not press the buttons or lever with unnecessary •
force when using the case underwater.
Do not spray the waterproof seal with tap-water.•
Do not damage the waterproof seal, or allow dirt to •
accumulate between the waterproof seal and the
case.
Do not disassemble or modify the Waterproof Case.•
The above actions could cause leaks.
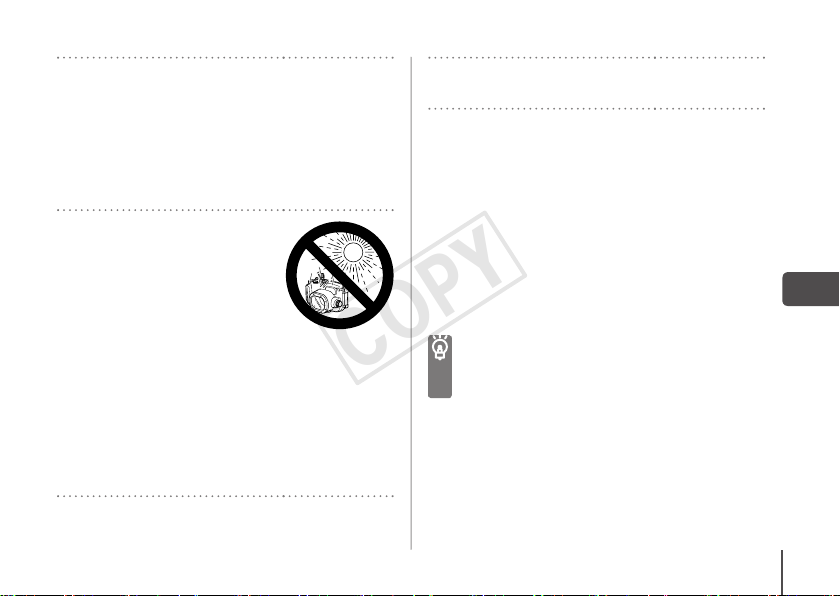
Avoid using or storing the
Waterproof Case in the following
places.
Depths exceeding 40 meters •
(130 ft.).
Places subject to temperatures •
above 40 °C (104 °F).
Avoid placing, or storing the
Waterproof Case in the following
places.
Places subject to strong sunlight.•
Humid or dusty areas.•
Near substances such as •
napthalene or insecticides
Do not drop or throw the Waterproof Case.
The above actions may warp the case and cause malfunctions.
Use only the supplied silicon grease.
Use of other waterproofing products may impair the strength
of the Waterproof Case.
Waterproof Seal
Debris stuck to the waterproof seal may cause water •
leakage. Catching a single strand of hair, or a tiny grain of
sand in the seal can cause leaks.
If you notice that the waterproof seal is damaged or •
cracked, stop using the case immediately and contact a
Canon Customer Support Help Desk.
When storing your Waterproof Case, keep it open to •
prevent the waterproof seal from deforming and to
maintain its waterproof capabilities.
Protect the waterproof seal from dust and scratches during •
storage.
To ensure that the case remains water tight, you should
replace the seal once a year.
Please contact a Canon Customer Support Help Desk •
for replacement seals.
3
Page 17
Components Guide
COPY
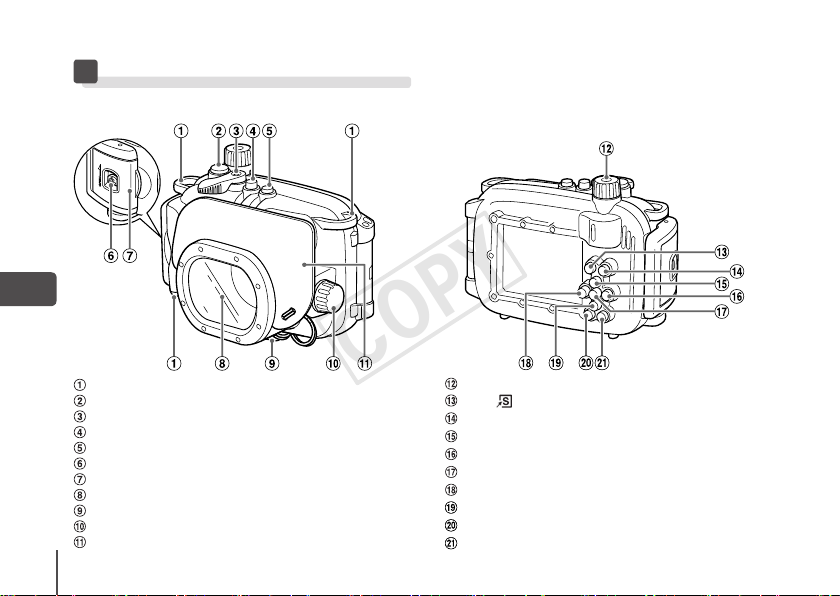
Strap Mounts
Shutter Button
Zoom Lever
Power Button
Ring Function Selector
Lock Release Switch
Catch
Lens Window
Tripod Socket
Control Ring
Diffusion Plate
4
Mode Dial
(Shortcut)/ c (Direct Print) Button
(Playback) Button
1
(Expo sure Comp ensation)/
b
(Flash)/r Button
h
FUNC./SET (Function/Set) Button
m
(Macro)/f (Manual F ocus)/q Button
e
(Self-timer)/a (Single Image Erase)/p Button
Q
(Display) Button
l
Button
n
(Jump)/o Button
d
Page 18
Preparations
COPY
Wrist Strap Neck Strap
Attach the strap and adjust the length.
1
Remove the neck strap and attach the wrist strap before using the case underwater. Using the neck strap may •
cause it to become wrapped around the neck and result in strangulation or other injuries.
Do not attach any straps except for the ones included with the Waterproof Case.•
5
Page 19
Diffusion Plate
COPY
Attach the diffusion plate.
2
Do not scratch the surface of the diffusion plate, •
as this may prevent light from the flash from
being properly diffused.
The effectiveness of the diffusion plate may be •
impaired if the subject is too close to the camera.
6
Removing the
Diffusion Plate
Lift and remove the
diffusion plate.
Page 20
Waterproof Seal
COPY
Release the catch to open the case.
3
When using commercially available •
anticondensation products, the
anticondensation solution should only
be applied to the inside surface of the
lens window using a soft, dry cloth. If
anticondensation solution comes in contact
with any surface other than the inside of the
lens widnow, wipe it off immediately with a
soft, dry cloth, as it could lead to deterioration
of the Waterproof Case.
Apply silicon grease to the waterproof
seal.
4
Remove the waterproof seal as shown.
1 .
Do not dig your fingernails into it or pull •
on it forcibly.
Using a cotton swab, wipe off any debris in
2 .
the mounting groove.
Apply a small amount (droplet) of grease to
3 .
your fingertip, and evenly coat the entire
surface of the waterproof seal.
Place the waterproof seal back in the seal
4 .
mounting groove.
Take care not to twist it.•
7
Page 21
Preparing the Camera
COPY
Memory Card
Remove the strap, and make sure the
battery and memory card are in the
5
camera.
Please refer to the • Camera User Guide for
information on the correct battery, and how
to insert the battery and memory card.
Use a battery that is adequately charged.•
Check the estimated capacity of your memory •
card and ensure there is enough space to
8
record images.
Strap
Battery
Inserting the Camera Into the Case
Insert the camera into the Waterproof
Case.
6
Choose a place well away from salty sea air. •
Keep the lens window clean by wiping it gently •
with a dry cloth.
Page 22
Close the case.
COPY
7
Make sure that the waterproof seal is free of •
debris.
Make sure that the catch is securely locked.•
9
Page 23
Using the Camera
COPY
Please refer to the Camera User Guide for instructions
on how to use the camera.
Underwater Mode
Setting the camera to S mode will tone down the
blues, letting you obtain more natural colors when
shooting underwater.
Mode Dial
Button
Button
o
Button
r
Button
m
Button
q
Set the mode dial to K.
Button
p
1
After pressing the m button, press the
buttons to choose I.
op
2
Press the qr buttons to choose S, then
press the m button.
3
10
When shooting underwater in •
D
modes, you should set the white balance to S
(Underwater) using the FUNC. menu.
You can set the white balance manually with the •
press of a single button if you assign the
White Balance) function to the
for adjusting the white balance to the shooting
conditions.
E, G, M, B
button. Try this
or
(Custom
Using the Control Dial
Using the control dial with the waterproof case differs
slightly from that of the camera itself.
Press the •
buttons while pressing the
qr
button.
Page 24
Removing the Camera Care and Maintenance
COPY
Make sure to do the following after using the
Waterproof Case.
Thoroughly dry the case, wiping off all
the water.
1
Remove any dirt, sand, hair or other debris •
from the case and wash it with clean, running
water to remove any salt deposits.
Open the case and remove the camera.
2
Close the case.
1
Do not wash the interior of the Waterproof •
Case with water. Wipe it with a soft, dry cloth.
Thoroughly wash the case with clean
water, then wipe it completely dry with
2
a soft, dry cloth.
After using the case in the ocean, soak it in clean •
water for several hours to remove any salt deposits.
11
Page 25

Specifications
COPY
Waterproof
Capability:
Waterproofing: Seal (crimp-type O-ring)
Body Materials: Polycarbonate
Camera Operating Temperatures:
Dimensions: 140.6 x 91.5 x 85.1 mm
Volume: Approx. 630 cm
Weight: Approx. 385 g (13.6 oz.)
Number of Separately Sold Waterproof Case Weights
(WW-DC1) Recommended Mounting:
*Including diffusion plate
All data noted here are based on Canon’s testing standards.•
Product specifications and appearance are subject to •
change without prior notice.
Meets IEC/JIS protection rating “I PX 8”
equivalent
For use within a depth of 40m (130 ft.)
0 to 40 °C (32 to 104 °F)
(5.54 x 3.60 x 3.35 in.)
(excluding protrusions)
(Waterproof Case only*)
When in sea water: 2 weights
When in fresh water: 1 weight
3
(38.4 in.3)
12
Page 26

Deutsch
COPY
Lesen Sie sich dieses Handbuch gut durch, •
bevor Sie das Unterwassergehäuse verwenden.
Bewahren Sie dieses Handbuch zur späteren •
Verwendung sicher auf.
Überprüfen des Lieferumfangs
Überprüfen Sie, ob die folgenden Teile im Lieferumfang
des Unterwassergehäuses enthalten sind. Wenden Sie
sich an den Händler, von dem Sie das Unterwassergehäuse
erworben haben, falls etwas fehlen sollte.
Unterwassergehäuse
Trageriemen
Handschlaufe
Streuscheibe
Silikon-Paste für Dichtungsring
Benutzerhandbuch (dieses Handbuch)
Separat erhältliches Zubehör
Gewicht für Canon Unterwassergehäuse WW-DC1•
Wird das Unterwassergehäuse für Unterwasseraufnahmen
verwendet, so dienen diese Gewichte dazu, das Gehäuse
zu beschweren. Weitere Informationen zur empfohlenen
Anzahl anzubringender Gewichte finden Sie in den
technischen Daten (S. 12). Informationen zur Befestigung
der Gewichte erhalten Sie im Benutzerhandbuch für die
Gewichte.
Bitte zuerst lesen
Stellen Sie vor dem Gebrauch des Unterwassergehäuses
sicher, dass es ordnungsgemäß funktioniert und kein
Leck hat. Zur Prüfung auf Lecks schließen Sie das
Kameragehäuse, bevor Sie die Kamera einsetzen,
und halten es etwa drei Minuten lang in einer Tiefe von
ca. 15 cm unter Wasser. Falls es eine undichte Stelle
aufweist, wenden Sie sich an den Canon-Kundendienst.
Haftungsausschluss
Dieses Handbuch darf ohne die Genehmigung von Canon •
weder ganz noch teilweise nachgedruckt, übertragen
oder in Informationssystemen gespeichert werden.
Canon behält sich das Recht vor, den Inhalt dieses •
Handbuchs jederzeit ohne Vorankündigung zu ändern.
Die in diesem Handbuch verwendeten Abbildungen •
können sich vom tatsächlichen Gerät unterscheiden.
Canon Inc., dessen Tochtergesellschaften und •
angegliederte Unternehmen sowie die Distributoren
des Unterwassergehäuses haften nicht für Schäden, die
durch die falsche Verwendung des Gehäuses entstehen.
Bitte lesen Sie ebenfalls das mit Ihrer Kamera gelieferte •
Kamera-Benutzerhandbuch sorgfältig.
• : Zu beachtende Punkte.
• : Hinweise zur optimalen Nutzung des
Unterwassergehäuses.
Die verschiedenen Arten der für die Kamera geeigneten •
Speicherkarten werden in diesem Benutzerhandbuch
einheitlich als Speicherkarten bezeichnet.
1
Page 27
Sicherheitsvorkehrungen
COPY
Lesen Sie die im Folgenden beschriebenen •
Sicherheitsvorkehrungen vor der Verwendung des
Unterwassergehäuses gut durch. Achten Sie stets
darauf, dass das Unterwassergehäuse ordnungsgemäß
verwendet wird.
Die auf den folgenden Seiten erläuterten •
Sicherheitsvorkehrungen sollen verhindern, dass Sie
selbst oder andere Personen zu Schaden kommen oder
Schäden am Gerät entstehen.
Warnhinweis
Vorsicht
Vorsicht
Denken Sie daran, die Kamera nach dem Gebrauch
des Unterwassergehäuses aus dem Gehäuse
herauszunehmen.
Wenn die Kamera im Unterwassergehäuse verbleibt und
direkter Sonneneinstrahlung oder hohen Temperaturen
ausgesetzt wird, kann sich ein Brand entwickeln oder das
Gehäuse bersten.
Verwenden Sie das Unterwassergehäuse nicht anstelle
eines Auftriebskörpers (z. B. Schwimmgürtel).
2
Weist auf die Möglichkeit von schweren
Verletzungen oder Tod hin.
Weist auf die Möglichkeit von
Verletzungen hin.
Weist auf die Möglichkeit von Schäden
an Unterwassergehäuse und Kamera hin.
Warnhinweis
Verwenden Sie den Trageriemen
nicht unter Wasser.
Nehmen Sie den Trageriemen ab, und
bringen Sie die Handschlaufe an, bevor
Sie das Unter wassergehäuse unter
Wasser verwenden. Bei der Verwendung
des Trageriemens besteht die Gefahr,
dass sich der Riemen am Hals verhedder t
und zu Strangulation oder anderen
Verletzungen führt.
Vorsicht
Schalten Sie die Kamera sofort aus, falls das
Unterwassergehäuse Lecks aufweist.
Lecks könnten Feuer oder einen elektrischen Schlag zur Folge
haben. Wischen Sie das Innere des Unter wassergehäuses und
die Kamera gründlich trocken, und wenden Sie sich an den
Canon-Kundendienst.
Vorsicht
Achten Sie auf die Bildung von Kondenswasser.
Ein schneller Wechsel des Unterwassergehäuses zwischen
hohen und niedrigen Temperaturen kann Kondensation
(Wassertropfen) auf seinen Innenflächen verursachen. Falls
dies geschieht, stellen Sie die Verwendung der Kamera ein,
da Kondensation zu Fehlfunktionen führen kann. Entnehmen
Sie die Kamera, und wischen Sie die Kondensationsfeuchtigkeit
mit einem weichen, trockenen Tuch von Gehäuse und Kamera
ab, bis diese vollständig trocken sind.
Page 28
Vergewissern Sie sich, dass die Handschlaufe von der •
COPY
Kamera entfernt ist, bevor Sie sie in das Gehäuse einsetzen.
Betätigen Sie die Tasten und den Hebel des Gehäuses unter •
Wasser nicht mit Gewalt.
Spritzen Sie den Dichtungsring nicht mit Leitungswasser ab.•
Beschädigen Sie den Dichtungsring nicht, und sorgen Sie •
dafür, dass sich kein Schmutz zwischen Dichtungsring und
Gehäuse ansammeln kann.
Zerlegen oder verändern Sie das Unterwassergehäuse nicht.•
Hierdurch könnten Lecks verursacht werden.
Verwenden oder lagern Sie das
Unterwassergehäuse nach Möglichkeit
nicht in folgenden Umgebungen.
Wassertiefen von mehr als 40 Meter.•
Umgebungen mit Temperaturen •
über 40 °C.
Bewahren Sie das Unterwassergehäuse
nach Möglichkeit nicht in folgenden
Umgebungen auf.
Umgebungen mit starker •
Sonneneinstrahlung.
Feuchte oder staubige Umgebungen.•
In der Nähe von chemischen •
Substanzen wie Naphthalin oder
Insektiziden.
Werfen Sie das Unterwassergehäuse nicht, und lassen Sie es
nicht fallen.
Dies könnte ein Verbiegen des Gehäuses und Fehlfunktionen zur
Folge haben.
Verwenden Sie nur die beiliegende Silikon-Paste.
Die Verwendung anderer Dichtungsmittel kann die Dichtheit des
Unterwassergehäuses beeinträchtigen.
Dichtungsring
Fremdkörper auf dem Dichtungsring können das Eindringen •
von Wasser verursachen. Ein einziges Haar oder Sandkorn
in der Dichtung kann Lecks verursachen.
Falls die Dichtung beschädigt oder rissig ist, stellen Sie die •
Benutzung des Gehäuses sofort ein, und wenden Sie sich
an den Canon-Kundendienst.
Lagern Sie das Unterwassergehäuse sorgsam in geöffnetem •
Zustand, um eine Verformung des Dichtungsrings zu vermeiden
und seine Wasserdichtfähigkeit aufrechtzuerhalten.
Schützen Sie die Dichtung während der Lagerung vor Staub •
und Kratzern.
Damit das Kameragehäuse auch wasserdicht bleibt,
sollten Sie den Dichtungsring einmal pro Jahr auswechseln.
Wenden Sie sich an Ihren Canon-Kundendienst, •
um Ersatz-Dichtungsringe zu erhalten.
3
Page 29
Überblick über die
COPY
Komponenten
Riemenbefestigung
Auslöser
Zoom-Hebel
Tas te ON /O FF
Wahltaste für Steuer-Ring
Entriegelungstaste
Verriegelung
Objektivfenster
Stativgewinde
Steuer-Ring
Streuscheibe
4
Modus-Wahlrad
Tas te (Direktwahl)/c (Direktdruck)
Tas te 1 (Wiedergabe)
Tas te b (Belichtungskorrektur)/ d (Springen)/
Tas te h (Blitz)/r
Tas te mFUNC./SET (Funktion/Einstellen)
Tas te e (Makro)/f (Manueller Fokus)/
Tas te Q (Selbstauslöser)/a (Einzelbild löschen)/
Tas te l (Anzeige)
Tas te n
q
o
p
Page 30
Vorbereitungen
COPY
Handschlaufe Trageriemen
Befestigen Sie die Schlaufe oder den Riemen, und passen Sie die Länge an.
1
Nehmen Sie den Trageriemen ab, und bringen Sie die Handschlaufe an, bevor Sie das Gehäuse unter •
Wasser verwenden. Bei der Verwendung des Trageriemens besteht die Gefahr, dass sich der Riemen
am Hals verheddert und zu Strangulation oder anderen Verletzungen führt.
Benutzen Sie nur die im Lieferumfang des Unterwassergehäuses enthaltenen Handschlaufen.•
5
Page 31

Streuscheibe
COPY
Bringen Sie die Streuscheibe an.
2
Vermeiden Sie Kratzer auf der Oberfläche der •
Streuscheibe, da dies die gleichmäßige Streuung
des Blitzlichts verringert.
Die Effektivität der Streuscheibe kann •
beeinträchtigt werden, wenn sich das
Motiv zu nah an der Kamera befindet.
6
Abnehmen der
Streuscheibe
Heben Sie die
Streuscheibe wie
abgebildet an, und
entfernen Sie sie.
Page 32

Dichtungsring
COPY
Lösen Sie die Verriegelung, um das
Gehäuse zu öffnen.
3
Falls Sie eine handelsübliche Antibeschlaglösung •
verwenden, tragen Sie sie mit einem
weichen, trockenen Tuch nur auf die
Innenseite des Objektivfensters auf. Sollte die
Antibeschlaglösung versehentlich mit anderen
Teilen in Kontakt kommen, wischen Sie sie sofort
mit einem weichen, trockenen Tuch ab, da sonst
Schäden verursacht werden können.
Tragen Sie Silikon-Paste auf den
Dichtungsring auf.
4
Entfernen Sie den Dichtungsring, wie in der
1 .
Abbildung gezeigt.
Drücken Sie nicht Ihre Fingernägel hinein, und •
ziehen Sie nicht gewaltsam am Dichtungsring.
Entfernen Sie Ablagerungen mit einem
2 .
Wattestäbchen aus der Nut.
Geben Sie etwas (einen Tropfen) Silikon-Paste
3 .
auf Ihre Fingerspitze, und überziehen Sie
die gesamte Oberfläche des Dichtungsrings
gleichmäßig mit der Paste.
Setzen Sie den Dichtungsring wieder
4 .
ordnungsgemäß in die Nut ein.
Achten Sie darauf, dass er dabei nicht •
verdreht wird.
7
Page 33

Vorbereiten der Kamera
COPY
Speicherkarte
Nehmen Sie die Schlaufe ab, und stellen
Sie sicher, dass sich der Akku und eine
5
Speicherkarte in der Kamera befinden.
Informationen zum richtigen Akku und zum •
Einsetzen von Akku und Speicherkarte finden
Sie im Kamera-Benutzerhandbuch.
Verwenden Sie einen ausreichend geladenen Akku.•
Überprüfen Sie die geschätzte Kapazität Ihrer •
Speicherkarte, und vergewissern Sie sich, dass
genügend Speicherplatz für die Aufnahme Ihrer
8
Bilder vorhanden ist.
Schlaufe
Akku
Einsetzen der Kamera in das Gehäuse
Setzen Sie die Kamera in das
Unterwassergehäuse ein.
6
Wählen Sie einen Ort fern der salzigen Meerluft. •
Halten Sie das Objektivfenster sauber, indem Sie es •
behutsam mit einem trockenen Tuch abwischen.
Page 34

Schließen Sie das Gehäuse.
COPY
7
Vergewissern Sie sich, dass der Dichtungsring •
frei von Fremdkörpern ist.
Stellen Sie sicher, dass die Verriegelung richtig •
geschlossen ist.
9
Page 35

Verwenden der Kamera
COPY
Anleitungen zur Verwendung der Kamera finden Sie
im Kamera-Benutzerhandbuch.
Unterwassermodus
Durch Auswahl des Modus S werden Blautöne
abgeschwächt und natürlichere Farben bei
Unterwasseraufnahmen erzielt.
Modus-Wahlrad
Tas te
Tas te
Tas te r
Tas te m
Tas te p Tas te q
Stellen Sie das Modus-Wahlrad auf K.
1
Drücken Sie die Taste m und danach die
Tasten op, um I auszuwählen.
2
Drücken Sie die Tasten qr, um S
auszuwählen, und drücken Sie dann
3
die Taste m.
10
Bei Unterwasseraufnahmen mit den Modi •
B
oder D empfiehlt es sich, den Weißabgleich
über das Menü FUNC. auf S (Unterwasser)
festzulegen.
Sie können den Weißabgleich manuell durch •
Betätigung einer einzelnen Taste festlegen, wenn Sie
die Funktion
zuweisen. Versuchen Sie so, den Weißabgleich an die
Aufnahmebedingungen anzupassen.
(Custom Weißabgleich) der Taste
E, G, M
,
Verwenden des Einstellungs-Wahlrads
Die Verwendung des Einstellungs-Wahlrads mit
o
dem Unterwassergehäuse weicht leicht von der
Verwendung des Einstellungs-Wahlrads der Kamera
selbst ab.
Drücken Sie gleichzeitig die Tasten •
Taste
.
qr
und die
Page 36

Herausnehmen der Kamera Pflege und Wartung
COPY
Befolgen Sie nachstehende Anweisungen nach der
Verwendung des Unterwassergehäuses.
Wischen Sie das Gehäuse gründlich
trocken.
1
Säubern Sie das Gehäuse von Schmutz, Sand, •
Haaren und anderen Fremdkörpern, und
waschen Sie es unter klarem, laufenden Wasser
ab, um Salzablagerungen zu entfernen.
Öffnen Sie das Gehäuse, und
entnehmen Sie die Kamera.
2
Schließen Sie das Gehäuse.
Waschen Sie das Innere des Unterwassergehäuses •
1
nicht mit Wasser aus. Wischen Sie es mit einem
weichen, trockenen Tuch ab.
Waschen Sie das Gehäuse gründlich mit
klarem Wasser ab, und trocknen Sie es
2
danach sorgfältig mit einem weichen,
trockenen Tuch.
Besonders nach der Verwendung in Meerwasser •
ist mehrstündiges Einweichen des geschlossenen
Kameragehäuse in sauberem Wasser zu
empfehlen, um Salzablagerungen zu entfernen.
11
Page 37

Technische Daten
COPY
Wasserdichtfähigkeit: Entspricht dem
Wasserabdichtung: Dichtungsring
Gehäusematerial: Polykarbonat
Betriebstemperaturen der Kamera:
Abmessungen: 140,6 x 91,5 x 85,1 mm
Volumen: ca. 630 cm
Gewicht: ca. 385 g
Empfohlene Anzahl der gesondert erhältlichen Gewichte
(WW-DC1) für das Unterwassergehäuse:
*Einschließlich Streuscheibe
Alle hier angegebenen Daten basieren auf den •
Teststandards von Canon.
Änderungen am Aussehen und an den Spezifikationen des •
Produkts können jederzeit ohne vorherige Benachrichtigung
vorgenommen werden.
IEC/JIS-Schutzgrad „IPX8 “
Für den Einsatz bis zu einer Tiefe
von 40 m
(eingepresster O-Ring)
0 bis 40 °C
(ohne vorstehende Teile)
3
(nur Unterwassergehäuse*)
Im Meerwasser: 2 Gewichte
Im Süßwasser: 1 Gewicht
12
Page 38

Español
COPY
Asegúre• se de leer esta guía antes de utilizar el estuche
impermeable.
Guarde es• ta guía en un lugar seguro de modo que
la pueda utilizar en el futuro.
Comprobación del contenido del paquete
Compruebe que el paquete del estuche impermeable
incluye los elementos siguientes. Si faltara alguno,
póngase en contacto con el vendedor al que adquirió
el estuche impermeable.
Estuche impermeable
Correa para el cuello
Correa de muñeca
Placa de difusión
Grasa de silicona para la junta hermética
Guía del usuario (esta guía)
Accesorios que se venden por separado
Lastre para estuche impermeable de Canon WW-DC1•
Cuando los utilice para tomar fotografías debajo del
agua, estos lastres evitarán que el estuche impermeable
flote. Consulte las especificaciones (pág. 12) para obtener
información sobre el número de lastres que se recomienda
utilizar. Para obtener información sobre cómo colocarlos,
consulte la guía del usuario proporcionada con los lastres.
Lea esta sección antes de empezar
Antes de utilizar el estuche impermeable, cerciórese de
que funciona correctamente y de que no se infiltra agua.
Para comprobar que no hay infiltraciones, cierre el estuche
antes de introducir la cámara y sumérjalo en agua a una
profundidad de unos 15 cm (5,9 pulgadas) durante unos
tres minutos. Si se infiltra agua, póngase en contacto con
el Servicio de asistencia al cliente de Canon.
Exención de responsabilidad
Está prohibido reimprimir, transmitir o guardar en un •
sistema de recuperación cualquier parte de esta guía
sin el permiso de Canon.
Canon se reserva el derecho a modificar el contenido •
de esta guía en cualquier momento y sin previo aviso.
Las ilustraciones y capturas de pantalla de esta guía •
pueden diferir ligeramente de las que aparezcan en
el equipo real.
Canon Inc., sus sucursales y filiales, y los distribuidores •
del estuche impermeable no se harán responsables de
ningún daño debido a un mal uso del mismo.
Lea también atentamente la • Guía del usuario de la
cámara proporcionada con ésta.
• : cosas a las que se debe prestar atención.
• : sugerencias para sacar el máximo partido
del estuche impermeable.
En esta guía denominaremos colectivamente tarjetas •
de memoria a los distintos tipos de tarjetas de memoria
que se pueden utilizar con una cámara.
1
Page 39

Precauciones de seguridad
COPY
Antes de comenzar a utilizar el estuche impermeable, •
asegúrese de leer las precauciones de seguridad que se
describen a continuación. Asegúrese siempre de que el
estuche impermeable se utiliza correctamente.
Las precauciones de seguridad que se indican en las •
páginas siguientes tienen como misión evitar lesiones tanto
al usuario como a las demás personas y daños en el equipo.
Advertencia
Precaución
Precaución
Asegúrese de extraer la cámara después de usar
el estuche impermeable.
Dejar la cámara en el estuche impermeable y colocarla
directamente bajo el sol o en cualquier otro lugar en el que
pueda estar sometida a altas temperaturas podría provocar
un incendio o que estallara el estuche.
No utilice el estuche impermeable como dispositivo
de flotación personal (como salvavidas).
2
Indica el riesgo de lesiones graves
o de muerte.
Indica el riesgo de lesiones.
Indica la posibilidad de daños al estuche
impermeable o a la cámara.
Advertencia
No utilice la correa para el cuello
bajo el agua.
Extraiga la correa de cuello y coloque
la correa de muñeca antes de utilizar
el estuche impermeable bajo el agua.
El uso de la correa para el cuello puede
hacer que se quede enganchado
alrededor del mismo y producir una
estrangulación o cualquier otra lesión.
Precaución
Si el estuche impermeable tuviera infiltraciones,
apague inmediatamente la cámara.
Las infiltraciones podrían provocar un incendio o descargas
eléctricas. Seque completamente el interior del estuche
impermeable y la cámara y póngase en contacto con el
Servicio de asistencia al cliente de Canon.
Precaución
Preste atención a la condensación.
El traslado rápido del estuche impermeable entre lugares con
temperaturas altas y bajas puede producir condensación (gotas
de agua) en sus superficies internas. Si ocurre esto, deje de
usar la cámara, ya que la condensación puede provocar un mal
funcionamiento. Extraiga la cámara y limpie la condensación
del estuche y de la cámara con un trapo suave y seco hasta
que estén completamente secos.
Page 40

No introduzca la cámara con la correa montada.•
COPY
No presione los botones ni la palanca demasiado •
fuerte cuando esté dentro del agua.
No rocíe la junta hermética con agua corriente.•
No dañe la junta hermética ni permita que la suciedad •
se acumule entre la misma y el estuche.
No desarme ni modifique el estuche impermeable.•
Todo lo anterior podría provocar infiltraciones.
Evite utilizar, colocar o almacenar el
estuche impermeable en los lugares
siguientes.
Profundidades superiores •
a 40 metros (130 pies).
Donde esté expuesta a •
temperaturas superiores
a 40 ºC (104 ºF).
Evite colocar o almacenar el
estuche impermeable en los
lugares siguientes.
Donde quede expuesto a la luz •
solar intensa.
En zonas húmedas •
o polvorientas.
Cerca de sustancias tales como •
naftalina o insecticidas.
No deje caer ni lance el estuche impermeable.
Las acciones anteriores podrían deformar el estuche y provocar
fallos en el funcionamiento.
Utilice solamente la grasa de silicona suministrada.
La utilización de otros productos impermeabilizantes podría
dañar la resistencia del estuche impermeable al agua.
Junta hermética
Las sustancias extrañas adheridas a la junta hermética •
pueden causar una infiltración de agua. Si quedase pillado
un solo pelo o un diminuto grano de arena en la junta
hermética, podría producirse una infiltración.
Si advierte que la junta hermética está dañada o •
resquebrajada, deje de utilizar el estuche inmediatamente
y póngase en contacto con el Ser vicio de asistencia al
cliente de Canon.
Cuando guarde el estuche impermeable, manténgalo •
abierto para impedir que la junta hermética se deforme
y para mantener sus propiedades impermeabilizantes.
Proteja la junta hermética de polvo y arañazos durante •
el almacenamiento.
Para asegurar la estanqueidad del estuche, se recomienda
reemplazar anualmente la junta hermética.
Póngase en contacto con el Ser vicio de asistencia al •
cliente de Canon para obtener la junta hermética.
3
Page 41

Guía de componentes
COPY
Anillas para la correa
Botón de disparo
Palanca del zoom
Botón ON/OFF
Selec tor de la función del anillo
Interruptor para liberar el blo queo
Cierre
Ventana del objetivo
Rosca para el trípode
Anillo de control
Placa de difusión
4
Dial de modo
Botón (acceso directo)/c (impresión directa)
Botón 1 (Reproducción)
Botón b (compensación de la exposición)/d (saltar)/
Botón h (Flash)/
Botón mFUNC./SET (Función/Establecer)
Botón e (Macro)/f (enfoque manual)/q
Botón Q (Temporizador)/a (Borrado de una única imagen)/
Botón l (Pantalla)
Botón
r
n
o
p
Page 42

Preparativos
COPY
Correa de muñeca Correa para el cuello
Monte la correa y ajuste la longitud.
1
Extraiga la correa para el cuello y coloque la correa de muñeca antes de utilizar el estuche debajo del agua. •
El uso de la correa para el cuello puede hacer que se quede enganchada alrededor del mismo y producir una
estrangulación o cualquier otra lesión.
No monte ninguna correa, excepto las que se incluyen en el estuche impermeable.•
5
Page 43

Placa de difusión
COPY
Monte la placa de difusión.
2
No raye la superficie de la placa de difusión, •
ya que esto podría evitar que la luz del flash
se difundiese adecuadamente.
La efectividad de la placa de difusión puede •
reducirse si el motivo está demasiado cerca
de la cámara.
6
Extracción de
la placa de
difusión
Levante y extraiga
la placa de difusión.
Page 44

Junta hermética
COPY
Suelte el cierre para abrir el estuche.
3
Cuando utilice algún producto contra la •
condensación de los que hay disponibles en
el mercado, la solución contra condensación
se deberá aplicar sólo a la superficie interior
del objetivo usando un paño suave y seco.
Si la solución contra condensación entra en
contacto con cualquier superficie que no
sea la cara interior del objetivo, límpiela de
inmediato con un paño suave y seco, ya que,
de lo contrario, podría deteriorar la funda
impermeable.
Aplique grasa de silicona a la junta
hermética.
4
Retire la junta hermética tal como se muestra.
1 .
No le clave las uñas ni tire de ella con fuerza.•
Con la ayuda de un bastoncillo de algodón, retire
2 .
cualquier sustancia extraña que se encuentre en
la ranura de montaje.
Aplique una pequeña cantidad (una gota) de grasa
3 .
en la punta del dedo y recubra uniformemente
toda la superficie de la junta hermética.
Vuelva a colocar la junta hermética en la ranura
4 .
de montaje de la junta.
Tenga cuidado de no retorcerla.•
7
Page 45

Preparación de la cámara
COPY
Tarjeta de memoria
Retire la correa y asegúrese de que
la batería y la tarjeta de memoria
5
se encuentran en la cámara.
Consulte la • Guía del usuario de la cámara para
obtener información sobre cuál es la batería
correcta y sobre cómo introducir la batería
y la tarjeta de memoria.
Utilice una batería adecuadamente cargada.•
Compruebe la capacidad estimada de la tarjeta •
de memoria y que haya suficiente espacio para
8
grabar imágenes.
Correa
Batería
Introducción de la cámara en el estuche
Inserte la cámara en el estuche
impermeable.
6
Elija un lugar alejado del aire salino del mar. •
Mantenga la ventana del objetivo limpia •
frotándola suavemente con un trapo seco.
Page 46

Cierre el estuche.
COPY
7
Asegúrese de que la junta hermética no tiene •
restos de suciedad.
Asegúrese de que el cierre está bien bloqueado.•
9
Page 47

Uso de la cámara
COPY
Consulte la Guía del usuario de la cámara para obtener
las instrucciones sobre cómo usar la cámara.
Modo Bajo el Agua
Al ajustar la cámara en el modo S se disminuirán los
tonos azules, permitiendo obtener unos colores más
naturales cuando se fotografía bajo el agua.
Dial de modo
Botón
Botón
Botón
Botón
Botón
Ajuste el dial de modo en K.
Botón
q
p
1
Después de pulsar el botón m, pulse
los botones op para elegir I.
2
Pulse los botones qr para elegir S y,
a continuación, pulse el botón m.
3
10
o
r
m
Cuando se fotografía bajo el agua en modos •
M, B
o D, se recomienda ajustar el balance de
blancos en S (Bajo el agua) en el menú FUNC.
Se puede ajustar manualmente el balance de blancos •
con solo presionar un botón si se asigna la función
(balance de blancos personalizado) al botón
recomienda probar este método para ajustar el balance
de blancos a las condiciones de disparo.
E, G
. Se
,
Uso del dial de control
El uso del dial de control con el estuche impermeable
es ligeramente diferente al de la propia cámara.
Pulse los botones •
pulsado el botón
a la vez que mantiene
qr
.
Page 48

Extracción de la cámara Cuidado y mantenimiento
COPY
Asegúrese de hacer lo siguiente después de utilizar
el estuche impermeable.
Seque el estuche meticulosamente,
eliminando toda el agua.
1
Elimine cualquier suciedad, arena, pelo y demás •
partículas del estuche y lávelo con agua corriente
limpia para eliminar cualquier depósito de sal.
Abra el estuche y retire la cámara.
2
Cierre el estuche.
No lave el interior del estuche impermeable con •
1
agua. Frótelo con un paño suave y seco.
Lave cuidadosamente el estuche con
agua limpia y, a continuación, séquelo
2
por completo con un trapo seco y suave.
Después de utilizar el estuche en el mar, •
sumérjalo en agua limpia durante varias horas
para eliminar cualquier depósito de sal.
11
Page 49

Especificaciones
COPY
Capacidad de
impermeabilidad:
Impermeabilidad: Junta (junta tórica rizada)
Material del
cuerpo:
Temperaturas de funcionamiento de la cámara:
Dimensiones: 140,6 x 91,5 x 85,1 mm
Volumen: Aprox. 630 cm
Peso: Aprox. 385 g (13,6 onzas.)
Número de lastres para estuche impermeable (W W-DC1,
se venden aparte) que se recomienda montar:
*Incluida la placa de difusión
Todos los datos indicados se basan en los niveles de prueba •
de Canon.
Las especificaciones y la apariencia del producto están •
sujetos a cambio sin previo aviso.
Cumple la evaluación de protección
de IEC/JIS equivalente a “IPX8”
Para utilizarse a una profundidad
de 40 m (130 pies)
Policarbonato
0 a 40 °C (32 a 104 °F)
(5,54 x 3,60 x 3,35 pulg.)
(excluidos salientes)
(Estuche impermeable solamente*)
3
(38,4 pulg.3)
En agua del mar: 2 pesos
En agua dulce: 1 peso
12
Page 50

Français
COPY
Prenez soin de lire ce guide avant d'utiliser le boîtier •
étanche.
Rangez-le dans un endroit sûr pour toute référence •
ultérieure.
Vérification du contenu du coffret
Vérifiez si tous les éléments suivants sont bien inclus
dans le coffret du boîtier étanche. Si un élément venait
à manquer, contactez le revendeur auprès duquel vous
avez acheté le boîtier étanche.
Boîtier étanche
Courroie
Dragonne
Plaque de diffusion
Graisse au silicone pour le joint d’étanchéité
Guide d’utilisation (ce guide)
Accessoires vendus séparément
Poids pour boîtier étanche Canon WW-DC1•
Lorsque vous prenez des photos sous l'eau, les poids
empêchent le boîtier étanche de flotter. Consultez la
section Caractéristiques (page 12) pour connaître le
nombre de poids recommandés. Pour savoir comment
fixer les poids, consultez le guide d'utilisation qui
accompagne les poids.
À lire en priorité
Avant d'utiliser ce boîtier étanche, assurez-vous qu'il
fonctionne correctement et qu'il n'y a pas d’infiltration d'eau.
Pour cette vérification, fermez le boîtier avant d'y installer
l'appareil photo et tenez-le sous l'eau à une profondeur de
15 cm (5,9 pouces) pendant environ trois minutes. En cas
de fuite, contactez le service clientèle Canon.
Limitation de la responsabilité
La réimpression, la transmission ou le stockage dans un •
système de stockage d'une partie quelconque de ce guide
sans l'autorisation de Canon est strictement interdit.
Canon se réserve le droit de modifier à tout moment •
le contenu de ce guide, sans avis préalable.
Les illustrations et les captures d'écran utilisées dans ce •
guide peuvent différer légèrement de l'équipement utilisé.
Canon Inc., ses filiales et succursales, ainsi que les •
distributeurs du boîtier étanche déclinent toute
responsabilité concernant tout dommage résultant d'une
mauvaise utilisation du boîtier.
Veuillez également lire attentivement le • Guide d'utilisation
de l'appareil photo fourni avec ce dernier.
• : opérations nécessitant une attention particulière.
• : astuces pour tirer le meilleur parti du boîtier étanche.
Dans le présent guide, les différents types de cartes •
mémoire susceptibles d'être utilisés avec cet appareil
photo sont appelés collectivement « cartes mémoire ».
1
Page 51

Précautions de sécurité
COPY
Avant d'utiliser le boîtier étanche, veuillez lire attentivement •
les précautions de sécurité exposées ci-après. Veillez à
toujours utiliser le boîtier étanche de manière appropriée.
Les précautions de sécurité reprises aux pages suivantes •
ont pour but d'éviter tout risque de dommages corporels
et matériels.
Avertissement
Attention
Attention
Assurez-vous de bien retirer l'appareil photo après
avoir utilisé le boîtier étanche.
Si vous laissez le boîtier étanche contenant l'appareil photo
sous la lumière directe du soleil ou dans un endroit où la
température est élevée, cela pourrait entraîner un incendie
ou le boîtier pourrait éclater.
N'utilisez pas le boîtier étanche comme un dispositif
flottant (par exemple, bouée de sauvetage).
2
Indique un risque de blessure grave
ou de mort.
Indique un risque de blessure.
Indique un risque de dommages pour
le boîtier étanche et l’appareil photo.
Avertissement
N’utilisez pas la courroie sous l'eau.
Enlevez la courroie et fixez la dragonne
avant d'utiliser le boîtier étanche sous
l'eau. La courroie pourrait s’enrouler
autour du cou et présenter ainsi
un risque d'étranglement ou autre
blessure.
Attention
Si le boîtier étanche présente une infiltration d'eau,
éteignez immédiatement l'appareil photo.
Une infiltration risque d'occasionner un incendie ou une
décharge électrique. Essuyez l'intérieur du boîtier étanche
et l'appareil photo jusqu'à ce qu'ils soient secs et contactez
le service clientèle Canon.
Attention
Soyez attentif à la présence de condensation.
Déplacer trop rapidement le boîtier étanche d'un endroit
chaud vers un endroit froid peut entraîner la formation de
condensation (gouttelettes d'eau) sur les surfaces intérieures,
susceptible de nuire au fonctionnement. Cessez d'utiliser
l'appareil photo si vous décelez de la condensation. Retirez
l'appareil photo et essuyez la condensation du boîtier et de
l'appareil avec un chiffon doux et sec jusqu'à ce qu’ils soient
complètement secs.
Page 52

Ne placez pas l'appareil photo dans le boîtier avec •
COPY
la dragonne.
N'appuyez pas trop fort sur les touches et le levier •
quand le boîtier étanche est immergé.
Ne vaporisez pas d'eau du robinet sur le joint •
d'étanchéité.
Prenez soin de ne pas abîmer le joint d'étanchéité et •
veillez à ne pas laisser de saletés se déposer entre le
joint et le boîtier.
Ne démontez pas et ne modifiez pas le boîtier étanche.•
Les actions précitées peuvent provoquer des infiltrations.
Évitez d'utiliser ou de ranger le boîtier
étanche dans les lieux suivants :
Profondeur supérieure •
à 40 mètres (130 pieds).
Endroits susceptibles d'atteindre •
des températures supérieures
à 40 °C (104 °F).
Évitez de déposer ou de ranger
le boîtier étanche dans les lieux
suivants :
Endroits directement exposés •
aux rayons du soleil.
Endroits humides ou poussiéreux.•
À proximité de substances •
telles que la naphtaline ou
des insecticides.
Ne faites pas tomber et ne jetez pas le boîtier étanche.
Les actions précitées pourraient déformer le boîtier
et provoquer un dysfonctionnement.
Utilisez uniquement la graisse au silicone fournie.
L'emploi d'autres produits d'étanchéité pourrait amoindrir
la résistance du boîtier étanche.
Joint d'étanchéité
Des corps étrangers collés sur le joint d'étanchéité peuvent •
entraîner des infiltrations d'eau. La présence d'un minuscule
grain de sable ou d’un cheveu sur le joint peut entraîner
des infiltrations d'eau.
Si vous constatez que le joint d'étanchéité est abîmé ou •
fissuré, arrêtez immédiatement d'utiliser le boîtier et
contactez le service clientèle Canon.
Rangez soigneusement le boîtier étanche en le laissant •
entrouver t pour éviter une déformation de son joint
d'étanchéité et pour préserver ses performances
d'étanchéité.
Protégez le joint d'étanchéité de la poussière et des •
éraflures pendant les périodes d'inactivité.
Pour garantir l'étanchéité du boîtier, il est recommandé
de remplacer le joint une fois par an.
Pour le remplacement du joint, contactez le service •
clientèle Canon.
3
Page 53

Guide des composants
COPY
Attaches de bandoulière
Déclencheur
Levier du zoom
Touche ON/OFF
Sélecteur de fonctions
Bouton de verrouillage
Cliquet
Fenêtre d’objectif
Filetage pour trépied
Bague de réglage
Plaque de diffusion
4
Molette modes
Tou che (Raccourci)/ c (Impression directe)
Tou che 1 (Lecture)
Tou che b (Correction d'exposition)/Touche d (Saut)/
Tou che h (Flash)/
Tou che mFUNC./ SET (Fonction/ Réglages)
Tou che e (Macro)/f (Mise au point manuelle)/
Tou che Q (Retardateur)/a (Effacer une image)/
Tou che l (Affichage)
Tou che
r
q
p
n
o
Page 54

Préparatifs
COPY
Dragonne Courroie
Fixez la bandoulière (dragonne ou courroie) et réglez sa longueur.
1
Enlevez la courroie et fixez la dragonne avant d'utiliser le boîtier sous l'eau. La courroie pourrait s'enrouler autour •
du cou et présenter ainsi un risque d'étranglement ou autre blessure.
N'utilisez pas de bandoulières autres que celles fournies avec le boîtier étanche.•
5
Page 55

Plaque de diffusion
COPY
Fixez la plaque de diffusion.
2
Veillez à ne pas rayer la surface de la plaque de •
diffusion au risque d'empêcher le flash d'être
diffusé correctement.
L'efficacité de la plaque de diffusion peut être •
réduite si le sujet est trop proche de l'appareil.
6
Retrait de la
plaque de
diffusion
Soulevez et retirez la
plaque de diffusion.
Page 56

Joint d’étanchéité
COPY
Relâchez le cliquet pour ouvrir
le boîtier.
3
Les produits antibuée en vente dans le •
commerce doivent uniquement être appliqués
sur la surface intérieure de la fenêtre de
l'objectif à l'aide d'un chiffon doux et sec.
Si la solution antibuée se trouve en contact
avec toute surface autre que l
de la fenêtre de l'objectif, essuyez-la
immédiatement avec un chiffon doux et sec
pour éviter d'endommager le boîtier étanche.
'
intérieur
Appliquez de la graisse au silicone
sur le joint d’étanchéité.
4
Retirez le joint d'étanchéité comme illustré.
1 .
Veillez à ne pas enfoncer vos ongles dans •
le joint et à ne pas tirer trop fort dessus.
À l'aide d'un coton-tige, enlevez les corps étrangers
2 .
présents dans la rainure de montage du joint.
Déposez une goutte de graisse sur votre doigt
3 .
et enduisez toute la surface du joint d'étanchéité
de manière uniforme.
Réinsérez le joint d
4 .
prévue pour l'accueillir.
Prenez soin de ne pas le tordre.•
'
étanchéité dans la rainure
7
Page 57

Préparation de l'appareil photo
COPY
Batterie
Carte mémoire
Retirez la bandoulière et vérifiez que
la batterie et la carte mémoire sont
5
insérées dans l'appareil photo.
Pour connaître le type de batterie à utiliser ainsi •
que les méthodes d'installation de la batterie et
de la carte mémoire, veuillez vous reporter au
Guide d’utilisation de l’appareil photo.
Utilisez une batterie correctement chargée.•
Vérifiez la capacité estimée de la carte mémoire •
et assurez-vous de disposer de suffisamment de
8
place pour y stocker vos images.
Dragonne
Installation de l'appareil photo
dans le boîtier
Insérez l'appareil photo dans le boîtier
étanche.
6
Choisissez un endroit à l'abri des embruns. •
Gardez la fenêtre de l'objectif propre en •
l'essuyant délicatement avec un chiffon sec.
Page 58

Fermez le boîtier.
COPY
7
Assurez-vous qu'il n'y a pas de corps étrangers •
sur le joint d'étanchéité.
Vérifiez que le cliquet est correctement fermé.•
9
Page 59

Utilisation de l'appareil photo
COPY
Pour en savoir plus sur l'utilisation de l'appareil photo,
consultez le Guide d'utilisation de l'appareil photo.
Mode Sous-marin
Réglez l'appareil photo sur le mode S pour adoucir les
tons bleus et obtenir ainsi des couleurs plus naturelles
lors de vos prises de vue sous-marines.
Molet te modes
Tou che
Tou che
Tou che
Tou che
q
Tou che
p
Tou che
Positionnez la molette modes sur K.
1
Après avoir appuyé sur la touche m,
appuyez sur les touches op pour
2
choisir I.
Appuyez sur les touches qr pour choisir
, et appuyez ensuite sur la touche m.
S
3
10
o
r
m
Lorsque vous prenez des photos sous l'eau en mode •
E, G, M, B
la balance des blancs sur S (Sous-marin) à l'aide du
menu FUNC.
Vous pouvez définir la balance des blancs •
manuellement en appuyant sur une seule touche
si vous attribuez la fonction
balance des blancs) à la touche
procédure pour le réglage de la balance des blancs
aux conditions de prise.
ou D, il est recommandé de définir
(Personnaliser la
. Essayez cette
Utilisation de la molette de sélection
L'utilisation de la molette de sélection avec le boîtier
étanche est légèrement différente de celle de
l'appareil photo.
Appuyez sur les touches •
la touche
.
en même temps que
qr
Page 60

Retrait de l'appareil photo Entretien du boîtier
COPY
Prenez soin d'effectuer les opérations suivantes après
chaque utilisation du boîtier étanche.
Séchez soigneusement le boîtier en
veillant à bien essuyer toute l'eau.
1
Éliminez les saletés, le sable, les cheveux et autres •
corps étrangers du boîtier et lavez-le à l'eau
courante afin de faire disparaître tous les dépôts
de sel.
Ouvrez le boîtier et retirez l'appareil photo.
2
Fermez le boîtier.
Ne lavez pas l'intérieur du boîtier étanche avec •
1
de l'eau. Essuyez-le avec un chiffon doux et sec.
Rincez soigneusement le boîtier avec de
l'eau propre, puis essuyez-le complètement
2
avec un chiffon doux et sec.
Si vous avez utilisé le boîtier dans l'océan, •
plongez-le dans de l'eau propre pendant plusieurs
heures afin d'éliminer tous les dépôts de sel.
11
Page 61

Caractéristiques
COPY
Capacité
d'étanchéité
à l'eau :
Étanchéité : Joint (joint torique de ser tissage)
Matériau du corps : Polycarbonate
Températures de fonctionnement de l'appareil photo :
Dimensions
extérieures :
Volume : Environ 630 cm
Poids : Environ 385 g (13,6 onces)
Nombre de poids vendus séparément pour ce boîtier
étanche (WW-DC1) et recommandés pour le montage :
*Avec plaque de diffusion
Toutes les données indiquées ici reposent sur les normes •
d'essai de Canon.
Les carac téristiques techniques et l'aspect sont susceptibles •
d'être modifiés sans préavis.
Conforme à la protection IEC/JIS
de classe équivalente à « IPX8 ».
Pour utiliser à une profondeur de
40 mètres (130 pieds) maximum.
0 à 40 °C (32 à 104 °F)
140,6 x 91,5 x 85,1 mm
(5,54 x 3,60 x 3,35 po)
(hors parties saillantes)
(boîtier étanche uniquement*)
3
(38,4 po3)
Dans l'eau de mer : 2 poids
Dans l'eau douce : 1 poids
12
Page 62

Italiano
COPY
Leggere con attenzione la presente guida prima •
di
utilizzare la custodia subacquea.
Conservare la guida in un luogo sicuro per riferimento •
futuro.
Informazioni preliminari
Prima di utilizzare la custodia subacquea, assicurarsi
che funzioni correttamente e che non vi siano infiltrazioni
d'acqua. A tale scopo, chiudere la custodia prima di inserirvi
la fotocamera e tenerla sott'acqua a una profondità di circa
15 centimetri per circa tre minuti. In caso di infiltrazioni di
acqua, contattare l'Help Desk del Supporto Clienti Canon.
Contenuto della confezione
Controllare che la confezione della custodia subacquea
contenga gli elementi riportati di seguito. In caso di
elementi mancanti, contattare il rivenditore presso
il quale è stata acquistata la custodia subacquea.
Custodia subacquea
Cinghia tracolla
Cinghietta da polso
Diffusore
Grasso al silicone per la guarnizione impermeabile
Guida dell'utente (la presente guida)
Accessori venduti separatamente
Peso per custodia subacquea Canon WW- DC1•
Quando si scattano fotografie subacquee, questi pesi
impediscono alla custodia subacquea di galleggiare.
Consultare la sezione Specifiche tecniche (pag. 12) per
informazioni relative al numero di pesi consigliato da
utilizzare. Per informazioni relative ai metodi di fissaggio
dei pesi, consultare la Guida dell'utente fornita con i pesi.
Dichiarazione di non responsabilità
È vietata la riproduzione, la trasmissione o la •
memorizzazione in un sistema di ricerca delle
informazioni, anche parziali, contenute in questa
guida senza la previa autorizzazione di Canon.
Canon si riserva il diritto di modificare in qualsiasi •
momento e senza preavviso il contenuto del presente
documento.
Le figure e le schermate riportate in questa guida •
potrebbero risultare leggermente diverse da quelle
effettivamente visualizzate nell'apparecchiatura.
Canon Inc., le sue consociate e affiliate e i distributori •
della custodia subacquea non sono responsabili per
eventuali danni dovuti a un utilizzo errato della custodia.
Leggere attentamente anche la • Guida dell'utente della
fotocamera fornita con la fotocamera.
• : particolari a cui prestare attenzione.
• : suggerimenti per ottenere il massimo dalla
custodia subacquea.
I vari tipi di schede di memoria che possono essere •
utilizzati con la fotocamera vengono denominati
collettivamente schede di memoria.
1
Page 63

Precauzioni per la sicurezza
COPY
Prima di utilizzare la custodia subacquea, leggere •
attentamente le precauzioni per la sicurezza riportate
di seguito. Accertarsi sempre che la custodia subacquea
sia utilizzata in modo corretto.
Le precauzioni per la sicurezza contenute nelle seguenti •
pagine vengono fornite per evitare incidenti alle persone
o danni all'apparecchiatura.
Avvertenza
Attenzione
Attenzione
Dopo avere utilizzato la custodia subacquea, assicurarsi
di rimuovere la fotocamera.
Se la fotocamera viene lasciata all'interno della custodia
subacquea e viene posizionata in un luogo esposto alla
luce solare o in altri luoghi soggetti ad alte temperature,
si potrebbero verificare incendi o esplosioni della custodia.
Non utilizzare la custodia subacquea come salvagente
personale.
2
Indica la possibilità di lesioni gravi
o di morte.
Indica la possibilità di lesioni.
Indica la possibilità di danni alla custodia
subacquea e alla fotocamera.
Avvertenza
Non utilizzare cinghia tracolla da
collo sott'acqua.
Prima di utilizzare la custodia
subacquea sott'acqua, rimuovere la
cinghia tracolla e collegare la cinghietta
da polso. La cinghia tracolla utilizzata
in queste condizioni potrebbe causare
soffocamento o altre lesioni.
Attenzione
In caso di infiltrazioni della custodia subacquea,
spegnere immediatamente la fotocamera.
Le fuoriuscite potrebbero provocare incendi o scosse
elettriche. Asciugare accuratamente l'interno della custodia
subacquea e la fotocamera, quindi contattare l'Help Desk
del Supporto Clienti Canon.
Attenzione
Prestare attenzione alla formazione di condensa.
Il repentino spostamento della custodia subacquea da un
luogo caldo a uno freddo può causare la formazione di
condensa (gocce d'acqua) sulle superfici interne. In questo
caso, interrompere l'utilizzo della fotocamera poiché la
condensa potrebbe causare malfunzionamenti. Rimuovere
la fotocamera, quindi asciugare completamente la condensa
dalla custodia e dalla fotocamera con un panno morbido
e asciutto.
Page 64

Non inserire la fotocamera quando è collegata la •
COPY
cinghia.
Non premere i pulsanti né la leva esercitando una forza •
eccessiva quando si utilizza la custodia sott'acqua.
Non spruzzare acqua del rubinetto sulla guarnizione •
impermeabile.
Non danneggiare la guarnizione impermeabile •
e accertarsi che non si accumuli sporcizia fra la
guarnizione impermeabile e la custodia.
Non smontare né modificare la custodia subacquea.•
Tali azioni potrebbero causare infiltrazioni.
Non utilizzare né conservare la
custodia subacquea nei seguenti
luoghi.
Profondità superiori a 40 metri.•
Luoghi con temperatura •
superiore a 40 °C .
Non posizionare né conservare la
custodia subacquea nei seguenti
luoghi.
Luoghi esposti a luce del sole •
intensa.
Ambienti umidi o polverosi.•
In prossimità di sostanze quali •
naftalina o insetticidi.
Non lasciare cadere né lanciare la custodia subacquea.
Tali azioni potrebbero deformare la custodia e causare
malfunzionamenti.
Utilizzare solamente il grasso al silicone fornito.
L'utilizzo di altri prodotti impermeabilizzanti potrebbe
diminuire la resistenza della custodia subacquea.
Guarnizione impermeabile
Eventuali residui presenti sulla guarnizione impermeabile •
potrebbero causare infiltrazioni d'acqua. Anche un solo
capello o un granello di sabbia presente sulla guarnizione
potrebbe essere causa di infiltrazioni.
Se la guarnizione impermeabile risulta danneggiata •
o si notano scalfitture, interrompere immediatamente
l'utilizzo della custodia e contattare l'Help Desk del
Supporto Clienti Canon.
Riporre la custodia subacquea lasciandola aperta per evitare •
che la guarnizione impermeabile si deformi e per mantenere
la sua impermeabilità.
Quando non viene utilizzata per un lungo periodo di •
tempo, assicurarsi che la guarnizione impermeabile sia
protetta da polvere o da scalfitture.
Per garantire l'impermeabilità della custodia, sostituire
la guarnizione una volta all'anno.
Per informazioni sulle guarnizioni sostitutive, •
contattare l'Help Desk del Supporto Clienti Canon.
3
Page 65

Guida ai componenti
COPY
Attacchi per le cinghie
Pulsante dell'otturatore
Leva dello zoom
Pulsante ON/OFF
Selet tore di modalità
Interruttore di rilascio blocco
Fermo
Finestra dell'obiettivo
Attacco del treppiede
Ghiera di controllo
Diffusore
4
Ghiera di selezione
Pulsante (Scelta rapida)/c (Stampa diretta)
Pulsante
Pulsante
Pulsante
Pulsante
Pulsante
Pulsante
Pulsante l (Visualizzazione)
Pulsante
(Riproduzione)
1
b
(Compensazione dell'esposizione)/d (Salta)/
(Flash)/
h
r
FUNC./ SET (Funzione/Imposta)
m
e
(Macro)/f (Focus Manuale)/
Q
(Autoscatto)/
n
(Cancella singola immagine)/
a
q
o
p
Page 66

Operazioni preliminari
COPY
Cinghietta da polso Cinghia tracolla
Collegare la cinghia e regolarne la lunghezza.
1
Prima di utilizzare la custodia sott'acqua, rimuovere la cinghia tracolla e collegare la cinghietta da polso. •
La cinghia tracolla utilizzata in queste condizioni potrebbe causare soffocamento o altre lesioni.
Non collegare cinghie diverse da quelle fornite con la custodia subacquea.•
5
Page 67

Diffusore
COPY
Collegare il diffusore.
2
Non graffiare la superficie del diffusore, poiché •
ciò potrebbe impedire alla luce del flash di
diffondersi correttamente.
L'efficacia del diffusore potrebbe risultare •
comunque ridotta se il soggetto è troppo
vicino alla fotocamera.
6
Rimozione del
diffusore
Sollevare e rimuovere
il diffusore.
Page 68

Guarnizione impermeabile
COPY
Rilasciare il fermo per aprire la custodia.
3
Quando si utilizzano prodotti anticondensa •
disponibili in commercio, applicare la soluzione
anticondensa solo all'interno della superficie
dell'obiettivo, usando un panno morbido e
asciutto. Se la soluzione anticondensa viene
a contatto di una superficie diversa da quella
dell'obiettivo, rimuoverla immediatamente
usando un panno morbido e asciutto in quanto
potrebbe essere causa di deterioramento della
custodia subacquea.
Applicare grasso al silicone alla
guarnizione impermeabile.
4
Rimuovere la guarnizione impermeabile come
1 .
mostrato.
Non inserirvi le unghie né estrarla con forza.•
Rimuovere eventuali residui presenti nella
2 .
scanalatura di avvitamento con un batuffolo
di cotone.
Applicare una goccia di grasso sulla punta delle
3 .
dita e spalmarla uniformemente su tutta la
superficie della guarnizione impermeabile.
Riposizionare la guarnizione impermeabile nella
4 .
scanalatura di avvitamento della guarnizione.
Prestare attenzione a non piegarla.•
7
Page 69

Preparazione della fotocamera
COPY
Batteria
Scheda di memoria
Rimuovere la cinghia e assicurarsi che
la batteria e la scheda di memoria siano
5
inserite nella fotocamera.
Per informazioni sulla scelta della corretta •
batteria e sull'inserimento della batteria
e della scheda di memoria, consultare la
Guida dell'utente della fotocamera.
Utilizzare una batteria sufficientemente carica.•
Controllare la capacità stimata della scheda •
di memoria e assicurarsi che vi sia spazio a
8
sufficienza per memorizzare le immagini.
Cinghia
Inserimento della fotocamera nella
custodia
Inserire la fotocamera nella custodia
subacquea.
6
Scegliere un luogo al riparo dall'aria salmastra. •
Pulire delicatamente la finestra dell'obiettivo con •
un panno asciutto.
Page 70

Chiudere la custodia.
COPY
7
Assicurarsi che la guarnizione impermeabile •
sia priva di residui.
Assicurarsi che il fermo sia correttamente •
chiuso.
9
Page 71

Utilizzo della fotocamera
COPY
Per istruzioni sull'utilizzo della fotocamera, consultare
la Guida dell'utente della fotocamera.
Modalità Subacqueo
Impostando la fotocamera sulla modalità S, le tonalità
di blu risulteranno attenuate e sarà possibile ottenere
colori più naturali durante le riprese subacquee.
Ghiera di selezione
Pulsante
Pulsante
Pulsante
Pulsante
Pulsante
Impostare la ghiera di selezione su K.
Pulsante
q
p
1
10
Dopo avere premuto il pulsante m,
premere i pulsanti
2
Premere i pulsanti qr per scegliere S,
quindi premere il pulsante
3
per scegliere I.
op
m
Quando si ef fettuano scatti subacquei in modalità •
E, G, M, B
del bianco su S (Subacqueo) nel menu FUNC.
È possibile impostare manualmente il bilanciamento •
del bianco premendo un singolo pulsante se si assegna
la funzione di personalizzazione del bilanciamento del
bianco
per regolare il bilanciamento del bianco in base alle
condizioni di scatto.
o D, impostare il bilanciamento
al pulsante . Adottare questa soluzione
Utilizzo della ghiera di controllo
L'utilizzo della ghiera di controllo con la custodia
subacquea differisce leggermente da quello della
o
r
m
.
fotocamera.
Premere i pulsanti •
contemporaneamente il pulsante .
e premere
qr
Page 72

Rimozione della fotocamera Manutenzione
COPY
Dopo avere utilizzato la custodia subacquea, eseguire
le seguenti operazioni.
Asciugare completamente la custodia,
rimuovendo tutta l'acqua.
1
Rimuovere la polvere, la sabbia, i capelli o altro •
tipo di sporcizia dalla custodia e lavarla con
acqua corrente pulita per eliminare eventuali
depositi di sale.
Aprire la custodia e rimuovere la
fotocamera.
2
Chiudere la custodia.
Non lavare la parte interna della custodia subacquea •
1
con acqua. Pulirla con un panno morbido e asciutto.
Lavare accuratamente la custodia con acqua
dolce, quindi asciugarla completamente con
2
un panno morbido e asciutto.
Dopo avere utilizzato la custodia in mare, •
immergerla in acqua dolce per diverse ore
per rimuovere eventuali depositi di sale.
11
Page 73

Specifiche tecniche
COPY
Proprietà di resistenza
all'acqua:
Impermeabilizzazione: Guarnizione (O-ring crimpato)
Materiali del corpo: Policarbonato
Temperature di funzionamento della fotocamera:
Dimensioni: 140,6 mm x 91,5 mm x 85,1 mm
Volume: Circa 630 cm
Peso: Circa 385 g
Numero consigliato di pesi per custodia subacquea
(WW-DC1) venduti separatamente:
*Incluso il diffusore
Tutti i dati riportati si basano sugli standard di test •
di Canon.
Le specifiche e l'aspetto del prodotto sono soggetti •
a modifiche senza preavviso.
Conforme alla classe di protezione
IEC/JIS equivalente a "IPX8"
Da utilizzarsi entro il limite di profondità
di 40 m
Da 0 °C a 40 °C
(escluse le parti sporgenti)
(solo custodia subacquea*)
In acqua di mare: 2 pesi
In acqua dolce: 1 peso
3
12
Page 74

Русский
COPY
Перед использованием водонепроницаемого футляра •
обязательно ознакомьтесь с данным Руководством.
Уберите это Руководство в надежное место для будущего •
использования.
Проверка комплектности
Проверьте комплект поставки водонепроницаемого футляра.
При отсутствии каких-либо принадлежностей обращайтесь
по месту приобретения водонепроницаемого футляра.
Водонепроницаемый футляр
Ремень
Наручный ремень
Рассеивающая пластина
Силиконовая смазка для водонепроницаемой прокладки
Руководство пользователя (данное Руководство)
Отдельно продаваемые аксессуары
Груз для водонепроницаемого футляра Canon WW-DC1•
При съемке под водой эти грузы не дают водонепроницаемому
футляру всплывать. Рекомендуемое количество устанавливаемых грузов см. в разделе «Технические характеристики» (стр. 12).
Сведения о порядке установки грузов см. в руководстве поль зователя, входящем в комплект поставки грузов.
Прочитайте это в первую очередь
Перед использованием водонепроницаемого футляра убедитесь,
что он правильно работает и не течет. Для проверки на течь
закройте футляр, не устанавливая в него камеру, и подержите
его под водой на глубине приблизительно 15 см около 3 мин.
В случае протечки обратитесь в службу поддержки клиентов
компании Canon.
Ограничение ответственности
Запрещается перепечатка, передача или хранение в поисковой •
системе любой части настоящего Руководства без разрешения
компании Canon.
Компания Canon сохраняет за собой право в любой момент •
вносить изменения в содержимое настоящего Руководства
без предварительного уведомления.
Приведенные в данном Руководстве иллюстрации и примеры •
экранов могут несколько отличаться от фактического
оборудования.
Компания Canon Inc., ее филиалы и дочерние компании, •
а также дистрибьюторы водонепроницаемого футляра
не несут ответственности за любой ущерб, вызванный
неправильным использованием этого футляра.
Также внимательно ознакомьтесь с • Руководством пользователя
камеры, прилагаемым к камере.
• : Моменты, на которые необходимо обратить внимание.
• : Рекомендации по наиболее эффективному
использованию водонепроницаемого футляра.
В данном • Руководстве для карт памяти различных типов,
которые могут использоваться с камерой, используется
собирательный термин «карты памяти».
1
Page 75

Меры предосторожности
COPY
Перед использованием водонепроницаемого футляра •
обяза тельно прочтите приведенные ниже правила техники
безопасности. Строго следите за соблюдением правил
надлежащего обращения с водонепроницаемым футляром.
Рассматриваемые на последующих страницах меры предо сто-•
рожности позволят исключить нанесение травм Вам и другим
людям, а также повреждение оборудования.
Предостережение
Предупреждение
Предупреждение
После использования водонепроницаемого футляра обязательно
извл екайте из н его камеру.
Если оставить камеру в водонепроницаемом футляре под прямыми
солнечными лучами или в других местах с высокой температурой,
это может привести к возгоранию или взрыву футляра.
Не используйте водонепроницаемый футляр в качестве личного
спаса тельного средства (например, вместо спасательного
жилета).
2
Указывает на возможность серьезной
травмы, вплоть до смертельного исхода.
Указывает на возможность травмы.
Указывает на возможность повреждения
водонепроницаемого футляра и камеры.
Предостережение
Не исп ользуйт е надеваем ый на шею
ремень под водой.
Перед использованием водонепроницаемого футляра под водой снимите
надеваемый на шею ремень и закрепите
наручный ремень. При использовании
надеваемого на шею ремня он может
обмотаться вокруг шеи и вызвать удушение
или привести к другим травмам.
Если водонепроницаемый футляр начал протекать, немедленно
выключите камеру.
Протечки могут привести к возгоранию или поражению электрическим током. Тщательно досуха протрите камеру и внутренние
поверхности водонепроницаемого футляра, затем обратитесь
в службу поддержки клиентов компании Canon.
Предупреждение
Предупреждение
Избегайте конденсации.
Быстрое перемещение водонепроницаемого футляра из зоны
высокой температуры в зону низкой температуры и наоборот может
привести к образованию конденсата (капель воды) на внутренних
поверхностях. В таком случае прекратите пользоваться камерой,
так как конденсация может привести к неполадкам. Извлеките
камеру и досуха протрите футляр и камеру мягкой сухой тканью.
Page 76

Не устанавливайте кам• еру с закрепленным на ней ремнем.
COPY
При ис пользов ании футл яра под вод ой не нажи майте на •
кнопки или рычаги с излишним усилием.
Не брызгайте на водонепроницаемую прокладку водой •
из-под крана.
Не допускайте повреждения водонепроницаемой прокладки, •
а также накопления грязи между водонепрони ца е мой
прокладкой и корпусом.
Не разб ирайте во донепро ницаемы й футляр и н е вносите •
изменения в его конструкцию.
Это может привести к протечкам.
Не используйте и не храните водо непроница емый футл яр в следую щих мест ах:
на глуб ине свыш е 40 м;•
в мест ах, в котор ых темпер атура •
прев ышает 40 °C.
Не ост авляйте и н е храните в одо неп роница емый футл яр в следую щих мест ах:
под яркими солнечными лучами;•
во вла жных и пыл ьных мест ах;•
рядо м с такими ве ществам и, как •
нафталин или инсектициды.
Не допускайте падения водонепроницаемого футляра
и не бросайте его.
Указанные выше действия могут привести к деформации футляра
и неполадкам в его работе.
Пользуйтесь только прилагаемой силиконовой смазкой.
При использовании других гидроизоляционных материалов
характеристики водонепроницаемого футляра могут ухудшиться.
Водонепроницаемая прокладка
При попадании грязи на водонепроницаемую прокладку возможно •
возникновение течи. Течь возможна при попадании на прокладку
единственного волоса или мелкой крупинки песка.
Если Вы заметите, что водонепроницаемая прокладка повреж дена •
или треснула, немедленно прекратите пользоваться футляром
и обратитесь в службу поддержки клиентов компании Canon.
При хранении водонепроницаемого футляра оставляйте его •
открытым во избежание деформации водонепроницаемой
прокладки и сохранения ее способности не пропускать воду.
При хранении следите, чтобы на водонепроницаемую прокладку •
не попадала пыль и оберегайте прокладку от царапин.
Для поддержания водонепроницаемости футляра необходимо
заменять прокладку один раз в год.
За запасными прокладками обращайтесь в службу •
поддержки клиентов компании Canon.
3
Page 77

COPY
Описание компонентов
Крепления ремня
Кнопка спуска затвора
Рычаг зумирования
Кнопка ON/OFF
Кнопка выбора функции кольца
Рычаг фиксатора
Защелка
Окно для объектива
Штативное гнездо
Кольцо управления
Рассеивающая пластина
4
Диск установки режима
Кнопка (Быстрый вызов)/ c (Прямая печать)
Кнопка 1 (Воспроизведение)
Кнопка b (Компенсация экспозиции)/ d (Переход)/
Кнопка h (Вспышка)/
Кнопка m FUNC./SET (Функция/установка)
Кнопка e (Макро)/f (Ручная фокусировка)/
Кнопка Q (Таймер)/a (Стирание одного изображения)/
Кнопка l (Индикация)
Кнопка
n
r
q
o
p
Page 78

COPY
Подготовка
Наручный ремень Ремень
Закрепите ремень и настройте его длину.
1
Перед использованием футляра под водой снимите надеваемый на шею ремень и закрепите наручный ремень. При исполь-•
зовании надеваемого на шею ремня он может обмотаться вокруг шеи и вызвать удушение или привести к другим травмам.
Не закрепляйте никаких других ремней, кроме входящих в комплект водонепроницаемого футляра.•
5
Page 79

Рассеивающая
COPY
пластина
Установите рассеивающую пластину.
2
Оберегайте поверхность рассеивающей пластины от •
царапин, так как они могут привести к неправильному
рассеиванию света вспышки.
Если объект расположен слишком близко к камере, •
эффективность рассеивающей пластины может
снизиться.
6
Снятие рассеивающей
пластины
Поднимите рассеивающую
пластину и снимите ее.
Page 80

Водонепроницаемая прокладка
COPY
Для открытия футляра освободите защелку.
3
При использовании имеющихся в продаже средств •
против конденсации наносите противо кон ден сатный раствор только на внутреннюю поверх ность
окна для объектива с помощью мягкой сухой ткани.
При попадании противоконденсатного раствора
на любую другую поверхность, кроме внутренней
стороны окна для объектива, сразу же сотрите его
мягкой сухой тканью, так как он может повредить
водонепроницаемый футляр.
Нанесите силиконовую смазку
на водонепроницаемую прокладку.
4
Снимите водонепрони
1 .
показано на рисунке.
Не прищипывайте ее ногтями и не тяните •
ее с силой.
Ватной палочкой удалите из монтажной канавки
2 .
всю грязь.
Нанесите небольшое количество (каплю) смазки
3 .
на кончик пальца и равномерно покройте смазкой
всю поверхность водонепроницаемой прокладки.
Установите водонепроницаемую прокладку обратно
4 .
в монтажную канавку.
Следите, чтобы прокла• дка не перекручивалась.
цаемую прокладку, как
7
Page 81

Подготовка камеры
COPY
Карта памяти
Снимите ремень и убедитесь, что в кам еру
установлены карта памяти и аккумулятор.
5
Сведения об используемом аккумуляторе, а также •
о порядке установки аккумулятора и карты памяти
см. в Руководстве пользователя камеры.
Используйте достаточно заряженный аккумулятор.•
Проверьте свободную емкость карты памяти и •
убедитесь, что на ней достаточно места для записи
изображений.
8
Ремень
Аккумулятор
Установка камеры в футляр
Установите камеру в водонепроницаемый футляр.
6
Выберите место с низкой вла жностью, куда не попадает •
соленый морской воздух.
Обеспечьте чистоту окна для объектива, аккуратно •
протерев его сухой тканью.
Page 82

Закройте футляр.
COPY
7
Убедитесь в отсутствии грязи на водонепрони-•
цаемой прокладке.
Убедитесь, что защелка надежно закрылась.•
9
Page 83

COPY
Использование камеры
Инструкции по работе с камерой см. в Руководстве
пользователя камеры.
Подводный режим
При установке в камере режима S уменьшается интенсивность синих тонов, позволяя получать более естественные цвета при подводной съемке.
Диск установки
режима
Кнопка
Кнопка
Кнопка
Кнопка
Кнопка
Поверните диск установки режима
в положение K.
1
Нажав кнопку m, кнопками op выберите
2
значок I.
Кнопками qr выберите значок S, затем
нажмите кнопку m.
3
10
Кнопка
q
p
o
r
m
При съемке под водой в режиме •
D
необходимо с помощью меню FUNC. установить для
баланса белого режим S (Под водой).
Баланс белого можно устанавливать вручную нажатием •
одной кнопки, если назначить функцию
вательский баланс белого) кнопке
функцию для настройки баланса белого в соответствии
с условиями съемки.
E, G, M, B
(Пользо-
. Попробуйте эту
или
Использование диска управления
Использование диска управления с водонепроницаемым
футляром немного отличается от использования этого
диска на самой камере.
Нажимайте кнопки •
при нажатой кнопке
qr
.
Page 84

COPY
Извлечение камеры
Тщательно просушите фу тляр, стерев с него
всю воду.
1
Удалите с футляра всю грязь, песок, волосы •
или другой мусор, затем промойте его чистой
проточной водой для удаления остатков соли.
Откройте футляр и изв леките кам еру.
2
Уход и обслуживание
После использования водонепроницаемого футляра
обязательно выполните следующие операции.
Закройте футляр.
1
Не мойте внутренние поверхности водонепрони-•
цае мого футляра водой. Протрите их мягкой сухой
тканью.
Тщательно вымойте футляр чистой водой, затем
досуха протрите его мягкой су хой тканью.
2
После использования футляра в океане опустите •
его в чистую воду на несколько часов, чтобы удалить
все остатки соли.
11
Page 85

COPY
Технические характеристики
Степень водонепроницаемости:
Гидроизоляция: Прокладка (обжимная кольцевая прокладка)
Материалы корпуса: Поликарбонат
Диапазон рабочих температур камеры:
Габариты: 140,6 × 91,5 × 85,1 мм
Объем: Прибл. 630 см
Вес: Прибл. 385 г
Рекомендуемое количество грузов д ля водонепроницаемого
футляра (WW-DC1):
*Включая рассеивающую пластину
Все указанные здесь данные основаны на стандартах •
тестирования Canon.
Технические характеристики и внешний вид изделия могут •
быть изменены без предварительного уведомления.
Удовлетворяет требованиям, эквивалентным
уровню защиты «IPX8» стандарта IEC/JIS
Для использования на глубине до 40 м
0 – 40 °C
(исключая выступающие части)
(только водонепроницаемый футляр*)
В морской воде: 2 груза
В пресной воде: 1 груз
3
12
Page 86

中文
COPY
在使用本产品之前,请务必先仔细阅读本使用说明书。•
请务必妥善保管好本书,以便日后能随时查阅。请在•
充分理解内容 的基 础上, 正确 使用。
检查包装内物品
请检查您的防水套包装中是否包含下列物件。如有任何
物件缺失,请与您购买防水套的零售商联系。
□ 防水套
□ 背带
□ 腕带
□ 闪光扩散 板
□ 防水封条用硅润滑脂
□ 使用者指南 ( 本指南 )
选购附件
佳能防水罩配重器 W W-DC1•
在水下拍摄时,配重器可防止防水套漂 浮。
有关建议安装的配重器数目,请参阅主要规格 ( 第 12 页 )。
有关安装方法的详细说明,请参阅配重器的使 用说明书。
请先阅读本文
使用前,请务必检查本防水套是 否能正常操作或有无漏
水。请先不要放入相机,关闭防水套,然后将其浸入水
深约 15 c m 的水中 3 分钟左右,以检查其是否漏水。如
果漏水,请与佳能热线中心联系。
免责声明
禁止擅自转 载部分或 全部内容。•
佳能公司保留权利随时变更本手册所提及的硬 件及软•
件规格而无需事先声明。
插图及图例可能会与实际情况有所不同。•
由于错误使用本防水套而导致的任何损失,佳能公司•
及其子公司、分支 机构和经销 商概 不负责。
同时请 仔细阅读 相机附带的使 用说明书。•
• :注 意 事 项 。
• :深 入 提 示 。
相机可使用多种存储卡。本指南通称这些卡为“存储卡”。•
1
Page 87

安全注意事项
COPY
使用防水套前,请务必阅读以下安全注意事项。请务•
必保证正确使用防水套。
这里指出的安全注意事项旨在防止您自己及他人受到•
伤害,或防止器材受到损坏。
警告 表示可能造成严重的人身伤害或死亡。
注意 表 示可 能造成 人身 伤害。
注意 表 示可能造成器 材损坏。
警告
用完防水套后,请务必取出相机。
将装有相机的防水套放在阳光直射的地方或高温处,可
能会导致起火或使防水套破裂。
请勿将防水套当作个人漂浮装置 ( 救生工具 ) 使用。
在水中使用前,请务必解下背带
并系 上腕 带。
否则会有背带缠绕引起窒息或其
他伤害的危险。
2
注意
如果防水套漏水,请立即关闭电源。
否则可能会导致着火或触电。请彻底擦干防水套内部和
相机, 并迅速与佳能热线中心联系。
注意
结露现象。
短时间内在温差很大的场所间移动可能会使防水套的内表面
出现结露 ( 小水珠 ),导致故障。如果发生结露现象,请
从防水套中取出相机并且用柔软的干布擦去防水套和相机
上的水珠,等水气完全蒸发以后再使用。
请勿将系有腕带的相机装入防水套。•
在水中时,请勿大力按压防水套的按钮或杆。•
清洗时,请勿用过强的自来水流冲洗防水封条。•
请勿损坏防水封条,或者让灰尘等污物积聚在防水封•
条和防水套之间。
请勿拆卸或改装防水套。•
上述 行为可 能会导致防水套 漏水 。
Page 88

请勿在以下场所使用、放置或存放
COPY
防水套。
水深超过 40 m 的水中。•
气温或水温超过 40 ℃ 的地 方。•
请勿在以下场所放置或存放防水套。
强烈阳光照射的地方。•
潮湿或多尘的区域。•
放置有卫 生 球等 防虫 剂的地 方。•
请勿投掷或摔落防水套。
上述行为可能会导致防水套变形,造成故障。
请勿使用附带的硅润滑脂之外的防水产品。
否则可能会降低防水套的防水强 度。
防水封条
防水封条上附着灰尘和污物等可能会导致漏水。封条•
上的一丝头发或一粒细沙也可能造成漏水。
一旦发现防水封条损坏或破裂,请立即停止使用并与•
佳能热线中心联系。
为防止防水封条变形,维持其防水性能,请将防水套•
打开存放。
存放防水封条时请注意不要沾上灰尘或擦伤防水封•
条。
为保证防水套的防水性能,建议每年更换一次防水
封条。
更换 时, 请与 佳能 热线 中心联系 。•
3
Page 89

部件指南
COPY
背带 / 腕带扣
快门按钮
变焦杆
电源按钮
控制环功能切换按钮
解锁开关
扣环
镜头窗
三脚架插孔
控制环
闪光扩散板
4
模式转盘
(
快捷 )/c( 直接打印 ) 按钮
( 播放 ) 按钮
1
( 曝光补偿 )/d( 跳转 )/o按钮
b
( 闪光灯 )/r按钮
h
FUNC./SET( 功能 / 设置 )按钮
m
( 微距 )/f( 手动对焦 )/q按钮
e
Q
( 自拍机 )/a ( 删除单张图像 )/p按钮
( 显示 ) 按钮
l
( 菜单 ) 按钮
n
Page 90

准备
COPY
腕带 背带
安装腕带 / 背带并调节其长度。
1
在水中使用前,请务必解下背带并系上腕带。否则会有背带缠绕引起窒息或其他伤害的危险。•
请只安装防水套附带的腕带 / 背带。•
5
Page 91

闪光扩散板
COPY
安装闪光扩散板。
2
请勿刮擦闪光扩散板表面。否则可能会阻碍闪光•
灯光线均匀扩散。
如果被摄体过于接近相机,则闪光扩散板的作用•
可能会削弱。
6
取下闪光扩散板
抬起并取下闪光扩散
板。
Page 92

防水封条
COPY
解开扣环以打开防水套。
3
使用市面销售的防结露产品时,只能用于镜•
头窗的内表面。 请使用软布等 涂 抹防结 露 溶
液。如果防结露溶液沾在镜头窗内表面以外
的地方,请立即用柔软的干布将其擦去,否
则会损坏防水套。
将硅润滑脂涂在防水封条上。
4
1.
如图所示,将防水封条取出。
请勿用指甲挑起,或强行拉伸防水封条。•
2.
请使用棉签等擦除安装凹槽内的灰尘或污
物。
3.
用手指 沾上少许 ( 一小滴 ) 润滑脂,然后将
润滑脂均匀地涂满整个防水封条表面。
4.
将防水封条装回安装凹槽内。
请注意不要扭曲。•
7
Page 93

8
COPY
准备相机
电池
存储卡
请检查是否已取下相机的腕带,并已放入电池
和存储卡。
5
请参阅相机附带的相机使用说明书,以确定•
相机所使用的电池类型及电池和存储卡的安
装方式。
请使用已充足电的电池。•
请检查存储卡上是否有足够的储存空间来记•
录图像。
将相机放入防水套
相机带
将相机 放入防水套。
6
装入相机时请避开海上含盐分的空气。•
镜头窗脏污时,请使用柔软的干布轻轻擦除。•
Page 94

关闭防水 套。
COPY
7
请确保防水封条上没有附着灰尘或污物等。•
请检查扣环是否锁紧。•
9
Page 95

使用相机
COPY
有关相机的操作方法,请参阅相机附带的相机使用说
明书。
关于潜水模式
潜 水拍摄 时, 设 置 为S模式,可消除偏蓝色调,拍
摄具有自然色调 的图像 。
模式转盘
o
r
按钮
q
将模式转盘设置为K。
按钮
p
m
1
按m按钮后,按
按钮选择[I]。
op
2
按q或r按钮选择 [S],然后按m按钮。
3
10
按钮
按钮
按钮
按钮
在水中使用 [•
时, 建 议 在
[S]( 水下 )。
将 [•
按钮即可获取白平衡数据。推荐在需要根据
场景调整白平衡时使用此功能。
]、[G]、[M]、[B]、[D] 模式拍摄
E
菜单 中将白平 衡设置为
Â
]( 自定义白平衡 ) 注册至 按钮 后 ,按下
使用控制环
控制环的使用方法与在相机机身上的操作方法不同。
按• 按钮,同时按q或r按钮。
Page 96

取出相机 保养方法
COPY
防水套使 用后请务必进行保养。
请将沾在防水套上的水滴全部擦干。
1
请将沾在防水套上的污物、沙尘、头发等异•
物去掉,并用清洁、流动的自来水冲掉盐渍。
打开防水套,取出相机。
2
关闭防水 套。
1
用柔软的干布擦拭防水套内部,请勿用水洗•
涤。
用清洁、流动的自来水仔细清洗,然后用柔软
的干布擦干防水套。
2
在海水中使用后,请将防水套浸 入自来水中•
几小时,泡掉盐渍。
11
Page 97

规格
COPY
防水性能 :
防水结构 : 防水封条 ( 压装式 O 形密封环 )
主体材质 : 聚碳酸酯
相机的操作温度 :
尺寸 : 140.6×91.5×85.1 mm
体积 : 约 630 cm
重量 : 约 385 g
配重器 WW-DC1( 选购 ) 建议安装数目 :
* 包括闪光扩散 板
所有数据均基于佳能公司的测试结果。•
产品规 格及外观如有 变更 ,恕 不另行 通知。•
12
符合 IEC/JIS 防水保 护规格,相 当 于“ IPX8”,
适用于不超 过 40 m 的水深
0 ~ 40℃
( 不包括突出部分 )
3
( 仅防水套 *)
海水时 :2 个
淡水时 :1 个
Page 98

COPY
FOR P.R.C. ONLY
进 口 商 : 佳能 ( 中国 ) 有限公司
进口商地址 : 北京市东城区金宝街 89 号金宝大厦 15 层
邮编 100005
日本制造
初版 :2010.06
CDI-M464-010 XXXXXXXX © CANON INC. 2010 IMPRIMÉ AU JAPON
PRINTED IN JAPAN
 Loading...