


WP-DC27
COPY
キヤノンデジタルカメラ ウォータープルーフケース
ユーザーガイド
Canon Digital Camera Waterproof Case
User Guide
Wasserdichtes Gehäuse für Canon Digitalkamera
Benutzerhandbuch
Canon Funda impermeable p ar a cámara digital
Guía del usuario
Boîtier étanche pour appareils photo numériques Canon
Guide d’utilisation
Canon Custodia Impermeabile per Fotocamer a Digitale
Guida dell’utente
日本語
ENGLISH
DEUTSCH
ESPAÑOL
FRANÇAIS
ITALIANO
中文

●ご使用前に、必ず、正常に動作するか、
水漏れはないかを確認してください。水
漏れを確認するには、カメラを入れる前
に、ウォータープルーフケースを閉じ、
約 15cm の深さの水に 3 分間ほど沈め
てください。さらに、カメラを入れた状
態でも同様の確認をしてください。水漏
れが起きたときは、修理受付窓口へお持
ちください。
日本語
COPY
本書と保証書をよくお読みのうえ、正しくお
使いください。また、お読みになった後は、
大切に保管してください。
保証書は必ず「購入店・購入日」などの記入
を確かめて、購入店でお受け取りください。
お使いになる前に
●お買い上げいただきありがとうございま
す。キヤノンデジタルカメラにウォーター
プルーフケースを装着すると、雨天時や海
辺、スキ-場での撮影のほか、水深 40m
以内での水中撮影を楽しむことができま
す。
●取り扱い上の不注意により、万一、水漏れ
事故を起こした場合、内部機材(カメラや
バッテリー、メモリーカードなど)の損
傷、および記録内容や撮影に要した諸費用
などの補償はご容赦ください。また、本製
品の不具合により撮影されなかった場合の
付随的損害(撮影、撮影に要した諸費用お
よび得るべき利益の損失など)について
は、補償いたしかねます。
●カメラに付属のカメラユーザーガイドもよ
くお読みください。
1

付属品の確認
COPY
本製品のパッケージには、以下の製品が入っ
ています。万一、不足のものがありましたら、
お手数ですがお買い求めの販売店までご連絡
ください。
• ウォータープルーフケース WP-DC27
• ネックストラップ
• リストストラップ
• 拡散板
• 防水パッキン用シリコングリース
• ユーザーガイド(本書)
• 保証書
2
別売品
• キヤノンウォータープルーフケース
ウェイト WW-DC1
ウォータープルーフケースを使って水中で撮
影するとき、ケースが浮かばないようにする
ためのおもりです。
ウェイトの推奨装着枚数は、主な仕様
(P.18)でご確認ください。また、取り付け
方法は、ウェイトの取扱説明書をご覧くださ
い。
安全上のご注意
COPY
●ご使用の前にこの「安全上のご注意」をよ
くお読みのうえ、正しくお使いください。
●ここに示した注意事項は、製品を安全に正
しくお使いいただき、あなたや他の人々へ
の危害や損害を未然に防止するためのもの
です。その表示と意味は次のようになって
います。内容をよく理解してから本文をお
読みください。
この表示を無視して、誤った取り扱
いをすると、人が死亡または重傷を
警告
負う可能性が想定される内容です。
必ずお守りください。
この表示を無視して、誤った取り扱
いをすると、人が重傷を負う可能性
が想定される内容および物的損害の
注意
みの発生が想定される内容です。必
ずお守りください。
この表示は禁止内容を意味します。
禁止
警告
ウォータープルーフケースを使用したあとは、
必ずカメラを取り出してください。カメラを入
れたまま、直射日光のあたる場所や高温になる
ところに放置しておくと、発火や破裂などの原
因になることがあります。
ウォータープルーフケースを浮き袋代わりに使
用しないでください。
水中でのネックストラップのご使用は、ネック
ストラップが首に巻きつくなど、思わぬ怪我や
事故の恐れがありますので、水中では、ネック
ストラップを外して、リストストラップをお使
いください。
注意
水深 40m を超える水中では使用しないでくだ
さい。動作不良や故障、水漏れの原因となり
ます。
水中でウォータープルーフケースのボタンや
レバーを必要以上に強く押さないでください。
ケースがゆがんで、水漏れの原因となります。
洗浄する際、防水パッキンに水道水を勢いよ
く当てないでください。水漏れの原因となり
ます。
3

注意
COPY
分解や改造をしないでください。水漏れの原
因となります。
防水パッキンやその接触面に傷を付けたり、
異物(砂やゴミ、頭髪など)を挟み込まない
ようにしてください。水漏れの原因となりま
す。
40 ℃を超える温水の中では使用しないでくだ
さい。熱によって変形し、水漏れの原因とな
ります。
直射日光が当たる場所、熱器具の近く、夏季
の密閉した車内などの高温になる所に放置し
ないでください。熱によって変形し、水漏れ
の原因となります。直射日光の当たる所では、
タオルなどをかけて遮光してください。
取り扱い上のご注意
●ウォータープルーフケースを投げたり、落と
したりしないでください。
●付属のシリコングリース以外のオイル、薬品
などは、ウォータープルーフケースの強度を
損なうことがありますので、使用しないでく
4
ださい。付着した場合は、すぐに拭き取って
ください。
●海辺や海上でのウォータープルーフケースの
開閉は、できるだけ避けてください。カメラ
の取り付けやメモリーカード、バッテリーの
交換などは、湿気の少ない、潮風の当たらな
い場所で行ってください。
●高温での長時間のご使用は避けてください。
●寒冷地でお使いのときは、バッグに入れるな
どして極端に冷えないようにし、撮影すると
きのみ出して使用するようにしてください
(寒冷地では、通常よりもバッテリーの使用時
間が短くなります)。また、周囲温度0℃以下
でのご使用はおすすめできません。
●短い時間で寒暖の差が大きい場所へ移動する
と、ウォータープルーフケースの内部に水滴
がつくこと(結露)があります。結露は故障
の原因となりますので、ご注意ください。な
お、結露してしまったときは、ウォータープ
ルーフケースからカメラを取り出し、ウォー
タープルーフケースとカメラについた水滴を
乾いたやわらかい布で拭き取り、それぞれ数
時間放置してください。

水漏れについて
●防水パッキンをウォータープルーフケース
から取り外すときは、防水パッキンに傷を
付けないよう、指で外してください(図 1
参照)。爪を立てたり、先のとがったものや
金属などをお使いにならないでください。
●防水パッキンは、引っ張らないようにして
ください。防水パッキンを引っ張ると伸び
てしまい、ケースが閉まりにくくなり、水
漏れの原因になります。
●防水パッキンをウォータープルーフケース
に取り付けるときは、よじれたり、無理に
引っ張ったり、高さが違わないよう十分に
ご注意のうえ、正しく装着しているかを必
ずご確認ください。
防水パッキン
図1
COPY
万一、水漏れが確認された場合には、ただち
に撮影を中止してください。そのまま使用す
ると発火や感電の原因となりますので、絶対
に使用しないでください。ウォータープルー
フケース内部とカメラの水分を十分に拭き取
り、至急、お近くの修理受付窓口へお持ちく
ださい。
防水パッキンについて
●防水パッキンに異物(砂やゴミ、頭髪な
ど)が付いていると、水漏れの原因になり
ます。髪の毛一本、また微小な砂粒一個が
挟まっているだけで水漏れする場合があり
ます。
5

●シリコングリースを塗りすぎると、水漏れ
ウォータープルーフケースの防水性能を維
持するために、1 年に 1 度は下記の方法
で防水パッキンの交換をおすすめします。
• 修理受付窓口で、有償にて交換させてい
ただきます。
• 修理受付窓口で販売しておりますので、
前ページの手順に従って、ご自分で交換
できます。
なお、シリコングリースも修理受付窓口で
販売しております。
COPY
の原因になります(米粒 1 粒程度が適量で
す)。塗りすぎないように注意してくださ
い。
●シリコングリースを塗るときには、布や紙
などを使わないでください。
●防水パッキンの傷やひび割れは水漏れの原
因となります。ただちに修理受付窓口へお
持ちください。有償で新しい防水パッキン
と交換します。
6
お手入れのしかた
●使用後は、ウォータープルーフケースの外
部を、なるべく早く真水(30 ℃以下の水
道水など)で十分に洗ってください。海で
使用した場合は、塩分を落とすため真水に
数時間漬けておくことをおすすめします。
ケース内部に水が入らないように、バック
ルがしっかりロックされていることを確認
してください。水洗い終了後は、乾いたや
わらかい布で水分を十分に拭き取ってくだ
さい。砂などが付いたまま直接拭くと表面
に傷を付ける恐れがあります。また、塩分
が付いたままにしておくと、金属部分がさ
びたり、ボタンが動きにくくなることがあ
ります。ウォータープルーフケース内部
は、乾いた布で拭き、水洗いしないでくだ
さい。

前面
各部の名称
ストラップ取り付け部
シャッターボタン
ズームレバー
グリップ /
バックル
三脚ねじ穴
レンズ窓
拡散板
電源ボタン
レンズ窓についてのご注意
レンズ窓が汚れていると、撮影画像に汚れが
写り込んでしまう場合がありますので、乾い
たやわらかい布で軽く拭き取ってください。
ロック解除
スイッチ
c(イージーダイレクト)ボタン
-/ (ジャンプ)/o ボタン
(ストロボ)/
r ボタン
mFUNC./SET(ファンクション / セット)
ボタン
n(メニュー)ボタン
l
(ディスプレイ)ボタン
(連続撮影)/ (セルフタイ
マー)/ (1 画像消去)/p ボタン
(マクロ)/f(マニュアルフォーカス)/
(遠景)/q ボタン
モードダイヤル
1(再生)ボタン
COPY
背面
7

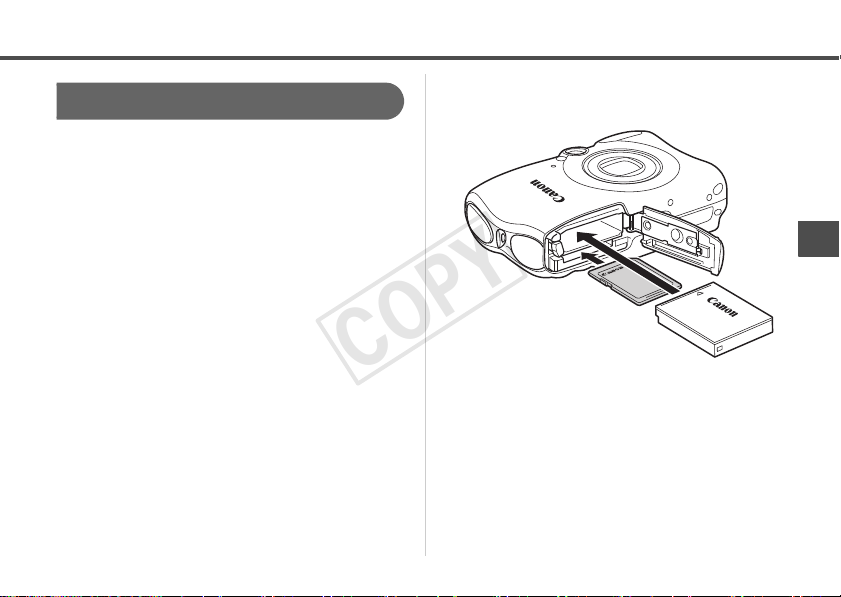
カメラを準備します
準備
COPY
バッテリー(バッテリーパック NB-5L)
1
とメモリーカードを入れます。
• バッテリーとメモリーカードの入れかた
は、カメラユーザーガイドでご確認くだ
さい。
• 十分に充電されたバッテリーをお使いく
ださい。
• メモリーカードの撮影可能枚数をご確認
ください。
8

カメラのストラップを外します。
ストラップ
ウォータープルーフケースのリス
トストラップを取り付ける場合
COPY
2
ストラップを付けた
ままカメラを入れる
と、ウォータープ
ルーフケース開閉部
にストラップを挟み、
水漏れの原因となり
ます。
ウォータープルーフケースを準備します
ネックストラップを図のように 2ヶ所に取
3
り付け、首にかけやすい長さに調節してく
ださい。
9

ネックストラップは、海辺でカメラを首にか
けるときにお使いください。水中では、ネッ
クストラップを外して、リストストラップを
お使いください。ネックストラップをお使い
になると、首に巻きつくなど、思わぬけがや
事故の恐れがあります。
ウォータープルーフケースに、カメラに付
属のストラップを使用しないでください。
COPY
10
ロック解除スイッチを矢印の方向へずらし
4
ながら、バックルを外してケースを開きま
す。
•
くもり止め(市販)をお使いになる場合は、
レンズ窓の内側のみにお使いください。く
もり止めを塗る際には、乾いたやわらかい
布をお使いください。くもり止めがレンズ
窓の内側以外に付着した場合、ウォーター
プルーフケースの劣化をまねく恐れがあり
ますので、すぐに拭き取ってください。

防水パッキンの摩耗や劣化を防ぐためウォー
タープルーフケースを使用する前に、パッキ
ン全面にごく薄くシリコングリースを塗って
ください。
防水パッキンの取り扱い上の注意について
は、「防水パッキンについて(p.5)」を参照
してください。
1. 防水パッキンを取り外します。
2. 防水パッキンと防水パッキンが埋め込ま
れていた溝の異物(砂やゴミ、頭髪など)
を綿棒などで拭き取ります。
3. 指にシリコングリースを少量(米粒 1 粒程
度)取ります。
4. 傷を付けないように注意しながら、防水
パッキン全面に均一にシリコングリース
を塗ります。
5. 防水パッキンを溝に取り付けます。
COPY
ウォータープルーフケースにカメラ
を入れます
カメラを図のように入れます。
5
ウォータープルーフケースを閉じます。
6
• 防水パッキンやその接触面、接点部に異
物(砂やゴミ、頭髪など)が付いていな
いことをよく確認してください。髪の毛
一本、また微小な砂粒一個が挟まってい
るだけで、水漏れすることがあります。
11

• バックルがしっかりロックされているこ
撮影
電源ボタン
ズームレバー
シャッターボタン
(ストロボ)/r ボタン
モードダイヤル
ランプ(背面)
c
(イージーダ
イレクト)ボタン
mFUNC./SET(ファンクション / セット)
ボタン
n(メニュー)ボタン
l
(ディスプレイ)ボタン
q ボタン
COPY
とを確認してください。
モードダイヤルを矢印のように回し、カメ
7
ラのモードスイッチとかみ合わせます。
12
電源ボタンを押して、電源を入れます。
コントローラーホイールの使いかた
カメラ本体での操作方法と異なります。
1. コントローラーホイールを時計方向へ回し
たいときは、c ボタンを押したまま
r ボタンを押します。
2. コントローラーホイールを反時計方向へ回
したいときは、c ボタンを押したまま
q ボタンを押します。
撮影モードをスペシャルシーンモードの
(水中)に設定する
水中で撮影するときに、スペシャルシーン
モードの に設定すると、水中に最適なホ
ワイトバランスに設定され、青みをおさえた
自然な色あいで撮影できます。
1. モードダイヤルを K(スペシャルシー
ンモード)に合わせます。
2. ボタンを押しながら、qr ボタンを
押して を選びます。
以下のモードで撮影するときは、cボタンに
(マニュアルホワイトバランス)を登録して
おくと、c ボタンを押すだけで白データを
取り込むことができます。状況に応じてホワイト
バランスを調整したい場合に、おすすめします。
・ (プログラム)
・ (デジタルマクロ)
・ (マニュアル)
・ (スタンダード)
COPY
1
目的のモードにします。
2
l ボタンを押して画面を表示します。
3
• 必要に応じて、各設定を行います。
• ズームレバーで画角を調整できます。
13

画面を見ながら構図を決めます。シャッ
• 節電機能が働いて電源が切れたときは、
再度電源ボタンを押してください。
• ファインダーを使った撮影はできませ
ん。
• ファインダーを使った撮影はできないた
め、モードダイヤルを 8 にしても正
しく撮影できません。
• 拡散板の表面に傷を付けないでくださ
い。ストロボ光が正しく拡散できなくな
る場合があります。
• ストロボ撮影したとき、画像の周辺が暗
くなることがありますので、拡散板を取
り付けて撮影してください。ただし、被
写体が近すぎる場合には拡散板を使って
も十分に効果が表われないことがありま
す。
COPY
4
ターボタンを半押しし、ランプ(背面)が
緑または橙になったら全押しします。
•
撮影するときは、レンズ窓はいつもきれ
いにしておいてください。
•
撮影時に指がレンズ窓やストロボ、拡散
板にかからないように注意してください。
使い終わったら、電源ボタンを押して
5
カメラの電源を切ります。
14
ストロボを使って撮影する場合
ストロボ光が均一に被写体にあたるように、
拡散板を取り付けて撮影してください。

取り付けかた
拡散板
COPY
取り付け部に、拡散版のひもを取り付けま
1
す。
拡散板をウォータープルーフケースに取り
2
付けます。
取り外しかた
拡散板を持ち、矢印の方向に取り外します。
15

1(再生)ボタンを押します。
再生
1(再生)ボタン
電源ボタン
ウォータープルーフケースを使用したあと
は、必ずカメラを取り出してください。カ
メラを入れたまま、直射日光のあたる場所
や高温になるところに放置しておくと、発
火や破裂などの原因になることがありま
す。
COPY
1
使い終わったら、カメラの電源を切ります。
2
16

使用後は、ウォータープルーフケースに付
カメラを取り出す
COPY
1
いている水滴を十分に拭き取ります。
• ウォータープルーフケースに付いている
ゴミや砂、頭髪などは取り除いてくださ
い。また、真水でよく洗い流して、塩分
などが残らないようにしてください。
ロック解除スイッチを矢印の方向へずらし
2
ながらバックルを外し、後部カバーを開
け、カメラを取り出します。
• ウォータープルーフケースを開ける際
に、体や頭髪から、ケース内またはカメ
ラに水滴が落ちないように注意してくだ
さい。
• ウォータープルーフケース内部は、乾い
た布で拭き、水洗いしないでください。
17

• 防水パッキンの変形を防いだり、防水効果
保管するときは
COPY
を保つため、ウォータープルーフケースを
開いた状態で保管してください。
• 防水パッキンにほこりや傷を付けないよう
に保管してください。
• 高温、低温、多湿な場所や、ナフタリンな
ど防虫剤のある所での保管は避けてくださ
い。
補修用性能部品について
保守サービスのために必要な補修用性能部品
の最低保有期間は、製品の製造打切り後 7 年
間です。(補修用性能部品とは、その製品の
機能を維持するために必要な部品です。)
18
主な仕様
耐圧水深: 40m(JIS 保護等級 8(水中型)
準拠)
防水構造: パッキン、O リングなど
主要材質: ポリカーボネート、ABS、白板
ガラス、EPDM
カメラ性能保証温度範囲:0~40℃
大きさ: 133.2 × 85.4 × 78.0mm
(突起部を除く)
体積: 約 465cm
質量: 約275g
(ウォータープルーフケースのみ*)
WW-DC1(別売)の推奨装着枚数:1枚
*拡散板を含む
●記載データはすべて当社試験基準によりま
す。
●製品の仕様、および外観の一部を予告なく
変更することがあります。
3

• While every effort has been made to ensure that the information contained in this guide is accurate
and complete, no liability can be accepted for any errors or omissions. Canon reserves the right to
change the specifications of the hardware and software described herein at any time without prior
notice.
• No part of this guide may be reproduced, transmitted, transcribed, stored in a retrieval system, or
translated into any language in any form, by any means, without the prior written permission of Canon.
• Canon makes no warranties for damages resulting from corrupted or lost data due to a mistaken
operation or malfunction of the camera, the software, the memory cards, personal computers,
peripheral devices, or use of non-Canon memory cards.
English
COPY
Disclaimer
Copyright © Canon Inc. 2008 All rights reserved.
1

Please read this manual carefully to operate the
• Before you use the Waterproof Case, please
make sure the case is functioning correctly
and does not leak. Close the Waterproof
Case before putting the camera inside it, and
hold it underwater at an approximate depth
of 15 cm (5.9 in.) for around three minutes to
check for leaks. Perform a similar check after
you have put the camera into the case.
If it leaks, contact your Canon Customer
Support Help Desk.
COPY
Waterproof Case correctly.
Store this manual in a safe place for further
reference once you have read it.
Introduction
• Thank you for purchasing this Waterproof Case.
Once installed in the Waterproof Case, you can
use your Canon Digital Camera in the rain, at
the beach or on the ski slopes. You can also use
it underwater at depths down to 40 meters
(130 ft.) and in wet or dusty environments.
2
• Canon Inc., its subsidiaries and affiliates, and
distributors of the Waterproof Case are not
liable for any consequential damages arising
from corrupted or lost data due to mistaken
operation or malfunction of the Waterproof
Case, the camera, the battery or the memory
card that results in the failure of an image to be
recorded.
• Please carefully read the Camera User Guide
supplied with your camera also.

Unpacking
COPY
The Waterproof Case is shipped with the items
listed below. Please check your package now to
confirm that it is complete. Contact your Canon
dealer if anything is missing.
• Waterproof Case WP-DC27
• Neck Strap
•Wrist Strap
• Diffusion Plate
• Silicone Grease for the Waterproof Seal
• User Guide (this guide)
Separately Sold Products
• Canon Waterproof Case Weight WW-DC1
When using the Waterproof Case to take
photographs underwater, the weights prevent the
case from floating. Please refer to the
specifications (p. 20) for information regarding the
number of weights recommended for installation.
For information regarding attachment methods,
please refer to the user guide for the weights.
3

Safety Precautions
COPY
Before you use the Waterproof Case, thoroughly
read these precautions to ensure correct use.
The precautions described below are for ensuring
safe use of the Waterproof Case and for
preventing danger and damage to yourself and
others. Thoroughly understand the details of these
precautions before reading the rest of this manual.
• After you use the Waterproof Case, be sure to
remove the camera from it. If you leave the
Waterproof Case containing the camera in
direct sunlight or in a high-temperature place,
this may cause a fire or the case to burst.
• Do not use the Waterproof Case in place of a
personal flotation device (life jacket).
• Do not use the neck strap underwater.
Remove the neck strap and attach the wrist
strap before use underwater. There is danger
that the neck strap will become entangled and
cause strangulation or another mishap.
• Do not use the Waterproof Case at water depths
exceeding 40 meters (130 ft.). The case may
malfunction, suffer damage or leak.
4
• Do not press the buttons or the lever of the
Waterproof Case with unnecessary force when
in the water. This may warp the casing and
cause leaks.
• When cleaning the case, do not spray water at
the waterproof seal under pressure. This may
cause leaks.
• Do not disassemble or modify the Waterproof
Case. This may cause leaks.
• Do not damage the waterproof seal, scratch its
contact surfaces, or allow dirt, sand, hair or
other debris to accumulate between the
waterproof seal and the case. This may cause
leaks.
• Do not use the Waterproof Case in water at
temperatures above 40 °C (104 °F). Heat may
warp the casing and cause leaks.
• Do not leave the Waterproof Case in direct
sunlight, inside a car in hot weather, or near a
heater. Heat may warp the casing and cause
leaks. Cover it with a towel, for example, if you
have to leave it in the sun.

Handling Precautions
COPY
• Do not drop or throw the Waterproof Case.
• Use only the supplied silicone grease. Use of
other waterproofing products may impair the
strength of the Waterproof Case. If any other
waterproofing product is mistakenly applied,
wipe it off immediately.
• Avoid opening or closing the Waterproof Case
near water. When you are installing the camera
or changing the memory card or the battery,
choose a place with low humidity well away from
salty sea air.
• Avoid using the Waterproof Case for long
periods of time in hot temperatures.
• Battery life is reduced in cold temperatures.
When you use the Waterproof Case in very cold
places, keep it warm by putting it in a bag
whenever you are not shooting. It is not
advisable to use the Waterproof Case in
temperatures below the freezing point.
• Moving the Waterproof Case rapidly between
hot and cold temperatures may cause
condensation (water droplets) to form on its
internal surfaces. If this occurs, stop using the
camera immediately as the condensation may
cause a malfunction. Remove the camera from
the Waterproof Case and wipe off the
condensation from the Waterproof Case and
the camera with a soft and dry cloth, and wait
until the moisture evaporates completely before
resuming use.
About Water Leakage
Stop shooting immediately if the Waterproof Case
leaks. If you use the camera in this state, this may
cause a fire or electric shocks. Never use it in this
state. Thoroughly wipe the Waterproof Case
interior and the camera dry. Please contact your
Canon Customer Support Help Desk.
5

Waterproof Seal
• When removing the seal from your
Waterproof Case, use your fingers so you do
not damage the waterproof seal (as shown in
Fig 1.). Do not dig your fingernails into it or
use pointed or metallic objects to remove it.
• Do not pull the waterproof seal. Pulling the
seal may overstretch it, which may cause the
case to not close properly and cause leaks.
• While mounting the waterproof seal, do not
twist or pull the seal with force. Extreme care
should be taken to ensure the waterproof
seal is level around the mounting groove.
Please check to ensure that the waterproof
seal is working.
Waterproof Seal
Fig. 1
To ensure that the Waterproof Case remains
waterproof, it is recommended to replace the
seal once a year. Please contact your Canon
Customer Support Help Desk.
COPY
• Debris (e.g. sand, dirt or hair) stuck to the
waterproof seal may cause water leakage.
Catching a single strand of hair or a tiny grain of
sand in the seal can cause leaks.
6
• Be careful not to apply too much grease.
Applying too much grease to the seal may
cause water leakage (about a droplet is
sufficient).
• Do not use paper or cloth to apply the grease to
the seal.
• A damaged or cracked waterproof seal may
cause leaks. Please contact your Canon
Customer Support Help Desk.

Care and Maintenance
COPY
• Wash the exterior of the Waterproof Case with
enough clean fresh water (tap water under 30 °C/
86 °F, etc.) as soon as possible after using it.
It is particularly advisable to soak it in fresh water
for several hours after use in salt water to remove
salt deposits.
locked the catch securely to prevent water
from entering the case.
cloth after washing. To avoid scratching the
Waterproof Case, do not wipe it while any sand or
grit remains on it. The metal parts may rust or the
buttons may become hard to press if salt deposits
remain.
Wipe the interior of the case with a soft, dry cloth.
Do not wash it with water.
Please check that you have
Wipe it dry with a soft
7

Front
Components
Strap Mounts
Shutter Button
Zoom Lever
Grip/Catch
Tripod Socket
Lens Window
Diffusion Plate
Power Button
Lens Window
Since dirt or smudges on the lens window may
show in photographs, keep the lens window
clean by wiping it gently with a soft, dry cloth.
Lock Release
Switch
c
(Print/Share) Button
-
/(Jump)/o Button
(Flash)/
r
Button
m
FUNC./SET(Function/Set) Button
n
Button
l
(Display) Button
(Continuous Shooting)/
(Self-timer)/ (Single Image
Erase)/p Button
(Macro)/f (Manual Focus)/ (Infinity)/
q
Button
Mode Dial
1
(Playback)
Button
COPY
8
Back
Preparing the Camera
Preparations
COPY
1 Insert the battery (Battery Pack
NB-5L), and the memory card.
• Please confirm the installation methods for
the battery and memory card in the Camera
User Guide for your camera.
• Use a battery that is adequately charged.
• Check the estimated capacity (recordable
images) of your memory card and ensure
there is enough storage space on the
memory card to record your images.
9

Preparing the Waterproof Case
Strap
When attaching the wrist strap
of the Waterproof Case
COPY
2 Remove the strap from the
camera.
If you put the camera in the
Waterproof Case without
first removing the strap,
the strap may catch in the
waterproof seal when
opening or closing the
Waterproof Case. This can
cause leaks.
10
3 Fast en both ends of the neck strap
to the strap mounts as shown, and
adjust it to a comfortable length.

Use the neck strap when carrying the camera
on the beach. Remove the neck strap and
attach the wrist strap before use underwater.
There is danger that the neck strap will
become entangled and cause strangulation or
another mishap.
Do not use the strap included with the camera
with the Waterproof Case.
Apply a thin coat of grease to the entire seal
before using the Waterproof Case in order to
prevent abrasion and deterioration.
For waterproof seal handling precautions, see
Waterproof Seal (p. 6).
1. Remove the waterproof seal.
2. Using a cotton swab, wipe off any debris
(e.g. sand, dirt or hair) which is present on
the waterproof seal and on the seal
mounting groove of the Waterproof Case.
3. Apply a small amount (droplet) of grease to
your fingertip.
4. Evenly coat the entire surface of the
waterproof seal, taking care not to scratch
the surface.
5. Place the waterproof seal back in the seal
mounting groove of the Waterproof Case.
COPY
4 Slide the lock release switch as
shown, and release the catch to
open the back cover.
• When using commercially available
anticondensation products, the
anticondensation solution should only be
applied to the inside surface of the lens
window using a soft cloth. If
anticondensation solution comes in contact
with any surface other than the inside of the
lens window, wipe it off immediately with a
soft, dry cloth, as it could lead to
deterioration of the Waterproof Case.
11
 Loading...