

Page 1
Canon
WM-V1
PUB.
DIM-0996-000
:t:t'
Canon
Microphone
Canon
Microfono
Micr6fono
6ecnposo.n.Ho~
./::;
Wireless
Funkmikrofon
'J-{
1'
L;
sans
Wireless
Wireless
A~-{?
Microphone
fil
Canon
Canon
Canon
M1!1Kpo¢oH
D
Jt\::;
Canon
0
Bluetooth
®
Page 2
l§§BOJ~~
CD
~
-\7
m
:;
uffiFT-
@
~J5tA.~
@
1t\'
lJ
@
~5-tB9~~~a-:7Y-::1
®
®1~Vi~25
@
--;z
~?
(J)
~~?
@
~)fuJ3\JC
®
7-"J')lJ7'Y?
@)~-\?mY
®
mmc7-"J'Ju
@
~-{:;
'Y7-
~-
L~~~TITI\'$Y:;
:J-::1
~=
'Y
t----
(WSZ§§B)
lj
'Y
-::1
(l::/5Jl;)
~:::z?
lj-:;
X
2
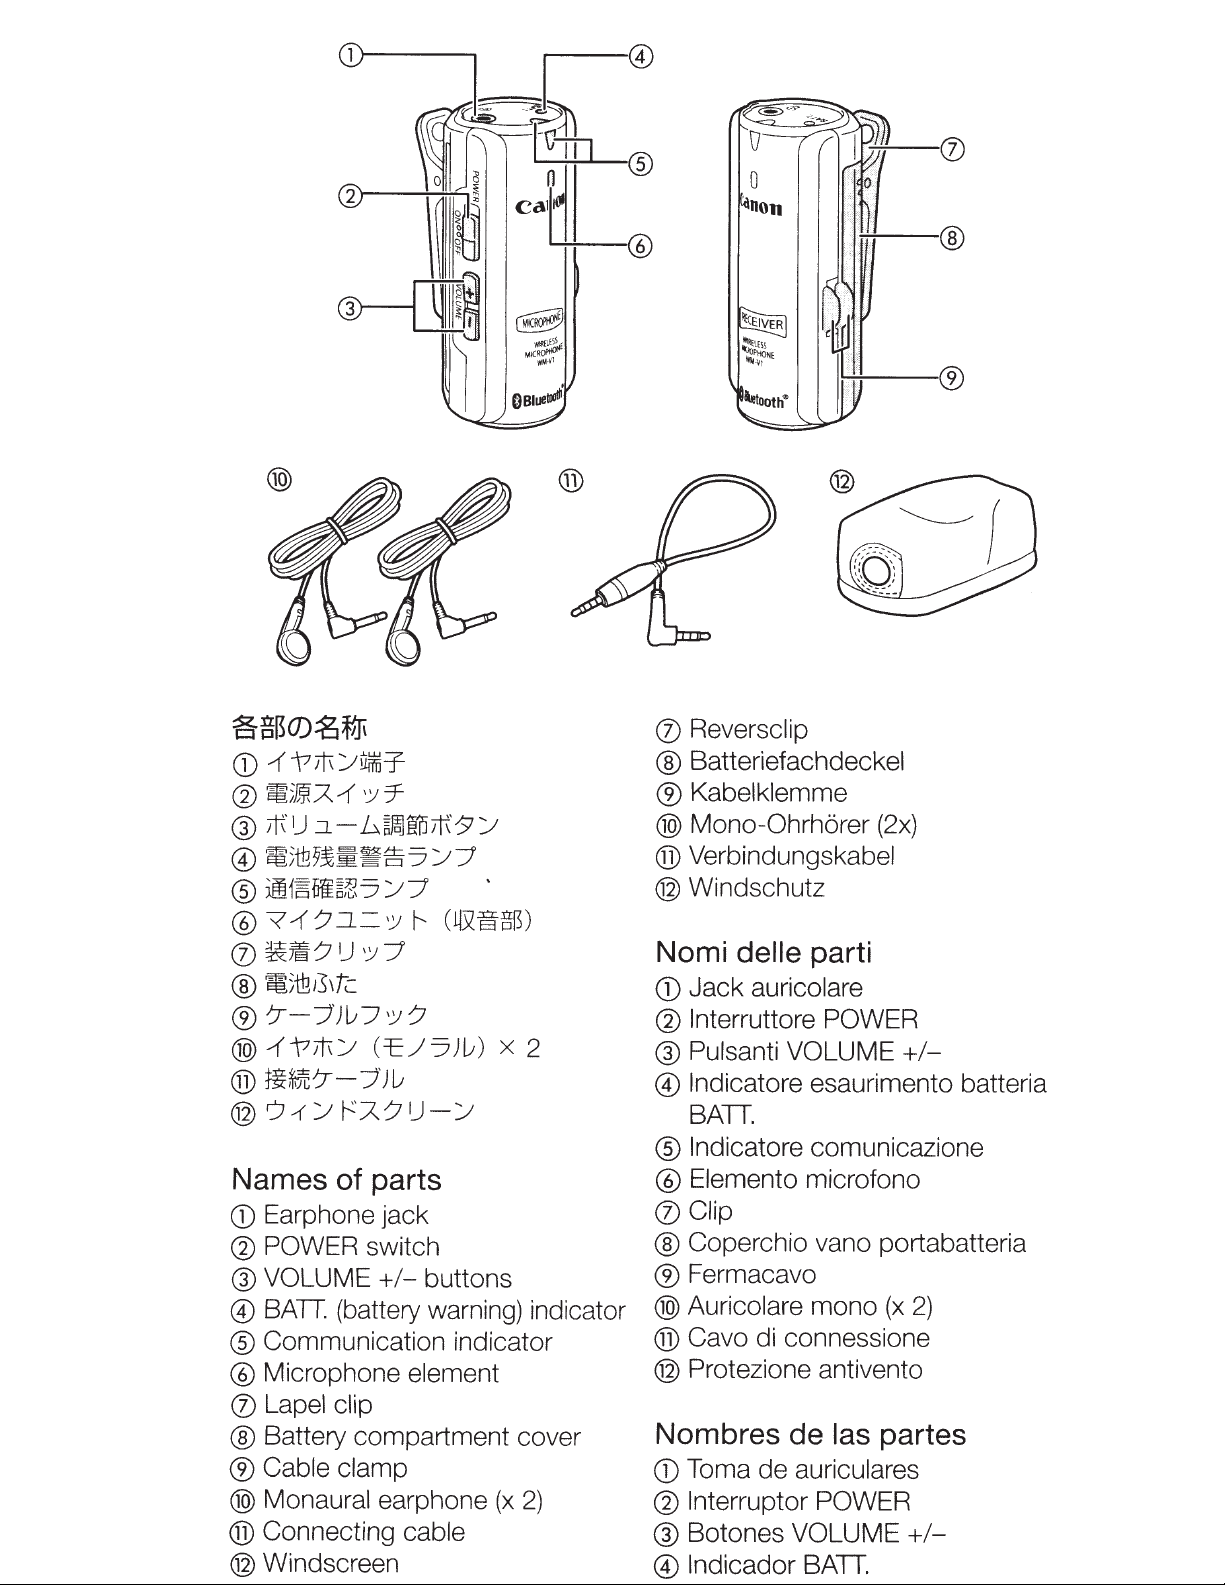
Names of parts
CD
Earphone jack
@
POWER switch
@VOLUME
@
BATT.
®
Communication indicator
@
Microphone
(J)
Lapel clip
®
Battery compartment cover
®
Cable clamp
@)
Monaural earphone
®
Connecting cable
@
Windscreen
+/-
buttons
(battery warning) indicator
element
(x
2)
(J)
Reversclip
®
Batteriefachdeckel
®
Kabelklemme
@)
Mono-Ohrhorer
®
Verbindungskabel
@
Windschutz
Nomi
CD
@
@ Pulsanti
@
®
@
(J)
®
®
@)
®
@
delle
Jack auricolare
lnterruttore POWER
lndicatore esaurimento batteria
BATI.
lndicatore comunicazione
Elemento microfono
Clip
Coperchio vano portabatteria
Fermacavo
Auricolare mono
Cava di connessione
Protezione
parti
VOLUME
Nombres de
CD
Toma de auriculares
Q)
lnterruptor
@ Botones VOLUME
@
lndicador BATI.
POWER
(2x)
+/-
(x
2)
antivento
las
partes
+/-
Page 3
0
Cd11011
0
Page 4

I
En
gli
sh
Instructions
Thank you for purch
Th
e WM-
unit, and was d
U
th
bu
sound from the camcorder's built-in microphon
*
and keep them for futu
instruction manua
The
by Bl
li
Using
By attaching the windsc reen to the microp h
caused by wind or breathi
when shooti
V1
si
ng Bluetooth wireless communication between the microphone and
receiver,
th
of locations. By placing t
subjec
t'
s
clothing and connec
e su
pp
lied
su
bjects
th
il
t-
in
microphone. Wi
Mix func
ti
on, you ca n even mix and record sound from
Refer to the o
in
struc
ti
on manual for det
Pl
ease
read
Bluetooth
ue
tooth
cense.
the
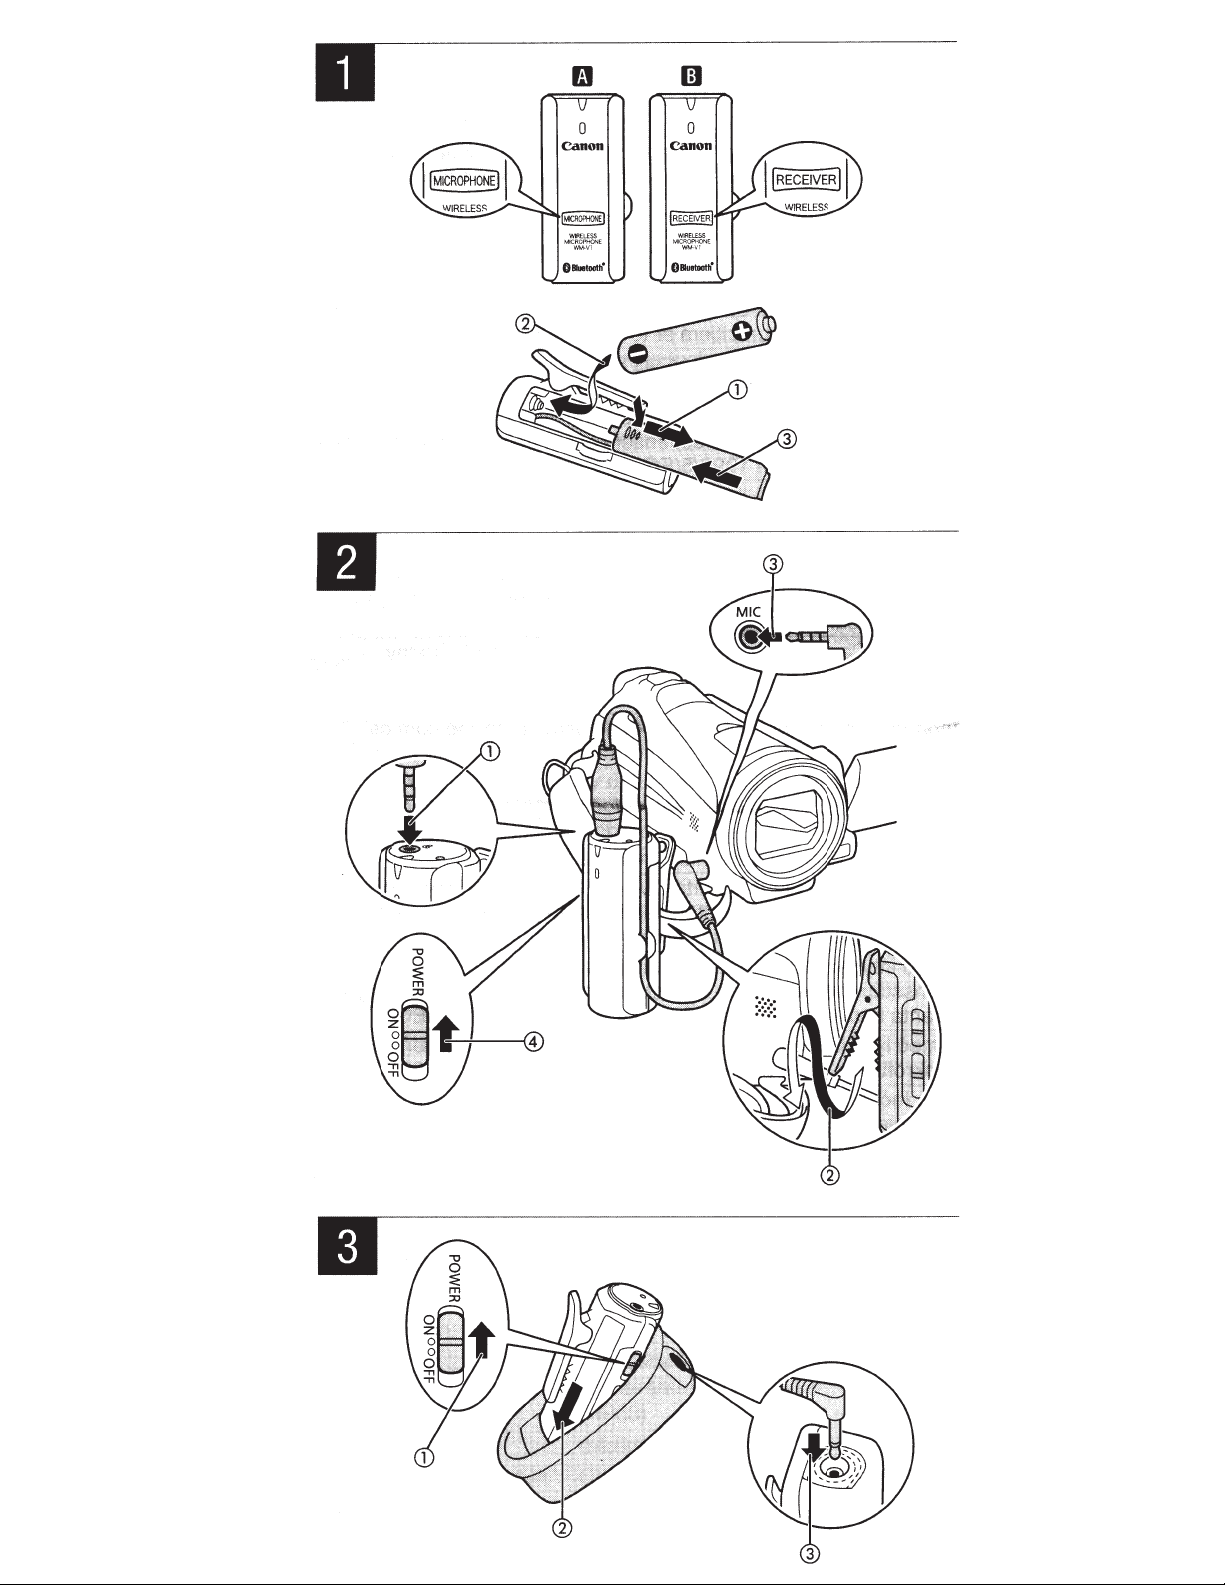
Inserting
T
he
WM-V1
"REC
EI
VE
battery (not included). U
(
2
3
4
R"
HR
03) rechargeable NiMH ba
Slide
and remove the microphone 's battery
(fig.
1-1).
Insert
one battery matching
Close the battery
Repeat steps 1 to 3
in the same way.
as
in
g the
co
nsists of a
eve
e WM
co
nnec
at would be difficu
ff
th
ese instructions ca ref
"'
word mark and
SIG,
mi
loped for exclusi
-V1
al
lows for high-quality sound recording
he
ti
ng
ca
th
cam
icial Canon Web
re
referenc
l.
In
c.
and any use of such marks by Canon
windscreen
ng
in outdoor locations.
batteries
's
units are
(f
i
g.
ng.
in
the
clearly labeled "MICROPHO
1-
B).
Each unit requires one commercially
se
compartment
to
WM-V1
Wireless Microphone.
crophone (transmitter) unit and a receiver
ve
use with Canon HD
microphone
ti
bl
e, you c
lt
co
ai
ls about compati
We
microphone
two AAA (
tt
insert the second batter y into the receiver
un
ng
to pick up us
rd
logos
eri
the+
it to the lapel area of the
the recei
ve
r to the camco
an
record sound from faraway
in
er models
si
te, catalog or your camcorde r
ull
e.
Refer
recomm
es
g o
th
at feature
e.
bl
e camcorder model
y before u
are re
LR
.
I -
cover (fig. 1-3).
si
also
to your camcorde
gi
stered trademarks owned
one,
en
d attach i
and
receiver
06) alka
lin
compartment
polarity marks (fig. 1-
camcorders•.
in
rd
er usi
nl
y the cam
ng
you can reduce noise
co
th
e Audio
th
e WM-V1 and
th
e microphone
Inc.
ng
the
wi
ndscreen
units
NE"
(f
i
g.
1-
A)
e batter
avai
ies
or two AAA
a variety
ng
rd
er's
's
s.
r'
s
is under
and
lable
cover
2)
.
Connecting
Attach
receiver to t
Insert
earphone jack (fig.
2
Using the
belt (fig. 2-2).
3
Insert
camcorder
•
4
Set
•
5
Set
•
• Bluetooth wireless communication between t
•
6
Place
•
7
Using the
clothing .
• If t
8
Turn on the camcorder.
• Unless [Audio
the
th
microphone
e microphone to the subject's clothing and connect the
he
camcorder.
the straight plug
the L-shaped
If
necessary, pass
the receiver's
The recei
the microphone's
The
microp hone's communi
and
th
e receiver
co
mm
un
both
un
its
When the micropho ne's or the receiver's battery
the BA
TT.
battery
as
the windscreen on the microphone (fi
Pl
ace the windscreen so that t
connected
he
microphone is not attached securely,
subject's cloth
to attach it secu
appear on the screen.
2-1).
lapel clip,
's
MIC
terminal (fig. 2-3).
POWER
ve
r
's
communication indicator flashes in b
w
ication
is
w
il
l stop flashing and st
(battery wa
soon
as
th
rough t
lapel clip,
es
and
re
Mix]
and
receiver
of
the connecting cable into the receiver's
attach the receiver
plug
of
the connecting
th
e
co
nn
ecting
cable through
switch
to
ON
POWER
switch to
ca
ti
on i
nd
ill
be establi
es
tablished,
possible.
he
attach the microphone to the subject's
ly.
is
sh
rn
in
g)
indicator
he
openi
ng
ru
stling noises m
set to
[
On
ed
au
th
e communicat
ay
earphone jack can be
in
t
he
],
the
to
the
camcorder
cable
into the
th
e cable clamp.
(fig. 2-4).
lu
ON
(fig.
3-1)
icator fl
as
h
es
in
he
toma
co
w
windscreen (
:;;
m,
microphone
ti
ca
ll
y. Wh
io
nstantly on.
ill
ay
n indicators on
is
flash in red. Replace t
(Wind
getti
g.
3-2).
fi
it
m
ay
rub agai
be picked up. Make
Screen
e.
.
bl
en
g. 3-
's grip
ue
.
wi
ng
low,
easily
3).
ns
o
f
f)
re
t t
icon
less
he
he
su
re
wi
ll
Page 5

Before
shooting
•
If
your camcorder is equipped with a
that the microphone is functioning
supplied earphones
the
microphone, and monitoring the sound that
• Depending on the camcorder used, you may be able
level indicator on your camcorder 's screen. Use the audio level
audio
indicator to check the audio recording levels.
•
Depending on the camcorder used, you may be able to manually
adjust the audio recording level. Select [Mic.Level] from the
camcorder's FUNC.
•
Depending on the camcorder used, you may be able to mix and
record audio from both the
microphone (Audio Mix function). Set [Audio Mix] to
the audio mix
Because audio from the WM-V1
WM-V1
microphone there may
microphone, creating
sound.
microphone and the camcorder.
balance.
's
microphone
In
such case, increase the distance between the WM-V1's
or
a pair of headphones, speaking into the
panel and set it to
WM-V1
is
too close to the camcorder's built-in
be
a slight lag between the sound from each
an
echo (reverberation) effect in the recorded
\)
(headphones) terminal, check
correctly by connecting to
is
picked up.
to
display an
[M
Manual].
and the camcorder 's built-in
is
processed digitally, when the
[On]
and adjust
it
one
Checking
sound
from
the
microphone
using
the
supplied
earphone
•
You
can check the sound picked up with the microphone by
connecting one of the
earphone jack. Adjust the
+1- buttons. (The volume will be reset
microphone unit is turned off.)
You
can connect both supplied earphones to the receiver and the
•
microphone units to
• Because audio from the WM-V1
slight lag between the actual sound and the audio you hear from the
earphone, creating an echo effect. This is not a
Bluetooth
• Bluetooth wireless communication is set up
automatically only
WM the WM-
•
If
cause noise
(3
•
Status
Unit is turned
Wireless
Microphone unit is turned
(receiver
Receiver unit is turned OFF
(microphone is still
• The indicator will dim gradually until
wireless
V1.
Bluetooth wireless communication with devices other than
V1
is not supported.
the microphone
ft.) away from the camcorder during use.
Status
in
of
the
ON
communication is established
is
still
ON)
supplied earphones to the microphone's
volume as necessary with the VOLUME
allow transceiver communication.
to
its default value when the
is
processed digitally, there may be a
malfunction.
communication
to
between the microphone and receiver units of the
is
too close to the camcorder,
the recorded sound. Keep the microphone at least 1 m
communication
OFF
ON)
indicator
it
is
be established
RF
interference may
Microphone Receiver
Flashing
Continuously on
Off*
Flashing Off*
completely off.
Flashing
After
using
the
WM-V1
1 Turn
off
the
camcorder
2 Turn
off
the
microphone
3 Disconnect the
terminal.
4 Remove the receiver from
5 Disconnect the
.
and receiver.
connecting
connecting
cable from
the
camcorder
cable from
the
camcorder
.
the
receiver.
's MIC
Maintenance
• Clean the units by dusting them lightly with a soft,
use thinner, benzene,
•
Keep the earphone jacks clean at
work properly
• The windscreen cannot be washed. If it gets wet, pat it with a soft ,
cloth and let it dry naturally.
alcohol, or other volatile cleaners or solvents.
all
if
the terminals are dirty.
times. The microphone will not
dry
cloth. Do not
dry
Page 6

OIMPORTANT
•
If
you
do
remove the batteries from both the microphone and receiver units.
• Do not touch the windscreen, microphone or receiver while recording,
as this
• Using the microphone close to high-voltage equipment or to devices
that emit strong electromagnetic
towers, some cellular phones, etc.) may cause noise to be recorded.
• When carrying the camcorder with the receiver attached, be sure to
support the camera body. Never carry the camcorder by the receiver.
• Test the microphone by speaking into
blow into
• Do not drop or jolt the microphone
or
care.
• Do not disassemble or touch the
recei
occur.
• Do not use
such as inside a car
•
Do not lea
camcorder
not intend to use the WM-V1 for a long period of time,
ll
cause noise to be recorded.
wi
fields (high-voltage lines, electrical
it.
it.
impair its performance. Handle the microphone and receiver with
ve
r. Consult your dealer
or
leave the microphone
ve
the receiver attached to the
in
a case, etc.
in
hot weather
or
Do not tap the microphone
or
receiver, as this may damage it
in
terior parts
a Canon Service Center if problems
or
or
of
receiver
in
in
direct sunlight.
camco
the microphone or
hot, humid places
rder when storing the
Specifications
Wireless
Communication system: Bluetooth
Power class:
Frequency band used:
Profile:
Communication
Communication
Bluetooth Power Class 1
2.4 GHz band (2400 - 2483.5 MHz)
A2DP
ra
nge': Approx.
Ver.
2.0
50 m (164
ft.)
or
Microphone
Directionality:
Frequency
Power
Power consumption:
' Continuous operating time
Earphone jack:
Operating temperature:
Dimensions [W x H x 0]:
(excluding
Weight (excluding battery):
Accessories:
1
Estimated distance with no obstructions between the receiver and
microphone. Obstructions such as
reduce the effective communication range.
2
Actual time may vary depending on the manufacturer, storage
conditions and other characteristics of the battery used.
Weight and dimensions are approximate. Errors and omissions
excepted. Subject to change without notice.
(transmitter)/Receiver
ra
nge:
y:
suppl
protrusions)
Non-directional,
500Hz-7kHz
1 x
AAA
or
1 x
AAA
hydride (NiMH) rechargeable
battery
2
:
250 mW or less
Approx. 3 hours (alkaline battery,
ambient temperature at 25
(77 °F), volume level at default
setting)
monaural
(LR03) alkaline battery
(HR03) nickel-metal
0 3.5 mm monaural minijack
40
oc (32 - 1 04 °
0 -
Approx.
Approx. 29 x 68 x 37 mm
(1.1
X 2.7 X 1.5
Approx. 28 g
Monaural earphones x
Connecting cable, Windscreen
people or metal objects may
in
.)
(1
oz.)
oc
F)
2,
Safety
Precautions
WARNING!
•
In
the following cases, turn off the microphone and receiver units,
remove the co nnecting
immediately. Continued use may present a risk of fire
If
you detect smoke or strange odors.
-
If
the microphone
-
If
water
or
-
units.
• Keep the wireless microphone out of the reach of children.
other liquid was spilled into the microphone
cable and batteries and stop using the WM-V1
or
receiver unit was dropped and broke open.
or
electric shock.
or
receiver
Page 7

• Do not insert metallic objects
microphone
• Stop using the wireless microphone if
wireless devices.
If
you
•
of time, remove the batteries from both the microphone and receiver
units.
• Handle the batteries with care.
hands.
• Never use leaking batteries and never expose batteries
heat
or
receiver units.
do
not intend to use the wireless microphone for a long period
or
fire.
or
other foreign objects inside the
it
causes interference with other
Do
not handle batteries with wet
to
excessive
CAUTION!
• Do not use the wireless microphone inside hospitals, medical clinics
or
onboard aircraft.
• Do not use the wireless microphone near medical equipment
sensitive electronic devices as it may affect their performance.
FCC/IC
NOTICE
Th
is
device complies with Part 15 of the FCC Rules and RSS-Gen
IC
Rules. Operation
of
(1)
this device may not cause harmful interference, and
(2)
this device must accept any interference received, including
interference that may cause undesired operation.
Not
e:
This equipment has been tested and found to comply with the
limits for class 8 digital device, pursuant to Part 15 of the FCC
These limits are designed to provide reasonable protection against
harmful interference
generates, uses and can radiate rad
installed and used
ful
interference to radio communications. However, there
harm
guarantee that interference
this equipment does cause harmful interference to rad
reception, which can
on, the user
more of the
• Reorient
• Increase the separation between the equipment and receiver.
• Connect the equipment into
to which the receiver
• Consult the dealer
help.
This transmitter must not be co-located
with any other antenna
Do not make any changes or modifications
unless otherwise specified in the manual. If such changes
modifications should be made, you could
operation of the equipment.
This equipment complies with
forth for
frequency (R
and
equipment has
cornply without testing of specific absorption ratio
is
following measures:
or
an
uncontrolled environment and meets the FCC radio
F)
RSS-1 02 of the IC radio frequency
is
subject
to
the following two condition
in a resi
dent
ial
installation. This equipment
io
in
accordance
will
be determined by turn i
encouraged to try to correct the interference by one or
relocate the receiving antenna.
is
connected.
or
an experienced radio!TV technician for
or
transmitter.
Exposure Guidelines
very low leve
frequency energy and, if not
wrth
the instructions, may cause
not occur
an outlet
ls
in
a particular installation.
ng
the equipment off and
on
a circuit different from that
or
operated
to
the equipment
be
required
FCC/IC radiation exposure lirnits set
in
Supplement C
(RF)
of
RF
Exposure rules. This
energy that are deemed to
(SAR).
or
s;
Rules.
is
no
io
or television
in conjunction
or
to
stop
to
OET65
If
Canadian Radio Interference Regulations
The Class 8 digital apparatus complies with Canadian ICES-003.
Areas
of
Use
and
You
can use this product
also use the product
can
table.
Please
do
for.
The use of radio waves is subject to local legislation and restrictions
and unauthorized use of this
apply.
Original Country/Region of Purchase
Canada, USA.
Australia,
Cyprus, Czech Republic, Denmark,
Estonia, Finla
Greece, Hong Kong
Iceland, Ireland, Italy, Latvia, Liechtenstein,
Lithuania, Luxembourg,
Netherlands,
Poland, Portugal , Romania, Singapore,
Slovakia, Slovenia, Spain, Sweden,
Switzerland,
Austria, Belgium, Bulgaria,
Restrictions
not use this
product
nd
, France, Germany,
S.A.R., Hungary,
New
Zealand, Norway,
United Kingdom.
in
the original country/region
in
the countries/regions listed in the following
in
countries/regions it was not designed
product
may
be
of
purchase. You
prohibited and fines may
Country/Region of Use
Canada, Hong Kong
S.A.R., USA.
All the countries/regions
l
is
ted to the left.
Malta,
Page 8

directive
EC
Statement
Canon Inc.
zakladnimi pozadavky a
1999/5/ES.
Undertegnede Canon
DV840210
direktiv 1999/5/EF.
Hiermit
Obereinstimmung mit den grundlegenden Anforderungen und den
Gbrigen einschlagigen Bestimmungen
befindet.
Kaesolevaga kinnitab
direktiivi 1999/5/EO
teistele asjakohastele
Hereby, Canon Inc.,
with the essential requirements and other relevant provisions
Directive 1999/5/EC.
Por
cumple
disposiciones
ME
LYMMOP<l>ONETAI
i\OinEr
Par Ia
conforme aux exigences essentielles
pertinentes de
Con
conforme ai requisiti essenziali ed aile
stabilite dalla direttiva 1999/5/CE.
--
Ar
butiskajam
Siuo
reikalavimus
Hierbij verklaart Canon
overeenstemming is met
~
Hawnhekk,
litigijiet
Dirrettiva 1999/5/EC.
Alulirott,
vonatkoz6
egyeb eloirasainak.
Niniejszym Canon Inc.
z zasadniczymi wymogami oraz pozostalymi stosownymi
postanowieniami Dyrektywy 1999/5/EC.
Canon
requisitos essenciais e outras
Canon
zahtevami in
Canon
a vsetky
Canon Inc.
direktiivin
direktiivin muiden ehtojen mukainen.
Harmed intygar
overensstammelse med de
relevanta
Her meil lys
grunnkrofur og ailrar
Canon
de grunnleggende krav og avrige
H
C
bma
C
Ha
Prin
cu cerin\ele principale
1999/5/EC.
on
DV840210
tento
timto prohlasuje,
overholder
Canon Inc.,
erklart
presente Canon
Ia
de
media
con los requisitos esenciales y cualesquiera otras
aplicables
nAPOYLA
THN
rXETIKEL
presente Canon
directive 1999/5/CE.
Ia
Ia presente
Canon Inc.
so
Canon
alingen
_
Canon Inc.
deklare, ka
prasTbam un citiem ar to saistTtajiem noteikumiem.
deklaruoja, kad
Inc.
kitas 1999/5/EB Direktyvos nuostatas.
ir
htlijn
<?
van ri
Canon Inc
essenzjali u ma provvedimenti olirajn relevanti
Canon Inc.
alapveto
c. declara
In
Inc. izjavlja,
Inc. tymto
prislusne
1999/5/EY oleellisten
bestammelser
Inc. erkl<erer herved at utstyret
ill!1>~il
O
T
aC
e C
;,
c
eKT
.Q11p
prezenta, Canon
que este
da
ostalimi
vyhlasuje,
ustanovenia Smernice 1999/5/
vakuuttaa
non Inc.
Ca
Canon
ir
,QOKyMeHT
HOBH>!Te
OC
1999/5/EC.
I1Ba
ze
dalsimi prislusnymi ustanovenimi smernice
falgende
at
Inc. erkl<erer
vcesentlige
de
Canon
pohinouetele
satetele.
declares that this
o exigibles de
Canon
nPOL
~IATA::::EIL
Inc. declare que
Inc.
de
1999/5/EG.
jiddikjara
..
nyilatkozom,
kovetelmenyeknek
oswiadcza,
ta
je
relevantnimi
taten etta DV840210
sam framgar av direktiv 1999/5/
yfir pvi
Inc.
krofur, sem
Canon
11
3
11
Inc. declara ca
cu
i
~
herved,
dass sich das
seadme
Inc.
nimetatud direktiivist tulenevatele.
ja
Inc. declara
~Hi\ONEI
Inc.
OYLIO~EIL
TIL
THL
dichiara che questa
DV840210 atbilst Direkt1vas
sis DV840210
toestel DV840210
dat het
essentieHe
dan
li
hogy a
i:e DV840210 jest zgodny
DV840210 esta
disposi96es
DV840210
dolocili
ze DV840210 spina zakladne
vaatimusten
att denna
vasentliga egenskapskrav och ovriga
DV840210
ail
gerilar
relevante krav i direktiv 1999/5/EF.
Inc.
il
BaHI1
CK
celelalte
avrige
krav og
Gerat DV840210
Richtlinie 199915/EG
der
DV840210
DV840210
que el
Directiva 1999/51CE.
Ia
OTI DV840210
AnAITHLEIL
O~HriAL
l'appareil DV840210
aux autres dispositions
et
disposizioni pertinenti
altre
eisen en
DV840210
DV840210 megfelel
az 1999/5/EC iranyelv
es
conforme com os
da Directiva 1999/5/CE.
skladu
v
direktive 1999/5/ES.
tyyppinen
ja
DV840210 star I
eru i tilskipun 1999/5/EC.
DV840210
,QeKnap>~pa
bOTBeTH>!Te
C
11
DV840
aces!
i relevant e ale Directivei
er
preved
se
shade
ve
je
udstyr
relevante krav i
in
vastavust
compliance
in
is
DV840210
1999/5/EK.
DV840210
atitinka esminius
andere relevante
de
jikkonforma mal-
z bistvenimi
.
ES
sita koskevien
samr<emi
i
er
er i samsvar med
Ye
,
21
of
KAI
est
e
1999/5/EK
in
hemm fid-
li
a
poziadavky
·
·-
-
..
on
laite
.
EG
viil
DV840210
nOCTaHOBJl
este co
0
TIL
nf
CE:
)I
!
I
I
I
i
a
e
HI1il
e
orm
contact the following address for the original D
ease
Pl
Conformity:
EUROPA N.V.
CANON
Bovenkerkerweg 59-61, 1185 XB Amstelveen, The Nethe
CANON INC.
Shimomaruko 3-chom
30-2 ,
e,
u, Tokyo 146-850
a-k
Oht
laration of
ec
ands
rl
Japan
1,
PRINTED IN JAPAN
MPR
I
IMPRE
IME
SO
AU
EN
JAPON
JA
PON
 Loading...