

Canon WFT-E1, WFT-E1A Network Setup Manual

Windows
COPY
Macintosh
Wireless File Transmitter
WFT-E1/E1A
Network Setup Guide
Compatible with WFT-E1 Utility Ver. 2
For customers using the WFT-E1A
Although this manual refers to the WFT-E1, the setup procedures are the same for the WFT-E1A.
INSTRUCTION
MANUAL
E

Manual contents and structure
COPY
To transfer images to a computer via a wireless or wired LAN using the WFT-E1, the
computer has to function as an FTP server. To transfer images from the WFT-E1 to a
computer, you need to have the proper settings on the computer and the WFT-E1.
To help you establish a simple image-transfer network, this manual explains a method of
operating a computer as an FTP server, and the settings and procedures to transfer
images using a wireless LAN or wired LAN to see images on a computer screen.
IP addresses and security settings such as authentication, encryption, and SSID
used in this manual are examples only. Make settings appropriate for your
environment.
For Windows infrastructure mode, this manual assumes that a wireless LAN access point
with a router function is already connected to the FTP server by a wireless LAN or a wired
LAN.
This manual contains explanations for Windows and Macintosh systems along with
troubleshooting methods and references. Click an item in the table of contents below to
view the page. This manual assumes that you have read the camera’s instruction manual
and are familiar with camera operating procedures. The menu screens are based on the
EOS-1Ds Mark II.
Table of contents
Windows
1 Setting Up the Computer
2 Transferring Images
Using a Wireless LAN
Infrastructure Mode
3 Transferring Images
Using a Wireless LAN
Ad Hoc Mode
4 Transferring Images
Using a Wired LAN
Troubleshooting
Reference: Changing the LAN Settings with the Camera
For EOS 20D users
The EOS 20D firmware has to be Ver. 2.0.0 or higher, and the WFT-E1 firmware Ver. 2.0.1 or
higher. If the firmware versions are older, upgrade them first.
2
1 Transferring Images
Using a Wireless LAN
Infrastructure Mode
2 Transferring Images
Using a Wireless LAN
Ad Hoc Mode
3 Transferring Images
Using a Wired LAN
Macintosh
Windows
COPY
Windows
W
Setting Up the
Computer
Setting Up the Computer
Install FTP Server Functions...........................................................4
Setting Up the Computer to Operate as an FTP Server ............... 10
Changing Firewall Settings ...........................................................12
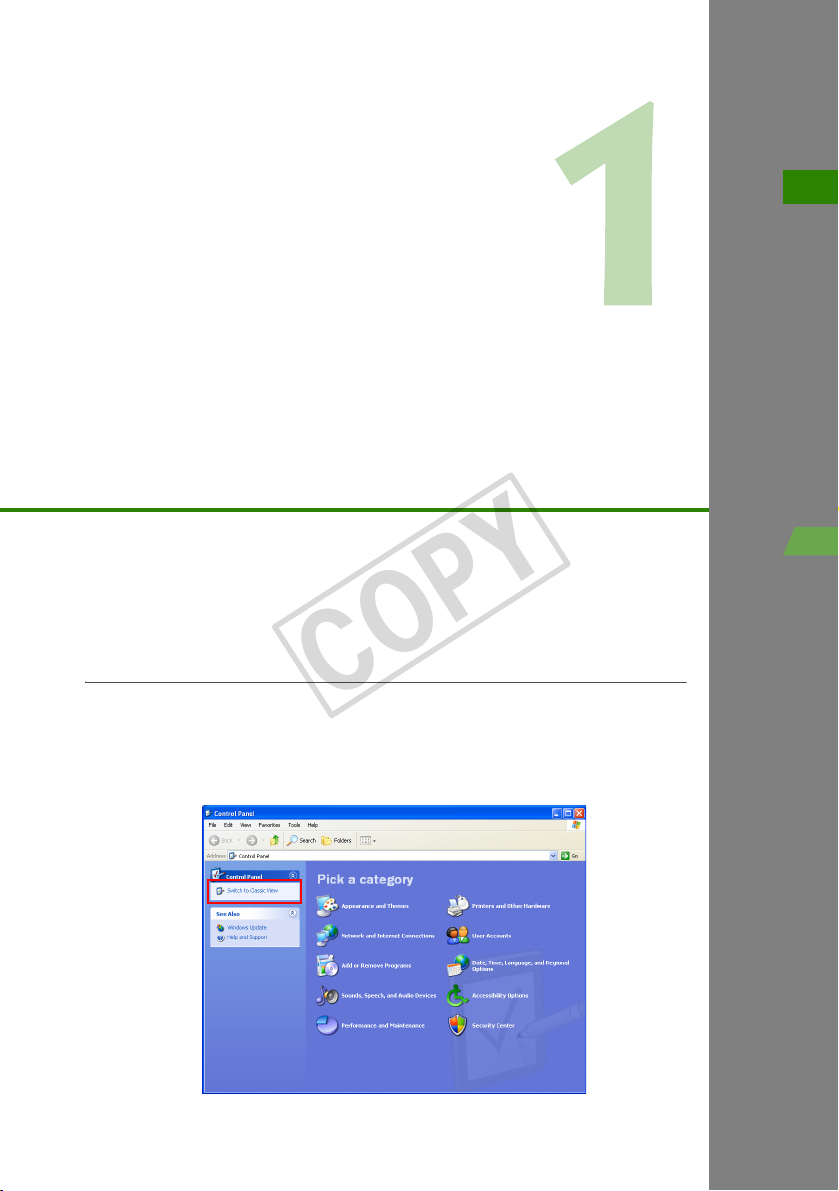
For Windows XP users
Follow the procedures below to restore the classic view in the Control Panel.
Click the [Start] button, select [Control Panel] to open the [Control Panel]
window, and click [Switch to Classic View].
1
3
Install FTP Server Functions
COPY
To use the computer as an FTP server, install Internet Information Services (IIS) on the
computer (Windows XP or Windows 2000) on which images will be transferred. Internet
Information Services can be installed using the Windows XP or Windows 2000 CD-ROM.
Please be sure to have the CD-ROM for the operating system installed on the
computer.
Although this chapter uses Windows XP screenshots, the procedure is the same for
Windows 2000. If IIS is already installed, proceed to the next item “Setting Up the
Computer to Operate as an FTP Server.”
Windows XP Home Edition is not compatible with Internet Information Services. Be
sure to use Windows XP Professional.
Do not insert the Windows XP CD-ROM into the computer until step 7.
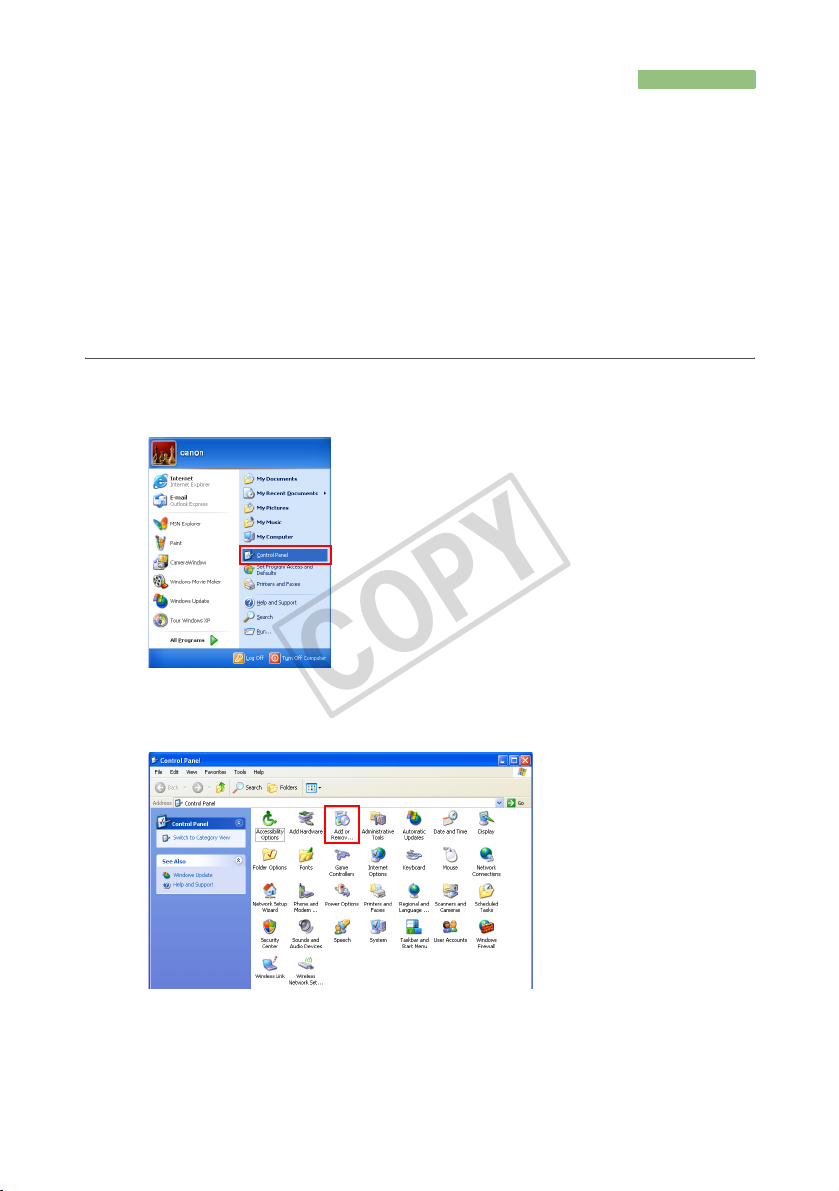
[Start] button Æ Select [Control Panel].
1
Double-click [Add or Remove Programs].
2
In Windows 2000, double-click [Add/Remove Programs].
4
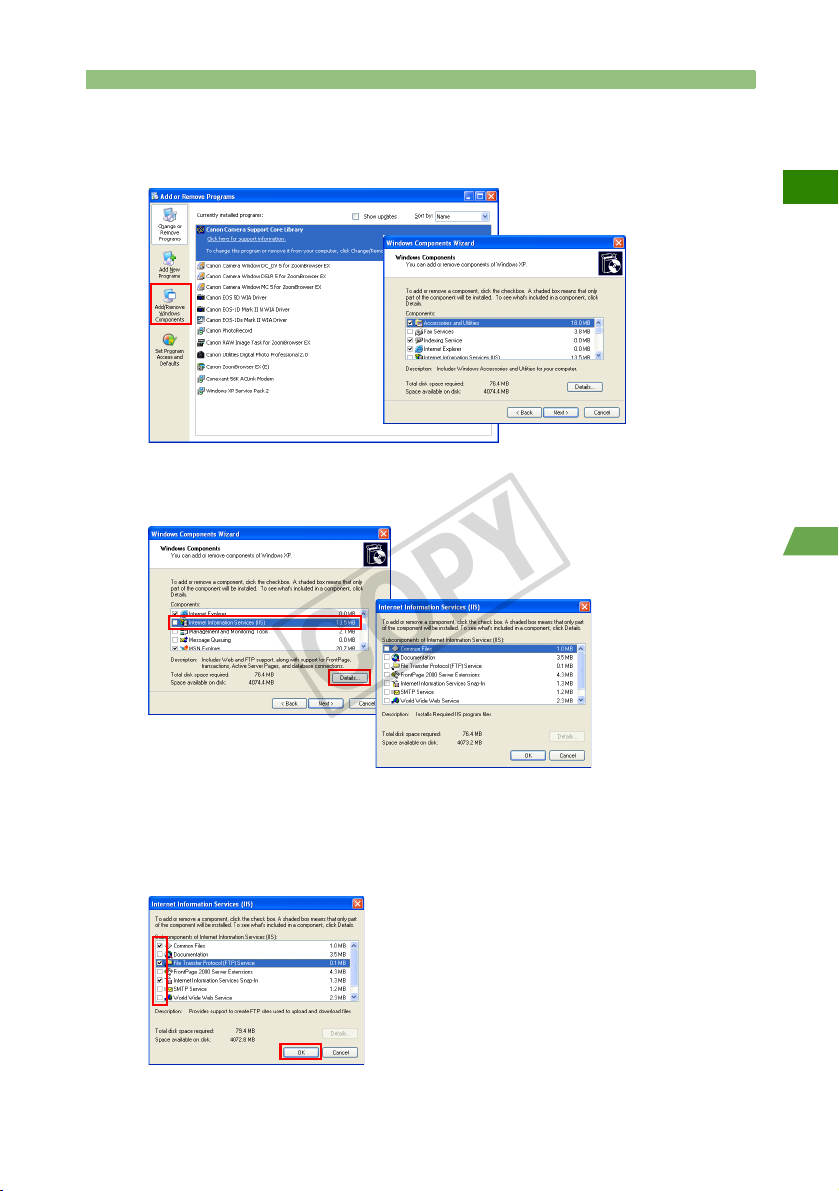
Click [Add/Remove Windows Components].
COPY
3
X The [Windows Components Wizard] will appear.
Double-click [Internet Information Services (IIS)].
4
X [Internet Information Services (IIS)] details will appear.
Install FTP Server Functions
W
1
Setting Up the Computer
Check [File Transfer Protocol (FTP) Service].
5
X Check marks will also be placed in [Internet Information Services Snap-in]
and [Common Files] as well.
Click the [OK] button to return to the [Windows Components Wizard].
5
Install FTP Server Functions
COPY
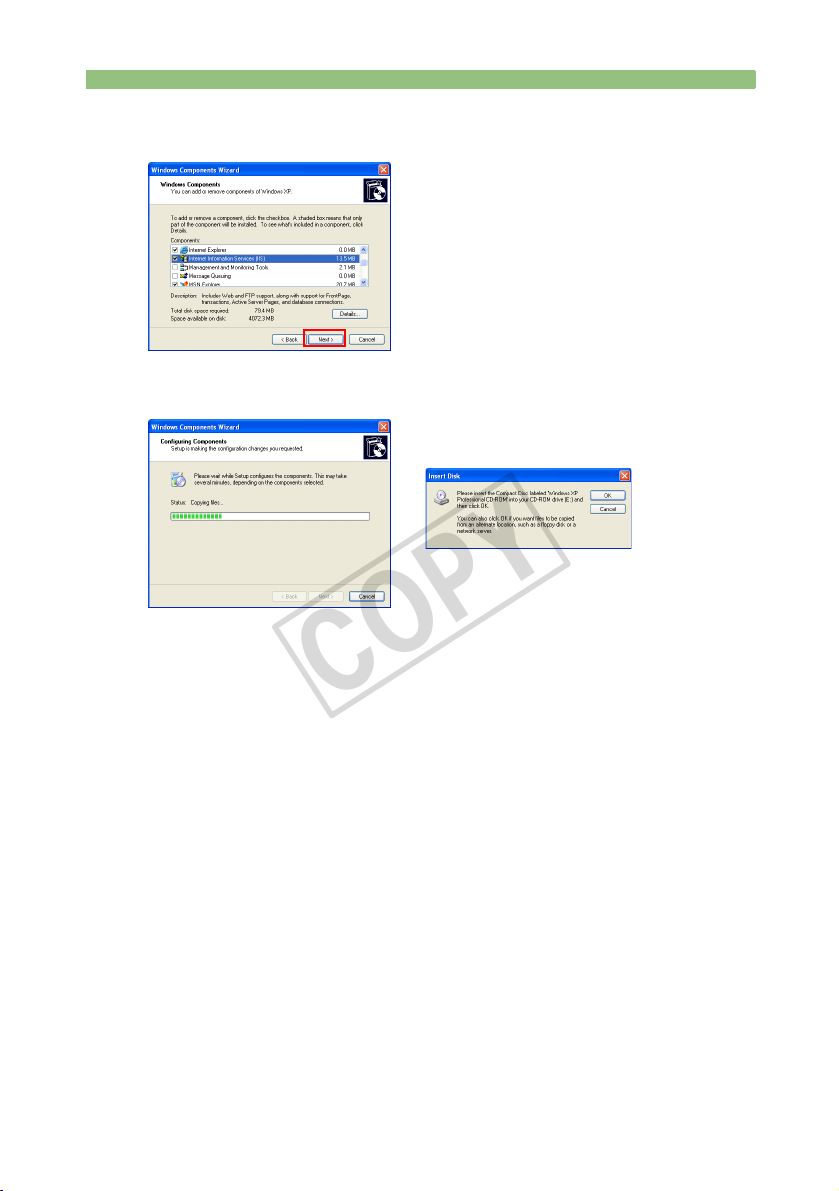
Click the [Next] button.
6
X Installation begins, and the [Insert Disk] message will appear. Depending on
the computer, installation may go ahead without showing this message.
6
Install FTP Server Functions
COPY
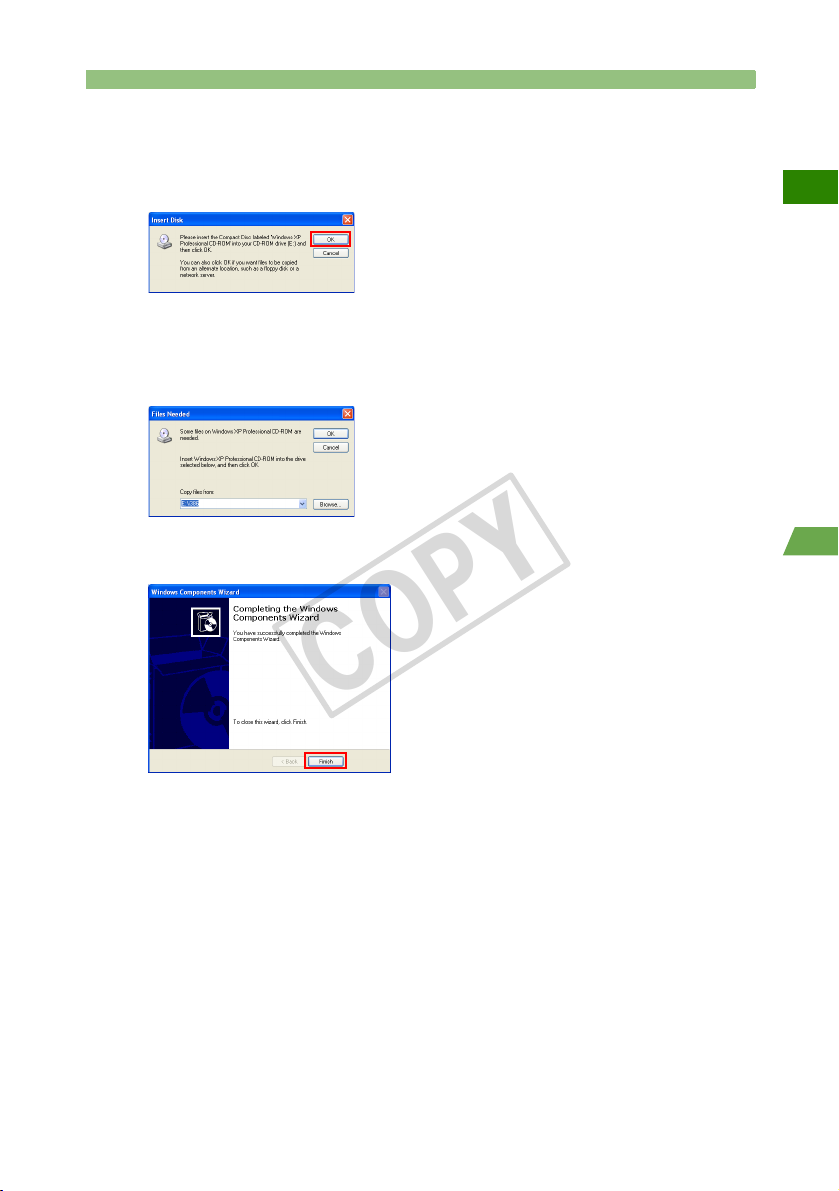
Insert the OS CD-ROM into the computer, and click the [OK]
button.
7
X Installation starts and the completion screen appears.
If a [Files Needed] message appears, click the [Browse] button to select [My
Computer], and open the drive in which the OS CD-ROM was inserted. Open
the [i386] folder and click the [Open] button. In the [Files Needed] message
screen, click the [OK] button to resume installation.
W
Click the [Finish] button to finish installation of Internet Information Services
(IIS).
Follow the procedures on the next page to make sure that Internet Information
Services (IIS) is installed.
1
Setting Up the Computer
7
Install FTP Server Functions
COPY
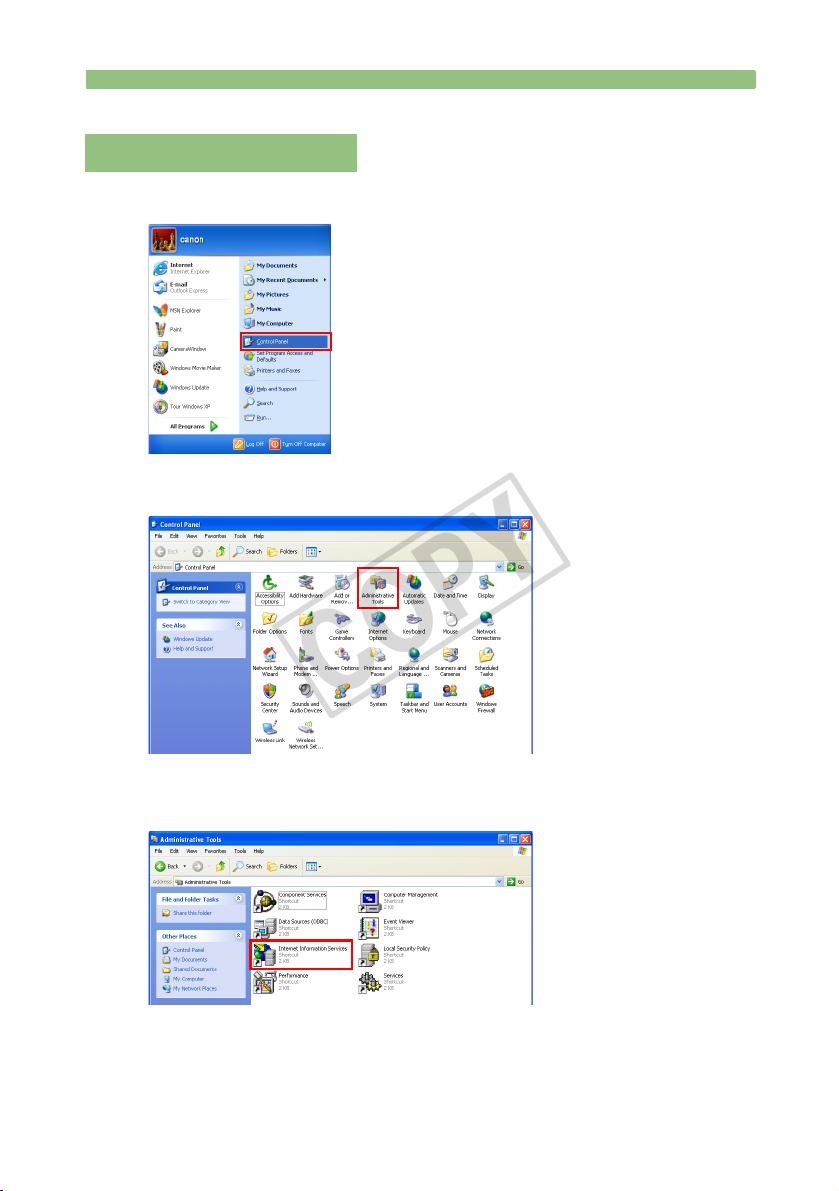
Checking Installation
[Start] button Æ Select [Control Panel].
1
Double-click [Administrative Tools].
2
Double-click [Internet Information Services].
3
In Windows 2000, double-click [Internet Service Manager].
8
Install FTP Server Functions
COPY
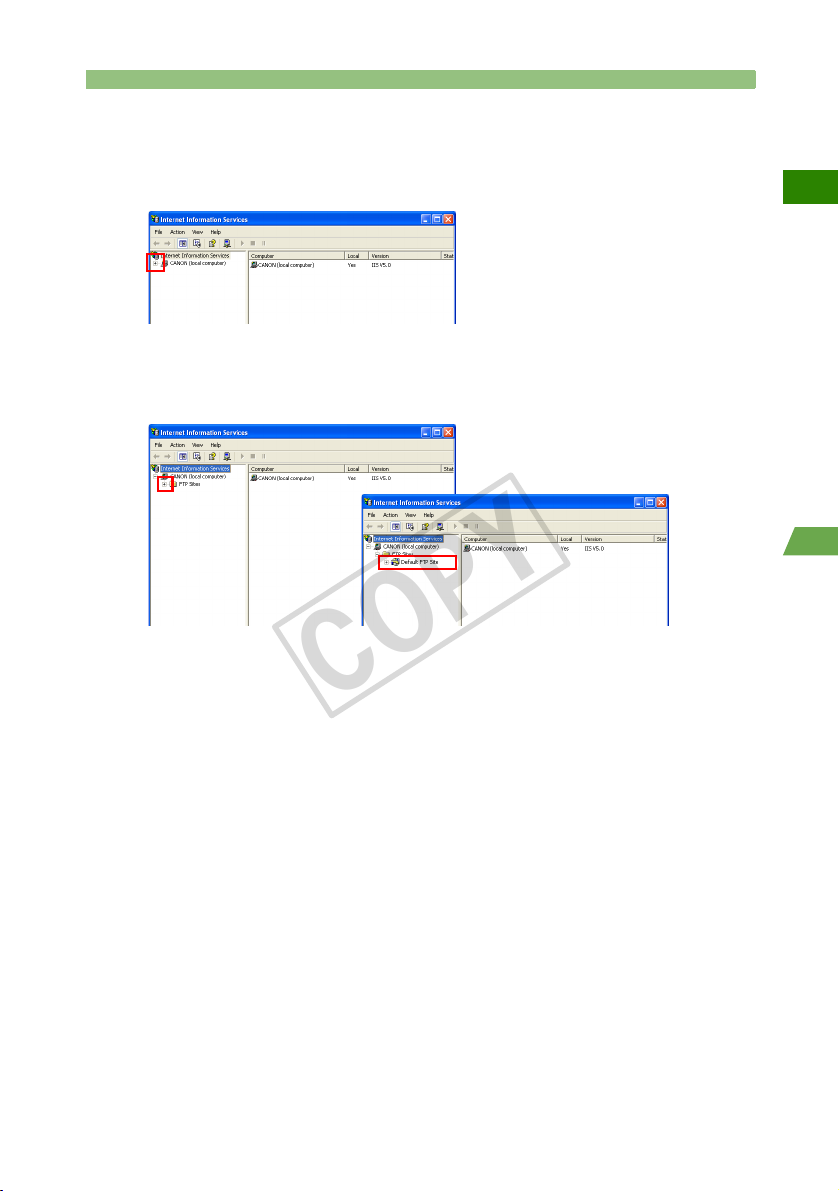
Click [+].
4
“CANON ...” on the right of the [+] sign indicates the computer’s name, so it will
differ depending on the computer.
Click [+] on the left of [FTP Sites].
5
X If [Default FTP Site] appears, Internet Information Services (IIS) is successfully
installed.
W
1
Setting Up the Computer
If [Default FTP Site] does not appear
Try installing Internet Information Services (IIS) again.
If you have confirmed that Internet Information Services (IIS) is installed,
proceed to “Setting Up the Computer to Operate as an FTP Server” on
page 10. Without these settings the computer will not operate as an FTP
server.
9
Setting Up the Computer to Operate as an FTP Server
COPY
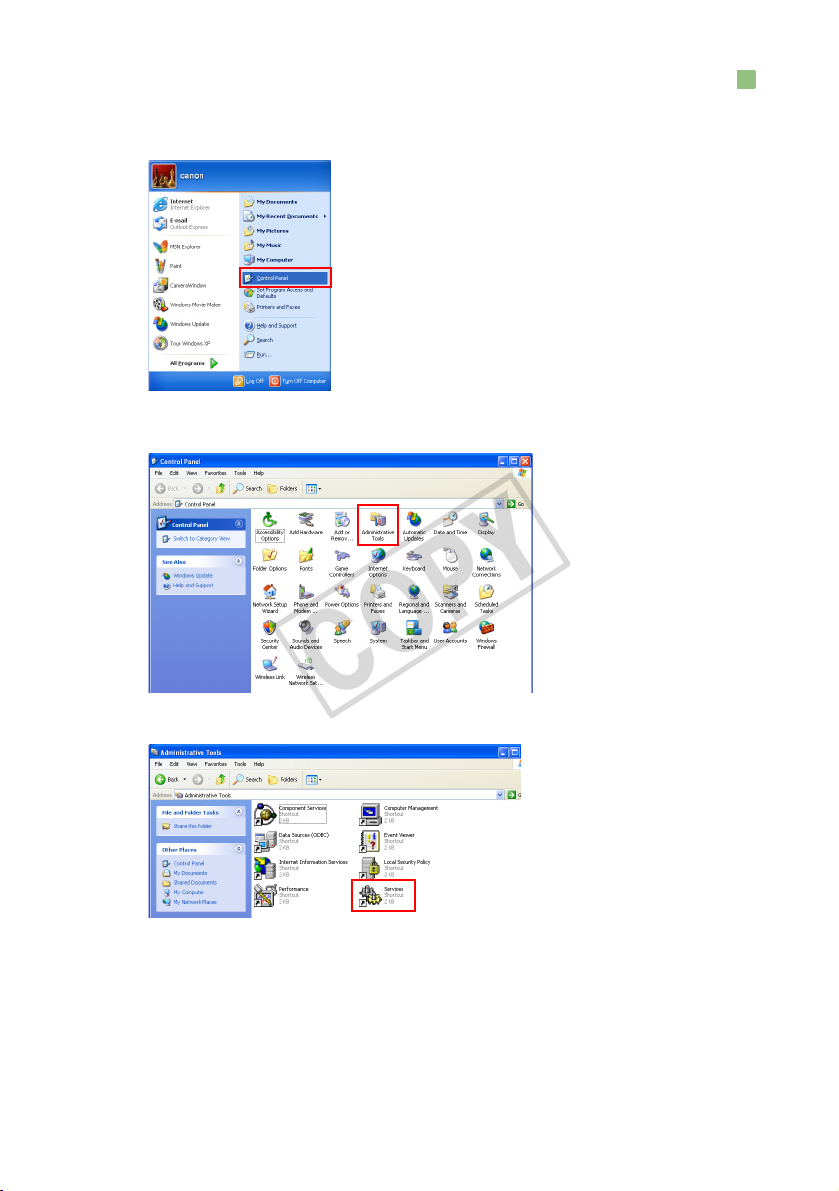
[Start] button Æ Select [Control Panel].
1
Double-click [Administrative Tools].
2
Double-click [Services].
3
10
Setting Up the Computer to Operate as an FTP Server
COPY
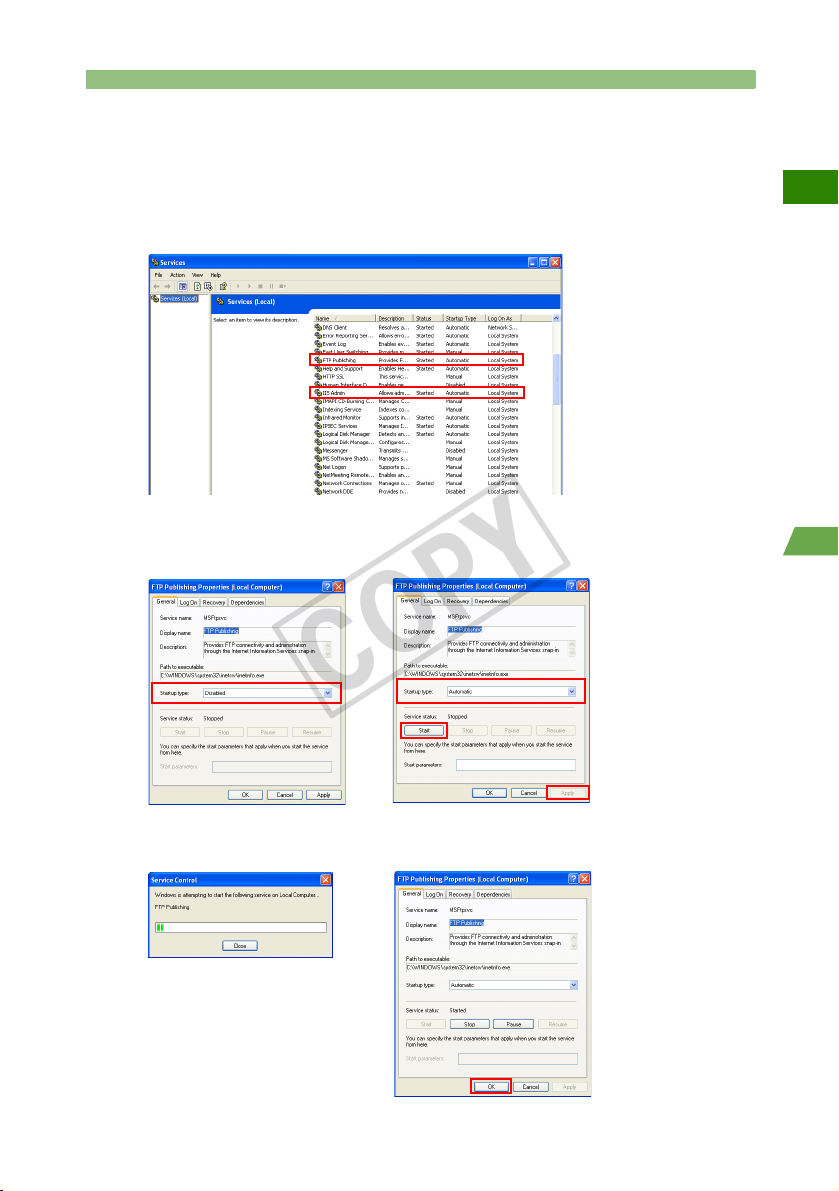
Select [Status] and [Startup Type] in [FTP Publishing] and [IIS
Admin].
4
If [Status] is set to [Started] and [Startup Type] is [Automatic], your computer
will operate as an FTP server.
In Windows 2000, [IIS Admin] appears as [IIS Admin Service].
If the settings are not configured as above
Double-click [Properties], select [Automatic] for [Startup type], and click the
[Apply] button. Then click the [Start] button in [Service status].
W
1
Setting Up the Computer
X A [Service Control] startup screen will appear.
Click the [OK] button in [Properties] to finish the settings.
c
e
d
11
Changing Firewall Settings
COPY
This section is only for people using Windows XP Service Pack 2 or a higher
version.
With Windows XP Service Pack 2, images may not be transferred if the Windows firewall
is on, so you need to change the settings of the Windows firewall.
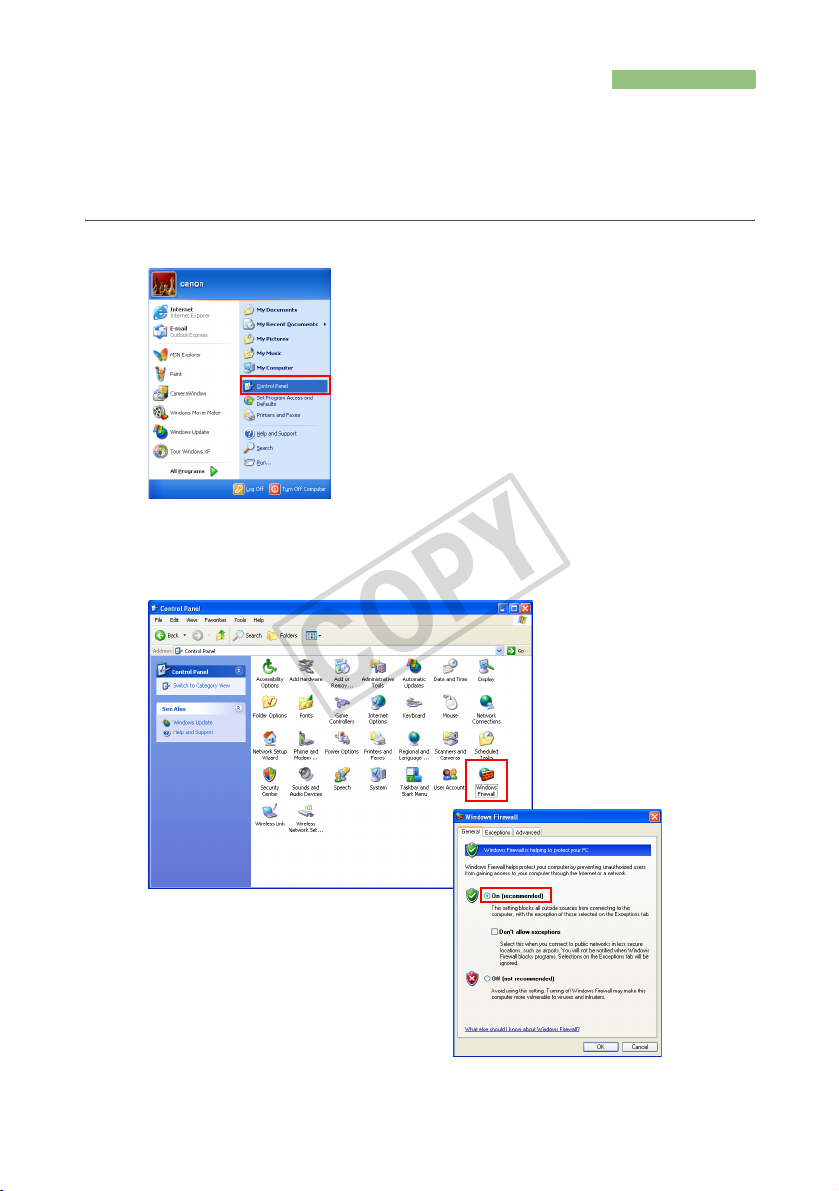
[Start] button Æ Select [Control Panel].
1
Double-click [Windows Firewall].
2
X [Windows Firewall] will appear.
X Select [{On (recommended)]
12
Changing Firewall Settings
COPY
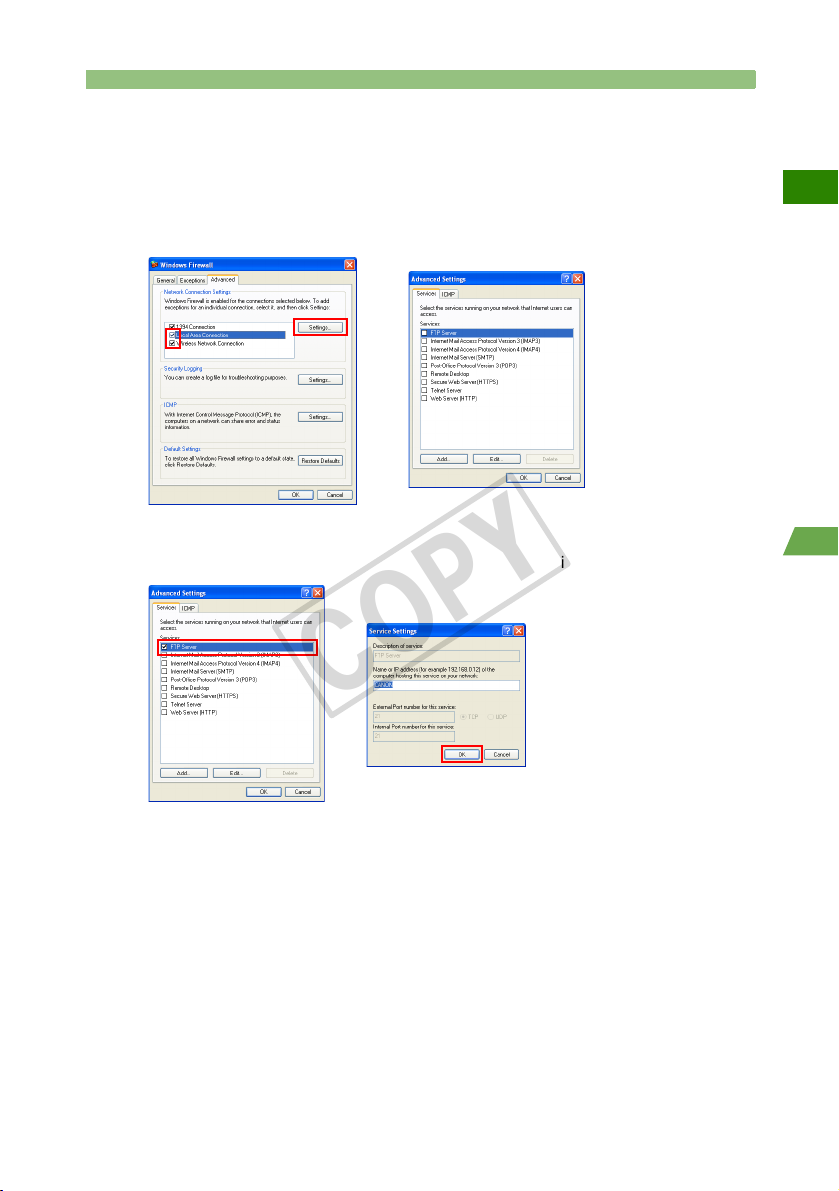
Double-click [Advanced].
3
Check [Local Area Connection] if you use a LAN cable to transfer images to
the computer, or [Wireless Network Connection] if you use a wireless
connection, and click the [Settings] button.
X [Advanced Settings] will appear.
W
Check [FTP Server].
4
X If [Service Settings] appears, click the [OK] button without changing anything.
X Click the [OK] button in [Advanced Settings] and click the [OK] button in
[Windows Firewall] to finish the settings.
1
Setting Up the Computer
13

MEMO
COPY
14
Windows
COPY
W
Transferring Images Using a Wireless LAN
Infrastructure Mode
Transferring Images Usi ng a Wireless LAN ( Infrastructure Mo de)
Setting Up the FTP Server ............................................................16
Setting Up the Wireless LAN Access Point ................................... 19
Creating the WFT-E1 Settings File................................................21
Setting Up the WFT-E1 ................................................................. 24
Checking the Connection Status................................................... 26
2
Transferring Images to the FTP Server......................................... 27
Viewing Transferred Images on the FTP Server........................... 28
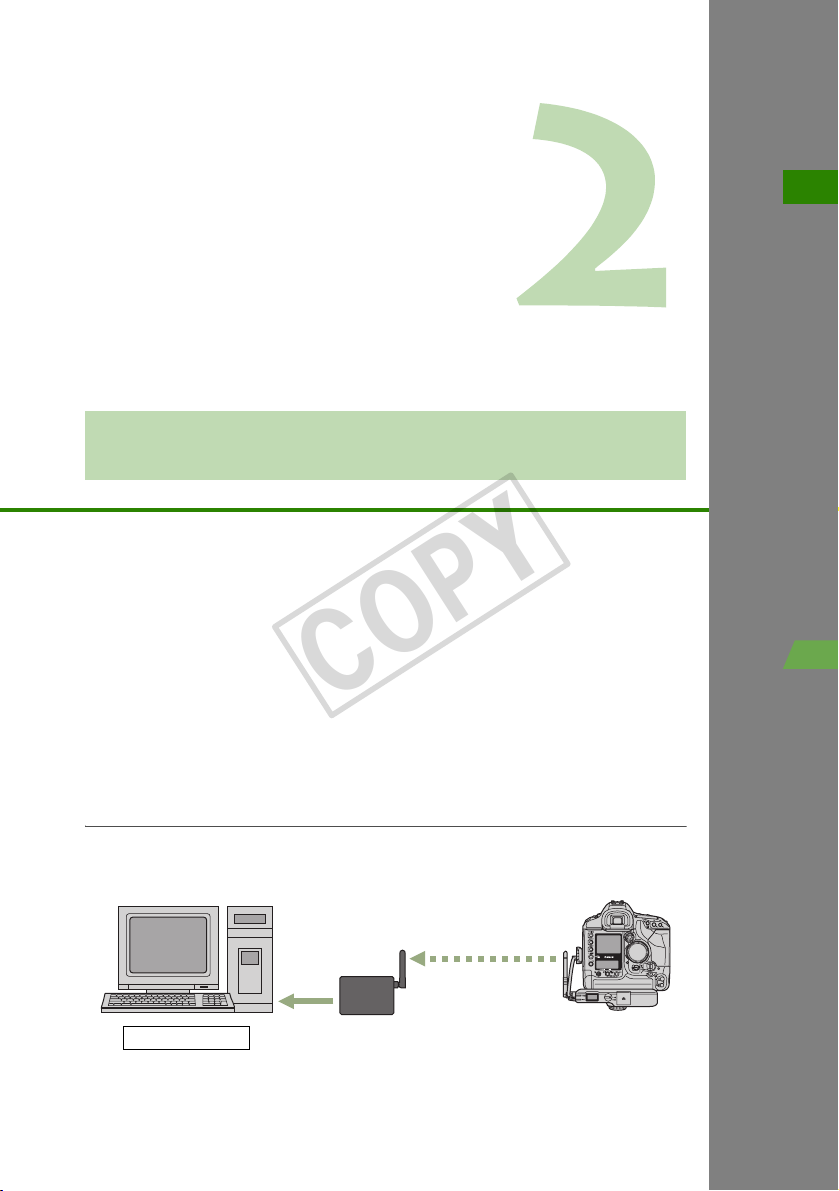
Infrastructure Mode Overview
Images are transmitted to an FTP server via a wireless LAN access point.
FTP server
Connect a wireless LAN access point to an FTP server using a LAN cable,
wireless LAN card or wireless LAN adapter.
Wireless LAN access point
(commercially available)
15

Setting Up the FTP Server
COPY
This chapter assumes that the wireless LAN access point is already connected to the FTP
server by a wireless LAN or a wired LAN.
[Start] button Æ Select [Control Panel].
1
Double-click [Administrative Tools].
2
Double-click [Internet Information Services].
3
In Windows 2000, double-click [Internet Service Manager].
16
Setting Up the FTP Server
COPY
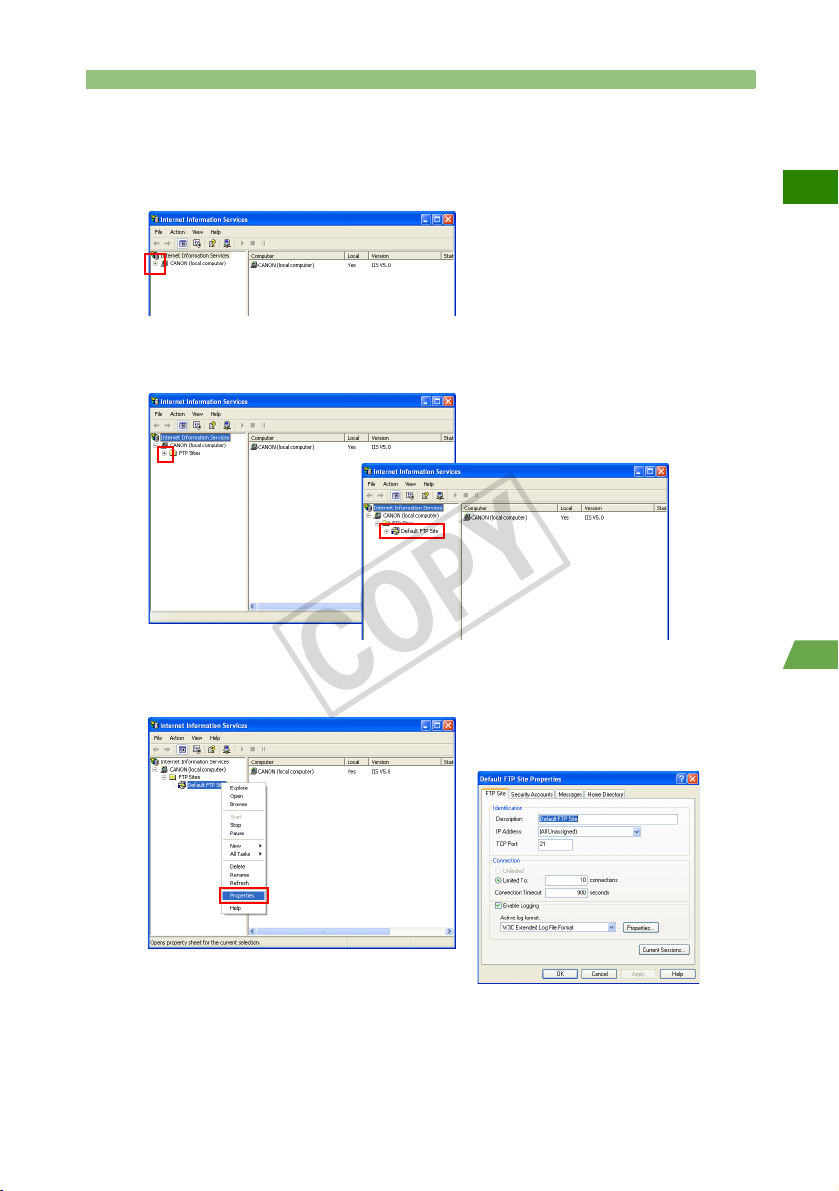
Click [+].
4
“CANON ...” on the right of the [+] sign indicates the computer's name, so it will
differ depending on the computer.
Click [+] on the left of [FTP Sites].
5
X [Default FTP Site] will appear.
W
Right-click [Default FTP Site], and select [Properties].
6
X [Default FTP Site Properties] will appear.
17
2
Infrastructure Mode
Setting Up the FTP Server
COPY
Configure settings in each tab.
7
Configure settings on the [FTP Site], the [Security Accounts], and the [Home
Directory] tabs as follows.
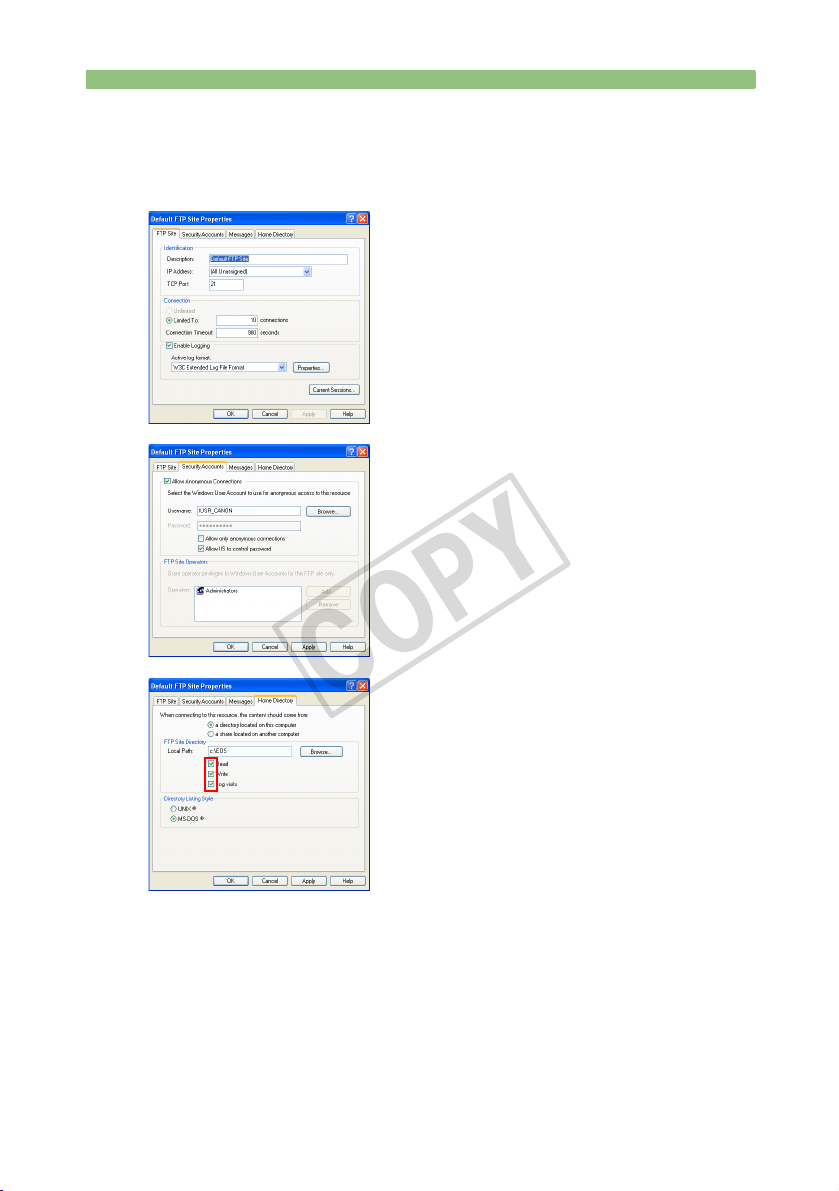
[FTP Site]
Usually it is already set like this, so you do not
need to change it.
[Security Accounts]
You do not need to change it.
Important!
Never change the [Username]. ([Username] in
the left window is an example.) The characters
following “IUSR_” indicate the computer's name,
so they will differ depending on your computer.
Click the [OK] button and close the screen to finish FTP site settings.
18
[Home Directory]
Assign a folder to transfer images to in the
[Local Path] of the [FTP Site Directory].
Create an [EOS] folder immediately under the C
drive.
Enter [C:\EOS] in [Local Path], and check
[Read], [Write], and [Log visits].

Setting Up the Wireless LAN Access Point
COPY
This section explains the minimal setup required to transfer images using a wireless LAN
access point with infrastructure mode. For detailed installation and setup procedures for a
wireless LAN access point, please read the instruction manual for the wireless LAN
access point or contact the manufacturer of the wireless LAN access point.
Terms used in this section may differ depending on the manufacturer of the wireless LAN
access point.
The high-speed transfer mode developed by the manufacturer may destabilize
communication, so it is recommended not to use it.
Selecting a Wireless LAN Standard
Operating mode, wireless mode, 802.11 mode, and other modes fall under this category.
Select “802.11b”, “802.11g”, or “Automatic.”
Setting the SSID
It is also known as the “ESSID.”
Enter a series of alphanumeric characters (up to 36 characters).
If a string is already entered, you do not need to change it.
Enter the same SSID in the WFT-E1.
Setting Security
Encryption and other items fall under this category.
Set up “WEP” as the minimum security.
Enter the encryption key set for WEP in the WFT-E1.
If authentication can be selected, set it to “Open.”
When using WPA-PSK authentication, use the TKIP encryption method. The WFT-E1
does not accommodate the AES encryption method.
W
2
Infrastructure Mode
19

Setting Up the Wireless LAN Access Point
COPY
Setting the IP Address
For a wireless LAN access point with a DHCP server function, it is recommended to
disable the DHCP server function and fix the IP addresses allocated to the wireless LAN
access point and the FTP server as follows.
If the DHCP server function is enabled, the IP address allocated to the FTP server will
change automatically so the WFT-E1 may not connect to the FTP server.
Enter the IP addresses for the wireless LAN access point and the FTP server and subnet
mask as follows.
If they are already entered, do not change them, and write down the IP addresses
configured in the wireless LAN access point and the FTP server, the subnet mask, and
the range of IP addresses available. The information will be used when setting up the
WFT-E1.
IP address
Wireless LAN access point :192.168.11.1
FTP server :192.168.11.2
Subnet mask
255.255.255.0
If other wireless LAN equipment is connected to the wireless LAN access point you set up in
this section, change the settings as required. If you use the equipment without changing the
settings, other wireless LAN equipment may not be able to connect to the wireless LAN access
point.
20
Creating the WFT-E1 Settings File
COPY
Use the WFT-E1 Utility software included in the package to create the settings file to
transfer images using infrastructure mode.
Start WFT-E1 Utility.exe and set up as follows. If the WFT-E1 Settings Wizard appears,
click the [Cancel] button.
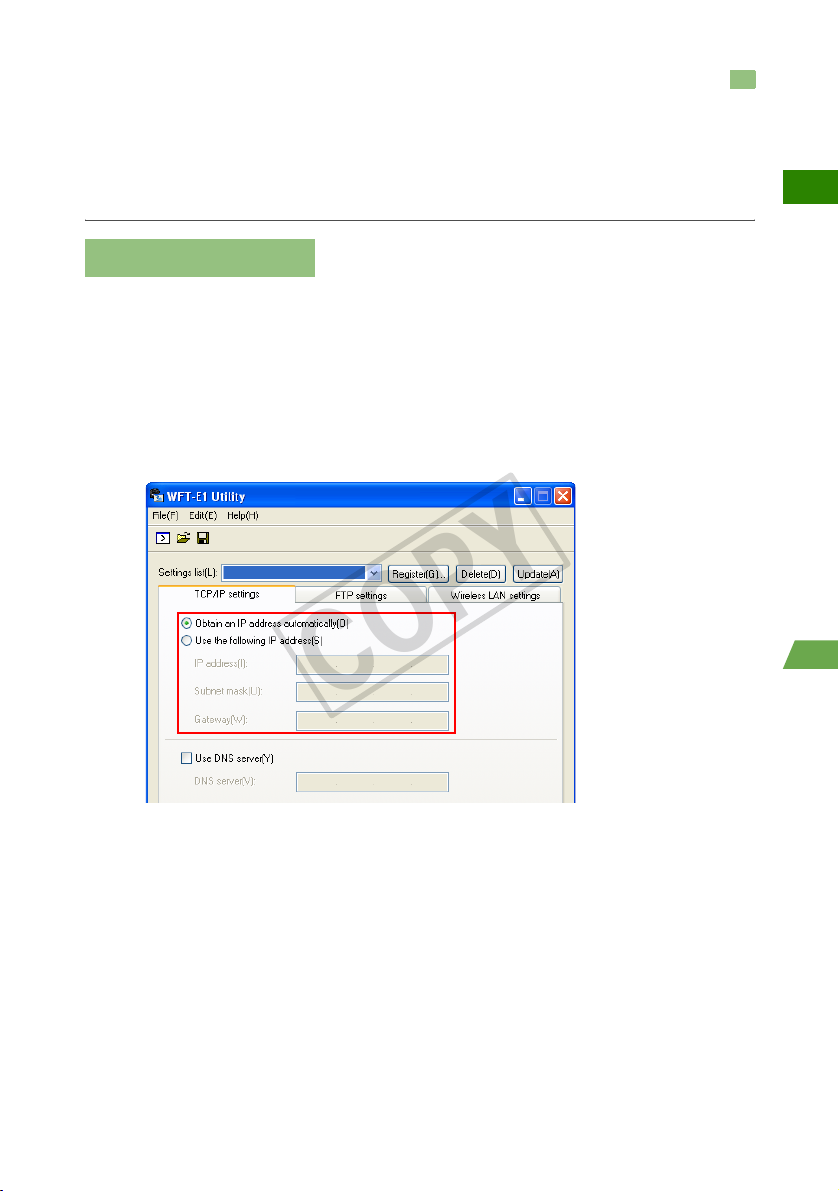
Setting Up TCP/IP
If the wireless LAN access point, etc., is set to disable the DHCP server function
in “Setting the IP Address” on the previous page, enter the IP address among
the allocated IP address in a range that is not duplicated with the FTP server or
other network equipment.
Enter the subnet mask the same way as for the wireless LAN access point.
If the wireless LAN access point, etc., is set to enable the DHCP server function
in “Setting the IP Address” on the previous page, check [{Obtain an IP
address automatically].
W
2
Infrastructure Mode
21
Creating the WFT-E1 Settings File
COPY
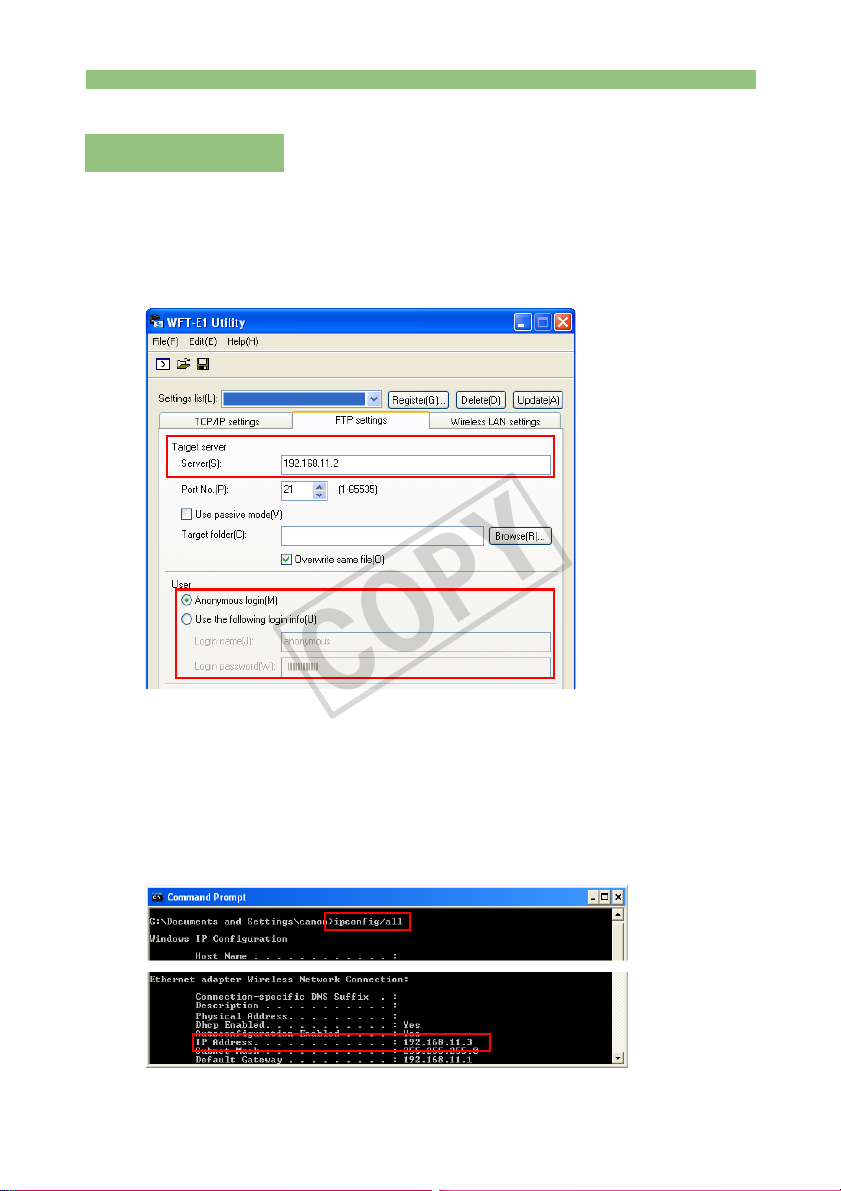
Setting Up FTP
For [Server] of [Target server], enter the IP address or server name for the
FTP server as found through the “Command Prompt” as follows.
For the [User], checkmark [{Anonymous login]. To login to the FTP server,
enter anonymous for the Login name, and enter wft-e1@canon for the
password.
Checking the IP address of the FTP server using the Command
Prompt
The FTP server’s [Start] button Æ Select [All Programs] Æ [Accessories] Æ
[Command Prompt].
Input ipconfig/all, and press the Enter key.
X “Wireless Network Connection” status appears. “Autoconfiguration IP
Address” or “IP Address” is the IP address for the FTP server.
22
Creating the WFT-E1 Settings File
COPY
If the IP address is referred to as the “Autoconfiguration IP Address”, the wireless LAN
access point may automatically change the IP address of the FTP server after a set amount of
time. In the wireless LAN access point settings, set the time to automatically allocate an IP
address as long as possible. If they are successfully connected at first and then error No. 41
(cannot connect to the FTP server) appears later, check the IP address for the FTP server
using the Command Prompt, and set the same IP address in the WFT-E1.
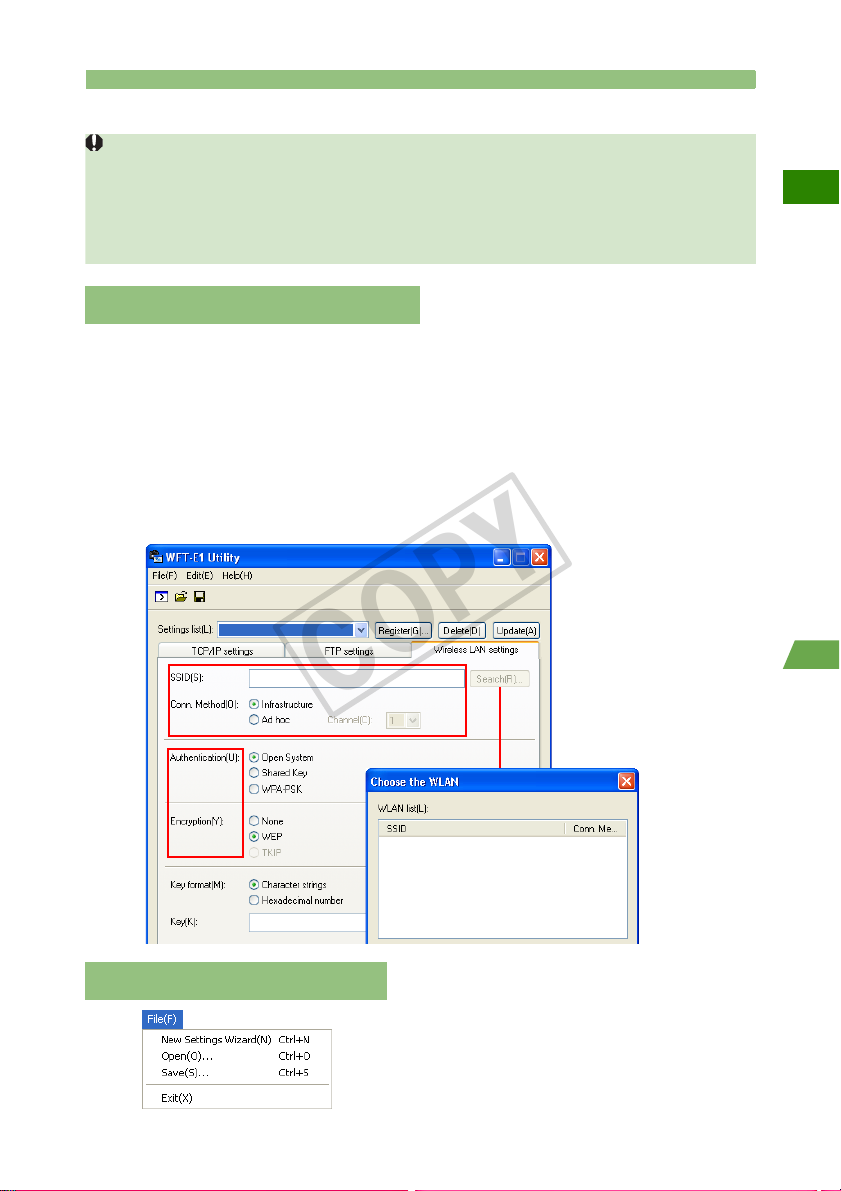
Setting Up a Wireless LAN
Enter the [SSID] the same way as for the wireless LAN access point.
If your personal computer is connected to a wireless LAN access point or wireless LAN
Search
adapter, click the [
environment for a wireless LAN terminal being used nearby. The terminal’s SSID will
then be displayed. When you select the displayed SSID, the SSID and connection
method and channel will be set automatically to connect to the wireless LAN terminal.
For [Conn. Method], set [Infrastructure].
Set [Authentication] and [Encryption] the same way as the security settings
for the wireless LAN access point.
] button to search within the personal computer’s wireless LAN
W
Saving the Settings File
Under the [File] menu, select [Save] to save the
Save the settings file to the root directory of the
communication settings file to the memory card.
memory card without changing the file name.
23
2
Infrastructure Mode
Setting Up the WFT-E1
COPY
Please read Chapter 2 “Setting Up the WFT-E1” in the PDF manual on the WFT-E1/E1A
Utility Disk included in the package.
Conduct the series of preparations described on pages 16 through 24, and download the
settings file to the camera.
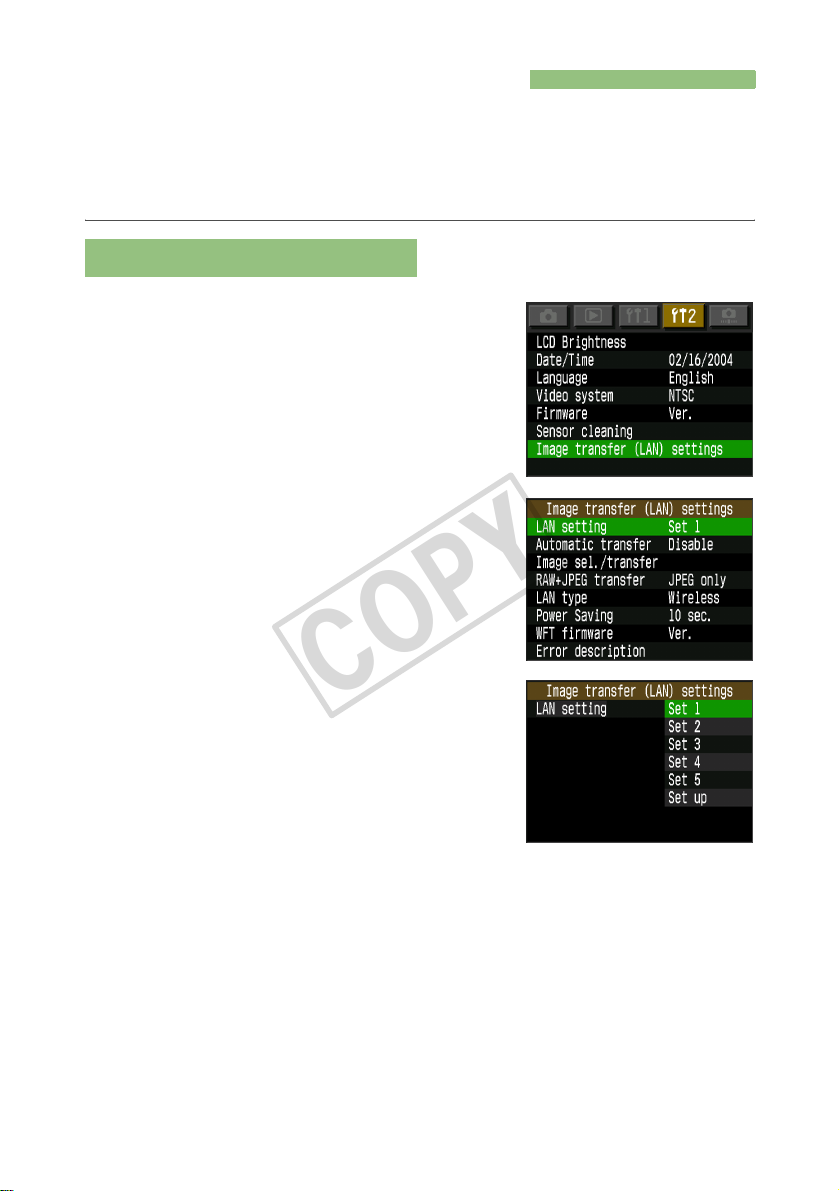
Selecting the Settings File
Select [Image transfer (LAN) settings]
from the menu.
1
[Image transfer (LAN) settings] will not appear
unless the WFT-E1 is connected to the camera,
and both are turned on.
Select [LAN setting].
2
Select a set number.
3
Select the set number where the settings file is
downloaded for infrastructure mode.
24
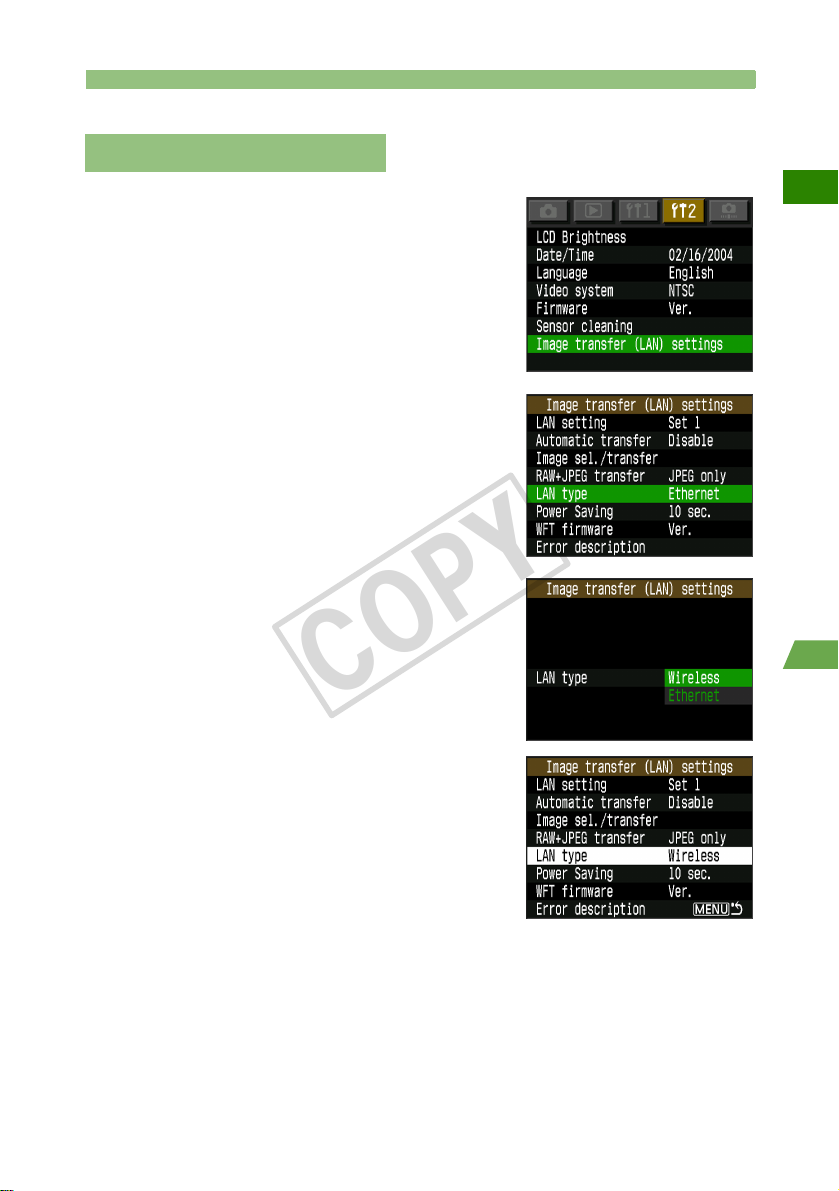
Selecting the LAN Type
COPY
Setting Up the WFT-E1
Select [Image transfer (LAN) settings]
from the menu.
1
[Image transfer (LAN) settings] will not appear
unless the WFT-E1 is connected to the camera,
and both are turned on.
Select [LAN type].
2
Select [Wireless].
3
W
2
Infrastructure Mode
25
Checking the Connection Status
COPY
Check the connection status with the wireless LAN access point.
Connect the FTP server and the wireless LAN access point, and turn the power on.
Connect the WFT-E1 and the camera, and turn the power on.
Check the connection when the WFT-E1 and the wireless LAN access point are close to
each other — 3m/9.8ft or less.
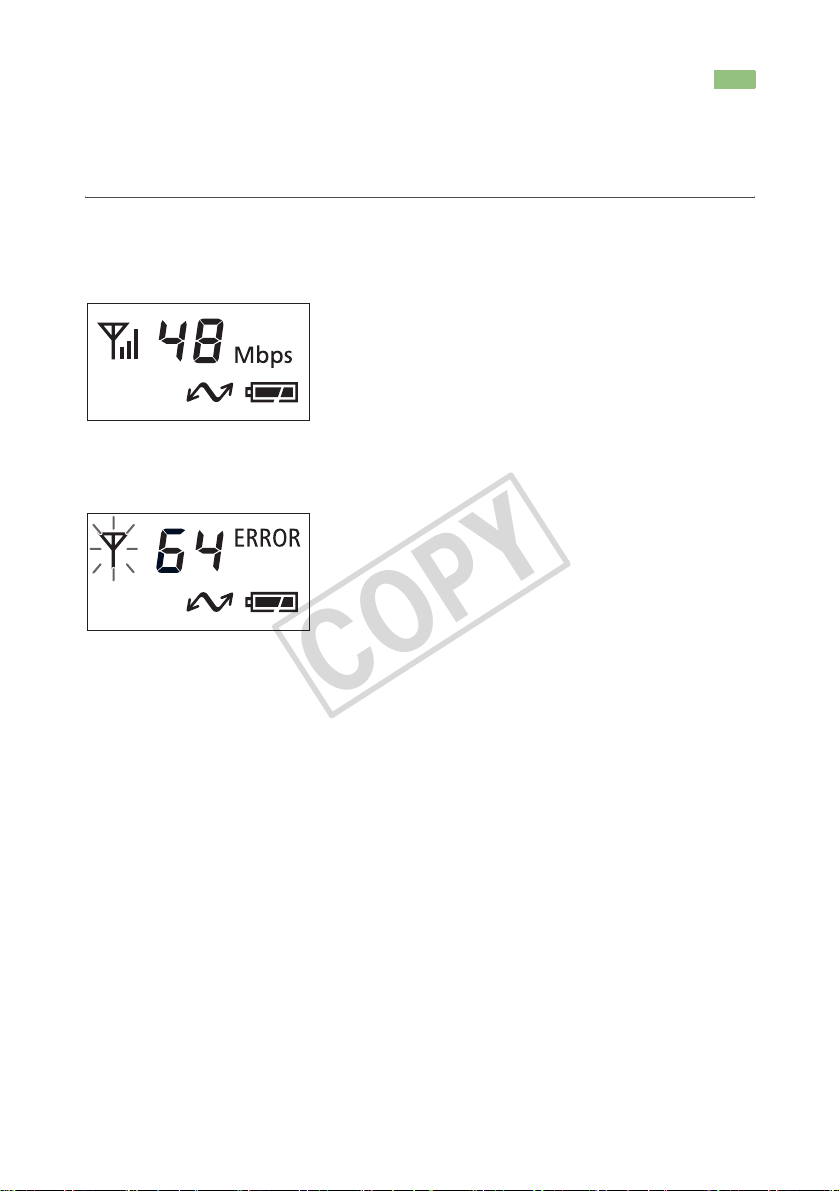
Successful connection display
The <3> lamp and the <4> lamp on the WFT-E1 will
light up, and the LCD panel will show the link speed
(Mbps) and <B>.
After the period of time passes with no activity as set
in the [Power Saving] menu, the <4> lamp will turn
off and the link speed and <B> will also disappear
from the LCD panel.
Failed connection display
The LCD panel will show <E> and an error number.
The <B> and <3> lamps will also blink.
See troubleshooting (p.103) to solve the problem.
26
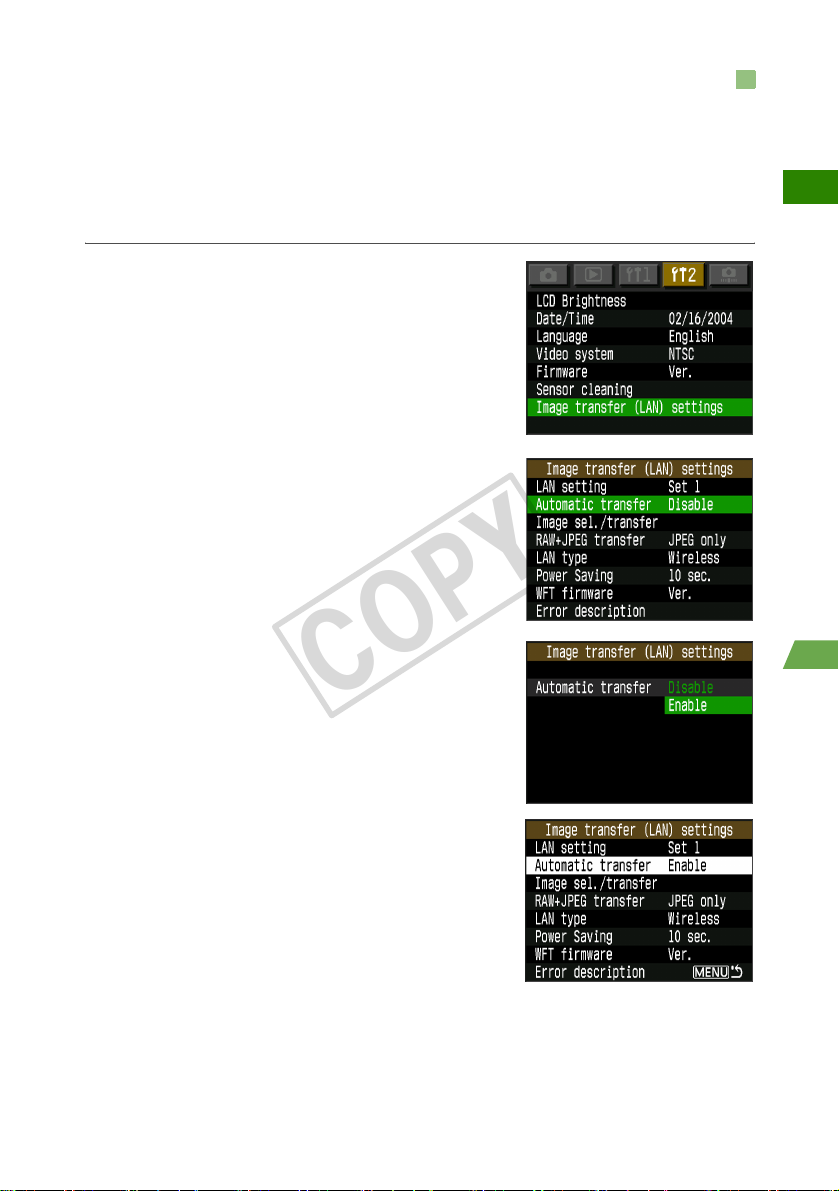
Transferring Images to the FTP Server
COPY
This section uses automatic transfer as an example to explain how to transfer images to
the FTP server.
If a memory card is not installed in the camera, images cannot be transferred. Images will
also be stored in the memory card, so insert a memory card with adequate available
space.
Select [Image transfer (LAN) settings]
from the menu.
1
[Image transfer (LAN) settings] will not appear
unless the WFT-E1 is connected to the camera,
and both are turned on.
Select [Automatic transfer].
W
2
Select [Enable].
3
Take a picture.
4
X The <4> lamp will blink and captured image will be transferred to the FTP
server.
27
2
Infrastructure Mode
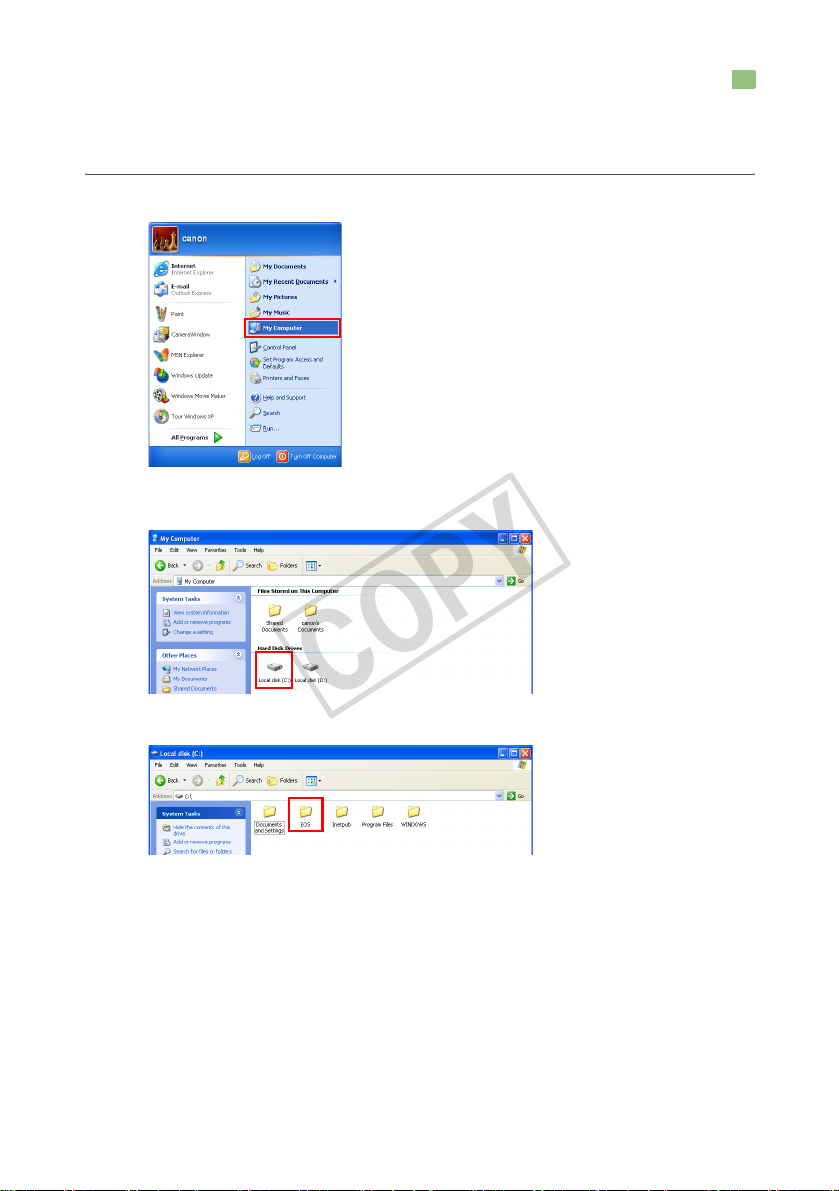
Viewing Transferred Images on the FTP Server
COPY
Transferred images are saved in the folder on the FTP server that was created on page
18.
[Start] button Æ Select [My Computer].
1
Double-click the [Local disk (C:)] icon in [Hard Disk Drives].
2
Double-click the [EOS] folder.
3
28
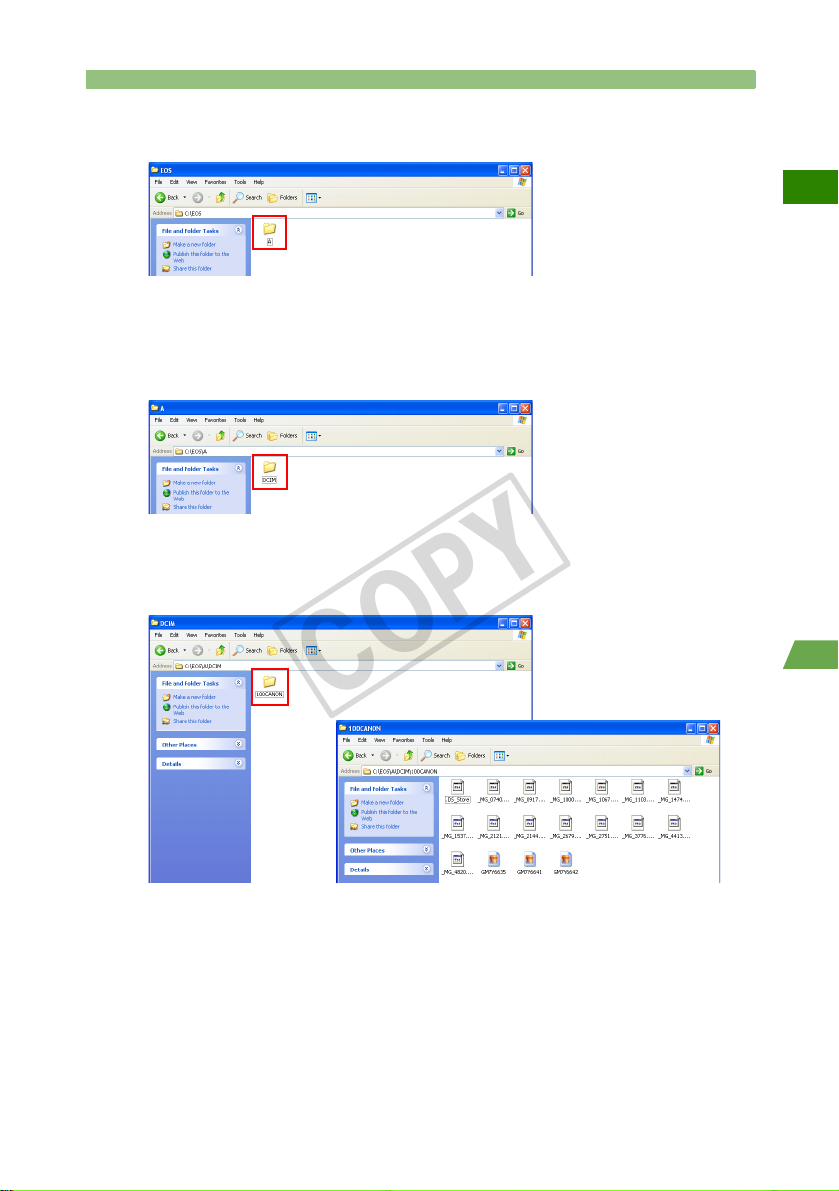
Viewing Transferred Images on the FTP Server
COPY
For the EOS-1D series, double-click the [A] folder.
4
The [A] folder contains images saved in the CF card. If the images saved in the
SD card have been transferred, a [B] folder is automatically created and images
will be saved there.
Double-click the [DCIM] folder.
5
Double-click the [***CANON], the [***EOS1D], or the [***EOS5D]
folder.
6
X Transferred image data will appear.
W
29
2
Infrastructure Mode

MEMO
COPY
30
 Loading...