

Page 1
MULTIMEDIA PROJECTOR
User’s Manual
Table of Contents
Safety Instructions
Before Use
Projecting an Image
Useful Functions Available During a Presentation
Setting Up Functions from Menus
Projecting an Image from a Digital Camera or an
USB Flash Memory (SX80 II)
Connecting the Projector to Network (SX80 II)
Appendix
Index
ENG
Page 2

Features of SX80 MarkII/SX800 Multimedia Projector
Thank you for purchasing a Canon projector.
The SX80 MarkII/SX800 Multimedia Projector (hereinafter referred to as "the projector") is
a high-performance projector that is capable of projecting high-resolution computer
screens, high-quality digital images (SX80 MarkII), images from digital cameras and USB
flash memories (SX80 MarkII) on a large screen.
Major Features
Smooth and Beautiful Imaging Capability
Incorporation of AISYS, Canon's unique optical engine, and LCOS (Liquid Crystal On Silicon) achieves high brightness, high contrast ratio, and smooth and beautiful lattice-free
images.
Native SXGA+ Resolution
Native SXGA+ resolution (1400 by 1050 dots) ensures projection of a high-quality image
in a wider projection area with a high degree of resolution.
High-powered 1.5X Zoom Lens
1.5X zoom aspheric lens can project a 100-inch image when placed 3 m (9.8') to 4.9 m
(16.1') away. (P35)
"Auto Setup Function" for Making Setup a Breeze
The keystone distortion is automatically adjusted for quick and easy setup of projector.
(P52)
Equipped with HDMI Input Terminal (SX80 II)
Connecting the projector to AV equipment via HDMI terminal allows you to project high
quality digital images. (P44)
Direct Projection of Images Taken by Digital Camera (SX80 II)
Capable of directly projecting images taken by PictBridge enabled digital cameras.
(P114)
Direct Projection of Data on USB Flash Memories (SX80 II)
Capable of directly projecting JPEG images on USB flash memories. (P118)
"Off and Go" Feature
It can be unplugged and packed away immediately. (P68)
* Wait until the cooling fan stops before putting the projector in the carrying bag.
User-Friendly On-Screen Menu
Settings are organized by four tabs. You can easily find settings for each function. (P76-
P112)
Compact and Easy-to-use Wireless Remote Control
It comes with a wireless remote control which allows you to control all functions of this
projector. (P26)
2
Page 3

Features of SX80 MarkII/SX800 Multimedia Projector
Various Image Modes for a Particular Use of Your Projector (SX80 II)
When projecting a digital still photo image or an image that has been processed on an
sRGB-compatible monitor, you can project the image with higher tone on the screen by
incorporating the appropriate image correction function for the particular lighting environment.
It is useful when projecting the image in a photo studio, portrait studio, wedding reception
hall, art museum, gallery, etc.
3
Page 4
Features of SX80 MarkII/SX800 Multimedia Projector
User's Manual (this document)
This is a User's Manual for the SX80 MarkII/SX800 Multimedia Projector. This manual provides detailed information on how to use the projector. Read this manual thoroughly to
make the most of your projector and ensure safety.
Important Information and Quick Start Guide
First read document. It provides information about projector safety, cautions, quick start
guide*, cleaning and replacing the air filter and lamp replacement.
* This guide shows an outline flowchart of the steps to start and stop the projector, as
well as the functions available for projecting images.
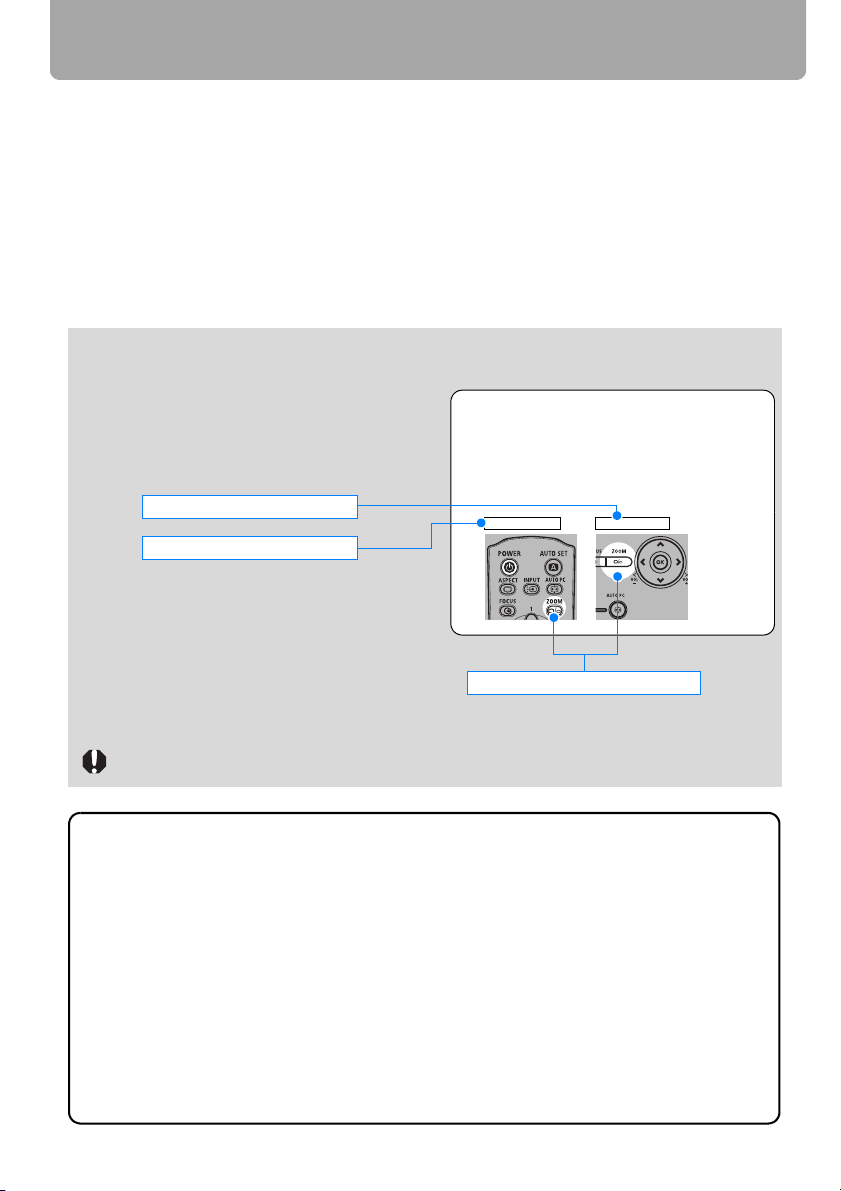
Symbols of Button Operations
The projector can be operated using buttons
on the remote control or the top control of the
projector. The remote control allows you to
operate all functions of the projector. In this
document, the buttons operation is shown as
below.
Top control button operation
Remote control button operation
Adjusting the Image Size
Use the ZOOM button to adjust the size of the proj
Change the projector installation position if your de
adjust it with the zoom function. (P35)
1 Press the ZOOM button to pop up a window sho
Remote control Top control
Symbols Used in This Manual
Meanings of the following symbols used in
this manual are as follows:
(SX80 II): Function or description only appli-
cable to SX80 MarkII.
Indicate the buttons to be pressed
(SX800): Function or description only appli-
cable to SX800.
A precaution about operation or restriction is given here.
COPYRIGHT NOTICE
Please note that enlarging or reducing the size of an image for commercial purposes or public presentation may infringe on the legally protected copyright or the
copyright holder of the original material.
About Trademarks
• Microsoft, Windows, Windows XP, Windows Vista and Internet Explorer are registered trademarks or trademarks of Microsoft Corporation in the United States and/
or other countries.
• Macintosh and Mac are registered trademarks of Apple Computer, Inc., registered in the United States and/or other countries.
• HDMI, HDMI logo, and High Definition Multimedia Interface are registered trademarks or trademarks of HDMI Licensing, LLC.
4
Page 5

Quick Reference Guide
This Quick Reference Guide will help you find functions that make full use of the projector,
are useful in producing an attractive presentation, and so on.
Connecting the Projector
Connecting to the Computer (P40 – P43)
Connecting to AV Equipment (P44 – P47)
Connecting a Digital Camera (SX80 II)
(P48, P114 – P115)
Connecting an USB Flash Memory (SX80 II)
(P48, P118 – P119)
Projecting an Image
Starting Projection (P49 – P51)
Selecting an Input Signal (P54 – P55)
Projecting an Image from a Digital Camera
(SX80 II) (P114 – P117)
Projecting Data on USB Flash Memory
(SX80 II) (P118 – P124)
Adjusting Image
Adjusting the Image Size and Focus
(P58 – P59)
Adjusting Keystone Distortion (P60 – P61)
Adjusting Aspect Ratio (P62 – P66)
Eliminating Flickers from Computer Screen or
Adjusting Positional Shift (P82)
Producing a Presentation
Blackened Out an Image Temporarily (P70)
Freezing the Picture (P70)
Adjusting the Volume (P71)
Muting the Sound (P71)
Zooming an Image (P72)
Showing the Elapsed Time (P73)
Ceiling Mounted Projection or
Projecting from behind Screen (P87)
Changing Remote Control Channel
(P107)
Resetting Projector Setting
Resetting the Image Settings (P102)
Resetting the Key Lock (P105)
Resetting Password (P108)
Resetting a Network Setting (SX80 II) (P111)
Resetting to the Default Setting (P111)
Adjusting Colors and Image Quality
Projecting an Image on a Greenboard (P86)
Selecting an Image Mode Suitable for the
Projecting Image (P93)
Making Fine Color Adjustments (P97, P100)
Removing Noise (P98)
Miscellaneous Functions
Reducing the Lamp Brightness (P102)
Using the Power Saving Mode (P103)
Turning on the Projector by Connecting the
Power Cord (P104)
Disabling the Beep During the Operation
(P104)
Disabling Buttons (P105)
Hiding Guide Messages (P106)
Turning Off the Projector LED Lamps (P106)
Setting a Password (P108)
5
Page 6

Table of Contents
Features of SX80 MarkII/SX800 Multimedia Projector..............................................2
Quick Reference Guide................................................................................................ 5
Safety Instructions.....................................................................................................12
Safety Precautions ................................................................................................................... 13
■ READ AND KEEP THIS OWNER'S MANUAL FOR LATER USE. ..................................... 14
AC Power Cord Requirement................................................................................................... 16
Federal Communication Commission Notice ........................................................................... 17
Canadian Radio Interference Regulations ............................................................................... 17
Precautions on Handling the Batteries in the Remote Controller ............................................. 18
Lamp Handling Precautions ..................................................................................................... 18
Carrying/Transporting the Projector ......................................................................................... 19
Installation Precautions ............................................................................................................ 19
Before Use ........................................................................................................ 21
Supplied Accessories................................................................................................22
■ Installing the Lens Cap ................................................................................................... 22
■ Putting the Projector in the Carrying Bag ....................................................................... 23
Part Names .................................................................................................................24
Main Unit of Projector............................................................................................................... 24
■ Front Side........................................................................................................................ 24
■ Rear Side ........................................................................................................................ 24
■ Bottom Side.....................................................................................................................25
Remote Control ........................................................................................................................ 26
Top Control............................................................................................................................... 28
Input Terminals......................................................................................................................... 29
■ SX80 MarkII.....................................................................................................................29
■ SX800.............................................................................................................................. 29
Preparing the Remote Control.................................................................................. 31
■ Installing Remote Control Batteries................................................................................. 31
■ Remote Control Operating Range .................................................................................. 31
Projecting an Image ......................................................................................... 33
Steps for Setting Up the Projector and Projecting an Image................................. 34
Setting Up the Projector............................................................................................35
■ Placing in Front of the Screen......................................................................................... 35
■ Placing on a Level Place................................................................................................. 36
■ When Pointing the Projector Up...................................................................................... 37
Connecting the Projector .......................................................................................... 38
Connectable Equipment and Input Terminals .......................................................................... 38
■ SX80 MarkII.....................................................................................................................38
■ SX800.............................................................................................................................. 39
Connecting the Projector to the Computer ............................................................................... 40
■ Connecting to RGB Monitor Output Terminal (analog connection) ................................ 40
■ Connecting to DVI Monitor Output Terminal (digital connection) (SX80 II) .................... 42
■ Outputting an Image and Audio ..................................................................................... 42
Connecting to AV Equipment ................................................................................................... 44
■ Connecting to Digital Video Output Terminal (digital connection) (SX80 II)................... 44
■ Connecting to Analog Video Output Terminal (analog connection) ............................... 45
6
Page 7

Table of Contents
■ Outputting Audio to Speakers .........................................................................................47
■ Connecting a Digital Camera or an USB Flash Memory (SX80 II) .................................. 48
Starting Projection .....................................................................................................49
■ When the Language Selection Screen Appears .............................................................50
■ When the Password Input Screen Appears .................................................................... 51
■ When "No signal" Appears............................................................................................... 51
■ When Notebook Computer Screen Does Not Appear..................................................... 51
■ Adjusting Image .............................................................................................................. 51
Changing Notebook Computer Screen Output ......................................................................... 51
■ Turning On External Monitor Output................................................................................ 51
Setting Up the Screen Automatically .......................................................................52
Auto Setup ................................................................................................................................ 52
■ Performing the Auto Setup .............................................................................................. 53
Selecting an Input Signal (INPUT) ............................................................................54
■ Types of Input Signals ..................................................................................................... 54
■ Selecting an Input Signal................................................................................................. 55
Adjusting Image .........................................................................................................56
Setting the Display Resolution of the Computer .......................................................................56
■ Windows Vista ................................................................................................................. 56
■ Windows XP..................................................................................................................... 56
■ Macintosh OSX ................................................................................................................ 56
AUTO PC.................................................................................................................................. 57
■ Performing the Auto PC Function ....................................................................................57
Adjusting the Image Size .......................................................................................................... 58
Adjusting the Focus .................................................................................................................. 59
■ Auto focusing (SX80 II).................................................................................................... 59
■ Manual focusing ..............................................................................................................59
Adjusting Keystone Distortion ...................................................................................................60
■ Auto adjustment............................................................................................................... 60
■ Manual adjustment ..........................................................................................................60
■ Resetting the Keystone Adjustment ................................................................................ 61
Selecting Screen Aspect and Aspect.......................................................................62
Selecting Screen Aspect........................................................................................................... 62
■ Moving Image with 16:9 D. Image Shift........................................................................... 64
■ Resetting the Image Shift ................................................................................................ 64
Selecting Aspect Ratio.............................................................................................................. 65
■ Types of Aspect Ratios.................................................................................................... 65
■ How to Select an Aspect Ratio ........................................................................................ 66
Selecting an Image Mode ..........................................................................................67
■ Image modes................................................................................................................... 67
■ How to Select an Image Mode ........................................................................................67
Turning Off the Projector...........................................................................................68
Useful Functions Available During a Presentation ....................................... 69
Useful Functions Available During a Presentation.................................................70
Blackened Out an Image Temporarily ......................................................................................70
Freezing the Picture.................................................................................................................. 70
Adjusting the Volume................................................................................................................ 71
Table of Contents
7
Page 8

Table of Contents
Muting the Sound ..................................................................................................................... 71
Zooming an Image ................................................................................................................... 72
Showing the Elapsed Time....................................................................................................... 73
Projecting Image Without Computer (SX80 II) ......................................................................... 73
Setting Functions from Menus ....................................................................... 75
How to Use Menus ..................................................................................................... 76
■ Menu Configuration......................................................................................................... 76
■ Basic Operation of Menu ................................................................................................ 77
Setting Display Status ............................................................................................... 79
Selecting an Image Projection Mode........................................................................................ 79
Selecting an Input Signal Type (ANALOG PC) ........................................................................ 80
Selecting an Input Signal Type (VIDEO/S-VIDEO) .................................................................. 80
Selecting an Input Signal Type (COMPONENT)...................................................................... 81
Adjusting Input Signal (ANALOG PC) – Total Dots.................................................................. 81
Adjusting Input Signal (ANALOG PC) – Tracking .................................................................... 82
Adjust Input Signal (ANALOG PC) – Horizontal position ......................................................... 82
Adjust Input Signal (ANALOG PC) – Vertical position.............................................................. 83
Adjust Input Signal (ANALOG PC) – Horizontal pixels............................................................. 83
Adjust Input Signal (ANALOG PC) – Vertical pixels................................................................. 84
Selecting HDMI Input Level (SX80 II)....................................................................................... 84
Select HDMI Over Scan (SX80 II) ............................................................................................ 85
Performing Progressive Processing ......................................................................................... 85
Selecting a Menu Position........................................................................................................ 86
Correcting the Screen Color.....................................................................................................86
Reversing projection................................................................................................................. 87
Capturing a Logo (SX800)........................................................................................................88
Selecting the User Logo Display Position (SX800) .................................................................. 88
No Signal Screen (SX80 II) ......................................................................................................89
Screen When Blank (SX80 II) .................................................................................................. 89
Selecting a Logo at Startup (SX80 II)....................................................................................... 90
No Signal Screen (SX800) ....................................................................................................... 90
Screen When Blank (SX800) ................................................................................................... 91
Selecting a Logo at Startup (SX800)........................................................................................ 91
Selecting Aspect Ratio of Screen............................................................................................. 92
Setting the Image Quality..........................................................................................93
Selecting an Image Quality ......................................................................................................93
Adjusting the Brightness........................................................................................................... 94
Adjusting the Contrast.............................................................................................................. 94
Adjusting the Sharpness .......................................................................................................... 95
Making a Gamma Correction ................................................................................................... 95
Making Color Adjustment (HDMI) (SX80 II) ............................................................................. 96
Making Color Adjustment (Digital PC/Analog PC/USB) (SX80 II) ............................................ 96
8
Page 9

Table of Contents
Making Color Adjustment (COMPONENT/VIDEO/S-VIDEO) (SX80 II).................................... 97
Making Color Adjustment (Analog PC) (SX800) ....................................................................... 97
Making Color Adjustment (COMPONENT/VIDEO) (SX800)..................................................... 98
Making Advanced Adjustment (Noise reduction)...................................................................... 98
Making Advanced Adjustment (Dynamic gamma) .................................................................... 99
Making Advanced Adjustment (Mem. color correct) (SX80 II) .................................................. 99
Making Advanced Adjustment (Auto fleshtone) (SX800)........................................................ 100
Adjusting Fine Color Adjustment (6-axis color adjust) (SX80 II) ............................................. 100
Correcting the Image According to the Ambient Light (SX80 II) .............................................101
Reducing the Lamp Brightness............................................................................................... 102
Resetting the Image Settings.................................................................................................. 102
Setting Various Function.........................................................................................103
Setting Auto Setup Function ................................................................................................... 103
Selecting the Power Management Mode ................................................................................ 103
Skip the POWER Button Operation ........................................................................................104
Enabling/Disabling the Beep................................................................................................... 104
Prohibiting the Projector Operation......................................................................................... 105
Selecting a Display Language ................................................................................................105
Showing/hiding the Guide Screen .......................................................................................... 106
Turning on/off LED Illumination .............................................................................................. 106
Setting for Slideshow (SX80 II)............................................................................................... 107
Setting up the Remote Control Channel ................................................................................107
Extending the Menu Display Time .......................................................................................... 108
Setting a Password................................................................................................................. 108
Registering a Password.......................................................................................................... 109
Resetting the Lamp Counter................................................................................................... 109
■ About the Display of the Lamp Counter ........................................................................110
Initializing network settings (SX80 II)...................................................................................... 111
Resetting to the Default Setting .............................................................................................. 111
Checking the Information of the Projector ............................................................112
Projecting an Image from a Digital Camera or an USB
Flash Memory (SX80 II) .................................................................................. 113
Projecting an Image from a Digital Camera (SX80 II)............................................114
Connecting a Digital Camera.................................................................................................. 114
Operating the Projected Image............................................................................................... 116
■ Switching to the Next Image.......................................................................................... 116
■ Rotating an Image ......................................................................................................... 116
Running a Slideshow .............................................................................................................. 117
■ Setting a Slideshow Interval .......................................................................................... 117
■ Finishing projection ....................................................................................................... 117
Projecting Data on USB Flash Memory (SX80 II)...................................................118
Connecting an USB Flash Memory ........................................................................................ 118
Description of USB File Browser ............................................................................................ 120
Table of Contents
9
Page 10

Table of Contents
Selecting an Image for Projection .......................................................................................... 121
■ Selecting a Drive........................................................................................................... 121
■ Selecting a Folder ......................................................................................................... 121
■ Selecting an Image File for Projection .......................................................................... 122
Operating the Projected Image .............................................................................................. 123
■ Switching to the Previous/Next Image .......................................................................... 123
■ Rotating an Image......................................................................................................... 123
■ Returning to the USB File Browser................................................................................ 123
Running a Slideshow of Data saved in a USB Flash Memory ............................................... 124
■ Creating an Image File Folder ...................................................................................... 124
■ Setting a Slideshow Interval.......................................................................................... 124
Connecting the Projector to Network (SX80 II)............................................ 125
Setting an IP Address (SX80 II)............................................................................... 126
■ Setting IP Address of the Computer ............................................................................. 126
■ Resetting the IP Address Setting of the Computer ....................................................... 127
Setting Network (SX80 II)......................................................................................... 128
■ Displaying the Network Configuration Screen .............................................................. 128
■ Setting the Network....................................................................................................... 129
■ Resetting the Network Setting....................................................................................... 134
■ Error Notification Message............................................................................................ 135
■ Projector Control ........................................................................................................... 136
Appendix......................................................................................................... 137
Troubleshooting....................................................................................................... 138
WARNING Lamp Flash Patterns............................................................................................ 138
Symptoms and Solutions........................................................................................................ 139
■ You cannot turn on the projector. ................................................................................. 139
■ You cannot project an image from the projector. ......................................................... 139
■ A digital camera or USB flash memory is not recognized. (SX80 II) ............................ 140
■ You cannot hear sound................................................................................................. 140
■ The projected image is blur. ......................................................................................... 141
■ You cannot project an image appropriately. ................................................................ 141
■ The projector is forced to be turned off. ....................................................................... 141
■ You cannot operate the remote control. ....................................................................... 142
Maintenance ............................................................................................................. 143
Cleaning the Projector............................................................................................................ 143
Cleaning and Replacing the Air Filter..................................................................................... 144
■ Cleaning the Air Filter.................................................................................................... 144
■ Replacing the Air Filter.................................................................................................. 144
Replacing the Lamp ............................................................................................................... 145
■ About the Replacing Lamp ........................................................................................... 145
■ Replacing the Lamp...................................................................................................... 146
Relationship between Aspect and Screen Aspect................................................147
When Projecting an Image from a Computer ......................................................................... 147
When Projecting an Image from Image Software................................................................... 148
When Projecting an Image from a Digital Camera or a USB Flash Memory (SX80 II) .......... 149
10
Page 11

Table of Contents
Supported Computer Signal Types ........................................................................150
Relationship between Screen Size and Projecting Distance ...............................151
Glossary.................................................................................................................... 152
Specifications........................................................................................................... 156
■ Projector ........................................................................................................................ 156
■ Remote Control.............................................................................................................. 156
■ External View ................................................................................................................. 157
■ ANALOG PC-1 (SX800), ANALOG PC-2/COMPONENT IN terminal ............................. 157
■ Service Port (CONTROL)............................................................................................... 158
Index ..........................................................................................................................160
Menu Configuration .................................................................................................164
Table of Contents
11
Page 12
Safety Instructions
Before operating this projector, read this manual thoroughly in order to operate the
projector properly.
This projector offers many convenient features and functions. Operating the projector
properly enables you to manage those features and maintain it in good condition for a
long period.
Improper operation may result in not only reducing the product-life, but also malfunctions,
fire hazards, or other accidents.
If your projector is not operating correctly, read this manual again, check operations and
cable connections, and try the solutions shown in the "Troubleshooting" section at the end
of this booklet. If the problem still persists, contact the service center or the dealer where
you purchased the projector.
CAUTION
RISK OF ELECTRIC SHOCK
DO NOT OPEN
CAUTION: TO REDUCE THE RISK OF ELECTRIC SHOCK, DO NOT REMOVE
COVER (OR BACK). THERE ARE NO USER-SERVICEABLE PARTS
INSIDE EXCEPT LAMPS. REFER SERVICING TO QUALIFIED SERVICE
PERSONNEL.
THIS SYMBOL INDICATES THAT DANGEROUS VOLTAGE
CONSTITUTING A RISK OF ELECTRIC SHOCK IS PRESENT WITHIN
THIS UNIT.
THIS SYMBOL INDICATES THAT THERE ARE IMPORTANT OPERATING
AND MAINTENANCE INSTRUCTIONS FOR THIS UNIT IN THE
OWNER'S MANUAL.
CAUTION
Not for use in a computer room as defined in the Standard for the Protection of Electronic
Computer/Data Processing Equipment, ANSI/NFPA 75.
12
Page 13
Safety Instructions
Safety Precautions
WARNING: TO REDUCE THE RISK OF FIRE OR ELECTRIC SHOCK, DO NOT
EXPOSE THIS APPLIANCE TO RAIN OR MOISTURE.
• This projector projects intense light from the projection lens. Do not stare directly into
the lens if possible, as doing so may result in eye damage. Be especially careful that
children do not stare directly into the beam.
• Install the projector in an appropriate position.
Installing the projector in an inappropriate position may result in a fire hazard.
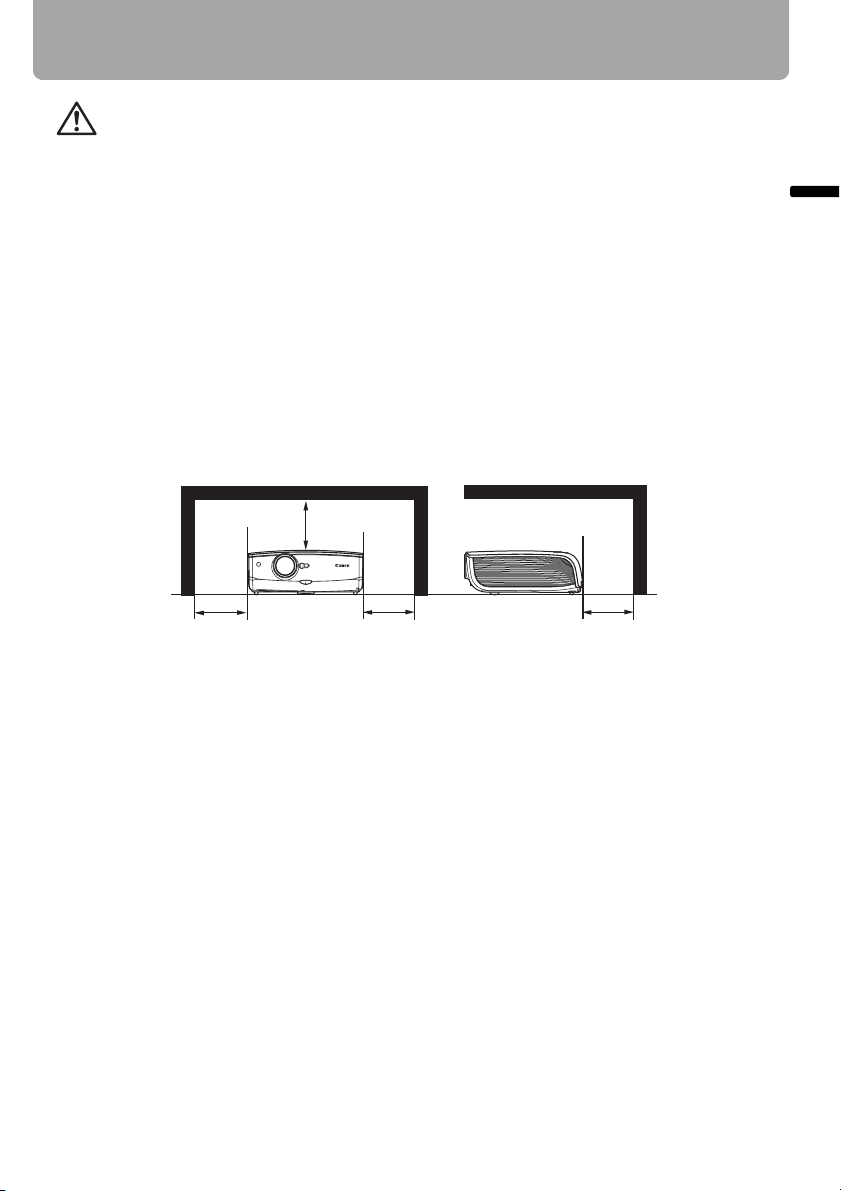
• Allow for appropriate space above beside and behind of the projector cabinet for
allowing air circulation and cooling of the projector. Minimum clearances must be
maintained. If the projector is to be built into a compartment or similarly space, the
minimum distances must be maintained. Do not cover the ventilation slot on the
projector. Heat build-up can reduce the service life of your projector, and can also be
dangerous.
SIDE and TOP REAR
1 m (3.3')
1 m (3.3') 1 m (3.3') 1 m (3.3')
Safety Instructions
• Do not put any flammable objects or spray cans near the projector, as the hot air
exhausted from the ventilation holes may result in an explosion.
• If the projector is not to be used for an extended period of time, unplug it from the
power outlet.
13
Page 14

Safety Instructions
■ READ AND KEEP THIS OWNER'S MANUAL FOR LATER USE.
All the safety and operating instructions should be read before beginning to operate the
product.
Read all of the instructions given here and retain them for later use. Unplug this projector
from the AC power supply before cleaning. Do not use liquid or aerosol cleaners on the
projector. Use a damp cloth for cleaning.
Follow all warnings and instructions marked on the projector.
For added protection of the projector during a lightning storm, or when it is left
unattended or unused for long periods of time, unplug it from the wall outlet. This will
prevent damage due to lightning and power surges.
Do not expose this unit to rain or use near water... for example, in a wet basement, near a
swimming pool, etc...
Do not use attachments not recommended by the manufacturer as they may result in
hazards.
Do not place this projector on an unstable cart, stand, or table. The projector may fall,
causing serious injury to a child or adult, and serious damage to the projector. Use only
with a cart or stand recommended by the manufacturer, or sold with the projector. Wall or
shelf mounting should be carried out in accordance with the manufacturer's directions,
and should use a mounting kit approved by the manufacturers.
An appliance and cart combination should be moved with care.
Sudden stops, excessive force, and uneven surfaces may cause the
appliance and cart combination to overturn.
Slots and openings in the back and bottom of the cabinet are provided
for ventilation, to insure reliable operation of the equipment and to
protect it from overheating.
The openings should never be covered with cloth or other materials, and the bottom
opening should not be blocked by placing the projector on a bed, sofa, rug, or other
similar surface. This projector should never be placed near or over a radiator or heat
register.
This projector should not be placed in a built-in installation such as a book case unless
proper ventilation is provided.
14
Page 15

Safety Instructions
Never push objects of any kind into this projector through cabinet slots as they may touch
dangerous voltage points or short out parts that could result in a fire or electric shock.
Never spill liquid of any kind onto the projector.
Do not install the projector near the ventilation duct of air-conditioning equipment.
This projector should be operated using only the type of power source indicated on the
marking label. If you are not sure of the type of power supplied, consult your authorized
dealer or local power company.
Do not overload wall outlets and extension cords as this can result in fire or electric shock.
Do not allow anything to rest on the power cord. Do not locate this projector where the
cord may be damaged by people walking on it.
Do not attempt to service this projector yourself as opening or removing covers may
expose you to dangerous voltages or other hazards. Refer all servicing to qualified
service personnel.
Unplug this projector from the wall outlet and refer servicing to qualified service
personnel under the following conditions:
a. When the power cord or plug is damaged or frayed.
b. If liquid has been spilled into the projector.
c. If the projector has been exposed to rain or water.
d. If the projector does not operate normally after following the operating instructions.
Adjust only those controls that are covered in the operating instructions as improper
adjustment of other controls may result in damage and will often require extensive
work by a qualified technician to restore the projector to normal operating condition.
e. If the projector has been dropped or the cabinet has been damaged.
f. When the projector exhibits a distinct change in performance-this indicates a need
for servicing.
Safety Instructions
When replacement parts are required, be sure the service technician uses replacement
parts specified by the manufacturer that have the same characteristics as the original
parts. Unauthorized substitutions may result in fire, electric shock, or injury.
Upon completion of any service or repairs to this projector, ask the service technician to
perform routine safety checks to determine that the projector is in safe operating
condition.
15
Page 16
Safety Instructions
AC Power Cord Requirement
The AC Power Cord supplied with this projector meets the requirements for use in the
country you purchased it.
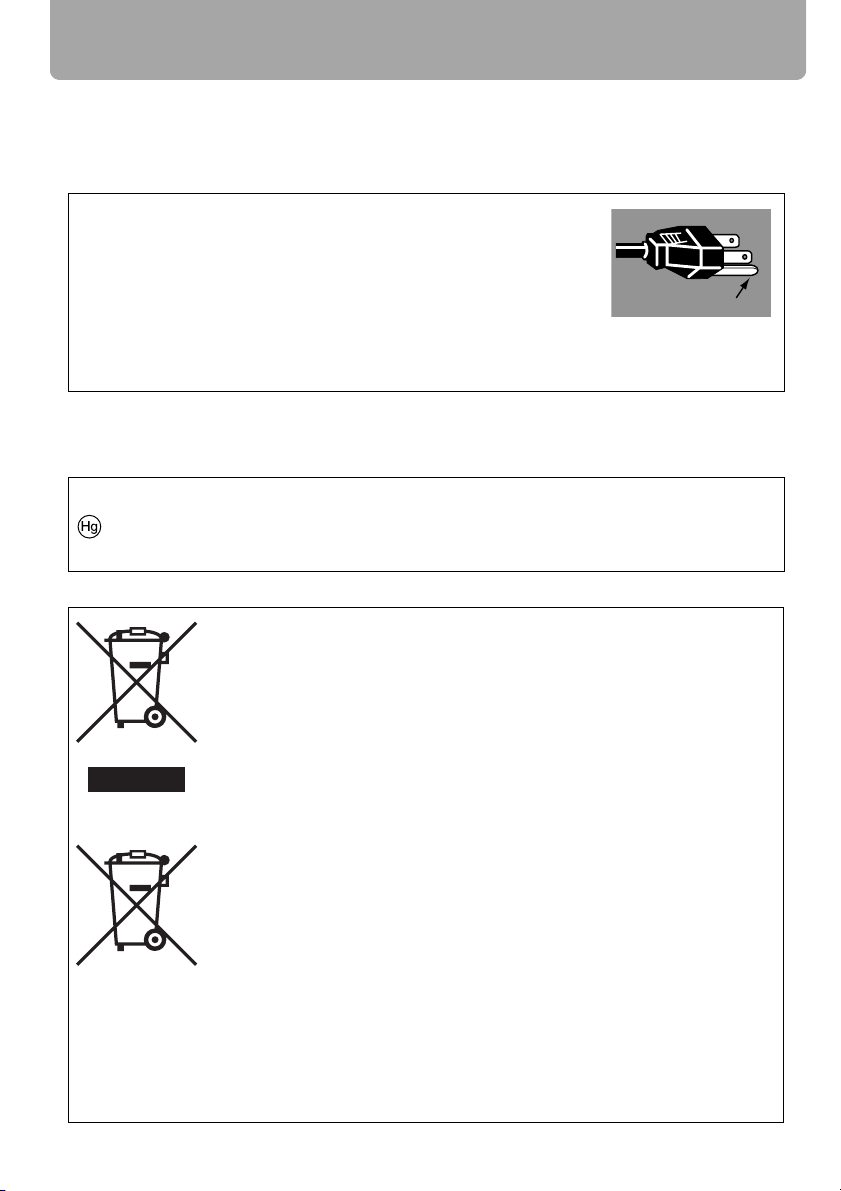
AC Power Cord for the United States and Canada:
The AC Power Cord used in the United States and Canada is
listed by the Underwriters Laboratories (UL) and certified by the
Canadian Standard Association (CSA).
The AC Power Cord has a grounding-type AC line plug. This is a
safety feature to ensure the plug fits into the power outlet. Do not
try to tamper with this safety feature. Should you be unable to
insert the plug into the outlet, contact your electrician.
THE SOCKET-OUTLET SHOULD BE INSTALLED NEAR THE EQUIPMENT AND
EASILY ACCESSIBLE.
NOTE FOR CUSTOMERS IN THE US
LAMP(S) INSIDE THIS PRODUCT CONTAIN MERCURY AND MUST BE RECYCLED
OR DISPOSED OF ACCORDING TO LOCAL, STATE OR FEDERAL LAWS.
European Union (and EEA) only.
These symbols indicate that this product is not to be disposed of with
your household waste, according to the WEEE Directive (2002/96/EC),
the Battery Directive (2006/66/EC) and/or your national laws
implementing those Directives. If a chemical symbol is printed beneath
the symbol shown above, in accordance with the Battery Directive, this
indicates that a heavy metal (Hg = Mercury, Cd = Cadmium, Pb =
Lead) is present in this battery or accumulator at a concentration above
an applicable threshold specified in the Battery Directive. This product
should be handed over to a designated collection point, e.g., on an
authorized one-for-one basis when you buy a new similar product or to
an authorized collection site for recycling waste electrical and
electronic equipment (EEE) and batteries and accumulators. Improper
handling of this type of waste could have a possible impact on the
environment and human health due to potentially hazardous
substances that are generally associated with EEE. Your cooperation in
the correct disposal of this product will contribute to the effective usage
of natural resources. For more information about the recycling of this
product, please contact your local city office, waste authority, approved
scheme or your household waste disposal service or visit
www.canon-europe.com/environment.
(EEA: Norway, Iceland and Liechtenstein)
Ground
16
Page 17

Safety Instructions
Federal Communication Commission Notice
Multimedia Projector, Model: SX80 MarkII/SX800
This device complies with Part 15 of the FCC Rules. Operation is subject to the following
two conditions:
(1) This device may not cause harmful interference, and
(2) this device must accept any interference received, including interference that may
cause undesired operation.
Note: This equipment has been tested and found to comply with the limits for a Class B
digital device, pursuant to Part 15 of the FCC Rules. These limits are designed to
provide reasonable protection against harmful interference in a residential installation.
This equipment generates, uses and can radiate radio frequency energy and, if not
installed and used in accordance with the instructions, may cause harmful interference
to radio communications. However, there is no guarantee that interference will not occur
in a particular installation. If this equipment does cause harmful interference to radio or
television reception, which can be determined by turning the equipment off and on, the
user is encouraged to try to correct the interference by one or more of the following
measures:
• Reorient or relocate the receiving antenna.
• Increase the separation between the equipment and receiver.
• Connect the equipment into an outlet on a circuit different from that to which the
receiver is connected.
• Consult the dealer or an experienced radio/TV technician for help.
Safety Instructions
The cable with a ferrite core provided with the projector must be used with this
equipment in order to comply with Class B limits in Subpart B of Part 15 of the FCC
rules.
Use of a shielded cable is required to comply with class B limits in Subpart B of Part 15
of FCC Rules.
Do not make any changes or modifications to the equipment unless otherwise specified
in the instructions. If such changes or modifications should be made, you could be
required to stop operation of the equipment.
Canon U.S.A., Inc.
One Canon Plaza, Lake Success, NY 11042, U.S.A.
Tel No. (516) 328-5600
Canadian Radio Interference Regulations
This Class B digital apparatus complies with Canadian ICES-003.
17
Page 18
Safety Instructions
Precautions on Handling the Batteries in the Remote Controller
Observe the following precautions when handling the batteries. Failure to do so
may cause explosion, heat generation, fire, or leakage of the battery fluid.
Caution
• Do not heat or disassemble the batteries, or throw them into fire.
• Do not attempt to recharge the batteries.
Observe the following precautions when handling the batteries. Failure to do so
may cause explosion, heat generation, fire or leakage of the battery fluid.
War ning
• Remove the batteries when they have been exhausted or not in use for an
extended period of time.
• Be sure to replace both batteries at the same time. Do not mix batteries of
different types.
• Insert batteries correctly according to the "+" and "–" markings.
• If a fluid from a battery leaks and comes in contact with your skin, rinse the
affected skin thoroughly as soon as possible.
Lamp Handling Precautions
This projector uses a high-pressure mercury lamp which must be handled carefully and
correctly as mentioned below.
The mercury lamp has the following characteristics.
• A lamp may explode with a loud sound or burn out due to a shock, scratch, or use
beyond its expiry date.
• The lamp life may differ from lamp to lamp and according to the usage environment.
There is no guarantee that all lamps will last for the same period of time. Some lamps
may fail in a shorter period of time than other similar lamps.
• A lamp gradually becomes darker over time.
If a Lamp Explodes
• If a lamp explodes, gas or dust may come out of the exhaust vent. Open win-
War ning
dows and doors for ventilation.
• The gas contains toxic mercury. Always keep your face away from the
exhaust vent when the projector is operating to avoid inhaling mercury
vapors or to prevent it from getting in your eyes or mouth.
• If you inhale the gas or the shards of the broken lamp contact your eyes or
mouth, consult a doctor immediately.
• If a lamp explodes, its shards may scatter inside the projector. Ask the Canon
service representative to clean and check the inside of the projector and
replace the lamp.
If the projector indicates that the lamp should be replaced (i.e., the LAMP
REPLACE indicator lights up twice),
Caution
• The chances of an explosion increase. Replace the lamp with a new one
immediately if such is the case.
18
Page 19
Disposal of Waste Lamp
• Dispose of the projector's mercury lamp according to local regulations just
Caution
like the fluorescent lamps.
Carrying/Transporting the Projector
• This projector is a precision machine. Do not subject the projector to strong
shocks or vibrations or turn it down.
Caution
• Install the lens cap to protect the lens and put the projector in the carrying
bag to protect it from dust and scratches on the surface of it when you carry
the projector. For details, see P23.
• Wait until the cooling fan stops before putting the projector in the carrying
bag. Do not put the projector in the carrying bag until the cooling fan stops
rotating. The projector may be damaged due to the heat.
• Replace the adjustable foot before putting the projector in the carrying bag.
The projector may be damaged if you put it in the bag without replacing the
adjustable foot.
• The carrying bag is not designed to protect the projector from external
shocks. When carrying the projector with it put in the carrying bag, do not
give a shock to it, drop it, or place anything on it. The projector may be damaged or malfunctioned.
• Do not transport the projector through a courier or transport service with the
carrying bag. Put the projector in an impact-resistant transport case if such is
the case.
Safety Instructions
Safety Instructions
Installation Precautions
The area around the exhaust vent and the cabinet above the exhaust vent
become hot when the projector is operating.
Caution
• Do not touch these areas, or you may get burnt. In particular, keep children
away from these areas. Do not put anything that may deform or discolor due
to heat on the projector.
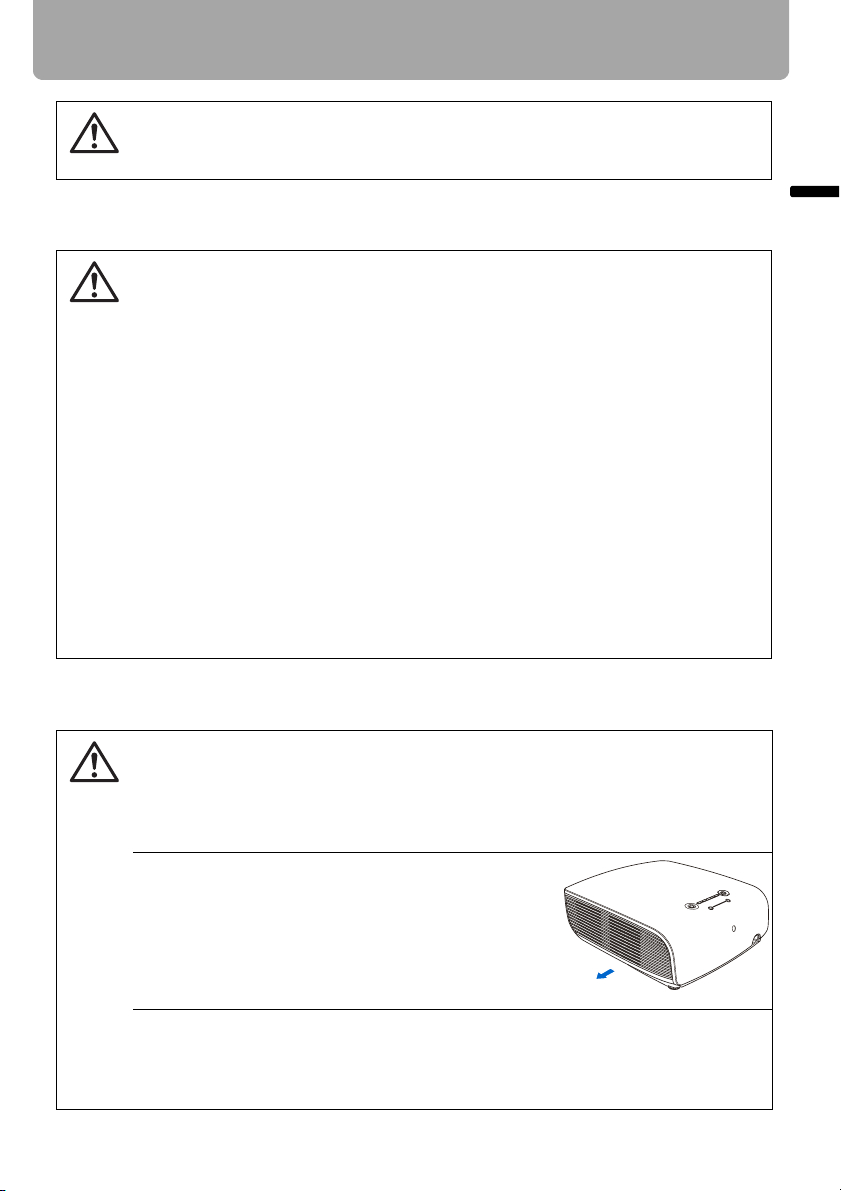
Hot air is exhausted from the exhaust vent. Observe
the following:
• Do not put any metallic object on the projector. It
may become hot, resulting in accident or injury.
• Do not seat anyone near the exhaust vent. Otherwise, you may get burned.
When placing the projector on a castered stand or table, be sure to lock the
casters.
• Failure to do so may cause the projector to move or topple, resulting in an
injury.
Hot air
19
Page 20
Safety Instructions
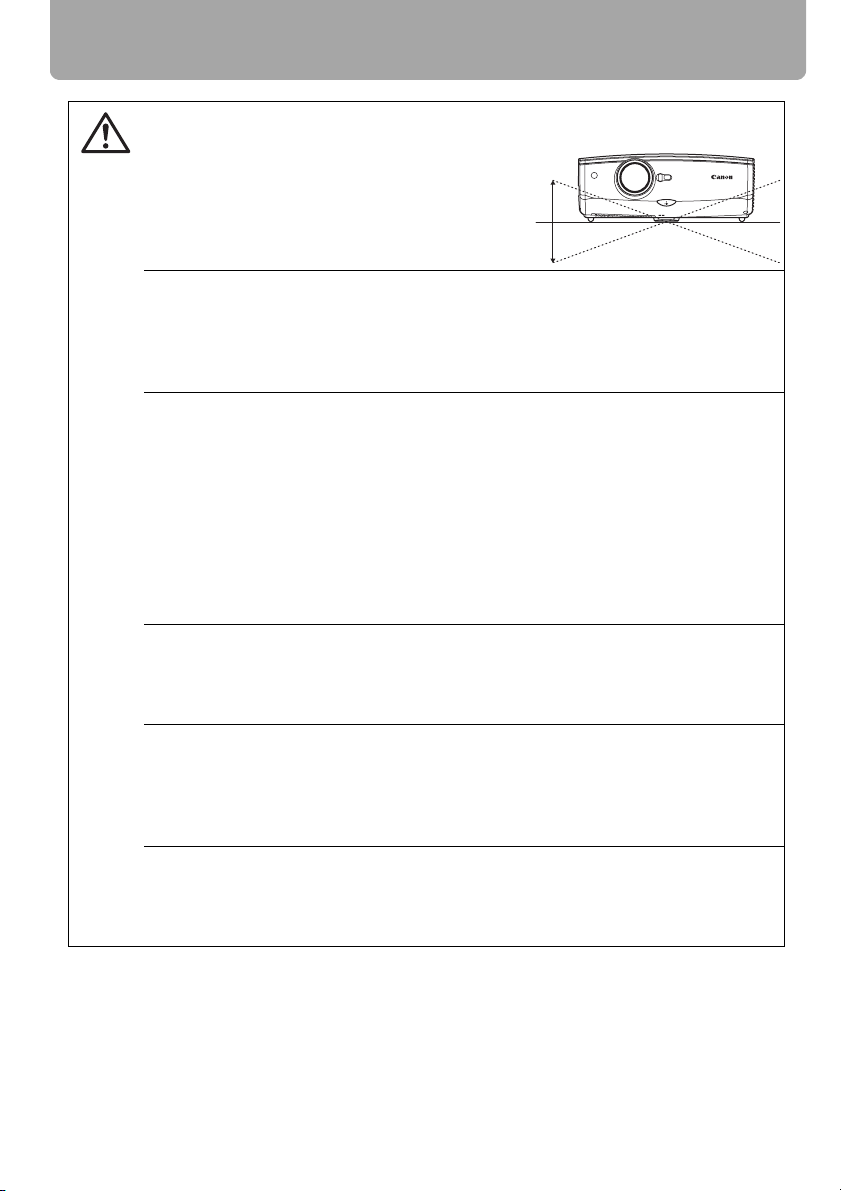
Position the projector in a horizontal position. Incorrect installation may cause
troubles and accidents.
Caution
• Do not tilt the projector more than 20
degrees above and below the horizontal.
• When you want to use your projector pointing up or down, make sure to place the projector straight up or down.
Do Not Use in the Following Environments
• Do not place the projector on an unstable or slanted surface. The projector
may fall causing a personal injury.
• Do not place it in an oily, smoky, or damp location (e.g., near a cooking table
or a humidifier). It may cause a fire or an electric shock.
• Place the projector with a minimum distance of 1 m (3.3') from its left, right,
rear, and top panels to the neighboring object such as a wall. Otherwise, it
may damage the projector due to bad exhaust ventilation.
• Do not put anything near the exhaust vent that may deform or deteriorate
due to heat.
• Do not install the projector in a humid or dusty location or a position where
there is a lot of oily or cigarette smoke. Optical parts such as a lens and mirror may be stained, resulting in poor picture quality.
• Do not place it near an exhaust outlet of air-conditioning equipment. Otherwise, it may be damaged.
If the projector is carried from a cold place to a warm place or the room temperature is raised rapidly, condensation may form on the lens and mirror due to
the moisture in the atmosphere, resulting in a blurred picture. Wait until condensation evaporates and normal picture is shown.
Do not use the projector in a place subject to either very high or very low temperatures. Doing so may cause malfunction. The ranges of the operating and
storage temperatures are as shown below:
Operating temperature: +5°C to +35°C (Humidity: 85% or below)
Storage temperature: -10°C to +60°C (Humidity: 90% or below)
Using the Projector at 2300 Meters or More Above Sea Level
• If you use the projector at 2300 meters or more above sea level, the special
configuration is required to cool down the projector properly. Contact your
dealer.
20°
20°
20
Page 21

Before Use
Table of Contents
Safety Instructions
Before Use
Projecting an Image
Useful Functions Available During a Presentation
Setting Up Functions from Menus
Projecting an Image from a Digital Camera or an
USB Flash Memory (SX80 II)
21
Connecting the Projector to Network (SX80 II)
Appendix
Index
Page 22
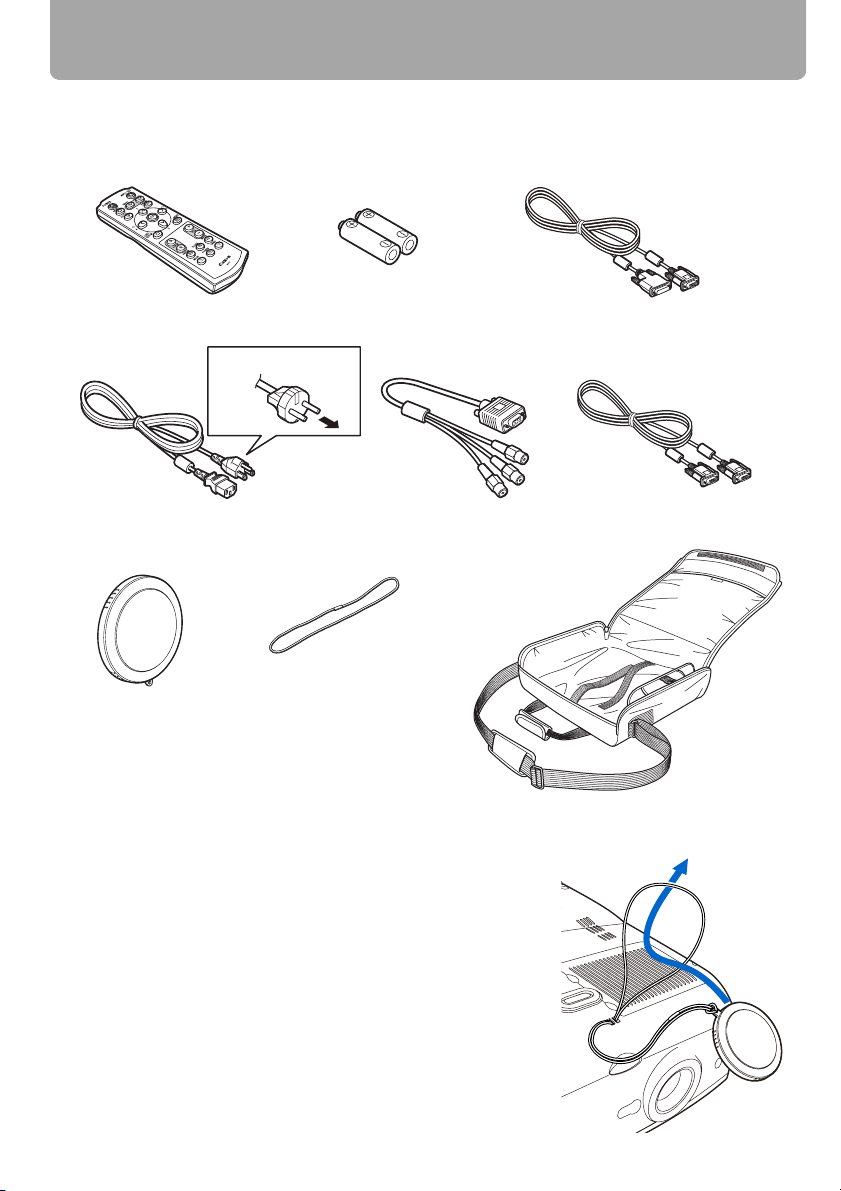
Supplied Accessories
Check whether the following accessories are supplied with the projector.
z Remote control z Batteries (type AAA, two)
z Power cord z Component cable
For Continental Europe
For the U.S.A and Canada
z Lens cap z Lens cap strap z Carrying bag
z User's Manual (CD-ROM)
z Warranty card
z Important Information
and Quick Start Guide
for remote control
(RCA/Mini D-sub, 15-pin)
YH7-2084
z Computer connection cable
(DVI/Mini D-sub, 15-pin) (SX80 II)
YH7-2052
z Computer connection cable
(VGA/Mini D-sub, 15-pin)
(SX800) YH7-2307
■ Installing the Lens Cap
As shown in the illustration on the right, put the lens cap
strap through the hole on the lens cap, and then through
the lens cap strap insertion hole at the bottom of the projector.
• When the projector is not in use, attach the lens cap to
protect the lens.
22
Page 23
Supplied Accessories
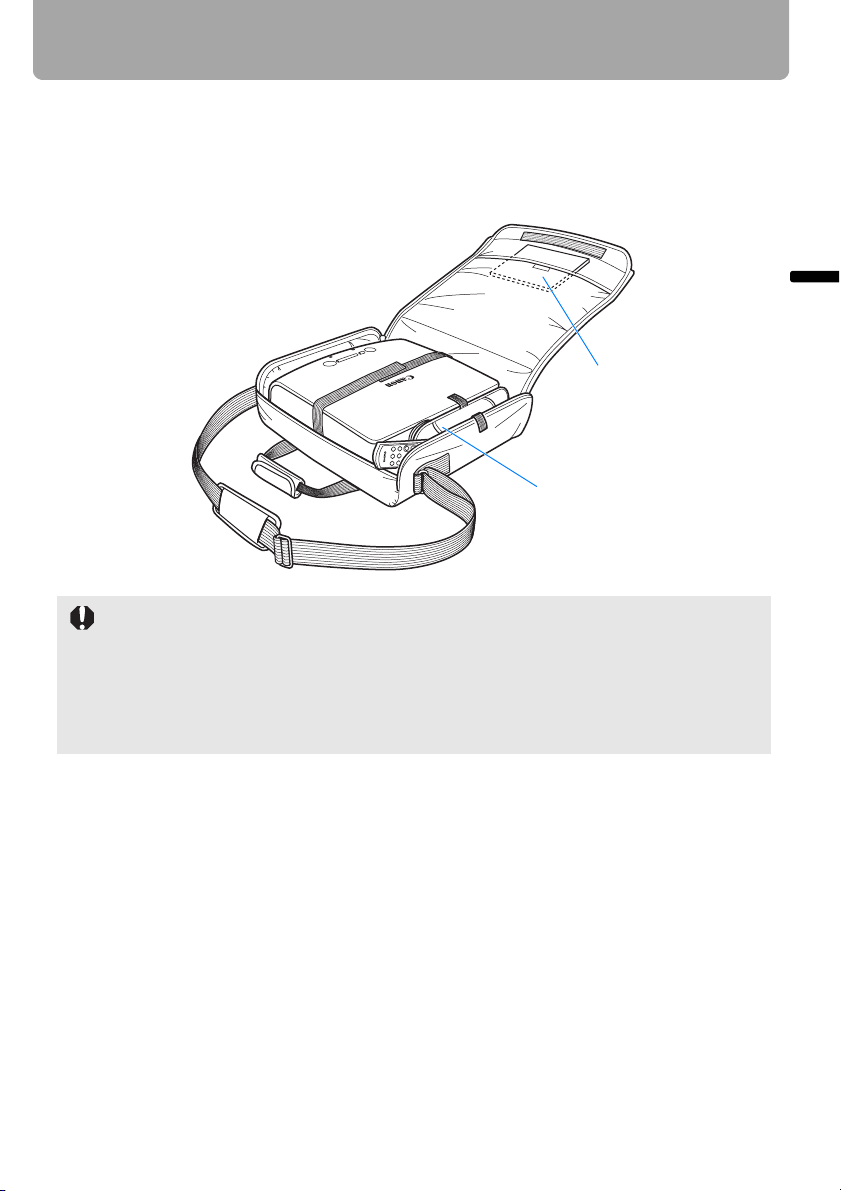
■ Putting the Projector in the Carrying Bag
Store the projector and the accessories in the carrying bag as shown in the illustration
below.
The carrying bag is intended to protect the surfaces of the projector from dust or
scratches, and is not designed to protect the projector from external shocks.
z User's Manual (CD-ROM)
z Important Information and
Quick Start Guide
Remote control and cables
• Wait until the cooling fan stops before putting the projector in the carrying bag. Do not put
the projector in the carrying bag until the cooling fan stops rotating. The projector may be
damaged due to the heat.
• Attach the lens cap to the lens to protect it and put the projector in the carrying bag.
Replace the adjustable foot to prevent the damage on the projector.
• When carrying the projector with it put in the carrying bag, do not give a shock to it, drop
it, or place anything on it. The projector may be damaged or malfunctioned.
Before Use
23
Page 24
Part Names
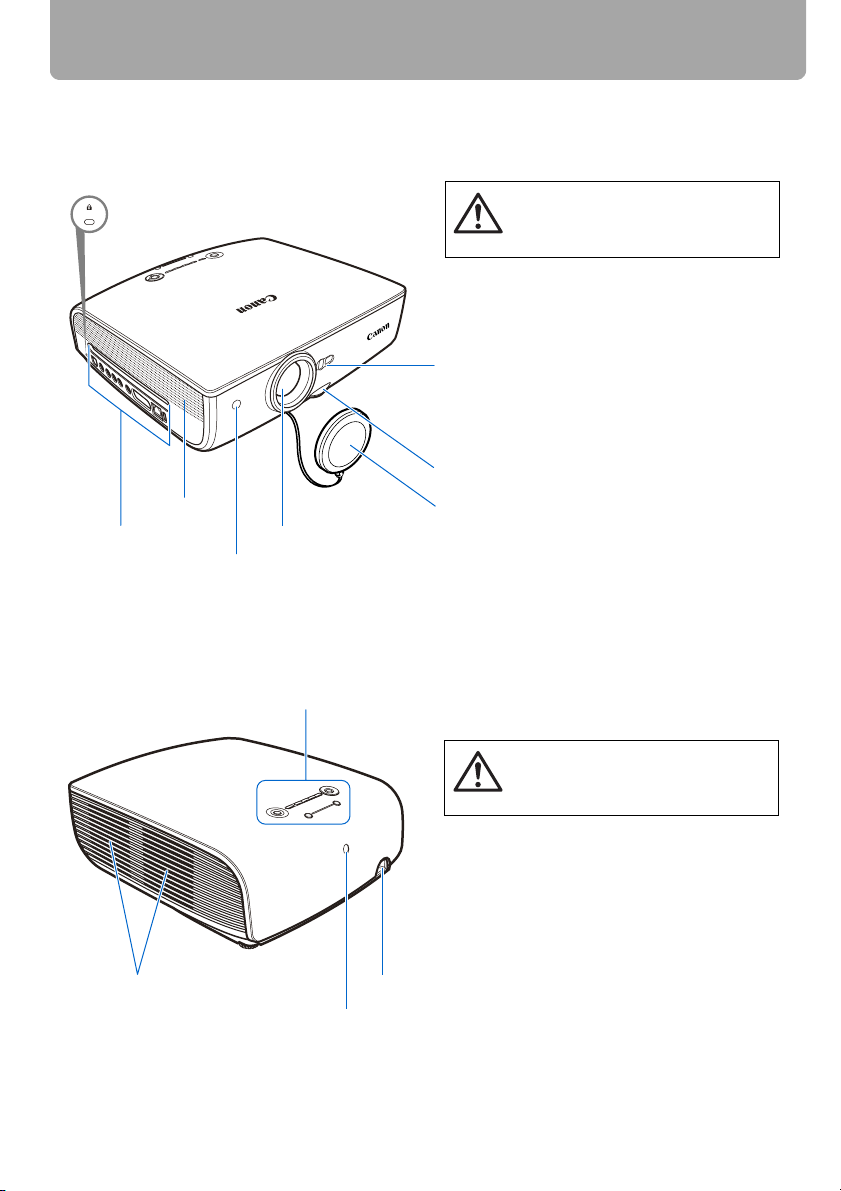
Main Unit of Projector (SX80 MarkII is used in the following illustrations)
■ Front Side
Anti-theft lock hole
An anti-theft wire cable available on the market can be connected.
Ranging window (SX80 II)
Do not place any obstacle between the projector and the screen, as the auto focusing function may fail to operate correctly.
Adjustable foot lock button (P37)
Be sure to remove the lens cap during
projection. Failure to do so will result in
fire hazards or cap deformation.
Caution
Speaker
Terminals and
connectors
■ Rear Side
Cooling fan exhaust vents
Lens
Infrared remote receiver (P31)
Top control (P28)
Power cord connector (P49)
Infrared remote receiver (P31)
Lens cap (P22)
Do not block the air exhaust. Failure to
do so will result in fire hazards or malfunctions.
Caution
24
Page 25
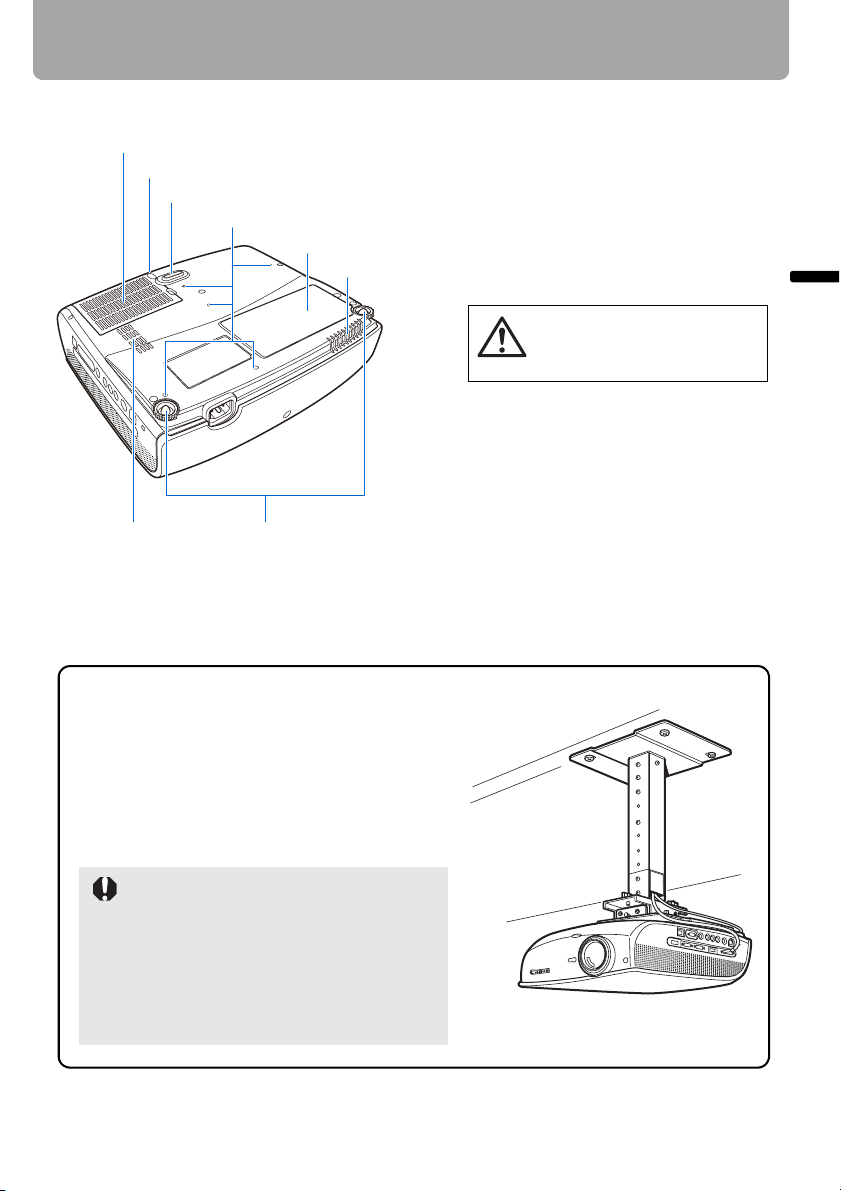
■ Bottom Side
Air fil
)
ter (P144
Lens cap strap insertion hole (P22)
Adjustable foot (P37)
Screw holes for installation of ceiling-mount hanger (M4x5) (P157)
Lamp cover (P146)
Air intake vent
Do not block the air exhaust. Failure to do so will result in fire hazards or malfunctions.
Caution
Part Names
Before Use
Air intake vent
Rear adjustable foot (for fine adjustment)
Mounting the Projector on the Ceiling
You can mount the projector on the ceiling.
You need an optional ceiling mounting hanger
(part number: RS-CL10) and an optional ceiling-mount pipe (part number: RS-CL08 or RSCL09) when appropriate. Contact the dealer
where you purchased the projector for more
detailed information.
• Make sure to use the optional ceilingmount hanger.
• You should never install the ceilingmount hanger by yourself.
• If you mount the projector on the ceiling,
you have to invert the projected image
by selecting [Image flip H/V] from the
menu. (P87)
25
Page 26
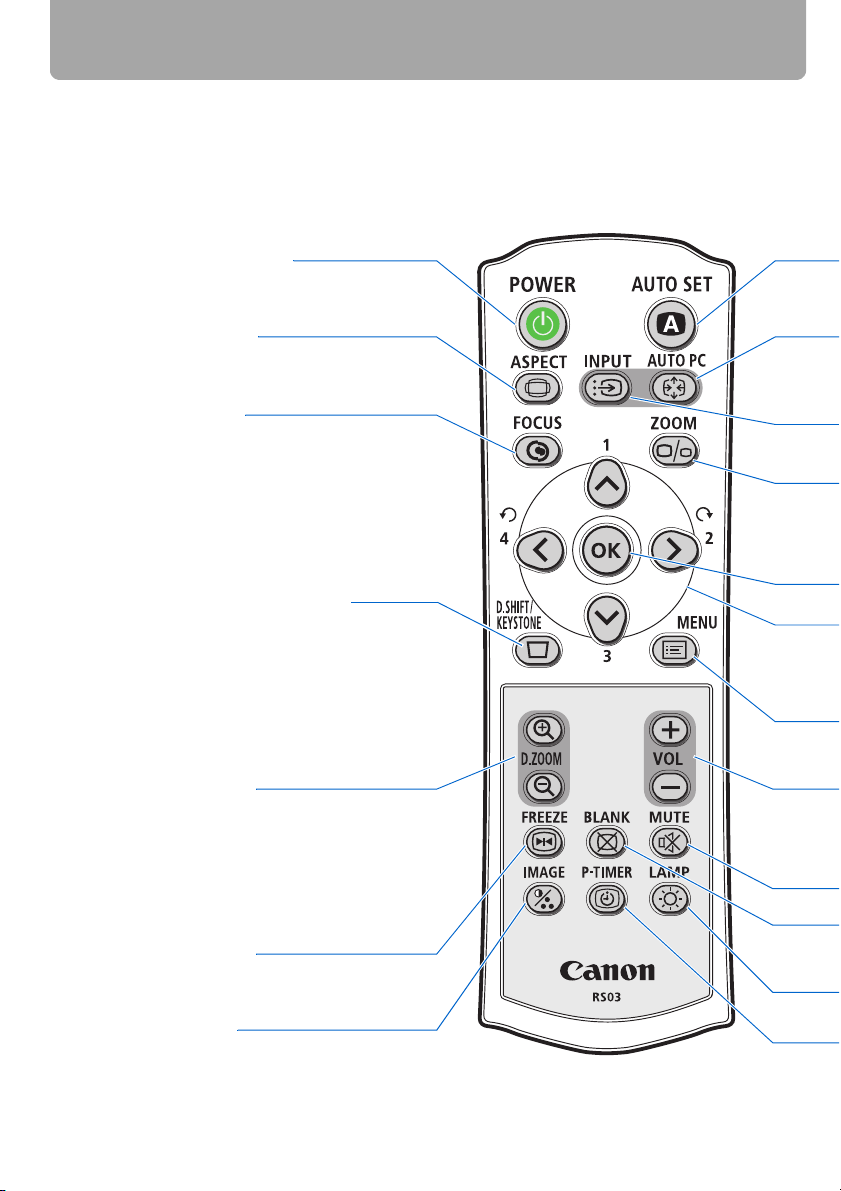
Part Names
Remote Control
The projector can be operated using buttons on the remote control or the top control on
the main unit.
The remote control allows you to operate all functions of the projector.
POWER button (P49, P68)
Turns the projector on or off.
ASPECT button (P66)
Toggles between the modes for aspect ratio.
FOCUS button (P59)
Adjusts focusing.
<
[ ] [ ]: For rough adjustment.
<
[<] [>]: For fine adjustment.
In SX80 MarkII, press FOCUS and then
AUTO SET to adjust the focus automatically.
D.SHIFT/KEYSTONE button (P60)
Corrects keystone distortion.
<
[ ] [ ]: For keystone adjustment.
<
Press D.SHIFT/KEYSTONE and then AUTO
SET to adjust the keystone automatically.
• Moves the image up and down when the
D. image shift is selected. (P64)
<
• [ ] [ ]: Adjust the vertical position.
D. ZOOM button (P72)
Zooms the image in or out digitally.
[+]: Zooms the image in (up to 12x).
[ ]: Zooms the image out (1x minimum).
[ ] [ ] [<] [>]: Moves an im.age to the
<
–
<
<
desired position.
FREEZE button (P70)
Freezes the projected image.
IMAGE button (P67)
Switches among image modes (image
qualities).
26
Page 27

Part Names
AUTO SET button (P53)
Performs input signal setting, keystone distortion adjustment, focusing
(SX80 II), and screen color correction (SX80 II) automatically.
AUTO PC button (P57)
Adjusts tracking and so on automatically in accordance with signal
from a computer when ANALOG
INPUT button (P55)
PC-1 or ANALOG PC-2 is selected.
Switches among input signals.
ZOOM button (P58)
Adjusts the image size.
<
[ ] [ ]: For rough adjustment.
<
[<] [>]: For fine adjustment.
OK button (P78)
Determines the item selected from
Pointer buttons (P77)
the menu.
Selects the upper, lower, left or right
item in the menu.
Before Use
MENU button (P76)
Displays a menu on the screen.
VOL button (P71)
Adjusts the sound volume.
[+]: Increases the volume.
[ ]: Decreases the volume.
–
BLANK button (P70)
Toggles between display/non-display of image.
P-TIMER button (P73)
Displays the time elapsed since this
button was pressed.
MUTE button (P71)
Mutes the sound.
LAMP button (P102)
Switches the lamp mode between
Standard and Silent.
27
Page 28
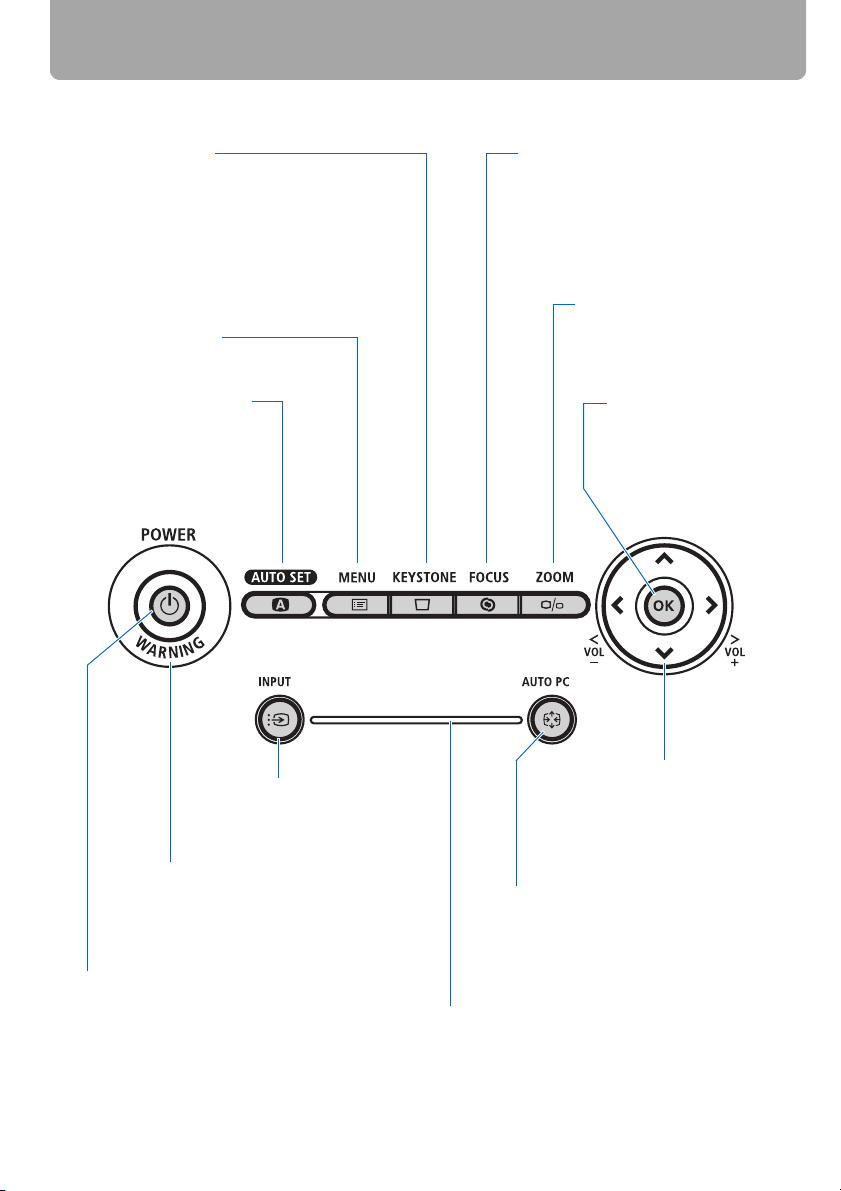
Part Names
Top Control
KEYSTONE button
Corrects keystone distortion. (P60)
<
[ ] [ ]: For keystone adjustment.
<
Press KEYSTONE and then AUTO SET to
adjust the keystone automatically.
• Moves the image up and down when
the D. image shift is selected. (P64)
<
• [ ] [ ]: Adjust the vertical position.
<
MENU button (P76)
Displays a menu on the screen.
AUTO SET button (P53)
Performs input signal setting,
keystone distortion adjustment, focusing (SX80 II), and
screen color correction (SX80
II) automatically.
FOCUS button (P59)
Adjusts focusing.
<
[ ] [ ]: For rough adjustment.
<
[<] [>]: For fine adjustment.
In SX80 MarkII, press FOCUS and
then AUTO SET to adjust the focus
automatically.
ZOOM button (P58)
Adjusts the image size.
<
[ ] [ ]: For rough adjust-
<
ment.
[<] [>]: For fine adjustment.
OK button (P78)
Determines the item selected from the menu.
INPUT button (P55)
Switches among input signals.
WARNING lamp (P138)
Flashes red when a problem has been
detected on the projector.
POWER button/lamp (P49, P68)
Turns the projector on or off.
Green: The projector is on.
Flashing green: The projector is being turned on.
Red: The projector can be turned on.
Flashing red: The projector is being
turned off (the lamp is being cooled).
Pointer/VOL button (P77, P71)
Adjusts the sound volume.
[<]: Decreases the volume.
[>]: Increases the volume.
Selects the upper, lower, left or
right item in the menu.
AUTO PC button (P57)
Adjusts tracking and so on automatically in accordance with signal from a
computer when ANALOG PC-1 or ANALOG PC-2 is selected.
LED illumination lamp (P106)
Indicates the projector status with LEDs.
Blinking from the left: The projector is being turned on.
Blinking from the right: The projector is being turned off.
Middle LED flashing slowly: The image is being blanked out.
Left and right LEDs flashing slowly: The image is freezing.
28
Page 29
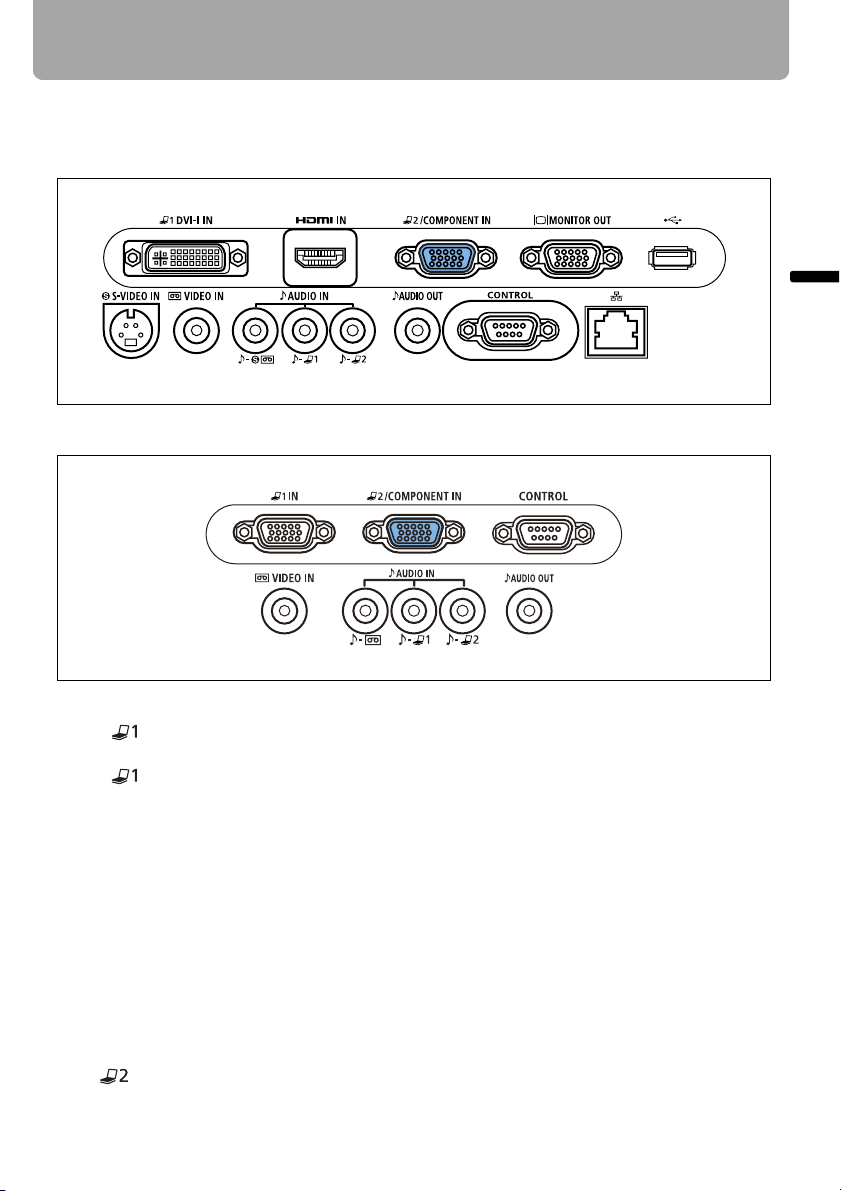
Input Terminals
■ SX80 MarkII
(1)-A (2) (3) (4) (5)
(6) (7) (8) (9) (10) (11)
■ SX800
Part Names
Before Use
(1)-B (3)
(7) (8) (9)
(1)-A
ANALOG PC-1/DVI-I IN Input Terminal
( DVI-I IN) (SX80 II) (P40, P42)
(1)-B
ANALOG PC-1 Input Terminal
( IN) (SX800) (P40)
Connects an external monitor output
from a computer.
Receives an analog PC (ANALOG
PC-1) or a digital signal (DIGITAL PC,
SX80 II).
(2) HDMI IN Terminal (SX80 II) (P44)
Receives a digital content image signal (HDMI).
Carries both video and audio signals
across a single cable.
ANALOG PC-2/COMPONENT IN Terminal
(3)
(/COMPONENT IN) (P41, P46)
Receives an analog PC signal (ANALOG PC-2).
(10)
Use a supplied component cable to
receive a component image signal
(COMPONENT).
(4) Monitor Output Terminal (MONITOR
OUT) (SX80 II) (P42)
Outputs an analog RGB signal to display an image on an external monitor.
(5) USB Terminal (SX80 II) (P48)
Connects a digital camera or an USB
flash memory.
(6) S-VIDEO IN Terminal (SX80 II) (P45)
Receives an S-Video signal from AV
equipment.
(7) VIDEO IN Terminal (P45)
Receives a composite video signal
from AV equipment.
29
Page 30

Part Names
(8) AUDIO IN Terminal (P40, P41, P42,
P45, P46)
The audio input terminals for 3 image
input systems other than HDMI-IN.
They receive the following audio signals in order from the left.
SX80 MarkII: "S-VIDEO or VIDEO", "DIGITAL
PC/ANALOG PC-1", and "ANALOG PC-2/COMPONENT"
SX800: "VIDEO", "ANALOG PC-1",
and "ANALOG PC-2/
COMPONENT"
The internal speaker outputs the
audio signal for the selected image
signal.
(9) AUDIO OUT Terminal (P43, P47)
The audio output terminal to output an
audio to external AV equipment. It outputs the audio signal corresponding
to the projected image signal.
(10)Service port (CONTROL)
Exclusively used by the service personnel (it is not used normally).
(11)LAN port (SX80 II) (P126)
Connects a LAN cable.
Used to connect the projector to the
network.
30
Page 31
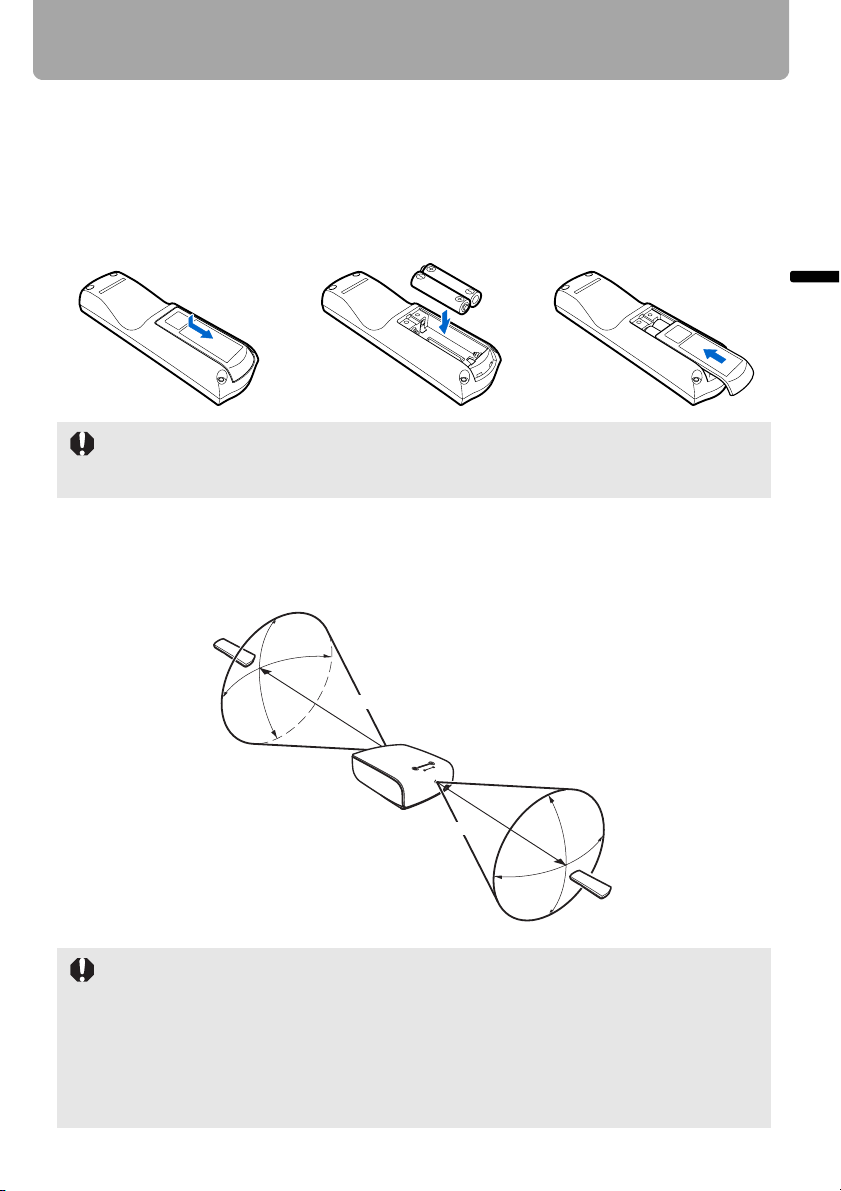
Preparing the Remote Control
■ Installing Remote Control Batteries
1 Open the battery com-
partment lid.
Slide the lid with it
pressed down.
• If buttons on the remote control are inoperative when you attempt to operate the projector,
replace the batteries with new ones.
• It is recommended to check the batteries before a presentation.
2 Insert batteries.
Insert new two AAA-size
batteries in the compartment with the + and –
poles positioned correctly.
3 Replace the compart-
ment lid.
■ Remote Control Operating Range
Point the remote control to the infrared remote receiver on the front or rear of the projector
whenever pressing any button.
30°
5m (16.4')
30°
Before Use
5m (16.4')
• Use the remote control within a distance of approximately 5 m (16.4') from the projector.
• Use the remote control within an angle of 30° in any direction from directly in front of the
infrared remote receiver.
• The remote control may be inoperative if there is an obstacle between the remote control
and main unit or the infrared remote receiver on the main unit is exposed to direct sunlight
or strong light of lighting equipment.
• When you use two projectors at the same time, you can change the channel settings to
prevent the two remote controls from interfering with each other. (P107)
31
30°
30°
Page 32

32
Page 33

Projecting an
Table of Contents
Safety Instructions
Before Use
Image
Projecting an Image
Useful Functions Available During a Presentation
Setting Up Functions from Menus
Projecting an Image from a Digital Camera or an
USB Flash Memory (SX80 II)
Connecting the Projector to Network (SX80 II)
Appendix
Index
33
Page 34
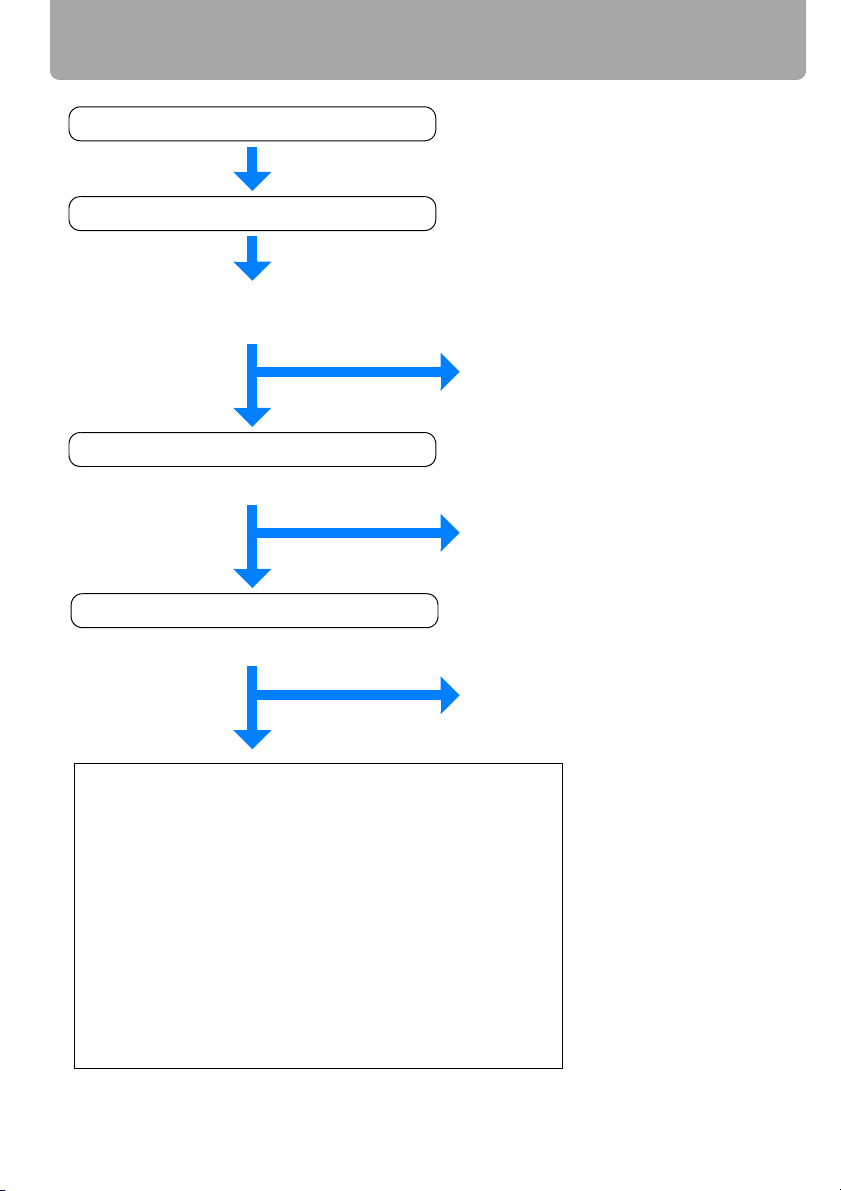
Steps for Setting Up the Projector and Projecting an Image
Connecting the Projector to Equipment (P38, P39)
Turning on the Power
(P49)
Do you want to project an image
from a notebook computer?
For a notebook computer, turn on
the monitor output (P51) and then
go to Auto Setup.
In SX800, manually adjust the
focus.
No
Performing the Auto Setup
Yes
(P52)
Image projected properly?
No
Selecting an
Yes
Input Signal (P54)
Projection is complete.
Image projected properly?
No
Adjusting the Image
Yes
(P56)
Projection is complete.
Do the following adjustments.
• Setting the Display Resolution of the Computer
•
Adjusting misaligned computer images or flickering of
the screen using the Auto PC (P57)
• Adjusting the Image Size
• Adjusting the Focus
• Adjusting keystone Distortion
(P58)
(P59)
(P60)
(P56)
Making Fine Adjustments
• Selecting an Aspect Ratio of Projected Image (Screen
aspect) and a Screen Mode (Aspect)
• Selecting an Image Mode
(P67)
(P62, P65)
34
Page 35
Setting Up the Projector
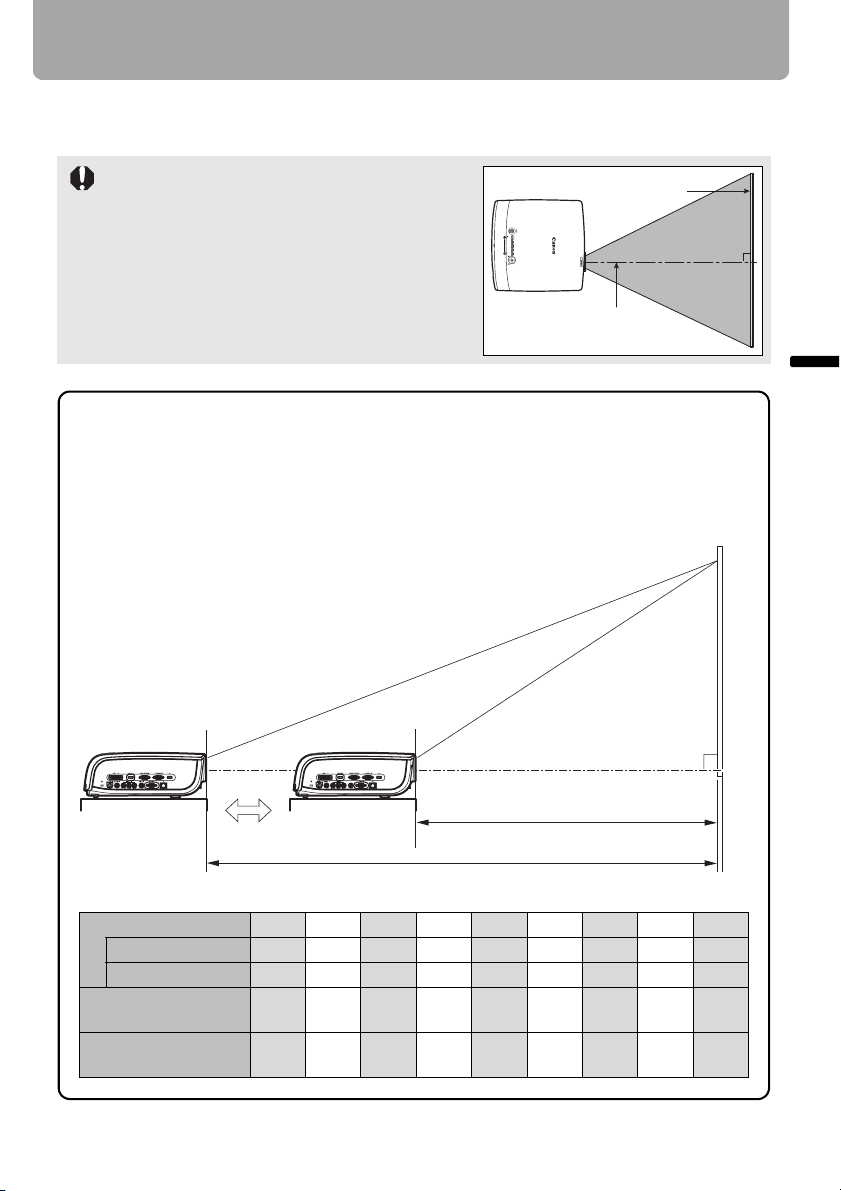
■ Placing in Front of the Screen
Place the projector in front of the screen.
• Be sure to place the projector parallel to the
screen to ensure distortion-free projections.
• The screen must not be exposed to direct sun-
light or light from lighting equipment. In a bright
room, it is recommended to limit ambient lighting in order to improve the image quality.
Screen
Optical axis
Projected Image Size
The projected image size is determined by the distance between the projector and
the screen (projection distance) as well as the zoom (P58). For the relationship
between the screen size and the projection distance, see also the table listed in
"Relationship between Screen Size and Projecting Distance" on page151.
Projecting an Image
Screen
Projection distance (zoom max)
Projection distance (zoom min)
Screen size 40 60 80 100 150 180 200 250 300
Width (cm) 81 122 163 203 305 366 406 508 610
Height (cm) 61 91 122 152 229 274 305 381 457
Projection distance
(zoom max)
Projection distance
(zoom min)
1.2 m
(3.9')
1.7 m
(5.6')
1.8 m
(5.9')
2.6 m
(8.5')
2.4 m
(7.9')
3.5 m
(11.5')
3.0 m
(9.8')
4.4 m
(14.4')
35
4.5 m
(14.8')
6.6 m
(21.7')
5.4 m
(17.7')
8.0 m
(26.3')
6.0 m
(19.7')
8.9
(29.2')
7.6 m
(24.9')
–
9.1 m
(29.9')
–
Page 36
Setting Up the Projector
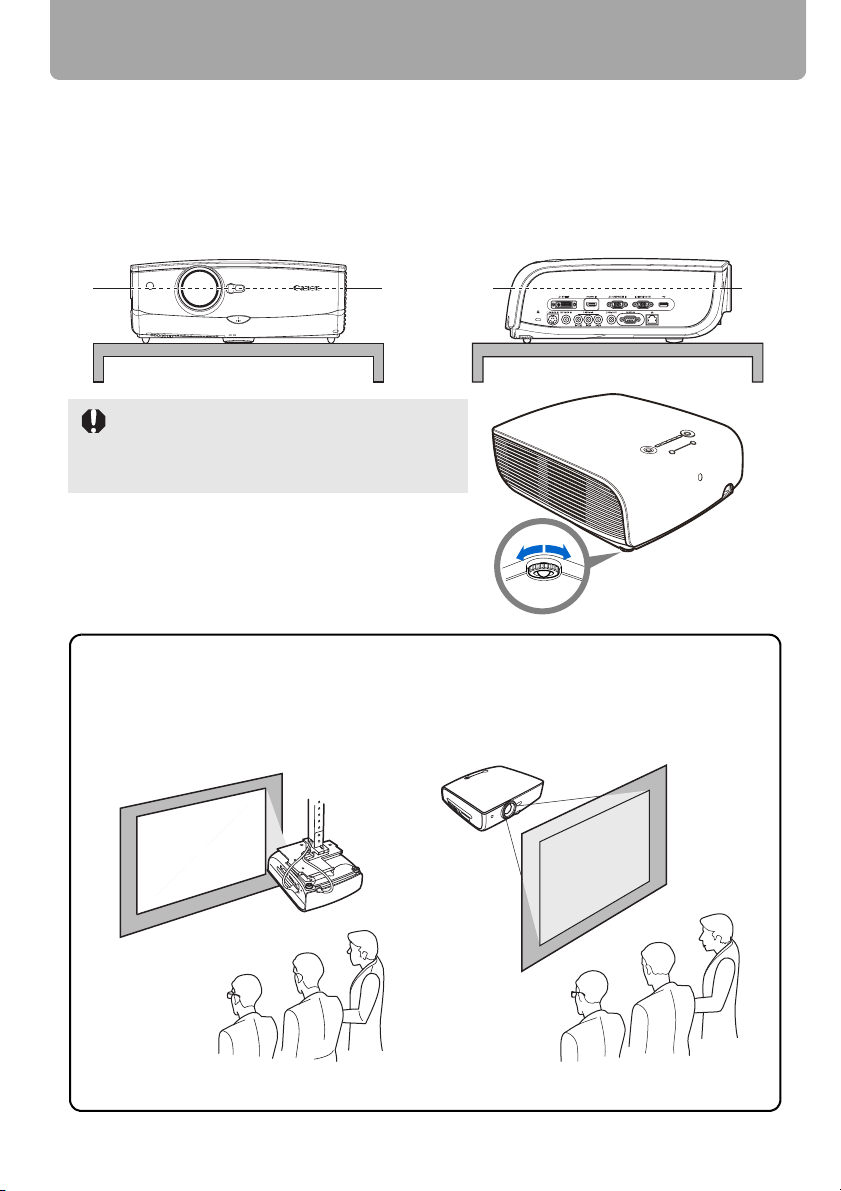
■ Placing on a Level Place
Be sure to keep the projector as horizontal as possible.
If you need to point the projector up (for example, when the screen is placed on a higher
position), follow the instruction given in "When Pointing the Projector Up" on the following
page.
• Adjust the tilt of the projecting image using the rear adjustable foot.
Make sure that the installation position is free
from any obstacle that may block the exhaust
vent on the right side of the projector and the air
intake vent on the bottom of the projector.
Ceiling Mounting or Rear Projection
You can mount the projector on the ceiling (Ceiling mounted) with it turned up side
down or place it behind the screen (Rear) if you use a translucent screen. For ceiling mounting or rear projection, you have to invert the projected image. (P87)
Ceiling Mounting Rear Projection
36
Page 37
Setting Up the Projector
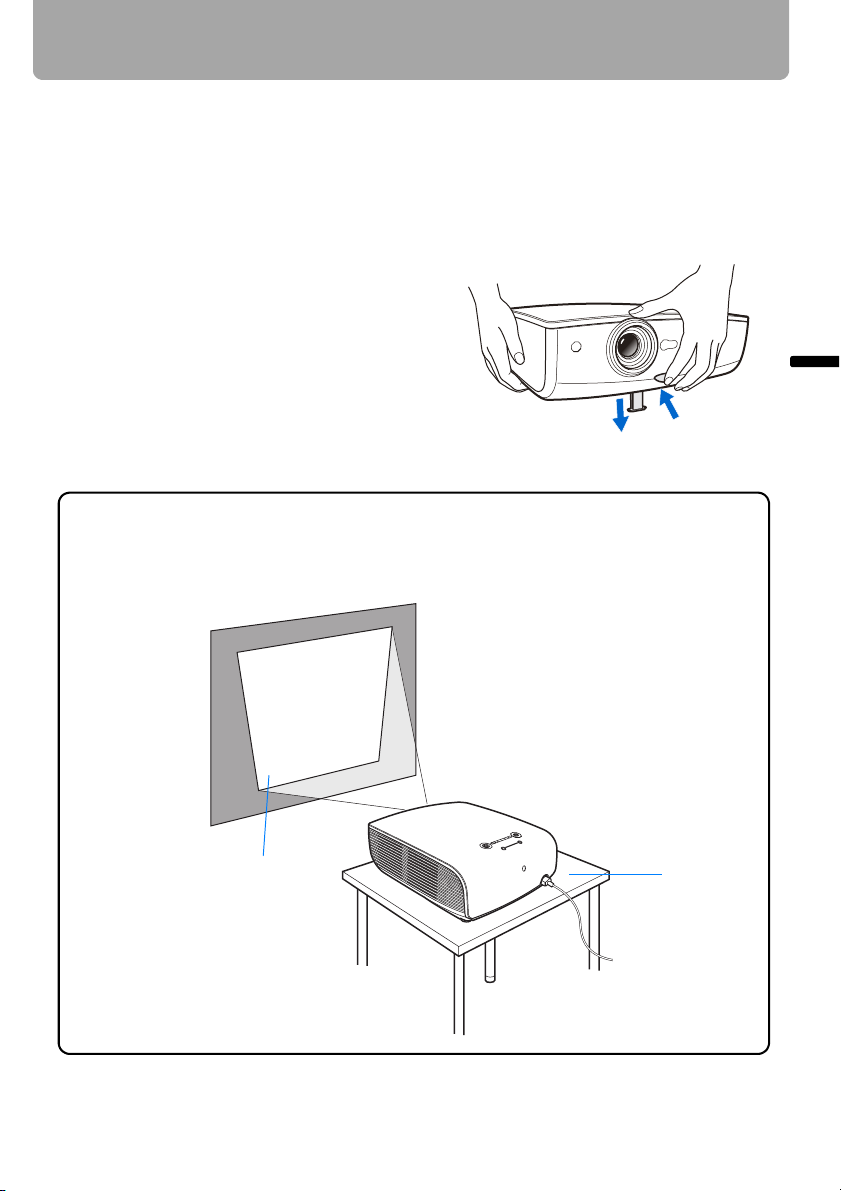
■ When Pointing the Projector Up
When the screen is placed on a higher position, point the projector up using the adjustable foot.
You can point it up as far as 10 degrees.
The keystone distortion of the projecting image can be corrected with the auto keystone
(P52) or by using the keystone distortion adjust function (P60).
1 Lift the front side of the projector and
push the adjusting foot lock button to
extend the adjustable foot.
2 Raise the image to the desired height
angle, then release the button to lock
the foot in place.
If Keystone Distortion is Too Large
If the keystone distortion is too large to adjust, adjust the projector height by, for
example, placing it on a pedestal.
Keystone Distortion
Pedestal
Projecting an Image
37
Page 38
Connecting the Projector
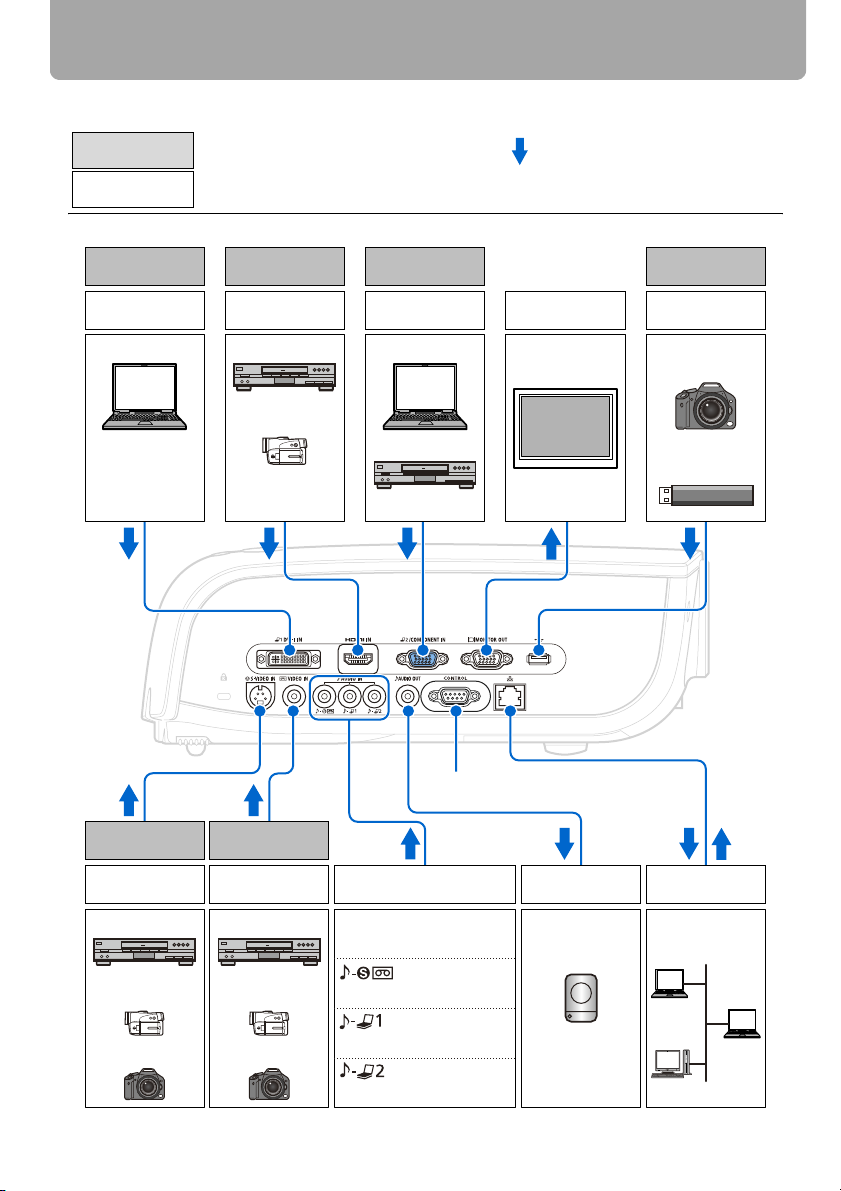
Connectable Equipment and Input Terminals
DIGITAL PC
ANALOG PC-1
DVI-I IN terminal
■ SX80 MarkII
DIGITAL PC
ANALOG PC-1
DVI-I IN terminal
Computer (P40, P42) AV equipment (P44)
DVI-I IN terminal
can be used to
connect only
computer.
Use this name to select the appropriate image. : Video signal or data flow
The name of the terminal to which to connect
equipment.
HDMI
HDMI IN terminal
Digital video
camera* (P44)
HDMI IN terminal can
be used to connect
only AV equipment.
ANALOG PC-2
COMPONENT
ANALOG PC-2/
COMPONENT IN
terminal
Computer (P41)
AV equipment (P46)
(Pxxx) : indicates the page(s) to refer to.
MONITOR OUT
terminal
External monitor
(P42)
USB
USB terminal
Digital camera* (P114)
USB flash memory
(P118)
S-VIDEO
S-VIDEO IN terminal
AV equipment (
Digital video
camera* (P45)
Digital camera*
P45
(P45)
Video
VIDEO IN terminal
) AV equipment (
Digital video
camera* (P45)
Digital camera*
(P45)
P45
* Connect to the playback mode.
)
(P45)
(P40, P42)
(P41, P46)
Service terminal
(Reserved)
AUDIO IN terminal
Audio signal for
each image input
S-VIDEO
VIDEO
DIGITAL PC
ANALOG PC-1
COMPONENT
ANALOG PC-2
38
AUDIO OUT
terminal
Amplified speaker
(P43, P47)
LAN terminal
Network
(P126)
Page 39
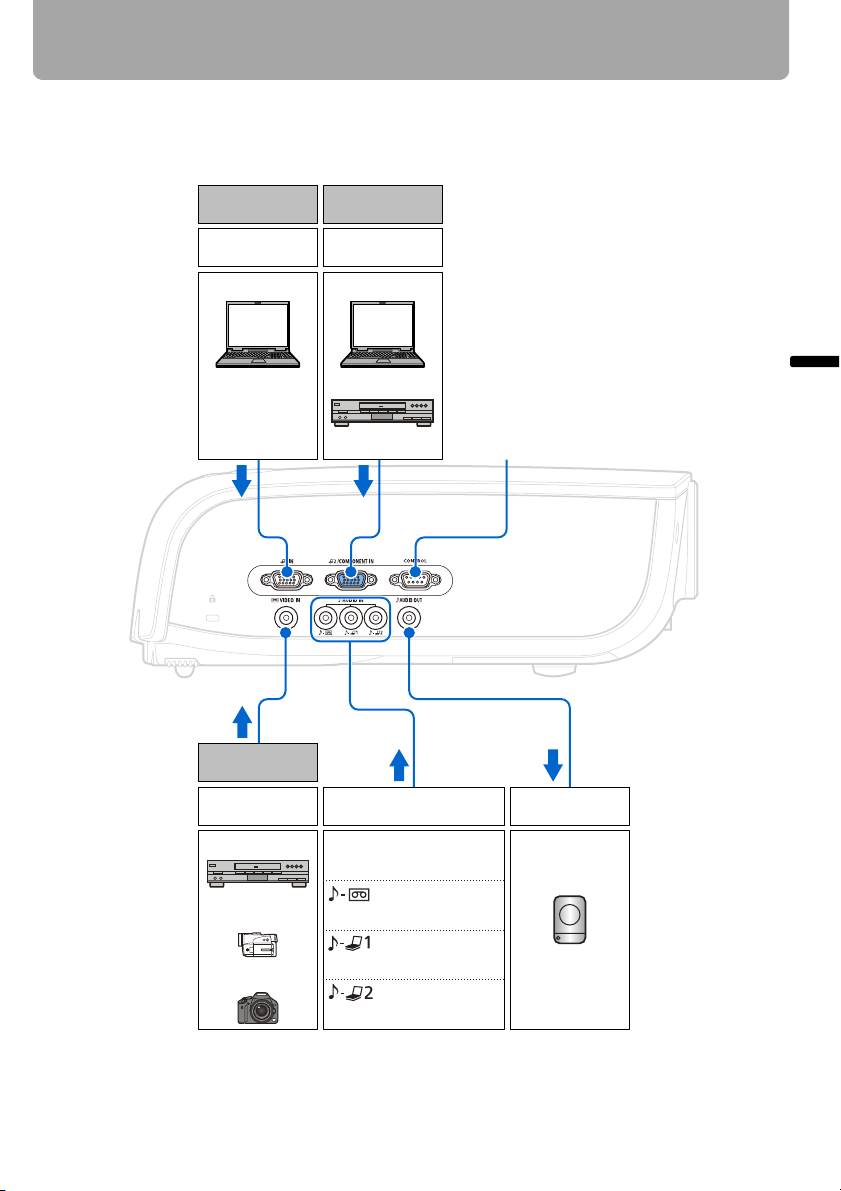
■ SX800
Connecting the Projector
ANALOG PC-1
ANALOG PC-1
terminal
Computer (P40)Computer (P41)
Video
ANALOG PC-2
COMPONENT
ANALOG PC-2/
COMPONENT IN
terminal
AV equipment (P46)
Service terminal
(Reserved)
Projecting an Image
VIDEO IN terminal
AV equipment (
Digital video
camera* (P45)
Digital camera*
P45
(P45)
* Connect to the
playback mode.
AUDIO IN terminal
)
(P45)
(P40)
(P41, P46)
Audio signal for
each image input
VIDEO
ANALOG PC-1
COMPONENT
ANALOG PC-2
39
AUDIO OUT
terminal
Amplified speaker
(P43, P47)
Page 40
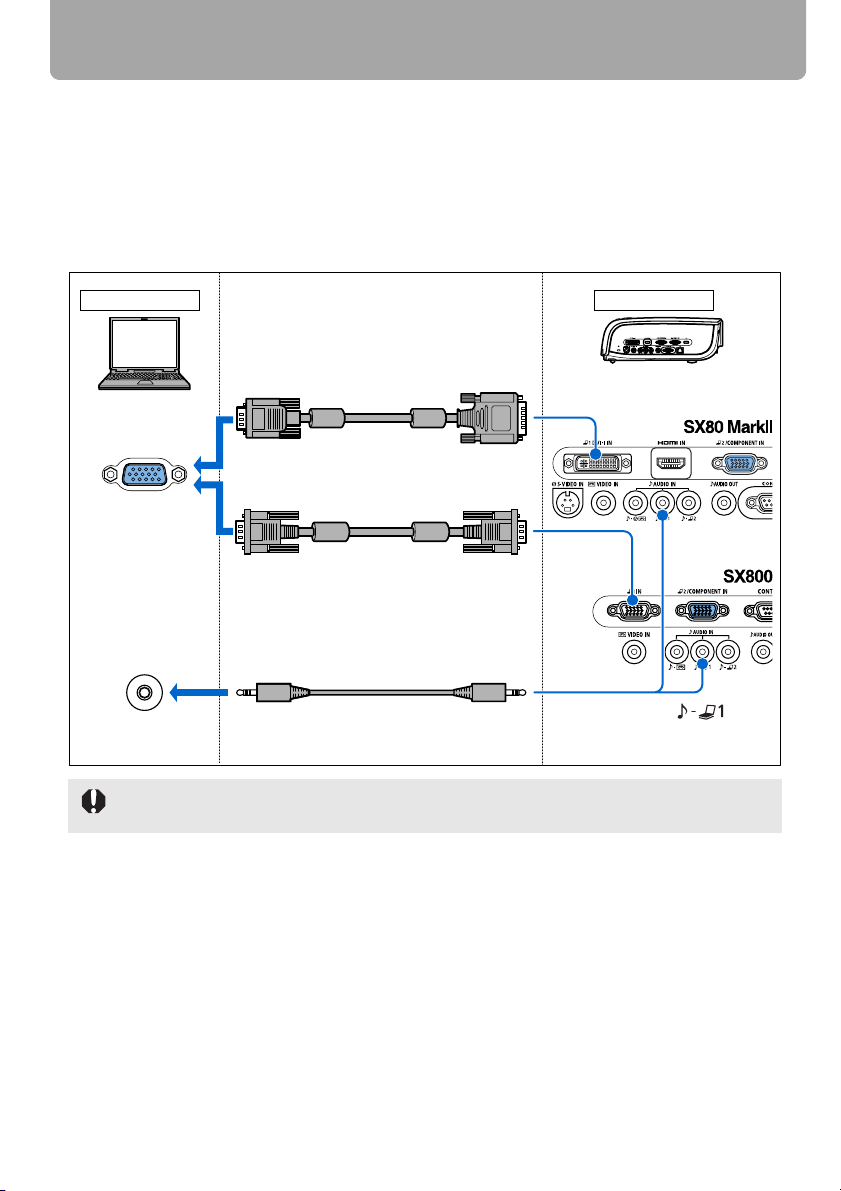
Connecting the Projector
Connecting the Projector to the Computer
Connect the projector to the computer.
Before connecting the cables, turn off both the projector and computer.
■ Connecting to RGB Monitor Output Terminal (analog connection)
Supplied computer connection cable (Input signal type: [ANALOG PC-1] - P54)
Computer
Supplied computer connection cable
Monitor output
terminal
(mini D-sub 15-pin)
Supplied VGA cable (SX800)
To input a corresponding
Audio output terminal
(AUDIO OUT)
Use an audio cable without a built-in resistor. Using an audio cable with a built-in resistor
turns down the sound.
Commercial audio cable
(SX80 II)
audio signal:
To ANALOG PC-1/
DVI-I IN
To ANALOG
PC-1
Projector
To AUDIO IN
40
Page 41
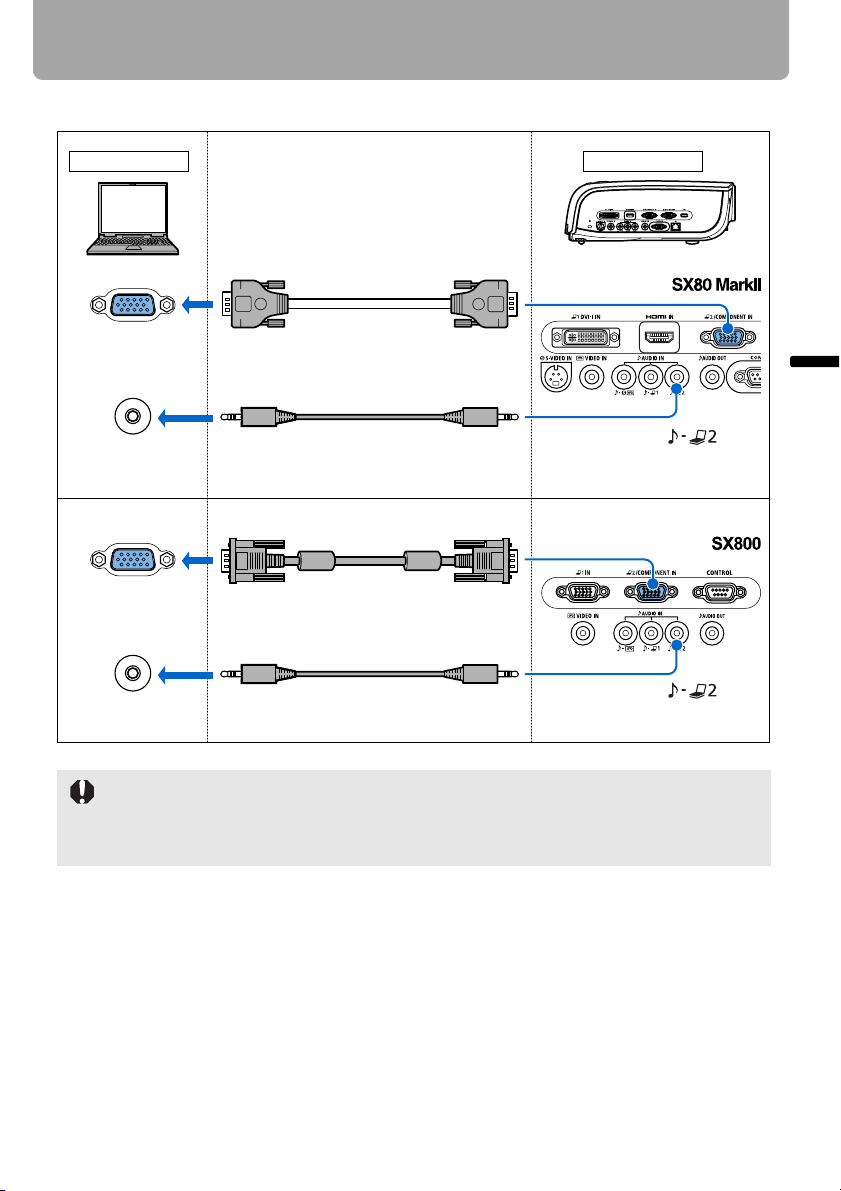
Connecting the Projector
Commercial or supplied VGA cable (Input signal type: [ANALOG PC-2] - P54)
Computer
Monitor output
terminal
(mini D-sub 15-pin)
Audio output terminal
(AUDIO OUT)
Monitor output
terminal
(mini D-sub 15-pin)
Audio output terminal
(AUDIO OUT)
Commercial VGA cable
To input a corresponding
audio signal:
Commercial audio cable
Supplied VGA cable (SX800)
To input a corresponding
audio signal:
Commercial audio cable
Projector
To ANALOG PC-2/
COMPONENT IN
Projecting an Image
To AUDIO IN
To ANALOG PC-2/
COMPONENT IN
To AUDIO IN
• If you use a commercial VGA cable, make sure to use a full connected VGA cable in
which all pins are connected; otherwise, an image may be projected improperly.
• Use an audio cable without a built-in resistor. Using an audio cable with a built-in resistor
turns down the sound.
41
Page 42
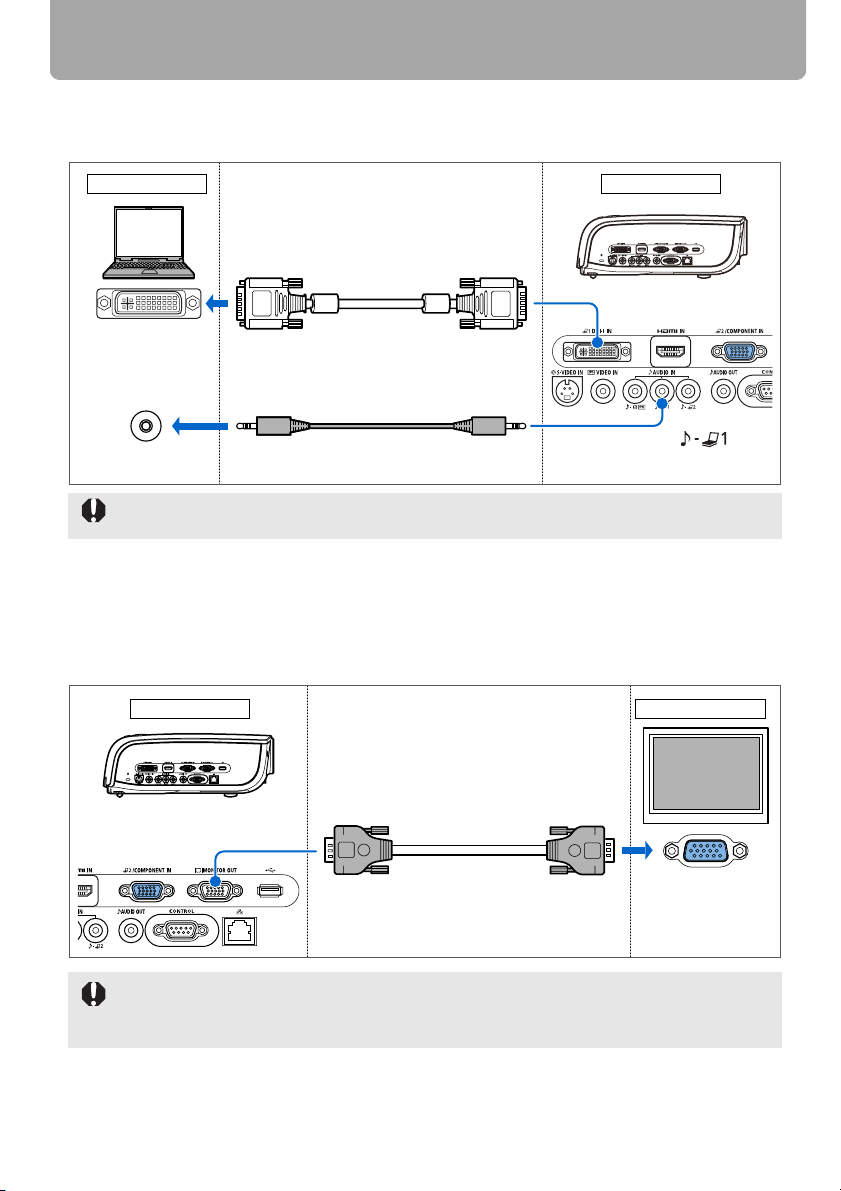
Connecting the Projector
■ Connecting to DVI Monitor Output Terminal (digital connection) (SX80 II)
DVI cable (Input signal type: [DIGITAL PC] - P54)
Computer Projector
To ANALOG PC-1/
Monitor output
terminal
(DVI terminal)
DVI digital cable (LV-CA29, option)
To input a corresponding
audio signal:
DVI-I IN
Audio output terminal
(AUDIO OUT)
Use an audio cable without a built-in resistor. Using an audio cable with a built-in resistor
turns down the sound.
Commercial audio cable
To AUDIO IN
■ Outputting an Image and Audio
Outputting an Image (SX80 II)
Images can be output to an external monitor via [ANALOG PC-1], [ANALOG PC-2] and
[COMPONENT].
Projector
To MONITOR OUT
Commercial VGA cable
• You can connect one external monitor.
• It outputs an image of the analog PC or component video signal, whichever was previously selected
External monitor
Monitor input
terminal
(mini D-sub 15-pin)
42
Page 43
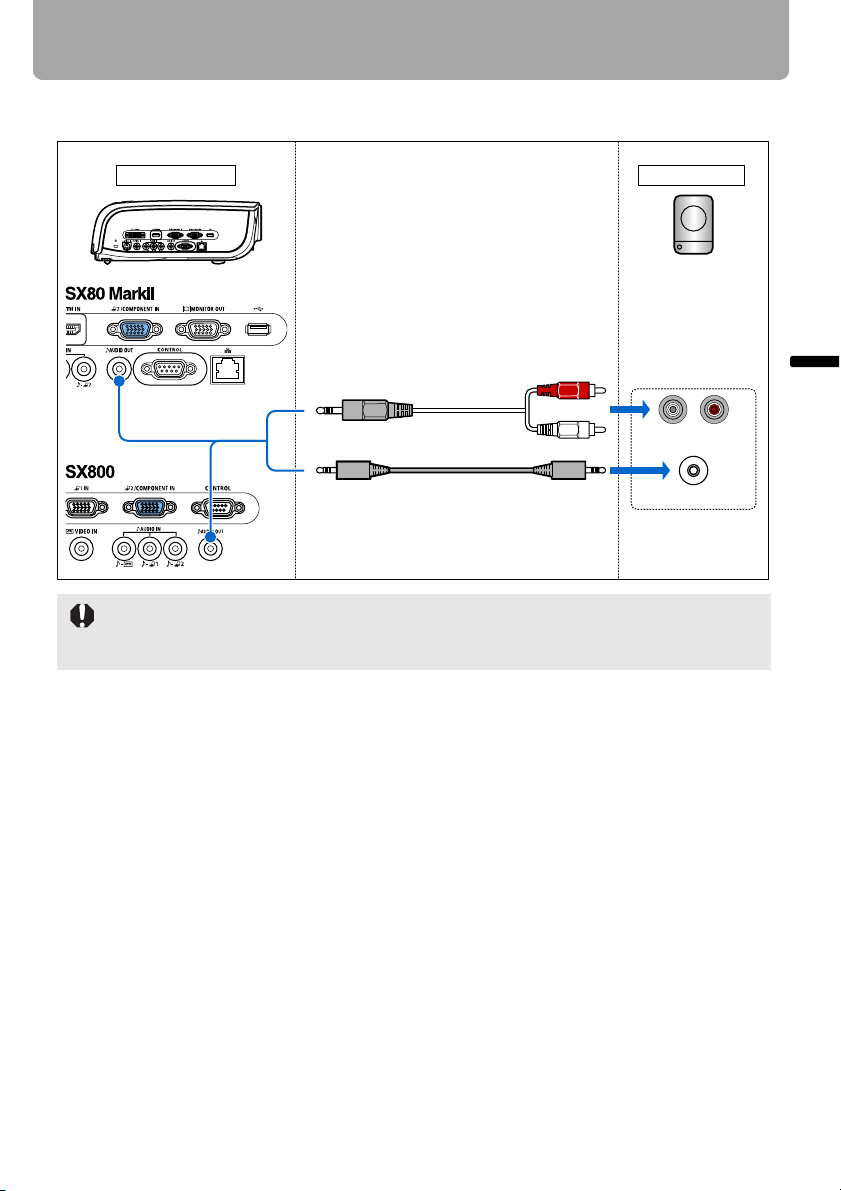
Connecting the Projector
Outputting Audio to Speakers
It is possible to output sound of projected images to AV equipment or amplified speakers.
Projector Speaker
Projecting an Image
To AUDIO OUT
Commercial audio cable
• The speaker outputs the audio signal corresponding to the selected image signal.
• Use an audio cable without a built-in resistor. Using an audio cable with a built-in resistor
turns down the sound.
RCA terminal
Mini jack
Audio input terminal
(AUDIO IN)
43
Page 44
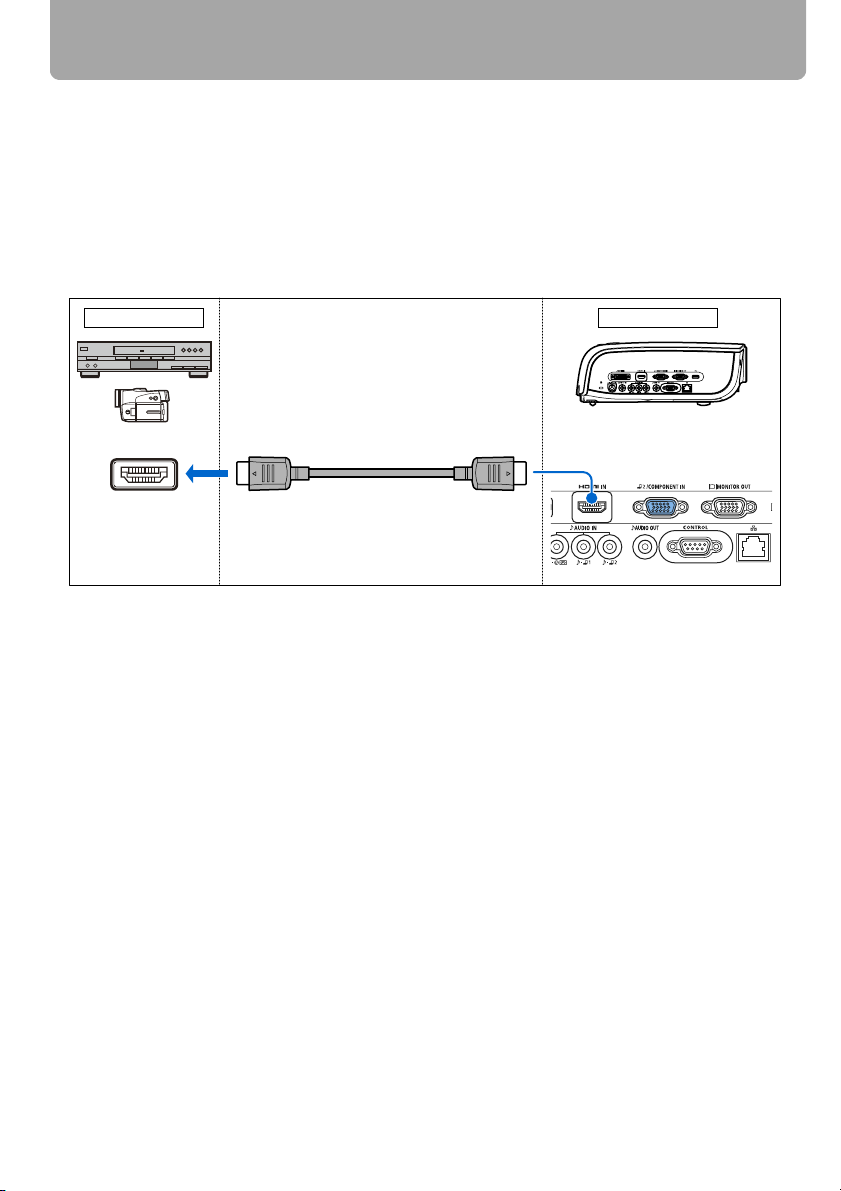
Connecting the Projector
Connecting to AV Equipment
Connect the projector and AV equipment.
Before connecting the cables, turn off both the projector and AV equipment.
The description provided here is just examples. For more detailed information, refer to the
manual for the connecting AV equipment.
■ Connecting to Digital Video Output Terminal (digital connection) (SX80 II)
HDMI cable (Input signal type: [HDMI] - P54)
AV equipment
Digital video camera
Digital video
output terminal
(HDMI terminal)
Projector
To HDMI IN
Commercial HDMI cable
* HDMI cable connection simulta-
neously connects digital sound.
44
Page 45
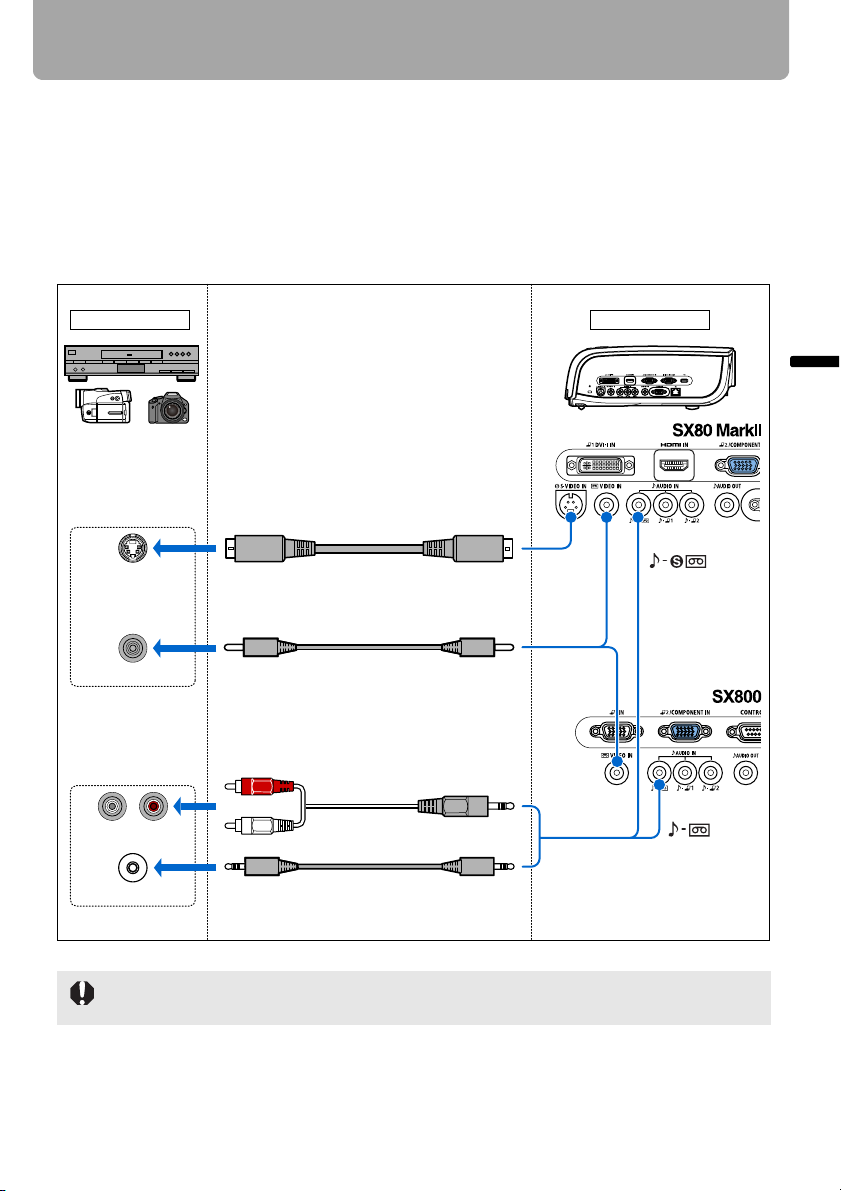
Connecting the Projector
■ Connecting to Analog Video Output Terminal (analog connection)
Video cable (Input signal type: [VIDEO] or [S-VIDEO] - P54)
Connect the projector and AV equipment using a video or S-VIDEO cable that fits to the
terminal type of the AV equipment.
The input signal type is [VIDEO] or [S-VIDEO].
Sound is common to [VIDEO] and [S-VIDEO].
[S-VIDEO] is supported only in SX80 MarkII.
AV equipment Projector
To AUDIO IN
S terminal
Commercial S-VIDEO cable
To S-VIDEO
IN
Projecting an Image
RCA terminal
Image output
terminal
RCA terminal
Mini jack
Audio output terminal
Use an audio cable without a built-in resistor. Using an audio cable with a built-in resistor
turns down the sound.
Commercial video cable
To input a corresponding
audio signal:
Commercial audio cable
45
To VIDEO
IN
To A U DI O I N
Page 46
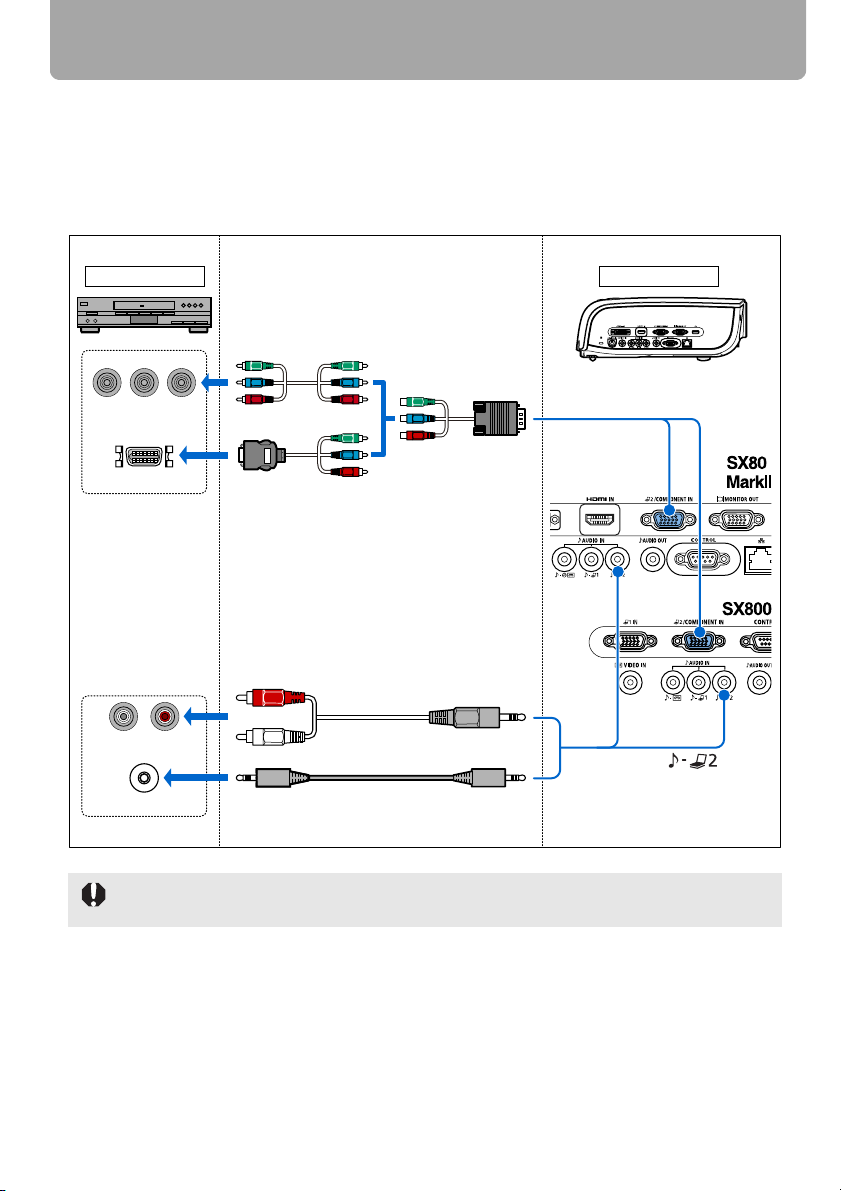
Connecting the Projector
Supplied component cable (Input signal type: [COMPONENT] - P54)
A Component video signal from AV equipment can be input to the projector by connecting the supplied component cable to the ANALOG PC-2/COMPONENT IN terminal of the
projector.
Use a commercial component cable that fits to the terminal type of the AV equipment to
connect the supplied component cable.
AV equipment
RCA Component
terminal
D terminal
Image output
terminal
RCA terminal
Mini jack
Audio output terminal
Projector
Commercial component cable
with RCA-RCA plugs
To ANALOG PC-2/
COMPONENT IN
Supplied component cable
Commercial component adapter cable with
D terminal – RCA plugs
To input a corresponding
audio signal:
To AUDIO IN
Commercial audio cable
Use an audio cable without a built-in resistor. Using an audio cable with a built-in resistor
turns down the sound.
46
Page 47
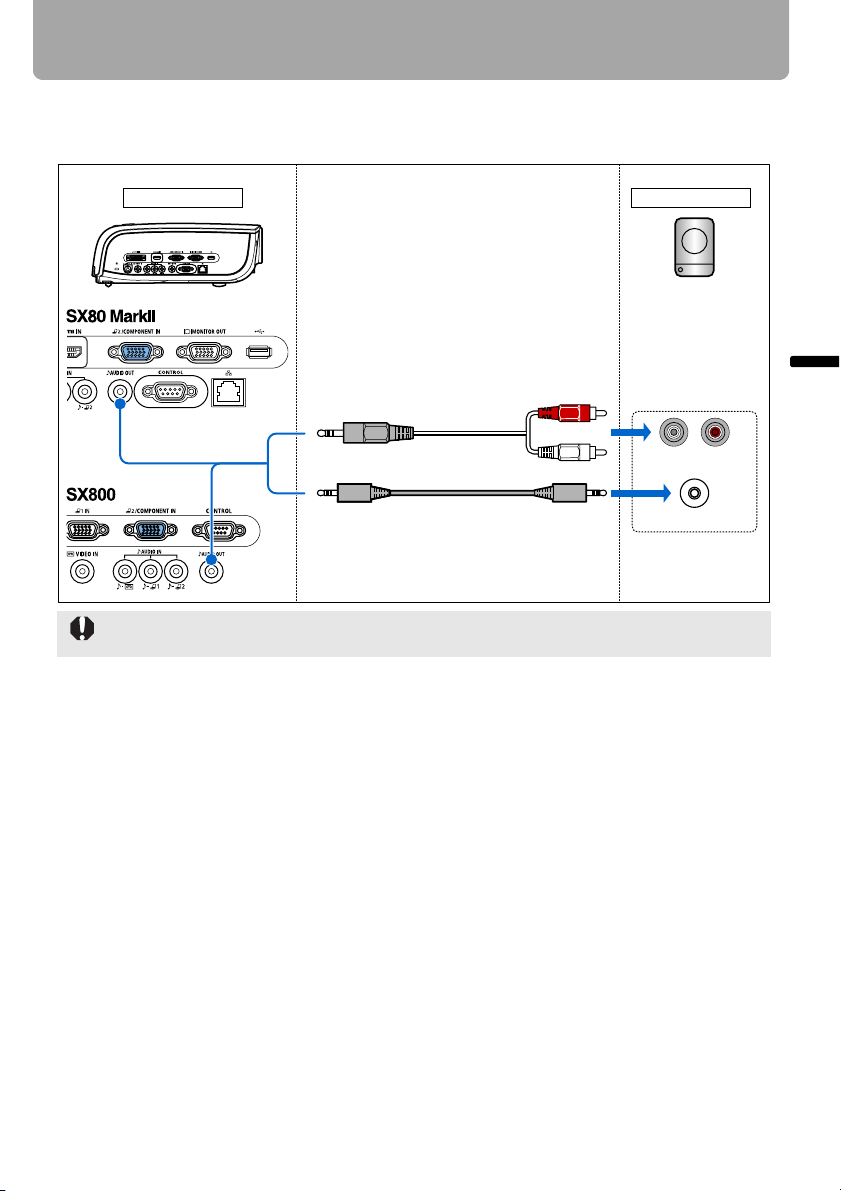
Connecting the Projector
■ Outputting Audio to Speakers
It is possible to output sound of projected images to AV equipment or amplified speakers.
Projector
To AUDIO OUT
Commercial audio cable
Use an audio cable without a built-in resistor. Using an audio cable with a built-in resistor
turns down the sound.
Speaker
RCA terminal
Mini jack
Audio input terminal
(AUDIO IN)
Projecting an Image
47
Page 48
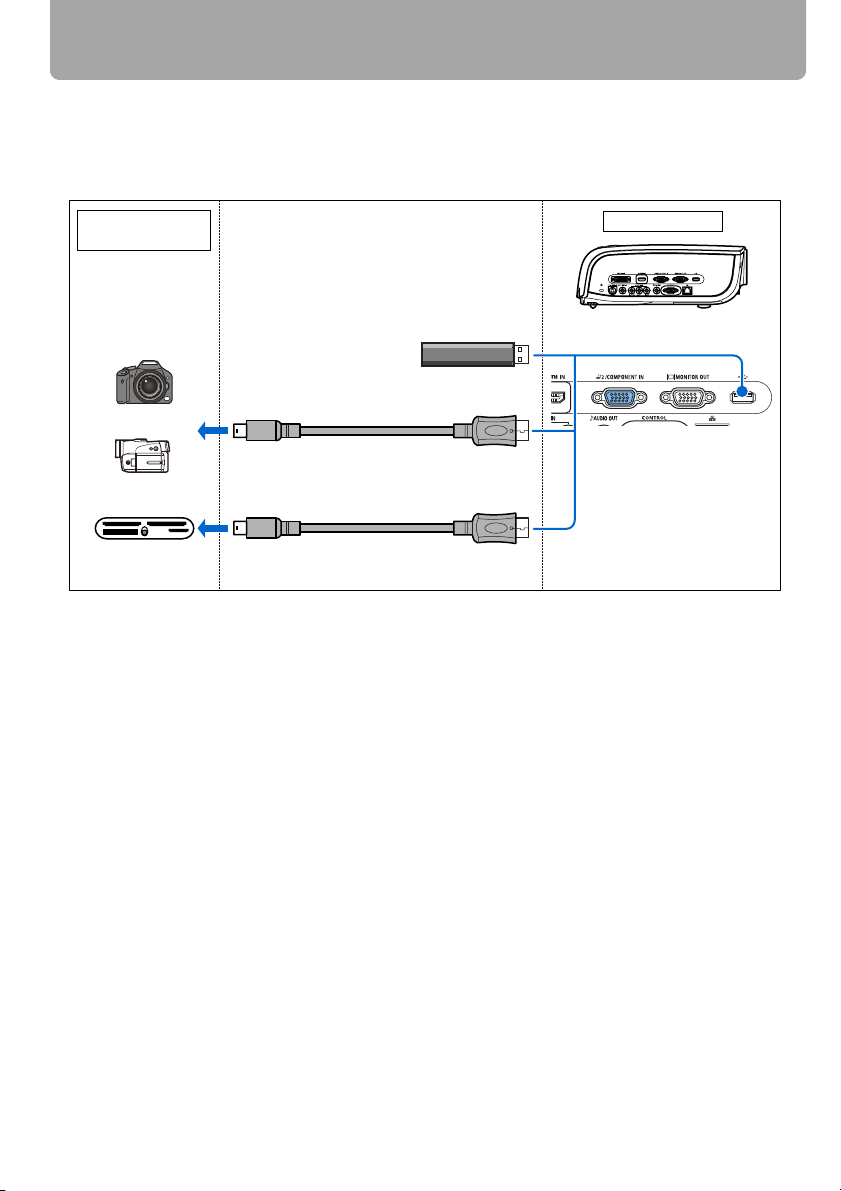
Connecting the Projector
■ Connecting a Digital Camera or an USB Flash Memory (SX80 II)
SX80 MarkII supports PictBridge.
You can connect a PictBridge enabled digital camera, a digital video camera, an USB
flash memory, or an USB memory card reader to directly project images.
Digital camera
USB flash memory
Digital camera
Digital video
camera
USB memory
card reader
Projector
To USB terminal
USB flash memory
USB cable (recommended by
digital camera manufacturer)
USB cable (supplied with memory
card reader)
48
Page 49
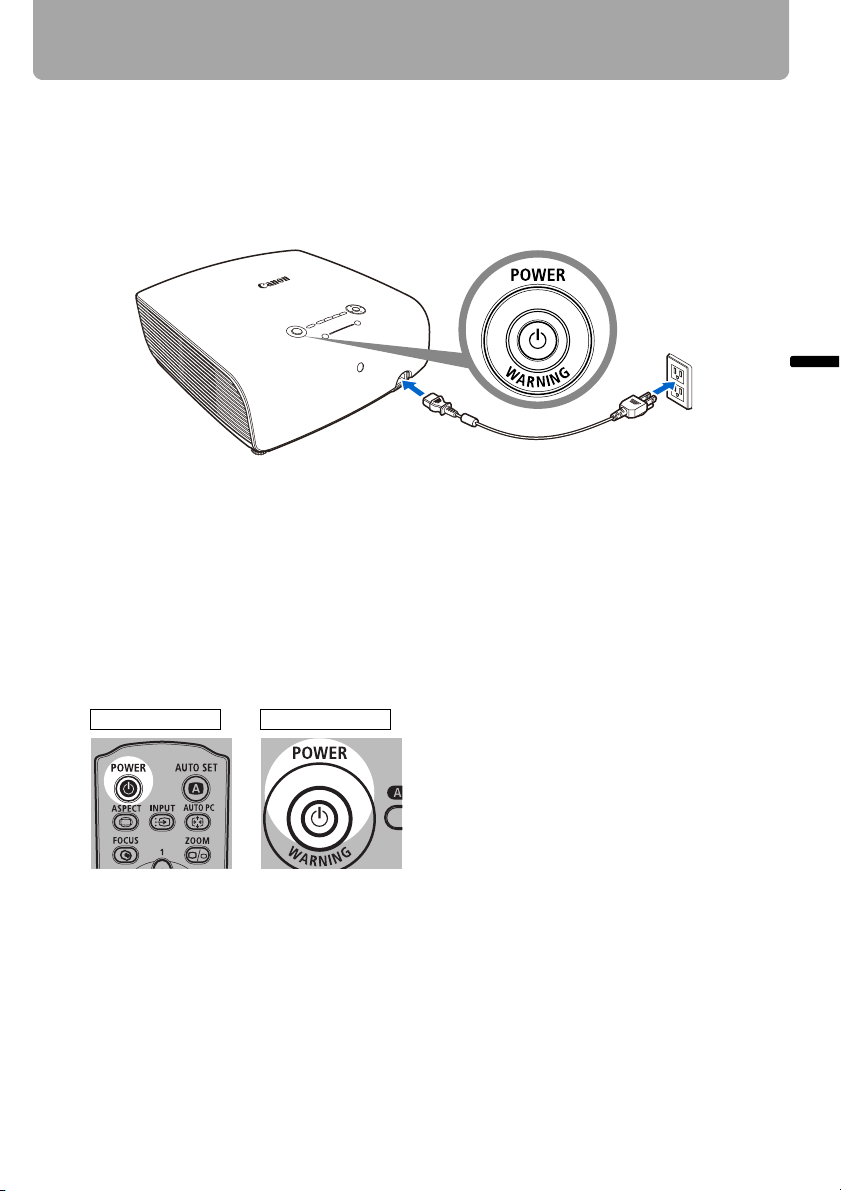
Starting Projection
1 Check the connection between the projector and a computer or AV equipment. (P38 –
P48)
2 Connect the power cord and make sure that the [POWER] indicator lights up red.
Flashing red [POWER] indicator indicates that the lamp is being cooled. Wait until the
indicator turns a steady red.
• Fully insert the power cord plug into the socket.
• Connect the ground terminal on the power plug to ground. Otherwise, an electric
shock may result or the computer may suffer electromagnetic radiation problems or
be subject to poor reception by TV and radio.
• Wait at least 5 minutes before turning on the projector when you turn off the projector.
It may shorten the lamp life if you turn on the projector immediately after turning it off.
• To save power, unplug the power cord when not in use.
Projecting an Image
3 Remove the lens cap and press the POWER button.
The POWER indicator flushes green, and then lights in green.
Remote control Top control
The countdown window is displayed for approximately 20 seconds, and then the projection is started. Press the OK button to make the countdown window disappear.
4 Turn on the computer or AV equipment power.
49
Page 50
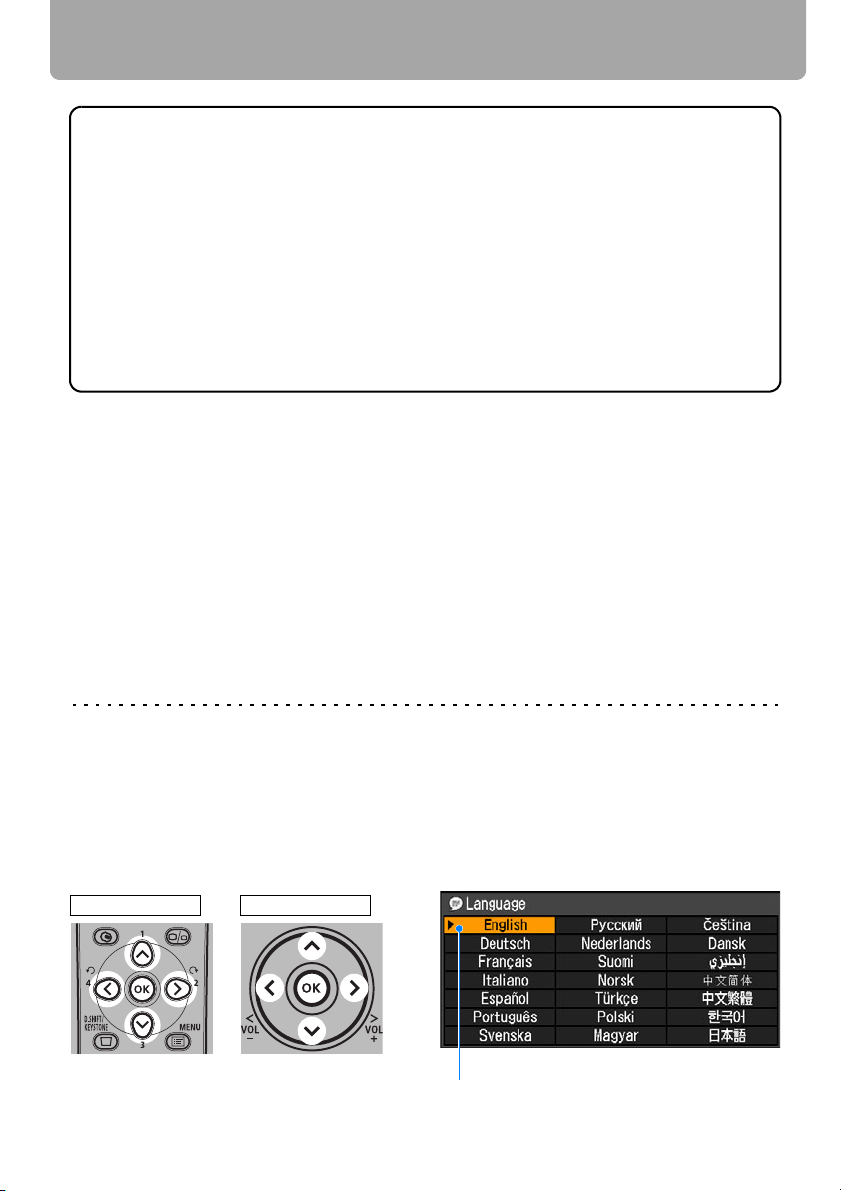
Starting Projection
Changing Operations When Projector is Turned On
You can change operations when the projector is turned on as follows:
• You can turn on the projector by connecting the power cord without pressing the
POWER button. (P104)
• You can specify whether to enable or disable the LED illumination lamp. (P106)
• You can change the countdown window. (P90)
• You can skip the countdown window. (P49)
Using the Power Saving Mode (power management)
When you enable the power management mode, the lamp is automatically turned
off if the projector receives no signal input for a certain period of time. (P103)
5 Press the AUTO SET button.
The auto setup function performs the following operations automatically:
SX80 MarkII: focusing and keystone distortion adjustment, input signal setting, and
screen color correction
SX800: keystone distortion adjustment and input signal setting
For more details, refer to the page 52.
If the projector is projecting an image properly with [AUTO SETUP], the projection is
complete.
In SX800, adjust the focus and correct the screen color manually.
For how to turn off the projector, refer to the page 68. Perform the appropriate operation depending on the following situations.
■ When the Language Selection Screen Appears
A window appears when the projector is turned on for the first time. You can select a language to be used by the projector for displaying menus and messages in the window.
Select the desired language with the pointer buttons and press the OK button.
You can change the language from the menu at a later time. (P105)
If you cannot check the language selection screen due to the out of focus, press the
FOCUS button to adjust the focus. (P59)
Remote control Top control
An item highlighted in orange will be selected.
50
Page 51
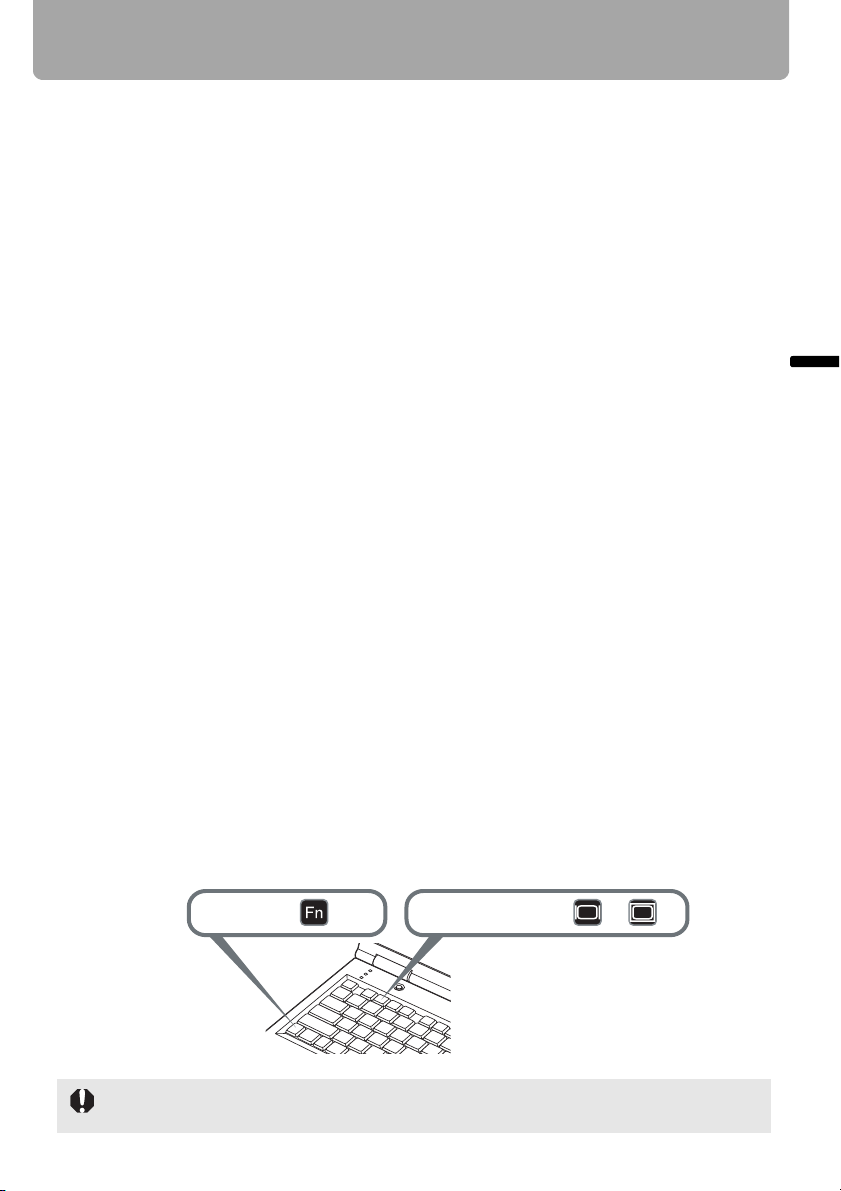
Starting Projection
■ When the Password Input Screen Appears
If you have set a password, the Password input screen appears. Enter your password.
(P108)
■ When "No signal" Appears
A notebook computer requires to turn on the external monitor output. (P51)
Press the INPUT button to select an appropriate input signal. (P55)
■ When Notebook Computer Screen Does Not Appear
Set your notebook computer to output signals to an external monitor. For more details,
refer to "Changing Notebook Computer Screen Output" below.
■ Adjusting Image
• For the display resolution of the computer, select "1400 x 1050 pixels" or a resolution
closest to the output signal resolution of the computer. (P56)
• Use the auto PC function to adjust shift in computer image or the flickering of the
screen. (P57)
• Use the ZOOM button to adjust the size of the projecting image. (P58)
• Use the FOCUS button to correct the focus adjustment if necessary. (P59)
• Use the
• Select the aspect ratio of the projecting image (screen aspect) or a screen mode
(aspect) according to the aspect ratio of the screen, type of input image signal and so
on. (P62 - P66)
• Select an image mode depending on the projecting image. (P67)
D.SHIFT/KEYSTONE
button to adjust keystone correction if necessary. (P60)
Changing Notebook Computer Screen Output
To use a notebook computer, you need to change the screen output on the notebook
computer.
This operation is not required for a desktop computer.
■ Turning On External Monitor Output
You can turn on the external monitor output via keyboard operation.
To turn on the external monitor output, press an icon for an external monitor or a function
key ([F1] to [F12]) while holding [Fn] key down.
While holding key Press a key such as or
Projecting an Image
The function keys you use and the method used to turn on the external monitor output vary
depending on the model. For details, see the instructions of your notebook computer.
51
Page 52
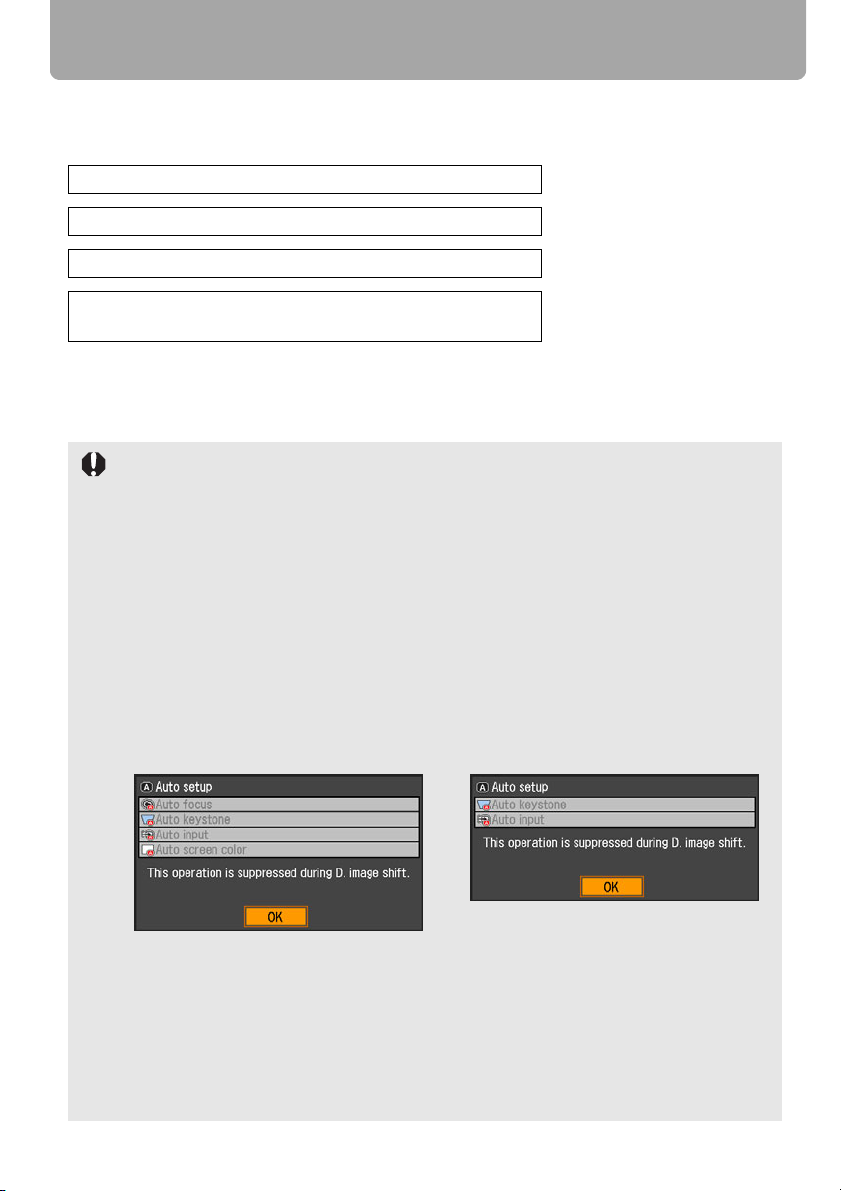
Setting Up the Screen Automatically
Auto Setup
The auto setup function automatically makes the following settings and adjustments.
Setting image input signal (Auto input)
Focusing (Auto focus) (SX80 II)
Keystone correction (Auto keystone)
Screen color correction (Auto screen color correction)
(SX80 II)
Use the auto setup function when:
• You turned the power on and the countdown sequence was completed.
• You changed the position or angle of the projector during the projection process.
• The auto screen color correction is disabled at the factory. To enable the auto screen color
correction when performing the auto setup, select the function in menu. (SX80 II) (P86)
• You cannot set a digital PC signal or an AV equipment signal ([Digital PC] and [HDMI])
with the auto setup function. Select the appropriate signal by pressing the INPUT button.
(SX80 II) (P55)
• When "No signal" message appears, press the INPUT button to select an appropriate
input signal. (P55)
• If focusing, keystone distortion and/or screen color correction have not been performed
properly, manually adjust them. (Adjusting the focus: P59, Correcting keystone distortion:
P60 and Correcting the screen color: P86)
• In SX800, the auto setup function does not adjust the focus. Please manually adjust the
focus. (P59)
• If you select [16:9 D. image shift] for [Screen aspect], [Auto setup] will be disabled and
the following screen appears.
SX80 MarkII SX800
• When you press the INPUT button and then the AUTO SET button, only the input signal
type is set.
• When you press the FOCUS button and then the AUTO SET button, only the focus is
adjusted. (SX80 II)
If you select [16:9 D. image shift] for [Screen aspect], the auto focus function will be disabled.
• When you press the D.SHIFT/KEYSTONE button and then the AUTO SET button, only the
keystone distortion is adjusted. If you select [16:9 D. image shift] for [Screen aspect], the
keystone adjustment will be disabled.
52
Page 53
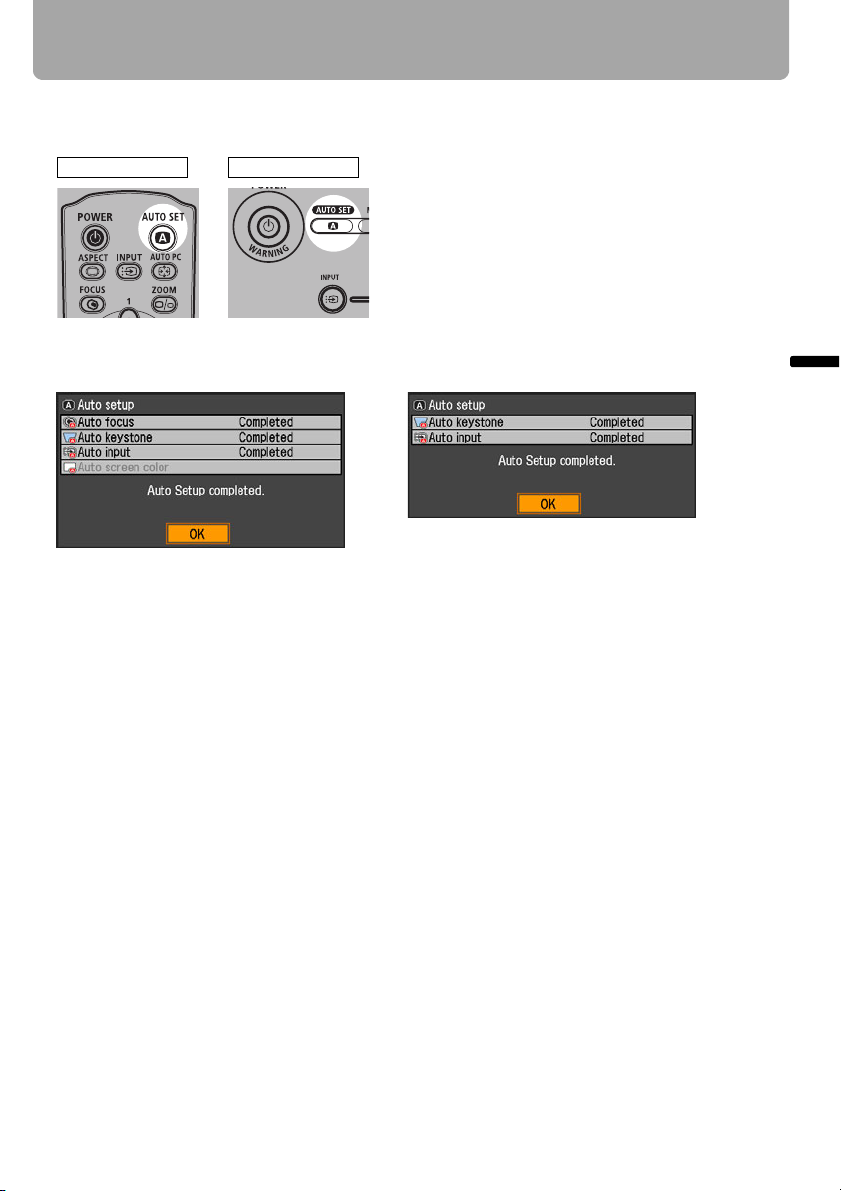
Setting Up the Screen Automatically
■ Performing the Auto Setup
Press the AUTO SET button to perform the auto setup.
Remote control Top control
• After the auto setup is complete, the following window appears. Press the OK button.
SX80 MarkII SX800
Projecting an Image
53
Page 54
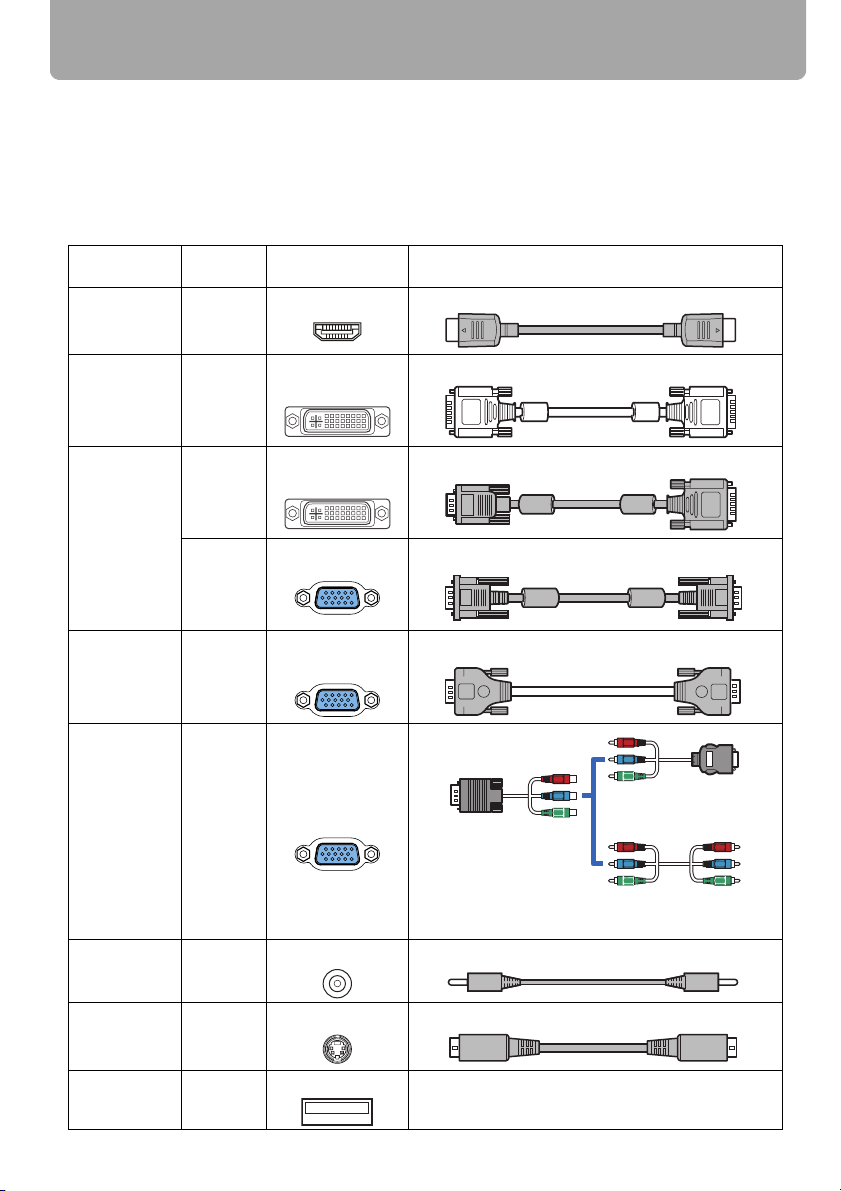
Selecting an Input Signal (INPUT)
Select an appropriate input signal in the [INPUT] menu if you want to project a digital PC or AV
equipment signal or you connect multiple computers or AV equipment to receive their input signals.
Skip this step if you have not changed the input signal since the last projection.
■ Types of Input Signals
The table below shows the relationship among input signals supported by the projector,
input terminals and connection cables.
S
Input signal
HDMI SX80 II
Supported
model
Input terminal Types of connection cables
HDMI IN
HDMI cable (commercial item)
DIGITAL PC SX80 II
SX80 II
ANALOG
PC-1
SX800
ANALOG
PC-2
COMPONENT
VIDEO
S-VIDEO SX80 II
SX80 II
SX800
SX80 II
SX800
SX80 II
SX800
ANALOG PC-1/
DVI-I IN
ANALOG PC-1/
DVI-I IN
ANALOG PC-1
ANALOG PC-2/
COMPONENT IN
ANALOG PC-2/
COMPONENT IN
VIDEO IN
S-VIDEO IN
DVI digital cable (LV-CA29, option)
Computer connection cable (supplied item)
VGA cable (supplied item)
VGA cable (commercial item)
Component cable
(supplied item)
Commercial component
adapter cable with
D terminal – RCA plugs
Commercial component
cable with RCA – RCA
plugs
Video cable (commercial item)
S-VIDEO cable (commercial item)
USB SX80 II
USB
USB cable or USB flash memory
(commercial item)
54
Page 55
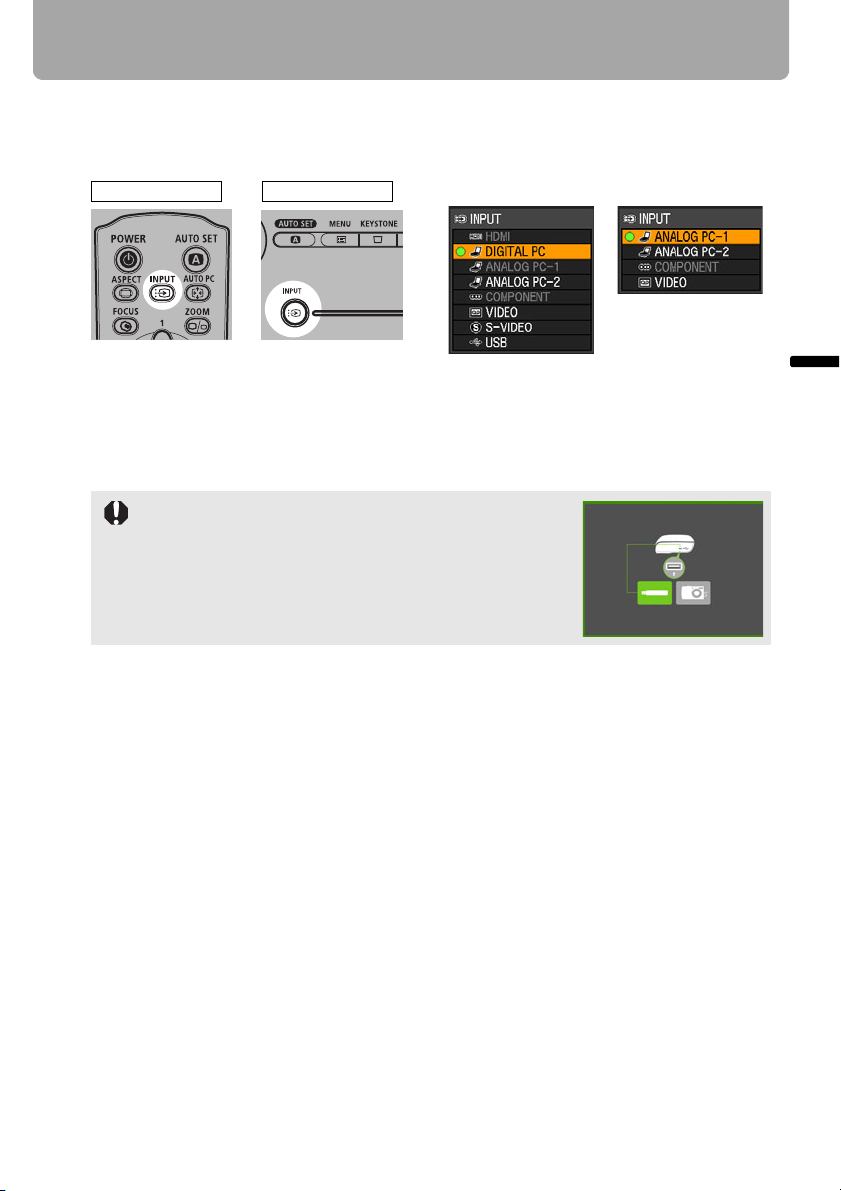
Selecting an Input Signal (INPUT)
■ Selecting an Input Signal
1 Press the INPUT button to pop up a window shown at the lower right.
Remote control Top control
SX80 MarkII SX800
The currently active input signal is marked with a circle and highlighted in orange.
An input signal that is ready for projection is displayed in white. When no signal is
received, it is displayed in gray.
In SX80 MarkII, [HDMI], [DIGITAL PC], and [ANALOG PC-1] may be displayed in
gray even if they are ready for projection.
When you select [USB] with no PictBridge enabled equipment or an USB flash memory connected and pressing the
OK button, a window waiting for you to connect a PictBridge enabled equipment or an USB flash memory
appears. For more details, refer to "Projecting an Image
from a Digital Camera (SX80 II)" (P114 – P117) or "Projecting Data on USB Flash Memory (SX80 II)" (P118 – P124).
2 The selection is toggled through available input signal types by pressing the INPUT
button.
• You can select the target input signal with [ ] / [ ].
• Only the input signals displayed in white can be selected.
<
<
3 Press the OK button to determine the input signal type.
If no button is pressed in 4 seconds, the selected input signal type is chosen.
Projecting an Image
55
Page 56
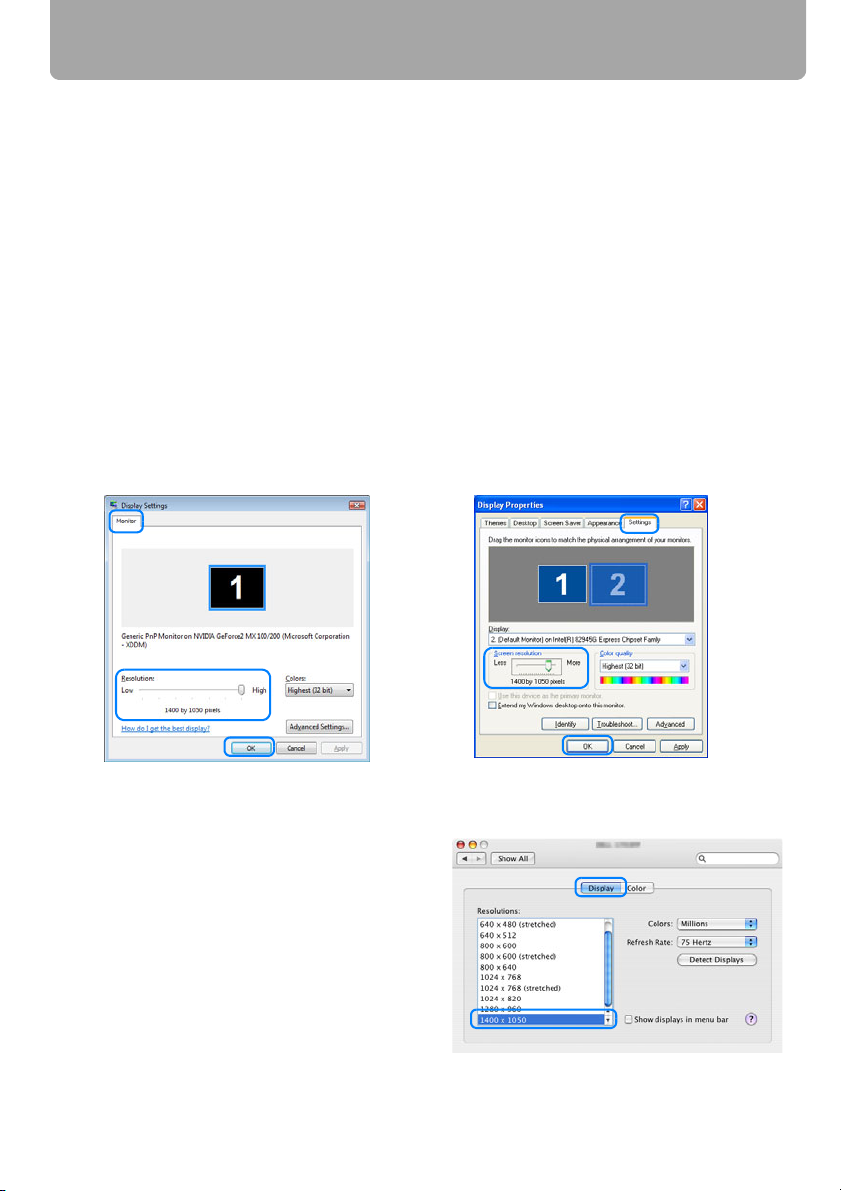
Adjusting Image
Setting the Display Resolution of the Computer
Set the display resolution of the computer to "1400 x 1050 pixels" or a resolution closest to
the output signal resolution of the computer based on the performance of the projector
(resolution: 1400 x 1050 pixels). (P150)
■ Windows Vista
1 Open the [Control Panel] from the start
menu, then select [Appearance and
Personalization] - [Adjust screen resolution] in the [Control Panel Home].
2 Select "1400 x 1050 pixels" or a reso-
lution closest to the output signal resolution of the computer.
3 Click the OK button.
■ Macintosh OSX
■ Windows XP
1 Right-click on the desktop back-
ground and select [Properties] to open
the [Display Properties].
2 Click the [Settings] tab, and under
[Screen Resolution], select "1400 x
1050 pixels" or a resolution closest to
the output signal resolution of the
computer.
3 Click the OK button.
1 Open the Apple Menu and select [System
Environment Setting].
2 In the System Environment Setting win-
dow, click the [Displays] icon to display
the Display window.
3
Select the [Display] tab and select "1400 x
1050" or a resolution closest to the output
signal resolution of the computer from the
[Resolution] list.
4 Close [System Environment Setting] window.
56
Page 57
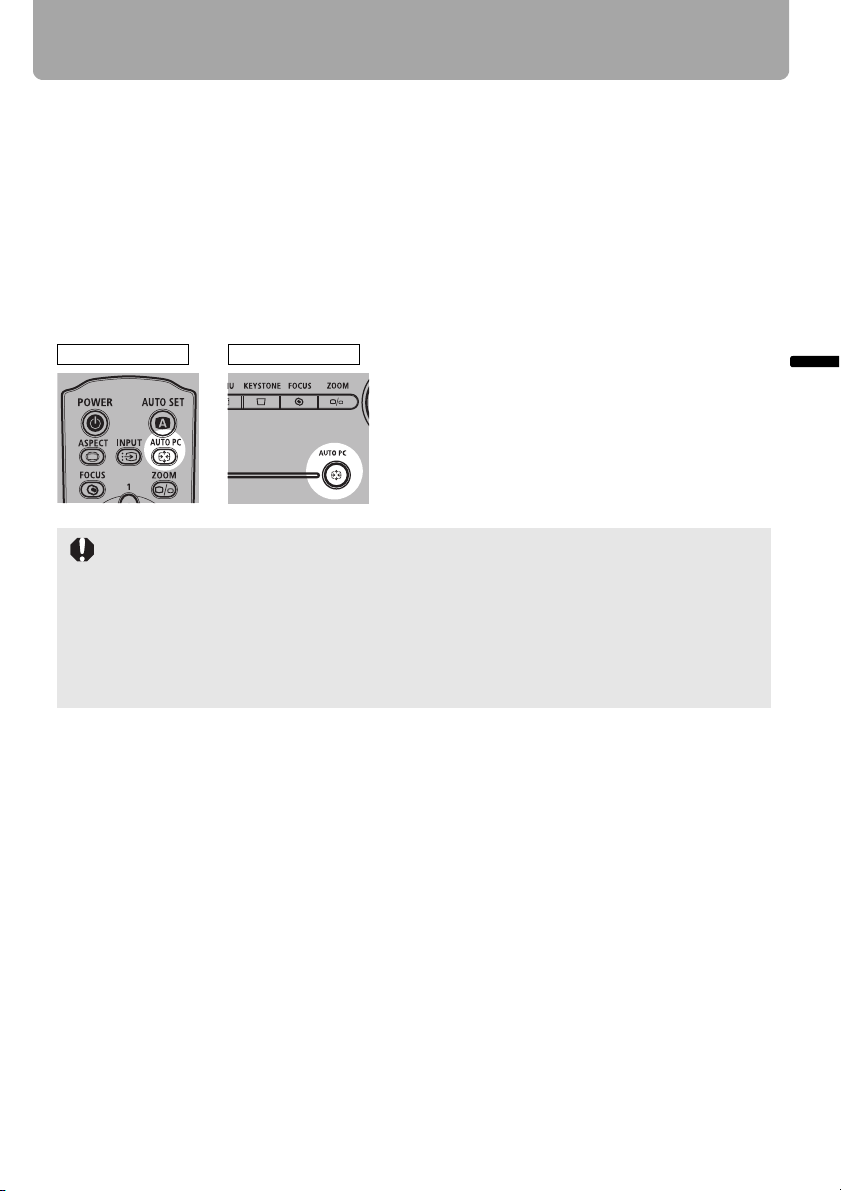
Adjusting Image
AUTO PC
When you press the AUTO PC button if there is a shift in image display or flickering of
screen with the [ANALOG PC-1] or [ANALOG PC-2] selected, the projector is adjusted to
an optimum condition.
The result of adjustment is recorded for each input signal ([ANALOG PC-1] or [ANALOG
PC-2]). If you connect the projector to the same computer, you can project the image with
the same settings as before simply by select the input signal.
■ Performing the Auto PC Function
Press the AUTO PC button to make projector adjustment.
Remote control Top control
Perform the following if the project image has not been properly adjusted with the auto PC
function.
• From [Input signal select], select an input signal type based on the resolution of the computer. (P80)
• If the adjustment is still insufficient, from [Input signal settings] select [Total dots], [Tracking], [Horizontal position], [Vertical position], [Horizontal pixels] and [Vertical pixels] to
make adjustments. (P81 – P84)
• For the signal types supported by the projector, see the table on page 150.
Projecting an Image
57
Page 58
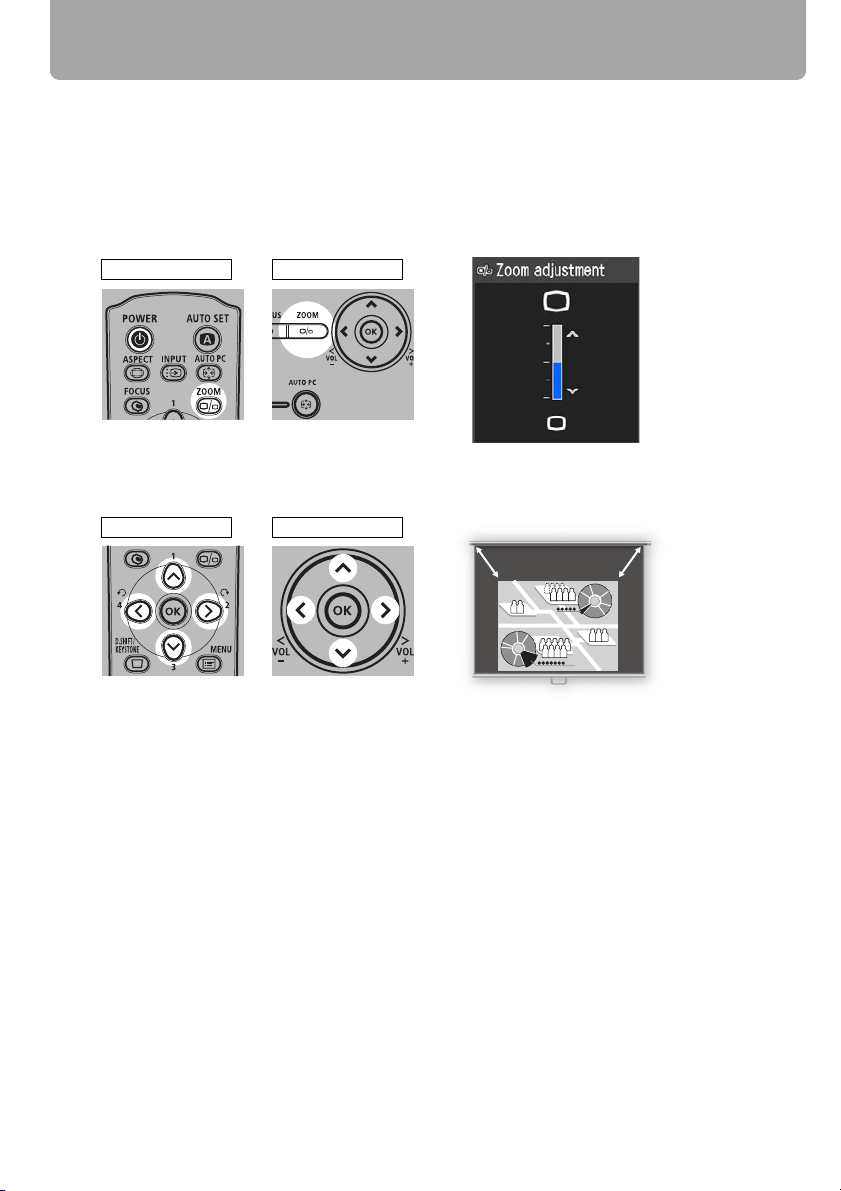
Adjusting Image
Adjusting the Image Size
Use the ZOOM button to adjust the size of the projecting image.
Change the projector installation position if your desired image is too large or too small to
adjust it with the zoom function. (P35)
1 Press the ZOOM button to pop up a window shown at the lower right.
Remote control Top control
2 Press the pointer buttons to adjust the image size.
Remote control Top control
<
[ ] / [ ]: Rough adjustment.
<
[<] / [>]: Fine adjustment.
3 When the image size is determined, press the OK button or the ZOOM button.
58
Page 59
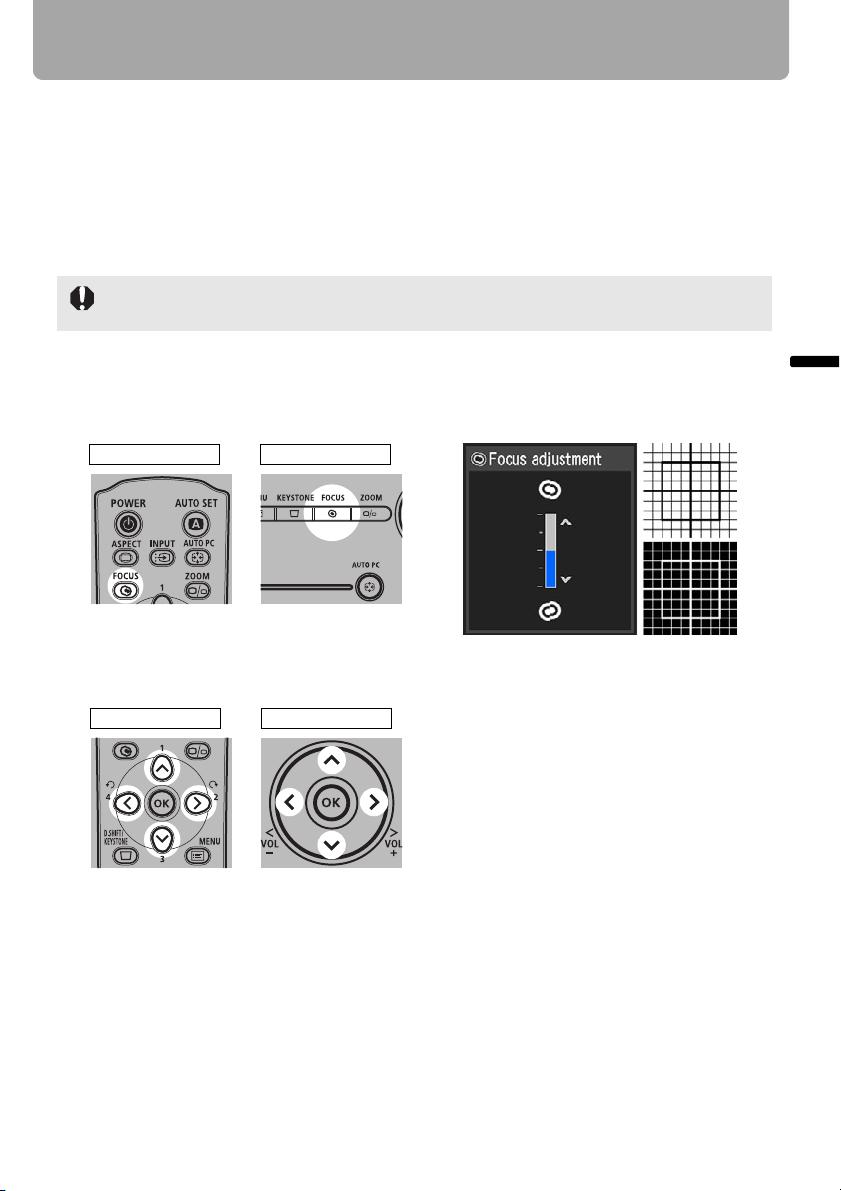
Adjusting Image
Adjusting the Focus
You can adjust the focus with the FOCUS button. The projection image may be out of
focus if the projection distance is beyond the range of 1.2 m (3.9') to 9.1 m (29.6'). Move
the projector installation position if such is the case. (P35)
■ Auto focusing (SX80 II)
Press the FOCUS button, and then the AUTO SET button.
If you select [16:9 D. image shift] for [Screen aspect], the auto focus function will be disabled.
■ Manual focusing
1 Press the FOCUS button to pop up a window shown at the lower right.
Remote control Top control
2 Press the pointer buttons to adjust the focus.
Remote control Top control
<
[ ] / [ ]: Rough adjustment.
<
[<] / [>]: Fine adjustment.
Projecting an Image
3 When the focus is adjusted optimally, press the OK button or the FOCUS button.
59
Page 60
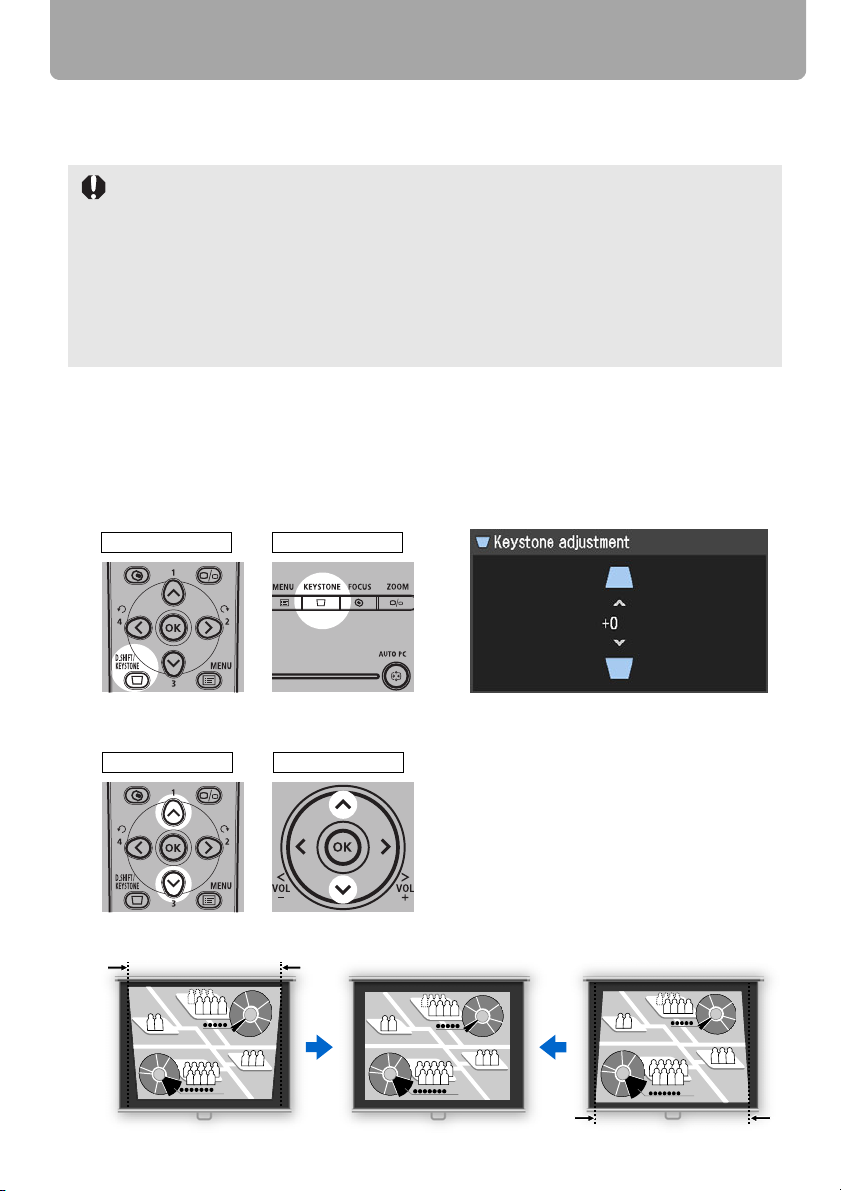
Adjusting Image
Adjusting Keystone Distortion
The D.SHIFT/KEYSTONE button corrects the keystone distortion.
• Keystone can be adjusted within the range of ± 20 degrees. If the keystone distortion is
too large to adjust, move the projector installation position. (P35)
• The amount of adjustment may be smaller depending on type of input signal.
• The result of keystone adjustment is memorized. If you place the projector at the same
position, the keystone adjustment is not necessary.
• Signals are processed digitally when keystone distortion is corrected. The image may
look different from the original one. In addition, the aspect ratio of the image may change.
• If you select [16:9 D. image shift] for [Screen aspect], the keystone adjustment will be disabled. Project the image at right angle to the screen.
■ Auto adjustment
Press the D.SHIFT/KEYSTONE button, and then the AUTO SET button.
■ Manual adjustment
1 Press the D.SHIFT/KEYSTONE button to pop up a window shown at the lower right.
Remote control Top control
2 Press the pointer buttons to adjust the focus.
Remote control Top control
<
[ ]: Reduces the length of
the upper edge.
60
[ ]: Reduces the length of
<
the lower edge.
Page 61

Adjusting Image
3 When the keystone distortion has been adjusted, press the OK button.
■ Resetting the Keystone Adjustment
Perform the following steps to reset the keystone adjustment.
Press the D.SHIFT/KEYSTONE button twice to display the [Keystone reset] window.
On the window, select [OK] with [<], and then press the OK button.
Projecting an Image
61
Page 62
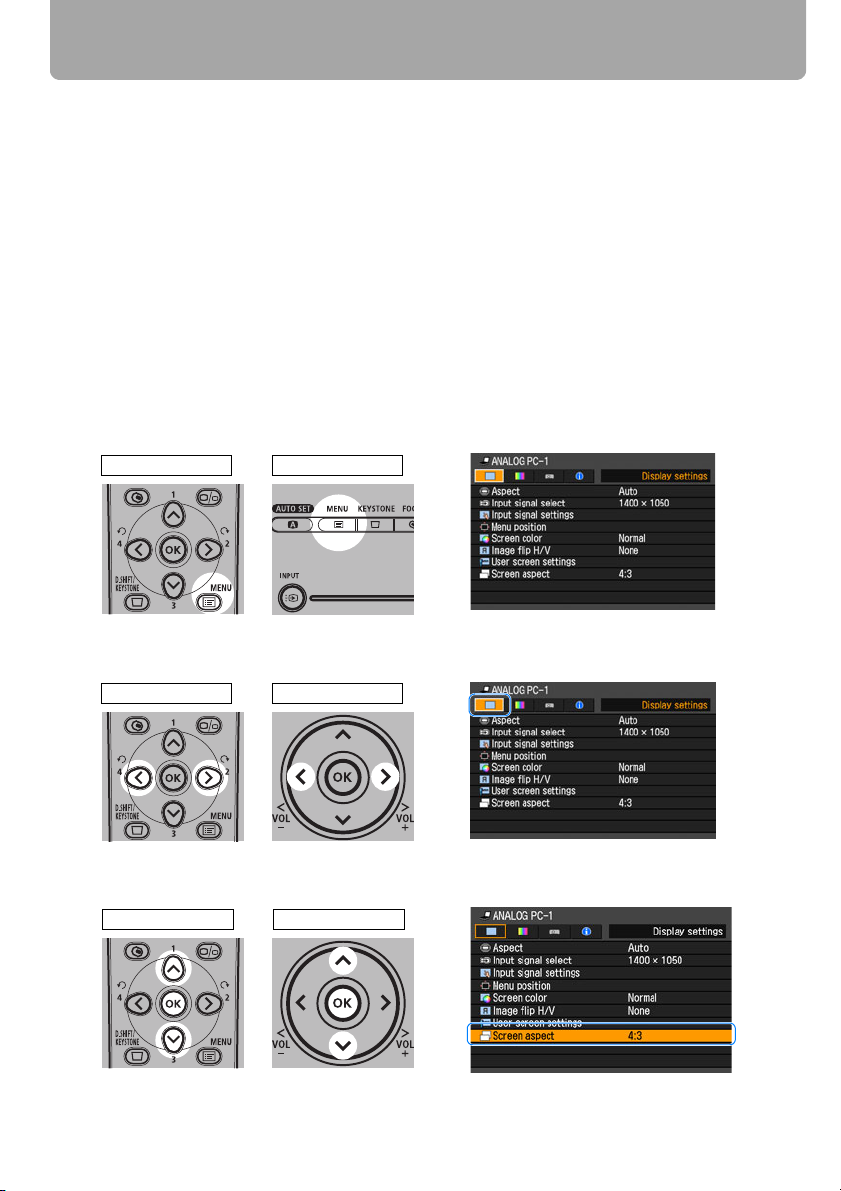
Selecting Screen Aspect and Aspect
Select an optimum aspect ratio of the projecting image (screen aspect) or an optimum
screen mode (aspect) according to the aspect ratio of the screen, type of input image
signal and so on for the projection making best use of the screen size.
• [Screen aspect]: Select the same aspect ratio with your screen.
• [Aspect]: Select [Auto] unless the type of input signal is [VIDEO].
You may need to change the setting depending on the resolution of the computer. If the
image is not projected with a desired aspect ratio, see "Relationship between Aspect and
Screen Aspect" in Appendix on page 147.
Selecting Screen Aspect
Select the aspect ratio of projecting image to the aspect ratio of the screen.
Perform the following steps to select the aspect ratio of the projecting image.
1 Press the MENU button to display a menu window.
Remote control Top control
2 Use [<] / [>] to select the [Display settings] tab.
Remote control Top control
3 Select [Screen aspect] with [ ] / [ ], and then press the OK button.
Remote control Top control
<
<
62
Page 63
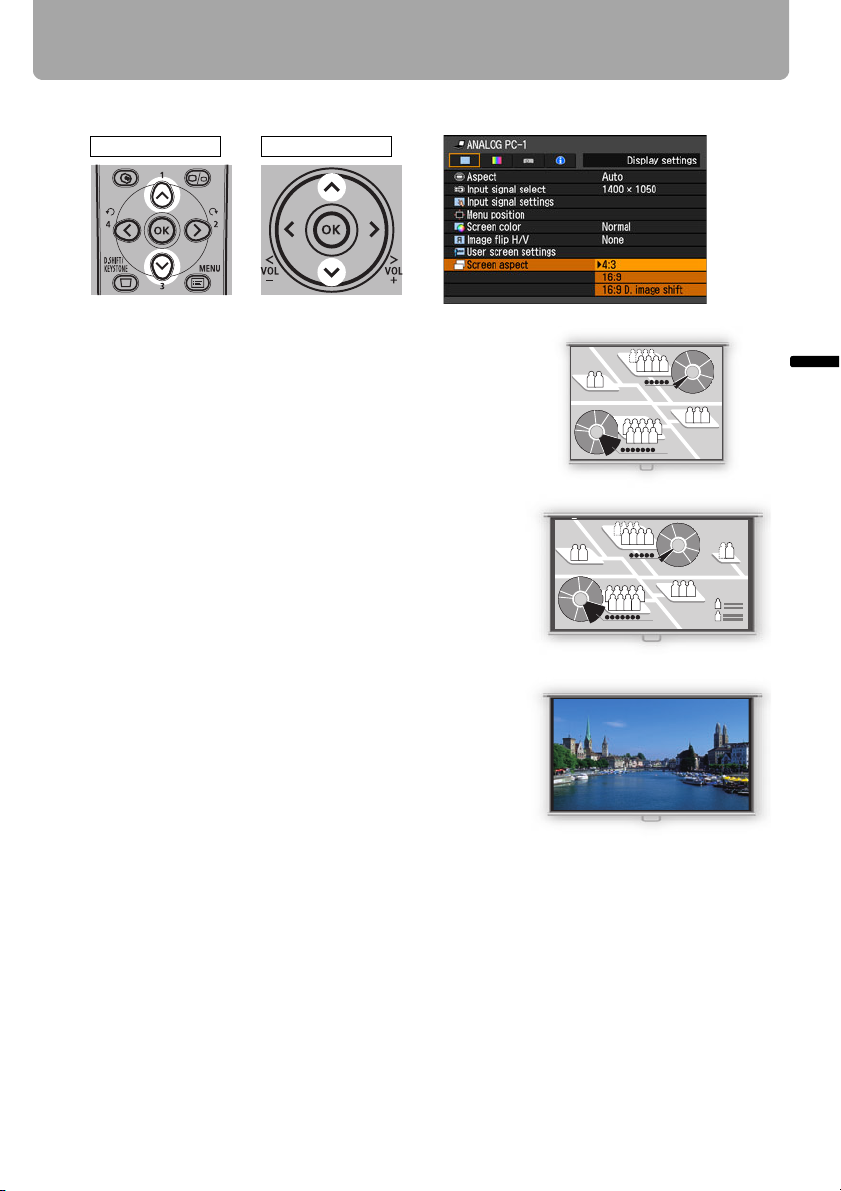
Selecting Screen Aspect and Aspect
4 Use [ ] / [ ] to select a screen aspect type.
<
<
Remote control Top control
4:3
Select this when you use a screen with aspect ratio
of 4:3.
16:9
Select this when you use a screen with aspect ratio
of 16:9.
16:9 D. image shift
Select this when you use a screen with aspect ratio
of 16:9. Suitable for projecting visual software having aspect ratio of 16:9.
You cannot correct the keystone distortion in this
mode, but you can move the image up or down with
images being projected horizontally.
See the following page on how to shift the image.
Projecting an Image
5 Press the OK button to accept your setting and then press the MENU button.
63
Page 64
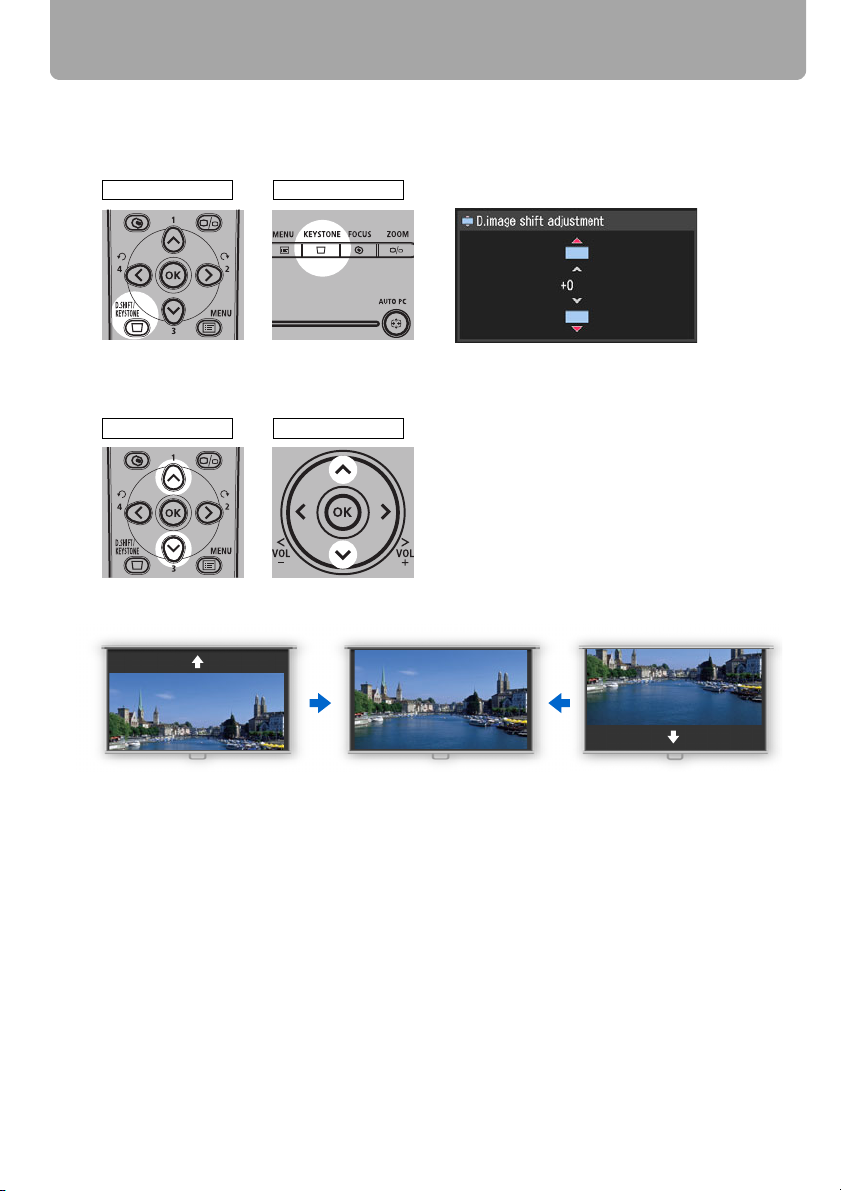
Selecting Screen Aspect and Aspect
■ Moving Image with 16:9 D. Image Shift
1 Press the D.SHIFT/KEYSTONE button to pop up a window shown at the lower right.
Remote control Top control
2 Use [ ] / [ ] to move the image.
<
<
Remote control Top control
<
[ ]: Moves up the image.
[ ]: Moves down the image.
<
3 When the image shift adjustment has been completed, press the OK button.
■ Resetting the Image Shift
Perform the following steps to reset the image shift adjustment.
Press the D.SHIFT/KEYSTONE button twice to display the [D.Image Shift reset] window.
On the window, select [OK] with [<], and then press the OK button.
64
Page 65

Selecting Screen Aspect and Aspect
Selecting Aspect Ratio
Select the aspect ratio of projecting image based on the input signal type, aspect ratio of
the screen and resolution.
For more details on the aspect ratios, refer to "When Projecting an Image from a Computer" on page 147.
■ Types of Aspect Ratios
Auto
An image is projected at an aspect ratio of the input signal. Select this mode for normal
image projection.
• [Auto] is not available if the input signal type is [VIDEO].
• [Auto] is automatically selected if the input signal type is [USB]. (SX80 II)
4:3
An image is projected at an aspect ratio of 4:3. Select this if an image of 4:3 aspect ratio
cannot be appropriately projected in the [AUTO] mode.
16:9
An image is projected at an aspect ratio of 16:9. Select this if an image of 16:9 aspect
ratio cannot be appropriately projected in the [AUTO] mode.
Zoom
An image with 4:3 aspect ratio is projected in the center of the screen enlarged in 16:9
aspect ratio with the upper and lower portion of the image cut off. Select this when projecting visual software having aspect ratio of 4:3 and black belts at the top and bottom of
the image.
• This mode is available when you select [16:9] or [16:9 D. image shift] for [Screen
aspect] and select [HDMI (576p, 480p) (SX80 II)], [COMPONENT (576p, 480p, 576i,
480i)], [VIDEO] or [S-VIDEO (SX80 II)] for input signal.
True size
An image is projected with the original resolution of the input signal. Select this to clearly
project computer screen images having a resolution SXGA+ or lower (VGA, SVGA, XGA
or SXGA) or visual software having a resolution lower than 1035i.
• This mode is available when you select [HDMI (720p, 576p, 480p) (SX80 II)] or [COMPONENT (720p, 576p, 480p)] for input signal.
Projecting an Image
• It is not available for an image having a resolution higher than SXGA+ or visual software
having a resolution of 1080i, 1080p, 1035i, 576i or 480i.
• It is also available if the input signal is [ANALOG PC-1], [ANALOG PC-2], or [DIGITAL PC
(SX80 II)]; however, it may not be available depending on the screen aspect setting.
65
Page 66
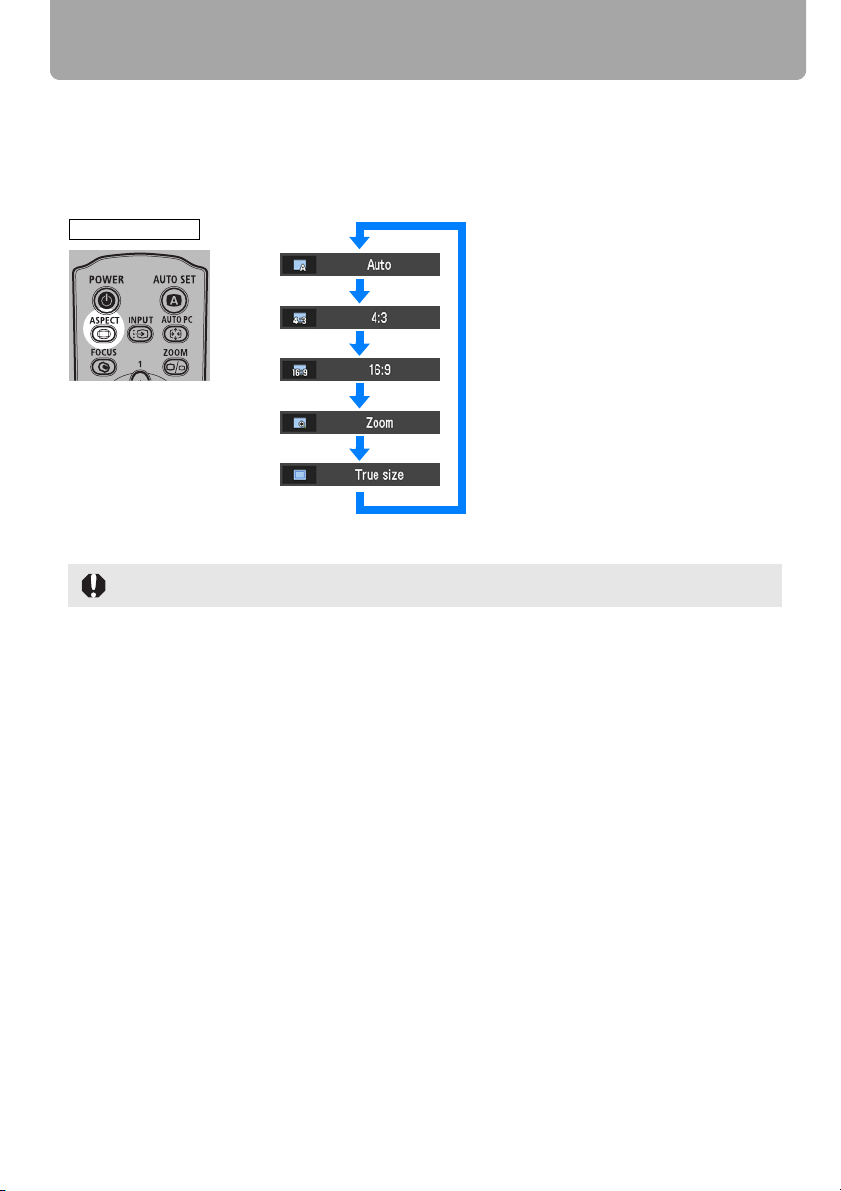
Selecting Screen Aspect and Aspect
■ How to Select an Aspect Ratio
Press the ASPECT button on the remote control to select an appropriate aspect ratio. The selection
is toggled among types for aspect ratios by pressing the ASPECT button.
For more details on the aspect ratios, refer to "
147.
Remote control
You can also select any aspect ratio from the menu. (P79)
Some aspect ratios may not appear depending on types of input signals.
When Projecting an Image from a Computer
" on page
66
Page 67
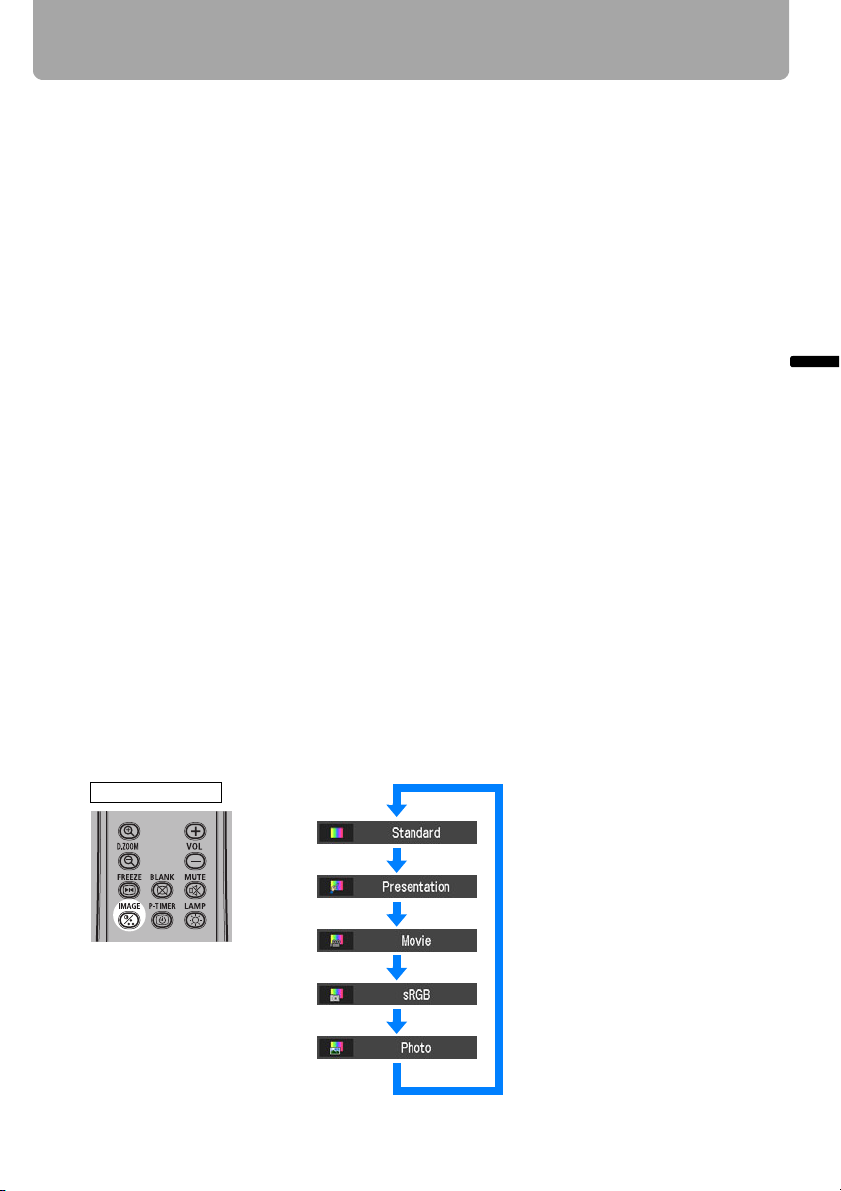
Selecting an Image Mode
You can select an image mode depending on the projecting image.
In each image mode, you can further adjust the brightness, contrast, sharpness, gamma,
color adjustment, advanced adjustment, and lamp mode. (P93)
■ Image modes
Standard
Select this to project an image with near-original quality and a high regard for reproduction of white. It is suited to project text-based computer screens or visual software (moving pictures) in a bright room.
Presentation
Select this to project an image with quality suited for the presentation. It is also suited to
project visual software (moving pictures) with a high regard for the brightness.
Movie
Select this to project common visual software (moving pictures). It is suited to easily enjoy
the atmosphere of a moving theater in a dim room.
sRGB
Select this if you want to project an image in the display mode conforming to the sRGB
standard (P152). It is suited to project an image shot by sRGB-compatible digital camera.
Photo (SX80 II)
If you select [Photo] for [Image mode], make sure to set [Ambient light] in the [Image
adjustment] as well.
You can correct an image according to the ambient light based on [sRGB] in [Image
mode] and project the image with higher tone on the screen by setting [Ambient light]. It
is suited to project an ornamental photo, etc. under an ambient light.
It is available if the input signal is [ANALOG PC-1], [ANALOG PC-2], [DIGITAL PC], or [USB].
Projecting an Image
■ How to Select an Image Mode
Press the IMAGE button on the remote control to select your desired image mode.
The selection is toggled among aspect types by pressing the button.
Remote control
(SX80 II)
You can also select any image mode from the [Image mode] menu. (P93)
67
Page 68
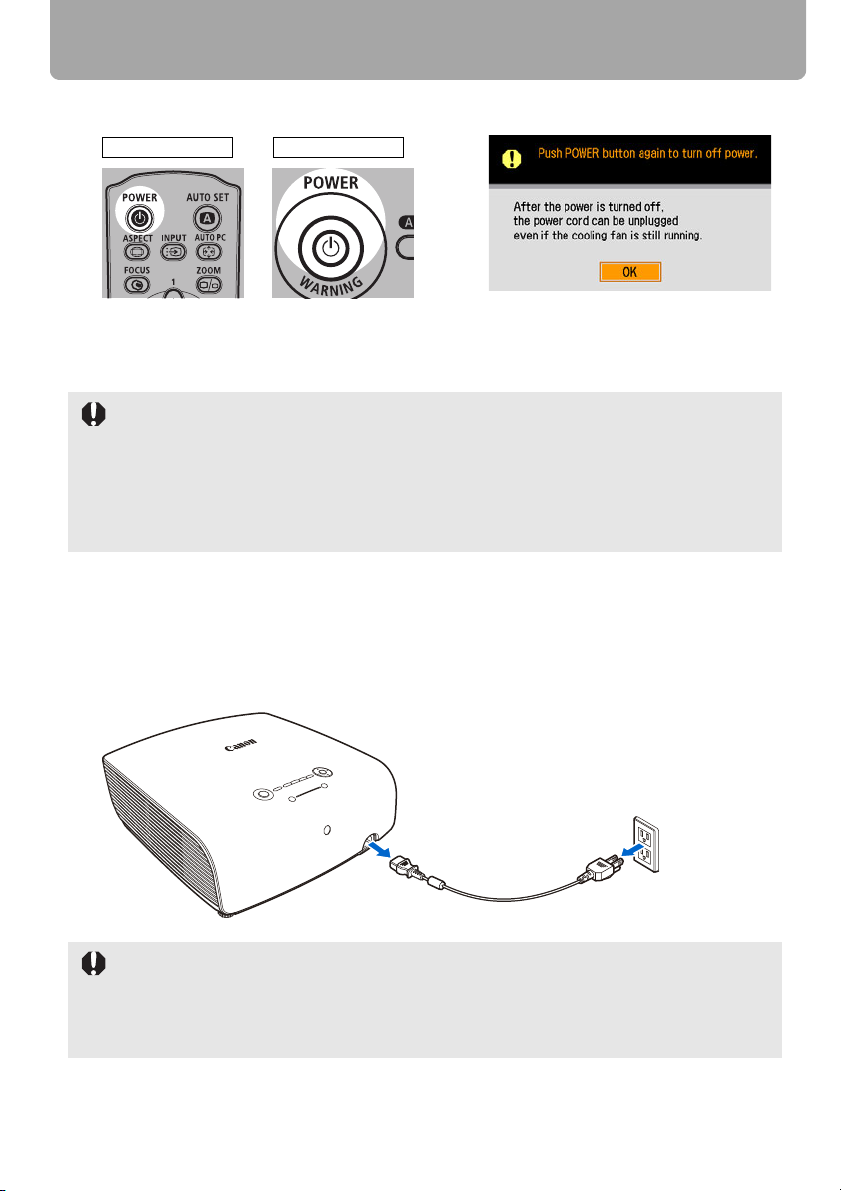
Turning Off the Projector
1 Press the POWER button to pop up a window shown at the lower right.
Remote control Top control
Press the POWER button again while the confirmation message is displayed.
The lamp goes off, the [POWER] indicator starts flashing in red and the cooling fan
starts.
• You cannot turn the projector on while the cooling fan is in operation.
• If you want to continue projecting, press a button other than POWER or wait until the con-
firmation message disappears.
• Wait at least 5 minutes before turning on the projector when you turn off the projector.
may shorten the lamp life if you turn on the projector immediately after turning it off.
• Using the projector for a long time may shorten the life of the lamp and internal optical
components.
2 Remove the power cord from the AC outlet.
It continues to cool down the lamp even after removing the power cord. Thus, you
may move or put away the projector immediately after the use.
With the power cord connected, the LED illumination lamp turns on during cooling
cycle.
It
• Wait until the cooling fan stops before putting the projector in the carrying bag. Do not put
the projector in the carrying bag until the cooling fan stops rotating. The projector may be
damaged due to the heat.
• Attach the lens cap to the lens to protect it and put the projector in the carrying bag.
Replace the adjustable foot to prevent the damage on the projector.
68
Page 69

Useful Functions
Table of Contents
Safety Instructions
Before Use
Available During
a Presentation
Projecting an Image
Useful Functions Available During a Presentation
Setting Up Functions from Menus
Projecting an Image from a Digital Camera or an
USB Flash Memory (SX80 II)
Connecting the Projector to Network (SX80 II)
Appendix
Index
69
Page 70
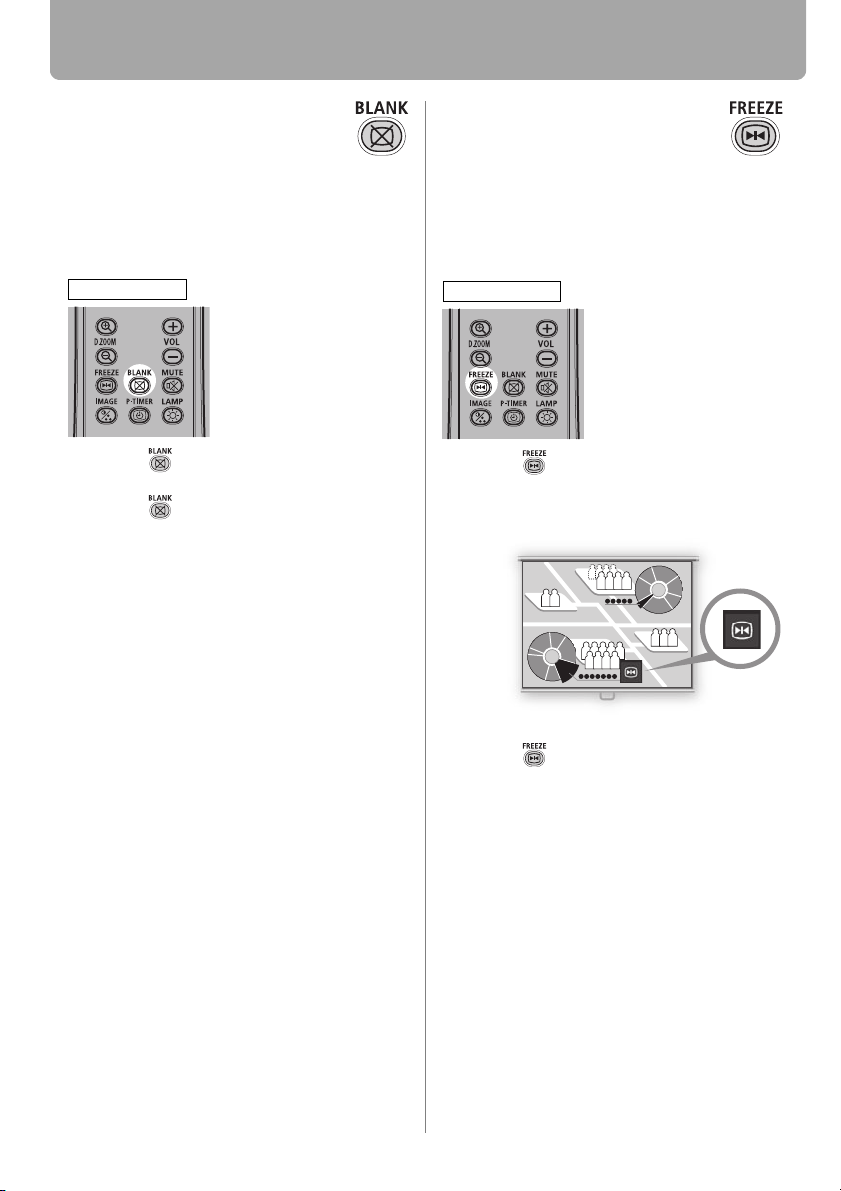
Useful Functions Available During a Presentation
Blackened Out an Image Temporarily
Useful when:
• You finished the presentation.
• You want to divert attendees' attention from
the screen.
Remote control
Press the button to blacken out the
image.
Press the button again to show the
image.
• You can set the screen state while
blackening out the image on the menu.
You can also set a specified image.
(P89)
• The lamp keeps a turn-on state while
blackening out the image.
• The (middle) LED illumination lamp on
the top control flush slowly while blackening out the image.
Freezing the Picture
Useful when:
• You want to perform a computer operation
which is irrelevant to the proceedings of the
presentation.
• You want to stop a moving image.
Remote control
Press the button to freeze the moving
image. The projector shows the following
icon.
Press the button again to cancel the
FREEZE function.
• The (left and right) LED illumination
lamps on the top control flushes slowly
while stopping the image.
• It is cancelled once the input signal is
terminated.
• You cannot zoom an image (P72) when
you are freezing the image.
70
Page 71
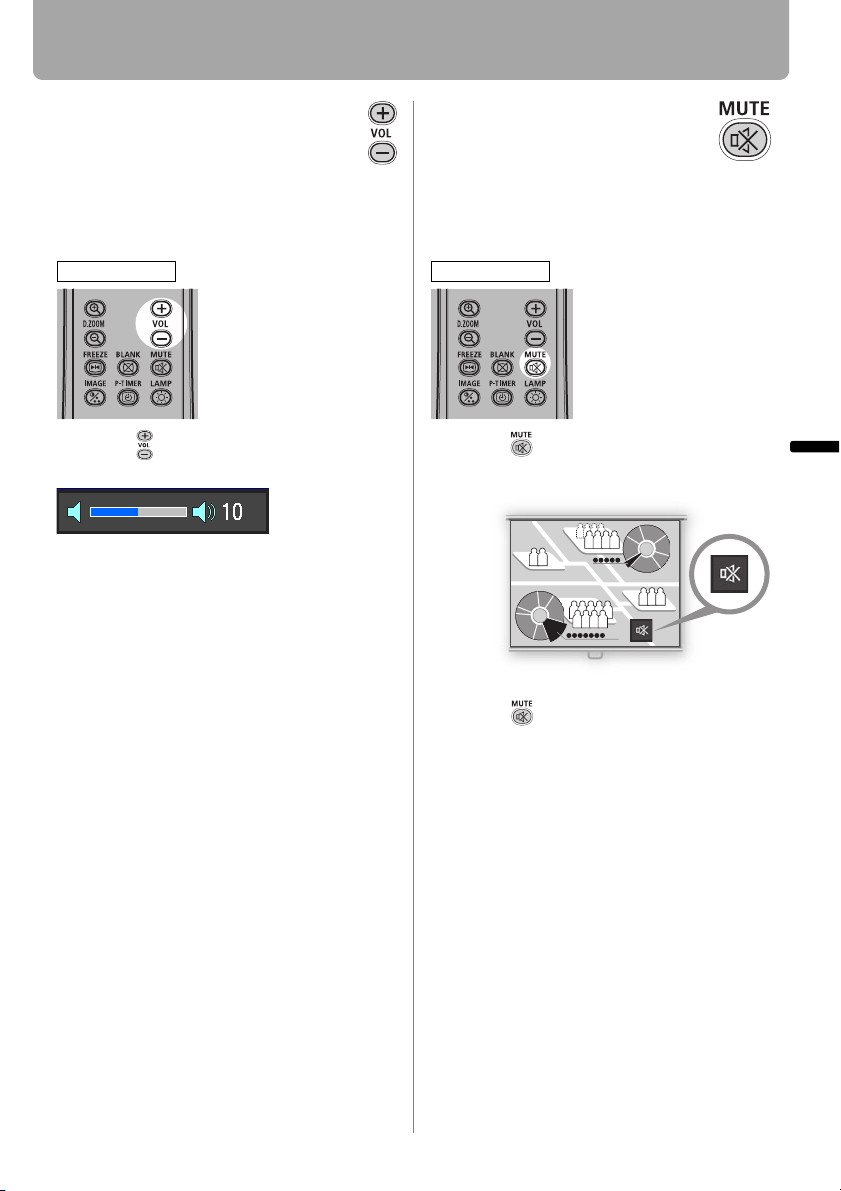
Useful Functions Available During a Presentation
Adjusting the Volume
Useful when:
• You want to adjust the volume level of the projectors or external speaker.
Remote control Remote control
Press the button. The following screen
appears.
Muting the Sound
Useful when:
• You want to temporality mute the unnecessary
sound.
• You want to immediately mute the sound.
Press the button to mute the sound.
The projector shows the following icon.
• You can also adjust the volume level
with [<] / [>] of the projector.
• Adjust the volume or mute setting on the
computer if the volume level is too low.
• You can also adjust the volume level of
the speakers connected via the audio
output terminal.
Press the button again to cancel the
MUTE function.
• You can also mute the sound of the
speakers connected via the audio output terminal.
Useful Functions Available During a Presentation
71
Page 72
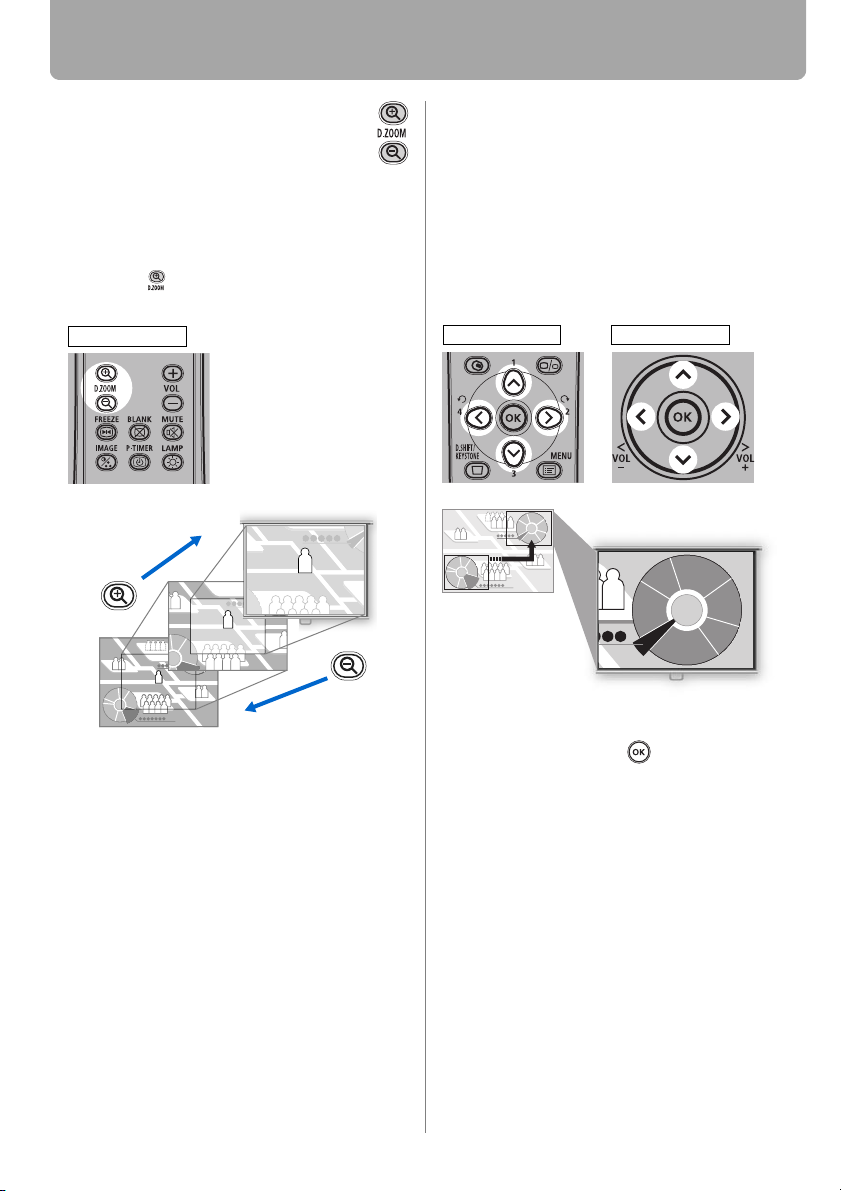
Useful Functions Available During a Presentation
Zooming an Image
Useful when:
• Zoom in an object such as a small graph during a presentation (up to 12x).
• Focusing on the current subject.
Press the button. A part of the image is
enlarged each time pressed.
Remote control
• The magnification appears on the
screen.
You can move the area to the enlarged by
<
using [ ] / [ ] / [<] / [>].
Remote control Projector
<
You can restore the original size of the
image by pressing the button.
72
Page 73
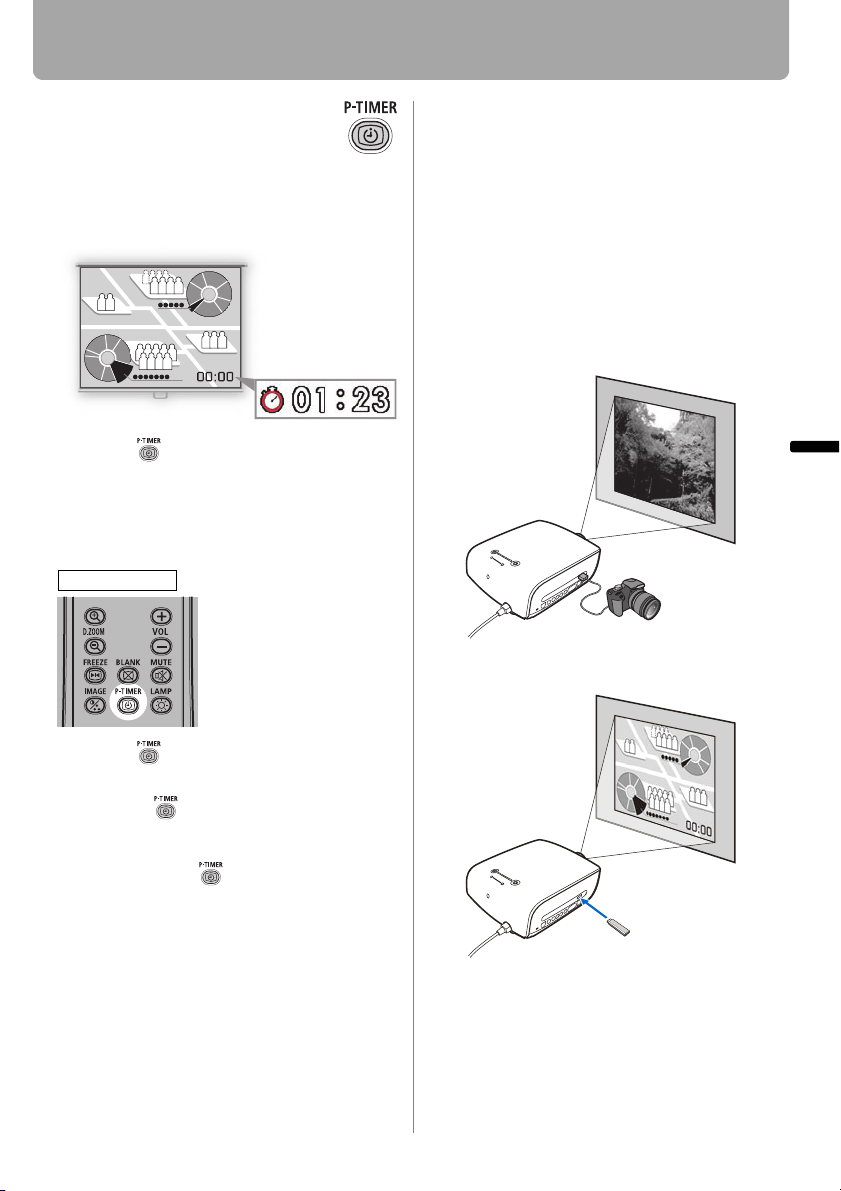
Useful Functions Available During a Presentation
Showing the Elapsed Time
Useful when:
• You want to manage the proceedings of the
presentation.
Press the button to start counting.
• The elapsed time is displayed at the
lower right corner of the screen.
• Time is counted up to 59:59. Then the
timer returns to 00:00.
Remote control
Projecting Image Without Computer (SX80 II)
Useful when:
• You want to project an image from a digital
camera.
• You want to project an image from USB flash
memory.
You can project an image directly by connecting the projector with a PictBridgecompatible digital camera or USB flash
memory.
Useful Functions Available During a Presentation
Digital camera
Refer to P114 – P117.
Press the button again to stop the
timer.
• Press the button while the timer is
stopped. The timer disappears from the
screen.
Then press the button to start counting from 00:00.
USB flash memory
Refer to P118 – P124.
73
Page 74

74
Page 75

Setting
Table of Contents
Safety Instructions
Before Use
Functions from
Menus
Projecting an Image
Useful Functions Available During a Presentation
Setting Up Functions from Menus
Projecting an Image from a Digital Camera or an
USB Flash Memory (SX80 II)
Connecting the Projector to Network (SX80 II)
Appendix
Index
75
Page 76
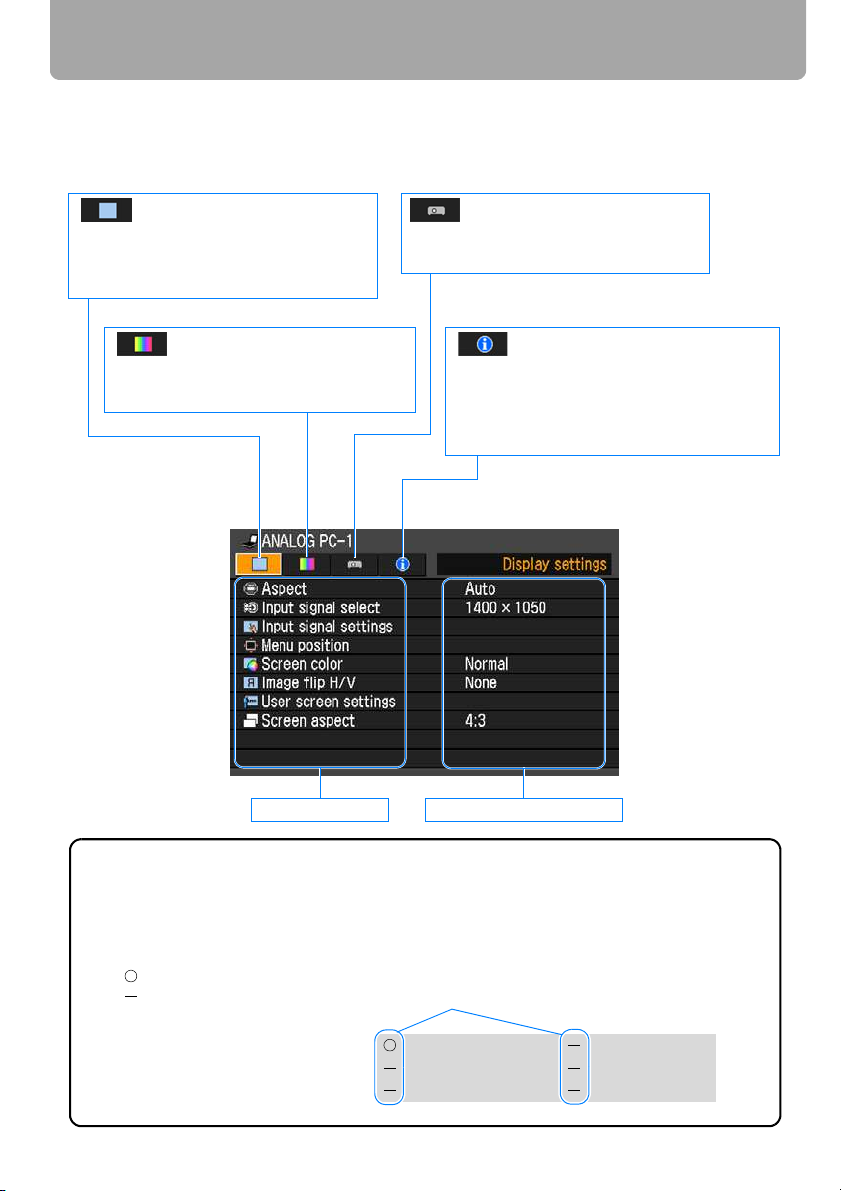
How to Use Menus
With a menu, you can set the operation of the projector in detail.
■ Menu Configuration
The menu screen is divided into four tabs as follows:
[Display settings] tab (P79)
You can set the type of signal or the
method of projection of the images
input.
[Image adjustment] tab (P93)
You can adjust the image quality
and colors as you like.
[System settings] tab (P103)
You can set the operation of the
projector.
[Information] tab (P112)
You can confirm the information about
the signal types of the images projected and other projector-specific
information.
Menu items Contents of menu
Input Signal Types for which a Menu Item is Displayed
Different menu items are displayed for different input signal types.
In the following explanation of each menu item, the input signal type for which the
menu item is displayed is indicated as follows:
The following is for SX80 MarkII.
Input signal for which the menu item is displayed
Input signal for which the menu item is not displayed
HDMI COMPONENT
DIGITAL PC
ANALOG PC USB
76
VIDEO/S-VIDEO
Page 77
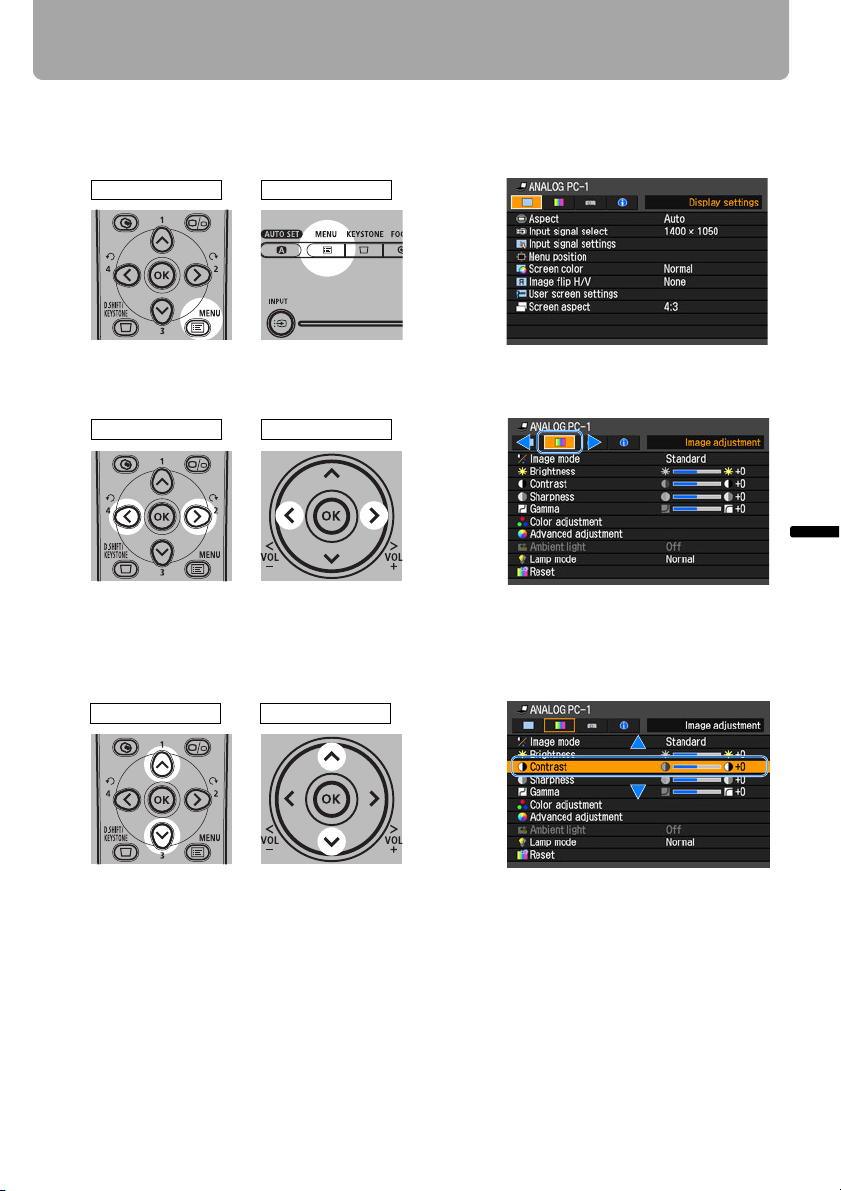
■ Basic Operation of Menu
1 Press the MENU button to display a menu window.
Remote control Top control
2 Use [<] / [>] to select a tab.
Remote control Top control
How to Use Menus
Setting Up Functions from Menus
• If the tab position is not highlighted in orange, use [ ] / [ ] to move the highlight to
the top.
3 Use [ ] / [ ] to select a item.
<
<
Remote control Top control
77
<
<
Page 78
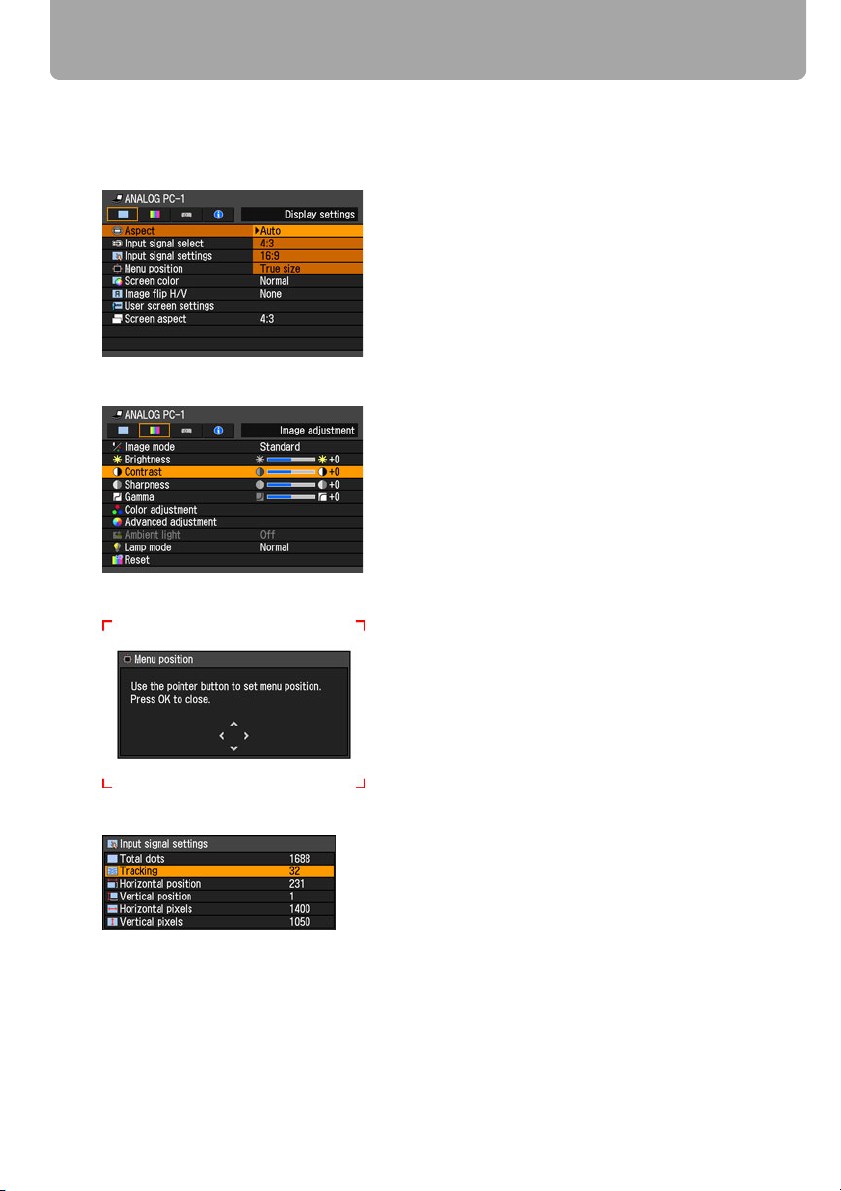
How to Use Menus
4 Select contents.
How to select the contents varies depending on items.
Selection from a list Example: Aspect
1. Press the OK button or [>], and a list of the
contents is displayed.
2. Use [ ] / [ ] to select contents.
3. If you found the contents you desired,
press the OK button or [>].
With [<] / [>] Example: Contrast
Use [<] / [>] to change the adjustment volume.
In a different screen (1) Example: Menu position
1. Press the OK button to display a different
screen.
2. The follow the instruction on the screen.
<
<
In a different screen (2) Example: Tracking
1. Press the OK button to display a different
screen.
2. Use [ ] / [ ] to select contents, and use [<]
3. If you found the contents you desired,
<
<
/ [>] to select a value.
press the OK button.
5 Press the MENU button, and the menu screen disappears.
78
Page 79
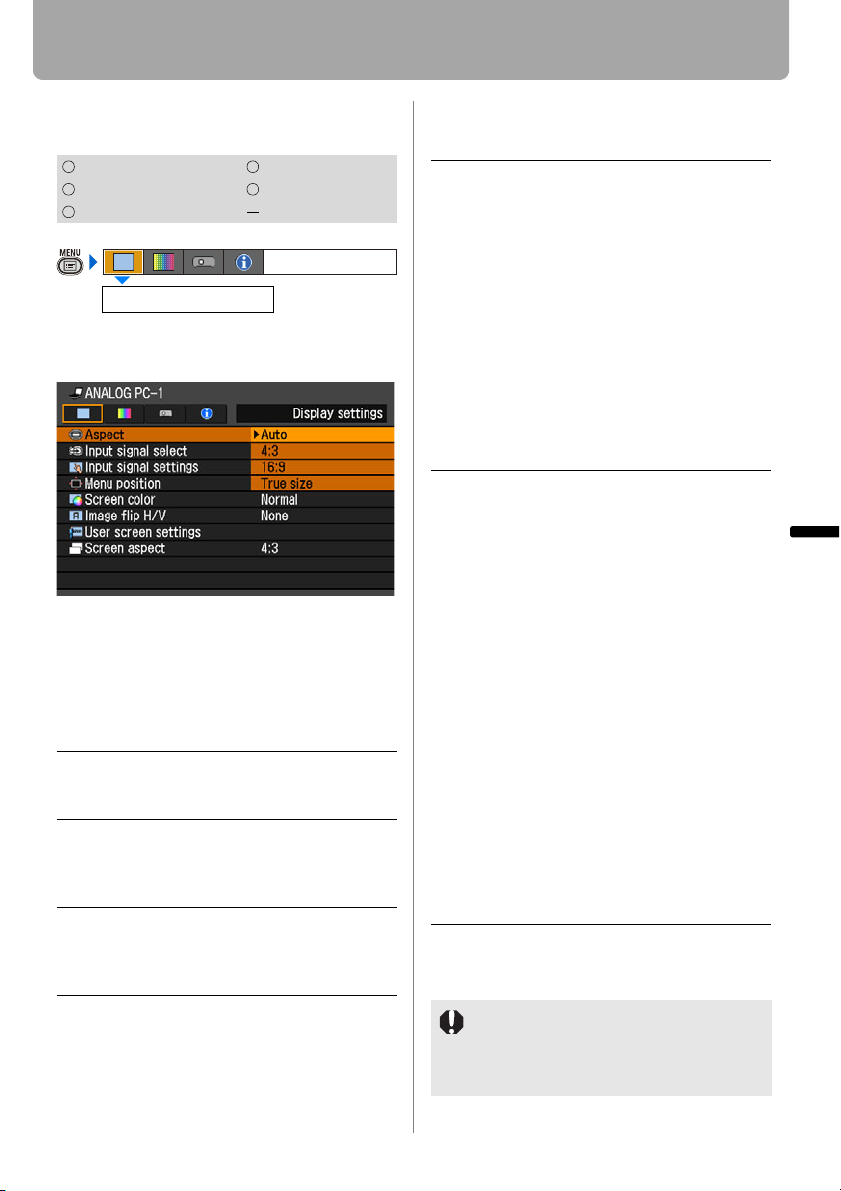
Setting Display Status
Selecting an Image Projection Mode
[Aspect]
HDMI COMPONENT
DIGITAL PC
ANALOG PC USB
Aspect
You can select a projection mode corresponding to the aspect ratio of image.
• Different contents are displayed for different screen aspects or input signal
types.
•The ASPECT button on the remote con-
trol can also be used to select the
Aspect settings.
Auto An image is projected at an aspect
ratio of the input signal. Select this
mode for normal image projection.
4:3 An image is projected at an aspect
ratio of 4:3. Select this if an image of
4:3 aspect ratio cannot be appropriately projected in the [AUTO] mode.
16:9 An image is projected at an aspect
ratio of 16:9. Select this if an image of
16:9 aspect ratio cannot be appropriately projected in the [AUTO] mode.
VIDEO/S-VIDEO
Display settings
Zoom An image with 4:3 aspect ratio is pro-
jected in the center of the screen
enlarged in 16:9 aspect ratio with the
upper and lower portion of the image
cut off. Select this when projecting
visual software having aspect ratio of
4:3 and black belts at the top and
bottom of the image.
• This mode is available when you
select [16:9] or [16:9 D. image
shift] for [Screen aspect] and
select [HDMI (576p, 480p) (SX80
II)], [COMPONENT (576p, 480p,
576i, 480i)], [VIDEO] or [S-VIDEO
(SX80 II)] for input signal.
True size An image is projected with the origi-
nal resolution of the input signal.
Select this to clearly project computer screen images having a resolution SXGA+ or lower (VGA, SVGA,
XGA or SXGA) or visual software having a resolution lower than 1035i.
• This mode is available when you
select [HDMI (720p, 576p, 480p)
(SX80 II)] or [COMPONENT (720p,
576p, 480p)] for input signal.
• It is not available for an image having a resolution higher than
SXGA+ or visual software having a
resolution of 1080i, 1080p, 1035i,
576i or 480i.
• It is also available if the input signal is [ANALOG PC-1], [ANALOG
PC-2], or [DIGITAL PC (SX80 II)];
however, it may not be available
depending on the screen aspect
setting.
Press the OK button to accept your setting
and then press the MENU button.
Setting Up Functions from Menus
79
• [Auto] and [True size] are not available
if the input signal type is [VIDEO].
• [Auto] is automatically selected if the
input signal type is [USB]. (SX80 II)
Page 80
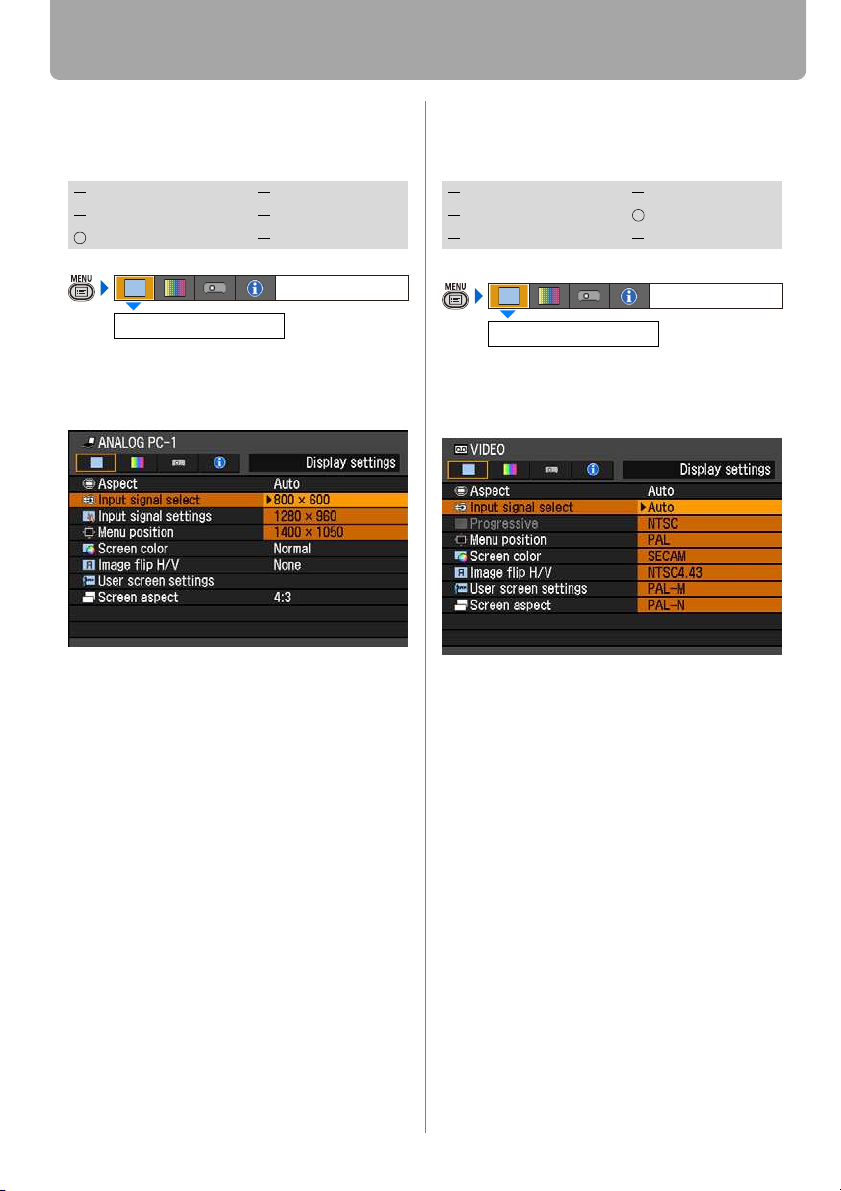
Setting Display Status
Selecting an Input Signal Type (ANALOG PC)
[Input signal select]
HDMI COMPONENT
DIGITAL PC
ANALOG PC USB
Input signal select
You can select a proper resolution if auto
PC adjustment function (P57) cannot
project a correct image from a computer.
Press the OK button to accept your setting
and then press the MENU button.
Select an input signal corresponding to
the resolution of the computer.
• For the signal types supported by the
projector, see the table on page 150.
VIDEO/S-VIDEO
Display settings
Selecting an Input Signal Type (VIDEO/SVIDEO*)
[Input signal select]
HDMI COMPONENT
DIGITAL PC
ANALOG PC USB
* is only applicable to SX80 MarkII
Input signal select
You can select a proper signal type if a
video image from your AV equipment is
not projected correctly.
Press the OK button to accept your setting
and then press the MENU button.
• [Auto] is the factory default.
• Refer to the User's Manual of your AV
equipment connected to the projector to
confirm the input signal type.
VIDEO/S-VIDEO
Display settings
80
Page 81
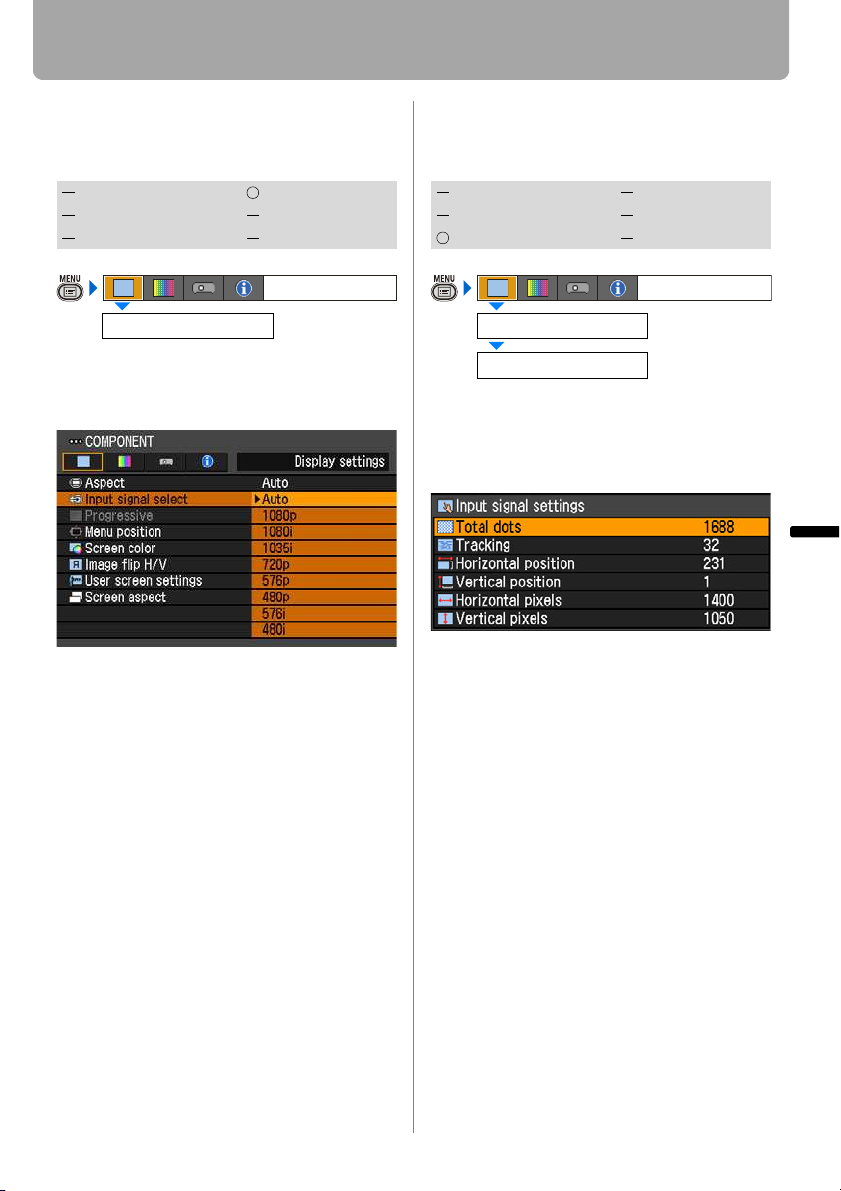
Setting Display Status
Selecting an Input Signal Type (COMPONENT)
[Input signal select]
HDMI COMPONENT
DIGITAL PC
ANALOG PC USB
Input signal select
You can select a proper component signal
type, if a video image from AV equipment
is not projected correctly.
Press the OK button to accept your setting
and then press the MENU button.
• [Auto] is the factory default.
• Refer to the User's Manual of your AV
equipment connected to the projector to
confirm the component signal type.
VIDEO/S-VIDEO
Display settings
Adjusting Input Signal (ANALOG PC) –
Total Dots
[Input signal settings] - [Total dots]
HDMI COMPONENT
DIGITAL PC
ANALOG PC USB
Input signal settings
Total dots
You can adjust the total number of dots in
the horizontal direction.
Adjust it when stripes are displayed on the
screen.
Use [<] / [>] to select a value.
When you have completed the adjustment, press the MENU button.
• Perform this adjustment if the [AUTO
PC] function (P57) cannot adjust the
project image correctly.
• You can make adjustment either for
[ANALOG PC-1] or [ANALOG PC-2].
VIDEO/S-VIDEO
Display settings
Setting Up Functions from Menus
81
Page 82
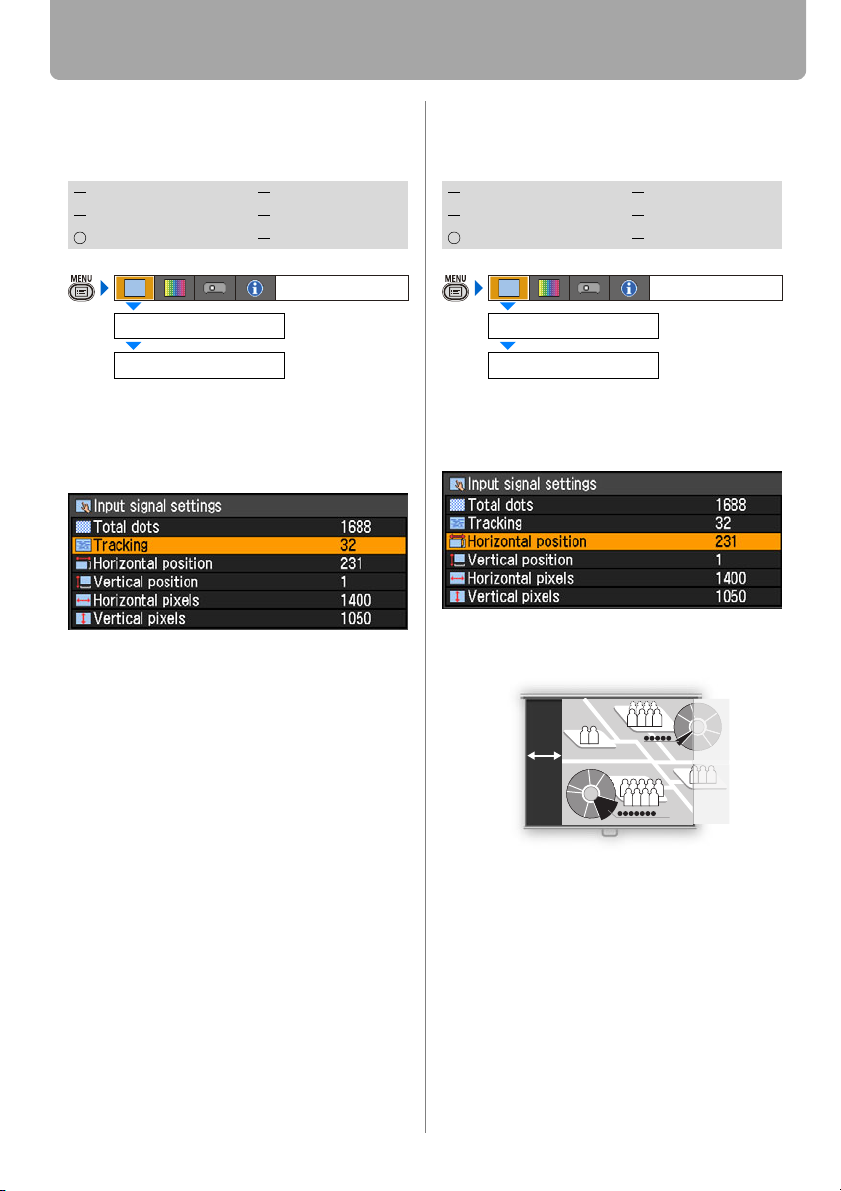
Setting Display Status
Adjusting Input Signal (ANALOG PC) –
Tracking
[Input signal settings] - [Tracking]
HDMI COMPONENT
DIGITAL PC
ANALOG PC USB
Input signal settings
Tracking
You can fine-tune the timing for generating
an image from the image signal.
Adjusts the tracking when the image distorts or flickers.
Use [<] / [>] to select a value.
When you have completed the adjustment, press the MENU button.
• Perform this adjustment if the [AUTO
PC] function (P57) cannot adjust the
project image correctly.
• You can make adjustment either for
[ANALOG PC-1] or [ANALOG PC-2].
VIDEO/S-VIDEO
Display settings
Adjust Input Signal (ANALOG PC) – Horizontal position
[Input signal settings] - [Horizontal position]
HDMI COMPONENT
DIGITAL PC
ANALOG PC USB
Input signal settings
Horizontal position
You can adjust the horizontal position of
the screen when the projected image is
shifted in the horizontal direction.
Use [<] / [>] to select a value. As the value
increases, the screen moves to the left.
VIDEO/S-VIDEO
Display settings
When you have completed the adjustment, press the MENU button.
• Perform this adjustment if the [AUTO
PC] function (P57) cannot adjust the
project image correctly.
• You can make adjustment either for
[ANALOG PC-1] or [ANALOG PC-2].
82
Page 83
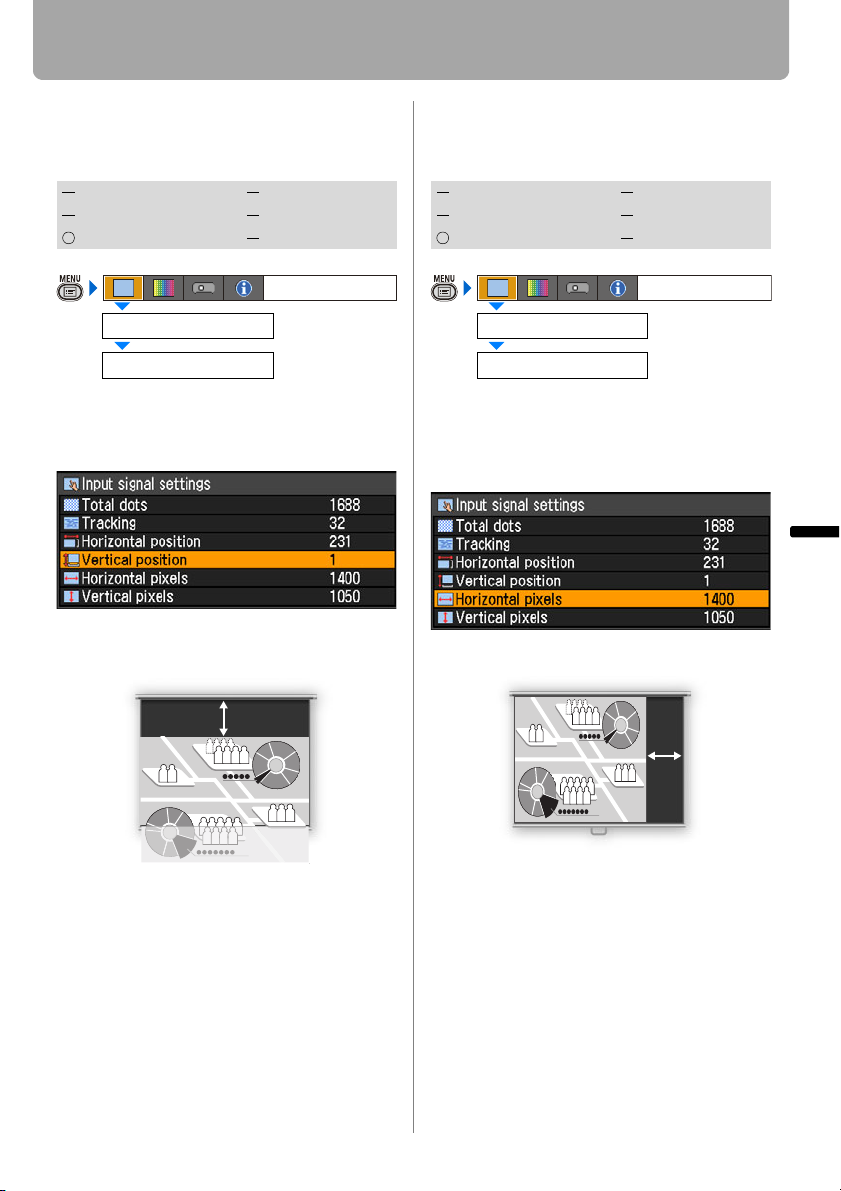
Setting Display Status
Adjust Input Signal (ANALOG PC) – Vertical
position
[Input signal settings] - [Vertical position]
HDMI COMPONENT
DIGITAL PC
ANALOG PC USB
Input signal settings
Vertical position
You can adjust the vertical position of the
screen when the projected image is
shifted in the vertical direction.
Use [<] / [>] to select a value. As the value
increases, the screen moves upward.
VIDEO/S-VIDEO
Display settings
Adjust Input Signal (ANALOG PC) – Horizontal pixels
[Input signal settings] - [Horizontal pixels]
HDMI COMPONENT
DIGITAL PC
ANALOG PC USB
Input signal settings
Horizontal pixels
You can adjust the number of the pixels in
the horizontal direction if the length of the
screen is too long or too short in the horizontal direction.
Use [<] / [>] to select a value.
VIDEO/S-VIDEO
Display settings
Setting Up Functions from Menus
When you have completed the adjustment, press the MENU button.
• Perform this adjustment if the [AUTO
PC] function (P57) cannot adjust the
project image correctly.
• You can make adjustment either for
[ANALOG PC-1] or [ANALOG PC-2].
When you have completed the adjustment, press the MENU button.
• Perform this adjustment if the [AUTO
PC] function (P57) cannot adjust the
project image correctly.
• You can make adjustment either for
[ANALOG PC-1] or [ANALOG PC-2].
83
Page 84
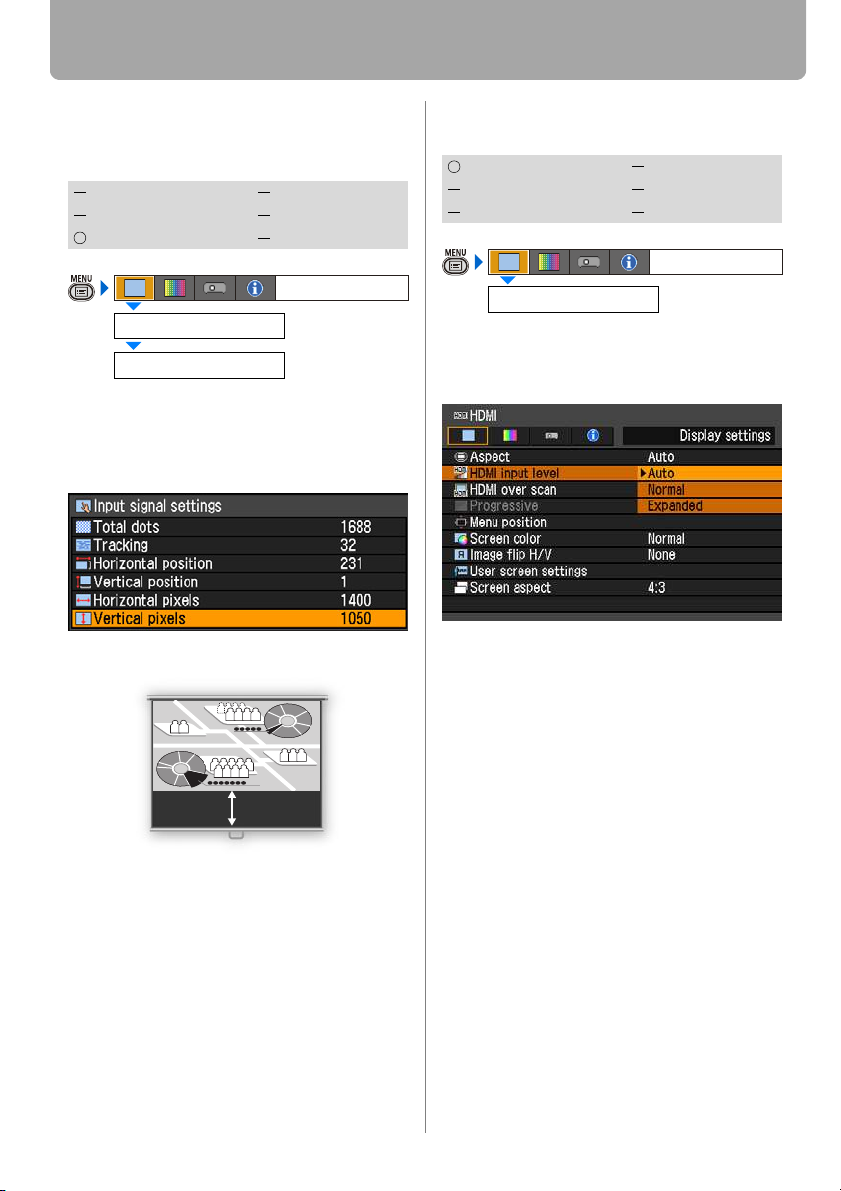
Setting Display Status
Adjust Input Signal (ANALOG PC) – Vertical
pixels
[Input signal settings] - [Vertical pixels]
HDMI COMPONENT
DIGITAL PC
ANALOG PC USB
Input signal settings
Vertical pixels
You can adjust the number of the pixels in
the vertical direction if the length of the
screen is too long or too short in the vertical direction.
Use [<] / [>] to select a value.
When you have completed the adjustment, press the MENU button.
• Perform this adjustment if the [AUTO
PC] function (P57) cannot adjust the
project image correctly.
• You can make adjustment either for
[ANALOG PC-1] or [ANALOG PC-2].
VIDEO/S-VIDEO
Display settings
Selecting HDMI Input Level (SX80 II)
[HDMI input level]
HDMI COMPONENT
DIGITAL PC
ANALOG PC USB
HDMI input level
You can select this as required when you
project visual software with the HDMI signals.
Press the OK button to accept your setting
and then press the MENU button.
• [Auto] is the factory default.
• You can select this only when the type of
signal sent from AV equipment is RGB.
• The signal level is select automatically in
[Auto] mode. (Some AV equipment may
not support this.)
• If the HDMI output of your AV equipment
allows switching between [Normal] and
[Expanded], we recommend you to set
[Expanded]. The contrast of images will
be improved and dark scenes will be
rendered more realistically. In this case,
select [Auto] or [Expanded] for the
HDMI input level.
For more detailed information, refer to
the User's Manual of your AV equipment
connected to the projector.
VIDEO/S-VIDEO
Display settings
84
Page 85
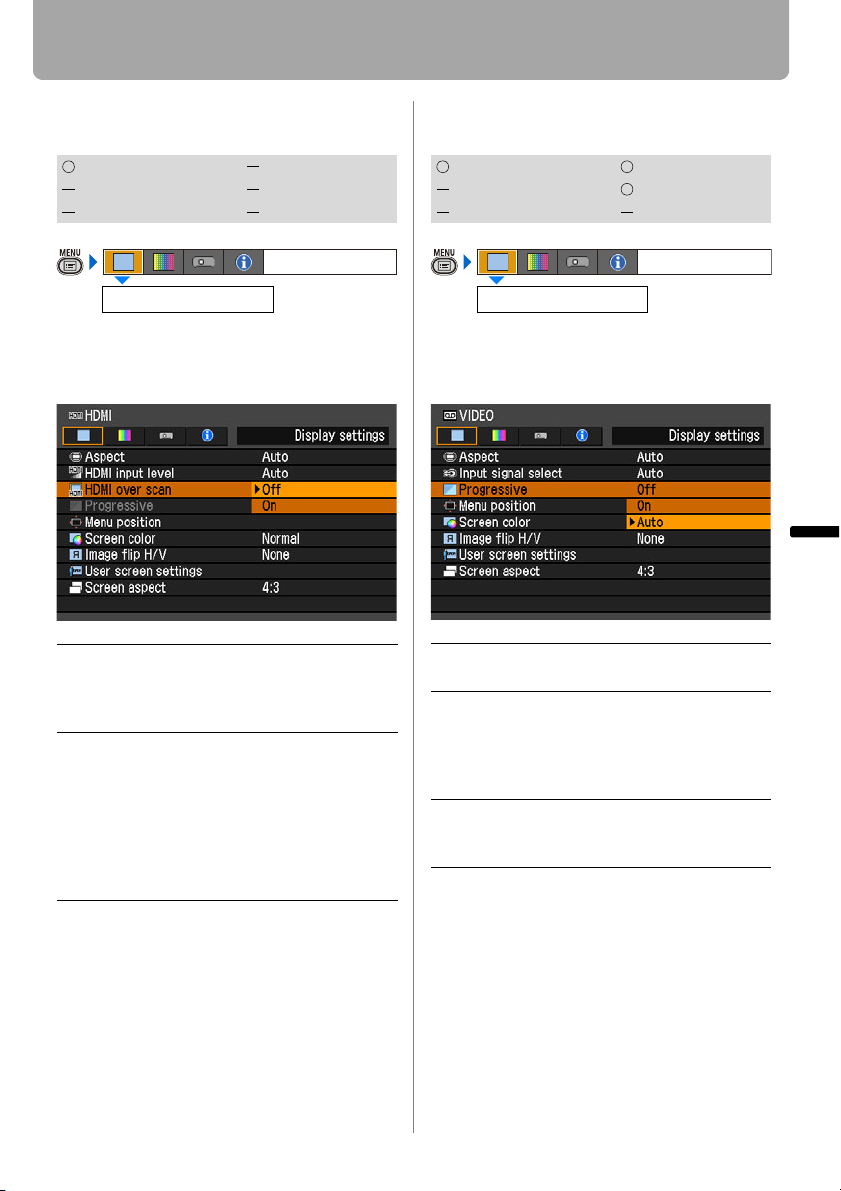
Setting Display Status
Select HDMI Over Scan (SX80 II)
[HDMI over scan]
HDMI COMPONENT
DIGITAL PC
ANALOG PC USB
HDMI over scan
You can select this as required when you
project visual software with the HDMI signals.
Off The entire input signals (100%) are pro-
jected.
The images projected may be smaller
than the full projection screen.
On Images are projected with disorders at
their peripheral section of images
trimmed off. (The central 95% of the
images are projected.)
A part of peripheral sections of images
may be cut out depending on the resolution of the signals. In such a case, select
[Off].
Press the OK button to accept your setting
and then press the MENU button.
• [On] is the factory default.
VIDEO/S-VIDEO
Display settings
Performing Progressive Processing
[Progressive]
HDMI COMPONENT
DIGITAL PC
ANALOG PC USB
Progressive
You can select this as required when the
images have low resolution.
Off Do not perform the progressive pro-
cessing.
On Performs the progressive processing.
This mode is available when the
HDMI signal is 1080i or, VIDEO/SVIDEO or COMPONENT signal is
1080i, 1035i, 576i, or 480i.
Auto Performs the appropriate progres-
sive processing according to the
input signal.
Press the OK button to accept your setting
and then press the MENU button.
• [Auto] is the factory default.
• You can set this mode for either [HDMI
(SX80 II)], [COMPONENT], [VIDEO] or
[S- VIDEO (SX80 II)].
• Select [Off] when flickers and horizontal lines
are noticeable on a fast-moving picture.
• For the details of the progressive processing, refer to the page 154.
VIDEO/S-VIDEO
Display settings
Setting Up Functions from Menus
85
Page 86
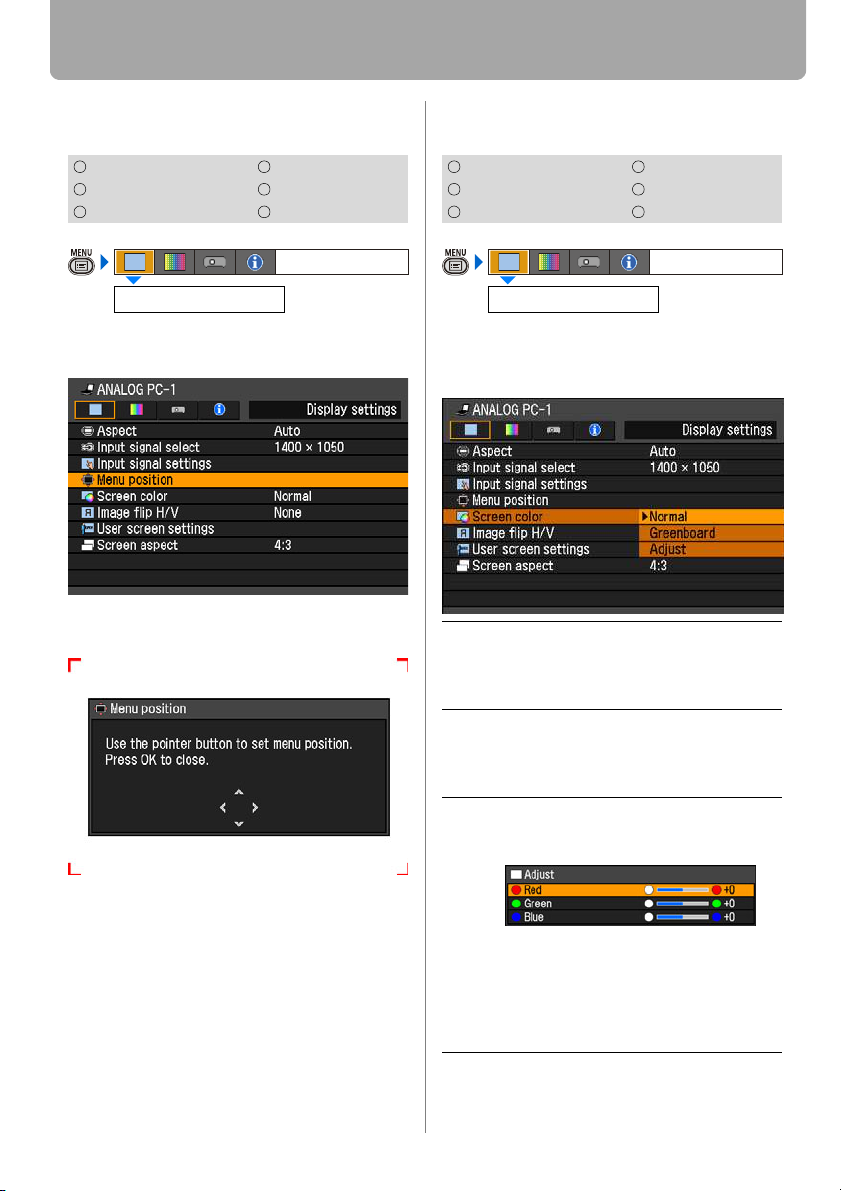
Setting Display Status
Selecting a Menu Position
[Menu position]
HDMI COMPONENT
DIGITAL PC
ANALOG PC USB
Menu position
You can change the position of menu displayed.
Move the menu to the desired position with [ ] /
[<] / [ ] / [>].
<
VIDEO/S-VIDEO
Display settings
<
Correcting the Screen Color
[Screen color]
HDMI COMPONENT
DIGITAL PC
ANALOG PC USB
Screen color
You can adjust the color quality of the images
projected corresponding to the color of the projection screen.
Normal Select this if a standard type of projec-
tion screen is used. The images are
projected in the light quality similar to
that of natural light.
Greenboard
Adjust Select this if you make detailed adjust-
Select this if a greenboard (in dark
green color) is used for the projection
screen. The color quality similar to [Normal] is obtained on the greenboard.
ment. The following popup screen will
appear.
VIDEO/S-VIDEO
Display settings
When the menu has been moved to the desired
position, press the OK or MENU button.
<
Use [ ] / [ ] to select a primary color.
[>] makes the color selected darker.
[<] makes the color selected lighter.
Press the
screen is displayed if you want to perform the auto color correction. (SX80 II)
Press the OK button to accept your setting and
then press the MENU button.
• [Normal] is the factory default.
86
<
AUTO SET
button while the
Page 87
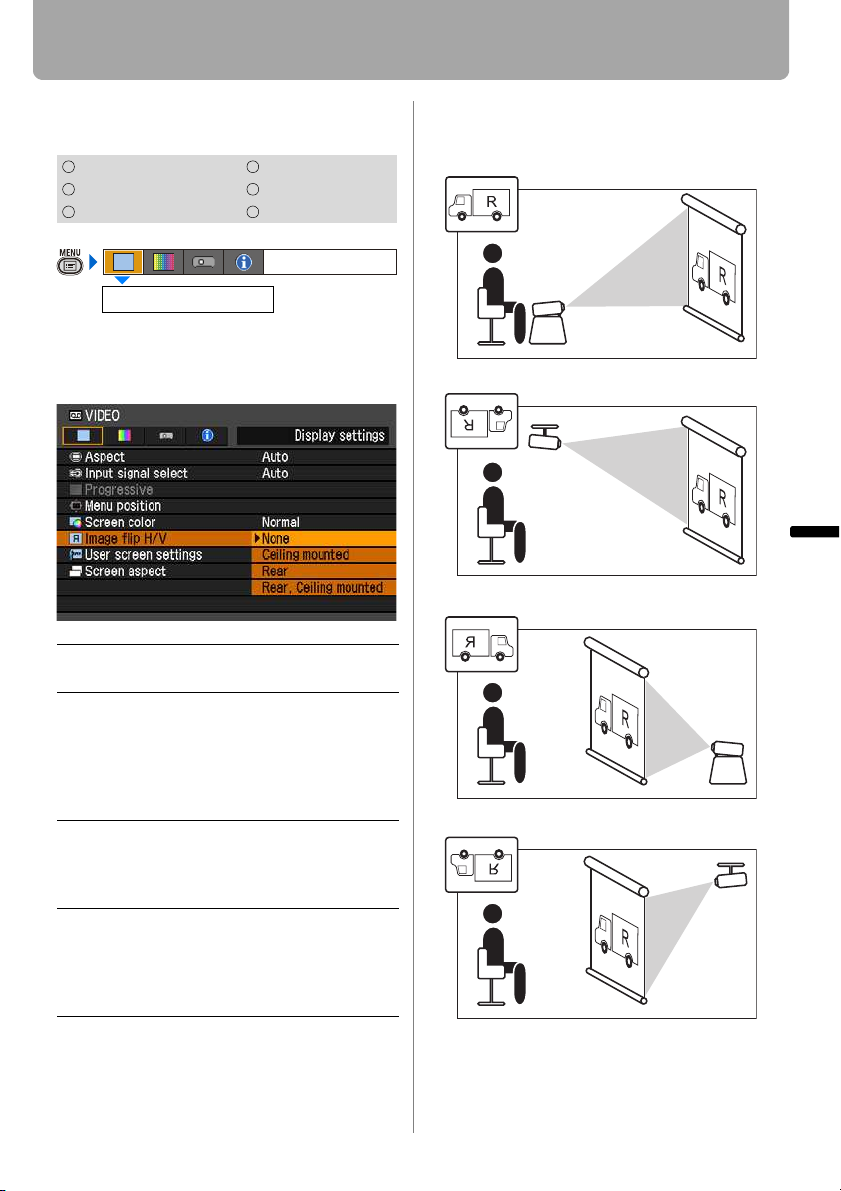
Reversing projection
[Image flip H/V]
HDMI COMPONENT
DIGITAL PC
ANALOG PC USB
Image flip H/V
You can make this setting if you want to
hang the projector from the ceiling or
project an image from behind the screen.
VIDEO/S-VIDEO
Display settings
Setting Display Status
None (Normal image)
Ceiling mounted
Setting Up Functions from Menus
Rear
None Select this if you project an image
normally.
Ceiling
mounted
Rear Select this if you project an image
Rear, Ceiling mounted
Select this if you project an image
with the projector hung from the
ceiling.
The projected images is inverted
in both vertical and horizontal
directions.
from behind the screen.
The projected images is inverted
in the horizontal direction.
Select this if you project an image
from behind the screen with the
projector hung from the ceiling.
The projected image is inverted in
the vertical direction.
Press the OK button to accept your setting
and then press the MENU button.
• [None] is the factory default.
Rear, Ceiling mounted
• To hung the projector from the ceiling,
use the optional bracket. Contact your
Canon dealer.
• The keystone distortion adjustment will
be reset.
87
Page 88
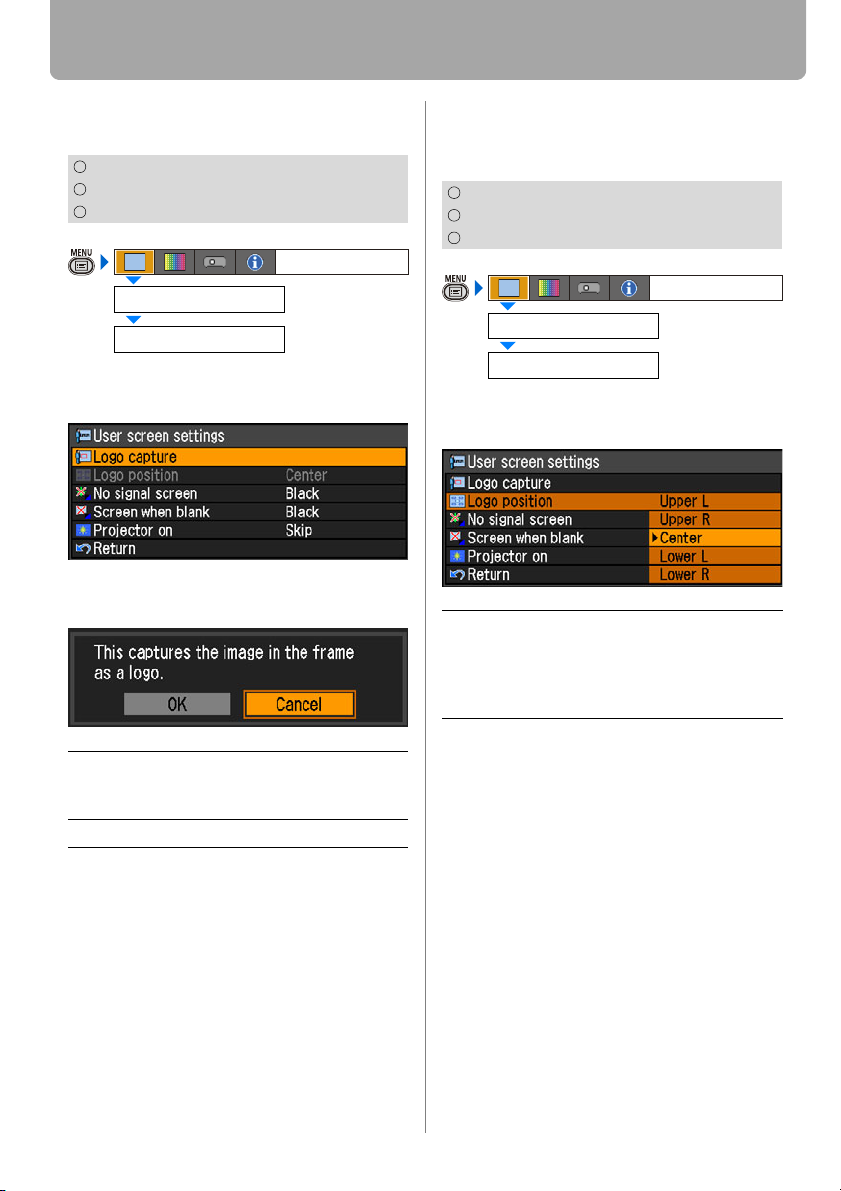
Setting Display Status
Capturing a Logo (SX800)
[User screen settings] - [Logo capture]
ANALOG PC
COMPONENT
VIDEO
Display settings
User screen settings
Logo capture
You can capture a part of the images
being projected as [User logo].
A screen for capturing images is displayed.
Selecting the User Logo Display Position (SX800)
[User screen settings] - [Logo position]
ANALOG PC
COMPONENT
VIDEO
Display settings
User screen settings
Logo position
You can select a log display position.
Upper L
Upper R
Center
Lower L
Lower R
Select a position you want to display a user logo and press the
OK button.
OK Press the OK button, and the image
in the red frame is captured as [User
logo].
Cancel Cancels the image capturing.
• For projecting the captured log on a
screen, select [User logo] on the [Projector on], [No signal screen], [Screen
when blank].
• You may not capture an image depending on the resolution and scan system.
• You cannot capture an image when
[16:9] or [16:9 D. image shift] is
selected for [Screen aspect].
Press the OK button to accept your setting
and then press the MENU button.
• [Center] is the factory default.
• You cannot select [Logo position] if you
have not captured a user logo on the
[Logo capture] screen.
88
Page 89
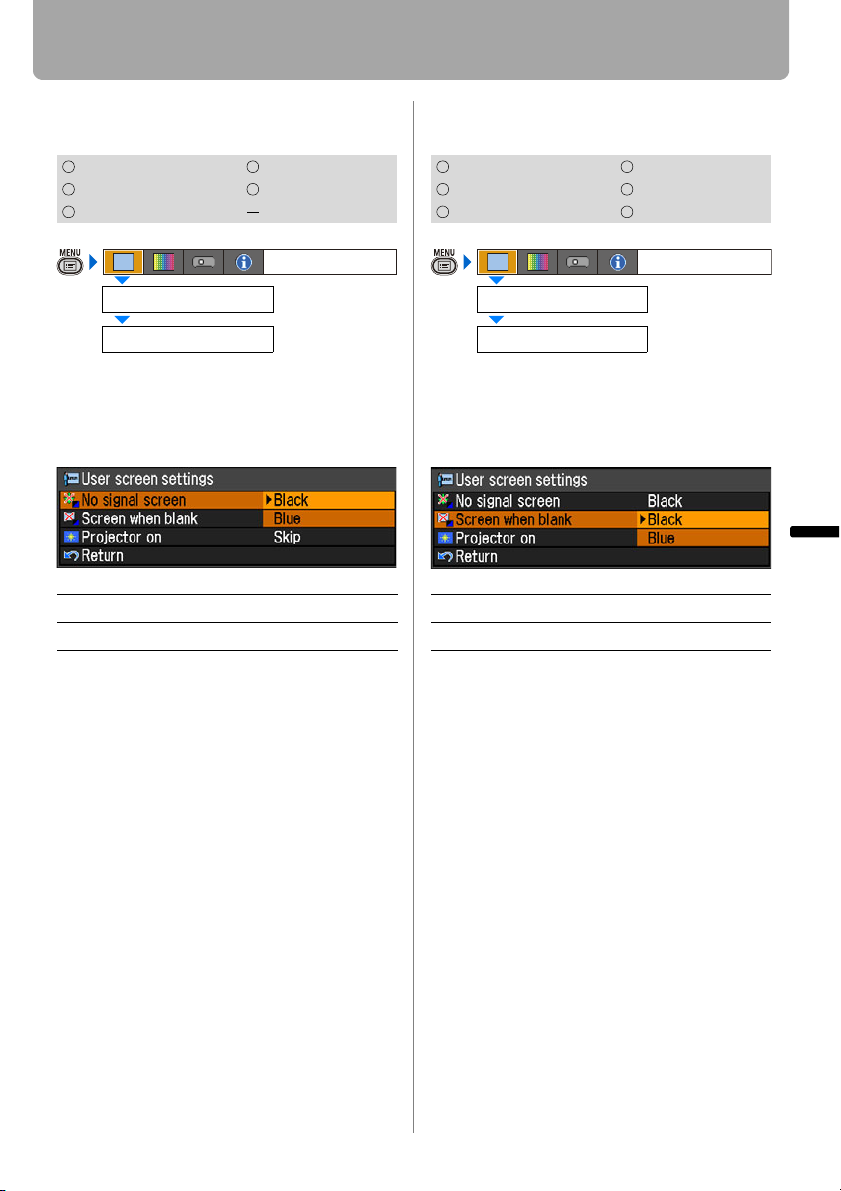
Setting Display Status
No Signal Screen (SX80 II)
[User screen settings] - [No signal screen]
HDMI COMPONENT
DIGITAL PC
ANALOG PC USB
User screen settings
No signal screen
You can display either of a black or blue
screen when there is no input signal.
Black The screen is all black.
Blue The screen is blue background.
Press the OK button to accept your setting
and then press the MENU button.
• [Blue] is the factory default.
VIDEO/S-VIDEO
Display settings
Screen When Blank (SX80 II)
[User screen settings] - [Screen when blank]
HDMI COMPONENT
DIGITAL PC
ANALOG PC USB
User screen settings
Screen when blank
You can display a black or blue screen
when the projected image is blanked off
temporarily by pressing the BLANK button
on the remote control.
Black The screen is all black.
Blue The screen is blue background.
Press the OK button to accept your setting
and then press the MENU button.
• [Black] is the factory default.
VIDEO/S-VIDEO
Display settings
Setting Up Functions from Menus
89
Page 90
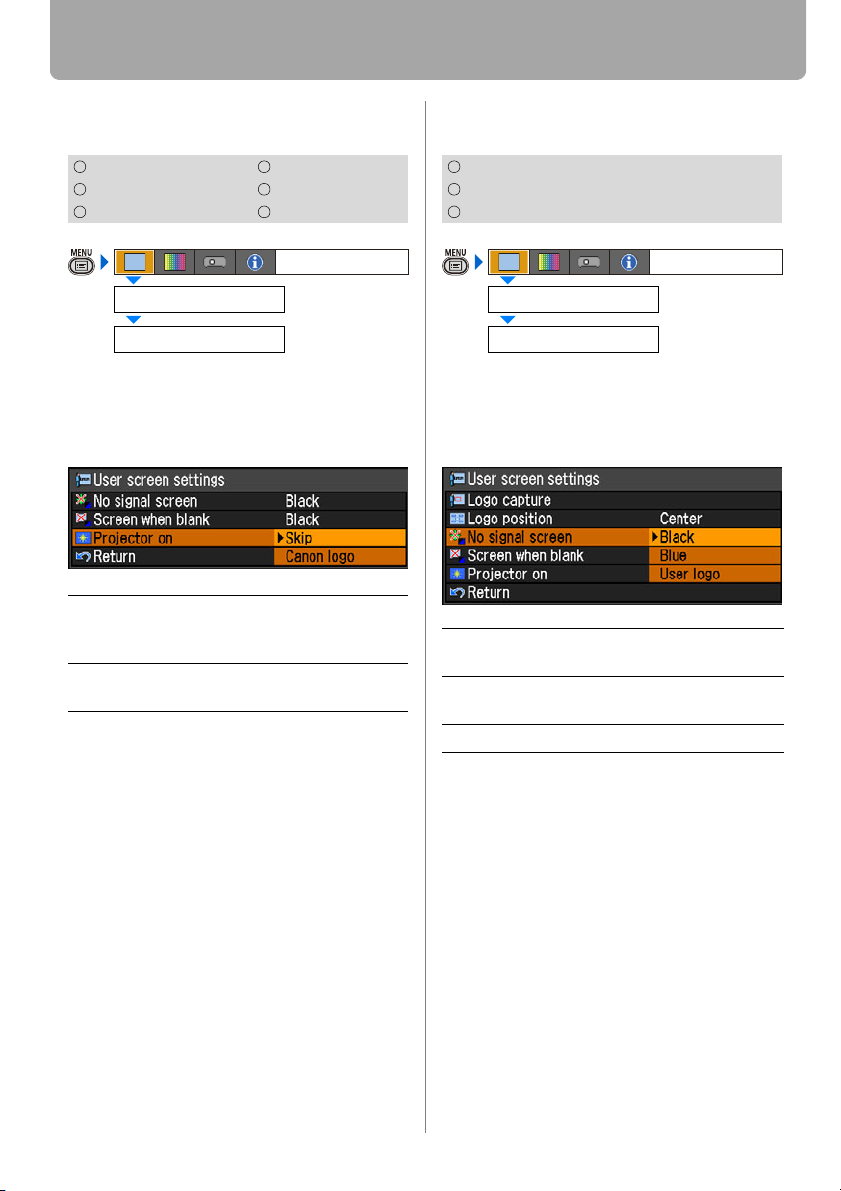
Setting Display Status
Selecting a Logo at Startup (SX80 II)
[User screen settings] - [Projector on]
HDMI COMPONENT
DIGITAL PC
ANALOG PC USB
User screen settings
Projector on
You can display a specified logo on a
screen from the moment the projector is
turned on to the moment it is ready fro projection.
Skip Projects an input signal immedi-
Canon logo
ately after turning on the projector.
Displays the Canon logo captured at the factory.
Press the OK button to accept your setting
and then press the MENU button.
• [Canon logo] is the factory default.
VIDEO/S-VIDEO
Display settings
No Signal Screen (SX800)
[User screen settings] - [No signal screen]
ANALOG PC
COMPONENT
VIDEO
Display settings
User screen settings
No signal screen
You can display a user logo on a screen
when there is no input signal.
Black The screen is all black.
Displays no user logo.
Blue The screen is blue background.
Displays no user logo.
User logo Displays a user logo.
Press the OK button to accept your setting
and then press the MENU button.
• [Blue] is the factory default.
• [User logo] is available only when a
user's logo has been registered.
90
Page 91
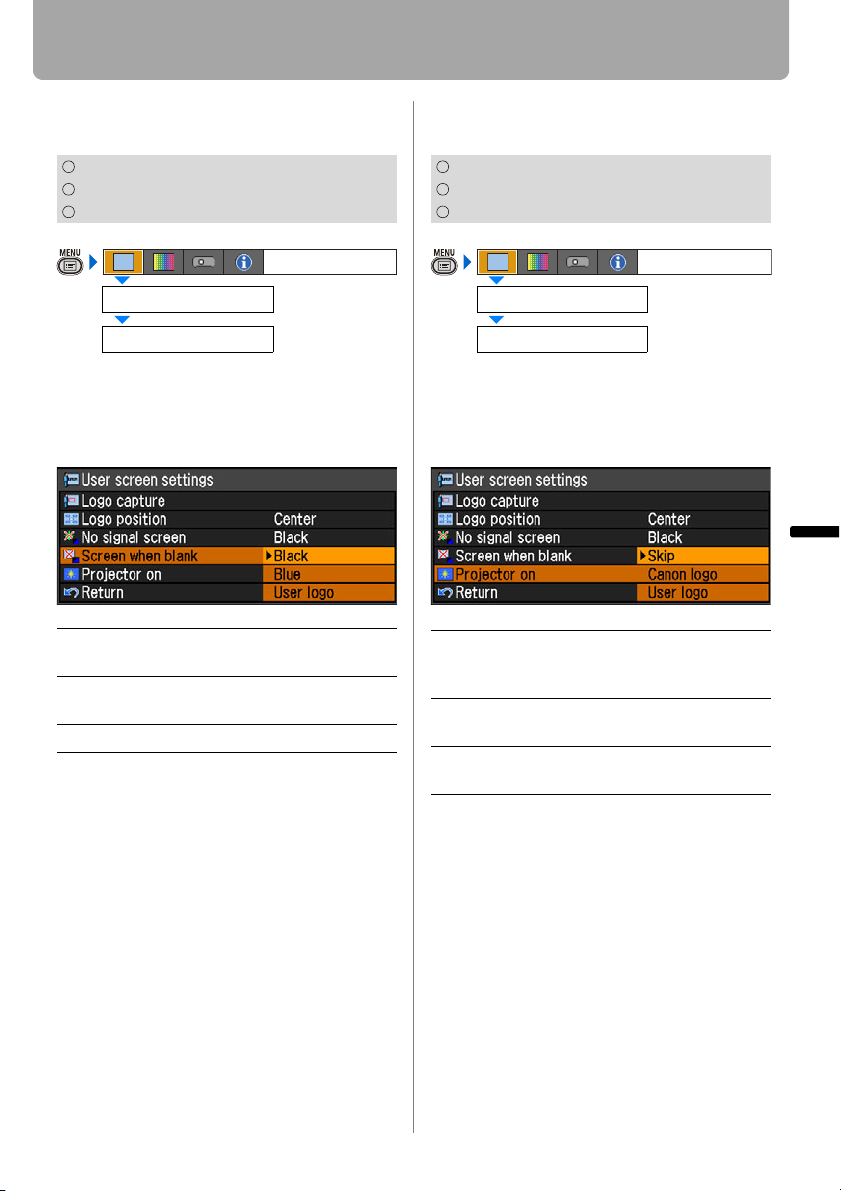
Setting Display Status
Screen When Blank (SX800)
[User screen settings] - [Screen when blank]
ANALOG PC
COMPONENT
VIDEO
Display settings
User screen settings
Screen when blank
You can display a user logo a screen
when the projected image is blackened
out temporarily by pressing the BLANK
button on the remote control.
Black The screen is all black.
Displays no user logo.
Blue The screen is blue background.
Displays no user logo.
User logo Displays a user logo.
Press the OK button to accept your setting
and then press the MENU button.
• [Black] is the factory default.
• [User logo] is available only when a
user's logo has been registered.
Selecting a Logo at Startup (SX800)
[User screen settings] - [Projector on]
ANALOG PC
COMPONENT
VIDEO
Display settings
User screen settings
Projector on
You can display a specified logo on a
screen from the moment the projector is
turned on to the moment it is ready fro projection.
Skip Projects an input signal immedi-
ately after turning on the projector.
Canon logo
User logo Displays a user logo captured on
Press the OK button to accept your setting
and then press the MENU button.
• [Canon logo] is the factory default.
• [User logo] is available only when a
user's logo has been registered.
Displays the Canon logo captured at the factory.
the [Logo capture] screen.
Setting Up Functions from Menus
91
Page 92
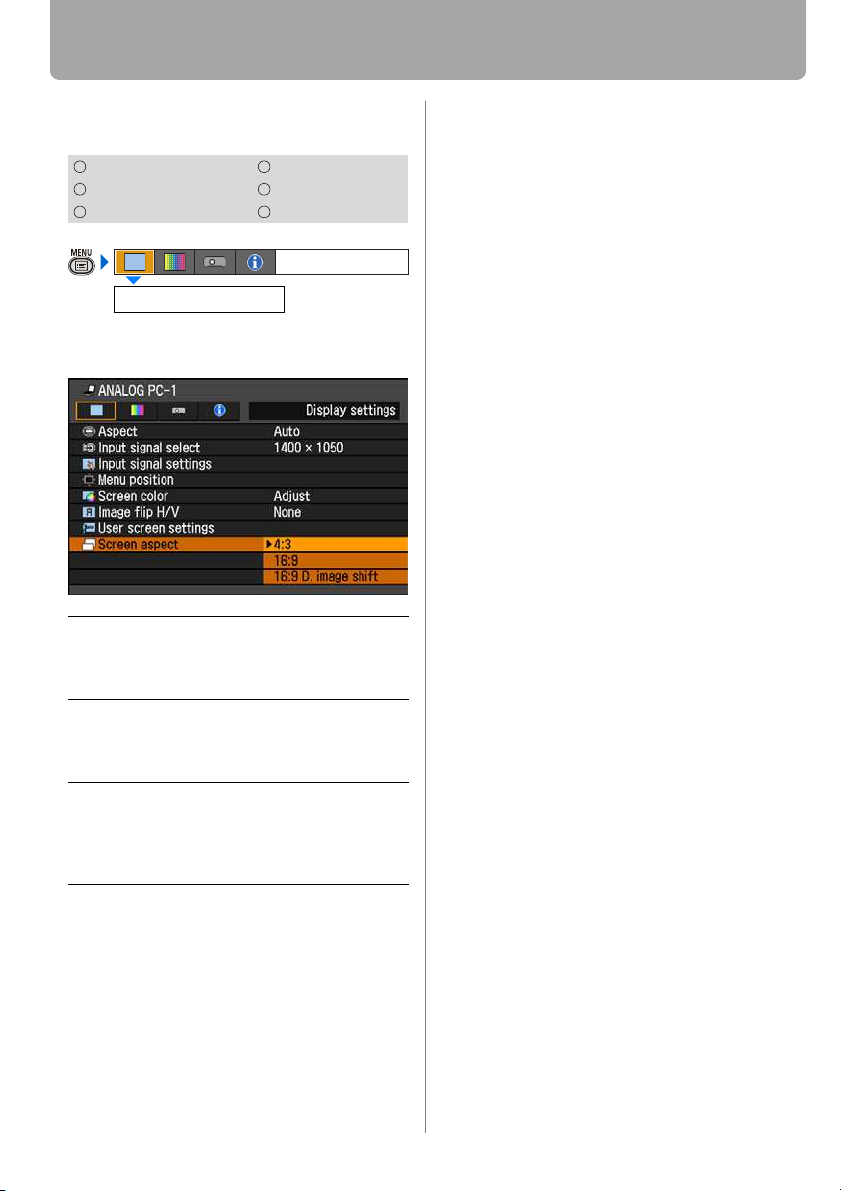
Setting Display Status
Selecting Aspect Ratio of Screen
[Screen aspect]
HDMI COMPONENT
DIGITAL PC
ANALOG PC USB
Screen aspect
You can select proper option corresponding
to the aspect ratio of the projecting screen.
VIDEO/S-VIDEO
Display settings
4:3
16:9 Select this when you use a screen
16:9
D. image
shift
Select this when you use a screen with
aspect ratio of 4:3.
You can adjust the keystone distortion
with D.SHIFT/KEYSTONE button.
with aspect ratio of 16:9.
You can adjust the keystone distortion
with D.SHIFT/KEYSTONE button.
Select this when you use a screen
with aspect ratio of 16:9.
You can move the screen upward or
downward with D.SHIFT/KEYSTONE
button.
Press the OK button to accept your setting
and then press the MENU button.
• [4:3] is the factory default.
• If you select [16:9 D. image shift], the
keystone adjustment will be reset. For
more details, refer to the page 63.
• [Auto] may be automatically selected for
[Screen aspect] depending on the
screen aspect setting.
92
Page 93
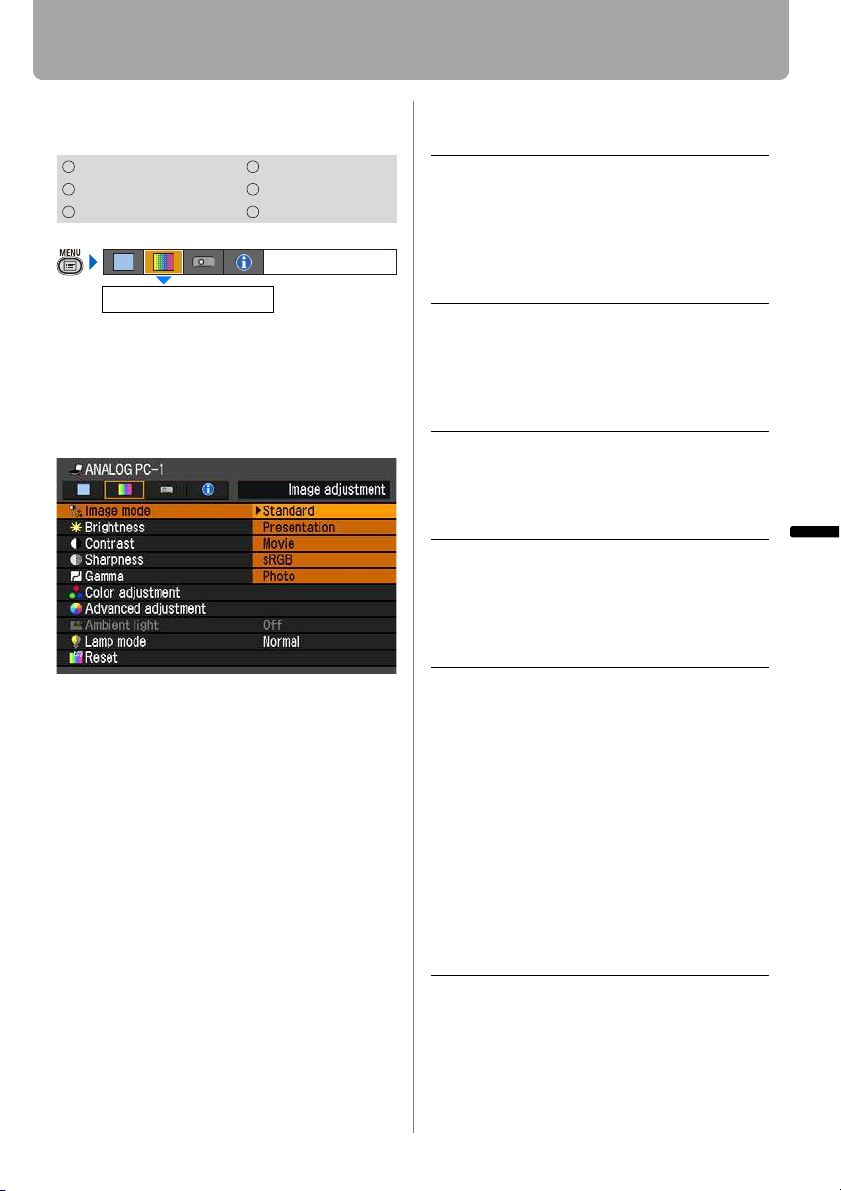
Setting the Image Quality
Selecting an Image Quality
[Image mode]
HDMI COMPONENT
DIGITAL PC
ANALOG PC USB
Image mode
You can select an image mode suitable for
the projecting image.
You can select it also with the IMAGE but-
ton on the remote control.
SX80 MarkII
Press the OK button to accept your setting
and then press the MENU button.
• [Standard] is the factory default.
• You can decide the image quality by
adjusting the following items in each
image mode:
[Brightness], [Contrast], [Sharpness],
[Gamma], [Color adjustment],
[Advanced adjustment] and
[Lamp mode].
• The adjustment you have made is
stored as each combination of input signals and an image mode.
VIDEO/S-VIDEO
Image adjustment
Standard Select this to project an image
with near-original quality and a
high regard for reproduction of
white. It is suited to showing a
computer screen or watching
visual software (moving pictures) in a bright room.
Presentation Select this to project an image
with quality suited for the presentation. It is also suited to project
visual software (moving pictures) with a high regard for the
brightness.
Movie Select this to project moving pic-
tures of all kinds. Its brightness is
suited to easily enjoy the atmosphere of a movie theatre in a
dim room.
sRGB Select this if you want to project
an image in the display mode
conforming to the sRGB standard (P152). It is suited to project
an image shot by sRGB-compatible digital camera.
Photo * If you select [Photo] for [Image
mode], make sure to set [Ambient light] in the [Image adjustment] as well.
You can correct an image
according to the ambient light
based on [sRGB] in [Image
mode] and project the image
with higher tone on the screen by
setting [Ambient light]. It is suited
to project an ornamental photo,
etc. under an ambient light.
It is available if the input signal is
[ANALOG PC-1], [ANALOG PC2], [DIGITAL PC], or [USB].
* is only applicable to SX80 MarkII
Setting Up Functions from Menus
93
Page 94
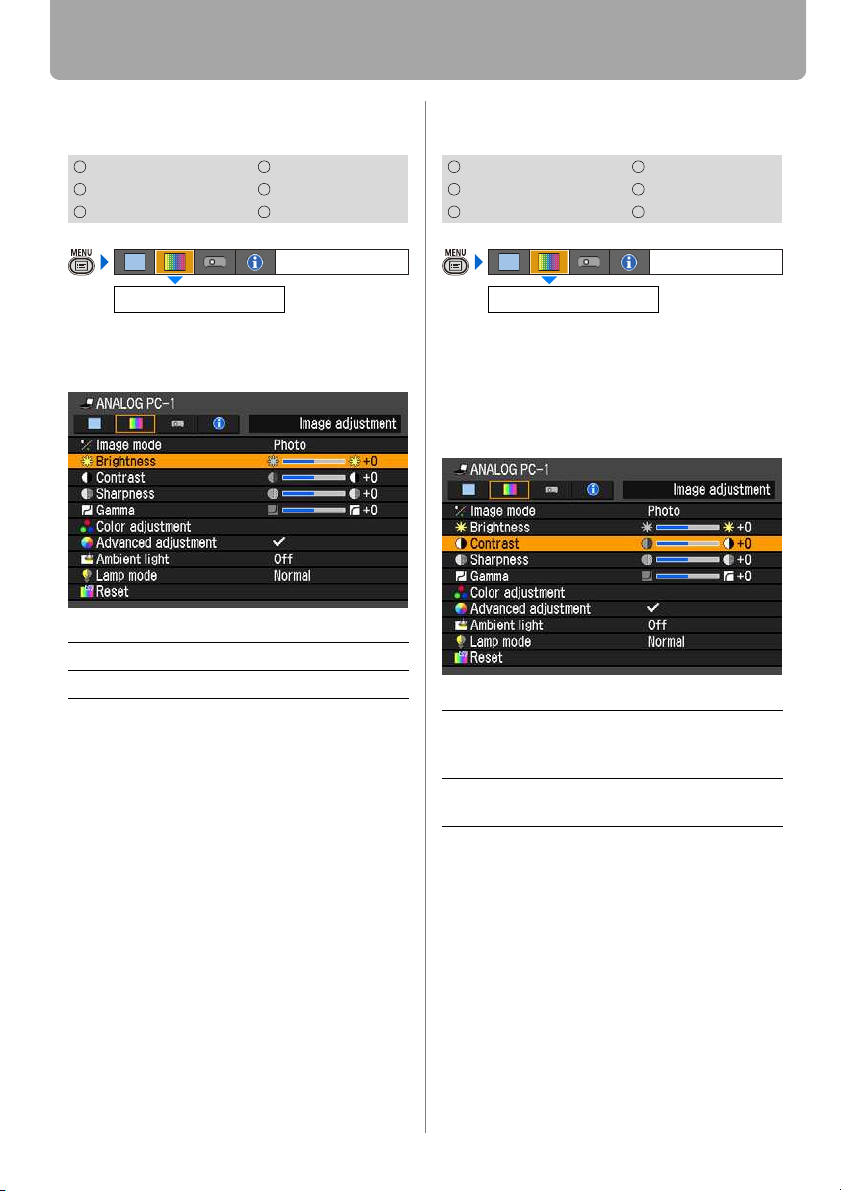
Setting the Image Quality
Adjusting the Brightness
[Brightness]
HDMI COMPONENT
DIGITAL PC
ANALOG PC USB
Brightness
You can adjust the brightness of images.
SX80 MarkII
[>] Increases the brightness of an image.
[<] Decreases the brightness of an image.
VIDEO/S-VIDEO
Image adjustment
Adjusting the Contrast
[Contrast]
HDMI COMPONENT
DIGITAL PC
ANALOG PC USB
Contrast
You can adjust the contrast of images.
If you want to make it more or less vivid,
adjust the difference in tone between the
lightest and darkest portions of the image.
SX80 MarkII
VIDEO/S-VIDEO
Image adjustment
When you have completed the adjustment, press the MENU button.
• The adjustment you have made is
stored as an adjusted value of input signals being projected in an image mode.
[>] Increases the contrast of an image. It
emphasizes the darker portion and the
bright portion on the projected image.
[<] Decreases the contrast of an image. The
image becomes less vivid.
When you have completed the adjustment, press the MENU button.
• The adjustment you have made is
stored as an adjusted value of input signals being projected in an image mode.
94
Page 95
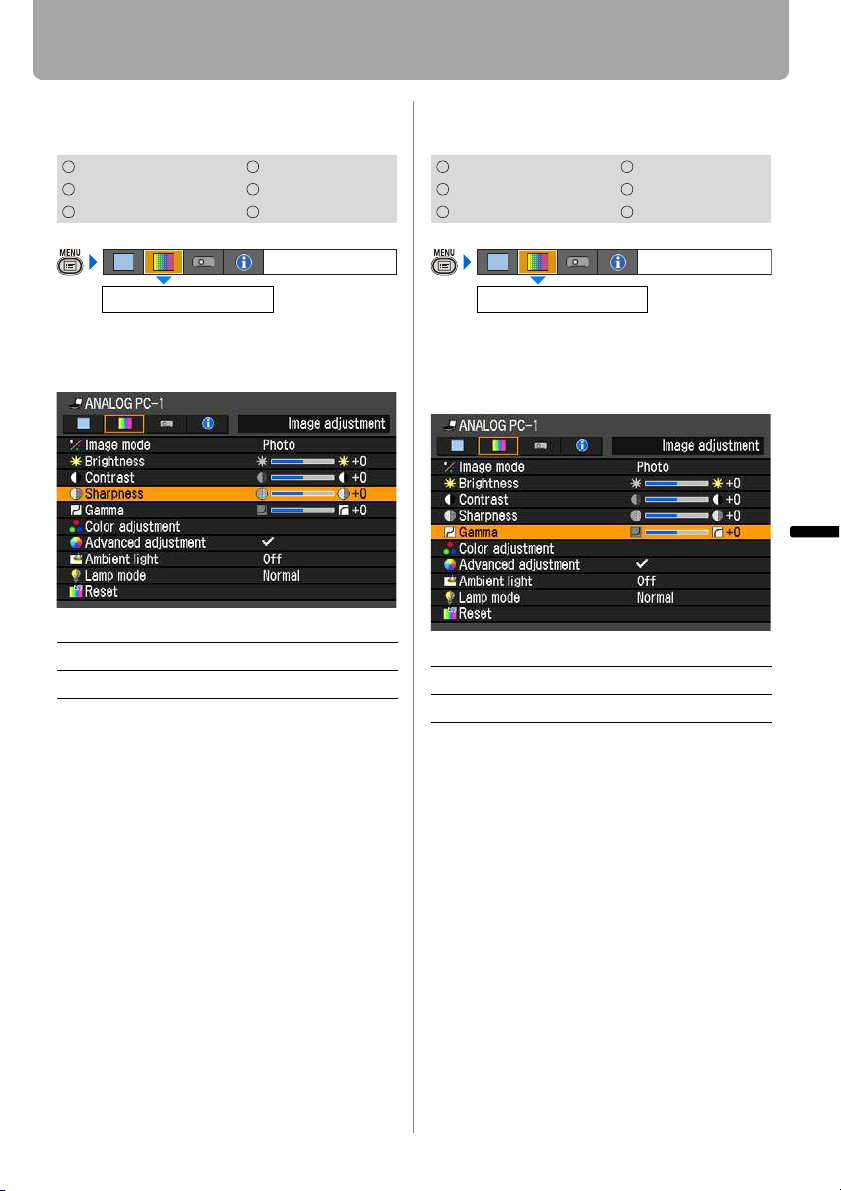
Setting the Image Quality
Adjusting the Sharpness
[Sharpness]
HDMI COMPONENT
DIGITAL PC
ANALOG PC USB
Sharpness
You can adjust the sharpness of images.
SX80 MarkII
[>] Increases the sharpness of an image.
[<] Decreases the sharpness of an image.
When you have completed the adjustment, press the MENU button.
• The adjustment you have made is
stored as an adjusted value of input signals being projected in an image mode.
VIDEO/S-VIDEO
Image adjustment
Making a Gamma Correction
[Gamma]
HDMI COMPONENT
DIGITAL PC
ANALOG PC USB
Gamma
You can correct the obscure portion of an
image due to too dark or bright.
SX80 MarkII
[>] Brighten the dark portion.
[<] Darken the bright portion.
When you have completed the adjustment, press the MENU button.
• The adjustment you have made is
stored as an adjusted value of input signals being projected in an image mode.
• For the details of the gamma correction,
refer to the page 154.
VIDEO/S-VIDEO
Image adjustment
Setting Up Functions from Menus
95
Page 96
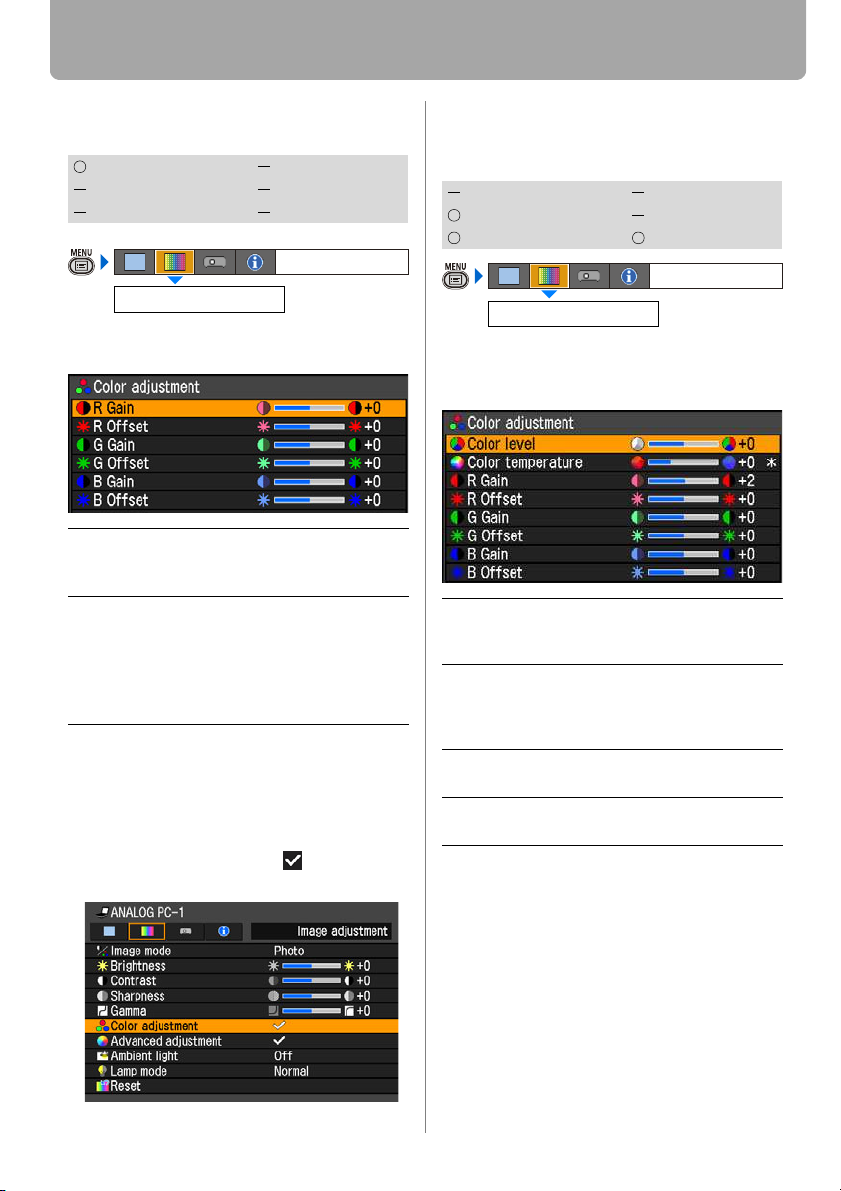
Setting the Image Quality
Making Color Adjustment (HDMI) (SX80 II)
[Color adjustment]
HDMI COMPONENT
DIGITAL PC
ANALOG PC USB
Color adjustment
You can adjust the color quality of images for
each of primary colors, red, green and blue.
R/G/B
Gain
R/G/B
Offset
Adjust the intensity of each color.
[>] Increases the color intensity.
[<] Decreases the color intensity.
Adjusts the color reproducibility of
dark portions of each color.
[>] Increases the color reproducibil-
ity of color.
[<] Decreases the color reproducibil-
ity of color.
When you have completed the adjustment, press the MENU button.
• The adjustment you have made is
stored as an adjusted value of input signals being projected in an image mode.
• Adjusting a color makes mark shown
in [Color adjustment] in the menu.
VIDEO/S-VIDEO
Image adjustment
Making Color Adjustment (Digital PC/ Analog PC/USB) (SX80 II)
[Color adjustment]
HDMI COMPONENT
DIGITAL PC
ANALOG PC USB
Color adjustment
You can adjust the color of an image for
each of primary colors, red, green, and blue.
You can also adjust the color temperature.
Color
level*
Color
temperature*
R/G/B
Gain
R/G/B
Offset
Adjusts the intensity of each color.
[>] Increases the intensity of color.
[<] Decreases the intensity of color.
Adjusts the color temperature of the
image.
[>] Changes to the blue color (cold color).
[<] Changes to the red color (warm color).
The same as “Making Color Adjustment (HDMI)”.
The same as “Making Color Adjustment (HDMI)”.
* You can set this if you have selected
[Photo] for [Image mode].
When you have completed the adjustment, press the MENU button.
• The adjustment you have made is
stored as an adjusted value of input signals being projected in an image mode.
• If you change R/G/B Gain or Offset once
color temperature has been specified,
the "*" mark is displayed at the right side
of the setting value to indicate the color
temperature has been specified.
VIDEO/S-VIDEO
Image adjustment
96
Page 97
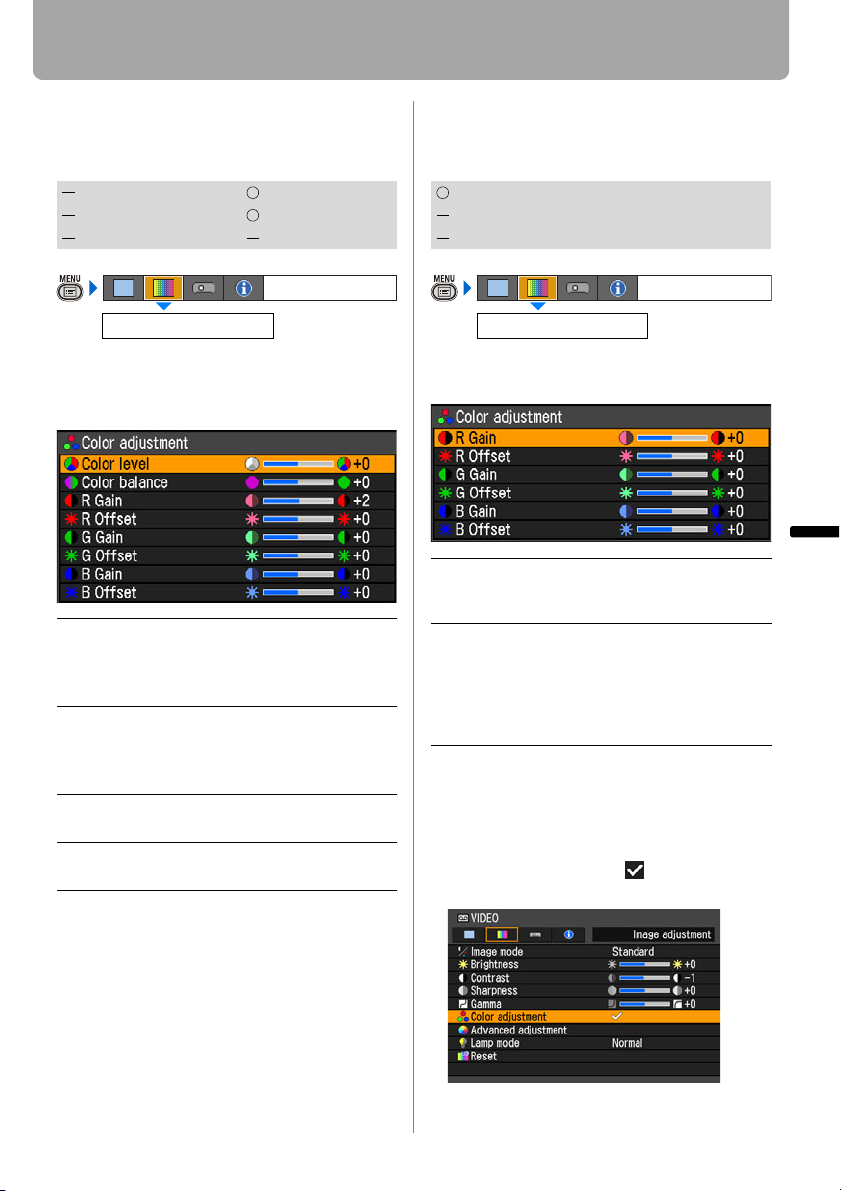
Setting the Image Quality
Making Color Adjustment (COMPONENT/ VIDEO/S-VIDEO) (SX80 II)
[Color adjustment]
HDMI COMPONENT
DIGITAL PC
ANALOG PC USB
Color adjustment
You can adjust the color depth and hue of
images for each of primary colors, red,
green and blue.
Color level Adjusts the intensity of each
color.
[>] Increases the intensity of color.
[<] Decreases the intensity of color.
Color balance Adjusts the color balance of a
reddish or greenish image.
[>] Corrects a reddish image.
[<] Corrects a greenish image.
R/G/B Gain The same as “Making Color
Adjustment (HDMI)”.
R/G/B Offset The same as “Making Color
Adjustment (HDMI)”.
When you have completed the adjustment, press the MENU button.
• You cannot adjust the [Color balance] in
[Video] or [S-Video] except NTSC.
• The adjustment you have made is
stored as an adjusted value of input signals being projected in an image mode.
VIDEO/S-VIDEO
Image adjustment
Making Color Adjustment (Analog PC) (SX800)
[Color adjustment]
ANALOG PC
COMPONENT
VIDEO
Image adjustment
Color adjustment
You can adjust the color quality of images for
each of primary colors, red, green and blue.
R/G/B
Gain
R/G/B
Offset
When you have completed the adjustment,
press the MENU button.
• The adjustment you have made is stored as
• Adjusting a color makes mark shown in
Adjust the intensity of each color.
[>] Increases the color intensity.
[<] Decreases the color intensity.
Adjusts the color reproducibility of dark
portions of each color.
[>] Increases the color reproducibility of
color.
[<] Decreases the color reproducibility
of color.
an adjusted value of input signals being projected in an image mode.
[Color adjustment] in the menu.
Setting Up Functions from Menus
97
Page 98
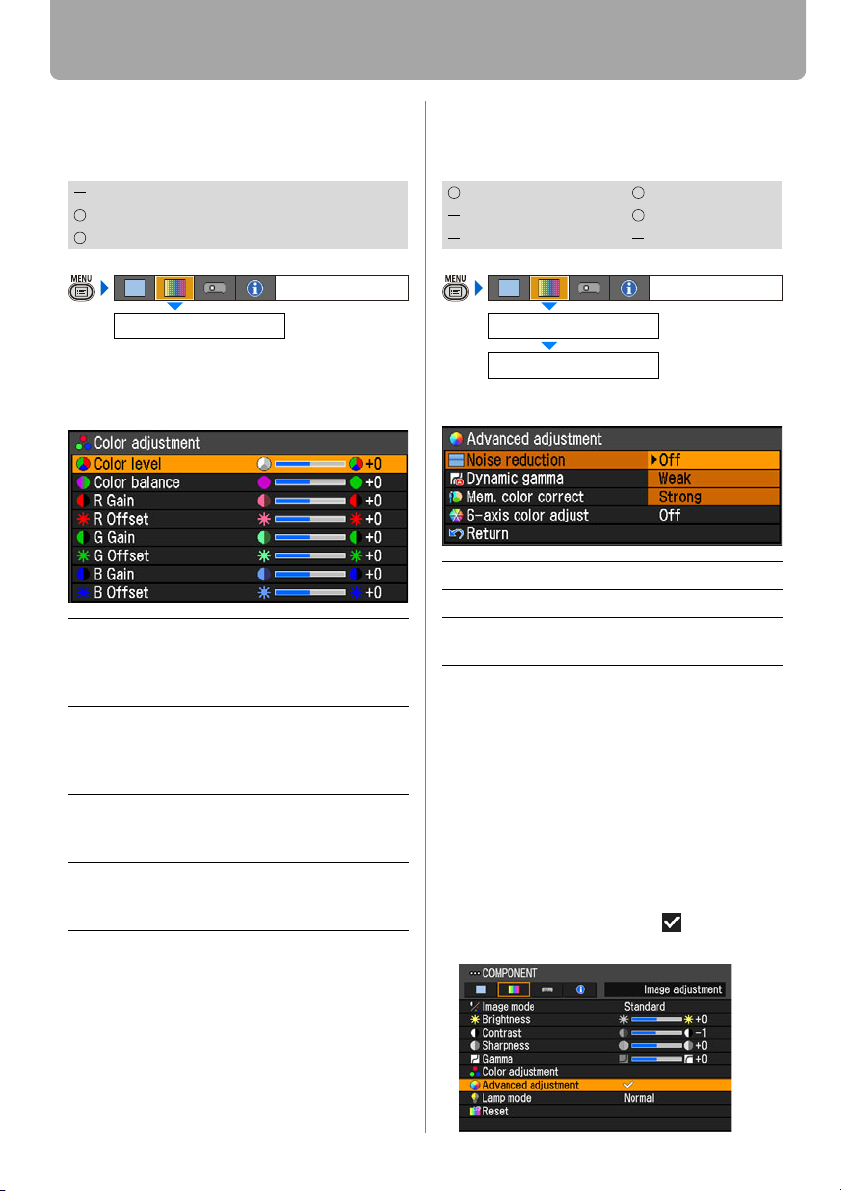
Setting the Image Quality
Making Color Adjustment (COMPONENT/ VIDEO) (SX800)
[Color adjustment]
ANALOG PC
COMPONENT
VIDEO
Image adjustment
Color adjustment
You can adjust the color depth and hue of
images for each of primary colors, red,
green and blue.
Color level Adjusts the intensity of each
color.
[>] Increases the intensity of color.
[<] Decreases the intensity of color.
Color balance Adjusts the color balance of a
reddish or greenish image.
[>] Corrects a reddish image.
[<] Corrects a greenish image.
R/G/B Gain The same as “Making Color
Adjustment (Analog PC)
(SX800)”.
R/G/B Offset The same as “Making Color
Adjustment (Analog PC)
(SX800)”.
When you have completed the adjustment, press the MENU button.
• You cannot adjust the [Color balance] in
[Video] except NTSC.
• The adjustment you have made is
stored as an adjusted value of input signals being projected in an image mode.
Making Advanced Adjustment (Noise reduction)
[Advanced adjustment] - [Noise reduction]
HDMI COMPONENT
DIGITAL PC
ANALOG PC USB
Advanced adjustment
Noise reduction
You can reduce noise of picture.
Off Disables noise reduction.
Weak Select this option for noisy picture.
Strong Select this option for excessively noisy
picture.
Press the OK button to accept your setting
and then press the MENU button.
• [Off] is the factory default.
• Noise reduction may produce an afterimage for quick footage.
• Select [Weak] for quick footage. Select
[Strong] for slow footage.
• The setting you have made is stored as
a setting value of input signals being
projected in an image mode.
• Making this setting makes mark shown
in [Advanced adjustment] in the menu.
VIDEO/S-VIDEO
Image adjustment
98
Page 99
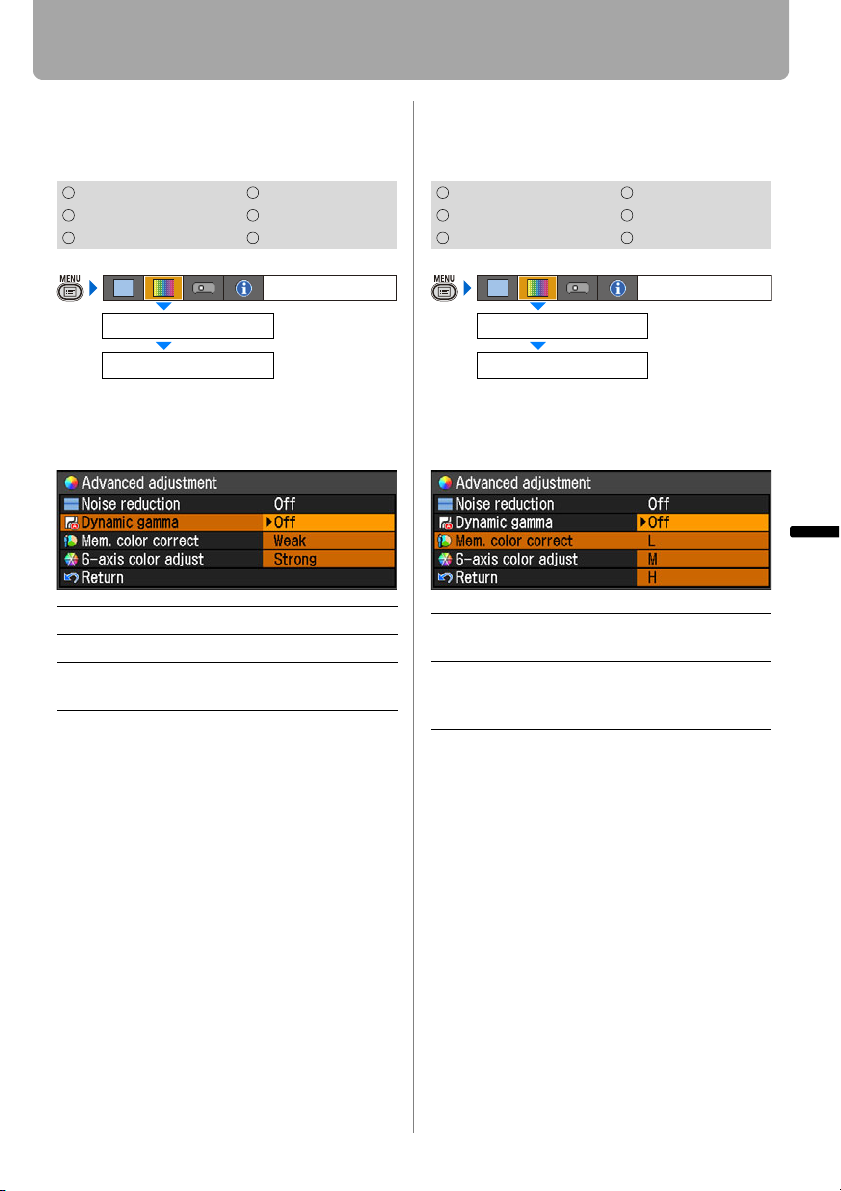
Setting the Image Quality
Making Advanced Adjustment (Dynamic gamma)
[Advanced adjustment] - [Dynamic gamma]
HDMI COMPONENT
DIGITAL PC
ANALOG PC USB
Advanced adjustment
Dynamic gamma
You can adjust the gradation representation of light and dark portions of an image
automatically.
Off Dynamic gamma is disabled.
Weak Dynamic gamma is used a little.
Strong Dynamic gamma is used to a large
extent.
Press the OK button to accept your setting
and then press the MENU button.
• [Off] is the factory default.
• The adjustment you have made is
stored as an adjusted value of input signals being projected in an image mode.
VIDEO/S-VIDEO
Image adjustment
Making Advanced Adjustment (Mem. color correct) (SX80 II)
[Advanced adjustment] - [Mem. color correct]
HDMI COMPONENT
DIGITAL PC
ANALOG PC USB
Advanced adjustment
Mem. color correct
You can correct colors (e.g. blue sky, field
of grass, skin) in our memory so that they
can be projected more vividly.
Off Disables the memorized color correction
function.
Specifies the intensity of the memorized
L
color correction in three steps.
M
H
Press the OK button to accept your setting
and then press the MENU button.
• [Off] is the factory default.
• The adjustment you have made is
stored as an adjusted value of input signals being projected in an image mode.
• For the details of the memorized color
correction, refer to the page 155.
VIDEO/S-VIDEO
Image adjustment
Setting Up Functions from Menus
99
Page 100
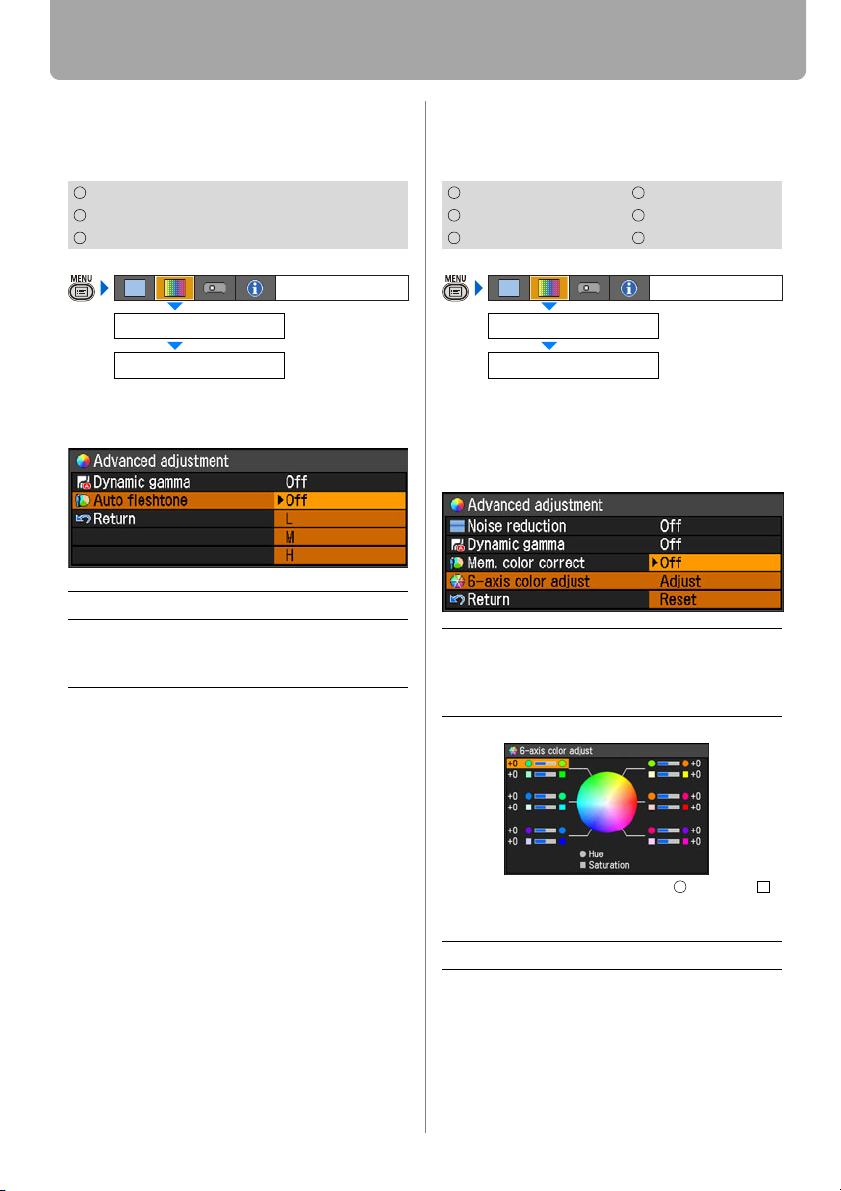
Setting the Image Quality
Making Advanced Adjustment (Auto fleshtone) (SX800)
[Advanced adjustment] - [Auto fleshtone]
ANALOG PC
COMPONENT
VIDEO
Image adjustment
Advanced adjustment
Auto fleshtone
You can represent the skin color impressively.
Off Disables the [Auto fleshtone] function.
Specifies the intensity of the [Auto flesh-
L
tone] in three steps.
M
H
Press the OK button to accept your setting
and then press the MENU button.
• The adjustment you have made is
stored as an adjusted value of input signals being projected in an image mode.
Adjusting Fine Color Adjustment (6-axis color adjust) (SX80 II)
[Advanced adjustment] - [6-axis color adjust]
HDMI COMPONENT
DIGITAL PC
ANALOG PC USB
Advanced adjustment
6-axis color adjust
You can make fine color adjustment with
RGB (red, green, blue) and CMY (cyan,
magenta, yellow). For the details of 6-axis
color adjust, refer to the page 155.
Off Disables the 6-axis color adjustment.
If you select [Adjust], the previous setting of 6-axis color adjustment
becomes active again.
Adjust Enables the 6-axis color adjustment.
VIDEO/S-VIDEO
Image adjustment
<
Use [ ] / [ ] to select [ Hue] or [
Saturation], then adjust them with [<] /
[>].
Reset Returns any adjustment values to zero.
<
When you have completed the adjustment, press the MENU button.
• [Off] is the factory default.
• The adjustment you have made is
stored as an adjusted value of input signals being projected in an image mode.
100
 Loading...