

Page 1
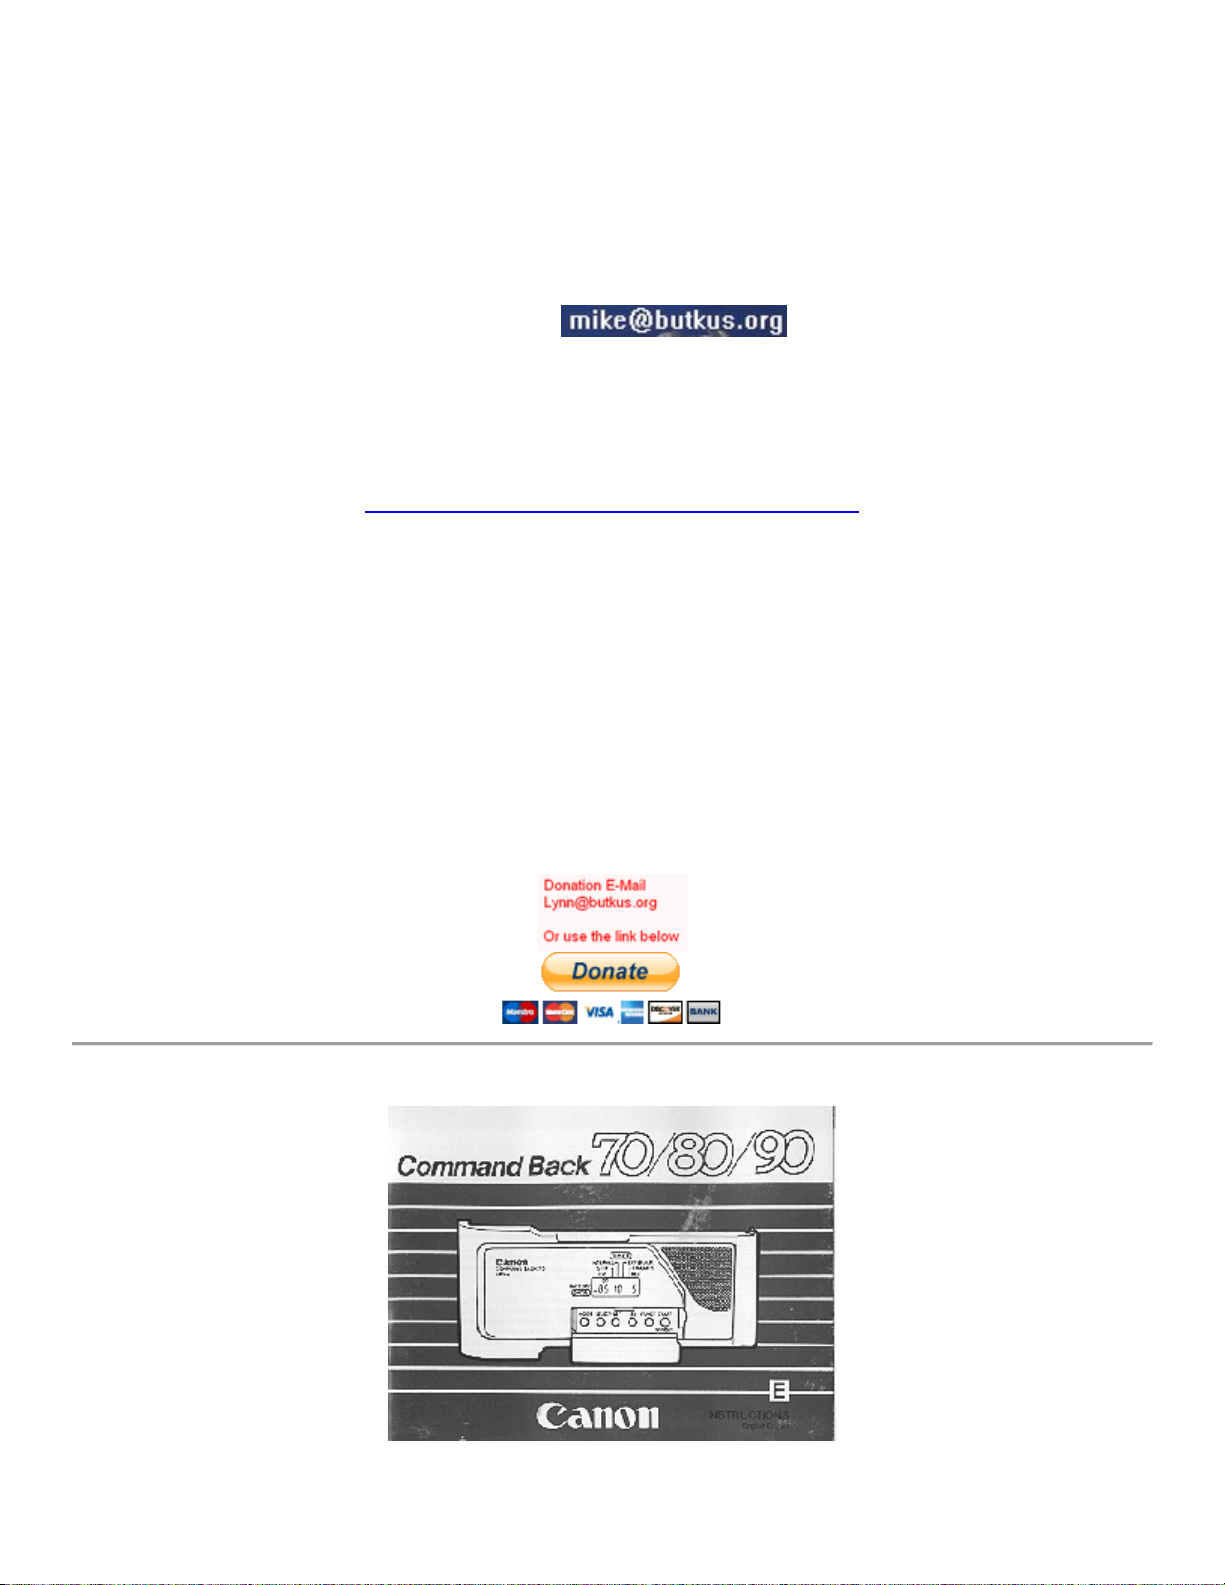
Canon Command Back
Venmo is @mike-butkus-camera
70/80/90
Posted 9-14-03
This camera manual library is for reference and historical purposes, all rights reserved.
This page may not be sold or distributed without the expressed permission of the producer
This page is copyright © , NJ.
I have no connection with any camera company
On-line camera manual library
Back to main on-line manual page
If you find this manual useful, how about a donation of $3 to:
M. Butkus, 29 Lake Ave.,
High Bridge, NJ 08829-1701
and send your e-mail address so I can thank you.
Most other places would charge you $7.50 for a electronic copy
or $18.00 for a hard to read Xerox copy.
This will help me to continue to host this site, buy new manuals, and pay their shipping costs.
It'll make you feel better, won't it?
If you use Pay Pal, use the link below. Use the above address for a check, M.O. or cash.
Page 2

Designed exclusively for the Canon T70, T80 and T90 respectively, the Canon Command Back 70, Command
Back 80 and Command Back 90 are special data backs which open up an amazing variety of automatic
operations. As their names indicate, the Command Backs are equipped with command functions to control the
camera in various timer modes, as well functions which allow you to record certain types of data automatically
on the film.
Features:
1. Data Recording Function:
1) Built-in automatic date recording mode programmed up through the year 2029.
· automatically compensates for long and short months and leap years.
www.4.butkus.org
· any of three sequences (Month/day/year, day/month/year, and year/month/day) may be selected.
2) Built-in automatic quartz digital clock mode with 24 hour display (Day/hour/minute is recorded.). 3)
Automatic recording of an arbitrary 6-digit code of numbers and the letters A through F.
4) Automatic recording of a 4-digit frame counter number from Fc 00 01 up to Fc 99 99.
2. Timer Control Function
1) Self-timer mode
· the shutter is released once after a fixed period of time.
2) Interval timer mode
· the shutter is released at fix. ed intervals.
3) Long release timer mode
· the shutter is released and held open for a fixed period of time.
1), 2) and 3) can be set in 1-sec. units to any value from 1 sec. to 23 hrs., 59 mine., 59 sees.
4) Frame counter setting (number of exposures setting) mode
· the number of exposures to be made can be set and operation stops automatically after the set number of
exposures has been made.
4) can be set to any value in the range from 1 up to 99.
The Command Backs can be programmed by combining the modes of the timer control function and using them
together with the data recording function.
Page 3
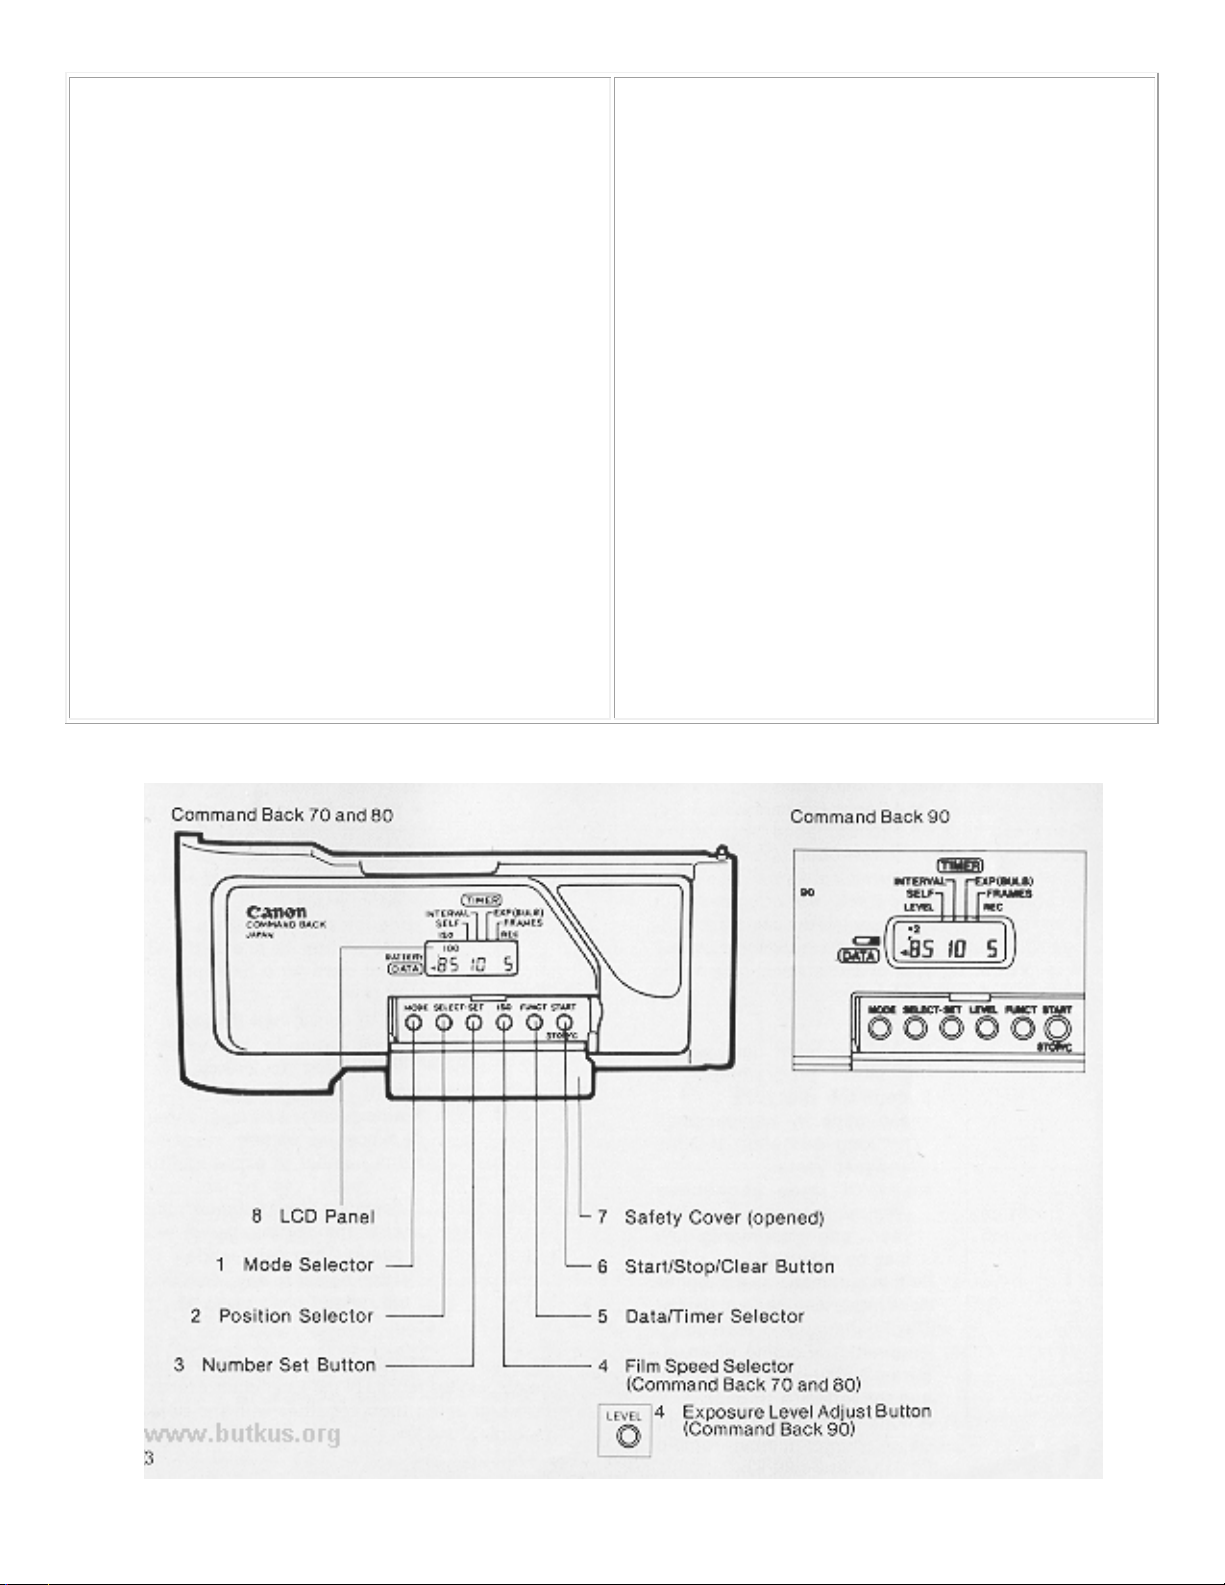
Table of of Contents
1. Nomenclature P. 3
2. Basic Functions of Control Buttons ..P. 4
3. Function Displays P. 6
9. Setting Each Mode of the Timer
Control Function P.22
4. Attaching the Command Back to the Camera P. 7
5. Setting the Film Speed P. 8
· Command Back 70 and 80
· Command Back 90
6. Basic Operation for Making Mode Settings P.10
7. Basic Operation for Setting Display Numbers P.12
8. Setting Each Mode of the Data Recording Function .
P.13
(1) Setting the Date P.14
(2) Setting the Time P.16
(3) Setting the Arbitrary 6-digit Code P.18
(4) Setting the 4-digit Frame Counter Number P.20
1. Nomenclature -
(1) Setting the Self-timer P.22
(2) Setting the Interval Timer P.24
(3) Setting the Long Release Timer P.26
(4) Setting the Frame Counter P.28
(5) Multiple Exposures: for the Command Back 90
only P.30
(6) Automatic Flash Photography: for the Command
Back 90 only. . . P.30
10. Combining Various Modes . P.31
11. Replacing the Battery P.40
12. Liquid Crystal Display P.41
Specifications P.42
Page 4
2. Basic Functions of Control Buttons
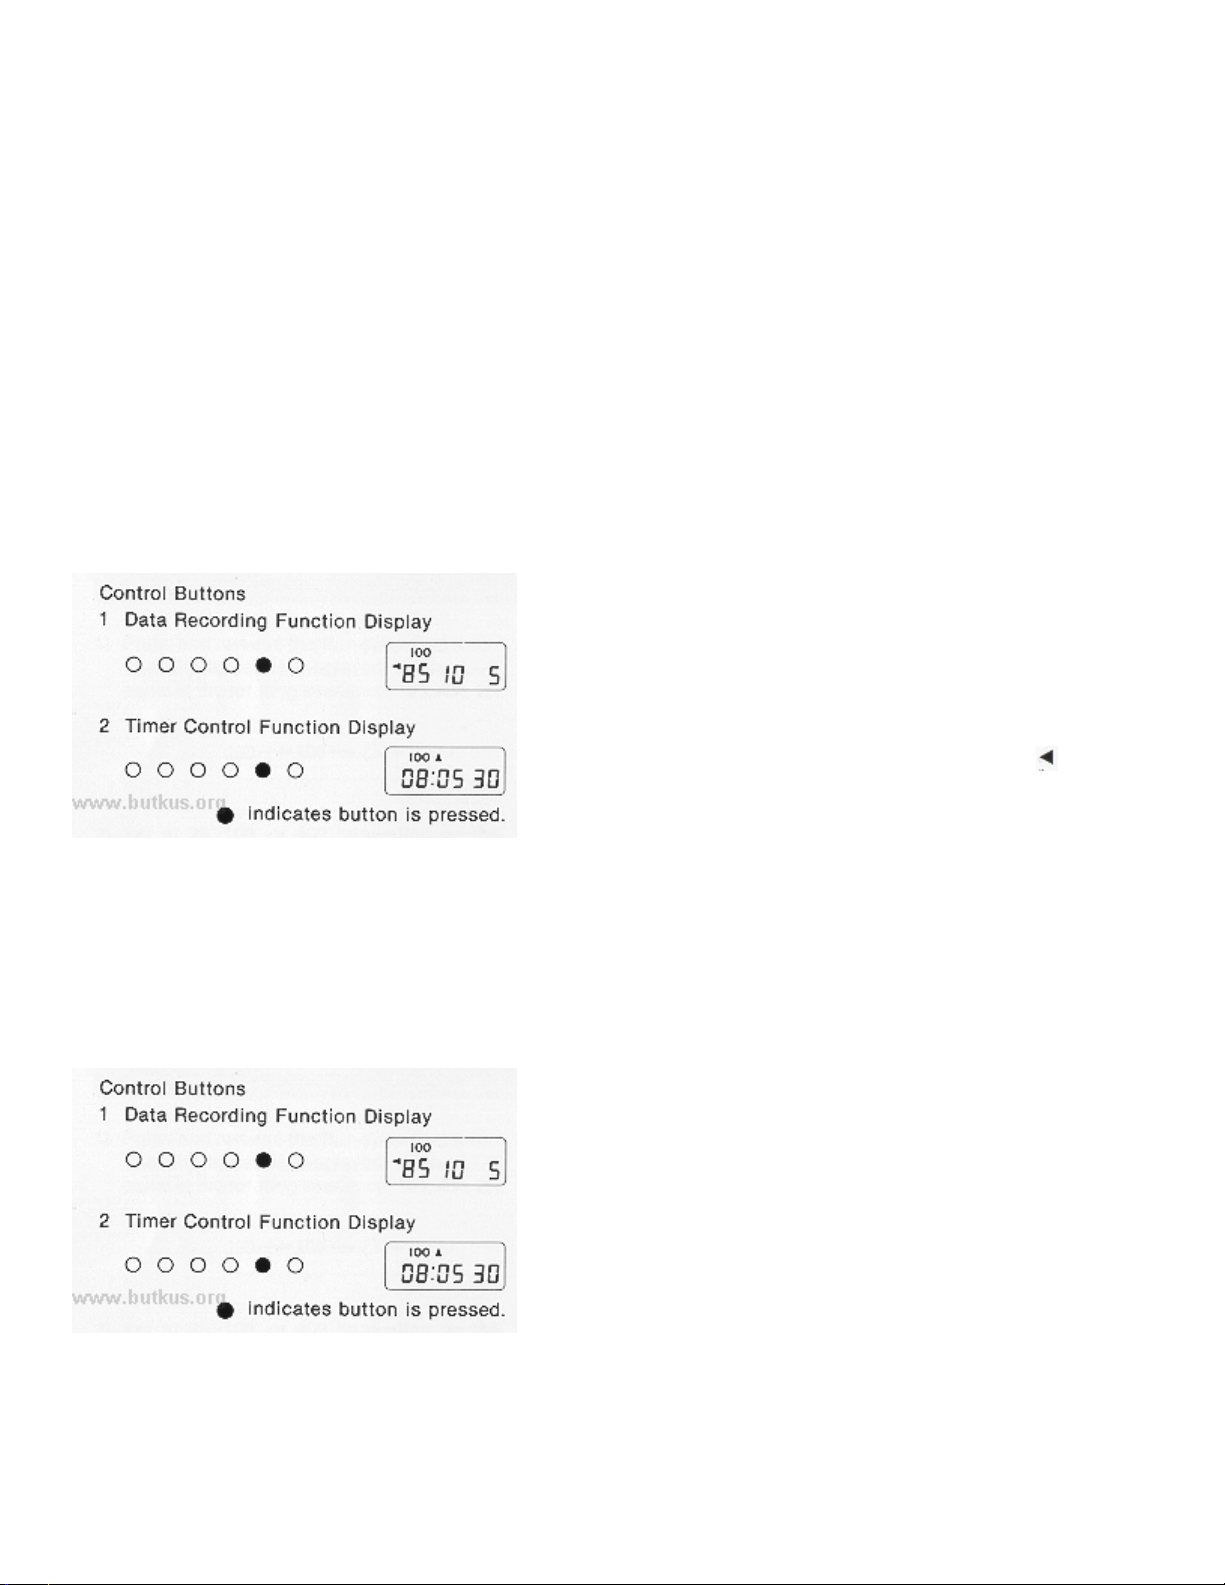
The basic functions of the Command Back's various control buttons are as follows:
1. Mode Selector--Selects the modes in either the data recording function or the timer control function.www.4.butkus.or g
2. Position Selector--Selects the digit to be set or reset when changing numbers in the various modes.
3. Number Set Button--Sets the desired numbers.
4. Film Speed Selector--Sets data exposure brightness according to the film speed in use (3 levels).
·Command Back 90
Exposure Level Adjust Button--Compensates the light intensity of data recording.
5. Data/Timer Selector--Switches between the data recording function and the timer control function.
6. Start/Stop/Clear Button--· Starts operation in the timer control function · Manually stops operation of the
timer control function. · Clears values when the digit is flashing.
Page 5
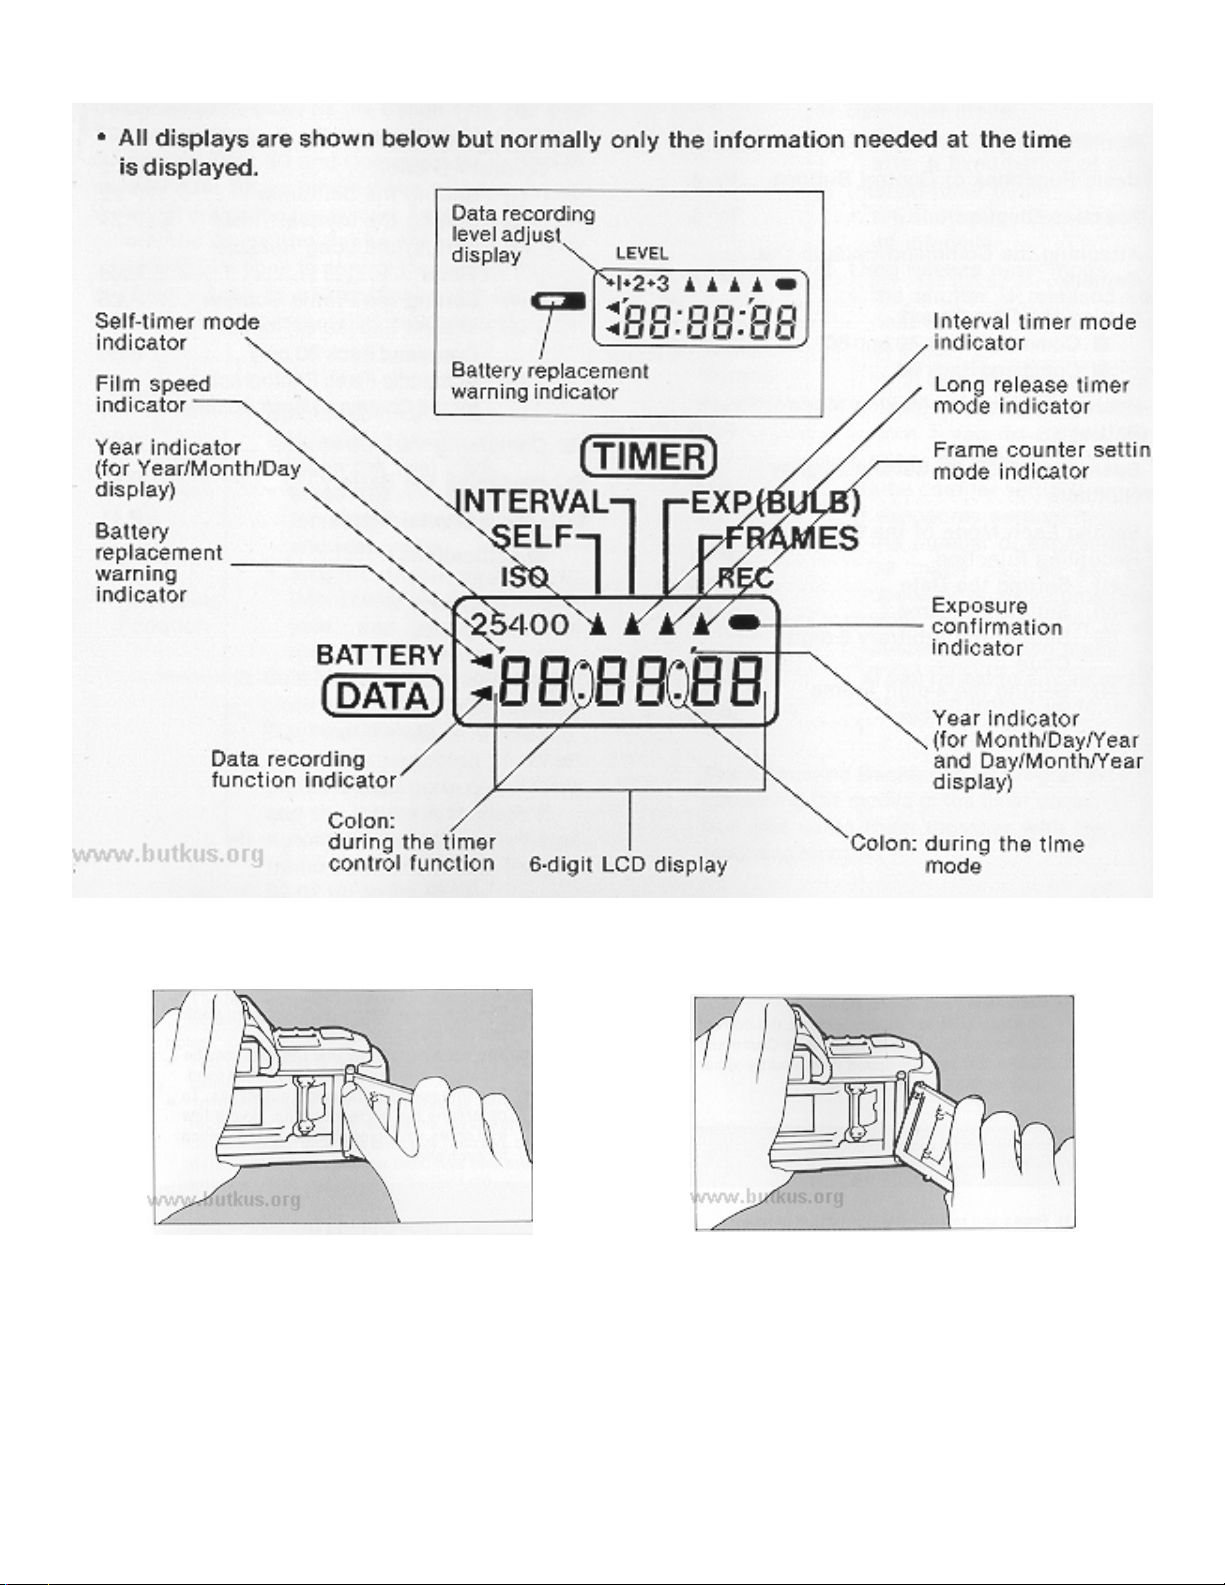
3. Function Displays
4. Attaching Command Back to the Camera
Be sure that there is no film in the camera before attaching the Command Back. Other wise, the film will be
exposed when the regular camera back is opened.
1) Open the back cover of the camera and push the hinge release pin down to remove the back cover.
2) To attach the Command Back, insert its lower hinge into the lower socket first. Then depress the hinge
release pin, align it with the upper socket and let go of the hinge release pin to lock it on.
Page 6
Note:
Wipe the contacts of the camera and the Command Back with a clean, dry cloth to ensure proper contact.
Otherwise the data may not be properly recorded.
5. Setting the Film Speed
· Command Back 70 and 80 To ensure correct data recording, the correct film speed must be set on these
Command Backs. Set the film speed indicated by either "ISO" or "ASA" on your film box.
Be sure that :the correct film speed is also set on the camera body.
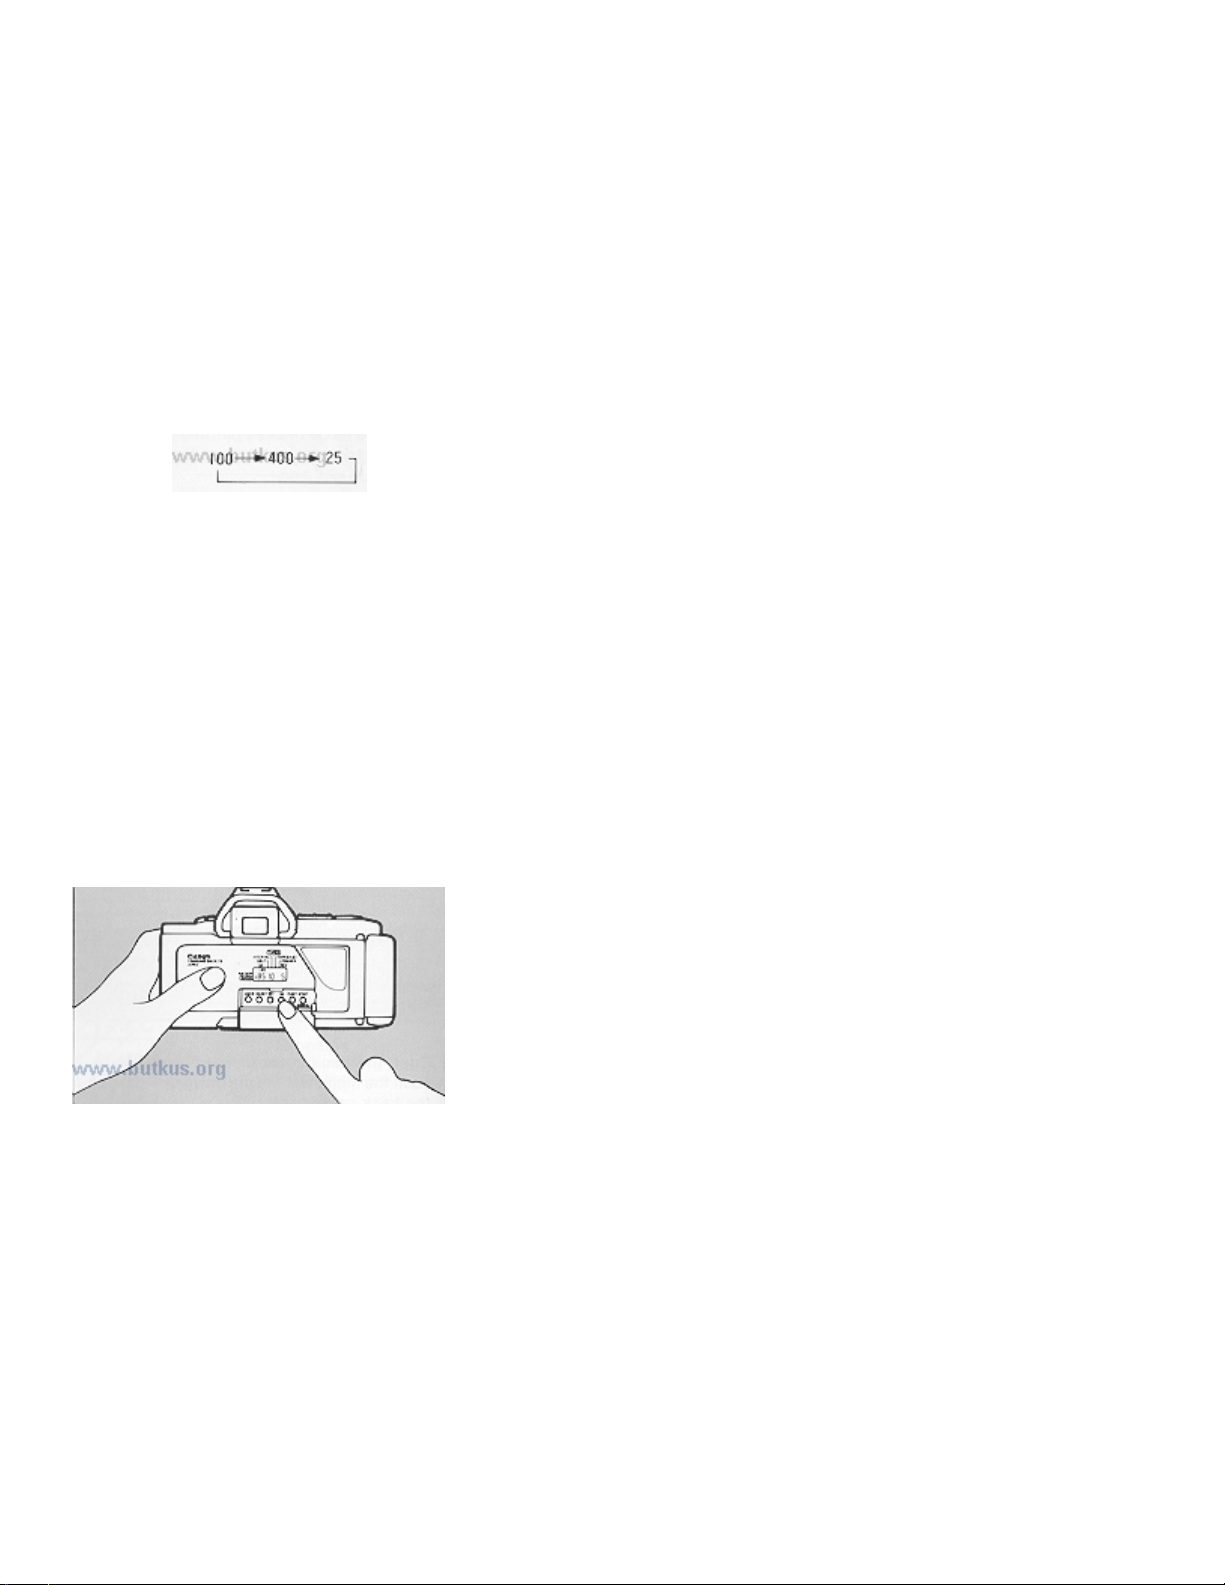
1) Press and release the film speed selector. The film speed is displayed on the LCD panel in the rotating
sequence:
2) Set at 25, 100, or 400 depending on the speed of your film. Use the following table for reference.
· ISO 25 - 64: Set at 25.
· IS0 80--160: Set at 100.
· IS0 200--400 and ISO 1000: Set at 400.
Notes:
· The film speed set on the Command Back will not be recorded.
· There is a possibility that the data may be slightly blurred when ISO 1000 film is used.
· The film speed settings are guidelines. To determine the perfect setting, take a few trial shots, changing the
film speed setting for each shot.
· Command Back 90
It is unnecessary to set the film speed on the Command Back
90, since the DX data of the film is automatically transmitted
from the T90.
The light intensity is varied automatically according to the film
speed.
Notes:
· The film speed is not displayed on the LCD panel.
www.4.butkus.org
· To compensate the light intensity of data recording, press the exposure level adjust button. Every time this
button is pressed, the data recording exposure becomes one step brighter up to three steps. On the LCD panel +
1, + 2 or + 3 is displayed.
Page 7
When using ISO 80--ISO 160 film, you can compensate the exposure level only up to 2 steps, and when using
ISO 25--ISO 64 film, you can compensate it only one step.
· Exposure compensation is necessary for data recording on the films below.
1 step brighter
Sakura Film SR Series ISO 100, 400 or 1600
Agfa Film ISO 100 or 400
Agfa Chrome ISO 1000 -Agfa Chrome RS Professional ISO 100 or 1000 --
2 steps brighter
Sakura Film SR ISO 200
Agfa Chrome RS Professional 200
6. Basic Operation for Making Mode Setting
1. Switching between the data recording function
and timer control function
Operation is switched between the data recording
function and the timer control function each time the
data/timer selector is pressed. You can confirm which
function the camera is in by looking at the " " " mark
on the LCD panel.
2. Mode Setting in Data Recording Function
The mode display of the data recording function changes each time the mode selector is pressed. These data are
automatically recorded upon shutter release except when "OFF" is displayed.
Note: Be sure to set to "OFF" when you do not want to record anything on the film.
3. Mode Settings In Timer Control Function
The mode display of the timer control function
changes each time the mode selector is pressed. The
camera is controlled according to these settings.
Page 8
7. Basic Operation Display Numbers
1. Each time the position selector is pressed, a 2-digit unit starts flashing.
2. After the 2-digits you wish to change start flashing, press the number set button until the desired number
appears.
3. Press the position selector until all the digits stop flashing.
· Each depression of the number set button increments the flashing numeral by one. If the number set button is
held down continuously in step 2, the number will advance rapidly.
· If the start/stop/clear button is pressed while the number is flashing, the number will be cleared in the
following way.
Command Back 70 and 80
Year -> '83
Month and Day -> 1
Hour -> 0
Minute, Second, and other numerals -> 00
Command Back 90
Year -> '85
Month and Day -> 1
Hour -> 0
Minute, Second, and other numerals -> 00
8. Setting Each Mode of the Data Recording Function
1. The data are automatically recorded upon shutter release.
2. The data are recorded in the lower right hand corner of the picture.
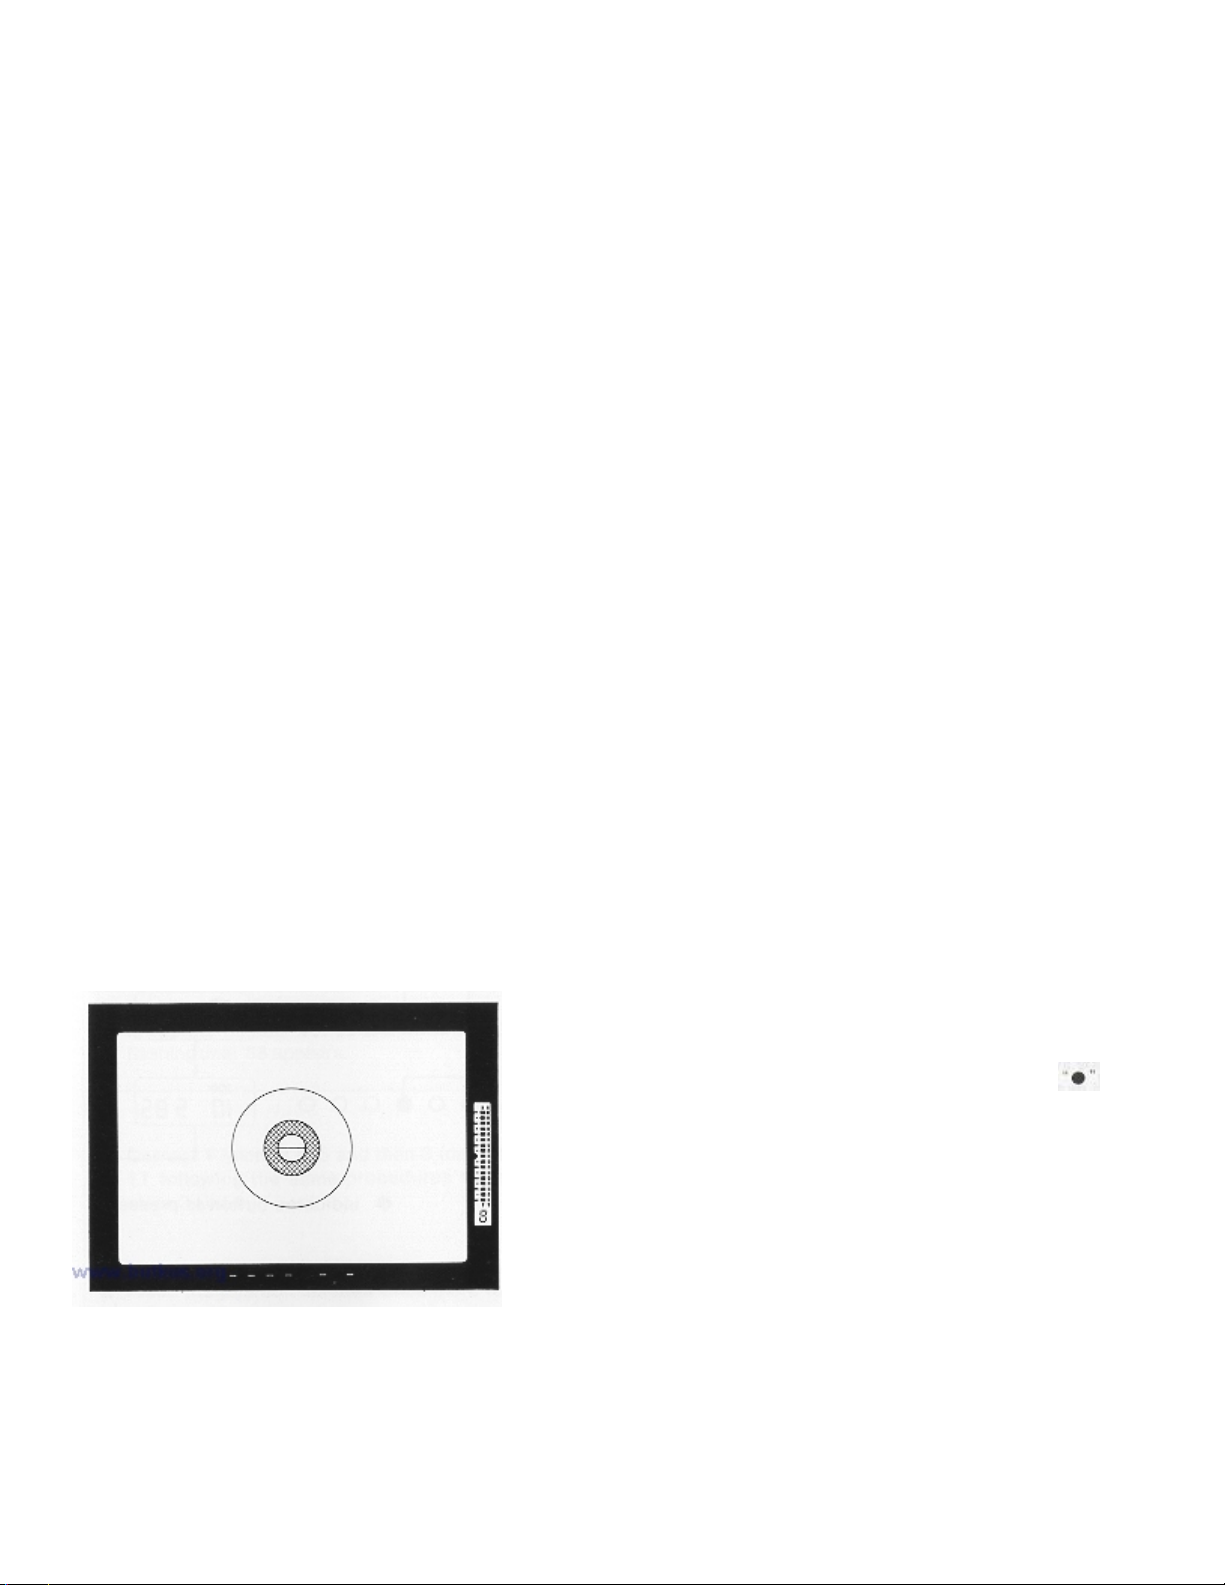
3. If the data have been recorded correctly, a " "
mark will appear in the upper right hand corner of the
LCD panel and light up for about 1.5 - 2 sees. With the
Command Back 90, the shutter speed and the aperture
value displayed under the viewfinder of the T90 will
change into LED bars.
4. When you do not want to record anything, be sure to set the display to "OFF."
5. It is impossible to record more than one mode at the same time. (For example: the date and time.)
6. It is impossible to record data if any part of the display is flashing.
Page 9
7. If the background of the data recording area is bright, the data may not appear clearly on the picture. Be sure
that a dark part of the subject lies within the data recording area.
8. When using color film, if the background of the data recording area is orange, the data may not appear
clearly. This is because the data are printed in orange.
9. In continuous shooting with the Too, the frame advancing rate may be slowed by data recording.
(1) Setting the Date
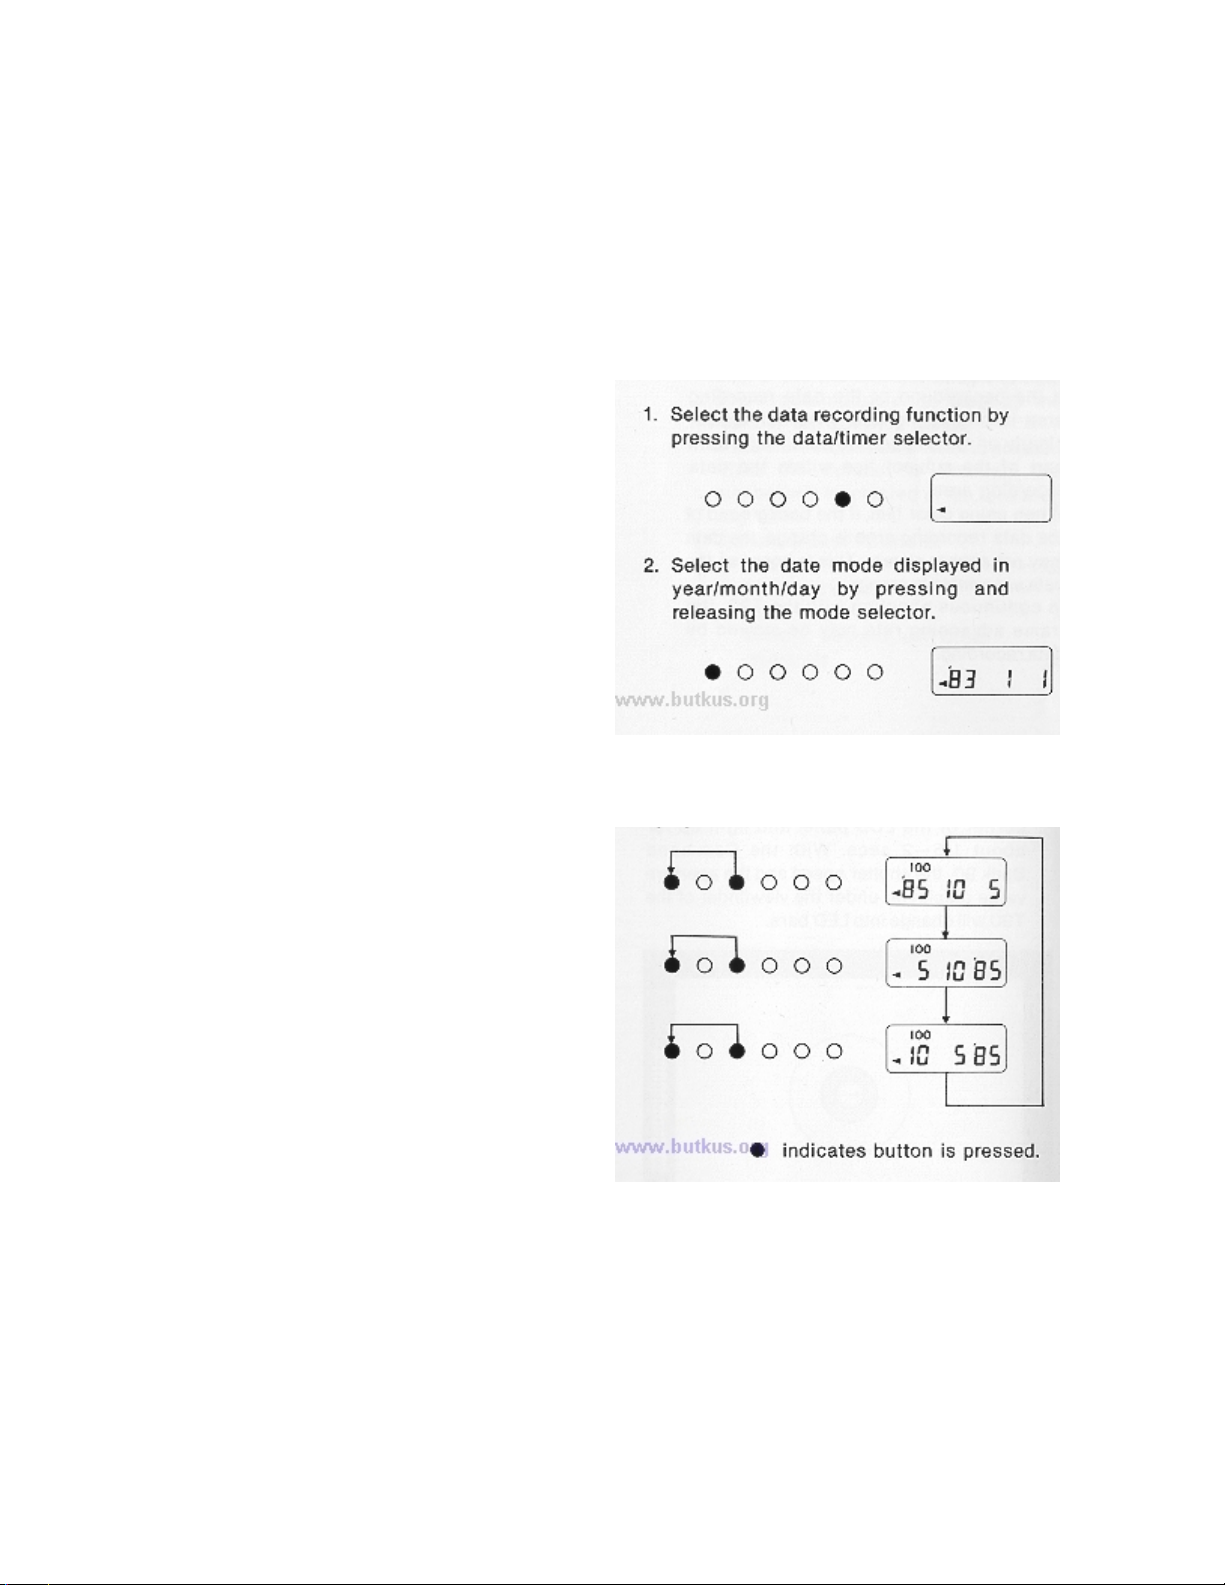
Any of three formats (year/month/day, day/month/year,
and month/day/year) may be selected in the date mode.
The year/month/day display is initially set. If you want
to change that order, follow these steps:
3. While pressing the number set button, press the
mode selector. Each time the mode selector is pressed,
the display rotates in the sequence: year/month/ day,
day/month/year, and month/day/ . year.
Select one of those three displays.www.4.butkus.org
Page 10
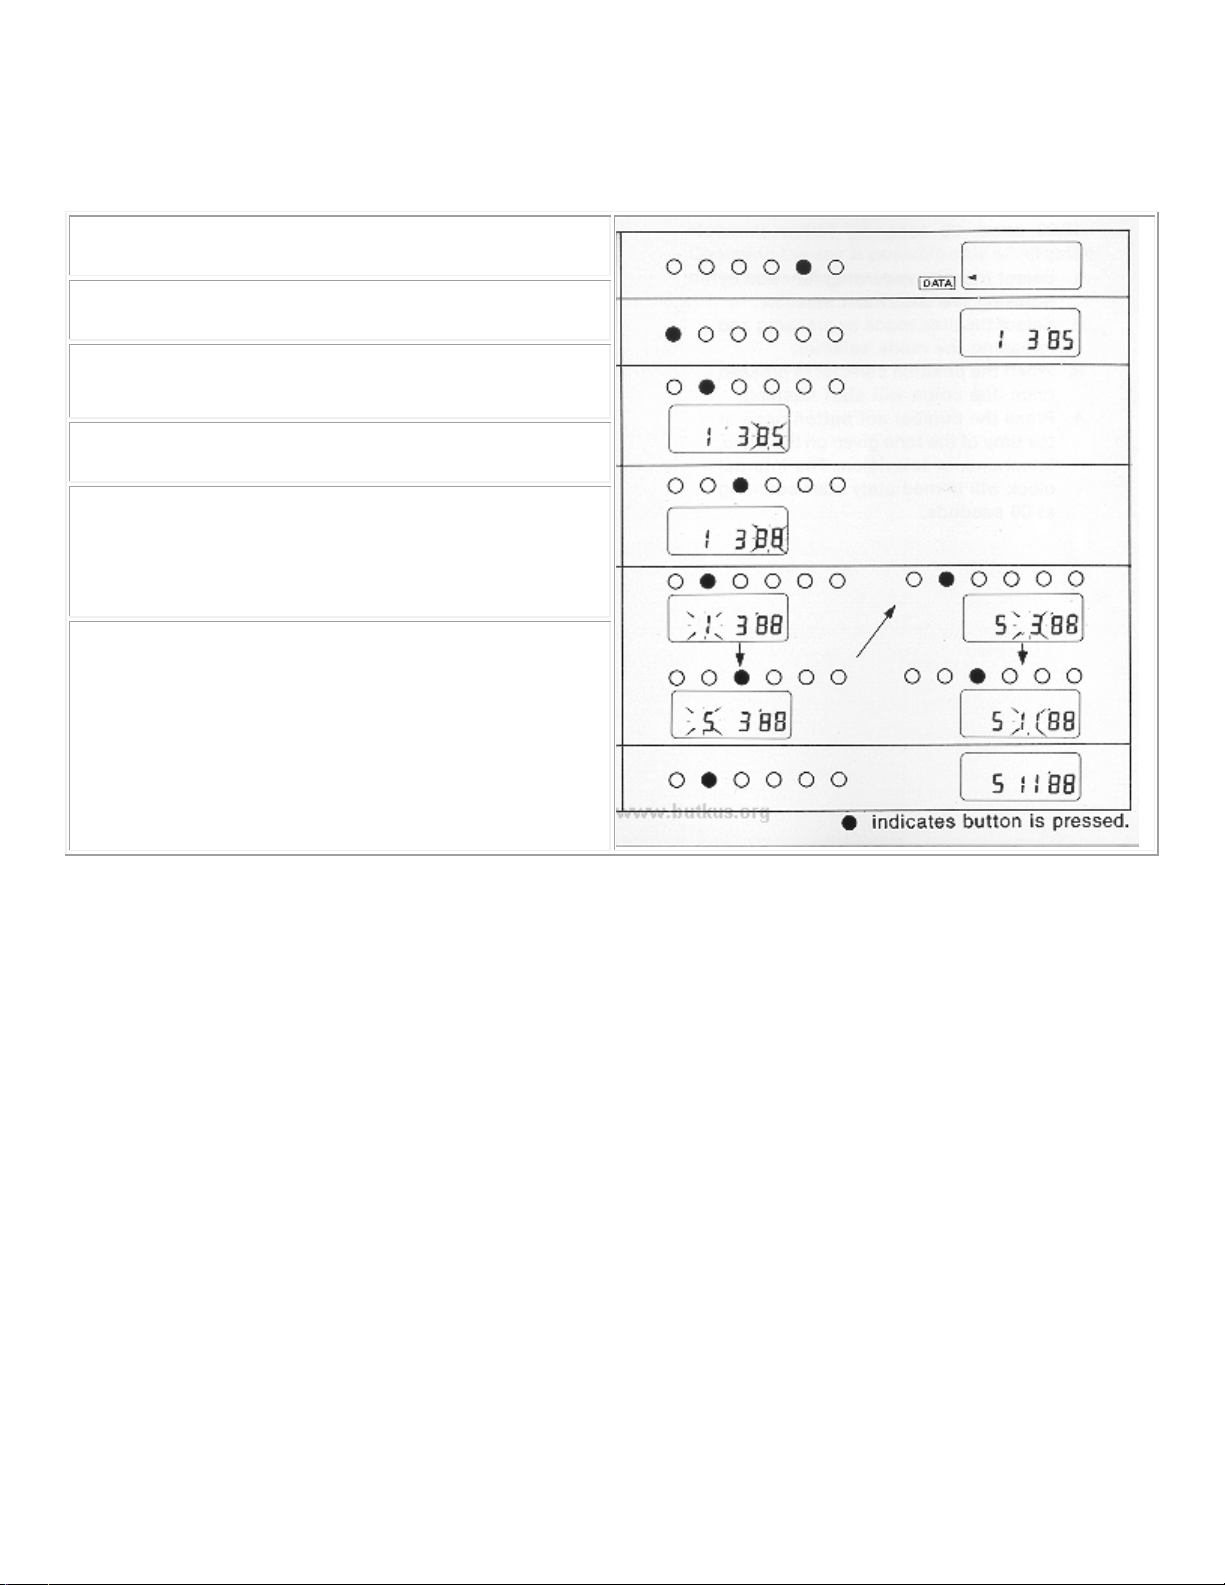
EXAMPLE :
When you want to change the date from January 3, 1985 to May 11, 1988. (Supposing that the display has
already been changed to month/day/year.)
1. Select the data recording function by pressing the
data/timer selector.
2. Select the date mode (month/day/year) by pressing
and releasing the mode selector.
3. When the position selector is pressed,'85 (year) will
start flashing.
4. Press the number set button while '85 is flashing
until '88 appears.
5. Correct 1 (month) to 5 and then 3 (day) to 11
following the same procedures as in steps 3 and 4.
6. Press the position selector once more to stop the
flashing.
(2) Setting the time
To set the precise time, for example, to 12:00 noon, 00 seconds, follow these steps:
1. Select the data recording function by pressing the data/timer selector.
2. Select the time mode by pressing and releasing the mode selector.
3. When the position selector is pressed once, the colon will start flashing.
4. Press the number set button once at the time of the tone given on the radio, telephone, or television. The
internal clock will immediately start counting at 00 seconds.www.4.butkus. or g
Page 11
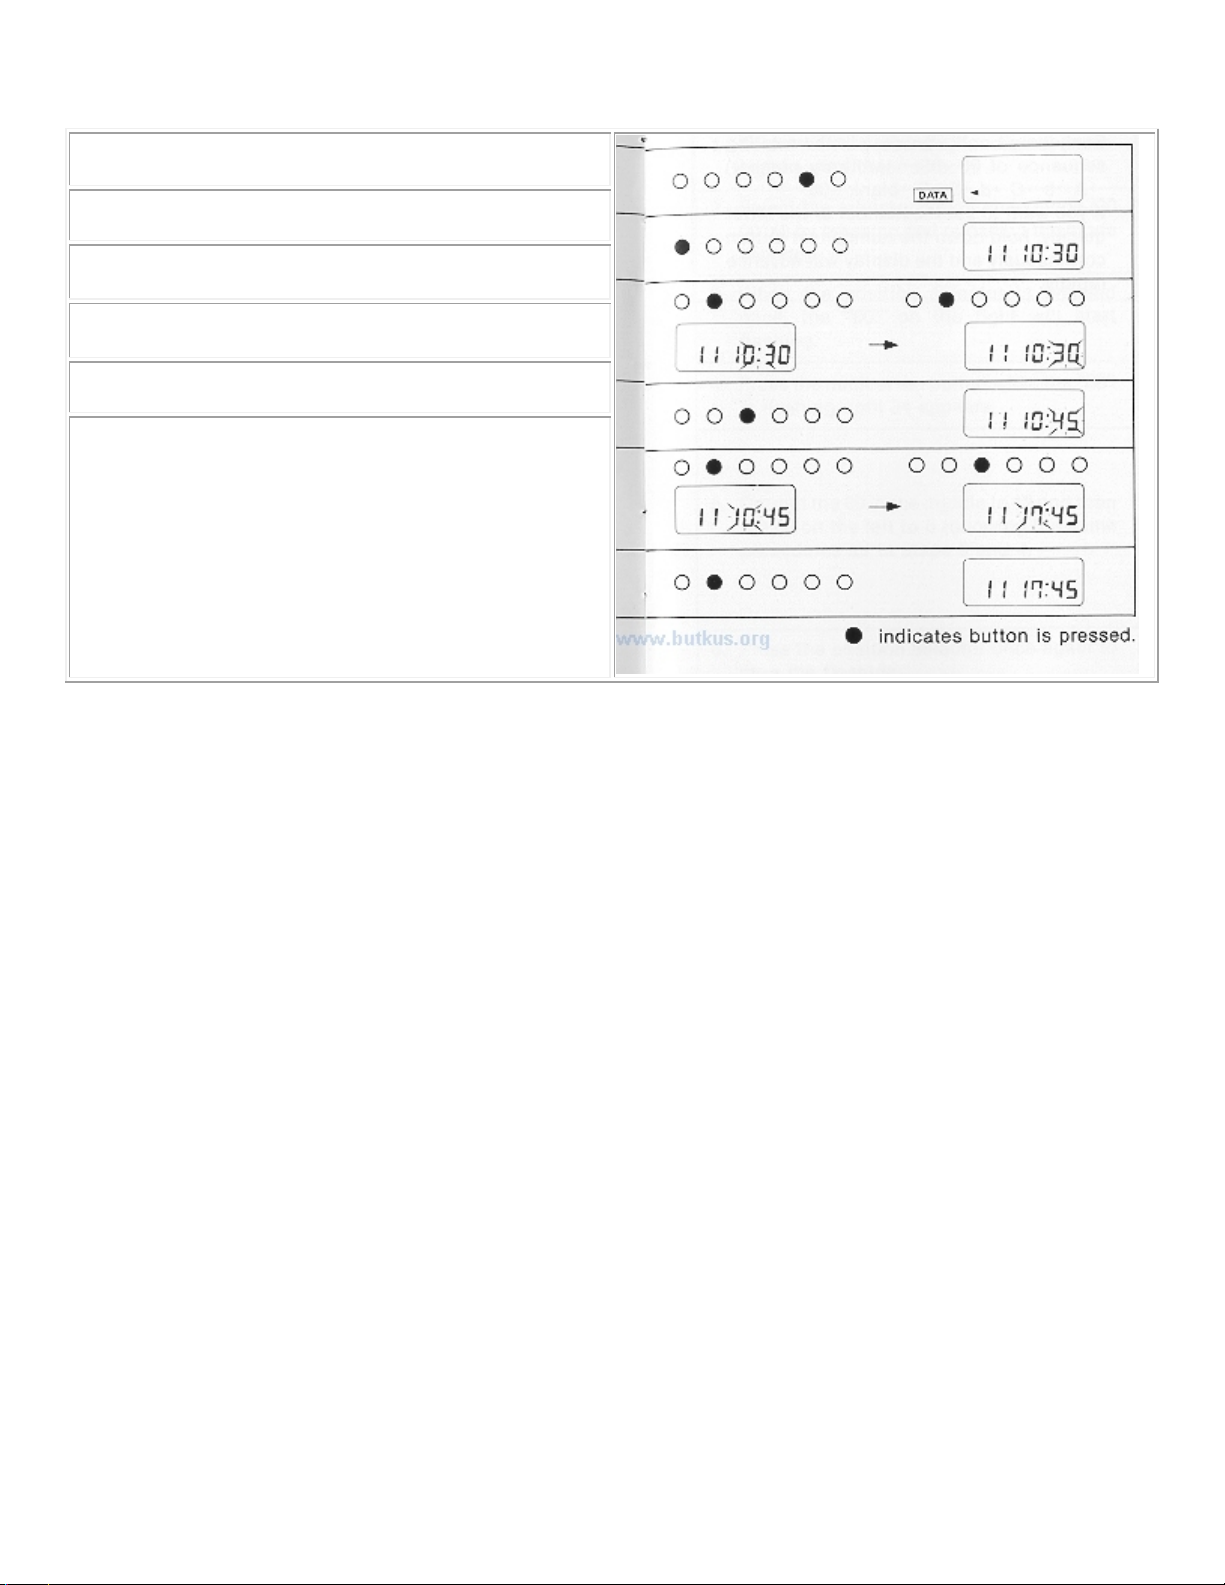
EXAMPLE: When you want to change the time from 10:30 to 17:45.
1. Select the data recording function by press ing the data/timer
selector.
2. Select the time mode (day/hour/minute) by pressing and
releasing the mode selector.
3. When the position selector is pressed once, the colon will start
flashing. When it is pressed again, 30 (minute) will start flashing.
4. Press the number set button while 30 is flashing until 45
appears.
5. Correct 10 (hour) to 17 following the same procedures as in
steps 3 and 4.
6. Press the position selector once again to stop the flashing.
(3) Setting the Arbitrary 6 digit Code.
You can set each 2-digit unit of the arbitrary 6-digit code from 00 to 99 plus the letters A through F. This mode
can be used to order your pictures for easy filing.
Each 2-digit unit advances in the rotating sequence of 00 ->99 - (arbitrary number) A->b->c->d->E->F->blank
.00.
If you want to set the number or the letter quickly, hold down the number set button continuously and the
display will advance rapidly.
Page 12
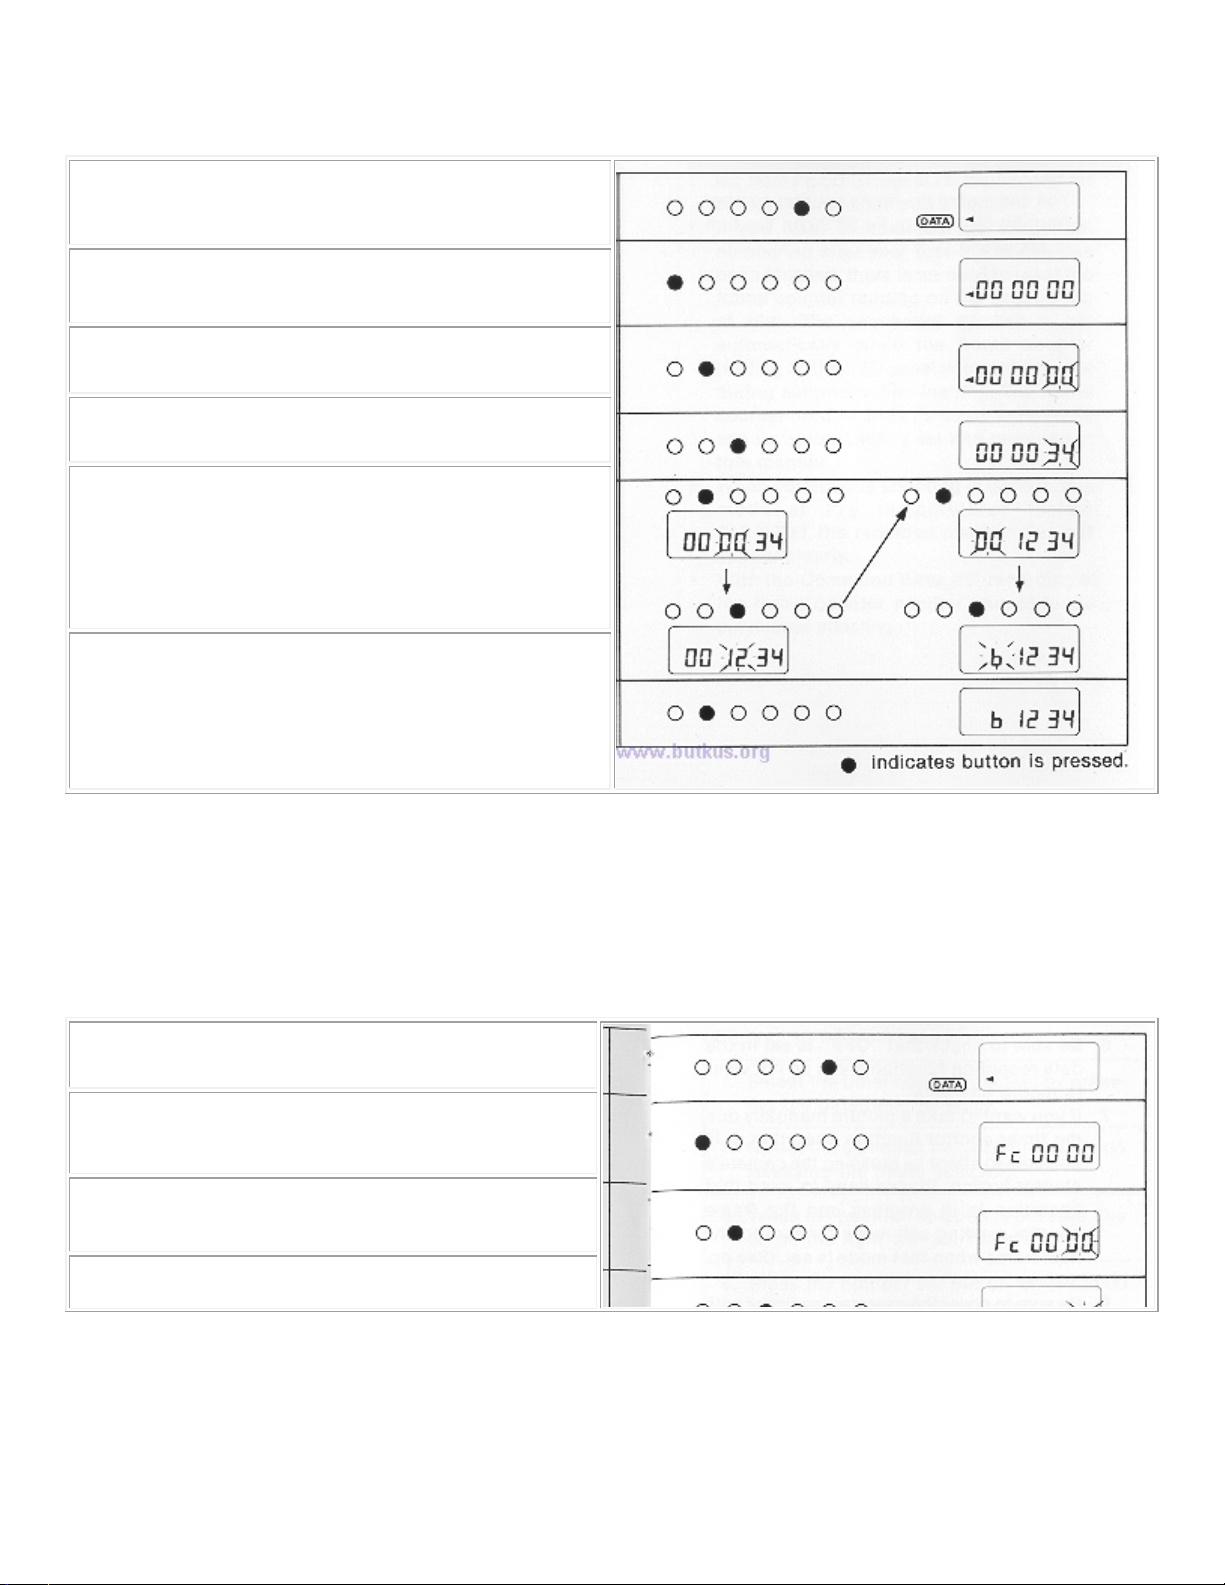
EXAMPLE
When you want to set "b 12 34".
1. Select the date recording function by pressing the data/timer
selector.
2. Select the arbitrary 6-digit code mode (00 00 00) by pressing
and releasing the mode selector.
3. When the position selector is pressed once, the "00" on the right
will start flashing.
4. Press the number set button while the "00" is flashing until 34
appears.
5. Correct the 00 in the middle to 12 and then the 00 on the left to
b following the same procedures as in steps 3 and 4.
6. Press the position selector once again to stop the flashing.
(4) Setting the 4-digit Frame Counter Number
You can record the frame counter number from Fc 00 01 up to Fc 99 99 on the film in sequence.
EXAMPLE
1. Select the data recording function by pressing the data/timer
selector.
2. Select the 4-digit frame counter number mode (Fc 00 00) by
pressing and releasing the mode selector.
3. When the position selector is pressed once, the right 2 digits
(00) will start flashing.
4. Press the number set button once while the 00 is flashing to
set 01.
Page 13

5. Press and release the position selector twice to stop the
flashing. The frame counter reading automatically advances with
the frame counter of the camera, as each exposure is made.
Notes:
· If you want to start the frame counter reading from Fc 00 01 again on the second roll of your film, reset to Fc
00 01 again.
· If you want to continue the sequential numbering after your first roll of film has been finished, there is no need
to reset the frame counter reading on the second roll of film. The sequential number is set automatically since
the frame counter reading on the LCD panel does not advance during automatic film loading. The frame counter
reading from Fc 00 01 to Fc 99 99 can be automatically set and recorded in this manner.www.4.butkus.org
· When continuous shooting is done in this mode at low temperatures (below 5°C/37°F), the recorded number
may not appear clearly.
· With the Command Back 90, recording of the frame counter number cannot follow continuous shooting.
9. Setting Each Mode of the Timer Control Function.
1. Operation of the timer control function can only be started by pressing the start/stop/clear button. Pushing the
camera's shutter button will not start timer control function operation.
2. Operation of the timer control function stops automatically after the specified operations have been
completed. However, if you want to manually stop operation, press the start/stop/clear button once again.
3. Operation of the timer control function is possible only when a mode of the timer control function is
displayed on the LCD panel. If a data recording function mode is displayed, the timer control function will not
operate even when the start/stop/clear button is pressed.
4. To set the timer control function with the Command Back 90, set the T90 for continuous shooting.
5. Do not set the self-timer on the camera itself when the timer control function is used.
6. Be sure to check that "OFF" is set in the data recording function if you do not want to record any data.
7. If you want to take a picture manually during timer control function operation, it is possible to shoot by
pressing the camera's shutter button. Please keep in mind that operation is in progress and the frame counter
reading will move forward to the next frame when that mode is set. (See pp. 20-21 )
8. Be sure to cover the camera viewfinder with the eyepiece cover to keep light from entering at the rear.
(1) Setting the Self-timer
The self-timer of the Command Back can be set in 1-sec. units to any delay from 1 sec. to 23 hrs., 59 mine., 59
sees.
Page 14
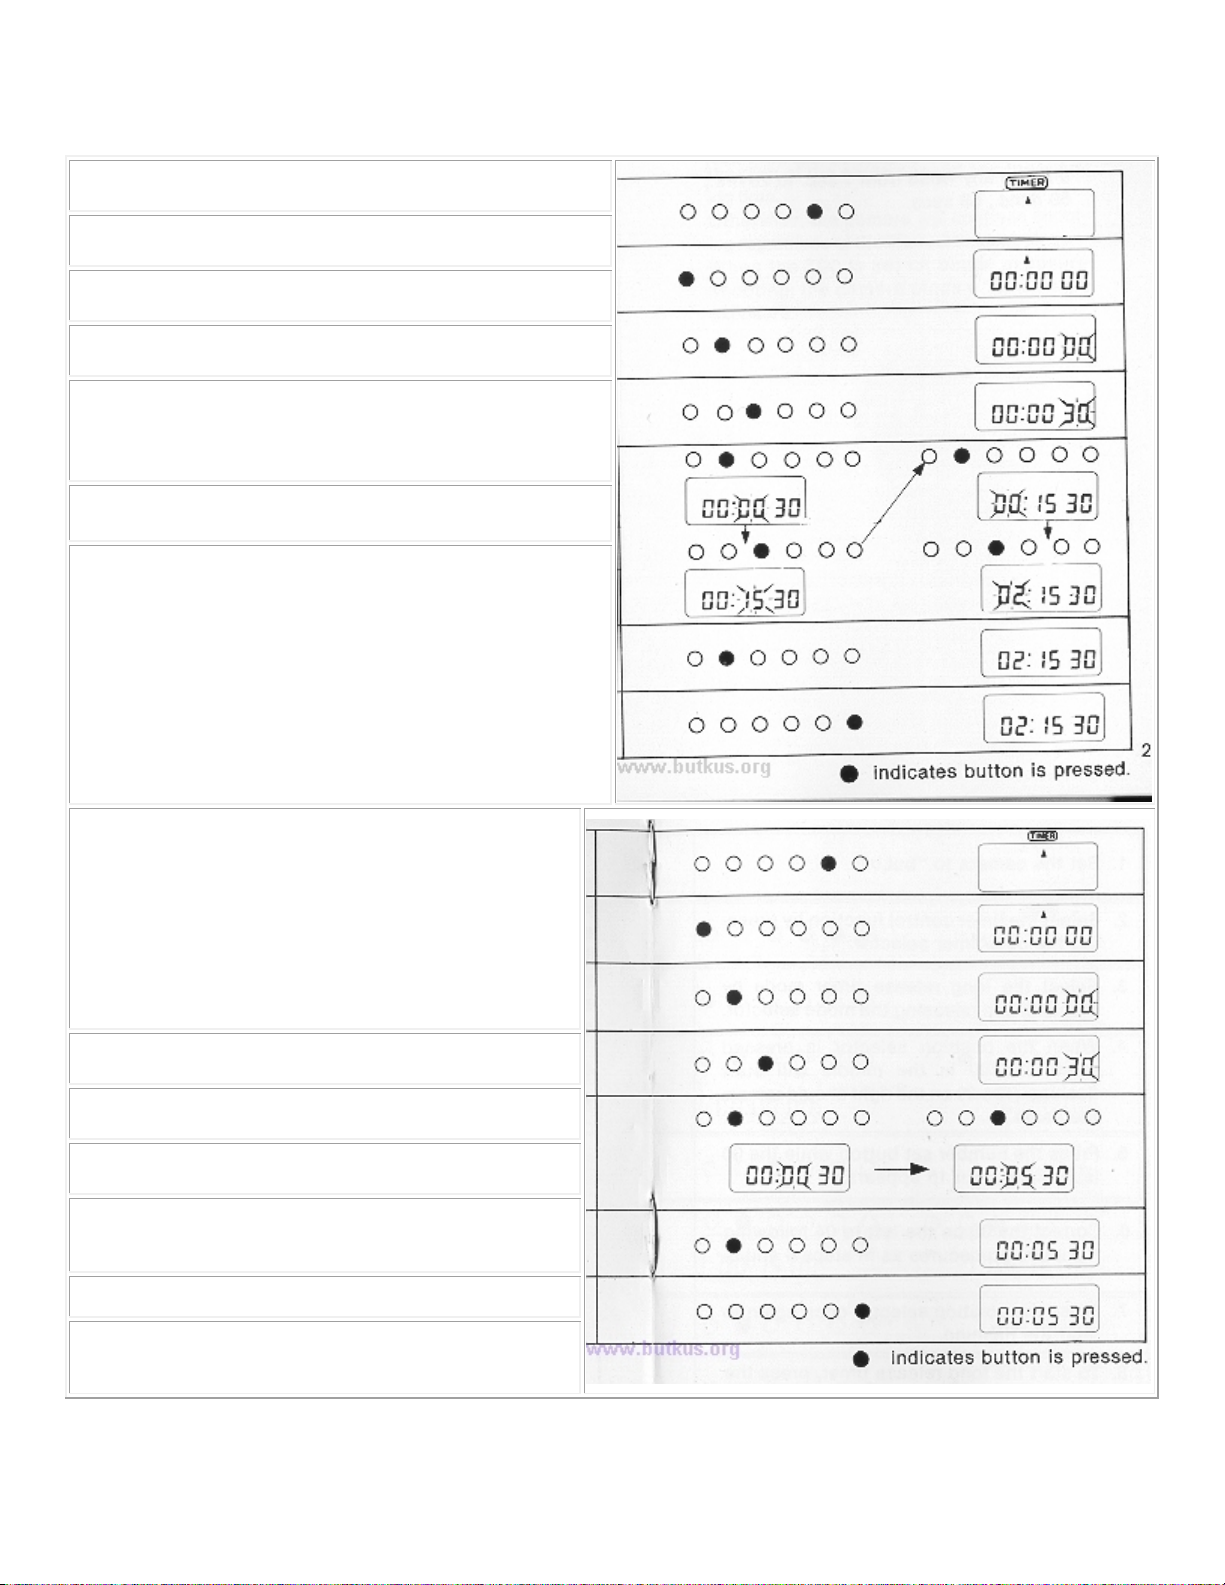
EXAMPLE :
When you want to take a picture after a delay of 2 hrs., 15 mine., 30 secs.
1. Select the timer control function by pressing the data/timer
selector.
2. Select the self-timer mode by pressing and releasing the mode
selector.
3. When the position selector is pressed, the 00 on the right will
start flashing.
4. Press the number set button while the 00 is flashing until 30
appears.
5. Correct the 00 in the middle to 15 and then the 00 on the left to
02 following the same procedures as In steps 3 and 4.
6. Press the position selector once again to stop the flashing.
7. To start the self-timer, press the start/stop/clear button once.
(2) Setting the Interval Timer
The interval timer can be set in 1-sec. units to any
value from 1 sec. to 23 hrs., 59 mine., 59 sees.
EXAMPLE When you want to release the shutter
every 5 mine., 30 sees. 1. Select the timer control function
by pressing the data/timer selector.
2. Select the interval timer mode by pressing and releasing the
mode selector.
3. When the position selector is pressed, the 00 on the right
will start flashing.
4. Press the number set button while the 00 is flashing until 30
appears.
5. Correct the 00 in the middle to 05 following the same
procedures as in steps 3 and 4. (The 00 on the left should
remain the same in this case.)
6. Press the position selector once again to stop the flashing.
7. To start the interval timer, press the start/stop/clear button
once.
Page 15
Note:
· In the case of the Command Backs, the interval timer mode must be set longer than the sum of the shutter
speed and the winding time. Otherwise, the camera will continue shooting regardless of the interval timer
setting.www.4.butkus.org
When the T90 is set for single exposure shooting, the camera stops after a single exposure.
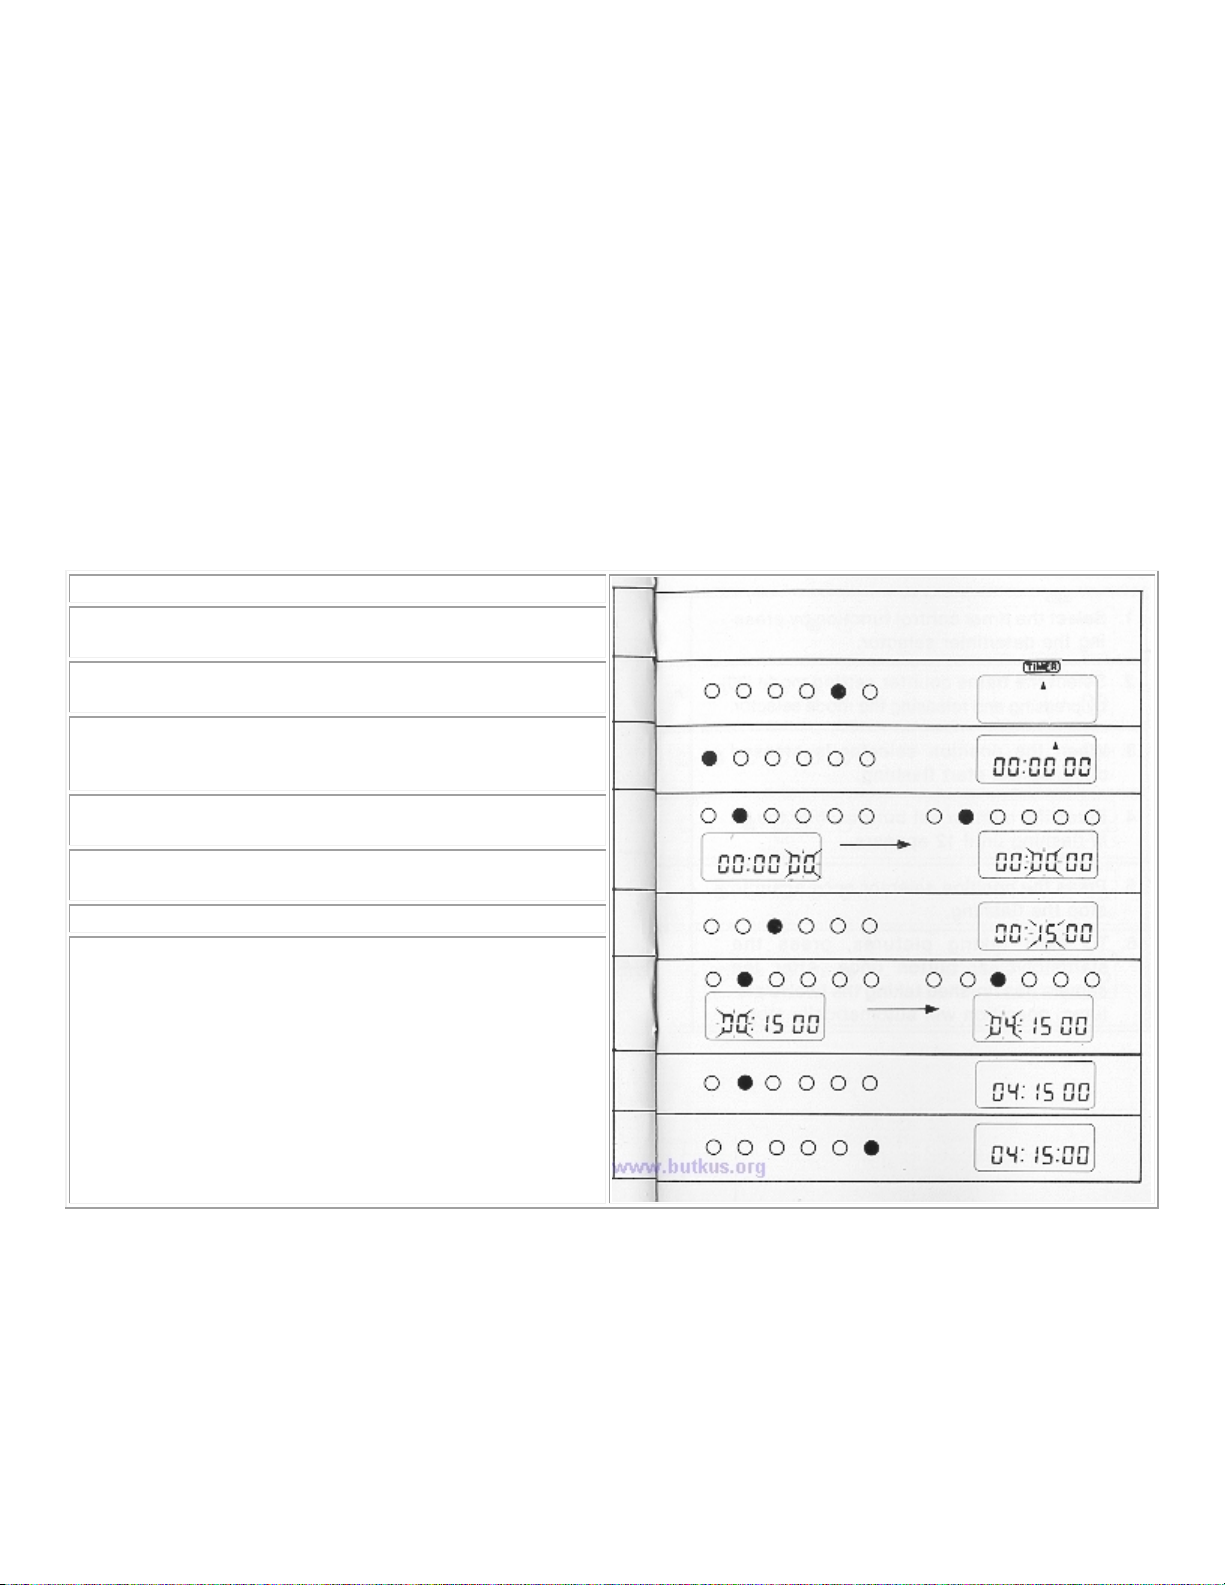
(3) Setting the Long Release Timer
The long release timer mode can be set in 1-sec. units to any value from 1 sec. to 23 hrs., 59 mine., 59 sees.
Bulb must be set on the camera when using the long release timer mode.
When an AC lens is mounted on the T80, the long release timer mode can not be used, since it is impossible to
set the camera to bulb when an AC lens is mount
EXAMPLE
When you want to keep the shutter open for 4 hrs., and 15 min.
1. Set the camera to "bulb."
2. Select the timer control function by pressing the data/timer
selector.
3. Select the long release timer mode by pressing and releasing
the mode selector.
4. When the position selector is pressed twice, the 00 in the
middle will start flashing. (The 00 on the right should remain the
same.)
5. Press the number set button while the 00 is flashing until 15
appears
6. Correct the 00 on the left to 04 following the same procedures
as in steps 4 and 5.
7. Press the position selector once again to stop the flashing.
8. To start the long release timer, press the start/stop/clear button
once.
Page 16
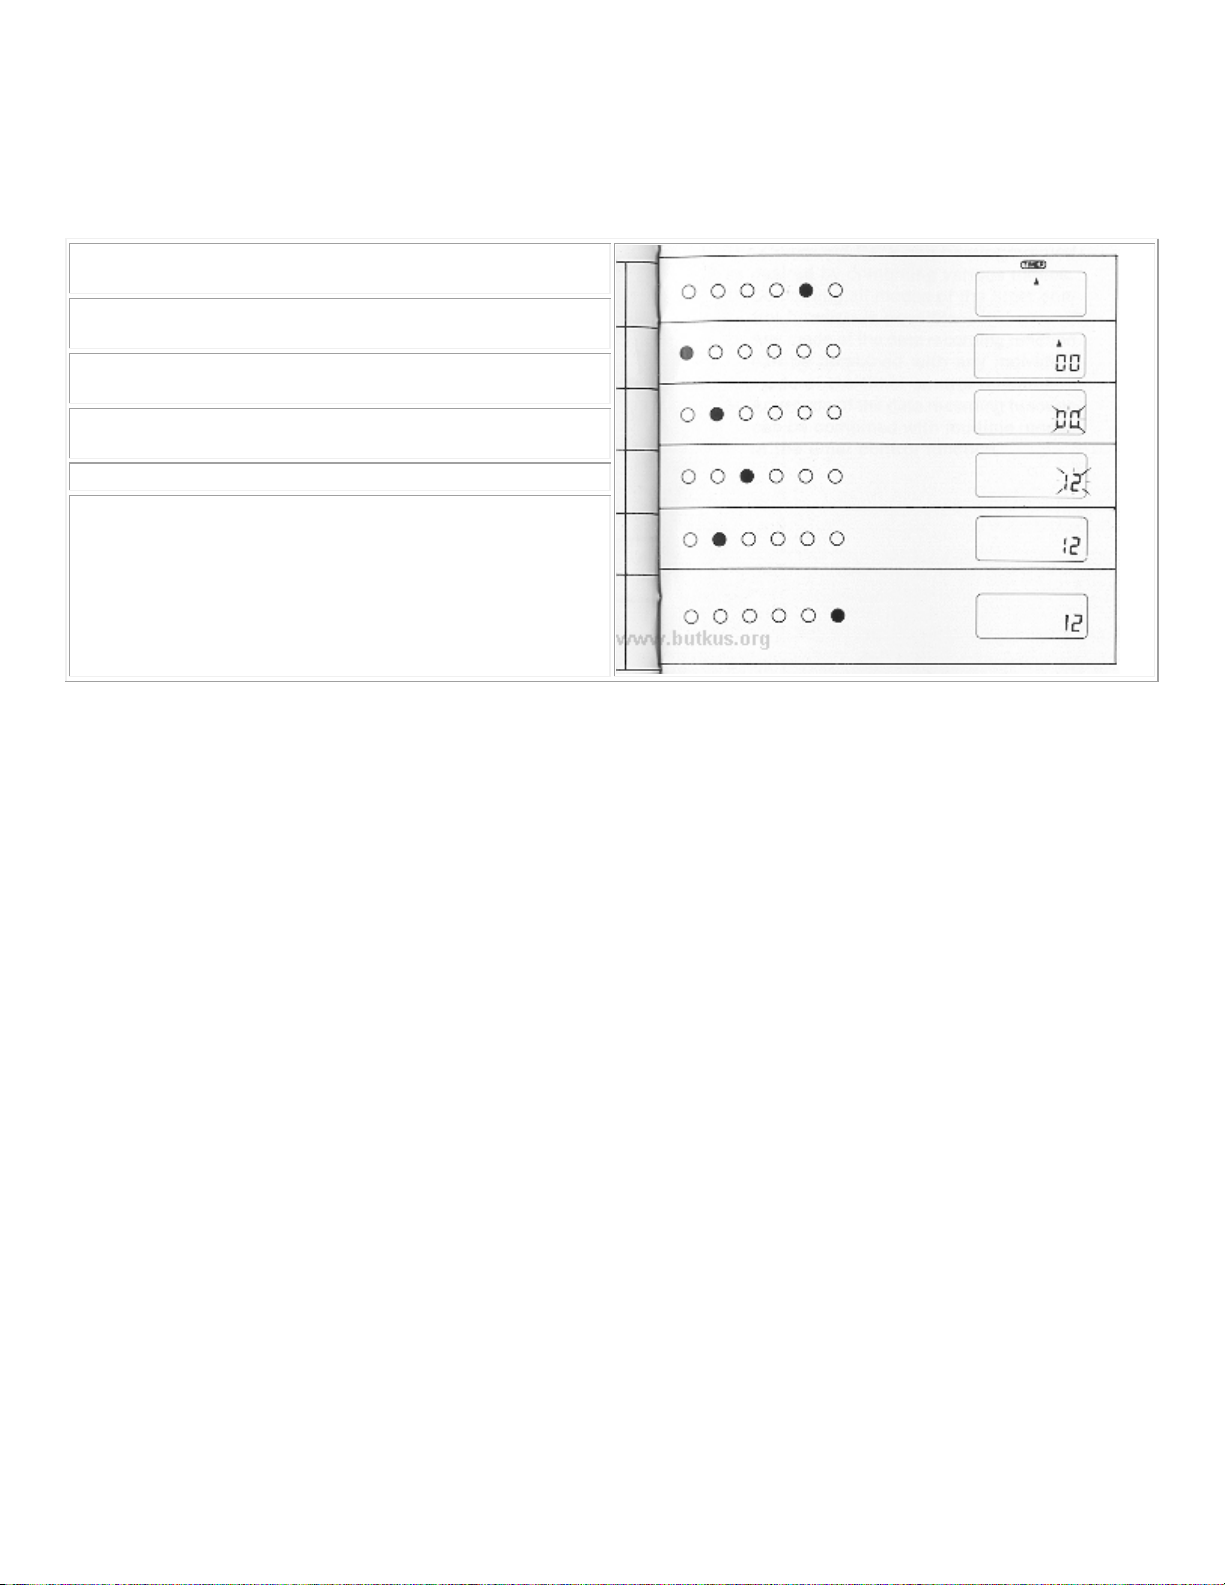
(4) Setting the Frame Counter
The number of pictures to be taken can be set from 1 to 99.
EXAMPLE
When you want to take twelve pictures in succession.
1. Select the timer control function by pressing the data/timer
selector.
2. Select the frame counter setting mode (00) by pressing and
releasing the mode selector.
3. When the position selector is pressed once, 00 will start
flashing.
4. Press the number set button while the 00 is flashing until 12
appears.
5. Press the position selector once again to stop the flashing.
6. To start taking pictures, press the start/stop/clear button once.
After the camera has finished taking the twelve pictures, operation
will automatically stop.
Note: If the frame counter of the Command Back is set to 00, shooting is impossible even when the
start/stop/clear button is pressed.
(5) Multiple Exposure: for the Command Back 90 only
When taking multiple exposures using the timer function, set the number of frames to "02". In this case, one
extra frame will be exposed after shooting.
(6) Automatic Flash photography: for the Command Back 90 only
The interval timer or self-timer can be used for automatic flash photography with the Speedlite 300TL or Macro
Ring Lite ML-2, which are designed exclusively for the T90.
To prevent unnecessary battery consumption, set the main switch of the Speedlite 300TL or Macro Ring Lite
ML-2 to the "SE" position. If the interval timer is set for longer than 5 minutes, the power to the flash unit is
automatically cut off, and the signal is transmitted from the Command Back 90 to charge the flash one minute
before shooting, so the power is automatically turned on.
10. Combining Various Modes
General Information and Notes
1. The Command Back can be programmed as desired by combining various modes.
1) Combining all modes of the timer control function is possible.
2) Any mode of the data recording function can be combined with any individual mode of the timer control
function.
3) Any mode of the data recording function can be combined with multiple modes of the timer control
function.
www.4.butkus.org
Page 17
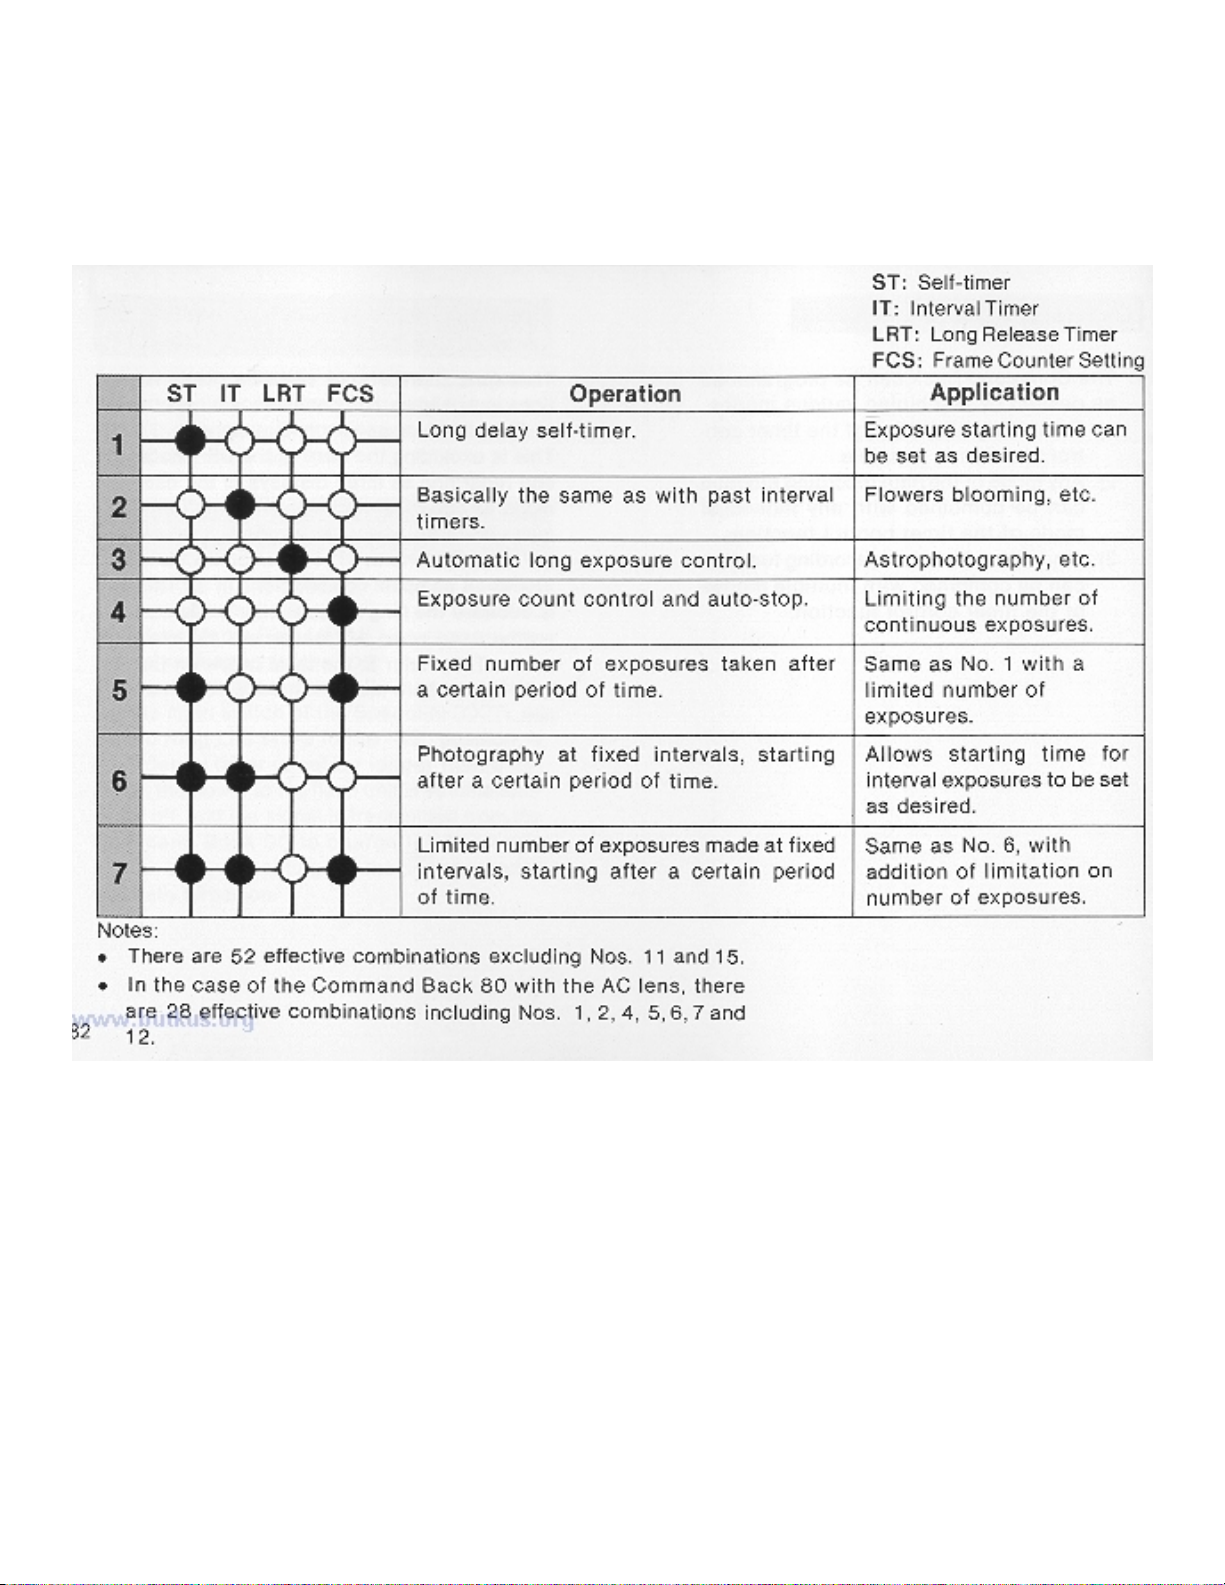
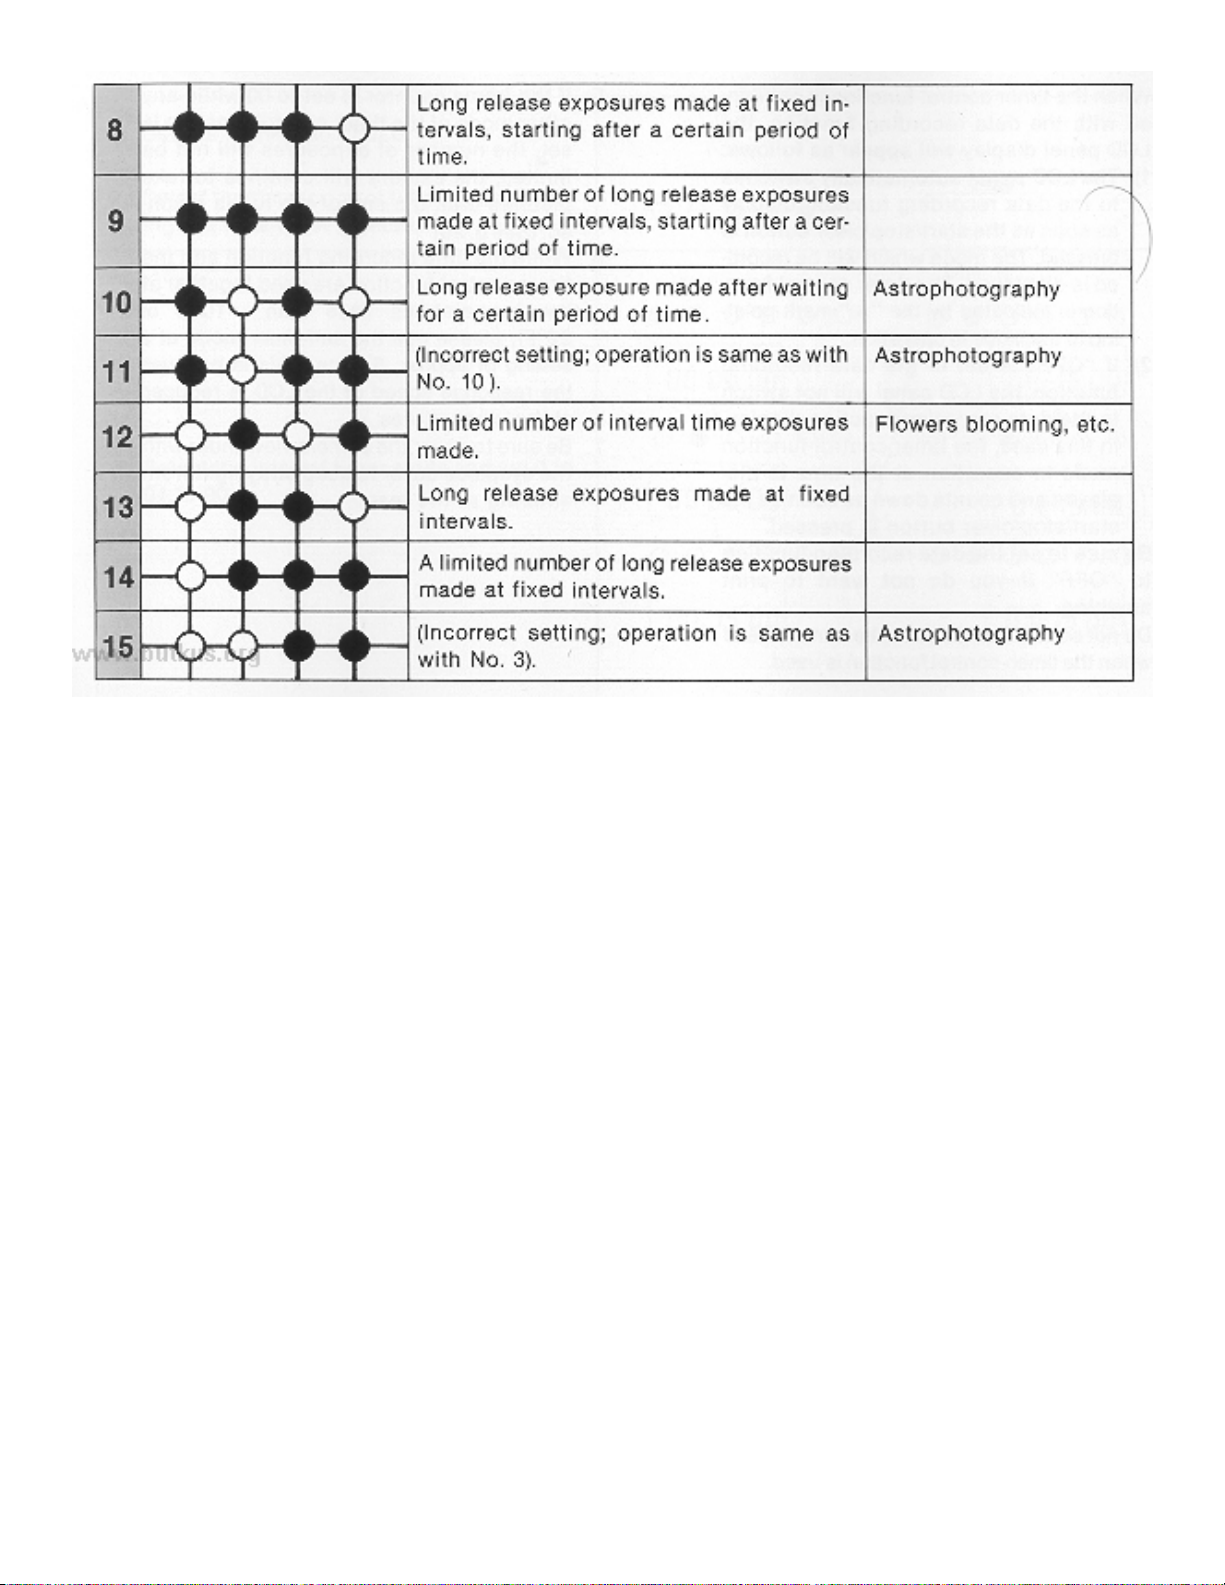
Therefore, there are 11 possible combinations in 1 ) above, 16 possible combinations in 2) and 44 complex
combinations in 3). This is excluding the case of the OFF mode and regarding all three displays of the date
mode as one mode. In the case of the Command Back 80, however, there are 4 possible combinations in 1), 12
combinations in 2) and 16 complex combinations in 3). This is because the long release timer mode can not be
used when AC lenses are mounted on the T80. Refer to the table below on the type of exposure made with each
combination.
Page 18
2. When the timer control function is combined with the data recording function, the LCD panel display
will appear as follows:
1) The LCD panel automatically switches to the data recording function display as soon as the
start/stop/clear button is pressed. The mode which will be recorded is displayed. The timer control
function is indicated by the "***" mark pointing to the mode in operation.
2) If "OFF" is set in the data recording function, the LCD panel will not switch to the data recording
function display. In this case, the timer control function mode in operation at the time is displayed and
counts down as soon as the start/stop/clear button is pressed.
3. Be sure to set the data recording function to "OFF" if you do not want to print anything.
4. Do not set the self-timer on the camera itself when the timer-control function is used.
5. If the frame counter is set to 00 while any other mode of the timer control function is set the number
of exposures will not be limited, the camera will continue to take pictures until the end of the roll is
reached. (See p. 29)
6. When the data recording function and the timer control function are used together at low temperatures
(less than --1 0°C or 22°F), please use the self-timer mode at a setting of approx. 5 sees. This is because
the response speed of the LCD is reduced at low temperatures.
7. Be sure to cover the camera viewfinder with the eyepiece cover to keep stray light from entering at
the rear.
Page 19
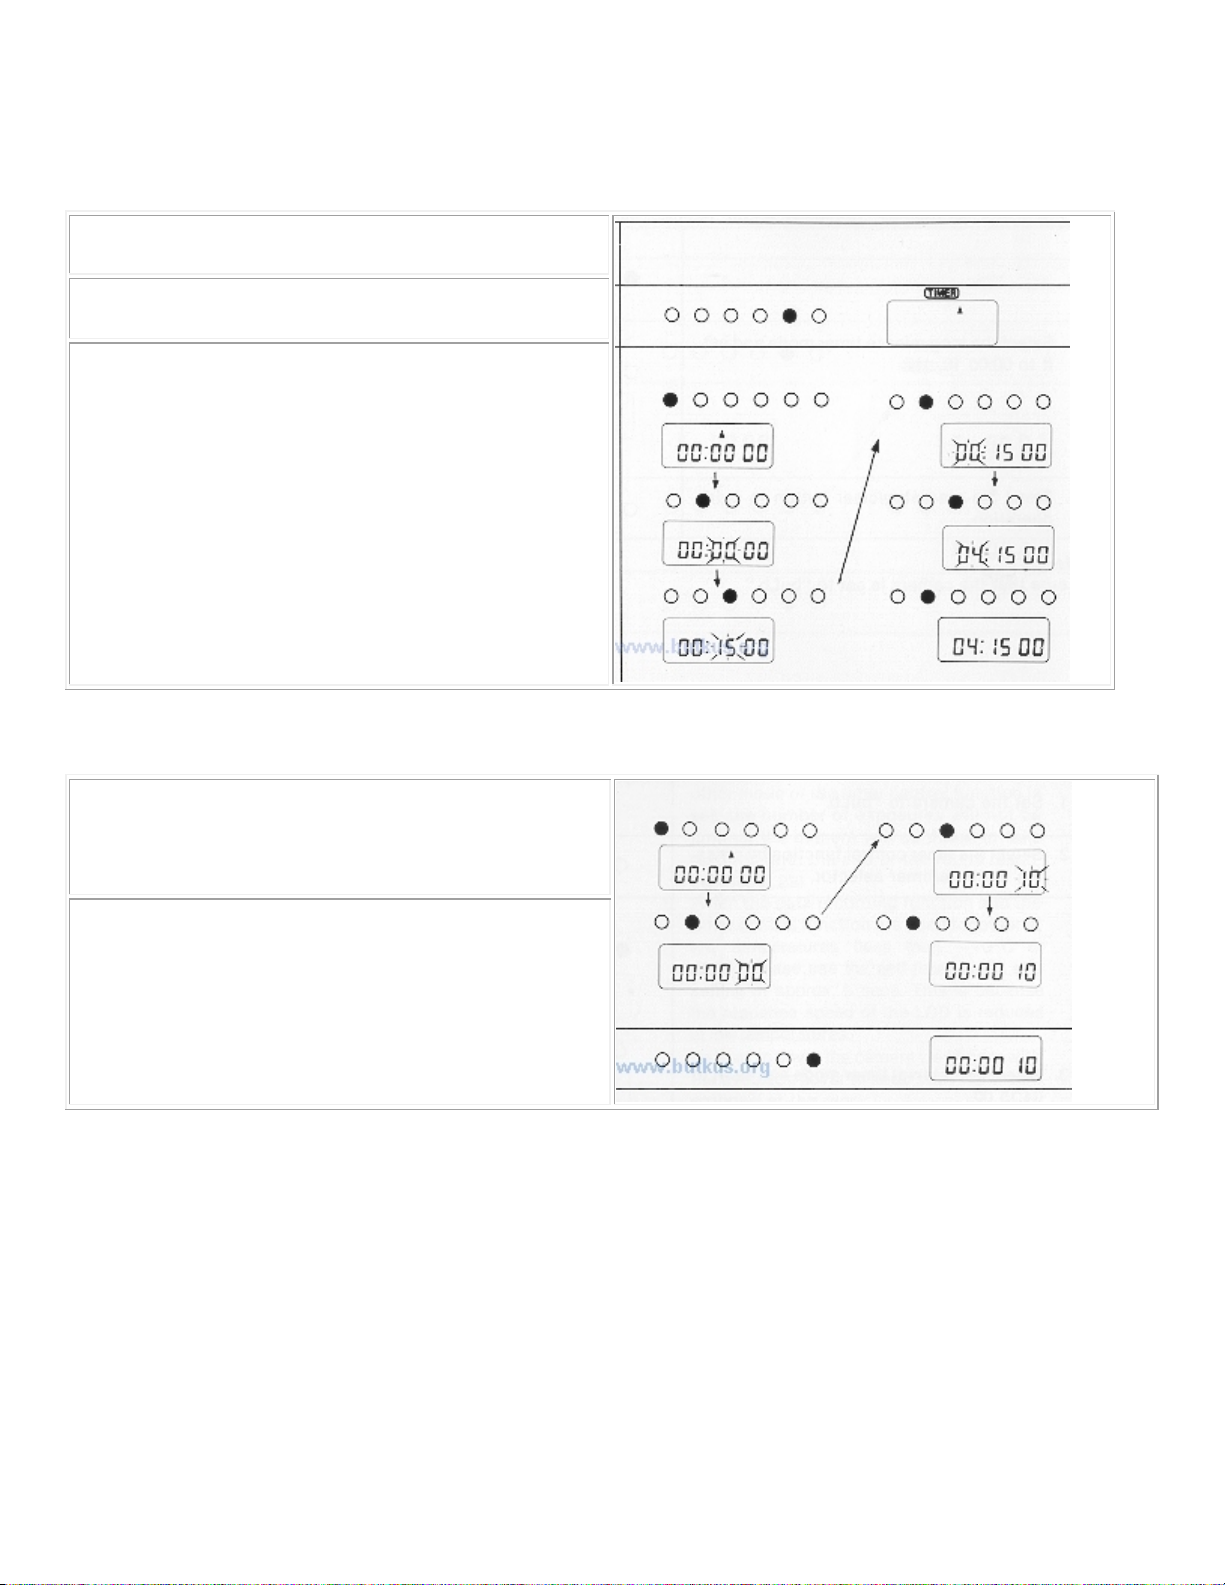
EXAMPLE 1
When you want to use the interval timer mode set at 4 hrs., 15 mine., and the long release timer mode
set at 10 sees.
1. Set the camera to "bulb."
2. Select the timer control function by pressing the
data/timer selector.
3. Select the interval timer mode and set it to 04:15 00.
4. Select the long release timer mode and set it to 00:00
10
5. Press the start/stop/clear button to start operation.www.4.butkus.org
Page 20
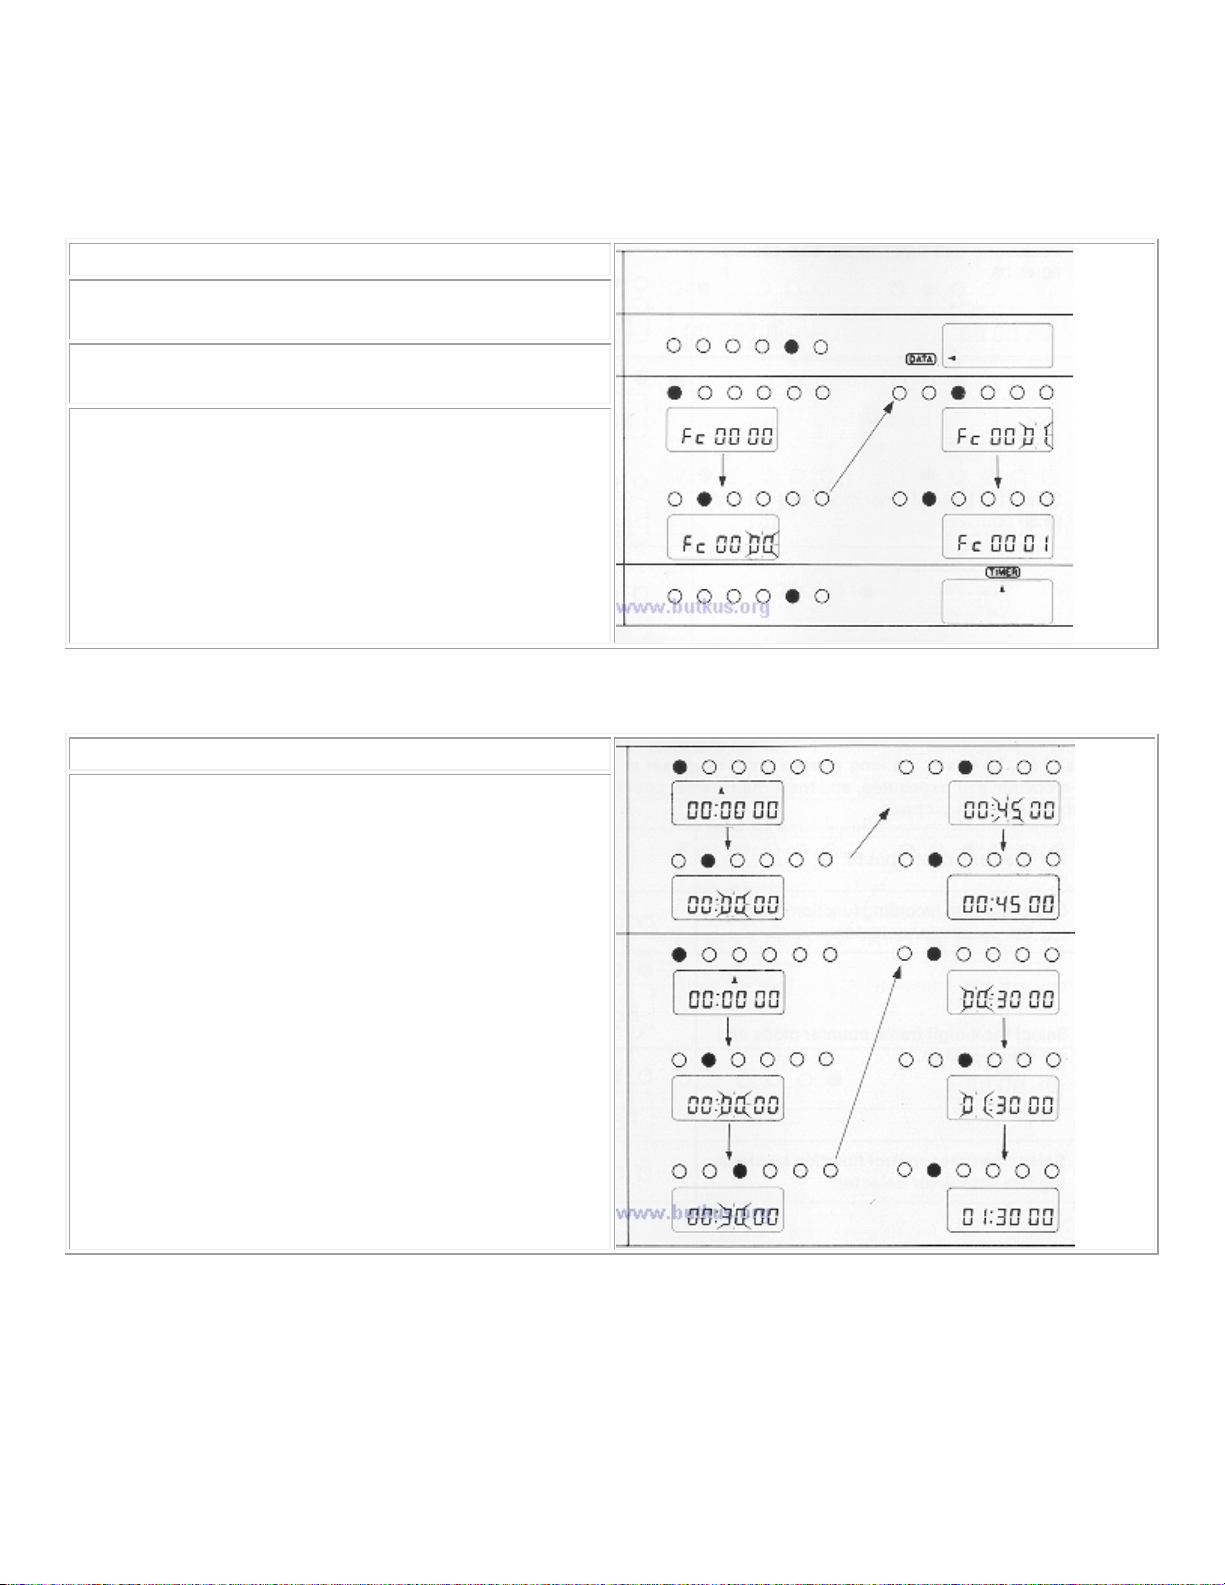
EXAMPLE 2
When you want to use the self-timer mode set at a delay of 45 mine., the interval timer mode set at 1 hr., 30
mine., the long release timer mode set at 20 sees., the frame counter set ting mode set at 7 exposures, and the 4digit frame counter mode to record sequential numbering on the pictures.
1. Set the camera to "bulb."
2. Select the data recording function by pressing the
data/timer selector.
3. Select the 4-digit frame counter mode and set it to Fc
00 01.
4. Select the timer control function by pressing the
data/timer selector.
5. Select the self-timer mode and set it to 00:45 00.
6. Select the interval timer mode and set it to 01:30 00
Page 21
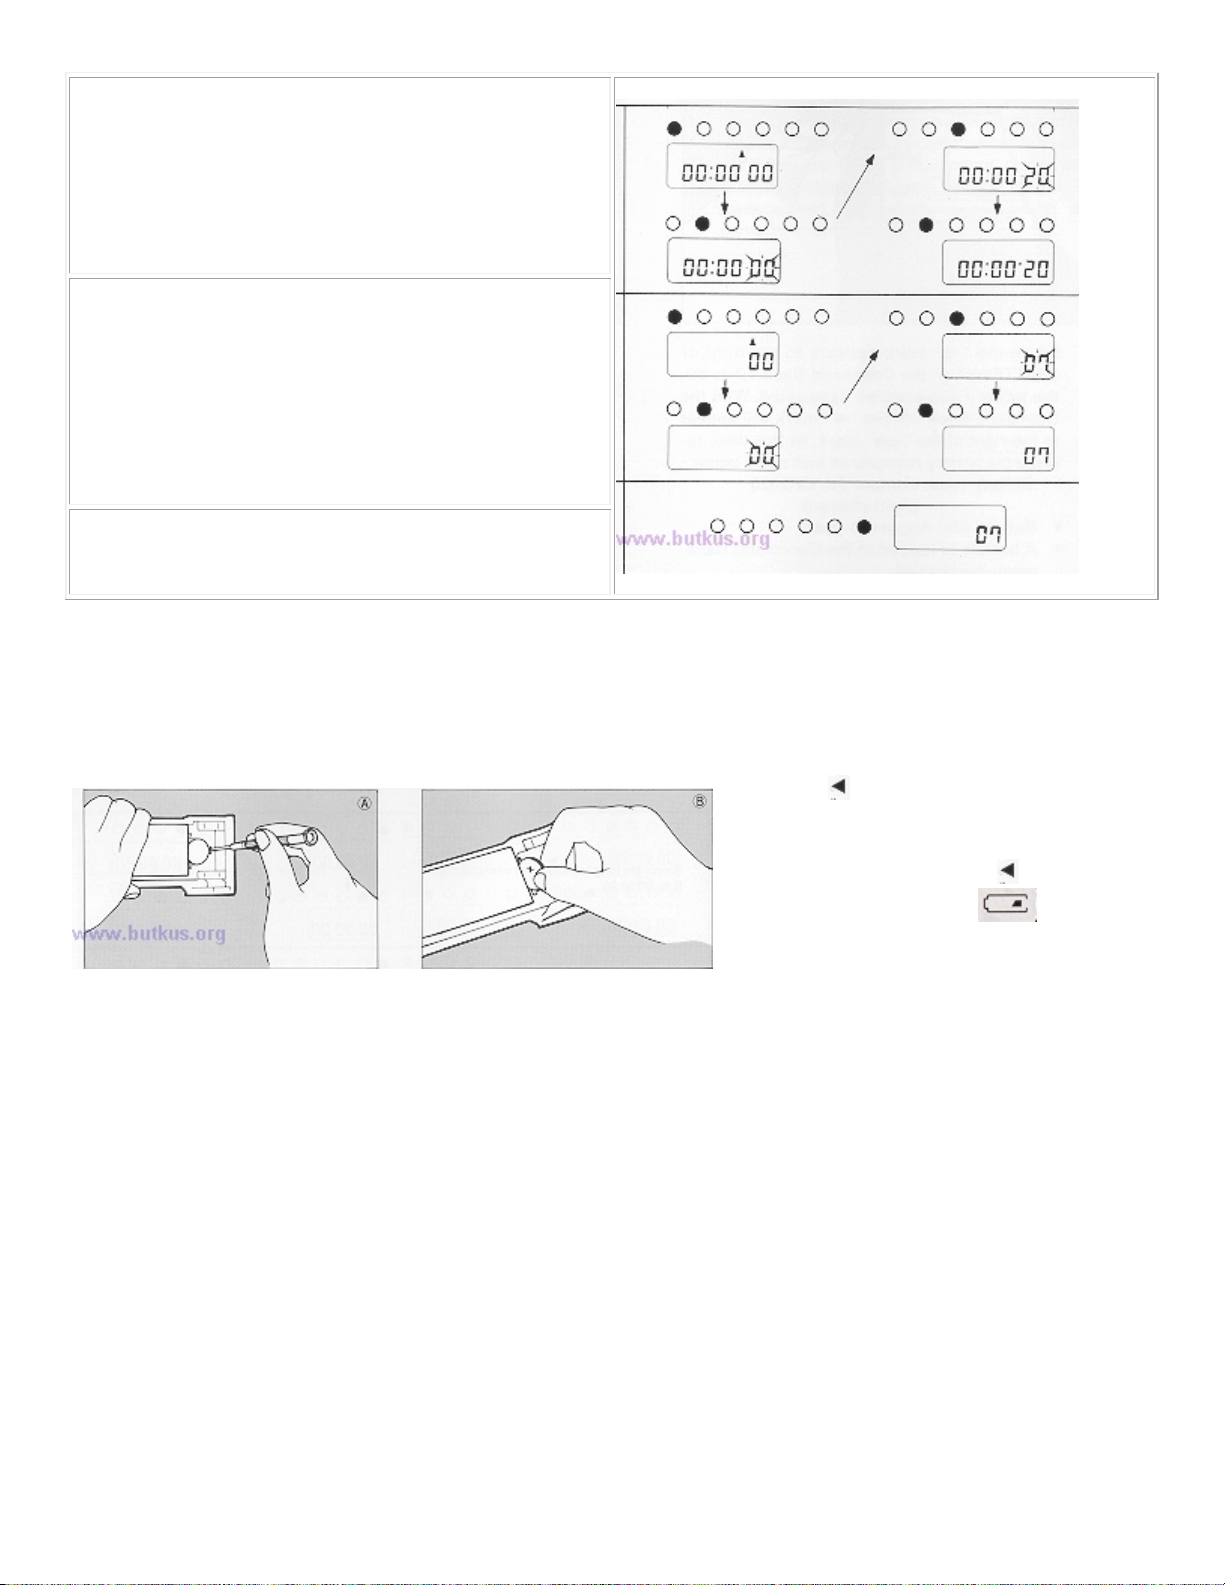
7. Select the long release timer mode and
set it to 00:00 20
8. Select the frame counter setting mode and set it to 07
9. Press the start/stop/clear button to start operation.
Note: Be sure the camera is set to BULB.
11. Replacing the Battery
When the " " mark appears to the right of
"BATTERY" on the Command Back 70 or
80, the battery has become exhausted. With
the Command Back 90, the " " mark will
appear to the right of the " " mark. At
this time, replace the battery promptly as
instructed below.
· Battery type: Lithium 3V, CR2025 (Coin-shaped)
· Battery life: Approx. 4 years
· A battery is-loaded in the Command Back when purchased.
1) Open the back cover.
2) Using a philips-head screwdriver, unscrew the retaining screw to remove the battery chamber cover.
3) Insert the tip of the screwdriver into the chamber and then push the battery to the left. The battery will pop up
(illus. A).
4) Wait for at least 15 seconds after removing the old battery and then load the new battery with the " + " side
facing up as indicated on the outside of the battery chamber cover (illus. B).
5) To load the new battery, first insert one side into the chamber and then press it to the left with your finger
until it will go no further (illus. C).
Page 22

6) Finally, slide the battery slightly to the right and lock it into place.www.4.butkus.org
7) Retighten the retaining screw.
The Command Back's settings upon completion of this procedure will be as follows.
Date: January 1, 1983 (Command Back 70 and 80); January 1,1985 (Command Back 90)
Time: 00 00:00
Film speed: ISO 100
Timer function: Completely cleared (all zeros).
Initialization is completed within 10 seconds.
Precautions:
1) Keep the batteries away from children. If swallowed, contact a physician immediately.
2) Do not remove the battery chamber cover except when the battery is being replaced.
12. Liquid Crystal Display
Liquid crystal is used in the display area and other parts for data recording. There is a possibility that a lack of
contrast or blur in the digital display may occur after about five years of normal use. If this should occur, please
contact an authorized Canon service facility for replacement. (Replacement will be at the owner's expense.)
Specifications
Used with: Canon T70 (Command Back 70) Canon T80 (Command Back 80) Canon T90 (Command Back 90)
Attachment: Exchanges with camera's back cover.
Type: Fully automatic data back with LCD panel, quartz digital auto-calendar and timer control function.
(However, film speed must be set manually on the Command Back 70 and 80.)
Data recording function:
1) Four modes plus non-recording (OFF)
a) Year/month/day (switchable to day/month/ year or month/day/year)
b) Day/hour/minute
c) Record number (up to six digits, or A, b, C, d, E, F. or a space)
d) Frame counter: Maximum of 4 digits (additive)
e) OFF (non-recording)
2) External display of data: Using a 7-segment, 6-digit LCD display that shows what is recorded on the film.
(OFF is displayed on the monitor panel only.)
3) Position and size of data: Recorded in the bottom right corner of horizontal frame and is horizontally arrayed.
Character height on negative is approx. 0.7 mm.
www.4.butkus.org
4) Recording system:
Projected onto the film through a transmissive type LCD. It is coupled to the camera's exposure mechanism,
thus exposure of characters is made automatically.
5) Exposure confirmation indicator:
An exposure confirmation mark (an LCD indicator) lights on the monitor panel for 1.5--2 seconds after the
exposure has been made. With the Command Back 90, seven-segment LED bars light under the viewfinder of
the T90.
Page 23

6) Adjustment of light intensity: Command Back 70 and 80: Switchable between three levels of brightness
according to the film speed. The LCD shows the corresponding film speed (25, 100, or 400). Command Back
90: Automatic settings correspond to film speeds (ISO 25--ISO 1600). Film speed is not displayed. Light
intensity compensation for data recording is possible.
7) Auto-calendar function:
Programmed for all dates from 1983 (1985 for the Command Back 90) to 2029. Correction for long and short
months and leap years is made automatically.
Timer control function (command function):
Includes three timer modes and a frame counter set mode. 1) Timer modes
a) Self-timer (shutter is released after a fixed amount of time)
b) Interval timer (repeat shots are made at fix. ed intervals)
c) Long release timer (shutter is released and held open continuously for an extended period of time) All of the
above can be set in 1-second units from 1 second to 23 hours, 59 minutes, 59 seconds. With the Command Back
80, the long release timer can not be used when AC lenses are mounted.
d) Frame counter set (the number of exposures to be made can be set from 1 to 99; the camera stops
automatically after the set number of exposures has been made)www.4.butkus.org
2) Timer control function display:
Selection of the above modes is done by moving a triangular LCD Mark "***". Data for modes a)--c) are
indicated by a 7-segment, 6-digit LCD display. Data for mode d) are indicated by a 7-segment, 2-digit LCD
display which shows the number of exposures set.
3) Use of the timer control function modes in combination:
Any combination of modes a) through d) is possible.
4) Timer control function operation:
Started by pressing the start/stop/clear button, and stopped by pressing that button again. The " " mark flashes
on and off during operation.
Timer control and data recording functions in combination:
Can be used in combination. Data set prior to the selection of the timer mode is coupled to exposure and is
automatically recorded on the film. Display of exposure data on the monitor display panel is resumed when
timer control function operation begins. If the Command Back's data recording function is the OFF mode, no
data is recorded and the timer control function information is displayed on the monitor display panel during
operation.
Digital clock accuracy:
Accurate to within +/- 15 seconds per month at 10°C--30°C and 60% RH.
Power supply:
Type--3 V, provided by one coin type lithium battery (CR2025)
www.4.butkus.org
Battery life and replacement warning:
About 4 years. The Command Back is equipped with an automatic battery check function which turns on a
monitor panel indicator " " when it is time for the battery to be replaced.
Dimensions:
Command Back 70 - 130.2(W) x59.1 (H) x23.8(D)mm - (5-1/8X2-5/16X15/16")
Page 24

Command Back80 - 130.5(W) x61.8(H) x26.2(D)mm - (5-1/8"x2-7/16"x1-1/16")
Command Back90 - 148.4(W) x58.4(H) x26.5(D)mm - (5-13/16"x2-5/16"x1 -1 /16")
Weight: Command Back 70 - 65 9 (2-5/16 oz.)
Command Back 80 - 70 9 (2-1 /2 oz.)
Command Back 90 - 75 9 (2-5/8 oz.)
Subject to change without notice.
 Loading...