

Page 1

Page 2
Canon
nmi6M
INSTRUCTIONS
Page 3

Page 4
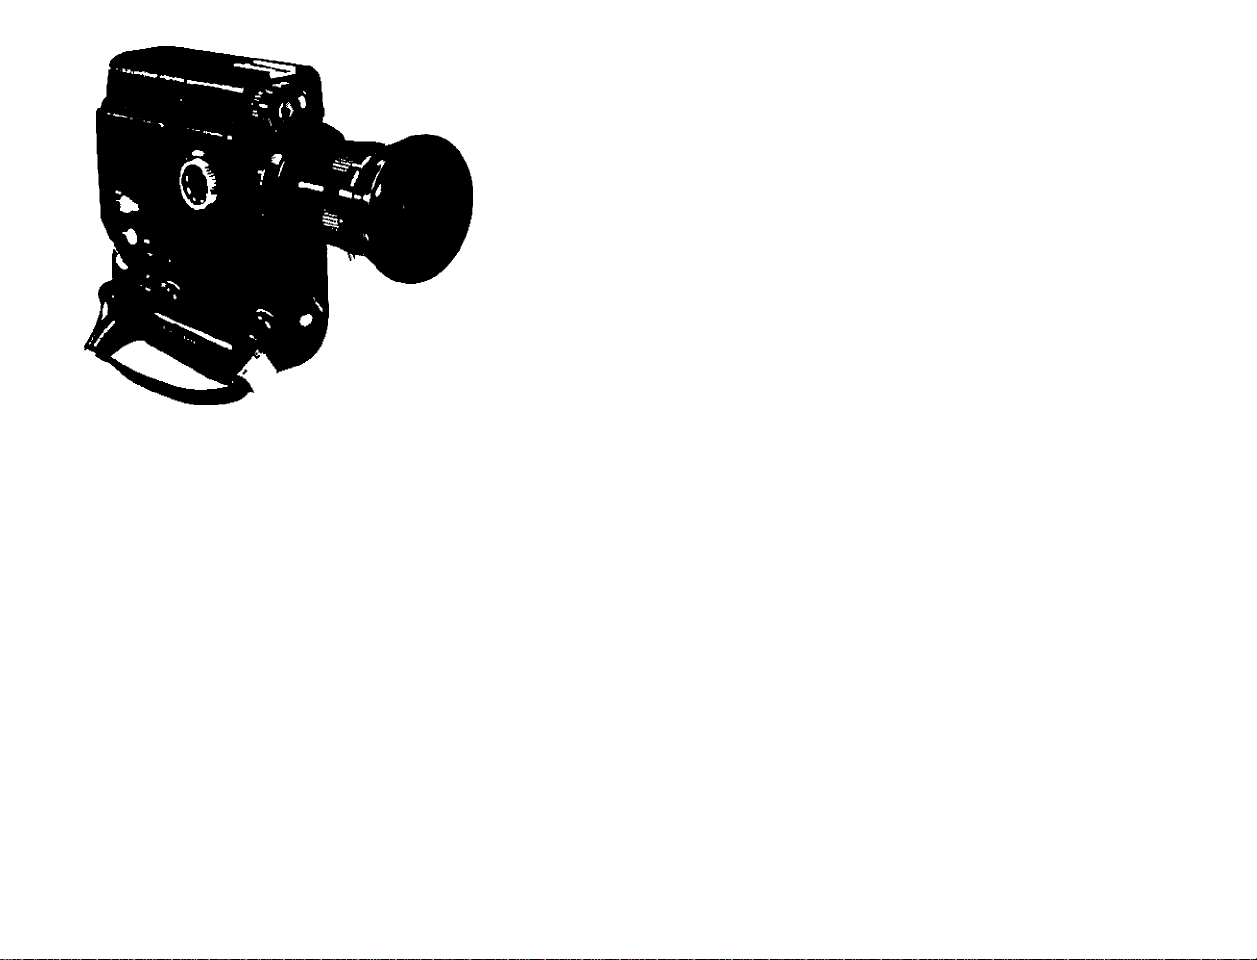
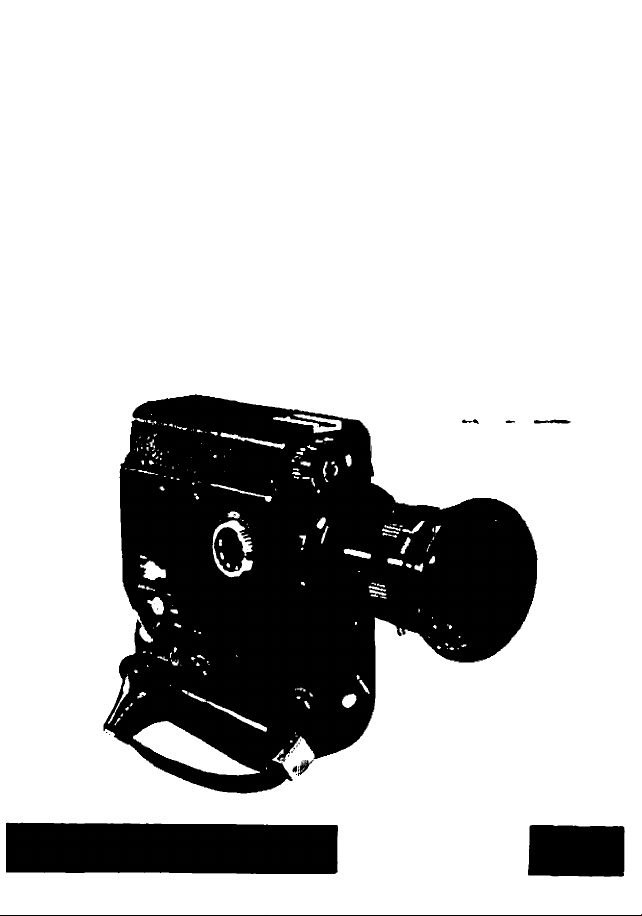
Your new Canon Scoopic 16M camera is an
updated and refined version of the Canon
Scoopic 16, America's best selling automatic
hand camera for television news and docu
mentary filmmaking. Improved in many areas
and offering more features than the standard
Scoopic 16, the 16M will give you professional
results everytime out simply, quickly and
efficiently.
To obtain the best possible results and the
most satisfaction from your new Scoopic 16M
camera, close attention should be paid to each
and every page of this instruction book prior to
shooting your first roll of film.
Canon Scoopic 16M Set
Scoopic 16M body
Nickel-cadmium battery S-12
75mm lens cap ................................................................. 1
72mm lens hood .............................................................. 1
Battery charger S-12
...........................................................
..........................................
........................................................
1
1
1
Case................................................................................... 1
Accessories
Close-up lenses
External battery box
Filters
86mm hood (for series No.9 filters)
CdS window compensating ND filter
Page 5

Page 6
Page 7
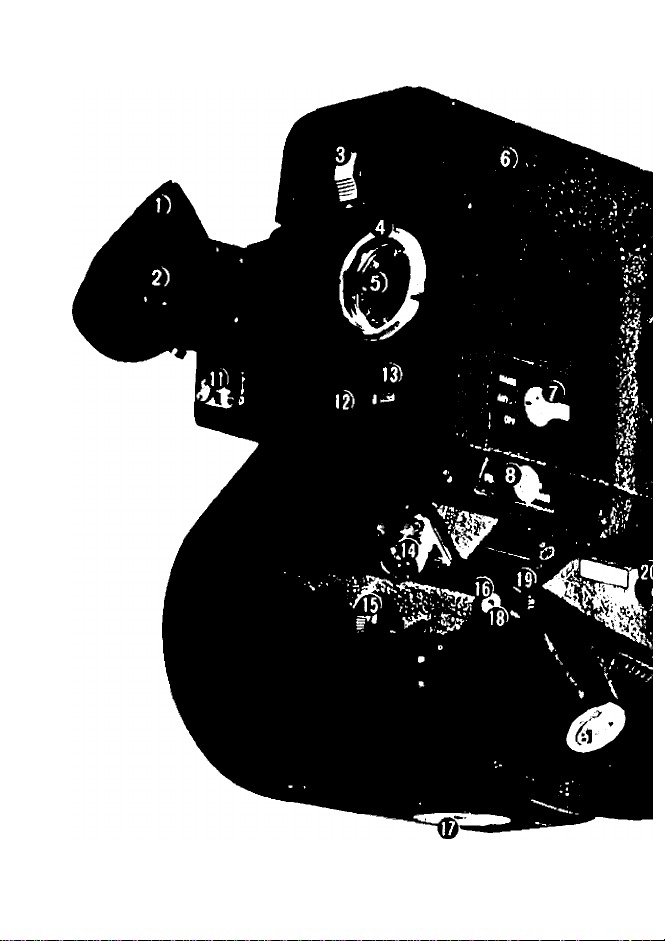
Location of Parts and Controls
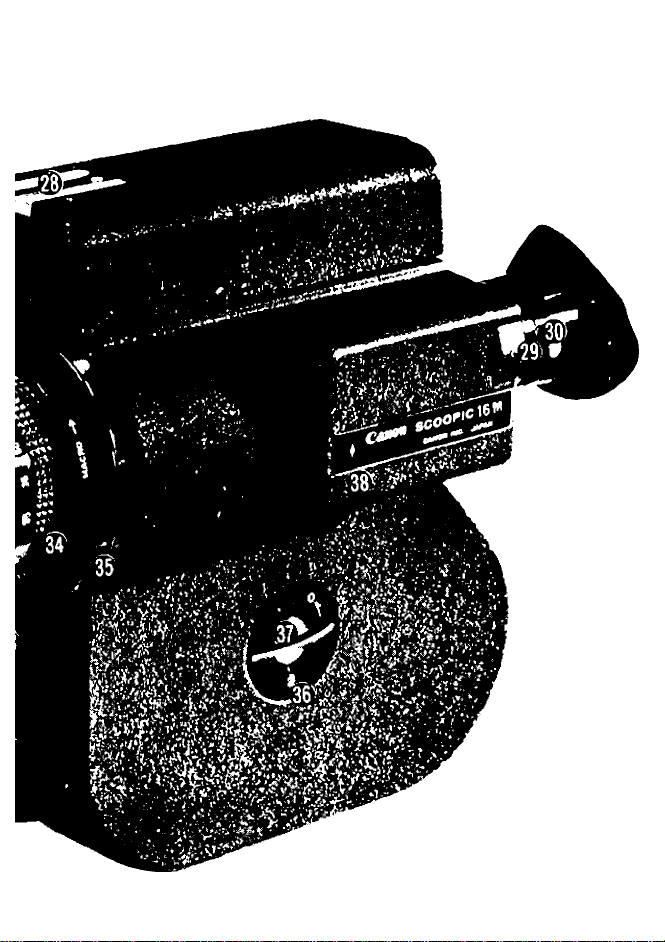
1. Eyecup
2. Finder eyepiece
3. Battery chamber lock button
4. Frame counter
5. Footage counter
6. Battery chamber
7. Power supply switch
8. Single frame shot knob
changeover knob
9. Filming speed selector
10. Film speed dial
11. Finder shutter lever
12. Battery checker button
13. Battery checker
14. External power supply connector
15. Film feed indicator
16. Release socket
17. Tripod socket
18. Shutter button
19. Running lock scale
20. Aperture opening button
21. Handgrip
22. Handstrap
Page 8

Page 9
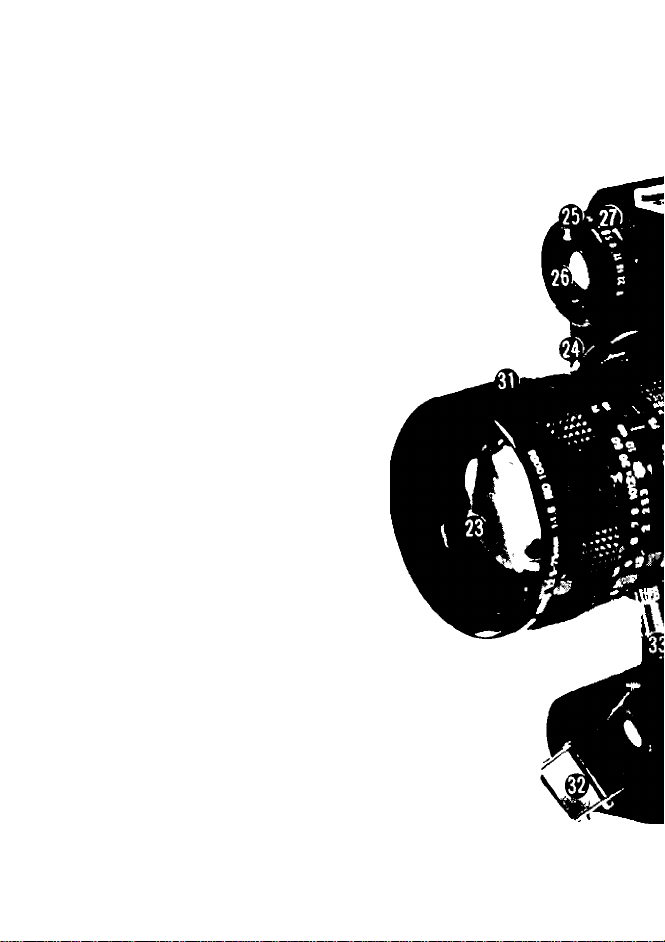
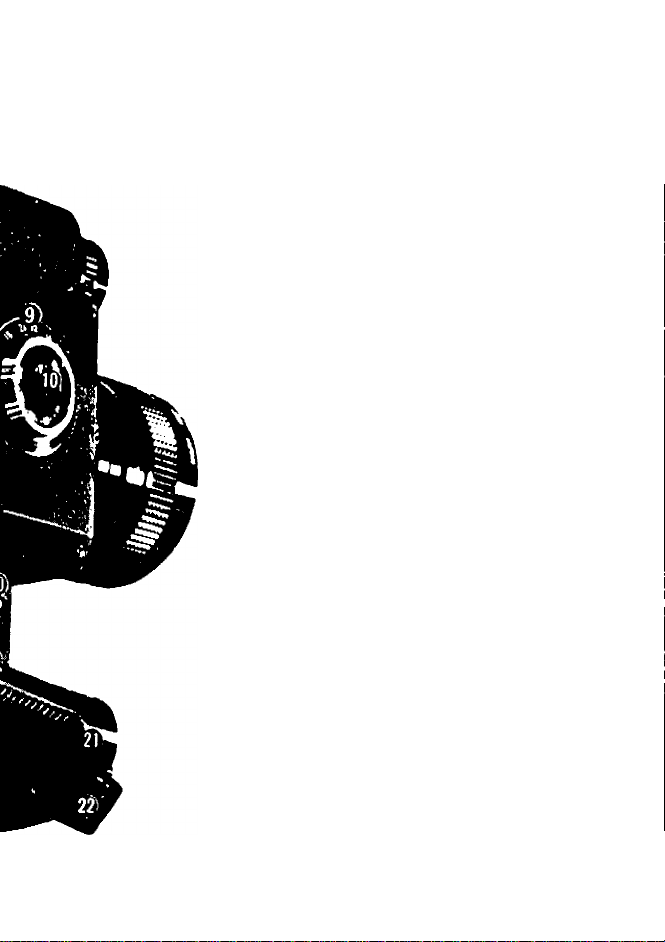
23. Zoom lens
24. Macro ring lock release knob
25. Manual aperture control ring
26. CdS window
27. Manual aperture setting
scale (T value)
28. Accessory shoe
29. Eyepiece adjusting ring
30. Eyepiece adjusting ring
setscrew
31. Focus ring
32. Handstrap fastener
33. Zoom lever
34. Zoom ring
35. Macro ring
36. Side cover lock button
37. Side cover knob
38. Film position mark
Page 10
Page 11

Page 12

Main Features
• World's First 16mm Movie Camera Incorporating
Zoom Lens with Macro Mechanism
The Scoopic 16M is the world's first 16mm movie
camera having a built-in zoom lens with macro
mechanism. The zoom lens has a focal length of 12.5 to
75mm (‘/2"— 3"), a zoom ratio of 6:1. The lens
T number is a fast T2.5 (FI .8).
T-stop means how much of the light entering the front
actually reaches the film plane. Since some light is
diverted both to CdS window for EE mechanism and to
viewfinder, the eventual T/stop comes to T2.5 in case of
12.5—75mm FI .8 built in this camera.
• CdS Electric Eye Mechanism
Shooting with accurate exposure is always assured by
the built-in automatic aperture mechanism coupled to
the electric eye circuit using a supersensitive CdS cell.
The finder features an exposure meter indicating needle.
Provision is made for either fully automatic or manual
electric eye metering.
• Powerful NiCd Battery
The film drive motor and EE circuit operate on a
rechargeable Canon NiCd battery. It can be recharged
more than 100 times. One charge allows shooting for
about sixteen 100-foot spools at 24fps. It is fully
recharged in 3.5 hours with the exclusive battery charger.
Page 13

• Automatic Film Loading
This mechanism provides for easy film handling and
eliminates misleading. Insert the film leader in the
guide, press the shutter button and the film will
automatically thread.
• Single-lens Reflex Finder
Through-the-lens reflex viewing assures perfect, parallaxfree subject composition.
Page 14

Page 15

Specifications
Type: EE 16mm movie camera with built-in zoom lens
with macro mechanism.
Film: 100 feet (30.5 meters) of 16mm single or double
perforated film.
Lnes: Focal length: 12.5 — 75mm (Vi" — 3")
Zoom ratio: 6:1
T number (F number): T2.5 (FI.8).
Construction; 16 elements in 12 components.
Front thread: 72mm (2 ‘V,6 ”), P 0.75.
Outer diameter: 75mm (3").
Focus range: 1.1m (3'7 Vi6 ” ) to infinity.
Macro control range: 80 — 750mm (3'/, " — 2'5V2").
(from the front vertex to focal plane).
Multipoint focusing is possible.
Exposure System: EE automatic aperture mechanism
coupled to built-in CdS photocell and micromotordriven servo mechanism. Manual aperture control is
also pxsssible.
EE Operating Range: Entire range of ASA 640, T2.5,
16fps. to ASA 20, T22, 64 fps. (single frame shoot
ing is not coupled).
Film Speed Indexes: ASA 20 (25 32) 40 (50 64) 80
(100 125) 160 (200 250) 320 (400 500) 640.
Filming speeds: Single frame, 16, 24, 32, 48 and 64 fps.
Shutter opening angle; 170 degrees.
Manual Aperture Control: Ordinary shooting is possible
at any T/stop.
Page 16

Film Drive System: By a built-in micromotor controlled
by electronic governor.
Power Supply: Film drive and automatic aperture
control by a built-in exclusive 12 V NiCd battery.
An external battery may be also used.
Film Loading: Automatic. Just insert the film tip into
the guide.
Zoom: Manual rotation of lens barrel.
Viewfinder: Single-lens reflex type. TV frame line, T/stop
scale, over-exposure and under-exposure warning
marks and meter needle are displayed. Visibility is
controllable from —4 to +2 diopters. A shutter is
incorporated to prevent incidence of light.
Footage Counter: Adding type which can be reset to S
position by opening the side cover. Frame counter
with 40 frames (1 foot) in one rotation.
Other: Film takeup knob, accessory shoe, battery
checker, shutter running lock.
Size: 287 x 230 x 162mm (11 V.e ” x 97,6 " x 6")
Weight: 3.3 kg (7.3 lbs.)
Page 17

Page 18
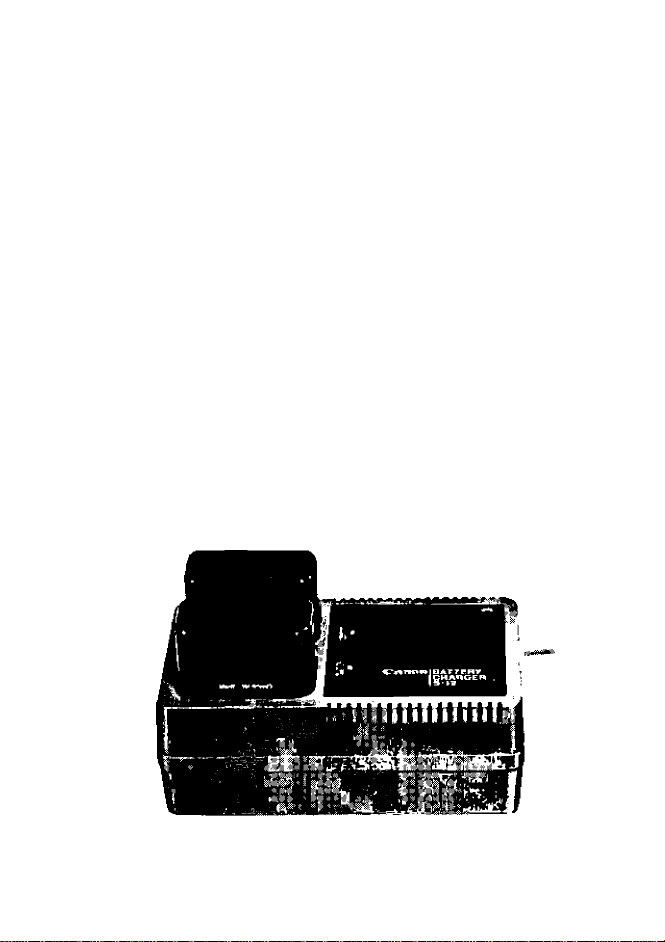
Battery and Battery Charger
The Scoopic 16M uses a 12 V NiCd battery for driving
film and operating the electric eye circuit.
The battery is shipped uncharged; therefore, charge it
before use. One battery permits shooting of sixteen
100-foot rolls at 24 fps.
The Canon Battery Charger S-12 can charge two bat
teries at the same time.
Page 19

• Canon Battery Charger S-12
Voltage: 50/60 H 2, AC 100-240V
Charging Time: 3.5 hours at a normal temperature
of 20—25°C for a battery whose
power level is found to be within
the red region on the battery
checker.
Charging Circuit: An electronic cut-off circuit pre
vents overcharging of Scoopic bat
teries. It also prevents accidental
discharge of battery should a power
failure occur during charging.
Recharging: Batteries may be recharged in pro
portion to film used. A battery on
which eight rolls of film have been
exposed may be recharged in
approximately 2 hours.
Page 20

Page 21

• Charging Battery
The pilot lamp goes on when the charger is plugged into
the power supply.
Insert the battery into the charger.
A weakening glow of the pilot ‘lamp indicates a full
charge.
Two batteries can be charged at the same time.
Recharge the battery if it has been left unused for over
one month. Have a spare battery ready when many
pictures are to be taken.
Page 22

• Setting Voltage
In charging the battery, set the voltage selector to the
voltage to be used.
Remove the fuse. Pull off the selector, set the selector,
display the voltage and reinstall the fuse.
Page 23

Page 24
Precautions for Battery Handling
1. Charge the battery at an ambient temperature of
10°C or over; charging at 0°C or less may damage the
battery.
2. Making contact between the positive and negative
terminals of your Scoopic battery may cause a high
speed discharge and possible damage to the battery.
Never store a spare battery in a pocket along with other
metal objects such as keys.
I ^
3. If the battery is left unused for a long period of
time, load it in the camera, operate the camera for a few
minutes to discharge it.
4. The battery can be recharged more than 100 times
under normal use. Replace battery when a full charge
will only provide power for half the amount of film as a
new battery.
5. All NiCd batteries can potentially explode if exposed
to extreme heat such as fire. NEVER INCINERATE A
USED BATTERY.
Page 25

Page 26
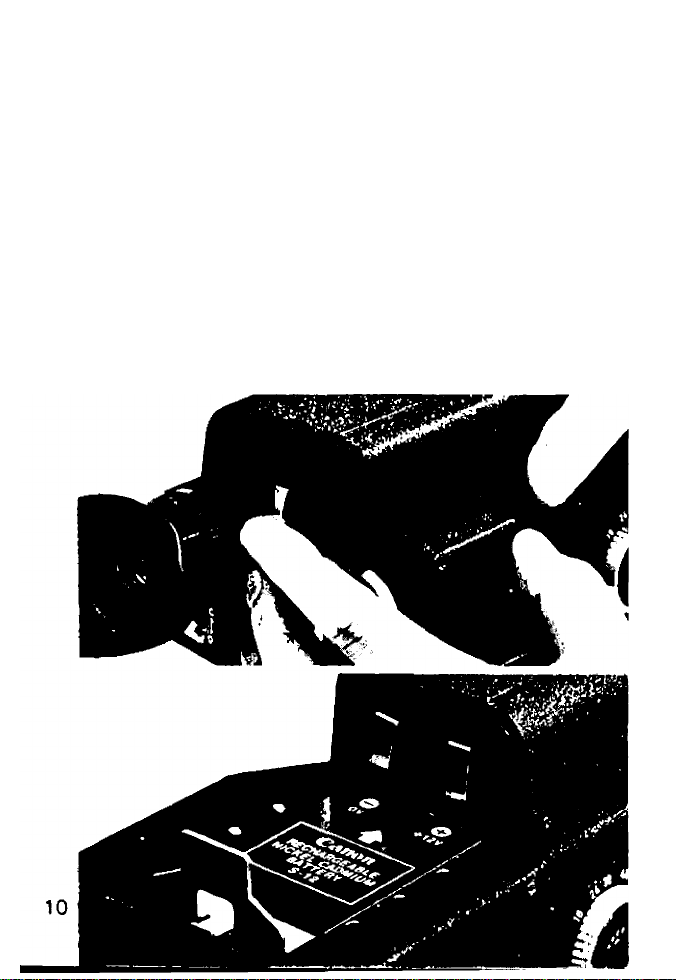
Loading Battery
1. Push up the lock button of the battery chamber and
pull the cover open.
2. Load the battery.
Take the battery out of the camera if it is not to be used
for an extended period of time.
Page 27
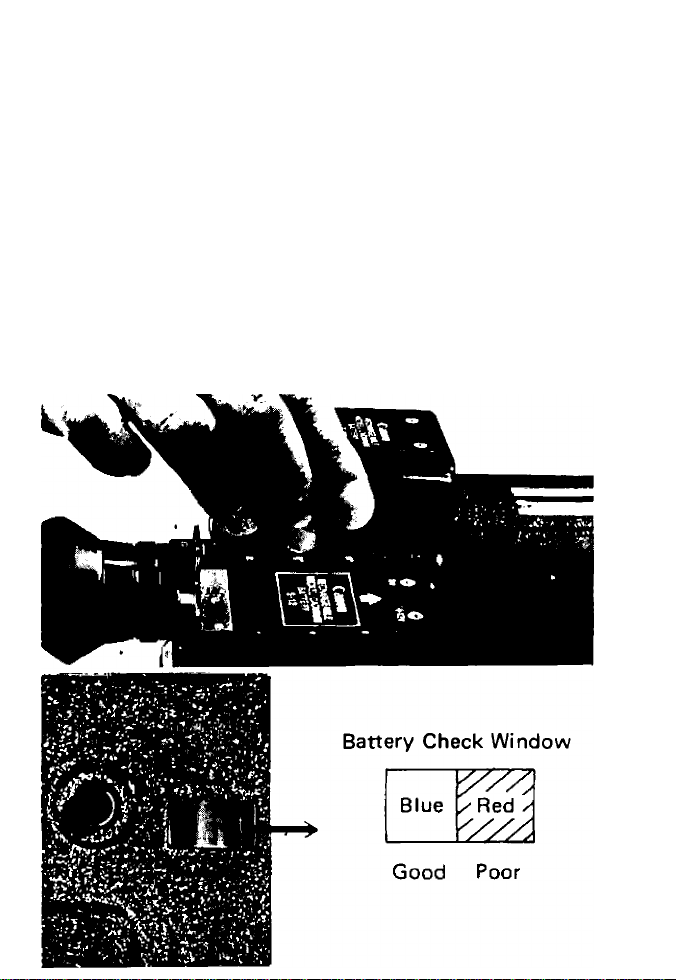
Checking Battery
Check the battery power level regularly.
1. Push the battery check button and evaluate the
power level according to the position of the needle in
the battery check window.
2. Recharge the battery when the needle stays within
the red region.
Page 28

Page 29
Adjusting Finder Eyepiece
1. Be sure the finder shutter lever is in 0 position.
2. Loosen the eyepiece setscrew, direct the camera at a
bright subject and look into the camera.
3. Place the EE changeover lever to MANU, turn the
manual aperture ring and set the meter needle at T2.5.
Page 30

4. Turn the eyepiece adjusting ring clockwise and
counterclockwise until grains are distinctly observed.
Then fix the eyepiece with the setscrew.
Without this adjustment, proper focusing is impossible.
The range of the adjustment is —4 to +2 diopters.
11
Page 31

Page 32

Setting Film Speed
The EE mechanism of the Scoopic 16M is coupled to
both the filming speed (frame rate) selector and the film
sfjeed (ASA) selector of the camera. The correct ASA of
the film is determined by referring to the manufacturers
specifications supplied with the film.
(Refer to pages 33 and 34 for ASA filter factor
adjustments.)
Scoopic 16M ASA Scale:
ASA 20 (25 32) 40 (50 64) 80 (100 1 25) 160 (200 250)
320 (400 500) 640
Figures in parentheses indicated by dots on ASA scale.
12
Page 33

Page 34

Page 35

Setting Filming Speed
The filming speed selector sets the number of frames to
be fed per second. 24 frames is standard for 16mm
movie cameras. Turn the diai and set the desired filming
speed to the index.
Since the film hardens at a temperature of 0°C or lower,
the number of frames may be reduced at 48 or 64 fps.
The use of a coldproof case and external battery is
recommended.
Page 36

The relations between frames per second and exposure
time at a shutter opening of 170° are as follows:
Frames per second
Exposure time(sec) 1/34
Filming speeds in between cannot be used.
Proper exposure of single frame shot is assured by
setting at 16 fps or 24 fps. Its exposure time is
*/34 or '/51 .
Never use higher filming speeds when unloaded.
16
24
1/51 1/68 1/102
32 48 64
1/136
32 _
A
1C-
Page 37

Page 38

Filming Speeds and
Projection Effects
It is standard to shoot and project the film at 24fps.
High Speed Filming
Projection at 24 fps. of film photographed at a speed of
48 or 64 fps. produces a slow-motion effect. For
example, when a film shot at 48 fps. is projected at a
standard 24fps., the projecting time will be doubled,
thereby halving the speed of the action projected. High
filming speed is effective for slowing the action of a
fast-moving subject or analyzing movements. Exposure
time is also speeded up and blurring during panning can
be eliminated.
14
Page 39

Low Filming Speed
Shooting at 16fps. gives the opposite effect. The
reduced filming speed will bring a fast motion
effect in the pictures projected at 24 fps. This
method is helpful in stressing the action of a subject,
bringing the projected action of a distant subject close
to the actual action or creating a humorous effect. The
slow speed is also used for overcoming under-exposure
conditions 24 fps. even at maximum aperture opening.
Page 40

Page 41

The 16fps. must be used for controlling exposure by
giving due considerations to change in speed of move
ment of a subject when projected.
Page 42

EE Changeover Lever
Place this lever on AUTO and the EE circuit will be
coupled to allow shooting with automatic aperture
control. When it is turned to OFF, all circuits except for
the battery checker are disconnected. Set the lever at
MANU for introduction of special effects. See page 23.
MANU.
AUTO •
m
If
Page 43

Page 44

Holding Camera
Firmly grasp the handgrip with the right hand and
depress the shutter button with the right thumb.
Focusing, zooming and steadying of the camera are
accomplished with the left hand. Hold the camera
steady, particularly when shooting at a long focal length
or zooming. The use of a tripod and cable release is
recommended.
Page 45

Page 46

Page 47

Adjusting Eyecup
The eyecup is revolvable. Adjust it to fit your eye.
Do not move your eye away from the eyecup, other
wise, strong light may enter through the finder eyepiece
thereby fogging the film. Use the finder shutter lever
when taking your eye away from the eyecup. Placing
the lever to C allows the shutter in the finder to drop
and thus prevents incidence of light.
Page 48

Adjusting Handstrap
Open the handstrap buckle and adjust the length of the
handstrap.
Page 49

Page 50

Zooming
Turning the zoom ring changes the magnification of an
image. The need for i/iterchangeable lenses is eliminated
and very effective expressions are assured.
The finder of the Scoopic 16M is of the single-lens
reflex type in which the field-of-view and the picture
frame are identical. Therefore, the pictures can be
composed within the maximum field-of-view.
Use the zoom lever when turning the zoom ring.
18
Page 51

delations between Focal Length and Field-of-view
Focal length
(mm)
Field-of-
view
12.5 17.5
Vk")
44.1°
("/le ”)
32.7° 23.2° 16.7°
X
33.0° 24.2°
25
(1")
X X
35
dVs ")
X
17.0° 12.2° 8.6° 5.8°
50
(2")
11.7°
X
75
(3”)
7.9°
X
Page 52

Page 53

• The focal point does not change by turning the zoom
ring.
• When you wish to keep the subject always in the
center of the picture while zooming, fix the camera in a
stationary position, set the subject in the center of the
viewfinder at the maximum focal length of 75mm (3”),
and focus. Zooming can be performed from any desired
focal length after that.
Page 54

When you wish to zoom up on a subject and put it into
the center of the viewfinder, set the focal length at
75mm (3”), position the subject in the center of the
viewfinder, return it to the short focal length side, and
then zoom up once more on the subject and shoot.
On the contrary, if the subject is positioned in the
center with the focal length set on the short side, the
slight aberration at that time will be expanded when the
lens is zoomed up to form a zooming aberration.
-4^
f = 1 2.5mm
i
f = 75mm
(3”)
19
Page 55

Page 56

Focusing
Turn the focus ring to obtain the sharpest image. The
greater the focal length the more easily and accurately
the aligned image can be seen. Zooming does not move
the image out of focus. First focus at the maximum
focal length of 75mm (3”), then return the lens to the
desired magnification.
When the shutter button is depressed, the correct
exposure for the subject being photographed will be
indicated by the needle in the T/stop scale and the lens
will "stop-down" to the correct T/stop. To temporarily
20
Page 57

override this system and bring the aperture to a full
open position for fast focusing, depress the aperture
opening button and hold during focusing. Releasing the
aperture opening button allows the diaphragm to return
to the correct shooting aperture.
Adoption of the all-matted focusing screen allows focus
ing at any point in the viewfinder.
Page 58

Page 59

Exposure Meter Needle
and Exposure
The automatic exposure system of the Scoopic 16M is
activated when the shutter release button is depressed
approximately half way. The lens will then "stop-down"
to the correct shooting aperture and this aperture will
be indicated by the needle in the T/stop scale.
AUTO Shooting
When the aperture setting needle is within the proper
exposure range, press the shutter button all the way.
The film will be fed and will be ready for shooting.
The needle within the right-hand red mark means
over-exposure. Attach an ND filter to reduce the light
intensity.
21
Page 60

Page 61

Shutter Button
The needle within the left-hand red mark means
under-exposure.
Depress the shutter button slightly at first, depress it all
the way down after determining the T/stop.
• When the shutter button is pressed only slightly, the
operating sound of the EE can be heard but the film
will not advance.
• Place the EE changeover lever at OFF when the
camera is not used. The battery cannot be consumed
even if the lever is not switched to OFF. An inadvertent
Page 62

depressing of the shutter button can be prevented with
the EE changeover lever at OFF.
Turn the shutter button clockwise while depressing it all
the way down, and it will remain depressed when you
release your finger and continuous shooting will be
possible. To end shooting, fully turn the shutter button
counterclockwise and it will release.
A cable release socket is provided in the center of the
shutter release button for remote operation.
Page 63

Page 64

Shooting with Manual Aperture Control
1. Place the EE changeover lever to M ANU.
2. Set the manual aperture control ring to the desired
T/stop or set the aperture needle within the finder to
the desired T/stop.
Zooming and focusing are made in the same manner as
in EE shooting.
Shooting with manual aperture control may be em
ployed in the following cases:
MANU.
AUTO*
m
OFF
• Shooting against light
• Obtaining special effects
• Panning at very high speed
• Shooting a subject whose brightness changes rapidly
Note:
If you should want to make an exposure determination
with a hand held meter instead of the built-in meter in
the Scoopic 16M, you need only adjust the T/stop scale
of the camera to the same number indicated by the
f/stop scale of the meter. For example, if meter reads
f4, set camera dial to T/4. Your exposures will always
be perfect since all light loss factors have already been
accounted for.
23
Page 65

Page 66

Macro Filmmaking
A macro mechanism is built into the lens of your
Scoopic 16M to film subjects at closer than the normal
minimum focusing distance of 1.1 meters O'TVis'').
Turn the macro ring clockwise while depressing the
lock button. When the focus ring is set at the close
distance and the macro ring is fully turned clockwise,
close-ups are possible to 80mm OVs ”) wide-angle and
750mm (2'5*/2") telephoto.
Page 67

Multi-point Focus Shooting
When the focal length is varied through zooming for
macro shooting, the focus point changes correspondingly.
Multi-point focusing utilizes this characteristic to give a
special effect in which the focus point is moved.
Mount the camera on a tripod, lock the macro ring,
set the zoom ring to the telephoto end and focus.
Then, set the zoom ring to the maximum wideangle, set the macro ring for macro shooting and
control it to focus the lens on the nearest subject. As a
checking measure, set the zoom ring to the maximum
telephoto with the macro ring left as it is and refocus
the lens on the deepest subject. When the zoom lens is
set to the maximum wide-angle and the camera is
zoomed the focus point will move from the nearest
subject to the deepest subject and diversified cuts will
be assured.
Page 68

Page 69

Single Frame Shooting
Single frame shooting is available to shoot titles or to
include such data as dates and cut numbers.
The EE operation cannot be employed in this case.
Place the EE changeover lever to MANU and pull the
single frame shooting changeover knob.
Depress the changeover knob to its original position at
the end of the shooting.
To continue single frame shooting, steady the picture
frame using a tripod and release.
FRAME
Page 70

Proper exposure is assured by operating the EE mecha
nism at 16fps., reading the T/stop, switching the lever
to MANU and performing single frame shooting.
For single frame shooting at 0°C or less, keep the
camera warm by the use of a coldproof case etc.
25
Page 71

Page 72

9К
Page 73

1. Pressure plate
2. Film holder
3. Film guide
4. Takeup spool shaft
5. Film guide
6. Film cutter
7. Film guide release pin
8. Sprocket
9. Film holder
10. Film guide
11. Guide roller
12. Takeoff spool shaft
Page 74

Page 75

Page 76

1. Film guide
2. Film guide release pin
3. Part of finder optical system
4. Pressure plate
5. Film holder
6. Film holder
7. Pressure plate release knob
8. Film holder
9. Film holder release knob
10. Film guide
Releasing Each Part
The pressure plate can be opened by turning the
setscrew for unloading the film or cleaning the aperture
plate.
• Unless knobs for the pressure plate and film holders
are properly dropped in, the film will not be properly
loaded or the side cover will not be closed completely.
Restore each part properly after cleaning.
27
Page 77

Vi
Page 78

Loading Film
Any standard 16mm, single or double perforated,
100-foot (30.5-meter) film can be used.
Film can be automatically loaded. Make a habit of
loading film correctly because carelessness may race or
fog the film.
Avoid Direct Sunlight
The film is wound naked around the reel; always load
the film in the shade. An extra length of leader is
attached to the film for protection against the entry of
light. But the film may be fogged by direct sunlight or
strong lighting if it is loosely wound.
28
Page 79

1. Depress the side cover lock button, turn the knob in
the direction of the arrow and remove the side cover.
2. Insert the takeoff film spool on the shaft as indicated
by the diagram inside the camera.
Page 80

Page 81

3. Cut off the tip of the film leader with the film
cutter.
• Make the cutoff by matching a perforation and a
positioning pin provided on the cutter.
Page 82

4. Insert the tip of the leader into the insertion guide.
/
k' N ^ I
1“
Vi
29
Page 83

Page 84

5. Have the filming speed at 16 or 24 fps. Make sure the
film holder on the side of the takeoff spool shaft is in
the proper position. Push the film slightly while pressing
the shutter button.
6. The film will automatically thread through the film
guide and the aperture plate and come out of the
bottom sprocket. Stop pressing the shutter button when
some 30cm (11‘Vie") of the film leader has passed
through the guide roller.
30
Page 85

Page 86

7. Have the takeup spool ready and check to see if its
top is facing upwards.
Bend the tip of the film leader toward the emulsioncoated side and insert it in the takeup spool as indicated
by the diagram. Wind the film leader tightly several
times around the takeup spool.
8. Place the takeup spool on the shaft.
Page 87

9. Press the shutter button while pressing the film guide
release pin, and check the top and bottom film loops to
be sure they are uniformly fed. A feed of 10 (
to 15cm (5Vg") is enough.
Page 88

Page 89

10. Reinstall and relock the side cover.
11. Press the shutter button and feed the film until tVie
footage counter advances from S to 0. Start shooting
from 0 position.
Make sure the film feed indicator is rotating. This
indicator corrects a slackened film and checks to see the
film is properly fed. The slackness can be removed by
turning the indicator counterclockwise.
32
Page 90

Footage Counter
As shooting proceeds, the frame counter of the footage
counter indicates the length of exposed film.
The footage counter is marked every five feet from 0
and numbered every 20 feet. The portions between S
and 0 and between 100 and F both indicate the feed of
film leader. Opening the side cover automatically resets
the needle to S.
Page 91

Page 92

Unloading Film
Stop shooting when the counter reachs 100, feed the
film to F and unload the takeup spool in the shade. Put
the film in a container and send it to a laboratory.
Page 93

Filters and Exposure
Compensation
Filters
72mm Screw-in type and Series No. 9 filters are
available. When using a filter, exposure time must be
increased by the exposure factor of the filter.
Canon Filters
{72mm Screw-in Type and Series No. 9)
Type
UV (SL 39.30
*Y1 (SY 44.20
Y3 (SY 50.20
R1 (SR 60.20
CCA12(Color Conversion A)
CCA 8
CCA 4
CCB12(Color Conversion B)
CCB 8 2 1
CCB 4
SKY (Skylight)
ND 4
ND 8
For screw-in type only
Exposure
factor
1
1.5
2 1
6
2
2 1
1.5
3
1.5
1
4 2
8
Amount of
adjustment
(step)
’A
2'A
1
*/2
1V2
‘/2
3
33
Page 94

Page 95

Adjustment 1
Changing ASA Index
Divide the ASA index of the film by the exposure
factor of the filter. Set the film speed dial to this
figure.
For example, a Y3 (exposure factor 3) filter is used
for an ASA 100 film, the compensated ASA index is
100 -r 2 = 50. Reset the film speed dial to ASA 50.
Adjustment 2
Adjusting T/stop
Adjust the T/stop by turning the aperture control
ring accoring to the exposure factor of the filter. The
T/stops are graduated in a multiple proportion.
Increase the T/stop by 1 graduation when using a
filter with an exposure factor of 2 and by 2
graduations when using a filter of an exposure factor
of 4.
34
Page 96

Adjustment 3
Adjusting by Using ND Filter
Use an ND 4 or ND 8 filter when the subject is too
bright. With the ND 4 filter, attach an EE compen
sating ND 4 filter onto the CdS window. In this case,
the film speed dial setting need not .be corrected.
When the ND 8 filter is used, divide the ASA index
of the film by a filter exposure factor of 8 and reset
the film speed. Or attach an EE compensating ND 4
filter onto the CdS window and reset the film speed
dial to the ASA index divided by 2.
Page 97

Page 98

Using External Battery
A 12 V Canon NiCd battery is available for shooting at
low temperatures. The performance of the external
battery and hence stable shooting at a low temperature
of 0°C or less are assured by keeping it warm by the
body temperature of the user or by a pocket warmer. A
power switch is provided for the external battery to
turn ON/OFF power. This switch allows the use of the
external battery as a remote control unit. Remove the
battery in the camera when using the external battery.
Page 99

Fit the plug of the external battery box into the socket
on the camera and turn it clockwise.
Check the external batteries with the battery checker
the same way as for the built-in battery.
Charge the external battery with the Canon Battery
Charger S-12.
./s..
Canon
scoopic
EXTERNAL
BATTERY BOX
S- 12
CANON INC ../APAN
35
Page 100

 Loading...