

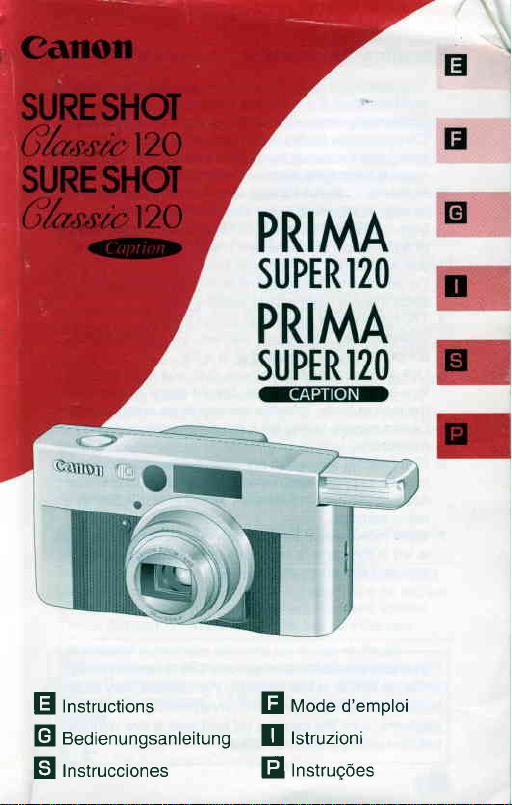
Canon Sure Shot Classic 120, Prima Super 120 Instructions Manual
Instructionr
E
EBedienrngsanleitung
Instrucciones
E
Mode d'emploi
E
Ilstruzioni
Instrue6es
El
I
www.orphancameras.com
Thank
taking
Before
carefully
operates.
Table of
instructions
These
Basic Operations,
Additional
and
sure to
Convention
u,
ii
The following
g
i
r','
u..
F
,r
I
'ffi"
|
D I
a
I
El-+
you
purchasing this Canon
for
pictures,
a thorough
for
please
Contents
are divided
Active
Information.
instructions
the
read
convention
you
gil:'ff"
Additional
Introduction
Handling
Table of
Quick
Attaching
Nomenclature
About
Holding
Basic
Loading
E
Loading
E
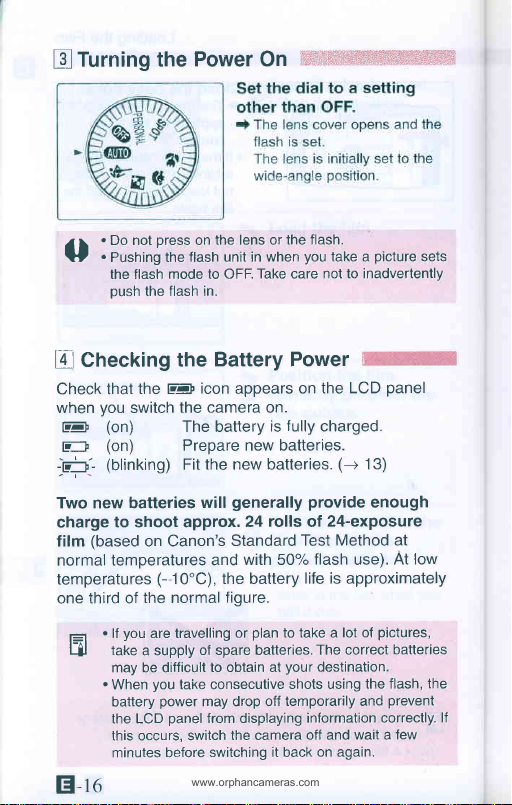
Turing
E
Checking
E
Using
E
Shooting
E
A|AF
Green/Orange
Taking
Taking
(Focus Lock).........'
Close-up
should
information
Precautions
Contents
Reference
the Strap
Eyesight
the
the Camera
Operations
the
the
the
the
in Auto
(Smart
Using
El
Pictures
Pictures
Photography
the
Zoom
Single-Point
product.
read
understanding
five sections:
into
first
from the
in these
observe
using
on
Advanced
Introduction.
when
Operations,
When
is used
the camera
how
of
the camera,
using
instructions:
usins
the camera.
Introduction,
Operations,
be
,,W,fktjM,$ft:t'"MA
the
instructions
these
...-.-'.'..'.'-'..-'2
'..-'-'-4
..........6
.....'-'-'.'..--'-'..-"7
..............
Adjustment
...............
Batteries...............'.......'........13
Film
Power
AF)
Indicators....
........'.........'.............1
On
Power
Battery
Mode........'........'.........-..
Function
Central
Window
a
through
Subject
the
with
....'........'....8
Knob............10
'.'-'12
..'-.,-'.'.'----'.'-14
...........'.......'16
....-.-.-'..'-.--...--17
............19
Focusing
.-.."'..'..---..'20
Center
Off
.-'.'..'.---.'...-..21
.'-'--'-'-'-....22
6
1
I
.........'19
'.'-----2O
Continuous
'$
Using the
Removing
Active Operations
3l
(
Shooting Moving Objects ......26
E Shooting
Using
t[
Shooting
Shooting Close-up
V
SpOT
PERSoNAI
Advanced Operations
4l
to
Changing the
(l
@
I
@
e)
Compensation ................ ............37
@
f mprinting the Date and Time
Setting the
lmprinting
Remote
E
Replacing the Remote Control Battery
Additional Information
5l
Troubleshooting ........ ..................46
Questions and
Photography ..............23
Self-timer
Film ......................25
the
Against Dark Backgrounds........27
Red-eye
Portraits ..................29
Shooting
Subjects
Shooting
Functions ..........32
)Auto
Flash ON ........... ...................35
+r.s
Very
with
Flash without Red-eye Reduction ......34
(t
Flash with Red-eye Reduction ....35
)Auto
Flasrr
OFF...........
-t.s
FlAsh OFF with Manual Exposure
tE
Slow-synchro
Date
Captions
Control
.............. ....................24
Reduction
and Time
Answers
Effectively ..............2B
..................30
Bright or
Customized
Flash Mode......................33
@M,
Photography
Very Dark
............31
Mode
.................36
with Red-eye Reduction......3B
GEEIIEED
GEEEED
................40
,tdt
.7t
a.aElrilr
..........39
..........42
........44
.............. ..................47
Specifications............. ...............,.48
the
with
@EED
the caption
only
symbol.
Please note that these instructions are for both the model
function
the model with the caption function
The separately sold Remote Control RC-5 is available for use with the
GEETdrD
model without
amd
model
only.
function. Inlormation relevant
caption
is marked with
......45
to
tr-s
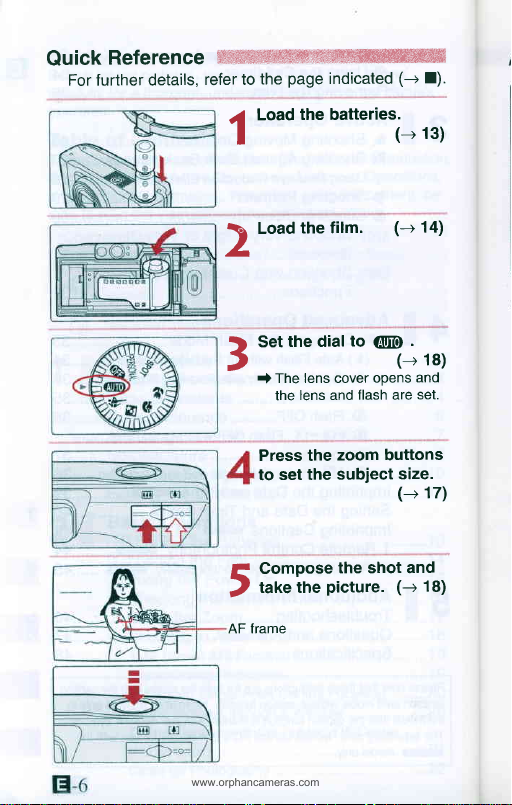
Quick
www.orphancameras.com
Reference
For further details,
refer to
i
I
2
page
the
the batteries.
Load
the film.
Load
indicated
(-+
(_
(+
f).
13)
1a)
the dial
Set
3
The lens cover
I
lens and
the
Press the
set the
to
F Compose
t"r" ihe
)
AF frame
to
zoom buttons
subject
.
Gm
(-+
and
opens
flash are set.
size.
(-+
the shot and
picture. (--+
18)
17)
18)
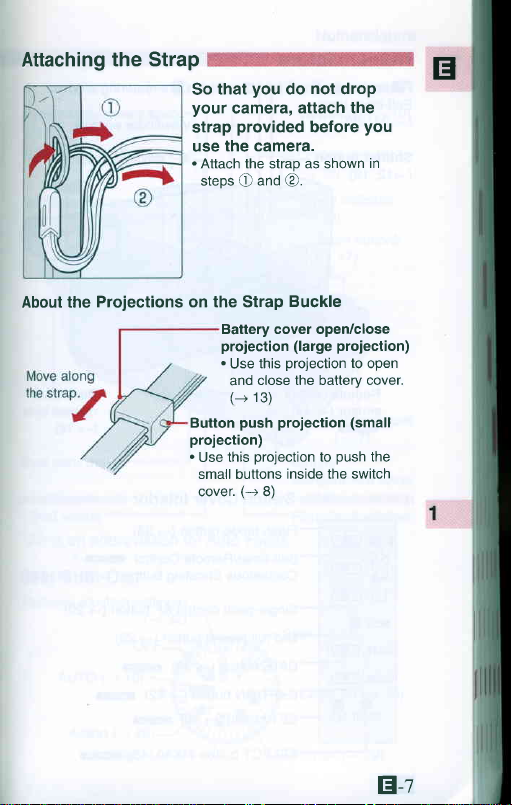
Attaching
the Strap
you
that
So
your
camera,
provided
strap
the camera.
use
.
Attach the strao as shown
steps O and
not
do
attach the
before
@.
drop
tr
you
in
About the
Projections on the Strap
Battery cover open/close
projection
.
this
Use
close the battery cover.
and
(-+
13)
push projection
Button
projection)
.
projection
Use this
small buttons
(+
cover.
8)
Buckle
projection)
(large
projection
inside the switch
to
to
(small
push
open
the
El-t
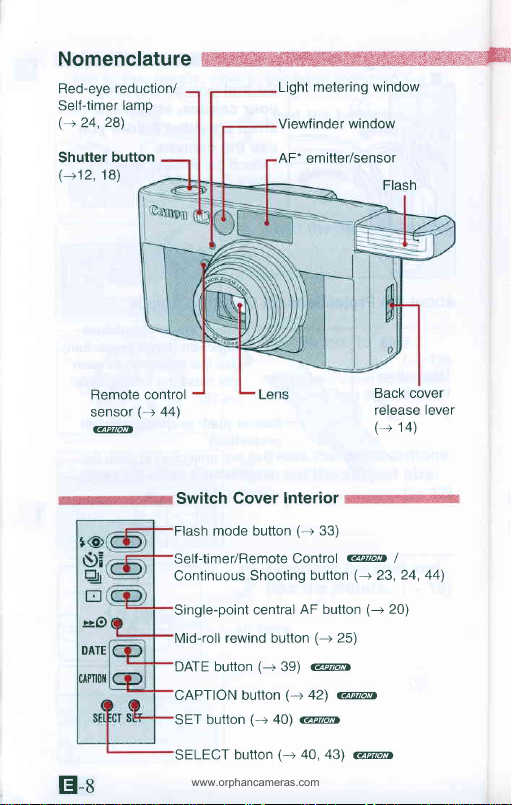
Nomenclature
www.orphancameras.com
reduction/
Red-eye
Self-timer
(
Shutter
(-+12,
lamp
> 24,28)
button
18)
metering window
Light
Viewfinder
AF"
emitter/sensor
window
Flash
Remote control
sensor
GZEEEED
rrO
DATE
cAPlr0il
tr-s
(->
44)
Switch
Flash mode button
Self-timer/Remote
Continuous
Single-point
Mid-roll
DATE button
CAPTION button
SET button
SELECT
Interior
Cover
Control
Shooting button
central
rewind
button
(-+
39)
(-+
(-+
a0)
(-+
button
(->
33)
w
AF button
(-+
25)
@EIEED
w
42)
GEEIIEED
40,43)
GEEIEED
Back cover
release
(+
(-+
23,24,
(-->
lever
14)
/
44)
20)

Nomenclature
(-+
Eyesight adjustment knob
(-+
10)
panel (-+
LCD
Switch cover
Best shot dial
Tripod socket
.AF
Best
Personal
11)
is
an abbreviation
Dial
Shot
(custom
settings)
(-+
OFF
(-+
AUTO
18)
f) is
shorthand
forAuto Focus.
32)
page
"See
for
Viewfinder
Orange
(--+
Green indicator
(-+
Battery
compartment cover
(-+
Film
Spot
Close-up
(-+
indicator
19)
1e)
Zoom buttons
(-->
17)
mount
Strap
(+
7)
13)
window
check
(-+
31)
(-+
30)
1".
10)
Action
(-->
26)
Night
(-+
27)
Portrait
(-+
29)
tr-q
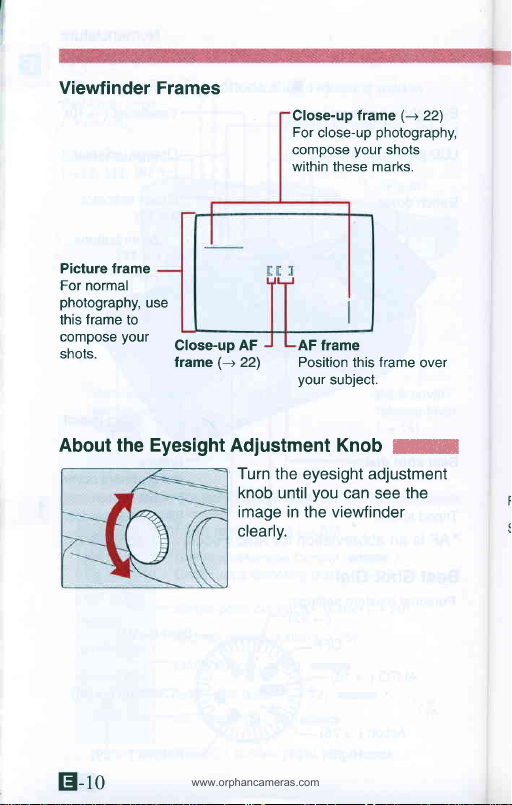
Viewfinder
www.orphancameras.com
Picture frame
For normal
photography,
frame
this
compose
shots.
to
your
Frames
use
Close-up AF
lrame
(-+
Cfose-up
For
compose
within these marks.
AF frame
22)
Position
your
frame
close-up
your
this
subject.
(-+
22)
photography,
shots
frame
over
About the Eyesight Adjustment Knob
Turn the eyesight adjustment
knob until
image in the viewfinder
clearly.
E-to
you
can
ffi
see
the

LCD Panel
Red-eye
reduction
Nomenclature
Manual Exposure
Flash
Flash
Slow-synchro
compensation
ON
OFF
Single-point
Remole
Single-point central AF
central AF
Battery
level
Film windino indicator
Date
and time or
caption number
Caption imprinting
-timer
control/Self
Battery level
Film
winding indicator
(Normally,
only the required
Self-timer
Continuous
Frame
Film loaded
Red-eve
Date and time imprinting
Flash
Flash
Slow-synchro
Manual
compensation
Frame
Continuous
Film loaded
information
is
shooting
counter
indicator
reduction
ON
OFF
Exposure
counter
shooting
indicator
displayed.)
E-tt
Holding the Camera itilt{{;tlWW
www.orphancameras.com
picture,
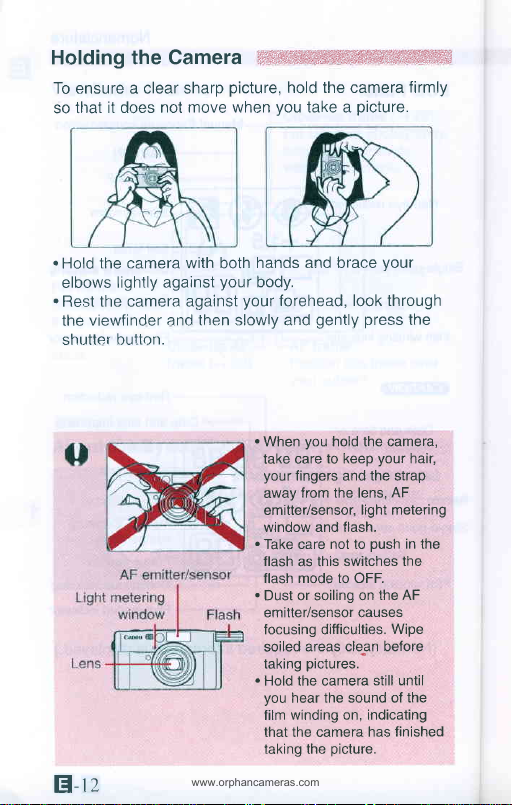
To ensure a clear sharp
so that
it does not
move when
hold the camera
you
take a
firmly
picture.
.
the camera with both
Hold
elbows
.
Rest the camera against
the viewfinder
shutter button.
z
H-t
lightly against
and then slowly and
hands and brace
your
body.
your
forehead, look through
.
you
When
take care
your
fingers and the strap
from the lens,
away
emitter/sensor,
window and flash.
.
Take care not to
flash
as this
mode to OFF.
flash
.
Dust or soiling on
emitter/sensor causes
focusing difficulties.
soiled areas
pictures.
taking
.
Hold the camera
you
hear the sound of the
winding on, indicating
film
that the camera
the
taking
your
gently press
hold the camera,
your
to keep
AF
light metering
push
switches the
the AF
Wipe
cle.an before
still until
has finished
picture.
the
hair,
in the
T
Loading the
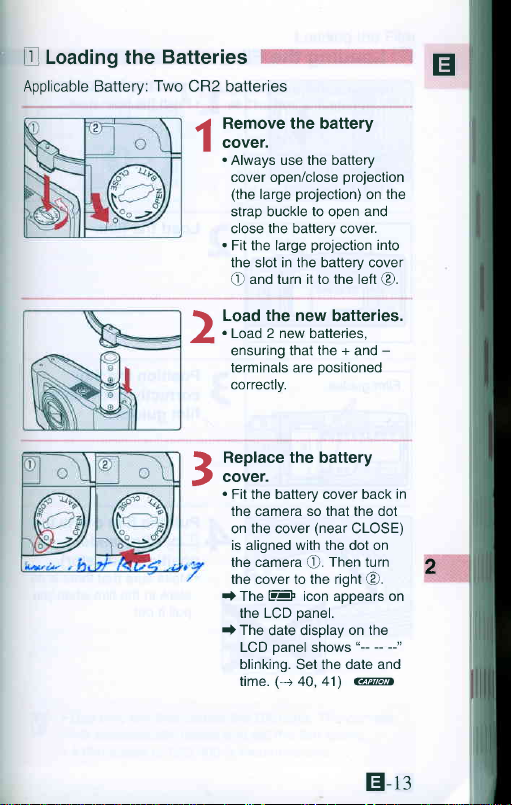
Applicable Battery:
Batteries
Two
CR2 batteries
Remove the battery
{
Cover.
I
.
Always use the battery
cover open/close
(the
strap buckle to open and
close the battery cover.
.
Fit the large
the slot in the battery cover
e
large
and turn it to the left
on
projection
projection
projection)
tr
the
into
@.
Load the new
\
.
Load 2 new
i/
ensuring that the + and
terminals are
correctly.
batteries.
positioned
Replace the battery
cover.
3
.
Fit the battery cover back
the camera so that the dot
on the cover
is aligned with the dot on
the camera
the cover to the right
t The EF icon appears on
the LCD oanel.
t
The
LCD
blinking.
time.
(near
e.
date display
panel
shows
the date and
Set
(-+
40,41)
batteries.
CLOSE)
Then
rurn
@.
on the
GFE,mrr
E-t:
-
in
2
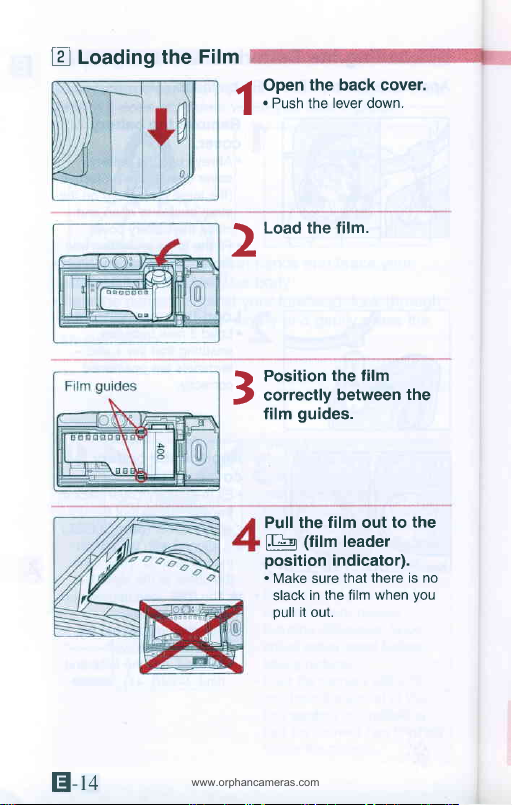
Loading the
www.orphancameras.com
[4
Film
Open
.tr
'
Push the
|
Load the film.
2
the back cover.
lever
down'
El-t+
Position
correctly
3
film
Pull the
lEr
position
.
Make sure that
slack
pull
the film
between
guides.
film out to the
(film
leader
indicator).
in the film
it out.
the
there is no
when
vou
'
,'.,'
,.rr
,,
:
;
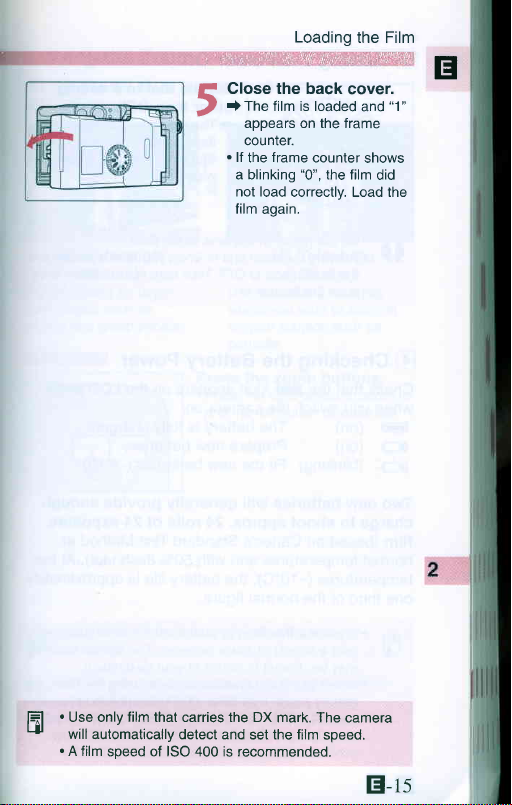
Close the back
(
a The
J
film is loaded
appears on the frame
counter.
.lf
frame
the
a blinking
not load
film
aoain.
Loading
11,,
correctly. Load the
the Film
'r1,1i.1,,]1r,,rr],,.r
ilri:,rtiiliriirirrili
cover.
and
counter
"0",
shows
the film
did
tr
"1"
.
Use only
l=l
qr
will automatically
.
A film
film
that carries the DX
speed of ISO 400 is
detect and
mark. The camera
film
set the
recommended.
speed.
El-ts
Turning the
www.orphancameras.com
E
.
Do not
a \
!t . Pushing the
the flash mode to
push
the flash
Power
press
the lens or the flash.
on
flash unit in when
OFF. Take care
in.
w:i#,:fritffitrffiwwwwffilwwt
on
you
picture
take
not to inadvertentlv
sets
a
Checfing
[4
Check that
you
when
(on)
EF
(on)
E-
(blinkinO)
-n--
Two new batteries
charge
(based
film
normal temperatures
temperatures
third of
one
'lf
t=l
ljl
.
E-to
Battery Power
the
the EF
switch
icon
the camera on.
The battery
Prepare new batteries.
Fit the new batteries.
will
to shoot approx.
on Canon's
and
(-
10'C), the battery
the normal
you
are travelling
take
a supply
may be difficult
you
When
power
battery
the LCD
this occurs, switch
minutes before
figure.
of spare batteries.
to obtain at
take consecutive
may drop off
panelfrom
switching
appears
fully
is
generally
rolls
24
Standard
with
50%
plan
or
to take a
your
shots using
temporarily and
displaying
the camera
it
back
,
panel
LCD
on the
charged.
(-+
13)
provide
of
Test Method at
life is approximately
information correctly.
off and wait a
enough
24-exposure
flash
use).
pictures,
lot of
The correct
destination.
the flash,
prevent
on again.
At low
batteries
the
few
lf
 Loading...