

Canon Powershot S2 IS - Powershot S2 IS 5MP Digital, s2is - PowerShot S2 IS Digital Camera, ImageBrowser 5.2 Camera User Manual
Table of
Contents
Chapter 1
What is
ImageBrowser?
Chapter 2
Downloading and
Printing Images
Chapter 3
What You Can Do with
a Camera Connected
5.2
Chapter 4
Viewing Images
Chapter 5
Organizing Images
Chapter 6
Using Supplementary
Features
Appendices Index
Click these tabs to jump to the Table of
Contents, Index or start of each chapter.
Click this button to advance to the next page.
Click this button to return to the previous page.
(Since this is the starting page, the [Back] button cannot be used.)
ImageBrowser Software User Guide 1
Back Next
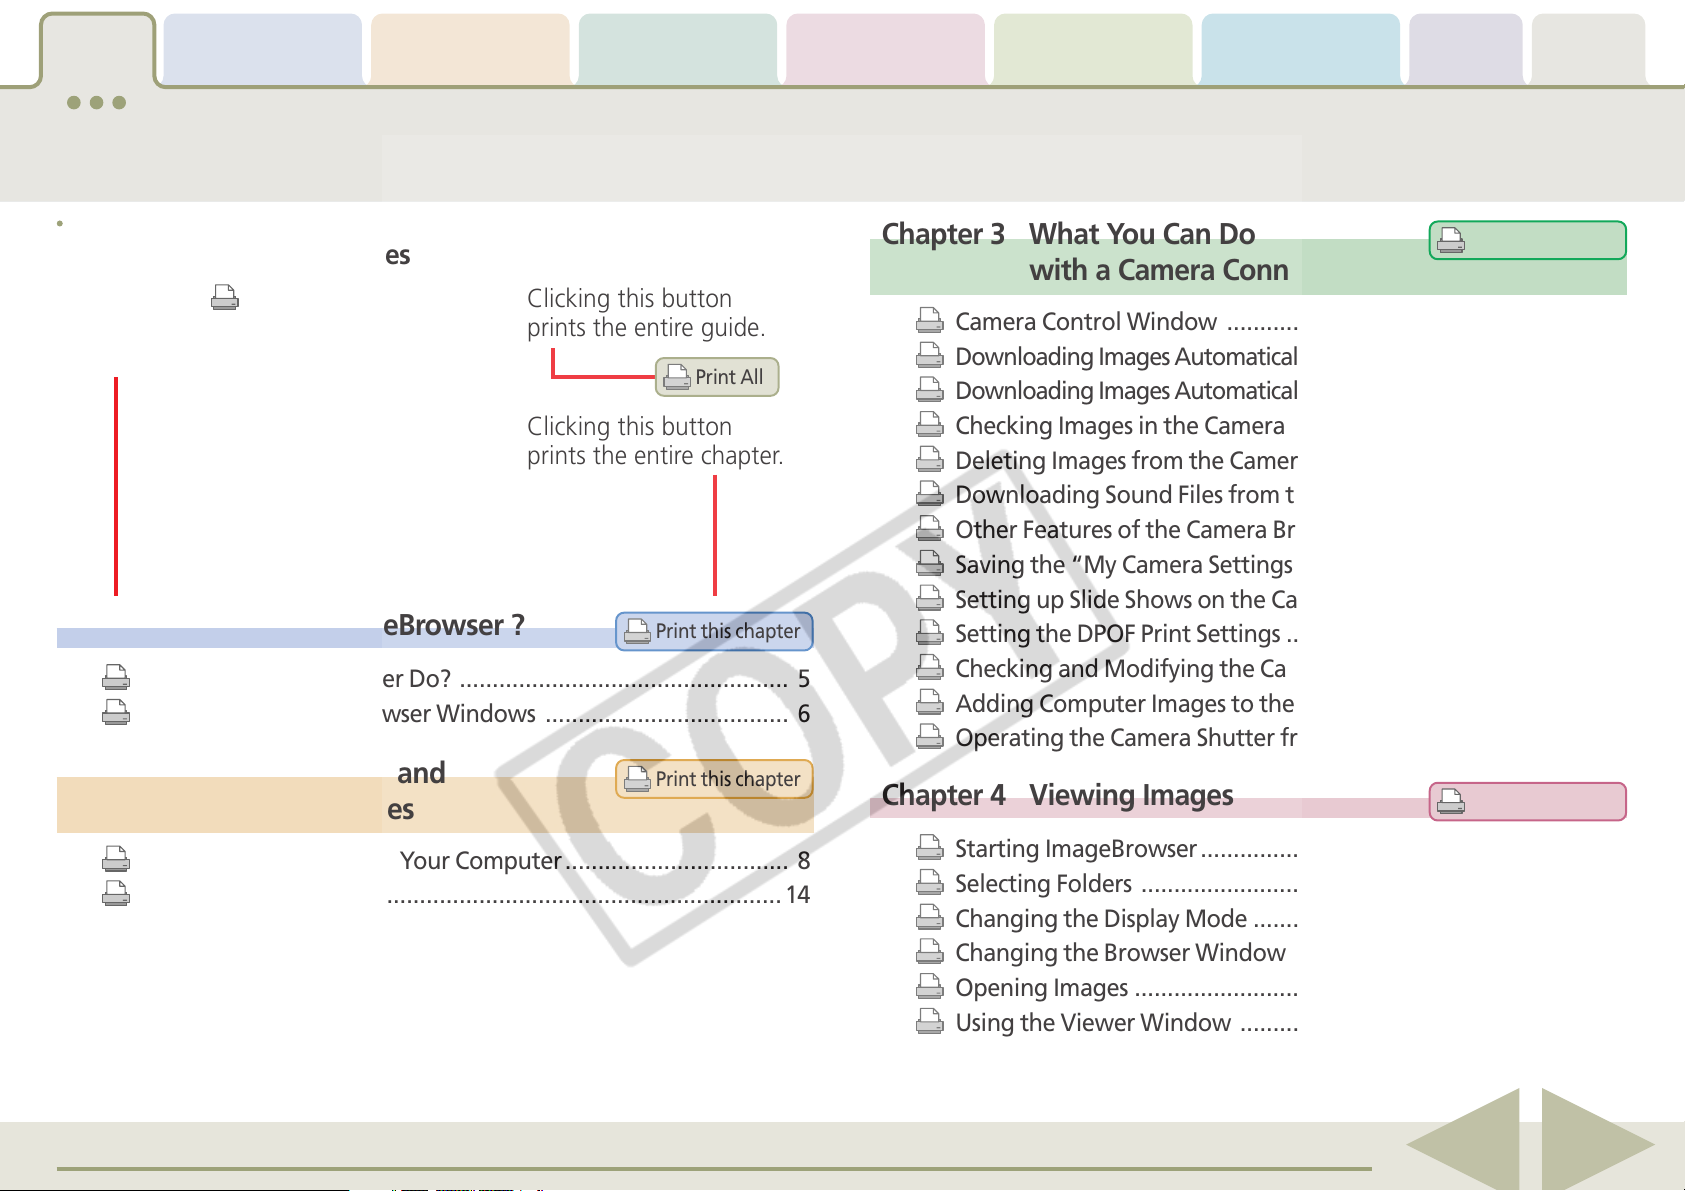
Table of
Contents
Chapter 1
What is
ImageBrowser?
Chapter 2
Downloading and
Printing Images
What You Can Do with
a Camera Connected
Table of Contents (1/2)
Chapter 3
Chapter 4
Viewing Images
Chapter 5
Organizing Images
Chapter 6
Using Supplementary
Features
Appendices Index
About the Printing Features
Clicking the icon at
the start of each topic
prints out that topic.
Chapter 1 What is ImageBrowser ?
What Can ImageBrowser Do? .................................................. 5
Guide to the ImageBrowser Windows ..................................... 6
Chapter 2 Downloading and
Printing Images
Clicking this button
prints the entire guide.
Print All
Clicking this button
prints the entire chapter.
Print this chapter
Print this chapter
Chapter 3 What You Can Do
with a Camera Connected
Camera Control Window ........................................................16
Downloading Images Automatically—Camera Operations ......... 18
Downloading Images Automatically—Computer Operations ..... 19
Checking Images in the Camera before Downloading ............22
Deleting Images from the Camera .......................................... 24
Downloading Sound Files from the Camera ............................25
Other Features of the Camera Browser Window ....................28
Saving the “My Camera Settings” to the Camera .................... 29
Setting up Slide Shows on the Camera .................................... 37
Setting the DPOF Print Settings ............................................... 38
Checking and Modifying the Camera Settings ........................40
Adding Computer Images to the Camera ................................41
Operating the Camera Shutter from a Computer ................... 42
Chapter 4 Viewing Images
Print this chapter
Print this chapter
Downloading Images to Your Computer .................................. 8
Printing Images ....................................................................... 14
Starting ImageBrowser ............................................................ 46
Selecting Folders ..................................................................... 47
Changing the Display Mode .................................................... 49
Changing the Browser Window Display ..................................51
Opening Images ...................................................................... 53
Using the Viewer Window ...................................................... 54
ImageBrowser Software User Guide 2
Back Next

Table of
Contents
Chapter 1
What is
ImageBrowser?
Chapter 2
Downloading and
Printing Images
What You Can Do with
a Camera Connected
Table of Contents (2/2)
Chapter 3
Chapter 4
Viewing Images
Chapter 5
Organizing Images
Chapter 6
Using Supplementary
Features
Appendices Index
Chapter 5 Organizing Images
Selecting Images ...................................................................... 58
Setting Star Ratings ................................................................. 59
Assigning Keywords ................................................................61
Sorting Images ........................................................................ 63
Renaming Images .................................................................... 65
Searching Images .................................................................... 67
Moving and Copying Images ...................................................69
Deleting Images ...................................................................... 71
Rotating Images ...................................................................... 72
Viewing Image Information .................................................... 73
Creating Folders ......................................................................74
Chapter 6 Using Supplementary
Features
Editing Images ......................................................................... 75
Print this chapter
Print this chapter
Playing Sound Files ................................................................ 101
Playing Movies ...................................................................... 102
Editing Movies ....................................................................... 103
Converting RAW Images ....................................................... 106
Stitching Panoramic Images - PhotoStitch ............................. 111
Appendices
Supported Image Types ......................................................... 112
Customizing Preferences .......................................................113
Troubleshooting ....................................................................116
Index
Index ..................................................................................... 117
Print this chapter
Print this chapter
Editing Images with Other Programs ...................................... 79
Creating Images for E-mail ...................................................... 80
Exporting Images .................................................................... 82
Running Slide Shows ...............................................................85
Adding Sounds to Images ........................................................ 88
Printing Images ....................................................................... 90
Printing Images over Multiple Pages ....................................... 98
Sorting Images by Date and Time - TimeTunnel ......................99
ImageBrowser Software User Guide 3
Back Next
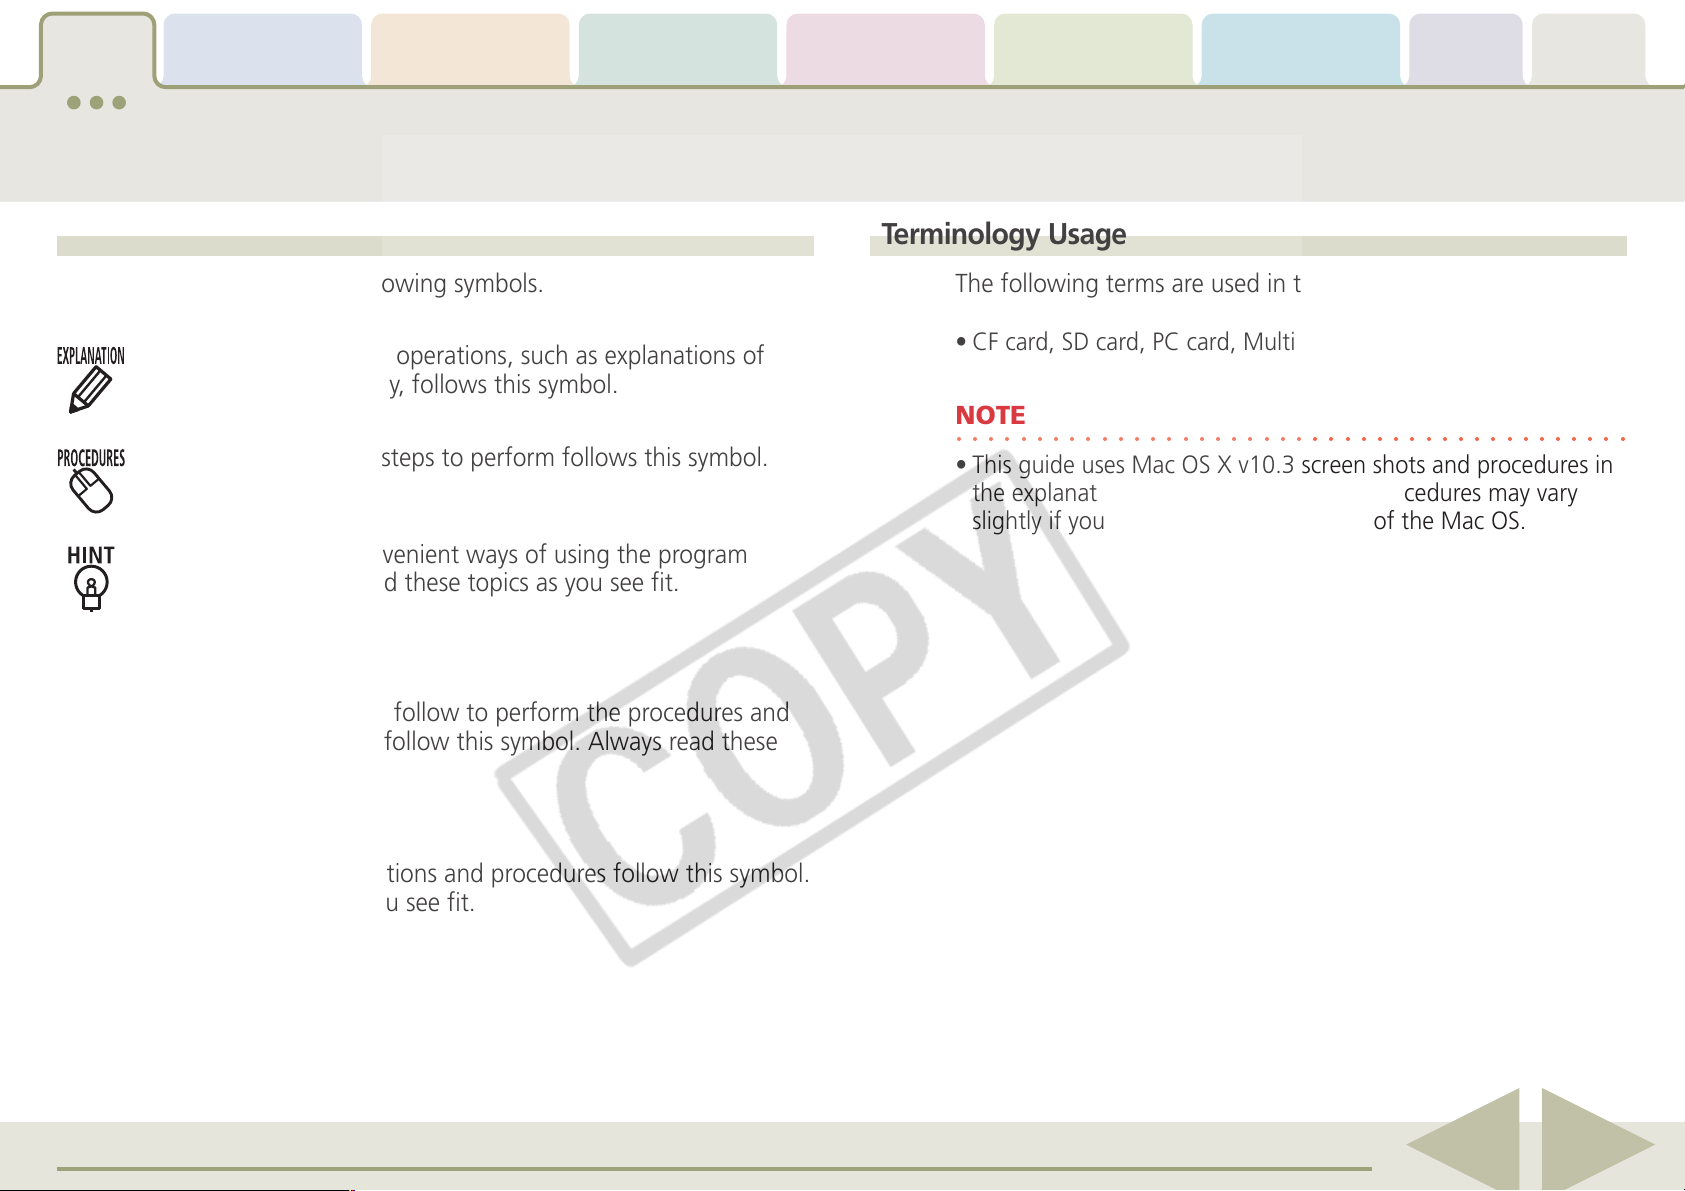
Table of
Contents
Chapter 1
What is
ImageBrowser?
Chapter 2
Downloading and
Printing Images
Chapter 3
What You Can Do with
a Camera Connected
Notations and Conventions
Chapter 4
Viewing Images
Chapter 5
Organizing Images
Chapter 6
Using Supplementary
Features
Appendices Index
Symbol Usage
This guide uses the following symbols.
Information essential to operations, such as explanations of
functions or terminology, follows this symbol.
Information about the steps to perform follows this symbol.
Operating tips and convenient ways of using the program
follow this symbol. Read these topics as you see fit.
IMPORTANT
Points that you need to follow to perform the procedures and
other important topics follow this symbol. Always read these
topics.
Terminology Usage
The following terms are used in this guide as indicated below.
• CF card, SD card, PC card, MultiMediaCard ➜ memory card
NOTE
○○○○○○○○○○○○○○○○○○○○○○○○○○○○○○○○○○○○○○○○○○
• This guide uses Mac OS X v10.3 screen shots and procedures in
the explanations. The screen shots and procedures may vary
slightly if you are using another version of the Mac OS.
REFERENCE
Supplementary explanations and procedures follow this symbol.
Read these topics as you see fit.
ImageBrowser Software User Guide 4
Back Next
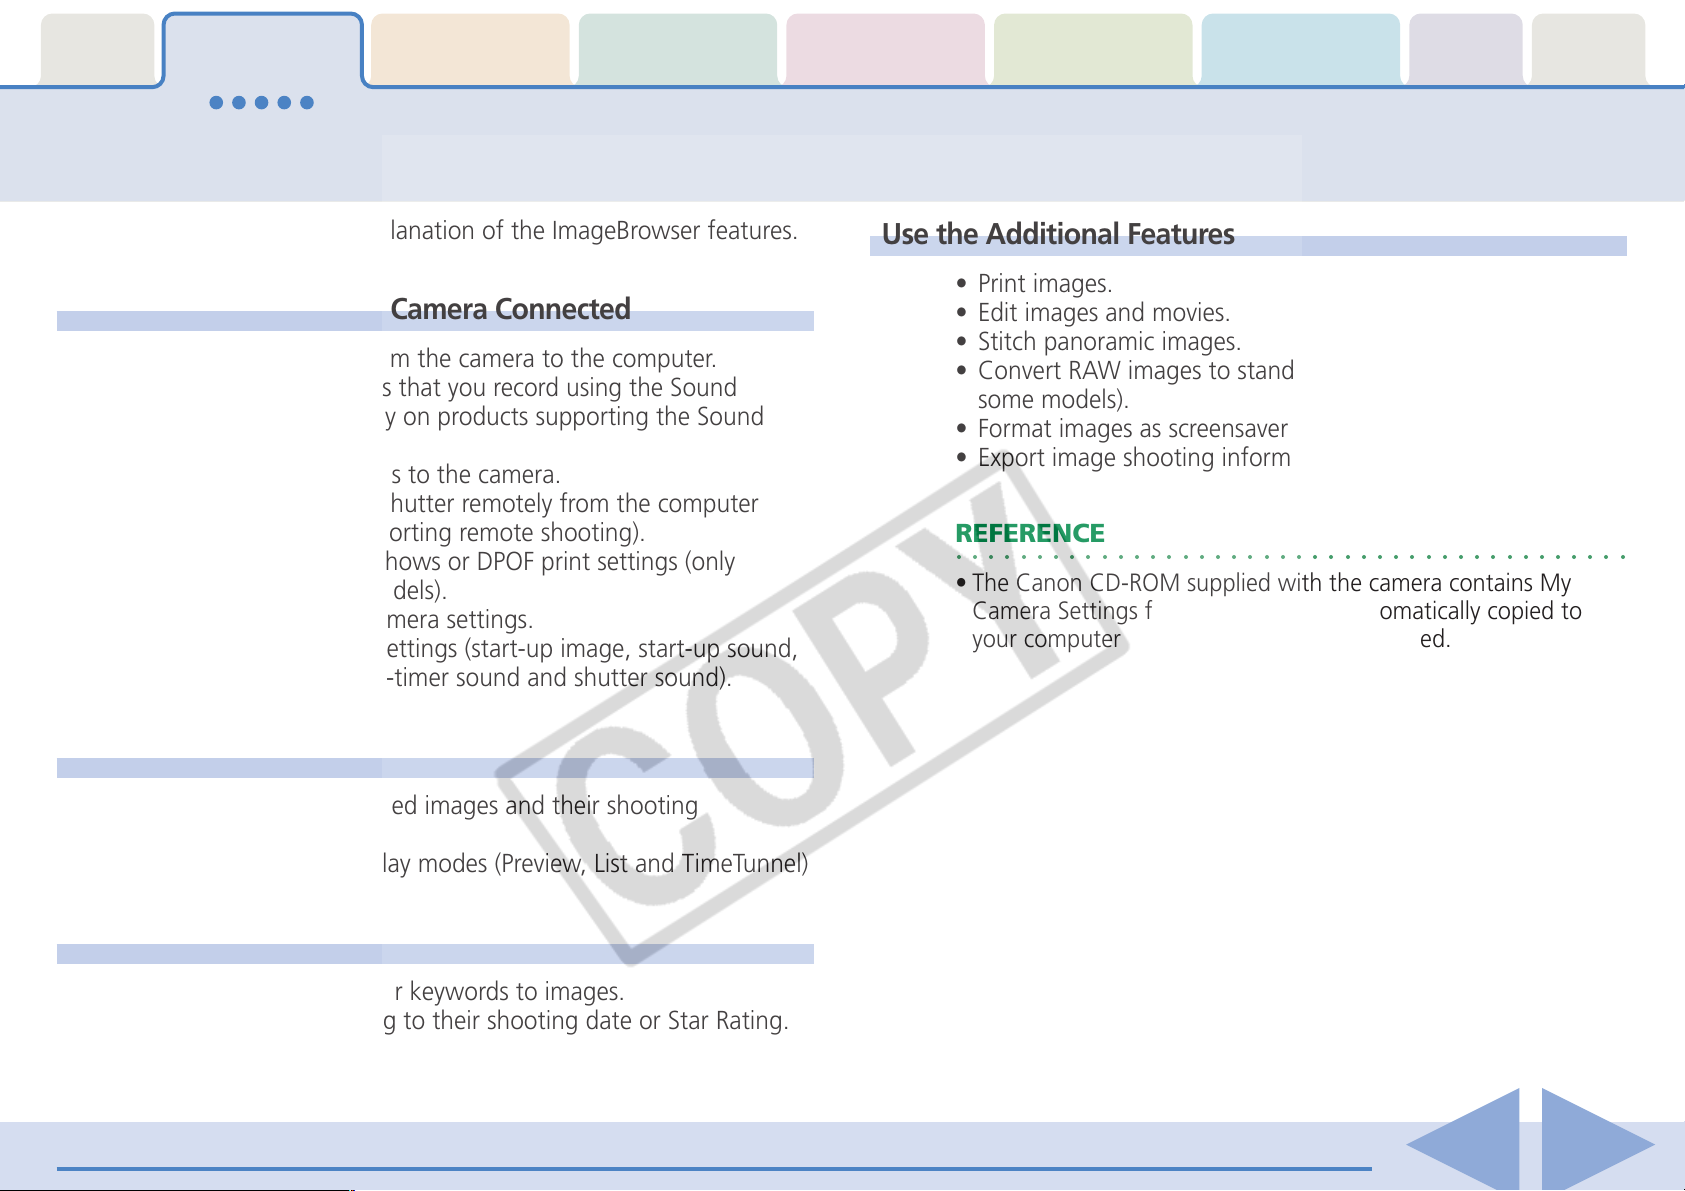
Table of
Contents
Chapter 1
What is
ImageBrowser?
Chapter 2
Downloading and
Printing Images
Chapter 3
What You Can Do with
a Camera Connected
Chapter 4
Viewing Images
What Can ImageBrowser Do?
Chapter 5
Organizing Images
Chapter 6
Using Supplementary
Features
Appendices Index
This section provides a brief explanation of the ImageBrowser features.
What You Can Do with a Camera Connected
• Download images from the camera to the computer.
• Download sound files that you record using the Sound
Recorder feature (only on products supporting the Sound
Recorder feature).
• Save computer images to the camera.
• Operate the camera shutter remotely from the computer
(only on models supporting remote shooting).
• Set up camera slide shows or DPOF print settings (only
available on some models).
• Check and modify camera settings.
• Set the My Camera Settings (start-up image, start-up sound,
operation sound, self-timer sound and shutter sound).
View Images
• Display the downloaded images and their shooting
information.
• Switch between display modes (Preview, List and TimeTunnel)
Use the Additional Features
• Print images.
• Edit images and movies.
• Stitch panoramic images.
• Convert RAW images to standard images (only available on
some models).
• Format images as screensaver and wallpaper files.
• Export image shooting information as a text file.
REFERENCE
○○○○○○○○○○○○○○○○○○○○○○○○○○○○○○○○○○○○○○○○○○
• The Canon CD-ROM supplied with the camera contains My
Camera Settings files. These files are automatically copied to
your computer when ImageBrowser is installed.
Organize Images
• Assign a Star Rating or keywords to images.
• Sort images according to their shooting date or Star Rating.
• Perform image searches.
ImageBrowser Software User Guide 5
Back Next
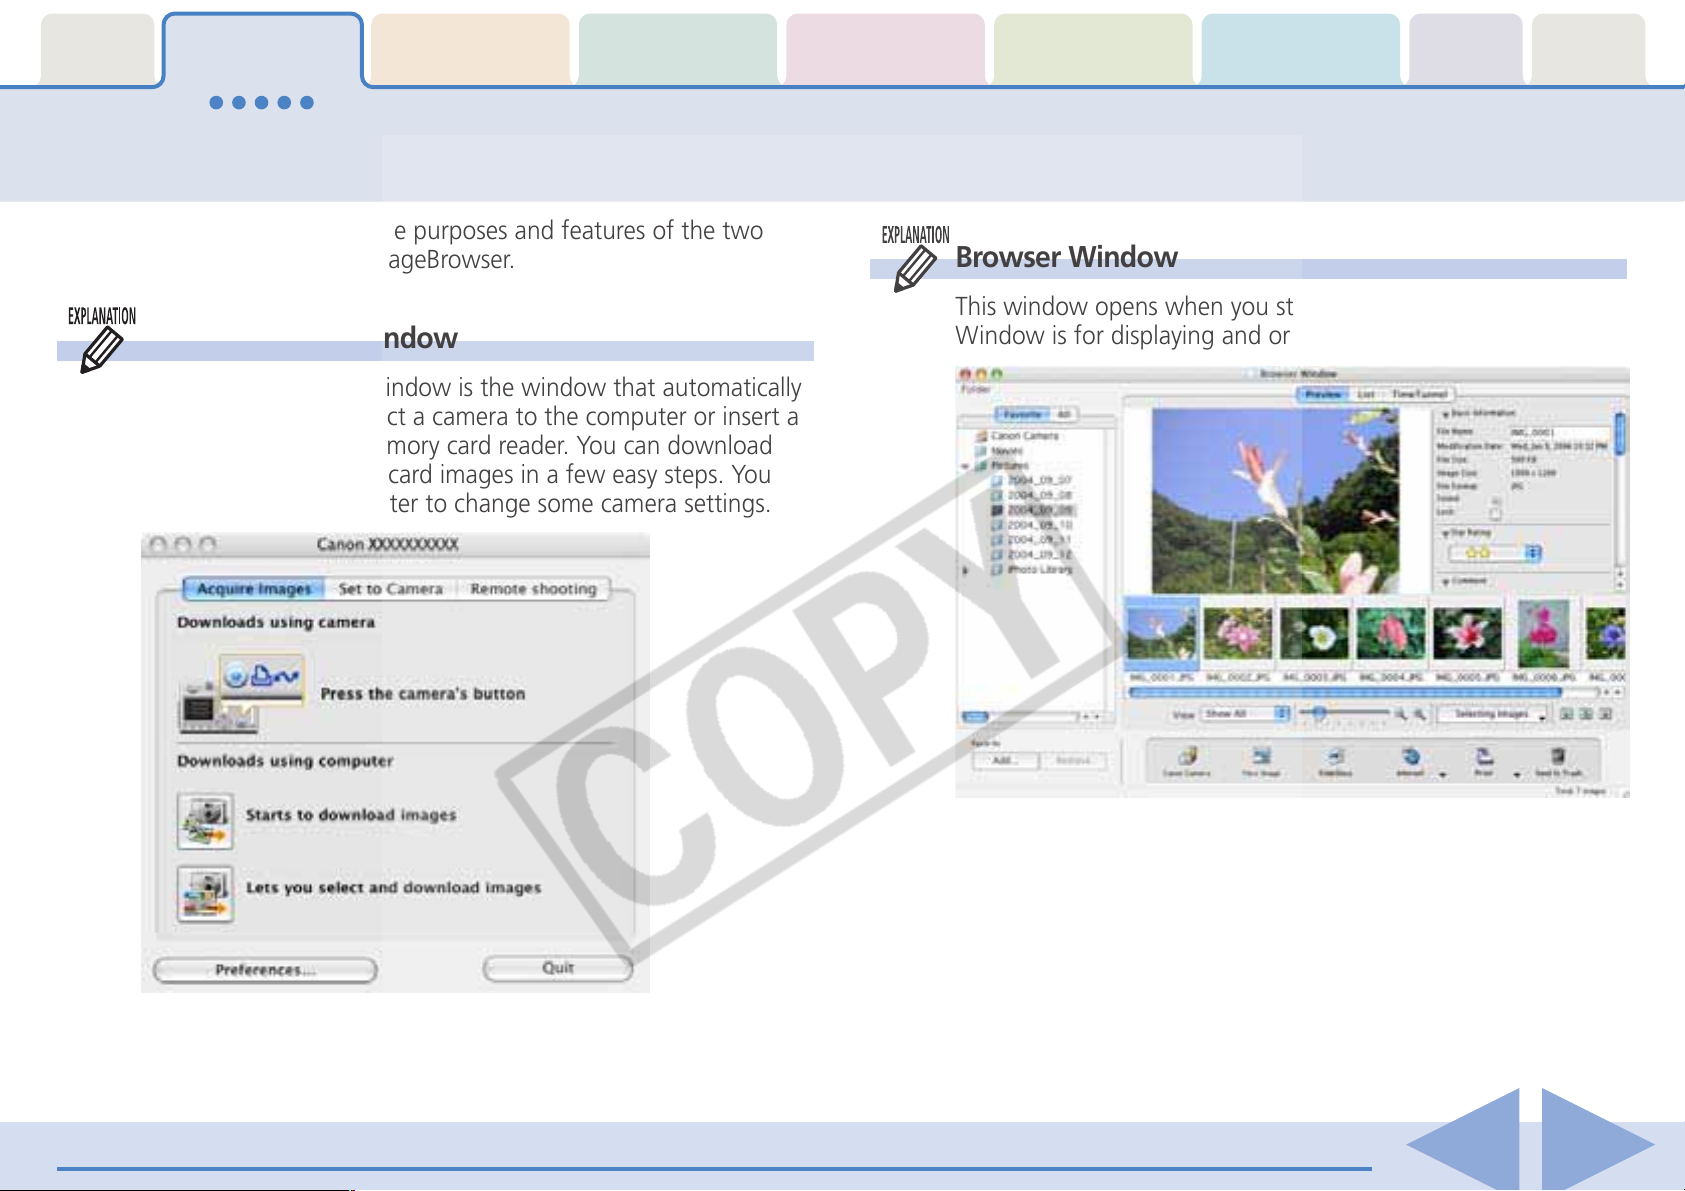
Table of
Contents
Chapter 1
What is
ImageBrowser?
Chapter 2
Downloading and
Printing Images
Chapter 3
What You Can Do with
a Camera Connected
Chapter 4
Viewing Images
Chapter 5
Organizing Images
Guide to the ImageBrowser Windows (1/2)
This section briefly introduces the purposes and features of the two
main windows for operating ImageBrowser.
Camera Control Window
The Camera Control Window is the window that automatically
opens when you connect a camera to the computer or insert a
memory card into a memory card reader. You can download
the camera or memory card images in a few easy steps. You
can also use the computer to change some camera settings.
Browser Window
This window opens when you start ImageBrowser. The Browser
Window is for displaying and organizing downloaded images.
Chapter 6
Using Supplementary
Features
Appendices Index
ImageBrowser Software User Guide 6
Back Next

Table of
Contents
Chapter 1
What is
ImageBrowser?
Chapter 2
Downloading and
Printing Images
Chapter 3
What You Can Do with
a Camera Connected
Chapter 4
Viewing Images
Chapter 5
Organizing Images
Guide to the ImageBrowser Windows (2/2)
A contextual menu is, as its name implies, a menu whose
Using Contextual Menus
When you hold down the [control] key and click the mouse
button, a menu is displayed. This is a contextual menu.
In ImageBrowser, you can access many useful functions through
contextual menus.
For example, the following contextual menu appears when you
press and hold the [control] key and click an image in the
Browser Area.
options vary according to the context. It is a collection of the
most commonly used buttons and commands that apply to a
given situation.
Contextual menus allow you to use ImageBrowser more
efficiently. When you feel comfortable with ImageBrowser, try
using the contextual menus in different situations.
Chapter 6
Using Supplementary
Features
Appendices Index
Contextual menu
ImageBrowser Software User Guide 7
Back Next
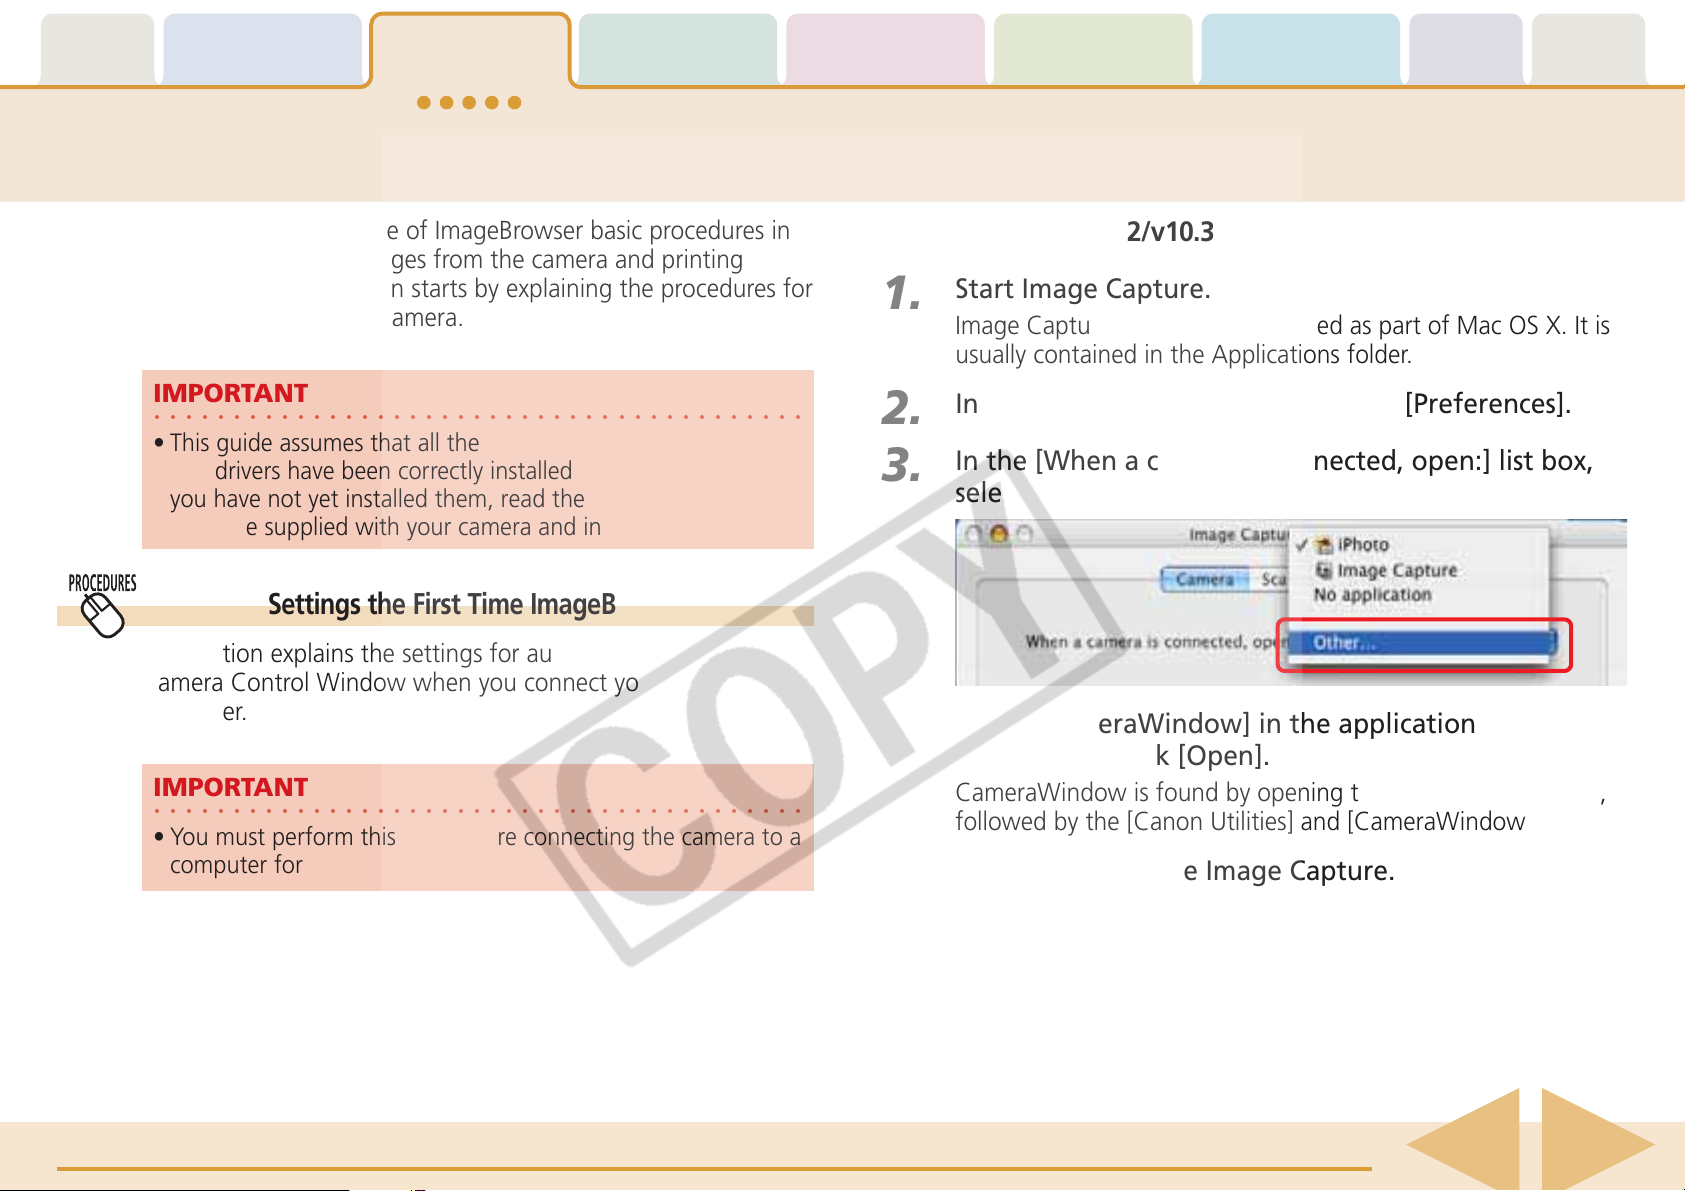
Table of
Contents
Chapter 1
What is
ImageBrowser?
Chapter 2
Downloading and
Printing Images
Chapter 3
What You Can Do with
a Camera Connected
Chapter 4
Viewing Images
Organizing Images
Downloading Images to Your Computer (1/6)
Chapter 5
Chapter 6
Using Supplementary
Features
Appendices Index
This chapter explains a sequence of ImageBrowser basic procedures in
order, such as downloading images from the camera and printing
downloaded images. This section starts by explaining the procedures for
downloading images from the camera.
IMPORTANT
○○○○○○○○○○○○○○○○○○○○○○○○○○○○○○○○○○○○○○○○○
• This guide assumes that all the relevant software programs
and drivers have been correctly installed on your computer. If
you have not yet installed them, read the guides for the
software supplied with your camera and install them.
Auto Start Settings the First Time ImageBrowser Is Used
This section explains the settings for automatically opening the
Camera Control Window when you connect your camera to a
computer.
IMPORTANT
○○○○○○○○○○○○○○○○○○○○○○○○○○○○○○○○○○○○○○○○○
• You must perform this step before connecting the camera to a
computer for the first time.
■ Mac OS X v10.2/v10.3
1.
2.
3.
Start Image Capture.
Image Capture is a program supplied as part of Mac OS X. It is
usually contained in the Applications folder.
In the [Image Capture] menu, select [Preferences].
In the [When a camera is connected, open:] list box,
select [Other].
4.
Select [CameraWindow] in the application selection
window and click [Open].
CameraWindow is found by opening the [Applications] folder,
followed by the [Canon Utilities] and [CameraWindow] folders.
5.
Click [OK] and close Image Capture.
ImageBrowser Software User Guide 8
Back Next
Table of
Contents
Chapter 1
What is
ImageBrowser?
Chapter 2
Downloading and
Printing Images
Chapter 3
What You Can Do with
a Camera Connected
Chapter 4
Viewing Images
Organizing Images
Downloading Images to Your Computer (2/6)
■ Mac OS X v10.1
Chapter 5
Chapter 6
Using Supplementary
Features
Appendices Index
1.
2.
3.
4.
Start Image Capture.
Image Capture is a program supplied as part of Mac OS X. It is
usually contained in the Applications folder.
In the [Hot Plug Action] list box, select [Other].
Select [CameraWindow] in the application selection
window.
CameraWindow is found by opening the [Applications] folder,
followed by the [Canon Utilities] and [CameraWindow] folders.
Close Image Capture.
ImageBrowser Software User Guide 9
Back Next
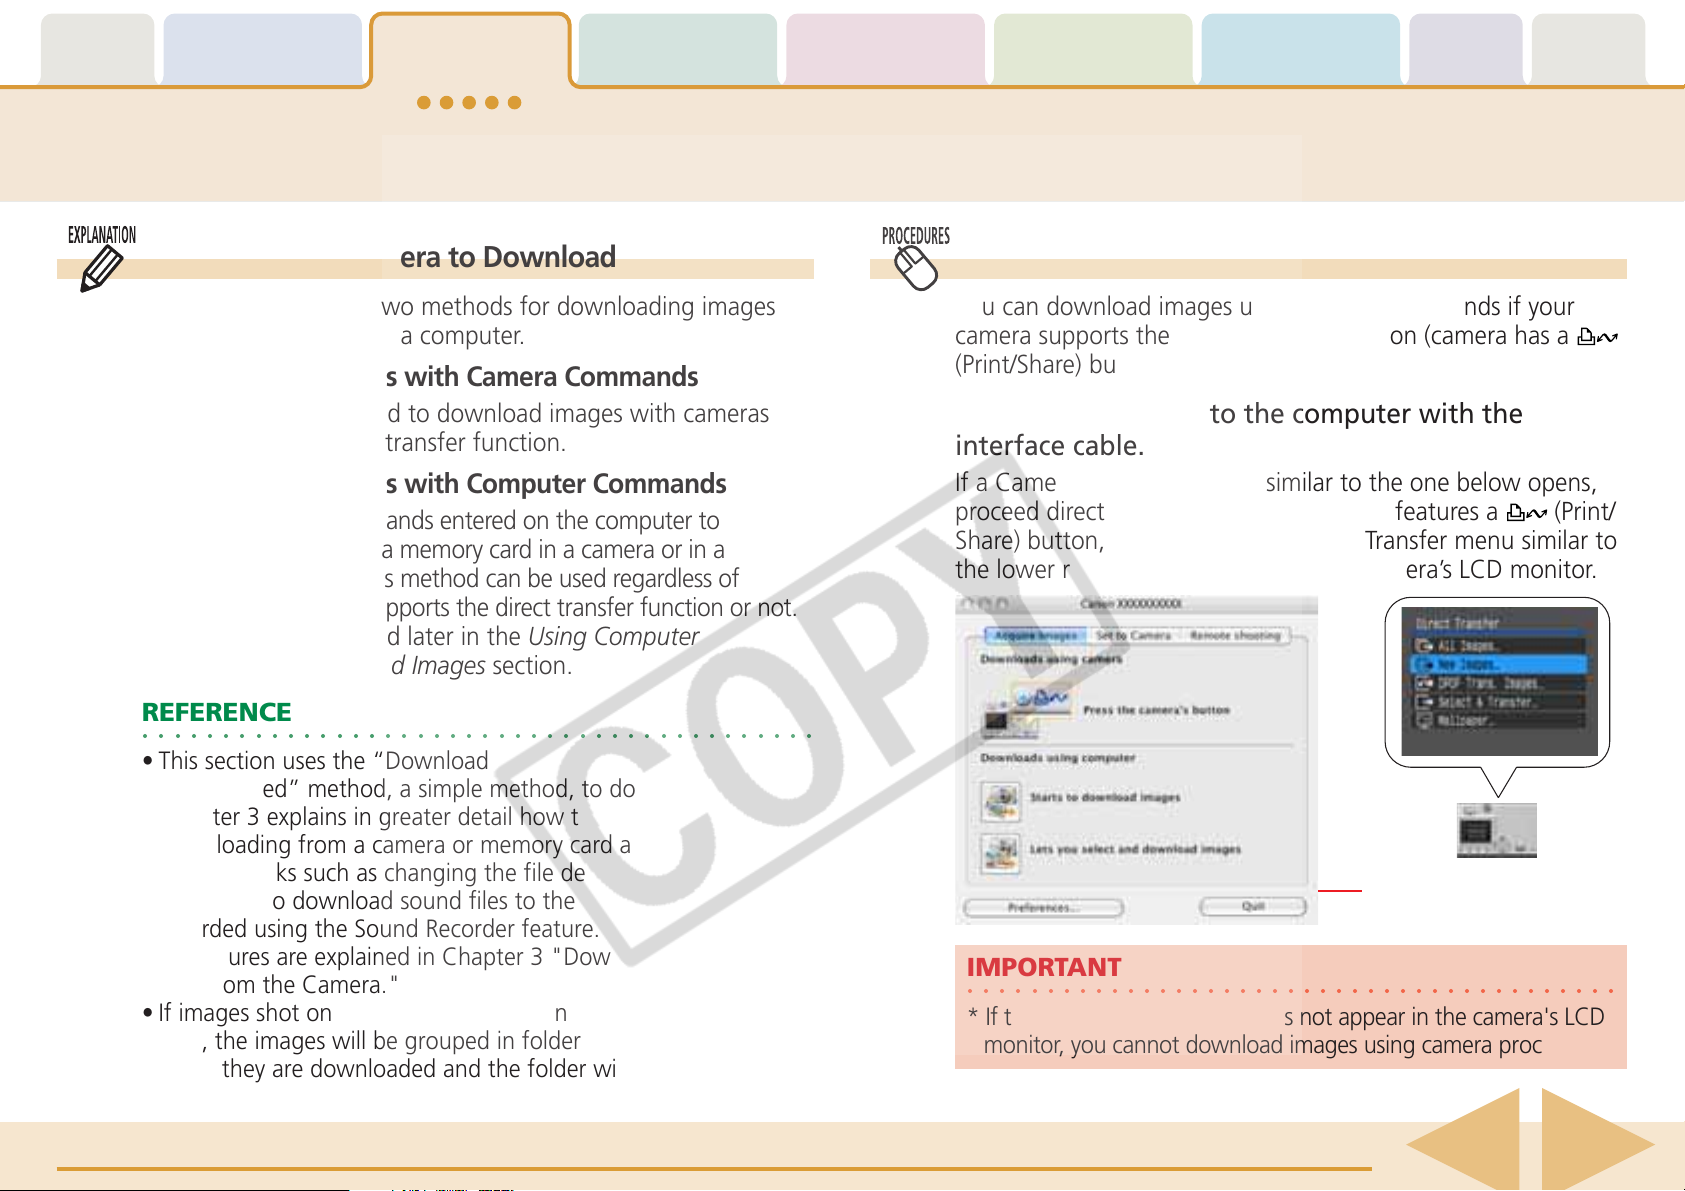
Table of
Contents
Chapter 1
What is
ImageBrowser?
Chapter 2
Downloading and
Printing Images
Chapter 3
What You Can Do with
a Camera Connected
Chapter 4
Viewing Images
Organizing Images
Downloading Images to Your Computer (3/6)
Chapter 5
Chapter 6
Using Supplementary
Features
Appendices Index
Connecting the Camera to Download
This section describes two methods for downloading images
shot with the camera to a computer.
■ Downloading Images with Camera Commands
You can use this method to download images with cameras
that support the direct transfer function.
■ Downloading Images with Computer Commands
This method uses commands entered on the computer to
download images from a memory card in a camera or in a
memory card reader. This method can be used regardless of
whether your camera supports the direct transfer function or not.
This method is explained later in the Using Computer
Commands to Download Images section.
REFERENCE
○○○○○○○○○○○○○○○○○○○○○○○○○○○○○○○○○○○○○○○○○○
• This section uses the “Download All Camera Images Not Yet
Downloaded” method, a simple method, to download images.
Chapter 3 explains in greater detail how to select images for
downloading from a camera or memory card and how to
perform tasks such as changing the file destination.
• You can also download sound files to the computer that were
recorded using the Sound Recorder feature. The downloading
procedures are explained in Chapter 3 "Downloading Sound
Files from the Camera."
• If images shot on different dates are contained on the memory
card, the images will be grouped in folders by shooting date
when they are downloaded and the folder with the most recent
shooting date will display.
1.
Using Camera Commands to Download Images
You can download images using camera commands if your
camera supports the direct transfer function (camera has a
(Print/Share) button).
Connect the camera to the computer with the
interface cable.
If a Camera Control Window similar to the one below opens,
proceed directly to Step 2. If your camera features a
Share) button, it will flash and a Direct Transfer menu similar to
the lower right one will appear on the camera’s LCD monitor.
Camera Control Window
IMPORTANT
○○○○○○○○○○○○○○○○○○○○○○○○○○○○○○○○○○○○○○○○○
* If the Direct Transfer menu does not appear in the camera's LCD
monitor, you cannot download images using camera procedures.
(Print/
ImageBrowser Software User Guide 10
Back Next
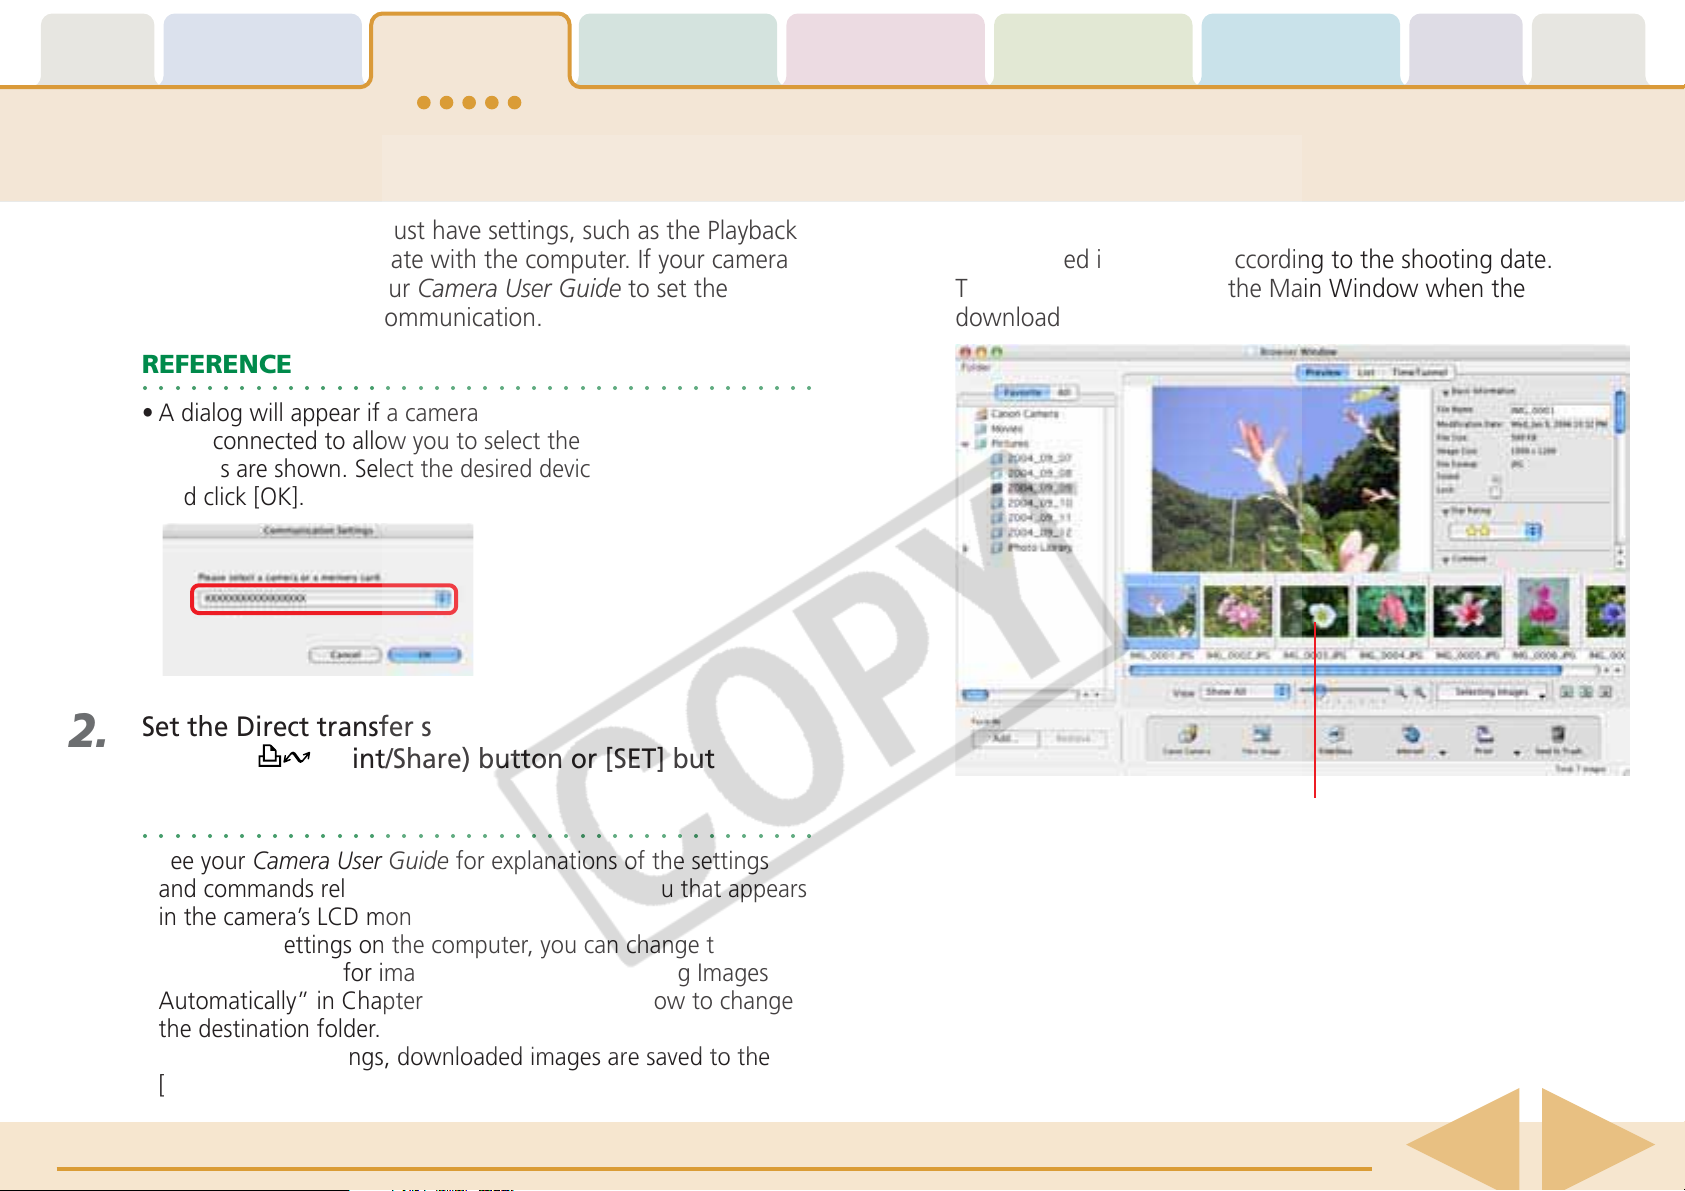
Table of
Contents
Chapter 1
What is
ImageBrowser?
Chapter 2
Downloading and
Printing Images
Chapter 3
What You Can Do with
a Camera Connected
Chapter 4
Viewing Images
Organizing Images
Downloading Images to Your Computer (4/6)
Chapter 5
Chapter 6
Using Supplementary
Features
Appendices Index
2.
Some camera models must have settings, such as the Playback
mode, set to communicate with the computer. If your camera
requires this, consult your Camera User Guide to set the
necessary settings for communication.
REFERENCE
○○○○○○○○○○○○○○○○○○○○○○○○○○○○○○○○○○○○○○○○○○
• A dialog will appear if a camera and a memory card reader are
both connected to allow you to select the device from which
images are shown. Select the desired device from the list box
and click [OK].
Set the Direct transfer settings on the camera, and
push the
(Print/Share) button or [SET] button.
The images will begin to download. The downloaded images
will be saved into folders according to the shooting date.
The images will display in the Main Window when the
download is complete.
REFERENCE
○○○○○○○○○○○○○○○○○○○○○○○○○○○○○○○○○○○○○○○○○○
Downloaded Images
• See your Camera User Guide for explanations of the settings
and commands related to the Direct Transfer menu that appears
in the camera’s LCD monitor.
• If you click Settings on the computer, you can change the
destination folder for image files. See “Downloading Images
Automatically” in Chapter 3 for instructions on how to change
the destination folder.
• By the default settings, downloaded images are saved to the
[Pictures] folder.
ImageBrowser Software User Guide 11
Back Next
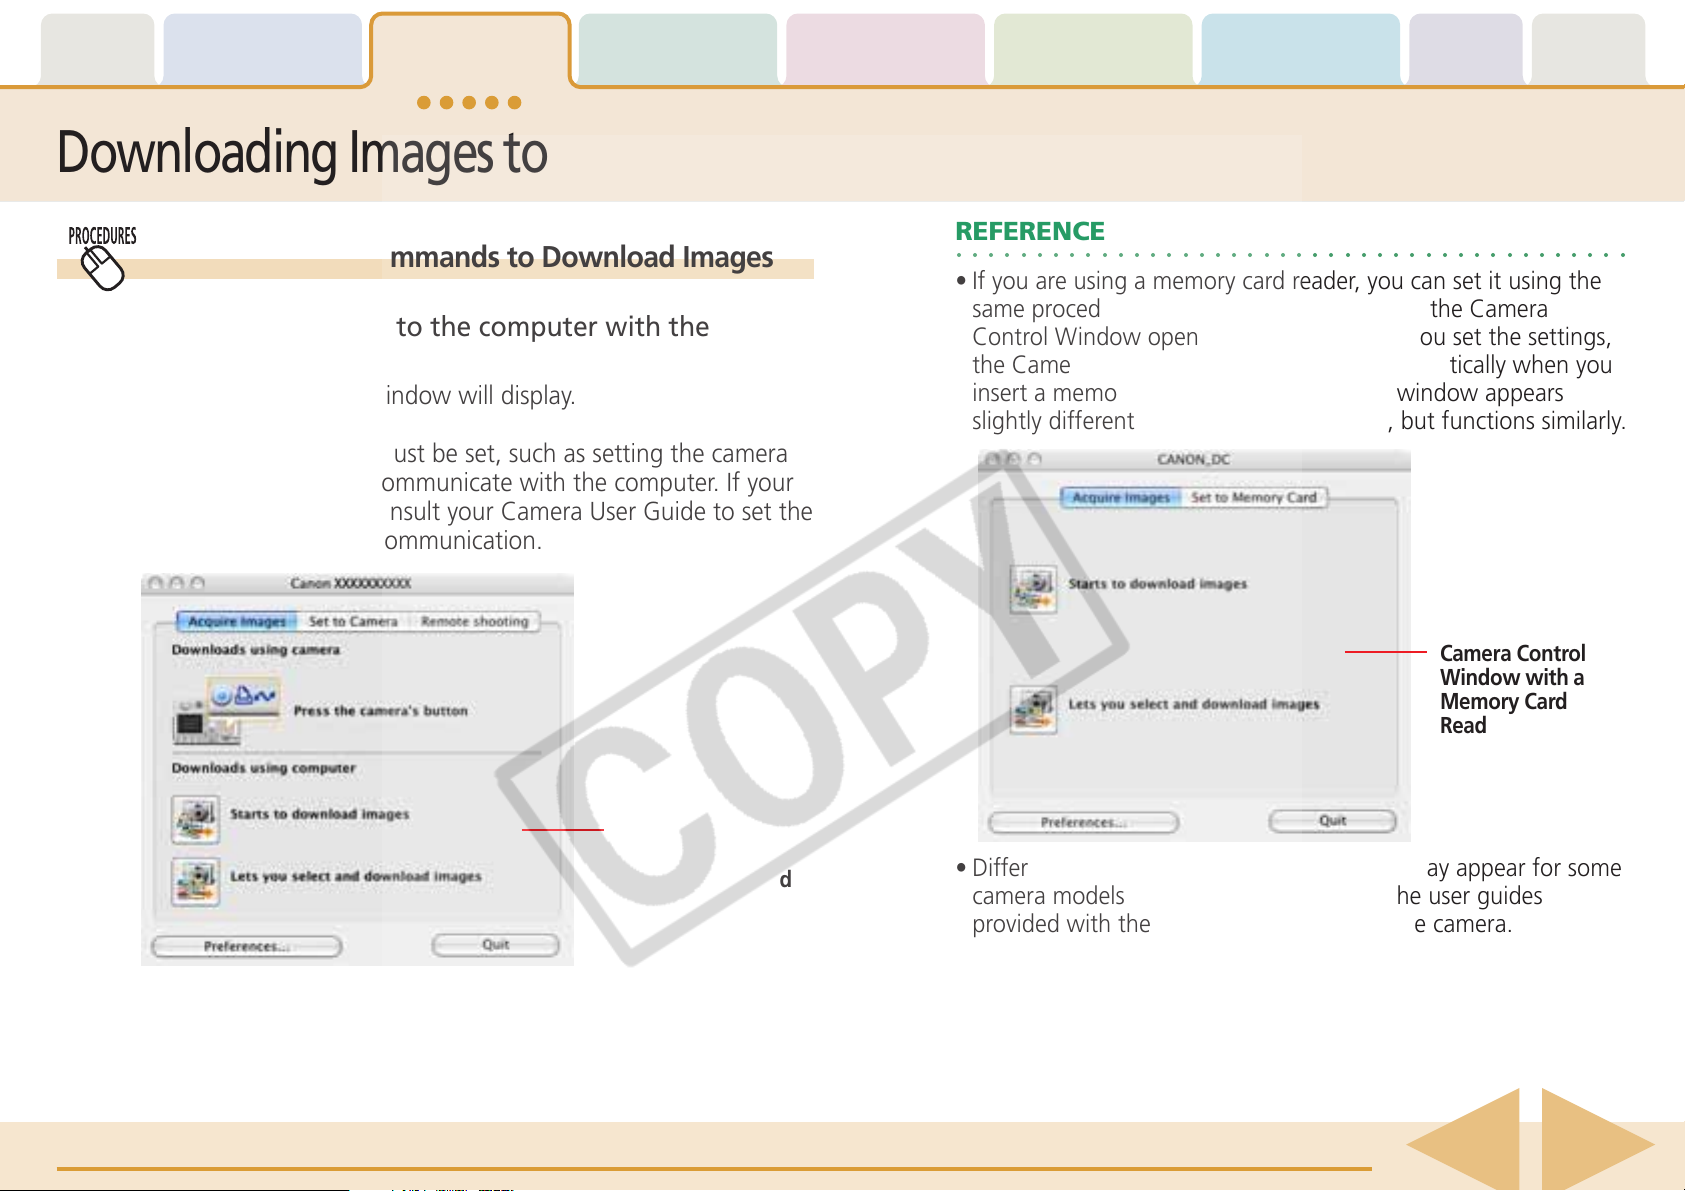
Table of
Contents
Chapter 1
What is
ImageBrowser?
Chapter 2
Downloading and
Printing Images
Chapter 3
What You Can Do with
a Camera Connected
Chapter 4
Viewing Images
Organizing Images
Downloading Images to Your Computer (5/6)
REFERENCE
○○○○○○○○○○○○○○○○○○○○○○○○○○○○○○○○○○○○○○○○○○
• If you are using a memory card reader, you can set it using the
same procedures as with the camera to have the Camera
Control Window open automatically. After you set the settings,
the Camera Control Window will open automatically when you
insert a memory card into the reader. The window appears
slightly different from the camera version, but functions similarly.
1.
Using Computer Commands to Download Images
Connect the camera to the computer with the
interface cable.
The Camera Control Window will display.
Some camera models must be set, such as setting the camera
to Playback mode, to communicate with the computer. If your
camera requires this, consult your Camera User Guide to set the
necessary settings for communication.
Chapter 5
Chapter 6
Using Supplementary
Features
Appendices Index
Camera Control
Window with a
Camera Connected
• Different windows from those shown here may appear for some
camera models. In that case, please read the user guides
provided with the software bundled with the camera.
ImageBrowser Software User Guide 12
Camera Control
Window with a
Memory Card
Reader Connected
Back Next
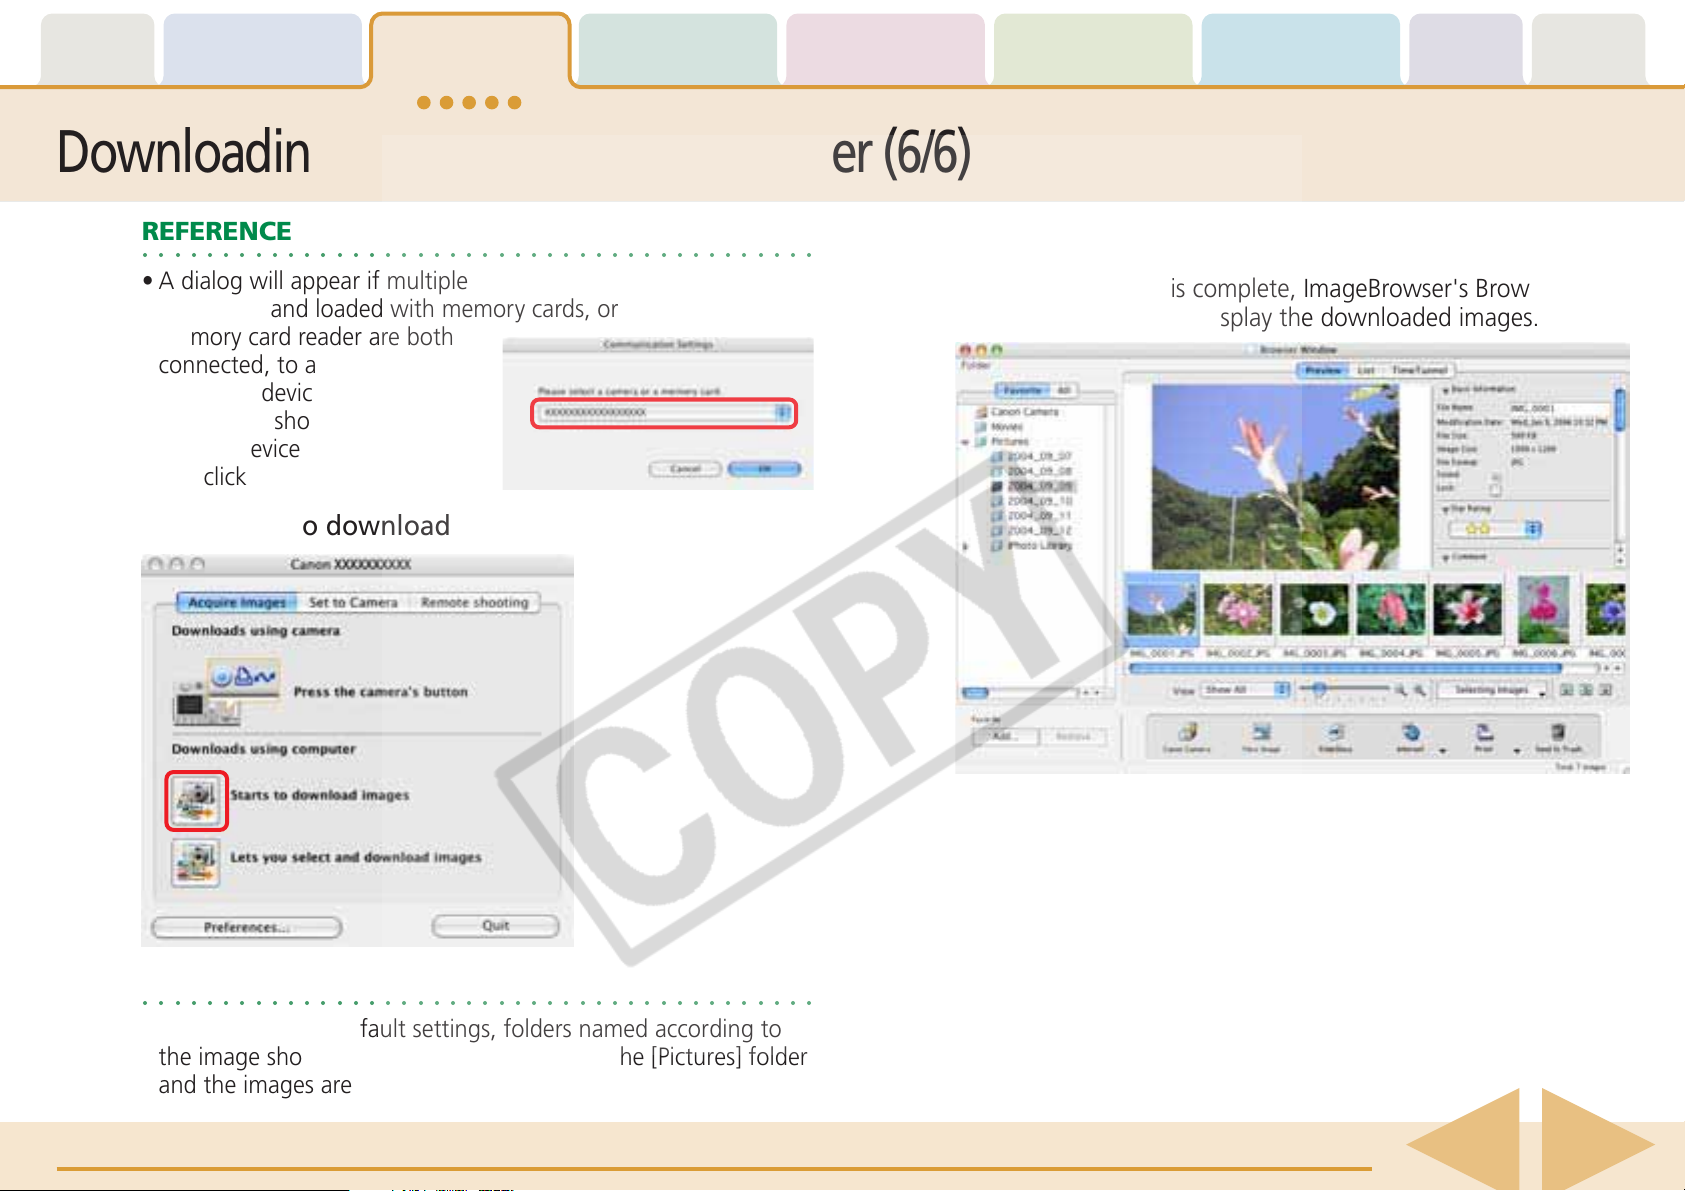
Table of
Contents
Chapter 1
What is
ImageBrowser?
Chapter 2
Downloading and
Printing Images
Chapter 3
What You Can Do with
a Camera Connected
Chapter 4
Viewing Images
Organizing Images
Downloading Images to Your Computer (6/6)
Chapter 5
Chapter 6
Using Supplementary
Features
Appendices Index
2.
REFERENCE
○○○○○○○○○○○○○○○○○○○○○○○○○○○○○○○○○○○○○○○○○○
• A dialog will appear if multiple memory card readers are
connected and loaded with memory cards, or if a camera and a
memory card reader are both
connected, to allow you to
select the device from which
images are shown. Select the
desired device from the list box
and click [OK].
Click [Starts to download images].
All the images that have yet to be downloaded will start to
download.
When downloading is complete, ImageBrowser's Browser
Window will open and display the downloaded images.
REFERENCE
○○○○○○○○○○○○○○○○○○○○○○○○○○○○○○○○○○○○○○○○○○
• According to the default settings, folders named according to
the image shooting dates are created within the [Pictures] folder
and the images are downloaded to them.
ImageBrowser Software User Guide 13
Back Next

Table of
Contents
Chapter 1
What is
ImageBrowser?
Chapter 2
Downloading and
Printing Images
Printing Images (1/2)
Chapter 3
What You Can Do with
a Camera Connected
Chapter 4
Viewing Images
Chapter 5
Organizing Images
Chapter 6
Using Supplementary
Features
Appendices Index
This section explains the procedures for printing downloaded images on
a printer.
REFERENCE
○○○○○○○○○○○○○○○○○○○○○○○○○○○○○○○○○○○○○○○○○○
• Images recorded in the Adobe RGB color space will appear
unsaturated when printed using PhotoRecord. Color space
settings are only available on select camera models.
1.
Click an image in the Browser Window to print.
A blue frame appears around the image.
REFERENCE
○○○○○○○○○○○○○○○○○○○○○○○○○○○○○○○○○○○○○○○○○○
• You can select multiple images by pressing and holding the
[shift] key or [
] (command) key while clicking on images. If
you hold down the [option] and [shift] keys together and click
on two images, you can select all the images between them.
2.
Click [Print] and select [Layout Printing] from the
displayed menu.
3.
In the Layout Options dialog, leave the [Custom layout
printing] option selected and click [Next].
Print Window
Layout Options Dialog
The Layout Options dialog and Print window open.
The selected images are automatically laid out in the Print
window. You can select a layout option in the Layout Options
dialog. For the moment, just print the images without making
any changes.
ImageBrowser Software User Guide 14
Back Next
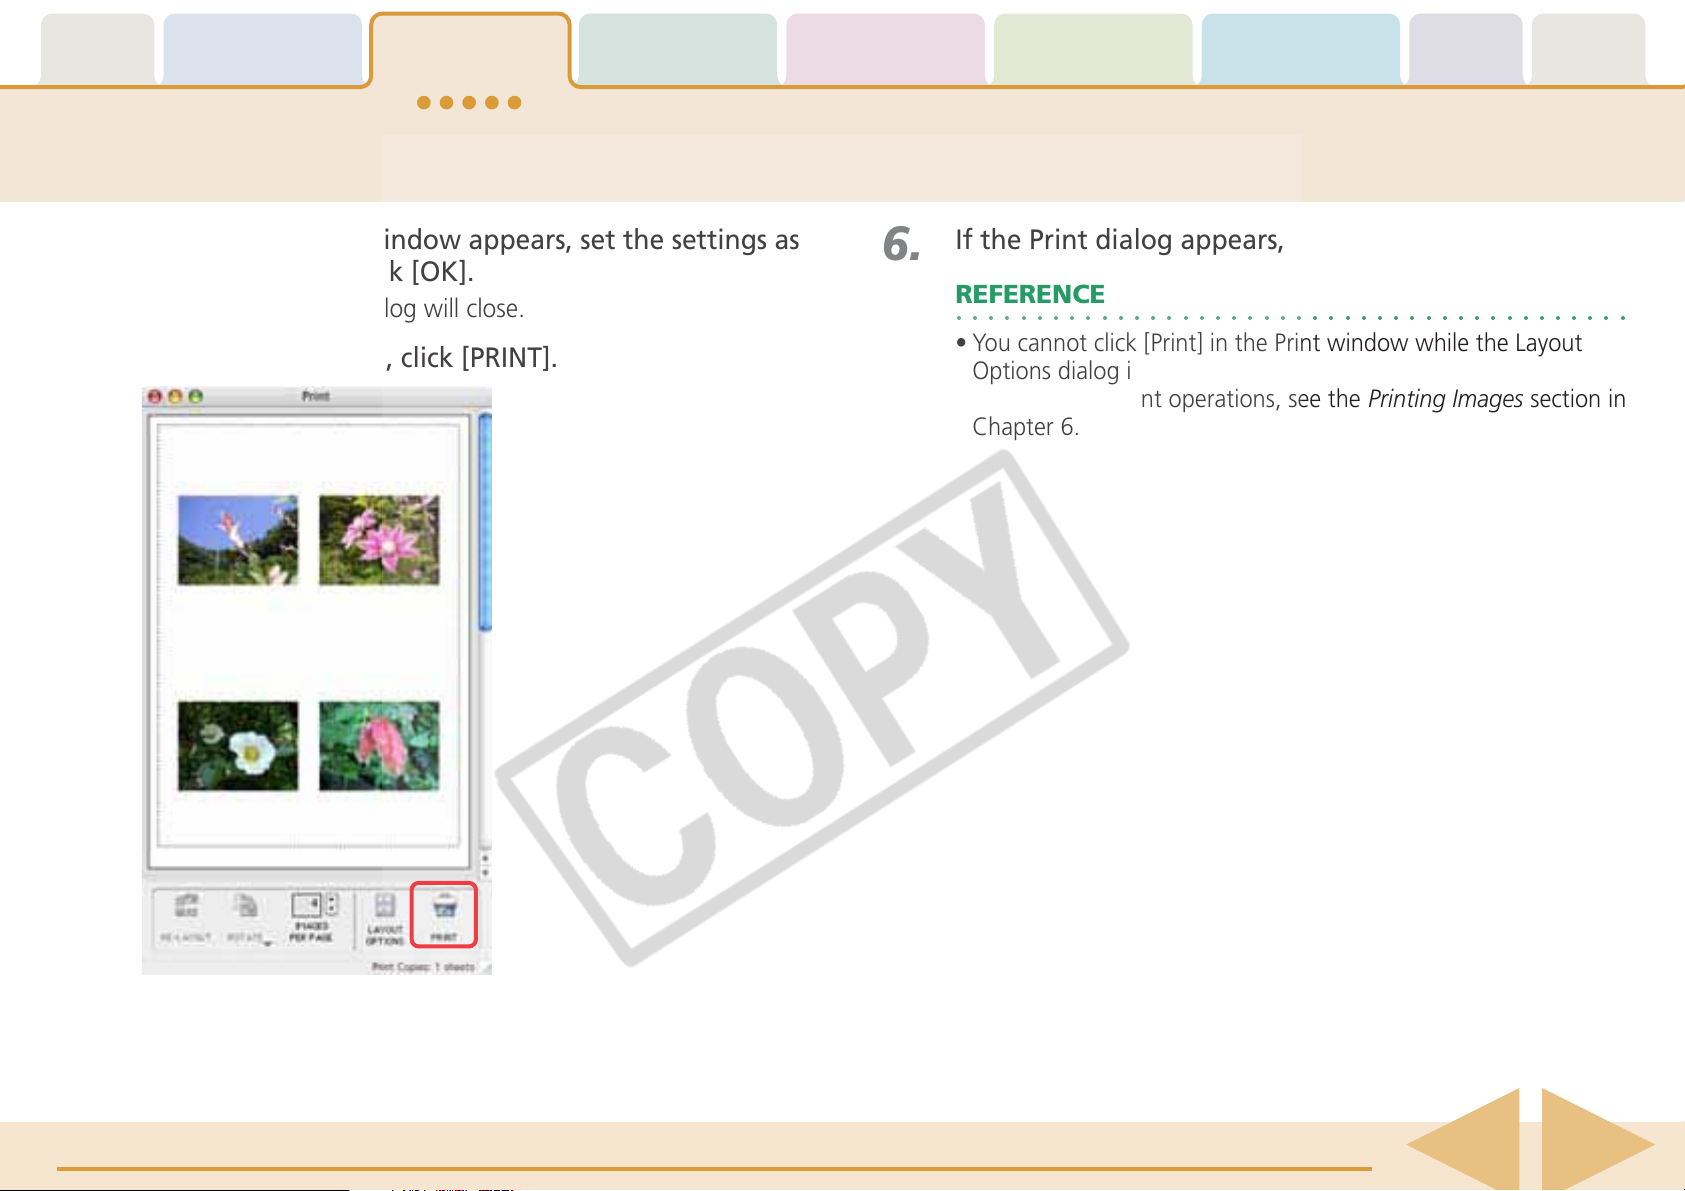
Table of
Contents
Chapter 1
What is
ImageBrowser?
Chapter 2
Downloading and
Printing Images
Printing Images (2/2)
Chapter 3
What You Can Do with
a Camera Connected
Chapter 4
Viewing Images
Chapter 5
Organizing Images
Chapter 6
Using Supplementary
Features
Appendices Index
4.
5.
If the Page Setup window appears, set the settings as
appropriate and click [OK].
The Layout Options dialog will close.
In the Print window, click [PRINT].
6.
If the Print dialog appears, click [Print].
REFERENCE
○○○○○○○○○○○○○○○○○○○○○○○○○○○○○○○○○○○○○○○○○○
• You cannot click [Print] in the Print window while the Layout
Options dialog is open.
• For details on print operations, see the Printing Images section in
Chapter 6.
ImageBrowser Software User Guide 15
Back Next
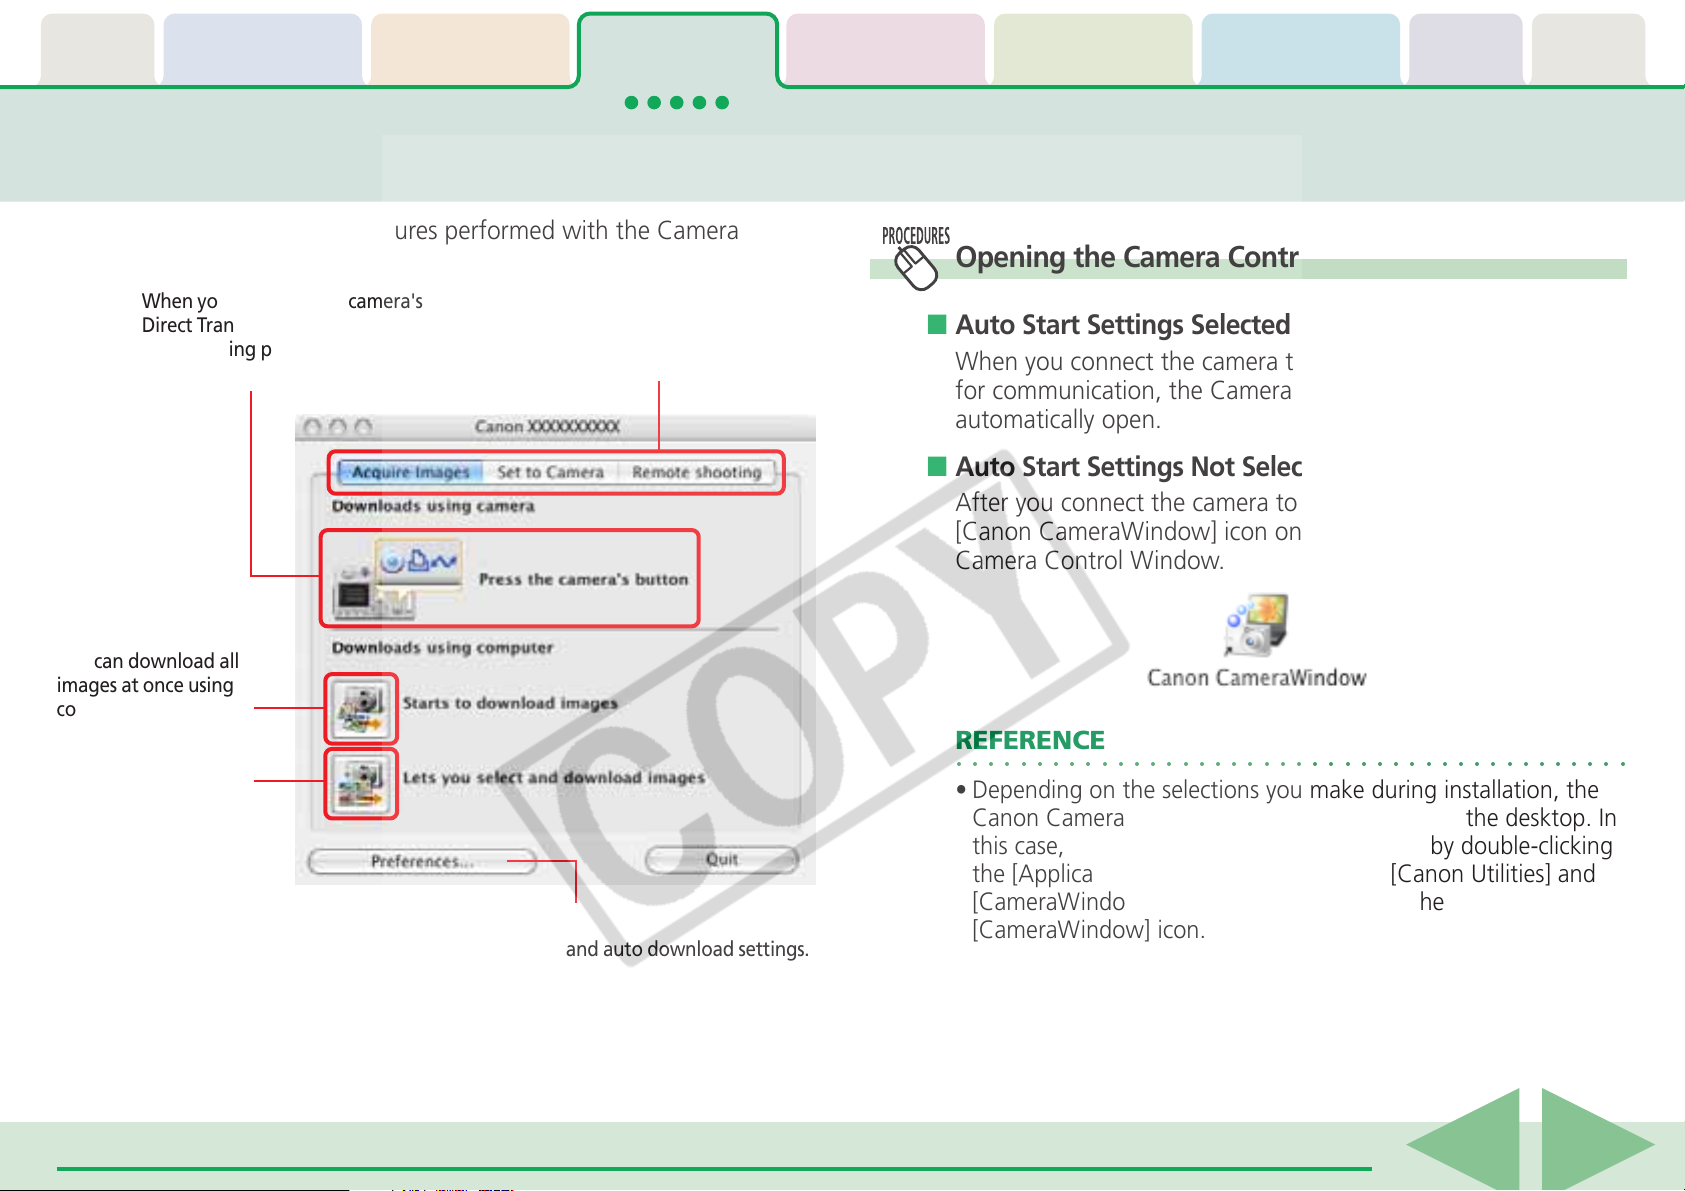
Table of
Contents
Chapter 1
What is
ImageBrowser?
Chapter 2
Downloading and
Printing Images
Chapter 3
What You Can Do with
a Camera Connected
Camera Control Window (1/2)
This chapter explains the procedures performed with the Camera
Control Window.
When you are using the camera's
Direct Transfer function, the
downloading procedures for
camera images are explained here.
Selects a Camera Window
function.
Chapter 4
Viewing Images
■ Auto Start Settings Selected
■ Auto Start Settings Not Selected
Chapter 5
Organizing Images
Chapter 6
Using Supplementary
Features
Appendices Index
Opening the Camera Control Window
When you connect the camera to the computer and prepare it
for communication, the Camera Control Window will
automatically open.
After you connect the camera to the computer, double-click the
[Canon CameraWindow] icon on the desktop to open the
Camera Control Window.
You can download all
images at once using
computer procedures.
REFERENCE
○○○○○○○○○○○○○○○○○○○○○○○○○○○○○○○○○○○○○○○○○○
Or you can check the
images and then
download them using
computer procedures.
• Depending on the selections you make during installation, the
Canon CameraWindow icon may not appear on the desktop. In
this case, open the Camera Control Window by double-clicking
the [Applications] folder, followed by the [Canon Utilities] and
[CameraWindow] folders, and double-click the
Sets the download method, file
destination and auto download settings.
ImageBrowser Software User Guide 16
[CameraWindow] icon.
Back Next
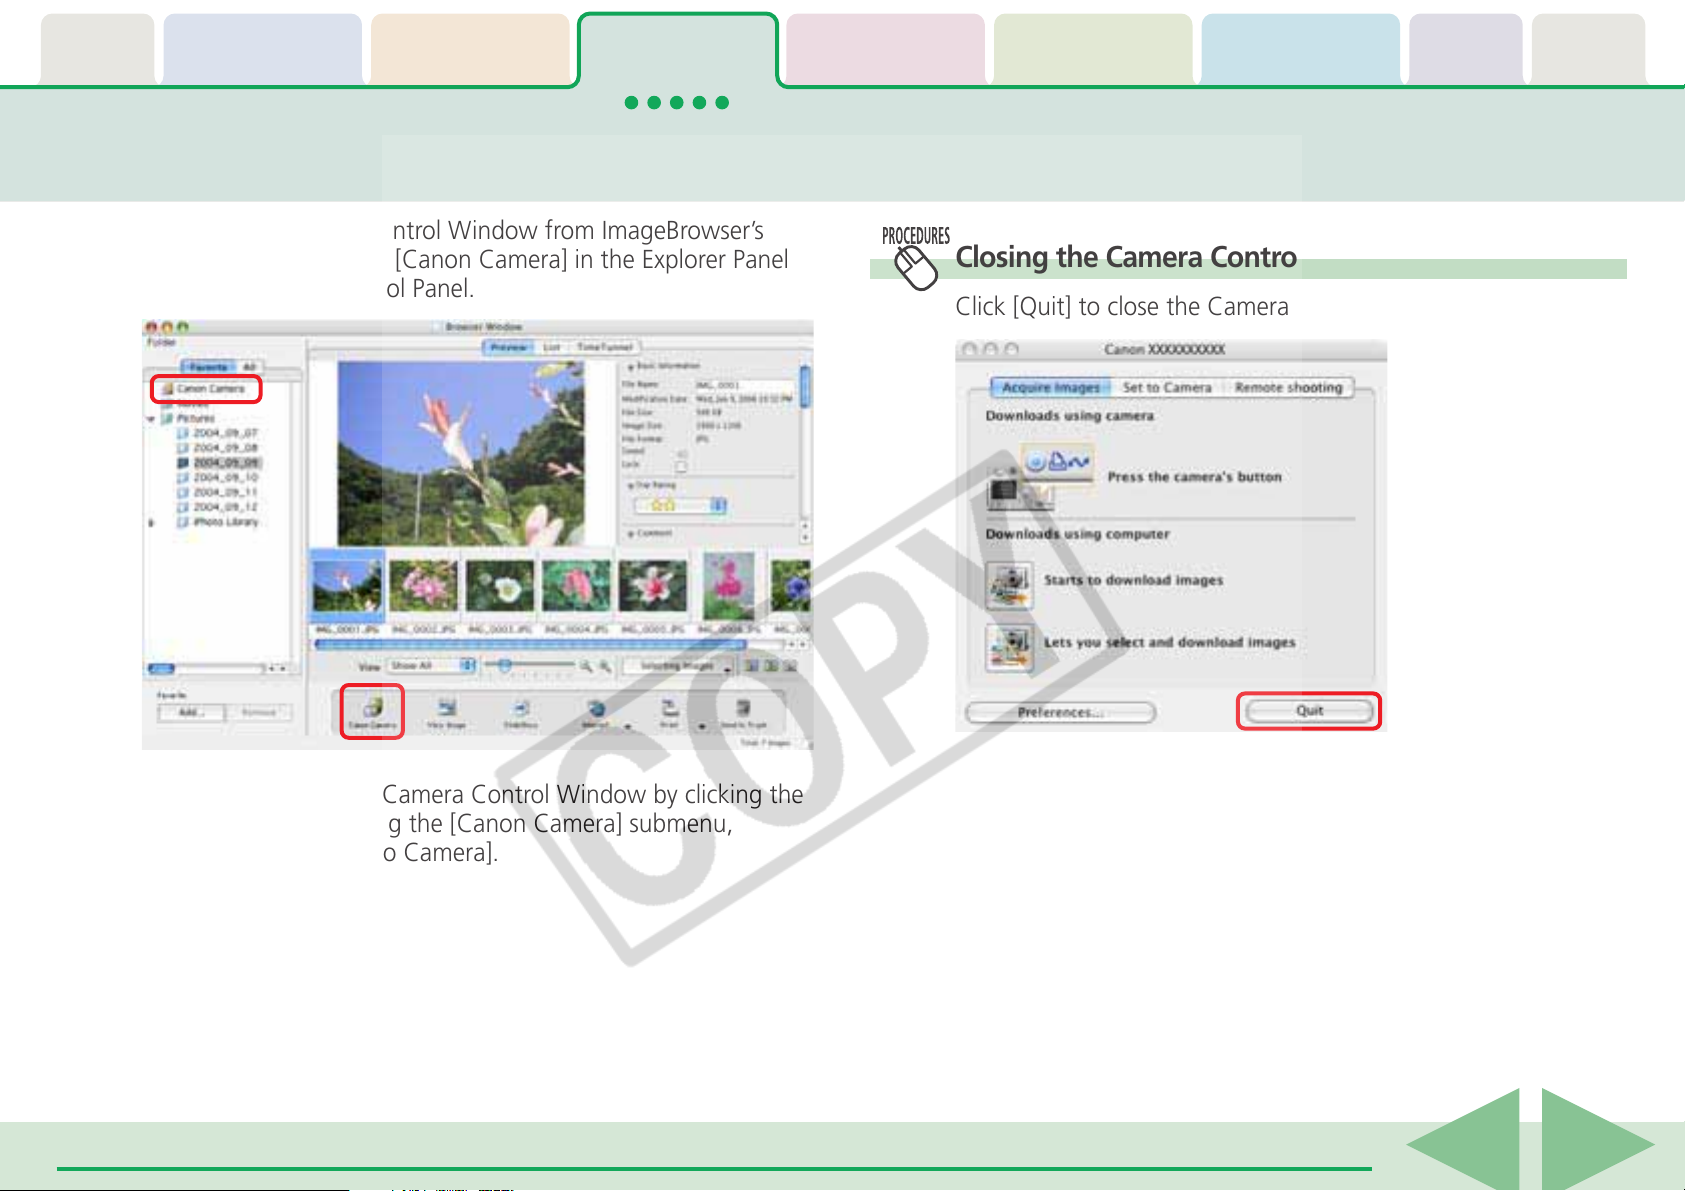
Table of
Contents
Chapter 1
What is
ImageBrowser?
Chapter 2
Downloading and
Printing Images
Chapter 3
What You Can Do with
a Camera Connected
Camera Control Window (2/2)
To open the Camera Control Window from ImageBrowser’s
Browser Window , click [Canon Camera] in the Explorer Panel
section or on the Control Panel.
Chapter 4
Viewing Images
Chapter 5
Organizing Images
Chapter 6
Using Supplementary
Features
Appendices Index
Closing the Camera Control Window
Click [Quit] to close the Camera Control Window.
You can also open the Camera Control Window by clicking the
[File] menu and selecting the [Canon Camera] submenu,
followed by [Connect to Camera].
ImageBrowser Software User Guide 17
Back Next
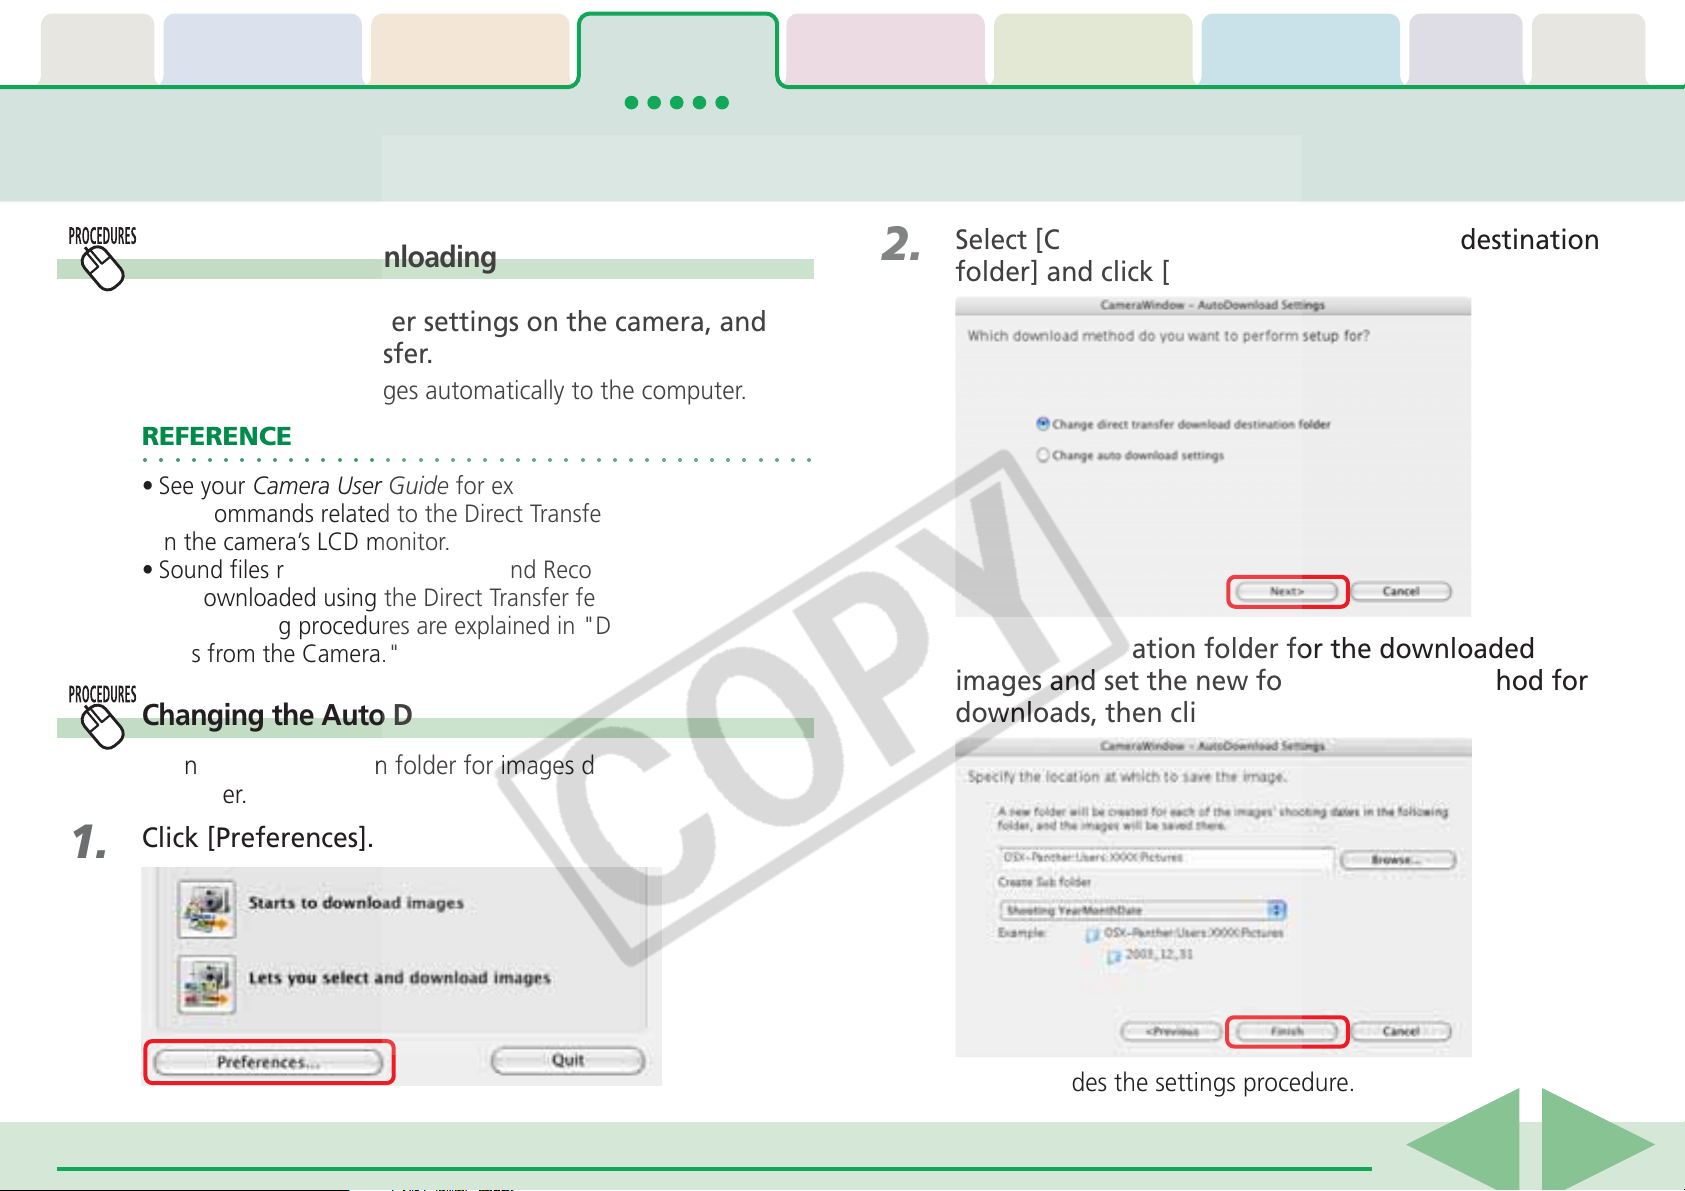
Table of
Contents
Chapter 1
What is
ImageBrowser?
Chapter 2
Downloading and
Printing Images
Chapter 3
What You Can Do with
a Camera Connected
Chapter 4
Viewing Images
Chapter 5
Organizing Images
Chapter 6
Using Supplementary
Features
Appendices Index
Downloading Images Automatically—Camera Operations
1.
Starting Auto Downloading
Set the Direct Transfer settings on the camera, and
start the direct transfer.
This will download images automatically to the computer.
REFERENCE
○○○○○○○○○○○○○○○○○○○○○○○○○○○○○○○○○○○○○○○○○○
• See your Camera User Guide for explanations of the settings
and commands related to the Direct Transfer menu that appears
in the camera’s LCD monitor.
• Sound files recorded using the Sound Recorder feature cannot
be downloaded using the Direct Transfer feature. The
downloading procedures are explained in "Downloading Sound
Files from the Camera."
Changing the Auto Downloading Settings
Change the destination folder for images downloaded to the
computer.
2.
3.
Select [Change direct transfer download destination
folder] and click [Next].
Select a destination folder for the downloaded
images and set the new folder creation method for
downloads, then click [Finish].
1.
Click [Preferences].
This concludes the settings procedure.
ImageBrowser Software User Guide 18
Back Next
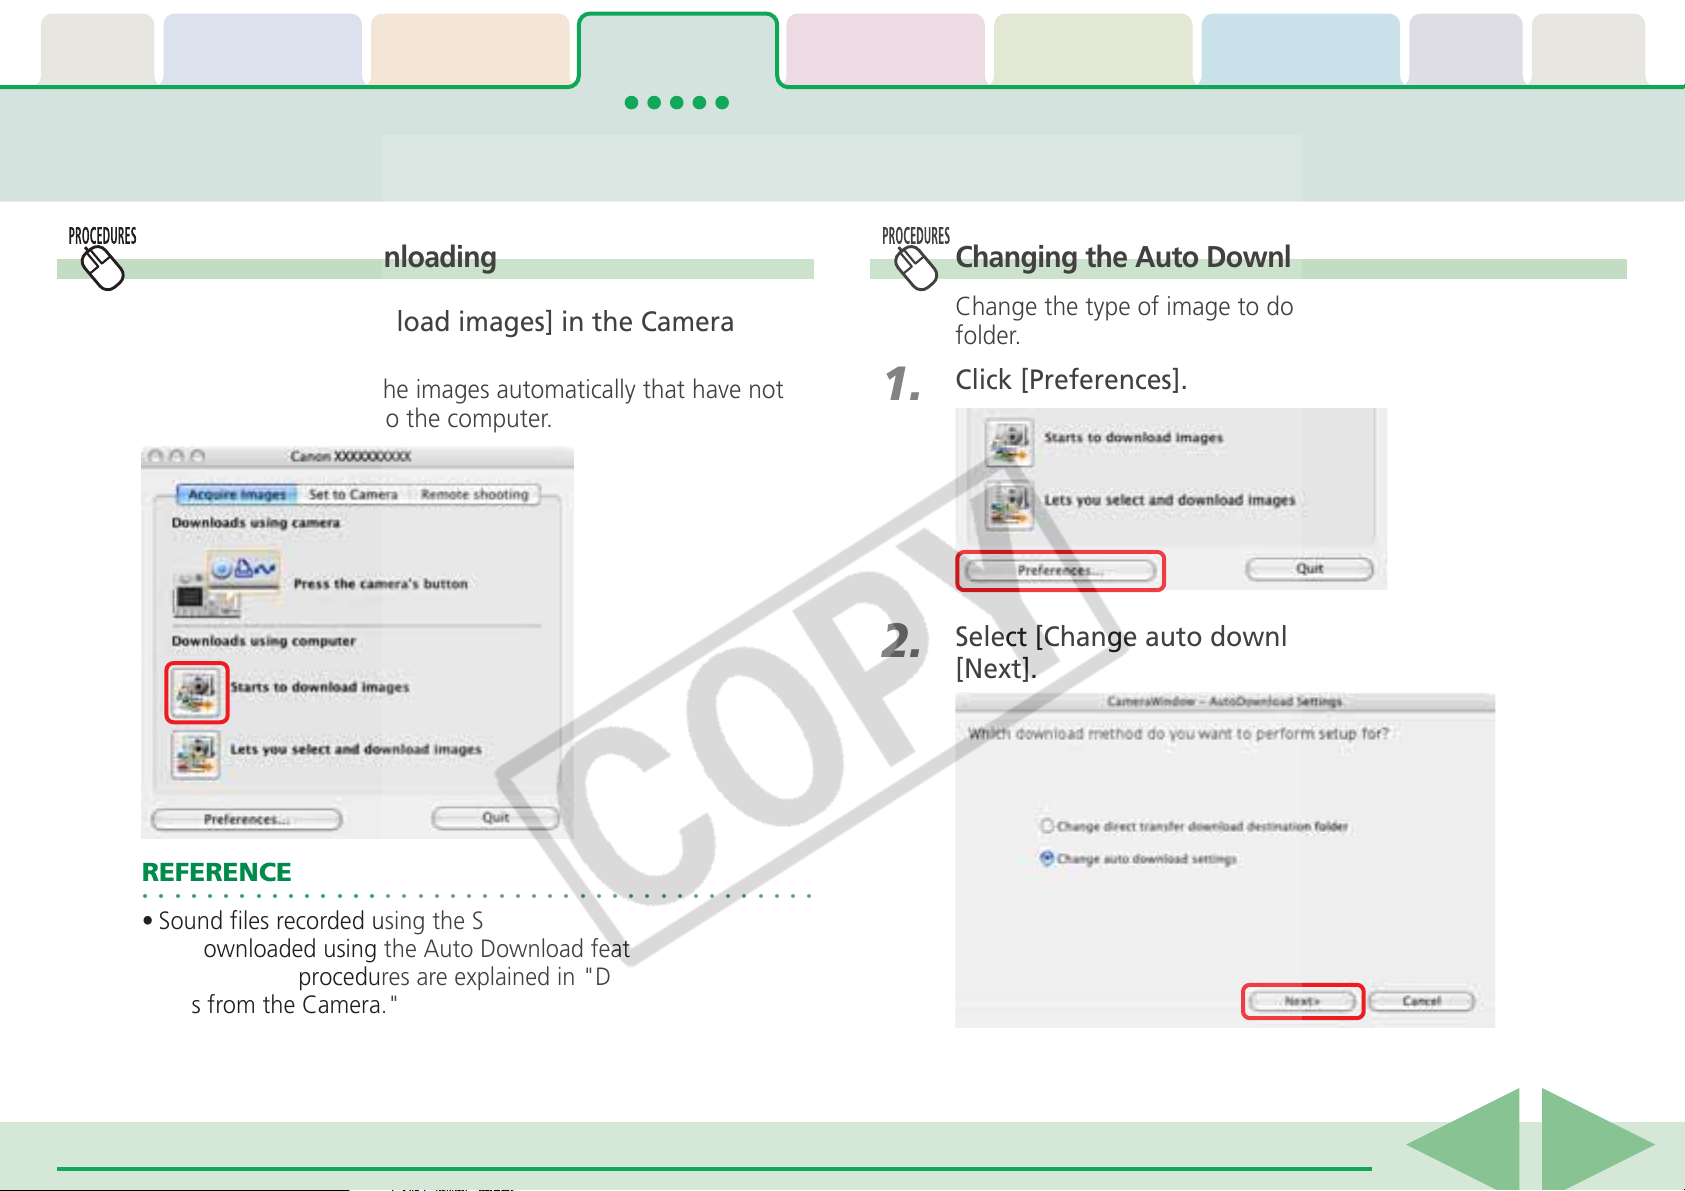
Table of
Contents
Chapter 1
What is
ImageBrowser?
Chapter 2
Downloading and
Printing Images
Chapter 3
What You Can Do with
a Camera Connected
Chapter 4
Viewing Images
Chapter 5
Organizing Images
Chapter 6
Using Supplementary
Features
Appendices Index
Downloading Images Automatically—Computer Operations (1/3)
1.
Starting Auto Downloading
Click [Starts to download images] in the Camera
Control Window.
This will download all the images automatically that have not
yet been downloaded to the computer.
1.
2.
Changing the Auto Download Settings
Change the type of image to download or the destination
folder.
Click [Preferences].
Select [Change auto download settings] and click
[Next].
REFERENCE
○○○○○○○○○○○○○○○○○○○○○○○○○○○○○○○○○○○○○○○○○○
• Sound files recorded using the Sound Recorder feature cannot
be downloaded using the Auto Download feature. The
downloading procedures are explained in "Downloading Sound
Files from the Camera."
ImageBrowser Software User Guide 19
Back Next
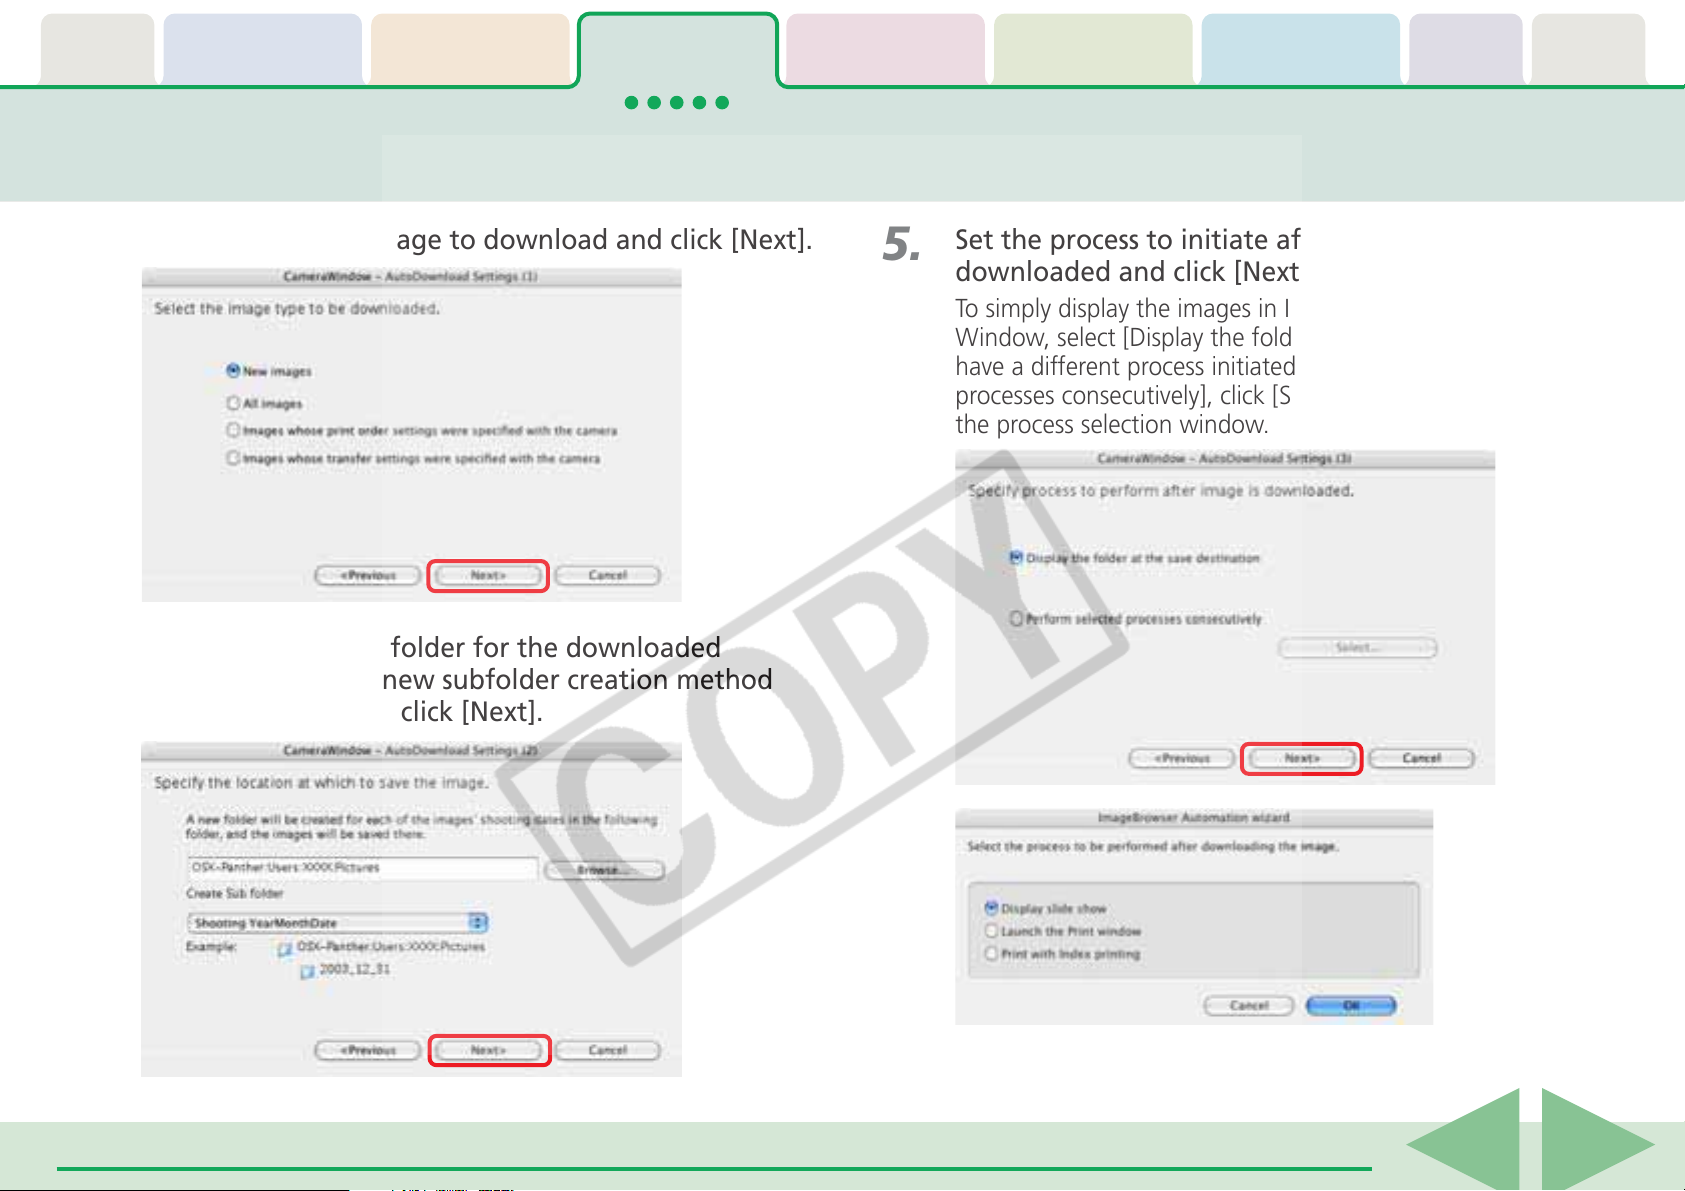
Table of
Contents
Chapter 1
What is
ImageBrowser?
Chapter 2
Downloading and
Printing Images
Chapter 3
What You Can Do with
a Camera Connected
Chapter 4
Viewing Images
Chapter 5
Organizing Images
Chapter 6
Using Supplementary
Features
Appendices Index
Downloading Images Automatically—Computer Operations (2/3)
3.
4.
Select the type of image to download and click [Next].
Select a destination folder for the downloaded
images and set the new subfolder creation method
for downloads, then click [Next].
5.
Set the process to initiate after the images are
downloaded and click [Next].
To simply display the images in ImageBrowser's Browser
Window, select [Display the folder at the save destination]. To
have a different process initiated, select [Perform selected
processes consecutively], click [Select] and select a process in
the process selection window.
ImageBrowser Software User Guide 20
Back Next
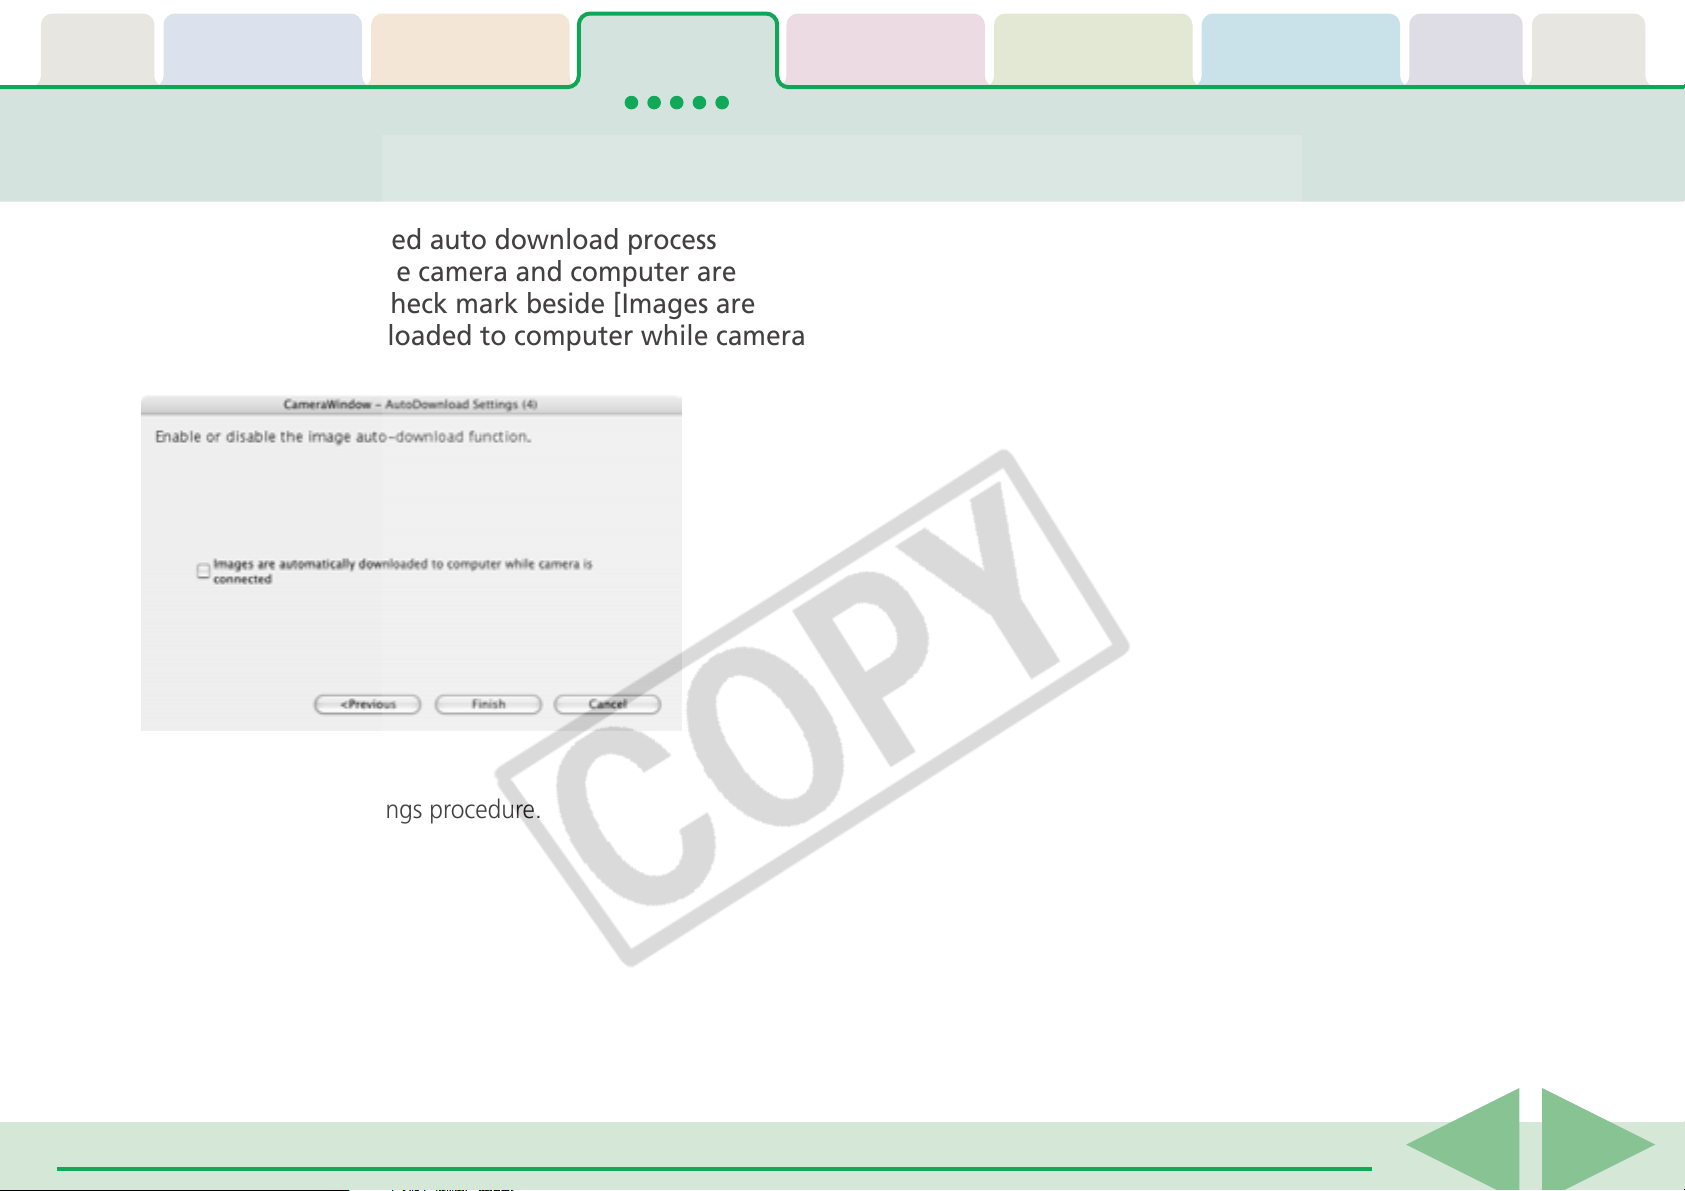
Table of
Contents
Chapter 1
What is
ImageBrowser?
Chapter 2
Downloading and
Printing Images
Chapter 3
What You Can Do with
a Camera Connected
Chapter 4
Viewing Images
Chapter 5
Organizing Images
Chapter 6
Using Supplementary
Features
Appendices Index
Downloading Images Automatically—Computer Operations (3/3)
6.
7.
To initiate the selected auto download process
immediately after the camera and computer are
connected, place a check mark beside [Images are
automatically downloaded to computer while camera
is connected].
Click [Finish].
This concludes the settings procedure.
ImageBrowser Software User Guide 21
Back Next
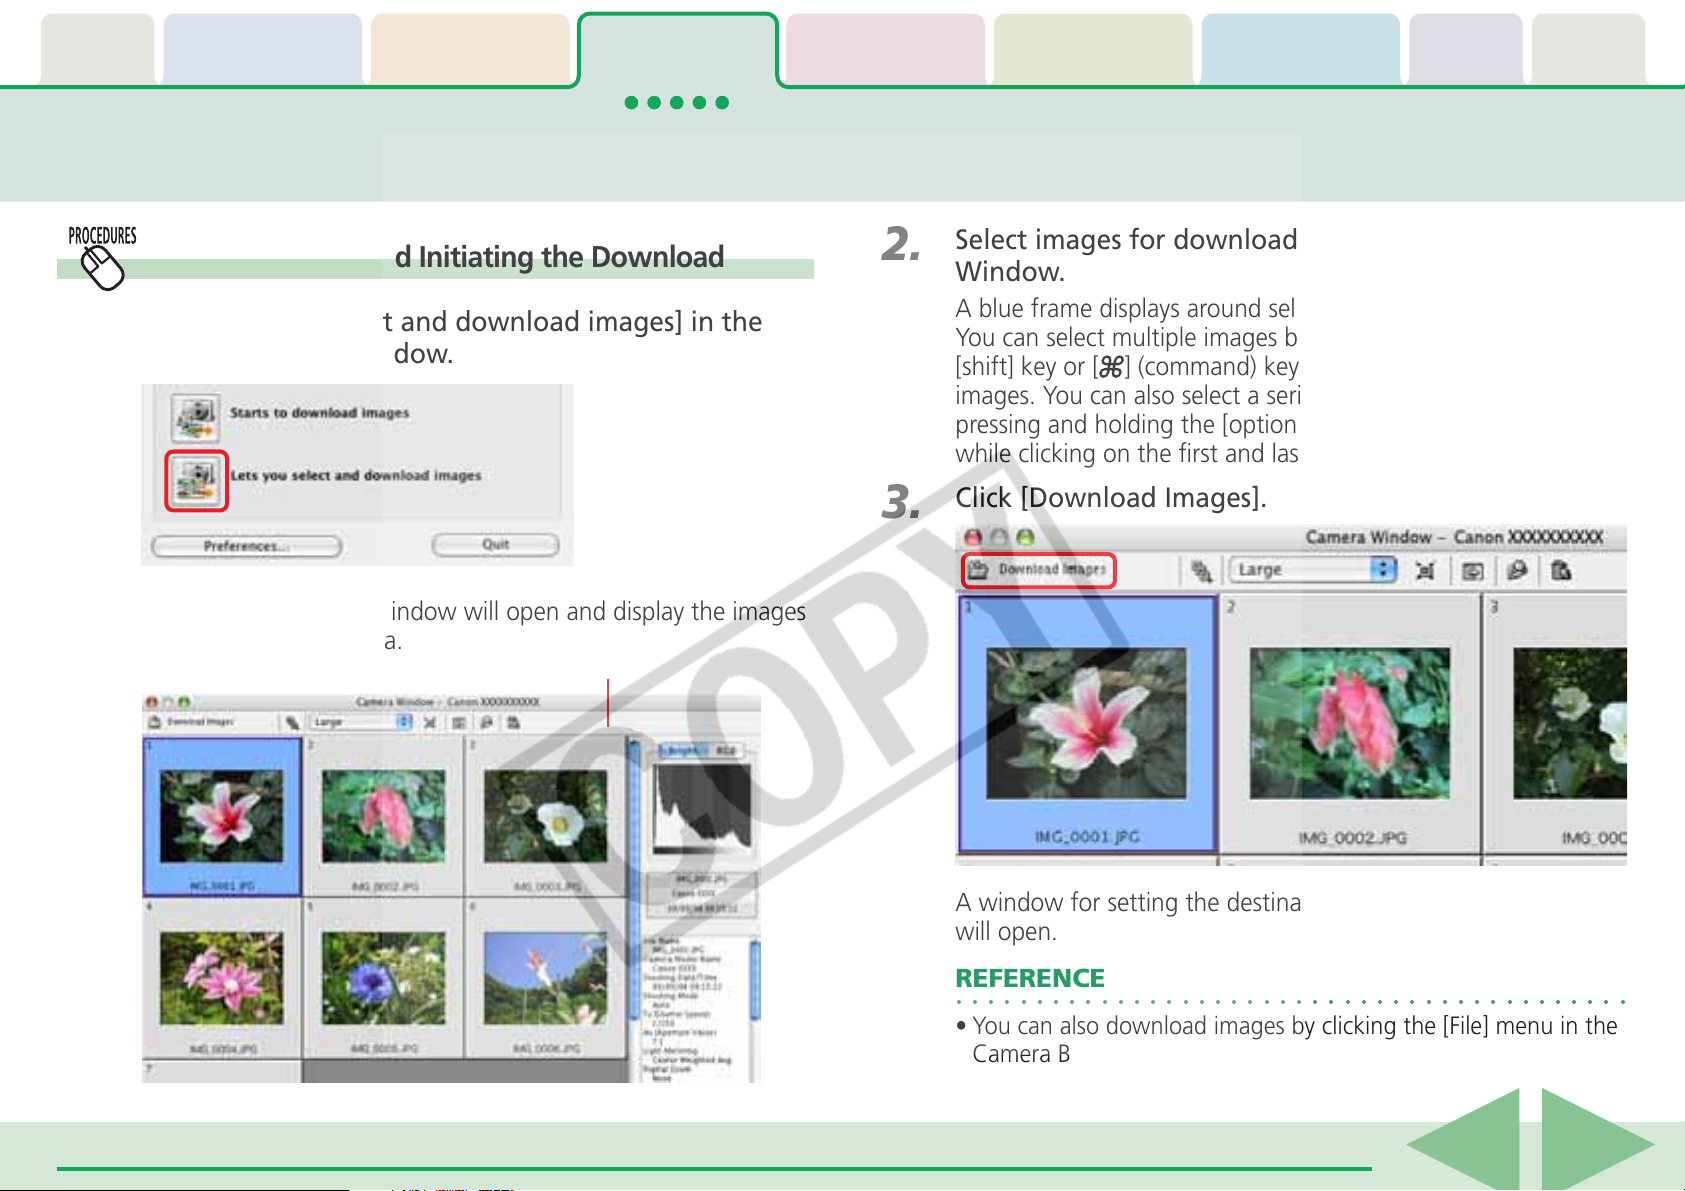
Table of
Contents
Chapter 1
What is
ImageBrowser?
Chapter 2
Downloading and
Printing Images
Chapter 3
What You Can Do with
a Camera Connected
Chapter 4
Viewing Images
Chapter 5
Organizing Images
Chapter 6
Using Supplementary
Features
Appendices Index
Checking Images in the Camera before Downloading (1/2)
1.
Selecting Images and Initiating the Download
Click [Lets you select and download images] in the
Camera Control Window.
The Camera Browser Window will open and display the images
contained in the camera.
Camera Browser Window
2.
3.
Select images for downloading in the Camera Browser
Window.
A blue frame displays around selected images.
You can select multiple images by pressing and holding the
[shift] key or [
] (command) key while you click on successive
images. You can also select a series of adjacent images by
pressing and holding the [option] and [shift] keys together
while clicking on the first and last images.
Click [Download Images].
A window for setting the destination folder and other settings
will open.
REFERENCE
○○○○○○○○○○○○○○○○○○○○○○○○○○○○○○○○○○○○○○○○○○
• You can also download images by clicking the [File] menu in the
Camera Browser Window and selecting [Download].
ImageBrowser Software User Guide 22
Back Next
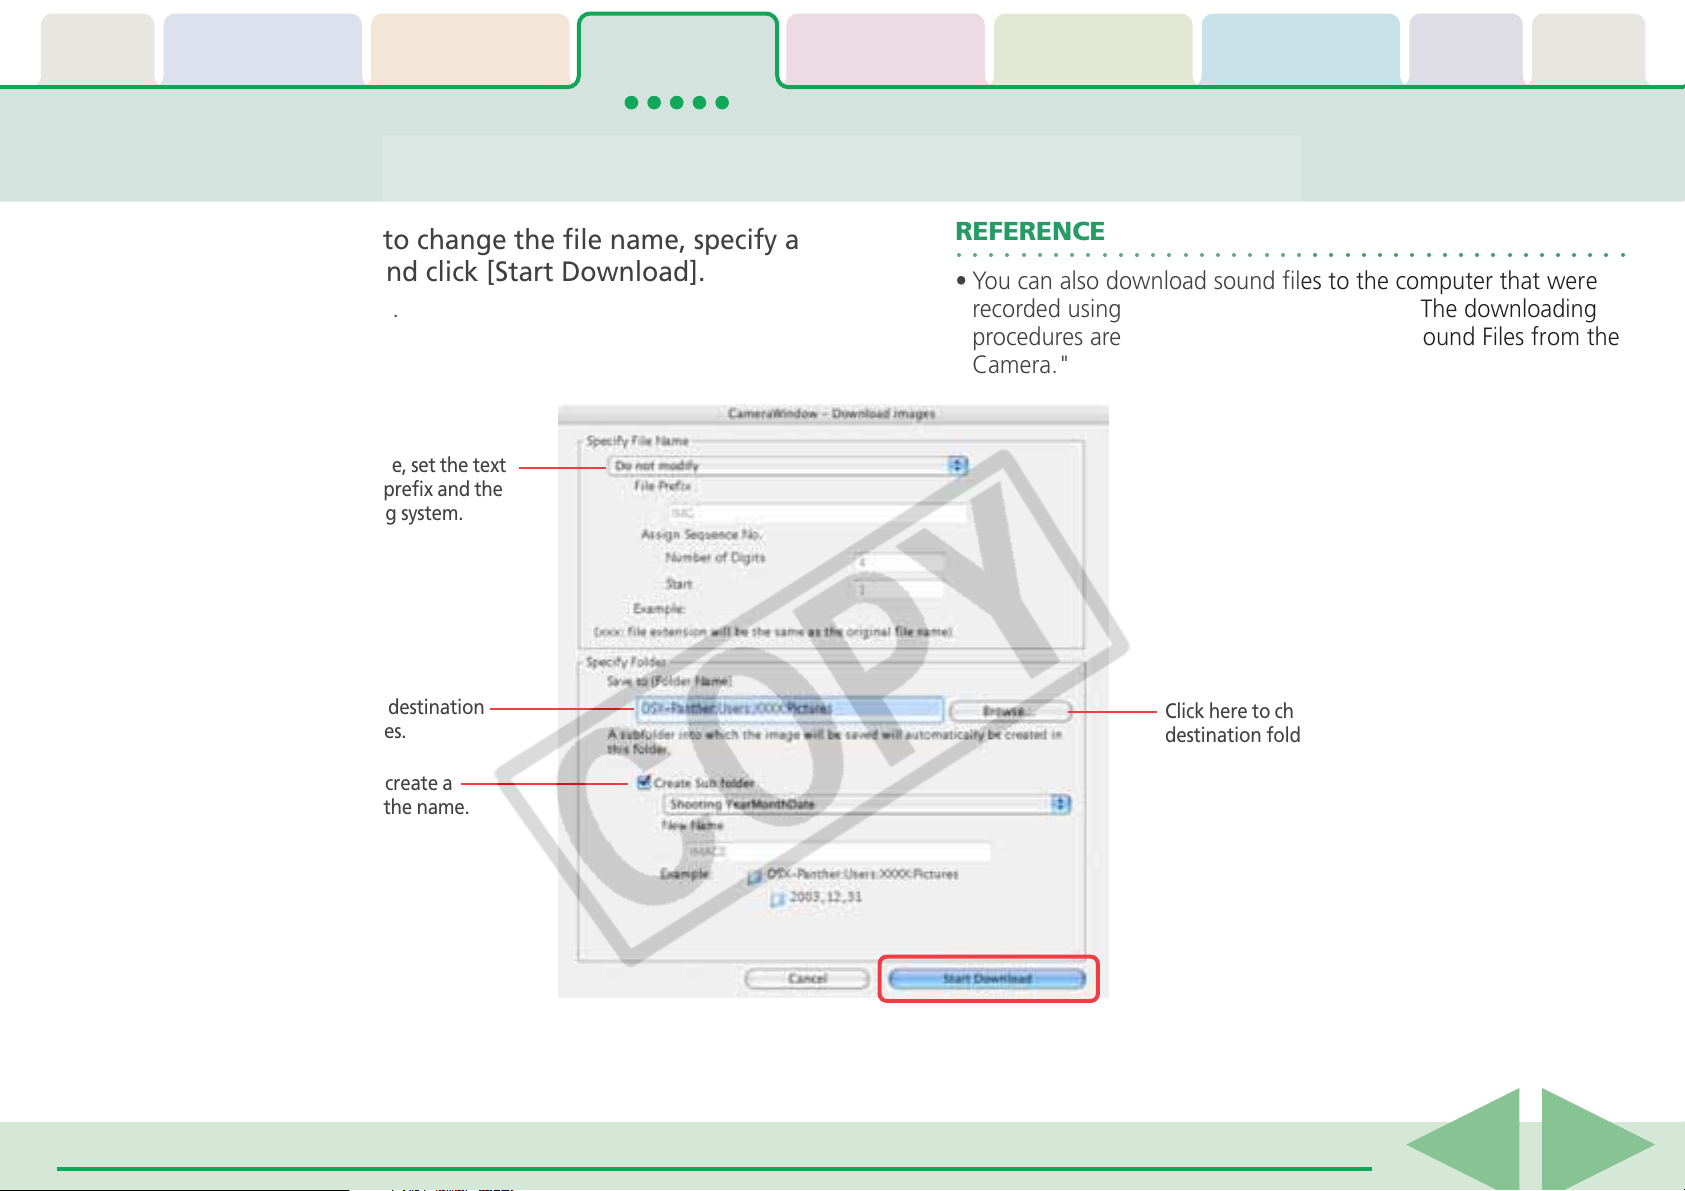
Table of
Contents
Chapter 1
What is
ImageBrowser?
Chapter 2
Downloading and
Printing Images
Chapter 3
What You Can Do with
a Camera Connected
Chapter 4
Viewing Images
Chapter 5
Organizing Images
Chapter 6
Using Supplementary
Features
Appendices Index
Checking Images in the Camera before Downloading (2/2)
4.
Set whether or not to change the file name, specify a
destination folder and click [Start Download].
The image will be saved.
To change the file name, set the text
characters for the file prefix and the
consecutive numbering system.
Specify a folder as the destination
for downloaded images.
Set whether or not to create a
subfolder and specify the name.
REFERENCE
○○○○○○○○○○○○○○○○○○○○○○○○○○○○○○○○○○○○○○○○○○
• You can also download sound files to the computer that were
recorded using the Sound Recorder feature. The downloading
procedures are explained in "Downloading Sound Files from the
Camera."
Click here to change the
destination folder.
ImageBrowser Software User Guide 23
Back Next
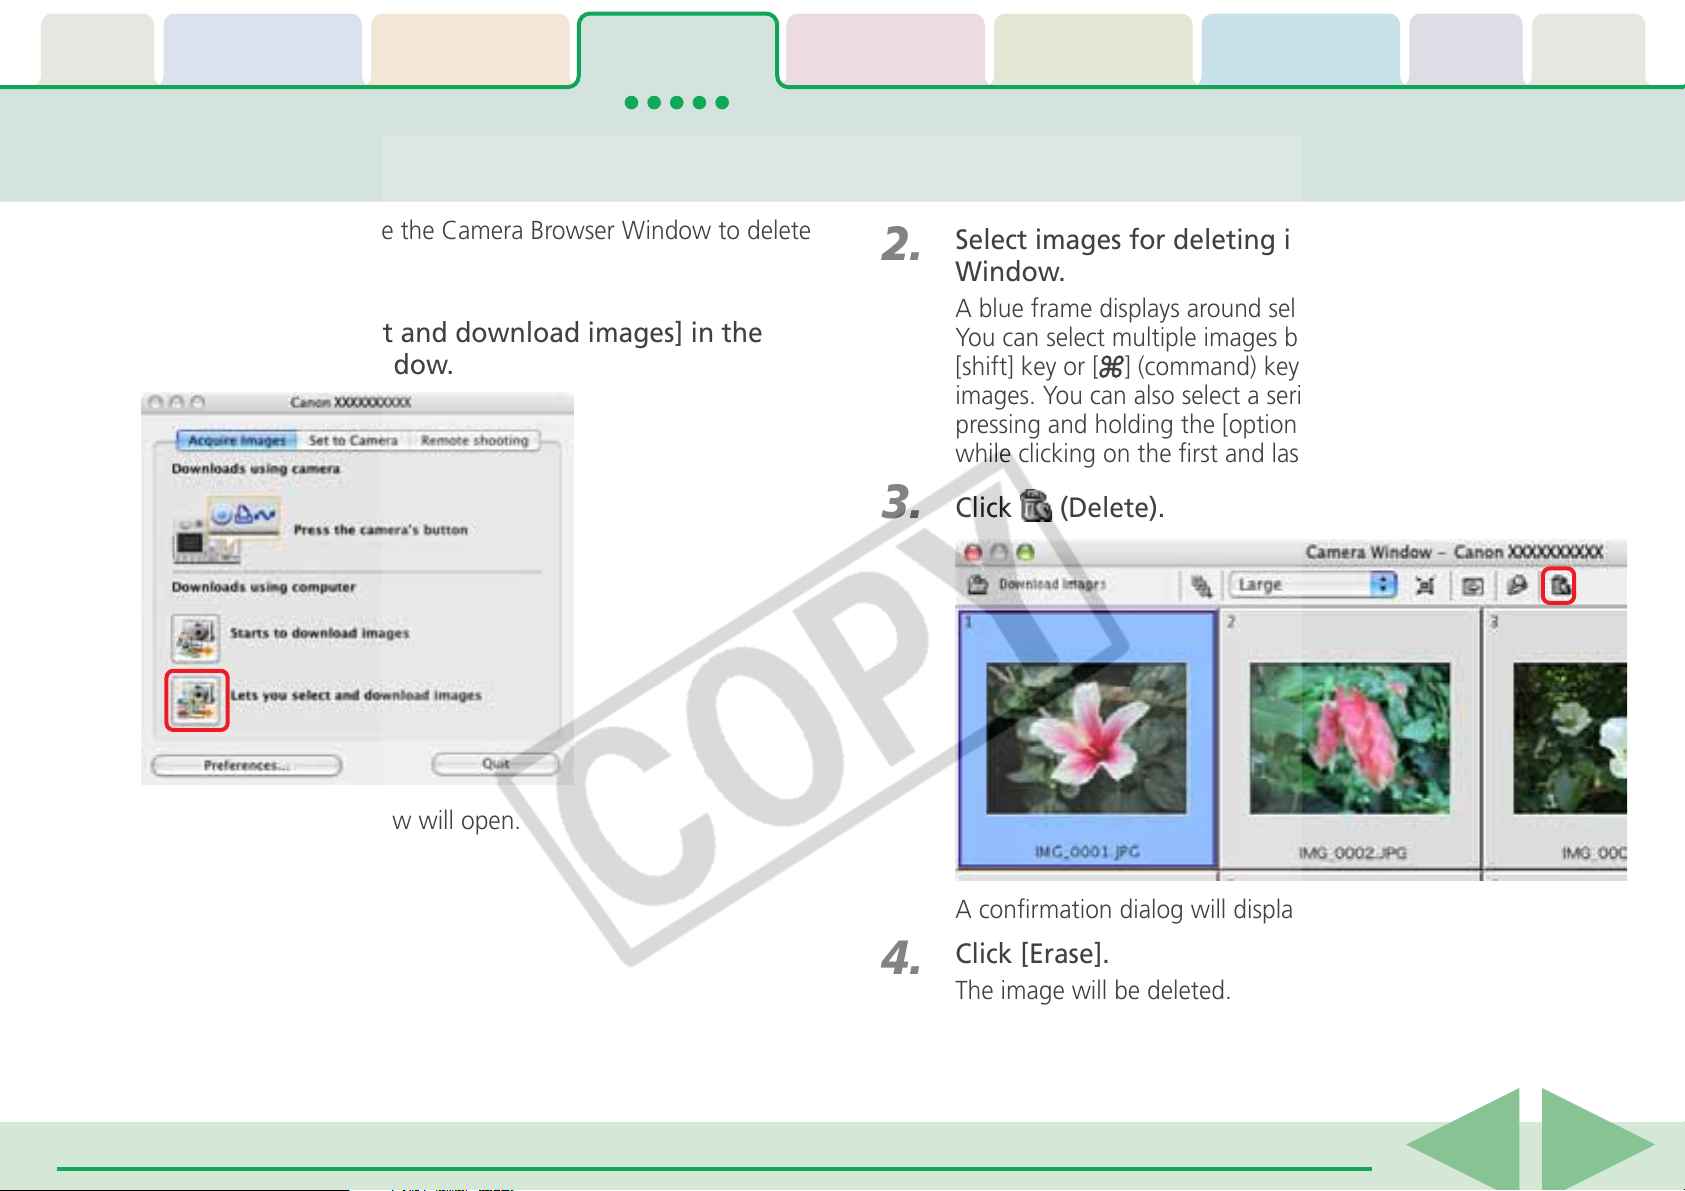
Table of
Contents
Chapter 1
What is
ImageBrowser?
Chapter 2
Downloading and
Printing Images
Chapter 3
What You Can Do with
a Camera Connected
Chapter 4
Viewing Images
Deleting Images from the Camera
Chapter 5
Organizing Images
Chapter 6
Using Supplementary
Features
Appendices Index
This section explains how to use the Camera Browser Window to delete
images from the camera.
1.
Click [Lets you select and download images] in the
Camera Control Window.
2.
3.
Select images for deleting in the Camera Browser
Window.
A blue frame displays around selected images.
You can select multiple images by pressing and holding the
[shift] key or [
] (command) key while you click on successive
images. You can also select a series of adjacent images by
pressing and holding the [option] and [shift] keys together
while clicking on the first and last images.
Click (Delete).
Camera Browser Window will open.
A confirmation dialog will display.
4.
Click [Erase].
The image will be deleted.
ImageBrowser Software User Guide 24
Back Next
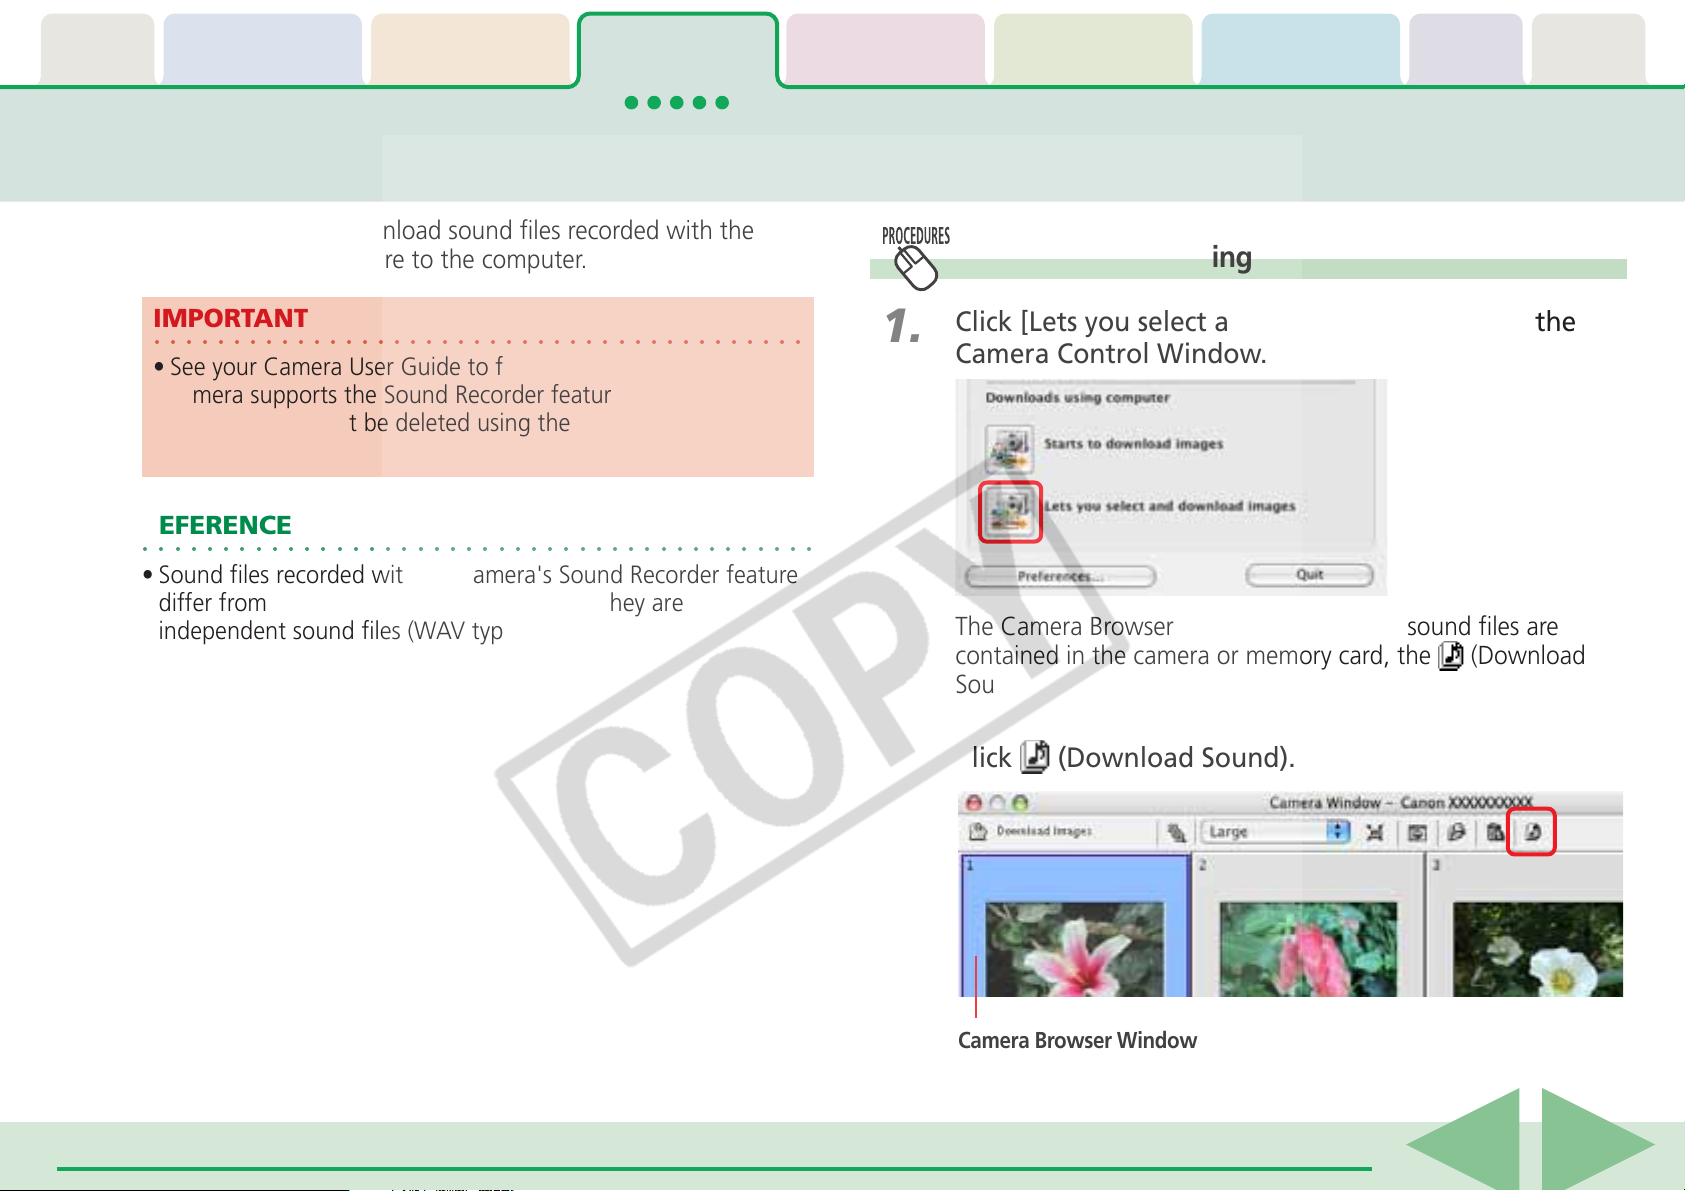
Table of
Contents
Chapter 1
What is
ImageBrowser?
Chapter 2
Downloading and
Printing Images
Chapter 3
What You Can Do with
a Camera Connected
Chapter 4
Viewing Images
Chapter 5
Organizing Images
Using Supplementary
Downloading Sound Files from the Camera (1/3)
This topic explains how to download sound files recorded with the
camera's Sound Recorder feature to the computer.
Initiating Downloading
Chapter 6
Appendices Index
Features
IMPORTANT
○○○○○○○○○○○○○○○○○○○○○○○○○○○○○○○○○○○○○○○○○
• See your Camera User Guide to find out whether or not your
camera supports the Sound Recorder feature.
• Sound files cannot be deleted using the Camera Browser
Window.
REFERENCE
○○○○○○○○○○○○○○○○○○○○○○○○○○○○○○○○○○○○○○○○○○
• Sound files recorded with the camera's Sound Recorder feature
differ from the sounds attached to images. They are
independent sound files (WAV type).
1.
2.
Click [Lets you select and download images] in the
Camera Control Window.
The Camera Browser Window will open. If sound files are
contained in the camera or memory card, the
(Download
Sound) button will display.
Click (Download Sound).
Camera Browser Window
ImageBrowser Software User Guide 25
Back Next

Table of
Contents
Chapter 1
What is
ImageBrowser?
Chapter 2
Downloading and
Printing Images
Chapter 3
What You Can Do with
a Camera Connected
Chapter 4
Viewing Images
Chapter 5
Organizing Images
Using Supplementary
Downloading Sound Files from the Camera (2/3)
Chapter 6
Appendices Index
Features
A list of sound files will display.
This symbol appears if the file is protected.
This symbol appears if the file has been
downloaded to the computer previously.
3.
4.
Select sound file(s) to download.
The selected files display in blue.
You can select multiple files by pressing and holding the [shift]
or [
] (Command) key while you click on successive files. If you
hold down the [option] and [shift] keys together and click on
two files, you can select all the files between them.
REFERENCE
○○○○○○○○○○○○○○○○○○○○○○○○○○○○○○○○○○○○○○○○○○
• It is convenient to use the [Select Files] menu to select all the
files, to deselect files, to select protected files or to select files
that have not yet been downloaded.
Click [Download Sound].
REFERENCE
○○○○○○○○○○○○○○○○○○○○○○○○○○○○○○○○○○○○○○○○○○
• You can also display the list of sound files by clicking the [File]
menu in the Camera Browser Window and selecting [Download
Sound Files].
A window for setting the destination folder and other settings
will open.
ImageBrowser Software User Guide 26
Back Next
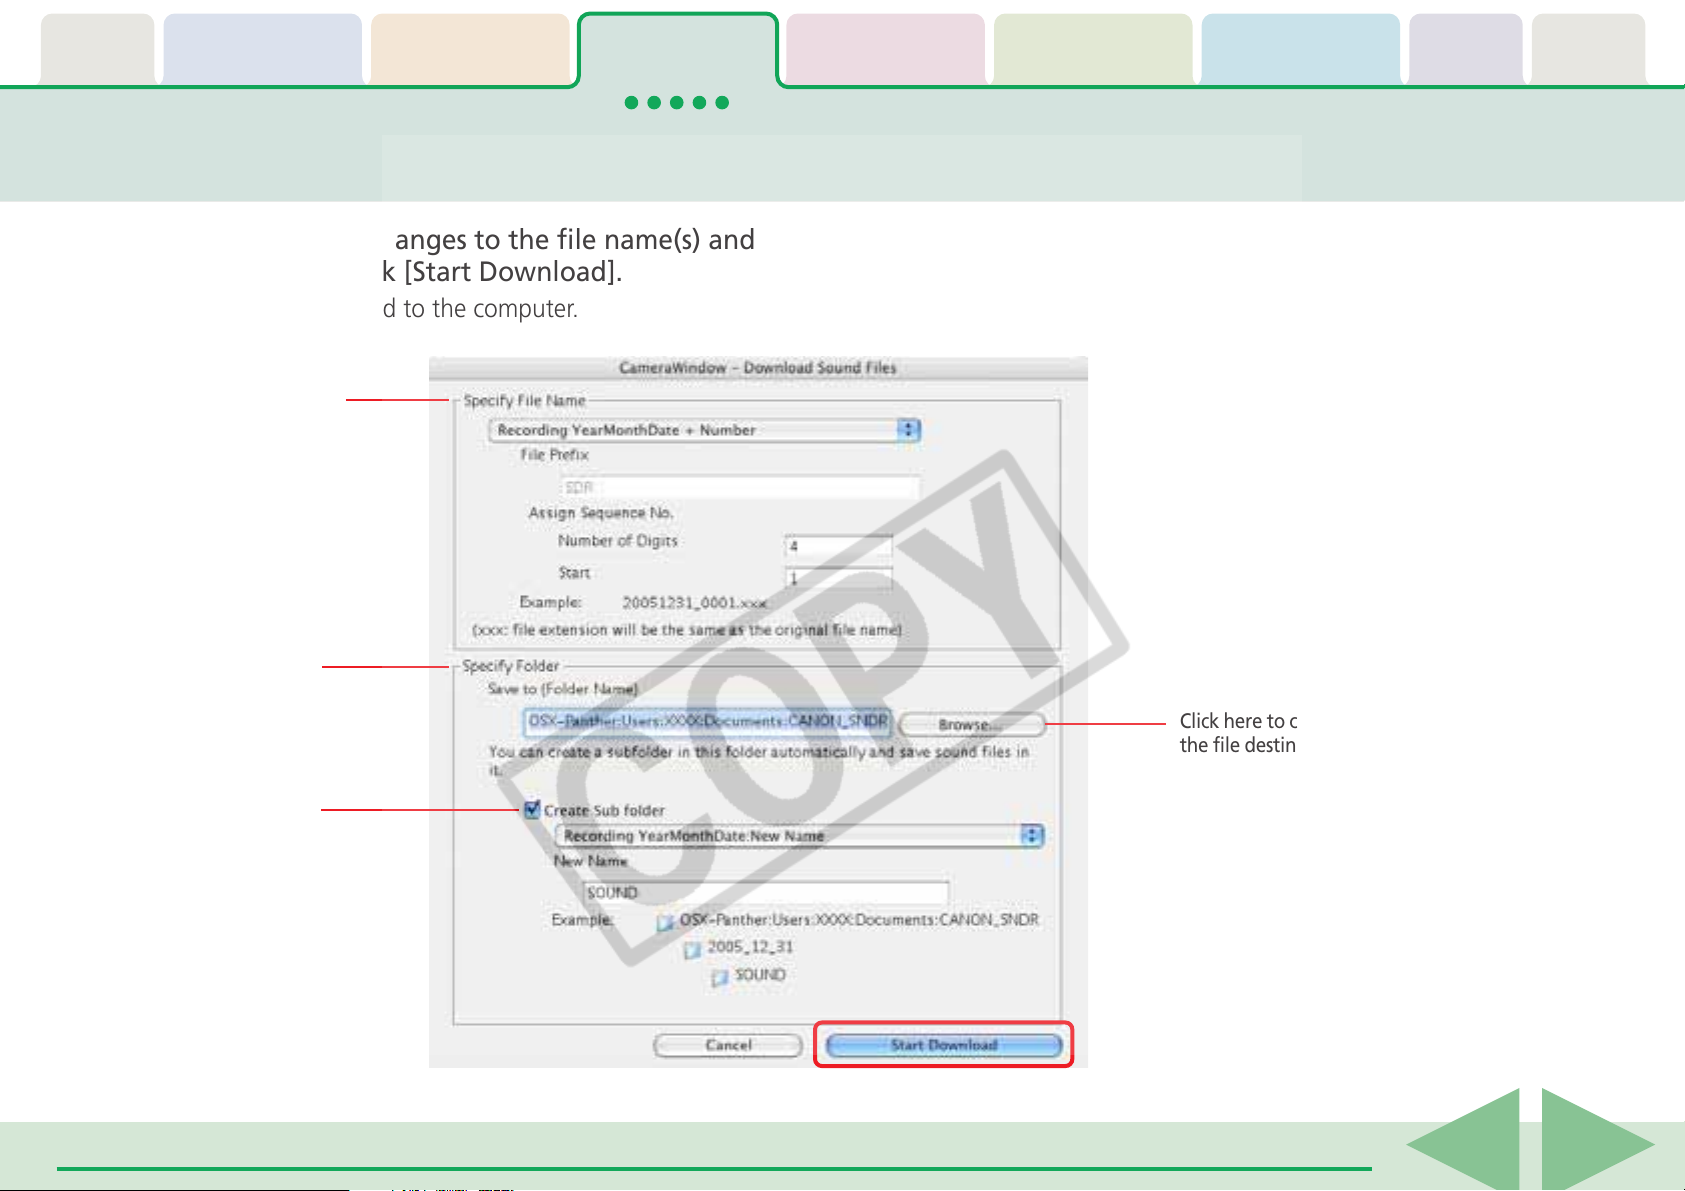
Table of
Contents
Chapter 1
What is
ImageBrowser?
Chapter 2
Downloading and
Printing Images
Chapter 3
What You Can Do with
a Camera Connected
Chapter 4
Viewing Images
Chapter 5
Organizing Images
Using Supplementary
Downloading Sound Files from the Camera (3/3)
Chapter 6
Appendices Index
Features
5.
Make any desired changes to the file name(s) and
destination and click [Start Download].
The file(s) will download to the computer.
Sets the text string and
numbering scheme if
you are making changes
to the file name(s).
Sets the destination
folder for the file(s).
Click here to change
the file destination.
Sets whether or not
subfolders are created
and how they are named.
ImageBrowser Software User Guide 27
Back Next

Table of
Contents
Chapter 1
What is
ImageBrowser?
Chapter 2
Downloading and
Printing Images
Chapter 3
What You Can Do with
a Camera Connected
Chapter 4
Viewing Images
Chapter 5
Organizing Images
Using Supplementary
Other Features of the Camera Browser Window
Chapter 6
Appendices Index
Features
This section explains the other features of the Camera Browser
Window.
Selects whether the image border and image number are
shown or hidden.
Changes the size of the image
thumbnail (tiny version).
Selects the image selection
method.
REFERENCE
○○○○○○○○○○○○○○○○○○○○○○○○○○○○○○○○○○○○○○○○○○
• You can also download images displayed in the Camera Browser
Window by dragging and dropping them into ImageBrowser’s
Browser Area or Explorer Panel section.
Selects whether the image information at the
window’s right is shown or hidden.
Starts ImageBrowser.
Displays separate histograms
of brightness or RGB data.
Histogram
Image Information
ImageBrowser Software User Guide 28
Back Next

Table of
Contents
Chapter 1
What is
ImageBrowser?
Chapter 2
Downloading and
Printing Images
Chapter 3
What You Can Do with
a Camera Connected
Chapter 4
Viewing Images
Chapter 5
Organizing Images
Chapter 6
Using Supplementary
Features
Saving the “My Camera Settings” to the Camera (1/8)
This section explains how to save the “My Camera Settings” on your
computer to the camera or vice versa.
What are the My Camera settings?
Displaying the My Camera window
Display the existing My Camera Settings supplied with
ImageBrowser.
Appendices Index
The start-up image for the camera and sounds such as the
start-up sound, the shutter sound, operation sound and the
self-timer sound are collectively referred to as the My Camera
Settings. You can add your favorite images and sounds from
your computer to the My Camera Settings in the camera.
1.
2.
Click the [Set to Camera] tab in the Camera Control
Window.
Click [Set My Camera].
The My Camera window displays.
ImageBrowser Software User Guide 29
Back Next
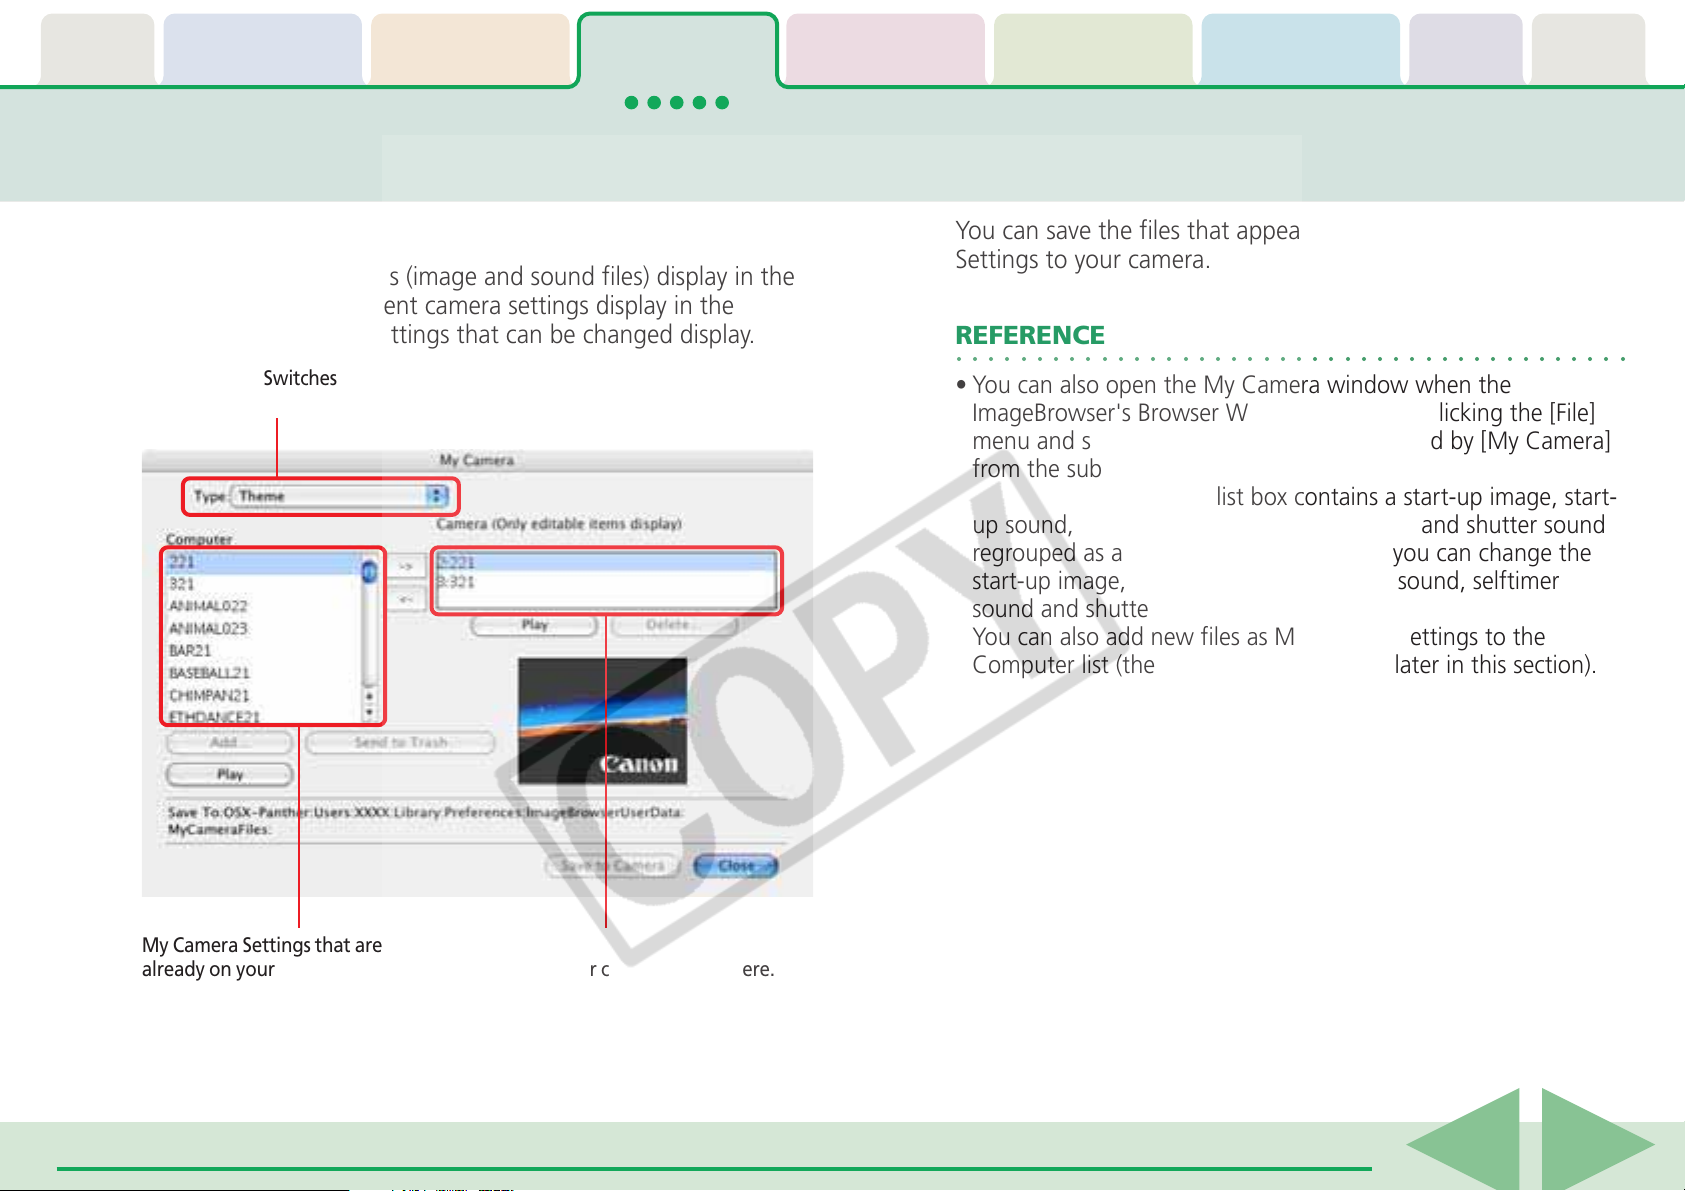
Table of
Contents
Chapter 1
What is
ImageBrowser?
Chapter 2
Downloading and
Printing Images
Chapter 3
What You Can Do with
a Camera Connected
Chapter 4
Viewing Images
Chapter 5
Organizing Images
Chapter 6
Using Supplementary
Features
Saving the “My Camera Settings” to the Camera (2/8)
Appendices Index
3.
Change the [Type].
The My Camera Settings (image and sound files) display in the
Computer list. The current camera settings display in the
Camera list. Only the settings that can be changed display.
Switches between
settings types.
You can save the files that appear in this list as My Camera
Settings to your camera.
REFERENCE
○○○○○○○○○○○○○○○○○○○○○○○○○○○○○○○○○○○○○○○○○○
• You can also open the My Camera window when the
ImageBrowser's Browser Window is open by clicking the [File]
menu and selecting [Canon Camera], followed by [My Camera]
from the submenu.
• The theme in the [Type] list box contains a start-up image, startup sound, operation sound, selftimer sound and shutter sound
regrouped as a set. By selecting a theme, you can change the
start-up image, start-up sound, operation sound, selftimer
sound and shutter sound in one easy step.
• You can also add new files as My Camera Settings to the
Computer list (the procedure is explained later in this section).
My Camera Settings that are
already on your computer
display here.
ImageBrowser Software User Guide 30
My Camera Settings in
your camera display here.
Back Next
 Loading...