

Canon PowerShot S230 DIGITAL ELPH, PowerShot Digital IXUS V3, Digital ELPH, PowerShot S230 Digital IXUS V3, DIGITAL IXUS V3 Connection Manual

2002 CANON INC. PRINTED IN JAPAN
• (*1) Also available for purchase separately.
• (*2) Not sold in some regions.
• For more information, see the Quick Start Guide supplied with the Bubble Jet
Printer
For customers who have purchased the S820D BJ Printer: If two direct interface
cables are not included with your printer, please contact your nearest support
center for BJ printers.
Canon Digital Camera
Solution Disk
ArcSoft Camera
Suite Disk
Direct Interface Cable DIF-200(*1)
(Supplied with Card Photo Printer CP-100 / CP-10)
Card Photo Printer
CP-10
CF Card Reader
PCMCIA Adapter
(PC Card Adapter) (*2 )
Card Photo Printer
CP-100
Direct Interface Cable
(Please refer to your
Bubble Jet Printer
Quick Start Guide for
cable information)
Bubble Jet Printer
(Compatible with the
direct print function)
USB Port
USB Port
PC Card Slot
PC Card Slot
IBM PC/AT
Compatible
Computer
Macintosh
Computer
TV / Video
CF Card (*2)
• FC-16M
• FC-32M
• FC-64M
• FC-128M
• FC-256MH

Other Accessories
• CF Card
CompactFlash
TM
(CF) cards are used to store
images recorded by the camera.
Canon CF cards are available in 16MB, 32MB,
64MB, 128MB, and 256MB capacities.
• AV Cable AVC-DC200
Use this cable to connect the camera to a TV
set.
• Waterproof Case WP-DC600
A waterproof case for the PowerShot S230
DIGITAL ELPH / DIGITAL IXUS v
3
.
You can use this case to take underwater
shots at depths of up to 30 meters (100
feet), and of course it’s an ideal for taking
worry-free pictures in the rain, at the beach,
or on the ski slopes.
• Soft Case SC-PS300
Protects the camera from dust and scratches.
The case pocket can be used to store items,
such as battery packs and CF cards.
Printers
Printers
Canon offers the following separately sold
printers for use with the camera. You can
produce prints quickly and easily with these
super-compact, light-weight printers with the
direct print function by connecting them to the
camera with a single cable and operating the
camera’s controls.
Some accessories are not sold in some regions.
Card Photo Printer CP-100
Prints high-quality L size, Postcard Size and Card
Size images. Canon’s separately sold
rechargeable batteries for the CP-100 make the
printer portable, even allowing you to print your
images outdoors.
• Color Ink / Paper Set KP-36IP, KL-36IP, KC-36IP
• Color Ink / Label Set KC-18IL
• Color Ink / Full-Sized Label Set KC-18IF
Color ink and paper sets for the CP-100.
• Paper Cassette PCL-CP100
L size paper cassette for the CP-100 printer.
• Computer Connection Kit CCK-CP200
Connects your computer and the CP-100 or
the CP-10, allowing you to print images
directly from your computer.
• Battery and Charge Adapter Kit BCA-CP100
These rechargeable lithium-ion batteries and
charger for the CP-100 let you print images
on the move.
• Car Battery Adapter CBA-CP100
(Can also be used with the Card Photo
Printer CP-10)
Allows you to power the CP-100 from your
car cigarette lighter.
Card Photo Printer CP-10
Prints high-quality, credit card-size images.
• Color Ink / Paper Set HC-36IP, HC-18IP
• Color Ink / Label Set HC-18IL
• Color Ink / Full-Sized Label Set HC-18IF
Color ink and paper sets for the CP-10.
Quick Start Guide
This guide explains basic operations for first-time use, how to
use the direct print function, and how to install the software
and download images to a computer. For more information
about usage precautions and detailed instructions, please
refer to the other related manuals. (p. 2)
You must install the software bundled on the Canon Digital Camera
Solution Disk before connecting the camera to the computer.
Please refer to the Troubleshooting section of the Software Starter Guide if
you have trouble installing the software or downloading images.
ENGLISH

2
Content
Preparing the Camera............................. 3
Shooting ................................................. 4
Reviewing an Image ............................... 5
Selecting Menus and Settings................. 6
List of Menu Options and Messages....... 7
Printing Images by Connecting
the Camera Directly to a Printer ......... 12
Downloading Images to a Computer
(Windows)........................................... 16
Downloading Images to a Computer
(Macintosh) ......................................... 23
For detailed instructions, see
the other manuals below.
▼
Camera User Guide
Printer User Guide
(Included with your Canon
printer)
Software Starter
Guide
3
1
2
Preparing the Camera
1
Charge the battery pack.
• Charge the battery pack using the supplied
battery charger. The charging is complete when
the charge indicator turns from red to green.
• Charging the battery pack takes approximately
130 minutes.
2
Slide the battery cover in the direction
of the arrows.
3
Install the battery pack and close the
battery cover.
• Press the battery lock while inserting the battery
pack.
4
Open the CF card slot cover.
• Slide the lock up to open the CF card slot cover.
5
Install the CF card and close the CF card
slot cover.
• Insert the CF card with its label facing upward
until the CF card eject button fully extends.
Charge indicator
Battery lock
1
2
CF card eject button
Lock
4
Shooting
1
Selecting a shooting mode.
• Slide the mode switch to .
2
Turn on the power.
• Press the ON/OFF button until the power lamp on
the back of the camera lights.
3
Set the date and time. (First time the
camera is powered on)
• The Set Date/Time menu will appear on the LCD
monitor.
• Select the items you wish to set using the
or
button and set the value using the
or
button.
• To put the settings into effect, press the
button.
4
Focus.
• Aim the camera and lightly press the shutter
button halfway. Two beeps will sound when the
autofocus is set.
power lamp
5
5
Shoot.
• Press the shutter button all the way. One beep
will sound when the shot is complete.
• The recorded image appears in the LCD monitor
for approximately 2 seconds.
Reviewing an Image
Displays the recorded images on the LCD monitor.
1
Selecting a replay mode.
• Slide the mode switch to .
2
Turn on the power.
• Press the ON/OFF button until the power lamp
lights.
• The last recorded image will appear in the display.
3
Use the
or button to select the
image.
To Immediately Delete the Displayed Image
1. Press the button while the image is displayed.
2. Confirm that [Erase] is selected and press the
button.
6
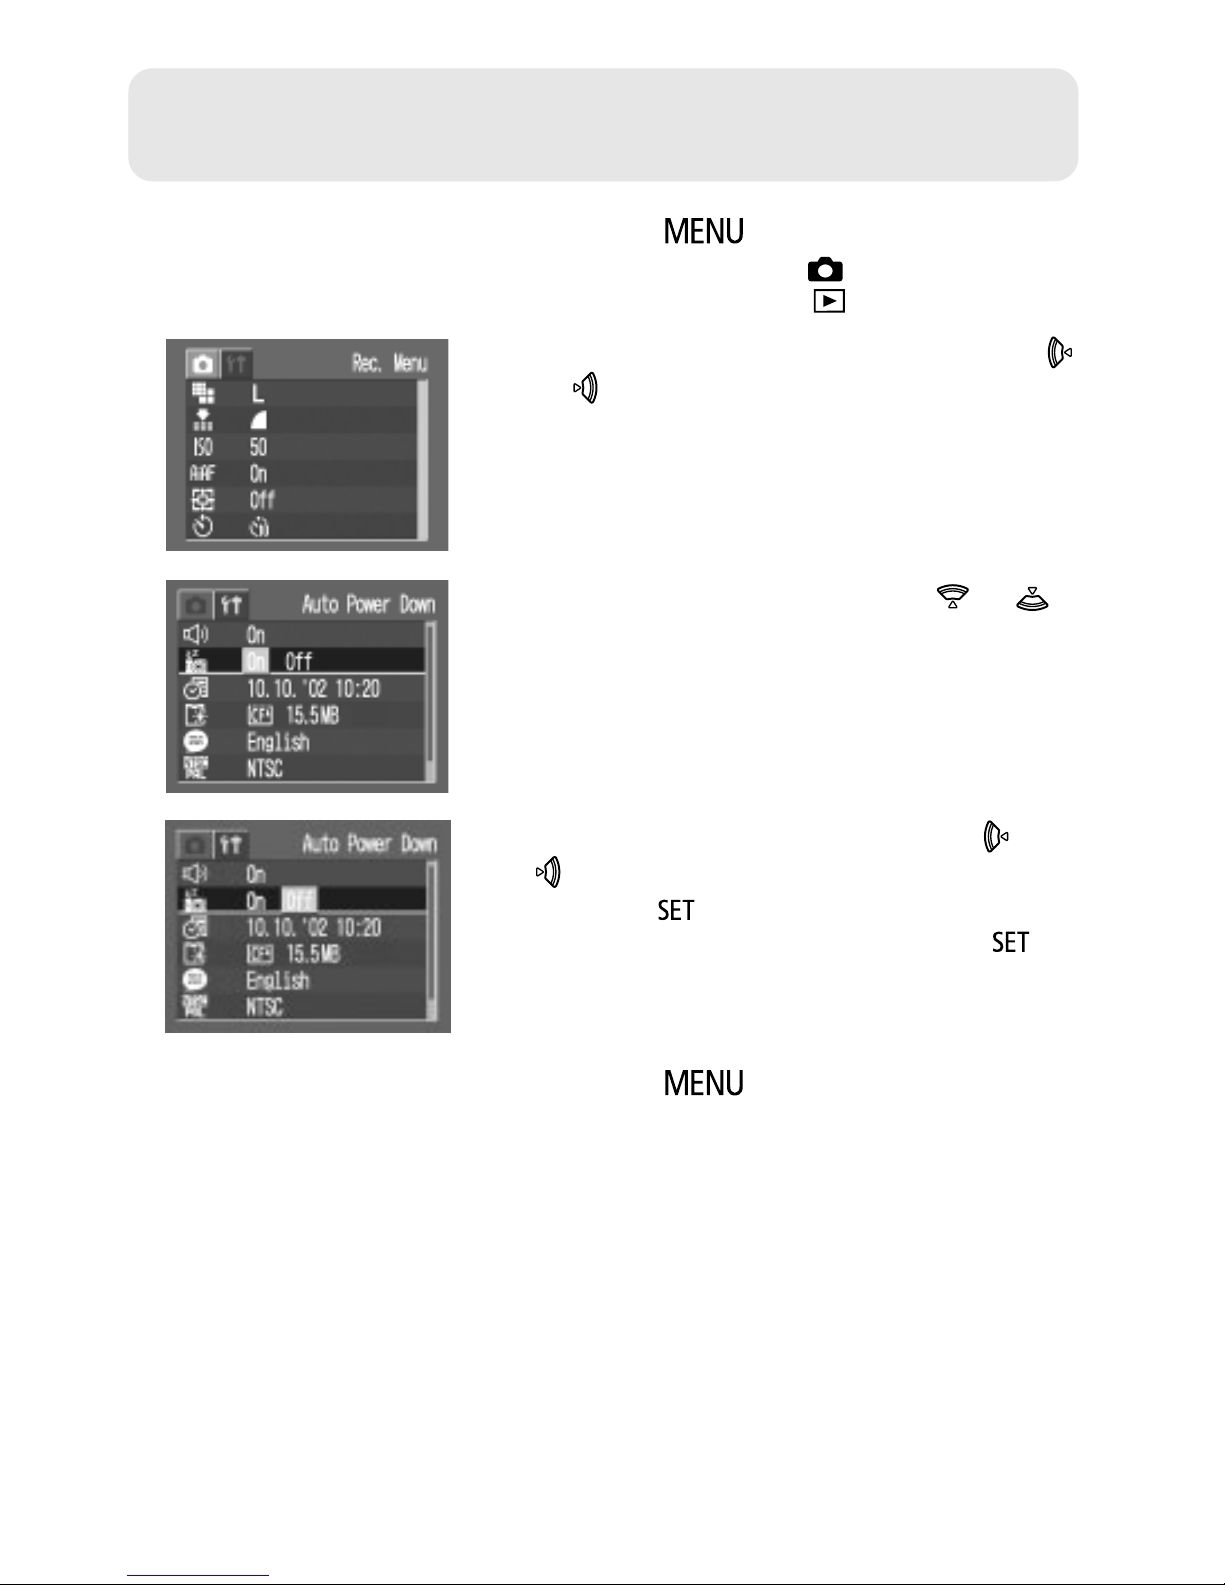
Selecting Menus and Settings
1
Press the button.
• In Shooting mode, the [ (Rec.)] menu appears.
In Replaying mode, the [ (Play)] menu appears.
2
Switch between menu tabs using the
or button.
3
Select a menu item using the
or
button.
4
Select setting contents using the
or
button.
• Press the button for items followed by an
ellipsis (...) then select a setting. Press the
button again to confirm the setting.
5
Press the button to close the
menu.

7
List of Menu Options and Messages
Rec. Menu
Some items may not appear in certain Shooting modes.
Resolution (Stills) Sets the number of pixels used to record
images to CF cards.
•
(Large)* 2048 x1536 pixels
• (Medium 1) 1600 x1200 pixels
• (Medium 2) 1024 x 768 pixels
• (Small) 640 x 480 pixels
Resolution (Movies) Sets the number of pixels used to record
movies to CF cards.
•
640 x 480 pixels
•
320 x 240 pixels*
• 160 x 120 pixels
Compression Sets the relative compression ratio used to
record images to CF cards.
• Superfine
• Fine*
•
Normal
ISO Speed Sets the sensitivity at which images are
recorded.
•50*
•100
•200
•400
•AUTO
AiAF Sets whether or not the camera
automatically selects one of nine AF frames
or a fixed center AF frame.
•On*
•Off
Item Menu Screen Settings Content
*Default setting
8
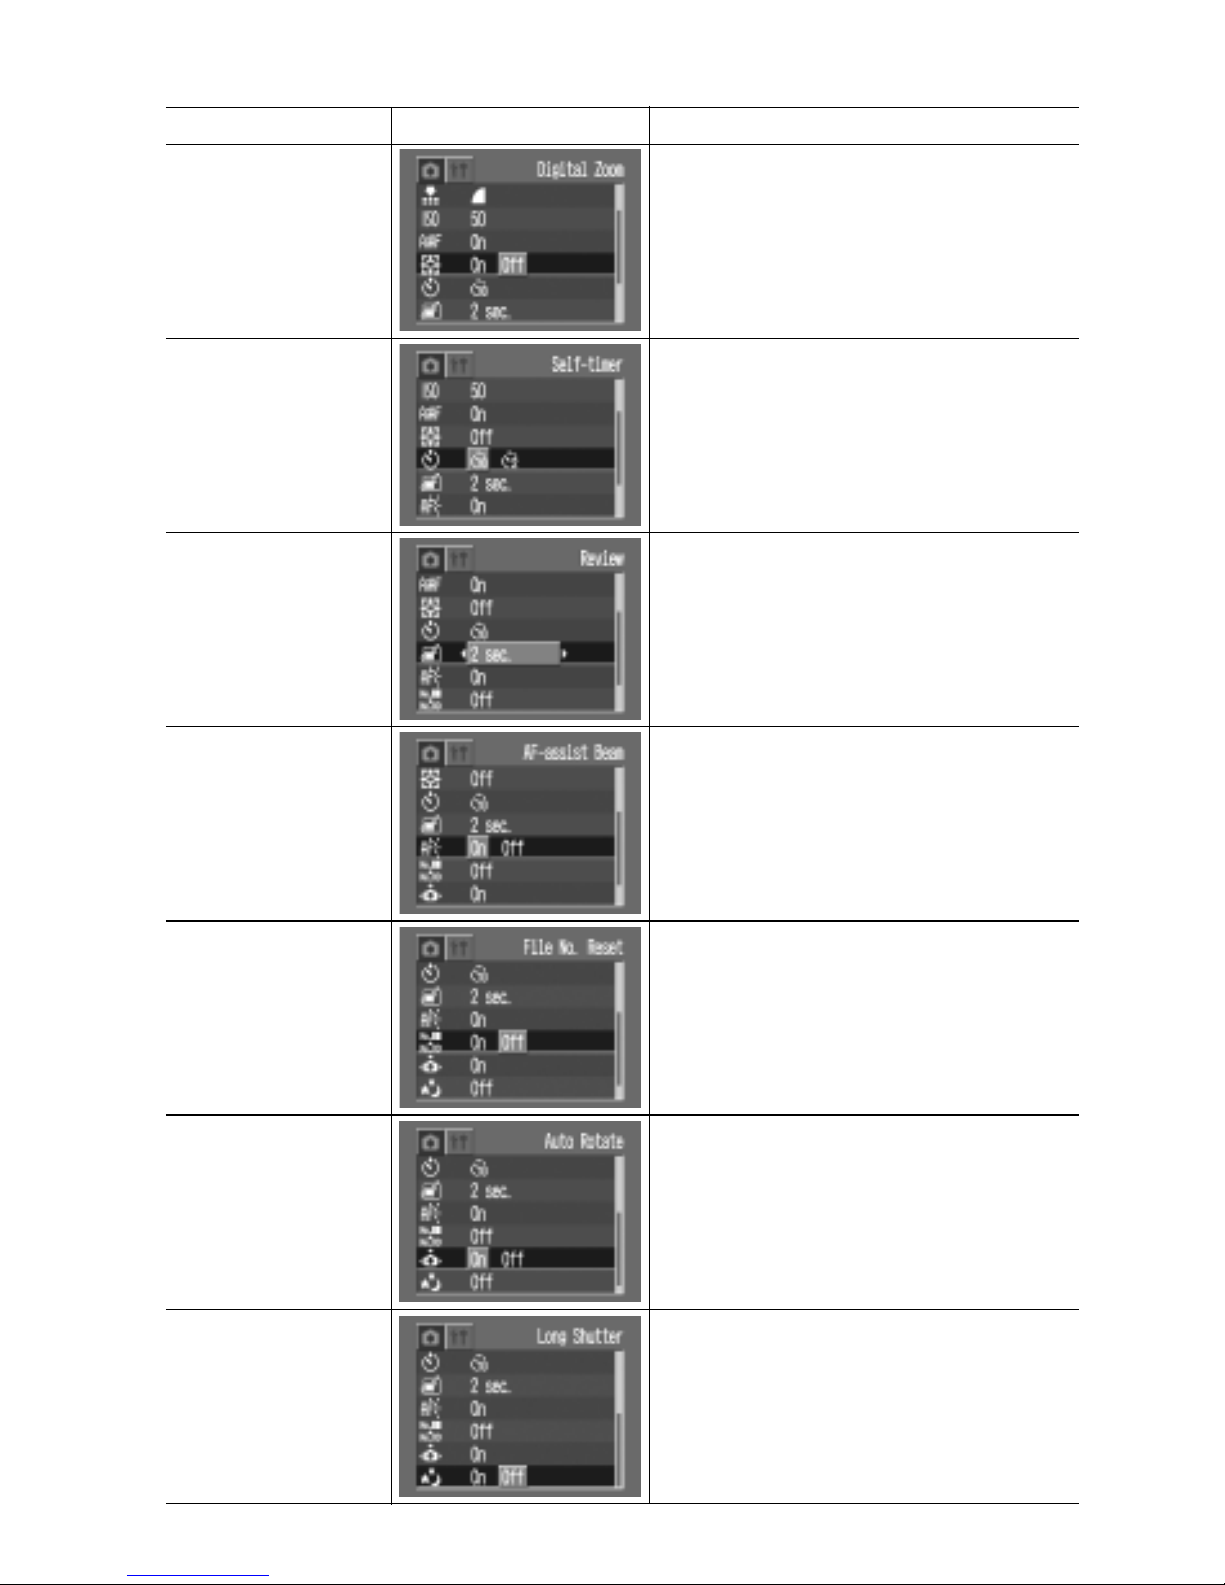
Item Menu Screen Settings Content
*Default setting
Digital Zoom Sets whether or not the optical zoom is
supplemented by digital processing.
•On
•Off*
Self-timer Sets the duration before the selftimer
releases the shutter.
•10 seconds*
•2 seconds
Review Sets the duration images display on the LCD
monitor after the shutter button releases.
•Off
•2*-10 seconds (1-second increments)
AF-assist Beam Sets the AF-assist Beam to on or off.
•On*
•Off
File No. Reset Sets how file numbers are assigned to
images when new CF cards are inserted.
•On
•Off*
Auto Rotate Sets whether or not images shot with the
camera on end are automatically rotated in
the display.
•On*
•Off
Long Shutter Sets the shutter speed to slow settings.
•On
•Off*
9
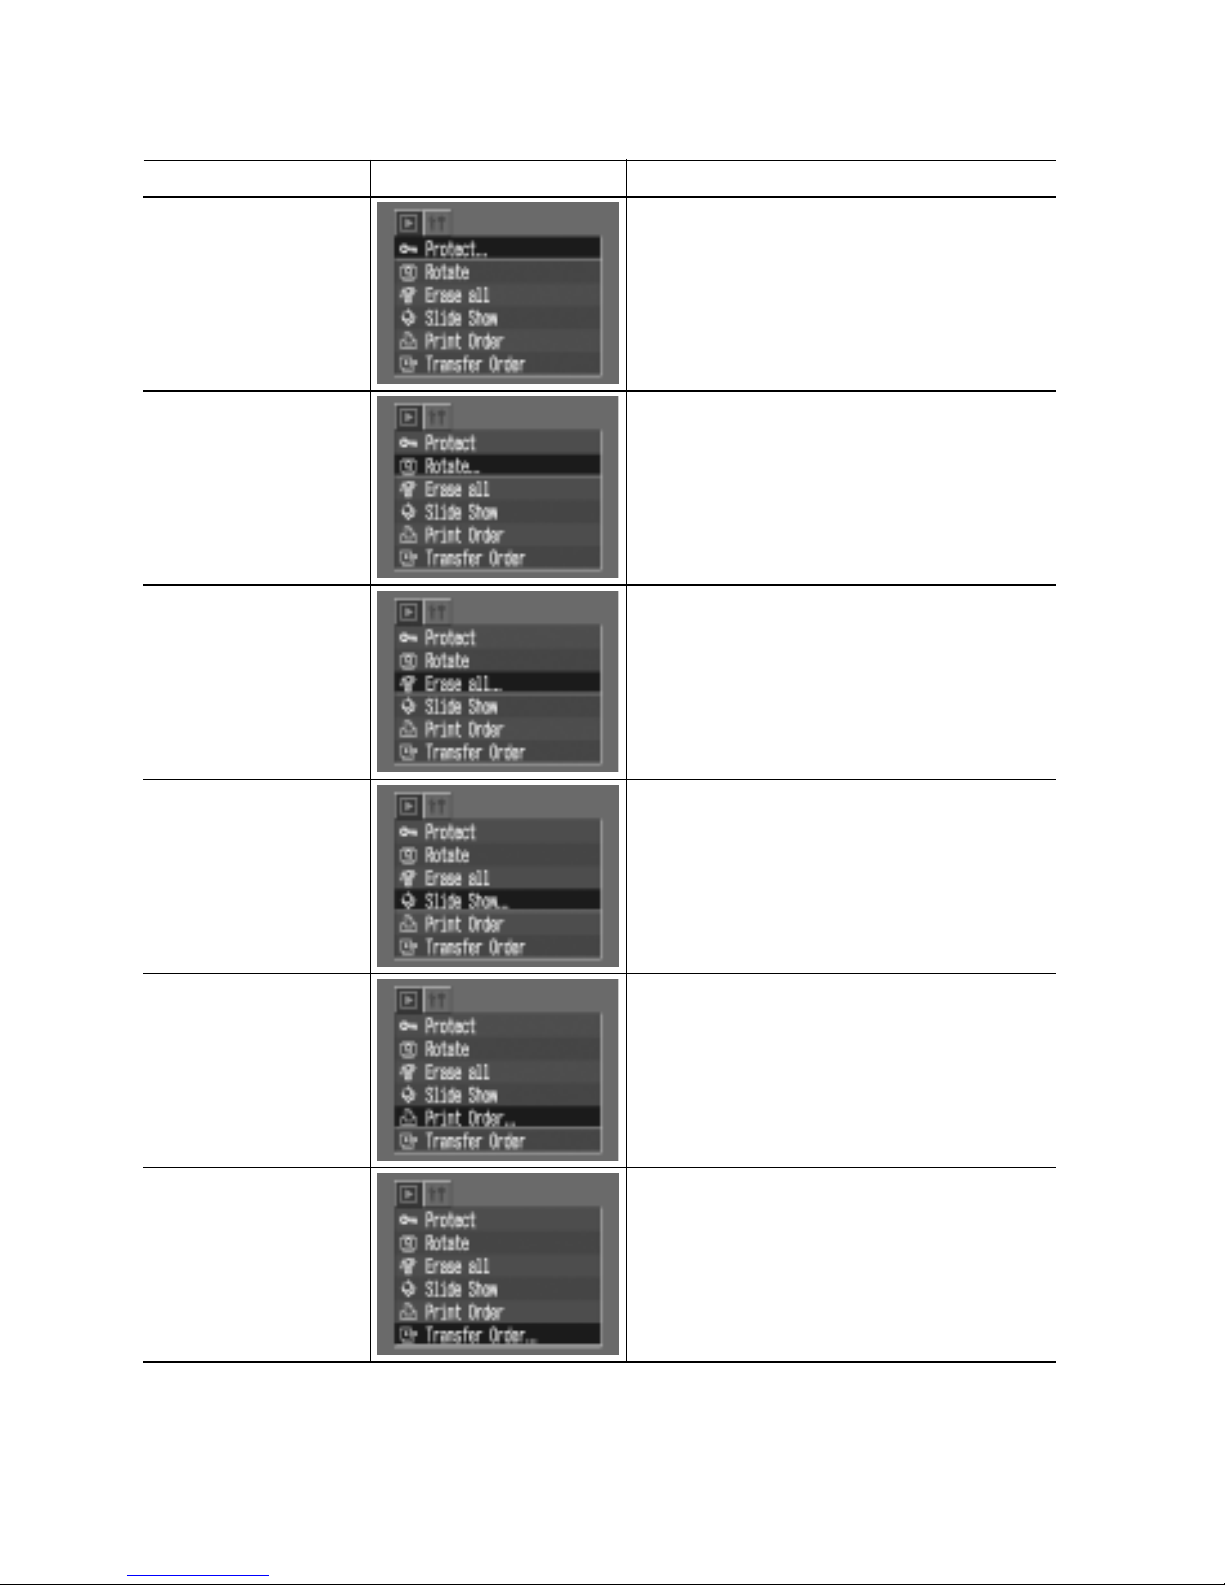
Item Menu Screen Settings Content
Protect Protects images from accidental erasure.
Rotate Rotates images clockwise 90º or 270º in the
display.
Erase all Deletes all images from a CF card (except
for protected images.)
Slide Show Plays images in automated slide shows.
Print Order Selects images and the number of print
copies for output to a DPOF-compatible
printer or a photo developing service.
Transfer Order Selects the images that will be transferred
to your email software.
Play Menu
10
Item Menu Screen Settings Content
*Default setting
Set up Menu
Beep Sets whether or not a beep sounds when
the shutter button is pressed or a menu
operation is performed.
•On*
•Off
A beep still sounds to warn of errors even
when Off is selected.
Power Save Sets whether or not the camera
automatically powers down after a set
period of time elapses without something
being pressed.
•On*
•Off
Date/Time Sets the date and time and the date format.
Format Formats (initializes) CF cards.
Language Sets the language used in menus and
messages on the LCD monitor.
•English* •Italiano
•Deutsch •Norsk
•Français •Svenska
•Nederlands • Español
•Dansk •Chinese
•Suomi •Japanese
You can also change the language in replay
mode by holding the
button and
pressing the button.

11
Item Menu Screen Settings Content
Video System Sets the video output signal standard.
•NTSC
•PAL
Communication Sets the camera and computer
communication settings.
•Normal*
•PTP

12
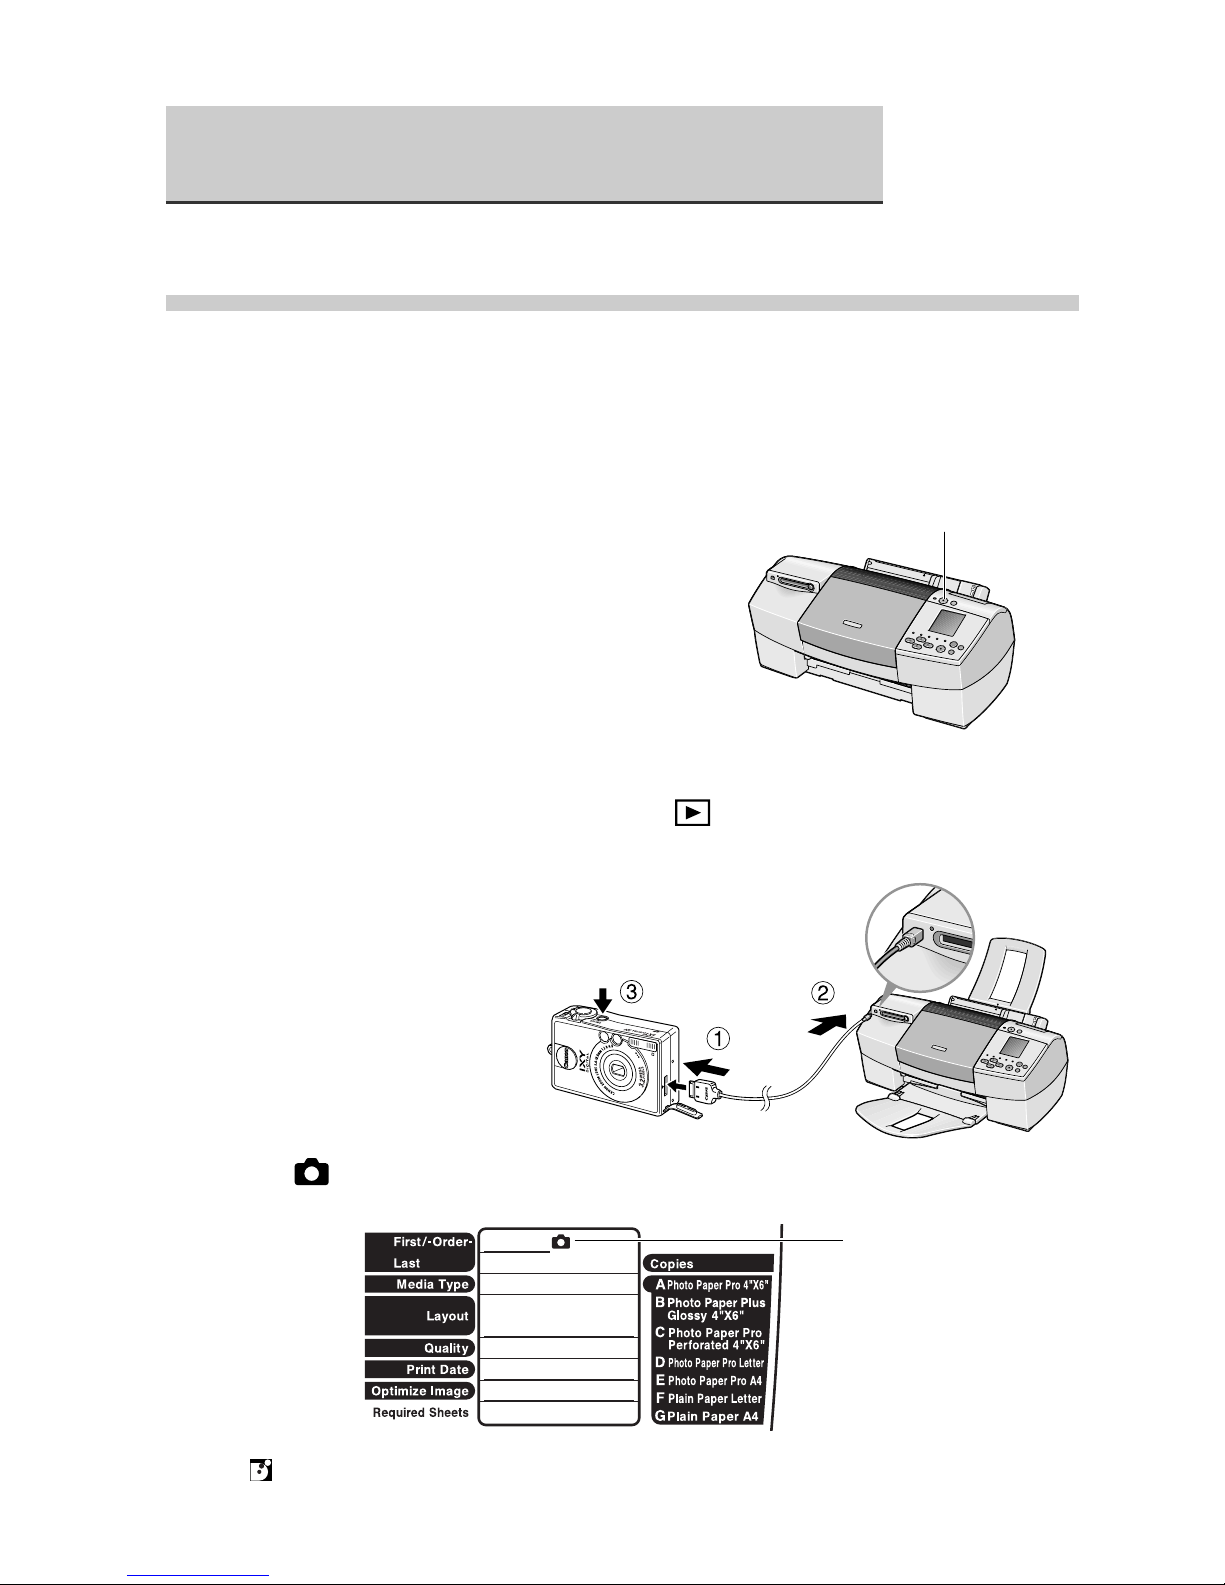
Printing Images by Connecting
the Camera Directly to a Printer
Printing with a Direct Print Compatible Printer
By connecting the camera with a single cable to a direct print function compatible
printer (optional), you can easily print your images with simple operations.
1
Load the ink cassette and the
paper cassette into the printer.
2
Connect the power cord to the printer.
• With the CP-10 printer, the printer ’s power turns on automatically.
3
Connect the camera to the printer and press the printer's ON/
OFF button to turn on the power. Set the camera's mode
switch to and turn on the power.
• appears on the camera’s LCD monitor.
• If you cannot use the camera's compact power adapter*, please use a fully
charged battery pack.
To DIGITAL
Terminal
Camera’s Compact Power
Adapter*
To Power
Outlet
To Power
Outlet
Ink cassette
Paper cassette
Direct Interface Cable DIF-200
(Included with the printer)
* Included with the optional AC Adapter Kit ACK500

13
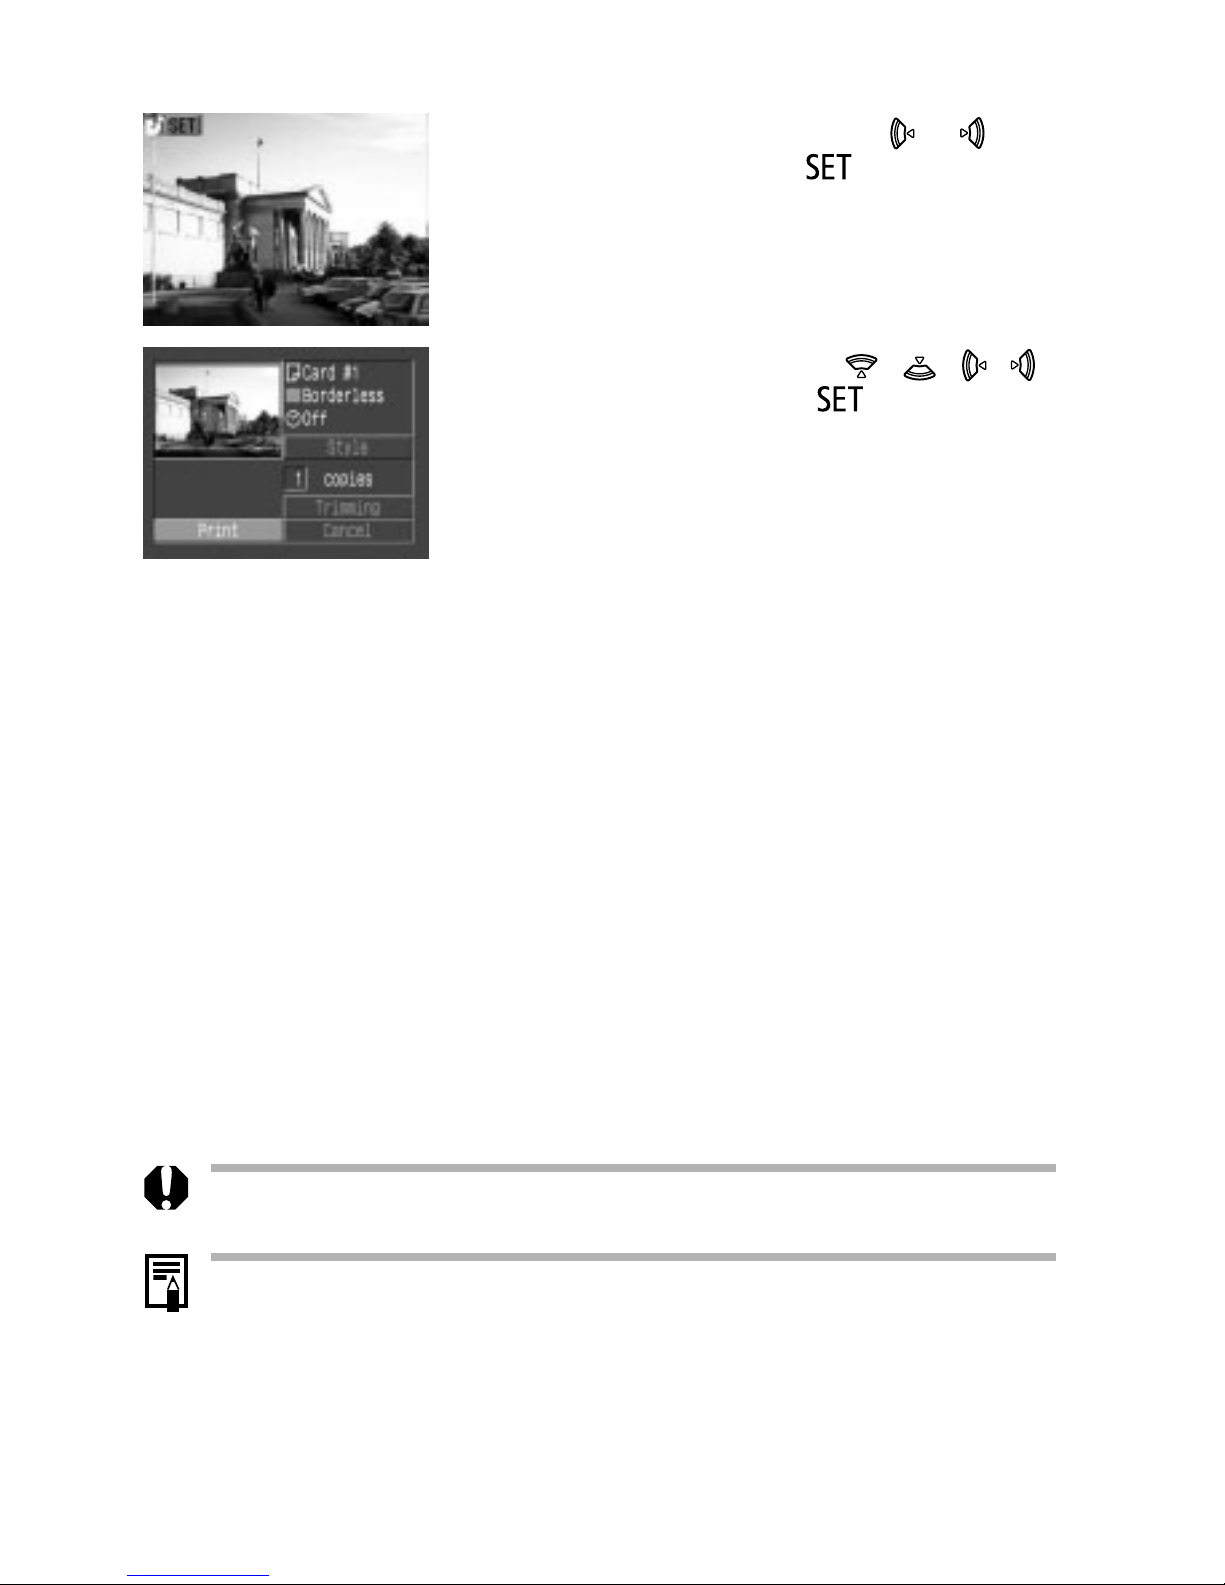
4
Choose an image using the or
button and press the button.
5
Choose [Print] using the
/
/
/
buttons and press the button.
• The image will start to print and, when it is
completely finished, the display will revert to
standard replay mode.
14
Printing with a Direct Print Function
Compatible Bubble Jet Printer
By connecting the camera with a single cable to a direct print function compatible BJ
printer (optional), you can easily print your images with simple operations.
1
Prepare the printer.
• For more information, please see the Quick
Start Guide that came with your BJ printer.
2
Turn the BJ printer's power on.
3
Connect the camera to the BJ printer.
Set the camera's mode switch to
and turn on the power.
• Connect the camera to the printer using
the cable supplied with your BJ printer.
• The icon appears on the BJ printer's operation panel.
• appears on the camera's LCD monitor.
Camera icon
Power button
15
4
Choose an image using the or
button and press the button.
5
Choose [Print] using the
/
/
/
buttons and press the button.
• The image will start to print and, when it is
completely finished, the display will revert to
standard replay mode.
• We recommend the use of the AC Adapter Kit ACK500 (optional) as the camera's
power source.
• Images cannot be printed through the BJ printer operation panel during the
camera connection.
• Please use the following procedures when you detach the cable from the printer
and the camera.
1. Detach the cable from the printer.
2. Turn off the camera power.
3. Detach the cable from the camera.
16
Downloading Images to a
Computer (Windows)
System Requirements
Computer Model IBM PC/AT compatible
OS Windows 98 (First or Second Edition)
Windows Millennium Edition (Windows Me)
Windows 2000
Windows XP
CPU Windows 98 / Windows Me / Windows 2000 :
Pentium 150MHz or better
Windows XP : Pentium 300MHz or better
RAM Windows 98 / Windows Me / Windows 2000 : 64MB or more
Windows XP : 128MB or more
Interface USB: Only preinstalled Windows 98 / Windows Me / Windows 2000 /
Windows XP
• All procedures performed with a connection to a USB 2.0 compliant board are not
guaranteed.
Installing the Software
• Do not connect the camera to the computer before the software is installed.
• The USB driver will start its installation procedures after the camera has been
connected to the computer.
• Users of Windows 2000 and Windows XP Professional must first log in as an
Administrator (computer system administrator) to install programs.
• Close any programs that are running.
1
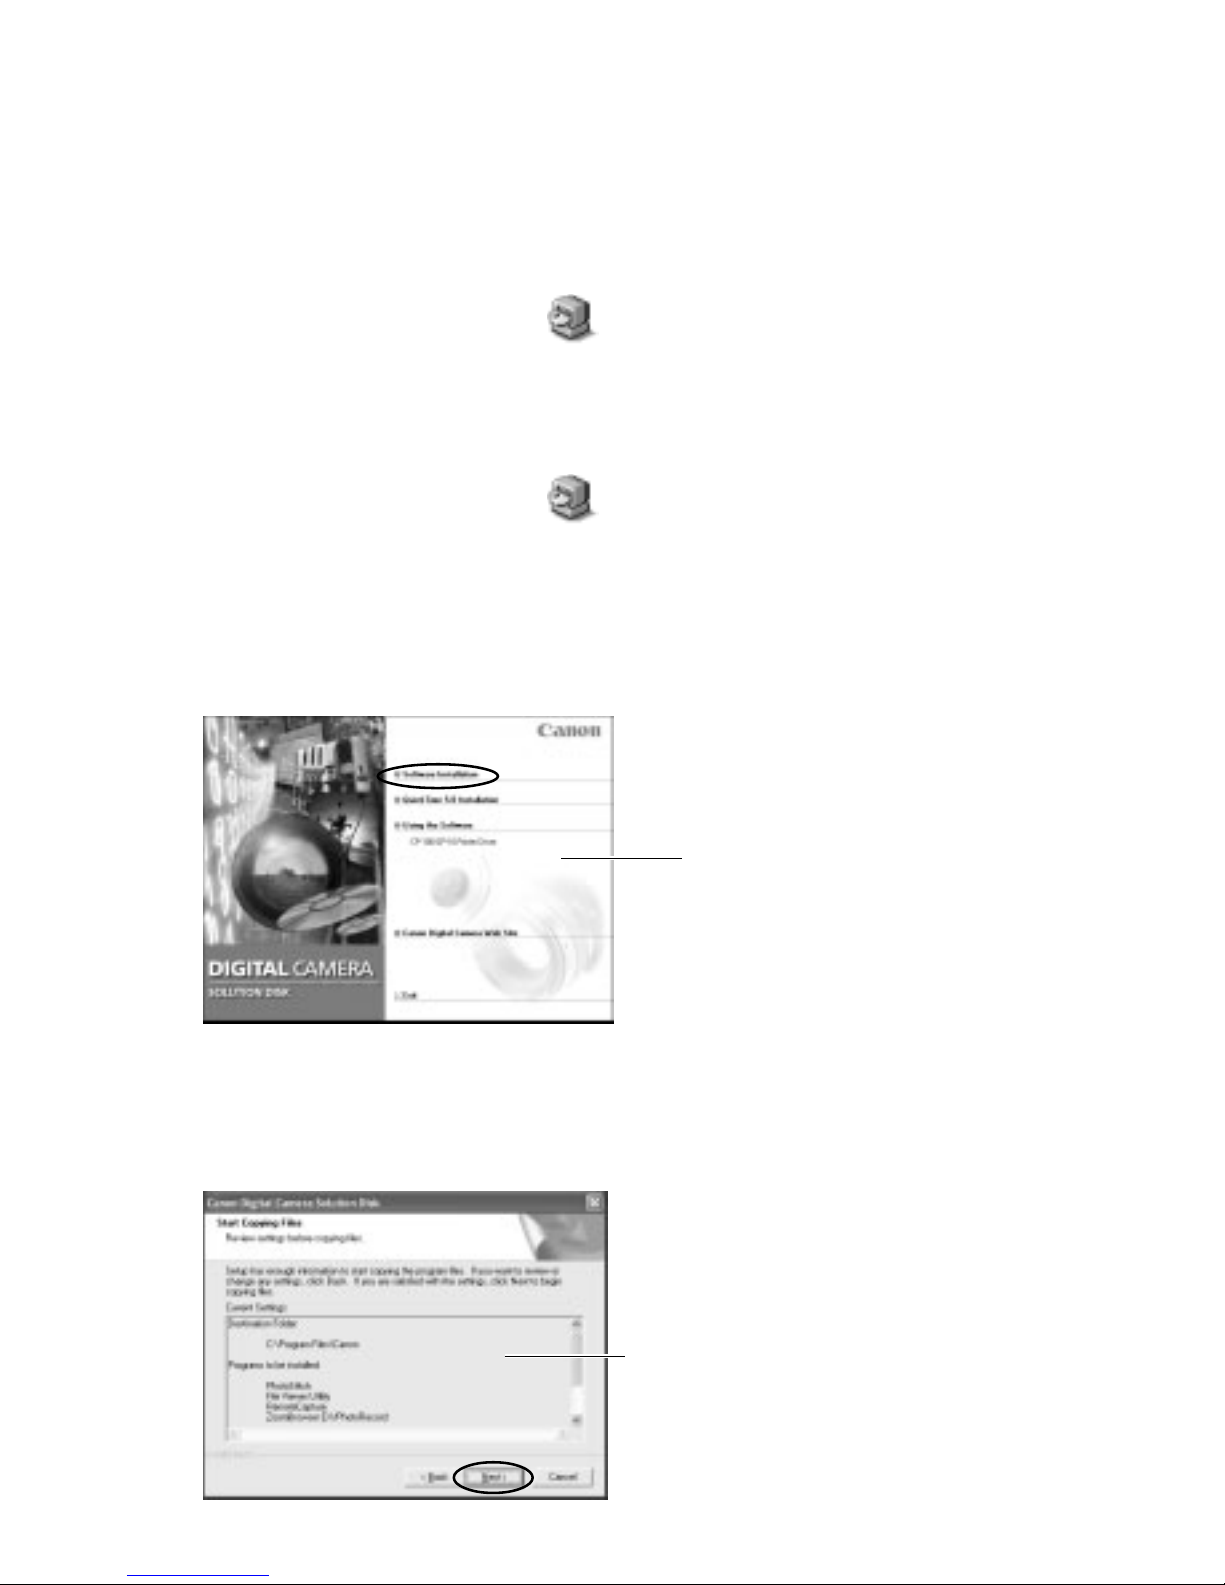
Place the Canon Digital Camera Solution Disk into your
computer’ s CD-ROM drive.
• The installer panel will display automatically.
17
• If the installer panel does not appear automatically, use the following
procedures to display it.
Windows XP
1.Click [My Computer] in the [Start] menu.
2.Right-click the CD-ROM icon and select [Open].
3.Double-click the [SETUP.exe] icon.
Windows 2000, Windows Me and Windows 98
1.Double-click [My Computer] on the desktop.
2.Right-click the CD-ROM icon and select [Open].
3.Double-click the [SETUP.exe] icon.
* If the "exe" extension does not show, see the computer's manual for instructions
on showing file name extensions.
2
Click [Software Installation], and follow the onscreen
instructions by clicking [Next] or [Yes].
• In the next steps, you will select the installation destination, the software to be
installed and the name of your camera model.
3
Review the installation settings and click [Next].
Installer panel
The items displayed
here differ according to
the software installed.

18
USB port
USB cable
• The installation starts.
• If you installed the WIA driver or the TWAIN driver, the following message will
appear once the installation is complete. Click [OK].
4
When the installation is over, select “Yes, I want to restart my
computer now .” in the screen below and click [Finish].
• Remove the Canon Digital Camera Solution Disk once the installation is complete
and before you connect the camera to the computer so that the proper driver can
be installed.
Connecting the Camera to the Computer
1
Connect one end of the USB
cable to the computer’s USB
port.
19
Installing the Driver
■ Windows XP
1
Install the driver.
• After a few moments, the following dialog will appear at the bottom right of
the screen and the WIA driver will automatically install.
• After installation, the Event dialog will appear, allowing you to select an
application program to start.
2
Select an application to start.
• Select [Canon ZoomBrowser EX] and click [OK].
• With Windows XP, the Event dialog does not appear the first time the camera is
connected after computer start-up. If this happens, see Downloading and Saving
Images from the Camera on page 20.
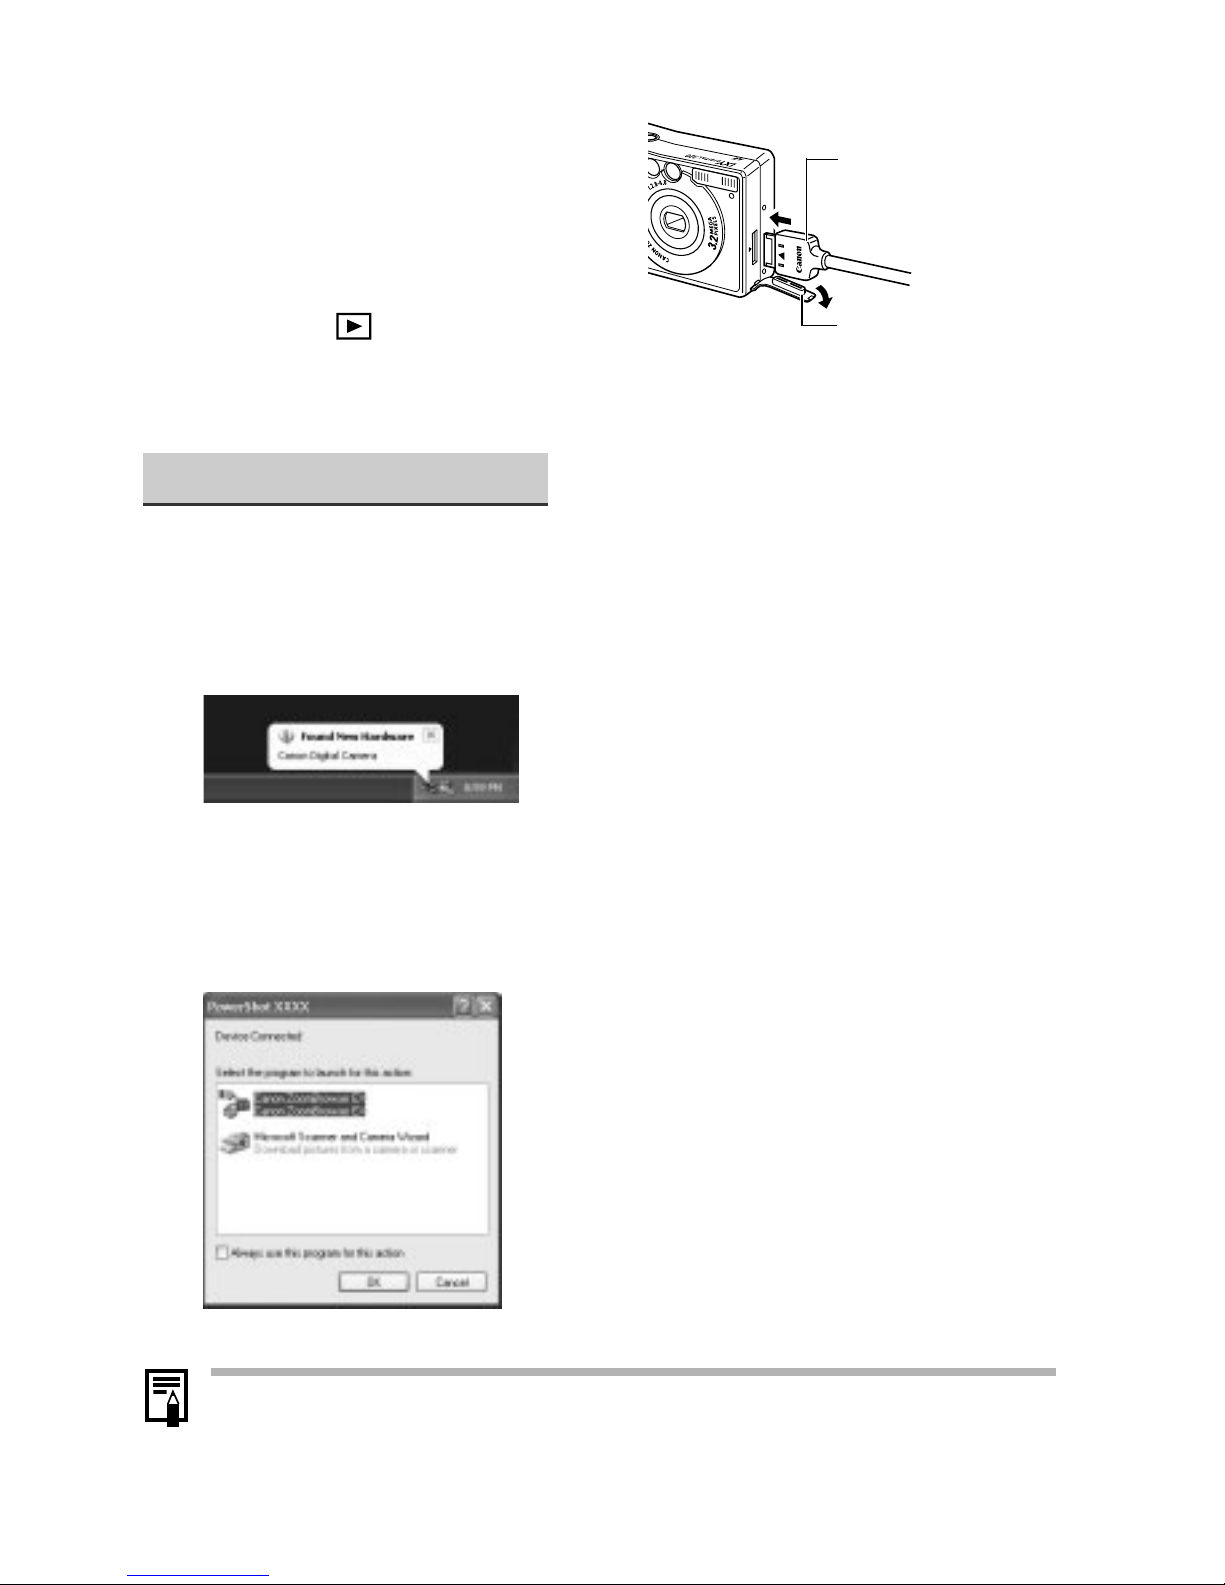
2. USB cable
Insert the connector
until it clicks.
1. Terminal cover
2
Connect the USB cable to the
camera’s Digital terminal.
• Open the terminal cover and
connect the cable.
3
Set the camera's mode
switch to and turn on the
power.
20
■ Windows 2000/ Windows Me/ Windows 98
1
Install the driver.
• After a few moments, the Add New Hardware Wizard will appear and
automatically install the TWAIN driver (for Windows 98 and Windows 2000) or
the WIA driver (for Windows Me).
• After installation, the Event dialog will appear, allowing you to select an
application program to start.
2
Select an application to start.
• Select [Canon ZoomBrowser EX] and click [OK].
• ZoomBrowser EX starts; the Camera Window opens and displays the camera
images as thumbnails (small images).
Downloading and Saving Images from the Camera
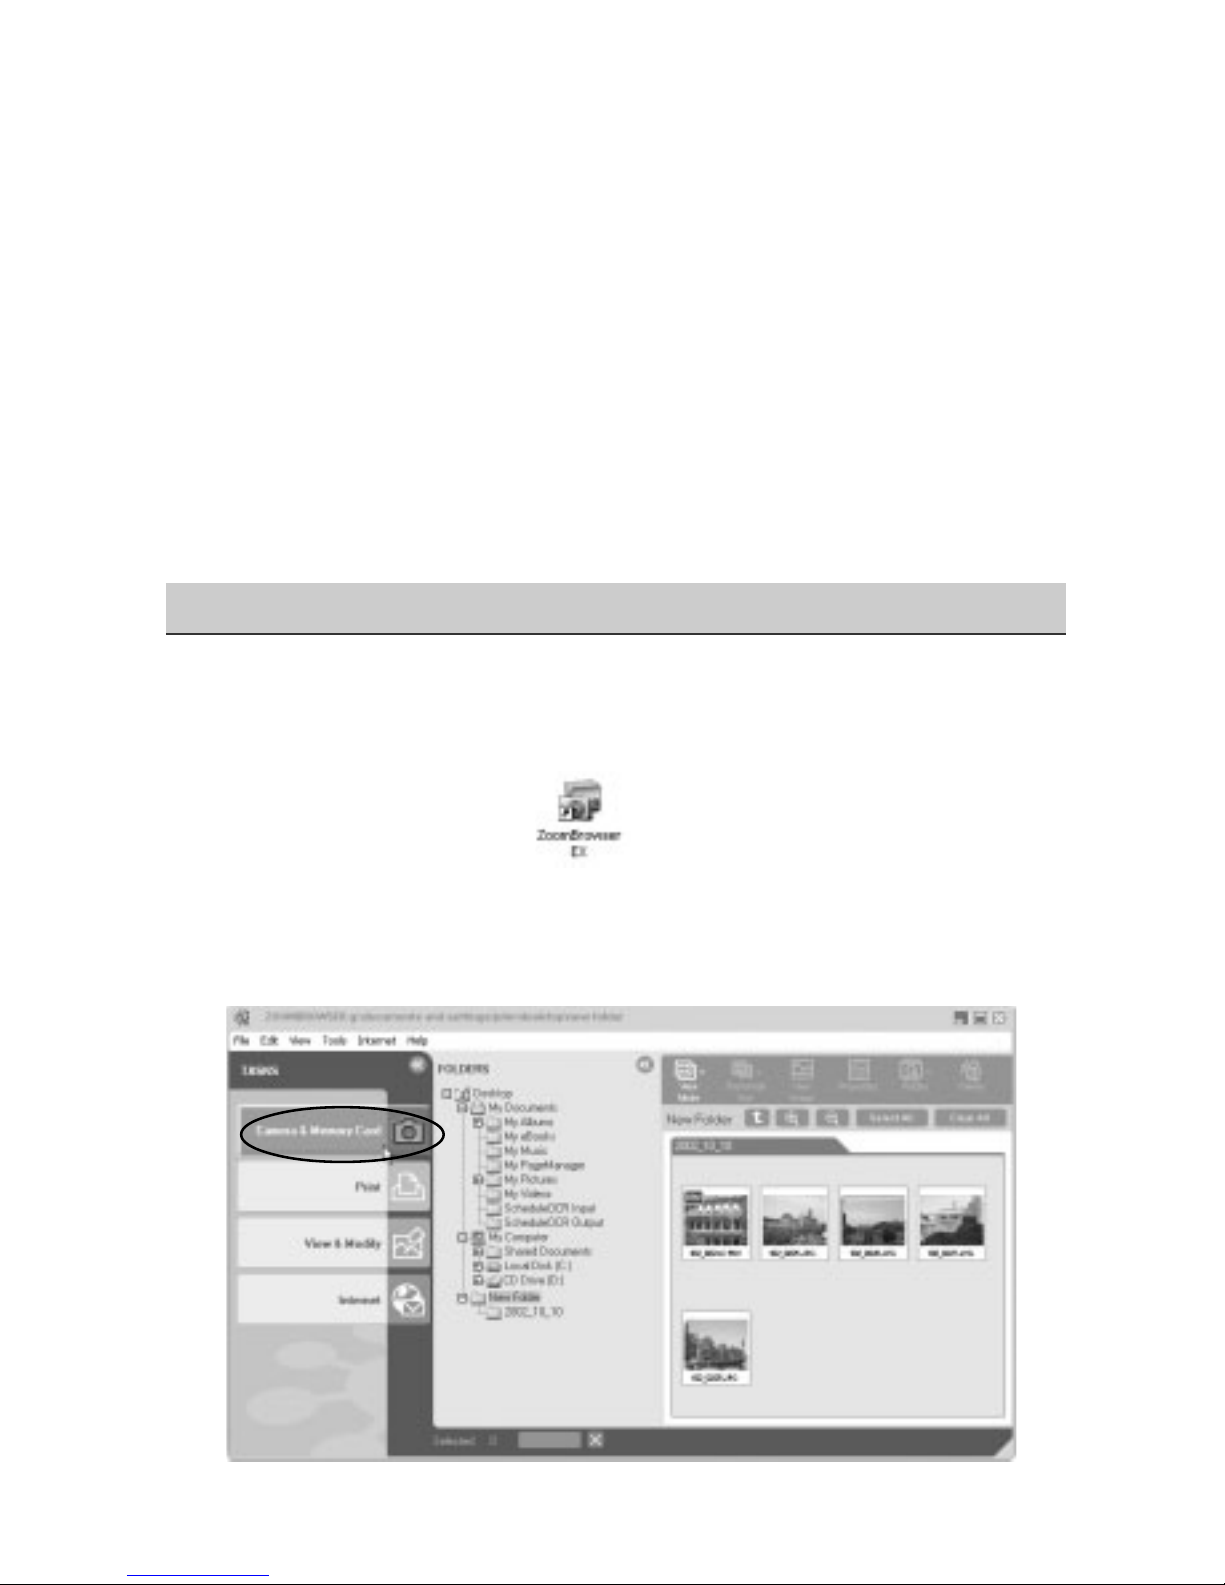
1
Start ZoomBrowser EX.
• Double-click the [ZoomBrowser EX] icon on the desktop.
2
Click [Camera & Memory Card] and [Browser & Download
Images].
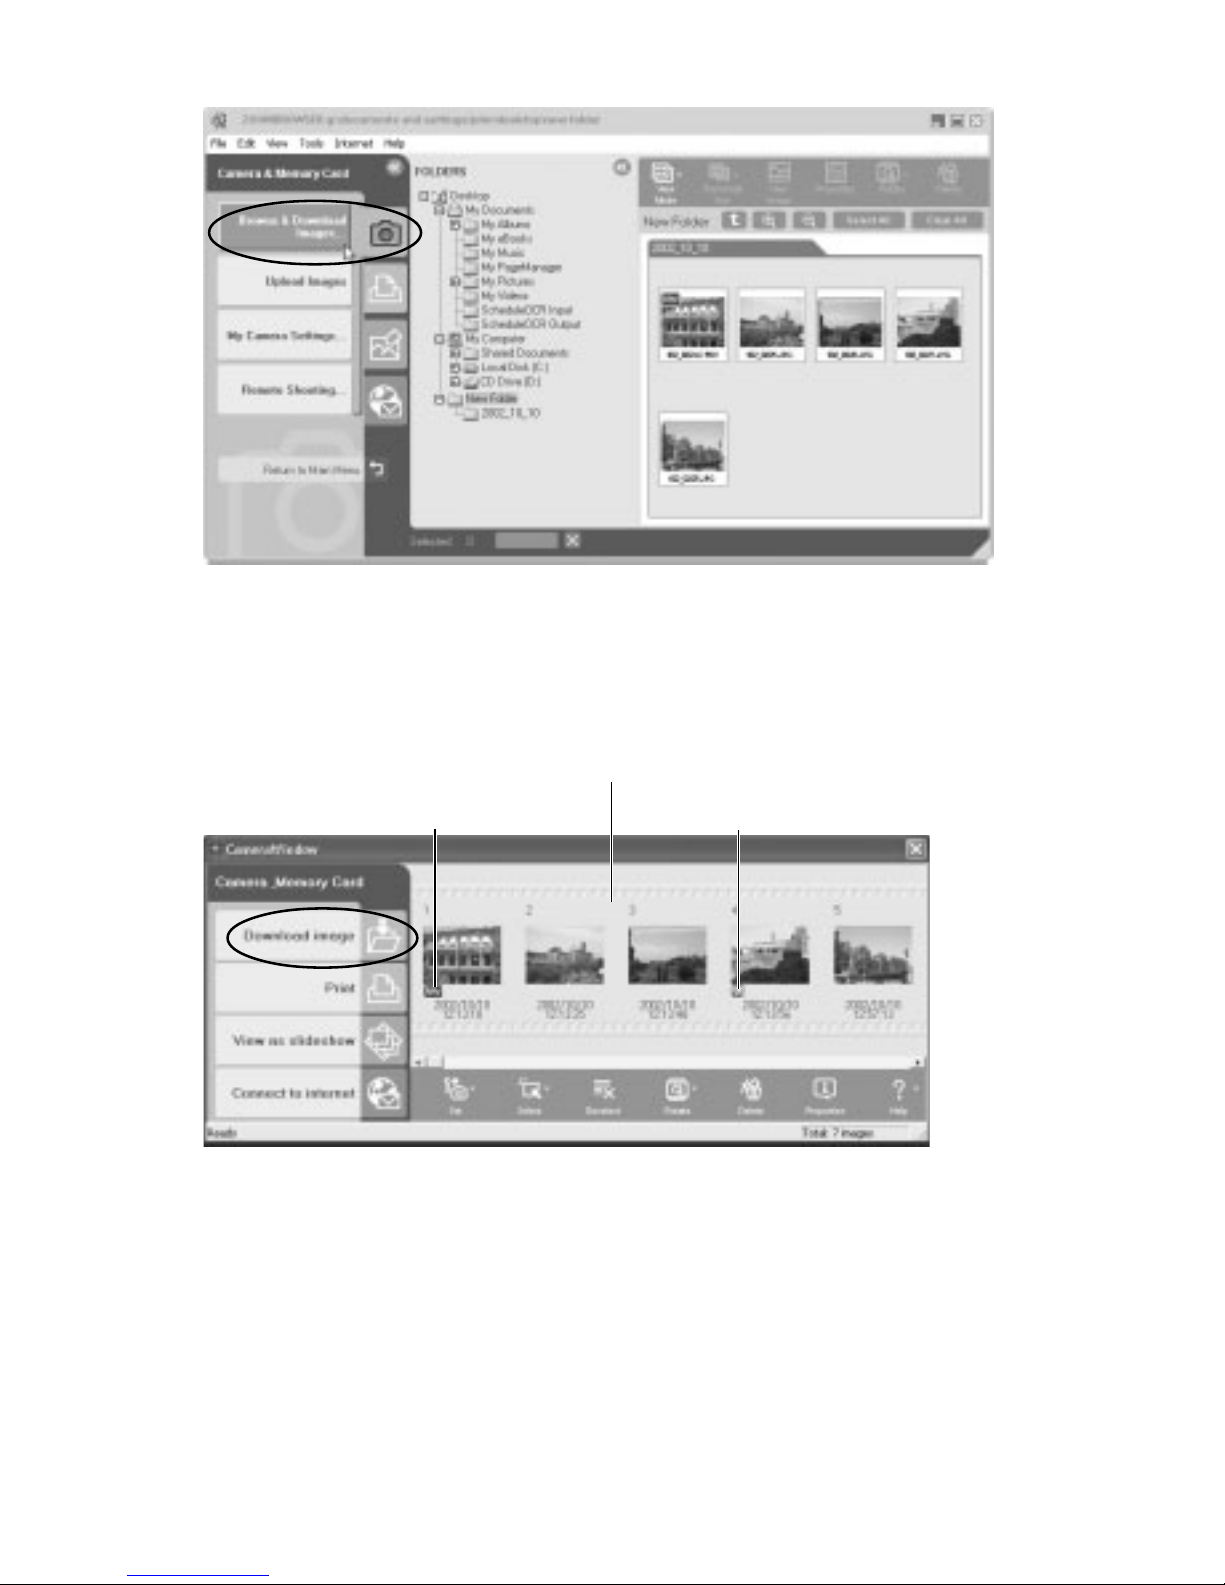
21
• This will display the Camera window. The images on the CF card will display in
the Camera window as thumbnails.
• Select the images you wish to download in the Camera window and click
[Download image].
“RAW” displays on
RAW images.
The movie icon displays
on movie thumbnails.
Thumbnail
22
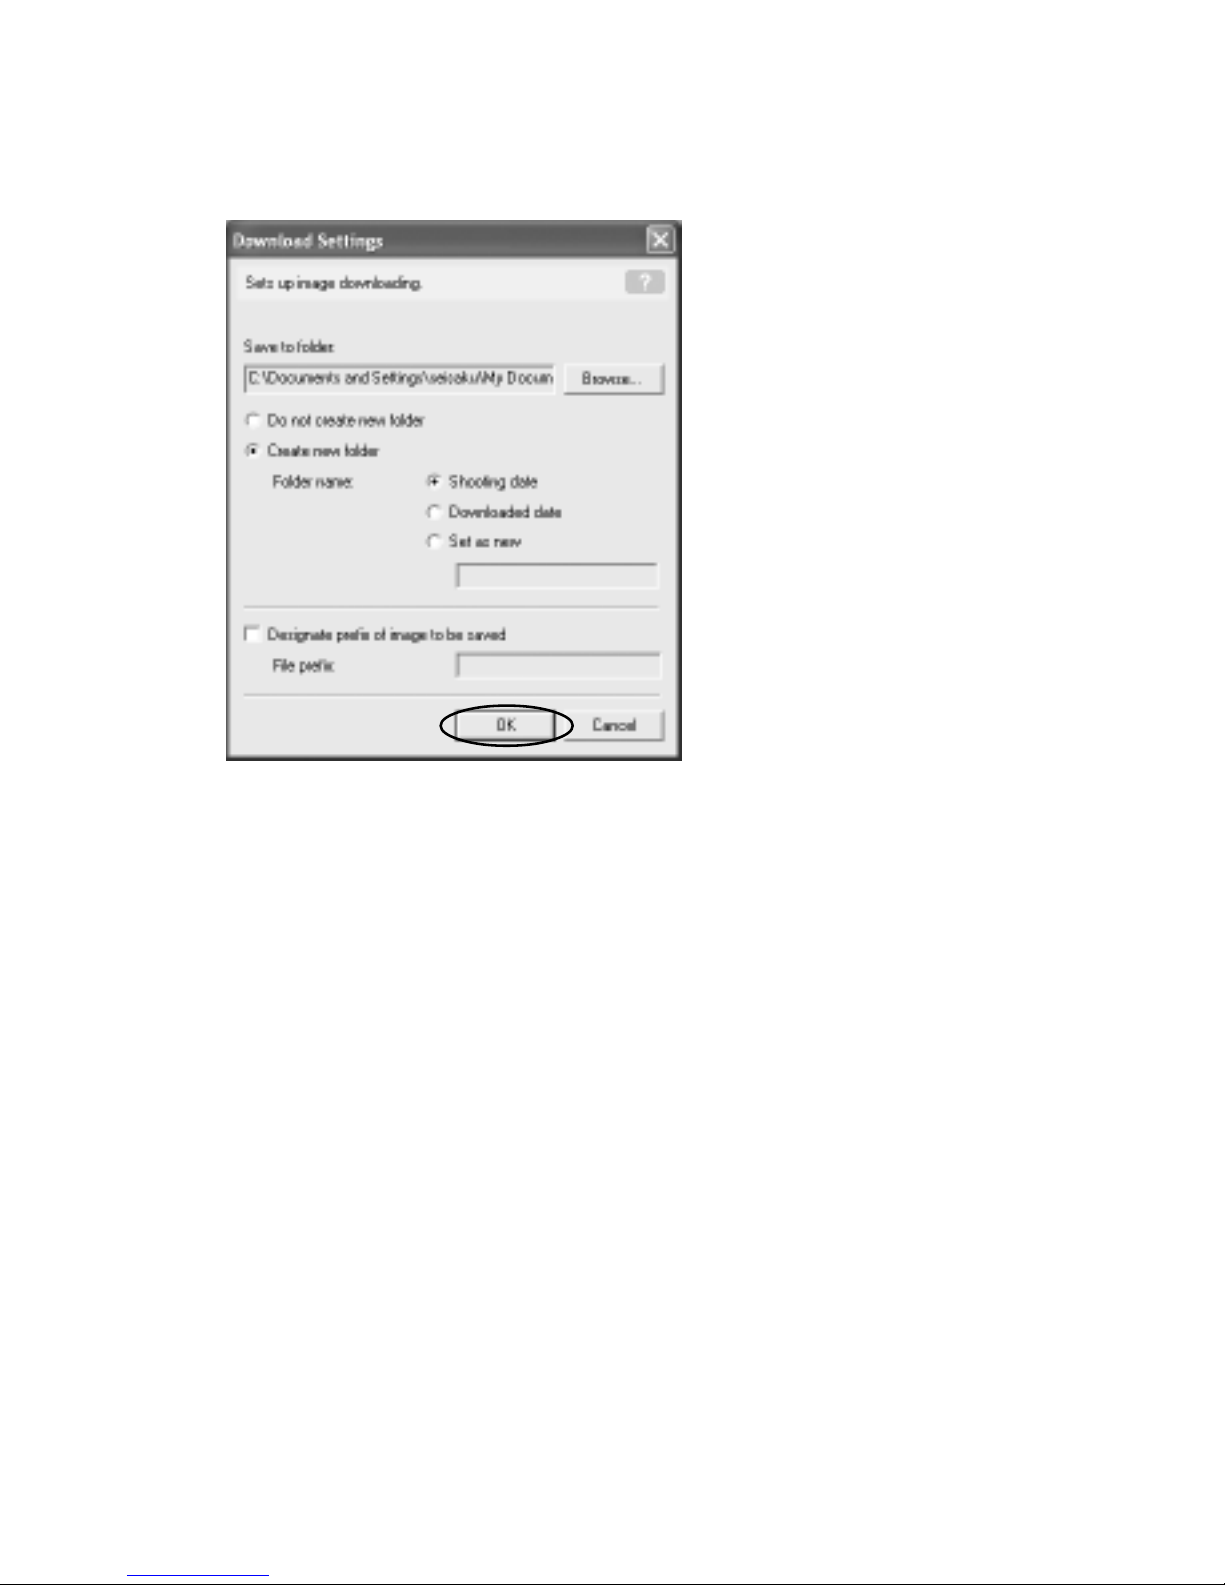
• A Download Settings dialog allowing you to select the image destination folder
will display.
• Make sure the settings are the same as the following and click [OK].
• At this point the Camera window will close and the main window will open.
The downloaded images will appear in the main window .
23
Downloading Images to a
Computer (Macintosh)
System Requirements
Computer Model Power Macintosh, PowerBook, iMac, iBook
OS Mac OS 8.6-9.2, Mac OS X (Version 10.1)
CPU PowerPC
RAM Mac OS 8.6-9.2: 20 MB or more of application memory
Mac OS X (Version 10.1): 128 MB or more of RAM
Interface USB: Only systems equipped with genuine Apple-brand built-in USB
interfaces
• All operations performed with a connection to a USB 2.0 compliant board are not
guaranteed.
Installing the Software
• Close any programs that are running.
1
Place the Canon Digital Camera Solution Disk into your
computer’ s CD-ROM drive.
Mac OS 8.6-9.2
• Double-click the CD-ROM icon, followed by the [Mac OS 8/9] and [Canon
Digital Camera Installer] icons.
Mac OS X
• Double-click the CD-ROM icon, followed by the [Mac OS X] and [Canon Digital
Camera Installer] icons.
24
2
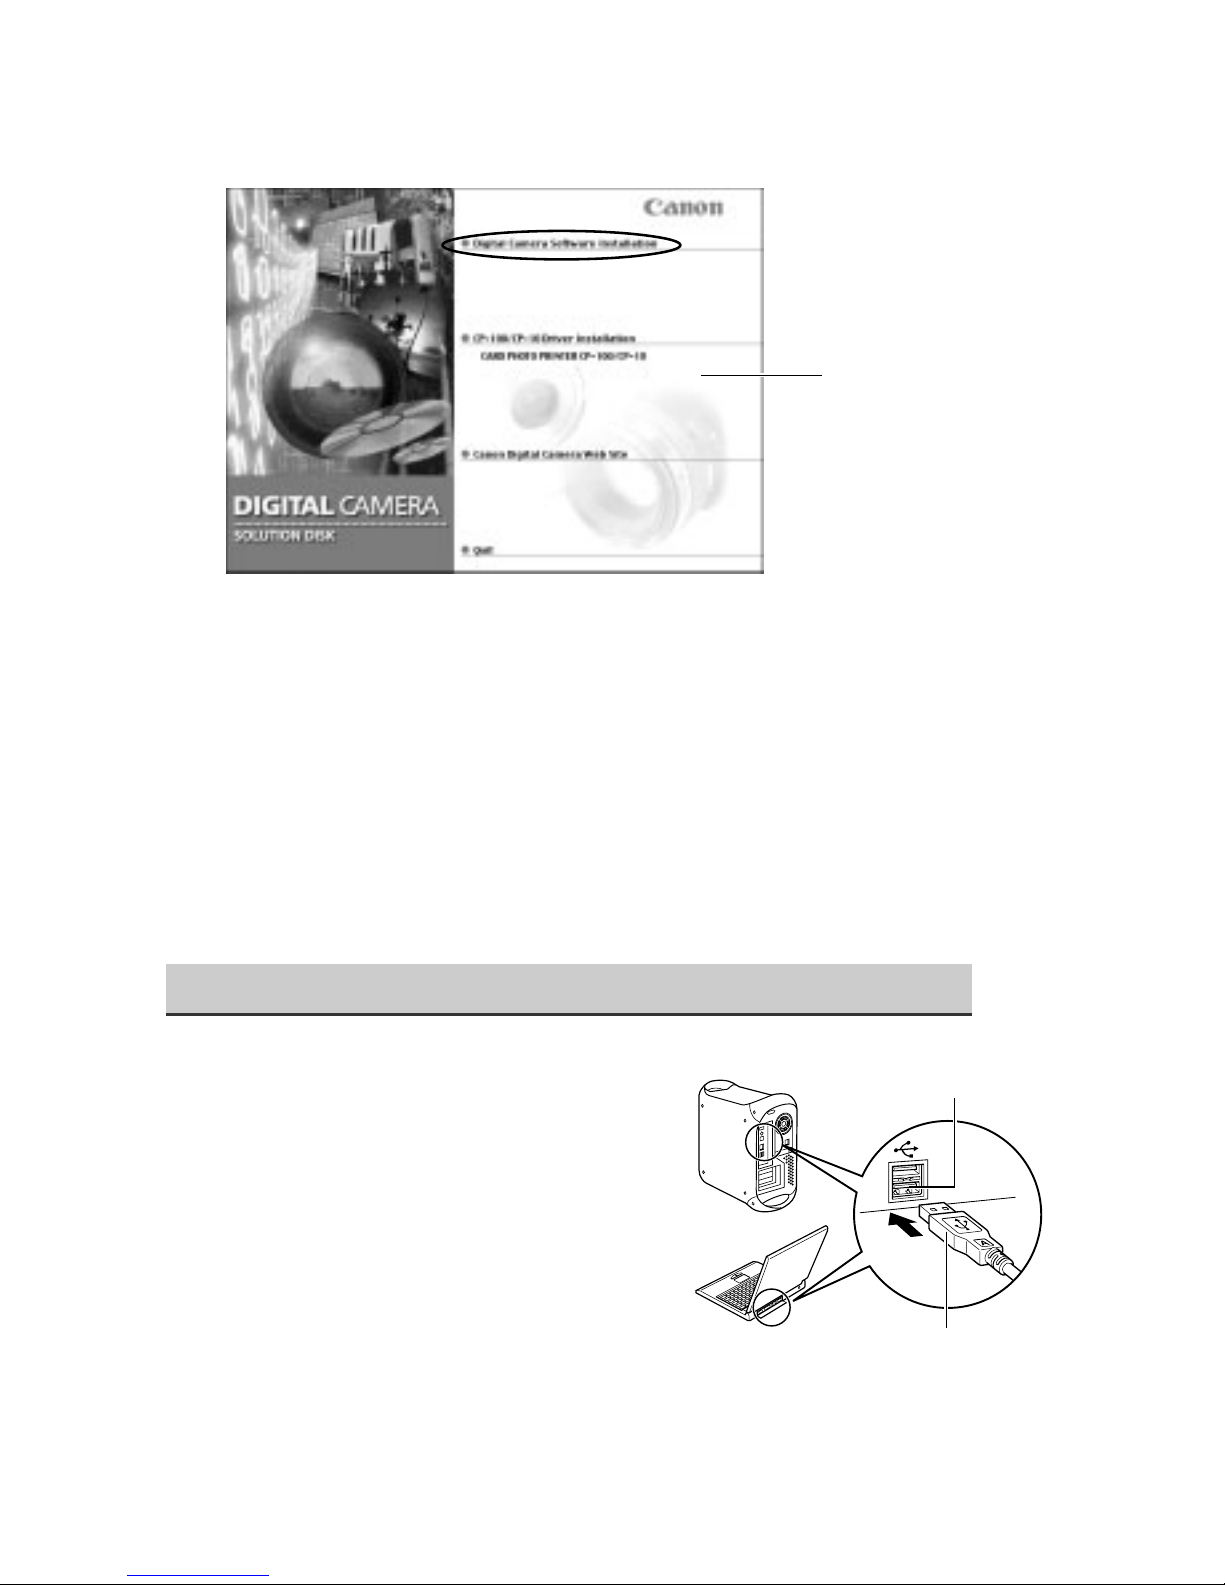
Click [Digital Camera Software Installation].
3
Select the programs you wish to install and follow the
instructions on the screen.
• The software required for the camera will be installed.
4
Once the installation is complete and the installer panel
appears, click [Quit].
5
Remove the Canon Digital Camera Solution Disk from the CDROM drive.
Connecting the Camera to the Computer
1
Connect one end of the USB
cable to the computer’s USB
port.
USB port
USB cable
Installer panel
25
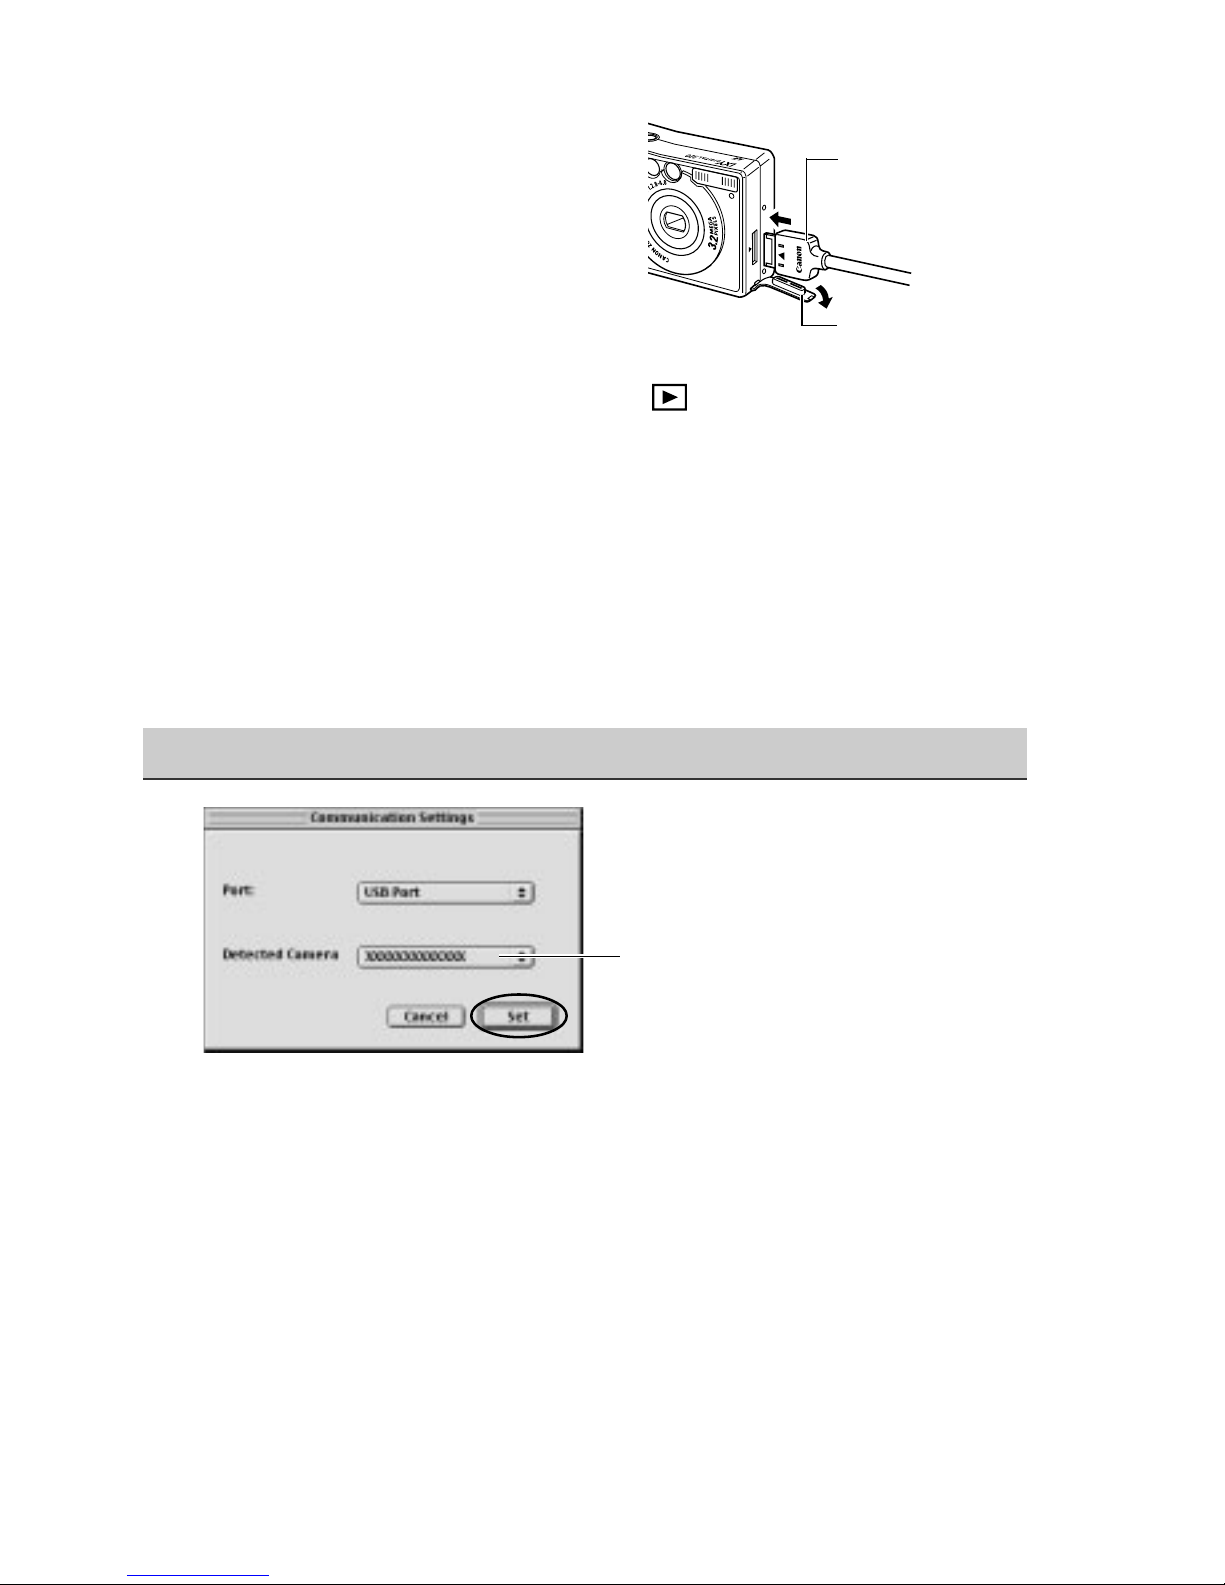
2
Connect the USB cable to the
camera’s Digital terminal.
• Open the terminal cover and
connect the cable.
3
Set the camera's mode switch to and turn on the power.
Mac OS 8.6-9.2
• ImageBrowser will start and open the ImageBrowser Automation Wizard
dialog. Confirm that [Display Images] is selected and click the [OK] button.
Mac OS X
• Double-click the [Canon ImageBrowser] icon on the desktop. Once
ImageBrowser is started, click [Canon Camera] in the Explorer View section.
Set the communication settings (first time connection only)
Mac OS 8.6-9.2 screen shot shown.
• Confirm that [USB Port] and your camera model name are selected and click
the [Set] button.
The Camera window will open and display the camera images.
The name of your camera
model appears here.
2. USB cable
Insert the connector
until it clicks.
1. Terminal cover
26
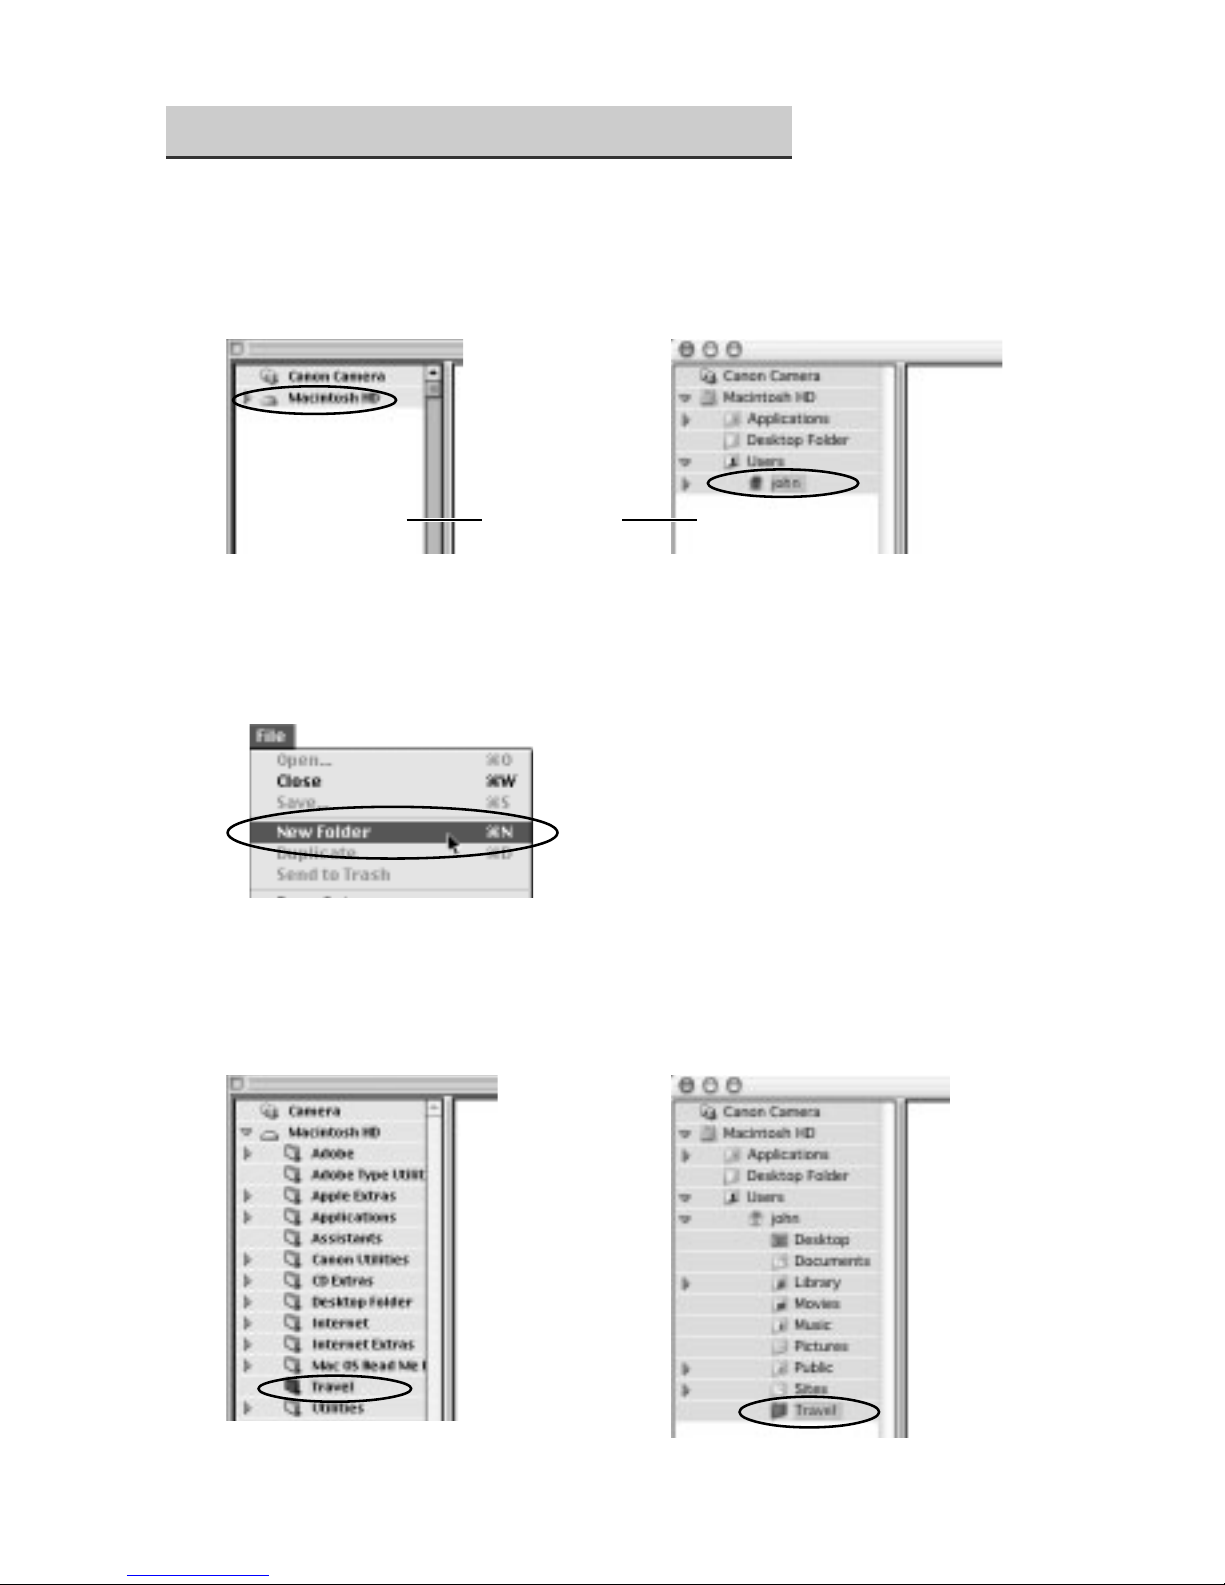
Create a File Destination Folder
Mac OS 8.6-9.2
• Select [Macintosh HD] in the
Explorer View section.
1. Create a new folder for saving images from the camera.
• Click the [File] menu and select [New Folder]. A folder with the name
“Untitled” will be created. Click it to change the folder name as you wish.
2. In the Explorer View Section, click the newly created folder.
Mac OS 8.6-9.2 Mac OS X
Mac OS X
• Select the [your name] subfolder of
the [Users] folder in the startup disk.
Explorer View

27
Downloading and Saving Images from the Camera
• Select images in the Camera window and click the [Download] button. The
downloaded images are saved to the computer and appear in the Browser
area.
“RAW” displays on
RAW images.
Thumbnail The movie icon displays
on movie thumbnails.

28
MEMO
 Loading...