

Canon POWERSHOT S2 User Manual
ENGLISH
Software Starter Guide
(For the Canon Digital Camera Solution Disk Version 24)
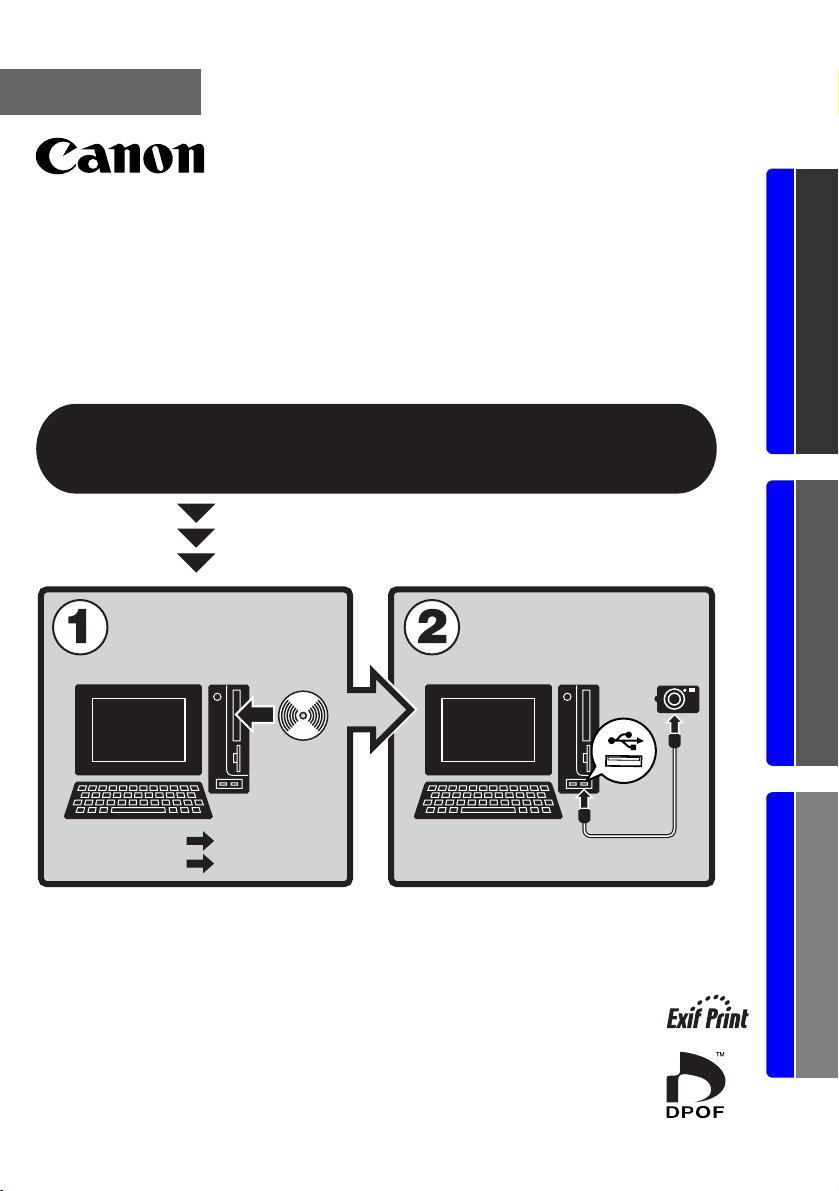
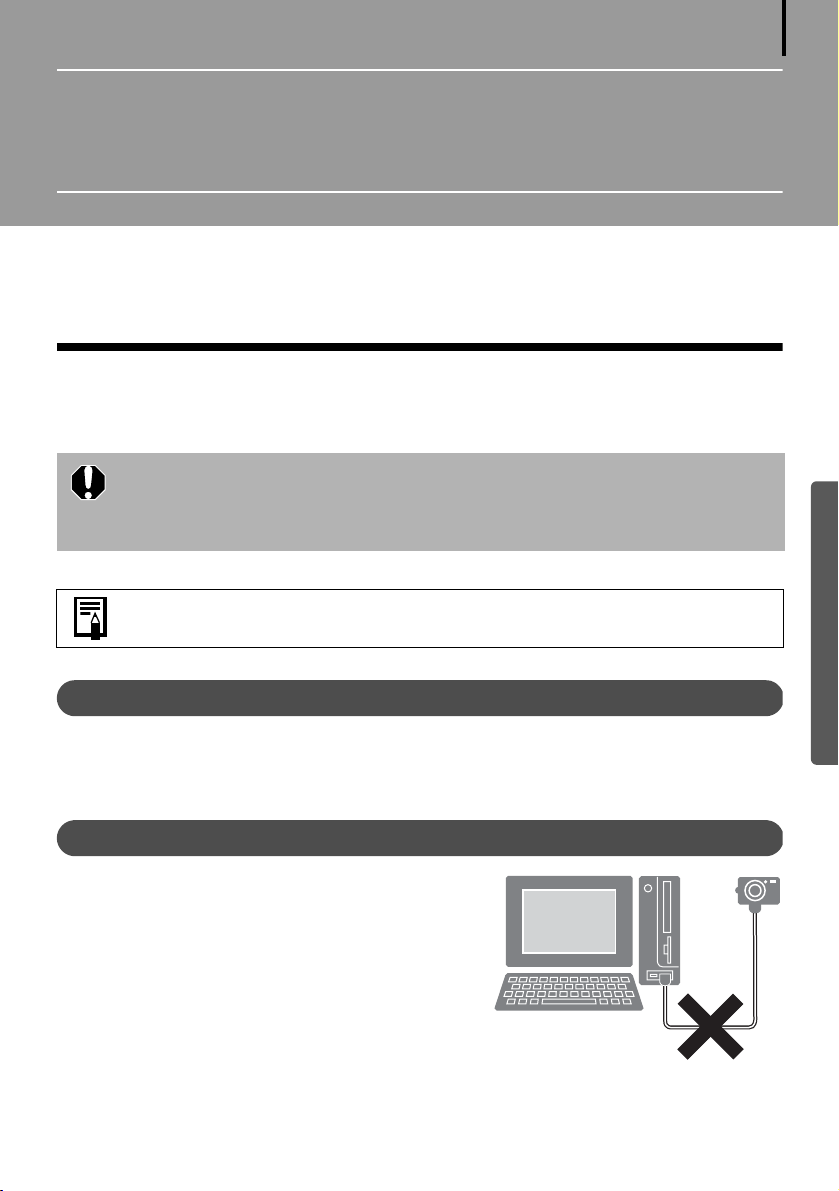
You must install the software bundled on the Canon
Digital Camera Solution Disk before connecting the
camera to the computer.
Windows/Macintosh Windows Macintosh
Install the
software.
Windows
Macintosh
• This guide explains how to install the software programs and
briefly introduces their functions and operating procedures.
• Please read the software license agreement that displays during
installation before using the software on the supplied CD-ROM.
You must accept the terms and conditions of the software
license agreement to use the software.
(p. 10)
(p. 49)
Connect the camera
to the computer.

SAFETY PRECAUTIONS
The precautions noted within this guide are intended to instruct you in the safe and correct
use of the products and to prevent injuries or damage to yourself, other persons and property.
Please read and ensure that you understand them before proceeding to other sections of
the guide.
Warnings This symbol indicates topics that could lead to death or serious injury if
ignored or handled incorrectly.
Warnings
• Do not play the supplied CD-ROM(s) in any CD player that does not support data CDROMs. Playing the CD-ROM(s) in an audio CD player (music player) could damage the
speakers. It is also possible to suffer from hearing loss from listening with headphones to
the loud sounds of a CD-ROM played on a music CD player.
Disclaimer
• While every effort has been made to ensure that the information contained in this guide is
accurate and complete, no liability can be accepted for any errors or omissions. Canon
reserves the right to change the specifications of the hardware and software described
herein at any time without prior notice.
• No part of this guide may be reproduced, transmitted, transcribed, stored in a retrieval
system, or translated into any language in any form, by any means, without the prior
written permission of Canon.
• Canon makes no warranties for damages resulting from corrupted or lost data due to a
mistaken operation or malfunction of the camera, the software, the CompactFlash™ cards
(CF cards), personal computers, peripheral devices, or use of non-Canon CF cards.
Trademark Acknowledgments
• ArcSoft, the ArcSoft logo and ArcSoft PhotoStudio are trademarks or registered trademarks
of ArcSoft, Inc.
• Adobe is a trademark of Adobe Systems Incorporated.
• CompactFlash is a trademark of SanDisk Corporation.
• Macintosh, Mac OS and QuickTime are trademarks of Apple Computer Inc., registered in
the United States and other countries.
• Microsoft
Corporation in the United States and/or other countries.
• Other names and products not mentioned above may be registered trademarks or
trademarks of their respective companies.
Copyright © 2005 Canon Inc. All rights reserved.
®
and Windows® are either registered trademarks or trademarks of Microsoft

Table of contents
Table of contents ...............................................................................1
Read This First 3
It’s so Simple! Make Prints Right at Home Like a Pro ...................... 4
Unbounded Possibilities with Entertaining Software .....................6
System Requirements ........................................................................ 8
Using the Software on the Windows Platform
– Preparations 10
Installing the Software and USB Driver .......................................... 10
Using the Software on the Windows Platform
– The Basics 15
Downloading Images to the Computer .......................................... 15
Printing Images ................................................................................ 21
Using the Software on the Windows Platform
– Advanced Techniques 26
The ZoomBrowser EX Windows ...................................................... 26
ZoomBrowser EX Features .............................................................. 32
Checking Images before Downloading .......................................... 34
Replaying Movies ............................................................................. 36
Editing Movies .................................................................................37
Converting RAW Images ................................................................. 38
Operating the Shutter Remotely .................................................... 41
Merging Panoramic Images - PhotoStitch ...................................... 44
Enjoy Customizing Your Camera with the My Camera Settings ... 45
1
Using the Software on the Macintosh Platform
– Preparations 49
Installing the Software ....................................................................49
Using the Software on the Macintosh Platform
– The Basics 51
Downloading Images to the Computer .......................................... 51
Printing Images ................................................................................ 56

Table of contents
Using the Software on the Macintosh Platform
– Advanced Techniques 59
The ImageBrowser Windows .......................................................... 59
ImageBrowser Features ...................................................................65
Checking Images before Downloading .......................................... 67
Replaying Movies ............................................................................. 69
Editing Movies .................................................................................70
Converting RAW Images ................................................................. 71
Operating the Shutter Remotely .................................................... 73
Merging Panoramic Images - PhotoStitch ...................................... 76
Enjoy Customizing Your Camera with the My Camera Settings ... 77
Appendices 81
ArcSoft PhotoStudio ........................................................................ 81
Uninstalling the Software ............................................................... 83
Memory Card Folder Structure ....................................................... 86
Troubleshooting .............................................................................. 87
Information about Your Camera 95
Information Common to All Models .............................................. 95
PowerShot A520/PowerShot A510 ..................................................97
DIGITAL IXUS 700/DIGITAL IXUS 50 ................................................97
PowerShot S2 IS ...............................................................................98
2
Index ................................................................................................. 99

Read This First
This chapter explains what you can accomplish using the camera with the software contained
on the Canon Digital Camera Solution Disk.
It also lists the computer system configurations required to use the software.
About this Guide
• The explanations in this guide are based on Windows XP and Mac OS X v10.3. If you are
using another version of these operating systems, the actual screen contents and
procedures may vary slightly from those shown.
• The following terms are used in this guide.
Mac OS X is used for Mac OS X (v10.1.5-v10.3)
Memory card is used for CF cards, SD cards, MultiMediaCards and PC cards.
3
Windows/Macintosh
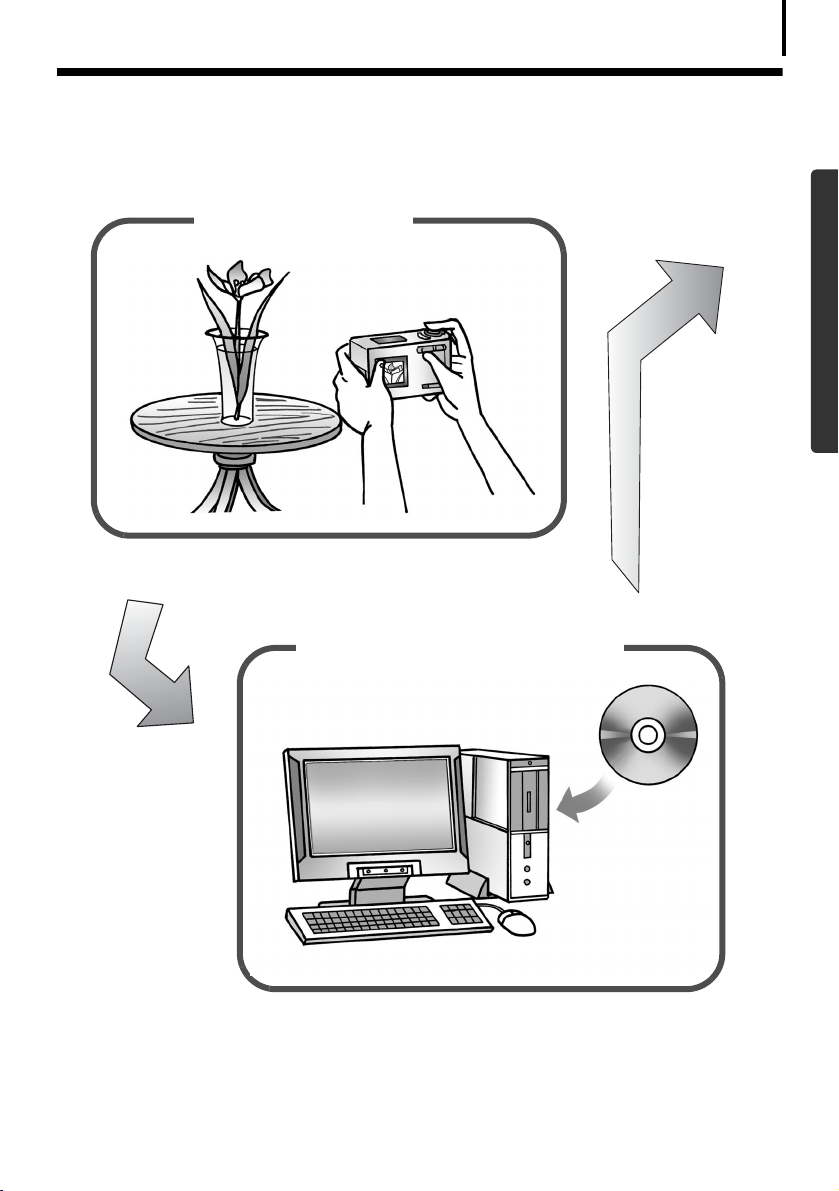
It’s so Simple! Make Prints Right at Home Like a Pro
It’s so Simple! Make Prints Right at Home
Like a Pro
4
Shoot the images
See your Camera User Guide for shooting instructions.
Install the software on the
computer
Windows (p. 10)
Macintosh (p. 49)
Windows/Macintosh
Just install the software once at the beginning.
It’s so Simple! Make Prints Right at Home Like a Pro
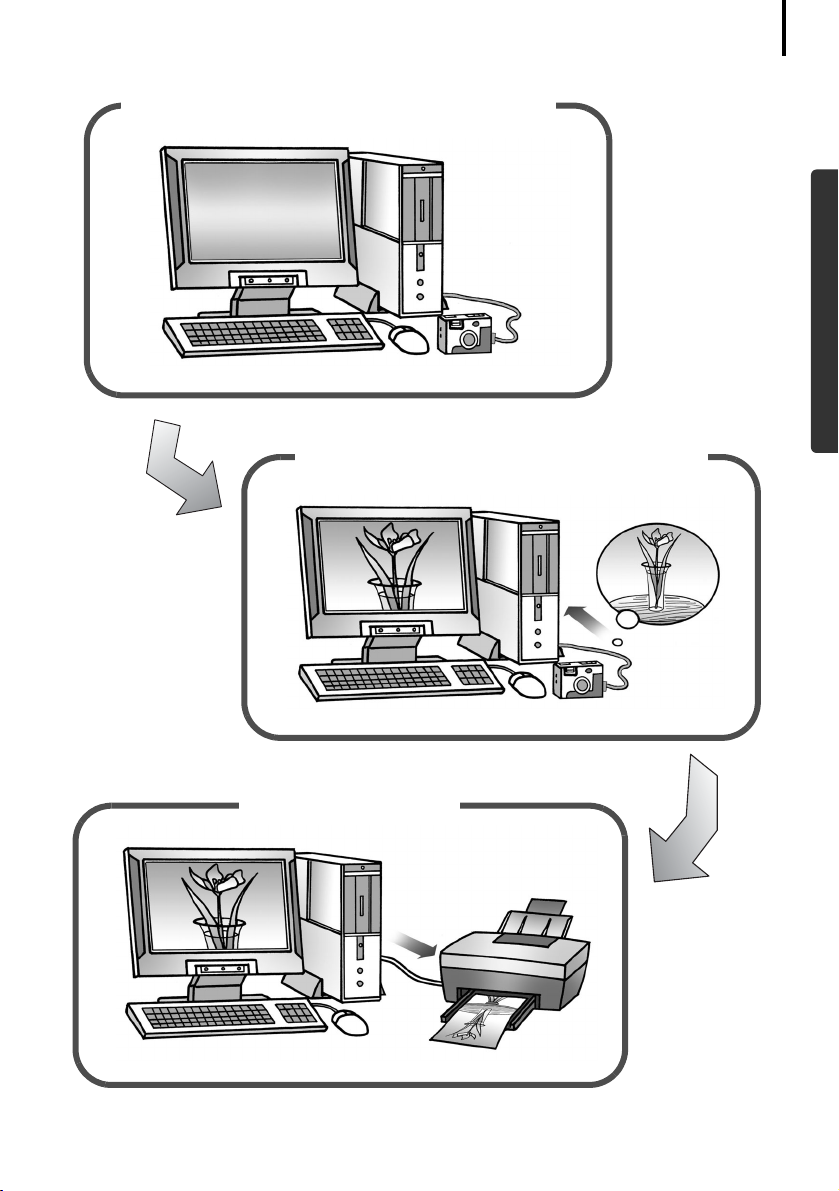
Connect the camera to the computer
5
Windows (p. 15)
Macintosh (p. 51)
(p. 96)
Windows/Macintosh
Download images to the computer
Print the images
Windows (p. 21)
Macintosh (p. 56)
Unbounded Possibilities with Entertaining Software
Unbounded Possibilities with Entertaining
Software
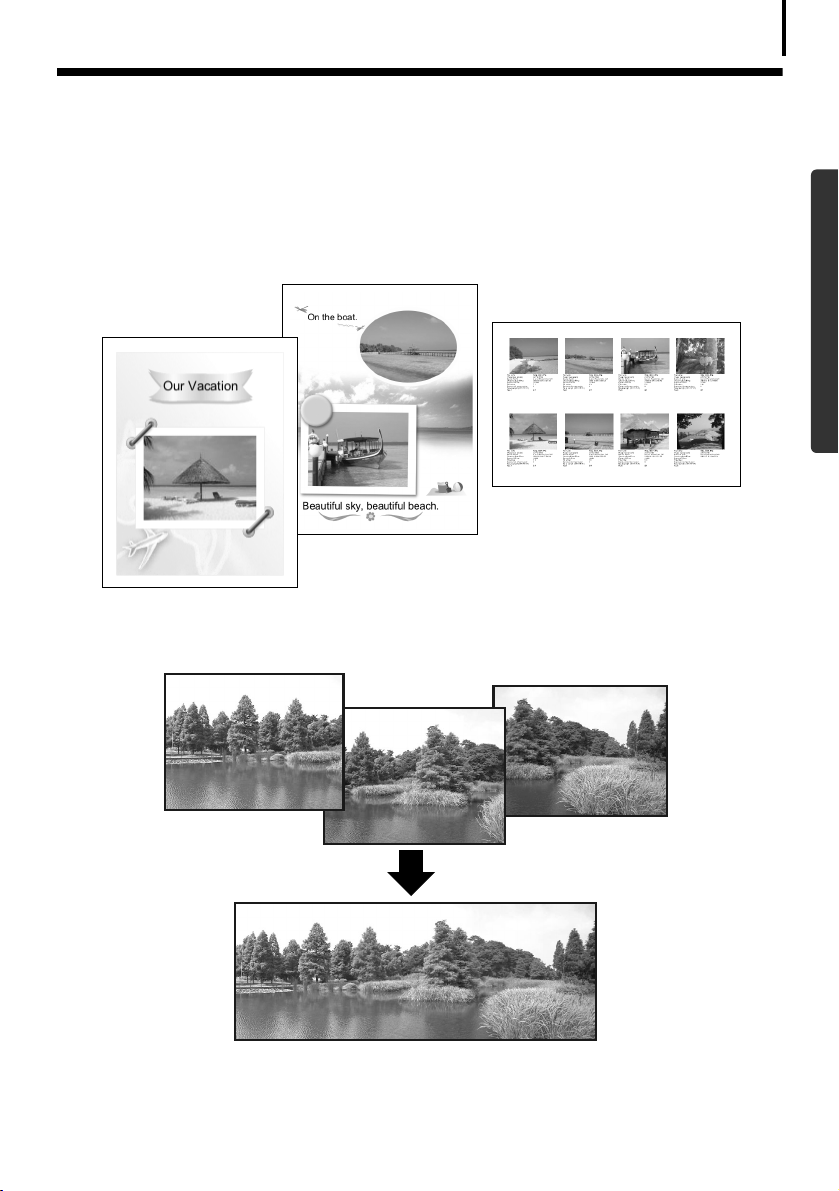
Print a Variety of Layouts
Print with the diverse layouts available in PhotoRecord (Windows) and ImageBrowser
(Macintosh). The examples shown are from PhotoRecord (Windows).
Make your own photo
album of precious
moments.
Confirm all your images in one
glance with index (contact sheet)
printing.
6
Windows/Macintosh
Stitch a Panorama Together
Create a panoramic image from a series of images with PhotoStitch.
Unbounded Possibilities with Entertaining Software
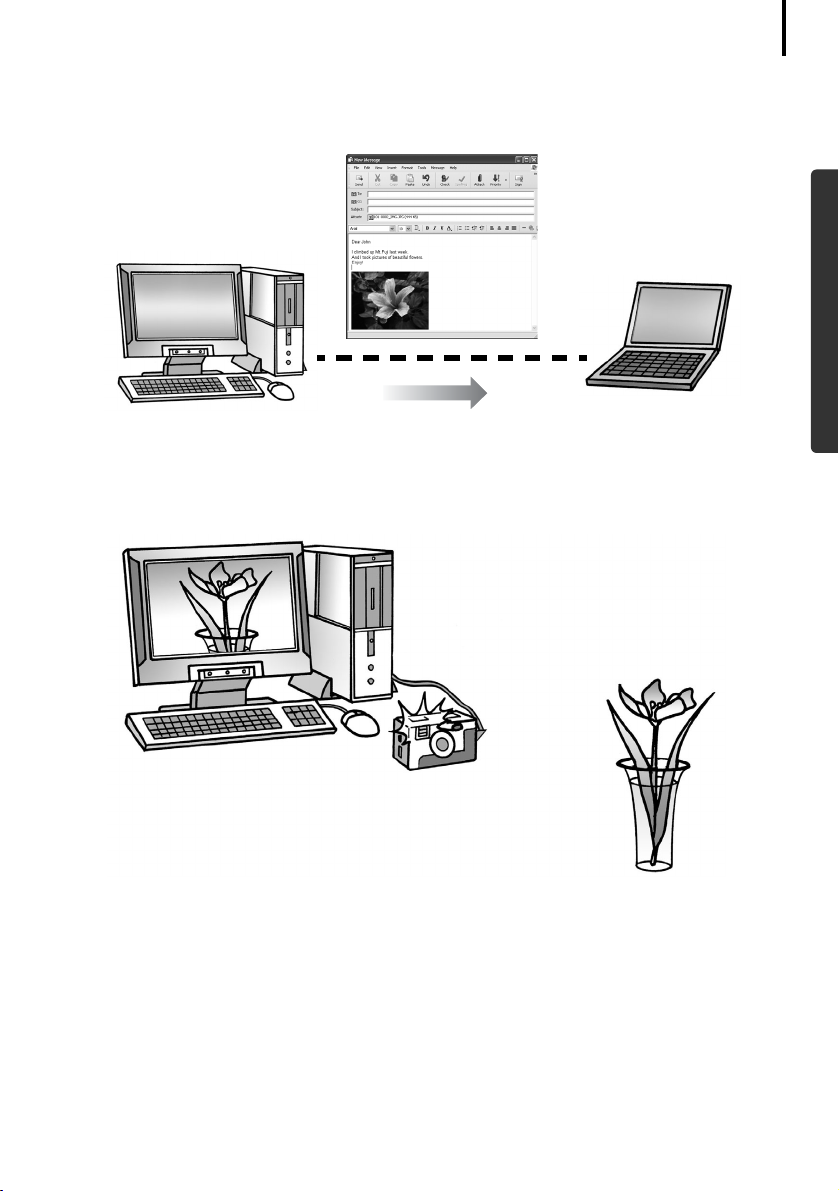
Send an Image as an E-mail Attachment
Attach an image to an e-mail message by starting your mail software from within
ZoomBrowser EX (Windows) or ImageBrowser (Macintosh).
Operate the Camera Shutter from the Computer
Release the camera’s shutter from the computer with ZoomBrowser EX (Windows) or
ImageBrowser (Macintosh). The recorded image is saved directly to your computer.
7
Windows/Macintosh
Release the shutter from the computer.
Edit a Movie
You can create and edit movies: link movies and stills that have been downloaded to your
computer, add background music, superimpose titles and other text, and apply various effects
to the movies.
Convert a RAW Image
RAW images are extremely high-quality images that are free of the resolution loss associated
with compression processing. However, since RAW images are a special type of image, it is
necessary to convert them into standard images. You can make fine adjustments to the image
quality and coloration when they are converted.

System Requirements
System Requirements
Please install the software on a computer meeting the following minimum requirements.
• A CD-ROM drive is required to install the software.
• Even when system requirements are met, not all computer functions can be
guaranteed.
• A sound card is required to play movie file audio tracks under Windows.
• With Windows, QuickTime 6.5 is required to play or edit movies or to save
images merged with PhotoStitch as QuickTime VR files. QuickTime is included
on the Canon Digital Camera Solution Disk.
• Macintosh software cannot be used on disks formatted in the UFS (Unix File
System) format.
Windows
OS Windows 98 Second Edition (SE)
Windows Me
Windows 2000 Service Pack 4
Windows XP (including Service Pack 1 and Service Pack 2)
Computer Model The above OS should be pre-installed on computers with built-in USB
ports.
8
Windows/Macintosh
CPU Pentium 500 MHz or higher processor
RAM Windows 98 SE/Windows Me: 128 MB or more
Interface USB
Free Hard Disk
Space
Display 1,024 x 768 pixels/High Color (16 bit) or better
Windows 2000/Windows XP: 256 MB or more
•Canon Utilities
- ZoomBrowser EX: 250 MB or more
(Including the PhotoRecord printing program)
- PhotoStitch: 40 MB or more
•Canon Camera TWAIN Driver: 25 MB or more
•Canon Camera WIA Driver: 25 MB or more
•ArcSoft PhotoStudio: 50 MB or more

System Requirements
Macintosh
OS Mac OS X (v10.1.5-v10.3)
9
Computer Model The above OS should be pre-installed on computers with built-in USB
CPU PowerPC G3/G4/G5
RAM 256 MB or more
Interface USB
Free Hard Disk
Space
Display 1,024 x 768 pixels/32,000 Colors or better
ports.
•Canon Utilities
- ImageBrowser: 200 MB or more
- PhotoStitch: 40 MB or more
•ArcSoft PhotoStudio: 50 MB or more
Windows/Macintosh
Using the Software on the Windows
Platform – Preparations
This chapter explains the basic procedures for installing the software and connecting the
camera to a computer. Read this material before you connect the camera to the computer.
Installing the Software and USB Driver
Start by installing the software from the Canon Digital Camera Solution Disk.
• You must install the software before you connect the camera to the
computer.
• Users of Windows XP and Windows 2000 must first log in as an Administrator
(computer system administrator) to install programs.
See ArcSoft PhotoStudio (p. 81) for details on how to install ArcSoft
PhotoStudio.
10
Windows
Items to Prepare
• Your camera and computer
• Canon Digital Camera Solution Disk
• Interface cable supplied with the camera
Installation Procedures
Confirm that the camera is NOT connected to
1
the computer.
If it is, disconnect the cable. The software cannot
be properly installed if the camera is connected to
the computer at the start.
2 Close any programs that are running.
Installing the Software and USB Driver
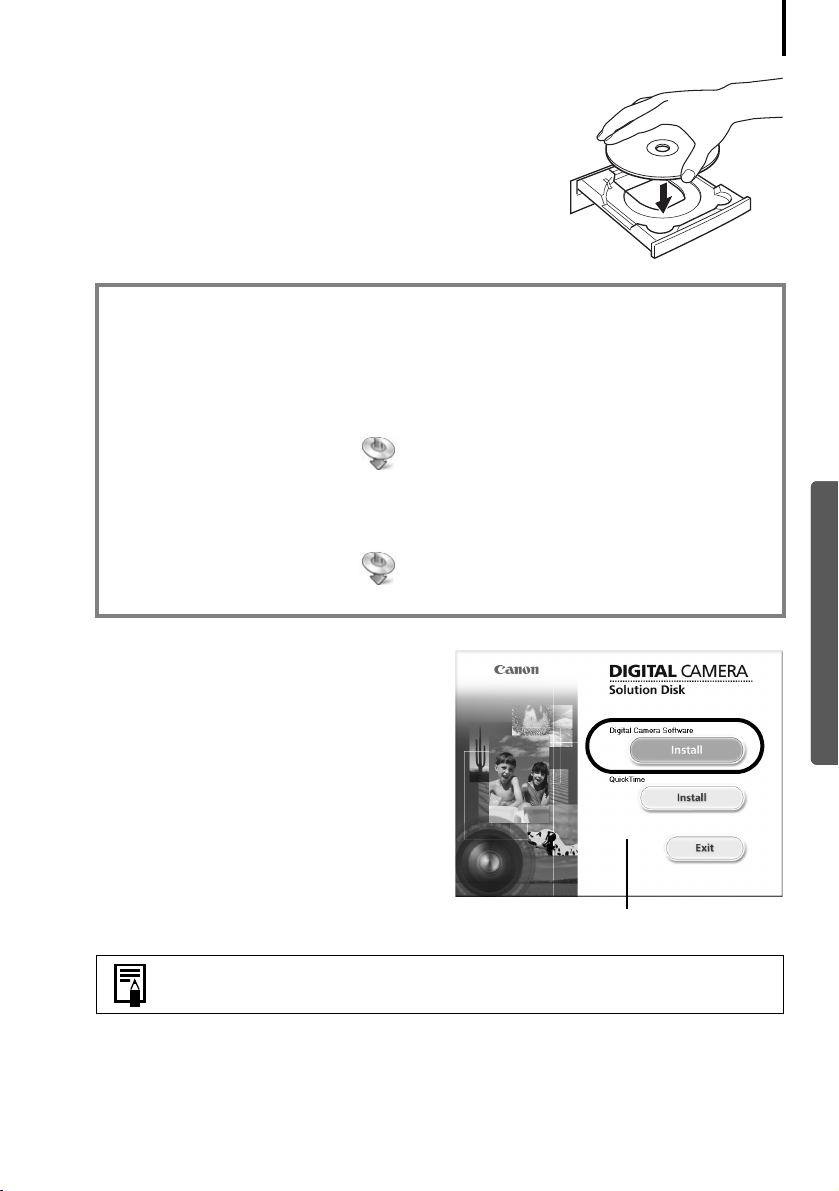
3 Place the Canon Digital Camera Solution Disk in the
computer’s CD-ROM drive.
If the installer panel does not appear automatically, use the
following procedures.
How to Display the Installer Panel
Use the following procedures to display the installer panel if it does not appear
automatically.
Windows XP
1. Select [My Computer] from the [Start] menu.
2. Right-click the CD-ROM icon and select [Open].
3. Double-click the [SETUP.EXE] icon.
Windows 2000, Windows Me, Windows 98 SE
1. Double-click the [My Computer] icon on the desktop.
2. Right-click the CD-ROM icon and select [Open].
11
3. Double-click the [SETUP.EXE] icon.
Some computers may not display the [.EXE] file name extension as shown above.
4 Click the Digital Camera Software
[Install] button.
Installer Panel
Follow any instructions to restart your computer, if they appear. If the
following window appears, continue with the installation.
Windows

Installing the Software and USB Driver
5 Click [Next].
6 Select [Easy Installation] as the setup
type and click [Next].
Select [Custom Installation] to select
programs individually for installation.
When [Custom Installation] is Selected
The USB driver (the software for connecting) is required when the camera
is connected to the computer with an interface cable. Ensure that you
select a USB driver from below (the appropriate one for your operating
system).
•Windows 2000/Windows 98 SE: Canon Camera TWAIN Driver
•Windows Me: Canon Camera WIA Driver
With Windows XP, the USB driver supplied with the Windows operating
system is used so there is no need to install a USB driver.
12
Windows
7 Click [Yes] if you agree to all of the terms of the software license agreement.
8 Review the installation settings and
click [Next].
Follow the onscreen instructions to
proceed.
The items displayed here differ according to
the software installed.
Installing the Software and USB Driver
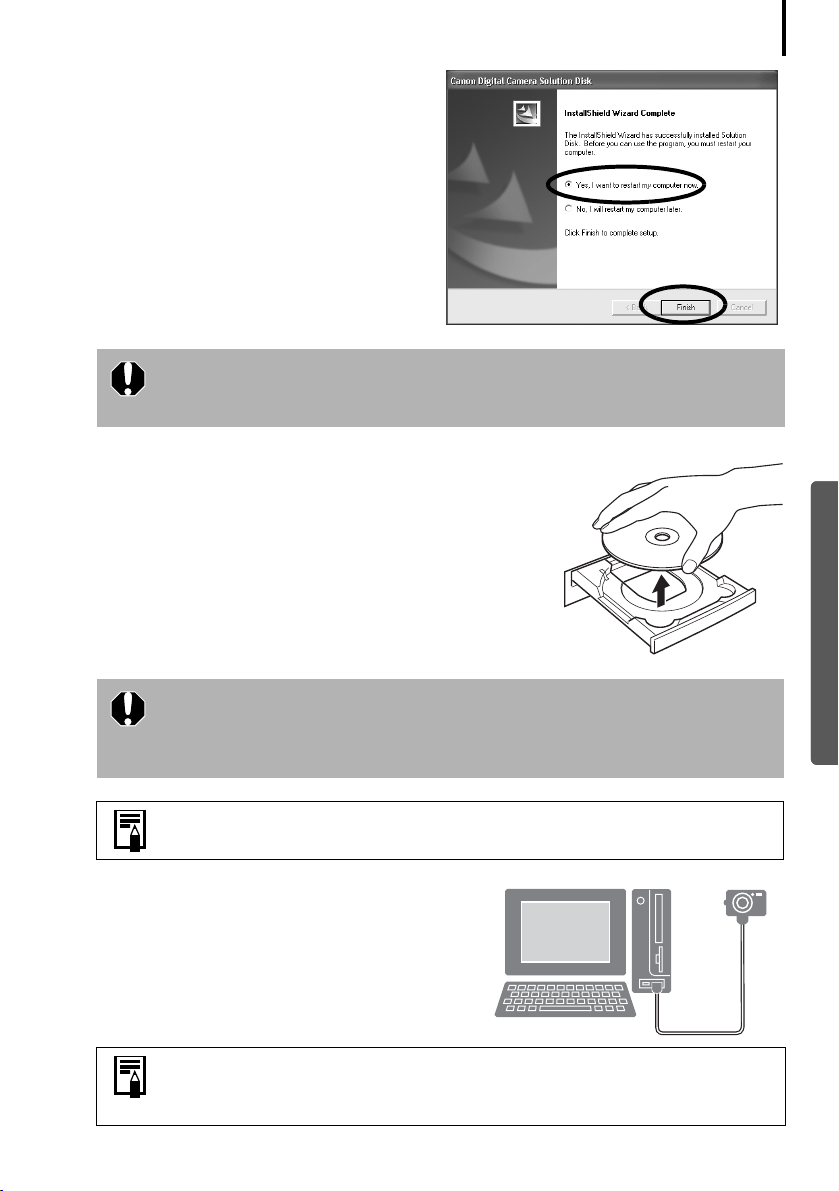
9 When the installation is over, select
[Yes, I want to restart my computer
now.] and click [Finish].
At this stage, do NOT remove the Solution
Disk from the CD-ROM drive yet.
Users of Windows XP and Windows 2000 must log in as an Administrator
(computer system administrator) after restarting to carry out the
subsequent procedures.
10 Remove the disk from the CD-ROM drive when your
normal desktop screen appears after restarting.
This concludes the software installation.
Continue by connecting the camera to the computer so
that the USB driver can be utilized.
13
Windows
If you installed a USB driver, so far the required files have only been
copied to your computer. You must now connect the camera to the
computer with the interface cable to complete the installation and
prepare the driver for use.
See Uninstalling the Software (p. 83) to delete the installed programs.
11 Attach the camera to the computer with the
interface cable and set the camera to the
correct mode for connecting.
Procedures for attaching the camera to the computer and placing the
camera in the correct mode for connecting vary between camera models.
See Information about Your Camera (p. 95).
Installing the Software and USB Driver
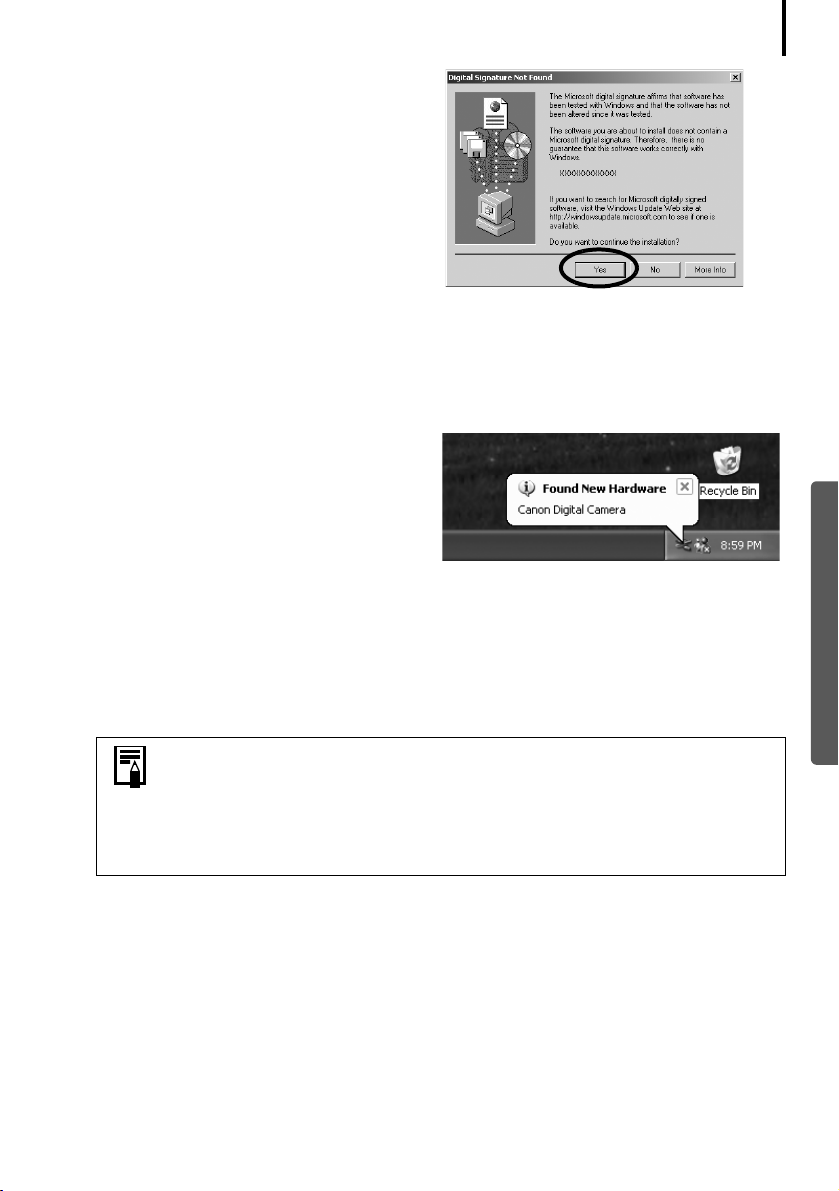
If the Digital Signature Not Found window
appears, click [Yes].
The USB driver will automatically finish installing onto the computer when you attach the
camera and open a connection.
Dialogs similar to the following will appear during this process (first time the camera is
connected to a computer only).
Windows XP
The dialog on the right will appear after a
few moments.
14
Windows 2000/Windows Me/Windows 98 SE
Restart the computer according to the instructions if you are prompted to do so by a
message.
A dialog allowing you to set the default settings will display after installation. See Using
the Software on the Windows Platform
procedures.
•See USB driver installation not proceeding well in the Troubleshooting
section (p. 87) if you are having problems installing the USB driver.
•See Uninstalling the USB Driver (p. 84) to delete the USB driver installed
with these procedures.
•See If You Were Using ZoomBrowser EX Version 2 or 3 (p. 94) if you
were previously using either version.
This concludes the software and USB driver installation and the procedures for connecting the
camera to the computer.
You may now download camera images to the computer (p. 15).
– The Basics (p. 15) for the subsequent
Windows
Using the Software on the Windows
Platform – The Basics
This chapter explains the procedures for using ZoomBrowser EX to download the camera's
images to the computer and print them.
Read this chapter after completing the preparations in the Using the Software on the Windows
Platform
Downloading Images to the Computer
Begin by downloading the images to your computer. The downloading procedure is slightly
different according to whether you are using a camera to computer connection (see below) or
a memory card reader (p. 19).
– Preparations section.
You can also display an index of the camera or memory card images to check
them before downloading or to download them selectively. For instructions,
see Checking Images before Downloading (p. 34).
15
Windows
Camera to Computer Connection
Attach the supplied interface cable to the computer’s USB port and the camera’s
1
DIGITAL Terminal. Prepare the camera for communication with the computer.
Procedures for attaching the camera to the computer and placing it in
the correct mode for connecting vary between camera models. See
Information about Your Camera (p. 95).
The Camera Control Window will appear.
Camera Control Window
Downloading Images to the Computer
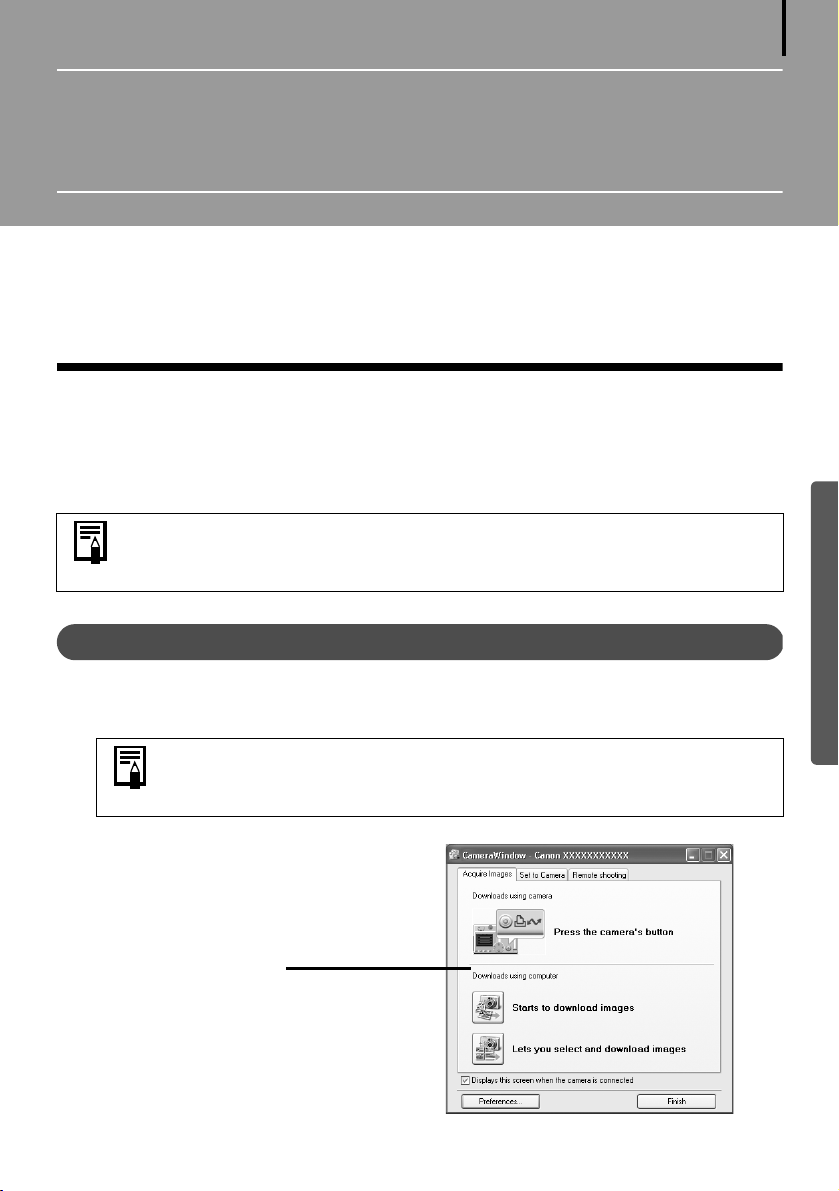
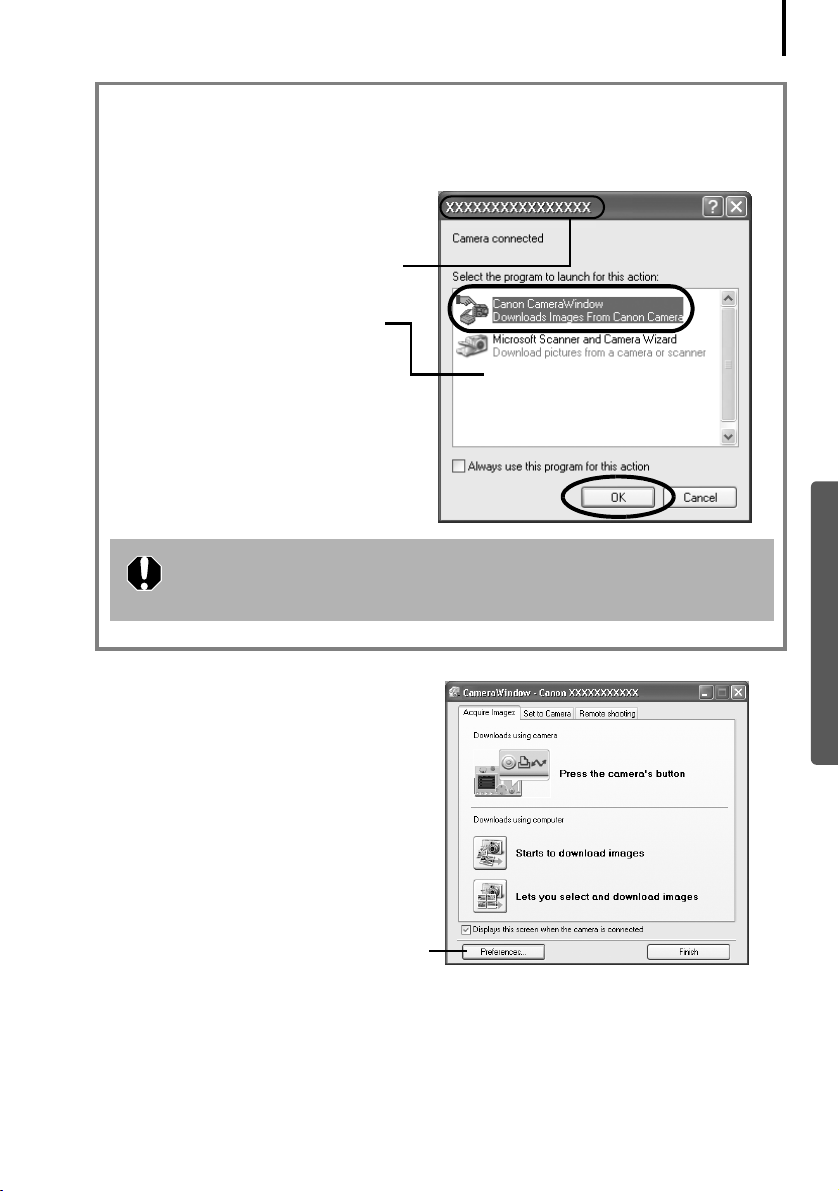
First Time Camera is Connected to a Computer
Set the following settings the first time you connect the camera to the computer. These
procedures are not required from the second connection onward.
Select [Canon CameraWindow] when a
dialog (Events dialog) similar to that on
the right displays and click [OK].
Your camera model name or [Canon
Camera] will appear here.
Different programs may display
according to your computer setup.
If this Events dialog does not appear, click the [Start] menu and select
[All Programs] or [Programs], followed by [Canon Utilities],
[CameraWindow] and [CameraWindow].
16
Windows
2 Download the images.
Download the images using the camera or
the computer. By default, the downloaded
images are saved into the [My Pictures]
folder.
You can adjust the settings, such as the type
of image downloaded and the destination
folder, by clicking [Preferences].
Downloading Images to the Computer
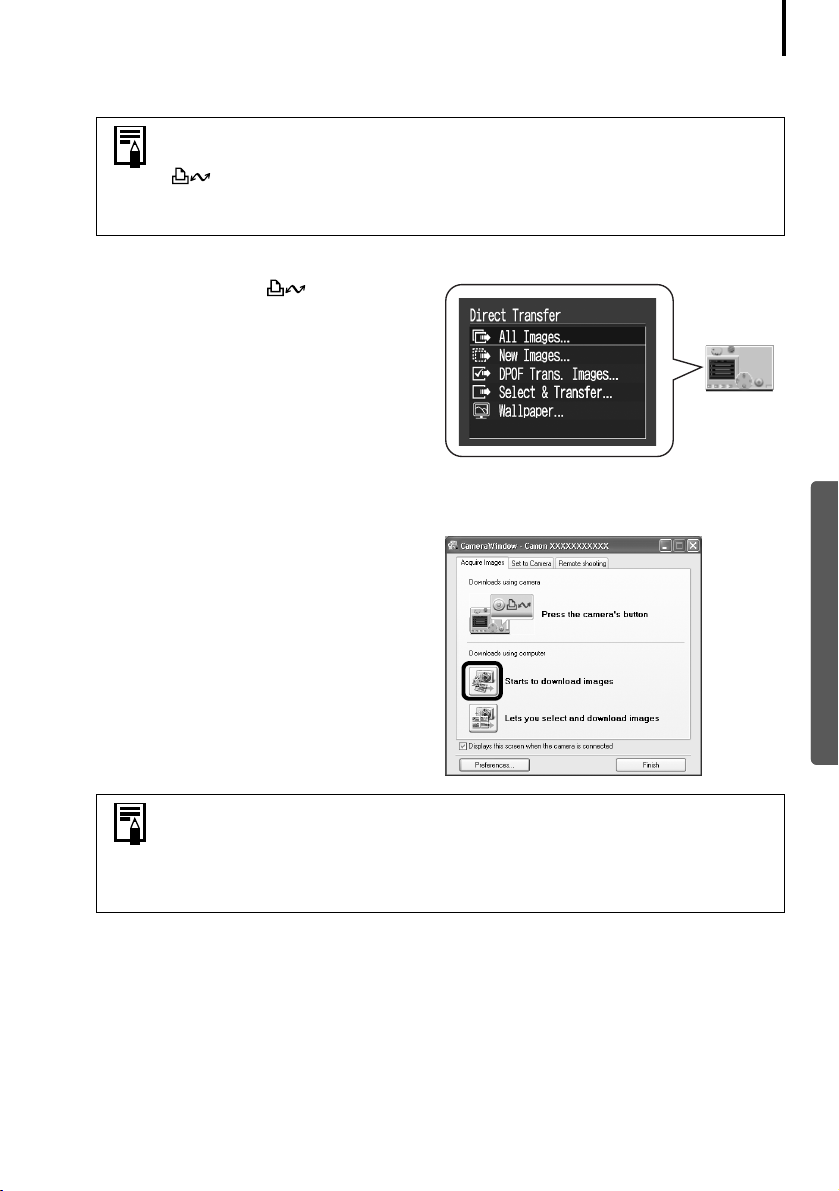
Using the Camera to Download Images (Direct Transfer Function)
• If the conditions are right for the Direct Transfer function, the Direct
Transfer settings menu will appear in the LCD monitor. In addition, the
(Print/Share) button will light if your camera is equipped with one.
• See the Camera User Guide for instructions regarding Direct Transfer
settings and procedures.
Set the Direct Transfer settings on the
camera and press the (Print/Share)
button or the [SET] button.
Using the Computer to Download Images
Click [Starts to download images].
17
Windows
• By default, all the images that have yet to be downloaded will
download.
• To download images that have had their transfer settings set with the
camera, click [Preferences] and select [Images whose transfer settings
were specified with the camera] as the image type to be downloaded.
The downloaded images will be saved into folders according to their shooting date.

Downloading Images to the Computer
By default, when downloading is complete,
the thumbnails (tiny versions) of the
downloaded images display in
ZoomBrowser EX’s Main Window.
Thumbnail
Shows the folder where the images are
saved.
Next, print out the images (p. 21).
18
Windows
Downloading Images to the Computer
Memory Card Reader Connection
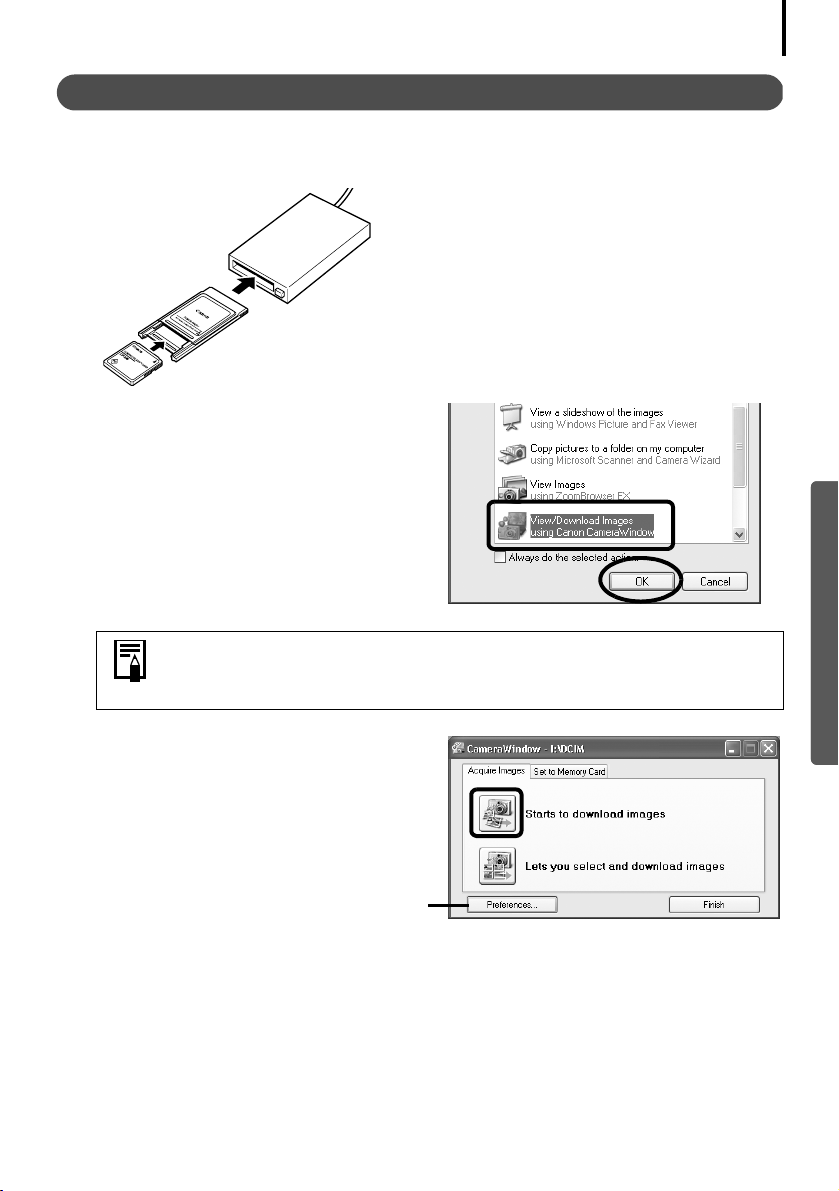
Insert the memory card into the reader.
1
Use a separately sold card adapter (PCMCIA adapter) if required.
See the manual for the memory card reader for its connection and handling instructions.
(2) Insert the loaded adapter into the slot.
(1) Place the memory card in an adapter if required.
The card adapter and memory card shape may vary according
to the type of memory card your camera utilizes.
2 Select [View/Download Images using
Canon CameraWindow] when the
dialog to the right appears and click
[OK].
The Camera Control Window will display.
19
Windows
If the dialog above fails to appear, click the [Start] menu and select [All
Programs] or [Programs], followed by [Canon Utilities], [CameraWindow]
and [CameraWindow], and proceed to Step 3.
3 Click [Starts to download images].
You can adjust the settings, such as the type
of image downloaded and the destination
folder, by clicking [Preferences].

Downloading Images to the Computer
• By default, all the images that have yet to be downloaded will
download to the [My Pictures] folder.
• To download images that have had their transfer settings set with the
camera, click [Preferences] and select [Images whose transfer settings
were specified with the camera] as the image type to be downloaded.
•See Memory Card Folder Structure (p. 86) for information about
memory card folder structures and file names.
The downloaded images are saved into folders according to the shooting date.
By default, when the download is complete, the thumbnails (tiny versions) of the
downloaded images display in ZoomBrowser EX’s main window.
Next, print out the images (p. 21).
20
Windows
Printing Images
Printing Images
This section explains the basic procedures for using PhotoRecord, a printing utility program. See
the program’s [Help] menu for more details.
• Movies cannot be printed.
• With images shot by Exif 2.2 (called Exif Print) compatible cameras, shooting
information such as the shooting settings and mode can be included with
the images. This data is then used to correct the images to obtain better
prints.
• PhotoRecord automatically carries out image correction (by default) both
with images shot with Exif 2.2 compatible cameras and other images,
yielding high-quality prints.
1 Click [Print] in ZoomBrowser EX’s Main Window, followed by [Layout Print].
21
Windows
2 Confirm that [1. Select Images] is selected and proceed to select images.
The background of the
selected image(s) will
turn blue.
Printing Images
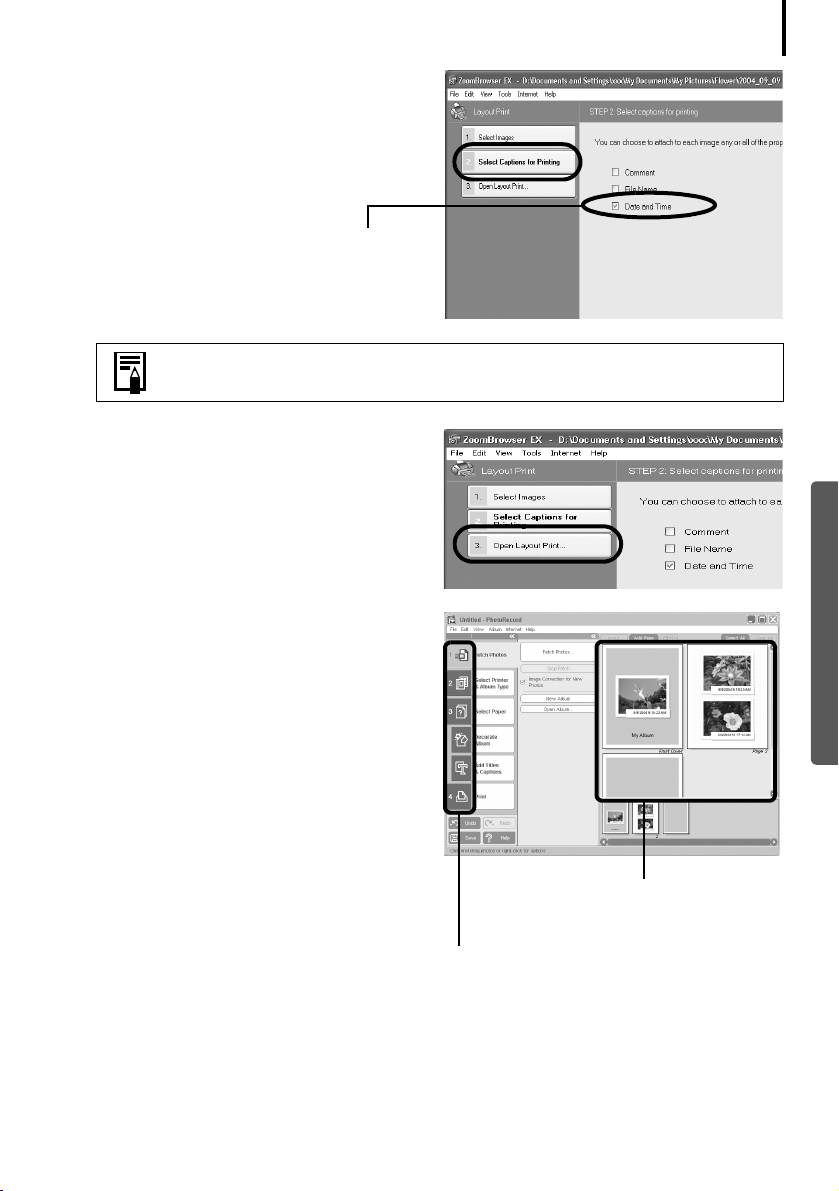
3 Click [2. Select Captions for Printing]
and place a check mark beside the type
of information that will be printed with
the images.
If you select [Date and Time], for example,
you can print the images with their shooting
dates and times included.
You can add a comment to an image in the Properties Window (p. 31).
4 Click [3. Open Layout Print].
22
PhotoRecord will start, displaying the
selected image and the information
selected in Step 3 in the Album window.
In addition, the steps that will take you
through the printing process will display on
the left side. Follow the steps in order to
proceed.
Album Window
The selected images display
here.
The printing procedures display here.
From this point onward, the procedures vary according to whether you select Full Page
Print (prints one image per page) or Layout and Print (prints an arrangement of images on
each page).
Windows
Printing Images
Full Page Print
This option prints one image per page.
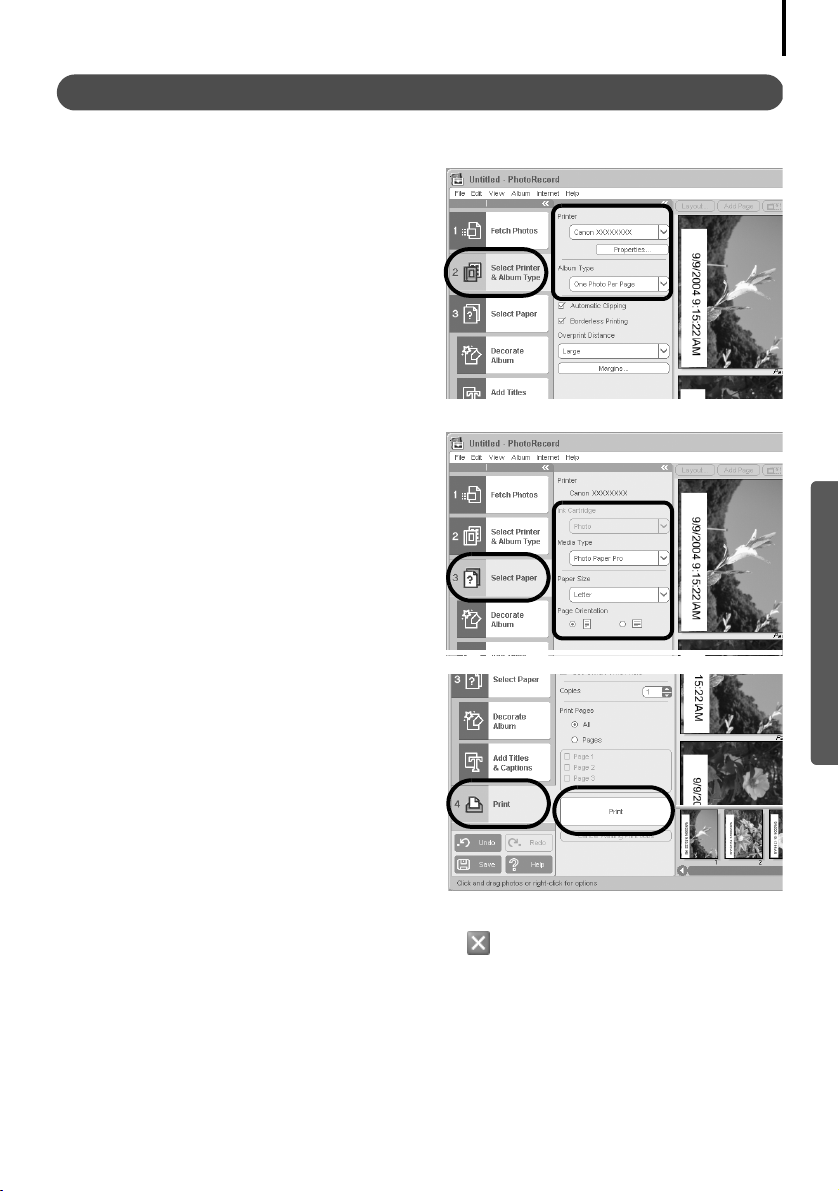
1 Click [2 Select Printer & Album Type].
Once you have chosen a printer, select
[One Photo Per Page] or [One Photo Per
Sheet] in the Album Type category.
2 Click [3 Select Paper] and select the
paper size and orientation.
23
Windows
3 Click [4 Print], confirm the number of
copies and other printing settings, and
click [Print].
This will start printing.
To close PhotoRecord after printing is complete, click . Click [Yes] to save the album or [No]
to close it without saving. The ZoomBrowser EX window will reappear when the save
procedure is complete.
Printing Images
Layout and Print
This option prints multiple images on a single page as in a photo album.
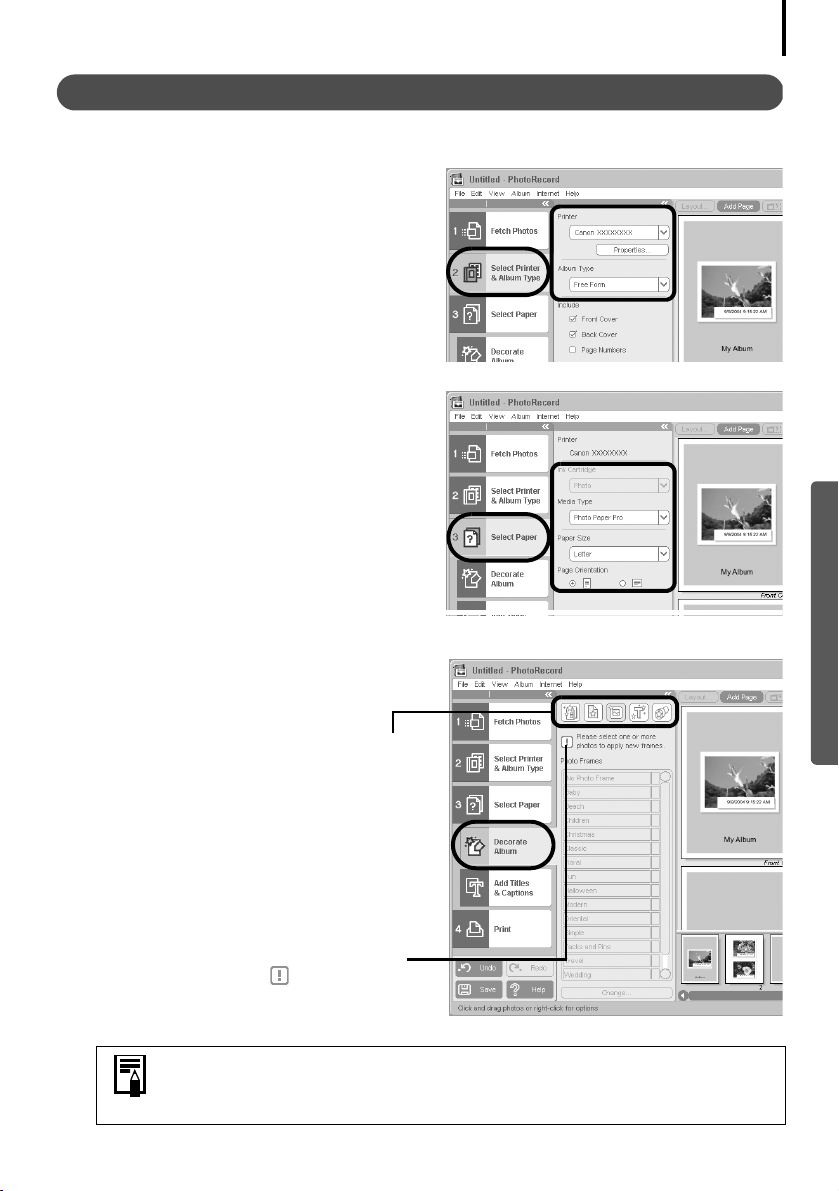
1 Click [2 Select Printer & Album Type].
Once you have chosen a printer, select
[Free Form] in the Album type category.
2 Click [3 Select Paper] and select the
paper size and orientation.
24
Windows
3 Click [Decorate Album] and change the
design of the image background and
border as desired.
Click the [Themes], [Backgrounds], [Photo
Frames], [Text Frames] or [Clipart] button to
switch between selections.
Perform the procedures according to the
instructions beside the symbol.
• The [Themes] category provides consistent designs for use throughout
an entire album.
• You can also click [Add Titles & Captions] to add text as a title or caption.
Printing Images
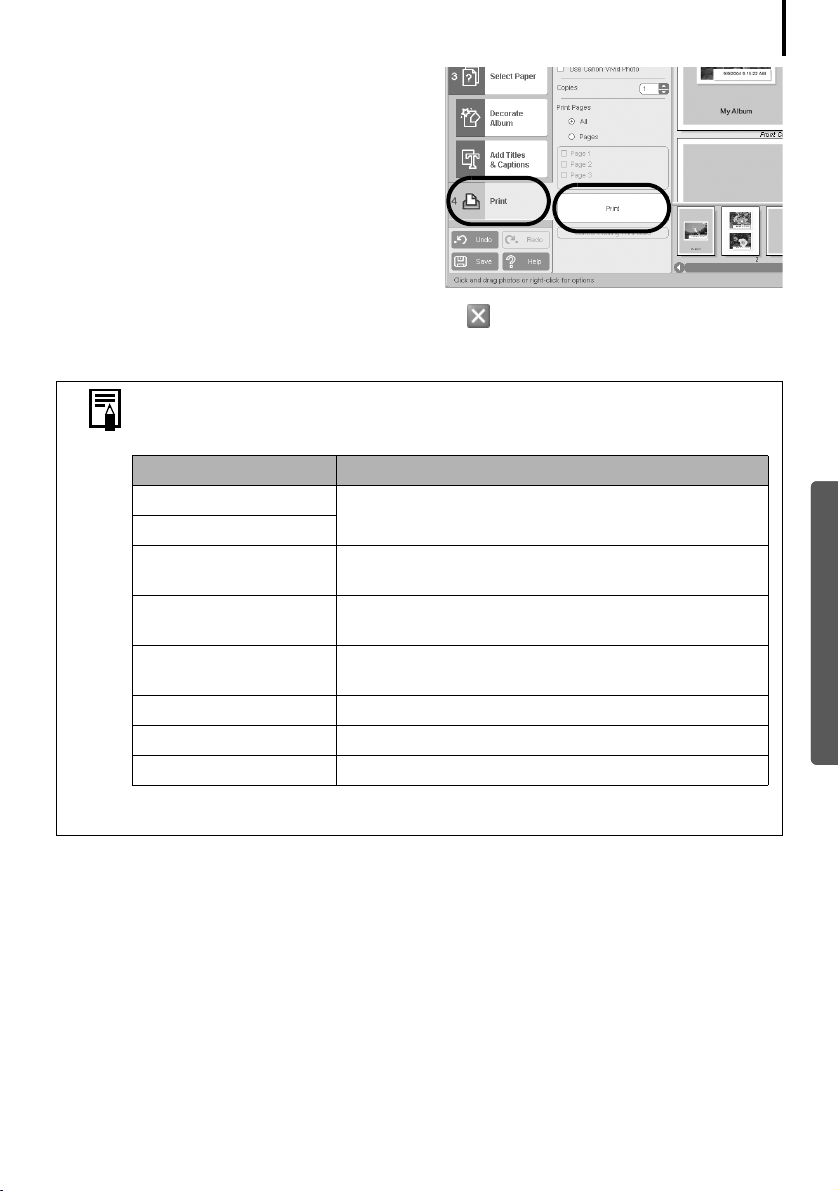
4 Click [4 Print], confirm the number of
copies and other printing settings, and
click [Print].
This will start printing.
To close PhotoRecord after printing is complete, click . Click [Yes] to save the album or [No]
to close it without saving. The ZoomBrowser EX window will reappear when the save
procedure is complete.
There are numerous varieties of albums. Select one to suit your purposes.
Please note that the available album types may vary slightly according to
the printer in use.
Album Type Description
One Photo Per Page
One Photo Per Sheet
Free Form
Contact Sheet
Fixed Size Photo
Mosaic Lines up the specified number of images and prints.
Perforated Paper Prints on perforated paper.
8-Sticker Label Prints on 8-label sheets.
* The shooting information displayed in ZoomBrowser EX and the Exif data
that can be printed using PhotoRecord differ slightly.
This chapter explained the ZoomBrowser EX basics. Once you have mastered them, try the
advanced techniques.
Using the Software on the Windows Platform
Prints one image on each sheet of paper.
Allows images to be freely positioned on the page
and printed.
Prints thumbnails of the images and their shooting
data (Exif data*).
Allows image heights and widths to be specified and
prints.
– Advanced Techniques (p. 26).
25
Windows
Using the Software on the Windows
Platform – Advanced Techniques
This chapter explains various ZoomBrowser EX features.
Proceed to this chapter once you have mastered the basic ZoomBrowser EX procedures in the
Using the Software on the Windows Platform
The ZoomBrowser EX Windows
This section describes the principal ZoomBrowser EX windows: the Main Window, Viewer
Window and Properties Window.
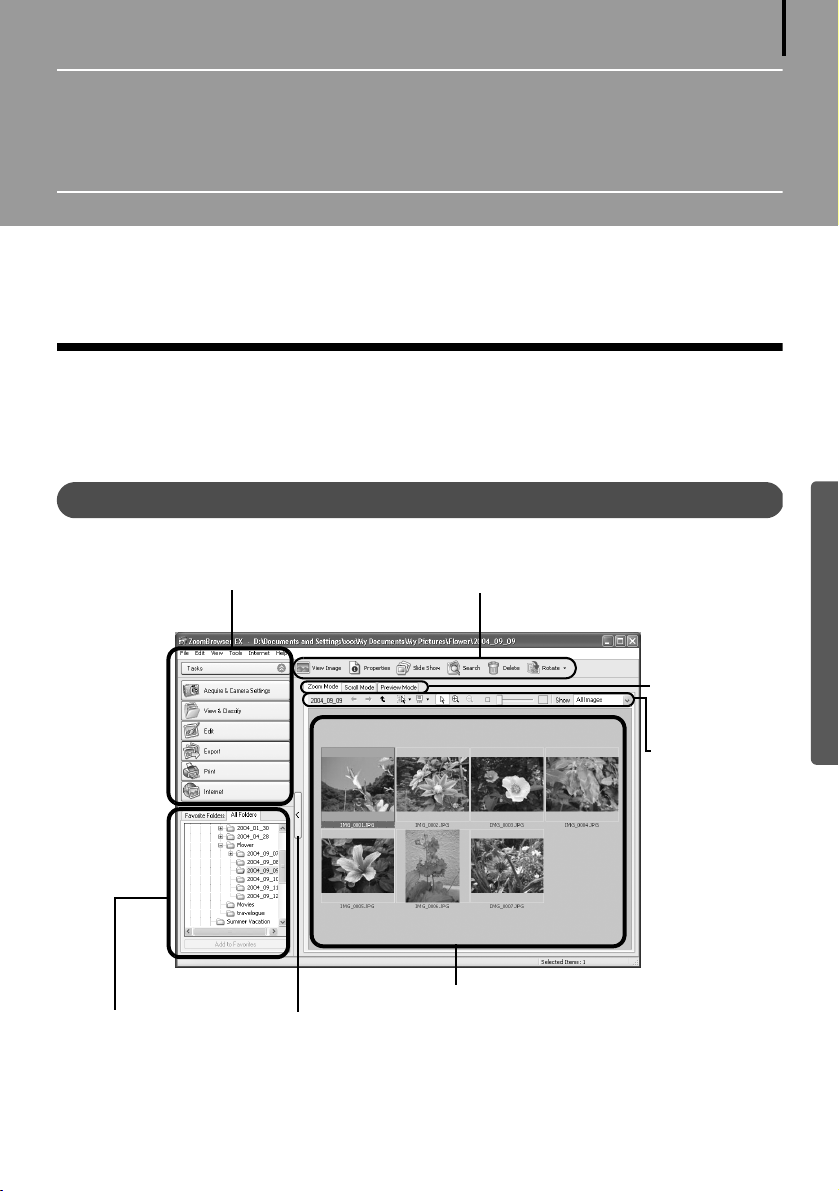
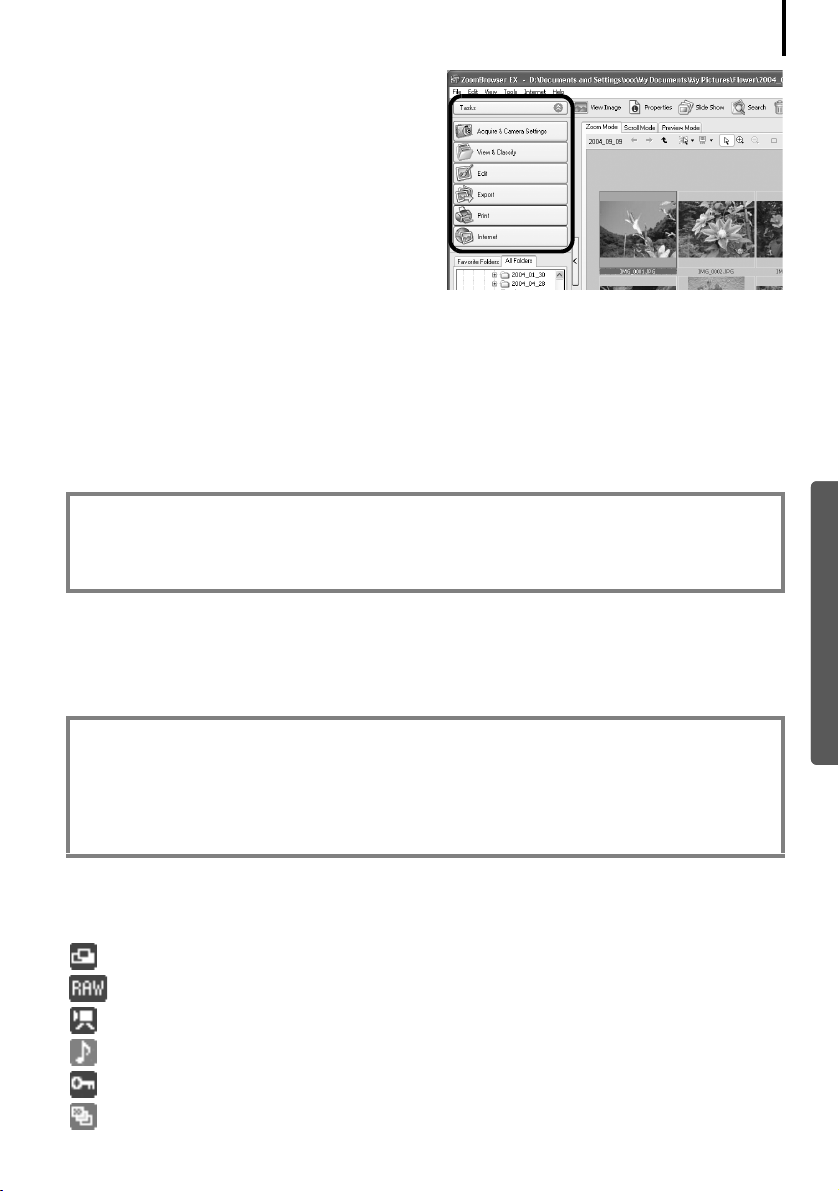
Main Window
This window is for displaying and organizing images downloaded to the computer.
– The Basics chapter.
26
Task Area (p. 27)
Folders Area (p. 27)
Function Buttons (p. 29)
Browser Area (p. 27)
Switches between showing and hiding
the Task Area and Folders Area.
Windows
Display Mode
(p. 28)
Display Control
Panel (p. 29)
The ZoomBrowser EX Windows
Task Area
• ZoomBrowser EX's tasks are arranged here like
an index.
• Click a Task button to carry out the desired
task.
These features are described in ZoomBrowser
EX Features (p. 32).
Folders Area
• Use this area to select folders. The images in the selected folder display in the Browser Area.
If you select a network drive in advance with Windows Explorer, you can display network
folders, but you cannot add, change or delete those folders in the Browser Area.
• If you selected Favorite Folders, only the folders registered in advance as Favorite Folders will
display. You are recommended to register a folder that you use frequently as one of the
Favorite Folders. If you selected All Folders, all the folders will display.
Methods for Registering a Favorite Folder
• If [Favorite Folders] is displayed: click [Add] and select a folder.
• If [All Folders] is displayed: select a folder and click [Add to Favorites].
•
To delete a folder in the Favorite Folders area, select a folder and click the [Delete] button.
27
Windows
Browser Area
• The images in the folder selected in the Folders Area will display here.
The display style will vary according to your Display Mode selection.
Methods for Selecting Images in the Browser Area
• Selecting a single image: click on an image.
• Selecting multiple images: click on the first image and then hold the [Ctrl] key down
while clicking on additional images.
• Selecting consecutive images: click on the first image and then hold the [Shift] key down
while clicking on the last image.
• You can sort the image order in the Browser Area by file name, shooting date or other
characteristics by clicking the [Tools] menu and selecting [View] and [Sort by].
• The following icons will display around images according to their attributes.
Images shot with the camera's Stitch Assist mode
RAW images
Movies
Images with sound memo attachments
Protected images
Images shot with the camera's AEB function
The ZoomBrowser EX Windows
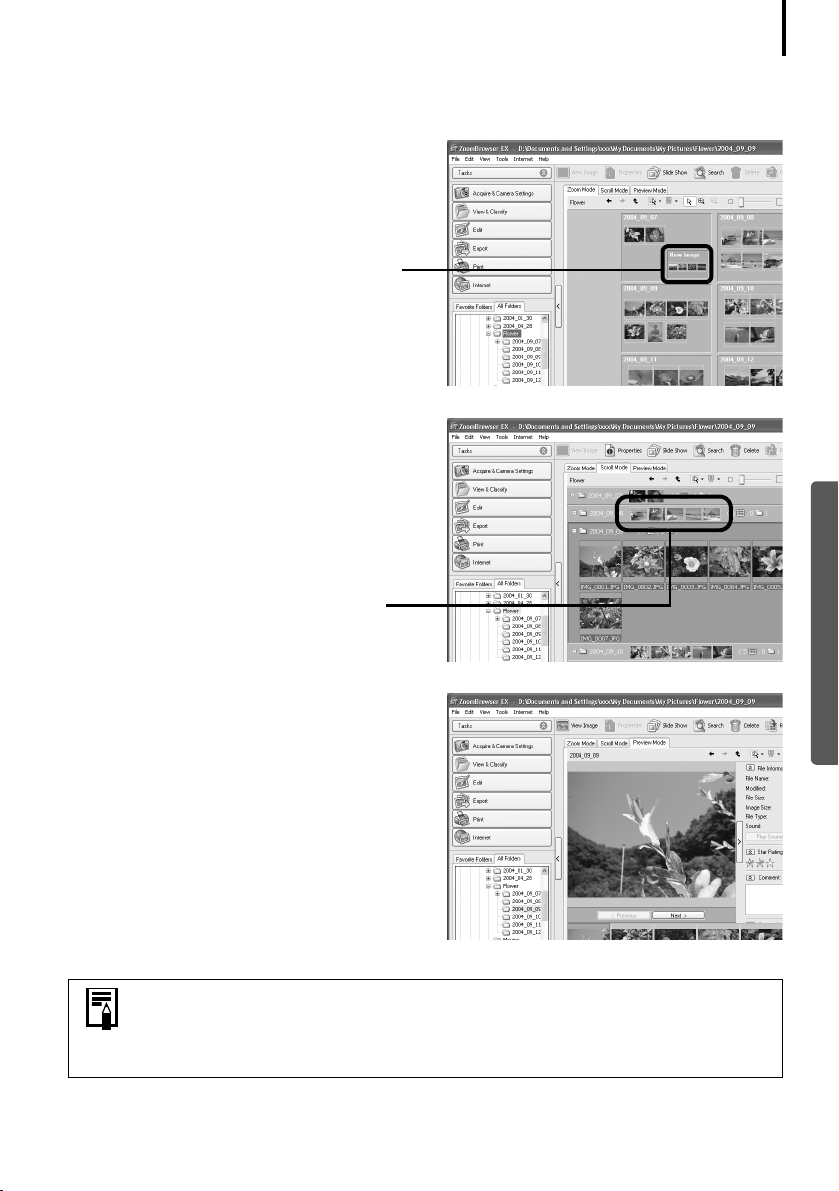
Display Mode
• Selects the display style for the Browser Area.
Zoom Mode
Displays all the images in a folder as thumbnail
images. This mode is convenient for searching
for images since many can be displayed at
once.
If additional folders are nested within a
folder, their images are displayed as
thumbnails as well.
Scroll Mode
This mode is convenient for checking the
images in multiple folders at once. If the
displayed folder is at the highest level, then all
thumbnails in the lower-level folders also
display. You can change the folder level (folder
depth) by clicking the [Tools] menu and
selecting [Preferences].
The images within nested folders also
display.
28
Windows
Preview Mode
This mode displays the image at a larger size as
well as the image information.
Positioning the mouse pointer over a thumbnail causes the image to display
at a higher magnification. You can turn off this function by clicking the
[Tools] menu, selecting [Preferences] and removing the check mark from the
[Show mouse over windows] option.
 Loading...