

Canon PowerShot Pro 90 IS, PowerShot S100 Digital ELPH, PowerShot S110 Digital ELPH, PowerShot S300 User Manual
Page 1
1 ImageBrowser Software User Guide
Page 2

Table of Contents (1/2)
Chapter 1 Try It! ImageBrowser
Starting ImageBrowser ............................................................. 4
Downloading Images to Your Computer .................................. 9
Printing Images .......................................................................12
Supplementary Information .................................................... 14
Chapter 2 What is ImageBrowser ?
What Can ImageBrowser Do? .................................................15
Storing Images ........................................................................17
Understanding the Browser Window ...................................... 18
Changing the Browser Window Display ..................................19
Using Contextual Menus .........................................................22
Chapter 3 Managing Images
Moving and Copying Images ...................................................23
Deleting Images ...................................................................... 26
Rotating Images ...................................................................... 27
Duplicating Images..................................................................28
Chapter 4 Viewing Images
Selecting Folders .....................................................................34
Opening Images ...................................................................... 35
Changing the Magnification ................................................... 36
Editing Images ......................................................................... 37
Editing Images with Other Programs ......................................41
Chapter 5 Using the Camera Window
Opening the Camera Window ................................................ 42
Downloading Images ..............................................................43
Deleting Images in the Camera ...............................................45
Rotating Images in the Camera ............................................... 46
Adding Computer Images to the Camera ................................47
Checking and Modifying the Camera Settings ........................49
Other Functions of the Camera Window .................................50
Renaming Images .................................................................... 29
Viewing Image Information ....................................................30
Creating Folders ......................................................................31
Renaming Folders .................................................................... 32
Deleting Folders ......................................................................33
2 ImageBrowser Software User Guide
Page 3
Table of Contents (2/2)
Chapter 6 Using Supplementary Features Appendices
Creating Images for E-mail ...................................................... 51
Exporting Images .................................................................... 53
Running Slide Shows ...............................................................55
Adding Sounds to Images ........................................................ 58
Saving the “My Camera Settings” to the Camera .................... 60
Printing Images ....................................................................... 70
Printing Images over Multiple Pages ....................................... 78
Sorting Images by Date and Time - TimeTunnel ......................79
Playing Movies ........................................................................81
Editing Movies (Mac OS X Only ) .............................................82
Converting RAW Images ......................................................... 85
Operating the Camera Shutter from a Computer ...................89
Stitching Panoramic Images with PhotoStitch .........................93
Index
Supported File Formats ...........................................................94
Starting ImageBrowser Automatically (Mac OS X Only) ..........95
Preventing ImageBrowser from Starting Automatically (Mac OS 9 Only) ..
Automation Wizard Feature at Startup (Mac OS 9 Only) ........97
Customizing Preferences .......................................................101
Setting up Slide Shows on the Camera .................................. 104
Print Settings ......................................................................... 105
Troubleshooting ....................................................................107
Index ..................................................................................... 108
96
3 ImageBrowser Software User Guide
NOTE
○○○○○○○○○○○○○○○○○○○○○○○○○○○○○○○○○○○○○○○○○○
• This guide uses Mac OS X (v10.2) screen shots and procedures in
the explanations. The screen shots and procedures may vary
slightly if you are using another version of the Mac OS.
• The following terms are used in this guide.
Mac OS X is used for Mac OS X (v10.1/v10.2/v10.3)
Mac OS 9 is used for Mac OS 9.0–9.2
Memory card is used for CF cards, SD cards and PC cards.
Page 4

Chapter 1
Try It! ImageBrowser
Starting ImageBrowser (1/5)
This chapter covers the ImageBrowser basics, such as starting the
program, downloading images from the camera and printing images. It
begins with the procedures for starting ImageBrowser.
IMPORTANT
○○○○○○○○○○○○○○○○○○○○○○○○○○○○○○○○○○○○○○○○○○
• This guide assumes that all the relevant software programs and
drivers have been correctly installed on your computer. If you
have not yet installed the software, please read the guide
supplied with your product and install it.
Starting ImageBrowser with Mac OS X
IMPORTANT
○○○○○○○○○○○○○○○○○○○○○○○○○○○○○○○○○○○○○○○○○○
•You can also use this procedure to start ImageBrowser in Mac
OS X when using a memory card reader.
1.
2.
3.
Use the interface cable to connect the camera to the
computer.
Please see the manual supplied with your camera for
connection instructions.
Some models cannot connect with the computer unless you set
them to a particular mode, such as the Playback mode. As
described in the guides for these models, set the camera to the
correct mode to transfer data.
Close iPhoto or Image Capture if either program starts up.
Double-click the [Canon ImageBrowser] icon on the
desktop.
4 ImageBrowser Software User Guide
ImageBrowser starts.
Page 5
Chapter 1
Try It! ImageBrowser
Starting ImageBrowser (2/5)
4.
REFERENCE
○○○○○○○○○○○○○○○○○○○○○○○○○○○○○○○○○○○○○○○○○○
•You can also start ImageBrowser automatically without starting
iPhoto or Image Capture when you connect the camera to the
computer. See the Starting ImageBrowser Automatically (Mac
OS X Only) topic in the Appendices for information on this
topic.
• Depending on the selections you make during installation, the
Canon ImageBrowser icon may not appear on the desktop. In
this case, start ImageBrowser by double-clicking on the application using the following sequence.
Locate and open the [Canon Utilities] folder, then open the
[ImageBrowser] folder and double-click on the [ImageBrowser]
icon.
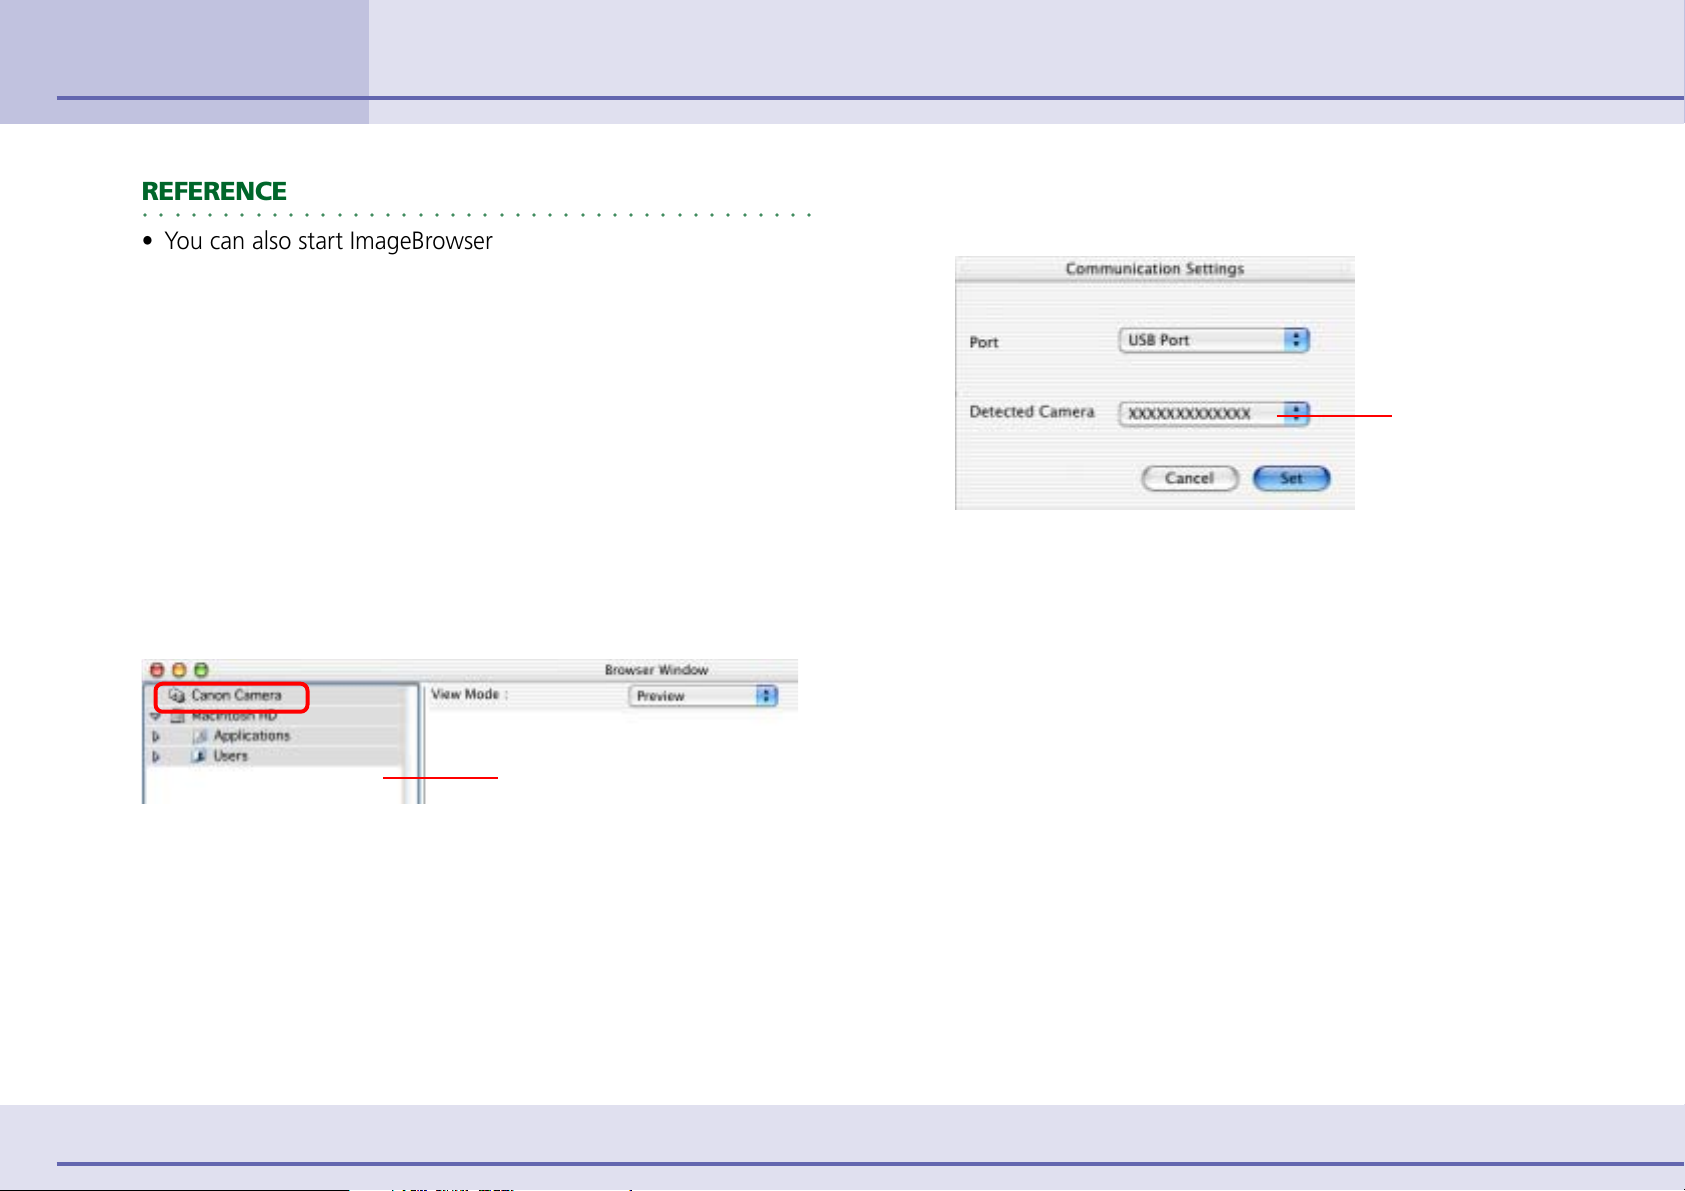
Click [Canon Camera] in the Explorer View section.
Explorer View Section
5.
6.
A dialog similar to the one below will open. (This dialog will
only appear the first time the program is started.)
Your camera model name
or [Canon Camera] and
the USB port number (i.e.
@1) appears here.
Confirm that [USB Port] is selected in the [Port] category and that your camera model name or [Canon
Camera] is selected in the [Detected Camera] category
and click [Set].
Close iPhoto or Image Capture if either program starts
up.
The Camera Window will open and display the images in the
camera.
5 ImageBrowser Software User Guide
Page 6
Chapter 1
Try It! ImageBrowser
Starting ImageBrowser (3/5)
Starting ImageBrowser with Mac OS 9
■ Starting ImageBrowser by connecting a camera to
your computer
This is the method in which ImageBrowser is started by
connecting the camera to the computer and preparing it for
communication.
IMPORTANT
○○○○○○○○○○○○○○○○○○○○○○○○○○○○○○○○○○○○○○○○○○
• This method can only be used when the camera is connected to
the computer with an interface cable. The program may not
start automatically with some camera models.
• If you are using a memory card reader, refer to the Starting
from the ImageBrowser Icon section of the Starting
ImageBrowser (5/5) topic.
REFERENCE
○○○○○○○○○○○○○○○○○○○○○○○○○○○○○○○○○○○○○○○○○○
•To stop ImageBrowser from starting automatically, refer to the
Preventing ImageBrowser from Starting Automatically (Mac OS
9 Only) topic of the Appendices.
1.
Use the interface cable to connect the camera to the
computer.
Please see the manual supplied with your camera for
connection instructions.
Some models cannot connect with the computer unless you set
them to a particular mode, such as the Playback mode. As
described in the guides for these models, set the camera to the
correct mode to transfer data.
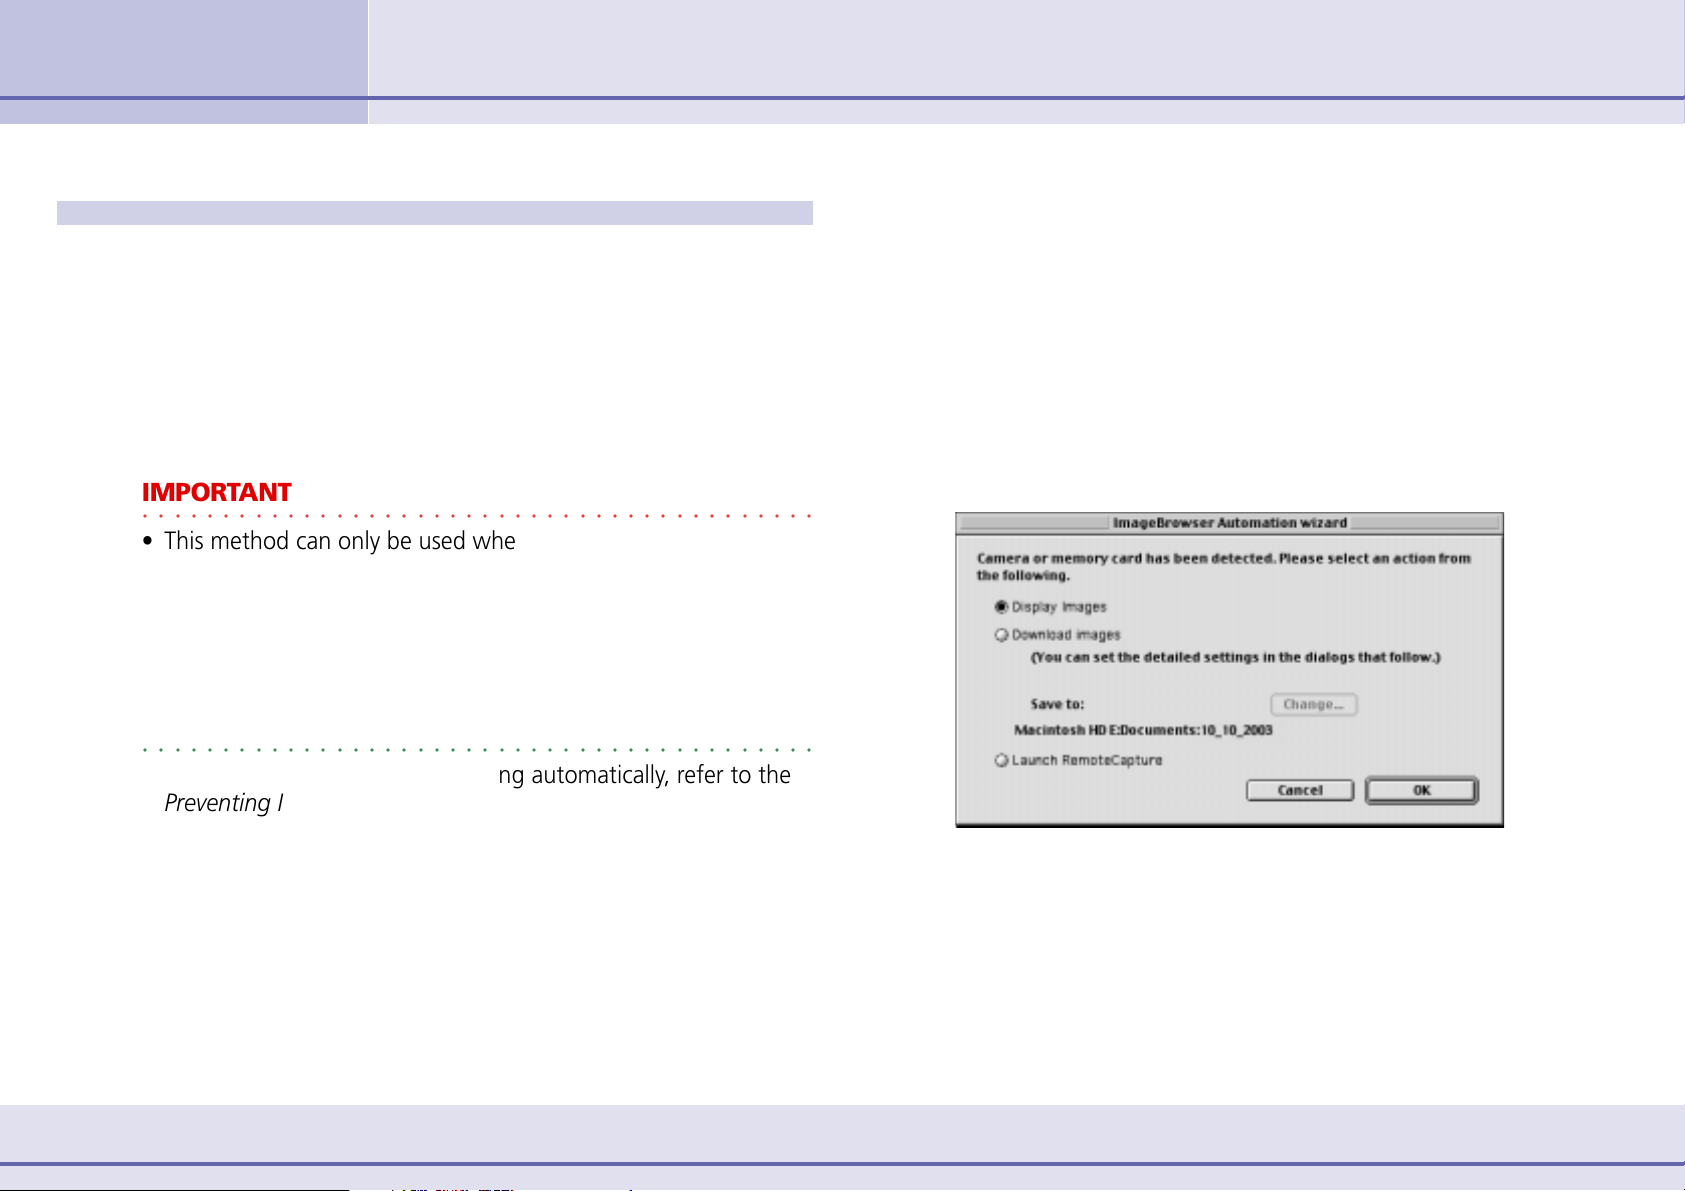
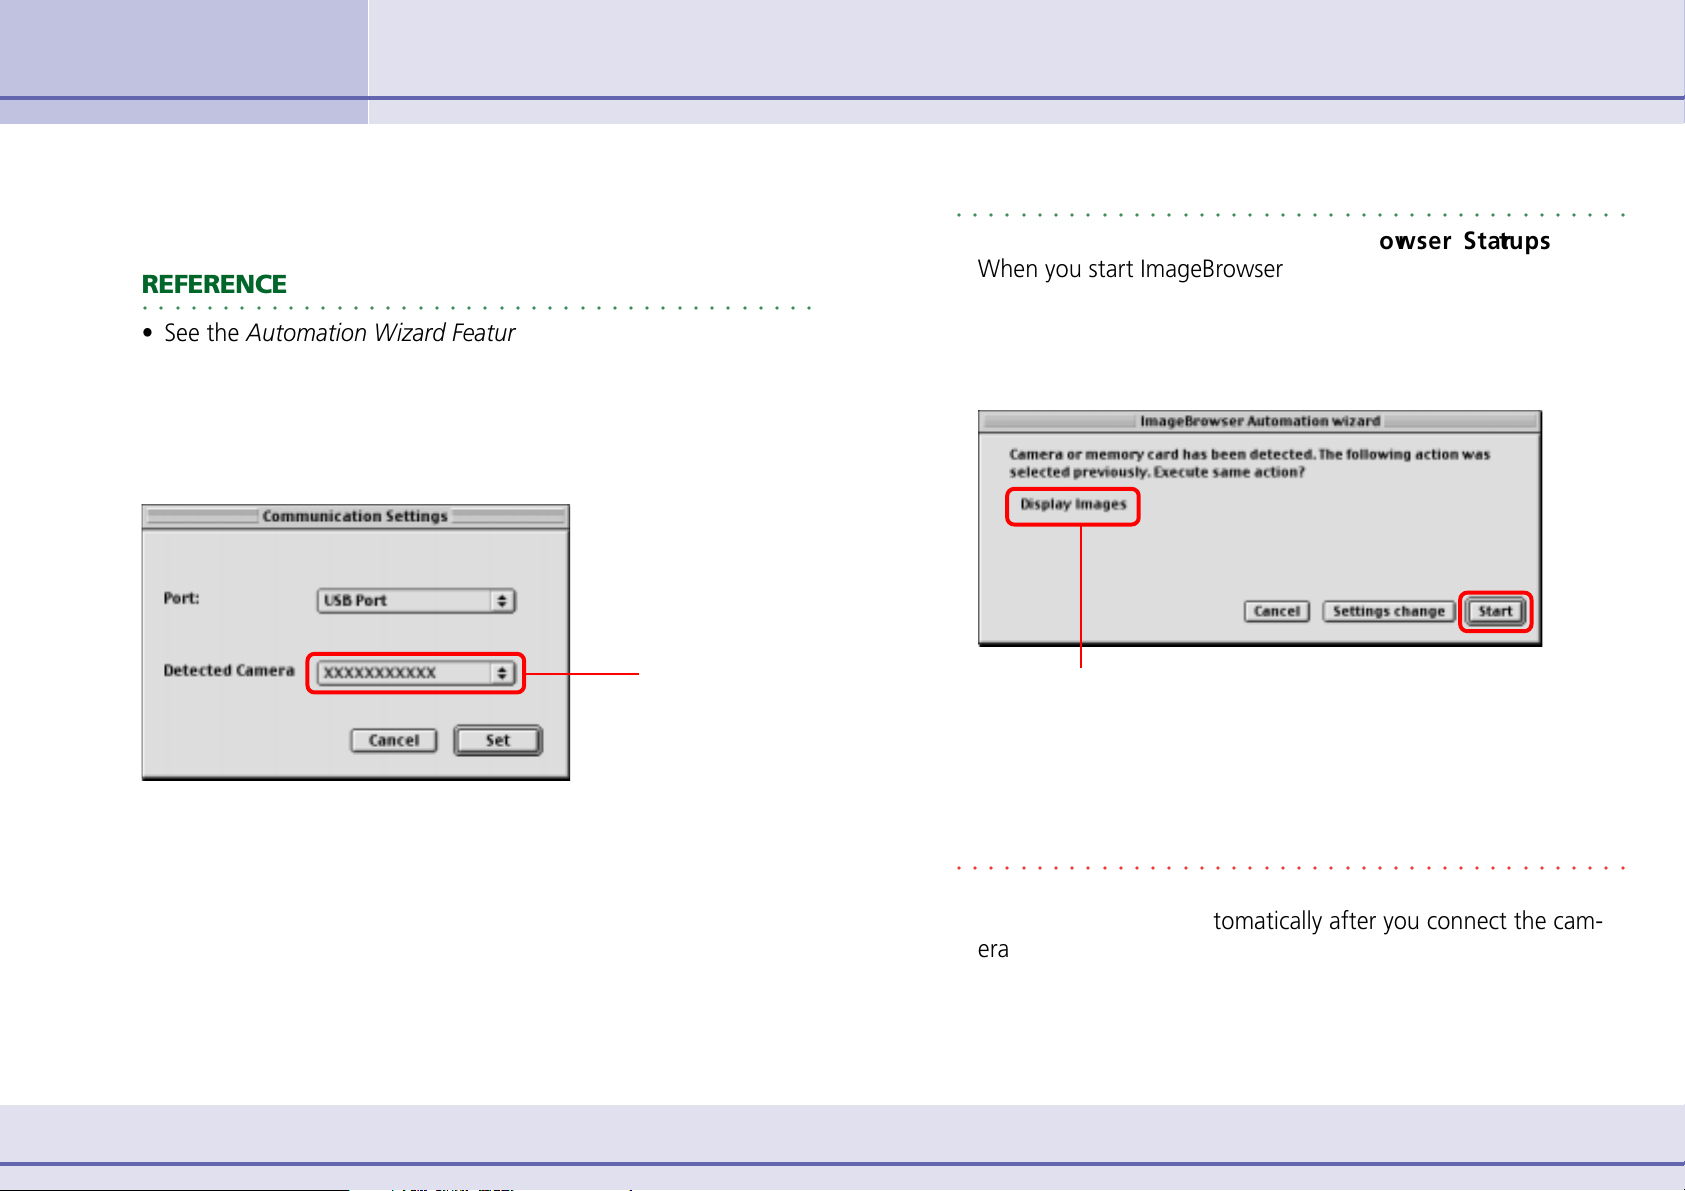
The ImageBrowser Automation Wizard dialog will appear the
first time you start ImageBrowser.
This dialog allows you to select the next action for
ImageBrowser to automatically perform after it is started.
6 ImageBrowser Software User Guide
See the Troubleshooting topic in the Appendices if a dialog like
the ImageBrowser Automation Wizard fails to appear.
Page 7
Chapter 1
Try It! ImageBrowser
Starting ImageBrowser (4/5)
2.
3.
For this example, leave the [Display Images] option
selected and click the [OK] button.
REFERENCE
○○○○○○○○○○○○○○○○○○○○○○○○○○○○○○○○○○○○○○○○○○
• See the Automation Wizard Feature at Startup (Mac OS 9 Only)
topic in the Appendices for information about [Download
Images] or [Launch RemoteCapture].
A dialog similar to the following one will appear. (This dialog
will only appear the first time the program is started.)
The model name
of the camera that
you are using
appears here.
Click [Set].
The Camera window will open and display the camera’s
images.
REFERENCE
○○○○○○○○○○○○○○○○○○○○○○○○○○○○○○○○○○○○○○○○○○
•Procedures for Subsequent ImageBrowser Startups
When you start ImageBrowser again the next time, the
previously selected auto processing option will display in the
dialog box. To execute the command, click the [Start] button.
To do nothing, click the [Cancel] button and to change the
settings, click the [Settings change] button.
The previously selected option will display.
• See the Automation Wizard Feature at Startup (Mac OS 9 Only)
topic in the Appendices for information about changing the
settings.
IMPORTANT
○○○○○○○○○○○○○○○○○○○○○○○○○○○○○○○○○○○○○○○○○○
• The ImageBrowser Automation Wizard only appears when
ImageBrowser starts automatically after you connect the camera to the computer with the interface cable. It will not appear
when you start ImageBrowser by using the icon as described on
the next page.
7 ImageBrowser Software User Guide
Page 8

Chapter 1
Try It! ImageBrowser
Starting ImageBrowser (5/5)
Starting from the ImageBrowser icon
Use this method to start ImageBrowser if you are using a
memory card reader. It may also be used to start ImageBrowser
without connecting a camera or to restart it after exiting.
1.
Double-click the [Canon ImageBrowser] icon on the
desktop.
ImageBrowser starts.
REFERENCE
○○○○○○○○○○○○○○○○○○○○○○○○○○○○○○○○○○○○○○○○○○
• Depending on the selections you make during installation, the
Canon ImageBrowser icon may not appear on the desktop. In
this case, start ImageBrowser by double-clicking on the application using the following sequence.
Locate and open the [Canon Utilities] folder, then open the
[ImageBrowser] folder and double-click on the [ImageBrowser]
icon.
8 ImageBrowser Software User Guide
Page 9
Chapter 1
Try It! ImageBrowser
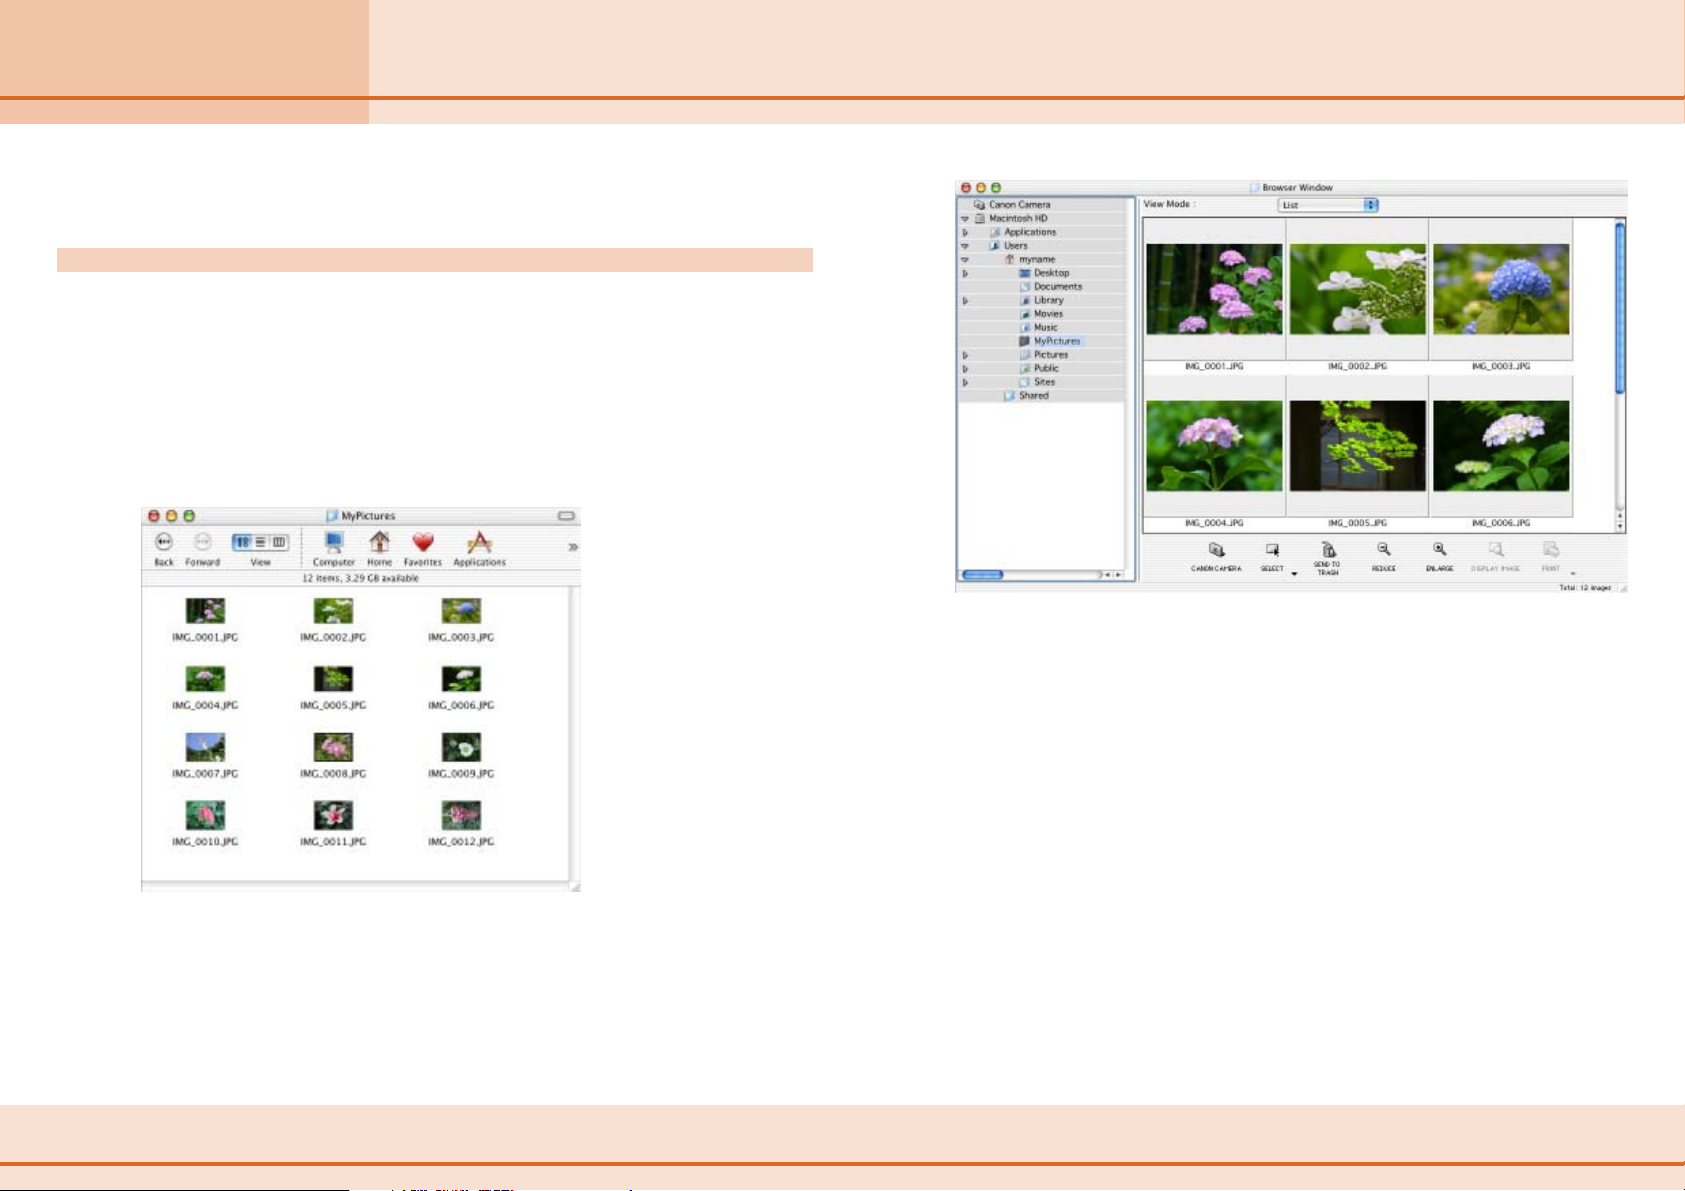
Downloading Images to Your Computer (1/3)
This section explains how to download images from the camera to a
computer.
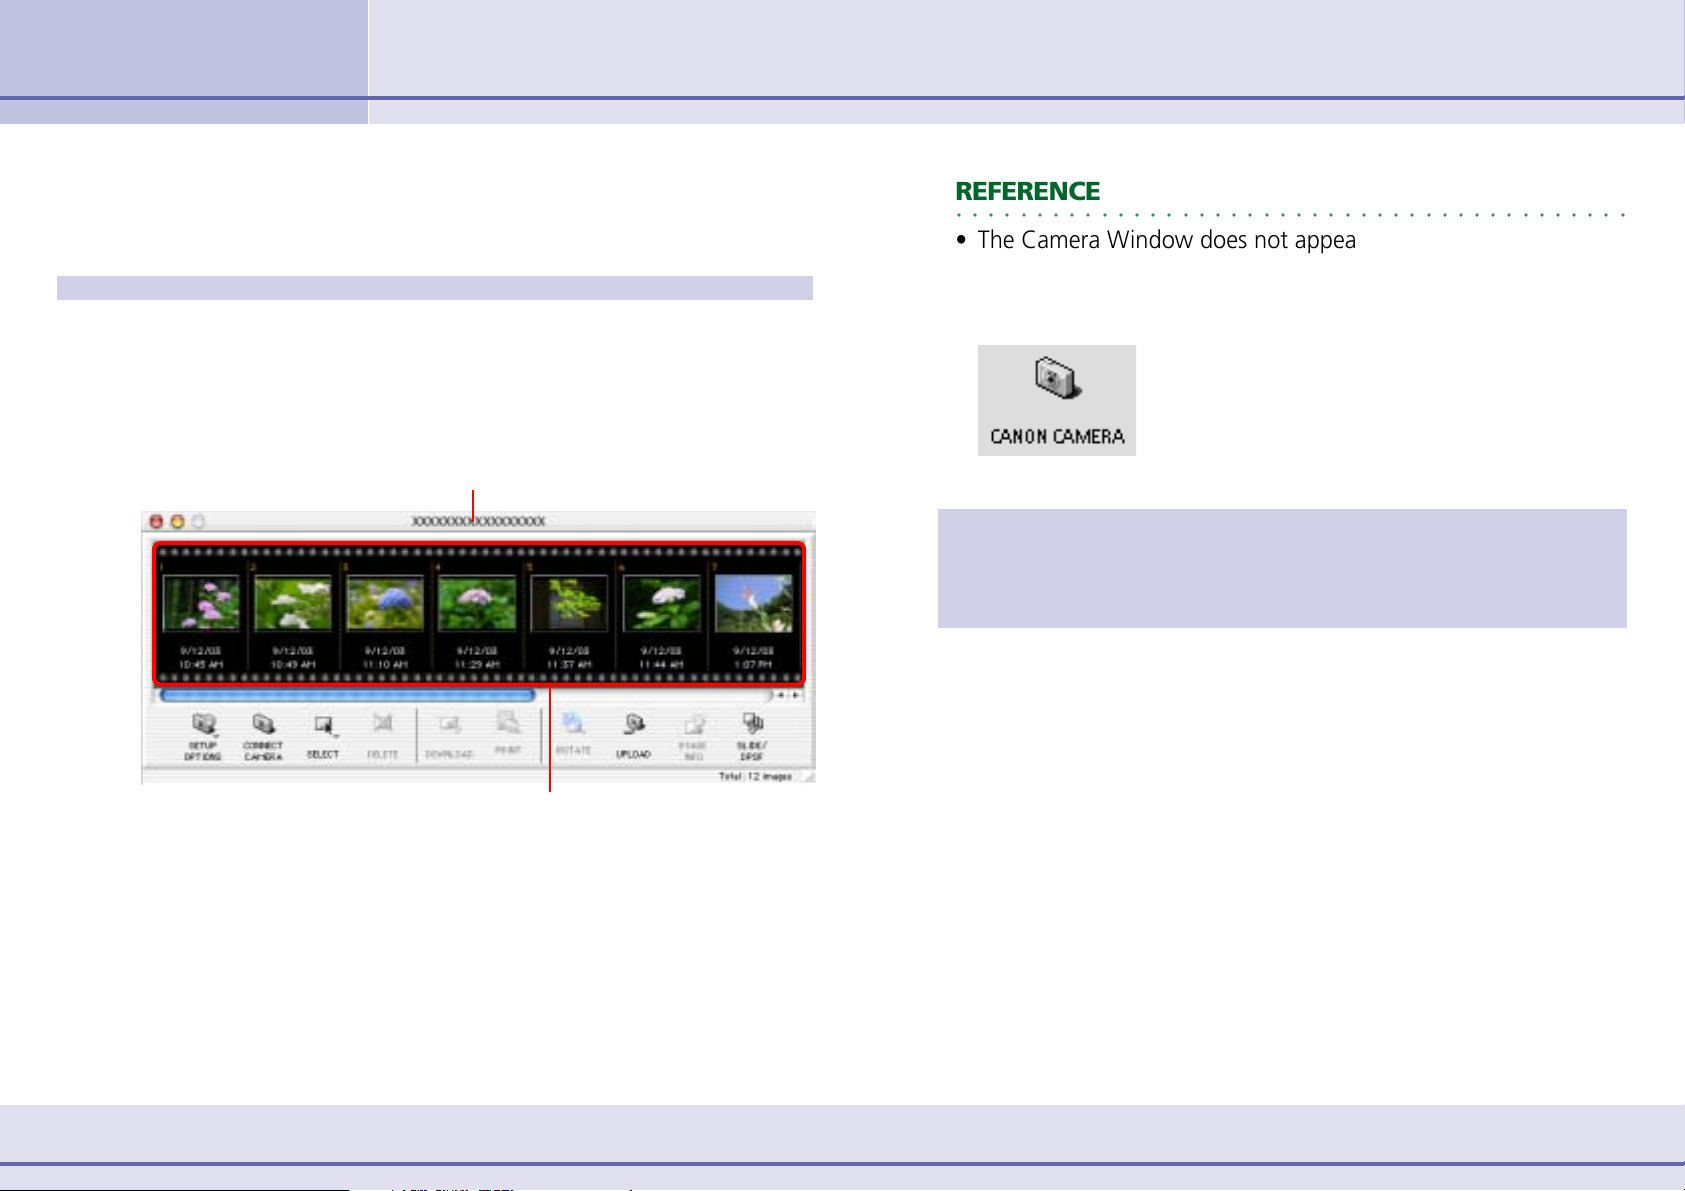
Camera Window
■ Mac OS X
Click [Canon Camera] in the Explorer View section to open the
Camera Window.
Your camera model name appears here
REFERENCE
○○○○○○○○○○○○○○○○○○○○○○○○○○○○○○○○○○○○○○○○○○
• The Camera Window does not appear when you start
ImageBrowser from the desktop. However, when you connect
the camera and make it ready for communication with your
computer, the Camera Window appears.
If the Camera Window does not appear even
when you prepare the camera for communication, click [Canon Camera] at the bottom left
of the Browser Window and select the appropriate port and camera model.
If you are using a memory card reader, open the memory card
that appears in the Explorer View section and double-click the
[DCIM] folder.
■ Mac OS 9
Open the Camera Window by connecting the camera to the
computer to start ImageBrowser and selecting [Display Images]
or [Download Images] in the ImageBrowser Automation
Wizard.
9 ImageBrowser Software User Guide
Images from the camera display in order
Page 10
Chapter 1
Try It! ImageBrowser
Downloading Images to Your Computer (2/3)
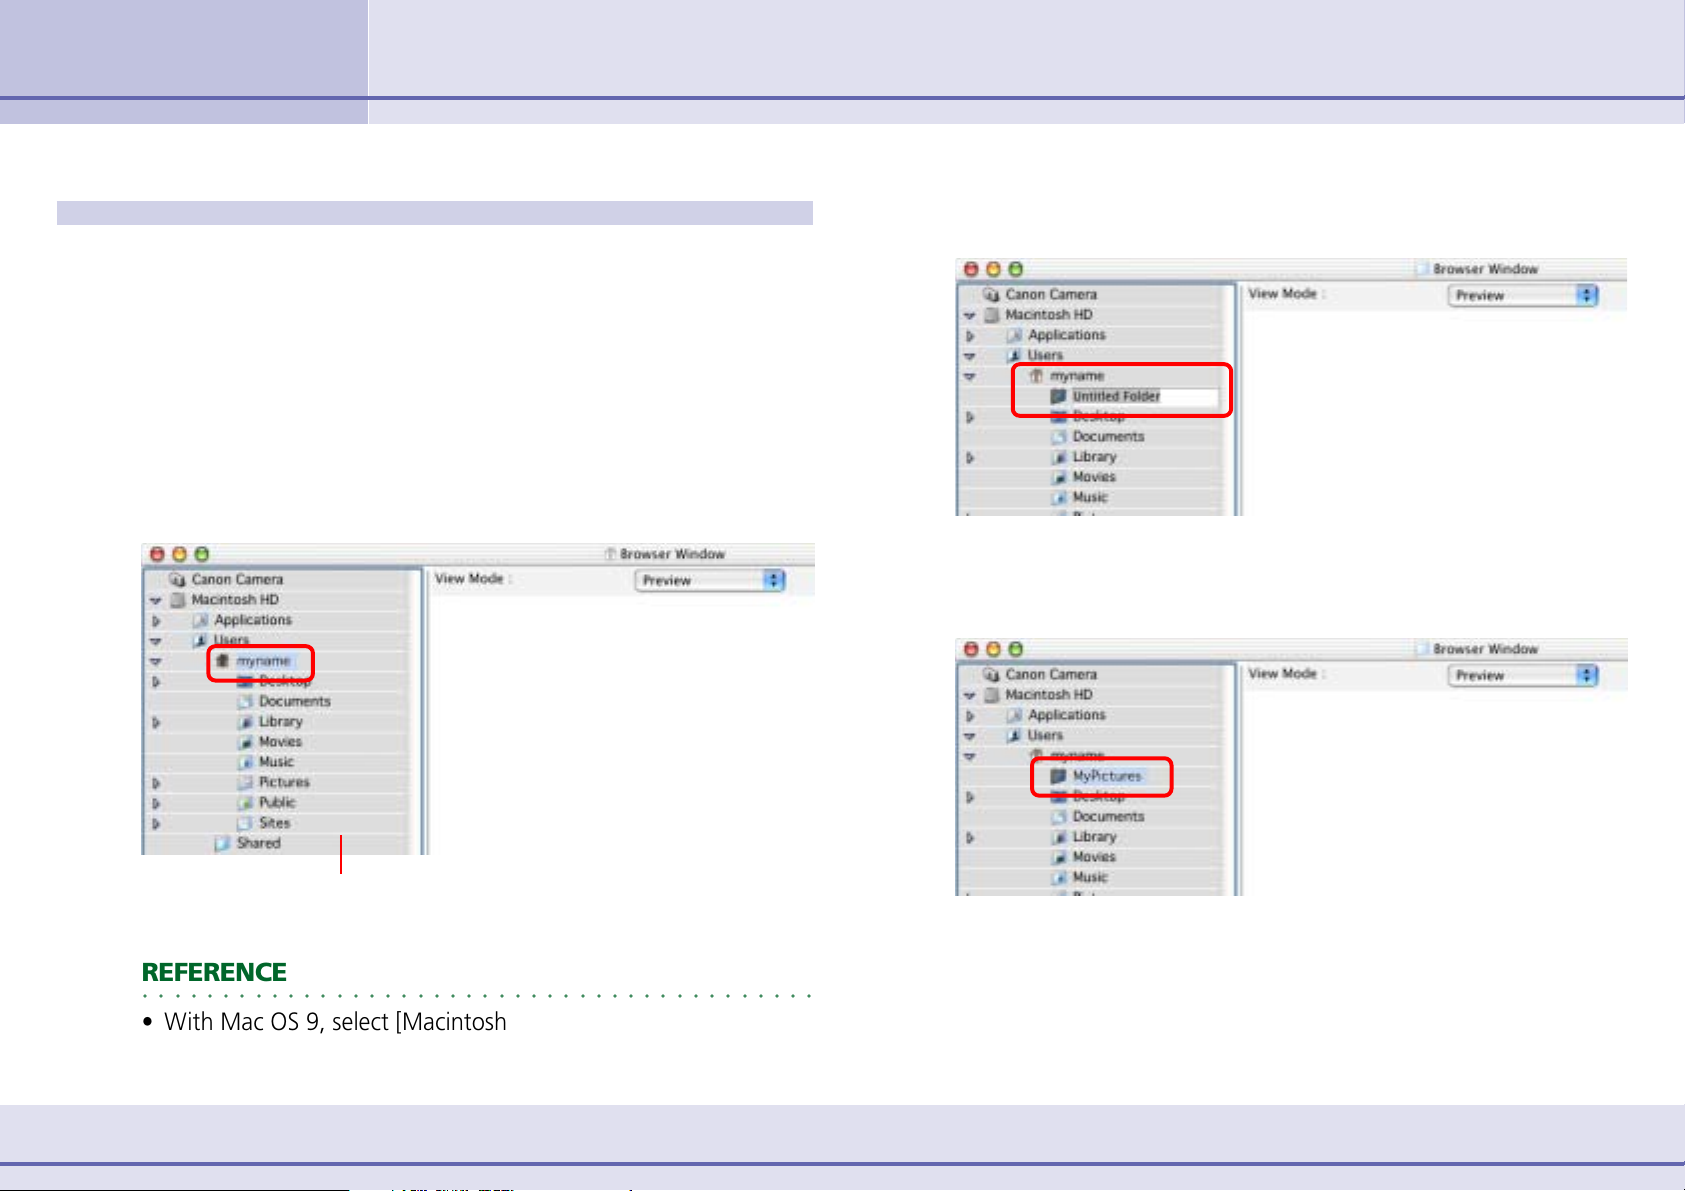
Creating a destination folder
Let’s begin with how to create a new folder to use as the
destination folder for images imported from the camera.
1.
2.
Click the Browser Window to bring it to the front.
Select [Users] on the startup disk and [your user log-in
name].
New folders are created on the disk that you select here.
Browser Window
Browser Area
3.
4.
On the [File] menu, click [New Folder].
A new folder is created.
Input a new folder name and press the [return] key.
This provides the new folder with the specified name.
Explorer View Section
The disks available to your computer display in the Explorer View area.
REFERENCE
○○○○○○○○○○○○○○○○○○○○○○○○○○○○○○○○○○○○○○○○○○
•With Mac OS 9, select [Macintosh HD] in the Explorer View
section.
10 ImageBrowser Software User Guide
Page 11
Chapter 1
Try It! ImageBrowser
Downloading Images to Your Computer (3/3)
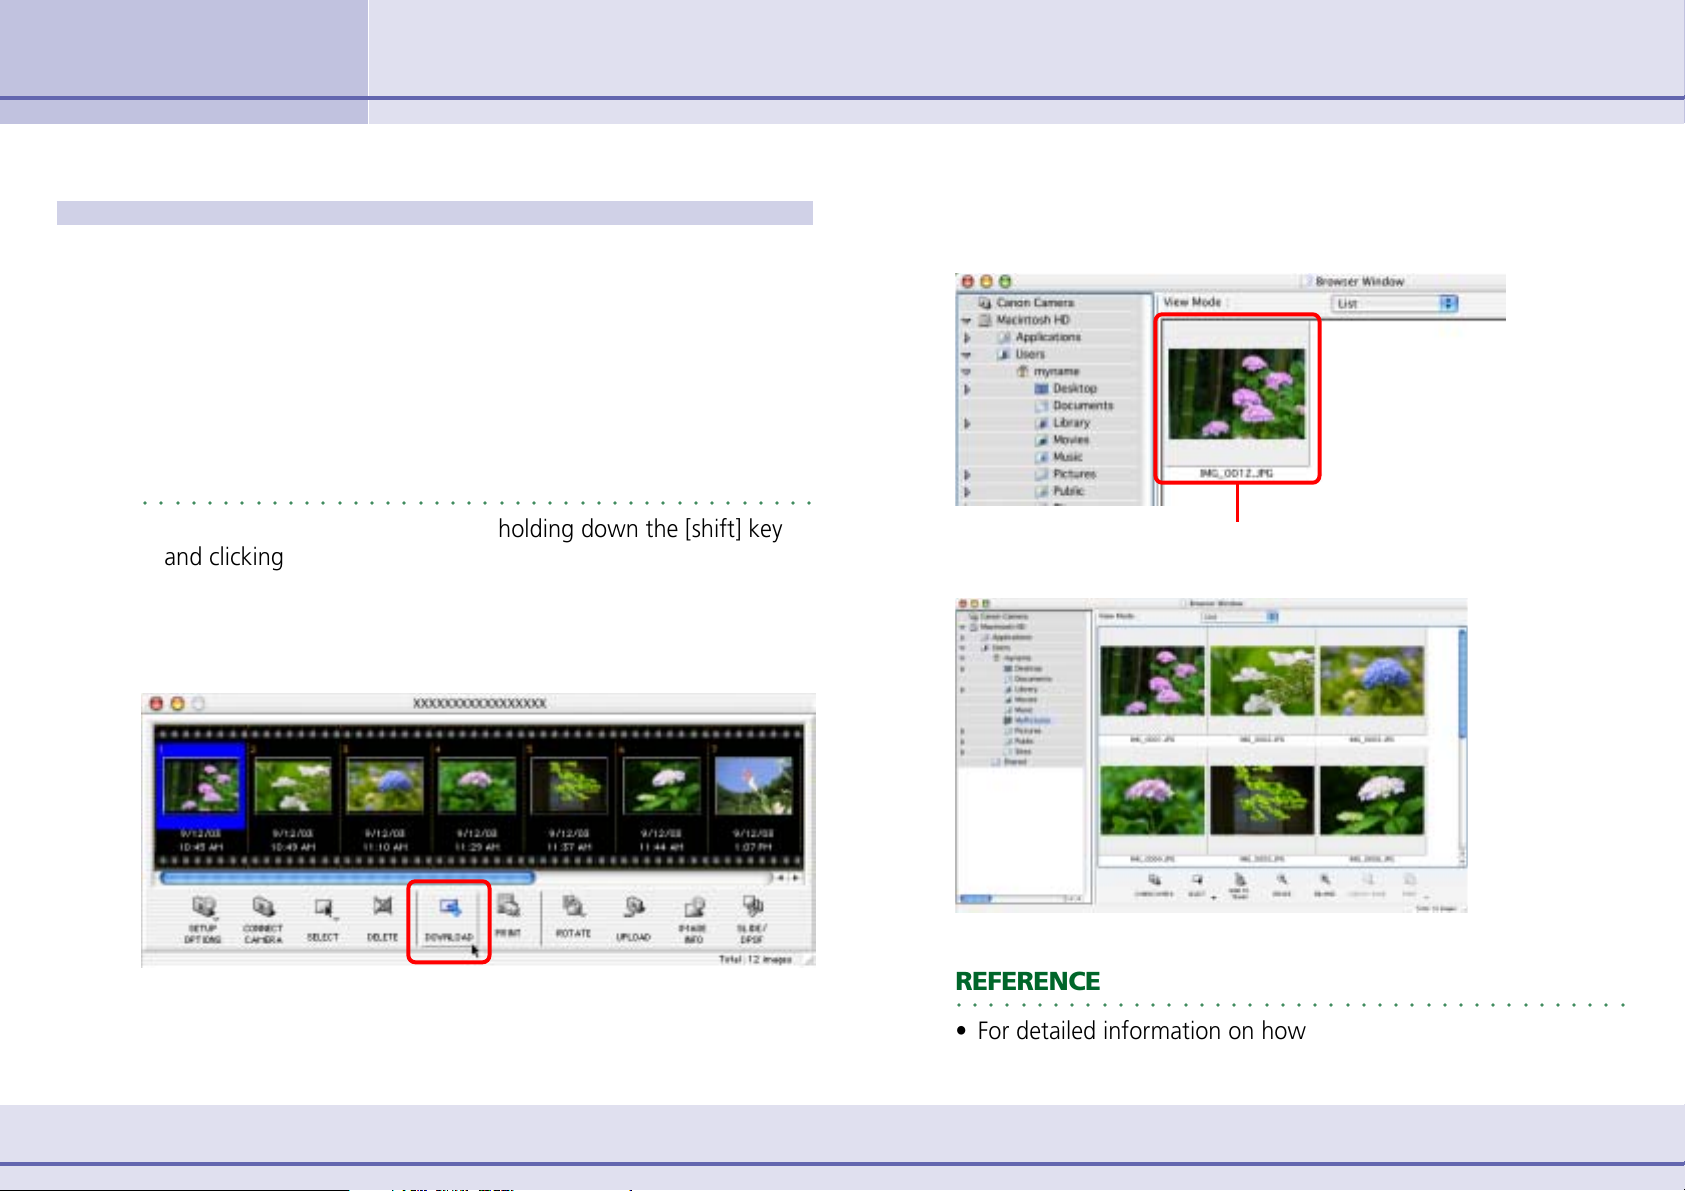
Importing Images to Your Computer
Use the following procedure to import (copy) images to the
newly created folder on your computer.
1.
2.
3.
Click the Camera Window to bring it to the front.
Click the image that you want to import.
A blue frame appears around the image.
REFERENCE
○○○○○○○○○○○○○○○○○○○○○○○○○○○○○○○○○○○○○○○○○○
•You can select several images by holding down the [shift] key
and clicking the images that you want to copy. If you hold
down the [option] and [shift] keys together and click on two
images, you can select all the images between them.
Click [Download].
The selected images are copied into the folder you just created
and small versions (thumbnails) are displayed in the Browser
Area of the Browser Window.
Image imported from the camera
Try to import all the images that you want.
11 ImageBrowser Software User Guide
Next, let’s try printing.
REFERENCE
○○○○○○○○○○○○○○○○○○○○○○○○○○○○○○○○○○○○○○○○○○
• For detailed information on how to use the Camera Window,
see Chapter 5.
Page 12
Chapter 1
Try It! ImageBrowser
Printing Images (1/2)
This section explains how to print the images downloaded to the folder
on a printer.
REFERENCE
○○○○○○○○○○○○○○○○○○○○○○○○○○○○○○○○○○○○○○○○○○
• Images recorded in the Adobe RGB color space will appear
unsaturated when printed using PhotoRecord. Color space
settings are only available on select camera models.
1.
2.
Click the image you want to print.
A blue frame appears around the image.
REFERENCE
○○○○○○○○○○○○○○○○○○○○○○○○○○○○○○○○○○○○○○○○○○
•You can select several images by holding down the [shift] key
and clicking the images that you want to print. If you hold
down the [option] and [shift] keys together and click on two
images, you can select all the images between them.
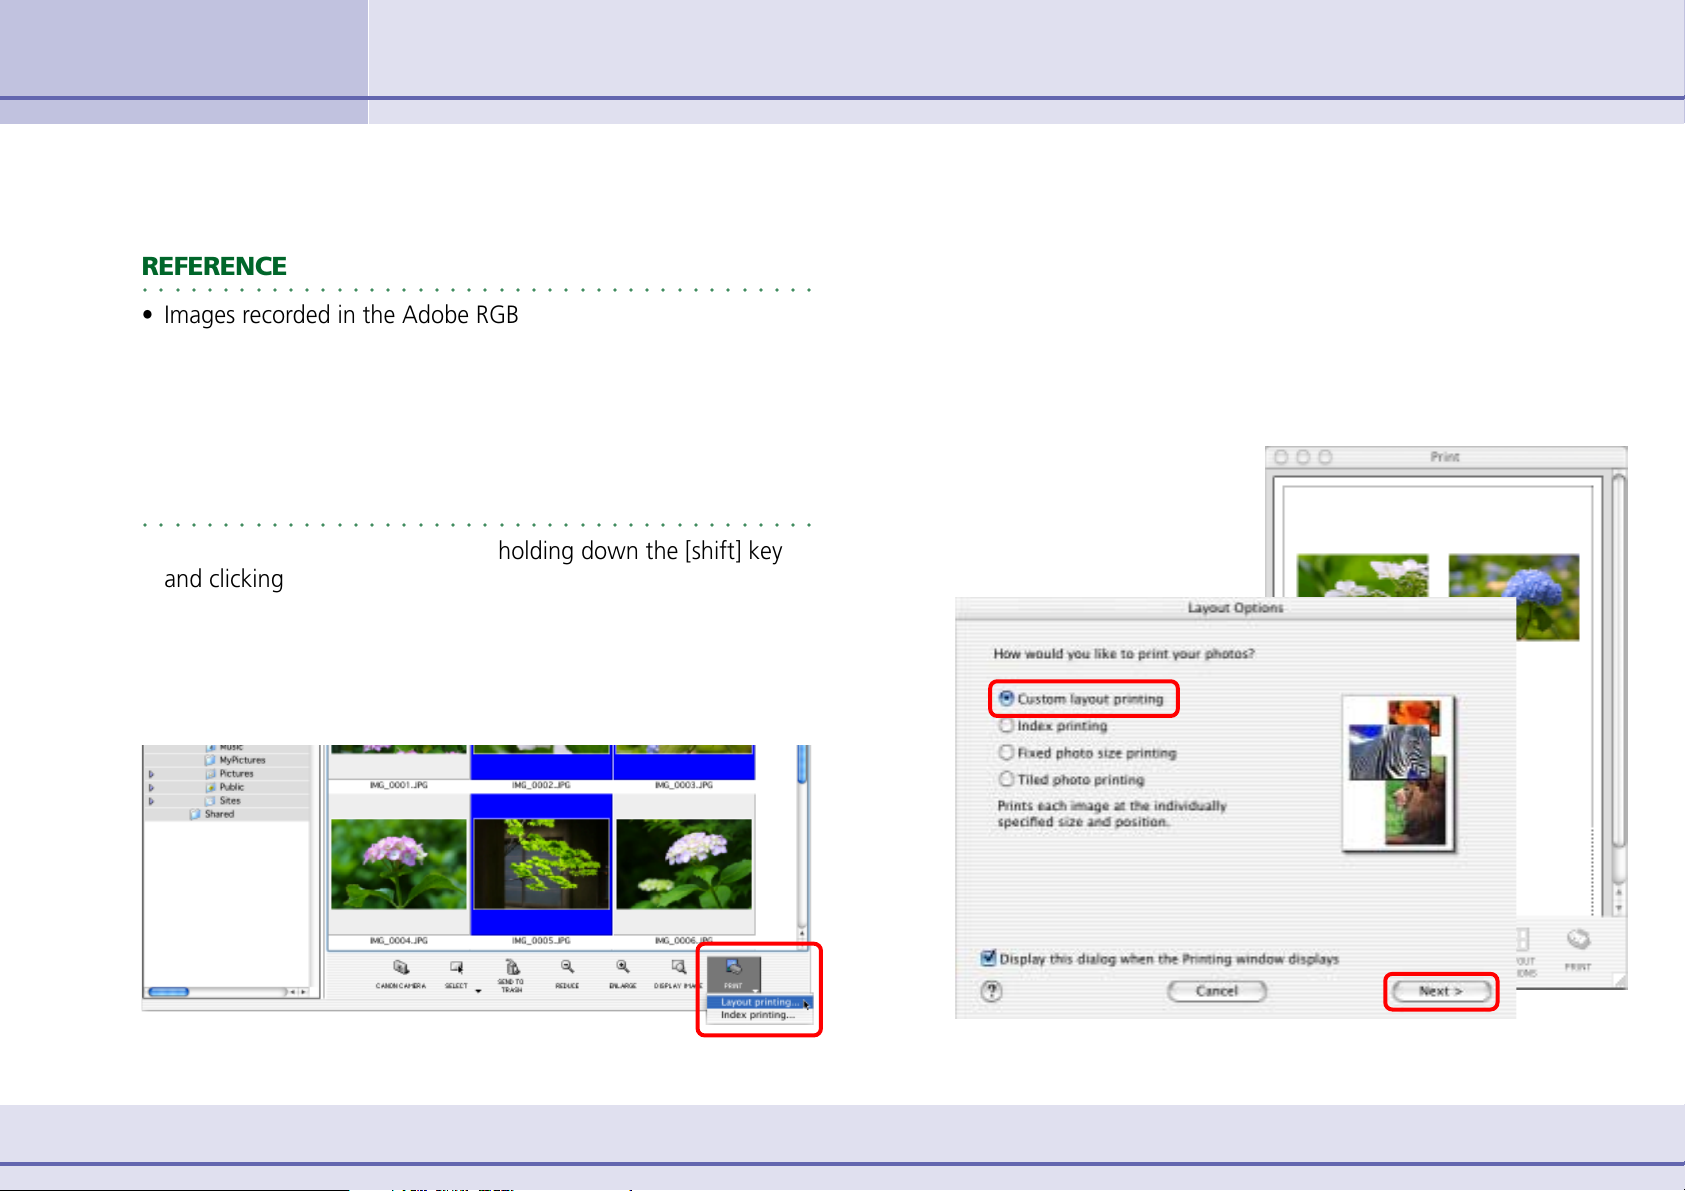
Click [Print] and select [Layout Printing] from the
displayed menu.
3.
The selected images are automatically laid out in the Print
window. You can select a layout option in the Layout Options
dialog. For the moment, just print the images without making
any changes.
In the Layout Options dialog, leave the [Custom layout
printing] option selected and click [Next].
Print Window
Layout Options Dialog
The Layout Options dialog and Print window open.
12 ImageBrowser Software User Guide
Page 13
Chapter 1
Try It! ImageBrowser
Printing Images (2/2)
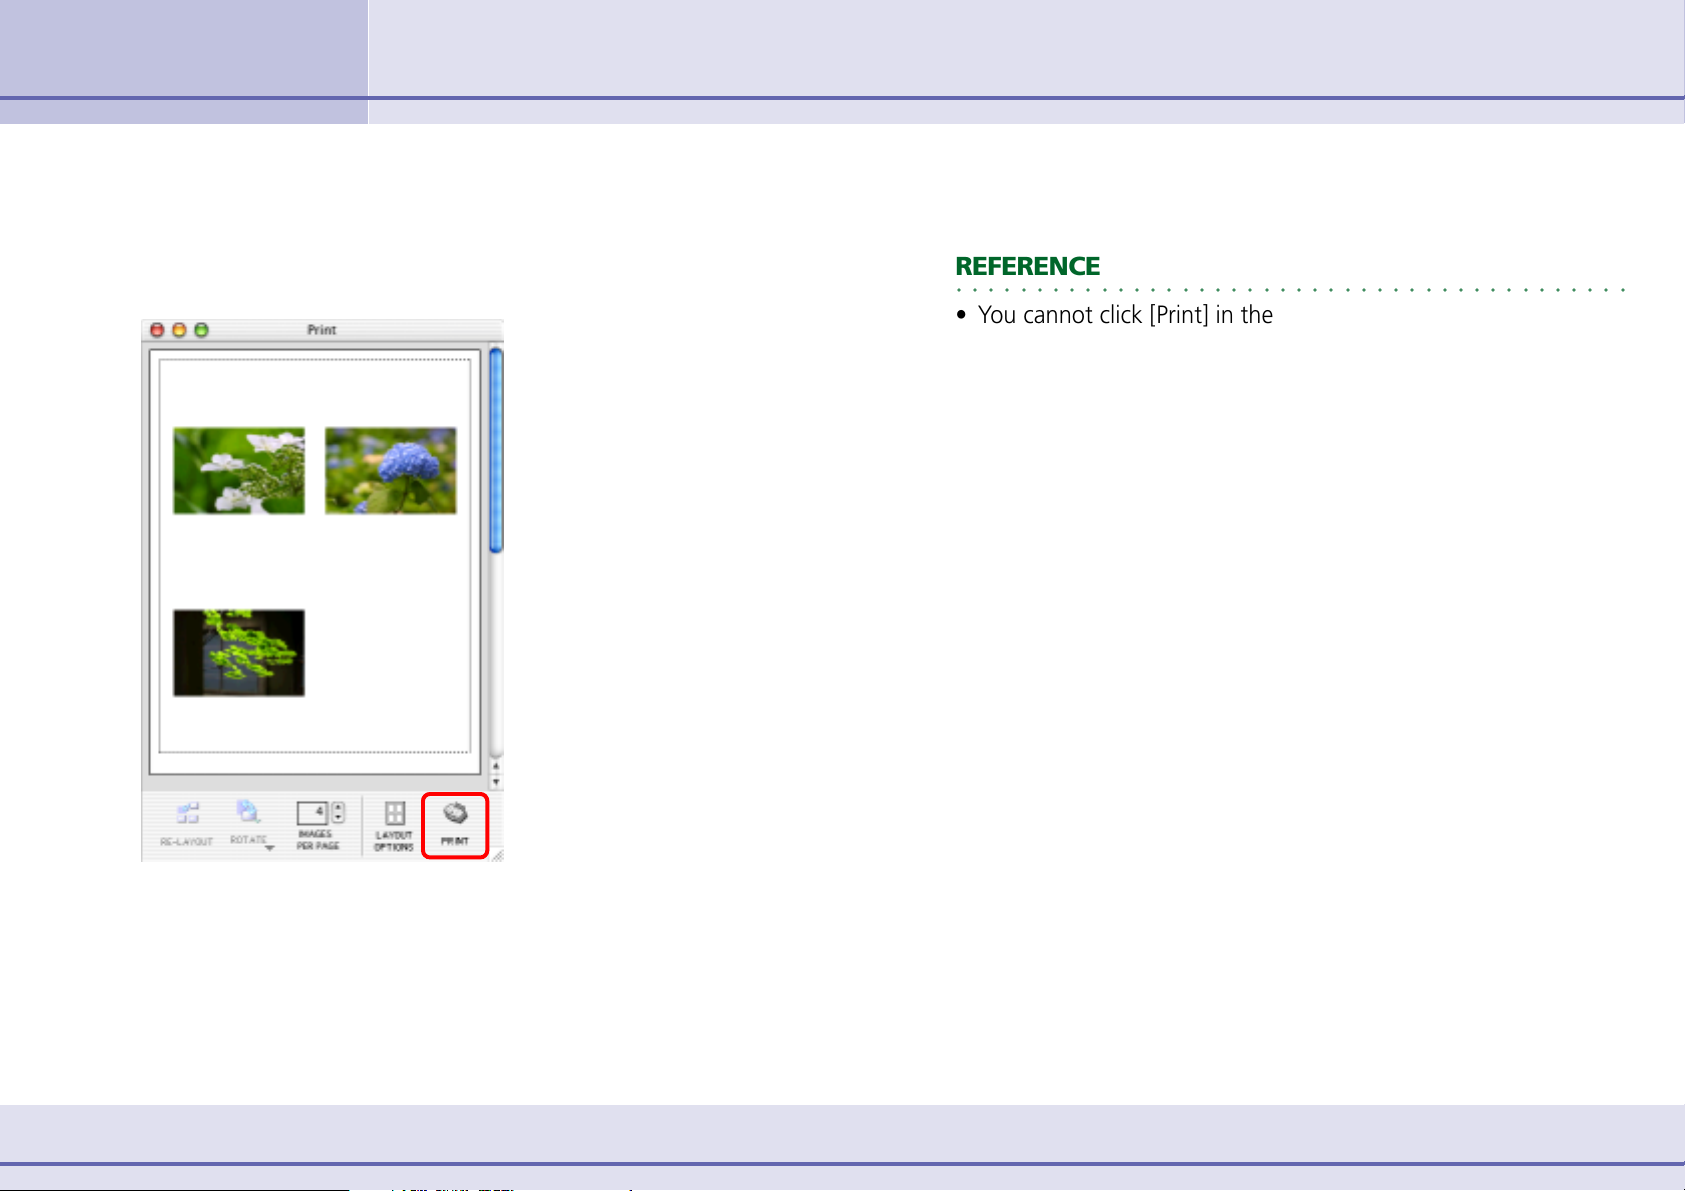
4.
5.
When the Page Setup dialog box appears, click [OK].
The Layout Options dialog closes.
In the Print window, click [Print].
The Print Settings dialog box appears. Select the print options
that you want and start printing.
REFERENCE
○○○○○○○○○○○○○○○○○○○○○○○○○○○○○○○○○○○○○○○○○○
•You cannot click [Print] in the Print window while the Layout
Options dialog is open.
• For details on print operations, see the Printing Images section
in Chapter 6.
13 ImageBrowser Software User Guide
Page 14
Chapter 1
Try It! ImageBrowser
Supplementary Information
We recommend that you memorize the following information before
you begin using ImageBrowser.
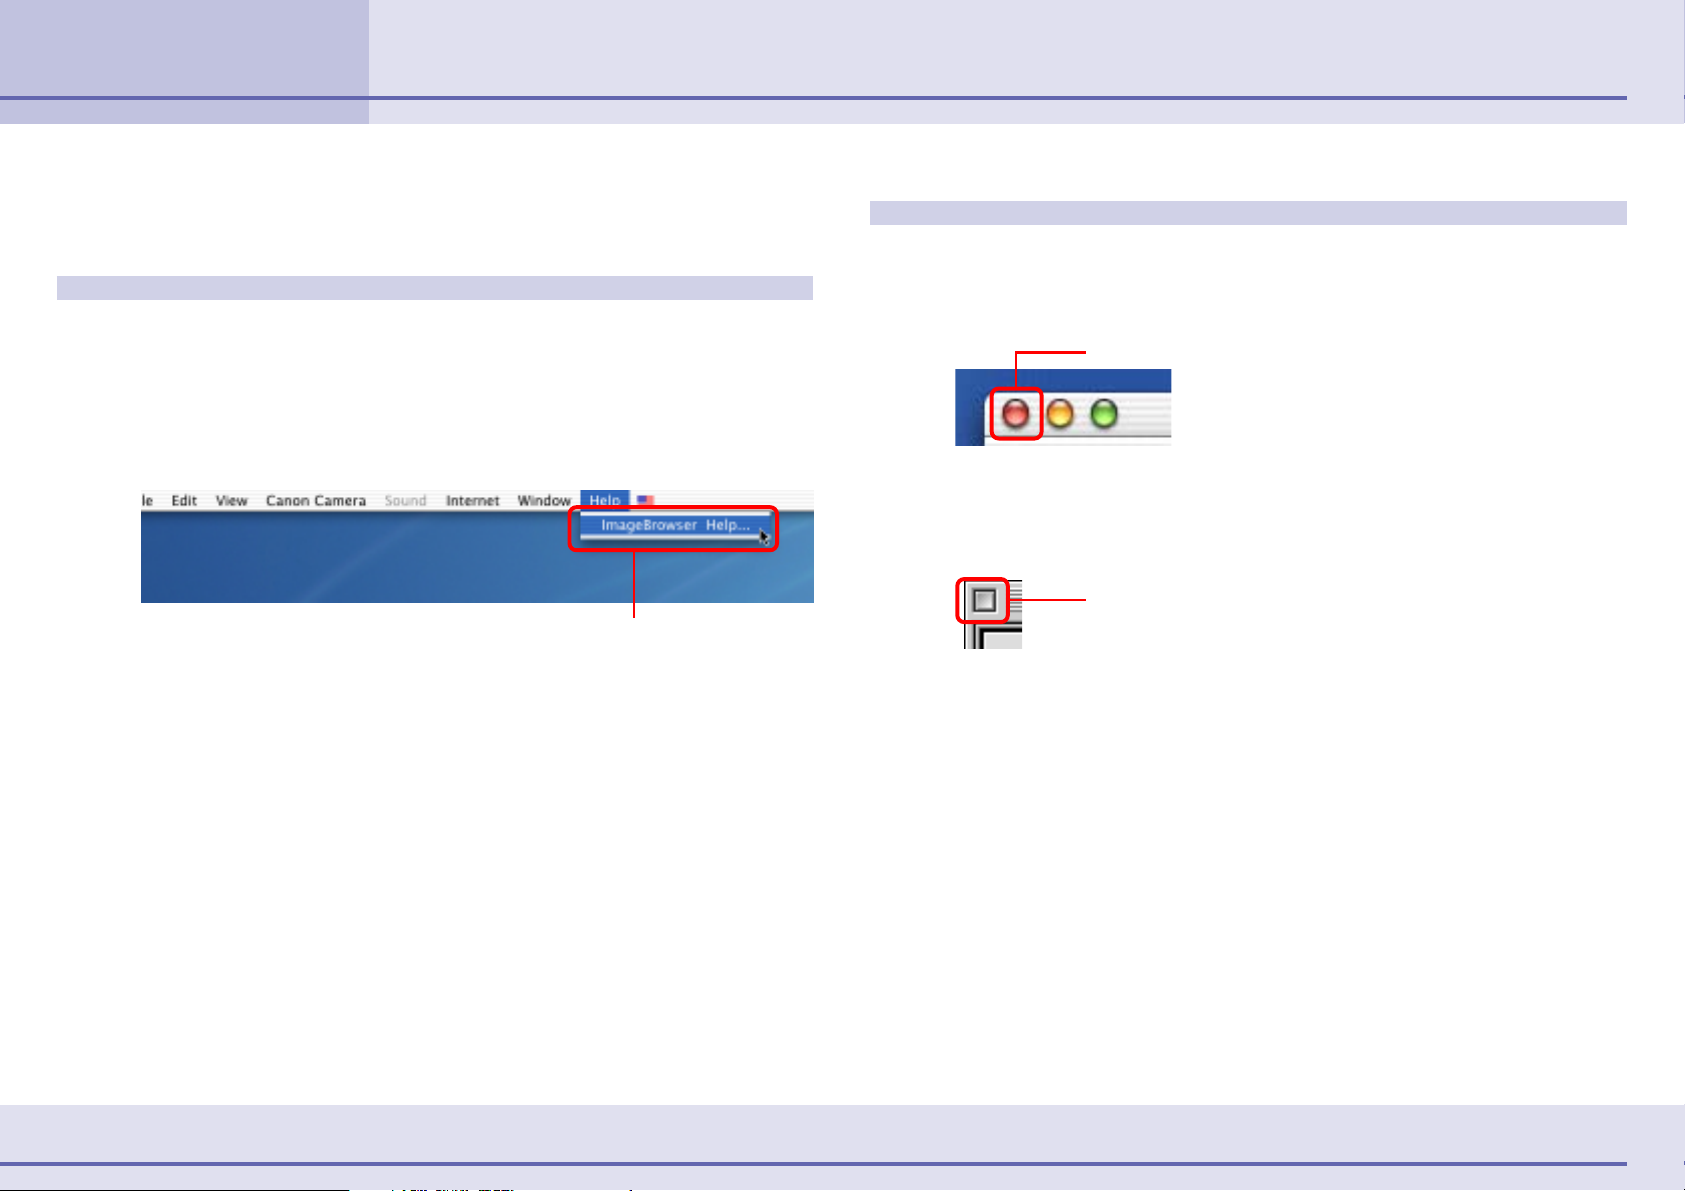
If You Have a Problem
ImageBrowser comes with a Help file. Use it when you want to
learn how to do an operation, or when you want to know
about the features of the application.
You can access Help by clicking [ImageBrowser Help] on the
[Help] menu.
Displays Help
Exiting ImageBrowser
With Mac OS X, you can exit ImageBrowser by clicking [Quit
ImageBrowser] from the [ImageBrowser] menu. Alternatively,
click the red button in the Browser Window.
Close Button
With Mac OS 9, you can exit ImageBrowser by clicking [Quit]
on the [File] menu. Alternatively, click the Close Box in the
Browser Window.
Close Box
14 ImageBrowser Software User Guide
Page 15
Chapter 2
What is ImageBrowser?
What Can ImageBrowser Do? (1/2)
This chapter explains the various basic skills required to master
ImageBrowser. Let’s begin with an overview of the main features of
ImageBrowser.
Connect the camera to a computer to:
•View an index of the images from the camera on the
computer monitor.
• Download images from the camera to the computer.
•View information about images stored in the camera, such as
the shooting date and camera settings.
• Use your computer to set up slide shows or DPOF print
settings (not available on some models).
• Save computer images onto your camera.
• Operate the shutter of a camera connected to a computer via
an interface cable to take pictures remotely. Or to perform
interval timer shooting after specifying an interval and the
number of images to be taken (only on models supporting
remote shooting).
• Convert RAW format images (change them to the TIFF or
JPEG format and resave them). Adjust the brightness,
contrast, color and other settings as you convert them. Some
camera models do not support RAW images.
Use the file management features to:
• Categorize, sort and manage image files on your computer
with easy procedures.
• Move or copy images.
• Perform simple editing such as cropping images or adjusting
their colors.
• Run a slide show displaying the images in sequence in fullscreen mode.
• Use the TimeTunnel feature to display images in a tunnel-like
arrangement in the order of their shooting dates.
•Create and edit movies, adding various effects: link movies
and still images, superimpose titles and other text, and add
background music (supported by Mac OS X only).
Use the My Camera Settings function to:
• Save the My Camera Settings in the computer to the camera
or vice versa.
• Manage newly created image and sound files as My Camera
Settings.
REFERENCE
○○○○○○○○○○○○○○○○○○○○○○○○○○○○○○○○○○○○○○○○○○
• The start-up image, start-up sound, shutter sound, operation
sound and self-timer sound are collectively called the “My
Camera Settings.”
• The Canon CD-ROM supplied with your product contains
several prepared My Camera Settings files. These files are
automatically copied to your computer when you install
ImageBrowser.
15 ImageBrowser Software User Guide
Page 16

Chapter 2
What is ImageBrowser?
By using other applications:
ImageBrowser gives you additional power when you use it
together with the following applications. (You can start these
applications from within ImageBrowser.)
■ PhotoStitch
•You can stitch multiple images (which were split and shot
individually using functions like the camera's Stitch Assist
mode) together to form a single, large size, panoramic
picture.
•You can stitch images horizontally or vertically or in a matrix
format.
• When you shoot the surroundings in 360 degrees, you can
later stitch the images to form a 360-degree cylindrical
shape. By saving this stitched image in QuickTime VR format,
you can then get a virtual view of the various parts of the
image.
What Can ImageBrowser Do? (2/2)
16 ImageBrowser Software User Guide
Page 17
Chapter 2
What is ImageBrowser?
What happens to the files you import, move or copy with ImageBrowser?
Storing Images
Where are images stored?
You can use the following procedure to locate images.
1.
2.
In the Finder, double-click the disk containing the
folder you created earlier.
Double-click the folder that you created.
Image files appear in the folder as shown below.
As you can see, they have exactly the same names.
Thus, the images displayed in the Browser Area of
ImageBrowser are actually the files in the folder that you
selected above. When you move or copy images using
ImageBrowser, files are moved or copied accordingly in the
Finder.
However, when you select [My Pictures] from the Browser
Window, images are displayed as follows:
17 ImageBrowser Software User Guide
Page 18

Chapter 2
What is ImageBrowser?
Understanding the Browser Window
This section describes the various parts of the Browser Window display.
Explorer View Section
Displays the disks and
folders that you can use
on your computer.
If you click the disclosure
triangle on the left edge
of the display, you can
switch between
collapsing and
expanding the contents
of that folder.
Browser Area
This is the area where
thumbnails of images in
the selected folder are
displayed.
Image Name
This is where the file
name of each individual
image is displayed.
You can drag this line to change the position
of the boundary between the Explorer View
Section and the Browser Area.
REFERENCE
○○○○○○○○○○○○○○○○○○○○○○○○○○○○○○○○○○○○○○○○○○
• Images recorded in the Adobe RGB color space will appear
unsaturated when displayed in ImageBrowser. Color space
settings are only available on select camera models.
18 ImageBrowser Software User Guide
Control Panel
This area contains buttons that allow
you to perform a variety of functions.
You can drag this part of
the frame to change the
size of the Browser
Window.
Page 19
Chapter 2
What is ImageBrowser?
You can change the way the Browser Window displays information to
make it easier to use. This section describes how to do this.
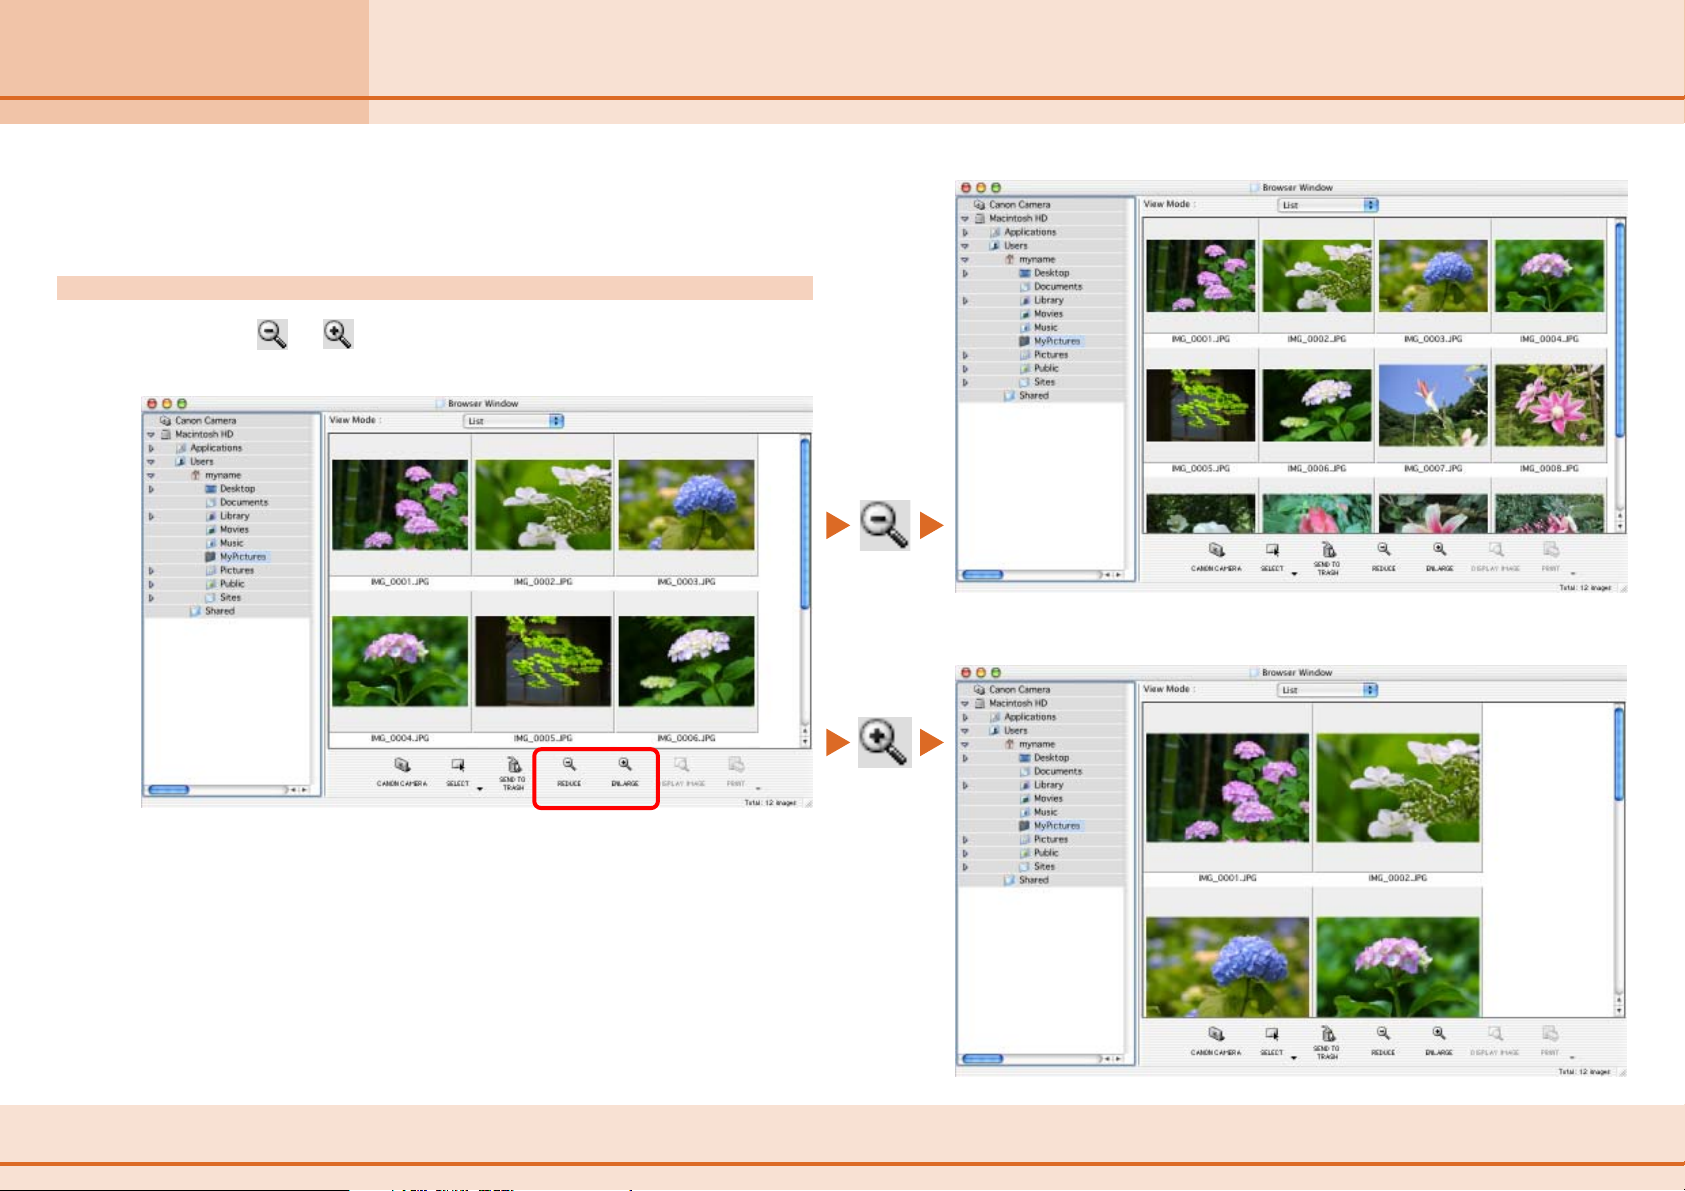
Changing the Browser Window Display (1/3)
Changing the size of thumbnails
By clicking or you can change the size of the thumbnails
displayed in the Browser Area.
19 ImageBrowser Software User Guide
Page 20
Chapter 2
What is ImageBrowser?
Changing the Browser Window Display (2/3)
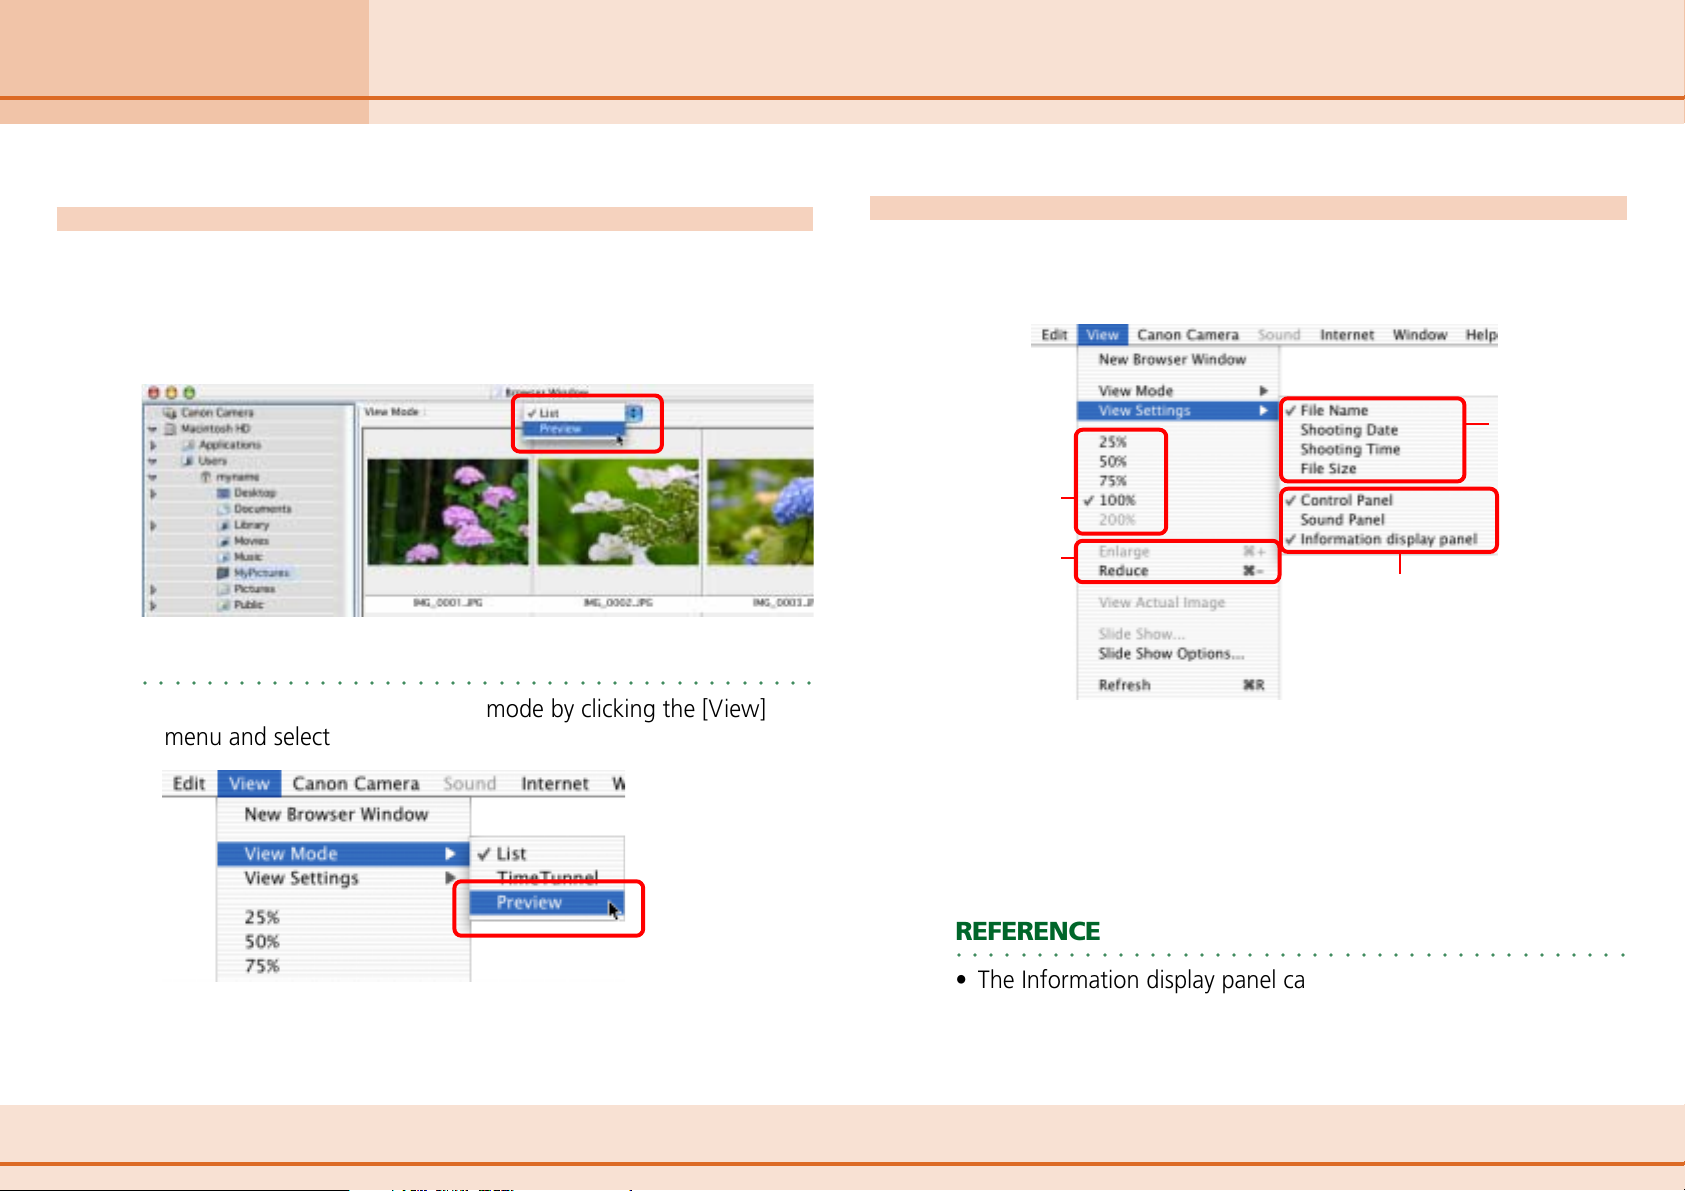
Changing the Display Mode
If you select [Preview] in the [View Mode] list box at the top of
the Browser Window, you can display a larger preview version
of an image above the thumbnails. To stop displaying the
preview image, change the [View Mode] list box back to [List].
REFERENCE
○○○○○○○○○○○○○○○○○○○○○○○○○○○○○○○○○○○○○○○○○○
•You can also select the preview mode by clicking the [View]
menu and selecting [View Mode], followed by [Preview].
Changing the Display Method
You can use the View menu to fine-tune the Browser Window
display settings.
Allows you
to enlarge
and reduce
the size of
thumbnails.
Allows you
to select
the size of
thumbnails.
Allows you
to specify the
information
displayed
under the
thumbnail.
Control Panel
Allows you to hide or display the
control panel in the lower part of the
Browser Area.
Sound Panel
Allows you to hide or display the
sound panel. This panel allows you to
record and play back voice messages.
20 ImageBrowser Software User Guide
Information Display Panel
Shows/hides comments added to
images, the histogram (graph
showing the distribution of
brightness data) and shooting
REFERENCE
○○○○○○○○○○○○○○○○○○○○○○○○○○○○○○○○○○○○○○○○○○
information.
• The Information display panel can be selected when the display
mode is set to Preview.
Page 21
Chapter 2
What is ImageBrowser?
For example, you can display the Browser Window as follows:
You can change the preview
image size by dragging here.
Changing the Browser Window Display (3/3)
Preview Image Display Area
Comments
Histogram
(graph showing the
distribution of brightness data)
Shooting Information
21 ImageBrowser Software User Guide
The shooting date is displayed as
well as the file name.
Sound PanelControl Panel
Page 22
Chapter 2
What is ImageBrowser?
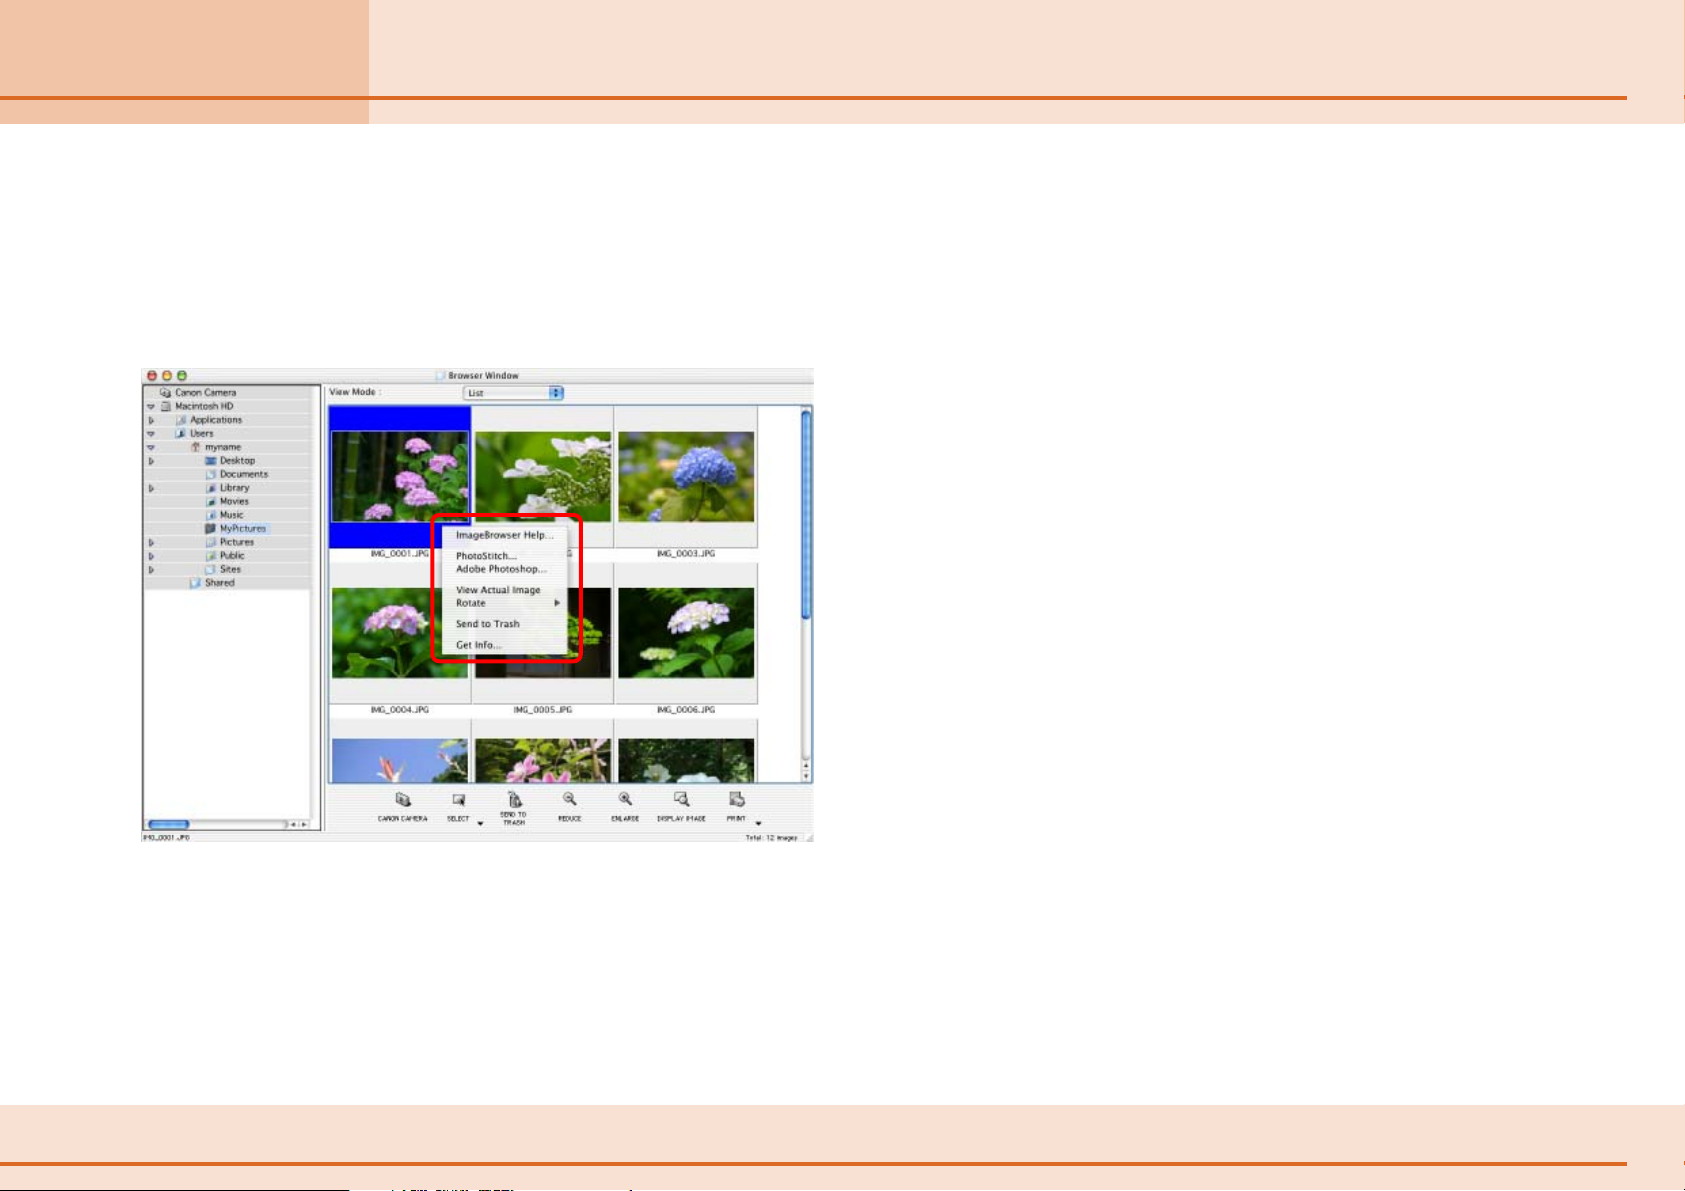
Using Contextual Menus
When you hold down the [control] key and click the mouse
button, a menu is displayed. This is a contextual menu.
In ImageBrowser, you can access many useful functions through
contextual menus.
For example, when you hold down the [control] key and click
an image, the following contextual menu appears.
A contextual menu is, as its name implies, a menu whose
options vary according to the context. It is a collection of the
most commonly used buttons and commands that apply to a
given situation.
Contextual menus allow you to use ImageBrowser more
efficiently. When you feel comfortable with ImageBrowser, try
using the contextual menus in different situations and you will
be impressed with their convenience.
Note that, in general, this manual does not cover operations
using contextual menus. (This is because explaining the many
menu variations would take too many pages.)
Nevertheless, a full explanation is provided on the
corresponding page when a contextual menu is used in a
procedure.
22 ImageBrowser Software User Guide
Page 23
Chapter 3
Managing Images
This section describes how to move and copy images between folders.
REFERENCE
○○○○○○○○○○○○○○○○○○○○○○○○○○○○○○○○○○○○○○○○○○
• Moving or copying images in ImageBrowser affects the actual
location in which those images are stored on your computer.
• When you use the Finder to modify files or folders while
ImageBrowser is open, those changes might not be reflected in
the ImageBrowser window. To remedy this, click [Refresh] on
the [View] menu.
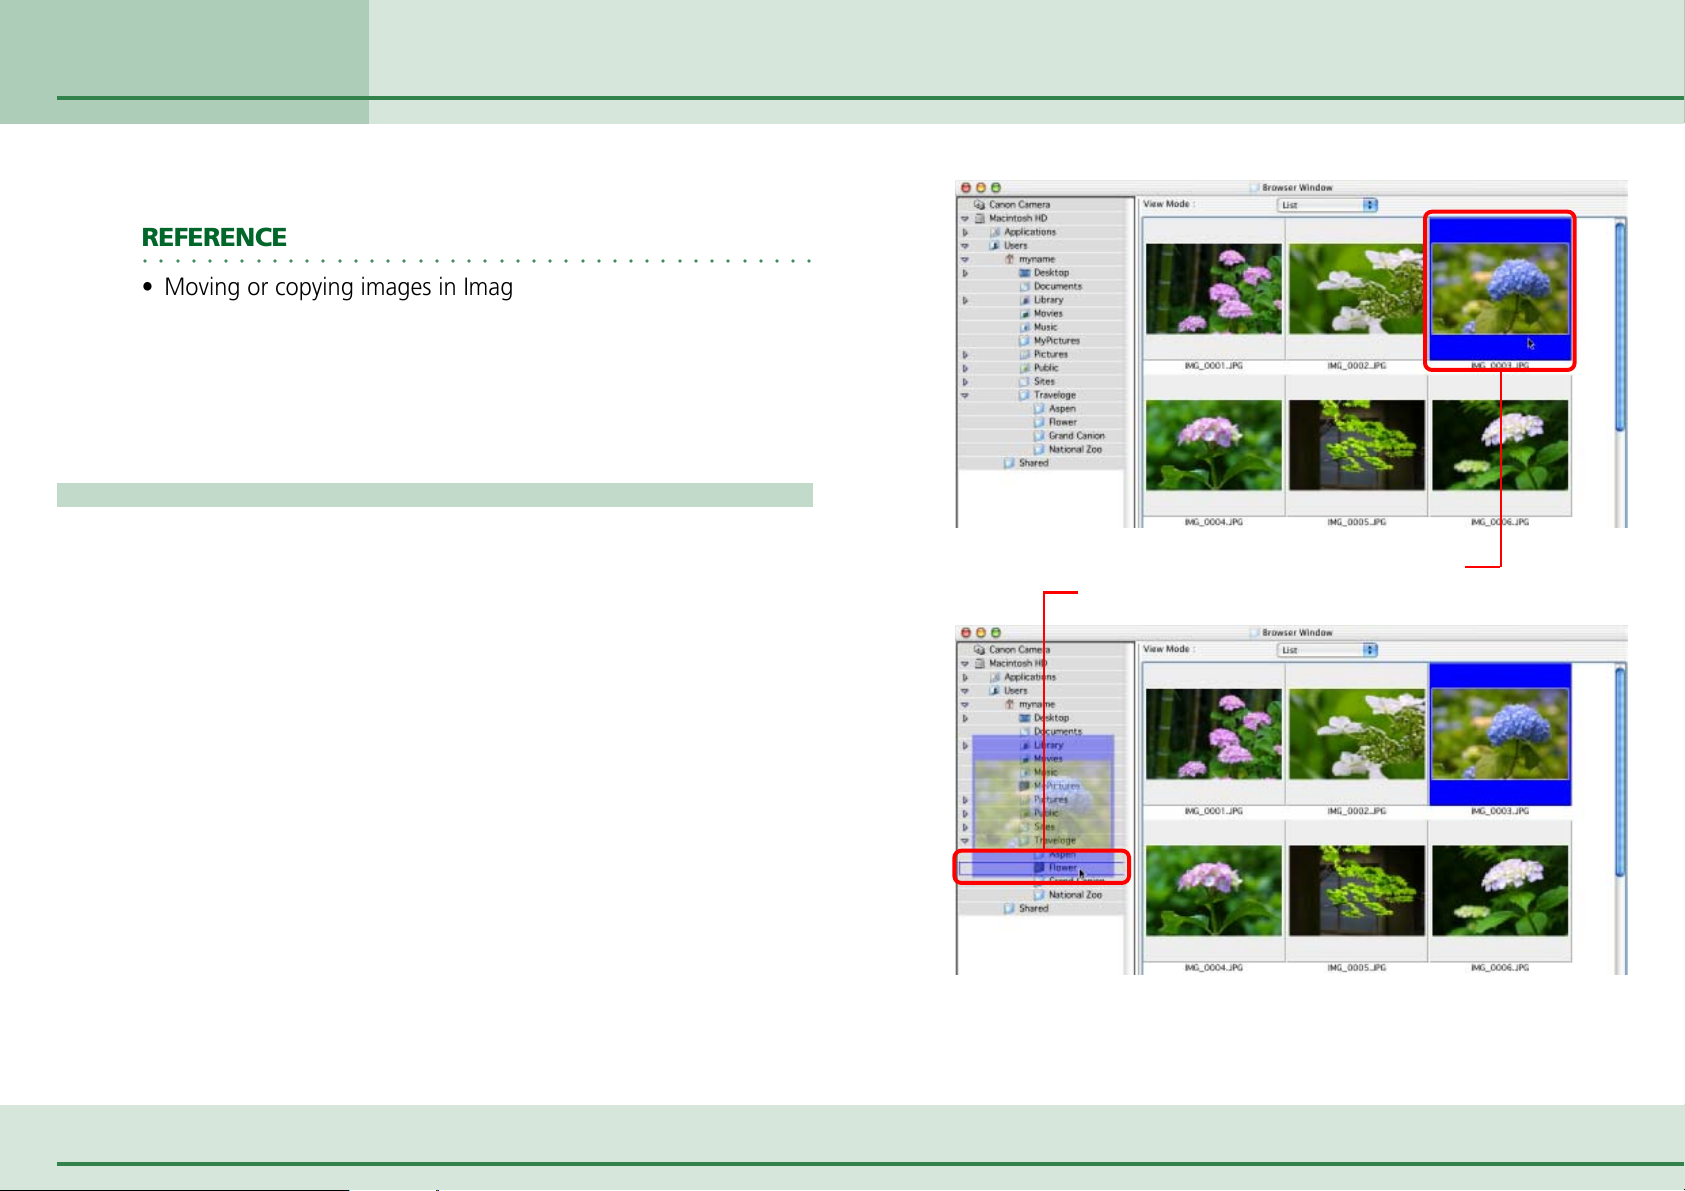
Moving and Copying Images (1/3)
Moving or copying in the Explorer View Section
When you want to move an image, you first need to display it
in the Browser Area. Then, drag that image to the destination
folder in the Explorer View Section.
When you want to copy an image, proceed as above, but press
and hold the [option] key before releasing the mouse button to
drop the image.
A Drag the image that you want to move.
B Drop it at the desired location.
23 ImageBrowser Software User Guide
Page 24
Chapter 3
Managing Images
Moving and Copying Images (2/3)
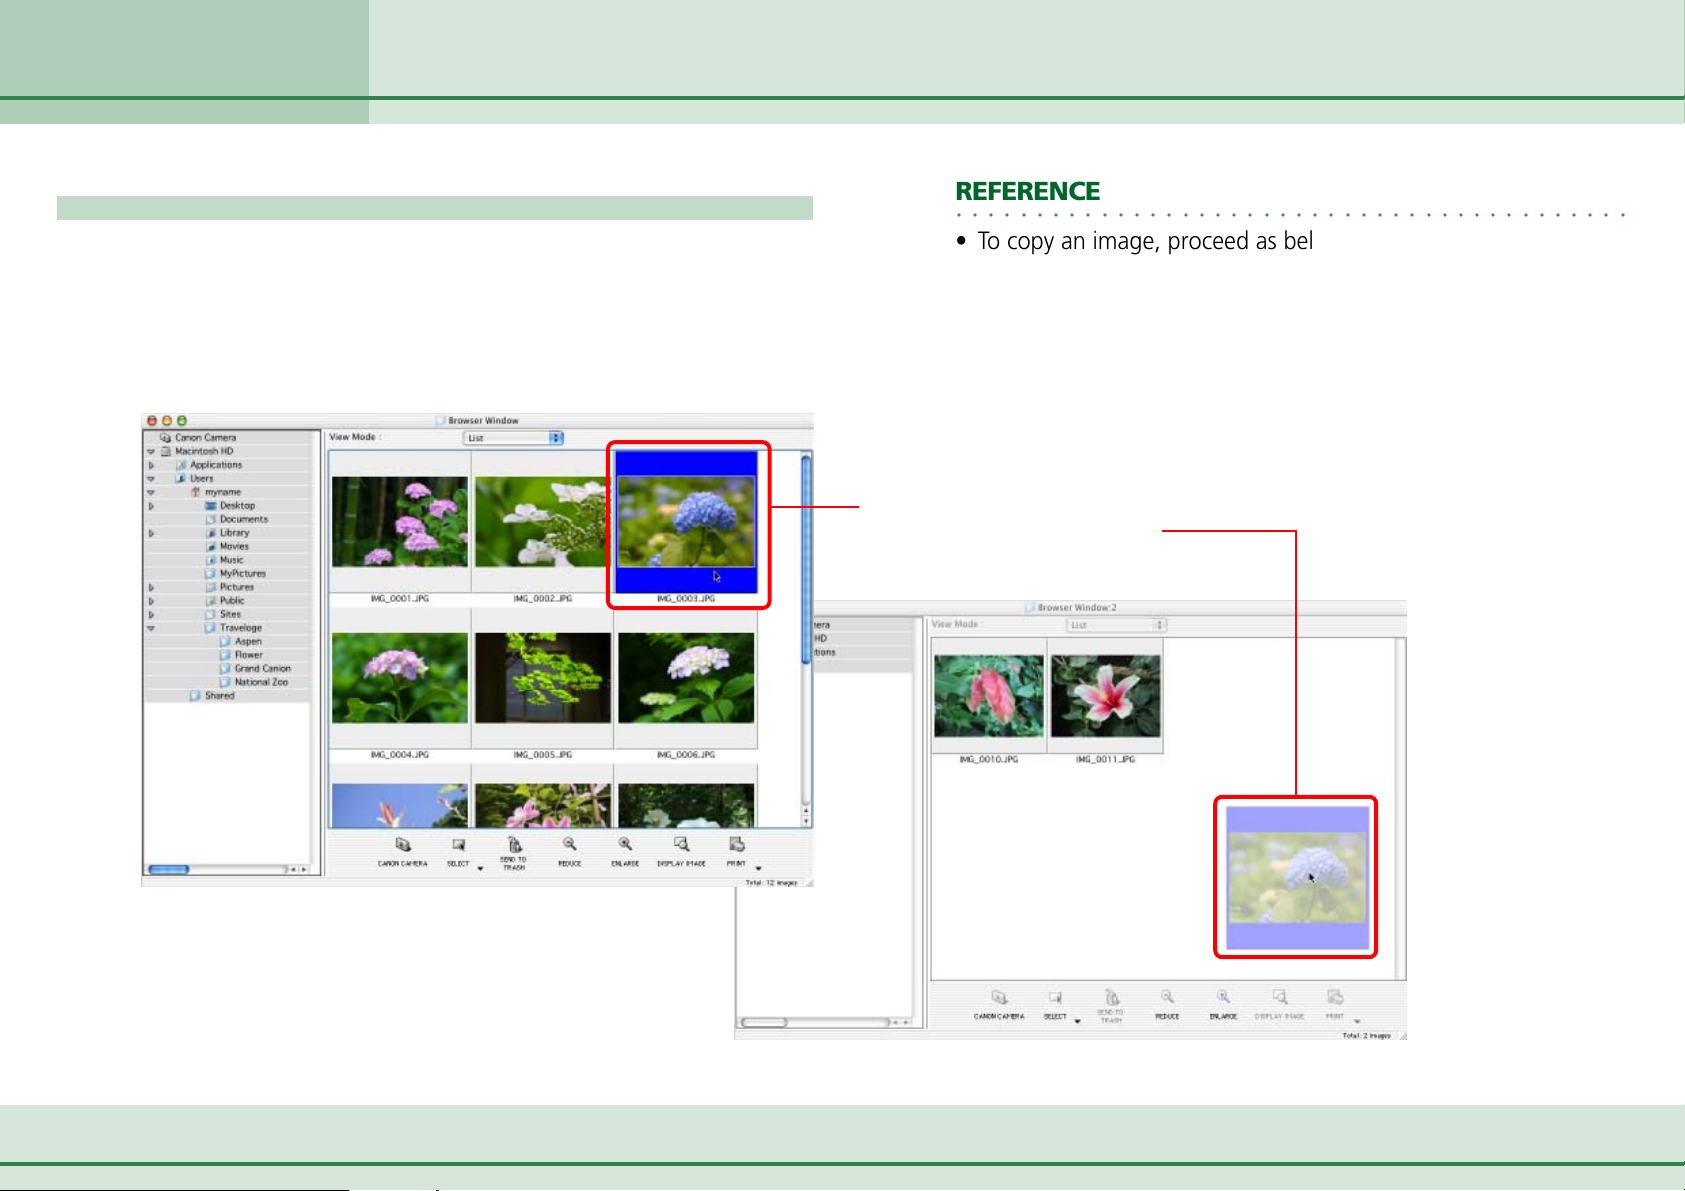
Moving or copying images using two Browser Windows
You can display a second Browser Window by clicking [New
Browser Window] on the [View] menu.
You can move or copy images between folders by displaying
different folders in two Browser Windows, then dragging
images from one Browser Window to another.
REFERENCE
○○○○○○○○○○○○○○○○○○○○○○○○○○○○○○○○○○○○○○○○○○
•To copy an image, proceed as below, but press and hold the
[option] key before releasing the mouse button to drop the
image.
• Up to two Browser Windows can be open simultaneously.
A Drag the image that you want to move.
B Drop it at the desired location.
The First Browser Window
24 ImageBrowser Software User Guide
The Second Browser Window
Page 25

Chapter 3
Managing Images
Moving and Copying Images (3/3)
More ways of moving and copying images
■ Moving or copying multiple images
You can select several images that you want to move or copy all
at once. While holding down the [shift] key, or the [option] +
[shift] keys, click the images you want to move or copy. After
selecting the images, you can move or copy all of them at the
same time using the same basic procedure as explained in the
previous page.
■ Moving or copying a complete folder
Instead of selecting individual images, you can select an entire
folder for moving or copying. Drag the folder that you have
chosen in the Explorer View Section, and drop it into another
folder.
■ Copying to a camera
You can copy images to a camera. When you open the Camera
Window and drag an image from the Browser Area into the
Camera Window, the image is copied to the camera. For details
on this feature, see the Adding Computer Images to the Camera
section in Chapter 5.
REFERENCE
○○○○○○○○○○○○○○○○○○○○○○○○○○○○○○○○○○○○○○○○○○
•You can select all the images at once by clicking (Select) at
the bottom of the Browser Window and choosing [Select All]
from the next menu. If you choose [Deselect All], you can
deselect all selected images.
•You can also select/deselect all images by clicking the [Edit]
menu and selecting [Select All] or [Deselect All].
25 ImageBrowser Software User Guide
Page 26
Chapter 3
Managing Images
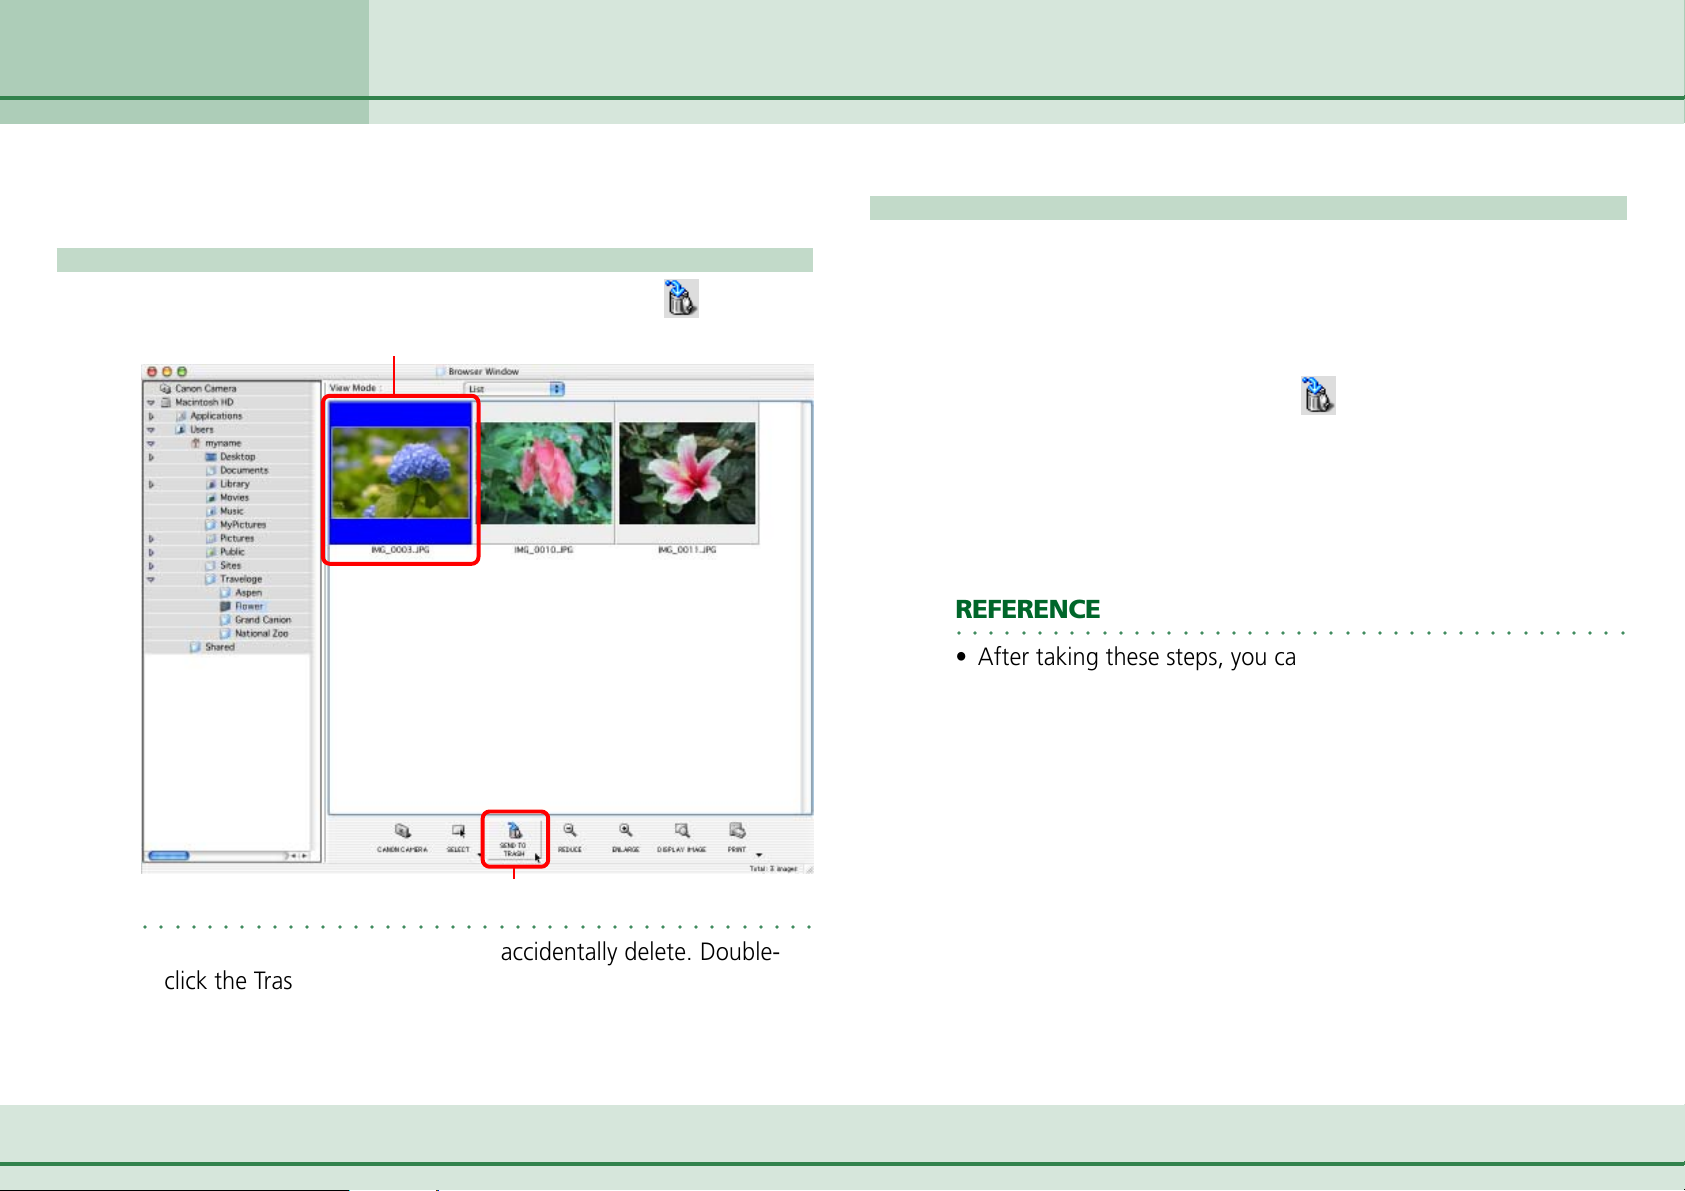
Deleting Images
This section describes how to delete images that you no longer need.
How to delete an image
Click the image that you want to delete and click (Send to
Trash).
A Click the image that you want to delete.
More ways of deleting images
■ Deleting multiple images
You can select several images at once by holding down the
[shift] key, or the [option] + [shift] keys, and clicking the images
you want to delete. When you have selected all the images
that you want to delete, clicking
the selected images at once.
■ Deleting images from the File menu
Click an image. Then, click [Send to Trash] on the [File] menu to
delete the image.
REFERENCE
○○○○○○○○○○○○○○○○○○○○○○○○○○○○○○○○○○○○○○○○○○
• After taking these steps, you can completely delete the images
from the computer by clicking the [Finder] menu in Mac OS X
or the [Special] menu in Mac OS 9 and selecting [Empty Trash].
(Send to Trash) deletes all
REFERENCE
○○○○○○○○○○○○○○○○○○○○○○○○○○○○○○○○○○○○○○○○○○
•You can recover images that you accidentally delete. Doubleclick the Trash icon to open it, and drag the image files from the
Trash to the original folder on the desktop (not the Explorer
View section).
26 ImageBrowser Software User Guide
B Click here.
Page 27
Chapter 3
Managing Images
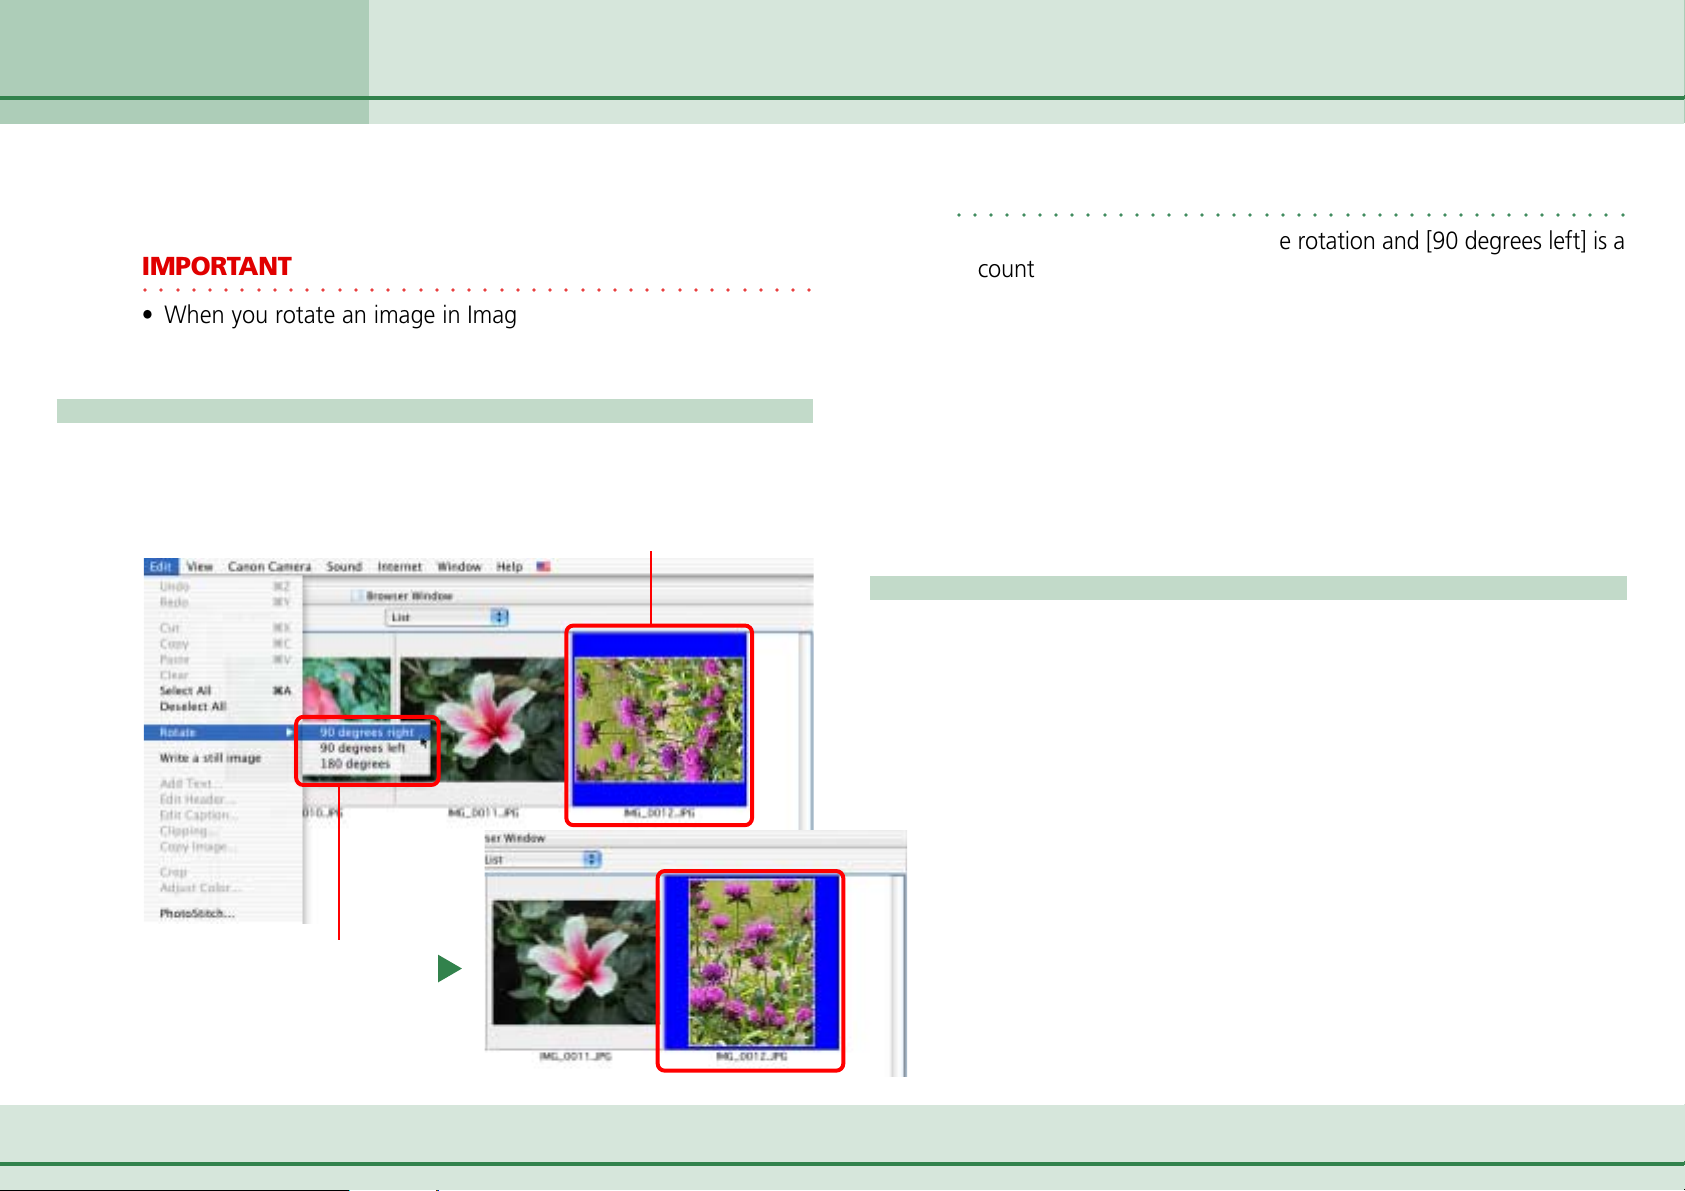
Rotating Images
This section describes how to rotate images to the desired orientation.
This is useful for images taken by holding the camera vertically.
IMPORTANT
○○○○○○○○○○○○○○○○○○○○○○○○○○○○○○○○○○○○○○○○○○
• When you rotate an image in ImageBrowser, the actual image
file on the disk is over-written with the rotated image.
How to rotate an image
Click the image that you want to rotate. On the [Edit] menu,
point to [Rotate] and click the desired rotation angle.
A Click the image that you want to rotate.
REFERENCE
○○○○○○○○○○○○○○○○○○○○○○○○○○○○○○○○○○○○○○○○○○
• [90 degrees right] is a clockwise rotation and [90 degrees left] is a
counterclockwise rotation.
• There are two settings for rotating images. The default setting
rotates the original image.
•You can also set it to display the image in both the original and
rotated positions. Click the [ImageBrowser] menu (in Mac OS 9,
click the [Edit] menu), select [Preferences] and [Browser Window], and click to place a check mark beside [Retain original
when rotating JPEG images].
• When you rotate an image in a format other than JPEG, only the
rotated image displays. The original image file is overwritten.
More ways of rotating images
■ Rotating multiple images
You can select several images at once by holding down the
[shift] key, or the [option] + [shift] keys, and clicking the images
you want to rotate. When you have selected all the images that
you want to rotate, perform the rotation operation and all the
selected images are rotated at the same time.
B Click a rotation angle.
27 ImageBrowser Software User Guide
Page 28
Chapter 3
Managing Images
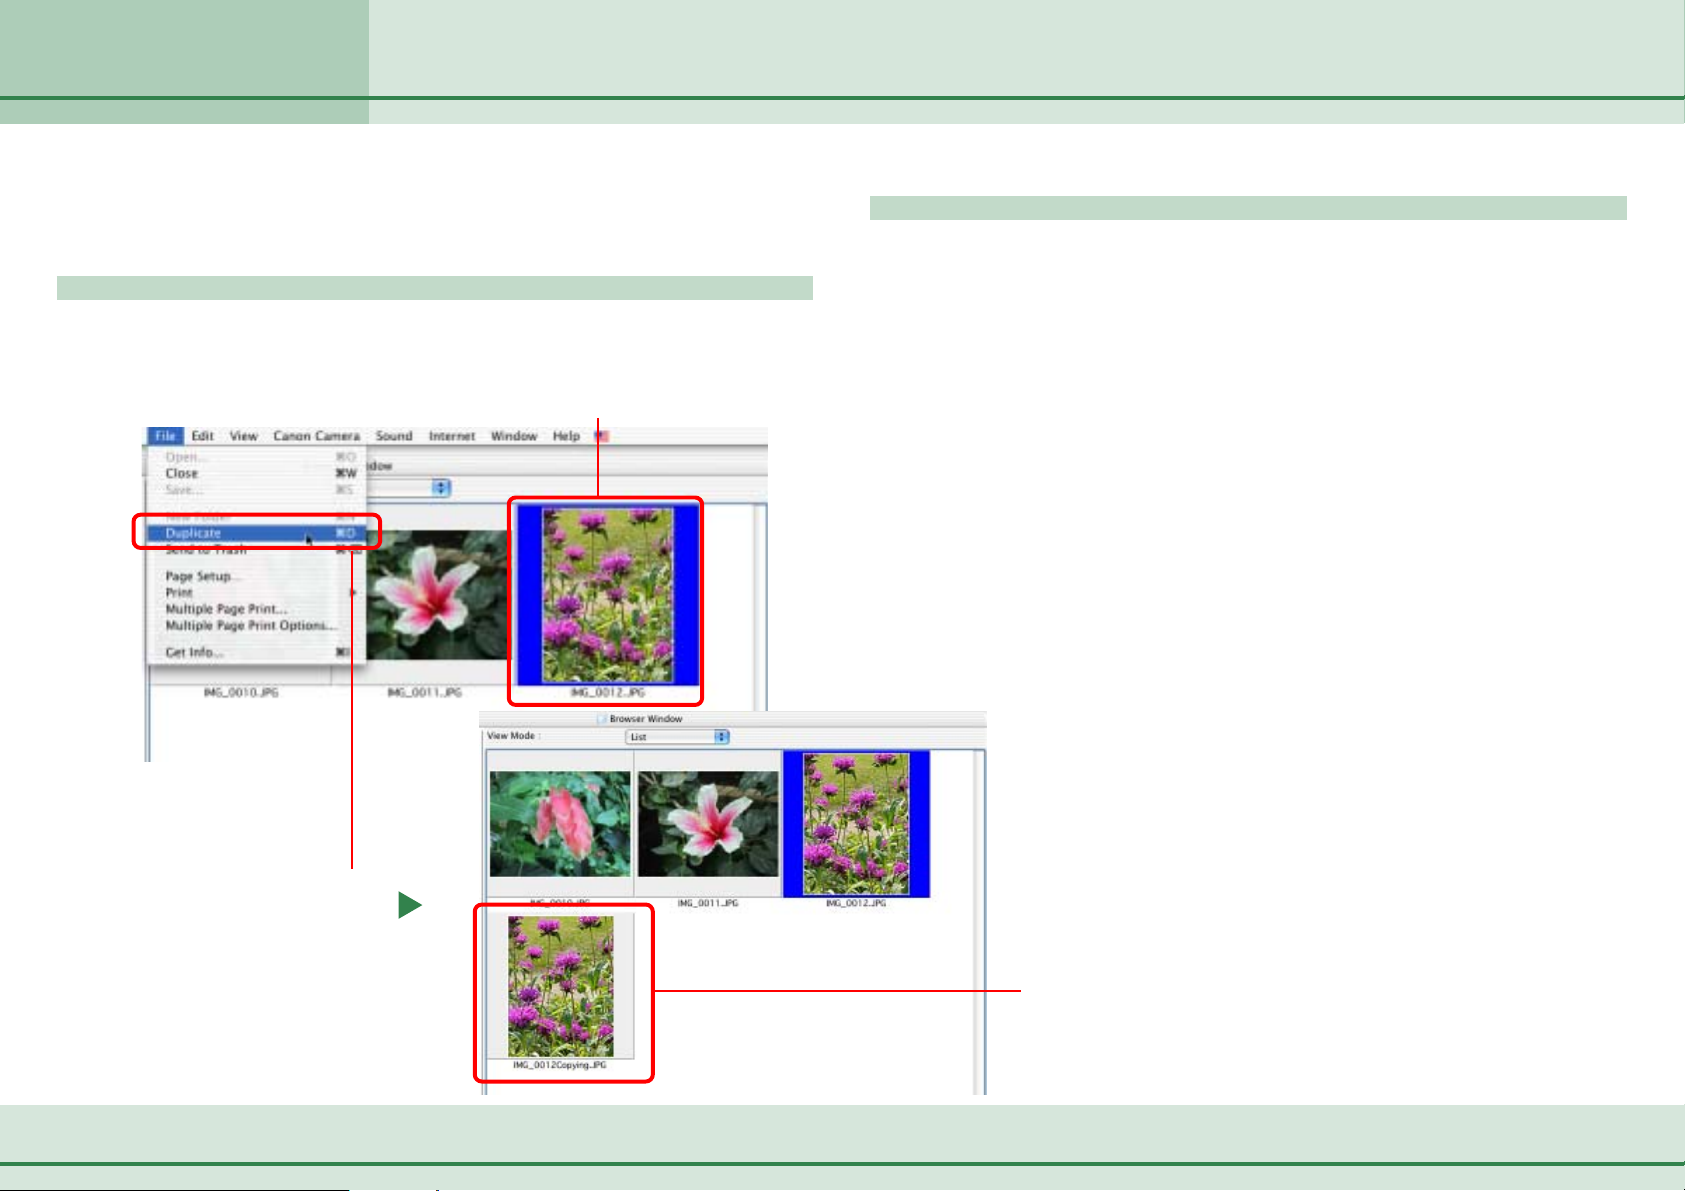
Duplicating Images
This section describes how to duplicate images (create an exact copy of
an image file).
How to duplicate an image
Click an image. On the [File] menu, click [Duplicate].
A Click the image that you want to duplicate.
More ways of duplicating images
■ Duplicating multiple images
You can select several images at once by holding down the
[shift] key, or the [option] + [shift] keys, and clicking the images
that you want to duplicate. When you have selected all the
images that you want to duplicate, perform the duplication
operation and all the selected images are duplicated at once.
■ Duplicating a complete folder
Instead of duplicating single images, you can select an entire
folder for duplication. Select the folder in the Explorer View
Section (make sure no images are selected in the Browser Area),
and on the [File] menu click [Duplicate]. The complete folder is
duplicated.
B Click here.
28 ImageBrowser Software User Guide
The duplicated image
Page 29
Chapter 3
Managing Images
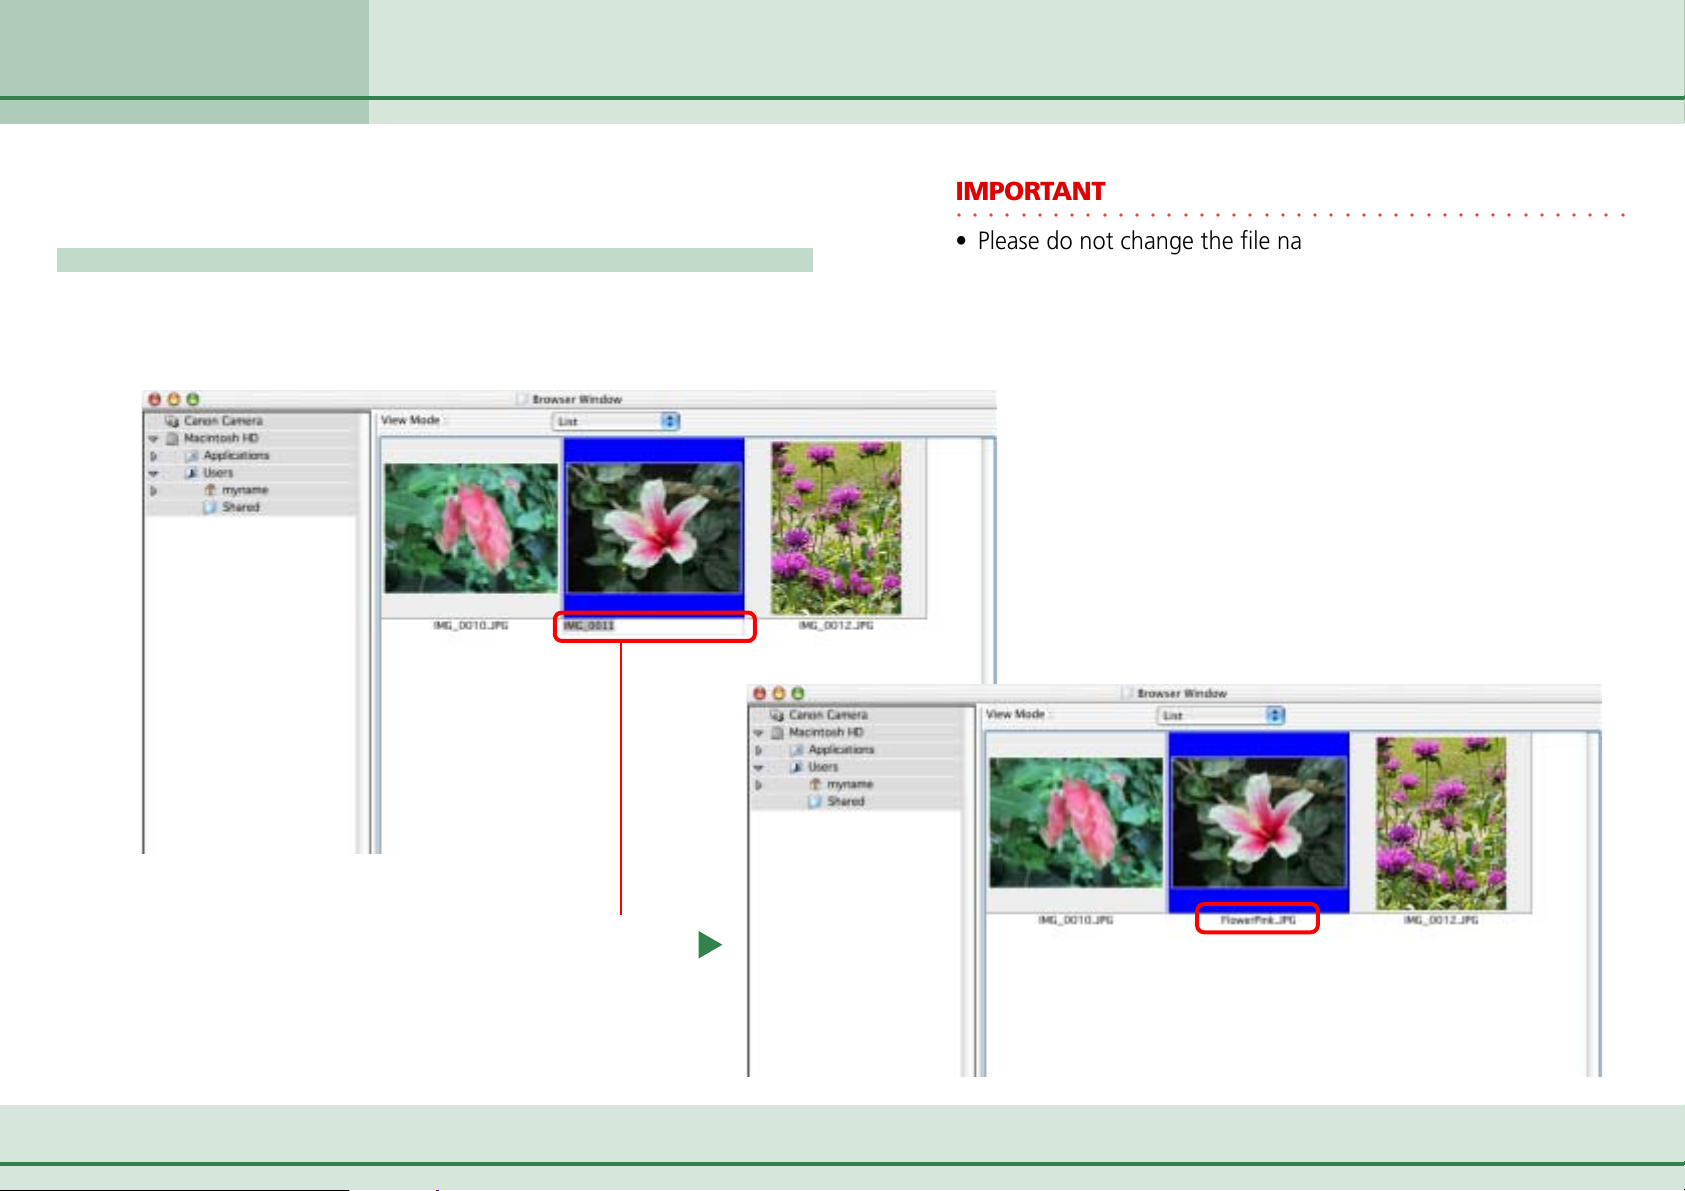
Renaming Images
This section describes how to rename images.
How to rename an image
Click the name of the image that you want to rename. After a
moment you can type the new name of the image. Type the
new name and press [return].
IMPORTANT
○○○○○○○○○○○○○○○○○○○○○○○○○○○○○○○○○○○○○○○○○○
• Please do not change the file name extension, which identifies
the file type. If you change this part of the name, the image
may cease to display in ImageBrowser. The file name extension,
such as [.JPG], is the last part of the file name and is preceded
by a period.
Click here, and wait a moment, then type
the new name and press [return].
29 ImageBrowser Software User Guide
Page 30
Chapter 3
Managing Images
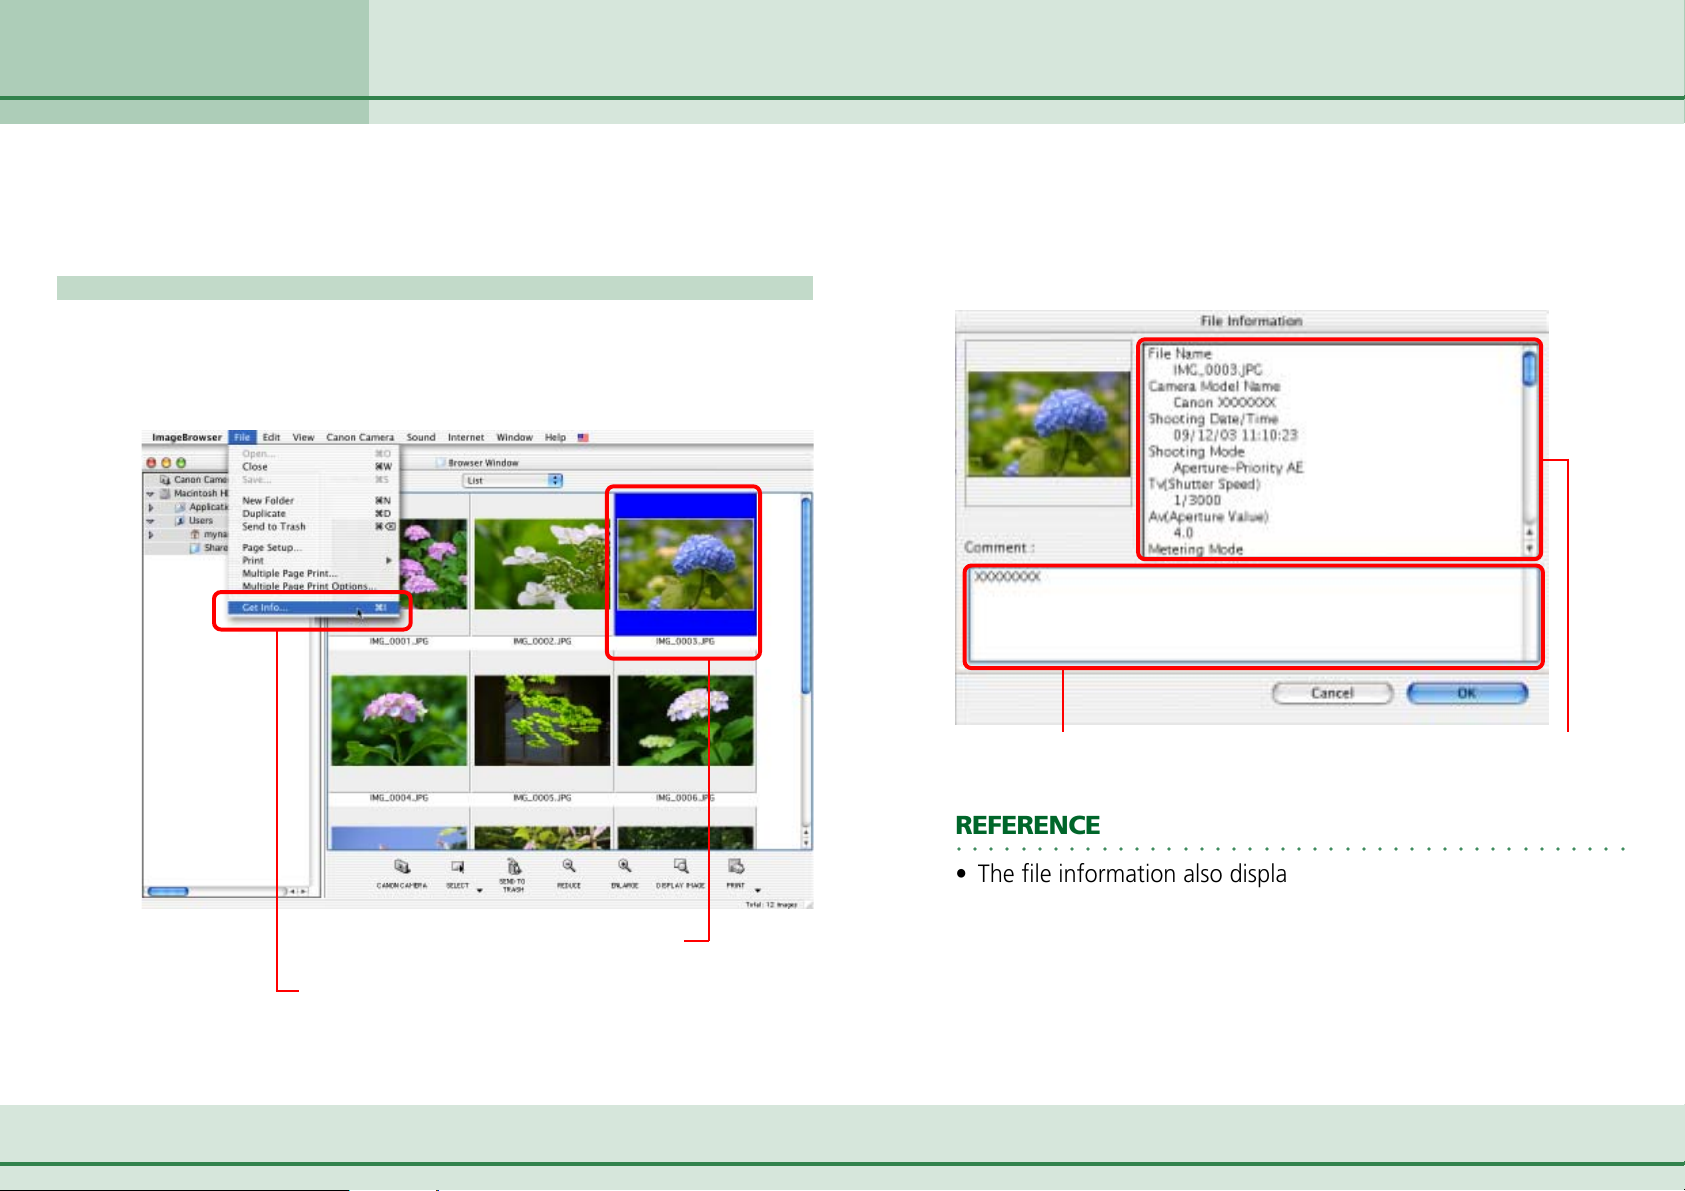
Viewing Image Information
You can click images and look at the various shooting information
about them.
How to view image information
In the Browser Area, click an image. Then, on the [File] menu,
click [Get Info] to open the File Information dialog box for that
image.
The File Information dialog box contains such information as
the camera model, the date the image was shot, and the
camera settings at the time of shooting. To close the File
Information dialog box, click [OK].
You can input a
comment here.
Information displayed here
depends on the camera used.
A Click the image for which you want to
view information.
B Click here.
30 ImageBrowser Software User Guide
REFERENCE
○○○○○○○○○○○○○○○○○○○○○○○○○○○○○○○○○○○○○○○○○○
• The file information also displays below the histogram when the
Browser Area display mode is set to [Preview].
• When an image taken by the camera is modified and saved by
another program, information about the camera settings might
be lost.
Page 31

Chapter 3
Managing Images
Creating Folders
This section describes how to create folders within disks or other folders.
How to create a folder
In the Explorer View Section, click the disk or folder in which
you wish to create the new folder. On the [File] menu, click
[New Folder] to create a new folder called [Untitled Folder].
Click the folder where you want to
create a new folder, then click
[New Folder] on the [File] menu.
REFERENCE
○○○○○○○○○○○○○○○○○○○○○○○○○○○○○○○○○○○○○○○○○○
• For details on how to change the folder name, see the next page.
• When you create a new folder in ImageBrowser, a new folder of
the same name appears in the Finder.
New folder
31 ImageBrowser Software User Guide
Page 32

Chapter 3
Managing Images
Renaming Folders
This section describes how to rename folders.
How to rename a folder
In the Explorer View Section, click the name of the folder that
you want to rename. After a moment, you can type the new
folder name. Type the new name and press [return].
Click the name of
the folder and
wait a moment.
REFERENCE
○○○○○○○○○○○○○○○○○○○○○○○○○○○○○○○○○○○○○○○○○○
• Renaming a folder in ImageBrowser changes the name of the
folder itself on your computer.
Type the new name
for the folder and
press [return].
32 ImageBrowser Software User Guide
Page 33

Chapter 3
Managing Images
Deleting Folders
This section describes how to delete unnecessary folders.
IMPORTANT
○○○○○○○○○○○○○○○○○○○○○○○○○○○○○○○○○○○○○○○○○○
• When you delete a folder, all the actual images and folders it
contains are deleted too. They cannot be recovered once they
are deleted. Please exercise caution when deleting folders.
How to delete a folder
Click the folder that you want to delete and click (Send to
Trash).
Another way to delete folders
■ Deleting a folder from the [File] menu
You can delete folders using the File menu. Click the folder you
wish to delete. Click the [File] menu and select [Send to Trash].
REFERENCE
○○○○○○○○○○○○○○○○○○○○○○○○○○○○○○○○○○○○○○○○○○
• After taking these steps, you can completely delete the images
from the computer by clicking the [Finder] menu in Mac OS X
or the [Special] menu in Mac OS 9 and selecting [Empty Trash].
A Click the folder to be deleted.
B Click here.
33 ImageBrowser Software User Guide
Page 34

Chapter 4
Viewing Images
Selecting Folders
This chapter describes how to view and edit images in ImageBrowser.
In this section, you will learn how to use the Explorer View Section to
choose a folder containing the images that you want to see.
How to select a folder
In the Explorer View Section, click the folder that you want to
open. The Browser Area displays a list of the images in the
selected folder.
Collapsing and expanding a folder
You can use the and buttons to collapse or expand a disk
or a folder.
Click
a folder.
REFERENCE
○○○○○○○○○○○○○○○○○○○○○○○○○○○○○○○○○○○○○○○○○○
•You can display the Camera Window (assuming the camera is
to collapse
connected and ready to transfer data) by clicking [Canon
Camera] in the Explorer View section. If you are using a
memory card reader, open the memory card icon in the Explorer
View section and double-click the [DCIM] folder to open the
Camera Window.
Click to expand
a folder.
Selected folder
The thumbnails of the images in the
folder that you selected appear here.
34 ImageBrowser Software User Guide
Page 35

Chapter 4
Viewing Images
Opening Images
This section describes how to open images using the thumbnails
displayed in the Browser Area.
How to open an image
In the Browser Area, double-click the thumbnail of the image
that you want to open. The image appears in a new window.
Double-click
the thumbnail
of the image
that you want
to see.
REFERENCE
○○○○○○○○○○○○○○○○○○○○○○○○○○○○○○○○○○○○○○○○○○
• After selecting a thumbnail, you can also click (Display
Image) to open the image.
• After selecting a thumbnail, you can click [View Actual Image]
on the [View] menu to open the image.
Opening several images
When you want to open several images at the same time, you
can use the following method.
• In the Browser Area, hold down the [shift] key or the [option]
+ [shift] keys and click the thumbnails of the images that you
want to open. Then, click
selected images.
Closing an image
To close an image window, click (Mac OS X) or (Mac OS
9). You can also close an image window by selecting [Close] in
the [File] menu.
(Display Image) to open all the
The size of the
image (vertical x
horizontal, in
pixels) appears
here.
35 ImageBrowser Software User Guide
Click here to display
or hide the toolbar
at the bottom of the
image window.
Page 36

Chapter 4
Viewing Images
Changing the Magnification
This section describes how to change the magnification of an image.
How to change the zoom ratio with the buttons in the image window
You can change the zoom ratio by clicking or directly in
the image window.
How to change the zoom ratio using the Display menu
You can change the zoom ratio by clicking one of the zoom
ratios on the [View] menu, or by clicking [Enlarge] or [Reduce].
REFERENCE
○○○○○○○○○○○○○○○○○○○○○○○○○○○○○○○○○○○○○○○○○○
•You can select a zoom ratio of [25%] to [200%].
36 ImageBrowser Software User Guide
Reduce Enlarge
Current zoom ratio
Page 37

Chapter 4
Viewing Images
Editing Images (1/4)
This section describes how to edit open images.
Editing functions
Using ImageBrowser, you can perform the following editing
operations.
■ Crop
You can extract part of an image, leaving out parts that you
don’t need.
■ Adjust Color
You can change the appearance of an image by adjusting its
hue, saturation, and lightness.
REFERENCE
○○○○○○○○○○○○○○○○○○○○○○○○○○○○○○○○○○○○○○○○○○
• After you edit an image, it is possible that the result might not
satisfy you. If you want to go back to the previous step, click
[Undo] on the [Edit] menu to cancel the operation and return to
the previous step. Keep clicking [Undo] to continue going back.
• If you feel that you have undone too many steps, you can
reverse it by clicking [Redo] on the [Edit] menu.
■ Save
After you have modified an image, you can save it under a
different name with this function.
Detailed explanations of these procedures start on the next
page.
37 ImageBrowser Software User Guide
Page 38

Chapter 4
Viewing Images
Editing Images (2/4)
Cropping
Use this function to extract only part of an image, leaving out
the parts that you do not want. Place the mouse pointer within
the image you want to crop. Drag the mouse to form a
rectangular frame. Then, click
within the frame.
(Crop) to extract the area
A Drag to frame the area that you want to crop.
B Click this button.
REFERENCE
○○○○○○○○○○○○○○○○○○○○○○○○○○○○○○○○○○○○○○○○○○
• When an area is selected for cropping, the following
information is displayed at the bottom of the window.
This is the size of the area that you
selected (horizontal x vertical, in pixels).
These are the coordinates of the
mouse pointer in the cropped area.
38 ImageBrowser Software User Guide
Page 39

Chapter 4
Viewing Images
Adjusting colors
You can change the appearance of an image by adjusting its
colors. Click
dialog box. In the dialog box, you can adjust the hue,
saturation and lightness, and click [OK].
Editing Images (3/4)
(Adjust Color) to display the Adjust Color
Click here.
Decrease Hue
Decrease
Saturation
Decrease
Lightness
Increase Hue
Increase
Saturation
Increase
Lightness
39 ImageBrowser Software User Guide
Page 40

Chapter 4
Viewing Images
Editing Images (4/4)
Saving images
After you have modified an image, you can save it under a
different name so that the original image remains intact. In this
case, click
and specify the file format you wish to use. Then, click [Save].
After you have modified an image file, you can save it under
the same file name (overwriting the original image). To do this,
type the original file name of the image under Save File in the
save dialog box, then click [Save].
Click this button.
(Save). In the save dialog box, type a new name
REFERENCE
○○○○○○○○○○○○○○○○○○○○○○○○○○○○○○○○○○○○○○○○○○
• After you have modified an image, if you try to close the image
window without saving your changes, a message appears to
prompt you to save the edited image.
To save the changes, click [Save]. In the save dialog box, type a
name and specify the file format that you want to use. Then,
click [Save].
If you do not want to save the changes, click [Don’t Save].
• The “Exif JPEG format” is a variety of JPEG file that contains
additional information, such as the shooting data. Files in this
format can be handled in the same fashion as conventional
JPEG files.
40 ImageBrowser Software User Guide
Page 41

Chapter 4
Viewing Images
Editing Images with Other Programs
It is possible to edit images that you have selected in ImageBrowser
using a different image editing program that you have registered. This
section describes how to perform this operation.
REFERENCE
○○○○○○○○○○○○○○○○○○○○○○○○○○○○○○○○○○○○○○○○○○
• If you installed the image editing program included with your
product (contained on a CD-ROM other than the Solution Disk),
it should automatically be registered in the ImageBrowser
menu.
• To register other programs, click the [ImageBrowser] menu (in
Mac OS 9, click the [Edit] menu) and select [Preferences] and
[Browser Window], and add the program to the [Register
Application] category.
Editing Images with Other Programs
After selecting an image, click the [Edit] menu and select the
desired program from the [Start Application] submenu.
41 ImageBrowser Software User Guide
Select an image.
A
B Select your application from this
submenu (program names vary
according to the camera model).
The image editing program starts and displays the selected
image.
Page 42

Chapter 5
Using the Camera Window
Opening the Camera Window
This chapter describes how to use the Camera Window of ImageBrowser.
Let’s begin by looking at the three ways of opening the Camera Window.
IMPORTANT
○○○○○○○○○○○○○○○○○○○○○○○○○○○○○○○○○○○○○○○○○○
• Ensure that the camera and computer are connected with an
interface cable and are ready to communicate before you
perform this procedure.
• If you are using a memory card reader, ensure that the memory
card is loaded into the reader before performing the procedure.
Clicking Canon Camera in the Explorer View Section
In the Explorer View Section, click [Canon Camera] to open the
Camera Window.
Click here.
Using the Canon Camera button
To open the Camera Window when you are using a memory
card reader, open the memory card icon in the Explorer View
section and double-click the [DCIM] folder.
Opening It Automatically (Mac OS 9 Only)
When you connect the camera to the computer with an
interface cable and prepare it to communicate, ImageBrowser
will automatically start and open the Browser Window and the
ImageBrowser Automation Wizard. If you select [Display
Images] in the ImageBrowser Automation Wizard, the Camera
Window will open.
You can also use the same procedure to open the Camera
Window when ImageBrowser is already running.
REFERENCE
○○○○○○○○○○○○○○○○○○○○○○○○○○○○○○○○○○○○○○○○○○
• ImageBrowser will not start automatically if the check mark is
removed from [The application program below will start]
category in the [Canon ImageBrowser Auto Launch] control
panel.
Click (Canon Camera) to display the Camera Window.
Click here.
42 ImageBrowser Software User Guide
Page 43

Chapter 5
Using the Camera Window
Downloading Images (1/2)
This section explains the procedures for downloading images from the
camera (memory card) to a computer disk.
How to import an image
Click the thumbnail of the image that you want to import from
the camera and click
(Download).
A Select an image.
B Click here.
REFERENCE
○○○○○○○○○○○○○○○○○○○○○○○○○○○○○○○○○○○○○○○○○○
• The imported images are downloaded into the folder selected
in the Browser Window.
Other ways of importing images
■ Double-clicking
You can import images by double-clicking them in the Camera
Window.
Image imported from the camera
43 ImageBrowser Software User Guide
Page 44

Chapter 5
Using the Camera Window
Downloading Images (2/2)
■ Drag-and-drop
Drag an image in the Camera Window and drop it into a folder
in the Browser Window. The image is then imported into
ImageBrowser. Further, you can import an image directly into a
recognized folder by dragging an image in the Camera
Window and dropping it into a folder in the Explorer View
Section.
■ Importing multiple images
You can select several images by holding down the [shift] key,
or the [option] + [shift] keys, and clicking the images you want
to import. When the images are selected, perform the
importation. All the images that you selected are imported.
■ Importing all the images
Click (Select) and click [Select All] on the menu. All the
images of the folder are selected and when you perform the
importation procedure, they are all imported at once.
REFERENCE
○○○○○○○○○○○○○○○○○○○○○○○○○○○○○○○○○○○○○○○○○○
• If an image is taken in the Stitch Assist mode, it appears in the
Camera Window as follows:
• If an image is taken in the RAW mode (some camera models do
not come with this feature), it appears in the Camera Window
as follows:
This mark indicates that
the image was taken in
the RAW mode.
• If an image is taken in the Movie mode, it appears in the Camera Window as follows:
This is the mark that
indicates a movie.
• If an image has a sound memo attached (this feature is not
available on some models), it appears in the Camera Window
as follows:
44 ImageBrowser Software User Guide
This mark indicates that
the image was taken in
the Stitch Assist mode.
(You can click the wavy
line to start PhotoStitch.)
This is the mark that
indicates a sound memo.
Page 45

Chapter 5
Using the Camera Window
Deleting Images in the Camera
This section describes how to delete images from the camera (memory
card).
IMPORTANT
○○○○○○○○○○○○○○○○○○○○○○○○○○○○○○○○○○○○○○○○○○
• Please note that deleting an image in the Camera Window
deletes the actual image from the memory card. Since deleted
images cannot be recovered, be extremely careful when using
this function.
How to delete an image in the camera
Select the image that you want to delete and click (Delete)
to delete it.
A Select an image.
Other ways of deleting images
■ Deleting multiple images
You can select several images by holding down the [shift] key, or
the [option] + [shift] keys, and clicking the images you want to
delete. When you have selected all the images to be deleted,
perform the deletion. All the selected images are deleted.
■ Deleting all the images
Click (Select) and click [Select All] on the menu. When you
proceed with the deletion, all the images contained in the
folder are deleted at once.
A message appears. Click [OK]. The image is deleted.
45 ImageBrowser Software User Guide
B Click here.
Page 46

Chapter 5
Using the Camera Window
Rotating Images in the Camera
This section describes how to rotate images (stored on the camera) to
the desired orientation.
How to rotate an image
In the Camera Window, select the image that you want to
rotate. Click
want to use on the menu.
(Rotate) and click the rotation angle that you
A Select an image.
B Click the [Rotate]
button and select
a rotation angle.
REFERENCE
○○○○○○○○○○○○○○○○○○○○○○○○○○○○○○○○○○○○○○○○○○
• 90 degrees left is a counterclockwise rotation and 90 degrees
right is a clockwise rotation.
• The Rotate function affects only the image displayed in the
Camera Window. The image stored on the camera is not
changed at all. However, when you download the image, the
image is rotated and saved on the computer in the correct
orientation.
•You can also set it to download both the original and rotated
image. Click the [ImageBrowser] menu (in Mac OS 9, click the
[Edit] menu) and select [Preferences] and [Browser Window],
and click to place a check mark beside [Retain original when
rotating JPEG images].
Another way to rotate images
■ Rotating multiple images
You can select several images at once by holding down the
[shift] key, or the [option] + [shift] keys, and clicking the images
that you want to rotate. When all the images are selected,
perform the rotation operation. All the selected images are
rotated at the same time at the same rotation angle.
46 ImageBrowser Software User Guide
Page 47

Chapter 5
Using the Camera Window
Adding Computer Images to the Camera (1/2)
This section explains the procedures for copying images from your
computer disk to the camera (memory card).
How to copy an image to the camera
Click (Upload).
Click here.
A dialog box appears. In the dialog box, select an image you
want to copy to the camera and click [Open].
REFERENCE
○○○○○○○○○○○○○○○○○○○○○○○○○○○○○○○○○○○○○○○○○○
•You can upload multiple images in the same operation.
When a dialog similar to the one below appears, set the
necessary options and click [Add]. This will add the image.
Select this to add images to the camera without making changes.
Select this to change the image size before adding it. Select the
desired size in the list box directly below (if you are using a
memory card reader, input the image size value).
REFERENCE
○○○○○○○○○○○○○○○○○○○○○○○○○○○○○○○○○○○○○○○○○○
•You can add JPEG images that have been recorded by a camera
to the camera without changing them.
• BMP, PICT and TIFF format images and rotated images cannot
be added to the camera as they are. Change their size.
•RAW format images and movie files (AVI format) cannot be
added to the camera.
• Image file formats are explained in more detail in the Supported
File Formats topic in the Appendices.
47 ImageBrowser Software User Guide
Page 48

Chapter 5
Using the Camera Window
Adding Computer Images to the Camera (2/2)
Other ways of copying images
■ Using the menu
You can copy images to a camera by clicking [Upload Images] on
the [Canon Camera] menu.
■ Drag-and-drop
In the Browser Area, drag an image that you want to copy into
the Camera Window.
48 ImageBrowser Software User Guide
Page 49

Chapter 5
Using the Camera Window
Checking and Modifying the Camera Settings
This section explains how you can check and modify the camera
settings from your computer.
How to check or modify the camera settings
Click (Setup Options) to display a menu. On the menu, click
[Camera Settings].
Type the name of
the owner of the
camera here.
Click this button
to synchronize
the camera’s
date and time
settings with the
computer.
Click this button
to format the
camera’s memory
card (not
supported by
some camera
models).
You can set the date and time from here.
After you have checked the camera settings and made the
necessary changes, click [OK].
This will open the Camera Settings dialog, which can be used
to change the settings shown on the right.
49 ImageBrowser Software User Guide
Page 50

Chapter 5
Using the Camera Window
Other Functions of the Camera Window
This section describes the additional functions of the Camera Window
that you can use.
On the [Setup Options] menu,
click [Communication Settings]
to adjust the communications
settings for the port
connecting the camera.
Click the [Setup Options]
button and select [My Camera]
to display the Select My
Camera dialog, which can be
used to change the start-up
image, shutter sound and
other camera settings (which
are explained in Saving the
‘My Camera Settings’ to the
Camera section in Chapter 6).
50 ImageBrowser Software User Guide
Click this button to
reconnect the camera and
computer after a
connection is broken.
Click this button to print the
selected image (For detailed
information on this
operation, see the Printing
Images section in Chapter 6).
Click this button to check the
various shooting information.
Click this button to run a camerabased slide show or set the DPOF
print settings (see the Setting Up
Slide Shows on the Camera and
Print Settings sections in the
Appendices). *
* Some camera models do not support this button.
Page 51

Chapter 6
Using Supplementary Features
Creating Images for E-mail (1/2)
This chapter describes how you can use the images stored in
ImageBrowser in various situations. First, let’s begin with how you can
reduce image files so they can be attached to e-mail.
How to send an image by e-mail
1.
2.
3.
In the Browser Area, select the image that you want
to send.
You can select several images by holding down the [shift] key or
the [option] + [shift] keys.
On the [Internet] menu, select [Create Image for
Email].
Specify the compression method that you want to
apply to the image.
Use this option when
you do not want to
reduce the size of the
image.
Normally, we
recommend that you
select this option.
Confirm the total size
of the file for
transmission here.
4.
5.
6.
Click [Next].
The Create Image for Email dialog box appears. (However, if you
selected the “Send without changing the file size” option, the
Send Email dialog box appears and you can proceed to step 7.)
Specify the reduction ratio and the image quality.
Specify the
reduction ratio
relative to the
original size of
the image (50%
means the size of
the image is
reduced by half
both vertically
and horizontally.)
Use it to check the file
size when you actually
compress the image.
(The file size appears
next to “Total Size after
compression.”)
Click here to preview
how the image will
appear after.
Specify the image quality.
(The lower the quality,
the rougher the image
becomes, but the size of
the file also becomes
smaller.)
Click [Next].
The last window appears.
51 ImageBrowser Software User Guide
Page 52

Chapter 6
Using Supplementary Features
Creating Images for E-mail (2/2)
7.
8.
Save the image and select whether you want to start
your e-mail program.
Save the image and place a checkmark here
if you want to start your e-mail program
A warning
message
displays when
the file size is
large.
To change the file
size, click [Back].
Click here to check an image
after changing it.
Click [Finish].
• If this is the first time you send an image in e-mail, the [Email
Images] folder appears in the Explorer View Section, and the
image is saved in that folder. If the [Email Images] folder
already exists, the image is saved in that folder.
• When you click [Finish], your e-mail program starts
automatically if you have selected “Start email application
after closing” in Step 7. Please note that some e-mail
programs may not support auto startup.
You can send the image you just created by opening a new email and attaching the image to the e-mail message.
•With e-mail programs, you can attach images to e-mail
messages simply by dragging them from the Browser Area to
the new message window.
REFERENCE
○○○○○○○○○○○○○○○○○○○○○○○○○○○○○○○○○○○○○○○○○○
• Changing the Email Program that Starts Automatically
- Mac OS X v10.1/10.2
Open [System Preferences] and select [Internet]. Use the
[Email] tab to set the program.
- Mac OS X v10.3
Open the [Applications] folder on the startup disk and doubleclick [Mail] within it to start the Mail program. Click the [Mail]
menu and select [Preferences…]. Use the [General] tab to set
the program.
- Mac OS 9
Open [Control Panels] and select [Internet]. Use the [Email] tab
to set the program.
• In Mac OS X, open the following folders to find the folder
containing e-mail images. On the startup disk open [Users],
[your user log-in name], [Library], [Preferences],
[ImageBrowserUserData] and [Mail]. In Mac OS 9, open the
folder into which ImageBrowser was installed or the [Documents] folder, followed by [ImageBrowserUserData] and [Mail].
52 ImageBrowser Software User Guide
Page 53

Chapter 6
Using Supplementary Features
Exporting Images (1/2)
This section explains how to change the size, resolution or file format of
a selected image and write it to a new file, and to export the shooting
information to a text file.
Export Options
The following types of image export options are available.
■ Resave the Image
You can change the file format and/or image size and save it to
a new file. Select one of four file formats: JPEG, PICT, TIFF or
BMP. You can also add identifying characters to the start of the
file name.
■ Write the Image Info
You can select specific items from the shooting information and
export it to a text file.
■ Rename the File and Copy
You can save a copy of the selected image. At this point, you
can also add identifying characters to the start of the file name.
Exporting Images
1.
2.
3.
Select the image(s) in the Browser Area.
You can use the [shift] key or the [option] + [shift] keys to select
multiple images.
Click the [Edit] menu and select [Write a still image].
A dialog for selecting the export options will open.
Select an export option and click [Next].
53 ImageBrowser Software User Guide
Page 54

Chapter 6
Using Supplementary Features
Exporting Images (2/ 2 )
4.
Set the export settings.
The export settings will vary with the option selected. Follow
the onscreen instructions to set the settings.
Whichever option you select, ensure that you note the file
name and destination when exporting so that you do not lose
track of the exported file.
5.
Click [Finish].
This completes the image export.
File NameDestination folder
54 ImageBrowser Software User Guide
Page 55

Chapter 6
Using Supplementary Features
Running Slide Shows (1/3)
This section describes how to use slide shows that display multiple
selections of images in sequence at full screen size.
Setting up a slide show
First, you need to specify how to run the slide show, as follows:
On the [View] menu, click [Slide Show Options] to set up the
options.
Select this option if you want to continue
running the slide show when it ends.
Place a check here if you do not wish the
buttons to show while a slide show is in
progress.
Select the “Auto Play” option if you want
the slide show to proceed automatically
and go to the next slide after a
predetermined number of seconds.
Select the “Control with Mouse or
keypad” option if you want to control
the progress of the slide show manually.
Select the transition effect to be used
when moving from one slide to another.
(When you click an effect, you can get a
preview of how the effect looks in the
area to the right.)
If you want the transition effects to be
randomly assigned, select [Random].
55 ImageBrowser Software User Guide
When you have completed the slide show
settings, click [OK].
Page 56

Chapter 6
Using Supplementary Features
Running Slide Shows (2/3)
How to run a slide show
First, in the Browser Area, select images that you want to use in
the slide show.
Next, on the [View] menu, click [Slide Show]. The slide show
starts.
REFERENCE
○○○○○○○○○○○○○○○○○○○○○○○○○○○○○○○○○○○○○○○○○○
• If you want to view all the images contained in the folder, click
(Select All).
While a slide show is underway, you can use the buttons at the
bottom of the screen to do the following.
Click here to return to
the previous image.
Click here to return
to the first image.
Click here to pause
the slide show (click
again to resume).
Print Settings Button
Click this button during a slide show when you see an
image you would like to print (a check mark appears
beside the button to indicate marked images). After
the slide show finishes, a dialog for printing the
marked photos will automatically appear.
Image Selection Button
Click this button during a slide show to select/ deselect images (a
check mark on the button indicates a selected image). After the
slide show finishes, the deselected images are no longer selected in
the Browser Window. You can also use this function to place a check
mark on needed images while they are displayed in the slide show.
This is useful when you wish to move selected images (images with
a check mark) in the Browser Area to a different folder.
Click here to move
to the next image.
Click here to jump
to the last image.
Click here to end
the slide show.
56 ImageBrowser Software User Guide
Page 57

Chapter 6
Using Supplementary Features
Running Slide Shows (3/3)
If you selected “Control with Mouse or keypad” in the Slide Show
Options dialog box, you can control the slide show as follows:
■ To move to the next image
Press the [return] or [ ] key.
Click the image.*
■ To return to the previous image
Press the [ ] key.
Hold the [shift] key and click the image.*
■ To end the show
Press the [esc] key.
REFERENCE
○○○○○○○○○○○○○○○○○○○○○○○○○○○○○○○○○○○○○○○○○○
• The operations marked with an asterisk can only be used when
[Hides buttons] has been selected in the Slide Show Options
dialog. (The mouse actions are disabled when the buttons are
displayed.)
If you selected [Hide buttons] in the Slide Show Options dialog,
you can display a contextual menu for controlling the slide
show by holding down the [control] key and clicking the
mouse. This feature is available even if you selected [Auto Play]
in the Slide Show Options dialog.
57 ImageBrowser Software User Guide
Page 58

Chapter 6
Using Supplementary Features
Adding Sounds to Images (1/2)
You can add sounds to your images and play them later.
REFERENCE
○○○○○○○○○○○○○○○○○○○○○○○○○○○○○○○○○○○○○○○○○○
•To add sound to images with ImageBrowser, you must use the
Mac OS recording function. Connect all the peripherals that you
need for your computer model, such as a microphone, and
confirm that the recording function is activated in the [Sound]
control panels.
How to add a sound to an image
In the Browser Area, select an image to which you want to add
sound. On the [Sound] menu, click [Record].
The following dialog box appears.
When you click , the [Save] button becomes enabled and
recording starts. When you click [Save], recording stops and the
sound is saved.
The sound is added to the image.
The following mark appears when an image is accompanied by
sound.
This mark indicates an image with sound.
How to play sound added to an image
Click here to
record.
58 ImageBrowser Software User Guide
■ Using the menu to replay sounds
Select the image for which you want to play the sound. On the
[Sound] menu, click [Play]. The sound is played.
Further, you can control playback by clicking [Pause] or [Stop]
on the [Sound] menu.
Recording starts when the
[Save] button is enabled.
To stop recording, click the
[Save] button.
Page 59

Chapter 6
Using Supplementary Features
Adding Sounds to Images (2/2)
■ Using the Sound Panel to replay sounds
On the [View] menu, select [View Settings] followed by [Sound
Panel] from the displayed menu.
Select [Sound Panel].
After selecting an image with a sound attached, you can use
the sound panel to perform the following.
Click here to stop playing a sound
Click here to pause a sound
Click here to record a sound
Click here to replay a sound.
Click here to delete the sound.
REFERENCE
○○○○○○○○○○○○○○○○○○○○○○○○○○○○○○○○○○○○○○○○○○
Move the tab to adjust
the sound volume.
•To remove a sound from an image, select the image, click the
[Sound] menu and select [Send to Trash] or click the in the
sound panel.
•You can record a new sound by selecting an image that has a
sound attached already, clicking the [Sound] menu and selecting [Record].
• When you add a sound to an image, the sound file is created in
the same folder as the image file as an AIFF format file with the
[.AIF] file name extension.
The Sound Panel appears.
59 ImageBrowser Software User Guide
Page 60

Chapter 6
Using Supplementary Features
Saving the “My Camera Settings” to the Camera (1/10)
This section explains how to save the “My Camera Settings” on your
computer to the camera or vice versa.
What are the My Camera Settings?
The start-up image for the camera and sounds such as the
start-up sound, the shutter sound, operation sound and the
self-timer sound are collectively referred to as the My Camera
Settings. You can add your favorite images and sounds from
your computer to the My Camera Settings in the camera.
Displaying the My Camera window
ImageBrowser comes with some My Camera Settings already
prepared. Start by displaying this data.
IMPORTANT
○○○○○○○○○○○○○○○○○○○○○○○○○○○○○○○○○○○○○○○○○○
• Ensure that the camera and computer are connected with an
interface cable and are ready to communicate before you
perform this procedure.
1.
2.
Connect the camera to the computer, prepare the
camera to transfer data and open the Camera
Window.
Click [Setup Options] and select [My Camera] in the
next menu.
60 ImageBrowser Software User Guide
3.
Click here.
Select [Start-up Image, Start-up Sound, Operation
Sound, Selftimer Sound and Shutter Sound] and click
[OK].
The My Camera window displays.
Page 61

Chapter 6
Using Supplementary Features
Saving the “My Camera Settings” to the Camera (2/10)
Try changing the settings type selected in the Type category.
The Computer list displays the image files and sounds that were
previously prepared.
Click [View Camera] to display the My Camera Settings in the
camera (only the editable settings are shown).
Switches between
settings types.
My Camera Settings that are
already on your computer
display here.
REFERENCE
○○○○○○○○○○○○○○○○○○○○○○○○○○○○○○○○○○○○○○○○○○
• The theme in the [Type] list box contains a start-up image, startup sound, shutter sound, operation sound, and self-timer
sound regrouped as a set. By selecting a theme, you can
change the start-up image, start-up sound, shutter sound,
operation sound, and self-timer sound in one easy step.
My Camera Settings in
your camera display here.
61 ImageBrowser Software User Guide
Page 62

Chapter 6
Using Supplementary Features
Saving the “My Camera Settings” to the Camera (3/10)
You can save the files that appear in this list as My Camera
Settings to your camera.
REFERENCE
○○○○○○○○○○○○○○○○○○○○○○○○○○○○○○○○○○○○○○○○○○
•You can also open the My Camera window by clicking the [Edit]
menu and selecting [My Camera].
• By selecting the desired theme and adding it to the camera, you
can change the start-up image, start-up sound, shutter sound,
operation sound, and self-timer sound in one easy step.
•You can also add new files as My Camera Settings to the Computer list (the procedure is explained later in this section).
• The factory prepared My Camera Settings files are found by
opening the following sequence of folders.
On the startup disk in Mac OS X, open the [Users] folder, followed by [your user log-in name], [Library], [Preferences],
[ImageBrowser UserData], and [MyCameraFiles]. In Mac OS 9,
open the [Canon Utilities] folder on the disk on which
ImageBrowser was installed, followed by [ImageBrowser],
[ImageBrowser.Info] and [MyCameraFiles].
However, if the disk on which the system is installed has a
[Documents] folder, open it followed by
[ImageBrowserUserData] and [MyCameraFiles].
Saving the My Camera Settings to the camera
This topic explains how to save the previously recorded My
Camera Settings files to the camera.
1.
Select a settings type.
Select a settings type.
62 ImageBrowser Software User Guide
Page 63

Chapter 6
Using Supplementary Features
Saving the “My Camera Settings” to the Camera (4/10)
2.
In the Computer list, select a setting you would like to
add to the camera.
When you select a start-up image, it will be displayed in the
preview area to the right.
When you select a sound file, it will automatically be played.
When you select a theme, it will be displayed in the preview
area to the right and the start-up sound, shutter sound,
operation sound and self-timer sound will be played in
succession.
3.
In the Camera list, select the settings file you would
like to replace and click .
The settings file in the Camera list will be replaced by the
settings file from the Computer list. If a settings file with the
same name has already been added, it will be overwritten.
Select the setting you want to replace
and click
Repeat steps 1-3 to replace all the settings files with those you
wish to save to the camera.
Up to this stage, only the settings in the Camera list change,
not those in the camera itself.
.
63 ImageBrowser Software User Guide
4.
Click the [Save to Camera] button.
The settings files in the Camera list are saved to the camera.
Page 64

Chapter 6
Using Supplementary Features
Saving the “My Camera Settings” to the Camera (5/10)
5.
Click the [Close] button to close the window.
This concludes the procedure for adding settings to the camera.
Next, change the settings on the camera itself to use the new
start-up image and sounds. See the guide supplied with your
camera for instructions for changing the settings.
IMPORTANT
○○○○○○○○○○○○○○○○○○○○○○○○○○○○○○○○○○○○○○○○○○
• Never detach the interface cable, turn off the camera power, or do
anything to stop communication between the camera and computer
while the My Camera Settings are being saved to the camera.
REFERENCE
○○○○○○○○○○○○○○○○○○○○○○○○○○○○○○○○○○○○○○○○○○
•To delete settings files in the Camera list, select the file and click
the [Delete] button.
•You can check the settings in the camera (sounds) by clicking
[Play].
Click here to delete a file
from the list.
Adding new files to the My Camera Settings
Create a new image or sound file and save it to the computer
and then add that file as a My Camera Settings file.
64 ImageBrowser Software User Guide
Click here to check the
camera settings (sounds).
Displays the camera settings
when an image file is selected.
Page 65

Chapter 6
Using Supplementary Features
Saving the “My Camera Settings” to the Camera (6/10)
Create new files before adding them
Start by creating the image or sound file that will become the
camera start-up image or sound setting and save it to the
computer.
■ Creating a Start-Up Image File
Create an image file using an image editing program. The file
should be in the JPEG format, 320 x 240 pixels, and less than
20KB.
REFERENCE
○○○○○○○○○○○○○○○○○○○○○○○○○○○○○○○○○○○○○○○○○○
• See the manual and help facility for the editing program for a
detailed explanation of how to use it.
■ Creating a Sound File
Record the sound as an 11.025 kHz or 8.000 kHz, 8 bit, Mono
sound and save it in the WAV file format.
Sound files that can be added to the camera should conform to
these guidelines.
In Mac OS 9, you can use the SimpleSound program, which is
supplied as a standard part of the Mac OS. However, this
program cannot save files in the WAV format. After you have
recorded and saved a sound file, use a program such as ArcSoft
VideoImpression to change the format to a WAV file. The
detailed creation instructions are explained in the next topic.
■ Procedures for Creating a Sound File (Mac OS 9 Only)
This topic explains how to use SimpleSound to record and save
a sound file and ArcSoft VideoImpression to convert the file
into a WAV format file.
1.
2.
3.
Start SimpleSound.
On the [File] menu, select [New].
The Recording Panel appears.
Click [Record].
Typ e
Start-Up Sound
Operation Sound
Self-Timer Sound
Shutter Sound
1.0 sec. or less
0.3 sec. or less
2.0 sec. or less
0.3 sec. or less
Duration in Seconds
11.025 kHz
65 ImageBrowser Software User Guide
8.000 kHz
1.3 sec. or less
0.4 sec. or less
2.0 sec. or less
0.4 sec. or less
Page 66

Chapter 6
Using Supplementary Features
Saving the “My Camera Settings” to the Camera (7/10)
4.
5.
6.
7.
8.
Click [Stop] to halt the recording.
Click [Save].
The Save dialog appears.
Save the file.
Input a file name and click the [Save] button. This saves the
recorded sound.
REFERENCE
○○○○○○○○○○○○○○○○○○○○○○○○○○○○○○○○○○○○○○○○○○
• Save the sound file to the disk containing the System folder.
You cannot save it to any other disk.
On the [File] menu, select [Quit].
SimpleSound closes.
On the disk to which ArcSoft VideoImpression was
installed, double-click the [VideoImpression] folder,
followed by the [VideoImpression] icon.
ArcSoft VideoImpression starts.
10.
11.
Select [audio] from the list box and click [get].
Click [get]. Select [audio].
When the “Open” dialog appears, select the sound file you
created in SimpleSound and click [Open]. A new sound icon is
added.
Double-click the newly added sound icon.
The window will change to the sound editing window.
9.
66 ImageBrowser Software User Guide
Click [New].
Page 67

Chapter 6
Using Supplementary Features
Saving the “My Camera Settings” to the Camera (8/10)
12.
Edit the length of the sound file.
Adjust the start and end marks to change the length of the sound.
Displays the length
Plays the sound.
Adjust the length of the sound file
by moving the green start mark or
the red end mark left or right.
REFERENCE
○○○○○○○○○○○○○○○○○○○○○○○○○○○○○○○○○○○○○○○○○○
• The allowable length of sound files used as My Camera Settings
varies with the type of sound. See the Create new files before
adding them section of the Saving the “My Camera Settings” to
the Camera (6/10) topic for details.
of the sound file.
13.
14.
15.
16.
17.
18.
Click [Play Movie].
The first window is restored.
Click [Save].
Click [QuickTime].
Set it to the following and click [Save].
Input a file name, select [Sound to Wave] in the Export
category, and select [8 kHz 8 bit Mono] or [11.025 kHz 8 bit
Mono] in the Use category.
When the [Add Album] dialog appears, click [OK].
This saves the file you created.
Select [Quit] in the [File] menu.
ArcSoft VideoImpression closes.
67 ImageBrowser Software User Guide
REFERENCE
○○○○○○○○○○○○○○○○○○○○○○○○○○○○○○○○○○○○○○○○○○
• For details of how to use ArcSoft VideoImpression, see its Help
file, which can be opened by clicking the [?] button at the top
right of its window.
Page 68

Chapter 6
Using Supplementary Features
Saving the “My Camera Settings” to the Camera (9/10)
■ Adding new files as My Camera Settings to the My
Camera window
1.
Open the My Camera window and select the settings
type in the [Type] list box.
2.
Click [Add].
Click [Add].
REFERENCE
○○○○○○○○○○○○○○○○○○○○○○○○○○○○○○○○○○○○○○○○○○
• The Add button is greyed out and disabled when the [Type] list
box is set to [Theme].
3.
Select the file you created in the Open dialog and
click [Open].
The selected file will appear in the Computer list.
The newly added settings will appear here.
You can save the newly created settings to the camera using
the procedures described in the Saving the “My Camera
Settings“ to the Camera section.
REFERENCE
○○○○○○○○○○○○○○○○○○○○○○○○○○○○○○○○○○○○○○○○○○
•To delete a settings file, select it and click the [Send to Trash]
button beneath the Computer list.
•Previously created settings can also be added as My Camera
Settings with the same procedures as above, but have to comply with the specifications listed in the Create the new files
before adding them section.
68 ImageBrowser Software User Guide
Page 69

Chapter 6
Using Supplementary Features
Saving the “My Camera Settings” to the Camera (10/10)
■ Saving the Settings to the Computer
You can copy the My Camera Settings from the camera to the
computer.
1.
2.
Select an option from the [Type] list box.
Select the setting you would like to copy from the
Camera list.
If you selected the start-up image in the Type list box in Step 1,
the preview image will display in the area to the right. If you
selected a sound, it will automatically play. If you selected
Theme as the Type, the start-up image will preview in the area
to the right and the start-up sound, the shutter sound, the
operation sound and the self-timer sound will play in order.
3.
4.
5.
Click [ ].
Assign a name to the settings file and click [OK].
The settings file will copy to the computer disk. If there is a
settings file with the same name, it will be over-written.
Repeat steps 1-4 as required to save the settings files you wish
to copy to the computer.
Click [Close] to close the My Camera window.
This completes the copying process.
IMPORTANT
○○○○○○○○○○○○○○○○○○○○○○○○○○○○○○○○○○○○○○○○○○
•
Never detach the interface cable, turn off the camera power, or do
anything to stop communication between the camera and computer
while the settings files are being copied.
69 ImageBrowser Software User Guide
Page 70

Chapter 6
Using Supplementary Features
Printing Images (1/8)
This section explains the procedures for printing.
Displaying the print layout
After you select the images you want to print in the Browser
Area, click
displayed menu.
The Layout Options dialog and Print window will open.
The selected images will automatically be laid out in the Print
window. You can select a layout option in the Layout Options
dialog.
REFERENCE
○○○○○○○○○○○○○○○○○○○○○○○○○○○○○○○○○○○○○○○○○○
•To select several images, hold down the [shift] key, or the
[option] and [shift] key, and click the images you want.
Further, you can select all of the images in a folder by clicking
the (Select All) button.
•You can also start printing by clicking the (Print) button in
the Camera Window.
• When the Print window is open, the shooting date and file
name appear as captions under the image when the respective
options have check marks in the Preferences dialog. Click the
[ImageBrowser] menu (in Mac OS 9, click the [Edit] menu) and
select [Preferences], and in the [Print] category place a check
mark in the [Shooting Date] and/or [File Name] options.
(Print) and select [Layout printing] from the
Select images
Click here
Print Window
Layout Options Dialog
70 ImageBrowser Software User Guide
Page 71

Chapter 6
Using Supplementary Features
Printing Images (2/8)
Selecting a layout
You can select from the following 5 layout types:
■ Custom layout printing
Allows you to specify the size and location of the images freely.
■ Index printing
Allows you to select between large, medium and small
thumbnails to print the index.
■ Fixed photo size printing
Allows you to squeeze images together to fit the specified
paper size. After printing, you can obtain photo-like prints by
separating the images with a cutter.
■ Tiled photo printing
Allows you to have the program lay out and print the specified
number of images per page with no gaps between images on
the page.
When you finish selecting a layout, click [OK].
A print preview displays on the
right after you select a layout.
■ Printing on Canon Perforated Paper (Mac OS 9 Only)
You can only use Canon Perforated Paper in some Canon
Bubble Jet printers that support Canon Perforated Paper media.
You can obtain photo-like prints by simply separating images at
the perforations.
71 ImageBrowser Software User Guide
Page 72

Chapter 6
Using Supplementary Features
Printing Images (3/8)
In the following dialog, you can select more detailed settings.
Set more detailed
settings here (the
available settings will
vary with the layout
option selected).
When you finish adjusting the settings, click [OK]. The Layout
Options dialog closes and you can now change the layout and
print settings in the Print window.
REFERENCE
○○○○○○○○○○○○○○○○○○○○○○○○○○○○○○○○○○○○○○○○○○
• If you do not want the Layout Options dialog to appear while
the Print window is open, remove the check mark beside the
[Display this dialog when the Print window displays] option.
REFERENCE
○○○○○○○○○○○○○○○○○○○○○○○○○○○○○○○○○○○○○○○○○○
•To open the Layout Options dialog again, click the (Layout
Options) button in the Print window.
Adding/Clearing images
You can add images by dragging them from the Browser Area
or Camera Window and dropping them into the Print window.
Conversely, you can clear images from the Print window by
selecting them, clicking the [Edit] menu and selecting [Clear].
Click here.
Remove this check mark.
72 ImageBrowser Software User Guide
Page 73

Chapter 6
Using Supplementary Features
Printing Images (4/8)
Moving or changing the size of an image
When [Custom layout printing] is selected in the Layout
Options dialog, you can move or change the size of an image.
Drag the image that
you want to move.
Reorganizing and rotating images, and specifying the number of images per page
When [Custom layout printing] is selected in the Layout
Options dialog, you can use the following functions.
Click to reorganize
the images
according to their
file size.
Click here to change the
orientation of an image.
Select an image, click the
button and click a rotation
angle on the menu.
Specify the number of images that you want
to see on each page. If you change this
value, the images are reorganized.
73 ImageBrowser Software User Guide
Drag any side of the
frame of the image
to change its size.
REFERENCE
○○○○○○○○○○○○○○○○○○○○○○○○○○○○○○○○○○○○○○○○○○
•You can also select a rotation angle on the [Rotate] submenu
on the [Edit] menu.
Page 74

Chapter 6
Using Supplementary Features
Printing Images (5/8)
Typing a caption
You can type captions for individual images. Select an image
and on the [Edit] menu, click [Edit Caption]. The Edit Caption
window appears. Type your caption and specify the font and its
size, as well as any styles that you want. Click [OK].
Specify the font
(typeface).
Specify the size
of the font.
The location of the caption differs depending on what kind of
layout you have selected.
Custom Layout Example
Fixed Photo Size Example
Specify the alignment
of the text.
Specify the style
of the font.
Specify spacing
between
characters.
74 ImageBrowser Software User Guide
Specify the color of
the characters.
Page 75

Chapter 6
Using Supplementary Features
Printing Images (6/8)
Typing text
You can type text anywhere you want in the layout.
First, make sure that no images are selected and on the [Edit]
menu, click [Add Text]. A window where you can type text
appears. Type your text and specify the font and its size, as well
as any styles that you want. Click [OK].
The text appears in the center of the page.
Text surrounded by a frame is called a “text box.” You can
control text boxes as follows:
■ Moving text boxes
You can move text boxes by dragging them.
■ Changing the size of text boxes
You can change the size of a text box by dragging its left or right
edge. The number of lines in the text box changes automatically
according to its size.
■ Editing text boxes
First select a text box and on the [Edit] menu, click [Edit Text]. A
window where you can edit your text appears. Edit your text.
Another way to open this window is to double-click the text box.
75 ImageBrowser Software User Guide
Page 76

Chapter 6
Using Supplementary Features
Printing Images (7/8)
Typing a header
You can type a page header.
First, make sure that no images are selected and on the [Edit]
menu, click [Edit Header]. The Edit Header window appears.
Type your text and specify the font and its size, as well as any
styles that you want. Click [OK].
The header appears at the top of the page.
Duplicating images
After selecting an image, click the [Edit] menu and select [Copy
Image] to display the copy dialog. Specify the number of copies
in this dialog and click [OK] to create only the specified number
of copies.
Clipping images
You can clip part of an image.
After selecting an image, click the [Edit] menu and select
[Clipping]. When the image appears, drag to specify the area
you are clipping out and click
(Mac OS X) or (Mac OS 9).
76 ImageBrowser Software User Guide
Clipping area
Page 77

Chapter 6
Using Supplementary Features
Printing Images (8/8)
Initiating Printing
Once you have finished making all the adjustments you want in
the Print window, click
When the Print dialog box appears, set the print settings and
start printing.
IMPORTANT
○○○○○○○○○○○○○○○○○○○○○○○○○○○○○○○○○○○○○○○○○○
• It may take relatively long to print if there are many images or
the images are large.
REFERENCE
○○○○○○○○○○○○○○○○○○○○○○○○○○○○○○○○○○○○○○○○○○
•You can save the layout you created by clicking the [File] menu
and selecting [Save].
•Click (Print) in the Browser Window and select [Index
printing] from the displayed menu. The settings dialog for
index printing will appear. Adjust the settings, such as the
thumbnail size or paper size and click [Start Printing] to begin
printing the index immediately.
•You can also start printing by clicking the [File] menu, selecting
[Print] and choosing [Layout printing] or [Index printing] from
the submenu.
(Print).
Click here.
Printing for Better Results
ImageBrowser supports the Exif 2.2 (nicknamed Exif Print)
standard. This feature can generate better print results because
it automatically corrects images.
To use this feature, click the [ImageBrowser] menu (in Mac OS 9,
the [Edit] menu) and select [Preferences] followed by [Print] in the
list box. Set the Exif 2.2 settings in the [Image Corrections Settings]
category. Then use the procedures in Printing Images 1/8 to print
the image. See the Print Dialog section of the Customizing
Preferences (3/3) topic in the Appendices for information about
Exif 2.2 settings.
REFERENCE
○○○○○○○○○○○○○○○○○○○○○○○○○○○○○○○○○○○○○○○○○○
• Images captured by cameras that support the Exif 2.2 standard
have the shooting settings data, such as the shooting
conditions and shooting mode, embedded in them. The Exif
Print function uses this data to more accurately reflect the
conditions at the time of shooting when it corrects the image.
• The image correction settings apply to all of the images printed
from ImageBrowser.
77 ImageBrowser Software User Guide
Page 78

Chapter 6
Using Supplementary Features
Printing Images over Multiple Pages
This function prints images, such as panoramic images created with
PhotoStitch, over several pages. You can paste the printed pages
together after printing to create one large print.
Multiple page printing
In the Browser Area, select an image and on the [File] menu,
click [Multiple Page Print].
Adjust the print settings in the dialog box illustrated below and
click [Print] to launch the print job.
Position setting
REFERENCE
○○○○○○○○○○○○○○○○○○○○○○○○○○○○○○○○○○○○○○○○○○
• If you are going to change the print size, you must make the
change before you print over multiple pages. Click the [File]
menu and select [Multiple Page Print Options] to display the
Options dialog with a resolution setting.
The smaller you make the resolution, the larger the image is
printed. Similarly, the larger you make the print resolution, the
smaller the image is printed.
Sets the overlap for binding
78 ImageBrowser Software User Guide
Page 79

Chapter 6
Using Supplementary Features
Sorting Images by Date and Time - TimeTunnel (1/2)
This section describes how to use TimeTunnel to sort images by date
and time, like arranging images in a time tunnel.
Displaying images in TimeTunnel
On the [View] menu, select [View Mode], followed by
[TimeTunnel] on the submenu. The Browser Area switches to
the TimeTunnel display. To close the TimeTunnel and restore
the standard display, on the [View Mode] submenu, select [List].
How to use TimeTunnel
You can perform the following operations in TimeTunnel display.
The date/time at which the images were
shot appears on the red line. You can
change this date/ time by double-clicking
it on the display. A window similar to the
one below appears. Specify the new
date/ time.
Point an image and
wait a moment.
The information
about the image is
displayed.
Double-click a thumbnail to
display it in another window.
Control Panel
Move the slider up or down to
move backward or forward
along the time line.
Click to display the control
panel menu (the menu is
explained on the next page).
If you select “Find and Show Item”
and no images with that date are
found, the closest match to the date
is displayed instead.
79 ImageBrowser Software User Guide
Page 80

Chapter 6
Using Supplementary Features
Sorting Images by Date and Time - TimeTunnel (2/2)
Using the Control Panel menu
The Control Panel menu allows you to control TimeTunnel.
Using the Tool Panel
Click to display the tool panel.
Enables or disables [Auto Cruise].
When [Auto Cruise] is active, the time
movement continues even after you
have moved and released the bar.
Click to play a sound attached to a
selected image.
Exit TimeTunnel, and return to the
previous screen.
Adjusting settings from the Display menu
On the [View] menu, you can also select the [View Settings]
submenu to adjust the settings.
To create a vanishing point, click a
position on the screen, then click
[Mouse Click Point] on this menu.
The point you clicked becomes the
vanishing point.
To display the following tool panel, click [Display Tool Panel] on
the Control Panel menu.
Allows you to
specify the date
for the images
displayed.
Select this option
to make the
TimeTunnel rings
octagonal.
80 ImageBrowser Software User Guide
Select this option
to make the
TimeTunnel look
curved.
Allows you to
change the
number of
TimeTunnel
rings.
Page 81

Chapter 6
Using Supplementary Features
ImageBrowser supports movies.
When you connect a camera with movie files on it to the
computer and open the Camera Window, a thumbnail of the
first image of each movie file will display with a video camera
symbol on it.
You can import movie files in the Browser Area the same way
you do images. In this case, a thumbnail and a movie mark
appear in the Browser Area. When you double-click the
thumbnail, QuickTime Player starts and plays the movie.
Playing Movies
Thumbnail with movie mark.
QuickTime Player window
81 ImageBrowser Software User Guide
Use this button to play the movie.
Page 82

Chapter 6
Using Supplementary Features
Editing Movies (Mac OS X Only ) (1/3)
You can create movies by adding various effects: linking movies and still
images that have been downloaded to a computer, superimposing titles
and other text, and adding background music.
Procedures for Editing Movies
1.
2.
3.
Select a file (movie or still image) to edit in the
Browser Area.
You can select multiple movies or still images.
Click the [Edit] menu and select [Movie Edit].
Edit the movie by following the steps displayed on the
tabs in the window’s midsection, then finish by saving it.
The features and procedures for each step are explained on the
following pages.
REFERENCE
○○○○○○○○○○○○○○○○○○○○○○○○○○○○○○○○○○○○○○○○○○
•You can set the default preferences for movie edits by clicking
the [MovieEdit Task] menu and selecting [Preferences].
Follow these steps to
proceed, switching between
tabs as appropriate
Guidance Click this button for detailed help
with operating procedures
You can change thumbnail sizes
in the storyboard area
Transition Box
Displays the icon of the transition
effect used to link adjacent images
82 ImageBrowser Software User Guide
Storyboard Area
Displays thumbnails of the selected images.
Links images in order from left to right
Page 83

Chapter 6
Using Supplementary Features
Editing Movies (Mac OS X Only ) (2/3)
Features of the [1. Arrange] Window Features of the [2. Effect] Window
Plays the entire movie
being edited
Adds images
Moves the selected image one
position to the left or right
Displays the properties of the
selected image
Removes the selected movie
from the storyboard
Superimposes titles and other text on the image selected in the
storyboard area
You can set the font, display duration, display position and scrolling
attributes of the text
You can change the movie or still image selected in
the storyboard area into a sepia or monochrome
version, or add noise for a film simulation
You can set the playback range (start and stop points)
for a movie by selecting it and clicking this button
You can set the play duration of a still image by
selecting it and clicking this button
83 ImageBrowser Software User Guide
You can rotate or invert the
selected image
You can set the transition effect between
images by selecting the transition effect
box in the storyboard area and clicking
this button
Page 84

Chapter 6
Using Supplementary Features
Editing Movies (Mac OS X Only ) (3/3)
Features of the [3. Audio] Window Features of the [4. Save] Window
You can link MP3, AIFF and WAV format audio files as background music
or sound effects
When you link a sound file using this procedure, a bar appears under the
thumbnail in the storyboard area indicating the duration of the audio file
You can adjust the volume or set the fade-in or fade-out
effect for a movie or its linked audio file by selecting the
movie or its linked audio file and clicking this button
Proceeds to a window for setting
the file name and destination
You can set the options
for a movie file
Select between [Motion-JPEG AVI] and
[Quick Time Movie] as the movie file format
84 ImageBrowser Software User Guide
Click here to add a check mark to save using the most
commonly used settings (the Options button
becomes unusable when a check mark is added here)
Page 85

Chapter 6
Using Supplementary Features
Converting RAW Images (1/4)
If your camera supports RAW images you can handle higher quality
images.
However, the RAW format is a special file format and RAW images
cannot be opened or processed in their native format in standard image
processing programs. RAW images must first be converted to standard
file formats, such as the TIFF or JPEG formats. This section explains
conversion procedures.
IMPORTANT
○○○○○○○○○○○○○○○○○○○○○○○○○○○○○○○○○○○○○○○○○○
• Refer to the manual supplied with your camera to determine
whether your camera supports RAW images or not.
• Depending upon your camera model, a different program than
the one introduced here may start when you convert RAW
images. If that occurs, refer to the manual for the software
supplied with your camera.
REFERENCE
○○○○○○○○○○○○○○○○○○○○○○○○○○○○○○○○○○○○○○○○○○
•RAW images are extremely high-quality images that are not
subject to any deterioration due to compression processing.
Converting RAW Images
1.
2.
Thumbnail
Check Mark
Select a RAW image in the Browser Area.
Click the [File] menu and select [RAW Image Processing].
As shown below and on the following pages, the main
window, navigator window and Image Quality Adjustment
Window will display.
REFERENCE
○○○○○○○○○○○○○○○○○○○○○○○○○○○○○○○○○○○○○○○○○○
• If the navigator window and Image Quality Adjustment
Window do not appear, click the [View] menu and select [Show
Navigator] or [Show Image Quality Adjustment Window].
■ Main Window
The conversion is conducted in this window.
You can use these
buttons to switch
between images and
display modes and set
various conversion
settings, such as the
image rotation
85 ImageBrowser Software User Guide
Preview
Page 86

Chapter 6
Using Supplementary Features
Converting RAW Images (2/4)
■ Navigator Window
You can change the area of a
preview image that is zoomed
in the main window by clicking
this red frame and dragging it
■ Image Quality Adjustment Window
You can adjust the brightness,
contrast and coloration of a RAW
image as it is converted. See
“Features of the Image Quality
Adjustment Window” on the
following page for details.
3.
Adjust the image quality as required in the Image
Quality Adjustment Window.
4.
Click the [2. Save] tab in the main window, set the file
format and save destination, and then click [Save].
Selects images that will be saved with the
same settings (All images, or images
marked with a check in the main window)
Selects the image
file format
Sets the destination
folder for the
image file
You can change the
image file name
86 ImageBrowser Software User Guide
5.
Click the [3. Finish] tab and click [OK].
Page 87

Chapter 6
Using Supplementary Features
Converting RAW Images (3/4)
Features of the Image Quality Adjustment Window
Adjusts the white balance
by the light source or color
temperature, etc.
Adjusts the exposure
compensation, photo
effect, contrast, saturation
and sharpness
Scrolling Tab Titles
Click the arrowhead to display the other tab titles. Click
a tab title to change tabs and access the other settings
Tone Curve Tab
You can adjust the RGB
channel settings together
or individually
Selects preset color schemes or
My Color custom color schemes
(see next page for explanation)
Advanced Adjustments Tab
You can set the settings for
noise reduction processing,
fading correction and the
output color
With a check mark here,
settings changes in this
window are immediately
reflected in the image
87 ImageBrowser Software User Guide
Applies the settings to
the displayed image
Restores all adjustments to the
initial shooting settings
Page 88

Chapter 6
Using Supplementary Features
Converting RAW Images (4/4)
Registering Custom Color Schemes (My Color)
If you register a custom color scheme as a “My Color” scheme,
you can apply this scheme easily to additional images when you
convert RAW images.
IMPORTANT
○○○○○○○○○○○○○○○○○○○○○○○○○○○○○○○○○○○○○○○○○○
•To register a “My Color” scheme, two images are required: the
pre-adjustment image and the post-adjustment image. Use
ImageBrowser’s image editing functions to prepare the two
images before proceeding. Save the two images in the BMP,
TIFF or JPEG format.
1.
2.
Click the [Edit] menu and select [My Color].
Select [Create and Add My Color] from the next
menu, followed by [Next].
4.
5.
Click [Select] beside the target image, select the postadjustment image (target image that you have
modified with an image editing program), and click
[Create].
The program will calculate the differences between the original
and target images, apply those corrections to the original image
and display the results as the Preview My Color image.
Check the Preview My Color image and click [Next].
3.
Click [Select] beside the
original image, select the
pre-adjustment image
(original image) and click
[Next].
88 ImageBrowser Software User Guide
6.
Type a name or comment and click [Create My Color].
REFERENCE
○○○○○○○○○○○○○○○○○○○○○○○○○○○○○○○○○○○○○○○○○○
•You can apply the registered My Color scheme to additional
RAW images when you convert them by selecting it from the
Photo Effect menu in the Image Quality Adjustment Window.
Page 89

Chapter 6
Using Supplementary Features
Operating the Camera Shutter from a Computer ( 1 / 4)
This section explains the procedures for remote shooting, the process of
operating the camera shutter remotely from a connected computer.
IMPORTANT
○○○○○○○○○○○○○○○○○○○○○○○○○○○○○○○○○○○○○○○○○○
•To confirm whether your camera supports remote shooting or
not, check the guides that accompanied the camera.
• Ensure that the camera and computer are connected with a
USB cable and that the camera is ready to communicate before
attempting remote shooting. If the camera is equipped with a
lens cover, ensure that it is open.
• Ensure that you turn off your computer’s sleep feature before
you begin remote shooting. The results cannot be guaranteed if
the computer goes to sleep while remote shooting.
• Close the Camera Window while remote shooting.
• Except for the shutter button, the camera’s buttons and
switches, including the zoom, cannot be manually operated
while the camera is being remotely controlled.
• The time lag between pushing the shutter button and the
release of the shutter is slightly longer for remote shooting
compared with the normal mode of operation.
Remote Shooting Procedures
After you have confirmed that the camera is connected to the
computer and ready for communication, click the [Edit] menu
and select [RemoteCapture].
A RemoteCapture Task window like the one below will open.
Clicking the [Release] button in this window records the image.
The image captured by the
camera displays here
REFERENCE
○○○○○○○○○○○○○○○○○○○○○○○○○○○○○○○○○○○○○○○○○○
• See the Help menu (it can be opened from the [Help] menu in
the remote shooting window) for detailed operating procedures
for remote shooting.
• Images captured while remote shooting are saved into the
folder that was selected when Remote Shooting was started.
89 ImageBrowser Software User Guide
This button turns the display on
or off
Page 90

Chapter 6
Using Supplementary Features
Operating the Camera Shutter from a Computer ( 2 / 4)
Features of the RemoteCapture Task Window
Selects the image’s recording size and resolution
Switches between showing and hiding
the viewfinder and the detailed
settings sections.
You can add a comment to an image
by clicking to place a check mark
here and inputting text in the box
below.
Sets the rotation setting of the image being recorded
This setting cannot be adjusted if your camera’s Auto Rotate
function is set to [On]
Releases the camera shutter
(you can also release it by pressing the camera’s shutter button
or the space bar on the keyboard)
Viewfinder
90 ImageBrowser Software User Guide
Sets the camera’s zoom
Turns the viewfinder display on or off
Refreshes the exposure, focus and white balance settings
(these settings remain fixed until this button is clicked)
Sets the shooting settings. It is divided into the “Field angle/
flash” tab and the “Shooting settings” tab.
(the settings categories vary according to your camera model)
Page 91

Chapter 6
Using Supplementary Features
Operating the Camera Shutter from a Computer ( 3 / 4)
Other Remote Shooting Features
■ Interval Timer Shooting
Interval timer shooting is the method of capturing images in
which a set number of frames is recorded at set intervals of
time.
Click the [Edit] menu in the
RemoteCapture Task window and
select [Interval Timer Shooting] to
open a confirmation dialog like the
one on the left. Set the values and
click [Start] to start shooting. The
interval may be set to a range from
5 seconds to 60 minutes.
REFERENCE
○○○○○○○○○○○○○○○○○○○○○○○○○○○○○○○○○○○○○○○○○○
•You may not be able to record at the set interval if it is too short
for the camera to transfer and save the image data.
■ Timer Shooting
Timer shooting is the method by which a single image is
recorded after a set number of seconds.
Click the [Edit] menu in the
RemoteCapture Task window and
select [Timer Shooting] to open a
window like the one shown here.
Set the number of seconds for the
delay and click [Start]. The timer may
be set to a range from 2 seconds to
30 seconds.
■ Saving and Recalling Shooting Settings
You can save the current zoom settings and the settings in the
“Field angle/flash” and “Shooting settings” tabs by clicking the
[File] menu in the RemoteCapture Task window and selecting
[Save Shooting Settings].
Later when you wish to recall those settings, click the [File]
menu in the RemoteCapture Task window and select [Batch
Shooting Settings].
■ Displaying the Subject in the Camera’s LCD Monitor
You can use the camera’s LCD monitor or a television
connected to the camera to view the subject while shooting
remotely.
Click the [File] menu in the
RemoteCapture Task window
and select [Camera Display
Settings] to open a window like
the one shown here.
Select [Camera’s LCD monitor] or [Video Out terminal] and click
[OK].
REFERENCE
○○○○○○○○○○○○○○○○○○○○○○○○○○○○○○○○○○○○○○○○○○
• See the Camera User Guide for instructions for connecting the
camera to the television.
91 ImageBrowser Software User Guide
Page 92

Chapter 6
Using Supplementary Features
Operating the Camera Shutter from a Computer ( 4 / 4)
Remote Shooting Default Settings
You can display the default settings for remote shooting by
clicking the [RemoteCapture Task] menu (in Mac OS 9, the
[File] menu) and selecting [Preferences].
■ File Settings Tab
Sets whether images are saved only to
the computer, or also to the camera’s
memory card
Sets the root file name for saved images.
For example, if you type “Capture,” file
names are automatically assigned in
ascending order starting from
“Capture_00001.jpg”.
You can also change the number of
assigned digits and the starting number
Folder to which recorded images are saved
(folder selected at the point when remote shooting was started)
■ Release Hotkey Tab
You can release the shutter using the
key specified here
REFERENCE
○○○○○○○○○○○○○○○○○○○○○○○○○○○○○○○○○○○○○○○○○○
• If you select [Computer only] in the [Save Images On] category,
you can record images when the memory card in the camera is
full and will not accept more images or when it is not present.
92 ImageBrowser Software User Guide
Page 93

Chapter 6
Using Supplementary Features
Stitching Panoramic Images with PhotoStitch
The following sections describe how to open and use programs in
ImageBrowser. If you have several images of the same scene with only a
slight difference, you can use PhotoStitch to connect the images
together to make a panoramic image. This section describes how to use
this program to stitch images.
REFERENCE
○○○○○○○○○○○○○○○○○○○○○○○○○○○○○○○○○○○○○○○○○○
• For detailed information on how to use PhotoStitch, refer to the
PhotoStitch Help (accessible from the [Help] menu).
•You can make it easier to stitch images together by using the
camera’s Stitch Assist mode to shoot them.
Opening PhotoStitch
In the Browser Area, select the images that you want to stitch
together. On the [Edit] menu, click [PhotoStitch].
REFERENCE
○○○○○○○○○○○○○○○○○○○○○○○○○○○○○○○○○○○○○○○○○○
•You can also start PhotoStitch by clicking the wavy line above
images shot in Stitch Assist mode in the Camera Window.
Then, follow the instructions on the upper part of the
PhotoStitch window, and stitch your images together.
Decide the order
in which the
images should be
stitched.
93 ImageBrowser Software User Guide
Perform stitching.
Save the image.
Page 94

Appendices
Supported File Formats
The following is a list of file formats supported by ImageBrowser.
Readable files
ImageBrowser can read the following file formats.
■ JPEG files
Most cameras use this file format. It compresses at very high
ratios, taking advantage of the characteristics of the human
eye. However, because it is an irreversible compression method
(part of the data is lost during compression), if you process and
save an image repeatedly using this method, the image may
become rougher.
The “Exif JPEG format” is a variety of JPEG file that contains
additional information, such as the shooting data.
■ RAW files
This format is a proprietary file format provided by Canon. It
allows the output of the image pixels from a digital camera
without any deterioration in the quality of the image. Some
cameras might not support this file format.
■ Windows Bitmap files
This format is standard on Windows. Most Windows programs
support it.
■ QuickTime files
This is a movie file format. The file appears as a movie mark in
the Browser Area of ImageBrowser. When you click the movie
mark or a thumbnail, QuickTime Player starts and plays the
movie.
■ PICT files
This is the standard file format for Macintosh. This file format is
supported by most Macintosh software.
■ TIFF files
This is a relatively popular format. It is widely supported by nonMacintosh programs (such as Windows).
94 ImageBrowser Software User Guide
Page 95

Appendices
Starting ImageBrowser Automatically (Mac OS X Only)
This method has ImageBrowser start automatically without starting up
iPhoto or Image Capture when you connect the camera to the
computer.
■ Mac OS X (v10.2/v10.3)
(The window will appear slightly different in v10.3.)
1.
2.
3.
Start Image Capture, click the [Image Capture] menu
and select [Preferences].
In the next window, click the [Camera Preferences] list
box and select [Other].
Select [ImageBrowser] in the program selection
window.
■ Mac OS X (v10.1)
1.
2.
3.
Start Image Capture, click the [Hot Plug Action] list
box in its window and select [Other].
Select [ImageBrowser] in the program selection window.
Close Image Capture.
ImageBrowser will start automatically the next time the camera
is connected.
4.
95 ImageBrowser Software User Guide
Close Image Capture.
ImageBrowser will start automatically the next time the camera
is connected.
Page 96

Appendices
Preventing ImageBrowser from Starting Automatically (Mac OS 9 Only)
This section explains how to set up ImageBrowser so that it does not
start automatically when you connect the camera to the computer.
Canceling the automatic start
On (Apple menu), select [Control Panels] followed by [Canon
ImageBrowser Auto Launch]. Clear the selection from “The
application program below will start.” in the dialog box.
Clear this selection.
REFERENCE
○○○○○○○○○○○○○○○○○○○○○○○○○○○○○○○○○○○○○○○○○○
•You can set it so that programs other than ImageBrowser will
start automatically when you connect the camera to the
computer and prepare it to transfer data.
In the dialog box displayed on the left, click the program that
you want to start automatically on the Program Name list.
However, if no other programs supported by the camera are
installed, the list only contains ImageBrowser.
When you have cleared the selection, click the Close box to
close the dialog box.
96 ImageBrowser Software User Guide
Page 97

Appendices
Automation Wizard Feature at Startup (Mac OS 9 Only) (1/4)
This section explains how to set up ImageBrowser so that it performs an
action automatically after it starts automatically.
IMPORTANT
○○○○○○○○○○○○○○○○○○○○○○○○○○○○○○○○○○○○○○○○○○
• Ensure that the camera is ready to transfer data to the computer
before setting the ImageBrowser Automation Wizard features.
How to set ImageBrowser to start automatically
In the following dialog, set the action to be performed at startup.
■ Display Images
Select this to have the Camera window open and display the
camera images after ImageBrowser starts.
■ Download images
Select this to have the Camera window open and automatically
download the camera images into ImageBrowser (the next
page discusses the detailed settings you can select when you
choose this option).
■ Launch RemoteCapture
Select this to open the remote shooting window after
ImageBrowser starts.
Select the desired startup action
REFERENCE
○○○○○○○○○○○○○○○○○○○○○○○○○○○○○○○○○○○○○○○○○○
• The dialog above will not display when you access a memory
card reader. To adjust ImageBrowser Automation Wizard
settings, connect the camera to the computer and open the
above dialog.
97 ImageBrowser Software User Guide
Page 98

Appendices
Automation Wizard Feature at Startup (Mac OS 9 Only) (2/4)
Displaying the Auto Run Dialog
You can display the Auto Run dialog for selecting the startup
actions using the following procedures.
■ Starting ImageBrowser for the first time
The Auto Run dialog will appear automatically.
■ Subsequent ImageBrowser starts
Click the [Settings Change] button in the ImageBrowser
Automation Wizard dialog, which will appear automatically.
Selecting the detailed settings for the [Download images] option
If you select the [Download images] option in the
ImageBrowser Automation Wizard, you can specify the folder
to which they are saved, a downloading option and a postdownloading action.
1.
Click [Change].
A dialog similar to the one below will appear.
98 ImageBrowser Software User Guide
Click here.
2.
Select a folder for the imported images.
Double-click drive and folder icons to open them.
Page 99

Appendices
Automation Wizard Feature at Startup (Mac OS 9 Only) (3/4)
3.
Click [OK] when the following dialog appears.
REFERENCE
○○○○○○○○○○○○○○○○○○○○○○○○○○○○○○○○○○○○○○○○○○
•A folder named with the current date will be created in the
folder selected in Step 2. The images will be imported to this
folder.
The selected folder will display in the [Save to] category of the
previous dialog.
5.
Select an image download option.
Click a downloading
option.
■ Download all images
Select this to download all the images in the camera.
Click here to return to
the previous dialog.
4.
Click [Next].
99 ImageBrowser Software User Guide
■ Download images marked for printing
Select this to download only the images that have been marked
for printing.
■ Download images marked for transferring
Select this to download only the images that have been marked
for transferring.
Page 100

Appendices
Automation Wizard Feature at Startup (Mac OS 9 Only) (4/4)
6.
7.
REFERENCE
○○○○○○○○○○○○○○○○○○○○○○○○○○○○○○○○○○○○○○○○○○
• Setting the print settings adds information to the memory card
about the images selected for printing and the number of
copies to print.
•Transmission settings are made from the camera (some camera
models do not support this function).
• Please refer to the guide supplied with your camera for more
information regarding print settings and transmission settings.
Click [OK].
The Camera Window will appear and ImageBrowser will
download the camera images. When the downloading process
is complete, a dialog allowing you to select a post-downloading
action will appear.
Select an action.
■ Display slide show
Select this to start a slide show of the downloaded images.
■ Launch the Print window
Select this to display a dialog for printing layouts.
■ Print with index printing
Select this to display the Print Index dialog.
■ Create image for Email
Select this to display a dialog for creating email attachments.
8.
Click [OK].
The selected action will take place.
Click an option for
processing the
downloaded images.
100 ImageBrowser Software User Guide
Click here to continue without
processing the images.
 Loading...