

Canon PIXMA TS8200 Series Getting Started
Getting Started
Guía de inicio
Web Setup
Conguración de la web
Detailed instructions and videos are
available on the Canon website.
Hay vídeos e instrucciones detalladas
enel sitio web de Canon.
Setup a Computer
Congurar un ordenador
Setup a Smartphone
Congurar un teléfono inteligente
Read Safety and Important Information
(addendum) rst.
Lea primero Información de seguridad e
información importante (apéndice).
TS8200_GS_book.indb 1 30/03/2018 10:30:24

Installing the Printer ...................................................................................................................page 1
Instalación de la impresora ............................................................................................... página 1
Connecting with Computer and Smartphone/Tablet .........................................page 4
Conexión con el ordenador y con el teléfono inteligente o la tableta ..........página 4
How to Hold Printer
Cómo sujetar la impresora
Instructional Videos
Vídeos instructivos
Go
TS8200_GS_book.indb 2 30/03/2018 10:30:25
ENGLISH
Setting up the printer
Web Setup
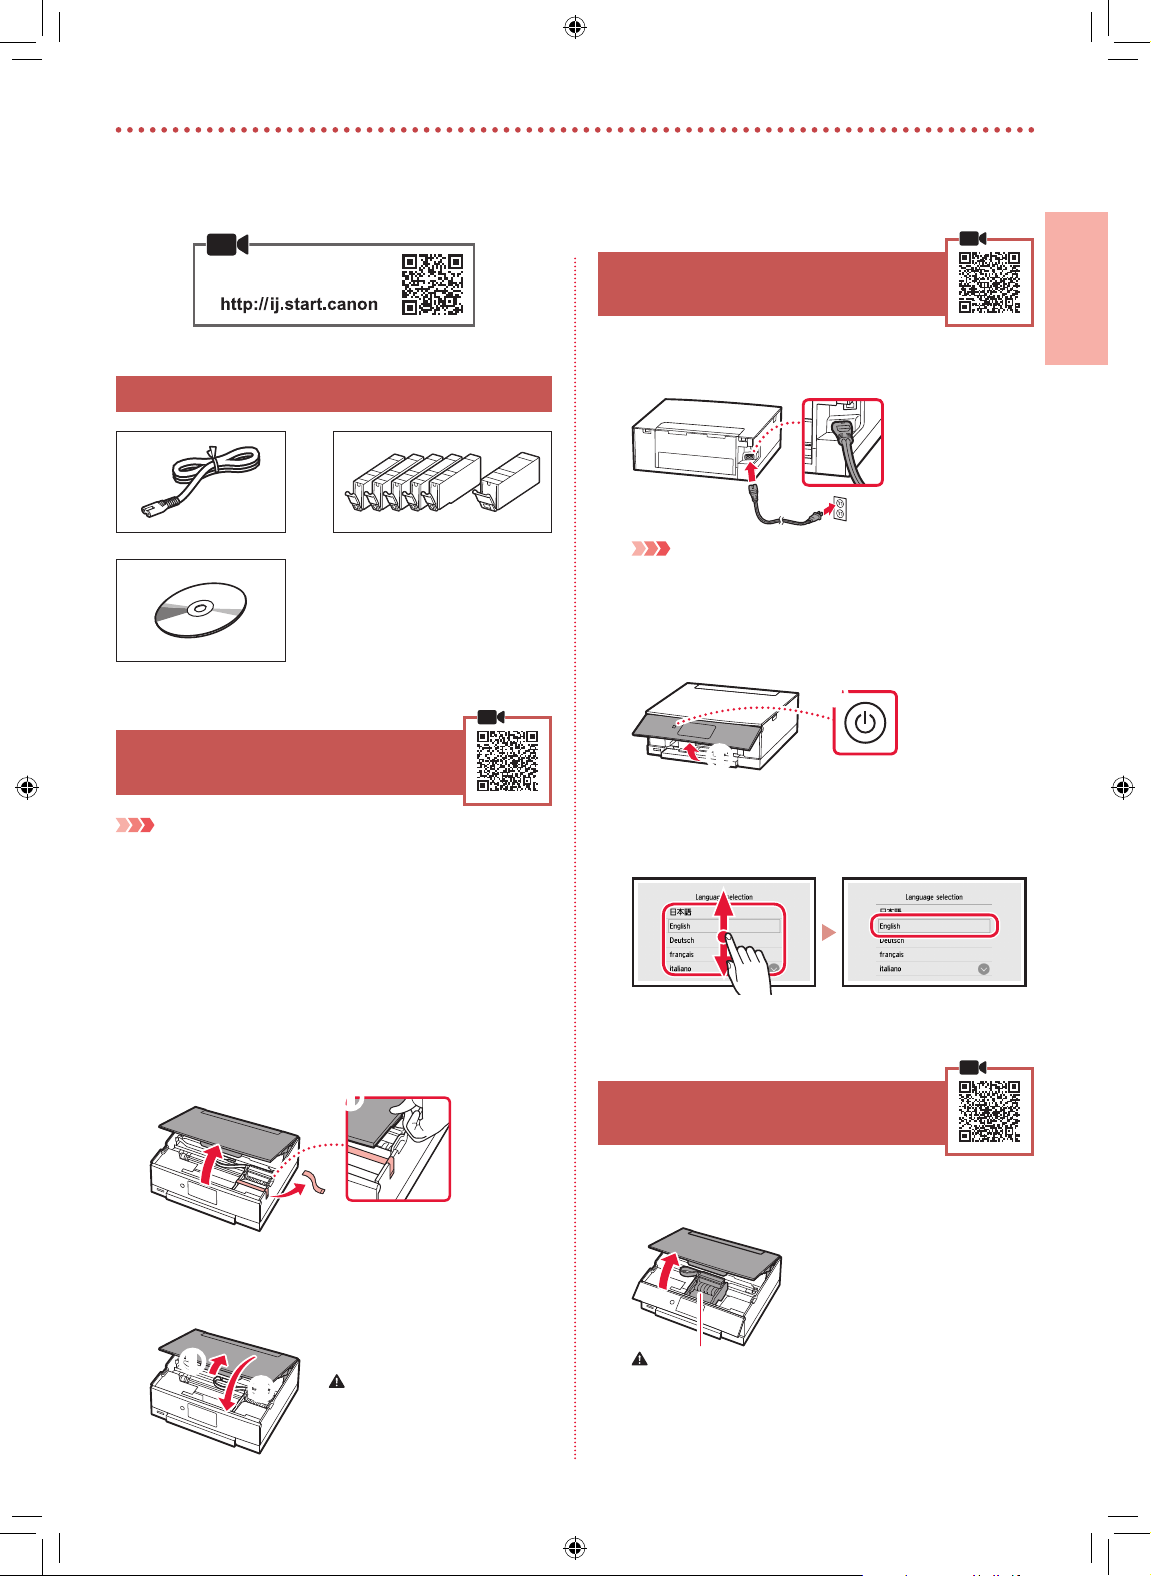
1. Box Contents
Power cord
•
Setup CD-ROM
•
2. Removing Packing Materials
Important
When printing starts, the operation panel opens and the paper
output tray comes out automatically. Do not put things in front of
the printer.
Ink tanks for setup
•
Safety and Important Information
•
Getting Started (this manual)
•
3. Turning on the Printer
Connect the power cord.
1
Back
Important
At this time, do not connect any other cables.
Open the operation panel and press the ON
2
button.
b
a
Scroll and tap to select your language, and then
3
tap OK.
Remove and dispose of the packing materials
1
from the device.
Operating the printer while the orange tape and
•
protective lm are still on it causes malfunctions. Be
sure to remove them.
Open the scanning unit / cover and remove the
2
orange tape.
a
b
Close the scanning unit / cover.
3
Lift up the scanning unit / cover briey, and then
•
close it.
a
b
Caution
Watch your ngers.
4. Installing the Ink Tanks
Open the scanning unit / cover.
1
Caution
Do not touch the print head holder until it stops moving.
1
TS8200_GS_book.indb 1 30/03/2018 10:30:26
Setting up the printer
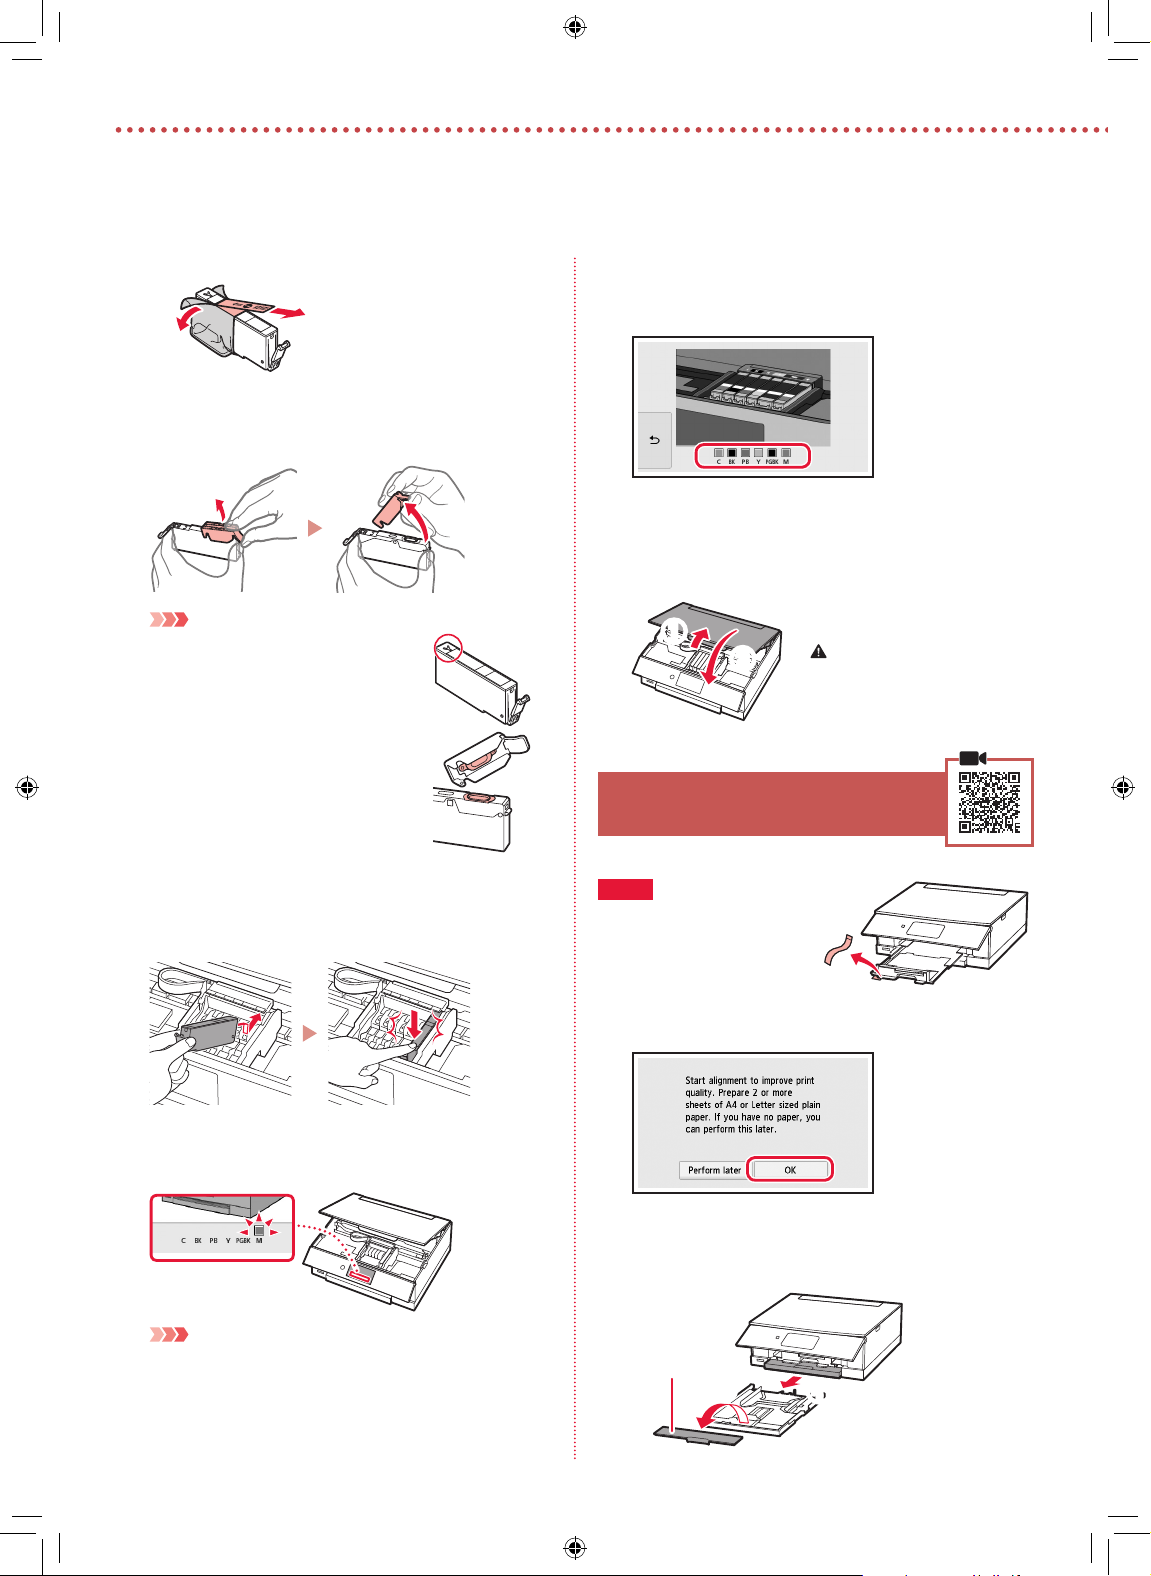
Remove the tape and lm on the ink tanks.
2
b
Check that no tape is left over.
•
Slowly remove the orange cap.
3
Important
Do not push both sides of the ink tank
•
with the Y-shape air hole blocked.
Do not touch the red areas shown in the
•
gure.
a
Repeat steps 2 through 5 to install all the ink
6
tanks.
Make sure that all the colors appear.
•
Close the scanning unit / cover.
7
When you close the scanning unit / cover, the
•
internal operations start.
a
b
Caution
Watch your ngers.
5. Loading Paper
Install the ink tanks.
4
Insert the ink tank into the print head and press it
•
from above until it clicks.
Make sure that the color of the ink tank you
5
installed appears on the screen.
Important
If the color is not displayed on the screen even though you
have installed the ink tank, the color of the ink tank may be
wrong or you may have installed an ink tank, such as one
with a dierent model number, that is not supported by this
printer. Either install an ink tank for the correct color or use the
provided ink tank for setup.
2
Check!
If there is any orange tape, remove
it.
Tap OK.
1
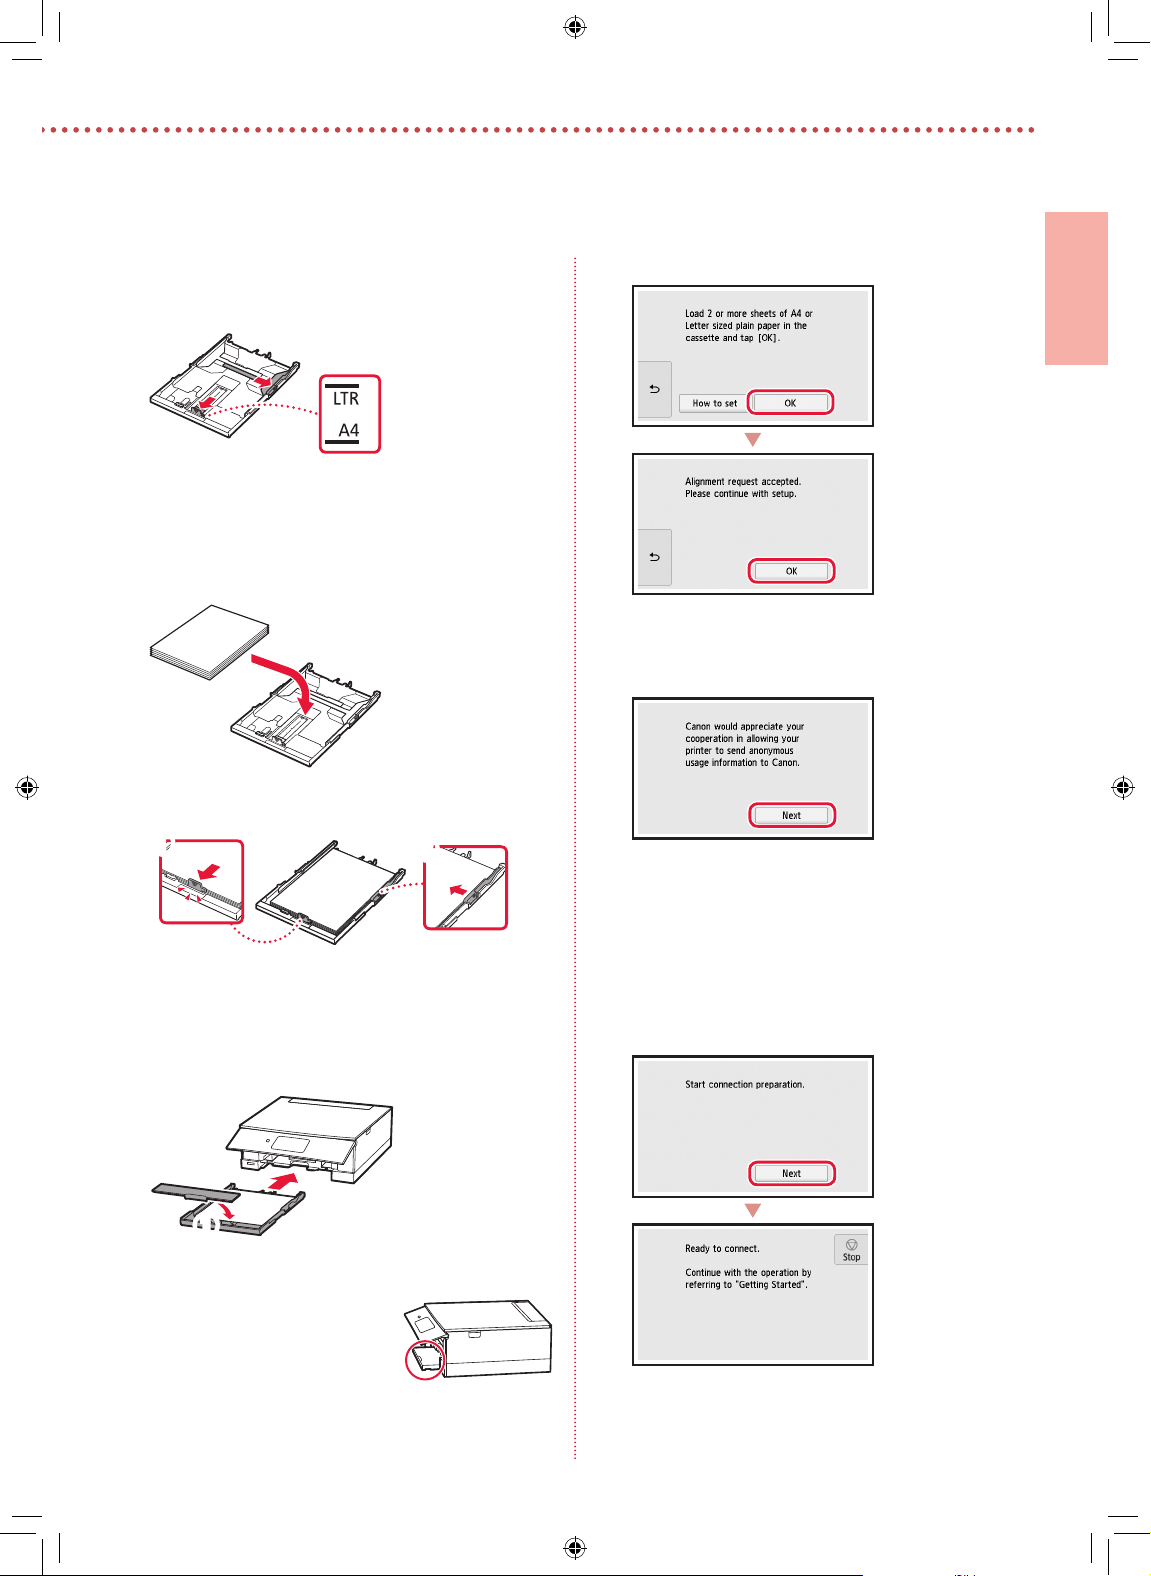
Pull the cassette out of the device and remove
2
the cassette cover.
Cassette cover
b
a
TS8200_GS_book.indb 2 30/03/2018 10:30:27
ENGLISH
Slide apart the paper guides.
3
Slide the right paper guide to the right edge. Align
•
the front paper guide with the LTR or A4 mark.
Load paper.
4
Load plain LTR or A4 size paper with the print side
•
facing down.
Place the paper against the front paper guide, and
•
align the right paper guide to the width of the paper.
6
7
Tap OK.
Tap Next.
a
Load the cassette.
5
Attach the cassette cover and put the cassette back
•
in.
b
a
Look at it from the side to conrm it looks like the
•
diagram.
b
Next, follow the onscreen instructions to continue
•
operations. During these operations, you will need
to make selections related to sending information.
Read "Sending Information To Canon" in Safety and
Important Information.
Tap Next.
8
TS8200_GS_book.indb 3 30/03/2018 10:30:27
3

Setting up the printer
What device are you connecting?
Select a device and follow the relevant section.
6-a
Computer Computer and
smartphone
Connecting to a Computer
If you are using multiple computers, perform these steps on each computer. There are
two methods, " Online Setup" and " Using the Setup CD-ROM (Windows Only)
Provided".
Smartphone
6-b
page 6
No device
Tap the Stop button,
and then select Do not
connect > Yes, in this
order.
Online Setup
Access the Canon website from a
1
computer.
Select Set Up.
2
Enter your printer's model name and
3
click Go.
Click Start.
4
Click If you have already prepared
5
your printer, go to Connect.
Note
When you are using a computer with Windows
(except for Windows 10 S) or macOS, proceed to
the next step. When you are using a computer with
another OS, continue the setup by following the onscreen instructions.
Click Download.
6
The setup le is downloaded to your
•
computer.
Run the downloaded le.
7
Proceed to step 9 on page 5.
8
4
TS8200_GS_book.indb 4 30/03/2018 10:30:27
 Loading...