

Canon PIXMA MG2220 Getting Started
1
5
6
1
3
4
2
1
2
55
66
11
33
44
Preparação
Itens incluídos
22
55
66
11
33
44
Preparativos
Elementos
suministrados
22
55
66
11
33
44
Préparation
Éléments
fournis
22
55
66
ENGLISH
11
33
44
Preparation
Included Items
22
Getting Started
Démarrage
Guía de inicio
Para Começar
Windows est une marque ou une
Windows is a trademark or registered
•
trademark of Microsoft Corporation in the
U.S. and/or other countries.
Windows Vista is a trademark or
•
registered trademark of Microsoft
Corporation in the U.S. and/or other
countries.
Mac and Mac OS are trademarks of
•
Apple Inc., registered in the U.S. and
other countries.
•
marque déposée de Microsoft
Corporation aux États-Unis et/ou dans
d'autres pays.
Windows Vista est une marque ou
•
une marque déposée de Microsoft
Corporation aux États-Unis et/ou dans
d'autres pays.
Mac et Mac OS sont des marques
•
d'Apple Inc., déposées aux États-Unis et
dans d'autres pays.
FRANÇAIS
Read me rst!
Keep me handy for future reference.
À lire en premier !
Conservez ce document à portée de
main an de pouvoir vous y reporter
ultérieurement.
¡Léame en primer lugar!
Consérvelo a mano para utilizarlo
como referencia en el futuro.
Leia-me primeiro!
Mantenha-me à mão para consulta
futura.
Windows es una marca comercial o una
•
marca comercial registrada de Microsoft
Corporation en EE. UU. y/u otros países.
Windows Vista es una marca comercial
•
o una marca comercial registrada de
Microsoft Corporation en EE. UU. y/u
otros países.
Mac y Mac OS son marcas comerciales
•
de Apple Inc., registradas en EE. UU. y
en otros países.
ESPAÑOL
PORT DO BRASIL
Windows é uma marca comercial ou
•
registrada da Microsoft Corporation nos
EUA e/ou em outros países.
Windows Vista é uma marca comercial
•
ou registrada da Microsoft Corporation
nos EUA e/ou em outros países.
Mac e Mac OS são marcas comerciais
•
da Apple Inc., registradas nos EUA e em
outros países.
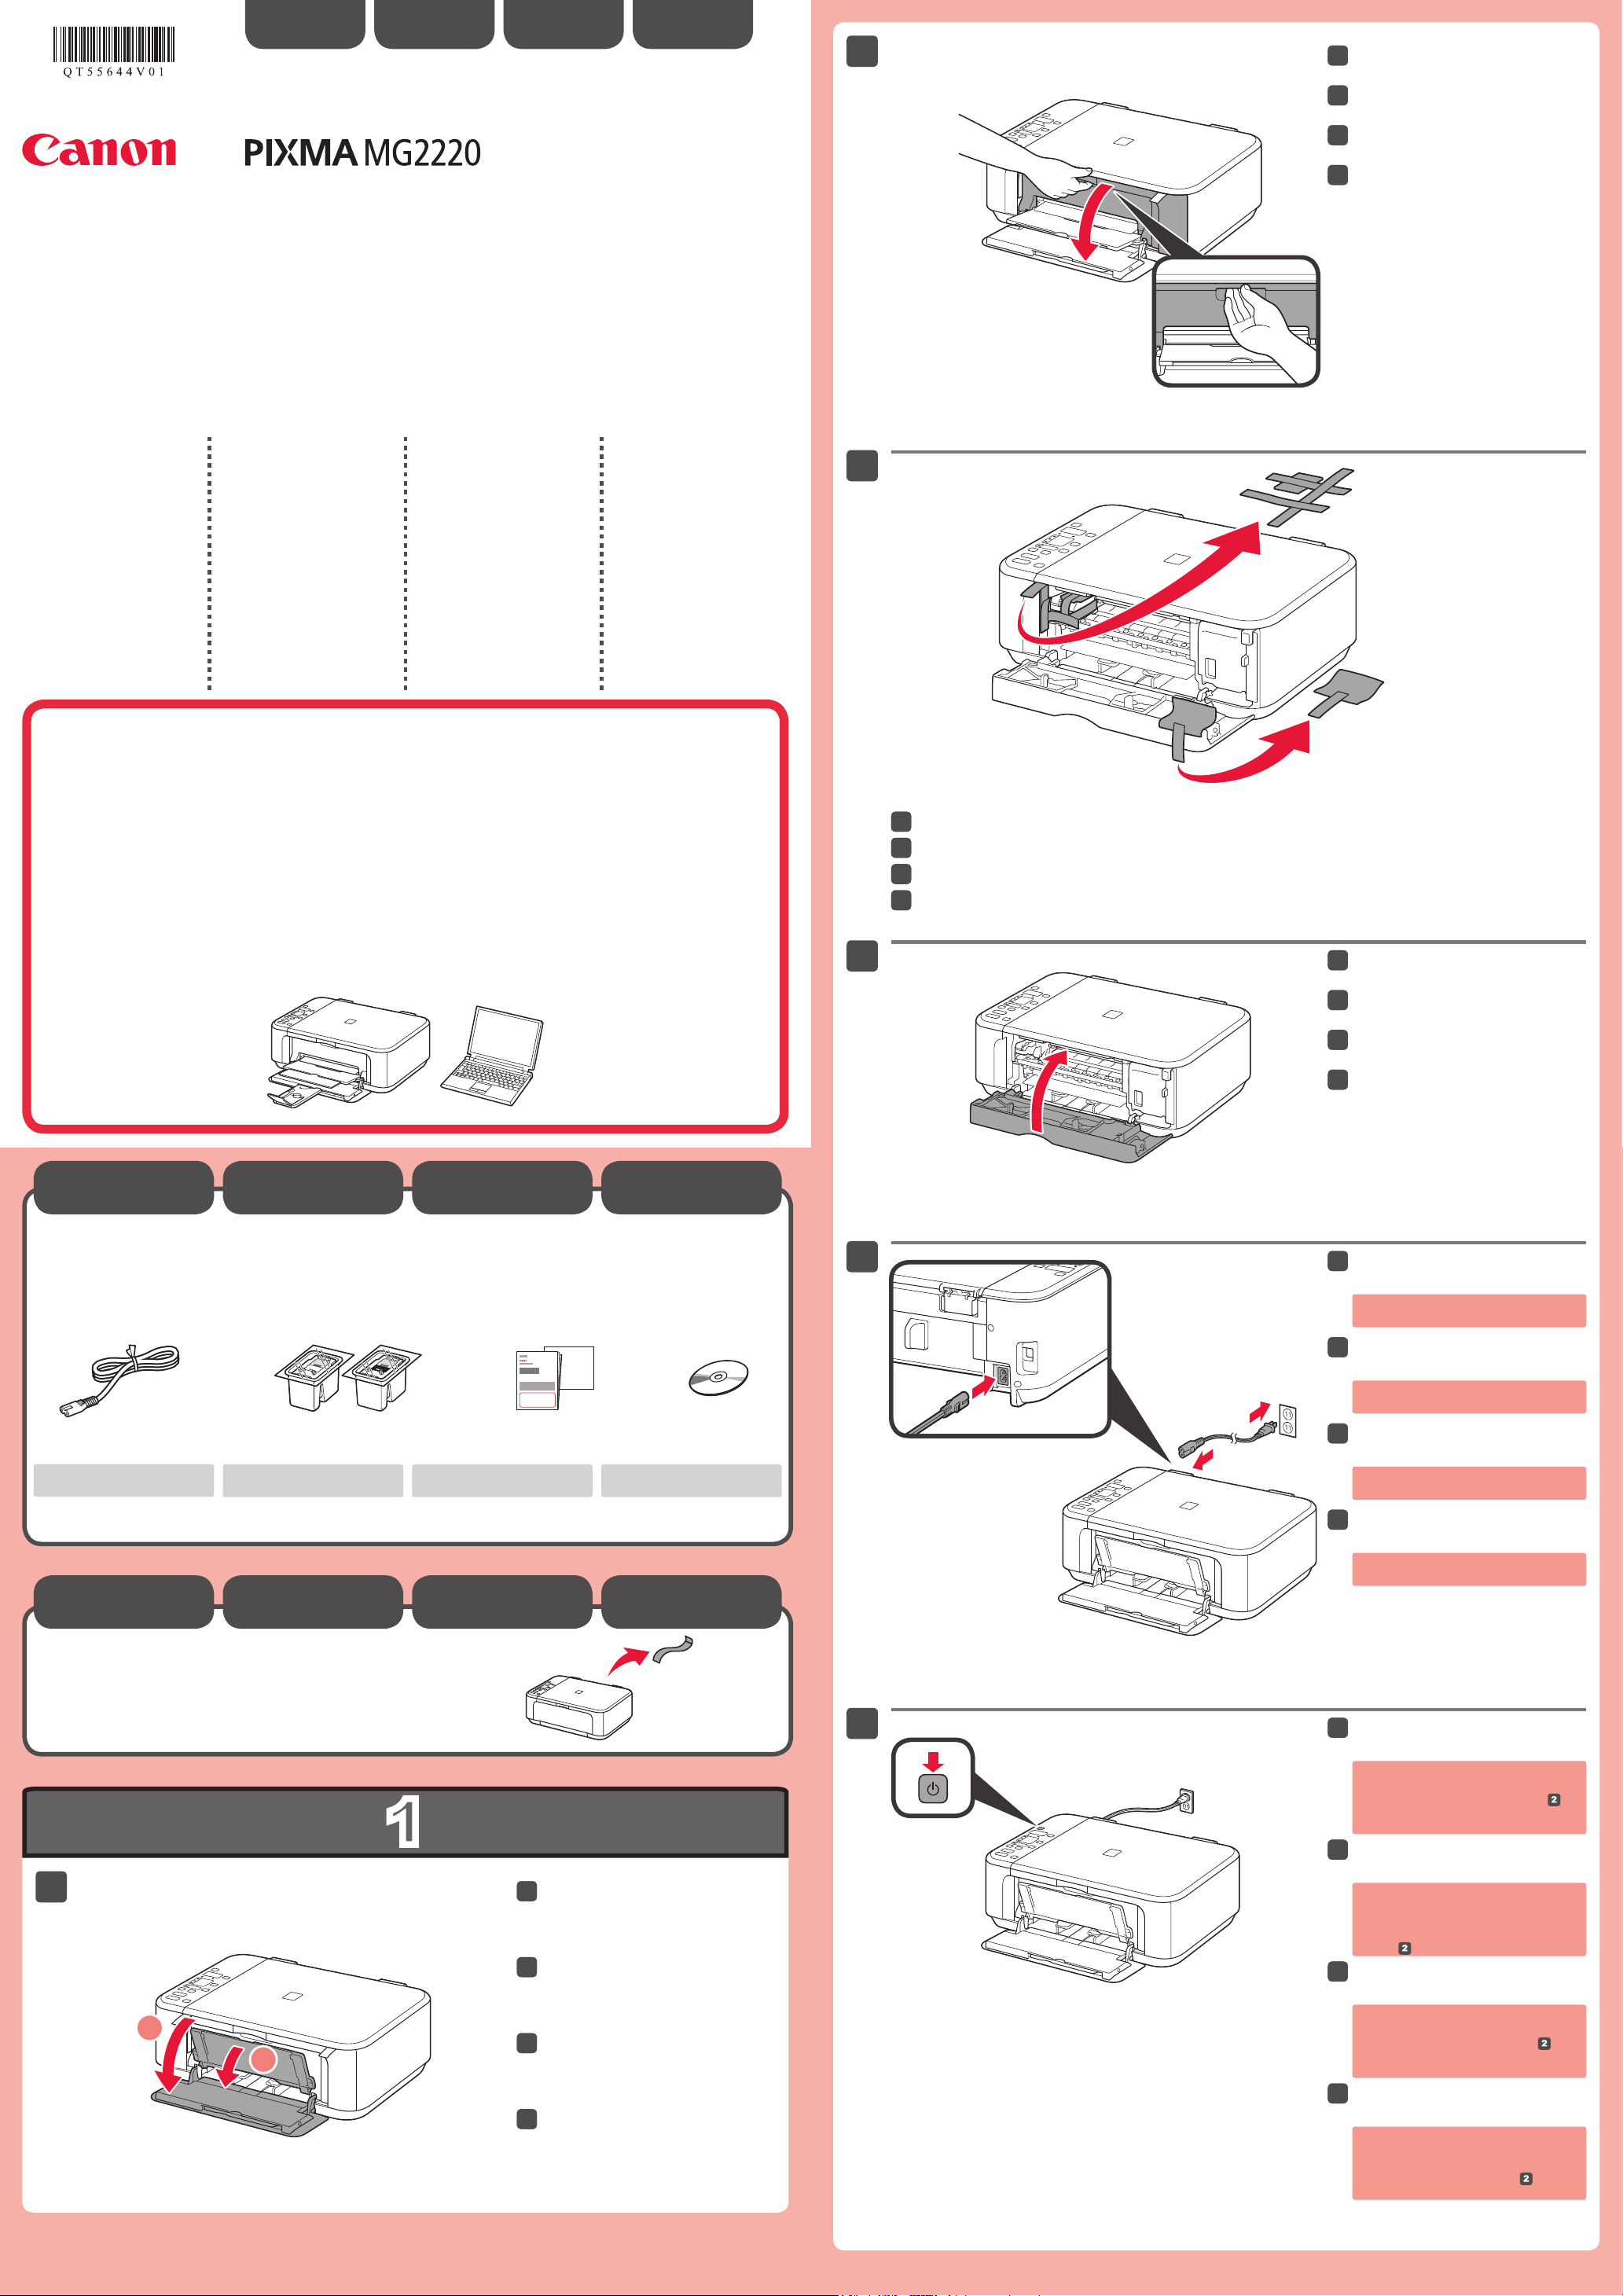
Open the Paper Output Cover.
Ouvrez le couvercle de sortie papier.
Abra la tapa de salida del papel.
Abra a Tampa de Saída do Papel.
Model Number: K10380
Référence du modèle : K10380
Número de modelo: K10380
Número do modelo: K10380
To perform setup, place the machine near the computer.
Pour procéder à l'installation, placez la machine à proximité de l'ordinateur.
Para llevar a cabo la instalación, coloque el equipo cerca del ordenador.
Para congurar, coloque a máquina próxima ao computador.
Remove the orange tape and protective material.
Retirez la bande orange ainsi que le matériau protecteur.
Retire la cinta naranja y el material de protección.
Retire a ta laranja e o material de proteção.
Close the Paper Output Cover.
Fermez le couvercle de sortie papier.
Cierre la tapa de salida del papel.
Feche a Tampa de Saída do Papel.
Check the included items.
Vériez les éléments fournis avec l'imprimante.
Compruebe que se le han suministrado los siguientes elementos.
Verique os itens incluídos.
A USB cable is required.
Un câble USB est nécessaire.
Es necesario un cable USB.
Remove the tape.
Retirez la bande.
Retire la cinta.
Retire a ta.
Um cabo USB é necessário.
Connect the power cord.
Do not connect the USB cable yet.
Branchez le cordon d'alimentation.
Ne branchez pas encore le câble USB.
Conecte el cable de alimentación.
No conecte aún el cable USB.
Conecte o cabo de alimentação.
Não conecte o cabo USB ainda.
Press the ON button.
Open the Front Cover and the
Paper Output Tray.
Ouvrez le panneau avant et le bac
de sortie papier.
Abra la cubierta delantera y la
bandeja de salida del papel.
Abra a Tampa Frontal e a Bandeja
de Saída do Papel.
If E > 4 > 0 are displayed on the
screen, press the ON button to turn
OFF the machine, then redo from .
Appuyez sur le bouton MARCHE
(ON).
Si E > 4 > 0 s'afche à l'écran, appuyez
sur le bouton MARCHE (ON) de la
machine pour mettre cette dernière
hors tension, puis reprenez à partir de
l'étape
.
Pulse el botón ACTIVADO (ON).
Si aparece E > 4 > 0 en la pantalla,
pulse el botón ACTIVADO (ON) para
apagar el equipo y repita desde .
Pressione o botão ATIVADO (ON).
Se E > 4 > 0 forem exibidos na tela,
pressione o botão ATIVADO (ON) para
DESLIGAR a máquina, em seguida
repita a operação a partir da .
QT5-5644-V01
XXXXXXXX © CANON INC. 2012
PRINTED IN XXXXXXXX
IMPRIME XX XXXXXXXX
2
1
2
1
7
5
2
4
7
6
3
44
33
11
22
55
77
66
77
44
33
11
22
55
77
66
77
44
33
11
22
55
77
66
77
44
33
11
22
55
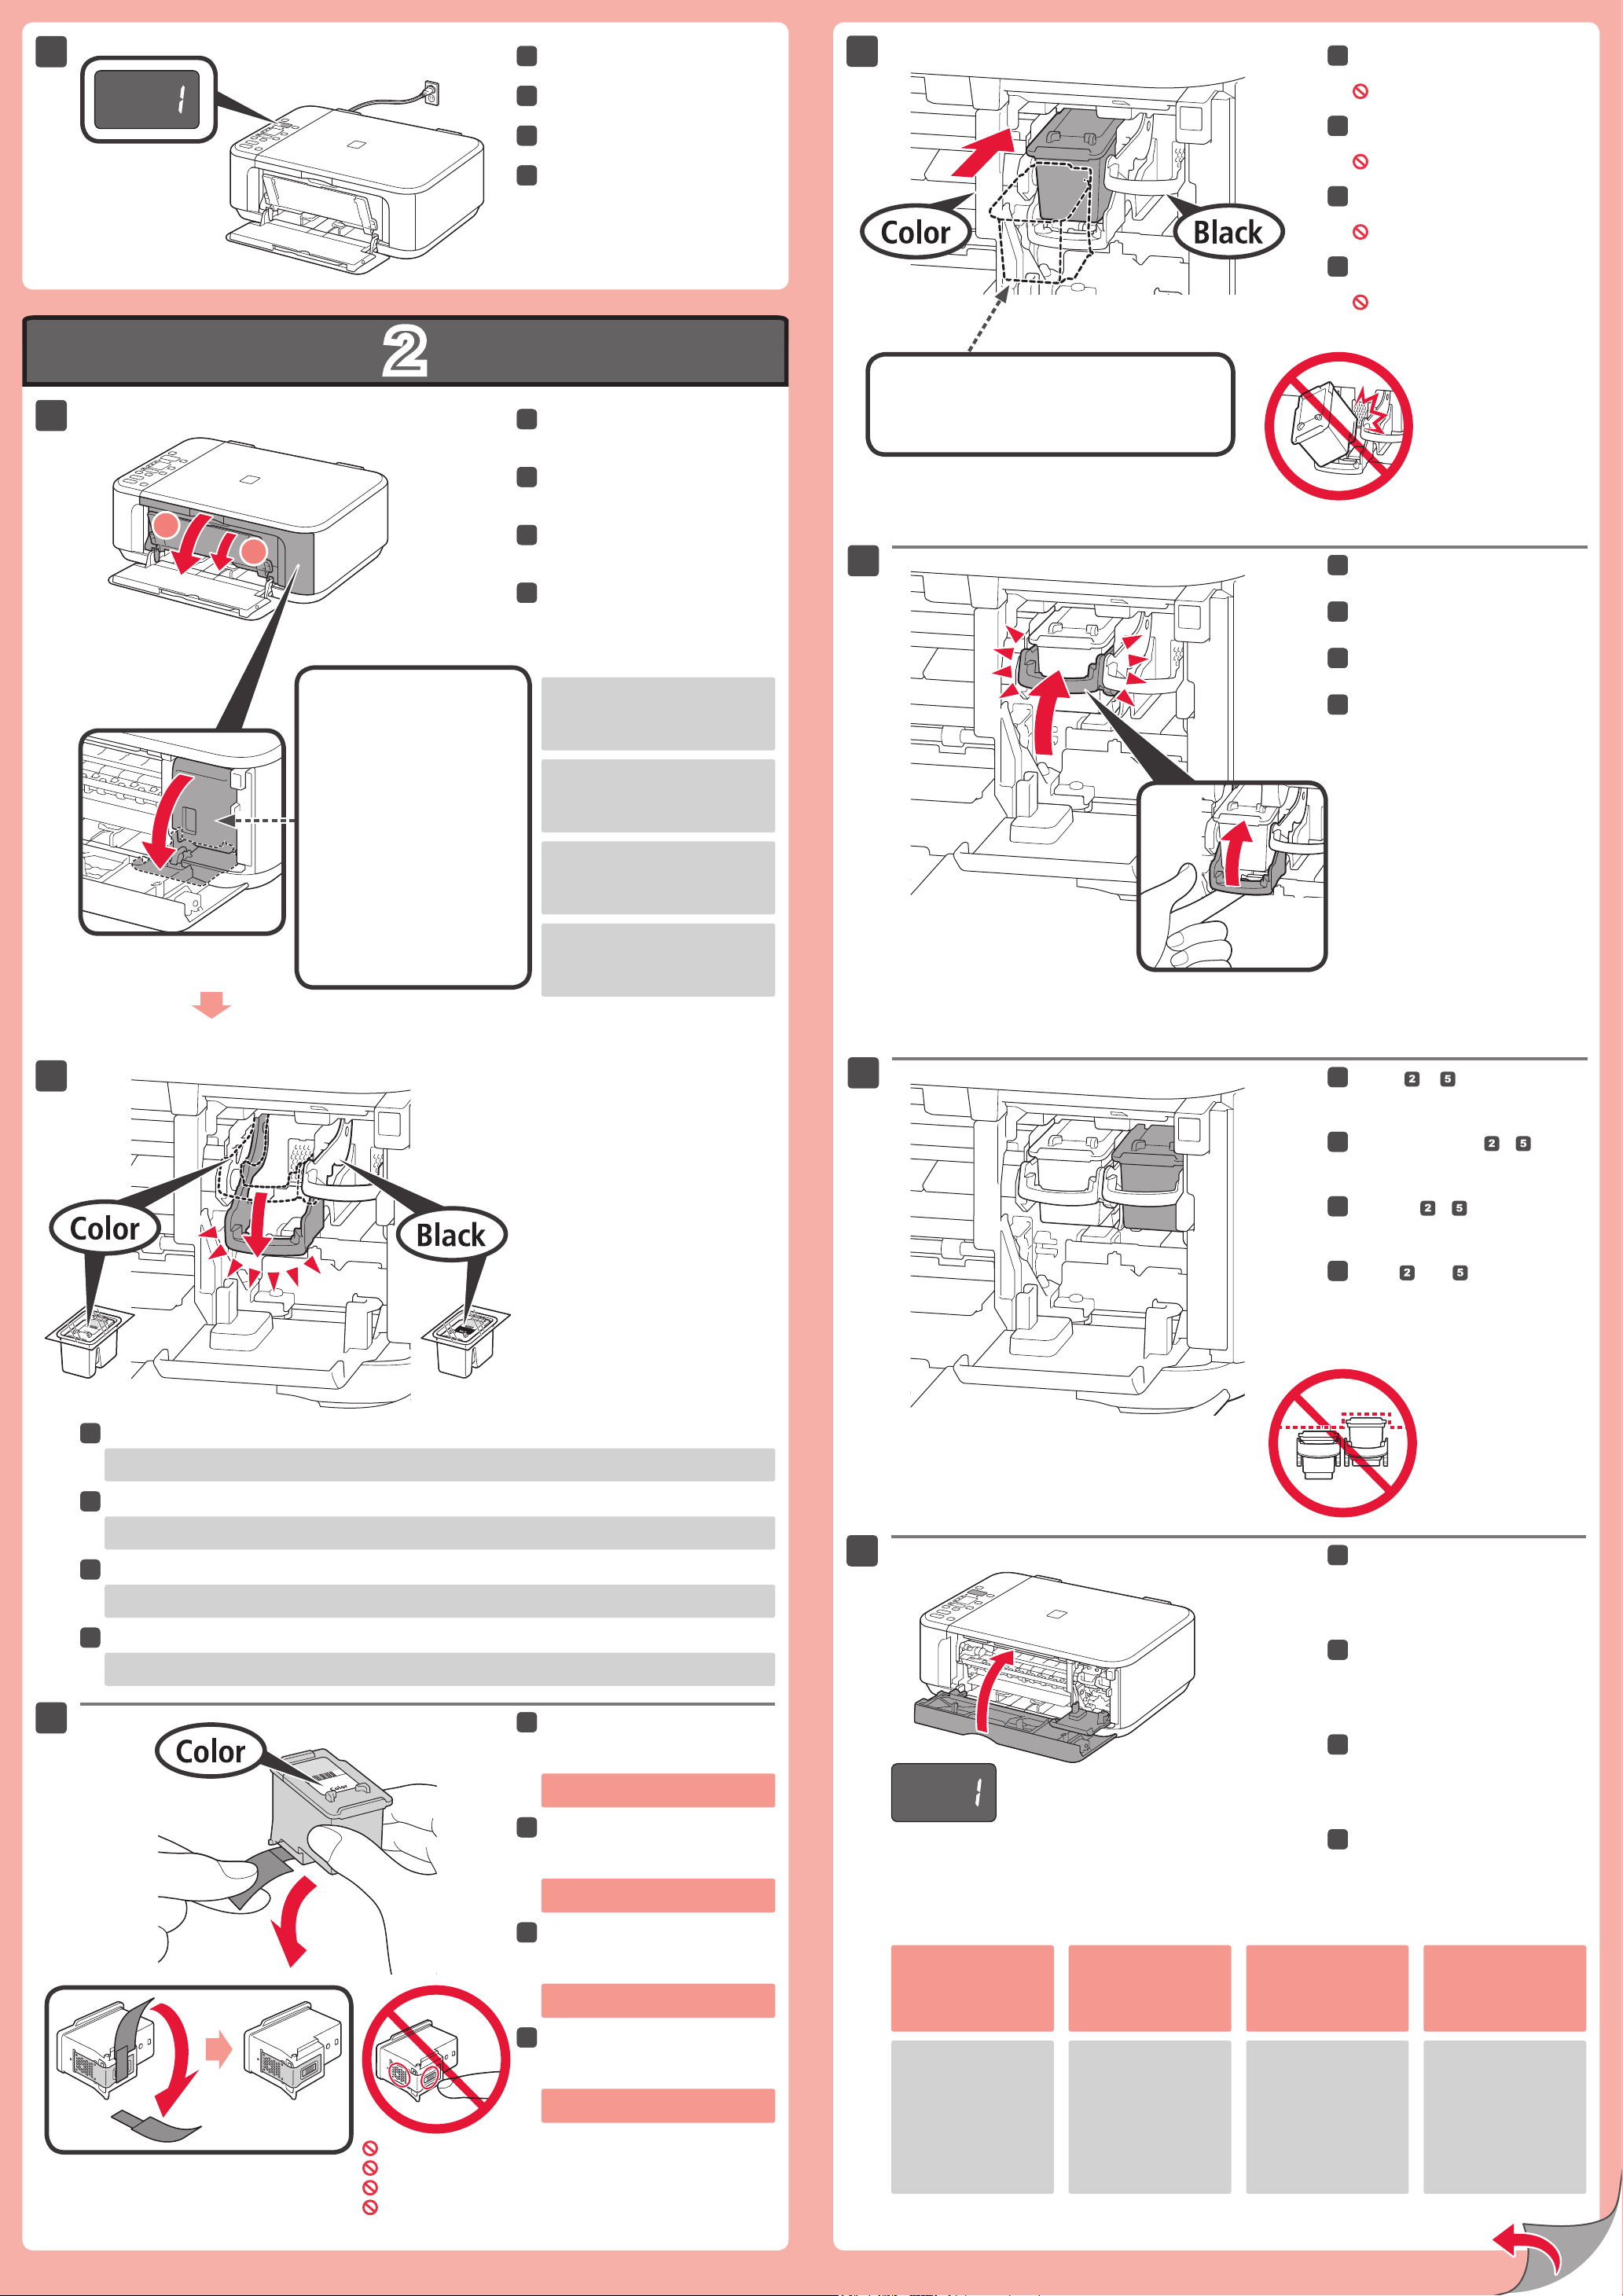
Check that this screen is displayed.
77
66
77
Vériez que cet écran s'afche.
Insert the FINE Cartridge until it
stops.
Do not knock it against the sides!
Compruebe si aparece esta pantalla.
Verique se essa tela é exibida.
Open the Paper Output Tray and
the Paper Output Cover.
Ouvrez le bac de sortie papier et le
couvercle de sortie papier.
Abra la bandeja de salida del papel
y la tapa de salida del papel.
Insert it straight until it stops.
Insérez-la sans la faire pencher jusqu'à ce qu'elle soit correctement installée.
Insértelo recto hasta que se detenga.
Insira-o diretamente até que ele pare.
Insérez la cartouche FINE jusqu'à ce
qu'elle soit correctement installée.
Ne cognez pas la cartouche contre
les bords !
Inserte el cartucho FINE (FINE
Cartridge) hasta que se detenga.
¡No lo golpee contra los lados!
Insira o Cartucho FINE (FINE
Cartridge) até que ele pare.
Não bata nas laterais do cartucho!
Lift the Ink Cartridge Lock Lever.
Check that the Head Cover has
opened automatically.
Vériez que le capot des têtes
s'est ouvert automatiquement.
Compruebe que la cubierta
del cabezal se ha abierto
automáticamente.
Verique se a Tampa
da Cabeça foi aberta
automaticamente.
Abra a Bandeja de Saída do Papel
e a Tampa de Saída do Papel.
If the Head Cover is closed, close the
Paper Output Cover and open it again
to open the Head Cover.
Si le capot des têtes est fermé, fermez
le couvercle de sortie papier, puis
ouvrez-le de nouveau pour ouvrir le
capot des têtes.
Si la cubierta del cabezal está cerrada,
cierre la tapa de salida del papel y
vuelva a abrirla para abrir la cubierta
del cabezal.
Se a Tampa da Cabeça estiver
fechada, feche a Tampa de Saída do
Papel e abra-a novamente para abrir
a Tampa da Cabeça.
Soulevez le levier de verrouillage
de cartouche d'encre.
Levante la palanca de bloqueo del
cartucho de tinta.
Levante a Alavanca de Bloqueio
do Cartucho de Tinta.
Lower the Ink Cartridge Lock Lever.
The left is where the Color FINE Cartridge is to be installed and the right is where the Black FINE Cartridge is to be
installed.
Rabaissez le levier de verrouillage de cartouche d'encre.
La cartouche FINE couleur doit être installée à gauche et la cartouche FINE noire doit être installée à droite.
Repeat to to install the other
FINE Cartridge.
Répétez les étapes à pour
installer l'autre cartouche FINE.
Repita de a para instalar
el otro cartucho FINE (FINE
Cartridge).
Repita para para instalar
o outro Cartucho FINE (FINE
Cartridge).
Baje la palanca de bloqueo del cartucho de tinta.
A la izquierda debe instalarse el cartucho FINE (FINE Cartridge) de color y a la derecha debe instalarse el cartucho
FINE (FINE Cartridge) negro.
Abaixe a Alavanca de Bloqueio do Cartucho de Tinta.
O Cartucho FINE (FINE Cartridge) Colorido deve ser instalado à esquerda e o Cartucho FINE (FINE Cartridge) Preto
deve ser instalado à direita.
Unpack the FINE Cartridge, then
remove the protective tape.
Be careful of ink on the protective tape.
Enlevez la cartouche FINE de
son emballage, puis le ruban
protecteur.
Faites attention à l'encre se trouvant
sur le ruban protecteur.
Desembale el cartucho FINE
(FINE Cartridge) y retire la cinta
protectora.
Tenga cuidado con la tinta de la cinta
protectora.
Retire o Cartucho FINE (FINE
Cartridge) da embalagem e, em
seguida, retire a ta de proteção.
Cuidado com a tinta na ta de
proteção.
Do not touch!
Ne pas toucher !
¡No tocar!
Não toque!
If the Alarm lamp is lit
orange, check that the
FINE Cartridges are
installed correctly.
The screen turns off if the
machine is not operated
for about 5 minutes. To
restore the display, press
any button (except the ON
button) on the Operation
Panel.
Si le témoin Alarme
(Alarm) est allumé en
orange, vériez que les
cartouches FINE sont
correctement installées.
L'écran s'éteint si la
machine n'est pas
utilisée pendant environ
5 minutes. Pour restaurer
l'afchage de l'écran,
appuyez sur n'importe
quel bouton (à l'exception
du bouton MARCHE (ON))
du panneau de contrôle.
Close the Paper Output Cover.
Wait for about 20 seconds until this
screen is displayed, then proceed.
Fermez le couvercle de sortie
papier.
Attendez environ 20 secondes que cet
écran s'afche, puis passez à l'étape
suivante.
Cierre la tapa de salida del papel.
Espere aproximadamente 20 segundos
hasta que aparezca esta pantalla y
continúe.
Feche a Tampa de Saída do Papel.
Aguarde cerca de 20 segundos até que
esta tela seja exibida e, em seguida,
prossiga.
Si la luz de Alarma
(Alarm) está encendida
en naranja, compruebe
que los cartuchos FINE
(FINE Cartridges) estén
instalados correctamente.
Cuando el equipo no
se utiliza durante unos
5 minutos, la pantalla
se desconecta. Para
reactivarla, pulse cualquier
botón (excepto el botón
ACTIVADO (ON)) en el
panel de control.
Se o indicador luminoso
Alarme (Alarm) estiver
aceso em laranja, verique
se o Cartucho FINE (FINE
Cartridges) está instalado
corretamente.
A tela desliga se a
máquina não for operada
por cerca de 5 minutos.
Para restaurar a exibição,
pressione qualquer botão
(exceto o botão ATIVADO
(ON)) no Painel de
Controle.
 Loading...