

Canon PI}{MA Pro 9000 Serie? Quick Start Manual
Canon
Photo Printer
P
I}{MA
Pro
9000
Series
Quick StartGuide
'"
~~
Ex;;
Plint
PictBridge
Getting
Help
from
Canon
Help
Us
Help
You
Better
Before
you
contact
Canon,
please
record
the following information.
Serial Number(located on
the
insideofthe
product):
Model
Number (located on
the topofthe product): _
Setup
CD-ROM
number
(located on
the
CD-ROM): _
Purchase Date: _
Customer
Technical
Support
Sequence*
1.
Internet -
www.canontechsupport.com
For
quick and comprehensive self-helpinan
intuitively guided interactivetroubleshooting
environment, the place to start is our helpful tech support web site.
In
addition, the latest
driver downloads, answers to frequently asked questions, product information, and
"where to buy" instructions
are
found here.
2.
Email
Tech
Support -
www.canontechsupport.com
For
individual attention to a special issue, try emailing our friendly technical support representatives, specially trained to communicate quick, easy, and logical solutions to your
inquiries within 24 hours.
3.
Toll-Free
Live
Tech
Support
-
(1-800-828-4040)
This option provides live telephone technical support, freeofservice charges, MondaySaturday (excluding holidays), during your product's 1year limited warranty period.
Telephone Device
forthe
Deaf
(TOO)
support is available at (1-866-251-3752).
4.
Extended
Service
and
Support
-
www.canonesp.com
Canon
CarePAK
Extended Service
Plan
is a cost-attractive and easy-to-use extended service
program
that
provides up to three fullyearsofservice and support coverage at a very
attractive price.
CarePAK
offers toll-free Canon technical support and includes Canon's
superb InstantExchange product replacement program.
For
further information about
extending your Canon service and support, call (1-800-385-2155),
or
visit our
Web
site at
www.canonesp.com.
CarePAK
mustbepurchased duringyour product's warranty period.
For
more information and updated program specifics, please visit
our
web site at
www.canontechsupport.com.
* Support program specifics
are
subject
to change
without
notice.
Canon
PI}{MA
Pro9000
Photo Printer
Quick StartGuide
Canon PIXMA Pro9000 Photo Printer Quick Start Guide.
Copyright
This manual is copyrighted by Canon U.S.A., Inc. with all rights reserved. Under the copyright laws, this manual
may not
be
reproduced in any form, in whole or in part,
without
the prior written consentofCanon U.S.A., Inc.
© 2006 Canon U.S.A., Inc.
Disclaimer
Canon U.S.A., Inc. has reviewed
this
manual thoroughly in order
thatitwillbean
easy-to-use
guide to your Canon
PIXMA
Pro9000 Photo Printer. All statements, technical information and recommendations
in this manual and in any guides
or
related documents are believed reliable, but the accuracy and completeness
thereofare not guaranteed orwarranted, and they are notintended to be, norshould they
be
understood to be,
representation or warranties concerningthe products described.
Specifications are subject to change
without
notice.
AsanENERGY
STAR®
partner,
Canon
U.s.A., Inc., has determined
that
this product meets the
ENERGY
STAR®
guidelines for energy efficiency.
All information regarding non-Canon products was compiled from publicly available information.
No
representation is made regarding the accuracy thereof.
About Consumables
Consumables (ink tanks /
FINE
Cartridges) are available for 5years after production has stopped.
Trademarks
• Microsoft and Windows are eitherregistered trademarks or trademarks
of
Microsoft Corporation in the U.s.
and/or
other countries.
• Macintosh and Mac are trademarks
of
Apple Computer, Inc., registered in the U.S. and other countries.
• Photo
Ragisa trademarkofHahnemUhle FineArt GmbH.
• Adobe and Adobe Photoshopare either registered trademarks ortrademarks
of
Adobe Systems Incorporated
in the United States
and/or
other
countries.
Canon
U.S.A., Inc.
One Canon Plaza
Lake
Success,NY11042
Contents
Contents
Basic
Printing
Turning on the Printer
........•..................••................................
2
Turning
off
the Printer
.......................••....................................
3
Loading Paper
........................•••...•....................................
4
Using Specialty Media
................•.....••.•..........•......................
15
Printing
with
Windows
..................••...•...........••......................
18
Printing
with
Macintosh
..•.........•••••...............••...................••...
21
Canceling Printing
•.•••...•.....•...•••..........................................
25
Advanced
Printing
Printing Photographs Directly from a PictBridge Compliant Device 26
Accessing the PrinterDriver (Windows)
............•...•••..........................
33
Usingthe Bundled Software
.•.....•................••..........•.•.•....•.........
35
Printing Maintenance
ReplacinganInk
Tank
...................••..............••••••...................
36
When PrintingBecomes Faint or Colors are Incorrect
..•...••.................•........
45
Printing
theNozzle
Check Pattern
.......•••..............•••••.....................
46
Print Head Cleaning
..................•.•••..............••......................•
51
Print Head Deep Cleaning
...............................•.................•..••...
55
Aligningthe Print Head
................••....•............••••....................
58
Troubleshooting
Cannot
Install
the Printer Driver oranApplication Program
.•.........•......•..........
63
Cannot ConnecttoPC
Properly
.••..•................•...........••••••..•.........
64
Print Results Not Satisfactory or Contains Errors
.....••....................•..........
65
Troubleshooting Printer Hardware
....•..................•................•••...•...
68
Paper Does Not
Feed
Properly
......•..............................•..•..•.•.......
71
PaperJams
..........••..•........................•.............•••••...........
72
Handling Error Messages
...............................•••.........••....••...•..
73
An
Error Message Appearsonthe Screen
................••................•••...•...
76
Cannot Print Properly from the Digital Camera
...........•••..............••••..•.....
80
Appendix
Specifications
........•.•...•.................•..•...........••••...............
84
Safety Precautions
••••.••.••.•..••..............
~
...•........••.................
87
Regulatory Information
•.••.••.•...................•..........••••................
89
Canon
U.S.A.,
INC.
LIMITED
WARRANlY --- (USA Only)
.•...............................
90
Index
92
1
Basic Printing
Basic Printing
WNote
This Quick
Start
Guidedescribes someofthe featuresofyour printer and how
to use them.
For
more information, viewthe Pr09000 User's Guide, Printer
DriverGuide, PhotoApplication Guide, and
Digital
Photo
Printing
Guide
installedonyour computer, or use the online help within your printerdriver
interface:
~
While in the printer's properties window, press theFlkey, or click~"in
the
upper right corner. Then click the feature you want to know more about, or click
the Help button when displayed. '
While in the
Page
Setup dialog box or Print dialogbox, click in the lower left
corner.
Clicking provides detailed information about
each
setting.
When the Help window appears, select your desired topic.
Turningon
the
Printer
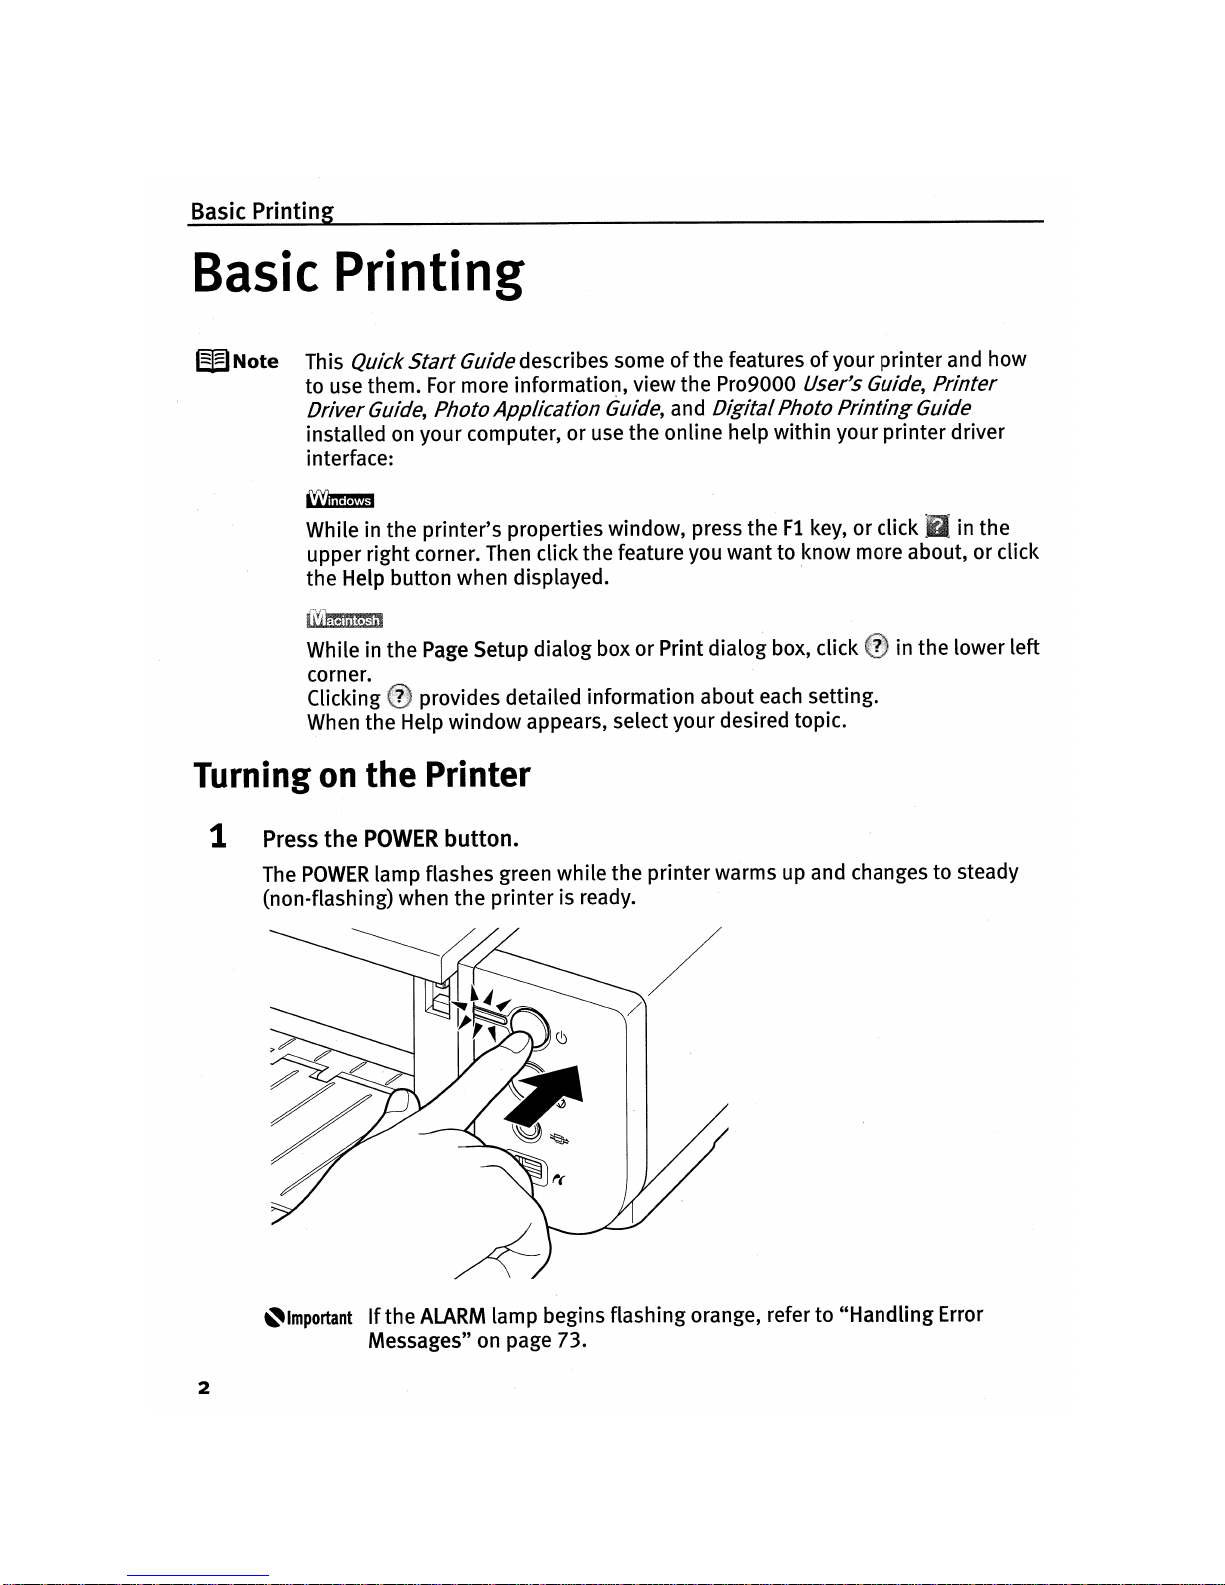
1 Press
the
POWER
button.
The
POWER
lamp flashes green while the printerwarms up and changes to steady
(non-flashing) when the printeris ready.
/
/
t'lmportant
If
the
ALARM
lamp begins flashing orange, refer to "Handling Error
Messages" on page 73.
2
Basic Printing
Turning
off
the
Printer
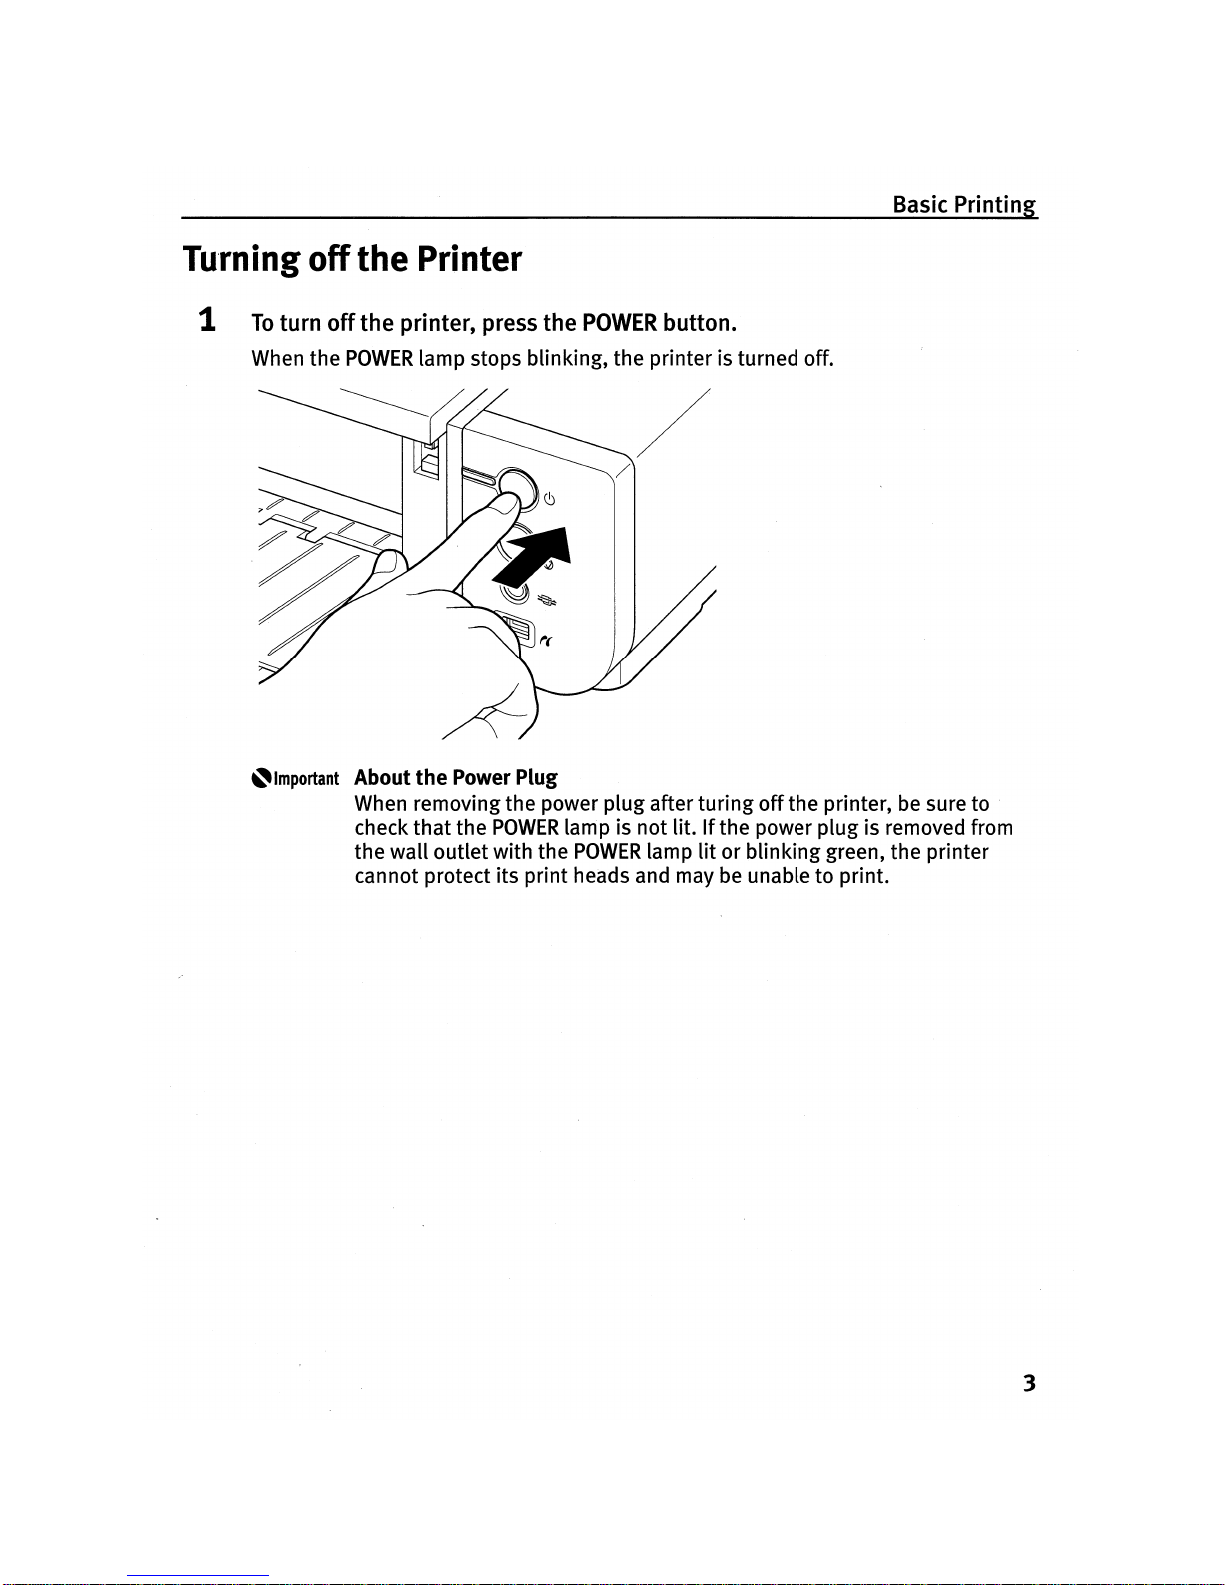
1
To
turn
off
the printer, press the
POWER
button.
When the
POWER
lamp stops blinking, the printeris turned off.
/
/
~Important
About
the
Power Plug
When removing the power
plug
after
turing
off
the
printer, be sure to
check
that
the
POWER
lamp is
not
lit.Ifthe power
plug
is removed from
the
wall
outlet
with the
POWER
lamp
litorblinking
green, the printer
cannot protectits print heads and may be unable
to
print.
3
Basic Printing
Loading
Paper
This section describes howtoload paper in the Auto Sheet Feeder and the Front
Tray.
II
Using
the
Auto Sheet Feeder and
the
FrontTray
You
can
load paper in both the Auto Sheet Feeder and the Front
Tray.
Loading paper in the Auto Sheet Feeder is easy, and is convenientifyou frequently
switch to and printonvarious sizes or typesofpaper.
Use
the Front
Traytoprint
on large size paper or to printonthick
paper suchasart
paper.
* There are some kinds
of
paper, dependingontheir
size or type,
that
can
onlybeused in eithertheAuto Sheet Feeder
or the Front
Tray.
See
"UsingSpecialty
Media"onpage 15.
II
Print MediatoAvoid
Do
not use the following typesofpaper. Using such paper
will
not
only produce
unsatisfactory results,
but
can
also cause the printerto jam or malfunction.
• Folded, curledorwrinkled paper
• Damp paper
• Excessively thin paper
Auto Sheet Feeder:
Less
than 64 gsm /17lb
Front Tray:
Less
than 0.1 mm / 4 mil
• Excessively
thick
paper
Auto Sheet Feeder: More than
105
gsm /28lb (plain paper except for supported
Canon genuine media)
* However, you
can
use
art
paper
that
is not produced by Canon
that
is up to 200 gsm /53lb.
See
"Non-Canon Genuine Specialty Paper" in the User's
Guide.'
Front Tray: More than
1.2
mm / 47
mil
• Picture postcards
• Postcards affixed
with
photos or stickers
• Envelopes with double flaps
• Envelopes with stickerflaps
• Envelopes withanembossed ortreated surface
• Any typeofpaper
with
holes
• Paper
that
is not rectangular
• Paper bound with staples orglue etc.
• Paper coated with adhesive
• Paper decorated with
glitter
etc.
4
Basic Printing
II
Loading Paper in
the
Auto Sheet Feeder
W
Note
For
detailed informationonthe Canon genuine media for use with its
various printers, refer to
"Using
Specialty
Media"
on page 15, or
"Printing
Media"
in the User's Guide.
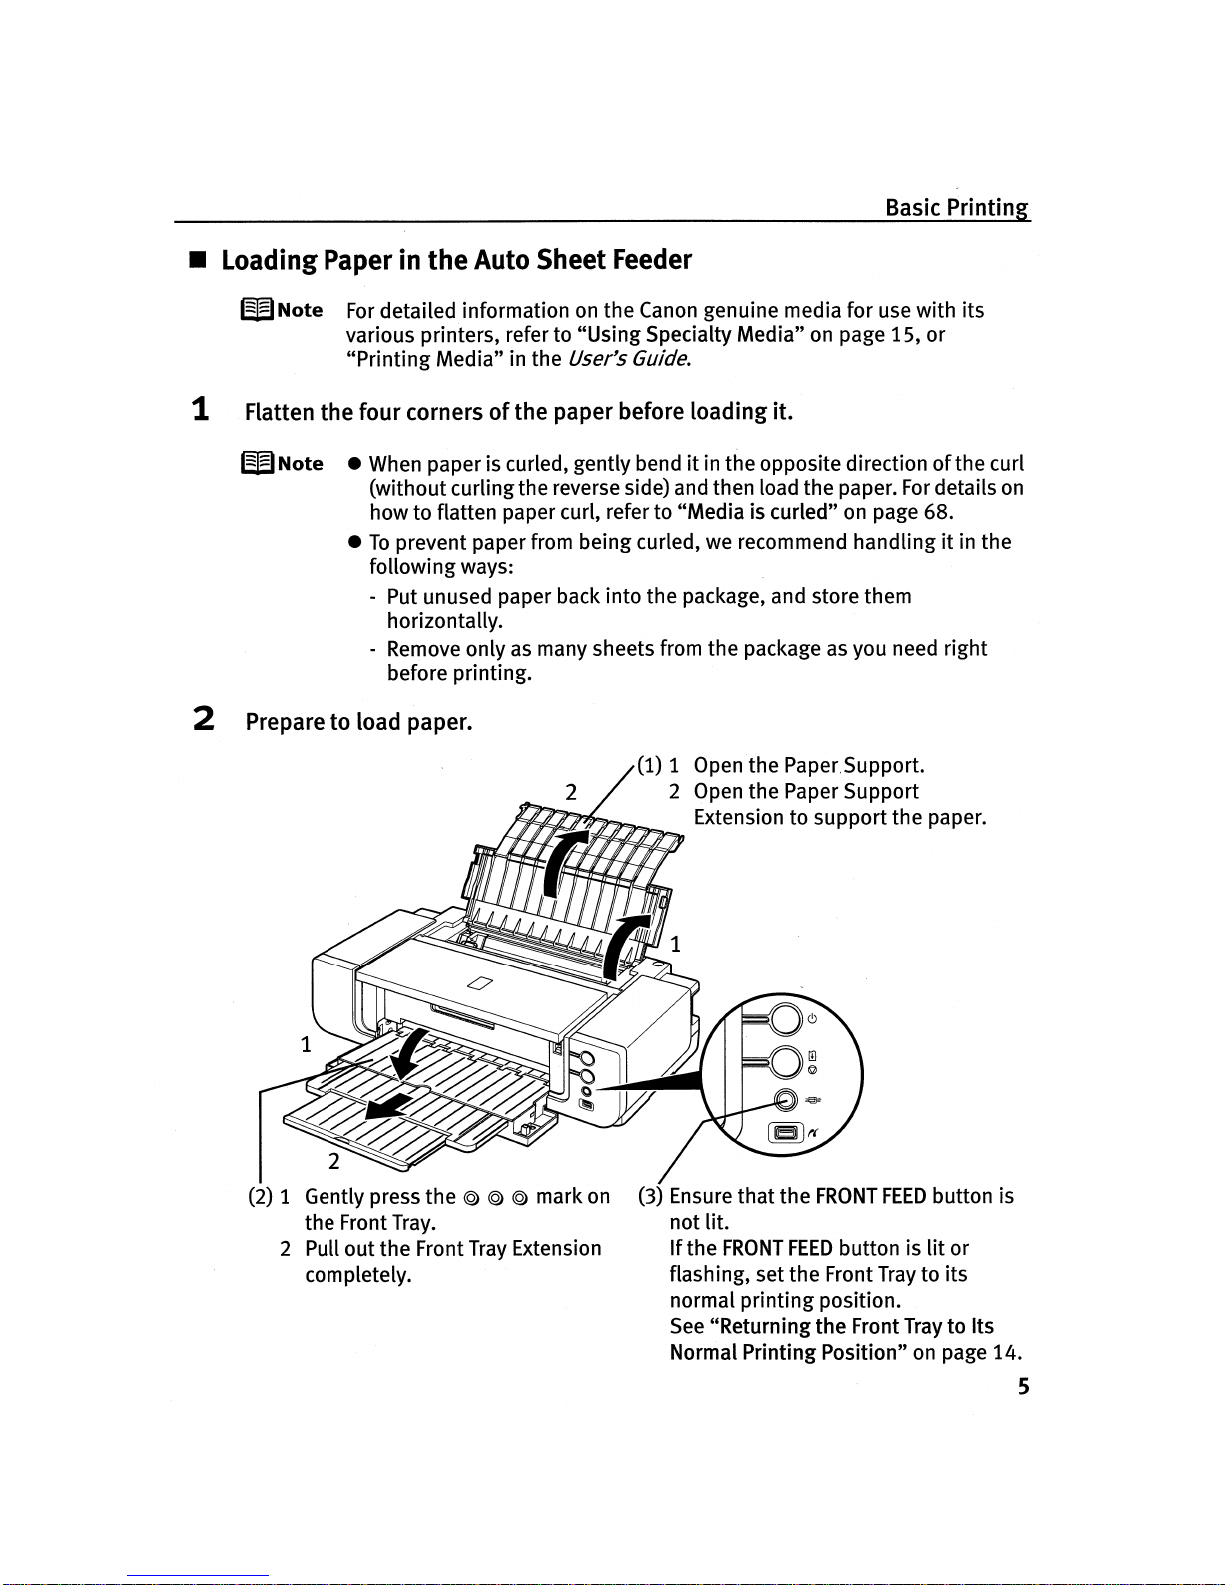
1 Flatten the four corners
of
the paper before loading it.
Open the Paper,Support.
Open the Paper Support
Extension to support the paper.
(2)
1 Gently press the © © © mark on
the FrontTray.
2
Pullout
the FrontTray Extension
completely.
(3) Ensure
that
the
FRONT
FEED
button is
not lit.
If
the
FRONT
FEED
button is
lit
or
flashing, set the Front
Tray
to its
normal
printing
position.
See
"Returning
the
Front TraytoIts
Normal Printing Position"onpage 14.
5
Basic Printing
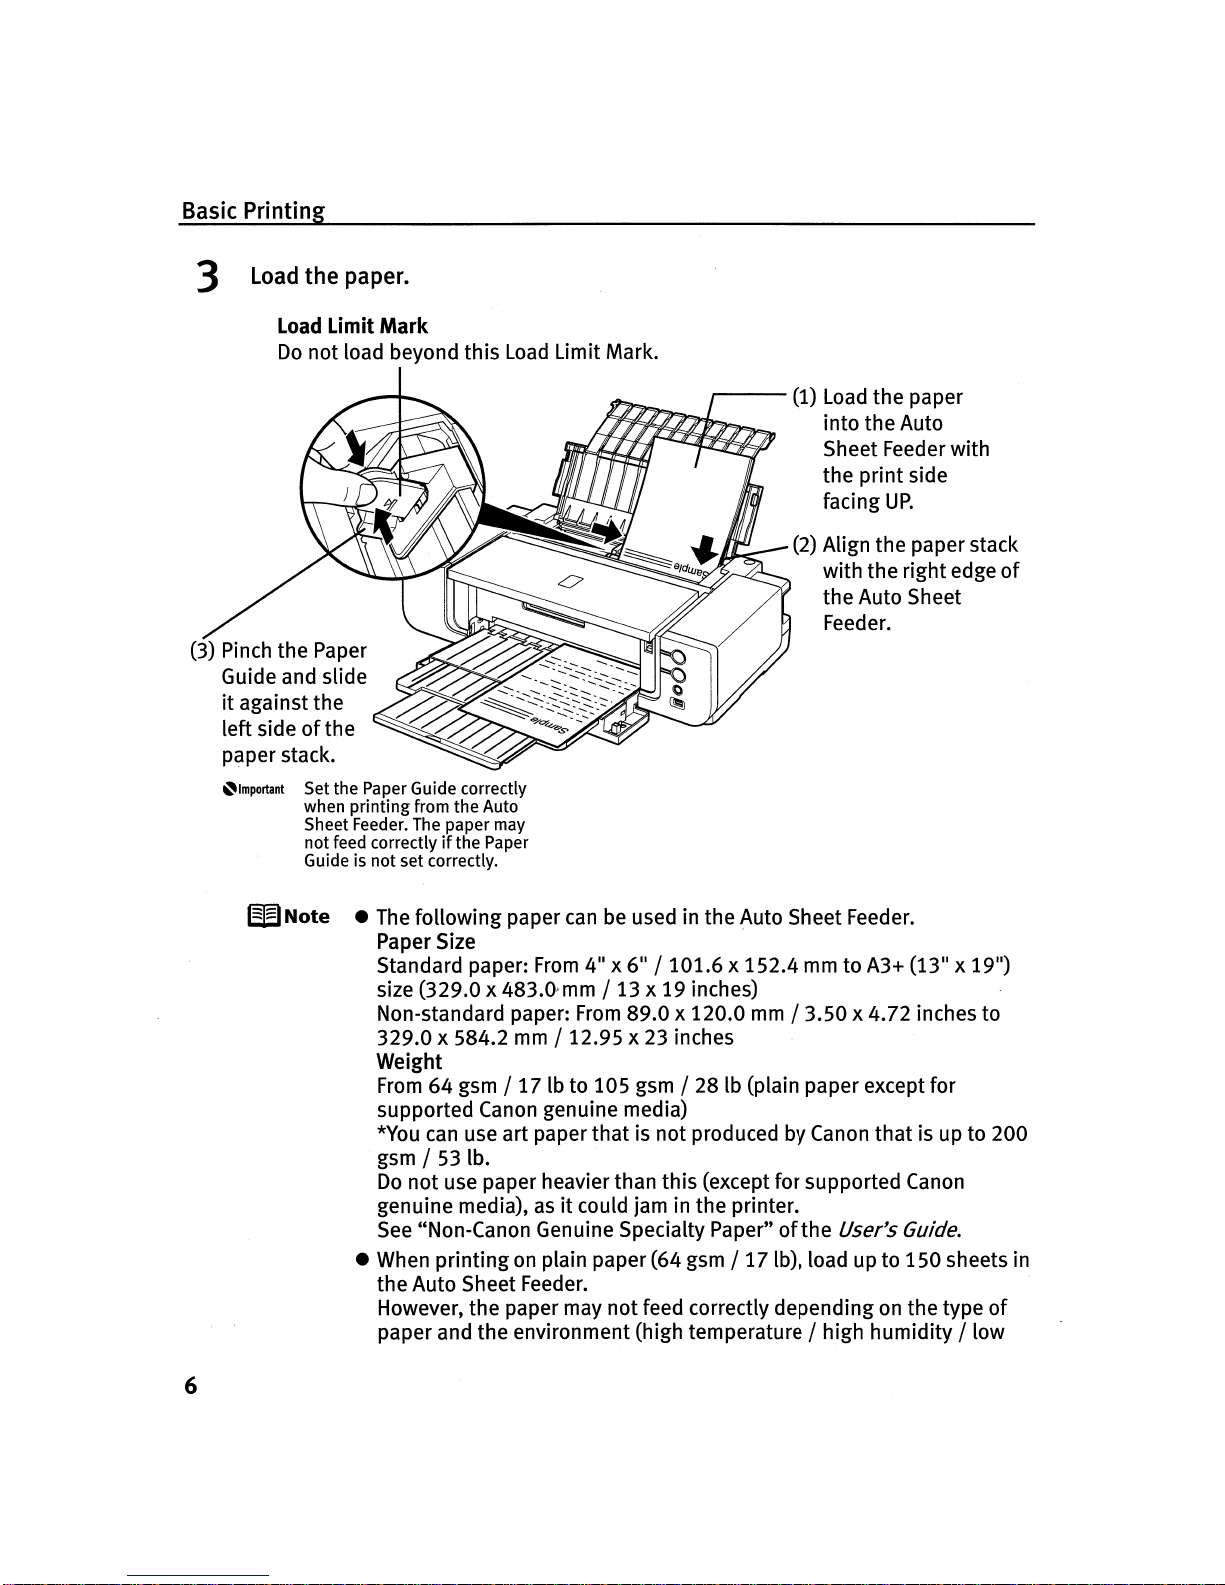
3 load the paper.
Load Limit
Mark
Do
not load beyond
this
Load
Limit Mark.
,-----
(1) Load the paper
into the Auto
Sheet Feeder with
the
print
side
facing
UP.
(2) Align the paper stack
with the right edge
of
the Auto Sheet
Feeder.
(3) Pinch the Paper
Guide and slide
it
against the
left sideofthe
p~per
stack.
~Important
Set the Paper Guide correctly
when
printing
from the Auto
Sheet Feeder. The paper may
not feed correctly
if
the Paper
Guide is
not
set correctly.
WNote
•
The
following paper
canbeused in the Auto Sheet Feeder.
Paper Size
Standard paper:
From
411x 6
11
/
101.6x152.4
mm to A3+ (1311x
19
11
)
size (329.0x 483.0·'mm / 13 x19inches)
Non-standard paper:
From
89.0 x
120.0
mm
/ 3.50 x 4.72 inches to
329.0 x 584.2
mm
/ 12.95 x 23 inches
Weight
From64gsm /17lbto
105 gsm / 28 lb (plain paper except for
supported Canon genuine media)
*You
can
use art paper
thatisnot
produced by Canon
that
is up to 200
gsm / 53 lb.
Do
not
use paper heavier than
this
(except for supported Canon
genuine media),asit
could jam in the printer.
See "Non-Canon Genuine Specialty Paper"ofthe User's Guide.
• When
printingonplain paper(64 gsm /17lb), load up to
150
sheets in
the Auto Sheet Feeder.
However, the paper may
not
feed correctly depending on the type
of
paper and the environment (high temperature / high
humidity
/ low
6
Basic Printing
temperature / low humidity).Ifthis happens, reduce the number
of
sheetsofpaper by about
half
(approximately 5
mm
/
0.2
inches).
• When printing
on
art paper
that
is not produced by Canon that is up to
200
gsm /
53
lb, load one sheet at a time.
• When
printingonplain paper, do not stack more than 50 sheets in the
Front
Tray.
•
Do
nottouch the printed surfaces until the ink,dries.
For
specific drying
times, refer to the instructions packaged with your media.
7
Basic Printing
II
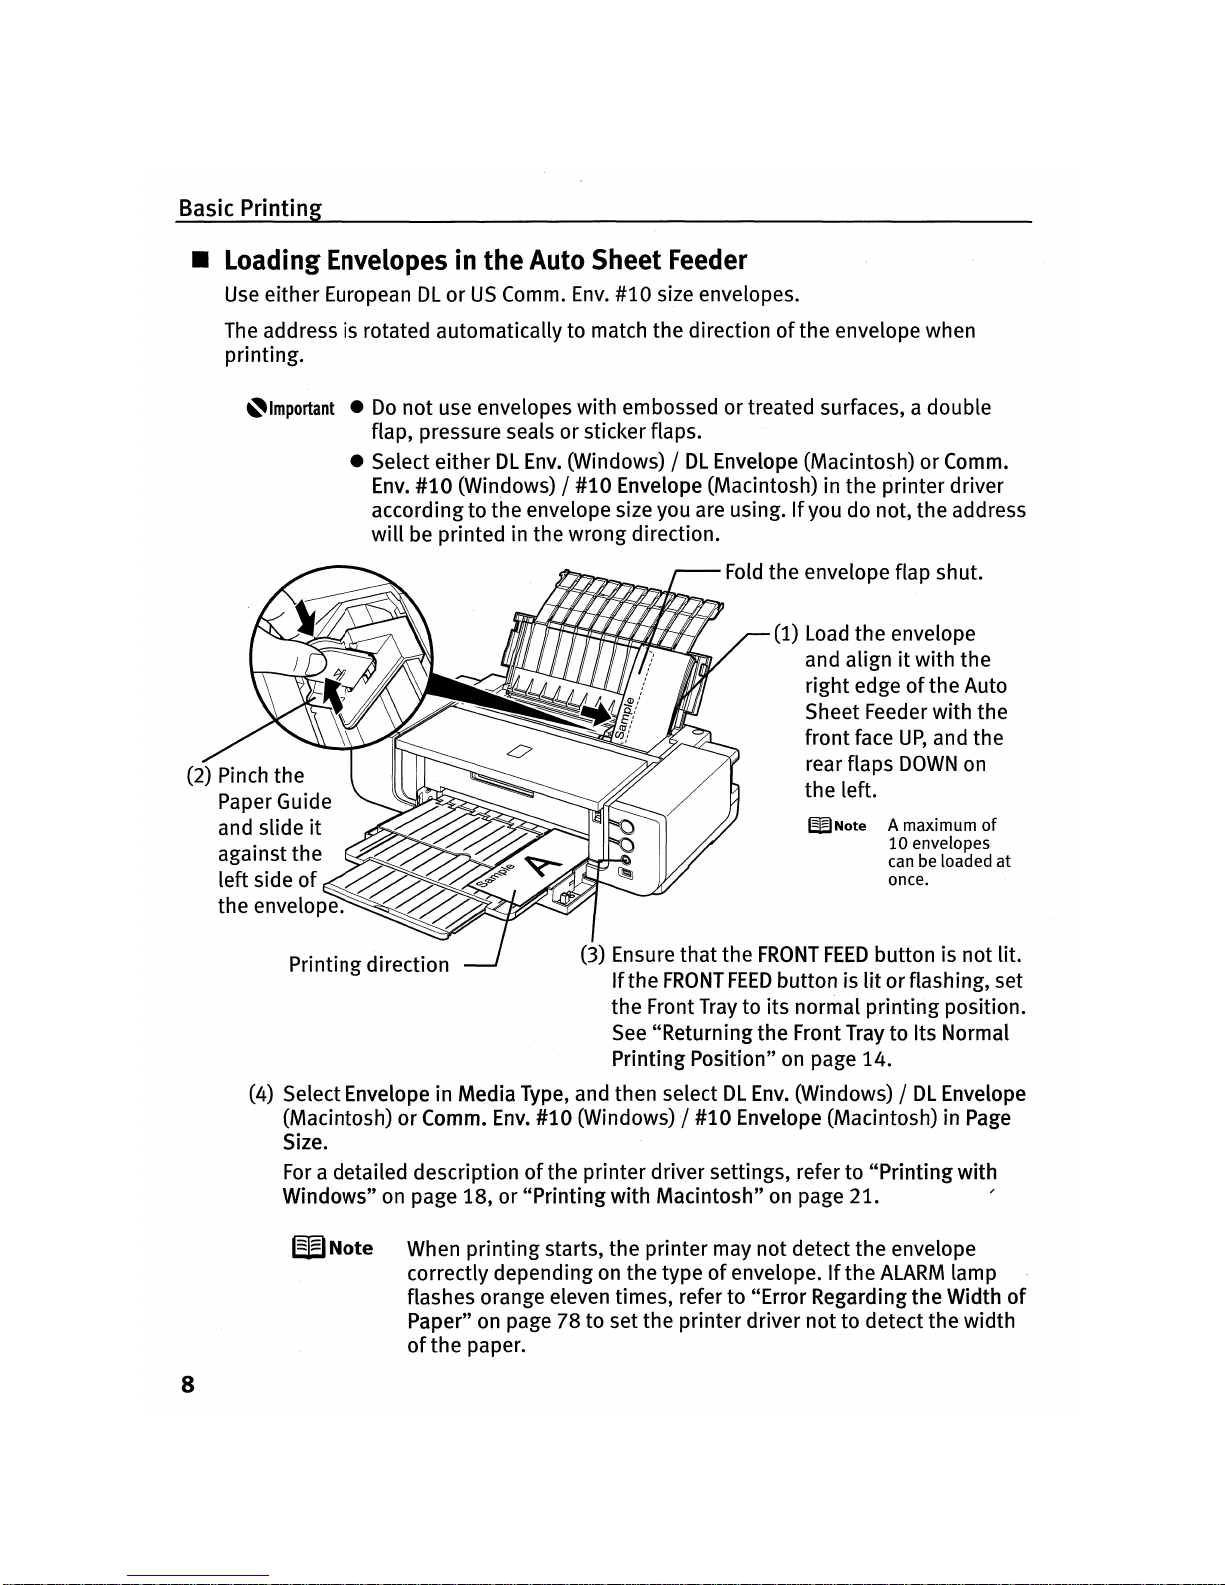
Loading Envelopes in
the
Auto Sheet Feeder
Use
either EuropeanDLorUS
Comm.
Env.
#10
size envelopes.
The
address is rotated automatically to match the directionofthe envelope when
printing.
WNote
A maximum
of
10
envelopes
can be loaded
at
once.
(1)
Load the envelope
and alignitwith the
right
edgeofthe Auto
Sheet Feeder with the
front face
UP,
and the
rear flaps
DOWN
on
the left.
Printing direction
(3) Ensure
that
the
FRONT
FEED
button is not lit.
If
the
FRONT
FEED
button is
litorflashing, set
the Front
Tray
to its normal
printing
position.
See
"Returningthe Front TraytoIts Normal
Printing Position"onpage
14.
(4) Select Envelope in Media Type, and then select
DL
Env.
(Windows) /DLEnvelope
(Macintosh)orComm.
Env.
#10 (Windows) /
#10
Envelope (Macintosh) in
Page
Size.
For
a detailed descriptionofthe
printer driver settings, referto
"Printing
with
Windows" on page
18,
or
"Printing
with Macintosh"onpage
21.
,.
~Important
•
Do
not
use envelopes with embossed ortreated surfaces, a double
flap, pressure seals or sticker flaps.
• Select eitherDLEnv.
(Windows) /DLEnvelope (Macintosh) or Comm.
Env.
#10
(Win,dows) /
#10
Envelope (Macintosh) in the printerdriver
accordingto the envelope size you are using.Ifyou do not, the address
will
be printed in the wrong direction.
Fold
the envelope flap shut.
WNote
When
printing
starts, the printer may not detect the envelope
correctly dependingonthe typeofenvelope.Ifthe
ALARM
lamp
flashes orange eleven times, refer to "ErrorRegarding the Width
of
Paper" on page 78 to setthe printer driver
not
to detectthe width
of
the
paper.
8
Basic Printing
II
Loading 411x 611or
511x 711-sized Paper in the Auto Sheet Feeder
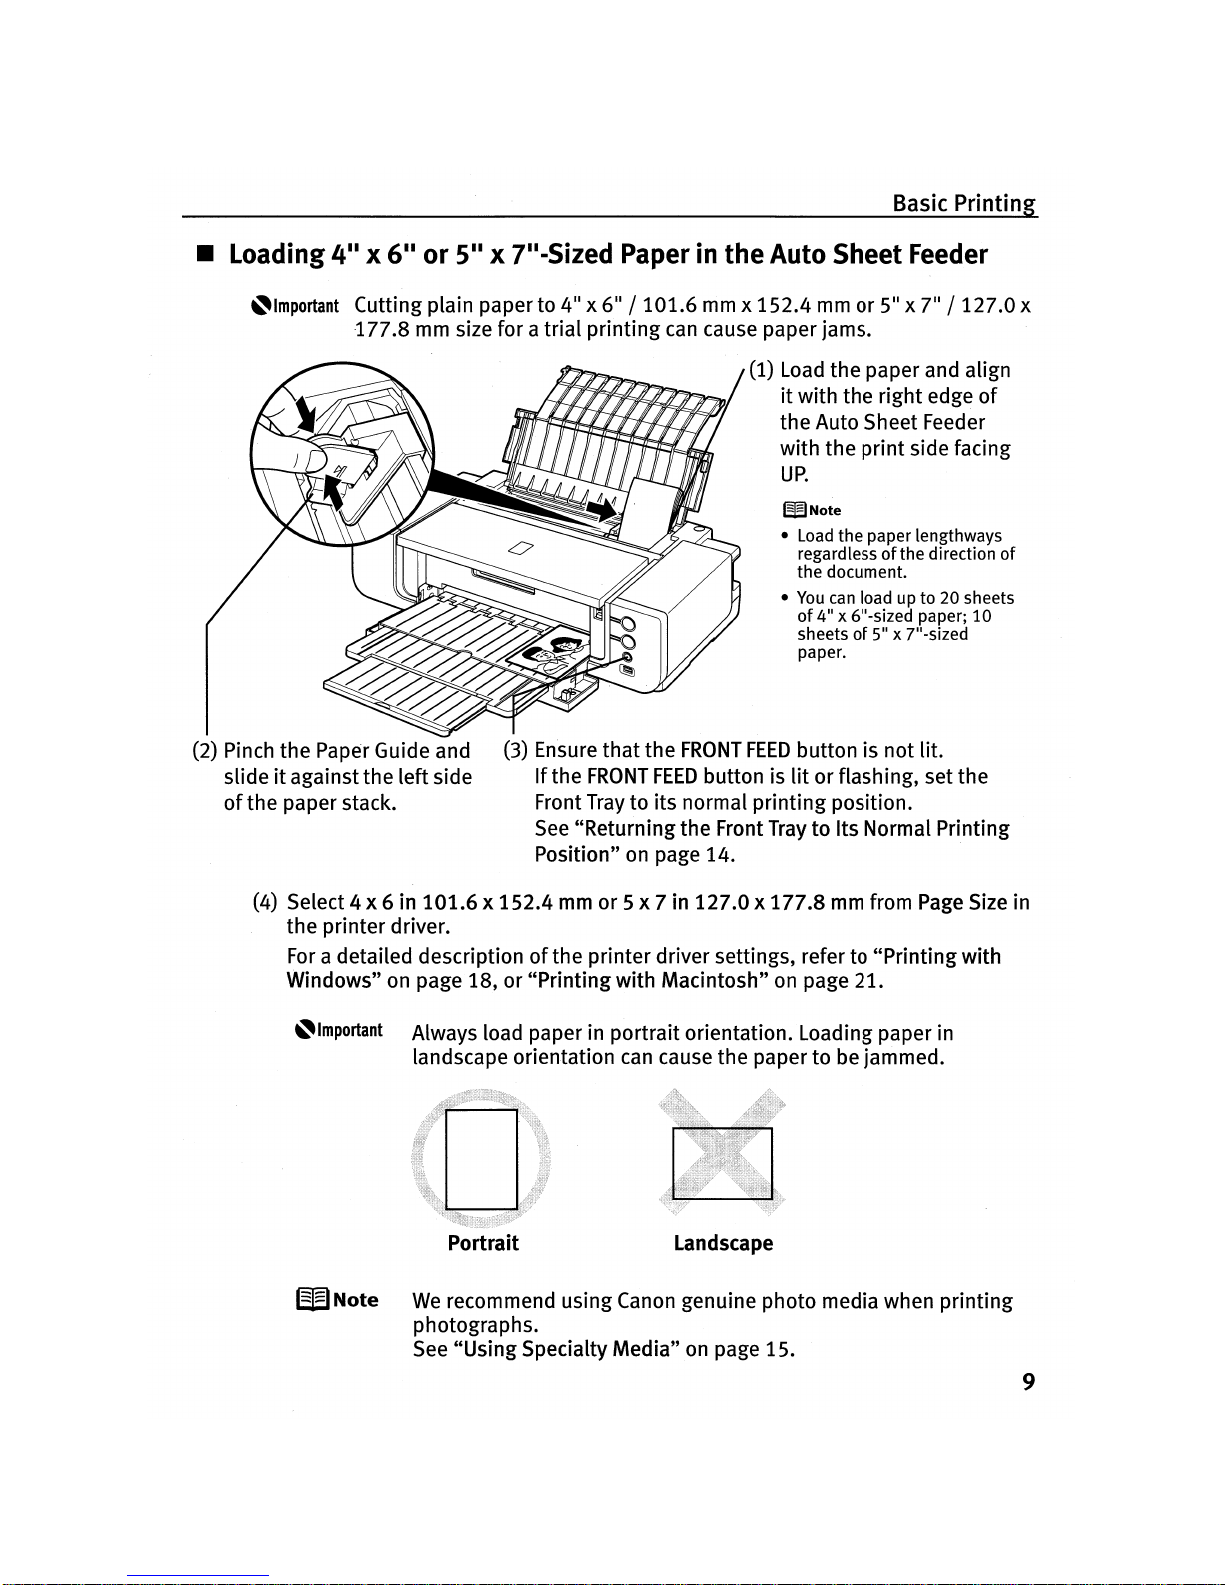
~Important
Cutting plain paperto 411x 6
11
/
101.6
mmx152.4
mmor511x 7
11
/
127.0
x
-177.8 mm size for a
trial
printing
can
cause paper jams.
(1) Load the paper and align
it
with the right edge
of
the Auto Sheet Feeder
with the
print
side facing
UP.
WNote
•
Load
the paper lengthways
regardless
of
the direction
of
the document.
•
You
can
load up to 20 sheets
of
4" x 6"-sized paper; 10
sheets
of
5" x 7"-sized
paper.
(2) Pinch the Paper Guide and
slideitagainstthe
left
side
of
the paperstack.
(3) Ensure
that
the
FRONT
FEED
button is not lit.
If
the
FRONT
FEED
button is
lit
or flashing, set the
Front
Traytoits normal
printing
position.
See
"Returningthe Front TraytoIts Normal Printing
Position"onpage 14.
(4) Select 4x 6 in
101.6x152.4
mm or 5 x 7 in
127.0x177.8
mm from
Page
Size in
the printerdriver.
For
a detailed descriptionofthe printer driver settings, refer to
"Printing
with
Windows" on page 18, or
"Printing
with Macintosh" on page 21.
~Important
Always load paper in portrait orientation. Loading paper in
landscape orientation
can
cause the paper to be jammed.
Portrait Landscape
W
Note
We
recommend using Canon genuine photo media when
printing
photographs.
See "UsingSpecialty
Media"onpage 15.
9
Basic Printing
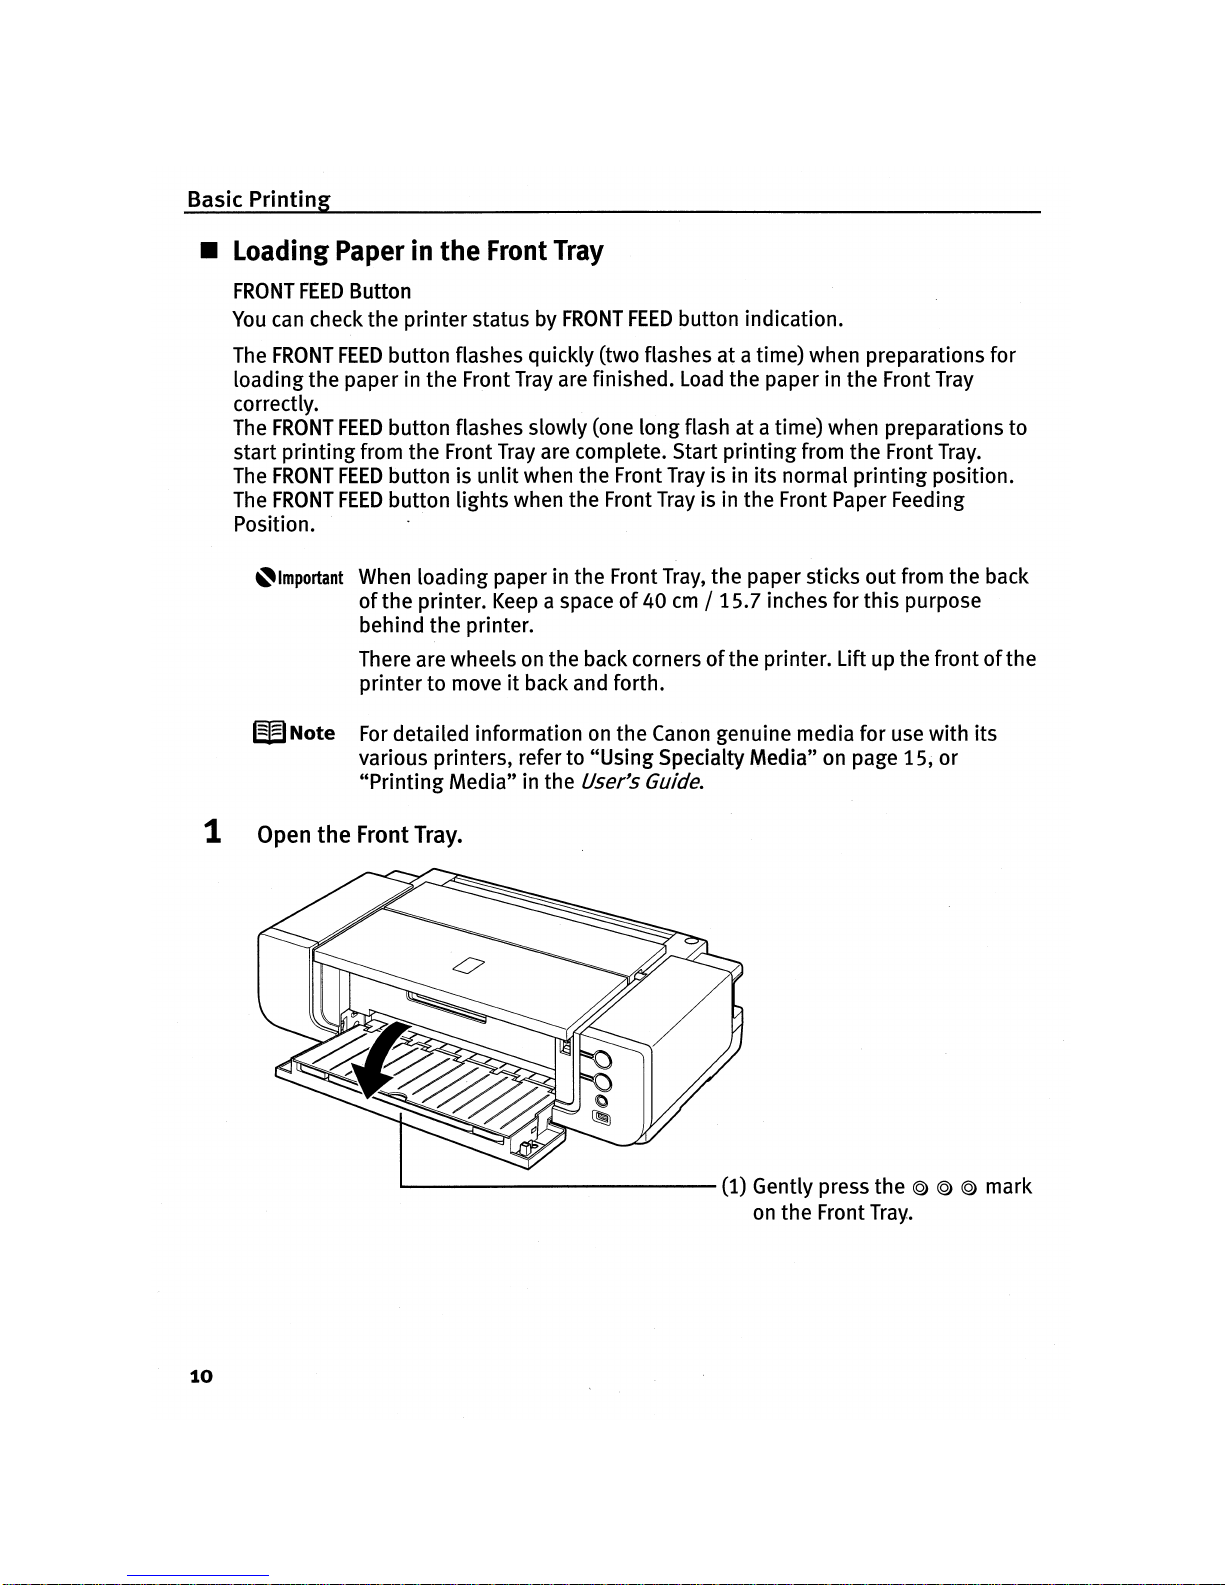
II
Loading Paper in
the
Front Tray
FRONT
FEED
Button
You
can check
the
printer
status by
FRONT
FEED
button indication.
The
FRONT
FEED
button
flashes quickly(two flashes at a time) when preparations
for
loading
the
paper in
the
Front Tray are finished. Load
the
paper in
the
Front Tray
correctly.
The
FRONT
FEED
button
flashes slowly(one
long
flashata time) when preparations
to
start
printing
from
the
Front Tray are complete. Start
printing
from
the
Front Tray.
The
FRONT
FEED
buttonisunlit
when
the
Front Tray is in
its
normal
printing
position.
The
FRONT
FEED
button
lights
when
the
Front Tray is in
the
Front Paper Feeding
Position.
~Important
When
loading
paper in
the
Front Tray,
the
paper sticks
out
from
the
back
of
the
printer. Keep a spaceof40cm/
15.7
inches
for
this
purpose
behind
the
printer.
There are wheels on
the
back cornersofthe
printer. Liftup
the
frontofthe
printertomoveitback and
forth.
WNote
For
detailed information on
the
Canon genuine media
for
use
with
its
various printers, referto"Using
Specialty
Media"
on page
15,
or
"Printing
Media"inthe
User's Guide.
1 Open the FrontTray.
~----------
(1) Gently press
the
© © © mark
on
the
Front Tray.
10
d e
below.
·
How
the
proce
ur
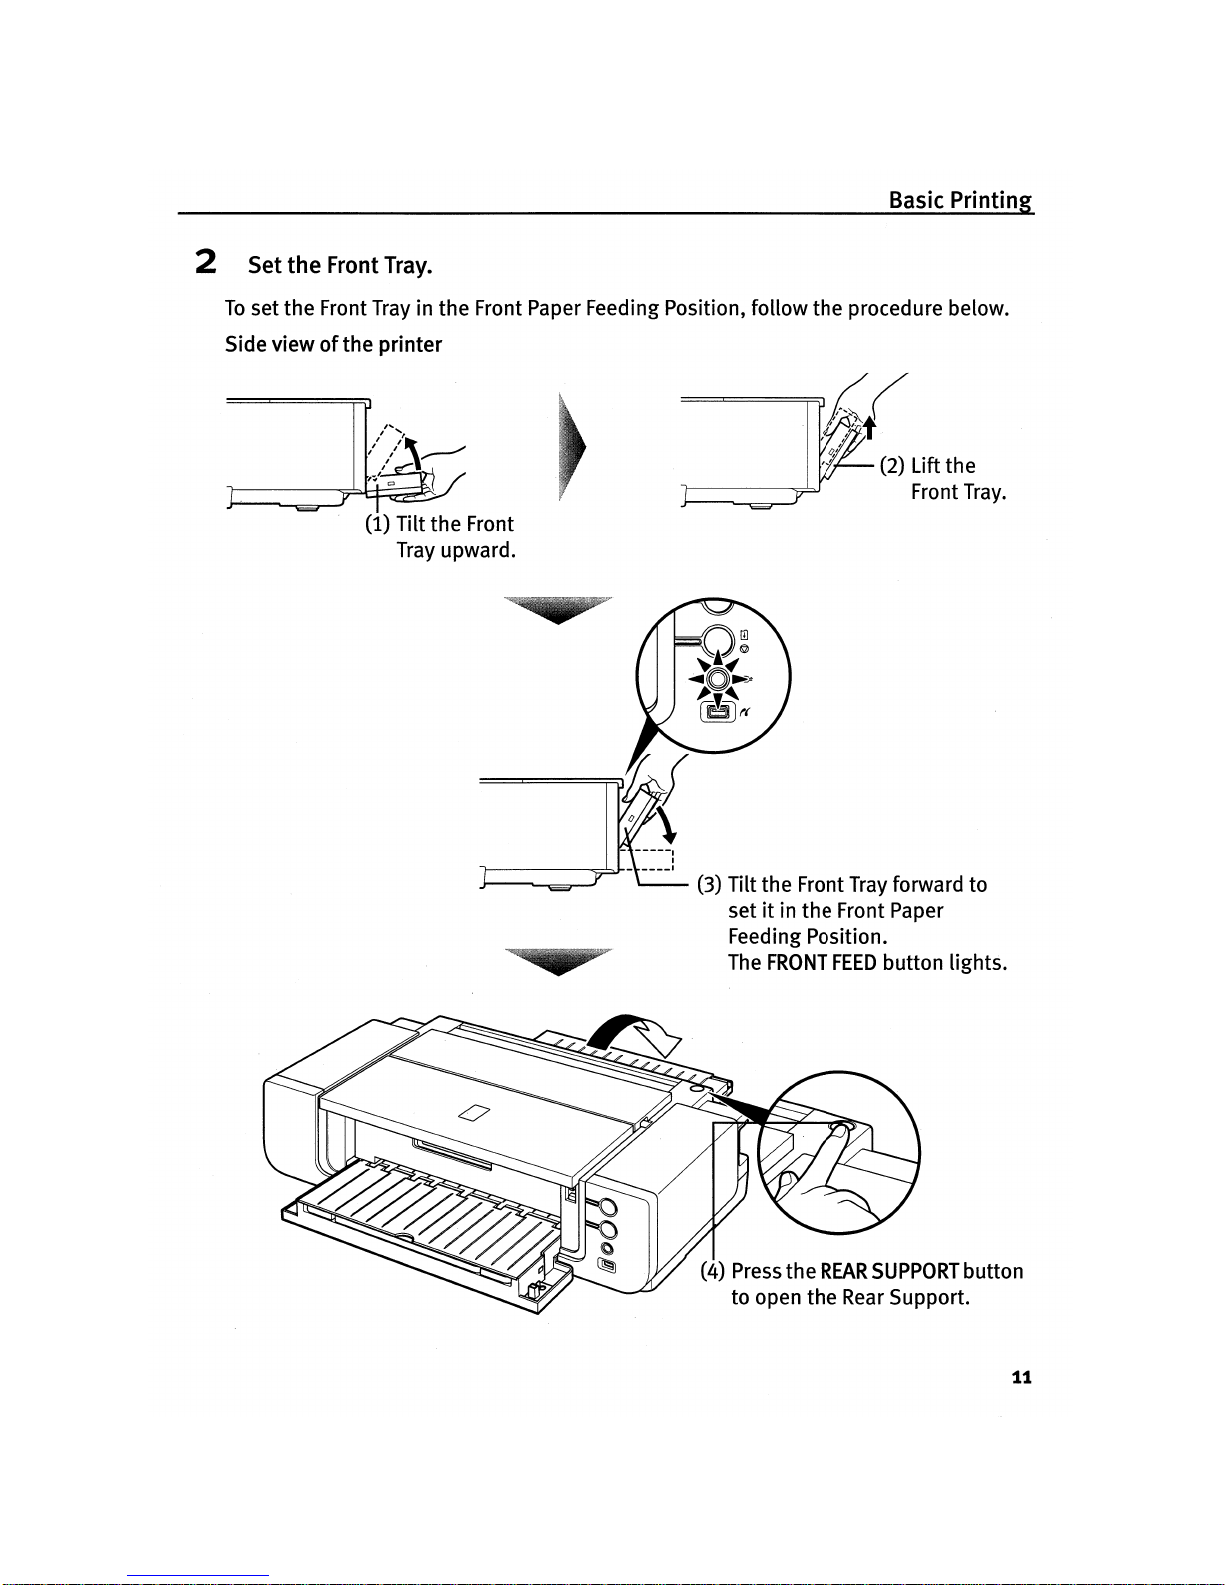
5 t the
Front
Tray.
Feeding Position, fo
e . the Front Paper
set
the
Front
Tray
In
~(
To
.
ter
Side viewofthe
prm
otl:?;t
:l'
(2) Lift the
Front
Tray.
2
(1)
Tilt
the
Front
Tray
upward.
nt
Tray
forward
to
(3)
Tilt
~h.e
Frho
Front Paper
setItIn
t e
..
·
Position.
.
hts
Feedmg
EED
button lIg
..
The
FRONT
F
EAR
SUPPORT
button
(4) Press
the
R Rear Support.
to
open
the
11
Basic Printing
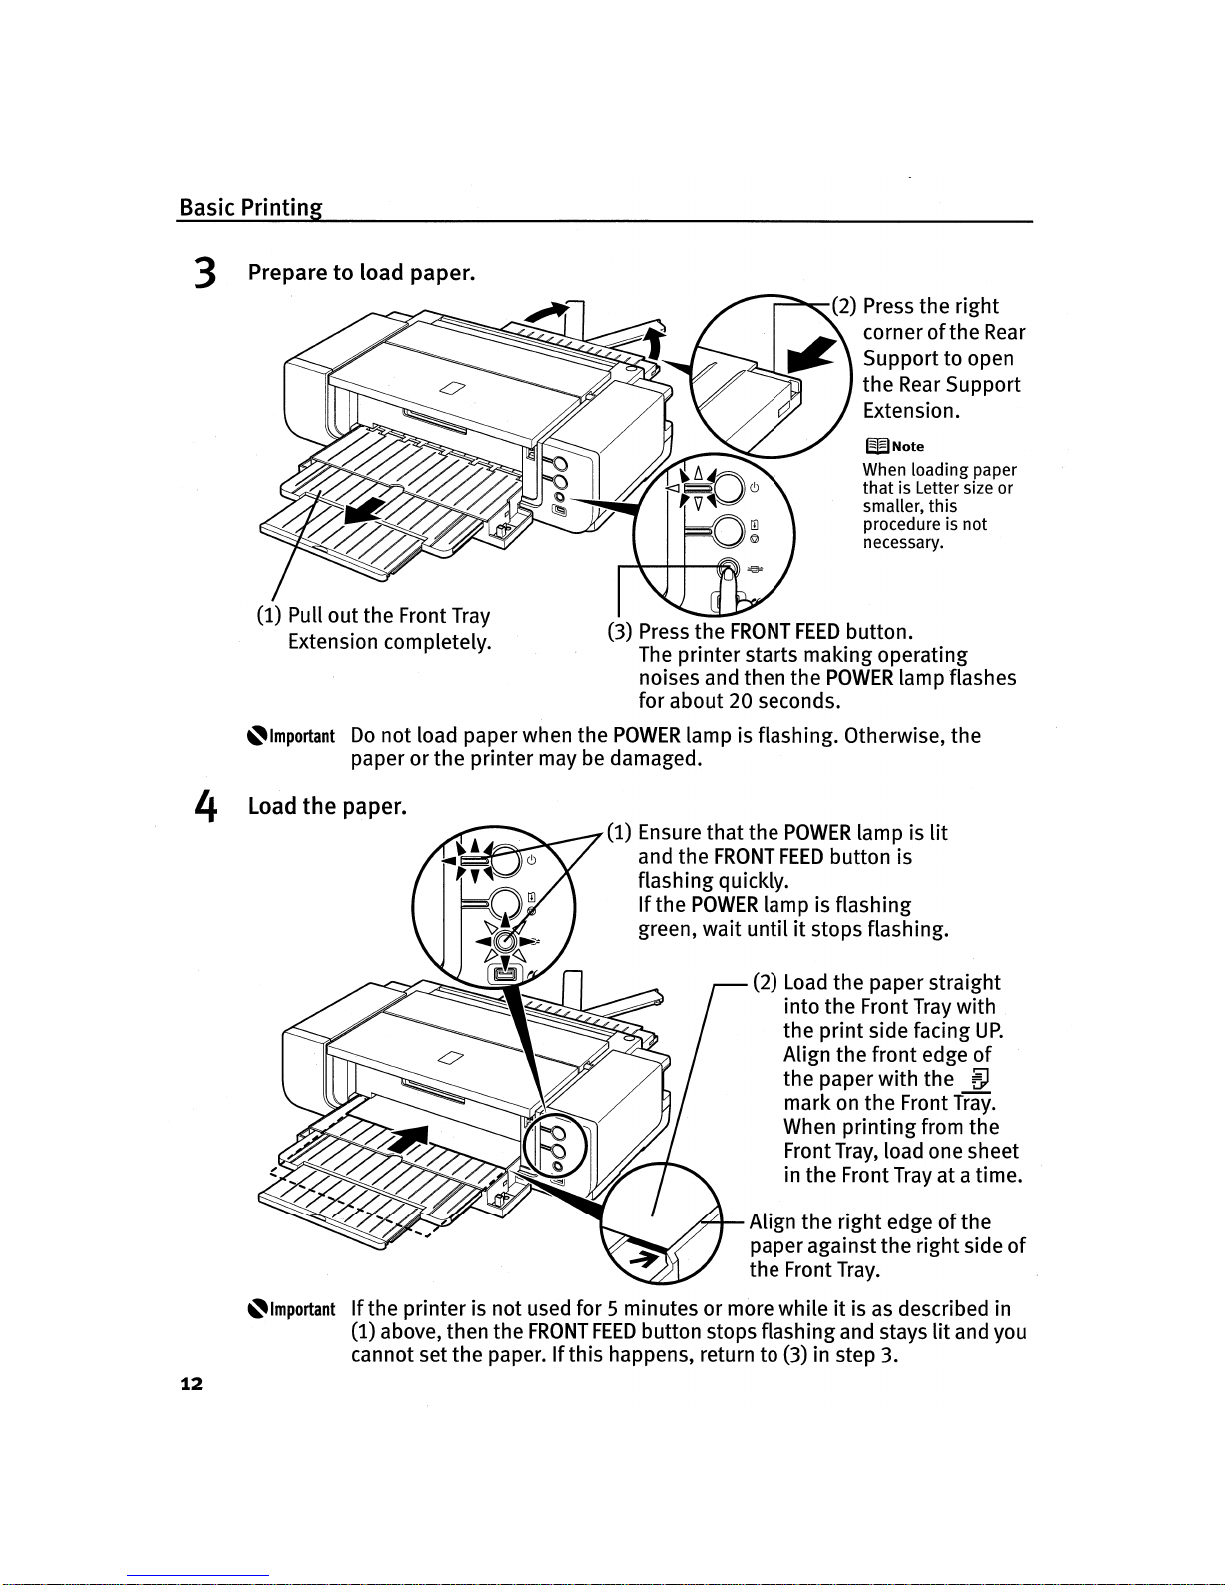
3 Prepare to load paper.
WNote
When loading paper
that
is Letter size or
smaller, this
procedure is not
necessary.
(2) Press
the
right
cornerofthe
Rear
Support
to open
the
Rear
Support
Extension.
(1) Pull
out
the
Front Tray
Extension completely.
(3) Press
the
FRONT
FEED
button.
The
printer
starts
making
operating
noises and then
the
POWER
lamp flashes
for
about
20 seconds.
~Important
Do
not
load paperwhen
the
POWER
lamp is flashing. Otherwise,
the
paperorthe
printer
may be damaged.
(2) Load
the
paper
straight
into
the
Front Tray
with
the
print
side facing
UP.
Align
the
front
edge
of
the
paper
with
the
~
markonthe
Front
Tray.
When
printing
from
the
Front Tray, load onesheet
in
the
Front Trayata time.
(1)
Ensure
that
the
POWER
lamp is
lit
and
the
FRONT
FEED
button
is
flashing
quickly.
If
the
POWER
lamp is
flashing
green,
wait
untilitstops flashing.
Align
the
right
edgeofthe
paperagainst
the
right
side
of
the
Front Tray.
~Important
If
the
printerisnot
used for 5 minutesormore
whileitis as described in
(1)
above, then
the
FRONT
FEED
button stops flashing and stays
lit
and you
cannot set
the
paper.Ifthis
happens, return to (3) in step 3.
4
load
the
paper.
12
Basic Printing
W Note • When paper is curled, gently bend
itinthe
opposite directionofthOe
curl
(without
curling
the
reverse side) and then load
the
paper.
For
detailsonhowtoflatten paper curl, refer to
"Mediaiscurled"
on page
68
.
•
To
prevent paper from being curled, we recommend
handlingitin
the
following
ways:
- Put unused paper back
into
the
package, and store them
horizontally.
- Remove only
as
many sheets from
the
packageasyou need
right
before
printing
.
•
For
details
on howtoload
the
paper, refer to
the
appropriate section in
"Printing
Media"inthe
User's Guide.
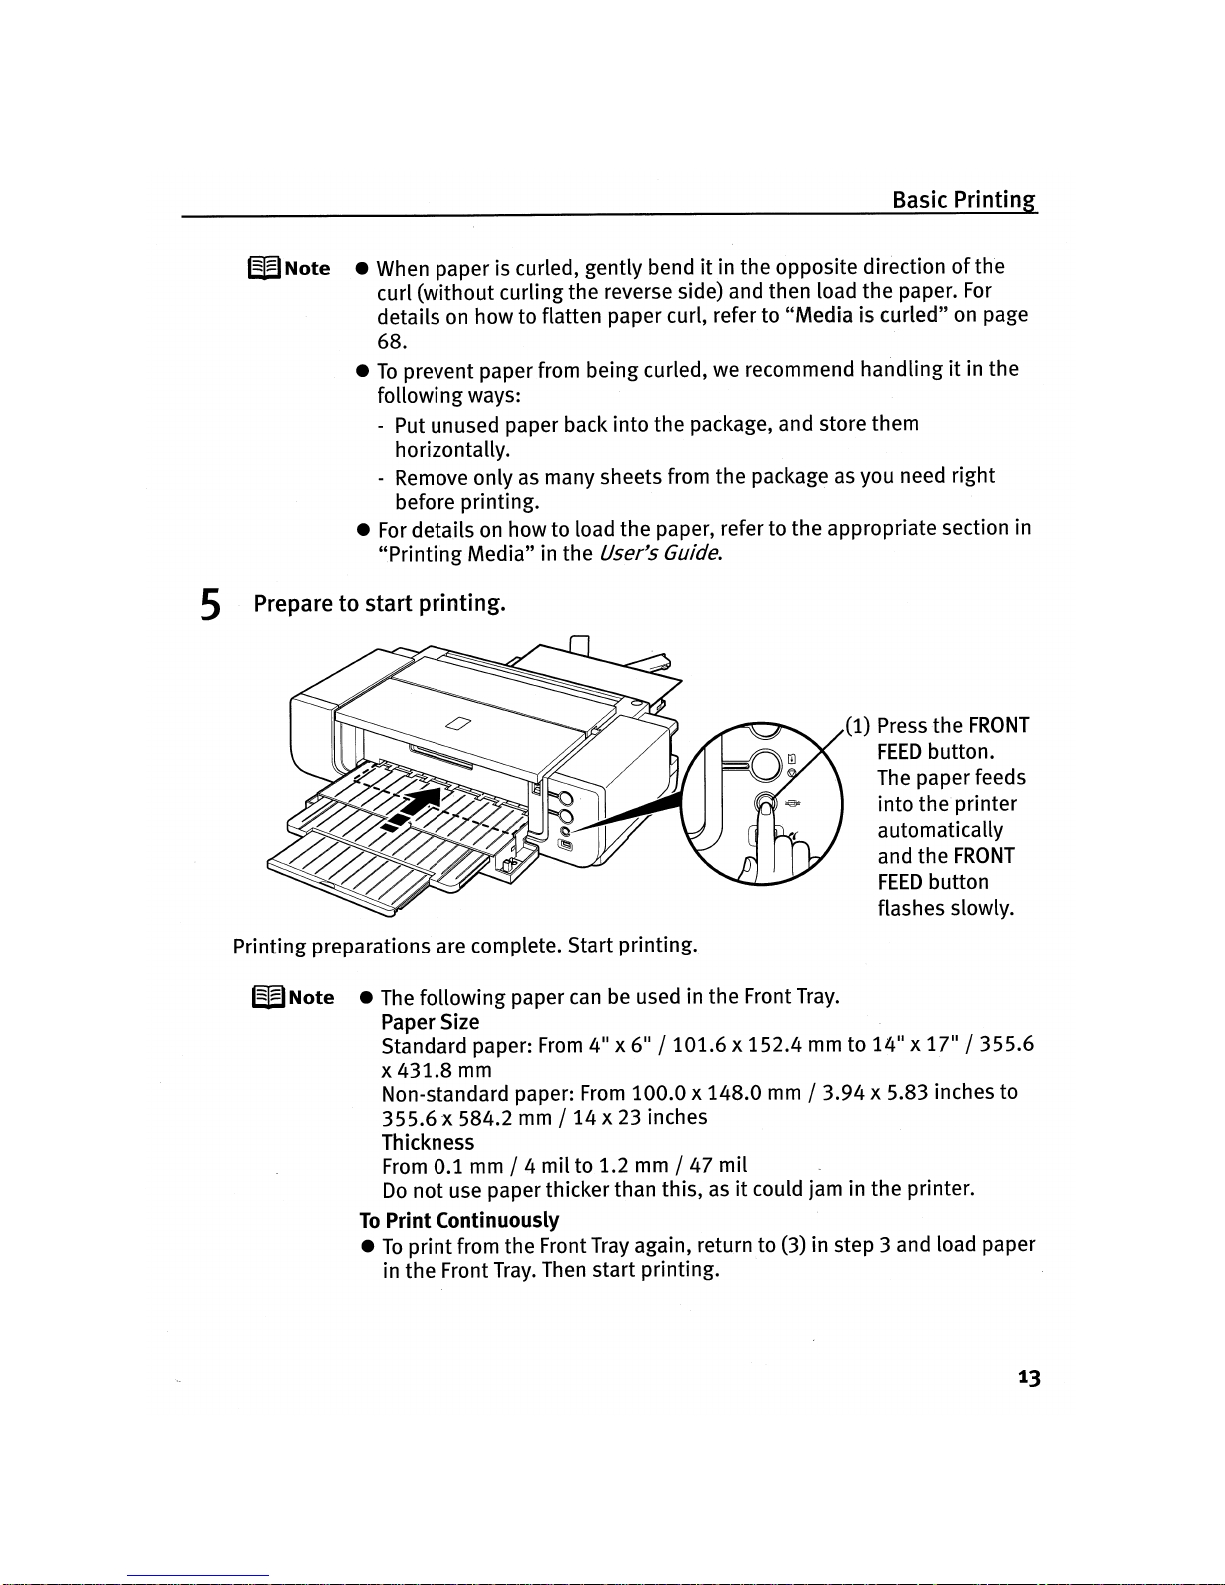
5 Prepare to start printing.
(1) Press
the
FRONT
FEED
button.
The paper feeds
into
the
printer
automatically
and
the
FRONT
FEED
button
flashes slowly.
Printing preparations are complete. Start
printing.
WNote
• The
following
paper
can
be used in
the
Front Tray.
Paper Size
Standard paper:
From
4" x 6" /
101.6x152.4
mm
to
14" x 17"
/355.6
x431.8
mm
Non-standard paper:
From
100.0x148.0
mm /
3.94
x 5.83 inches to
355.6
x 584.2 mm /14x 23 inches
Thickness
From
0.1 mm / 4
mil
to
1.2 mm / 47
mil
Do
not
use paperthicker than this,asit
could jam in
the
printer.
To
Print
Continuously
•
To
print
from
the
Front Tray again, return to (3) in step 3 and load paper
in
the
Front Tray. Then
start
printing.
13
Basic Printing
II
Returning
the
Front TraytoIts Normal PrintingPosition
When using the Auto Sheet Feeder, set the Front
Traytoits normal
printing
position.
~Important
•
Be
sure to followthe procedure belowwhen returning the Front
Tray
to
its normal printingposition. Otherwise, the printer maybedamaged.
• When the Front
Tray
is set to the Front Paper Feeding Position,
printing
by usingthe Auto Sheet Feeder is not possible.Besuretosetitto
its
normal
printing
position.
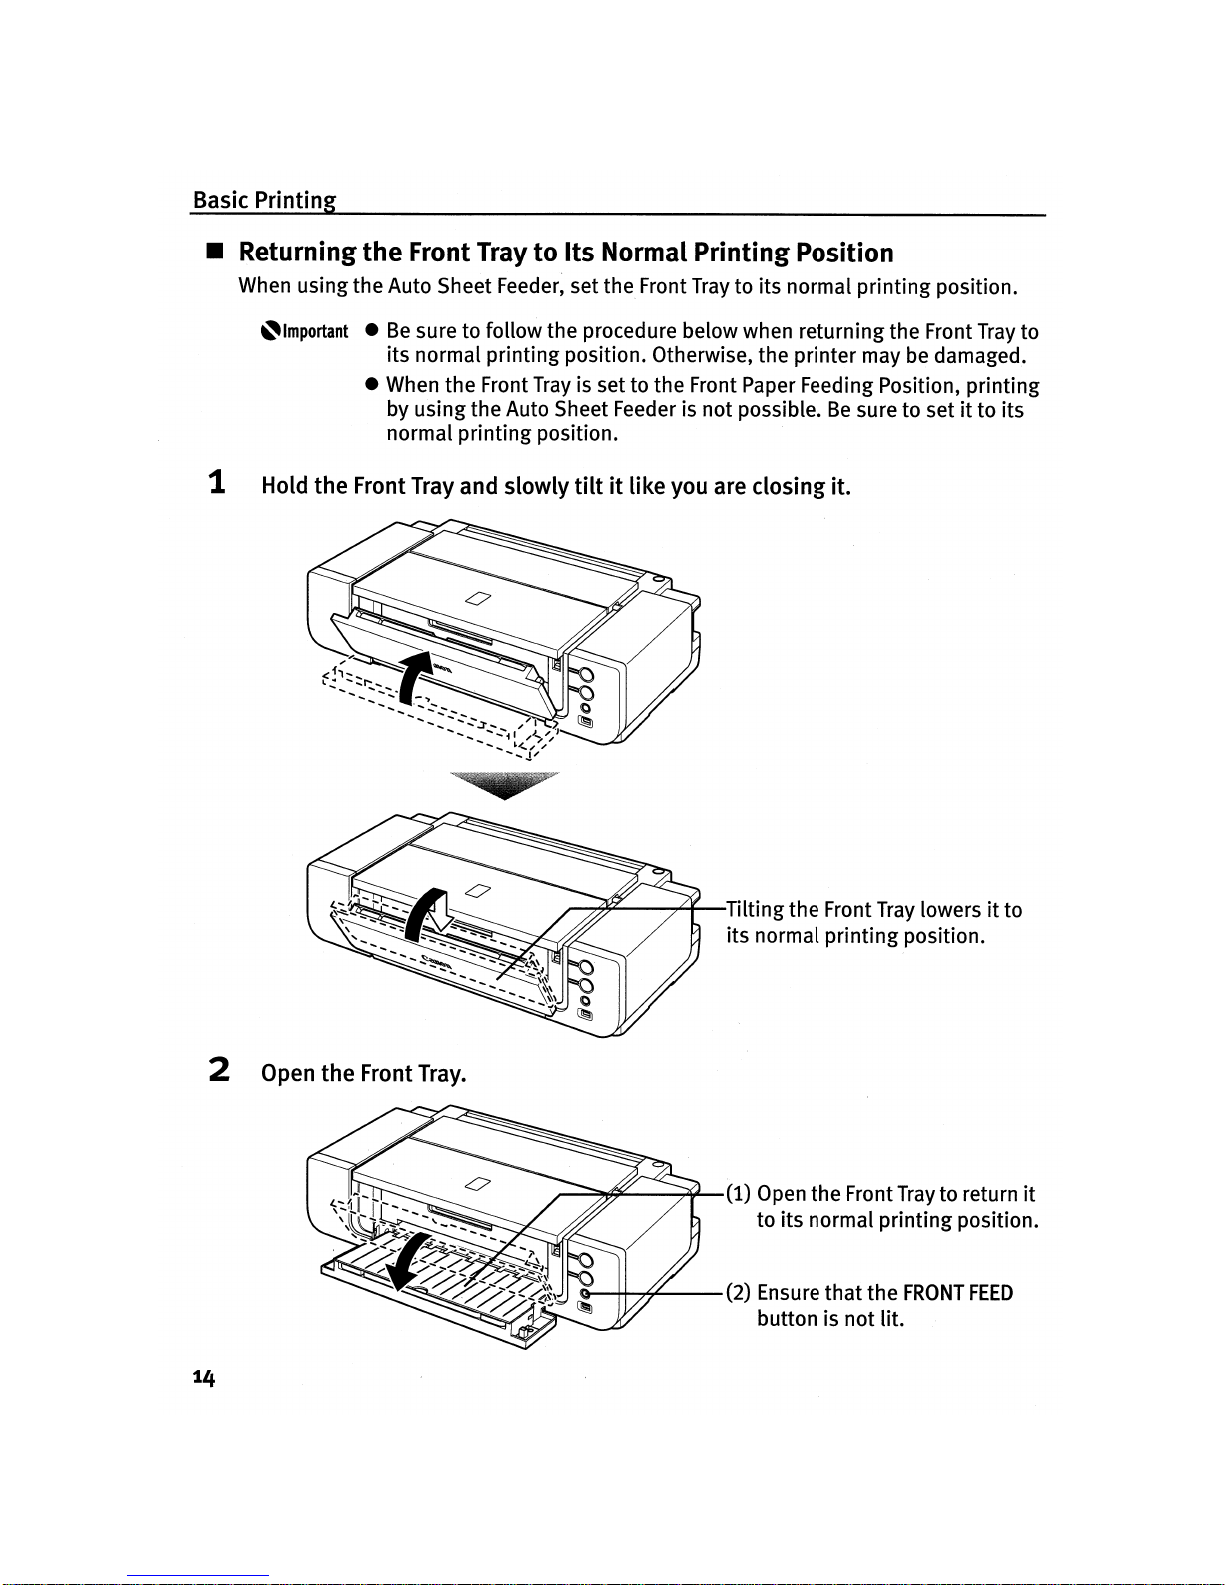
1 Hold the Front Tray and slowly
tiltitlike you are closing it.
~~----,.''''''''--Tilting
the
Front
Tray
lowersitto
its normal
printing
position.
2 Open the Front
Tray.
""-~1I1"---~-(1)
Open theFront
Tray
to return
it
to
its
normal
printing
position.
o---~~--(2)
Ensure
that
the
FRONT
FEED
button is
not
lit.
1
4
Basic Printing
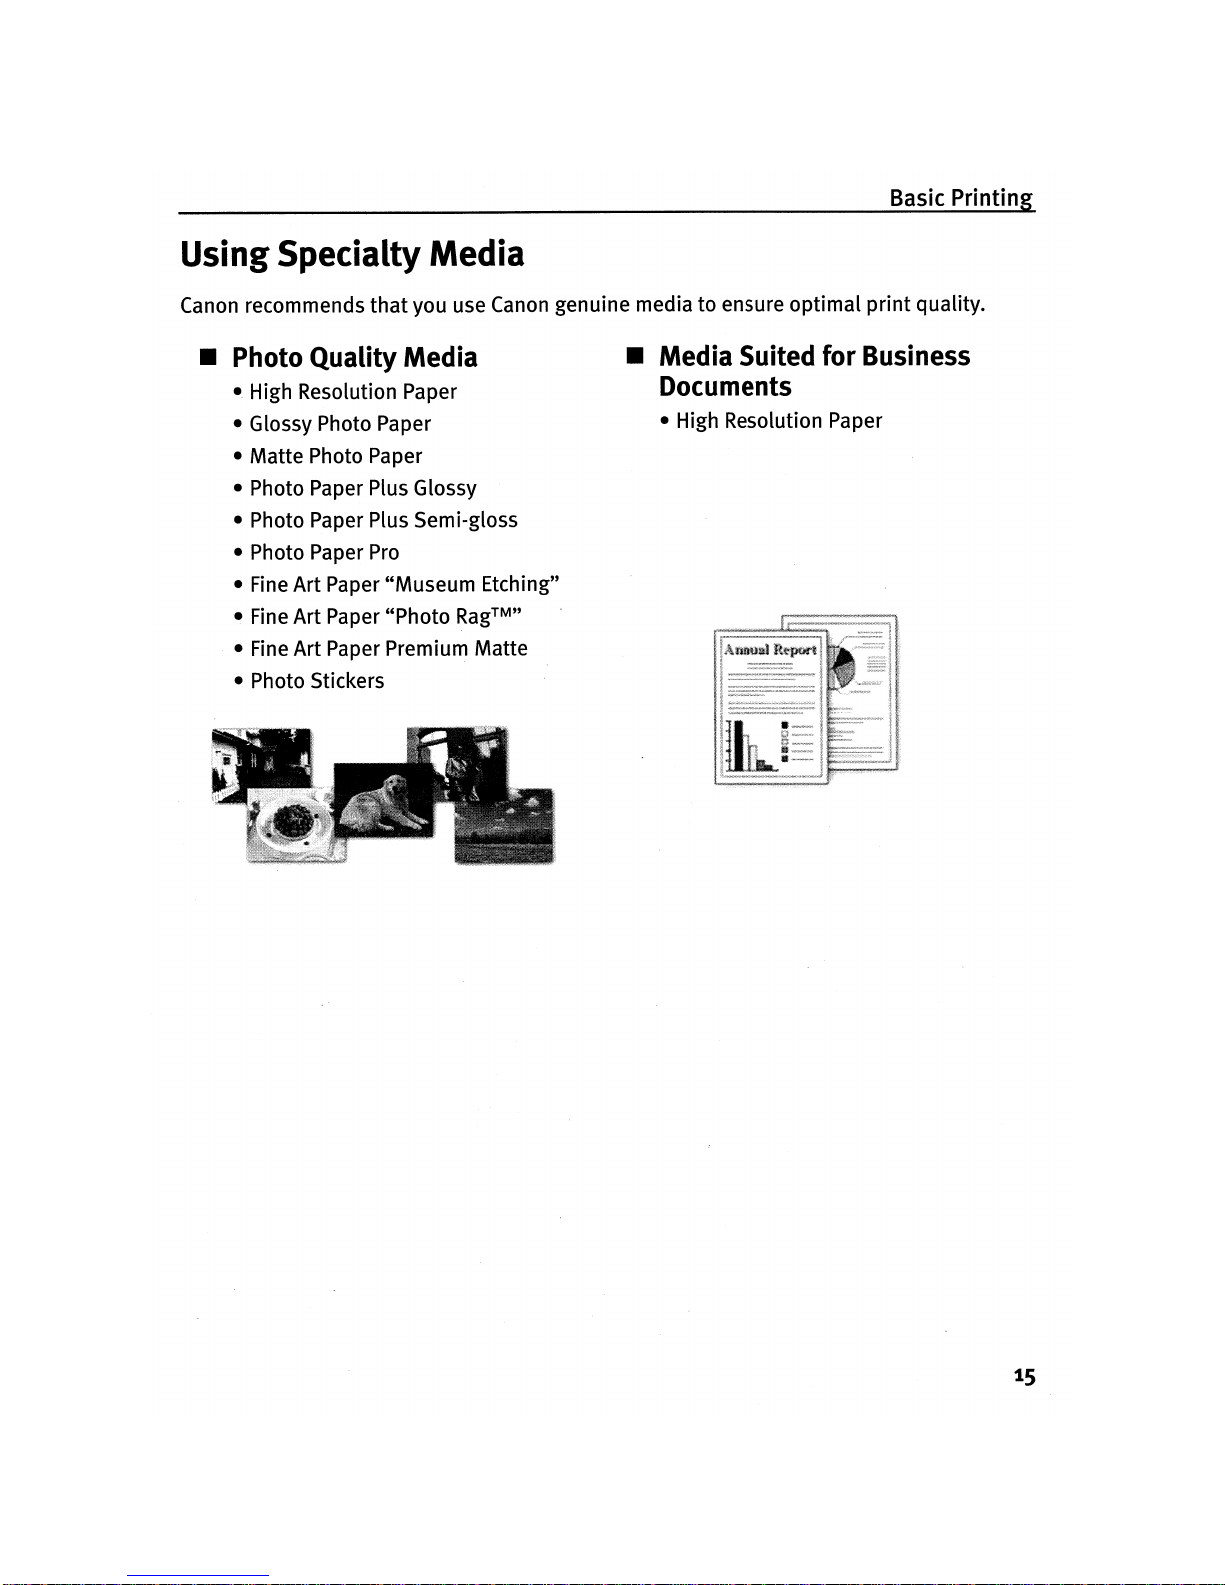
UsingSpecialty Media
Canon recommends
that
you use Canon genuine media to ensure
optimal
print
quality.
II
Photo Quality Media
• High Resolution Paper
• Glossy Photo Paper
• Matte Photo Paper
• Photo Paper Plus Glossy
• Photo Paper Plus Semi-gloss
• Photo Paper
Pro
• Fine Art Paper
"Museum
Etching"
• Fine Art Paper "Photo Rag™''
• Fine Art Paper Premium Matte
• Photo Stickers
II
Media Suited forBusiness
Documents
• High Resolution Paper
15

Basic Printing
II
Canon Genuine
Media
Media
Type
Printe[DriverSetting
for
Media
Type
High Resolution
1311x
1911: up to 20
1311x
1911: 1 sheet High Resolution
Paper sheets
Paper
1111x
1711: up to 50
11
11
x
1711: 1 sheet
sheets
Letter: up
to
80
Letter: 1 sheet
sheets
Super White Paper
Up
to13mm
or
1 sheet Plain Paper
0.52
inches
Glossy Photo Paper
1311x
1911: 1 sheet
1311x
1911: 1 sheet
Glossy Photo Paper
Letter: up
to
10
Letter: 1 sheet
sheets
4
11x611
: upto20
4
11
X 6
11
: 1 sheet
sheets
Matte
Photo Paper
1311x
1911: 1 sheet
1311x
1911: 1 sheet
Matte
Photo Paper
Letter: up to
10
Letter: 1 sheet
sheets
4
11
x 611: up to 20
4
11
x 611: 1 sheet
sheets
Photo Paper Plus
1311x
1911: 1 sheet
1311x
1911: 1 sheet
Photo Paper Plus
Glossy Letter: up
to
10
Letter: 1 sheet
Glossy
sheets*l
511x 711: up to
10
511x 711: 1 sheet
sheets*l
4
11
x 611: up to 20
4
11
x 611: 1 sheet
sheets*l
Photo Paper Plus
1311x
1911: 1 sheet
1311x·1911: 1 sheet Photo Paper Plus
Semi-gloss
811x
1011:
up
to
10
8
11
x
1011:
1 sheet
Semi-gloss
sheets*l
Letter: up
to
10
Letter: 1 sheet
sheets*l
4
11
x 611: upto20
4
11
x 611: 1 sheet
sheets*l
Photo Paper
Pro
1311x
1911: 1 sheet
1311x
1911: 1 sheet
Photo Paper
Pro
8
11
x
1011:
up
to
10
8
11
x
1011:
1 sheet
sheets*l
Letter: up
to
10
Letter: 1 sheet
sheets*l
4
11
x 611: upto20
4
11
x 611: 1 sheet
sheets*l
16
Basic Printing
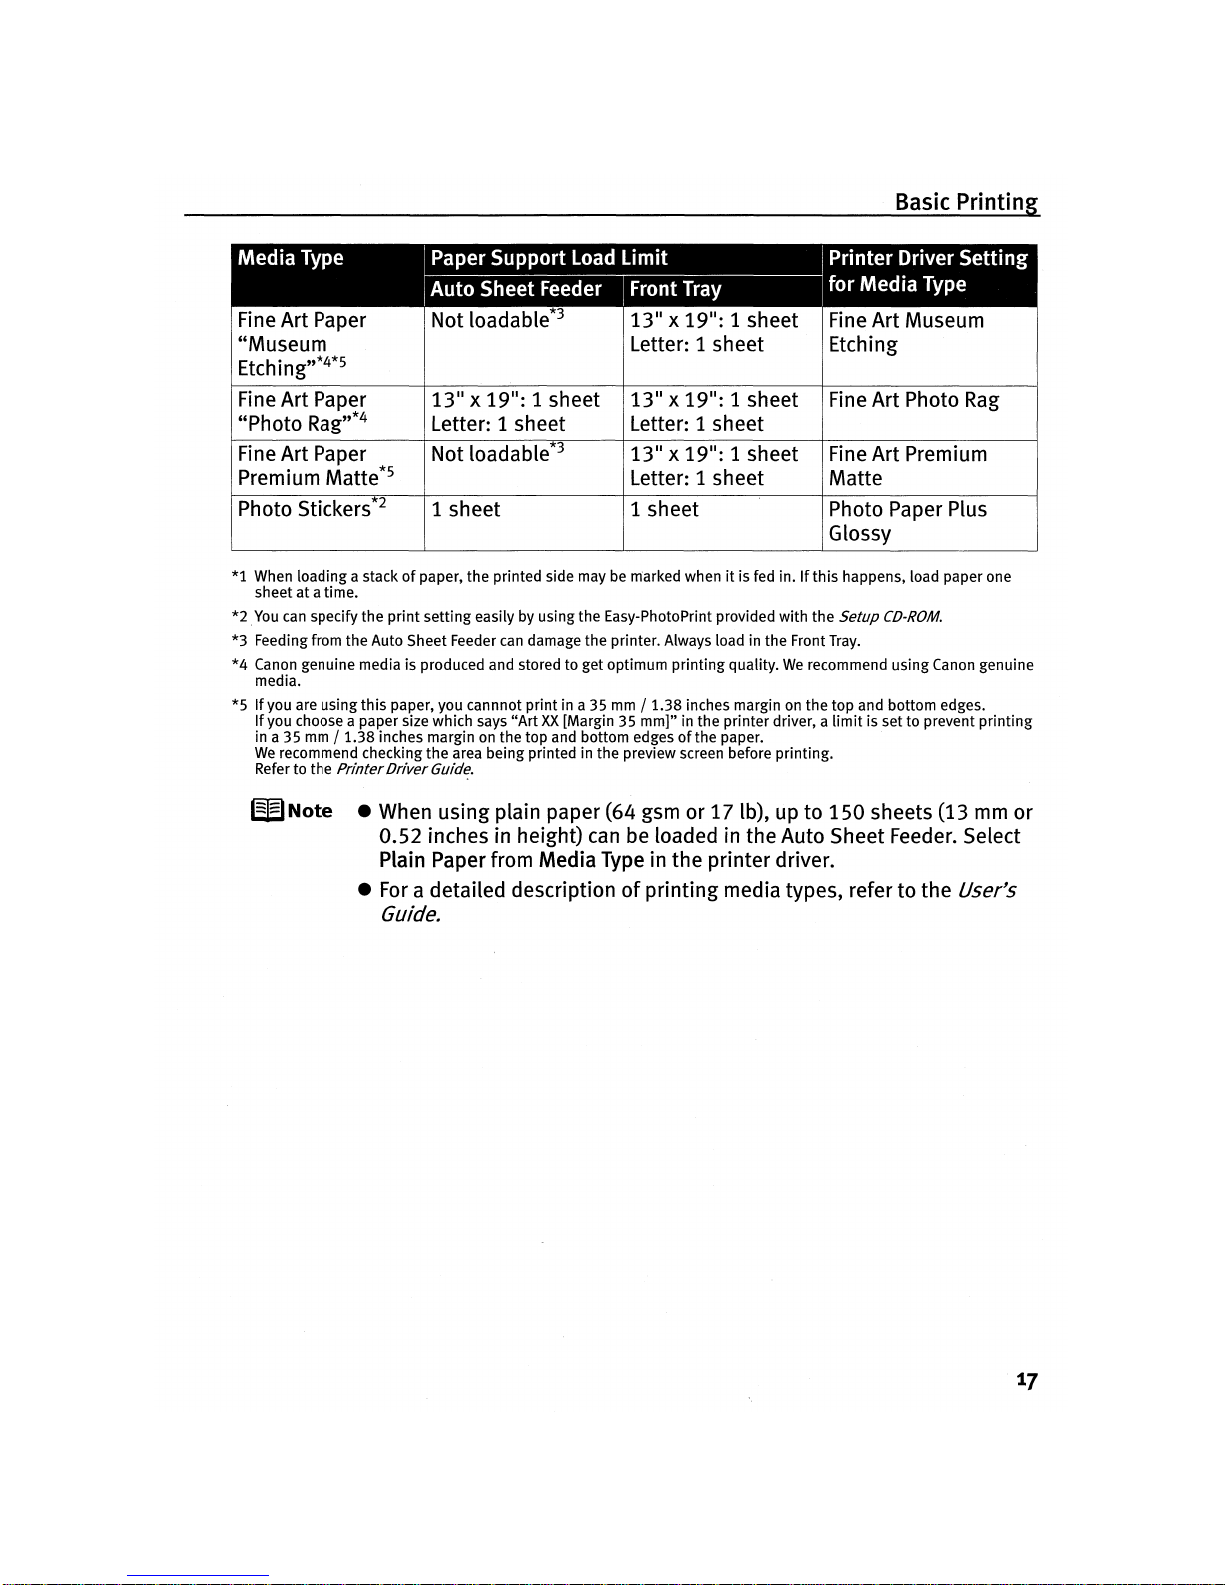
Media
Type
Printer
~river~ettin~
for
Media
Type
Fine
Art
Paper
Not loadable*3
1311x
19
11
: 1 sheet Fine
Art
Museum
"Museum
Letter: 1 sheet
Etching
Etching,,*4*5
Fine
Art
Paper
1311x
19
11
: 1 sheet
1311x
19
11
: 1 sheet Fine
Art
Photo
Rag
"Photo
Rag,,*4
Letter: 1 sheet
Letter: 1
sheet
Fine
Art
Paper
Not loadable*3
1311x
19
11
: 1 sheet Fine
Art
Premium
Premium Matte*5
Letter: 1 sheet
Matte
Photo Stickers*2
1 sheet 1 sheet Photo Paper Plus
Glossy
*1
When loading a stackofpaper, the printed side maybem'arked whenitis fed in.Ifthis
happens, load paper one
sheet at a time.
*2
,You
can
specify the
print
setting easily by using the Easy-PhotoPrint provided with the Setup
CD-ROM.
*3
Feeding from the Auto Sheet Feeder
can
damage the printer. Always load in the Front
Tray.
*4
Canon genuine media is produced and stored to get optimum printing quality.Werecommend using Canon genuine
media.
*5
If
you are using
this
paper, you cannnot print in a35mm
/
1.38
inches marginonthe top and bottom edges.
If
you choose a paper size which says
"ArtXX[Margin35mm]"
in the printer driver, a
limit
is set to prevent
printing
in a35mm /
1.38
inches marginonthe top and bottom edgesofthe paper.
We
recommend checking
the
area being printed in the preview screen before printing.
Refer to the
Printer
Driver
Guide.
WNote
• When
using
plain paper (64 gsmor17Ib),upto
150
sheets (13 mm
or
0.52
inches in height) can be loaded in
the
Auto Sheet Feeder. Select
Plain Paper from Media Type in
the
printer
driver
.
• For a detailed description
of
printing
media types, refertothe
User's
Guide.
17
Basic Printing
Printingwith Windows
WNote
• Menu and command names may
differ
between software applications, and
more steps may be required.
For
details, referto the documentation for each
software application you use.
•
The
steps described in this section are for
printing
in Windows®XPService
Pack 2 (hereafter, called WindowsXPSP2)
.
•
You
can
use Easy-PhotoPrint or Easy-PhotoPrint
Protoeasily do
print
operations when
printing
photographs. Easy-PhotoPrintand Easy-PhotoPrint
Pro
are provided on the Setup
CD-ROM.
For
details on how to use
Easy-
PhotoPrint and Easy-PhotoPrint Pro, refer to
th~
Photo
Application
Guide.
1
Turnonthe printer.
See
"Turning on
the
Printer"onpage 2.
2
Load
the paperin the printer.
See
"Loading Paper in theAuto Sheet Feeder"onpage 5 or "Loading Paper in the
Front Tray" on page
10.
3 Create a document
or
open a file to print.
WNote
When
printing
in grayscale, we recommend
printing
with
the
top and
bottom marginsofthe papersettomore than 45 mm /
1.77
inches.
Depending onanimage,
without
these margins, the
printing
troubles
may occur on the top
and/or
bottom edgesofthe papersuchasuneven
coloration or
white
streaks, and the printquality may be degraded.Inthis
case,
print
the image usingthe Easy-PhotoPrint
Pro
provided on the
Setup
CD-ROM.
Or,
prepare paperwhose longer side is at least 90
mm
/
3.54 inches longerthan the lengthofthe image, then
printitwith the top
and bottom marginsofthe paper set to 45 mm /
1.77
inches usingyour
page layout software.
For
details on how to use the Easy-PhotoPrint Pro,
refertothe
PhotoApplication Guide.
18
Basic Printing
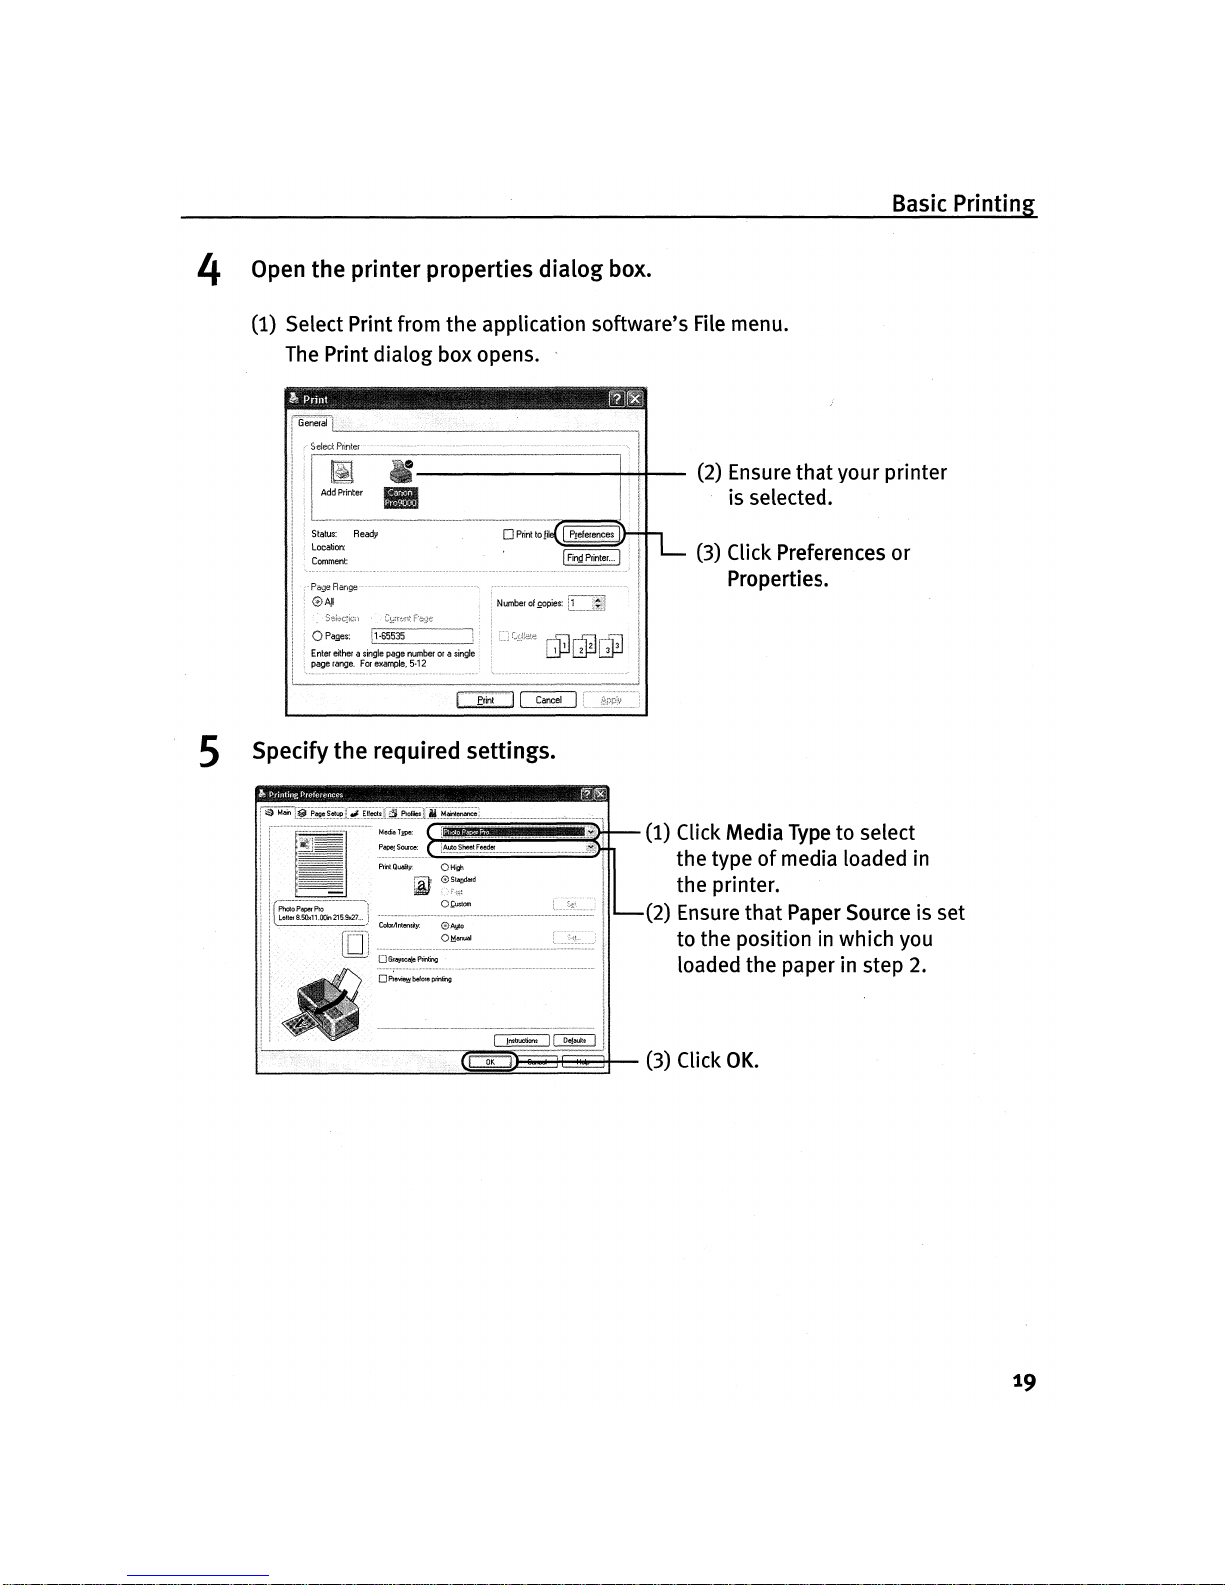
4 Open the printerproperties dialog box.
(1) Select Print from
the
application software's File menu.
The Print
dialog
box opens. '
Status:
Ready
Location:
Comment:
--------+--++---
(2)
Ensure
that
your
printer
is selected.
(3) Click Preferences
or
Properties.
5 Specifythe required settings.
(1) Click Media Typetoselect
the
typeofmedia loaded in
the
printer.
(2)
Ensure
that
Paper Source is set
to
the
position in which you
loaded
the
paper in step 2.
19
Basic Printing
W
Note
•
From
the
Page
Setup tab, select the correct document size to
be
printed.Ifthe size is differentfrom that set in the application, then you
needtosetitto the same size or use Scaled Printing or Fit-to-Page
Printing. Refer to the
Printer
DriverGuide.
•
To
adjust the Print Quality settings, select Custom and click Setonthe
Main tab.
You
can
control the printquality in the Custom dialogbox.
•
For
details about otherprinter driver functions, click Help or
Instructions to view the Help or
Printer
DriverGuide. Instructions is
displayedonthe Main and Maintenance tabs only.Ifthe On-screen
Manual is not installed, Instructions is notdisplayed.
• Selecting the Preview before printingcheck box displays a preview
screen
that
allows you to confirm the selected printing effects and how
your document
will
look when printed. Some applications do not have
a preview function.
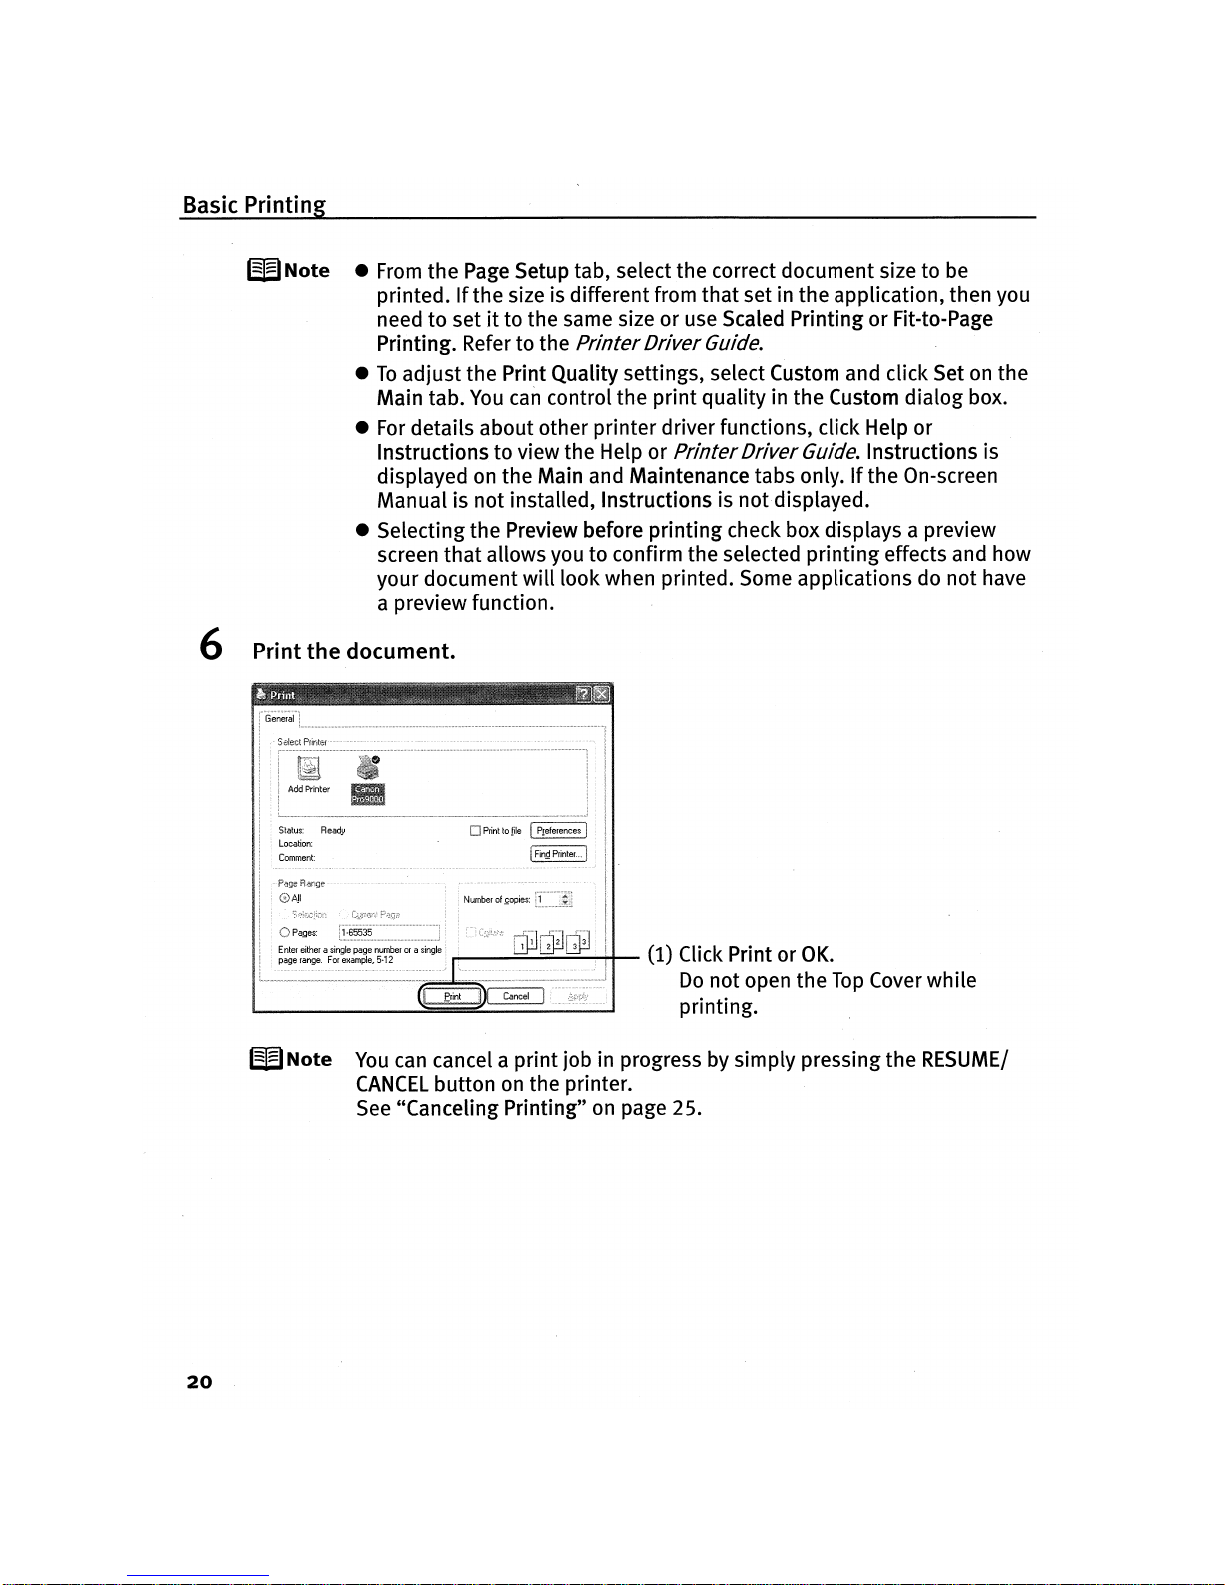
6 Print the document.
D
PrinttofileIPreferences
I
I
Fin.£!
Printer...]
Number
of
~opies:
Status:
Read)'
Location:
Comment:
"-""'--"";;;;;;;;;;;';;;;;""";;;;;;;;;;""'---io+--
(1) Click Print or
OK
.
................................................................................................................
Do
not open the
Top
Cover while
printing.
W
Note
You
can
cancel aprint job in progress by simply pressing the
RESUME/
CANCEL
buttononthe printer.
See
"Canceling Printing"onpage 25.
20
Basic Printing
Printingwith Macintosh
~Note
• Menu and command names may differ between software applications, and
more steps may be required.
For
details, refer to the documentation for each
software application you use.
•
The
steps described in this section are for
printing
in Mac®OSXv.10.4.x
(hereafter called Macintosh®).
•
You
can
use Easy-PhotoPrint or Easy-PhotoPrint
Protoeasily do
print
operations when printing photographs. Easy-PhotoPrint and Easy-PhotoPrint
Pro
are providedonthe Setup
CD-ROM.
For
details on howtouse
Easy-
PhotoPrint and Easy-PhotoPrint Pro, refer to the Photo
Application
Guide.
1
Turnonthe printer.
See
"Turning on
the
Printer"onpage 2.
2
load
the paper on the printer.
See
"Loading Paper in the Auto Sheet Feeder"onpage 5 or "Loading Paper in the
Front Tray"onpage 10.
3 Create a document or open a file
to
print.
~Note
When
printing
in grayscale, we recommend
printing
with thetop and
bottom marginsofthe paper setto more than 45
mm/1.77
inches.
Depending onanimage,
without
these margins, the
printing
troubles
may occur on the top
and/
or bottom edgesofthe paper suchasuneven
coloration orwhite streaks, and the printquality may be degraded.Inthis
case,
print
the image using the Easy-PhotoPrint
Pro
providedpnthe
Setup
CD-ROM.
Or,
prepare paperwhose longer side is at least 90 mm /
3.54 inches longerthan the lengthofthe image, then
printitwith the top
and bottom marginsofthe paperset to 45
mm/1.77
inches usingyour
page layout software.
For
detailsonhow to use
the
Easy-PhotoPrint Pro,
refertothe
Photo
Application
Guide.
21
Basic Printing
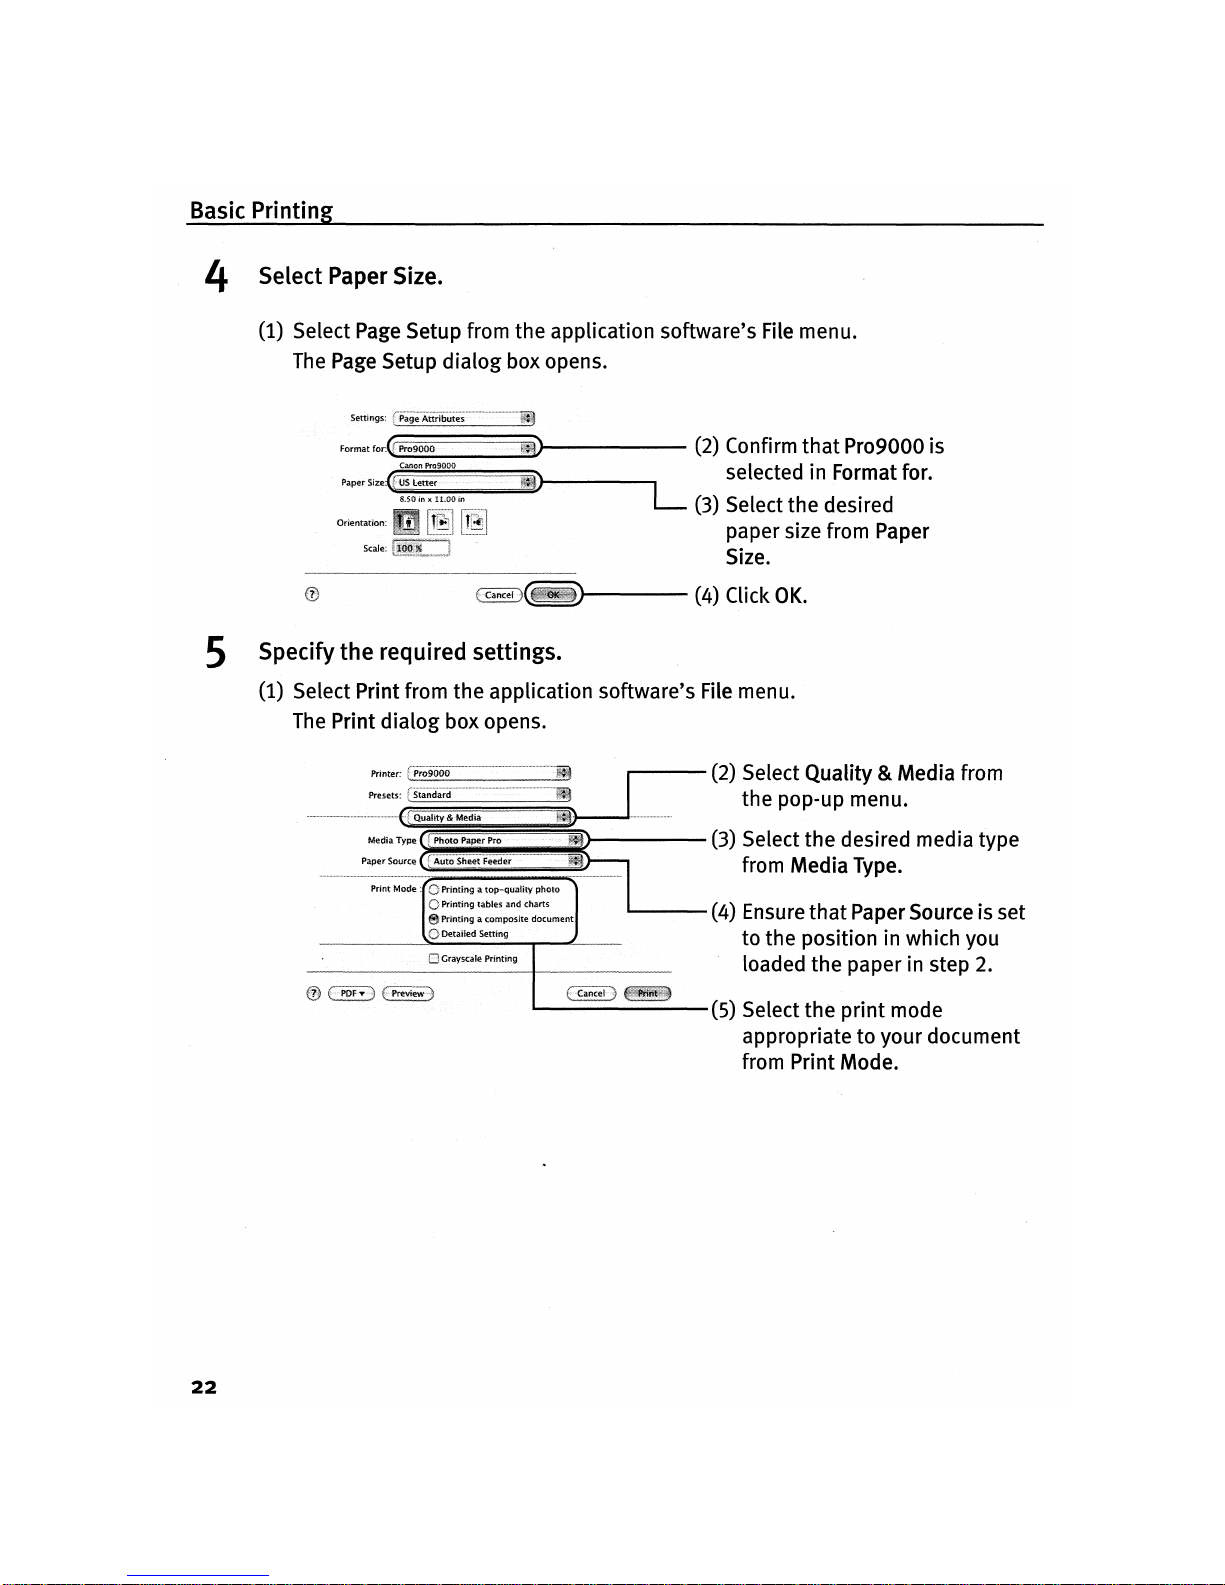
4 Select Paper Size.
(1) Select Page
Setup
from
the
application software'sFile menu.
The Page Setup
dialog
box opens.
Settings::Cfi~ge"Att~ibut~~
.
Formatfor:G
......i
p
_ro9_o00_.
I"iitiiit'~;i~J------
(2)
Confirm
that
Pro9000 is
P
...
iSl~(~:::::,".)
L
(3)
;:~:~:et~:nd:o~::tfor.
paper size from Paper
Size.
tea
~t'.#f;~
(4) Click
OK.
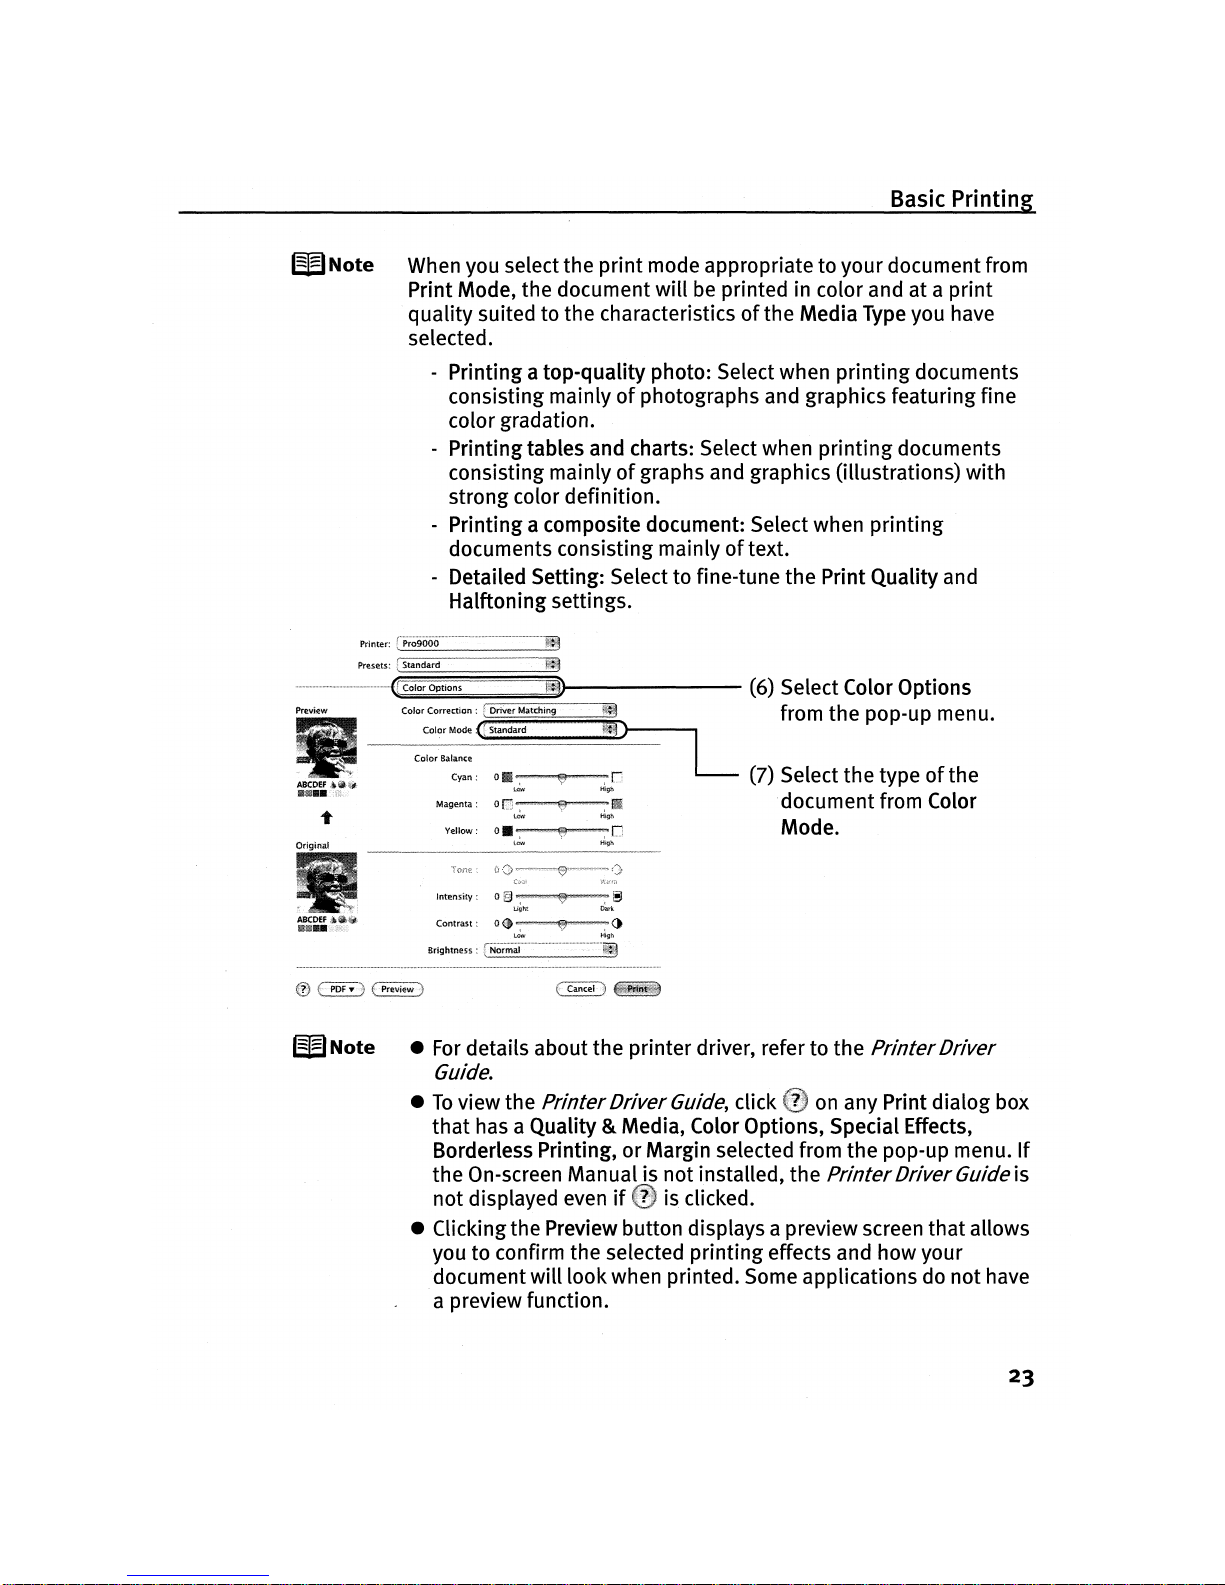
5 Specifythe required settings.
(1) Select Print from
the
application
software's
File menu.
The Print
dialog
box
opens.
Print Mode
:0
Printing a top-quality photo
oPrinting tables and charts
e
Printing
a composite document
oDetailed Setting
---
(2)
Select
Quality&Media
from
the
pop-up menu.
5~~~~~~===--
(3) Select
the
desired media
type
from
Media
Type.
---
(4) Ensure
that
PaperSource is set
to
the
position
in which you
loaded
the
paper
in step 2.
---------(5)
Select
the
print
mode
appropriatetoyour
document
from Print Mode.
22
Color
Balance
Cyan:
om=-~~~=;
C
High
Basic Printing
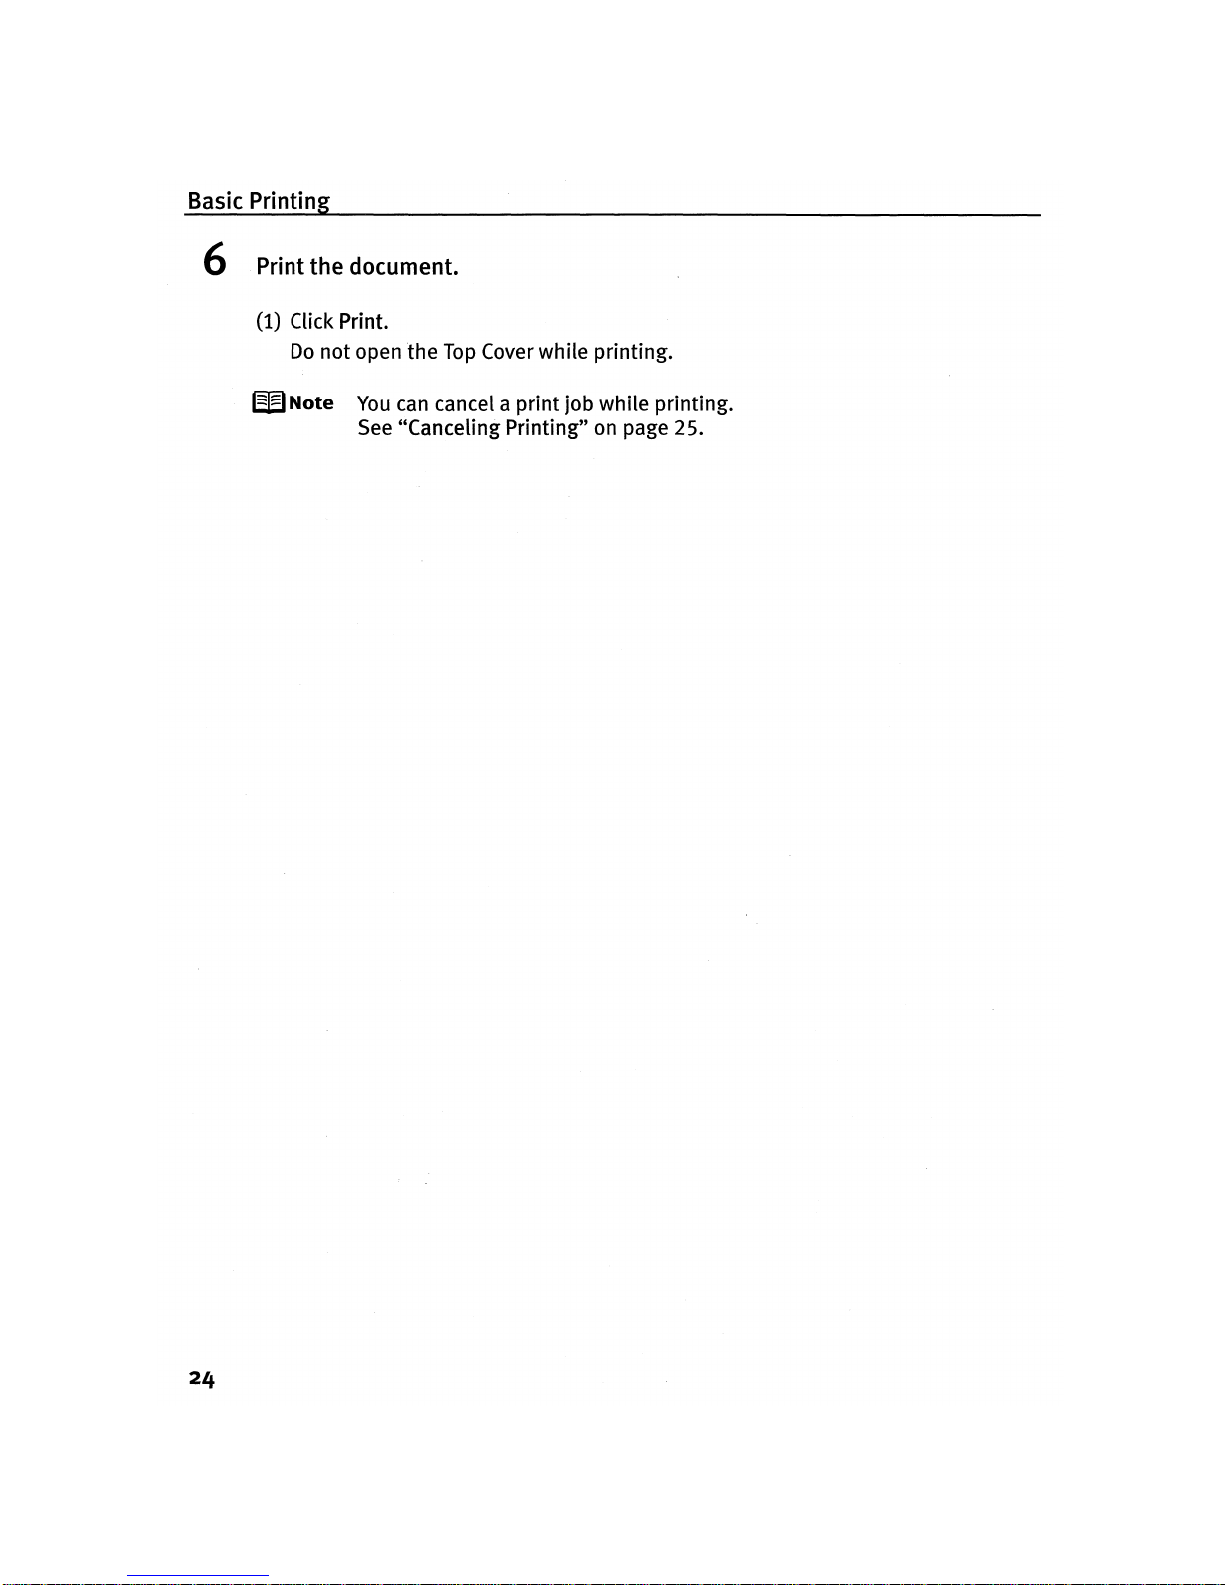
WNote
When you select the
print
mode appropriate to your document from
Print Mode, the document
willbeprinted in color and at a
print
quality suited to the characteristicsofthe Media
Type
you have
selected.
- Printing a top-quality photo: Select when
printing
documents
consisting mainly
of
photographs and graphics featuring fine
color gradation.
- Printingtables and charts: Select when
printing
documents
consisting mainly
of
graphs and graphics (illustrations) with
strong color definition.
- Printing a composite document: Select when printing
documents consisting mainly
of
text.
- Detailed Setting: Selectto fine-tune the Print Quality and
Halftoningsettings.
Printer:
rp~~9000····""·········
~
Presets: {Standard
M:"
.........
·· ··
(tColorOptions
li~D
(6) Select Color Options
PrevlEw
cmo::~:·:a:(~:~:;:tehm.I)t--_---,
from the pop-up menu.
L(7) Select
the
type of
the
document from Color
Mode.
W Note •
For
details about the printerdriver, refer to the
Printer
Driver
Guide.
•Toview the Printer DriverGuide, click
on
any Print dialogbox
that
has aQuality & Media, Color Options, Special Effects,
Borderless Printing, orMargin selected from the pop-up menu.
If
the On-screen Manual is not installed, the
Printer
DriverGuide is
not
displayed even
if
f]I
is clicked.
• Clicking the Preview button displays a preview screen that allows
you to confirm the selected printingeffects and how your
documentwill lookwhen printed. Some applications do not have
a preview function.
23
Basic Printing
6 Print the document.
(1) Click Print.
Do
not open
the
Top
Cover while printing.
W
Note
You
can
cancel a print job while printing.
See
"Canceling Printing"onpage 25.
24
Basic Printing
Canceling Printing
~
You
can cancel a
print
job
while
printing,
with
the
RESUME/CANCEL
button on
the
printer.
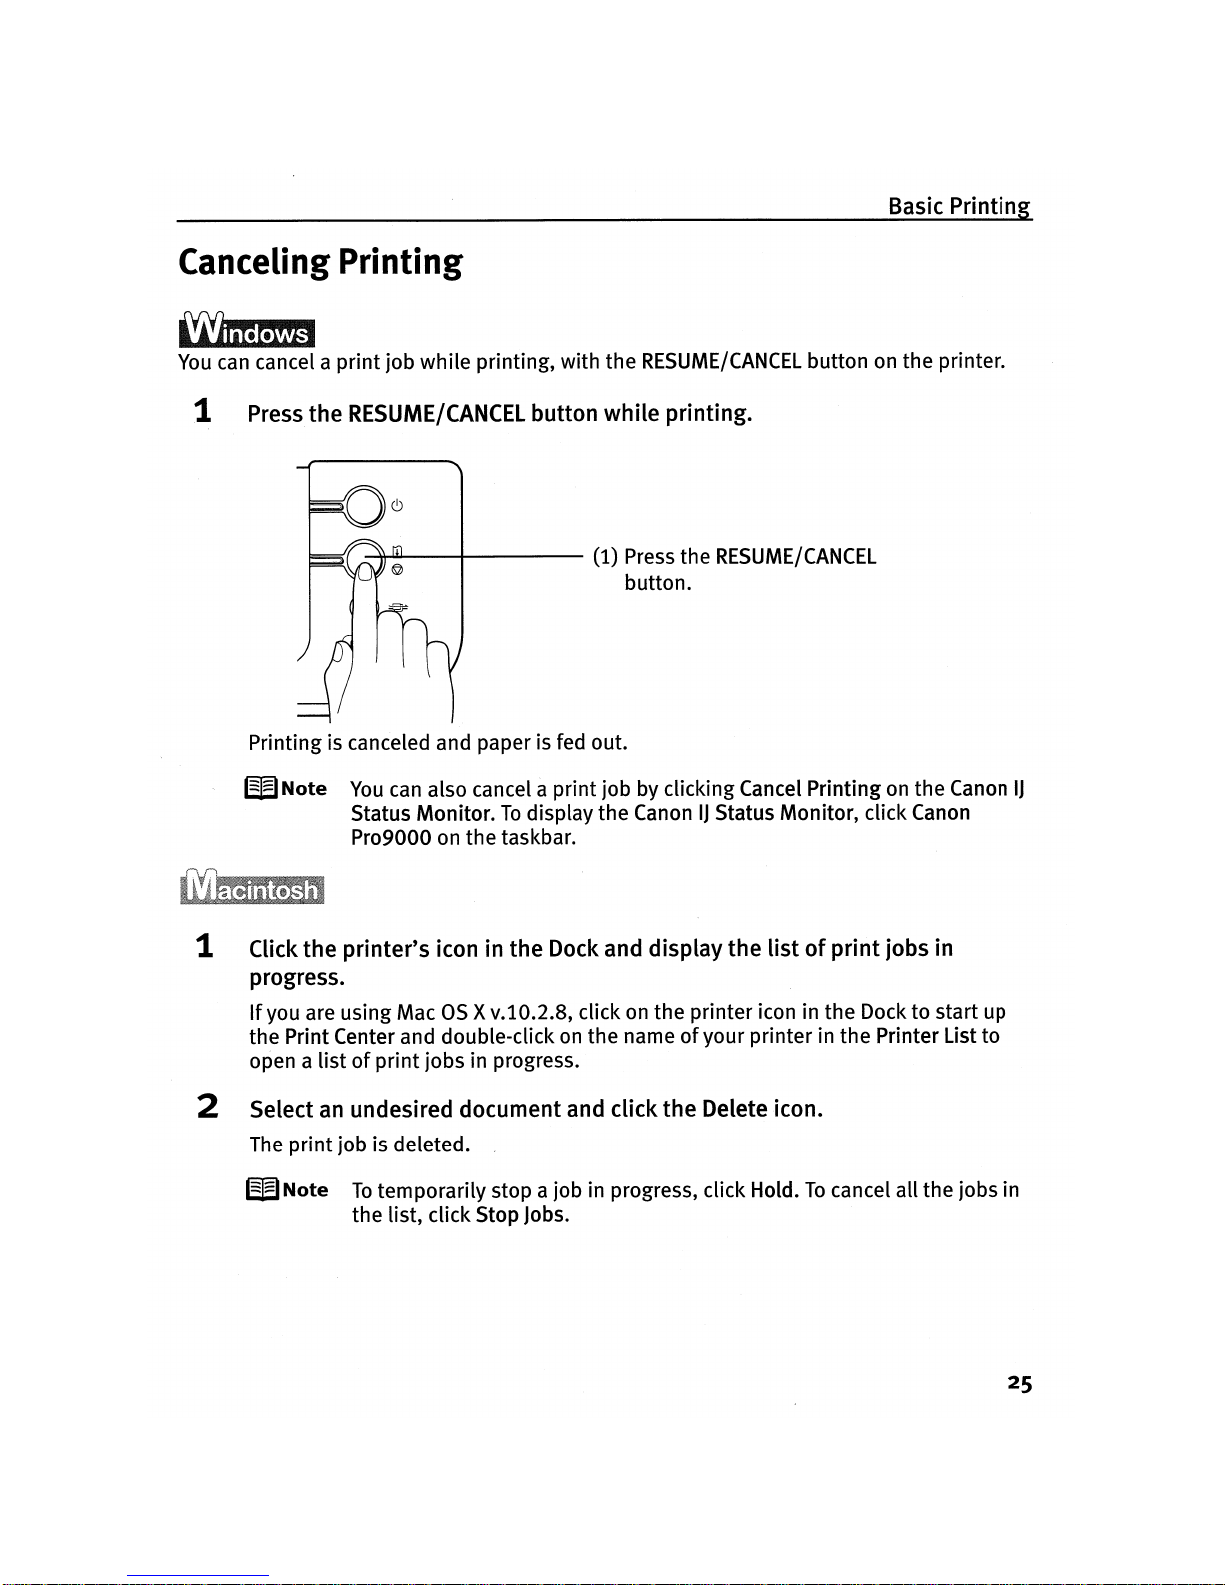
1 Press the
RESUME/CANCEL
button while printing.
~101--0_+--
(1) Press the
RESUME/CANCEL
button.
Printing is canceled and paper is fed out.
W
Note
You
can also cancel a
print
job by clicking Cancel
Printingonthe
Canon
IJ
Status
Monitor.Todisplay
the
CanonIJStatus
Monitor,
click Canon
Pro9000 on
the
taskbar.
1 Click the printer's icon in the Dock and display the
listofprint
jobs in
progress.
If
you are using Mac
as
xv.10.2.8, click on
the
printer
icon in
the
Docktostart up
the
Print Center and double-clickonthe
nameofyour
printerinthe
Printer List
to
open a
listofprint
jobs
in progress.
2 Select
an
undesired document and click the Delete icon.
The
print
job is deleted.
W
Note
To
temporarily
stop a job in progress, click Hold.Tocancel all
the
jobs in
the
list, click Stop Jobs.
25
Advanced Printing
Advanced Printing
PrintingPhotographs Directly from a PictBridge
Compliant Device
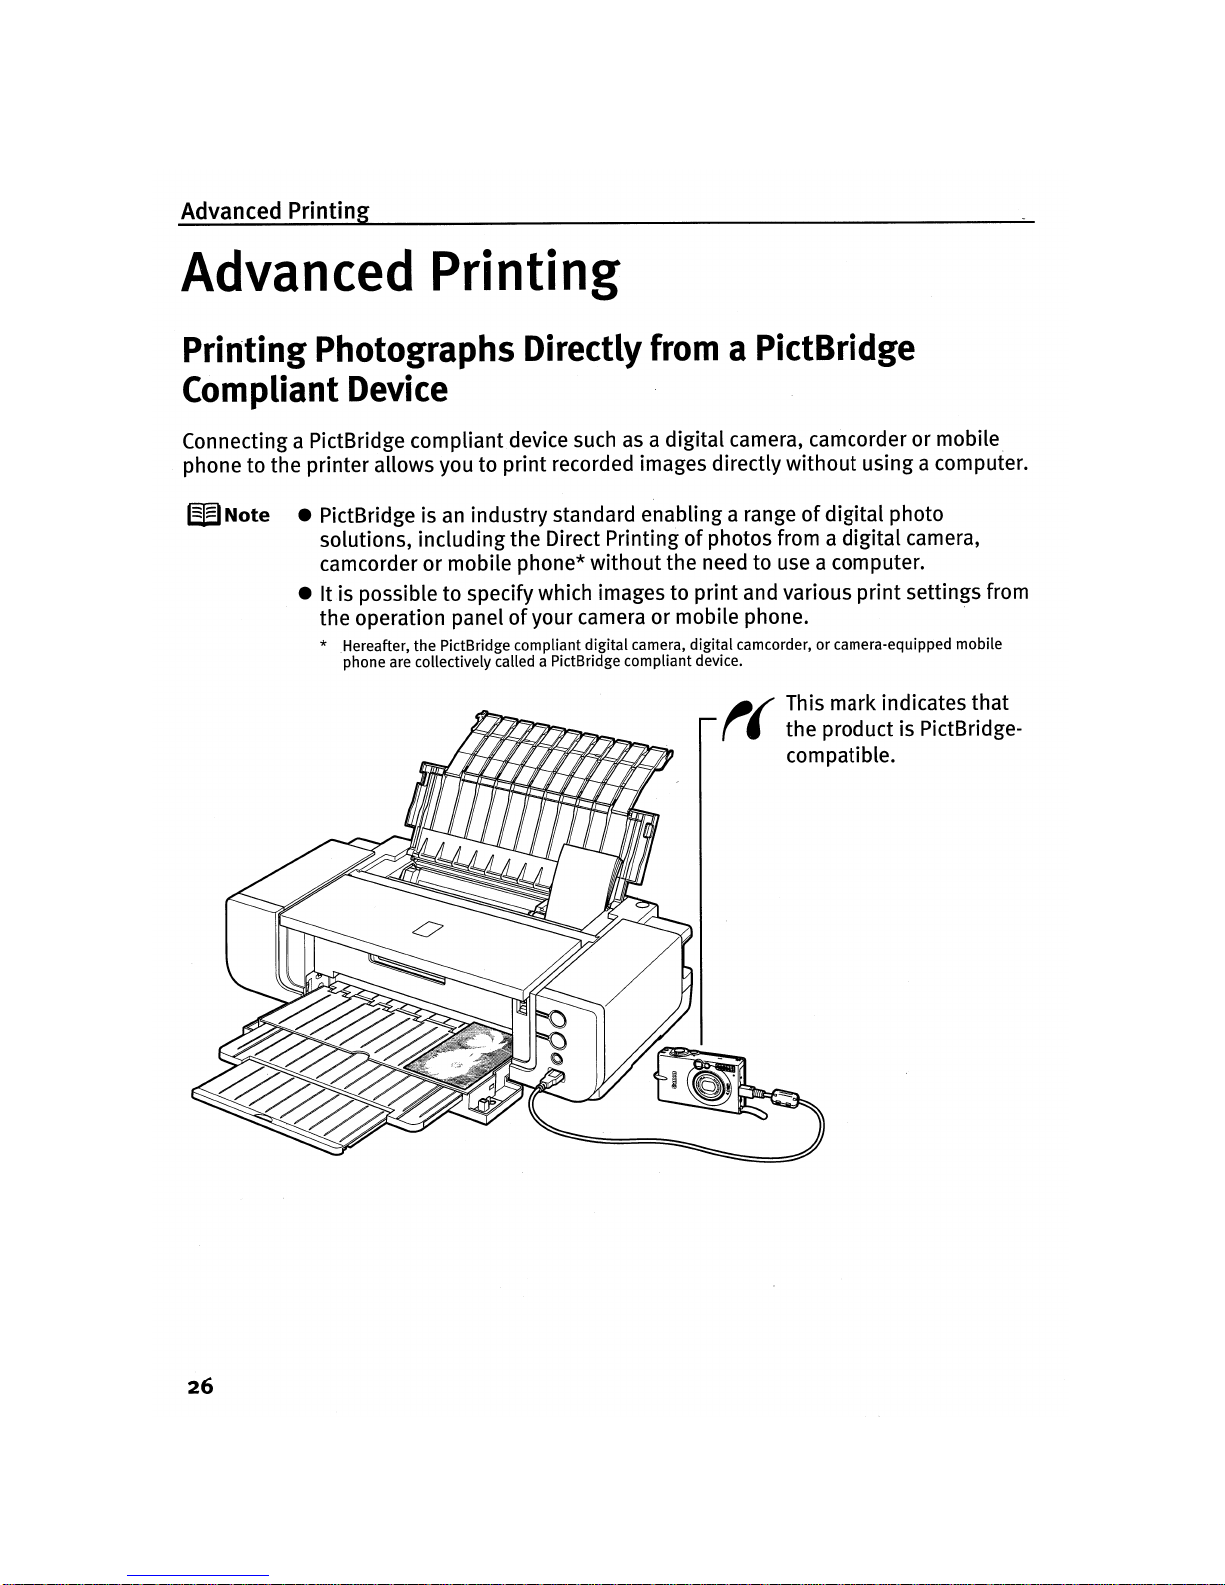
Connecting a PictBridge
compliant
device suchasa digital camera, camcorder ormobile
phone to the printer allows you to printrecorded images directly
without
using a computer.
W
Note
• PictBridge is
an
industry standard enabling a rangeofdigital photo
solutions, includingthe Direct Printing
of
photos from a
digital
camera,
camcorder or mobile phone*
without
the need to use a computer.
• It
is
possible to specifywhich images to print and various
print
settings from
the operation panel
of
your camera or mobile phone. .
* Hereafter, the PictBridge compliant digital camera, digital camcorder, orcamera-equipped mobile
phone are collectivelycalled a PictBridge compliant device.
~/
This mark indicates
that
r I the product is PictBridge-
compatible.
26
 Loading...