

Page 1

Operation guide
Océ PlotWave 450/550
Page 2

Copyright
© 2016, Océ
All rights reserved. No part of this work may be reproduced, copied, adapted, or transmitted in
any form or by any means without written permission from Océ.
Océ makes no representation or warranties with respect to the contents hereof and specifically
disclaims any implied warranties of merchantability or fitness for any particular purpose.
Furthermore, Océ reserves the right to revise this publication and to make changes from time to
time in the content hereof without obligation to notify any person of such revision or changes.
Edition 2016-03
US
Page 3

Trademarks
Océ, Océ PlotWave 450/550, Océ Express WebTools, Océ Publisher Express, Océ Publisher
Mobile, and Océ Mobile WebTools are registered trademarks of Océ.
Adobe®, Acrobat®, Reader® are registered trademarks of Adobe® Systems Incorporated.
Microsoft®, Windows®, Windows XP®, Windows Server 2003®, Windows Vista® , Windows Server
2008®, Windows 7®, Windows 8® and Windows 10® are either registered trademarks or
trademarks of Microsoft® Corporation in the United States and/or other countries.
Mozilla ® and Firefox® are registered trademarks of Mozilla® Systems Incorporated.
PostScript® 3™ is a registered trademark of Adobe® Systems Incorporated.
“QR Code” is a registered trademark of DENSO WAVE INCORPORATED.
PlanWell® Collaborate is a registered trademark of ARC™ Document Solutions.
Products in this publication are referred to by their general trade names. In most, if not all cases,
these designations are claimed as trademarks or registered trademarks of their respective
companies.
Edition 2016-03
US
Page 4

Page 5

Contents
Contents
Chapter 1
Introduction.......................................................................................................................11
Notes for the reader....................................................................................................................................... 12
Available documentation...............................................................................................................................14
Chapter 2
Get to Know the Printing System................................................................................... 17
The Océ PlotWave 450/550............................................................................................................................ 18
Connect your Printing System...................................................................................................................... 19
Working area [Footprint]......................................................................................................................... 19
Connect the mains supply cable and the network cable...................................................................... 20
Switch on the printing system................................................................................................................ 21
Turn off the printing system................................................................................................................... 22
Move and re-adjust the printing system................................................................................................ 24
The Hardware................................................................................................................................................. 25
The components of the printer (front)....................................................................................................25
The components of the printer (left side).............................................................................................. 26
The components of the printer (back).................................................................................................... 27
The media drawer.................................................................................................................................... 28
The user panel: Océ ClearConnect......................................................................................................... 29
The components of the scanner (optional)............................................................................................30
The delivery destination for print jobs................................................................................................... 32
The folding device (optional).................................................................................................................. 34
Workflow of the Océ ClearConnect user panel............................................................................................ 35
The home screen......................................................................................................................................35
The job queue and the system menu.....................................................................................................37
Presets, templates and advanced settings.............................................................................................39
Job preview.............................................................................................................................................. 40
The cloud.................................................................................................................................................. 41
Chapter 3
Define your Workflow with Océ Express WebTools..................................................... 43
Getting Started............................................................................................................................................... 44
Océ Express WebTools............................................................................................................................44
Set another language for Océ Express WebTools................................................................................ 45
User roles and authorizations................................................................................................................. 46
Log in as an authorized user................................................................................................................... 47
Log out after your session.......................................................................................................................48
Change the password for authorized users........................................................................................... 49
The system monitor.................................................................................................................................50
Shut down or restart the system............................................................................................................ 52
Define the defaults......................................................................................................................................... 53
About the default settings in Océ Express WebTools...........................................................................53
How to edit a setting................................................................................................................................54
View and check the settings ...................................................................................................................55
Save the settings in a file ....................................................................................................................... 56
Load the settings from a file .................................................................................................................. 57
Restore the factory defaults ................................................................................................................... 58
Set the print job default settings............................................................................................................ 59
5
Page 6

Contents
Set the copy job default settings............................................................................................................ 62
Set the scan job default settings.............................................................................................................63
Configure the Smart Inbox settings..............................................................................................................64
The Smart Inbox and the queue concept...............................................................................................64
The Smart Inbox in the Jobs tab............................................................................................................ 65
Create and open a Smart Inbox.............................................................................................................. 67
Close or delete a Smart Inbox.................................................................................................................70
The job states........................................................................................................................................... 71
Configure the job management settings............................................................................................... 72
Configure the network and security settings............................................................................................... 73
Configure the network settings in Océ Express WebTools.................................................................. 73
Set the security settings for Microsoft Internet Explorer .....................................................................74
Set the security settings for Mozilla Firefox.......................................................................................... 75
Set the link speed and duplex mode...................................................................................................... 76
Enable user authentication......................................................................................................................77
Enable Access control .............................................................................................................................78
Access control and IPsec settings...........................................................................................................79
Enable or disable the e-shredding function...........................................................................................80
Select the e-shredding algorithm........................................................................................................... 81
Specify the number of overwrite passes............................................................................................... 82
Remote security....................................................................................................................................... 83
Generate a new CA-signed certificate.................................................................................................... 84
Import a CA-signed certificate: Import the root certificate .................................................................. 86
Import a CA-signed certificate: Import the intermediate certificate.................................................... 87
Import a CA-signed certificate................................................................................................................ 88
Import a CA-signed certificate: Check and import the root certificate................................................ 89
Configure the presets and stamping............................................................................................................ 90
What you need to know about presets ................................................................................................. 90
Set the default copy preset .................................................................................................................... 91
Configure the custom copy preset ........................................................................................................ 92
Set the default print preset .....................................................................................................................93
Configure the custom print preset .........................................................................................................94
Make a custom preset available on the user panel...............................................................................95
Create a stamp......................................................................................................................................... 96
Configure the Templates............................................................................................................................... 97
Fold and Scan templates ........................................................................................................................ 97
Create a new template.............................................................................................................................98
Delete all templates................................................................................................................................. 99
Import templates....................................................................................................................................100
Export templates.................................................................................................................................... 101
Restore the factory defaults of the templates......................................................................................102
Enable or disable scan templates......................................................................................................... 103
Fold settings........................................................................................................................................... 104
Configure the locations................................................................................................................................107
Configure your locations....................................................................................................................... 107
Enable or disable USB........................................................................................................................... 108
Enable and edit the Home folder.......................................................................................................... 109
Enable PlanWell Collaborate (optional)............................................................................................... 110
Create an external location................................................................................................................... 111
Set a default external location ............................................................................................................. 113
Set a default print destination...............................................................................................................114
Troubleshoot the creation of an FTP external location (after an error message).............................115
Troubleshoot the creation of an SMB external location (after an error message)...........................118
Troubleshoot the creation of a WebDAV external location (after an error message)......................120
Configure the printer settings..................................................................................................................... 121
Configure the regional settings ........................................................................................................... 121
Configure the user session time-out.................................................................................................... 122
Configure the working hours................................................................................................................ 123
Configure the sleep mode..................................................................................................................... 124
Configure the media request time-out ................................................................................................ 125
6
Page 7

Contents
Configure the media types.................................................................................................................... 126
Configure the media sizes..................................................................................................................... 127
Configure the pen settings.................................................................................................................... 128
Optimise the print quality and print productivity...................................................................................... 129
Set transparency flattening for PDF..................................................................................................... 129
Set the wipeout correction for PDF...................................................................................................... 130
Set the long plot mode.......................................................................................................................... 131
Set the automatic roll switch................................................................................................................ 132
Set the spool threshold......................................................................................................................... 133
Set the rotation mode............................................................................................................................134
Set the alignment mode ....................................................................................................................... 135
Set the climate control (optional)......................................................................................................... 136
Configure Mobile Printing and Scanning................................................................................................... 137
Océ Mobile WebTools........................................................................................................................... 137
Configure Océ Express WebTools settings for a mobile connection................................................ 139
Generate the Quick Response Card......................................................................................................140
Connect your mobile device to Océ Mobile WebTools ..................................................................... 141
Chapter 4
Use the Printing System................................................................................................ 143
How to feed an original................................................................................................................................144
How to auto-feed an original.......................................................................................................................145
How to use the carrier sheet........................................................................................................................146
Print Jobs - Job submission tools...............................................................................................................147
Use Océ Publisher Express to send a print job................................................................................... 147
Use the Smart Inbox to send a print job.............................................................................................. 149
Use Océ Publisher Select 2 to send a print job................................................................................... 150
Use Océ Wide format Printer Driver 2 for Microsoft® Windows® to send a print job.................... 152
Use the Océ PostScript® 3 Driver to send a print job.........................................................................154
Use Océ Publisher Mobile to send a print job..................................................................................... 155
Print from your mobile device.............................................................................................................. 157
Use FTP to send a print job................................................................................................................... 158
Use LPR to send a print job...................................................................................................................159
Use the cloud to send a print job..........................................................................................................160
Use the home folder to send a print job.............................................................................................. 161
Troubleshoot print job submission...................................................................................................... 162
Print Jobs...................................................................................................................................................... 163
Do a default print job ............................................................................................................................ 163
Direct print ............................................................................................................................................. 165
Print from a USB key............................................................................................................................. 166
Print presets on the user panel............................................................................................................. 167
Advanced settings for print jobs...........................................................................................................168
Copy Jobs..................................................................................................................................................... 172
Do a default copy job ............................................................................................................................172
Copy presets on the user panel............................................................................................................ 173
The Image preset for copy jobs............................................................................................................ 174
Advanced settings for copy jobs.......................................................................................................... 175
Recommended settings for copy jobs..................................................................................................182
The original type.................................................................................................................................... 183
Make a half size copy.............................................................................................................................184
Make a copy and add a strip................................................................................................................. 185
Make a copy and remove a strip...........................................................................................................186
Make a copy of a specific area of an original...................................................................................... 187
Make a copy and remove a specific area of an original..................................................................... 188
Make a copy and scale to another size.................................................................................................189
Make a copy of a dark original (Diazo)................................................................................................. 190
Make a copy of an original with highlighted colors............................................................................191
Make a copy on a cut sheet...................................................................................................................192
Make a copy with a stamp.....................................................................................................................193
7
Page 8

Contents
Copy by set............................................................................................................................................. 194
Scan Jobs......................................................................................................................................................195
Do a default scan job ............................................................................................................................ 195
Scan templates on the user panel........................................................................................................ 196
Advanced settings for scan jobs...........................................................................................................197
Advised settings for scan jobs.............................................................................................................. 203
The original type.................................................................................................................................... 205
File type...................................................................................................................................................207
Scan to a USB key..................................................................................................................................209
Scan to the home folder........................................................................................................................ 210
Save a scanned document on your mobile device............................................................................. 211
Pause, resume, or stop an active job..........................................................................................................212
Clear the system........................................................................................................................................... 213
Chapter 5
Use the Folder................................................................................................................. 215
The components of the Océ PlotWave folder............................................................................................ 216
The folder configuration options................................................................................................................ 217
Fold methods................................................................................................................................................ 218
Fold delivery destination............................................................................................................................. 219
Set the maximum folding length................................................................................................................ 221
Use offline folding (manual fold)................................................................................................................ 222
Use the reinforcement unit .........................................................................................................................223
Use the belt unit .......................................................................................................................................... 224
Adjust the side guides of the belt............................................................................................................... 225
Chapter 6
Maintain the Printing System........................................................................................227
Update your System.................................................................................................................................... 228
Update the system software on the user panel...................................................................................228
Update the system software in Océ Express WebTools.....................................................................229
Install the system security patches in Océ Express WebTools.......................................................... 230
Replace the Media........................................................................................................................................ 231
Remove a media roll..............................................................................................................................231
Unpack the media roll............................................................................................................................234
Load a media roll (position 1)............................................................................................................... 236
Load a media roll (position 2)............................................................................................................... 240
Media types............................................................................................................................................ 244
Media sizes............................................................................................................................................. 246
Refill the Toner............................................................................................................................................. 248
Refill the toner........................................................................................................................................ 248
Replace the residual toner container....................................................................................................251
Maintain the Scanner................................................................................................................................... 253
Clean the scanner...................................................................................................................................253
Calibrate the scanner............................................................................................................................. 256
Maintain the Reinforcement Unit (Optional)..............................................................................................257
Remove an empty tape roll................................................................................................................... 257
Insert a new tape roll............................................................................................................................. 259
Prepare the tape roll for operation....................................................................................................... 262
Empty the waste box of the reinforcement unit..................................................................................264
Clean the reinforcement knives............................................................................................................ 265
Chapter 7
License Management..................................................................................................... 267
Introduction to license management..........................................................................................................268
Check your licenses......................................................................................................................................269
Save the currently active licenses ..............................................................................................................270
Get a new license file................................................................................................................................... 271
8
Page 9

Contents
Activate a new license..................................................................................................................................272
Chapter 8
Account Management.................................................................................................... 273
An overview of Océ Account Center...........................................................................................................274
Océ Account Console ®............................................................................................................................... 275
Introduction to Océ Account Console.................................................................................................. 275
Summary of Océ Account Console...................................................................................................... 276
Enable account management in Océ Express WebTools................................................................... 278
Accounting workflow.............................................................................................................................279
Workflow on the printer..................................................................................................................279
Chapter 9
Solve Problems............................................................................................................... 281
How to solve problems with jobs............................................................................................................... 282
Clear an original jam in the scanner........................................................................................................... 283
Clear a media jam in the heater section..................................................................................................... 284
Clear a media jam in the media bypass section........................................................................................ 286
Clear a media jam in the roll feed section..................................................................................................288
Clear a media jam in the first fold section..................................................................................................289
Clear a media jam in the second fold section............................................................................................ 291
Clear a media jam in the folder transport section..................................................................................... 294
Clear a media jam in the belt unit............................................................................................................... 295
Clear a tape jam in the reinforcement unit.................................................................................................297
Get reinforcement strips on the output...................................................................................................... 299
Use the circuit breaker................................................................................................................................. 300
Disconnect the network cable and the mains supply cable......................................................................301
Event messages............................................................................................................................................302
Print a demo print.........................................................................................................................................305
Print a test print............................................................................................................................................ 306
Print the print density chart......................................................................................................................... 307
Chapter 10
Support............................................................................................................................ 309
Counter history............................................................................................................................................. 310
Settings in case of errors............................................................................................................................. 311
Audit log........................................................................................................................................................312
Remote Service: configure the proxy......................................................................................................... 313
Remote Service: check the connection.......................................................................................................314
Remote Service: allow remote assistance..................................................................................................315
Remote Service: download log files........................................................................................................... 316
Chapter 11
Contact.............................................................................................................................317
Downloads and support for your product..................................................................................................318
Reader's comment sheet............................................................................................................................. 319
Index.................................................................................................................................321
9
Page 10

Contents
10
Page 11

Chapter 1
Introduction
Page 12
Notes for the reader
Notes for the reader
Introduction
This manual helps you to use the Océ PlotWave 450/550. The manual contains a description of
the product and guidelines to use and operate the Océ PlotWave 450/550.
Definition
Attention Getters
Parts of this manual require your special attention. These parts can provide the following:
• Additional general information, for example information that is useful when you perform a
task.
• Information to prevent personal injuries or property damage.
Typography used in this manual
Overview of the characters and the special fonts
Text display Indicates
[text between square brackets] Button, feature or value of the Océ PlotWave 450/550 user in-
< text between angle brackets > Key on your keyboard.
'text between quotes' Feature or value of the Windows operating system.
text displayed with the
Courier font
Symbols used in this manual
The following symbols are used in this manual to explain procedures, restrictions, handling
precautions, and instructions that must be observed for safety.
Overview of the attention getters
Word Icon Indicates
WARNING
terface.
Path from your Windows operating system or from a software application.
Indicates a warning concerning operations that may
lead to death or injury to persons if not performed
correctly. To use the machine safely, always pay attention to these warnings.
4
Chapter 1 - Introduction
12
Page 13
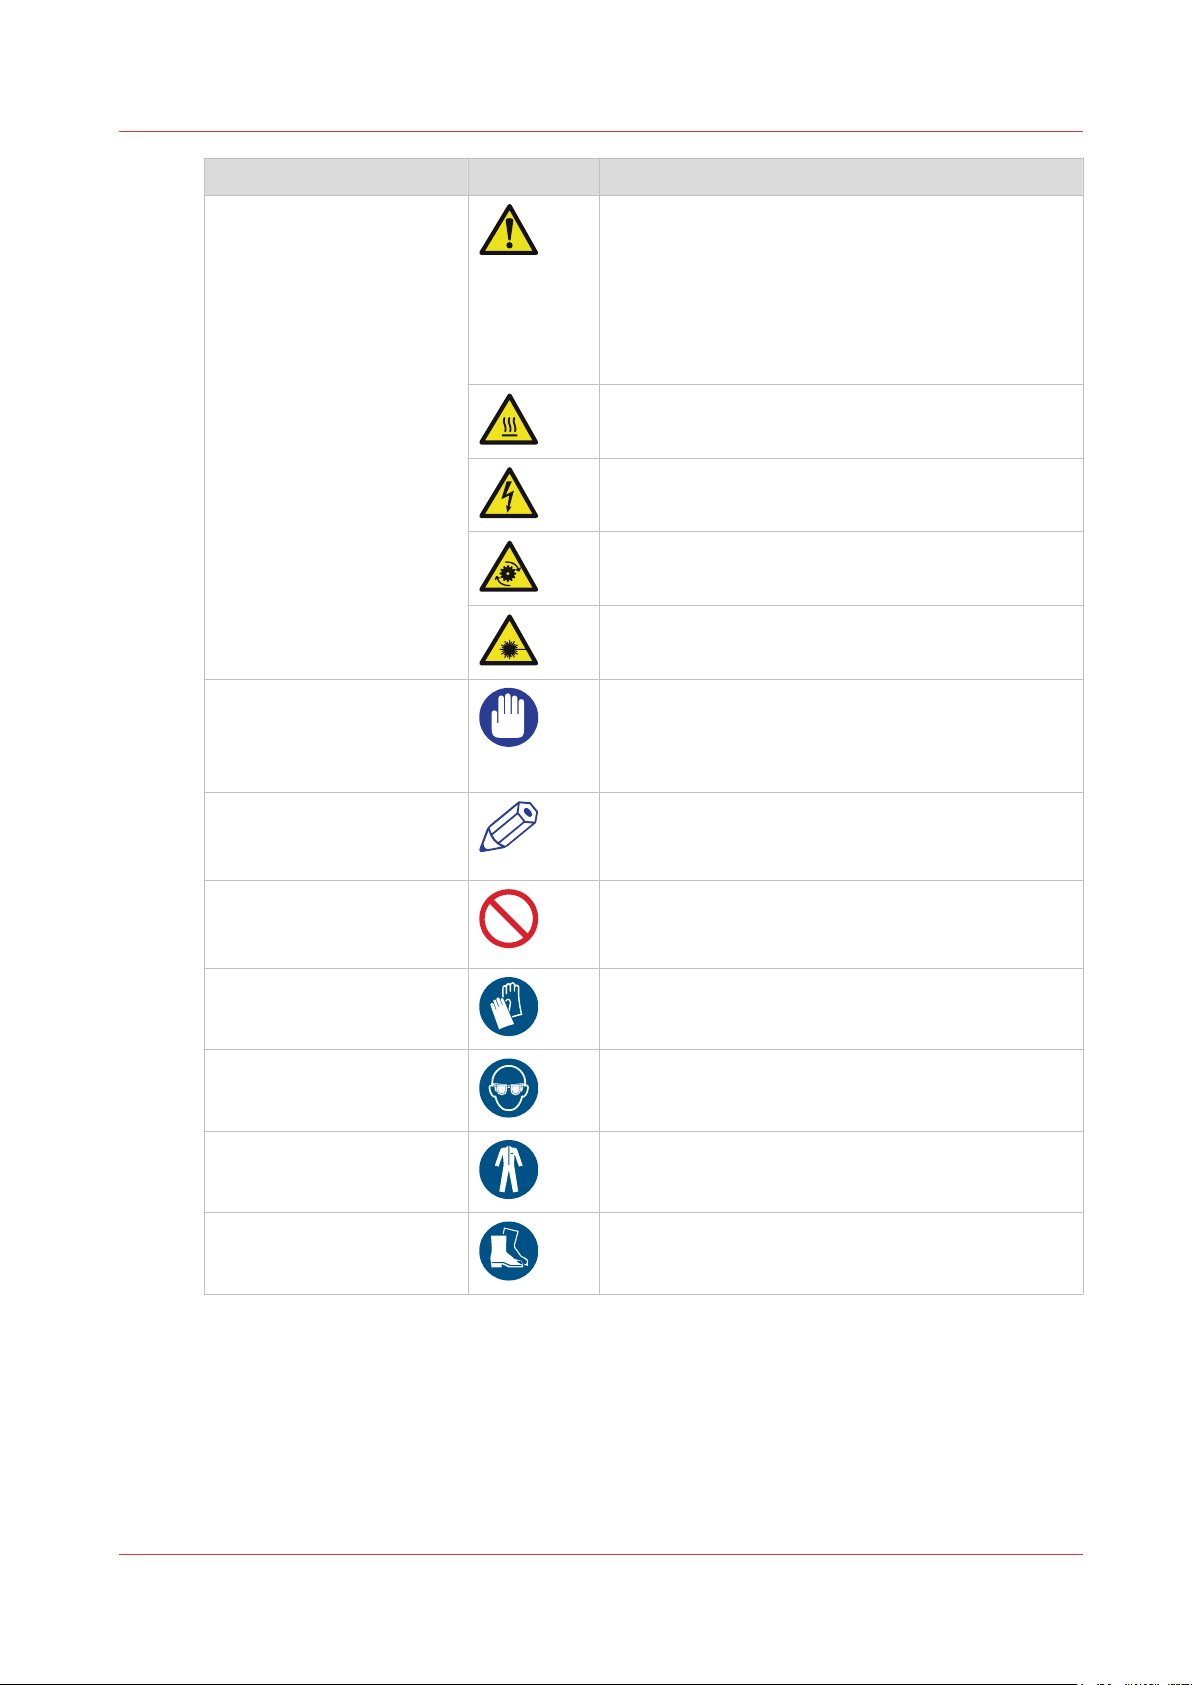
Word Icon Indicates
Notes for the reader
CAUTION
IMPORTANT
General hazard
Indicates a caution concerning operations that may
lead to injury to persons if not performed correctly.
To use the machine safely, always pay attention to
these cautions.
This indication has several icons that warn against
various hazards. The icons are shown below.
Hot surface
Electric shock
Moving parts
Laser beam
Indicates operational requirements and restrictions.
Be sure to read these items carefully to operate the
machine correctly and to avoid damaging the machine or property.
NOTE
Indicates an operation that must not be performed.
The use of heat-resistant gloves is mandatory when
The use of eye protection is mandatory when you
The use of protective clothing is mandatory when
The use of safety footwear is mandatory when you
Safety information
Before using this Océ product, make sure that you read and understand the safety information
which is part of the user documentation. You can download the safety information via
downloads.oce.com"
together with the machine or obtain the safety information from your local Océ representative. To
avoid potential hazards, maintenance is strictly preserved to properly qualified and trained
service technicians.
Indicates a clarification of an operation or contains
additional explanations for a procedure. Reading
these notes is highly recommended.
Read these items carefully and make sure not to
perform the described operations.
you carry out the actions concerned.
carry out the actions concerned.
you carry out the actions concerned.
carry out the actions concerned.
"http://
or, if applicable, find it on the user documentation CD/DVD that is delivered
Chapter 1 - Introduction
13
Page 14

Available documentation
Available documentation
Introduction
This manual is part of a complete documentation set. The following table shows a complete
overview of the available documentation.
NOTE
For up-to-date documentation, visit the Océ downloads page on the Internet and find all the
information for your printer.
Available documentation
Documentation Availability
User Manual - Operation guide • On the download website under the product
Online Help - Océ Express WebTools • Embedded in the application
name (
Available as a PDF file in multiple languages.
Available in multiple languages.
"http://downloads.oce.com"
).
User manual - Safety guide • On the download website under the product
Quick Reference Guide for the use of Océ
Mobile WebTools
Océ Large Format Systems Connectivity Administration guide
Océ PlotWave-ColorWave Systems Security - Administration guide
name (
Available as a PDF file in multiple languages.
• On the download website under the product
name (
Available as a PDF file.
• On the download website under the product
name (
Available as a PDF file in English only.
• On the download website under the product
name (
Available as a PDF file in English only.
"http://downloads.oce.com"
"http://downloads.oce.com"
"http://downloads.oce.com"
"http://downloads.oce.com"
Available documentation Océ Wide format Printer Driver for Microsoft ® Windows
Documentation Availability
User guide • On the download website under the product
name (
Available as a PDF file in multiple languages.
Online Help • Embedded in the application
Available in multiple languages.
"http://downloads.oce.com"
).
).
).
).
®
).
Available documentation Océ PostScript® 3 Driver
Documentation
Installation guide • On the download website under the product
Chapter 1 - Introduction
14
Availability
name (
Available as a PDF file in multiple languages.
"http://downloads.oce.com"
).
4
Page 15

Documentation Availability
Online Help • Embedded in the application
Available documentation Océ Publisher Select
Documentation Availability
User guide - Océ Publisher Select • On the download website under the product
Online Help • Embedded in the application
Available documentation
Available in multiple languages.
name (
"http://downloads.oce.com"
).
Available as a PDF file in multiple languages.
Available in multiple languages.
Chapter 1 - Introduction
15
Page 16

Available documentation
Chapter 1 - Introduction
16
Page 17

Chapter 2
Get to Know the Printing System
Page 18
The Océ PlotWave 450/550
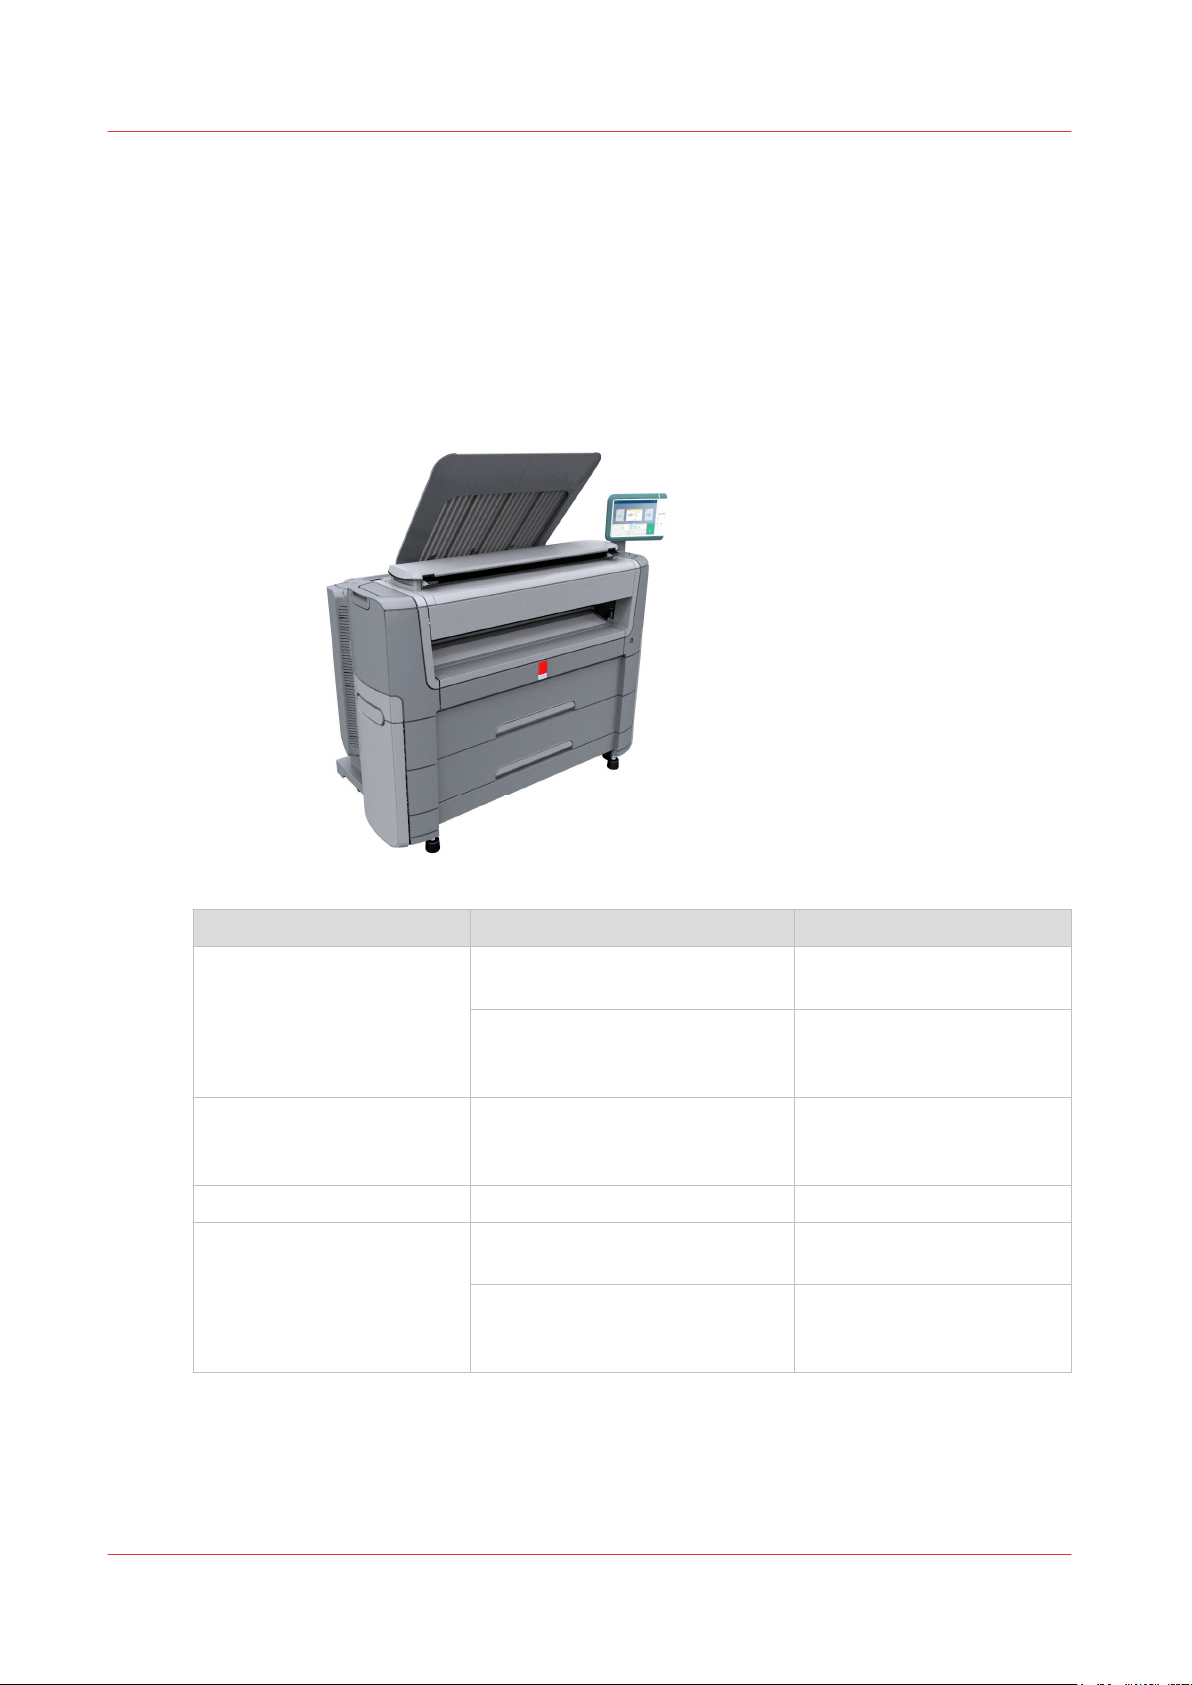
The Océ PlotWave 450/550
Introduction
The Océ PlotWave 450/550 is a black and white, all-in-one wide format print, copy and scan
system with a multi-touch user panel and an optional color scanner.
Workflow of the Océ PlotWave 450/550
Process Actions Reference
Before using the system
Connect the printer
Define and configure the settings
Connect your Printing System
on page 19
Define your Workflow with
Océ Express WebTools
page 43
Daily use
Use the printer for copy, print,
and scan jobs
Print Jobs
Copy Jobs
Scan Jobs
Optionals
Maintenance and support
Use the Océ PlotWave folder
Maintain the system
Get support to solve problems
Use the Folder
Maintain the Printing System
on page 227
Solve Problems
page 281
Support
on page 309
on
on page 163
on page 172
on page 195
on page 215
on
Chapter 2 - Get to Know the Printing System
18
Page 19
Connect your Printing System
1560mm
61.4”
1620mm
63.8”
1403mm
55.2”
60mm
2.4”
600mm
23.6”
803mm
31.6”
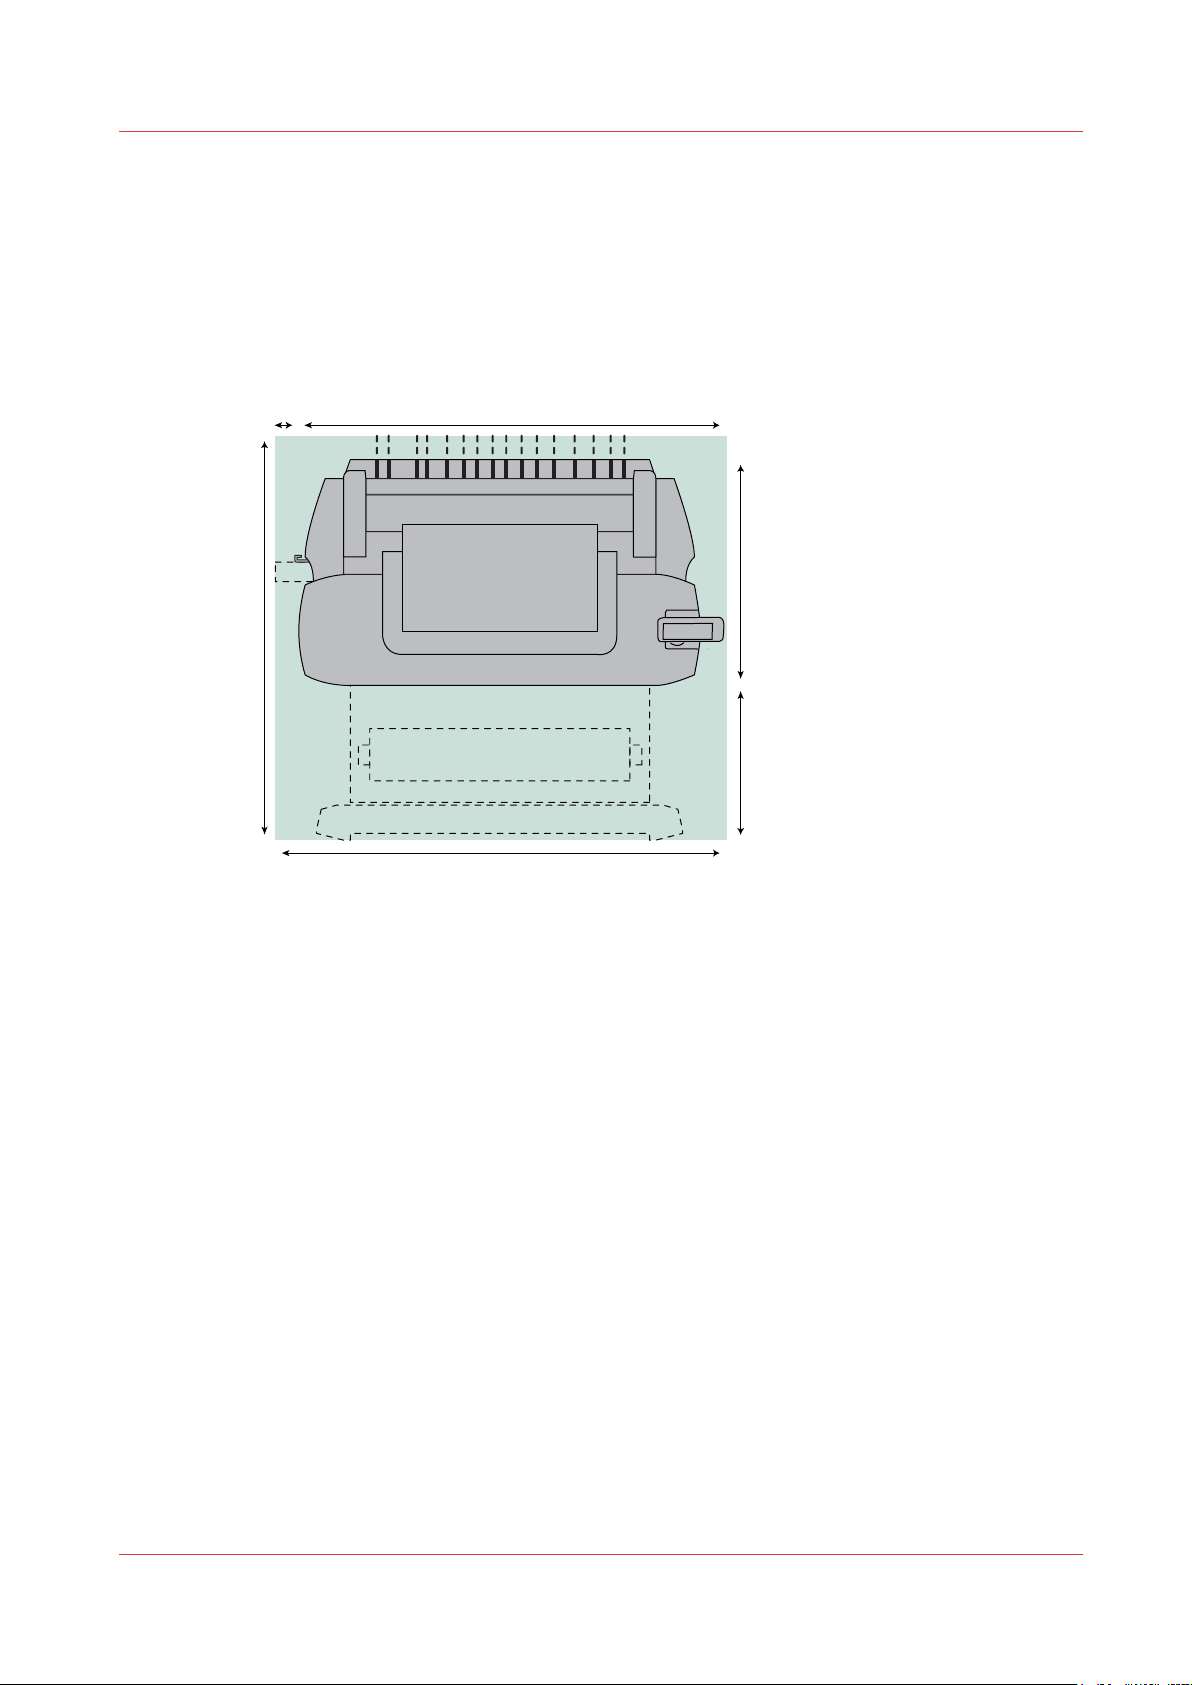
Working area [Footprint]
The printing system (with or without the optional [Océ Scanner Express]) requires a specific floor
space / working area as indicated in the illustration below.
Connect your Printing System
Chapter 2 - Get to Know the Printing System
19
Page 20
A
B
C
Connect the mains supply cable and the network cable
Connect the mains supply cable and the network cable
Procedure
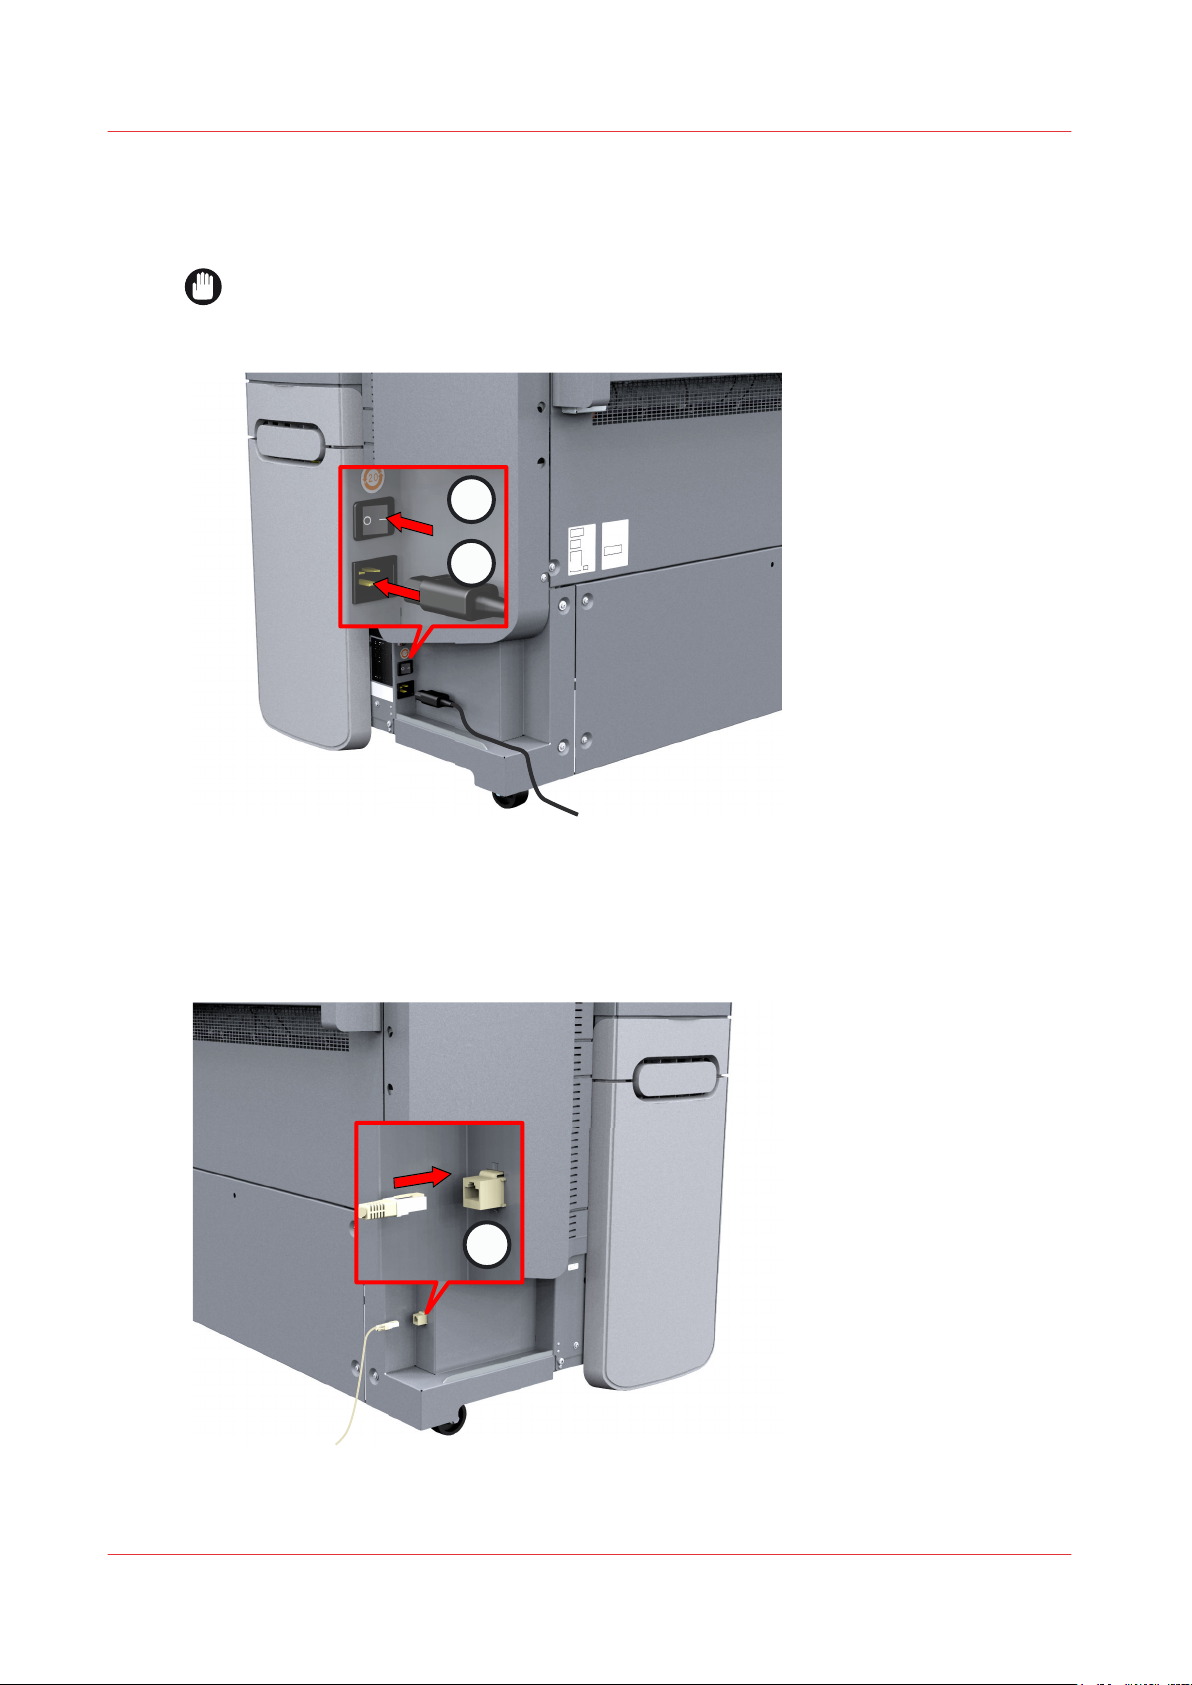
IMPORTANT
Make sure the power switch (A) is in 'off' position.
Plug the mains supply cable into the power connection at the left back of the printer (B).
1.
Plug the other side of the mains supply cable into the wall socket.
2.
Make sure one end of the network cable is plugged into the modem or router of your company
3.
network.
Plug the other end of the network cable into the network connection at the right back of the
4.
printer (C) , to connect the printer to your company network.
Chapter 2 - Get to Know the Printing System
20
Page 21
Switch on the printing system
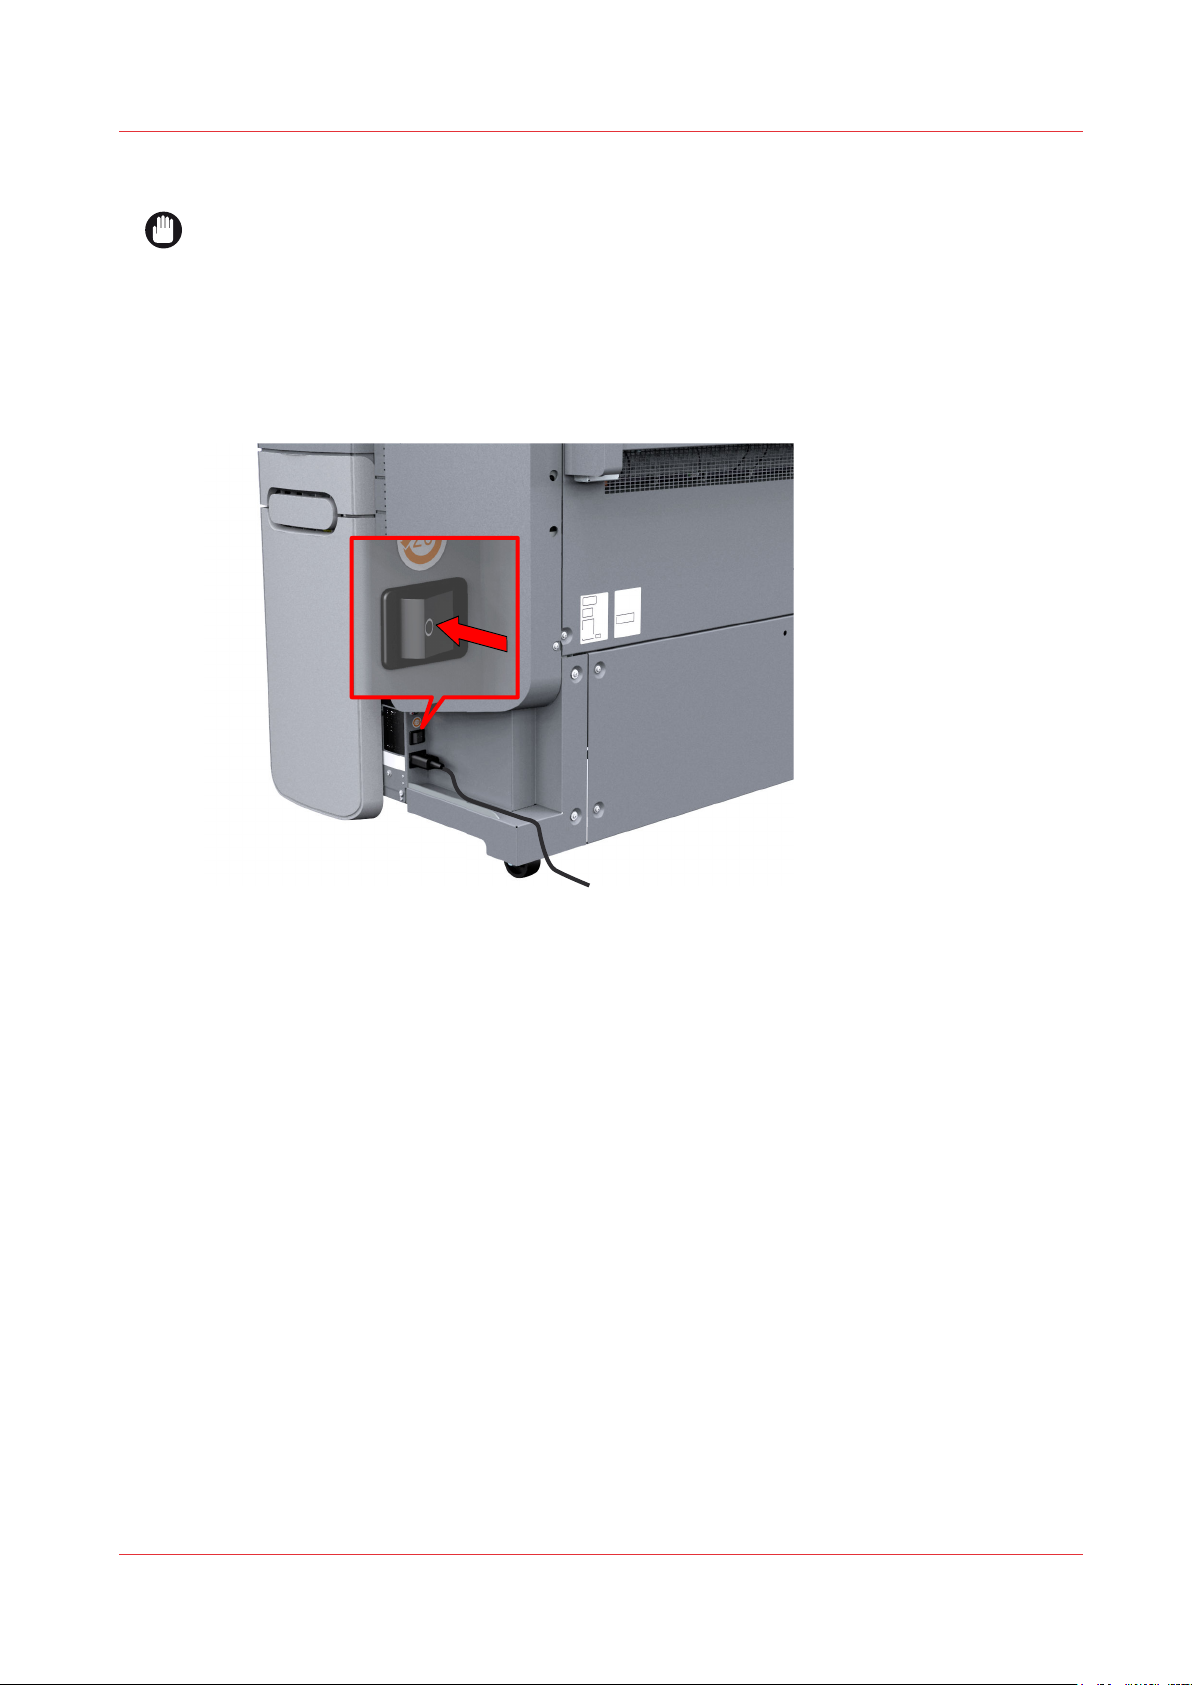
IMPORTANT
• Make sure the mains supply cable (B) is plugged in.
• Make sure the network cable ©) is plugged in.
Switch on the printing system
For more information, see
Procedure
Switch on the power switch at the left back of the printer.
1.
Connect the mains supply cable and the network cable
on page 20
Chapter 2 - Get to Know the Printing System
21
Page 22
Turn off the printing system
Turn off the printing system
Introduction
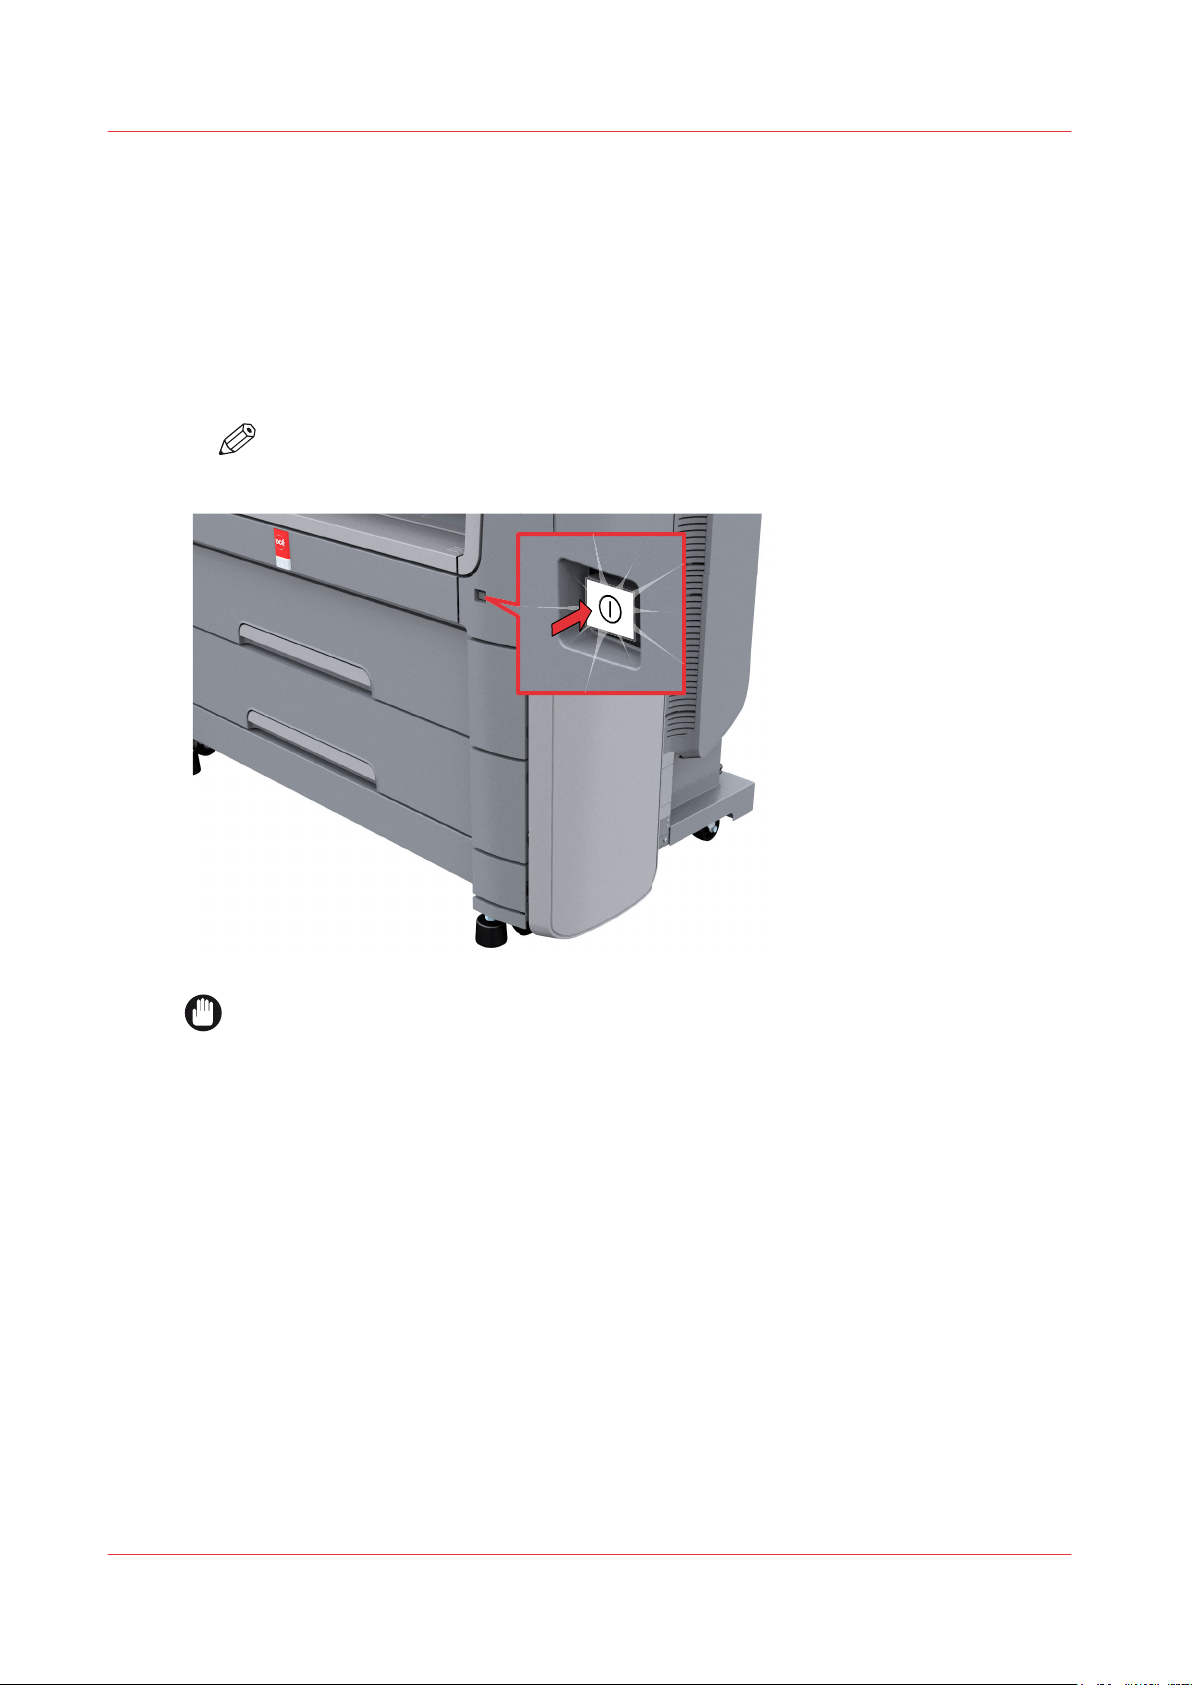
When you want to switch off the printing system completely, you have to take a few steps.
Procedure
Press the on/off button at the front of the printer to switch the printing system off. The button
1.
light starts to blink.
NOTE
You can also use the [Shut down] button in Océ Express WebTools.
IMPORTANT
Wait until the on/off button stops blinking.
Chapter 2 - Get to Know the Printing System
22
Page 23
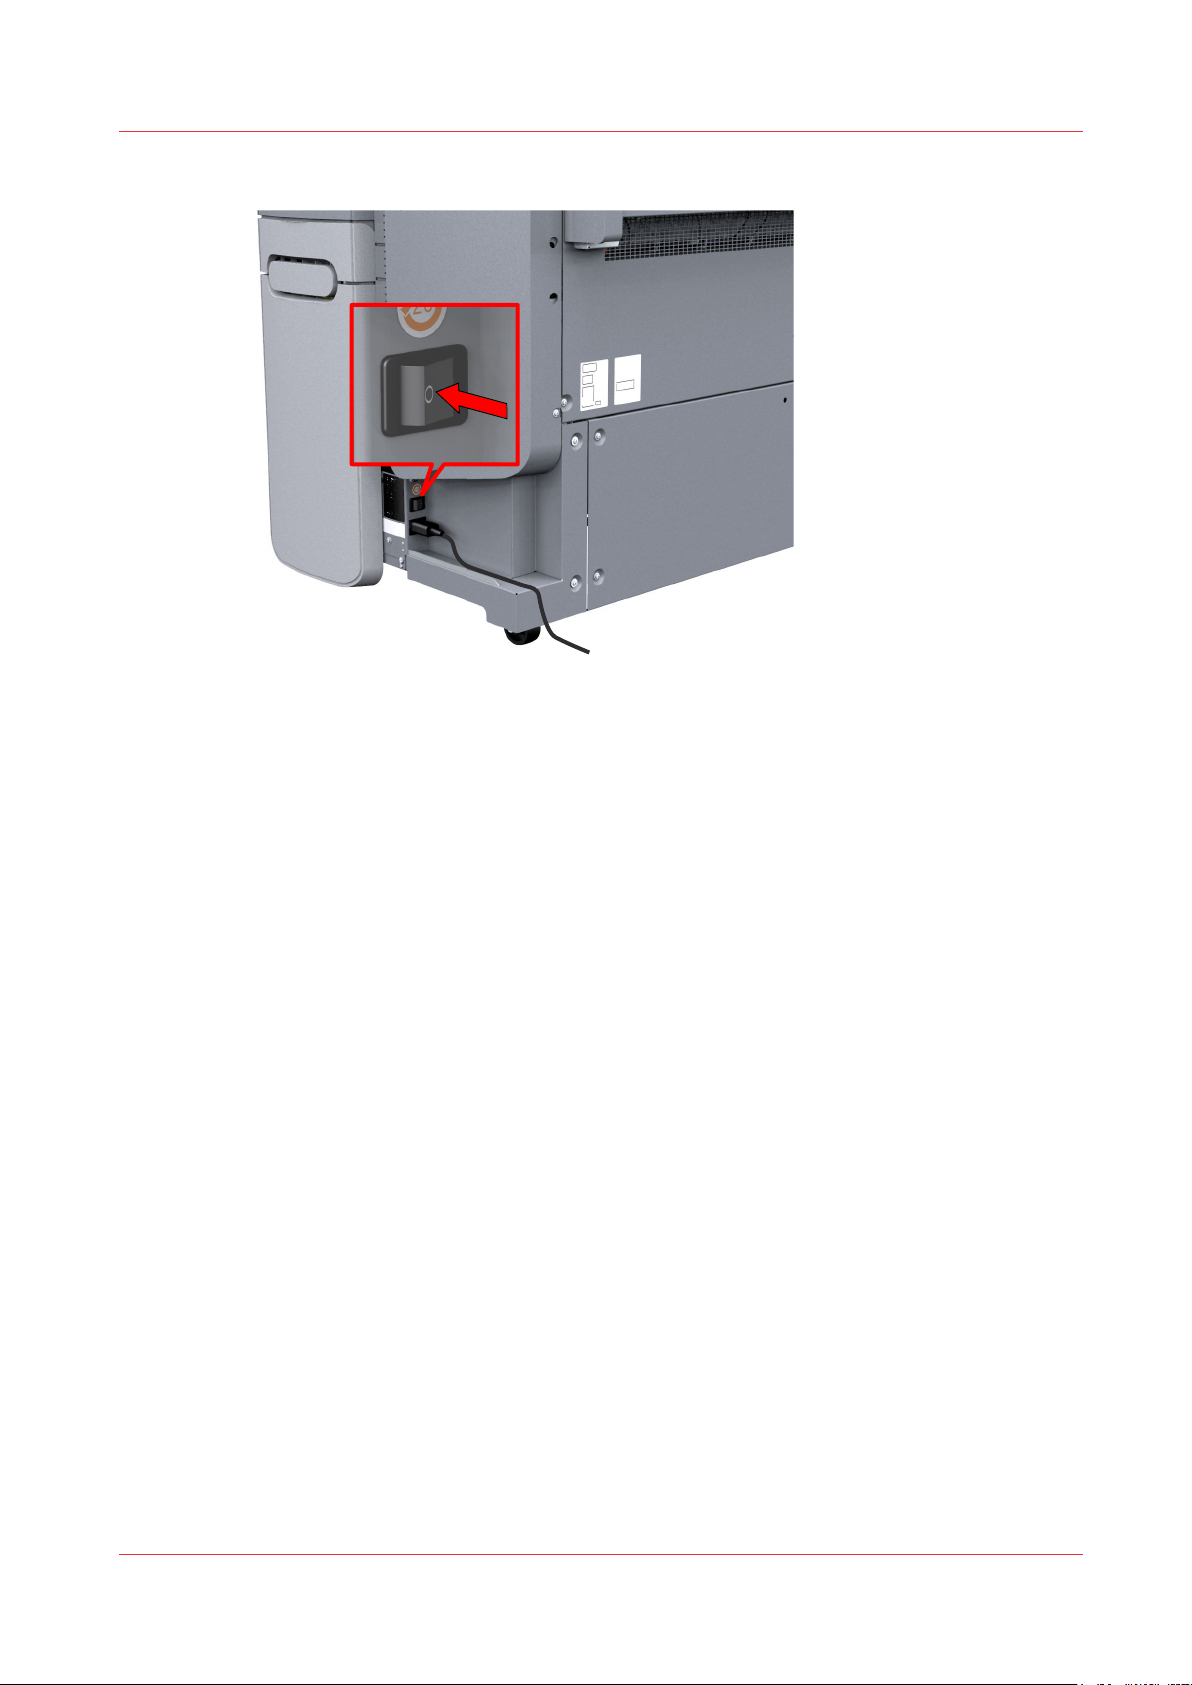
Switch off the power switch at the back of the printing system.
2.
Turn off the printing system
Chapter 2 - Get to Know the Printing System
23
Page 24
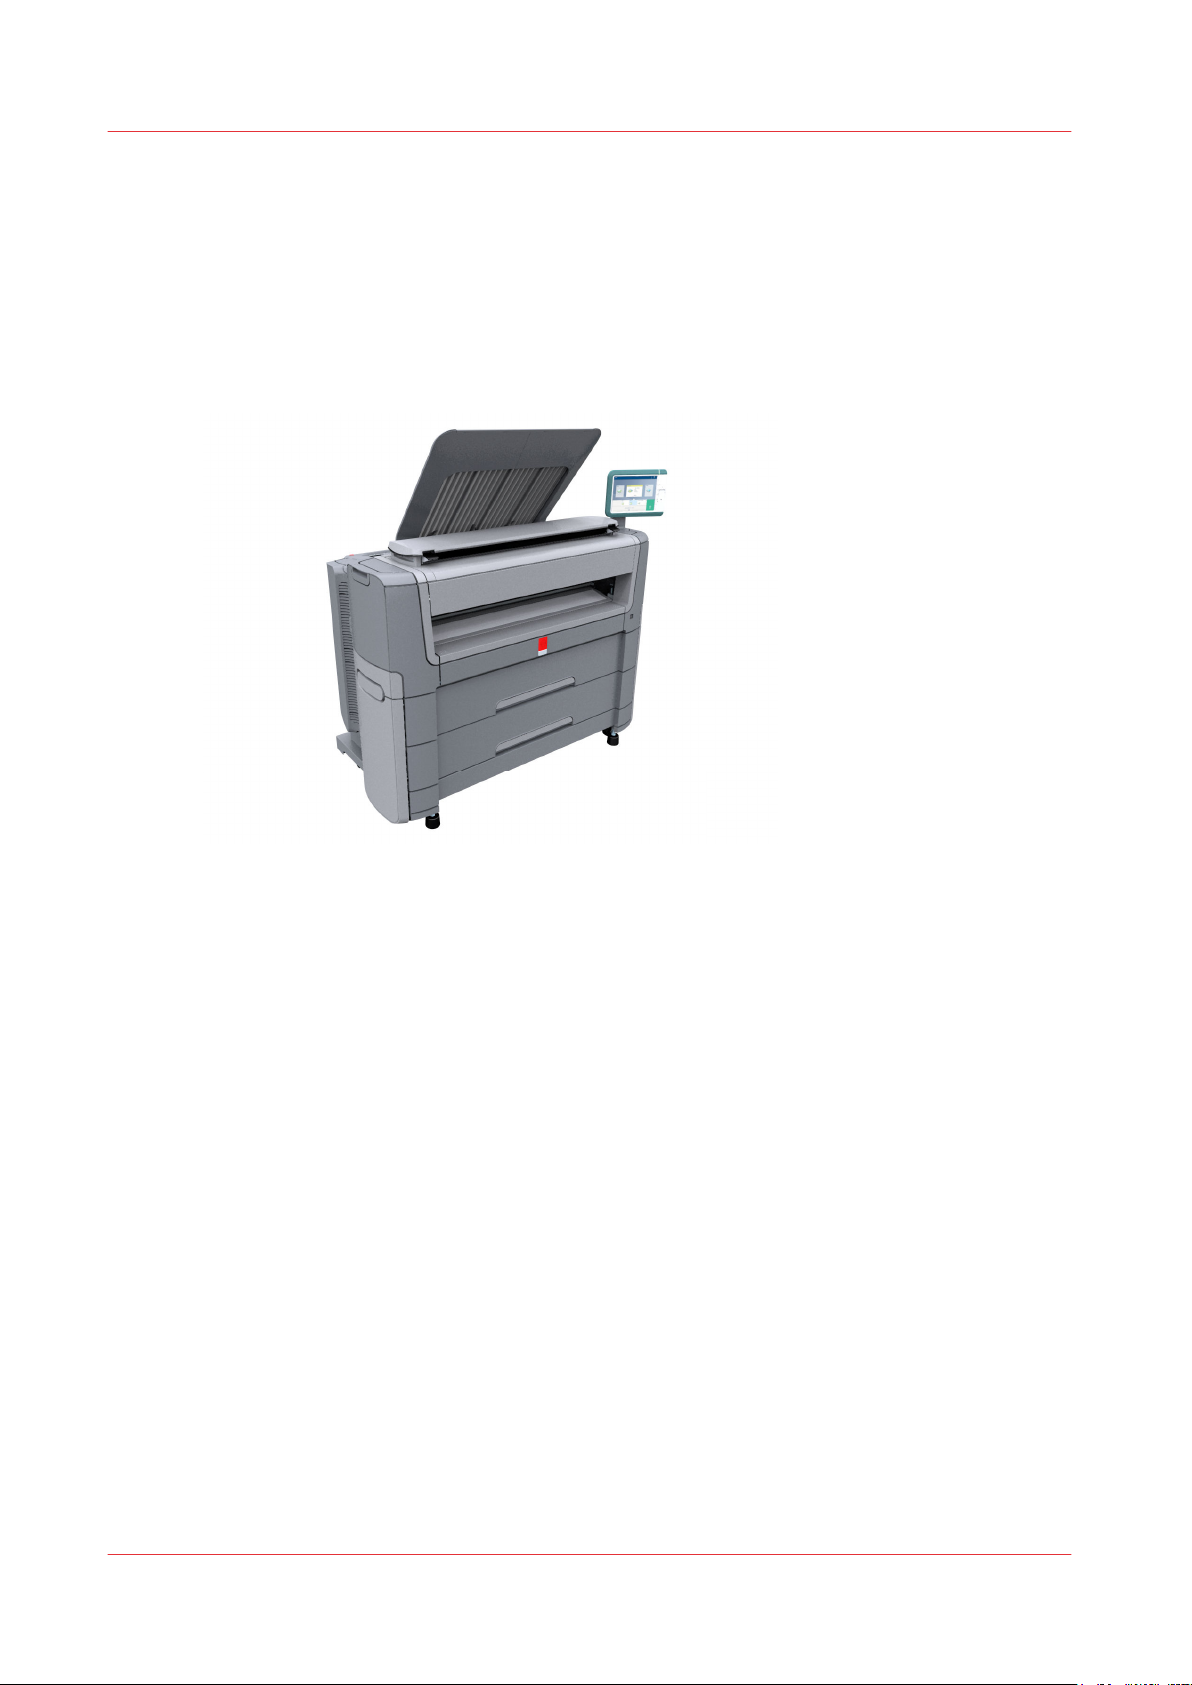
Move and re-adjust the printing system
Move and re-adjust the printing system
Introduction
A user cannot move the printing system by himself. When you want to move the printing system
to a new location or you want to re-adjust the system, please contact the service.
Contact your local service representative or visit the support website
support"
for more information.
"http://www.canon.com/
Chapter 2 - Get to Know the Printing System
24
Page 25
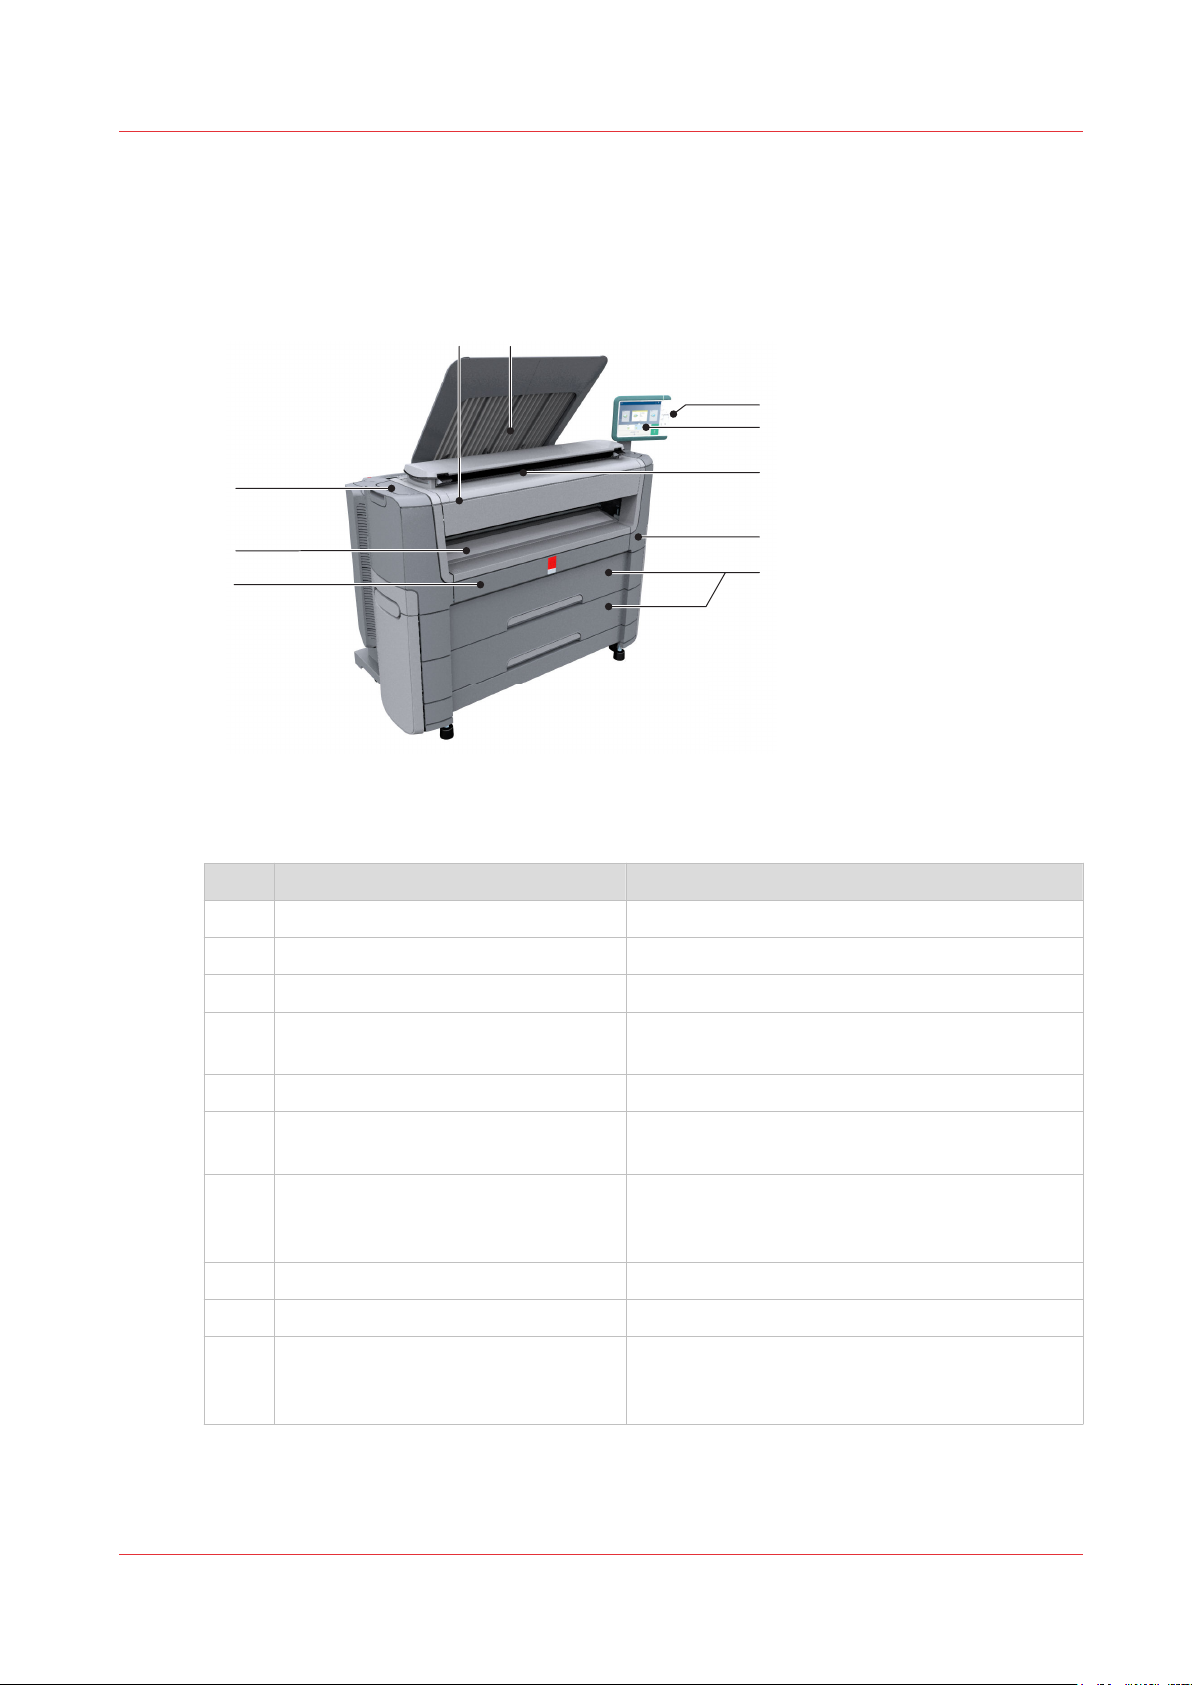
The Hardware
7
6
1
2
3
4
9
8
10
5
The components of the printer (front)
The Hardware
Component - function table
No. Component Description / Function
1 [lower front cover] Located at the front, used for error recovery.
2 [media bypass] To manually feed cut-sheets up to 36" width.
3 [toner compartment] Compartment to refill toner.
4 [Easy Access cover] Cover that gives easy access for servicing the
printer.
5 [top delivery tray] Delivery tray that collects the printed sheets.
6 [USB port] USB connector to use a USB mass storage de-
vice to print from or to scan to.
7 Océ ClearConnect: multi-touch [user
panel]
8 [printer top cover] Only available in printer-only version.
9 [on/off button] Button to start or shut down the printer.
10 [media drawer] Media drawer that contains media roll 1 and 2.
The Océ ClearConnect user panel allows the user
to start copy, scan, or print jobs, and to monitor
the system and the job status.
Optional media drawer that contains media roll 3
and 4.
Chapter 2 - Get to Know the Printing System
25
Page 26
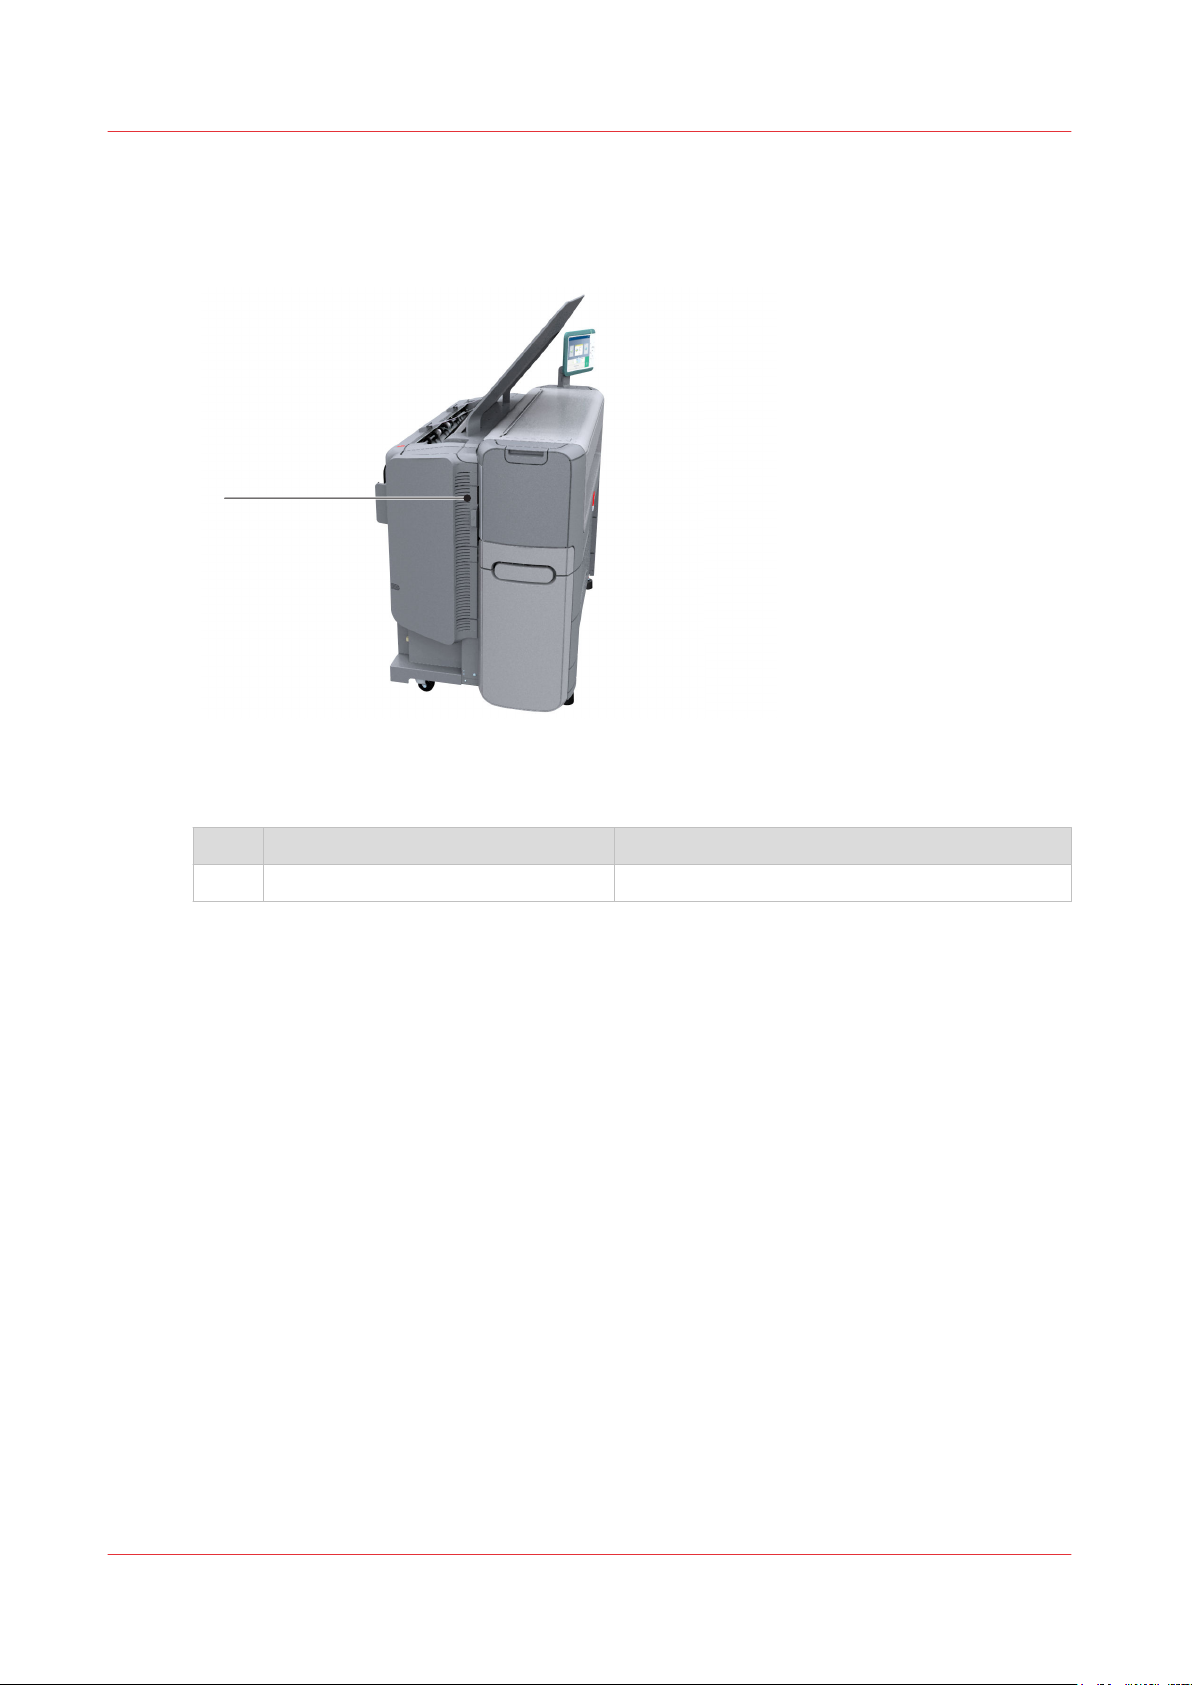
1
The components of the printer (left side)
The components of the printer (left side)
Illustration
Component - function table
No. Component Description / Function
1 [residual toner compartment] Gives access to the residual toner container.
Chapter 2 - Get to Know the Printing System
26
Page 27
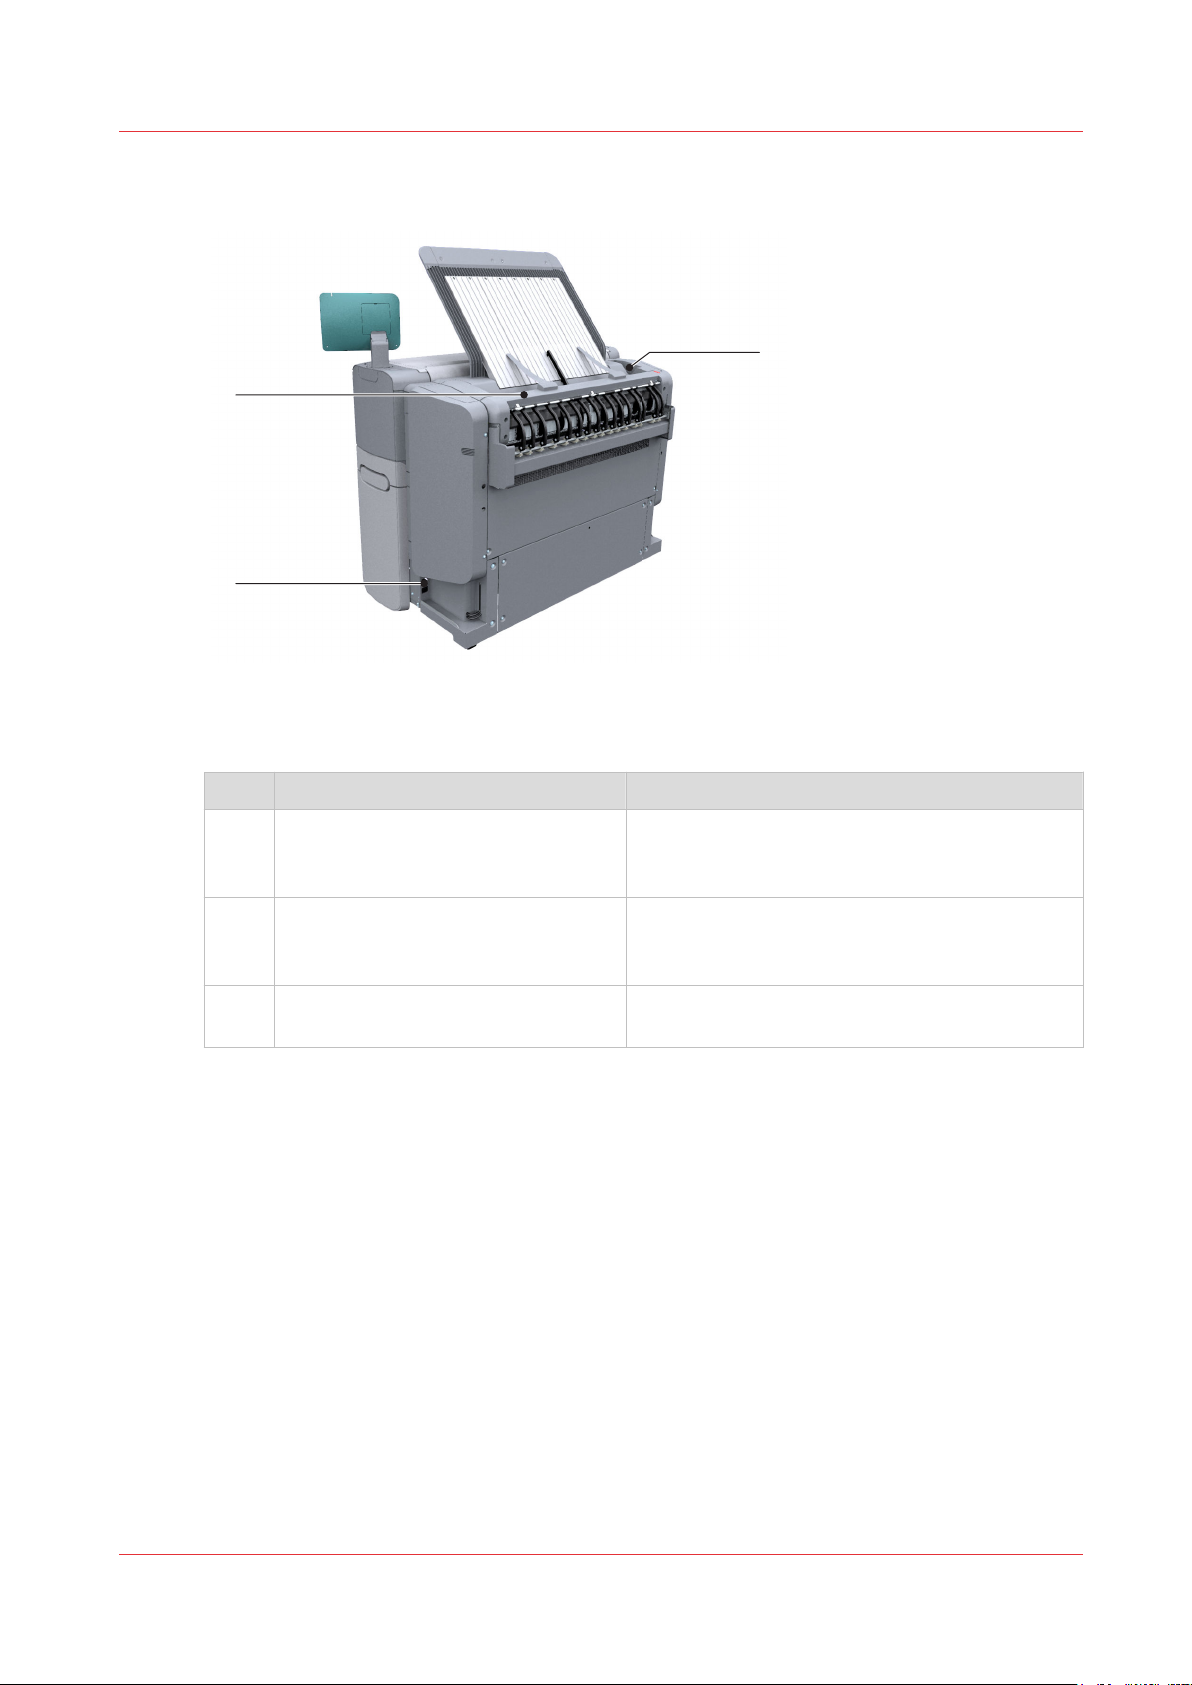
The components of the printer (back)
3
1
2
The components of the printer (back)
Component - function table
No Component Description / Function
1 [power switch] Switch the main power supply on or off.
2 [upper back cover] Open the upper back cover with the media jam
3 [media jam clearance handle] Use this handle to access the paper in case of a
You can find the serial number of the printer on
the sticker next to the power switch.
clearance handle, when you want to access the
heater section in case of a media jam.
paper jam in the heater section.
Chapter 2 - Get to Know the Printing System
27
Page 28
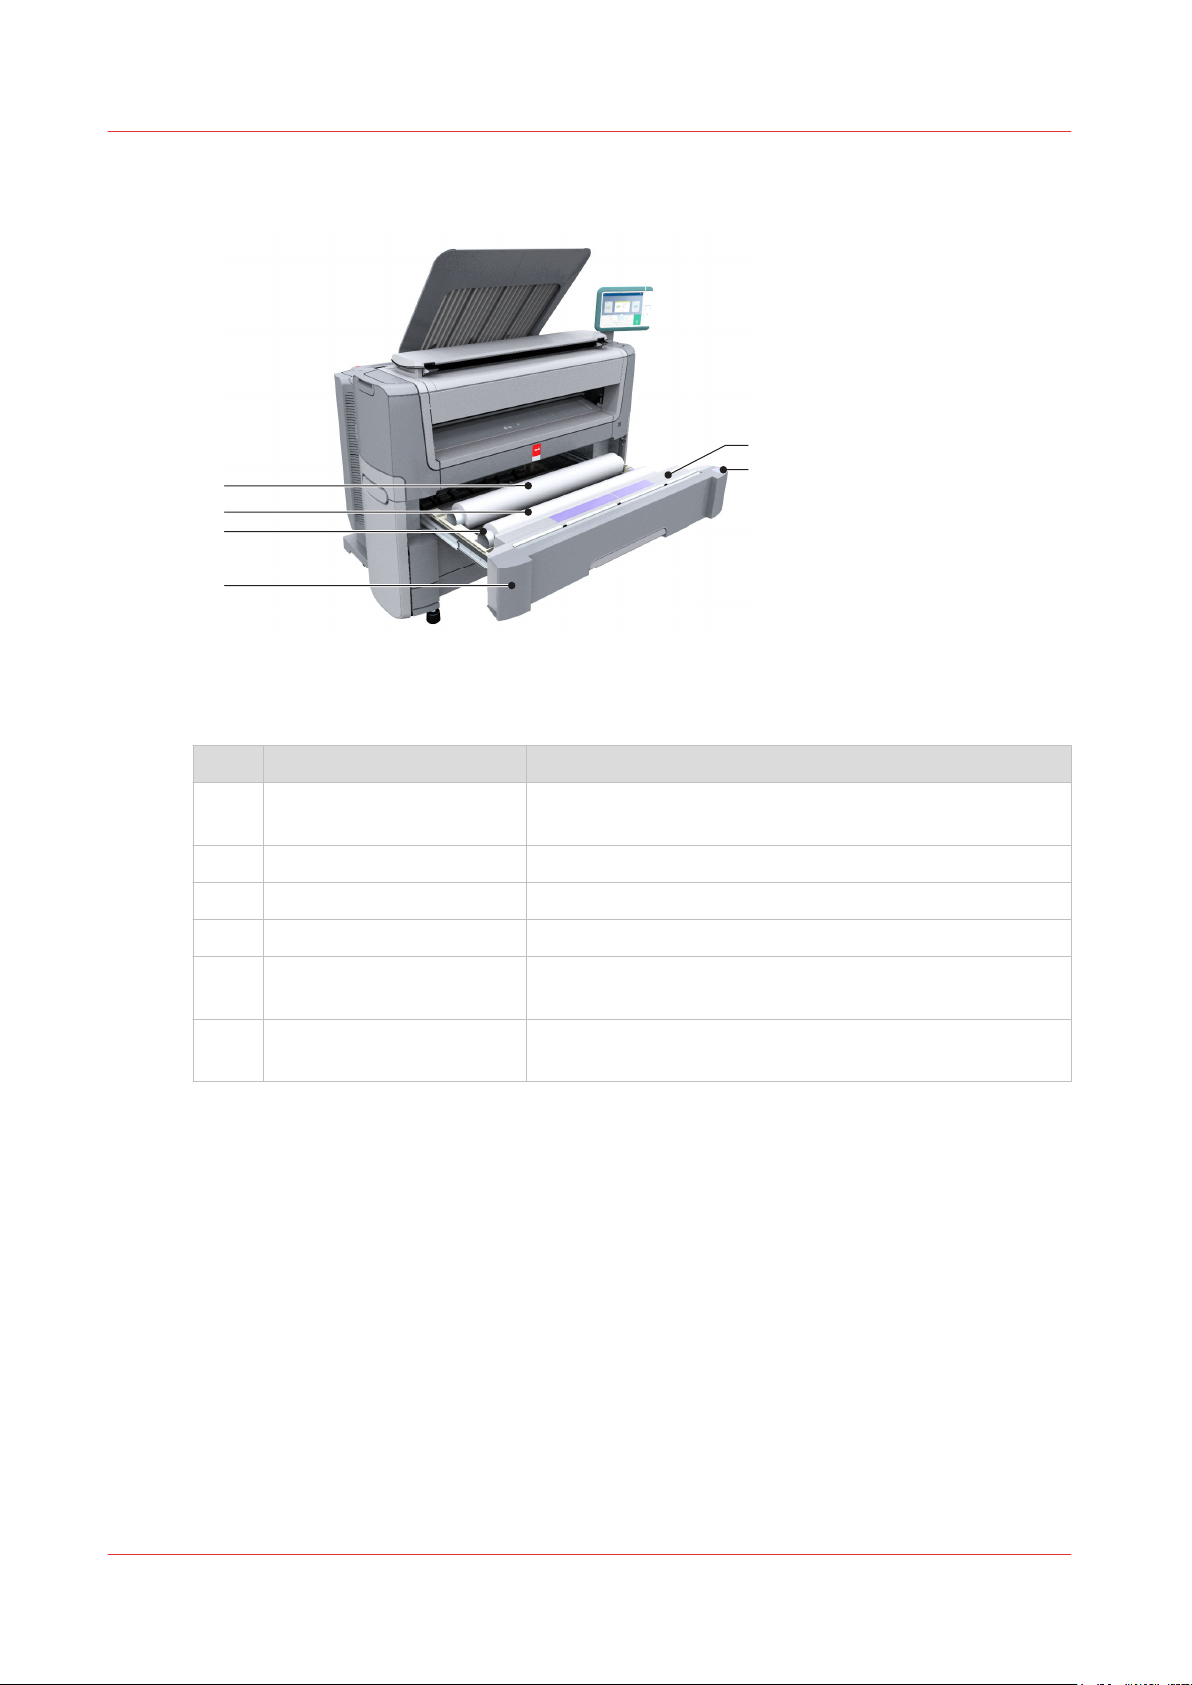
1
2
3
4
6
5
The media drawer
The media drawer
Component - function table
No. Component Description / Function
1 [media drawer] Media drawer that contains media roll 1 and 2. Optional
2 [roll holder] Carries the media roll
3 [media roll] 1 Media placed on roll holder in first position.
4 [media roll] 2 Media placed on roll holder in second position.
5 [roll loading station] Groove integrated behind the front cover of the media
6 [clean cut button] Button used to trim a strip of a new or damaged media
media drawer below contains media roll 3 and 4.
drawer, on which the media can be easily loaded.
roll.
Chapter 2 - Get to Know the Printing System
28
Page 29
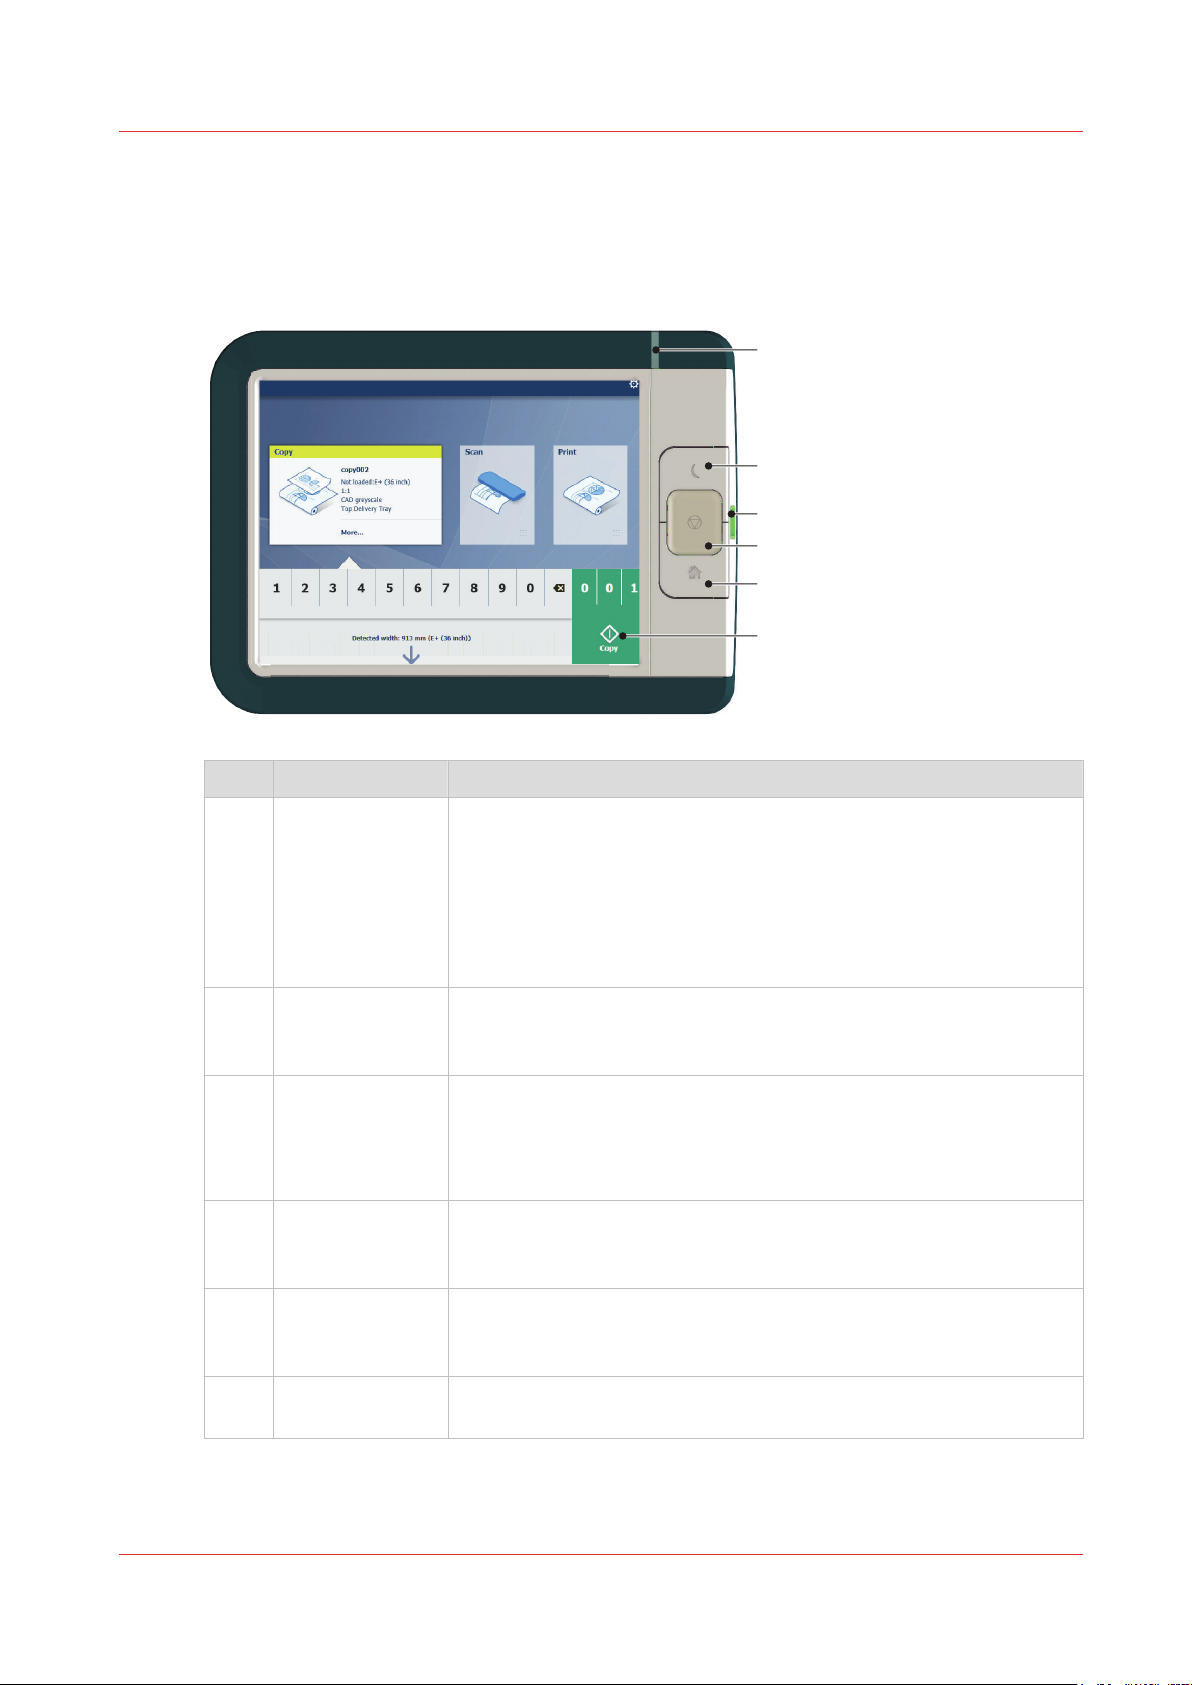
The user panel: Océ ClearConnect
1
4
2
3
5
6
Introduction
The Océ ClearConnect is the multi-touch user panel of the printer.
The user panel: Océ ClearConnect
No. Component Function
1. [status light] Light that gives feedback on the status of the printer.
• A green light indicates that the printer is scanning or printing.
• A green blinking light indicates that the printer is in a transition
state (start-up, shut-down, pause).
• A red light indicates that an error occurred or the print queue is
paused.
• When the light is off the system is ready or shutdown.
2. [wake-up button] Button to:
• Get the printer out of sleep mode.
• Wake the printer up to full functionality.
3. [USB port] Insert a USB key to:
• Print a file directly from the USB key.
• Save a scan file directly on the USB key.
The port green light starts to blink during data transfer.
4. [stop button] Button, with a red light, to:
• Immediately interrupt a scan job.
• Stop a print job after the page that is being printed.
5. [home button] Button to:
• Return to the user panel home screen.
• Reset settings to default by pressing the button twice.
6. [green button]
(touch)
Dynamic tile on the user panel display to:
• Start a scan job, a print job or a copy job on the user panel.
Chapter 2 - Get to Know the Printing System
29
Page 30
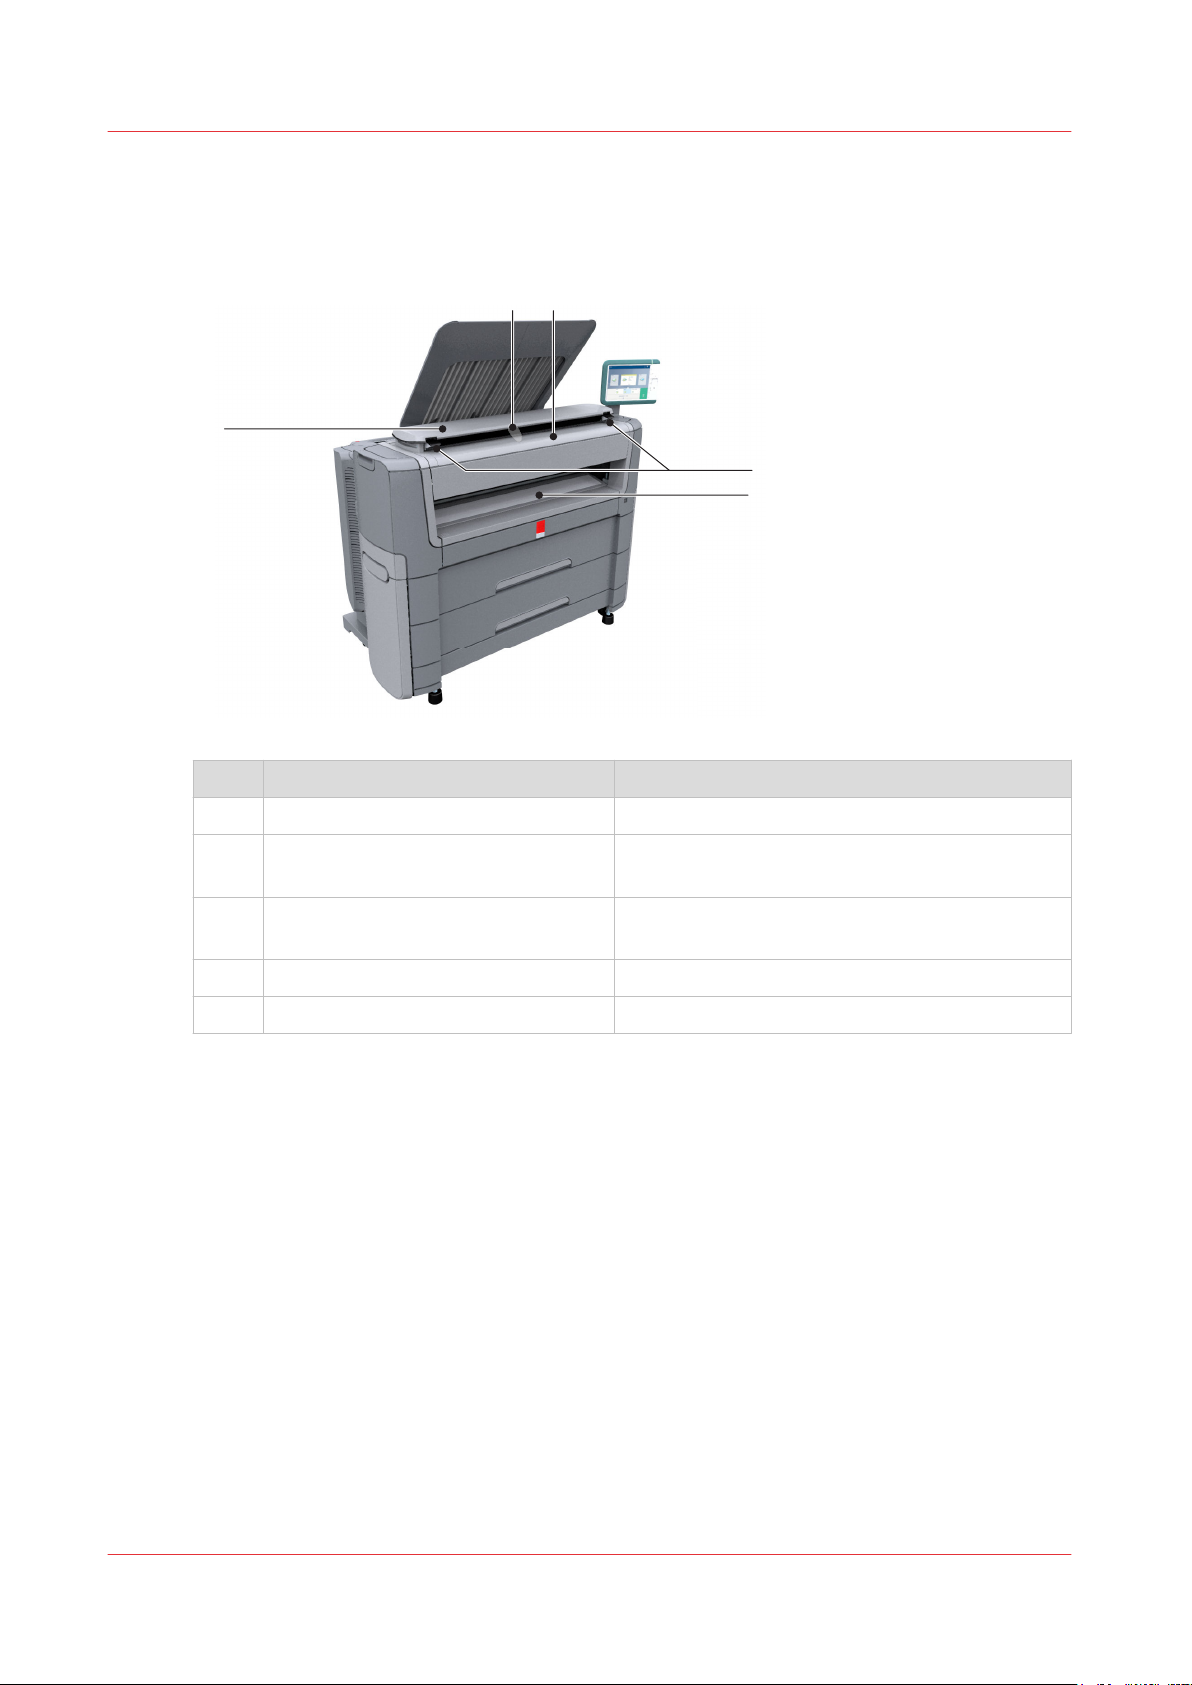
1
5
4
3
2
The components of the scanner (optional)
The components of the scanner (optional)
The components of the scanner (top cover closed)
Component Description/Function
1 [top cover] Closes off the scanner.
2 [output refeed protector] Prevents that your output is refed into the scan-
ner.
3 [original feeding table] Use the [original feeding table] to feed the origi-
nal into the scanner (face up).
4 [open levers] Use the [open levers] to open the top cover.
5 [originals exit] Exit for the scanned original.
Chapter 2 - Get to Know the Printing System
30
Page 31
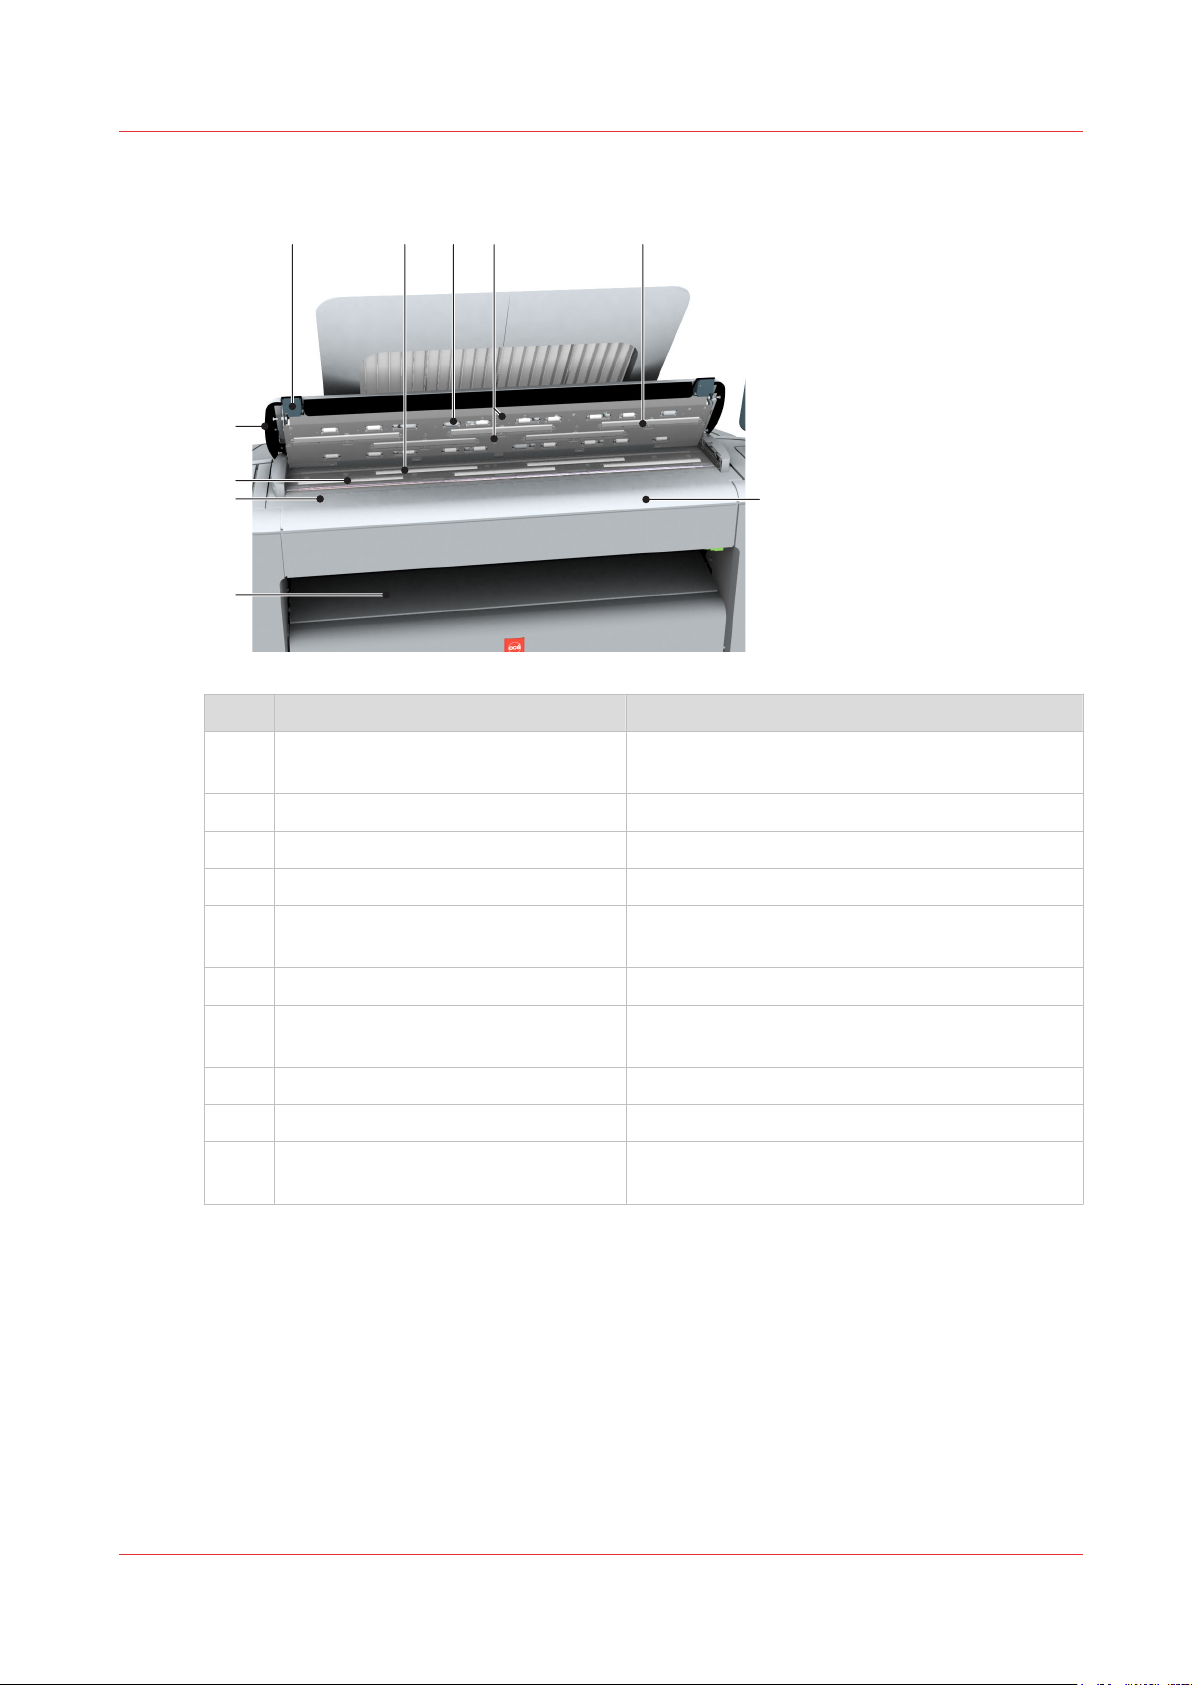
The components of the scanner (top cover opened)
10
1
2
3
4
6 7 8 95
The components of the scanner (optional)
Component Description/Function
1 [originals exit] Exits originals for reception into the front origi-
nal tray.
2 [original size ruler] Use this ruler to measure the original.
3 [original feed rollers] A set of rollers used to transport the original.
4 [top cover] Closes off the scanner.
5 [open levers] Use the open levers to open the top cover of the
scanner.
6 [original support rollers] A set of rollers to guide the original.
7 [scanner top cover rollers] A set of rollers in the top cover to guide the orig-
inal.
8 [original sensors] Sensors to detect the original.
9 [transparent contact plates] Cover of the image sensors.
10 [original feeding table] Use the original feeding table to feed the original
into the scanner (face up).
Chapter 2 - Get to Know the Printing System
31
Page 32
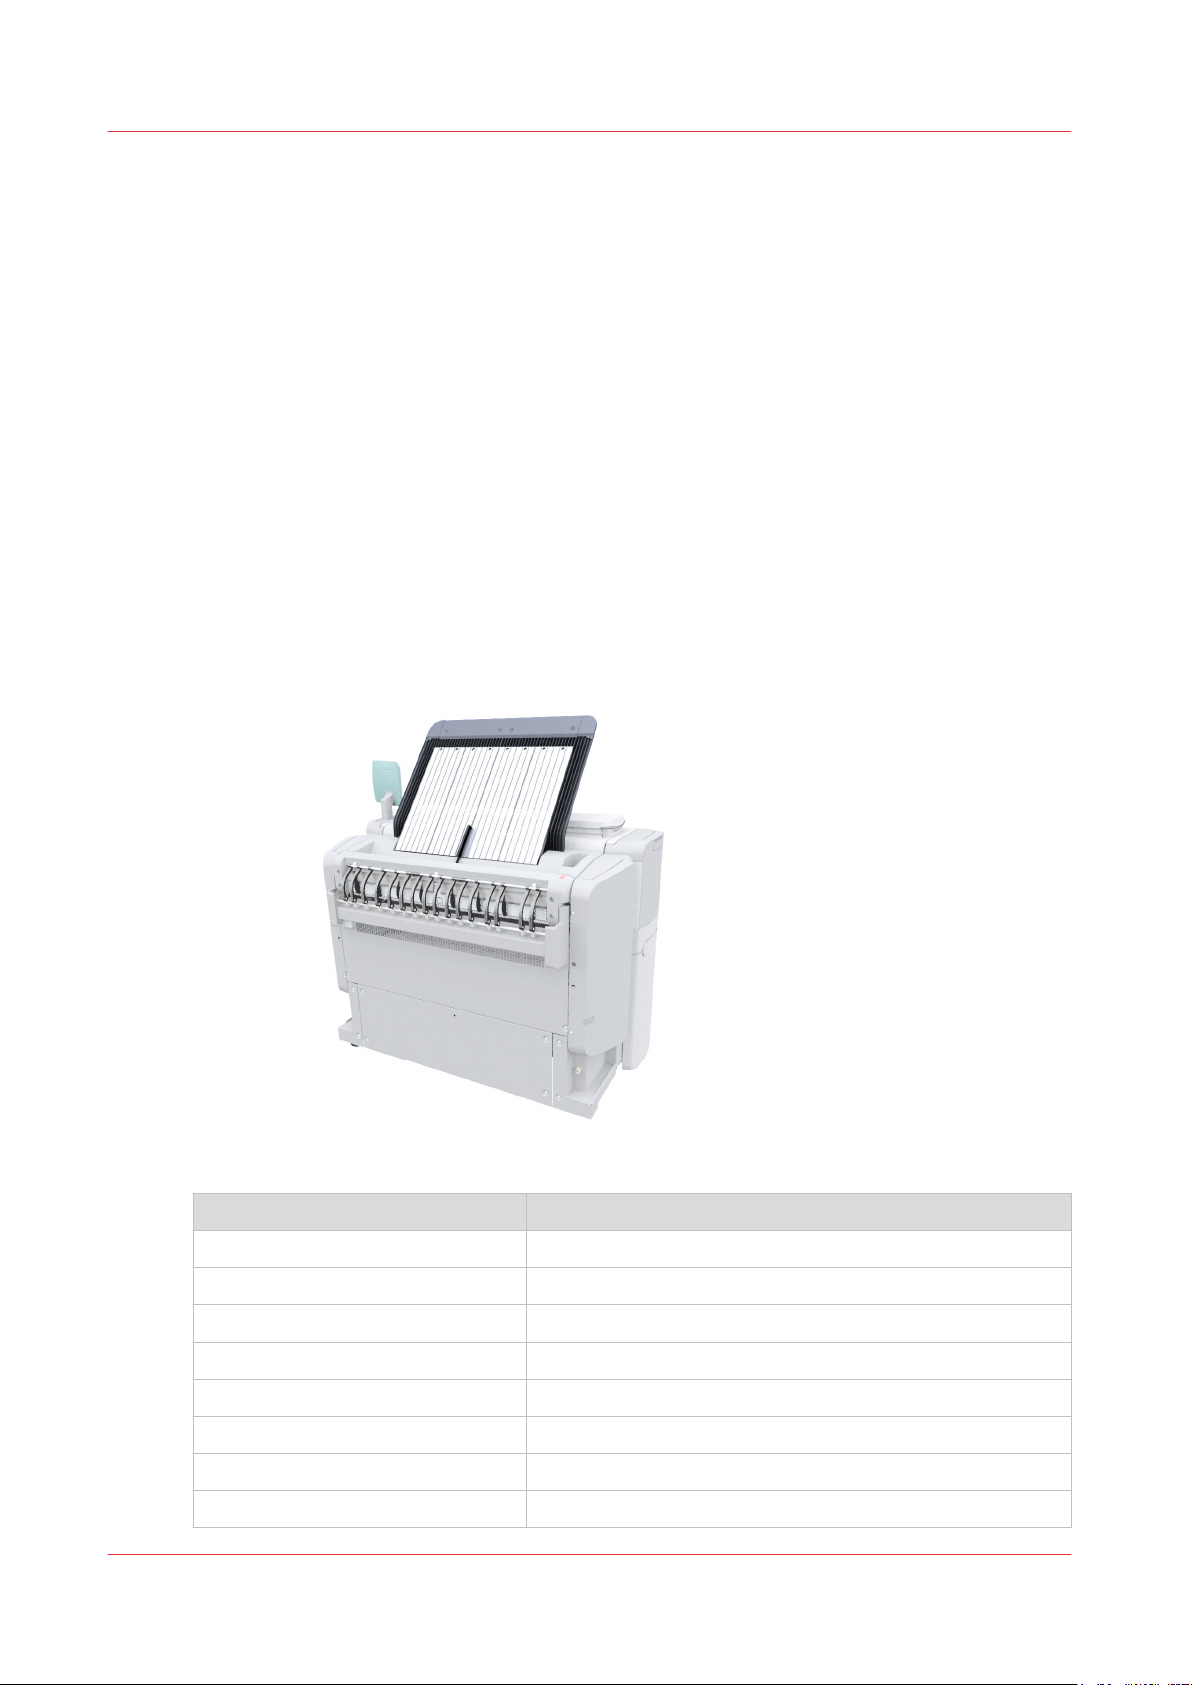
The delivery destination for print jobs
The delivery destination for print jobs
Introduction
The printer is equipped with a top delivery tray to collect your printed output.
The delivery destination
In Océ Express WebTools and under [Show all settings] on the user panel you can define the
delivery destination for your printed output.
• When you select [Top Delivery Tray] and you use plain or transparent paper, your printed
output is by default delivered face-down in the Top Delivery Tray. If you use a different media
type, the printed output is always delivered at the back of the printer.
The Top Delivery Tray can collect up to 100 prints. When the sensor detects that the delivery
tray is full, the printer will stop printing. The message [The Top Delivery Tray is full. Remove
the printed output.] appears on the user panel. Remove the paper to continue printing.
• If you select [Back output], your printed output is by default delivered at the back of the printer.
Your printed output is delivered face-up.
Media compatibility with the Top Delivery Tray and the back output
Paper media
Media name Compatible with the Top Delivery Tray
Paper 60 g Yes
[Bond 17 lb] Yes
[Bond 20 lb] Yes
[Bond 20 lb] Yes
[Recycled bond 20 lb] Yes
[Bond 24-28 lb] Yes
[Transp. 20 lb] Yes
[Transp. 24 lb] Yes
Chapter 2 - Get to Know the Printing System
32
Page 33

The delivery destination for print jobs
Other media
Media name Compatible with the
[Film 3.5 mil] No, delivered to the [Back output]
[Film 4.5 mil] No, delivered to the
[Translucent] No, delivered to the
[Vellum] No, delivered to the
Chapter 2 - Get to Know the Printing System
33
Page 34
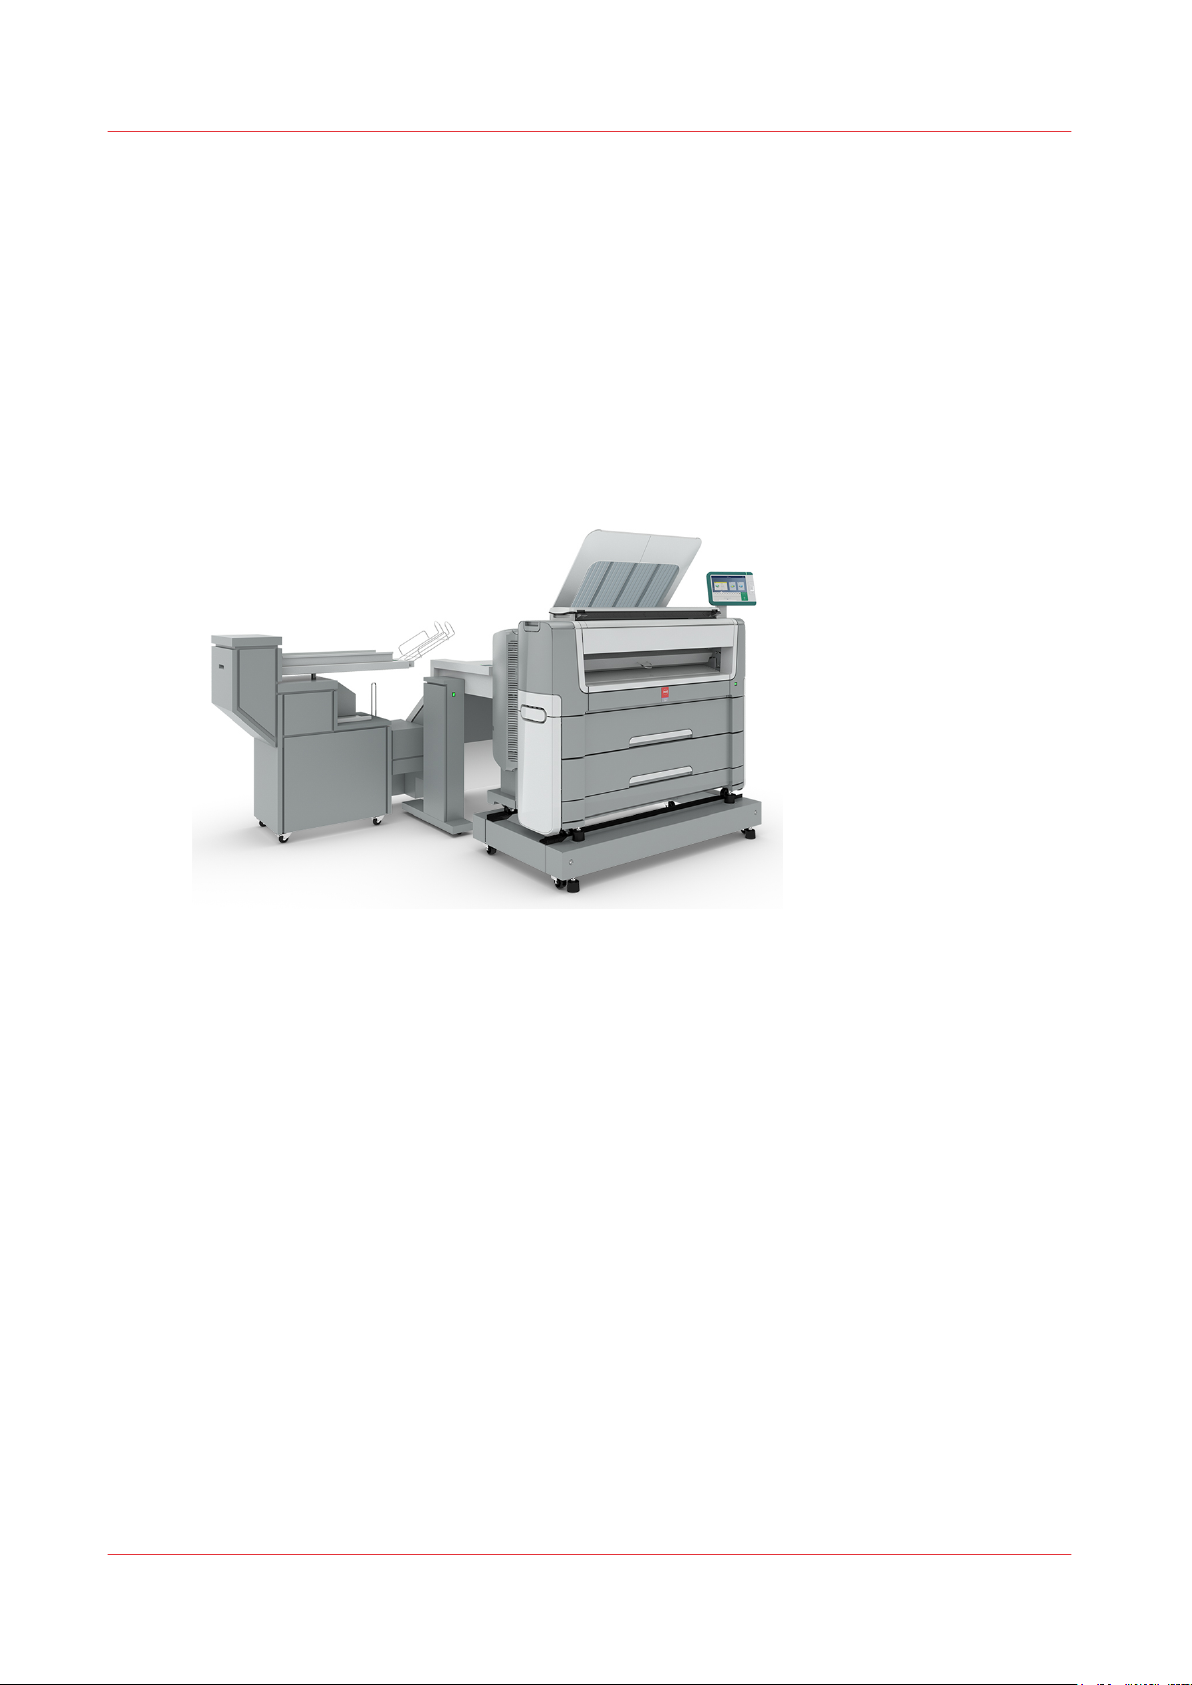
The folding device (optional)
The folding device (optional)
Introduction
The printer can be delivered with an integrated folding device.
The Océ PlotWave 450/550 is compatible with the Océ PlotWave folder.
The Océ PlotWave folder
The Océ PlotWave folder can be used with a reinforcement unit and belt unit.
A technician is required to install the folder and configure the system.
For more information on the folder, see
Use the Folder
on page 215.
Chapter 2 - Get to Know the Printing System
34
Page 35
1
4
2
3
5
6
Workflow of the Océ ClearConnect user panel
Workflow of the Océ ClearConnect user panel
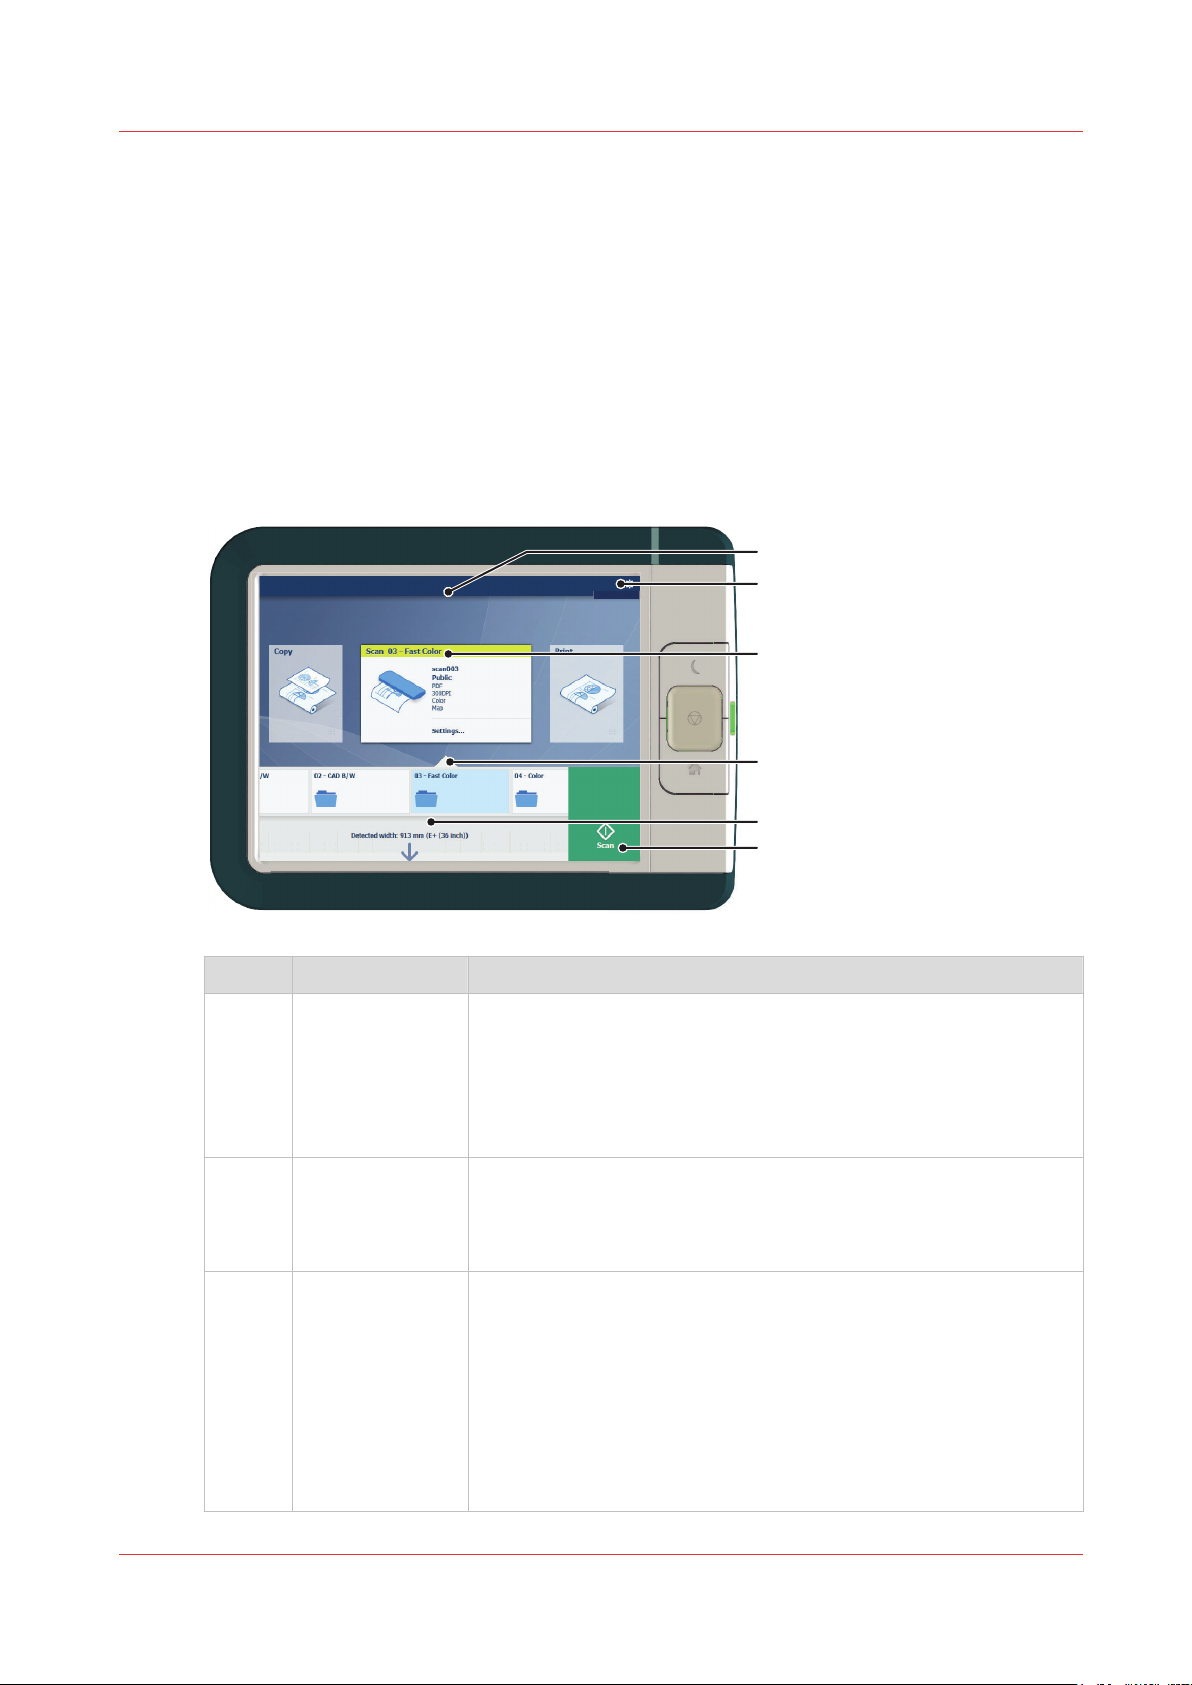
The home screen
Introduction
The default screen of the Océ ClearConnect user panel is the home screen.
From the home screen you can manage jobs and enter the system menu.
The home screen
No. Component Function
1. dynamic bar and
[active job]
2. [system menu] In the dynamic bar you can access the system menu.
3. [Copy tile]
[Scan tile]
[Print tile]
In the dynamic bar you can see the system states (warming-up,
cleaning etc.) and the active job when present.
• When you tap the active job the job queue appears with the list
of waiting jobs.
• When you tap the active job the pause tile appears, with which
you can pause the printing process.
• When you tap the system menu thumbnail, a new window
opens with a dynamic view of the system and printer setup settings.
These dynamic tiles help you to perform copy, scan and print jobs.
Select the correct tile for your job:
• When you tap one of the tiles and then use the Smart Access,
• As default the print tile is selected, but when you insert an origi-
• When you want to make more settings you can tap the tile
you can start your job immediately.
nal into the scanner the copy tile is selected. When you insert
an original and a USB key the scan tile is selected.
twice, and a new window with presets or settings opens.
4
Chapter 2 - Get to Know the Printing System
35
Page 36

The home screen
No. Component Function
4. Smart Access The dynamic Smart Access changes specifically for a print, copy
5. [live scan view] The live scan view appears in the Smart Access.
6. [green button] The green button is dynamic and appears on all screens in the
or scan job and helps you to quickly start a job.
The view shows the width and alignment of your document while
it slides through the Smart Access.
bottom right corner of the display.
• When the button is green, the printer is ready to process your
job.
• When the button is gray, the printer is not ready to process your
job.
Chapter 2 - Get to Know the Printing System
36
Page 37
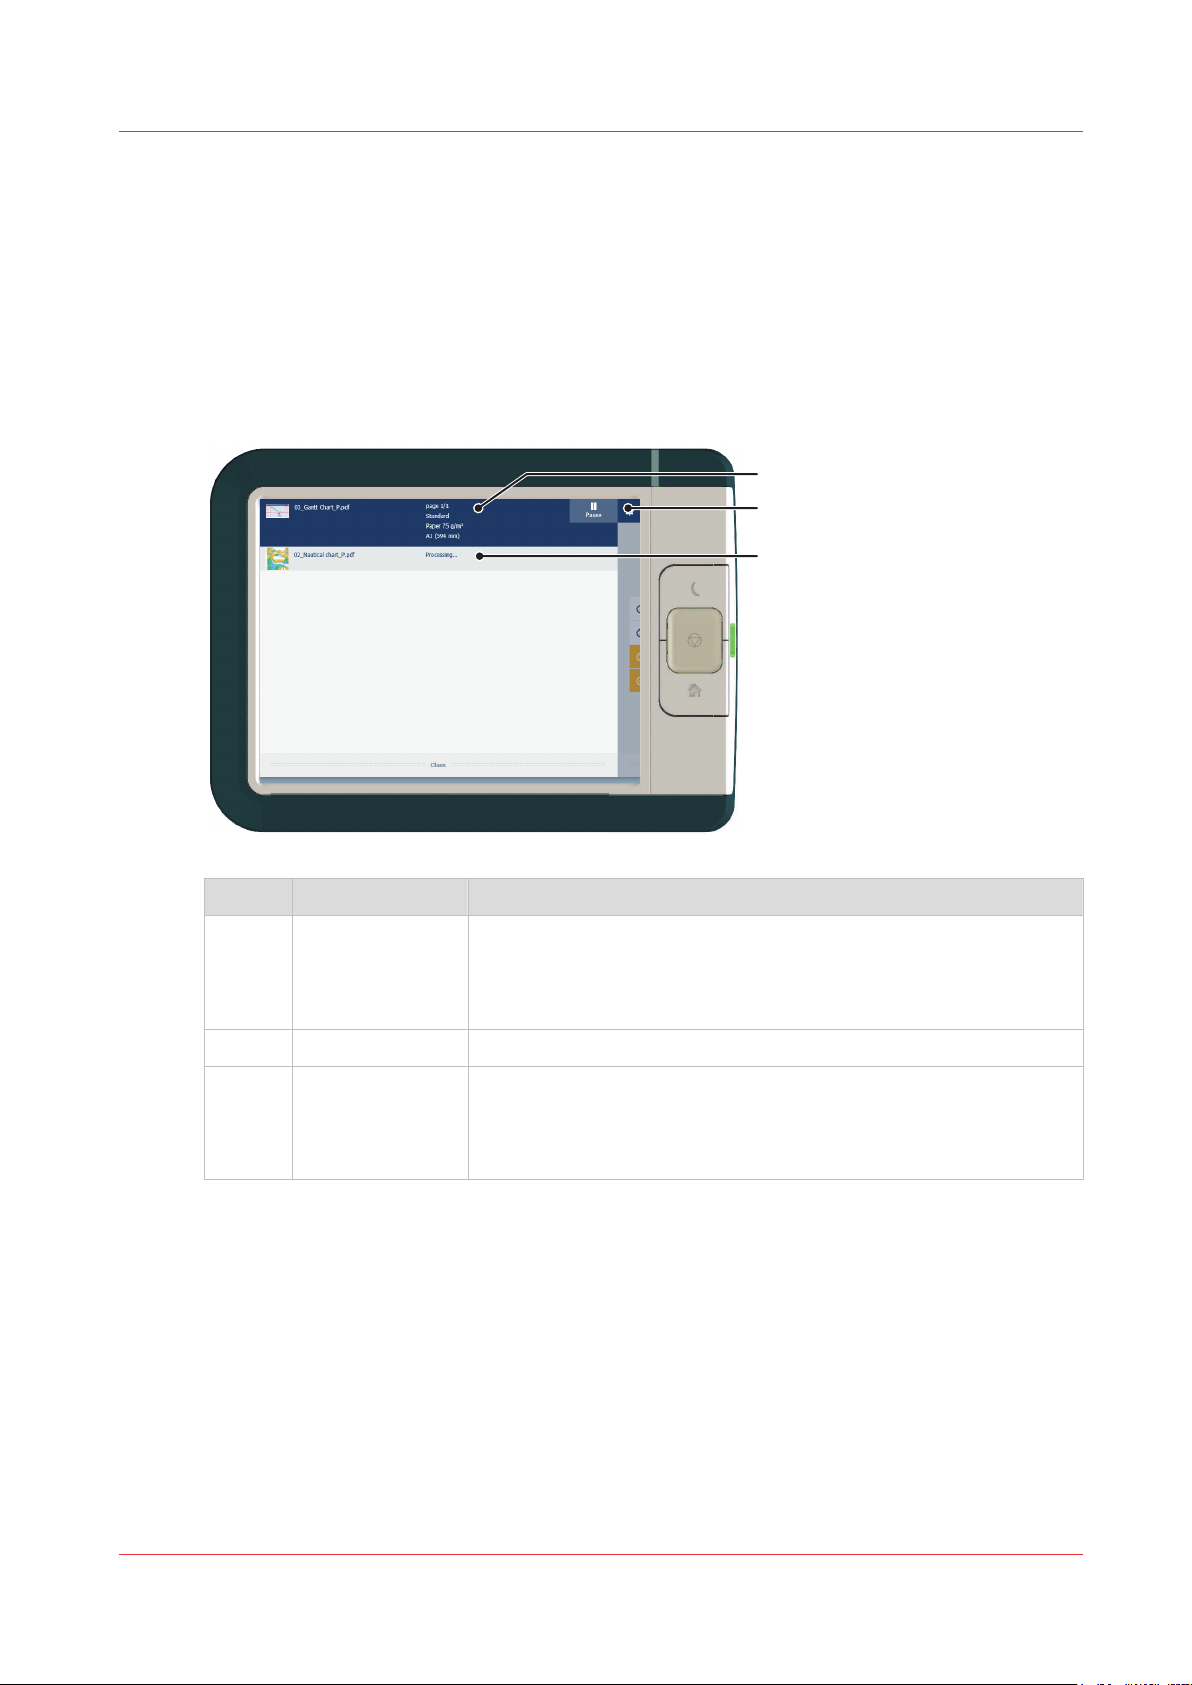
The job queue and the system menu
3
2
1
Introduction
The dynamic bar is located in the upper part of the home screen on the user panel display. The
dynamic bar consists of the job status with the job queue, the printer status, and the system
menu.
The active job and the job queue
The job queue and the system menu
No. Component Function
1. job and printer
status
View information on the job and the printing system, such as:
• Job information of the active job.
• The printer status (e.g. printing, toner low, folder connected
etc.).
2. system menu Tap the system thumbnail to access the system menu.
3. job queue Tap on the active job to open the job queue window.
• See all the listed jobs and access them when you tap the job
settings.
• Move the listed jobs up or down the list.
Chapter 2 - Get to Know the Printing System
37
Page 38
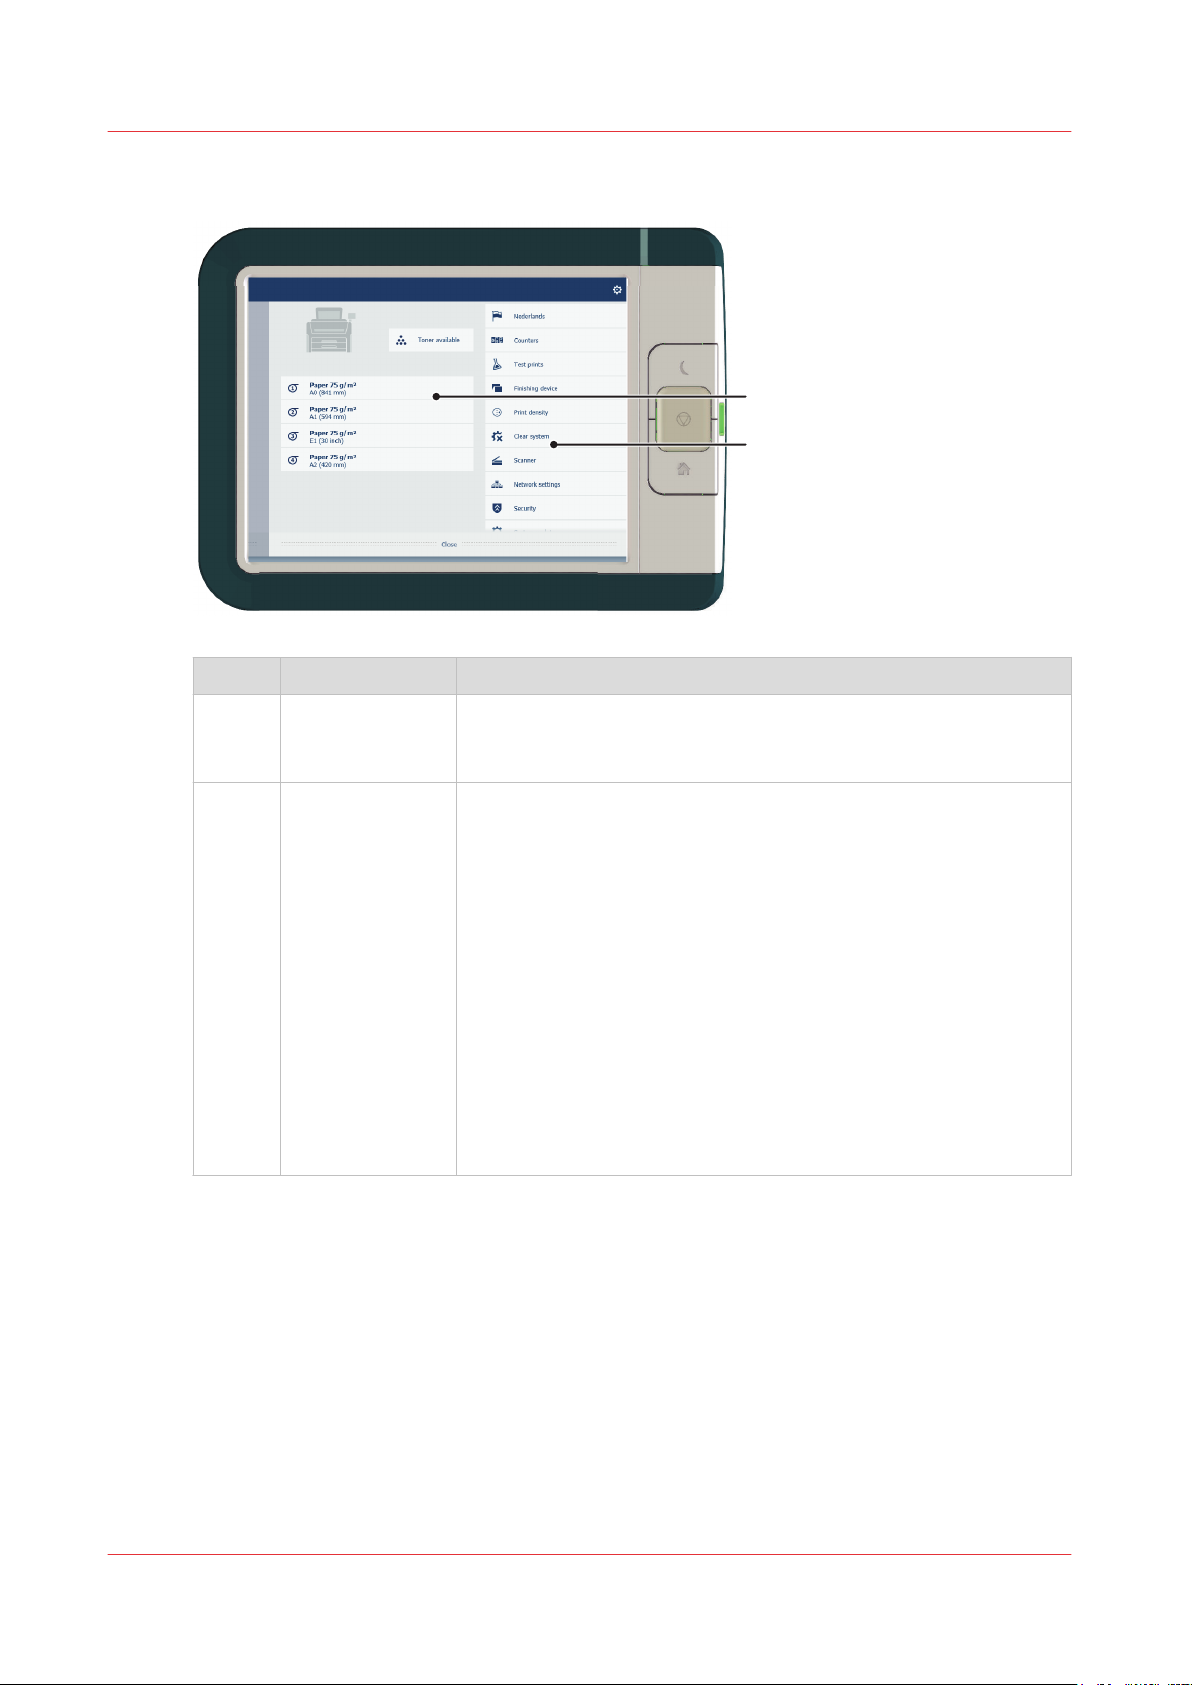
2
1
The job queue and the system menu
System menu
No. Component Function
1. Printing system
and media
• The loaded media in the printer is displayed.
• Tap the drawer to change the media settings.
• Wizards appear, to help you change media or refill toner.
2. [setup menu] The [setup menu] gives general information on the printer. In the
list you can get access to:
• Switch between first and second language
• [Counters]
• [Test prints]
• [Finishing device]
• [Print density]
• [Clear system]
• [Scanner]
• [Network settings]
• [Security]
• [System update]
• [About]
• [Offline folding] (when the integrated folder is installed)
• [Clean the knife] (when the integrated folder is installed)
Chapter 2 - Get to Know the Printing System
38
Page 39
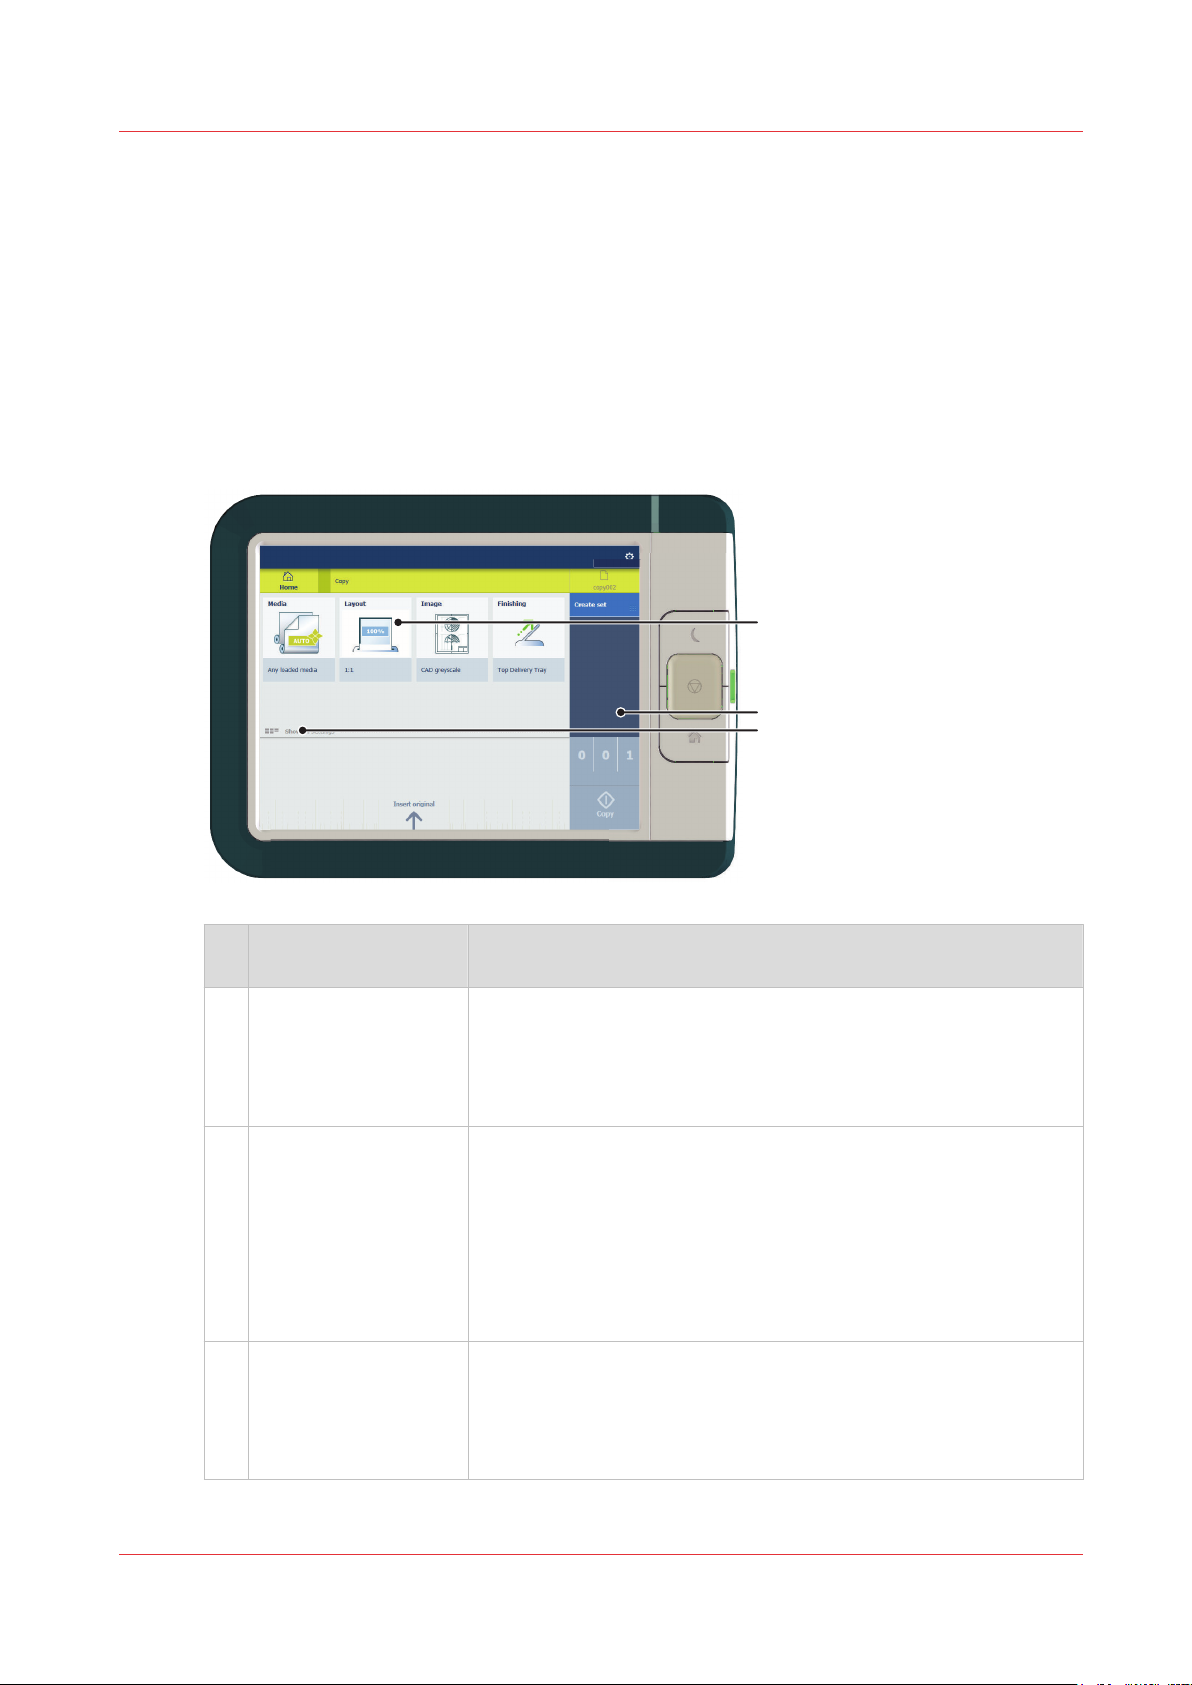
Presets, templates and advanced settings
3
2
1
Introduction
Presets and templates help you to submit jobs quickly and easily. Advanced settings help you to
fine-tune the settings of your job, and give access to all settings.
When you tap the copy tile in the home screen, a window with copy presets and advanced
settings opens. When you tap the scan tile, the templates are visible in the Smart Access. When
you tap the scan tile again, the window with the advanced settings opens. When you tap the print
tile and tap the settings of a listed job, the window with print presets and advanced settings
opens.
Presets, templates and advanced settings
No.Component Function
1. [preset tiles] The preset tiles show the default settings for your job.
• The presets are divided into categories, such as [Media], [Layout] etc.
• When you tap a preset tile, it gives quick access to a short list of
other presets you can choose.
2. [job pane] The [job pane] helps to manage jobs.
• Information is given on your job.
• Make sets.
• Delete a job.
• Tap a tile to switch between the presets/settings window and a
window with a preview of the document (only for Smart Inbox
jobs).
• Start a job with the green button.
3. [Show all settings]
(Advanced settings)
When you tap on [Show all settings], a list with all the advanced
settings opens. For Scan, the advanced settings are already visible.
• The advanced settings are categorized and presented as tiles.
• When you tap a tile you can fine-tune the settings.
Chapter 2 - Get to Know the Printing System
39
Page 40
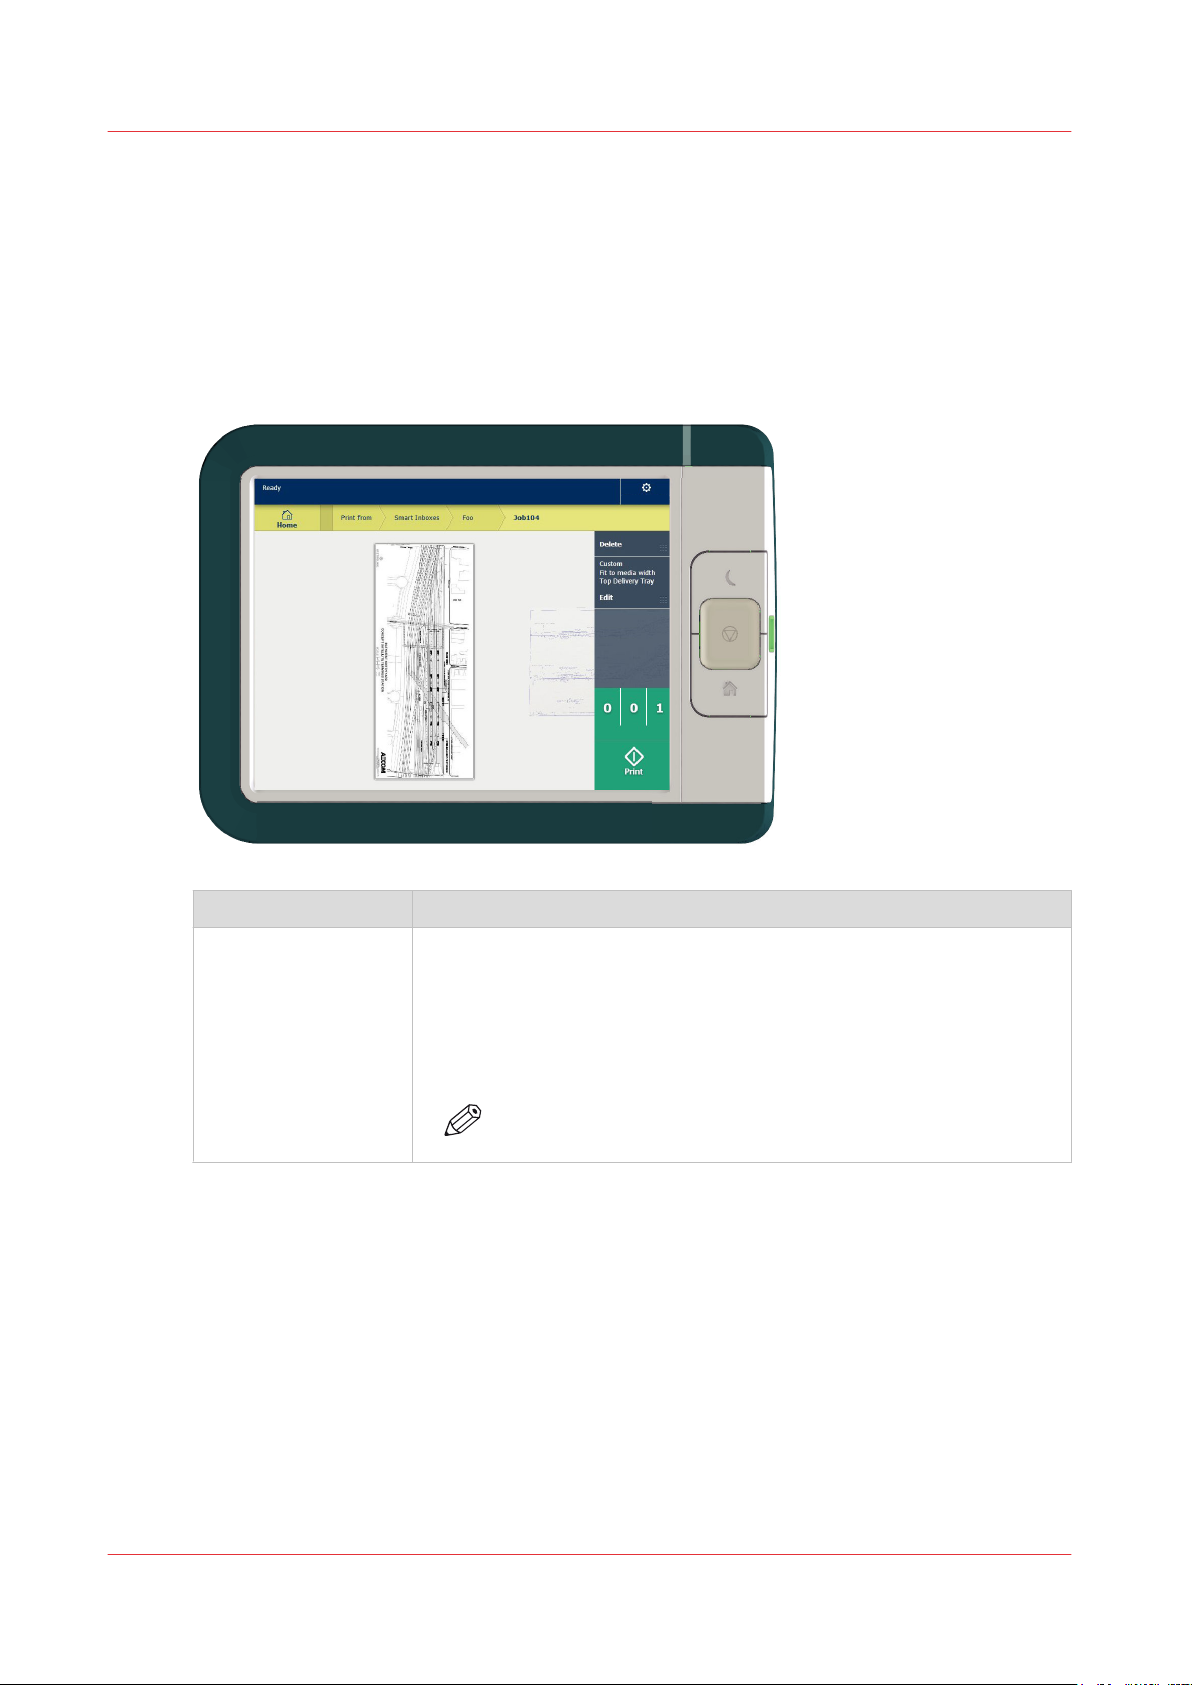
Job preview
Job preview
Introduction
The multi-touch user panel offers a detailed preview of your job. Touch the preview thumbnail to
access the preview window.
Job preview
Component Function
Job [preview] You can pan the image to see it in more detail.
You can shift between the various job files that are part of one location.
Swipe left or right to view the other job files.
Tap the Edit tile in the job pane to open the preset window.
In the preset window, tap the View tile to go back to the preview window.
NOTE
If you have a multi-page job, you can only view the first page.
Chapter 2 - Get to Know the Printing System
40
Page 41
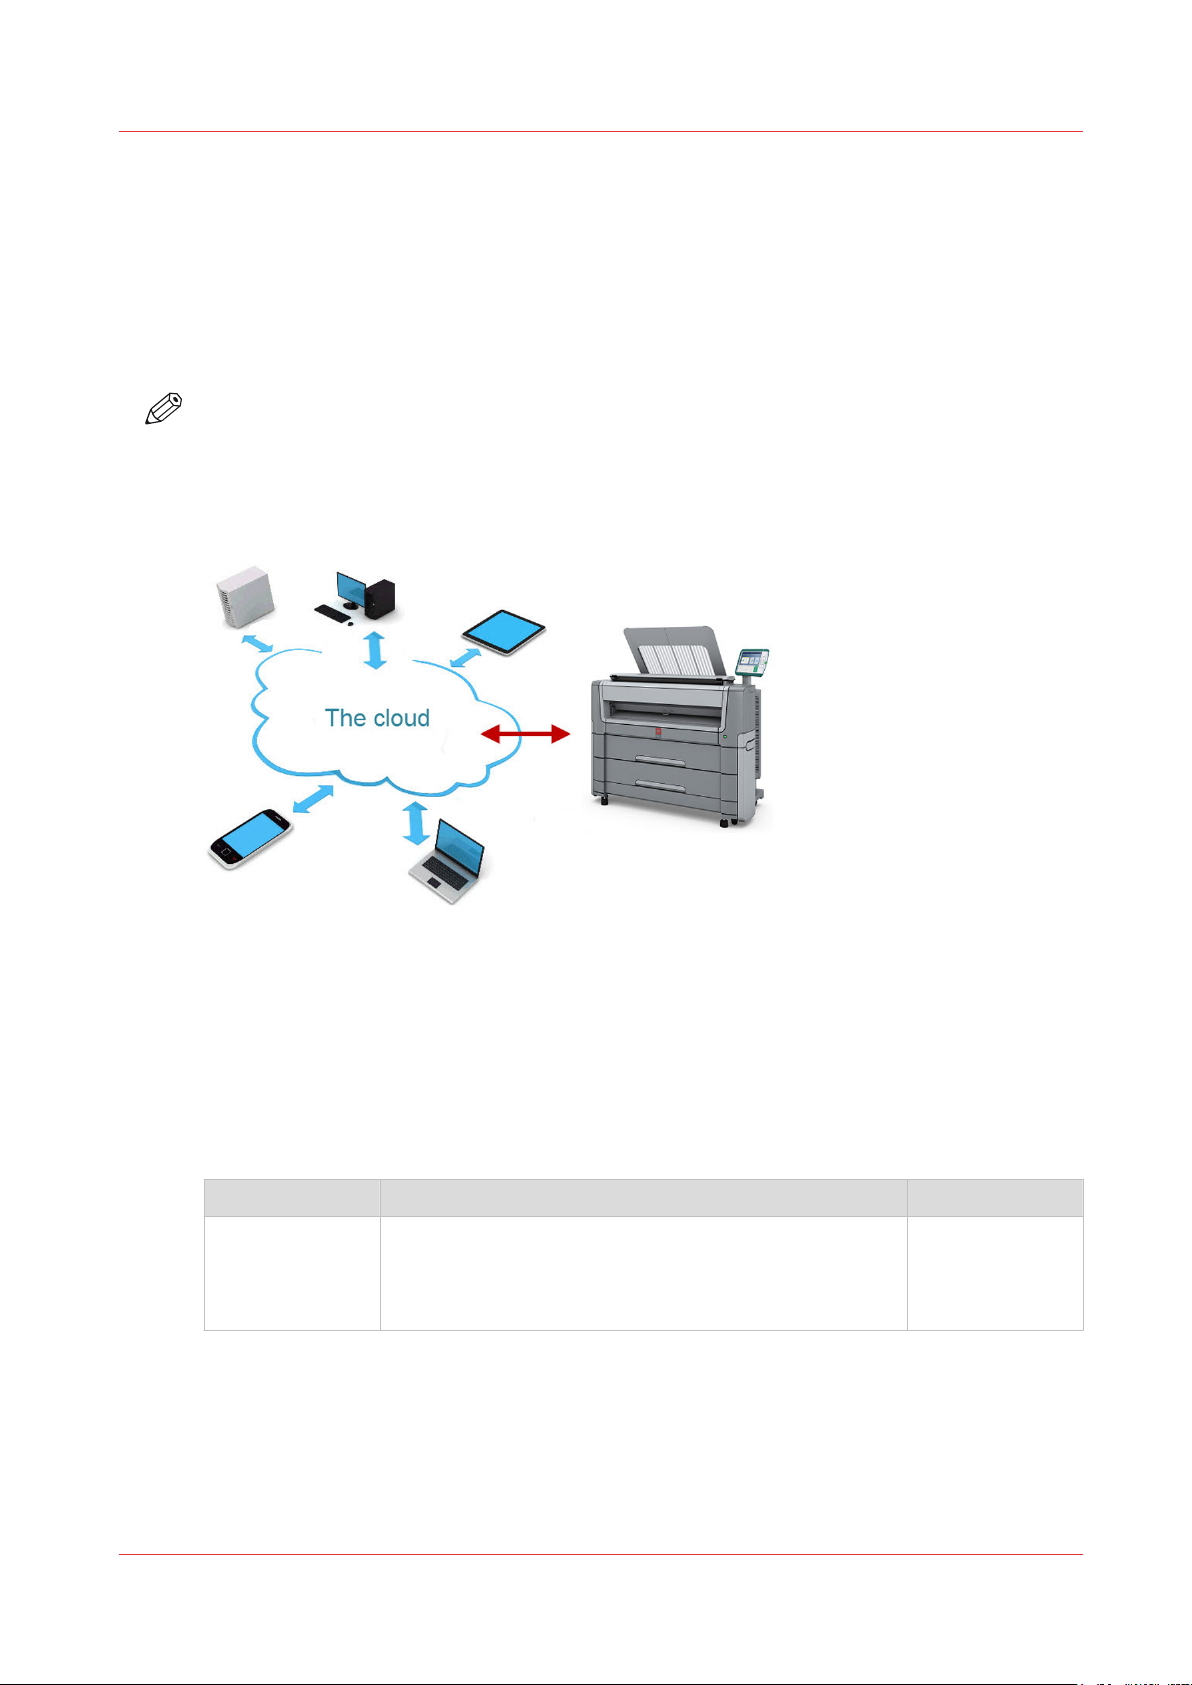
The cloud
Introduction
The multi-touch user panel gives the user the opportunity to print from and scan to various
locations. One of these locations is the cloud.
You can enter the cloud via WebDAV and use it as a network drive. This way, the cloud
application of your choice is accessible.
NOTE
• For more information on how to configure the cloud as an external location, see
external location
• Note that WebDAV is the type selected when creating a cloud location. For more information
on how to use the cloud for print jobs, see
on page 111.
Use the cloud to send a print job
The cloud
Create an
on page 160.
Concept of the cloud
The cloud can be seen as a virtual network drive you use to send files to, but also to save and
share files on.
There are general cloud applications, such as SharePoint or applications via a HTTP URL, but
companies can also use their own private and internal clouds.
Working with the cloud on the Océ PlotWave 450/550 is very easy:
Procedure Description Via
Connection
Make a connection between your preferred cloud application and the printer.
To do this, create an external location in Océ Express
WebTools via WebDAV .
Océ Express
WebTools
4
Chapter 2 - Get to Know the Printing System
41
Page 42

The cloud
Procedure Description Via
For print jobs:
For scan jobs:
Open the cloud application locally. PC or mobile de-
vice
Add and save the file you want to print, in the cloud. Or
send your file to the printer in the cloud.
Open your cloud application as location, in the Smart
PC or mobile device
user panel
Access of the print tile.
Select the file you want to print. user panel
Tap the green button. user panel
Insert the original and select the scan tile. user panel
Select the template with the cloud set as destination in
user panel
the Smart Access.
Tap the green button. user panel
Open the cloud application on your PC or mobile device,
and find the scanned file there.
PC or mobile device
Chapter 2 - Get to Know the Printing System
42
Page 43

Chapter 3
Define your Workflow with Océ
Express WebTools
Page 44

Getting Started
Getting Started
Océ Express WebTools
Introduction
Océ Express WebTools is an application that runs embedded on your printer. Use an up-to-date
Internet browser (Google Chrome, Microsoft Internet Explorer or Mozilla Firefox) to open the
homepage of Océ Express WebTools on your computer or mobile device.
Definition
You can use Océ Express WebTools to:
• Manage print, copy and scan jobs.
• Send print jobs to the printer with Océ Publisher Express.
• Access the settings to manage the configuration and preferences of the printing system.
When you want to change settings in Océ Express WebTools, you must log in with one of three
predefined user roles. For more information, see
• Monitor the status of the printing system.
User roles and authorizations
on page 46.
How to access Océ Express WebTools
To access Océ Express WebTools:
• Enter the product name of the printer as a Hostname, for example http://PlotWave3XX, in the
workstation web browser.
or
• Enter the printer's IP address, for example http://123.123.23.123, in the workstation web
browser.
NOTE
When Océ Express WebTools does not appear, contact the network administrator to check the
network parameters. Check whether the printer's network settings have been registered in the
network infrastructure.
Chapter 3 - Define your Workflow with Océ Express WebTools
44
Page 45

Set another language for Océ Express WebTools
Set another language for Océ Express WebTools
Introduction
The language setting of the Internet browser you use defines the language of Océ Express
WebTools.
Set another language
You can change the language of Océ Express WebTools in your Internet browser. Depending on
the Internet browser you use you have to follow several steps to change the language. Use the
specific help information in your browser to learn more. The Internet browsers that are supported
are: Google Chrome, Microsoft Internet Explorer, and Mozilla Firefox.
The following languages are supported: Dutch, UK English, German, French, US English,
Spanish, Danish, Italian, Swedish, Norwegian, Finnish, Portuguese, Polish, Hungarian, Czech,
Japanese, Simplified Chinese, Traditional Chinese, Russian and Korean.
NOTE
• The language setting does not influence the language on the user panel. On the user panel,
you can choose between the [First language] and the [Second language]. You can define the
values for the [First language] and the [Second language] in the regional settings of Océ
Express WebTools.
• When the selected language cannot be supported, the default language for Océ Express
WebTools
Chapter 3 - Define your Workflow with Océ Express WebTools
45
Page 46

User roles and authorizations
User roles and authorizations
Introduction
You can view all settings in Océ Express WebTools, but when you want to edit a setting a
message appears. This message indicates that the setting is password protected. You must log in
with a password to change a setting.
IMPORTANT
Handle and store all passwords securely and with care. In case of forgotten passwords, a service
technician can reset the Key operator, System administrator, Power user passwords only when
his rights have been enabled. Otherwise the machine has to be reinstalled.
NOTE
• When the [User authentication] setting is enabled, rights and authorization can be different.
For more information, see
• You do not need a password for daily use of the system.
Overview of user roles and authorizations
The table below displays the different user roles and the authorizations that belong to the role.
Enable user authentication
on page 77.
User role Description
[Key operator] Besides the normal use of the system, the Key Operator takes care of
the system's daily maintenance.
The Key operator is authorized to change all default settings in the Preference tab of Océ Express WebTools.
[System administrator]
[Power user] The Power User is authorized to access all functionalities of Océ Ex-
The System administrator takes care of the integration of the system
into the IT-infrastructure of the customer.
The System administrator is authorized to change all settings in the
Configuration tab of Océ Express WebTools.
press WebTools. It combines the Key operator and System administrator roles.
Chapter 3 - Define your Workflow with Océ Express WebTools
46
Page 47

Log in as an authorized user
To change certain settings, you must log in as an authorized user. There are three user roles:
System Administrator, Key Operator and Power User. They have authorization to edit specific
groups of settings. You do not need to log in before you start a session. The system will only
display a login screen when you want to perform a special action.
Upon login
NOTE
• Once you have logged in, the log in lasts for the duration of the browser session. If you have
not been active for more than 30 minutes, the session expires and you need to login again.
• For security reasons it may be useful to periodically change the password for the three access
modes in Océ Express WebTools.
Procedure
Click on the value of the setting you want to edit. A login window opens.
1.
Select a user role from the drop-down list.
2.
Enter the password.
3.
Click [Ok] to confirm your entry.
4.
Log in as an authorized user
Chapter 3 - Define your Workflow with Océ Express WebTools
47
Page 48

Log out after your session
Log out after your session
Purpose
When you have finished the modification of a setting, it is advised to log out again.
Procedure
Click the log out hyperlink in the top right-hand corner of the screen.
1.
or
Close the screen of your internet browser.
2.
Chapter 3 - Define your Workflow with Océ Express WebTools
48
Page 49

Change the password for authorized users
When to do
For security reasons it is advised to periodically change the password of the three access modes
(Key operator, System administrator, Power user) in Océ Express WebTools.
IMPORTANT
Handle and store all passwords securely and with care. In case of forgotten passwords, a service
technician can reset the Key operator, System administrator, Power user passwords only when
his rights have been enabled. Otherwise the machine has to be reinstalled.
Procedure
Open the [Configuration] - [Connectivity] tab.
1.
Under the [Passwords] section, select [Key Operator password], [System Administrator
2.
password], or [Power User password] depending on the password you want to change. A new
window opens.
Log in as:
3.
• Key operator to change the key operator password. The default key operator password is
KeyOp.
• System administrator to change the system administrator password. The default system
administrator password is SysAdm.
• Power user to change all the passwords. The default power user password is PowUsr.
Change the password for authorized users
NOTE
The passwords are case sensitive. You can only use characters from the following
range:
A-Z a-z
0-9 _ - ~ ! ? @ # $ % ^ * + = , . : ; / | [ ] ( ) { }
You cannot use Chinese, Cyrillic or Japanese characters.
Enter the new password twice to confirm your input. The password is hidden.
4.
Click [Ok] to confirm, or [Cancel] to reject your entries.
5.
Chapter 3 - Define your Workflow with Océ Express WebTools
49
Page 50
The system monitor
The system monitor
Introduction
You can open the system monitor to get an overview of the current status of the printing system.
When you click on the system tab in the lower left corner of the screen, the system monitor
opens.
The system state (for example: [Printing:]) is displayed in the upper right corner of the system
monitor section of the Océ Express WebTools.
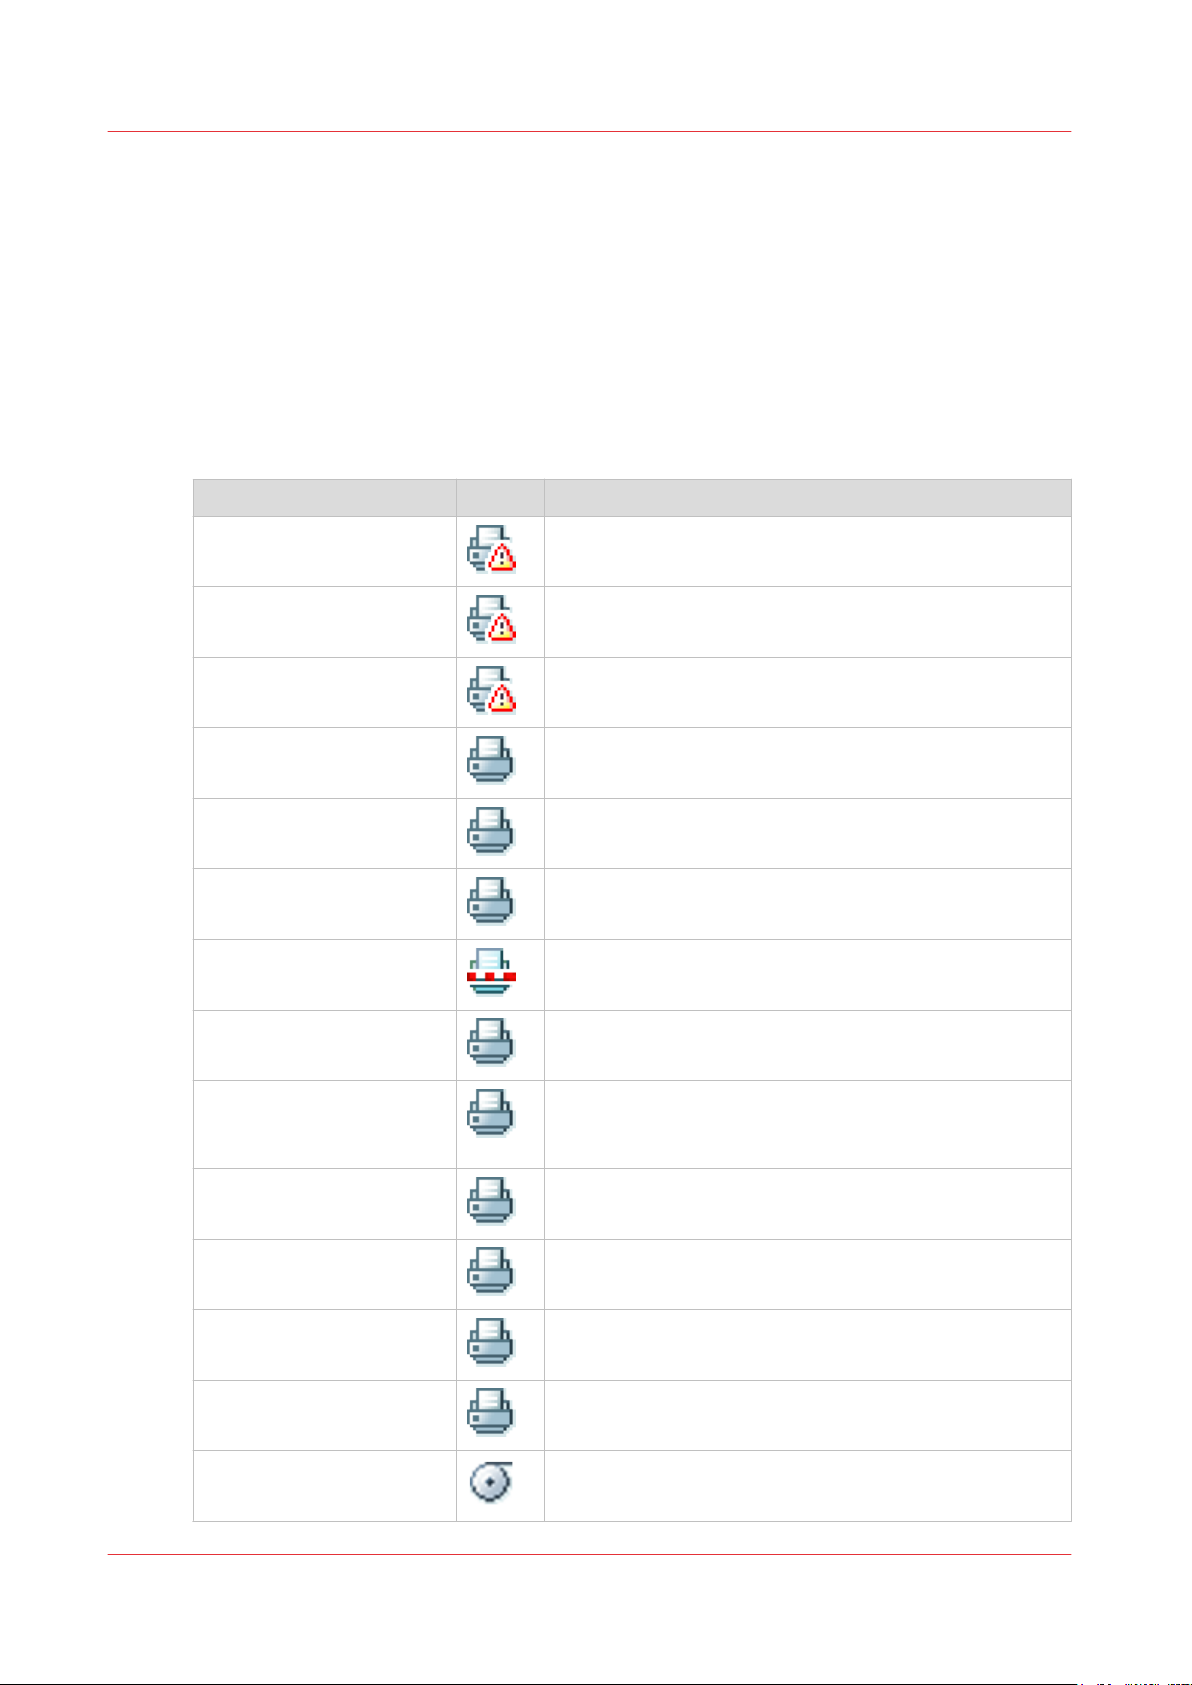
Overview of the system states
State Icon Description
[User intervention required]
[System memory is full] Status message when printer does not print because the
[Out of toner] Status message when printer does not print because the
[Sleeping...] Energy saving state: State when not all functionality is
[Warming up...] State when not all functionality is available due to print-
[Initializing...] State when the system software is initializing.
[Printer paused] The system pauses the print queue but keeps access to
[Processing...] The system is receiving or processing data.
[Ready to print] State when there is no active job and no waiting job.
The user is requested to go to the printer and follow the
instructions displayed on the operator panel.
system memory is full.
printer is out of toner.
available due to printer sleeping.
er warming up.
all other functionality.
When a job arrives, no user intervention is needed to
start printing.
[Printing:] <job-name> State when a print job is active.
[Processing:] <job-name> The system is processing the job data.
[Receiving:] <job-name> The system is receiving the job data.
[Optimizing print quality,
please wait...]
'Media indication' Roll media and roll width indication for each roll.
Chapter 3 - Define your Workflow with Océ Express WebTools
50
The system is making settings to optimize the print quality.
Page 51
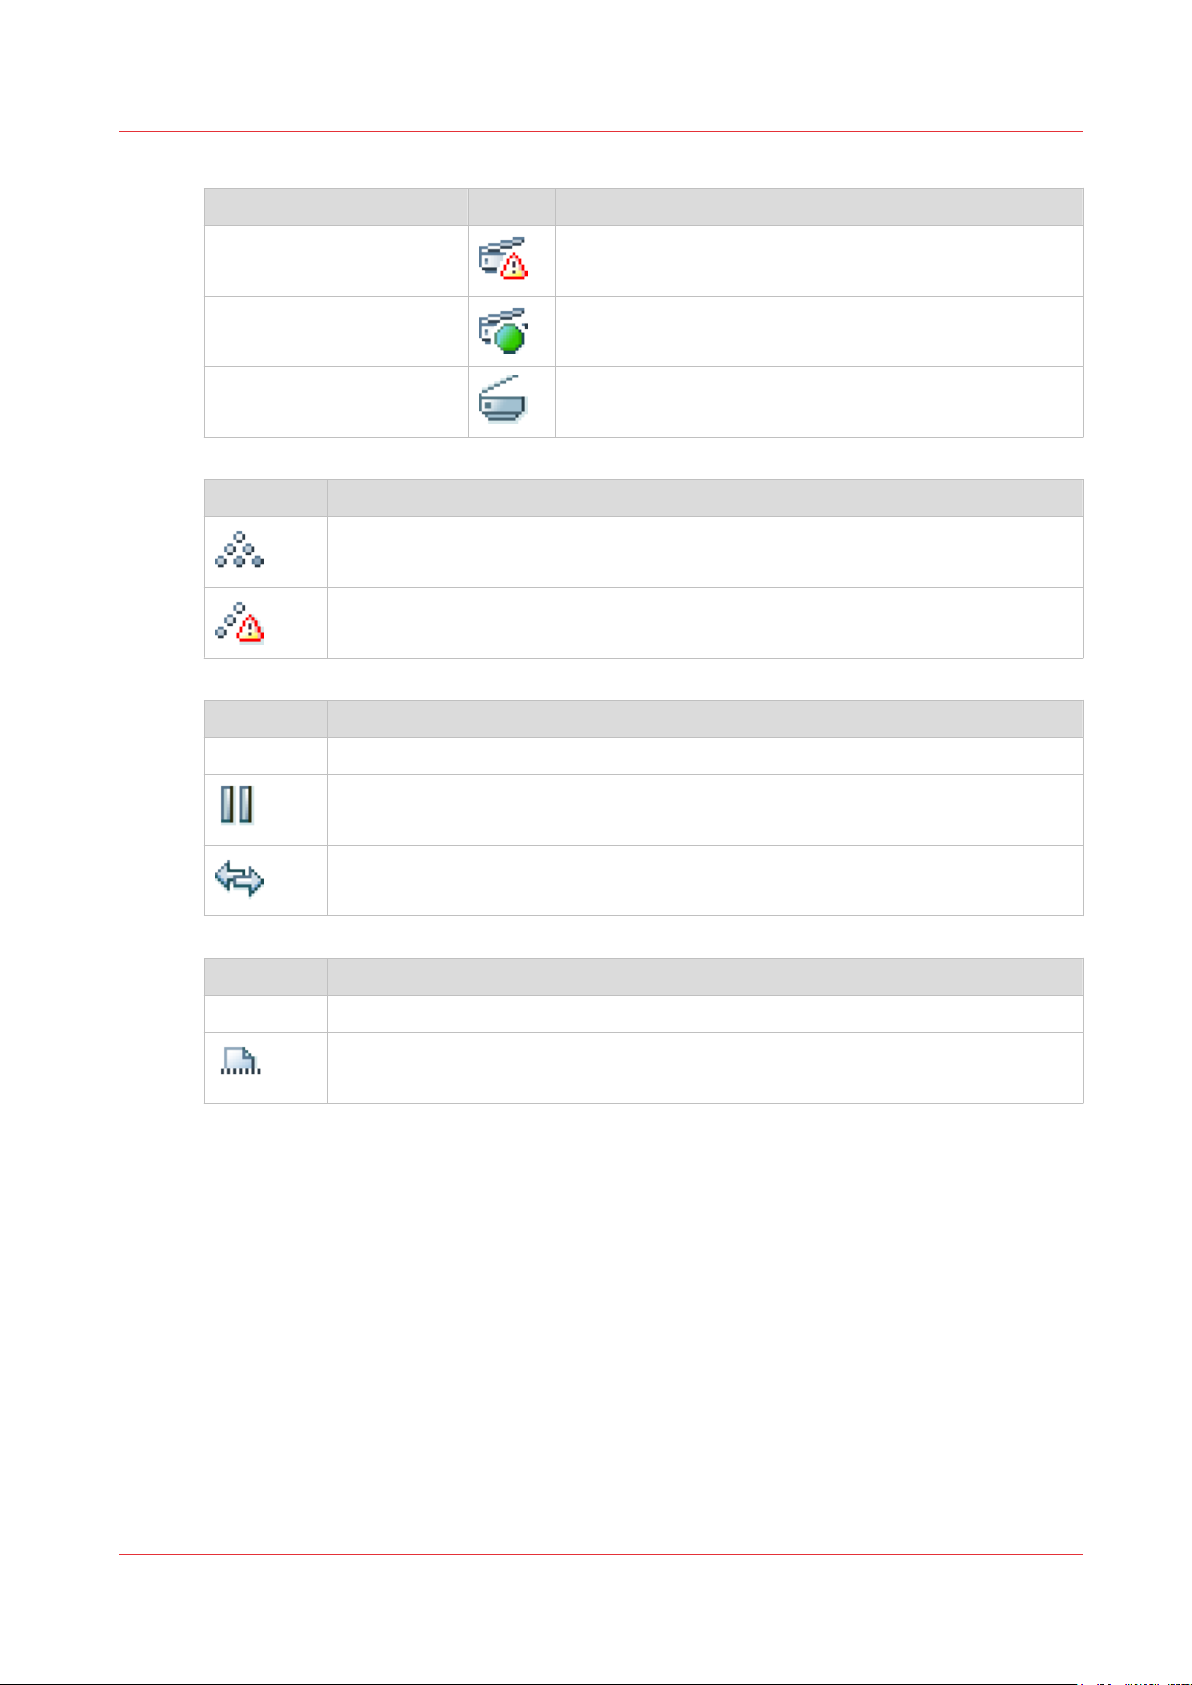
The scanner states
State Icon Description
The system monitor
[User intervention re-
General error message.
quired]
[Scanner is busy] The scanner is active.
[Scanner is ready] The scanner is ready to start a scan job.
The toner states
Icon Description
Toner OK
Toner low, or empty.
The Remote Service States
Icon Description
no icon [ Remote Service ] is either disabled or enabled and connected to Océ.
[ Remote Service ] is enabled, but could not connect to Océ.
Remote assistance to the system is enabled and currently accepting a connection.
The E-shredding states
Icon Description
no icon E-shredding is disabled.
E-shredding is enabled or busy.
A tooltip is available with extra information.
Chapter 3 - Define your Workflow with Océ Express WebTools
51
Page 52

Shut down or restart the system
Shut down or restart the system
NOTE
For this procedure, you need to log in as a System Administrator.
To remotely shut down the printing system, you can click on [Shut down] in the Support tab of
Océ Express WebTools.
When the printing system is on, you can also use this button to restart the system.
Chapter 3 - Define your Workflow with Océ Express WebTools
52
Page 53

Define the defaults
About the default settings in Océ Express WebTools
Definition
Before you send jobs to the printer, remember the following:
The values defined in Océ Express WebTools are default values for the general system behavior.
You can define a number of job settings in the printer drivers or the job submission tools. The
settings defined in the printer drivers or the job submission tools always overrule the settings
defined in Océ Express WebTools.
Define the defaults
Chapter 3 - Define your Workflow with Océ Express WebTools
53
Page 54

How to edit a setting
How to edit a setting
Introduction
In Océ Express WebTools, you can make settings to personalise your printing system.
NOTE
• Before you can edit a setting or a settings group, you must log in as an authorized user.
• You may have to reboot the system after you changed the settings.
Procedure
Browse to the settings group you want to edit, for example [Preferences] - [System defaults] -
1.
[Regional settings].
Click directly on the value of a setting, when you want to edit a single setting
2.
or
click [Edit] in the settings group bar to access a window with all settings if you want to edit more
settings in the group.
Modify the settings. A setting is enabled when you check the box.
3.
Click [Ok] to confirm, or [Cancel] to reject your entries.
4.
Chapter 3 - Define your Workflow with Océ Express WebTools
54
Page 55

View and check the settings
Introduction
In Océ Express WebTools you can view and check your settings. You can also check which
settings are no longer set to the factory default value.
Procedure
Open the [Configuration] tab or the [Preferences] tab.
1.
Click on [View configuration] in the upper right-hand corner of the screen. A window opens.
2.
Scroll through the list of settings. The first column displays the setting and the second column
3.
displays the values. A "*" indicates that the value of the setting is different than the original
factory default value.
NOTE
You can print the information with the standard print function of your browser.
View and check the settings
Chapter 3 - Define your Workflow with Océ Express WebTools
55
Page 56

Save the settings in a file
Save the settings in a file
Introduction
Save the settings and the values that you configured in Océ Express WebTools in a file.
Save the settings in a file to duplicate the settings very easily to another printer of the same type.
NOTE
Not all settings are stored in the settings file. The network settings are excluded from the file
because the network settings cannot be transferred to another printer. The passwords for
authorized users and the passwords for external locations are excluded from the file for security
reasons. License information is not included in the file either.
Procedure
Open the [Configuration] tab or the [Preferences] tab.
1.
Click on [Save configuration] in the upper right-hand corner of the tab. A window opens.
2.
Navigate to a location on the network to store the file.
3.
Save the settings<hostname of printer><date>.xml file. The file name is not fixed. You can
4.
change the name if required.
Click [Ok] to confirm, or [Cancel] to close the window without storing the file.
5.
Chapter 3 - Define your Workflow with Océ Express WebTools
56
Page 57

Load the settings from a file
Introduction
Load the settings and the values for Océ Express WebTools from a file. Load the settings from a
file to duplicate them to another printer of the same type.
NOTE
• Not all settings are stored in the settings file. The network settings are excluded from the file
because the network settings cannot be transferred to another printer. The passwords for
authorized users and the passwords for external locations are excluded from the file for
security reasons. License information is not included in the file either.
• For this procedure, you need to log in as a Key operator, System administrator, or Power user.
The loaded settings depend on the login profile. Only the settings corresponding to the user
login are loaded.
Procedure
Open the [Configuration] tab or the [Preferences] tab.
1.
Click on [Restore configuration] in the upper right-hand corner of the screen. A window opens.
2.
Navigate to a location on the network and select the settings file.
3.
Click [Ok] to load the settings file, or [Cancel] to close the window without loading the settings
4.
file.
In some cases a reboot dialog will appear.
Load the settings from a file
Result
The values of the settings in the settings file overwrite the current values. The network
configuration settings of the system and the passwords are not loaded to prevent connectivity
problems and to guarantee the integrity of the passwords.
Chapter 3 - Define your Workflow with Océ Express WebTools
57
Page 58

Restore the factory defaults
Restore the factory defaults
Introduction
Sometimes you want to go back to the initial settings. You can restore the factory default settings
in Océ Express WebTools.
NOTE
Log in as a Key Operator to only restore the Key Operator settings. Log in as a System
Administrator to only restore the System Administrator settings. To restore all the factory
default settings you must log in as a Power User.
Procedure
Open the [Configuration] tab, or the [Preferences] tab.
1.
Click on [Restore defaults] in the upper right-hand corner of the screen. A window opens.
2.
Click [Ok] to restore the factory default settings, or [Cancel] to close the window without restoring
3.
the factory defaults.
Chapter 3 - Define your Workflow with Océ Express WebTools
58
Page 59

Set the print job default settings
Definition
In Océ Express WebTools you can configure the default values for the print job settings. When
you optimize the print job default settings for your document, you get the best results.
The print job settings are grouped under the [Preferences] - [Print job defaults] tab. You can find a
short explanation of the most important print job default settings below. Under the print job
default settings you can also define the print presets that are visible on the user panel.
NOTE
• When you define print job settings in the printer drivers or the job submission tools, these
values always overrule the default values defined in Océ Express WebTools.
• Under the [Preferences] - [Print job defaults] tab, you can also make settings for the print
presets. Only the settings you make for the presets are visible on the multi-touch user panel,
under the Print tile. For more information on the print presets, see
on page 93.
Overview of the [Print job defaults] - [Basic] settings
Open the [Preferences] - [Print job defaults] tab. Go to [Basic] and click Edit in the upper righthand corner.
Set the print job default settings
Set the default print preset
Setting Description
[Number of sets] Enter the default value for the number of times you want your
jobs to be printed.
[Collate] • Select [On (sort by set)] to sort your output by set (123 - 123).
• Select [Off (sort by page)] to sort your output by page (11 - 22 -
33).
[Print delivery] • Select [Top Delivery Tray (TDT)] to default deliver your output
in the Top Delivery Tray.
• Select [Back output] to default deliver your output at the back of
the printer. Also select this option when you use an optional finishing device.
[Fold] This setting is only available when a folding device is configured
and enabled.
• Select [Yes] to fold each document by default.
• Select [No] to fold each document by default.
Overview of the [Print job defaults] - [Sheet] settings
Open the [Preferences] - [Print job defaults] tab. Go to [Sheet] and click Edit in the upper righthand corner.
Chapter 3 - Define your Workflow with Océ Express WebTools
59
Page 60

Set the print job default settings
Setting Description
[Media source] Select the default output material and format for the media used
[Media selection policy] • Select [Automatic next larger] to allow the printer to use a me-
on the printer.
• Select [Automatic] to automatically select the media.
• Select [Manual feed] to insert a cut sheet.
• Select the specific roll number of the media you want to use by
default.
The system screen on the printer user panel displays the loaded
rolls.
NOTE
You can only configure the Media selection policy setting, when Media source is set to [Automatic].
dia roll larger than the size of the print, when the exact size is
not available.
• Select [Automatic exact fit] to only allow the printer to use a
media roll that has the exact media size of the print. When the
media roll with the exact media size is not available a media request appears.
[Cut method] • Select [Standard] to cut the print at a standard media size (DIN,
ANSI etc.).
• Select [Synchro] to cut the print at the end of the image.
• Select [Custom] (numeric) to cut the print at a specific length.
[Custom print length] Enter the cut length of your print job.
[Add leading strip] When you enter a value, the printer adds a blank strip of the speci-
fied length at the top of the output.
[Add trailing strip] When you enter a value, the printer adds a blank strip of the speci-
fied length at the bottom of the output.
Overview of the [Print job defaults] - [Layout] settings
Open the [Preferences] - [Print job defaults] tab. Go to [Layout] and click Edit in the upper righthand corner.
Setting Description
[Scale] • Select [Automatic scale to the media size] to scale the image to
the media.
• Select [Automatic scale down when image is larger than media]
to scale down the image one format smaller than the original.
• Select [Custom scale factor] to enter your own scale percentage, with 100 percent as no scaling.
[Mirror] Select [On] to mirror the image along the vertical axis - the media
transport direction.
Chapter 3 - Define your Workflow with Océ Express WebTools
60
4
Page 61

Set the print job default settings
Setting Description
[Océ Finishing Assistant] This setting is only available when a folding device is configured
and enabled.
Enable the setting to automatically detect the legend in an image
and rotate and align the image so the legend will be on the cover
page of the folded package.
NOTE
• When a legend cannot be detected, the document is
not folded.
• The Océ Finishing Assistant overrules the rotation
and alignment settings.
[Rotation] Select any option to rotate the image counterclockwise.
When you want to print faster, select [Automatic landscape]. You
can print faster due to less media transport.
Select [Automatic media saving] to use the media in the most efficient way.
For more information, see
Set the rotation mode
on page 134.
[Alignment] Select any of the options to define where to align the image on the
media.
For more information, see
Set the alignment mode
on page 135.
[Horizontal shift] Define how much you want the image to shift horizontally in the
chosen alignment position.
[Vertical shift] Define how much you want the image to shift vertically in the
chosen alignment position.
Overview of the [Print job defaults] - [Image] settings
Open the [Preferences] - [Print job defaults] tab. Go to [Image] and click Edit in the upper righthand corner.
Setting Description
[Print quality] • [Standard] is the default value.
• Select [Lines/text] for line drawings. The lines are sharpened.
• Select [Photo] for large photos. The printed output is optimized for
large gray areas.
Chapter 3 - Define your Workflow with Océ Express WebTools
61
Page 62

Set the copy job default settings
Set the copy job default settings
In Océ Express WebTools, you can configure the default values for the copy job settings. When
you optimize the copy job default settings for your document, you get the best results.
The copy job settings are grouped under the [Preferences] - [Copy job defaults] tab. You can find
a short explanation of the General copy job settings below.
NOTE
Under the [Preferences] - [Copy job defaults] tab, you can also make settings for the copy
presets. Only the settings you make for the presets are visible on the multi-touch user panel,
under the Copy tile. For more information on the copy presets, see
on page 91.
Overview of the [Copy job defaults] - [General copy job settings]
Open the [Preferences] - [Copy job defaults] settings tab. Click Edit in the upper right-hand corner
of the [General copy job settings].
Setting Description
Set the default copy preset
[Productivity mode for
copy ("Lines/text" only)]
[Media selection policy] • Select [Next larger] to continue printing with a larger size me-
[Start value for ### in the
copy job name]
[File name for copy to
Smart Inbox ]
• Select [Standard] for default speed.
• Select [Productive] for optimized speed: originals are scanned
faster.
dia.
• Select [Exact size], to only continue printing when the specified
media size is available.
Fill in the number that replaces the # hashes in the name of copy
files. The number increases.
Fill in the copy filename used to save the copy in the Smart Inbox.
When the copy file name contains one or more # hashes, the #
hashes are replaced by ascending numbers.
Chapter 3 - Define your Workflow with Océ Express WebTools
62
Page 63

Set the scan job default settings
In Océ Express WebTools, you can configure the default values for the scan job settings. When
you optimize the scan job default settings for your document, you get the best results.
The scan job settings are grouped under the [Preferences] - [Scan job defaults] tab. You can find a
short explanation of the General scan job settings below.
NOTE
The file extensions that are defined in Scan job defaults, cannot be changed via the Smart Inbox.
Overview of the [Scan job defaults] - [General scan job settings]
Open the [Preferences] - [Scan job defaults] tab. Click edit in the upper right hand corner of the
[General scan job settings] section.
Setting Description
Set the scan job default settings
[File extension for scan-toPDF]
[File extension for scan-toTIFF]
[File extension for scan-toJPEG]
[File extension for scan-toCALS]
[Scan delivery retry interval]
Enter any text string. The string is the file extension for scan-toPDF (default: PDF).
Enter any text string. The string is the file extension for scan-toTIFF (default: TIF).
Enter any text string. The string is the file extension for scan-toJPEG (default: JPG).
Enter any text string. The string is the file extension for scan-toCALS (default: CAL).
When a scan is delivered to a remote location and scan delivery
fails, the printer retries after the time you set here.
Chapter 3 - Define your Workflow with Océ Express WebTools
63
Page 64

Configure the Smart Inbox settings
Configure the Smart Inbox settings
The Smart Inbox and the queue concept
Definition
You can use the Smart Inbox for customized job management. A Smart Inbox works as a
personal mailbox from which you print jobs, in which you can store jobs, and where you can scan
jobs to. Jobs that are waiting to be processed are visible in the queue.
The Smart Inbox and Job queue concept
Concept User intention Used to
The Job
queue
The Smart
Inbox
Jobs in a Smart Inbox
You can use Smart Inboxes to manage your jobs. When you open the Jobs tab in Océ Express
WebTools the Smart Inbox section displays an overview of the Smart Inboxes. Define one or
more Smart Inbox names that allow you to easily organize and access your jobs. For more
information, see
Inbox
on page 67.
In the printer driver application or job submitter, you can select the specific Smart Inbox you want
to print to. When a job is kept in the Smart Inbox, you can start the job manually on the user
panel or in Océ Express WebTools.
Under [Preferences] - [System defaults] - [Job management] you can determine rights, make
settings for the Smart Inbox, and make more settings for general job management. For more
information, see
• Get the job printed as soon as
possible.
• Send jobs to the system.
• Organize jobs.
The Smart Inbox in the Jobs tab
on page 65 and
Configure the job management settings
• Get feedback of the printer progress.
• Cancel requests.
• Change priority (local).
• Keep together sets of documents from
various origin.
• Organize documents over various
Smart Inboxes, to easily retrieve jobs.
• Reprint jobs or change settings of jobs
that are already sent to the printer.
Create and open a Smart
on page 72
Chapter 3 - Define your Workflow with Océ Express WebTools
64
Page 65
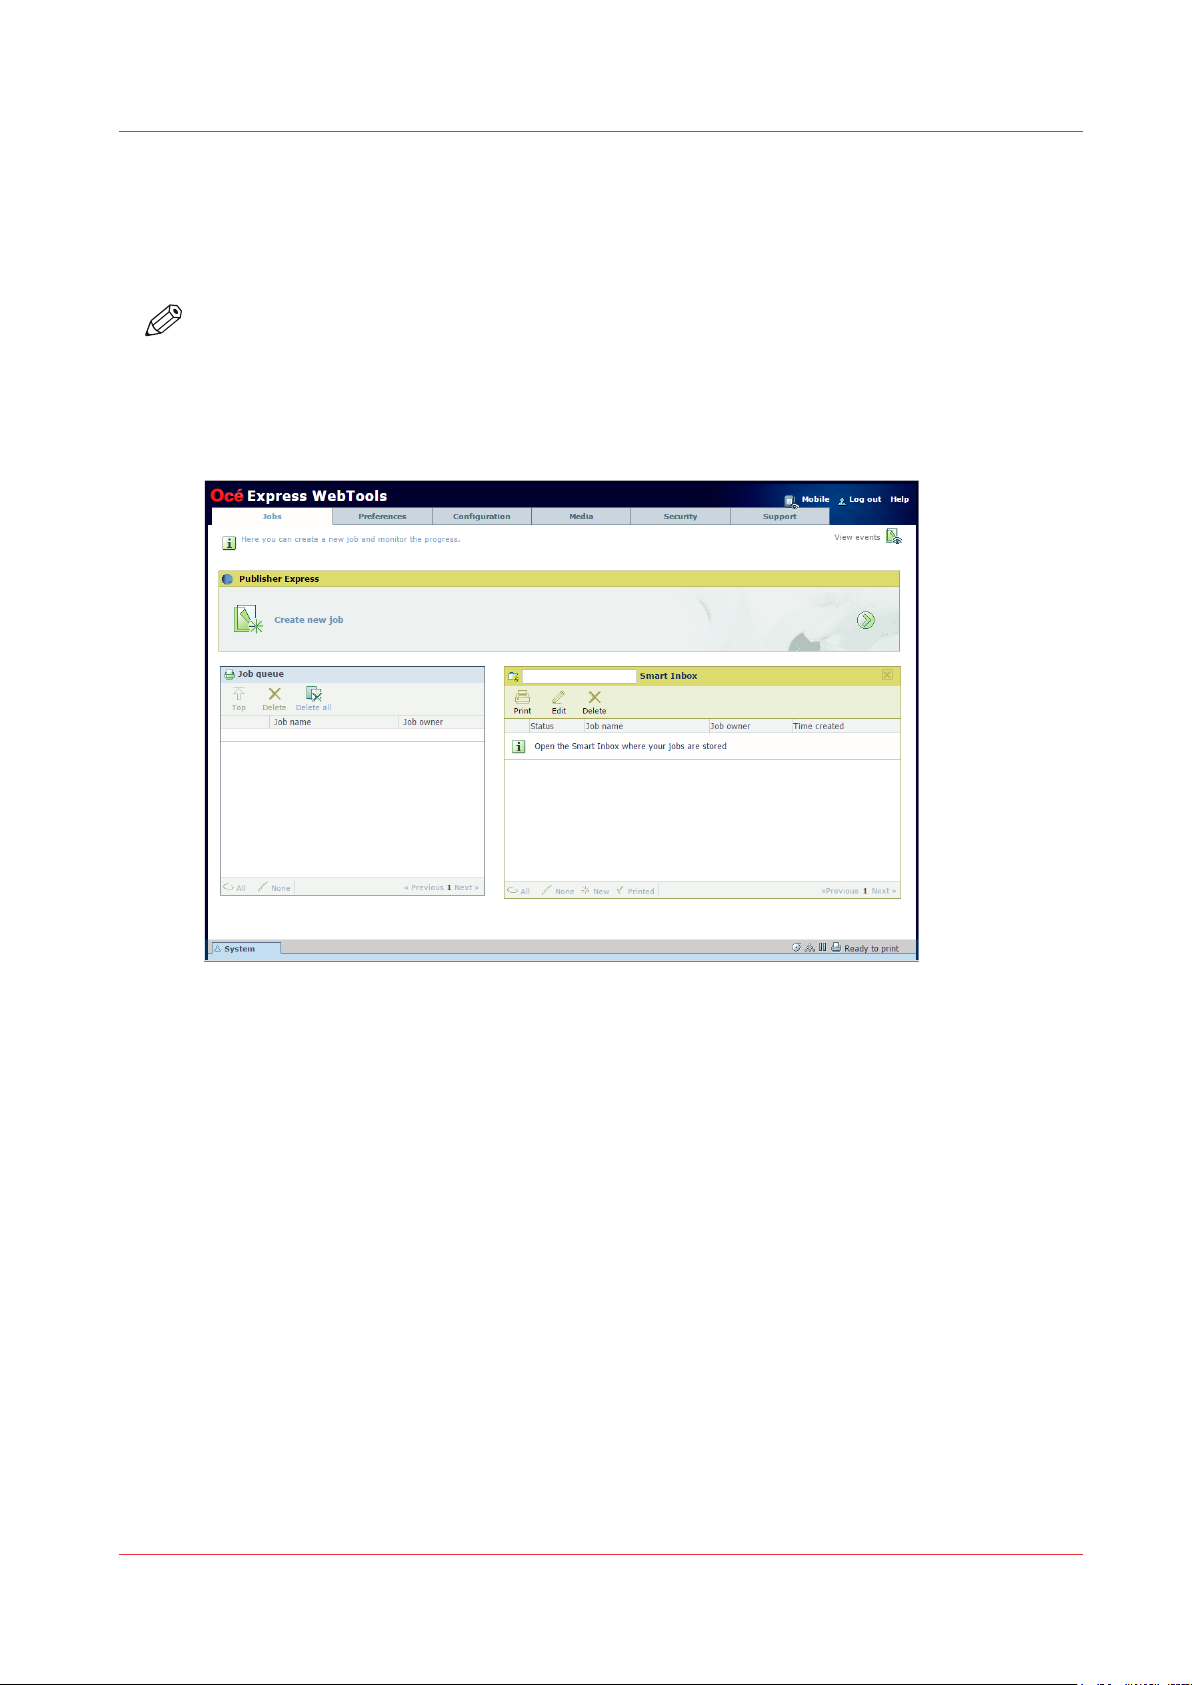
The Smart Inbox in the Jobs tab
Introduction
In the Jobs tab you can create jobs or manage your jobs in the queue and the Smart Inbox.
NOTE
When the [User authentication] setting is enabled, your rights and view on the Jobs tab can
differ.
Functionalities of the Jobs tab
The Smart Inbox in the Jobs tab
Create a new job in the Publisher Express section.
When you want to submit a new job, click [Create new job]. A new window opens, here you can
define some basic job settings and browse to the file you want to print.
Monitor jobs in the Queue section.
In the Job queue and Scan queue you get an overview of the jobs waiting to be printed, or scans
waiting to be sent. The options listed above the queue section allow you to move a selected job
to the top of the queue, to delete a job, to retry sending a job, or to send a scanned job to a
specific location. When you click [Delete all] all jobs are deleted from the queue.
Control your jobs in the Smart Inbox section.
You can create and open a Smart Inbox in the Smart Inbox section. For more information, see
Create and open a Smart Inbox
You can get an overview of all the Smart Inboxes on your system. Click on [Open Smart Inbox],
click on the white space and select a Smart Inbox name from the list. The Smart Inbox appears
below.
on page 67.
Chapter 3 - Define your Workflow with Océ Express WebTools
65
Page 66

The Smart Inbox in the Jobs tab
Perform actions on your jobs in the Smart Inbox. When you select a job in the Smart Inbox you
can use the options listed above to print, edit, send to, save or delete the jobs.
Get an overview of all jobs on the system. When you enable the [Preferences] - [System defaults]
- [Job management] - [Display a view on all Smart Inbox jobs] setting, all jobs can be displayed in
one overview.
Chapter 3 - Define your Workflow with Océ Express WebTools
66
Page 67
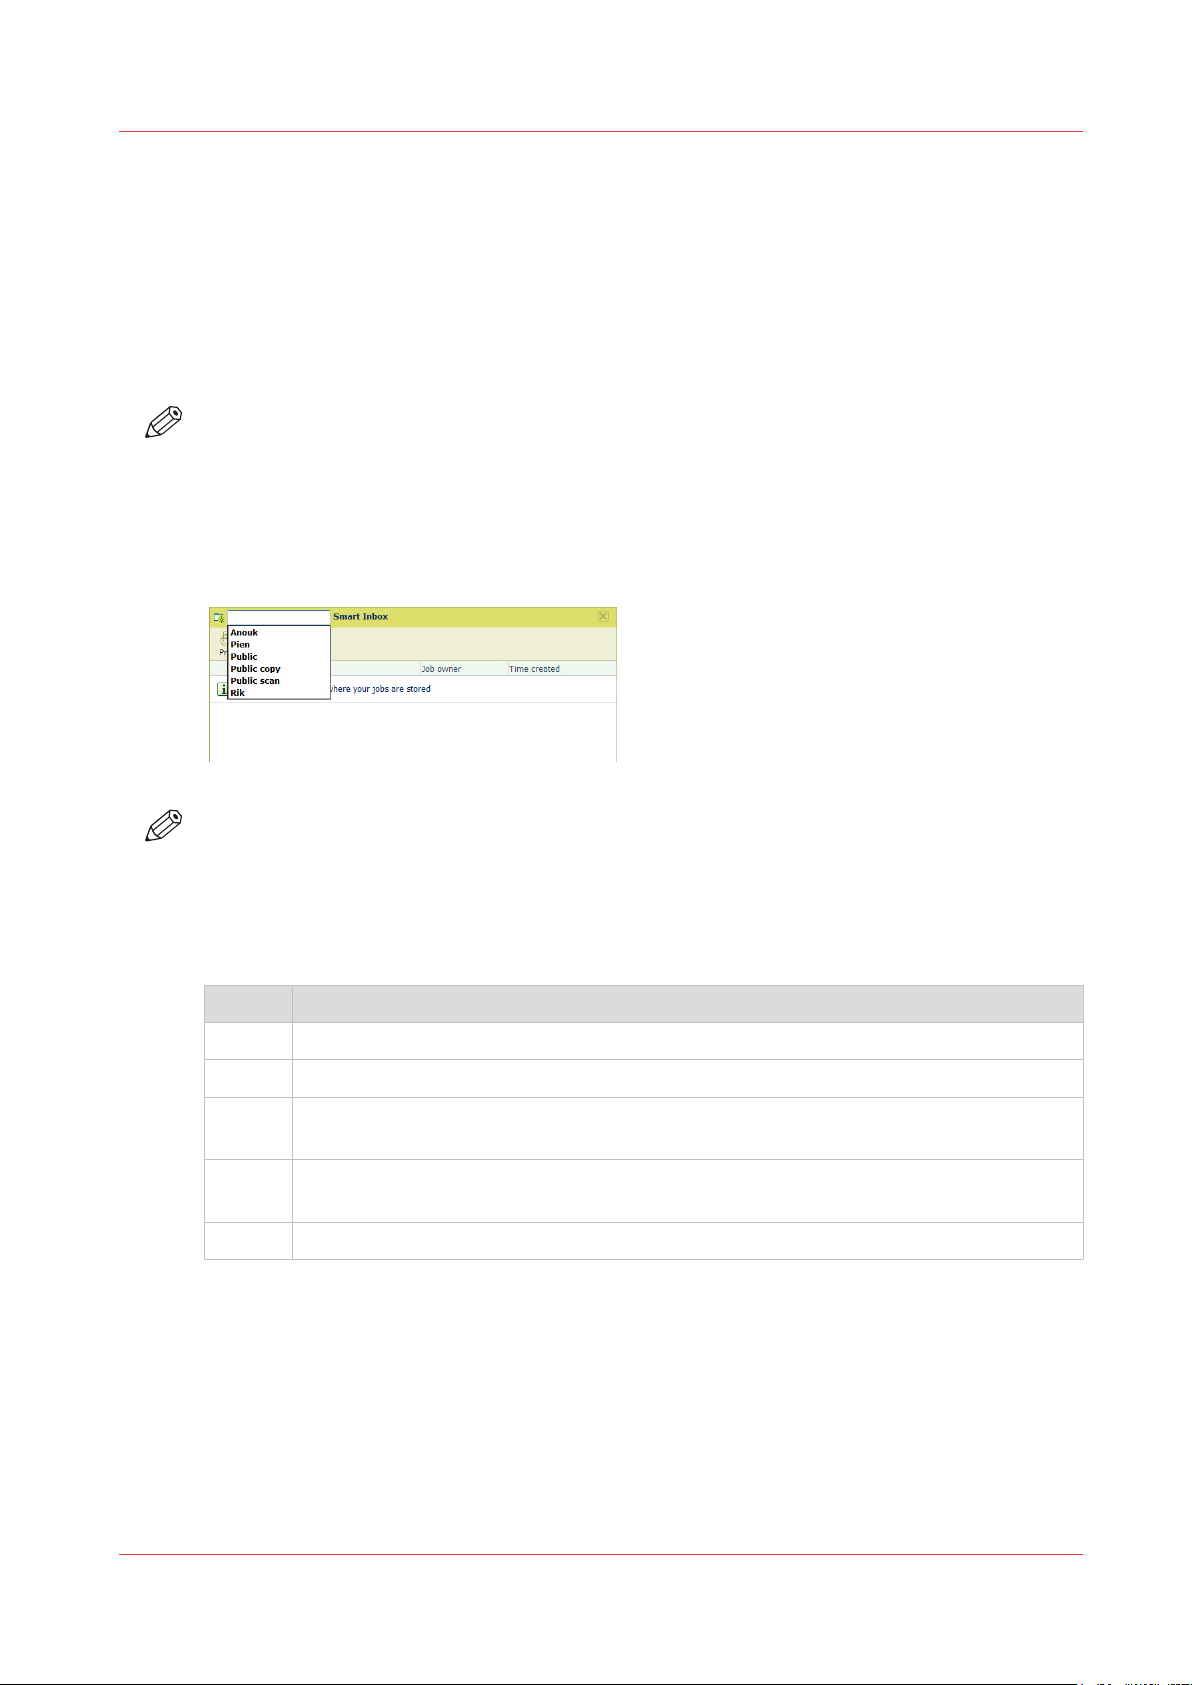
Create and open a Smart Inbox
Introduction
A Smart Inbox is used as a personal folder to print files from, scan files to, or store files in. In Océ
Express WebTools you can create a Smart Inbox in:
•
The [Jobs] tab - Smart Inbox section.
•
The [Jobs] tab - Publisher Express section.
•
The [Configuration] tab - [ Smart Inbox ] section.
NOTE
• Note that the behavior of the Smart Inbox can differ, depending on which of the three ways is
used for the creation.
• When user authentication is enabled your Smart Inbox rights can differ.
Create a Smart Inbox in the [Jobs] tab - Smart Inbox section
Create and open a Smart Inbox
NOTE
• The Smart Inboxes created in the Smart Inbox section are only visible on your personal
browser. When you send a print job to the specific Smart Inbox, that Smart Inbox also
becomes visible on the user panel.
• The Smart Inboxes created in the Smart Inbox section are not permanent. Once the Smart
Inbox is empty, it will disappear.
Step Action
1. Select the [Jobs] tab.
2. Click on [Open Smart Inbox].
3. Click on the blank field to open a drop-down list with the Smart Inboxes available on
your system.
4. Enter the name of the new Smart Inbox and press Enter, or select the desired Smart
Inbox from the list.
5. The Smart Inbox is now displayed in the Smart Inbox section.
Chapter 3 - Define your Workflow with Océ Express WebTools
67
Page 68
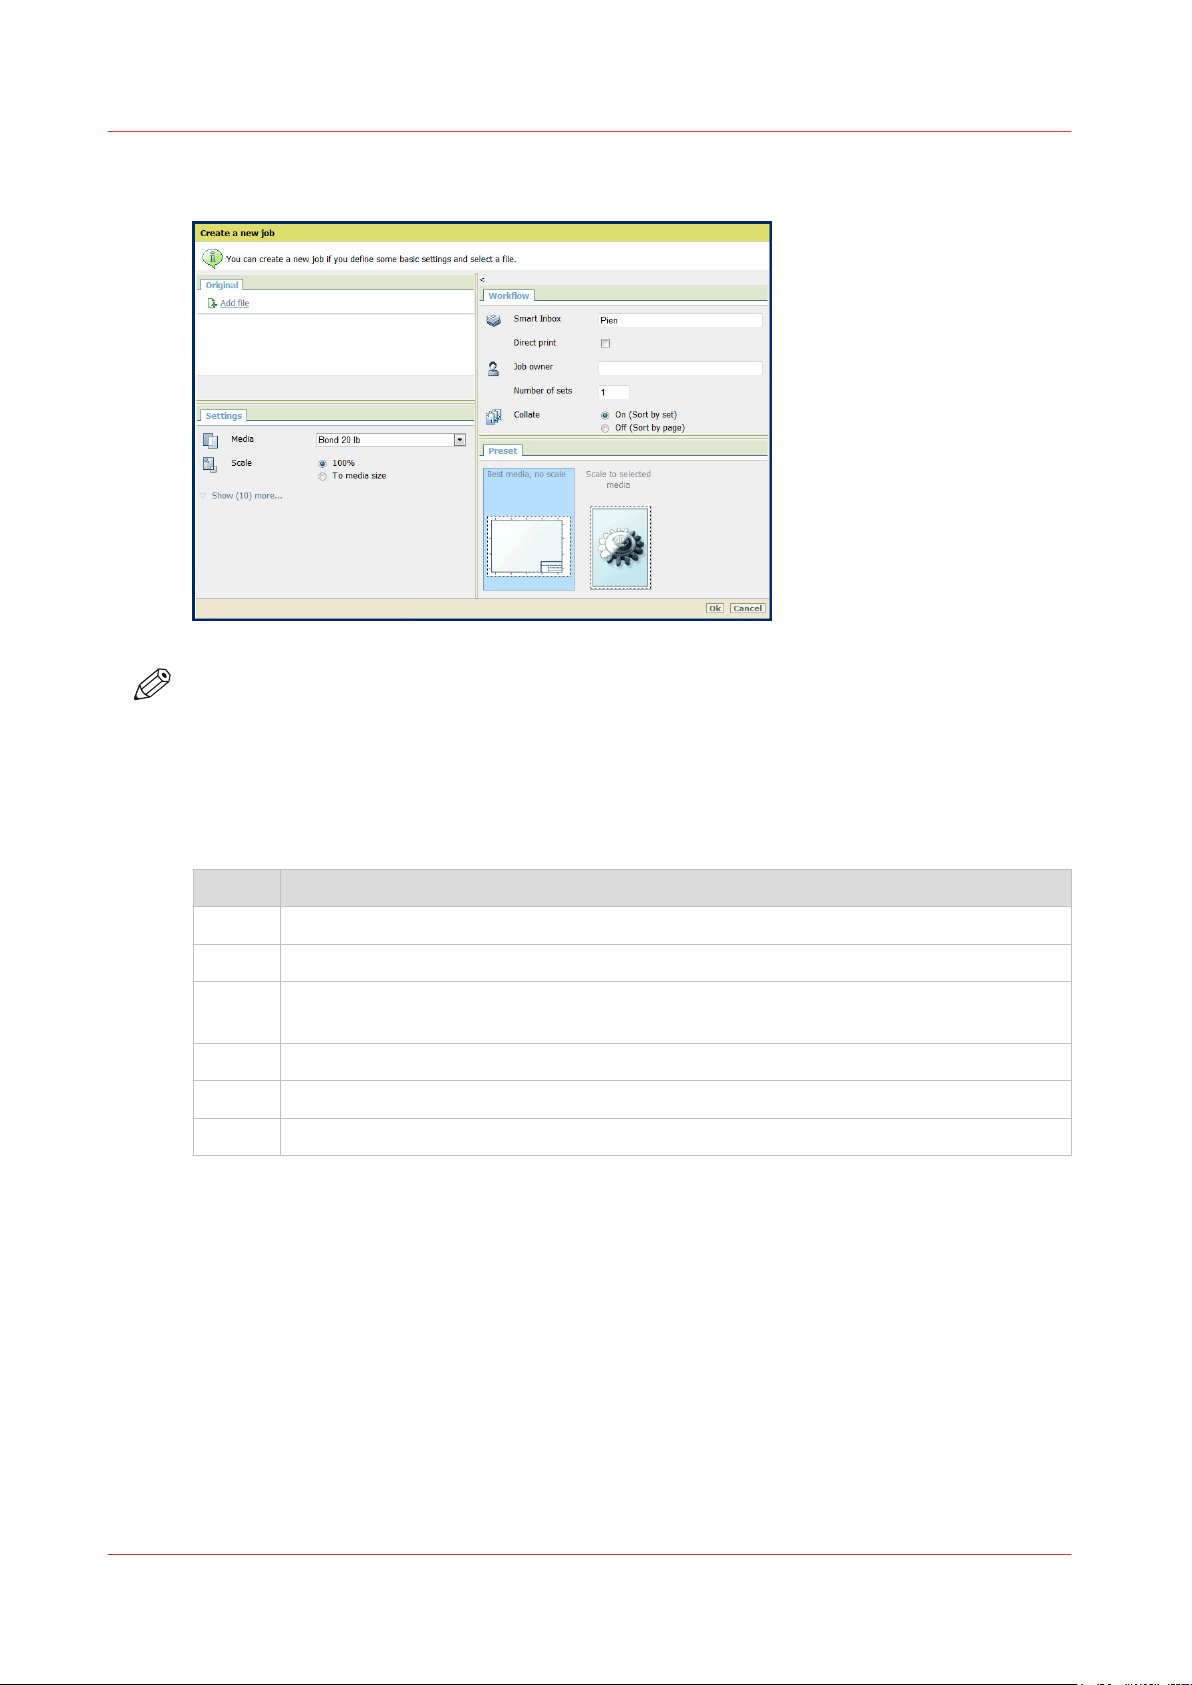
Create and open a Smart Inbox
Create a Smart Inbox in the [Jobs] tab - Publisher Express section
NOTE
• With this procedure you not only create a Smart Inbox, but you also send a job to the printer.
• The Smart Inboxes created in Publisher Express are only visible on your personal browser.
When you send a print job to the specific Smart Inbox, that Smart Inbox also becomes visible
on the user panel.
• The Smart Inboxes created in Publisher Express are not permanent. Once the Smart Inbox is
empty, it will disappear.
Step Action
1. Select the [Jobs] tab.
2. Click on [Create new job] in the Publisher Express section.
3. In the [Workflow] section, click on the Smart Inbox field. A drop-down list with Smart
Inboxes that contain one or more jobs opens.
4. Enter the name of the new Smart Inbox and press Enter.
5. Click [Ok] to send the print job to the printer via the new Smart Inbox.
6. The Smart Inbox is now displayed in the Smart Inbox section.
Chapter 3 - Define your Workflow with Océ Express WebTools
68
Page 69
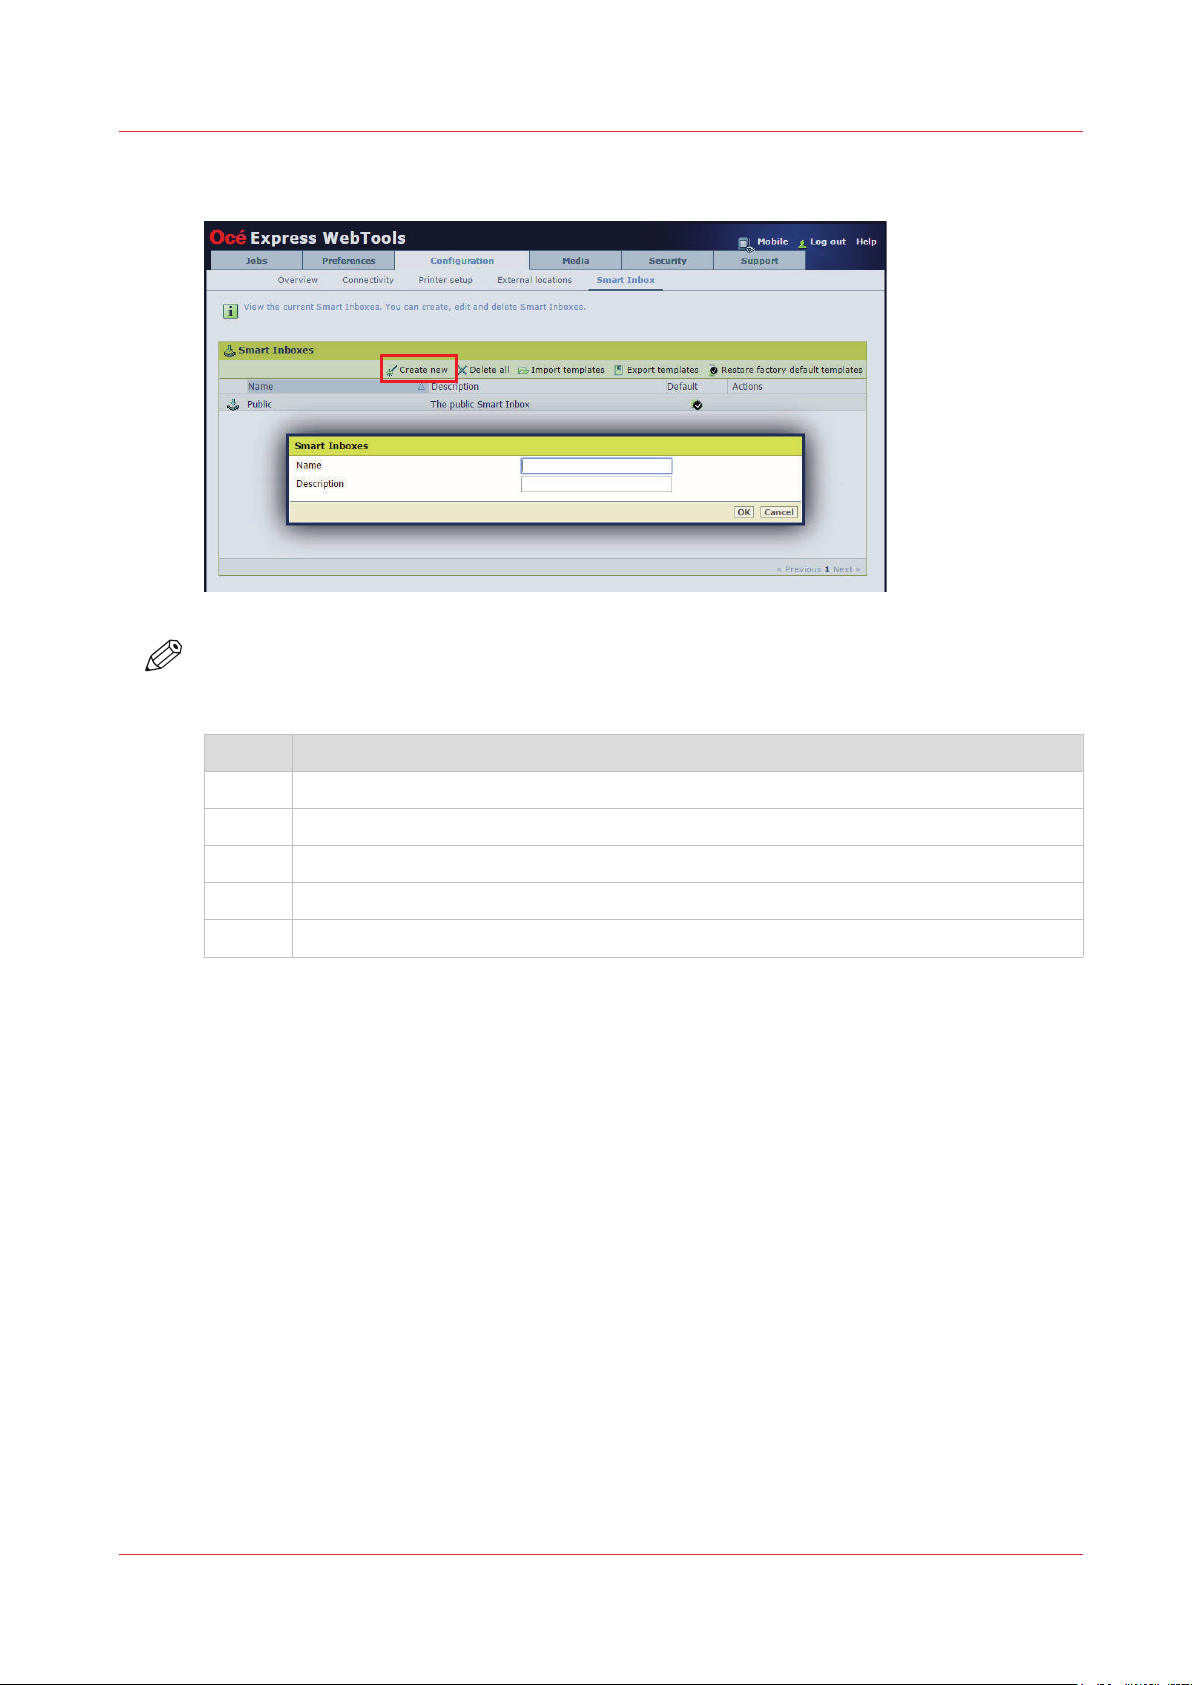
Create a Smart Inbox in the [Configuration] tab - [ Smart Inbox ] section
NOTE
The Smart Inboxes created in [Configuration] tab are permanent. Even when the Smart Inbox is
empty, it will always be available on the user panel.
Create and open a Smart Inbox
Step Action
1. Open the [Configuration] - [ Smart Inbox ] tab.
2. Click on [Create new]. A window opens.
3. Enter a [Name] recognizable for the user. This name appears on the user panel.
4. Enter a [Description].
5. Click OK to confirm.
Chapter 3 - Define your Workflow with Océ Express WebTools
69
Page 70
Close or delete a Smart Inbox
Close or delete a Smart Inbox
Introduction
In Océ Express WebTools you can close or delete a Smart Inbox in:
•
The [Jobs] tab - Smart Inbox section.
•
The [Configuration] tab - [ Smart Inbox ] section.
NOTE
• When you delete a Smart Inbox, you only delete the view on the Smart Inbox, but not the
content. To permanently delete the jobs from a Smart Inbox you must select the jobs in the
Smart Inbox and click [Delete].
• The default 'Public' Smart Inbox cannot be deleted, and will always be present.
Close a Smart Inbox in the [Jobs] tab - Smart Inbox section
Step Action
1. Open the [Jobs] tab.
2. Click on the X - button at the right hand side of the [ Smart Inbox ] bar.
Delete a Smart Inbox in the [Configuration] tab - [ Smart Inbox ] section
Step Action
1. Open the [Configuration] - [ Smart Inbox ] tab.
2. Select the Smart Inbox you want to delete.
3. On the right-hand side under [Actions], click on the X.
If you want to delete all Smart Inboxes at once, click on [Delete all] in the upper right
corner.
Chapter 3 - Define your Workflow with Océ Express WebTools
70
Page 71
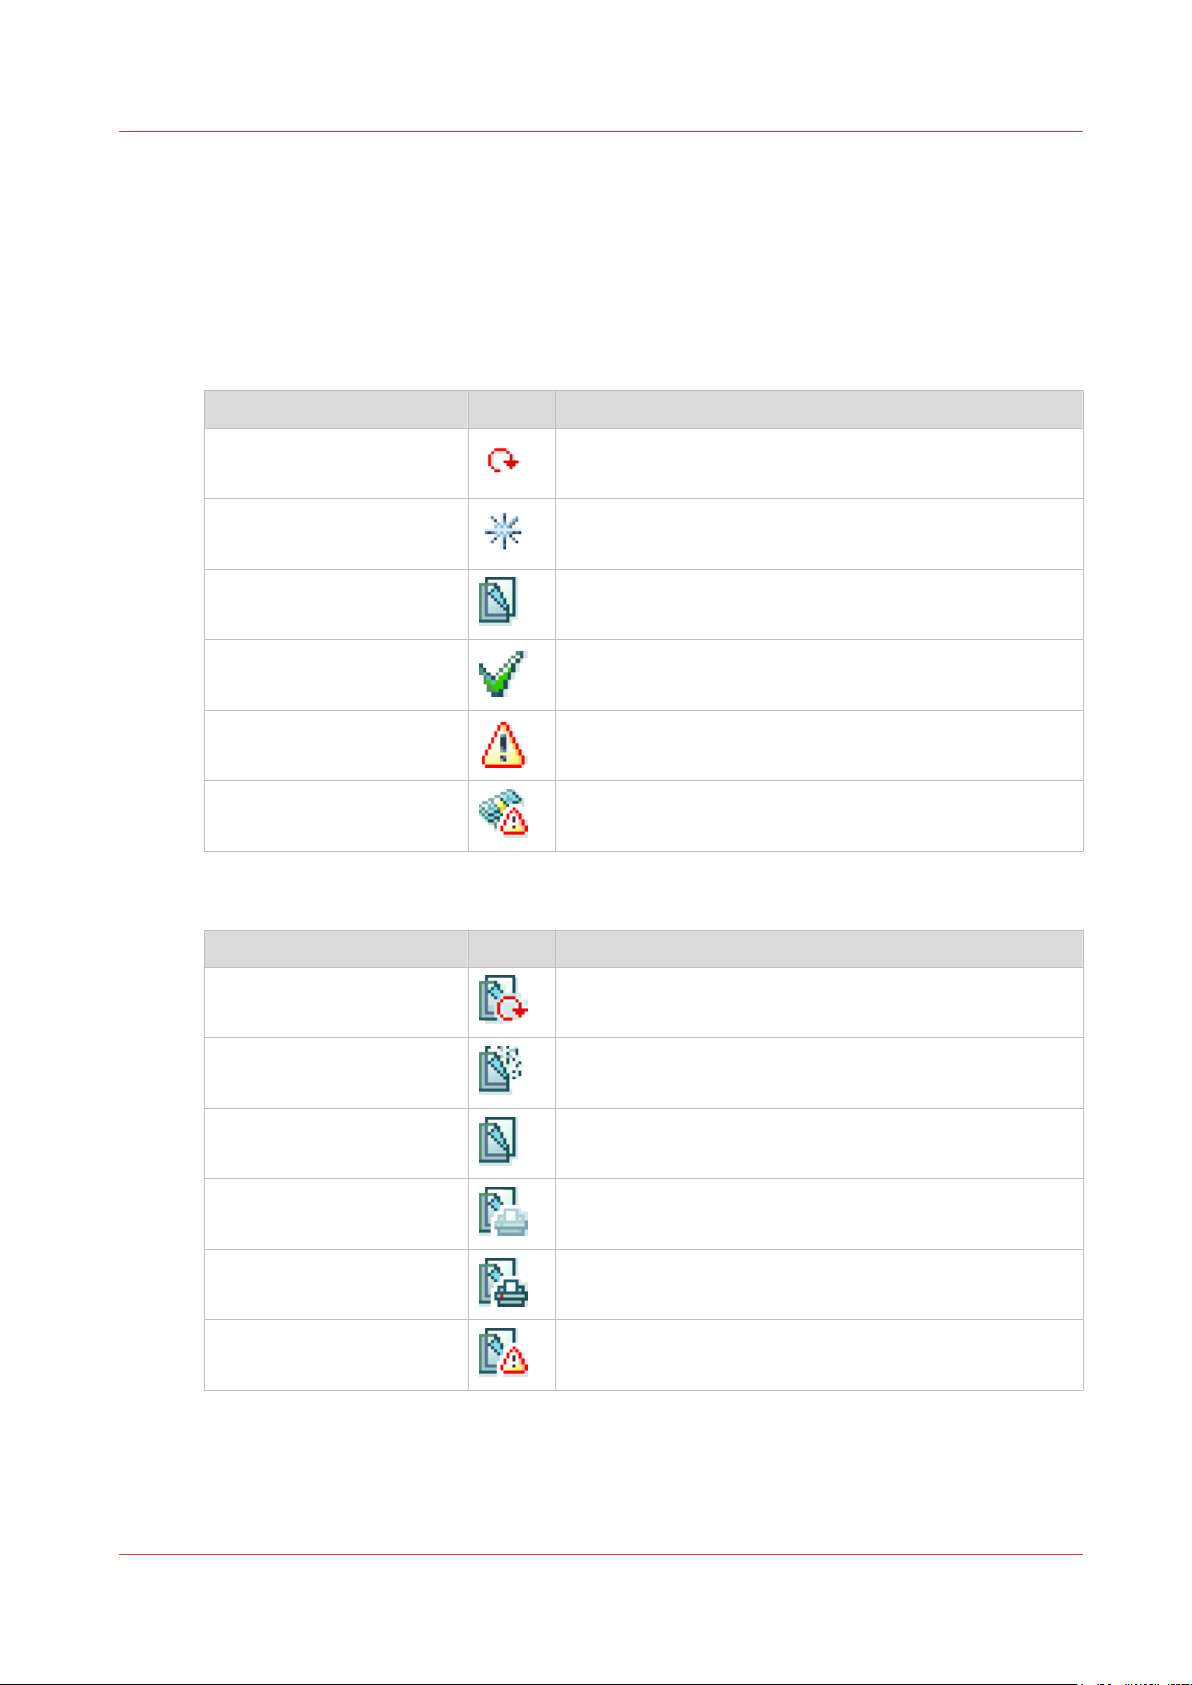
The job states
Introduction
When a job is placed in a Smart Inbox or in the job queue, the icon in front of the job name gives
information about the status of the job.
Overview of the job states in the Smart Inbox
State Icon Description
Receiving Indicates that the Smart Inbox is receiving the job data.
New Indicates that a new job is available in the Smart Inbox.
Queued Indicates that the job is copied to the queue and waiting
Printed Indicates that the job has been printed.
The job states
to be printed.
Attention needed General error message.
Account data missing State when the account data for the job is missing.
Overview of the job states in the Job queue
State Icon Description
Receiving Indicates that the Queue is receiving the job data.
Processing Indicates that the Queue is processing the job data.
Ready to print Indicates that the job is ready for printing.
Scheduled Indicates that the job is waiting to be printed.
Printing Indicates that the job is currently being printed.
Attention needed General error message.
Chapter 3 - Define your Workflow with Océ Express WebTools
71
Page 72

Configure the job management settings
Configure the job management settings
Introduction
When you want to control the rights or actions that can be performed on jobs or Smart Inboxes,
you can configure the [Job management] settings.
Attention:
• You can read a full explanation of each setting, when you click on the specific setting's name.
• When the [User authentication] setting is enabled, rights and the available settings can differ.
Procedure
Open the [Preferences] - [System defaults] tab.
1.
Click [Edit] in the [Job management] section, or select a specific setting.
2.
Change the values and make your preferred settings.
3.
Click [Ok] to confirm, or [Cancel] to reject your entries.
4.
For more information, see
Enable user authentication
on page 77.
Chapter 3 - Define your Workflow with Océ Express WebTools
72
Page 73

Configure the network and security settings
Configure the network and security settings
Configure the network settings in Océ Express WebTools
Introduction
Some of the network settings are configured during the installation of your system. When you
want to define more network settings, you can do so under the [Configuration] tab.
NOTE
For more detailed information on network settings, refer to the Océ LF Systems Connectivity
manual.
Procedure
Open the [Configuration] - [Connectivity] tab.
1.
Click [Edit] in the upper right hand corner of the [Network adapter] section. Here you can edit all
2.
the settings of the group in one window.
or
Click on a single setting in the list to edit only one setting.
3.
For example, click on the value of the IP type setting to display a window where you can change
the value.
NOTE
You can always find a short explanation of the setting in the tooltip.
Click [Ok] to confirm, or [Cancel] to reject your entries.
4.
Chapter 3 - Define your Workflow with Océ Express WebTools
73
Page 74

Set the security settings for Microsoft Internet Explorer
Set the security settings for Microsoft Internet Explorer
Introduction
You can use a web browser to open the home page of Océ Express WebTools. Depending on the
Internet browser you use, set the required minimum browser security settings as indicated
below.
NOTE
You must enable cookies.
Procedure
Step Action Value
1 Select Tools / Internet Options / Security / Local intranet / Custom Level
2
3
4
5
ActiveX controls and plug-ins
Binary and script behaviours Enable
Downloads:
File download Enable
Miscellaneous
Allow META REFRESH Enable
Launching applications and unsafe files Enable
Use Pop-up blocker Disable
Scripting
Active scripting Enable
Chapter 3 - Define your Workflow with Océ Express WebTools
74
Page 75

Set the security settings for Mozilla Firefox
Introduction
You can use a web browser to open the home page of Océ Express WebTools. Depending on the
Internet browser you use, set the required minimum browser security settings as indicated
below.
NOTE
You must enable cookies.
Procedure
Step Action Value
1 Select Firefox / Options / Options
Set the security settings for Mozilla Firefox
2
Block pop-up windows Disable
Enable Javascript Enable
Content
Chapter 3 - Define your Workflow with Océ Express WebTools
75
Page 76

Set the link speed and duplex mode
Set the link speed and duplex mode
Introduction
Use Océ Express WebTools to set the transmission speed and duplex mode for your network
adapter.
Before you begin
NOTE
The list of values you can select depends on the network card type.
Procedure
Open the [Configuration] - [Connectivity] tab.
1.
Click on [Edit] in the [Network adapter] section or click on the [Link speed and duplex mode]
2.
setting.
Select the value. [Automatic detection] is default.
3.
Click on [Ok] to confirm or [Cancel] to reject your entries.
4.
Chapter 3 - Define your Workflow with Océ Express WebTools
76
Page 77

Enable user authentication
Introduction
You can enable user authentication in Océ Express WebTools. A special user authentication
license is required.
When user authentication is enabled:
• Users have to authenticate to get access to the system.
• Users will only see their own jobs.
• Already scanned files that have been locally stored on the controller cannot be retrieved.
• [Direct print] is disabled.
• Various [Job management] settings are disabled.
• Various Smart Inbox rights are disabled.
• Various [Other network interfaces] settings are disabled.
NOTE
For more details on user authentication and a full list of disabled settings please refer to the Océ
PlotWave-ColorWave Systems Security manual.
Procedure
Enable user authentication
Open the [Security] - [Configuration] tab.
1.
In the [User access mode] section, click on the [User authentication] setting.
2.
Change the [User authentication] setting to the required authentication.
3.
• [User name and password]: the user has to select the domain and enter his credentials (user
name and password) to get access to the system.
NOTE
• At least one domain has to be configured under the [Domains] tab, for more
information refer to the security manual.
• When you set user authentication to [User name and password] and you have
configured the domain, the [Home folder] will also become available as an
external location.
• [Smart card]: the user has to use a smart card to get access to the system.
NOTE
At least a root certificate has to be uploaded under the [Trusted certificates] tab, for
more information refer to the security manual.
Click OK to confirm.
4.
Chapter 3 - Define your Workflow with Océ Express WebTools
77
Page 78

Enable Access control
Enable Access control
Introduction
When you want to control access to your printer, you need to enable access control in Océ
Express WebTools. With access control enabled, you are able to choose up to five hosts who are
allowed to communicate with the printer through your network. This amount of hosts allows for
flexible configuration.
For each of the hosts you can decide whether the communication from this host to the system
needs to be encrypted by IPsec.
Procedure
Open the [Security] - [Configuration] tab.
1.
In the [Access control] section, click on the [Access control] setting.
2.
Change the [Access control] setting from [Disabled] to [Enabled]. The setting is enabled when you
3.
check the box.
Click OK to confirm.
4.
Chapter 3 - Define your Workflow with Océ Express WebTools
78
Page 79

Access control and IPsec settings
Introduction
When access control is enabled, you can edit the access control settings.
[Access control] and IPsec settings
Under [Security] - [Configuration] - [Access control], you can set the following settings for each of
the 5 stations:
Setting Description
Access control and IPsec settings
[Access control station 1]
[Access control station 1: IPv4 address]
[Access control station 1: IPv6 address]
[IPsec station 1] Enable or disable IPsec. IPsec is a security protocol that encrypts the
[IPsec station 1: Preshared key]
For IPsec., you can set the following setting:
Setting Description
[IPsec default preshared key]
Enable or disable communication of this host with the printer.
The IPv4 address of the host is allowed to connect to the printer.
The IPv6 address of the host is allowed to connect to the printer.
communication between the host and the printer.
The key for encryption of this host connected via IPsec. If empty, the default preshared key is used.
This is the default key for encryption of hosts connected via IPsec. This
key holds for all stations whose preshared key is unspecified.
NOTE
For more details on these settings please consult the Océ PlotWave-ColorWave Systems
Security manual.
Chapter 3 - Define your Workflow with Océ Express WebTools
79
Page 80

Enable or disable the e-shredding function
Enable or disable the e-shredding function
Introduction
The e-shredding function allows you to securely erase jobs from the system. This prevents
unauthorized people from recovering deleted jobs. When the e-shredding function is enabled,
you can select an e-shredding algorithm. You can enable the e-shredding function in Océ Express
WebTools. By factory default, the e-shredding function is disabled.
NOTE
For more details on these settings please consult the Océ PlotWave-ColorWave Systems
Security manual.
Procedure
Open the [Security] - [Configuration] tab.
1.
In the [E-shredding] section, click on the [E-shredding] field.
2.
Select [Enabled] or [Disabled]. The setting is enabled when you check the box.
3.
NOTE
When e-shredding is enabled, the system may require more time to process jobs.
Click OK to confirm.
4.
Chapter 3 - Define your Workflow with Océ Express WebTools
80
Page 81

Select the e-shredding algorithm
Introduction
The e-shredding function allows you to securely erase jobs from the system. This prevents
unauthorized people from accessing deleted jobs.
You can select one of the following algorithms:
• [Gutmann].
All jobs on the system are erased in 35 overwrite passes.
• [DoD 5220.22-M].
All jobs on the system are erased in three overwrite passes.
• [Custom] allows you to define the number of passes manually.
The factory default is [DoD 5220.22-M].
NOTE
Only set the number of overwrite passes to a number higher than 1 if your security policy
requires it. An increase of passes can affect the performance.
Procedure
Open the [Security] - [Configuration] tab.
1.
Click on [Edit] in the upper right hand corner of the [E-shredding] section.
2.
Select the preferred method for the [E-shredding algorithm].
3.
Click OK to confirm.
4.
Select the e-shredding algorithm
Chapter 3 - Define your Workflow with Océ Express WebTools
81
Page 82

Specify the number of overwrite passes
Specify the number of overwrite passes
Introduction
The e-shredding function allows you to erase jobs from the system. This prevents unauthorized
people from accessing deleted jobs. You can manually enter the required number of overwrite
passes. You can enter any number from 1 to 35. The factory default is 3.
NOTE
• Only set the number of overwrite passes to a number higher than 1 if your security policy
requires it. An increase of passes can affect the performance.
• Note that more passes take more time.
Before you begin
Make sure that [E-shredding] is enabled. For more information see,
shredding function
Procedure
Open the [Security] - [Configuration] tab.
1.
Under [E-shredding] click on [E-shredding algorithm] and select [Custom].
2.
Under [E-shredding] click on [E-shredding custom number of passes].
3.
Enter the required number of overwrite passes.
4.
Click OK to confirm.
5.
Enable or disable the e-
on page 80.
Chapter 3 - Define your Workflow with Océ Express WebTools
82
Page 83

Remote security
Introduction
By default, the first certificate delivered for the use of HTTPS is an Océ self-signed certificate.
To ensure a fully trusted authentication, you can request and import a certificate delivered by a
Certification Authority (CA-signed certificate). In Océ Express WebTools you can generate the
certificates.
When you use a certificate, the client station that submits the print can check the identity of the
controller.
Remote security: certificates
• By default, Océ delivers an Océ self-signed certificate. This certificate provides encryption of
the print data between the client and the controller. It can be easily used.
This self-signed certificate has not been signed by a Certification Authority, consequently the
web browser will display a 'Certificate Error' message the first time you use the HTTPS
protocol.
• When your security policy recommends it, the administrator can request and import a
certificate delivered by a Certification Authority (CA-signed certificate).
For more information on how to do this, see
page 84, and
certificate into the workstation's browser
Remote security: import a CA-signed certificate - Check and import the Root
Remote security
Generate a new CA-signed certificate request
on page 89.
on
Chapter 3 - Define your Workflow with Océ Express WebTools
83
Page 84
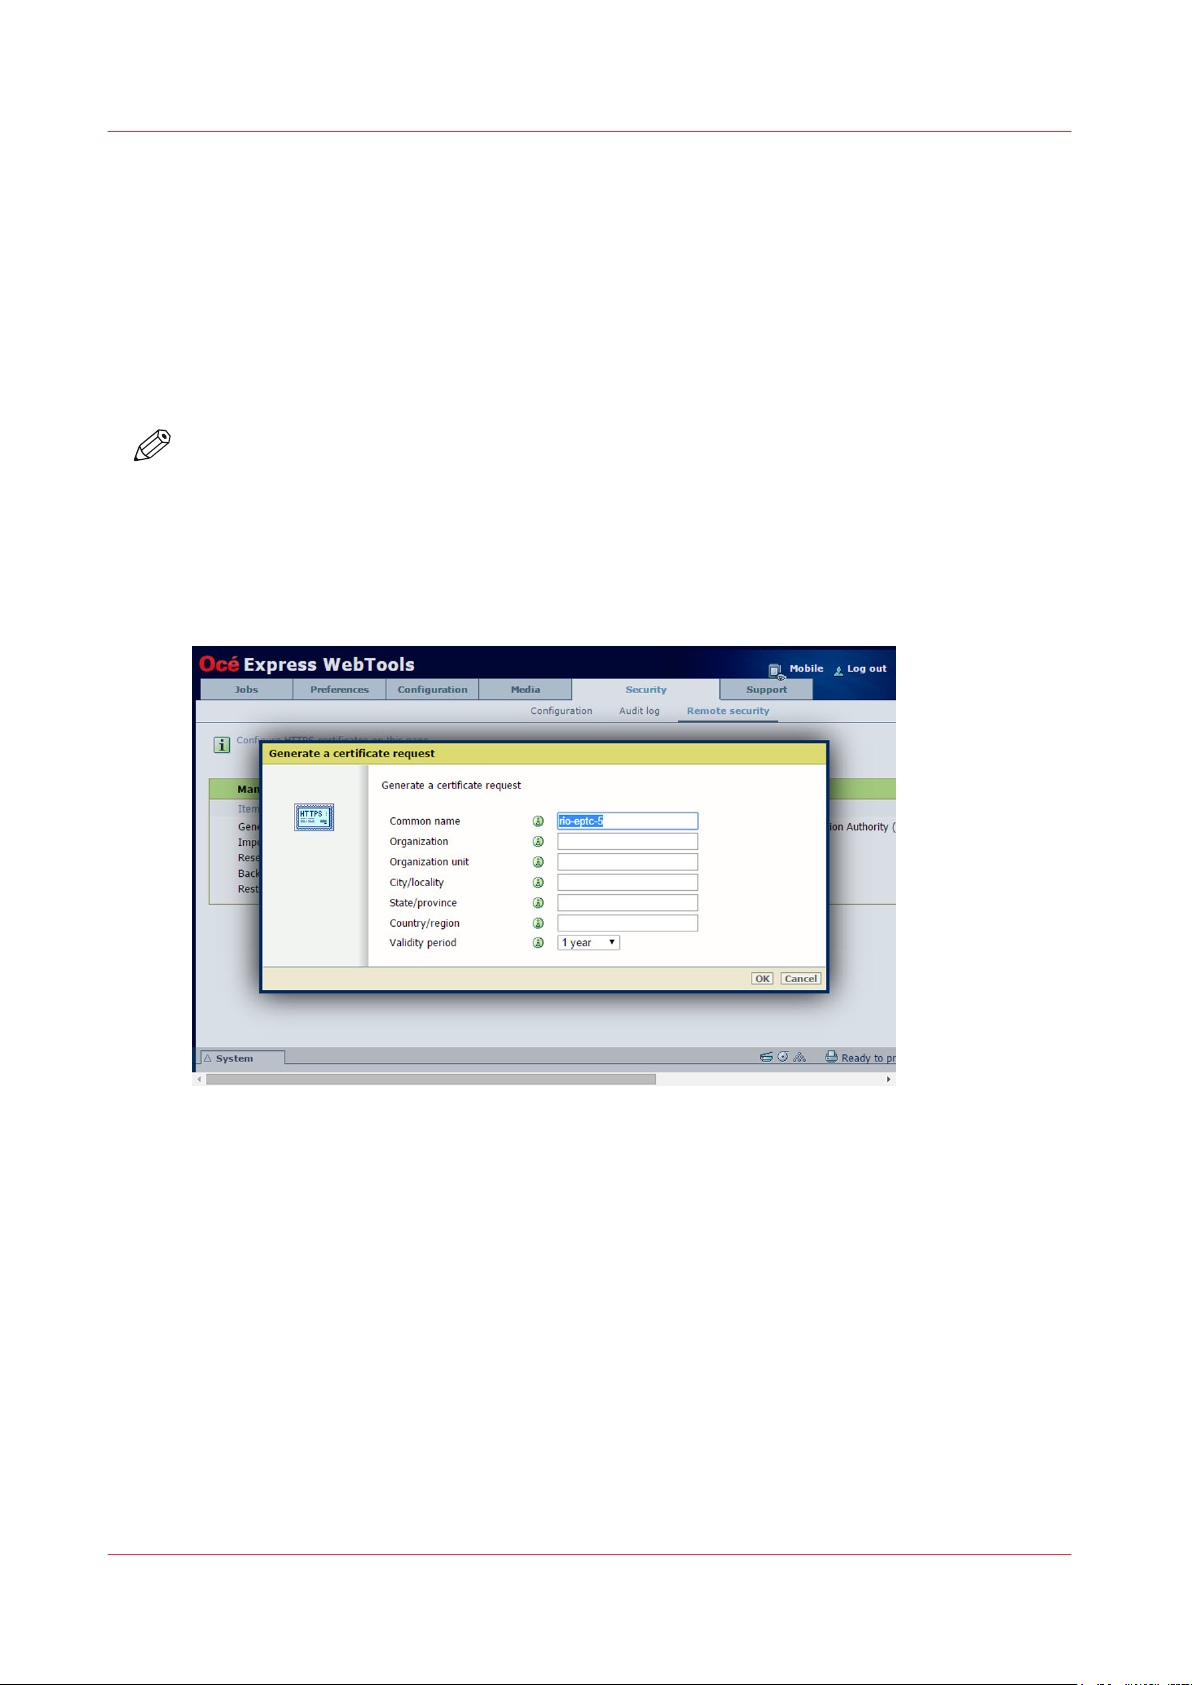
Generate a new CA-signed certificate
Generate a new CA-signed certificate
Introduction
To ensure a fully trusted authentication via HTTPS, you can request and import a certificate
delivered by a Certification Authority (CA-signed certificate).
In Océ Express WebTools, you can generate a certificate request yourself or you can import a
predefined certificate via your computer or network. When generating a certificate request, you
need to take the following steps.
NOTE
For more details on these settings please consult the Océ PlotWave-ColorWave Systems
Security manual.
Procedure
Open the [Security] - [HTTPS] tab.
1.
Click on [Generate a certificate request]. A window opens.
2.
Make the required settings: fill in the fully required domain name or the IP address and the
3.
additional information.
Click [Ok] to save.
4.
The web server generates a certificate request. The content of the request is displayed (plain
text).
Example (fake request):
-----BEGIN NEW CERTIFICATE REQUEST----MIIBvDCCASQAwfDELMAkGA1UEBMCRlIxDDAKBgNVBAgTA0lERjEQMA4GA1UEBxMHQ1JFVEV
J
TDEBEGA1UEChMKT2NlIFBMVCBTQTEMMAoGA1UECxMDU05TMSowKAYDVQQDEyF0ZHM3M
DAtNzQw
LnNucy5vY2VjcmV0WlsLm9jZS5uZwgZ8wDQYJKoZIhvcNAQEBBQADgY0AMIGJAoGBAJ2NKQM
d
HjiDZ1khzTJTORxHqjKl3AtE3PXqRsiHouTH5JTceYtaBjCnxCJ4pGKY5iKN8KJiJuZG8PHxY7o
W/+zpvxN2VtX7TcyTAvyCThUwL+cqo75tvODo5HMCUa2sLdl8GO9WMLpgZkxH5KzIiO+LcI4
yQbqhENynywS0C2ObXCq3yksF74+XIO0swhoA2yfDp4T+LuF3wxys8lUH3ZhhkOYg==
Chapter 3 - Define your Workflow with Océ Express WebTools
84
Page 85

Generate a new CA-signed certificate
-----END NEW CERTIFICATE REQUEST-----
Copy and paste the content of the request in a .csr file (named 'certificate_request.csr' by default).
5.
Restart the controller
6.
Send the content of this request to the Certification Authority.
7.
Chapter 3 - Define your Workflow with Océ Express WebTools
85
Page 86

Import a CA-signed certificate: Import the root certificate
Import a CA-signed certificate: Import the root certificate
Introduction
To ensure a fully trusted authentication via HTTPS, you can request and import a certificate
delivered by a Certification Authority (CA-signed certificate).
In Océ Express WebTools, you can generate a certificate request yourself or you can import a
predefined certificate via your computer or network. When you import the certificate you need to:
•
Import the root certificate
• Import the intermediate certificate
• Import a CA-signed certificate
• Check and import the root certificate
Complete all procedures to successfully import the certificate.
NOTE
For more details on these settings please consult the Océ PlotWave-ColorWave Systems
Security manual.
Procedure
Open Océ Express WebTools
1.
Open the [Security] - [HTTPS] tab.
2.
Click on [Import CA-signed certificate]. A window opens.
3.
Select [Root certificate] in Certificate type.
4.
Browse to the Root certificate file and click on Open.
5.
NOTE
The Root certificate may already exist in the web server certificates list.
Validate to confirm the import.
6.
When the message [Certificate successfully imported.] pops up, go on to import the [Intermediate
7.
certificate].
Click [Ok] to save.
8.
Chapter 3 - Define your Workflow with Océ Express WebTools
86
Page 87

Import a CA-signed certificate: Import the intermediate certificate
Import a CA-signed certificate: Import the intermediate certificate
To ensure a fully trusted authentication via HTTPS, you can request and import a certificate
delivered by a Certification Authority (CA-signed certificate).
When you import the certificate you need to:
• import the root certificate
•
Import the intermediate certificate
• Import a CA-signed certificate
• Check and import the root certificate
Complete all procedures to successfully import the certificate.
Procedure
Open the [Security] - [HTTPS] tab.
1.
Click on [Import CA-signed certificate]
2.
Select [Intermediate certificate] in Certificate type.
3.
Browse to the Intermediate certificate file and click on Open.
4.
When the message [Certificate successfully imported.] opens, go back to the main page to import
5.
the [CA-signed certificate]
Chapter 3 - Define your Workflow with Océ Express WebTools
87
Page 88

Import a CA-signed certificate
Import a CA-signed certificate
To ensure a fully trusted authentication via HTTPS, you can request and import a certificate
delivered by a Certification Authority (CA-signed certificate).
When you import the certificate you need to:
• Import the root certificate
• Import the intermediate certificate
•
Import the CA-signed certificate
• Check and import the root certificate
Complete all procedures to successfully import the certificate.
Procedure
Open the [Security] - [HTTPS] tab.
1.
Click on [Import CA-signed certificate].
2.
Select [CA-signed certificate] in Certificate type.
3.
Select 'Yes' to validate the certificate against Java root certificates and click 'Open'.
4.
When the message [Certificate successfully imported.] pops up, restart the controller.
5.
The certificate is now installed on the server.
Check and import (if needed) the CA Root certificate into the workstation web browser as well.
That will secure the complete data workflow between the workstations and the server.
Chapter 3 - Define your Workflow with Océ Express WebTools
88
Page 89

Import a CA-signed certificate: Check and import the root certificate
Import a CA-signed certificate: Check and import the root
certificate
To ensure a fully trusted authentication via HTTPS, you can request and import a certificate
delivered by a Certification Authority (CA-signed certificate).
When you import the certificate you need to:
• import the root certificate
• Import the intermediate certificate
• Import the CA-signed certificate
•
Check and import the root certificate
Complete all procedures to successfully import the certificate.
Procedure
On each workstation, open the web browser.
1.
Open the 'Certificates' option of the browser.
2.
For Internet Explorer: In the Tools - Internet Options - Content window, open "Certificates".
Check whether the CA Root certificate is already displayed in the "Trusted Root Certification
3.
Authorities" list.
If it is not on the list, import the CA Root certificate.
4.
Chapter 3 - Define your Workflow with Océ Express WebTools
89
Page 90

Configure the presets and stamping
Configure the presets and stamping
What you need to know about presets
Introduction
A preset is a predefined setting that is available on the user panel to easily perform print or copy
jobs. The preset concept supports the green button approach. The default presets are
automatically selected on the user panel, so you only have to press the green button to start a job
with your predefined settings.
Presets on the user panel
When you tap the copy tile on the user panel, a window opens with a list of presets. When you
tap the print tile and tap the settings of a listed job, the print presets are shown.
Per preset category, the default preset is visible as a preset tile. When you tap the default tile, the
other available presets are shown.
Set the presets in Océ Express WebTools
In Océ Express WebTools you can make the settings for the print or copy presets . You only have
to make the settings once, and they will be visible on the user panel as presets.
Presets Description
Default presets The default presets support the green button approach. When you do not
make settings, the printer uses the default presets for print or copy jobs.
You can set the default presets in Océ Express WebTools.
Custom presets When you want to use your own preferred settings, you can configure cus-
tom presets in Océ Express WebTools. Make the custom preset available on
the user panel or set it as the default preset.
Chapter 3 - Define your Workflow with Océ Express WebTools
90
Page 91

Set the default copy preset
Introduction
With a preset you can predefine the settings you need for a copy job.
Copy has four preset categories: [Media], [Layout], [Image], and [Finishing] For each category you
can set one default preset in Océ Express WebTools. The default preset is automatically used
when you press the green button on the user panel.
NOTE
You can always find a short explanation of the setting in the tooltip.
Procedure
Open the [Preferences] - [Copy job defaults] tab.
1.
Under [ User panel configuration: Default presets for copy] select the preset category you want to
2.
change, for example [Default layout preset].
Select the setting you want to use as the default preset, for example [Standard half size ].
3.
When you want to make your custom preset default, select [Custom].
Click [Ok] to confirm, or [Cancel] to reject your entries.
4.
Set the default copy preset
After you finish
To make sure your preset is active on the user panel, press the home button on the home screen
of the user panel.
Chapter 3 - Define your Workflow with Océ Express WebTools
91
Page 92

Configure the custom copy preset
Configure the custom copy preset
Introduction
With a preset you can predefine the settings you need for a copy job.
When you want to use other predefined settings than the default presets, you can configure
custom presets in Océ Express WebTools . You can configure one custom preset per preset
category: [Media], [Layout], or [Image]. The custom preset becomes available on the user panel,
and you are able to set it as the default preset.
Procedure
Open the [Preferences] - [Copy job defaults] tab.
1.
Select the preset category you want to make a custom preset in and click on [Edit], for example
2.
[Custom image preset for copy].
Check the box next to the [Custom image preset for copy] setting to enable the preset, and make
3.
it available on the user panel.
Fill in a name and description that will be used for the preset on the user panel.
4.
Select the settings you want to use for the custom preset, for example choose to set [Original
5.
type] to [Blueprint] , and [Background compensation] to [On].
Click [Ok] to confirm, or [Cancel] to reject your entries.
6.
After you finish
To make sure your preset is active on the user panel, press the home button on the home screen
of the user panel. When you want to make the custom preset the default preset, follow the
procedure
Set the default copy preset
on page 91.
Chapter 3 - Define your Workflow with Océ Express WebTools
92
Page 93

Set the default print preset
Introduction
With a preset you can predefine the settings you need for a print job from USB or an external
location.
Print has four preset categories: [Media], [Layout], [Image], and [Finishing]. For each category you
can set one default preset in Océ Express WebTools. The default preset is automatically used
when you press the green button on the user panel.
NOTE
You can always find a short explanation of the setting in the tooltip.
Procedure
Open the [Preferences] - [Print job defaults] tab.
1.
Under [User panel configuration: Default presets for print] select the preset category you want to
2.
change, for example [Default layout preset].
Select the setting you want to use as the default preset, for example [Standard half size].
3.
Select [Custom] to make your custom preset default.
Click [Ok] to confirm, or [Cancel] to reject your entries.
4.
Set the default print preset
After you finish
To make sure your preset is active on the user panel, press the home button on the home screen
of the user panel.
Chapter 3 - Define your Workflow with Océ Express WebTools
93
Page 94

Configure the custom print preset
Configure the custom print preset
Introduction
With a preset you can predefine the settings you need for a print job.
When you want to use other predefined settings than the default presets, you can configure
custom presets in Océ Express WebTools . You can configure one custom preset per preset
category: [Media], [Layout], or [Image]. The custom preset becomes available on the user panel,
and you are able to set it as the default preset.
Procedure
Open the [Preferences] - [Print job defaults] tab.
1.
Select the preset category you want to make a custom preset in and click on [Edit], for example
2.
[Custom image preset for print].
Check the box next to the [Custom image preset for print] setting to enable the preset, and make
3.
it available on the user panel.
Fill in a name and description that will be used for the preset on the user panel.
4.
Select the settings you want to use for the custom preset, for example choose to set [Mirror] to
5.
[On].
Click [Ok] to confirm, or [Cancel] to reject your entries.
6.
After you finish
To make sure your preset is active on the user panel, press the home button on the home screen
of the user panel. When you want to make the custom preset the default preset, follow the
procedure
Set the default print preset
on page 93.
Chapter 3 - Define your Workflow with Océ Express WebTools
94
Page 95

Make a custom preset available on the user panel
Make a custom preset available on the user panel
Introduction
When you create a custom preset, you can enable the preset to make it available on the user
panel.
Before you begin
Create the custom preset first. For more information, see
page 92 or
Procedure
Open the [Preferences] tab.
1.
Select the [Copy job defaults] or the [Print job defaults] tab, dependent of your custom preset.
2.
Under the preferred custom preset category, select the custom preset setting.
3.
For example under [Custom image preset for copy], select the [Custom image preset for copy]
setting.
Check the box to enable the setting and click [Ok].
4.
The custom preset is now visible on the user panel, and can be selected locally.
Create the custom print preset
on page 94.
Create the custom copy preset
on
Chapter 3 - Define your Workflow with Océ Express WebTools
95
Page 96
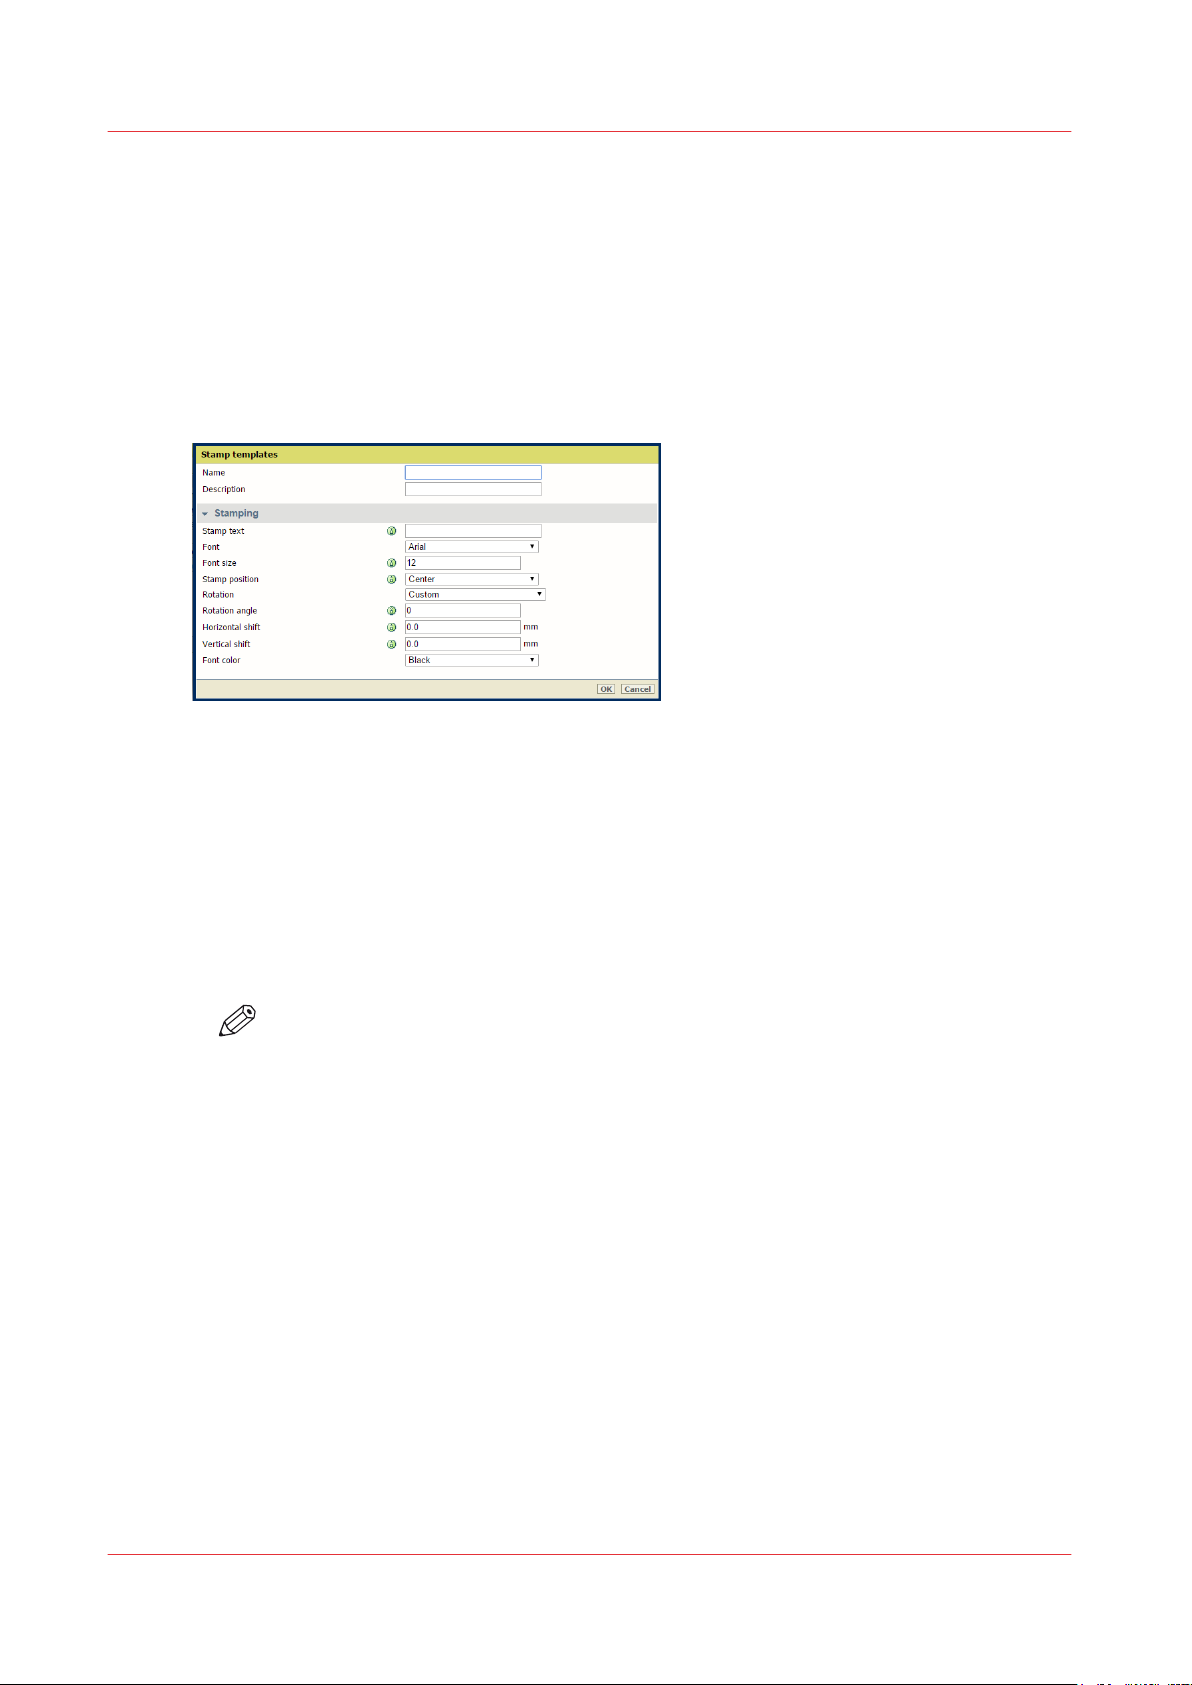
Create a stamp
Create a stamp
Introduction
In the custom preset section of the [Copy job defaults] in Océ Express WebTools you can enable
the stamp functionality. Under the [Stamping] tab you can create your own predefined stamp.
Procedure
Open the [Preferences] - [Stamping] tab.
1.
Result
Click on [Create new] in the upper right hand corner .
2.
Enter a [Name] recognizable for the user.
3.
Enter a [Description] of the stamp.
4.
Enter the [Stamp text] that will appear on the stamp. If you insert text, also choose the [Font] and
5.
the [Font size].
Choose the [Stamp position] on the original.
6.
Choose the [Rotation] and the [Rotation angle], when you want to turn the stamp on the original.
7.
Enter the [Horizontal shift] and [Vertical shift] in mm, to specify the position you have chosen at
8.
step 5.
Select the [Font color].
9.
NOTE
Most settings are optional, so you do not have to enter all settings if it is not necessary.
Your stamp is created. You can now enable your stamp under [Preferences] - [Copy job defaults] [Custom image preset for copy] - [Stamping] to use it on the user panel.
For more information, see
Define the custom copy preset
on page 92.
Chapter 3 - Define your Workflow with Océ Express WebTools
96
Page 97
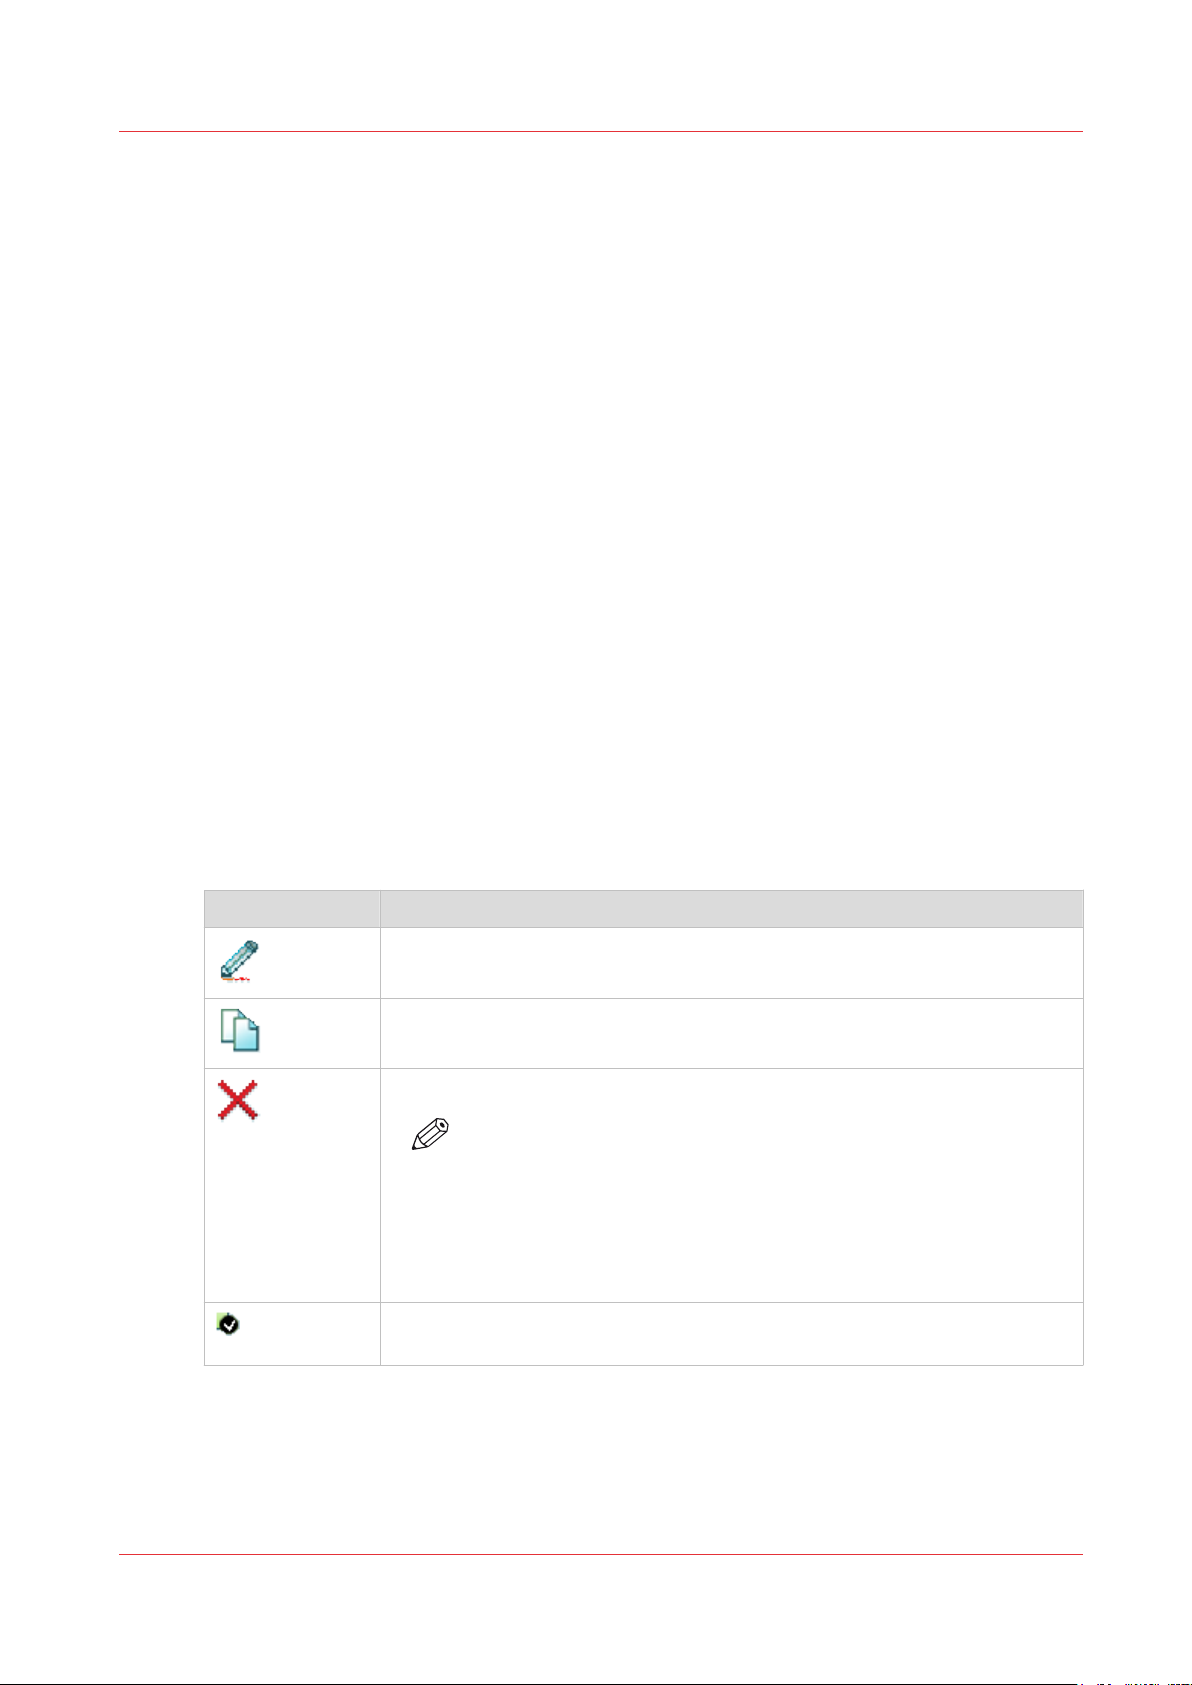
Configure the Templates
Fold and Scan templates
Introduction
A template is a group of predefined settings you can configure yourself. Select the template on
the user panel to easily submit a job with optimized settings.
You can create templates for folding and scanning in Océ Express WebTools under the
[Preferences] tab. You can create various templates and select one of the templates as default.
For scan templates you can also enable one of the factory installed templates.
General template actions
There are several general actions you can perform for templates. You can:
Create a new template
•
•
Delete all templates
•
Export templates
•
Import templates
•
Restore the factory defaults of the templates
•
Enable or disable scan templates
on page 98
on page 99
on page 101
on page 100
on page 103
Configure the Templates
on page 102
Actions per template
Next to this, you can perform actions per template. When you move the mouse pointer over the
template in the list you can see the available actions:
Icon Description
[Edit a template], to change the settings or the destination. You can also
modify factory installed scan templates.
[Copy a template], to create a new template.
[Delete a template], to remove one specific template.
NOTE
• When you have deleted a factory installed scan template, you
can retrieve it by restoring the factory defaults. For more information, see
• Some destinations (external locations and Smart Inboxes) cannot be deleted when they are set as a scan destination in the
scan template.
[Set this template as the default template], to set one default selected template.
Restore the factory defaults
on page 58.
Chapter 3 - Define your Workflow with Océ Express WebTools
97
Page 98

Create a new template
Create a new template
Introduction
Create a new template in Océ Express WebTools.
NOTE
• Depending on the configuration, less or more settings are available.
• More or fewer settings will be shown depending on the selections made.
• Note that the templates on the user panel are ordered alphabetically. When you want to order
the templates to your preference, it is advised to use ascending numbers in front of the name
(01-02-03 etc.).
• Click on the home button on the user panel to update the scan templates.
Procedure
Select the [Preferences] - [Fold] tab in Océ Express WebTools for the fold template.
1.
Select the [Preferences] - [Scan] tab in Océ Express WebTools for the scan template.
Click on [Create new] at the right hand side.
2.
Enter a [Name], recognisable for the user.
3.
Enter a [Description], a description of the settings used.
4.
Select the desired settings. For every individual setting, there is a tooltip available in the template
5.
editor to give a short explanation.
For more information on the settings, see
page 197.
Click [Ok] to save the template or [Cancel] to reject your entries.
6.
Fold settings
on page 104 and
Scan settings
on
Chapter 3 - Define your Workflow with Océ Express WebTools
98
Page 99

Delete all templates
Introduction
You can delete all templates at once with Océ Express WebTools.
Procedure
Select the [Preferences] - [Fold] tab in Océ Express WebTools for the fold templates.
1.
Select the [Preferences] - [Scan] tab in Océ Express WebTools for the scan templates.
Click on [Delete all] at the right hand side.
2.
The system displays the message [Do you want to delete all the templates?]
3.
Click [Ok] to delete all templates or [Cancel] to cancel the deletion.
4.
Delete all templates
Chapter 3 - Define your Workflow with Océ Express WebTools
99
Page 100

Import templates
Import templates
Introduction
You can import templates with Océ Express WebTools.
Use a zip file with templates that was previously created by the [Export templates] procedure.
Procedure
Select the [Preferences] - [Fold] tab in Océ Express WebTools for the fold templates.
1.
Select the [Preferences] - [Scan] tab in Océ Express WebTools for the scan templates.
Click on [Import] at the right hand side.
2.
Mark the [Overwrite existing templates] checkbox to overwrite existing templates. When you do
3.
not tick the checkbox, duplicate imported templates will be given a serial number.
Click Browse to [Select the location of the zip file].
4.
Click [Ok] to import all templates or [Cancel] to cancel the import.
5.
Chapter 3 - Define your Workflow with Océ Express WebTools
100
 Loading...