

Page 1
Set-Up Sheet
Set-Up Sheet
Thank you for purchasing the Canon MultiPASS MP370/360. To prepare your
machine for use, please follow the instructions in this
Set-Up Sheet before referring to
any other documentation.
READ THIS SHEET FIRSTREAD THIS SHEET FIRST
Do not connect the USB cable until , "Connect the USB
cable."
IMPORTANT
Setup procedures
Start
Setup flow
Setup procedures
End
This side explains the setup procedure for use without connecting to a computer. <Check packed contents, install and adjust machine>
This side explains the setup procedure for use by connecting to a computer. <Install MP Drivers and Utility Software>
You can use the copy, photo print (MP370) functions.
You can use the print, scan functions.
Connect power
cord
Install Utility Software
Install print head
Install MP Drivers
Install ink tanks
Connect USB cable
Load print media
Align print head
Unpack and install
the machine
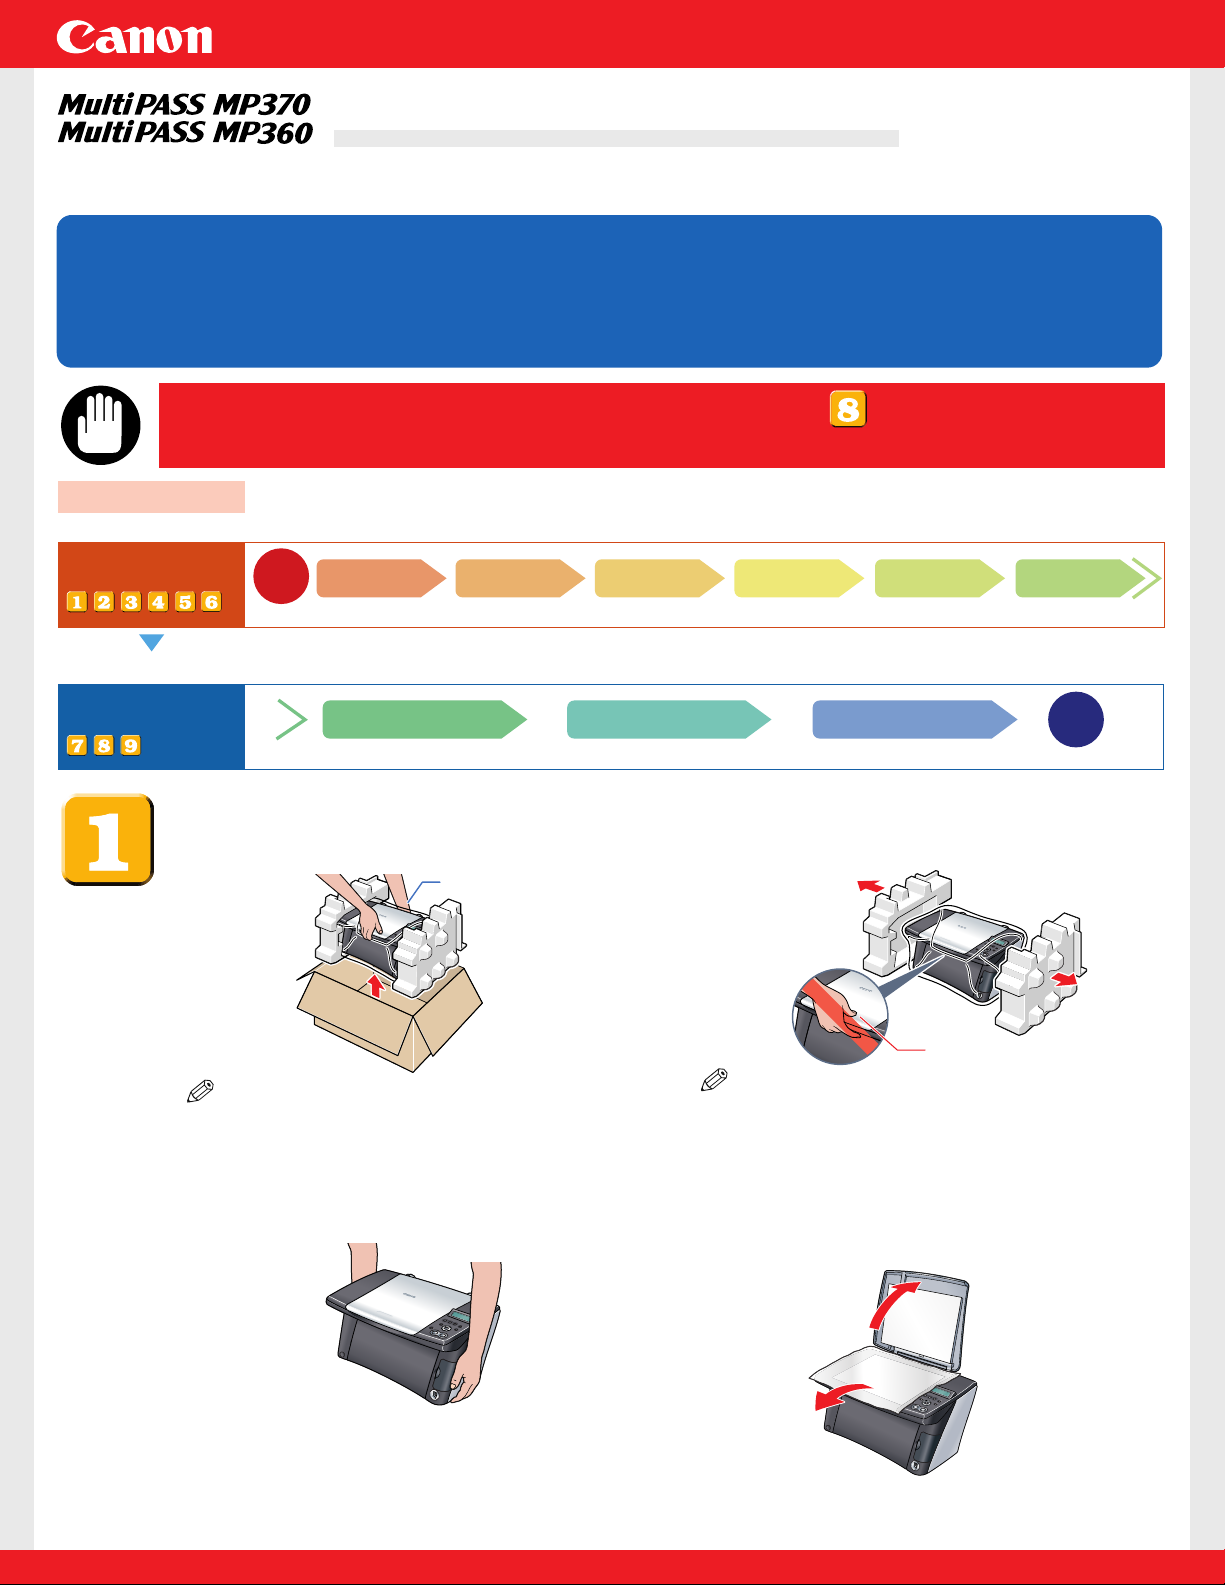
Unpack and install the machine.
1 Carefully remove all items from the box.
NOTE
• When removing the machine from the
box, take sufficient care not to drop it.
2 Remove the protective material.
NOTE
• After removing the protective material,
do not lift the machine by grasping the
scan unit.
Hold the bottom side.
3 Place the machine on a flat surface.
• Be sure to hold the machine by the
sides. Set nothing in front of the
machine.
4 Remove all shipping tape from the
exterior of the machine.
• After removing the tape, remove the
protective sheet.
Do not grasp the
scan unit.
HT3-2142-000-V.1.0
Page 2
NOTE
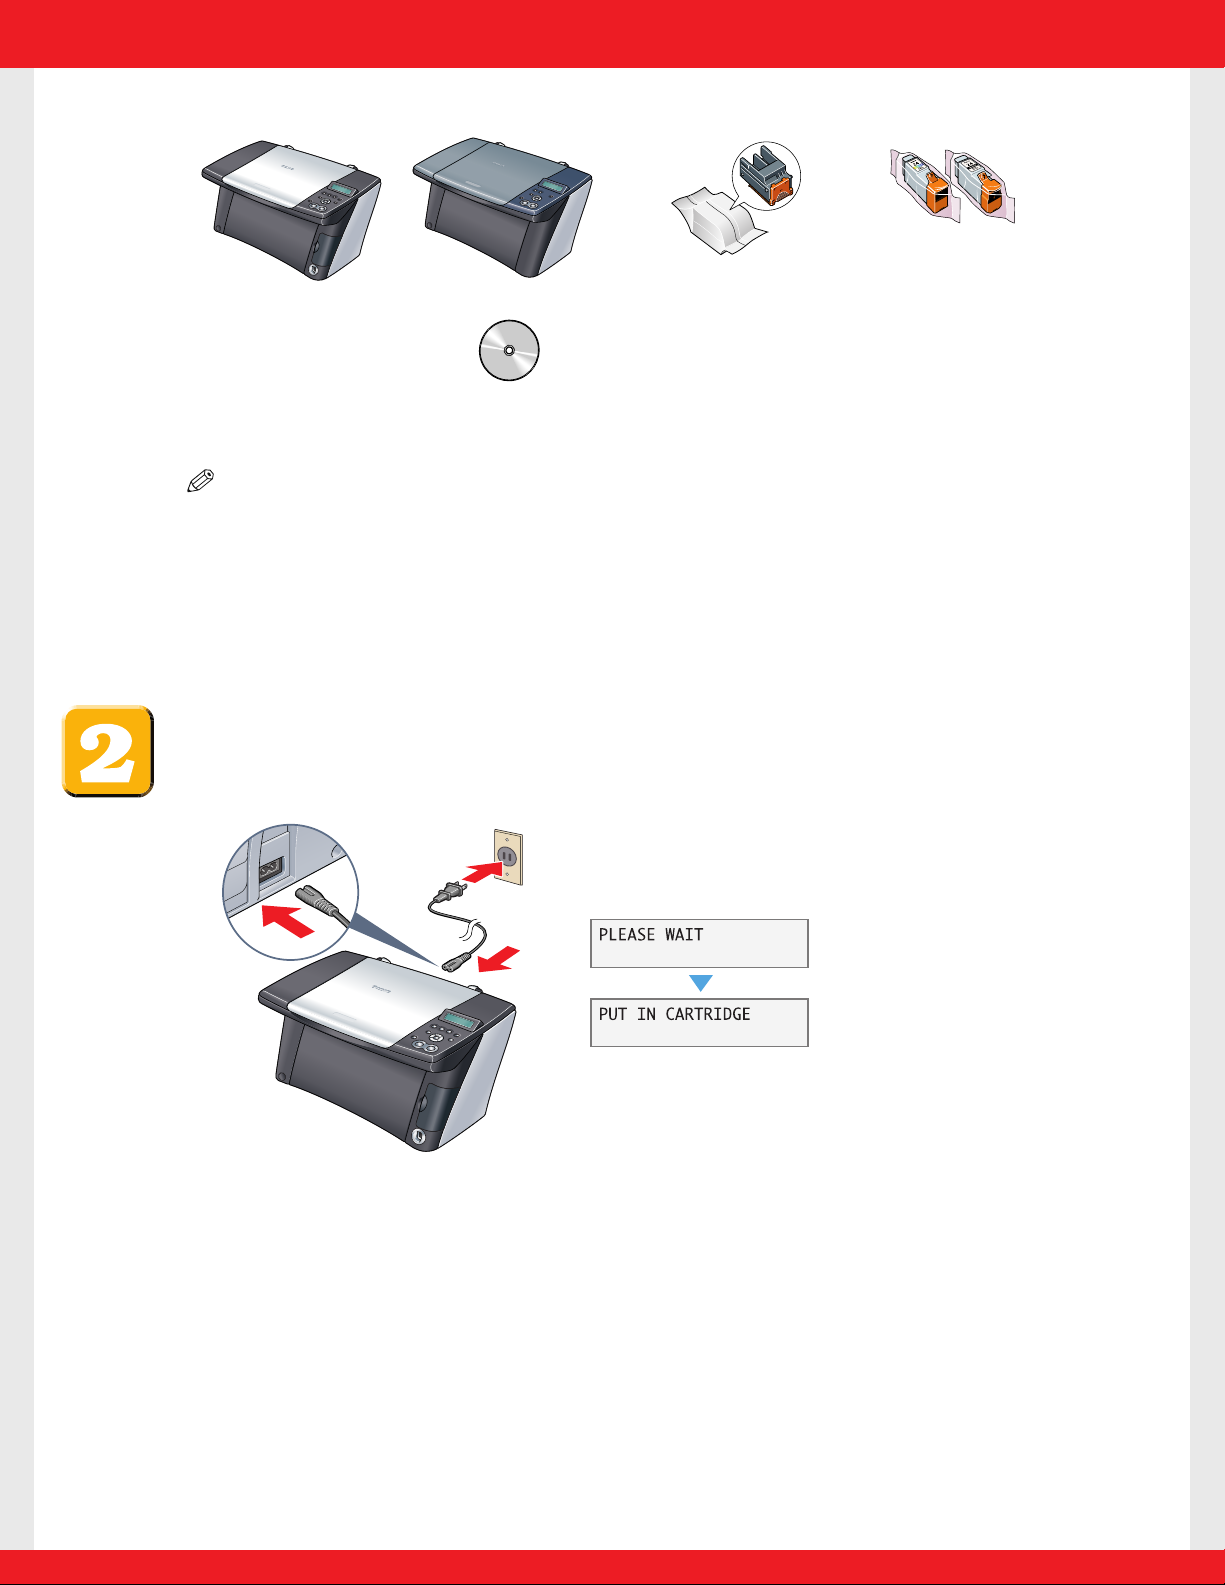
• In this sheet, illustrations of MP370 are shown.
• A printer cable is not included.You must purchase a USB cable (less than 16
3
/8ft./5 m)
to connect your machine to a computer.
• MP370
• MP360
• Print head
• Ink tanks
BCI-24 Black
BCI-24 Color
• Power cord
• Set-Up Sheet
• User's Guide
• Setup
CD-ROM
The Setup CD-ROM contains the MP
Drivers, as well as the electronic manuals
Software Guide and Photo Application
Guide
.
Please read these guides.
Check the contents.
Connect the power cord.
1 Connect the power cord.
If the message <PUT IN CARTRIDGE> appears, go
to procedure 3, "Install the print head."
Approx. 15 seconds
Page 3
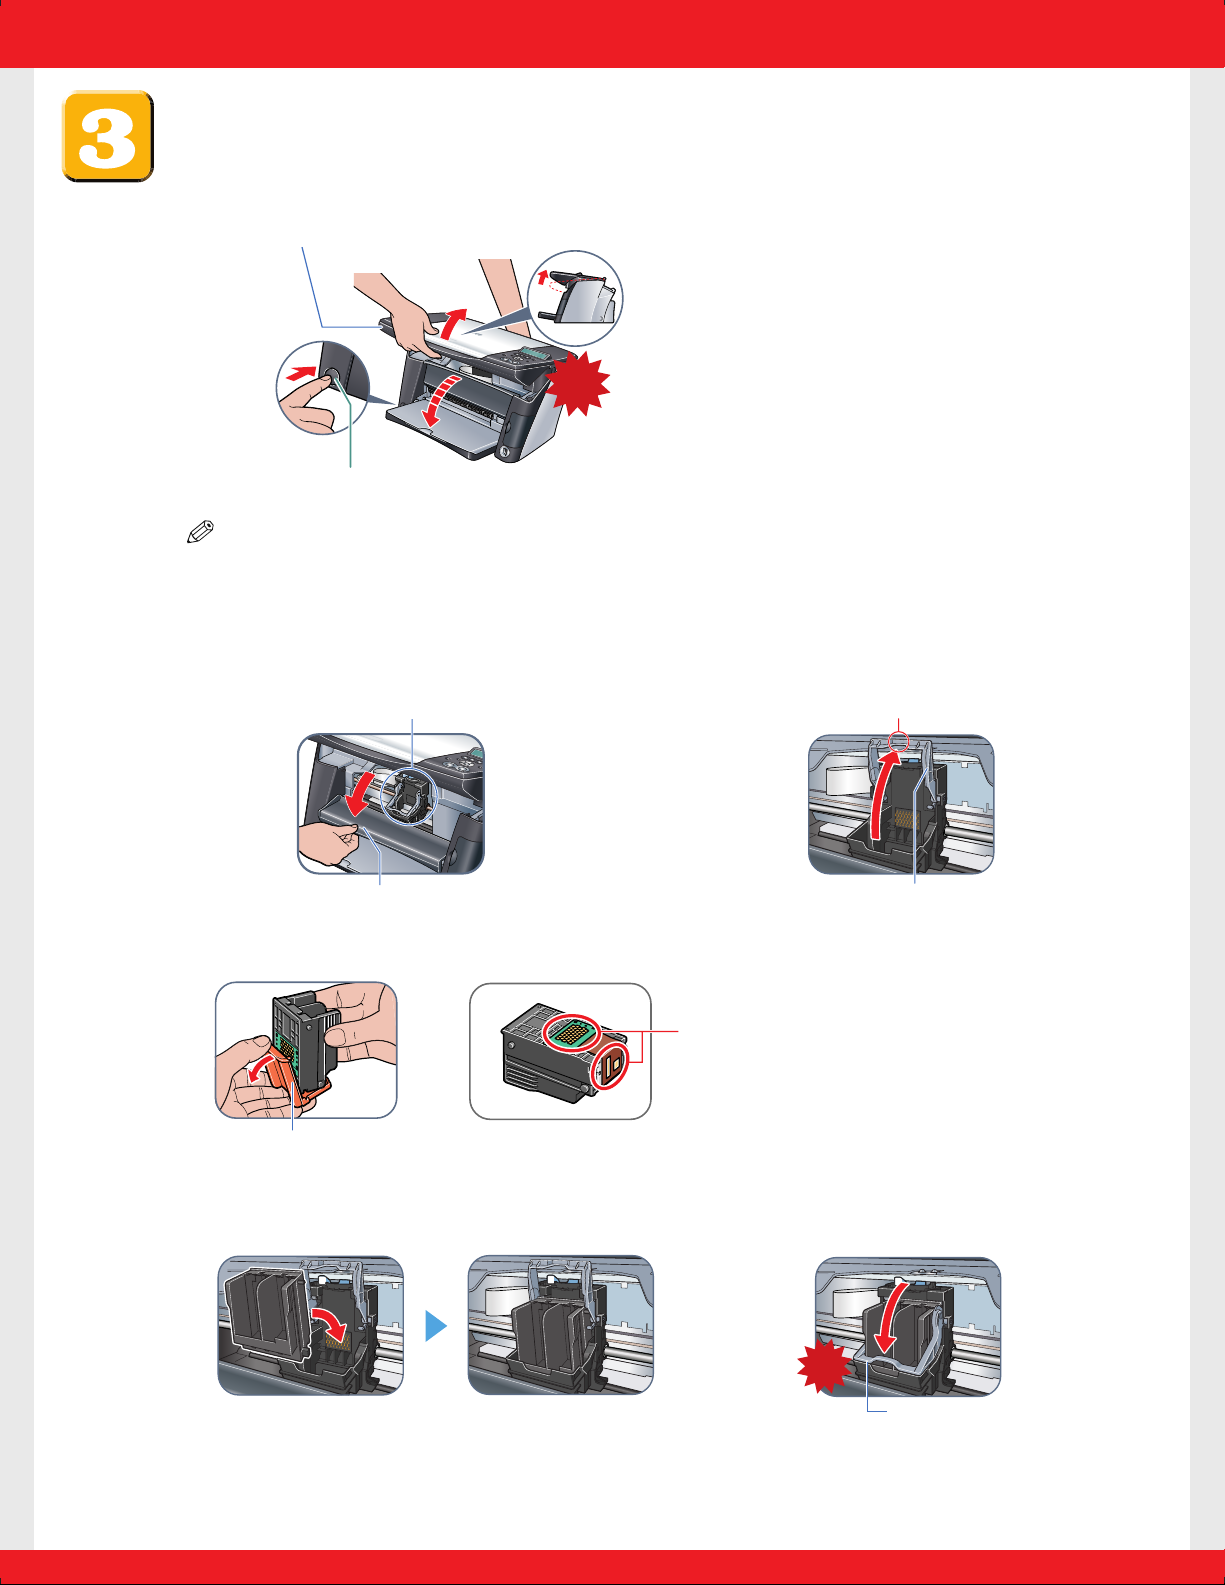
Install the print head.
1 Lift the scan unit until it locks into place.
• If a protective sheet is on the inner side of the scan unit, remove the protective sheet.
NOTE
• If you open the scan unit while the machine is turned ON, the paper output tray will
open.
Click
Lift the scan unit.
q Open the inner cover.
2 Open the inner cover. 3 Raise the lock lever.
Touch only here!
Raise this securely.
Remove the protective cap
and dispose of it.
Do not touch!
5 Insert the print head. 6 Lower the lock lever.
Click
Lower the lock lever until it
locks into place.
4 Prepare the print head.
If the paper output tray does not open, press
the Open button to open the paper output tray.
w The print head holder moves to the center.
Install here.
Page 4
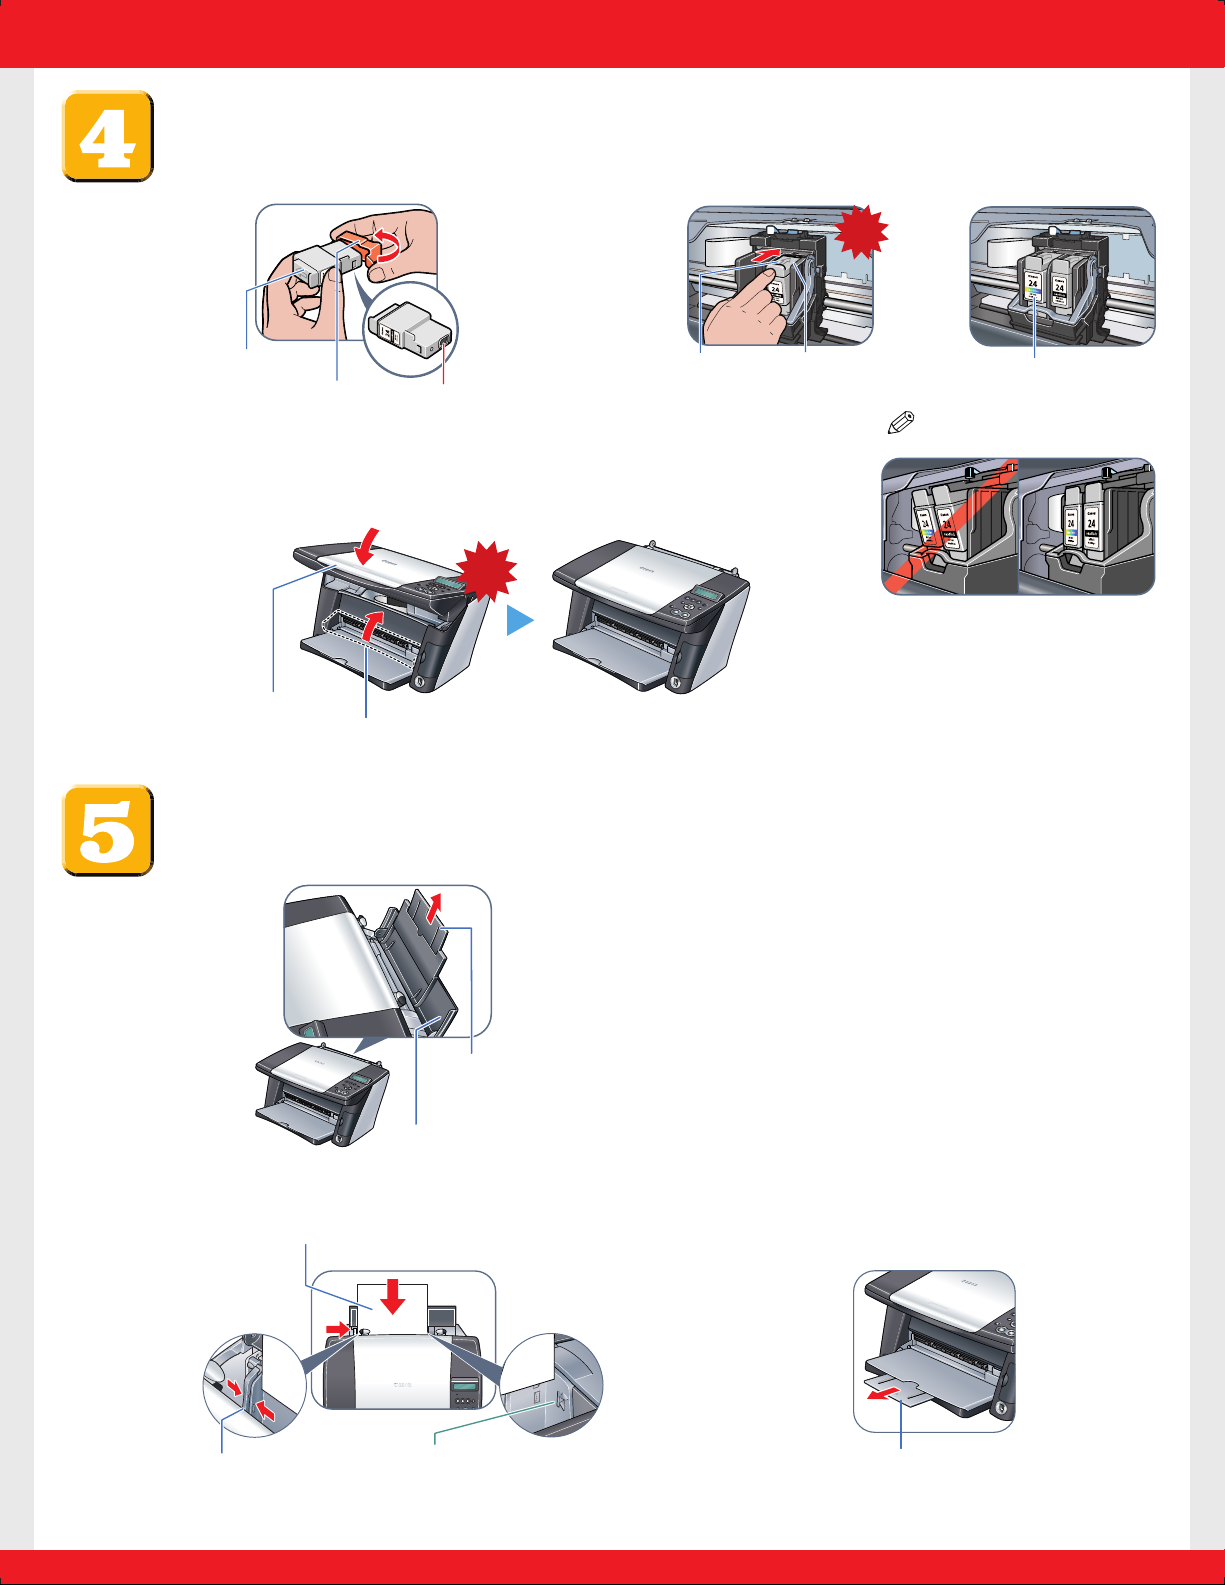
2 Load the print media. 3 Pull out the tray extension of the
paper output tray.
Install the ink tanks.
1 Prepare the ink tanks. 2 Insert the ink tanks.
Remove the protective
cap and dispose of it.
Black
Do not touch!
Click
Insert the black ink
tank into the right slot.
Push it in until it
locks into place.
Insert the color ink
tank into the left slot.
3 Close the inner cover q and
the scan unit w.
Click
q Swing it upward into place.
w Lower it into place.
Load the print media.
1 Open the multi-purpose tray.
w Pull up the tray
extension until it stops.
Incorrectly
installed
Correctly
installed
Rear side a
NOTE
Pull it out until it stops.
q Load the print media with the print side face up.
w Pinch and adjust the
paper guide to the
width of the stack.
Ensure the paper stack does
not exceed paper limit mark.
q Open the tray.
Page 5
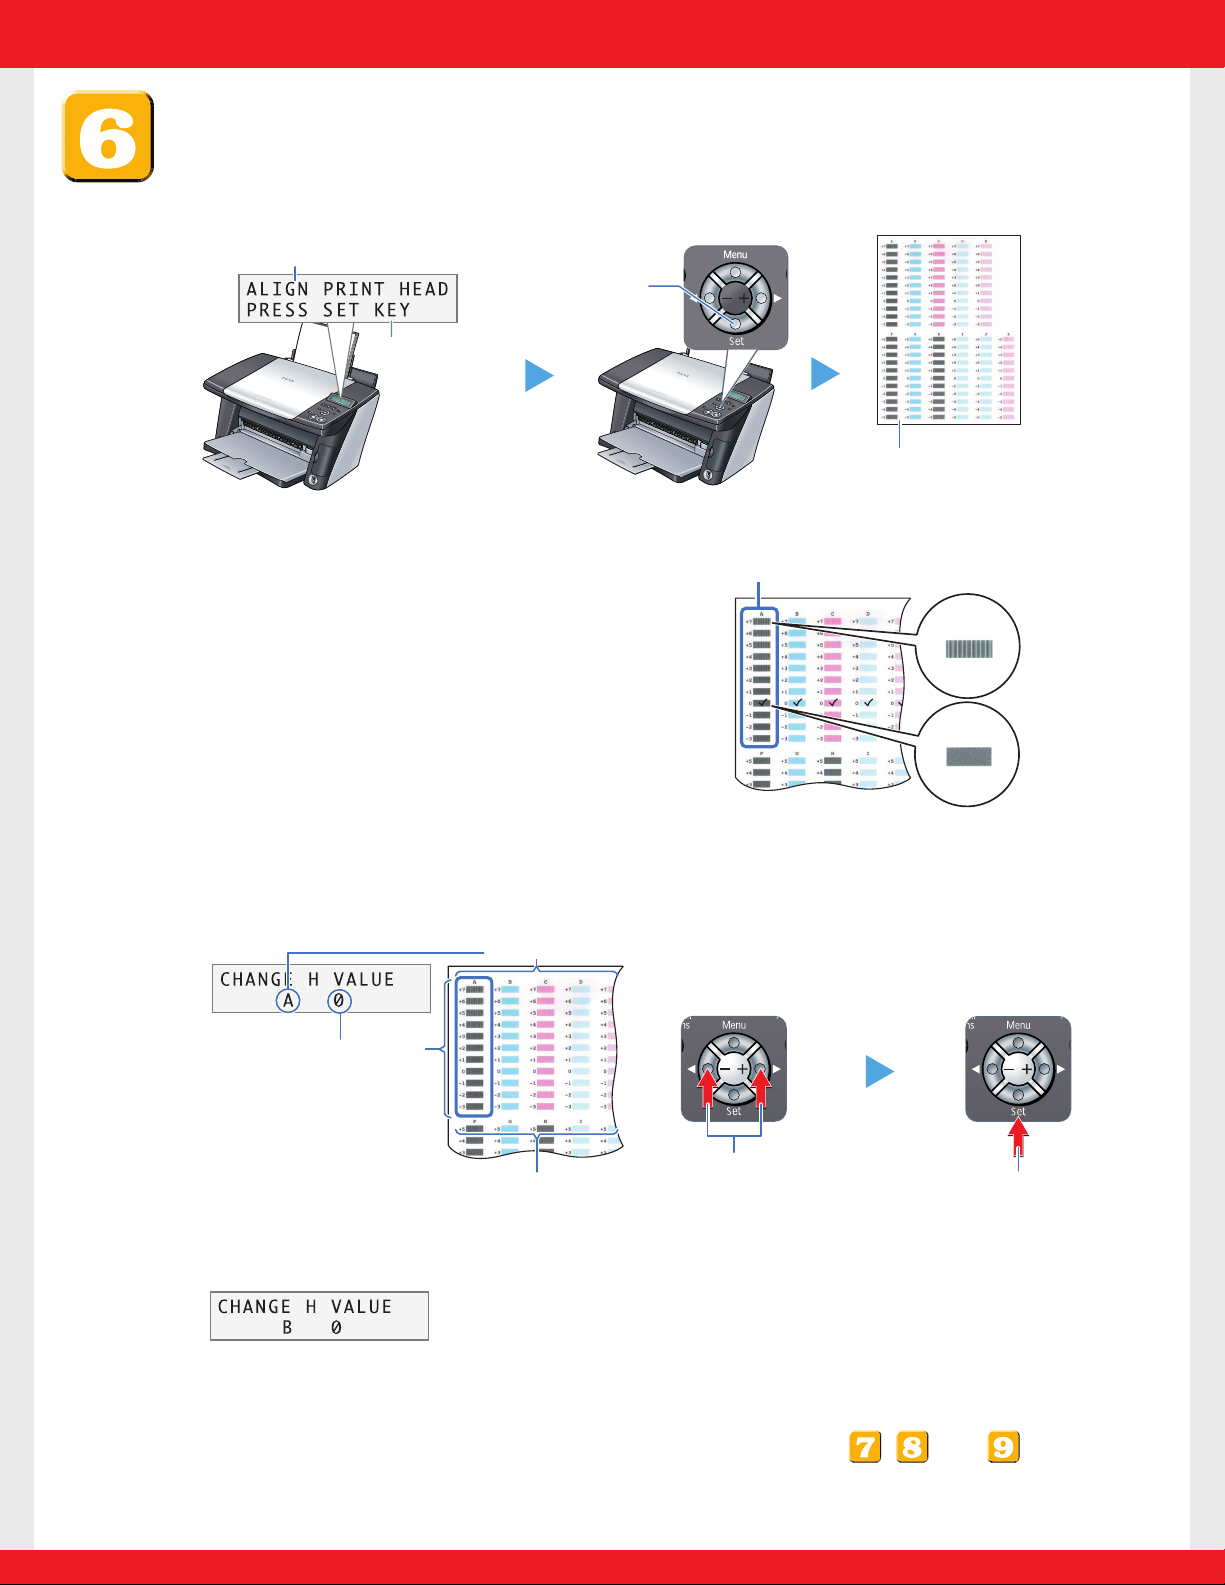
Align the print head from the operation panel.
Be sure to align the position of the print head to ensure quality printing.
1 Print the print head position pattern.
2 Enter checkmarks in the printed patterns.
• From column A to column K on the
printout, enter checkmarks in the patterns
that have the most solid image.
3 Align the print head.
• In column A on the printout, select the pattern that you checked on the printout in
step
2, then press [Set].
4 Repeat step 3 for columns B to K.
w Press
[Set].
If this message
does not
appear after
closing the
scan unit, see
page 86 of the
User's Guide.
Column A
GOOD SAMPLE
BAD SAMPLE
Least solid box
Most solid box
q Press [+] or [-] to select
the pattern number of
the good sample.
w Press [Set].
Press [+] to increase the number one digit.
Press [–] to decrease the number one digit.
You have completed installation and alignment.
If you are connecting the machine to a computer for use, see , and for
instructions on installing the software.
e The machine prints
a print head
position pattern.
Columns (A to E)
Pattern numbers
Columns (F to K)
q This message appears.
Page 6
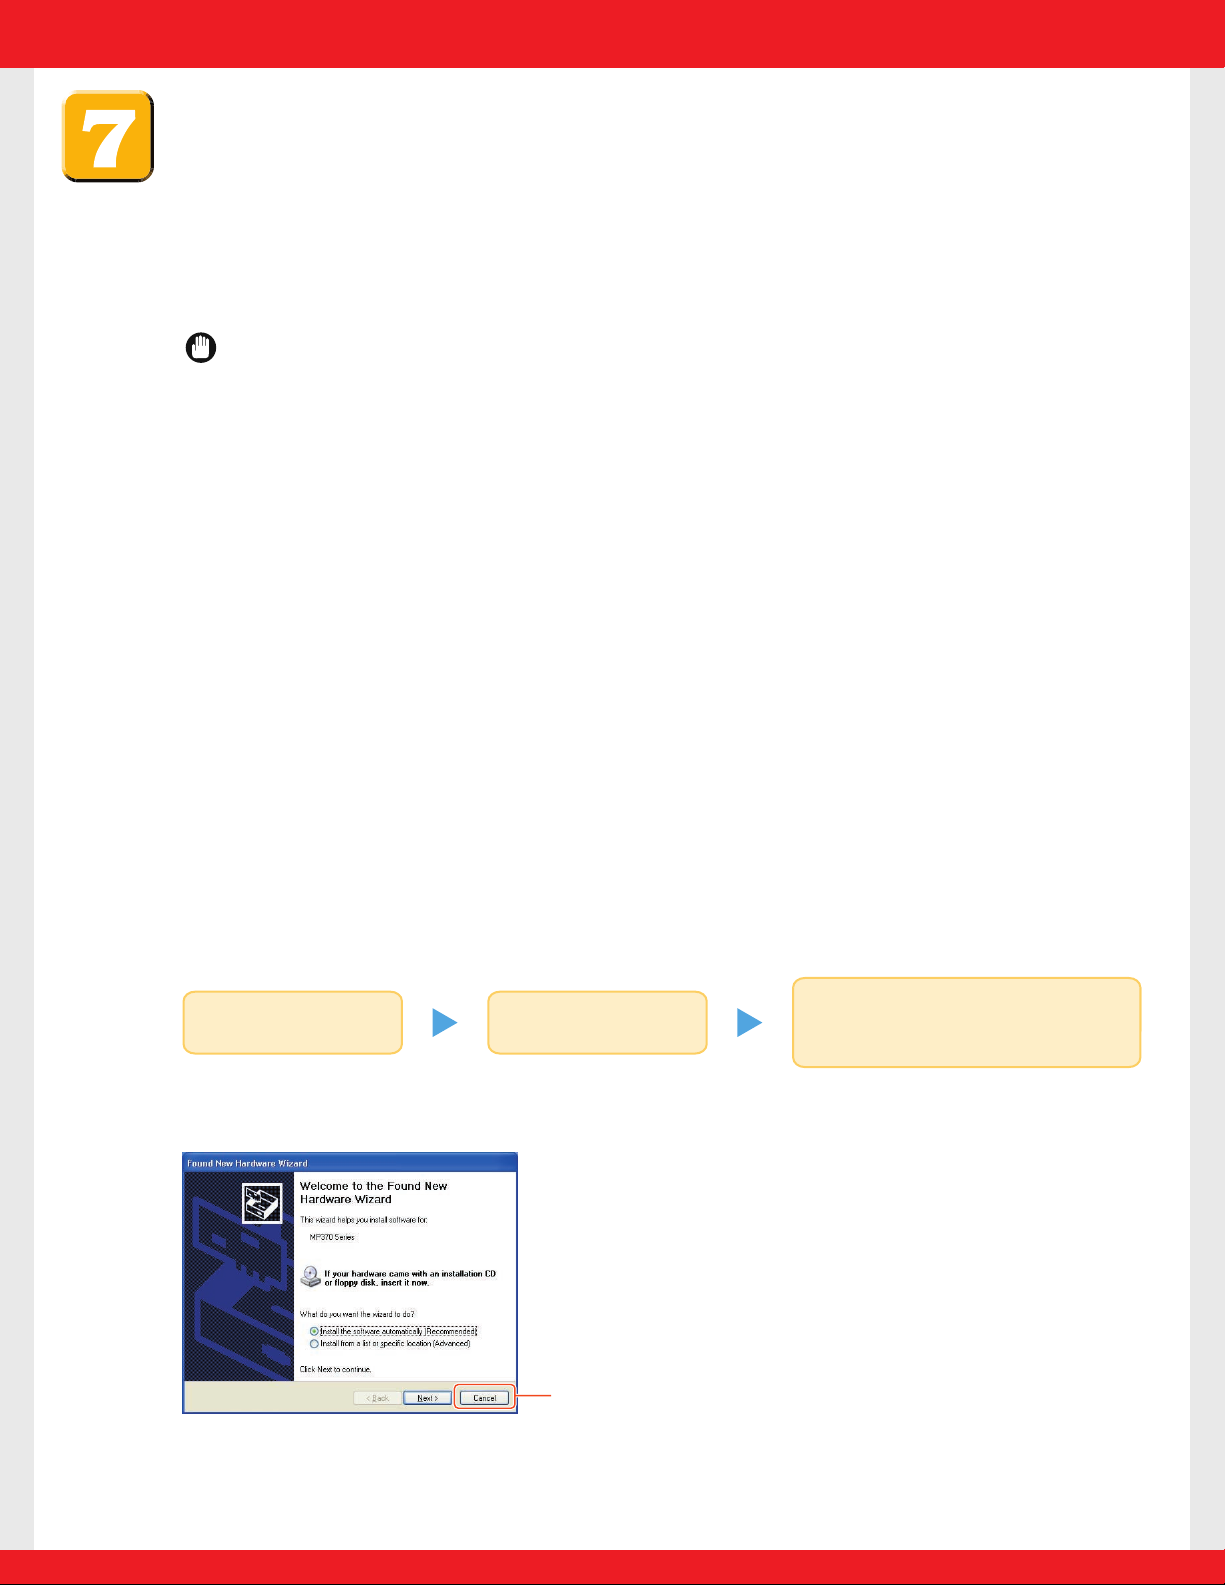
Install the MP Drivers.
The MP Drivers must be installed on the hard disk of your computer in order to print
from or scan images to the computer. In addition to installing the MP Drivers, install
the MP Toolbox. Use the MP Toolbox to attach scanned images to e-mail and store
them.
IMPORTANT
• For detailed system requirements, see page 64 of the
User's Guide.
• When installing the software in Windows 2000, you must have Service Pack 1 or
later version installed.
• When installing the software in Windows 2000, you must log on as Administrator
or have Administrator privileges.
• When installing the software in Windows XP, you must log on as Administrator
privileges.
• If you have an earlier version of the MultiPASS Suite software installed on your
computer, uninstall this version before installing the new version.
For instructions on uninstallation, see the guides for that version of MultiPASS Suite.
• On your computer, close any open software applications, including virus checkers,
in advance.
For details, see the instruction guide for each software application (or consult the
system administrator).
• If using the machine with USB 2.0 Hi-Speed mode, you must connect it to a
computer standard-equipped with a USB 2.0 Hi-Speed interface.
Turn ON your computer,
and start Windows.
Insert the Setup CD-ROM
into the CD-ROM drive.
The setup program should automatically run. If
the setup program does not automatically run,
click [My Computer], then double-click
[setup.exe] or [setup] on the Setup CD-ROM.
Click
Prepare the Setup CD-ROM (Installation preparation)
If the following screen appears:
The USB cable is connected.
Perform the following steps.
1. Disconnect the USB cable.
2. Click [Cancel].
Page 7
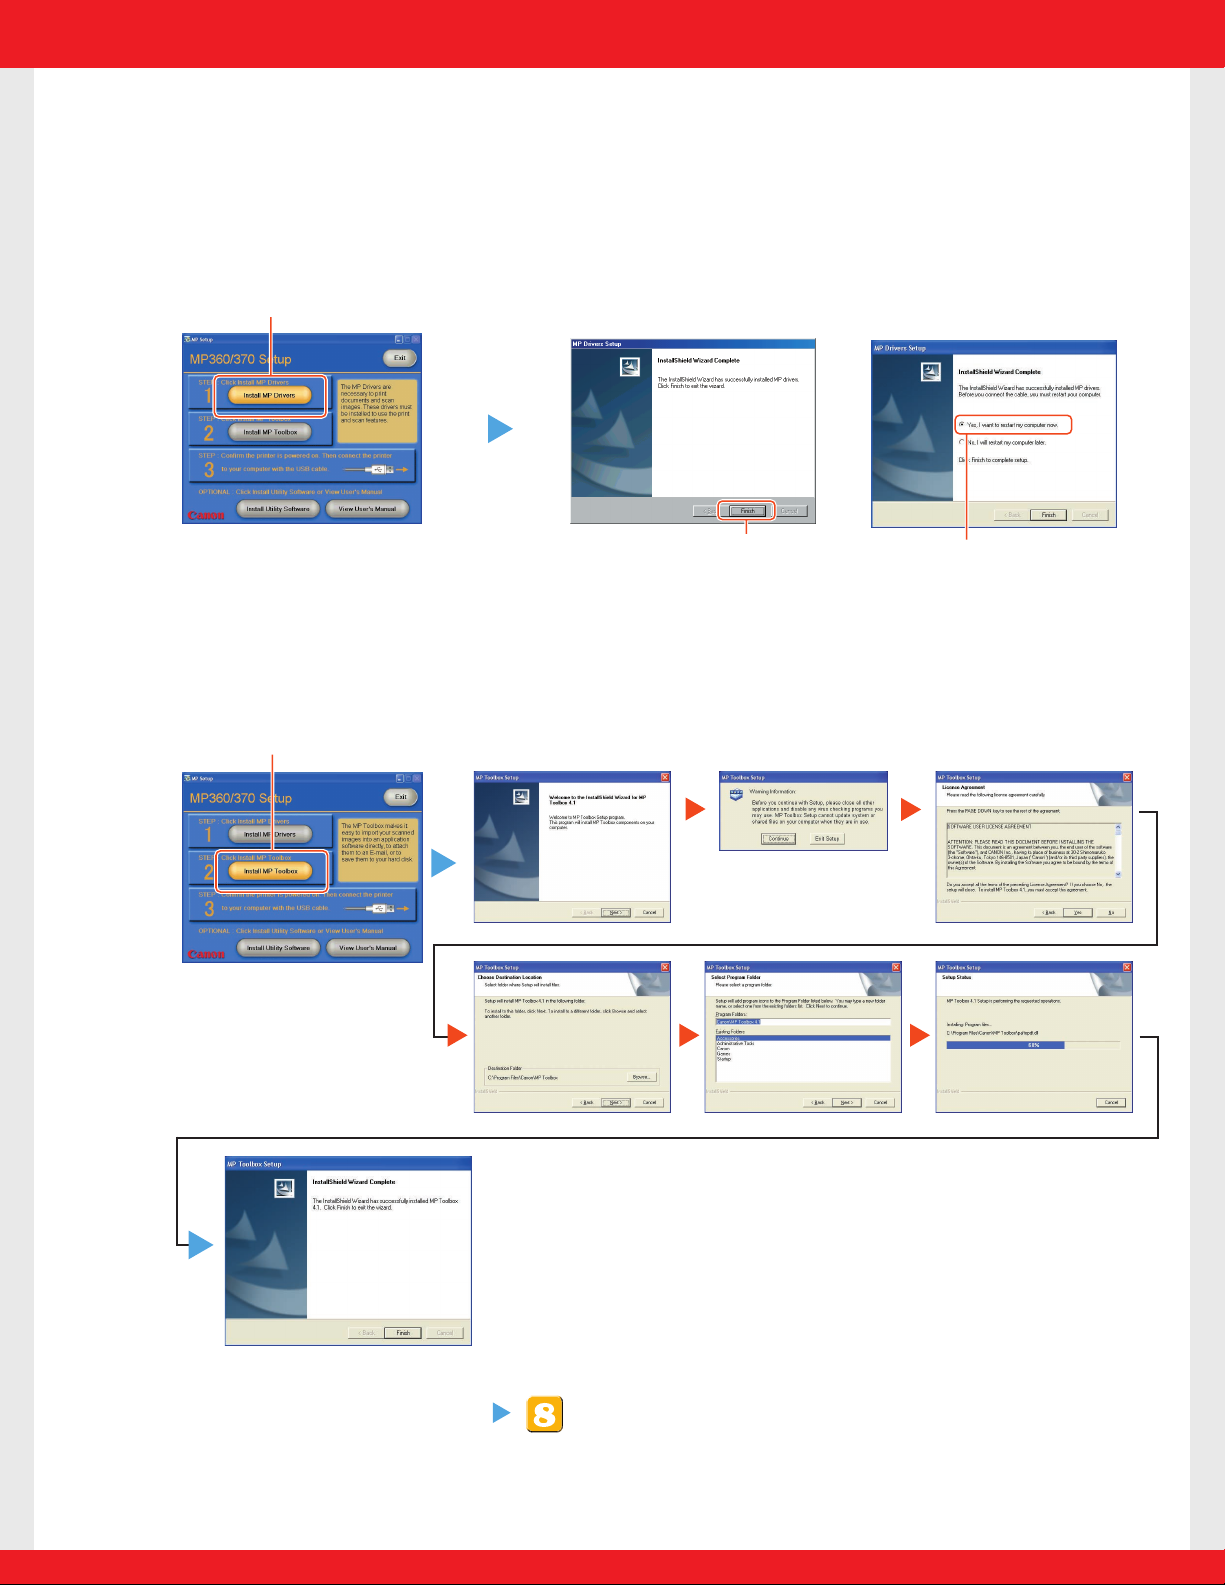
1 Install the MP Drivers. (Use when printing from PC applications or scanning images.)
Follow the on-screen
instructions to install
the software.
When the InstallShield Wizard Complete window
appears, click [Finish].
If you are prompted to restart your computer after the
installation, restart your computer.
2 Install the MP Toolbox.
(Use to scan documents and send as e-mail or save as PDF files.)
Follow the on-screen instructions to install the software.
When the InstallShield Wizard Complete window
appears, click [Finish].
If you are prompted to restart your computer after the
installation, restart your computer.
3 Connect the USB cable
Click
Select [Yes, I want to restart
my computer now.].
When restarting your
computer is
necessary:
Click
When restarting your
computer is not
necessary:
Click
Page 8
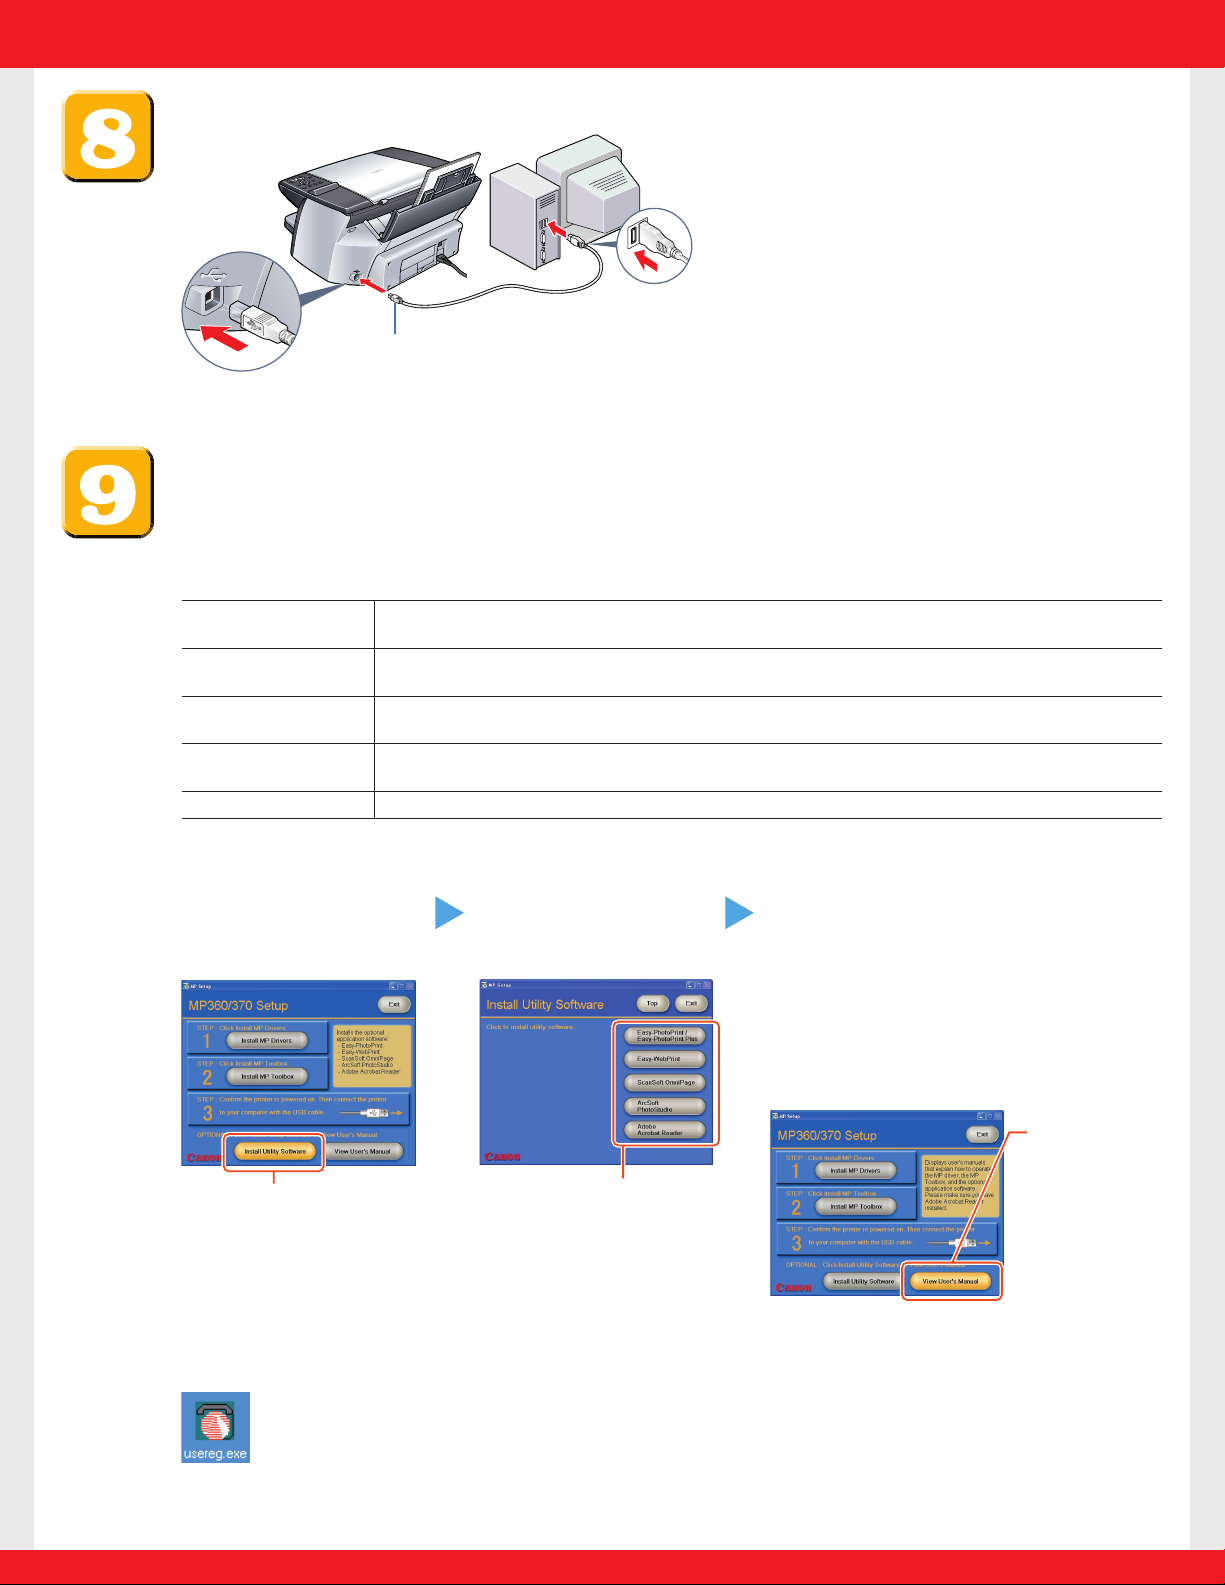
● Outline of utility software
Easy-PhotoPrint allows you to make high-quality borderless (full page) prints easily by simply
selecting the paper type and image you recorded with your digital camera.
Easy-WebPrint allows you to print a whole web page from Microsoft Internet Explorer (version 5.5,
version 6.0 recommended) quickly and without any complicated settings.
ScanSoft OmniPage SE is an OCR (Optical Character Recognition) program which can convert the
text in books or newspaper characters into text data.
ArcSoft PhotoStudio allows you to import images from your scanner and digital camera to enhance
them in various ways, blend them together, convert their data format, or add them to an album.
The Adobe Acrobat Reader displays documents in PDF (Portable Document Format) form.
Easy-PhotoPrint /
Easy PhotoPrint Plus*
Easy-WebPrint
ScanSoft OmniPage SE
ArcSoft PhotoStudio
Adobe Acrobat Reader
Connect the USB cable.
Make sure both your machine and
computer are turned ON.
When connecting the USB cable, the
computer will automatically set
necessary information.
Please wait shortly. Click [OK] if you are
prompted to restart your computer.
Install the utility software.
Utility software also is stored on the Setup CD-ROM. You can select not to install the
utility software at this stage and install it later.
The Photo Application Guide is contained on the Setup CD-ROM. *U.S.A. only
● Install the utility software.
Connect one end of the USB cable to the computer,
the other (square shaped plug) to the machine.
Click [Install Utility
Software].
Select the software
to install.
When the InstallShield Wizard
Complete window appears, click
[Finish].**
If you are prompted to restart your computer
after the installation, restart your computer.
** This procedure varies depending on the
application software.
Click this to read
the guides stored
on the Setup
CD-ROM, such
as the Photo
Application
Guide.
Click
Click
To view guides
© CANON INC. 2003
PRINTED IN THAILAND
You now have completed installation of the software.
For details of the operations,see the User's Guide.
Canon, MultiPASS, and BCI are trademarks of Canon Inc.
All other products and brand names are registered trademarks or trademarks of their respective owners.
Specifications subject to change without notice.
In Windows 2000, the machine may not be set as [Set As Default Printer]. For details,see the Software Guide.
When installation of the MP Drivers completes, the icon appears on the desktop.You
can register your machine online by double-clicking this icon.
 Loading...