

Page 1
How to Use This Manual
Printing This Manual
MC-3752-V1.00
Page 1 of 678 pagesCanon MP270 series / MP250 series On-screen Manual
Basic Guide
Describes the summary of
this product.
Advanced Guide
Describes the detailed
function of this product.
Troubleshooting
Page 2

How to Use This Manual
Advanced Guide
Printing This Manual
Contents
Page 2 of 678 pagesMP270/MP250 series Basic Guide
MP-3273-V1.00
Overview of the Machine
Main Components
LED Display and Basic Operations
Copying
Copying Documents
Copying Photos
Fit-to-Page Copying
Scanning
Saving Scanned Data on the Computer
Printing from Your Computer
Printing Photos (Easy-PhotoPrint EX)
Printing Documents (Windows)
Printing Documents (Macintosh)
Loading Paper / Originals
Loading Paper
Loading Originals
Routine Maintenance
When Printing Becomes Faint or Colors Are
Incorrect
Replacing a FINE Cartridge
Cleaning the Machine
Appendix
Legal Limitations on Use of Your Product and
Use of Images
Tips on How to Use Your Machine
Other Usages
Printing Photos from a PictBridge Compliant
Device (MP270 series only)
Useful Software Applications
Page 3

Page 3 of 678 pagesOverview of the Machine
Troubleshooting
Contents
Advanced Guide
> Overview of the Machine
Overview of the Machine
This section shows the component names of the machine and describes the basic operations you need
to know before using it.
Main Components
Front View
Rear View
Inside View
Operation Panel
LED Display and Basic Operations
Page top
Page 4
Page 4 of 678 pagesMain Components
>
Contents
Overview of the Machine
Main Components
Front View
Rear View
Inside View
Operation Panel
Front View
> Main Components
Advanced Guide
Troubleshooting
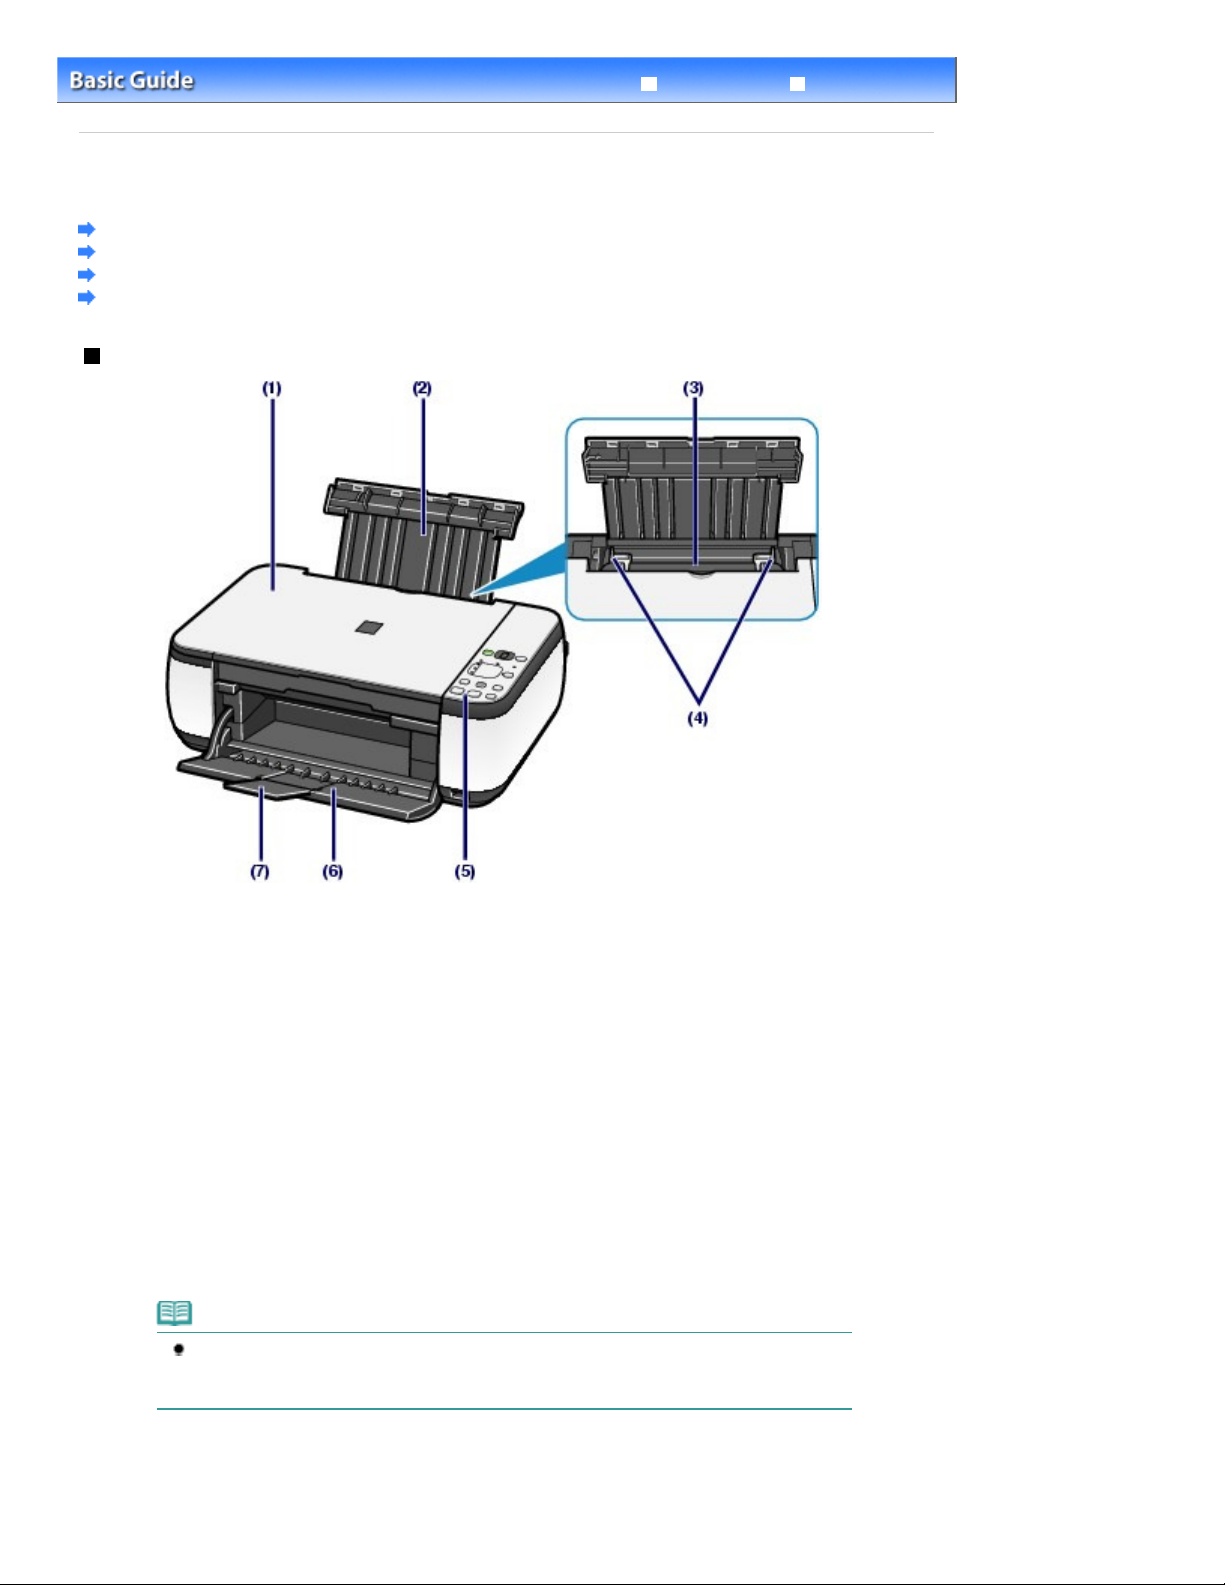
(1)
Document Cover
Open to load an original on the Platen Glass.
(2)
Paper Support
Raise and tip back to load paper in the Rear Tray.
(3)
Rear Tray
Load various sizes or types of paper which you can use on the machine. Two or more sheets of the same
size and type of paper can be loaded at the same time, and fed automatically one sheet at a time.
Loading Paper
See
(4)
Paper Guides
Slide to align with both sides of the paper stack.
(5)
Operation Panel
Use to change the settings of the machine or to operate it.
Operation Panel
See
.
.
Note
The LED and lamps on the Operation Panel other than the
machine is not operated for about 5 minutes. To restore them, press any button except the
ON
button or perform the print operation.
(6)
Paper Output Tray
Opens automatically when printing or copying starts and printed paper is ejected.
lamp will go out if the
Power
(7)
Output Tray Extension
Page 5
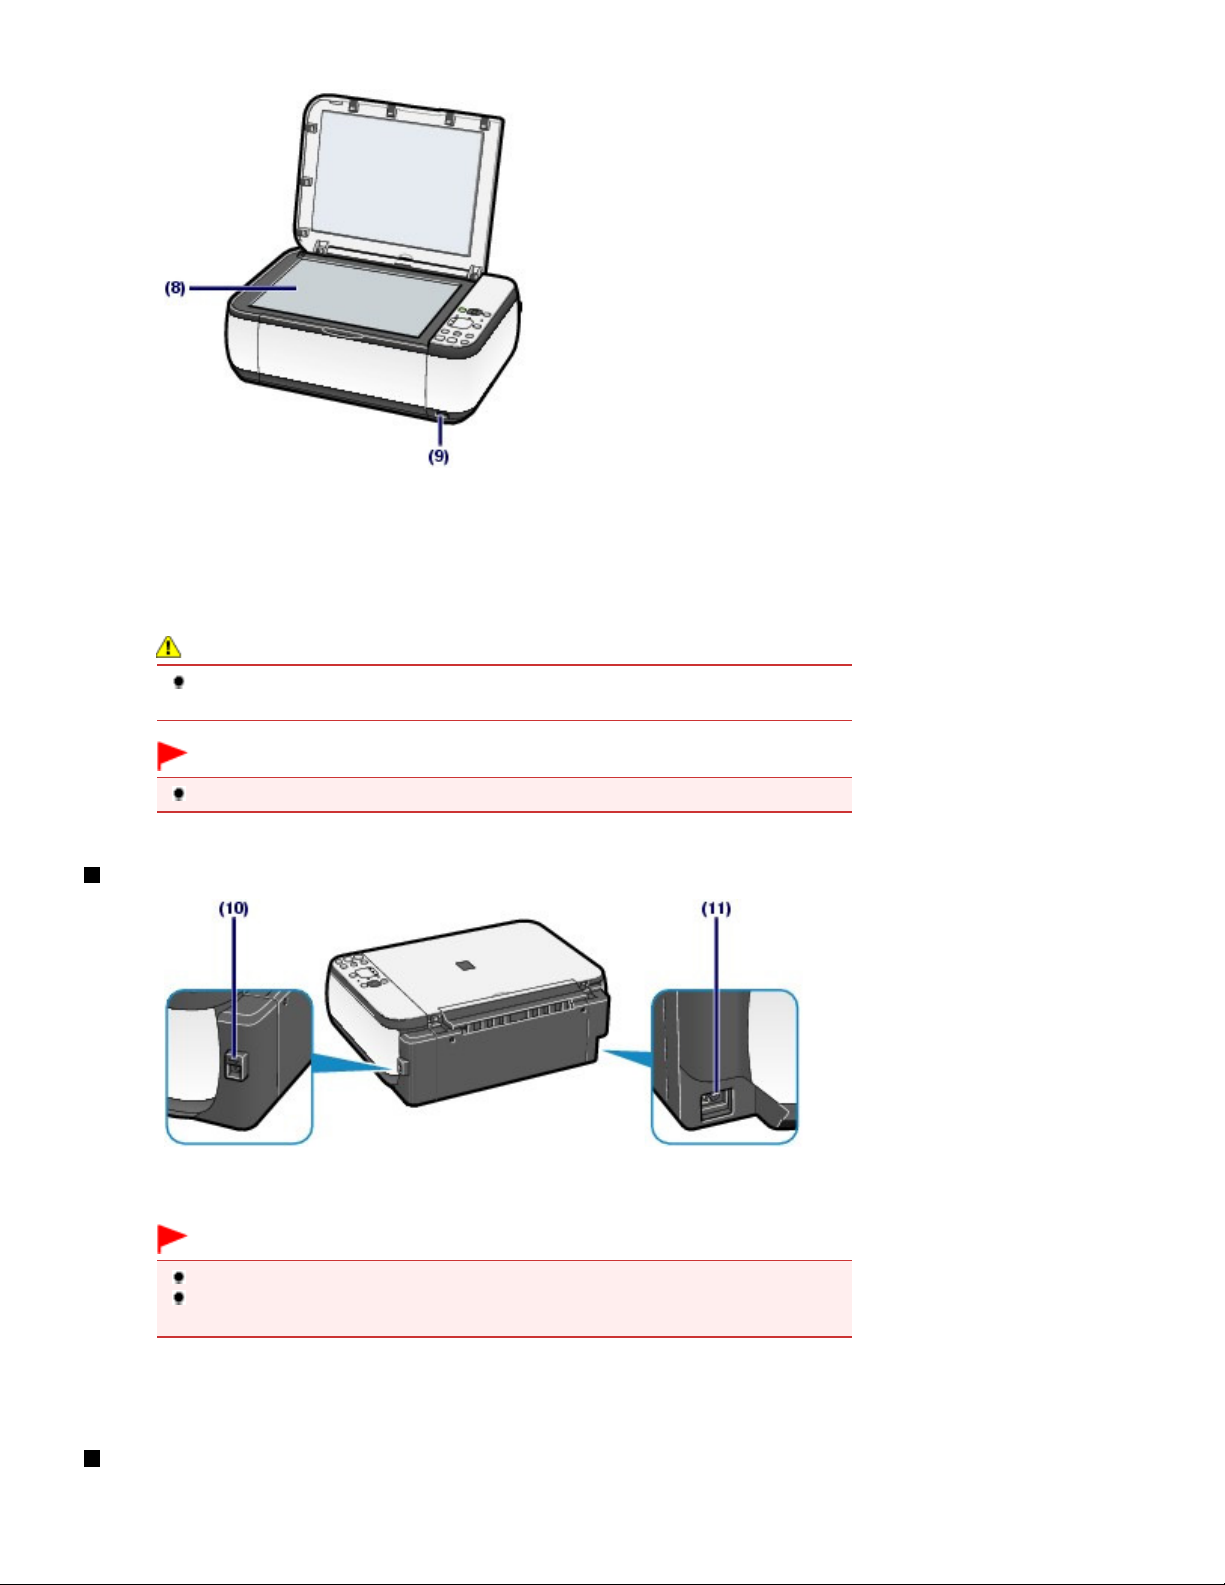
Open to support the printouts. Open it when printing or copying.
with the computer.
(8)
Platen Glass
Load an original to copy or scan.
(9)
Direct Print Port (MP270 series only)
Connect a PictBridge compliant device such as a digital camera to print directly.
See Printing Photos from a PictBridge Compliant Device (MP270 series only).
Page 5 of 678 pagesMain Components
Warning
Do not connect any equipment other than PictBridge compliant devices to the Direct Print
Port of the machine. This may cause fire, electric shock, or damage to the machine.
Important
Do not touch the metal casing.
Rear View
(10)
USB Port
Plug in the USB cable to connect the machine with a computer.
Inside View
Important
Do not touch the metal casing.
Do not plug in or unplug the USB cable while the machine is printing or scanning originals
(11)
Power Cord Connector
Plug in the supplied power cord.
Page 6
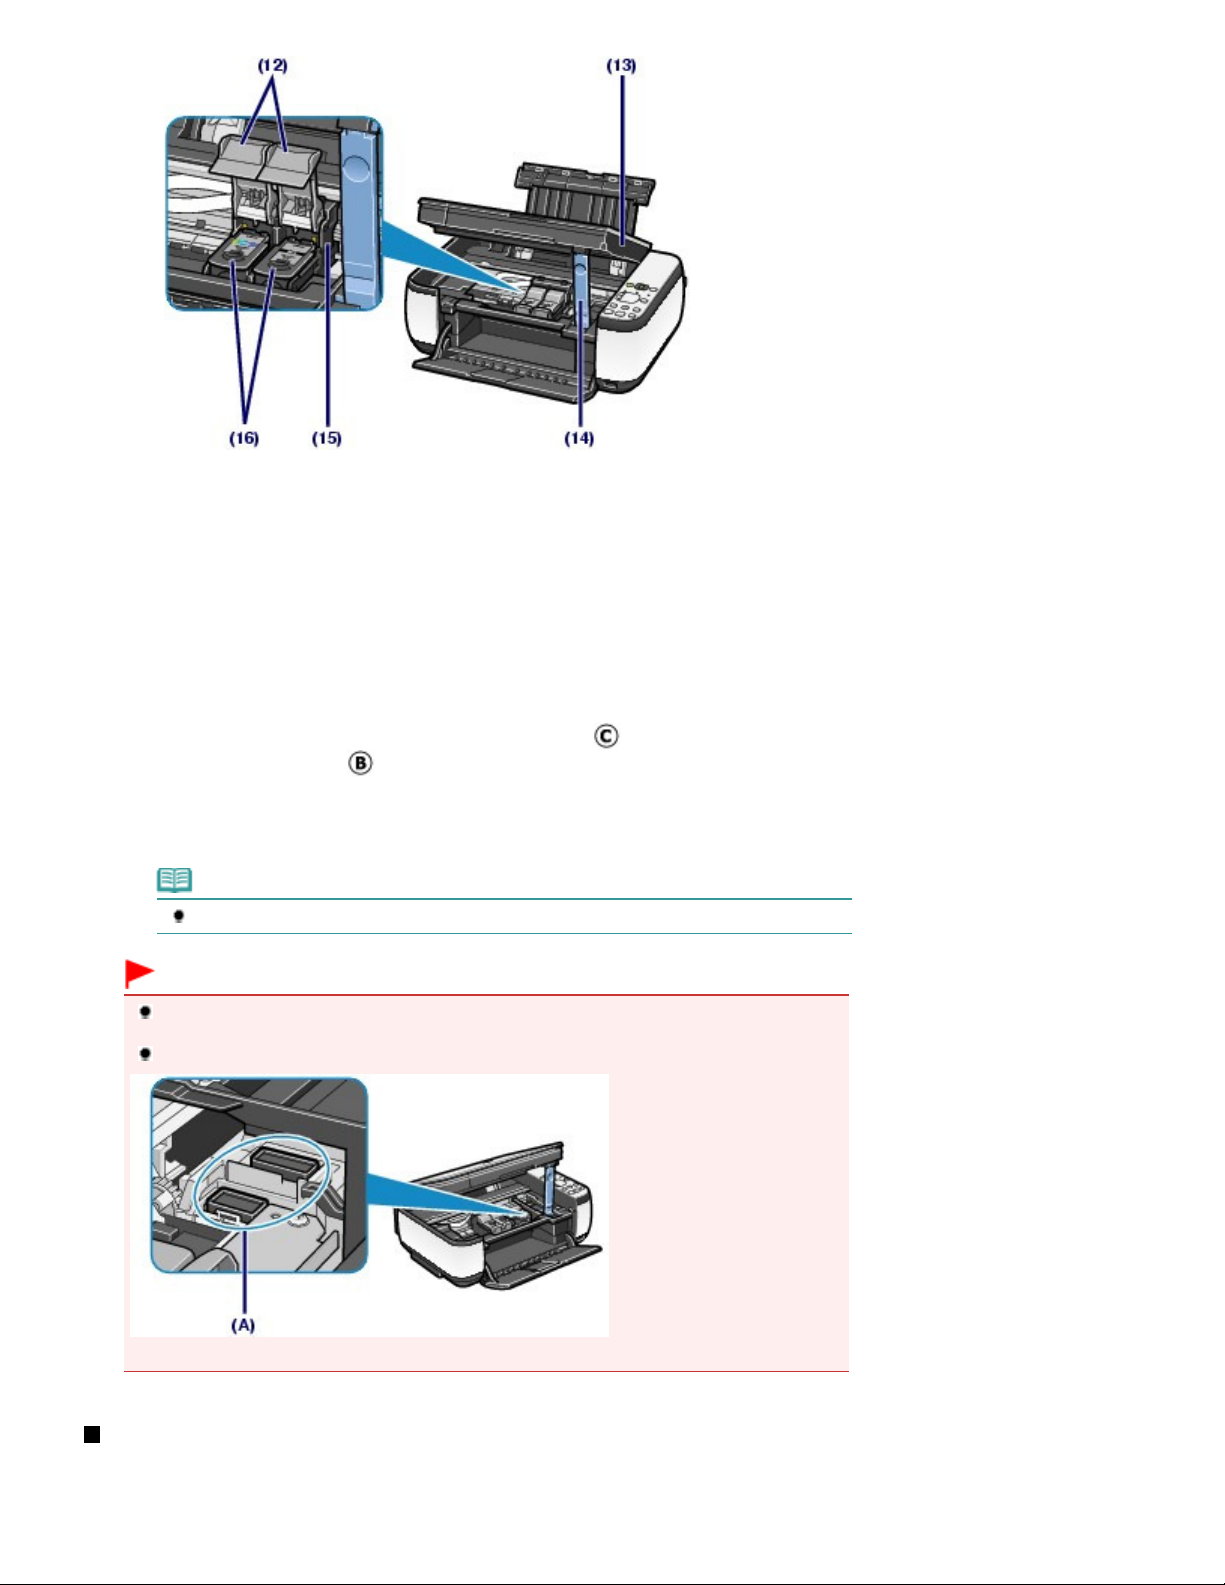
(12)
Ink Cartridge Locking Covers
Lock the FINE Cartridges into place.
(13)
Scanning Unit (Cover)
Scans originals. Open it to replace the FINE Cartridges or remove jammed paper inside the machine. When
opening the Scanning Unit (Cover), lift it with the Document Cover closed.
Page 6 of 678 pagesMain Components
(14)
Scanning Unit Support
Holds the Scanning Unit (Cover) while it is open.
(15)
FINE Cartridge Holder
Install the FINE Cartridges.
The Color FINE Cartridge should be installed into the left slot ( ) and the Black FINE Cartridge should be
installed into the right slot (
(16)
FINE Cartridges (Ink Cartridges)
A replaceable cartridge that is integrated with Print Head and ink tank.
).
Note
For details on installing the FINE Cartridges, refer to the printed manual:
Getting Started
.
Important
The area (A) indicated in the figure below may be splattered with ink. It does not affect the
performance of the machine.
Do not touch the area (A). The machine may not print properly if you touch it.
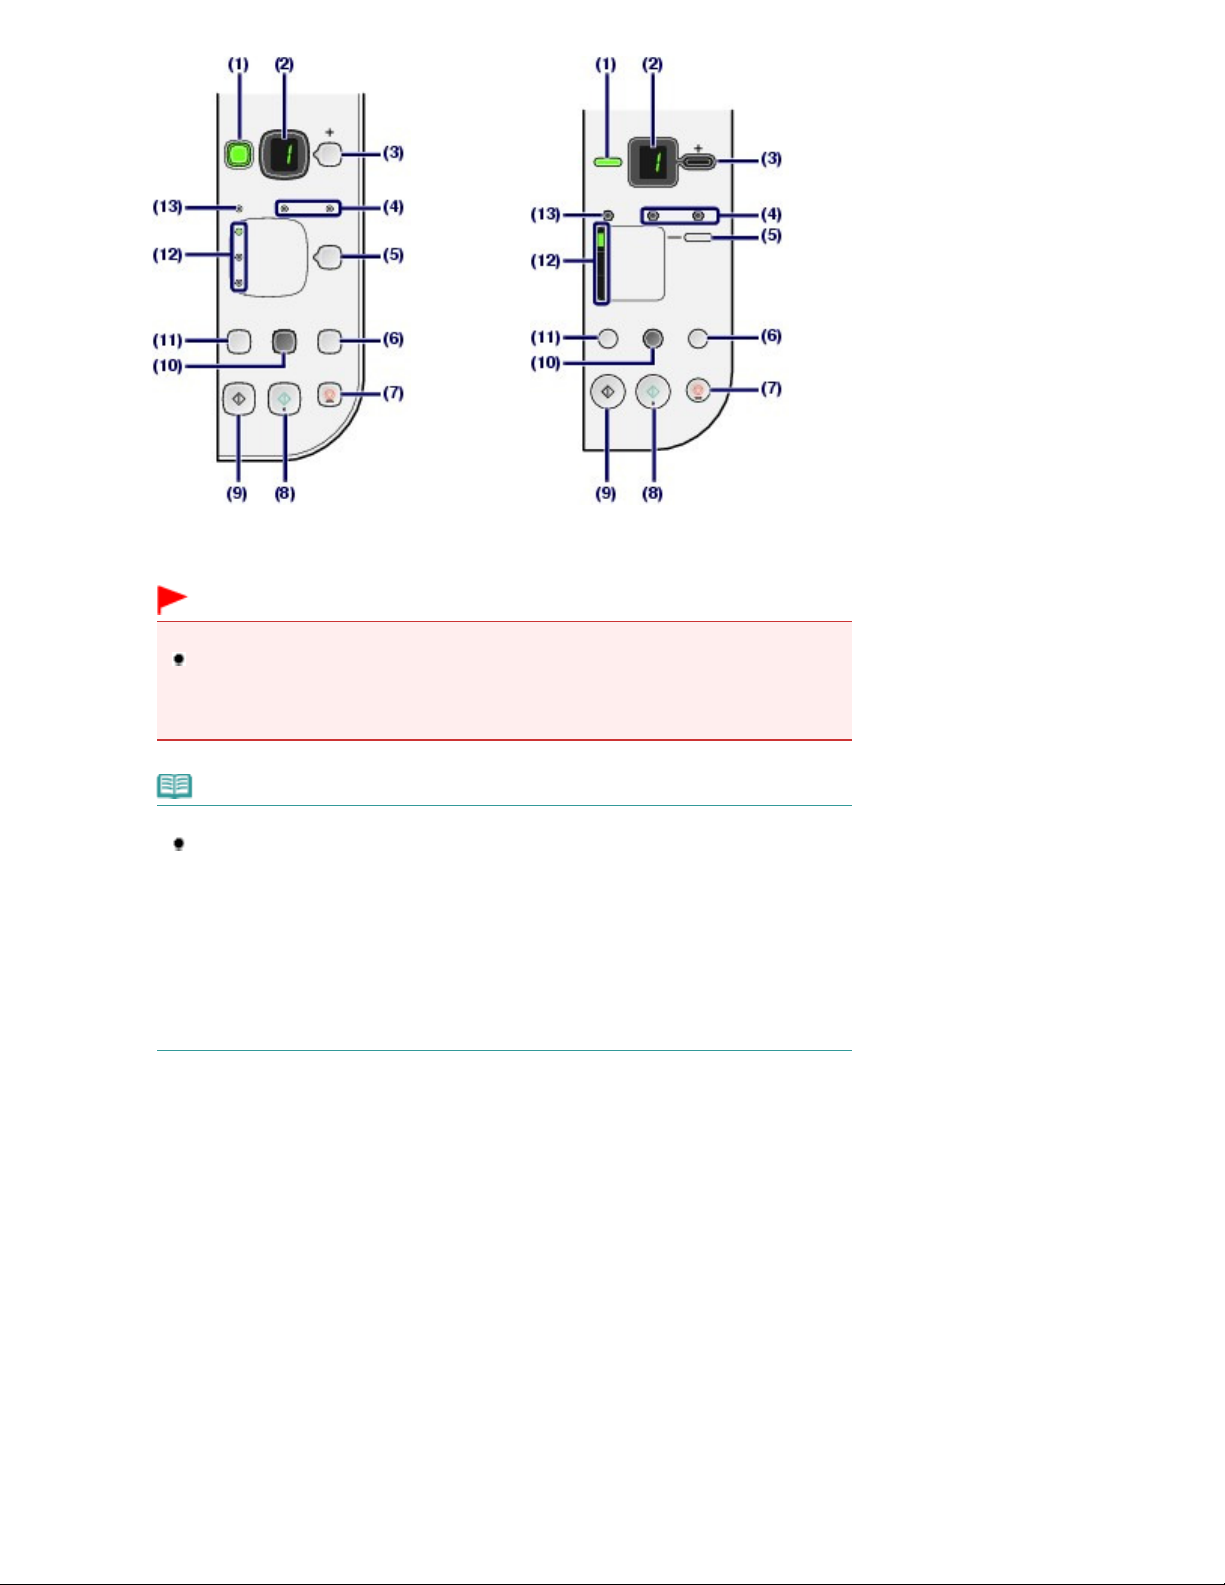
Operation Panel
MP270 series MP250 series
Page 7
Advanced
Advanced Guide
Page 7 of 678 pagesMain Components
ON button / Power lamp
(1)
Turns the power on or off. Before turning on the power, make sure that the Document Cover is closed.
Important
Disconnecting the power plug
When disconnecting the power plug after turning off the power, be sure to confirm that
the
Power
Print Head is not protected.
lamp is not lit. If the power plug is disconnected from the wall outlet while the
Power
lamp is lit or flashing, the machine may become unable to print properly since the
Note
Power and Alarm lamps
You can check the status of the machine with the
-
- Power
-
-
-
(2)
LED (Light Emitting Diode)
Displays the number of copies, Maintenance code, or operational status such as an error code.
(3)
[+] button
Specifies the number of copies.
lamp is off: The power is off.
Power
lamp lights green: The machine is ready to print.
lamp flashes green: The machine is initializing or shutting down.
Power
lamp lights or flashes orange: An error has occurred and the machine is not
Alarm
ready to print. For details, refer to "
.
Guide
lamp flashes green and
Power
requires contacting the service center may have occurred. For details, refer to "
Troubleshooting" in the on-screen manual:
Troubleshooting " in the on-screen manual:
lamp flashes orange alternately: An error that
Alarm
Power
lamp and
.
Alarm
lamp.
Ink lamps
(4)
Light or flash orange when ink runs out, etc. The lamp on the left indicates the Color FINE Cartridge status
and the lamp on the right indicates the Black FINE Cartridge status.
(5)
Paper button
Selects the page size and media type.
(6) SCAN button
Starts scanning the original to save it on the computer.
(7)
Stop/Reset button
Cancels operations. You can also press this button to cancel a print, copy, or scan job in progress.
(8)
Color button
Starts color copying. You can also press this button to finalize your selection for the setting item.
*
Page 8

Black button
(9)
Starts black & white copying. You can also press this button to finalize your selection for the setting item.
*
(10) Fit to Page button / Fit to Page lamp
Enables the Fit-to-Page copy function. You can copy the original automatically enlarged or reduced to fit the
selected page size. When the Fit-to-Page copy function is disabled, you can make copies in the same size
as the original.
(11)
(Maintenance) button
Specifies the Maintenance code.
(12) Paper lamp
Lights to indicate the page size and media type selected with the
Alarm lamp
(13)
Lights or flashes orange when an error occurs, such as paper-out or ink-out.
* In the software applications or manuals, the
button.
Black
and
buttons are collectively called the "Start" or "OK"
Color
Paper
button.
Page 8 of 678 pagesMain Components
Page top
Page 9
Advanced Guide
An error that requires contacting the service center may
Advanced Guide
Page 9 of 678 pagesLED Display and Basic Operations
Troubleshooting
Contents
>
Overview of the Machine
Advanced Guide
> LED Display and Basic Operations
LED Display and Basic Operations
You can use the machine to make copies or perform maintenance operations without a computer.
This section describes the LED display and basic operations on the Operation Panel.
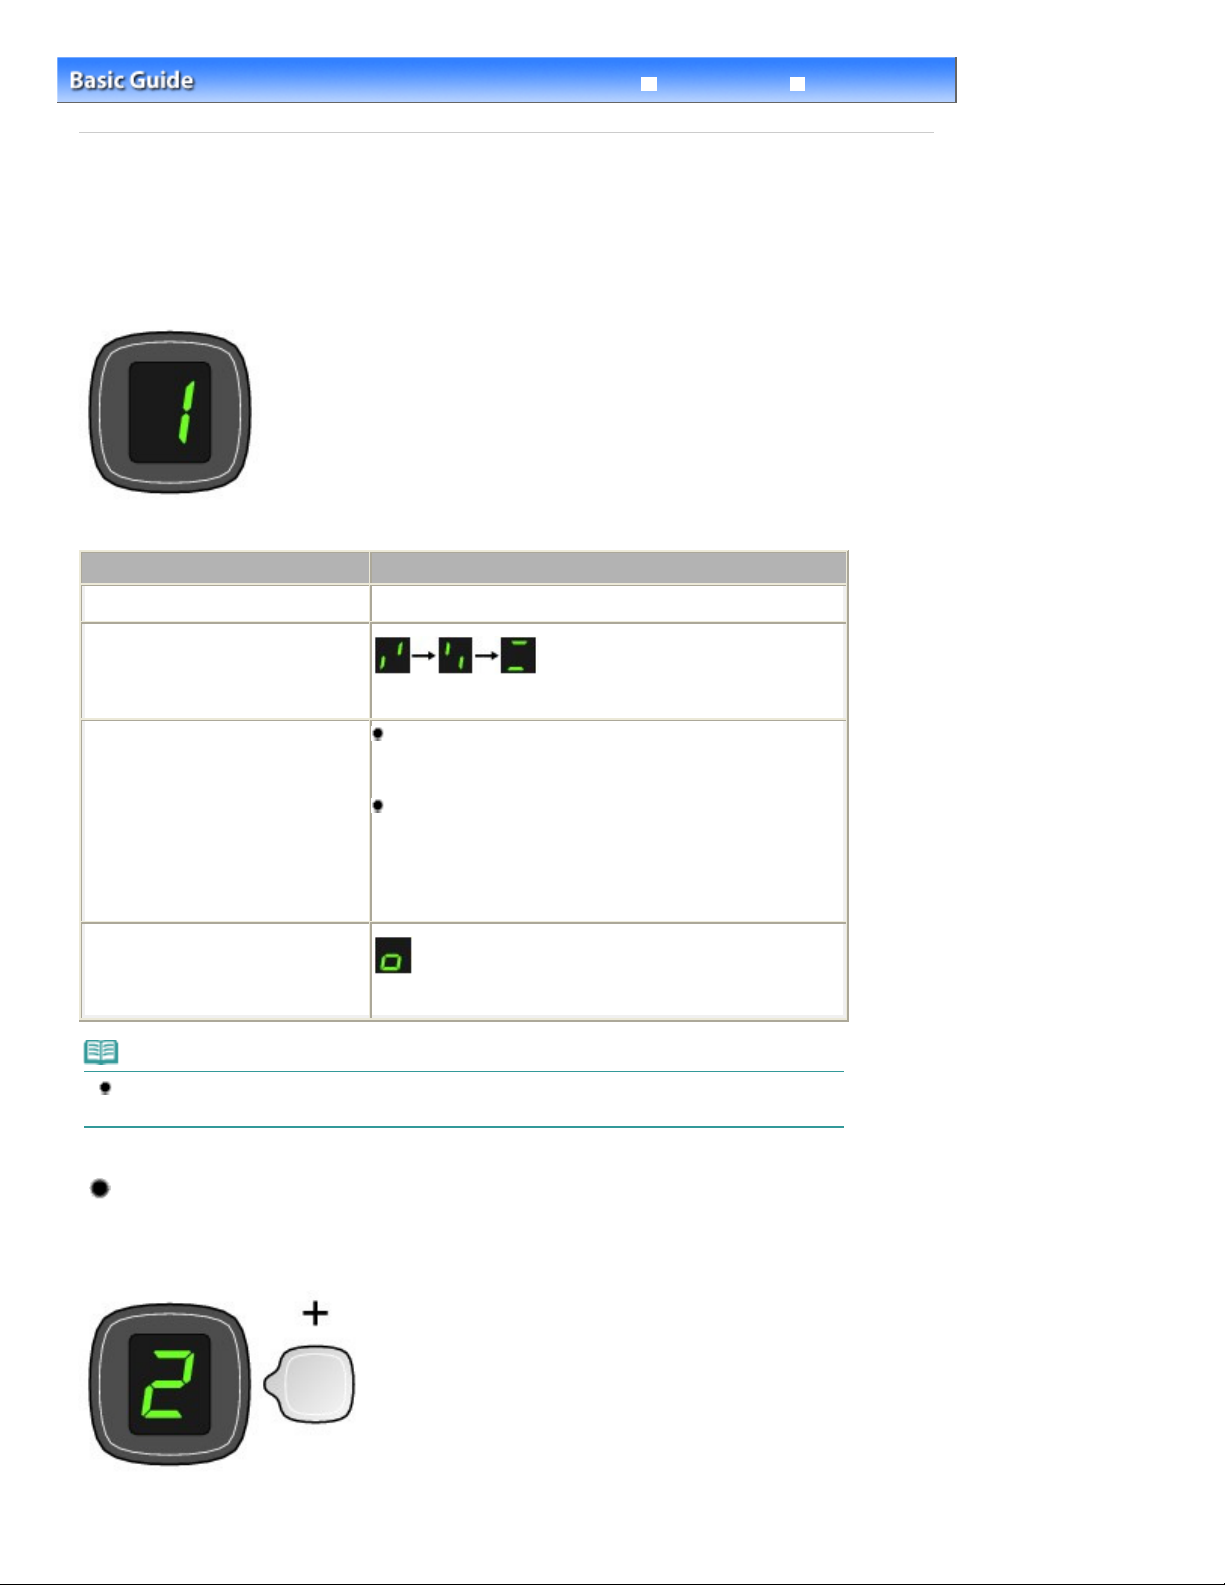
The number
The LED display indicates the machine status as follows.
While copying
While printing, scanning, or performing
maintenance operations
appears on the LED normally when turning on the power.
1
Machine Status
Number of copies (flashing)
LED Display
(flashing in order)
E
When an error occurs
While the Scanning Unit (Cover) is
open
and number appear alternately.
For details on the error codes, refer to "
the on-screen manual:
P
and number appear alternately.
have occurred.
For details, refer to "
manual:
(flashing)
Troubleshooting
.
Troubleshooting
.
" in the on-screen
" in
Note
When a PictBridge compliant device such as a digital camera is connected to the machine,
appears on the LED (MP270 series only).
C
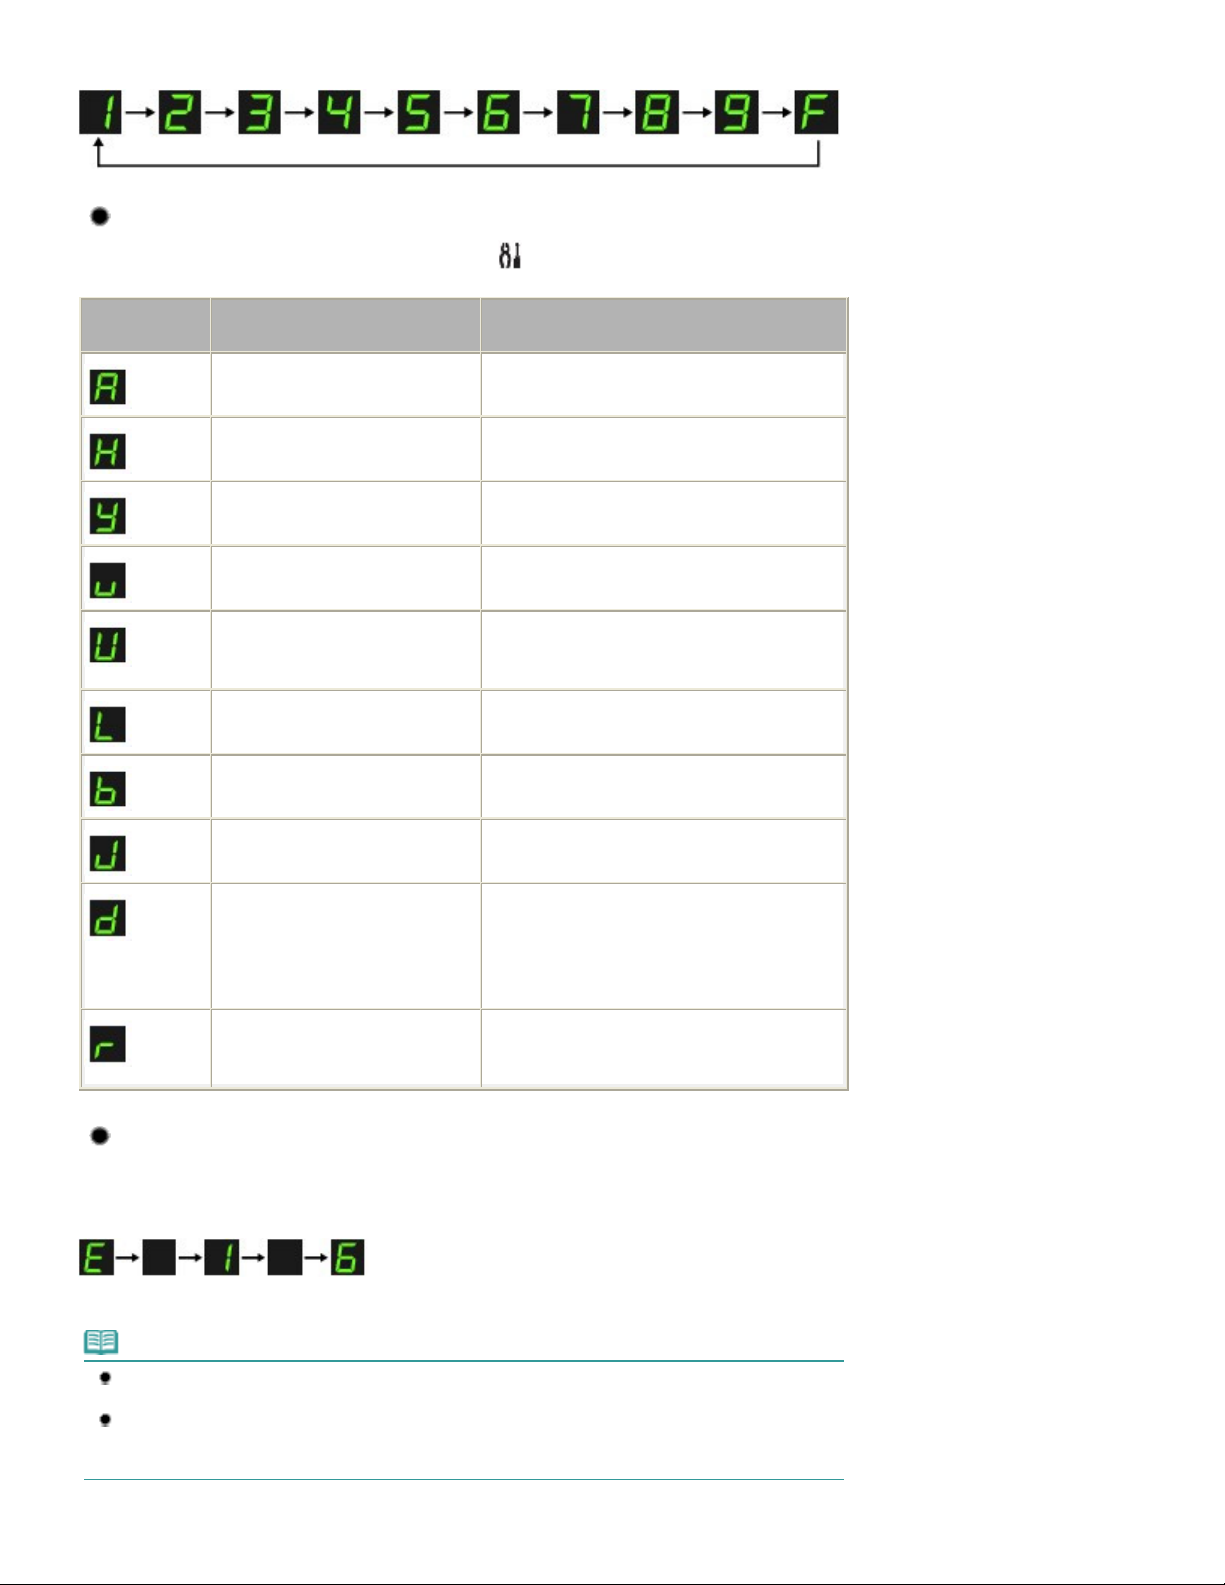
Number of Copies
When copying starts, the specified number of copies appears on the LED. W hile copying is in progress,
the number on the LED flashes and decreases by one to indicate the remaining number of copies to be
made.
Each time you press the [+] button, the number on the LED increases by one. W hen
F
appears, the
Page 10
Advanced Guide
Advanced
Advanced Guide
Page 10 of 678 pagesLED Display and Basic Operations
number of copies is set to "20". Press the [
] button again to return to "1".
+
Maintenance Codes
To perform maintenance of the machine, press the (Maintenance) button repeatedly until the desired
Color
code appears on the LED, and then press the Black
Maintenance
Code
Prints the nozzle check pattern.
Cleans the Print Head. Cleaning the Print Head
Cleans the Print Head deeply.
Prints the print head alignment
sheet.
Scans the print head alignment
sheet to align the Print Head
automatically.
Operation
Printing the Nozzle Check Pattern
Cleaning the Print Head Deeply
Aligning the Print Head
Aligning the Print Head
or
button.
See
Prints the current head position
adjustment values.
Cleans the Paper Feed Roller. Cleaning the Paper Feed Roller
Cleans the inside of the machine.
Switches the size of paper loaded
in the Rear Tray between A4 and
8.5" x 11" (Letter).
(This setting is used for making
copies.)
Sets the machine to prevent paper
abrasion.
Aligning the Print Head
Cleaning the Inside of the Machine (Bottom Plate
Cleaning)
Switching the Page Size between A4 and 8.5" x
11" (Letter)
Refer to "Paper Is Smudged/Printed Surface Is
Scratched" in "
screen manual:
Troubleshooting
" of the on-
.
Error Codes
When an error occurs, E and number appear alternately on the LED to indicate the error code.
e.g. "E, 1, 6"
(flashing in order)
Note
For details on the error codes, refer to "
.
Guide
If an error code with
occurred.
For details, refer to "Troubleshooting" in the on-screen manual:
P
appears, an error that requires contacting the service center may have
Troubleshooting" in the on-screen manual:
.
Page 11

Page 11 of 678 pagesLED Display and Basic Operations
Page top
Page 12

Page 12 of 678 pagesCopying
Troubleshooting
Contents
Advanced Guide
> Copying
Copying
You can make enlarged or reduced copies of the original to fit the page size, and borderless copies of a
printed photo, besides standard copies.
Copying Documents
Switching the Page Size between A4 and 8.5" x 11" (Letter)
Copying Photos
Fit-to-Page Copying
Page top
Page 13
You need to prepare:
Page 13 of 678 pagesCopying Documents
Advanced Guide
Contents
> Copying > Copying Documents
Copying Documents
This section describes the procedure to copy a document of A4 or Letter size on plain paper.
For the operation, see the notes and operation procedure described in the reference page.
Originals to copy. See
Originals You Can Load
.
Troubleshooting
Paper for printing. See Media Types You Can Use
1. Prepare for copying.
Turn on the power.
(1)
Operation Panel
See
Load paper.
(2)
Loading Plain Paper / Photo Paper
See
Here we load A4 or Letter-sized plain paper.
Open the Paper Output Tray gently, and open the Output Tray Extension.
(3)
.
.
.
Page 14
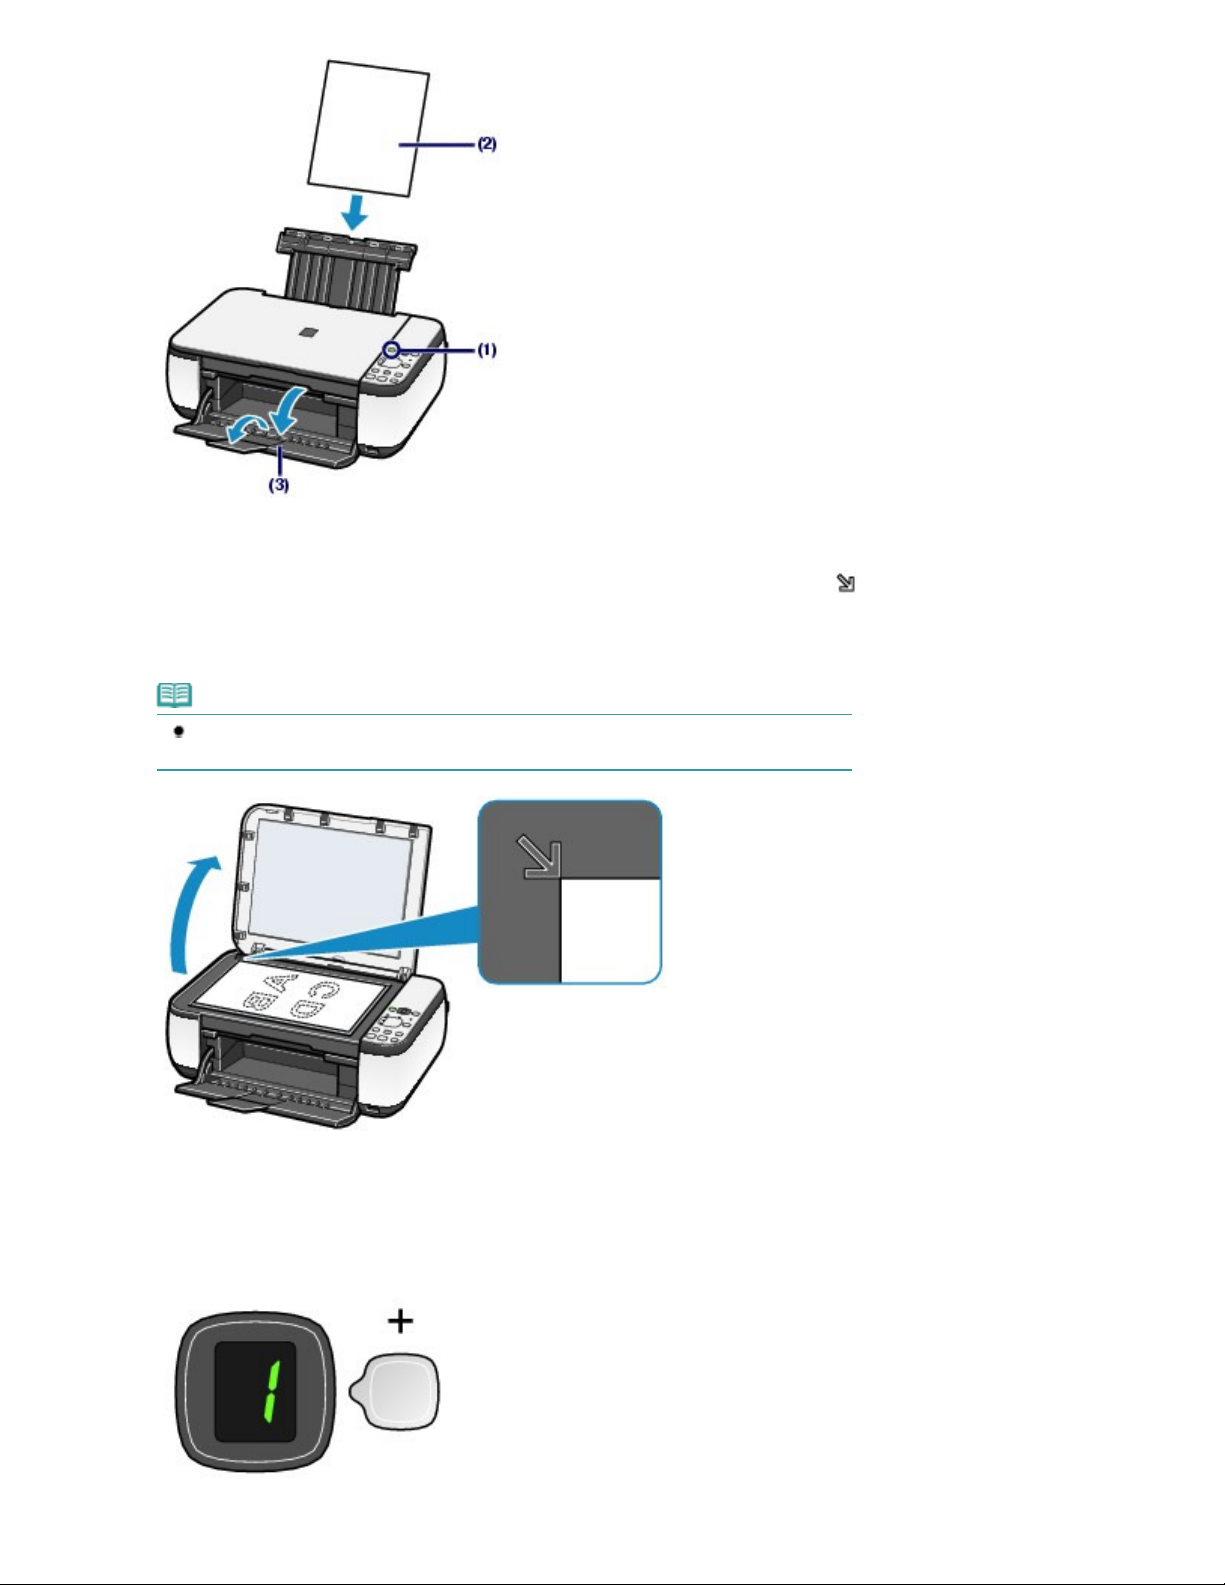
Load an original on the Platen Glass.
(4)
See Loading Originals.
Page 14 of 678 pagesCopying Documents
Load the original WITH THE SIDE TO COPY FACING DOWN and align it with the alignment mark
shown below.
Then close the Document Cover gently.
Note
For details on the types and conditions of the original which can be copied, see
You Can Load
.
Originals
as
2.
Start copying.
Press the [
(1)
copies).
To make 1 to 9 copies or 20 copies
] button repeatedly to specify the number of copies (max. 20
+
Page 15

Display the desired number of copies on the LED.
Each time you press the [+] button, the number on the LED increases by one. When F appears, the number
of copies is set to "20". Press the [
To make 10 to 19 copies
F
Display
(1)
(2)
Load only the desired number of sheets to copy.
on the LED.
+
] button again to return to "1".
Page 15 of 678 pagesCopying Documents
Press the
(2)
The
Paper
Here we select A4 or 8.5" x 11" Plain Paper.
Paper
lamp indicates the selected page size and media type.
button repeatedly to select the page size and media type.
Note
You can select the following page sizes and media types.
- A4 or 8.5" x 11" Plain Paper
- A4 or 8.5" x 11" Photo Paper
- 10 x 15 cm or 4" x 6" Photo Paper
You can switch the size of paper loaded in the Rear Tray between A4 and 8.5" x 11"
(Letter) regardless of the size indicated on the Operation Panel.
Press the
(3)
See
Switching the Page Size between A4 and 8.5" x 11" (Letter)
When the Fit-to-Page copy function is enabled, you can copy the original in the size
automatically enlarged or reduced to fit the selected page size. In this case, the original is
copied with borders on the plain paper and without borders on the photo
paper.
Cancel the Fit-to-Page copy function to copy the original in the same size.
See Fit-to-Page Copying.
button for color copying, or the
Color
.
button for black & white
Black
copying.
The machine starts copying.
While copying is in progress, the number on the LED flashes and decreases by one to indicate the
remaining number of copies to be made.
Remove the original on the Platen Glass after copying is completed.
To make 10 to 19 copies
The paper-out error will occur ("E, 0, 2" will appear on the LED) when all of the loaded paper runs out.
Press the
Stop/Reset button to release the error.
Note
You can set the print quality to "Fast" (speed priority) only when A4 or Letter-sized plain
paper is selected for the page size and media type.
To set the print quality to "Fast" (speed priority)
1. Press and hold down the
The LED flashes once.
* When you press the
copying in the print quality "Standard".
2. Release the button.
The machine starts copying.
When the print quality is set to "Fast", print speed is given priority over quality. To give
priority to quality, press the
print quality "Standard".
Color
Color
or
or
Color or
button for 2 or more seconds in (3) of step 2.
Black
button for less than 2 seconds, the machine starts
Black
button for less than 2 seconds to copy in the
Black
Important
Do not open the Document Cover or move the loaded original until copying is completed.
Note
To cancel copying, press the Stop/Reset
button.
Page 16
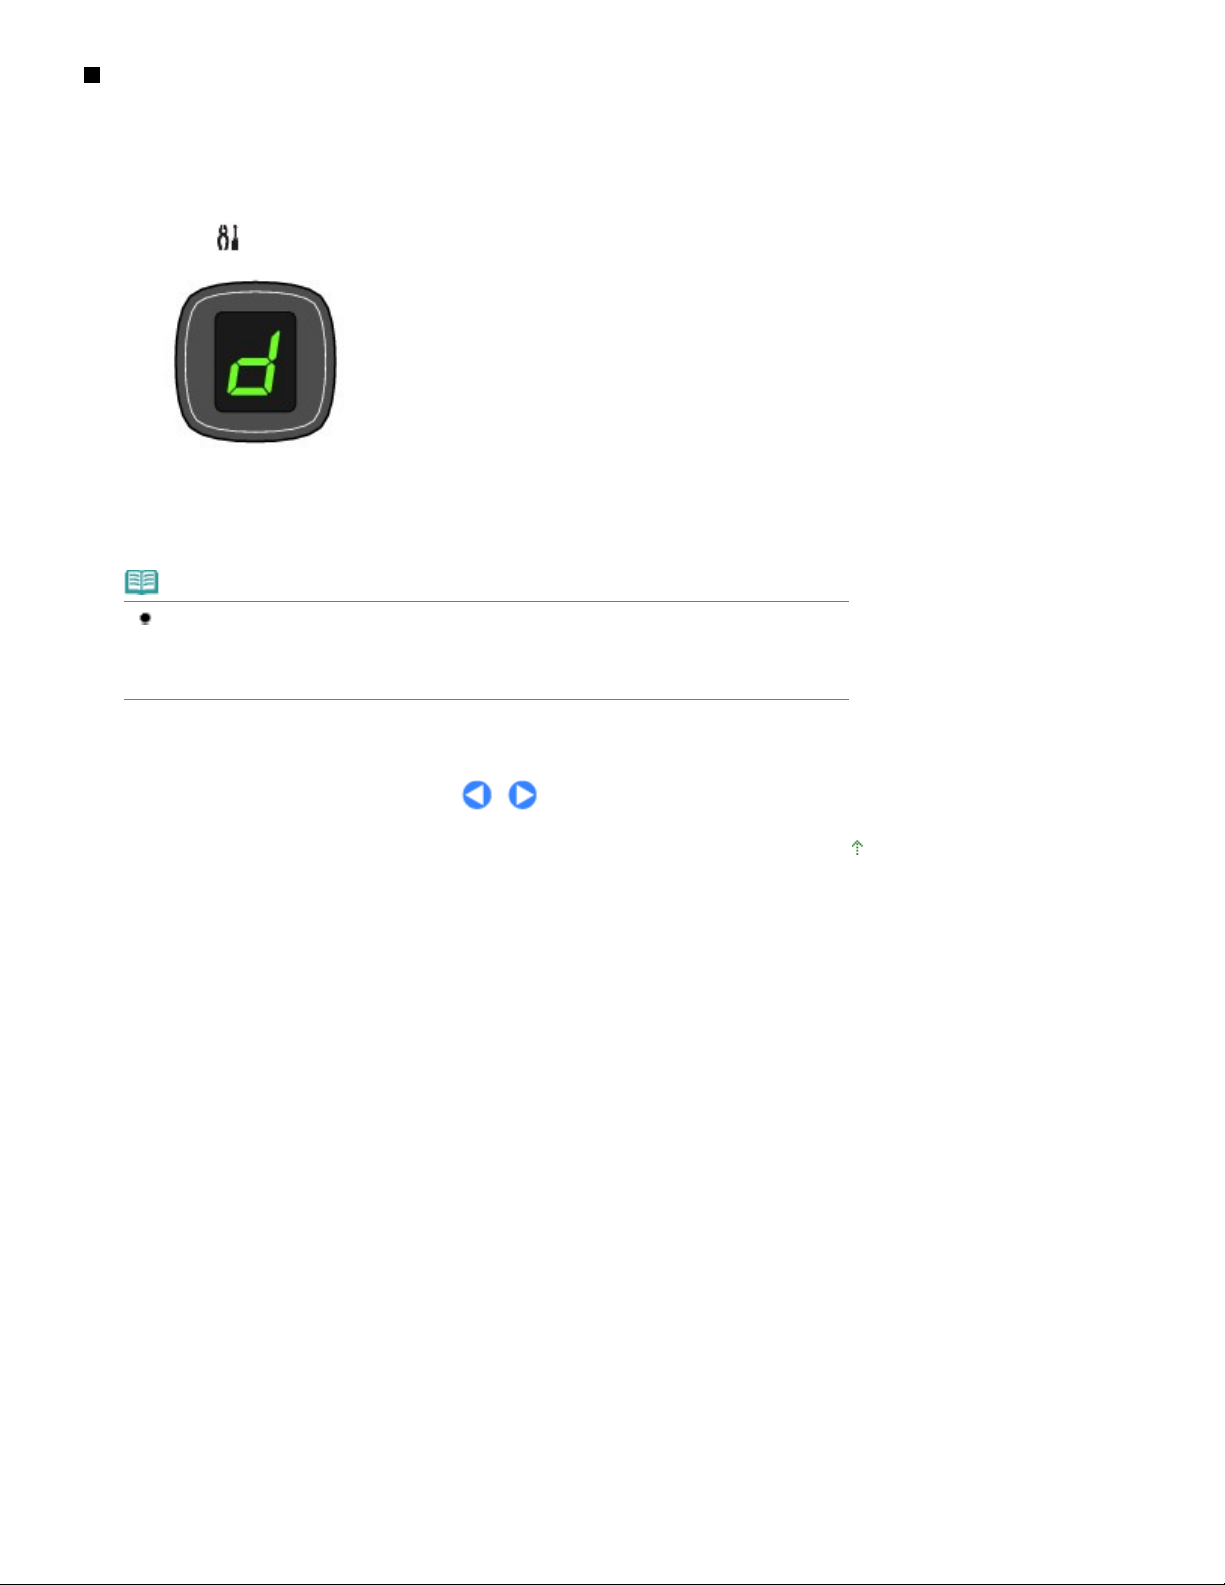
Switching the Page Size between A4 and 8.5" x 11" (Letter)
You can switch the size of paper loaded in the Rear Tray between A4 and 8.5" x 11" (Letter).
This setting is useful if you usually load Letter-sized paper in the Rear Tray regardless of the page size
indication "A4" on the Operation Panel, or vice versa.
Page 16 of 678 pagesCopying Documents
1.
Press the
2.
Press the
(Maintenance) button repeatedly until
button to select A4, or the
Black
Color
appears.
d
button to select 8.5" x 11" (Letter).
Note
When you switch the page size to A4 or 8.5" x 11" (Letter), load paper of the selected size
regardless of the size indicated on the Operation Panel.
- When the page size is set to A4, load A4 plain paper or photo paper.
- When the page size is set to 8.5" x 11" (Letter), load Letter-sized plain paper or photo paper.
Page top
Page 17
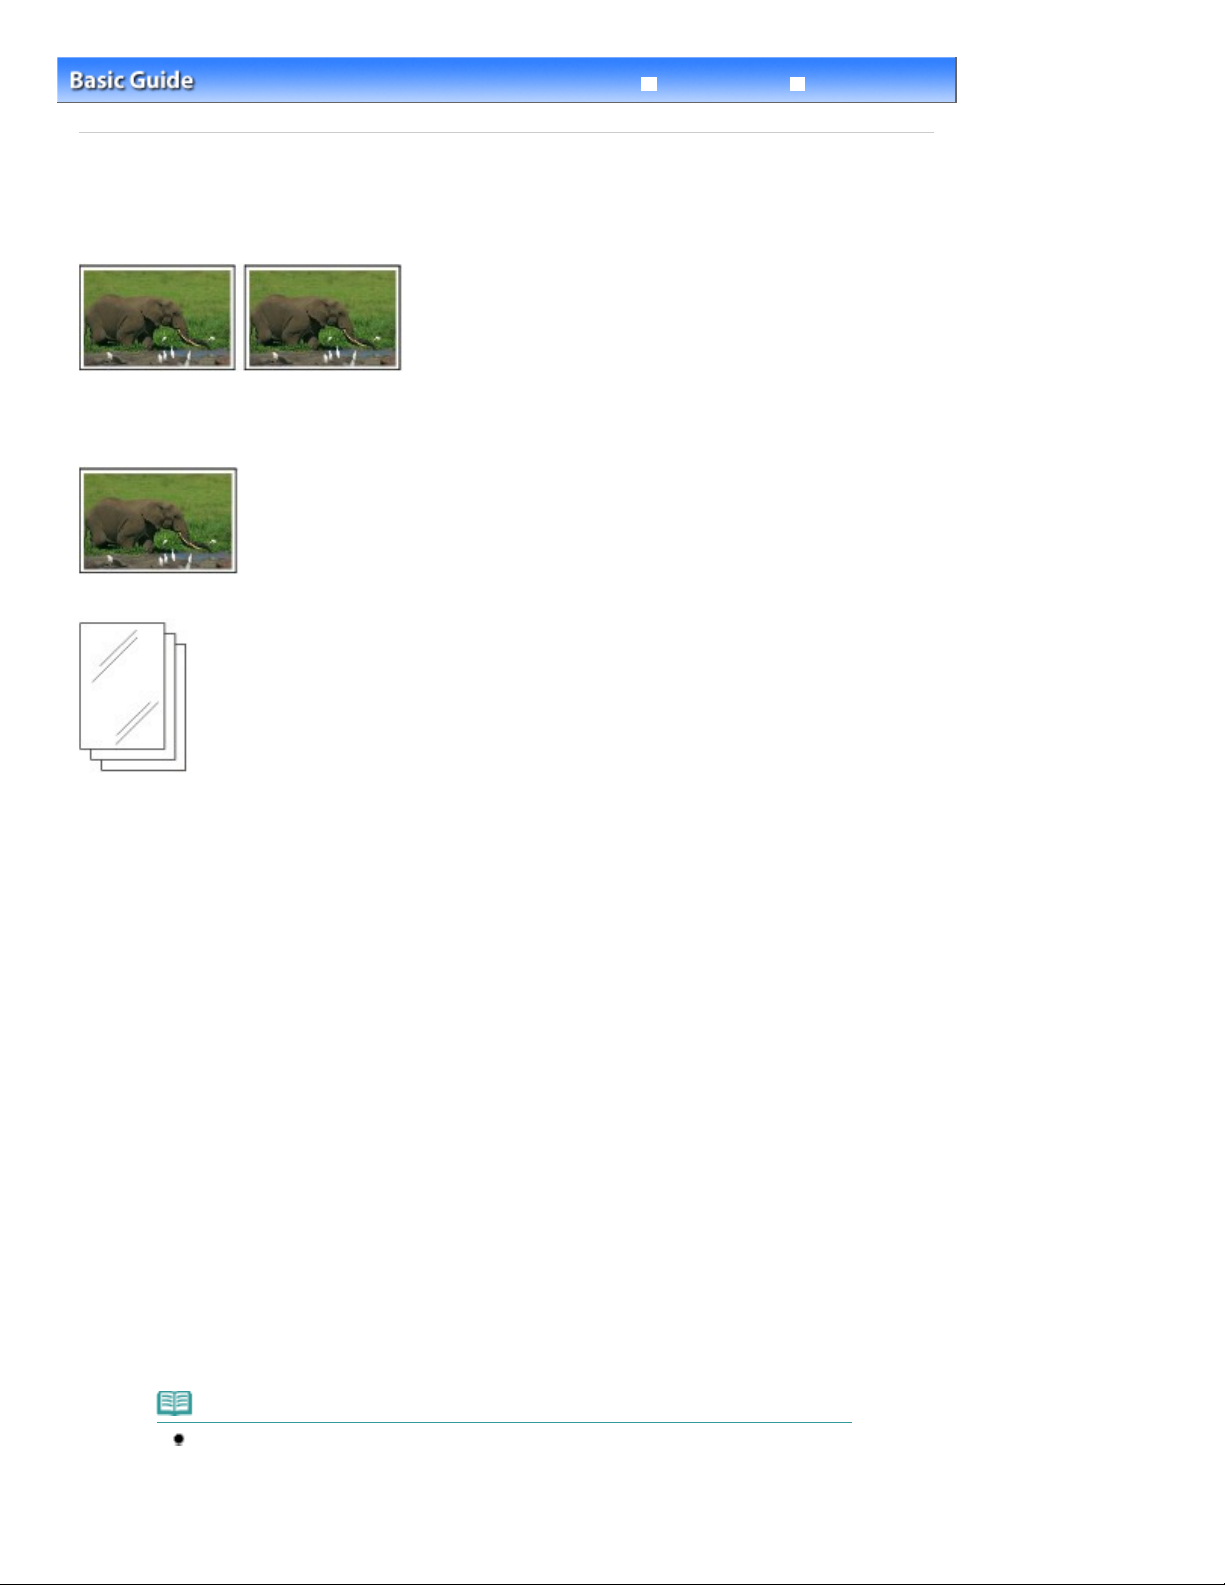
You need to prepare:
Page 17 of 678 pagesCopying Photos
Troubleshooting
Contents
Advanced Guide
> Copying > Copying Photos
Copying Photos
This section describes the procedure to copy a printed photo on 4" x 6" / 10 x 15 cm photo paper.
Printed photos.
Paper for photo printing. See Media Types You Can Use
.
1.
Prepare for copying a photo.
Turn on the power.
(1)
Operation Panel
See
Load paper.
(2)
See
Here we load 4" x 6" / 10 x 15 cm photo paper.
Open the Paper Output Tray gently, and open the Output Tray Extension.
(3)
Load a photo on the Platen Glass.
(4)
See Loading Originals.
2.
Start copying.
Press the [
(1)
See step 2 in
Press the
(2)
The
Here we select 10 x 15 cm or 4" x 6" Photo Paper.
Loading Plain Paper / Photo Paper
lamp indicates the selected page size and media type.
Paper
.
] button repeatedly to specify the number of copies.
+
Copying Documents.
Paper
Note
You can select the following page sizes and media types.
- A4 or 8.5" x 11" Plain Paper
- A4 or 8.5" x 11" Photo Paper
- 10 x 15 cm or 4" x 6" Photo Paper
.
button repeatedly to select the page size and media type.
Page 18

You can switch the size of paper loaded in the Rear Tray between A4 and 8.5" x 11"
(Letter) regardless of the size indicated on the Operation Panel.
See
Switching the Page Size between A4 and 8.5" x 11" (Letter)
When the Fit-to-Page copy function is enabled, you can copy the original in the size
automatically enlarged or reduced to fit the selected page size. In this case, the original is
copied with borders on the plain paper and without borders on the photo paper.
Cancel the Fit-to-Page copy function to copy the original in the same size.
See Fit-to-Page Copying.
.
Page 18 of 678 pagesCopying Photos
Press the
(3)
button for color copying, or the
Color
button for black & white
Black
copying.
The machine starts copying.
Remove the photo on the Platen Glass after copying is completed.
Important
Do not open the Document Cover or move the loaded photo until copying is completed.
Note
To cancel copying, press the
Stop/Reset
button.
Page top
Page 19

Page 19 of 678 pagesFit-to-Page Copying
Troubleshooting
Contents
Advanced Guide
> Copying > Fit-to-Page Copying
Fit-to-Page Copying
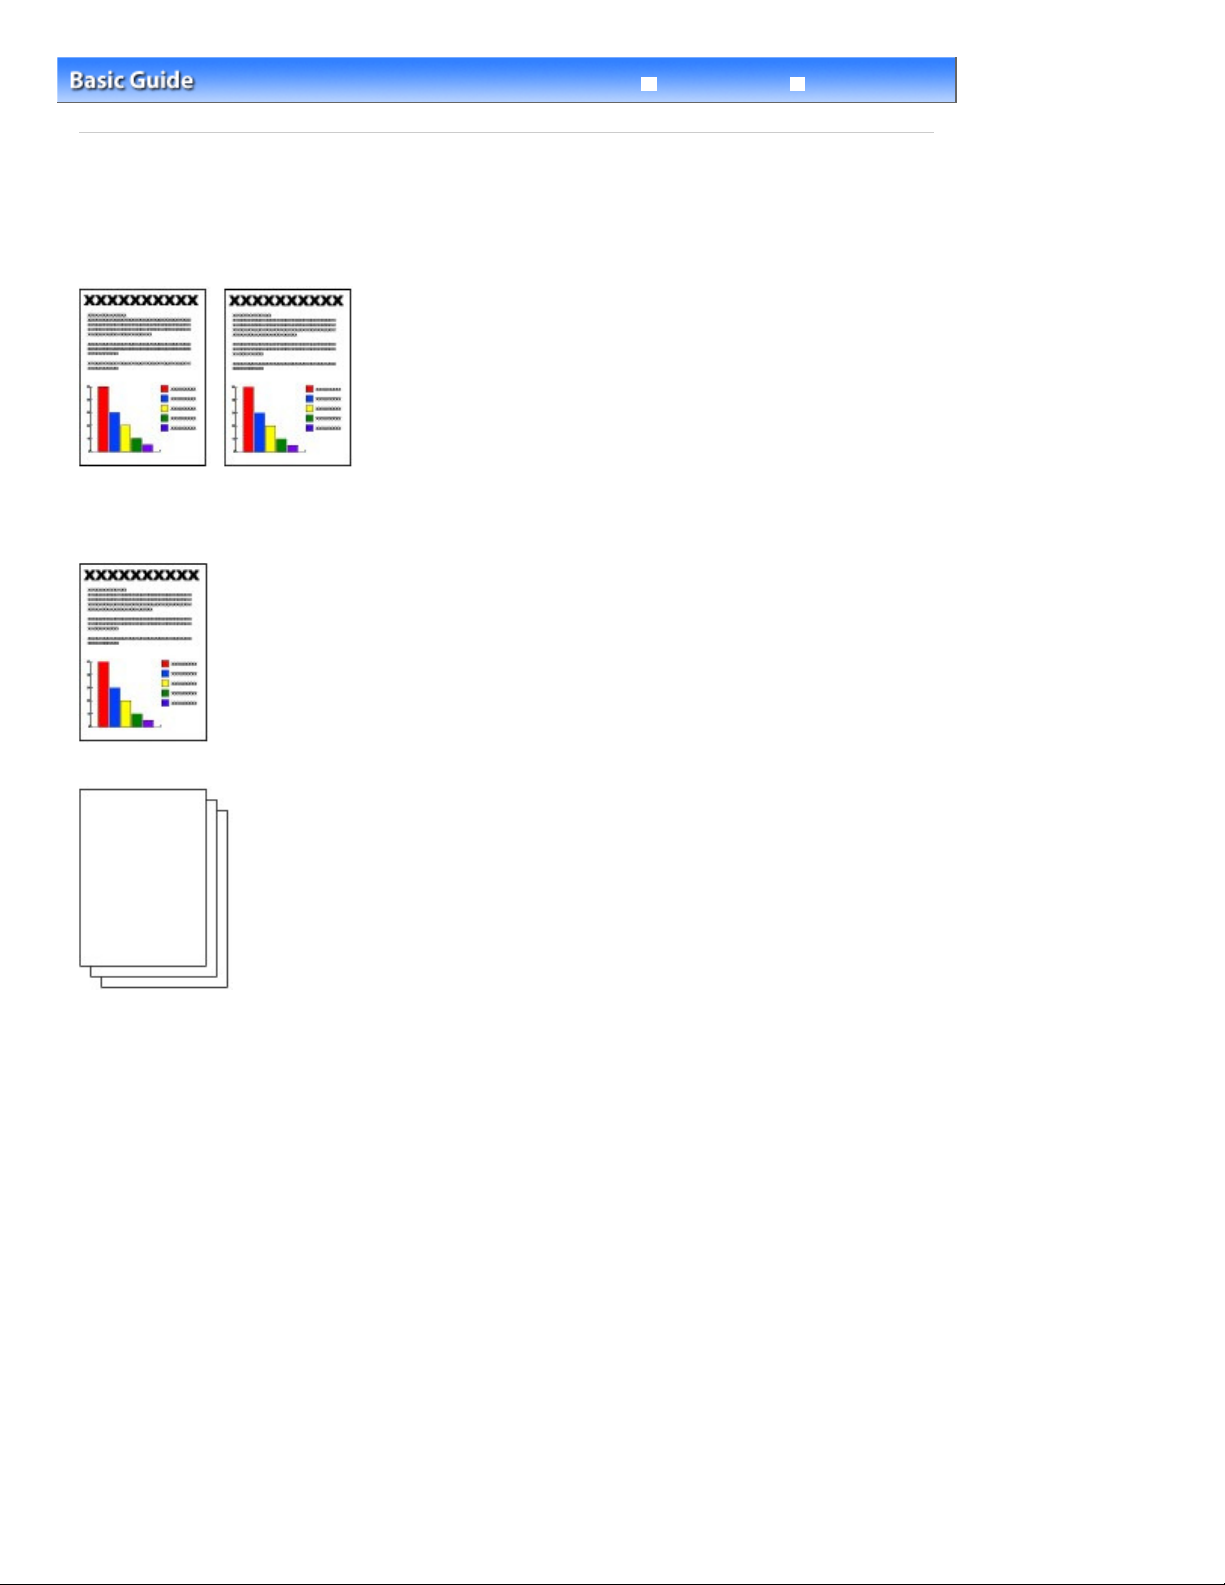
The Fit-to-Page copy function enables you to copy the original automatically enlarged or reduced to fit the
selected page size.
1.
Prepare for copying.
See step 1 in
2.
Press the [
Copying Documents.
] button repeatedly to specify the number of copies.
+
3.
Press the
Paper
button repeatedly to select the page size and media type.
Note
When the plain paper is selected for the media type, the original is copied with borders.
When the photo paper is selected for the media type, the original is copied without borders
and fills the entire page.
In borderless copying, slight cropping may occur at the edges since the copied image is
enlarged to fill the whole page.
4.
Press the
The
Fit to Page
automatically enlarged or reduced to fit the selected page size.
Fit to Page
lamp lights up and the Fit-to-Page copy function is enabled. The original is copied in the size
button.
Note
Press the Fit to Page button again to cancel the Fit-to-Page copy function and copy the
original in the same size.
5.
Press the
button for color copying, or the
Color
copying.
The machine starts Fit-to-Page copying.
Remove the original on the Platen Glass after copying is completed.
button for black & white
Black
Important
Do not open the Document Cover or move the loaded original until copying is completed.
Note
You can set the print quality to "Fast" (speed priority) only when A4 or Letter-sized plain paper
Page 20

is selected for the page size and media type. To set the print quality to "Fast", press and hold
or Black
down the
See
To cancel copying, press the
Color
To set the print quality to "Fast" (speed priority)
button for 2 or more seconds in step 5.
.
Stop/Reset
button.
Page 20 of 678 pagesFit-to-Page Copying
Page top
Page 21

Page 21 of 678 pagesScanning
Troubleshooting
Contents
Advanced Guide
> Scanning
Scanning
You can save scanned data on your computer, and edit or process them with the supplied software
application.
Saving Scanned Data on the Computer
Preparing for Scanning with the Operation Panel
Saving Scanned Data on the Computer
Page top
Page 22
whatsoever, even within the warranty period of the machine.
Application to launch when scanner button is pressed, then click OK.
Page 22 of 678 pagesSaving Scanned Data on the Computer
Troubleshooting
Contents
>
Scanning
Advanced Guide
> Saving Scanned Data on the Computer
Saving Scanned Data on the Computer
This section describes the procedure to scan originals using the Operation Panel on the machine and
save them on the computer, according to the settings specified with MP Navigator EX.
For the operation on scanning from the computer, refer to the on-screen manual:
Advanced Guide
.
Important
Please note that Canon shall not be liable for any damage or loss of the data for any reason
Preparing for Scanning with the Operation Panel
Before scanning originals, check the following.
Are the necessary software applications (MP Drivers and MP Navigator EX) installed?
If the software applications are not installed, refer to the printed manual:
Are the required settings specified with MP Navigator EX?
When you scan to save originals on the computer using the Operation Panel, you can specify the
settings for saving scanned data in Preferences of MP Navigator EX.
For details on the settings, refer to the on-screen manual:
Does the original to be scanned meet the requirements for the original to be set on the Platen
Glass?
For details, see Originals You Can Load
Is the machine connected to a computer correctly?
Confirm that the connection between the machine and the computer is physically secure.
.
Advanced Guide
Getting Started
.
.
Important
Do not plug in or unplug the USB cable while the machine is scanning originals.
When You Are Using Mac OS X v.10.3.9
You need to set MP Navigator EX as the starting software application in Image Capture under
Applications in Mac OS X.
Select Applications on the Go menu, and double-click the Image Capture icon.
(1)
Click Options at lower left of the scanner window, select MP Navigator EX 3 in
(2)
To quit Image Capture, select Quit Image Capture on the Image Capture menu.
Note
If Options does not appear, select Preferences on the Image Capture menu, click Scanner, and
click Use TWAIN software whenever possible to clear the option. Then quit Image Capture and
restart it.
Saving Scanned Data on the Computer
1.
Prepare for scanning.
Turn on the power.
(1)
Operation Panel
See
Load an original on the Platen Glass.
(2)
See Loading Originals.
.
Page 23

Advanced Guide
Page 23 of 678 pagesSaving Scanned Data on the Computer
2.
Press the
The original will be scanned and saved on the computer, according to the settings specified with MP Navigator
EX.
Remove the original on the Platen Glass after scanning is completed.
SCAN
button to start scanning.
Important
Do not turn off the power while the machine is operating.
Do not open the Document Cover or move the loaded original until scanning is completed.
Note
The position or size of the original may not be scanned correctly depending on the type of
original.
In this case, refer to the on-screen manual:
Document Type and Document Size of MP Navigator EX to match the original and scan it.
When you are using Windows Vista
The program selection screen may appear after performing step 2. In this case, select MP
Navigator EX Ver3.0 and click OK.
When you are using Windows XP
The program selection screen may appear after performing step 2 for the first time. In this
case, specify MP Navigator EX Ver3.0 as the application software to be used, select Always
use this program for this action, then click OK. From the next time, MP Navigator EX will be
automatically started.
to change the settings in
Page top
Page 24

Page 24 of 678 pagesPrinting from Your Computer
Troubleshooting
Contents
Advanced Guide
> Printing from Your Computer
Printing from Your Computer
This section describes how to print photos or documents with a computer.
You can easily print photos taken with your digital camera by using Easy-PhotoPrint EX supplied with the
machine.
Printing Photos (Easy-PhotoPrint EX)
Using Various Functions of Easy-PhotoPrint EX
Printing Documents (Windows)
Printing Documents (Macintosh)
For Mac OS X v.10.5.x
For Mac OS X v.10.4.x or Mac OS X v.10.3.9
Page top
Page 25
Page 25 of 678 pagesPrinting Photos (Easy-PhotoPrint EX)
Troubleshooting
Contents
> Printing from Your Computer
Advanced Guide
> Printing Photos (Easy-PhotoPrint EX)
Printing Photos (Easy-PhotoPrint EX)
Print image data saved on your computer by using Easy-PhotoPrint EX supplied with the machine.
This section describes the procedure to print borderless photos on 4" x 6" / 10 x 15 cm photo paper.
For details on Easy-PhotoPrint EX, refer to the on-screen manual:
Advanced Guide
Note
The screens used in this section are for printing with Windows. The operations are also the same
for printing with Macintosh.
Install Easy-PhotoPrint EX from the
uninstalled. To install Easy-PhotoPrint EX, select Easy-PhotoPrint EX in Custom Install.
1.
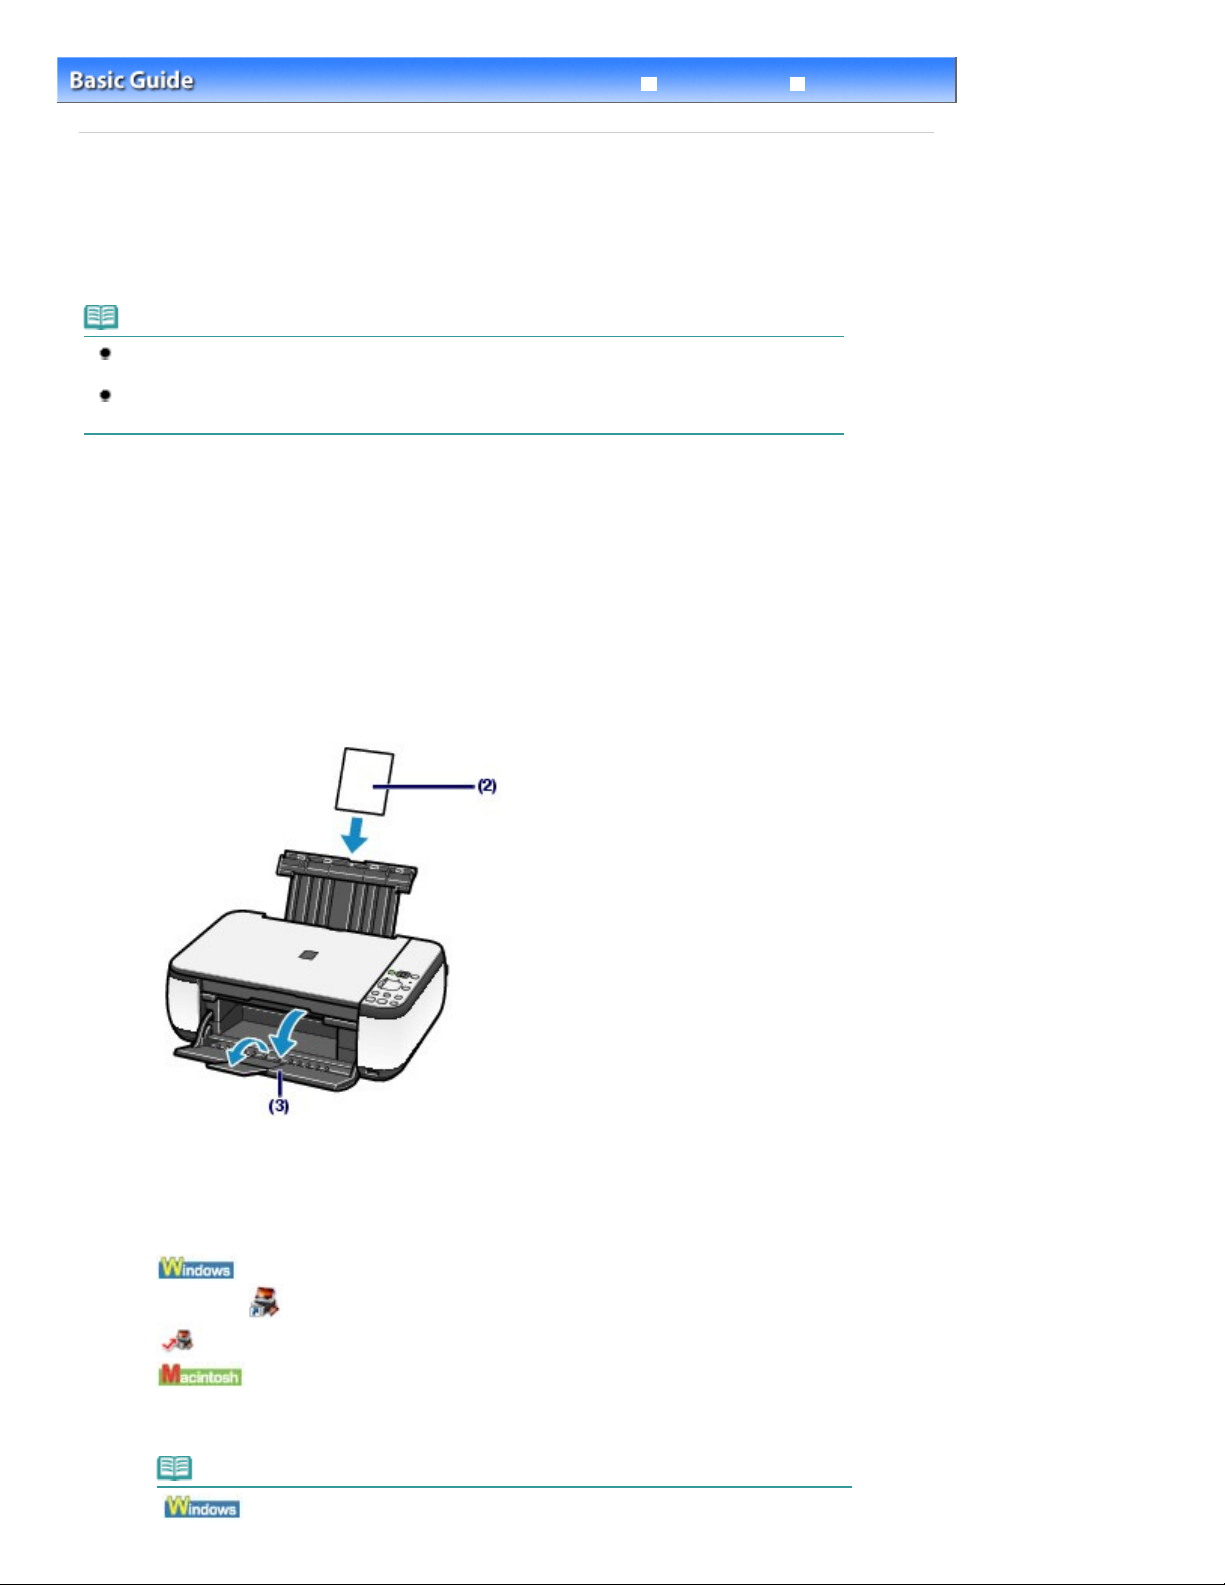
Prepare for printing.
Make sure that the machine is turned on.
(1)
Operation Panel
See
Load paper.
(2)
Loading Plain Paper / Photo Paper
See
.
Setup CD-ROM
when it has not been installed or has been
.
.
Here we load 4" x 6" / 10 x 15 cm photo paper.
Open the Paper Output Tray gently, and open the Output Tray Extension.
(3)
2.
Start Easy-PhotoPrint EX, and select Photo Print.
Start Easy-PhotoPrint EX.
(1)
Double-click (Easy-PhotoPrint EX) on the desktop.
Click Here: Easy-PhotoPrint EX
Select the Go menu, Applications, Canon Utilities, Easy-PhotoPrint EX, then double-click Easy-
PhotoPrint EX.
Note
Page 26

To start Easy-PhotoPrint EX from Solution Menu, double-click (Solution Menu) on the
desktop and click (Print photos or albums, etc.).
Solution Menu
See
To start Easy-PhotoPrint EX from the Start menu, select All Programs (or Programs), Canon
Utilities, Easy-PhotoPrint EX, then Easy-PhotoPrint EX.
To start Easy-PhotoPrint EX from Solution Menu, click (Solution Menu) in the Dock and
click
Solution Menu
See
Click Photo Print.
(2)
Note
You can select Album, Calendar, Stickers, etc., besides Photo Print.
See Using Various Functions of Easy-PhotoPrint EX.
Page 26 of 678 pagesPrinting Photos (Easy-PhotoPrint EX)
.
(Print photos or albums, etc.).
.
3.
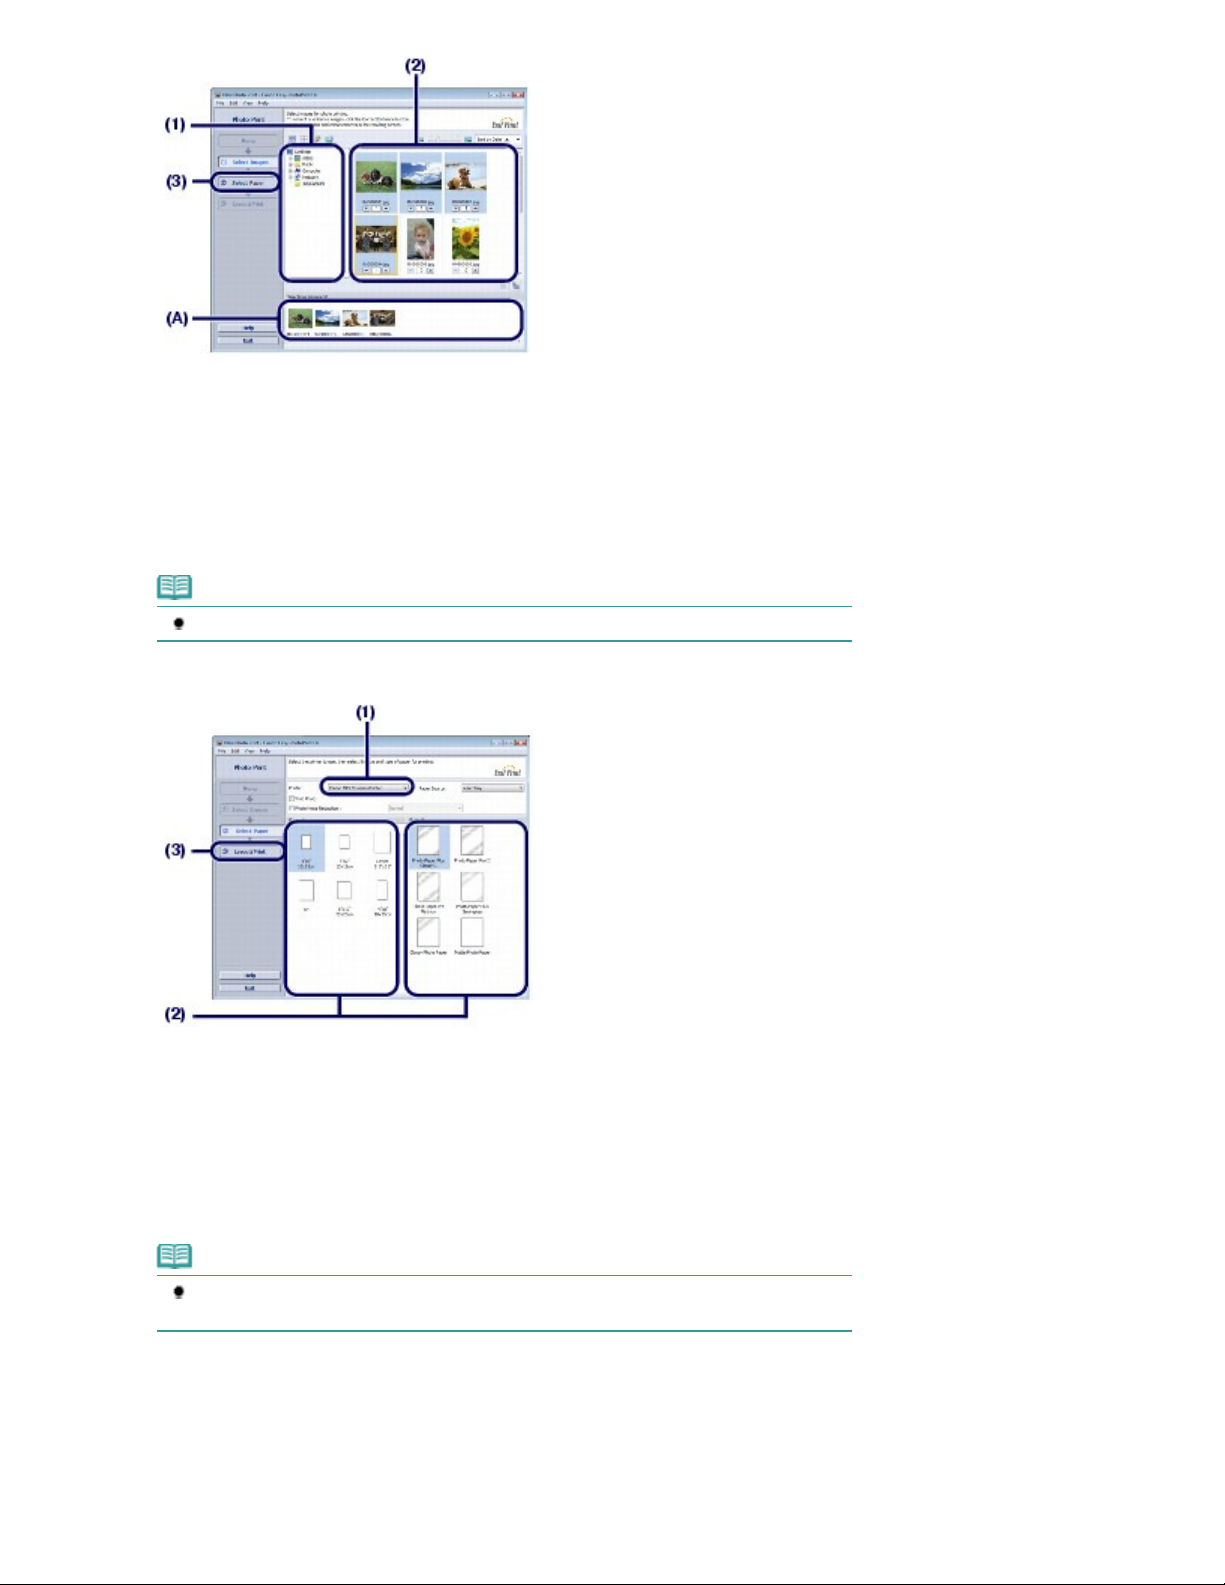
Select a photo to print.
Select the folder in which images are saved.
(1)
Click the image to print.
(2)
The number of copies appears as "1", and the image you selected appears in the selected image area (A).
You can select two or more images at the same time.
Note
To print two or more copies, click (Up arrow) to change the number of copies.
To cancel the selection, click the image to cancel in the selected image area and click
(Delete Imported Image). You can also use
copies to zero.
You can also correct or enhance the selected image.
See Using Various Functions of Easy-PhotoPrint EX.
Click Select Paper.
(3)
(Down arrow) to change the number of
Page 27
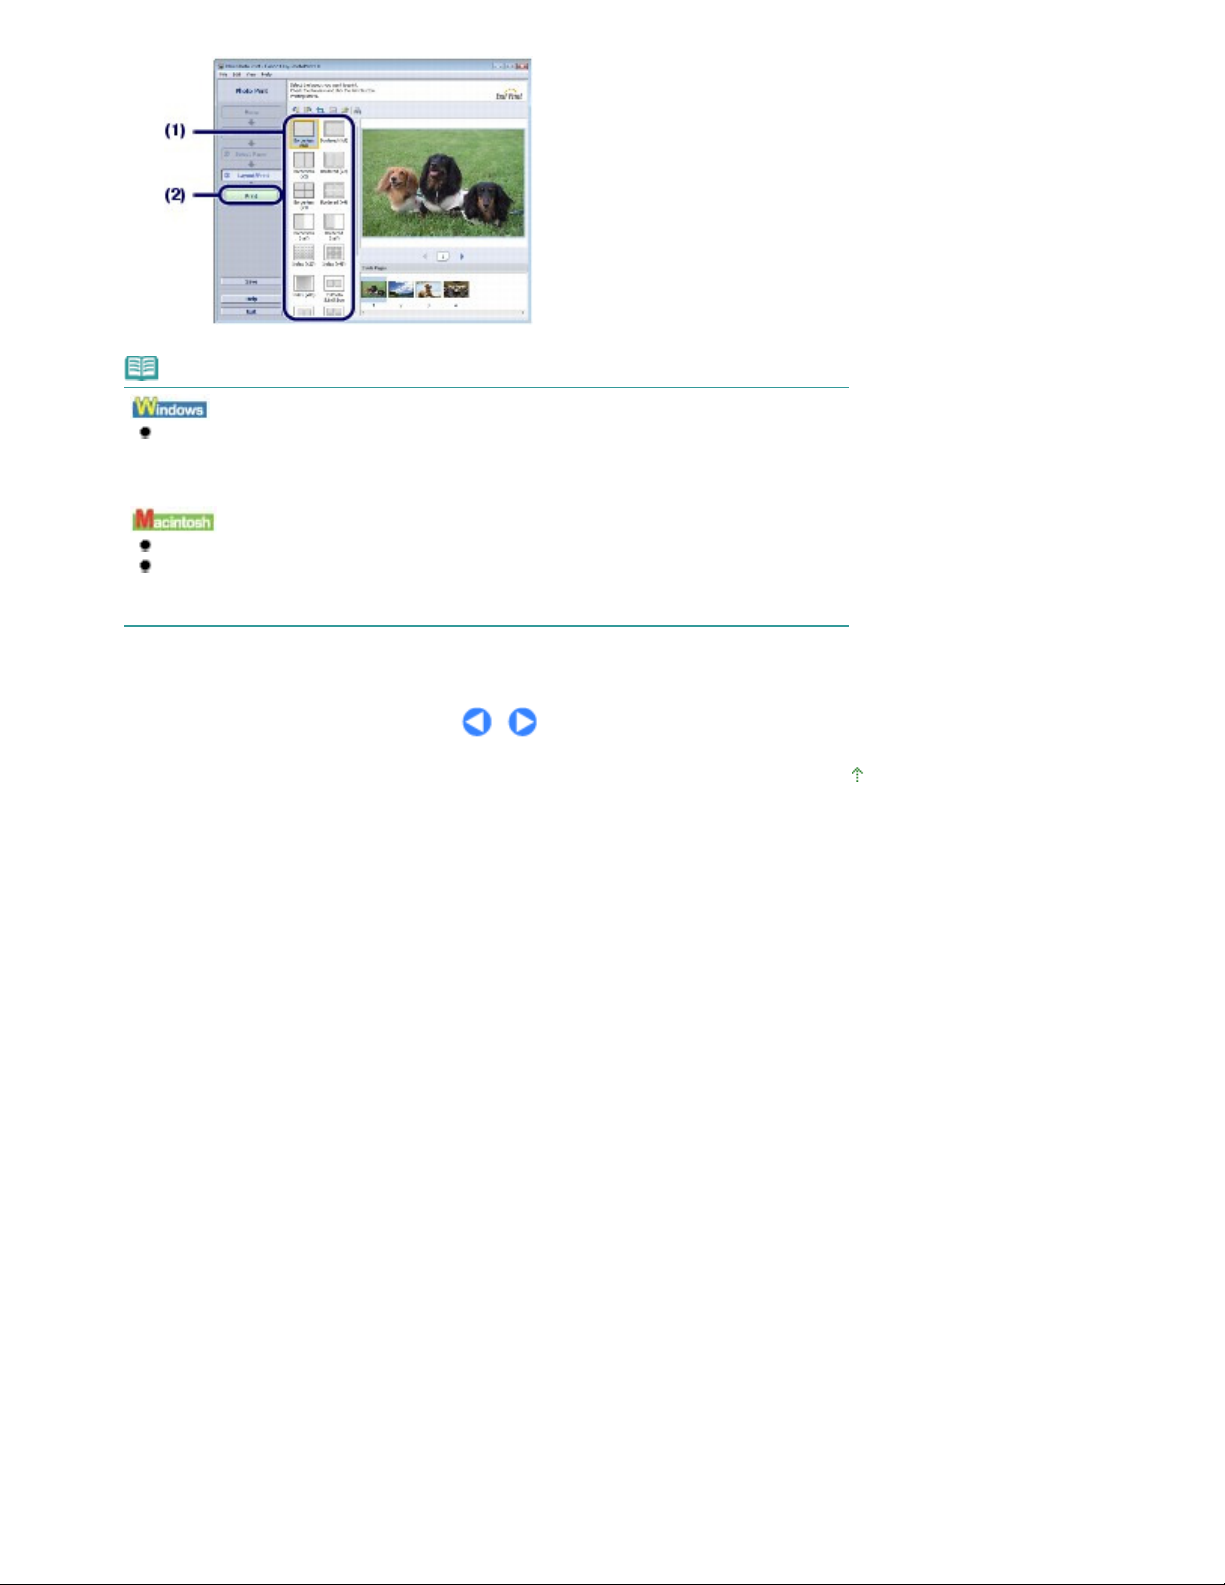
4. Select the loaded paper.
Advanced Guide
Make sure that your machine's name is selected in Printer.
(1)
Select the size and type of the loaded paper in Paper Size and Media Type.
(2)
Here we select 4"x6" 10x15cm in Paper Size and the type of the loaded photo paper in Media Type.
Note
If you select the wrong media type, the machine may not print with the proper print quality.
Page 27 of 678 pagesPrinting Photos (Easy-PhotoPrint EX)
Click Layout/Print.
(3)
5.
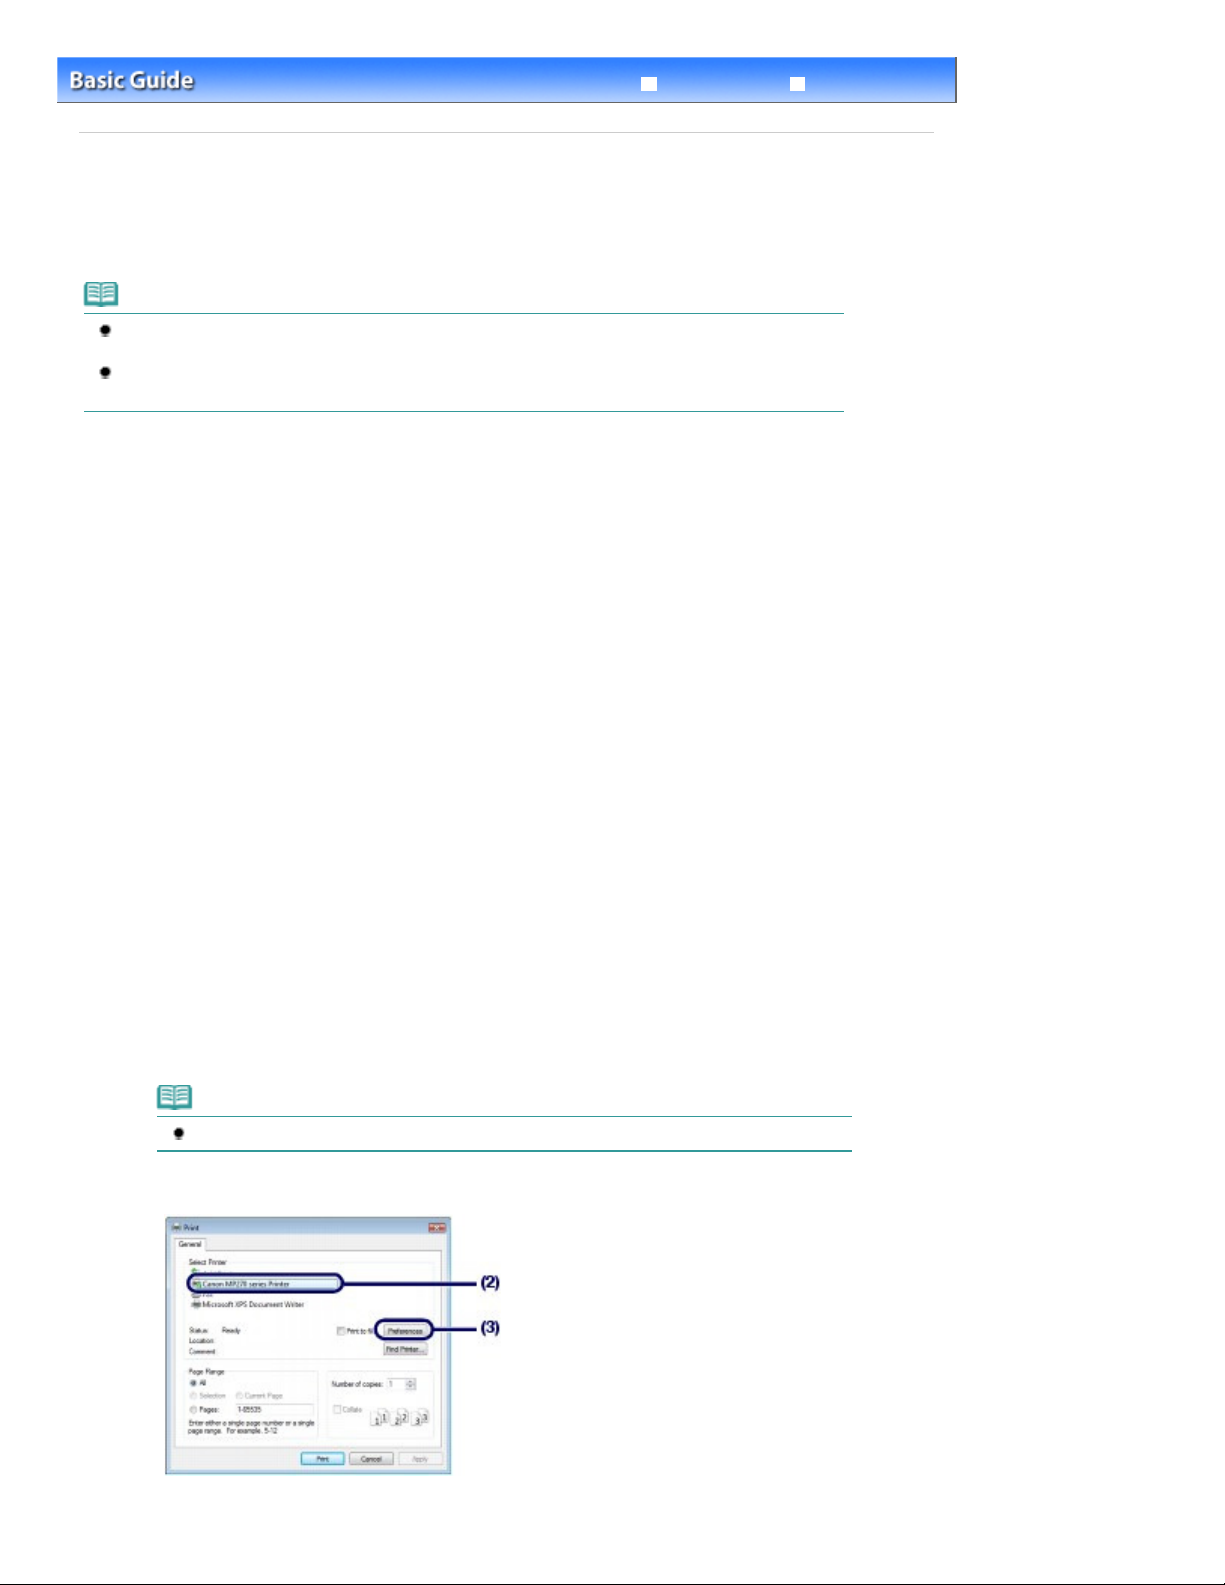
Select a layout and start printing.
Select the layout of the photo.
(1)
Here we select Borderless (full).
The preview appears in the selected layout for confirmation of the required print result.
You can change the direction of photo or crop photos (trimming) to print.
Click Print.
(2)
Note
For details on the operation, refer to the on-screen manual:
.
Page 28
Note
Page 28 of 678 pagesPrinting Photos (Easy-PhotoPrint EX)
To cancel a print job in progress, press the
Stop/Reset
button on the machine or click Cancel
Printing on the printer status monitor.
XXX
To display the printer status monitor, click Canon XXX Printer
(where "
" is your machine's
name) on the taskbar.
Click the printer icon in the Dock to display the list of print jobs in progress.
To cancel a print job in progress, select the desired job in the Name list and click Delete.
To temporarily stop a job in progress, click Hold. To temporarily stop all the jobs in the list, click
Pause Printer (or Stop Jobs).
Page top
Page 29

Page 29 of 678 pagesUsing Various Functions of Easy-PhotoPrint EX
Advanced Guide
Contents
PhotoPrint EX
> Printing from Your Computer >
Printing Photos (Easy-PhotoPrint EX)
> Using Various Functions of Easy-
Using Various Functions of Easy-PhotoPrint EX
This section introduces a few of the useful functions of Easy-PhotoPrint EX.
For details, refer to the on-screen manual:
Advanced Guide
.
Creating Your Own Prints
You can create an album or calendar using your photos.
Album
Calendar
Troubleshooting
Stickers Layout Print
Correcting Images
You can use Red-Eye Correction, Face Sharpener, Digital Face Smoothing, Brightness, Contrast,
etc. to adjust, correct, or enhance images automatically or manually.
Brightness
Page top
Page 30
Page 30 of 678 pagesPrinting Documents (Windows)
Advanced Guide
Contents
> Printing from Your Computer
> Printing Documents (Windows)
Printing Documents (Windows)
This section describes the procedure to print a document of A4 size on plain paper.
For details, refer to the on-screen manual:
Advanced Guide
.
Note
Operations may vary depending on your software application. For details on the operation, refer to
the instruction manual of your application.
The screens used in this section are for printing with Windows Vista operating system Ultimate
Edition (hereafter referred to as "W indows Vista").
1. Make sure that the machine is turned on.
Operation Panel
See
2.
Load paper.
Loading Plain Paper / Photo Paper
See
Here we load A4 plain paper.
.
.
Troubleshooting
3.
Open the Paper Output Tray gently, and open the Output Tray Extension.
4.
Create (or open) a document to print using an appropriate software application.
5.
Open the printer driver setup window.
Select Print on the File menu or the command bar in your software application.
(1)
The Print dialog box will appear.
Make sure that your machine's name is selected.
(2)
Note
If another printer's name is selected, click and select your machine's name.
Click Preferences (or Properties).
(3)
Page 31
6.
Specify the required print settings.
Advanced Guide
Advanced Guide
Advanced Guide
Advanced Guide
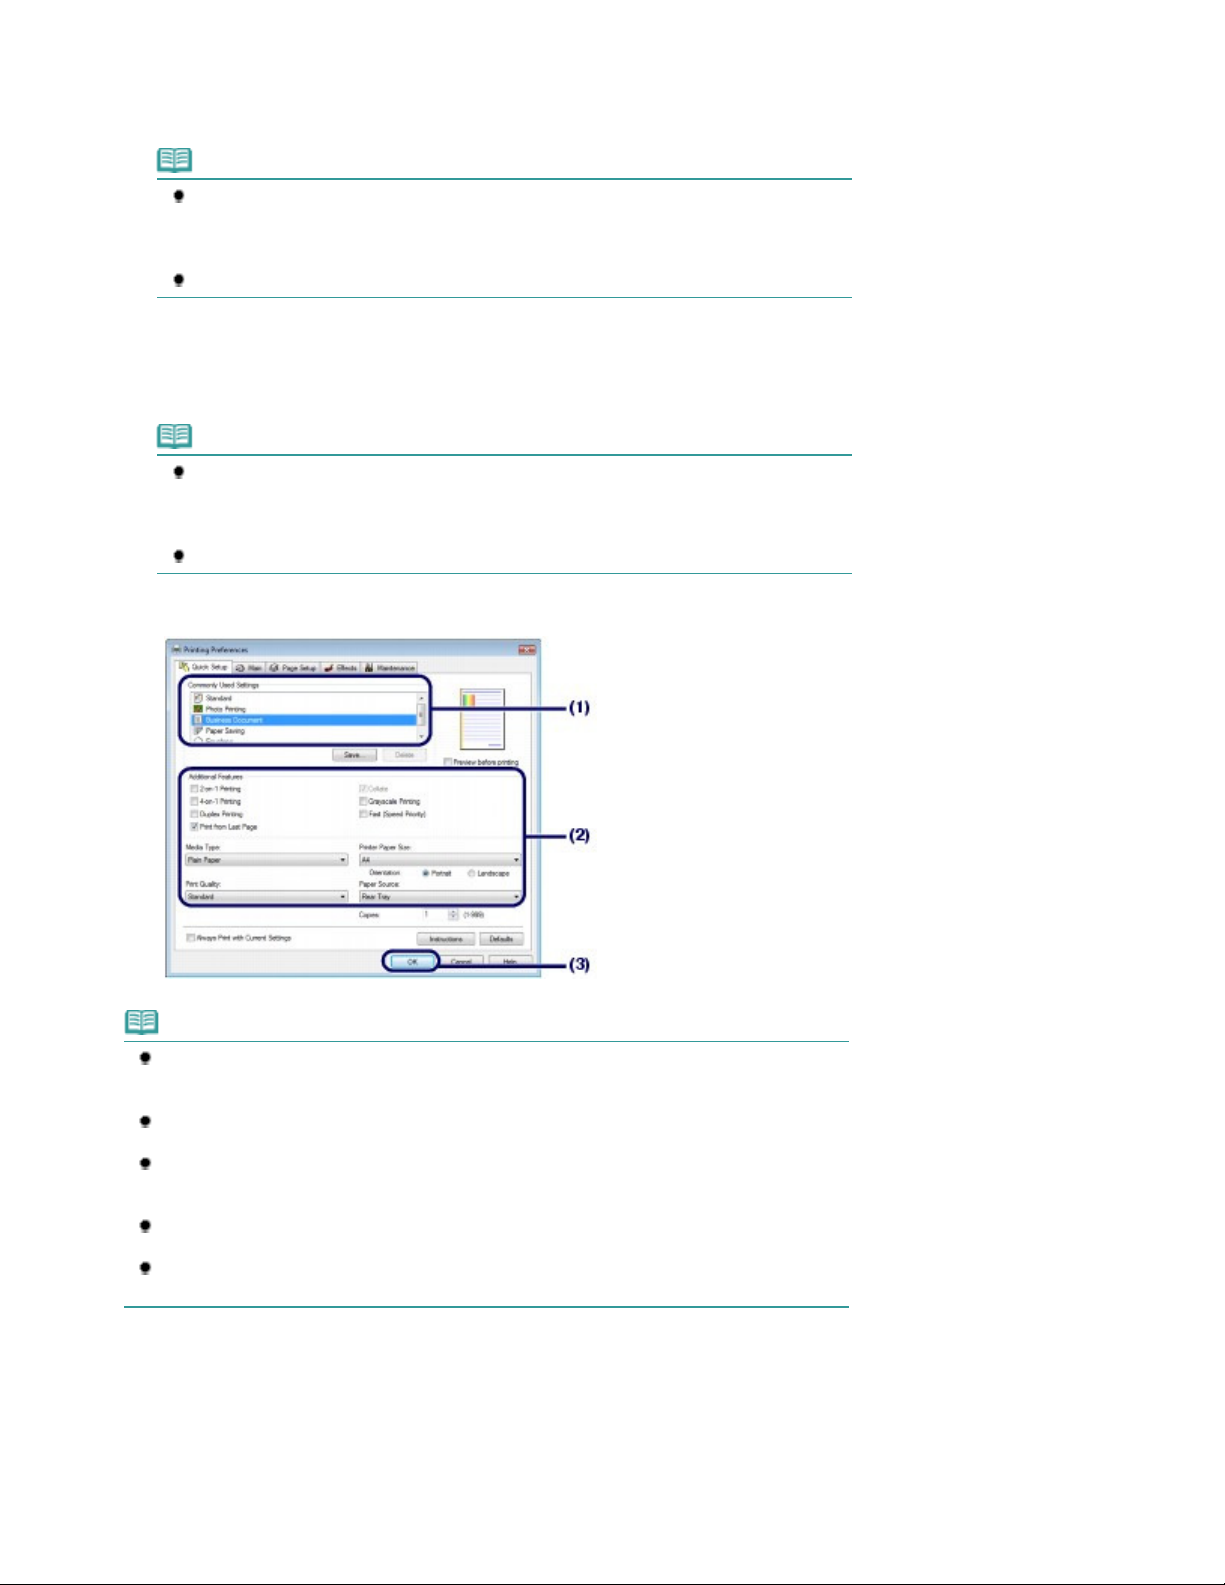
Select Business Document in Commonly Used Settings.
(1)
Note
When the print object such as Business Document or Photo Printing is selected in
Commonly Used Settings, the items in Additional Features will be selected automatically.
The settings suitable for the print object such as media type or print quality will also
appear.
When you specify two or more copies in Copies, the Collate check box will be selected.
Make sure of the displayed settings.
(2)
Here we make sure that Plain Paper in Media Type, Standard in Print Quality, and A4 in Printer Paper Size
are selected.
Note
The settings can be changed.
However, after changing Printer Paper Size, confirm that the setting for Page Size on the
Page Setup sheet matches the setting set in the software application.
For details, refer to the on-screen manual:
If you select the wrong media type, the machine may not print with the proper print quality.
.
Page 31 of 678 pagesPrinting Documents (Windows)
Click OK.
(3)
Note
For details on the printer driver functions, click Help or Instructions to view the online help or
the on-screen manual:
Main, and Maintenance sheets if the on-screen manual is installed on your computer.
You can name the changed settings and add to Commonly Used Settings.
For details, refer to the on-screen manual:
To display the current settings next time when you open the printer driver setup window,
select the Always Print with Current Settings check box. Some software applications may not
have this function.
To display the preview to confirm the print result, select the Preview before printing check
box. Some software applications may not have a preview function.
You can specify detailed print settings on the Main sheet or Page Setup sheet.
For details, refer to the on-screen manual:
. The Instructions button appears on the Quick Setup,
.
.
7.
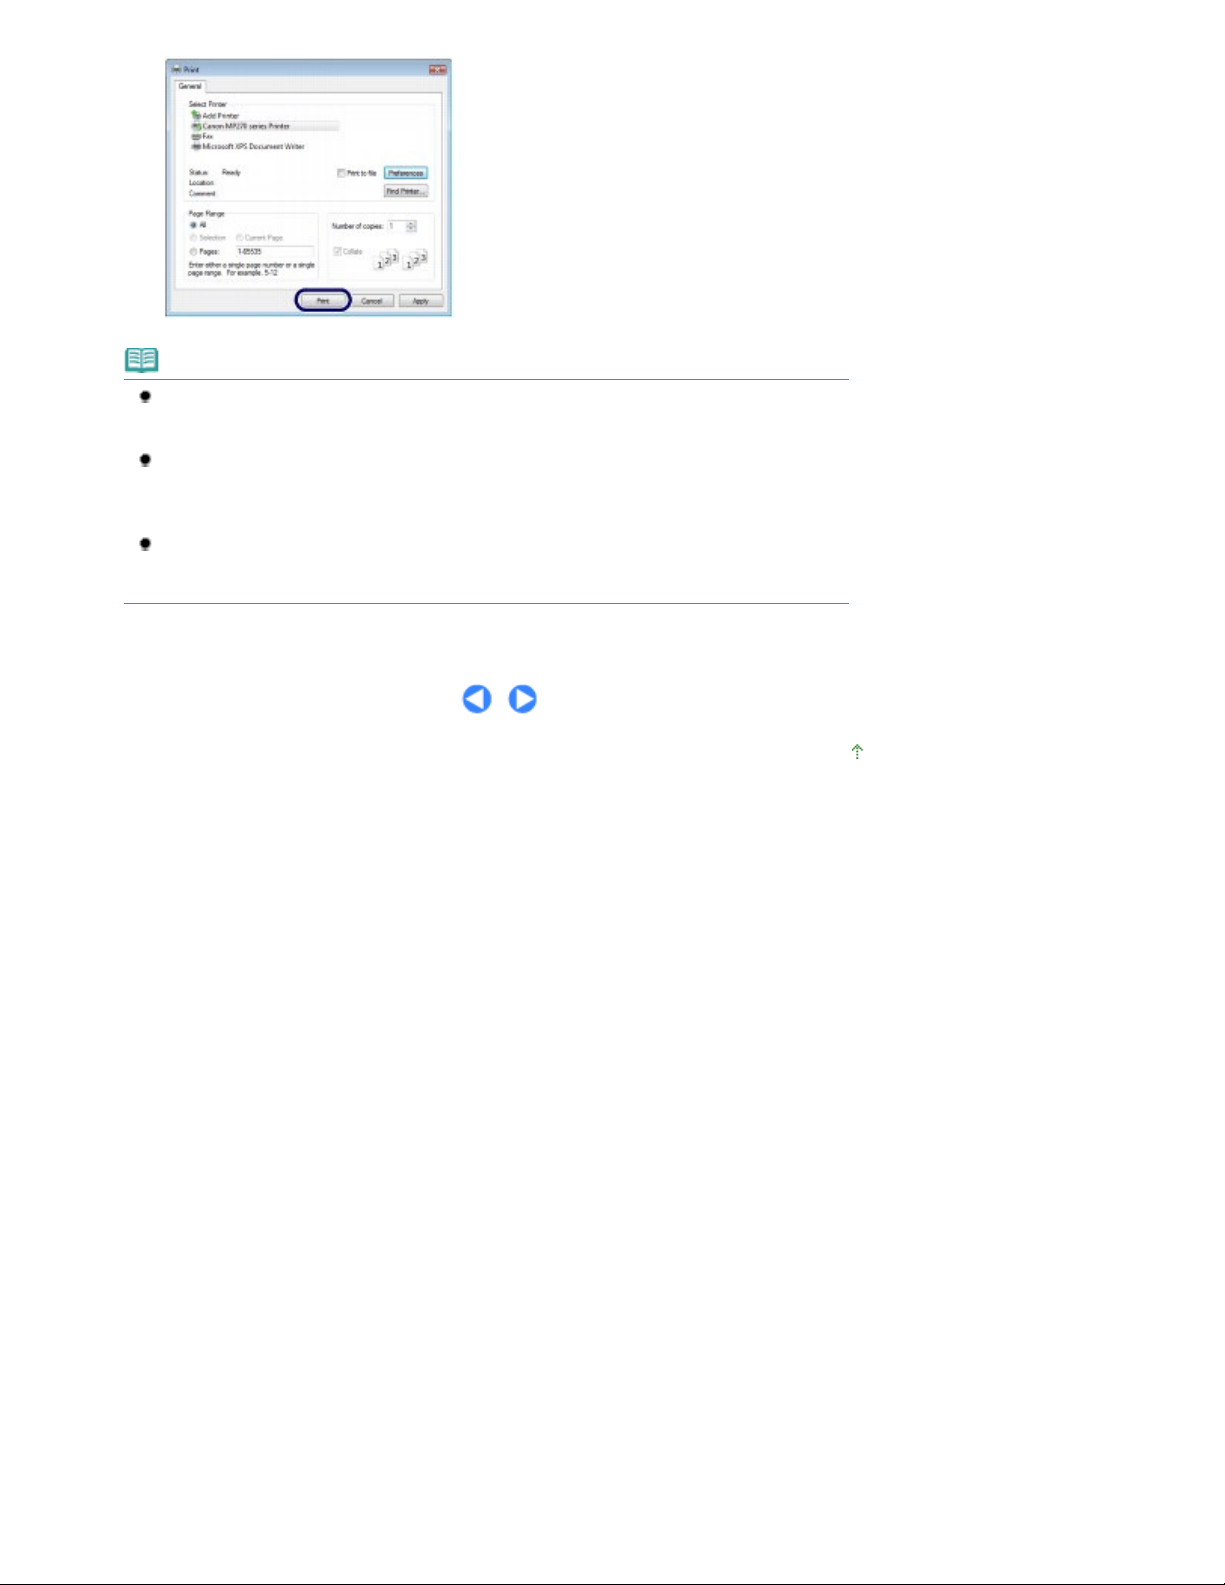
Start printing.
Click Print (or OK) to start printing.
Page 32
Note
The message on how to load envelopes will appear when printing on them. This message will
not appear next time if you select the Do not show this message again. check box.
For details on the settings to print envelopes, see
To cancel a print job in progress, press the
Printing on the printer status monitor.
To display the printer status monitor, click Canon XXX Printer
name) on the taskbar.
If printed ruled lines are misaligned or print results are unsatisfactory, adjust the print head
position.
Aligning the Print Head
See
.
Loading Envelopes.
Stop/Reset
button on the machine or click Cancel
XXX
(where "
" is your machine's
Page 32 of 678 pagesPrinting Documents (Windows)
Page top
Page 33
Page 33 of 678 pagesPrinting Documents (Macintosh)
Advanced Guide
Contents
> Printing from Your Computer > Printing Documents (Macintosh)
Printing Documents (Macintosh)
This section describes the procedure to print a document of A4 size on plain paper.
For details, refer to the on-screen manual:
Advanced Guide
.
Note
Operations may vary depending on your software application. For details on the operation, refer to
the instruction manual of your application.
For Mac OS X v.10.5.x
1.
Make sure that the machine is turned on.
Operation Panel
See
.
2. Load paper.
Loading Plain Paper / Photo Paper
See
Here we load A4 plain paper.
.
Troubleshooting
3. Open the Paper Output Tray gently, and open the Output Tray Extension.
4.
Create (or open) a document to print using an appropriate software application.
5. Open the Print dialog box.
Select Print on the File menu in your software application.
The Print dialog box will appear.
Note
If the dialog box below appears, click
(Down arrow).
6. Specify the required print settings.
Make sure that your machine's name is selected in Printer.
(1)
Select the page size of the loaded paper in Paper Size.
(2)
Here we select A4.
Select Quality & Media in the pop-up menu.
(3)
Page 34
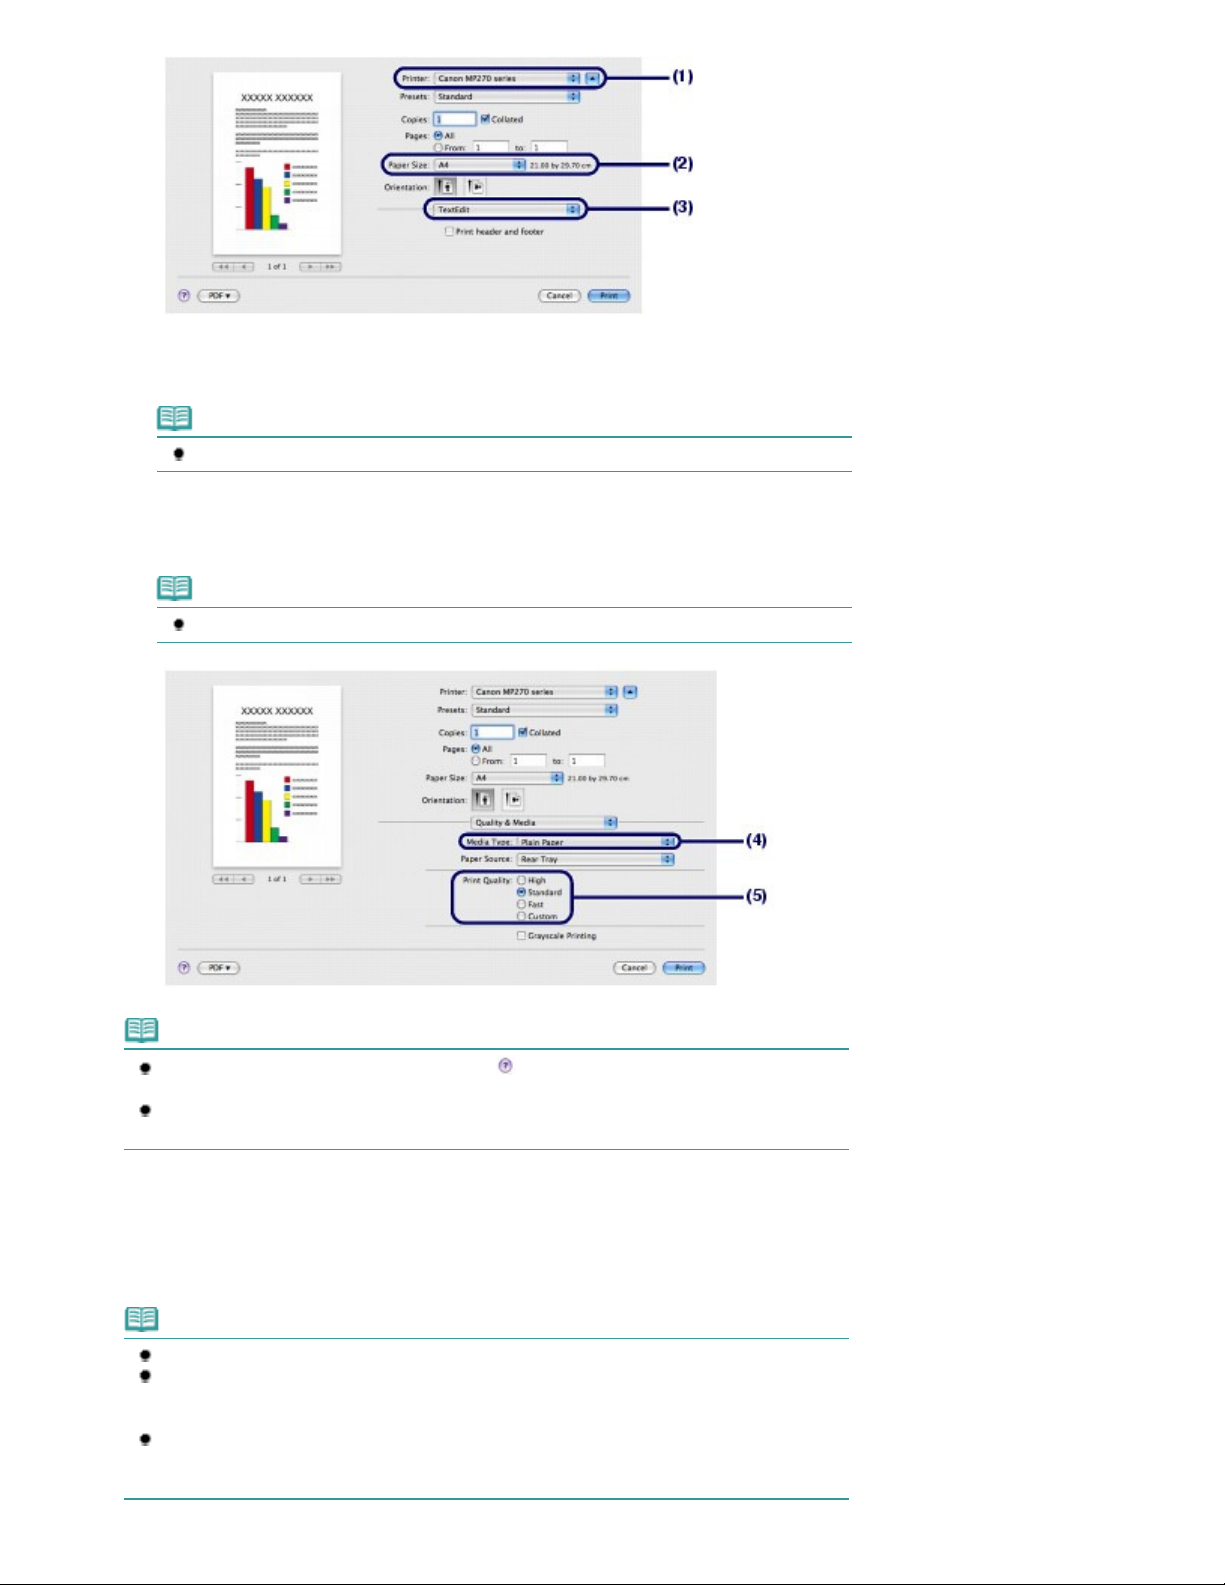
Select the media type of the loaded paper in Media Type.
Advanced Guide
(4)
Here we select Plain Paper.
Note
If you select the wrong media type, the machine may not print with the proper print quality.
Select the print quality in Print Quality.
(5)
Here we select Standard.
Note
For details on the print quality, refer to the on-screen manual:
Page 34 of 678 pagesPrinting Documents (Macintosh)
.
7. Start printing.
Note
For details on the printer driver functions, click
Options, Borderless Printing, or Margin screen.
The preview appears on the left of the dialog box to confirm the print result. Some software
applications may not have a preview function.
Click Print to start printing.
(Question) on the Quality & Media, Color
Note
Click the printer icon in the Dock to display the list of print jobs in progress.
To cancel a print job in progress, select the desired job in the Name list and click Delete.
To temporarily stop a job in progress, click Hold. To temporarily stop all the jobs in the list, click
Pause Printer.
If printed ruled lines are misaligned or print results are unsatisfactory, adjust the print head
position.
Aligning the Print Head
See
.
Page 35
For Mac OS X v.10.4.x or Mac OS X v.10.3.9
Note
The screens used in this section are for printing with Mac OS X v.10.4.x.
1.
Make sure that the machine is turned on.
Operation Panel
See
2.
Load paper.
Loading Plain Paper / Photo Paper
See
Here we load A4 plain paper.
3.
Open the Paper Output Tray gently, and open the Output Tray Extension.
.
.
Page 35 of 678 pagesPrinting Documents (Macintosh)
4.
Create (or open) a document to print using an appropriate software application.
5.
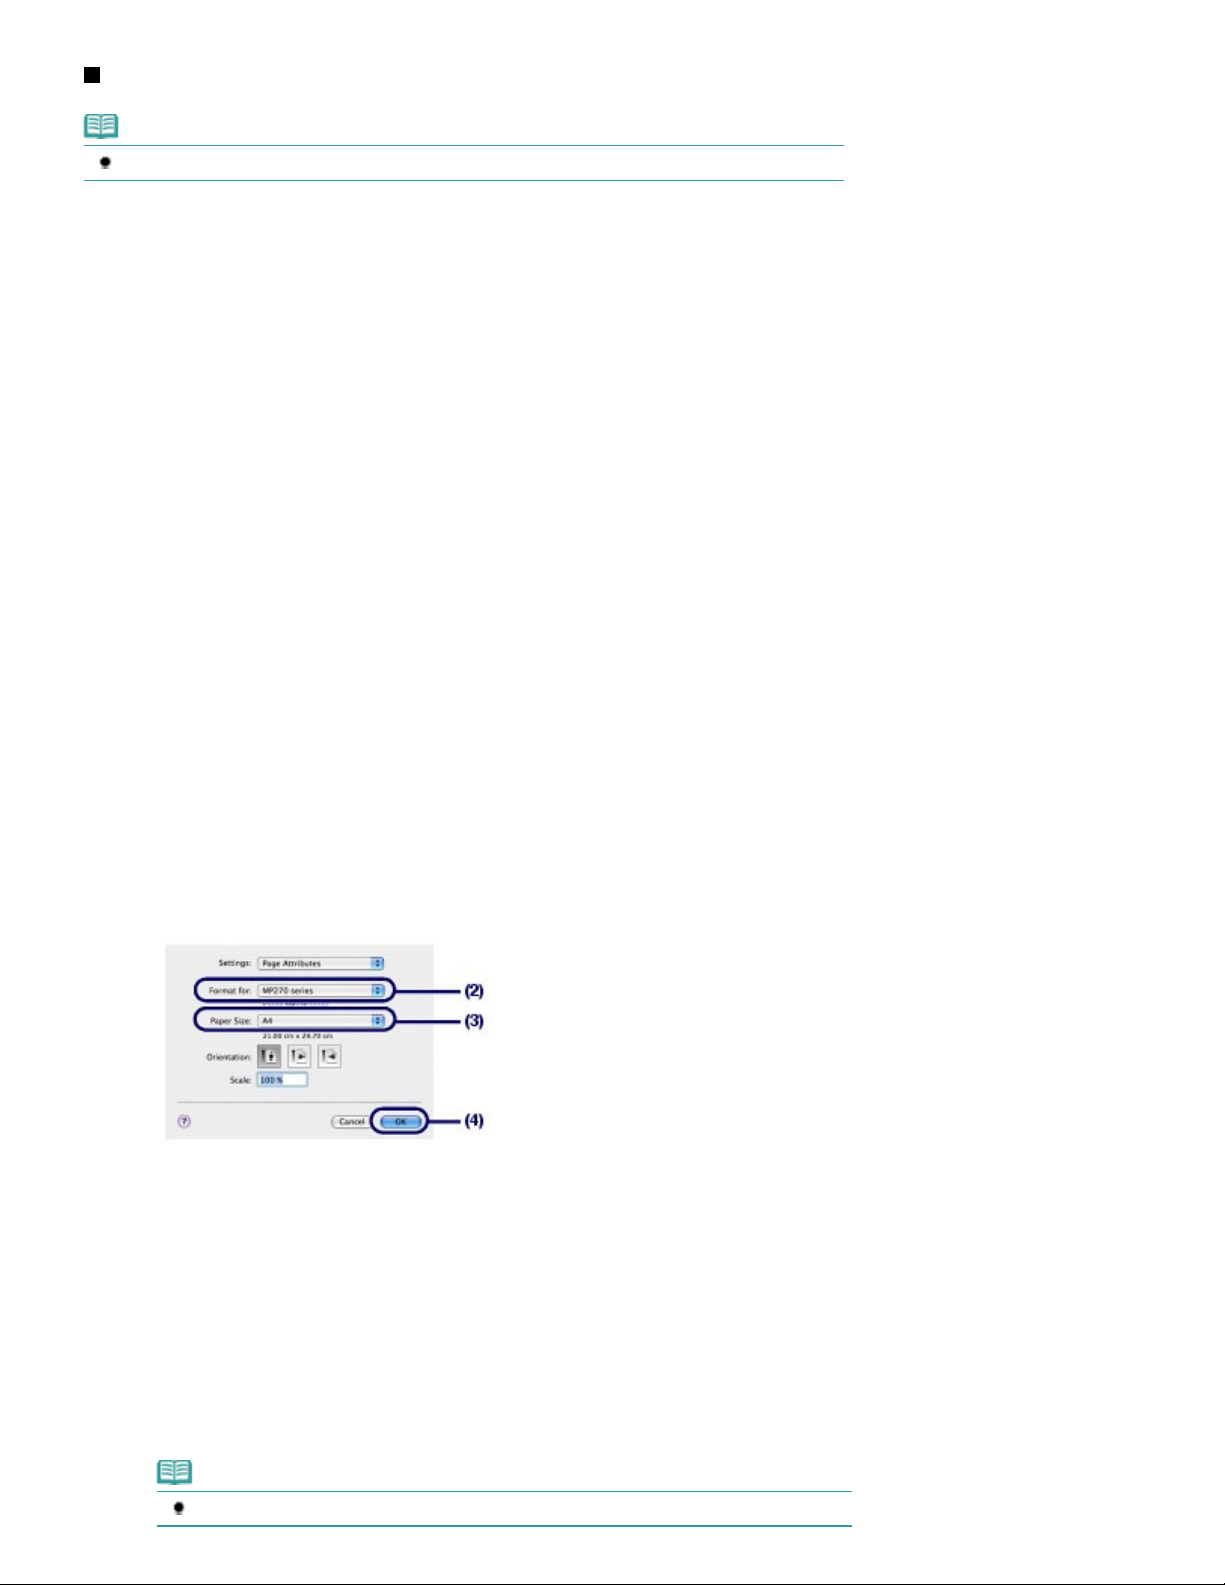
Specify the page size.
Select Page Setup on the File menu in your software application.
(1)
The Page Setup dialog box will appear.
Make sure that your machine's name is selected in Format for.
(2)
Select the page size of the loaded paper in Paper Size.
(3)
Here we select A4.
Click OK.
(4)
6.
Specify the required print settings.
Select Print on the File menu in your software application.
(1)
The Print dialog box will appear.
Make sure that your machine's name is selected in Printer.
(2)
Select Quality & Media in the pop-up menu.
(3)
Select the media type of the loaded paper in Media Type.
(4)
Here we select Plain Paper.
Note
If you select the wrong media type, the machine may not print with the proper print quality.
Page 36
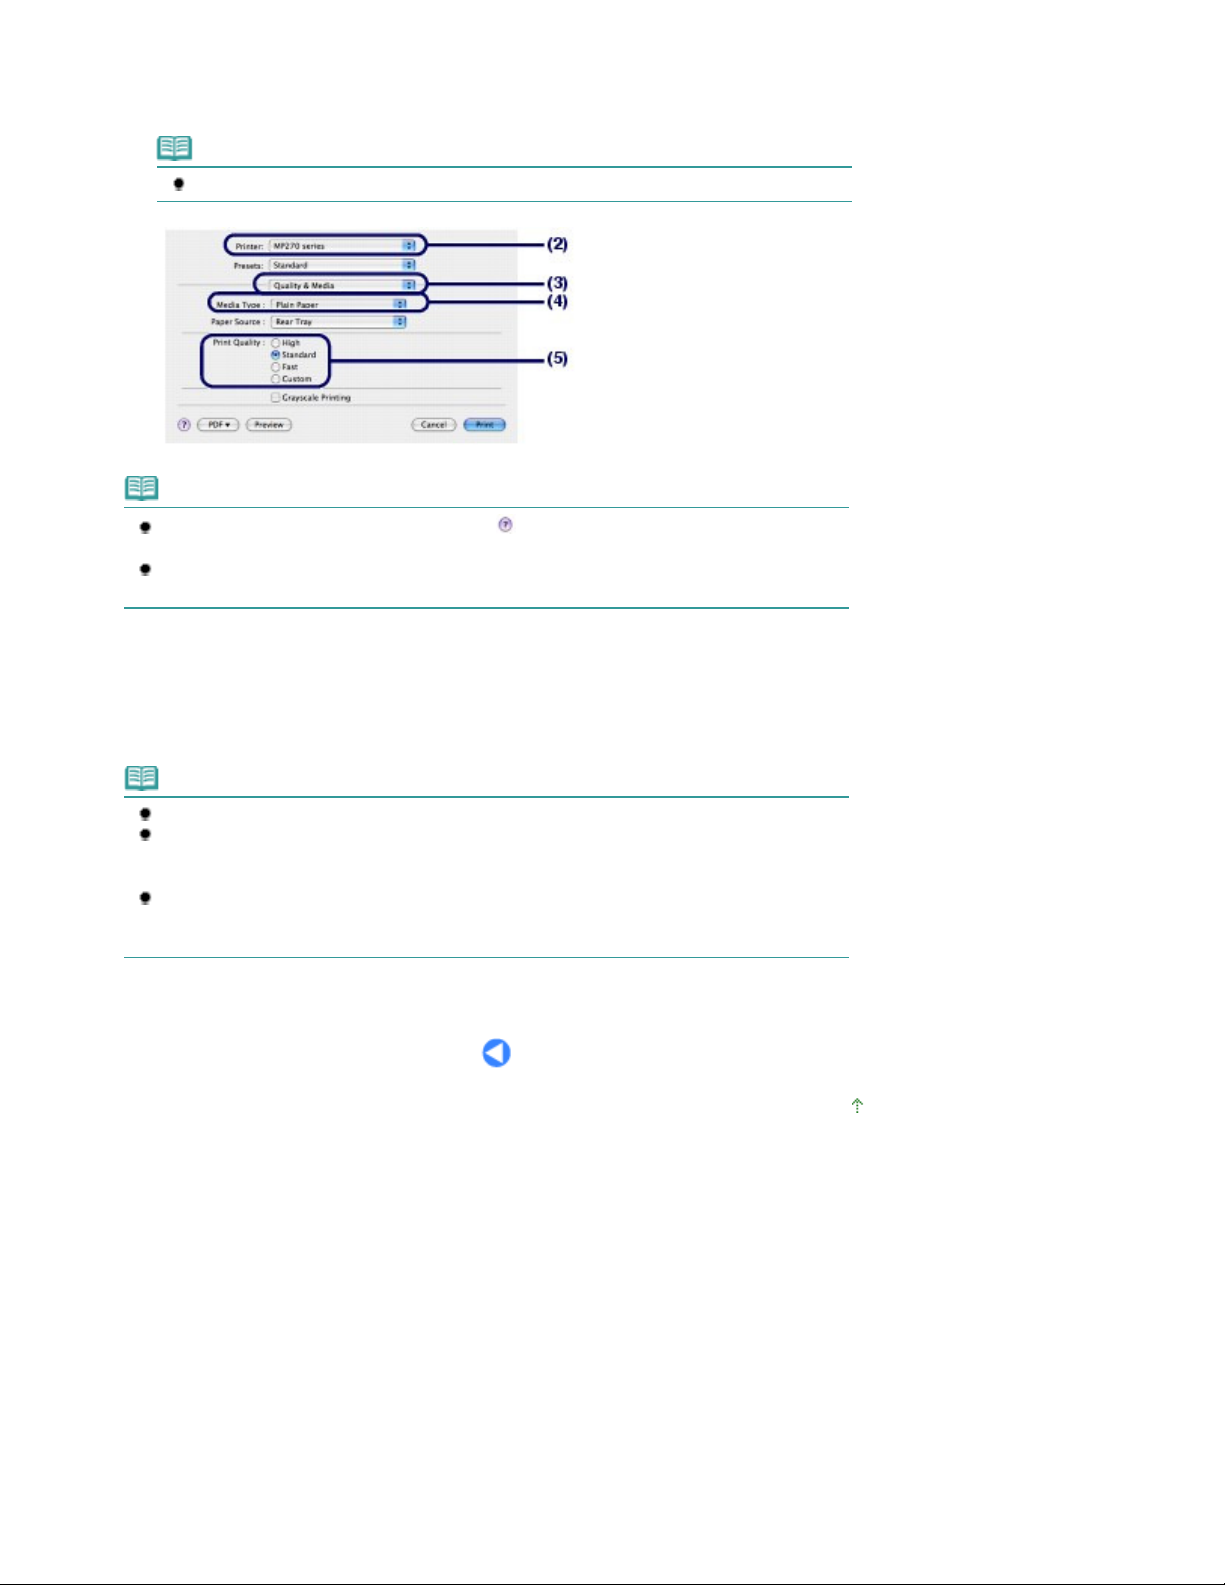
Select the print quality in Print Quality.
Advanced Guide
(5)
Here we select Standard.
Note
For details on the print quality, refer to the on-screen manual:
Note
For details on the printer driver functions, click
Options, Special Effects, Borderless Printing, or Margin screen.
To display the preview to confirm the print result, click Preview. Some software applications
may not have a preview function.
(Question) on the Quality & Media, Color
Page 36 of 678 pagesPrinting Documents (Macintosh)
.
7.
Start printing.
Click Print to start printing.
Note
Click the printer icon in the Dock to display the list of print jobs in progress.
To cancel a print job in progress, select the desired job in the Name list and click Delete.
To temporarily stop a job in progress, click Hold. To temporarily stop all the jobs in the list, click
Stop Jobs.
If printed ruled lines are misaligned or print results are unsatisfactory, adjust the print head
position.
Aligning the Print Head
See
.
Page top
Page 37

Page 37 of 678 pagesOther Usages
Advanced Guide
Contents > Other Usages
Troubleshooting
Other Usages
This section introduces the function to print photos from your PictBridge compliant device such as a
digital camera connected with a USB cable (MP270 series only).
This section also introduces useful software applications you can use with the machine.
Printing Photos from a PictBridge Compliant Device (MP270 series only)
Useful Software Applications
Solution Menu
My Printer
Easy-WebPrint EX
Page top
Page 38
Page 38 of 678 pagesPrinting Photos from a PictBridge Compliant Device (MP270 series only)
Troubleshooting
Contents
>
Other Usages
Advanced Guide
> Printing Photos from a PictBridge Compliant Device (MP270 series only)
Printing Photos from a PictBridge Compliant Device (MP270
series only)
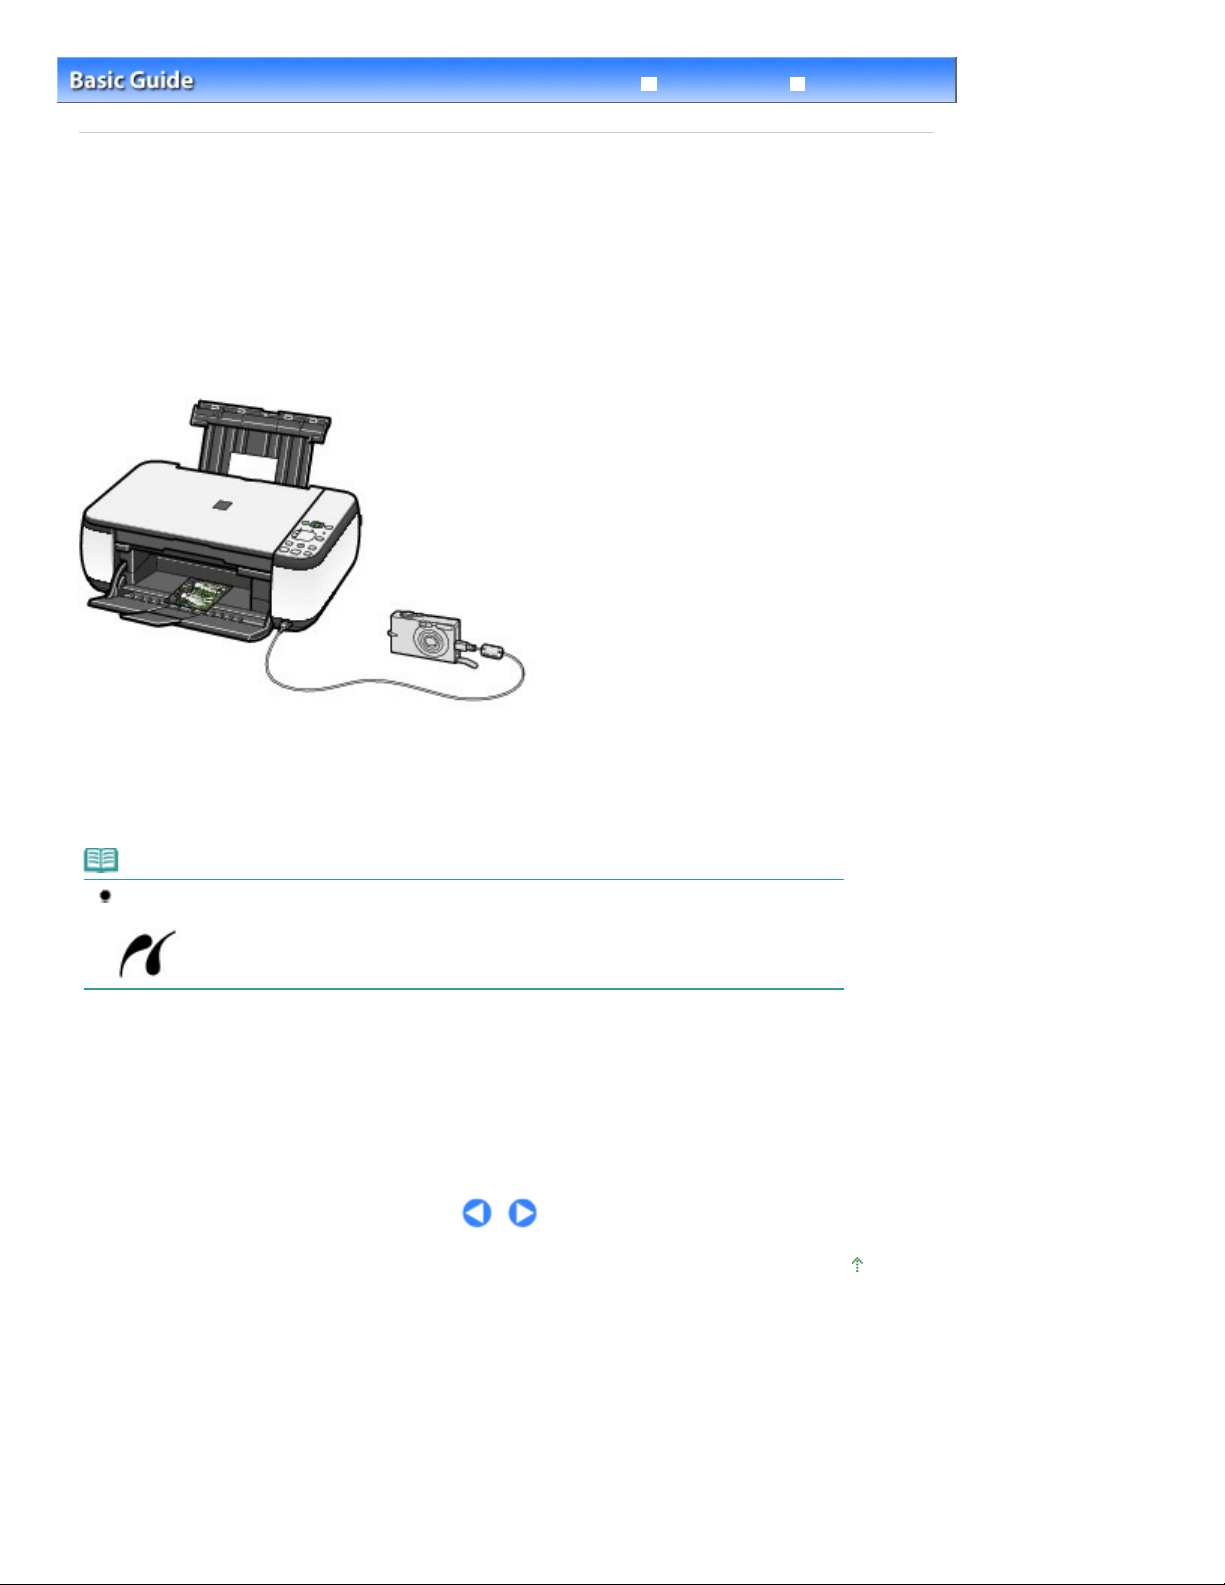
You can connect the PictBridge compliant device to this machine with a USB cable that is recommended
by the device's manufacturer, and print saved images directly.
For details on how to print saved images connecting the PictBridge compliant device, refer to the on-
screen manual:
For details on the print settings on the PictBridge compliant device, refer to the instruction manual
supplied with the device.
Advanced Guide
.
Connectable devices:
Any PictBridge compliant device can be connected to this machine regardless of the manufacturer or
model as long as it is compliant with the PictBridge Standard.
Note
PictBridge is the Standard to print your photos directly without using a computer, connecting a
device such as a digital still camera, digital camcorder, or camera-equipped mobile phone.
(PictBridge) A device with this mark is PictBridge compliant.
Printable image data format:
This machine accepts images* taken with a camera compliant with the Design rule for Camera File
system and PNG files.
* Exif 2.2/2.21 compliant
Page top
Page 39
Page 39 of 678 pagesUseful Software Applications
Troubleshooting
Contents
>
Other Usages
Advanced Guide
> Useful Software Applications
Useful Software Applications
The machine can be used with useful software applications such as Solution Menu, My Printer, and Easy
-WebPrint EX.
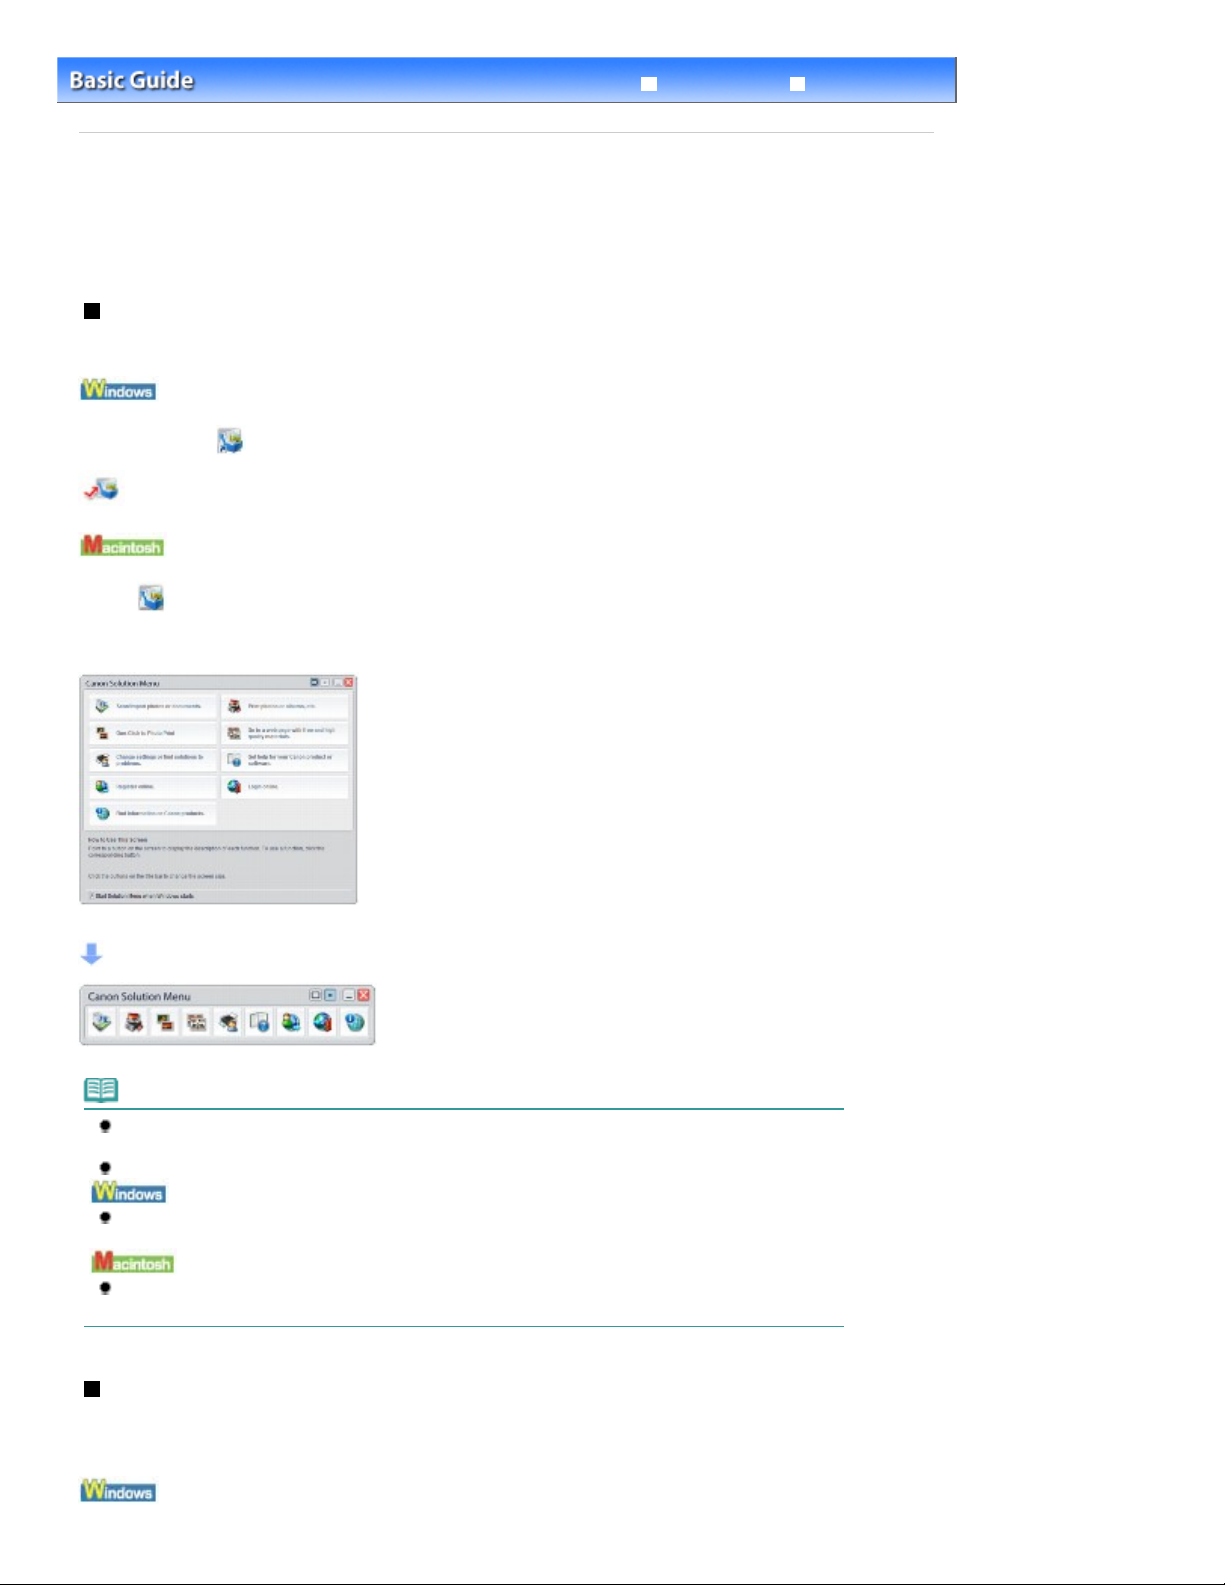
Solution Menu
With Solution Menu, you can start the software applications supplied with the machine or display the
operating instructions.
Double-click (Solution Menu) on the desktop.
Click Here: Solution Menu
Click
* The screens below are for Windows Vista.
(Solution Menu) in the Dock.
Click the button of a function to use.
After starting Solution Menu, click the button on the title bar to reduce the window size.
Note
Install Solution Menu from the
uninstalled. To install Solution Menu, select Solution Menu in Custom Install.
The buttons displayed on the screen may vary depending on the country or region of purchase.
To start Solution Menu from the Start menu, select All Programs (or Programs), Canon Utilities,
Solution Menu, then Solution Menu.
To start Solution Menu from the menu bar, select the Go menu, Applications, Canon Utilities, Solution
Menu, then double-click Solution Menu.
Setup CD-ROM
when it has not been installed or has been
My Printer
With My Printer, you can display the printer driver setup window. It also provides you with the information
on how to take an action when you have trouble with the operation.
My Printer is not available in Macintosh.
Page 40
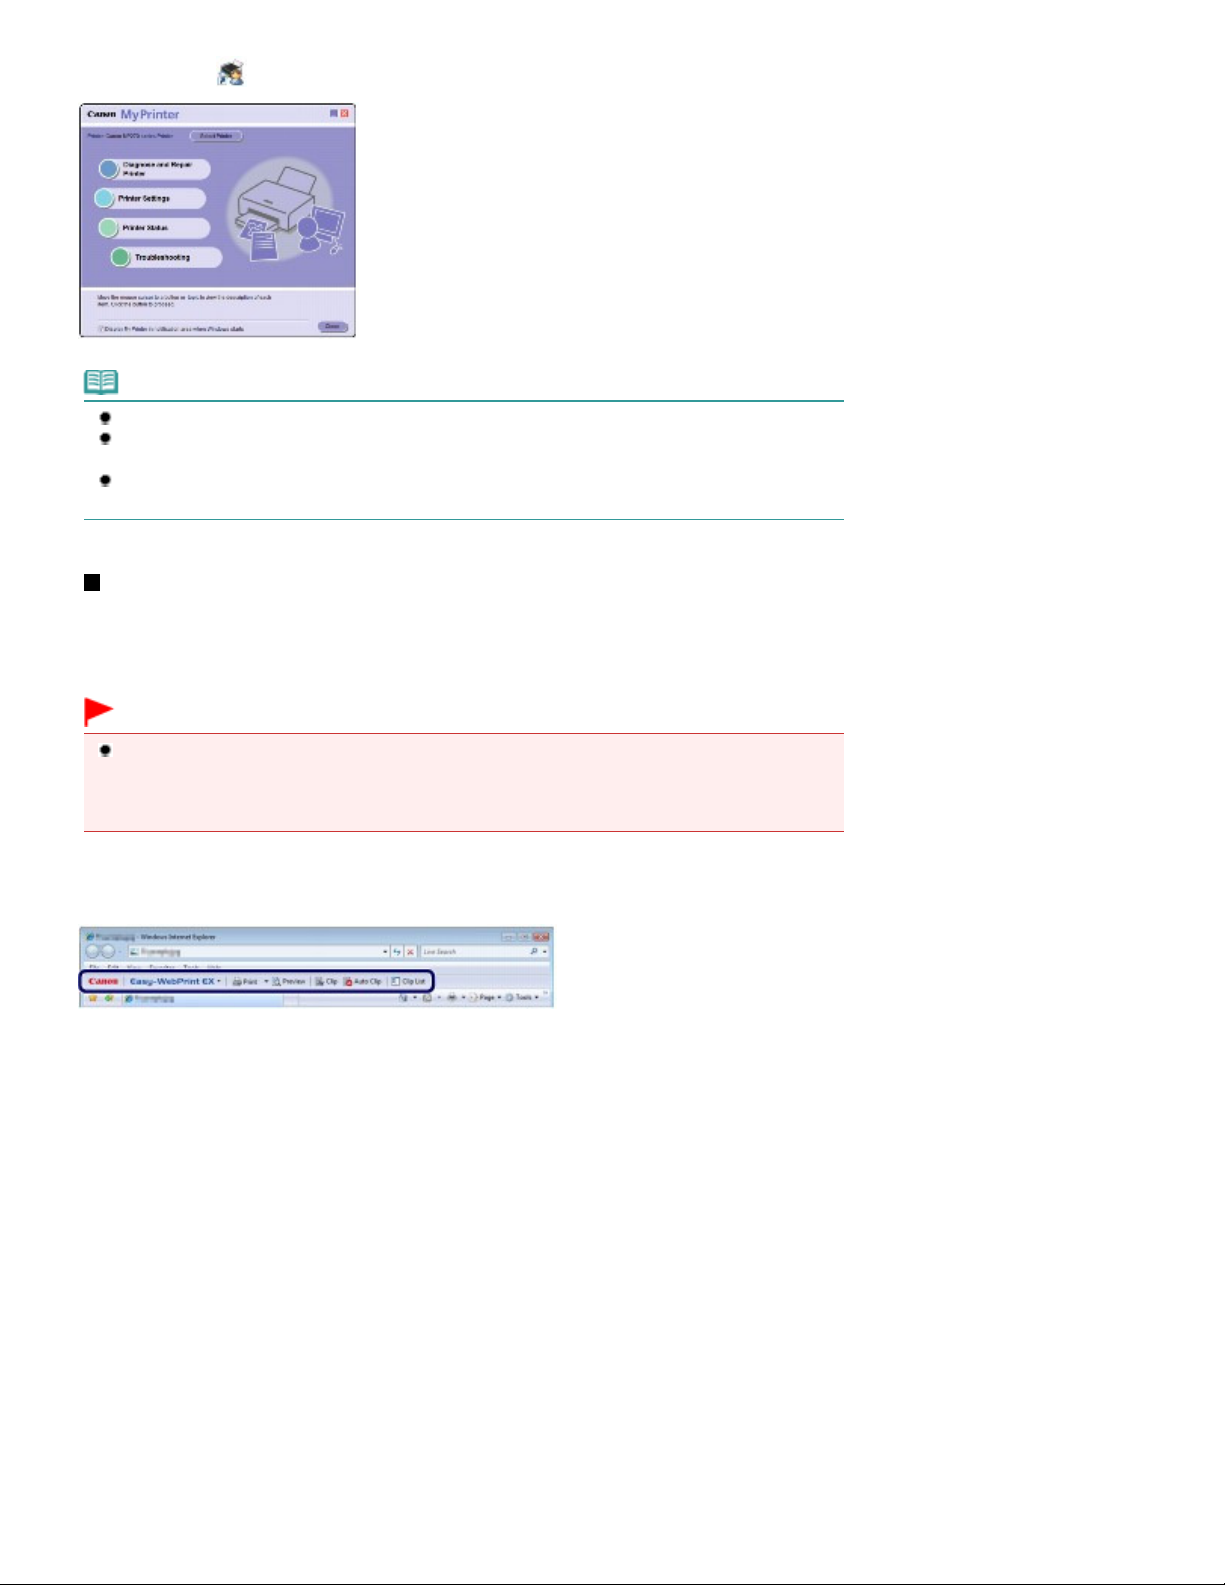
Double-click (My Printer) on the desktop.
Note
You can also start My Printer from Solution Menu or the taskbar.
Install My Printer from the
install My Printer, select My Printer in Custom Install.
To start My Printer from the Start menu, select All Programs (or Programs), Canon Utilities, My
Printer, then My Printer.
Setup CD-ROM when it has not been installed or has been uninstalled. To
Easy-WebPrint EX
Easy-WebPrint EX provides quick and easy printing of web pages for Internet Explorer. You can print web
pages automatically resized to fit the paper width without cutting off the sides of pages, or preview and
select the desired web pages to print.
Easy-WebPrint EX is not available in Windows 2000 and Macintosh.
Page 40 of 678 pagesUseful Software Applications
Important
It is unlawful to reproduce or edit the copyrighted work of another person without permission from
the copyright holder, except for personal use, use within the home, or other use within the limited
scope as defined by the copyright. Additionally, reproducing or editing photographs of people may
infringe on portrait rights.
When Easy-WebPrint EX is installed, it adds a toolbar to your Internet Explorer screen. The toolbar is
available whenever Internet Explorer is running.
The clip function, for example, allows you to clip desired parts of web pages and edit them to print.
Page 41
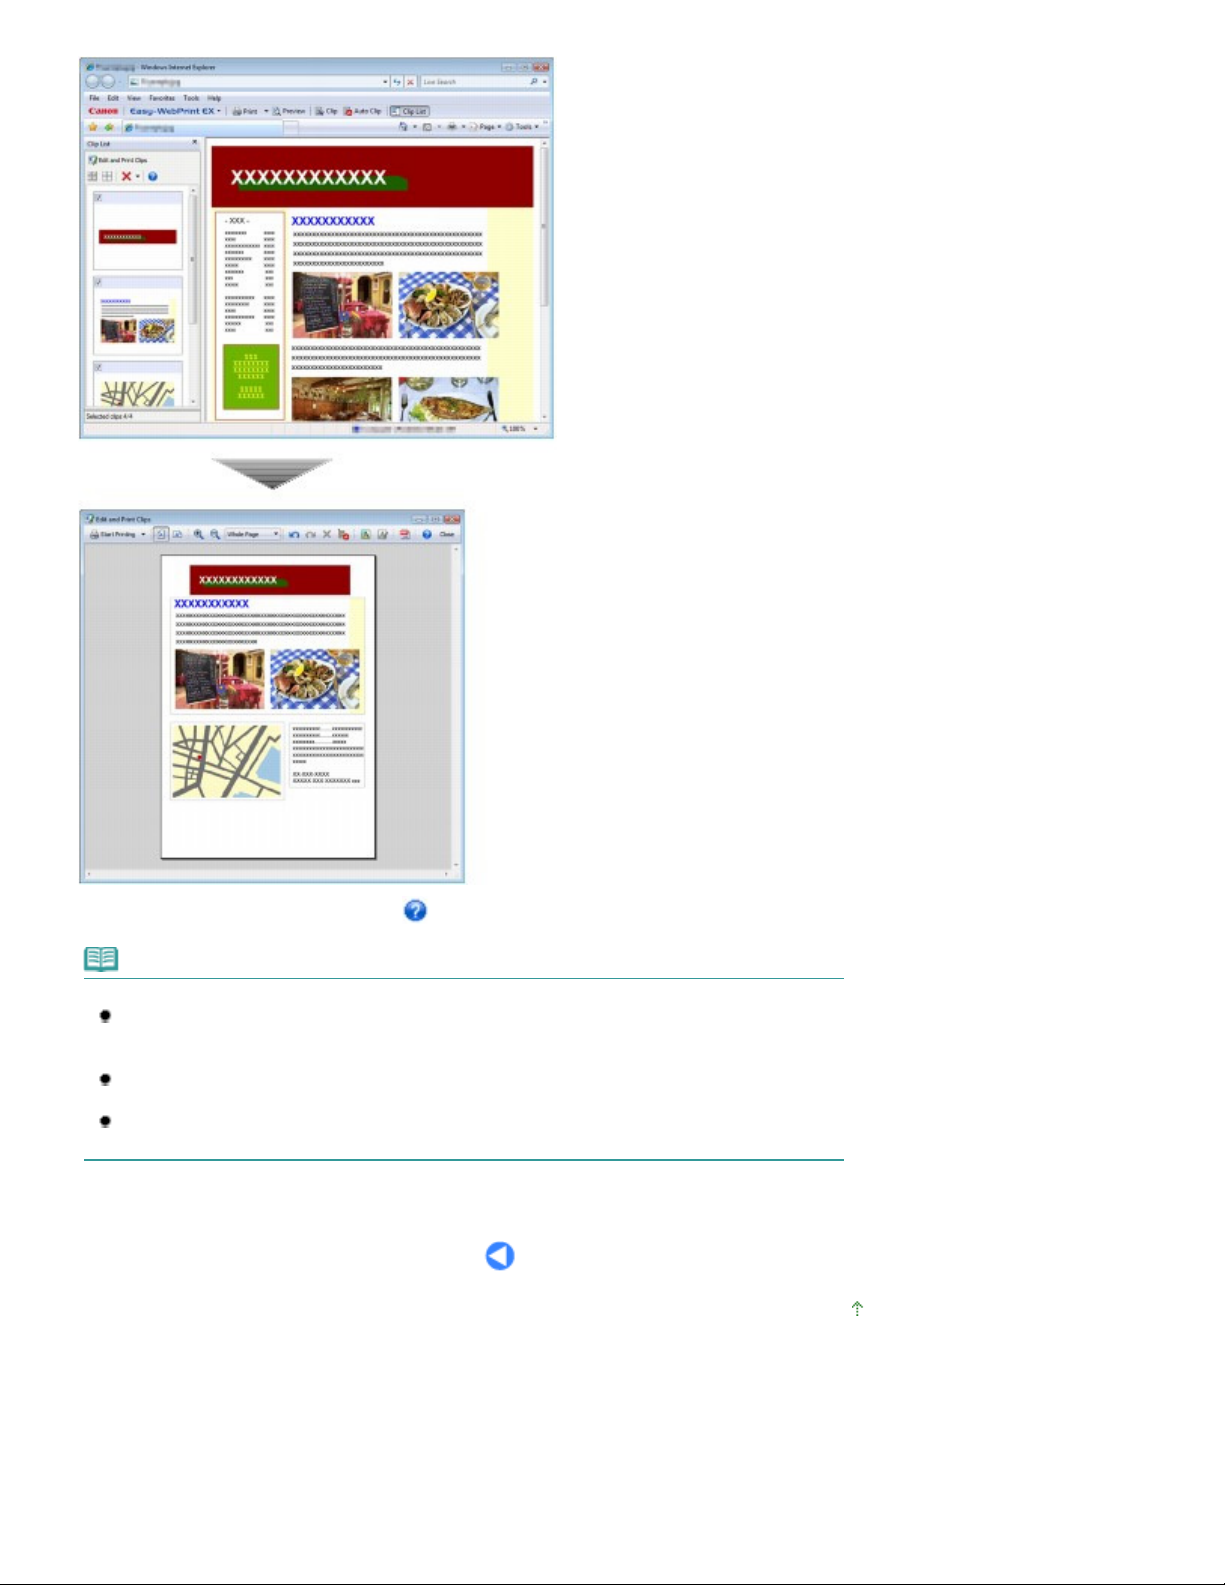
Page 41 of 678 pagesUseful Software Applications
For details on printing web pages, click
(Help) to view the online help.
Note
Notes for installation of Easy-WebPrint EX
If Easy-WebPrint EX is not installed, the guidance for installation of Easy-WebPrint EX may appear
from the taskbar on the desktop.
To install Easy-WebPrint EX, click the displayed guidance and follow the instructions on the screen.
You can also install Easy-WebPrint EX from the
To install Easy-WebPrint EX, select Easy-WebPrint EX in Custom Install.
To install Easy-WebPrint EX on your computer, Internet Explorer 7 or later is required and the
computer must be connected to the Internet.
Setup CD-ROM
.
Page top
Page 42

Page 42 of 678 pagesLoading Paper / Originals
Troubleshooting
Contents
Advanced Guide
> Loading Paper / Originals
Loading Paper / Originals
This section describes types of paper or originals you can load, how to load printing paper in the Rear
Tray, and how to load originals to copy or scan.
Loading Paper
Loading Plain Paper / Photo Paper
Loading Envelopes
Media Types You Can Use
Media Types You Cannot Use
Loading Originals
Loading Originals
Originals You Can Load
Page top
Page 43
jams.
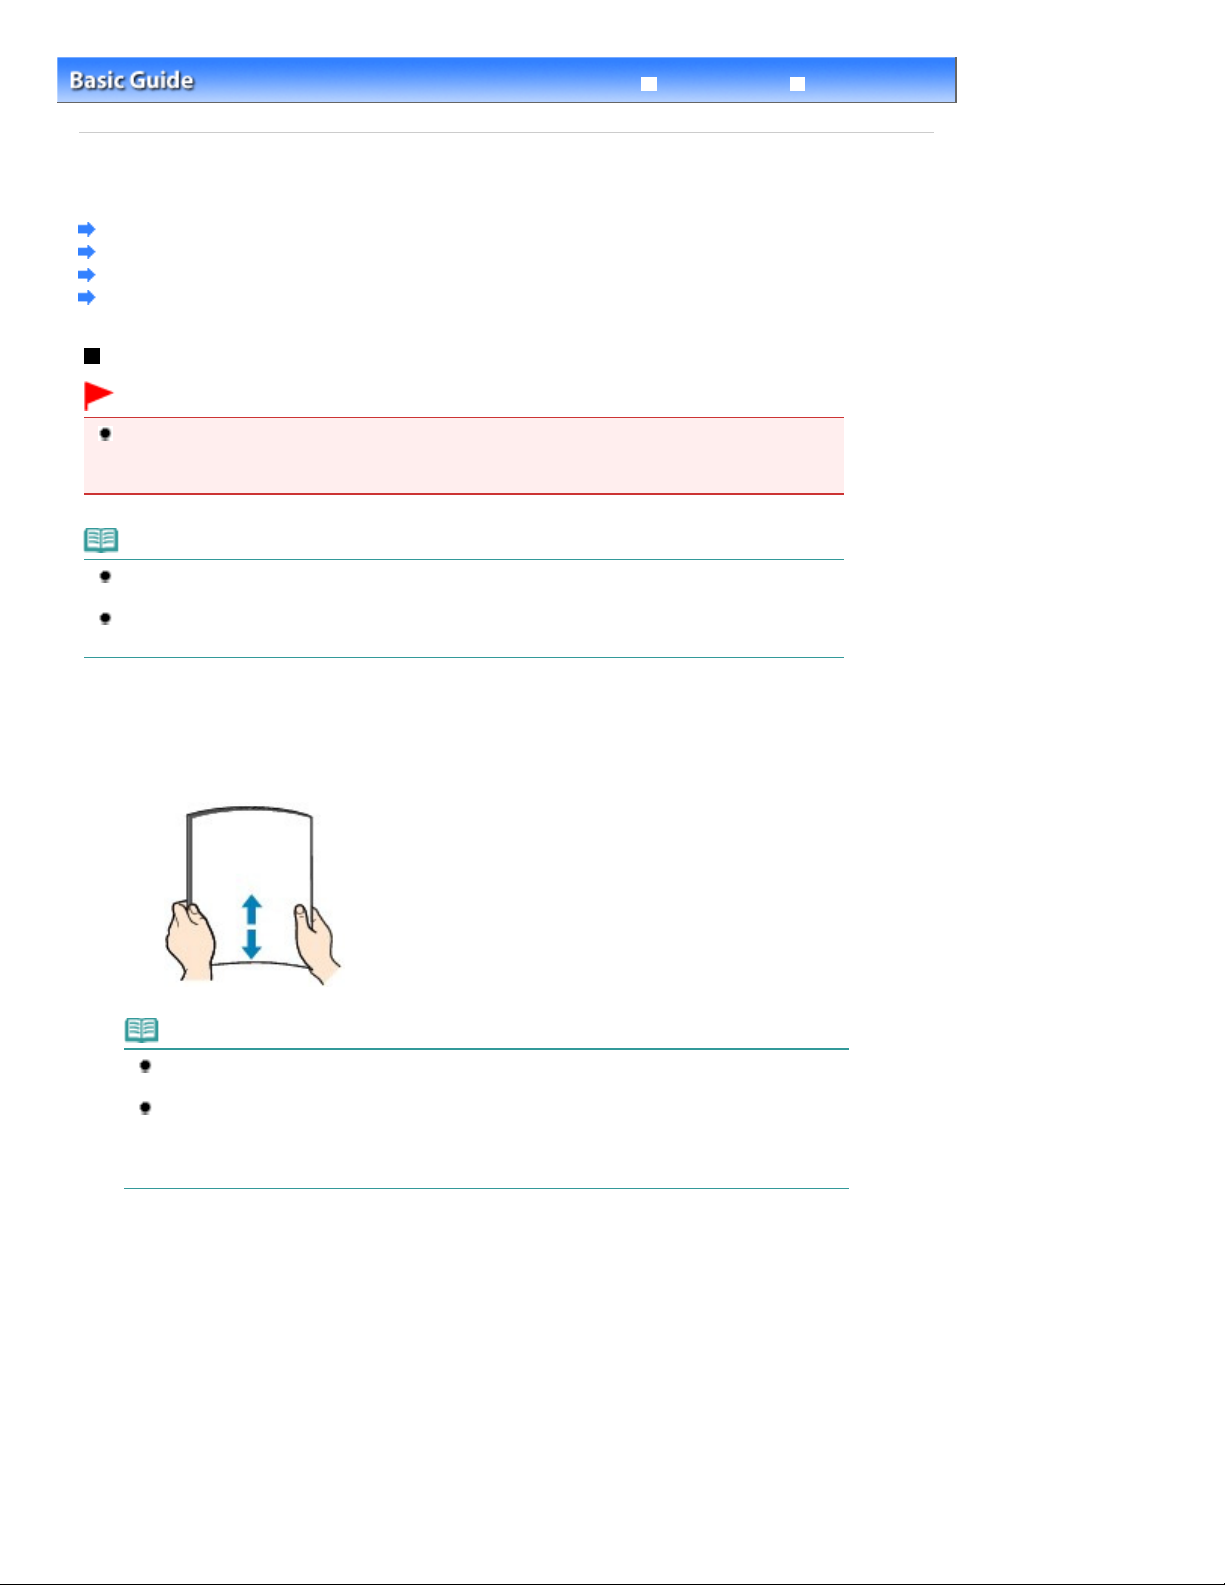
Align the edges of paper. If paper is curled, flatten it.
Advanced Guide
Page 43 of 678 pagesLoading Paper
Advanced Guide
Contents
> Loading Paper / Originals
> Loading Paper
Loading Paper
Loading Plain Paper / Photo Paper
Loading Envelopes
Media Types You Can Use
Media Types You Cannot Use
Loading Plain Paper / Photo Paper
Important
If you cut plain paper into small size such as 4" x 6" / 10 x 15 cm, 4" X 8" / 101.6 x 203.2 mm, 5" x 7"
/ 13 x 18 cm, or 2.16" x 3.58" / 55.0 x 91.0 mm (Card size) to perform trial print, it can cause paper
Note
We recommend Canon genuine photo paper for printing photos.
For details on the Canon genuine paper, see Media Types You Can Use
You can use general copy paper.
For the page size and paper weight you can use for this machine, see
.
Media Types You Can Use
Troubleshooting
.
1. Prepare paper.
Note
Align the edges of paper neatly before loading. Loading paper without aligning the edges may
cause paper jams.
If paper is curled, hold the curled corners and gently bend them in the opposite direction until
the paper becomes completely flat.
For details on how to flatten curled paper, refer to "
2.
Load paper.
Open the Paper Support, raise it, then tip it back.
(1)
.
Troubleshooting" in the on-screen manual:
Open the Paper Output Tray gently, and open the Output Tray Extension.
(2)
Page 44
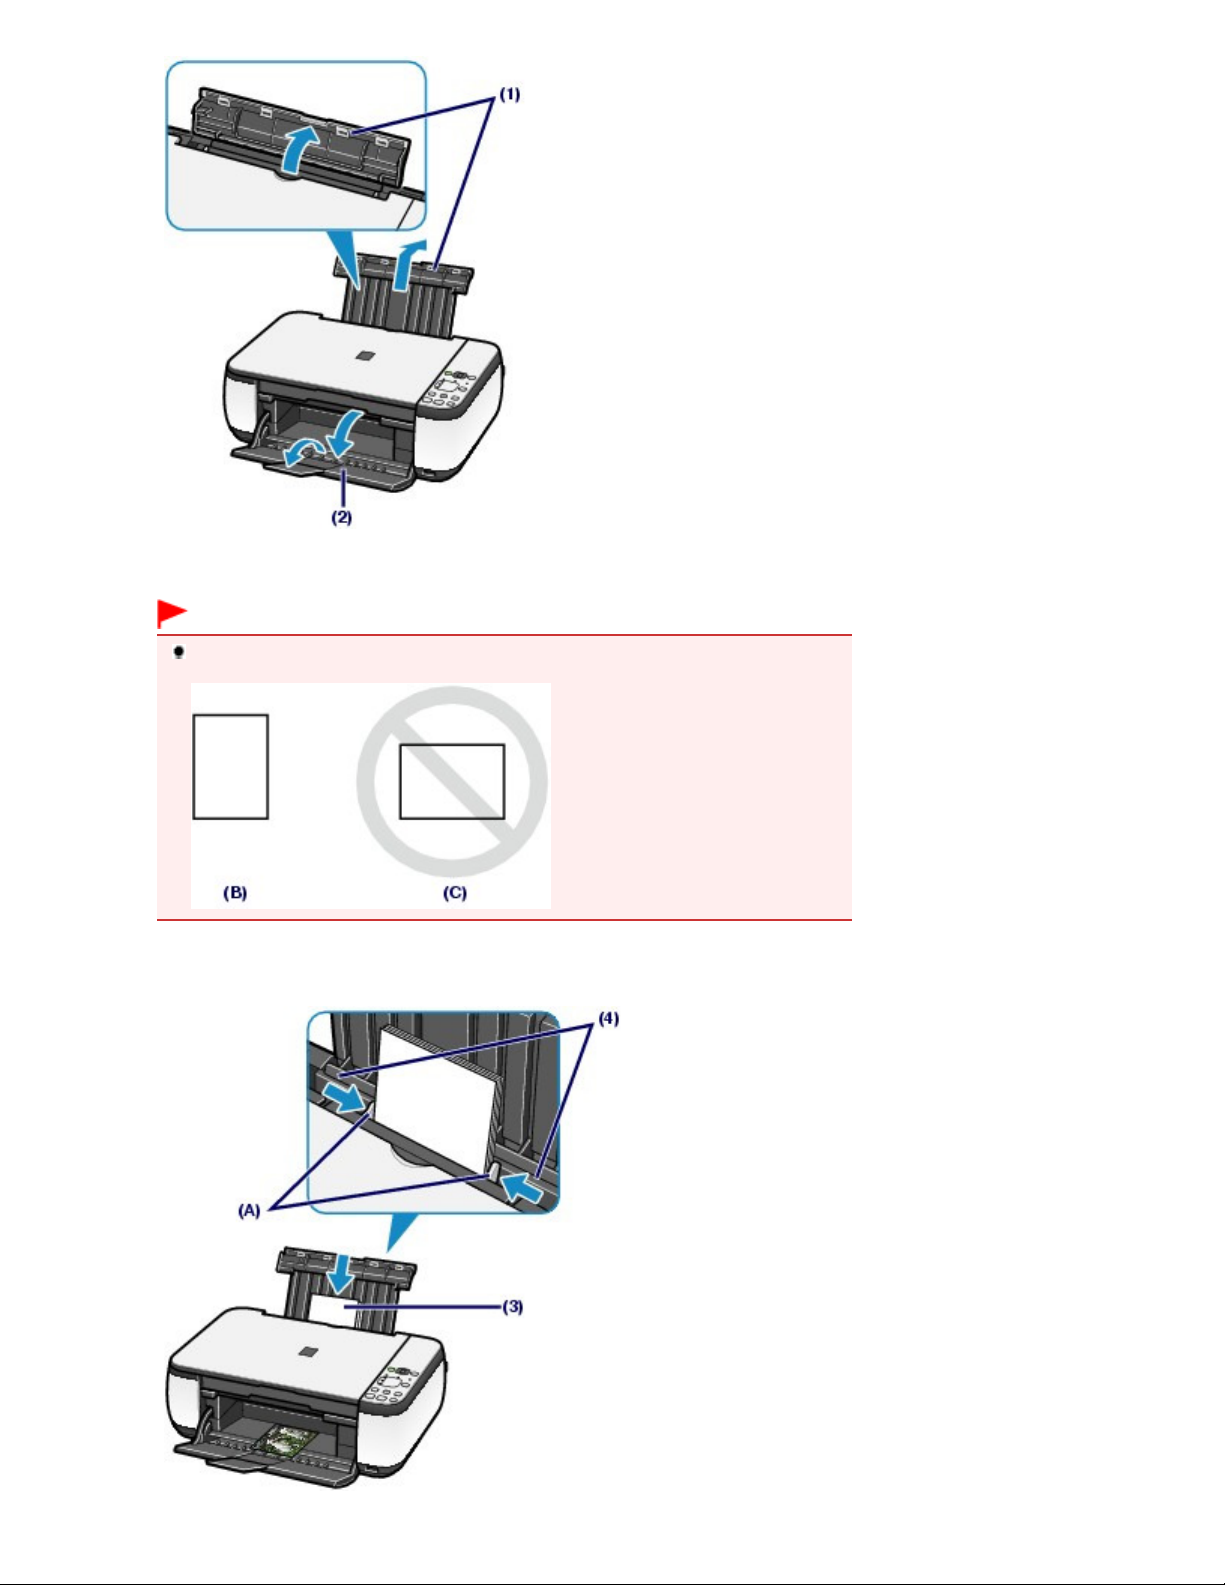
Slide the Paper Guides (A) to open them, and load the paper in the center of the
(3)
Rear Tray WITH THE PRINT SIDE FACING YOU.
Page 44 of 678 pagesLoading Paper
Important
Always load paper in the portrait orientation (B). Loading paper in the landscape
orientation (C) can cause paper jams.
Slide the Paper Guides (A) to align them with both sides of the paper stack.
(4)
Do not slide the Paper Guides too hard. The paper may not be fed properly.
Page 45
Note
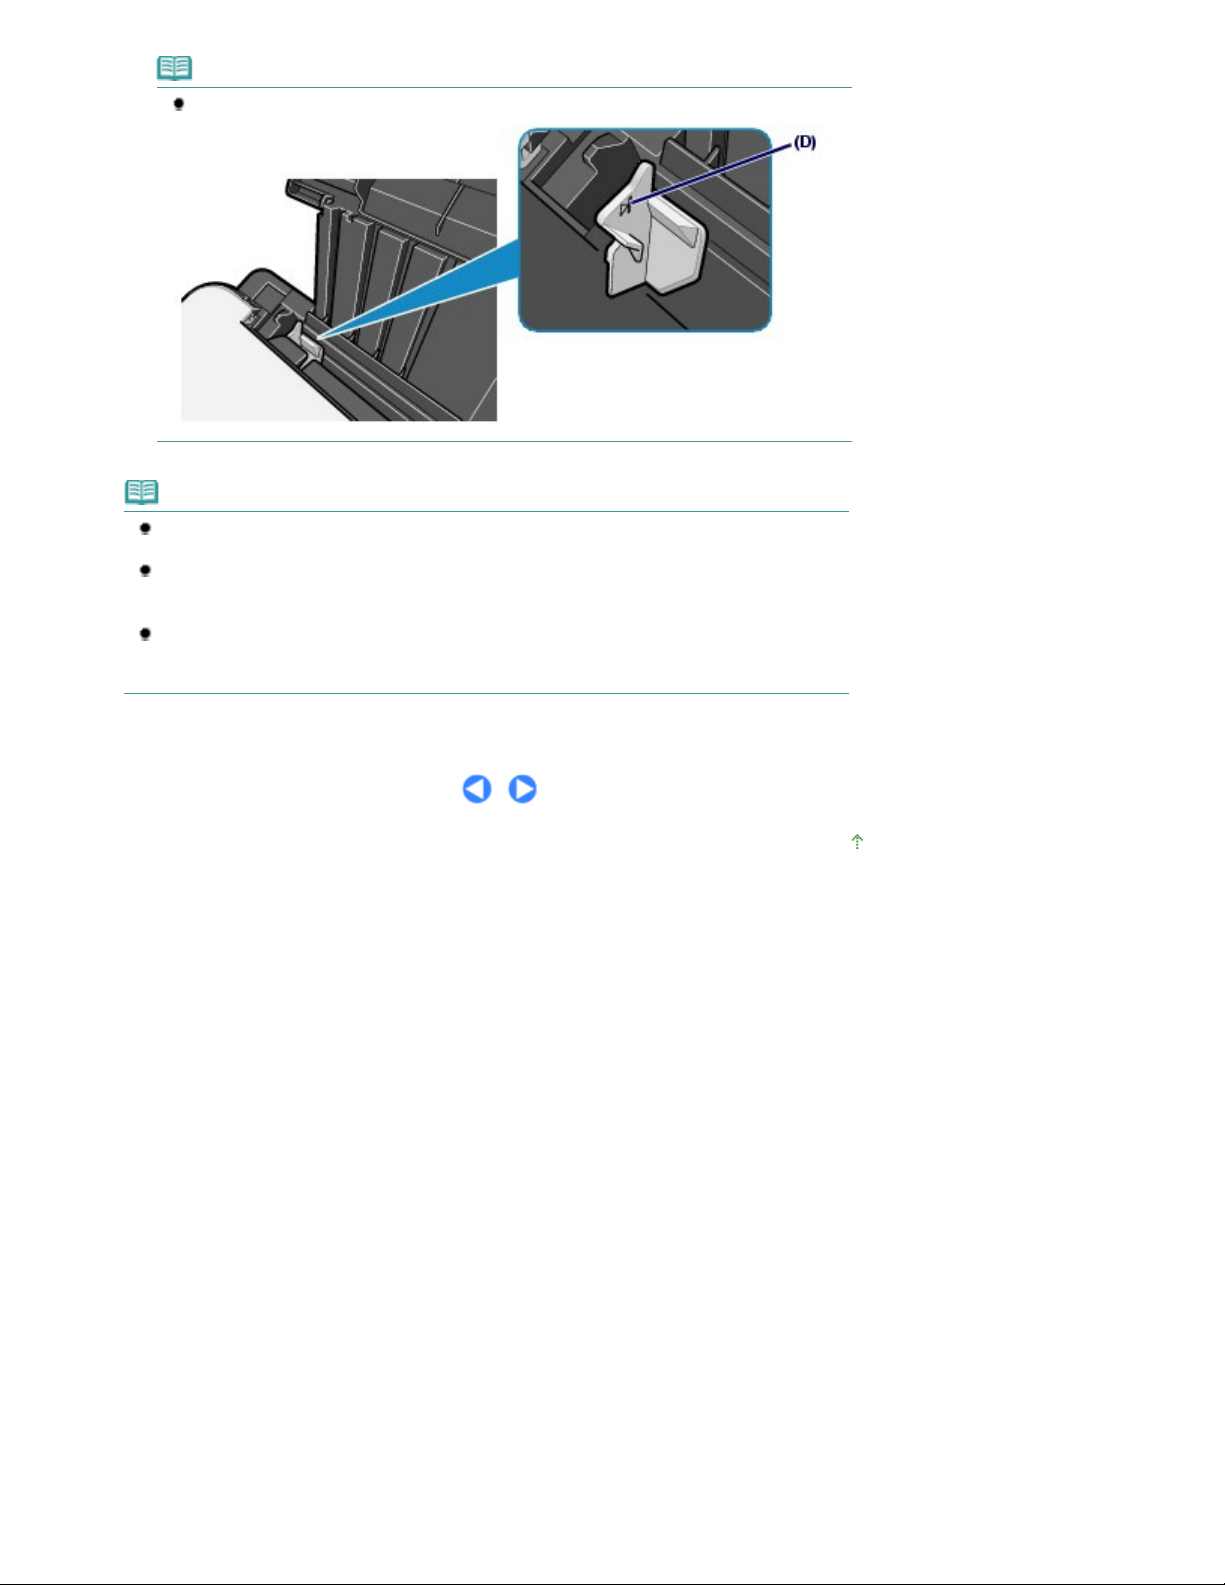
Do not load sheets of paper higher than the Load Limit Mark (D).
Note
The machine may make operating noise when feeding paper.
After loading paper
When copying, select the size and type of the loaded paper using the Operation Panel on the
machine.
See Copying.
When printing with a computer, select the size and type of the loaded paper in Printer Paper
Size (or Paper Size) and Media Type in the printer driver.
See
Printing Documents (Windows) or
Printing Documents (Macintosh) .
Page 45 of 678 pagesLoading Paper
Page top
Page 46
Page 46 of 678 pagesLoading Envelopes
Troubleshooting
Contents
> Loading Paper / Originals >
Loading Paper
Advanced Guide
> Loading Envelopes
Loading Envelopes
You can print on European DL and US Comm. Env. #10-sized envelopes.
The address is automatically rotated and printed according to the envelope's direction by specifying with
the printer driver properly.
Important
You can only print on envelopes with the computer.
You cannot use the following envelopes.
- Envelopes with an embossed or treated surface
- Envelopes with a double flap (or sticker flaps)
- Envelopes whose gummed flaps are already moistened and adhesive
Note
In Windows, the message on how to load envelopes will appear when printing on them. This
message will not appear next time if you select the Do not show this message again. check box.
1.
Prepare envelopes.
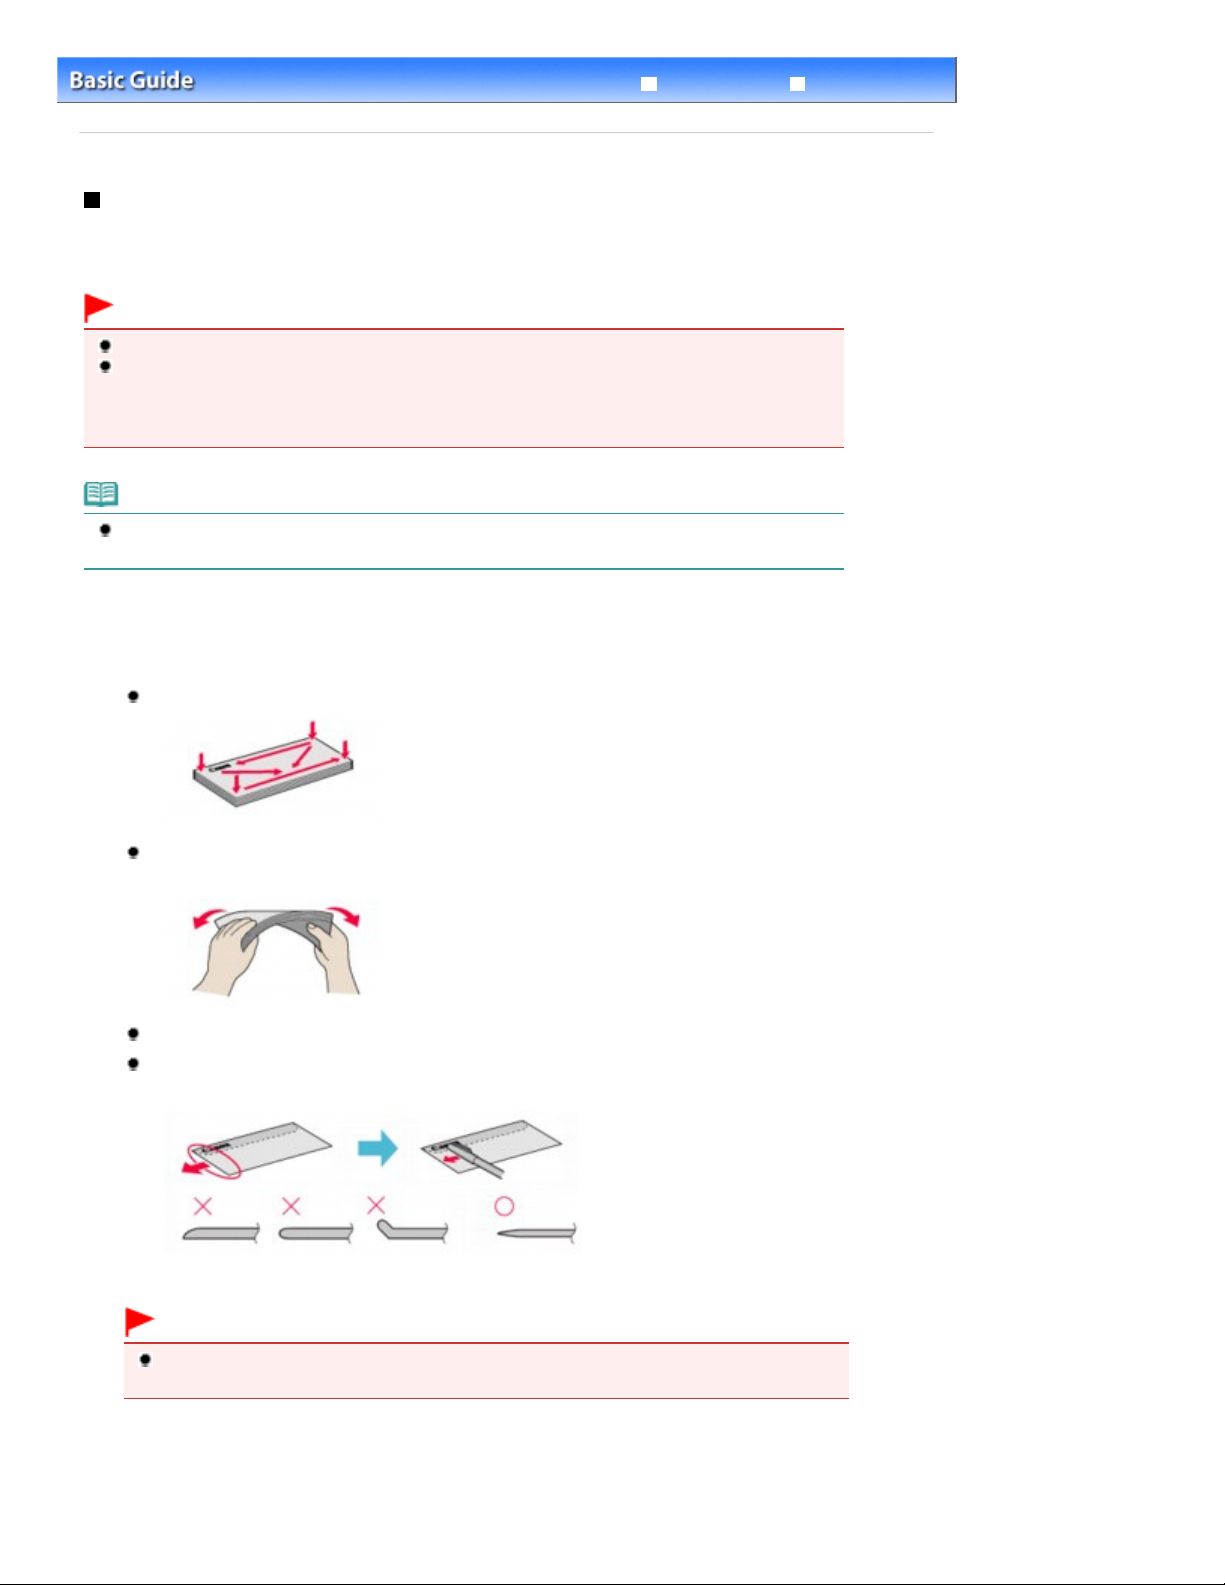
Press down on all four corners and edges of the envelopes to flatten them.
If the envelopes are curled, hold the opposite corners and gently twist them in the
opposite direction.
If the corner of the envelope flap is folded, flatten it.
Use a pen to press the leading edge in the inserting direction flat and sharpen the
crease.
The figures above show a side view of the leading edge of the envelope.
Important
The envelopes may jam in the machine if they are not flat or the edges are not aligned. Make
sure that no curl or puff exceeds 0.1 inches / 3 mm.
2.
Load envelopes.
Page 47
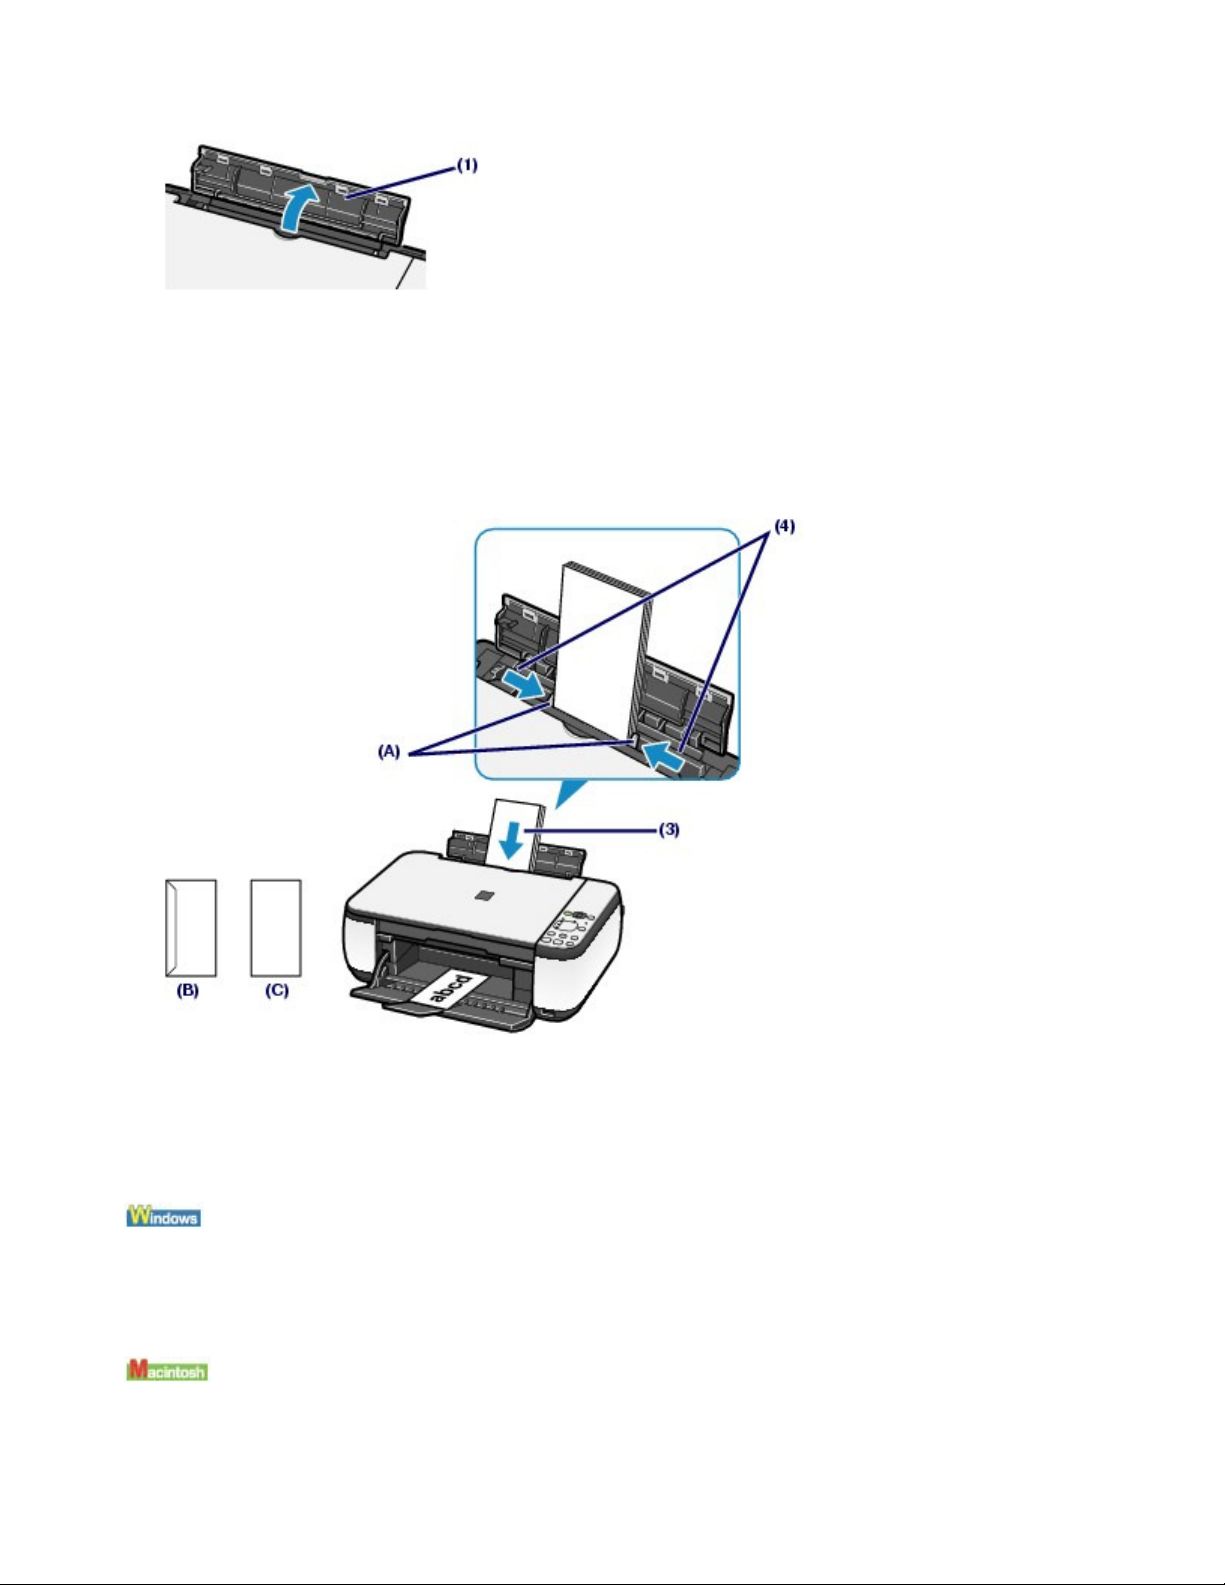
Open the Paper Support.
(1)
Do not raise the Paper Support.
Open the Paper Output Tray gently, and open the Output Tray Extension.
(2)
Slide the Paper Guides (A) to open them, and load the envelopes in the center of
(3)
the Rear Tray WITH THE ADDRESS SIDE FACING YOU.
The folded flap of the envelope will be faced down on the left side.
Up to 10 envelopes can be loaded at once.
Slide the Paper Guides (A) to align them with both sides of the envelopes.
(4)
Do not slide the Paper Guides too hard. The envelopes may not be fed properly.
Page 47 of 678 pagesLoading Envelopes
(B) Rear side
(C) Address side
3.
Specify the settings in the printer driver.
Select Envelope in Commonly Used Settings on the Quick Setup sheet.
(1)
Select DL Env. or Comm. Env. #10 in the Envelope Size Setting window.
(2)
Select Landscape in Orientation.
(3)
Select Envelope in Media Type.
(1)
Select DL Envelope or #10 Envelope in Paper Size.
(2)
Select the landscape orientation in Orientation.
(3)
Page 48

Important
If you do not specify the envelope size or orientation properly, the address will be printed
upside down or will be turned to 90 degrees.
Note
The machine may make operating noise when feeding envelopes.
In Windows, if the print result is upside down, open the printer driver setup window, select
Envelope in Commonly Used Settings, then select the Rotate 180 degrees check box in
Additional Features.
For details on the printer driver settings, see Printing Documents (Windows)
Documents (Macintosh)
.
or
Printing
Page 48 of 678 pagesLoading Envelopes
Page top
Page 49
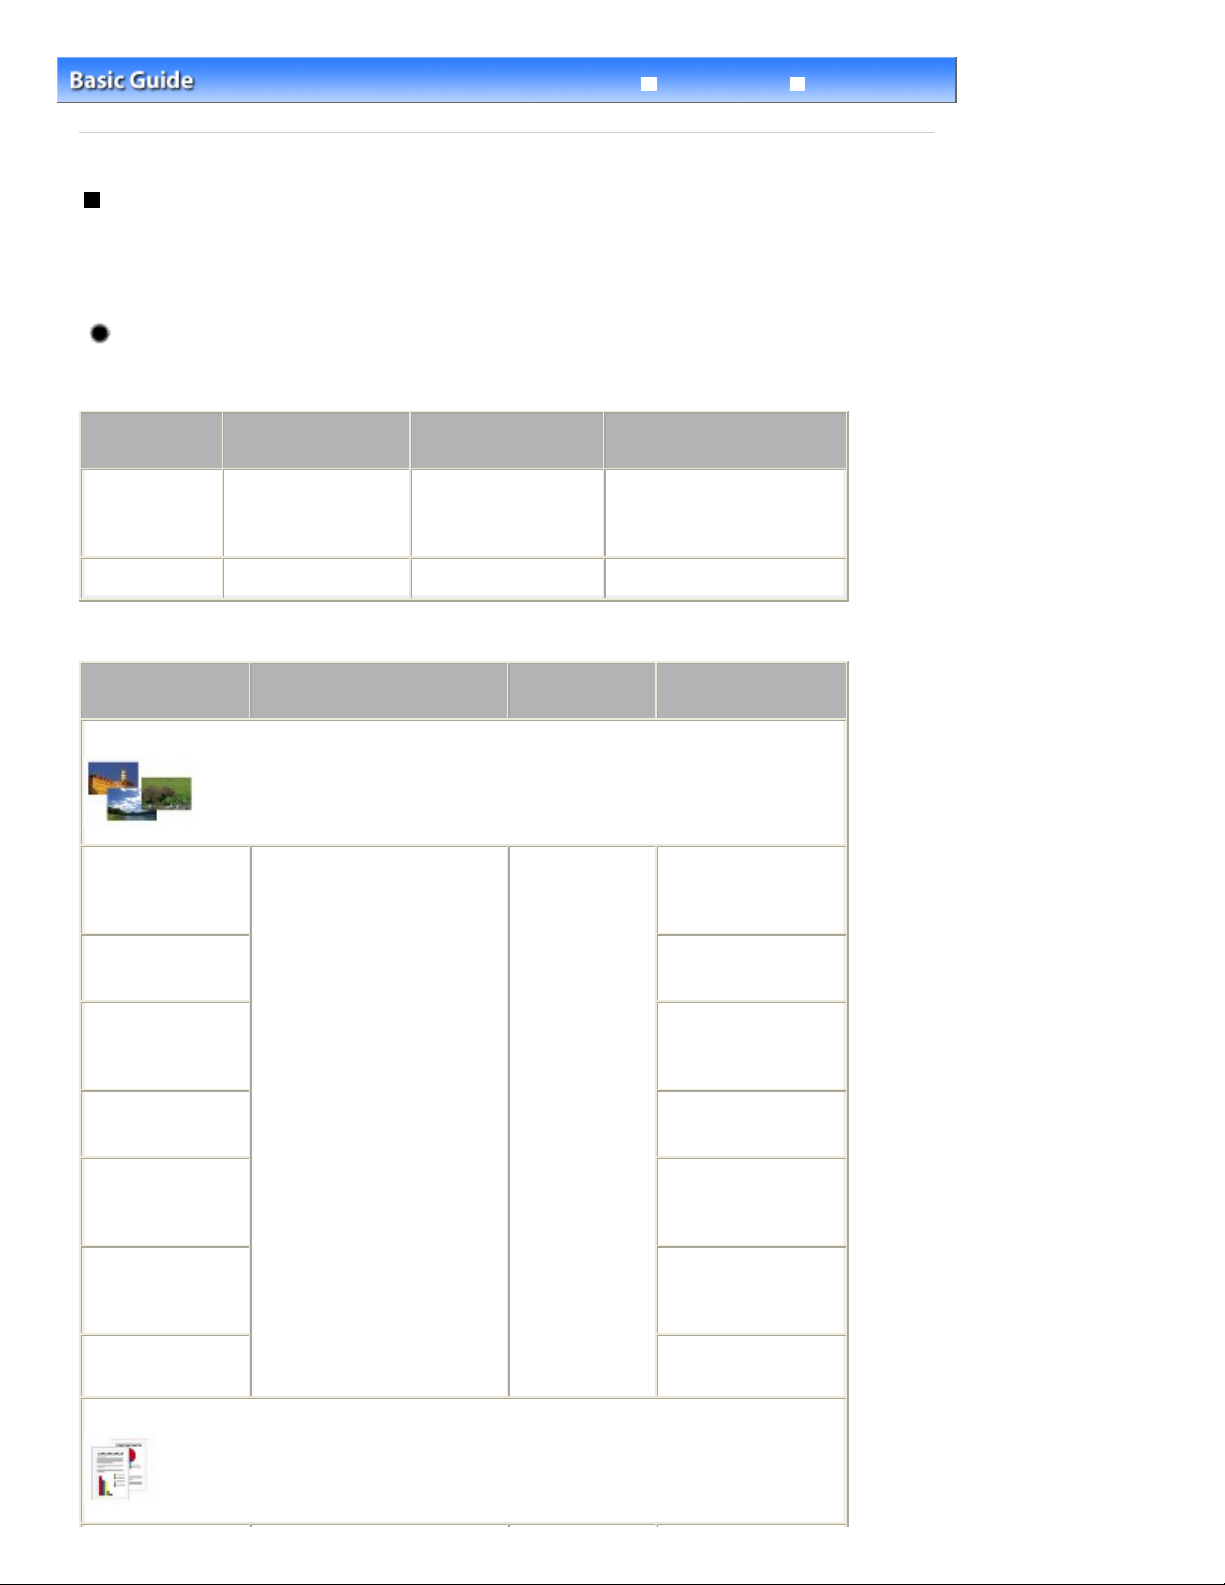
Approx. 100 sheets
Approx. 50 sheets
A4, Letter, 5" x 7" / 13 x 18 cm,
Page 49 of 678 pagesMedia Types You Can Use
Troubleshooting
Contents
> Loading Paper / Originals >
Loading Paper
Advanced Guide
> Media Types You Can Use
Media Types You Can Use
Choose paper suitable for printing, for the best print results. Canon provides you various types of paper
to enhance the fun of printing, such as stickers as well as papers for photo or document. W e
recommend the use of Canon genuine paper for printing your important photos.
Media Types
Commercially available papers
Name of Paper
<Model No.>
Plain Paper
(Recycled paper)
*2 *3
Envelopes 10 envelopes
Canon genuine papers
Rear Tray Paper Load
*1
Limit
Paper Output Tray
Load Limit
*4
Settings in Printer Driver:
Media Type
Plain Paper
Envelope
Name of Paper
<Model No.>
For printing photos:
Photo Paper Pro
Platinum
<PT-101>
Photo Paper Pro II
<PR-201>
Glossy Photo Paper
"Everyday Use"
<GP-501>
Photo Paper Glossy
<GP-502>
Photo Paper Plus
Glossy II
<PP- 201>
*1
*5
*5
*3 *5
*3 *5
*3 *5
Rear Tray Paper Load Limit
and 8" x 10" / 20 x 25 cm: 10
sheets
4" x 6" / 10 x 15 cm: 20 sheets
Paper Output
Tray Load Limit
*4 Photo Paper Pro Platinum
Settings in Printer
Driver: Media Type
Photo Paper Pro II
Glossy Photo Paper
Glossy Photo Paper
Photo Paper Plus Glossy
II
Photo Paper Plus
Semi-gloss
<SG-201>
Matte Photo Paper
<MP-101>
For printing business documents:
*3 *5
Photo Paper Plus Semi-
gloss
Matte Photo Paper
Page 50
Advanced Guide
Page 50 of 678 pagesMedia Types You Can Use
High Resolution Paper
<HR-101N>
For creating your own prints:
T-Shirt Transfers
<TR-301>
Photo Stickers
<PS-101>
*1
Paper with a Model Number is Canon genuine paper. Refer to the instruction manual supplied with
*6
80 sheets 50 sheets
1 sheet
*4
High Resolution Paper
T-Shirt Transfers
Glossy Photo Paper
the paper for detailed information on the printable side and notes on handling paper. For information on
the page sizes available for each Canon genuine paper, visit our website. You may not be able to
purchase some Canon genuine papers depending on the country or region of purchase. Paper is not
sold in the US by Model Number. Purchase paper by name.
*2
Proper feeding of paper may not be possible at the maximum capacity depending on the type of paper
or environmental conditions (either very high or low temperature or humidity). In such cases, reduce the
number of paper you load at a time to less than half (100% recycled paper can be used).
*3
Paper that can be used for making copies when selecting the media type with the
Paper
button on the
Operation Panel. You can only select A4 or Letter-sized plain paper, A4 or Letter-sized photo paper, and
4" x 6" / 10 x 15 cm photo paper.
*4
We recommend that you remove the previously printed sheet from the Paper Output Tray before
continuously printing to avoid blurs and discoloration.
*5
When loading paper in stacks, the print side may become marked as it is fed or paper may not feed
properly. In this case, load one sheet at a time.
*6
You can easily specify print settings for sticker paper with Easy-PhotoPrint EX provided on the
CD-ROM
. Install it on your computer.
Setup
Note
For details on the page size and media type settings when printing from a PictBridge compliant
device, refer to the on-screen manual:
(MP270 series only).
Page Sizes
You can use the following page sizes.
Note
In Macintosh, Choukei 3 and Choukei 4 are not available.
Standard sizes:
Letter (8.50 x 11.00 inches / 215.9 x 279.4 mm)
Legal (8.50 x 14.00 inches / 215.9 x 355.6 mm)
A5 (5.83 x 8.27 inches / 148.0 x 210.0 mm)
A4 (8.27 x 11.69 inches / 210.0 x 297.0 mm)
B5 (7.17 x 10.12 inches / 182.0 x 257.0 mm)
4" x 6" (4.00 x 6.00 inches / 10 x 15 cm)
4" x 8" (4.00 x 8.00 inches / 101.6 x 203.2 mm)
5" x 7" (5.00 x 7.00 inches / 13 x 18 cm)
8" x 10" (8.00 x 10.00 inches / 20 x 25 cm)
L (3.50 x 5.00 inches / 89.0 x 127.0 mm)
2L (5.00 x 7.01 inches / 127.0 x 178.0 mm)
Hagaki (3.94 x 5.83 inches / 100.0 x 148.0 mm)
Hagaki 2 (7.87 x 5.83 inches / 200.0 x 148.0 mm)
Comm. Env. #10 (4.12 x 9.50 inches / 104.6 x 241.3 mm)
DL Env. (4.33 x 8.66 inches / 110.0 x 220.0 mm)
Page 51

Choukei 3 (4.72 x 9.25 inches / 120.0 x 235.0 mm)
Choukei 4 (3.54 x 8.07 inches / 90.0 x 205.0 mm)
Youkei 4 (4.13 x 9.25 inches / 105.0 x 235.0 mm)
Youkei 6 (3.86 x 7.48 inches / 98.0 x 190.0 mm)
Card (2.16 x 3.58 inches / 55.0 x 91.0 mm)
Wide (4.00 x 7.10 inches / 101.6 x 180.6 mm)
Non-standard sizes:
You can also specify a custom size within the following range.
Minimum size:
Maximum size:
2.17 x 3.58 inches / 55.0 x 91.0 mm
8.50 x 26.61 inches / 215.9 x 676.0 mm
Paper Weight
17 to 28 lb / 64 to 105 g/m2 (except for Canon genuine paper)
Do not use heavier or lighter paper (except for Canon genuine paper), as it could jam in the machine.
Notes on Storing Paper
Take out only the necessary number of paper from the package, just before printing.
To avoid curling, when you do not print, put unused paper back into the package and keep it on a
level surface. And also, store it avoiding heat, humidity, and direct sunlight.
Page 51 of 678 pagesMedia Types You Can Use
Notes on Paper for Full-page Borderless Printing
You cannot use A5, B5, and Legal-sized paper, and envelopes for full-page borderless printing.
You can use plain paper for full-page borderless printing only when printing from a computer.
However, this may result in lower print quality. We recommend using plain paper for a trial print.
Page top
Page 52

Page 52 of 678 pagesMedia Types You Cannot Use
Troubleshooting
Contents
> Loading Paper / Originals >
Loading Paper
Advanced Guide
> Media Types You Cannot Use
Media Types You Cannot Use
Do not use the following types of paper. Using such paper will cause not only unsatisfactory results, but
also the machine to jam or malfunction.
Folded, curled, or wrinkled paper
Damp paper
2
Paper that is too thin (weighing less than 17 lb / 64 g/m
Paper that is too thick (weighing more than 28 lb / 105 g/m2, except for Canon genuine paper)
Paper thinner than a postcard, including plain paper or notepad paper cut to a small size (when
printing on paper smaller than A5)
Picture postcards
Postcards affixed with photos or stickers
Envelopes with a double flap (or sticker flaps)
Envelopes with an embossed or treated surface
Envelopes whose gummed flaps are already moistened and adhesive
Any type of paper with holes
Paper that is not rectangular
Paper bound with staples or glue
Paper with adhesives
Paper decorated with glitter, etc.
)
Page top
Page 53
Advanced Guide
Page 53 of 678 pagesLoading Originals
Advanced Guide
Contents
> Loading Paper / Originals > Loading Originals
Loading Originals
Loading Originals
Originals You Can Load
Loading Originals
Load originals to copy or scan on the Platen Glass.
Important
After loading the original, be sure to close the Document Cover before starting to copy or scan.
When scanning from a computer using a software application, you need to load the original in a
different way.
For details, refer to the on-screen manual:
1.
Load an original on the Platen Glass.
Open the Document Cover.
(1)
.
Troubleshooting
Important
Do not place any object on the Document Cover. It will fall into the Rear Tray when the
Document Cover is opened and cause the machine to malfunction.
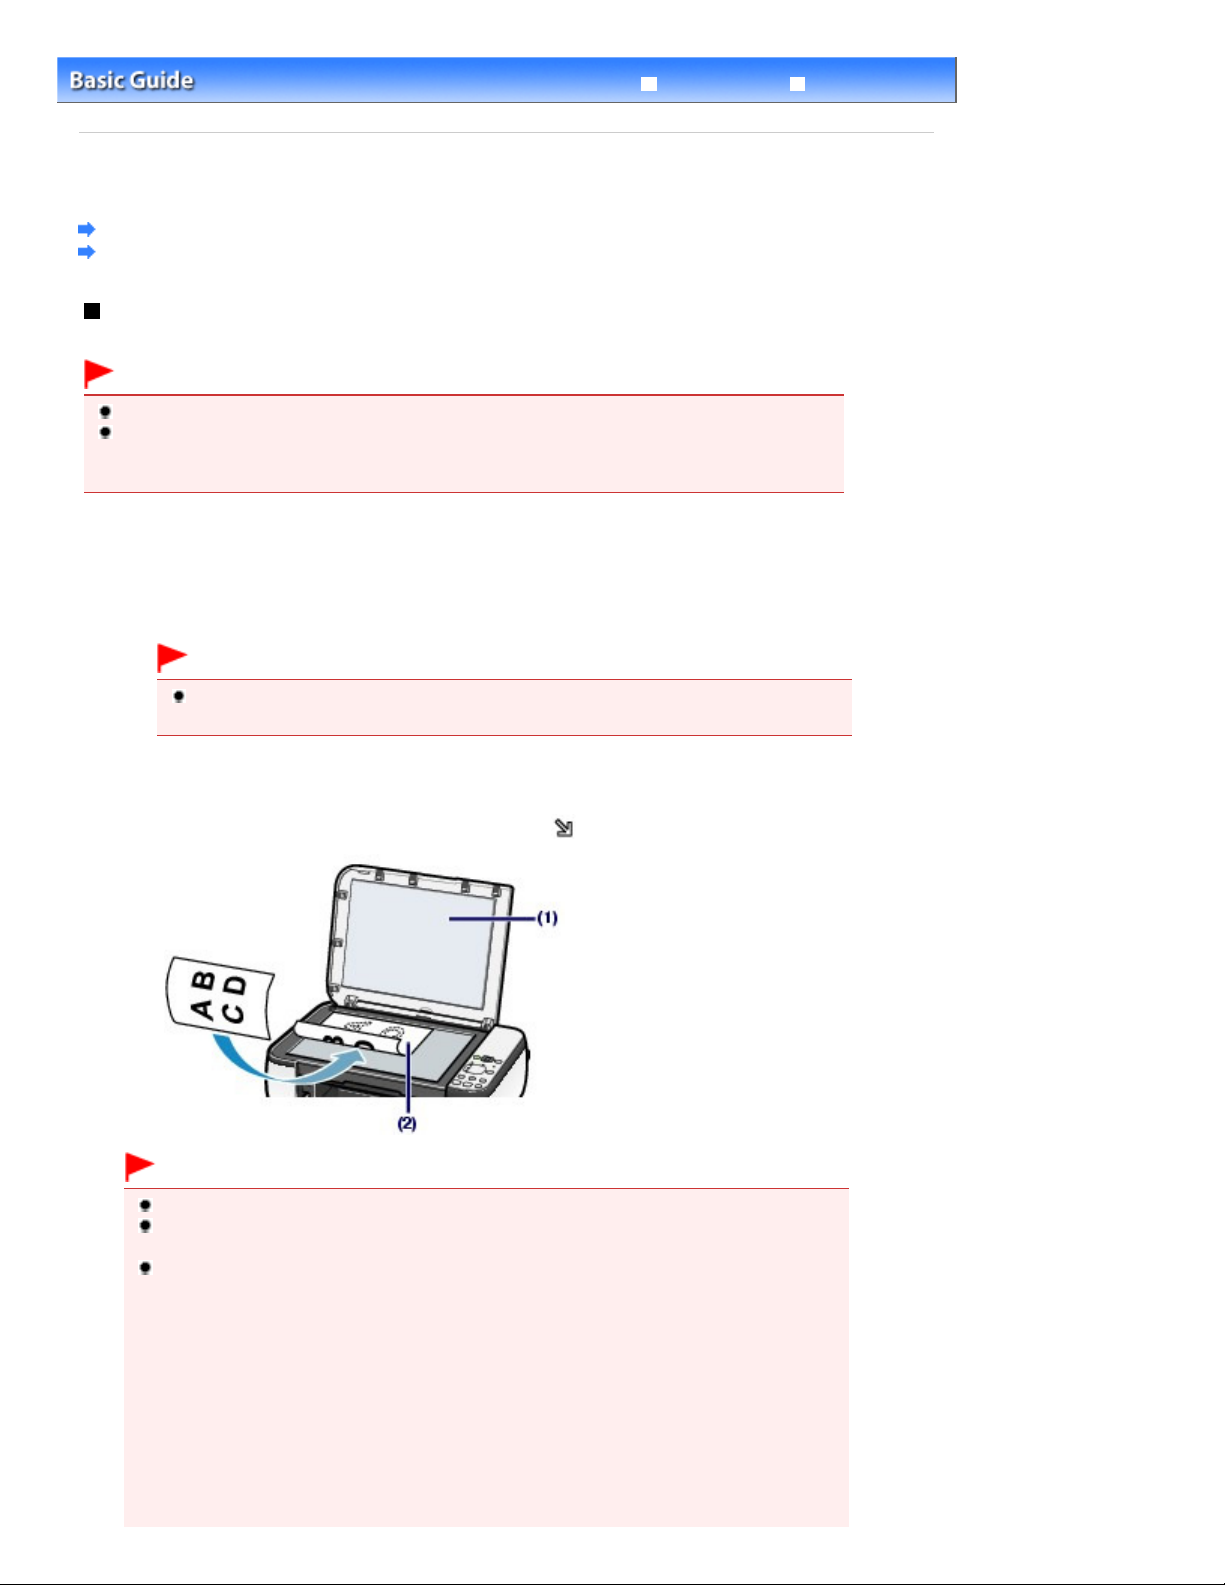
Load an original WITH THE SIDE TO COPY OR SCAN FACING DOWN on the
(2)
Platen Glass.
Align the corner of the original with the alignment mark
.
Important
Do not place any objects weighing more than 4.4 lb / 2.0 kg on the Platen Glass.
Do not press or put weight on the original with pressure exceeding 4.4 lb / 2.0 kg. Doing so
may cause the scanner to malfunction or the Platen Glass to break.
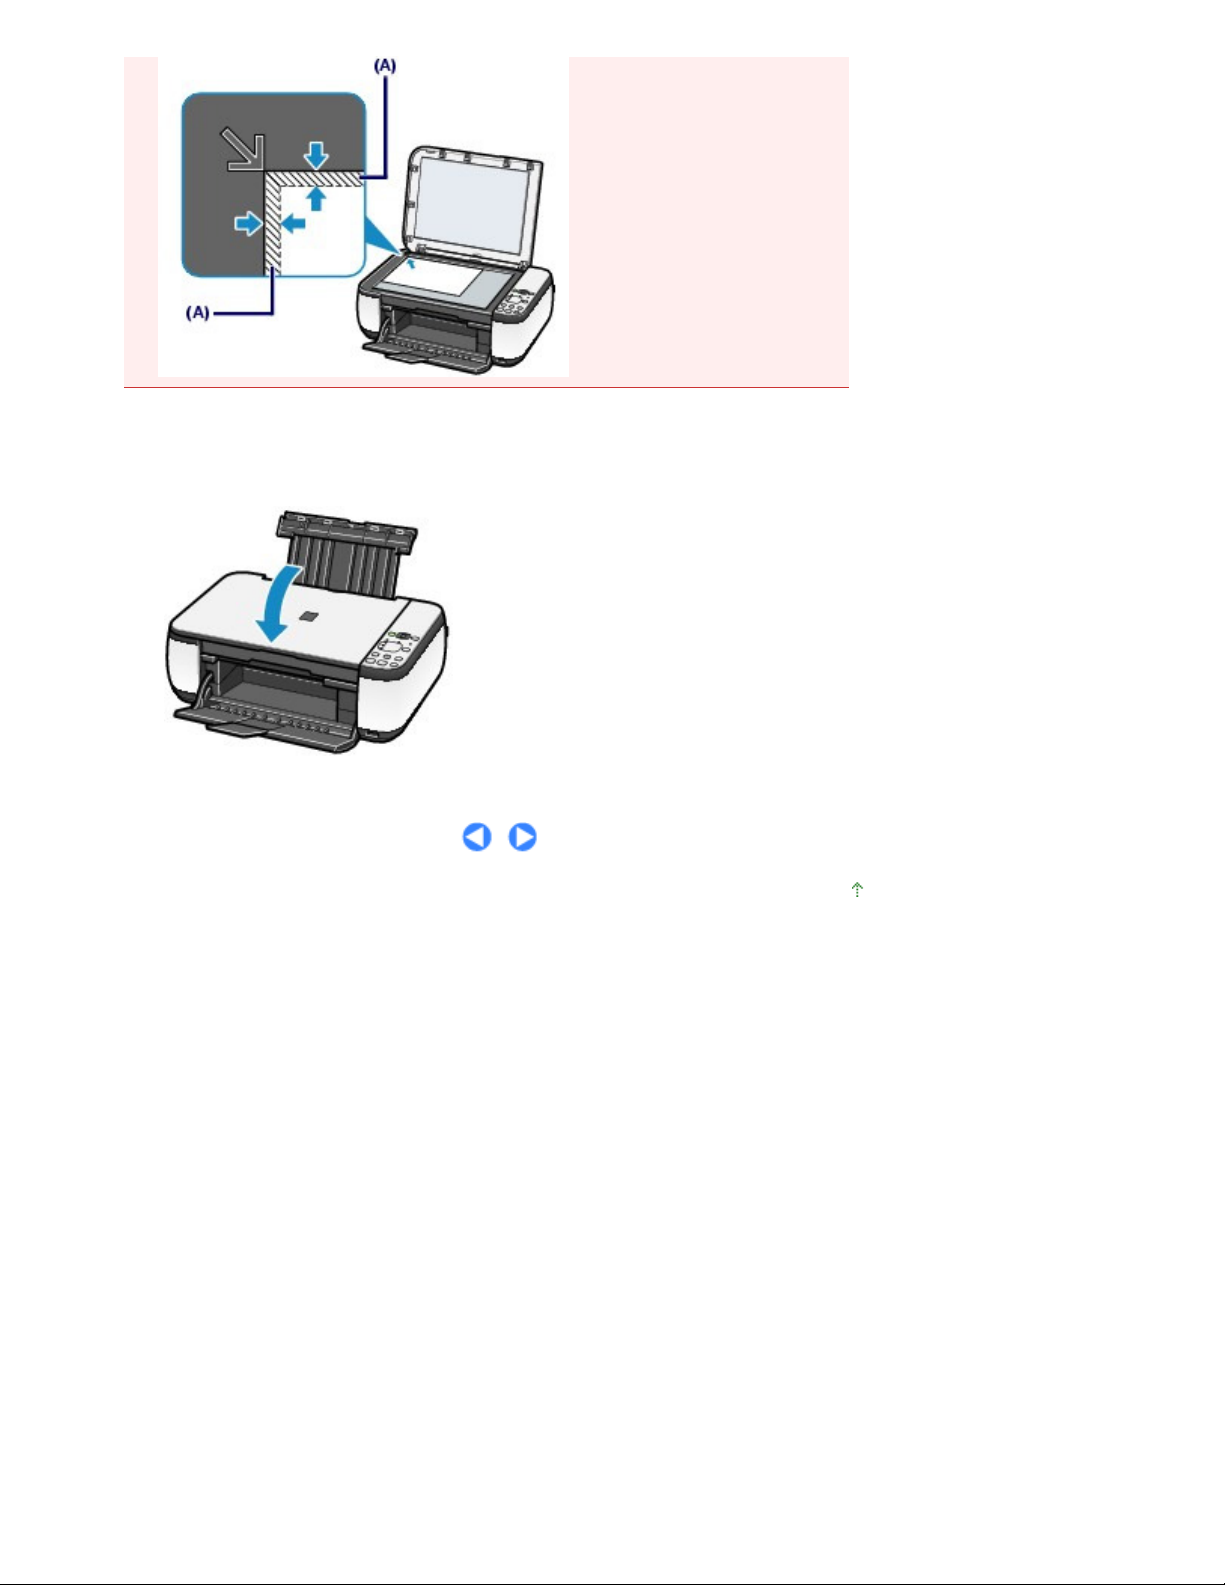
The machine cannot scan the shaded area (A) (0.04 inches / 1 mm from the edges of the
Platen Glass).
Page 54
2.
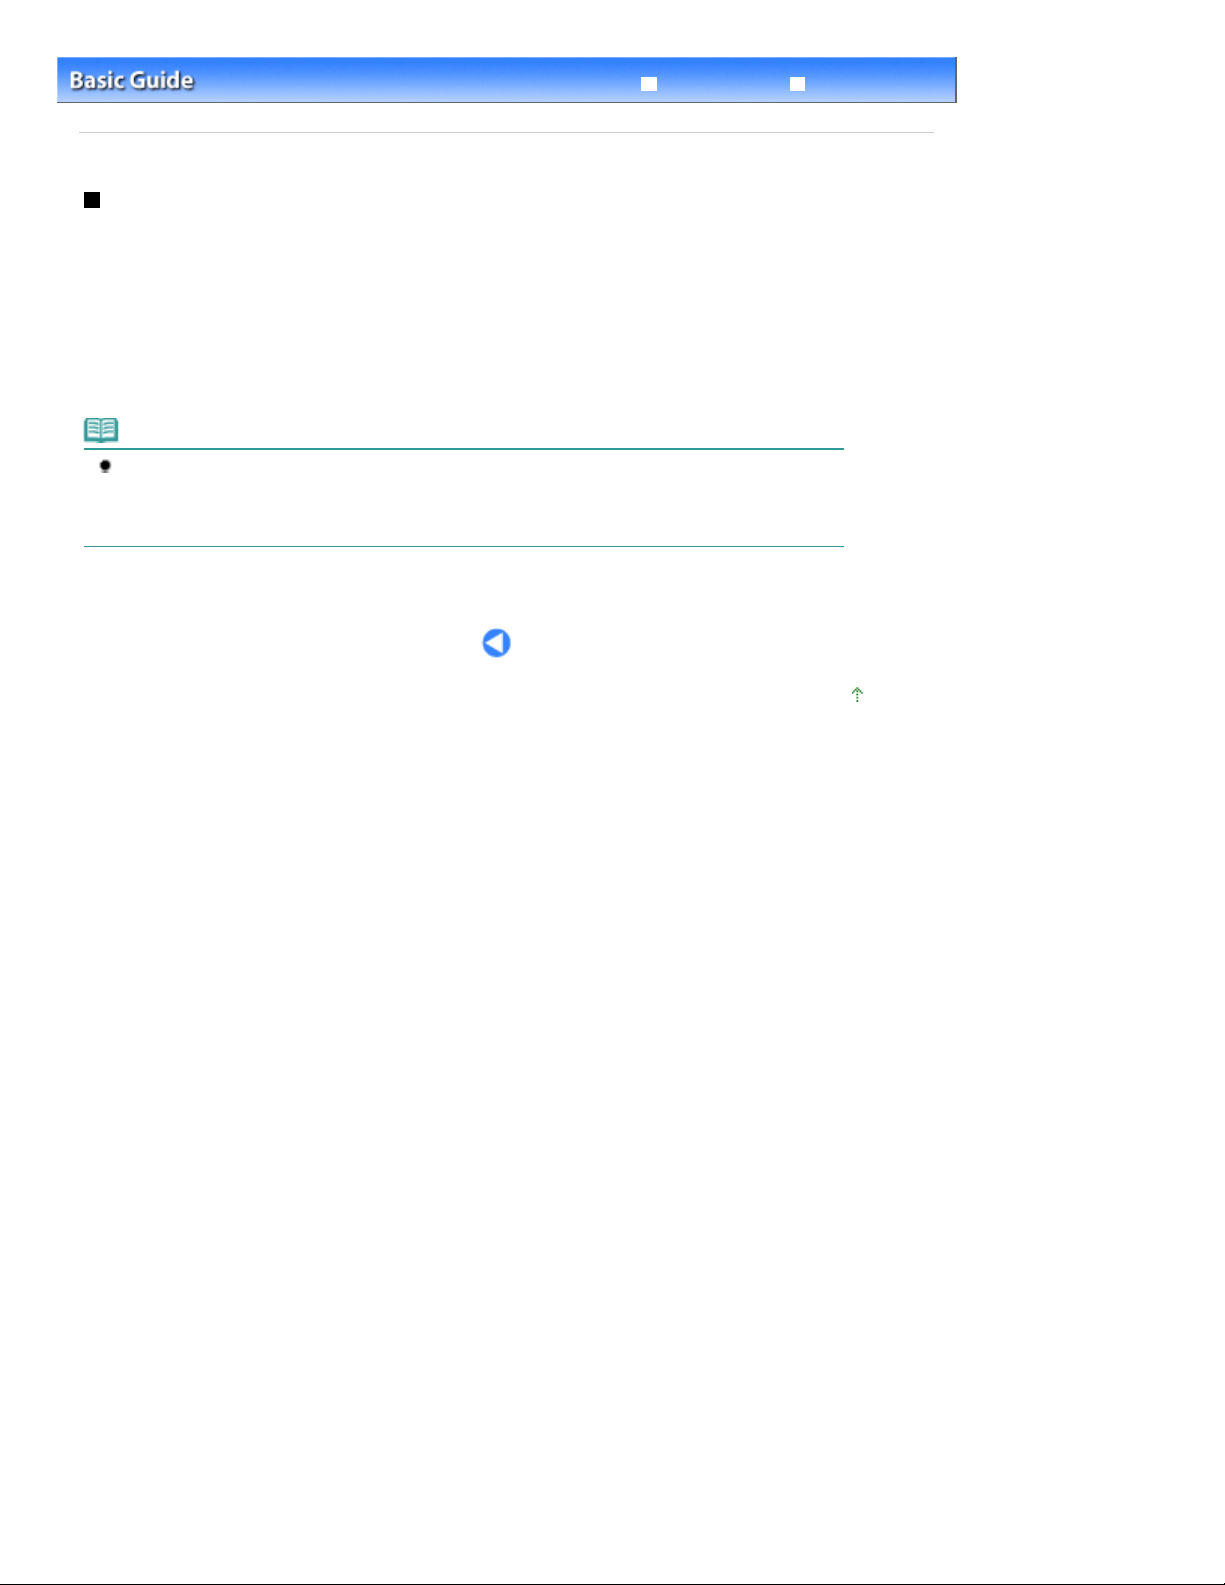
Close the Document Cover gently.
Page 54 of 678 pagesLoading Originals
Page top
Page 55
Advanced Guide
Page 55 of 678 pagesOriginals You Can Load
Advanced Guide
Contents
> Loading Paper / Originals > Loading Originals > Originals You Can Load
Originals You Can Load
You can copy or scan the following originals.
Types of originals:
Size (W x L):
Note
When loading a thick original such as a book on the Platen Glass, you can load it by removing the
Document Cover from the machine.
For details on how to remove or attach the Document Cover, refer to the on-screen manual:
.
Text document, magazine, or newspaper
Printed photo, picture card, business card, or DVD/CD
Max. 8.5 x 11.7 inches / 216 x 297 mm
Troubleshooting
Page top
Page 56

Page 56 of 678 pagesRoutine Maintenance
Troubleshooting
Contents
Advanced Guide
> Routine Maintenance
Routine Maintenance
This section describes how to clean the machine when the print result is faint, to replace FINE
Cartridges when they run out of ink, or to take an action when paper does not feed properly.
When Printing Becomes Faint or Colors Are Incorrect
Printing the Nozzle Check Pattern
Examining the Nozzle Check Pattern
Cleaning the Print Head
Cleaning the Print Head Deeply
Aligning the Print Head
Replacing a FINE Cartridge
Replacing Procedure
Checking the Ink Status
Cleaning the Machine
Cleaning the Paper Feed Roller
Cleaning the Inside of the Machine (Bottom Plate Cleaning)
Cleaning the Protrusions inside the Machine
Page top
Page 57
Advanced Guide
Advanced Guide
Page 57 of 678 pagesWhen Printing Becomes Faint or Colors Are Incorrect
Troubleshooting
Contents
Routine Maintenance
>
Advanced Guide
> When Printing Becomes Faint or Colors Are Incorrect
When Printing Becomes Faint or Colors Are Incorrect
If print results are blurred or colors are not printed correctly, the print head nozzles (FINE Cartridges) are
probably clogged. Follow the procedure below to print the nozzle check pattern, check the print head
nozzle condition, then clean the Print Head.
If printed ruled lines are misaligned or print results are otherwise unsatisfactory, aligning the Print Head
may improve print quality.
Important
Do not rinse or wipe the FINE Cartridges. This can cause trouble with the FINE Cartridges.
Note
Before performing maintenance
Check if ink remains in the FINE Cartridge.
See Checking the Ink Status.
Check if the FINE Cartridges are installed correctly.
See
Replacing Procedure
Check if the orange protective tape on the bottom of the FINE Cartridge is removed.
See
Replacing Procedure
If the
Increasing the print quality in the printer driver settings may improve the print result.
For details, refer to the on-screen manual:
lamp lights or flashes orange, refer to "
Alarm
.
.
.
Troubleshooting " in the on-screen manual:
.
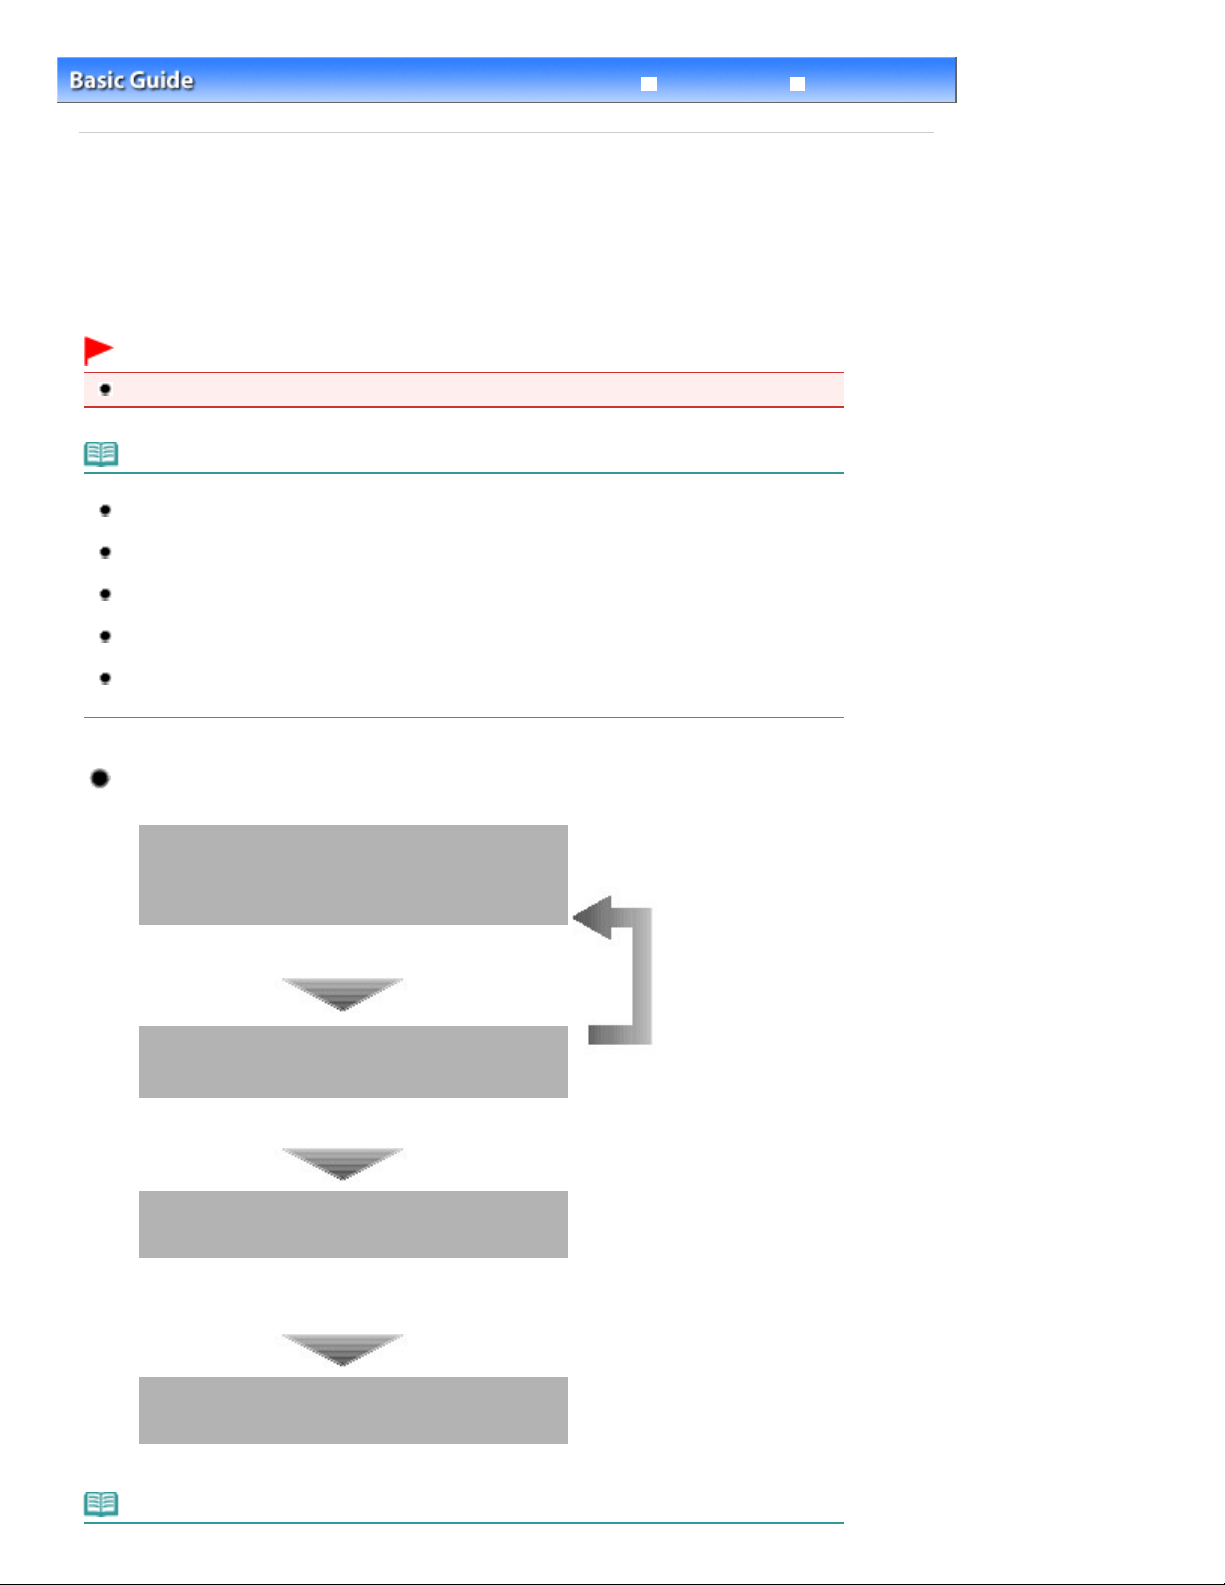
When the Print Results Are Blurred or Uneven:
Step 1
See Printing the Nozzle Check Pattern.
See Examining the Nozzle Check Pattern.
If there are missing lines or horizontal white streaks in the
pattern:
Step 2
Cleaning the Print Head
See
If the problem is not resolved after cleaning the Print Head
twice:
Step 3
Cleaning the Print Head Deeply
See
If the problem is not resolved, turn off the power and
clean the Print Head deeply again after 24 hours.
If the problem is still not resolved:
.
.
After cleaning the Print Head, print
and examine the nozzle check
pattern.
Step 4
Note
Replacing a FINE Cartridge
See
.
Page 58

If the problem is still not resolved after replacing the FINE Cartridge, contact the service center.
Are Misaligned:
Advanced Guide
When the Print Results Are Not Even such as the Ruled Lines
Aligning the Print Head
See
Note
You can also perform the maintenance operations from your computer.
For details, refer to the on-screen manual:
.
.
Page 58 of 678 pagesWhen Printing Becomes Faint or Colors Are Incorrect
Page top
Page 59
You need to prepare: a sheet of A4 or Letter-sized plain paper
Page 59 of 678 pagesPrinting the Nozzle Check Pattern
Troubleshooting
Contents
Pattern
Routine Maintenance
>
>
When Printing Becomes Faint or Colors Are Incorrect
Advanced Guide
> Printing the Nozzle Check
Printing the Nozzle Check Pattern
Print the nozzle check pattern to determine whether the ink ejects properly from the print head nozzles.
Note
If the remaining ink level is low, the nozzle check pattern will not be printed correctly. Replace the
FINE Cartridge whose ink is low.
Replacing a FINE Cartridge
See
1.
Make sure that the power is turned on.
2.
Load a sheet of A4 or Letter-sized plain paper in the Rear Tray.
.
3.
Open the Paper Output Tray gently, and open the Output Tray Extension.
4.
Print the nozzle check pattern.
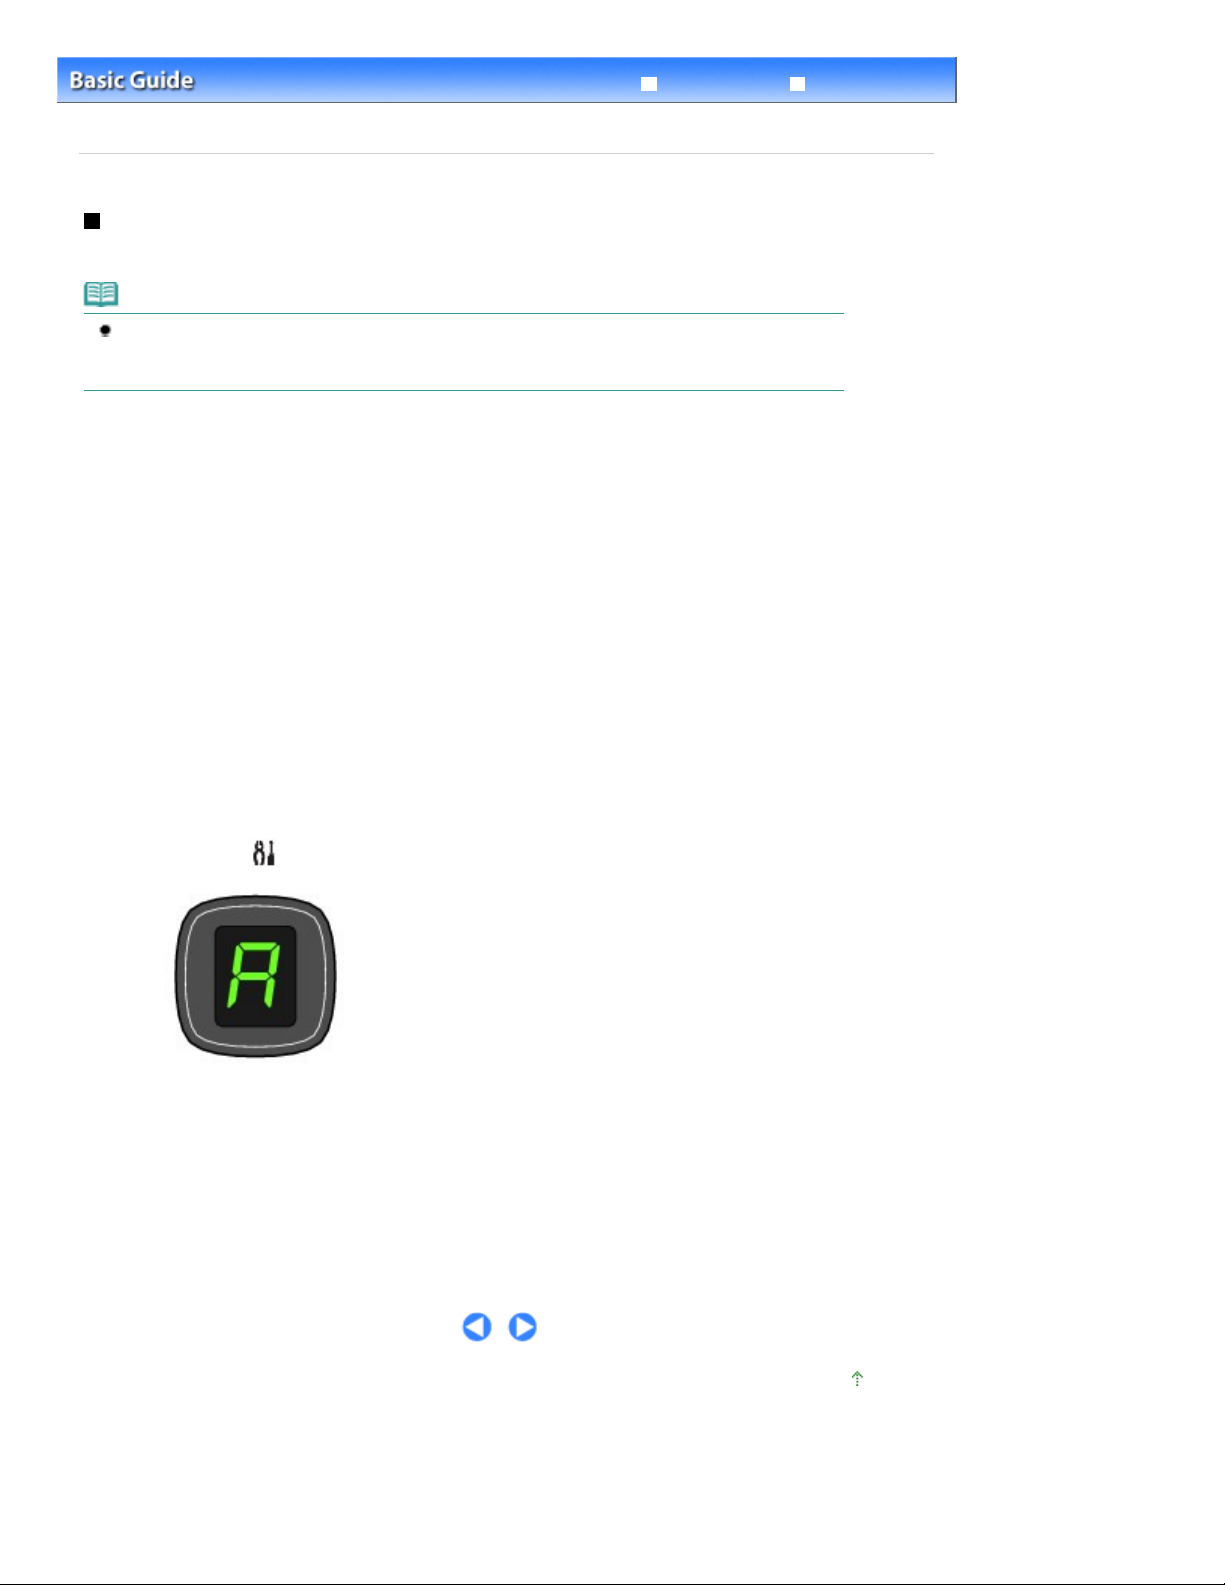
Press the
(1)
Press the
(2)
The nozzle check pattern will be printed.
5.
Examine the nozzle check pattern.
See Examining the Nozzle Check Pattern.
(Maintenance) button repeatedly until
or
Black
Color
button.
A
appears.
Page top
Page 60
Page 60 of 678 pagesExamining the Nozzle Check Pattern
Troubleshooting
Routine Maintenance
Contents
Check Pattern
>
>
When Printing Becomes Faint or Colors Are Incorrect
Advanced Guide
> Examining the Nozzle
Examining the Nozzle Check Pattern
Examine the nozzle check pattern, and clean the Print Head if necessary.
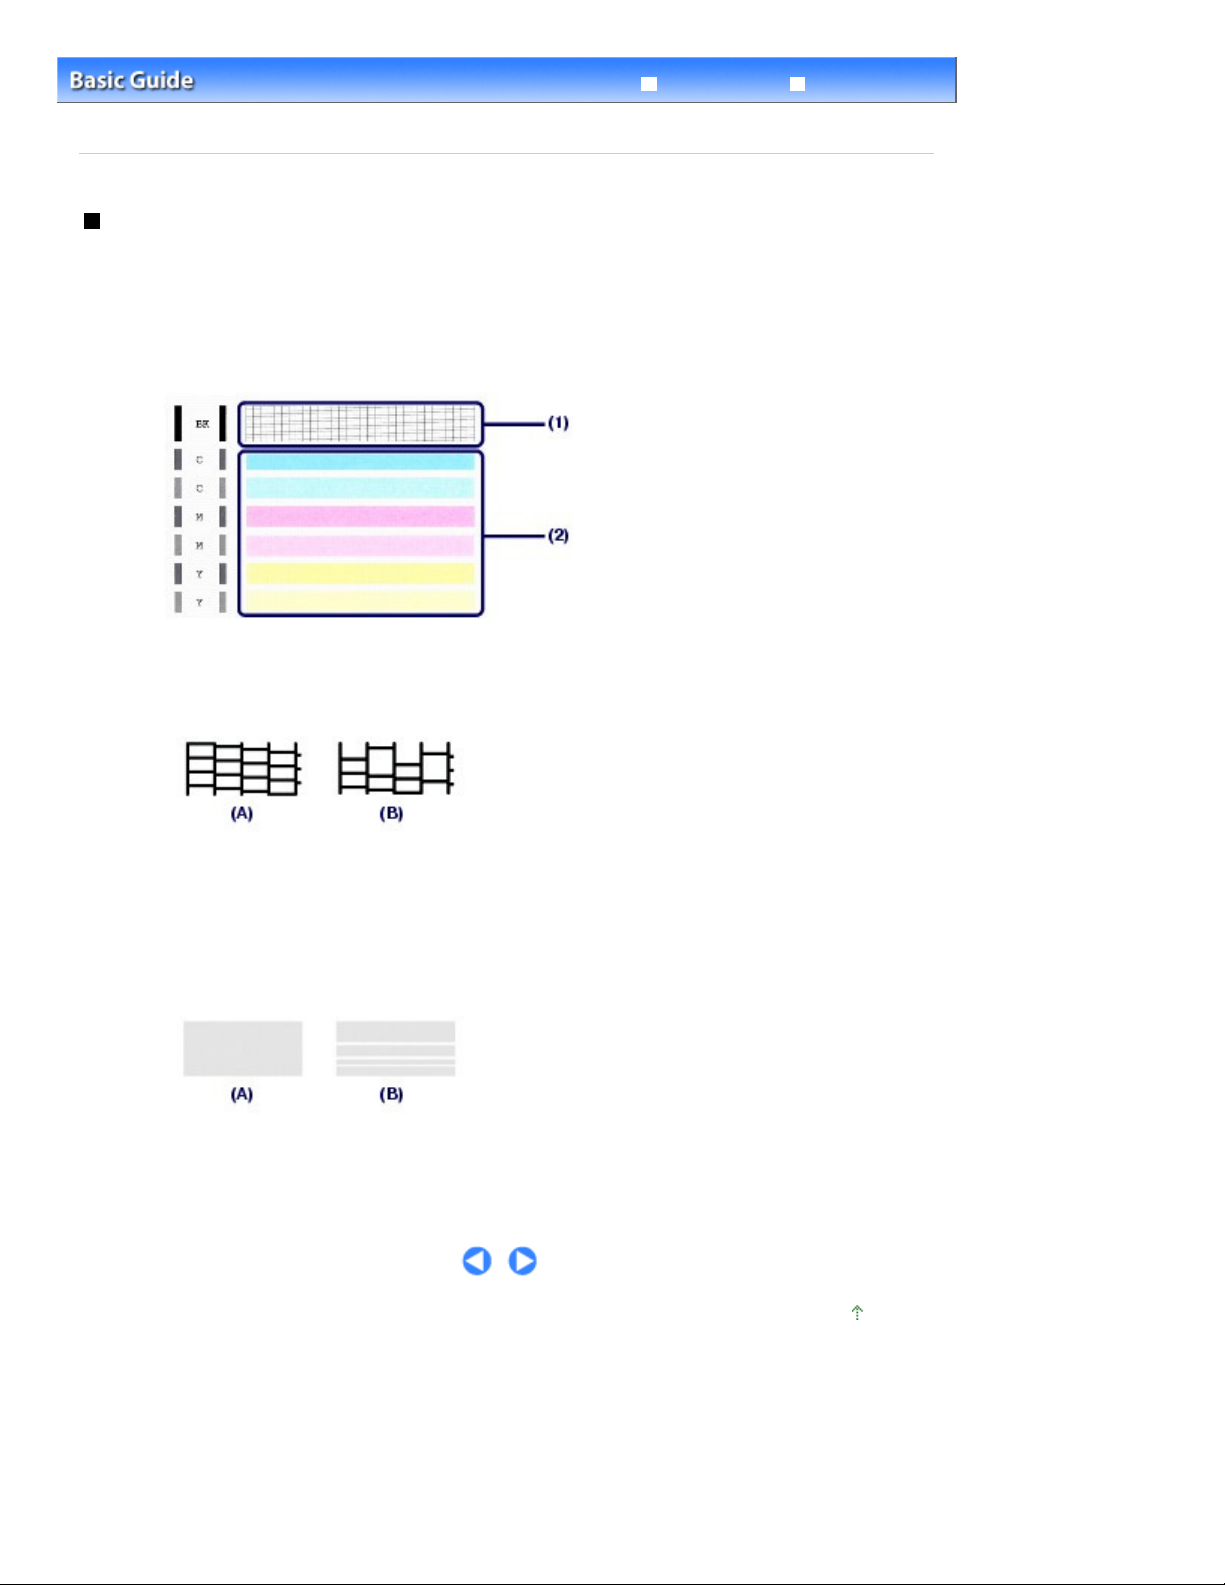
1.
Check if there are missing lines in the pattern (1) or horizontal white streaks in the
pattern (2).
Check if lines are missing in this pattern.
(1)
If yes, the cleaning is required.
Cleaning the Print Head
See
.
(A) Good
(B) Bad (lines are missing)
Check if horizontal white streaks are present in this pattern.
(2)
If yes, the cleaning is required.
Cleaning the Print Head
See
(A) Good
(B) Bad (horizontal white streaks are present)
.
Page top
Page 61
Page 61 of 678 pagesCleaning the Print Head
Troubleshooting
Contents
Routine Maintenance
>
>
When Printing Becomes Faint or Colors Are Incorrect
Advanced Guide
> Cleaning the Print Head
Cleaning the Print Head
Clean the Print Head if lines are missing or if horizontal white streaks are present in the printed nozzle
check pattern. Cleaning unclogs the nozzles and restores the print head condition. Cleaning the Print
Head consumes ink, so clean the Print Head only when necessary.
1.
Make sure that the power is turned on.
2.
Clean the Print Head.
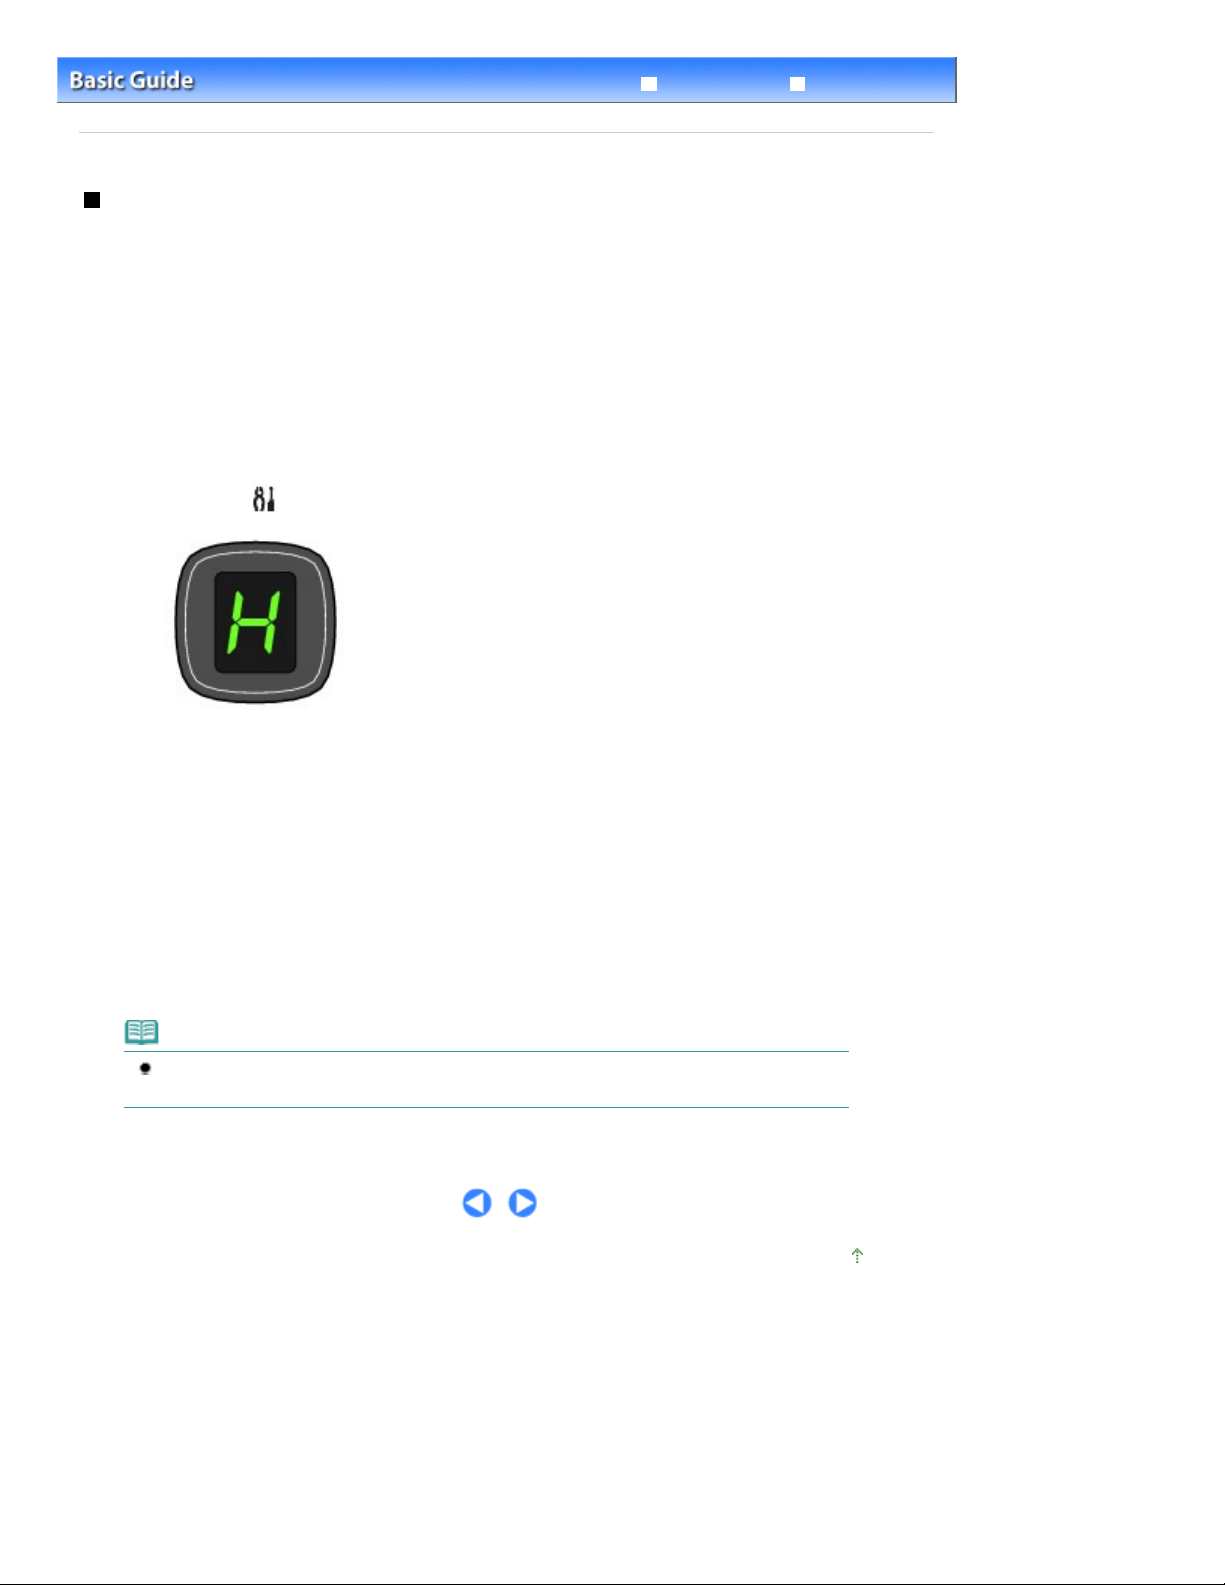
Press the
(1)
(Maintenance) button repeatedly until
appears.
H
Color
button.
or
Press the
(2)
The machine starts cleaning the Print Head.
Do not perform any other operations until the machine completes the cleaning of the Print Head. This takes
about 1 to 2 minutes.
3.
Check the print head condition.
When the cleaning is completed, the LED returns to the copy standby mode.
To check the print head condition, print the nozzle check pattern.
See Printing the Nozzle Check Pattern.
Black
Note
If the problem is not resolved after cleaning the Print Head twice, clean the Print Head deeply.
Cleaning the Print Head Deeply
See
.
Page top
Page 62
Page 62 of 678 pagesCleaning the Print Head Deeply
Troubleshooting
Contents
Deeply
Routine Maintenance
>
>
When Printing Becomes Faint or Colors Are Incorrect
Advanced Guide
> Cleaning the Print Head
Cleaning the Print Head Deeply
If print quality does not improve by the standard cleaning of the Print Head, clean the Print Head deeply.
Cleaning the Print Head deeply consumes more ink than the standard cleaning of the Print Head, so
clean the Print Head deeply only when necessary.
1.
Make sure that the power is turned on.
2.
Clean the Print Head deeply.
Press the
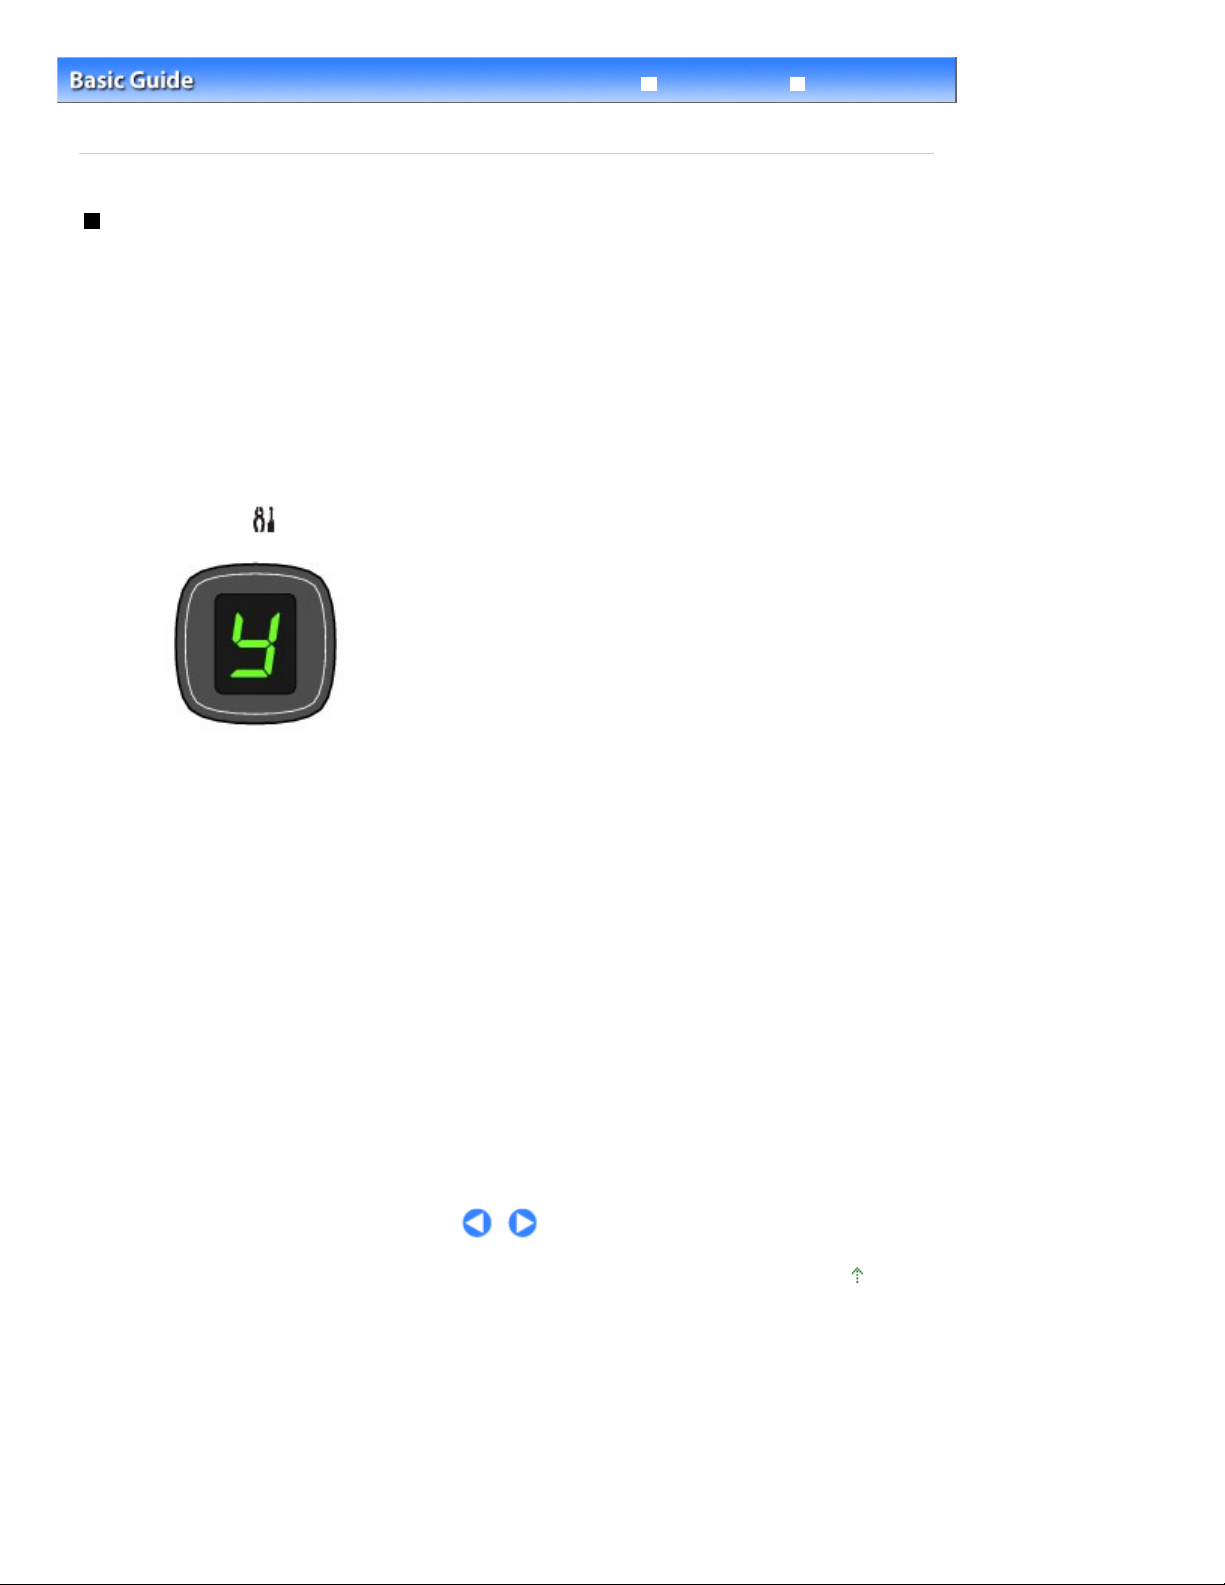
(1)
(Maintenance) button repeatedly until
y
appears.
Color
.
button.
or
Press the
(2)
The machine starts cleaning the Print Head deeply.
Do not perform any other operations until the machine completes the deep cleaning of the Print Head. This
takes about 2 minutes.
3.
Check the print head condition.
When the deep cleaning is completed, the LED returns to the copy standby mode.
To check the print head condition, print the nozzle check pattern.
See Printing the Nozzle Check Pattern.
If the problem is not resolved, turn off the power and clean the Print Head deeply again after 24 hours.
If the problem is still not resolved, replace the FINE Cartridge with a new one.
Replacing a FINE Cartridge
See
If the problem is still not resolved after replacing the FINE Cartridge, contact the service center.
Black
Page top
Page 63
You need to prepare: a sheet of A4 or Letter-sized plain paper*
wrinkled, it may not be scanned properly.
Page 63 of 678 pagesAligning the Print Head
Troubleshooting
Contents
Routine Maintenance
>
>
When Printing Becomes Faint or Colors Are Incorrect
Advanced Guide
> Aligning the Print Head
Aligning the Print Head
If printed ruled lines are misaligned or print results are otherwise unsatisfactory, adjust the print head
position.
Note
If the remaining ink level is low, the print head alignment sheet will not be printed correctly. Replace
the FINE Cartridge whose ink is low.
Replacing a FINE Cartridge
See
* Be sure to use paper that is white and clean on both sides.
1.
Make sure that the power is turned on.
.
2. Load a sheet of A4 or Letter-sized plain paper in the Rear Tray.
3.
Open the Paper Output Tray gently, and open the Output Tray Extension.
4. Print the print head alignment sheet.
Press the
(1)
Press the
(2)
The print head alignment sheet will be printed.
(Maintenance) button repeatedly until
or
Black
Color
Important
Do not touch any printed part on the print head alignment sheet.
Be careful not to get the print head alignment sheet dirty. If the sheet is stained or
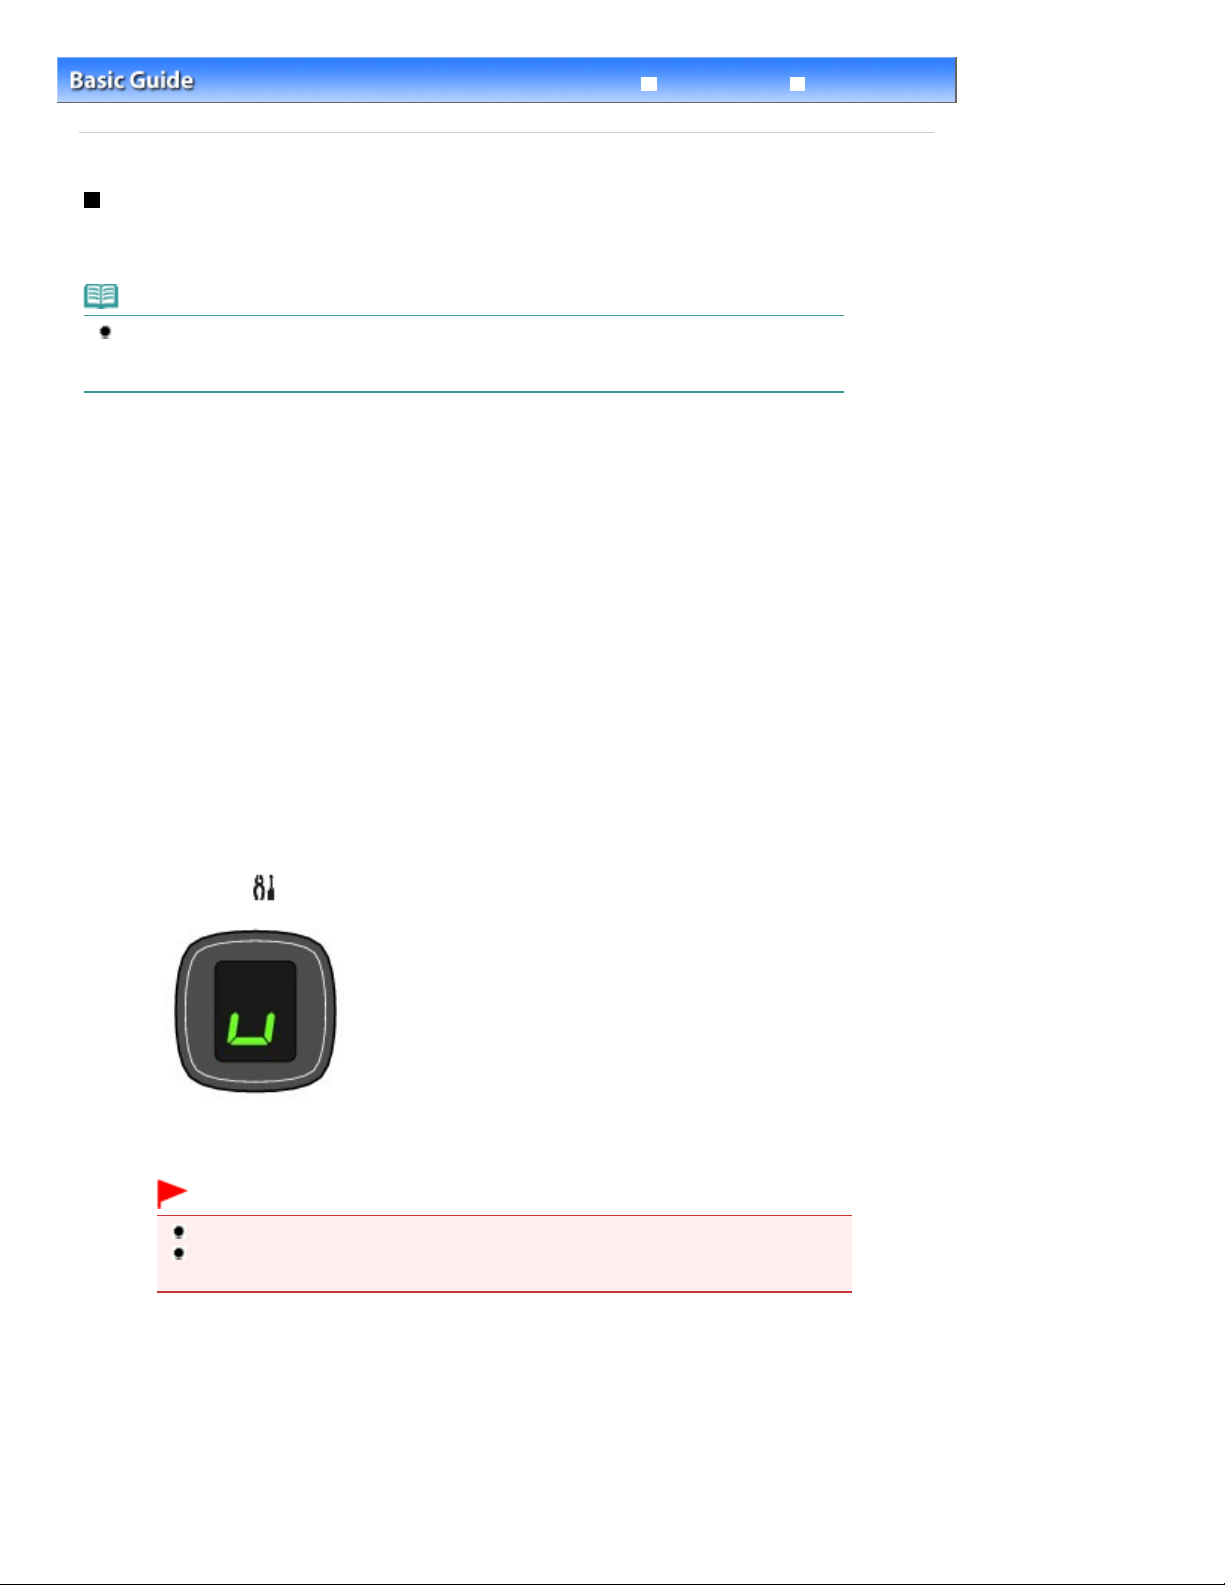
button.
(lowercase "u") appears.
u
Page 64
Page 64 of 678 pagesAligning the Print Head
5.
Scan the print head alignment sheet to adjust the print head position.
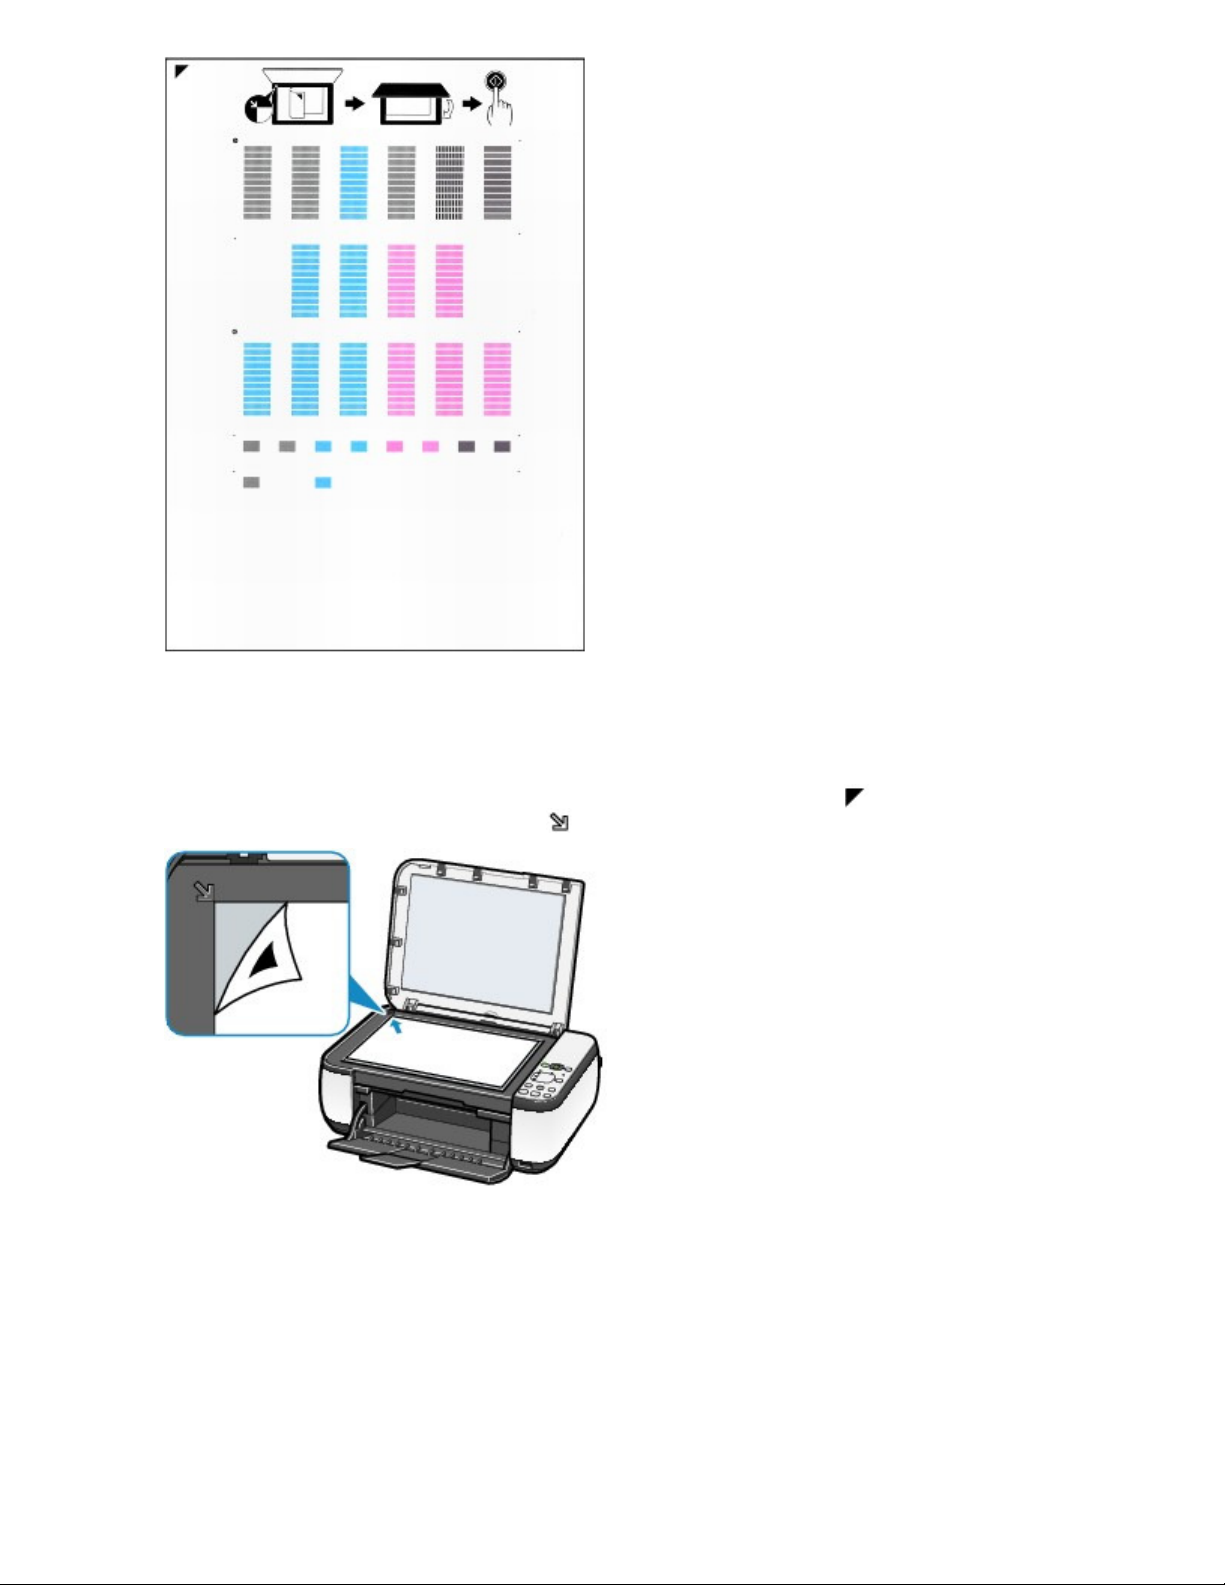
Load the print head alignment sheet on the Platen Glass.
(1)
Load the print head alignment sheet W ITH THE PRINTED SIDE FACING DOWN and align the mark
upper left corner of the sheet with the alignment mark
Close the Document Cover gently, make sure that U (uppercase "U") appears
(2)
on the LED, then press the
The machine starts scanning the print head alignment sheet, and the print head position will be adjusted
automatically.
Black
or
Color
.
button.
on the
When adjusting the print head position is completed, the LED returns to the copy standby mode. Remove the
sheet on the Platen Glass.
Page 65
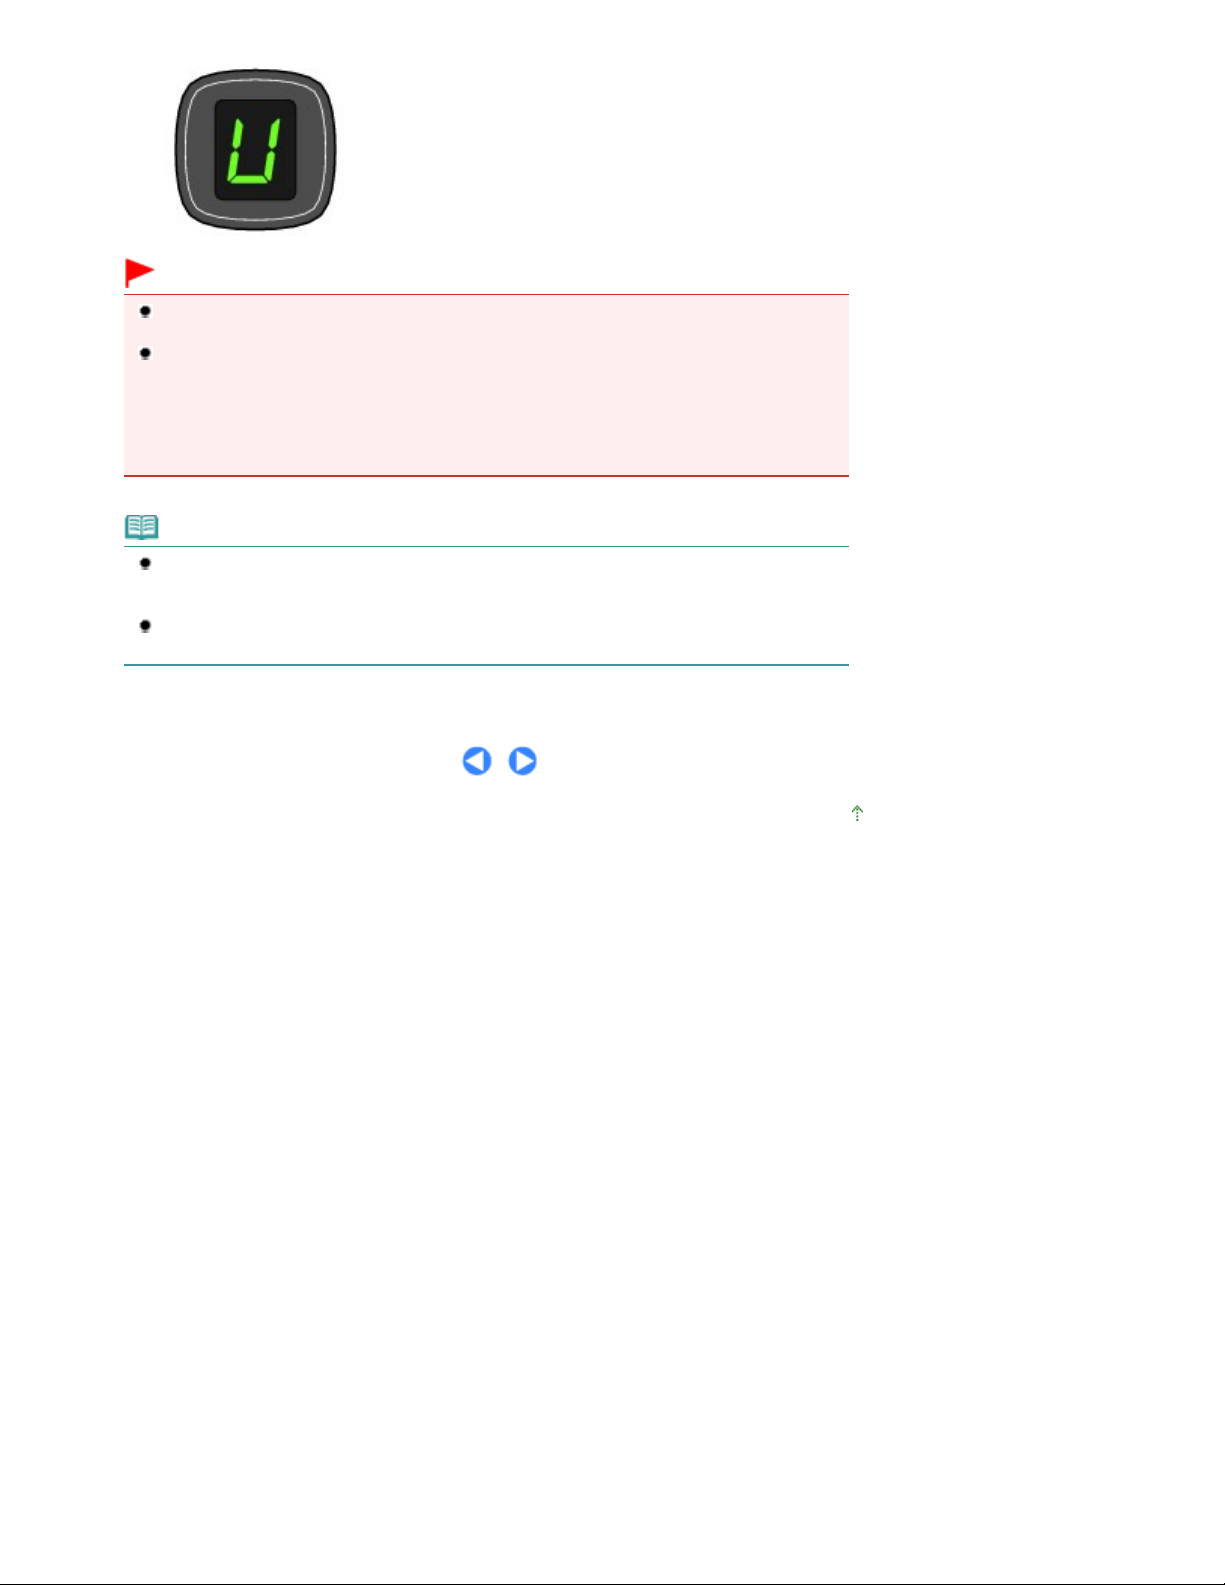
Important
Advanced Guide
Advanced Guide
Do not open the Document Cover or move the loaded print head alignment sheet until adjusting
the print head position is completed.
If adjusting the print head position has failed, the error code will appear on the LED.
Press the
- The Platen Glass and the print head alignment sheet are not dirty.
- The print head alignment sheet is placed in the correct position with the printed side facing
Stop/Reset
button to release the error, then confirm the following.
down.
For details, refer to "
Troubleshooting " in the on-screen manual:
.
Note
If the print results are still not satisfactory after adjusting the print head position as described
above, adjust the print head position manually from the computer.
For details, refer to the on-screen manual:
To print and check the current head position adjustment values, display
press the
Black
or
Color
button.
.
on the LED, then
L
Page 65 of 678 pagesAligning the Print Head
Page top
Page 66
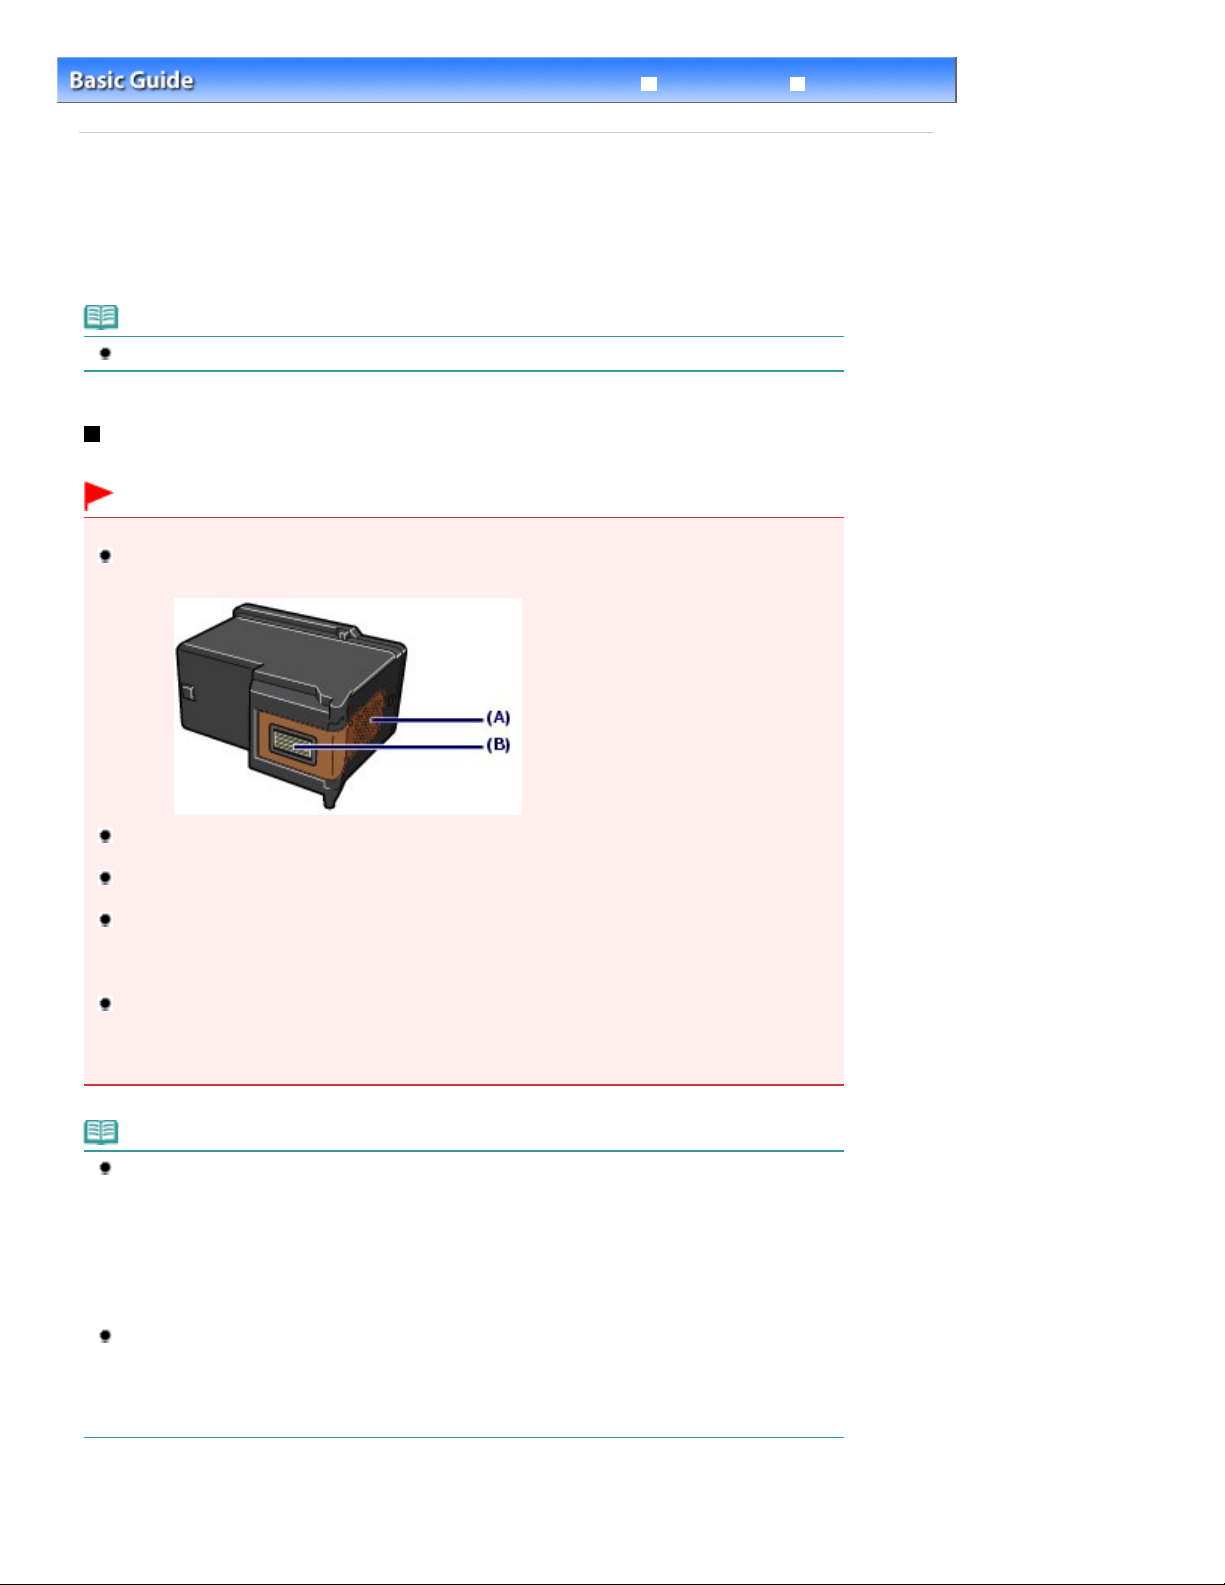
whichever ink remains, only for a while. However the print quality may be reduced compared to
when printing with both cartridges. We recommend to use new FINE Cartridges in order to obtain
Advanced Guide
white printing is specified.
Page 66 of 678 pagesReplacing a FINE Cartridge
Troubleshooting
Contents
Routine Maintenance > Replacing a FINE Cartridge
>
Advanced Guide
Replacing a FINE Cartridge
When ink runs out while printing is in progress, the error code "E, 1, 6" will appear on the LED. The
lamp will light up and the
Alarm
Ink
lamp will start flashing.
Make sure which FINE Cartridge has run out of ink and replace it with a new one.
Note
For information on the compatible FINE Cartridges, refer to the printed manual:
Getting Started
.
Replacing Procedure
When FINE Cartridges run out of ink, follow the procedure below to replace them.
Important
Handling FINE Cartridges
Do not touch the electrical contacts (A) or print head nozzles (B) on the FINE Cartridge. The
machine may not print properly if you touch it.
To maintain optimal print quality, we recommend the use of specified Canon brand FINE Cartridges.
Refilling the ink is not recommended.
If you remove a FINE Cartridge, replace it immediately. Do not leave the machine with FINE
Cartridges removed.
Use new FINE Cartridges for replacement. Installing used FINE Cartridges may cause the nozzles to
clog.
Furthermore, with such cartridges, the machine will not be able to inform you when to replace the
cartridges properly.
Once a FINE Cartridge has been installed, do not remove it from the machine and leave it out in the
open. This will cause the FINE Cartridge to dry out, and the machine may not operate properly when
it is reinstalled. To maintain optimal printing quality, use a FINE Cartridge within six months of first
use.
Note
If a FINE Cartridge runs out of ink, you can print with either Color or Black FINE Cartridge, in
optimum qualities.
Even when printing with one ink only, print with leaving the empty FINE Cartridge installed. If either
of the Color FINE Cartridge or Black FINE Cartridge is not installed, an error occurs and the machine
cannot print.
For information on how to configure this setting, refer to the on-screen manual:
Color ink may be consumed even when printing a black-and-white document or when black-and-
Both color ink and black ink are also consumed in the standard cleaning and deep cleaning of the
Print Head, which may be necessary to maintain the machine's performance. When ink runs out,
replace the FINE Cartridge immediately with a new one.
.
Page 67
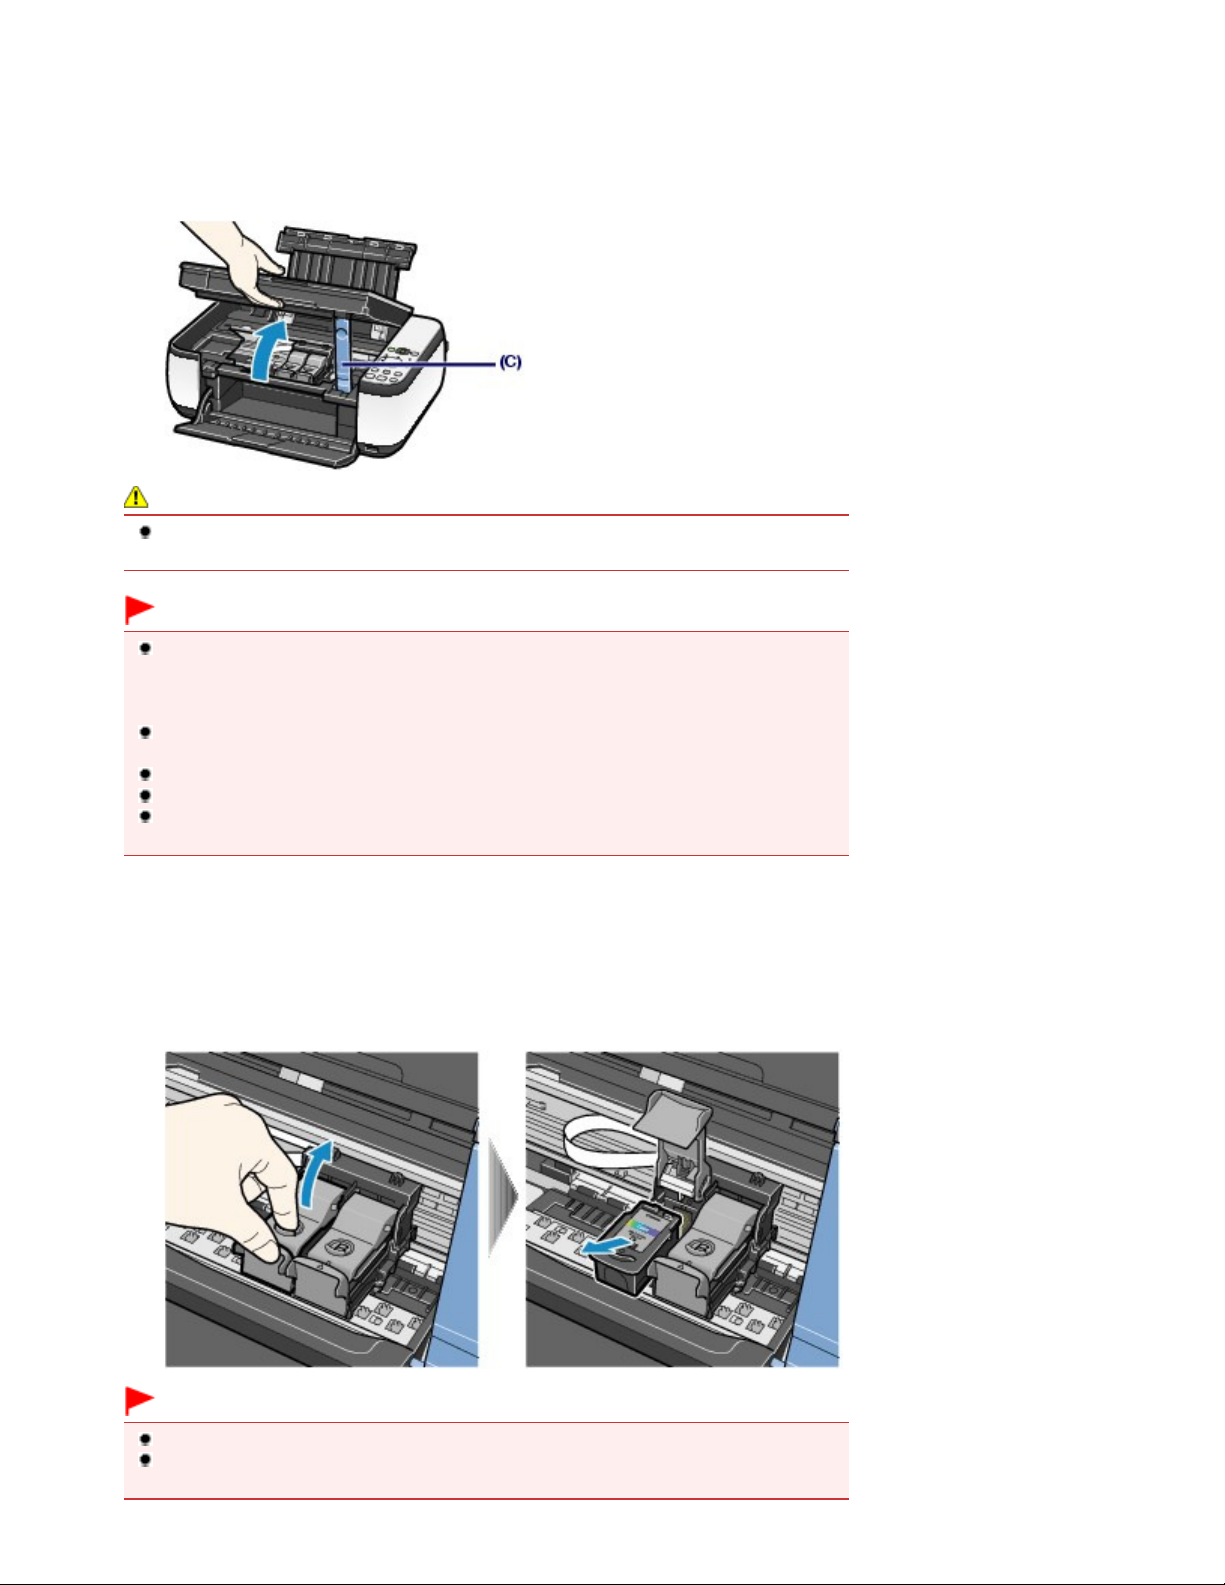
1.
Make sure that the power is turned on, and open the Paper Output Tray.
2. Lift the Scanning Unit (Cover), then hold it open with the Scanning Unit Support (C).
The FINE Cartridge Holder moves to the replacement position.
Caution
Do not hold the FINE Cartridge Holder to stop or move it forcibly. Do not touch the FINE
Cartridge Holder until it stops completely.
Page 67 of 678 pagesReplacing a FINE Cartridge
Important
The inside of the machine may be stained with ink. Be careful not to stain your hands or
clothing when replacing FINE Cartridges. You can easily wipe off the ink from the inside of the
machine with tissue paper or the like.
For details on the cleaning, refer to the printed manual:
Do not place any object on the Document Cover. It will fall into the Rear Tray when the
Document Cover is opened and cause the machine to malfunction.
When opening the Scanning Unit (Cover), lift it with the Document Cover closed.
Do not touch the metallic parts or other parts inside the machine.
If the Scanning Unit (Cover) is left open, the FINE Cartridge Holder moves to the right. In this
case, close and reopen the Scanning Unit (Cover).
3. Remove the empty FINE Cartridge.
Pinch the tabs and open the Ink Cartridge Locking Cover.
(1)
Remove the FINE Cartridge.
(2)
Getting Started
.
Important
Handle FINE Cartridges carefully to avoid staining of clothing or the surrounding area.
Discard empty FINE Cartridges according to the local laws and regulations regarding disposal
of consumables.
Page 68
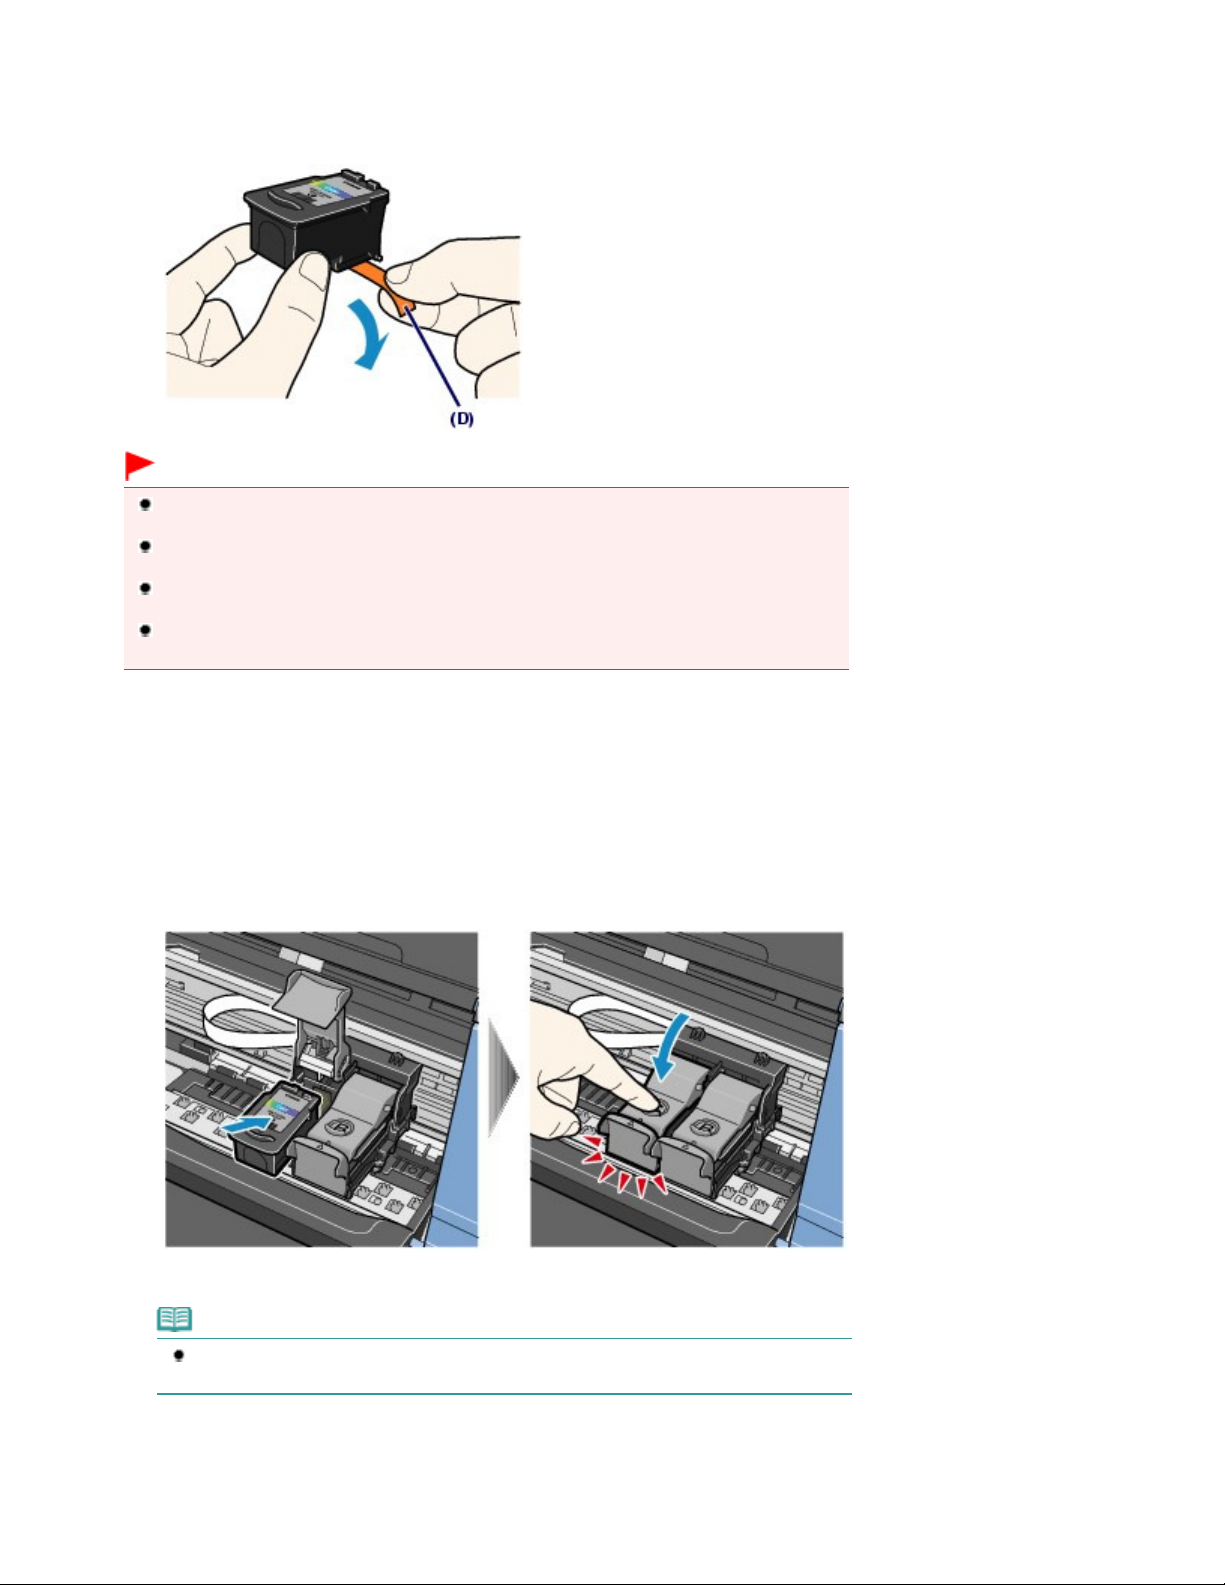
4.
Prepare the new FINE Cartridge.
Take a new FINE Cartridge out of its package and remove the orange protective
(1)
tape (D) gently.
Important
If you shake a FINE Cartridge, ink may spill out and stain your hands and the surrounding area.
Handle a FINE Cartridge carefully.
Be careful not to stain your hands and the surrounding area with ink on the removed
protective tape.
Do not reattach the protective tape once you have removed it. Discard it according to the local
laws and regulations regarding disposal of consumables.
Do not touch the electrical contacts or print head nozzles on a FINE Cartridge. The machine
may not print properly if you touch it.
Page 68 of 678 pagesReplacing a FINE Cartridge
5. Install the FINE Cartridge.
Put a new FINE Cartridge in the FINE Cartridge Holder.
(1)
The Color FINE Cartridge should be installed into the left slot and the Black FINE Cartridge should be installed
into the right slot.
Close the Ink Cartridge Locking Cover to lock the FINE Cartridge into place.
(2)
Push down the Ink Cartridge Locking Cover until it clicks.
Confirm that the Ink Cartridge Locking Cover is closed correctly.
(3)
Note
If the Ink Cartridge Locking Cover is not closed correctly, push down the Ink Cartridge
Locking Cover until it clicks.
Page 69
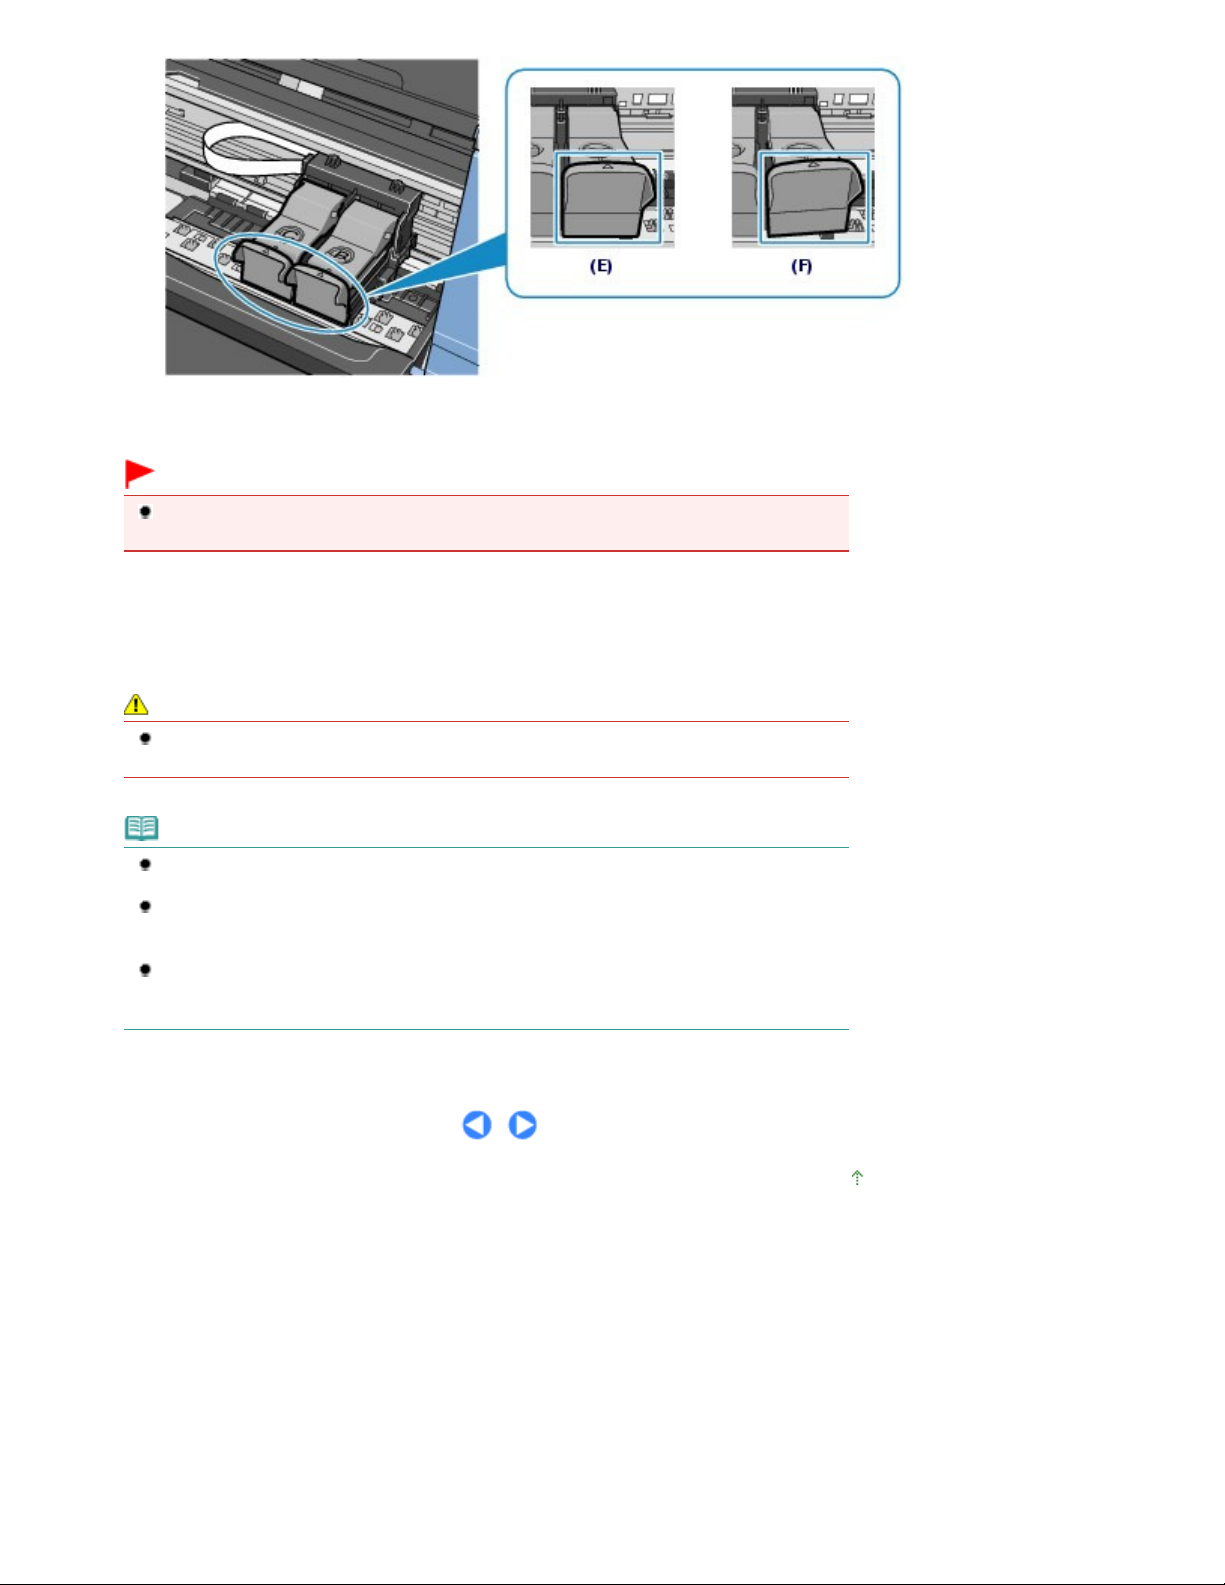
(E) Closed correctly
Advanced Guide
(F) Not closed correctly (the cover is tilted)
Important
The machine cannot print unless both the Color and Black FINE Cartridges are installed. Be
sure to install both the FINE Cartridges.
Page 69 of 678 pagesReplacing a FINE Cartridge
6.
Lift the Scanning Unit (Cover) slightly to set the Scanning Unit Support back to its
original position, and gently close the Scanning Unit (Cover).
Caution
When setting the Scanning Unit Support back to its original position, be sure to hold the
Scanning Unit (Cover) firmly, and be careful not to get your fingers caught.
Note
If the
Troubleshooting" in the on-screen manual:
When you start printing after replacing the FINE Cartridge, the machine starts cleaning the Print
Head automatically. Do not perform any other operations until the machine completes the
cleaning of the Print Head.
If printed ruled lines are misaligned or the print head position is misaligned, adjust the print head
position.
See
lamp lights or flashes orange after the Scanning Unit (Cover) is closed, refer to "
Alarm
Aligning the Print Head
.
.
Page top
Page 70
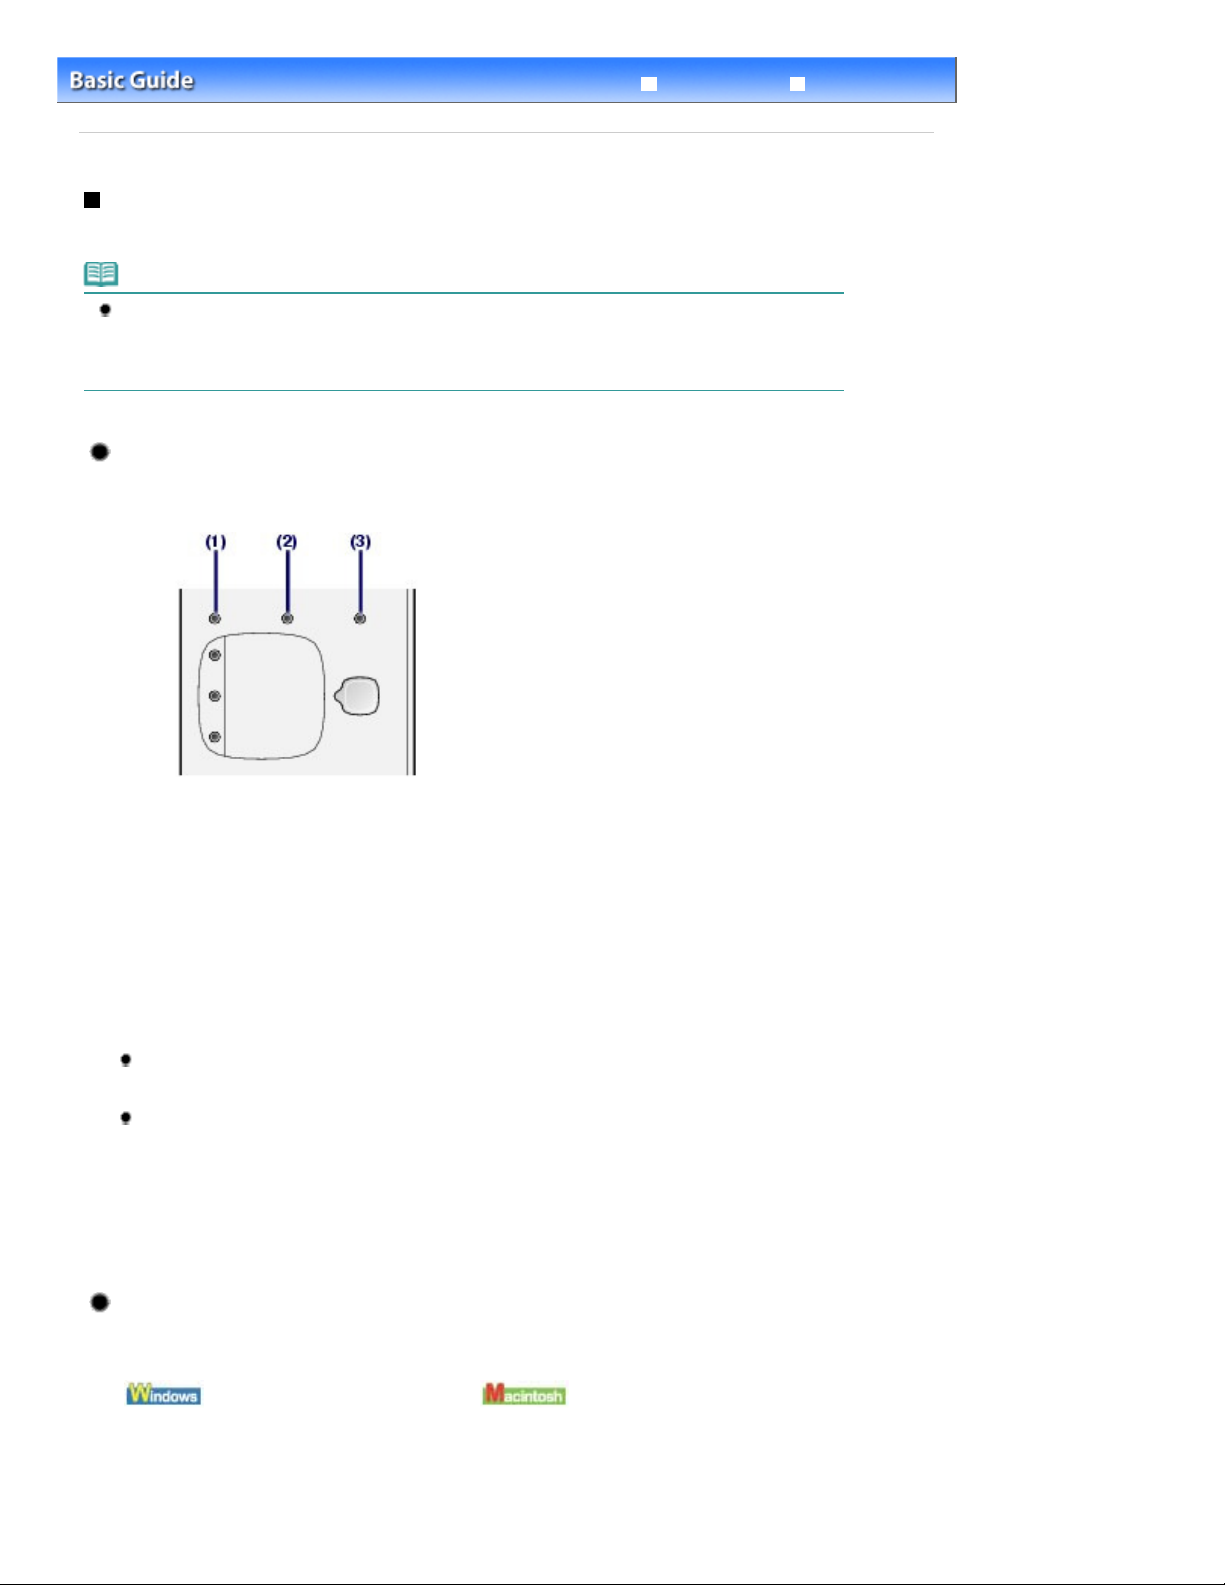
Page 70 of 678 pagesChecking the Ink Status
Advanced Guide
Contents
Routine Maintenance
>
Replacing a FINE Cartridge
>
> Checking the Ink Status
Checking the Ink Status
You can check the ink status with the
Note
The ink level detector is mounted on the machine to detect the remaining ink level. The machine
considers as ink is full when a new FINE Cartridge is installed, and then starts to detect a remaining
ink level. If you install a used FINE Cartridge, the indicated ink level of it may not be correct. In such
case, refer to the ink level information only as a guide.
Ink
lamps on the Operation Panel or with the computer screen.
With the Ink Lamps on the Operation Panel
Make sure that the LED is in the copy standby mode. You can confirm the ink status with the
lamps.
Troubleshooting
Ink
(1)
Alarm
lamp
(2) Color Ink
(3)
Black Ink
lamp
lamp
Color Ink lamp or Black Ink lamp lights
Ink is low. You can continue printing for a while, but we recommend you to have a new FINE
Cartridge available.
Color Ink lamp or Black Ink lamp flashes, while Alarm lamp lights
If "E, 1, 6" appears on the LED, ink has run out.
Refer to "
Troubleshooting
" in the on-screen manual:
Advanced Guide
.
If "E, 1, 3" appears on the LED, ink may have run out.
Refer to "
Troubleshooting
" in the on-screen manual:
Advanced Guide
.
Color Ink lamp or Black Ink lamp flashes, while Alarm lamp is off
The function for detecting the remaining ink level is disabled.
With the Computer Screen
You can confirm the ink status with the printer status monitor (Windows) or Canon IJ Printer Utility
(Macintosh).
Page 71
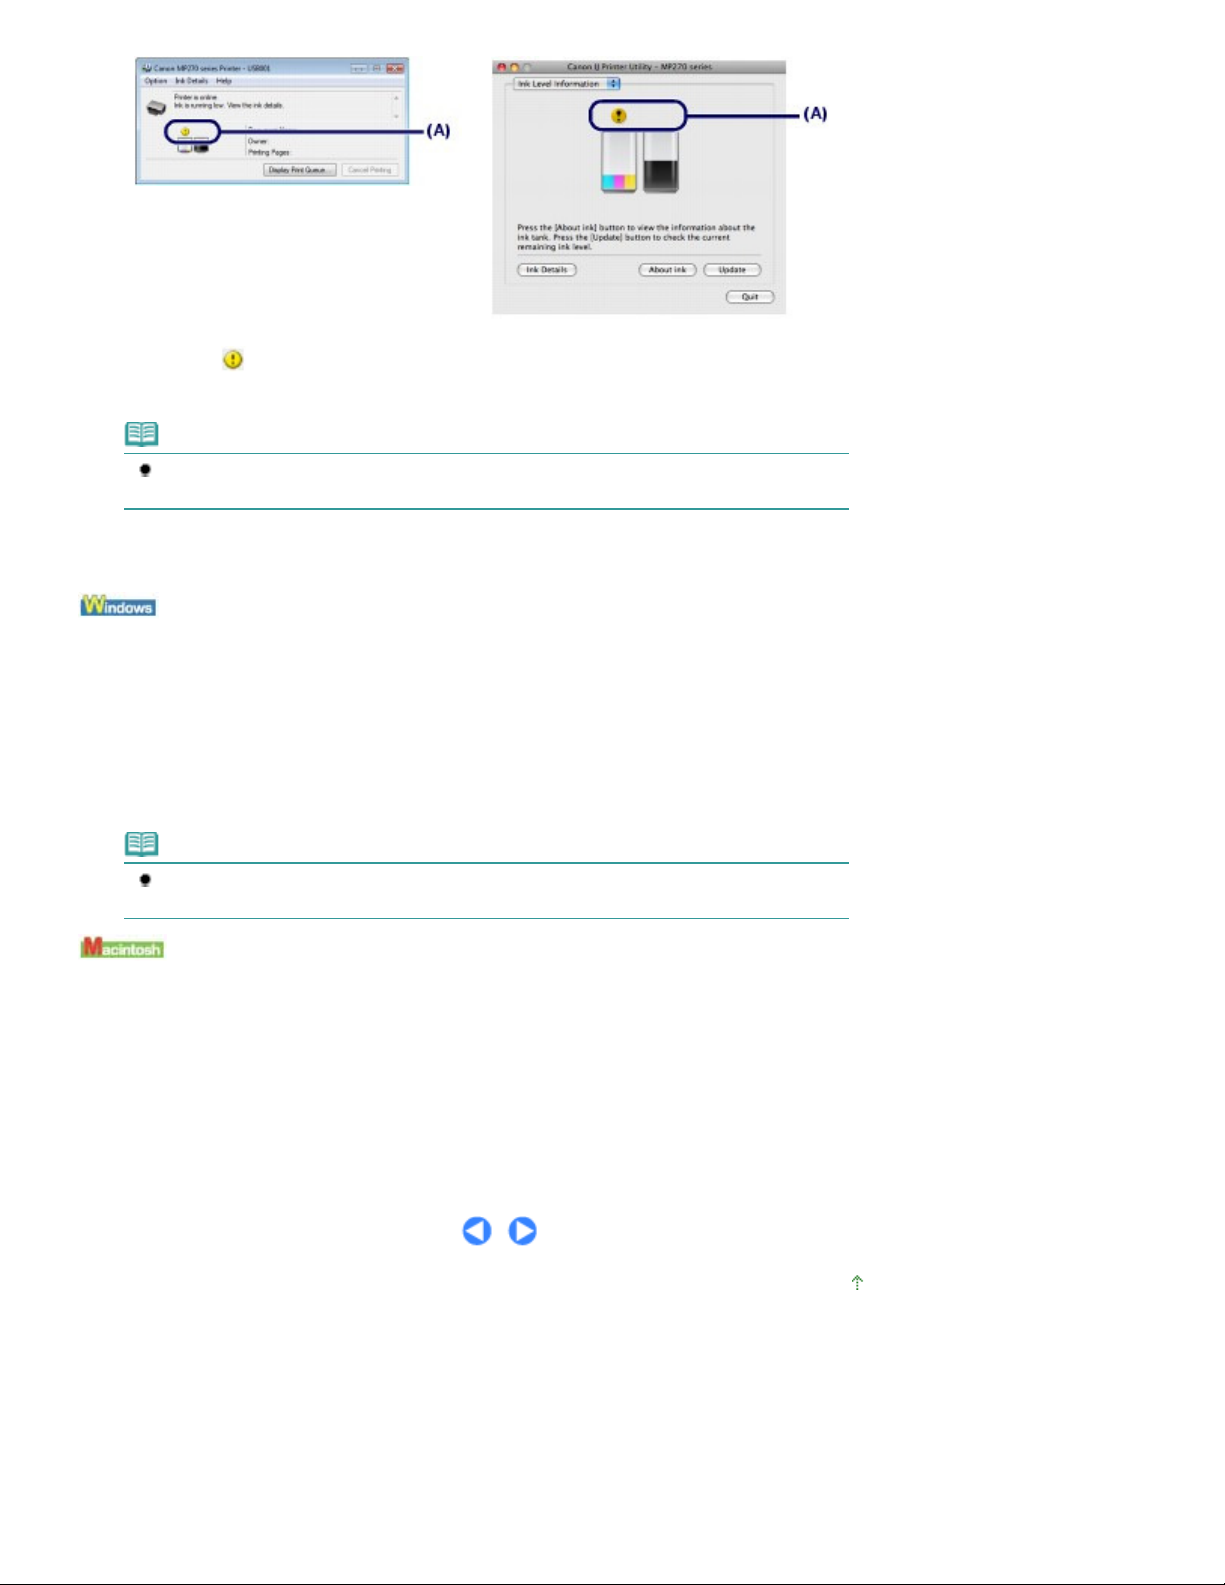
(A) Check if any symbol appears on the screen.
Advanced Guide
Advanced Guide
The ink with
you to have a new FINE Cartridge available.
(Ink low) is running low. You can continue printing for a while, but we recommend
Note
An error message may appear while printing. Confirm the message and take an appropriate
action.
Follow the procedure below to open each of the confirmation screens.
Page 71 of 678 pagesChecking the Ink Status
1.
Open the printer driver setup window from Control Panel.
Refer to the on-screen manual:
2.
Click View Printer Status on the Maintenance sheet.
To confirm the FINE Cartridge information, click the Ink Details menu.
.
Note
You can also display the printer status monitor by clicking Canon XXX Printer (where "
your machine's name) which appears on the taskbar while printing.
1. Open the Canon IJ Printer Utility.
Refer to the on-screen manual:
2.
Select Ink Level Information in the pop-up menu.
To confirm the FINE Cartridge information, click Ink Details.
.
XXX
" is
Page top
Page 72

Page 72 of 678 pagesCleaning the Machine
Routine Maintenance > Cleaning the Machine
Contents
>
Cleaning the Machine
This section describes how to clean the inside of the machine.
Cleaning the Paper Feed Roller
Cleaning the Inside of the Machine (Bottom Plate Cleaning)
Cleaning the Protrusions inside the Machine
Advanced Guide
Troubleshooting
Page top
Page 73
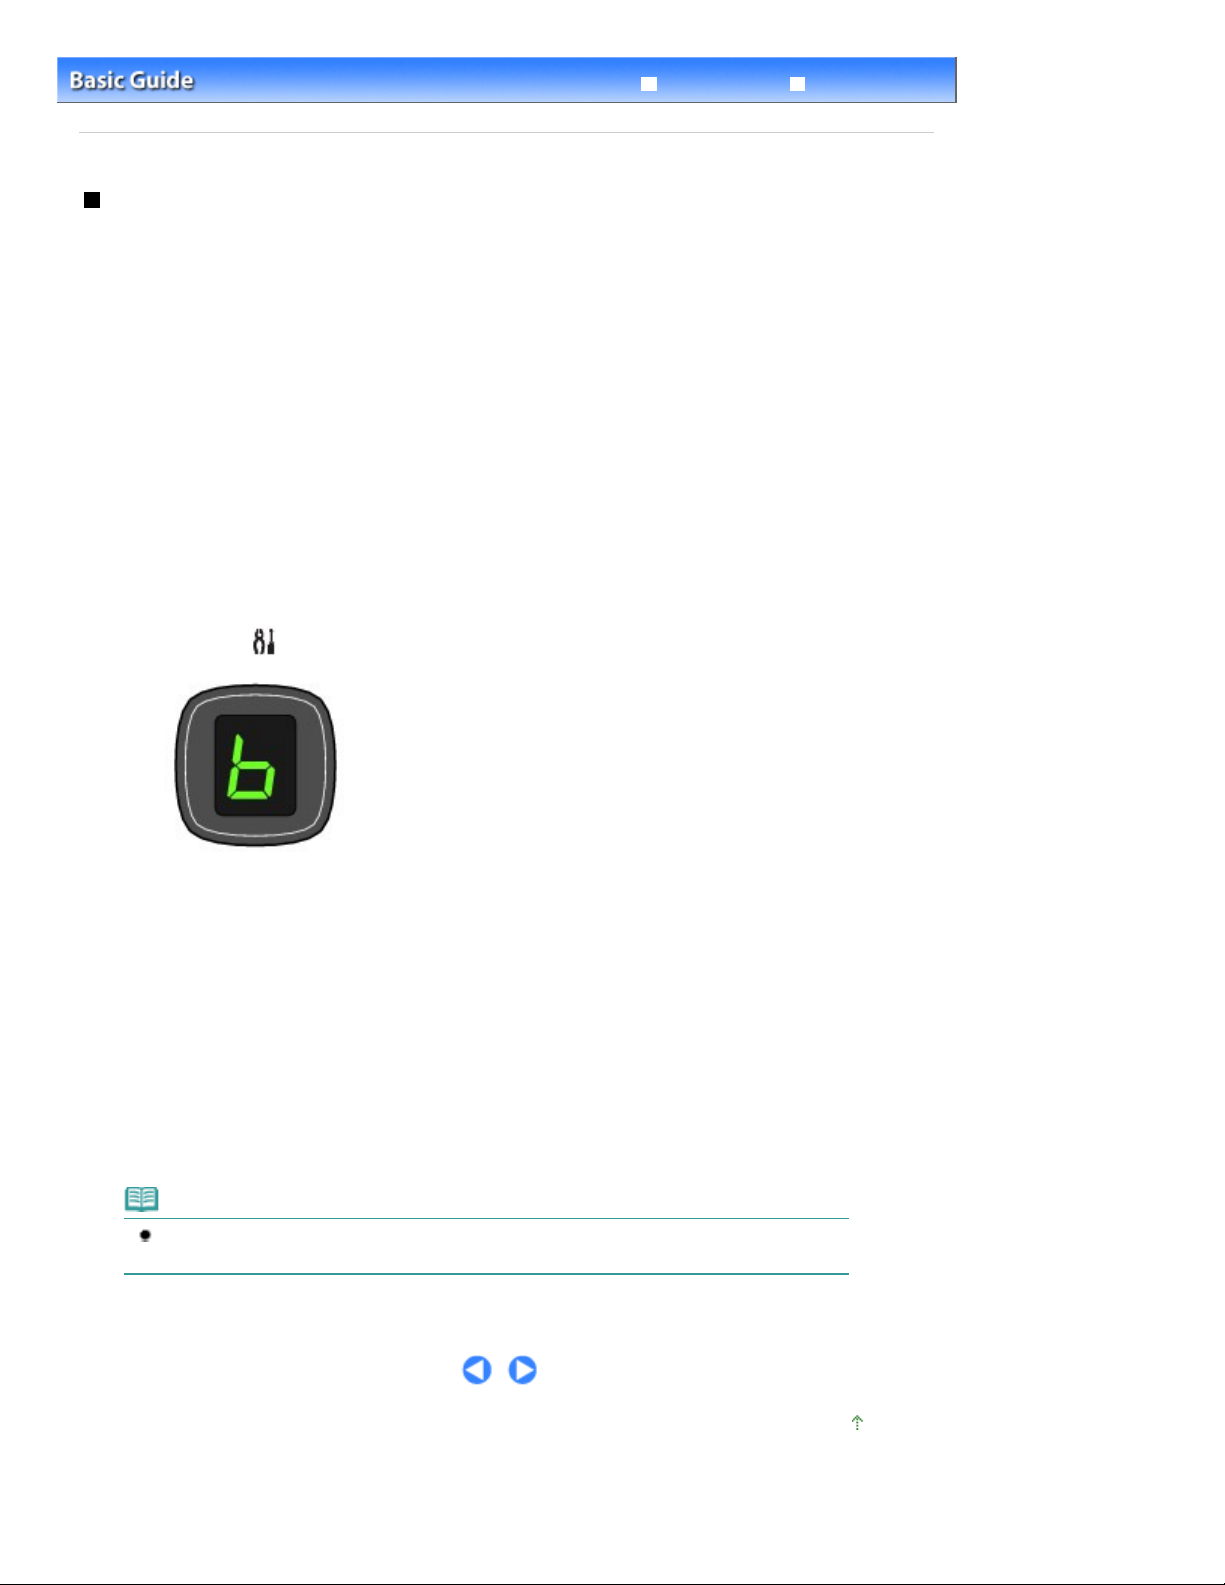
You need to prepare: three sheets of A4 or Letter-sized plain paper
Page 73 of 678 pagesCleaning the Paper Feed Roller
Troubleshooting
Contents
Routine Maintenance
>
Advanced Guide
Cleaning the Machine > Cleaning the Paper Feed Roller
>
Cleaning the Paper Feed Roller
If the Paper Feed Roller is dirty or paper powder is attached to it, paper may not be fed properly.
In this case, clean the Paper Feed Roller. Cleaning will wear out the Paper Feed Roller, so perform this
only when necessary.
1. Make sure that the power is turned on, and remove any paper from the Rear Tray.
2.
Open the Paper Output Tray gently, and open the Output Tray Extension.
3. Clean the Paper Feed Roller.
Press the
(1)
(Maintenance) button repeatedly until
appears.
b
Color
button.
or
Press the
(2)
The Paper Feed Roller will rotate as it is cleaned.
4.
Clean the Paper Feed Roller with paper.
Make sure that the Paper Feed Roller has stopped rotating, and load three
(1)
Black
sheets of A4 or Letter-sized plain paper in the Rear Tray.
Make sure that
(2)
The machine starts cleaning. The cleaning will be completed after the paper is ejected.
If the problem is not resolved after cleaning the Paper Feed Roller, contact the service center.
appears on the LED, then press the
b
Black
Note
After the cleaning is completed, press the
standby mode.
Stop/Reset
button to return the LED to the copy
or
Color
button.
Page top
Page 74
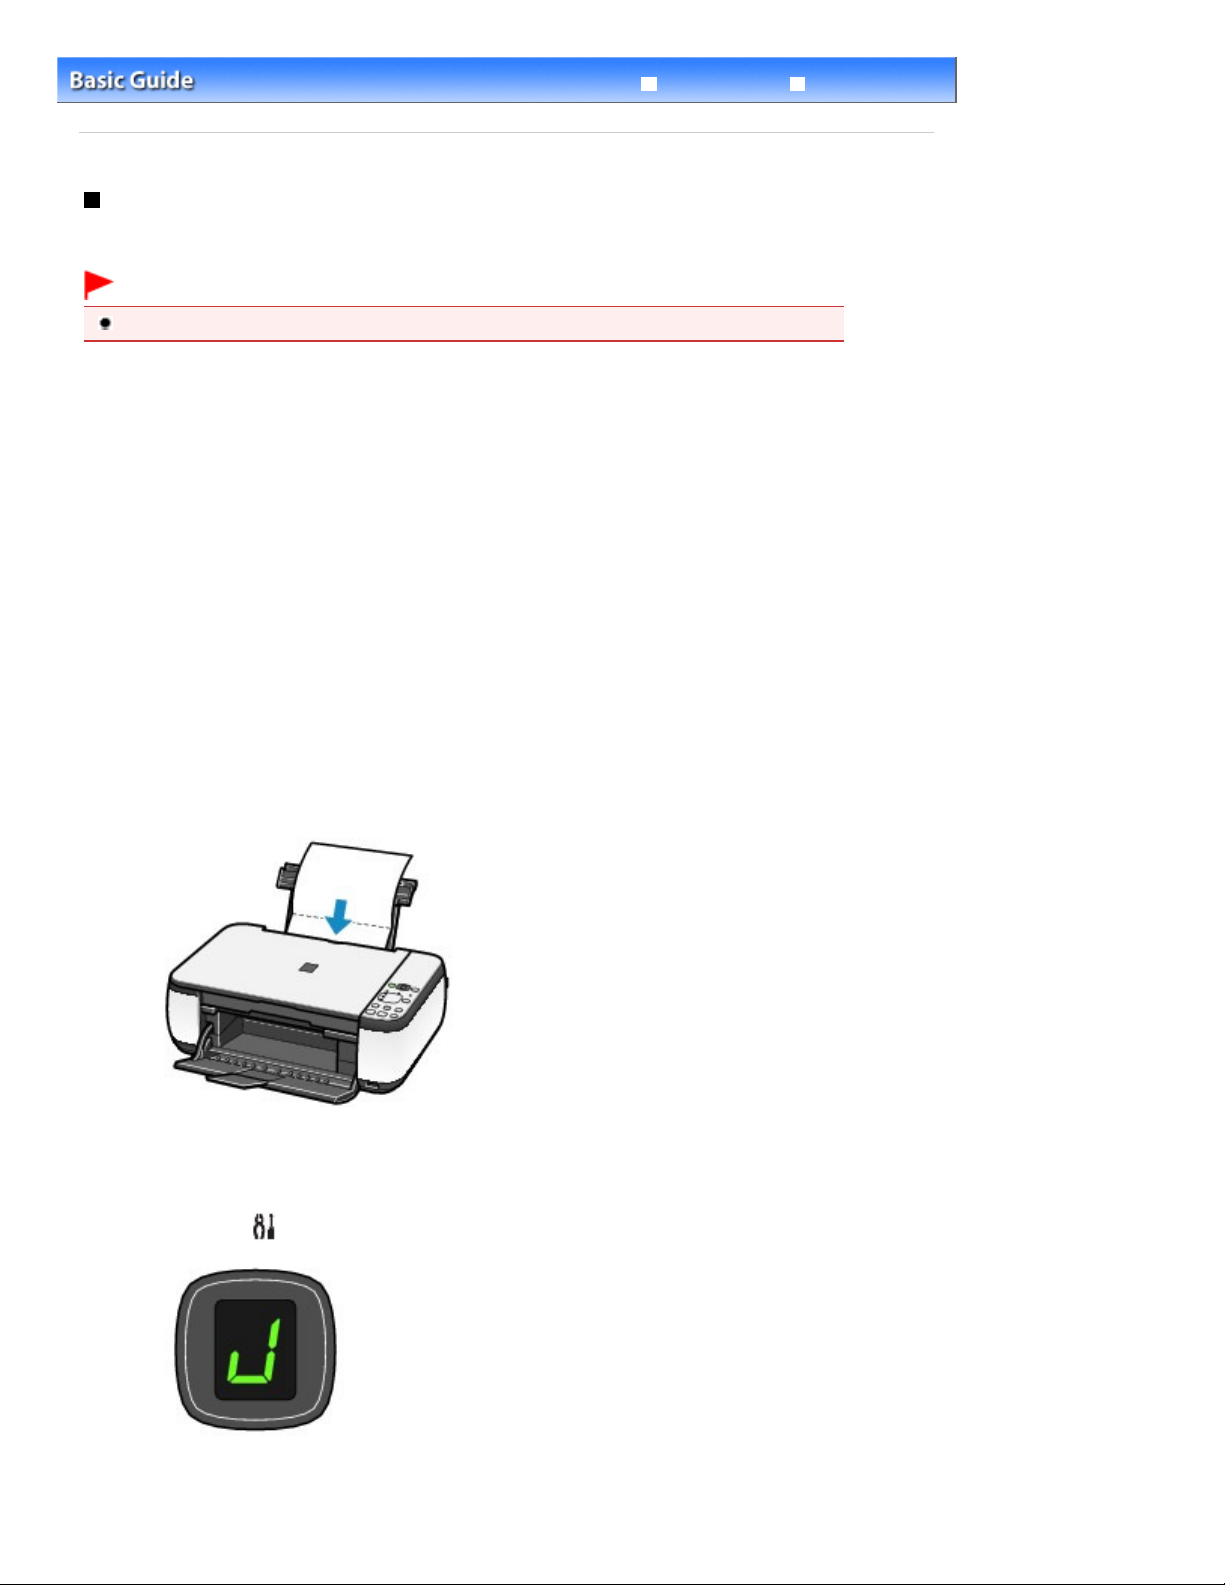
You need to prepare: a sheet of A4 or Letter-sized plain paper
Page 74 of 678 pagesCleaning the Inside of the Machine (Bottom Plate Cleaning)
Troubleshooting
Contents
Routine Maintenance
>
Advanced Guide
Cleaning the Machine > Cleaning the Inside of the Machine (Bottom Plate Cleaning)
>
Cleaning the Inside of the Machine (Bottom Plate Cleaning)
Remove stains from the inside of the machine. If the inside of the machine becomes dirty, printed paper
may get dirty, so we recommend performing cleaning regularly.
Important
Do not perform any other operations while performing the Bottom Plate Cleaning.
1.
Make sure that the power is turned on, and remove any paper from the Rear Tray.
2. Open the Paper Output Tray gently, and open the Output Tray Extension.
3.
Fold a single sheet of A4 or Letter-sized plain paper in half widthwise, and unfold the
paper.
4.
Load only this sheet of paper in the Rear Tray with the open side facing you.
5.
Clean the inside of the machine.
Press the
(1)
(Maintenance) button repeatedly until
appears.
J
Color
button.
or
Press the
(2)
The paper cleans the inside of the machine as it feeds through the machine.
Black
Page 75

Check the folded area of the ejected paper. If it is smudged with ink, perform the Bottom Plate Cleaning
again.
If the problem is not resolved after performing the Bottom Plate Cleaning twice, the protrusions inside the
machine may be stained.
See Cleaning the Protrusions inside the Machine to clean them.
Note
When performing the Bottom Plate Cleaning again, make sure to use a new piece of paper.
Page 75 of 678 pagesCleaning the Inside of the Machine (Bottom Plate Cleaning)
Page top
Page 76
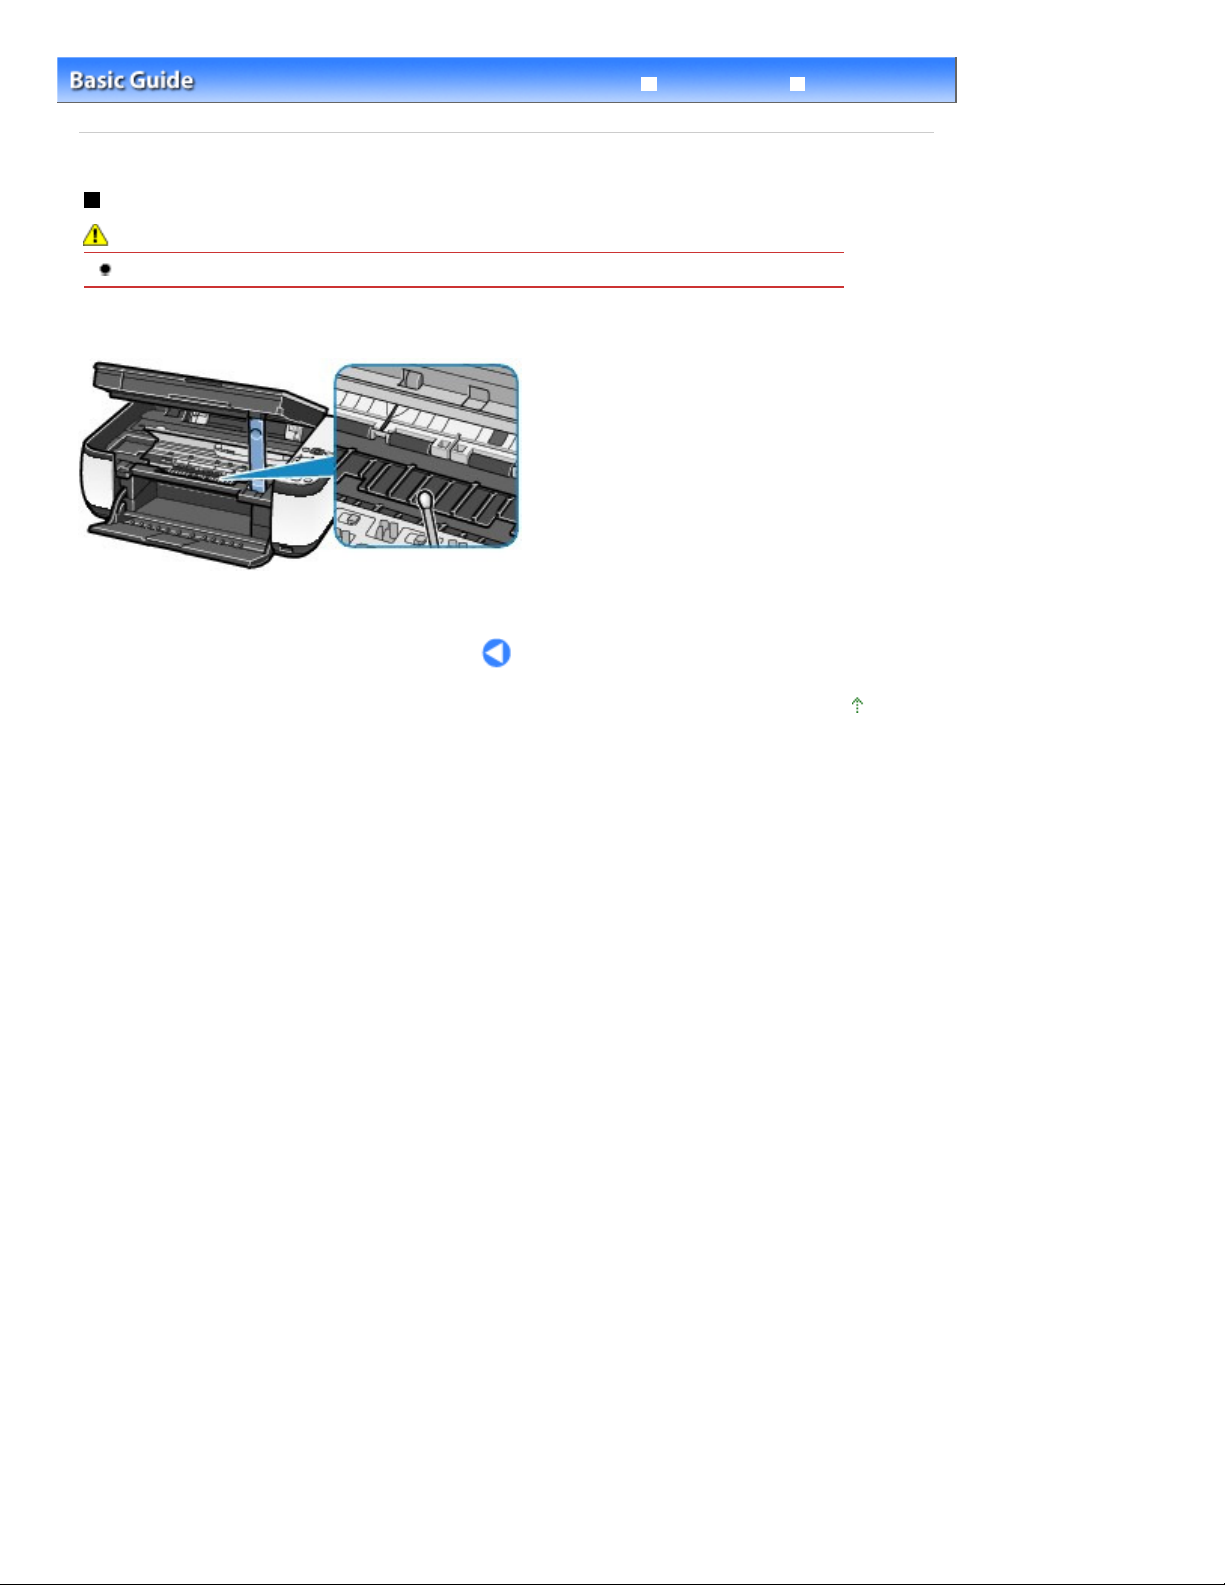
Page 76 of 678 pagesCleaning the Protrusions inside the Machine
Troubleshooting
Contents
Routine Maintenance
>
Cleaning the Machine
>
Advanced Guide
> Cleaning the Protrusions inside the Machine
Cleaning the Protrusions inside the Machine
Caution
Be sure to turn off the power and disconnect the power plug before cleaning the machine.
If the protrusions inside the machine are stained, wipe off any ink from the protrusions using a cotton
swab or the like.
Page top
Page 77

Page 77 of 678 pagesAppendix
Advanced Guide
Contents
> Appendix
Appendix
Legal Limitations on Use of Your Product and Use of Images
Tips on How to Use Your Machine
Troubleshooting
Page top
Page 78

Appendix
Page 78 of 678 pagesLegal Limitations on Use of Your Product and Use of Images
Troubleshooting
Contents
>
Advanced Guide
> Legal Limitations on Use of Your Product and Use of Images
Legal Limitations on Use of Your Product and Use of Images
It may be unlawful to make copies of, scan, print, or use reproductions of the following documents.
The list provided is non-exhaustive. When in doubt, check with a legal representative in your jurisdiction.
Paper money
Money orders
Certificates of deposit
Postage stamps (canceled or
uncanceled)
Identifying badges or insignias
Selective service or draft papers
Checks or drafts issued by
governmental agencies
Motor vehicle licenses and
certificates of title
Traveler's checks
Food stamps
Passports
Immigration papers
Internal revenue stamps (canceled or
uncanceled)
Bonds or other certificates of indebtedness
Stock certificates
Copyrighted works/works of art without
permission of copyright owner
Page top
Page 79
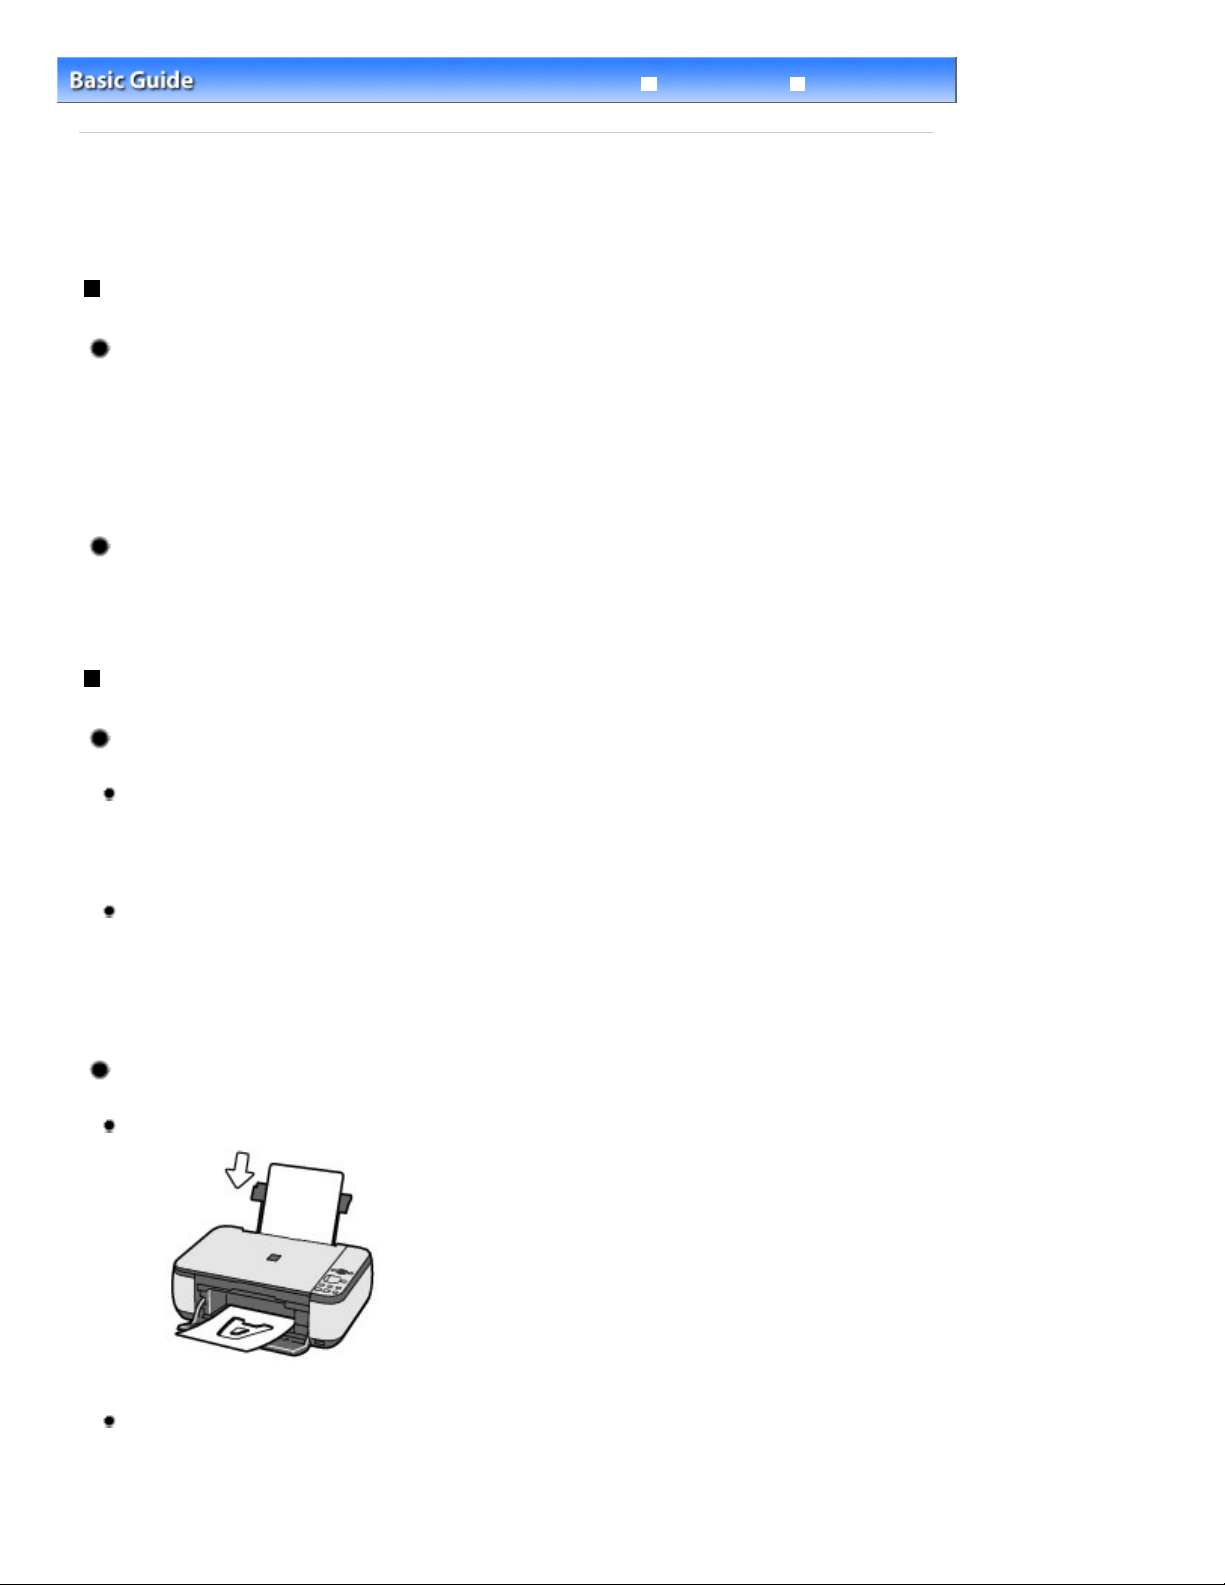
Appendix
Page 79 of 678 pages
Tips on How to Use Your Machine
Troubleshooting
Contents
>
Advanced Guide
> Tips on How to Use Your Machine
Tips on How to Use Your Machine
This section introduces the tips on how to use your machine and for printing with optimal quality.
Ink is used for various purposes.
How is ink used for various purposes other than printing?
Ink may be used for purposes other than printing. Ink is not only used for printing, but also for
cleaning the Print Head to maintain the optimal printing quality.
The machine has the function to automatically clean the ink jet nozzles to prevent clogging. In the
cleaning procedure, ink is pumped out from the nozzles. Used ink for nozzle cleaning is limited to a
small amount.
Does black-and-white printing use color ink?
Black-and-white printing may use color ink depending on the type of printing paper or the settings of
the printer driver. So, color ink is consumed even when printing in black-and-white.
Printing on special paper: How to print with optimal quality!?
Tip!: Check the machine status before printing!
Is the Print Head OK?
If print head nozzles are clogged, print will be faint and papers will be wasted. Print the nozzle
check pattern to check the Print Head.
When Printing Becomes Faint or Colors Are Incorrect
See
.
Is the inside of the machine smeared with ink?
After printing large quantities of paper or performing borderless printing, the area where papers
go through may get smeared with ink. Clean the inside of your machine with the Bottom Plate
Cleaning.
Cleaning the Inside of the Machine (Bottom Plate Cleaning)
See
.
Tip!: Check how to load the paper correctly!
Is the paper loaded in the correct orientation?
Load paper in the Rear Tray with the printing side facing you.
Is the paper curled?
The curled paper causes paper jam. Flatten the curled paper, then reload it.
Refer to "
Troubleshooting
" in the on-screen manual:
Advanced Guide
.
Page 80
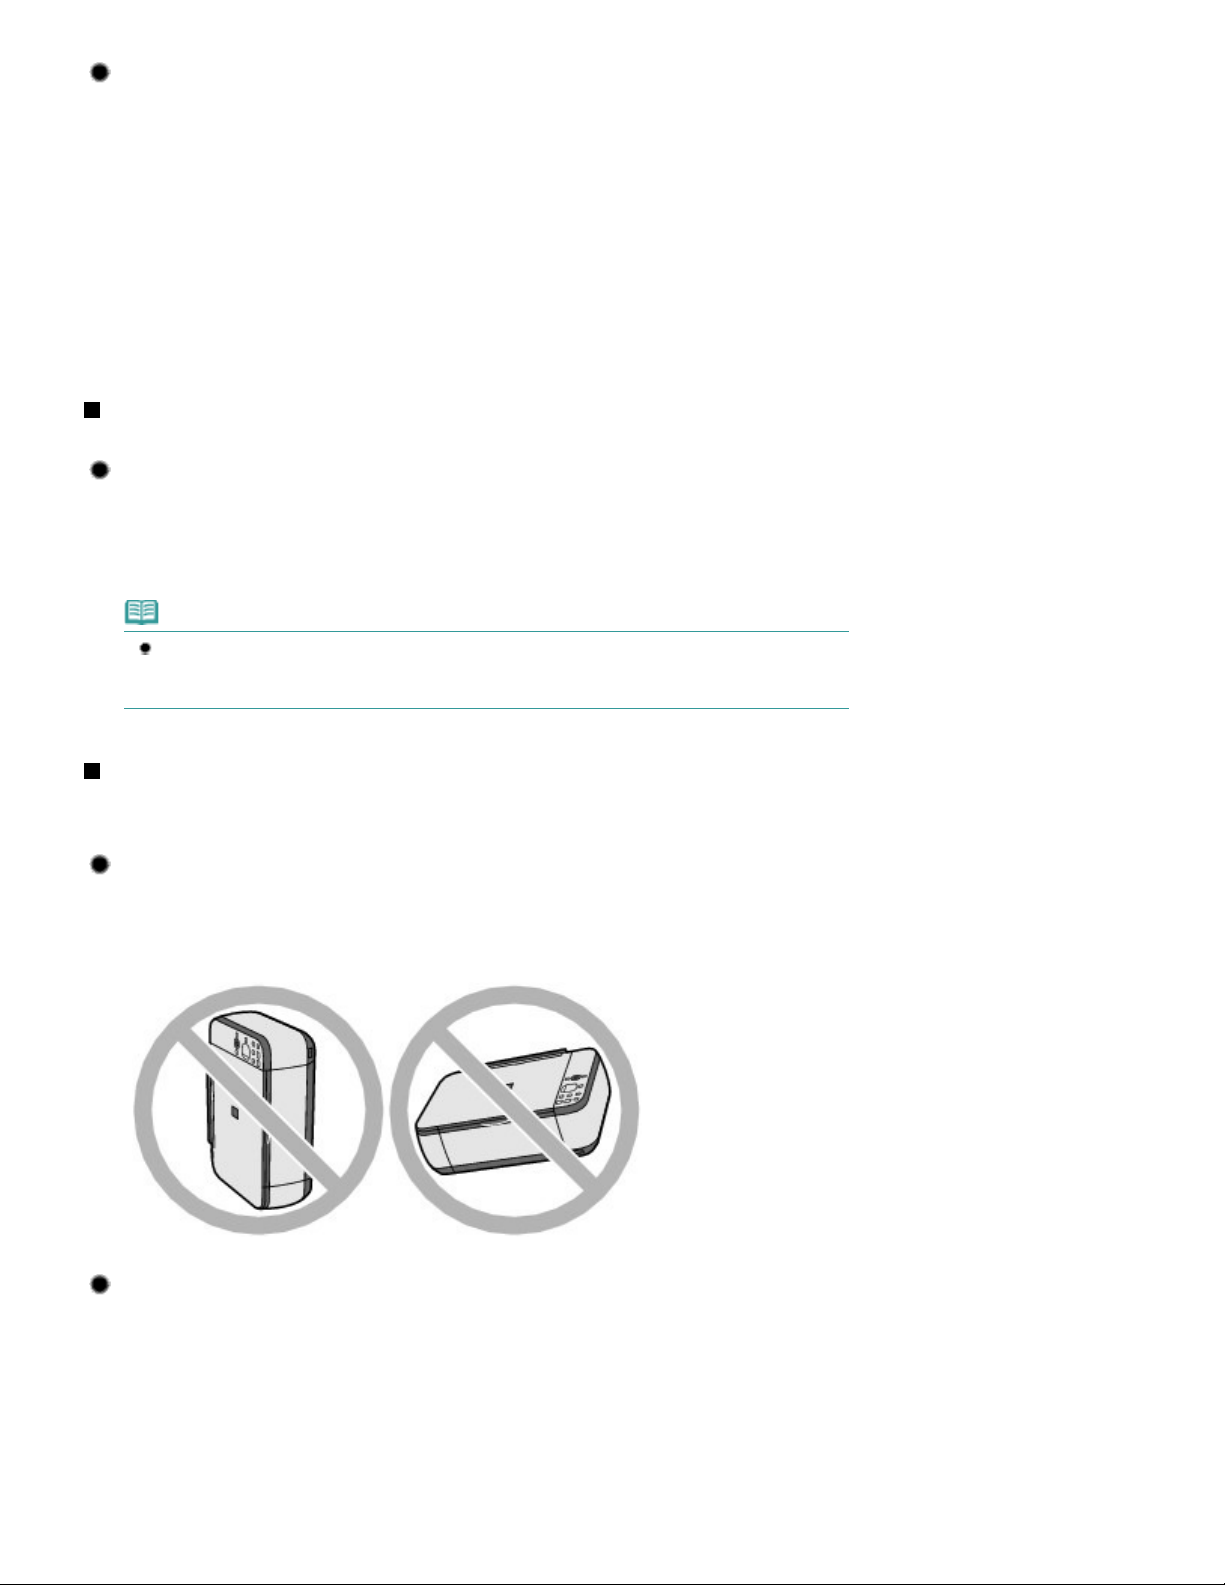
Tip!: After loading paper, be sure to specify the paper settings!
Tips on How to Use Your Machine
After loading paper, be sure to select the loaded paper in Media Type of the printer driver or with the
button on the Operation Panel. If the type of paper is not selected, you may not be able to get
Paper
the satisfactory print result.
See Copying, Printing from Your Computer
There are various types of paper: paper with special coating on the surface for printing photos with
optimal quality and paper suitable for documents. Media Type of the printer driver has different
settings for each type of paper in advance (such as using ink, ejecting ink, or distance from nozzles)
so that you can print on each paper with the optimal image quality. The
Operation Panel, which is used for making copies, also has some settings similar to Media Type of
the printer driver. You can print with different settings in Media Type of the printer driver or with the
button on the Operation Panel, suitable for each type of loaded paper.
Paper
, and Media Types You Can Use
.
button on the
Paper
Use the Stop/Reset button to cancel printing!
Tip!: Never press the ON button!
ON
If you press the
queues in the machine and you may not be able to continue to print.
Press the
Stop/Reset button to cancel printing.
button while printing is in progress, the print data sent from the computer
Page 80 of 678 pages
Note
If you cannot cancel printing by pressing the
computer, open the printer driver setup window to delete the unnecessary print jobs from the
printer status monitor (Windows).
Stop/Reset button while printing from a
Does the machine need to be handled with care when using or
transporting?
Tip!: Do not use or transport the machine vertically or slanted!
If the machine is used or transported vertically or slanted, the machine may become damaged or
ink may leak from the machine.
Be sure not to use or transport the machine vertically or slanted.
Tip!: Do not place any object on the Document Cover!
Do not place any object on the Document Cover. It will fall into the Rear Tray when the Document
Cover is opened and cause the machine to malfunction.
Also, place the machine where objects will not fall on it.
Page 81
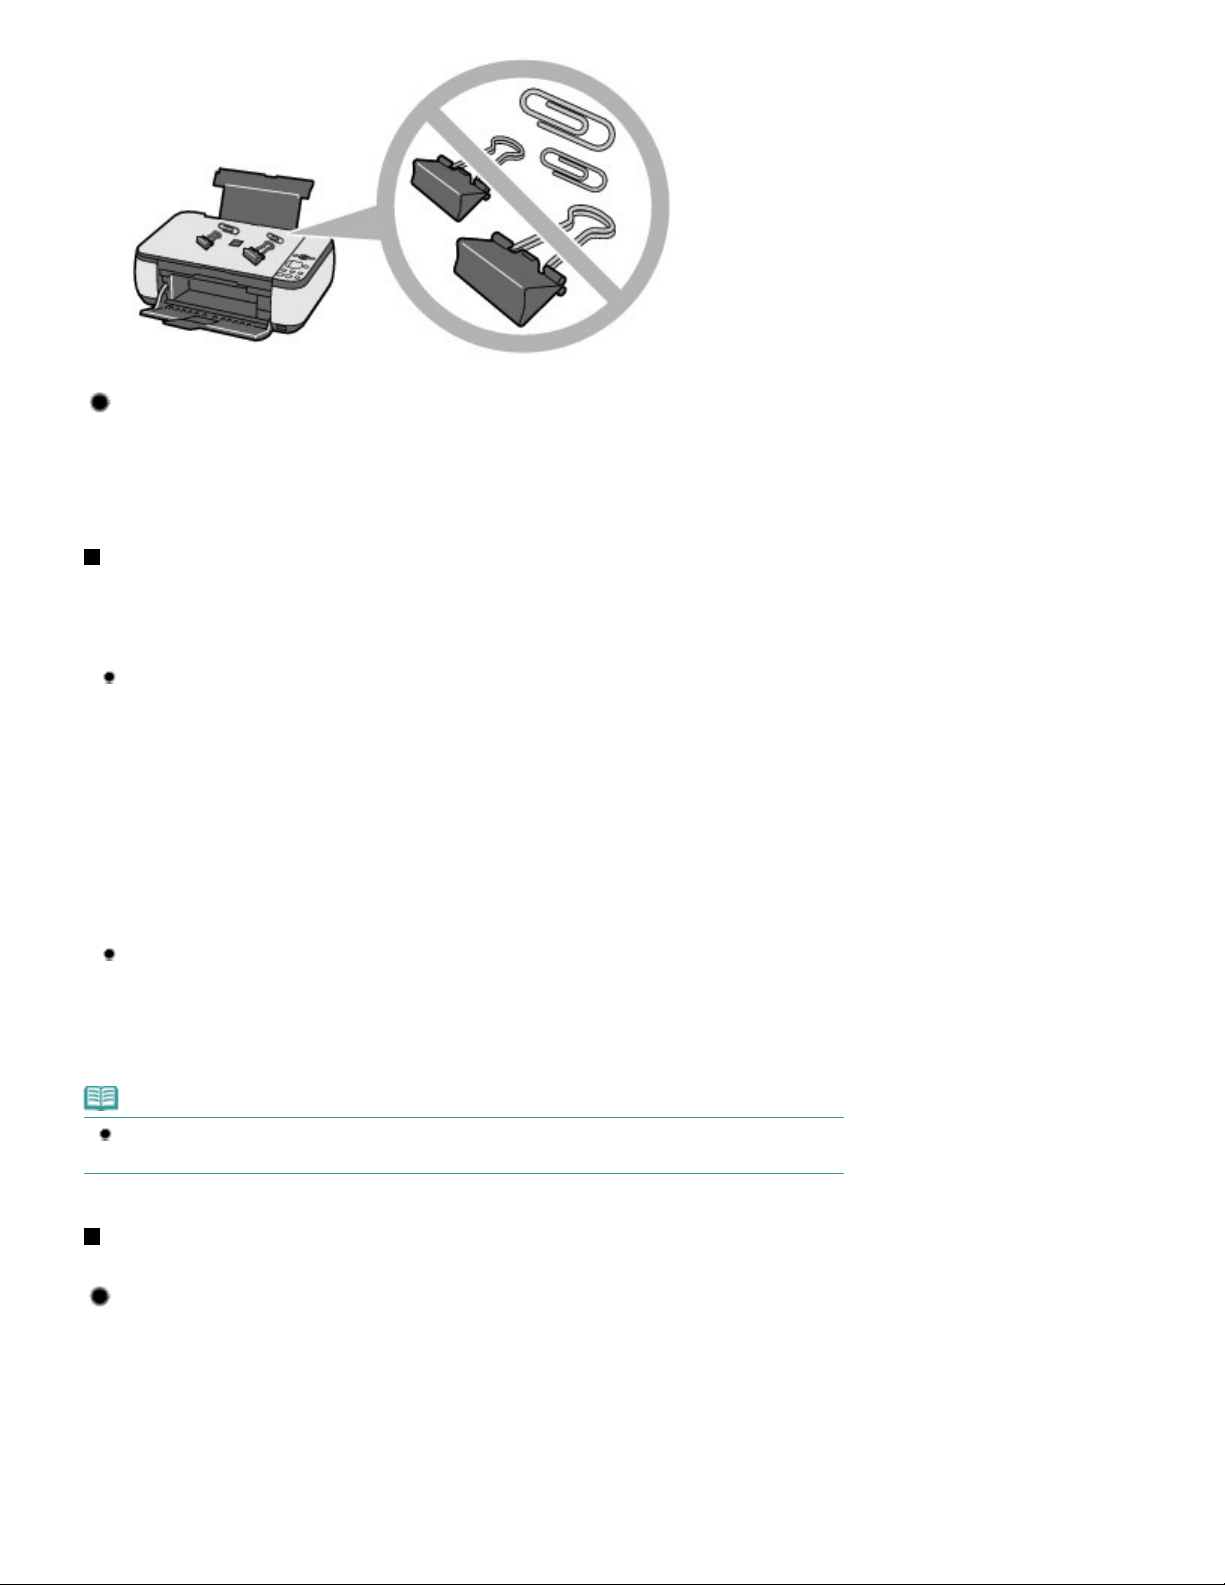
Tip!: Carefully choose the area to place the machine!
Tips on How to Use Your Machine
Place the machine at least 5.91 inches / 15 cm away from other electrical appliances such as
fluorescent lamps. If the machine is placed closer to those, it may not be able to work properly due
to fluorescent noises.
How to maintain the optimal printing quality?
Page 81 of 678 pages
The key to printing with the optimal printing quality is to prevent the Print Head from drying or clogging.
Always follow the following steps for optimal printing quality.
Follow the procedure below to disconnect the power plug.
ON
1. Press the
2. Make sure that the
3. Disconnect the power plug from the wall outlet, or turn off the extender cable connector.
If you press the
automatically to prevent from drying. If you disconnect the power plug from the wall outlet or turn
off the extender cable connector before the
capped properly and this will cause drying or clogging.
To disconnect the power plug, be sure to follow this procedure.
button on the machine to turn it off.
lamp is not lit.
Power
ON
button to turn off the power, the machine caps the Print Head (nozzles)
lamp is turned off, the Print Head will not be
Power
Print periodically!
Just as the tip of a felt pen becomes dry and unusable if it has not been used for a long time,
even if it is capped, the Print Head too, may become dried or clogged if the machine has not
been used for a long time.
We recommend you to use the machine at least once a month.
Note
Depending on the type of paper, ink may blur if you trace the printed area with a highlight pen or
paint-stick, or bleed if water or sweat comes in contact with the printed area.
Colors are uneven, and print results are blurred.
Tip!: Print the nozzle check pattern to check if the nozzles are
clogged.
If the print head nozzles are clogged, colors may become uneven or the print results may be blurred.
Page 82

In this case
Tips on How to Use Your Machine
Print the nozzle check pattern
Check the printed check pattern to see if the nozzles are clogged.
See
When Printing Becomes Faint or Colors Are Incorrect
.
Page 82 of 678 pages
Page top
Page 83

MC-3791-V1.00
Page 83 of 678 pagesMP270 series / MP250 series Advanced Guide
Basic Guide
Printing
Scanning
Copying
Troubleshooting
How to Use This Manual
Printing This Manual
Maintenance
Changing the Machine Settings
Appendix
When you display this on-screen
manual in a language
environment other than English,
some English descriptions may
be displayed.
Printing
Printing from a Computer
Printing with the Bundled Application Software
What Is Easy-PhotoPrint EX?
Printing Photos
Starting Easy-PhotoPrint EX
Selecting a Photo
Selecting the Paper
Printing
Creating an Album
Starting Easy-PhotoPrint EX
Selecting the Paper and Layout
Selecting a Photo
Editing
Printing
Printing Calendars
Starting Easy-PhotoPrint EX
Selecting the Paper and Layout
Selecting a Photo
Editing
Printing
Printing Stickers
Starting Easy-PhotoPrint EX
Selecting the Paper and Layout
Selecting a Photo
Editing
Printing
Printing Layout
Starting Easy-PhotoPrint EX
Selecting the Paper and Layout
Selecting a Photo
Editing
Printing
Correcting and Enhancing Photos
Using the Auto Photo Fix Function
Using the Red-Eye Correction Function
Using the Face Brightener Function
Page 84

Using the Face Sharpener Function
Using the Digital Face Smoothing Function
Using the Blemish Remover Function
Adjusting Images
Correct/Enhance Images Window
Questions and Answers
How Can I Move (or Copy) the Saved File?
Which Side of the Displayed Image Does the Printing
Start from?
How Do I Print with Even Margins?
What Is "C1" or "C4"?
Photo Print Settings
Printing Vivid Photos
Reducing Photo Noise
Cropping Photos (Photo Print)
Printing Dates on Photos (Photo Print)
Printing Multiple Photos on One Page
Printing an Index
Printing ID Photos (ID Photo Print)
Printing Photo Information
Saving Photos
Opening Saved Files
Other Settings
Changing Layout
Changing Background
Adding Photos
Swapping Positions of Photos
Replacing Photos
Changing Position, Angle and Size of Photos
Cropping Photos
Framing Photos
Printing Dates on Photos
Attaching Comments to Photos
Adding Text to Photos
Saving
Setting Holidays
Setting Calendar Display
Opening Saved Files
Printing with Other Application Software
Various Printing Methods
Printing with Easy Setup
Setting a Page Size and Orientation
Setting the Number of Copies and Printing Order
Setting the Stapling Margin
Borderless Printing
Fit-to-Page Printing
Scaled Printing
Page 84 of 678 pagesMP270 series / MP250 series Advanced Guide
Page 85

Page Layout Printing
Poster Printing
Booklet Printing
Duplex Printing
Stamp/Background Printing
Registering a Stamp
Registering Image Data to be Used as a Background
Printing an Envelope
Displaying the Print Results before Printing
Setting Paper Dimensions (Custom Size)
Changing the Print Quality and Correcting Image Data
Selecting a Combination of the Print Quality Level
and a Halftoning Method
Printing a Color Document in Monochrome
Specifying Color Correction
Optimal Photo Printing of Image Data
Adjusting Colors with the Printer Driver
Printing with ICC Profiles
Adjusting Color Balance
Adjusting Brightness
Adjusting Intensity
Adjusting Contrast
Simulating an Illustration
Representing Image Data with a Single Color
Presenting Image Data with Vivid Colors
Smoothing Jagged Outlines
Changing Color Properties to Improve Coloration
Reducing Photo Noise
Overview of the Printer Driver
Printer Driver Operations
Canon IJ Printer Driver
How to Open the Printer Driver Setup Window
Maintenance Tab
Canon IJ Status Monitor
Canon IJ Preview
Page 85 of 678 pagesMP270 series / MP250 series Advanced Guide
Printing Photographs Directly from a Compliant Device (MP270
series only)
Printing Photographs Directly from a Compliant Device
(MP270 series only)
Printing Photographs Directly from a Compliant Device
(MP270 series only)
About PictBridge Print Settings (MP270 series only)
Settings on a PictBridge Compliant Device
Scanning
Scanning
Scanning Images
Page 86

Scanning Images
Before Scanning
Placing Documents
Saving Scanned Data to PC Using the Operation Panel of the
Machine
Saving Scanned Data to PC Using the Operation Panel of
the Machine
Appendix: Various Scan Settings
Selecting a Response to Commands from the
Operation Panel Using MP Navigator EX
Scanning with the Bundled Application Software
What Is MP Navigator EX (Supplied Scanner Software)?
Let's Try Scanning
Starting MP Navigator EX
Scanning Photos and Documents
Scanning Multiple Documents at One Time
Scanning Images Larger than the Platen (Stitch
Assist)
Easy Scanning with One-click
Useful MP Navigator EX Functions
Correcting/Enhancing Images Automatically
Correcting/Enhancing Images Manually
Adjusting Images
Searching Images
Classifying Images into Categories
Utilizing Images in MP Navigator EX
Saving
Saving as PDF Files
Creating/Editing PDF Files
Printing Documents
Printing Photos
Sending via E-mail
Editing Files
Setting Passwords for PDF Files
Opening/Editing Password-protected PDF Files
MP Navigator EX Screens
Navigation Mode Screen
Scan/Import Documents or Images Tab
View & Use Images on your Computer Tab
Custom Scan with One-click Tab
Photos/Documents (Platen) Screen (Scan/Import
Window)
Scan Settings Dialog Box (Photos/Documents)
Save Dialog Box
Save as PDF file Dialog Box
PDF Settings Dialog Box
View & Use Window
Create/Edit PDF file Window
Page 86 of 678 pagesMP270 series / MP250 series Advanced Guide
Page 87

Print Document Dialog Box
Print Photo Dialog Box
Send via E-mail Dialog Box
Correct/Enhance Images Window
One-click Mode Screen
Auto Scan Dialog Box
Save Dialog Box (One-click Mode Screen)
Scan Settings Dialog Box
Save Dialog Box
Exif Settings Dialog Box
PDF Dialog Box
Save as PDF file Dialog Box
Mail Dialog Box
OCR Dialog Box
Custom Dialog Box
Preferences Dialog Box
General Tab
Scanner Button Settings Tab (Save)
Appendix: Opening Files Other than Scanned Images
Opening Images Saved on a Computer
Scanning with Other Application Software
What Is ScanGear (Scanner Driver)?
Scanning with Advanced Settings Using ScanGear
(Scanner Driver)
Starting ScanGear (Scanner Driver)
Scanning in Basic Mode
Scanning in Advanced Mode
Scanning in Auto Scan Mode
Scanning Multiple Documents at One Time with
ScanGear (Scanner Driver)
Correcting Images and Adjusting Colors with ScanGear
(Scanner Driver)
Correcting Images (Unsharp Mask, Reduce Dust
and Scratches, Fading Correction, etc.)
Adjusting Colors Using a Color Pattern
Adjusting Saturation and Color Balance
Adjusting Brightness and Contrast
Adjusting Histogram
Adjusting Tone Curve
Setting Threshold
ScanGear (Scanner Driver) Screens
Basic Mode Tab
Advanced Mode Tab
Input Settings
Output Settings
Image Settings
Color Adjustment Buttons
Auto Scan Mode Tab
Page 87 of 678 pagesMP270 series / MP250 series Advanced Guide
Page 88

Preferences Dialog Box
Scanner Tab
Preview Tab
Scan Tab
Color Settings Tab
Appendix: Useful Information on Scanning
Adjusting Cropping Frames
Resolution
File Formats
Color Matching
Other Scanning Methods
Scanning with WIA Driver
Scanning Using the Control Panel (Windows XP Only)
Copying
Printing Using the Operation Panel of the Machine
Copying
Making Copies
Reducing or Enlarging a Copy
Using Useful Copy Functions
Switching the Page Size between A4 and Letter
Copying without Borders (Borderless Copy)
Page 88 of 678 pagesMP270 series / MP250 series Advanced Guide
Troubleshooting
Troubleshooting
If an Error Occurs
The Machine Cannot Be Powered On
An Error Code Is Displayed on the LED
Alarm Lamp is lit Orange
Power Lamp Flashes Green and Alarm Lamp Flashes
Orange Alternately
LED Cannot Be Seen At All
Cannot Install the MP Drivers
Cannot Connect to Computer Properly
Print Results Not Satisfactory
Cannot Print to End of Job
No Printing Results/Printing Is Blurred/Colors Are Wrong/
White Streaks
Colors Are Unclear
Lines Are Misaligned
Printed Paper Curls or Has Ink Blots
Paper Is Smudged/Printed Surface Is Scratched
Back of the Paper Is Smudged
Vertical Lines Are Printed on the Sides of the Printout
Colors Are Uneven or Streaked
Printing Does Not Start
Page 89

Copying/Printing Stops Before It Is Completed
Machine Moves But Ink Is Not Ejected
Printing Speed Is Not as Fast as Expected
FINE Cartridge Holder Does Not Move to the Position for
Replacing
Paper Does Not Feed Properly
Paper Jams
Paper Is Jammed in the Paper Output Slot or the Rear
Tray
In Other Cases
Message Appears on the Computer Screen
Error Number: B200 A printer error has occurred. Turn the
printer off and unplug the power cord of the printer from
the power supply. Then contact the service center. Is
Displayed
Error Number: **** A printer error has occurred. Turn the
printer off and then on again. If this doesn't clear the error,
see the user's guide for more detail. Is Displayed
Writing Error/Output Error/Communication Error
Error Number: 300 Is Displayed
Error Number: 1700 Is Displayed
Ink Info Number: 1688 Is Displayed
Ink Info Number: 1686 Is Displayed
Error Number: 2001 Is Displayed (MP270 series only)
Error Number: 2002 Is Displayed (MP270 series only)
Other Error Messages
The Inkjet Printer/Scanner/Fax Extended Survey Program
Screen Is Displayed
The Inkjet Printer/Scanner/Fax Extended Survey Program
Icon Appears
For Windows Users
Printer Status Monitor Is Not Displayed
Error Message Appears on a PictBridge Compliant Device
(MP270 series only)
Problems with Scanning
Scanner Does Not Work
ScanGear (Scanner Driver) Does Not Start
Error Message Appears and the ScanGear (Scanner
Driver) Screen Does Not Appear
Scan Quality (Image Displayed on the Monitor) Is Poor
Scanned Image Is Surrounded by Extra White Areas
Cannot Scan Multiple Documents at One Time
Cannot Scan Properly in Auto Scan Mode
Slow Scanning Speed
"There is not enough memory." Message Is Displayed
Computer Stops Operating during Scanning
Scanner Does Not Work After Upgrading Windows
Software Problems
E-mail Software Program You Want to Use Does Not
Appear in the Screen for Selecting an E-mail Software
Page 89 of 678 pagesMP270 series / MP250 series Advanced Guide
Page 90

Program
Scanned Image Is Printed Enlarged (Reduced)
Scanned Image Is Enlarged (Reduced) on the Computer
Monitor
Scanned Image Does Not Open
MP Navigator EX Problems
Cannot Scan at the Correct Size
Position or Size of the Image Cannot be Detected
Correctly When Scanning Using the Operation Panel
Document Is Placed Correctly, but the Scanned Image Is
Slanted
Document Is Placed Correctly, but the Orientation
Changes in the Scanned Image
If You Cannot Resolve the Problem
FAQs
Instructions for Use (Printer Driver)
General Notes (Scanner Driver)
Using Easy-PhotoPrint EX
Page 90 of 678 pagesMP270 series / MP250 series Advanced Guide
Using MP Navigator EX
About Solution Menu
Page 91

Advanced Guide
> How to Use This Manual
How to Use This Manual
Operating the Contents Pane
Operating the Explanation Window
Printing This Manual
Using Keywords to Find a Document
Registering Documents to My Manual
Symbols Used in This Document
Trademarks
Page 91 of 678 pagesHow to Use This Manual
Page top
Page 92
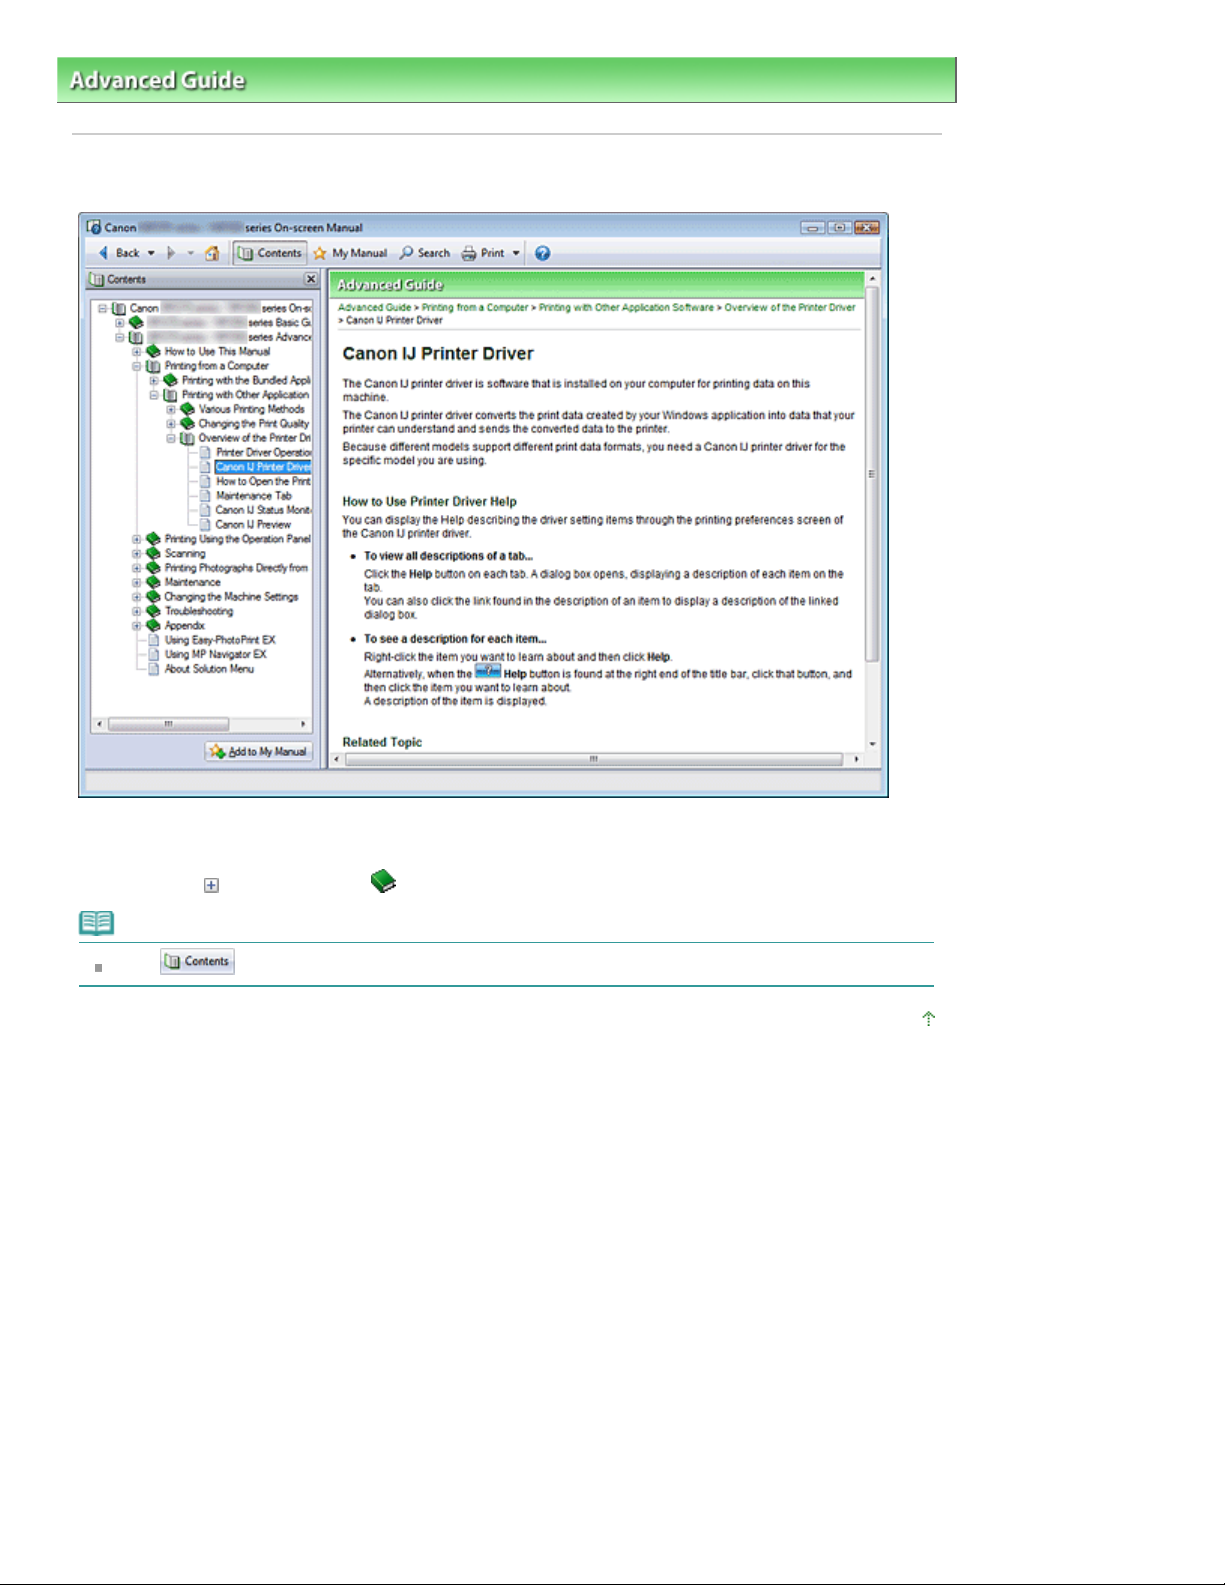
Advanced Guide
Page 92 of 678 pagesOperating the Contents Pane
>
How to Use This Manual
> Operating the Contents Pane
Operating the Contents Pane
When you click a document title displayed in the contents pane found to the left of the on-screen manual,
the documents of that title are displayed in the explanation window on the right side.
When you click found to the left of
, the document titles found in the lower hierarchies are displayed.
Note
Click to close or display the contents pane.
Page top
Page 93
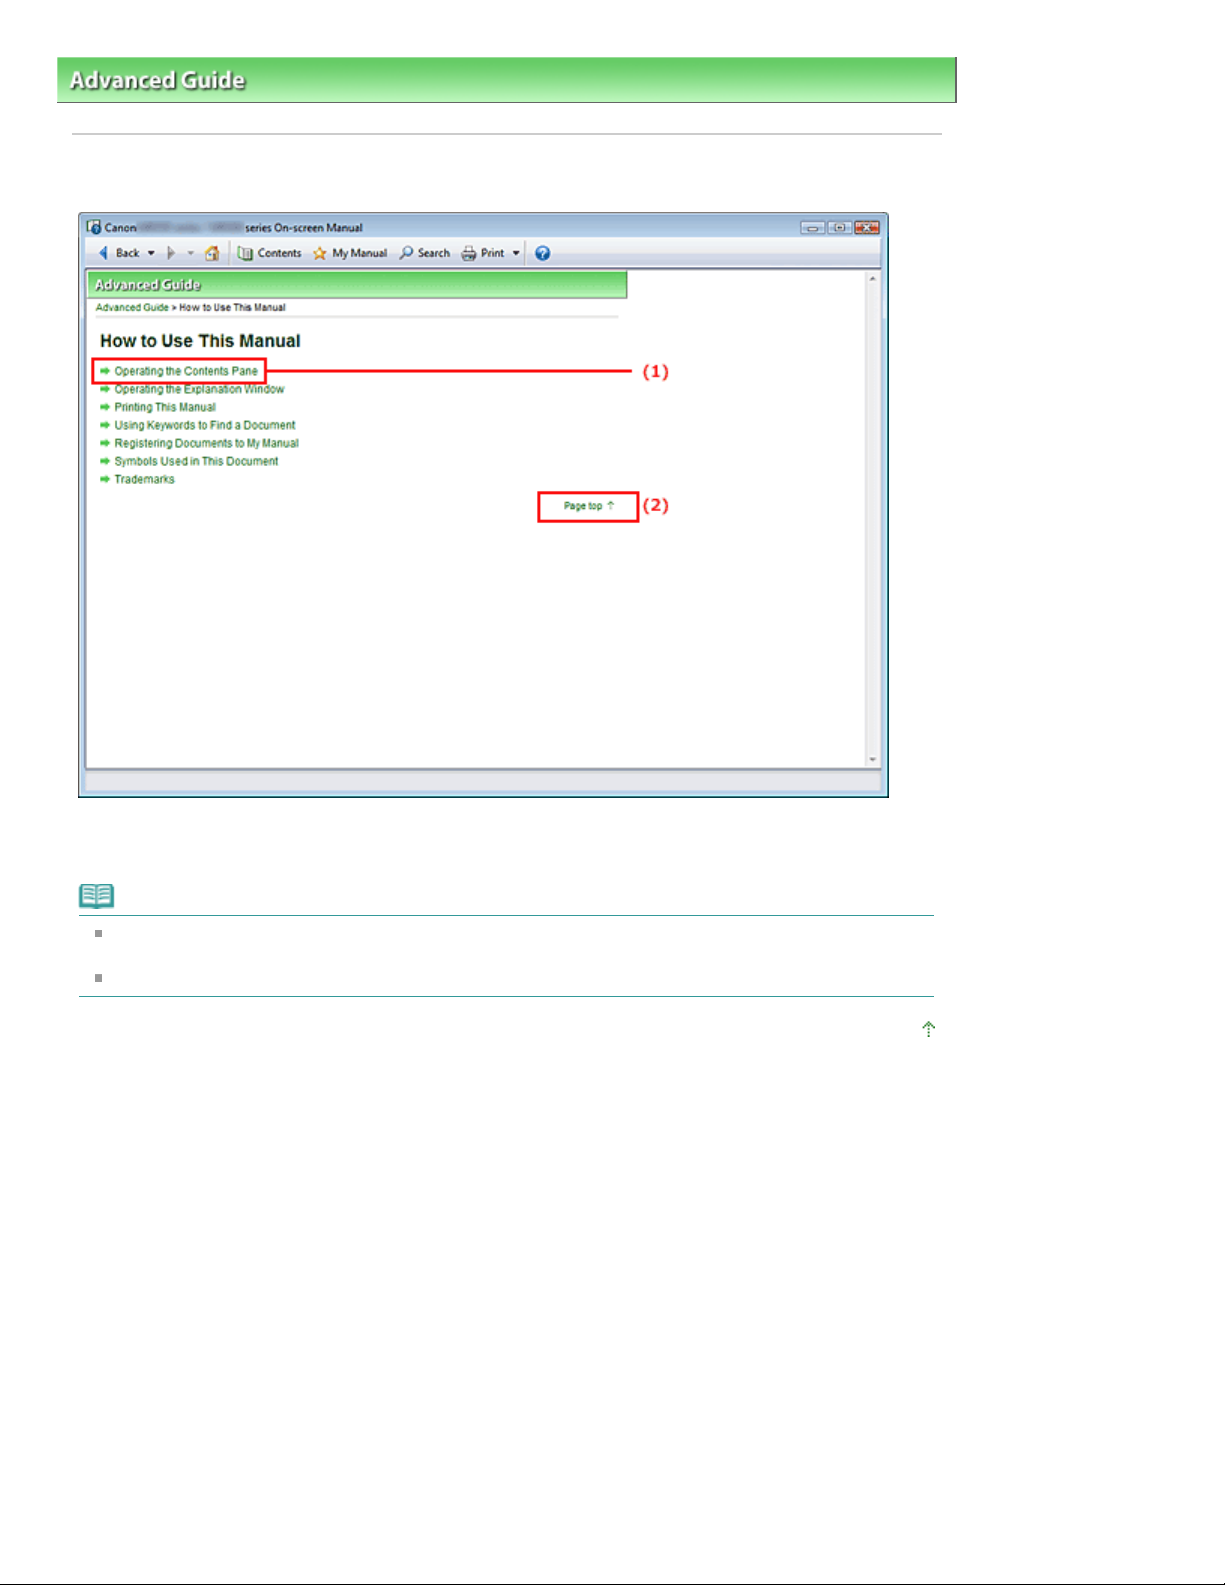
Advanced Guide
>
How to Use This Manual > Operating the Explanation Window
Operating the Explanation Window
Page 93 of 678 pagesOperating the Explanation Window
(1) Click the green characters to jump to the corresponding document.
(2) The cursor jumps to the top of this document.
Note
The diagrams and computer screens in this guide refer to MP270 series.
The operations are exactly the same as those for the MP250 series, unless otherwise described.
You may not be able to purchase some models in certain regions.
Page top
Page 94
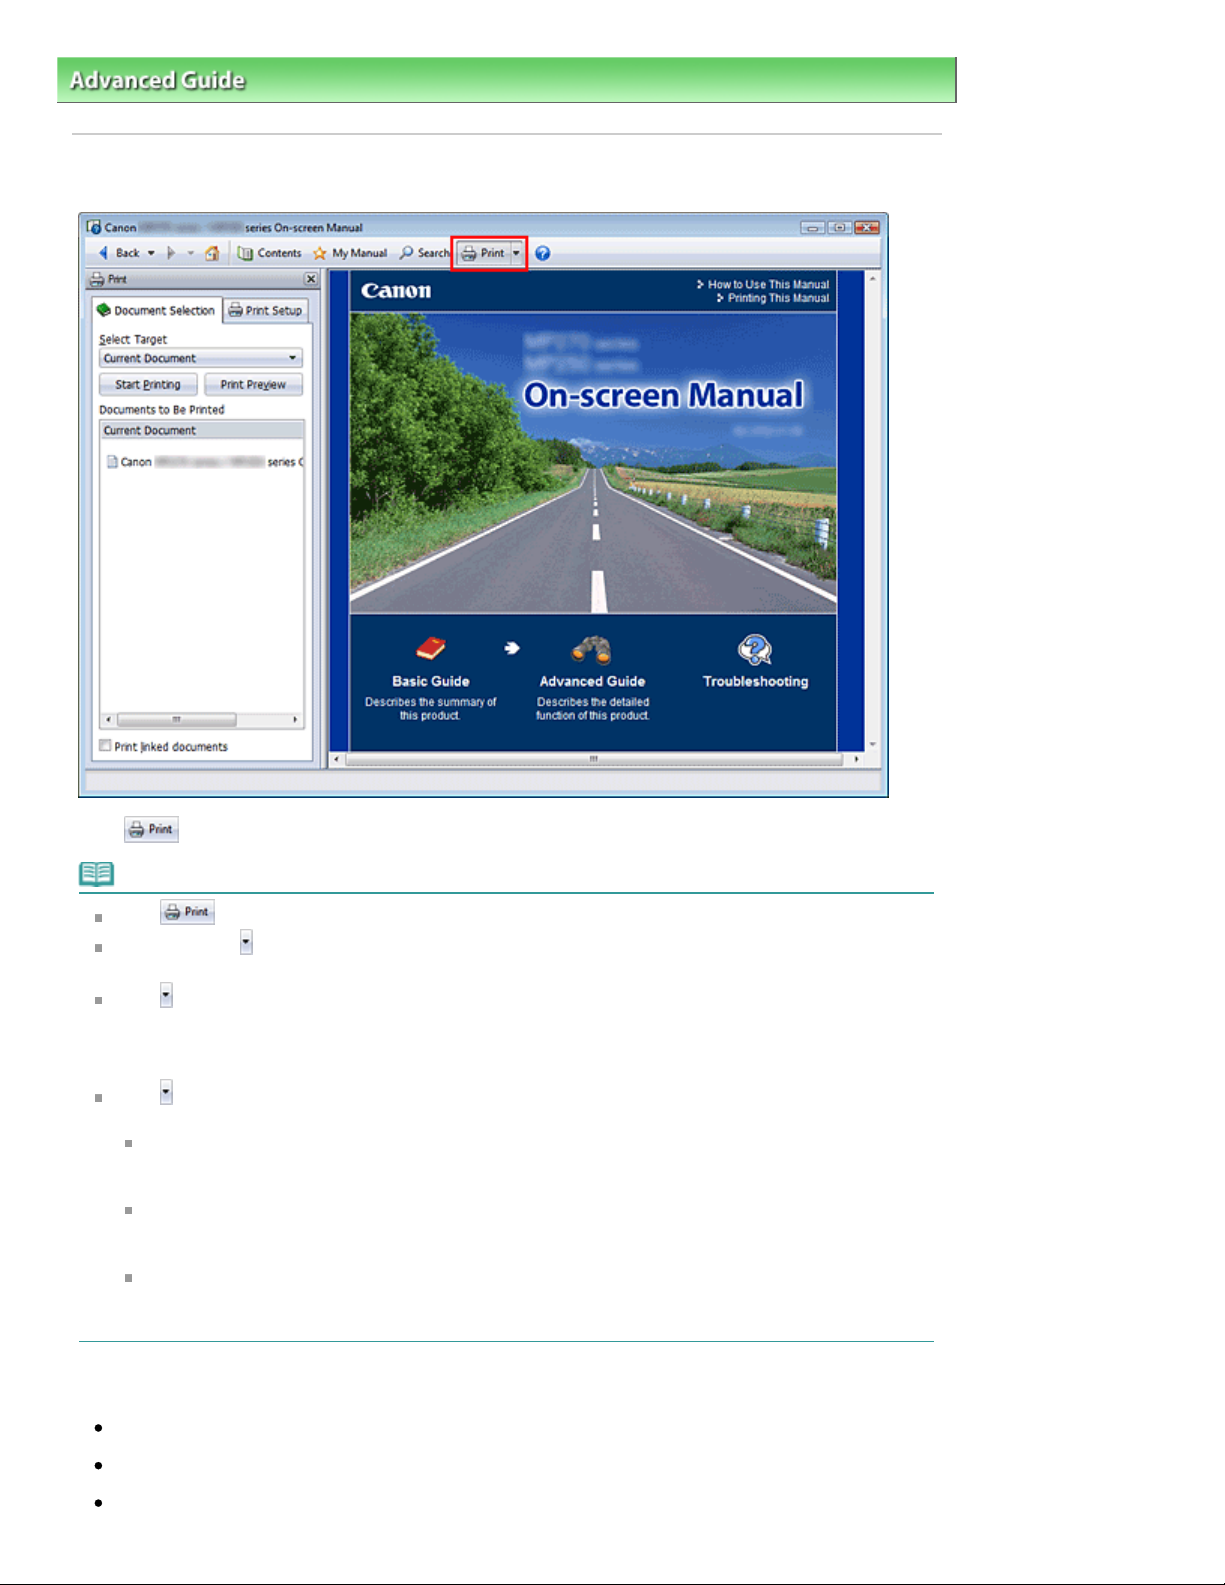
Advanced Guide
Page 94 of 678 pagesPrinting This Manual
>
How to Use This Manual
Printing This Manual
> Printing This Manual
Click to display the print pane to the left of the on-screen manual.
Note
Click to close or display the print pane.
When you click
easily set up the paper to be used for printing.
Click , and then click Print Settings to display the Print dialog box. When the dialog box is
displayed, select the printer to be used for printing. The Print Setup tab also allows you to select the
printer to be used.
After selecting the printer to be used, click Properties... to specify the print settings.
Click , and then click Option Settings to display the Option Settings dialog box. You can then set up
the printing operation.
Print document title and page number
When this check box is checked, the manual name and the page number are printed in the
header (top of the document).
Print background color and images
When this check box is checked, the background color and the image are printed. Some
images are printed regardless of whether this check box is checked or not.
Check number of pages to be printed before printing
When this check box is checked, the Print Page Count Confirmation dialog box is displayed
before printing starts. This dialog box allows you to check how many pages will be printed.
On the Document Selection tab, select the method for printing the document. The following four methods
of printing are available:
and then click Page Setup, the Page Setup dialog box appears. You can then
Print Current Document
Print Selected Documents
Print My Manual
Page 95

Print All Documents
Note
You can select the type to be printed, and then easily specify print settings on the Print Setup tab.
Print Current Document
You can print the currently displayed document.
From Select Target, select Current Document
1.
The title of the currently displayed document is displayed in the Documents to Be Printed list.
Note
By selecting Print linked documents, you can also print documents that are linked to the current
document. The linked documents are added to the Documents to Be Printed list.
Click Print Preview to display and check what the print results will look like before you actually
print the document.
Click Print Setup tab
2.
On the Page Setup tab, select the printer to be used and specify simple print settings, as necessary.
Page 95 of 678 pagesPrinting This Manual
Click Start Printing
3.
A message confirming the number of print pages is displayed.
Execute print
4.
Confirm the number of pages to be printed, and then click Yes.
The documents that are currently displayed are printed.
Print Selected Documents
You can select and print the documents that you want printed.
From Select Target, select Selected Documents
1.
The titles of all documents are displayed in the Documents to Be Printed list.
Select the documents to be printed
2.
From the Documents to Be Printed list, select the title check boxes of the documents to be printed.
Note
When you select the Automatically select documents in lower hierarchies check box, the check
boxes of all document titles found in the lower hierarchies are selected.
Click Select All to select the check boxes of all document titles.
Click Clear All to clear the check boxes of all document titles.
Click Print Preview to display and check what the print results will look like before you actually
print the document.
Click Print Setup tab
3.
On the Page Setup tab, select the printer to be used and specify simple print settings, as necessary.
Click Start Printing
4.
A message confirming the number of print pages is displayed.
Execute print
5.
Page 96

Confirm the number of pages to be printed, and then click Yes.
All documents with selected check boxes are printed.
Print My Manual
You can select and print documents registered in My Manual.
For details about My Manual, see "
From Select Target, select My Manual
1.
The titles of the documents that have been registered to My Manual are displayed in the Documents
to Be Printed list.
Select the documents to be printed
2.
From the Documents to Be Printed list, select the title check boxes of the documents to be printed.
Registering Documents to My Manual
."
Note
Click Select All to select the check boxes of all document titles.
Click Clear All to clear the check boxes of all document titles.
Click Print Preview to display and check what the print results will look like before you actually
print the document.
Page 96 of 678 pagesPrinting This Manual
Click Print Setup tab
3.
On the Page Setup tab, select the printer to be used and specify simple print settings, as necessary.
Click Start Printing
4.
A message confirming the number of print pages is displayed.
Execute print
5.
Confirm the number of pages to be printed, and then click Yes.
All documents with selected check boxes are printed.
Print All Documents
You can print all documents of the on-screen manual.
From Select Target, select All Documents
1.
The titles of all documents are displayed in the Documents to Be Printed list, and the check boxes
are automatically selected.
Note
When you uncheck the check box of a document title, that document is not printed.
Click Select All to select the check boxes of all document titles.
Click Clear All to clear the check boxes of all document titles.
Click Print Preview to display and check what the print results will look like before you actually
print the document.
Click Print Setup tab
2.
On the Page Setup tab, select the printer to be used and specify simple print settings, as necessary.
Click Start Printing
3.
A message confirming the number of print pages is displayed.
Execute print
4.
Page 97

Confirm the number of pages to be printed, and then click Yes.
All documents are printed.
Important
A large amount of paper is necessary to print all documents. Before printing, be sure to check
the number of print pages displayed in the Print Page Count Confirmation dialog box.
The Print Preview dialog box allows you to scale the printing to the paper width or to set the
zoom rate. However, if the print data extends outside the paper because of the new zoom rate,
that portion of the document will not be printed on the paper.
Page 97 of 678 pagesPrinting This Manual
Page top
Page 98
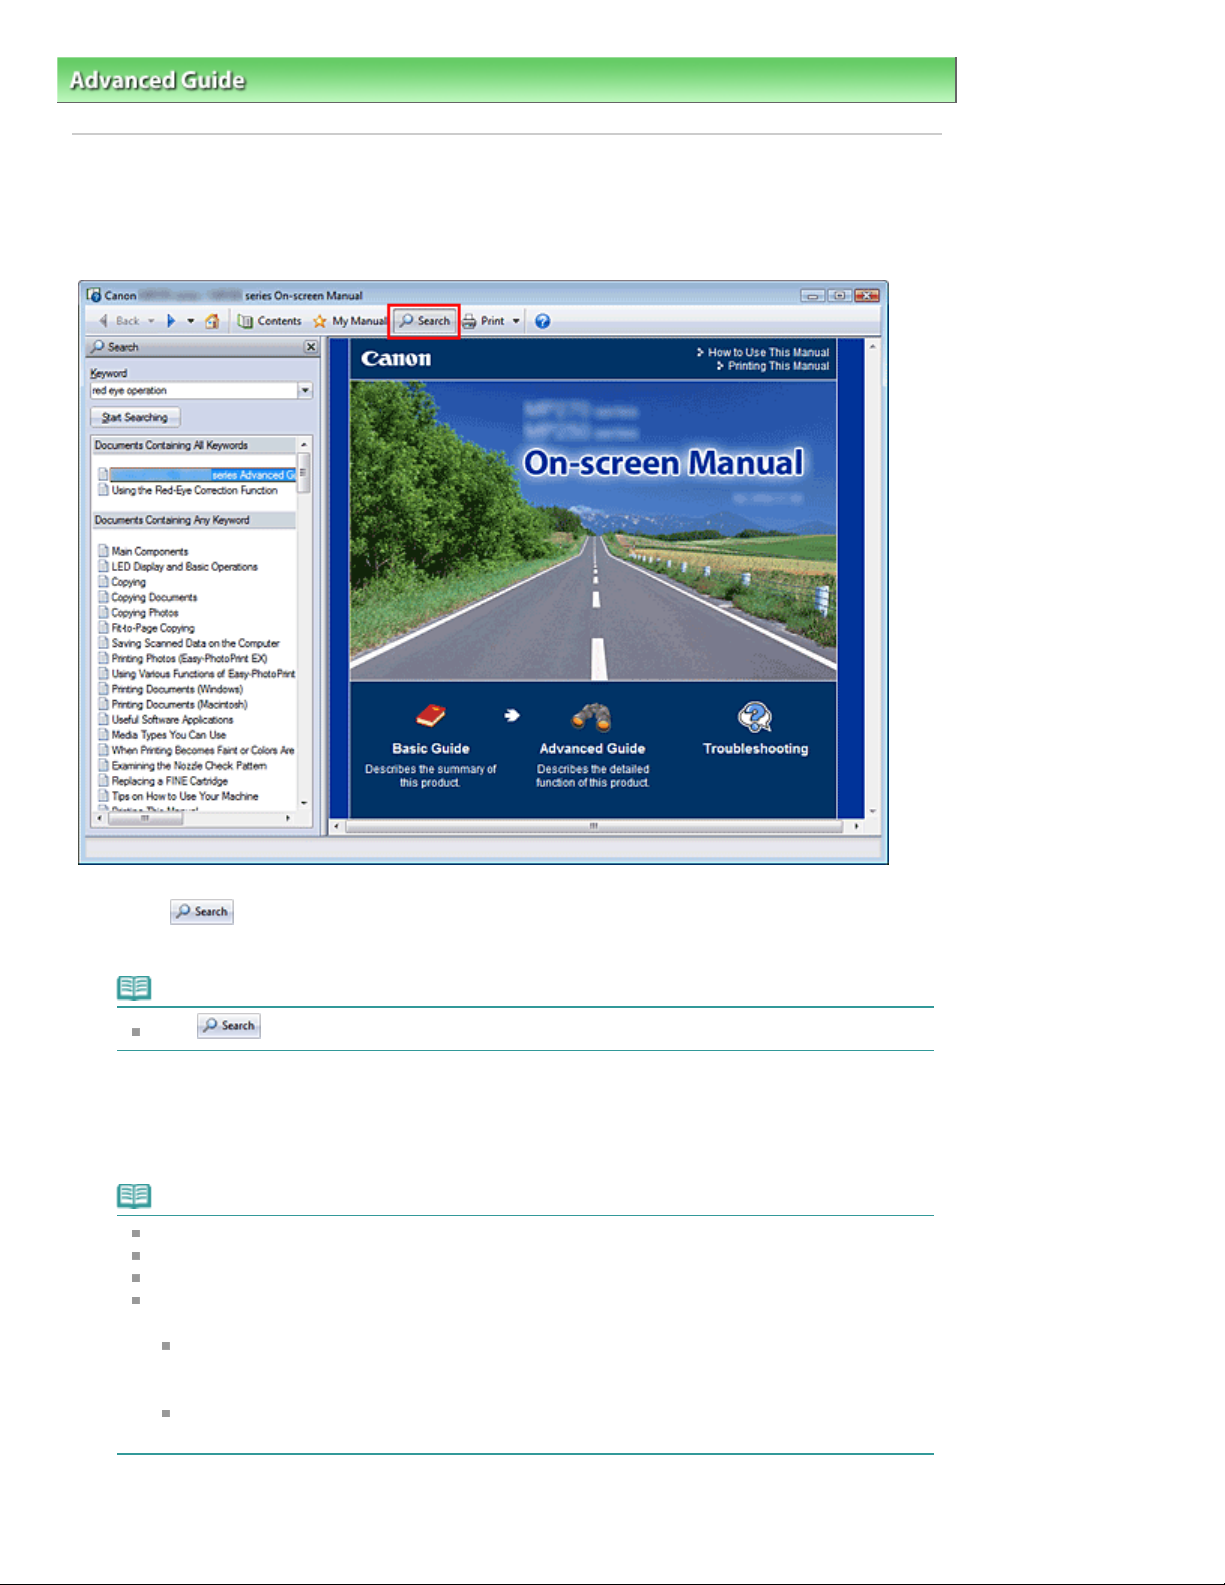
Advanced Guide
>
How to Use This Manual > Using Keywords to Find a Document
Using Keywords to Find a Document
You can enter a keyword to search for a target document.
All documents in the currently displayed on-screen manual are searched.
Page 98 of 678 pagesUsing Keywords to Find a Document
Click
1.
The search pane is displayed to the left of the on-screen manual.
Note
Click
Enter a keyword
2.
In Keyword, enter a keyword for the item to be checked.
When you want to enter multiple keywords, insert a space between the keywords.
to close or display the search pane.
Note
You can enter up to 10 search keywords or up to 255 characters.
Uppercase and lowercase are not discriminated.
The program can also search for keywords that contain spaces.
A convenient way of quickly finding a document to be read is to enter keywords as described
below.
To learn how to operate a function you are using:
Enter the menu name displayed on the operation panel of this machine or on the computer
(for example, frame erase copy).
To find an explanation of the operation for a specific purpose:
Enter function + item to be printed (for example, print calendar).
3.
Click Start Searching
Page 99

The search is started, and the titles of documents containing the keyword are displayed in the
want to read.
search results list.
When you execute a search by entering multiple keywords, the search results are displayed as
shown below.
[Documents Containing Perfect Match]
Documents containing the entire search character string (including spaces) exactly as entered
(perfect match)
[Documents Containing All Keywords]
Documents containing all keywords that were entered
[Documents Containing Any Keyword]
Documents containing at least one of the keywords that were entered
Display the document that you want to read
4.
From the search results list, double-click (or select and press Enter) the title of the document you
When the documents of that title are displayed, the keywords found on those documents are
highlighted.
Note
If you modify the keyword entry and perform multiple searches, a search history remains. To delete
the search history, click located to the right of Keyword, and select Clear History, which is
displayed.
Page 99 of 678 pagesUsing Keywords to Find a Document
Page top
Page 100
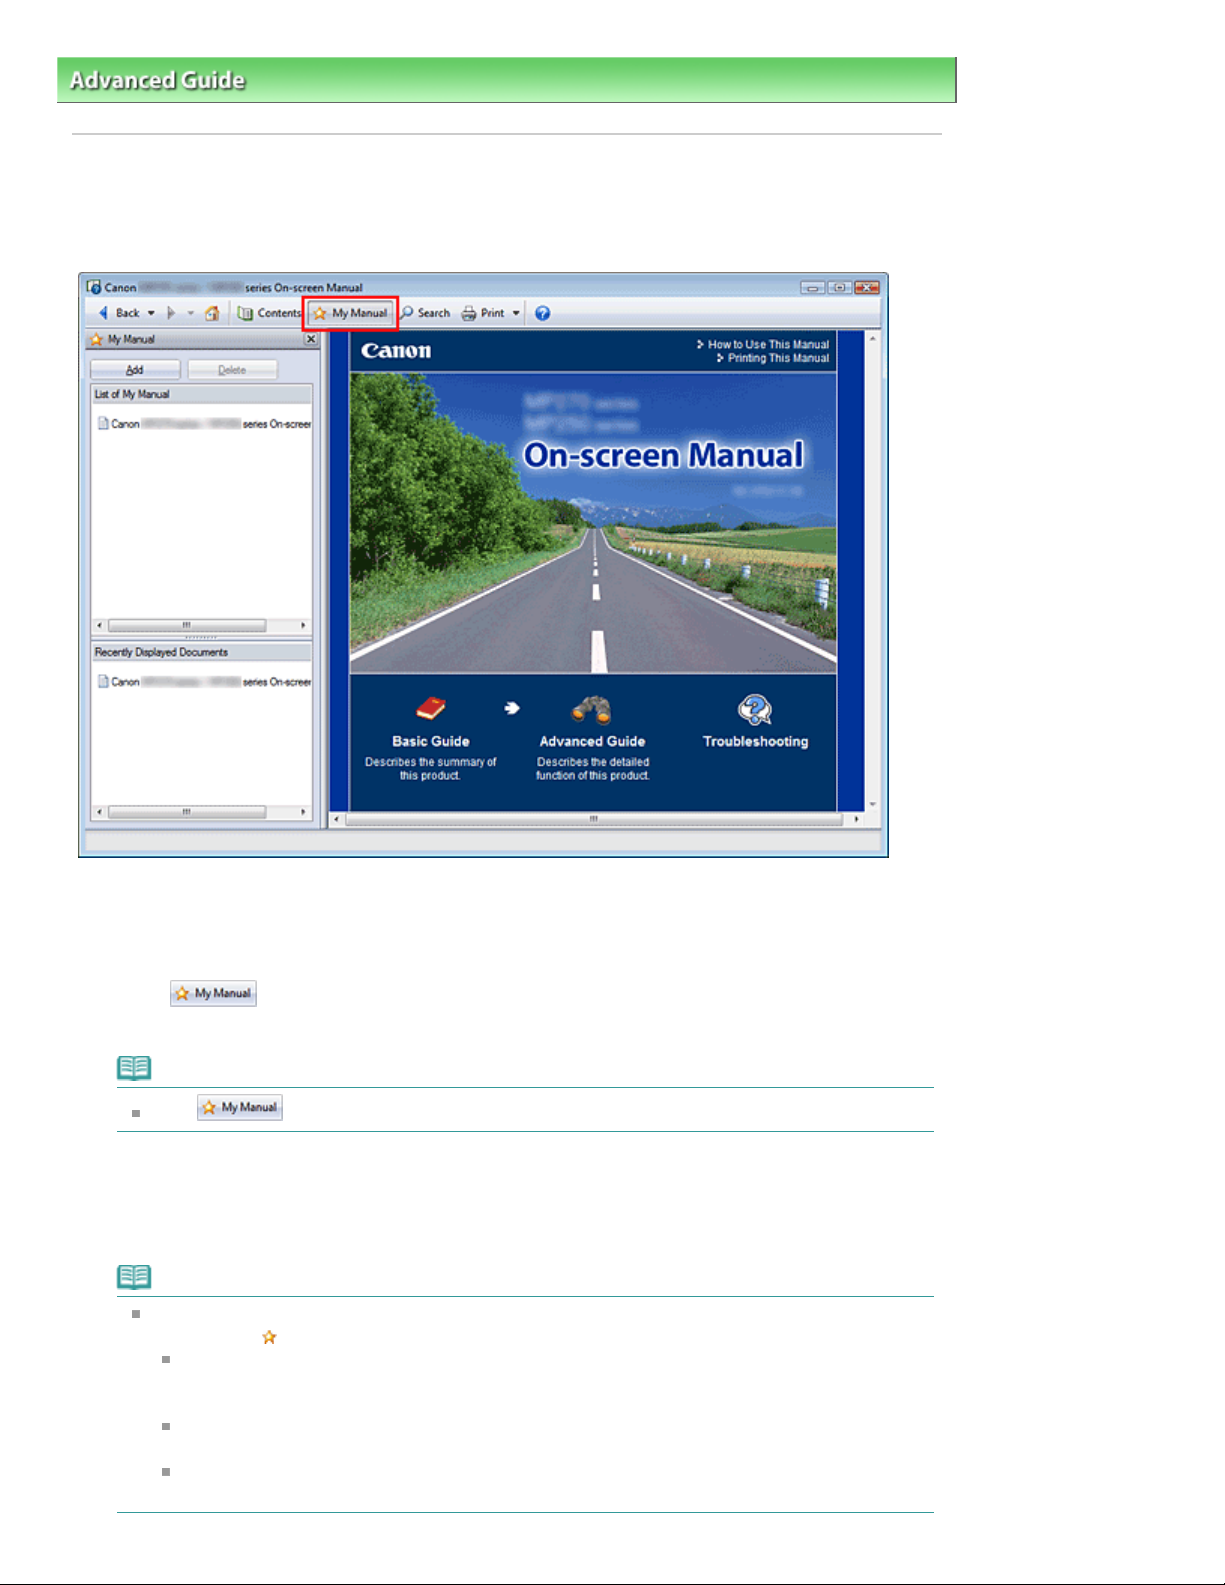
Advanced Guide
window, and then select Add to My Manual from the right-click menu.
Page 100 of 678 pagesRegistering Documents to My Manual
>
How to Use This Manual
> Registering Documents to My Manual
Registering Documents to My Manual
Register frequently read documents as My Manual documents so that you can refer to those documents
easily at any time.
Display the document
1.
Display the document to be added to My Manual.
Click
2.
The My Manual pane is displayed to the left of the on-screen manual.
Note
Click
Register the document to My Manual
3.
Click Add.
The title of the currently displayed document is added to List of My Manual.
to close or display the My Manual pane.
Note
You can also add documents to My Manual by the following methods. If you add a document to
My Manual, a
From the Recently Displayed Documents list, double-click the document title that you want
to add to My Manual (or select the document and press Enter key) to display the title, and
then click Add.
Right-click the document title displayed in the contents pane or right-click the explanation
In the contents pane, select the document title that you want to add to My Manual, and then
click Add to My Manual at the bottom right of the pane.
mark is displayed in the document icons in the contents pane.
 Loading...