

Getting Started
Please read "Important Safety Instructions" of the FAQ Guide before operating this product.
After you nish reading this guide, store it in a safe place for future reference.
The information in this document is subject to change without notice.
You can access http://canon.com/oip-manual
to read the User's Guide that describes all functions of this machine.
1
2
3
5
6
7
8
Installation of the Machine
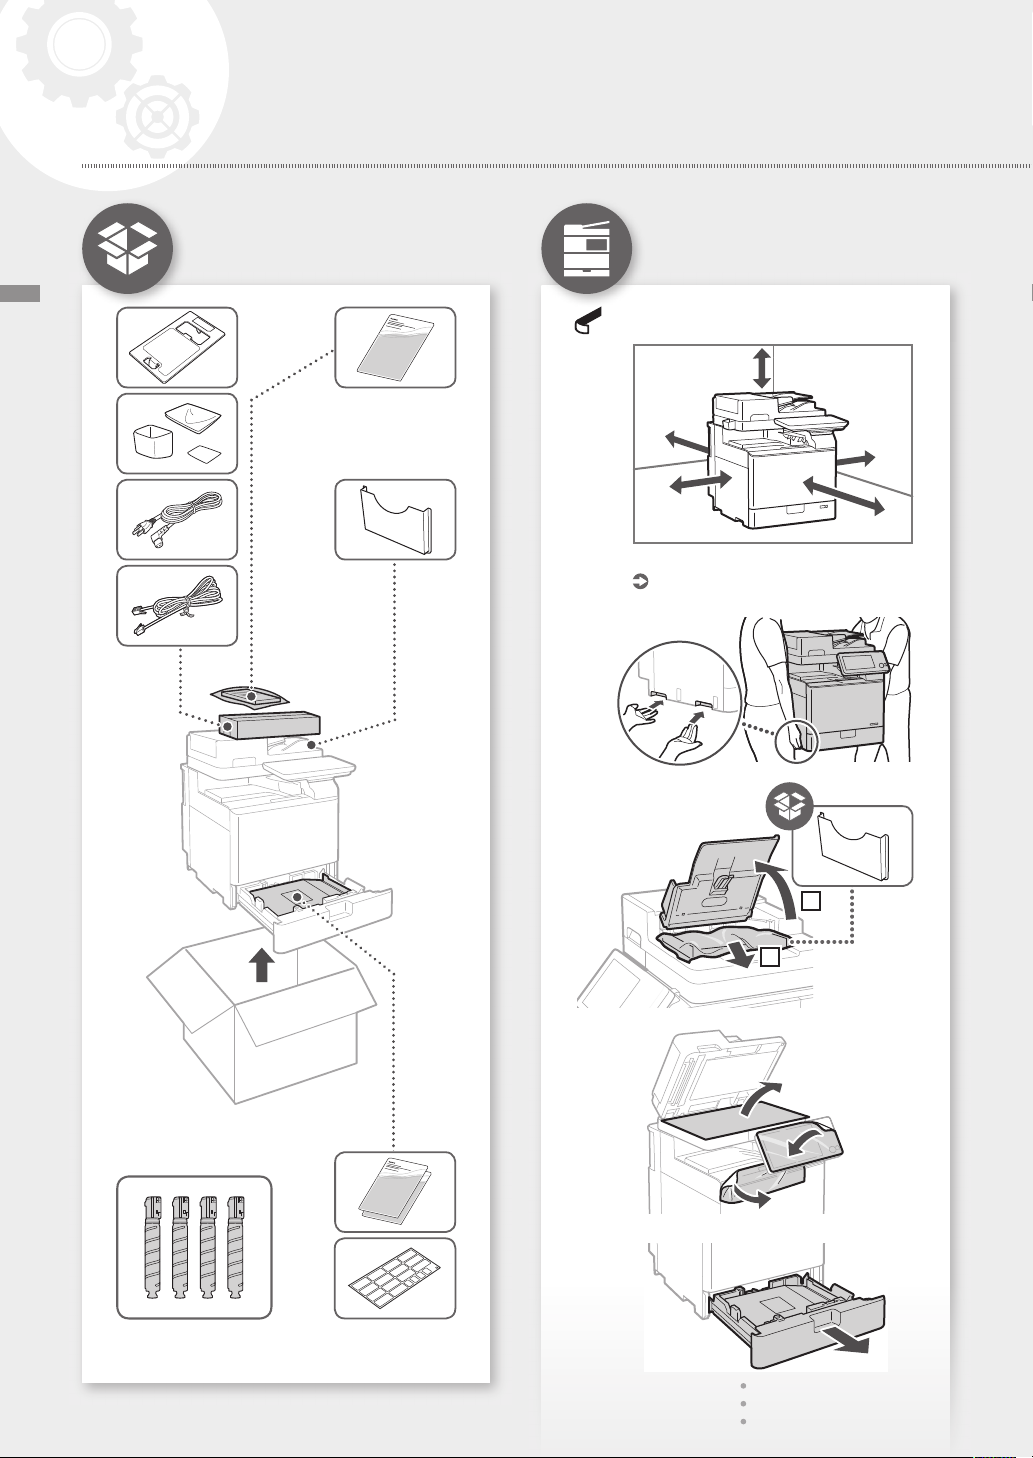
Items Included with the
Machine
Items Included with the Machine / Installing the Machine
This Guide
Installing the Machine
Remove all the tape.
Enough Space ?
Installation Space
http://canon.com/oip-manual
See this equipment manual
1
2
* 1
*1 Packaged separately from the other items
2
5
6
7
8
9
10
11
12
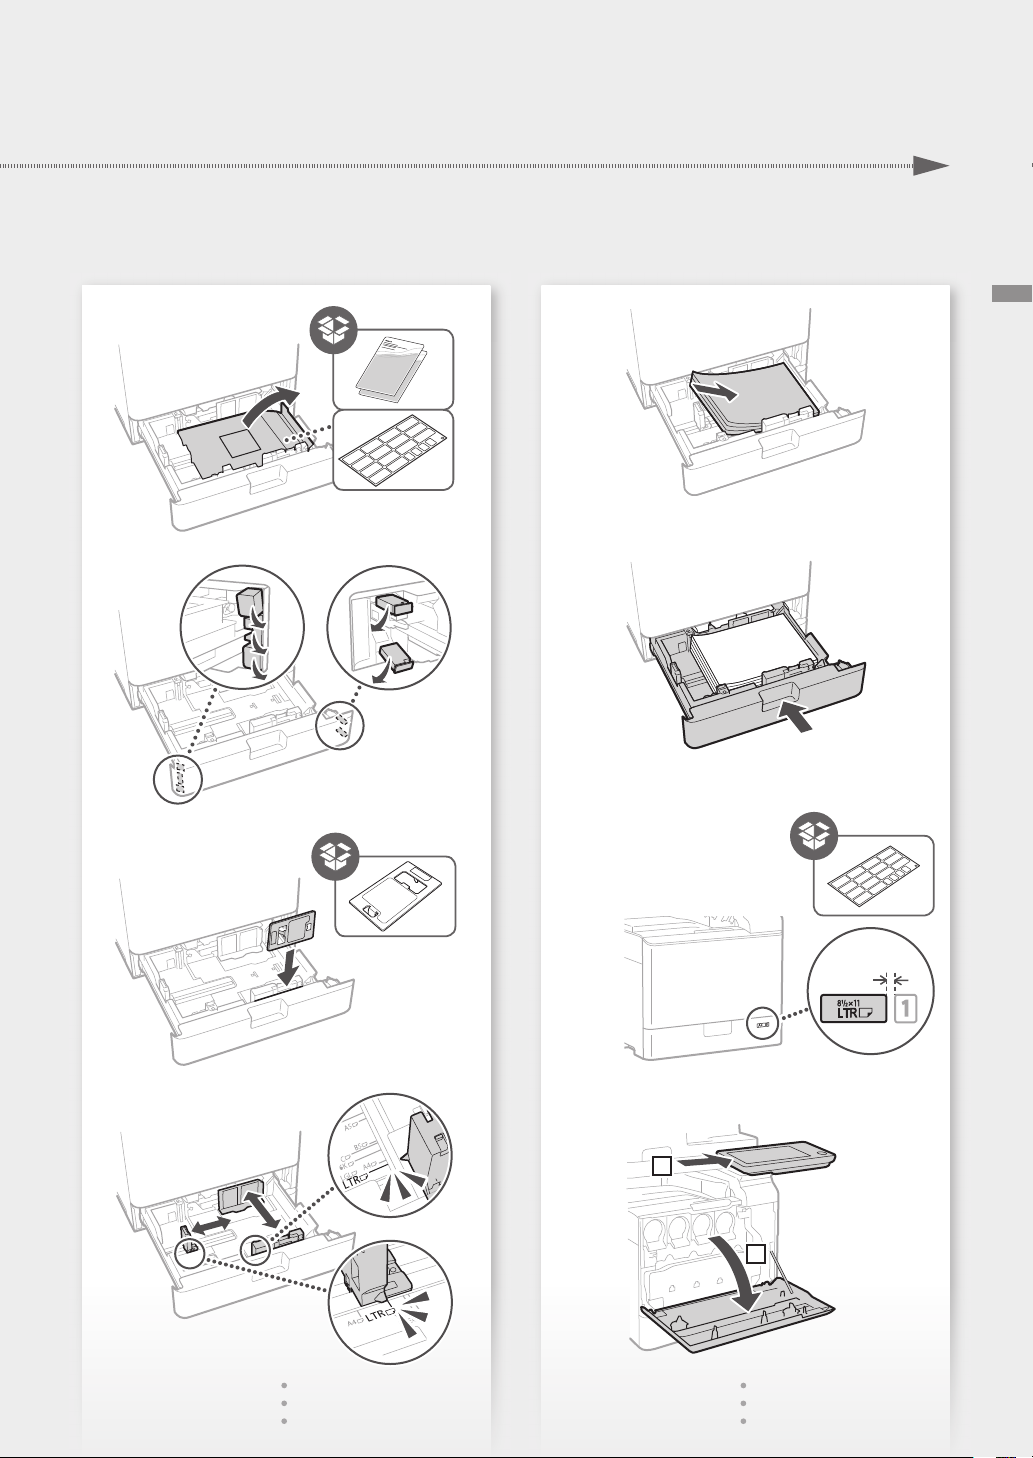
Installing the Machine
approx. 1/4"
(5 mm)
1
2
3

16
17
13
14
15
Installing the Machine
9 -10
K
4
Repeat step 13
Y M C
2
1

When using optional equipment,
18
19
install it in this step
Connect cables
Power cable
1
Installing the Machine
2
Cassette Feeding Unit‐AK1
Cassette Feeding Unit‐AJ1
Cassette Module‐AE1
LAN or USB cable
Modular cable
NEXT STEP
5

When the power is turned ON for the first time after installing the machine
The "Setup Guide" screen is
displayed automatically
Press [Skip] on the
[Authentication Login] screen
All users can make the following
settings
How to use the search number
Configuring the Machine
CASE1
1.
Language/Keyboard Layout Settings
2.
Paper Size/Type Settings
3.
Gradation Adjustment
4.
Report Printing
First Setup finished!
Now you can use a limited variety of functions
including copying.
If you want to use
all functions of the machine...
proceed to CASE2
If you want to use
copy function first of all...
proceed to CASE1
ABCD-123
8.
Gradation Adjustment
9.
Report Printing
You can also configure the settings
listed on the right half of this page,
as necessary.
3.
Logging In as an Administrator
The default PIN is '7654321'.
1.
Language/Keyboard Layout Settings
2.
Paper Size/Type Settings
4.
User Authentication Settings
5.
Date/Time Settings
6.
Network Setting
7.
Fax Settings
Only the Administrator is allowed to
configure the following settings
Setting up the Network Environment
Installing Drivers
Setting E-mail/I-Fax Communication
Setting the Advanced Box
Setup finished!
Now you can use all functions including
printing and sending faxes from a computer.
CASE2
Administrator privileges are required
to make the following settings
1. Display the online manual
website for user's guides
hp://canon.com/oip-manual
2. Select the appropriate
user's guide
[imageRUNNER ADVANCE]
[Color] Select this machine
3. To access information in the User's
Guide, use the search number
For more information about the
"Setup Guide"
User's Guide
User's Guide
User's Guide
User's Guide
User's Guide
0YAS-006
140K-015
0YAS-017
140K-018
140K-003
IP:192.168.
See this topic also when making
connection via wireless LAN
Configuring the Machine
1
2
6

8.
Gradation Adjustment
9.
Report Printing
You can also configure the settings
listed on the right half of this page,
as necessary.
3.
Logging In as an Administrator
The default PIN is '7654321'.
1.
Language/Keyboard Layout Settings
2.
Paper Size/Type Settings
4.
User Authentication Settings
5.
Date/Time Settings
6.
Network Setting
7.
Fax Settings
Only the Administrator is allowed to
configure the following settings
Setting up the Network Environment
Installing Drivers
Setting E-mail/I-Fax Communication
Setting the Advanced Box
Setup finished!
Now you can use all functions including
printing and sending faxes from a computer.
CASE2
Administrator privileges are required
to make the following settings
1. Display the online manual
website for user's guides
hp://canon.com/oip-manual
2. Select the appropriate
user's guide
[imageRUNNER ADVANCE]
[Color] Select this machine
3. To access information in the User's
Guide, use the search number
For more information about the
"Setup Guide"
User's Guide
User's Guide
User's Guide
User's Guide
User's Guide
0YAS-006
140K-015
0YAS-017
140K-018
140K-003
IP:192.168.
See this topic also when making
connection via wireless LAN
Configuring the Machine
7

CANON INC.
30-2, Shimomaruko 3-chome, Ohta-ku, Tokyo 1468501, Japan
CANON AUSTRALIA PTY. LTD
Building A, The Park Estate, 5 Talavera Road,
Macquarie Park, NSW 2113, Australia
CANON U.S.A., INC.
One Canon Park, Melville, NY 11747, U.S.A.
CANON CANADA INC.
8000 Mississauga Road Brampton ON L6Y 5Z7,
Canada
CANON EUROPA N.V.
Bovenkerkerweg 59, 1185 XB Amstelveen, The
Netherlands
(See http://www.canon-europe.com/ for details
on your regional dealer)
FT6-1641 (000) XXXXXXXXXX Copyright CANON INC. 2016 PRINTED IN CHINA
CANON CHINA CO., LTD
2F Jinbao Building No.89 Jinbao Street,
Dongcheng District, Beijing 100005, China
CANON SINGAPORE PTE. LTD.
1 Fusionopolis Place, #15-10, Galaxis, Singapore
138522
CANON HONGKONG CO., LTD
19/F., The Metropolis Tower, 10 Metropolis Drive,
Hunghom, Kowloon, Hong Kong
F170700
 Loading...