

Page 1

macOS
MF Printer Driver
User's Guide
USRM2-5807-07 2020-09 en Copyright CANON INC. 2020
Page 2

Contents
Introduction ....................................................................................................................................................... 2
How to Use the Manual ............................................................................................................................................. 3
Notations Used in the Manual ................................................................................................................................ 4
Disclaimers ............................................................................................................................................................... 5
Copyright .................................................................................................................................................................. 6
Trademarks .............................................................................................................................................................. 7
Before Use ........................................................................................................................................................... 9
Installing the Driver .................................................................................................................................. 11
Preparations for Using the Driver ............................................................................................................................ 12
Pre-installation Check ............................................................................................................................................. 13
System Requirements ......................................................................................................................................... 14
About the Readme File ........................................................................................................................................ 15
Installing the Driver ................................................................................................................................................ 16
Registering a Printer ............................................................................................................................................... 17
Registering a Printer Connected by TCP/IP ............................................................................................................. 18
Registering a Printer Connected by USB ................................................................................................................ 22
Registering a Printer Connected by Bonjour ........................................................................................................... 26
Uninstalling a Driver ............................................................................................................................................... 29
Printing ................................................................................................................................................................ 32
Printing from an Application ................................................................................................................................... 33
Arranging Multiple Pages on One Sheet of Paper ...................................................................................................... 34
Attaching a PIN to Print Data .................................................................................................................................. 35
Registering Presets ................................................................................................................................................. 36
Registering Custom Paper Sizes ............................................................................................................................... 37
Linking the Driver and the Device ................................................................................................ 39
Setting the Options of the Device ............................................................................................................................. 40
Setting the Authentication Function ........................................................................................................................ 42
Settings List ..................................................................................................................................................... 44
[Paper Source] Panel ............................................................................................................................................... 45
[Basic] Panel ........................................................................................................................................................... 46
[Authenticate and Print] Panel ................................................................................................................................. 47
[Advanced] Panel .................................................................................................................................................... 48
Troubleshooting ........................................................................................................................................... 50
Cannot Register a Device Connected by Bonjour ....................................................................................................... 51
I
Page 3

Printing is Slow ....................................................................................................................................................... 52
II
Page 4

Introduction
Introduction
Introduction .......................................................................................................................................................... 2
How to Use the Manual ......................................................................................................................................... 3
Notations Used in the Manual .......................................................................................................................... 4
Disclaimers ............................................................................................................................................................. 5
Copyright ............................................................................................................................................................... 6
Trademarks ............................................................................................................................................................ 7
1
Page 5

Introduction
How to Use the Manual(P. 3)
Disclaimers(P. 5)
Copyright(P. 6)
Trademarks(P. 7)
Introduction
2
Page 6

Introduction
How to Use the Manual
This explains things that you need to know in order to use this manual.
Notations Used in the Manual(P. 4)
3
Page 7

Introduction
Notations Used in the Manual
This explains symbols and settings used in this manual.
Symbols Used in This Manual
In this manual, explanations of items and operations that must be followed while using the driver are set forth
the symbols that indicate the following.
IMPORTANT
● Indicates operational requirements and restrictions. Be sure to read these items carefully to operate the
product correctly, and avoid damage to the product.
NOTE
● Indicates a clarication of an operation, or contains additional explanations for a procedure. Reading these
notes is highly recommended.
About Settings
In this manual, setting names displayed on the computer screen are represented as shown in the following
examples.
Example:
[Settings]
[OK]
4
Page 8

Introduction
Disclaimers
The information in this document is subject to change without notice.
CANON INC. MAKES NO WARRANTY OF ANY KIND WITH REGARD TO THIS MATERIAL, EITHER EXPRESS OR
IMPLIED, EXCEPT AS PROVIDED HEREIN, INCLUDING WITHOUT LIMITATION, THEREOF, WARRANTIES AS TO
MARKETABILITY, MERCHANTABILITY, FITNESS FOR A PARTICULAR PURPOSE OF USE OR NON-INFRINGEMENT.
CANON INC. SHALL NOT BE LIABLE FOR ANY DIRECT, INCIDENTAL, OR CONSEQUENTIAL DAMAGES OF ANY
NATURE, OR LOSSES OR EXPENSES RESULTING FROM THE USE OF THIS MATERIAL.
5
Page 9

Introduction
Copyright
Copyright CANON INC. 2020
No part of this publication may be reproduced, transmitted, transcribed, stored in a retrieval system, or
translated into any language or computer language in any form or by any means, electronic, mechanical,
magnetic, optical, chemical, manual, or otherwise, without the prior written permission of Canon Inc.
6
Page 10

Introduction
Trademarks
Microsoft, Windows, Internet Explorer, and Microsoft Edge are either registered trademarks or trademarks of
Microsoft Corporation in the United States and/or other countries.
Apple, Mac, macOS, OS X, Macintosh, and Safari are trademarks of Apple Inc.
Other product and company names herein may be the trademarks of their respective owners.
7
Page 11

Before Use
Before Use
Before Use .............................................................................................................................................................. 9
8
Page 12

Before Use
Before Use
● The newest driver versions are released on the Canon website. You can download them as necessary after
checking your operating environment.
Canon website: https://global.canon/
● The functions that you can use may vary according to the following conditions.
- The device you are using and its conguration
- The device rmware version
- The option structure of the device
- The driver version
- The environment of the computer you are using
- The application you are using
● There may be instances where the illustrations of displays and content of procedures in this manual differ
from what is actually displayed.
● The descriptions in this manual use examples from macOS 10.12 (Sierra).
9
Page 13

Installing the Driver
Installing the Driver
Installing the Driver ....................................................................................................................................... 11
Preparations for Using the Driver ...................................................................................................................... 12
Pre-installation Check ......................................................................................................................................... 13
System Requirements ..................................................................................................................................... 14
About the Readme File ................................................................................................................................... 15
Installing the Driver ............................................................................................................................................ 16
Registering a Printer ........................................................................................................................................... 17
Registering a Printer Connected by TCP/IP ..................................................................................................... 18
Registering a Printer Connected by USB ......................................................................................................... 22
Registering a Printer Connected by Bonjour ................................................................................................... 26
Uninstalling a Driver ........................................................................................................................................... 29
10
Page 14

Installing the Driver
Installing the Driver
This section explains driver installation and device preparation.
Preparations for Using the Driver(P. 12)
Pre-installation Check(P. 13)
Installing the Driver(P. 16)
Registering a Printer(P. 17)
Uninstalling a Driver(P. 29)
11
Page 15

Installing the Driver
Preparations for Using the Driver
Before using the driver and printing, there are preparations that need to be done beforehand.
Carry out preparations and settings in the following order.
1. Obtain an installer by one of the following methods.
- Download it from the Canon website (https://global.canon/)
- Supplied CD-ROM
2. Install the driver to the operating system.
3. Register the printer you want to use to the operating system.
4. Set the device options as necessary.
NOTE
● You can check the version of the installed driver in the [Basic] panel.
Related Topics
Installing the Driver(P. 16)
Registering a Printer Connected by TCP/IP(P. 18)
Registering a Printer Connected by USB(P. 22)
Registering a Printer Connected by Bonjour(P. 26)
Setting the Options of the Device(P. 40)
12
Page 16

Installing the Driver
Pre-installation Check
This describes the items to be checked beforehand in order to install the driver correctly.
System Requirements(P. 14)
About the Readme File(P. 15)
13
Page 17

Installing the Driver
System Requirements
Use one of the following system environments with this driver.
Operating Systems
Mac OS X 10.10.5 or later
Hardware
A computer guaranteed to operate using the above operating system.
14
Page 18

Installing the Driver
About the Readme File
The following content is contained in the Readme le.
● Limitations, restrictions, and cautions when installing or using the driver
● Devices that support the driver
Refer to README-ENG.html in the accompanying CD-ROM or the downloaded driver folder.
15
Page 19

Installing the Driver
Installing the Driver
This section explains the procedure for installing the driver to the operating system.
Install the driver and register the printer to use.
Prerequisites
● Obtain the driver installer.
● System Requirements(P. 14)
● Close all running applications.
● If the computer and device are connected by USB, turn off the main power of the device.
Procedures
Open the driver installer folder → select [MF_Printer_Installer.pkg] or
1
[Canon_Driver.pkg].
Read the Software License Agreement → click [Continue].
2
If a dialog box asking you to conrm that you agree to the Software License Agreement is displayed, click
[Agree].
Click [Install].
3
If a dialog box for entering a user name and/or password is displayed, enter the name and password of a
computer administrator and continue according to the instructions in the dialog box.
Click [Close].
4
Register the printer.
Related Topics
Preparations for Using the Driver(P. 12)
Registering a Printer Connected by TCP/IP(P. 18)
Registering a Printer Connected by USB(P. 22)
Registering a Printer Connected by Bonjour(P. 26)
16
Page 20

Installing the Driver
Registering a Printer
Register the printer you are going to use.
Select a registration method according to the method by which the computer and printer are connected.
Registering a Printer Connected by TCP/IP(P. 18)
Registering a Printer Connected by USB(P. 22)
Registering a Printer Connected by Bonjour(P. 26)
17
Page 21
Installing the Driver
Registering a Printer Connected by TCP/IP
You can register a printer connected by LPD (Line Printer Daemon) in the operating system.
Prerequisites
● System Requirements(P. 14)
● Installing the Driver(P. 16)
● Conrmation of driver names corresponding to the printer
For driver names corresponding to printers, refer to the Readme le.
● Conrmation of specied IP address
If you do not know the IP address, check with the network administrator or check the network settings. For
details, refer to the manual of the device.
NOTE
● If IPP (Internet Printing Protocol) is usable, only IPv4 is supported.
Procedures
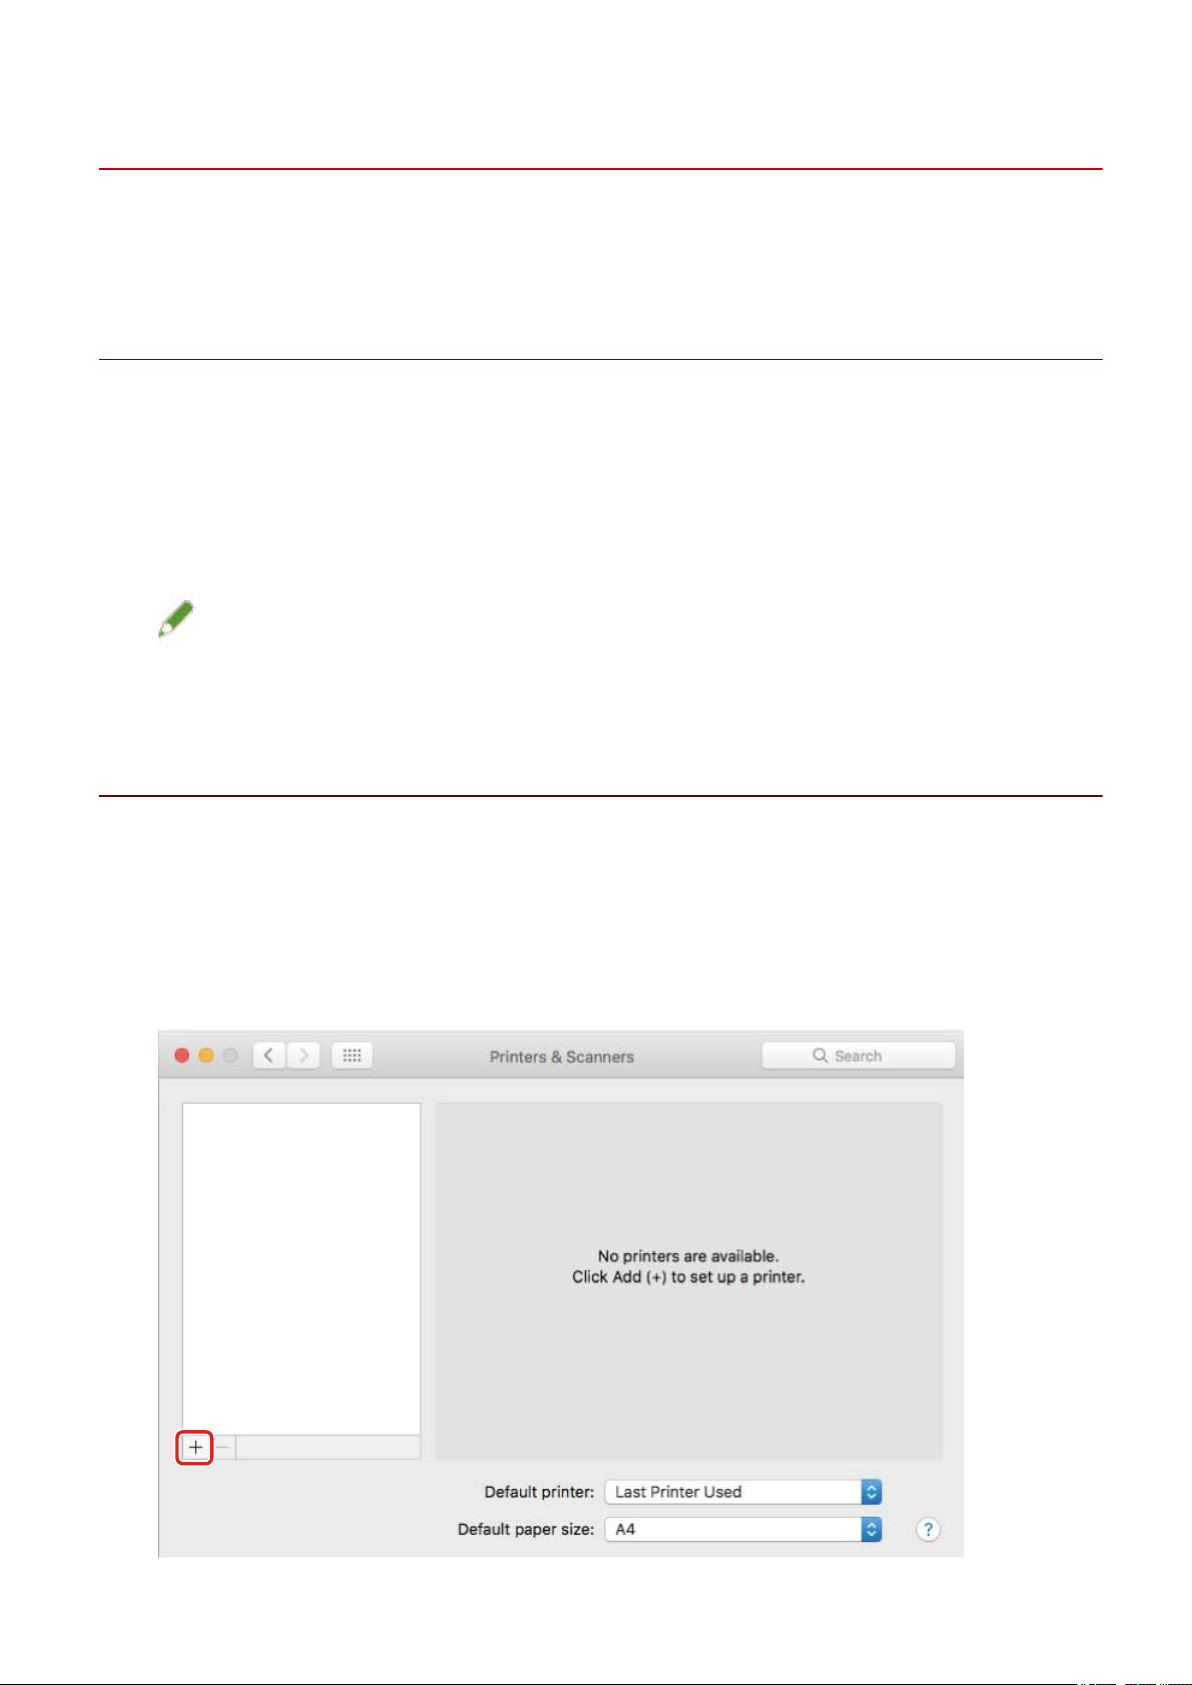
Display the [System Preferences] dialog box of the operating system → click [Printers &
1
Scanners].
Click [+] at the bottom of the displayed dialog box.
2
If a pull-down menu is displayed after you click [+], select [Add Printer or Scanner].
18
Page 22

Installing the Driver
Select [IP] in the toolbar → select [Line Printer Daemon – LPD] from [Protocol].
3
Enter the printer's IP address in [Address] → select [Select Software] from [Use].
4
If the driver corresponding to the printer is displayed in [Use], proceed to step 6.(P. 20) .
19
Page 23

Installing the Driver
NOTE
● A message indicating that the IP address is incorrect may be displayed even if the correct IP address has
been entered.
Refer to the Readme le to conrm the driver corresponding to your printer → select
5
the appropriate driver from the list in the [Printer Software] dialog box → click [OK].
Change [Name] for the printer as necessary → click [Add].
6
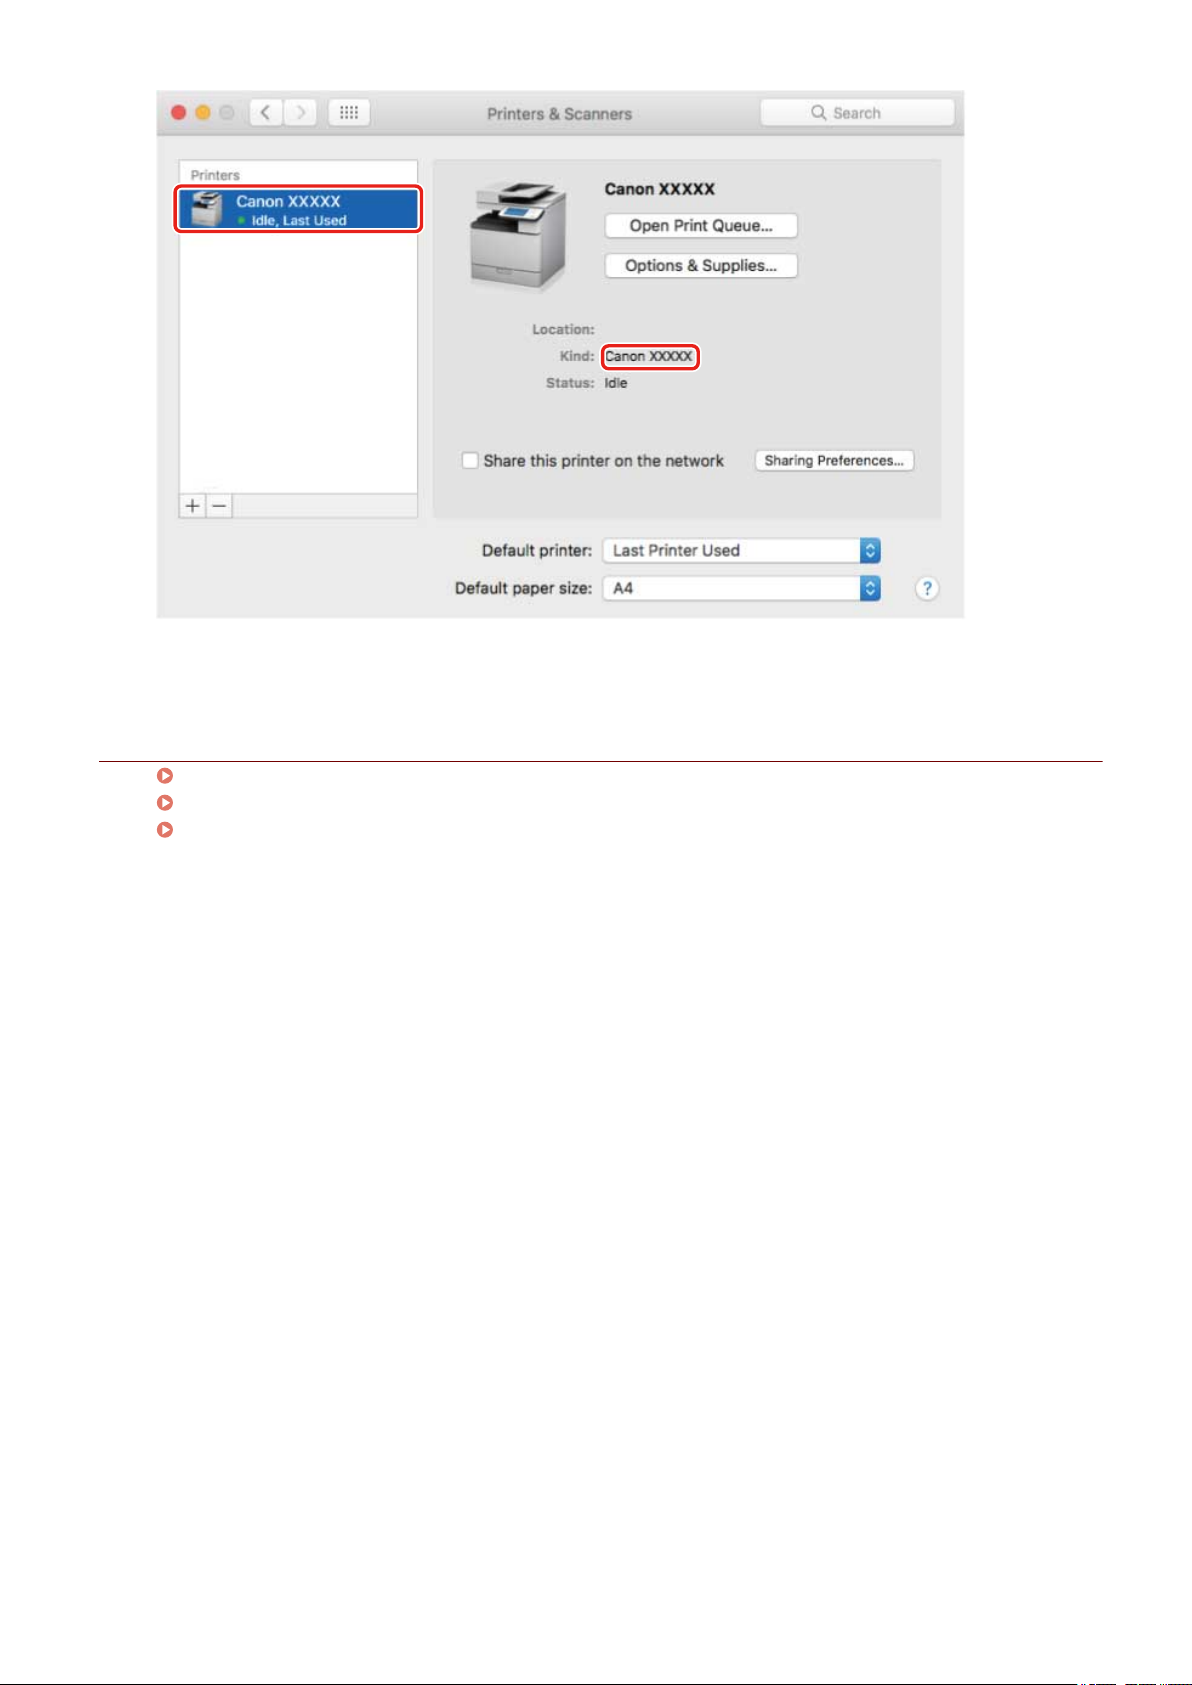
Check that the registered printer and model are displayed in the dialog box.
7
20
Page 24
Installing the Driver
Set the device options as necessary.
Related Topics
Preparations for Using the Driver(P. 12)
About the Readme File(P. 15)
Setting the Options of the Device(P. 40)
21
Page 25

Installing the Driver
Registering a Printer Connected by USB
You can register a printer connected by USB in the operating system.
Prerequisites
● System Requirements(P. 14)
● Installing the Driver(P. 16)
● Conrmation of driver names corresponding to the printer
For driver names corresponding to printers, refer to the Readme le.
● Installation of the optional USB interface board (if required with the printer you are using)
Procedures
Display the [System Preferences] dialog box of the operating system → click [Printers &
1
Scanners].
Turn the printer on → connect the printer and the computer by USB cable.
2
Check that the connected printer and model are displayed in the dialog box.
3
If the connected printer and model are not displayed, perform the following procedure.
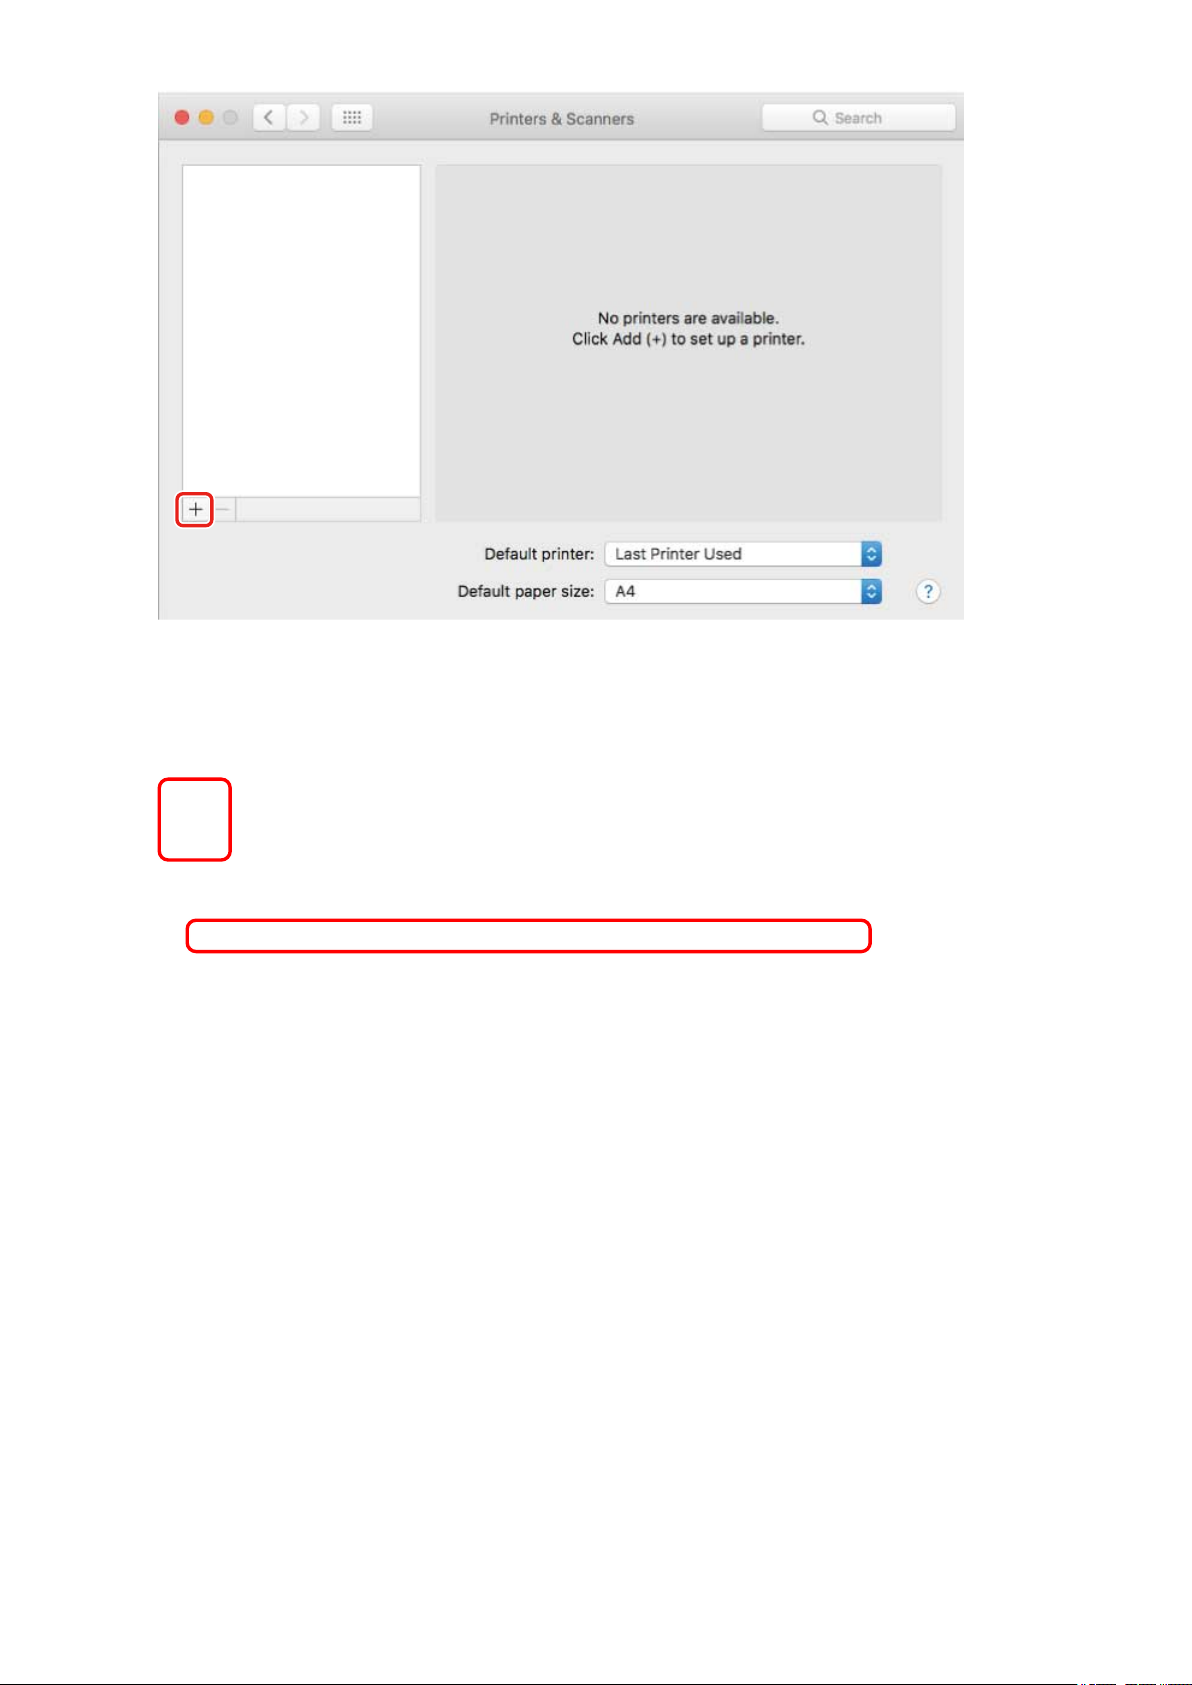
Click [+] at the bottom of the displayed dialog box.
4
If a pull-down menu is displayed after you click [+], select [Add Printer or Scanner].
22
Page 26
Installing the Driver
Select [Default] in the toolbar → select a printer from the list.
5
Select a printer displayed as "USB" in [Kind].
Select [Select Software] from [Use].
6
23
Page 27
Installing the Driver
Select the driver corresponding to the printer from the list in the [Printer Software]
7
dialog box → click [OK].
Change [Name] for the printer as necessary → click [Add].
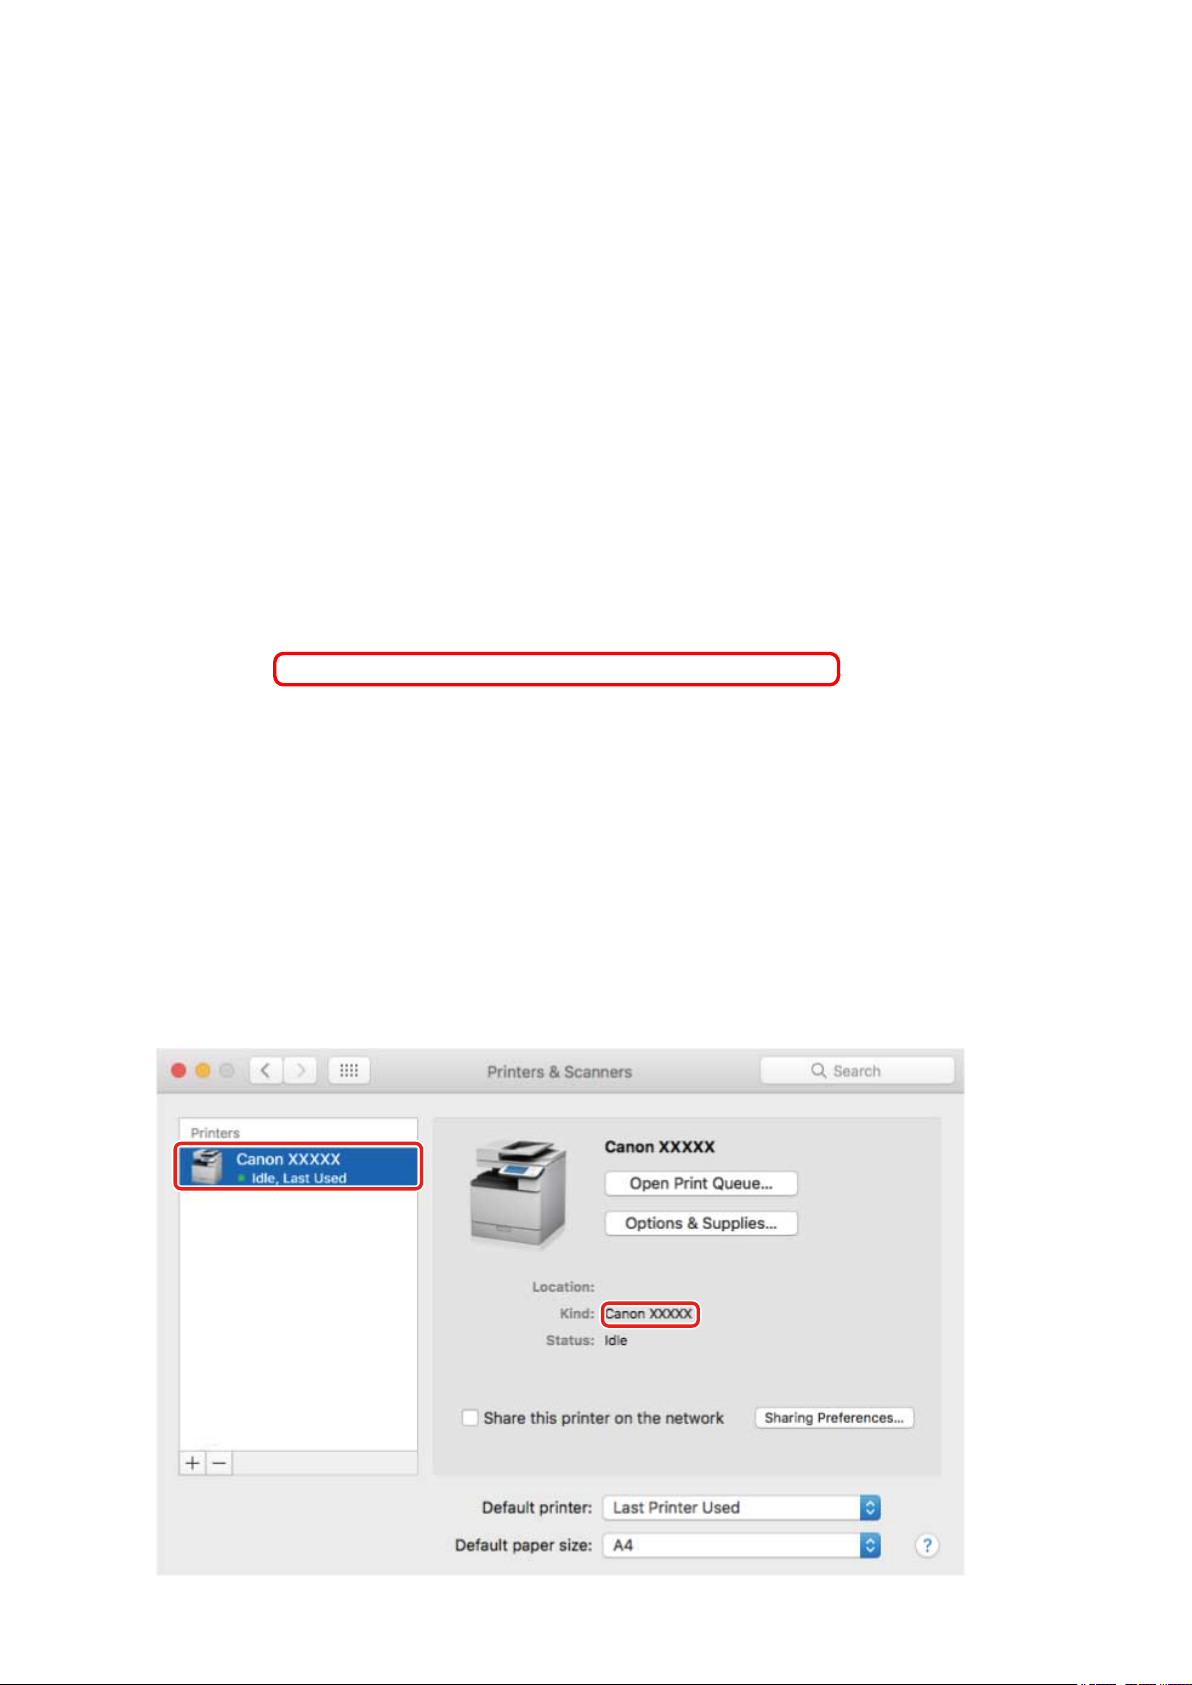
8
Check that the registered printer and model are displayed in the dialog box.
9
24
Page 28

Set the device options as necessary.
Related Topics
Preparations for Using the Driver(P. 12)
About the Readme File(P. 15)
Setting the Options of the Device(P. 40)
Installing the Driver
25
Page 29
Installing the Driver
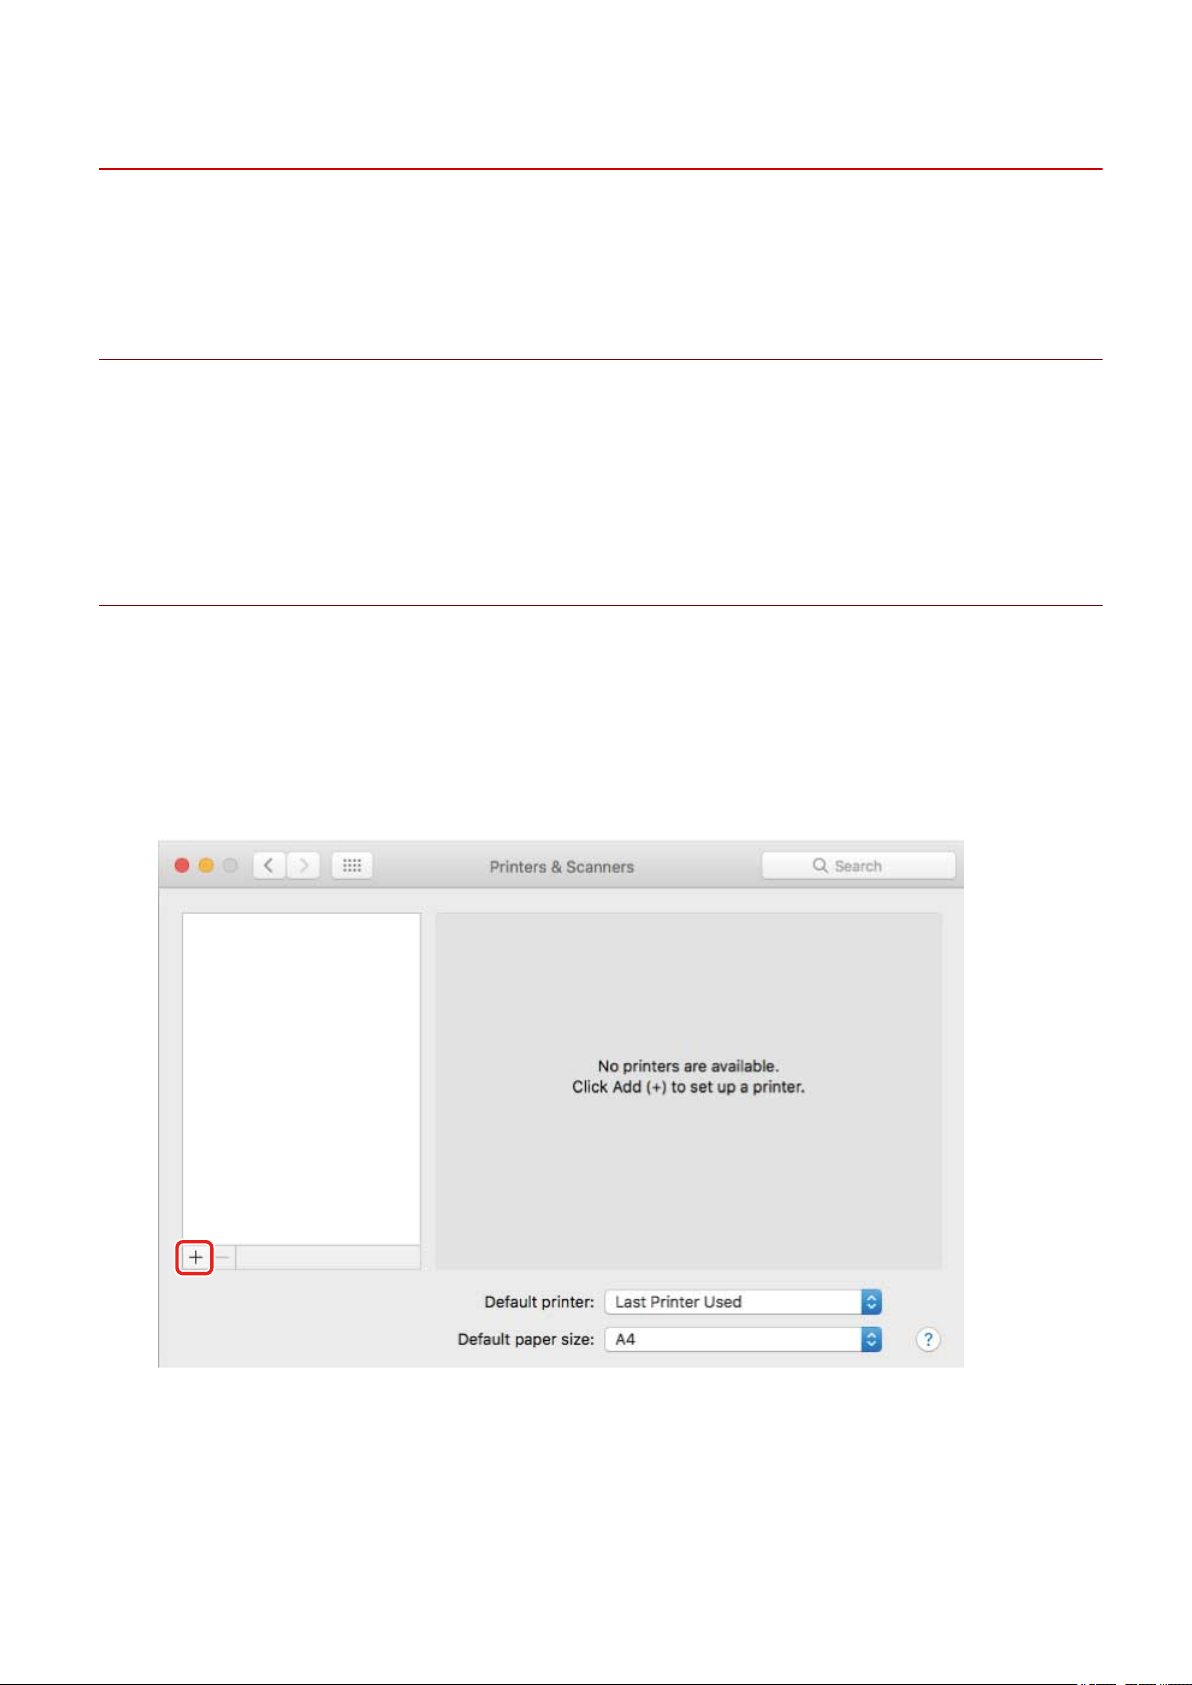
Registering a Printer Connected by Bonjour
You can register a printer connected by Bonjour to the operating system.
Prerequisites
● System Requirements(P. 14)
● Installing the Driver(P. 16)
● Conrmation of driver names corresponding to the printer
For driver names corresponding to printers, refer to the Readme le.
Procedures
Display the [System Preferences] dialog box of the operating system → click [Printers &
1
Scanners].
Click [+] at the bottom of the displayed dialog box.
2
If a pull-down menu is displayed after you click [+], select [Add Printer or Scanner].
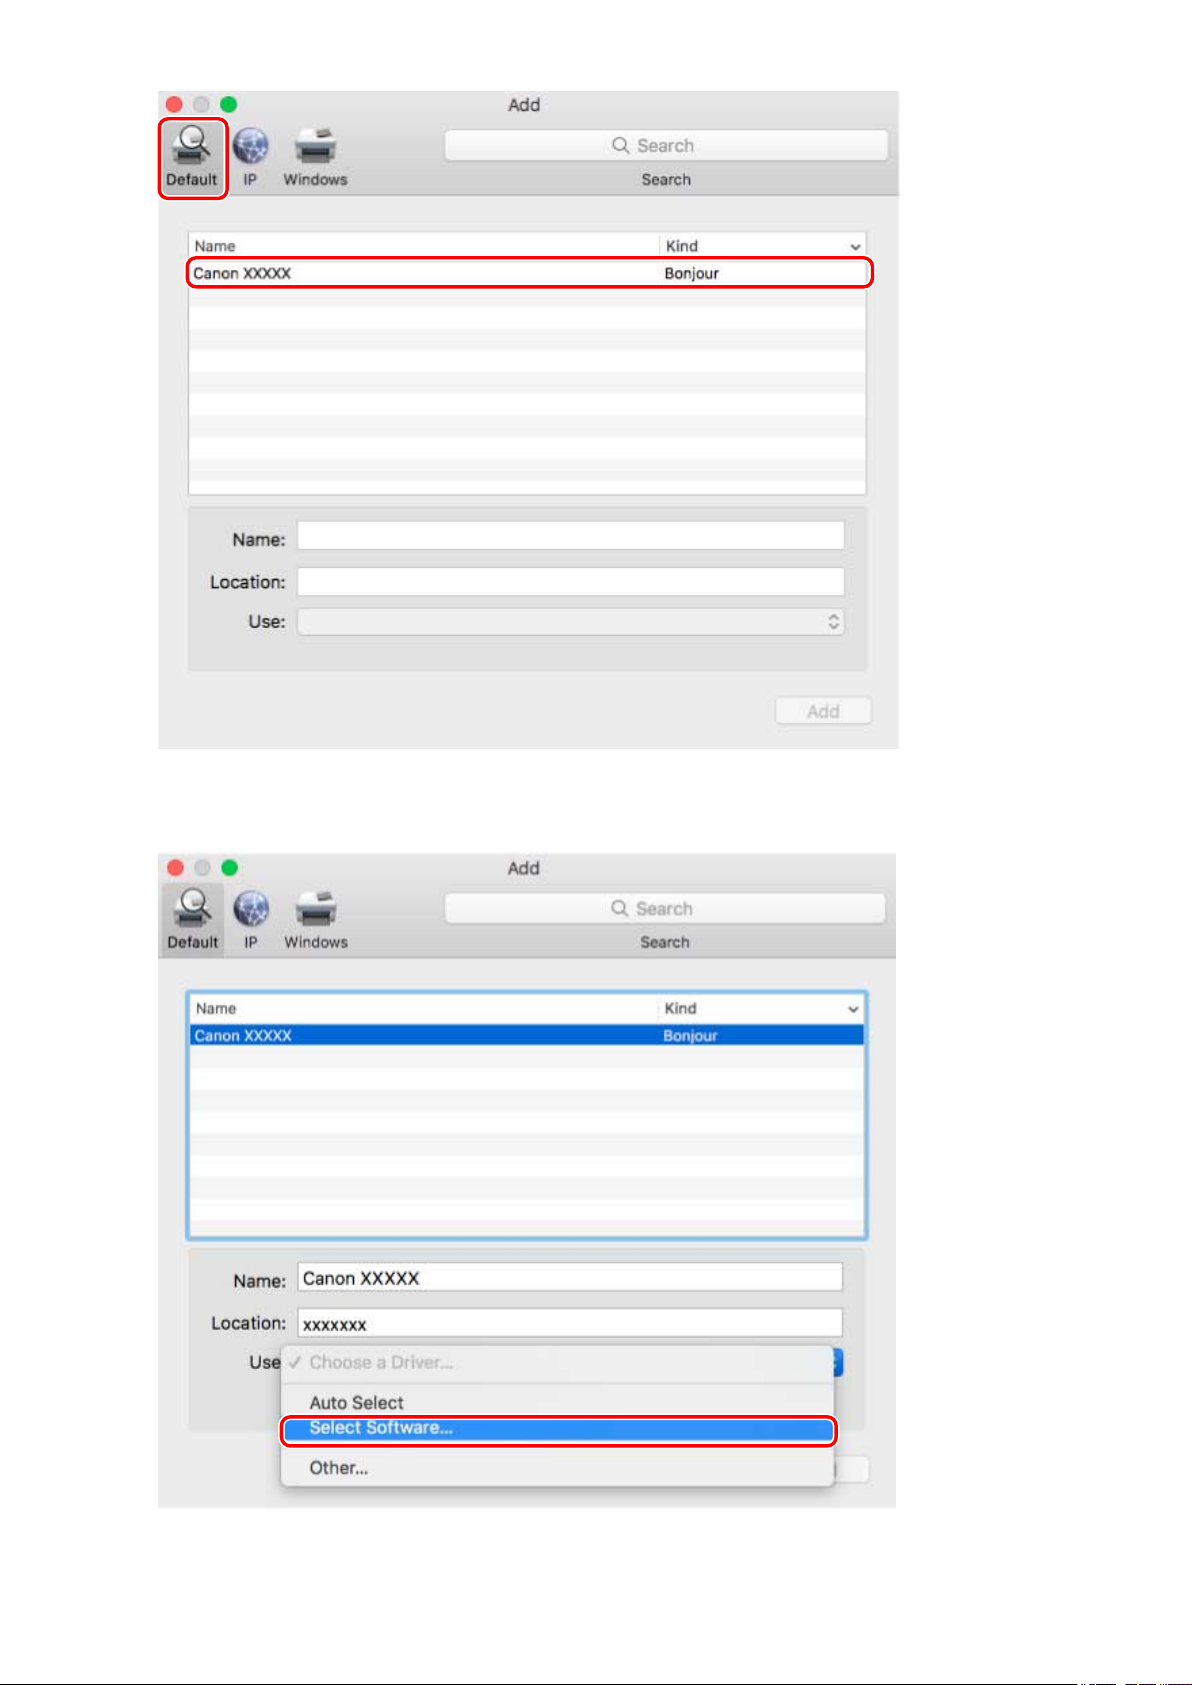
Select [Default] in the toolbar → select a printer from the list.
3
Select a printer displayed as "Bonjour" in [Kind].
If the corresponding driver is already registered in [Use] in the displayed dialog box, proceed to step 7.
(P. 28) .
26
Page 30
Installing the Driver
Select [Select Software] from [Use].
4
27
Page 31
Installing the Driver
Refer to the Readme le to conrm the driver corresponding to your printer → select
5
the appropriate driver from the list in the [Printer Software] dialog box → click [OK].
Change [Name] for the printer as necessary → click [Add].
6
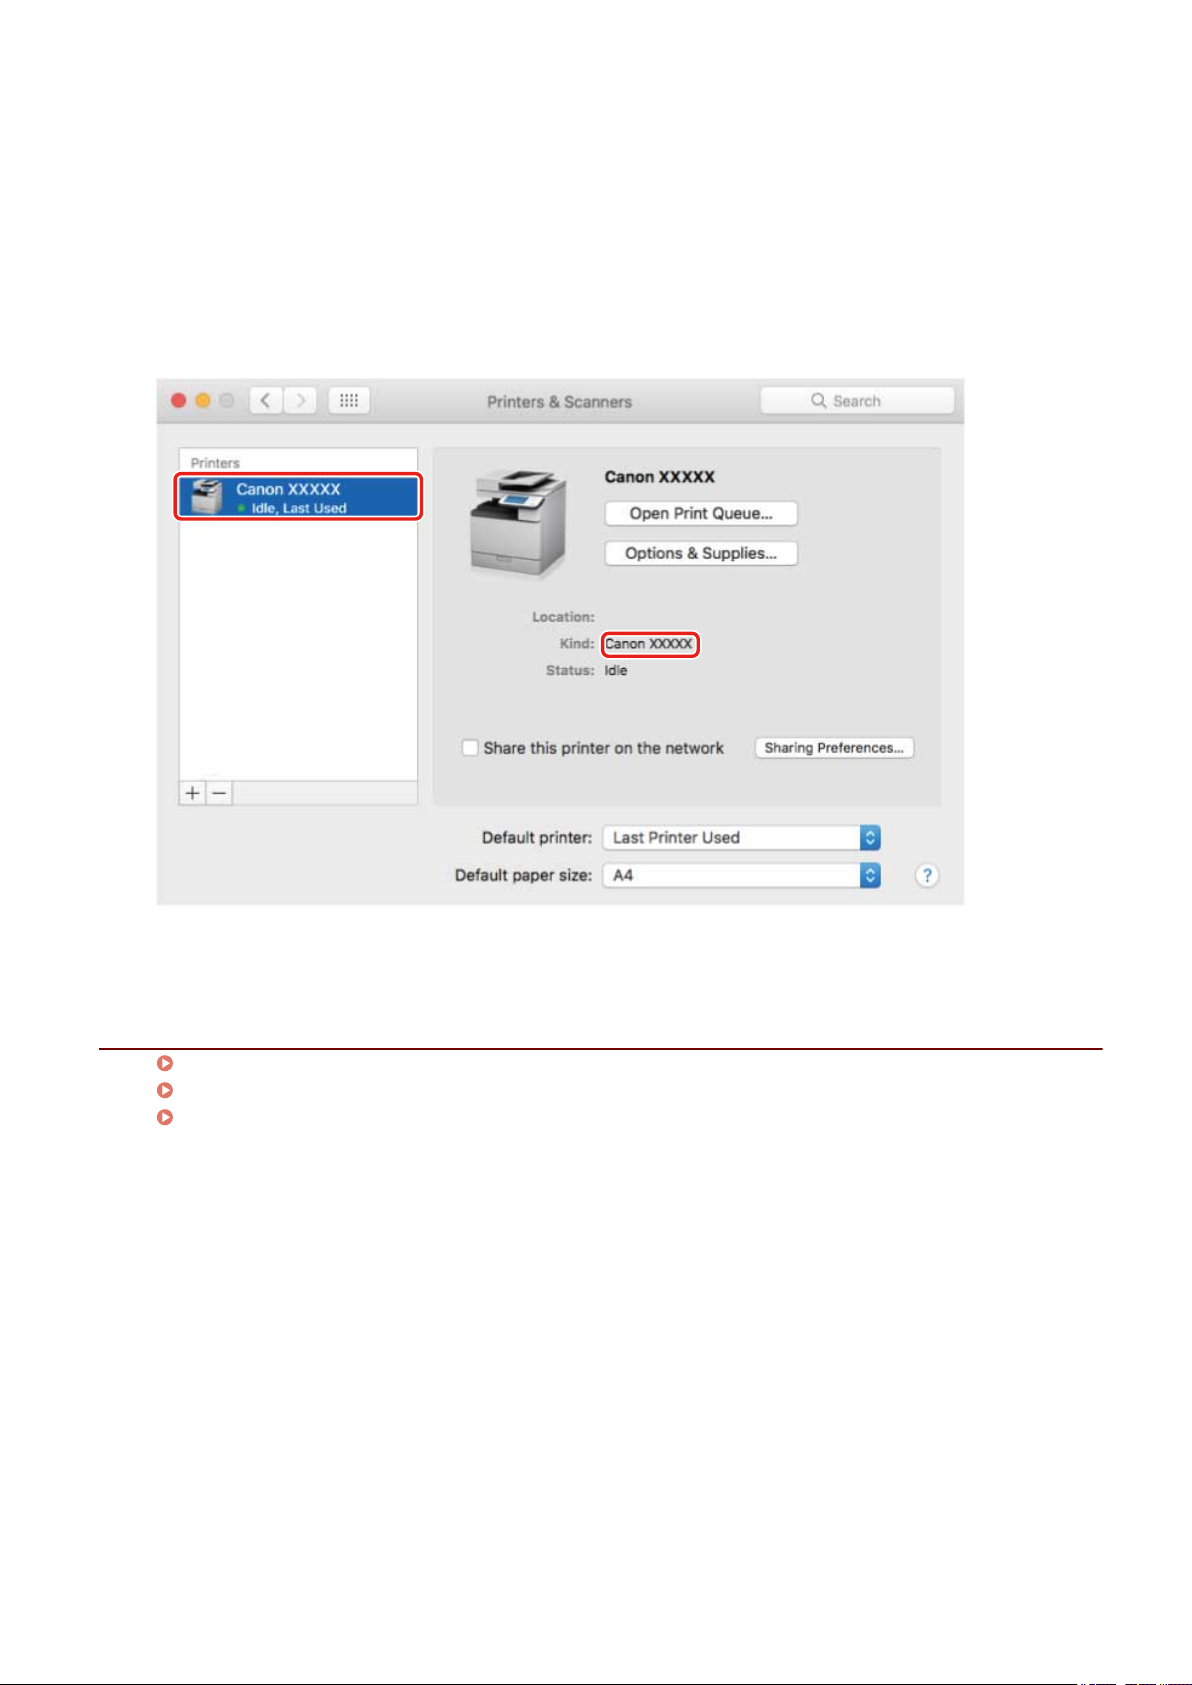
Check that the registered printer and model are displayed in the dialog box.
7
Set the device options as necessary.
Related Topics
Preparations for Using the Driver(P. 12)
About the Readme File(P. 15)
Setting the Options of the Device(P. 40)
28
Page 32

Installing the Driver
Uninstalling a Driver
This explains the procedure for uninstalling a driver that is no longer needed.
Prerequisites
● When connected by USB, removal of the USB cable connecting the device and the computer
● Conrmation of the device name to be deleted
NOTE
● The driver can be upgraded. It is not necessary to uninstall the old driver.
Procedures
Display the [System Preferences] dialog box of the operating system → click [Printers &
1
Scanners].
Select the device to be uninstalled → click [-] displayed at the bottom of the dialog box.
2
Delete the les of the driver to be uninstalled in the following folders of the operating
3
system.
If a conrmation dialog box is displayed, enter an administrator name and password and click [OK].
The name represented by "****" varies according to the device.
- Library/Printers/Canon/CUPS_MF_Printer
29
Page 33

Installing the Driver
- Library/Printers/PPDs/Contents/Resources/CNPZB****ZB.ppd.gz
- usr/libexec/cups/backend/canonoipnetzb
Restart the operating system.
4
30
Page 34

Printing
Printing
Printing .................................................................................................................................................................. 32
Printing from an Application .............................................................................................................................. 33
Arranging Multiple Pages on One Sheet of Paper ............................................................................................. 34
Attaching a PIN to Print Data ............................................................................................................................. 35
Registering Presets ............................................................................................................................................. 36
Registering Custom Paper Sizes ......................................................................................................................... 37
31
Page 35

Printing
Printing from an Application(P. 33)
Arranging Multiple Pages on One Sheet of Paper(P. 34)
Attaching a PIN to Print Data(P. 35)
Registering Presets(P. 36)
Registering Custom Paper Sizes(P. 37)
Printing
32
Page 36

Printing
Printing from an Application
This explains the basic procedure for displaying the print dialog box of the driver and printing from an
application.
NOTE
● [Printer Features] may be displayed in the popup menu, depending on the application you are using. In this
case, switch [Feature Sets] on the [Printer Features] panel to display the items to set.
Select [Print] from the application's [File] menu.
1
Select a device from [Printer] → select the panel from the pop-up menu and set the
2
necessary items.
If no print options are displayed, click [Show Details] at the bottom of the dialog box.
When printing using a preset, select the name of the preset you want to use from [Presets].
NOTE
● If the functions you want to use are not displayed in the print options, enable the device options etc., then
congure the print settings.
Click [Print].
3
Related Topics
Preparations for Using the Driver(P. 12)
Registering Presets(P. 36)
33
Page 37

Printing
Arranging Multiple Pages on One Sheet of Paper
This section explains the procedure for printing multiple pages on a single sheet of paper.
Select the direction you want to arrange the pages in on the paper and print borders around the arranged
pages.
Select [Layout] from the pop-up menu.
1
Select the number of pages to be arranged on each sheet of paper from [Pages per
2
Sheet].
For detailed settings such as the direction in which the pages are arranged, printing borders around each
page, etc., perform the following procedure.
Select what direction the pages are to be arranged in from [Layout Direction].
3
Select the type of border from [Border].
4
Select the binding location when performing two-sided printing from [Two-Sided].
5
34
Page 38

Printing
Attaching a PIN to Print Data
You can attach a PIN to print data and save it in the device. This is useful when printing condential documents
etc.
NOTE
● To use this function, it may be necessary to enable secure printing in the device options in advance,
depending on the device model.
Select [Authenticate and Print] from the pop-up menu.
1
Select [Use Secured Print] → enter [Document Name], [User Name], and [PIN].
2
Related Topics
Setting the Options of the Device(P. 40)
[Authenticate and Print] Panel(P. 47)
35
Page 39

Printing
Registering Presets
You can register frequently used print settings in [Presets] and recall the settings when printing.
For example, if you frequently use 1-sided printing, registering the 1-sided print setting as a preset is
convenient.
You can also set a preset you use frequently so that it is displayed and immediately available next time you
print.
Select a panel in the pop-up menu and set the functions to register as a preset.
1
Select [Save Current Settings as Preset] from [Presets].
2
Enter [Preset Name] → select [Preset Available For] → click [OK].
3
When you frequently use a registered preset, select the preset and print after executing the following
procedure. Next time you print thereafter, it will be displayed in [Presets].
Select [Show Presets] from [Presets] → disable [Reset Presets Menu to "Default
4
Settings" After Printing] → click [OK].
36
Page 40

Printing
Registering Custom Paper Sizes
You can register a desired paper size and use it for printing.
A registered custom paper size can also be used when printing from another device.
Select [Manage Custom Sizes] from [Paper Size] in the print dialog box.
1
Click [+] at the bottom of the displayed dialog box.
2
Congure detailed settings such as the name, dimensions, etc. of the custom paper
3
size → click [OK].
37
Page 41

Linking the Driver and the Device
Linking the Driver and the Device
Linking the Driver and the Device ......................................................................................................... 39
Setting the Options of the Device ...................................................................................................................... 40
Setting the Authentication Function ................................................................................................................. 42
38
Page 42

Linking the Driver and the Device
Linking the Driver and the Device
Setting the Options of the Device(P. 40)
Setting the Authentication Function(P. 42)
39
Page 43

Linking the Driver and the Device
Setting the Options of the Device
You can set the options (paper supply drawers, nisher, etc.) installed in the device.
When using the device for the rst time or changing the options of the device, the options must be set in order
to be able to use the functions of the device.
Prerequisites
● Installing the Driver(P. 16)
● Registering a Printer(P. 17)
● Conrmation of driver names corresponding to the device
For driver names corresponding to devices, refer to the Readme le.
Procedures
Display the [System Preferences] dialog box of the operating system → click [Printers &
1
Scanners].
Select the device → click [Options & Supplies].
2
Click [Options].
3
In the displayed dialog box, check the options of the device → click [OK].
4
40
Page 44

Linking the Driver and the Device
NOTE
● Select only the options that are actually installed in the device.
● For information on operating the device, check the manual of the device.
Related Topics
Preparations for Using the Driver(P. 12)
About the Readme File(P. 15)
Registering a Printer Connected by TCP/IP(P. 18)
Registering a Printer Connected by USB(P. 22)
Registering a Printer Connected by Bonjour(P. 26)
41
Page 45

Linking the Driver and the Device
Setting the Authentication Function
You can perform print management by means of the department ID management function.
NOTE
● To use this function, enable the authentication function in the device options in advance.
Select [Authenticate and Print] from the pop-up menu.
1
Select [Use Department ID Management] → enter [Department ID] or [PIN].
2
Related Topics
Setting the Options of the Device(P. 40)
[Authenticate and Print] Panel(P. 47)
42
Page 46

Settings List
Settings List
Settings List ......................................................................................................................................................... 44
[Paper Source] Panel ........................................................................................................................................... 45
[Basic] Panel ......................................................................................................................................................... 46
[Authenticate and Print] Panel ........................................................................................................................... 47
[Advanced] Panel ................................................................................................................................................. 48
43
Page 47

Settings List
[Paper Source] Panel(P. 45)
[Basic] Panel(P. 46)
[Authenticate and Print] Panel(P. 47)
[Advanced] Panel(P. 48)
Settings List
44
Page 48

Settings List
[Paper Source] Panel
You can set the paper type and paper source.
[Select by]
Species whether to set the paper to print on from a paper source or by paper type.
[Paper Source]
Select this to specify the paper to print on from a paper source. If you select [Auto], a paper source is
automatically selected according to the specied output paper size.
[Paper Type]
Select this to specify the paper to print on by paper type. If [Settings] is displayed, display the dialog box for
selecting the paper type, and set the paper type.
45
Page 49

[Basic] Panel
You can set the print quality, printing colors, etc.
[Settings]/[Adjustments]
Sets the resolution, colors, etc.
[Quality]
Selects whether to print with ne rendering or standard rendering.
[Paper Type]
Selects the paper type.
[Color Mode]
Switches between printing in color or black-and-white.
Settings List
[Toner Save]
Saves toner by reducing its density when printing.
[Print on the Other Side]
When manually performing two-sided printing, select this to print on the back side.
[Reduce Blurring/Smudging]
Adjusts the level of toner xing to improve the print result.
Strengthening blur improvement improves the haziness of contours.
Strengthening improvement of striping improves prolonged striping.
[Graphics Mode]
Selects a processing method for print data.
[Brightness]
Adjust the brightness by moving the slider.
[Contrast]
Adjust the contrast by moving the slider.
[Version]
Displays information about the driver version.
46
Page 50

Settings List
[Authenticate and Print] Panel
You can manage the print status by department, and encrypt and print the print data, etc.
[Use Secured Print]
Sets a PIN in the print data and saves it to the device.
The saved data can be printed by entering the PIN at the control panel of the device.
[Use Department ID Management]
Manages the print status of each department.
You can print by entering the department ID and PIN registered in the device.
Related Topics
Attaching a PIN to Print Data(P. 35)
Setting the Authentication Function(P. 42)
47
Page 51
Settings List
[Advanced] Panel
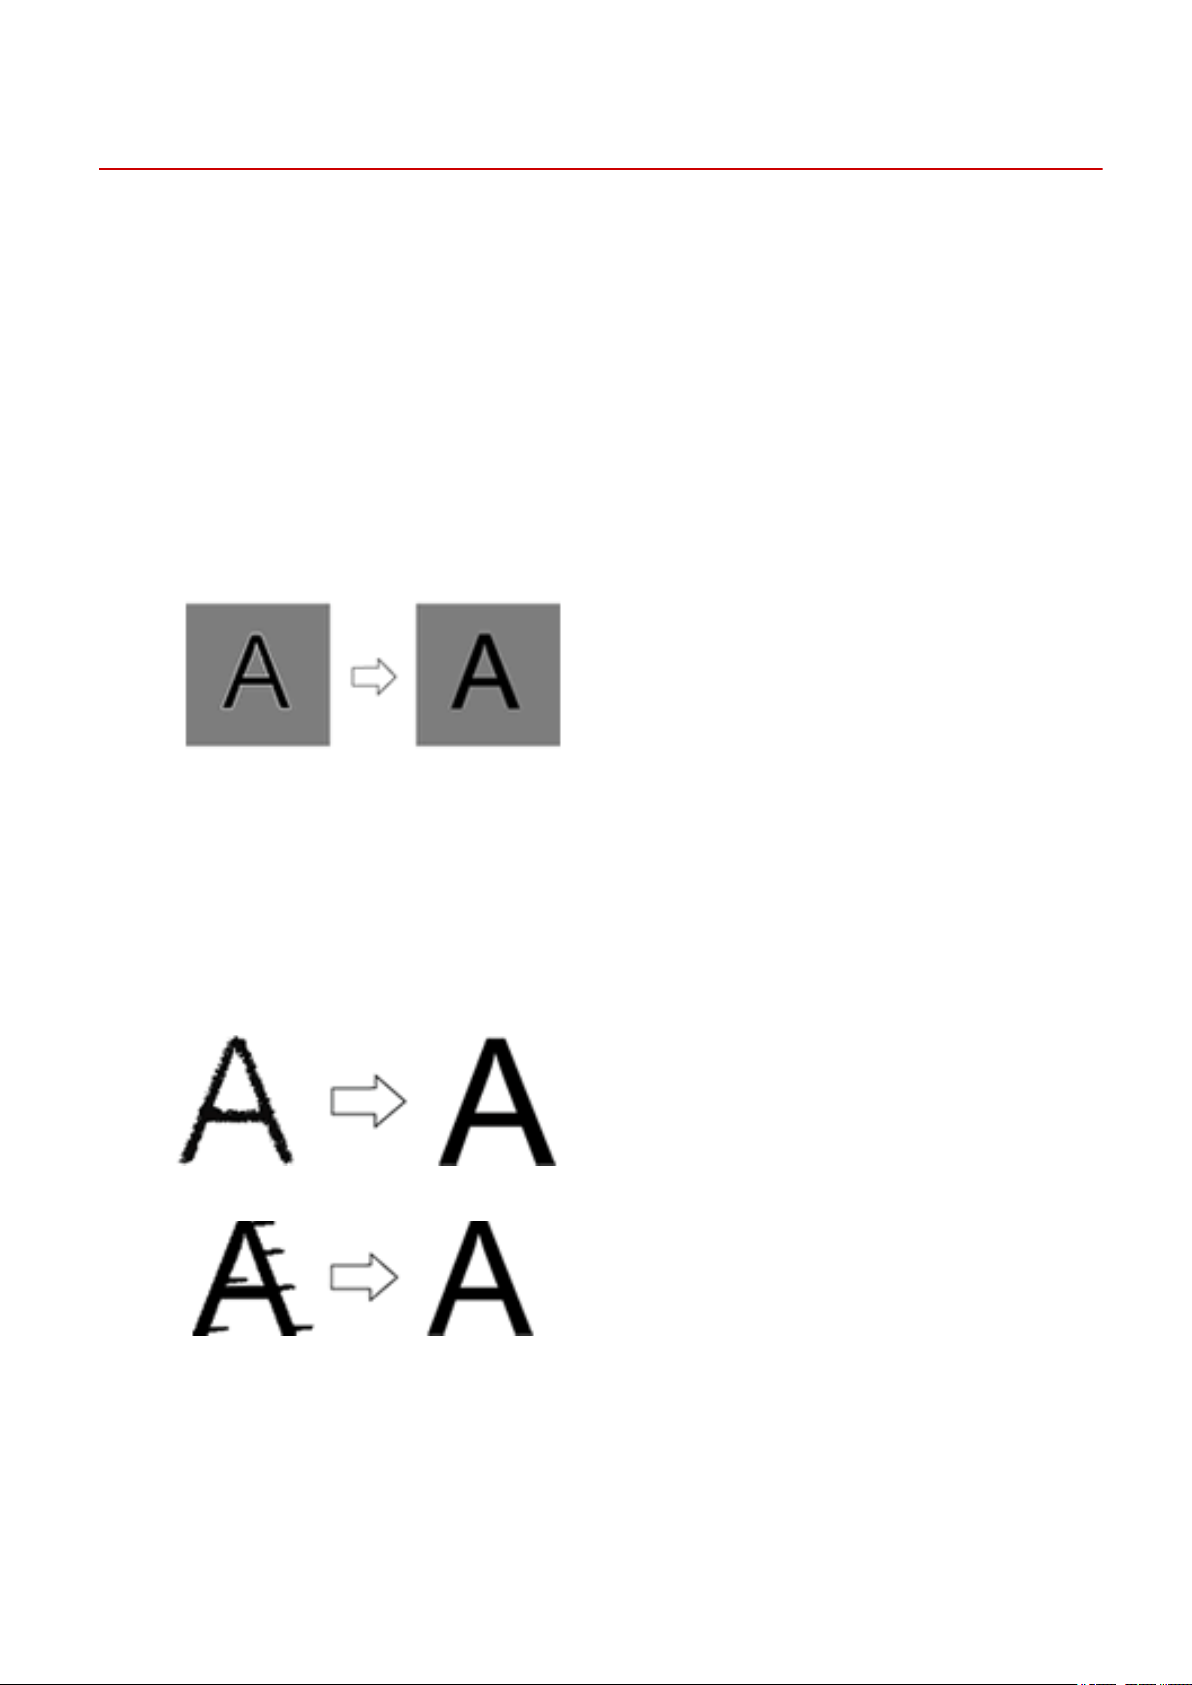
When printing text or images, you can improve the print results when contours are hazy or blurred.
[Smooth Outline of Characters and Figures]
Corrects the smoothness of the contours of text and diagrams by means of a smoothing process.
[Improve Barcode Printing]
Improves ne lines such as barcodes etc. so that they are not blurred or broken.
[Improve White Specks on Outlines]
Improves outlines so that the contours of text and images are not printed outlined in white.
[Fine Print Data]
Prints images with ner quality.
[Reduce Blurring/Smudging]
Adjusts the level of toner xing to improve the print result.
Strengthening blur improvement improves the haziness of contours.
Strengthening improvement of striping improves prolonged striping.
48
Page 52

Troubleshooting
Troubleshooting
Troubleshooting ............................................................................................................................................... 50
Cannot Register a Device Connected by Bonjour .............................................................................................. 51
Printing is Slow .................................................................................................................................................... 52
49
Page 53

Troubleshooting
Troubleshooting
This explains solutions to common problems.
Limitations and precautions are also included in the Readme le.
Cannot Register a Device Connected by Bonjour(P. 51)
Printing is Slow(P. 52)
50
Page 54

Troubleshooting
Cannot Register a Device Connected by Bonjour
When registering a device connected by Bonjour in the operating system, the corresponding device may not be
displayed in the [Add] dialog box.
If this happens, it could be due to a number of causes. Change settings as necessary by referring to each
"Remedy."
Cause 1.
The settings of the device are incorrect
Remedy
Conrm that the Bonjour settings in the control panel of the device are enabled. For details, refer to the
manual of the device.
Cause 2.
The network settings of the operating system are incorrect
Remedy
Check whether the necessary settings have been congured in the network settings of the operating system.
If they have not been set, change the settings according to the following procedure.
(1) Display the [System Preferences] dialog box of the operating system → click [Network].
(2) Enable the network settings you are using in the [Network] panel.
(3) Click the [Finder] icon → click [Finder] > [Preferences] in the menu bar.
(4) Click the [General] tab in the [Finder Preferences] dialog box → enable [Connected servers].
Cause 3.
The driver has not been installed correctly
Remedy
Reinstall the driver and register the device again.
Related Topics
Installing the Driver(P. 16)
51
Page 55

Troubleshooting
Printing is Slow
If transmission takes a long time when sending data to the device, it could be caused by the following. Follow
the instructions described in "Remedy."
Cause
The amount of data being sent to the device is large, such as a document containing color photographs
or large images
Remedy
If the resolution of the image is higher than needed, set the resolution to an appropriate value in the [Basic]
panel > [Settings] > [Quality].
Related Topics
[Basic] Panel(P. 46)
52
Page 56

SIL OPEN FONT LICENSE
This Font Software is licensed under the SIL Open Font License,
Version 1.1.
This license is copied below, and is also available with a FAQ at:
http://scripts.sil.org/OFL
----------------------------------------------------------SIL OPEN FONT LICENSE Version 1.1 - 26 February 2007
-----------------------------------------------------------
PREAMBLE
The goals of the Open Font License (OFL) are to stimulate worldwide
development of collaborative font projects, to support the font
creation efforts of academic and linguistic communities, and to
provide a free and open framework in which fonts may be shared and
improved in partnership with others.
The OFL allows the licensed fonts to be used, studied, modied and
redistributed freely as long as they are not sold by themselves. The
fonts, including any derivative works, can be bundled, embedded,
redistributed and/or sold with any software provided that any reserved
names are not used by derivative works. The fonts and derivatives,
however, cannot be released under any other type of license. The
requirement for fonts to remain under this license does not apply to
any document created using the fonts or their derivatives.
DEFINITIONS
"Font Software" refers to the set of les released by the Copyright
Holder(s) under this license and clearly marked as such. This may
include source les, build scripts and documentation.
"Reserved Font Name" refers to any names specied as such after the
copyright statement(s).
"Original Version" refers to the collection of Font Software
components as distributed by the Copyright Holder(s).
"Modied Version" refers to any derivative made by adding to,
deleting, or substituting -- in part or in whole -- any of the
components of the Original Version, by changing formats or by porting
the Font Software to a new environment.
"Author" refers to any designer, engineer, programmer, technical
writer or other person who contributed to the Font Software.
PERMISSION & CONDITIONS
Permission is hereby granted, free of charge, to any person obtaining
a copy of the Font Software, to use, study, copy, merge, embed,
modify, redistribute, and sell modied and unmodied copies of the
Font Software, subject to the following conditions:
53
Page 57

SIL OPEN FONT LICENSE
1) Neither the Font Software nor any of its individual components, in
Original or Modied Versions, may be sold by itself.
2) Original or Modied Versions of the Font Software may be bundled,
redistributed and/or sold with any software, provided that each copy
contains the above copyright notice and this license. These can be
included either as stand-alone text les, human-readable headers or
in the appropriate machine-readable metadata elds within text or
binary les as long as those elds can be easily viewed by the user.
3) No Modied Version of the Font Software may use the Reserved Font
Name(s) unless explicit written permission is granted by the
corresponding Copyright Holder. This restriction only applies to the
primary font name as presented to the users.
4) The name(s) of the Copyright Holder(s) or the Author(s) of the Font
Software shall not be used to promote, endorse or advertise any
Modied Version, except to acknowledge the contribution(s) of the
Copyright Holder(s) and the Author(s) or with their explicit written
permission.
5) The Font Software, modied or unmodied, in part or in whole,
must be distributed entirely under this license, and must not be
distributed under any other license. The requirement for fonts to
remain under this license does not apply to any document created using
the Font Software.
TERMINATION
This license becomes null and void if any of the above conditions are
not met.
DISCLAIMER
THE FONT SOFTWARE IS PROVIDED "AS IS", WITHOUT WARRANTY OF ANY KIND,
EXPRESS OR IMPLIED, INCLUDING BUT NOT LIMITED TO ANY WARRANTIES OF
MERCHANTABILITY, FITNESS FOR A PARTICULAR PURPOSE AND NONINFRINGEMENT
OF COPYRIGHT, PATENT, TRADEMARK, OR OTHER RIGHT. IN NO EVENT SHALL THE
COPYRIGHT HOLDER BE LIABLE FOR ANY CLAIM, DAMAGES OR OTHER LIABILITY,
INCLUDING ANY GENERAL, SPECIAL, INDIRECT, INCIDENTAL, OR CONSEQUENTIAL
DAMAGES, WHETHER IN AN ACTION OF CONTRACT, TORT OR OTHERWISE, ARISING
FROM, OUT OF THE USE OR INABILITY TO USE THE FONT SOFTWARE OR FROM
OTHER DEALINGS IN THE FONT SOFTWARE.
54
 Loading...