

Canon
MACRO
RING
LITE
MR-14EX
MACRO
TWIN
LITE
MT-24EX
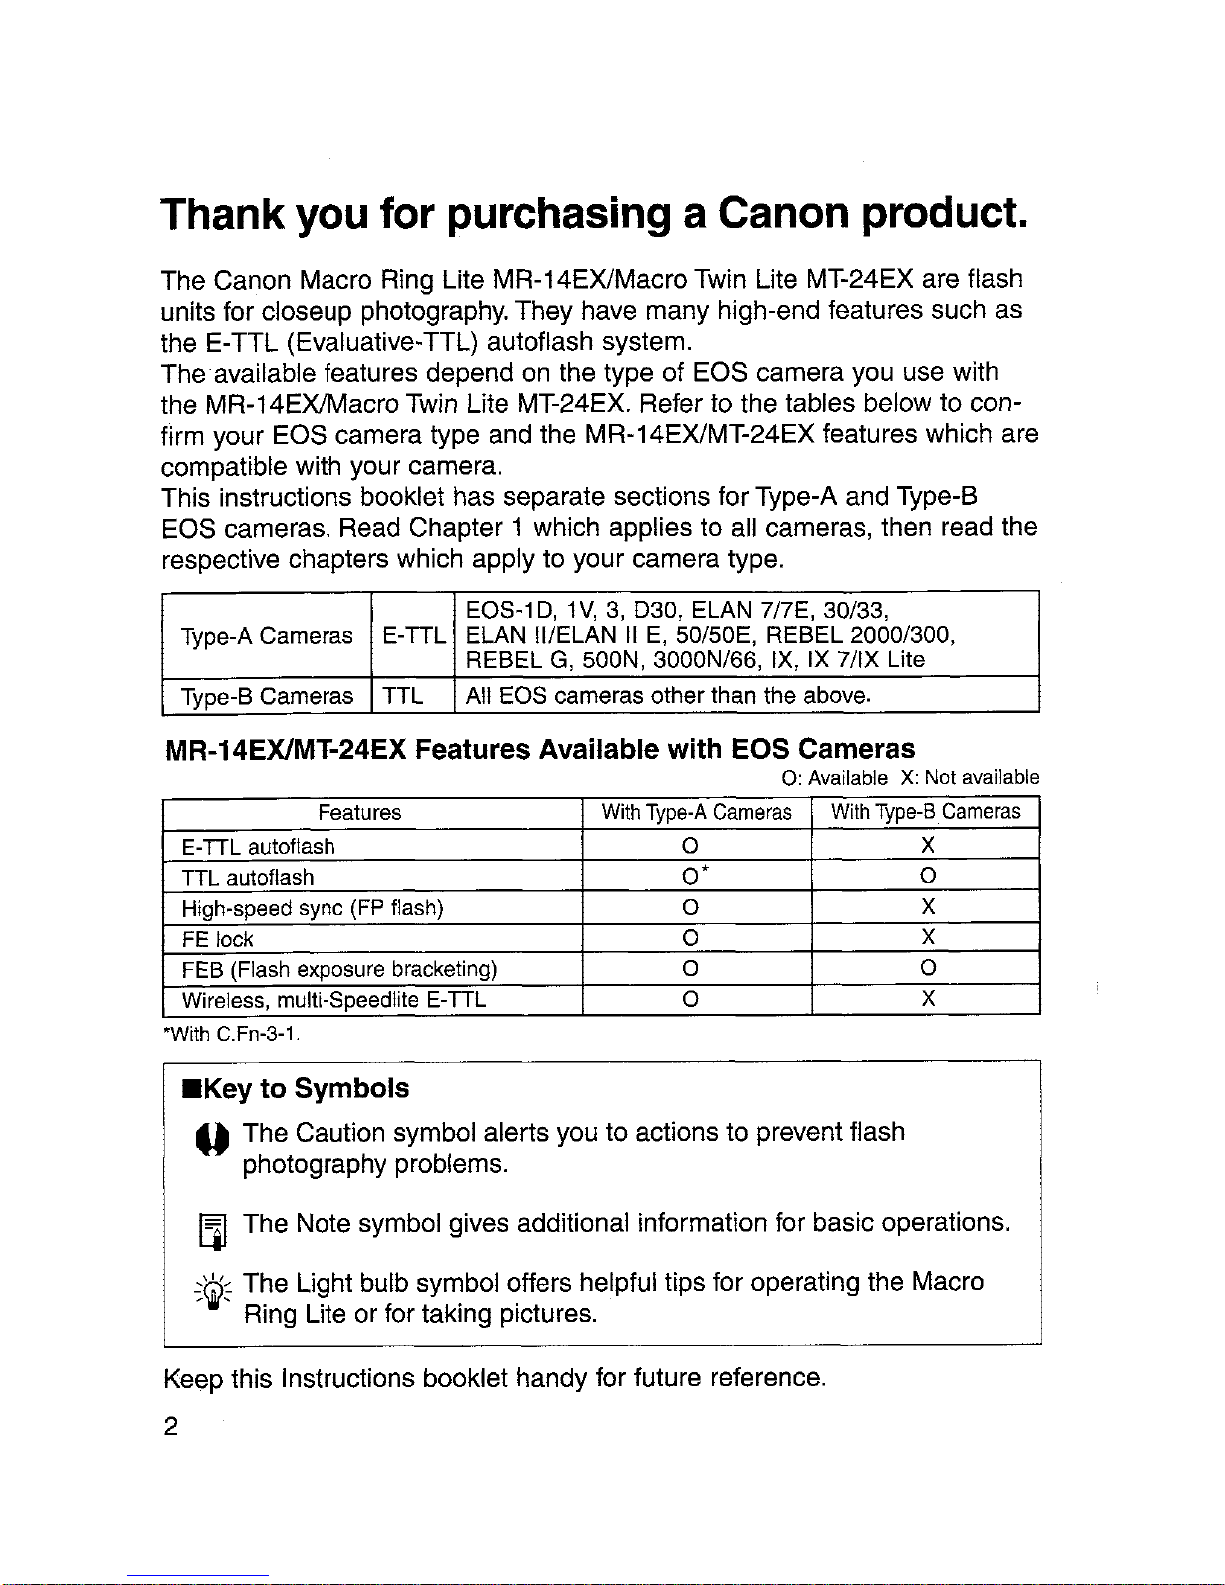
Thank you for purchasing a Canon product.
The Canon Macro Ring Lite MR-14EXlMacroTwin Lite MT-24EX are flash
units for closeup photography. They have many high-end features such as
the E-TTL (Evaluative-TTL) autoflash system.
The available features depend
on
the type of EOS camera you use with
the MR-14EXlMacro
Twin
Lite MT-24EX. Refer to the tables below to confirm your EOS camera type and the MR-14EXlMT-24EX features which are
compatible with your camera.
This instructions booklet has separate sections for Type-A and Type-B
EOS cameras. Read Chapter 1 which applies to all cameras, then read the
respective chapters which apply to your camera type.
EOS-1D,1V,3, D30, ELAN 7/7E, 30/33,
Type-A Cameras
E-TTL ELAN II/ELAN
IIE,SO/SOE,
REBEL 2000/300,
REBEL
G,
SOON,
3000N/66, IX, IX 7/IX
Lite
Type-B Cameras TTL All EOS cameras other than the above.
MR-14EXlMT-24EX Features Available with EOS Cameras
0:
AvailableX:Not available
Features
With
Type-A
Cameras With
Type-B.
Cameras
E-
TIL
autoflash 0
X
TTL autoftash
O'
0
High-speed sync (FP flash)
0
X
FE lock 0
X
FEB (Flash exposure bracketing) 0 0
Wireless, multi-Speedlite E-
TTL
0
X
'With C.Fn-3-1 .
• Key to Symbols
U The Caution symbol alerts you to actions to prevent flash
photography problems.
[lJ
The Note symbol gives additional information for basic operations.
~~~
The Light bulb symbol offers helpful tips for operating the Macro
Ring Lite or for taking pictures.
Keep this Instructions booklet handy for future reference.
2
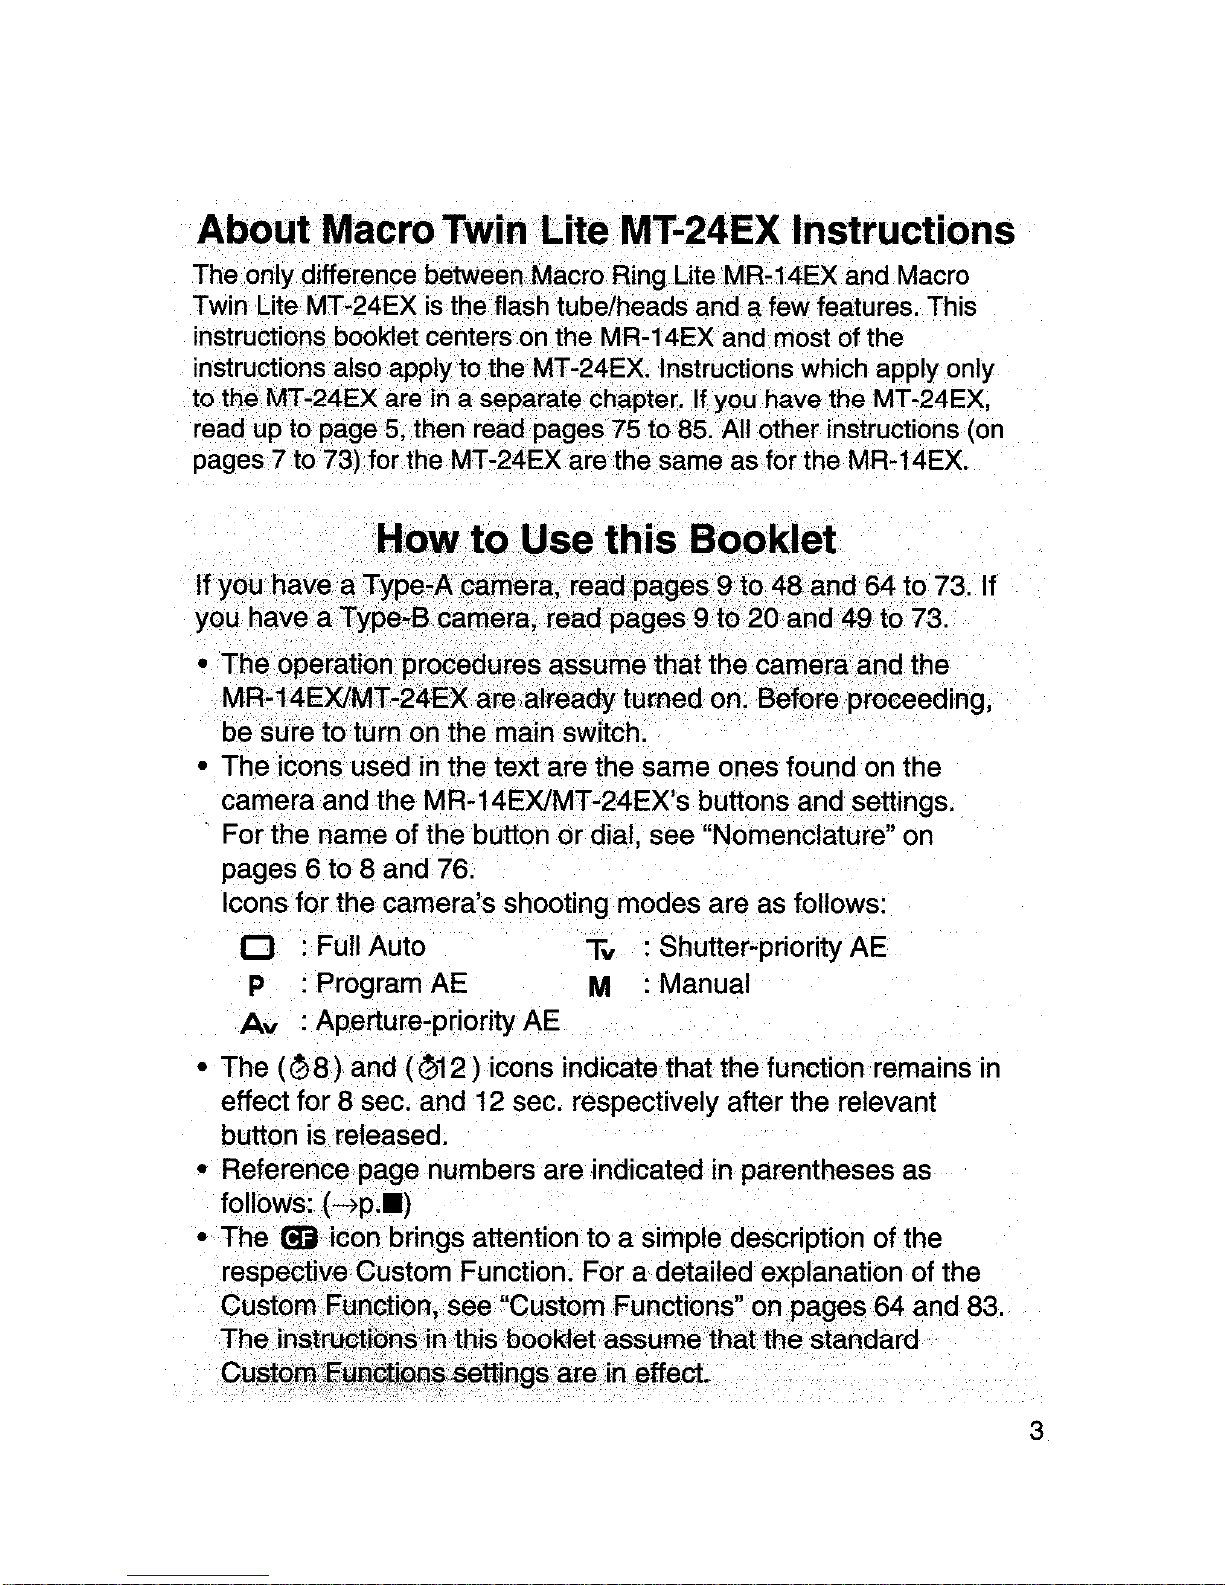
Abol.Jt·Macro.TwiRt.ite.MT~24EXlllstructlons
TheonIY~differencepetwean~acrof3ing4iteMR-149)(~ndMacro
Twin
LiteMT..24EXistheJlash tube/heads and
~fewfe'atures
..
This
instructi9D§bookletcenterson.
theMH-1AEXandmostofthe
instr~ctionsalso'appltt?th~fv1T
~~4~)(
..Instructionswhi?h·applyonly
tott:JeMT
..
?4~Xar~rin
.Cl.sePC1rCl.t~(Jhapter.·lf.y9u.
havetheMT
-24
EX,
rea.dupt<lpage5,then
rea.dpa~es7!)to85:.·
Allot~er
instructions.·
(on
pages?
·.to
73)fortheMT~24EXarethesameasforthe·.
MR..14EX.
~p~.t~~$~t~i$~~~l(let
IfY(jUit"lC3.,,~a:rype-~.·e~'n1·~r<l,~¢~9;pag~si~·t()
•.
4fi~ndi64t9".
73,'.
'If
YOU
••
h~;}
••
a
••
JypeS~ccaJera:,
..
t;sd~ig7s9
•.•
t020ard49t~.'73
•.
ti
..
"ThE?op~rCl!i9PHr8PE:}tf~r~~assyrTletf1at
tti.
e
.·SC1I1"l~ra.C3.nd
..••
the
rv1R.;!4E?</~-r:
..
g~·~Xa~~1~.lreadY.turned·on
.•.
·Bef()Feproeeeding,
be
suretotwno0fhernainswitch. . ...' ' '
• .
Theicon$usedinthetextarethesame
ones found on
the
carn~raangthe
MR-14EXlfv1T.;24EX's
buttons andsettings
•.
For
the name of
thErbottOh
ordial,
see
"NomenClature"
on
pages6to
8
and
76.
Icons
for
the
camera's shooting modes.
are.
as
follows:
o :
FoJI
Auto
Tv
:
Shutter..priority
AE
P :ProgramAE
M:
Manual
Av
:
.Aperture:priorityAE
•
The
(~a}and(~12)icons
indicate
thatthe function remains
in
effecUor8 sec. and
12
sec.
respectively after the relevant
button
is released.
•
Heferenc~pagenumbersareindicat~in
parentheses
as
follbWS:{7p
...
)
.····The~icC)rl.·brings
attention
to
a'
sirllpledescription.
of
the
resp~cti\,~~u~tom
.•
Function~.For.adetCitled~xplanati.on.
of
the
CustO~1~~n~tipnJ·.·r~e.~9~st(.)mFupcti()I1~"{)1'l8?weS\
...
·.~4
and.
83.
'·Th~j~~~r~~ti~l'l~'jn'~h~~·
•.•..
bOt:)~tE}t~~~urne.th~tthes
tandard·
",'
C
.•...............
·.u:,s
.•.........•.
t
·.
Q
'
.....•.
'm:iElil~~Qm$i$ttJngs
.•
arein.effe.ct
..
· ' .
....
:(.
-'.'.:'/<:;,::',::'::,::-":-:
~:":'
,'-'-.-:
"\:'::";"'-':~:-'::-::-:~:::Y:
':/:':"'"
:"','::
':::.('.:->
'.'
',-'
,-,,:'-:,:.-:":
,:-:-
,',,':::,
"":
'-'.
',:,:
:-:':,':-'.
'.,'.:"',:'
:".-.'.:--
3

About Macro Twin Lite MT-24EX Instructions 3
How to Use this Booklet 3
Nomenclature 6
1 Before You Start (Type-A Cameras,"-ype-B Cameras)....9
Installing Batteries 10
External Power Sources 12
Attaching the Control Unit to the Camera 13
Attaching the Flash Ring 14
Main Switch 15
Pilot Lamp and Test Firing 16
Flash Exposu
re
Confirmation 16
Flash Range 17
Flash Mode 19
Setting the Film Speed 19
LCD Panel Illumination 19
Focusing Lamp 20
Resetting to the Default Settings 20
Using Flash with the Camera's Shooting Modes 22
3 Advanced Flash RhotographV (Type-A Cameras). 25
~tD
at:
Selecting the Flash Tube 26
Modeling Flash 29
FE Lock 30
~
Flash Exposure Compensation 32
~
FEB (Flash Exposure Bracketing) 34
GIl
High-Speed Sync (FP Flash) 36
M Manual Flash Mode 38
~
Second-Curtain Synchronization 40
4

Contents
Setting Up a Wireless Flash System 42
~
Using the Wireless Flash System 45
..
S Basic Flash Photography rype-B
Cameras~
4.9
Using Flash with the Camera's Shooting Modes 50
~.D
at:
Selecting the Flash Tube 54
~
Flash Exposure Compensation 56
~
FEB (Flash Exposure Bracketing) 58
M Manual Flash Mode 60
1::1>
Second-Curtain Synchronization 62
Wireless Manual Flash 63
~
Custom Functions 64
MR-14EX/MT-24EX System 66
Troubleshooting Guide 68
Specifications 69
Feature Availability Table 72
I Macro"fwin Ilite
M"f-24.EX
Features .....•.........................
'75
Nomenclature 76
Attaching the Flash Heads 77
Flash Head Movements 80
Flash Distance Range 83
~
Custom Functions 83
Major Specifications 84
iI
5
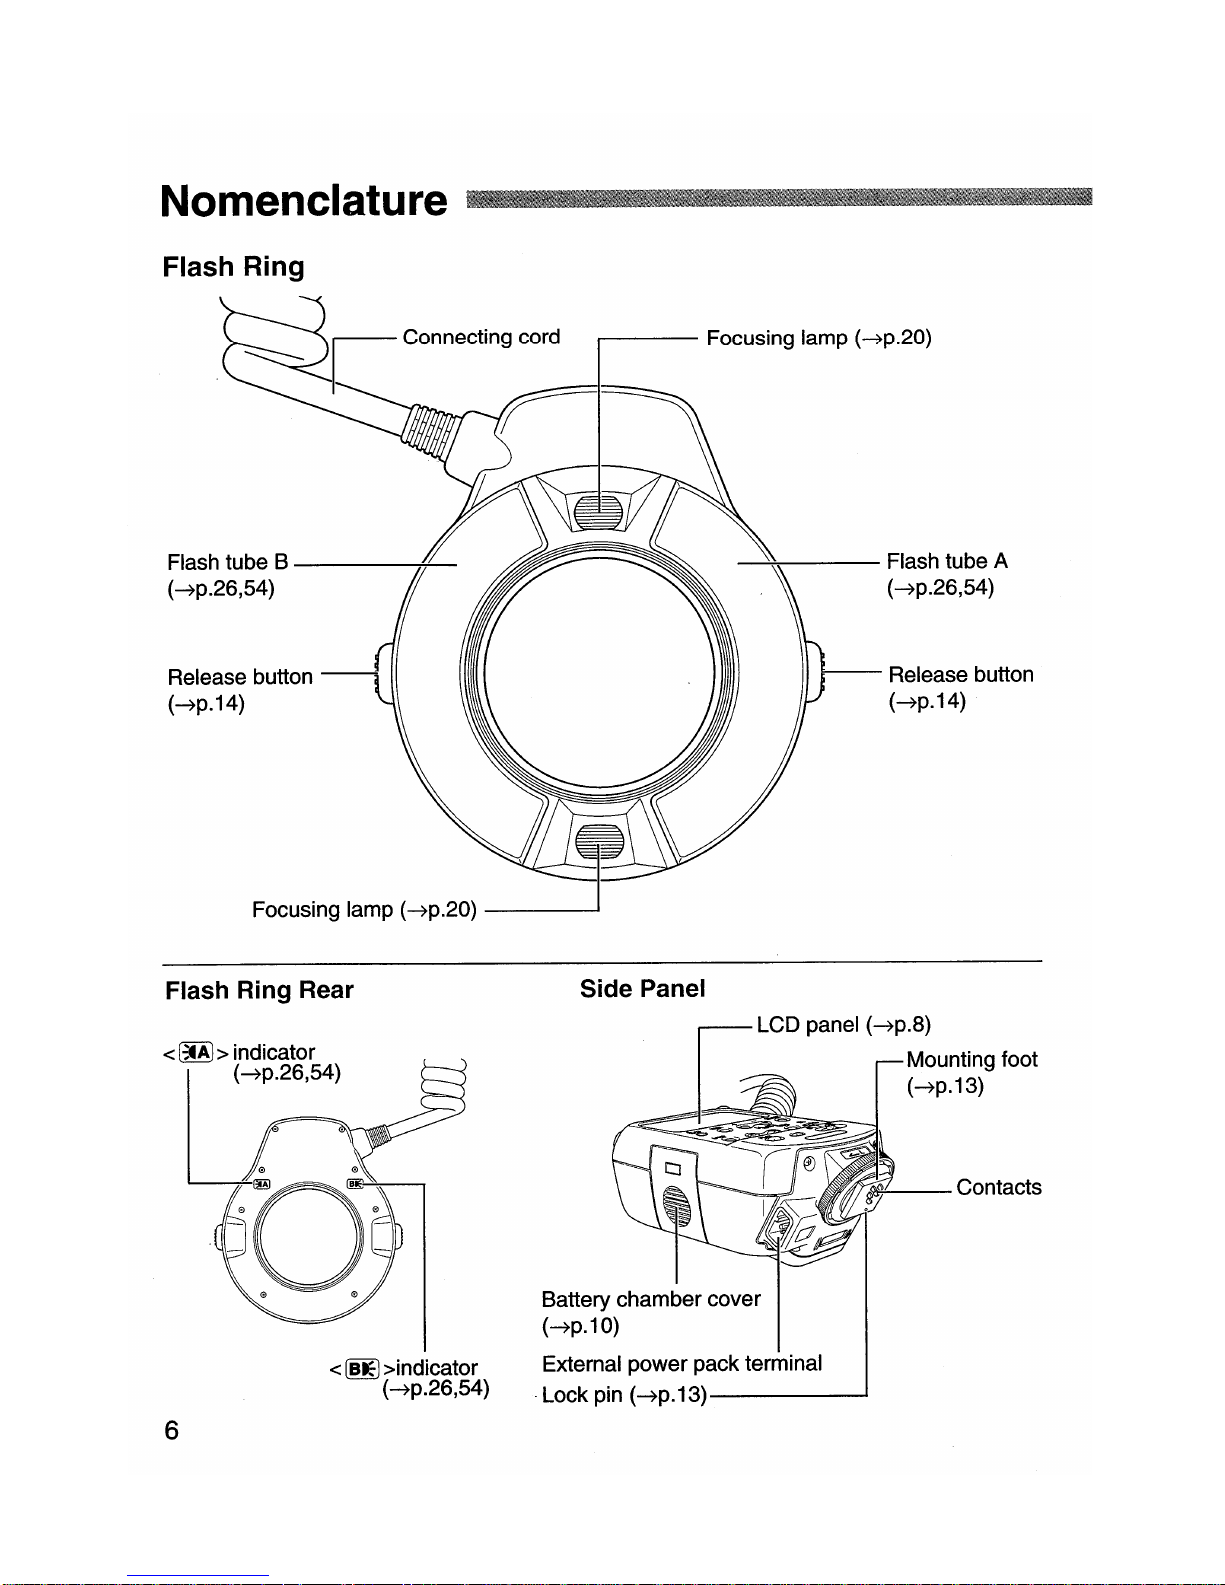
Nomenclature
__
IIJ1IllI.I88IlfIjfllllllllllll._JlllJlJfIIIIIIJIIII
__
1IJ1JA
Flash Ring
Release button
(--7p.14)
-:.:::-----
Flash tube A
(--7p.26,54)
c-
Connecting cor
_d_:_-:_
--
Focusing lamp (--7p.20)
r-
Flash tube B
----.....;!--
(--7p.26,54)
Release button
--
(--7p.14)
Flash Ring Rear Side Panel
<
~
> indicator
L:
--7
P
.26,54)
r:s,
~
@
<
~
>indicator
(--7p.26,54)
LCD panel (--7p.8)
Mounting foot
(--7p.13)
Battery chamber cover
(--7p.10)
External power pack terminal
Lock pin
(--7p.13)--------'
6
Nomenclature
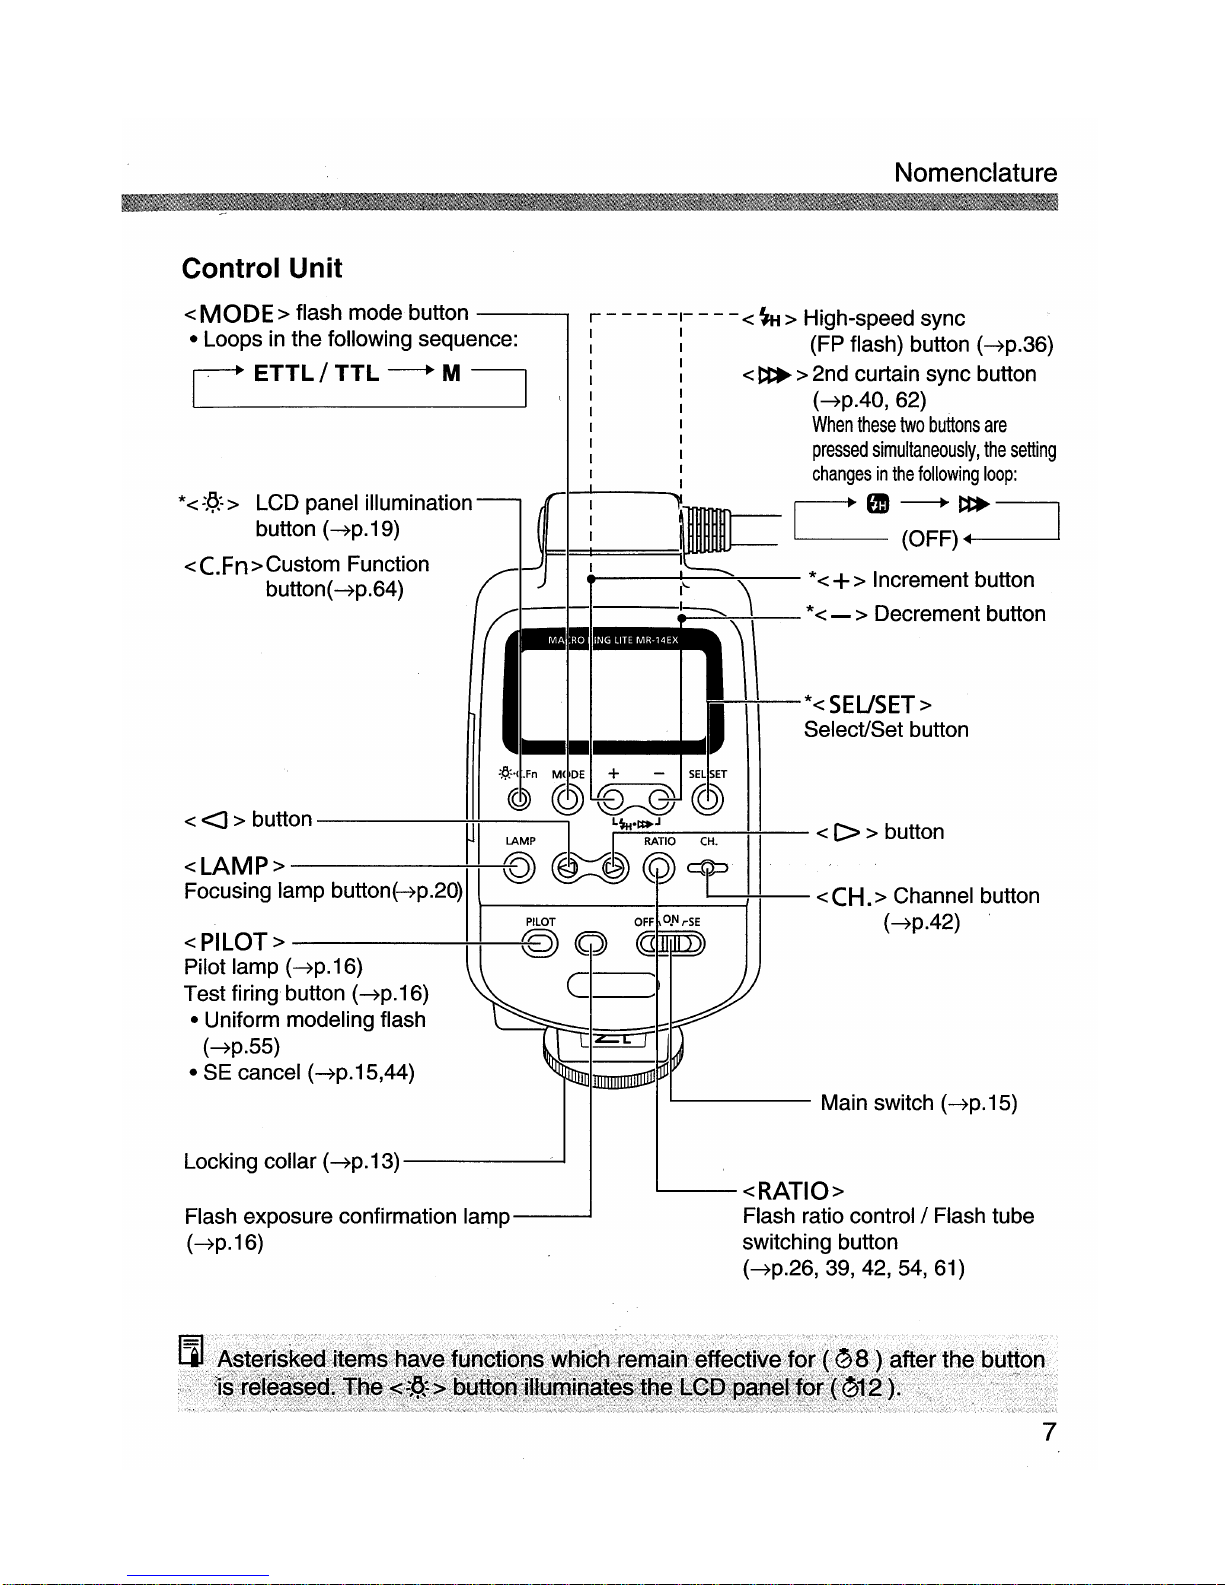
Control
Unit
<
MODE>
flash mode button - r - - - -
-1-
- - - <
~
> High-speed sync
• Loops
in
the following sequence: : (FP flash) button
(~p.36)
1
C
·
ETTL/TTL
---.
M
~
:1
<t:l> >2nd curtain sync button
_
~
(~p.40,62)
1
When
these
two
buttons
are
:
pressed
simultaneously,
the
setting
:
changesinthe
following
loop:
*<:!?:->
LCD panel
illumination-}I-'----l~
~
eD
~
~_
button
(~p.19)
I
~
(OFF)~
<C.Fn>Custom
Function
1r
i
----+--~--
*<+>
Increment button
button(~p.64)
~_.
_.•_._.
:~\\\
*
....
-.-.;
....
"---'-
'-
<- > Decrement button
_111-_-
~..!...!--*<SEUSET>
Select/Set button
:t>.:.(
.FnM(DE
+ -
SEL
SET
CD.
®~®
< <J> button
-----*U-:-'-----,I
....::L~:;:..:.~~J
----++--
<C>> button
I
LAMP
...-:I:--......-:l
RATIO
CH.
II
<LAMP>----++--©
~
®
~.
Focusing lamp
bUtlOnl-7po20)1
\
PILOT
OFF
O.NrSE
LI-----!~_
<
CH.
>(
:~~2;)el
button
<PILOT>
©
(Q)
~
Pilot lamp
(~p.16)
~_-----..
Test firing button
(~p.16)
C
__
• Uniform modeling flash
____
(~p.55)
~
• SE cancel
(~p.15,44)
~
L....-
Main switch
(~p.15)
Locking collar
(~p.13)
-
""-1
Flash exposure confirmation lamp
(~p.16)
<RATIO>
Flash ratio
control/Flash
tube
switching button
(~p.26,
39, 42, 54, 61)
7
Nomenclature
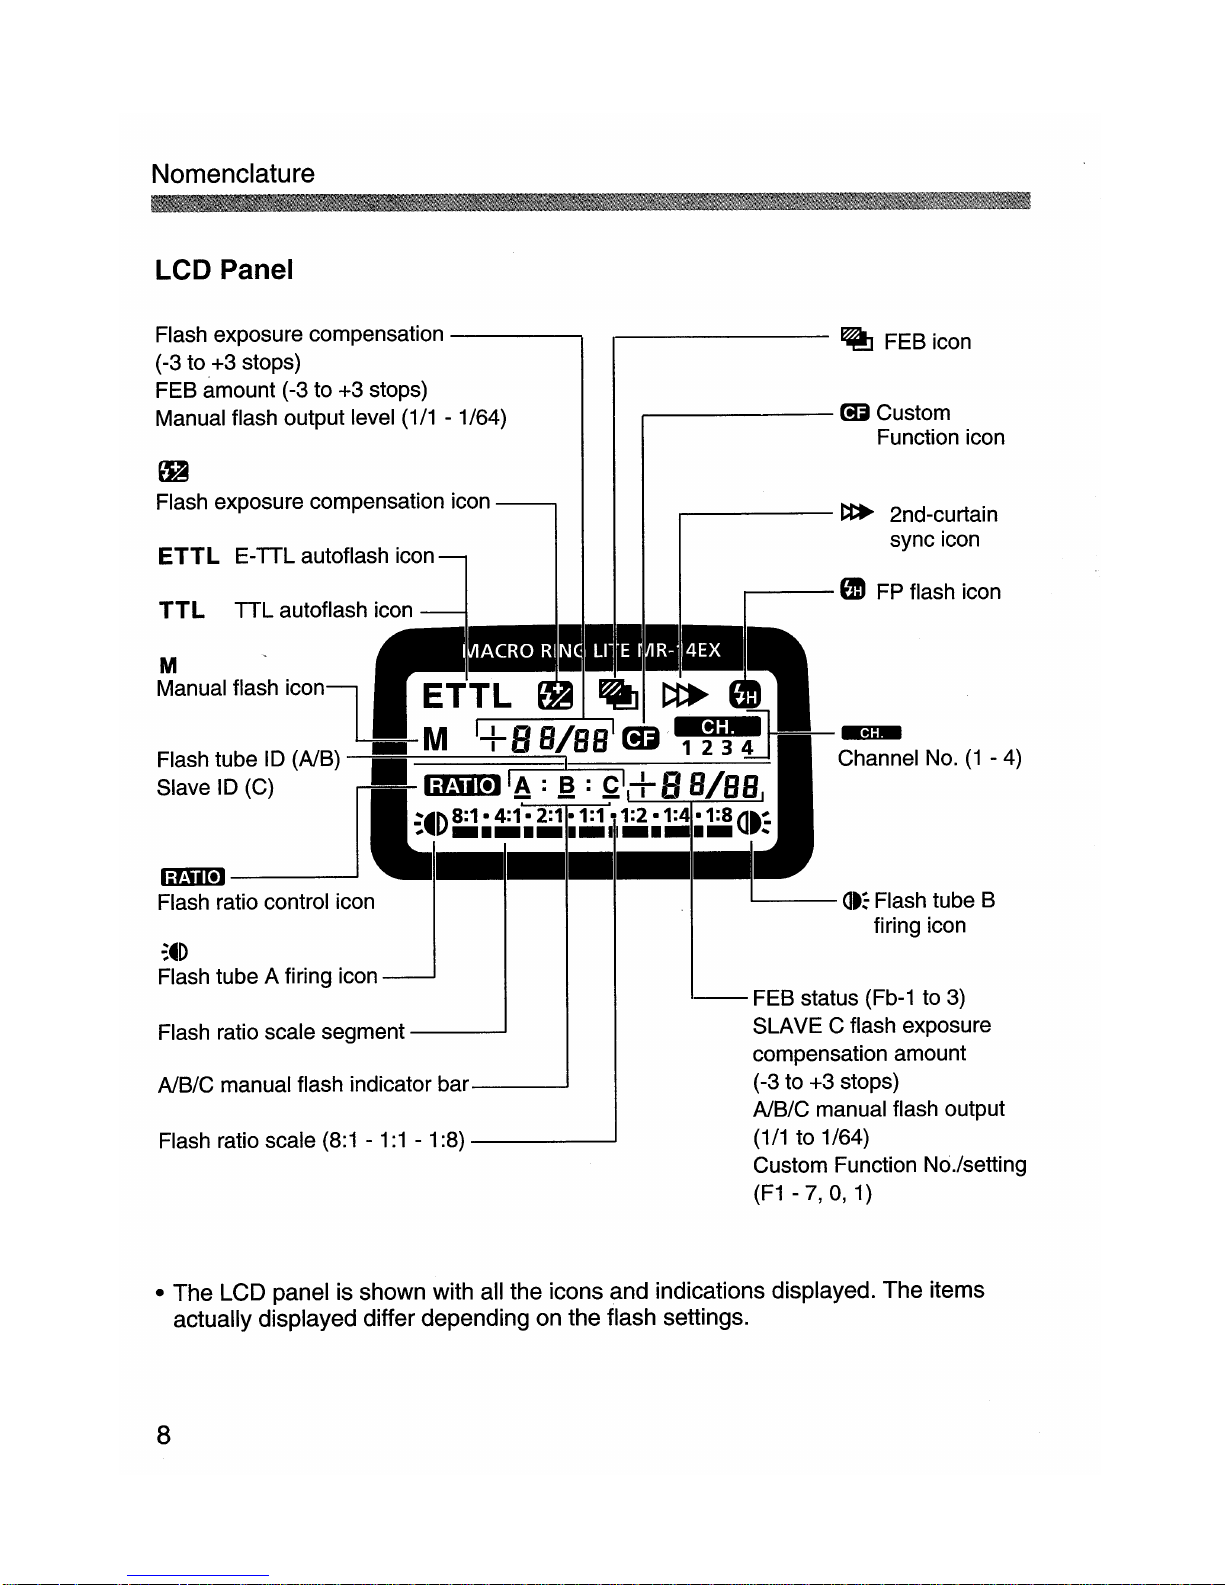
LCD Panel
Flash exposure compensation
----
.......
(-3 to+3stops)
FEB amount (-3 to
+3
stops)
Manual flash output level
(1/1-1164)
,--------
~
FEB icon
r---------
(fi
Custom
Function icon
Flash exposure compensation icon
Flash ratio scale segment
------'
AlBIC manual flash indicator
bar------'
Flash ratio scale (8:1 -
1:1
- 1:8)
---------I
,....-----
t:I>
2nd-curtain
ETTL
E-TT.
L autoflash
iCOi
sync icon
Ii
GIl
FP flash icon
TTL
TTL
autoflash icon
M '
~
•
•••
11111
__
ManualflaShiconi.
ETTL
~
~
~I
LlLM
+B
BIBB
(6
~~
~
Flash tube10(AlB)
11-
I 1 2 3 4 Channel No.
(1
- 4)
Slave
10
(C)
mamllA:
~:
~I+B
BIBB
~
~.D8:1-
4:1- 2:1-1:1 -1:2 -1:4
-1:811.~
,.
- ._11
\1
...
IiBml
j----_.
Flash ratio control icon
~
at:
Flash tube B
firing icon
~~D
Flash tube A firing icon
--
FEB status (Fb-1 to 3)
SLAVE
C flash exposure
compensation amount
(-3 to
+3
stops)
AlBIC manual flash output
(1/1to1164)
Custom Function Nc>.Isetting
(F1-7,O,1)
• The LCD panel is shown with all the icons and indications displayed. The items
actually displayed differ depending on the flash settings.
8
Learn how to prepare the Macro Ring
Lite MR-14EX for actual use.
BeforeYou Start

Macro Ring Lite MR-14EX requires one of the following two types of
batteries:
(1) Four size-AA alkaline batteries
(2) Four size-AA
nickel-hydride batteries
Slide the battery compartment
cover as shown by the arrow and
flip it up.
Insert the batteries.
• Make sure the +and - battery
contacts are properly oriented as
shown in the battery chamber.
Close the battery chamber cover
as shown
in
the diagram.
10
Inr;:,t<:lllinn
Batteries
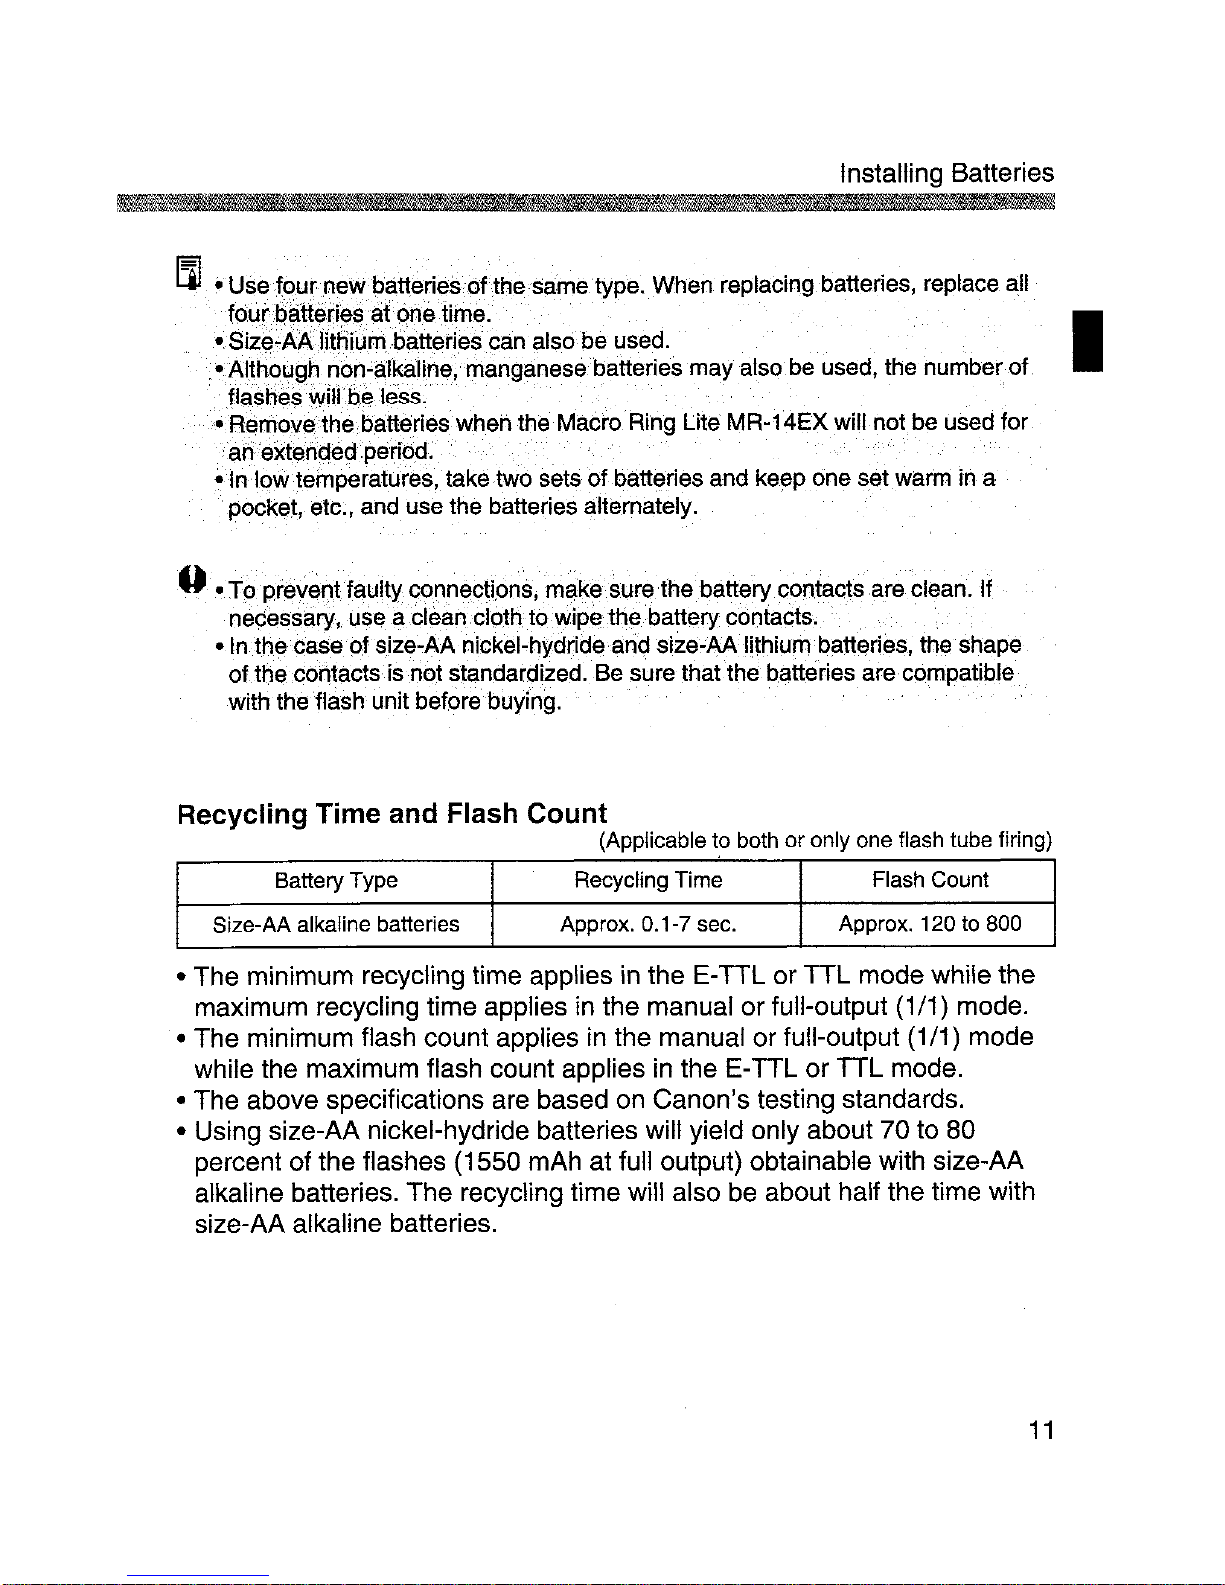
Ill
.•
usef8~rpewbatteri~softhesame
type..When replacing batteries, replace all
fou.rb~tten~~at
gne
time. I
.SiZE)"AAJithiurnb~tteries
c:an·
also
be
used.
.-AltholJ9h1l0n-aJkaline,manganese batteries
may
also be used, the number
of
flashes
Will
be
less.
•
H~rrl0vethebatte.rieswheh
the Macro Ring Lite MR-14EXwill
notbe
used for
anextended.period.
-In
low temperatures, take
two
set50f
batteries and
keepone
setwarmina
pocket, etc:,
and
use the batteries alternately.
o.
To
preveQtfaultyconnections,
make
sure the
battery
contacts are clean. If
necessary, use a
dean
cloth to
wipe
the
battery contacts, .
•
In
the case ofs.ize-AA•nickel-hydride and size-AAlithiumbatteries, the· shape
of
the contacts is
not
standardized. Be sure that the batteries are compatible
with the flash unit before buying.
Recycling Time and Flash
Count
(Applicable to both or only one flash tube firing)
Battery Type Recycling Time Flash Count
Size-AA alkaline batteries Approx.
0.1-7 sec. Approx. 120 to 800
• The minimum recycling time applies in theE-TTL or TTL mode while the
maximum recycling time applies in the manual
or
full-output (1/1) mode.
• The minimum flash count applies in the manual
or
full-output (1/1) mode
while the maximum flash count applies in the
E-TIL
or
TIL
mode.
• The above specifications are based
on
Canon's testing standards.
• Using size-AA nickel-hydride batteries will yield only about 70 to 80
percent of the flashes (1550 mAh at full output) obtainable with size-AA
alkaline batteries. The recycling time will also be about half the time with
size-AA alkaline batteries.
11

External Power Sources
~~1
Macro Ring Lite MR-14EX can use either of the following two external
power packs. For details
on
the power pack, refer to the Instructions of the
respective power pack.
(1) Compact Battery Pack CP-E2
Uses six size-AA alkaline, nickel-hydride, or lithium batteries.
(2) Transistor Pack E
Uses Battery Magazine TP (six size-C alkaline batteries) or Ni-Cd
Pack TP.
Recycling Time and Flash Count
(Applicable to bothoronly one flash tube tiring)
Power Source
Recycling
Flash Count
Time
(sec.)
Internal
Power
Size-AA alkaline batteries Approx.0.1-7
Approx.120-800
Sources
Compact Battery Pack
CP-E2
Approx.0.1-4
Approx,
400-2500
External
Power
(w/alkaline batteries)
Sources
Transistor Pack E (w/alkaline batteries) Approx.0.1-4
Approx.
400-2500
Transistor Pack E
(wiN
i-Cd Pack TP) Approx. 0.1-3
Approx.
330-2000
• The minimum recycling time appliesinthe E-TTL or
TIL
mode while the
maximum recycling time applies
in
the manualorfull-output (1/1) mode.
• The minimum flash count applies in the manual or full-output (1/1) mode
while the maximum flash count applies
in
the
E-TIL
or TTL mode.
• The above specifications are based on Canon's testing standards.
..
-Evenwhen
an~xternal
power source isused, batteries must still
be
installed
in
tbeMR-14EX to power
its
internal circuitry.
-TheMR-14EX
usesboth the internal and external power sources to recycle
the flash. Therefore,.the.internalpower source.
may
become exhaustedsooner
thanthe
externalpow~rso~
rce.
ForproI5m~edflash·
photography,keepa spare
set
of·
size-AA batteries handyfortheinternal.power source.
12
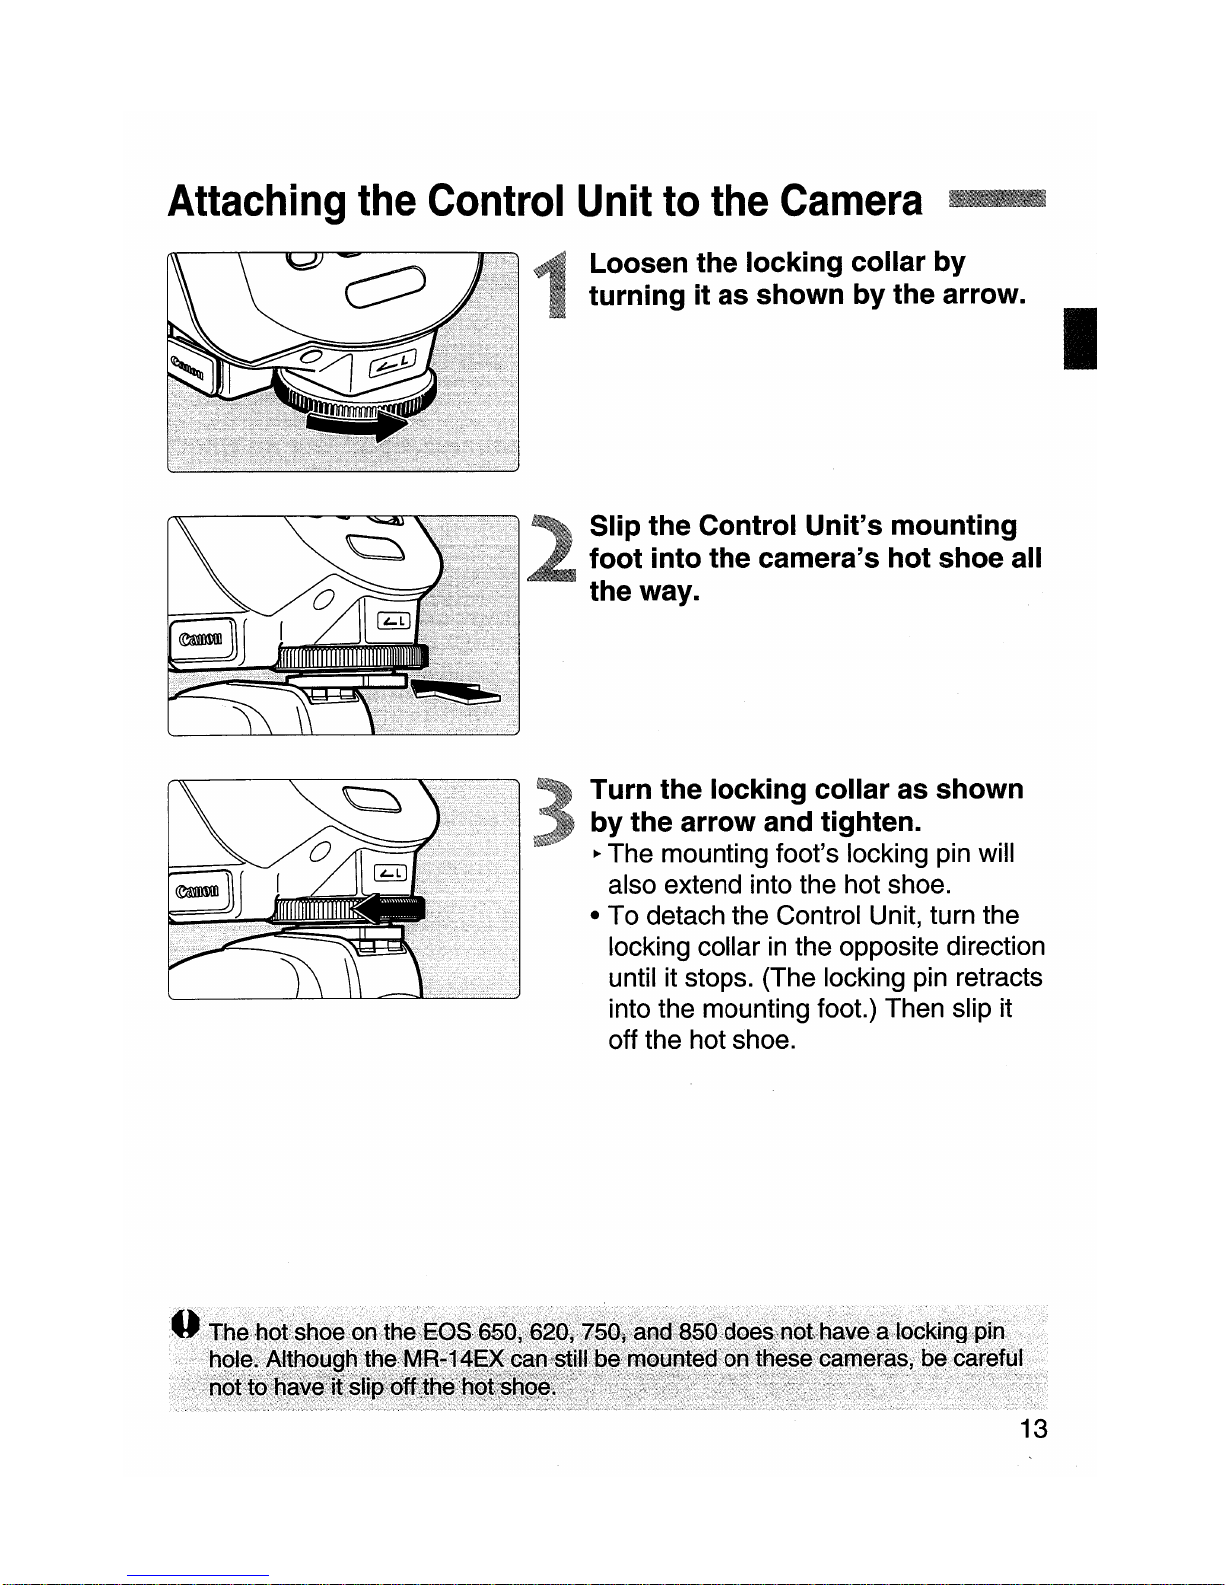
Attaching
the
Control
Unit
to
the
Camera",....
Loosen the locking collar by
turning it as shown by the arrow.
Slip the Control Unit's mounting
foot into the camera's hot shoe all
the way.
Turn the locking collar as shown
by the arrow and tighten.
~
The mounting foot's locking pin will
also extend into the hot shoe.
• To detach the Control Unit, turn the
locking collar
in
the opposite direction
until it stops. (The locking pin retracts
into the mounting foot.) Then slip it
off the hot shoe.
I
13
Attaching the Flash Ring .IIIIIII'IlJIJIII.IIIJIII'
.....
1IJJIJIJ1lf1J
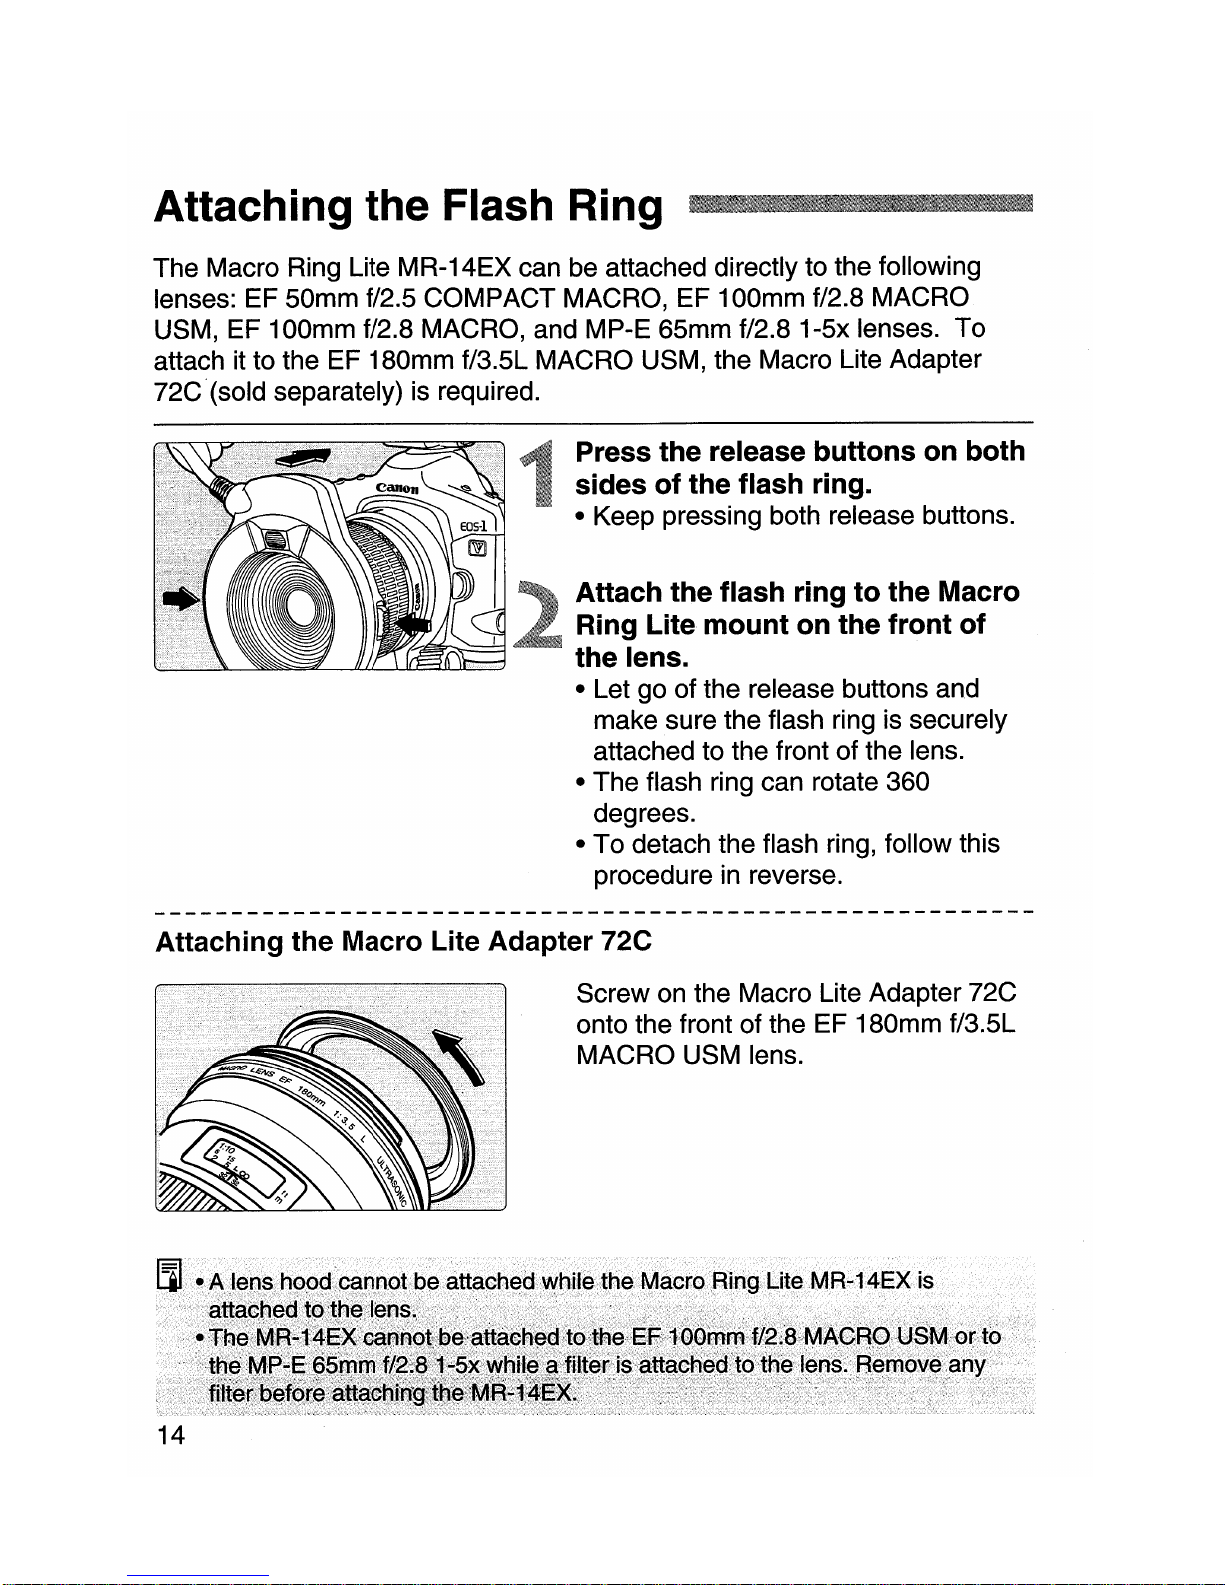
The Macro Ring Lite MR-14EX can be attached directly to the following
lenses: EF 50mm f/2.5 COMPACT MACRO, EF 100mm f/2.8 MACRO
USM, EF 100mm f/2.8 MACRO, and MP-E 65mm f/2.8 1-5x lenses. To
attach it to the EF 180mm f/3.5L MACRO USM, the Macro Lite Adapter
72C"(sold separately) is required.
Press the release
buttons
on
both
sides
of
the flash ring.
• Keep pressing both release buttons.
Attach the flash ring
to
the Macro
Ring Lite
mount
on the
front
of
the lens.
• Let go of the release buttons and
make sure the flash ring is securely
attached to the front of the lens.
• The flash ring can rotate 360
degrees.
• To detach the flash ring, follow this
procedure
in
reverse.
Attaching the Macro Lite Adapter 72C
Screw on the Macro Lite Adapter 72C
onto the front of the EF 180mm f/3.5L
MACRO USM lens.
14

The main switch has three settings as shown below.
Turns off the power.
OFF,O.N rSE
«JIIIr»
I
OFF,O.N rSE
mum)
OFF,O.N rSE
Turns on the power.
Turns on the power and enables
the SE mode .
..
To save battery power, the SE (Save
Energy) mode turns off the Macro
Ring Lite automatically after
90
sec.
of
non-use.
• To cancel the SE mode, press the
test firing button.
~~~
Mel110ryfeature
The·.MacroRi~g
Lite'scurrentfl(l$h
••
mode~flashexposurecompensationsetting,
etc..,
...
are.
retaineci.in memoryeyenafterit.is
turn~doff.Wtien
the
~acroBingLite
jsturf)ecionagain,.allth8:settin?s.winstjUbejn
•.
effect.·\I\Ih~nxo~replacethe
batteries{Y()119(lnret~n.tf:1I;l
••
settingsi!Yol,I·.
insta:Une'lllb.~tterie$·within90sec,
15

This tests whether the Macro Ring Lite can fire a flash.
Check the Pilot lamp.
• When the flash is ready, the Pilot
lamp will light.
Press the Pilot lamp (test firing
button).
~
A flash will fire.
• The Pilot lamp is also a test firing
button.
I.lI
•A test flash cannot be fired after you press the camera's shutterbutton halfway
and the camera metering is still active
for
(~6
).
• If the Macro Ring Lite
is
in the SE mode, pressing the test firing button turns on
the Macro Ring Lile.
OFhO.NrS
16
©@
C"-
)
When a correct flash exposure has
been obtained, the flash exposure
confirmation lamp lights in yellowgreen for 3 sec. immediately after the
flash fires.
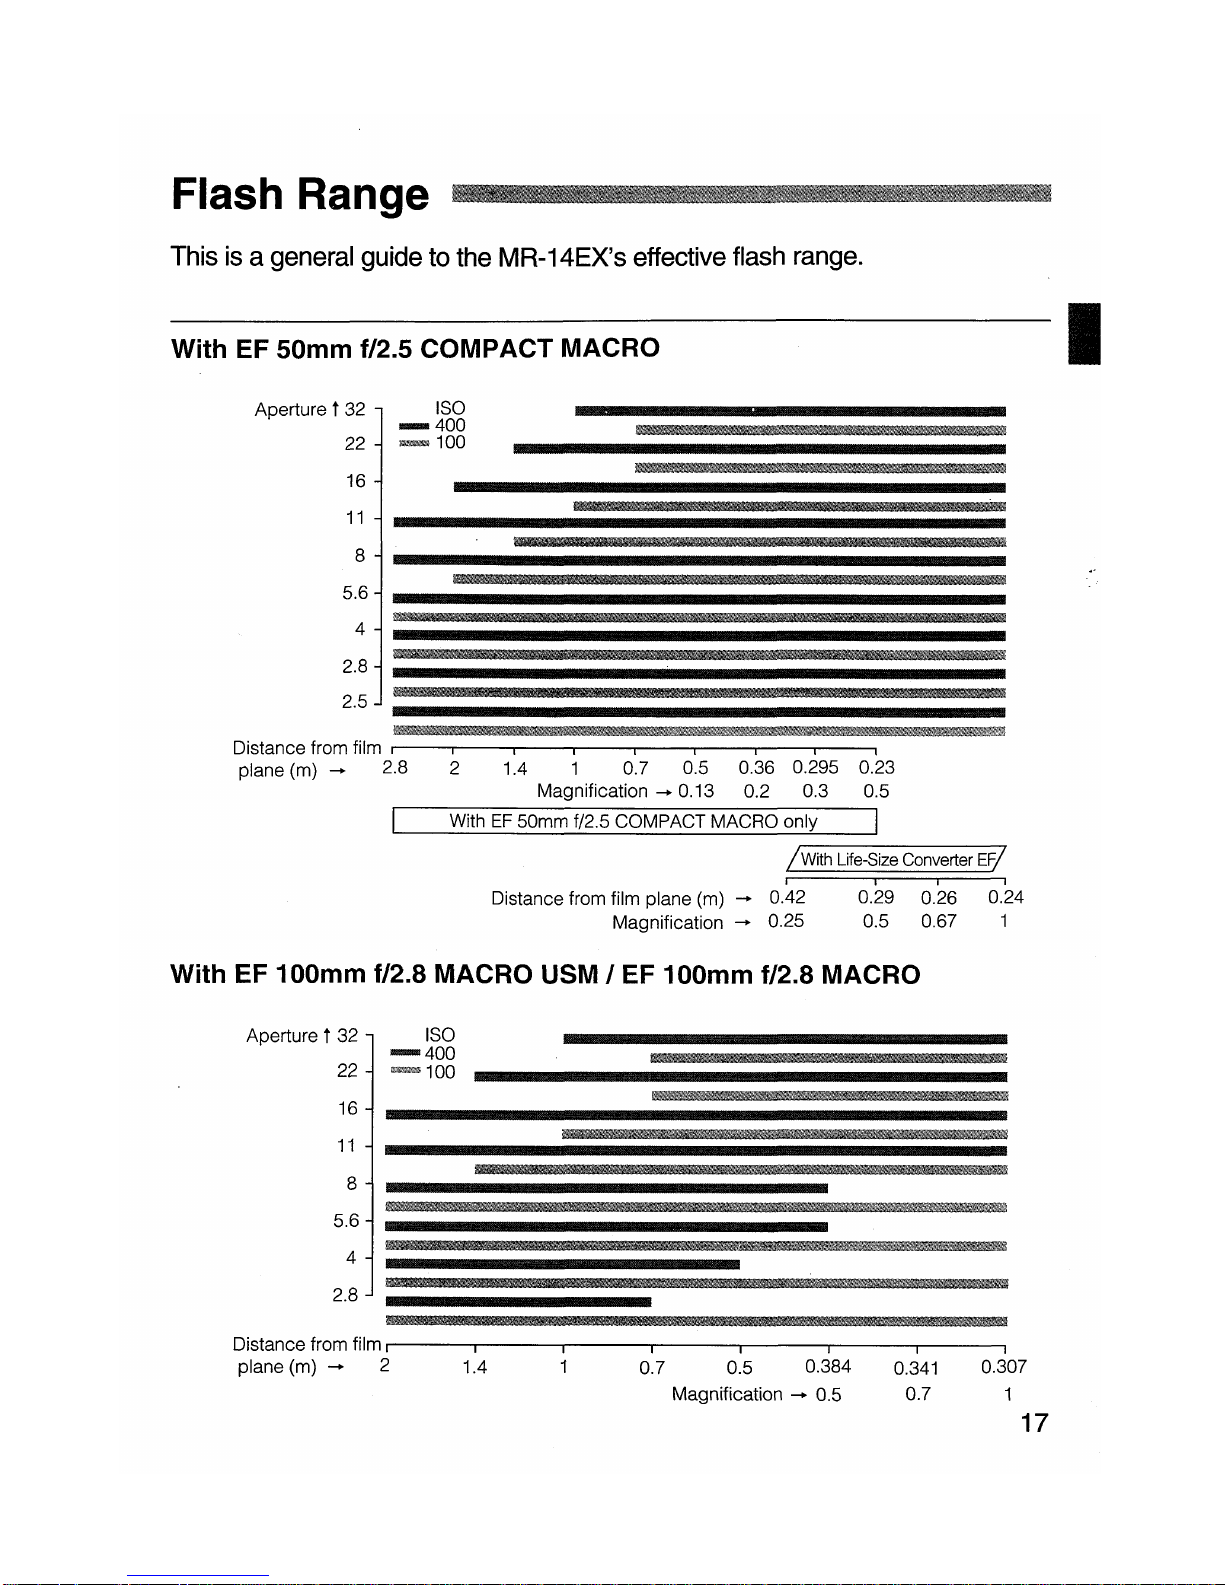
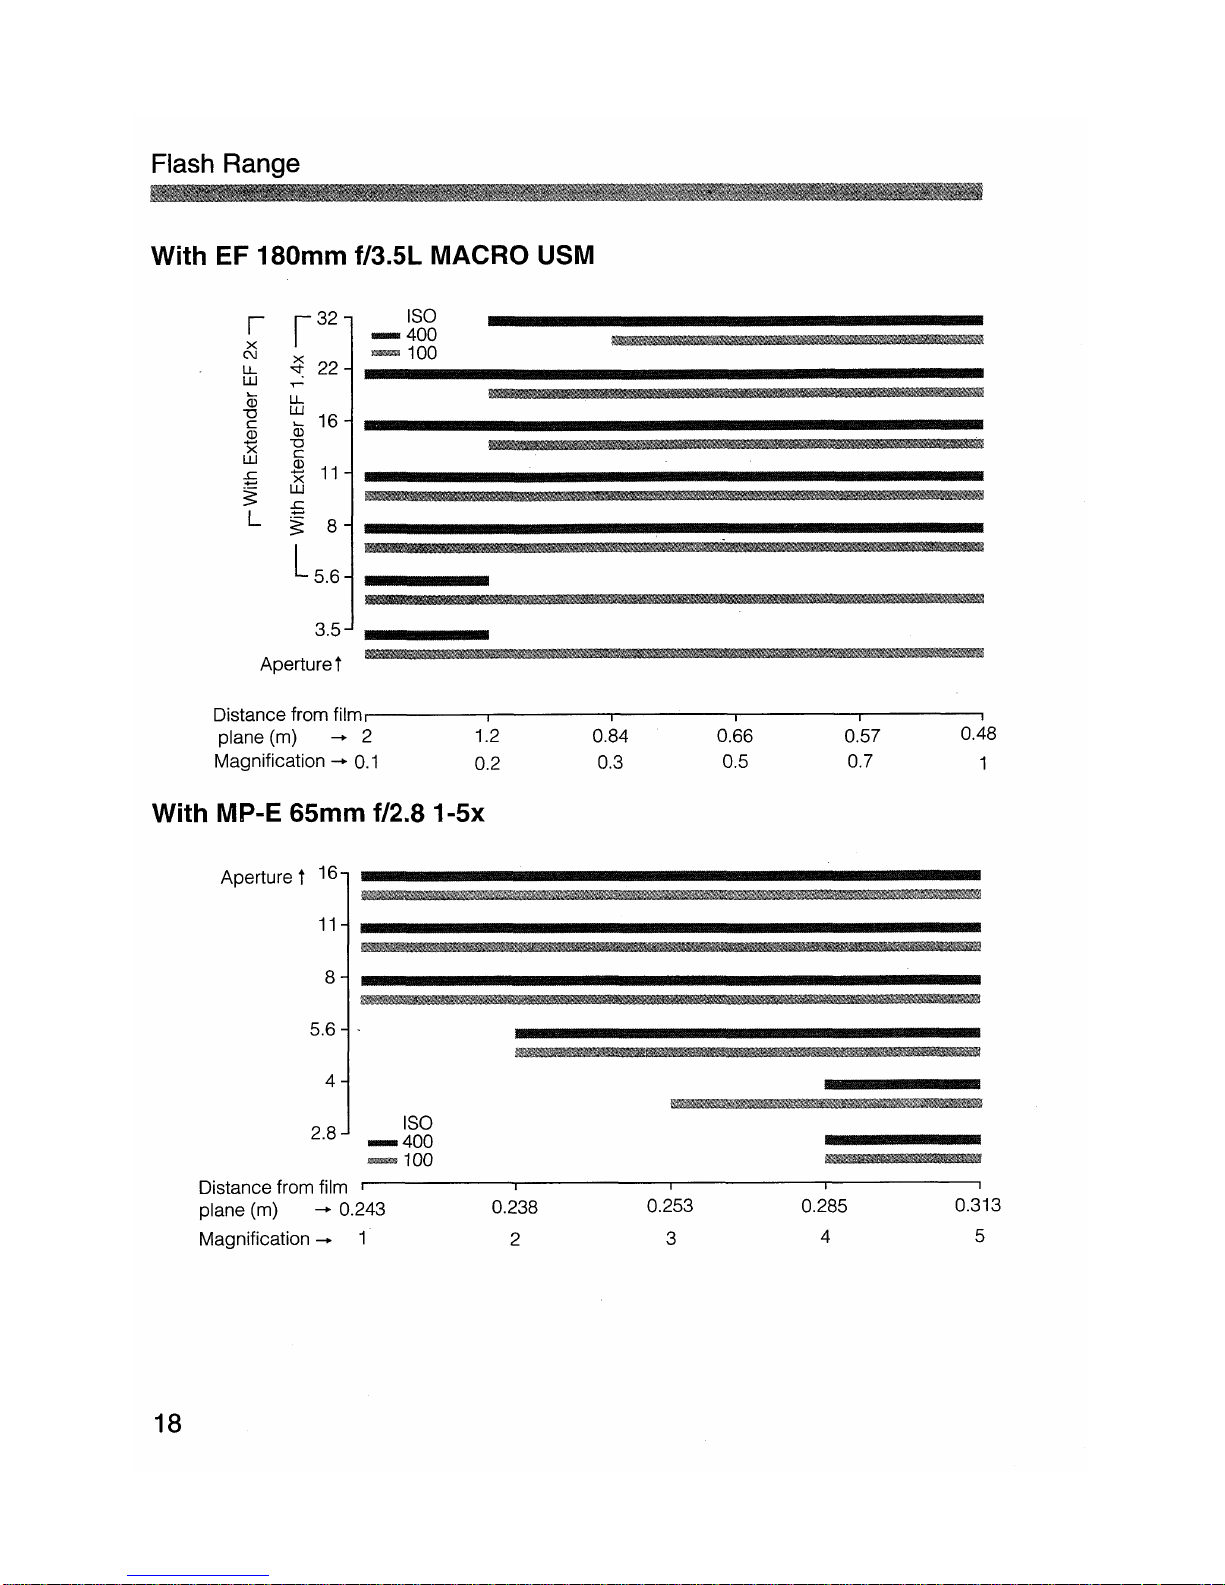
Flash
Range
With EF 180mm f/3.5L MACRO USM
I
x
C\J
LL
ill
Q5
""0
c
Q)
X
ill
:5
~
L
LL
~
16
""0
c
~
11
ill
£
~
8
L
5
.
6
ISO
--400
y-100
3.5
Aperturet
Distance from
film"
------.-----.,.------.--------r---------,.
plane (m)
-+
2 1.2 0.84 0.66 0.57 0.48
Magnification
-+
0.1
0.2 0.3 0.5 0.7 1
With MP-E 65mm f/2.8 1-5x
Aperture t
16
11
8
5.6
4
'l/JJ!]JJJIJJlJiiJllli!J/iffJJffJ!f!!/llW'J/IJII!l!lIIJlI§JJJ;7IJ_I/lII!JIIIJJf!I/.IJ_#I/l'l/fffflll_&
2.8
ISO
--400
100
18
Distance from film
plane (m)
-+
0.243
Magnification
-+
1
0.238
2
0.253
3
0.285
4
0.313
5
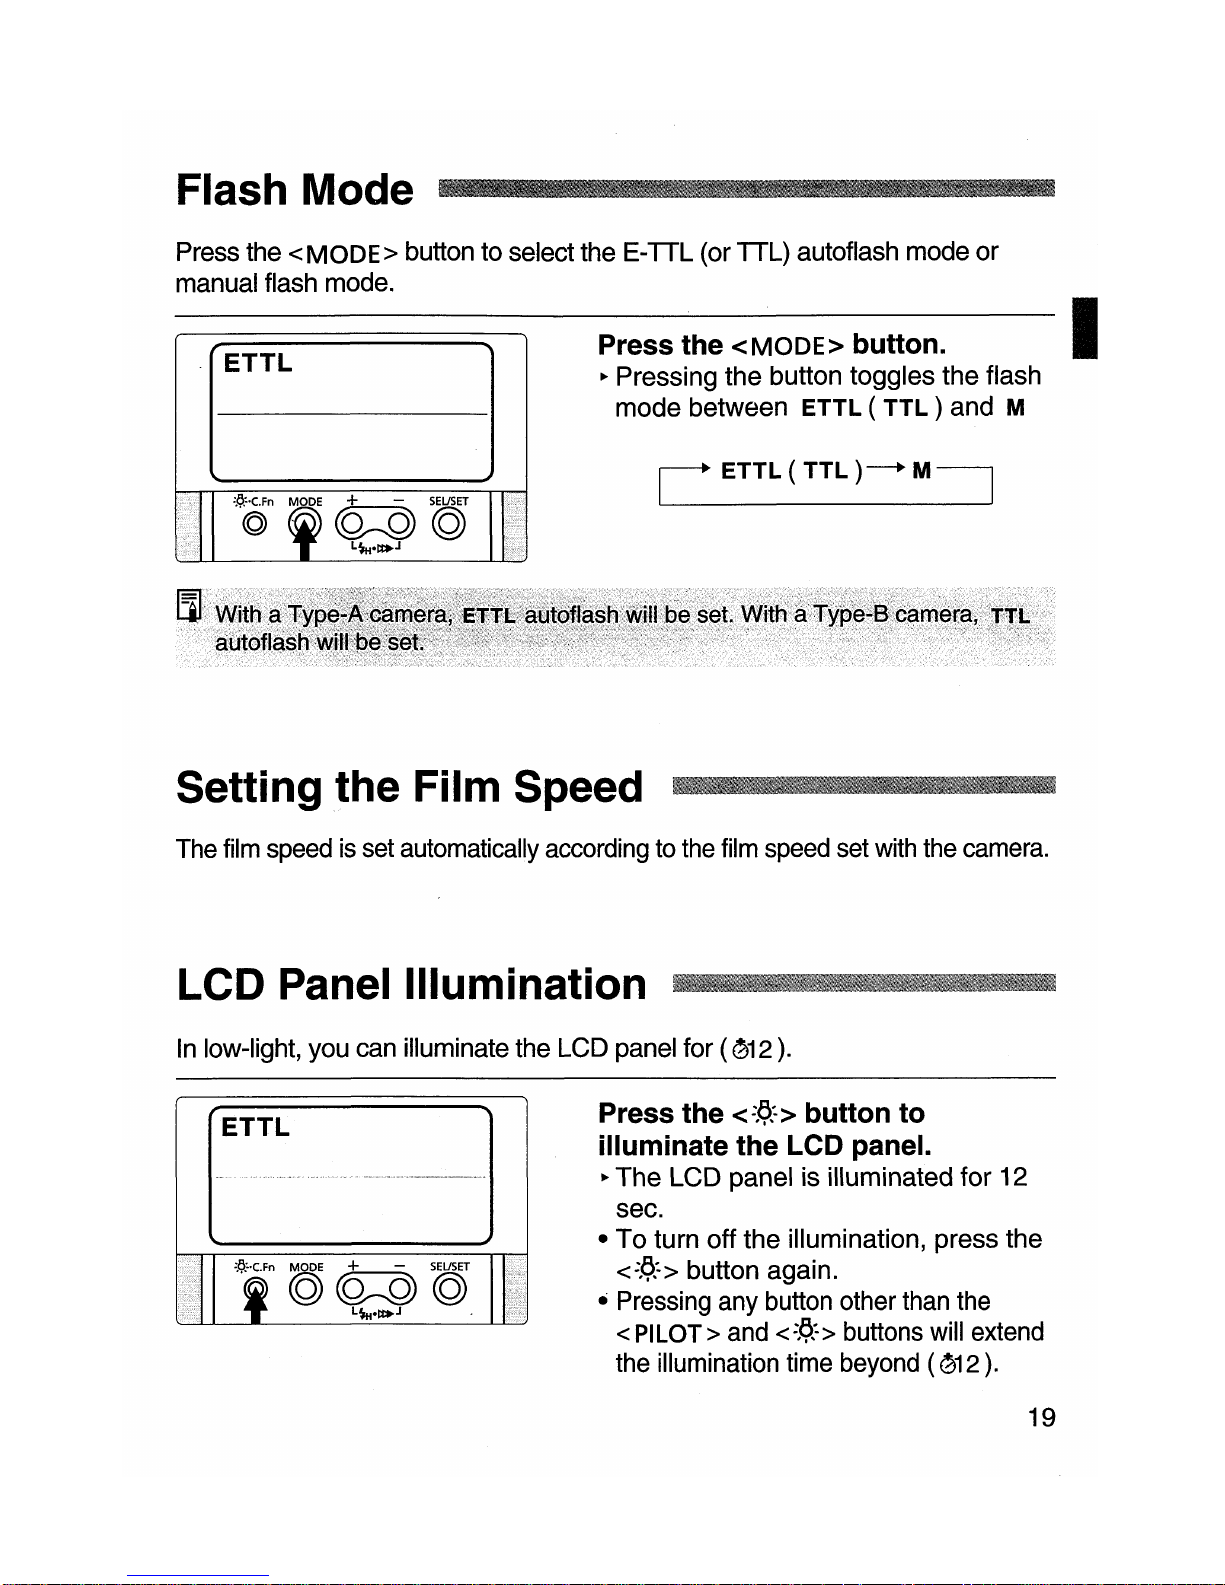
Press the
<MODE>
button to select the E-TTL (or TTL) autoflash mode or
manual flash mode.
Press the
<MODE>
button.
~
Pressing the button toggles the flash
mode
between
ETTL(TTL)
and M
C
ETTL(TTL)-'M~
I
Setting
the
Film
Speed
._I8III,._1IIIIJIj
The film speedisset automatically according to the film speed set with the camera.
LCD
Pa
ne
I IIIumi
nat
ion
&IJJII."IIIJ11I11I!//lI1/I1If1llilllIlllJJ
••
lI/11111JJIIIIIIIIIJ_
In
low-light, you can illuminate the LCD panel for (
~12
).
:8:.(
Fn
MODE
+ -
SEUSET
",.
©
(Q:Q)
©
L~H"t:I>J
Press the
<=1>:->
button
to
illuminate the LCD panel.
~
The
LCD panel is illuminated for 12
sec.
•
To
turn off the illumination, press the
<=.c>:->
button again.
• Pressing any button other than the
<
PI
LOT> and <
=J?:
> buttons will extend
the illumination time beyond (
~12
).
19
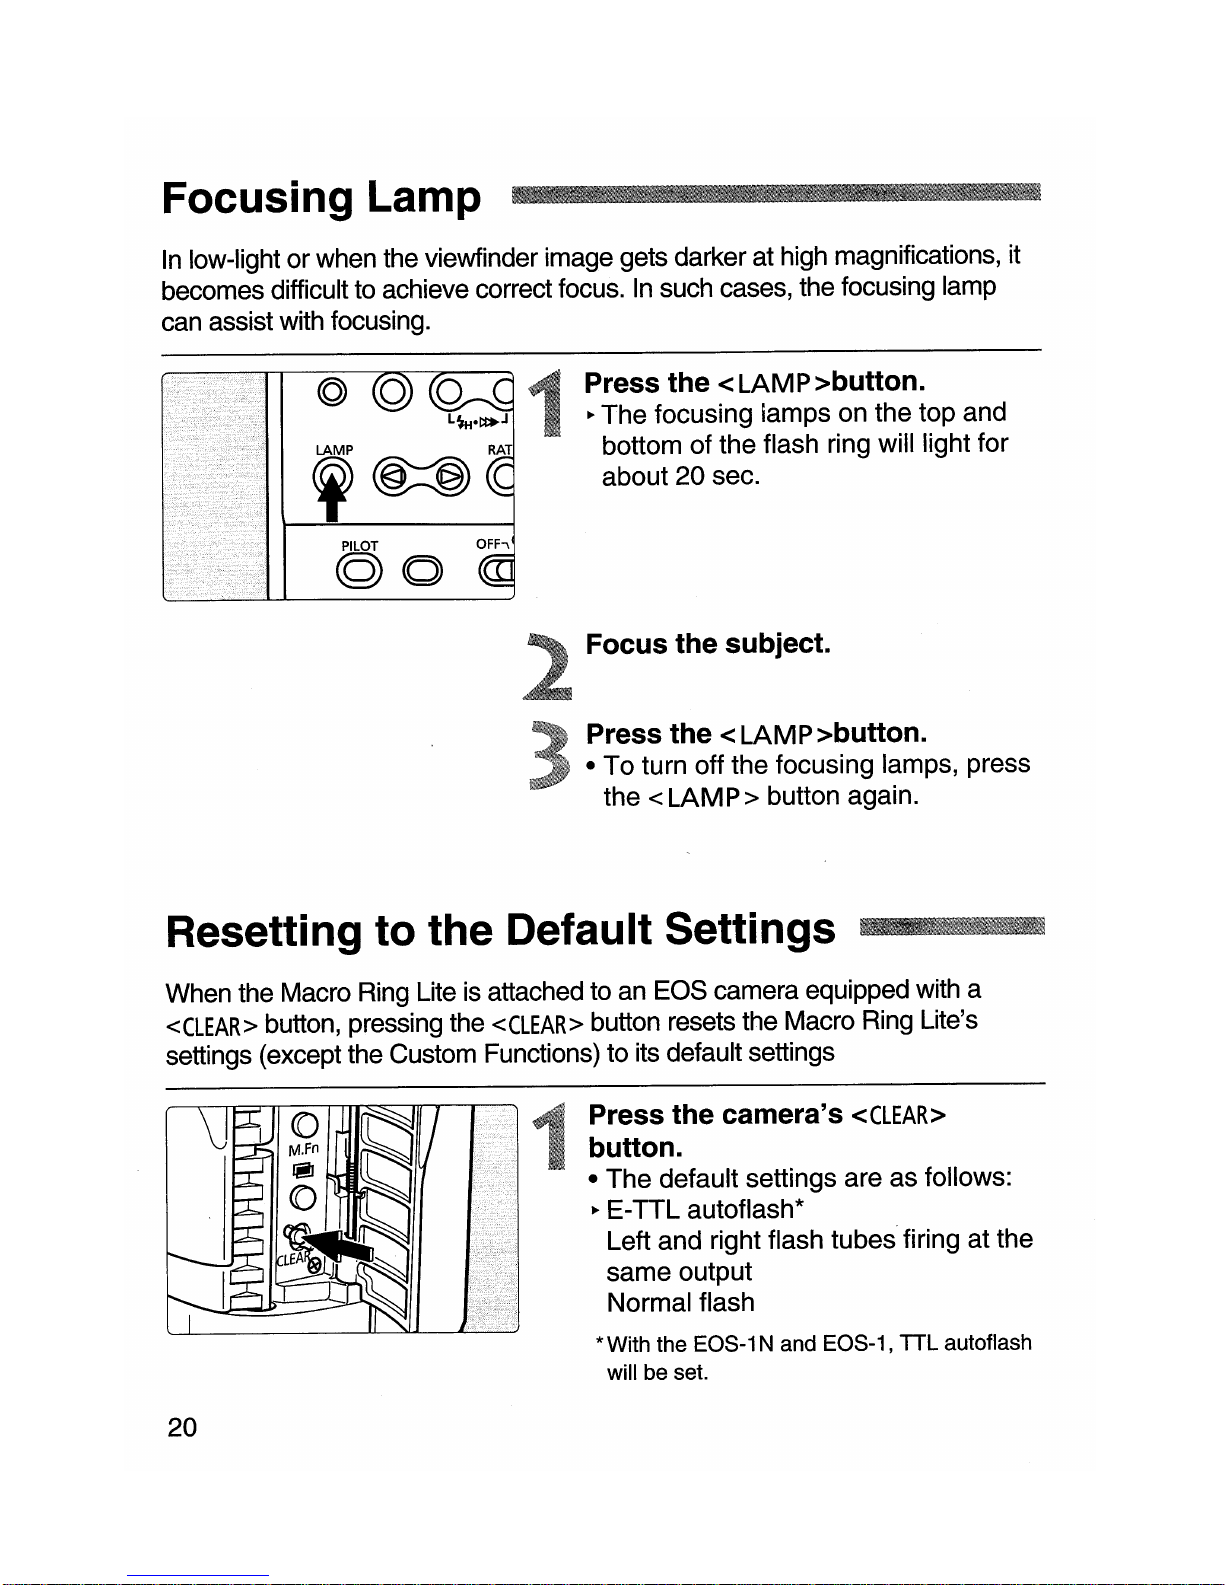
Focusing Lamp
~111,lIllIJlJl~I[]~lmIUiUllmli~mnlmm~m~
In
low-light or when the viewfinder image gets darker at high magnifications, it
becomes difficultto achieve correct focus.
In
such cases, the focusing lamp
can assist with focusing.
PILOT
(Q)O
Press
the
<LAMP>button.
~
The
focusing lamps on the top and
bottom of the flash ring will light for
about
20
sec.
Focus
the
sUbject.
Press
the
<LAM P
>button.
•
To
turn off the focusing lamps, press
the
<LAMP>
button again.
Resetting to the Default Settings
_JllJlfIJlIJ'
••
When the Macro Ring Lite is attached to an EOS camera equipped with a
<CLEAR>
button, pressing the
<CLEAR>
button resets the Macro Ring Lite's
settings (except the Custom Functions) to its default settings
Press
the
camera's
<CLEAR>
button.
•
The
default settings are as follows:
~
E-TTL autoflash*
Left and right flash tubes firing at the
same
output
Normal flash
*With the EOS-1
Nand
EOS-1, TTL autoflash
will be set.
20

When the MR-14EX is mounted on a
Type-A camera such as the EOS-1
V,
taking flash pictures with E-TTL
autoflash is just as easy as normal
autoexposure (AE) pictures.
As with evaluative metering, the E-TTL
autoflash system uses a multi-zone
_metering sensor which enables highly
precise flash exposure control. A
preflash is fired for evaluative flash
metering and the reading
is
stored in
memory. The result
is
a flash picture
with excellent balance between the flash
exposure and ambient light.
ForType-A Cameras
Basic Flash
Photography
oIn macrophotography, setting the correct exposure greatly depends
on
the
subject. Itwould
be
besttobracket the exposure even forthe
same
subject.
(~p.32)
[iI·.ThiS
s~cti()nusestheEQS-l
Vas
the
Type-A qamera.
·Sefore
proceeding,
firsttumonthe
MainSwitchonthe
EOS~
1 V
and
MR~
14EX.·
. . .
•
F6rEOS;;t
V.<>p~ratiGris,referJo.
th~
EOS-1·.Vlnstrl.lctionsbooklet

Using
Flash
with
the
Camera's
Shooting
Modes
.......
ForE-TTL autoflash shots, just set the camera's shooting mode to P
(Program AE),
Av (aperture-priority AE), or M (Manual exposure). For
serious closeup flash photography,
Av or M
is
recommended.
* When you press the shutter button completely, a preflash is fired
immediately before the picture is taken. The preflash is used to obtain the
subject's reflected-light reading for calculating the optimum output of the
main flash.
Set the camera's shooting mode to P, and the camera will set the flash
aperture and shutter speed automatically. You can thereby concentrate
on
the subject.
~
60
5.6 •
Set
the
camera's
shooting
mode
to
P.
Set
the
MR-14EX's flash mode
to
ETTL.
Focus and take the
picture
• Check that the Jicon (flash ready) is
displayed
in
the viewfinder before
taking the picture.
22

Using Flash with the Camera's Shooting Modes
This mode is effective for controlling the depth of field
in
your flash pictures.
YC?u
can also obtain a correct exposure for both the subject and
background. You set the aperture and the camera sets the shutter speed
automatically for the correct exposure of the background. The E-TTL
autoflash system obtains the correct flash exposure based on the aperture
you set.
Av
D
----)
Set the camera's shooting mode
to
Av
and set the aperture.
~
60
5.6 •
Set the MR-14EX's flash mode to
ETTL.
Focus and take the picture.
• Check that the t icon (flash ready) is
displayedinthe viewfinder before
taking the picture.
23

Using Flash with the Camera's Shooting Modes
In
this mode, you set both the shutter speed and aperture. The
E-TTl
autoflash system controls the flash exposure based on the aperture you
set. The proper exposure of the background is set with both the aperture
and shutter speed.
M
D
)
Set the camera's shooting mode
to M and set the aperture and
shutter speed.
• Set the desired aperture and the
shutter speed anywhere from 30 sec.
to the top sync speed. You can also
use
bulb.
Set the MR-14EX's flash mode to
ETTL.
~
bO
s.b •
Focus and take the picture.
• Check that the t icon (flash ready) is
displayed
in
the viewfinder before
taking the picture.
24
The MR-14EX's advanced features are
explained
in
this chapter. They are as
follows:
• Selecting the Flash Tube
(~p.26)
• Modeling Flash
(~p.29)
• FE Lock
(~p.30)
• Flash Exposure Compensation
(~p.32)
• FEB (Flash Exposure Bracketing)
(--7p.34)
• High-Speed Sync (FP flash)
(~p.36)
• Manual Flash Mode (--7p.38)
• Second-Curtain Synchronization
(~p.40)
ForType-A Cameras
Advanced Flash
Photography
I:iI
•
This
section
uses
the
EOS-1
Vas
the
Type-A
camera:
• Before proceeding, first turn on
the
Main
Switchonthe .
.EOS
..
t V and
MR-
14EX.
• For
EOS..1Voperati6ns,
refer to
the
EQS:'l
Vlnslructions
booklet.
~~D
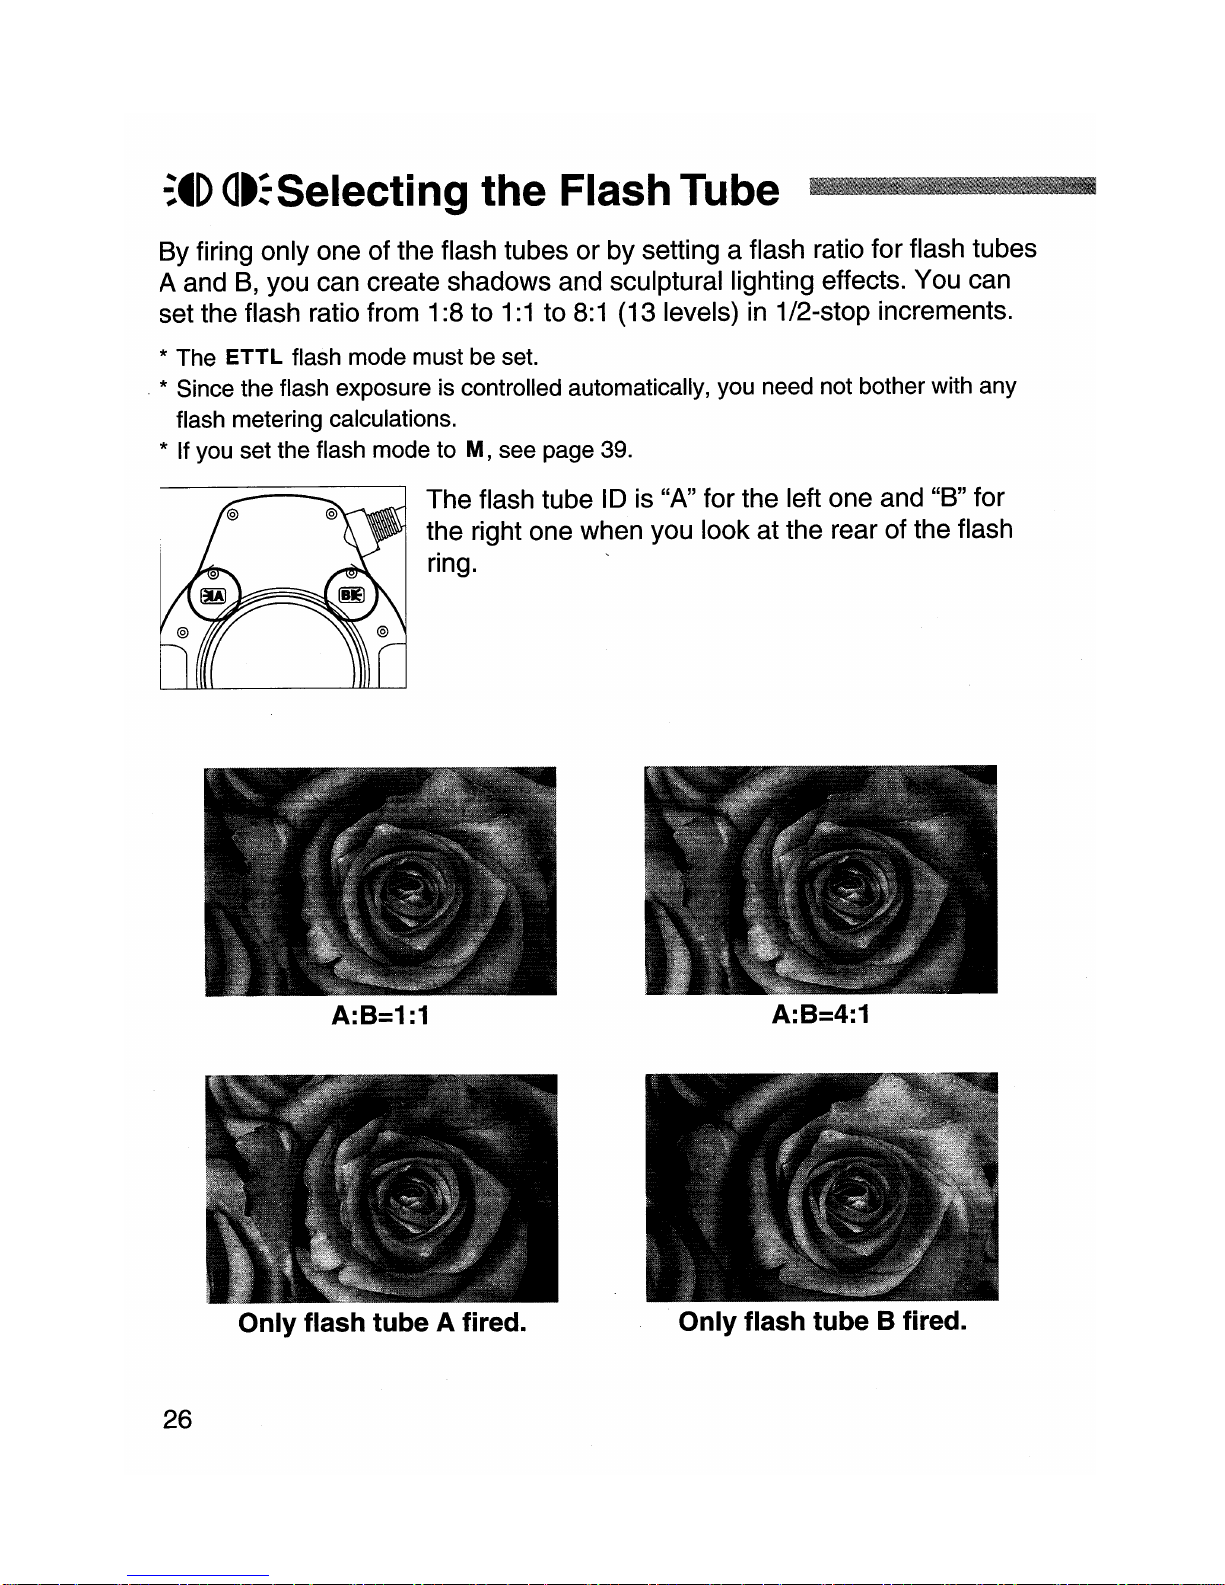
at:Selecting the Flash Tube
IfIItHlni_.
nnmllOm'il!
i
'I
in
By firing only one of the flash tubes or by setting a flash ratio for flash tubes
A and
B,
you can create shadows and sculptural lighting effects. You can
set the flash ratio from 1:8 to
1:1to8:1
(13 levels)in1/2-stop increments.
* The
ETTL
flash mode must be set.
* Since the flash exposure is controlled automatically, you need not bother with any
flash metering calculations.
* If you set the flash mode to M, see page 39.
The flash tube ID is "A" for the left one and "B" for
the right one when you look at the rear of the flash
ring. '
26
A:B=1:1
Only flash tube A fired.
A:B=4:1
Only flash tube B fired.
ETTL
lim][!]
A : B
:~D
8:1-
4:1- 2:1-~-1:2
-1:4
-1:8
at:
Selecting the Flash Tube
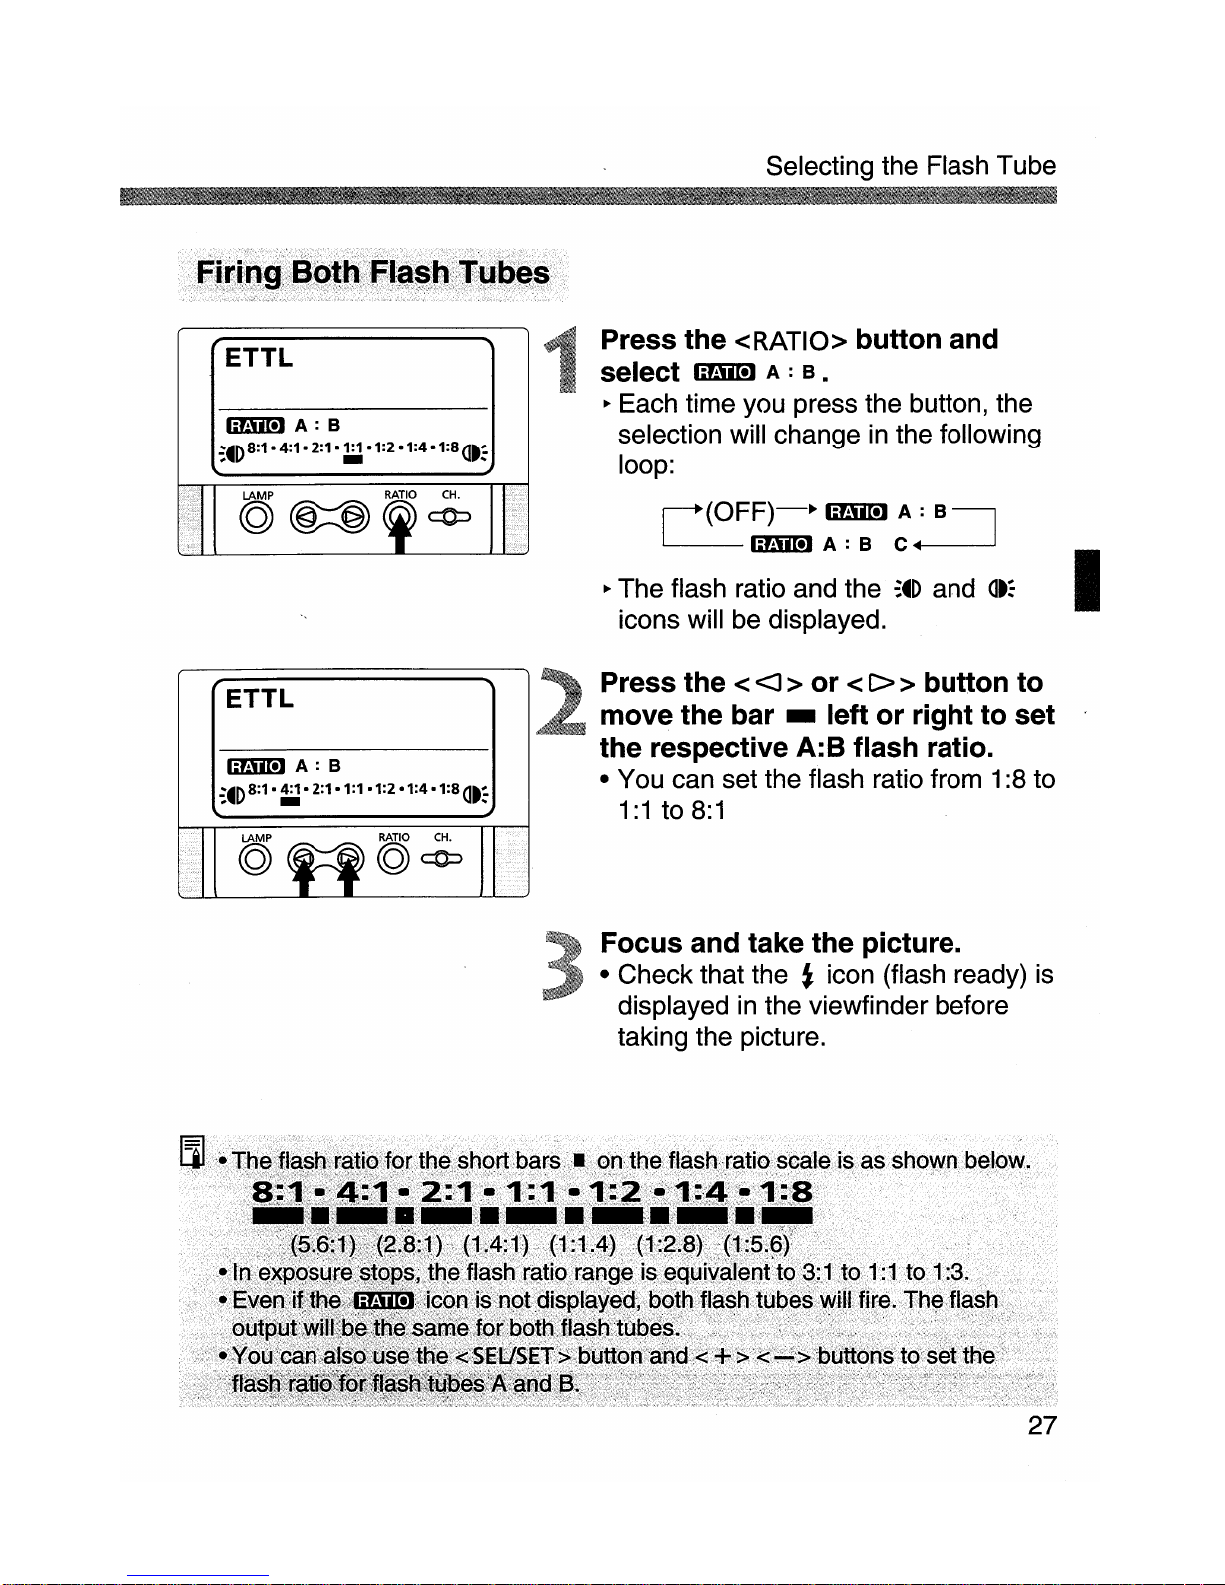
Press the <RATIO> button and
select
IiBml A : B •
~
Each time you press the button, the
selection will change
in
the following
loop:
~(OFF)-~
IiBml
A : B I
~IiBmlA:B
c~
~
The flash ratio and the
:~D
and
at:
icons will be displayed.
Press the <
<J
> or <C>> button to
move the bar - left or right to set
the respective A:B flash ratio.
• You can set the flash ratio from 1:8 to
1:1
to
8:1
Focus and take the picture.
• Check that the t icon (flash ready)
is
displayedinthe viewfinder before
taking the picture.
I
27
 Loading...