

Page 1

LR1
USER
MANUAL
Canon
Page 2
Page 3

Copyright
This manual is copyrighted by Canon Computer Systems, Inc. (CCSI) with all rights
reserved. Under the copyright laws, this manual may not be reproduced in any form, in
whole or part, without the prior wr itten consent of CCSI.
© 1999 Canon Computer Systems,Inc.
Disclaimer
Canon Computer Systems,Inc. has reviewed this manual thoroughly in order that it
will be an easy to use guide to your Canon LR1 Color Bubble Jet Printer. All statements,
technical information, and recommendations in this manual and in any guides or related
documents are believed reliable,but the accuracy and completeness thereof are not
guaranteed or warranted, and they are not intended to be,nor should they be understood
to be, representations or warranties concerning the products described.
Your printer and the software media included with your printer have been sold to you
subject to the limited warranties set forth in the warranty card and license agreement
enclosed with the respective product.All software is licensed AS IS,as described in the
license agreement enclosed with the software media. Further, CCSI reserves the right to
make changes in the specifications of the products described in this manual at any time
without notice and without obligation to notify any person of such changes.
Trademarks
Canon, BCI, BJ,BJC Bubble Jet,the Bubble Jet logo,Drop Modulation Technology,
PhotoRealism,and “See What We Mean”are trademarks of Canon Inc.
All other product and brand names are registered trademarks,trademarks, or service
marks of their respective owners.
E
NERGY STAR
As an ENERGY STAR® Partner, Canon U.S.A.,Inc. has determined that this product meets
the ENERGY STAR® guidelines for energy efficiency.
ii
®
COMPLIANT
Page 4
Using Your Documentation
The following documentation is supplied with the Canon LR1 Color Bubble Jet™ Printer
to help you efficiently use your new printer.
Quick Start Guide
Follow the instructions in Quick Start Guideto set up the printer and prepare it
for use.
Quick Guide to Printing
This guide (on the back of Quick Start Guide) provides explanations about every-
day operations, such as remedies for low print quality, replacing ink tanks, what
to do if the lig hts come on, and loading paper.
User’s Manual (this guide)
Read this manual to find out specific details about printer operation.Before
using the printer,please be sure to read “Impor tant Notes on Safety”(see
page 1-2).
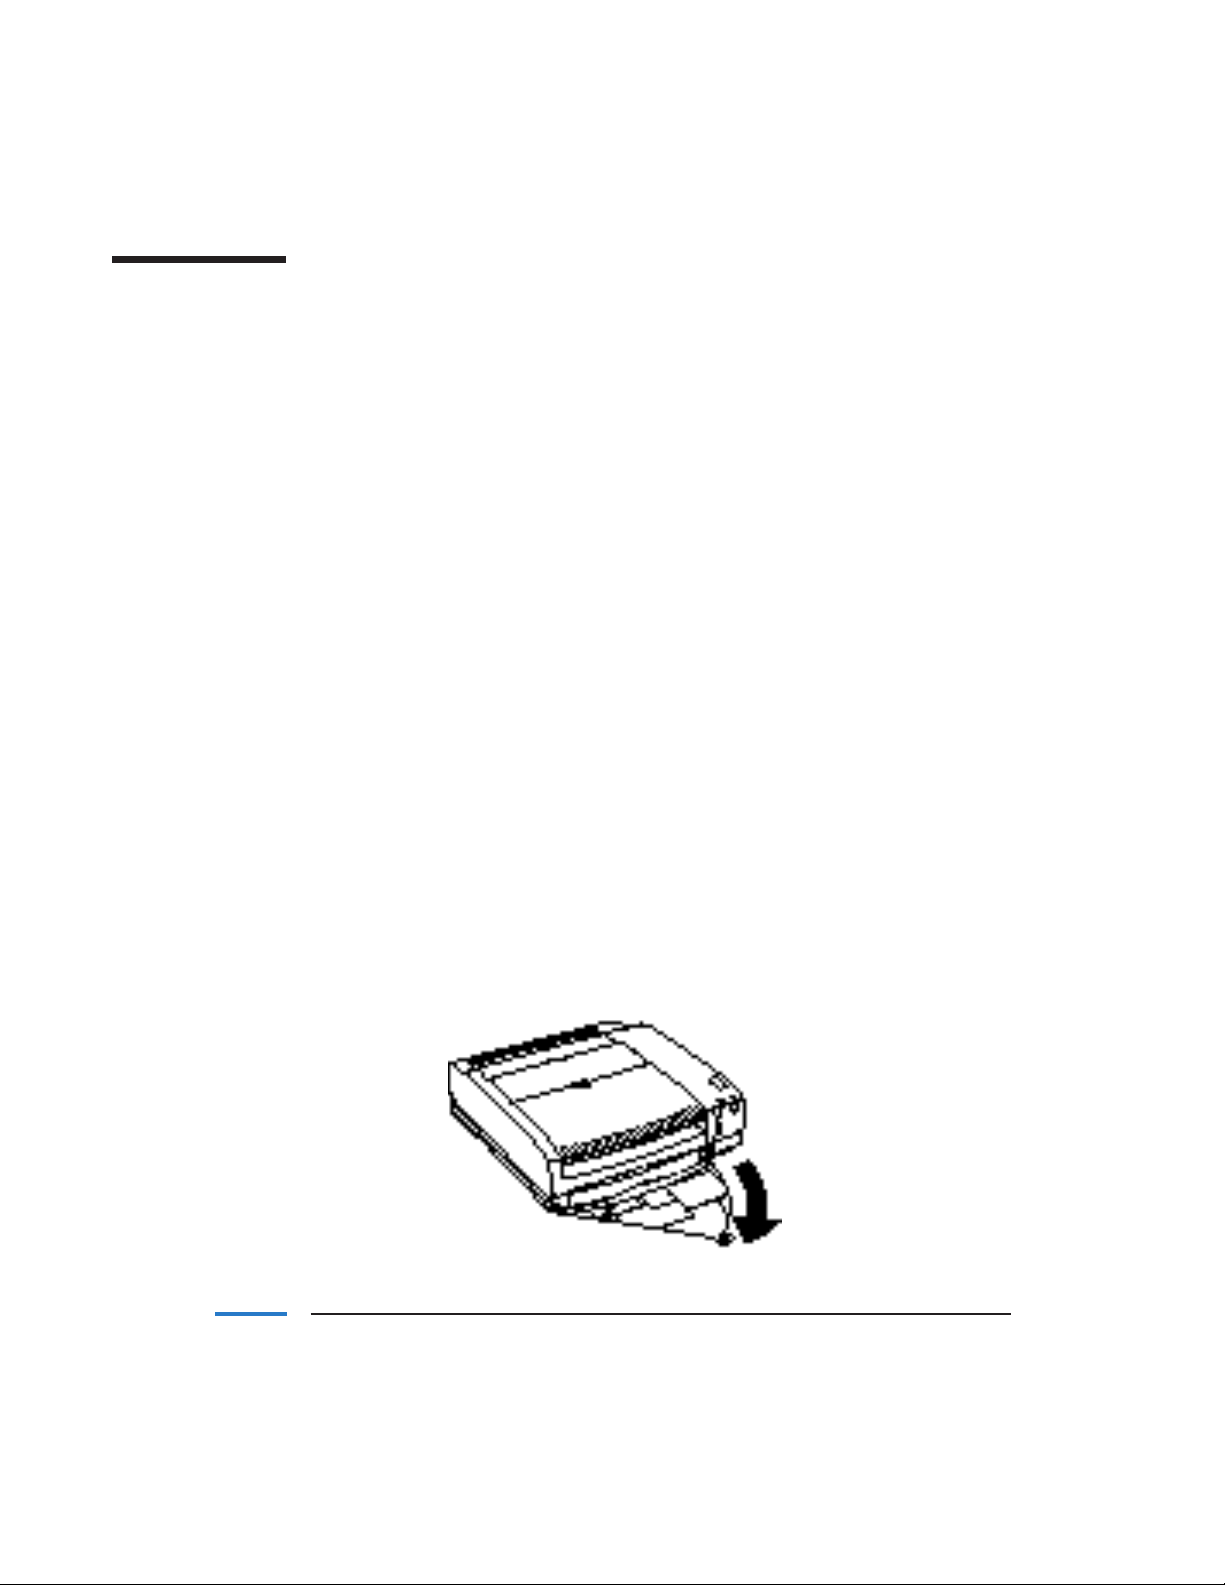
Quick Reference
This is a convenient guide that attaches to the bottom of the printer for easy
reference.Attach the Quick Reference panel to the bottom of the printer as shown
here,and refer to it when necessary.
iii
Page 5

Conventions
This User’s Manual uses the following conventions to alert you to information
that will help you operate the printer correctly and safely.
Notes provide advice or suggestions regarding the use of the pr inter.
Cautions alert you to operations that could cause damage to your hardware or
software,or cause injury to yourself.
iv
Page 6

Contents
1 Introduction .....................................................................................................1-1
Important Notes on Safety ................................................................................1-2
Choosing a Place for Your Printer ..............................................................1-2
Supplying Power to the Printer ..................................................................1-3
Handling the Printer ...................................................................................1-5
Maintaining the Printer...............................................................................1-6
Handling the BJ Cartridge ..........................................................................1-6
Supplies and Accessories ...................................................................................1-7
Names and Functions of the Printer’s Par ts .....................................................1-9
Front View ...................................................................................................1-9
Back View ...................................................................................................1-10
Control Panel .............................................................................................1-10
Turning the Power On and Off .......................................................................1-11
Turning On the Power ..............................................................................1-11
Turning the Power Off ..............................................................................1-12
Getting Help From Canon ..............................................................................1-13
Servicing the Printer .................................................................................1-14
2 Using BJ Cartridges ........................................................................................2-1
If Printing Is Unclear or Colors Are Missing ...................................................2-2
Printing the Nozzle Check Pattern ...................................................................2-2
Cleaning the Print Head ....................................................................................2-4
Normal Print Head Cleaning ......................................................................2-4
Deep Print Head Cleaning ..........................................................................2-5
Replacing Ink Tanks ...........................................................................................2-6
Ink Ty pe and Ink Replacement ...................................................................2-6
Replacing an Ink Tank ................................................................................2-8
Replacing the BJ Cartridge ..............................................................................2-14
3 Paper Handling ................................................................................................3-1
Important Notes on Paper ................................................................................3-2
Loading Paper ....................................................................................................3-3
Loading the Paper SupplyTray ...................................................................3-3
Loading Single Sheets in the Manual Feed Slot .........................................3-5
Using High Resolution Paper ............................................................................3-6
Clearing Paper Jams ...........................................................................................3-8
4 Maintaining the Printer ................................................................................4-1
Printer Maintenance ..........................................................................................4-1
Cleaning the Printer ..........................................................................................4-2
Transpor ting the Printer ....................................................................................4-3
v
Page 7

5 Troubleshooting ..............................................................................................5-1
Power...................................................................................................................5-1
Lights ..................................................................................................................5-1
Paper Trouble When Printing ...........................................................................5-3
Paper Trouble After Printing .............................................................................5-5
Trouble When Printing ......................................................................................5-6
Appendix A—Specifications.................................................................................A-1
Glossary ...................................................................................................................G-1
Index ..........................................................................................................................I-1
FCC Regulations ...............................................................................................FCC-1
Canadian Radio Interference Regulations .................................................FCC-1
vi
Page 8
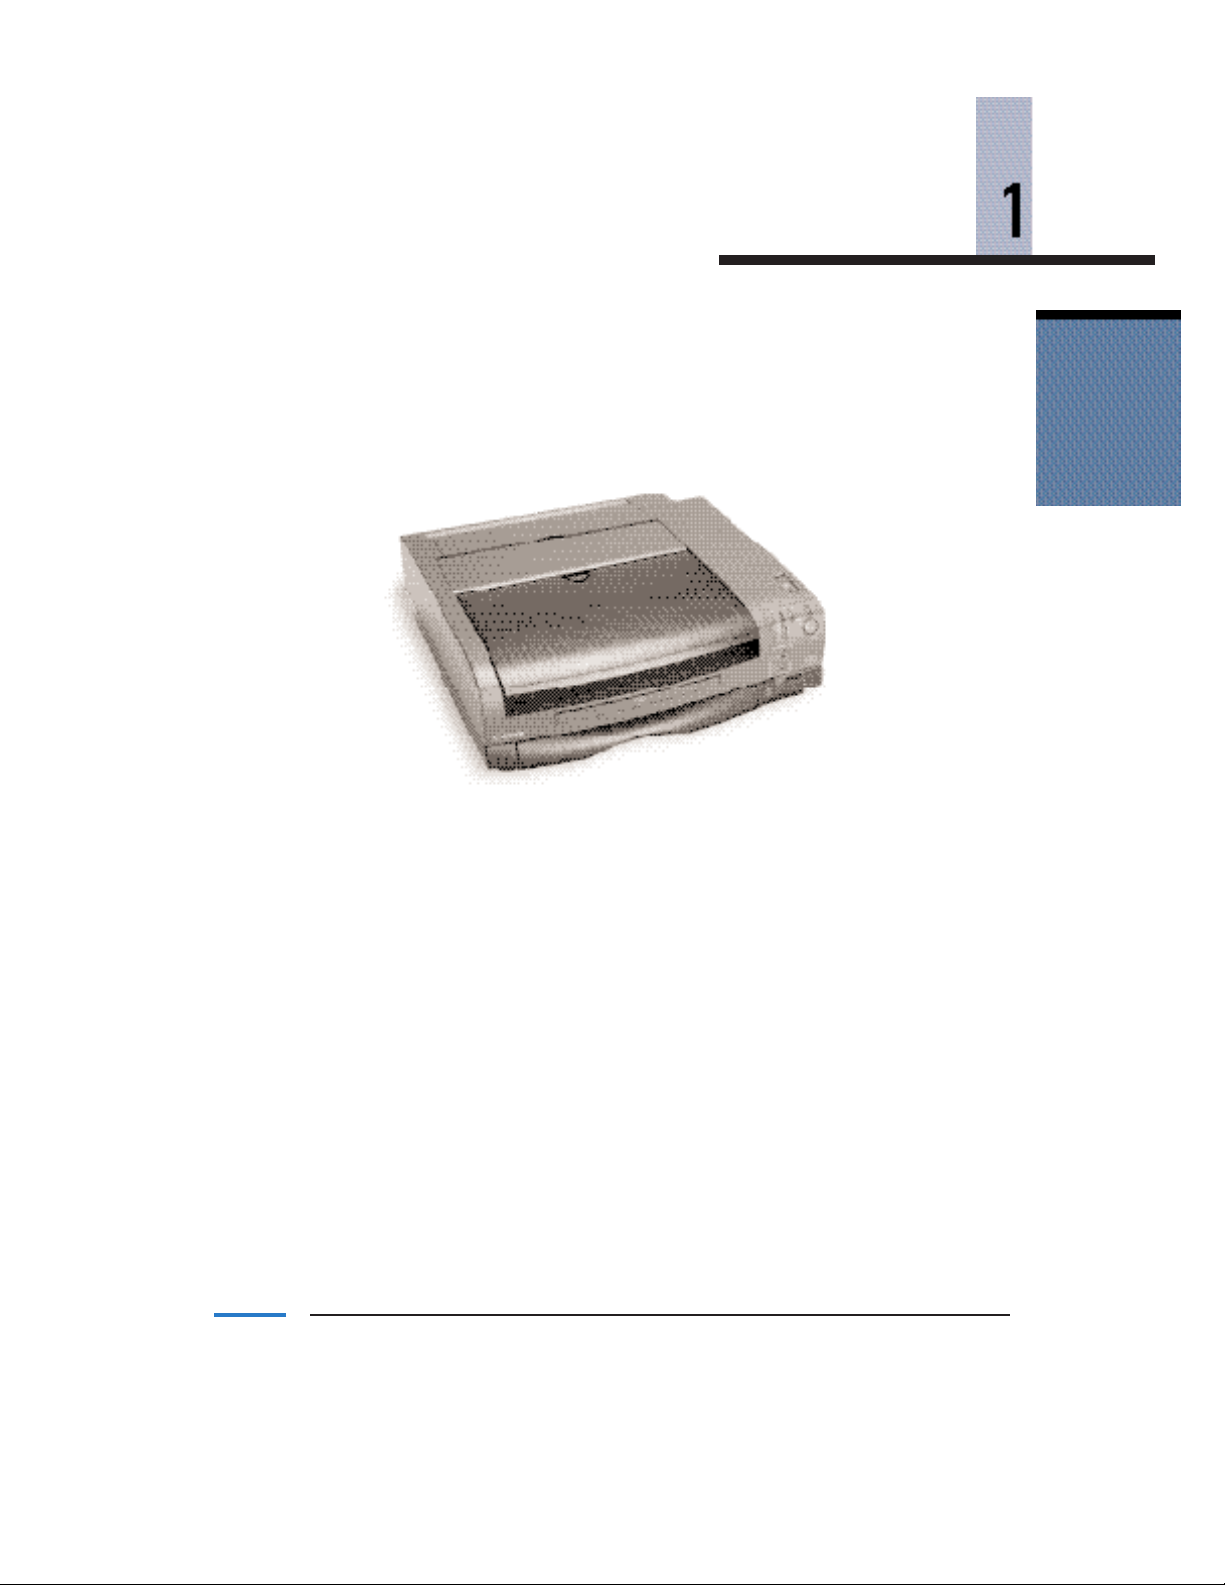
Introduction
Congratulations on your purchase of the Canon LR1 Color Bubble Jet Printer.
We appreciate your choosing this printer to meet your printing needs.
The Canon LR1 printer offers excellent print quality and fast print speed using both
color and black inks.We are certain you will be satisfied with this advanced Bubble Jet
technology.
Introduction
This chapter describes:
■ Important notes on safety
■ Supplies and accessories you can purchase for the printer
■ Printer components
■ Turning the power on and off
■ Canon’s customer support services
Chapter 1 Introduction 1-1
Page 9
Important Notes on Safety
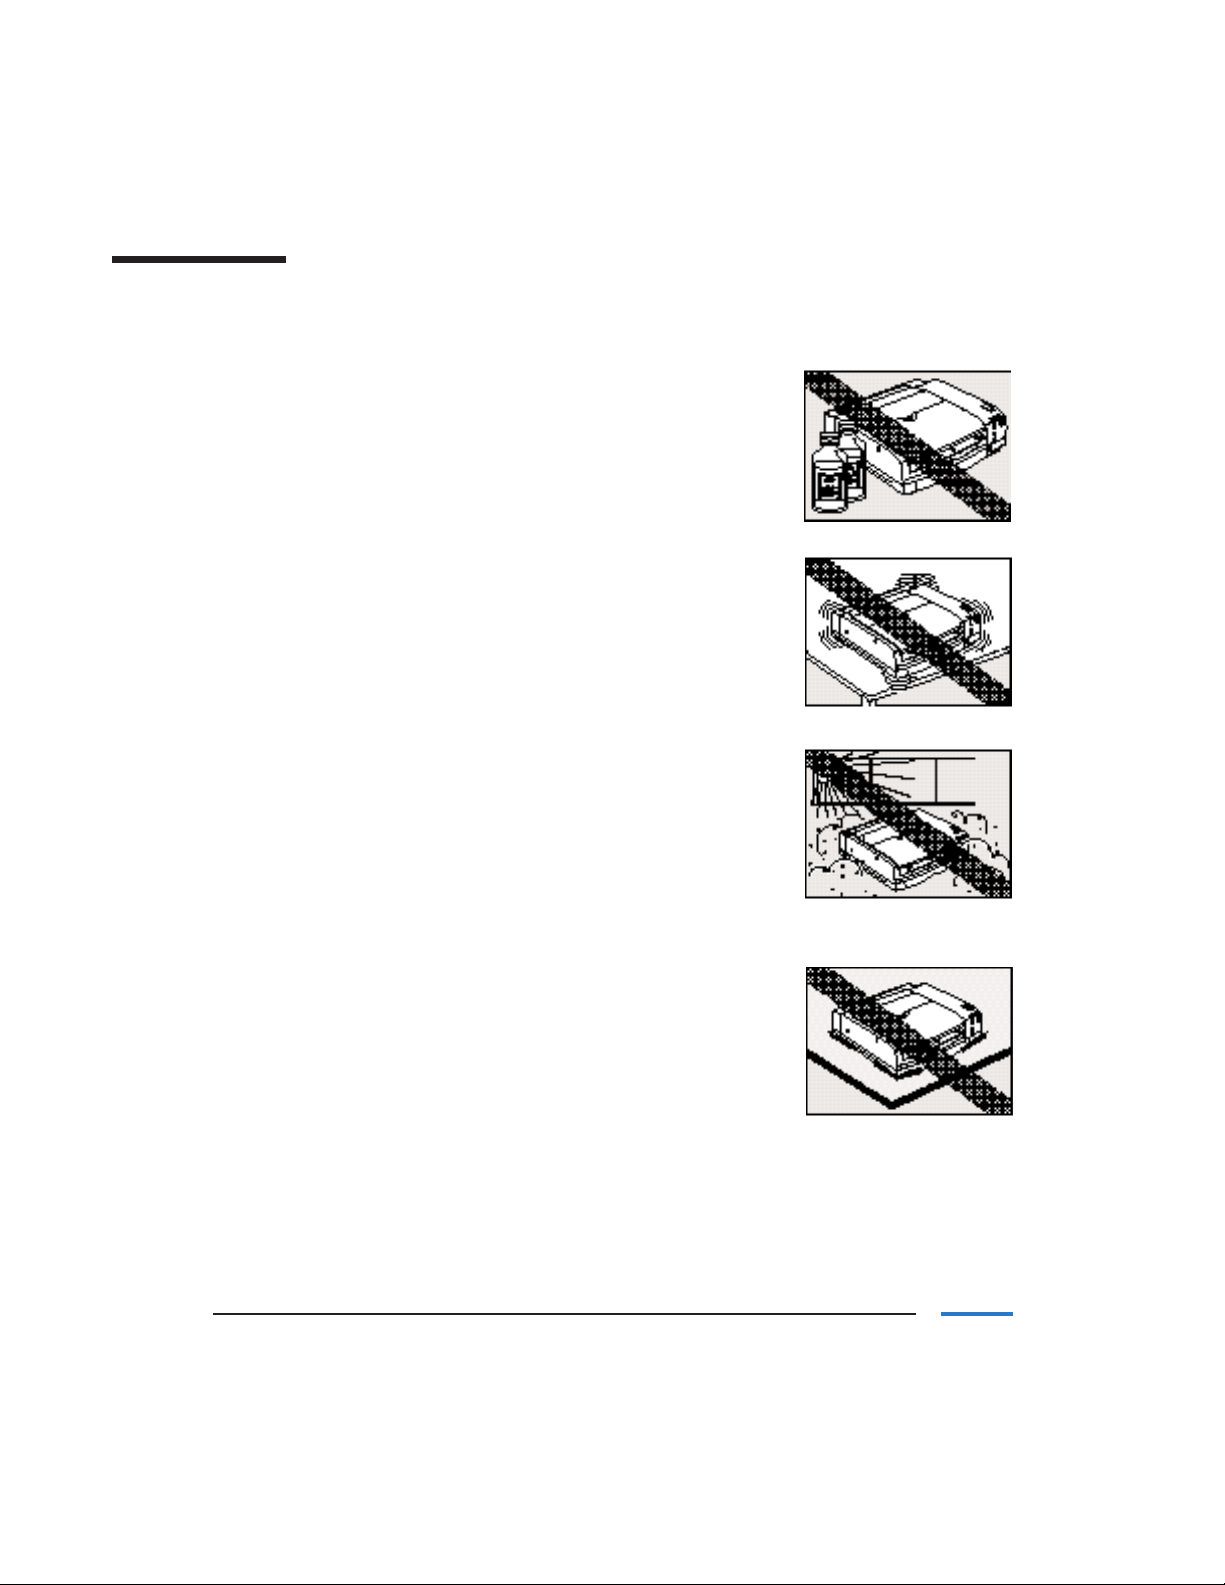
Choosing a Place for Your Printer
■ Do not place the printer near volatile liquids, such as
alcohol or paint thinner.
Volatile liquids coming in contact with the electrical
components inside the printer may result in fire or
electrical shock.
■ Do not place the printer on an unstable or vibrating
surface.
If the pr inter falls or tips over,it may be damaged or
cause injury.
■ Avoid placing the printer in humid or dusty areas,
direct sunlight, and areas of high temperature or
excessive heat.
Doing so can result in fire or electrical shock.
■ Do not place the printer on thick rugs or carpets.
Carpet fibers or dust entering the printer can result in
fire or electrical shock.
1-2 Introduction Chapter 1
Page 10
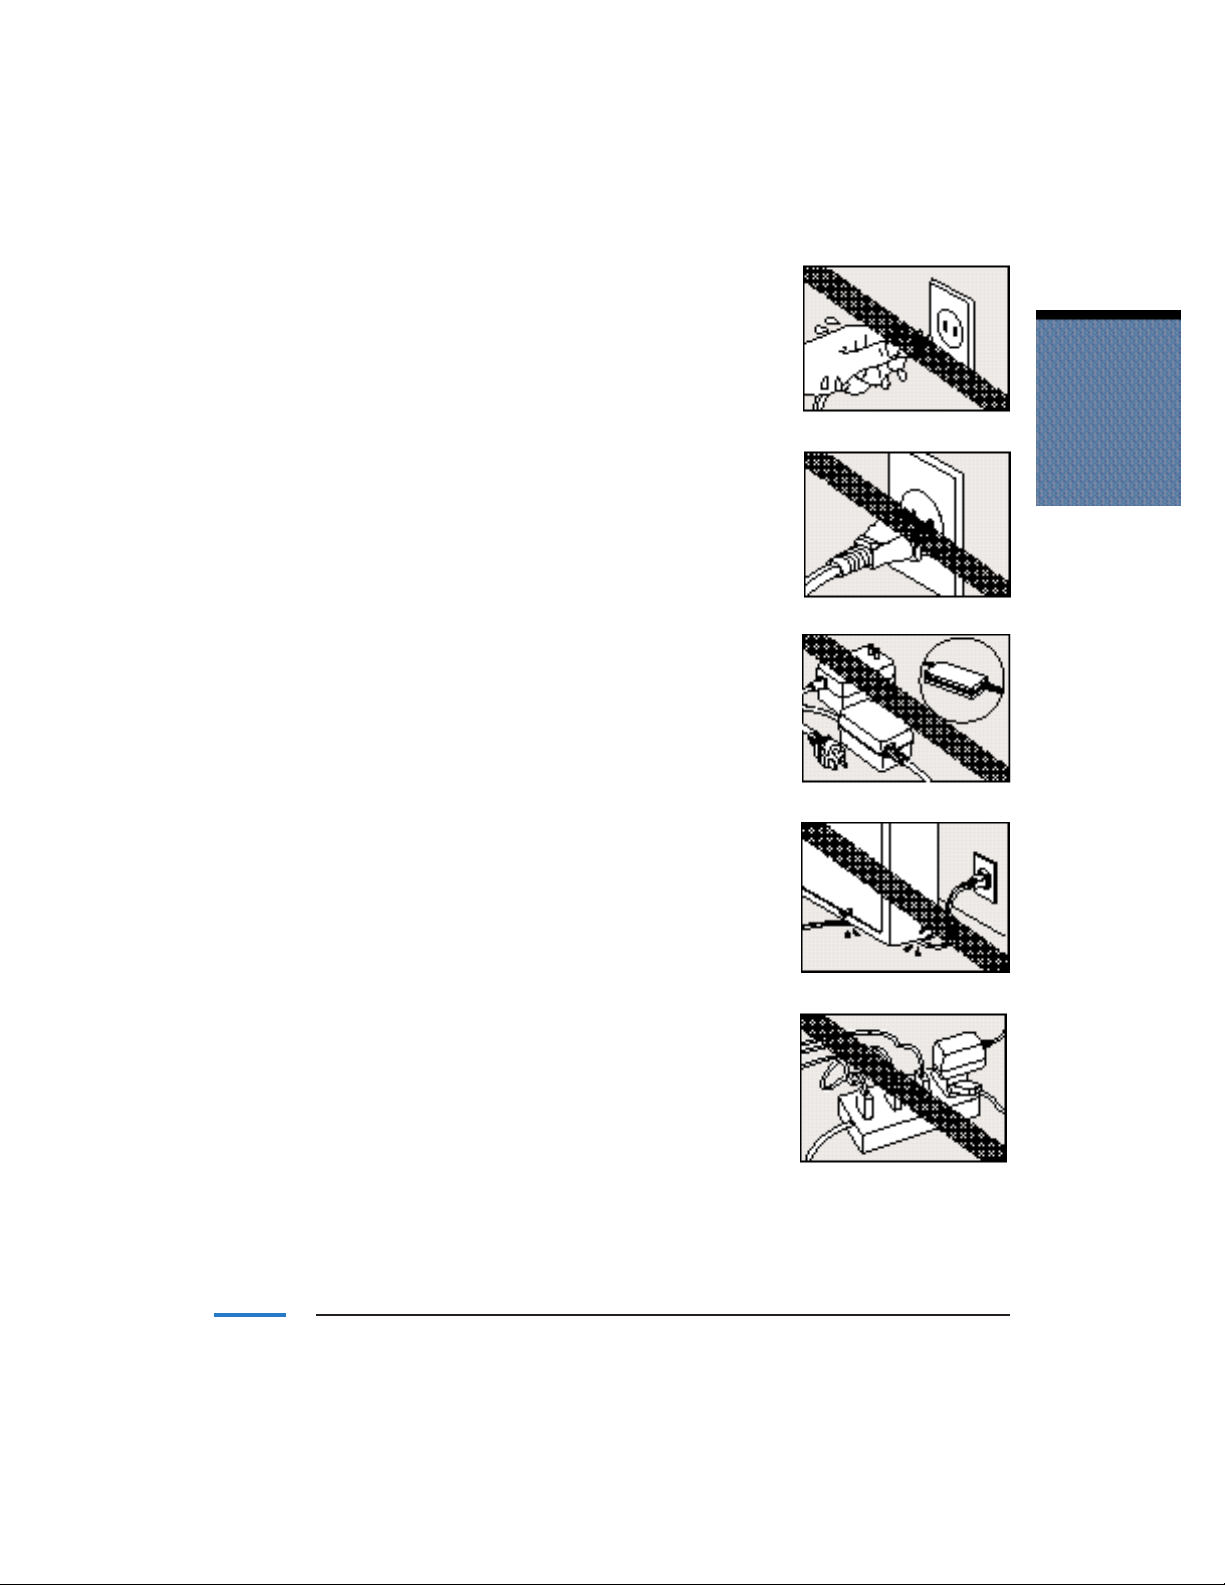
Supplying Power to the Printer
■ To avoid electrical shock, make sure your hands are dry
before plugging in the power cord.
■ Make sure you insert the plug all the way into the
power outlet.
Loose connections can result in fire or electrical shock.
■ Attempting to use a power cord or AC adapter other
than those provided can result in fire or electrical
shock.
Do not use the printer’s power cord and AC adapter
with any other machine.
■ Avoid damaging, modifying, pulling, or excessively
bending the AC adapter and power cord. Do not place
heavy objects on top of the power cord.
Damaged cords may short-circuit,resulting in fire or
electrical shock.
Introduction
■ Overloading the electrical outlet can result in fire or
electrical shock.
Chapter 1 Introduction 1-3
Page 11
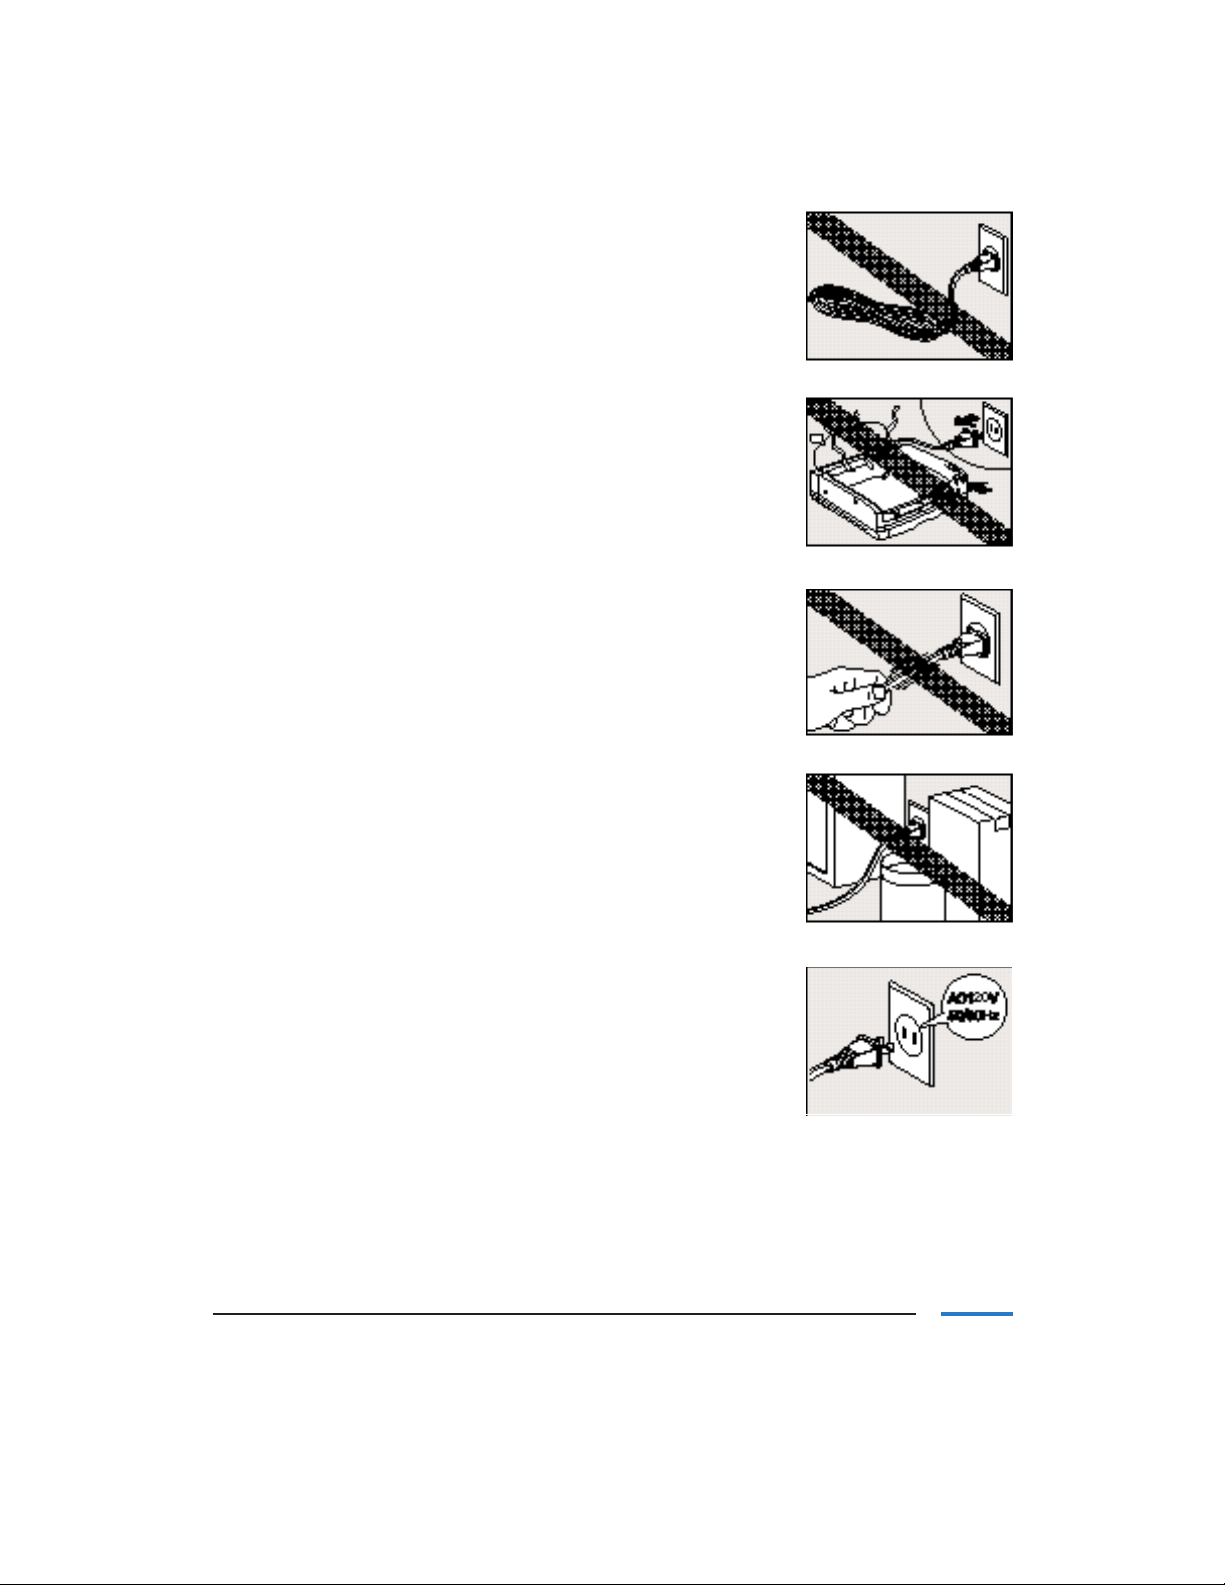
■ Do not use the power cord if it is tied or knotted.
Doing so may result in fire or electrical shock.
■ If you notice smoke or any strange odor coming from
your printer, immediately turn off the power and
unplug the power cord from the power outlet.
Continuing to use the printer under these conditions
may cause fire or electrical shock.Contact the Canon
Customer Care Center.
■ When removing the power cord, make sure you pull on
the plug, and not on the cord.
Pulling on the cord can damage it,possibly resulting in
fire or electrical shock.
■ Do not place any object next to the power outlet that
would prevent you from pulling out the power cord.
In emergencies, fire or electrical shock could result if you
are unable to pull out the plug quickly.
■ The printer is designed for use with AC 120 V.
Using it with any other voltage can result in fire or
electrical shock. Please use with a power source that
meets these conditions:
Voltage: AC 120 V
Frequency: 60 Hz
1-4 Introduction Chapter 1
Page 12
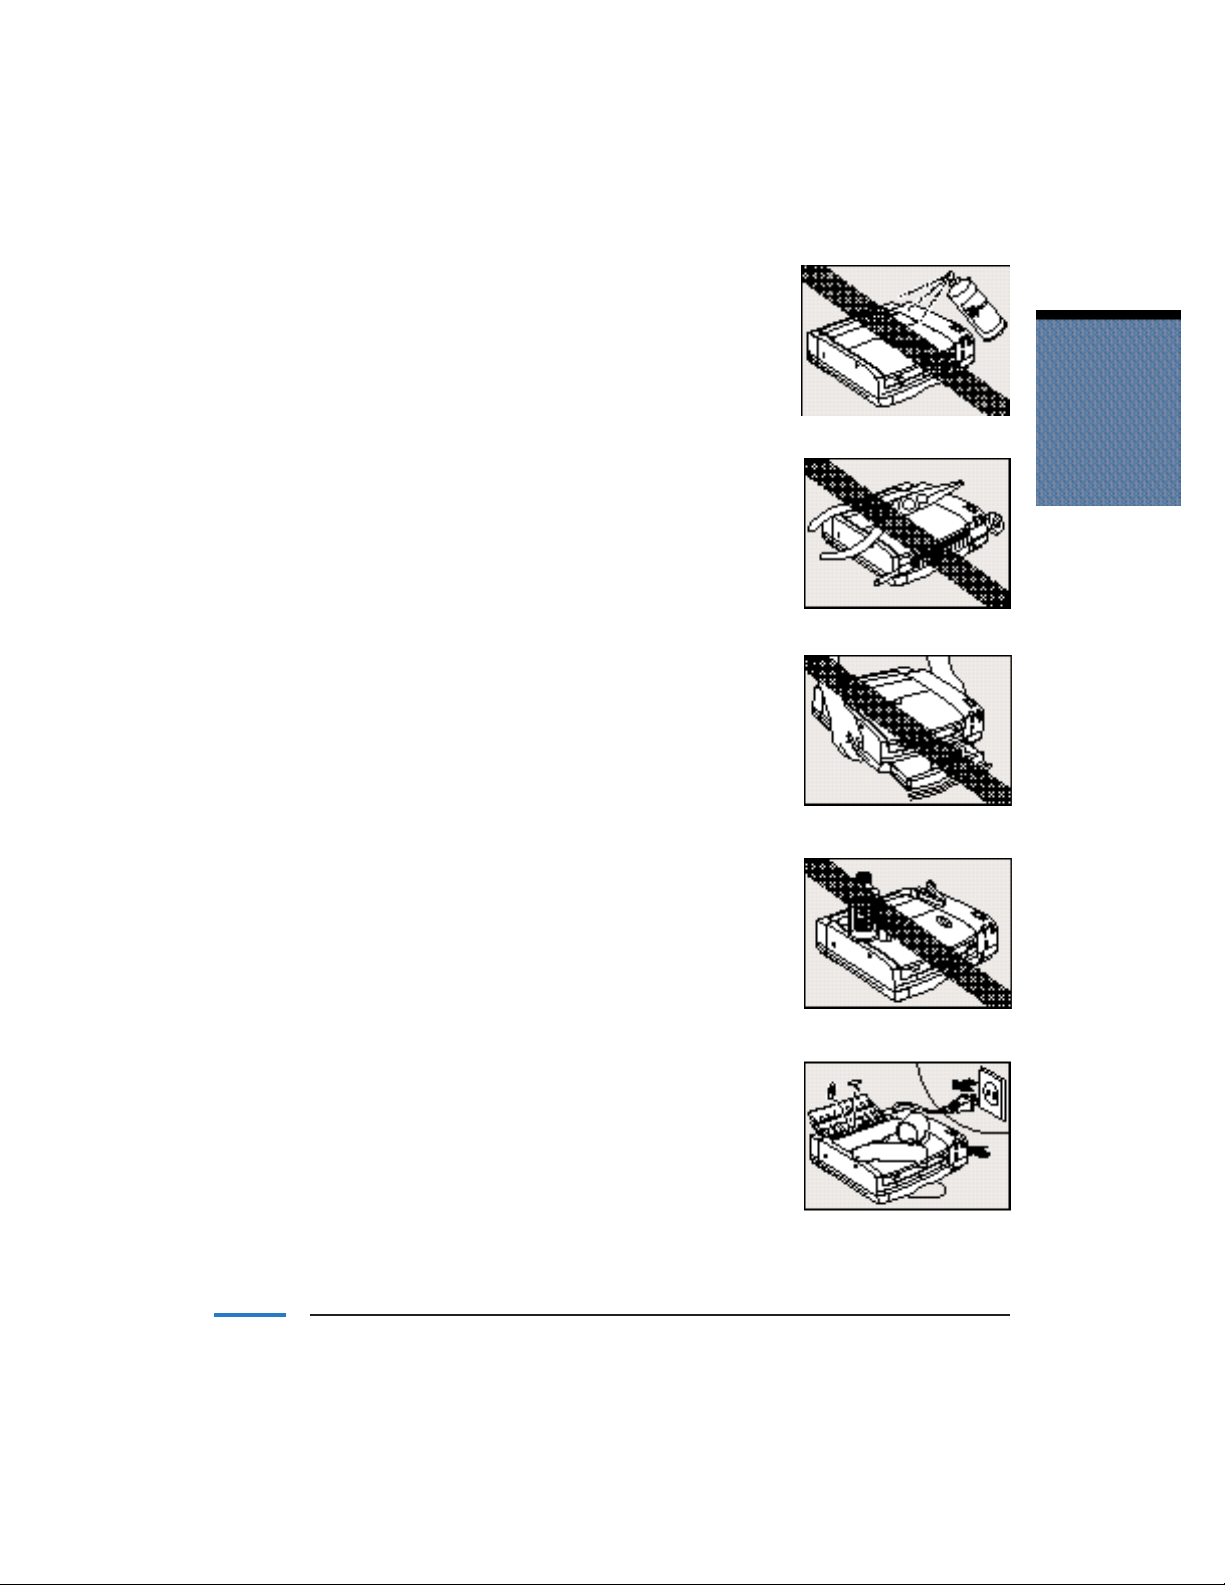
Handling the Printer
■ Do not use items such as flammable sprays near the
printer.
If gas from the spray contacts electrical components
inside the printer,fire or electrical shock may result.
■ Do not disassemble or alter the printer in any way.
The printer includes high voltage components that
can cause fire or electrical shock.
■ When moving the printer, be sure to hold it so that
the front side is angled up away from the floor.
Otherwise, the paper output tray may fall out of the
printer and be damaged.
■ Do not place paper clips, staples, other metal objects,
or bottles that contain liquid or volatile substances
(such as alcohol or paint thinner) on the printer.
Fire or electrical shock can result if the y fall or spill
inside the printer.
Introduction
■ If foreign objects (such as metal objects or liquids)
fall or spill inside the printer, turn off the printer,
unplug the power cord from the electrical outlet,
and contact the Canon Customer Care Center.
Continuing to use the printer under these conditions
can result in fire or electrical shock.
Chapter 1 Introduction 1-5
Page 13
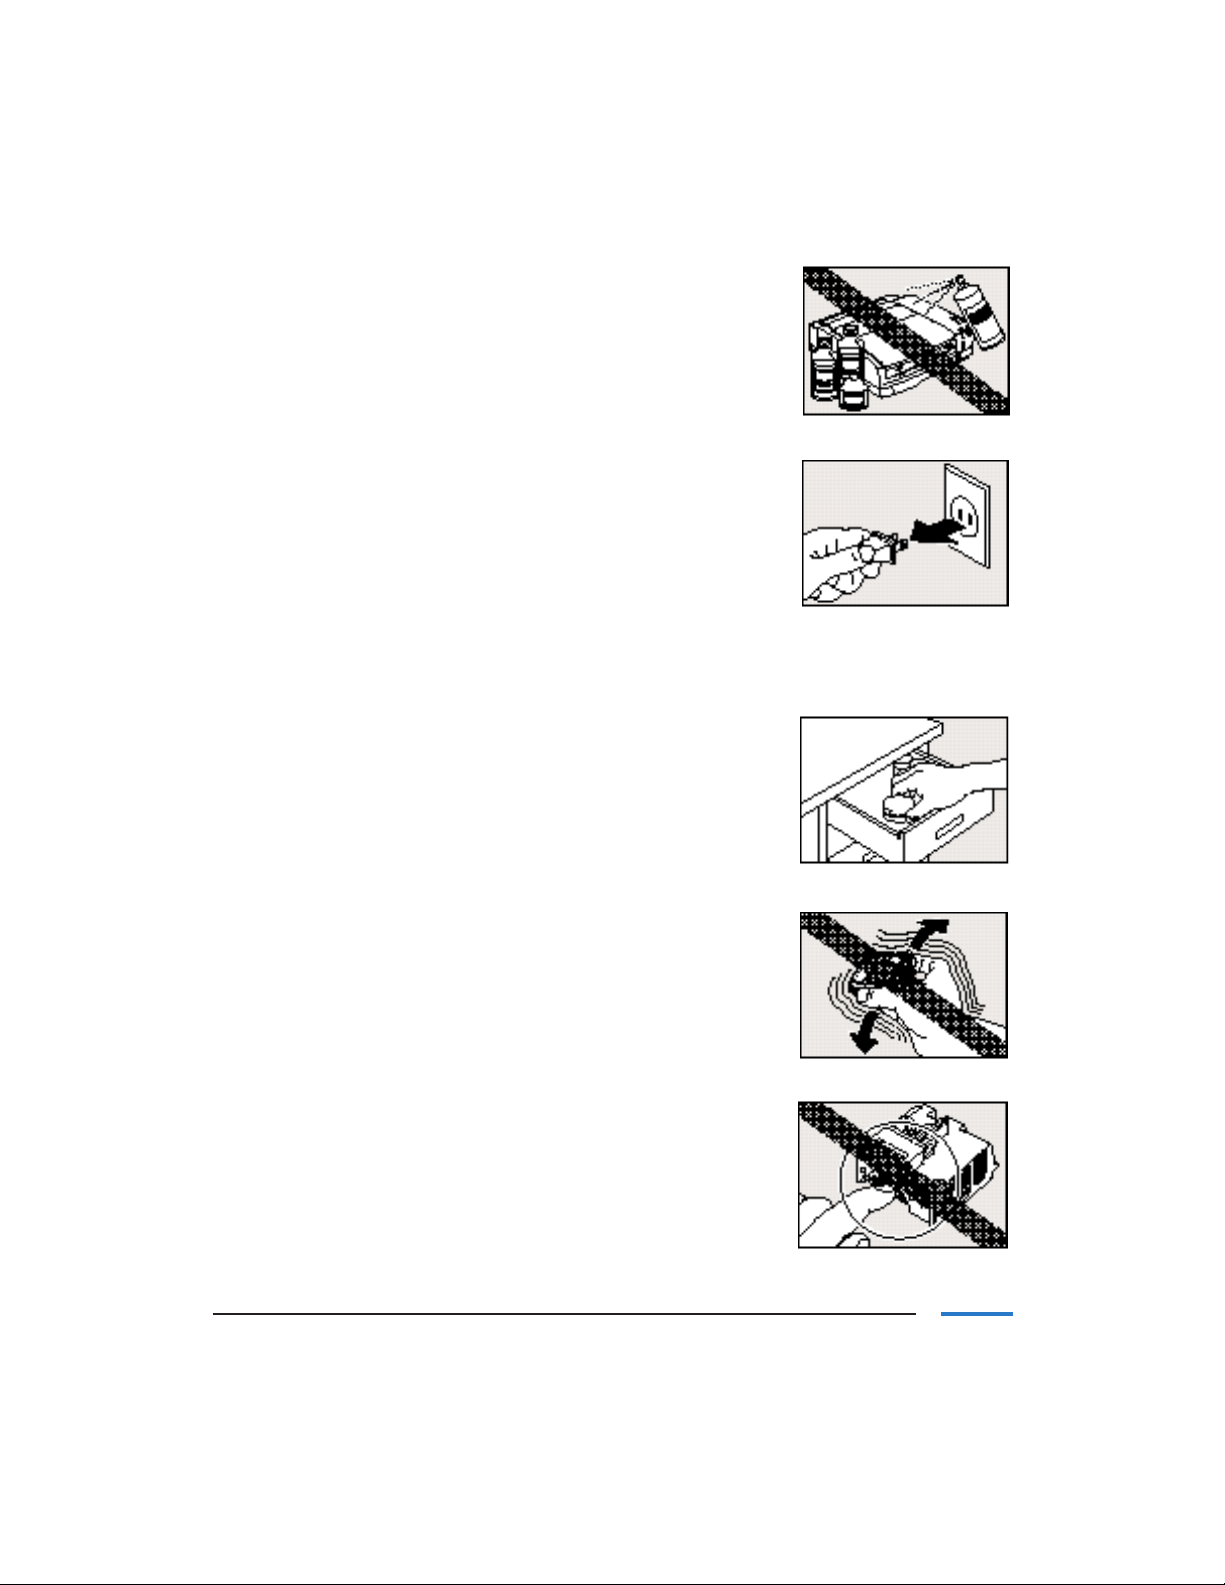
Maintaining the Printer
■ When cleaning, use a damp cloth. Do not use volatile
liquids such as alcohol, benzene, or paint thinner.
Such substances can cause fire or electrical shock if
they contact electrical components inside the printer.
■ Before cleaning the printer, turn off the power and
unplug the power cord from the electrical outlet.
If you leave the printer plugged in and accidentally
turn the power on,the par ts inside the pr inter will
start to move and you could be injured.
Handling the BJ Cartridge
■ For safety reasons, always store BJ cartridges and
ink tanks out of reach of children.
In case of accidental ink ingestion, consult a
physician immediately.
■ Do not drop or shake BJ cartridges.
If spilled, the ink w ill stain objects and clothing.
■ After printing, do not touch the metallic portion
of the BJ cartridge.
This part of the cartridge becomes hot during
printing and can cause burns.
1-6 Introduction Chapter 1
Page 14

Supplies and Accessories
Canon has an extensive dealer network equipped to offer you supplies as you need them.
To find a dealer near you, call the Canon referral service at 1-800-848-4123.
If supplies are not available from your local dealer, you can order directly from Canon by
calling 1-800-671-1090.
Canon has more engineers dedicated to creating quality ink for providing the
best results for output on Bubble Jet printers than any other organization.
Canon does not prohibit the use of third-part y inks and the use of third-party
inks does not invalidate the product’s limited warranty.However, Canon cannot
guarantee the quality or performance of your printer when you are using inks
from other suppliers.
Canon’s limited warrant y does not cover damage caused to Canon’s Bubble Jet
products that is attributable to the use of third part y par ts or supplies, including
inks. The limited warranty remains in effect for its life once that particular
damage has been properly repaired.
For optimum printing results,Canon recommends that you use only Canon
BJ cartridges and ink tanks.
■ Paper
You can use the following paper with the LR1:
● Plain paper
● Canon’s Bubble Jet Paper
● Canon’s High Resolution Paper
■ BJ Cartridges
Number of items
Type Product name in package
Color BC-11e Color BJ Cartridge 1
Black BC-10 Black BJ Cartridge 1
Photo BC-12e Photo BJ Cartridge 1
When purchasing additional BJ cartridges,make sure to purchase an SB-11 Ink
Cartridge Storage Box.
Introduction
Chapter 1 Introduction 1-7
Page 15

■ Ink Tanks
BC-11e Color BJ Cartridge
Type Product name in package
Black ink BCI-11 Black Ink Tank 3
BCI-18 Black Ink Tank (High capacity) 2
Color ink BCI-11 Color Ink Tank 3
BCI-18 Color Ink Tank (High capacity) 1
BC-10 Black BJ Cartridge
Type Product name in package
Black ink BCI-10 Black Ink Tank 3
BCI-17 Black Ink Tank (High capacity) 1
BC-12e Photo BJ Cartridge
Type Product name in package
Black ink BCI-12 Photo Black Ink Tank 3
Color ink BCI-12 Photo Color Ink Tank 3
Number of items
Number of items
Number of items
■ Ink Cartridge Storage Box
Number of items
Type Product name in package
Container SB-11 Ink Cartridge Storage Box 1
1-8 Introduction Chapter 1
Page 16
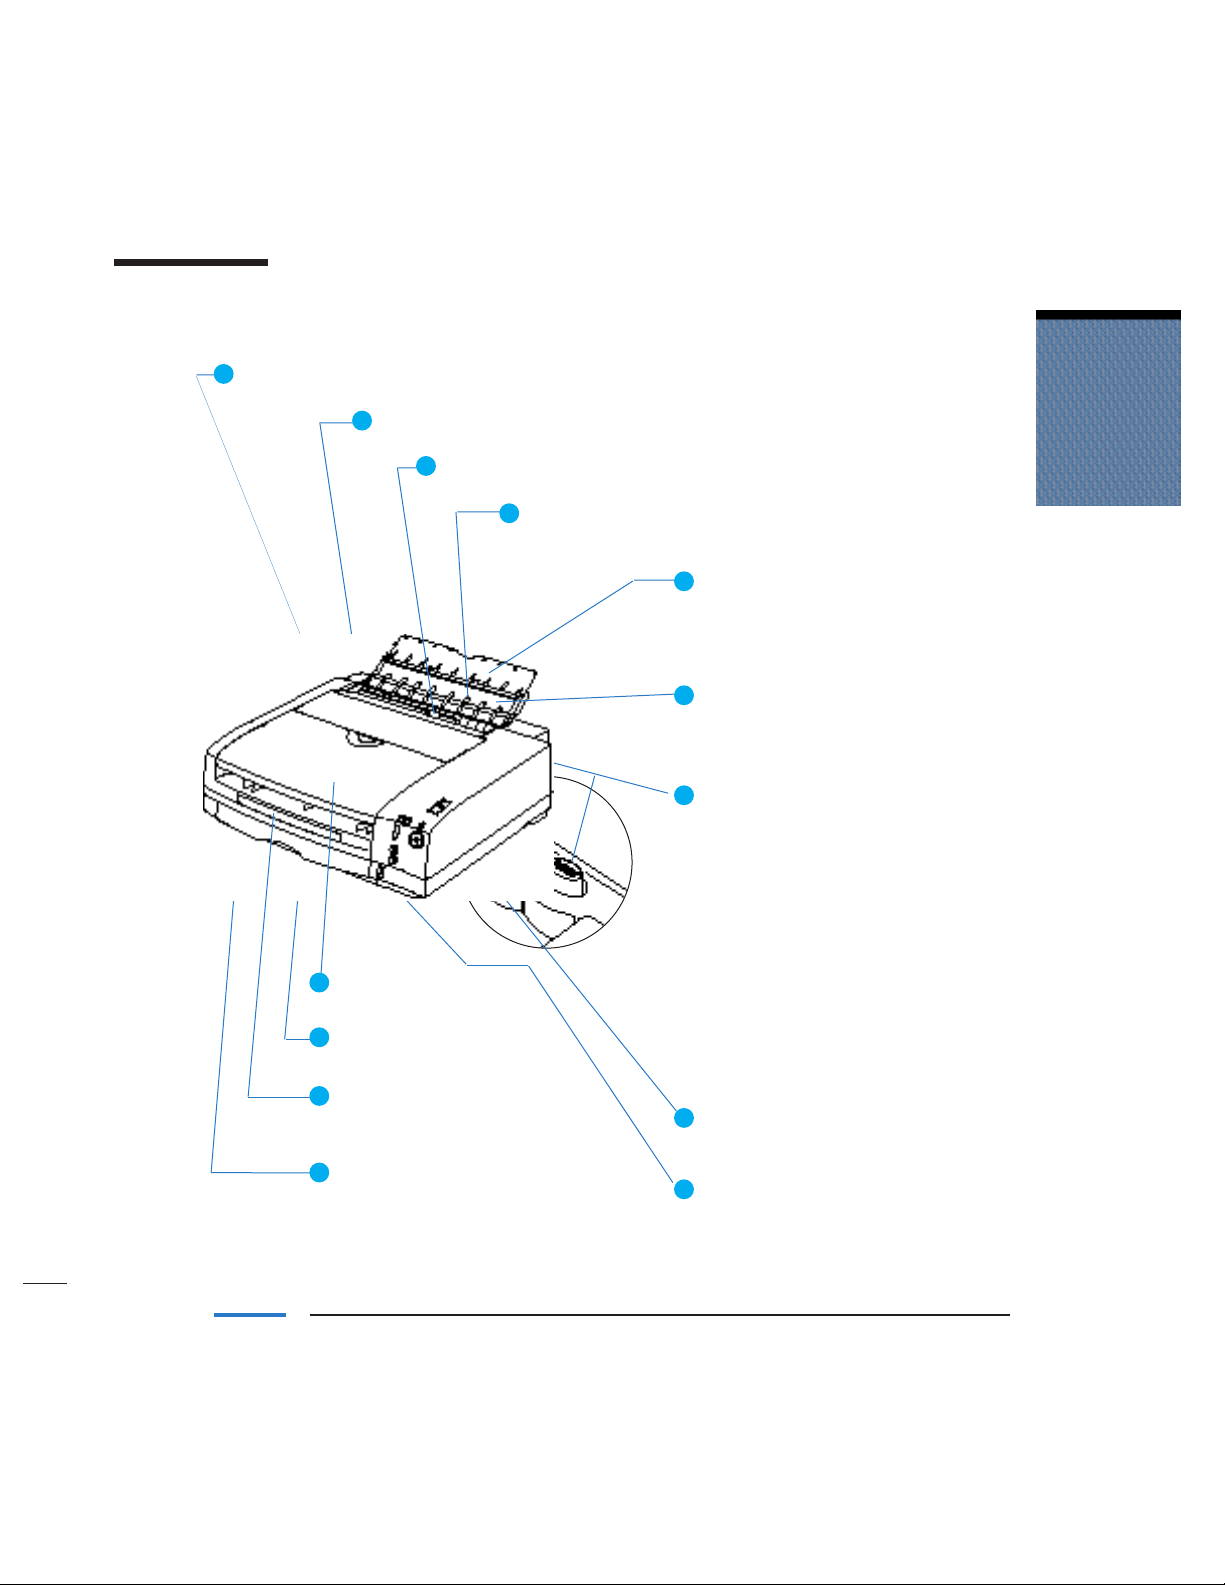
Names and Functions of the Printer’s Parts
Front View
1
BJ Cartridge Access Cover
Open to install and replace BJ cartridges and ink tanks.
2
Access Cover Release Button
Press this button to open the BJ cartridge access cover.
3
Paper Guide
When setting paper, slide this guide to align it with the left edge of the paper.
Manual Feed Slot
4
Use this slot for loading single sheets of paper to be
printed.
5
Manual Feed Support
Extension
When using the Manual Feed
Support, you can also raise this
extension guide.
6
Manual Feed Support
Open this support when you
want to feed paper one sheet
at a time.
7
Ink Light Reset Buttons
Press these buttons after replacing
old (empty) ink tanks with new ink
tanks. Pressing either of these
buttons informs the printer that an
ink tank has been replaced and
the corresponding LOW INK light
goes out.
10
Paper Output Cover
Protects printed documents.
11
Paper Output Tray
Printed documents come out here.
12
Paper Output Tray Extension
Press PUSH and pull out the
extension.
13
Paper Supply Tray
Holds plain paper and High Resolution
Paper (letter size and A4 size only).
Maximum Capacity
Plain paper: 50 sheets
High Resolution Paper: 40 sheets
BLACK Button
Press this button after replacing
the black ink tank.
COLOR Button
Press this button after replacing
the color ink tank.
Mode Switch
8
At this time, this switch is not
used.
Paper Indicator
9
Shows the amount of paper
remaining in the
paper supply tray.
Introduction
Chapter 1 Introduction 1-9
Page 17
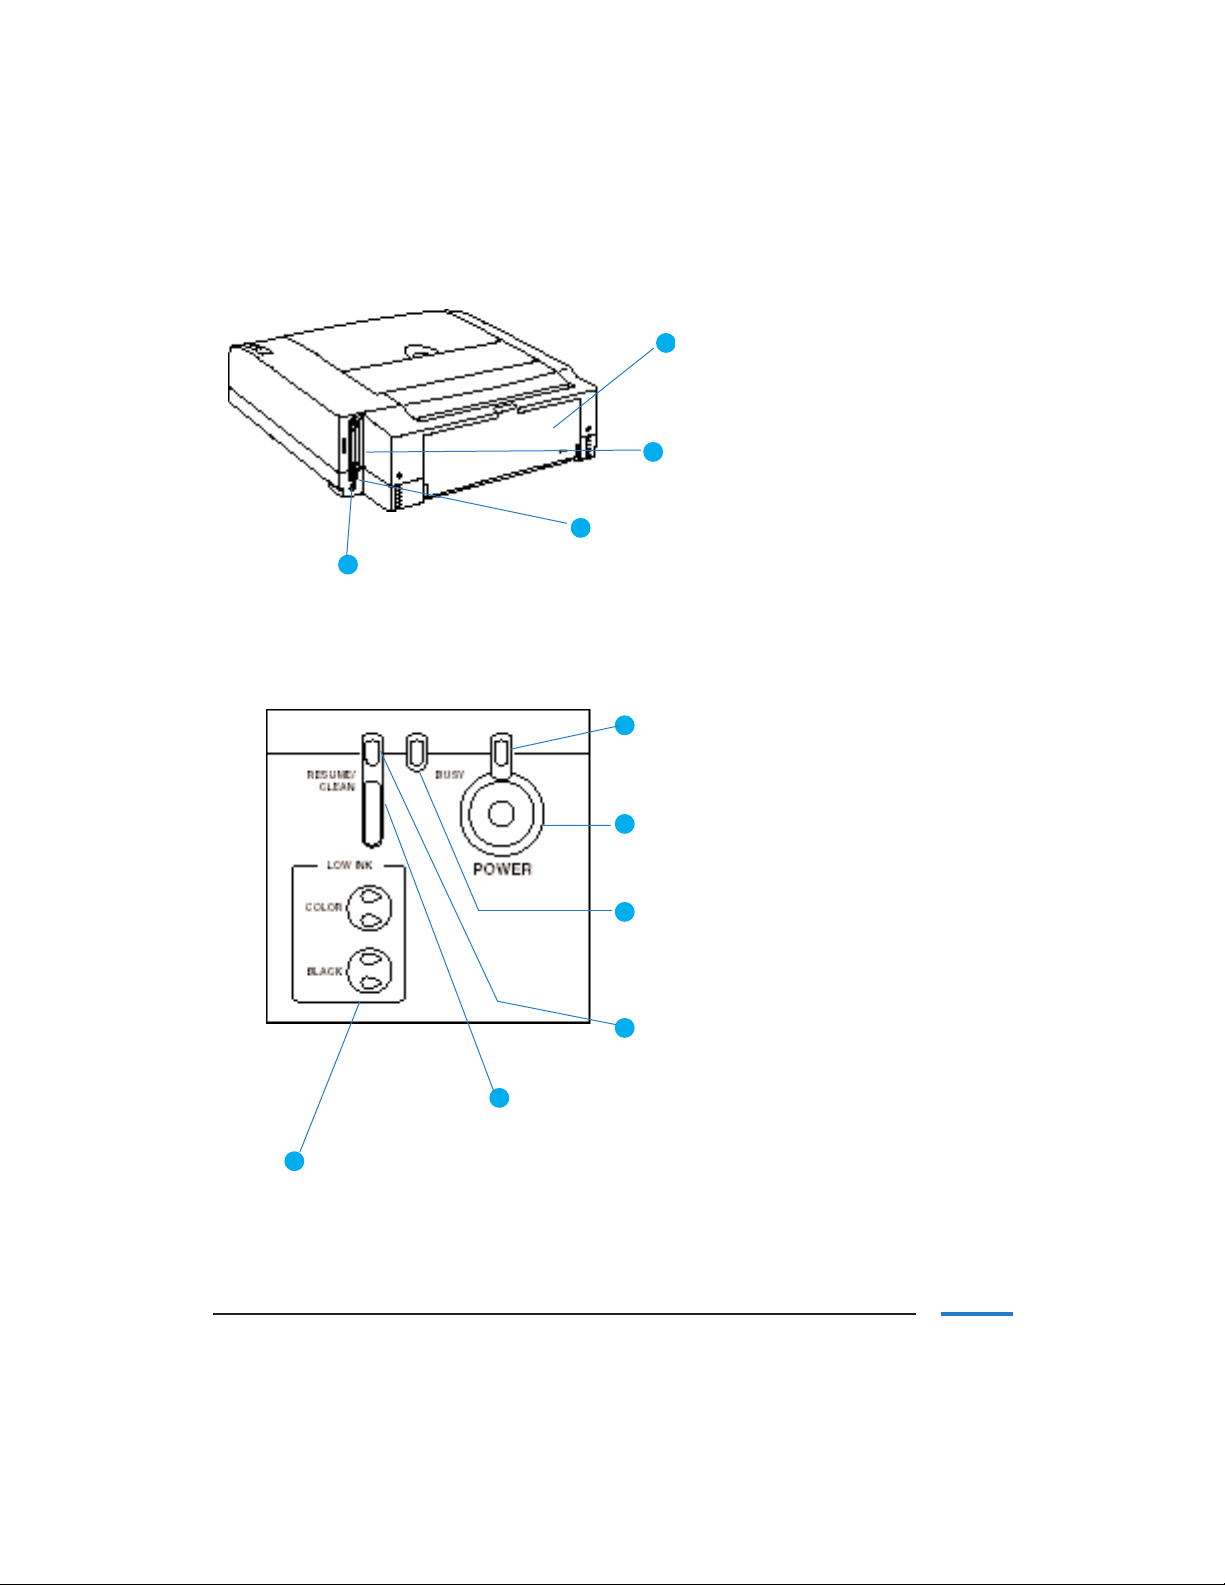
Back View
17
Power Connector
Connects to the AC adapter.
Control Panel
Back Cover
14
Open this cover when cleaning
inside the printer or clearing
paper jams.
15
Parallel Connector Port
Connects to a parallel printer
cable.
16
USB Connector Port
Connects to a USB cable.
18
POWER Light
Lights when the power is on.
19
POWER Button
Switches the power on and off.
20
BUSY Light
Lights while data is being received.
Flashes during print head cleaning
and when an error occurs.
21
RESUME/CLEAN Light
Lights or flashes when an error occurs.
22
RESUME/CLEAN Button
Press when cleaning the BJ cartridge
or clearing an error.
LOW INK Lights
23
Indicate when ink is running low.
1-10 Introduction Chapter 1
Page 18
Turning the Power On and Off
Turning On the Power
Confirm that the connected Internet device is turned off.
If the Internet device is turned on first, it may not detect the printer.
Make sure you turn the printer on first.
Make sure the printer is plugged in and
press the
The
Turn on the connected Internet device.
If the power does not come on:
Refer to Chapter 5,Troubleshooting.
Auto power on/off function:
If you do not use the printer within 30 minutes of turning it on, it automatically
switches off. If this happens, the power automatically switches back on again
when you select Print from the connected Internet device, even if you do not
press the
POWER button on the printer.
POWER light comes on.
POWER button.
Introduction
Chapter 1 Introduction 1-11
Page 19

Turning the Power Offitching the power OFF
Press the printer’s POWER button.
Once the
BUSY light stops flashing, the printer is powered off.
After turning off the printer, wait at least three seconds before turning it back on again.
Do not unplug the power cord from the power outlet while the
is flashing. If you turn off the power while the
light is flashing, the
BUSY
BUSY
light
BJ cartridge ink nozzles are not capped and will dry, causing an ink blockage.
If you do not intend to use the printer for an extended period of time,unplug
the power cord from the power outlet after turning off the printer.
Introduction
1-12 Introduction Chapter 1
Page 20

Getting Help From Canon
Canon Computer Systems,Inc. offers a full range of customer technical support* options
including:
■ 24-hour,7-day-a-week, toll-free automated support for troubleshooting issues on
most current products (1-800-423-2366)
■ Speak to a technician free of serv ice charge (currently Monday—Friday 8:00 a.m.to
10:00 p.m.and Saturday 12:00 p.m. to 6:00 p.m.EST,excluding holidays) for
products still under warranty** (1-757-413-2848)
■ Speak to a technician (currently $24.99) during holidays and days/hours not listed
above regarding urgent product questions or for products no longer under
warranty (1-800-423-2366)
Or for a charge of $2.50 per minute, to a maximum of $25.00 per call
(1-900-246-1200)
■ To find out about all Canon products and accessories, to download the latest drivers,
and to explore all your technical support options including e-mail support,v isit the
Canon Computer Systems,Inc. Web site (www.ccsi.canon.com)
■ 24-hour,toll-free Fax Retrieval System (1-800-526-4345)
■ To download the latest printer driver using your modem, 24-hour Bulletin Board
Service (1-757-420-2000)
■ Within Canada,24 hours a day,7 days a week* (1-800-263-1121)
Introduction
*Support program specifics subject to change without notice.
**Refer to individual product information for warranty details.
Chapter 1 Introduction 1-13
Page 21

Servicing the Printer
The Canon LR1 Color Bubble Jet Printer is designed with the latest technology to provide
trouble-free operation.The Warranty Card that comes with the printer describes Canon’s
limited warranty for your Bubble Jet printer. Be sure to read the warranty information to
find out about the different service options available to you.
Save your sales receipt for proof of purchase. In the event that your printer
needs service, you will need your proof of purchase to obtain warranty serv ice.
If you feel your LR1 Color Bubble Jet Printer needs servicing, contact Canon on the
World Wide Web (www.ccsi.canon.com) to locate the Canon Authorized Service Facility
(ASF) nearest you.If you do not have access to the Web, you can call the Canon
Customer Care Center.
1-14 Introduction Chapter 1
Page 22
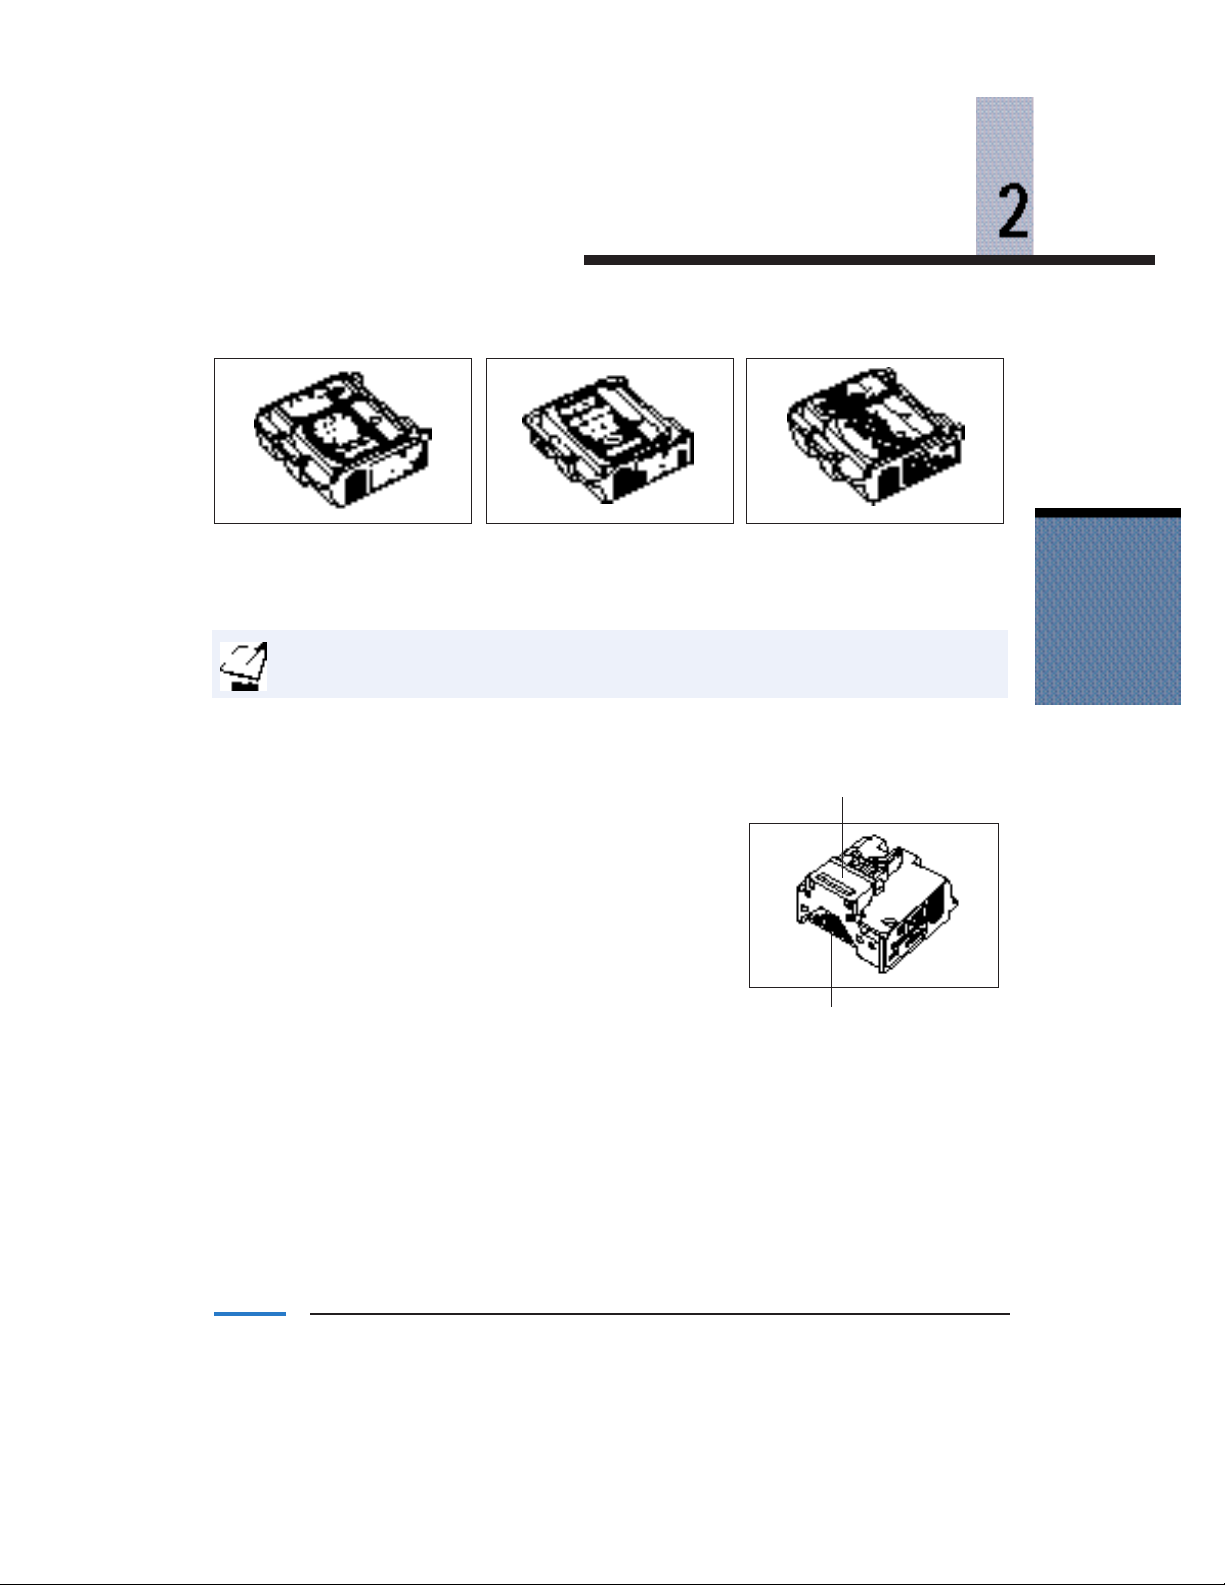
Using BJ Cartridges
You can use the following BJ cartridges w ith the LR1:
BC-11e Color BJ Cartridge
Use for color printing
(provided)
BC-10 Black BJ Cartridge
Ideal for high volume black and
white printing (optional)
BC-12e Photo BJ Cartridge
Ideal for printing high quality
color photos (optional)
The BJ cartridge contains the print head (where the ink comes out) and the ink
tanks.When the ink runs out, replace only the ink tank.
Follow these guidelines when using a BJ cartridge.
■ Keep the BJ cartridge in its sealed container until
Print Head
you are ready to use it.
■ Do not attempt to disassemble the BJ cartridge.
■ Do not touch the print head or circuit board
surface.
■ Do not drop,bump, or subject the BJ cartridge to
any type of hard impact.
Circuit Board Surface
■ Do not place BJ cartridges in direct sunlight or in
hot and humid areas.
■ When placing the BJ cartridge on hard surfaces, such as a desk,place the cartridge
with the print head facing up.
Using BJ Cartridges
■ Dispose of used BJ cartridges according to the rules and regulations in your area.
■ Do not use BJ cartridges that have been used in other printers. If you do so, the
LOW INK light function will not work properly.
Chapter 2 Using BJ Cartridges 2-1
Page 23

If Printing Is Unclear or Colors Are Missing
If your printing is unclear or colors are missing, one of the following may be the reason:
■ The BJ cartridge print head nozzles are clogged.
■ An ink tank is empty.
If pr inting becomes unclear or colors are missing, print the Nozzle Check Pattern to
determine whether each nozzle in the print head is operating correctly.If the print head is
clogged, perform the print head cleaning procedure.If the print head is operating
properly,replace the ink tank.
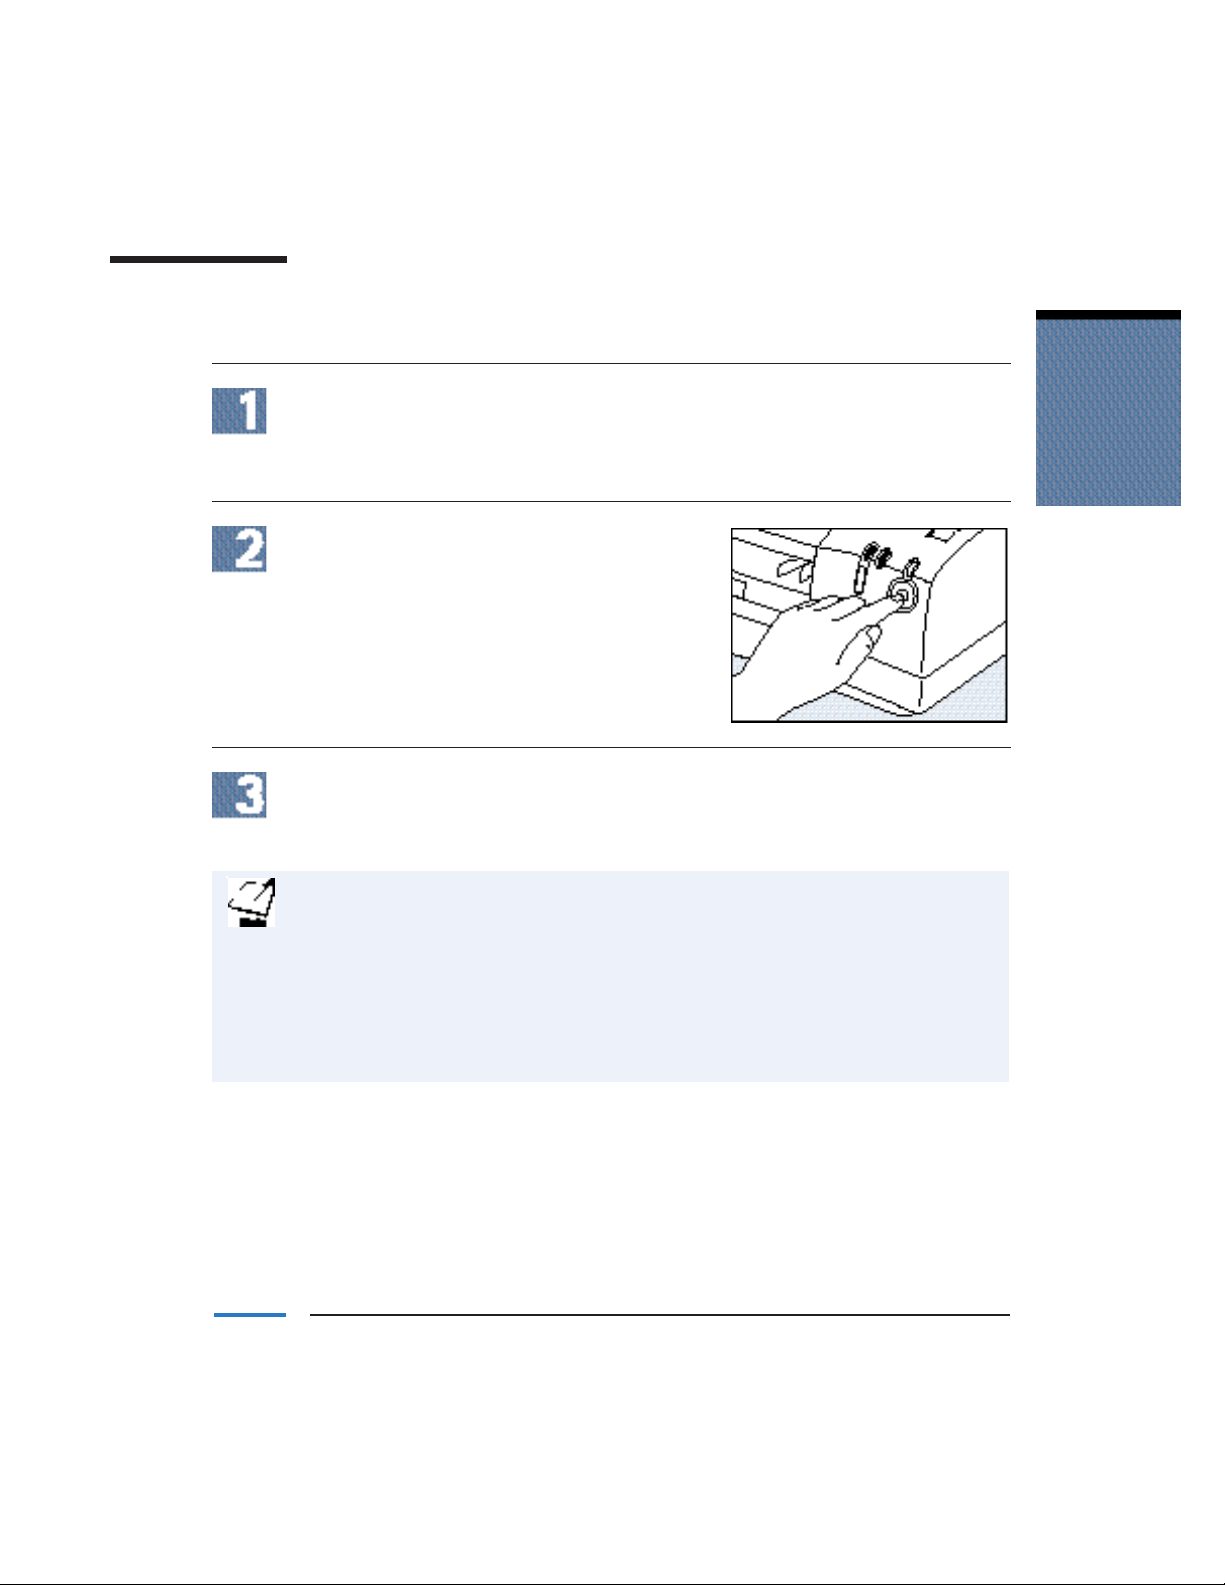
Printing the Nozzle Check Pattern
Make sure paper is loaded in the paper supply tray.
Important! Paper must be loaded in the paper supply tray! You cannot print a
Nozzle Check Pattern when using manual paper feed.The paper in the manual
feed slot will be ejected.
If the printer is on, turn it off.
Press and hold the POWER button until you hear four beeps, then release
the button.
The printer loads paper and prints the Nozzle Check Pattern. (If the pr inter has
not been used in awhile,the printer cleans the print head before loading paper.)
2-2 Using BJ Cartridges Chapter 2
Page 24

A normal Nozzle Check Pattern looks like this:
For the BC-11e Color BJCartridge or the BC-12e Photo BJ Cartridge
Cyan
Black
For the BC-10 Black BJ Cartridge
If the pr int head nozzles are clogged, some horizontal lines will have a broken appearance.
If this happens, clean the pr int head.
If the ink tank is empt y,some colors w ill not print. If some colors do not print even after
you have done the print head cleaning,replace the ink tank.
If the problem persists, tr y replacing the BJ cartr idge.
Avoid the following operations which can cause print heads to clog:
■ Storing BJ cartridges that have been removed from the printer in an unsealed
Ink Cartridge Storage Box. (To purchase an Ink Cartridge Storage Box, call
1-800-671-1090.)
Using BJ Cartridges
■ Touching the print head with your fingers.
■ Placing the print head directly on any surface,such as a desk.
■ Pulling out the power cord while the BJ cartridge access cover is open.This allows
air to get into the print head and causes drying.
Chapter 2 Using BJ Cartridges 2-3
Page 25

Cleaning the Print Head
The LR1 is equipped with two print head cleaning functions: normal print head cleaning
and a more powerful deep print head cleaning.
Only execute deep print head cleaning when the print quality does not improve after
executing normal print head cleaning.
Perform print head cleaning only when necessary; unnecessary and repetitious
print head cleaning wastes ink. Deep print head cleaning consumes a
particularly large amount of ink.
Normal Print Head Cleaning
Make sure the printer is turned on.
The green
Press and hold the RESUME/CLEAN button until you hear two beeps, then
release the button.
Cleaning begins. The
finished, the
Print a Nozzle Check Pattern (see page 2-2).
If broken lines appear,repeat the above operation two or three times.If broken
lines still appear in the Nozzle Check Pattern, execute deep print head cleaning.
POWER light is on.
BUSY light flashes during cleaning . When cleaning is
BUSY light goes out.
2-4 Using BJ Cartridges Chapter 2
Page 26

Deep Print Head Cleaning
Make sure the printer is turned on.
The green
POWER light is on.
Press and hold the RESUME/CLEAN button until you hear two beeps, wait for
one more beep, then release the button.
It takes approximately 3 seconds for the third beep to sound after the first two
beeps. Be careful not to release the button until you hear the third beep.
Print a Nozzle Check Pattern (see page 2-2).
Using BJ Cartridges
Chapter 2 Using BJ Cartridges 2-5
Page 27

Replacing Ink Tanks
If the LOW INK lights come on,replace the corresponding ink tank.
Ink Type and Ink Replacement
The LOW INK lights on the front of the printer prompt you to replace an ink tank when
the ink runs low.Confirm the type of ink tank currently installed, and then replace the
ink tank.
Replace an ink tank when
Type of BJ Cartridge Type of Ink Tank when you see these lights
BC-11e Color
BJ Cartridge
(provided)
BCI-11 Black
BCI-18 Black
(high capacity)
BCI-11 Color
BCI-18 Color
(high capacity)
BC-10 Black
BJ Cartridge
(optional)
BC-12e Photo
BJ Cartridge
(optional)
2-6 Using BJ Cartridges Chapter 2
BCI-10 Black
BCI-17 Black
(high capacity)
BCI-12 Photo
Black
BCI-12 Photo
Color
Page 28

You can install any combination of BCI-11 and high-capacit y BCI-18 ink tanks
in a BC-11e Color BJ Cartridge. However, you cannot install both a BCI-11 Black
and a BCI-18 Black Ink Tank in the cartridge.
For safety reasons,always store ink tanks out of reach of children. If ink is
accidentally ingested,consult a physician immediately.(The ink contains
isopropyl alcohol 67-63-0.)
Do not drop or shake BJ cartridges or ink tanks. If spilled,the ink w ill stain
objects and clothing.
Important Notes:
■ Perform ink tank replacement operations promptly, and do not leave ink tanks
lying around after removing them from the LR1.
■ Always replace empty ink tanks with new ones. If you install an ink tank that has
already been used,the pr int head may become clogged, and the
LOW INK light
function will not work properly.
■ To ensure freshness of ink tanks, use them within one year of purchase.Also, it’s a
good idea to change an ink tank if it has not been used within six months of the
time it was put in the printer.
Using BJ Cartridges
■ Do not open the sealed container that the ink tank comes in until you are ready
to use the ink tank.
■ Do not refill the ink tanks.
■ The ink is water-soluble. Keep water and other liquids out of contact with prints,
as the ink may run.
Chapter 2 Using BJ Cartridges 2-7
Page 29

Replacing an Ink Tank
Make sure the LR1 is turned on.
Do not turn off or unplug the printer while replacing an ink tank.Doing so
may cause damage to the BJ cartridge.
Press the access cover release button and open the BJ cartridge access cover.
The BJ cartridge automatically moves to the center.
BJ cartridge access cover
Do not touch this cable
➜
Remove the ink tank.
■ Do not remove the green print head unit when replacing ink tanks.
■ When disposing of used ink tanks, follow local regulations for disposal.
For the BC-11e Color BJ Cartridge
■ Black ink tank — Raise the gray tab by lifting it with your finger.
BCI-11 Black
BCI-18 Black (high capacity tank)
2-8 Using BJ Cartridges Chapter 2
Page 30

Replacing an Ink Tank
Make sure the LR1 is turned on.
Do not turn off or unplug the printer while replacing an ink tank.Doing so
may cause damage to the BJ cartridge.
Press the access cover release button and open the BJ cartridge access cover.
The BJ cartridge automatically moves to the center.
BJ cartridge access cover
Do not touch this cable
➜
Remove the ink tank.
■ Do not remove the green print head unit when replacing ink tanks.
■ When disposing of used ink tanks, follow local regulations for disposal.
For the BC-11e Color BJ Cartridge
■ Black ink tank — Raise the gray tab by lifting it with your finger.
BCI-11 Black
BCI-18 Black (high capacity tank)
2-8 Using BJ Cartridges Chapter 2
Page 31

■ Color ink tank — Raise the white tab by lifting it with your finger.
BCI-11 Color
BCI-18 Color (high capacity tank)
For the BC-10 Black BJ Cartridge
■ Raise the gr ay tab by lifting it with your finger.
BCI-10 Black
BCI-17 Black (high capacity tank)
For the BC-12e Photo BJ Cartridge
■ Raise the gr ay tab by lifting it with your finger.
Using BJ Cartridges
BCI-12 Photo Black
■ Raise the white tab by lifting it with your finger.
BCI-12 Photo Color
Chapter 2 Using BJ Cartridges 2-9
Page 32

For the BC-10 Black BJ Cartridge
BCI-10 Black
BCI-17 Black
➜
For the BC-12e Photo BJ Cartridge
BCI-12 Photo Black
Install the new ink tank.
Align the arrows (
then gently press down until the ink tank locks into place.
e and f) and set the new ink tank so that it rests at an angle,
BCI-12 Photo Color
Do not touch
this part
Using BJ Cartridges
For the BC-11e Color BJ Cartridge
■ Black ink tank
BCI-11 Black
➜
Chapter 2 Using BJ Cartridges 2-11
BCI-18 Black
➜
Page 33

■ Color ink tank
BCI-11 Color
➜
For the BC-10 Black BJ Cartridge
BCI-10 Black
BCI-18 Color
➜
BCI-17 Black
➜
2-12 Using BJ Cartridges Chapter 2
➜
Page 34

For the BC-12e Photo BJ Cartridge
BCI-12 Photo Black
BCI-12 Photo Color
➜
Press the ink light reset button.
If you do not press the ink light reset button, the
not work correctly.
Press here when you
replace a black ink tank
Press here when you
replace a color ink tank
➜
Using BJ Cartridges
LOW INK light function will
➜
Pressing the ink light reset button
turns off the LOW INK light(s)
corresponding to the button pressed.
If you replace both ink tanks, press both the
at a time, until you hear two beeps.
Chapter 2 Using BJ Cartridges 2-13
BLACK and COLOR buttons, one
Page 35

Close the BJ cartridge access cover.
Print head cleaning starts and the
the
BUSY light goes out, you are ready to print.
BUSY light flashes. When the printer beeps and
Replacing the BJ Cartridge
You can use the following BJ cartridges w ith the LR1:
■ BC-11e Color BJ Cartridge for normal color printing (provided)
■ BC-10 Black BJ Cartridge for printing large volumes of black and white (optional)
■ BC-12e Photo BJ Cartridge for pr inting photos in high quality color (optional)
When switching BJ cartridges, store the unused cartridge in the SB-11 Ink
Cartridge Storage Box. If you do not store an opened cartridge in the
Ink Cartridge Storage Box, the ink will dry,rendering the car tridge unusable.
To purchase an Ink Cartridge Storage Box, call 1-800-671-1090.
Make sure the printer’s power is on. Press the access cover release button
and open the BJ cartridge access cover.
The BJ cartridge automatically moves to the center.
➜
Do not touch this cable
2-14 Using BJ Cartridges Chapter 2
Page 36

Remove the BJ cartridge.
Release and raise the green tab with your finger.
Lift here
Place the BJ cartridge you just removed in the Ink Cartridge Storage Box.
Align these arrows
Using BJ Cartridges
Securely twist the lid. Make sure the box is tightly closed.
Chapter 2 Using BJ Cartridges 2-15
Page 37

Prepare the replacement BJ cartridge.
If using a new BJ cartridge, open the packaging and remove the protective orange
cap and orange tape.
➜
Protective
■ Do not replace the protective orange cap once it has been removed.You may
damage the print head.
■ Make sure you remove the protective orange tape.If you do not do so,the ink
will not be able to flow out.
■ Do not drop or shake BJ cartridges. If spilled, the ink w ill stain objects and
clothing.
■ Do not touch the print head or circuit areas.
■ Do not use BJ cartridges that have been used in other printers. If you do so,
the
LOW INK light function will not work properly.
Install the BJ cartridge.
Set the new BJ cartridge so it rests diagonally.Align the arrows on the
BJ cartridge with the ar rows on the cartridge holder. Gently press down
until you hear the BJ cartridge lock into place.
Orange tape
➜
2-16 Using BJ Cartridges Chapter 2
Page 38

Press the ink light reset buttons only after installing a new BJ cartridge.
Press each button,one at a time.
Do not press these buttons when installing a BJ cartridge that has been used
before.The printer will not be able to detect when the ink runs out.
Close the BJ cartridge access cover.
When the printer beeps and the
BUSY light goes out, you are ready to print.
Using BJ Cartridges
Chapter 2 Using BJ Cartridges 2-17
Page 39

2-18 Using BJ Cartridges Chapter 2
Page 40

Paper Handling
This chapter describes the type of paper you can use with the Canon LR1, and how you
load the paper.You can stack paper in the paper supply tray to load it automatically or
you can manually feed one sheet at a time.You can use either plain paper or high
resolution paper.
■ Plain Paper
You can use ordinary paper made for use with photocopiers. You can also use Canon
Bubble Jet Paper.
Paper size: Letter (8.5 × 11 in)
A4 (210 × 297 mm)
A5 (148 × 210 mm)
B5 (182 × 257 mm)
Paper thickness: Less than 0.2 mm
Paper weight: 17 to 35 lb (64 to 90 g/m
2
) (when using the paper
supply tray)
2
17 to 38 lb (64 to 105 g/m
) (when using manual feed)
Do not use continuous forms (paper with perforations).
■ High Resolution Paper
High Resolution Paper (letter size only) is superior to plain paper when printing
color. This paper is suitable for printing photos or business documents which
incorporate graphics with High Resolution Paper, you print on the whiter side of
the sheet.
Paper Handling
Chapter 3 Paper Handling 3-1
Page 41

Important Notes on Paper
Do not use any of the following ty pes of paper.Not only will they reduce print quality,
but paper jams may also result.
■ Folded paper
■ Curled paper
■ Creased paper
■ Wet paper
■ Extremely thin paper (less than 17 lb or 64 g/m
■ Extremely thick paper (more than 38 lb or 105 g/m
■ Perforated paper (either continuous form or loose leaf)
2
)
2
)
3-2 Paper Handling Chapter 3
LR1_V1/11-99
Page 42

Loading Paper
The LR1 provides two methods of feeding paper: from the paper supply tray and from the
manual feed slot. Load letter size paper in the paper supply tray. You can also load one
sheet at a time in the manual feed slot.
■ Set paper in the paper supply tray with the print side facing down.
■ Set paper in the manual feed slot with the print side facing up.
Loading the Paper Supply Tray
Pull the paper supply tray all the
way out.
After pulling the tray out a short
distance, grasp it on both sides
with your hands and slowly pull
it out the rest of the way.
Do not remove the paper supply
tray by pulling on the front edge
with one hand.You could lose
your grip on the tray and drop it.
Paper Handling
Fan the paper to be loaded and align the four corners.
Align edges
Chapter 3 Paper Handling 3-3
LR1_V1/11-99
Page 43

Set the paper guide and size guide.
You will normally set up the paper supply tray for letter size paper.Settings are
also available for A4 size paper.
Paper guide
Size guide
Load the paper and make sure
the corners are under the clips.
Set the paper in the tray with
the print side down.
Adjust the paper guide so that it is
flush with the paper. If there is any
gap,paper w ill feed diagonally
and a paper jam may occur.
Push the tray all the way into
the printer.
Paper guide
3-4 Paper Handling Chapter 3
Page 44

Press PUSH on the front of the printer,
and pull out the paper output tray
extension.
Printed documents are stacked in the paper output tray. If possible, remove each
sheet as it is printed to avoid getting ink on the back of the next sheet.
If you do let printed sheets pile up in the paper output tray,do not allow more
than 20 sheets to accumulate in the tray at any one time.
Loading Single Sheets in the Manual Feed Slot
Lift the manual feed support and fold out the manual feed support extension.
Manual feed support
Manual feed support extension
Insert the paper.
Holding the paper with the printing side
facing up,alig n it with the r ight edge of
the manual feed support, then insert
the paper.
Insert the paper all the way into the printer.
The printer will automatically feed the sheet.
Align the right edge
Chapter 3 Paper Handling 3-5
Paper Handling
LR1_V1/11-99
Page 45

Align the paper guide with the left edge of the paper.
Paper guide
Press PUSH on the front of the printer,
and pull out the paper output tray
extension.
Using High Resolution Paper
After printing High Resolution Paper,fine powder from the paper accumulates
inside the printer and paper may not feed properly. Be sure to use the cleaning
sheet that comes with the High Resolution Paper to periodically clean the printer.
Normally, you’ll want to use the cleaning sheet after you finish a packet of
High Resolution Paper.
Open the back cover.
The cleaning sheet is delivered
from here.Make sure there is
enough space at the back of
the printer.
Sheet exits
here
Back cover
3-6 Paper Handling Chapter 3
Page 46

Pull out the paper supply tray.
Remove the peel-off tabs from the
cut-outs on the cleaning sheet.
Place the side with the exposed
sticky cut-outs facing up, and
insert the paper so the cut-outs
enter the printer first.
Push the paper supply tray back into the printer.
Push the RESUME/CLEAN button.
You will hear a beep and cleaning
starts, The cleaning sheet exits
from the back cover.
Close the back cover and press the RESUME/CLEAN button again.
The
RESUME/CLEAN light goes out and cleaning is finished.
Chapter 3 Paper Handling 3-7
Paper Handling
Page 47

Clearing Paper Jams
FRONT
Paper output cover Paper supply tray
Manual feed slot
BACK
Back cover
If a paper jams occurs, check the following and gently pull the jammed paper out
in the direction indicated by the arrows.
If the
RESUME/CLEAN light comes on:
■ Paper is not loaded, or paper has not ejected completely.All lights come on.
■ Load paper and press the RESUME/CLEAN button, or remove the jammed
paper from the printer.
If the paper tears off and gets jammed inside the printer:
■ Turn off the power, open the BJ cartridge access cover, and remove the torn
paper.
3-8 Paper Handling Chapter 3
Page 48

Maintaining the Printer
This section describes printer maintenance and cautions for transporting the printer.
Printer Maintenance
When maintaining the printer, always follow these precautions:
■ When caring for your printer,turn the power off,and unplug the power cord from
the electrical outlet. If you do not unplug the printer and you accidentally turn the
power on,the par ts inside the printer w ill start to move and you could be injured.
■ Do not use flammable solvents,such as paint thinner, benzene,or alcohol.They can
result in fire or electrical shock.
■ Do not unplug the power cord from the power outlet while the POWER light is on or
flashing. This may damage the printer.
■ Do not use paper towels or tissue to clean the inside of the printer.Paper particles
remaining inside the printer will stick to the print head and cause a blockage in the
nozzle. Use a soft cloth.
■ Be careful that no liquids, such as water, enter the printer unit.This may damage the
printer.
■ When cleaning inside the printer, be careful not to bend or pull the film cable.This
may damage the printer.
Chapter 4 Maintaining the Printer 4-1
the Printer
Maintaining
Page 49

Cleaning the Printer
Turn off the printer and unplug the power cord from the electrical outlet.
Wipe any dirt from the outside of the printer (such as around the paper
output tray) with a soft cloth that has been moistened with water, then
firmly wrung out.
Open the BJ cartridge access cover
and wipe the back of the flap with
a soft damp cloth.
Wipe away any ink and paper
sediment. Be careful not to bend the
plate attached to the BJ cartridge
access cover (the cover with ink
replacement instructions).
If the platen becomes soiled from
paper jams, wipe it clean with a
dry cloth.
Be careful not to bend or pull the
film cable.
Platen
4-2 Maintaining the Printer Chapter 4
Film cable
Page 50

Transporting the Printer
When transporting the printer,pack it in its original box and affix all protective materials.
Do not remove the power cord from the electrical outlet while the
POWER light
is on or flashing. Damage to the printer may result.
Turn off the power to the Internet device and the printer.
Confirm that the
POWER light is out.
Unplug the printer’s power cord from the electrical outlet and remove the
power cord.
Disconnect the printer cable.
Pull out the paper supply tray and
affix tape to the printer.
Place the paper supply tray in its bag.
Place tape here
Pack the printer and paper supply tray in their protective materials and
set them in the box.
Chapter 4 Maintaining the Printer 4-3
the Printer
Maintaining
Page 51

When using a shipping company to transport your printer,make sure you do the
following:
■ Secure the lid of the box with tape.
■ Write “Precision Machinery — Handle With Care” in a prominent location on the
outside of the box.
When transporting the printer by automobile,be careful not to vibrate or bump the
printer.On sunny days, be careful not to leave the printer in a closed vehicle for long
periods of time; this may expose the printer to extremely high temperatures.
4-4 Maintaining the Printer Chapter 4
Page 52

Troubleshooting
This chapter describes remedies for various printer problems.
Power
Power does not go on
Is the power cord properly Make sure the power cord is securely plugged into
plugged into the printer the electrical outlet. Then make sure the power cord
and the electrical outlet? is securely inserted into the AC adapter and that
the AC adapter is plugged into the printer’s power
connector port.
Is the electrical outlet Plug another electrical appliance into the electrical
operating? outlet to confirm that it is operating correctly.
Lights
The light above the POWER button comes on
On Flashing Off
Light Number of Beeps Printer Condition and Status/Solution
— Normal (power is on).
— Normal (power is off).
Chapter 5 Troubleshooting 5-1
Troubleshooting
Page 53

Light Number of Beeps Printer Condition and Status/Solution
— Normal (setup or cleaning is in process).
Wait until the flashing light goes out.
The BJ cartridge access cover is open.
Close the BJ cartridge access cover.
When replacing BJ cartridges and ink
tanks, close the access cover after you
have finished replacement,then wait
until the flashing light goes out.
— Normal (receiving print data).
Wait for printing to begin.
1 Paper is not loaded correctly.
Check the feed areas and reload the paper
(see page 3-3).
2 Paper is jammed.
Remove the jammed paper (see page 3-8).
3 The BJ cartridge is not inserted correctly.
Remove the BJ cartridge and reinsert it
(see page 2-14).
4 The BJ cartridge is overheated.
Stop printing and wait until the BJ cartridge
cools.When the cartridge cools, the light
stops flashing.
— A serious error has occurred.
Turn off the power,wait approximately 15
seconds,and then turn it back on. If the
lights continue flashing, contact the Canon
Customer Care Center (see page 1-13).
5-2 Troubleshooting Chapter 5
Page 54

The LOW INK light comes on
Is it time to replace the Confirm the type of ink installed in your printer
ink tanks? and check the ink tank (see page 2-6).
Paper Trouble When Printing
The paper is jammed
Follow the steps in Clearing Paper Jams (see page 3-8) and remove the paper.
The paper does not feed properly
Paper does not feed / Paper feeds diagonally
Is the paper too thick? You cannot use paper that exceeds 38 lb (105 g/m
(see page 3-1).
Is there too much paper You can load up to 50 sheets (20 lb or 75 g/m
loaded in the printer? feeding from the paper supply tray (40 sheets with
High Resolution Paper),but only one sheet at a time
when feeding manually.
Is the paper bent or curled? Do not use paper that is bent or creased.Smooth
out all curls before using curled paper (see page 3-6).
When feeding manually, is Align the paper guide with the left edge of the paper
the paper guide set properly? (see page 3-5).
When feeding from the paper Place the edge of the paper so it fits under the clips
supply tray, is the paper (see page 3-4).
loaded correctly into the
tray?
Chapter 5 Troubleshooting 5-3
2
2
) when
)
Troubleshooting
Page 55

When feeding from the Push the paper supply tray firmly into the printer as
paper supply tray, is the far as it will go (see page 3-4).
tray inserted properly?
After printing on High Use the cleaning sheet that came with the High
Resolution Paper, are Resolution Paper to clean the rollers (see page 3-6).
the rollers soiled?
Paper double feeds
Was the paper fanned Fan the paper thoroughly before loading it into the
before loading? paper supply tray (see page 3-3).
Is too much paper You can load up to 50 sheets (20 lb or 75 g/m
2
) when
loaded? feeding from the paper supply tray (40 sheets for
High Resolution Paper),but only one sheet at a time
when feeding manually.
Is the paper bent or Do not use paper that is bent or has creases. Smooth
curled? out all curls before using curled paper.
5-4 Troubleshooting Chapter 5
Page 56

Paper Trouble After Printing
The back side of the paper is soiled
Is the paper output tray Clean the printer (see page 4-2).
soiled?
Is a second page printing If you print documents that require some time to dry,
before the first one such as photos,the printer may eject the next page
is dry? before the first page is dry.If this happens, remove
each page as it prints to avoid stacking.
The printed side of the paper is soiled
Is the paper too thick? You cannot use paper that exceeds 38 lb (105 g/m2)
(see page 3-1).
Is the paper bent Do not use paper that is bent or creased. Smooth out
or curled? all curls before printing.
Is the printing on the Paper has a right side and a wrong side for printing.
wrong side of the paper? Confirm which side of the paper to print on and reset
the paper in the printer.
Paper curls after printing
Is the paper suitable When printing colorful illustrations, such as photos,
for printing? thin paper will curl or warp because of the large
amount of ink used.
If this happens, use paper that is desig ned for printing
illustrations and photos, such as High Resolution
Paper.
Chapter 5 Troubleshooting 5-5
Troubleshooting
Page 57

Trouble When Printing
If the printer does not print or stops during printing
The printer does not print at all
Is the power on? Check whether the
the
POWER button.
Is the printer properly Securely connect the power cord and the printer cable.
connected to the Internet
device?
Does the document involve When printing documents that involve a large quantity
a large quantity of data, of data, it may take several moments before printing
such as photos and starts. If the BUSY light is green, print data is being
illustrations? sent to the printer.Wait for printing to star t.
The printer starts, but does not print anything
Is ink flowing properly The BJ cartridge print head may be blocked or the ink
from the BJ cartridge? tanks may be empty.Print a Nozzle Check Pattern to
check the condition of the print head (see page 2-2).
If the Nozzle Check Pattern prints correctly, the printer
and the Internet device may not be connected correctly.
Reconfirm the connections.
If the Nozzle Check Pattern does not print correctly,
the print head may be blocked or the ink tanks may be
empty.Perform the print head cleaning procedure
(see page 2-4).
POWER light is on. If not, press
If you still cannot print, replace the ink tanks (see
page 2-6).
When installing a new BJ Remove the BJ cartridge and confirm that the
cartridge, was the protective protective tape has been removed from the print head
orange tape removed? (see page 2-16).
5-6 Troubleshooting Chapter 5
Page 58

The last part of the document does not pr int
Is the printer properly Fir mly connect the power cord and the printer cable.
connected to the Internet
device?
Printing starts, but stops before it is finished
Does the document involve When printing documents that involve a large amount
a large amount of data, such of data, it may take several moments before printing
as photos and illustrations? starts. If the
BUSY light is green, print data is being
sent to the printer.Wait for printing to star t.
Has the printer been If you print for extended periods of time, the BJ
printing for an extended car tr idge overheats and the RESUME/CLEAN light
period of time? flashes. If this happens, stop printing and wait until
the BJ cartridge has cooled. When the BJ cartridge is
cool, the light stops flashing.
The printer is printing garbage
Was the previous printing Data from the previously printed job may be left in
job cancelled while it was the printer’s memory.Tur n off the power to the
still printing? printer and the Internet device, then turn the power
on again.
Is the printer properly Fir mly connect the power cord and the printer cable.
connected to the Internet
device?
Is the data printout If unreadable characters are printed only when
correct? printing certain data, there may be a problem with the
data or the application software.Re-create the data and
print again. If the problem persists,call the Canon
Customer Care Center (see page 1-13).
Chapter 5 Troubleshooting 5-7
Troubleshooting
Page 59

Printing is unclear
Is ink flowing properly The BJ cartridge may be out of certain ink colors,or
from the BJ cartridge? the print head may be blocked. Print a Nozzle Check
Pattern to check the condition of the print head
(see page 2-2).
If the Nozzle Check Pattern does not print correctly,
the print head may be blocked.Perform the print head
cleaning procedure (see page 2-4).
If you still cannot print, replace the ink tanks (see
page 2-6).
Was the protective cap If you reattached the protective cap and tape after they
or tape reattached after have been removed, dirt and air can enter the ink tank,
it was removed? and ink may stop flowing.If the protective cap and
tape have been reattached,remove them immediately
and clean the print head (see page 2-4).
Are you printing on the Paper has a right side and a wrong side for printing.
wrong side of the paper? Confirm which side of the paper to print on and reset
the paper in the printer.
Printing has a “scratched” appearance
Is the paper too thick? You cannot use paper that exceeds 38 lb (105 g/m2)
(see page 3-1).
Is the paper bent or Do not use paper that is bent or creased. Smooth out
curled? all curls before printing.
Are you printing on the Paper has a right side and a wrong side for printing.
wrong side of the paper? Confirm which side of the paper to print on and reset
it in the printer.
5-8 Troubleshooting Chapter 5
Page 60

White lines appear
Is ink flowing properly The BJ cartridge’s print head may be blocked. Print a
from the BJ cartridge? Nozzle Check Pattern to check the condition of the
print head (see page 2-2).
If the Nozzle Check Pattern does not print correctly,
perform the print head cleaning procedure
(see page 2-4).
If you still cannot print, replace the ink tanks and, if
necessary,the BJ cartr idge (see page 2-6).
The ink bleeds
Is the paper suitable for Change the type of paper you are using and try
printing? printing again.Paper such as High Resolution Paper is
more resistant to bleeding than plain paper.
Is the print head dirty? Tr y cleaning the print head (see page 2-4).
Does the document require When printing colorful documents, such as
a large amount of ink; for illustrations and photos, ink may bleed because of the
example, are you printing quantity used. If this happens,use paper that is
photos and illustrations? desig ned for printing illustr ations and photos, such
as High Resolution Paper.
Chapter 5 Troubleshooting 5-9
Troubleshooting
Page 61

Colors are wrong
Color documents are printed in black ink only
Is the BC-10 Black BJ When printing in color,install the BC-11e Color
Cartridge installed? BJ Cartridge or the BC-12e Photo BJ Cartridge (see
page 2-14).
Printed colors differ markedly from those on screen
Is ink flowing properly The BJ cartridge may be out of certain ink colors,or
from the BJ cartridge? the print head may be blocked. Print a Nozzle Check
Pattern to check the condition of the pr int head
(see page 2-2).
If the Nozzle Check Pattern does not print correctly,
the print head may be blocked.Perform the print head
cleaning procedure (see page 2-4).
If you still cannot print, replace the ink tanks.
(see page 2-6).
Color quality does not meet expectations
Is the paper suitable for When printing illustrations and photos, use High
printing? Resolution Paper. To achieve a non-grainy,life-like
appearance for illustrations and photos of natural
images that have many color gradations, use the
optional BC-12e Photo BJ Cartridge.
Are you using a refillable Refilling of ink tanks is not recommended.For ideal
ink tank? printing, use Canon ink products.
5-10 Troubleshooting Chapter 5
Page 62

Lines do not print straight
Is the BJ cartridge Remove the BJ cartridge and reinstall it (see
correctly installed? page 2-14).
The cartridge does not move into the replacement position
Is the power on? Confirm that the printer’s POWER light is green.
If the power is not on, refer to “Power does not go on”
(see page 5-1).
Is the BJ cartridge If you leave the BJ cartridge access cover open, the
access cover open? cartr idge holder moves to the right (home position)
to prevent the print head from drying out. Close the
cover, then open it again; the cartridge holder will
move into the replacement position.
Is the
RESUME/CLEAN Open the BJ cartridge access cover and check for a
light flashing? paper jam. Remove any jammed paper.
Has the printer been If you print for extended periods of time, the BJ
printing for an extended car tr idge overheats and the RESUME/CLEAN light
period of time? flashes. If this happens, stop printing and wait until
the BJ cartridge has cooled. When the BJ cartridge is
cool, the light stops flashing.
Chapter 5 Troubleshooting 5-11
Troubleshooting
Page 63

5-12 Troubleshooting Chapter 5
Page 64

Specifications
Printing Method Bubble Jet Ink on demand
Printing Resolution Maximum 720 (horizontal) ×360 (vertical) dpi
Printing Speed (measured by Canon’s standard pattern)
Black printing Fast: 3.8 ppm
Standard: 3.5 ppm
Color printing Fast: 1.8 ppm
Standard: 1.5 ppm
Photo printing High resolution: 0.1 ppm
Printing Direction
Uni-directional (or bi-directional,depending on data format)
Printing Width 8 in./203.2 mm
Receiving Buffer 64 KB
Interface
IEEE1284 standard parallel interface (Parallel printer cable is provided)
USB1.00 standard USB interface (USB cable is optionally available)
Operating Signal Approximately 45 dB(A)
Operating Environment Temperature: 41° F to 95° F (5 to 35° C)
Humidity: 10 to 90% RH (without condensation)
Specifications
Storage Environment Temperature: 32° F to 95° F (5 to 35° C)
Humidity: 5 to 90% RH (without condensation)
Power Source AC 120 V, 60 Hz
Power Consumption Approximately 3 W (standby)
Approximately 30 W (printing)
Dimensions 14.4" (W) × 4.3" (D) × 4.3" (H)
365 mm (W) × 364 mm (D) × 110 mm (H)
Weight Approximately 8.8 lb (4.0 kg)
Paper Feeding Method
Paper supply tray Letter and A4 size only
Plain paper,High Resolution Paper
Manual feed slot Plain paper, High Resolution Paper
Appendix A Specifications A-1
Page 65

Paper Supply Tray Capacity
Plain paper Maximum 50 sheets (20 lb or 75 g/m2)
High Resolution Paper Maximum 40 sheets
Maximum capacity Less than 0.2 in/5 mm (approximately)
Paper Size
Paper supply tray Letter,A4
Manual feed slot Letter,A4, B5, A5
Minimum 3.86" (W) × 3.86" (H)
Maximum 9.5" (W) × 14.0" (H)
Paper Weight
Paper supply tray 17 lb to 35 lb (64 g/m2to 90 g/m2)
Manual feed slot 17 lb to 38 lb (64 g/m2to 105 g/m2)
Extremely thin or thick paper that exceeds these limits
cannot be used
BJ Cartridges
● BC-11e Color BJ Cartridge (provided)
Print head 64 nozzles for black
24 nozzles each for cyan,magenta, and yellow
Ink colors Black,cyan, magenta, and yellow
Capacity Black Approximately 25 pages (for the BCI-11 Black)
Approximately 40 pages (for the BCI-18 Black)
Color Approximately 30 pages (for the BCI-11 Color)
Approximately 50 pages (for the BCI-18 Color)
At 7.5 % coverage for each color; calculated for the number of pages
possible printing with an ink tank, based on the possible printing
area for an A4 page.
● BC-10 Black BJ Cartridge (optional)
Print head 128 nozzles
Ink color Black
Capacity Approximately 170 pages (for the BCI-10)
Approximately 270 pages (for the BCI-17)
For 1,500 character standard documents
● BC-12e Photo Color BJ Cartridge (optional)
Print head 64 nozzles for black
24 nozzles each for cyan,magenta, and yellow
Ink colors Black,cyan, magenta, and yellow
Capacity Approximately 20 pages
At 7.5 % coverage for each color; calculated for the number of pages
possible printing with an ink tank, based on the possible printing
area for an A4 page.
A-2 Specifications Appendix A
LR1_V1/11-99
Page 66

To use this printer with a computer:
● Printer Driver
You must download the printer driver from the CCSI website (http://www.ccsi.canon.com).
For details on using the driver, see the driver and accompanying downloaded manual.
● Computer
Computers that operate under Microsoft®Windows®98, or Microsoft Windows 95
When connecting with a USB cable,USB port operation is limited to computers on which
Microsoft Windows 98 was preinstalled by the computer manufacturer.
● Operating System
Microsoft Windows 98 or Microsoft Windows 95
Printable Area
To maintain printing quality, please leave sufficient spacing on all four sides of the pr inting page.
Please note that the dimensions of this area vary according to paper size.The measurements for
Letter,A4, A5 and B5 are shown below.
Recommended Printing Area ( area):
It is recommended that you print within this area.
Possible Printable Area( area):
You can print within this area. However,print and paper feed accuracy may be reduced.
A4, A5, B5 Size Paper
1.18 in
(3 mm)
0.87 in
(22 mm)
1.18 in
(3 mm)
0.87 in
(22 mm)
Specifications
0.25 in
(6.4 mm)
0.25 in
(6.4 mm)
0.28 in
(7 mm)
0.87 in
(22 mm)
0.13 in
(3.4 mm)
0.13 in
(3.4 mm)
0.28 in
(7 mm)
0.87 in
(22 mm)
Appendix A Specifications A-3
Page 67

A-4 Specifications Appendix A
Page 68

Glossary
Automatic feed
Refers to one way in which paper can be fed into the printer when the paper supply tray
is used.
BJ cartridge
The printing mechanism that contains the print head unit and ink tanks.
Bubble Jet printing
An ink jet type of printing that heats the ink to a boiling point in a nozzle to form a
bubble.When the bubble expands, there is no room left in the nozzle for the ink and the
ink is projected onto paper.
CMYK
Acronym for cyan, magenta, yellow, and black; the four colors used in the standard color
model of the pr inting industr y. Refers to a method of specifying color using CMYK color
values. (K is used for black because B is used to represent blue in RGB.)
dB(A)
Stands for decibel level (a decibel being a unit of measurement for the intensity of the
sound coming from the printer),adjusted for background noise.
Glossary
dpi
Dots per inch.A unit of measurement for indicating a printer’s resolution.Your printer
can produce a resolution up to 720 dpi (horizontal) by 360 dpi (vertical).
Ink Cartridge Storage Box
A box for storing a BJ cartridge.A BJ cartridge removed from the printer must be stored
inside this container to prevent the print head of the cartridge from dr y ing and clogging .
Interface
The connection between two devices that makes it possible for them to communicate
with each other.This printer features both a parallel and a USB interface.
Manual feed
A method of feeding paper to the pr inter one sheet at a time.
Noise level
See dB(A).
Glossary G-1
Page 69

Parallel interface
An interface that transmits multiple bits simultaneously (usually in one-byte segments).
Your printer has a built-in, Centronics-type parallel interface with bi-directional
capability.See also In te r f a ce.
Platen
Printer component that holds the paper in position during ink transfer.
Print head
The printing mechanism that contains print nozzles and ejects the ink for printing.
Print head capping
An automatic protection function that prevents the print head unit and BJ cartridges
from drying out or becoming clogged with dust.
Printable area
The area of a sheet of paper on which a printer can reproduce text or graphics (the
printing area is smaller than the paper). On this printer,the printing area varies
depending on the type of paper being used.
Printer driver
Software that sends printing instructions to a printer.The printer driver keeps track of the
attributes of a printer and the codes the program must send to access those attributes.
RAM
Random Access Memory. Printer memory that is used for temporary storage of
information you want to print and downloaded fonts.
Resolution
The density of dots for any given output device.Expressed in terms of dots per inch (dpi).
Low resolution causes font characters and graphics to have a jagged appearance. Higher
resolution means smoother curves and angles as well as a better match to traditional
typeface designs. Resolution values are represented by horizontal data and vertical data,
for example, 360 × 360 dpi. This printer can produce output with resolutions up to
720 × 360 dpi precision.
RGB
An acronym for Red,Green, and Blue; the three primary colors used in the additive
process to form a wide spectrum of colors.
G-2 Glossary
Page 70

Index
A
AC adapter: 1-3—4
Access cover release button:1-9, 2-8
Accessories:1-7—8
B
Back cover: 1-10
Back view,pr inter: 1-10
BC-10 Black BJ Cartridge: 1-7, 2-6, 2-9,
2-11, 2-12,A-2
BC-11e Color BJ Cartridge: 1-7, 2-6, 2-8,
2-10—11,A-2
BC-12e Photo BJ Cartridge: 1-7, 2-6, 2-9,
2-11, 2-13,A-2
BCI-10 Black Ink Tank: 1-8, 2-6
BCI-11 Black Ink Tank: 1-8, 2-6
BCI-11 Color Ink Tank: 1-8, 2-6
BCI-12 Photo Ink Tank: 1-8, 2-6
BCI-12 Photo Ink Tank: 1-8, 2-6
BCI-17 Black Ink Tank: 1-8, 2-6
BCI-18 Black Ink Tank: 1-8, 2-6
BCI-18 Color Ink Tank: 1-8, 2-6
BJ cartridge(s): 1-7, A-2
does not move: 5-11
guidelines: 2-1
handling: 1-6
replacing: 2-14—17
using: 2-1—17
BJ cartridge access cover: 1-9, 2-8
BLACK button: 1-9
BUSY light: 1-10,1-12
C
Canon
Authorized Service Facility: 1-14
help: 1-13
referral service: 1-7
Web site: 1-13—14, A-4
Cleaning
print head: 2-4—5
printer: 4-2
Cleaning sheet, High Resolution
Paper: 3-6—7
Clearing, paper jams: 3-8
COLOR button: 1-9
Colors
missing: 2-2
wrong: 5-10
Computer: A-3
Control panel: 1-10
Conventions: iv
Customer support: 1-13
Index
D
Deep print head cleaning: 2-5
Dimensions, printer: A-1
Documentation: iii
F
Frequency: 1-4
Front view,printer: 1-9
Index I-1
Page 71

G
N
Guidelines: 2-1
H
Handling
BJ cartridge: 1-6
paper: 3-1—8
printer: 1-5
High Resolution Paper:1-9, 3-1, 3-6—7
cleaning sheet: 3-6—7
I
Ink, bleeds: 5-9
Ink Cartridge Storage Box: 1-7—8, 2-14
Ink light reset buttons: 1-9, 2-13, 2-17
Ink tanks: 1-8
replacing: 2-6—14
Interface:A-1
Internet device: 1-11
L
Lights: 5-1—2
Limited warranty: 1-7
Lines, do not print straight: 5-11
Loading, paper: 3-3—6
Locating, printer: 1-2
LOW INK lights: 1-9—10,2-6, 2-13, 5-3
M
Maintaining, printer: 1-6, 4-1—4
Manual feed slot: 1-9, 3-5—6
Manual feed support: 1-9
extension: 1-9
Microsoft Windows: A-3
Mode switch: 1-9
Normal print head cleaning: 2-4
Nozzle Check Pattern, printing: 2-2—3
O
Operating
environment:A-1
signal: A-1
system: A-3
P
Paper: 1-7
curls: 5-5
does not feed properly: 5-3
feeding method: A-1
handling: 3-1—8
jammed: 5-3
jams, clearing: 3-8
notes: 3-2
size: 3-1, A-2
soiled: 5-5
thickness: 3-1
trouble, after printing: 5-5
trouble, when printing: 5-3—4
weight: 3-1, A-2
Paper guide:1-9
Paper indicator: 1-9
Paper output cover: 1-9
Paper output tray: 1-9
extension: 1-9
Paper supply tray: 1-9, 3-3
capacity: 1-9, A-2
Parallel
connector port: 1-10
interface:A-1
Plain paper: 1-9, 3-1
Platen: 4-2
I-2 Index
Page 72

Power: 1-3—4, 5-1
connector: 1-10
consumption:A-1
cord: 1-3—4
does not go on: 5-1
source:A-1
turn off: 1-12
turn on: 1-11
POWER button: 1-10—12
POWER light: 1-10—11
Precautions,pr inter: 4-1
Print head, cleaning: 2-4—5
Printable area:A-3
Printer
cleaning: 4-2
does not print: 5-6
handling: 1-5
maintaining: 1-6, 4-1—4
parts: 1-9
prints garbage: 5-7
servicing: 1-14
stops during printing: 5-6
transporting: 4-3—4
Printing
colors wrong: 5-10
direction:A-1
ink bleeds: 5-9
method: A-1
Nozzle Check Pattern: 2-2—3
resolution: A-1
scratched: 5-8
speed: A-1
unclear: 2-2, 5-8
white lines: 5-9
width: A-1
R
S
Safety notes: 1-2—6
SB-11 Ink Cartridge Storage Box:
1-7—8, 2-14
Servicing, printer : 1-14
Specifications: A-1—3
Storage environment:A-1
Supplies: 1-7—8
T
Technical support: 1-13
Transpor ting, printer : 4-3—4
Trouble, when printing: 5-6—11
Troubleshooting: 5-1—11
U
USB
connector port: 1-10
interface:A-1
Index
V
Voltage: 1-4
W
Warranty: 1-7
Web site: 1-13—14, A-3
Weight, pr inter: A-1
White lines:5-9
Windows:A-3
Receiving buffer: A-1
RESUME/CLEAN button: 1-10, 3-7—8
RESUME/CLEAN light: 1-10,3-7—8
Index I-3
Page 73

FCC Regulations
Color Bubble Jet Printer, Model K10191
This equipment has been tested and found to comply with the limits for a Class B digital
device, pursuant to Part 15 of the FCC Rules. These limits are designed to provide
reasonable protection against harmful interference in a residential installation. This
equipment generates, uses and can radiate radio frequency energy and, if not installed
and used in accordance with the instructions,may cause harmful interference to radio
communications.However,there is no guarantee that interference will not occur in a
particular installation. If this equipment does cause harmful interference to radio or
television reception, which can be determined by turning the equipment off and on, the
user is encouraged to try to correct the interference by one or more of the follow ing
measures:
■ Reorient or relocate the receiving antenna.
■ Increase the separation between the equipment and receiver.
■ Connect the equipment into an outlet on a circuit different from that to which the
receiver is connected.
■ Consult the dealer or an experienced radio/TV technician for help.
Do not make any changes or modifications to the equipment unless otherwise specified in
the manual. If such changes or modifications should be made, you could be required to
stop operation of the equipment.
Use of shielded cable is required to comply with Class B limits in Subpart B of Part 15 of
FCC Rules.
Canadian Radio Interference Regulations
This digital apparatus does not exceed the Class B limits for radio noise emissions from
digital apparatus as set out in the interference-causing equipment standard entitled
“Digital Apparatus,”ICES-003 of the Industry and Science Canada.
Cet appareil numérique respecte les limites de bruits radio électriques applicables aux
appareils numériques de Classe B prescrites dans la norme sur le matériel brouilleur:
“Appareils Numériques,”NMB-003 édictée par l’Industrie et Sciences Canada.
FCC Regulations FCC-1
 Loading...