

Page 1
PUB. DIE-0382-000
Digital Camcorder
Instruction Manual
Page 2

Introduc tion
Important Usage Instructions
WARNING!
WARNING!
COPYRIGHT WARNING:
Unauthorized recording of copyrighted materials may infringe on the rights of copyright
owners and be contrary to copyright laws.
CAUTION:
TO REDUCE THE RISK OF ELECTRIC SHOCK AND TO REDUCE ANNOYING INTERFERENCE, USE
THE RECOMMENDED ACCESSORIES ONLY.
CAUTION:
DISCONNECT THE MAINS PLUG FROM THE SUPPLY SOCKET WHEN NOT IN USE.
To reduce the risk of electric shock, do not expose this product to dripping or splashing.
The Mains plug is used as the disconnect device. The Mains plug shall remain readily operable
to disconnect the plug in case of an accident.
While using the compact power adapter, do not wrap it or cover it with a piece of cloth, and do
not place it in confined narrow spaces. Heat may build up, the plastic case may deform and it
could result in electric shock or fire.
CA-570E identification plate is located on the bottom.
TO REDUCE THE RISK OF ELECTRIC SHOCK, DO NOT REMOVE COVER (OR
BACK). NO USER SERVICEABLE PARTS INSIDE. REFER SERVICING TO QUALIFIED
SERVICE PERSONNEL.
TO REDUCE THE RISK OF FIRE OR ELECTRIC SHOCK, DO NOT EXPOSE THIS
PRODUCT TO RAIN OR MOISTURE.
Using any device other than the Compact Power Adapter CA-570E may damage
the camcorder.
2
Page 3
European Union (and EEA) only.
These symbols indicate that this product is not to be disposed of
with your household waste, according to the WEEE Directive (2002/
96/EC), the Battery Directive (2006/66/EC) and/or your national laws
implementing those Directives.
This product should be handed over to a designated collection point, e.g., on an
authorized one-for-one basis when you buy a new similar product or to an authorized
collection site for recycling waste electrical and electronic equipment (EEE) and batteries
and accumulators. Improper handling of this type of waste could have a possible impact
on the environment and human health due to potentially hazardous substances that are
generally associated with EEE. Your cooperation in the correct disposal of this product
will contribute to the effective usage of natural resources.
For more information about the recycling of this product, please contact your local city
office, waste authority, approved scheme or your household waste disposal service or
visit www.canon-europe.com/environment.
(EEA: Norway, Iceland and Liechtenstein)
Trademark Acknowledgements
• SD, SDHC and SDXC Logos are trademarks of SD-3C, LLC.
• Microsoft and Windows are trademarks or registered trademarks of Microsoft Corporation in the United States
and/or other countries.
• Macintosh and Mac OS are trademarks of Apple Inc., registered in the U.S. and other countries.
• Manufactured under license from Dolby Labora tories.
“Dolby” and the double-D symbol are trademarks of Dolby Laboratories.
• Other names and products not mentioned above may be trademarks or
registered trademarks of their respective companies.
• This device incorporates exFAT technology licensed from Microsoft.
• ANY USE OF THIS PRODUCT OTHER THAN CONSUMER PERSONAL USE IN
ANY MANNER THAT COMPLIES WITH THE MPEG-2 STANDARD FOR ENCODING VIDEO INFORMATION FOR
PACKAGED MEDIA IS EXPRESSLY PROHIBITED WITHOUT A LICENSE UNDER APPLICABLE PATENTS IN THE
MPEG-2 PATENT PORTFOLIO, WHICH LICENSE IS AVAILABLE FROM MPEG LA, L.L.C., 250 STEELE STREET,
SUITE 300, DENVER, COLORADO 80206.
3
Page 4
Exciting Features
Whether you are using a camcorder for the first time or are very
experienced, this camcorder offers many easy-to-use functions. The
following are just but a few examples of the many functions that can
enrich your shooting experience.
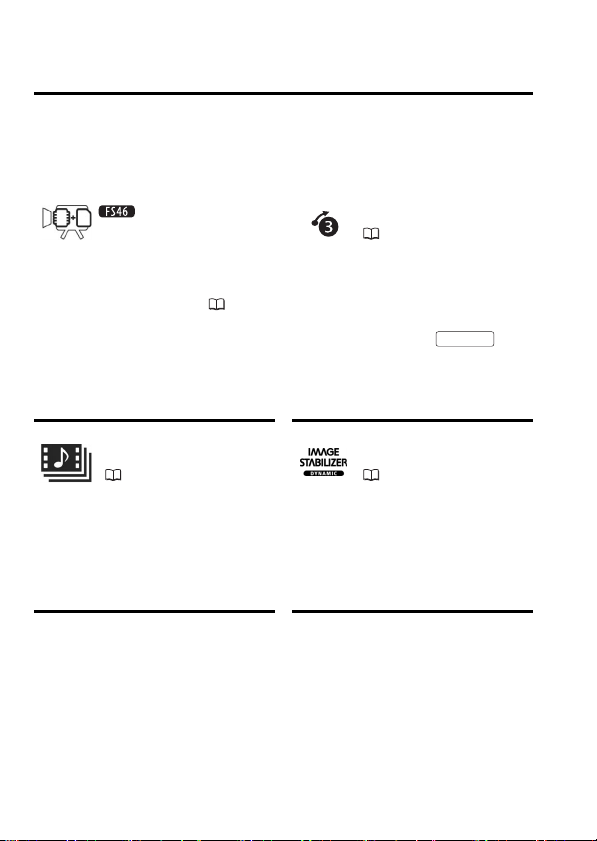
Dual Flash Memory
You can record in the built-in
memory or on commercially
available memory cards ( 31).
Video Snapshot
(51)
Shoot or capture short scenes
and arrange them into a video
clip set to your favorite
background music.
Pre-recording
( 50)
When pre-recording is activated,
the camcorder starts recording
video continuously into a
temporary 3-second memory.
When you press the
button, the scene recorded will
have started 3 seconds before
you started shooting.
Start/Stop
Image Stabilization
( 50)
Dynamic IS compensates for
camcorder shake when you
shoot video while walking. This
gives you more freedom and
mobility when recording movies.
4
Page 5

T
able of contents
Introduction
4 Exciting Features
8 About this Manual
10 Getting to Know the Camcorder
10 Supplied Accessories and CD-ROMs
12 Names of Parts
Preparations
15 Getting Started
15 Charging the Battery Pack
18 Preparing the Accessories
19 Adjusting the Position and Brightness of the LCD
21 Basic Operation of the Camcorder
21 Operating Modes
23 Joystick and Joystick Guide
23 Using the Menus
26 First Time Settings
26 Setting the Date and Time
27 Changing the Language
27 Changing the Time Zone
28 Using a Memory Card
28 Memory Cards Compatible for Use with the
30 Inserting and Removing a Memory Card
31 Selecting the Memory for the Recordings
31 Initializing the Memory
Screen
Camcorder
Table of contents 5
Page 6

Video
34 Basic Recording
34 Shooting Video
35 Selecting the Video Quality (Recording Mode)
36 Zooming: Optical, Advanced and Digital Zoom
37 Quick Start Function
39 Basic Playback
39 Playing Back Video
41 Selecting what Recordings to Play Back
42 Searching for Scenes
44 Pre-selecting Recordings from the Index Screen
45 Deleting Scenes
47 Advanced Functions
47 Automatic Exposure and Special Scene Recording
49 Automatic Backlight Correction
50 Advanced Image Stabilization
50 Pre-Recording
51 Video Snapshot
52 Digital Effects
53 Manual Exposure Adjustment
54 Manual Focus Adjustment
55 White Balance
56 Image Effects
57 Mini Video Light
57 Self Timer
58 Selecting the Playback Starting Point
59 Playing Back Recordings Set to Background Music
62 On-Screen Displays and Data Code
63 Playlist and Scene Operations
63 Editing the Playlist: Adding, Deleting and Moving
65 Dividing Scenes
66 Copying Scenes to a Memory Card
Programs
Scenes
6 Table of contents
Page 7

Photos
69 Taking Photos
70 Viewing Photos
72 Slideshow
72 Deleting Photos
74 Copying Photos to a Memory Card
External Connections
76 Terminals on the Camcorder
76 Connection Diagrams
78 Playback on a TV Screen
79 Saving and Sharing Your Recordings
79 Saving Recordings on a Computer
81 Copying Movies to an External Video Recorder
82 Preparing Movies for the Web
Additional Information
86 Appendix: Menu Options Lists
86 FUNC. Menu
88 Setup Menus
94 Onscreen Icons and Displays
98 Trouble?
98 Troubleshooting
103 List of Messages
109 Do’s and Don’ts
109 Handling Precautions
113 Maintenance/Others
114 Using the Camcorder Abroad
115 General Information
115 Accessories
116 Optional Accessories
119 Specifications
123 Index
Table of contents 7
Page 8
About this Manual
Thank you for purchasing the Canon LEGRIA FS46 / LEGRIA FS405 /
LEGRIA FS406. Please read this manual carefully before you use the
camcorder and retain it for future reference. Should your camcorder
fail to operate correctly, refer to Trouble shoo ting (98).
Conventions Used in this Manual
• IMPORTANT: Precautions related to the camcorder’s operation.
• NOTES: Additional topics that complement the basic operating
procedures.
• POINTS TO CHECK: Restrictions or requirements regarding the
function described.
• : Reference page number within this manual.
• : Text that applies only to the model shown in the icon.
• The following terms are used in this manual:
When not specified as “memory card” or “built-in memory”, the
term “memory” by itself refers to both.
“Scene” refers to one movie unit from the point you press the
Start/Stop
the recording.
• The photos included in this manual are simulated pictures taken
with a still camera. Unless indicated otherwise, illustrations and
menu icons refer to the .
button to start recording until you press again to pause
8 Introduction
Page 9
Brackets [ ] are used to refer to
menu options as they are
displayed on screen.
The names of most buttons and
switches are indicated within a
“button” frame.
For example .
The arrow is used to abbreviate menu selections. For a detailed
explanation on how to use the menus, refer to Using the Menus
( 23). For a concise summary of all available menu options and
settings, refer to the appendix Menu Options Lists ( 86).
refer to Operating Modes ( 21).
FUNC.
indicates that a function is available in the operating mode indicated and
indicates that the function is not available. For a detailed explanation
Introduction 9
Page 10
Getting to Know t he Cam corder
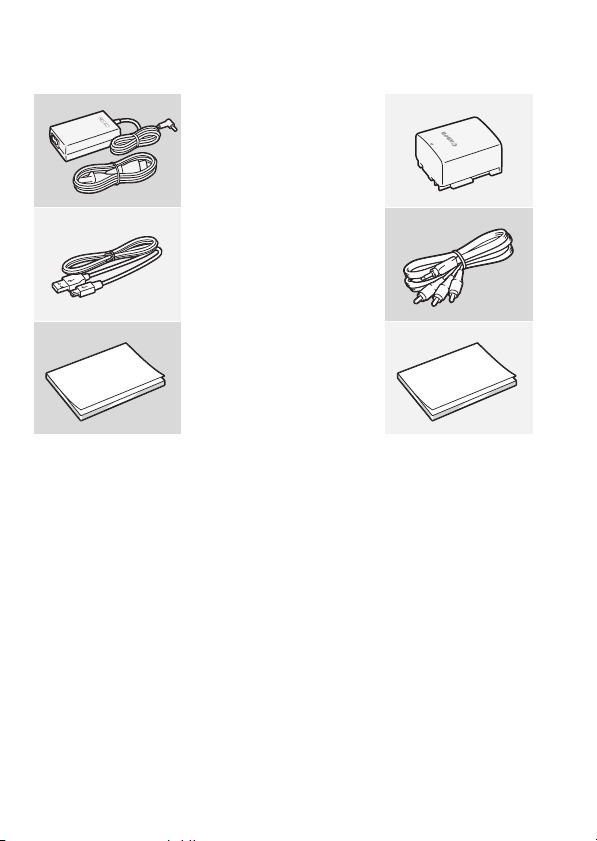
Supplied Accessories and CD-ROMs
The following accessories are supplied with the camcorder:
XCA-570E Compact Power Adapter
(incl. power cord)
BP-808 Battery PackW
XIFC-300PCU/S USB Cable
STV-250N Stereo Video CableW
Yellow • Red • White plugs
XQuick Guide
10 Introduction
Installation Guide for PIXELA’sW
Software
Page 11

The following CD-ROMs and software are supplied with the camcorder:
• PIXELA’s Transfer Utility CD-ROM*
-Use Transfer Utility for saving and transferring movies and music
files you can use as background music.
•/ PIXELA’s VideoBrowser CD-ROM*
- In addition to all the functionality of Transfer Utility, you can use
VideoBrowser for managing, editing, and playing back movies.
Instruction Manual/Music Data CD-ROM (referred to in this
•
manual as “Camcorder Supplemental Disc”)
- Instruction Manual - The full-version instruction manual of the
camcorder (this PDF file).
- Music data - Music files that can be used as background music
during playback. These music files are for exclusive use with the
supplied PIXELA’s software. The disc cannot be played back on CD
players.
* The CD-ROM includes the instruction manual of the software (on PDF file).
Introduction 11
Page 12
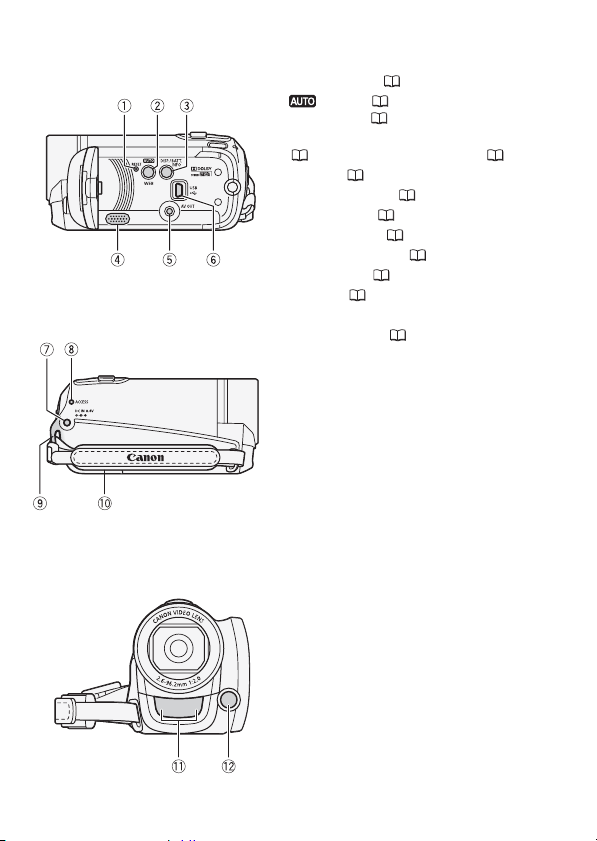
Names of Parts
Left side view
Right side view
Front view
1 RESET button ( 102)
2 button ( 21)/
WEB button ( 82)
3 DISP. (on-screen display) button
( 58, 62)/BATT. INFO button ( 97)
4 Speaker ( 39)
5 AV OUT terminal ( 76, 77)
6 USB terminal ( 76, 77)
7 DC IN terminal ( 15)
8 ACCESS indicator ( 34, 69)
9 Strap mount ( 18)
Aq Grip belt ( 18)
Aa Stereo microphone
As Mini video light ( 57)
12 Introduction
Page 13
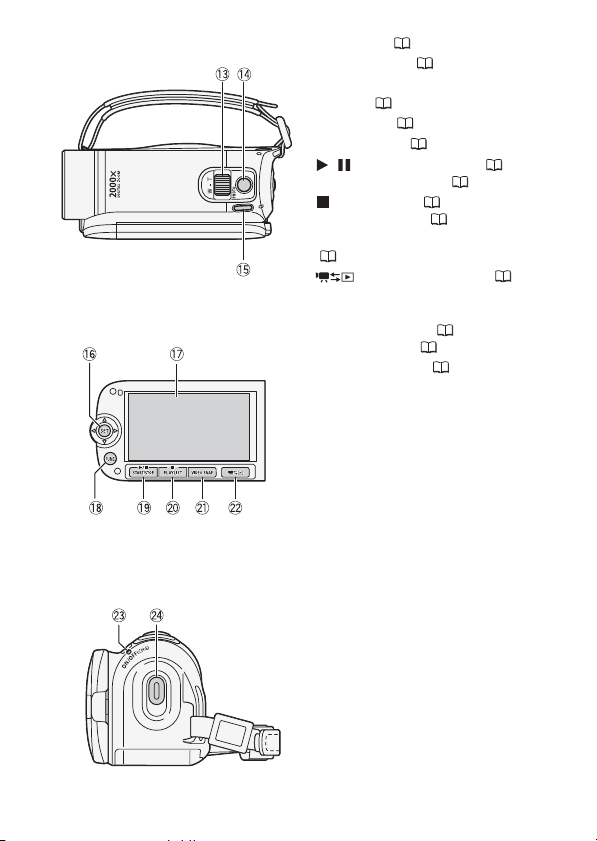
Top vie w
LCD panel
Back view
Ad Zoom lever ( 36)
Af PHOTO button ( 69)
Ag POWER button
Ah Joystick ( 23)
Aj LCD screen ( 19)
Ak FUNC. button ( 24, 86)
Al / (play/pause) button ( 39)/
START/STOP button ( 34)
Sq (stop) button ( 39)/
PLAYLIST button ( 42)
Sa VIDEO SNAP (video snapshot) button
( 51)
Ss (camera/play) button ( 22)
Sd ON/OFF (CHG) (charge) indicator:
Green – On
Orange – Standby ( 37)
Red – Charging ( 15)
Sf Start/Stop button ( 34)
Introduction 13
Page 14
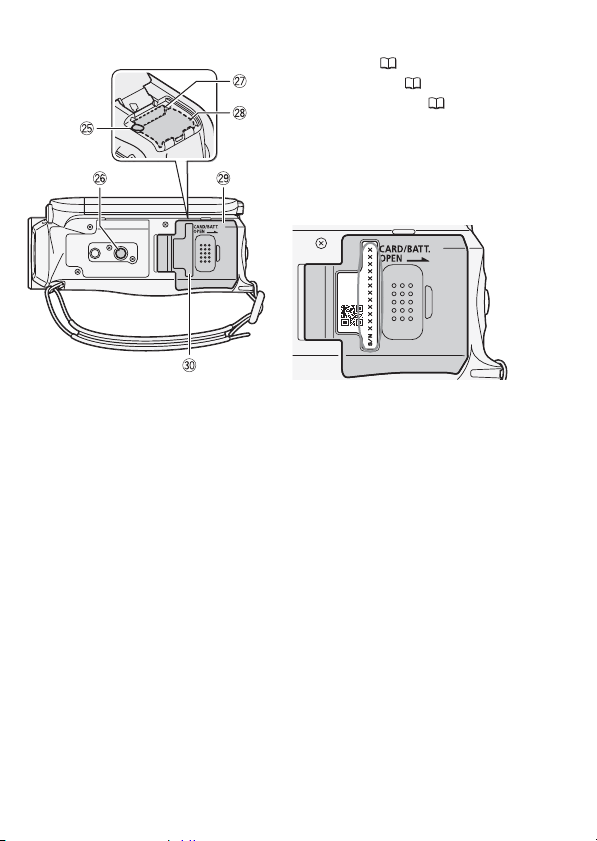
Bottom view
Sg Battery release latch
Sh Tripod socket ( 109)
Sj Memory card slot ( 30)
Sk Battery compartment ( 15)
Sl Battery compartment cover/Memory
card slot cover
Dq Serial number
The serial number label is located on
the battery compartment cover.
14 Introduction
Page 15
Preparations
This chapter describes basic operations, such as navigating
the menus, and first time settings to help you learn more about
your camcorder.
Getting Started
Charging the Battery Pack
The camcorder can be powered with a battery pack or directly using
the compact power adapter. The first time you use a battery pack, fully
charge it and then use the camcorder until the battery pack is completely exhausted. Doing so will ensure that the remaining recording
time will be displayed accurately.
For approximate charging times and recording/playback times with a
fully charged battery pack, refer to Charging, Recording and Playback
Times ( 117).
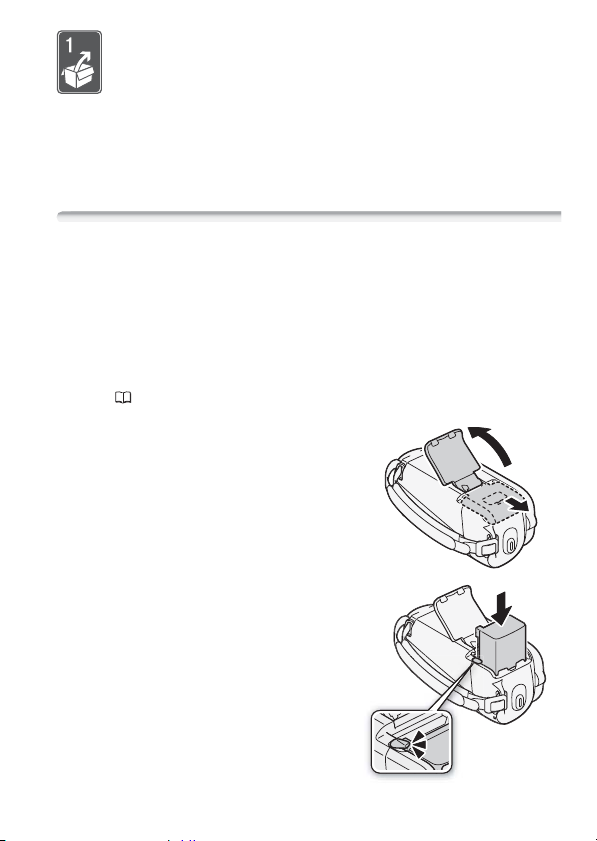
1 Slide the battery compartment
cover away from the lens and open
it.
2 Insert the battery pack all the way
into the compartment and press
gently until it clicks.
1
2
Preparations 15
Page 16
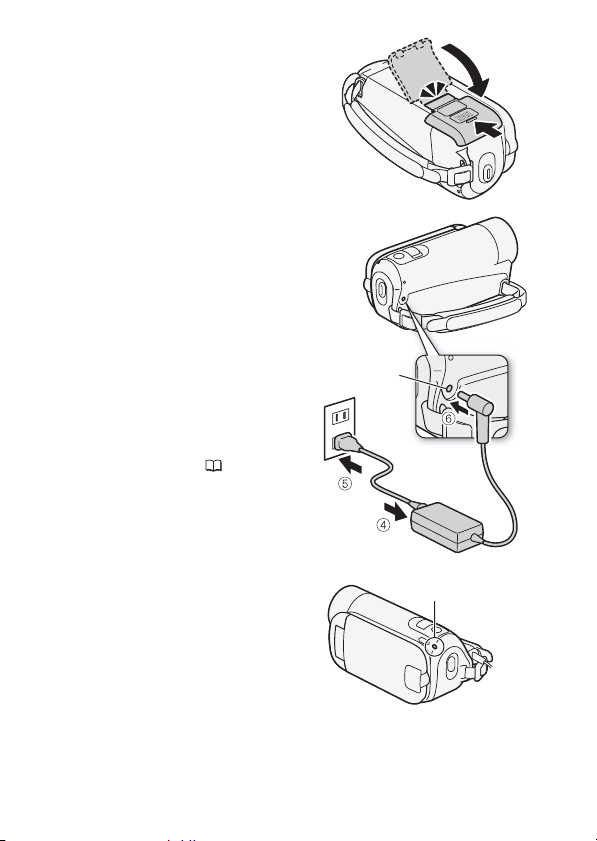
3 Close the cover and slide it toward
the lens until you hear a click.
4 Connect the power cord to the
compact power adapter.
5 Plug the compact power adapter
into a power outlet.
6 Connect the compact power
adapter to the camcorder’s DC IN
terminal.
7 Charging will start when the
camcorder is turned off.
• If the camcorder was on, the green
ON/OFF (CHG) indicator will go out
when you turn off the camcorder.
After a moment, the ON/OFF (CHG)
indicator will start flashing in red
(battery pack charging). The red
ON/OFF (CHG) indicator will go out
when the battery pack is fully
charged.
• If the indicator flashes quickly, refer
Troubleshooting
to
( 98).
3
terminal
DC IN
ON/OFF (CHG)
(charge) indicator
16 Preparations
Page 17

To remove the battery pack
1 Slide the battery compartment
cover away from the lens and
open it.
2 Press the battery release latch
and pull out the battery pack.
3 Close the cover and slide it
toward the lens until you hear a
click.
Battery release latch
IMPORTANT
• Turn off the camcorder before connecting or disconnecting the compact power adapter. After pressing to turn off the camcorder,
POWER
important data is updated in the memory. Be sure to wait until the
green ON/OFF (CHG) indicator goes out.
• We recommend charging the battery pack in temperatures between
10 °C and 30 °C. Outside the temperature range of 0 °C to 40 °C,
charging will not start.
• Do not connect to the camcorder’s DC IN terminal or to the compact
power adapter any electrical equipment that is not expressly recommended for use with this camcorder.
• To prevent equipment breakdowns and excessive heating, do not connect the supplied compact power adapter to voltage converters for
overseas travels or special power sources such as those on aircraft
and ships, DC-AC inverters, etc.
NOTES
• The battery pack will be charged only when the camcorder is off.
• If remaining battery time is an issue, you can power the camcorder
using the compact power adapter so the battery pack will not be consumed.
• Charged battery packs continue to discharge naturally. Therefore,
charge them on the day of use, or the day before, to ensure a full
charge.
Preparations 17
Page 18
• We recommend that you prepare battery packs to last 2 to 3 times
longer than you think you might need.
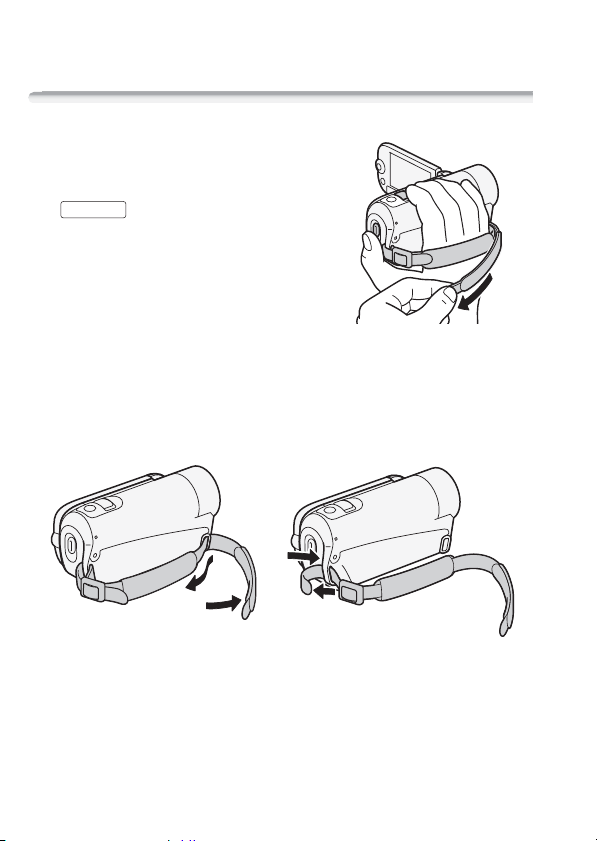
Preparing the Accessories
Fasten the grip belt.
Adjust the grip belt so that you can reach
the zoom lever with your index finger, and
the button with your thumb.
Start/Stop
To remove the grip belt
1 Lift the padded handgrip’s flap and detach the strap from the Velcro
pad. Pull the strap to remove it from the camcorder’s front bracket.
2 Pull the other end of the strap through the buckle and remove it
from the camcorder’s rear bracket.
18 Preparations
Page 19
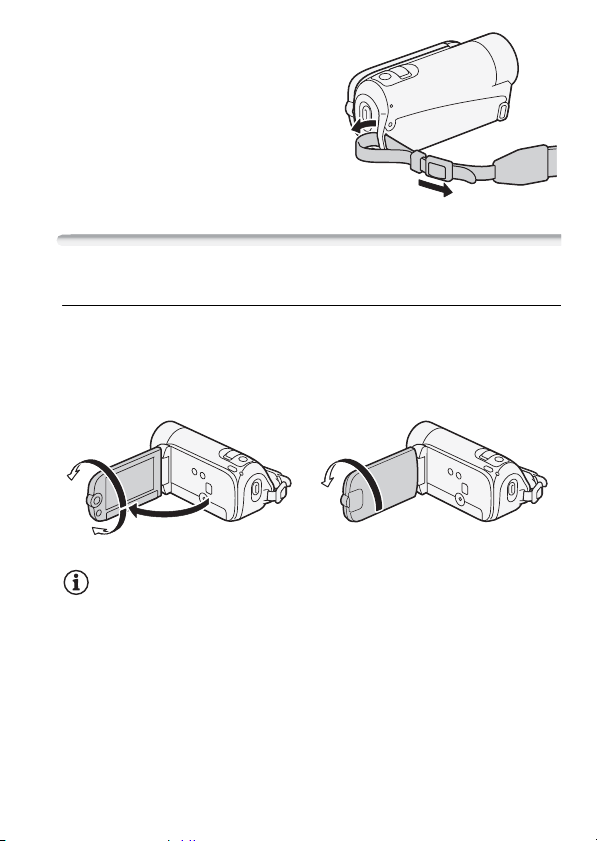
To attach an optional wrist strap
Pass the attaching end of the wrist
strap through the rear bracket on the
camcorder, thread the wrist strap
through the loop and fasten.
Adjusting the Position and Brightness of the LCD Screen
Rotating the LCD Panel
Open the LCD panel 90 degrees.
• You can rotate the panel 90 degrees downward.
• You can rotate the panel 180 degrees toward the lens. Rotating the
LCD panel 180 degrees can be useful when you wish to include yourself in the picture when recording with the self timer.
180°
90°
180°
Subject can monitor the LCD screen
NOTES
• About the LCD screen: The screen is produced using extremely high-precision manufacturing techniques, with more than 99.99% of the pixels
operating to specification. Less than 0.01% of the pixels may occasionally misfire or appear as black, red, blue or green dots. This has no
effect on the recorded image and does not constitute a malfunction.
Preparations 19
Page 20
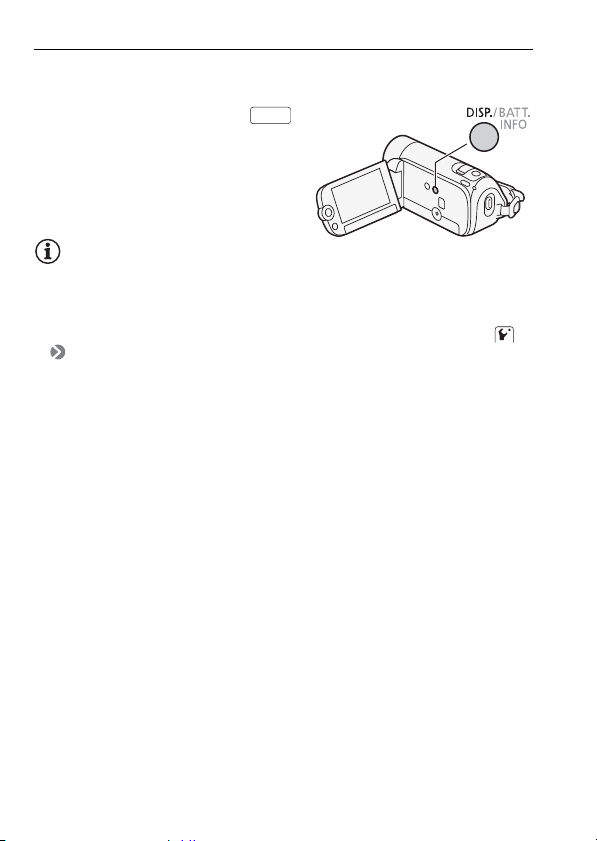
LCD Backlight
When recording in bright places it may be difficult to use the LCD
screen. Turn on the LCD backlight to make it brighter.
With the camcorder on, hold
pressed down for more than
2 seconds.
Repeat this action to switch the LCD
backlight between off (normal) and on
(bright).
NOTES
• The LCD backlight does not affect the brightness of the recordings.
• Using the bright setting will shorten the effective usage time of the battery pack.
• You can further adjust the brightness of the LCD screen with the
[LCD Brightness] setting.
DISP.
20 Preparations
Page 21

Basic Operation of the Camcorder
Operating Modes
Recording
The camcorder offers two basic modes for recording video
and photos: mode, for beginners or if you just prefer
not to bother with detailed camcorder settings, and flexible
recording ( ) mode, which lets you change the camcorder’s settings to your preference. Press the button to
switch the camcorder to mode and press the button
again to switch back to mode. In either mode, you can record
movies by pressing or take photos by pressing .
Start/Stop
PHOTO
Operating
mode
Onscreen
icon
Operation
Easy recording of movies and photos.
Recording of movies and photos while enjoying full
access to the menus and advanced functions.
About mode
• Only the following buttons/functions are available in this mode.
Start/Stop
- for recording movies
PHOTO
- for recording photos
- Zoom ( 36)
- Quick Start ( 37)
VIDEO SNAP
- for recording video snapshot scenes ( 51)
NOTES
• In mode, menus cannot be accessed but the following settings
can be changed in advance.
- FUNC. menu: Recording mode of movies.
Preparations 21
Page 22
- menu: [Rec Media for Movies]*, [Rec Media for Photos]*,
[Widescreen], [Video Snapshot Length].
- menu: [Image Stabilizer]**, [Auto Slow Shutter].
- , and menus: All settings.
* only.
** The [ Standard] setting will be used in mode if set to [ Off] in
mode.
• Even in mode, the camcorder can help you with the settings. For
example, you can use the Special Scene recording programs ( 47)
to set at once all the optimal settings to match special recording conditions.
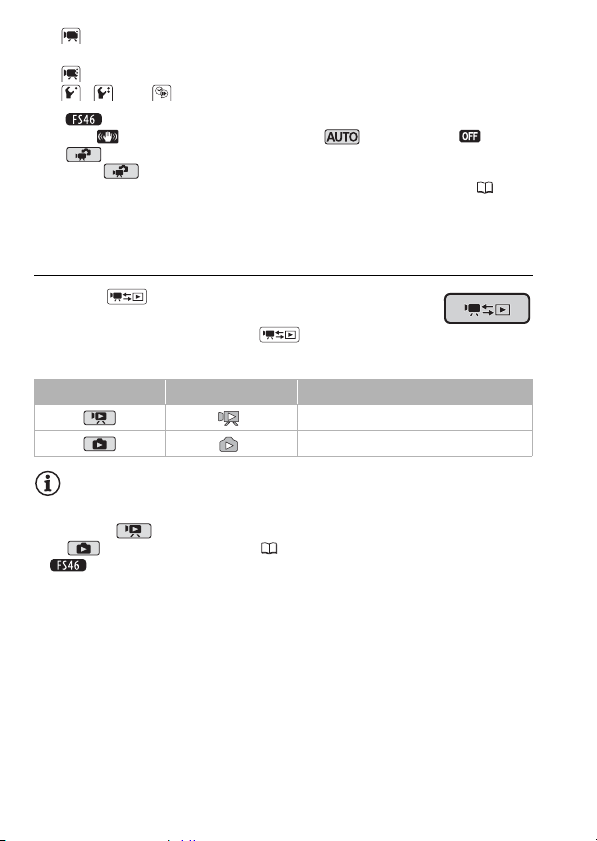
Playback
Press the (camera/play) button to switch the
camcorder between camera (recording) mode and
playback mode. You can press when the camcorder is off to turn it on directly in playback mode.
Operating mode Onscreen icon Operation
Playing back movies.
Viewing photos.
NOTES
• When switching to playback mode, the [Movies] index screen will be
selected ( mode). Use the tabs on the top of the screen to switch
to mode to view photos ( 41).
• When switching to playback mode, the memory selected for
playback will be the same currently used for recording movies.
22 Preparations
Page 23
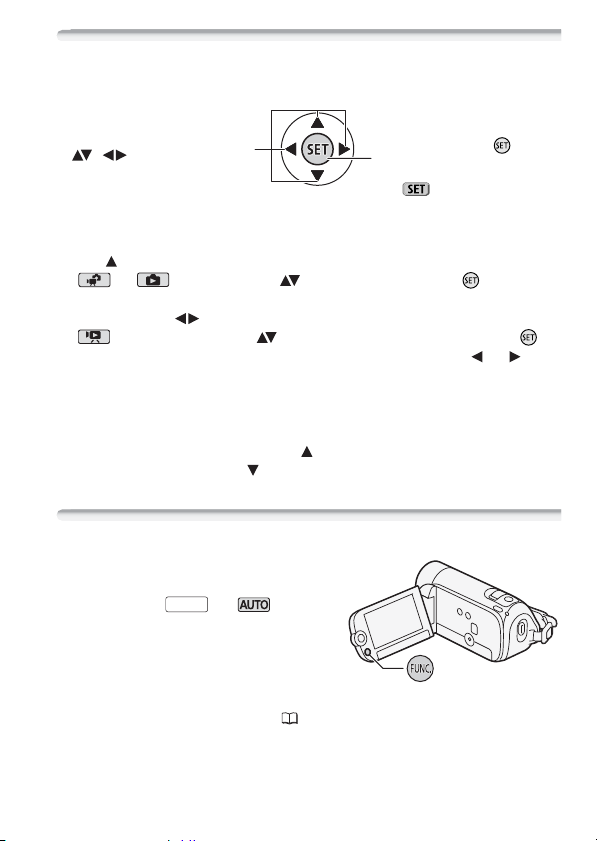
Joystick and Joystick Guide
Use the joystick to operate the camcorder’s menus.
Push the joystick up, down, left or right
( , ) to select an item or
change settings.
Press the joystick itself ( ) to save
the settings or confirm an action. On
menu screens, this is indicated by the
icon .
The functions that appear in the joystick guide depend on the operating mode. By default, the joystick guide is minimized. Push the joystick ( ) to display it.
• or mode: Select ( ) a function and press to change
the setting. With some functions, you will need to make further
adjustments ( ).
• mode: First, select ( ) a “row” of functions; then, press to
operate the function in the middle or push the joystick ( or ) to
operate the function on the left or right, respectively.
The joystick guide will minimize after 2 seconds. When the joystick
guide is minimized, you can still adjust or turn on/off the selected
function; you can also maximize ( ) the joystick guide to select
another function, or hide ( ) it altogether.
Using the Menus
Many of the camcorder’s functions can
be adjusted from the menus that open
after pressing . In mode,
however, menus cannot be accessed
and, except in a few cases, most menu
settings will return to their default values.
For details about the available menu options and settings, refer to the
appendix Menu Options Lists ( 86).
FUNC.
Preparations 23
Page 24

Selecting an Option from the FUNC. Menu
The following is an example of selecting a FUNC. menu option in
mode. In playback modes, the operation varies depending on the
function selected so refer to the relevant chapter as necessary.
1Press .
FUNC.
2 Select ( ) the icon of the function
you want to change from the left
side column.
Menu items not available will appear
grayed out.
3 Select ( ) the desired setting from the available options at the
bottom bar.
• The selected option will be highlighted in orange.
• With some settings you will need to make further selections and/or
press . Follow the additional operation guides that will appear on
the screen (such as the icon, small arrows, etc.).
4 Press to save the settings and close the menu.
FUNC.
You can press to close the menu at any time.
FUNC.
Selecting an Option from the Setup Menus
1Press .
2 Select ( ) [ Menu] and press
3 Select ( ) the tab of the desired menu.
4 Select ( ) the setting you want to change and press .
5 Select ( , ) the desired option and press to save the
FUNC.
to open the setup menus.
You can also hold pressed
FUNC.
down for more than 1 second to
open directly the setup menus
screen.
• The orange selection bar indicates the menu setting currently
selected. Menu items not available appear grayed out.
• Move ( ) the orange selection bar to the tabs at the top of the
screen to select a different menu (step 3).
setting.
24 Preparations
Page 25

6Press .
FUNC.
You can press to close the menu at any time.
FUNC.
Preparations 25
Page 26
First Time Settings
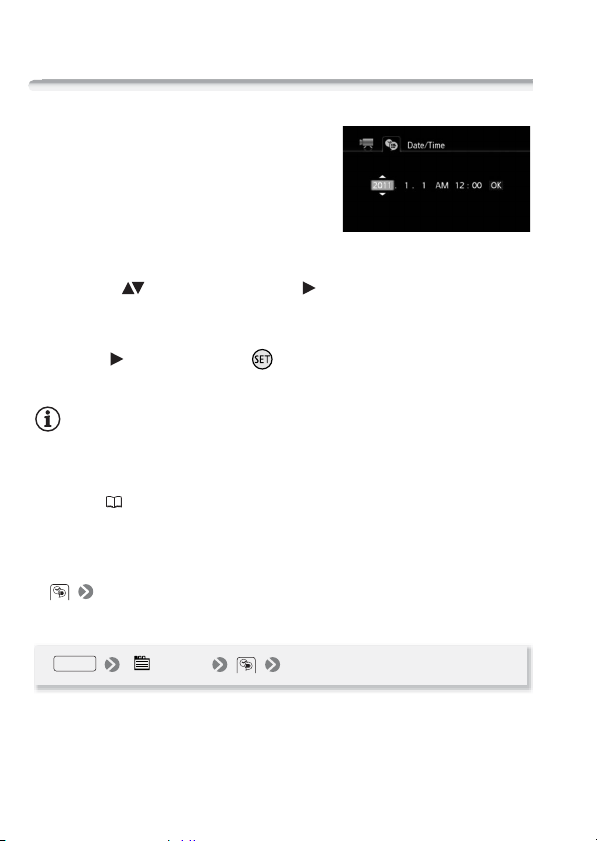
Setting the Date and Time
You will need to set the date and time of
the camcorder before you can start
using it. The [Date/Time] screen will
appear automatically when the camcorder’s clock is not set.
When the [Date/Time] screen appears,
the year will be selected.
1 Change ( ) the year and move ( ) to the month.
2 Change the rest of the fields (month, day, hour and minutes) in
the same way.
3 Select ( ) [OK] and press to start the clock and close the
setup screen.
NOTES
• When you do not use the camcorder for about 3 months, the built-in
rechargeable lithium battery may discharge completely and the date
and time setting may be lost. In such case, recharge the built-in lithium
battery ( 112) and set the time zone, date and time again.
• The date appears in a year-month-day format only in the first setup
screen. In subsequent screen displays the date and time will appear as
day-month-year (for example, [1.Jan.2011 12:00 AM]). You can
change the date format and the clock format (12/24 hours) with the
[Date Format] setting.
• You can also change the date and time later on (not during the initial
setup). Open the [Date/Time] screen from the setup menus:
FUNC.
[ Menu] [Date/Time]
26 Preparations
Page 27
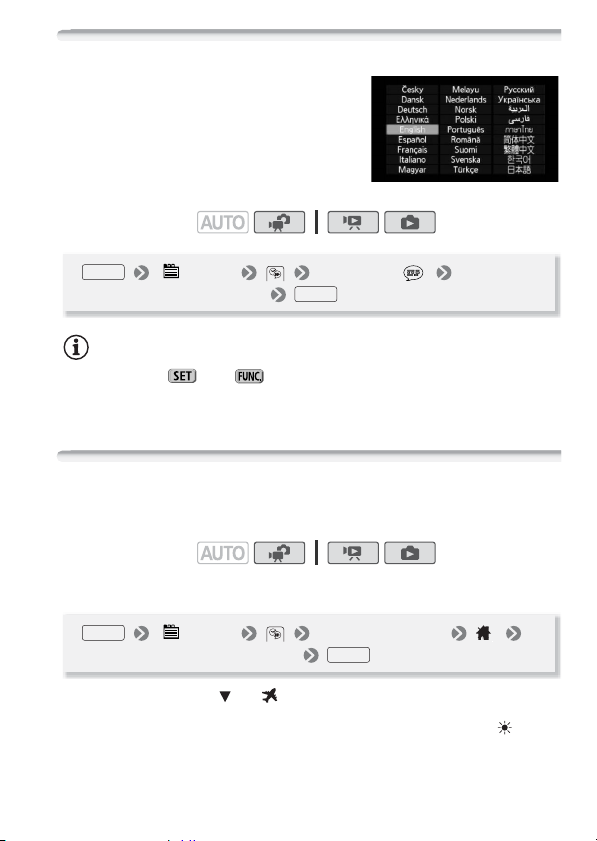
Changing the Language
The default language of the camcorder is English. You can set it to one
of 26 other languages.
Operating modes:
FUNC.
[ Menu] [Language ]
Desired language
FUNC.
NOTES
• The displays and that appear in some menu screens refer to
the name of buttons on the camcorder and will not change, regardless
of the language selected.
Changing the Time Zone
Change the time zone to match your location. The default setting is
Paris.
Operating modes:
To set the home time zone
FUNC.
* When you travel, select ( ) the icon and select the time zone that matches the
local time at your destination.
**To adjust for daylight saving time, select the area name marked with a .
[ Menu] [Time Zone/DST] *
Your local time zone**
FUNC.
Preparations 27
Page 28
Using a Memory Card
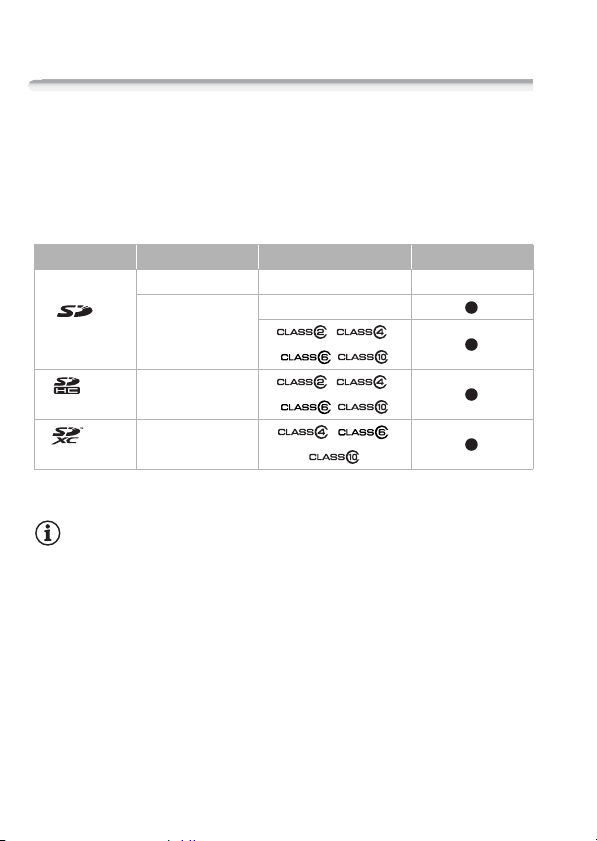
Memory Cards Compatible for Use with the Camcorder
You can use commercially available Secure Digital (SD) cards with this
camcorder. However, depending on the memory card, you may not be
able to record movies. Refer to the table below.
As of May 2010, the movie recording function has been tested using
SD/SDHC memory cards made by Panasonic, Toshiba and SanDisk,
and SDXC memory cards made by Panasonic and Toshiba.
Memory card Capacity SD Speed Class Recording movies
64 MB or less – –
SD
memory cards
SDHC
memory cards
SDXC
memory cards
* Depending on the memory card used, it may not be possible to record movies.
128 MB or more
Over 2 GB
Over 32 GB
–
, ,
,
, ,
,
, ,
NOTES
• About the SD Speed Class: The SD Speed Class is a standard that indicates the minimum guaranteed data transfer speed of SD/SDHC/
SDXC memory cards. When you buy a new memory card, look for the
Speed Class logo on the package.
*
28 Preparations
Page 29

SDXC Memory Cards
As of May 2010, SDXC memory cards have been tested to work under
Windows 7. For details on whether your computer's operating system
is SDXC-compatible, check with your computer's manufacturer.
IMPORTANT
• If you use an SDXC memory card with a computer OS that is not
SDXC-compatible, you may be prompted to format the memory card.
In such case, cancel the operation to prevent data loss.
• To use an SDXC memory card with external devices, such as card
readers or digital recorders, make sure the external device is SDXCcompatible.
• After repeatedly recording, deleting and editing scenes (fragmented
memory), it will take longer to write data on the memory and recording
may stop. Save your recordings and initialize the memory.
Eye-Fi cards
This product is not guaranteed to support Eye-Fi card functions
(including wireless transfer). In case of an issue with an Eye-Fi card,
please check with the card manufacturer.
Also note that an approval is required to use Eye-Fi cards in many
countries or regions. Without approval, use of the card is not permitted. If it is unclear whether the card has been approved for use in the
area, please check with the card manufacturer.
Preparations 29
Page 30
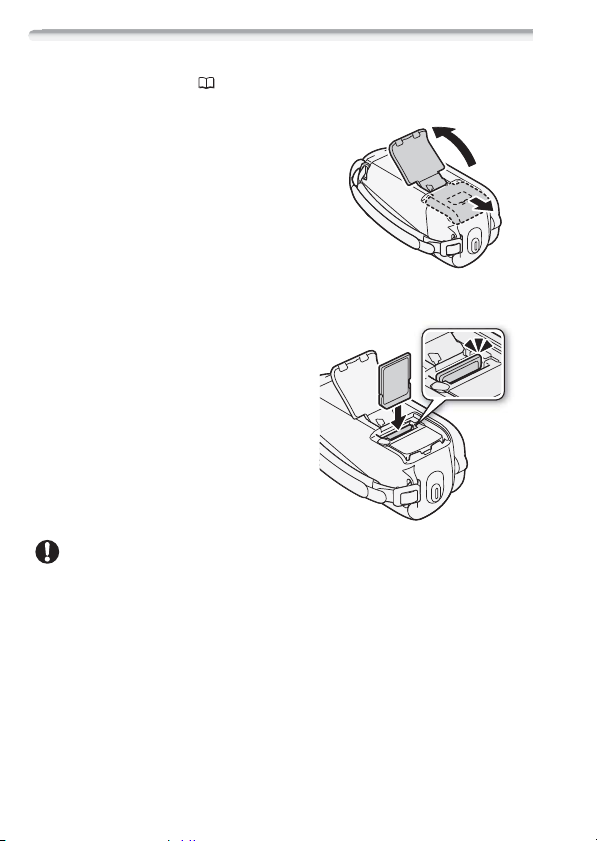
Inserting and Removing a Memory Card
Make sure to initialize ( 31) all memory cards before using them
with this camcorder.
1 Turn off the camcorder.
Make sure the
indicator is off.
2 Slide the memory card slot cover
away from the lens and open it.
3 Insert the memory card straight,
with the label facing away from
the lens, all the way into the
memory card slot until it clicks.
4 Close the cover and slide it
toward the lens until you hear a
click.
Do not force the cover closed if the
memory card is not correctly
inserted.
To remove the memory card
Push the memory card once to
release it. When the memory card
springs out, pull it all the way out.
IMPORTANT
• Memory cards have front and back sides that are not interchangeable.
Inserting a memory card facing the wrong direction can cause a malfunction of the camcorder. Be sure to insert the memory card as
described in step 3.
ON/OFF (CHG)
2
3
30 Preparations
Page 31

Selecting the Memory for the Recordings
You can select to record your movies and photos in the built-in memory or on a memory card. The built-in memory is the default memory
for recording both.
Operating modes:
POINTS TO CHECK
• Be sure you understand the information provided in
Eye-Fi cards
( 29) before using an Eye-Fi card.
FUNC.
[ Menu] [Rec Media for Movies] or
[Rec Media for Photos] [Built-in Mem.] (built-in
memory) or [Mem. Card] (memory card)*
* When selecting the memory, you can check the total, used and approximate
available recording time/number of photos. (Recording time is estimated based
on the recording mode currently in use.)
FUNC.
Initializing the Memory
Initialize memory cards when you use them with this camcorder for
the first time. You can also initialize a memory card or the built-in
memory ( only) to permanently delete all the recordings it contains.
At the time of purchase, the built-in memory comes pre-initialized and contains music files for use as background music during
playback.
Operating modes:
1 Power the camcorder using the compact power adapter.
Do not disconnect the power source or turn off the camcorder until
the initialization is completed.
2 Initialize the memory.
Preparations 31
Page 32

FUNC.
[ Menu] [Initialize / ]
[Built-in Mem.] or [Mem. Card] Initialization
method [Yes]* [OK]
FUNC.
[ Menu] [Initialize ]
Initialization method [Yes]* [OK]
* If you selected the [Complete Initialization] option, you can press to cancel
the initialization while it is in progress. All recordings will be erased and the
memory can be used without any problem.
FUNC.
FUNC.
Options
[Quick Initialization] Clears the file allocation table but does not
physically erase the stored data.
[Complete Initialization] Erases all data completely.
IMPORTANT
• Initializing the memory will permanently erase all recordings. Lost original recordings cannot be recovered. Make sure you save important
recordings in advance using an external device ( 79).
• Initializing a memory card will permanently erase any music files you
may have transferred to the card. ( The music files that come
pre-installed in the built-in memory will be restored after it is initialized.)
To transfer music files from the supplied Camcorder Supplemental Disc
to the memory card:
- Windows users: Remove the memory card from the camcorder,
connect it to a computer and use the supplied PIXELA’s software. For
details, refer to the Software Guide (PDF file) of the supplied PIXELA’s
software.
- Mac OS users: Remove the memory card from the camcorder and
connect it to a computer. Use Finder to transfer the music files from
the [MUSIC] folder on the supplied Camcorder Supplemental Disc to
32 Preparations
Page 33

the memory card. Refer to
About the music files
( 122) for the
folder structure of the memory card.
• At the time of purchase, Eye-Fi cards contain the necessary network
configuration software. Be sure to install the software and complete the
required configuration setup before you initialize the Eye-Fi card prior to
using it with this camcorder.
Preparations 33
Page 34

Video
This chapter covers functions related to shooting movies,
including recording, playback, advanced functions and playlist
and scene operations.
Basic Recording
Shooting Video
Operating modes:
1 Turn on the camcorder.
By default, movies are
recorded in the built-in memory.
You can select the memory that
will be used to record movies
( 31).
2Press to begin
When you have finished recording
1 Make sure that the ACCESS indicator is off.
2 Turn off the camcorder.
3 Close the LCD panel.
Start/Stop
recording.
Start/Stop
Press again to pause
the recording.
Start/Stop button
IMPORTANT
• Observe the following precautions while the ACCESS indicator is on or
flashing. Failing to do so may result in permanent data loss or damage
to the memory.
- Do not open the memory card slot cover.
- Do not disconnect the power source or turn off the camcorder.
- Do not change the camcorder’s operating mode.
34 Video
Page 35

• Be sure to save your recordings regularly ( 79), especially after making important recordings. Canon shall not be liable for any loss or corruption of data.
NOTES
• About the Power Save mode: If [Power Saving Mode] is set to
[ On], the camcorder will shut off automatically to save power when
it is powered by a battery pack and is left without any operation for 5
minutes. Press to turn on the camcorder.
POWER
• When recording in bright places, it may be difficult to use the LCD
screen. In such cases, you can turn on the LCD backlight ( 20) or
adjust the brightness of the LCD screen with the [LCD Brightness] setting.
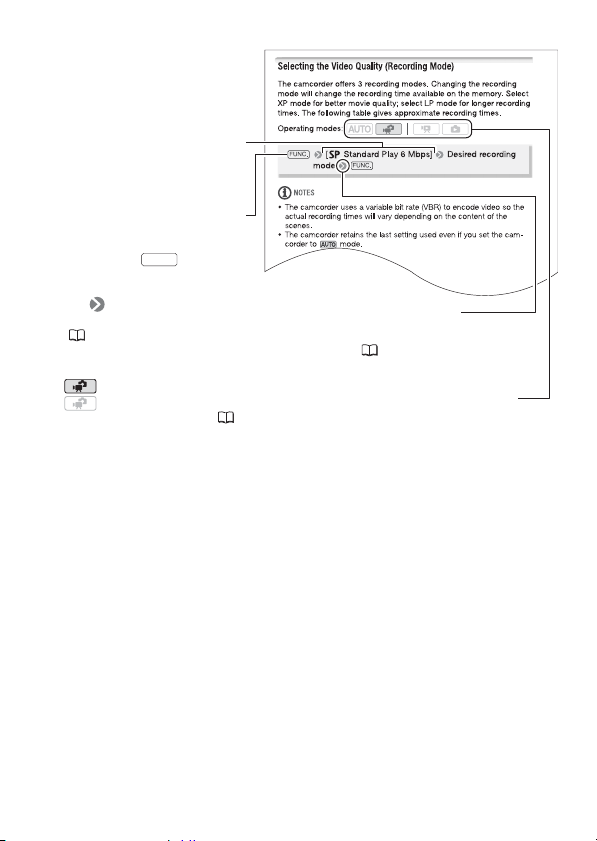
Selecting the Video Quality (Recording Mode)
The camcorder offers 3 recording modes. Changing the recording
mode will change the recording time available on the memory. Select
XP mode for better movie quality; select LP mode for longer recording
times. The following table gives approximate recording times.
Operating modes:
FUNC.
[ Standard Play 6 Mbps] Desired recording
mode
FUNC.
NOTES
• The camcorder uses a variable bit rate (VBR) to encode video so the
actual recording times will vary depending on the content of the
scenes.
• The camcorder retains the last setting used even if you set the camcorder to mode.
Video 35
Page 36

Approximate recording times
Recording mode
→
Memory ↓
XP SP
Default value
LP
4 GB memory card 55 min. 1 hr. 20 min. 2 hr. 35 min.
Built-in memory/
8 GB memory card
1 hr. 50 min. 2 hr. 45 min. 5 hr. 10 min.
16 GB memory card 3 hr. 40 min. 5 hr. 30 min. 10 hr. 25 min.
32 GB memory card 7 hr. 25 min. 11 hr. 20 hr. 50 min.
• When a recording exceeds 2 GB or 12 continuous hours, it will be divided and
saved as scenes smaller than 2 GB.
• At the time of purchase, the built-in memory contains about 70 MB of
music files.
Zooming: Optical, Advanced and Digital Zoom
The camcorder offers the following three types of zoom:
Zoom Type Description and use
Optical 37x The optical magnification ratio of the lens. Used for recording movies
Advanced 41x The camcorder processes the image beyond the range of the optical
Digital 2000x*
(1800x for the
* 1800x (1600x for the ) when [Image Stabilizer] is set to
[Dynamic].
only when [Image Stabilizer] is set to [ Dynamic] or when
[Widescreen] is set to [ Off] and for recording photos.
zoom to obtain a larger zoom without any deterioration in image
quality. Used for recording movies in all cases but the two exceptions
above.
You can activate it with the [Digital Zoom] setting. When set to
[ On] and only while recording movies, the camcorder will switch
)
to digital zoom (light blue area on the zoom indicator) when you zoom
in beyond the optical zoom range (white area on the zoom indicator).
With the digital zoom, the image is processed digitally so image
quality will deteriorate the more you zoom in.
Operating modes:
36 Video
Page 37

Move the zoom lever toward W
(wide angle) to zoom out. Move it
toward T (telephoto) to zoom in.
By default, the zoom lever operates at
a variable speed – press gently for a
slow zoom; press harder for faster
zooms.
NOTES
• Keep at least 1 m away from the
subject. At full wide angle, you can
focus on a subject as close as 1 cm.
• While the advanced zoom is activated, the field of view will be wider
W Zoom out
T Zoom in
at full wide-angle.
• You can set [Zoom Speed] to one of three constant speeds (3
is the fastest, 1 the slowest).
• When [Zoom Speed] is set to [ Variable], the zoom speed will be
faster in record pause mode than when actually recording, except
when pre-recording ( 50) is activated.
Quick Start Function
When you close the LCD panel with the camcorder on, the camcorder
enters the standby mode. In standby mode the camcorder consumes
only about half the power used when recording, saving energy when
you are using a battery pack. Additionally, when you open the LCD
panel, the camcorder is ready to start recording in approximately
1 second*, allowing you to record the subject right away.
* The actual time required varies depending on the shooting conditions.
Operating modes:
1 With the camcorder on and in a recording mode, close the LCD
panel.
A beep will sound and the green ON/OFF (CHG) indicator will change
to orange to indicate the camcorder entered standby mode.
Video 37
Page 38

2 When you wish to resume recording, open the LCD panel.
The ON/OFF (CHG) indicator turns back green and the camcorder is
ready to record.
IMPORTANT
• Do not disconnect the power source during standby mode (while the
ON/OFF (CHG) indicator is lit in orange).
NOTES
• The camcorder will not enter standby mode if the LCD panel is closed
while the ACCESS indicator is on or flashing, while a menu is being displayed, or while the PHOTO button is pressed down halfway. The camcorder may also not enter standby mode if the LCD panel is closed
while the memory card slot cover is open or when the battery charge is
too low. Check that the ON/OFF (CHG) indicator changes to orange.
• The camcorder will shut off if left in standby mode for 10 minutes,
regardless of the [Power Saving Mode] setting. Press
POWER
to turn on the camcorder.
• You can select the length of time until shut-off or turn off the Quick
Start function altogether with the [Quick Start] setting.
38 Video
Page 39

Basic Playback
Playing Back Video
Operating modes:
1 Press to open the [Movies]
index screen.
2 Move ( , ) the selection
frame to the scene you want to
play back.
When you have recorded a large
number of scenes, you can display
( ) a slidebar below the scene
thumbnails and browse ( ) through index pages; then, return ( )
to select the desired scene.
3 Press to begin the playback.
Playback will start from the scene selected and continue until the end
of the last scene recorded.
To pause/stop the playback
1 During playback, open ( ) the joystick
guide.
2 Select ( ) to pause the playback or
to stop the playback.
3 You can also use the and
buttons on the LCD panel.
/
To adjust the volume
1 During playback, open ( ) the joystick
guide.
2 Select ( ) the top row ( ).
3 Adjust ( ) the volume.
To turn off the volume, keep the joystick pressed ( ) toward until
the volume bars disappear.
Video 39
Page 40

IMPORTANT
• Observe the following precautions while the ACCESS indicator is on or
flashing. Failing to do so may result in permanent data loss.
- Do not open the memory card slot cover.
- Do not disconnect the power source or turn off the camcorder.
- Do not change the camcorder’s operating mode.
• You may not be able to play back with this camcorder movies recorded
on a memory card using another device.
NOTES
• Depending on the recording conditions, you may notice brief stops in
video or sound playback between scenes.
Special playback modes
To enter the special playback modes, use the joystick guide. There is
no sound during the special playback modes.
Fast playback
Perform the following operation during
normal playback. Repeat to increase the
playback speed to approximately 5x
→
60x the normal speed.
Open ( ) the joystick guide Select ( ) the bottom row Push
the joystick ( ) toward or .
Slow playback
Perform the following operation during
playback pause. Repeat to increase the
playback speed 1/8
Open ( ) the joystick guide Select ( ) the bottom row Push
the joystick ( ) toward * or .
* Slow reverse playback will look the same as continuous frame reverse.
Skipping scenes
Open ( ) the joystick guide Select ( )
the middle row Push the joystick ( )
→
1/4 the normal speed.
→
15x
40 Video
Page 41

toward * to skip to the beginning of the current scene or to skip
to the next scene.
* Push twice to skip to the beginning of the previous scene.
Ending special playback modes
During any special playback mode, press . The camcorder will
return to its initial mode (playback or playback pause).
NOTES
• During some special playback modes, you may notice some anomalies
(blocky video artifacts, banding, etc.) in the playback picture.
• The speed indicated on the screen is approximate.
Selecting what Recordings to Play Back
From the index screen, you can use the tabs on the top of the screen
to select whether to play back your original movies or photos. Additionally, you can switch to index screens that contain only certain
types of scenes, such as the [Playlist] or [Video Snapshot] index
screen, or switch memories to play back recordings from the built-in
memory or memory card ( only).
Operating modes:
Movies
Photos
Recordings in the built-in memory
Recordings on the memory card
Movies
Photos
Video 41
Page 42

1 In the index screen, move ( ) the orange selection frame to the
tabs on the top of the screen.
2 Select ( ) the tab corresponding to the recordings you want to
play back.
3 Return ( ) to the index screen to select a scene or photo.
To open the [Video Snapshot] index screen
You can open an index screen that contains
only your video snapshot scenes ( 51).
In the original [Movies] index screen, press
VIDEO SNAP
.
To open the [Playlist] index screen
Open the [Playlist] index screen to play back
the scenes you added to the playlist ( 63).
In the original [Movies] index screen, press
.
PLAYLIST
NOTES
• You can press both and to open the [Playlist:
PLAYLIST
VIDEO SNAP
Video Snapshot] index screen that contains only those video snapshot
scenes that were also added to the playlist.
Searching for Scenes
From the [Movies] index screen, you can search for recordings you
made on a particular date (for example, to find all the movies you shot
during a special event).
Operating modes:
Selecting from the Calendar Screen
1 Open the [Movies] or [Video Snapshot] index screen.
You can select the original movies in the built-in memory or on
the memory card.
42 Video
Page 43

2 Open the calendar screen.
FUNC.
[ Scene Search] [Calendar Screen]
• The calendar screen appears.
• Dates that contain scenes (that is, movies were recorded on that
date) appear in white. Dates without recordings appear in black.
3 Move ( , ) the cursor to the desired date.
• When you move the cursor to a date displayed in white, a thumbnail
showing a still image from the first scene recorded on that date will
be displayed next to the calendar. Below it will appear the number of
scenes recorded ( ) and the total recording time for the same day.
• You can select ( ) the year or month field and change ( ) the
year or month to move faster between calendar months.
4 Press to return to the index screen.
The orange selection frame will appear on the first scene recorded on
the selected date.
NOTES
• You can change on what day to start the week for the calendar display
with the [Calendar Start Day] setting.
• You can press to return to the index screen at any time.
FUNC.
Selecting from the List of Recordings
1 Open the [Movies] or [Video Snapshot] index screen.
You can select the original movies in the built-in memory or on
the memory card.
2 Open the list of recordings.
FUNC.
[ Scene Search] [Date Selection]
• The list of recordings displays all dates in which recordings were
made. An orange selection frame appears on the day.
• The thumbnail shows a still image from the first scene recorded on
that day. Below it will appear the number of scenes recorded ( )
and the total recording time for the same day.
Video 43
Page 44

3 Select ( ) the date, month or year and move ( ) between
recording dates.
4 After selecting the desired date, press .
The index screen will appear with the selection frame on the first
scene recorded on the selected date.
NOTES
• You can press to return to the index screen at any time.
FUNC.
Pre-selecting Recordings from the Index Screen
You can select in advance a number of original movies or photos from
the index screen in order to perform certain actions on them collectively, all at once. This way you can easily delete recordings, copy
recordings to the memory card ( only), or add a number of
scenes to the playlist.
Operating modes:
1 Open the [Movies], [Video Snapshot] or [Photos] index screen.
You can select the original movies or photos in the built-in
memory or on the memory card.
2 Open the selection screen.
FUNC.
[ Select] [Individual Scenes] or
[Individual Photos]
• The selection screen appears.
3 Move ( , ) between the scenes or photos in the index
screen and press to select an individual scene/photo.
• A checkmark will appear on the selected scenes/photos. Press
again to remove the checkmark.
• Repeat this step to add all the scenes/photos you want to include in
your selection (up to 100).
44 Video
Page 45

Total number of scenes selected
Selected scenes
4 Press twice to close the menu.
FUNC.
To cancel all the selections
FUNC.
[ Select] [Remove All Selections] [Yes]
[OK]
FUNC.
NOTES
• The pre-selection of scenes/photos will be canceled if you turn off the
camcorder or change the operating mode.
• Scenes in the playlist cannot be included in the pre-selection.
Deleting Scenes
You can delete those scenes that you are not interested in keeping.
Deleting scenes allows you also to free up space on the memory. See
also Deleting Scenes from the Playlist ( 64).
Operating modes:
1 Open the [Movies] or [Video Snapshot] index screen.
• You can select the original movies in the built-in memory or on
the memory card.
• To select in advance multiple scenes to delete, refer to
Recordings from the Index Screen
( 44).
2 Select ( , ) the scene you want to delete, or a scene
recorded on the date you want to delete.
This step is not necessary to delete all scenes or previously selected
scenes.
Pre-selecting
Video 45
Page 46

3 Delete the scenes.
FUNC.
* If you selected any option other than [This Scene], you can press to inter-
rupt the operation while it is in progress. Some scenes will be deleted nevertheless.
[ Delete] Desired option [Yes]* [OK]
FUNC.
Options
[All Scenes] Deletes all the scenes.
[All Scenes (this date)] Deletes all the scenes recorded on the
same day as the selected scene.
[This Scene] Deletes only the scene marked with the orange
selection frame.
[Selected Scenes] Deletes all the scenes selected in advance
(marked with a checkmark). Refer to
ings from the Index Screen
( 44).
Pre-selecting Record-
IMPORTANT
• Be careful when deleting original recordings. Once deleted, original
scenes cannot be recovered.
• Save copies of important scenes before deleting them ( 79).
• Observe the following precautions while the ACCESS indicator is on or
flashing (while scenes are being deleted).
- Do not open the memory card slot cover.
- Do not disconnect the power source or turn off the camcorder.
- Do not change the camcorder’s operating mode.
NOTES
• Deleting an original scene from the [Movies] or [Video Snapshot] index
screen also deletes that scene from the playlist.
• To delete all movies and make all recordable space available again you
may prefer to initialize the memory ( 31).
46 Video
Page 47

Advanced Functions
Automatic Exposure and Special Scene Recording Programs
The recording program determines how much control you have over
the camcorder’s recording-related settings. Select the [ Programmed AE] recording program to give you full control over functions
like the white balance or image effects. Alternatively, give the camcorder more control by selecting a Special Scene recording program.
Operating modes:
Using [ Programmed AE]
When you use the [ Programmed AE] recording program, the camcorder automatically adjusts the aperture and shutter speed to obtain
the optimal exposure for the subject.
FUNC. FUNC.
[ Programmed AE]
Special Scene Recording Programs
Select a Special Scene recording program to easily make recordings
in a variety of situations by letting the camcorder take control of various settings.
FUNC.
[ Programmed AE] [ Portrait] Press to
display the Special Scene (SCN) recording programs
Desired recording program
Options
( Default value)
[ Portrait]
ture, to achieve a sharp focus on the subject
while blurring the background.
The camcorder uses a large aper-
FUNC.
Video 47
Page 48

[Sports]To record sports scenes such as
tennis or golf.
[Snow]To record in bright ski resorts with-
out the subject being underexposed.
[Beach]To record on a sunny beach with-
out the subject being underexposed.
[Sunset]To record sunsets in vibrant col-
ors.
[ Night Scene]To record nightscapes with
lower noise.
[ Low Light] To record in low-light situations.
[ Spotlight] To record spotlit scenes.
[ Fireworks] To record fireworks.
48 Video
Page 49

NOTES
• [ Portrait]/[ Sports]/[ Snow]/[ Beach]: The picture may not
appear smooth during playback.
• [ Portrait]: The blur effect of the background increases the more you
zoom in (T).
• [ Snow]/[ Beach]: The subject may become overexposed on
cloudy days or in shaded places. Check the image on the screen.
• [ Low Light]:
- Moving subjects may leave a trailing afterimage.
- Picture quality may not be as good as in other modes.
- White points may appear on the screen.
- Autofocus may not work as well as in other modes. In such case,
adjust the focus manually.
•[ Fireworks]:
- To avoid camcorder blur (blur due to the camcorder moving) we
recommend using a tripod.
- When you take photos, slower shutter speeds are used so blur is
more likely to occur. Stabilize the camcorder, for example, by
mounting it on a tripod.
Automatic Backlight Correction
When shooting subjects with a strong light source behind them, you
can have the camcorder automatically correct for backlight.
Operating modes:
1 Open ( ) the joystick guide.
2 Select ( ) [ BLC] and press .
• appears.
• Press again to turn off the backlight correction.
BLC
Video 49
Page 50

Advanced Image Stabilization
The image stabilizer reduces camcorder blur (blur due to the camcorder moving) so you can get nice, stable shots. Select the image
stabilization mode according to the shooting conditions.
Operating modes:
FUNC.
Options
[ Menu]
Desired IS mode
( Default value)
[Image Stabilizer]
FUNC.
[Dynamic]Compensates for a higher degree of camcorder
shake, such as when shooting while walking, and is more effective as the zoom approaches full wide angle.
[ Standard]
Compensates for a lower degree of camcorder
shake, such as when shooting while remaining stationary, and is
suitable for shooting natural-looking scenes. With this setting,
the field of view will be wider at full wide-angle.
[Off]Use this setting when the camcorder is mounted on a tri-
pod.
NOTES
• The image stabilizer may not be able to successfully eliminate all blur if
the camcorder or the subject is moving too much.
• The image stabilizer may not work well on subjects with low contrast,
with a recurring, repetitive pattern or without vertical lines.
• When [Image Stabilizer] is set to [ Dynamic], if the background’s
movement does not appear natural, select [ Standard] or [ Off].
Pre-Recording
The camcorder will start recording 3 seconds before you press
Start/Stop
This is especially useful when it is difficult to predict when to start
recording.
, ensuring you do not miss important shooting opportunities.
50 Video
Page 51

Operating modes:
1 Open ( ) the joystick guide.
2 Select ( ) [ Pre REC] and press .
Pre REC
• appears.
• Press again to turn pre-recording off.
3Press .
Start/Stop
The scene recorded in the memory will start 3 seconds before
Start/Stop
was pressed.
NOTES
• While pre-recording is activated, the camcorder will not emit any notification sounds.
• The camcorder will not record the full 3 seconds prior to pressing
Start/Stop
if the button was pressed within 3 seconds of having turned
on pre-recording or having finished the previous recording.
• Any of the following actions will deactivate the pre-recording function.
- Leaving the camcorder without any operation for 5 minutes.
- Pressing , , or .
FUNC.
VIDEO SNAP
- Closing the LCD panel to set the camcorder to standby mode.
Video Snapshot
Record a series of short scenes. Play your video snapshot scenes set
to your favorite music ( 59) to create your own fun music video. You
will be surprised how by changing the background music, you can
give your scenes an entirely new feel.
Operating modes:
1Press .
2Press .
VIDEO SNAP
• A blue border appears on the
screen.
• Press again to
VIDEO SNAP
return to normal video recording
mode.
Start/Stop
Video 51
Page 52

• The camcorder records for about 4 seconds (the blue frame serves
as a visual progress bar) and then automatically returns to record
pause mode.
• You can change the length of video snapshot scenes to 2 or 8
seconds with the
[Video Snapshot Length] setting.
• When the camcorder stops recording, the screen will momentarily
turn black as if a camera shutter had released.
• In index screens, video snapshot scenes are indicated with the
mark.
NOTES
• Video snapshot is deactivated if the camcorder is switched to playback
mode.
Digital Effects
Operating modes:
FUNC.
* You can preview the digital effect on the screen.
[ Digital Effect Off] Desired fader/effect*
FUNC.
• The icon of the selected digital effect appears.
Options
( Default value)
[ Digital Effect Off]
Select this setting when you do not intend
to use the digital effects.
[ Fade Trigger], [ Wipe] Select one of the faders to begin or
end a scene with a fade from or to a black screen.
[ Black & White]* Records movies and photos in black and
white.
[ Sepia]* Records movies and photos in sepia tones for an
“old” look.
* Only these digital effects are available for photos.
52 Video
Page 53

Applying the Selected Digital Effect
1 Open ( ) the joystick guide.
2 Select ( ) [ Digital Effects] and
press .
• The icon of the selected digital effect
turns green.
• Press again to deactivate the digital
effect (its icon will turn white again).
To fade in/out
Activate the selected fader in record pause mode ( ), then press
Start/Stop
while recording ( ), then press to fade out and pause the
to start recording with a fade in. Activate the selected fader
Start/Stop
recording.
To activate an effect
For movies: Activate the selected effect while recording or in record
pause mode.
For photos: Activate the selected effect and then press to
record the photo.
NOTES
• When you apply a fader, not only the picture but also the sound will
fade in or out. When you apply an effect, the sound will be recorded
normally.
• Faders cannot be used when recording video snapshot scenes or
when pre-recording is activated.
Digital Effects
PHOTO
Manual Exposure Adjustment
At times, backlit subjects may appear too dark (underexposed) or
subjects under very strong lights may appear too bright or glaring
(overexposed). To correct this, you can manually adjust the exposure.
Operating modes:
Video 53
Page 54

POINTS TO CHECK
• Select a recording program other than [ Fireworks].
1 Open ( ) the joystick guide.
2 Select ( ) [ Exposure] and press
.
• The current exposure is locked.
• The exposure adjustment indicator
and the neutral value “±0” appear
on the screen.
• The adjustment range and the length of the exposure adjustment
indicator will vary depending on the initial brightness of the picture.
• If you operate the zoom, the brightness of the image may change.
3 Adjust the ( ) the brightness of the image as required, then
hide ( ) the joystick guide.
• The exposure adjustment indicator will change to white and the
selected exposure will be locked.
• During exposure lock, press twice to return the camcorder to
automatic exposure.
NOTES
• If the recording program is changed during exposure lock, the camcorder will return to automatic exposure.
Exposure
Manual Focus Adjustment
Autofocus may not work well on the following subjects. In such case,
focus manually.
• Reflective surfaces
• Subjects with low contrast
or without vertical lines
• Fast moving subjects
• Through wet windows
• Night scenes
Operating modes:
54 Video
Page 55

POINTS TO CHECK
• Adjust the zoom before you start the procedure.
1 Open ( ) the joystick guide.
2 Select ( ) [ Focus] and press .
The current focus is locked and
[MF]
Focus
appears.
3 Adjust ( ) the focus as required.
• If you wish to focus on faraway subjects
such as mountains or fireworks, push the joystick ( ) toward
and hold it pressed down until [MF] changes to .
4 Push the joystick ( ) to hide the joystick guide.
• The selected focus will be locked.
• During focus lock, press twice to return the camcorder to
autofocus.
White Balance
The white balance function helps you to accurately reproduce colors
under different lighting conditions so that white objects will always
look truly white in your recordings.
Operating modes:
POINTS TO CHECK
• Set the recording program to [ Programmed AE].
FUNC. FUNC.
* When you select [ Custom WB], do not press and continue instead
with the following procedure.
[ Automatic] Desired option*
FUNC.
To set the custom white balance
1 Point the camcorder at a white object so it fills the whole screen
and press .
Video 55
Page 56

When the adjustment is completed, stops flashing and stays on.
The camcorder retains the custom setting even if you turn off the
camcorder.
2 Press to save the setting and close the menu.
Options (
FUNC.
Default value)
[Automatic]
The camcorder automatically sets the white bal-
ance for natural looking colors.
[ Daylight] To record outdoors on a bright day.
[ Tungsten] To record under tungsten and tungsten-type
(3-wavelength) fluorescent lighting.
[Custom WB]Use the custom white balance setting to make
white subjects appear white under colored lighting.
NOTES
• When you select the custom white balance:
- Set [Digital Zoom] to [ Off].
- Reset the white balance when you change locations or the lighting or
other conditions change.
- Depending on the light source, may keep flashing. The result will
still be better than with [ Automatic].
• Custom white balance may provide better results in the following
cases:
- Changing lighting conditions
-Close-ups
- Subjects in a single color (sky, sea or forest)
- Under mercury lamps and certain types of fluorescent lights
Image Effects
You can use the image effects to change the color saturation and contrast to record movies and photos with special color effects.
Operating modes:
POINTS TO CHECK
• Set the recording program to [ Programmed AE].
56 Video
Page 57

FUNC. FUNC.
[ Image Effect Off] Desired option
Options (
Default value)
[ Image Effect Off]
Records with no image enhancing effects.
[ Vivid] Emphasizes the contrast and color saturation.
[Neutral]Tones down the contrast and color saturation.
[ Soft Skin Detail] Softens the details in the skin tone area for a
more complimentary appearance. To obtain the best effect, use
this setting when recording a person in close-up. Note that
areas similar to the skin color may lack in detail.
Mini Video Light
You can turn on the mini video light to shoot video or take photos in
dark places.
Operating modes:
1 Open ( ) the joystick guide.
2 Select ( ) [ Video Light] and press
Video Light
.
• appears on the screen.
• Press again to turn the mini video
light off.
Self Timer
Operating modes:
FUNC.
appears.
[ Menu] [Self Timer] [On ]
FUNC.
Video 57
Page 58

For movies: Press .
Start/Stop
The camcorder starts recording after a 10-second countdown. The
countdown appears on the screen.
For photos: Press , first halfway to activate the autofocus
PHOTO
and then fully.
The camcorder will record the photo after a 10-second countdown. The
countdown appears on the screen.
NOTES
• Once the countdown has begun, any of the following actions will cancel the self timer.
- Pressing (when recording movies) or fully (when
Start/Stop
PHOTO
recording photos).
- Turning off the camcorder.
- Changing the camcorder’s operating mode.
- Closing the LCD panel to set the camcorder to standby mode.
Selecting the Playback Starting Point
If you have a very long scene, you
may want to start playing back the
scene from a certain point. You can
use the movie timeline to break the
scene to segments at fixed time intervals ranging from 6 seconds to 6 minutes.
Operating modes:
1 Open the [Movies] or [Playlist] index screen.
You can select the original movies or playlist in the built-in
memory or on the memory card.
2 Select ( , ) the scene you want to view and press .
DISP.
• The [Timeline] screen appears. The large thumbnail will show the
first frame of the scene. Below it, the timeline ruler shows frames
taken from the scene at fixed intervals.
58 Video
Page 59

• Press again to return to the index screen.
DISP.
Timeline ruler
Page slidebar
Frame selected for start of playback
Current scene / Total number
of scenes
Scene length
Recording date and time
Interval between frames
3 Select ( ) the playback starting point from the timeline ruler.
4 Press to begin the playback.
To select another scene
Move ( ) the orange selection frame to the large thumbnail and
select ( ) another scene.
To move between timeline ruler pages
Move ( ) the orange selection frame to the slidebar below the ruler
and display ( ) the previous/next 5 frames in the scene.
To change the interval between frames
FUNC. FUNC.
Desired interval
Playing Back Recordings Set to Background Music
You can play back video snapshot scenes, scenes in the playlist and
photo slideshows set to background music (instead of the original
sound) using one of the supplied tracks.
Operating modes:
Using a Supplied Music Track as Background Music
The supplied Camcorder Supplemental Disc contains three music
tracks you can use as background music. The music files come
pre-installed in the built-in memory.
Video 59
Page 60

POINTS TO CHECK
To play back scenes or a slideshow of photos recorded on a memory
card, you will need to connect the memory card that contains your
recordings to a computer and transfer the music tracks in advance.
Windows users: Use the supplied PIXELA’s software. For details, refer to
the Software Guide (PDF file) of the supplied PIXELA’s software. Mac OS
users: Use Finder to transfer music files from the [MUSIC] folder on the
supplied Camcorder Supplemental Disc. Refer to
About the music files
( 122) for the folder structure on the memory card.
1 Open the [Playlist], [Video Snapshot], [Playlist: Video Snapshot]
or [Photos] index screen.
You can select the recordings in the built-in memory or on the
memory card.
2 Open the list of background music tracks.
FUNC.
3 Select ( ) a music track and press twice.
• Before pressing , you can press to listen to the track you
[ Select Music]
FUNC.
FUNC.
selected. Press again to stop the playback.
• Select [Off] to play back scenes with their original sound or to play
back slideshows without any music.
4 Back in the index screen, select ( , ) the recording from
which to start playback.
5 Press to begin the playback set to the background music
selected.
In mode, press to begin the slideshow playback.
/
To delete a music track
After step 2 in the previous procedure, select ( ) the track you want
to delete.
1 Select ( ) the icon and press .
2 Select ( ) [Yes] and press .
3Press twice.
FUNC.
60 Video
Page 61

IMPORTANT
• If you use copyrighted songs and music tracks in your video creations,
remember that music under copyright may not be used without permission from the copyright holder, except for cases permitted under
applicable laws, such as for personal use. Make sure to follow applicable laws when using music files.
NOTES
• You can also add to the playlist just the video snapshot scenes you
want to watch and arrange their playback order.
• Initializing a memory card will permanently erase any music files you
may have transferred to the card. ( The music files that come preinstalled in the built-in memory will be restored after it is initialized.) To
transfer music files from the supplied Camcorder Supplemental Disc to
the memory card:
- Windows users: Remove the memory card from the camcorder,
connect it to a computer and use the supplied PIXELA’s software.
For details, refer to the Software Guide (PDF file) of the supplied
PIXELA’s software.
- Mac OS users: Remove the memory card from the camcorder and
connect it to a computer. Use Finder to transfer the music files from
the [MUSIC] folder on the supplied Camcorder Supplemental Disc to
the memory card. Refer to
About the music files
( 122) for the
folder structure of the memory card.
• Transfer music files from the supplied Camcorder Supplemental Disc to
the memory card that contains the recordings you want to play back
with background music.
• The background music may not be played back correctly when playing
back a slideshow from a memory card with slow transfer rates.
Video 61
Page 62

On-Screen Displays and Data Code
You can turn most on-screen displays on or off.
Operating modes:
Repeatedly press to turn the on-screen displays on/off in the
DISP.
following sequence:
, mode:
• All displays on
• Most displays off*
mode:
• All displays on
• Data code only
• All displays off
* Pressing will turn off most of the icons and displays that appears automat-
DISP.
ically but will not remove onscreen displays that were turned on manually (for
example, onscreen markers or the joystick guide).
About the Data Code
With every scene or photo recorded, the camcorder keeps a data
code (date/time of recording, information about the camera setup,
etc.). In mode, the recording date and time are displayed on the
bottom bar; in mode, you can select the information to be displayed with the [Data Code] setting.
62 Video
Page 63

Playlist and Scene Operations
Editing the Playlist: Adding, Deleting and Moving Scenes
Create a playlist to play back only the scenes you prefer and in the
order of your choice. You can play back the scenes in the playlist
using your favorite song as background music ( 59).
Operating modes:
Adding Scenes to the Playlist
1 Open the [Movies] or [Video Snapshot] index screen.
You can select the original movies in the built-in memory or on
the memory card.
2 Select ( , ) the scene you want to add to the playlist, or a
scene recorded on the date you want to add to the playlist.
3 Add the scenes to the playlist.
FUNC.
[ Add to Playlist] Desired option [Yes]
• When the operation is completed [Scene(s) added to the playlist] will
be displayed.
• Scenes are added to the playlist on the same memory they
are recorded on.
• To check the playlist, press .
Options
[All Scenes (this date)] Adds to the playlist all the scenes that were
recorded on the same day as the selected scene.
[This Scene] Adds to the playlist only the scene marked with the
orange selection frame.
[Selected Scenes] Adds to the playlist all the scenes selected in
advance (marked with a checkmark). Refer to
Recordings from the Index Screen
PLAYLIST
Pre-selecting
( 44).
Video 63
Page 64

NOTES
• Deleting or moving scenes in the playlist will not affect the original
recordin gs.
• You can copy scenes from the built-in memory to the memory
card ( 66) to include in the memory card’s playlist also scenes that
were originally recorded in the built-in memory.
Deleting Scenes from the Playlist
Deleting scenes from the playlist will not affect your original recordings.
1 Open the [Playlist] or [Playlist: Video Snapshot] index screen.
Before opening the playlist, you can select the original movies in
the built-in memory or on the memory card to open the playlist of the
respective memory.
2 Select ( , ) the scene you want to delete.
This step is not necessary to delete all scenes.
3 Delete the scene.
FUNC.
[ Delete] Desired option [Yes]* [OK]
FUNC.
* If you selected [All Scenes], you can press to interrupt the operation while
it is in progress. Some scenes will be deleted nevertheless.
Options
[All Scenes] Deletes all the scenes from the playlist.
[This Scene] Deletes from the playlist only the scene marked with
the orange selection frame.
Moving Scenes in the Playlist
Move the scenes in the playlist to play them back in the order of your
choice.
1 Open the [Playlist] or [Playlist: Video Snapshot] index screen.
Before opening the playlist, you can select the original movies in
the built-in memory or on the memory card to open the playlist of the
respective memory.
64 Video
Page 65

2 Select ( , ) the scene you want to move.
3 Press , select [ Move] and press .
FUNC.
4 Move ( , ) the orange marker to the desired position of the
scene and press .
The original position of the scene and the current position of the
marker are displayed at the bottom of the screen.
5 Select ( ) [Yes] and press to move the scene.
Dividing Scenes
You can divide scenes (original scenes only) in order to leave out the
best parts and later cut out the rest.
Operating modes:
1 Open the [Movies] index screen.
You can select the original movies in the built-in memory or on
the memory card ( 41).
2 Select ( , ) the scene you want to divide.
3 Press , select [ Divide] and press .
4 Select ( ) the icon and press to divide the scene.
5 Select ( ) [Yes] and press .
6 When the confirmation screen appears, press .
FUNC.
• The scene selected will start playing back. Pause the playback at
the point where you want to divide the scene.
• You can use the following icons to bring the scene to a precise
point.
/ : Search (fast playback) backward/forward.
/ : Skip to the beginning/end of the current scene.
: Pause playback. : Resume playback.
: Stop playback (cancel).
/ : Frame backward/forward (during playback pause).
• You can also press to stop the playback and cancel the
FUNC.
division of the scene.
• A progress bar will be displayed on the screen.
• You can press to cancel the operation while it is in progress.
Video 65
Page 66

The video from the division point to the end of the scene will appear as
a new scene in the index screen.
NOTES
• When advancing/reversing frames while dividing the scenes, the interval will be 0.5 second.
• If the scene cannot be divided at the point where you paused the playback, advance/reverse a frame and then divide the scene.
• During the playback of a scene that was divided, you may notice some
anomalies in the picture/sound at the point where the scene was cut.
• The following scenes cannot be divided:
- Scenes included in the scene pre-selection (marked with a
checkmark). Remove the selection mark in advance.
- Video snapshot scenes and other scenes that are too short (less than
3 seconds).
- Scenes that were edited using the supplied PIXELA’s software and
were then written back to a memory card connected to a computer.
• Scenes cannot be divided within 2 seconds from the beginning or the
end of the scene.
Copying Scenes to a Memory Card
You can copy original movies or the entire playlist only from the built-in
memory to the corresponding location on the memory card. See
Photos to a Memory Card
memory card.
Operating modes:
( 74) for details on copying photos to the
Copying Original Movies
1 Open the [Movies] or [Video Snapshot] index screen for original
scenes recorded in the built-in memory.
Select the tab under the icon.
2 Select ( , ) the scene you want to copy to the memory
card, or a scene recorded on the date you want to copy.
This step is not necessary to copy all scenes or previously selected
scenes.
3 Copy the scenes.
66 Video
Copying
Page 67

FUNC.
[ Copy ( )] Desired option [Yes]*
[OK]
* Press to interrupt the operation while it is in progress.
FUNC.
Options
[All Scenes] Copies all the scenes to the memory card.
[All Scenes (this date)] Copies to the memory card all the scenes
that were recorded on the same day as the selected scene.
[This Scene] Copies to the memory card only the scene marked
with the orange selection frame.
[Selected Scenes] Copies to the memory card all the scenes
selected in advance (marked with a checkmark). Refer to
Pre-selecting Recordings from the Index Screen
( 44).
Copying the Entire Playlist
1 Open the built-in memory's [Playlist] or [Playlist: Video Snapshot]
index screen.
Select the tab under the icon and then open the desired
playlist.
2 Copy the playlist.
FUNC. FUNC.
[ Copy ( )] [Yes]* [OK]
* Press to interrupt the operation while it is in progress.
IMPORTANT
• Observe the following precautions while the ACCESS indicator is on or
flashing. Failing to do so may result in permanent data loss.
- Do not open the memory card slot cover.
- Do not disconnect the power source or turn off the camcorder.
- Do not change the camcorder’s operating mode.
Video 67
Page 68

NOTES
• In the following cases, you will not be able to copy recordings to the
memory card:
- If the memory card slot is open.
- If the LOCK switch on the memory card is set to prevent writing.
- If there is no memory card in the memory card slot.
68 Video
Page 69

Photos
Refer to this chapter for details on taking photos and playing
them back.
Taking Photos
Operating modes:
POINTS TO CHECK
• Please read the IMPORTANT section before using an Eye-Fi card.
1 Turn on the camcorder.
By default, photos are
recorded in the built-in memory.
You can select the memory that
will be used to record photos
( 31).
2 Press halfway.
3 Press fully.
PHOTO
Once the focus is automatically
adjusted, the onscreen icon will
turn green and one or more AF
frames will appear.
PHOTO
The ACCESS indicator will flash as the photo is being recorded.
IMPORTANT
• Observe the following precautions while the ACCESS indicator is on or
flashing. Failing to do so may result in permanent data loss.
- Do not open the memory card slot cover.
- Do not disconnect the power source or turn off the camcorder.
- Do not change the camcorder’s operating mode.
Photos 69
Page 70

- Photos recorded on an Eye-Fi card will be uploaded automatically
after setting the camcorder to playback mode if you are within the
range of a configured network. Always verify that Eye-Fi cards have
been approved in the country/region of use. See also Using an Eye-Fi
card ( 84).
NOTES
• Photos are recorded as JPG files. The photo size (1024x768) and quality cannot be changed. As a general guideline, you can use photos
recorded with this camcorder to print photos up to L size
(10 x 14.8 cm).
At the above photo size and quality, a 1 GB memory card can hold
approximately 1,885 photos. However, the actual number of photos
that can be recorded will vary depending on the subject and shooting
conditions.
Viewing Photos
Operating modes:
1Press .
2 Open the [Photos] index screen.
You can select the photos in
the built-in memory or on the
memory card.
3 Select ( , ) a photo.
• Move the orange selection frame
to the photo you want to view.
• When you have recorded a large
number of photos, you can display
( ) a slidebar below the photo
thumbnails and browse ( ) through whole index pages.
4 Press or move the zoom lever toward T.
The selected photo is displayed in single photo view.
70 Photos
Page 71

To return to the index screen from single photo view
1 Open ( ) the joystick guide.
2 Select ( ) the icon and press .
You can also move the zoom lever toward
W to return to the index screen.
Photo Jump Function
When you have recorded a large number of photos, you can jump 10
or 100 photos at a time.
1 In single photo view, open ( ) the
joystick guide.
2 Select ( ) the icon and press .
3 Select ( ) [ Jump 10 photos] or [ Jump 100 photos].
4 Jump ( ) the number of photos selected and press .
IMPORTANT
• Observe the following precautions while the ACCESS indicator is on or
flashing. Failing to do so may result in permanent data loss.
- Do not open the memory card slot cover.
- Do not disconnect the power source or turn off the camcorder.
- Do not change the camcorder’s operating mode.
• The following types of images files that have been transferred to a
memory card connected to a computer may not be displayed correctly.
- Images not recorded with this camcorder.
- Images edited on or uploaded from a computer.
- Images whose file names have been changed.
Photos 71
Page 72

Slideshow
You can play a slideshow of all the photos and even set it to music.
Operating modes:
1 Open the [Photos] index screen.
2 Select the background music to use when playing back the
photo slideshow ( 59, steps 1-3).
3 Back in the index screen, select ( , ) the first photo of the
slideshow.
4 Press to begin the slideshow playback set to the selected
music track.
• You can adjust ( ) the volume during the slideshow playback.
• Press to stop the slideshow.
/
Hide ( ) the joystick guide if necessary.
Deleting Photos
You can delete those photos that you are not interested in keeping.
Operating modes:
Deleting a Single Photo
1 In single photo view, select ( ) the photo you want to delete.
2 Open ( ) the joystick guide.
3 Select ( ) the icon and press .
4 Select ( ) [Yes] and press .
Using the FUNC. Menu
1 In single photo view, open the photo selection screen.
FUNC.
[ Delete]
[ Delete] appears on the screen.
72 Photos
Page 73

2 Select ( ) the photo you want to delete and press .
3 Select ( ) [Yes] and press to delete the photo.
4 Repeat steps 2-3 to delete additional photos or press
FUNC.
twice to close the menu.
Deleting Photos from the Index Screen
1 Open the [Photos] index screen.
You can select the photos in the built-in memory or on the
memory card.
2 Select ( , ) the photo you want to delete.
This step is not necessary to delete all photos or previously selected
photos.
3 Delete the photos.
FUNC.
[ Delete] Desired option [Yes]* [OK]
FUNC.
* If you selected an option other than [This Photo], you can press to interrupt
the operation while it is in progress. Some photos will be deleted nevertheless.
Options
[All Photos] Deletes all the photos.
[This Photo] Deletes only the photo marked with the orange selec-
tion frame.
[Selected Photos] Deletes all the photos selected in advance
(marked with a checkmark). Refer to
ings from the Index Screen
( 44).
Pre-selecting Record-
IMPORTANT
• Be careful when deleting photos. Deleted photos cannot be recovered.
• Photos that were protected with other devices and then transferred to
the memory card when it was connected to a computer cannot be
deleted with this camcorder.
Photos 73
Page 74

Copying Photos to a Memory Card
You can copy photos only from the built-in memory to the memory
card.
POINTS TO CHECK
• Please read the IMPORTANT section ( 75) before using an Eye-Fi
card.
Operating modes:
Copying a Single Photo
1 Select to view the photos recorded in the built-in memory.
In the index screen, select the tab under the icon and move the
zoom lever toward T to return to single photo view.
2 Open the photo selection screen.
FUNC.
[ Copy ( )]
[ Copy ( )] appears on the screen.
3 Select ( ) the photo you want to copy and press .
4 Select ( ) [Yes] and press to copy the photo.
5 Repeat steps 3-4 to copy additional photos or press twice
to close the menu.
Copying Photos from the Index Screen
1 Open the [Photos] index screen of the photos recorded in the
built-in memory.
Select the tab under the icon.
2 Select ( , ) the photo you want to copy.
This step is not necessary to copy all photos or previously selected
photos.
FUNC.
74 Photos
Page 75

3 Copy the photos.
FUNC.
[ Copy ( )] Desired option [Yes]*
[OK]
* If you selected an option other than [This Photo], you can press to interrupt
the operation while it is in progress.
FUNC.
Options
[All Photos] Copies all the photos.
[This Photo] Copies only the photo marked with the orange selec-
tion frame.
[Selected Photos] Copies all the photos selected in advance
(marked with a checkmark). Refer to
ings from the Index Screen
( 44).
Pre-selecting Record-
IMPORTANT
• Observe the following precautions while the ACCESS indicator is on or
flashing. Failing to do so may result in permanent data loss.
- Do not open the memory card slot cover.
- Do not disconnect the power source or turn off the camcorder.
- Do not change the camcorder’s operating mode.
• When copying photos onto an Eye-Fi card, photos will be uploaded
automatically if you are within the range of a configured network.
Always verify that Eye-Fi cards have been approved in the country/
region of use. See also
Using an Eye-Fi card
( 84).
NOTES
• In the following cases, you will not be able to copy recordings to the
memory card:
- If the memory card slot is open.
- If the LOCK switch on the memory card is set to prevent writing.
- If there is no memory card in the memory card slot.
• If there is not enough space on the memory card, as many photos as
possible will be copied before stopping the operation.
Photos 75
Page 76

External Connections
This chapter explains how to connect your camcorder to an
external device such as a TV, VCR, or computer.
Terminals on the Camcorder
1 USB Terminal
Access: Open the LCD panel.
2 AV O UT Ter mi na l
Access: Open the LCD panel.
Sound from the built-in speaker will be muted
while the STV-250N Stereo Video Cable is
connected to the camcorder. Adjust the volume
on the connected TV.
Connection Diagrams
In the following connection diagrams, the left side shows the terminals
on the camcorder and the right side shows (for reference only) an
example of terminals on a connected device.
76 External Connections
Page 77

Connection
1
Composite Video
Type: Analog Quality: Standard definition Output only
Connect to a standard TV or a VCR with audio/video input terminals. Change the following
settings on the camcorder:
- [TV Type] according to the TV set (widescreen or 4:3), if the TV cannot
automatically detect and change the aspect ratio
Yellow
White
STV-250N Stereo Video Cable
(supplied)
Red
Connection
In all respects, exactly the same connection as connection .
1
Composite Video (SCART)
1
Connect to a standard TV or VCR with SCART input terminal. Requires a SCART adapter
(commercially available).
Red
White
Yellow
(commercially available)
SCART adapter
Connection
STV-250N Stereo Video Cable
(supplied)
2
Type: Digital data connection
Connect to a computer to save your recordings.
USB Cable
(supplied)
External Connections 77
USB
Page 78

Playback on a TV Screen
Connect the camcorder to a TV to enjoy your recordings with family
and friends. Playback on an HDTV using one of the high-definition
connections will ensure the best playback quality.
Operating modes:
1 Turn off the camcorder and the TV.
2 Connect the camcorder to the TV.
Connection or ( 77).
3 Turn on the connected TV.
On the TV, select as the video input the same terminal to which you
connected the camcorder. Refer to the instruction manual of the
connected TV.
4 Turn on the camcorder and set it to or mode.
Play back the movies or photos.
NOTES
• We recommend powering the camcorder using the compact power
adapter.
• When you play back your 16:9 movies on standard TV sets with a 4:3
aspect ratio, the TV set will switch automatically to widescreen mode if
it is compatible with the WSS system. Otherwise, change the aspect
ratio of the TV manually.
1 1
78 External Connections
Page 79

Saving and Sharing Your Recordings
Saving Recordings on a Computer
Movies and photos recorded with this camcorder are saved in the
built-in memory ( only) or on the memory card. Because space is
limited, make sure to save your recordings on a computer on a regular
basis.
Installing the Supplied Software
With the supplied software Transfer Utility you can save scenes to
your computer. Additionally, the supplied software VideoBrowser
( only) offers many options for organizing your video library,
editing video and more.
Installation
Refer to the Installation Guide (supplied leaflet) and follow the instructions in the Software Guide (PDF file) to install the supplied PIXELA’s
software.
Connecting the Camcorder to a Computer
Operating modes:
1 Turn on the camcorder and set it to or mode.
• We recommend powering the camcorder using the compact power
adapter.
• Select in advance the memory that contains the recordings
you wish to transfer.
2 Connect the camcorder to the computer using the supplied USB
cable.
Connection ( 77).
2
mode: Transferring movies
3 Camcorder: When the connection is successfully established,
[PC Connection] appears on the screen.
External Connections 79
Page 80

4 Computer: Depending on the software you chose to install,
Transfer Utility SD or VideoBrowser SD* will start up
automatically.
• Transfer Utility SD: Click [Video file import] to start transferring files.
For details about using the software, click [Help] to open the
Software Guide (PDF file).
• VideoBrowser SD*: Click in the menu panel to start
transferring files. For details about using the software, click to
open the Software Guide (PDF file).
* only.
mode: Transferring photos
3 Camcorder: When the connection is successfully established,
[PC Connection] appears on the screen.
4 Computer: The camcorder will appear as a new device (or drive),
for example, [Canon FS46]*. Use the program of your choice or
the standard application built into your computer’s operating
system to transfer or copy your photos to the computer.
• Windows 7/Vista: Your photos can be found under [Canon FS46]* >
[Removable Storage] > [DCIM] > [xxxCANON], where “xxx” is a
folder number between 101 and 998.
• Windows XP: Your photos can be found under [Canon FS46]*.
• Mac OS X: iPhoto will start up automatically and [Canon FS46]* will
appear as a new device.
* The actual name of the device will show your camcorder’s model.
IMPORTANT
• When the camcorder is connected to a computer:
- Do not open the memory card slot cover and do not remove the
memory card.
- Do not change or delete any of the camcorder’s folders or files
directly from the computer as this may result in permanent data loss.
Always use only the supplied PIXELA’s software to save your movies
on the computer.
• Operation may not work correctly depending on the software and the
specifications/settings of your computer.
• If you wish to use the image files on your computer, make copies of
them first. Use the copied files, retaining the originals.
80 External Connections
Page 81

• Observe the following precautions while the ACCESS indicator is on or
flashing. Failing to do so may result in permanent data loss.
- Do not open the memory card slot cover.
- Do not disconnect the USB cable.
- Do not turn off the camcorder or the computer.
- Do not change the camcorder’s operating mode.
• When transferring video files previously saved on a computer to a
memory card connected to the computer, do not disconnect the USB
cable or turn off the camcorder or computer. Doing so may result in
scenes that cannot be played back on the camcorder.
NOTES
• Refer also to the computer’s instruction manual.
• Depending on the number of photos on the memory card (Windows:
2,500 photos or more; Macintosh: 1,000 photos or more), you may not
be able to transfer photos to a computer. Try using a card reader.
• Always use the computer’s Safely Remove Hardware function (Windows) or Eject function (Mac OS) to end the connection with the camcorder before disconnecting the USB cable and operating the
camcorder.
Copying Movies to an External Video Recorder
You can copy your movies by connecting the camcorder to a VCR or a
digital video recorder with analog audio/video inputs.
Operating modes:
Connecting
Connect the camcorder to the VCR using Connection or ( 77).
1 1
Recording
1 External device: Load a blank cassette or disc and set the device
to record pause mode.
2 Turn on the camcorder and set it to mode.
3 Camcorder: Locate the scene you wish to copy and pause the
playback just before the desired scene.
External Connections 81
Page 82

4 Camcorder: Resume playback.
• Push the joystick ( ) to hide the joystick guide.
• By default, on-screen displays will be embedded in the output video
signal. You can change the displays by repeatedly pressing
(62).
5 External device: Start recording when the scene you wish to copy
appears; stop recording when it ends.
6 Camcorder: Stop playback.
NOTES
• We recommend powering the camcorder using the compact power
adapter.
DISP.
Preparing Movies for the Web
You can convert your movies into MPEG files that you can easily
upload to your favorite video sharing Web sites. Create the MPEG files
in the camcorder and then connect the camcorder to a computer and
use the supplied PIXELA’s software to upload your videos to the Web.
Installing the Supplied Software
Refer to the Installation Guide (supplied leaflet) and follow the instructions in the Software Guide (PDF file) to install the supplied PIXELA’s
software.
Operating modes:
Converting Scenes into MPEG Files
1 Power the camcorder using the compact power adapter.
2 Make sure there is enough available space in the memory that
contains the scenes you want to convert.
3 Select ( , ) the scene you want to convert.
4 Play back the scene and pause the playback where you want the
conversion to begin.
82 External Connections
Page 83

5Press .
WEB
6 Select ( ) [Yes] and press .
• Press twice to interrupt the
operation while it is in progress.
• The video from the point where
you pressed until the end of
WEB
the scene (or up to 10 minutes in
case of longer scenes) will be
copied as a Web-friendly MPEG file.
7 When the conversion is completed, a confirmation screen will
appear.
Press and repeat steps 3 to 6 to convert additional scenes or
continue with the procedure without pressing to upload your
videos to the Web.
8 Connect the camcorder to the computer using the supplied USB
cable.
• Connection ( 77).
2
• On the computer: Depending on the software you chose to install,
Transfer Utility SD or VideoBrowser SD* will start up
automatically.
9 Computer: Click [Web upload] (Transfer Utility SD) or
(VideoBrowser SD*) and continue the operation following the
software's indications.
For details about using the software, click [Help] (Transfer Utility SD) or
(VideoBrowser SD*) to open the Software Guide (PDF file).
* only.
IMPORTANT
• While the camcorder is connected to the computer, do not open the
memory card slot cover and do not remove the memory card.
• Observe the following precautions while the ACCESS indicator is on or
flashing. Failing to do so may result in permanent data loss.
- Do not open the memory card slot cover.
- Do not disconnect the USB cable.
- Do not disconnect the power source or turn off the camcorder or the
computer.
External Connections 83
Page 84

• After you connect the camcorder to the computer, the supplied
PIXELA’s software will copy the MPEG video files to the computer and
upload them to the Web, leaving behind a copy of the video files in the
memory card. Use the [Delete All Web Movies ] option to
delete the MPEG files from the memory card after you confirm that the
video files were correctly uploaded to the Web.
Uploading your Videos Wirelessly
If you used an Eye-Fi card to record your movies, after converting your
movies to MPEG files, the video files will be uploaded wirelessly to the
Web, directly from the camcorder. You will need to have installed the
software supplied with your Eye-Fi card and completed all the
required configuration setup in advance. For details about the configuration and the latest information on compatible Web sites, refer to
Eye-Fi's homepage and the instruction manual of the Eye-Fi card.
Please read the IMPORTANT section before using an Eye-Fi card.
1 Insert your Eye-Fi card in the camcorder and make sure there is
sufficient available space on the card.
2 Convert the desired movie ( 82).
• When the conversion is completed, press .
• If you are within the range of a configured network, the wireless
transfer will start automatically after the conversion is completed.
• The status of the wireless communication is shown by the Eye-Fi
icon as follows:
- (grayed out) Communication not established
- (white, flashing) Connecting; (white, continuously on)
Wireless upload on standby
- (animated) Wireless upload in progress
- [Eye-Fi Communication] is set to [ Off]
- Wireless upload stopped by the camcorder ( 102)
- Error reading from the Eye-Fi card ( 101)
IMPORTANT
Using an Eye-Fi card:
• This product is not guaranteed to support Eye-Fi card functions
(including wireless transfer). In case of an issue with an Eye-Fi card,
please check with the card manufacturer. Also note that an approval is
84 External Connections
Page 85

required to use Eye-Fi cards in many countries or regions. Without
approval, use of the card is not permitted. If it is unclear whether the
card has been approved for use in the area, please check with the card
manufacturer.
• Do not use Eye-Fi cards on airplanes and in other places where wireless communication is forbidden. Remove the Eye-Fi card from the
camcorder beforehand.
NOTES
• Depending on the amount of data to be transferred or wireless signal
conditions, uploading may take a long time. In addition, if wireless signal conditions worsen, uploading may be interrupted.
• Wireless transfer will decrease the effective usage time of the battery
pack. You can power the camcorder using the compact power adapter
so the battery pack will not be consumed.
• While files are being uploaded, the camcorder’s automatic power off
function will be disabled.
• The ACCESS indicator may flash periodically while the Eye-Fi card is in
use.
• Wireless transfer is available only in playback mode. Any wireless transfer in progress will be stopped if you set the camcorder to recording
mode.
• You can turn off the wireless communication with the [Eye-Fi
Communication]* setting.
• If the LOCK switch on the Eye-Fi card is set to prevent writing, you
cannot change the [Eye-Fi Communication] setting. In such case, the
icon will appear on the screen. Change the position of the LOCK
switch to change the setting.
* This menu option will appear only when using an Eye-Fi card.
External Connections 85
Page 86

Additional Information
This chapter contains troubleshooting advice, screen messages, handling and maintenance tips, and other information.
Appendix: Menu Options Lists
Menu items not available appear grayed out. For details about how to
select an item, refer to Using the Menus ( 23). For details about
each function, see the reference page. Menu options without a reference page are explained after the tables. Menu options in boldface
indicate default values.
FUNC. Menu
FUNC. Menu
Mode
Menu item Setting options
Recording programs [ Programmed AE] 47
[ Portrait], [ Sports], [ Snow], [ Beach],
[ Sunset], [ Night Scene], [ Low Light],
[ Spotlight], [ Fireworks]
White balance [ Automatic], [ Daylight], [ Tungsten],
Image effects [ Image Effect Off], [ Vivid], [ Neutral],
Digital effects [ Digital Effect Off], [ Fade Trigger]*, [ Wipe]*,
Recording mode* [ High Quality 9 Mbps], [ Standard Play 6 Mbps],
* For movies only.
Setup Menus
[ Custom WB]
[ Soft Skin Detail]
[Black & White], [Sepia]
[ Long Play 3 Mbps]
55
56
52
35
86 Additional Information
Page 87

Mode
: [Movies] index screen (original scenes)
: [Playlist] and [Playlist: Video Snapshot] index screens
: [Video Snapshot] index screen
Menu item Setting options
[Select Music] [Off], list of music tracks – zz59
[Select] [Individual Scenes], [Remove All Selections] z – z 44
[Copy ]
[All Scenes], [All Scenes (this date)],
1
[This Scene], [Selected Scenes]
z – z 66
[Playlist] – z –
[Add to Playlist] [All Scenes (this date)], [This Scene],
z – z 63
[Selected Scenes]
[Divide] – z
2
––65
[Move] – – z –64
[Delete] [All Scenes], [All Scenes (this date)],
z – z 45
[This Scene], [Selected Scenes]
[All Scenes], [This Scene] – z –64
[Scene Search] [Calendar Screen], [Date Selection] z – z 42
[Menu] Open the setup menus. zzz24
1
Only for scenes recorded in the built-in memory.
2
Not available for video snapshot scenes.
Mode
Menu item [Photos] index screen
Single photo view
[Select Music] [Off], list of music tracks – 59
[Select]
[Copy ]
[Delete] [All Photos], [This Photo],
[Individual Photos], [Remove All Selections]
[All Photos], [This Photo],
1
[Selected Photos]
–44
[No], [Yes]
[No], [Yes] 72
[Selected Photos]
[Menu] Open the setup menus. – 24
1
Only for photos recorded in the built-in memory.
Additional Information 87
74
Page 88

Setup Menus
Camera Setup 1 ( Mode)
Menu item Setting options
[Rec Media for Movies]
[Rec Media for Photos]
[Widescreen] [On], [ Off] –
[Video Snapshot Length] [ 2 sec], [ 4 sec], [ 8 sec] –
[Self Timer] [ On ], [Off] 57
[Onscreen Markers] [Off], [ Level (White)], [ Level (Gray)],
[Widescreen]: The camcorder uses the full width of the image sensor
providing high-resolution 16:9 recordings.
• Since the screen on the camcorder has an aspect ratio of 16:9, recordings with a 4:3 aspect ratio will appear in the center of the screen with
black sidebars.
• Playing back a widescreen recording: TV sets compatible with the
WSS system will automatically switch to wide (16:9) mode. Otherwise,
change the aspect ratio of the TV manually. To play back on a TV with
normal aspect ratio (4:3) change the
ingly.
• The camcorder retains the last setting used even if you set the camcorder to mode.
[Video Snapshot Length]: Selects the length of video snapshot scenes.
[Onscreen Markers]: You can display a grid or a horizontal line at the
center of the screen. Use the markers as a reference to make sure your
subject is framed correctly (vertically and/or horizontally).
• Using the onscreen markers will not affect the recordings.
[Built-in Mem.], [Mem. Card] 31
[Built-in Mem.], [Mem. Card]
–
[ Grid (White)], [ Grid (Gray)]
[TV Type] setting accord-
88 Additional Information
Page 89

Camera Setup 2 ( Mode)
Menu item Setting options
[Digital Zoom] [ On], [Off] 36
[Zoom Speed] [Variable], [ Speed 3], [ Speed 2],
[Speed 1]
[Image Stabilizer] [ Dynamic], [Standard], [ Off] 50
[Flicker Reduction] [Off], [ 50 Hz], [ 60 Hz] –
[Auto Slow Shutter] [On], [Off] –
[Wind Screen] [ Automatic], [ Off ] –
36
[Flicker Reduction]: If the screen starts to flicker when recording movies
under fluorescent lights, change the setting to reduce the effect.
• Flicker reduction can be activated only when the recording program is
set to [ Programmed AE.]
[Auto Slow Shutter]: The camcorder automatically uses slow shutter
speeds to obtain brighter recordings in places with insufficient lighting.
• Minimum shutter speed used: 1/25.
• The auto slow shutter can only be activated when the recording program is set to [ Programmed AE], but the setting will not change
even if you set the camcorder to mode.
• If a trailing afterimage appears, set the slow shutter to [ Off].
• If (camcorder shake warning) appears, we recommend stabilizing
the camcorder, for example, by mounting it on a tripod.
[Wind Screen]: The camcorder automatically reduces the background
sound of wind when recording outdoors.
• Some low-frequency sounds will be suppressed along with the sound
of wind. When recording in surroundings unaffected by wind or if you
want to record low-frequency sounds, we recommend setting the wind
screen to [ Off ].
Playback Setup ( Mode)
Menu item Setting options
[Data Code] [ Date], [ Time], [ Date and Time],
[ Camera Data]
Additional Information 89
–
Page 90

[Data Code]: Displays the date and/or time when the scene was
recorded.
[ Camera Data]: Displays the aperture (f-stop) and shutter speed used
when recording the scene.
System Setup 1
Menu item Setting options
[Output Onscreen Displays] [ On], [ Off] z –––
[LCD Brightness] zzz –
[TV Type] [ Normal TV], [ Wide TV] – zz –
[Speaker Volume] – zz –
[Demo Mode] [ On], [ Off] z –– –
[Output Onscreen Displays]: When set to [ On], the camcorder’s on-
screen displays will appear also on the screen of a TV or monitor connected to the camcorder.
[LCD Brightness]: Adjusts the brightness of the LCD screen.
• Changing the brightness of the LCD screen does not affect the brightness of your recordings or the brightness of the playback image on a
TV.
[TV Type]: When you connect the camcorder to a TV using the supplied
STV-250N Stereo Video Cable, select the setting according to the type of
TV in order to display the picture in full and in the correct aspect ratio.
[ Normal TV]: TV sets with 4:3 aspect ratio.
[ Wide TV]: TV sets with 16:9 aspect ratio.
• When the TV type is set to [ Normal TV], during the playback of
video originally recorded with an aspect ratio of 16:9, the picture will
not be displayed fullscreen.
[Speaker Volume]: Adjust ( ) the volume of the playback. You can also
adjust the volume using the joystick guide ( 39).
[Demo Mode]: The demonstration mode displays the camcorder’s main
features. It starts automatically when the camcorder is powered with the
compact power adapter if you leave it turned on without a memory card
for more than 5 minutes.
• To cancel the demo mode once it has started, press any button or turn
off the camcorder.
90 Additional Information
Page 91

System Setup 2
Menu item Setting options
[Notification Sounds] [ High Volume],
[Power Saving Mode] [ On], [ Off] zzz –
[Quick Start] [ Off], [10min],
[Initialize
[Initialize ]
[Delete All Web Movies ][No], [Yes] – z –82
[Photo Numbering] [ Reset], [ Continuous] zzz –
[Firmware] – – – z –
[Eye-Fi Communication]
1
Option available only from the [Movies] or [Video Snapshot] index screen.
2
Option available only after having inserted an Eye-Fi card in the memory card slot.
/ ]
[ Low Volume], [ Off]
[ 20min], [ 30min]
[Built-in Mem.], [Mem. Card]
[Quick Initialization],
[Complete Initialization]
2
[
Automatic
], [ Off] zzz84
zzz –
z –––
1
zz
z 31
[Notification Sounds]: A beep will accompany some operations like turn-
ing on the camcorder, the self-timer countdown, etc.
[Power Saving Mode]: In order to save power when the camcorder is
powered by a battery pack, it will automatically shut off if left without any
operation for 5 minutes.
• Approximately 30 seconds before the camcorder shuts off, [Auto
Power Off] will appear.
• In standby mode, the camcorder will shut off after the time selected for
the [Quick Start] setting.
[Quick Start]: Select whether to activate the Quick Start function ( 37)
when you close the LCD panel in a recording mode and the length of
time after which the camcorder will end the standby mode and shut off
automatically.
[Photo Numbering]: Select the photo numbering method to be used on a
new memory card. Photos are automatically assigned consecutive num-
Additional Information 91
Page 92

bers from 0101 to 9900, and stored in folders containing up to 100 photos. Folders are numbered from 101 to 998.
[ Reset]: Photo numbers will restart from 101-0101 every time you
insert a new memory card.
[ Continuous]: Photo numbers will continue from the number following that of the last photo recorded with the camcorder.
• If the memory card you insert already contains a photo with a larger
number, a new photo will be assigned a number one higher than that of
the last photo on the memory card.
• We recommend using the [ Continuous] setting.
• The photo number indicates the name and location of the file on the
memory card. For example, the file name of a photo numbered 1010107 is “IMG_0107.JPG”, stored under the folder “DCIM\101CANON”.
[Firmware]: You can verify the current version of the camcorder’s firm-
ware. This menu option is usually unavailable.
Language and Date/Time Setup
Menu item Setting options
[Language ] [ ], [Dansk], [Deutsch], [ ],
[English], [Español], [Français],
[Italiano], [Magyar], [Melayu],
[Nederlands], [Norsk], [Polski],
[Português], [ ], [Suomi],
[Svenska], [Türkçe], [ ],
[ ], [ ], [ ],
[ ], [ ], [ ],
[], []
[Time Zone/DST] [ ] (home time zone) or [ ] (travel
time zone): [Paris], list of world time
zones
[Date/Time] – zzz26
[Date Format] [Y.M.D AM/PM] (2011.1.1 AM 12:00),
[Y.M.D 24H] (2011.1.1 0:00),
[M.D,Y AM/PM] (Jan. 1, 2011 12:00 AM),
[M.D,Y 24H] (Jan. 1, 2011 0:00),
[D.M.Y AM/PM] (1.Jan.2011 12:00 AM),
[D.M.Y 24H] (1.Jan.2011 0:00)
zzz27
zzz27
zzz –
92 Additional Information
Page 93

Menu item Setting options
[Calendar Start Day] [Saturday], [Sunday], [Monday] – z ––
[Date Format]: Select the date format to be used for most on-screen dis-
plays.
[Calendar Start Day]: Select the day on which the week starts for the cal-
endar screen ( 42).
Information Screens
Menu item Setting options
[Memory Info]
[Memory Card Info] – zzz –
[Battery Info] – zzz –
– zzz –
[Memory Info]/[Memory Card Info]: Displays a screen where you can
verify how much of the built-in memory ( only) or the memory card
is currently in use ( total recording time and total number of photos) and how much space remains available for recording.
• Estimated figures about available movie recording time and available
number of photos are approximate and based on the recording mode
currently in use.
• The total space for the built-in memory may be less than the
capacity listed in
Specifications
( 119).
• In the [Memory Card Info] screen you can verify also the Speed Class
of the memory card.
[Battery Info]: Displays a screen where you can verify the battery charge
(as a percentage) and the remaining recording time ( mode) or playback time ( , mode).
Additional Information 93
Page 94

Appendix: Onscreen Icons and Displays
Recording Movies
1 Operating mode ( 21),
Zoom ( 36),
Manual exposure ( 53)
2 Recording program ( 47)
3 White balance ( 55)
4 Image effect ( 56)
5 Digital effect ( 52)
6 Recording mode ( 35)
7 Manual focus ( 54)
8 Automatic backlight correction
(49)
9 Pre-recording ( 50)
Aq Memory operation ( 97)
Aa Remaining battery time ( 97)
94 Additional Information
As While recording/during playback:
Scene counter (hours : minutes :
seconds)
In record pause mode:
Total number of scenes
Ad Remaining recording time
On the memory card
In the built-in memory
( only)
Af Image stabilizer ( 50)
Ag Mini video light ( 57)
Ah Wind screen off ( 89)
Aj Flicker reduction ( 89)
Ak Level marker ( 88)
Al Joystick guide ( 23)
Page 95

Recording Photos
Sq AF frame ( 69)
Sa Self timer ( 57)
Ss Number of available photos
On the memory card
In the built-in memory
( only)
Playing Movies (During Playback)
Sg Data code ( 62)
Sh Eye-Fi wireless communication
(84)
Sd Camcorder shake warning ( 89)
Sf Focus and exposure lock ( 69)
Sj Scene number
Additional Information 95
Page 96

Viewing Photos
Sk Protected photo mark (photos on
the memory card that were
protected using another device)
Sl Current photo / Total number of
photos
96 Additional Information
Dq Photo number ( 91)
Da Date and time of recording
Page 97

Aq Memory operation
Record, Record pause, Playback, Playback pause, Fast playback,
Fast reverse playback, Slow playback, Slow reverse playback
Aa Remaining battery time
• The icon shows a rough estimate
of the remaining charge as a
100% 75% 50% 25% 0%
percentage of the full charge of
the battery pack.
• When is displayed in red, replace the battery pack with a fully charged one.
• When you attach an empty battery pack, the power may turn off without displaying .
• Depending on the conditions under which the camcorder and the battery pack are
used, the actual battery charge may not be indicated accurately.
• When the camcorder is off, press to display the charge status of a
BATT. INFO
battery pack. The Intelligent System will display the charge status (as a percentage)
and the remaining recording time (in minutes) for 5 seconds. If the battery pack is
exhausted, the battery information may not be displayed.
Ad Remaining recording time
When there is no more free space on the memory, [
End] (built-in memory,
only) or [ End] (memory card) will be displayed and the recording will stop.
Ss Number of available photos
in red: There is no memory card in the camcorder.
in green: 6 or more photos in yellow: 1 to 5 photos in red: No more photos
can be recorded.
• When viewing the photos, the display will always be in green.
• Depending on the recording conditions, the number of available photos displayed
may not decrease even after a recording has been made, or may decrease by 2
photos at once.
Additional Information 97
Page 98

Troubl e?
Troubleshooting
If you have a problem with your camcorder, refer to this section.
Sometimes what you think is a malfunction of the camcorder may
have the simplest of solutions - please read the “CHECK THIS FIRST”
box before going on to the more detailed problems and solutions.
Consult your dealer or a Canon Service Center if the problem persists.
CHECK THIS FIRST
Power supply
• Is the battery charged? Is the compact power adapter correctly connected to the camcorder? ( 15)
Recording
• Did you turn the camcorder on and correctly set it to recording
mode? ( 21) If you are recording on a memory card, is one correctly inserted into the camcoder? ( 30)
Playback
• Did you turn the camcorder on and correctly set it to playback
mode? ( 39, 70) If you are playing back recordings from a memory
card, is one correctly inserted into the camcorder? ( 30) Does it
contain any recordings?
Power source
The camcorder will not turn on or it turns off by itself.
- The battery pack is exhausted. Replace or charge the battery pack.
- Remove the battery pack and reattach it correctly.
Cannot charge the battery pack.
- Make sure the camcorder is off so charging can start.
- The temperature of the battery pack is outside the charging range. If the battery pack’s temperature is below 0 °C, warm it before charging it; if it is above 40 °C, let the battery pack
cool down before charging it.
- Charge the battery pack in temperatures between 0 °C and 40 °C.
- The battery pack is faulty. Replace the battery pack.
- The camcorder cannot communicate with the battery pack attached. Such battery packs
cannot be charged using this camcorder.
A noise can be heard from the compact power adapter.
- A faint sound can be heard while the compact power adapter is connected to a power outlet.
This is not a malfunction.
98 Additional Information
Page 99

The battery pack is exhausted extremely quickly even at normal temperatures.
- The battery may have reached the end of its battery life. Buy a new battery pack.
Recording
Start/Stop
Pressing will not start recording.
- You cannot record while the camcorder is writing previous recordings onto the memory
(while the ACCESS indicator is on or flashing). Wait until the camcorder has finished.
- The memory is full or it already contains the maximum number of scenes (3,999 scenes).
Delete some recordings ( 45, 72) or initialize the memory ( 31) to free some space.
The point where was pressed does not match the beginning/end of the recording.
- There is a slight interval between pressing and the actual start/end of recording.
This is not a malfunction.
- When the pre-recording function is used, the beginning of the scene will differ from when
Start/Stop
The camcorder will not focus.
- Autofocus does not work on the subject. Focus manually ( 54).
- The lens is dirty. Clean the lens with a soft lens-cleaning cloth ( 113). Never use tissue
paper to clean the lens.
Changing between recording ( )/record pause ( )/playback ( ) takes longer than
usual.
- When the memory contains a large number of scenes, some operations may take longer
than usual. Save your recordings ( 79) and initialize the memory ( 31).
Movies or photos cannot be recorded properly.
- This may occur as movies and photos are recorded/deleted over time. Save your recordings
( 79) and initialize the memory ( 31).
After using the camcorder for a long time, it becomes hot.
- The camcorder may become hot after using it continuously for long periods of time; this is
not a malfunction. If the camcorder becomes unusually hot or it becomes hot after using it
only for a short while, it may indicate a problem with the camcorder. Consult a Canon Service
Center.
Start/Stop
Start/Stop
was pressed.
Playback
Cannot add scenes to the playlist.
- The playlist can contain a maximum of 99 scenes.
- You may not be able to add scenes to the playlist if they were recorded or edited using
another device and then transferred to a memory card connected to a computer.
Additional Information 99
Page 100

- The memory is full. Delete some recordings ( 45, 72) or initialize the memory ( 31)
to free some space.
Cannot move scenes in the playlist.
- The memory is full. Delete some recordings ( 45, 72) or initialize the memory ( 31) to
free some space.
Cannot delete a scene.
- You may not be able to delete scenes recorded or edited using another device and then
transferred to a memory card connected to a computer.
Deleting scenes takes longer than usual.
- When the memory contains a large number of scenes, some operations may take longer
than usual. Save your recordings ( 79) and initialize the memory ( 31).
Cannot delete a photo.
- Photos that were protected with other devices and then transferred to a memory card connected to a computer cannot be deleted with this camcorder.
When playing back scenes/slideshow with background music, the music track is not played
back correctly.
- This can occur when you transfer the music files from the supplied Camcorder Supplemental
Disc to a memory card connected to a computer after repeatedly recording and deleting
scenes (fragmented memory). Save your recordings ( 79) and initialize the memory card
( 31). Connect the memory card to the computer and transfer the music files first, before
writing the video files back to the memory card.
- Music tracks will not play back correctly if the connection with the memory card was interrupted while transferring the music files from the supplied Camcorder Supplemental Disc.
Delete the music tracks and transfer the music files again.
- The transfer rate of the memory card used is too slow. Use a recommended memory card
( 28).
Cannot divide scenes
- You cannot divide scenes recorded or edited using another device and then transferred to a
memory card connected to a computer.
- The memory is full. Delete some recordings ( 45, 72) or initialize the memory ( 31) to
free some space.
Cannot mark individual scenes/photos in the index screen with a checkmark .
- You cannot select more than 100 scenes/photos individually. Reduce the number of selected
scenes/photos.
Indicators and Onscreen Displays
lights up in red.
- Battery pack is exhausted. Replace or charge the battery pack.
100 Additional Information
 Loading...