

Canon imageRUNNER C3489, imageRUNNER C3089, imageRUNNER C3080i, imageRUNNER C2550, imageRUNNER C3480i Reference Manual

Reference Guide
Reference Guide
Please read this guide before operating this product.
After you finish reading this guide, store it in a safe place for future reference.
ENG


Ot¯
0
Color imageRUNNER
C3480/C3480i
C3080/C3080i
C2550
Reference Guide

Manuals for the Machine
The manuals for this machine are divided as follows. Please refer to them for detailed information.
The manuals supplied with optional equipment are included in the list below. Depending on the system
configuration and product purchased, some manuals may not be needed.
Guides with this symbol are pr inted manuals.
Guides with this symbol are included on the accompanying
CD-ROM
CD-ROM. (See footnote on the next page.)
• Quick Reference for Basic Operations
• Learn How to Use Your Machine
The Tutorial CD is a teaching aid, designed to help you learn the various
functions of the machine.
• Precautions for Using Your Machine
• Troubleshooting
• Specifications
• Basic Operations
• Copying and Mail Box Instructions
• Sending and Fax Instructions
• Setting Up the Network Connection and
Installing the CD-ROM Software
• Remote User Interface Instructions
• Network Connectivity and Setup Instructions
Easy Operation Guide
Tutorial CD
Support Guide
Reference Guide
(This Document)
Copying and Mail Box
Guide
Sending and Facsimile
Guide
Network Quick Start Guide
Remote UI Guide
Network Guide
CD-ROM
CD-ROM
CD-ROM
CD-ROM
CD-ROM
CD-ROM
• Color Network ScanGear Installation and
Instructions
• PS/PCL/UFR II Printer and Direct Printing
Instructions
• PCL Printer Driver Installation and
Instructions
Color Network ScanGear
User's Guide
PS/PCL/UFR II Printer
Guide
PCL Driver Guide
CD-ROM
CD-ROM
CD-ROM

• PS Printer Driver Installation and
Instructions
PS Driver Guide
CD-ROM
• UFR II Printer Driver Installation and
Instructions
• Mac OS X PS Printer Driver Installation and
Instructions
• Mac OS X UFR II Printer Driver Installation
and Instructions
• Fax Driver Installation and Instructions
• Installing MEAP Applications and Using the
Login Service
UFR II Driver Guide
Mac PS Driver Guide
Mac UFR II Driver Guide
Fax Driver Guide
MEAP SMS Administrator
Guide
CD-ROM
CD-ROM
CD-ROM
CD-ROM
CD-ROM
• To view the manual in PDF format, Adobe Reader/Acrobat Reader/Acrobat is required. If Adobe Reader/Acro bat Reader/Acrobat is not installed on
your system, please download it from the Adobe Systems Incorporated website (http://www.adobe.com).
• The machine illustration on the cover may differ slightly from your machine.

How This Manual Is Organized
Chapter 1 Before You Start Using This Machine
Chapter 2 Basic Operations
Chapter 3
Chapter 4 Customizing Settings
Chapter 5 Checking Job and Device Status
Chapter 6 System Manager Settings
Chapter 7 Routine Maintenance
Chapter 8 Troubleshooting
Chapter 9 Appendix
Optional Equipment
Includes the Sample Reports, the Relationship between Original Orientation and
Preprinted Paper Output Chart, and index.
Considerable effort has been made to ensure that this manual is free of inaccuracies and omissions. However, as we are constantly improving our
products, if you need an exact specification, please contact Canon.

Contents
Preface . . . . . . . . . . . . . . . . . . . . . . . . . . . . . . . . . . . . . . . . . . . . . . . . . . . . . . . . . xiv
How To Use This Manual. . . . . . . . . . . . . . . . . . . . . . . . . . . . . . . . . . . . . . . . . . . xiv
Symbols Used in This Manual . . . . . . . . . . . . . . . . . . . . . . . . . . . . . . . . . . . . . xiv
Keys Used in This Manual . . . . . . . . . . . . . . . . . . . . . . . . . . . . . . . . . . . . . . . . .xv
Displays Used in This Manual . . . . . . . . . . . . . . . . . . . . . . . . . . . . . . . . . . . . . .xv
Illustrations Used in This Manual. . . . . . . . . . . . . . . . . . . . . . . . . . . . . . . . . . . xvi
Abbreviations Used in This Manual . . . . . . . . . . . . . . . . . . . . . . . . . . . . . . . . . xvi
Trademarks . . . . . . . . . . . . . . . . . . . . . . . . . . . . . . . . . . . . . . . . . . . . . . . . . . . xvi
Chapter 1 Before You Start Using This Machine
Installation Location and Handling . . . . . . . . . . . . . . . . . . . . . . . . . . . . . . . . . . 1-2
Installation Precautions . . . . . . . . . . . . . . . . . . . . . . . . . . . . . . . . . . . . . . . . . .1-2
Avoid Installing the Machine in the Following Locations . . . . . . . . . . . . . .1-2
Select a Safe Power Supply. . . . . . . . . . . . . . . . . . . . . . . . . . . . . . . . . . . .1-5
Moving the Machine. . . . . . . . . . . . . . . . . . . . . . . . . . . . . . . . . . . . . . . . . . 1-5
Handling Precautions. . . . . . . . . . . . . . . . . . . . . . . . . . . . . . . . . . . . . . . . . . . . 1-6
Backing Up Data . . . . . . . . . . . . . . . . . . . . . . . . . . . . . . . . . . . . . . . . . . . . . . . . .1-9
Parts and Their Functions . . . . . . . . . . . . . . . . . . . . . . . . . . . . . . . . . . . . . . . . 1-10
External View. . . . . . . . . . . . . . . . . . . . . . . . . . . . . . . . . . . . . . . . . . . . . . . . .1-10
Internal View . . . . . . . . . . . . . . . . . . . . . . . . . . . . . . . . . . . . . . . . . . . . . . . . . 1-12
Control Panel Parts and Functions . . . . . . . . . . . . . . . . . . . . . . . . . . . . . . . . 1-13
Main Power and Control Panel Power . . . . . . . . . . . . . . . . . . . . . . . . . . . . . . .1-14
How to Turn ON the Main Power . . . . . . . . . . . . . . . . . . . . . . . . . . . . . . . . . .1-14
Control Panel Power Switch. . . . . . . . . . . . . . . . . . . . . . . . . . . . . . . . . . . . . . 1-19
Shutting Down the Machine. . . . . . . . . . . . . . . . . . . . . . . . . . . . . . . . . . . . . .1-20
System Settings. . . . . . . . . . . . . . . . . . . . . . . . . . . . . . . . . . . . . . . . . . . . . . . . .1-25
Chapter 2 Basic Operations
What This Machine Can Do . . . . . . . . . . . . . . . . . . . . . . . . . . . . . . . . . . . . . . . .2-2
Overview of the Color imageRUNNER
C3480/C3480i/C3080/C3080i/C2550 . . . . . . . . . . . . . . . . . . . . . . . . . . . . . . . . . .2-5
The Touch Panel Display . . . . . . . . . . . . . . . . . . . . . . . . . . . . . . . . . . . . . . . . . 2-5
Switching the Functions Indicated on the Touch Panel Display . . . . . . . . 2-5
Various Touch Panel Display Screens . . . . . . . . . . . . . . . . . . . . . . . . . . . . 2-8
Adding New Functions. . . . . . . . . . . . . . . . . . . . . . . . . . . . . . . . . . . . . . . . . . . 2-8
v

Specifying Settings. . . . . . . . . . . . . . . . . . . . . . . . . . . . . . . . . . . . . . . . . . . . .2-10
Functions That Conserve Power . . . . . . . . . . . . . . . . . . . . . . . . . . . . . . . . . .2-11
Checking, Changing, and Canceling Print Jobs . . . . . . . . . . . . . . . . . . . . . . .2-13
Displaying a Help Screen. . . . . . . . . . . . . . . . . . . . . . . . . . . . . . . . . . . . . . . .2-15
Reading Messages from the System Manager . . . . . . . . . . . . . . . . . . . . . . .2-17
Types of Message Boards . . . . . . . . . . . . . . . . . . . . . . . . . . . . . . . . . . . .2-17
Other Useful Functions . . . . . . . . . . . . . . . . . . . . . . . . . . . . . . . . . . . . . . . . .2-18
Using the Touch Panel Display. . . . . . . . . . . . . . . . . . . . . . . . . . . . . . . . . . . . .2-21
Frequently Used Keys . . . . . . . . . . . . . . . . . . . . . . . . . . . . . . . . . . . . . . . . . .2-21
Touch Panel Key Display . . . . . . . . . . . . . . . . . . . . . . . . . . . . . . . . . . . . . . . .2-22
Adjusting the Brightness . . . . . . . . . . . . . . . . . . . . . . . . . . . . . . . . . . . . . . . .2-23
Entering Characters from the Touch Panel Display . . . . . . . . . . . . . . . . . . . .2-24
Entering Characters . . . . . . . . . . . . . . . . . . . . . . . . . . . . . . . . . . . . . . . . . . . .2-24
Values in Inches . . . . . . . . . . . . . . . . . . . . . . . . . . . . . . . . . . . . . . . . . . . . . . .2-25
Entering the Department ID and Password . . . . . . . . . . . . . . . . . . . . . . . . . . .2-26
Using a Login Service . . . . . . . . . . . . . . . . . . . . . . . . . . . . . . . . . . . . . . . . . . . .2-29
Placing Originals . . . . . . . . . . . . . . . . . . . . . . . . . . . . . . . . . . . . . . . . . . . . . . . .2-34
Document Sizes . . . . . . . . . . . . . . . . . . . . . . . . . . . . . . . . . . . . . . . . . . . . . . .2-34
Orientation . . . . . . . . . . . . . . . . . . . . . . . . . . . . . . . . . . . . . . . . . . . . . . . . . . .2-35
Platen Glass. . . . . . . . . . . . . . . . . . . . . . . . . . . . . . . . . . . . . . . . . . . . . . . . . .2-36
Feeder . . . . . . . . . . . . . . . . . . . . . . . . . . . . . . . . . . . . . . . . . . . . . . . . . . . . . .2-39
Making Prints Using the Stack Bypass . . . . . . . . . . . . . . . . . . . . . . . . . . . . . .2-42
Multifunctional Operations . . . . . . . . . . . . . . . . . . . . . . . . . . . . . . . . . . . . . . . .2-55
Available Paper Stock . . . . . . . . . . . . . . . . . . . . . . . . . . . . . . . . . . . . . . . . . . . .2-57
Chapter 3 Optional Equipment
System Configuration . . . . . . . . . . . . . . . . . . . . . . . . . . . . . . . . . . . . . . . . . . . . .3-2
Optional Equipment . . . . . . . . . . . . . . . . . . . . . . . . . . . . . . . . . . . . . . . . . . . . .3-2
Sample System Configurations . . . . . . . . . . . . . . . . . . . . . . . . . . . . . . . . . . . .3-4
System Options . . . . . . . . . . . . . . . . . . . . . . . . . . . . . . . . . . . . . . . . . . . . . . . .3-5
Available Combinations of Options. . . . . . . . . . . . . . . . . . . . . . . . . . . . . . . . . .3-9
Utilities . . . . . . . . . . . . . . . . . . . . . . . . . . . . . . . . . . . . . . . . . . . . . . . . . . . . . .3-12
Cassette Feeding Unit-Y3 . . . . . . . . . . . . . . . . . . . . . . . . . . . . . . . . . . . . . . . . .3-13
Parts and Their Functions . . . . . . . . . . . . . . . . . . . . . . . . . . . . . . . . . . . . . . .3-13
Optional Accessories . . . . . . . . . . . . . . . . . . . . . . . . . . . . . . . . . . . . . . . . . . .3-14
Paper Deck-Z1 . . . . . . . . . . . . . . . . . . . . . . . . . . . . . . . . . . . . . . . . . . . . . . . . . .3-15
Parts and Their Functions . . . . . . . . . . . . . . . . . . . . . . . . . . . . . . . . . . . . . . .3-15
Envelope Feeder Attachment-C2 . . . . . . . . . . . . . . . . . . . . . . . . . . . . . . . . . . .3-16
Parts and Their Functions . . . . . . . . . . . . . . . . . . . . . . . . . . . . . . . . . . . . . . .3-17
vi

Feeder (DADF-L1) . . . . . . . . . . . . . . . . . . . . . . . . . . . . . . . . . . . . . . . . . . . . . . .3-18
Parts and Their Functions . . . . . . . . . . . . . . . . . . . . . . . . . . . . . . . . . . . . . . . 3-19
Finisher-Z1 . . . . . . . . . . . . . . . . . . . . . . . . . . . . . . . . . . . . . . . . . . . . . . . . . . . . . 3-20
Parts and Their Functions . . . . . . . . . . . . . . . . . . . . . . . . . . . . . . . . . . . . . . . 3-20
Finishing Modes. . . . . . . . . . . . . . . . . . . . . . . . . . . . . . . . . . . . . . . . . . . . . . .3-21
Finisher-Y1, Saddle Finisher-Y2, and Puncher Unit-M1. . . . . . . . . . . . . . . . .3-25
Parts and Their Functions . . . . . . . . . . . . . . . . . . . . . . . . . . . . . . . . . . . . . . . 3-25
Finishing Modes. . . . . . . . . . . . . . . . . . . . . . . . . . . . . . . . . . . . . . . . . . . . . . .3-27
Inner 2way Tray-D1 . . . . . . . . . . . . . . . . . . . . . . . . . . . . . . . . . . . . . . . . . . . . . .3-33
Parts and Their Functions . . . . . . . . . . . . . . . . . . . . . . . . . . . . . . . . . . . . . . . 3-34
Copy Tray-J1 . . . . . . . . . . . . . . . . . . . . . . . . . . . . . . . . . . . . . . . . . . . . . . . . . . . 3-36
Parts and Their Functions . . . . . . . . . . . . . . . . . . . . . . . . . . . . . . . . . . . . . . . 3-36
Card Reader-C1 . . . . . . . . . . . . . . . . . . . . . . . . . . . . . . . . . . . . . . . . . . . . . . . . .3-38
Procedure before Using the Machine . . . . . . . . . . . . . . . . . . . . . . . . . . . . . . 3-39
Procedure after Using the Machine . . . . . . . . . . . . . . . . . . . . . . . . . . . . . . . .3-39
Department ID Management . . . . . . . . . . . . . . . . . . . . . . . . . . . . . . . . . . . . .3-40
Flow of Additional Functions Operations . . . . . . . . . . . . . . . . . . . . . . . . . 3-40
Changing the Password and Page Limit . . . . . . . . . . . . . . . . . . . . . . . . .3-42
Checking the Page Counts on a Control Card. . . . . . . . . . . . . . . . . . . . . 3-47
Checking and Printing Counter Information. . . . . . . . . . . . . . . . . . . . . . .3-48
Clearing Page Totals . . . . . . . . . . . . . . . . . . . . . . . . . . . . . . . . . . . . . . . . 3-49
Accepting Print and Scan Jobs with Unknown IDs . . . . . . . . . . . . . . . . .3-49
Accepting B&W Copy and Print Jobs without a Control Card. . . . . . . . . 3-51
Chapter 4 Customizing Settings
What Are Additional Functions? . . . . . . . . . . . . . . . . . . . . . . . . . . . . . . . . . . . . 4-3
Additional Functions Settings Table . . . . . . . . . . . . . . . . . . . . . . . . . . . . . . . . .4-6
Specifying Common Settings. . . . . . . . . . . . . . . . . . . . . . . . . . . . . . . . . . . . . .4-27
Initial Function at Power ON . . . . . . . . . . . . . . . . . . . . . . . . . . . . . . . . . . . . . 4-27
Default Display after Auto Clear. . . . . . . . . . . . . . . . . . . . . . . . . . . . . . . . . . . 4-30
Tone Settings . . . . . . . . . . . . . . . . . . . . . . . . . . . . . . . . . . . . . . . . . . . . . . . . . 4-31
Display the Remaining Paper Message. . . . . . . . . . . . . . . . . . . . . . . . . . . . . 4-31
Text/Photo Priority in a Black-and-White Original . . . . . . . . . . . . . . . . . . . . . 4-32
Display the Black Mode Shortcut Key . . . . . . . . . . . . . . . . . . . . . . . . . . . . . . 4-32
Inch Entry. . . . . . . . . . . . . . . . . . . . . . . . . . . . . . . . . . . . . . . . . . . . . . . . . . . .4-33
Auto Paper Selection/Auto Drawer Switching . . . . . . . . . . . . . . . . . . . . . . . . 4-33
Designating the Envelope Type . . . . . . . . . . . . . . . . . . . . . . . . . . . . . . . . . . . 4-35
Identifying the Type of Paper in a Paper Source . . . . . . . . . . . . . . . . . . . . . . 4-35
Paper Select Screen Priority . . . . . . . . . . . . . . . . . . . . . . . . . . . . . . . . . . . . . 4-37
vii

Energy Consumption in the Sleep Mode . . . . . . . . . . . . . . . . . . . . . . . . . . . .4-38
Distinguishing LTRR and STMT Originals . . . . . . . . . . . . . . . . . . . . . . . . . . .4-39
Output Tray Designation. . . . . . . . . . . . . . . . . . . . . . . . . . . . . . . . . . . . . . . . .4-40
Setting the Printing Priority. . . . . . . . . . . . . . . . . . . . . . . . . . . . . . . . . . . . . . .4-42
Image Form . . . . . . . . . . . . . . . . . . . . . . . . . . . . . . . . . . . . . . . . . . . . . . . . . .4-43
Storing an Image Form. . . . . . . . . . . . . . . . . . . . . . . . . . . . . . . . . . . . . . .4-43
Checking Image Form Details . . . . . . . . . . . . . . . . . . . . . . . . . . . . . . . . .4-44
Erasing an Image Form . . . . . . . . . . . . . . . . . . . . . . . . . . . . . . . . . . . . . .4-45
Setting the Image Priority. . . . . . . . . . . . . . . . . . . . . . . . . . . . . . . . . . . . . . . .4-46
User-Defined Text for Page Numbers and Watermarks . . . . . . . . . . . . . . . . .4-46
Registering User-Defined Text . . . . . . . . . . . . . . . . . . . . . . . . . . . . . . . . .4-46
Editing User-Defined Text . . . . . . . . . . . . . . . . . . . . . . . . . . . . . . . . . . . . .4-47
Erasing User-Defined Text . . . . . . . . . . . . . . . . . . . . . . . . . . . . . . . . . . . .4-47
Standard Paper for the Stack Bypass . . . . . . . . . . . . . . . . . . . . . . . . . . . . . .4-48
Irregular Paper Size Settings for the Stack Bypass . . . . . . . . . . . . . . . . . . . .4-50
Registering and Editing Irregular Paper Sizes . . . . . . . . . . . . . . . . . . . . .4-50
Naming a Size Key. . . . . . . . . . . . . . . . . . . . . . . . . . . . . . . . . . . . . . . . . .4-51
Erasing Irregular Paper Sizes. . . . . . . . . . . . . . . . . . . . . . . . . . . . . . . . . .4-51
Setting the Speed or Print Side Priority . . . . . . . . . . . . . . . . . . . . . . . . . . . . .4-52
Standard Local Print Settings. . . . . . . . . . . . . . . . . . . . . . . . . . . . . . . . . . . . .4-54
Changing the Language Shown on the Touch Panel Display. . . . . . . . . . . . .4-55
Reversing the Contrast of the Touch Panel Display . . . . . . . . . . . . . . . . . . . .4-56
Alternating the Print Output (Offset Jobs) . . . . . . . . . . . . . . . . . . . . . . . . . . .4-56
Inserting a Job Separation Sheet between Print Jobs . . . . . . . . . . . . . . . . . .4-57
Inserting a Job Separation Sheet between Copy Sets. . . . . . . . . . . . . . . . . .4-57
Job Duration Display . . . . . . . . . . . . . . . . . . . . . . . . . . . . . . . . . . . . . . . . . . .4-58
Number of Copies/Wait Time Status Display . . . . . . . . . . . . . . . . . . . . . . . . .4-58
Clean the Original Scanning Area Prompt . . . . . . . . . . . . . . . . . . . . . . . . . . .4-59
Data Compression Ratio for Remote Scans . . . . . . . . . . . . . . . . . . . . . . . . .4-59
Setting the Gamma Value for Remote Scans. . . . . . . . . . . . . . . . . . . . . . . . .4-60
Limiting Functions . . . . . . . . . . . . . . . . . . . . . . . . . . . . . . . . . . . . . . . . . . . . .4-61
Erasing the Remaining Toner Error Message . . . . . . . . . . . . . . . . . . . . . . . .4-62
Returning the Common Settings to Their Defaults. . . . . . . . . . . . . . . . . . . . .4-62
Timer Settings . . . . . . . . . . . . . . . . . . . . . . . . . . . . . . . . . . . . . . . . . . . . . . . . . .4-63
Current Time Adjustment . . . . . . . . . . . . . . . . . . . . . . . . . . . . . . . . . . . . . . . .4-63
Auto Sleep Time. . . . . . . . . . . . . . . . . . . . . . . . . . . . . . . . . . . . . . . . . . . . . . .4-63
Auto Clear Time . . . . . . . . . . . . . . . . . . . . . . . . . . . . . . . . . . . . . . . . . . . . . . .4-64
Daily Timer Settings . . . . . . . . . . . . . . . . . . . . . . . . . . . . . . . . . . . . . . . . . . . .4-64
Low-Power Mode Time. . . . . . . . . . . . . . . . . . . . . . . . . . . . . . . . . . . . . . . . . .4-65
viii

Adjusting the Machine . . . . . . . . . . . . . . . . . . . . . . . . . . . . . . . . . . . . . . . . . . . 4-66
Zoom Fine Adjustment. . . . . . . . . . . . . . . . . . . . . . . . . . . . . . . . . . . . . . . . . . 4-66
Saddle Stitch Staple Repositioning . . . . . . . . . . . . . . . . . . . . . . . . . . . . . . . .4-66
Saddle Stitch Position Adjustment . . . . . . . . . . . . . . . . . . . . . . . . . . . . . . . . . 4-67
Adjusting Creep (Displacement) Correction. . . . . . . . . . . . . . . . . . . . . . . . . . 4-68
Automatic Gradation Adjustment . . . . . . . . . . . . . . . . . . . . . . . . . . . . . . . . . .4-68
Quick Adjustment. . . . . . . . . . . . . . . . . . . . . . . . . . . . . . . . . . . . . . . . . . .4-69
Full Adjustment . . . . . . . . . . . . . . . . . . . . . . . . . . . . . . . . . . . . . . . . . . . . 4-69
Exposure Recalibration . . . . . . . . . . . . . . . . . . . . . . . . . . . . . . . . . . . . . . . . . 4-71
Color Mismatch Correction . . . . . . . . . . . . . . . . . . . . . . . . . . . . . . . . . . . . . . 4-71
Character/Background Contrast Adjustment . . . . . . . . . . . . . . . . . . . . . . . . .4-71
Cleaning the Inside of the Main Unit . . . . . . . . . . . . . . . . . . . . . . . . . . . . . . . 4-74
Automatic Feeder Cleaning . . . . . . . . . . . . . . . . . . . . . . . . . . . . . . . . . . . . . .4-75
Replacing the Toner While Printing Is Possible . . . . . . . . . . . . . . . . . . . . . . . 4-76
Chapter 5 Checking Job and Device Status
Checking the Counter and Controller Version . . . . . . . . . . . . . . . . . . . . . . . . .5-2
Checking Job Status. . . . . . . . . . . . . . . . . . . . . . . . . . . . . . . . . . . . . . . . . . . . . . 5-4
Checking Job Status from the System Monitor Screen . . . . . . . . . . . . . . . . . .5-6
Checking Job Status from the Print Job Screen . . . . . . . . . . . . . . . . . . . . . . .5-8
Job Details . . . . . . . . . . . . . . . . . . . . . . . . . . . . . . . . . . . . . . . . . . . . . . . . . . . . . 5-10
Checking Copy/Print Job Details . . . . . . . . . . . . . . . . . . . . . . . . . . . . . . . . . . 5-10
Checking Copy/Print Job Details from the System Monitor Screen. . . . . 5-10
Checking Copy/Print Job Details from the Print Job Screen . . . . . . . . . . 5-11
Printing the Copy/Print Log . . . . . . . . . . . . . . . . . . . . . . . . . . . . . . . . . . . . . . 5-12
Printing Copy/Print Log from the System Monitor Screen . . . . . . . . . . . . 5-12
Printing the Copy/Print Log from the Print Job Screen . . . . . . . . . . . . . .5-13
Priority Printing . . . . . . . . . . . . . . . . . . . . . . . . . . . . . . . . . . . . . . . . . . . . . . . . .5-14
Selecting the Job for Priority Printing from the System Monitor Screen . . . .5-14
Selecting the Job for Priority Printing from the Print Job Screen. . . . . . . . . .5-15
Chapter 6 System Manager Settings
Specifying the System Manager Settings . . . . . . . . . . . . . . . . . . . . . . . . . . . . . 6-3
Department ID Management. . . . . . . . . . . . . . . . . . . . . . . . . . . . . . . . . . . . . . . . 6-6
Registering the Department ID, Password, and Page Limit. . . . . . . . . . . . . . .6-8
Changing the Password and Page Limit . . . . . . . . . . . . . . . . . . . . . . . . . . . . 6-12
Erasing the Department ID and Password. . . . . . . . . . . . . . . . . . . . . . . . . . .6-14
Checking and Printing Counter Information . . . . . . . . . . . . . . . . . . . . . . . . . .6-15
Clearing Page Totals . . . . . . . . . . . . . . . . . . . . . . . . . . . . . . . . . . . . . . . . . . . 6-16
ix

Accepting Print and Scan Jobs with Unknown IDs . . . . . . . . . . . . . . . . . . . .6-17
Accepting B&W Copy and Print Jobs without Entering a Department ID. . . .6-18
Remote UI . . . . . . . . . . . . . . . . . . . . . . . . . . . . . . . . . . . . . . . . . . . . . . . . . . . . . .6-20
Device Information Settings . . . . . . . . . . . . . . . . . . . . . . . . . . . . . . . . . . . . . . .6-22
Clearing the Message Board. . . . . . . . . . . . . . . . . . . . . . . . . . . . . . . . . . . . . . .6-23
Auto Online/Offline . . . . . . . . . . . . . . . . . . . . . . . . . . . . . . . . . . . . . . . . . . . . . .6-24
Auto Online. . . . . . . . . . . . . . . . . . . . . . . . . . . . . . . . . . . . . . . . . . . . . . . . . . .6-24
Auto Offline. . . . . . . . . . . . . . . . . . . . . . . . . . . . . . . . . . . . . . . . . . . . . . . . . . .6-24
Current Date and Time . . . . . . . . . . . . . . . . . . . . . . . . . . . . . . . . . . . . . . . . . . .6-26
Limiting Functions When the Optional Security Key Is Turned OFF . . . . . .6-29
License Registration . . . . . . . . . . . . . . . . . . . . . . . . . . . . . . . . . . . . . . . . . . . . .6-30
Setting System Monitor Screen Restrictions . . . . . . . . . . . . . . . . . . . . . . . . .6-33
Restricting Access to the System Monitor Screen . . . . . . . . . . . . . . . . . . . . .6-33
Setting to Allow Secured Printing from the System Monitor Screen . . . . . . .6-34
Setting to Display Job Logs from the System Monitor Screen . . . . . . . . . . . .6-34
MEAP Settings . . . . . . . . . . . . . . . . . . . . . . . . . . . . . . . . . . . . . . . . . . . . . . . . . .6-36
Use HTTP Server. . . . . . . . . . . . . . . . . . . . . . . . . . . . . . . . . . . . . . . . . . . . . .6-36
Printing Installed Application Information . . . . . . . . . . . . . . . . . . . . . . . . . . . .6-37
Copy Set Numbering Options. . . . . . . . . . . . . . . . . . . . . . . . . . . . . . . . . . . . . .6-40
Displaying the Remaining Toner Error Message . . . . . . . . . . . . . . . . . . . . . .6-42
Displaying the Current Department ID/User Name . . . . . . . . . . . . . . . . . . . . .6-43
USB Settings . . . . . . . . . . . . . . . . . . . . . . . . . . . . . . . . . . . . . . . . . . . . . . . . . . .6-44
Using a USB Device. . . . . . . . . . . . . . . . . . . . . . . . . . . . . . . . . . . . . . . . . . . .6-44
Using a USB Host . . . . . . . . . . . . . . . . . . . . . . . . . . . . . . . . . . . . . . . . . . . . .6-44
Specifying Device Information Delivery Settings . . . . . . . . . . . . . . . . . . . . . .6-45
Registering/Deleting/Printing Delivery Destinations. . . . . . . . . . . . . . . . . . . .6-48
Registering Delivery Destinations . . . . . . . . . . . . . . . . . . . . . . . . . . . . . .6-48
Confirming Delivery Destination Settings . . . . . . . . . . . . . . . . . . . . . . . . .6-50
Deleting a Delivery Destination . . . . . . . . . . . . . . . . . . . . . . . . . . . . . . . .6-51
Printing the Delivery Destinations. . . . . . . . . . . . . . . . . . . . . . . . . . . . . . .6-52
Setting Automatic Delivery . . . . . . . . . . . . . . . . . . . . . . . . . . . . . . . . . . . . . . .6-53
Setting Manual Delivery . . . . . . . . . . . . . . . . . . . . . . . . . . . . . . . . . . . . . . . . .6-56
Restricting the Reception of Device Information . . . . . . . . . . . . . . . . . . . . . .6-57
Restoring Device Information. . . . . . . . . . . . . . . . . . . . . . . . . . . . . . . . . . . . .6-58
Restricting the Type of Information That Is Updated . . . . . . . . . . . . . . . . . . .6-59
Checking/Printing the Communication Log . . . . . . . . . . . . . . . . . . . . . . . . . .6-60
Checking the Communication Log . . . . . . . . . . . . . . . . . . . . . . . . . . . . . .6-60
Printing the Communication Log . . . . . . . . . . . . . . . . . . . . . . . . . . . . . . .6-60
Initializing All Data/Settings . . . . . . . . . . . . . . . . . . . . . . . . . . . . . . . . . . . . . . .6-62
x

Setting the Display Method When Entering a Password . . . . . . . . . . . . . . . .6-64
Setting the Secure Watermark Mode . . . . . . . . . . . . . . . . . . . . . . . . . . . . . . . . 6-65
Forced Secure Watermark. . . . . . . . . . . . . . . . . . . . . . . . . . . . . . . . . . . . . . . 6-65
Printer Driver Secure Watermark. . . . . . . . . . . . . . . . . . . . . . . . . . . . . . . . . . 6-68
Specifying Encrypted Secured Printing Settings. . . . . . . . . . . . . . . . . . . . . .6-72
Setting to Receive Only Encrypted Secured Print Jobs. . . . . . . . . . . . . . . . .6-72
Storing/Editing Irregular Paper Types . . . . . . . . . . . . . . . . . . . . . . . . . . . . . . .6-73
Storing Irregular Paper Types . . . . . . . . . . . . . . . . . . . . . . . . . . . . . . . . . . . .6-73
Editing Irregular Paper Types. . . . . . . . . . . . . . . . . . . . . . . . . . . . . . . . . . . . .6-74
Erasing Irregular Paper Types . . . . . . . . . . . . . . . . . . . . . . . . . . . . . . . . . . . . 6-77
Detecting and Installing Drivers that Support Functions Specified on
the Machine into Your Computer . . . . . . . . . . . . . . . . . . . . . . . . . . . . . . . . . . .6-78
Specifying Settings for All User Inboxes . . . . . . . . . . . . . . . . . . . . . . . . . . . . 6-79
Setting the Time until Documents Are Automatically Erased. . . . . . . . . . . . .6-79
Printing upon Storing from the Printer Driver. . . . . . . . . . . . . . . . . . . . . . . . . 6-80
Restricting Printer Jobs . . . . . . . . . . . . . . . . . . . . . . . . . . . . . . . . . . . . . . . . . .6-81
Restricting the Color Mode of Copy Jobs. . . . . . . . . . . . . . . . . . . . . . . . . . . . 6-82
Restricting Use of Auto-Color Select . . . . . . . . . . . . . . . . . . . . . . . . . . . . . . .6-82
Restricting the Use of Full Color . . . . . . . . . . . . . . . . . . . . . . . . . . . . . . . . . .6-82
Chapter 7 Routine Maintenance
Paper Drawers . . . . . . . . . . . . . . . . . . . . . . . . . . . . . . . . . . . . . . . . . . . . . . . . . . . 7-2
Loading Paper . . . . . . . . . . . . . . . . . . . . . . . . . . . . . . . . . . . . . . . . . . . . . . . . . 7-2
Adjusting a Paper Drawer to Hold a Different Paper Size . . . . . . . . . . . . . . . . 7-7
Paper Deck-Z1 (Optional) . . . . . . . . . . . . . . . . . . . . . . . . . . . . . . . . . . . . . . . . .7-10
Loading Paper . . . . . . . . . . . . . . . . . . . . . . . . . . . . . . . . . . . . . . . . . . . . . . . . 7-10
Envelope Feeder Attachment-C2 (Optional) . . . . . . . . . . . . . . . . . . . . . . . . . . 7-14
How to Use the Envelope Feeder Attachment . . . . . . . . . . . . . . . . . . . . . . . . 7-14
Preparing the Envelopes . . . . . . . . . . . . . . . . . . . . . . . . . . . . . . . . . . . . . . . .7-16
Loading Envelopes . . . . . . . . . . . . . . . . . . . . . . . . . . . . . . . . . . . . . . . . . . . . 7-18
Changing Envelope Sizes . . . . . . . . . . . . . . . . . . . . . . . . . . . . . . . . . . . . . . . 7-21
Feeder (DADF-L1) (Optional) . . . . . . . . . . . . . . . . . . . . . . . . . . . . . . . . . . . . . . 7-27
Replacing the Stamp Cartridge . . . . . . . . . . . . . . . . . . . . . . . . . . . . . . . . . . . 7-27
Finisher-Z1 (Optional) . . . . . . . . . . . . . . . . . . . . . . . . . . . . . . . . . . . . . . . . . . . . 7-29
Replacing the Staple Cartridge . . . . . . . . . . . . . . . . . . . . . . . . . . . . . . . . . . .7-29
Finisher-Y1/Saddle Finisher-Y2/Puncher Unit-M1 (Optional) . . . . . . . . . . . . 7-33
Replacing the Staple Cartridge in the Stapler Unit . . . . . . . . . . . . . . . . . . . . 7-33
Replacing the Staple Cartridge in the Saddle Stitcher Unit . . . . . . . . . . . . . .7-37
Removing Punch Waste . . . . . . . . . . . . . . . . . . . . . . . . . . . . . . . . . . . . . . . .7-40
xi

Replacing the Toner Cartridge . . . . . . . . . . . . . . . . . . . . . . . . . . . . . . . . . . . . .7-43
Replacing the Waste Toner Container . . . . . . . . . . . . . . . . . . . . . . . . . . . . . . .7-51
Routine Cleaning . . . . . . . . . . . . . . . . . . . . . . . . . . . . . . . . . . . . . . . . . . . . . . . .7-55
Platen Glass and Underside of the Feeder/Platen Cover. . . . . . . . . . . . . . . .7-55
Manual Feeder Cleaning . . . . . . . . . . . . . . . . . . . . . . . . . . . . . . . . . . . . . . . .7-56
Cleaning the Inside of the Main Unit . . . . . . . . . . . . . . . . . . . . . . . . . . . . . . .7-60
Cleaning the Dust Proof Glass. . . . . . . . . . . . . . . . . . . . . . . . . . . . . . . . . . . .7-61
Automatic Feeder Cleaning . . . . . . . . . . . . . . . . . . . . . . . . . . . . . . . . . . . . . .7-63
Consumables . . . . . . . . . . . . . . . . . . . . . . . . . . . . . . . . . . . . . . . . . . . . . . . . . . .7-64
Chapter 8 Troubleshooting
Reducing the Frequency of Paper Jams . . . . . . . . . . . . . . . . . . . . . . . . . . . . . .8-3
Clearing Paper Jams . . . . . . . . . . . . . . . . . . . . . . . . . . . . . . . . . . . . . . . . . . . . . .8-4
Screens Indicating the Locations of Paper Jams . . . . . . . . . . . . . . . . . . . . . . .8-4
Fixing Unit (Inside the Main Unit) . . . . . . . . . . . . . . . . . . . . . . . . . . . . . . . . . .8-11
Entrance of Duplexing Unit (Inside the Main Unit) . . . . . . . . . . . . . . . . . . . . .8-13
Duplexing Unit (Inside the Main Unit). . . . . . . . . . . . . . . . . . . . . . . . . . . . . . .8-16
Stack Bypass . . . . . . . . . . . . . . . . . . . . . . . . . . . . . . . . . . . . . . . . . . . . . . . . .8-18
Paper Drawer 1 . . . . . . . . . . . . . . . . . . . . . . . . . . . . . . . . . . . . . . . . . . . . . . .8-21
Paper Drawer 2 . . . . . . . . . . . . . . . . . . . . . . . . . . . . . . . . . . . . . . . . . . . . . . .8-26
Cassette Feeding Unit-Y3 (Optional) . . . . . . . . . . . . . . . . . . . . . . . . . . . . . . .8-29
Paper Deck-Z1 (Optional) . . . . . . . . . . . . . . . . . . . . . . . . . . . . . . . . . . . . . . .8-33
Feeder (DADF-L1) (Optional). . . . . . . . . . . . . . . . . . . . . . . . . . . . . . . . . . . . .8-36
Finisher-Z1 (Optional) . . . . . . . . . . . . . . . . . . . . . . . . . . . . . . . . . . . . . . . . . .8-40
Inside the Top Cover of the Finisher-Y1 or Saddle Finisher-Y2
(Optional) . . . . . . . . . . . . . . . . . . . . . . . . . . . . . . . . . . . . . . . . . . . . . . . . . . . .8-44
Inside the Buffer Pass Unit-E2 of the Finisher-Y1 or Saddle Finisher-Y2
(Optional) . . . . . . . . . . . . . . . . . . . . . . . . . . . . . . . . . . . . . . . . . . . . . . . . . . . .8-47
Inside the Front Cover of the Saddle Finisher-Y2 (Optional) . . . . . . . . . . . . .8-49
Saddle Stitcher Unit (Optional). . . . . . . . . . . . . . . . . . . . . . . . . . . . . . . . . . . .8-52
Puncher Unit-M1 (Optional) . . . . . . . . . . . . . . . . . . . . . . . . . . . . . . . . . . . . . .8-56
Inner 2way Tray-D1 (Optional) . . . . . . . . . . . . . . . . . . . . . . . . . . . . . . . . . . . .8-58
Copy Tray-J1 (Optional) . . . . . . . . . . . . . . . . . . . . . . . . . . . . . . . . . . . . . . . . .8-61
Clearing Staple Jams. . . . . . . . . . . . . . . . . . . . . . . . . . . . . . . . . . . . . . . . . . . . .8-64
Finisher-Z1 (Optional) . . . . . . . . . . . . . . . . . . . . . . . . . . . . . . . . . . . . . . . . . .8-64
Finisher-Y1/Saddle Finisher-Y2 (Optional) . . . . . . . . . . . . . . . . . . . . . . . . . .8-68
Saddle Stitcher Unit (Optional). . . . . . . . . . . . . . . . . . . . . . . . . . . . . . . . . . . .8-71
List of Error Messages . . . . . . . . . . . . . . . . . . . . . . . . . . . . . . . . . . . . . . . . . . .8-76
Self-Diagnostic Display . . . . . . . . . . . . . . . . . . . . . . . . . . . . . . . . . . . . . . . . .8-76
xii

List of Error Codes without Messages . . . . . . . . . . . . . . . . . . . . . . . . . . . . . . 8-80
If Memory Becomes Full during Scanning . . . . . . . . . . . . . . . . . . . . . . . . . . . 8-87
Service Call Message . . . . . . . . . . . . . . . . . . . . . . . . . . . . . . . . . . . . . . . . . . . .8-89
Contacting Your Local Authorized Canon Dealer . . . . . . . . . . . . . . . . . . . . . .8-89
Setting the Limited Functions Mode from the Service Call Message
Screen . . . . . . . . . . . . . . . . . . . . . . . . . . . . . . . . . . . . . . . . . . . . . . . . . . . . . . 8-91
When the Power Does Not Turn ON. . . . . . . . . . . . . . . . . . . . . . . . . . . . . . . . . 8-93
Chapter 9 Appendix
Sample Reports . . . . . . . . . . . . . . . . . . . . . . . . . . . . . . . . . . . . . . . . . . . . . . . . . . 9-2
Copy Log List. . . . . . . . . . . . . . . . . . . . . . . . . . . . . . . . . . . . . . . . . . . . . . . . . .9-2
Print Log List . . . . . . . . . . . . . . . . . . . . . . . . . . . . . . . . . . . . . . . . . . . . . . . . . .9-3
Device Information Delivery Destination List . . . . . . . . . . . . . . . . . . . . . . . . . . 9-4
Device Information Communication Log Report . . . . . . . . . . . . . . . . . . . . . . . 9-5
Number of Enterable Characters and Capacity of Various Functions . . . . . . 9-6
Number of Enterable Characters . . . . . . . . . . . . . . . . . . . . . . . . . . . . . . . . . . . 9-6
Capacity of Various Functions . . . . . . . . . . . . . . . . . . . . . . . . . . . . . . . . . . . . . 9-8
Relationship between Original Orientation and Preprinted Paper
Output Chart . . . . . . . . . . . . . . . . . . . . . . . . . . . . . . . . . . . . . . . . . . . . . . . . . . . 9-10
Index . . . . . . . . . . . . . . . . . . . . . . . . . . . . . . . . . . . . . . . . . . . . . . . . . . . . . . . . . .9-13
xiii

Preface
Thank you for purchasing the Canon Color imageRUNNER C3480/C3480i/C3080/C3080i/
C2550. Please read this manual thoroughly before operating the machine to familiarize
yourself with its capabilities, and to make the most of its many functions. After reading this
manual, store it in a safe place for future reference.
How To Use This Manual
Symbols Used in This Manual
The following symbols are used in this manual to explain procedures, restrictions,
handling precautions, and instructions that should be observed for safety.
.
WARNING
CAUTION
IMPORTANT
NOTE
Indicates a warning concerning operations that may lead to death or
injury to persons if not performed correctly. To use the machine safely,
always pay attention to these warnings.
.
Indicates a caution concerning operations that may lead to injury to
persons, or damage to property if not performed correctly. To use the
machine safely, always pay attention to these cautions.
.
Indicates operational requirements and restrictions. Be sure to read
these items carefully to operate the machine correctly, and avoid
damage to the machine.
.
Indicates a clarification of an operation, or contains additional
explanations for a procedure. Reading these notes is highly
recommended.
xiv
Keys Used in This Manual
The following symbols and key names are a few examples of how keys to be
pressed are expressed in this manual:
• Touch Panel Display Keys: [Key Name]
Examples: [Cancel]
[Done]
• Control Panel Keys: Key Icon (Key Name)
Examples: (Start)
Displays Used in This Manual
Screen shots of the touch panel display used in this manual are those taken when
the following optional equipment is attached to the Color imageRUNNER C3480i:
the Super G3 FAX Board, Finisher-Z1, and Cassette Feeding Unit-Y3.
Note that functions that cannot be used depending on the model or options, are not
displayed on the touch panel display.
(Stop)
The keys which you should press are marked with a , as shown below.
When multiple keys can be pressed on the touch panel display, all keys are marked.
Select the keys which suit your needs.
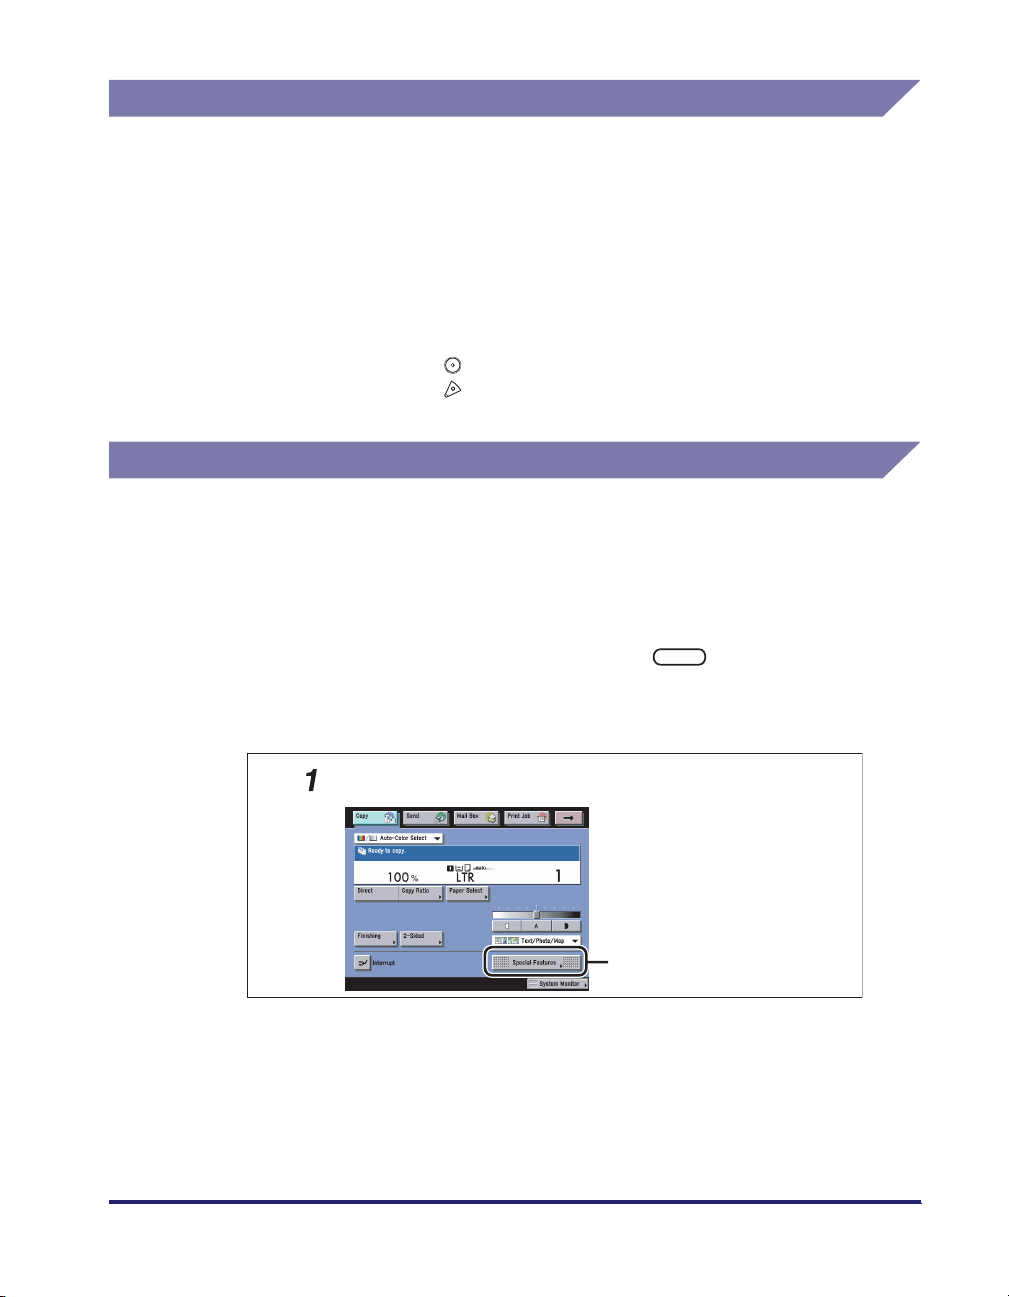
Place your originals ➞ press [Special Features].
Press this key for operation.
xv
Illustrations Used in This Manual
Illustrations used in this manual are those displayed when the Color
imageRUNNER C3480i has the following optional equipment attached to it: the
Finisher-Z1 and Cassette Feeding Unit-Y3.
Abbreviations Used in This Manual
In this manual, product names and model names are abbreviated as follows:
Novell NetWare
Trademarks
MEAP and the MEAP logo are trademarks of Canon Inc.
AppleTalk, Macintosh, and Mac OS are trademarks of Apple Inc., registered in the
U.S. and other countries.
Windows is a registered trademark of Microsoft Corporation in the United States
and/or other countries.
The following fonts are licensed from Bitstream Technologies, Inc.
Dutch 801 Bold, Dutch 801 Roman, Fixed Pitch 810 Courier 10 Pitch/Text.
The following font is a trademark of Bitstream Inc.
Dutch 801
© Copyright 1987, Bitstream Inc., Cambridge Massachusetts USA.
All rights reserved.
Other product and company names herein may be the trademarks of their
respective owners.
xvi
®
:
NetWare

Before You Start Using This Machine
This chapter describes what you should know before using this machine, such as parts and
their functions, and how to turn ON the main power.
Installation Location and Handling . . . . . . . . . . . . . . . . . . . . . . . . . . . . . . . . . . . . . . . . . . 1-2
Installation Precautions . . . . . . . . . . . . . . . . . . . . . . . . . . . . . . . . . . . . . . . . . . . . . . . . . . . . . . . .1-2
Handling Precautions . . . . . . . . . . . . . . . . . . . . . . . . . . . . . . . . . . . . . . . . . . . . . . . . . . . . . . . . . .1-6
Backing Up Data. . . . . . . . . . . . . . . . . . . . . . . . . . . . . . . . . . . . . . . . . . . . . . . . . . . . . . . .1-9
Parts and Their Functions. . . . . . . . . . . . . . . . . . . . . . . . . . . . . . . . . . . . . . . . . . . . . . . . 1-10
External View . . . . . . . . . . . . . . . . . . . . . . . . . . . . . . . . . . . . . . . . . . . . . . . . . . . . . . . . . . . . . . . 1-10
Internal View. . . . . . . . . . . . . . . . . . . . . . . . . . . . . . . . . . . . . . . . . . . . . . . . . . . . . . . . . . . . . . . .1-12
Control Panel Parts and Functions. . . . . . . . . . . . . . . . . . . . . . . . . . . . . . . . . . . . . . . . . . . . . . .1-13
Main Power and Control Panel Power . . . . . . . . . . . . . . . . . . . . . . . . . . . . . . . . . . . . . .1-14
How to Turn ON the Main Power . . . . . . . . . . . . . . . . . . . . . . . . . . . . . . . . . . . . . . . . . . . . . . . .1-14
Control Panel Power Switch . . . . . . . . . . . . . . . . . . . . . . . . . . . . . . . . . . . . . . . . . . . . . . . . . . . .1-19
Shutting Down the Machine . . . . . . . . . . . . . . . . . . . . . . . . . . . . . . . . . . . . . . . . . . . . . . . . . . . .1-20
System Settings . . . . . . . . . . . . . . . . . . . . . . . . . . . . . . . . . . . . . . . . . . . . . . . . . . . . . . .1-25
CHAPTER
1
1-1
Installation Location and Handling
1
This section describes precautions for installation location and handling. We
recommend that you read this section prior to using this machine.
Installation Precautions
Avoid Installing the Machine in the Following Locations
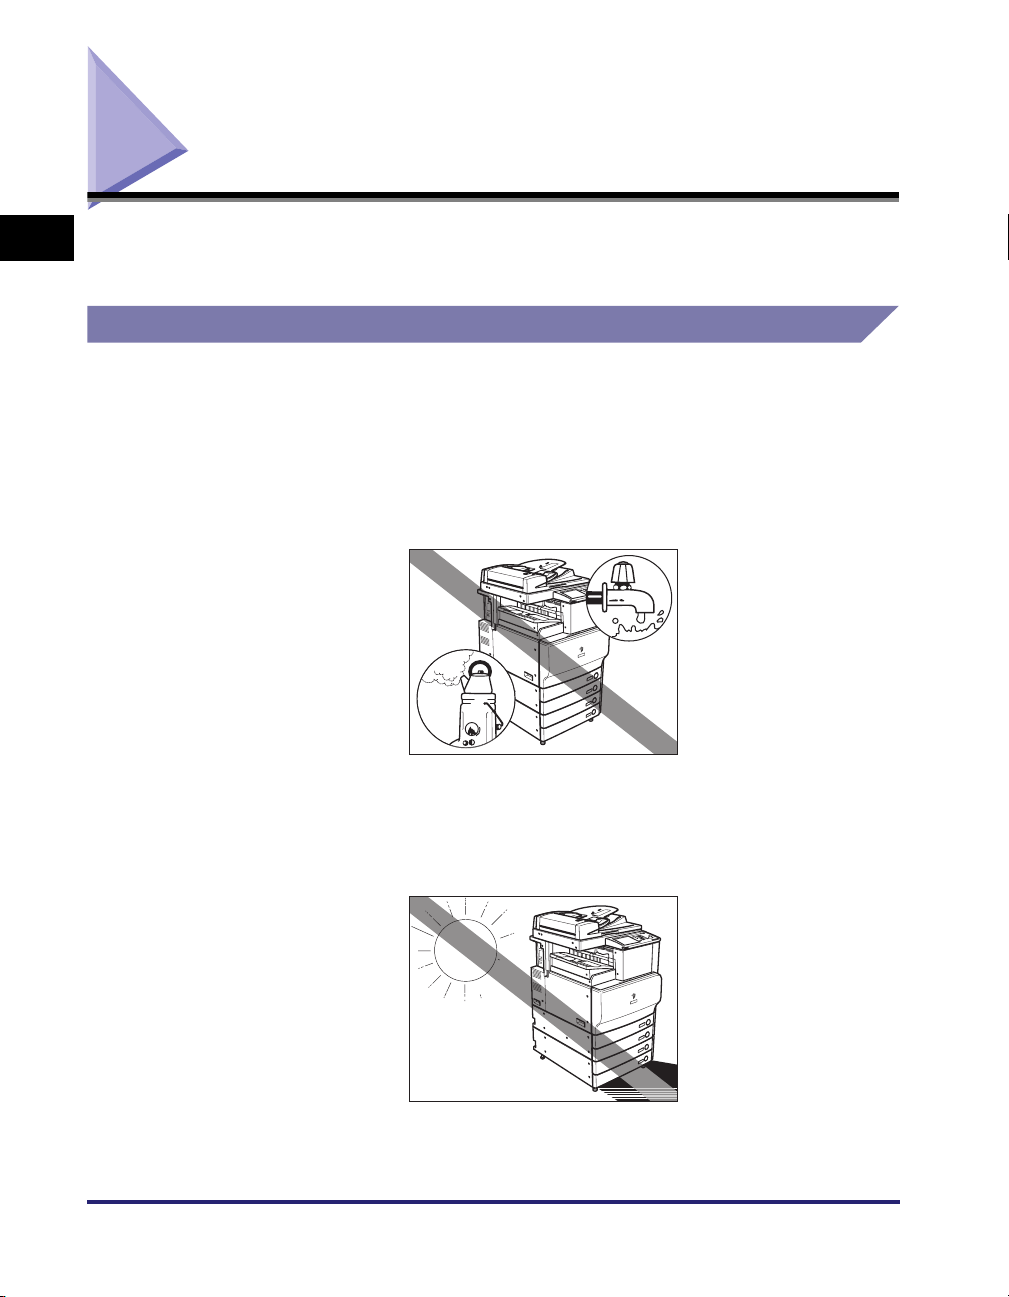
■ Avoid locations subject to temperature and humidity extremes, whether
low or high.
For example, avoid installing the machine near water faucets, hot water heaters,
humidifiers, air conditioners, heaters, or stoves.
Before You Start Using This Machine
■ Avoid installing the machine in direct sunlight.
If this is unavoidable, use curtains to shade the machine. Be sure that the curtains do not
block the machine's ventilation slots or louvers, or interfere with the electrical cord or
power supply.
1-2
Installation Location and Handling
■ Avoid poorly ventilated locations.
This machine generates a slight amount of ozone during normal use. Although sensitivity
to ozone may vary, this amount is not harmful. Ozone may be more noticeable during
extended use or long production runs, especially in poorly ventilated rooms. It is
recommended that the room be appropriately ventilated, sufficient to maintain a
comfortable working environment, in areas of machine operation.
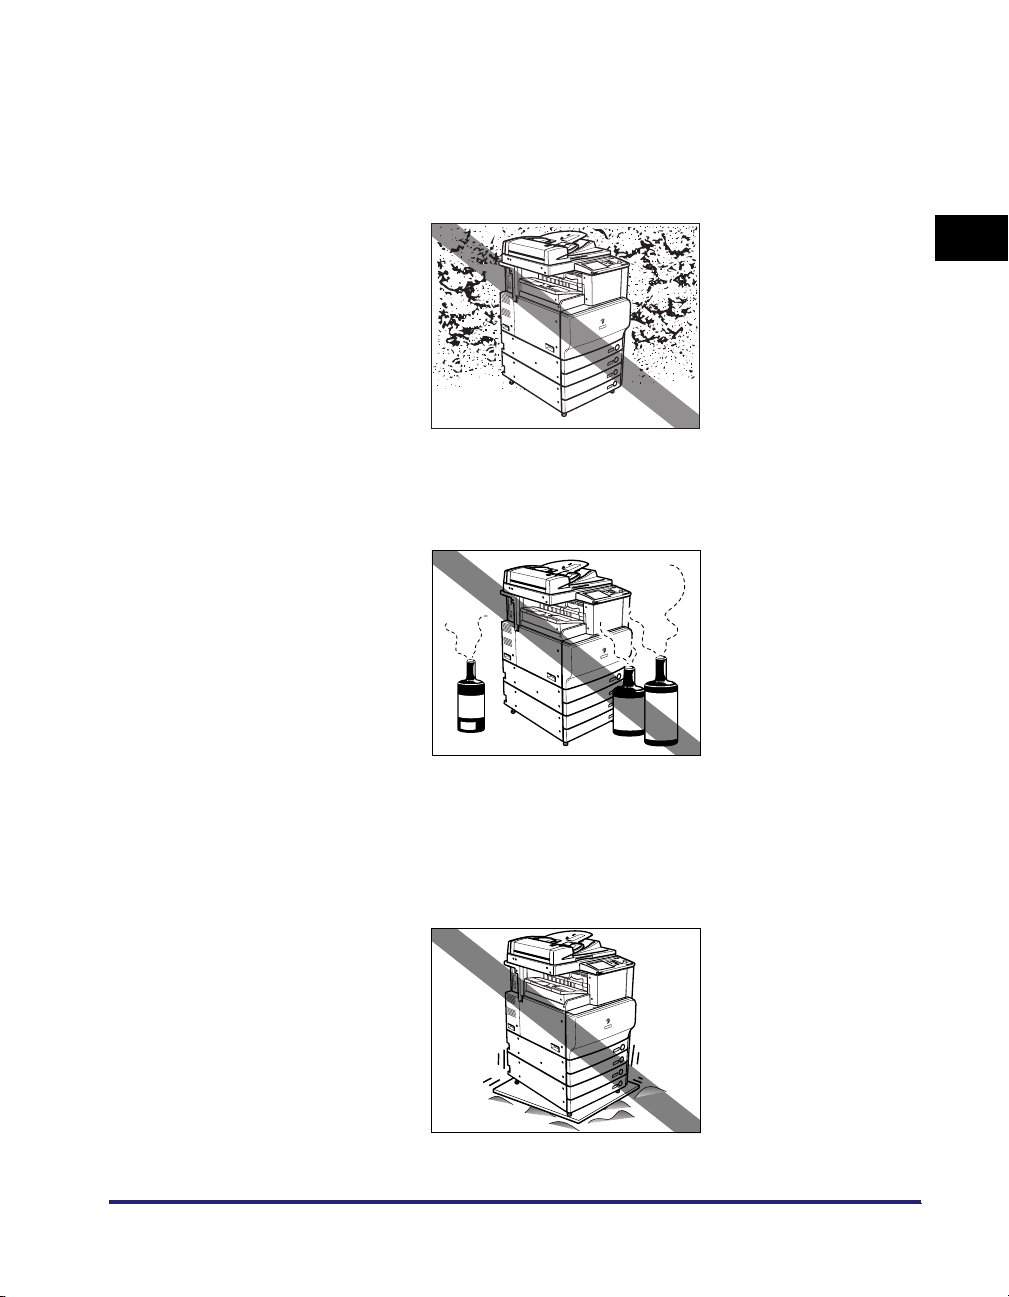
■ Avoid locations where a considerable amount of dust accumulates.
■ Avoid locations where ammonia gas is emitted.
1
Before You Start Using This Machine
■ Avoid locations near volatile or flammable materials, such as alcohol or
paint thinner.
■ Avoid locations that are subject to vibration.
For example, avoid installing the machine on unstable floors or stands.
Installation Location and Handling
1-3
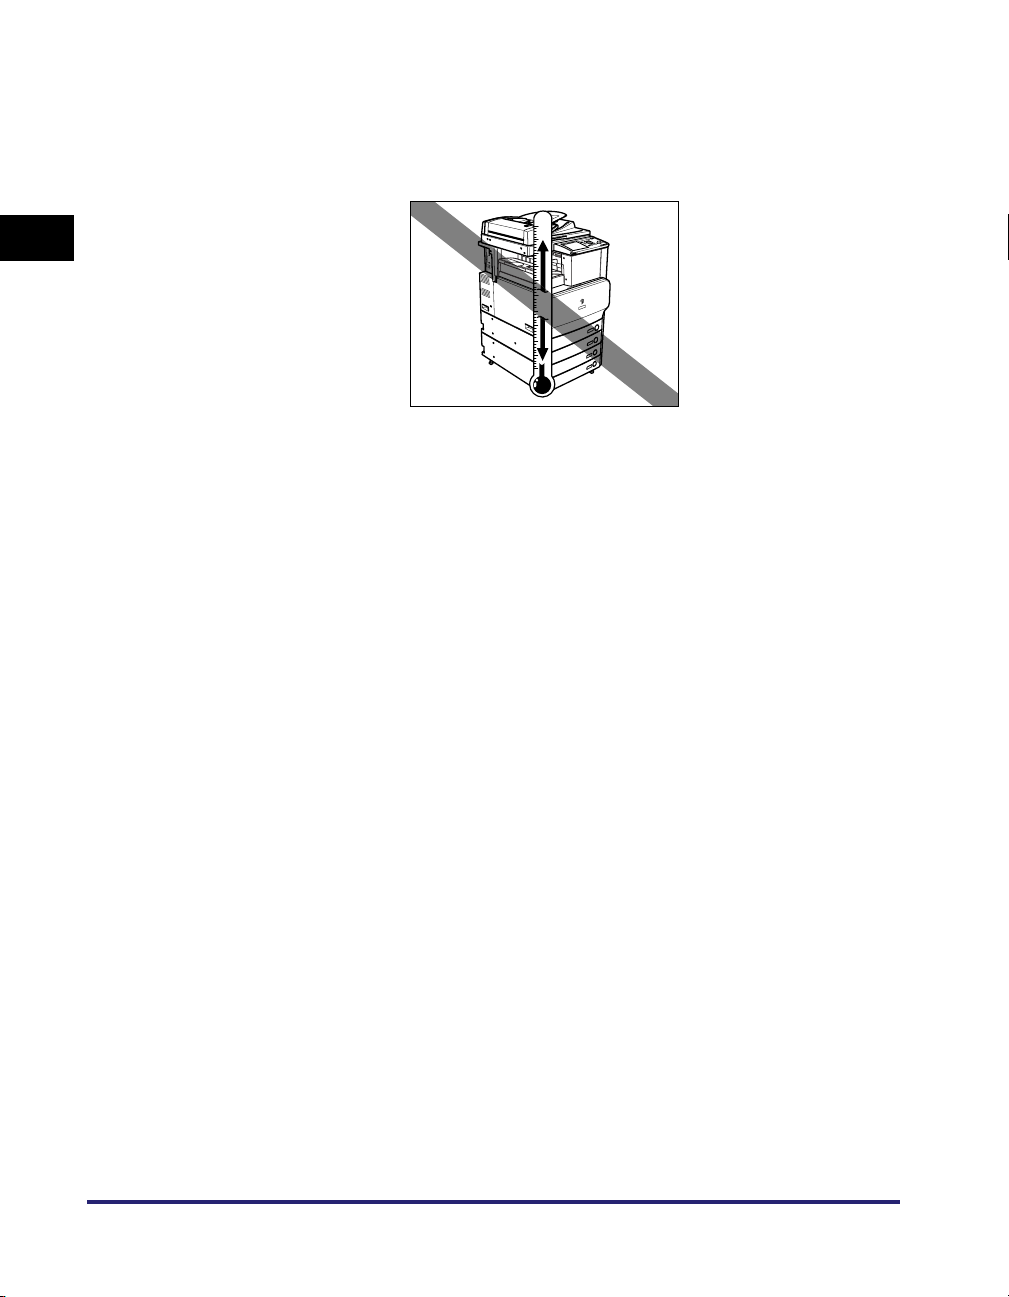
■ Avoid exposing the machine to rapid changes in temperature.
If the room in which the machine is installed is cold but rapidly heated, water droplets
(condensation) may form inside the machine. This may result in a noticeable degradation
in the quality of the copied image, the inability to properly scan an original, or the copies
having no printed image at all.
1
■ Avoid installing the machine near computers or other precision electronic
equipment.
Electrical interference and vibrations generated by the machine during printing can
adversely affect the operation of such equipment.
Before You Start Using This Machine
■ Avoid installing the machine near televisions, radios, or similar electronic
equipment.
The machine might interfere with sound and picture signal reception. Insert the power
plug into a dedicated power outlet, and maintain as much space as possible between the
machine and other electronic equipment.
■ Do not remove the machine's leveling feet.
Do not remove the machine's leveling feet after the machine has been installed. If you put
weight on the front of the machine while the drawers or units within the machine are pulled
out, the machine may fall forward. To prevent this from happening, make sure that the
machine's leveling feet are in place.
1-4
Installation Location and Handling

Select a Safe Power Supply
■ Plug the machine into a 120 V AC outlet.
■ Make sure that the power supply for the machine is safe, and has a steady
voltage.
■ Do not connect other electrical equipment to the same power outlet to
which the machine is connected.
■ Do not connect the power cord to a multiplug power strip, as this may
cause a fire or electrical shock.
■ The power cord may become damaged if it is often stepped on or if heavy
objects are placed on it. Continued use of a damaged power cord can lead
to an accident, such as a fire or electrical shock.
1
Before You Start Using This Machine
Moving the Machine
■ If you intend to move the machine, even to a location on the same floor of
your building, contact your local authorized Canon dealer beforehand. Do
not attempt to move the machine yourself.
Installation Location and Handling
1-5
Handling Precautions
■ Do not attempt to disassemble or modify the machine.
1
■ Some parts inside the machine are subject to high-voltages and
temperatures. Take adequate precautions when inspecting the inside of
the machine. Do not carry out any inspections not described in this
manual.
Before You Start Using This Machine
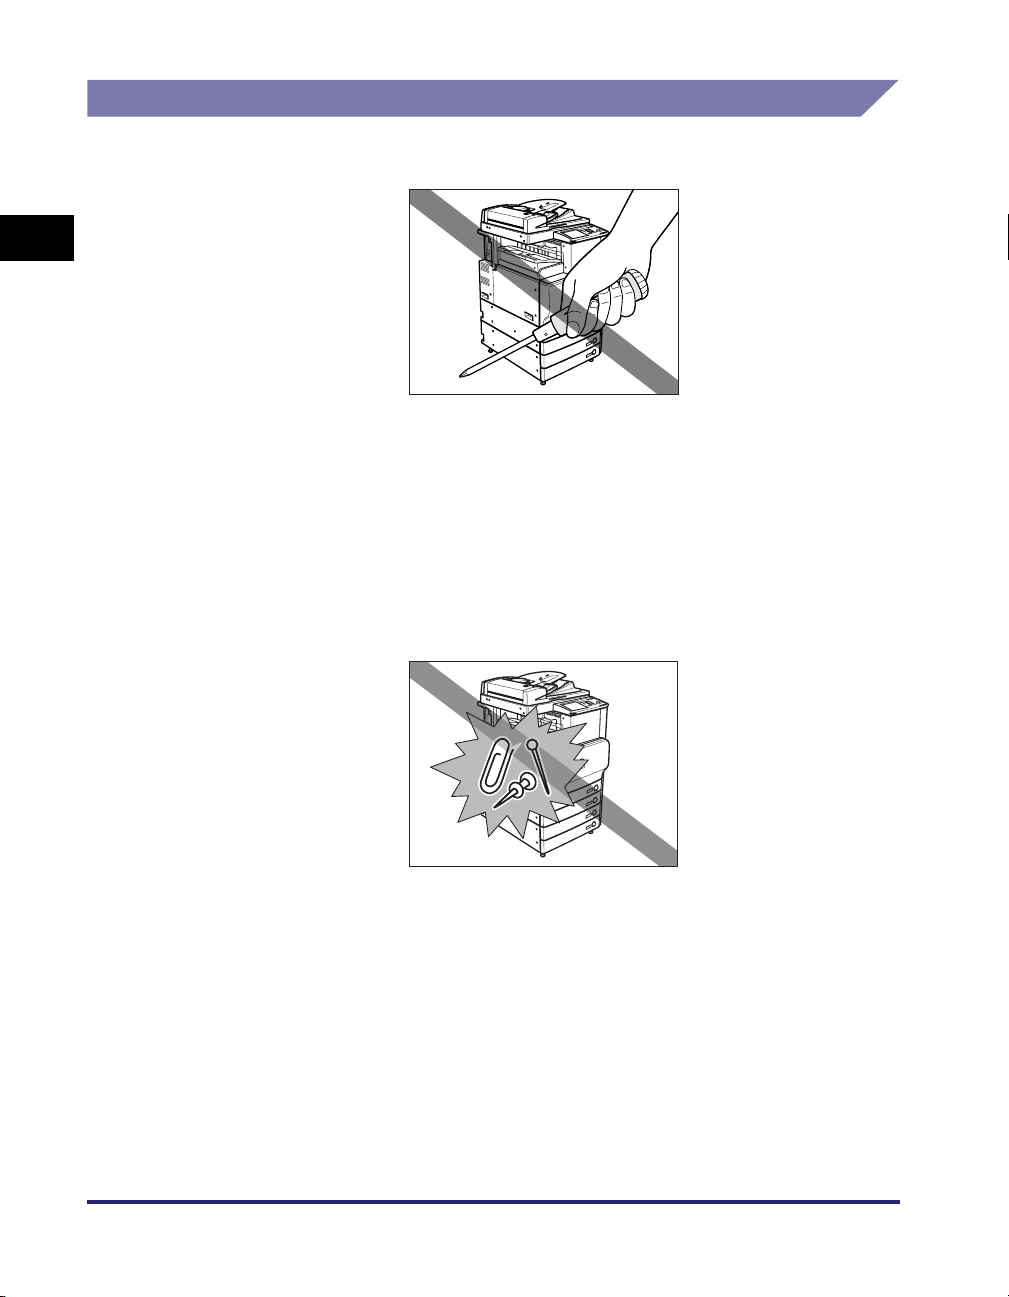
■ Be careful not to spill liquid or drop any foreign objects, such as paper
clips or staples inside the machine. If a foreign object comes into contact
with electrical parts inside the machine, it might cause a short circuit and
result in a fire or electrical shock.
1-6
Installation Location and Handling
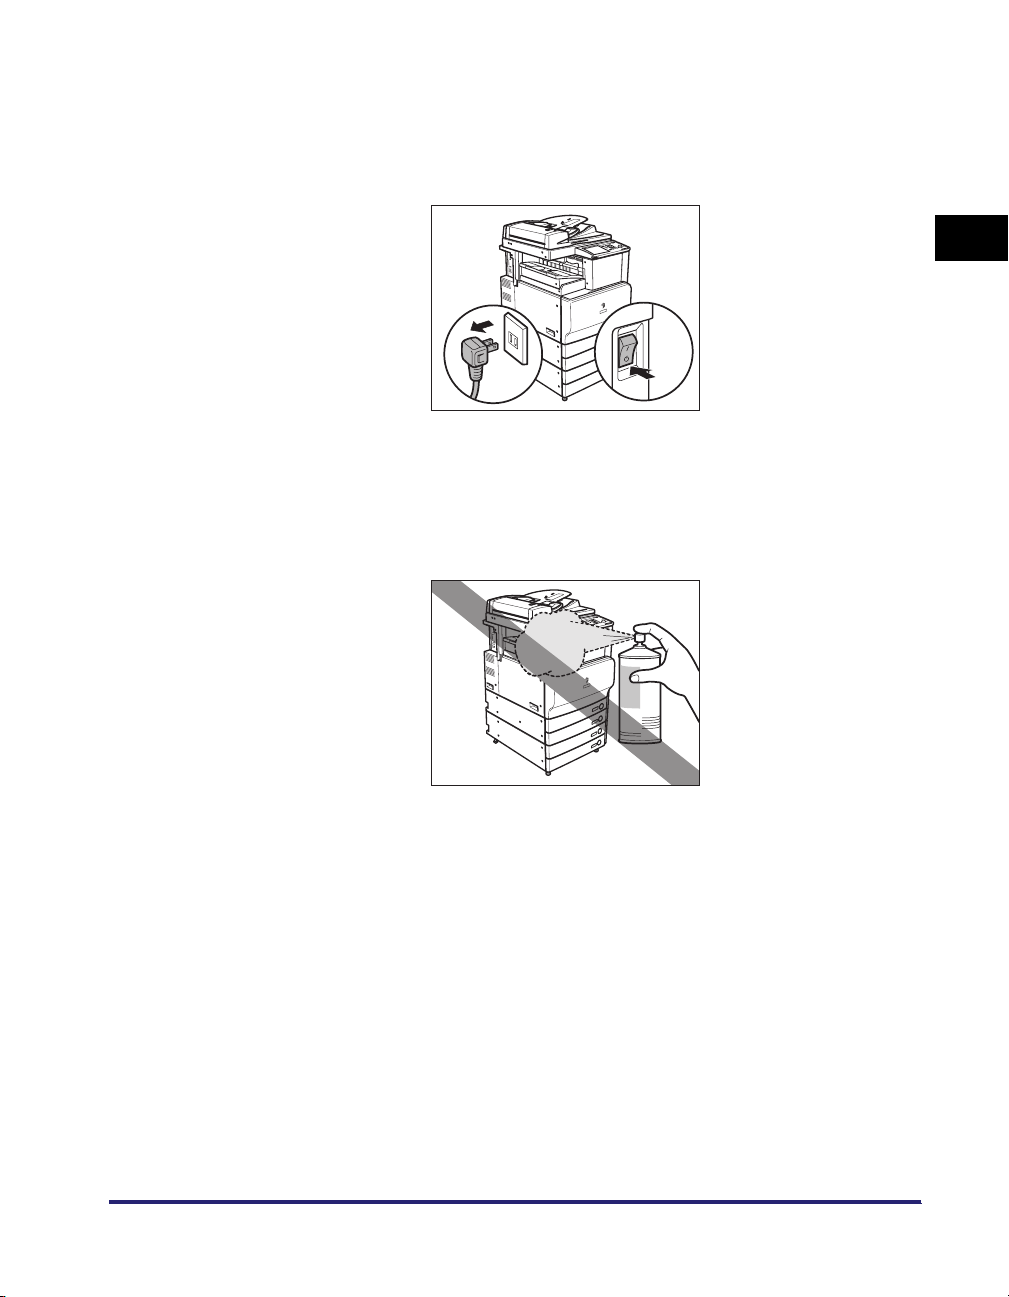
■ If there is smoke, or unusual noise, immediately turn the main power
switch OFF, disconnect the power cord from the outlet, and call your local
authorized Canon dealer. Using the machine in this state may cause a fire
or electrical shock. Also, avoid placing objects around the power plug so
that the machine can be disconnected whenever necessary.
■ Do not turn the main power switch OFF or open the front covers while the
machine is in operation. This might result in paper jams.
■ Do not use flammable sprays, such as spray glue, near the machine. There
is a danger of ignition.
1
Before You Start Using This Machine
Installation Location and Handling
1-7
■ This machine generates a slight amount of ozone during normal use.
Although sensitivity to ozone may vary, this amount is not harmful. Ozone
may be more noticeable during extended use or long production runs,
especially in poorly ventilated rooms. It is recommended that the room be
appropriately ventilated, sufficient to maintain a comfortable working
environment, in areas of machine operation.
1
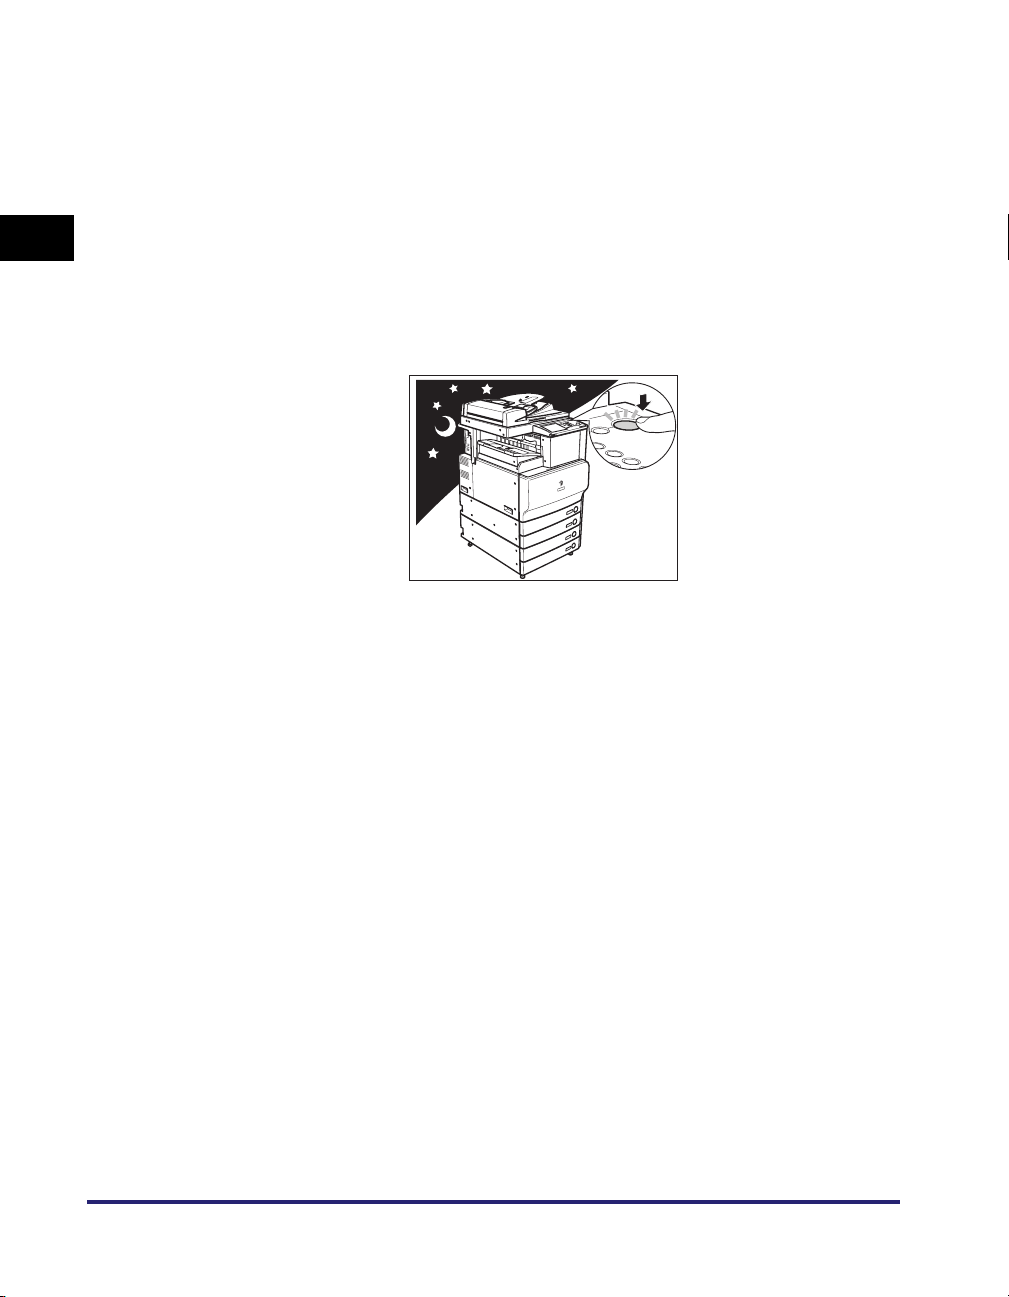
■ For safety reasons, turn OFF the control panel power switch of the
machine when it will not be used for a long period of time, such as
overnight. As an added safety measure, turn OFF the main power switch,
and disconnect the power cord when the machine will not be used for an
extended period of time, such as during consecutive holidays.
OFF
Before You Start Using This Machine
1-8
Installation Location and Handling

Backing Up Data
Data such as the Address Book and Additional Functions settings are stored on the
internal hard disk of the machine.
Please regularly back up your important data, as it is possible that a malfunction in
the hard disk may cause received data and stored data to be lost.
Please note that Canon will not be held responsible for any damages caused by the
loss of data.
The data that can be backed up is indicated below.
■ Address Book, Additional Functions settings, forwarding settings, Mail
Box function data (User Inbox data, forms for the Form Composition mode)
For information on backing up (exporting) this data, see Chapter 3, "Customizing
Settings," in the Remote UI Guide.
■ Data that can be backed up using the Device Information Delivery Settings
mode
You can perform temporary backing up of your data by delivering data registered in the
machine to other client machines. For information on the Device Information Delivery
Settings mode, see "Specifying Device Information Delivery Settings," on p. 6-45.
■ Data relating to MEAP
• License files for MEAP applications
For information on backing up (downloading) license files, see the MEAP SMS
Administrator Guide.
• User authentication information registered for the Local Device Authentication system of
SDL (Simple Device Login)/SSO (Single Sign-On)
For information on backing up (exporting) user authentication information, see the MEAP
SMS Administrator Guide.
• Data stored by MEAP applications
You may be able to back up data stored by MEAP applications, depending on the
application. For more information, see the documentation for each MEAP application.
NOTE
If your machine is not connected to a network. it is recommended you print and store
important information such as the Address Book. See Chapter 12, "Printing
Communication Reports," in the
Sending and Facsimile Guide
.
1
Before You Start Using This Machine
Backing Up Data
1-9
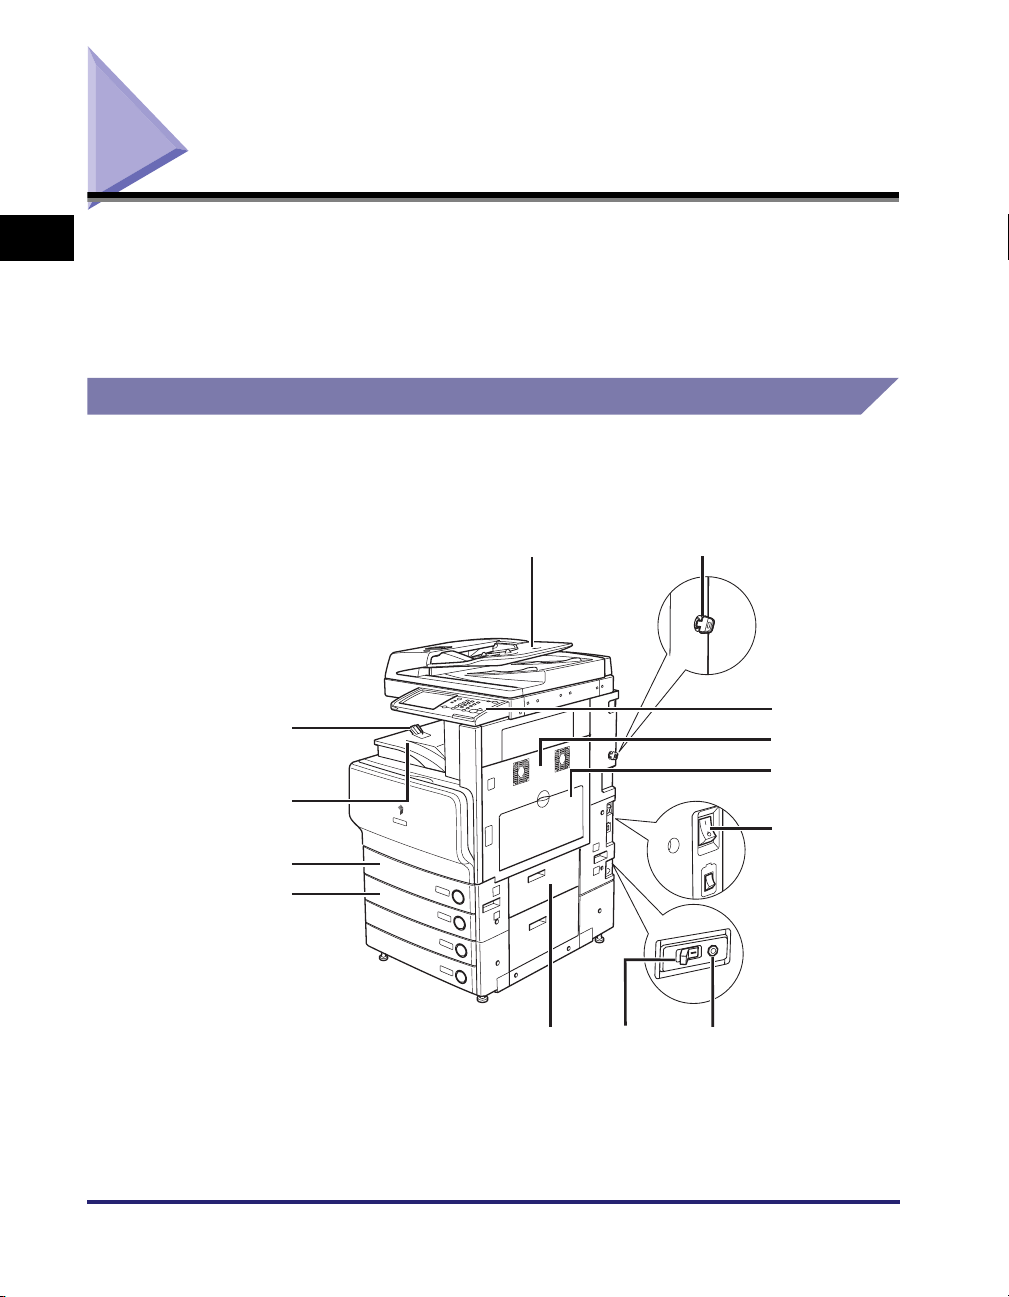
Parts and Their Functions
i
1
This section provides you with the names and functions of all the parts on the
outside and inside of the main unit, control panel, and the touch panel display. An
illustration of the machine with some optional equipment attached to it is also
provided. For more information on optional equipment, parts and their functions,
see Chapter 3, "Optional Equipment."
External View
The optional Feeder (DADF-L1) (standard-equipped for the Color
imageRUNNER C3480i/C3080i) and Cassette Feeding Unit-Y3 are
attached.
Before You Start Using This Machine
a
m
l
b
c
d
e
f
1-10
k
j
Parts and Their Functions
h
g

a Feeder (DADF-L1) (Optional)
Originals placed in the feeder are automatically
fed sheet by sheet to the platen glass for
scanning. The feeder also automatically turns
over two-sided originals to make two or one
sided copies. The feeder is standard-equipped
for the Color imageRUNNER C3480i/C3080i.
b Security Key (Optional)
For managing the use of the machine and
preventing unauthorized copies.
c Control Panel
Includes the keys, touch panel display, and
indicators required for operating the machine.
(See "Control Panel Parts and Functions," on p.
1-13.)
d Main Unit's Upper Right Cover, Main
Unit's Lower Right Cover
Open this cover when clearing a paper jam
inside the main unit. (See "Screens Indicating
the Locations of Paper Jams," on p. 8-4.)
e Stack Bypass
Use the stack bypass to feed paper manually,
and for loading nonstandard paper stock, such
as envelopes. (See "Making Prints Using the
Stack Bypass," on p. 2-42.)
NOTE
For more information on the optional equipment that can be attached to the machine, see
Chapter 3, "Optional Equipment."
f Main Power Switch
Press to the "I" side to turn the power ON. (See
"Main Power and Control Panel Power," on p.
1-14.)
g Test Button
Press this button to periodically test the circuit
breaker.
h Breaker
Detects excess current or leakage current. (See
the Support Guide.)
i Paper Drawer's Right Cover
Open this cover when clearing a paper jam in
Paper Drawers 1 and 2.
j Paper Drawer 2
Holds up to 550 sheets of paper (20 lb bond
2
(80 g/m
)).
k Paper Drawer 1
Holds up to 550 sheets of paper (20 lb bond
2
(80 g/m
)).
l Output Tray
Prints and copies are output to this tray.
m Output Paper Tray Guide
Tilt the output paper tray guide up to prevent
output papers from falling down.
1
Before You Start Using This Machine
Parts and Their Functions
1-11
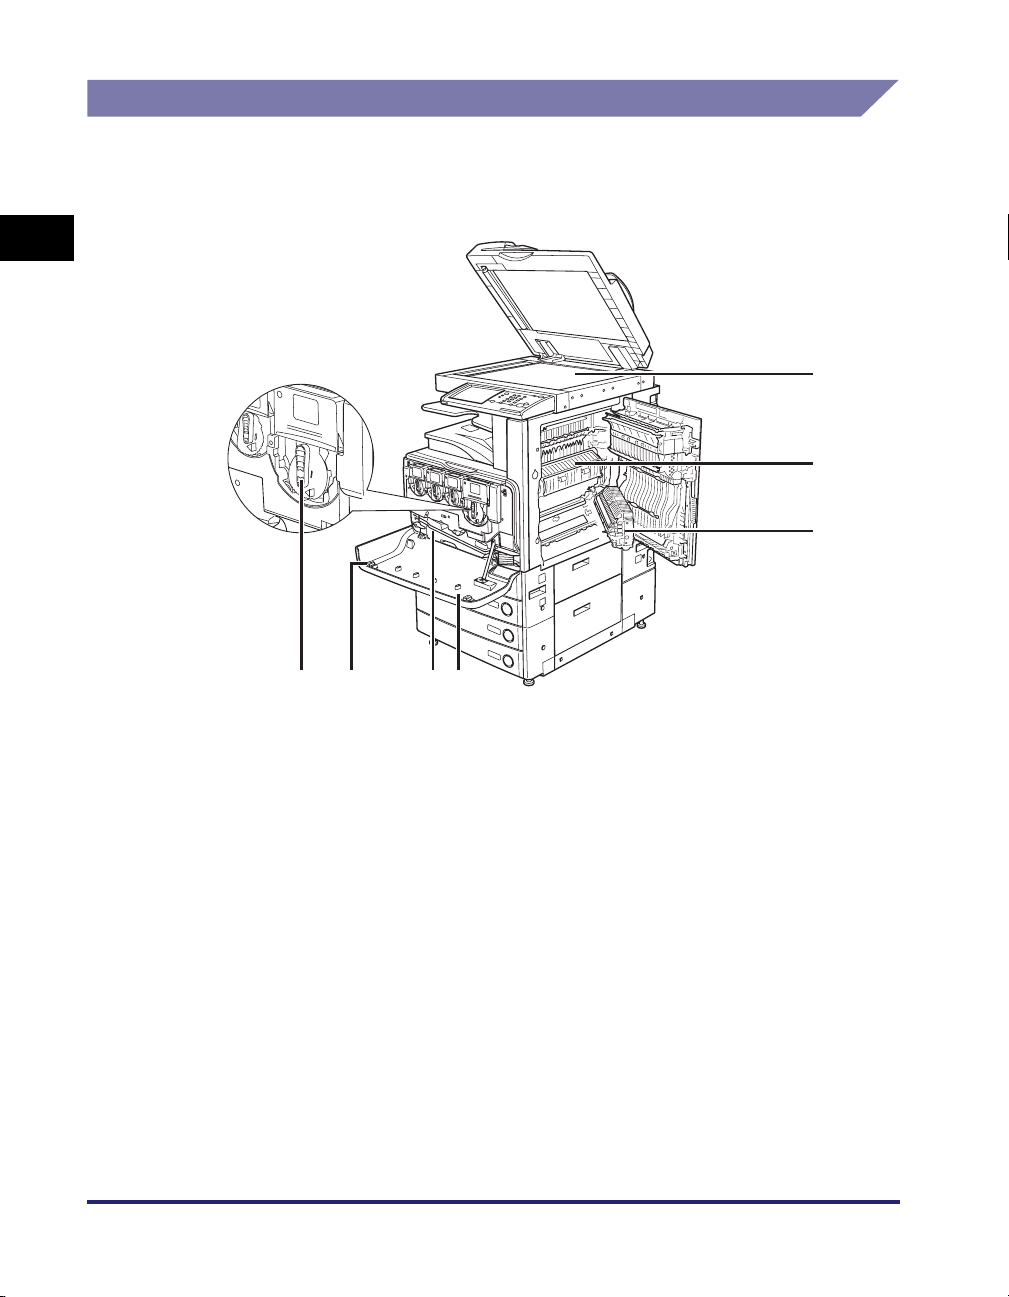
Internal View
The optional Feeder (DADF-L1) (standard-equipped for the Color
imageRUNNER C3480i/C3080i) and Cassette Feeding Unit-Y3 are
attached.
1
a
b
c
Before You Start Using This Machine
g
f
a Platen Glass
Use the platen glass when scanning books, thick
originals, thin originals, transparencies, etc.
b Fixing Unit's Upper Cover
Open this cover to clear a paper jam in the fixing
unit. (See "Fixing Unit (Inside the Main Unit)," on
p. 8-11.)
c Duplexing Unit
Pull out the duplexing unit to clear a paper jam.
(See "Duplexing Unit (Inside the Main Unit)," on
p. 8-16.)
d Front Cover
Open this cover to replace the toner cartridges
or to clean the dust proof glass.
1-12
Parts and Their Functions
de
e Waste Toner Container
Collects the waste toner.
f Dust Proof Glass Cleaner
Place the tool for cleaning the dust proof glass
here.
g Toner Cartridge
When toner of a specific color runs out, pull out
the toner cartridge, and replace it with a new
one. Toner cartridges are sold separately (not
standard equipment). (See "Consumables," on
p. 7-64.)
 Loading...