

Canon imageRunner 2204F, imageRunner 2004, imageRunner 2204N, imageRunner 2004N Getting Started
Page 1
Getting Started
FT6-1425 (000)
Page 2

Contents
Installation Requirements ................................................................................................. 3
About the Supplied Manuals ...........................................................................................3
Navigating the Menu and Text Input Method ...........................................................4
Turning ON/OFF the Power ..............................................................................................4
Specifying the Initial Settings .......................................................................................... 5
Choosing the Method to Connect the Machine to the Computer .....................5
Connecting via a LAN (imageRUNNER 2204F/2204N/2004N) ............................. 5
Connecting via a USB Cable .............................................................................................6
Connecting via a Wireless LAN (imageRUNNER 2204F/2204N/2004N) ............ 6
Setting Wireless LAN (imageRUNNER 2204F/2204N/2004N) ............................... 7
Checking That the Wireless LAN Setting is Completed
(imageRUNNER 2204F/2204N/2004N) .........................................................................9
Setting a Paper Size and Type .......................................................................................... 9
Perform Useful Tasks .........................................................................................................10
Clearing Paper Jams ..........................................................................................................11
Replacing Toner Cartridge ..............................................................................................12
2
Page 3

Installation Requirements
imageRUNNER 2204F/2204N/2004N
100 mm or more
533 mm
1,022.9 mm
imageRUNNER 2004
100 mm or more
1,285 mm
1,285 mm
About the Supplied Manuals
①
Getting Started (This manual):
Read this manual rst. This manual describes the basic machine
settings, operations, and cautions. Be sure to read this manual
before using the machine.
②
MF Driver Installation Guide (User Software and Manuals
CD-ROM/DVD-ROM):
Read this manual next. This manual describes software
installation.
③
e-Manual (User Software and Manuals CD-ROM/
DVD-ROM):
Read the desired chapter to suit your needs. The e-Manual is
categorized by subject to nd desired information easily.
1,022.9 mm
533 mm
Viewing the e-Manual from the CD-ROM/DVD-ROM
1 Insert the User Software and Manuals CD-ROM/DVD-ROM in
your computer.
• Select a language and click [OK] if you are prompted to do so.
2 Click [Manuals].
3 Click [e-Manual].
Depending on the operating system you are using, a security
protection message appears.
If the User Software and Manuals CD-ROM/DVD-ROM has been already
inserted in your computer and the setup screen is not displayed,
remove the CD-ROM/DVD-ROM and insert it again.
3
Page 4
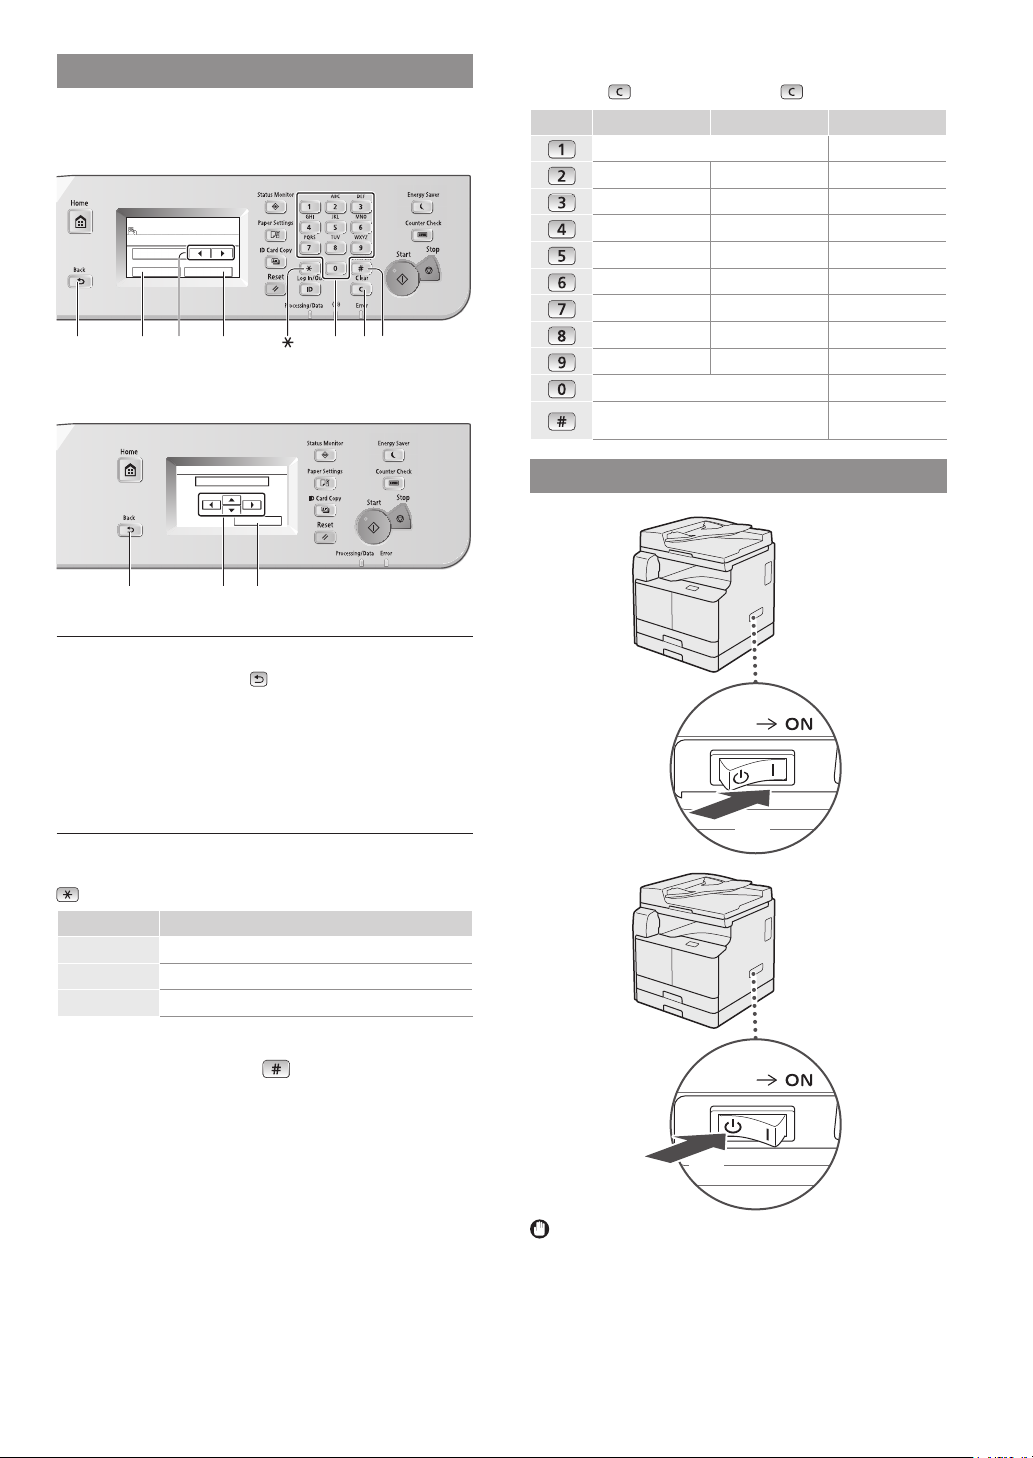
Navigating the Menu and Text Input Method
imageRUNNER 2204F/2204N/2004N
The operation panel shown here is for the imageRUNNER
2204F. The available keys vary depending on the model.
Register Unit Name
Canon-1
Symbol
<A/a/12>Back
◄►
imageRUNNER 2004
aA
ApplyA/a/12
<Apply>
Numeric
key
Clear
#
Deleting characters
Delete with . Pressing and holding deletes all characters.
Entry mode: <A> Entry mode: <a> Entry mode: <12>
@ . - _ / 1
ABC abc 2
DEF def 3
GHI ghi 4
JKL jkl 5
MNO mno 6
PQRS pqrs 7
TUV tuv 8
WXYZ wxyz 9
(Not available) 0
(space) - . * # ! “ , ; : ^ ` _ = / | ‘ ? $ @ % & + \ ˜ ( )
[ ] { } < >
(Not available)
Current Date/Time Settings
01/08 2014 10:00 AM
(0:00-12:59)
Apply
Back <Apply>
◄►
Navigating the Menu
Item selection
Tap an item to select it. Press to return to the previous
screen.
Setting conrmation
Tap the item. However, when <Apply> appears, tap <Apply>.
Text Input Method
(imageRUNNER 2204F/2204N/2004N)
Changing entry mode
Tap <A/a/12> to change the entry mode. You can also press
to change the entry mode.
Entry mode Available text
<A> Uppercase alphabetic letters and symbols
<a> Lowercase alphabetic letters and symbols
<12> Numbers
Entering text, symbols, and numbers
Enter with the numeric keys or
Moving the cursor (Entering a space)
Tap <◄> or <►> to move the cursor. To enter a space, move
the cursor to the end of the text, and tap <►>.
.
Turning ON/OFF the Power
ON
OFF
• Make sure that the power plug is rmly inserted into the
power outlet.
• Do not connect the USB cable at this time. Connect it
when installing software.
4
Page 5
Specifying the Initial Settings
Follow the instructions on the screen to perform the following:
• Set the language
• Set the country and region
• Set the time zone
• Set the date and time
• Register the Purchase Information
• Set the Remote UI Access PIN*
• Set the Wireless LAN Connecting*
* imageRUNNER 2204F/2204N/2004N only
For details on navigating the menu and how to input the
numbers, see “Navigating the Menu and Text Input Method”
P.4).
(
Setting the Remote UI Access PIN is recommended when
using Remote UI to prevent unauthorized access by a third
party. The Remote UI uses a Web browser to operate the
machine, check the status, and specify settings, enabling you
to manage the machine while remaining at your desk. For
information on using the Remote UI, see the e-Manual.
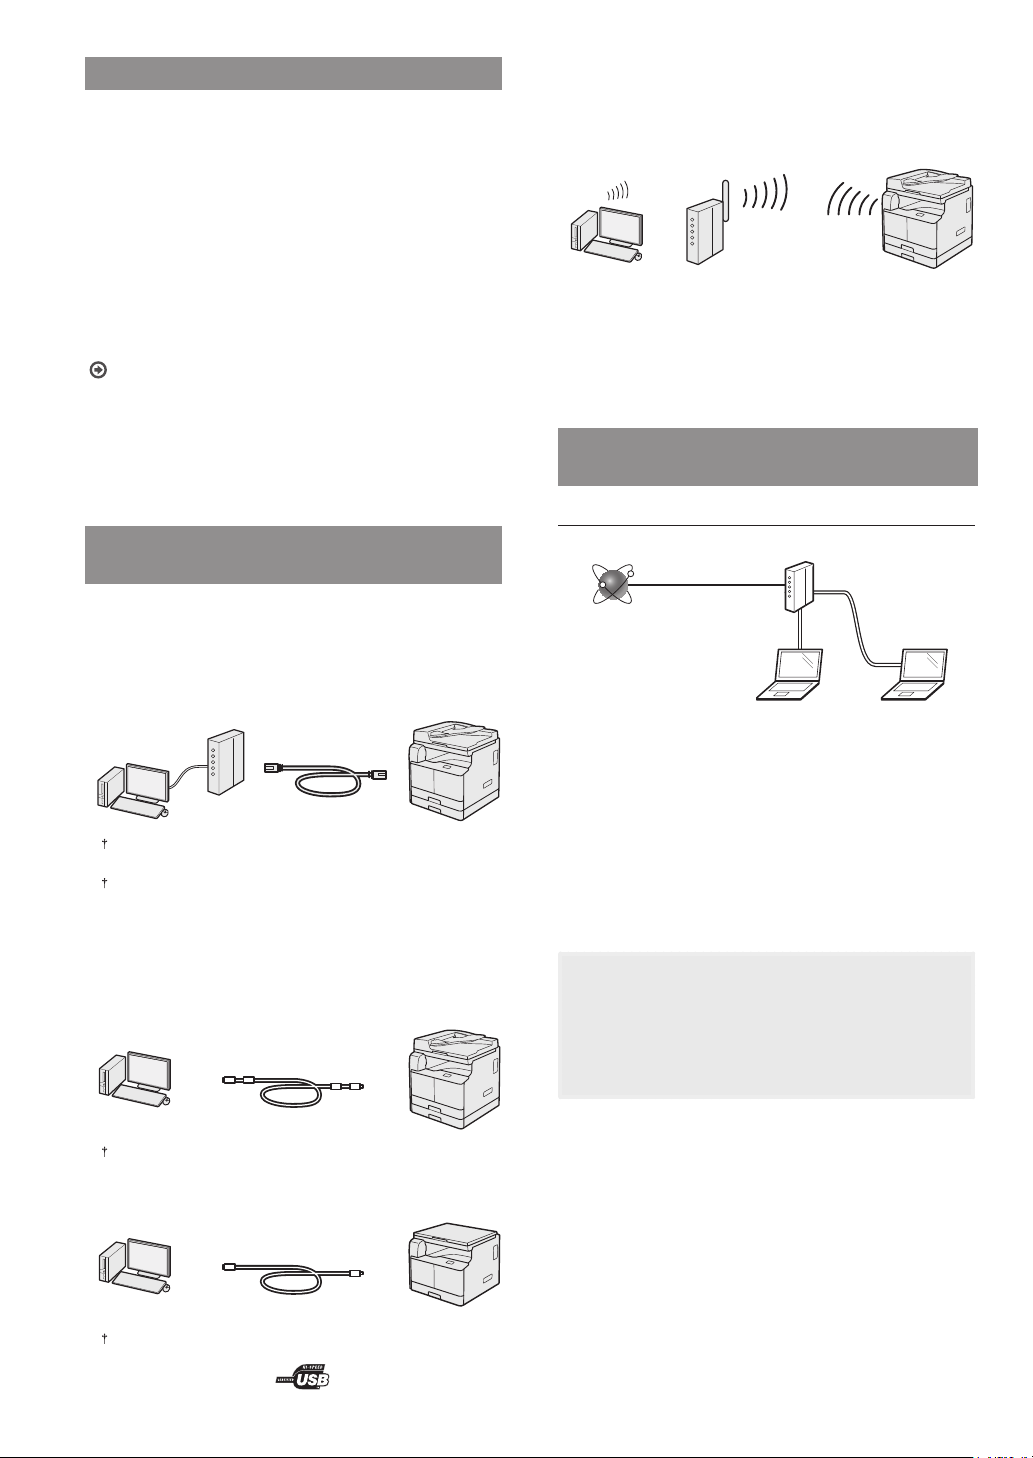
Choosing the Method to Connect the Machine to the Computer
•
Connecting via a Wireless LAN
(imageRUNNER 2204F/2204N/2004N)
You can connect the machine to the computer through a
wireless router*. Since it is connected to wireless, no LAN
cables are needed.
* A wireless router (access point), which supports IEEE802.11b/g/n,
is required.
If you do not sure whether your router is wireless or wired:
See the instruction manual provided with your network
device, or contact the manufacturer.
Connecting via a LAN (imageRUNNER 2204F/2204N/2004N)
Checking Before the Setup
Internet
Router
•
Connecting via a LAN
(imageRUNNER 2204F/2204N/2004N)
You can connect the machine to the computer through a
wired LAN router. Use a LAN cable to connect the machine
to the router.
Make sure that there are ports available on the router to connect
the machine and the computer.
Have a Category 5 or higher twisted pair LAN cable ready.
•
Connecting via a USB cable
You can connect the machine to the computer using a USB
cable.
imageRUNNER 2204F/2204N/2004N
A USB cable is included with the machine.
LAN cable
Are the computer and the router properly connected using
a LAN cable?
For more information, see the instruction manual for the
network device you are using, or contact the networking
device manufacturer.
Have the network settings on the computer been
completed?
If the computer is not properly congured, you may not use
the wired LAN connection even after completing the following
settings.
NOTE
• When you connect to a network environment that is not
security protected, your personal information could be
disclosed to third parties. Please use caution.
• If you connect through a LAN in the oce, contact your
network administrator.
imageRUNNER 2004
A USB cable is not included in this package. Please obtain a
suitable cable for your computer. Make sure that the USB cable you
use has the following mark.
5
Page 6
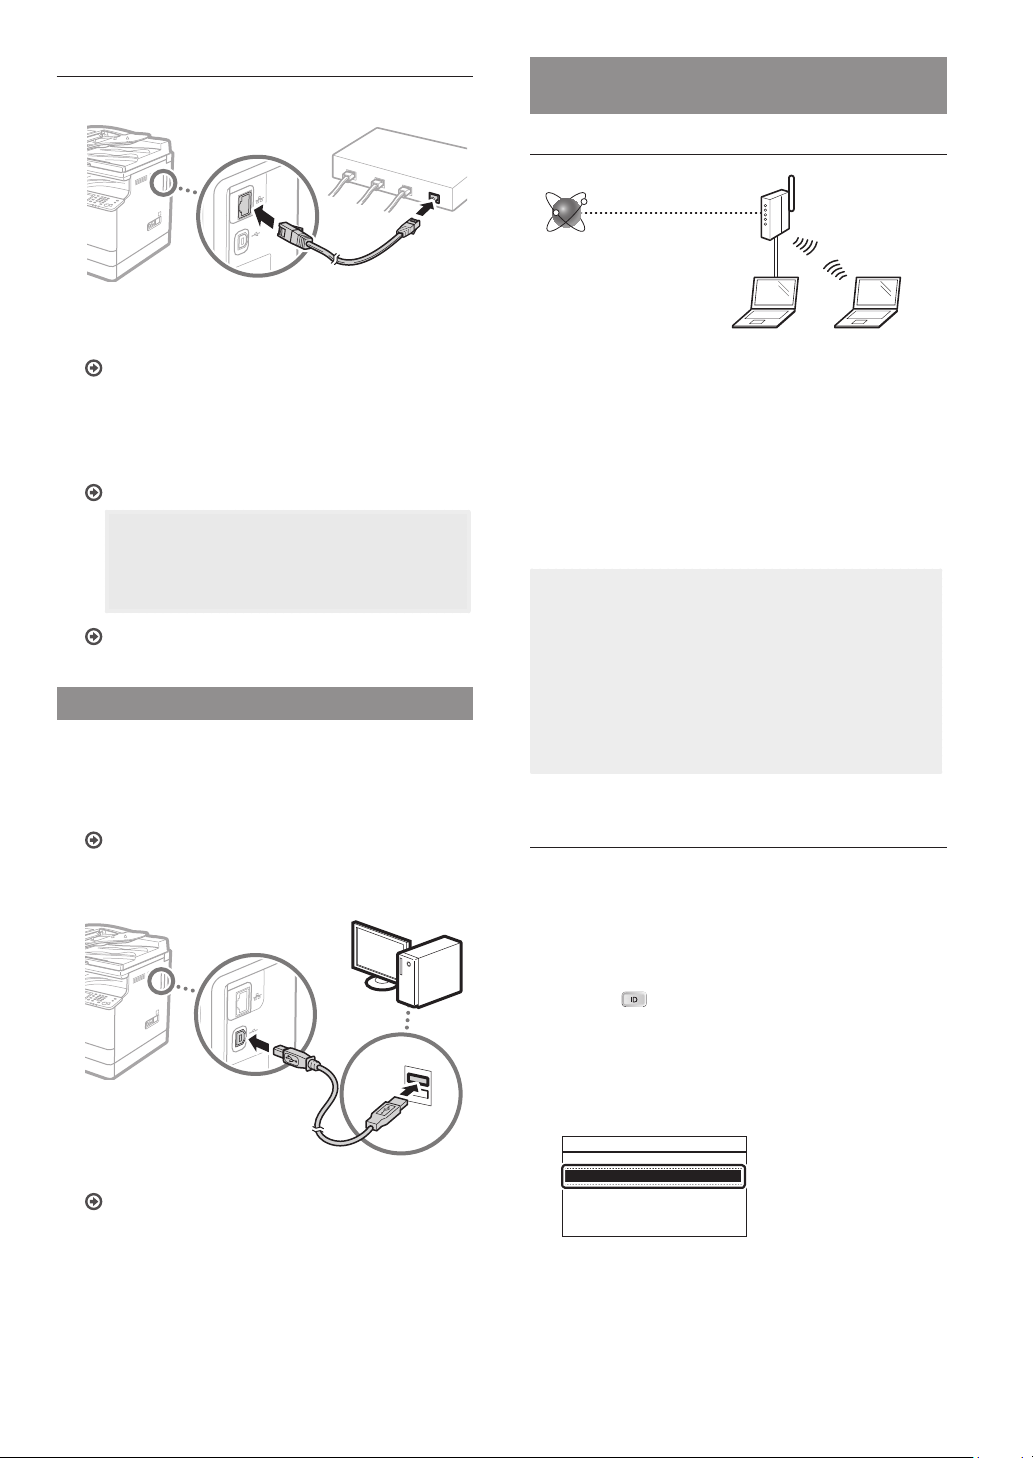
Setting Up the LAN Connection
Connect the LAN cable.
1
The IP address will be automatically congured in 2
minutes. If you want to set the IP address manually, see
the following items.
e-Manual “Network” ► “Connecting to a Network” ►
“Setting IP Addresses”
Install the drivers on your computer using the User
2
Software and Manuals CD-ROM/DVD-ROM.
See “For details on the installation procedures:” (P.9).
NOTE
The scanner driver cannot be installed if the
machine and your computer are connected in an
IPv6 environment.
Proceed to “Setting a Paper Size and Type” (P.9).
Connecting via a USB Cable
Connect the USB cable after installing the drivers.
Install the drivers on your computer using the User
1
Software and Manuals CD-ROM/DVD-ROM.
See “For details on the installation procedures:” (P.9).
Connecting via a Wireless LAN (imageRUNNER 2204F/2204N/2004N)
Checking Before the Setup
Wireless LAN Router
Internet
Is the computer connected to the router (access point)
correctly by a LAN cable or wireless LAN?
For more information, see the instruction manual for the
network device you are using, or contact the networking
device manufacturer.
Have the network settings on the computer been
completed?
If the computer is not properly congured, you may not use
the wireless LAN connection even after completing the
following settings.
NOTE
• You cannot connect both the wired LAN and wireless
LAN at the same time. In addition, the machine is set to
the “Wired LAN” by default.
• When you connect to a network environment that is
not security protected, your personal information
could be disclosed to third parties. Please use caution.
• If you connect through a LAN in the oce, contact your
network administrator.
Switching the Connection Method to Wireless LAN
Connect the USB cable.
2
Proceed to “Setting a Paper Size and Type” (P.9).
6
Tap <Menu> in the Home Screen.
1
Tap <Network Settings>.
2
If a screen for entering a System Manager ID and PIN is
displayed, enter the System Manager ID and PIN, tap <Apply>,
and press .
Tap <Select Wired/Wireless LAN>.
3
Tap <Wireless LAN>.
4
Select LAN
Wired LAN
Wireless LAN
Page 7
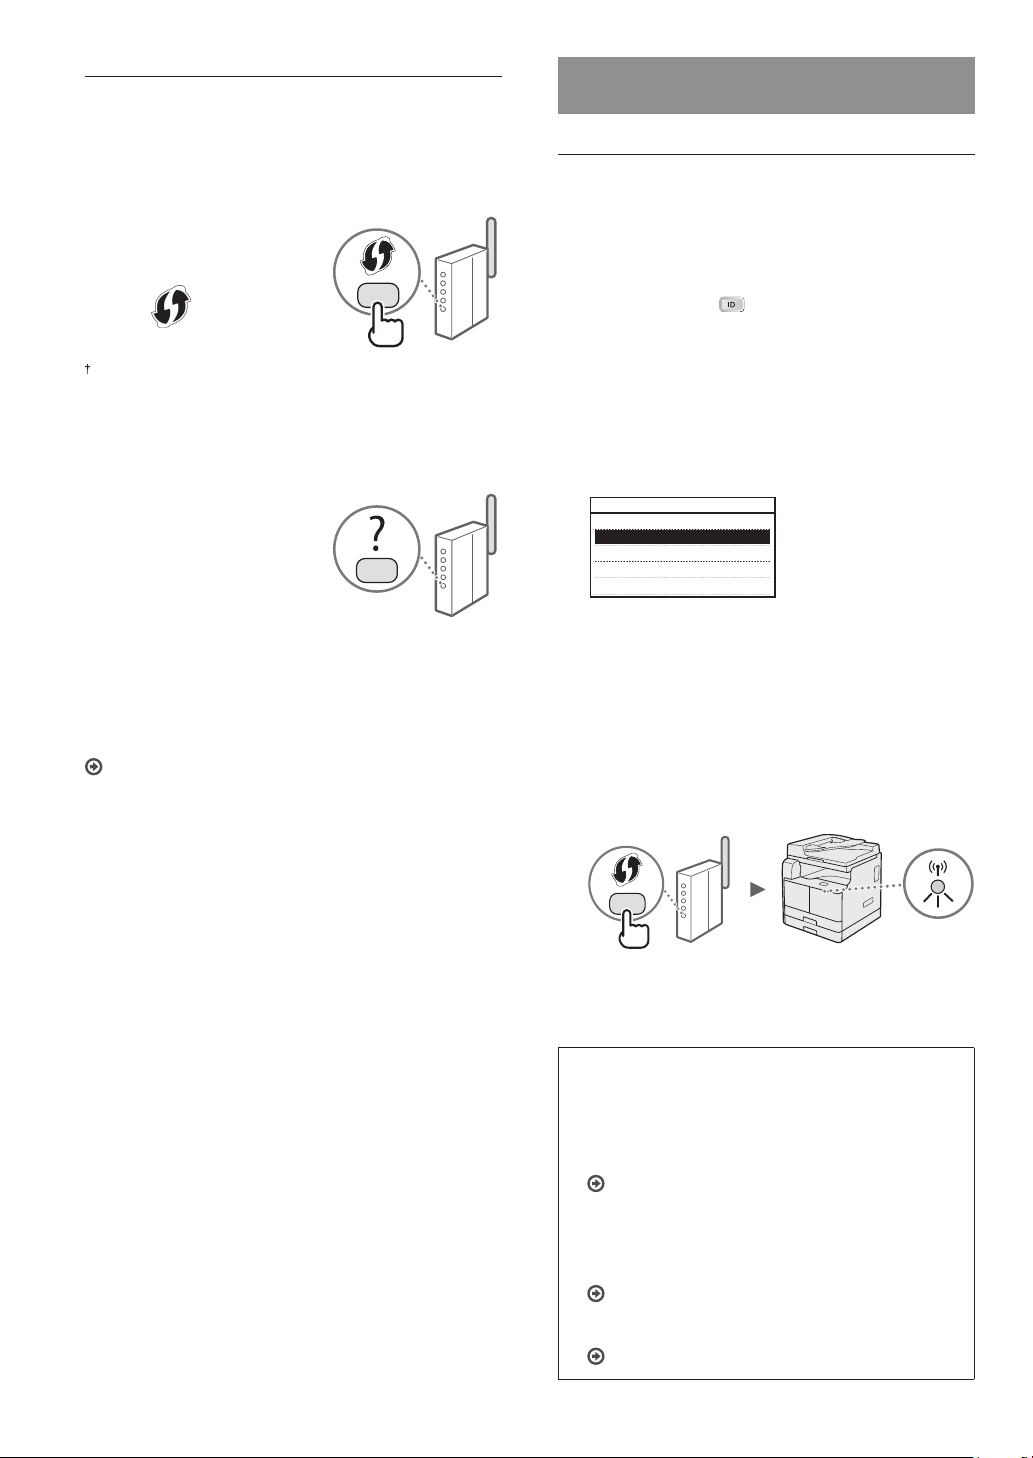
Checking the Router
Select the connection method to the wireless LAN. Select from
the following two methods depending on the router (access
point) that you are using.
There is a button.
This machine supports WPS
(Wi-Fi Protected Setup). You
can easily set up if your router
(access point) has a button,
and if the
router.
If you are not sure whether or not your router supports WPS, please
see the manual included in the product, or contact the product
manufacturer.
mark is on the
Setting Wireless LAN (imageRUNNER 2204F/2204N/2004N)
Push Button Mode
Tap <Menu> in the Home Screen.
1
Tap <Network Settings>.
2
If a screen for entering a System Manager ID and PIN is
displayed, enter the System Manager ID and PIN, tap
<Apply>, and press .
Tap <Wireless LAN Settings>.
3
Read the message that is displayed, and tap <OK>.
4
There is no button.
If there is no button on your
router (access point), you may
manually select SSID and
complete the settings. In this
case, you need to remember
SSID and network key of your
router (access point).
See “Checking That the
Wireless LAN Setting is Completed (imageRUNNER
2204F/2204N/2004N)” (P.9) to learn how to nd out your SSID
and network key.
To set up with WPS PIN code method, or setup manually:
e-Manual “Connecting to a Wireless LAN”
Tap <WPS Push Button Mode>.
5
Wireless LAN Settings
SSID Settings
WPS Push Button Mode
WPS PIN Code Mode
Power Save Mode
Wireless LAN Information
Tap <Yes>.
6
Press and hold* the button until the lamp lights or
7
blinks.
You should press the WPS button within 2 minutes after
you tap <Yes> in step 6.
* The time that you should hold the button may vary depending
on the router you are using.
Wait approximately 2 minutes after the connection.
8
IP address is set during this period of time.
When an error message appears:
Tap <Close> to close the screen, check whether or not
the network key is correct, and then retry the settings.
If the access point cannot be detected even after
retrying, see the following.
e-Manual “When an Error Message Appears”
When checking the network connection:
You can check if the machine is properly connected to the
network using a computer that connected to a network.
e-Manual “Viewing Network Settings”
To set IP address manually:
e-Manual “Connecting to a Wireless LAN”
7
Page 8
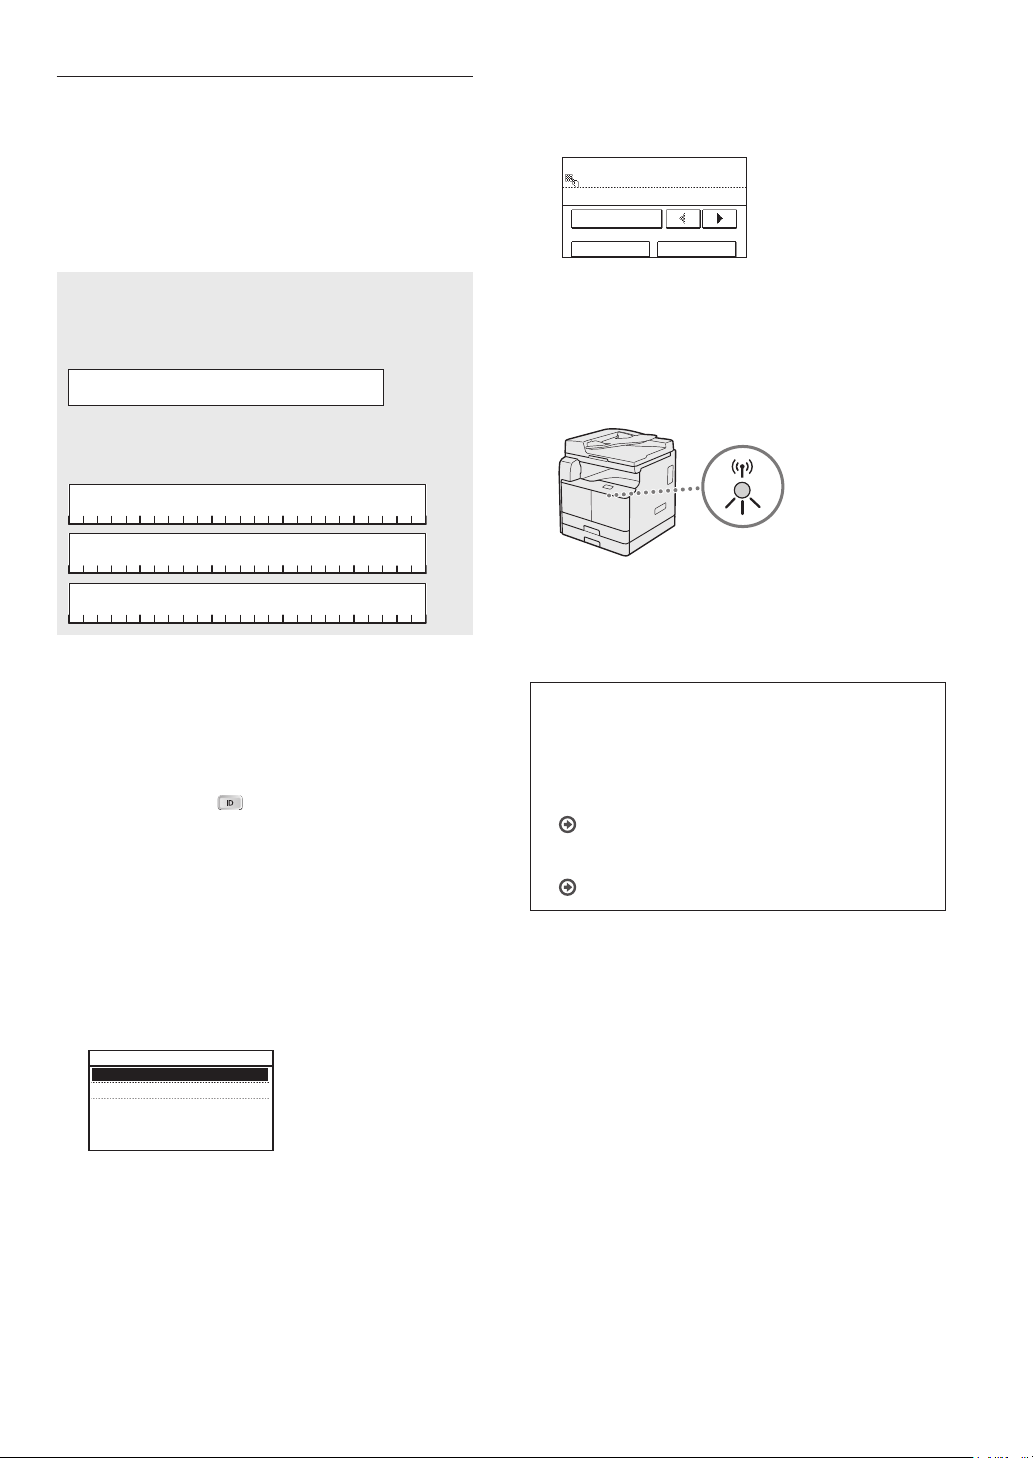
Setting the Access Point Manually
Check SSID or Network Key for a Wireless LAN
1
Router/Access Point.
• Check the label on the Wireless LAN router.
Write down the name of SSID and network key
2
displayed in step 1. When multiple access points are
displayed, write all SSIDs that are displayed.
Enter the network key that you have written
10
down.
Enter the network key using the numeric keys, and tap
<Apply>.
WEP Key (5-26 Characters)
XXXXXXXX
Symbol
A
ApplyA/a/12
SSID
It is sometimes written as name of network, or name of
access point. If there are multiple SSIDs, please write down
all.
Network Key
It is sometimes written as PIN, WEP key, WPA/WPA2
passphrase, PSK or preshared key.
Tap <Menu> in the Home Screen.
3
Tap <Network Settings>.
4
If a screen for entering a System Manager ID and PIN is
displayed, enter the System Manager ID and PIN, tap
<Apply>, and press .
Tap <Wireless LAN Settings>.
5
Read the message that is displayed, and tap <OK>.
6
Tap <Yes>.
11
After the <Connected.> screen is displayed, wait
12
until the Wi-Fi indicator stops blinking and turns
on.
Wait approximately 2 minutes after the
13
connection.
IP address is set during this period of time.
When an error message appears:
Tap <Close> to close the screen, check whether or not
the network key is correct, and then retry the settings.
If the access point cannot be detected even after
retrying, see the following.
e-Manual “When an Error Message Appears”
To set IP address manually:
e-Manual “Connecting to a Wireless LAN”
Tap <SSID Settings>.
7
Tap <Select Access Point>.
8
SSID Settings
Select Access Point
Enter Manually
Select a wireless LAN router.
9
If multiple matched SSIDs are displayed, select the ID that
is listed rst (the one with the strongest signal).
8
Page 9
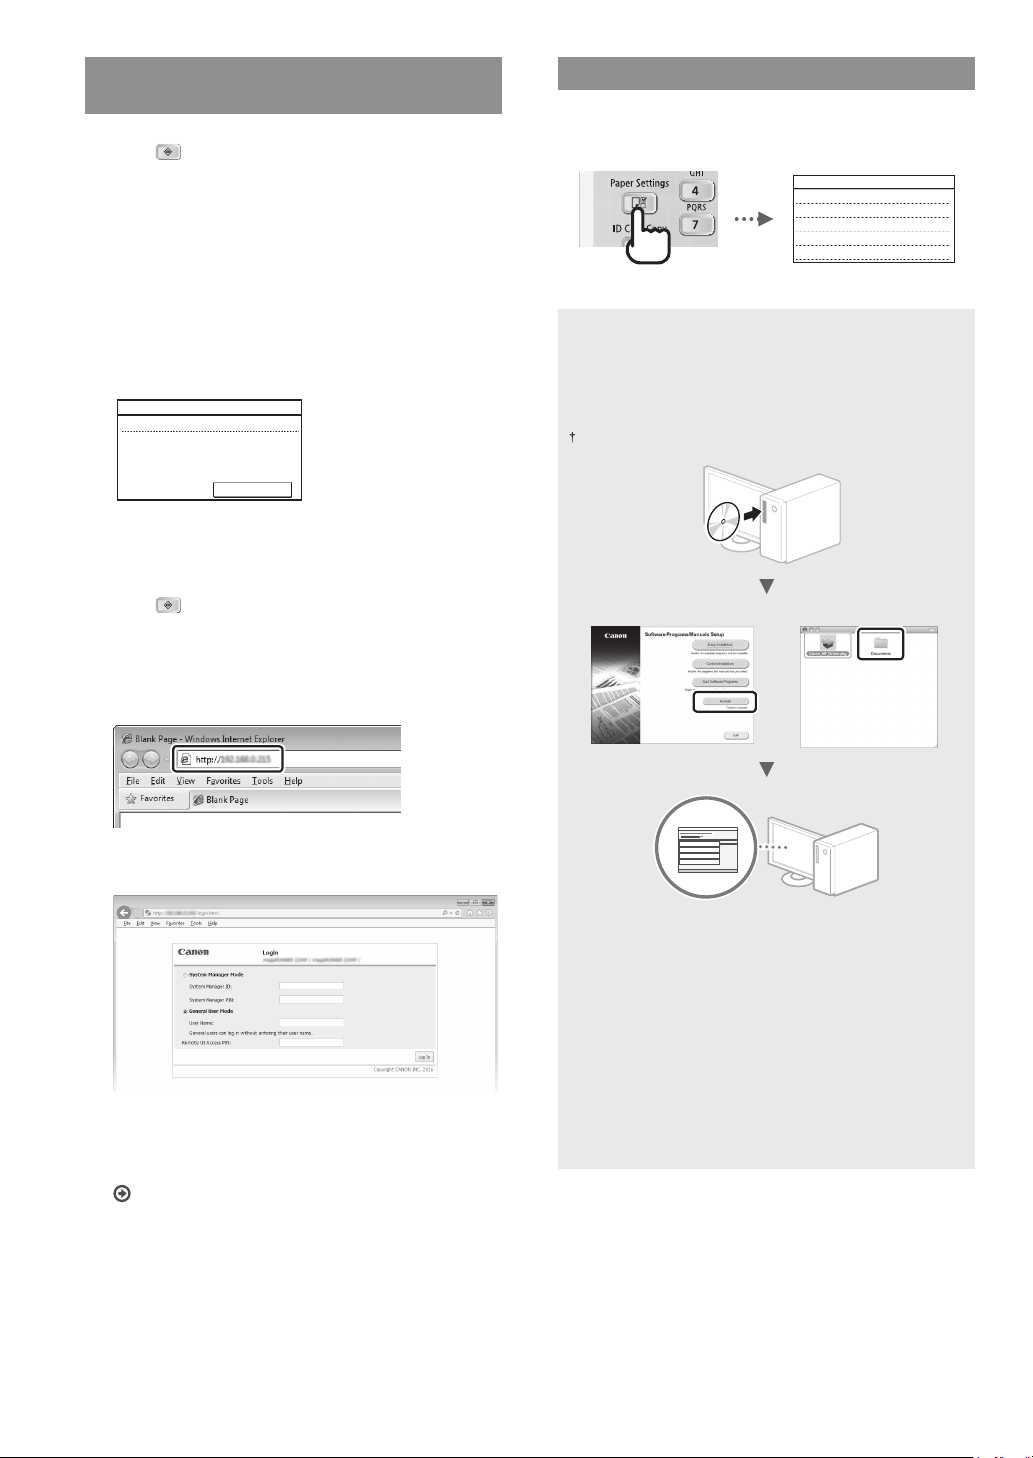
Checking That the Wireless LAN Setting is Completed (imageRUNNER 2204F/2204N/2004N)
Press .
1
Tap <Network Information>.
2
Tap <IPv4>.
3
Tap <IP Address>.
4
Take note of the IP address.
5
IP Address
XXX.XXX.XXX.XXX
Close
Tap <Close>.
6
Press .
7
Setting a Paper Size and Type
Follow the instructions on the screen to set the paper size and
type.
Paper Settings
Multi-Purpose Tray
Drawer 1
Drawer 2
Select Frequently Used Pape...
For details on the installation procedures:
Install the drivers on your computer using the User
Software and Manuals CD-ROM/DVD-ROM. For details on
the installation procedures, see the MF Driver Installation
Guide.
You can also download the drivers from the Canon website.
Windows Mac OS
Start a web browser from a computer, enter
8
“http://<IP address of the machine>/” in the address
eld, and then press [Enter] on your keyboard.
Check that the screen of the Remote UI is displayed.
9
Connection is completed if the screen is displayed.
When the screen is not displayed correctly:
e-Manual “Common Problems”
For Mac OS users:
The CD-ROM/DVD-ROM supplied with this machine may
not include the driver for Mac OS. This is dierent
depending on when you purchase the machine. Please nd
and download the appropriate driver on our Canon
website. For further information on installation or using the
driver, see the following manuals or the help on the drivers.
• Canon UFR II/UFRII LT Printer Driver Guide
• Canon Fax Driver Guide
• Canon Scanner Driver Guide
• Driver’s Help
9
Page 10
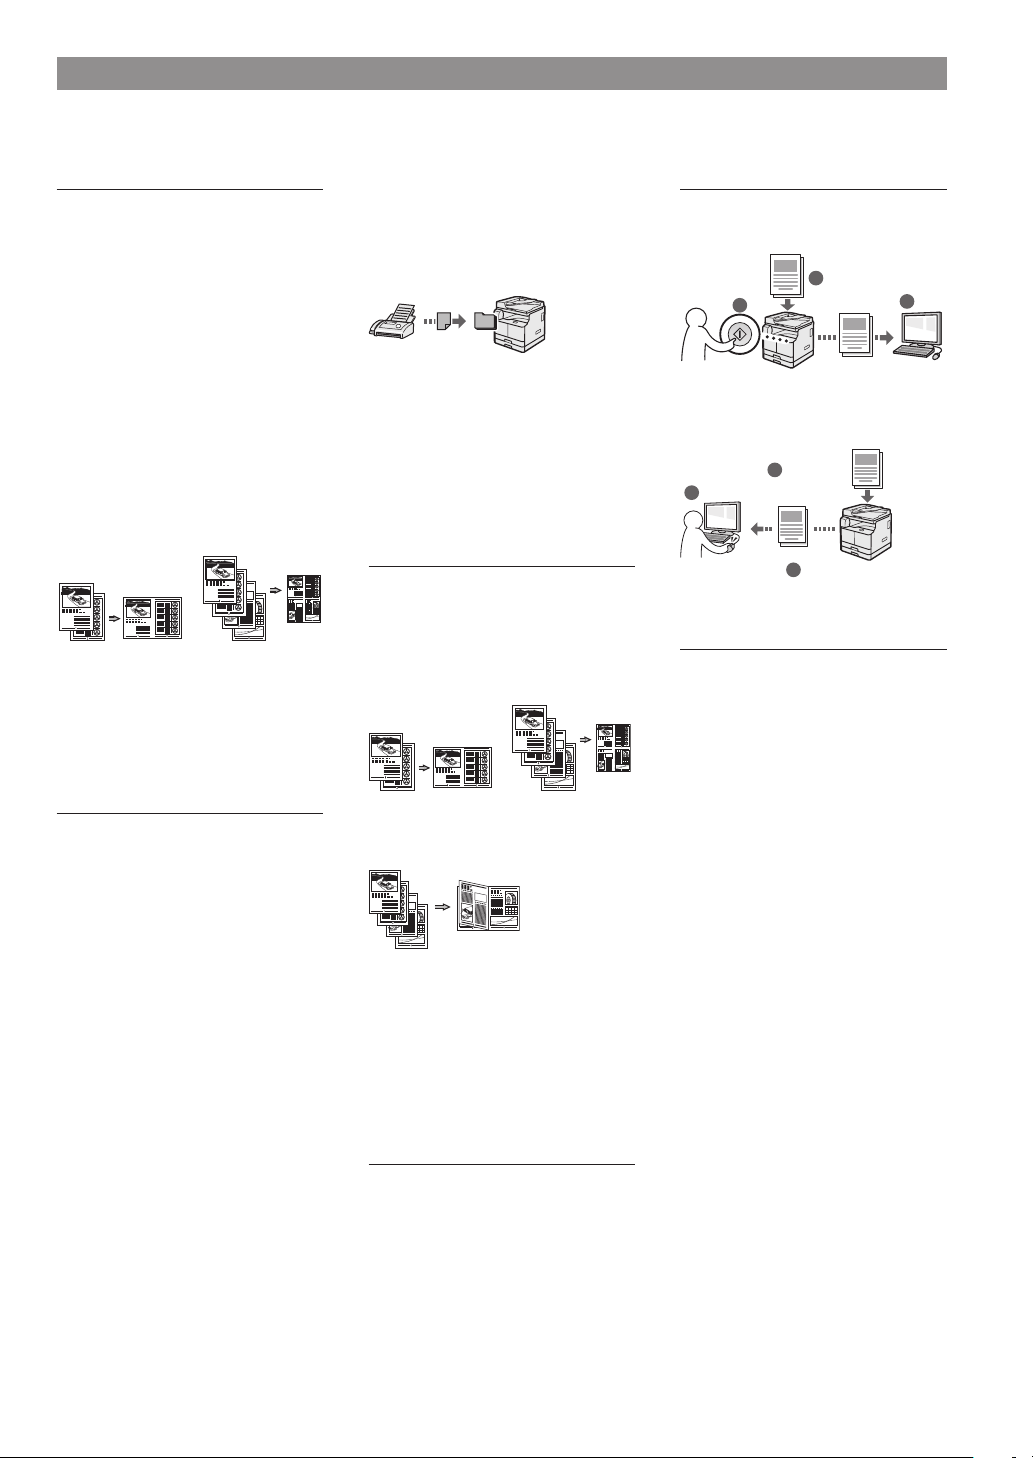
Perform Useful Tasks
A variety of functions are available. An overview of some useful functions is provided below.
Copy
Enlarged/Reduced Copies
You can enlarge or reduce standard size
documents to copy on standard size
paper or specify the copy ratio in
percentage.
2-Sided Copying***
You can copy 1-sided documents on
both sides of paper.
Collating
You can sort copies into sets arranged
in page order.
Reduced Layout
You can reduce multiple documents to
copy them onto one sheet.
2 on 1
Copying ID Card
You can make a copy of a 2-sided card
onto one side of paper.
4 on 1
Receiving
•
Receiving in the memory
You can store the received documents
in the memory. You can print the stored
documents at any time, and if you do
not need them, you can delete them.
•
Remote Receiving
If an external telephone is connected,
you can switch to the fax receiving
mode immediately by dialing the ID
number for fax receiving using the dial
buttons of the telephone during a
phone call.
Print
Enlarged/Reduced Printing
2-Sided Printing***
Reduced Layout
You can reduce multiple documents to
print them onto one sheet.
Scan
Scanning Documents from the
Operation Panel of the Machine
Documents
1
2
Data
3
Scanning Documents from a
Computer
Documents
1
2
Data
3
Remote UI**
You can understand the condition of
the machine from the computers on the
network. You can access the machine
and manage jobs or specify various
settings via network.
Fax*
Sending a Document Directly from a
Computer (PC Fax)
In addition to the normal sending and
receiving faxes, you can use the PC fax.
Sending
You can register fax destinations in the
Address Book. You can specify the
destinations using various methods,
enabling you to send documents
quickly and easily.
• Destination search
• One-touch keys
• Coded dialing
• Destination Group
• Specifying from the sending history
• Sequential broadcast
2 on 1
4 on 1
Booklet Printing***
Poster Printing
Watermark Printing
Combining and Printing Multiple
Documents
Selecting a “Prole”
Network Settings**
This machine comes equipped with a
network interface that you can
construct a network environment easily.
You can print a document, use the PC
fax*, and use the network scan from all
computers which are connected with
the machine. The machine supports to
increase work eciency as a shared
machine in the oce.
* imageRUNNER 2204F Only
** imageRUNNER 2204F/2204N/2004N Only
*** The optional Duplex Unit is required to
use this function.
10
Page 11
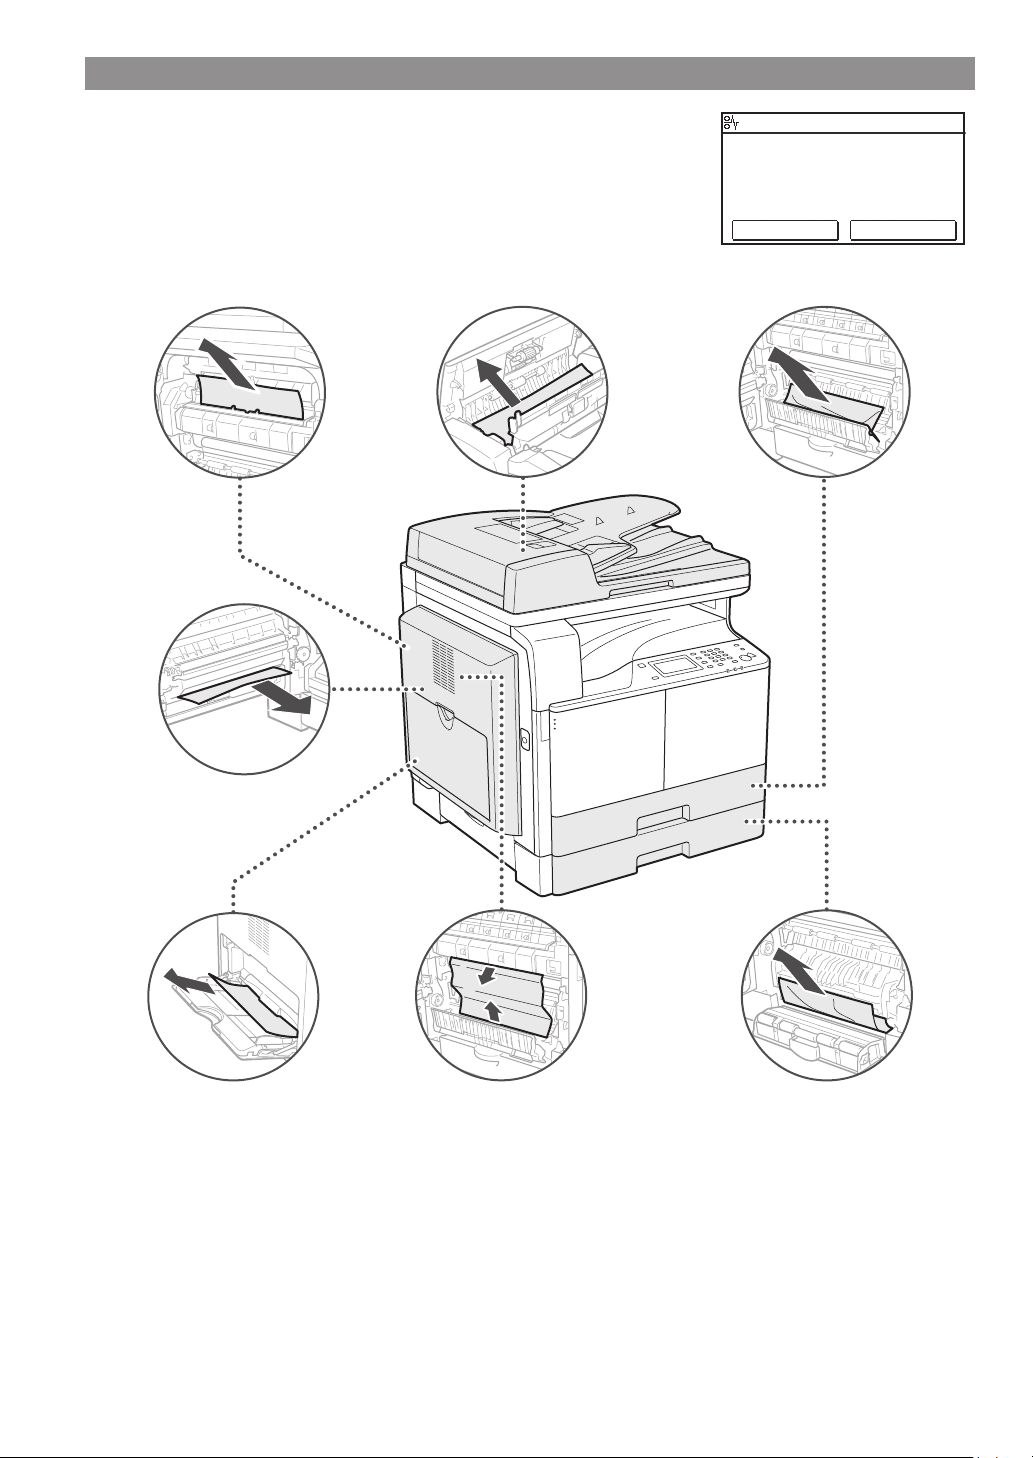
Clearing Paper Jams
If the following screen appears, a paper jam has occurred in the feeder or inside the
machine. Follow the procedure displayed on the screen to remove the jammed
document or paper. This manual indicates only areas where paper jams occur. For details
on the procedures, see the e-Manual.
Output Area
(Optional for imageRUNNER 2204N/2004N)
Feeder (DADF-AT1)
Paper jammed.
Press [Next] to display the
steps.
Previous Next
Drawer 1
Duplex Unit-C1 (Optional
for imageRUNNER
2204F/2204N/2004N)
Multi-Purpose Tray Fixing Unit Cassette Feeding Module-AD1
(Optional for imageRUNNER 2204F/2204N/2004N)
11
Page 12
Replacing Toner Cartridge
Toner cartridges are consumables. When the toner becomes nearly empty or has run out completely in the middle of a job run, a
message appears on the screen, or the following problems may occur. Take the appropriate action accordingly.
When a Message Appears
When the toner becomes nearly empty or has run out in the middle of a job run, a message appears on the screen.
Message
<Prepare the
toner cartridge.>
<Replace the
toner cartridge.>
When the message is
displayed on the screen
The toner cartridge needs
to be replaced soon.
The toner cartridge has
reached the end of its
lifetime.
Description and solutions
Make sure that you have a replacement toner cartridge ready. We recommend
checking the level of remaining toner before printing high-volume documents.
e-Manual “Replacing the Toner Cartridge”
Replace the toner cartridge.
e-Manual ”Replacing the Toner Cartridge”
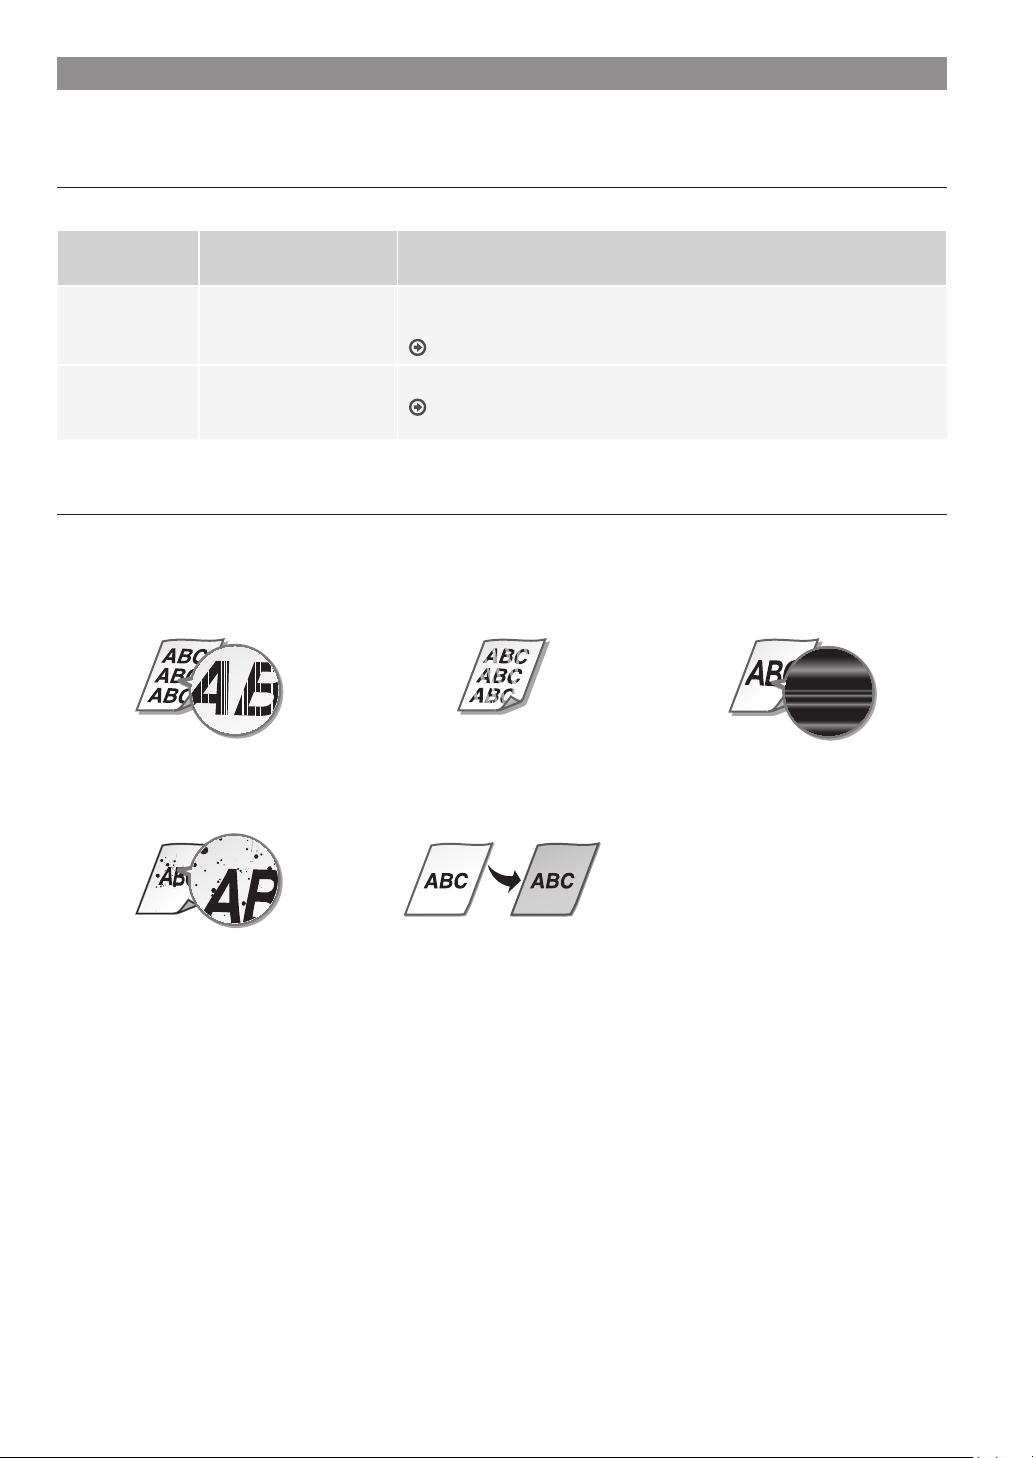
If Printouts are Poor in Quality
If your printouts begin to show any of the characteristics below, the toner cartridge is nearly empty. Replace the nearly empty toner
cartridge even if no message is displayed.
White streaks appear Partially faded Density is uneven
Toner smudges and splatters
appear Printouts are grayish
12
Page 13
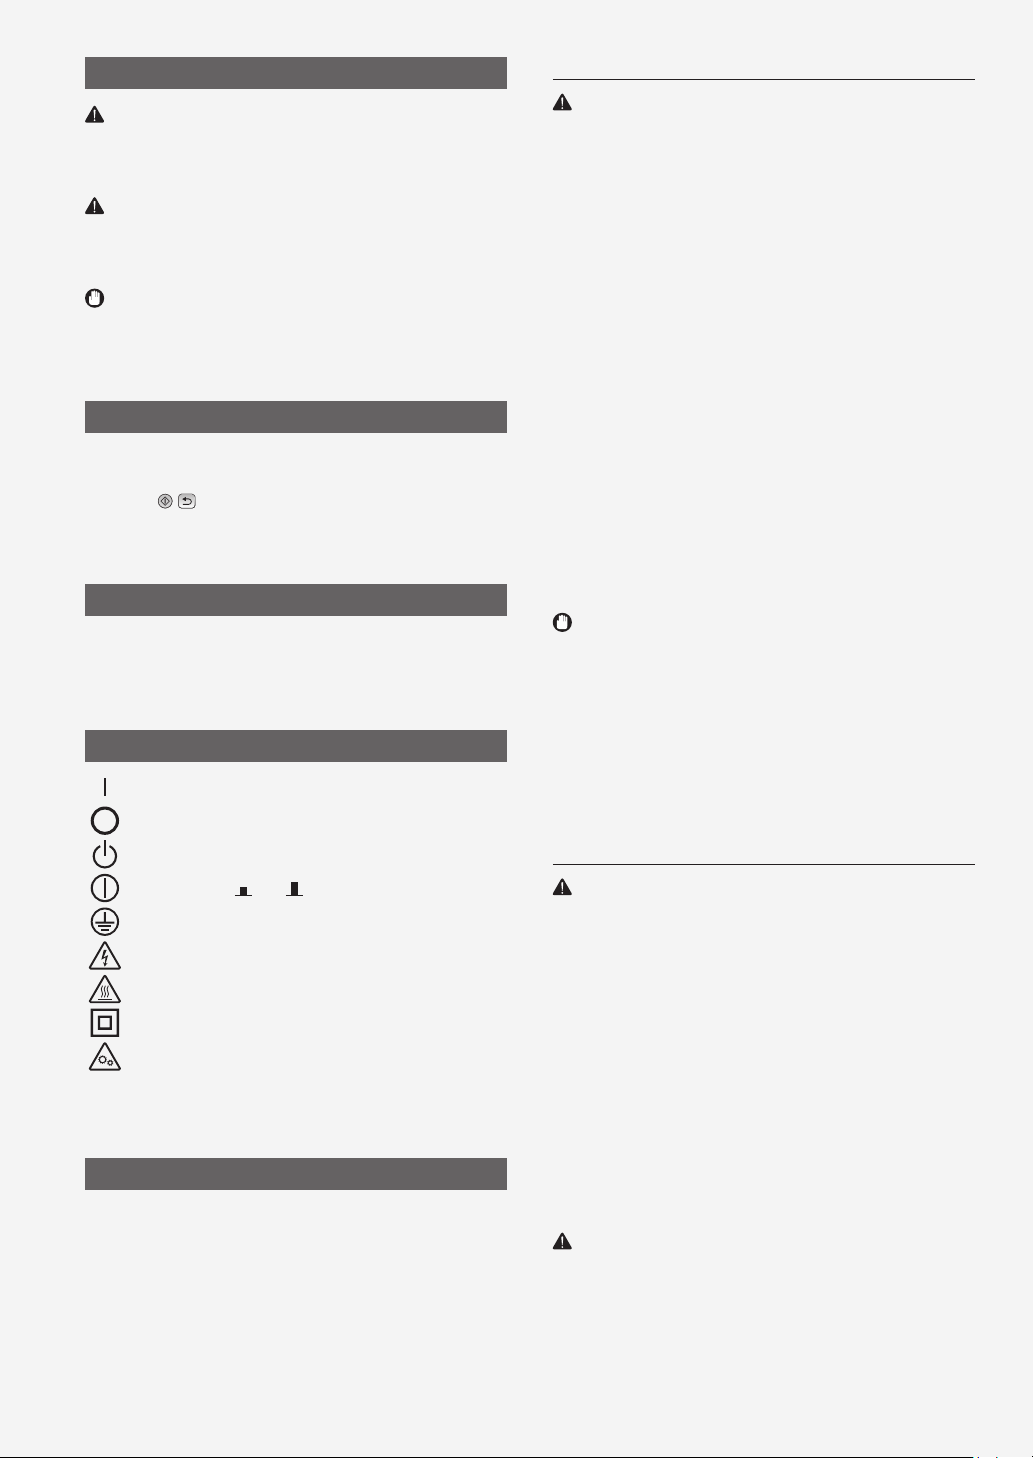
Symbols Used in This Manual
WARNING
Indicates a warning concerning operations that may lead to death or
injury to persons if not performed correctly. To use the machine safely,
always pay attention to these warnings.
CAUTION
Indicates a caution concerning operations that may lead to injury to
persons if not performed correctly. To use the machine safely, always pay
attention to these cautions.
IMPORTANT
Indicates operational requirements and restrictions. Be sure to read
these items carefully to operate the machine correctly, and avoid
damage to the machine or property.
Keys and Buttons Used in This Manual
The following symbols and key names are a few examples of how keys to
be pressed are expressed in this manual.
• Operation panel keys: [Key icon], [Key icon] + (Key name)
Example:
• Display: <Specify destination.>
• Buttons and items on the computer display: [Preferences]
, (Back)
Illustrations and Displays Used in This Manual
Unless otherwise stated, illustrations used in this manual are those
displayed when the imageRUNNER 2204F has the following optional
equipment attached to it:
• Cassette Feeding Module-AD1
Safety-Related Symbols
Power switch: “ON” position
Power switch: “OFF” position
Power switch: “STAND‐BY” position
Push‐push switch ”ON” ”OFF”
Protective earthing terminal
Dangerous voltage inside. Do not open covers other than
instructed.
CAUTION: Hot surface. Do not touch.
Class II equipment
Moving parts: Keep body parts away from moving parts
Some of symbols shown above may not be axed depending on the
product.
Important Safety Instructions
Please read these “Important Safety Instructions” in this manual and in
the e-Manual thoroughly before operating the machine. As these
instructions are intended to prevent injury to the user or other persons
or destruction of property, always pay attention to these instructions.
Also, since it may result in unexpected accidents or injuries, do not
perform any operation unless otherwise specied in the manuals.
Improper operation or use of this machine could result in personal injury
and/or damage requiring extensive repair that may not be covered
under your Limited Warranty.
Installation
WARNING
• Do not install the machine in the following locations. Doing so may
result in personal injury, re or electrical shock.
ū A location where the ventilation slots are blocked
(too close to walls, beds, rugs, or similar objects)
ū A damp or dusty location
ū A location exposed to direct sunlight or outdoors
ū A location subject to high temperatures
ū A location exposed to open ames
ū Near alcohol, paint thinners or other ammable substances
• Do not connect unapproved cables to this machine. Doing so may
result in a re or electrical shock.
• Do not place necklaces and other metal objects or containers lled
with liquid on the machine. If foreign substances come in contact
with electrical parts inside the machine, it may result in a re or
electrical shock.
• When installing and removing the optional accessories, be sure to
turn OFF the power, unplug the power plug, and then disconnect all
the interface cables and power cord from the machine. Otherwise,
the power cord or interface cables may be damaged, resulting in a
re or electrical shock.
• Do not use near any medical equipment. Radiowaves emitted from
this machine may interfere with medical equipment, which may
cause a malfunction and result in serious accidents.
• If any foreign substance falls into this machine, unplug the power
plug from the AC power outlet and contact your local authorized
Canon dealer.
IMPORTANT
• This machine generates a slight amount of ozone, etc. during normal
use. Although sensitivity to ozone, etc. may vary, this amount is not
harmful. Ozone, etc. may be more noticeable during extended use or
long production runs, especially in poorly ventilated rooms. It is
recommended that the room where the machine operates be
appropriately ventilated to maintain a comfortable working
environment. Also avoid locations where people would be exposed
to emissions from the machine.
• Machines with a hard disk may not operate properly when used at
high altitudes of about 3,000 meters above sea level, or higher.
Power Supply
WARNING
• Do not use power cords other than the one provided, as this may
result in a re or electrical shock.
• The provided power cord is intended for use with this machine. Do
not connect the power cord to other devices.
• Do not modify, pull, forcibly bend, or perform any other act that may
damage the power cord. Do not place heavy objects on the power
cord. Damaging the power cord may result in a re or electrical shock.
• Do not plug in or unplug the power plug with wet hands, as this may
result in an electrical shock.
• Do not use extension cords or multi-plug power strips with the
machine. Doing so may result in a re or electrical shock.
• Do not wrap the power cord or tie it in a knot, as this may result in a
re or electrical shock.
• Insert the power plug completely into the AC power outlet. Failure to
do so may result in a re or electrical shock.
• Remove the power plug completely from the AC power outlet during
a thunder storm. Failure to do so may result in a re, electrical shock,
or damage to the machine.
CAUTION
• Install this machine near the power outlet and leave sucient space
around the power plug so that it can be unplugged easily in an
emergency.
13
Page 14
Handling
Maintenance and Inspections
WARNING
• Immediately unplug the power plug from the AC power outlet and
contact an authorized Canon dealer if the machine makes an unusual
noise, emits an unusual smell, or emits smoke or excessive heat.
Continued use may result in a re or electrical shock.
• Do not disassemble or modify this machine. There are high-voltage
and high-temperature components inside the machine which may
result in a re or electrical shock.
• Place the machine where children will not come in contact with the
power cord and other cables or internal and electrical parts. Failure to
do so may result in unexpected accidents.
• Do not use ammable sprays near this machine. If ammable
substances come into contact with electrical parts inside this
machine, it may result in a re or electrical shock.
• When plugging or unplugging a USB cable when the power plug is
plugged into an AC power outlet, do not touch the metal part of the
connector, as this may result in an electrical shock.
• If you are using a cardiac pacemaker:
This machine generates a low level magnetic ux. If you use a cardiac
pacemaker and feel abnormalities, please move away from this
machine and consult your physician immediately.
CAUTION
• For your safety, please unplug the power cord if the machine will not
be used for a long period of time.
• Use caution when opening and closing covers to avoid injury to your
hands.
• Close the feeder gently to avoid catching your hands in the back of
the feeder, as this may result in personal injury. (imageRUNNER
2204F/2204N/2004N).
• Keep hands and clothing away from the rollers in the output area. If
the rollers catch your hands or clothing, this may result in personal
injury.
• The inside of the machine and the output slot is very hot during and
immediately after use. Avoid contact with these areas to prevent
burns. Also, printed paper may be hot immediately after being
output, so use caution when handling it. Failure to do so may result in
burns.
• The laser beam can be harmful to human bodies. Since radiation
emitted inside the product is completely conned within protective
housings and external covers, the laser beam cannot escape from the
machine during any phase of user operation. Read the following
remarks and instructions for safety.
ū Never open covers other than those instructed in the manuals for
this machine.
• If you operate the machine in manners other than the control,
adjustment, and operating procedures prescribed in this manual, this
may result in hazardous radiation exposure.
• If the laser beam should escape and enter your eyes, exposure may
cause damage to your eyes.
WARNING
• Before cleaning, turn OFF the power and unplug the power plug from
the AC power outlet. Failure to do so may result in a re or electrical
shock.
• Unplug the power plug periodically and clean with a dry cloth to
remove dust and grime. Accumulated dust may absorb humidity in
the air and may result in a re if it comes into contact with electricity.
• Use a damp, well wrung-out cloth to clean the machine. Dampen
cleaning cloths with water only. Do not use alcohol, benzenes, paint
thinners, or other ammable substances. Do not use tissue paper or
paper towels. If these substances come into contact with electrical
parts inside the machine, they may generate static electricity or result
in a re or electrical shock.
• Check the power cord and plug periodically for damage. Check the
machine for rust, dents, scratches, cracks, or excessive heat
generation. Use of poorly-maintained equipment may result in a re
or electrical shock.
Consumables
WARNING
• Do not dispose of used toner cartridges in open ames. Also, do not
store toner cartridges or paper in a location exposed to open ames.
This may cause the toner to ignite, and result in burns or re.
• If you accidentally spill or scatter toner, carefully wipe up the loose
toner with a damp, soft cloth and avoid inhaling any toner dust. Do
not use a vacuum cleaner that is not equipped with safety measures
to prevent dust explosions to clean up loose toner. Doing so may
cause damage to the vacuum cleaner or result in a dust explosion
due to static discharge.
CAUTION
• Use caution not to inhale any toner. If you should inhale toner,
consult a physician immediately.
• Use caution so that toner does not get into your eyes or mouth. If
toner should get into your eyes or mouth, immediately wash with
cold water and consult a physician.
• Use caution so that toner does not come into contact with your skin.
If it should, wash with soap and cold water. If there is any irritation on
your skin, consult a physician immediately.
• Keep the toner cartridges and other consumables out of the reach of
small children. If toner is ingested, consult a physician or poison
control center immediately.
• Do not disassemble or modify the toner cartridges. Doing so may
cause the toner to scatter.
• Remove the sealing tape of the toner cartridge completely without
using excessive force. Doing otherwise may cause the toner to scatter.
IMPORTANT
• If the operating noise concerns you:
Depending on the use environment and operating mode, if the
operating noise is of concern, it is recommended that the machine be
Installed in a place other than the oce.
14
Legal Notices
Product Name
Safety regulations require the product’s name to be registered. In some
regions where this product is sold, the following name(s) in parenthesis
may be registered instead.
imageRUNNER 2204F (F193300)
imageRUNNER 2204N/2004N (F193302)
imageRUNNER 2004 (F193200)
EMC requirements of EC Directive
This equipment conforms with the essential EMC requirements of EC
Directive. We declare that this product conforms with the EMC
requirements of EC Directive at nominal mains input 230 V, 50 Hz
although the rated input of the product is 220 to 240 V, 50/60 Hz. Use of
shielded cable is necessary to comply with the technical EMC
requirements of EC Directive.
Page 15
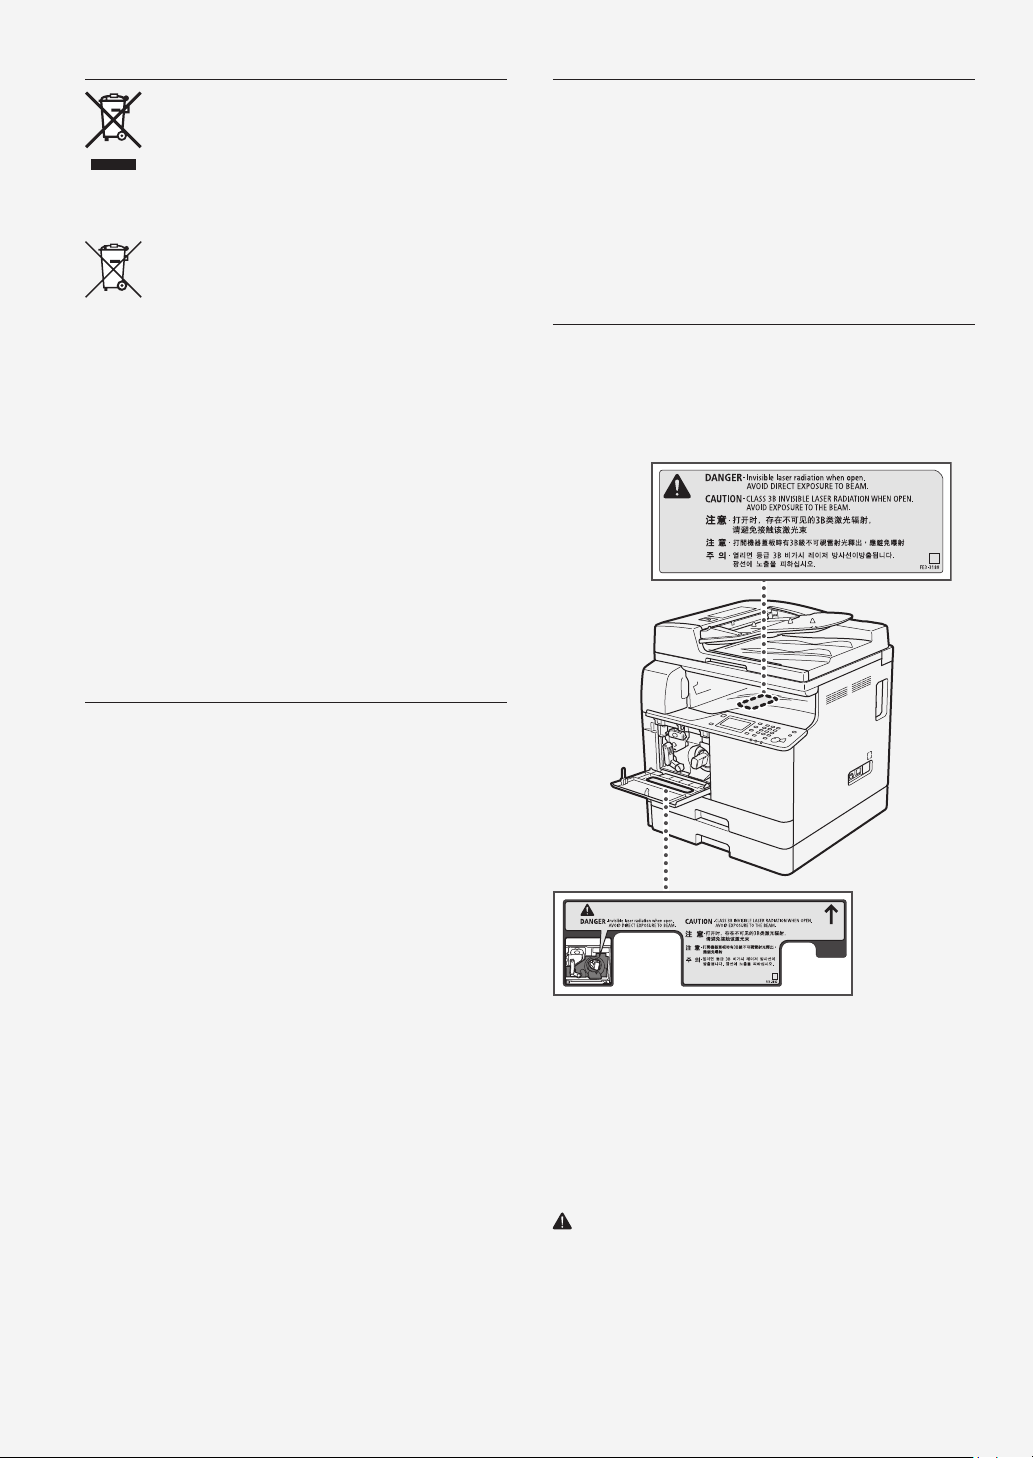
WEEE Directive / Rule
-European Union (and EEA) onlyThis symbol attached on the product is according to the WEEE Directive
(2002/96/EC).
Laser Safety
This Product is certied as a Class 1 laser product under IEC60825-1:2007
and EN60825-1:2007. This means that the product does not produce
hazardous laser radiation.
Since radiation emitted inside the product is completely conned within
protective housings and external covers, the laser beam cannot escape
from the machine during any phase of user operation.
Do not remove protective housings or external covers, except as
directed by the equipment’s manual.
This product includes laser diode.
[Maximum Output 8 mW, Wavelength 785-800 nm]
-India onlyThis product is not to be disposed of with your household waste,
according to the e-waste (Management and Handling) Rules, 2011. This
product should be handed over to a designated collection point, e.g., to
an authorized collection site for recycling waste electrical and electronic
equipment (EEE). Improper handling of this type of waste could have a
possible negative impact on the environment and human health due to
potentially hazardous substances that are generally associated with EEE.
At the same time, your cooperation in the correct disposal of this
product will contribute to the eective usage of natural resources.
For more information regarding return and recycling of WEEE products,
please visit <http://www.canon.co.in/environment>.
Also, this product complies with the “India E-waste Rule 2011” and
prohibits use of lead, mercury, hexavalent chromium, polybrominated
biphenyls or polybrominated diphenyl ethers in concentrations
exceeding 0.1 % by weight and 0.01 % by weight for Cadmium, except
for the exemptions set in Schedule II of the Rule.
Legal Limitations on the Usage of Your Product
and the Use of Images
Using your product to scan, print or otherwise reproduce certain
documents, and the use of such images as scanned, printed or otherwise
reproduced by your product, may be prohibited by law and may result in
criminal and/or civil liability. A non-exhaustive list of these documents is
set forth below. This list is intended to be a guide only. If you are
uncertain about the legality of using your product to scan, print or
otherwise reproduce any particular document, and/or of the use of the
images scanned, printed or otherwise reproduced, you should consult in
advance with your legal advisor for guidance.
ū Paper Money
ū Traveler’s Checks
ū Money Orders
ū Food Stamps
ū Certicates of Deposit
ū Passports
ū Postage Stamps (canceled or uncanceled)
ū Immigration Papers
ū Identifying Badges or Insignias
ū Internal Revenue Stamps (canceled or uncanceled)
ū Selective Service or Draft Papers
ū Bonds or Other Certicates of Indebtedness
ū Checks or Drafts Issued by Governmental Agencies
ū Stock Certicates
ū Motor Vehicle Licenses and Certicates of Title
ū Copyrighted Works/Works of Art without Permission of Copyright
Owner
Additional Information
When servicing or adjusting the optical system of the product, be careful
not to place screwdrivers or other shiny objects in the path of the laser
beam.
Also, accessories such as watches and rings should be removed before
working on the product.
The reected beam, even though visible or invisible, can permanently
damage your eyes.
This Product has been classied under IEC60825-1:2007 and EN608251:2007, which conform to the following classes;
CLASS 1 LASER PRODUCT
LASER KLASSE 1
APPAREIL À LASER DE CLASSE 1
APPARECCHIO LASER DI CLASSE 1
PRODUCTO LÁSER DE CLASE 1
APARELHO A LASER DE CLASSE 1
LUOKAN 1 LASER-TUOTE
LASERPRODUKT KLASS 1
CAUTION
Use of controls, adjustments, or performance of procedures other than
those specied in the manuals for this machine may result in hazardous
radiation exposure.
15
Page 16
Super G3
Super G3 is a phrase used to describe the new generation of fax
machines that use ITU-T V.34 standard 33.6 Kbps* modems. Super G3
High Speed Fax machines allow transmission times of approximately 3
seconds* per page which results in reduced telephone line charges.
* Approximately 3 seconds per page fax transmission time based on
CCITT/ITU-T No.1 Chart, (JBIG, Standard Mode) at 33.6 Kbps modem
speed. The Public Switched Telephone Network (PSTN) currently
supports 28.8 Kbps modem speeds or slower, depending on telephone
line conditions.
NOTE
The fax function is available only if the FAX Board is
installed.
Wireless LAN Regulatory Information
Regulatory information for users in Singapore
imageRUNNER 2204F/2204N/2004N includes approved Wireless LAN
Module (Model name: AW-NM383).
Complies with IDA
Standards
DA103787
Regulatory information for users in Thailand
imageRUNNER 2204F/2204N/2004N includes approved Wireless LAN
Module (Model name: AW-NM383).
This telecommunication equipment conforms to NTC technical
requirement.
16
Page 17

Page 18

Page 19

Page 20

CANON INC.
30-2, Shimomaruko 3-chome, Ohta-ku, Tokyo 146-8501, Japan
CANON U.S.A., INC.
One Canon Park, Melville, NY 11747, U.S.A.
CANON CANADA INC.
6390 Dixie Road Mississauga, Ontario L5T 1P7, Canada
CANON EUROPA N.V.
Bovenkerkerweg 59, 1185 XB Amstelveen, The Netherlands
(See http://www.canon-europe.com/ for details on your regional dealer)
CANON AUSTRALIA PTY LTD
Building A, The Park Estate, 5 Talavera Road, Macquarie Park, NSW 2113, Australia
CANON CHINA CO. LTD.
2F Jinbao Building No.89, Jinbao Street, Dongcheng District, Beijing 100005, PRC
CANON SINGAPORE PTE LTD
1 Fusionopolis Place, #15-10, Galaxis, Singapore 138522
CANON HONGKONG CO., LTD.
19/F., The Metropolis Tower, 10 Metropolis Drive, Hunghom, Kowloon, Hong Kong
FT6-1425 (000) XXXXXXXXXX Copyright CANON INC. 2016 PRINTED IN CHINA
 Loading...