

Page 1

Print Plug-In for Photoshop Guide
For Macintosh
Contents
Before You Begin ..................................................................................................................iii
■ The Features of Print Plug-In .......................................................................................iii
How to Read this Document .................................................................................................iv
■ Symbols........................................................................................................................iv
■ Buttons .........................................................................................................................iv
■ Screens ........................................................................................................................iv
■ Trademarks ..................................................................................................................iv
Chapter 1 Installing Print Plug-In ........................................................................ 1-1
Operating Environment....................................................................................................... 1-1
■ Compatible Printers ................................................................................................... 1-1
■ Operating Environment.............................................................................................. 1-1
Installation Procedures ....................................................................................................... 1-3
Starting the Print Plug-In.....................................................................................................1-6
Uninstall Procedures...........................................................................................................1-8
Chapter 2 Functions of Print Plug-In................................................................... 2-1
Print Plug-In Screen Content .............................................................................................. 2-1
■ Five-Sheet Joint Display............................................................................................ 2-1
■ Main Sheet ................................................................................................................ 2-5
■ Page Setup Sheet ..................................................................................................... 2-8
■ Color Settings Sheet................................................................................................ 2-11
■ Print History Sheet................................................................................................... 2-12
■ Maintenance Sheet (displayed only with W8400PG and W6400PG) ...................... 2-13
■ Print History Details Dialog Box............................................................................... 2-14
Chapter 3 Utilize Print Plug-In to Print ................................................................ 3-1
Utilize Three Types of Previews ......................................................................................... 3-1
■ Check Image with Print Area Layout 1 ...................................................................... 3-1
■ Check Image with Print Area Layout 2 ...................................................................... 3-2
■ Check Original Image with Image Preview................................................................ 3-3
Print with a Desired Picture Quality .................................................................................... 3-4
Adjust the Colors and Print ................................................................................................. 3-8
■ Adjust the Colors while Checking the Preview .......................................................... 3-8
■ Adjust the Colors by Color Matching ....................................................................... 3-12
■ Print High-Quality AdobeRGB16bit Images............................................................. 3-14
■ Prints monochrome photographs with high quality.................................................. 3-18
Enlarge/Reduce and Print ................................................................................................3-20
■ Enlarge/Reduce and Print Matching Output Media Size ......................................... 3-20
■ Enlarge/Reduce and Print Matching Width of Roll Paper........................................ 3-23
■ Specify Scaling, Enlarge/Reduce and Print............................................................. 3-27
Print with No Borders........................................................................................................3-31
Customize Media Settings ................................................................................................ 3-34
Utilize Print History ...........................................................................................................3-38
■ Confirm Print History Details ................................................................................... 3-38
■ Apply Print History to an Image ............................................................................... 3-40
■ Store Print History to Print Preferences................................................................... 3-41
■ Delete Print History.................................................................................................. 3-44
i
Page 2

■ Export Print History from Print Preferences............................................................. 3-46
■ Import Print History to Print Preferences ................................................................. 3-48
■ Delete Print History from Print Preferences............................................................. 3-50
■ Set Information to Print with Image ......................................................................... 3-52
Index ...................................................................................................................Index-1
ii
Page 3

Print Plug-In for Photoshop
Before You Begin
Before You Begin
imagePROGRAF Print Plug-In for Photoshop (Print Plug-In) is the special plug-in software to
customize your pinting by installing Adobe Systems “Photoshop”. Read this document
thoroughly before using Print Plug-In, so you will fully understand the functions of this product
and be able to use it with greater facility. After you are done reading this document keep it in a
safe place, so that you can refer back to it at a later date.
This document explains how to use Print Plug-In in Mac OS. Refer to Print Plug-In for
Photoshop Guide for Windows for more information on how to use this product in a Windows
environment.
■ The Features of Print Plug-In
The main features of Print Plug-In are as follows.
• This software can automatically recognize the color space of images for RGB and
AdobeRGB and can automatically set those images to an optimum profile. Thus, printing of
AdobeRGB is made possible without performing tedious settings.
• This software can directly process image data on Photoshop, and can send that image data
to the printer. This allows for the processing of not just RGB8bit image data, but also of
RGB16bit image data.
• By using the preview function for images based on real images, and the preview function for
layouts based on image positioning by media size, you can use this software to make color
adjustments and confirm print layout.
• You can perform basic printer settings such as printer selection, media type and output
profile selection, and matching methods, in addition to borderless printing and enlargement/
reduction process without growing through the printer driver.
• By using the print history management function, you can import past print settings
parameters. Additionally, you can save often-used print history as a preference and you can
save preferences as a file.
Note
The media type, image size, detailed media settings, and the printer settings
can cause the actual print output to differ from the Print Plug-In settings (the
arrangement of the image in the layout preview, the print start position, and the
media size). For more details, refer to the printer User’s Guide.
iii
Page 4
Print Plug-In for Photoshop
How to Read this Document
How to Read this Document
■ Symbols
In this document, explanations regarding safety precautions, restrictions and cautions in use
will be indicated with the following marks.
Note
This indicates references for operations or supplementary explanations. We
recommend that you read these instructions.
■ Buttons
In this document, the button names are displayed in the following manner.
• Buttons on the computer screen: Button Name
Ex: OK
Settings
■ Screens
Buttons that are clickable while operating Print Plug-In are shown surrounded by
. Additionally, when multiple clickable buttons are shown, they are all
surrounded by the same marking.
Clickable
button while
When the OS Locale is set as U.S., the unit of length is displayed in inch.
operating
■ Trademarks
Canon, the Canon logo, and imagePROGRAF are trademarks or registered trademarks of
CANON INC.
Adobe and Photoshop are trademarks of Adobe Systems Incorporated.
Apple, Macintosh and Mac OS are registered trademarks or trademarks of Apple Computer,
Inc.
Intel and Pentium are registered trademarks of Intel Corporation in the United States and any
other country.
Microsoft
States and any other country.
Any other company name and product name are company trademarks or registered
trademarks.
®
and Windows® are registered trademarks of the Microsoft Corporation in United
iv
Page 5
Print Plug-In for Photoshop
Chapter 1 Installing Print Plug-In
The explanation below is on the Print Plug-In operating environment, and how to install, start
up and uninstall Print Plug-In.
Operating Environment
The Print Plug-In operating environment is as follows.
■ Compatible Printers
Canon Large Format Printer W6400
Canon Large Format Printer W8400
Canon Graphic Color Printer W2200S
■ Operating Environment
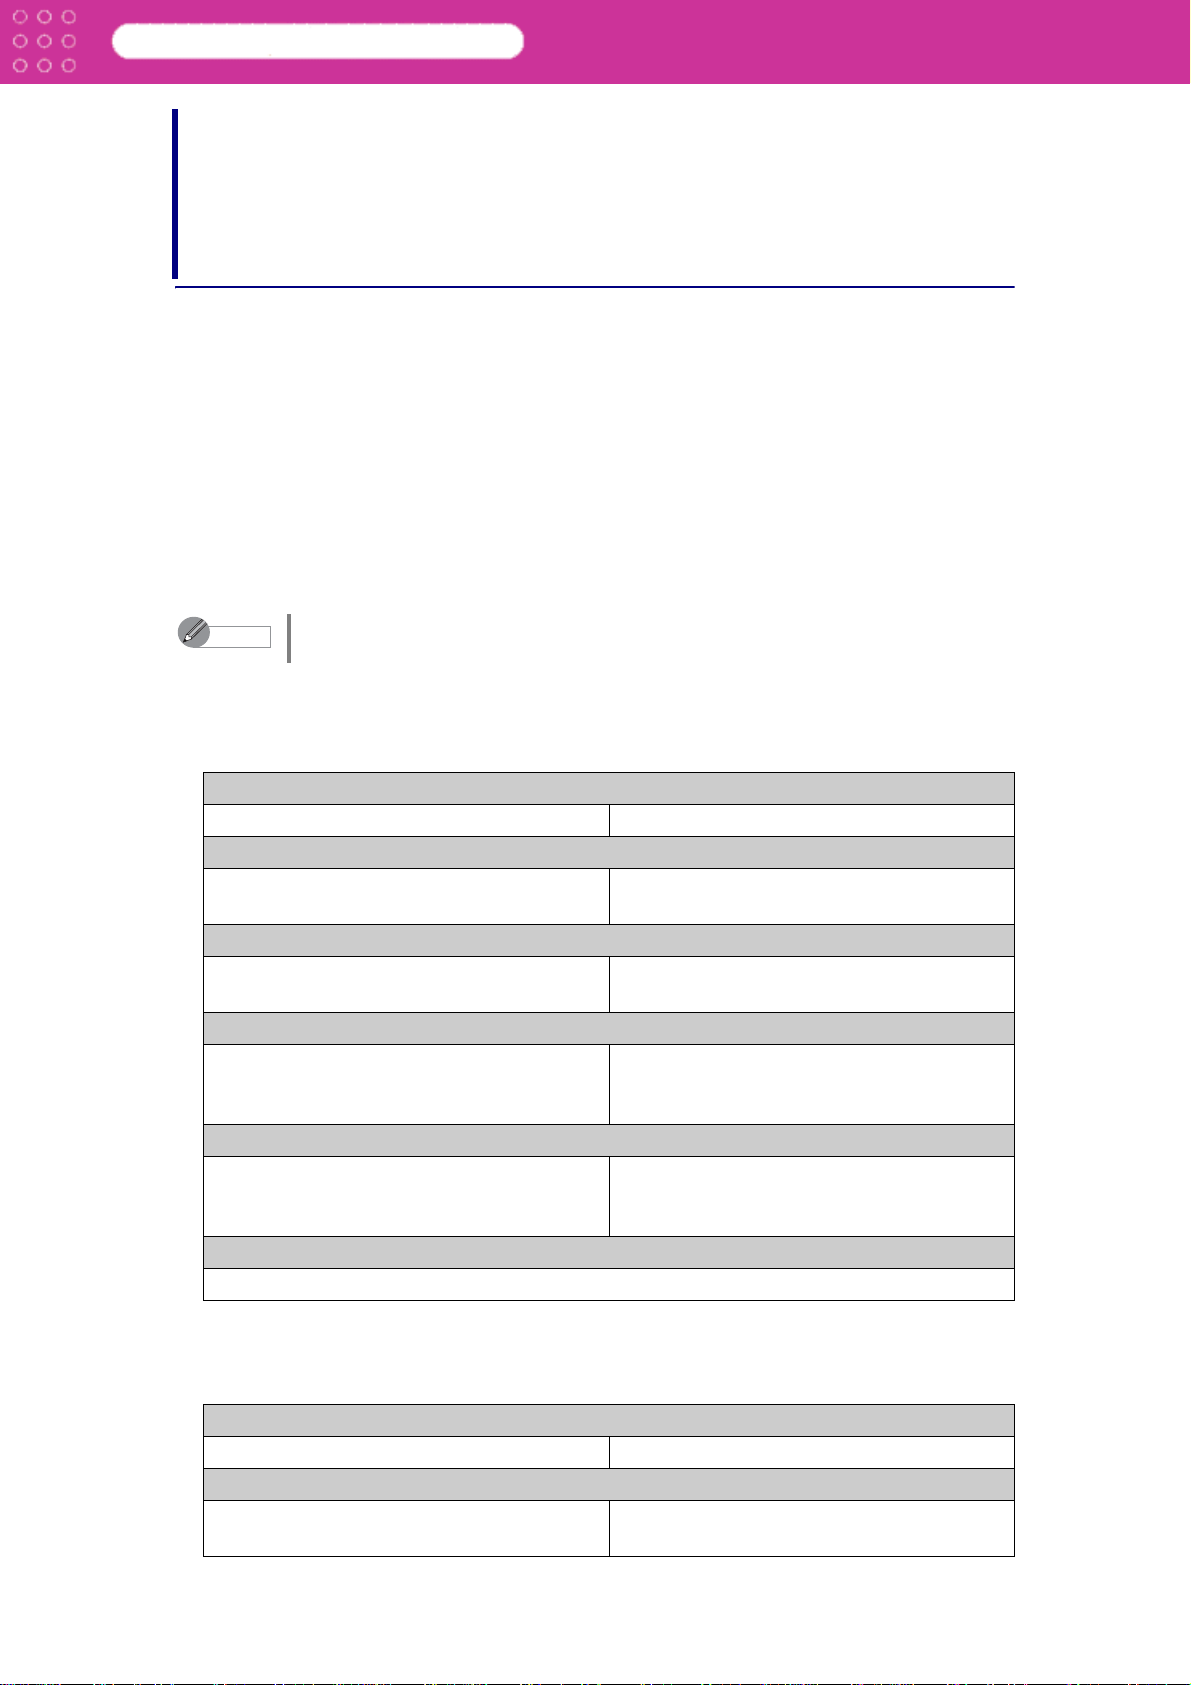
Compatible OS Version
Mac OS (9.1 to 9.2.2, 10.1 to 10.3)
Chapter 1 Installing Print Plug-In
Note
System
Compatible Photoshop versions may differ by Mac OS version.
With Mac OS (10.1 to 10.3)
Photoshop Version
Photoshop CS/CS2 Photoshop 7.0*
CPU
Computer with Power PC G3, G4, or G5 Computer with Power PC G3, G4 or G4
Available Memory
192MB (CS)/320MB (CS2) or more
(384MB or more recommended)
Available Space on Harddisk
750MB (CS)/950MB (CS2) or more
(A large amount of space on the virtual disk
is recommended)
Display/Video Card
• Support of screen resolution of
1,024x768 or more
• Color display of 16bit or more
Other
CD-ROM Drive
Operation in Mac OS X Classic is not guaranteed.
1
dual processor
128MB or more (192MB or more
recommended
550MB or more (A large amount of space
on the virtual disk is recommended)
• Support of screen resolution of 800x600
or more
• Color display of 16bit or more
*1: May be partially incompatible in some cases.
With Mac OS (9.1 to 9.2.2)
Photoshop Version
Photoshop 7.0 Photoshop 6.0
CPU
Computer with Power PC G3, G4 or G4
dual processor
Computer with Power PC G3 or G4
1-1
Page 6

Print Plug-In for Photoshop
Available Memory
128MB or more (192MB or more
recommended)
Available Space on Hard Disk
550MB or more (A large amount of space
on the virtual disk is recommended)
Display/Video Card
• Support of screen resolution of 800x600
or more
• Color display of 16bit or more
Other
CD-ROM Drive
Software needed for Print Plug-In Installation
Photoshop, Canon imagePROGRAF Printer Driver 2005 (referred to below as
imagePROGRAF printer driver)
Chapter 1 Installing Print Plug-In
64MB or more (96MB or more
recommended)
130MB or more (A large amount of space
on the virtual disk is recommended)
Support of screen resolution of 800x600 or
more
1-2
Page 7
Print Plug-In for Photoshop
Chapter 1 Installing Print Plug-In
Installation Procedures
The procedures to install Print Plug-In are as follows.
1. Close Photoshop.
2. Insert the User Software CD-ROM into the CD-ROM drive.
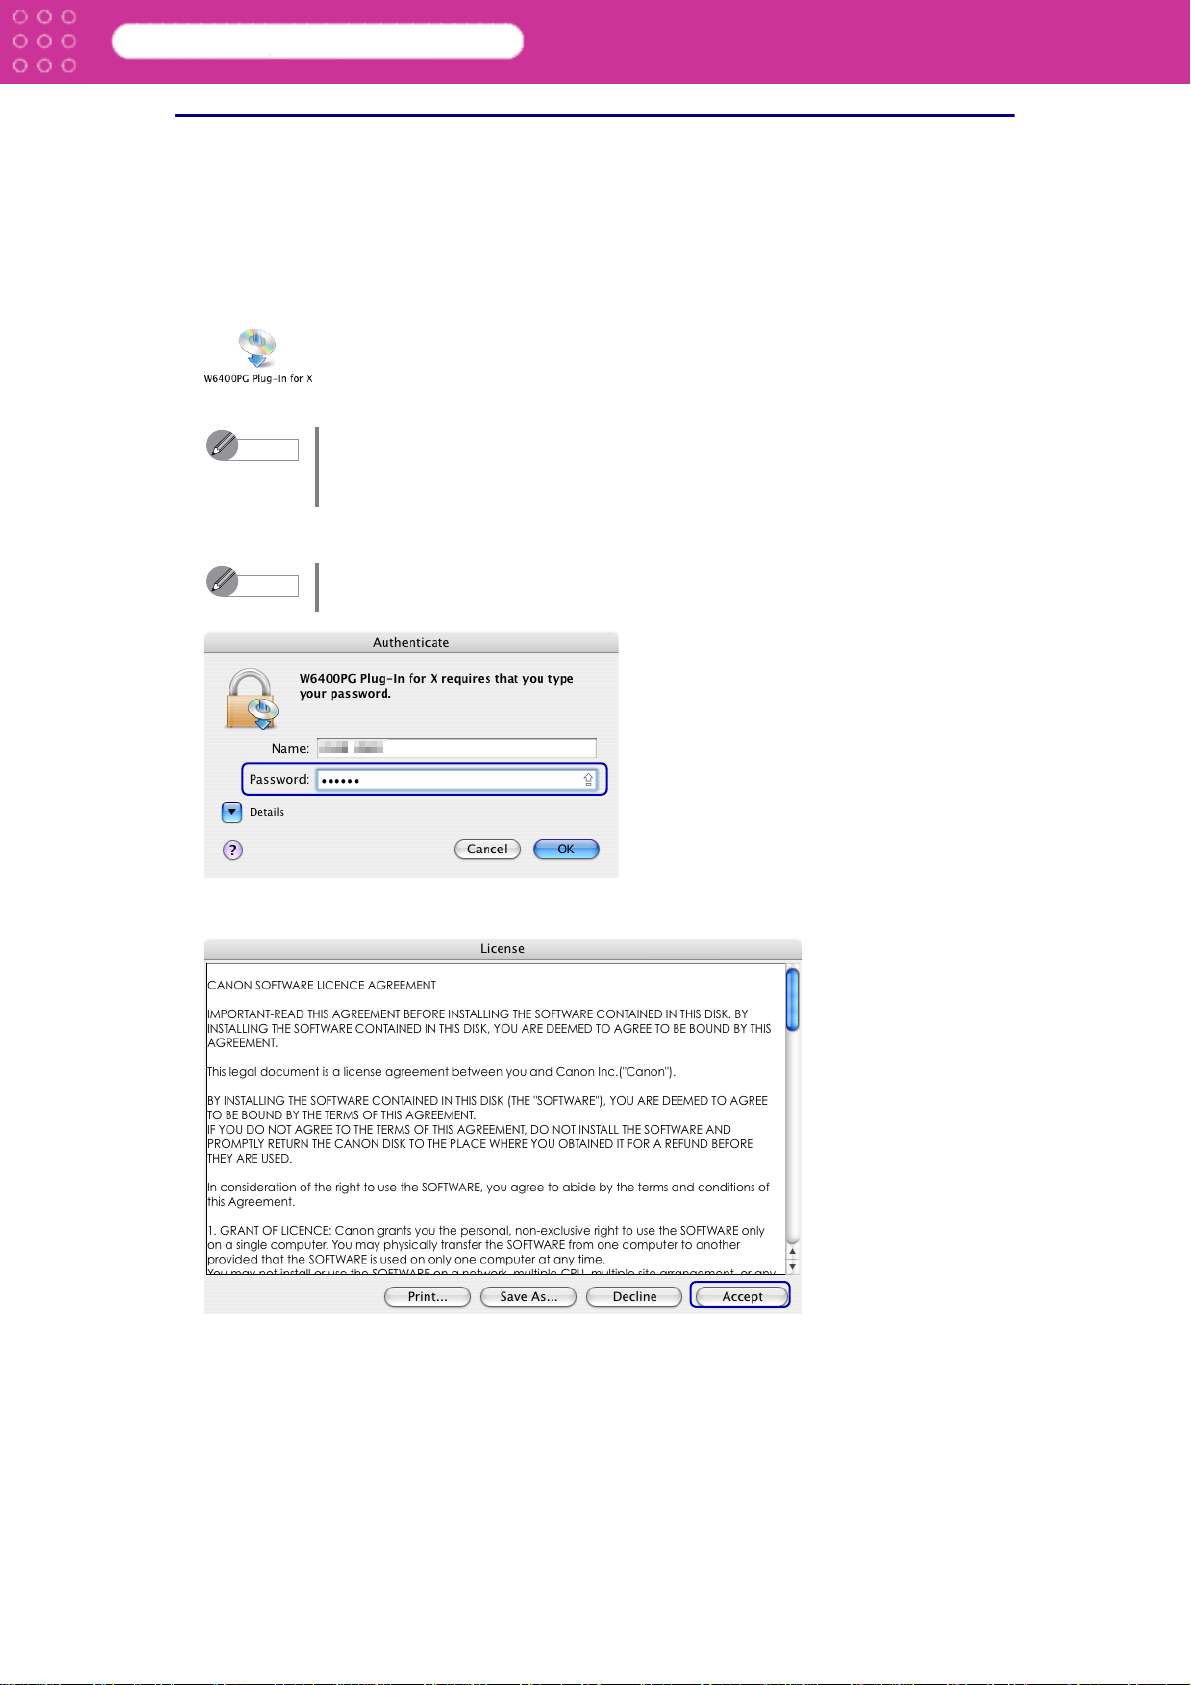
3. Click on the W6400PG Plugin for X icon in the Plug-in: OSX (or OS9) folder in the User
Software CD-ROM.
Note
4. For Mac OS X, input the Administrator name and password and click OK.
Note
5. After you have read the software User Licensing Agreement, click Accept.
The W6400PG icon is the name of the printer you are using.
The “X” icon is the OS version you are using. Select the icon for the relevant
version.
With Mac OS 9, go to step 5.
1-3
Page 8
Print Plug-In for Photoshop
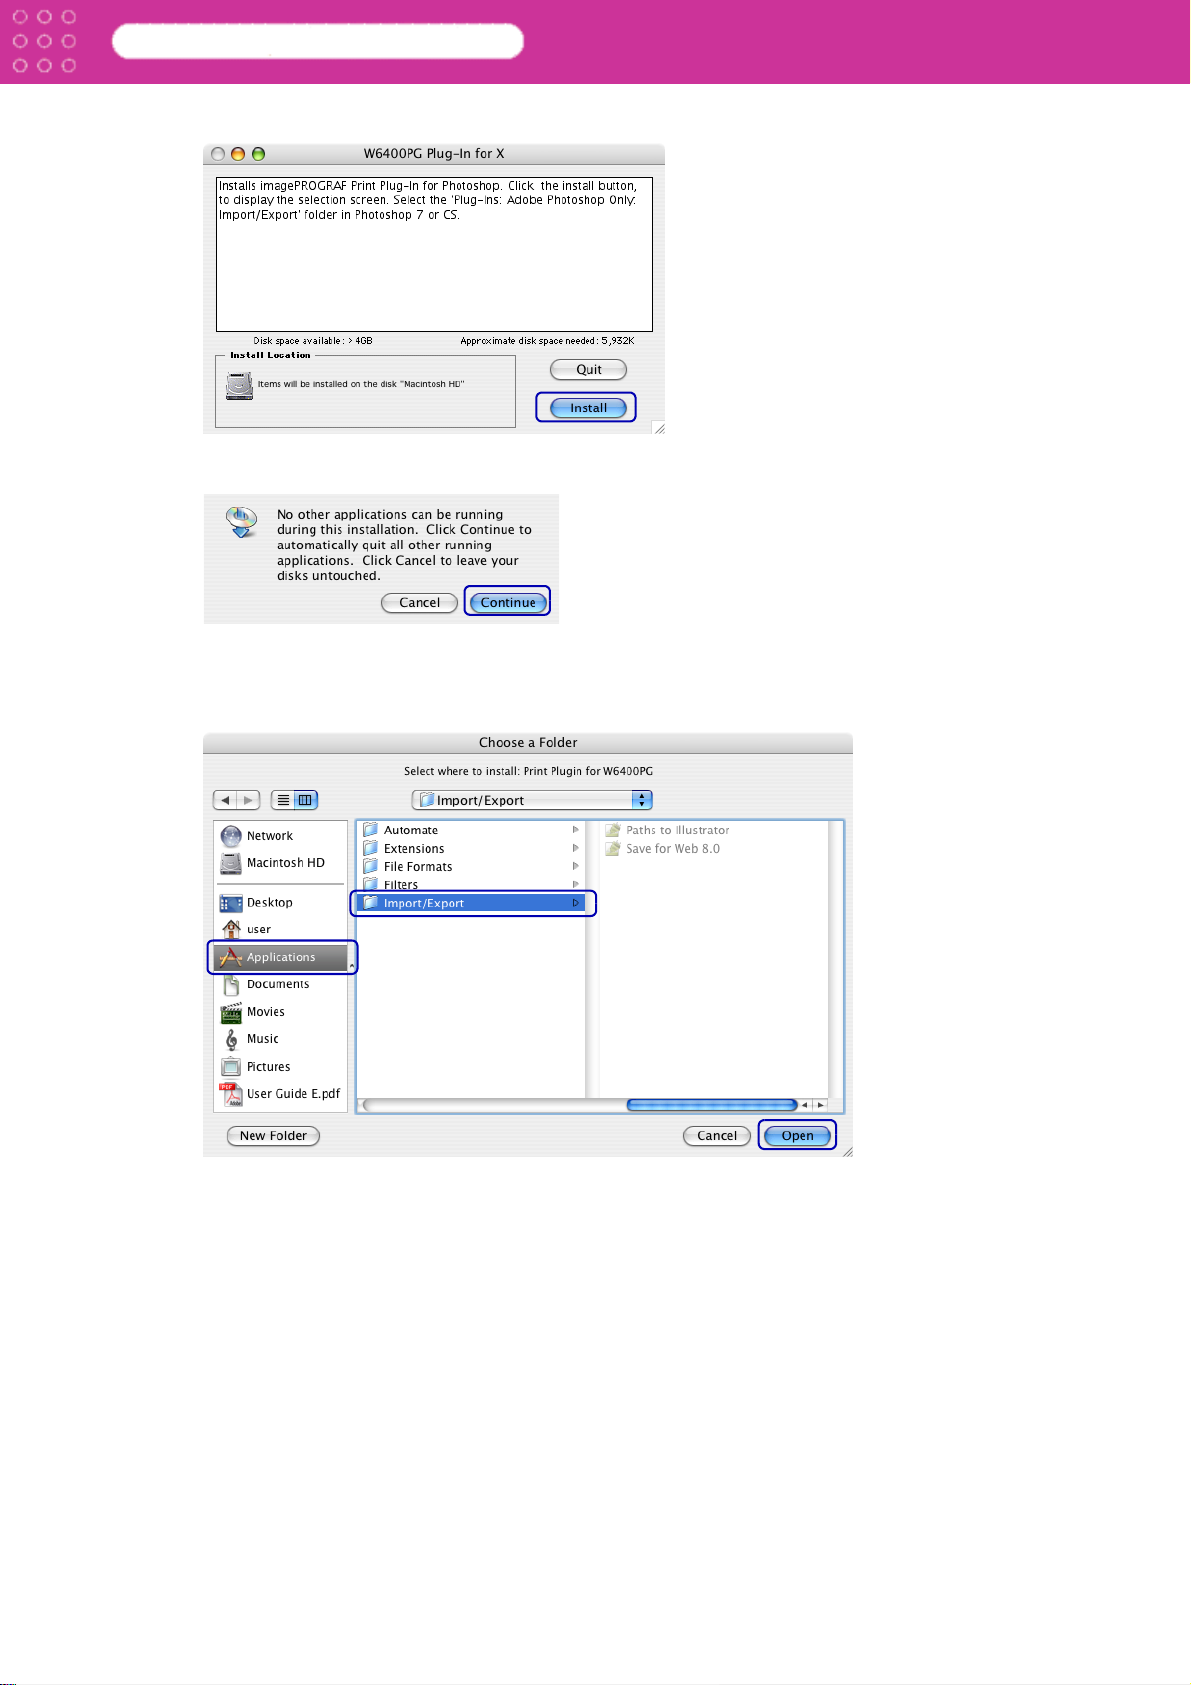
6. Click the Install button.
7. To quit another application, click on Continue.
Chapter 1 Installing Print Plug-In
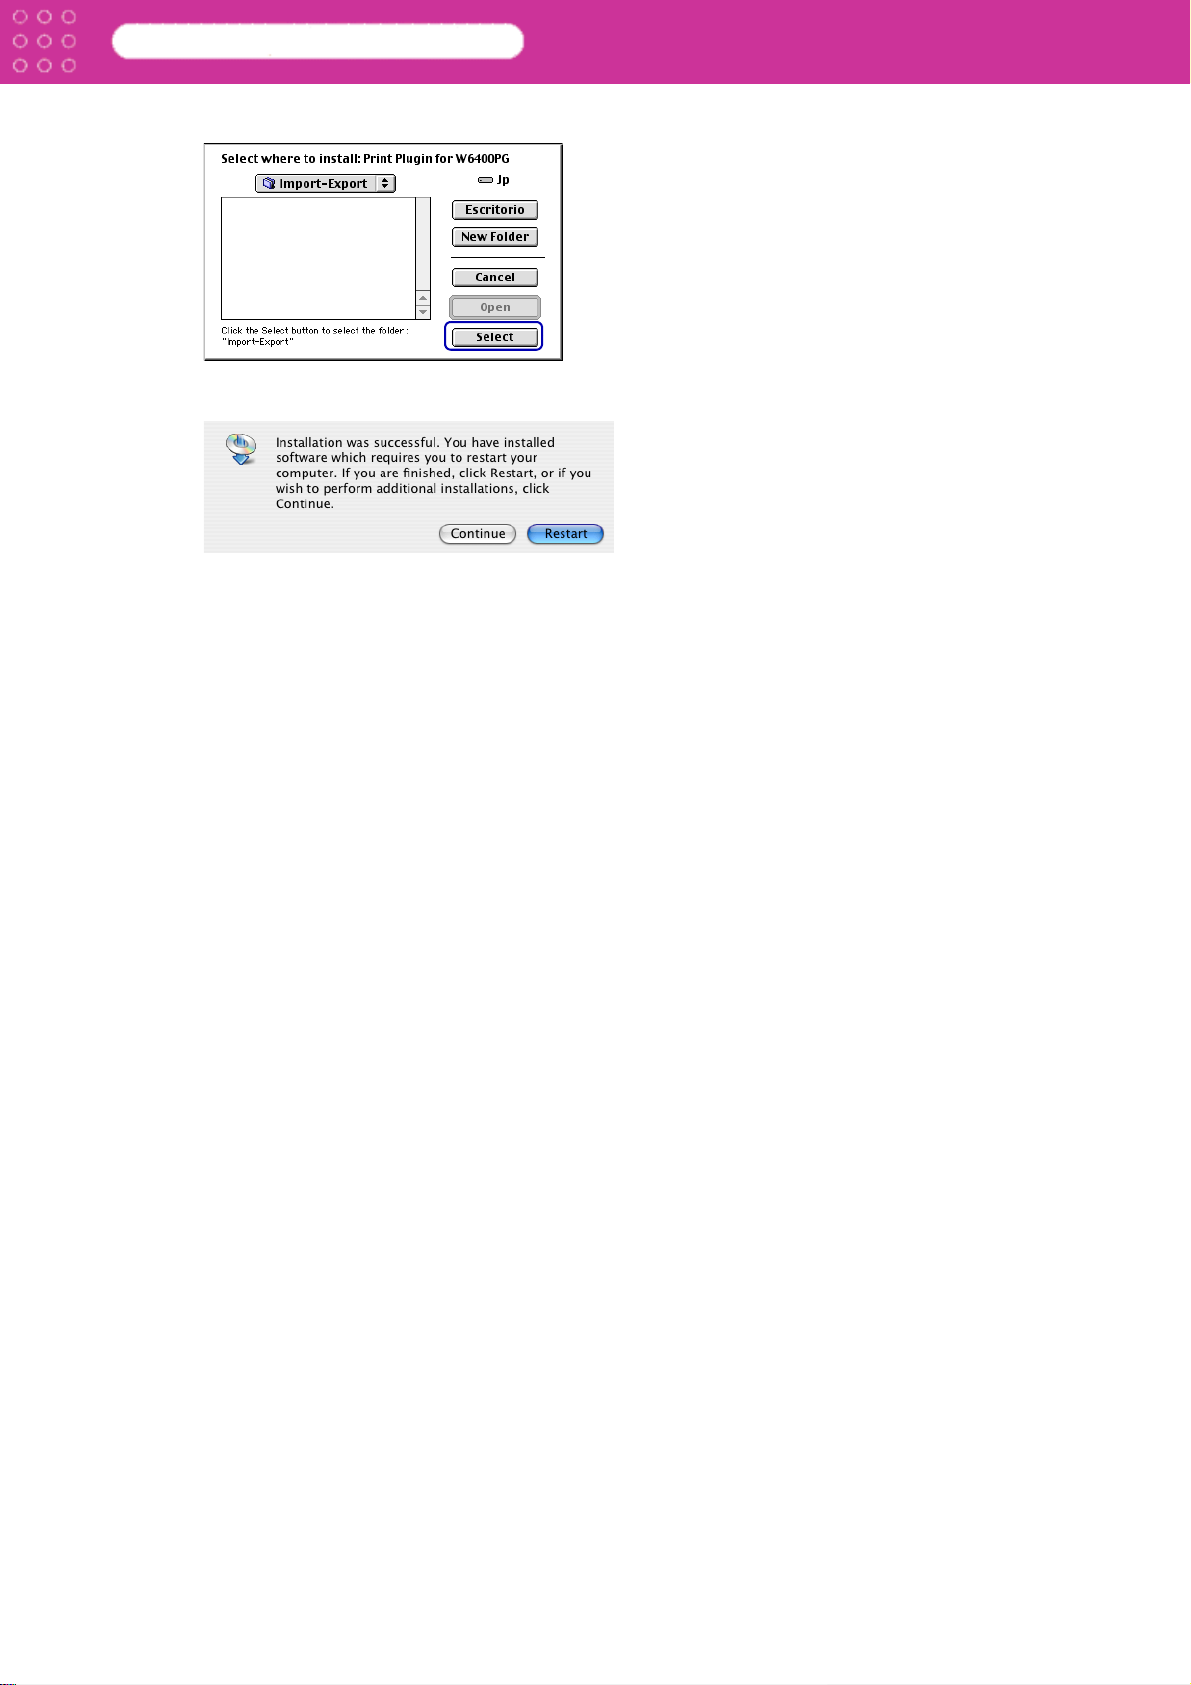
8. Select Applications:Photoshop:Plug-Ins:Adobe Photoshop Only:Import/Export folder,
and click the Open button.
Mac OS X
1-4
Page 9
Print Plug-In for Photoshop
Mac OS 9
9. Click the Restart button.
The Print Plug-In installation is complete.
10.Remove the User Software CD-ROM from the CD-ROM drive.
Chapter 1 Installing Print Plug-In
1-5
Page 10
Print Plug-In for Photoshop
Chapter 1 Installing Print Plug-In
Starting the Print Plug-In
The procedures to start the Print Plug-In are as follows.
1. Start Photoshop.
2. Open the RGB color image that you wish to print.
3. If required, select the print range.
Note
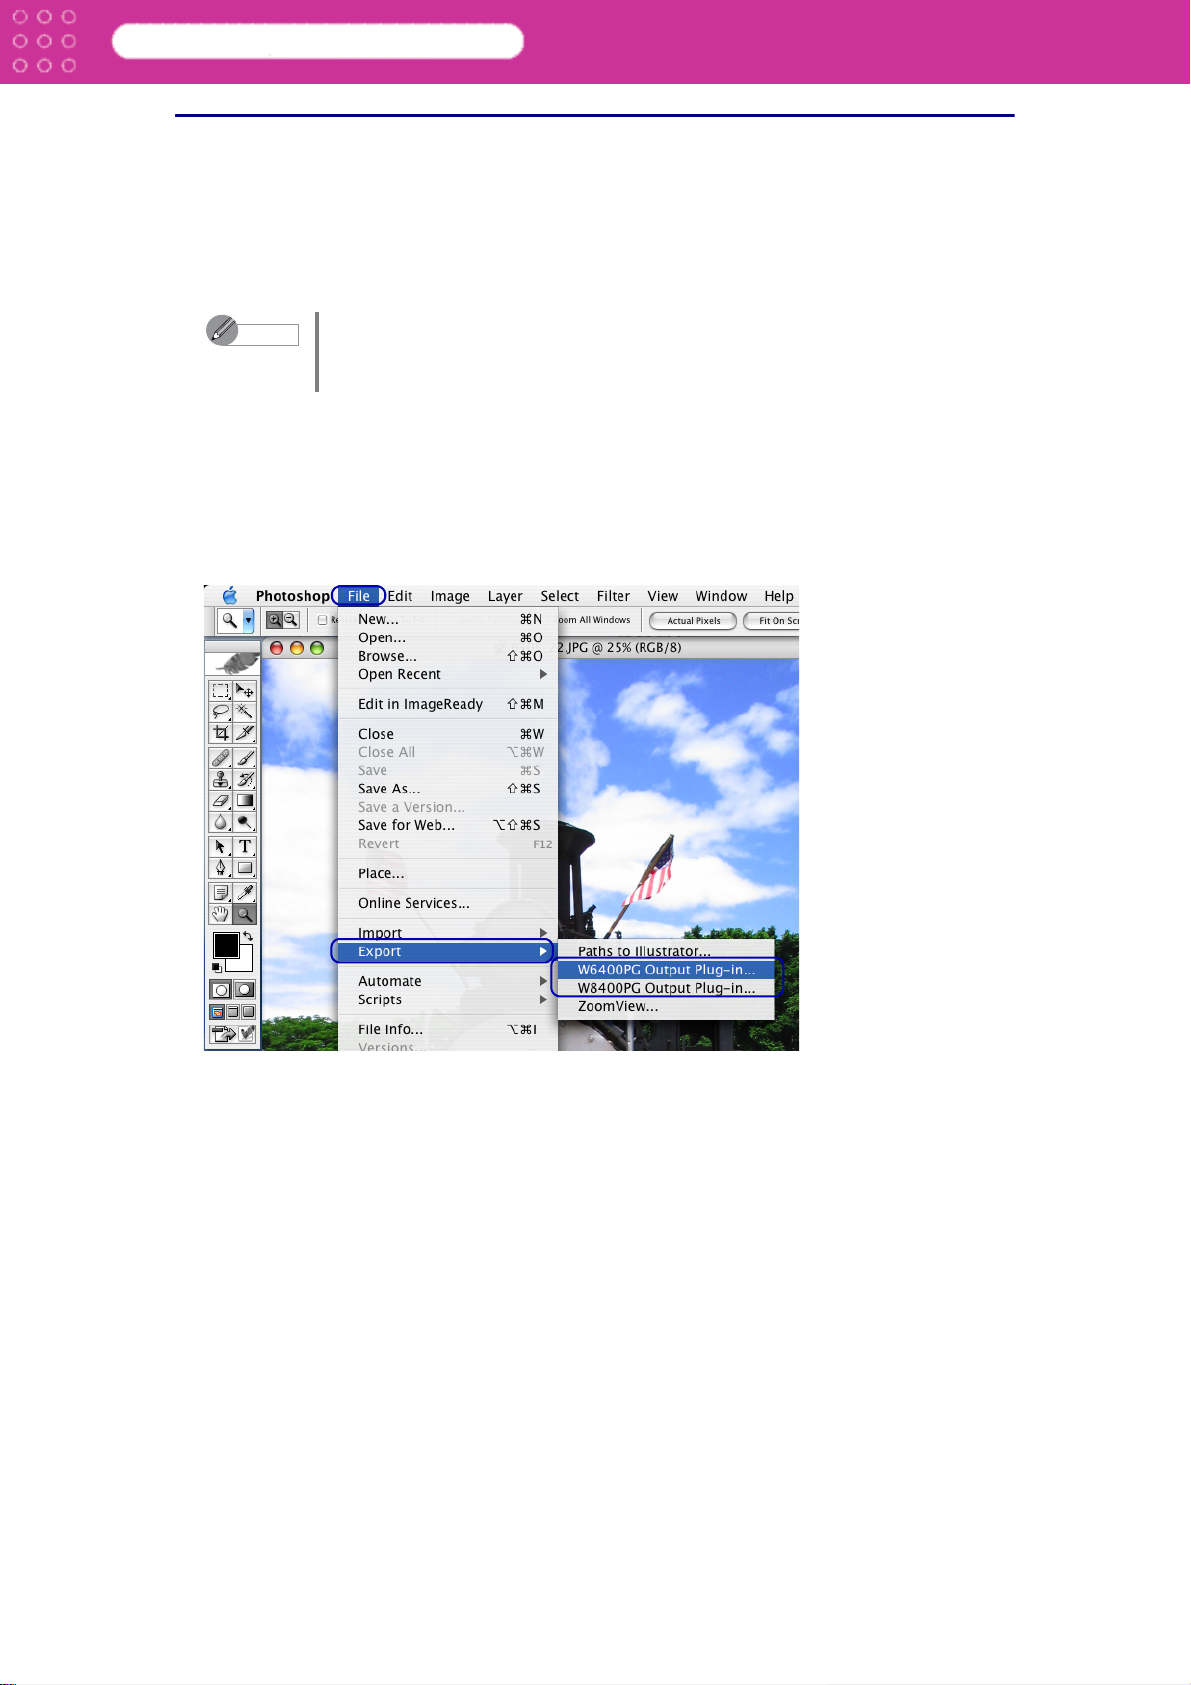
4. Select Export (or Data Export) from the File menu and then select the output plug-in that
matches your printer.
Output plug-ins you can select are as follows.
W6400PG Output Plug-in
W8400PG Output Plug-in
W2200 Output Plug-in
Images for use with Print Plug-In are not more than 30,000 pixels in width
and height. Reduce the selection range or reduce the image with processing
for images over 30,000 pixels in width and height and then attempt step 3.
1-6
Page 11
Print Plug-In for Photoshop
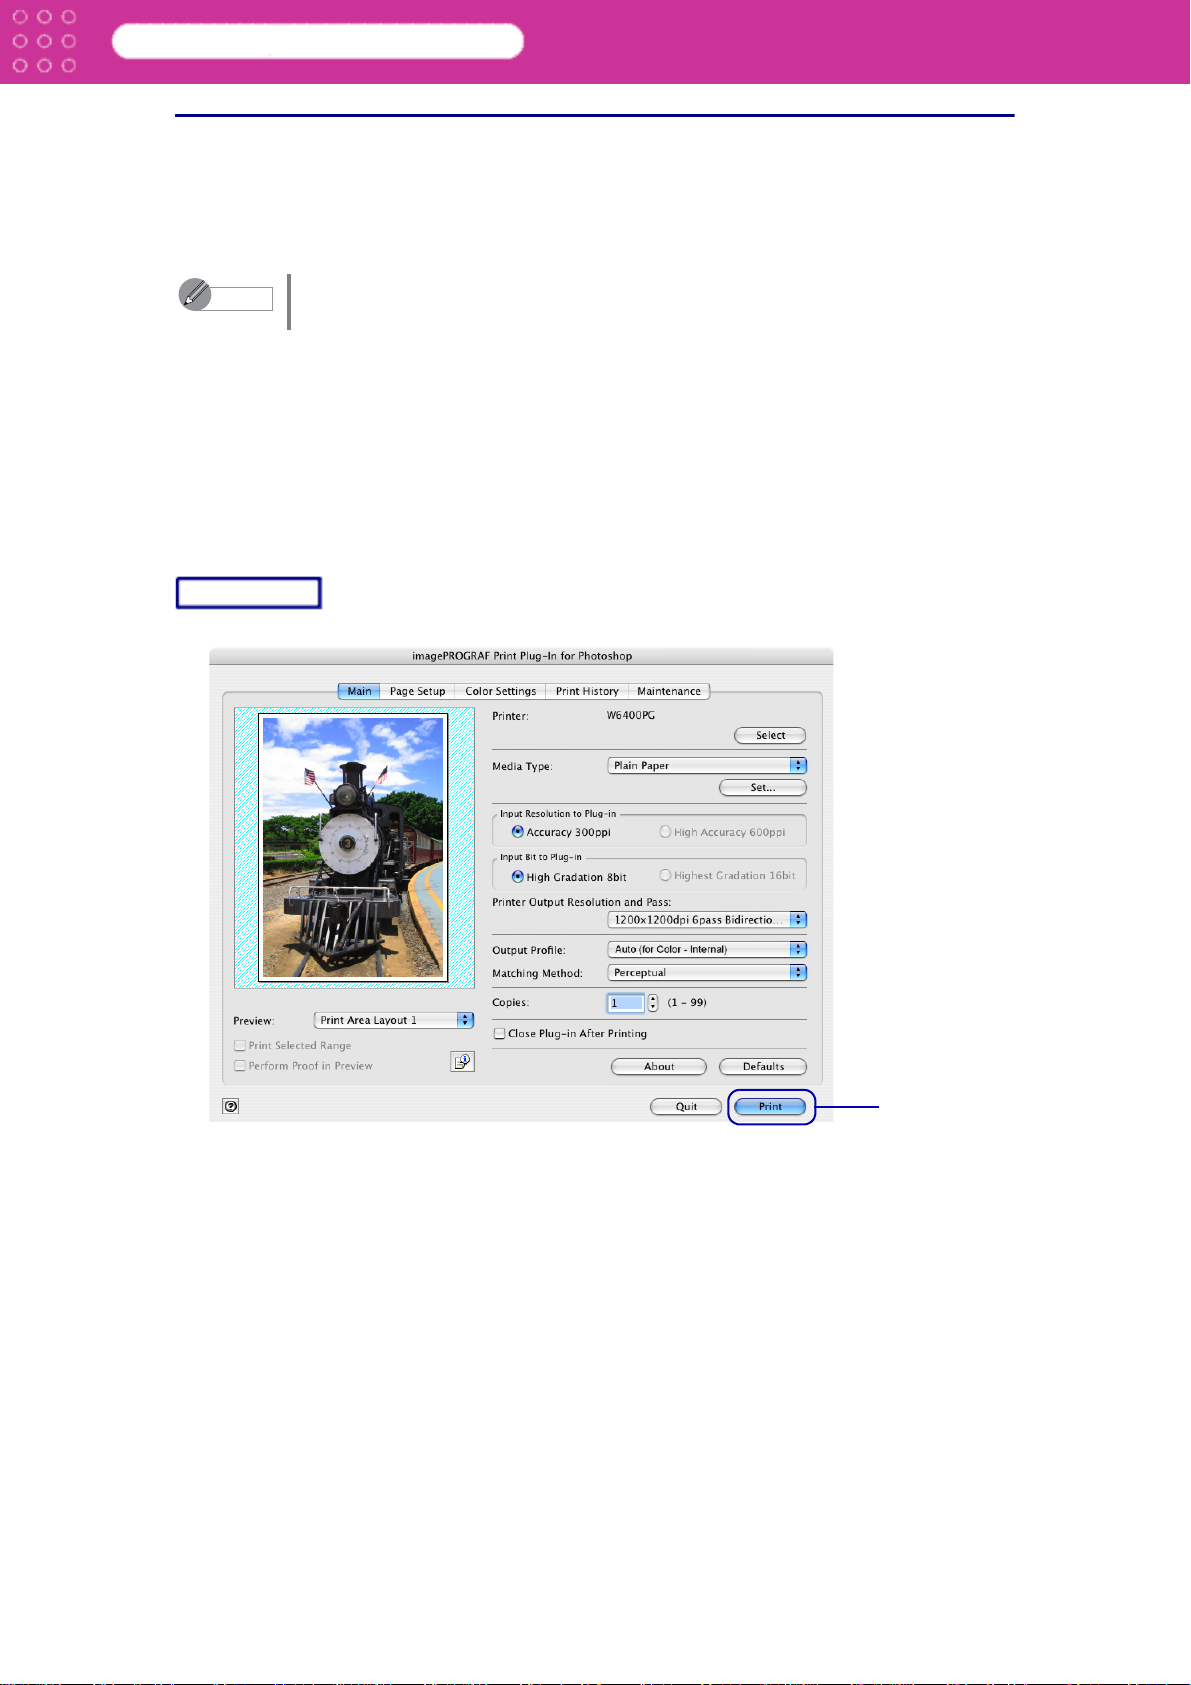
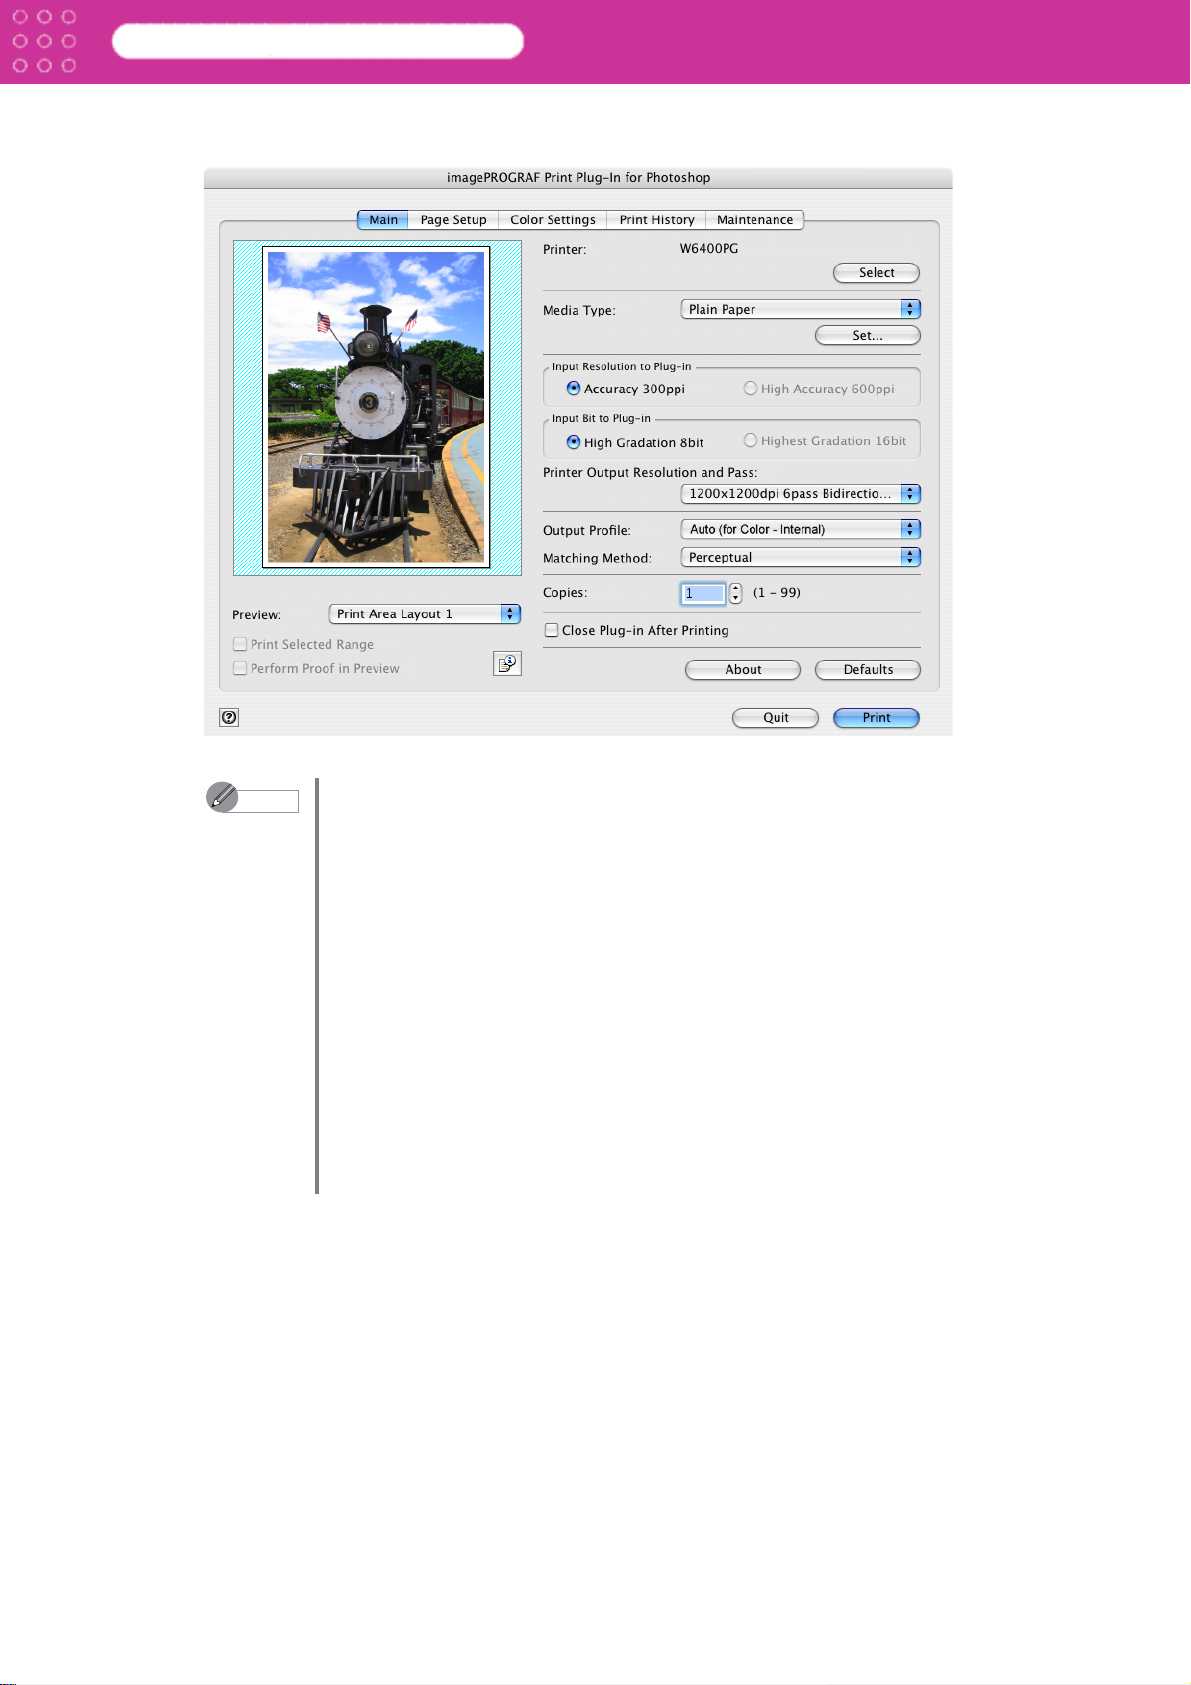
The imagePROGRAF Print Plug-In for Photoshop window (known below as the Plug-In
window) is displayed.
Chapter 1 Installing Print Plug-In
Note
• If the message below is displayed but the Print Plug-In window is not
displayed, install the newest imagePROGRAF printer driver and then
attempt step 3.
Version 2.41 or later of the W6400PG GARO printer driver must be
installed. Install the latest driver.
(The W6400PG portion of the above message will reflect your printer
name.)
• If the following message is displayed, but the Print Plug-In window is not
displayed, use Print Plug-In with Mac OS 9.1 or higher.
You cannot use this plug-in in this environment. This plug-in requires
Mac OS 9.1 or higher.
• If the following message is displayed, but the Print Plug-In window is not
displayed, open only one Photoshop.
Cannot start plug-in when Photoshop is open multiple times.
• If the message below is displayed but the Print Plug-In window is not
displayed, convert the image to RGB and then attempt step 3.
Set the image color space to RGB color.
1-7
Page 12

Print Plug-In for Photoshop
Chapter 1 Installing Print Plug-In
Uninstall Procedures
The procedures for uninstalling the Print Plug-In are as follows.
1. Close Photoshop.
2. In Finder, display the Print Plugin for W6400PG folder inside the Applications:
Photoshop:Plug-Ins:Adobe Photoshop Import:Export folder.
Note
3. Delete the Print Plugin for W6400PG folder.
Note
• W6400PG is the name of your printer.
• Normally, the Photoshop folder is located inside Macintosh HD:
Applications.
• W6400PG is the name of your printer.
1-8
Page 13

Print Plug-In for Photoshop
Chapter 2 Functions of Print Plug-In
Chapter 2 Functions of Print Plug-In
The explanation below is on the Print Plug-In screen content.
Print Plug-In Screen Content
The Print Plug-In window is composed of five sheets, and you can perform printing related
settings on each sheet. The explanation of the Print Plug-In window is broken up into the
following sections.
“Five-Sheet Joint Display” (p.2-1)
“Main Sheet” (p.2-5)
“Page Setup Sheet” (p.2-8)
“Color Settings Sheet” (p.2-11)
“Print History Sheet” (p.2-12)
“Maintenance Sheet (displayed only with W8400PG and W6400PG)” (p.2-13)
“Print History Details Dialog Box” (p.2-14)
■ Five-Sheet Joint Display
The five sheets of the Print Plug-In window are displayed in the common area illustrated below.
Preview Area
Sheet Selection Area
Button Area
2-1
Page 14
Print Plug-In for Photoshop
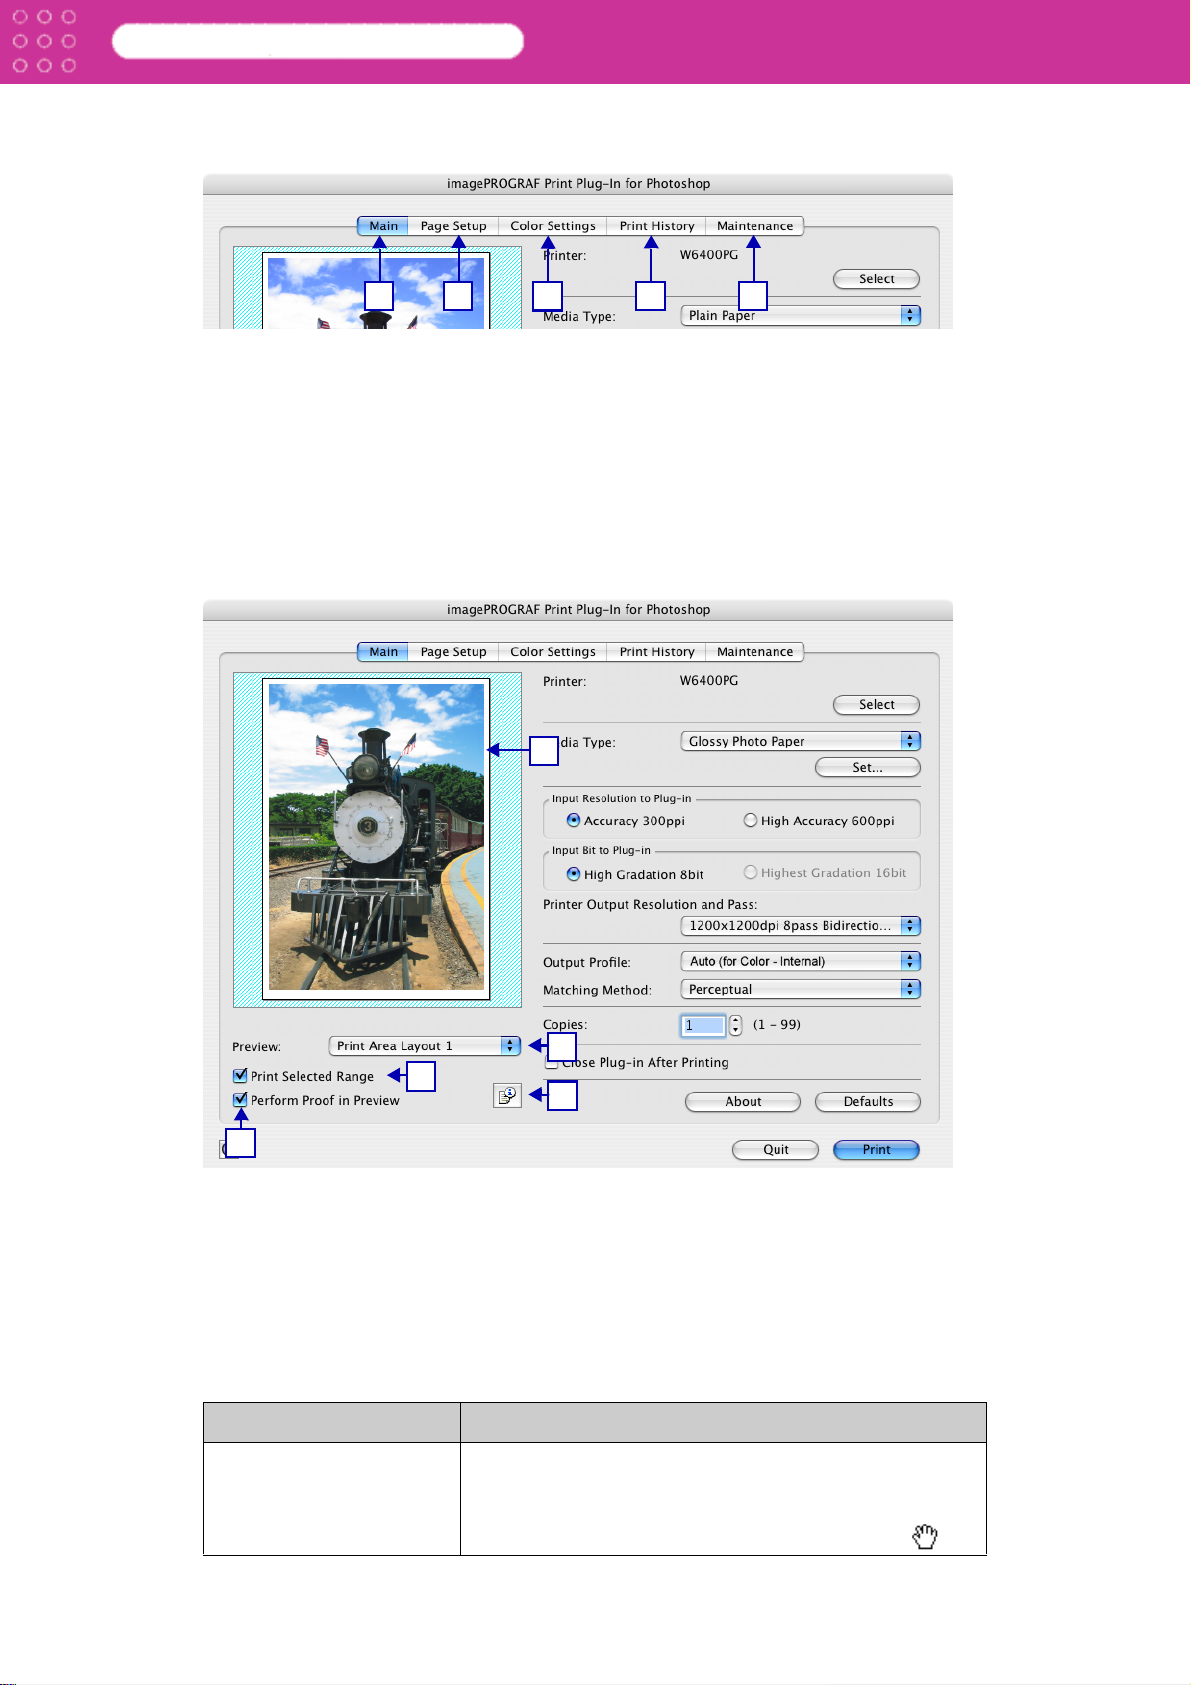
Sheet Selection Area
The tabs used to switch between each sheet on the Print Plug-In window are displayed.
Chapter 2 Functions of Print Plug-In
1
When you select a tab, a sheet is displayed. The settings available on each sheet are as
follows.
1 Main Sheet (p.2-5)
2 Page Setup Sheet (p.2-8)
3 Color Settings Sheet (p.2-11)
4 Print History Sheet (p.2-12)
5 Maintenance Sheet (displayed only with W8400PG and W6400PG) (p.2-13)
Preview Area
You can check the settings you made on the image in this area.
2
3
1
4
5
2
3
4
1 Preview Display
The image displays as a preview according to the settings you select in Preview.
Refer to “Utilize Three Types of Previews” (p.3-1)
2 Preview
Select the preview display method.
Refer to “Utilize Three Types of Previews” (p.3-1) for more information on the preview.
The details of Preview you have set is saved even after closing Print Plug-In.
Settings Details
Print Area Layout 1 This is the layout matching the Media Size you have set,
and only the valid print range is displayed.
• You can change the image print position when you
drag the image while the cursor is displayed as .
5
2-2
Page 15
Print Plug-In for Photoshop
Settings Details
Print Area Layout 2 This is the layout matching the Media Size you have set,
Image The entire image is displayed.
3 Print Selected Range
Place a checkmark here to only print the selected range.
Chapter 2 Functions of Print Plug-In
and both the valid print range and the area outside of that
range are displayed.
• You can change the image print position when you
drag the image while the cursor is displayed as .
• You can select the print range when you drag the
image while the cursor is displayed as .
• When you click the image while the cursor is displayed
as , the selected area is deselected.
Note
4 Perform Proof in Preview
Place a checkmark here to simulate the colors of the output product in the preview.
Note
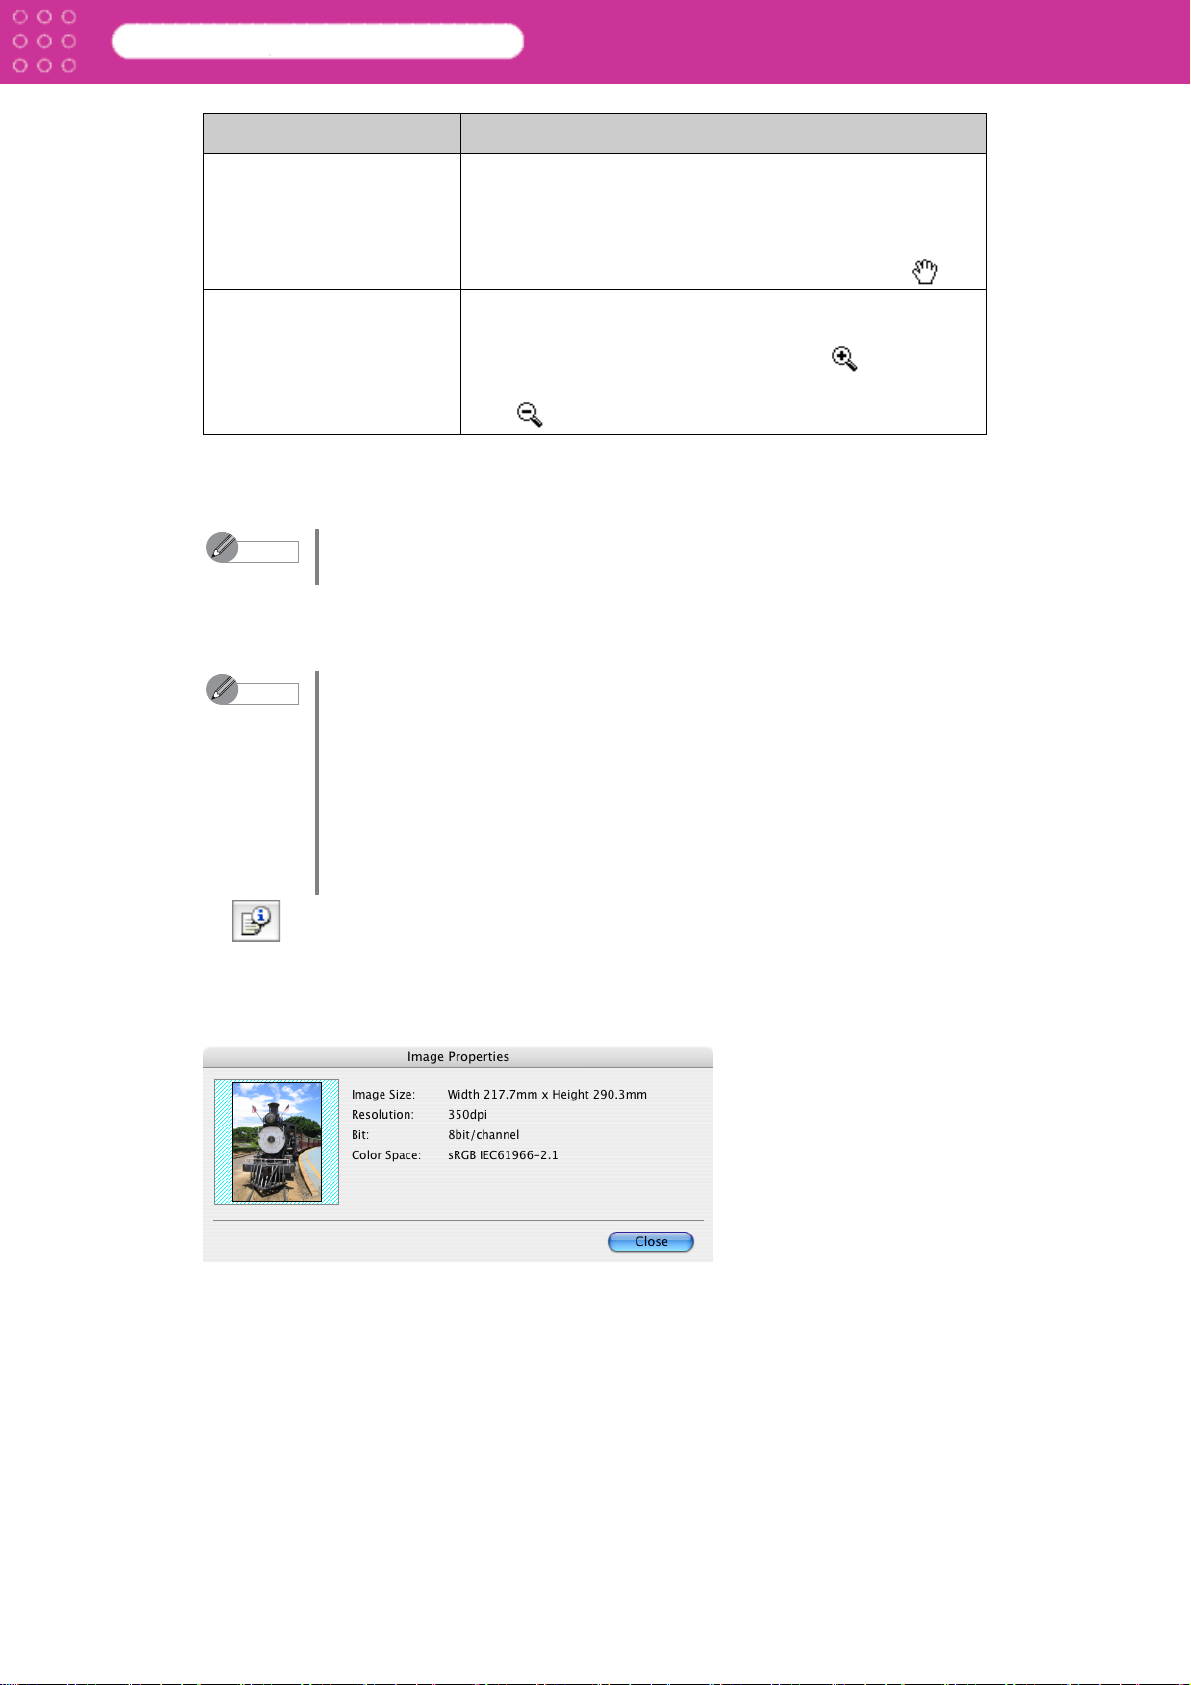
5
When you click this button to open the Image Properties dialog box, where the image size,
the resolution, the pass number and the color space information of the image imported to
Print Plug-In are displayed.
Click the Close button to return to Print Plug-In.
When you select Image in the Preview, then select a portion of the image on
the preview display, this becomes valid.
• When you have selected Auto (for Color - Internal) in Output Profile,
this becomes active for a portion of the media, the resolution and the pass
number. In addition, when you have selected ICC Profile in Output
Profile, this is always active.
• The actual color balance of the print product and the simulation product
may differ with some environments and conditions. In addition, when you
have selected an ICC Profile with Output Profile and it is not compatible
with the printer or media that you are using, the color balance of the actual
print product will differ.
2-3
Page 16

Print Plug-In for Photoshop
Button Area
This contains the buttons Print, Quit and .
Chapter 2 Functions of Print Plug-In
2 3
1
1 Button
Click this button to display the Print Plug-In Help file.
2 Quit Button
Click this button to close the Print Plug-In window and return to Photoshop.
3Print Button
Click this button to begin printing.
Note
When you place a checkmark in Close Plug-In after Printing in the Main
sheet, you will return to Photoshop after closing the Print Plug-In window
after printing.
2-4
Page 17
Print Plug-In for Photoshop
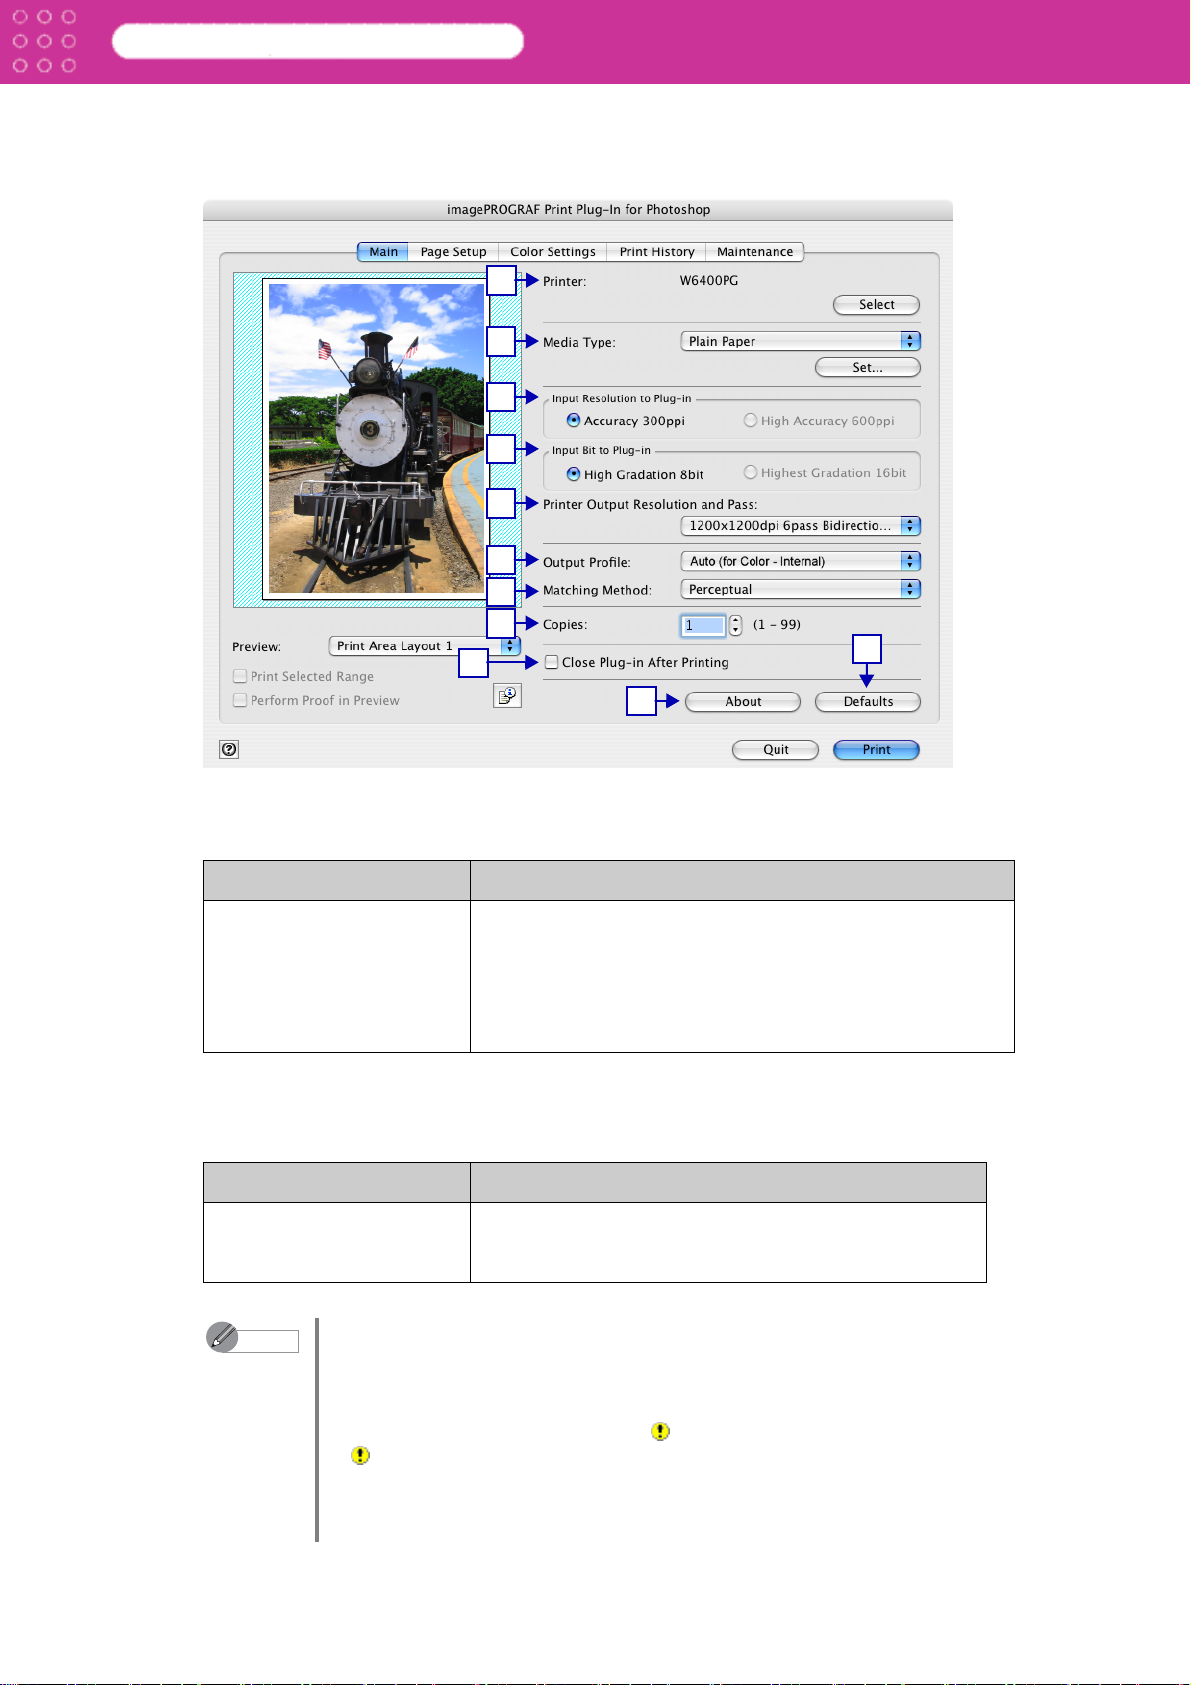
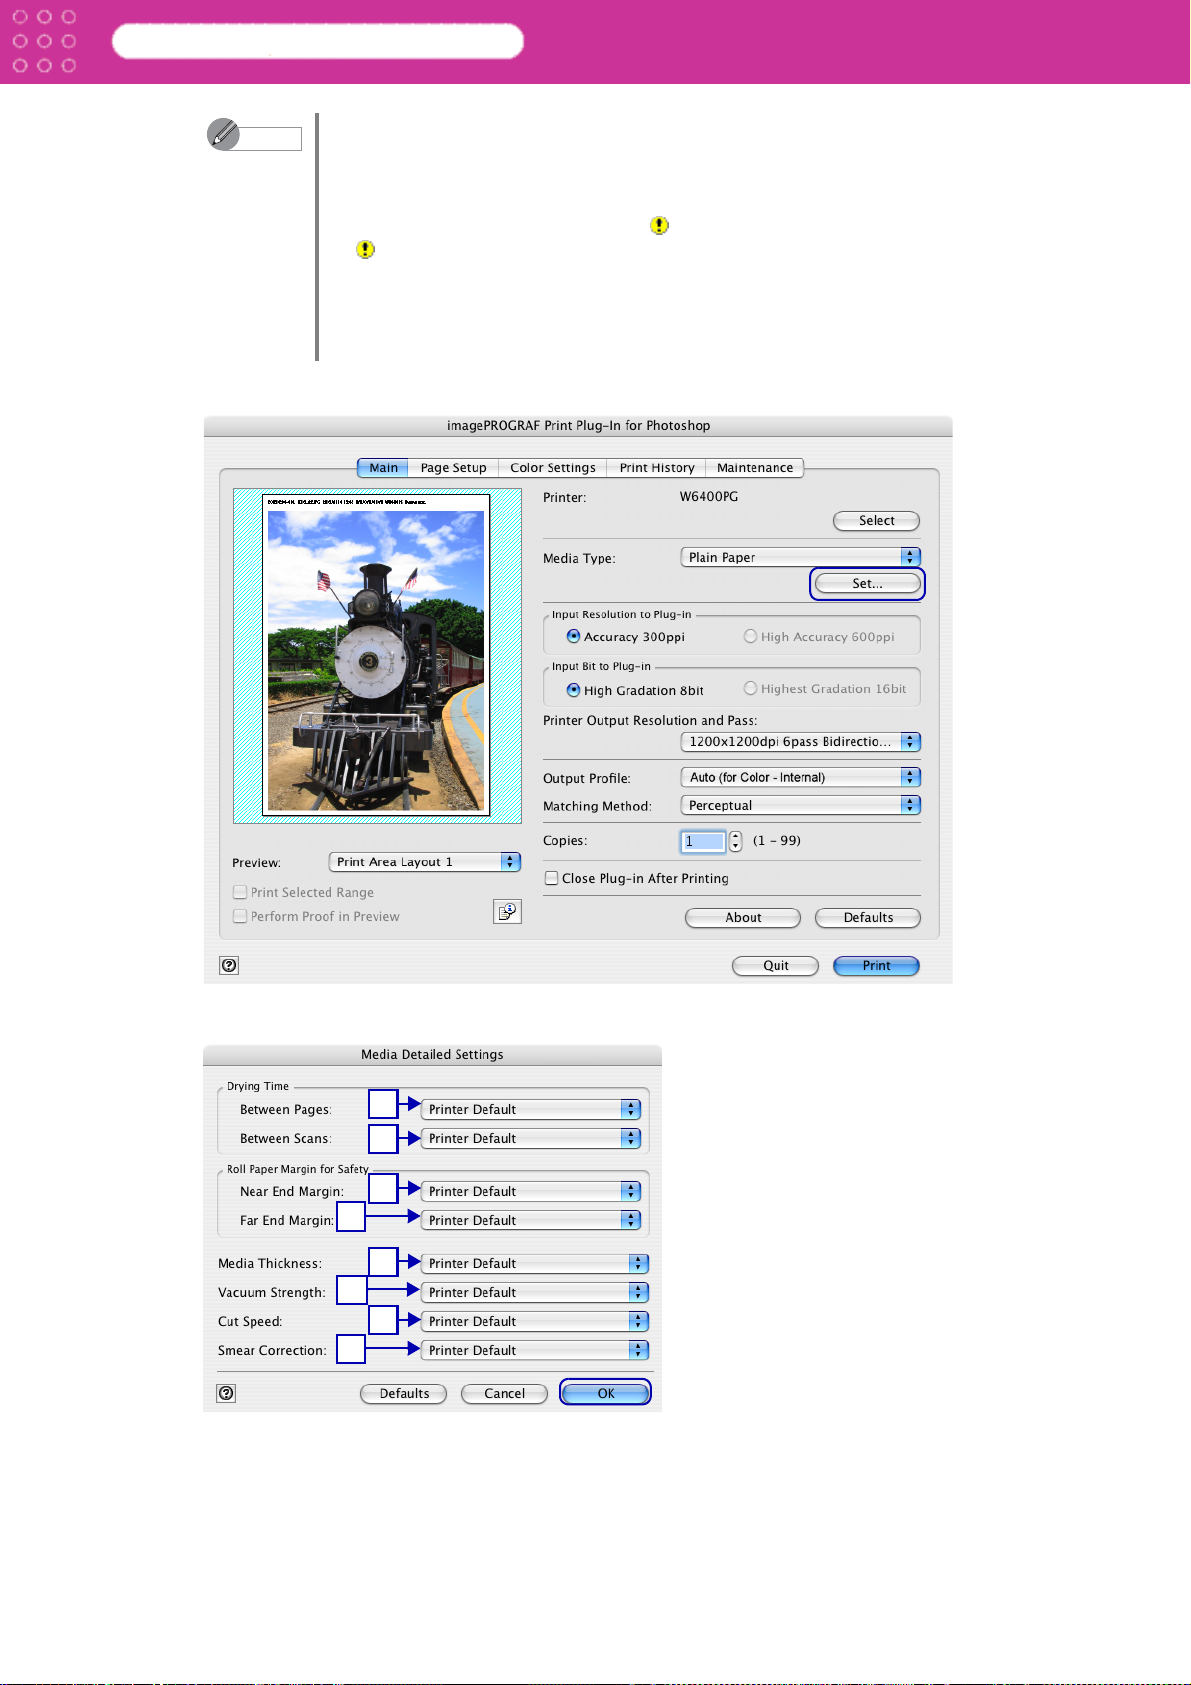
■ Main Sheet
You can use this sheet to perform basic settings such as selecting a printer, setting the
media type, or adjusting image quality.
Chapter 2 Functions of Print Plug-In
1
2
3
4
5
6
7
8
9
11
10
1Printer
The printer types are displayed.
Setting Details
Select button Click this button to display the Select Printer dialog box.
When you click the OK button after selecting the printer in
the Select Printer dialog box, you can change the printer
that corresponds with Print Plug-In.
• The details of Printer you have set is saved even when
you close Print Plug-In.
2 Media Type
This allows you to select the media type.
Refer to “Customize Media Settings” (p.3-34) for more information.
Setting Details
Set button
(Displays on the W8400PG
and W6400PG)
Click this button to display the Media Detailed Settings
dialog box, where you can set the ink Drying Time and
Roll Paper Margin for Safety by media type.
Note
• The media that you can select differs by printer.
• Always select media type that is actually set in the printer. When the media
you chose is different from the media set in the printer, you may not
receive the desired print results.
• With W8400PG and W6400PG, a may be displayed as a choice.
indicates that the media is inappropriate for the currently selected ink
type. Refer to “Changing the Ink Type” (p.2-14) to change the ink type.
• The details of Media Type you have set is saved despite closing Print
Plug-In.
2-5
Page 18
Print Plug-In for Photoshop
3 Input Resolution to Plug-in
You can select the resolution to process the image with Print Plug-In.
The following settings are available for resolution.
Setting Details
Chapter 2 Functions of Print Plug-In
Accuracy
300ppi
High Accuracy
600ppi
Note
4 Input Bit to Plug-In
You can select the bit number to process with Print Plug-In.
The following settings are available for the input bit number.
Setting Details
High Gradation
8bit
Highest Gradation
16bit
Note
The details of Input Resolution to Plug-in to the Plug-In that you have set
is saved even when you close Print Plug-In.
The details of Input Bit to Plug-In that you have set is saved even when you
close Print Plug-In.
This processes images at an accurate resolution. This can control
print speed and memory capacity.
This processes images at a more accurate resolution. This setting
results in the best print quality, but this takes more time to print than
Accuracy 300ppi while also requiring more memory capacity.
• This may not be displayed depending on how you set Media Type.
This processes images with at 8bit/channel (24 bit).
This processes images with at 16bit/channel (48 bit).
• This may not be displayed depending on how you set Media
Type and Input Resolution to Plug-in.
5 Printer Output Resolution and Pass
You can select the print image output resolution and pass number.
The output resolution is the density of ink points contained in a printed image. The larger the
value is for this setting the more smooth the printed image will appear.
Pass number is the number of times the print head travels back and forth over one line of
print. The larger the value is for this setting, the more balanced and consistent the image will
appear.
Note
• The selectable fields may vary according to the Media Type, Input
Resolution to Plug-in and Input Bit to Plug-in settings.
• The details of Printer Output Resolution and Pass that you have set is
saved even when you close Print Plug-In.
2-6
Page 19
Print Plug-In for Photoshop
6 Output Profile
You can select the output profile.
The following settings are available for the output profile.
Setting Details
Auto (for Color - Internal) Performs the optimum color conversion from the input
Auto (for Monochrome Internal)
(Displays on the W8400PG
and W6400PG)
None (No Color Correction) You cannot perform color conversion with a plug-in. This
Other ICC Profiles This selects printer ICC profiles to be output to ICC
Chapter 2 Functions of Print Plug-In
image data color space information (sRGB, AdobeRGB),
media settings etc. You should normally select these
settings.
Performs the best color conversion to monochrome from
the input image data color space information (sRGB,
AdobeRGB), media settings etc.
is useful for creating an original ICC profile.
profiles saved in the OS standard folder. Use the color
space of the input data as well as the select ICC profile to
perform color conversion.
Note
7 Matching Method
You can select the processing method when performing color conversion.
The following settings are available for the matching method.
Setting Details
Perceptual This converts the image to an image with natural color
Saturation This converts the image to an image with heightened
Relative Colorimetric This converts the image with emphasis on color balance
Note
• The details of Output Profile that you have set is saved even when you
close Print Plug-In.
• Auto (for Monochrome - Internal) can only be selected for the
corresponding media types.
balance and gradation. This is useful for pictures.
color saturation. The color balance of pictures and
drawings may change. This is useful for graphs, charts
and business documents.
before the conversion or on visual color balance. This is
useful for pictures and drawings.
• When the Output Profile you have set is Auto (for Monochrome -
Internal) or None (No Color Correction), you cannot select a matching
method.
• The details of Matching Method that you have set is saved even when
you close Print Plug-In.
8 Copies
You can input the number of print copies in numerical characters.
Note
9 Close Plug-in After Printing
When you place a checkmark in this field, the Plug-In closes after printing is complete and
the screen returns to Photoshop.
• The maximum valuable is 99.
• You can change the numbers by clicking either ▲ or ▼.
• The details of Copies that you have set is saved even when you close
Print Plug-In.
2-7
Page 20
Print Plug-In for Photoshop
10 About Button
Click this button to display the Print Plug-In version information window. When you click the
OK button in the version information window, the screen returns to the Print Plug-In window.
11 Defaults Button
Click this button to return all of the settings on the Main sheet to their defaults.
Chapter 2 Functions of Print Plug-In
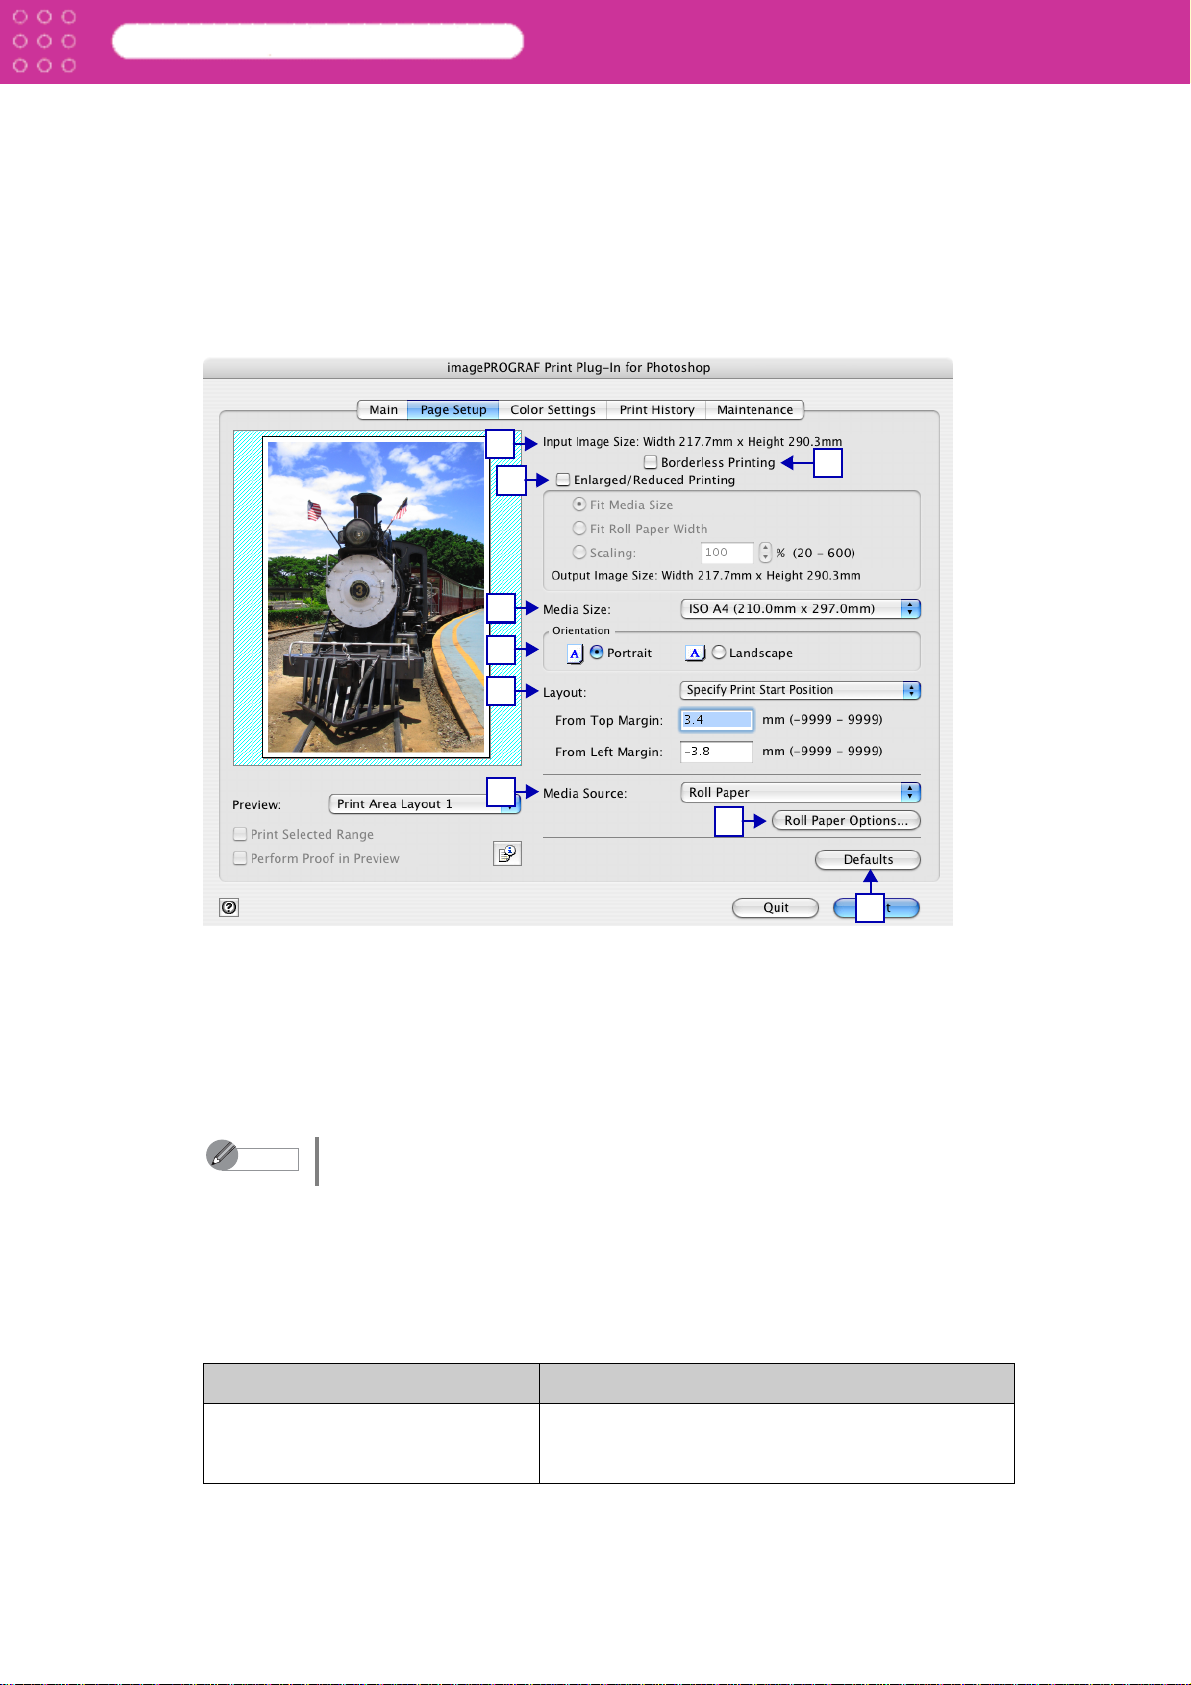
■ Page Setup Sheet
You can use this sheet to set the size of the image to be printed, the media size, and whether to
enlarge/reduce the image.
1
3
4
5
6
7
1 Input Image Size
The size of the image imported to Print Plug-In is displayed.
2
8
9
2 Borderless Printing (displayed only with W8400PG and W6400PG)
When you place a checkmark here, the Specify Roll Paper Width dialog box is displayed
and you can print an image without borders.
Refer to “Print with No Borders” (p.3-31) for more information about borderless printing.
Note
3 Enlarged/Reduced Printing
When you place a checkmark here, you can print enlarged/reduced images.
When printing an enlarged/reduced image, select the method for enlargement/reduction.
The image size sent to the printer is displayed matching the selected method in Output
Image Size.
The following settings are available for enlarged/reduced printing.
Setting Details
Fit Media Size This automatically enlarges/reduces the entire
You cannot select this if Cut Sheet is selected in Media Source.
image imported to Print Plug-In to match the export
media size when printing.
2-8
Page 21
Print Plug-In for Photoshop
Setting Details
Chapter 2 Functions of Print Plug-In
Fit Roll Paper Width
(displayed only with W8400PG and
W6400PG)
Scaling This enlarges/reduces the entire image by the
Note
4 Media Size
You can select the size of the print media.
Note
This is not displayed when a checkmark is placed in Borderless Printing.
• The media sizes you can select differ with printers.
• This is not displayed when a checkmark is placed in Borderless Printing.
• This is not displayed when Fit Roll Paper Width is set in Enlarged/
Reduced Printing.
• The details of Media Size you have set is saved even when you close
Print Plug-In.
This automatically enlarges/reduces the entire
image imported to Print Plug-In to match the width
of the roll paper with the width of the image when
printing.
• This is not displayed if Cut Sheet is selected in
Media Source.
specified scaling value.Input the scaling value in
numerical characters. You can specify a range
between 20-600%.
• You can change the numbers by clicking either ▲
or ▼.
5Orientation
This selects the print orientation.
The following settings are available for orientation.
Setting Details
Portrait Prints the image on the media as it appears on the screen.
Landscape Prints the image on the media rotated 90 degrees.
6Layout
You can select the print position of an image on the media.
The following settings are available for layout.
Setting Details
Top Left This prints the image to fit the top left of the effective print
area for Media Size.
Center of Output Media
Size
Specify Print Start
Position
Center of Roll Paper
Width
(displayed only with
W8400PG and
W6400PG)
This prints the center of the image on the center of the
selected Media Size.
You can print after specifying the print field top margin start
position and the left margin start position in From Top
Margin and From Left Margin for Media Size.
From
Top
Margin
From
Left
Margin
This prints the center of the image on the center of the
selected roll paper.
• This is not displayed if Cut Sheet is selected in Media
Source.
Input the margin from the top of the media in
numbers.
• You can input between -9999 and 9999 mm.
Input the margin from the left of the media in
numbers.
• You can input between -9999 and 9999 mm.
2-9
Page 22
Print Plug-In for Photoshop
Chapter 2 Functions of Print Plug-In
Note
7 Media Source
You can select the media source.
The following settings are available for media source.
For W8400PG and W6400PG
Setting Details
Roll Paper Roll paper is output.
Cut Sheet Cut paper is output.
For W2200S
Setting Details
• You can specify the print position if you drag the image on the preview
display. Refer to “Utilize Three Types of Previews” (p.3-1) for more
information.
• This is not displayed when a checkmark is placed in Borderless Printing.
• This is not displayed when Fit Roll Paper Width is set in Enlarged/
Reduced Printing.
• This is not displayed when Fit Media Size is set in Enlarged/Reduced
Printing.
• The Layout settings and the actual print product may differ with Media
Typ e and media detailed settings and printer settings.
Auto Media is output by the method set to the printer.
Cassette 1, Cassette 2 Media is output from the selected cassette.
Manual Media is output from the manual feed media slot.
Note
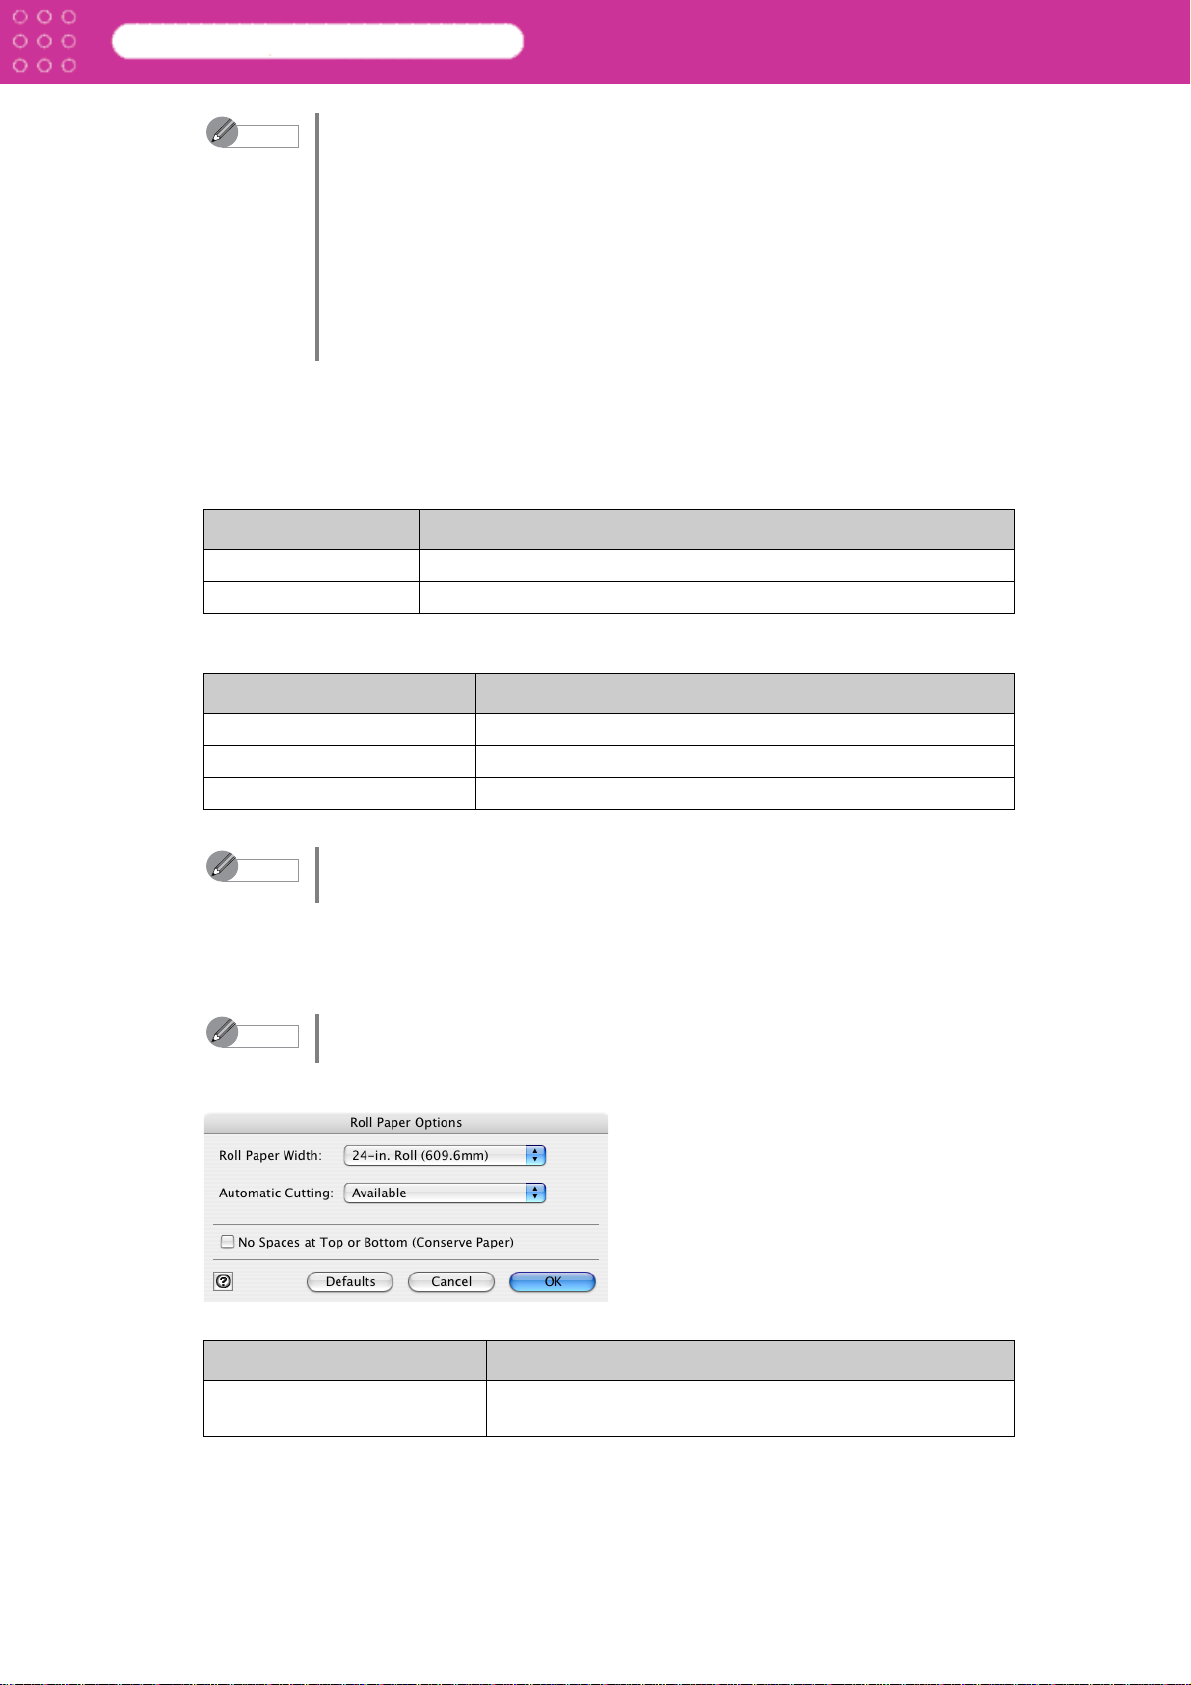
8 Roll Paper Options Button (displayed only with W8400PG and W6400PG)
Click this button to open the Roll Paper Options dialog box, where you can set roll paper
width and perform auto cut settings.
Note
Roll Paper Options Dialog Box
The details of Media Source you have set is saved even when you close
Print Plug-In.
You cannot select this if Cut Sheet is selected in Media Source.
Setting Details
Roll Paper Width This selects the width of the roll media set to the printer.
• The selectable roll paper widths differ by printer.
2-10
Page 23
Print Plug-In for Photoshop
Setting Details
Chapter 2 Functions of Print Plug-In
Automatic
Cutting
No Spaces at Top or
Bottom (Conserve Paper)
9 Defaults Button
Click this button to return all of the settings on the Page Setup sheet to their defaults.
Available When printing is complete, the roll media is automatically
cut.
None When printing is complete, the roll media is not
automatically cut and should be cut by hand.
Print Cut
Guideline
When printing is complete, the roll media is not
automatically cut. Print cut line is printed for cutting by
manual.
When you place a checkmark here, the print data is
printed without margins.
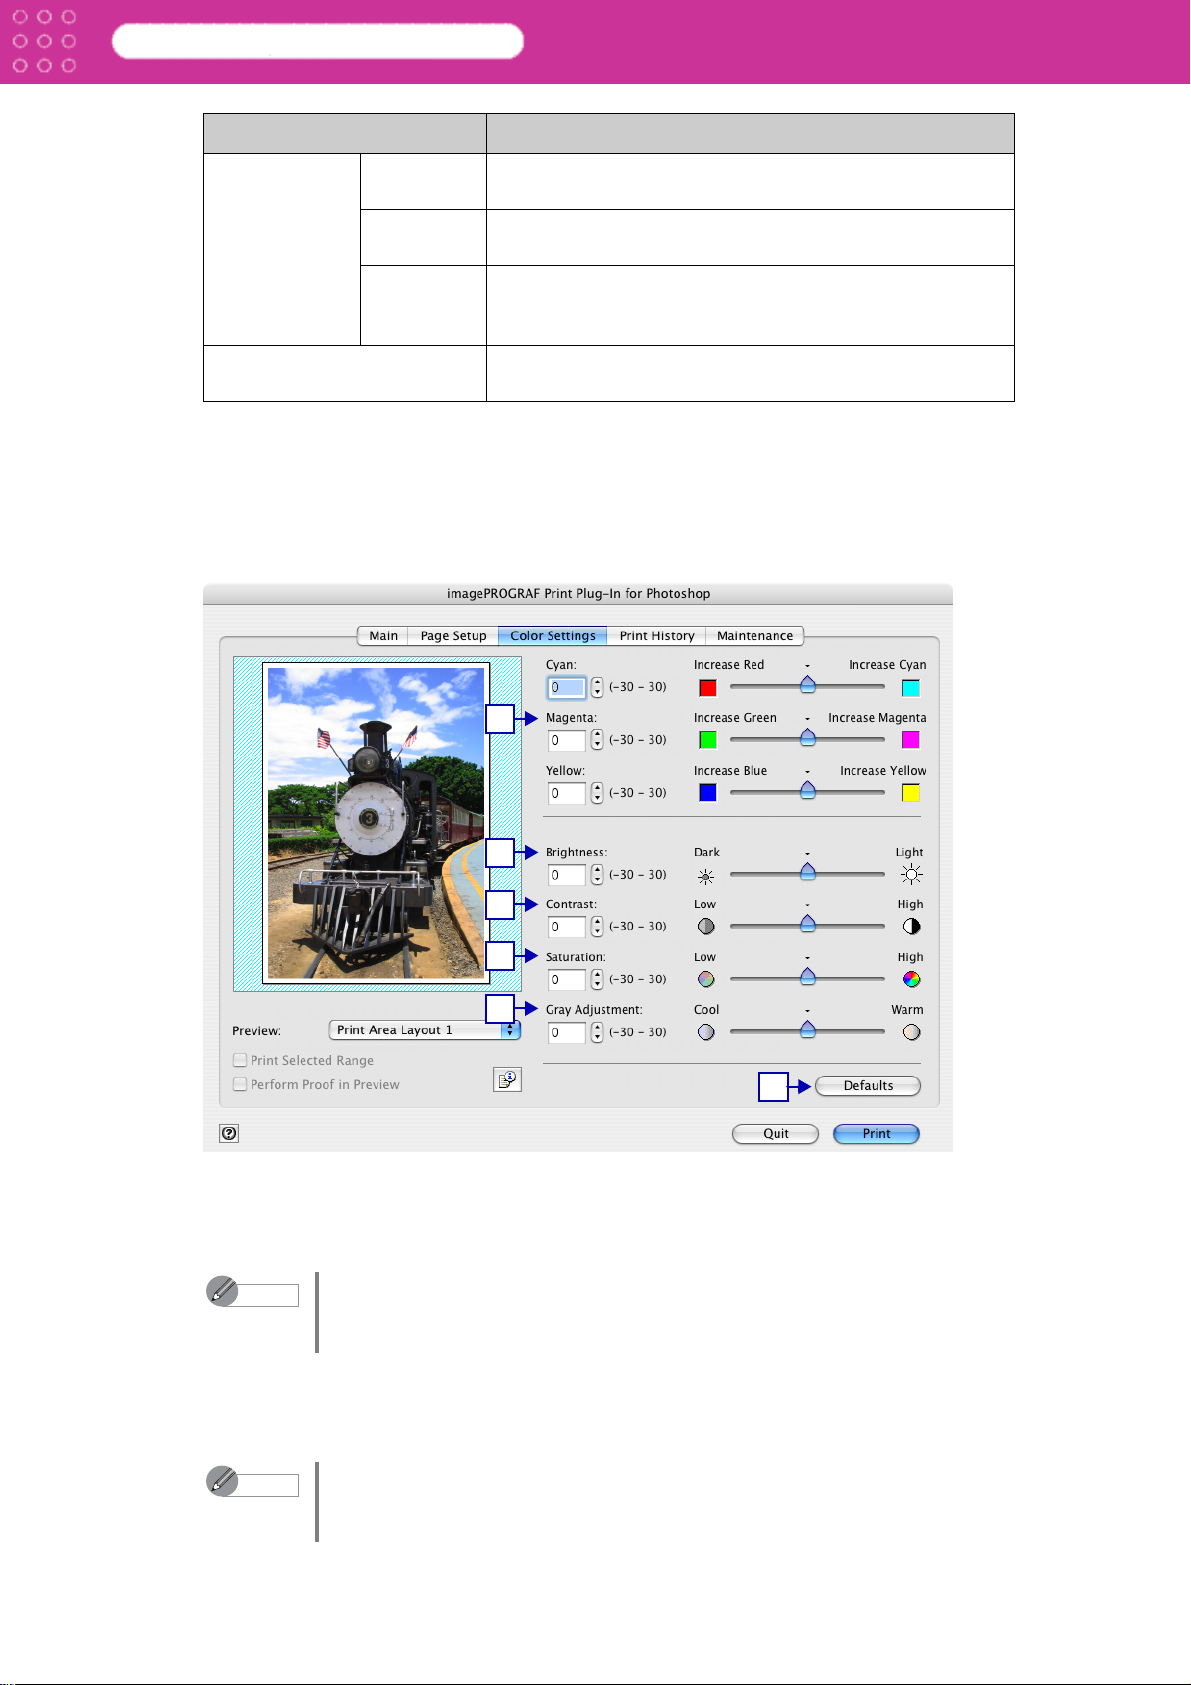
■ Color Settings Sheet
You can use this sheet to adjust image Color, Brightness, Contrast, and Saturation, and you can
set the color balance of print product more to your liking.
1
2
3
4
5
6
1 Cyan, Magenta, Yellow
You can adjust the strength or weakness of a color by either inputting a numerical value or
dragging the slide bar.
Note
2 Brightness
You can adjust the brightness of the printed image without losing the brightest and darkest
areas by either inputting a numerical value or dragging the slide bar.
• You can check the adjustments in the preview display.
• The values of Cyan, Magenta and Yelow you have set is saved even after
closing Print Plug-In.
Note
• You can check the adjustments in the preview display.
• The values of Brightness you have set is saved even after closing Print
Plug-In.
2-11
Page 24
Print Plug-In for Photoshop
3 Contrast
You can relatively adjust the brightness of the brightest and darkness areas by either
inputting a numerical value or dragging the slide bar.
Chapter 2 Functions of Print Plug-In
Note
4Saturation
You can adjust the saturation of vivid color balance to dark color balance by either inputting
a numerical value or dragging the slide bar.
Note
5 Gray Adjustment
You can adjust gray tone from cold colors to warm colors by either inputting a numerical
value or dragging the slide bar.
Note
6 Defaults Button
Click this button to return all of the settings on the Color Settings sheet to their defaults.
• You can check the adjustments in the preview display.
• The values of Contrast you have set is saved even after closing Print
Plug-In.
• You can check the adjustments in the preview display.
• The values of Saturation you have set is saved even after closing Print
Plug-In.
• You can check the adjustments in the preview display.
• The values of Grey Adjustment you have set is saved even after closing
Print Plug-In.
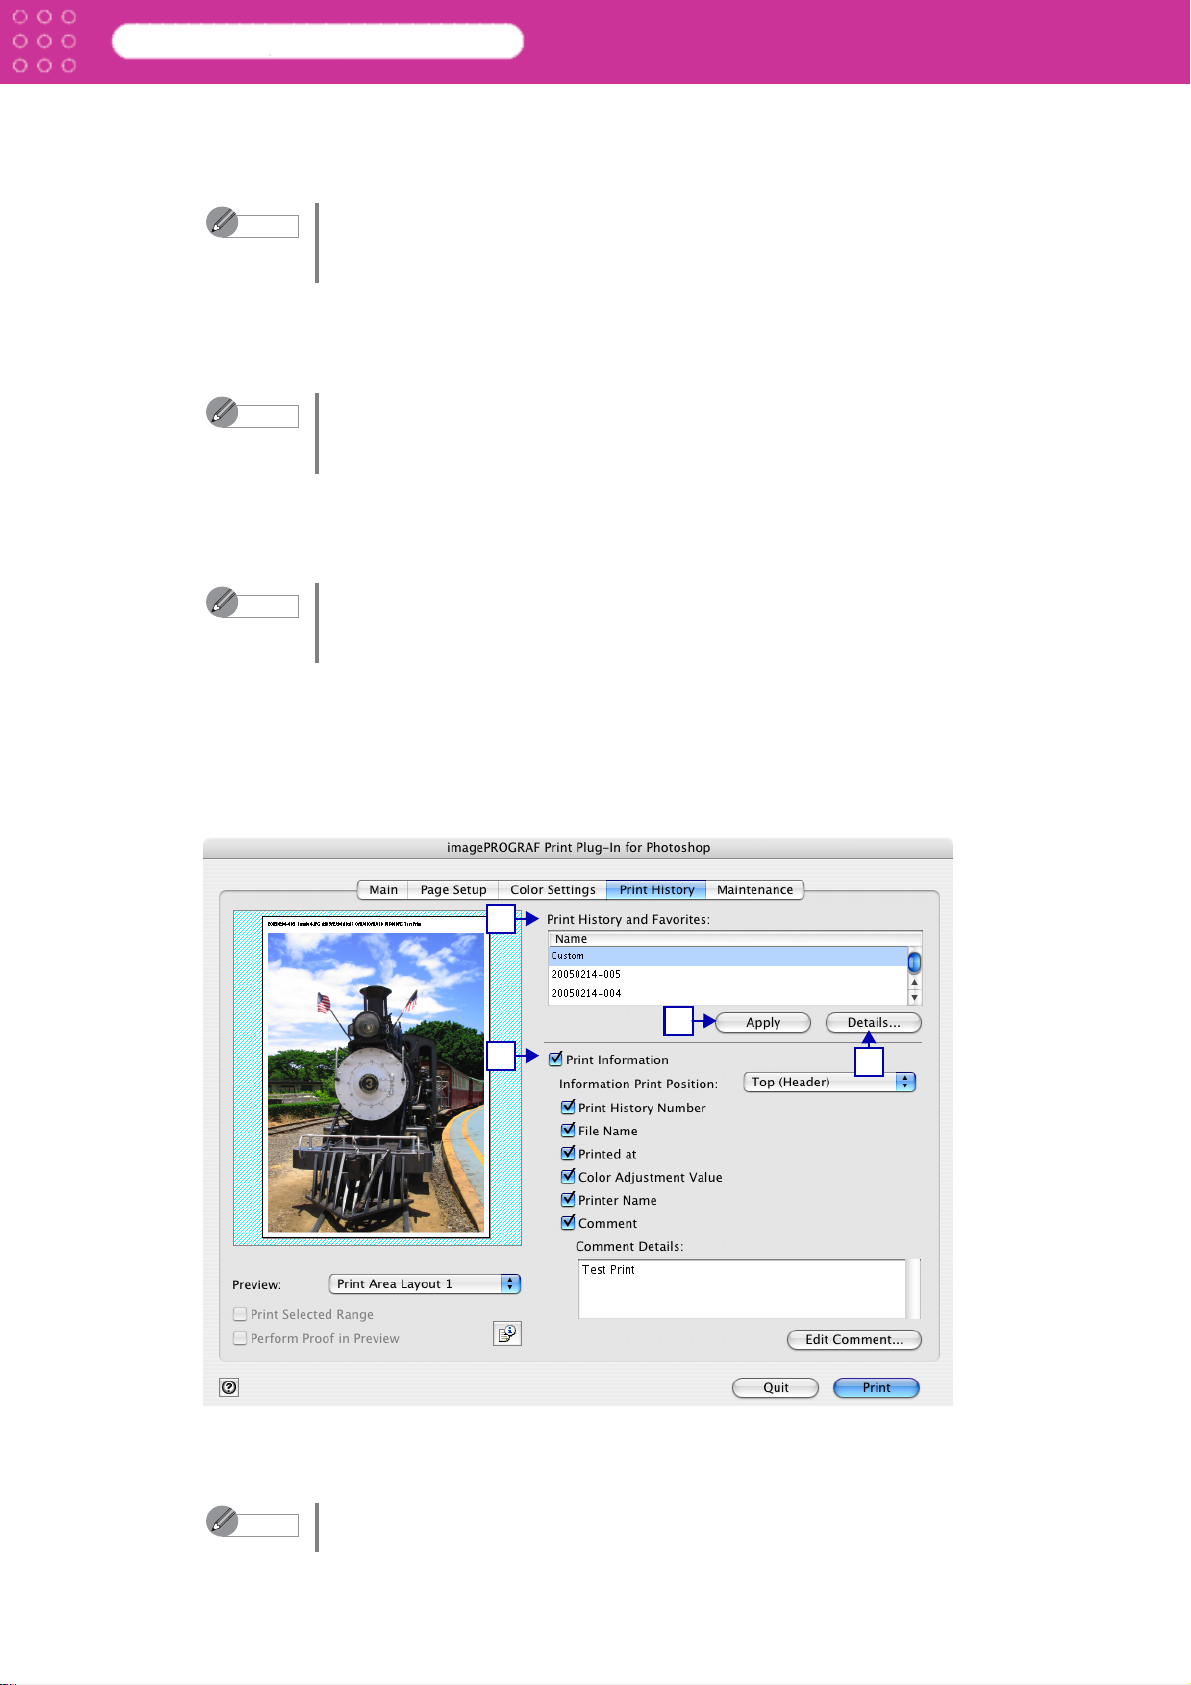
■ Print History Sheet
You can use this sheet to apply settings history used in printing, and to print information, such
as the image file name, with the image.
1
2
4
1 Print History and Favorites
This displays a list of the print history and print preferences.
3
Note
You can check the 3 print preferences in the preview display.
2-12
Page 25
Print Plug-In for Photoshop
2 Apply Button
When you click the Apply button the print setting content applies to the current image
selected with Print History and Favorites.
3 Details Button
Click the Details button to open the Print History Details dialog box, where you can manage
print history. Refer to “Print History Details Dialog Box” (p.2-14) for more information.
4 Print Information
When you place a checkmark here, you can print the file name and print time and date on
the image. The following settings are available for the print position and content.
Refer to “Set Information to Print with Image” (p.3-52) for more information.
Setting Details
Chapter 2 Functions of Print Plug-In
Information Print
Position
Print History Number Place a checkmark here to print the print history number.
File Name Place a checkmark here to print the file name.
Printed at Place a checkmark here to print the time and date.
Color Adjustment Value Place a checkmark here to print the color adjustment value.
Printer Name Place a checkmark here to print the printer name.
Comment Place a checkmark here to print a comment.
Comment Details Displays comment details.
Edit Comment Button Click this button to display the Edit Comment dialog box,
Selects the information print position.
Top (Header) Information is printed on the top of the
image.
Bottom
(Footer)
where you can edit the comment.
• You can input a comment of up to 255 characters.
Information is printed on the bottom of the
image.
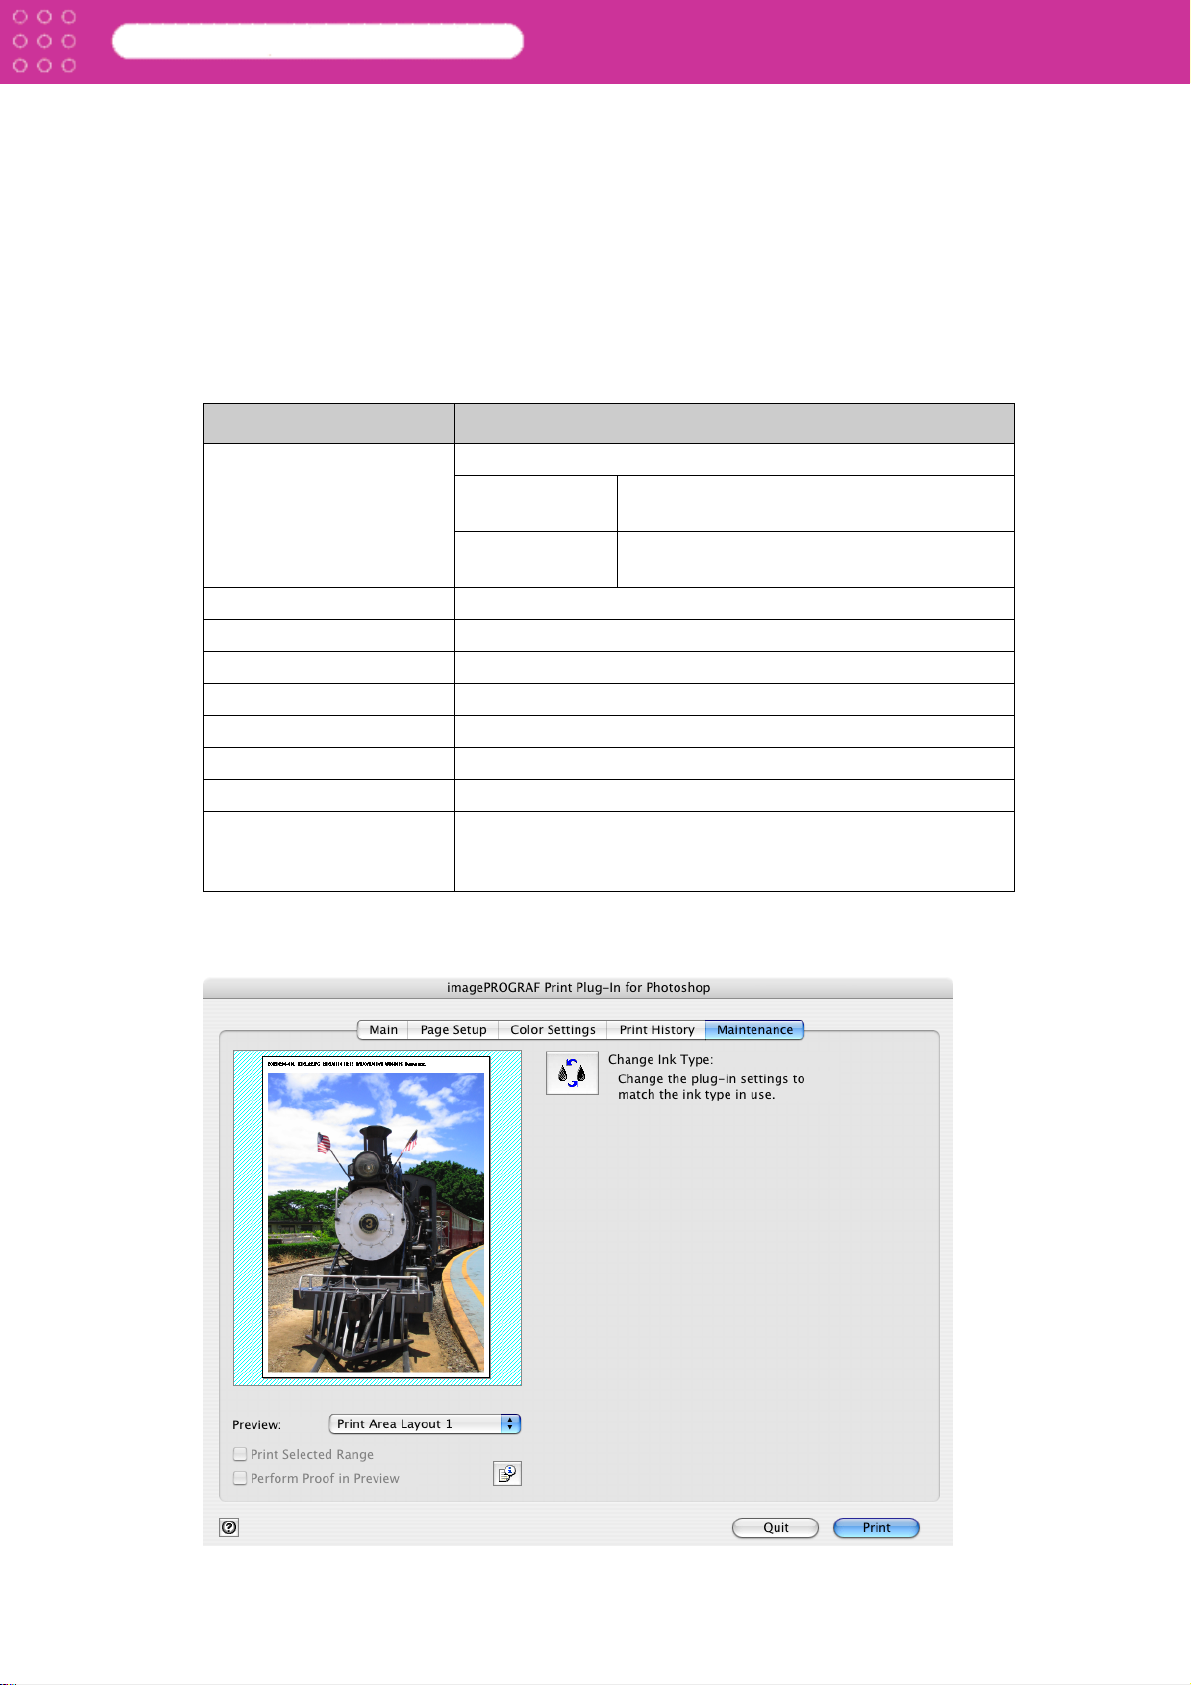
■ Maintenance Sheet (displayed only with W8400PG and W6400PG)
You can update the ink information when the ink type set in the printer is changed.
2-13
Page 26
Print Plug-In for Photoshop
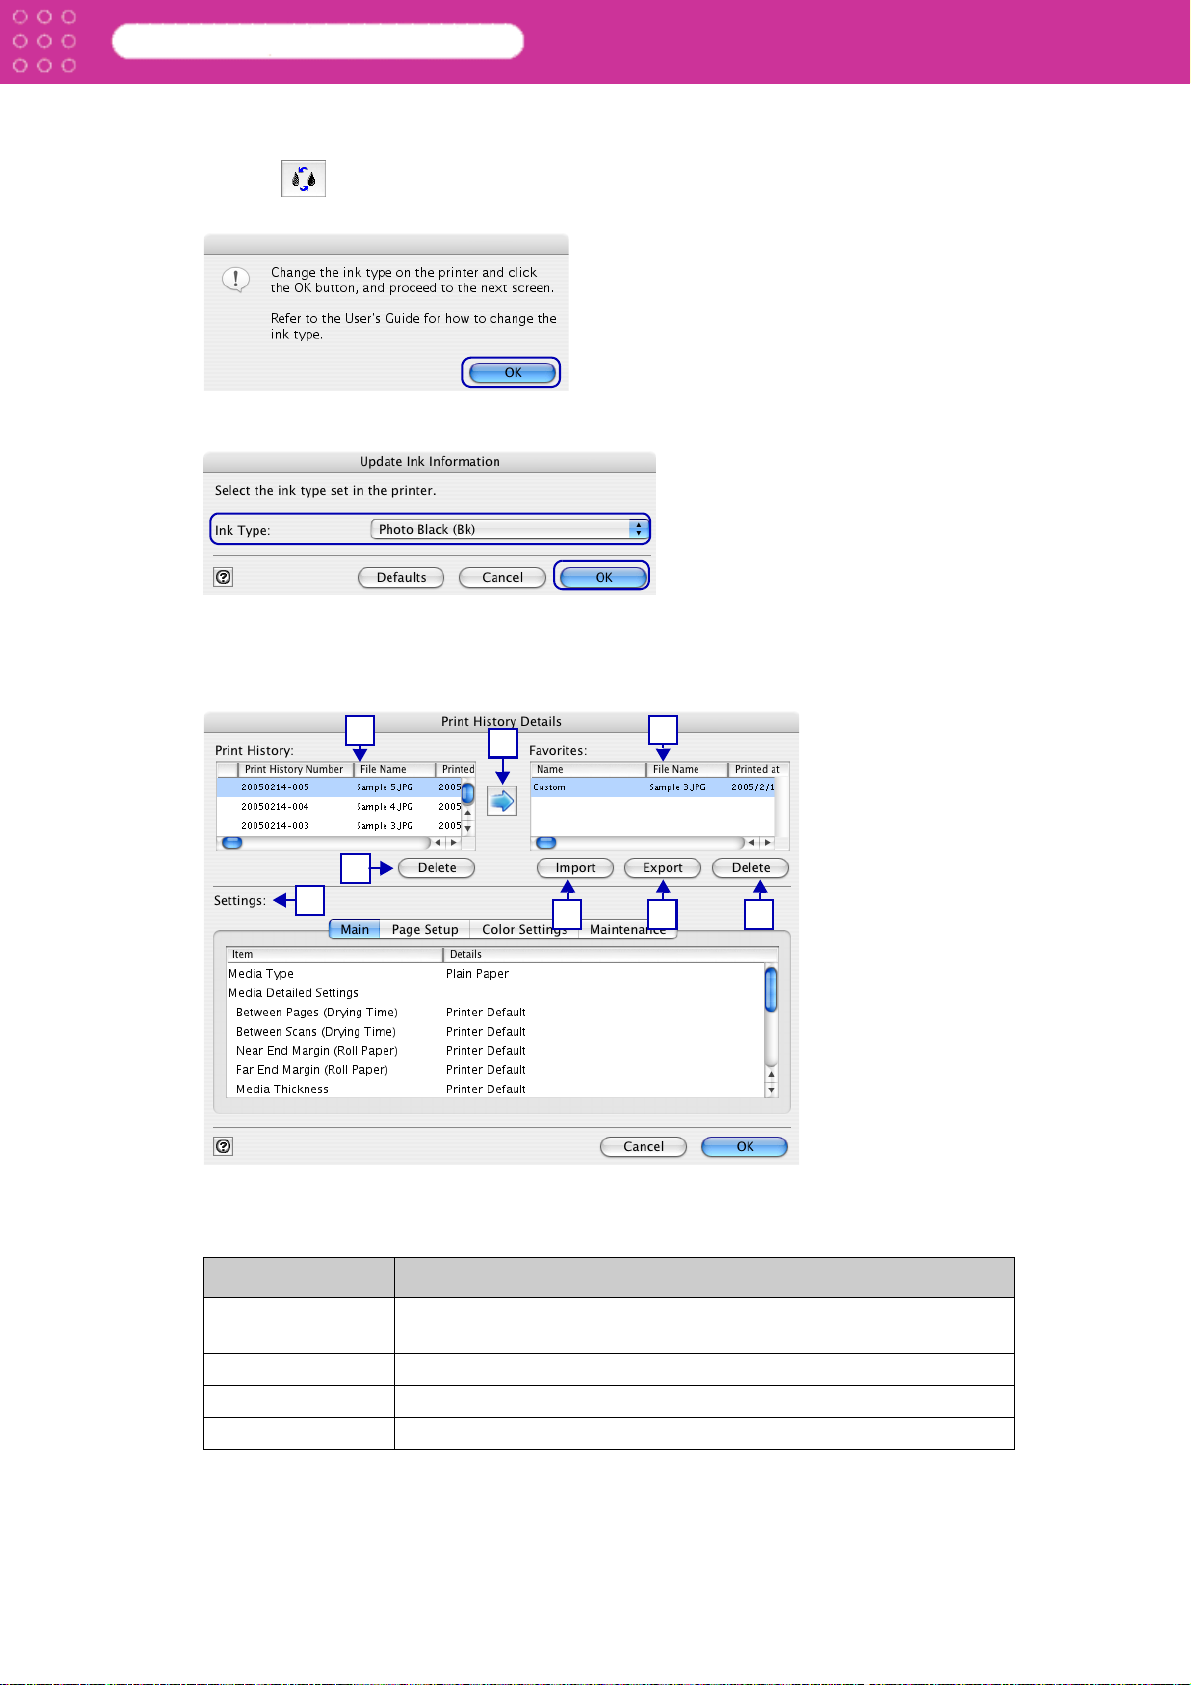
Changing the Ink Type
The procedures for changing the ink type are as follows.
1. Click on the Maintenance sheet.
2. Click OK.
3. Select an ink type set to the printer with Ink Type, and click OK.
Chapter 2 Functions of Print Plug-In
■ Print History Details Dialog Box
This controls print history.
Refer to “Utilize Print History” (p.3-38) for more information on how to use this.
1
2
8
1 Print History
Print History appears in list format.
3
5 6 7
4
Display Items Details
Print History
Number
File Name Displays image file name.
Printed at Displays time and date of printing.
Comment Displays comment details.
Displays the print history number.
2-14
Page 27
Print Plug-In for Photoshop
Chapter 2 Functions of Print Plug-In
Note
2 The Delete Button
Click this button to delete the selected print history.
3
Click this button to add the selected print history to preferences.
Note
4Favorites
The print history stored in print preferences displays in list format.
Note
5 The Import Button
Click this button to import print history saved as a file.
6 The Export Button
Click this button to save print history as a file that is stored in print preferences.
• Up to 100 print history items can be displayed. All items above 100 are
deleted.
• When you cannot print properly because you canceled the printing or an
error occurred, appears to the left of the print history number.
Up to 50 print preference items can be added.
You can change the order by selecting an item and dragging it to another
place.
7 The Delete Button
Click this button to delete print history stored in print preferences.
8Settings
Displays the print history settings selected from the Print History or Favorites.
Setting Details
Main When you select this the Main sheet settings are displayed.
Page Setup When you select this the Page Setup sheet settings are
displayed.
Color Settings When you select this the Color Settings sheet settings are
displayed.
Maintenance
(displayed only with
W8400PG and
W6400PG)
When you select this the Maintenance sheet settings are
displayed.
2-15
Page 28

Print Plug-In for Photoshop
Chapter 3 Utilize Print Plug-In to Print
Chapter 3 Utilize Print Plug-In to Print
The explanation below is on how to utilize Print Plug-In.
“Utilize Three Types of Previews” (p.3-1)
“Print with a Desired Picture Quality” (p.3-4)
“Adjust the Colors and Print” (p.3-8)
“Enlarge/Reduce and Print” (p.3-20)
“Print with No Borders” (p.3-31)*
“Customize Media Settings” (p.3-34)*
“Utilize Print History” (p.3-38)
* compatible with W8400PG and W6400PG
Utilize Three Types of Previews
You can use Print Plug-In to check an image in three types of previews.
The preview types are as follows.
“Check Image with Print Area Layout 1” (p.3-1)
“Check Image with Print Area Layout 2” (p.3-2)
“Check Original Image with Image Preview” (p.3-3)
■ Check Image with Print Area Layout 1
In Print Area Layout 1 the layout is matches the Media Size you have set, and only the valid
print range is displayed.
Select Print Area Layout 1 in Preview.
3-1
Page 29
Print Plug-In for Photoshop
Chapter 3 Utilize Print Plug-In to Print
Note
When the cursor on the preview is displayed as on the preview, you can
specify the print position by dragging the image. When the cursor is
displayed as on the preview, the below conditions on the Main sheet
have all been met.
• There is no checkmark in Borderless Printing (Borderless Printing is
only available with W8400PG and W6400PG).
• There is no checkmark in Enlarged/Reduced Printing, or Scaling has
been selected.
• Center of Roll Paper has not been selected in Layout (Center of Roll
Paper is available only with W8400PG and W6400PG).
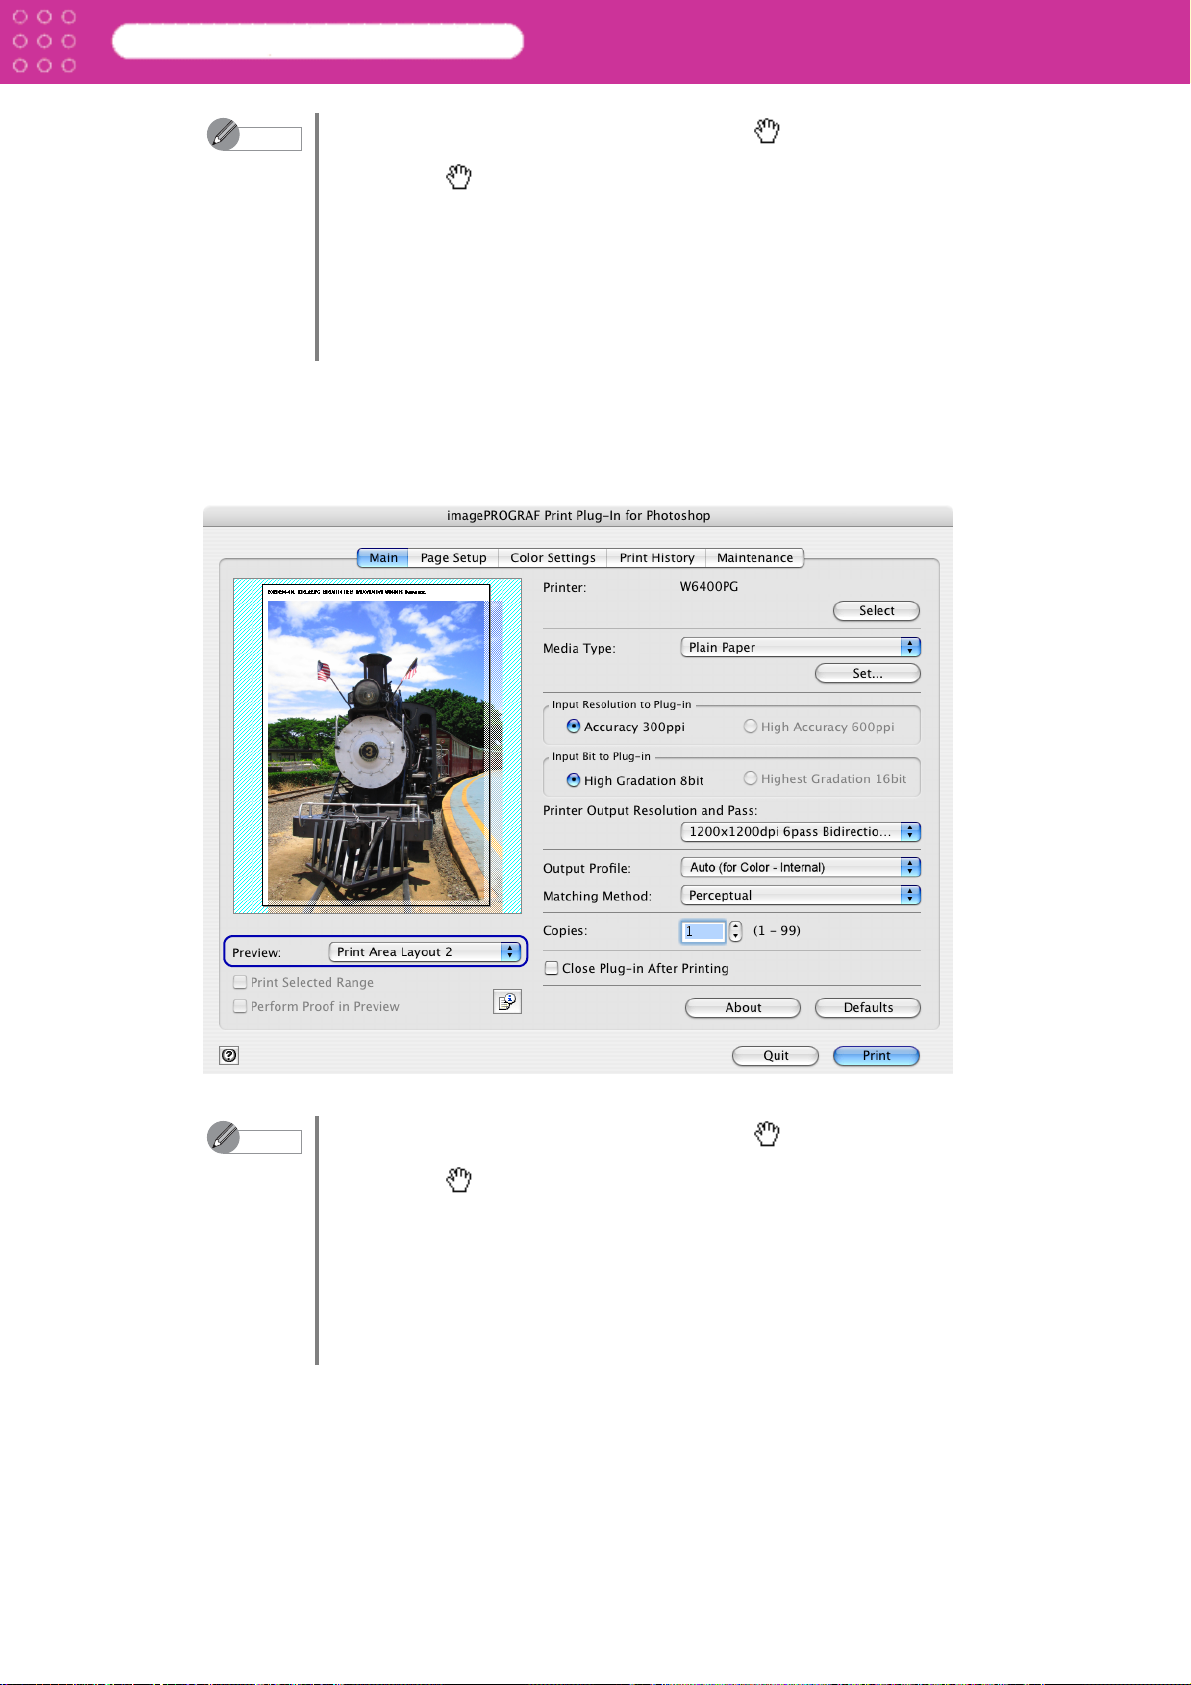
■ Check Image with Print Area Layout 2
In Print Area Layout 2 the layout is matches the Media Size you have set, and both the valid
print range and the area outside of that range are displayed.
Select Print Area Layout 2 in Preview.
Note
When the cursor on the preview is displayed as on the preview, you can
specify the print position by dragging the image. When the cursor is
displayed as on the preview, the below conditions on the Main sheet
have all been met.
• There is no checkmark in Borderless Printing (Borderless Printing is
only available with W8400PG and W6400PG).
• There is no checkmark in Enlarged/Reduced Printing, or Scaling has
been selected.
• Center of Roll Paper has not been selected in Layout (Center of Roll
Paper is available only with W8400PG and W6400PG).
3-2
Page 30
Print Plug-In for Photoshop
Chapter 3 Utilize Print Plug-In to Print
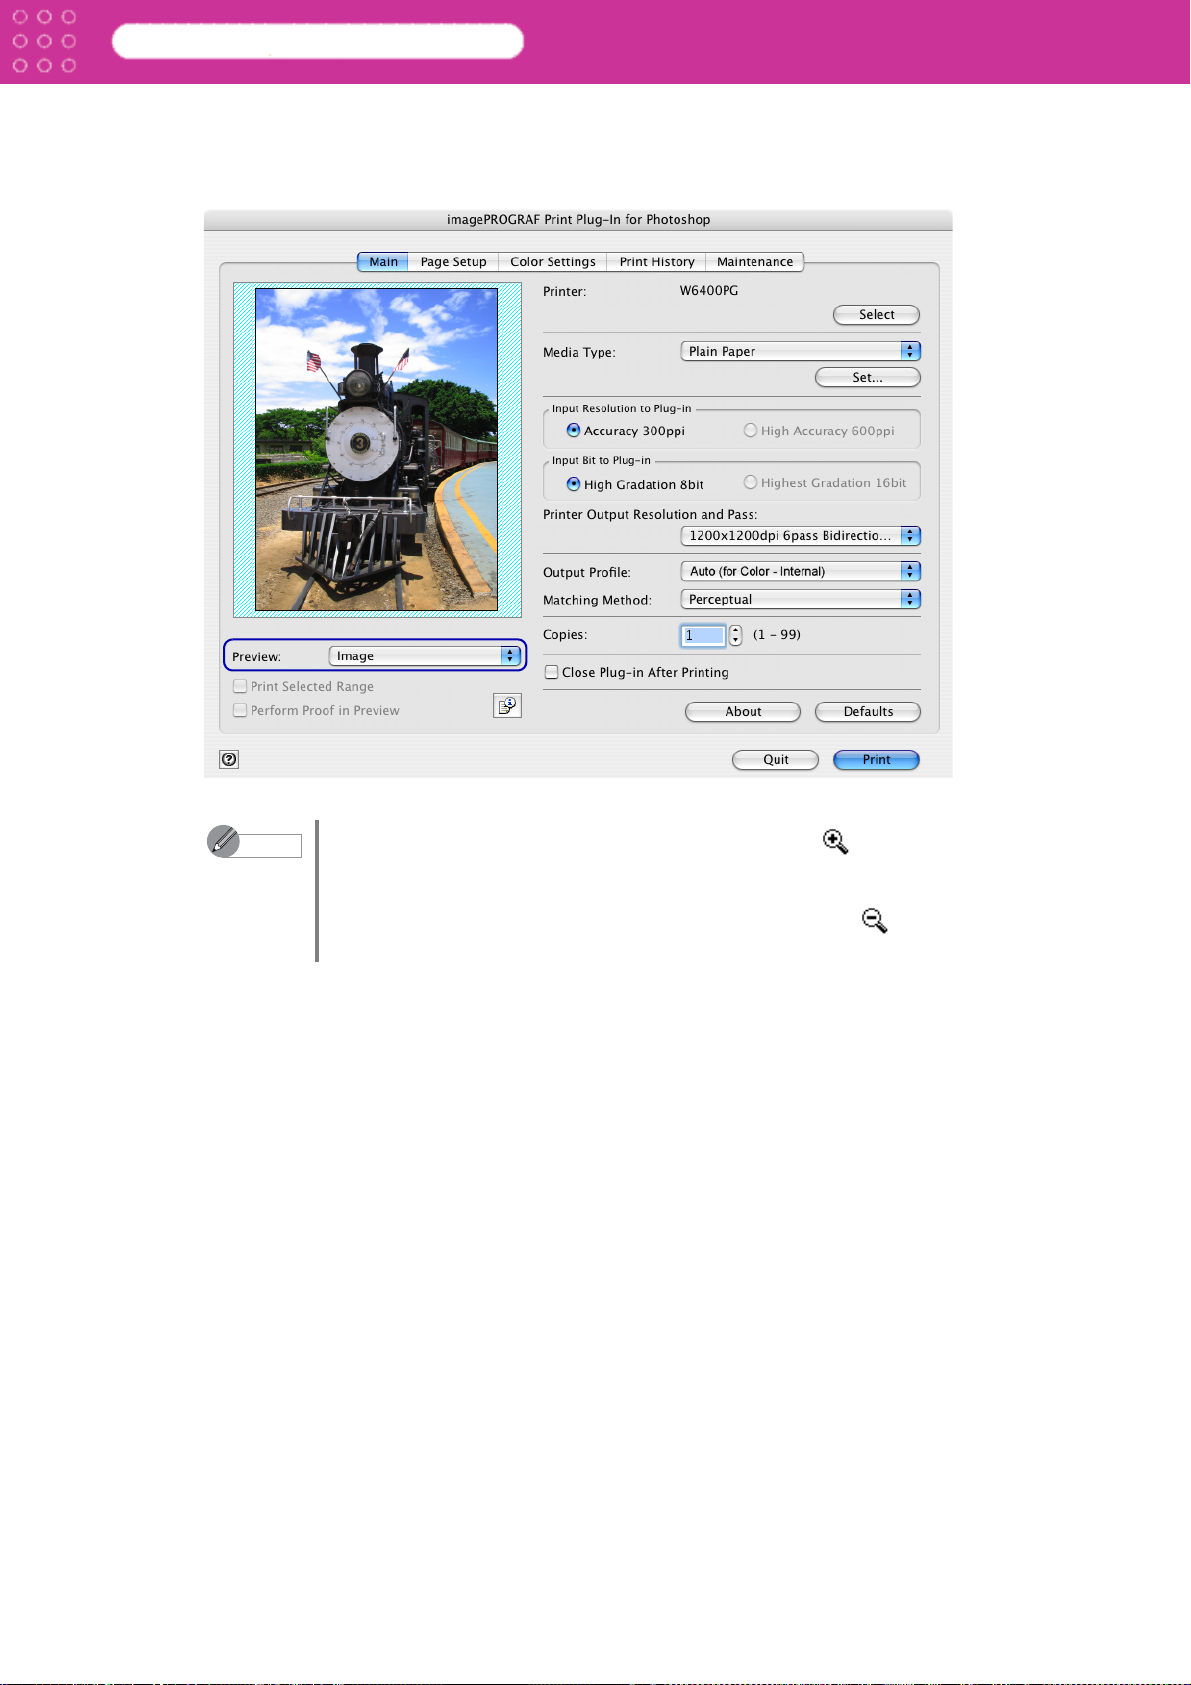
■ Check Original Image with Image Preview
In the image preview you can check the entire image that you have input.
Select Image in Preview.
Note
• When the cursor appears as a small magnifying glass while there is an
Image in the Preview area, the Print Selected Range feature is enabled
and you an drag the cursor on the image and select an area for printing.
• When you click the image while the cursor is displayed as on the
preview, the selected area is deselected.
3-3
Page 31
Print Plug-In for Photoshop
Print with a Desired Picture Quality
You can specify and print at the resolution you desire.
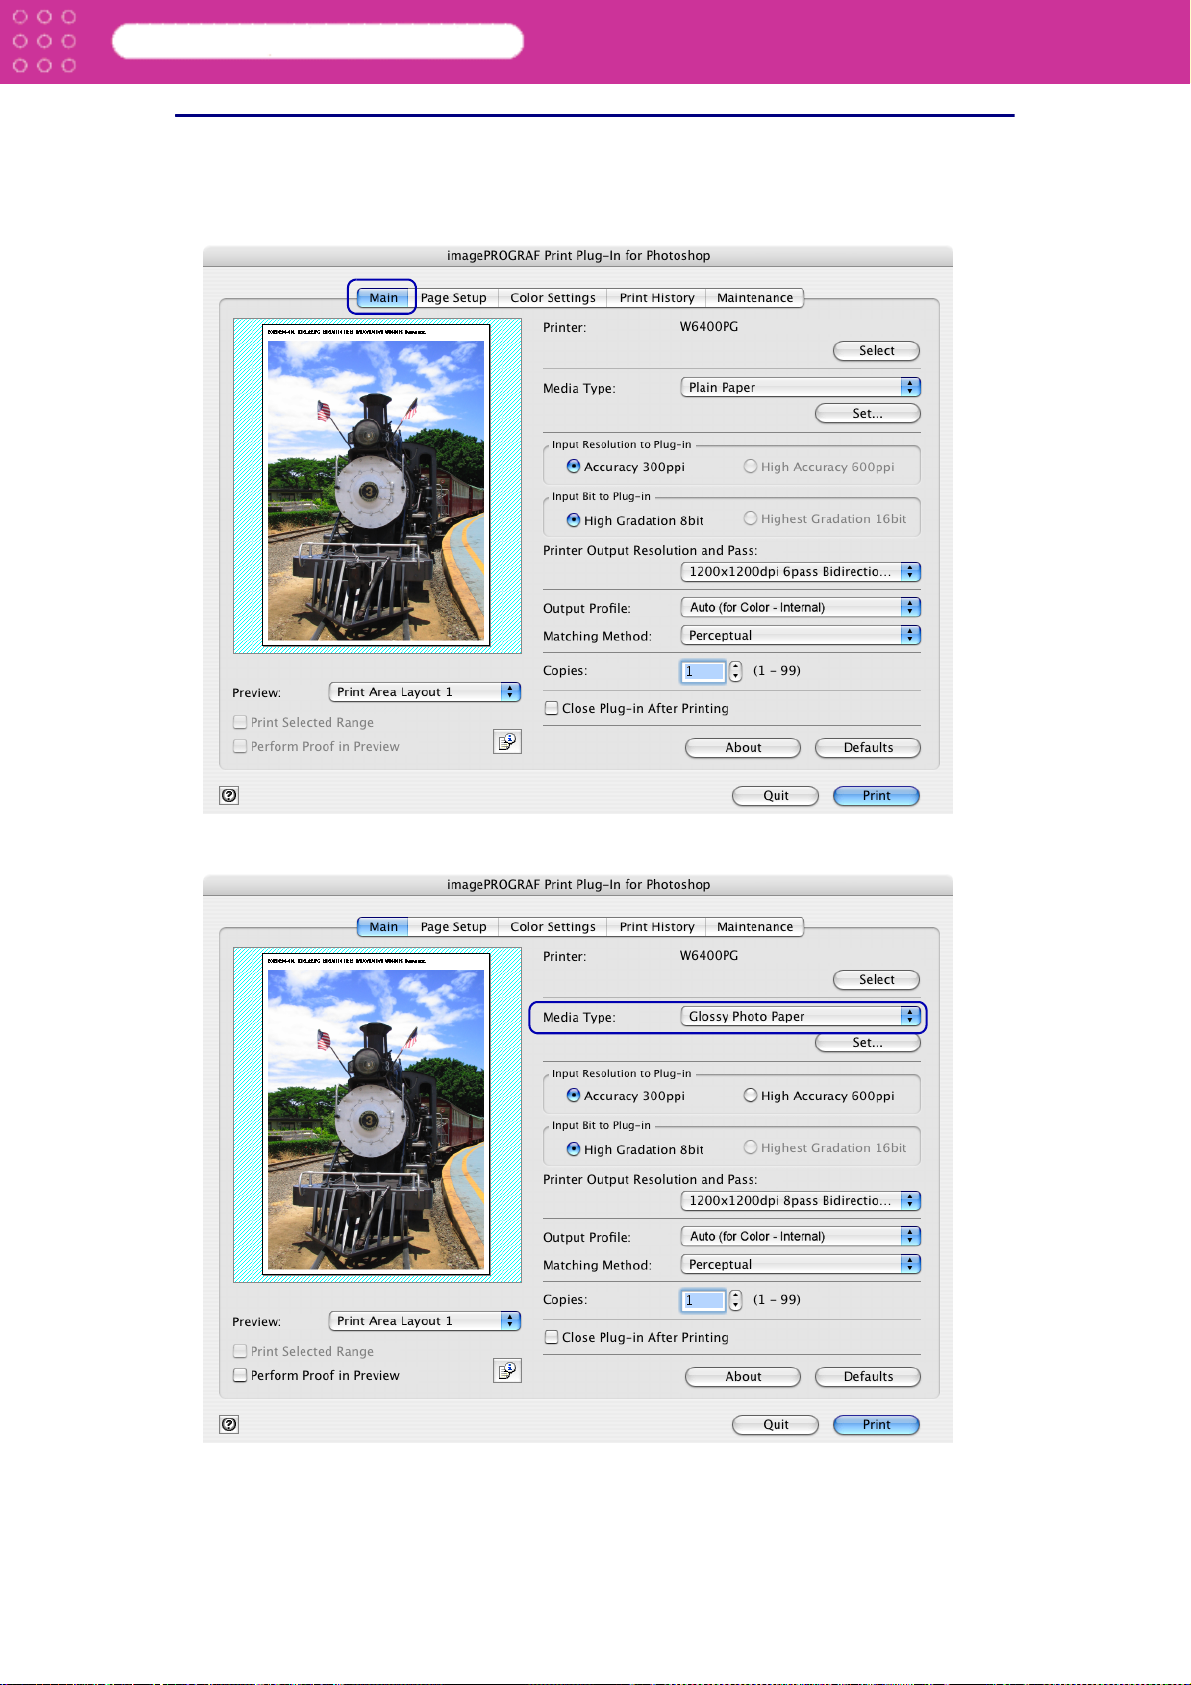
1. Display the Main sheet.
Chapter 3 Utilize Print Plug-In to Print
2. Select the media set to the printer in Media Type.
3-4
Page 32

Print Plug-In for Photoshop
Chapter 3 Utilize Print Plug-In to Print
Note
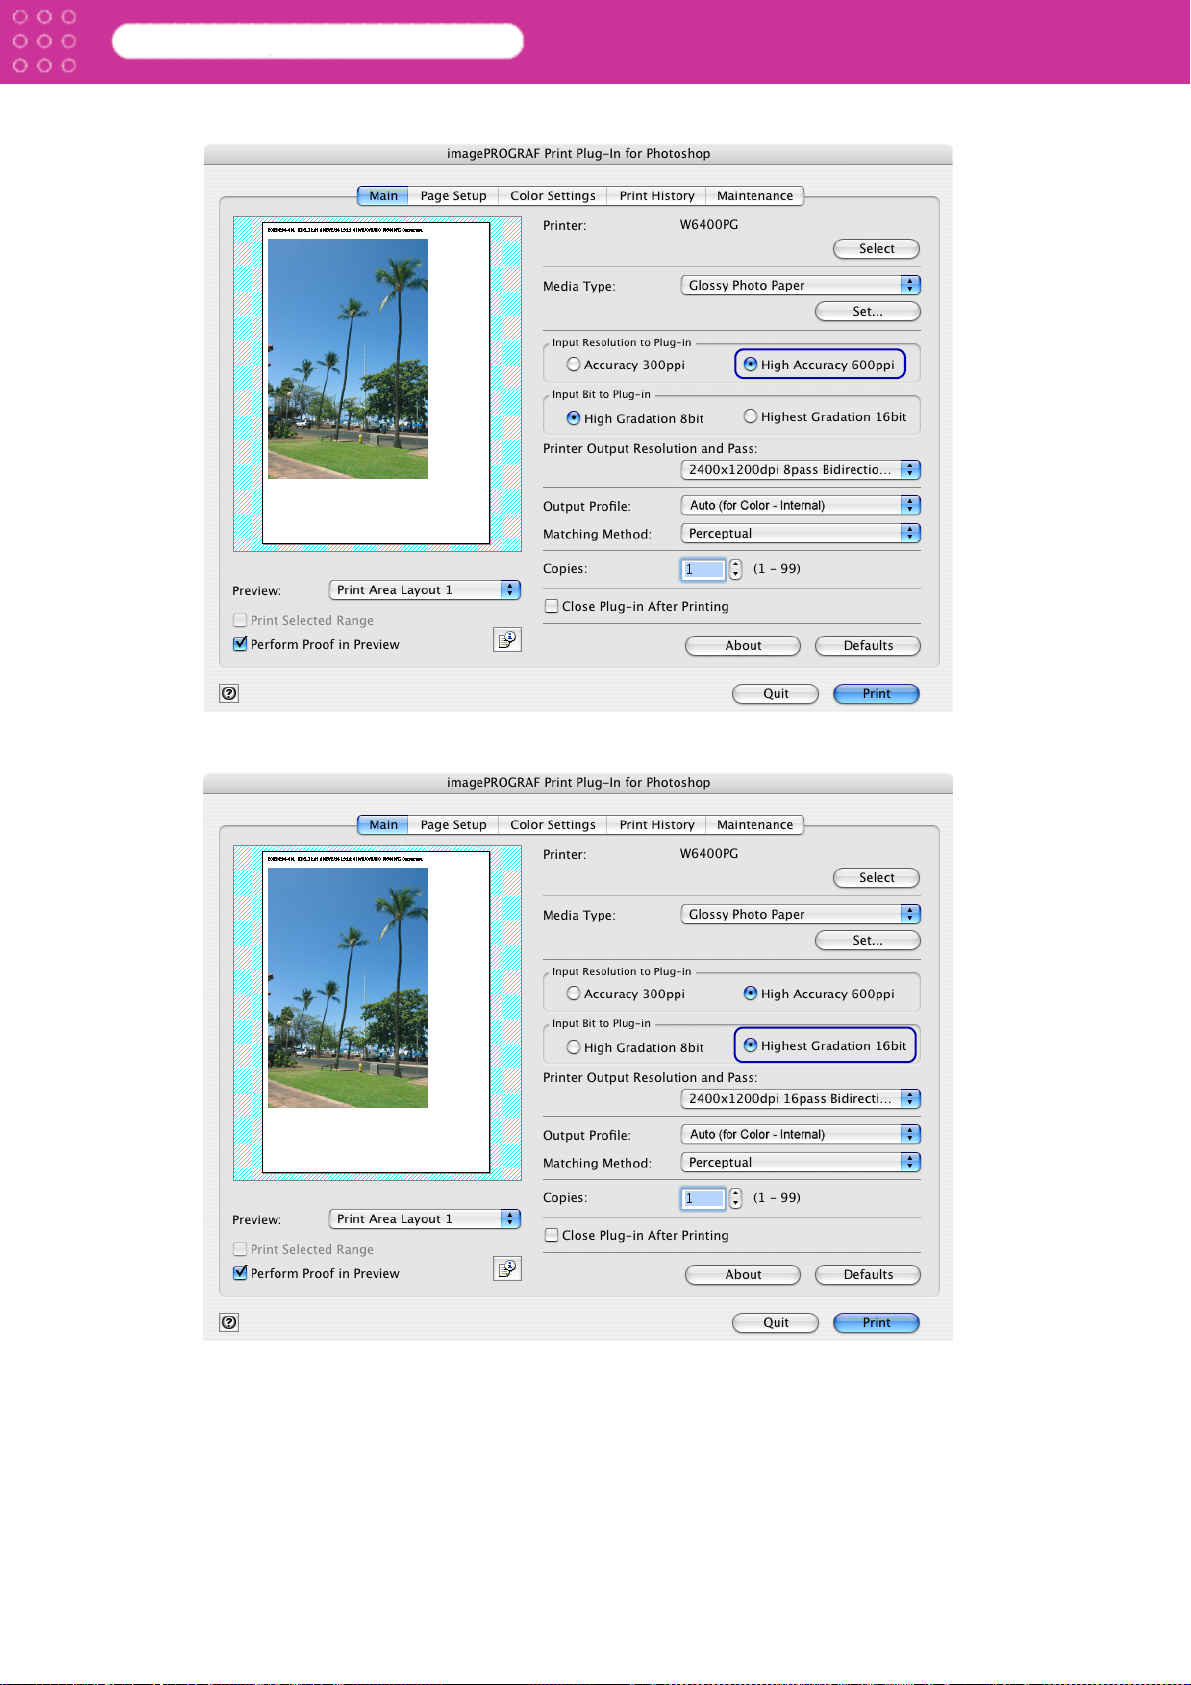
3. Choose either Accuracy 300ppi or High Accuracy 600ppi for the resolution to process
images in Input Resolution to Plug-in.
• The media type you can select differs by printer.
• Always select media type that is actually set in the printer. When the media
you chose is different from the media set in the printer, you may not
receive the desired print results.
• With W8400PG and W6400PG, a may be displayed as a choice.
indicates that the media is determined to be inappropriate with the
currently selected ink type. Refer to “Changing the Ink Type” (p.2-14) to
change the ink type.
• The details of Media Type that you have set is saved despite closing Print
Plug-In.
Note
• When you select Accuracy 300ppi images are processed at an accurate
resolution. This can control print speed and memory capacity.
• When you select High Accuracy 600ppi images are processed at a more
accurate resolution. This setting results in the best print quality, but this
takes more time to print than Accuracy 300ppi while also requiring more
memory capacity.
• High Accuracy 600ppi will not display with some Media Type settings.
• The values of Input Resolution to Plug-in that you have set is saved
even when you close Print Plug-In.
3-5
Page 33

Print Plug-In for Photoshop
4. Choose either High Gradation 8bit or Highest Gradation 16bit for the bit number when
processing images with Print Plug-In in Input Bit to Plug-In.
Chapter 3 Utilize Print Plug-In to Print
Note
5. Select the resolution and pass number to be printed in Printer Output Resolution and Pass.
• When you select High Gradation 8bit, images are processed at 8 bit/
channel (24 bit).
• When you select Highest Gradation 16bit, images are processed at
16bit/channel (48 bit).
• Highest Gradation 16bit will not display with some Media Type or Input
Resolution to Plug-in settings.
• The values of Input Bit to Plug-In that you have set is saved even when
you close Print Plug-In.
3-6
Page 34

Print Plug-In for Photoshop
Chapter 3 Utilize Print Plug-In to Print
Note
6. Click the Print button.
• The settings that can be selected differ by media type, input resolution to
Plug-In, and input pass number to Plug-In selected.
• The output resolution is the density of ink points contained in a printed
image. The larger the value is for this setting the more smooth the printed
image will appear. Pass number is the number of times the print head
travels back and forth over one line of print. The larger the value is for this
setting the more balanced and consistent the image will appear.
• The settings selected in Printer Output Resolution and Pass are saved
even when you close Print Plug-In.
Printing begins.
3-7
Page 35

Print Plug-In for Photoshop
Chapter 3 Utilize Print Plug-In to Print
Adjust the Colors and Print
You can adjust the colors to your liking and print images.
The explanation below is on three ways to adjust the colors using Print Plug-In.
“Adjust the Colors while Checking the Preview” (p.3-8)
“Adjust the Colors by Color Matching” (p.3-12)
“Print High-Quality AdobeRGB16bit Images” (p.3-14)
“Prints monochrome photographs with high quality” (p.3-18)*
* compatible with W8400PG and W6400PG
■ Adjust the Colors while Checking the Preview
You can adjust the colors while checking the adjustments in the preview.
The following explanation is on the procedures for adjusting example image below.
• Increase Red for the Cyan value.
• Increase Yellow for the Yellow value.
• Low for Saturation.
• Warm for Gray Tone Adjustment.
The above image adjustments are reflected in the before and after images below.
Note
Before
Application
The settings you have set in the Color Settings sheet are saved even after
closing Print Plug-In.
After
Application
3-8
Page 36

Print Plug-In for Photoshop
1. Display the Color Settings sheet.
Chapter 3 Utilize Print Plug-In to Print
2. Input –10 in Cyan.
3-9
Page 37

Print Plug-In for Photoshop
3. Click the ▲ button and input 10 in Yellow.
Chapter 3 Utilize Print Plug-In to Print
4. Drag the slide bar in the direction of Low in Saturation.
3-10
Page 38

Print Plug-In for Photoshop
5. Drag the slide bar in the direction of Warm in Gray Adjustment.
Chapter 3 Utilize Print Plug-In to Print
6. Click the Print button.
The adjustments are reflected in the image and printing begins.
3-11
Page 39

Print Plug-In for Photoshop
Chapter 3 Utilize Print Plug-In to Print
■ Adjust the Colors by Color Matching
When you print a color image imported from a scanner or a digital camera, the image may
appear different from the image on the screen. That is due to the differences in color on the
screen and in the printer. In Print Plug-In, you can get the color balance of the print product
closer to the color balance displayed on the screen through performing ICC (International Color
Consortium) color profile settings, matching method settings, and settings for the internal
profile, which performs optimum color conversion in response to media and resolution settings.
1. Display the Main sheet.
2. Select the profile in Output Profile.
3-12
Page 40

Print Plug-In for Photoshop
Chapter 3 Utilize Print Plug-In to Print
Note
3. Select the profile matching method in Matching Method.
• The output profiles that can be set are as follows.
Auto (for Color - Internal): Performs the optimum color conversion from
the input image data color space information (sRGB, AdobeRGB), media
settings etc. You should normally select these settings.
Auto (for Monochrome - Internal): Performs the best color conversion
to monochrome from the input image data color space information (sRGB,
AdobeRGB), media settings etc.
None (No Color Correction): You cannot perform color conversion with
a plug-in. This is useful for creating an original ICC profile.
Other ICC Profiles: This selects printer ICC profiles to be output to ICC
profiles saved in the OS standard folder. Use the color space of the input
data as well as the select ICC profile to perform color conversion.
• When you place a checkmark in Perform Proof in Preview, you can
check the color matching in the preview. This may not be displayed
depending on how you set Media Type.
• The details of Output Profile you have set is saved even when you close
the Print Plug-In, but when the specified profile cannot be located it is set
to Auto (for Color - Internal).
Note
• The matching methods that can be selected are as follows.
Perceptual: This converts the image to an image with natural color
balance and gradation. This is useful for pictures.
Saturation: This converts the image to an image with heightened color
saturation. The color balance of pictures and drawings may change. This
is useful for graphs, charts and business documents.
Maintain Relative Color: This converts the image with emphasis on
color balance before the conversion or on visual color balance. This is
useful for pictures and drawings.
• The details of Matching Method that you have set is saved even when
you close the Print Plug-In.
3-13
Page 41

Print Plug-In for Photoshop
4. Click the Print button.
Chapter 3 Utilize Print Plug-In to Print
Printing begins with the output profile and matching method that you have set.
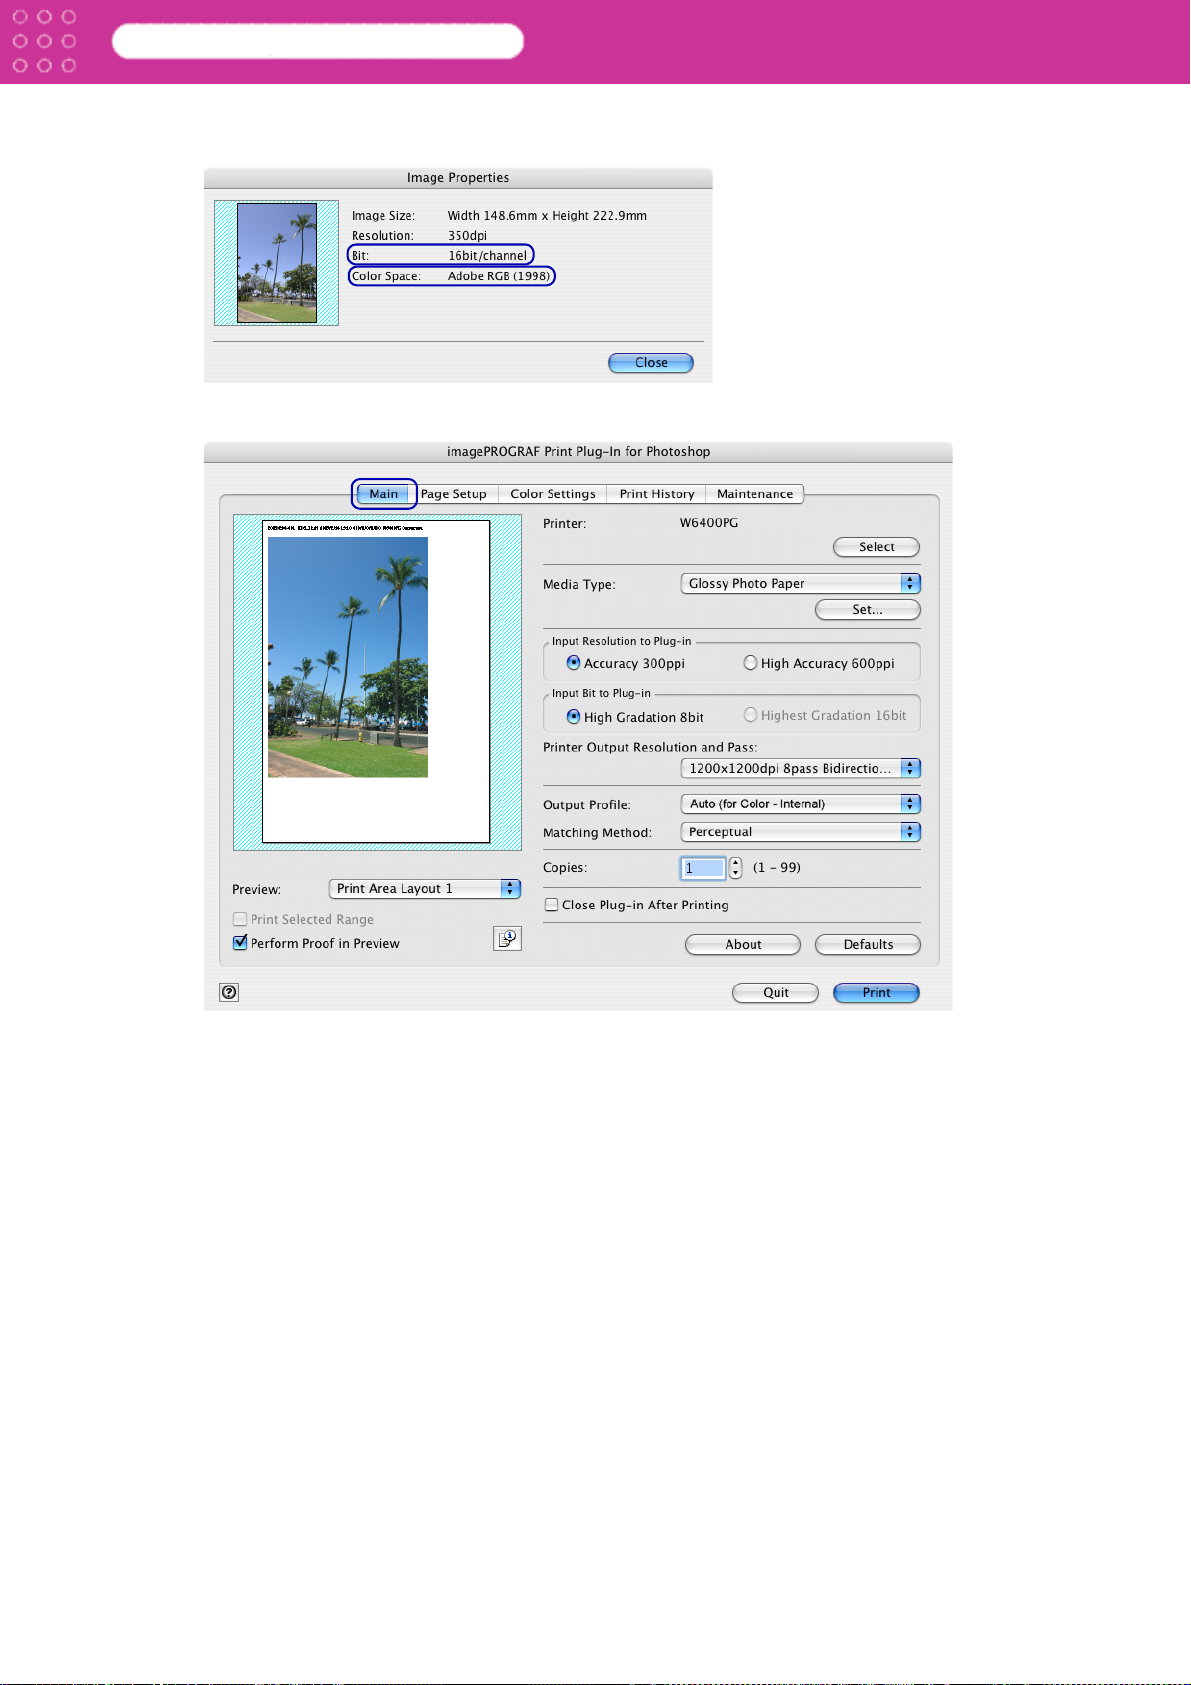
■ Print High-Quality AdobeRGB16bit Images
This prints a high-quality AdobeRGB16bit image taken with a high-end digital camera. Print
Plug-In allows you to print high color gamut and high tone images, when the AdobeRGB16bit
image data has been retouched in Photoshop, without compromising the level of tone in the
image.
1. Select the AdobeRGB16bit image data in Photoshop and start Print Plug-In.
2. Click .
3-14
Page 42
Print Plug-In for Photoshop
3. Check that AdobeRGB is displayed in Color Space, and 16bit/channel is displayed in Bit
in the Image Properties dialog box, and click the Close button.
4. Display the Main sheet.
Chapter 3 Utilize Print Plug-In to Print
3-15
Page 43
Print Plug-In for Photoshop
5. Select High Accuracy 600ppi in Input Resolution to Plug-in.
Chapter 3 Utilize Print Plug-In to Print
6. Select Highest Gradation 16bit in the input bit number to the Plug-In.
3-16
Page 44

Print Plug-In for Photoshop
7. Select the largest value possible in Printer Output Resolution and Pass.
Chapter 3 Utilize Print Plug-In to Print
8. If required, adjust the colors using color matching.
Note
9. Click the Print button.
Refer to “Adjust the Colors by Color Matching” (p.3-12) for information on
how to perform color matching.
Printing of the AdobeRGB16bit image begins.
3-17
Page 45

Print Plug-In for Photoshop
Chapter 3 Utilize Print Plug-In to Print
■ Prints monochrome photographs with high quality
Prints images captured with a scanner or digital camera in monochrome with high quality.
Provides stable monochrome photo images without color casts and minimizes the influences of
the difference of the light source.
1. Display the Main sheet.
2. Select Auto (for Monochrome - Internal) in Output Profile.
Note
• Auto (for Monochrome - Internal) can be selected only after a
compatible Media Type has been selected.
• Install Version 2.41 or later of imagePROGRAF Printer Driver to use Auto
(for Monochrome - Internal).
3-18
Page 46

Print Plug-In for Photoshop
3. Click the Print button.
Chapter 3 Utilize Print Plug-In to Print
Performs conversion to the most suitable monochrome and printing begins.
3-19
Page 47
Print Plug-In for Photoshop
Chapter 3 Utilize Print Plug-In to Print
Enlarge/Reduce and Print
You can enlarge or reduce an image in Print Plug-In.
Three methods to enlarge/reduce and print are as follows.
“Enlarge/Reduce and Print Matching Output Media Size” (p.3-20)
“Enlarge/Reduce and Print Matching Width of Roll Paper” (p.3-23) for W8400PG and
W6400PG
“Specify Scaling, Enlarge/Reduce and Print” (p.3-27)
■ Enlarge/Reduce and Print Matching Output Media Size
You can enlarge/reduce and print the image to match with the print regions of the specified
media set to the printer.
This feature is useful when you need to print on the full width of Media that you have selected.
Note
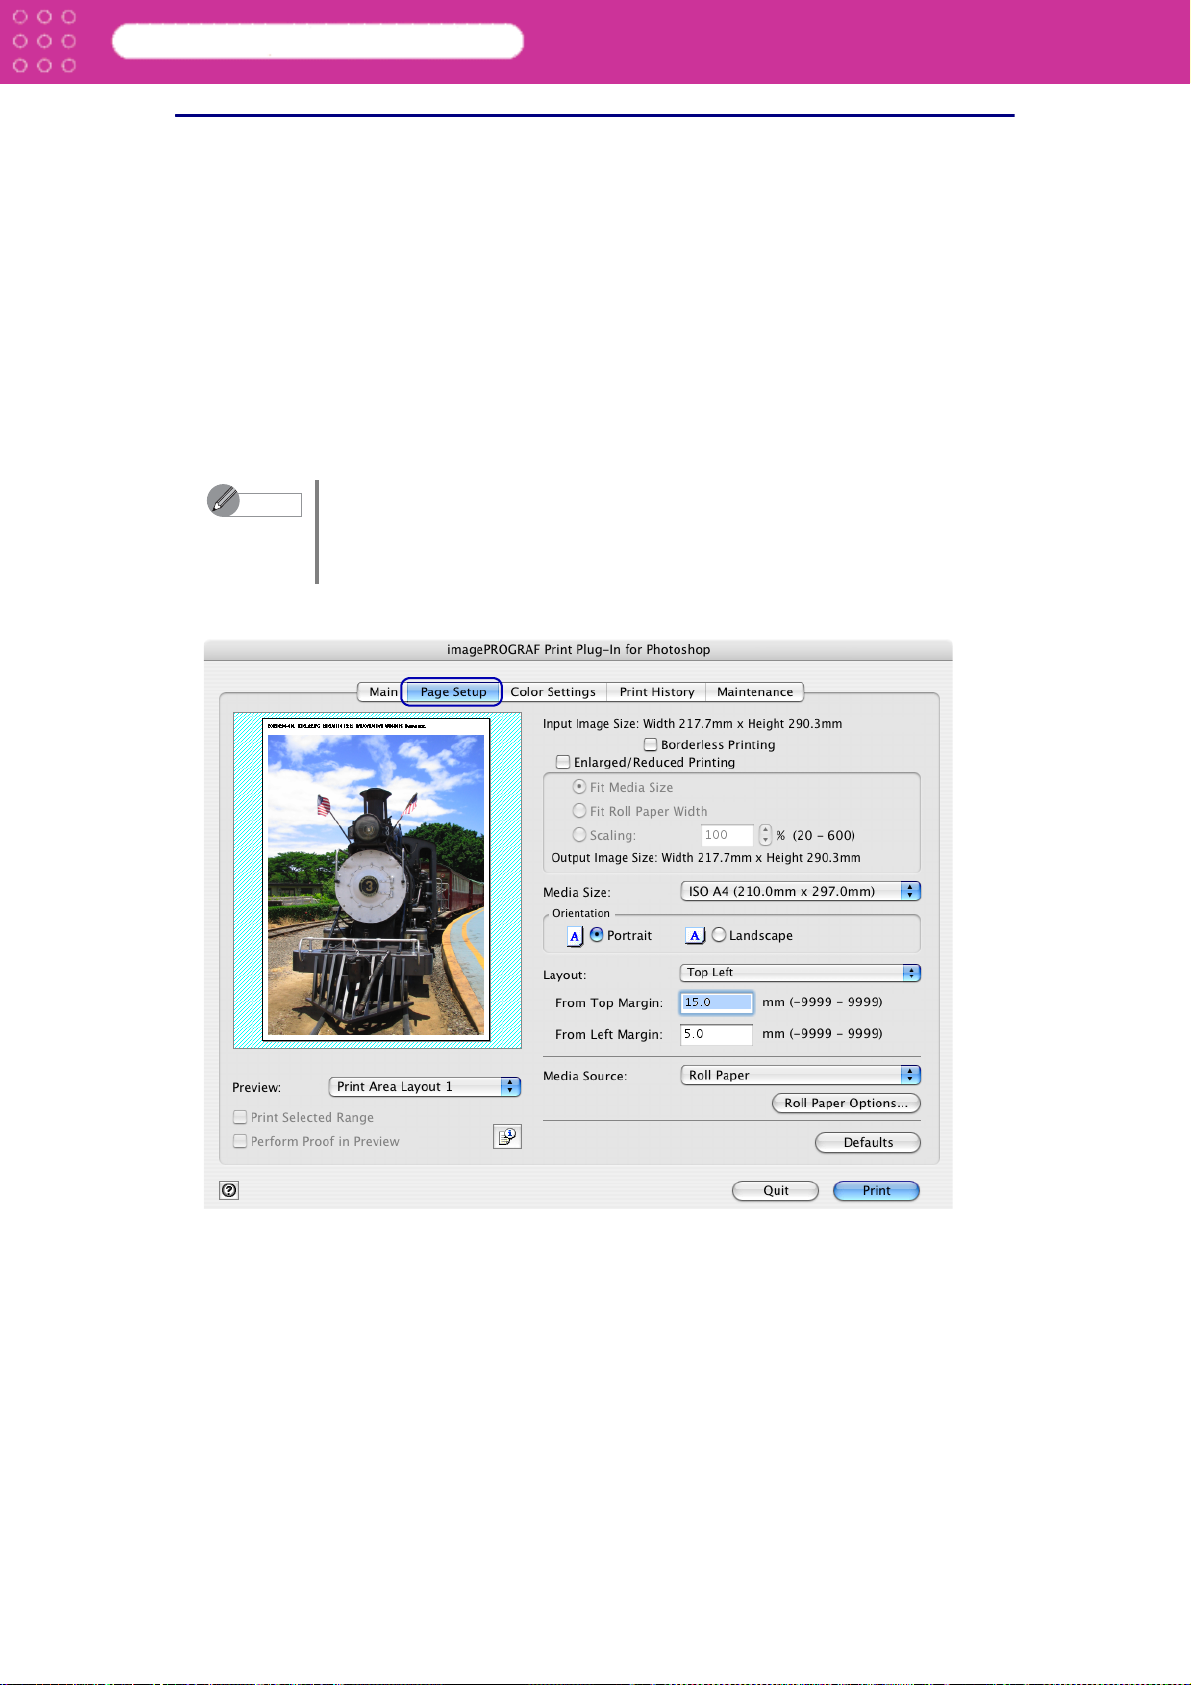
1. Display the Page Setup sheet.
When you need to print on the full width of roll media, refer to “Enlarge/
Reduce and Print Matching Width of Roll Paper” (p.3-23). When you do the
procedure below to print on roll media, the print job will match the size of the
output with the media selected with the Output Media Size setting.
3-20
Page 48

Print Plug-In for Photoshop
2. Select the size of the media that you want to print in Media Size.
Chapter 3 Utilize Print Plug-In to Print
Note
3. Select either Portrait or Landscape as the media orientation for the image in Orientation.
• The media sizes you can select differ with printers.
• This is not displayed when a checkmark is placed in Borderless Printing.
• This is not displayed when Fit Roll Paper Width is set in Enlarged/
Reduced Printing.
• The details of Media Size that you have set is saved even after closing
Print Plug-In.
3-21
Page 49

Print Plug-In for Photoshop
Chapter 3 Utilize Print Plug-In to Print
Note
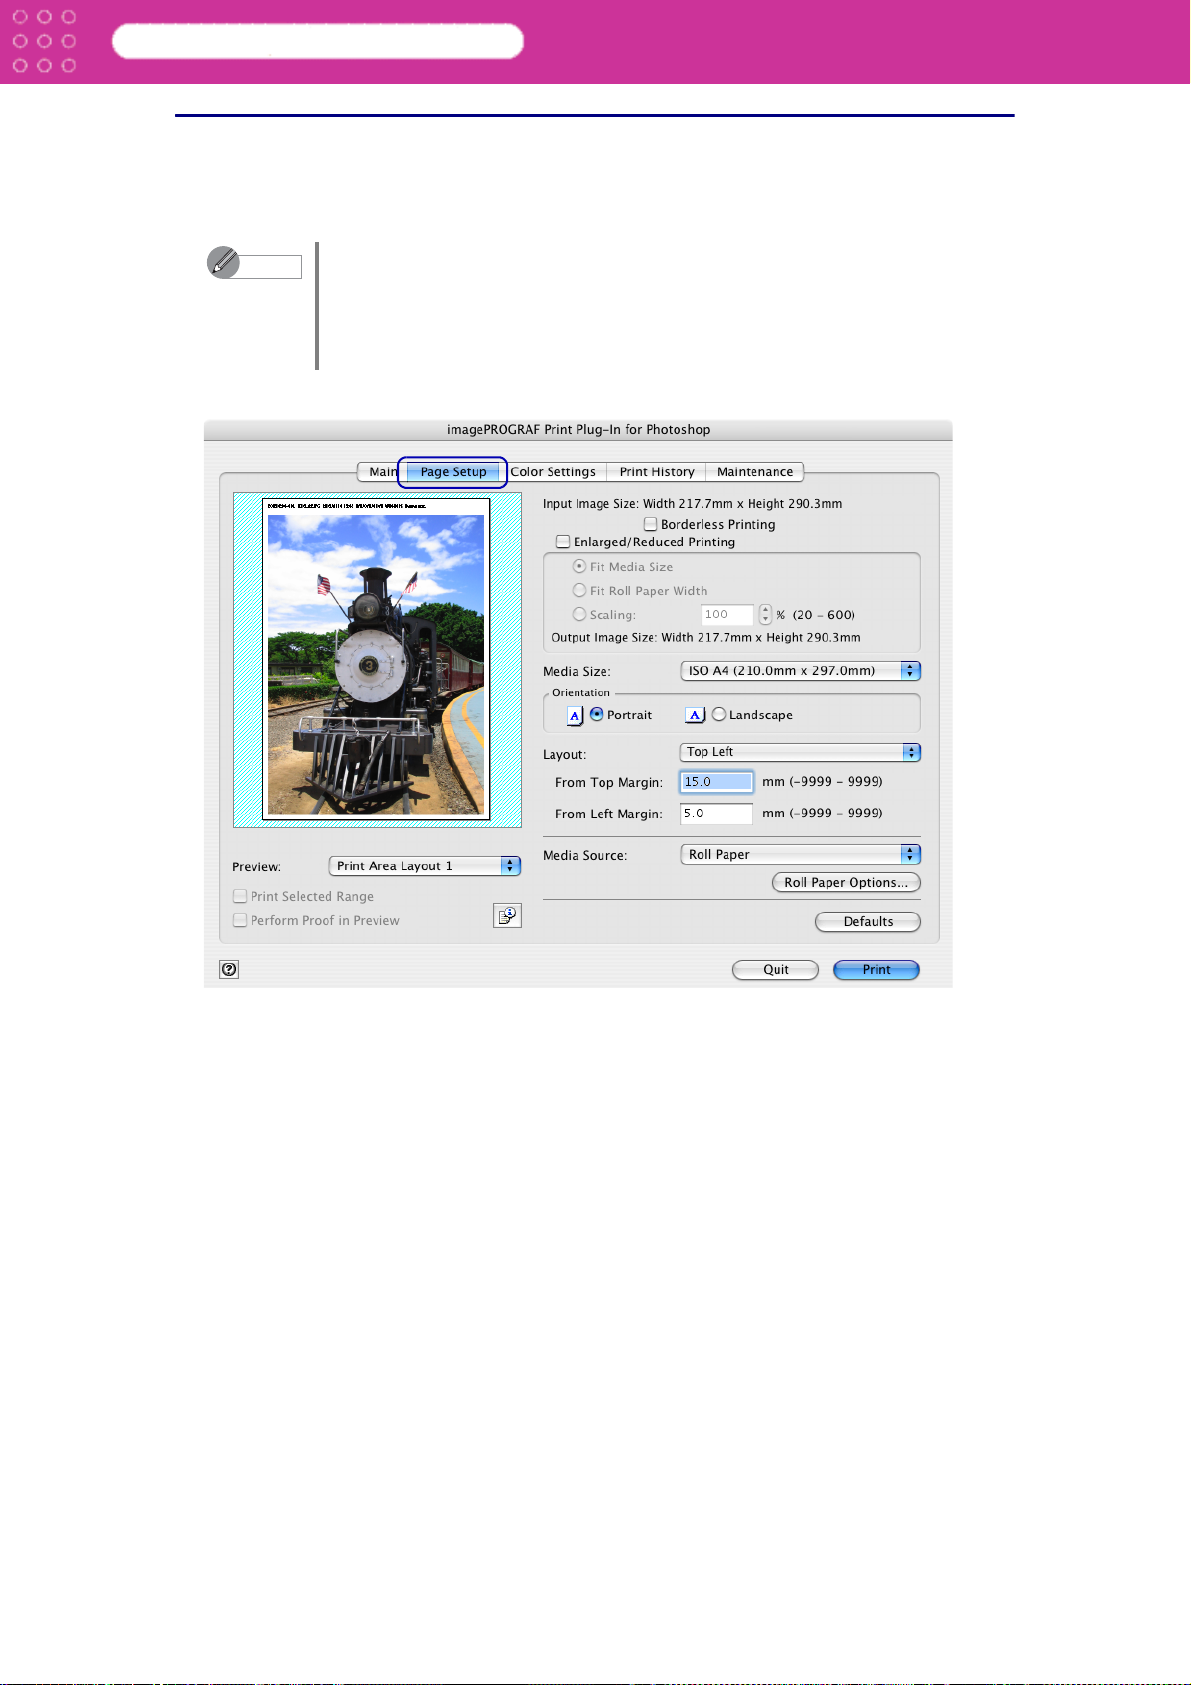
4. Place a checkmark in Enlarged/Reduced Printing.
• When you select Portrait, the image on the media prints as it appears on
the screen.
• When you select Landscape, the image on the media prints rotated 90
degrees.
Note
5. Select Fit Media Size.
This is not displayed when a checkmark is placed in Borderless Printing.
3-22
Page 50

Print Plug-In for Photoshop
6. Click the Print button.
Chapter 3 Utilize Print Plug-In to Print
The image prints filling the entire output media surface.
■ Enlarge/Reduce and Print Matching Width of Roll Paper
You can enlarge/reduce and print an image matching the width of the roll paper set in the printer
in W8400PG and W6400PG.
This is useful when you wish to print an image that covers the entire width of the roll paper.
Note
1. Display the Page Setup sheet.
Printing will not occur properly when a print roll is not set to the printer.
3-23
Page 51

Print Plug-In for Photoshop
2. Select Roll Paper in Media Source.
Chapter 3 Utilize Print Plug-In to Print
Note
3. Click the Roll Paper Options button.
The detailes of Media Source that you have set is saved even after closing
Print Plug-In.
3-24
Page 52

Print Plug-In for Photoshop
4. Set the roll paper options and click OK.
Setting Details
Roll Paper Width This selects the width of the roll paper set to the
Automatic Cutting Select either Yes, No or Print Cut Guideline to
No Spaces at Top or
Bottom (Conserve Paper)
Chapter 3 Utilize Print Plug-In to Print
printer.
activate automatic cutting.
When you place a checkmark here, you can print
without any margins at the top and bottom of an
image.
Note
5. Select either Portrait or Landscape as the media orientation for the image in Orientation.
• Refer to “Roll Paper Options Dialog Box” (p.2-10) for more information on
the Roll Paper Options dialog box.
• Click the Defaults button to return all of the roll paper option settings to
their defaults.
Note
• When you select Portrait, the image on the media prints as it appears on
the screen.
• When you select Landscape, the image on the media prints rotated 90
degrees.
3-25
Page 53

Print Plug-In for Photoshop
6. Place a checkmark in Enlarged/Reduced Printing.
Chapter 3 Utilize Print Plug-In to Print
Note
7. Select Fit Roll Paper Width.
This is not displayed when a checkmark is placed in Borderless Printing.
3-26
Page 54

Print Plug-In for Photoshop
8. Click the Print button.
Chapter 3 Utilize Print Plug-In to Print
The image prints covering the entire width of the roll paper.
■ Specify Scaling, Enlarge/Reduce and Print
You can specify scaling to enlarge/reduce an image and print.
This is useful when you wish to print an image at a specific size.
1. Display the Page Setup sheet.
3-27
Page 55

Print Plug-In for Photoshop
2. Select the size of the media that you want to print in Media Size.
Chapter 3 Utilize Print Plug-In to Print
Note
3. Select either Portrait or Landscape as the media orientation for the image in Orientation.
• The media sizes you can select differ with printers.
• This is not displayed when a checkmark is placed in Borderless Printing.
• This is not displayed when Fit Roll Paper Width is set in
Enlarged/Reduced Printing.
• The details of Media Size that you have set is saved even after closing
Print Plug-In.
3-28
Page 56

Print Plug-In for Photoshop
Chapter 3 Utilize Print Plug-In to Print
Note
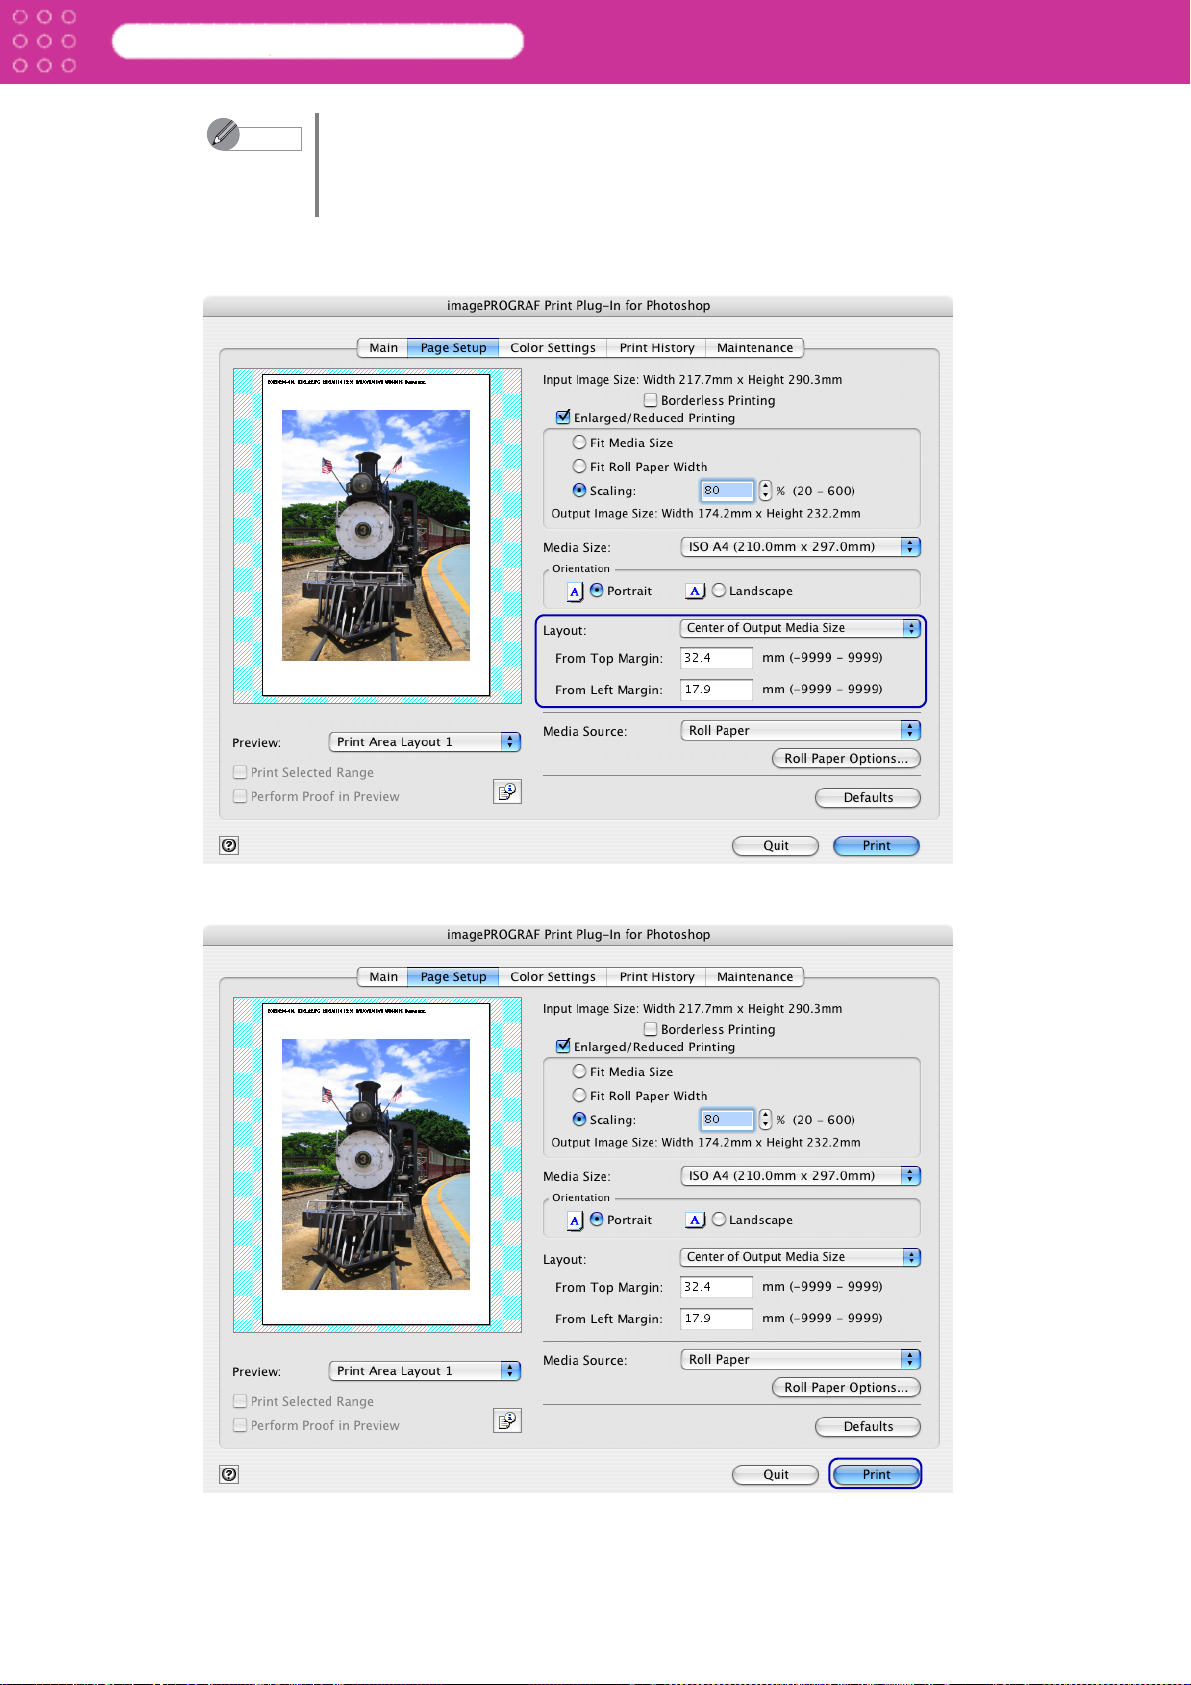
4. Place a checkmark in Enlarged/Reduced Printing.
• When you select Portrait, the image on the media prints as it appears on
the screen.
• When you select Landscape, the image on the media prints rotated 90
degrees.
Note
5. Select Scaling and input the scaling rate in numbers.
This is not displayed when a checkmark is placed in Borderless Printing.
3-29
Page 57
Print Plug-In for Photoshop
Chapter 3 Utilize Print Plug-In to Print
Note
6. Either drag the image on the Print Area Layout 1 or Print Area Layout 2 preview, or set
the print position Layout.
• You can specify scaling rate in intervals of 1%.
• You can specify a range between 20-600%
• The size of the width and height proportionally grow when the image is
enlarged/reduced.
7. Click the Print button.
Printing begins at the set scaling rate.
3-30
Page 58
Print Plug-In for Photoshop
Chapter 3 Utilize Print Plug-In to Print
Print with No Borders
You can use the borderless printing function to print without margins surrounding the image in
W8400PG and W6400PG.
Note
1. Display the Page Setup sheet.
• With some media borderless printing can be performed only between two
edges.
• To use the borderless printing function, the specified media must be set to
the printer.
For further information about the media types, read the printer manual.
3-31
Page 59

Print Plug-In for Photoshop
2. Select Roll Paper in Media Source.
Chapter 3 Utilize Print Plug-In to Print
Note
3. Select Borderless Printing.
The details of Media Source that you have set is saved even after closing
Print Plug-In.
3-32
Page 60
Print Plug-In for Photoshop
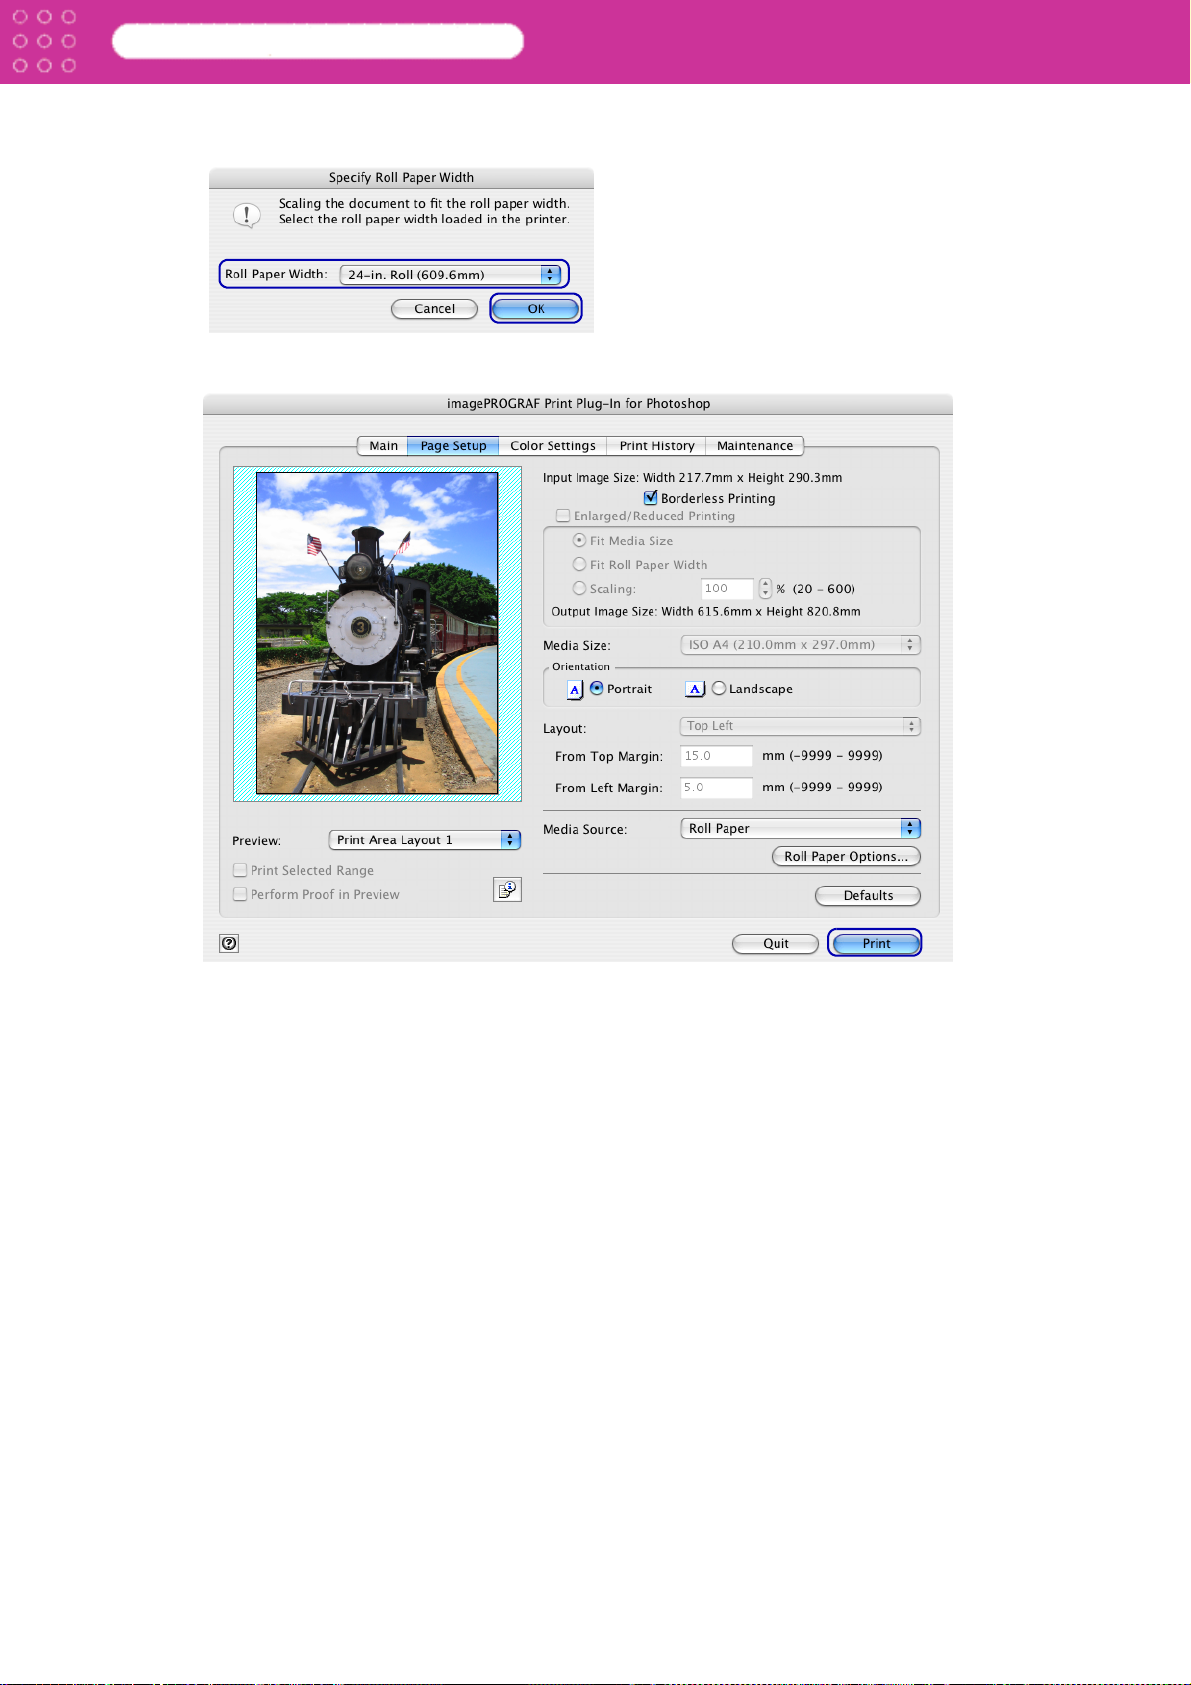
4. Select the width for roll paper set in the printer in Roll Paper Width in the Specify Roll
Paper Width dialog box, and click OK.
5. Click the Print button.
Chapter 3 Utilize Print Plug-In to Print
Borderless printing begins.
3-33
Page 61

Print Plug-In for Photoshop
Chapter 3 Utilize Print Plug-In to Print
Customize Media Settings
You can customize media settings in the W8400PG and W6400PG.
1. Display the Main sheet.
2. Select the media type that you wish to customize in Media Type.
3-34
Page 62
Print Plug-In for Photoshop
Chapter 3 Utilize Print Plug-In to Print
Note
3. Click the Set button.
• The media that you can select differs by printer.
• Always select media type that is actually set in the printer. When the media
you chose is different from the media set in the printer, you may not
receive the desired print results.
• With W8400PG and W6400PG, a may be displayed as a choice.
indicates that the media is determined to be inappropriate with the
currently selected ink type. Refer to “Changing the Ink Type” (p.2-14) to
change the ink type.
• The details of Media Type that you have set is saved despite closing Print
Plug-In.
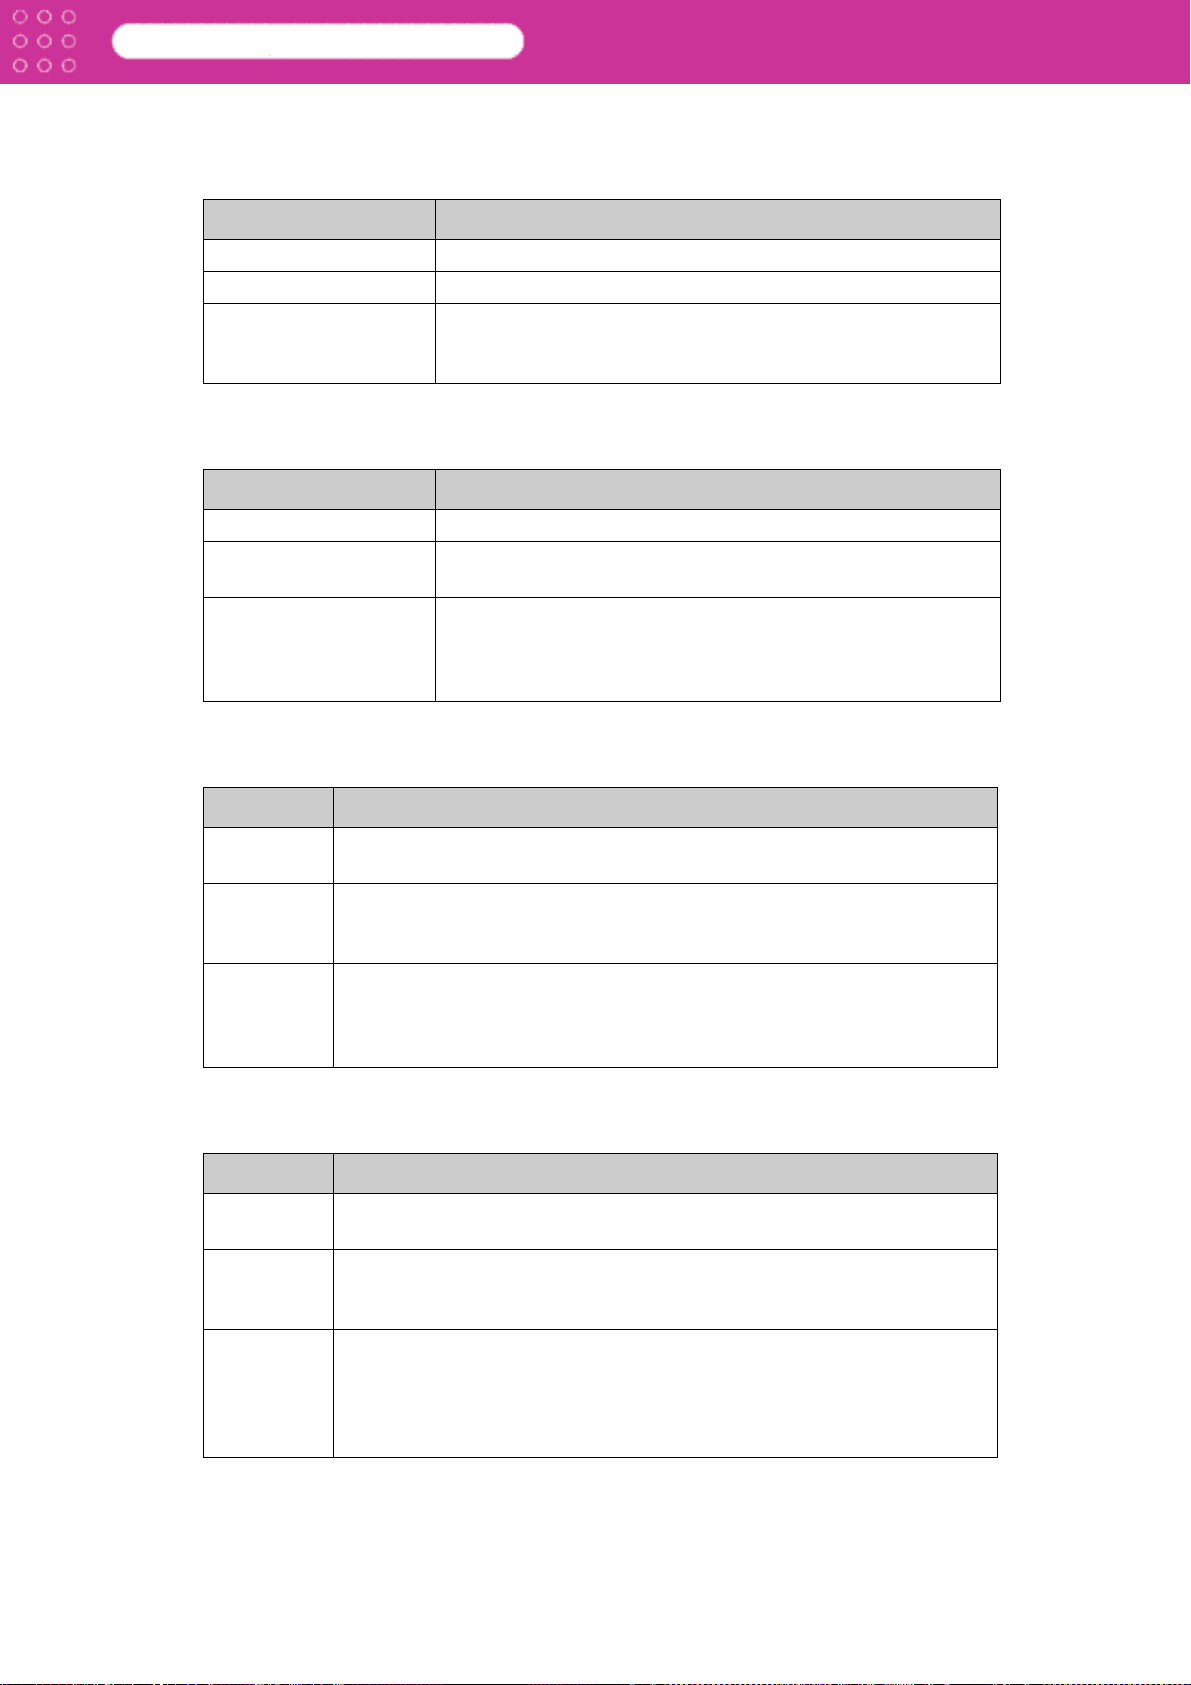
4. Perform the settings in the Media Detailed Settings and click OK.
1
2
3
4
5
6
7
8
3-35
Page 63
Print Plug-In for Photoshop
1 Drying Time Between Pages
This sets the wait time for the ink to dry between each completely printed sheet and the
output of the next sheet.
Setting Details
Printer Default The settings of the printer operating panel are applied.
None The paper is ejected immediately after printing.
30 sec., 1 min., 3 min.,
5 min., 10 min., 30
min., 60 min.
2 Drying Time Between Scans
This sets the wait time between line scans during printing.
Setting Details
Printer Default The settings of the printer operating panel are applied.
None The printing continues to the next line immediately after the
1 sec., 3 sec., 5 sec.,
7sec., 9 sec.
Chapter 3 Utilize Print Plug-In to Print
The sheet is ejected when the specified time after printing
has elapsed.
last line.
The printing continues to the next line after the set time.
• For Media Type that has problems, such as ink smears on
the page or colors that seem uneven during borderless
printing etc., increase the value for this setting.
3 Roll Paper Margin for Safety Near End Margin
This sets the length of the near end margin of the roll paper.
Setting Details
Printer
Default
5 mm Print at a standard size.
20 mm This setting sets the margin about 15 mm (in the feed direction) longer
4 Roll Paper Margin for Safety Far End Margin
This sets the length of the far end margin of the roll paper.
Setting Details
Printer
Default
5 mm Print at a standard size.
10 mm This setting sets the margin about 5 mm (in the feed direction) longer
The settings of the printer operating panel are applied.
• Select for Media Type that has no problem when printing with a
standard size margin.
than the standard margin for the media size. This is for Media Type that
has a strong tendency to curl, causing the printhead to scratch the
surface.
The settings of the printer operating panel are applied.
• Select for Media Type that has no problem when printing with a
standard size margin.
than the standard margin for the media size.
• When printing an image at the very end of the end margin, the cutter
touches the page before the ink has dried and dirties the printed
image.
3-36
Page 64

Print Plug-In for Photoshop
5 Media Thickness
This sets the media thickness.
Setting Details
Chapter 3 Utilize Print Plug-In to Print
Printer
Default
Normal For media that is of a standard thickness and has no problem printing.
Thick Select this when the media set is thick.
Thin Select this when the media set is thin.
6 Vacuum Strength
This set the suction volume to match the media.
Setting Details
Printer
Default
Strongest The media suction is somewhat strong.
Strong The media suction is somewhat strong.
Normal The media suction is at normal strength.
Weak The media suction is weak.
The settings of the printer operating panel are applied.
The settings of the printer operating panel are applied.
• Select this when the media is not pulled down well by the suction.
• Select this when the media is not pulled down well by the suction.
• Select this when there is no problem with the media suction.
• Select this when the paper jams or when multiple pages are to be
pulled down by suction.
7Cut Speed
This selects the auto cut speed.
Setting Details
Printer
Default
Normal This performs auto cut at a normal speed.
Fast This performs auto cut at high speed.
8 Smear Correction
Select this to turn on the smear correction function.
Setting Details
Printer
Default
Off Smear correction is turned off.
On Smear correction is turned on.
The settings of the printer operating panel are applied.
• Select this when there is no problem with auto cut.
• Select this when the media is not cut well.
The settings of the printer operating panel are applied.
• Select this when part of the image is yellow, the entire image is
smeared or the image color balance is different.
3-37
Page 65

Print Plug-In for Photoshop
Chapter 3 Utilize Print Plug-In to Print
Utilize Print History
When you perform various settings and print in Print Plug-In, those settings are saved as print
history. You can apply print history to other images, or export and import as files. You can store
often-used print history under a specified name in print preferences.
Note
You can do the following things using print history.
“Confirm Print History Details” (p.3-38)
“Apply Print History to an Image” (p.3-40)
“Store Print History to Print Preferences” (p.3-41)
“Delete Print History” (p.3-44)
“Export Print History from Print Preferences” (p.3-46)
“Import Print History to Print Preferences” (p.3-48)
“Delete Print History from Print Preferences” (p.3-50)
“Set Information to Print with Image” (p.3-52)
You can save up to 100 print history items. All items over 100 are deleted in
chronological order.
■ Confirm Print History Details
You can confirm the print history details.
1. Display Print History sheet.
3-38
Page 66

Print Plug-In for Photoshop
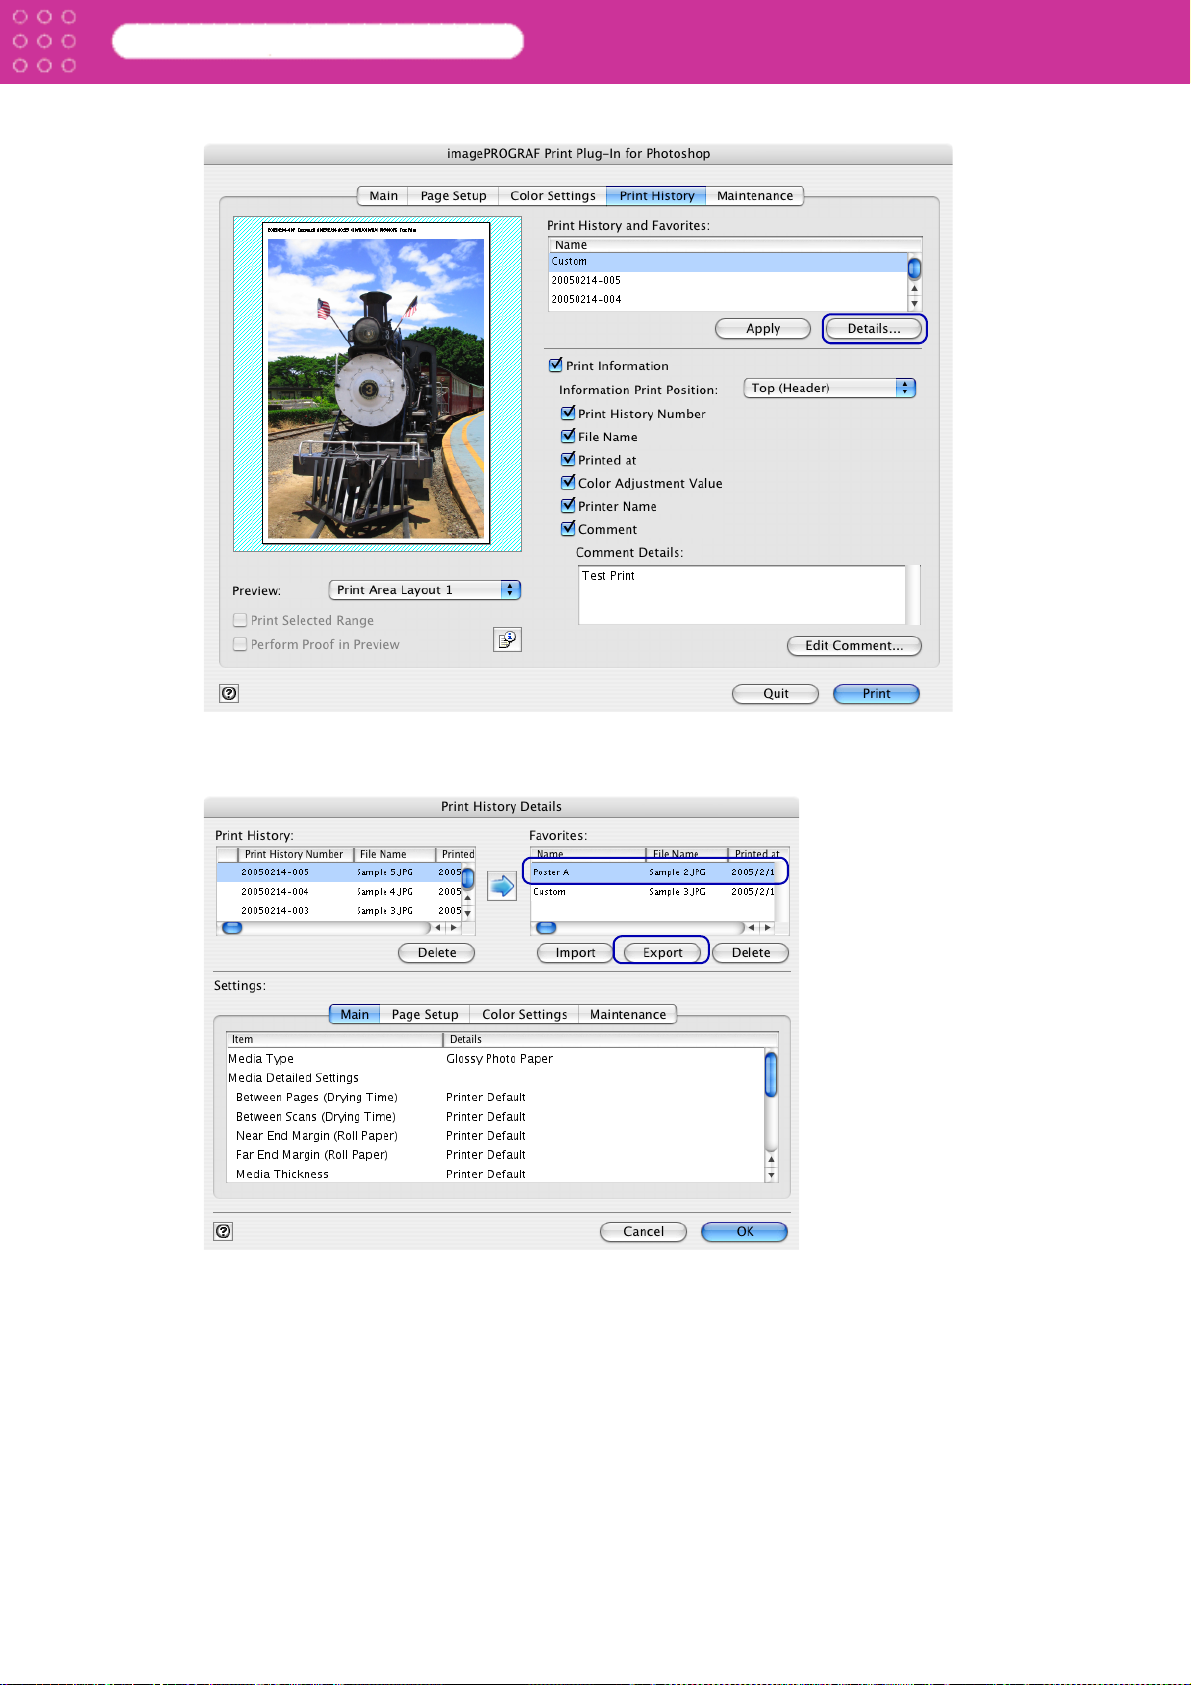
2. Click the Details button.
Chapter 3 Utilize Print Plug-In to Print
3. Select the print history you wish to check the details of, from either Print History or
Favorites in the Print History Details dialog box.
3-39
Page 67

Print Plug-In for Photoshop
4. Check the print history details in Settings, and click OK.
Chapter 3 Utilize Print Plug-In to Print
Note
• You can display the print history details by switching the sheets.
• The Maintenance sheet is displayed only with W8400PG and W6400PG.
■ Apply Print History to an Image
You can use previous print history, and apply it to an image.
1. Display the Print History sheet.
2. If required, check the print history details.
Note
Refer to “Confirm Print History Details” (p.3-38) for more information.
3-40
Page 68

Print Plug-In for Photoshop
Chapter 3 Utilize Print Plug-In to Print
3. Select the print history you wish to apply from Print History and Favorites, and click the
Apply button.
Note
Print history that has been stored in print preferences is displayed at the top
of Print History and Favorites.
■ Store Print History to Print Preferences
You can store often-used print history to print preferences. Not only can you store the print
history stored under a different name in print preferences, you can also find it with ease.
Note
1. Display the Print History sheet.
You can store up to 50 print history items to print preferences.
3-41
Page 69

Print Plug-In for Photoshop
2. Click the Details button.
Chapter 3 Utilize Print Plug-In to Print
3. Select the print history you wish to store in print preferences from Print History in the Print
History Details dialog box, and check the print history details in Settings.
3-42
Page 70

Print Plug-In for Photoshop
4. Select the print history you wish to store in print preferences from Print History and click the
button.
Chapter 3 Utilize Print Plug-In to Print
5. In the Add Favorites dialog box input the name of the print history in Name, input a
comment in Comment, and click OK.
3-43
Page 71

Print Plug-In for Photoshop
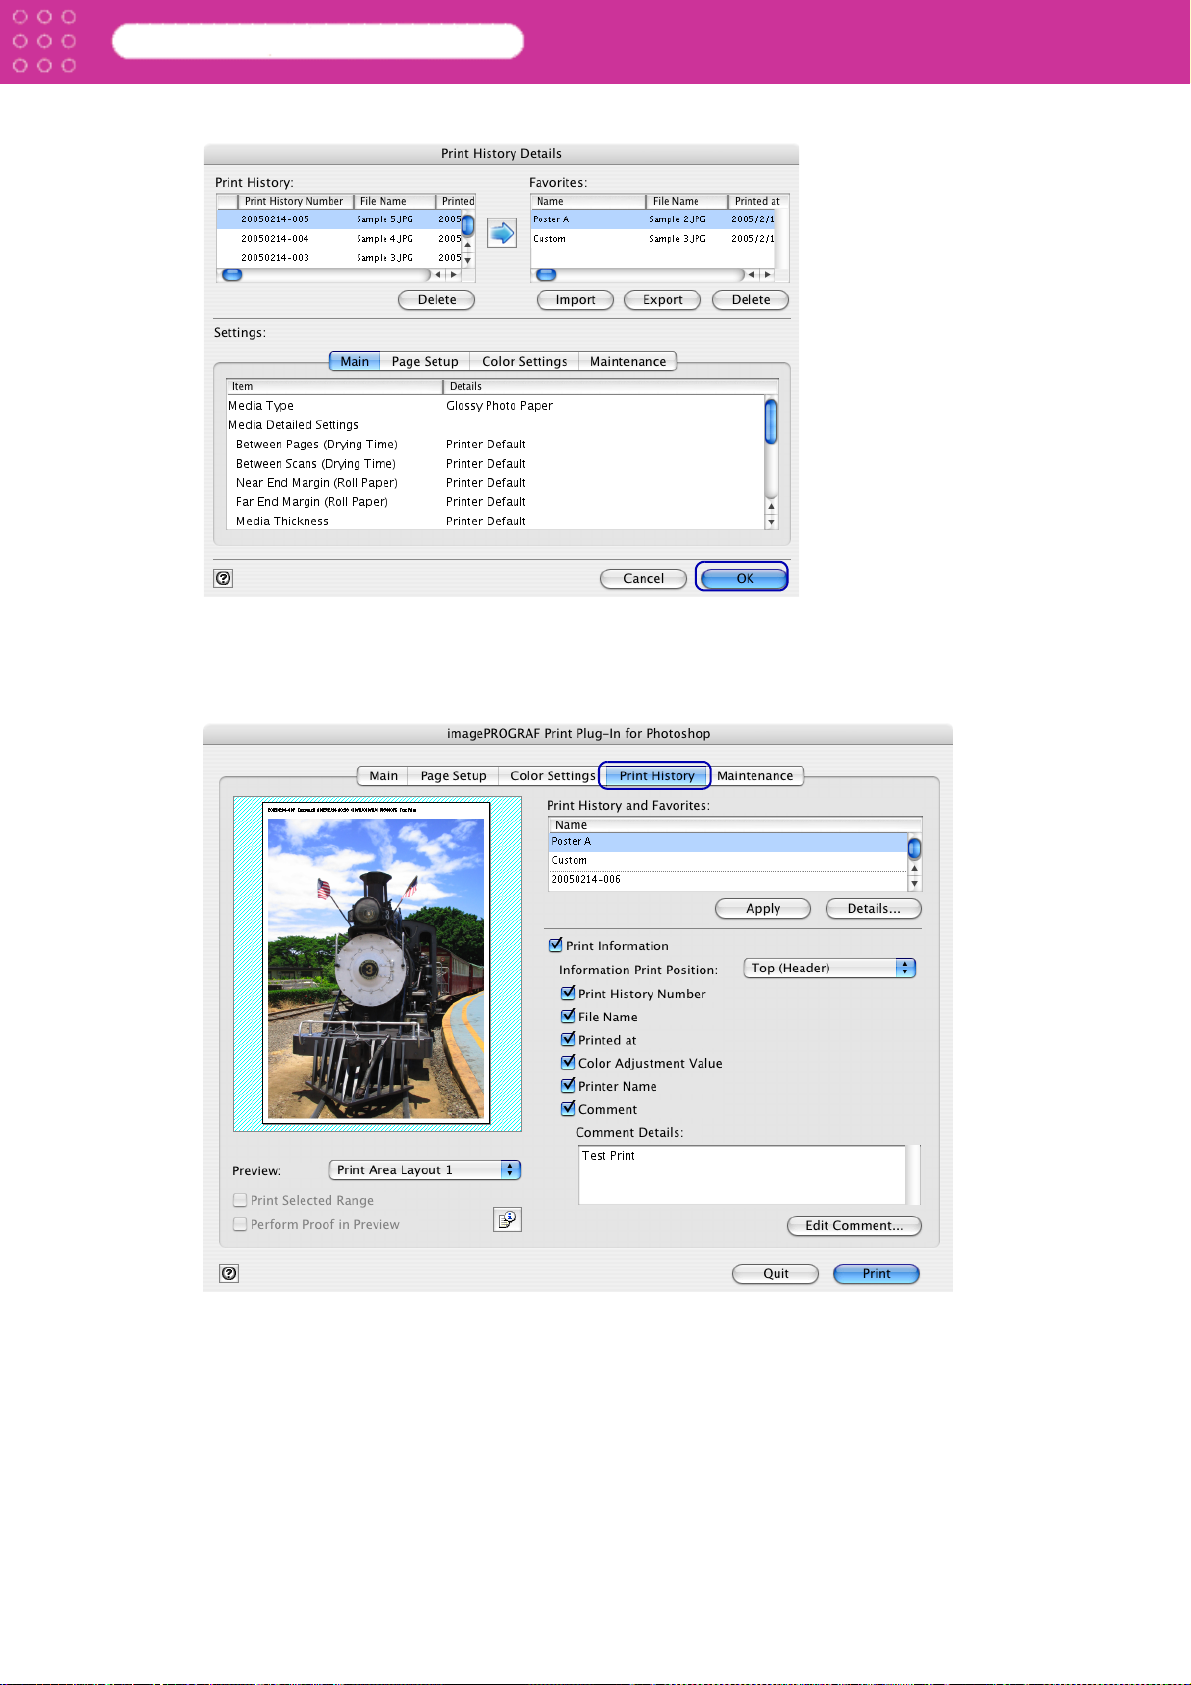
6. Click OK to close the Print History Details dialog box.
Chapter 3 Utilize Print Plug-In to Print
■ Delete Print History
You can delete print history. Be aware that you cannot undo deletions of print history.
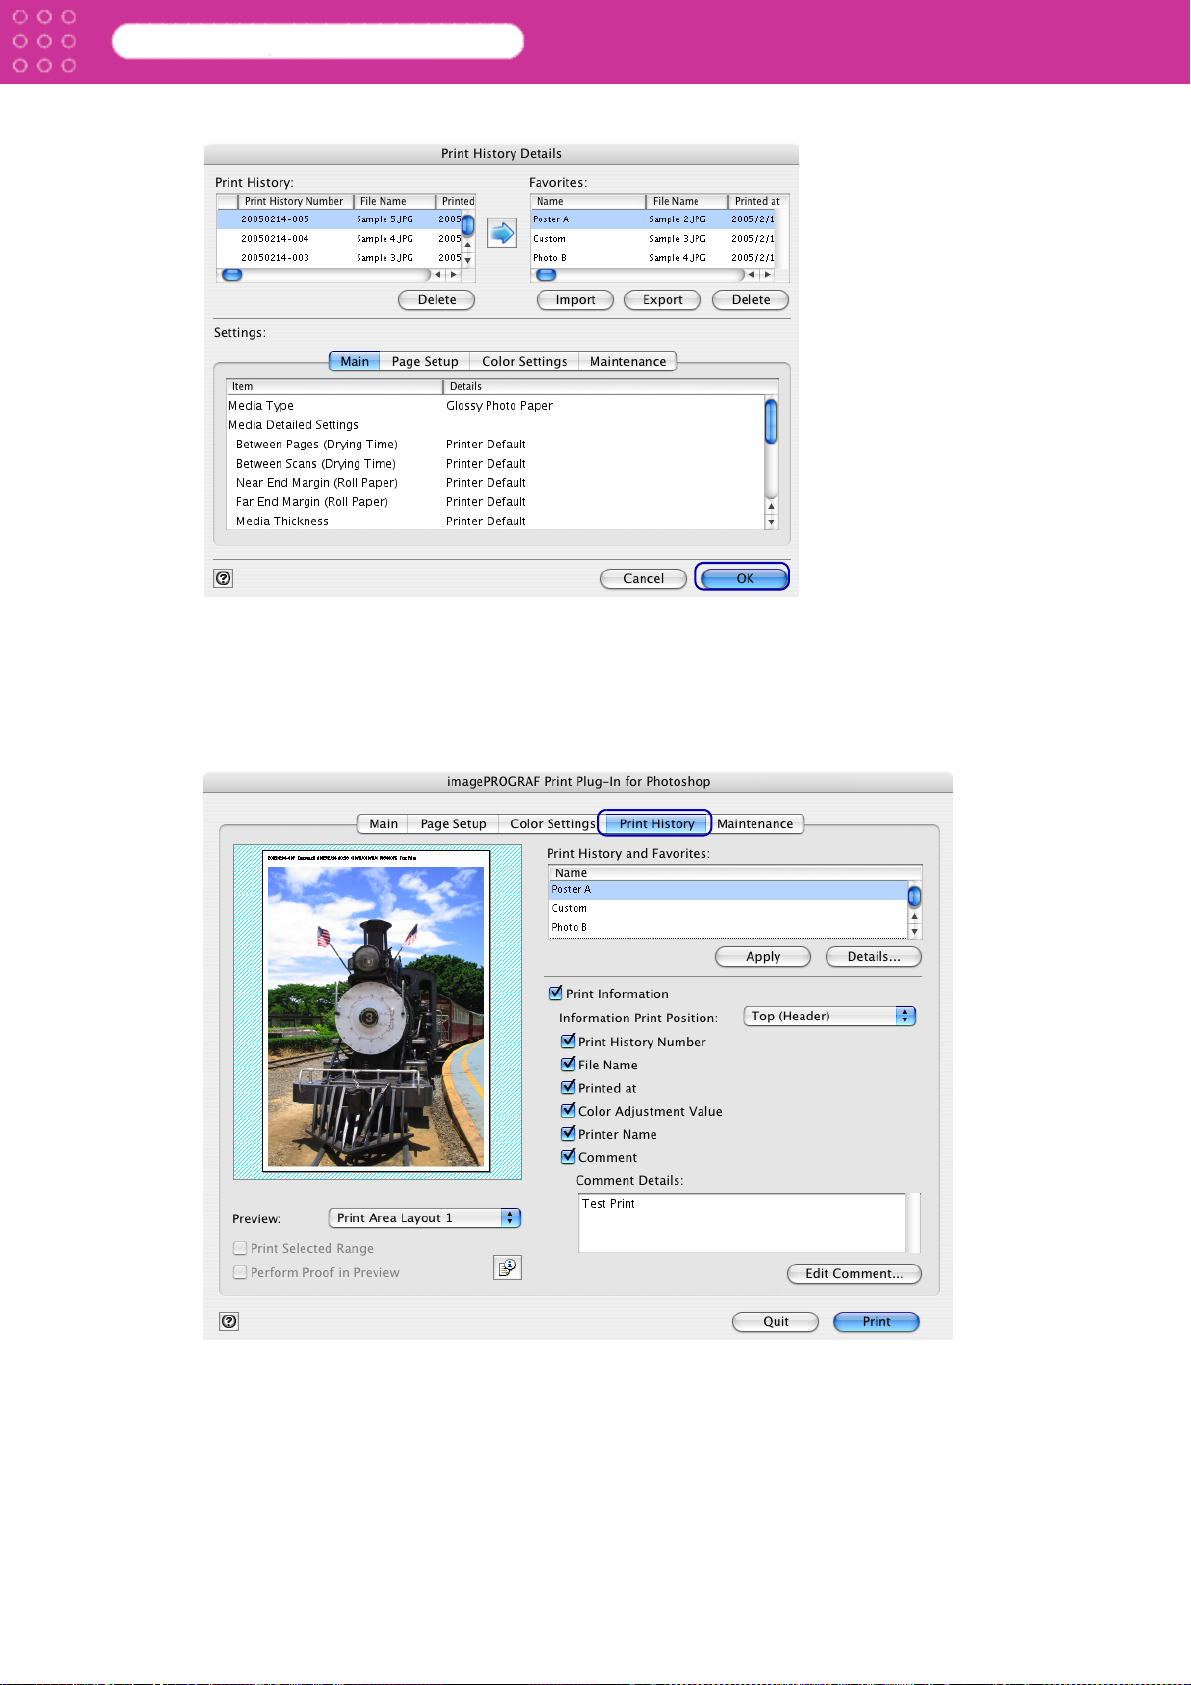
1. Display the Print History sheet.
3-44
Page 72

Print Plug-In for Photoshop
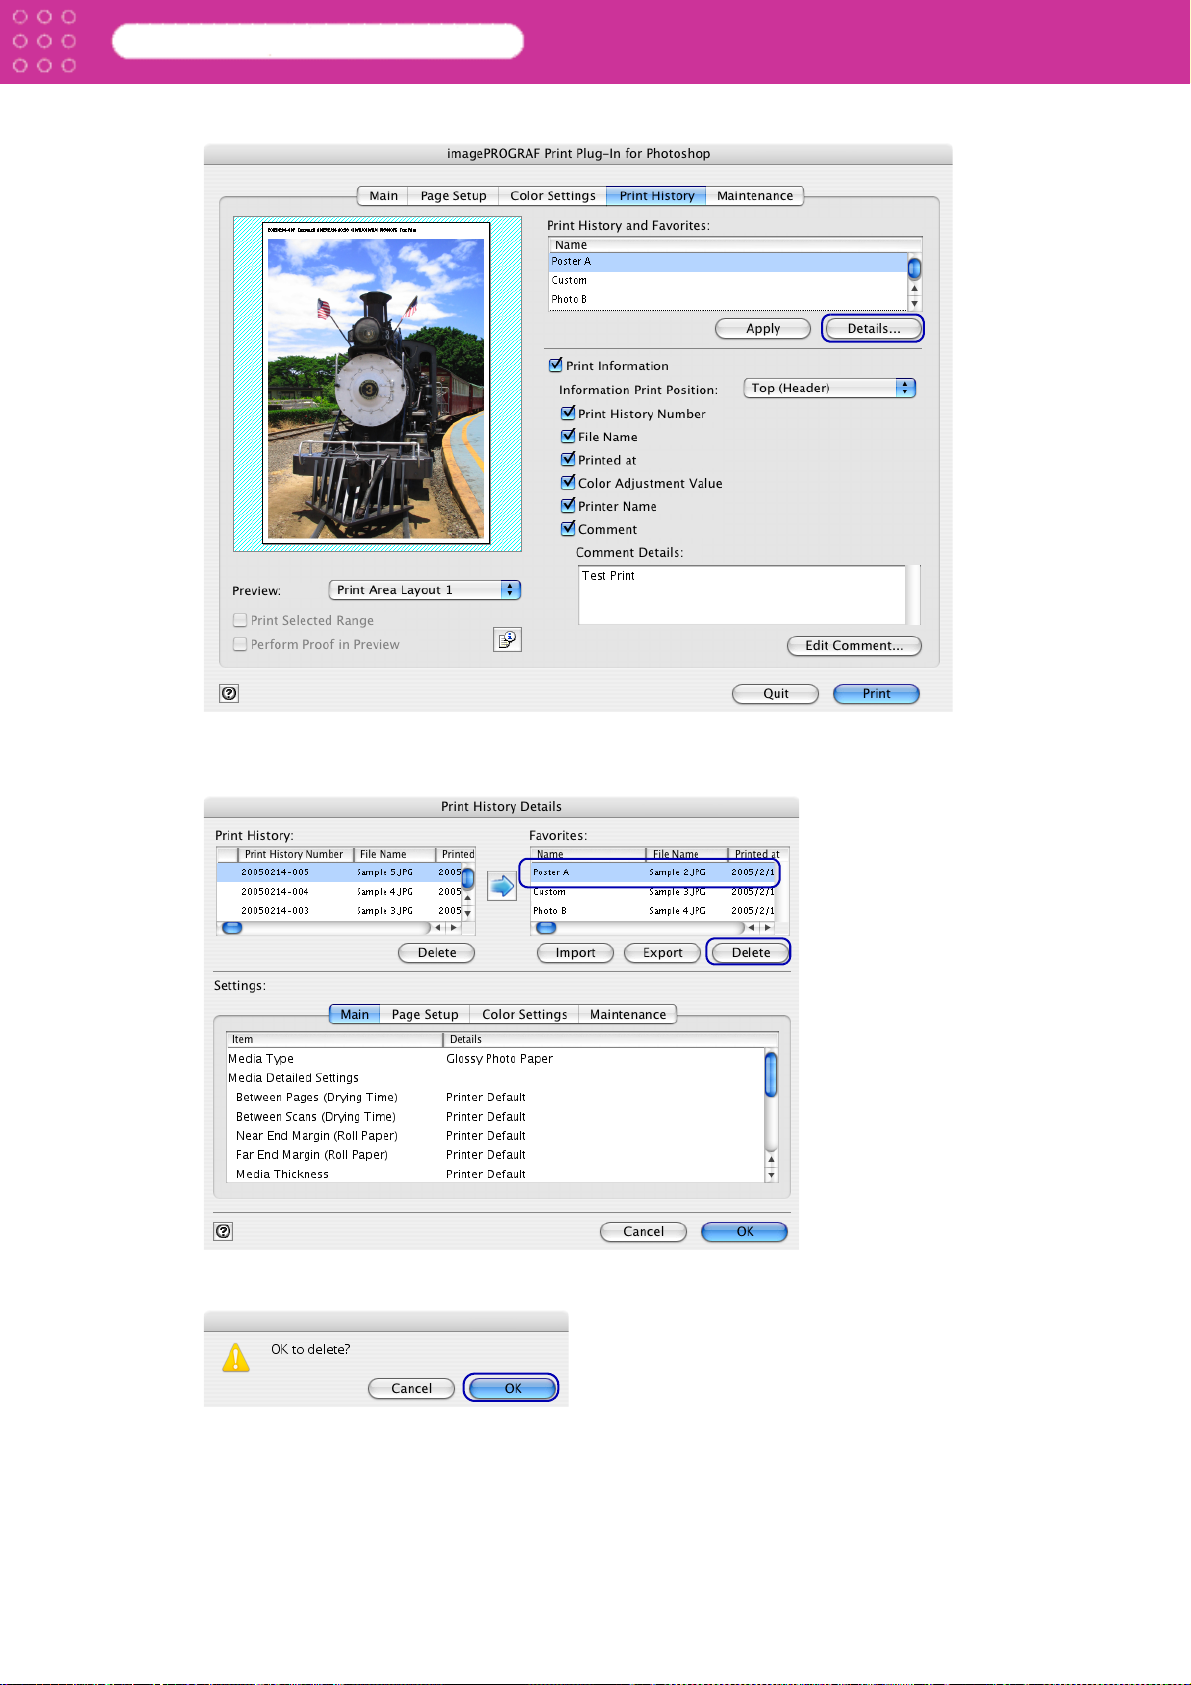
2. Click the Details button.
Chapter 3 Utilize Print Plug-In to Print
3. Select the print history you wish to delete from Print History in the Print History Details
dialog box, and click the Delete button.
4. Click OK.
The print history is deleted.
3-45
Page 73

Print Plug-In for Photoshop
5. Click OK to close the Print History Details dialog box.
Chapter 3 Utilize Print Plug-In to Print
■ Export Print History from Print Preferences
You can export print history stored in print preferences as a file.
1. Display the Print History sheet.
3-46
Page 74
Print Plug-In for Photoshop
2. Click the Details button.
Chapter 3 Utilize Print Plug-In to Print
3. Select the print history you wish to export from Favorites in the Print History Details dialog
box, and click the Export button.
4. Input the print history file name in Save Under a Different Name in the Save: Print History
Save File, and click the Save button.
3-47
Page 75
Print Plug-In for Photoshop
5. Click OK to close the Print History Details dialog box.
Chapter 3 Utilize Print Plug-In to Print
■ Import Print History to Print Preferences
You can import print history in file format and store it to print preferences.
1. Display the Print History sheet.
3-48
Page 76

Print Plug-In for Photoshop
2. Click the Details button.
Chapter 3 Utilize Print Plug-In to Print
3. Click the Import button in the Print History Details dialog box.
4. Select the print history you wish to import in the Open dialog box, and click the Open button.
The print history is imported.
Note
• The print history file name suffix is *.pjb.
• You cannot import a print history file exported from a different OS in Print
Plug-In.
• You cannot import a print history file exported from a different printer in
Print Plug-In.
3-49
Page 77
Print Plug-In for Photoshop
5. Click OK to close the Print History Details dialog box.
Chapter 3 Utilize Print Plug-In to Print
■ Delete Print History from Print Preferences
You can delete print history store to print preferences. You cannot store more than 50 print
history items in print preferences. When you would like to store more, delete print history that is
not needed.
1. Display the Print History sheet.
3-50
Page 78
Print Plug-In for Photoshop
2. Click the Details button.
Chapter 3 Utilize Print Plug-In to Print
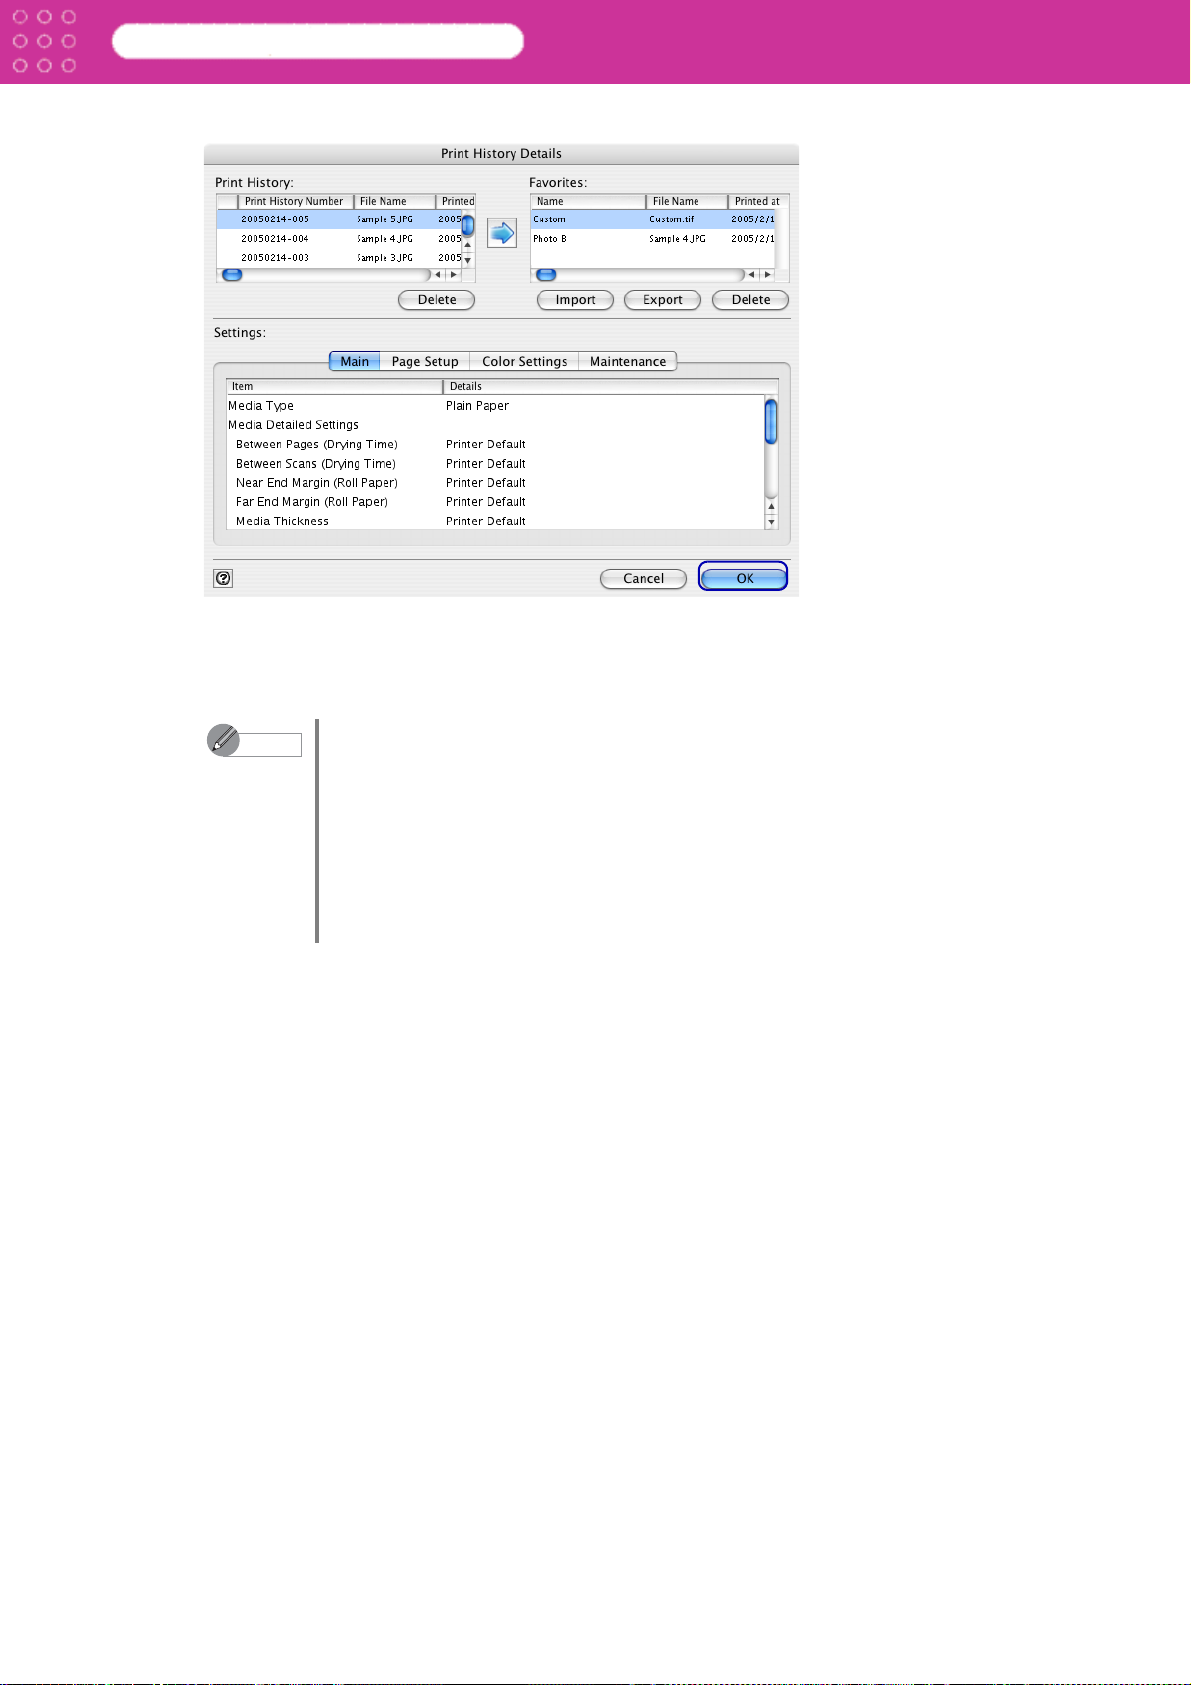
3. Select the print history you wish to delete from Favorites in the Print History Details dialog
box, and click the Delete button.
4. Click OK.
The print history is deleted from Favorites.
3-51
Page 79
Print Plug-In for Photoshop
5. Click OK to close the Print History Details dialog box.
Chapter 3 Utilize Print Plug-In to Print
■ Set Information to Print with Image
You can print information with an image that is related, such as the file name and the time and
date.
Note
• When you use the borderless printing function to print, the information will
not be printed. Refer to “Print with No Borders” (p.3-31) for more
information.
• When the printed information is too long as does not fit on the media, a
break will appear in the printed information.
• The information may print on the image data with some media sizes,
enlargement rates and print position values.
• When Keep Media Size is set to ON on the printer, a portion of bottom of
the print data is not printed.
3-52
Page 80

Print Plug-In for Photoshop
1. Display the Print History sheet.
Chapter 3 Utilize Print Plug-In to Print
2. Place a checkmark in Print Information.
3-53
Page 81

Print Plug-In for Photoshop
3. Select the position where you wish to print the information in Information Print Position.
Chapter 3 Utilize Print Plug-In to Print
4. Place a checkmark in the information you wish to print.
3-54
Page 82

Print Plug-In for Photoshop
5. When you wish to edit the comment, click the Edit Comment button.
Chapter 3 Utilize Print Plug-In to Print
Note
When you do not wish to edit the comment, move to step 7.
6. Input the comment in the Edit Comment dialog box, and click OK.
3-55
Page 83

Print Plug-In for Photoshop
7. Click the Print button.
Chapter 3 Utilize Print Plug-In to Print
Comments are printed with images.
3-56
Page 84

Print Plug-In for Photoshop
Index
Index
Numerics
16bit, 3-14
A
About Button, 2-8
AdobeRGB, 3-14
Apply, 2-13, 3-41
Area, 3-2
B
Borderless Printing, 2-8, 3-31, 3-32
Brightness, 2-11
C
Changing the Ink Type, 2-14
Close Plug-in After Printing, 2-7
Color Matching, 3-12
Color Settings, 2-11, 3-8
Contrast, 2-11, 2-12
Copies, 2-7
Cyan, 2-11
D
Defaults Button, 2-8, 2-11, 2-12
Delete Print History from Print
Preferences, 3-50
Maintenance, 2-13
Matching Method, 2-7, 3-13
Media Detailed Settings, 3-35
Media Size, 2-9
Media Source, 2-10
Media Type, 2-5
O
Orientation, 2-9
Output Profile, 2-7, 3-12, 3-18
P
Page Setup, 2-8, 2-11, 3-20, 3-31
Perform Proof in Preview, 2-3
Plug-In, 2-6
Preview, 3-1
Print, 2-3, 2-4, 3-1
Print Area, 3-2
Print History, 2-12, 3-38
Print History and Favorites, 2-12
Print History Details, 2-13, 2-14, 3-38
Print Information, 2-13, 3-53
Printer Output Resolution and Pass, 2-6
Q
Quit, 2-4
E
Enlarged/Reduced Printing, 2-8, 3-20
Export, 2-15, 3-47
F
Favorites, 2-15
Fit Media Size, 3-22
G
Gray Adjustment, 2-12
H
Help, 2-4
I
Image, 3-3
Image Properties, 2-3
Import, 2-15
Input Bit, 2-6
Input Image Size, 2-8
Input Resolution to Plug-in, 2-6
Install, 1-3
L
Layout, 2-9
Layout 1, 3-1
Layout 2, 3-2
R
Range, 2-3
Roll Paper Options, 2-10
S
Saturation, 2-11, 2-12
Select Printer, 2-5
Selected, 2-3
Settings, 2-15
Start (Print Plug-In), 1-6
Store Print History to Print Preferences, 3-41
Stored in print preferences, 2-15
U
Uninstall, 1-8
Y
Yellow, 2-11
M
Magenta, 2-11
Main (sheet), 2-2, 2-5, 3-4, 3-15, 3-18
Index-1
 Loading...