

Canon imagePROGRAF W8200 Network Manual

Copyright ©2003 Canon Inc. all rights reserved.
• Unauthorized transfer or duplication of all or any part of this document is prohibited.
• The content of this document is subject to change without notice.
• Every effort has been made to ensure that the information contained in this guide is
correct. If any error or omission is found, contact us directly or an authorized Canon
representative.
• Canon is not responsible for any damages, direct or indirect, arising from or related to
the use of this printer.
Trademarks
• Canon and the Canon logo, Page Composer are registered trademarks or trademarks
of Canon Inc.
•Microsoft
Microsoft Corporation in the United States and/or other countries.
• Apple, AppleTalk, EtherTalk, LocalTalk, and Macintosh are trademarks of Apple
Computer, Inc. in the United States.
• IBM is a trademark of the IBM Corporation in the United States.
•NetWare
and/or other countries. NDS, NDPS, NLM, and Novell Client are trademarks of Novell,
Inc. in the United States.
• Ethernet is a trademark of the Xerox Corporation in the United States.
• Netscape, Netscape Communicator, and Netscape Navigator are trademarks of
Netscape Communications Corporation.
• Other brand and product names in this document may be trademarks or registered
trademarks of their respective companies.
®
, Windows®, Windows NT®, and MS-DOS® are registered trademarks of
®
and Novell are registered trademarks of Novell, Inc., in the United States

About These Manuals
These manuals are provided for your reference to ensure safe, reliable operation of the W8200
printers. Read them as required to achieve maximum performance with the W8200 printer.
When you open the package ...
Ð
SETTING UP THE PRINTER
Setup Guide
• Making sure that you have
everything
• Setting up the printer
• Loading paper
• Confirming printer operation
• Installing the printer driver
(TCP/IP, USB, IEEE1394
connection)
Mount the User Manuals CD-ROM in your computer’s CDROM drive, then open the CD-ROM window in “My
Computer”. Open the [English] folder, then double-click the
PDF file to open.
NETWORK CONNECTIONS
Network Guide
User Manuals
CD-ROM
• TCP/IP detailed settings
• NetWare settings
• AppleTalk settings
D
ETAILS ABOUT USING THE PRINTER
User’s Guide
Î
C
o
p
y
r
i
g
h
t
Ver. 1.00 MMCD
QH7-0925
C
A
N
O
N
I
N
C
.
2
0
0
3
n
a
p
a
J
n
i
e
d
a
M
.
d
e
v
r
e
s
e
R
A
s
l
t
l
h
R
i
g
• Operation panel function
• Media that can be used and how
to load them
• Starting and canceling a print job
• How to handle printer errors
• How to maintain the printer
• More about options and
consumables
PRINTER DRIVER FUNCTIONS
Windows Help
– In Windows click the Help button on any
printer driver screen to open Help.
Macintosh Help
– On a Macintosh open the Help PDF file
on the provided User Software CD-ROM.
i

Notations About Text
Conventions
To ensure the safe and most efficient use of this printer, important
information is provided under the headings listed below. Before you use this
guide, make sure that you understand what these headings mean and
remember the important information described under these headings.
Warning
z Failure to follow these instructions could result in fatal or serious injury.
Always remember and follow the guidelines and advice described under
this heading to ensure your own safety and the safety of other people
working around the printer.
Caution
z Failure to follow these instructions could lead to mistakes in the use of
printer and result in minor injury or serious damage to the printer. Always
remember and follow the guidelines and advice described under this
heading to ensure safe use of the printer.
Important
z Instructions and guidelines for operation of the printer provided under this heading
Note
z Information under this heading includes tips and hints that will help you avoid
describe restrictions and other important information which if ignored could cause
minor damage to the printer or other equipment or result in the loss of valuable
data. Always remember and follow the guidelines and advice under this heading to
avoid mistakes in procedure.
minor problems and use the printer more efficiently.
ii
Screen Examples
The screenshots provided as examples in operational procedures may be
slightly different, depending on the operating system in use.
A button or item to press or select in a procedure appears enclosed with a
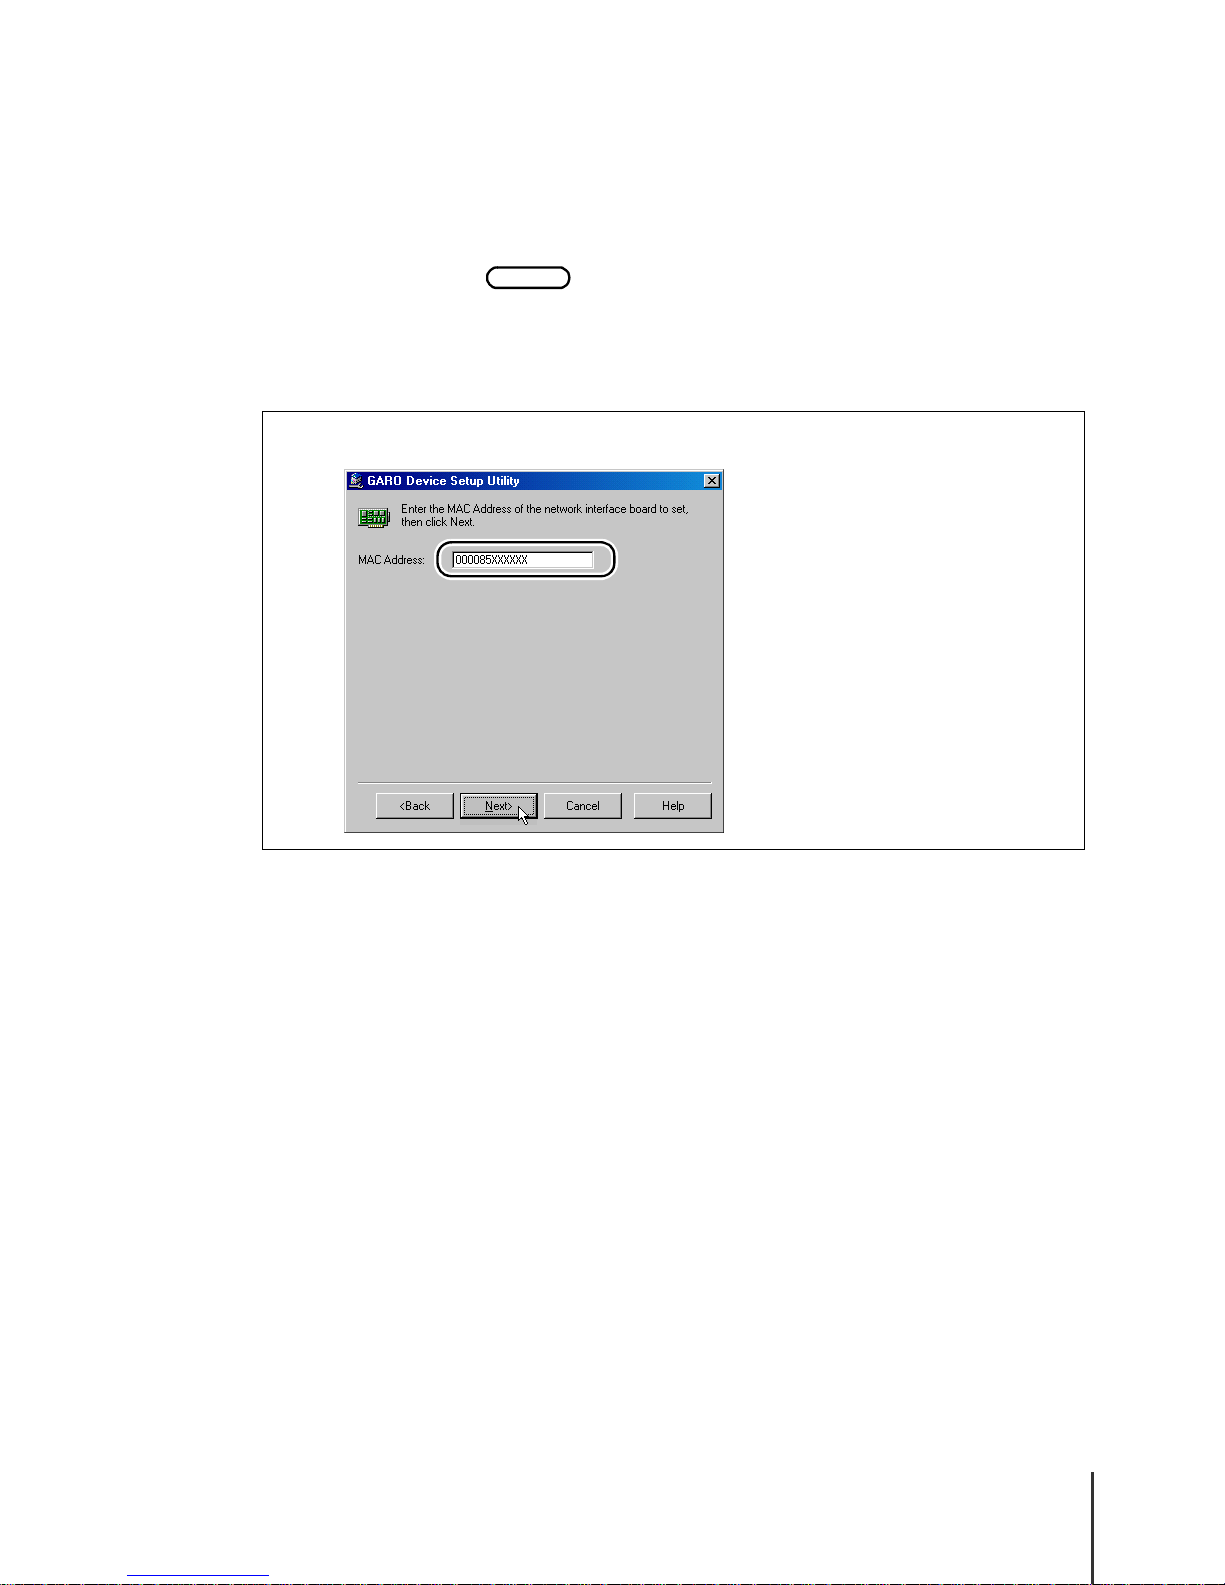
circular mark in the screen sample. If a procedure requires more
than one button press or selection, all the items are marked, so be sure to
select them as described in the procedure.
3
Enter the MAC address into the MAC Address box then click the Next button.
iii

Abbreviations
Throughout this document the following abbreviations are used in text.
•Microsoft
•Microsoft
•Microsoft
•Microsoft
•Microsoft
•Microsoft
•Microsoft
• The term “GARO”, used in the name of this printer driver, is an acronym
Legal Notice
®
Windows® Millennium Edition is abbreviated as “Windows
Me”
®
Windows® 98 is abbreviated as “Windows 98”
®
Windows® 95 is abbreviated as “Windows 95”
®
Windows® XP is abbreviated as “Windows XP”
®
Windows® 2000 is abbreviated as “Windows 2000”
®
Windows NT® is abbreviated as “Windows NT”
®
Windows® is abbreviated as “Windows”
for “Graphic Arts Language with Raster Operations”, a printer language
of creating raster images.
• It is illegal to reproduce currency, bills, negotiable securities and other
documents prohibited by law. Reproduction of such items may be subject
to criminal prosecution.
• It is illegal to reproduce legal certificates, licenses, travel tickets, and
certain public and private documents prohibited from reproduction by
law. Reproduction of such items may be subject to criminal prosecution.
• Please note that intellectual property protected by copyright may not be
reproduced without the express permission of the copyright holder
except for personal or household use under limited circumstances.
iv

Contents
About These Manuals . . . . . . . . . . . . . . . . . . . . . . . . . . . . . . . . . . . . i
Notations About Text . . . . . . . . . . . . . . . . . . . . . . . . . . . . . . . . . . . . . ii
Conventions . . . . . . . . . . . . . . . . . . . . . . . . . . . . . . . . . . . . . . . . . . . . . . . . . .ii
Screen Examples . . . . . . . . . . . . . . . . . . . . . . . . . . . . . . . . . . . . . . . . . . . . . iii
Abbreviations . . . . . . . . . . . . . . . . . . . . . . . . . . . . . . . . . . . . . . . . . . . . . . . . iv
Legal Notice . . . . . . . . . . . . . . . . . . . . . . . . . . . . . . . . . . . . . . . . . . . . . . . . . iv
Contents . . . . . . . . . . . . . . . . . . . . . . . . . . . . . . . . . . . . . . . . . . . . . . v
Chapter 1 Before You Begin
Required System Environment . . . . . . . . . . . . . . . . . . . . . . . . . . . 1-2
System Environment Required for Printing . . . . . . . . . . . . . . . . . . . . . . . . 1-2
Using a TCP/IP Network for Printing . . . . . . . . . . . . . . . . . . . . . . . . . . . . . . . . 1-2
Using an AppleTalk Network for Printing . . . . . . . . . . . . . . . . . . . . . . . . . . . . 1-2
Using a NetWare
The Network Environment . . . . . . . . . . . . . . . . . . . . . . . . . . . . . . . 1-4
Windows Network Examples . . . . . . . . . . . . . . . . . . . . . . . . . . . . . . . . . . . 1-4
Macintosh Network Examples . . . . . . . . . . . . . . . . . . . . . . . . . . . . . . . . . . 1-5
NetWare® Network Examples . . . . . . . . . . . . . . . . . . . . . . . . . . . . . . . . . . 1-5
®
Network for Printing . . . . . . . . . . . . . . . . . . . . . . . . . . . . . . 1-3
Chapter 2 TCP/IP Network Settings (Windows)
Procedures Required for a TCP/IP Network . . . . . . . . . . . . . . . . . 2-2
Setting the Printer IP Address . . . . . . . . . . . . . . . . . . . . . . . . . . . . 2-3
Setting the IP Address with GARO Device Setup Utility . . . . . . . . . . . . . 2-4
Setting the IP Address with the ARP/PING Command . . . . . . . . . . . . . . . 2-6
Setting TCP/IP Protocol for the Printer . . . . . . . . . . . . . . . . . . . . . 2-8
Setting up with a Web Browser (Remote UI) . . . . . . . . . . . . . . . . . . . . . . 2-8
Setting the Computer . . . . . . . . . . . . . . . . . . . . . . . . . . . . . . . . . 2-13
Windows Me, Windows 98, and Windows 95 Settings . . . . . . . . . . . . . . . . . 2-13
Windows XP and Windows 2000 Settings . . . . . . . . . . . . . . . . . . . . . . . . . . . 2-13
Windows NT 4.0 Settings . . . . . . . . . . . . . . . . . . . . . . . . . . . . . . . . . . . . . . . . 2-14
Setting the Printer for Sharing . . . . . . . . . . . . . . . . . . . . . . . . . . . 2-15
Managing the Printer from a Computer . . . . . . . . . . . . . . . . . . . . 2-17
Chapter 3 AppleTalk Network Settings (Macintosh)
Procedures Required for an AppleTalk Network . . . . . . . . . . . . . . 3-2
Setting a Macintosh . . . . . . . . . . . . . . . . . . . . . . . . . . . . . . . . . . . . 3-3
Setting the Network Functions . . . . . . . . . . . . . . . . . . . . . . . . . . . . . . . . . . 3-3
Mac OS 8.6/9.x . . . . . . . . . . . . . . . . . . . . . . . . . . . . . . . . . . . . . . . . . . . . . . . . . 3-3
Mac OS X . . . . . . . . . . . . . . . . . . . . . . . . . . . . . . . . . . . . . . . . . . . . . . . . . . . . . 3-4
Setting the Printer Protocols . . . . . . . . . . . . . . . . . . . . . . . . . . . . . 3-5
Setting up with a Web Browser (Remote UI) . . . . . . . . . . . . . . . . . . . . . . 3-5
Installing the Printer Driver . . . . . . . . . . . . . . . . . . . . . . . . . . . . . . 3-9
v

Chapter 4 NetWare® Settings (Windows)
Procedures Required for a NetWare® Network . . . . . . . . . . . . . . . 4-2
Setting the Printer Frame Type . . . . . . . . . . . . . . . . . . . . . . . . . . . 4-3
Setting the frame type with GARO Device Setup Utility . . . . . . . . . . . . . 4-4
Setting Up a NetWare® Print Service . . . . . . . . . . . . . . . . . . . . . . 4-6
Types of Print Services . . . . . . . . . . . . . . . . . . . . . . . . . . . . . . . . . . . . . . . 4-6
Setting Up a NetWare
Using NDS Queue Server Mode/Remote Printer Mode . . . . . . . . . . . . . . . . . . 4-8
Using Bindery Queue Server/Remote Printer Mode . . . . . . . . . . . . . . . . . . . . . 4-9
®
Server with NWADMIN and PCONSOLE . . . . . 4-8
Setting NetWare® Printer Protocol . . . . . . . . . . . . . . . . . . . . . . . 4-11
Setting up with a Web Browser (Remote UI) . . . . . . . . . . . . . . . . . . . . . 4-11
Setting the Computer for NetWare® . . . . . . . . . . . . . . . . . . . . . . 4-18
Connecting to a NetWare® Network . . . . . . . . . . . . . . . . . . . . . . . . . . . . 4-18
Installing the Printer Driver . . . . . . . . . . . . . . . . . . . . . . . . . . . . . . . . . . . 4-18
Setting the Printer Port . . . . . . . . . . . . . . . . . . . . . . . . . . . . . . . . . . . . . . . 4-18
Chapter 5 Troubleshooting
When You Cannot Use GARO Device Setup Utility . . . . . . . . . . . 5-2
When You Cannot Print . . . . . . . . . . . . . . . . . . . . . . . . . . . . . . . . . 5-3
Chapter 6 Other Important Information
Initializing Network Settings . . . . . . . . . . . . . . . . . . . . . . . . . . . . . . 6-2
List of Network Settings . . . . . . . . . . . . . . . . . . . . . . . . . . . . . . . . . 6-3
General Settings . . . . . . . . . . . . . . . . . . . . . . . . . . . . . . . . . . . . . . . . . . . . . . . . . 6-3
TCP/IP Settings . . . . . . . . . . . . . . . . . . . . . . . . . . . . . . . . . . . . . . . . . . . . . . . . . 6-3
AppleTalk Settings . . . . . . . . . . . . . . . . . . . . . . . . . . . . . . . . . . . . . . . . . . . . . . 6-4
NetWare
Software Applications that Use Network Settings . . . . . . . . . . . . . 6-6
Index . . . . . . . . . . . . . . . . . . . . . . . . . . . . . . . . . . . . . . . . . . . . . . . 6-7
®
Settings . . . . . . . . . . . . . . . . . . . . . . . . . . . . . . . . . . . . . . . . . . . . . . . 6-4
vi

1
Before You Begin
This chapter describes the network, network environment, and
other important information that you should confirm before
you begin.

Required System Environment
This section describes the system environments that are supported by the
network interface of the printer.
System Environment Required for Printing
The lists below describe the system environments required to support the
network in use.
Using a TCP/IP Network for Printing
z Compatible Operating Systems:
• Windows Me/Windows 98/Windows 95
• Windows NT 4.0
• Windows 2000
• Windows XP
z Compatible Computers:
• IBM PC or IBM compatible PC
Important
z If you are using Windows NT 4.0, install Service Pack 6 or later.
Using an AppleTalk Network for Printing
z Compatible Computer
• A Macintosh Series computer equipped with a Power PC processor.
z Compatible Operating Systems
• Mac OS 8.6 or later
• Mac OS x 10.1 or later
z Compatible AppleTalk
• EtherTalk Phase 2
z Required Memory
• 24 MB or more for Mac OS 8.6, 32 MB or more for Mac OS 9
Note
z This printer is not compatible with a Macintosh Local Network.
Before You Begin
1-2

Using a NetWare® Network for Printing
z Compatible Servers
• Novell NetWare
®
Version 4.2/5.1
z Compatible Clients
• Windows Me/Windows 98/Windows 95
• Windows XP Professional
• Windows 2000 Server
• Windows 2000 Professional
• Windows NT Server 4.0
• Windows NT Workstation 4.0
z Compatible Computers
• IBM PC or IBM compatible PC
Required System Environment
1-3
The Network Environment
Use the diagrams below as reference to determine the type of network where
the printer is connected, and then follow the required procedure.
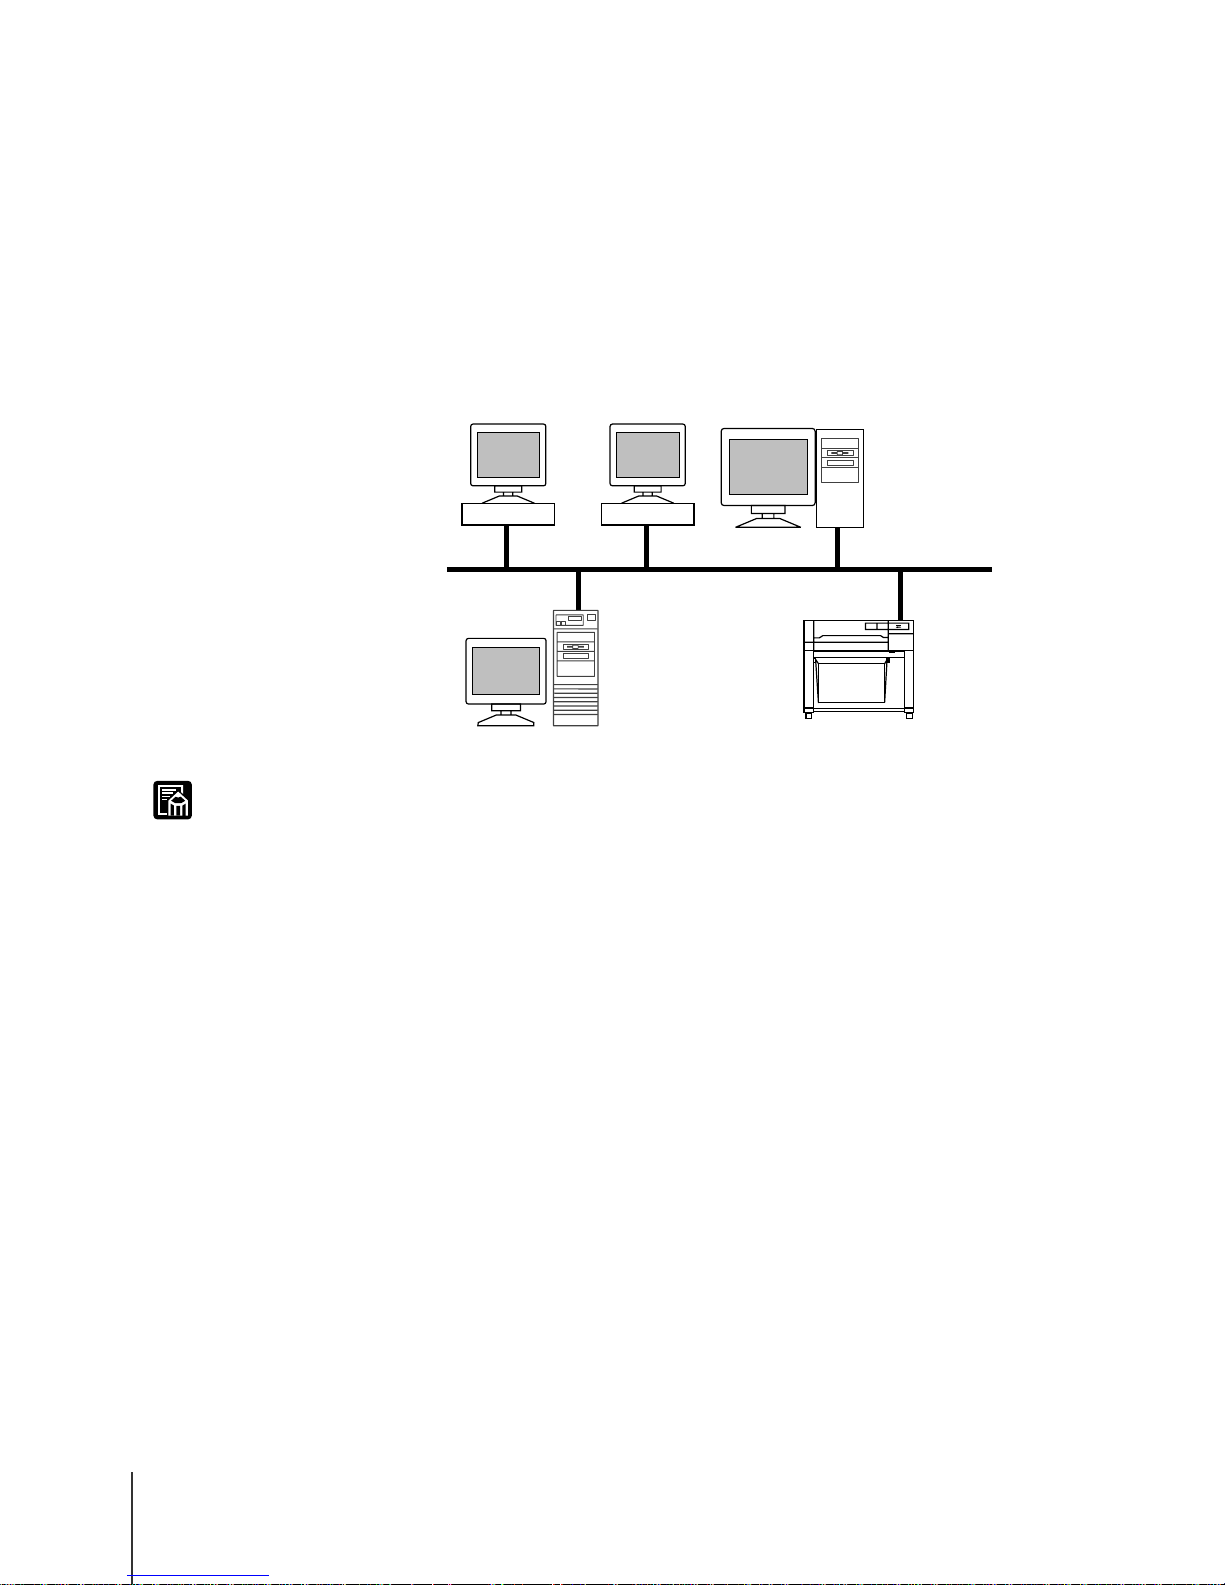
Windows Network Examples
If you are using Windows network, you can use TCP/IP as the protocol.
(Æ Chapter 2, “TCP/IP Network Settings (Windows)” )
Windows 98
Windows 95
Windows XP
TCP/IP
Note
Windows 2000 Server
z After performing the settings for a TCP/IP network with a Windows computer,
every computer on the network can print with every printer connected directly to
the network. Also, setting up a Windows XP, Windows 2000, or Windows NT
computer as a server greatly improves the efficiency of managing network printers.
For more details about how to set up a server, see “Setting the Printer for Sharing”.
(Æ P. 2 - 1 5 )
z The NetBIOS protocol cannot be used with this printer.
W8200
Before You Begin
1-4
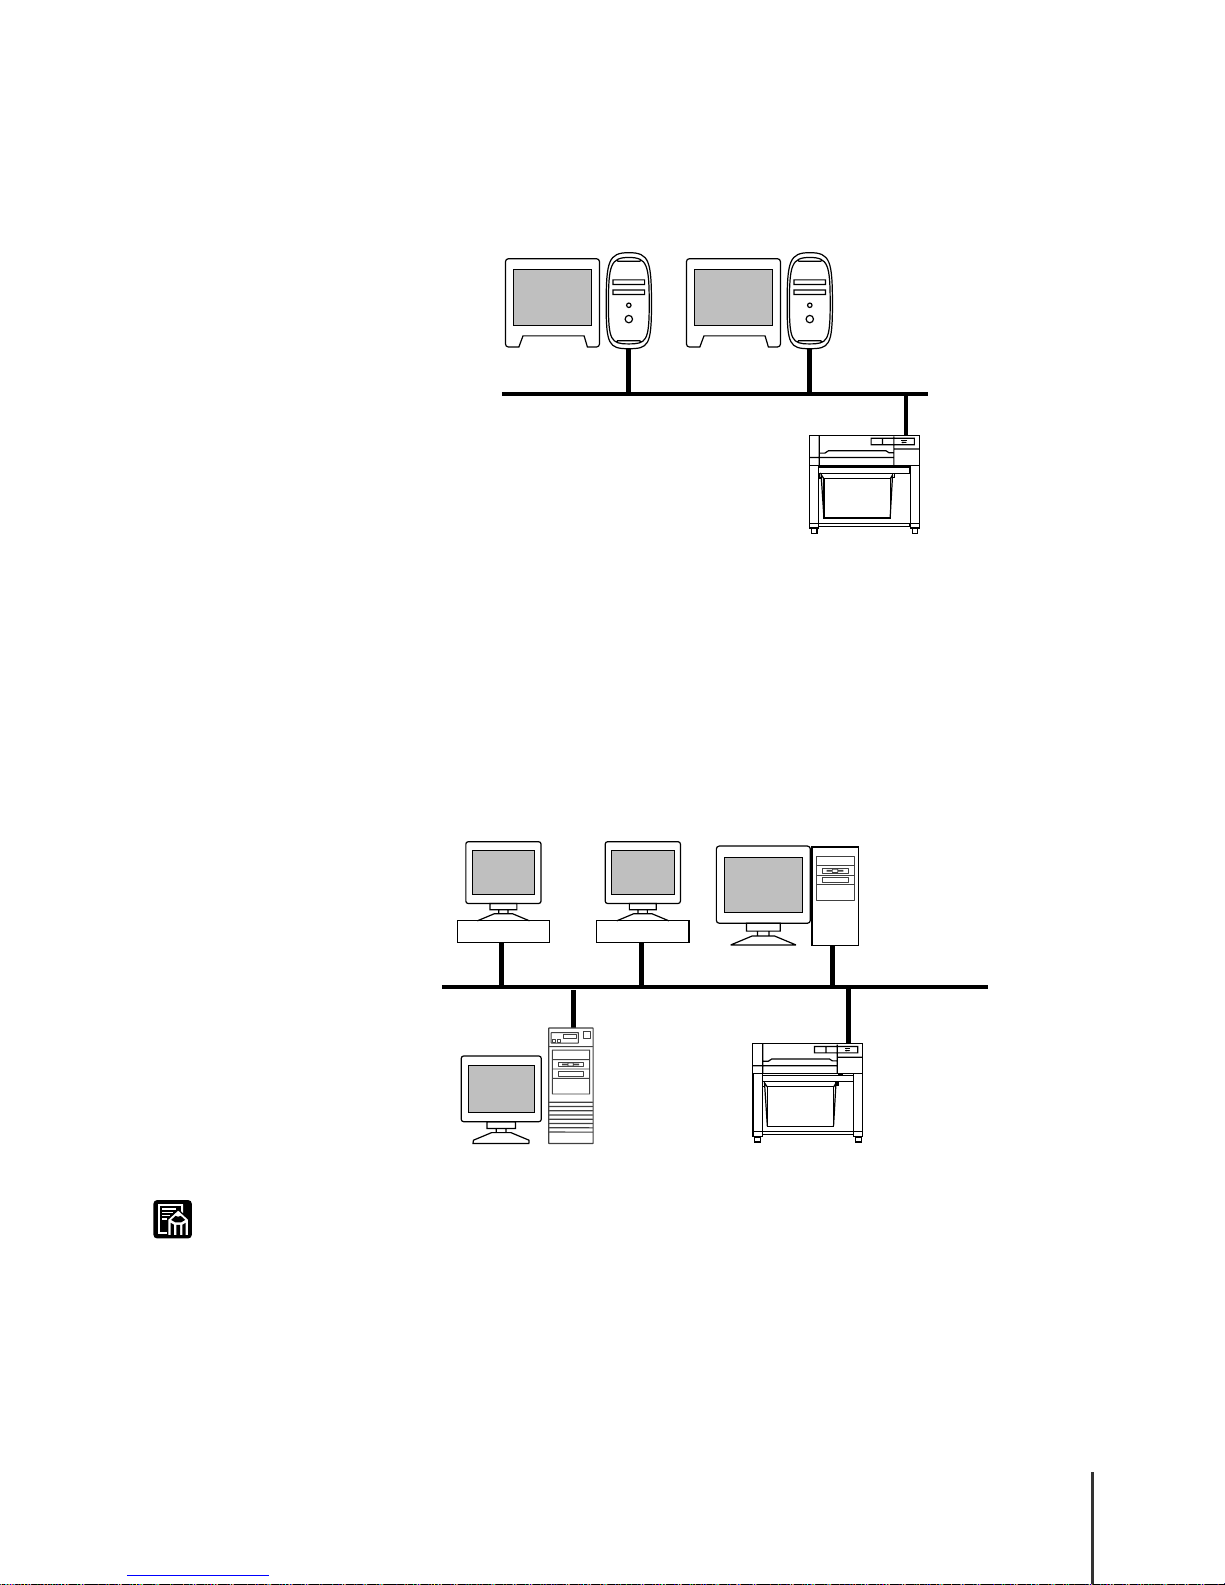
Macintosh Network Examples
For a Macintosh computer, the AppleTalk (EtherTalk) protocol is used.
(Æ Chapter 3, “AppleTalk Network Settings (Macintosh)” )
Macintosh
NetWare® Network Examples
If the network is like the network environment shown in the illustration
below, you can print using NetWare
must be installed on every server computer and client computer.
(ÆChapter 4, “NetWare
Windows 98
Macintosh
AppleTalk
®
protocol. NetWare® client software
®
Settings (Windows)” )
Windows 95
Windows 2000
W8200
Note
z You can use TCP/IP or AppleTalk in common even in a network environment
where there is a NetWare® server. In such a case, perform the settings for the
protocol to use.
NetWare® Server
NetWare
®
W8200
The Network Environment
1-5

Before You Begin
1-6

2
TCP/IP Network Settings
(Windows)
This chapter describes the setting methods and procedures for
connecting the printer to a TCP/IP network.

Procedures Required for a TCP/IP Network
Here is a summary of the procedures required to set the printer for use on a
TCP/IP network.
1
Connect the network cable. ÆSetup Guide
Follow the instructions in the Setup Guide to connect the network cable.
2
Setting the Printer IP Address ÆP. 2 - 3
Setting the IP address allows setting the printer protocol to enable communication between the
printer and the computer . You can use one of the methods below to set the protocol:
• GARO Device Setup Utility (Canon software application provided with the printer)
• ARP/PING command
• Printer operation panel
3
Setting TCP/IP Protocol for the Printer ÆP. 2 - 8
Perform this procedure to set the printer protocol. You can perform these settings with the web
browser from a computer on the network:
• Web browser (Remote UI)
4
Setting the Computer ÆP. 2 - 1 3
This procedure is performed for each computer to be used for printing.
Important
z Steps 1, 2, and 3 should be performed by the network system administrator.
z An LPD connected print application can be used to print on the TCP/IP network.
z This printer is not compatible with RAW protocol. If you are using Windows XP or
Windows 2000, you must set and use LPR protocol.
TCP/IP Network Settings (Windows)
2-2

Setting the Printer IP Address
Before setting the printer protocol, you must set the IP address to enable
communication between the printer and the computer. You can use one of the
methods below to set the IP address. Use whichever method is easiest:
• GARO Device Setup Utility (Æ P. 2 - 4)
• ARP/PING command (Æ P. 2 - 6 )
• Printer operation panel (Æ Setup Guide, Chapter 2, “Doing the settings
on the Printer Operation Panel”)
Important
z When you use the GARO Device Setup Utility to perform the settings, you must
make the settings from a computer in the same subnet as the printer.
z When you use the GARO Device Setup Utility to perform the printer network
settings, the subnet mask and gateway address settings are set to 0.0.0.0, so use the
Remote UI or printer operation panel to make the settings for your network.
z If you are using an operating system that is not compatible with the GARO Device
Setup Utility, use another computer on the network, use the ARP/PING command,
or use the printer operation panel to perform the settings.
z The GARO Device Setup Utility must be installed on your computer in order to
use this utility to make the settings. Ask your system administrator to install the
GARO Device Setup Utility on your computer. (Æ Setup Guide)
z Before setting the IP address, confirm that the printer is switched on and connected
to the network.
z The MAC address is required to perform the setting with the GARO Device Setup
Utility or the ARP/PING command. If you need to confirm the MAC address, use
the printer operation panel to print a Status Print.
1. Press Online to display MAIN MENU.
2. Press or to select Test Print then press .
3. Press or to select Status Print then press Enter.
Setting the Printer IP Address
2-3
Setting the IP Address with GARO Device Setup Utility
If you are using Windows, use the GARO Device Setup Utility, the software
utility provided with the printer, to perform the printer network settings.
Note
z If you are using a Macintosh computer, use the printer operation panel to perform
the settings. (Æ Setup Guide, Chapter 2, “Doing the settings on the Printer
Operation Panel”)
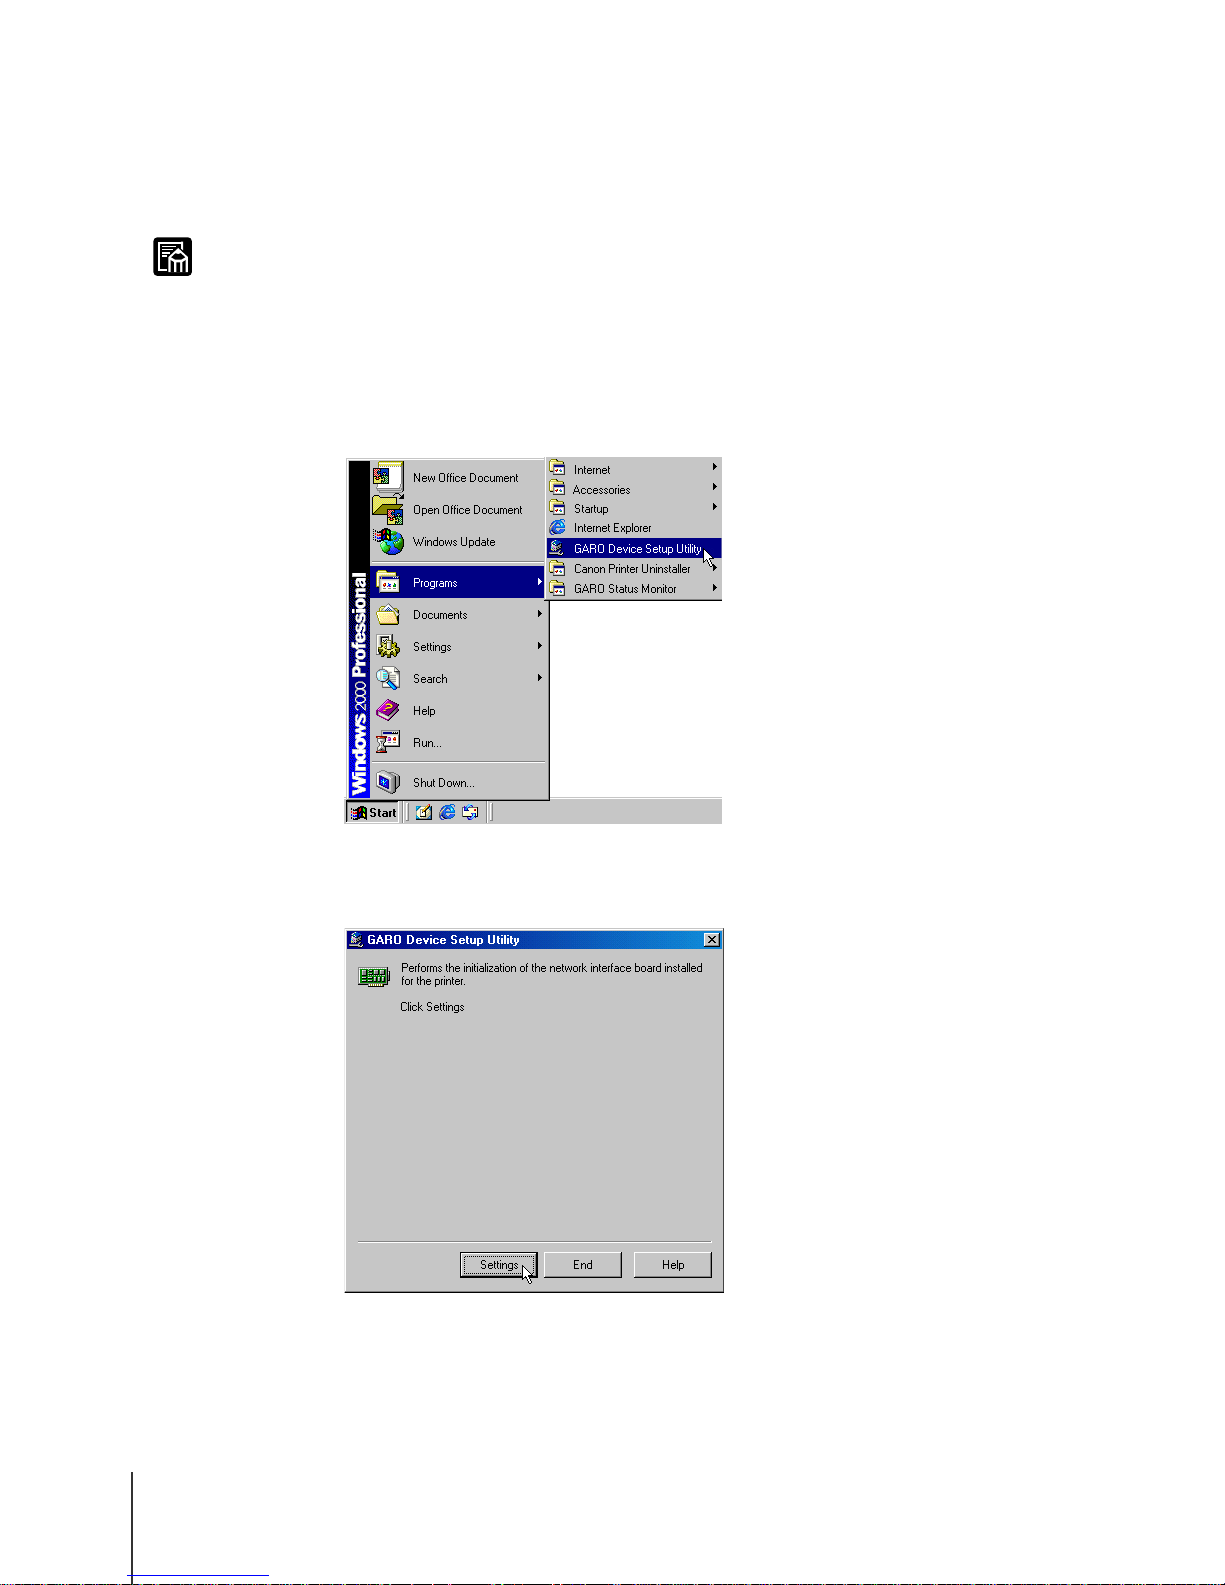
1
On the desktop, click the Start button, point to Programs, then click
GARO Device Setup Utility.
2
Click the Settings button.
TCP/IP Network Settings (Windows)
2-4
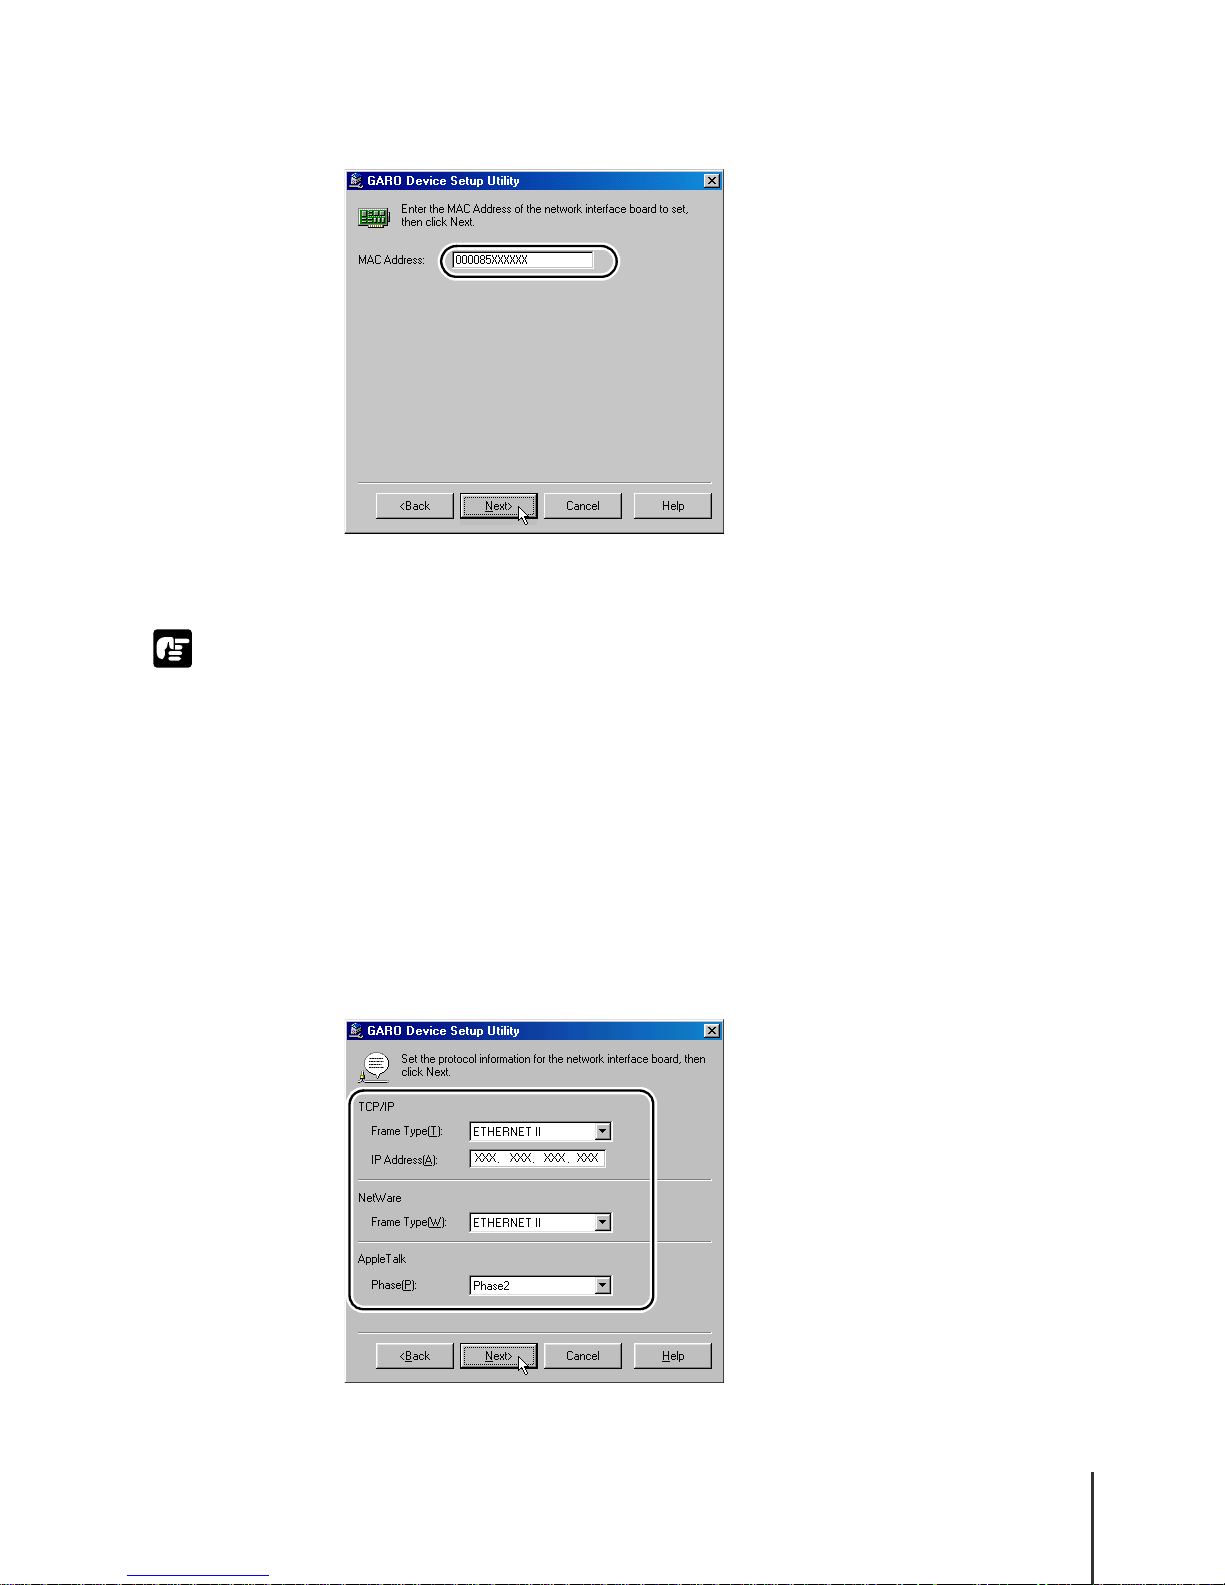
3
Enter the MAC address into the MAC Address box then click the Next
button.
The utility searches for the printer on the network and when the printer is
found, the protocol settings dialog box opens.
Important
z If the printer cannot be found, make sure that the computer and the printer are in
the same subnet. If you use the GARO Device Setup Utility to perform the settings,
you must make the settings from a computer in the same subnet as the printer.
4
For the TCP/IP Frame Type, select ETHERNET II from the list, enter
the IP address allocated for the printer into the IP Address box, then
click the Next button.
When printing via AppleTalk, select Phase2 for AppleTalk Phase. When
printing with NetWare
Type.
®
, select the frame type in use for NetWare Frame
Setting the Printer IP Address
2-5

5
Confirm the settings then click the Finish button.
The network interface settings are changed.
Note
z The subnet mask and gateway address settings have been set to 0.0.0.0. After
completing the above settings, use the Remote UI or the printer operation panel to
perform the subnet mask and gateway address settings for your network. (Æ P. 2 - 8)
This completes preparation for selecting the printer protocol. Now you are
ready to select the printer protocol. (Æ P.2 - 8 )
Setting the IP Address with the ARP/PING Command
The examples of entries and settings below are for the English operating
system.
1
Start at the MS-DOS prompt or command line.
2
Execute the following commands, and add the static entry to the arp
table.
arp -s <IP address> <MAC address>
IP address:
Set the IP address assigned to the printer. The IP address consists of four
decimal numbers (within the range 0 to 255) separated by dots.
MAC address:
Set the MAC address of the printer. In the MAC address every two numbers
is separated by a hyphen (-).
arp -s XXX.XXX.XXX.XXX 00-00-XX-XX-XX-XX
3
Execute the following commands to set the IP address for the printer.
ping <IP address> -l 479
IP address:
Set the same address entered at Step 2.
Sample:
ping XXX.XXX.XXX.XXX -l 479
TCP/IP Network Settings (Windows)
2-6

Note
z The -l entry is the alphabetic lower case “L” (not the number “1”).
z The subnet mask and gateway address settings have been set to 0.0.0.0. After
completing the above settings, use the Remote UI or the printer operation panel to
perform the subnet mask and gateway address settings for your network. (Æ P. 2 - 8)
This completes preparation for the protocol setting.
Setting the Printer IP Address
2-7

Setting TCP/IP Protocol for the Printer
You can use your Web browser on your computer with the Remote UI, the
software built into the network interface, to perform the printer protocol
settings.
Setting up with a Web Browser (Remote UI)
1
Start the Web Browser, enter the following URL for the Address, then
press the Enter key.
http://<Printer IP address or name>/
Example: http://XXX.XXX.XXX.XXX/
Important
z For the Web Browser, use Netscape Navigator/Communicator 4.04 or later, or use
Internet Explorer 4.01SP1 or later. However, Netscape Navigator Version 6 or later
is not compatible.
z A connection through a Proxy Server cannot be used. If you are using a network
environment with a Proxy Server, use the “Proxies” server setting in the Web
Browser to add the printer IP address to the “Exceptions” text box (the address not
used by the Proxy Server). (Performing this setting may differ, depending on the
network environment.)
z Use the Web Browser to enable JavaScript and Cookie so these features can be
used.
z If more than one Remote UI is being used, then the most recently used settings
remain enabled. Starting and using only one Remote UI at a time is recommended.
TCP/IP Network Settings (Windows)
2-8
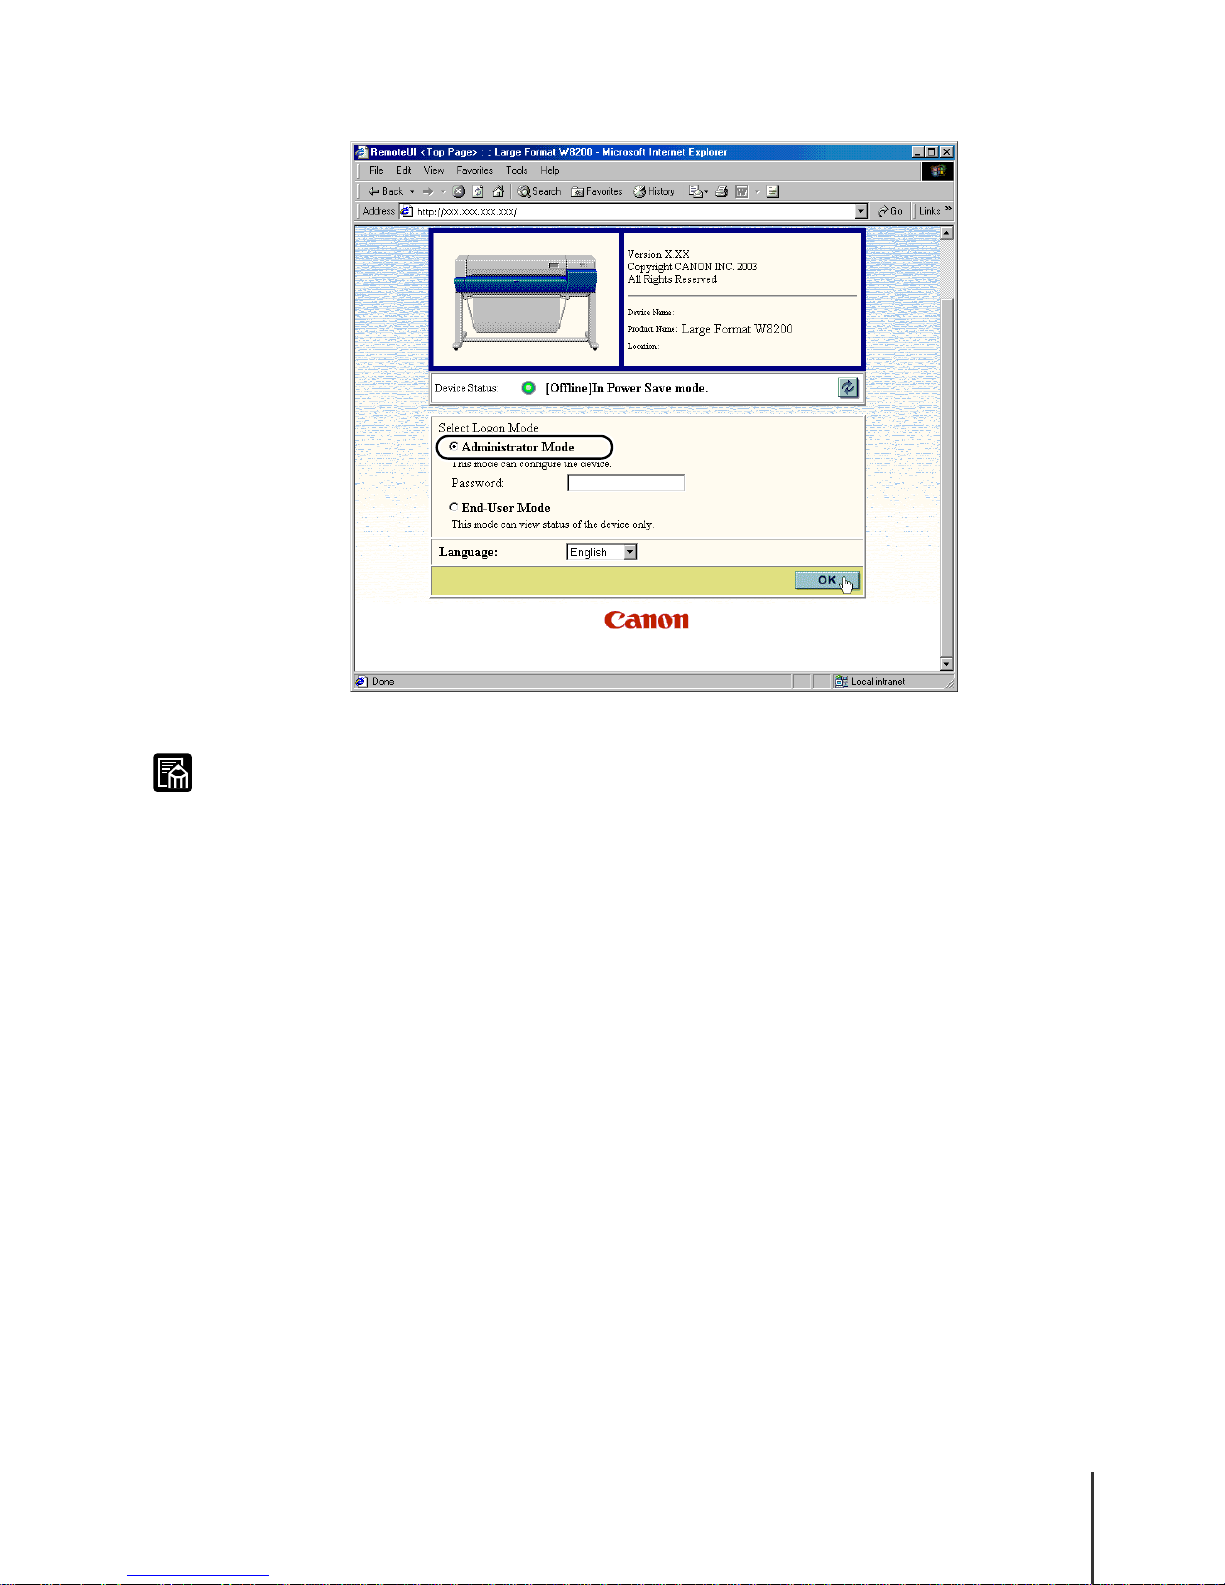
2
Click and select Administrator Mode then click the OK button.
Note
The Remote UI starts.
z If a password has been set for the printer, enter the password and click the OK
button. If no password has been set, then a password entry is not required.
Setting TCP/IP Protocol for the Printer
2-9
 Loading...