

Quick Guide
Read this guide rst.
Please read this guide before operating this product.
After you finish reading the guide, store it in a safe
place for future reference.
You can access
canon.com/oip-manual to read
the User’s Guide that describes
all functions of this machine.
imagePRESS C10000VP/C8000VP
Practical Features
Auto Gradation Adjustment for Various
Paper Types
The Auto Adjust Gradation function adjusts the gradation, density,
and color tone of images, and only requires you to scan the test
page. This function can be used for various weights of paper so that
a high quality print result can be obtained in different paper types.
"Adjustment for Image Quality and Finishing (Calibration)" in the
User's Guide
Achieve High Quality Color Reproduction
with Auto Color Tone Correction
Compared to the Auto Adjust Gradation function, which adjusts
CMYK, the Auto Correct Color Tone function adjusts mixed colors
that are expressed with multiple toner. By using these functions
together, you can perform the precise color adjustment.
"Adjustment for Image Quality and Finishing (Calibration)" in the
User's Guide
Optimum Print Result for Each Paper Type
Paper information, which includes the basis weight, finish, fixing, and
curl correction level, can be registered as the paper characteristics.
As the detailed information can be specified for each different paper
type, you can obtain the fine print result with considering the paper
characteristics. This function is also effective for improving paper
conveyance and print quality.
"Paper Type Management" in the User's Guide
Curl Correction for Stable Paper Conveyance
The machine constantly corrects the paper curl which occurs due
to the pressure applied when toner is fixed. Moreover, by correcting
the paper curl during outputting, the machine reduces the risk of
a paper jam, and achieves the stable paper conveyance. The curl
correction can be specified for each paper type you want to use.
"Adjustment for Image Quality and Finishing (Calibration)" in the
User's Guide
"Paper Type Management" in the User's Guide
Easy Operation for Adjusting Image Position
You can adjust the image positions easily with this machine. All you
need is measuring marks on the test page and then entering the
measured values on the touch panel display. After that, the machine
will automatically adjust the image positions. You can make the
complicated adjustment easily by entering values for each edge of
front and back sides on a single screen.
"Paper Type Management" in the User's Guide
Quick Access to Frequently Used Settings
Different settings are required, depending on the printing purpose
or paper types, but accessing setting items located in various menus
every time is a quite complicated operation. In this case, register
frequently used settings in "Settings/Registration Shortcut" button.
You can directly access to the setting screen with this button and
save the effort to search necessary setting items.
"Settings/Registration" in the User's Guide
Alternative Settings for Your Needs,
"Productivity" or "Quality"
You can set a priority to either print productivity or image quality. For
instance, select "Productivity Priority" when printing a large number
of documents to achieve speedy printing. On the other hands, select
"Quality Priority" when printing documents which contain many
pictures to obtain precisely printed images. This function can be set
for each paper type to suit your various needs for printing.
"Settings/Registration" in the User's Guide

Contents
Thank you for purchasing this Canon product. Please read this manual thoroughly before operating the machine
to familiarize yourself with its capabilities, and to make the most of its many functions. For more information on the
detailed settings for the functions, see the User's Guide. After reading this manual, store it in a safe place for future
reference.
Important Safety Instructions . . . . . . . . . . . . . . . . . . . . . . 6
Installation . . . . . . . . . . . . . . . . . . . . . . . . . . . . . . . . . . . . . . . . . . . . . . . . . . .6
Power Supply . . . . . . . . . . . . . . . . . . . . . . . . . . . . . . . . . . . . . . . . . . . . . . . . . 9
Handling . . . . . . . . . . . . . . . . . . . . . . . . . . . . . . . . . . . . . . . . . . . . . . . . . . . .10
Maintenance and Inspections. . . . . . . . . . . . . . . . . . . . . . . . . . . . . . . .14
Consumables . . . . . . . . . . . . . . . . . . . . . . . . . . . . . . . . . . . . . . . . . . . . . . . .15
Safety-Related Symbols . . . . . . . . . . . . . . . . . . . . . . . . . . . . . . . . . . . . . .16
Parts and Their Functions . . . . . . . . . . . . . . . . . . . . . . . . . . 17
External View . . . . . . . . . . . . . . . . . . . . . . . . . . . . . . . . . . . . . . . . . . . . . . . .17
Internal View (Marking Engine) . . . . . . . . . . . . . . . . . . . . . . . . . . . . . . .18
Internal View (Fixing Station) . . . . . . . . . . . . . . . . . . . . . . . . . . . . . . . . .19
Control Panel (Upright Control Panel-F1)
OPTION
. . . . . . . . .20
Status Monitor/Cancel Screen . . . . . . . . . . . . . . . . . . . . . 22
How to Turn ON the Main Power . . . . . . . . . . . . . . . . . . . 23
Turning ON the Main Power . . . . . . . . . . . . . . . . . . . . . . . . . . . . . . . . .23
Shutting Down the Machine . . . . . . . . . . . . . . . . . . . . . . . . . . . . . . . . .24
Loading Paper . . . . . . . . . . . . . . . . . . . . . . . . . . . . . . . . . . . . 25
Available Paper . . . . . . . . . . . . . . . . . . . . . . . . . . . . . . . . . . . . . . . . . . . . . .25
Registering Paper Types in the Paper Database . . . . . . . . . . . . . . .27
Loading Paper into the Paper Deck . . . . . . . . . . . . . . . . . . . . . . . . . .28
Selecting Paper Types from the Paper Database . . . . . . . . . . . . . .31
Cleaning and Maintenance . . . . . . . . . . . . . . . . . . . . . . . .33
Cleaning the Platen Glass . . . . . . . . . . . . . . . . . . . . . . . . . . . . . . . . . . . .33
Cleaning the Original Scanning Area . . . . . . . . . . . . . . . . . . . . . . . . .33
Cleaning the Feeder . . . . . . . . . . . . . . . . . . . . . . . . . . . . . . . . . . . . . . . . .34
Automatic Feeder Cleaning . . . . . . . . . . . . . . . . . . . . . . . . . . . . . . . . . .35
Cleaning the Inside of the Main Unit . . . . . . . . . . . . . . . . . . . . . . . . .35
Refreshing the Fixing Roller . . . . . . . . . . . . . . . . . . . . . . . . . . . . . . . . . .36
Cleaning the Touch Panel Display . . . . . . . . . . . . . . . . . . . . . . . . . . . .36
Inspection of the Breaker . . . . . . . . . . . . . . . . . . . . . . . . . . . . . . . . . . . .37
Consumables . . . . . . . . . . . . . . . . . . . . . . . . . . . . . . . . . . . . . 39
Troubleshooting . . . . . . . . . . . . . . . . . . . . . . . . . . . . . . . . . . 41
Clearing Paper Jams and Staple Jams . . . . . . . . . . . . . . . . . . . . . . . .41
Reducing the Frequency of Paper Jams . . . . . . . . . . . . . . . . . . . . . .41
When an Error Message Is Displayed . . . . . . . . . . . . . . . . . . . . . . . . .42
Contacting Your Local Authorized Canon Dealer . . . . . . . . . . . . .43
If the Main Power Does Not Turn ON . . . . . . . . . . . . . . . . . . . . . . . . .44
If Memory Becomes Full . . . . . . . . . . . . . . . . . . . . . . . . . . . . . . . . . . . . .44
Specifications . . . . . . . . . . . . . . . . . . . . . . . . . . . . . . . . . . . . . 45
Symbols Used in This Manual
Indicates a warning concerning operations that may lead to death or injury to persons if not
WARNING
CAUTION
IMPORTANT
NOTE
OPTION
performed correctly. To use the machine safely, always pay attention to these warnings.
Indicates a caution concerning operations that may lead to injury to persons if not performed
correctly. To use the machine safely, always pay attention to these cautions.
Indicates operational requirements and restrictions. Be sure to read these items carefully to
operate the machine correctly, and avoid damage to the machine or property.
Indicates a clarification of an operation, or contains additional explanations for a procedure.
Reading these notes is highly recommended.
Indicates an optional product which can be used with this machine.

Keys and Buttons Used in This Manual
The followings are examples of how keys and
buttons are expressed in this manual.
•
Touch Panel Display Keys: [Key Name]
[Copy] [Close]
Illustrations Used in This Manual
Illustrations used in this manual are those displayed
when the imagePRESS C10000VP has the following
optional equipment attached to it: the Duplex
Color Image Reader Unit-K1, Upright Control
Panel-F1, and Saddle Finisher-AN2 .
•
Control Panel Keys: Key Icon (Key Name)
(Start) (Stop)
•
Buttons on Computer Operation Screens: [Button
Name]
[OK], [Add], [Cancel]

Important Safety Instructions
These "Important Safety Instructions" are intended to prevent injury to user or other persons or destruction of
property. Please read these instructions thoroughly before operating the machine. Also, since it may result in
unexpected accidents or injuries, do not perform any operation unless otherwise specified in the manual. Improper
operation or use of this machine could result in personal injury and/or damage requiring extensive repair that may not
be covered under your Limited Warranty.
Installation
▀
Read the following installation precautions thoroughly to maintain a comfortable and safe working environment, in
areas of machine operation.
WARNING
Do not install the machine in locations where there
are risks of a fire or electrical shock
•
A location where the ventilation slots are block
(i.e. by the walls, on the soft surface such as a bed,
sofa, or rug)
•
A damp or dusty location
•
A location exposed to direct sunlight
•
A location subject to high temperatures
•
A location near open flames
•
A location near alcohol, paint thinner, or other
flammable substances
CAUTION
Do not install the machine in unstable locations
Installing the machine in the following locations
my cause the machine to fall or tip over, r
personal injury.
•
An unsteady platform
•
A location subject to excessive vibrations
Do not remove the leveling feet
Do not remove the machine’s leveling feet after the
machine has been installed, as this may cause the
machine to fall or tip over
, resulting in personal injury.
ed
esulting in
ther Warnings
O
•
D
o not place jewelry and other metal objec
or containers filled with water or liquids on the
machine. If these items come into contact with a
high-voltage area inside the machine, it may result in
a fire or electrical shock.
•
Do not use the machine near any medical
equipment. Electric waves emitted from the machine
may interfere with medical equipment, which may
result in a malfunction or personal injury.
•
If objects are dropped or spilled inside the machine,
immediately turn OFF the main power switch, and
disconnect the power cord from the power outlet.
Then, contact your local authorized Canon dealer.
Avoid installing the machine at high altitudes of
about 3,000 meters above sea level
Machines with a hard disk may not operate properly
when used at high altitudes of about 3,000 meters
above sea level, or higher
Avoid installing the machine near computers or
other precision electronic equipment.
Electr
ical interference and vibrations generated by
the machine while printing can adversely affect the
operation of such equipment.
.
, or higher.
ts,
6

Avoid installing the machine near televisions, radios,
or similar elec
The machine might interf
signal reception. Insert the pow
tronic equipment.
ere with sound and picture
er plug into a
dedicated power outlet, and maintain as much space
as possible between the machine and other electronic
equipment.
IMPORTANT
Important Safety Instructions
Do not install the machine in the following locations
•
A location subject to rapid changes in temperatur
e
and humidity
•
A location near equipment that generates magnetic
waves or electromagnetic waves
•
A location where chemical reactions occur, such as a
laboratory
•
A location exposed to corrosive gas or toxic gas
•
A location where the floor may be warped due to
the weight of the machine, such as on a carpet
Avoid poorly ventilated locations
This machine generates a slight amount of ozone
etc. during normal use
. Although sensitivity to ozone
etc. may vary, this amount is not harmful. Ozone etc.
may be more noticeable during extended use or long
production runs, especially in poorly ventilated rooms.
It is recommended that the room be appropriately
ventilated, sufficient to maintain a comfortable
working environment, in areas of machine operation.
In addition, do not install this machine where it
exhausts directly onto a person.
Do not install the machine in a location where
c
ondensation occurs
oom where the machine is installed is heated
If the r
rapidly, or the machine is moved from a cool, dr
y
location to a hot, humid location, water droplets
(condensation) may form inside the machine. This
may result in paper jams, poor print quality, or a
malfunction. To prevent these problems, wait at
least two hours before using the machine in order to
adapt the machine to the ambient temperature and
humidity.
7
Provide Adequate Installation Space
Provide enough space on each side of the machine for unrestricted operation.
31 1/2" (800 mm) or more
73 3/8" (1,862 mm)
19 3/4"
(500 mm)
or more
19 3/4"
(500 mm)
or more
191" (4,851 mm)
19 3/4"
(500 mm)
or more
When the Finisher-AN1, Duplex Color Image Reader Unit-K1, Upright Control Panel-F1, and POD Deck-D1 are
attached.
31 1/2" (800 mm) or more
77 5/8"
(1,971 mm)
19 3/4"
(500 mm)
or more
19 3/4"
(500 mm)
or more
457 3/4" (11,628 mm)
19 3/4"
(500 mm)
or more
When the Two-Knife Booklet Trimmer-A1, Booklet Trimmer-D1, Saddle Finisher-AN2, Paper Folding Unit-J1,
High Capacity Stacker-H1 x 2, Perfect Binder-E1, Multi Function Professional Puncher-A1, Document Insertion
Unit-N1, Duplex Color Image Reader Unit-K1, Upright Control Panel-F1, and POD Deck-D1/Secondary POD
Deck-D1 are attached.
8

Power Supply
▀
This machine has two power cords. Plug the machine into the following outlets.
•
208 V AC 16 A or greater (1-phase 3-wire)
•
208 V AC 24 A or greater (3-phrase 5-wire)
WARNING
Important Safety Instructions
•
Do not use power supplies with voltages other than
those specified herein, as this may result in a fire or
electrical shock.
•
Do not use power cords other than the provided
power cord, as this may result in a fire or electrical
shock.
•
The provided power cord is intended for use with
this machine. Do not connect the power cord to
other devices.
•
Do not damage, modify, pull on, or excessively bend
the power cord. Also do not place heavy objects
on the power cord, as this could cause electrical
damage and result in a fire or electrical shock.
CAUTION
•
Do not connect any unauthorized optional products
to the outlet for connecting optional products, as
this could result in a fire or smoke.
IMPORTANT
•
Do not connect or disconnect the power plug with
wet hands, as this may result in electrical shock.
•
Do not connect the power cord to a multiplug
power strip, or do not use extension cords, as this
may cause a fire or electrical shock.
•
Do not bundle up or tie the power cord in a knot, as
this may result in a fire or electrical shock.
•
Insert the power plug completely into the power
outlet, as failure to do so may result in a fire or
electrical shock.
•
When there is thunder and lightning, disconnect the
power plug from the power outlet, as failure to do so
may result in a fire, malfunction, or electrical shock.
•
Install this machine near the power outlet and leave
sufficient space around the power plug so that it can
be unplugged easily in an emergency.
Power supply connection
•
Do not connect the power cor
d to an uninterruptible
power source.
•
If the machine is connected to the power outlet with
multiple sockets, do not use the remaining sockets
to connect other devices.
•
It is recommended that the power outlet wired to an
indoor circuit breaker is used.
•
When disconnecting the power cord, wait at least 5
seconds before connecting the power cord again.
Other Precautions
Electrical noise and excessive voltage drop may cause
a malfunc
tion or loss of data in the machine and
computers.
9
Handling
▀
WARNING
•
If the machine makes strange noises, or gives off
smoke, heat, or strange smells, immediately turn
OFF the main power switch, and disconnect the
power cord from the power outlet. Then, contact
your local authorized Canon dealer. Continued use of
the machine in this condition may result in a fire or
electrical shock.
•
Do not attempt to disassemble or modify the
machine. There are high-temperature and highvoltage components inside the machine, and
contact with those components may result in a fire
or electrical shock.
CAUTION
•
Do not place heavy objects on the machine, as they
may fall or tip over, resulting in personal injury.
•
For your safety, disconnect the power cord when the
machine will not be used for an extended period of
time.
•
When opening and closing covers, be careful not to
get your hands caught, as this may result in personal
injury.
•
Keep your hands, hair, clothing, etc. away from
the rollers in the output area, as your hand, hair, or
clothing may get caught in the rollers which may
result in personal injury.
•
In order to prevent burns, do not touch the fixing
transport unit and its surroundings and output area
when using the machine, as these areas are very hot
during use. Also, be careful when handling printed
paper as it may be hot especially during continuous
printing.
•
Paper that has just been output from the machine
may be hot. Be careful when removing or aligning
paper from the output tray. Touching paper right
after it is output may result in low-temperature burns.
•
If you are using a cardiac pacemaker and feel
abnormalities, please move away from the product
immediately. This product emits low level magnetic
flux.
•
Do not use highly flammable sprays near the
machine. If gas from these sprays comes into contact
with the electrical components inside the machine,
it may result in a fire or electrical shock.
•
When moving the machine, always turn OFF the
main power switch, disconnect the power plug from
the power outlet, and then unplug the interface
cable. Otherwise, the power cord or interface cable
may be damaged, resulting in a fire or electrical
shock.
•
Do not press down the feeder forcefully when using
the platen glass to make copies of thick books.
Doing so may damage the platen glass and result in
personal injury.
•
Close the feeder gently to avoid catching your hands,
as this may result in personal injury.
•
Be careful not to put your hands or fingers into the
feeder. Otherwise, you may be injured.
•
Be careful not to drop heavy object, such as a
dictionary, on the platen glass. Doing so may damage
the platen glass and result in personal injury.
•
There are high-voltage components inside the
machine. Do not touch the labeled component and
its surroundings when removing jammed paper or
inspecting the inside of the machine, as doing so
may result in an electrical shock.
10

Important Safety Instructions
Paper drawer (only for products with a paper drawer)
•
Do not insert your hand into the machine while
the paper dra
personal injury.
Energy Saver key (only for products with an Energy
Sa
ver key)
•
P
ress
will not be used for a long period of time, such as
overnight. Also, turn OFF the main power switch,
and disconnect the power cord for safety when the
machine will not be used for an extended period of
time, such as during consecutive holidays.
wer is removed, as this may result in
(Energy Saver) for safety when the machine
Finisher (only for products with a finisher)
•
D
o not place your hands in the part of the tray wher
stapling is performed (near the rollers), especially
pay careful attention to the sharp staples, as this may
result in personal injury.
e
11
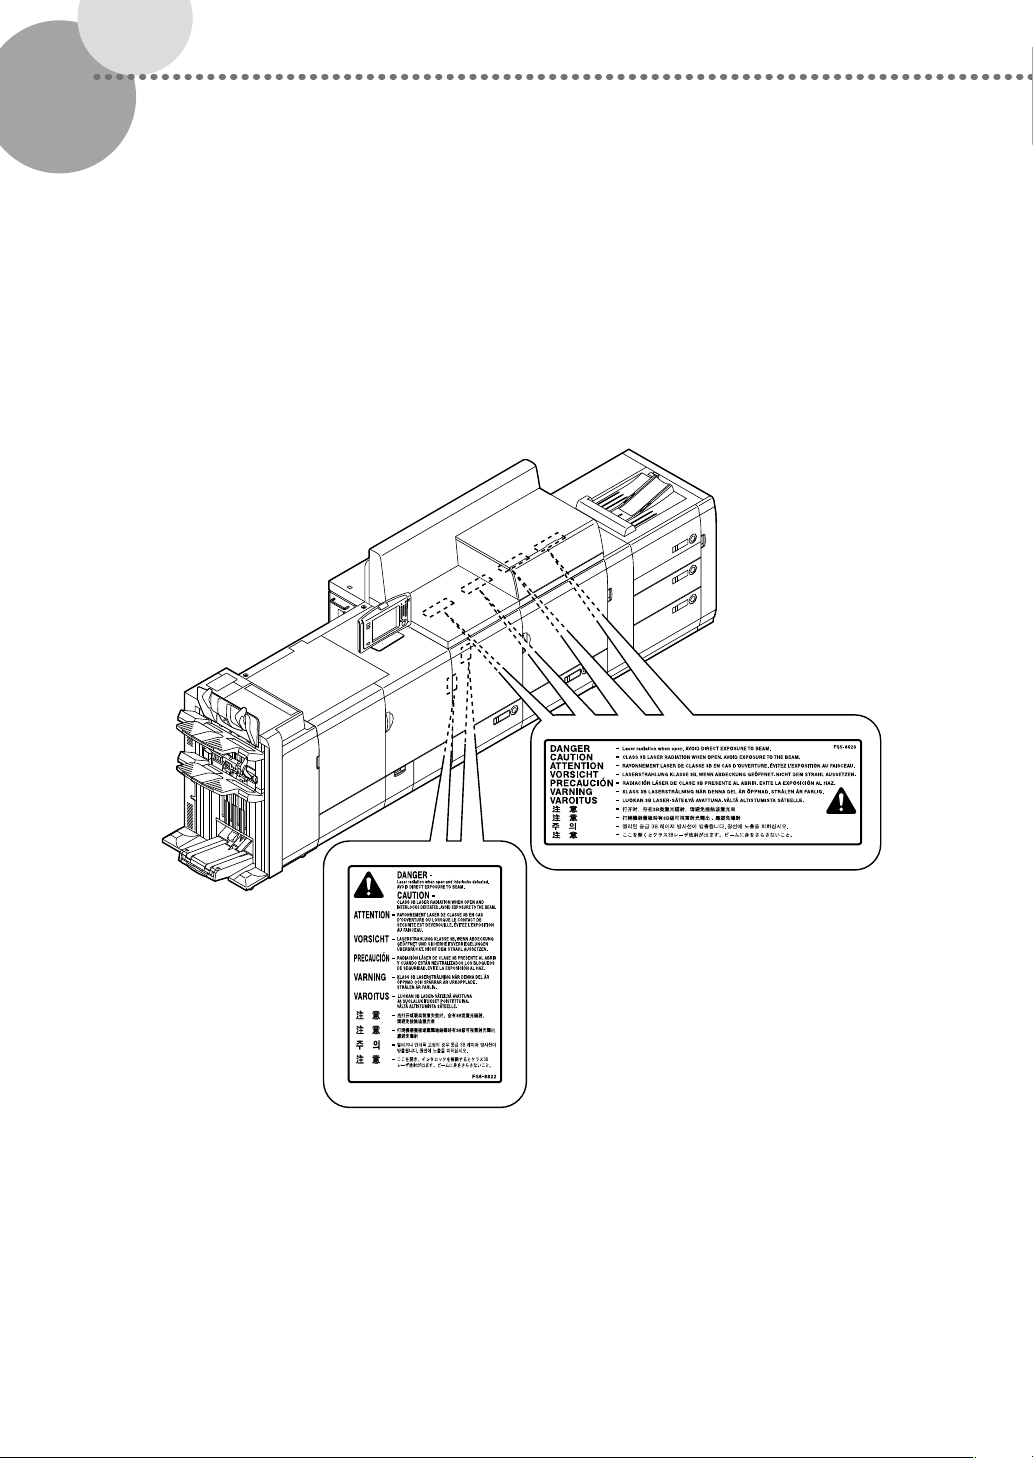
Laser beam
The laser beam can be harmful to human bodies. Since radiation emitted inside the product is completely confined
within protec
tiv
e housings and ex
ternal covers, the laser beam cannot escape from the machine during any phase of
user operation. Read the following remarks and instructions for safety.
•
Never open covers other than those instructed in the manuals for this machine.
Controlling, adjusting, or operating the machine in ways not mentioned in the manuals for this machine may cause
dangerous radiation to escape from the machine. If the laser beam escapes from the machine, exposure may cause
serious damage to your eyes.
12
IMPORTANT
Important Safety Instructions
•
Follow the instructions in the caution label attached
to the machine.
•
Do not shake the machine or do not apply shock to
the machine.
•
Do not forcibly open and close covers and other
parts of the machine. Doing so may result in damage
to the machine.
•
During printing, do not turn OFF the main power,
open and close covers, or load and remove paper, in
order to prevent a paper jam.
•
Do not use this product for uses other than as a color
digital multitasking machine.
Transporting the machine
If you intend to move the machine over a long
distance, contact your local authoriz
ed Canon dealer
beforehand. Do not attempt to move the machine
yourself.
13

Maintenance and Inspections
▀
Clean this machine regularly. The machine may not operate properly if dust accumulates. Make sure to read the
followings when cleaning the machine.
WARNING
•
When cleaning the machine, first turn OFF the main
power switch, then disconnect the power cord.
Failure to observe these steps may result in a fire or
electrical shock.
•
Clean the machine using a cloth which is wrung
after being damped in water. Do not use alcohol,
benzene, paint thinner, or other flammable
substances. Do not use tissue paper or paper towels.
If these substances come into contact with a highvoltage area inside the machine, it may result in a
fire, electrical shock, or generating of static electricity.
•
Disconnect the power cord from the power outlet
regularly, and clean the area around the base of
the power plug’s metal pins and the power outlet
with a dry cloth to ensure that all dust and grime is
CAUTION
•
If a paper jam occurs, follow the instructions
displayed on the touch panel display to remove any
jammed paper from inside the machine. Make sure
to remove any piece of paper inside the machine. Do
not insert your fingers into any parts not indicated
on the touch panel display, as doing so may result in
personal injury or burns.
removed. If the power cord is connected for a long
period of time in a damp, dusty, or smoky location,
dust can build up around the power plug and
become damp. This may cause a short circuit and
result in a fire.
•
Check the power cord and power plug regularly to
see if there are any excessive heat generation, rust,
deformation, scratches, or cracks. Using the power
cord and power plug under these conditions may
result in a fire or electrical shock.
•
When loading paper or removing jammed paper,
take care not to cut your hands or injure yourself on
the edges of the paper.
IMPORTANT
When removing jammed paper or replacing the toner
cartridge, take care not to allow the toner to come into
contact with your hands or clothing, as this will dirty
your hands or clothing. If toner gets onto your hands
or clothing, wash it off immediately with cold water.
Washing it off with warm water will set the toner, and
make it impossible to remove the toner stains.
14

Consumables
▀
▀
WARNING
Important Safety Instructions
•
If you accidentally spill or scatter toner, carefully
wipe up the loose toner with a damp, soft cloth and
avoid inhaling any toner dust. Do not use a vacuum
cleaner that is not equipped with safety measures
to prevent dust explosions to clean up loose toner.
Doing so may cause damage to the vacuum cleaner
or result in a dust explosion due to static discharge.
CAUTION
•
Be careful not to inhale toner. If toner is inhaled,
consult a physician immediately.
•
Be careful not to allow toner to get into your eyes
and mouth. If toner gets into your eyes or mouth,
wash them immediately with cold water and consult
a physician immediately.
•
Be careful not to allow toner to directly touch your
skin. If toner touches your skin, wash it away with
soap and water. If your skin still feels irritated after
washing it, consult a physician immediately.
•
Do not burn or throw toner cartridges in open
flames. Do not store toner cartridges in places
exposed to open flames.
•
Keep toner and other consumables out of the reach
of small children. If these items are ingested, consult
a physician immediately.
•
Do not dismantle the toner cartridge, as doing so
may cause toner to fly out.
IMPORTANT
When discarding used toner cartridges
Put the used toner cartridges into a bag to prevent the
toner remaining inside the cartridges fr
om scattering,
and dispose of them in a location away from open
flames.
15

Safety-Related Symbols
▀
Power switch: “ON” position
Power switch: “OFF” position
Power switch: “STAND - BY” position
Push - push switch “ON” “OFF”
Protective earthing terminal
Dangerous voltage inside. Do not open covers other than instructed.
CAUTION: Hot surface. Do not touch.
Class II equipment
Moving parts: Keep body parts away from moving parts
NOTE
Some of symbols shown above may not be affixed depending on the product.
16
Parts and Their Functions
This section provides you with the names and functions of all the parts of the machine. The keys and display on the
control panel are also described. Read this section to use the machine’s various functions smoothly.
"Optional Products" in the User's Guide
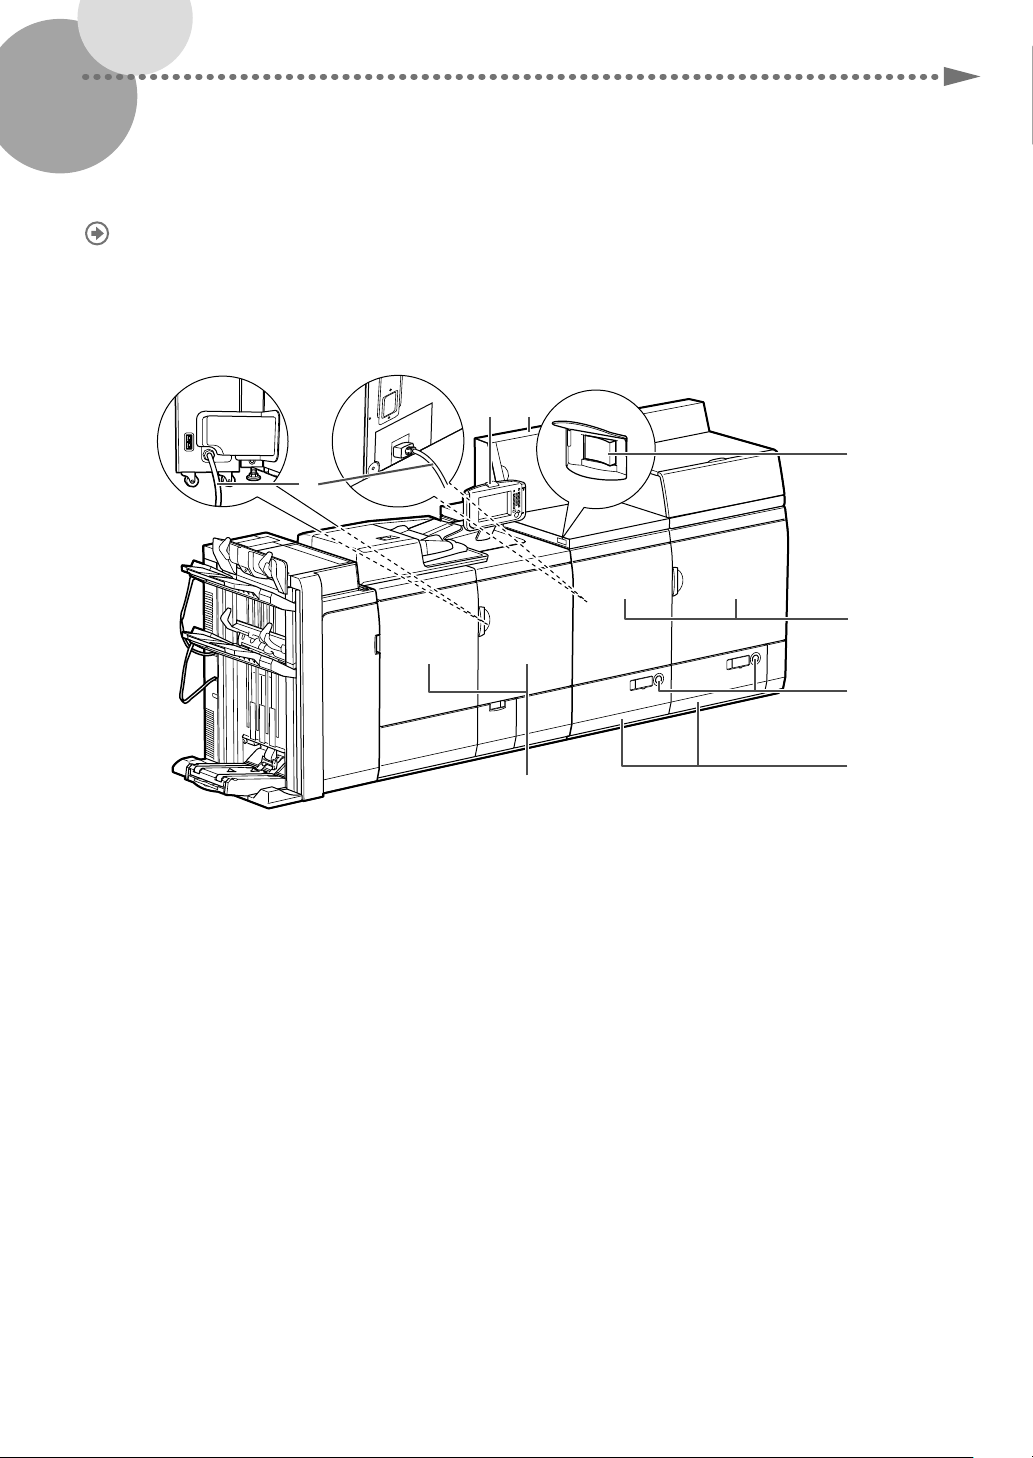
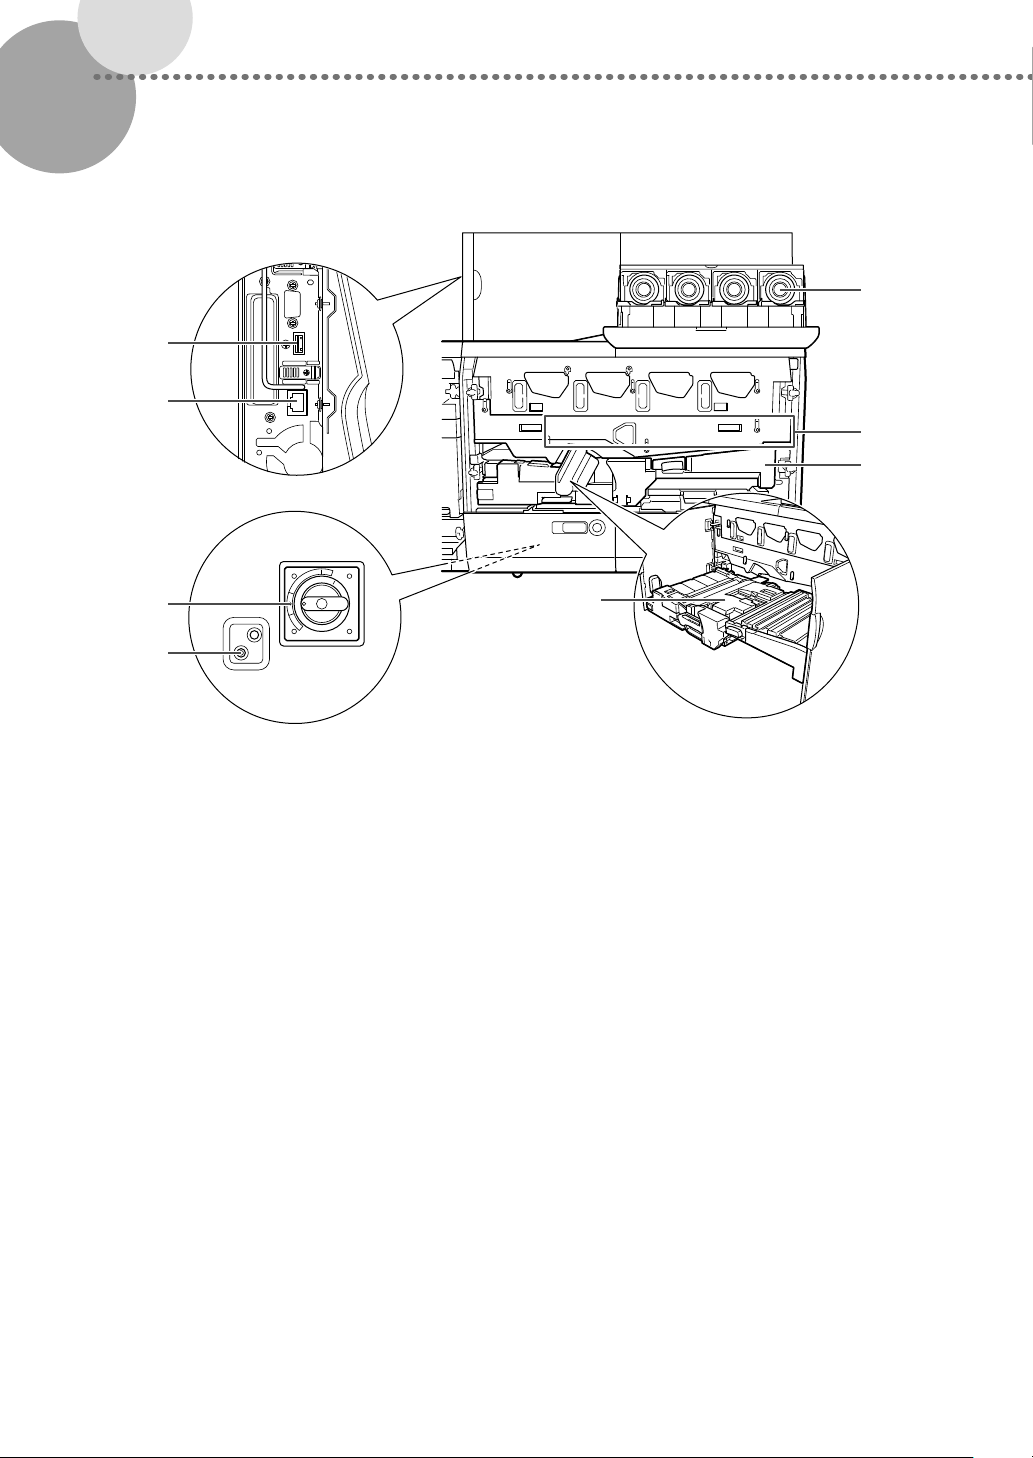
External View
▀
12
8
3
4
5
1 Upright Control Panel-F1
Includes the keys, touch panel display, and
indicators required for operating the machine.
2 Power Supply Unit
Provides power to the marking engine and fixing
station.
3 Main Power Switch
Press to the "|" side to turn the power ON.
4 Marking Engine Front Right Cover/Front Left
Cover
Open these covers to clear a paper jam inside the
marking engine.
6
7
Open Button
5
Press to open the paper deck when you need to
load paper or check for a paper jam.
The paper supply indicator enables you to check
the amount of paper remaining in the paper deck.
6 Right/Left Paper Deck
Holds up to 1,000 sheets of paper (20 lb bond (80
2
g/m
)).
7 Fixing Station Front Right Cover/Front Left
Cover
Open these covers to clear a paper jam inside the
fixing station.
8 Power Cord
Supplies power from an AC outlet to the main unit
and Duplex Color Image Reader Unit-K1 (option).
17
Internal View (Marking Engine)
▀
8
7
1
2
3
6
5
1 Toner Cartridge
Open the cover to replace the toner cartridge.
2 ITB (Intermediate Transfer Belt)
Transfers the toner to the paper.
3 Feeding Unit
Delivers paper that is fed from the paper deck to
the fixing station via the toner transfer position.
Also, the Feeding Unit delivers paper from the
fixing station when the 2nd side of 2-Sided page
mode is set. Pull out this unit to clear a paper jam
inside the unit.
4
5 Test Button
Located on the back of the power supply unit. Press
this button to periodically test the circuit breaker.
6 Breaker
Located on the back of the power supply unit.
Detects excess current or leakage current.
7 Network Connector
Located on the upper left area of the marking
engine. This port supports 1000/100/10 BASE-T. Use
this port to connect the machine to the network
(imagePRESS Server).
4 Skew Correction Roller
Compensates for paper skewing or dispersion of
side edges.
18
8 USB Connector
Located on the upper left area of the marking
engine. This connector is not normally used as it is
for service representatives.
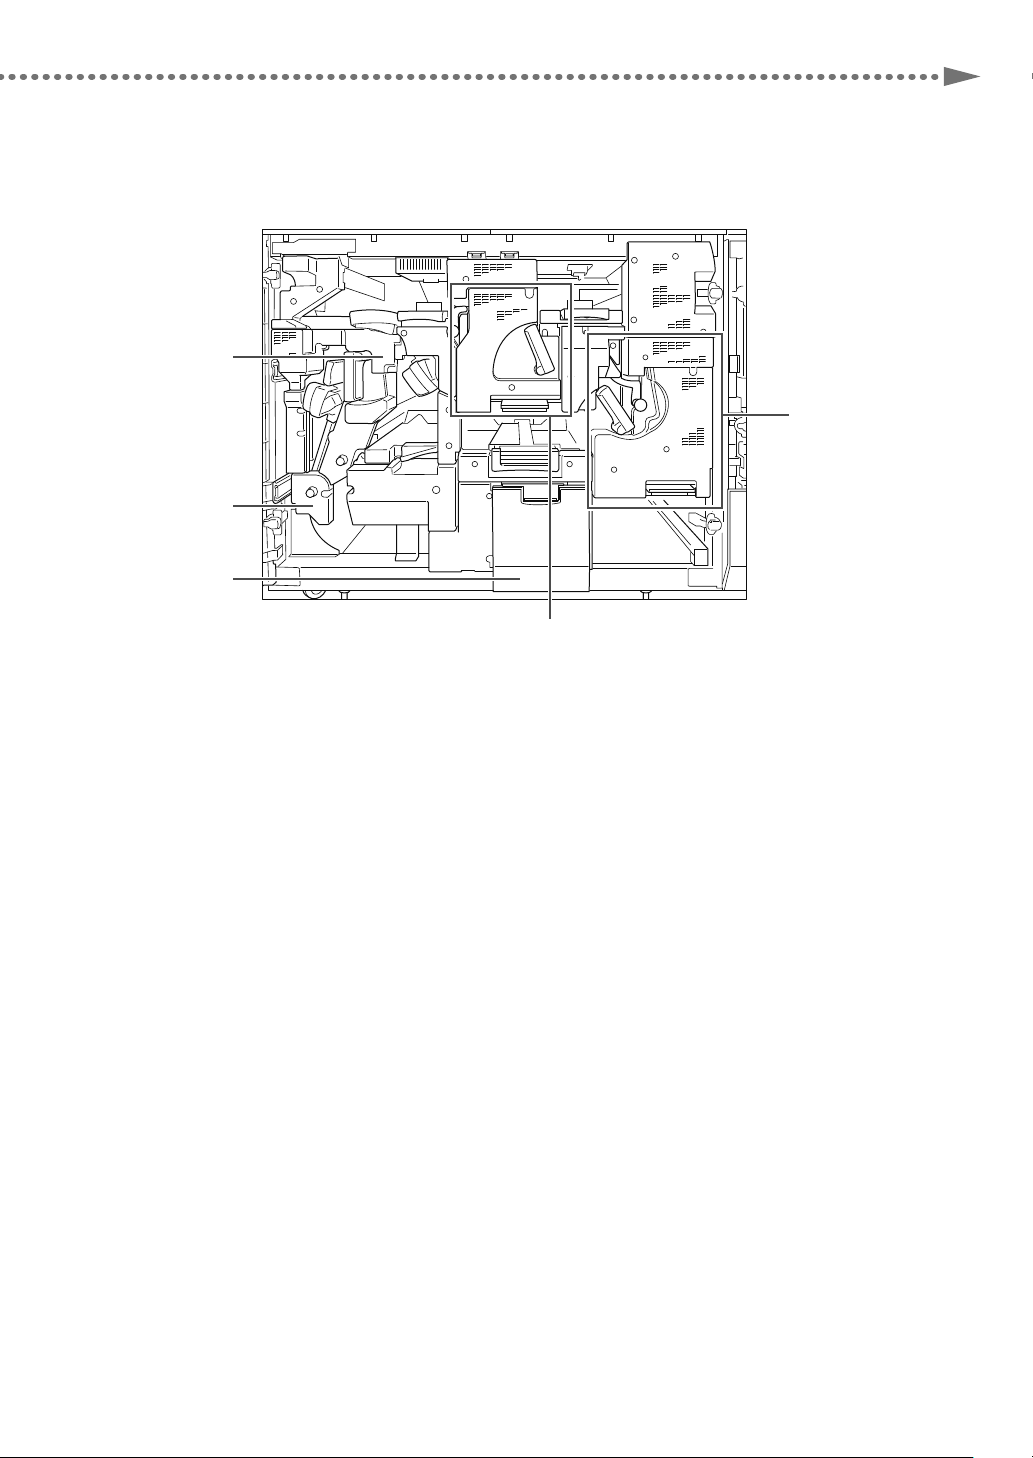
Internal View (Fixing Station)
▀
5
4
3
Parts and Their Functions
1
1 Primary Fixing Assembly
Fixes toner that has transferred to paper. Pull out
the primary fixing unit to clear a paper jam inside
the assembly.
2 Secondary Fixing Assembly
Some paper types need to pass through the
secondary fixing assembly after passing through
the primary fixing assembly to fix the toner
securely. Pull out the secondary fixing unit to clear a
paper jam inside the assembly.
3 Waste Toner Container Tray
Pull out this tray to replace the waste toner
container.
2
4 Reverse Unit
Reverses paper and returns it to the marking engine
when performing two-sided printing. This unit also
reverses paper to output the printed side face up or
down according to the Face Up/Face Down mode
settings.
Pull out the delivery/reverse unit to clear a paper
jam inside the unit.
5 Decurler Unit
Corrects paper curling caused by heat. Pull out this
unit to clear a paper jam inside the unit.
19
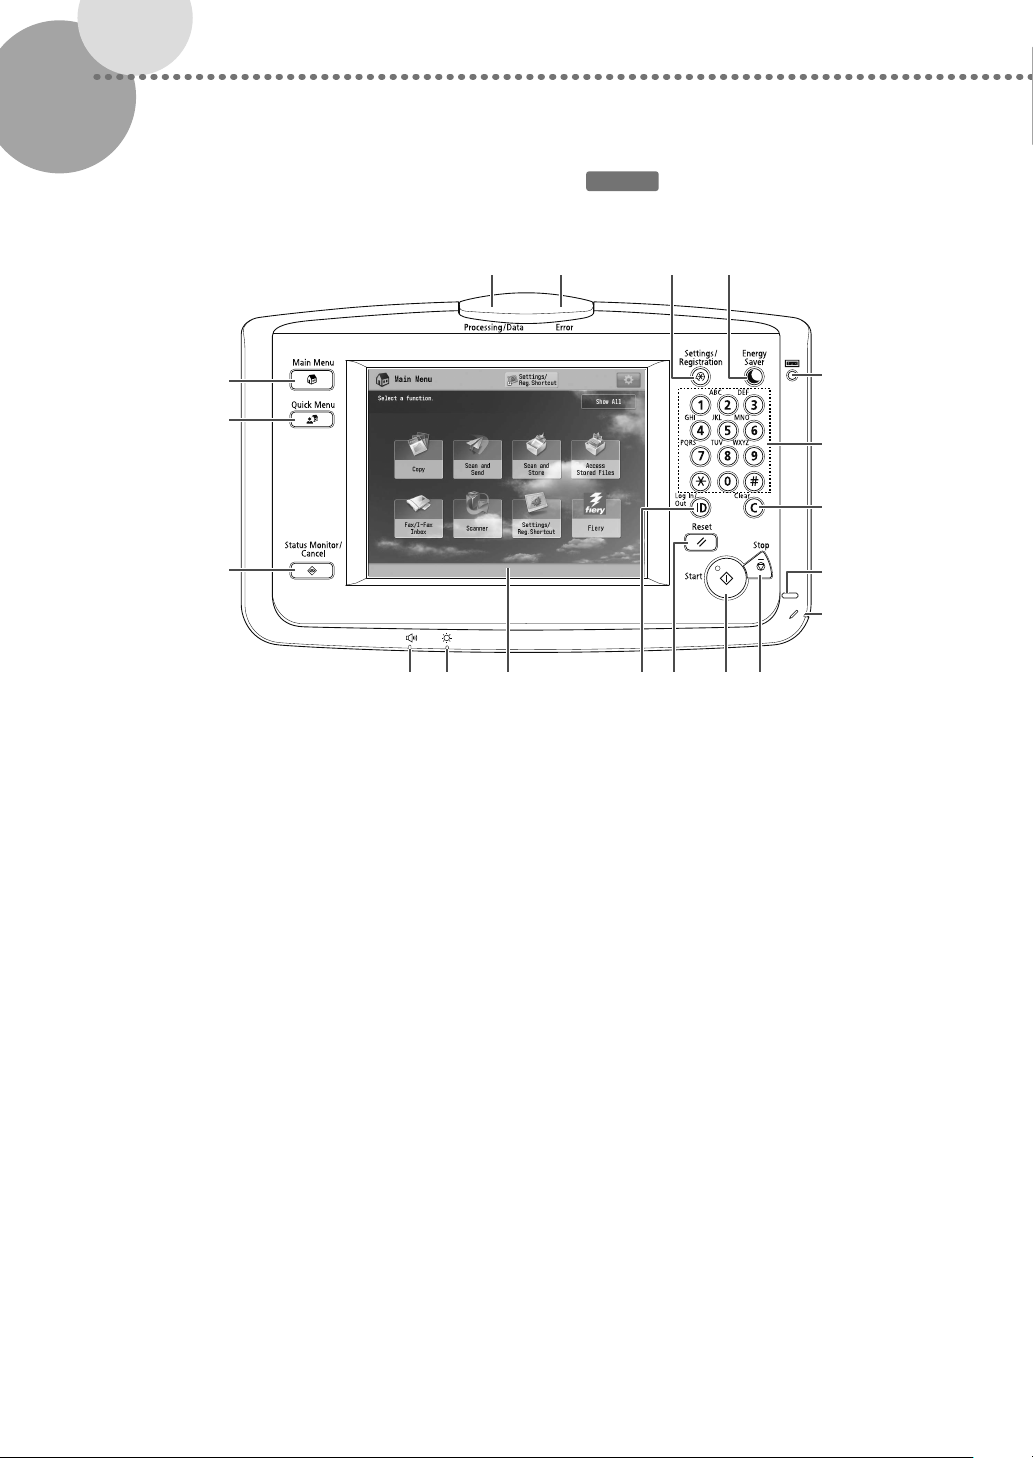
Control Panel (Upright Control Panel-F1)
▀
12 34
OPTION
19
18
17
1 Processing/Data Indicator
Blinks green when the machine is performing
operations, and maintains a steady green light
when received data is stored in memory.
2 Error Indicator
Blinks or lights if there is an error in the machine.
When the Error indicator blinks, follow the
instructions that appear on the touch panel display.
When the Error indicator maintains a steady red
light, contact your local authorized Canon dealer.
3 Settings/Registration key
Press to register and specify settings.
4 Energy Saver key
Press to set the Energy Saver mode or Sleep mode.
The mode activated after pressing the Energy
Saver key can be selected beforehand. This key
lights when the machine enters either mode. To
reactivate the machine, press this key again.
5
6
7
8
9
10111213141516
5 Counter Check key
Press to display the copy and print count totals.
6 Numeric keys
Press to enter numerical values.
7 Clear key
Press to clear entered values or characters.
8 Main Power Indicator
Lights when the main power is turned ON.
9 Edit Pen
Use when operating the touch panel display, such
as to enter characters.
10
Stop key
Press to stop a job in progress.
11
Start key
Press to start an operation, such as scanning or
copying.
20
12
Reset key
Press to restore the standard settings of the
machine.
13
ID (Log In/Out) key
Press to log in/out when a login service such as
Department ID Management has been set.
14
Touch Panel Display
The settings screen for each function is shown on
this display.
15
Brightness Adjustment Dial
Use to adjust the brightness of the touch panel
display.
16
Volume Settings key
Press to display the screen to specify the audible
tones.
Parts and Their Functions
17
Status Monitor/Cancel key
Press to check the status of jobs or to cancel print
jobs. Also, press to check status of the machine,
such as checking the amount of paper remaining.
18
Quick Menu key
Press to retrieve favorite functions stored in Quick
Menu. Also, if you are using authentication, Quick
Menu set for each individual user can be displayed.
19
Main Menu key
Press to return to the Main Menu screen, such as
when you want to switch functions.
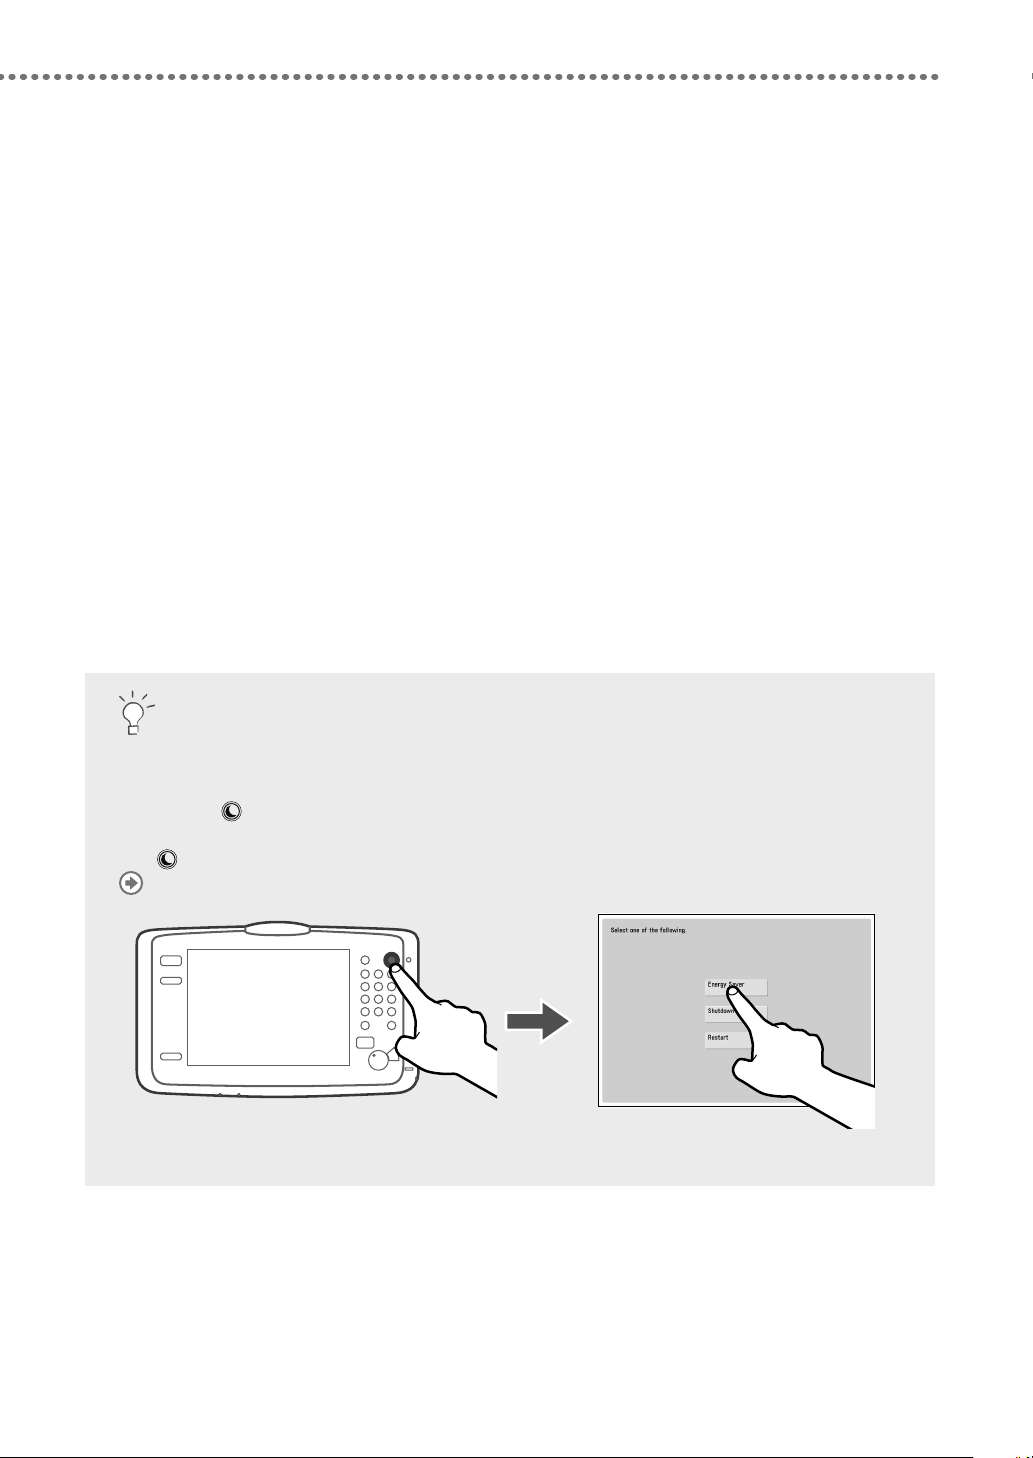
Setting the Energy Saver mode/Sleep mode to minimize energy consumption
You can save energy consumption by using the Energy Saver mode/Sleep mode when the machine is not
being used for a prolonged period of time, such as a lunch time. To use these modes, press [Energy Saver]
after pressing
machine will enter the Sleep mode (Auto Sleep mode). For more information on the mode which activates
after
(Energy Saver) is pressed, and detailed information on the Auto Sleep mode, see the User's Guide.
"Basic Operations" > "Energy Saving Features" in the User's Guide
(Energy Saver) on the control panel. If the machine is idle for a certain period of time, the
21
 Loading...