

Page 1

Operation guide
imag e PRESS C800 Series
Page 2

Copyright
Copyright CANON INC. 2014
No part of this publication may be reproduced, transmitted, transcribed, stored in a retrieval
system, or translated into any language or computer language in any form or by any means,
electronic, mechanical, magnetic, optical, chemical, manual or otherwise, without the prior
written permission of Canon Inc.
Edition 2014-10
US
Page 3

Contents
Contents
Chapter 1
Preface................................................................................................................................. 7
Disclaimers........................................................................................................................................................8
Trademarks....................................................................................................................................................... 9
Notes for the reader....................................................................................................................................... 11
Installation precautions..................................................................................................................................12
Handling precautions..................................................................................................................................... 16
Information in this operation guide.............................................................................................................. 18
Chapter 2
Explore the print system..................................................................................................19
What can this print system do for you?........................................................................................................20
What output can you create.......................................................................................................................... 21
Media for your output..............................................................................................................................21
Finishing for your output.........................................................................................................................23
Color reproduction for your output........................................................................................................ 26
PRISMAsync operating concept....................................................................................................................28
Main hardware parts...................................................................................................................................... 32
Overview of licenses...................................................................................................................................... 35
Control panel.................................................................................................................................................. 36
Paper Input......................................................................................................................................................38
Paper module .......................................................................................................................................... 38
Bulk paper module...................................................................................................................................39
Inserter...................................................................................................................................................... 40
Automatic document feeder................................................................................................................... 41
Special feeder...........................................................................................................................................42
Finishing and delivery....................................................................................................................................43
Professional stacker / stapler.................................................................................................................. 43
Standard stacker / stapler........................................................................................................................45
Professional puncher............................................................................................................................... 46
Folder........................................................................................................................................................ 47
Output tray................................................................................................................................................48
Chapter 3
Prepare the jobs................................................................................................................ 49
Prepare print jobs........................................................................................................................................... 50
Prepare print jobs with the printer driver.............................................................................................. 50
Prepare print jobs with PRISMAprepare................................................................................................ 52
Print a file from a USB drive................................................................................................................... 54
Prepare copy and scan jobs...........................................................................................................................55
Copy jobs.................................................................................................................................................. 55
Scan jobs.................................................................................................................................................. 57
Use the automatic document feeder to copy or scan........................................................................... 59
Use the glass plate to copy or scan........................................................................................................61
Make a copy..............................................................................................................................................63
Make a scan.............................................................................................................................................. 64
Use templates for recurring jobs............................................................................................................ 66
Copy subsets (combined copying)......................................................................................................... 67
Scan subsets (combined scanning)........................................................................................................68
imagePRESS C800 Series
3
Page 4

Contents
Chapter 4
Plan the jobs......................................................................................................................69
Set up your print production preferences.................................................................................................... 70
Automated workflows............................................................................................................................. 70
Workflow profiles ....................................................................................................................................73
Select a workflow profile.........................................................................................................................79
Select an accounting mode.....................................................................................................................80
Change or disable the warning time...................................................................................................... 82
Change the system language..................................................................................................................83
Use of shorter job names........................................................................................................................ 84
Adjust the readability of the control panel ........................................................................................... 85
Use the remote monitor.......................................................................................................................... 86
Transaction printing.................................................................................................................................87
Print in transaction printing mode..........................................................................................................90
Use the DocBox.............................................................................................................................................. 91
DocBox......................................................................................................................................................91
Change a DocBox job.............................................................................................................................. 92
Combine DocBox jobs............................................................................................................................. 93
Lock DocBox job settings........................................................................................................................ 94
Print DocBox jobs.....................................................................................................................................95
Load and assign media.................................................................................................................................. 96
Add temporary media to the media catalog..........................................................................................96
Assign media to a paper tray.................................................................................................................. 97
Manage the jobs in the queue.......................................................................................................................99
Job management in the queues............................................................................................................. 99
View the jobs in the queues.................................................................................................................. 102
Bundle jobs.............................................................................................................................................103
Add extra sheets to a job.......................................................................................................................105
Change job settings............................................................................................................................... 106
Use page programming........................................................................................................................ 107
Print a waiting job ................................................................................................................................. 109
Print a scheduled job immediately....................................................................................................... 110
Move a scheduled job to the list of waiting jobs.................................................................................111
Reprint a job........................................................................................................................................... 112
Send a job to another printer................................................................................................................113
Remove print jobs..................................................................................................................................114
Chapter 5
Print the jobs................................................................................................................... 115
Proofing.........................................................................................................................................................116
Proof and test prints.............................................................................................................................. 116
Make a proof...........................................................................................................................................118
Print a job ticket......................................................................................................................................119
Keep the system printing.............................................................................................................................120
System monitoring................................................................................................................................ 120
Schedule................................................................................................................................................. 122
Load media for the scheduled jobs...................................................................................................... 125
Check the filling level of the toner cartridge........................................................................................127
Check the filling level of the staple cartridge.......................................................................................128
Check the filling level of the waste toner container............................................................................ 129
Handle media................................................................................................................................................130
Check and prepare media before loading............................................................................................130
Check and prepare envelopes before loading..................................................................................... 132
Check and prepare transparencies before loading............................................................................. 134
Load media into the internal paper trays.............................................................................................135
Load media into the paper module...................................................................................................... 137
Load media into the bulk paper module.............................................................................................. 141
Load media into the special feeder...................................................................................................... 145
4
imagePRESS C800 Series
Page 5

Contents
Load media into the inserter................................................................................................................. 147
Load envelopes into the internal paper trays...................................................................................... 149
Load tab paper into the internal paper trays....................................................................................... 152
Stop printing................................................................................................................................................. 154
Remove printed output from the stacker/stapler.......................................................................................155
Store the printed output.............................................................................................................................. 158
Chapter 6
Keep the image quality high..........................................................................................159
Calibration.....................................................................................................................................................160
About calibration....................................................................................................................................160
Calibrate the printer............................................................................................................................... 162
Calibrate the media family.................................................................................................................... 163
Calibrate for maximum print quality.................................................................................................... 165
Adjust the color quality................................................................................................................................166
About image and color adjustments.................................................................................................... 166
Adjust CMYK curves for a single job....................................................................................................167
Adjust CMYK curves for all jobs........................................................................................................... 169
Automatic color mismatch correction..................................................................................................171
Register the color tones for the ACCT function...................................................................................172
Correct the color tones with the ACCT function..................................................................................173
Create a trapping preset........................................................................................................................ 174
Adjust the print quality for media............................................................................................................... 175
About print quality for media................................................................................................................175
Correct curled output media................................................................................................................. 176
Perform a media registration................................................................................................................ 177
Correct skewed and rotated images.....................................................................................................179
Chapter 7
Maintain the print system..............................................................................................181
System configuration and maintenance.................................................................................................... 182
Consumables................................................................................................................................................ 185
Use the power modes.................................................................................................................................. 189
Turn on the print system....................................................................................................................... 189
Turn off the print system.......................................................................................................................190
Restart the print system........................................................................................................................ 191
Use the energy save modes..................................................................................................................192
Refill toner and staples................................................................................................................................ 193
Replace a toner cartridge...................................................................................................................... 193
Replace the waste toner container....................................................................................................... 196
Replace in the professional stacker / stapler the staple cartridge in the staple unit........................ 199
Replace in the professional stacker / stapler the staple cartridge in the saddle-stitch unit.............201
Replace in the standard stacker / stapler the staple cartridge in the staple unit.............................. 204
Replace in the standard stacker /stapler the staple cartridge in the saddle-stitch unit....................207
Remove the staple waste...................................................................................................................... 209
Remove in the professional stacker /stapler the punch waste ..........................................................211
Remove in the standard stacker / stapler the punch waste................................................................213
Keep the print system clean........................................................................................................................ 214
Cleaning tasks and procedures.............................................................................................................214
Clean the control panel..........................................................................................................................215
Clean the glass plate area..................................................................................................................... 216
Clean the automatic document feeder scanning area........................................................................ 217
Clean the scanning sensors.................................................................................................................. 219
Clean the automatic document feeder rollers..................................................................................... 220
Clean the inside of the print module.................................................................................................... 221
Clean the corona assembly wires.........................................................................................................222
Clean the main unit rollers.................................................................................................................... 223
Refresh the fixing belt............................................................................................................................224
Enable Remote Service................................................................................................................................ 225
imagePRESS C800 Series
5
Page 6

Contents
Read the counters.........................................................................................................................................226
Chapter 8
Help.................................................................................................................................. 227
Access the print module parts.....................................................................................................................228
Problem Solving........................................................................................................................................... 230
Optimize the scan quality of the print system........................................................................................... 232
Fix "density not within required range" error............................................................................................ 233
Chapter 9
References....................................................................................................................... 235
Job settings...................................................................................................................................................236
Copy job settings................................................................................................................................... 236
Scan job settings....................................................................................................................................240
Print job settings.................................................................................................................................... 242
Output settings, values and icons........................................................................................................ 246
Zoom function.............................................................................................................................................. 250
Feed direction............................................................................................................................................... 251
Feed direction for stapling.................................................................................................................... 251
Feed direction for punching.................................................................................................................. 256
Feed direction for folding...................................................................................................................... 257
Feed direction for the inserter...............................................................................................................259
Feed instruction for envelopes............................................................................................................. 261
Feed instruction for tab paper...............................................................................................................263
Status indicators...........................................................................................................................................264
Job status indicators..............................................................................................................................264
Paper tray indicators..............................................................................................................................265
More PRISMAsync color information......................................................................................................... 266
System specifications.................................................................................................................................. 268
Print system specifications....................................................................................................................268
Paper input specifications..................................................................................................................... 270
Finishing and delivery specifications .................................................................................................. 274
Remote monitor specifications............................................................................................................. 288
Media specifications.....................................................................................................................................289
Supported media types for paper input optionals.............................................................................. 289
Supported media sizes by paper input optional................................................................................. 291
Supported envelope types by paper input optional........................................................................... 292
Settings Editor.............................................................................................................................................. 293
Settings Editor specifications................................................................................................................293
Settings Editor media attributes........................................................................................................... 294
Settings Editor settings and information............................................................................................. 295
Index.................................................................................................................................305
6
imagePRESS C800 Series
Page 7

Chapter 1 Preface
Page 8

Disclaimers
Disclaimers
The information in this document is subject to change without notice.
CANON INC. MAKES NO WARRANTY OF ANY KIND WITH REGARD TO THIS MATERIAL, EITHER
EXPRESS OR IMPLIED, EXCEPT AS PROVIDED HEREIN, INCLUDING WITHOUT LIMITATION,
THEREOF, WARRANTIES AS TO MARKETABILITY, MERCHANTABILITY, FITNESS FOR A
PARTICULAR PURPOSE OF USE OR NON-INFRINGEMENT. CANON INC. SHALL NOT BE LIABLE
FOR ANY DIRECT, INCIDENTAL, OR CONSEQUENTIAL DAMAGES OF ANY NATURE, OR LOSSES
OR EXPENSES RESULTING FROM THE USE OF THIS MATERIAL.
To view the manual in PDF format, Adobe Reader/Adobe Acrobat Reader is required. If Adobe
Reader/Adobe Acrobat Reader is not installed on your system, please download it from the
Adobe Systems Incorporated website.
Chapter 1 - Preface
8
imagePRESS C800 Series
Page 9

Trademarks
Océ, Océ PRISMA, Océ PRISMAsync, Océ PRISMAprepare and Océ PRISMAaccess are registered
trademarks of Océ.
PANTONE® Colors displayed in the software application or in the user documentation may not
match PANTONE-identified standards. Consult current PANTONE Color Publications for accurate
color. PANTONE® and other Pantone, Inc. trademarks are the property of Pantone, Inc. ©
Pantone, Inc., 2007
Pantone, Inc. is the copyright owner of color data and/or software which are licensed to (insert
name of your company) to distribute for use only in combination with (insert appropriate name of
Licensed Materials). PANTONE Color Data and/or Software shall not be copied onto another disk
or into memory unless as part of the execution of (insert appropriate name of Licensed
Materials).
Xerox is a registered trademark of Xerox Corporation.
This product contains the Universal Font Scaling Technology or UFST® under license from
Monotype Imaging, Inc. UFST® is a trademark of Monotype Imaging, Inc. registered in the United
States Patent and Trademark Office and may be registered in certain jurisdictions.
UFST: Copyright © 1989 - 1996, 1997, 2003, 2004, 2008, all rights reserved, by Monotype Imaging
Inc.
Trademarks
Apple, AppleTalk, EtherTalk, LocalTalk, Mac, Macintosh, Mac OS, and Safari are trademarks of
Apple Inc., registered in the U.S. and other countries.
Microsoft, Windows, Windows Vista, Windows Server, Internet Explorer, Excel and PowerPoint
are either registered trademarks or trademarks of Microsoft Corporation in the United States
and/or other countries.
Portions of this software are copyright © 2007 The FreeType Project (www.freetype.org). All
rights reserved.
Copyright (C) 1999, 2000, 2002 Aladdin Enterprises. All rights reserved.
Java and all Java based trademarks and logos are trademarks or registered trademarks of Oracle
and/or its affiliates.
Adobe, PostScript, and the PostScript logo are either registered trademarks or trademarks of
Adobe Systems Incorporated in the United States and/or other countries.
Copyright © 2007 -08 Adobe Systems Incorporated. All rights reserved.
Protected by U.S. Patents 5,737,599; 5,781,785; 5,819,301; 5,929,866; 5,943,063; 6,073,148;
6,515,763; 6,639,593; 6,754,382; 7,046,403; 7,213,269; 7,242,415; Patents pending in the U.S. and
other countries.
imagePRESS C800 Series
Chapter 1 - Preface
9
Page 10

Trademarks
All instances of the name PostScript in the text are references to the PostScript language as
defined by Adobe Systems Incorporated unless otherwise stated. The name PostScript also is
used as a product trademark for Adobe Systems' implementation of the PostScript language
interpreter.
Except as otherwise stated, any reference to a "PostScript printing device," "PostScript display
device," or similar item refers to a printing device, display device or item (respectively) that
contains PostScript technology created or licensed by Adobe Systems Incorporated and not to
devices or items that purport to be merely compatible with the PostScript language.
Adobe, the Adobe logo, PostScript, the PostScript logo, and PostScript 3 are either registered
trademarks or trademarks of Adobe Systems Incorporated in the United States and/or other
countries.
Linux is a registered trademark of Linus Torvalds. Microsoft and Windows are either registered
trademarks or trademarks of Microsoft Corporation in the United States and/or other countries.
All other trademarks are the property of their respective owners.
The PDF logo is a trademark or registered trademark of Adobe Systems Incorporated in the
United States and other countries.
Copyright © 2008 Adobe Systems Incorporated. All rights reserved.
Protected by U.S. Patents 6,185,684; 6,205,549; 7,213,269; 7,272,628; 7,278,168; Patents pending in
the U.S. and other countries.
All instances of the name PostScript in the text are references to the PostScript language as
defined by Adobe Systems Incorporated unless otherwise stated. The name PostScript also is
used as a product trademark for Adobe Systems' implementation of the PostScript language
interpreter.
Except as otherwise stated, any reference to a "PostScript printing device," "PostScript display
device," or similar item refers to a printing device, display device or item (respectively) that
contains PostScript technology created or licensed by Adobe Systems Incorporated and not to
devices or items that purport to be merely compatible with the PostScript language.
Adobe, the Adobe logo, PostScript, the PostScript Logo, and PostScript 3 are either registered
trademarks or trademarks of Adobe Systems Incorporated in the United States and/or other
countries.
All other trademarks are the property of their respective owners.
Other product and company names herein may be the trademarks of their respective owners.
Chapter 1 - Preface
10
imagePRESS C800 Series
Page 11
Notes for the reader
Introduction
This manual helps you to use the imagePRESS C800 Series. The manual contains a description of
the product and guidelines to use and operate the imagePRESS C800 Series.
Definition
Attention-Getters
Parts of this manual require your special attention. These parts can provide the following:
• Additional general information, for example, information that is useful when you perform a
task.
• Information to prevent personal injuries or property damage.
Symbols used in this manual
The following symbols are used in this manual to explain procedures, restrictions, handling
precautions, and instructions that should be observed for safety.
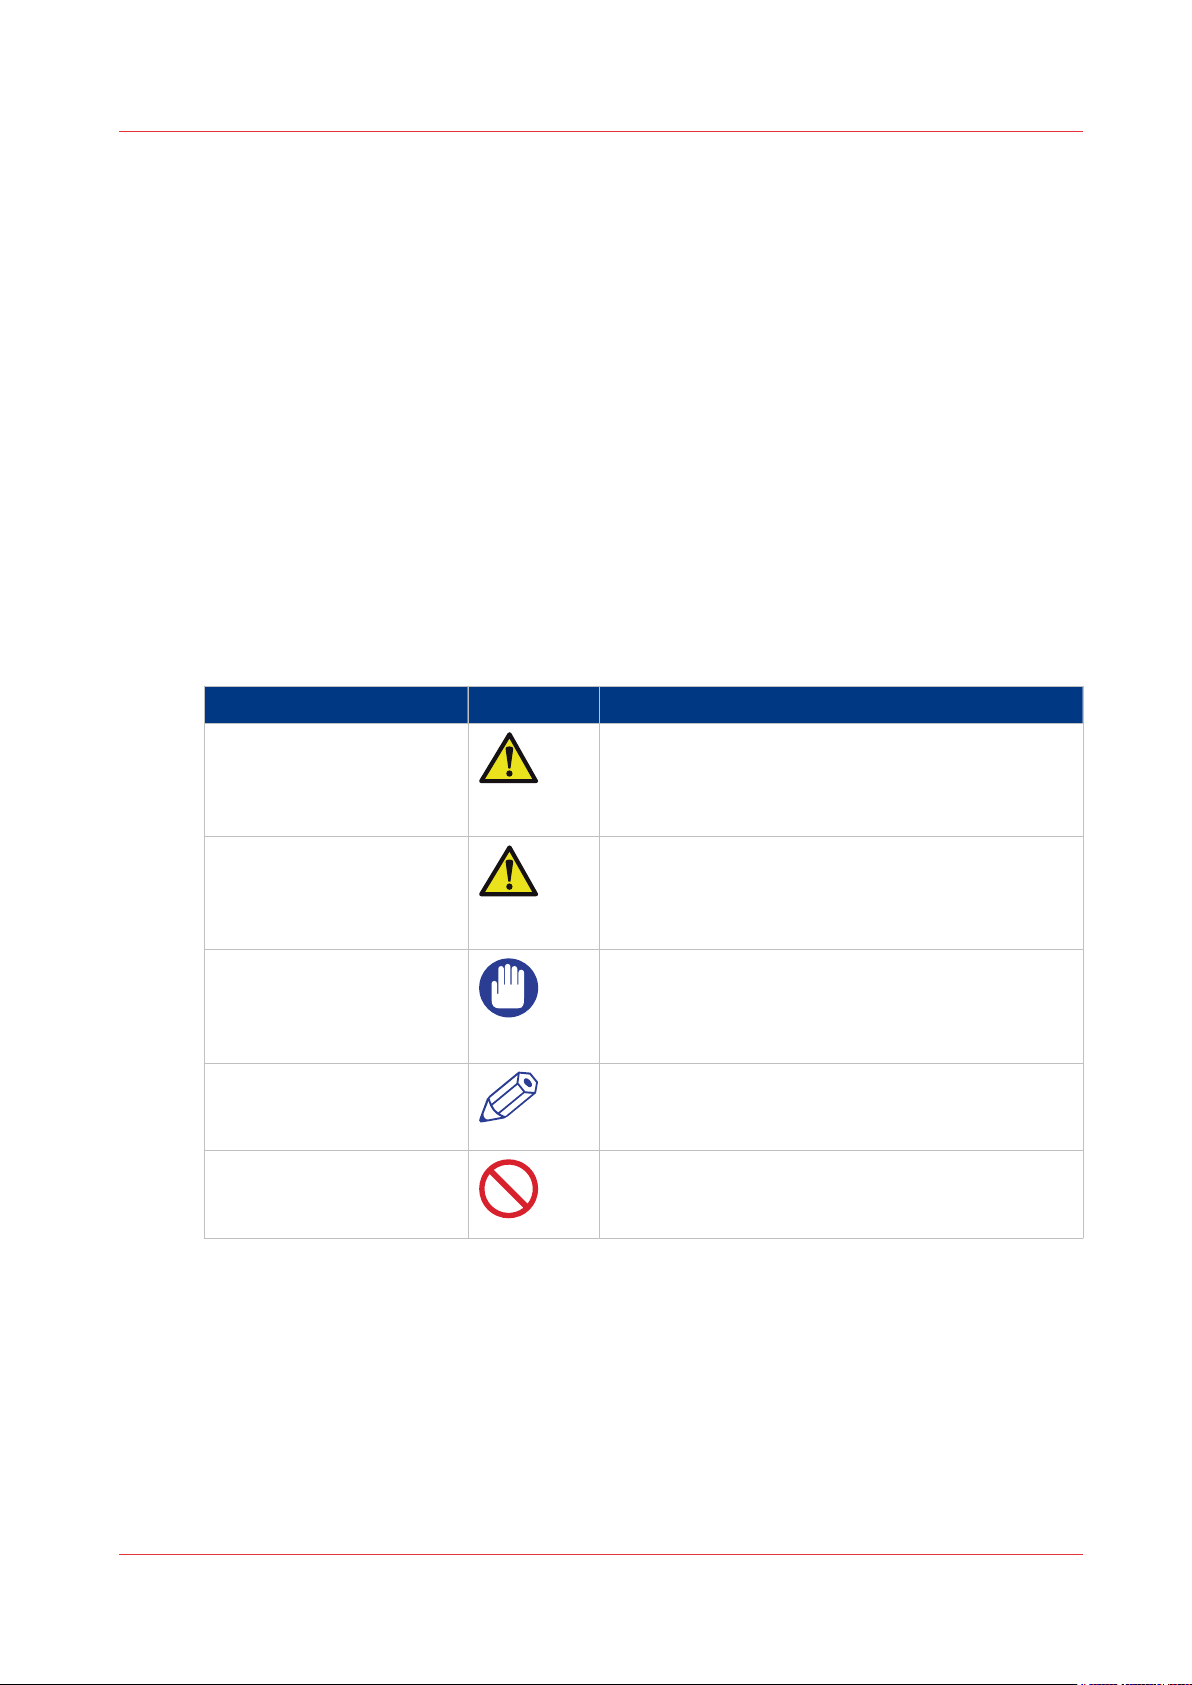
Overview of the attention-getters
Word Icon Indicates
Notes for the reader
WARNING
CAUTION
IMPORTANT
NOTE
- Indicates an operation that must not be performed.
Indicates a warning concerning operations that may
lead to death or injury to persons if not performed
correctly. To use the machine safely, always pay attention to these warnings.
Indicates a caution concerning operations that may
lead to injury to persons if not performed correctly.
To use the machine safely, always pay attention to
these cautions.
Indicates operational requirements and restrictions.
Be sure to read these items carefully to operate the
machine correctly and to avoid damaging the machine or property.
Indicates a clarification of an operation or contains
additional explanations for a procedure. Reading
these notes is highly recommended.
Read these items carefully and make sure not to
perform the described operations.
imagePRESS C800 Series
Chapter 1 - Preface
11
Page 12
Installation precautions
Installation precautions
Avoid installing the machine in the following locations
•
Avoid locations subject to temperature and humidity extremes, whether low or high.
For example, avoid installing the machine near water faucets, hot water heaters, humidifiers,
air conditioners, heaters, or stoves.
•
Avoid installing the machine in direct sunlight.
If this is unavoidable, use curtains to shade the machine. Be sure that the curtains do not block
the machine's ventilation slots or louvers, or interfere with the electrical cord or power supply.
•
Avoid poorly ventilated locations.
This machine generates a slight amount of ozone etc. during normal use. Although sensitivity
to ozone etc. may vary, this amount is not harmful. Ozone etc. may be more noticeable during
extended use or long production runs, especially in poorly ventilated rooms. It is
recommended that the room be appropriately ventilated, sufficient to maintain a comfortable
working environment, in areas of machine operation. In addition, do not install this machine
where it exhausts directly onto a person.
•
Avoid locations where a considerable amount of dust accumulates.
•
Avoid locations where ammonia gas is emitted.
Chapter 1 - Preface
12
imagePRESS C800 Series
Page 13
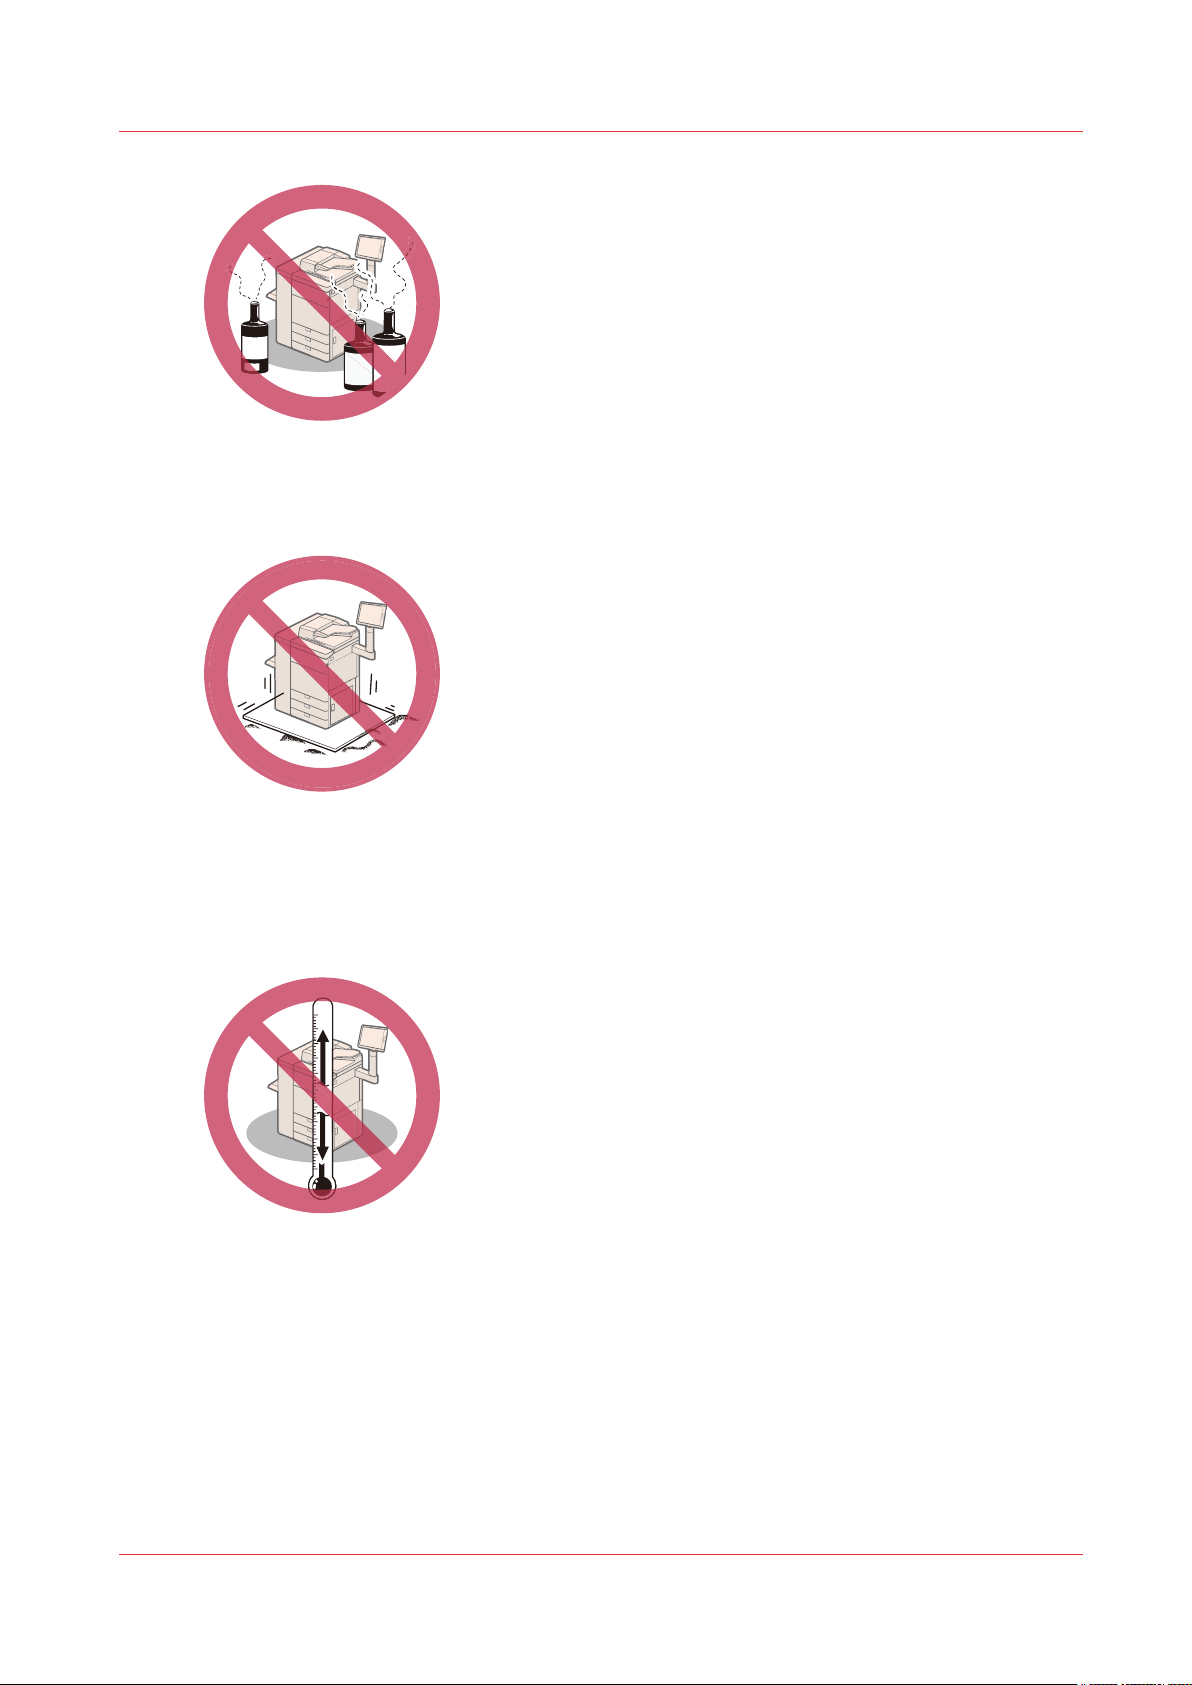
Installation precautions
•
Avoid locations near volatile or flammable materials, such as alcohol or paint thinner.
•
Avoid locations that are subject to vibration.
For example, avoid installing the machine on unstable floors or stands.
•
Avoid exposing the machine to rapid changes in temperature.
If the room in which the machine is installed is cold but rapidly heated, water droplets
(condensation) may form inside the machine. This may result in a noticeable degradation in
the quality of the copied image, the inability to properly scan an original, or the copies having
no printed image at all.
•
Avoid installing the machine near computers or other precision electronic equipment.
Electrical interference and vibrations generated by the machine during printing can adversely
affect the operation of such equipment.
•
Avoid installing the machine near televisions, radios, or similar electronic equipment.
The machine might interfere with sound and picture signal reception. Insert the power plug
into a dedicated power outlet, and maintain as much space as possible between the machine
and other electronic equipment.
•
Contact an authorized Canon dealer if communication is unavailable.
Depending on your locale or your telephone connection, you may be unable to perform data
communication. In this case, contact your local authorized Canon dealer.
•
Do not remove the machine's leveling feet.
imagePRESS C800 Series
Chapter 1 - Preface
13
Page 14

Installation precautions
Do not remove the machine's leveling feet after the machine has been installed.
If you put weight on the front of the machine while the drawers are pulled out, the machine
may fall forward. To prevent this from happening, make sure that the machine's leveling feet
are in place.
•
Avoid installing the machine at high altitudes of about 3,000 meters above sea level, or
higher.
Machines with a hard disk may not operate properly when used at high altitudes of about 3,000
meters above sea level, or higher.
Select a safe power supply
•
Plug the machine into an outlet that is 208 V AC 20 A or greater.
•
Make sure that the power supply for the machine is safe, and has a steady voltage.
•
Do not connect other electrical equipment to the same power outlet to which the machine is
connected.
•
Do not connect the power cord to a multiplug power strip, as this may cause a fire or
electrical shock.
•
The power cord may become damaged if it is stepped on, affixed with staples, or if heavy
objects are placed on it. Continued use of a damaged power cord can lead to an accident, such
as a fire or electrical shock.
•
The power cord should not be taut, as this may lead to a loose connection and cause
overheating, which could result in a fire.
•
If excessive stress is applied to the connection part of the power cord, it may damage the
power cord or the wires inside the machine may disconnect. This could result in a fire. Avoid
the following situations:
• Connecting and disconnecting the power cord frequently.
• Tripping over the power cord.
• The power cord is bent near the connection part, and continuous stress is being applied to
the power outlet or the connection part.
• Applying excessive force on the power plug.
Moving the machine
If you intend to move the machine, even to a location on the same floor of your building, contact
your local authorized Canon dealer beforehand. Do not attempt to move the machine yourself.
Provide Adequate Installation Space
Provide enough space on each side of the machine for unrestricted operation.
When the Output Tray-A1, Duplex Color Image Reader Unit-H1, and control panel are attached:
Chapter 1 - Preface
14
imagePRESS C800 Series
Page 15
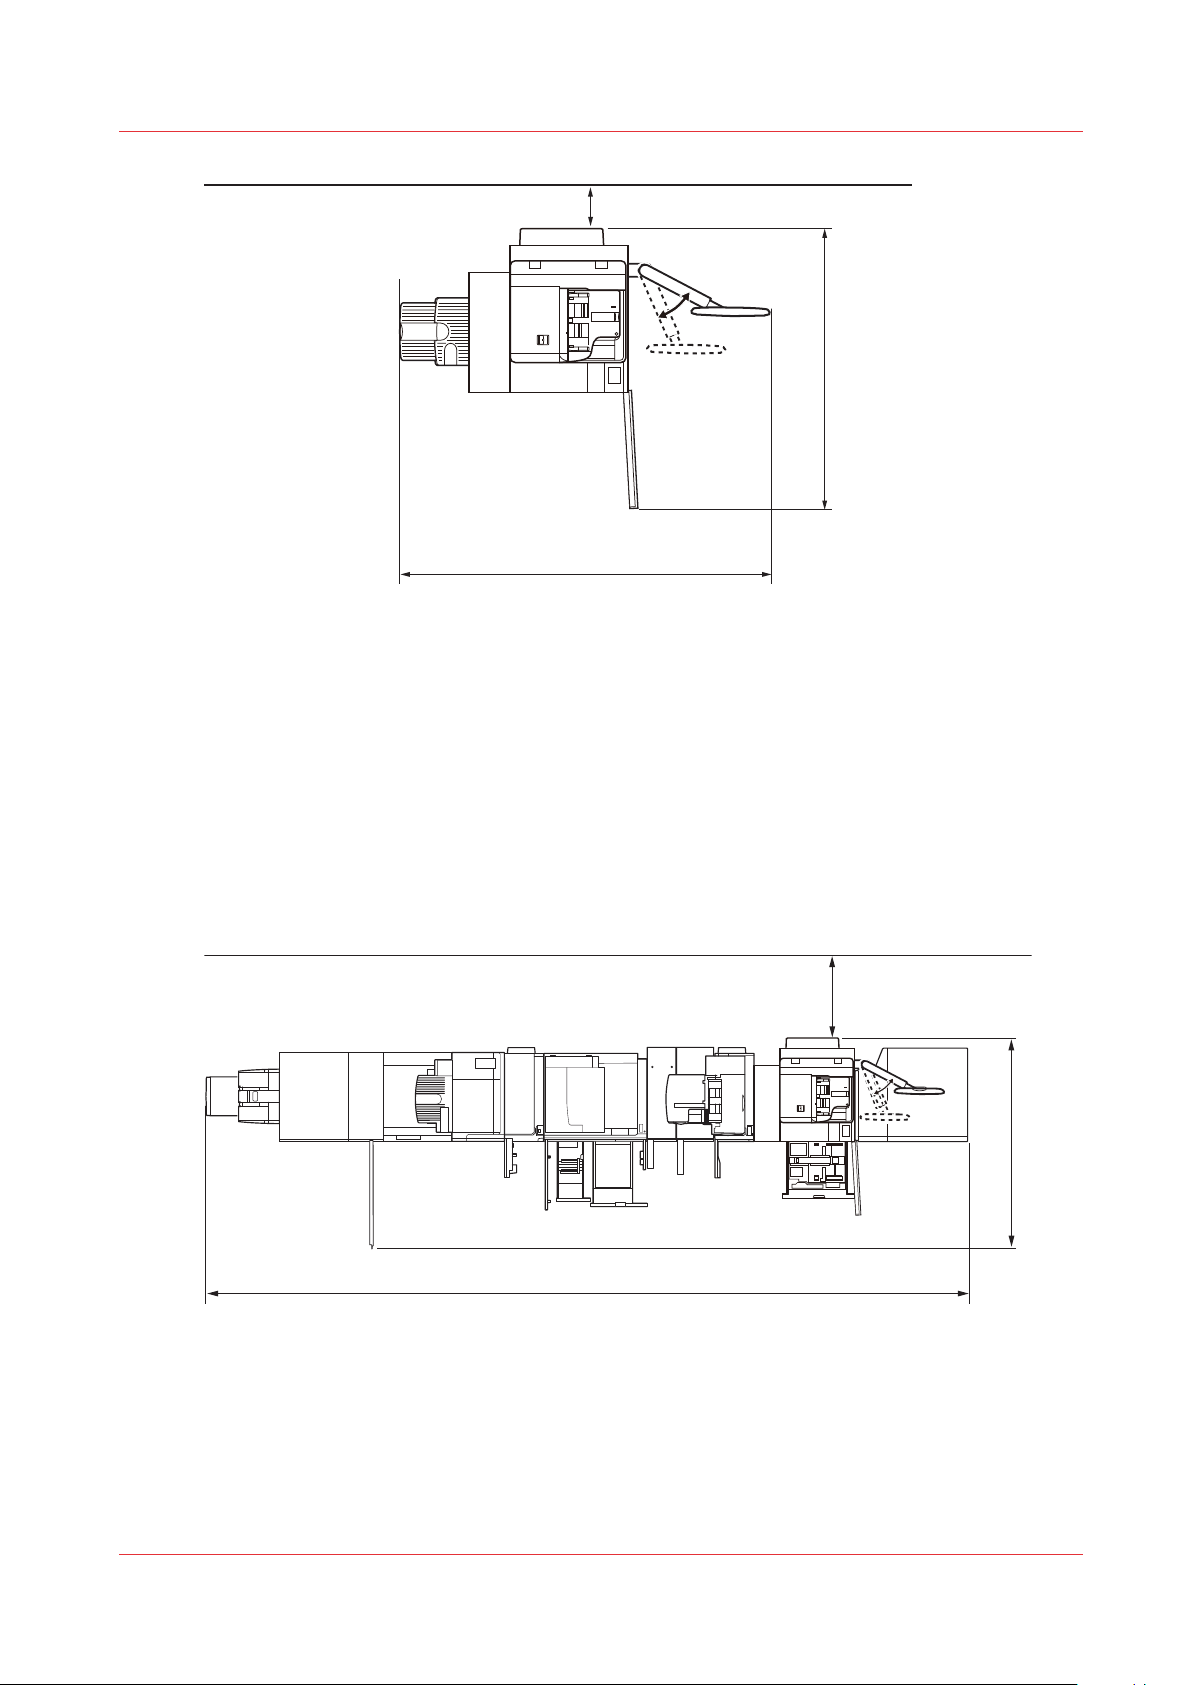
100 mm /4” *1
1,952 mm / 76 7/8”
1,524 mm / 60”
800 mm / 31 1/2” *2
6,445 mm / 253 3/4”
1,765 mm / 69 1/2”
Installation precautions
*1 Make sure to provide at least 800 mm / 31 1/2" of space if you attach one or more of the
following: Paper Folding Unit-F1, Professional Puncher-C1, Document Insertion Unit-M1 or MultiDrawer Paper Deck-A1..
When the Two-Knife Booklet Trimmer-A1, Booklet Trimmer-D1, Saddle Finisher-AM2, Paper
Folding Unit-F1, Perfect Binder-D1, Professional Puncher Integration Unit-A1, Professional
Puncher-C1, Document Insertion Unit-M1, Duplex Color Image Reader Unit-H1, control panel,
and Multi-Drawer Paper Deck-A1. are attached:
*2 Make sure you provide at least 100 mm / 4" of space if none of the Paper Folding Unit-F1,
Professional Puncher-C1, Document Insertion Unit-M1, or Multi-Drawer Paper Deck-A1. are
attached.
imagePRESS C800 Series
Chapter 1 - Preface
15
Page 16

Handling precautions
Handling precautions
Do not attempt to disassemble or modify the machine.
Some parts inside the machine are subject to high voltages and temperatures. Take adequate
precautions when inspecting the inside of the machine. Do not carry out any inspections that are
not described in the manuals for this machine.
Be careful not to spill liquid or drop any foreign objects, such as paper clips or staples inside the
machine. If a foreign object comes into contact with electrical parts inside the machine, it might
cause a short circuit and result in a fire or electrical shock.
Chapter 1 - Preface
16
If there is smoke, or unusual noise, immediately turn the main power switch OFF, disconnect the
power cord from the power outlet, and then call your local authorized Canon dealer. Using the
machine in this state may cause a fire or electrical shock. Also, avoid placing objects around the
power plug so that the machine can be disconnected whenever necessary.
Do not turn the main power switch OFF or open the front covers while the machine is in
operation. This may result in paper jams.
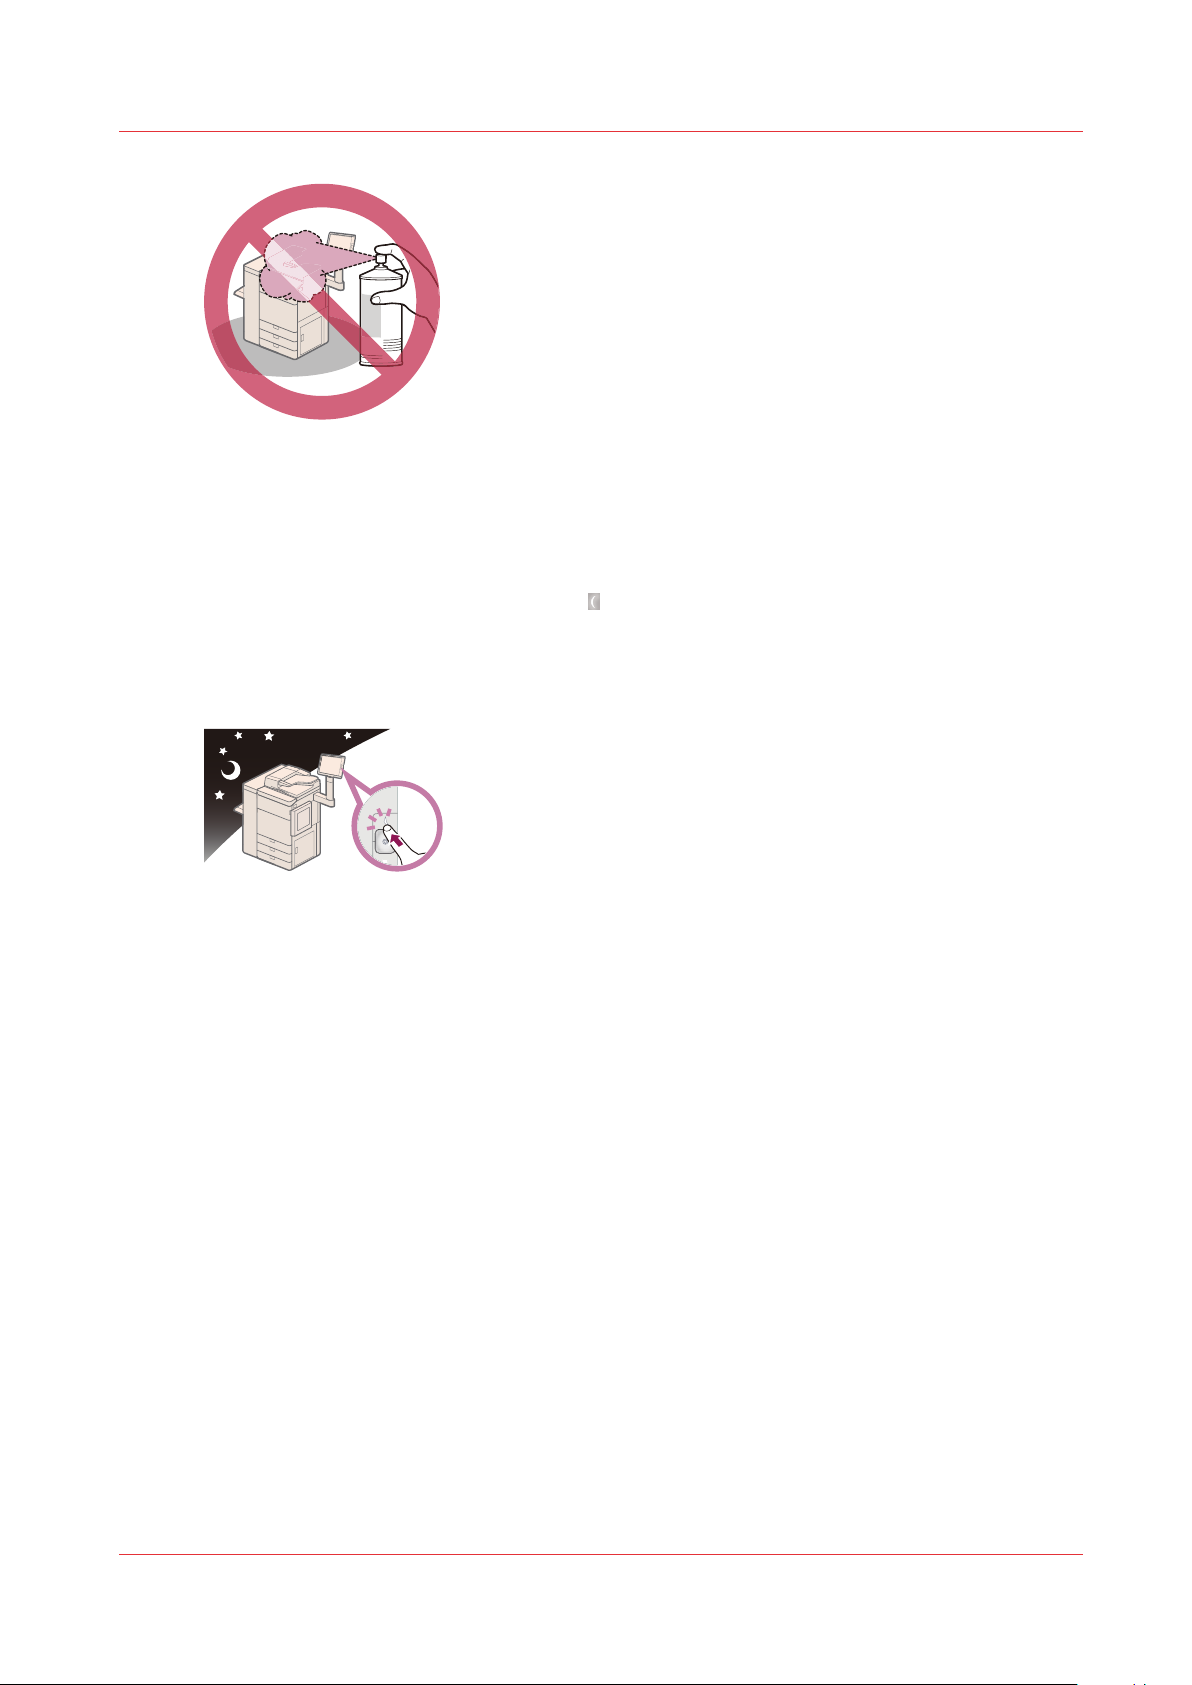
Do not use flammable sprays, such as spray glue, near the machine. There is a danger of
ignition.
imagePRESS C800 Series
Page 17
Handling precautions
This machine generates a slight amount of ozone etc. during normal use. Although sensitivity to
ozone etc. may vary, this amount is not harmful. Ozone etc. may be more noticeable during
extended use or long production runs, especially in poorly ventilated rooms. It is recommended
that the room be appropriately ventilated, sufficient to maintain a comfortable working
environment, in areas of machine operation.
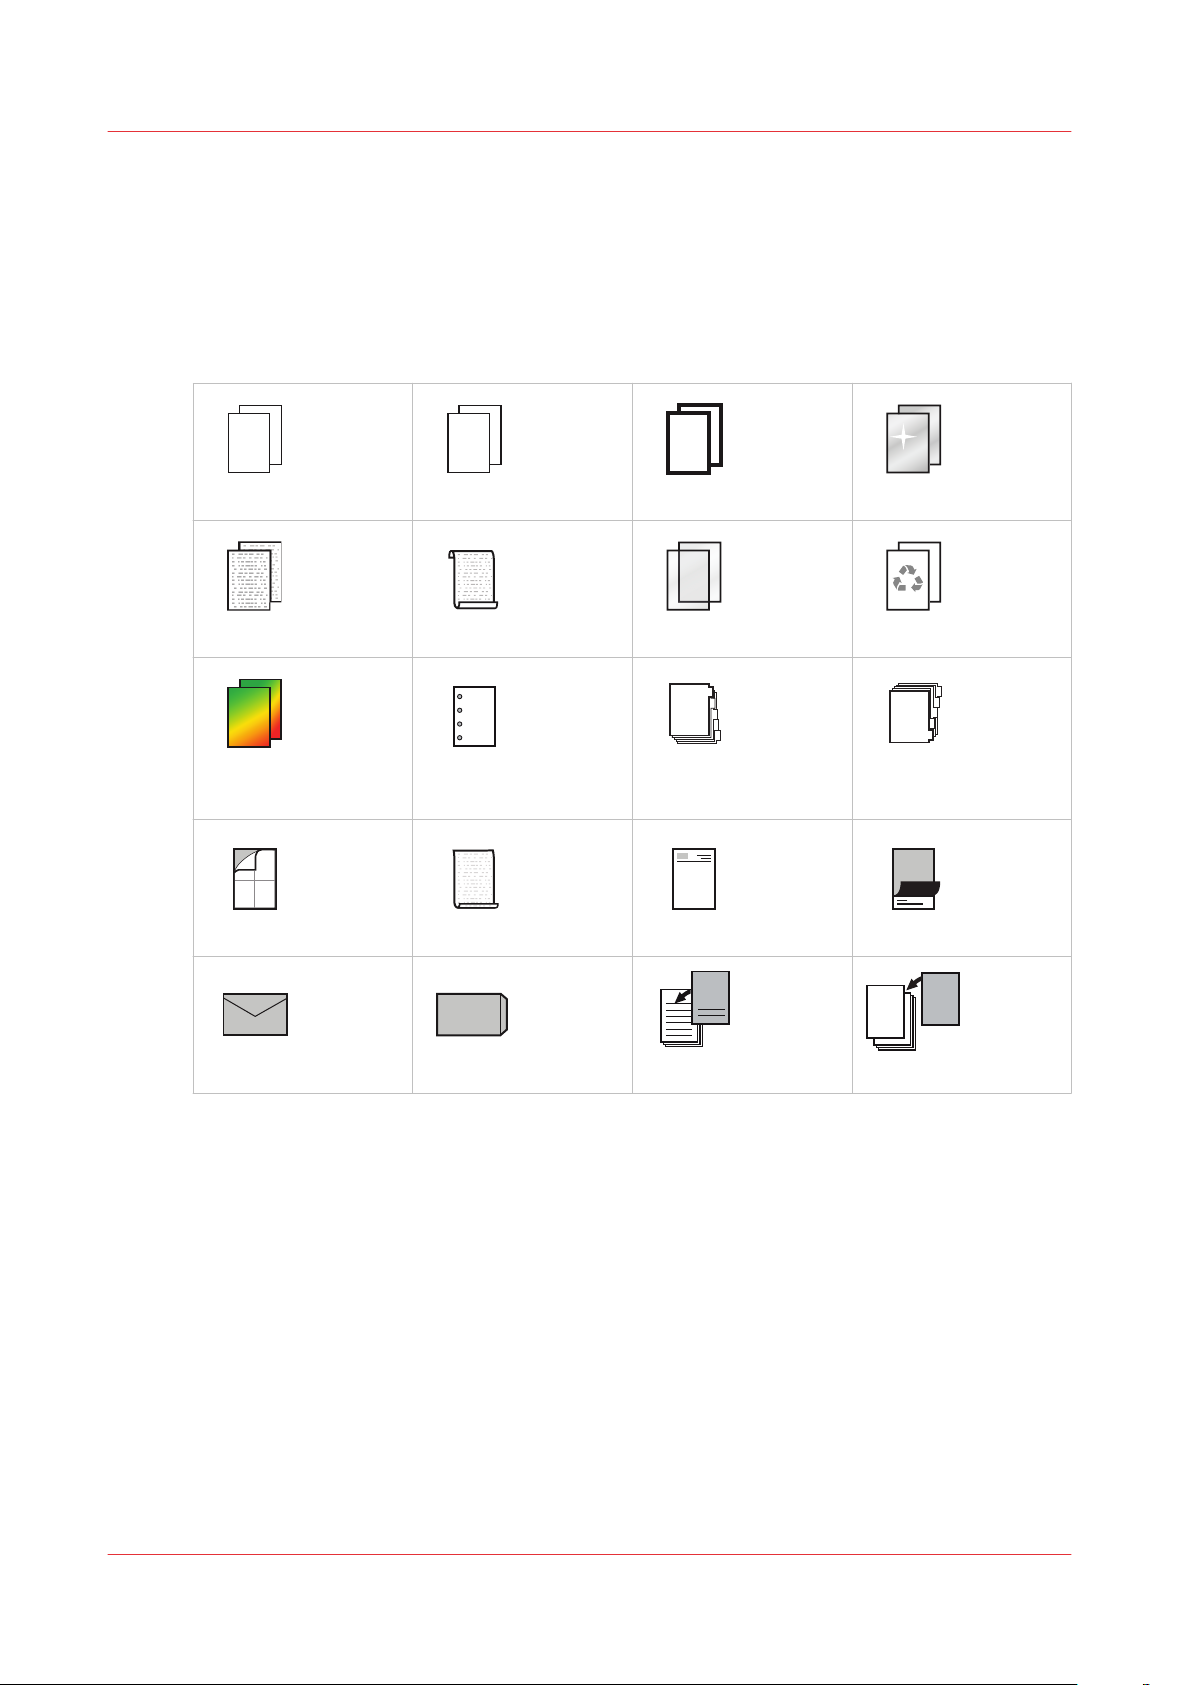
For safety reasons, press the sleep button
when it will not be used for a long period of time,
such as overnight. As an added safety measure, turn OFF the main power switch, and disconnect
the power cord when the machine will not be used for an extended period of time, such as
during consecutive holidays.
Use a USB cable that is shorter than 3 meters / 9' 10" inch.
Paper that has just been output from the machine may be hot. Be careful when removing or
aligning paper from the output tray. Touching paper right after it is output may result in lowtemperature burns.
imagePRESS C800 Series
Chapter 1 - Preface
17
Page 18

Information in this operation guide
Information in this operation guide
Read this operation guide to learn what this product can do for you, how to operate and maintain
the print system and how to use it in a safe way.
The guide begins with basic information on the print system parts, the concept workflow and an
overview of useful functions (Chapter 2).
In the next chapters you can find instructions that detail how to prepare, submit, plan and print
jobs in (Chapter 3, 4 and 5). Please read the media handling instructions carefully.
To keep the image quality high, it is important to read the calibration information and the
instructions detailing how to adjust the color and media quality (Chapter 6).
Maintenance instructions teach you how to keep the print system clean and the performance high
(Chapter 7).
When you encounter problems, you can find some useful solutions for common problems
(Chapter 8).
The reference chapter provides you with topics and detailed information and specifications about
your product and the product supplies (Chapter 9).
Other product information
On the downloads site downloads.oce.com you can find the following product information:
• Separate operation guides for the print system and system accessories
• Separate reference guides for the product
• Separate safety guides for the print system and system accessories
• Third party software overview
Guides on the use of optionals
This operation guide includes the functions and descriptions of the following finishing optionals:
• Document Insertion Unit-M1
• Professional Puncher-C1 and Professional Puncher Integration Unit-A1
• Paper Folding Unit-F1
• Finisher-AM1 / Saddle Finisher-AM2
• Puncher Unit-BS1
• Staple Finisher-T1 / Booklet Finisher-T1
• External 2/3 Hole Puncher-C1
The following optionals have their own operation guides:
• Perfect Binder-D1
• High Capacity Stacker-G1
• Booklet Trimmer-D1
• Two-Knife Booklet Trimmer-A1
Chapter 1 - Preface
18
imagePRESS C800 Series
Page 19

Chapter 2 Explore the print system
Page 20

What can this print system do for you?
What can this print system do for you?
The imagePRESS C800 Series is an easy-to-use multitasking print system that offers many useful
functions.
•
There is one central control panel, the single point of control, which simplifies the print
process.
•
The workflow concept places the operator at the control panel in a central position. The print
operator can manage colors, jobs and schedules, and last-minute job changes from the control
panel.
•
The workflow concept supports efficient task splitting to make the best use of staff resources
and expertise.
•
The central media catalog is available across the whole print workflow. This ensures first-timeright output.
•
The intelligent color management helps you: without an expert color knowledge, you can
reproduce a high and consistent color quality.
•
The input and finishing optionals support many different media types and finishing options.
The print system can staple, fold, trim or punch the printed output in various ways. You can
print professional looking, high quality output, such as stapled booklets and books with glued,
preprinted covers.
•
You can use the print system in two modes: document printing and transaction printing.
This operation guide helps you to meet business demands when you prepare, plan and print your
jobs with the print system.
Chapter 2 - Explore the print system
20
imagePRESS C800 Series
Page 21

What output can you create
Media for your output
Media catalog for media selection
PRISMAsync controls the media definition centrally with the media catalogue. The controller's
media-based workflow PRISMAsync results in less mistakes.
page 28 (See )
When you prepare a job, you can select media from the media catalog. The media catalog stores
attributes for all media that are key to the print quality, such as size, weight, media type, color,
media family and surface. (See
A media family is a group of media that has the same specifications and uses the same color
output profile. (See
After the job submission, use the schedule to see which media the job requires and when to
assign these media to paper trays.
Temporary media
Color reproduction for your output
Settings Editor media attributes
What output can you create
PRISMAsync operating concept
on page 294)
on page 26)
on
During the job preparation you can also temporarily specify media for a job. Temporary media
are not part of the media catalog. When the job is printed on temporary media, you can find these
temporary media in the media section of the System view on the control panel. When you want
to use these media more often, you can add the temporary media to the media catalog. In the
Settings Editor you can define the attributes for these new media.
The temporary media remains available in the System view as long as there are jobs in the queue
that use these temporary media, or these temporary media are assigned to a paper tray.
Media and image quality
Media has a big influence on the image quality and the productivity of a print system. The
performance of a print system, the print quality and the consumption of consumables depend on
media factors, such as:
• Media type
• Media weight
• Surface
• Moisture content
• Smoothness
To ensure optimal output quality and performance, media must comply with the paper
specifications of your print system. Store the media in a dry environment away from direct
sunlight. Before you load the media into the paper trays, it is important to check the media
sheets.
For information detailing how to check and prepare media, see:
Check and prepare media before loading
Check and prepare envelopes before loading
Check and prepare transparencies before loading
imagePRESS C800 Series
on page 130
on page 132
on page 134
Chapter 2 - Explore the print system
21
Page 22
5
4
3
2
1
1
2
3
4
5
Media for your output
Types of media for the paper trays
The paper trays of your print system can handle a variety of media types and sizes, including
uncoated, offset coated, plain, recycled, thin, satinated, tabs, textured paper, digital coated media,
preprinted media and offset coated media. You can use envelopes, tab paper and transparencies
in most paper trays. For covers, insert sheets and separator sheets between sets, you can use the
inserter.
The following table shows the types of media that paper trays support.
Thin Plain Heavy
Textured
Color
Vellum
Prepunched
Transparencies *1 Recycled
Forward-order tab paper
Labels *1 *2
Envelope type a *1
Bond
Envelope type b *1
Letterhead Carbonless
Preprinted covers *3 Insert sheets *3
Coated
Reverse-order tab paper
*1 Not supported by the inserter
*2 Not supported by the internal paper trays
*3 The inserter supports insert sheets. Make sure that the media you use for the inserter have the
insert sheet definition in the media catalog. (See
Settings Editor media attributes
on page 294)
For more information on media specifications, see:
Consumables
Paper input specifications
Supported media types for paper input optionals
Chapter 2 - Explore the print system
22
on page 185
on page 270
on page 289
imagePRESS C800 Series
Page 23
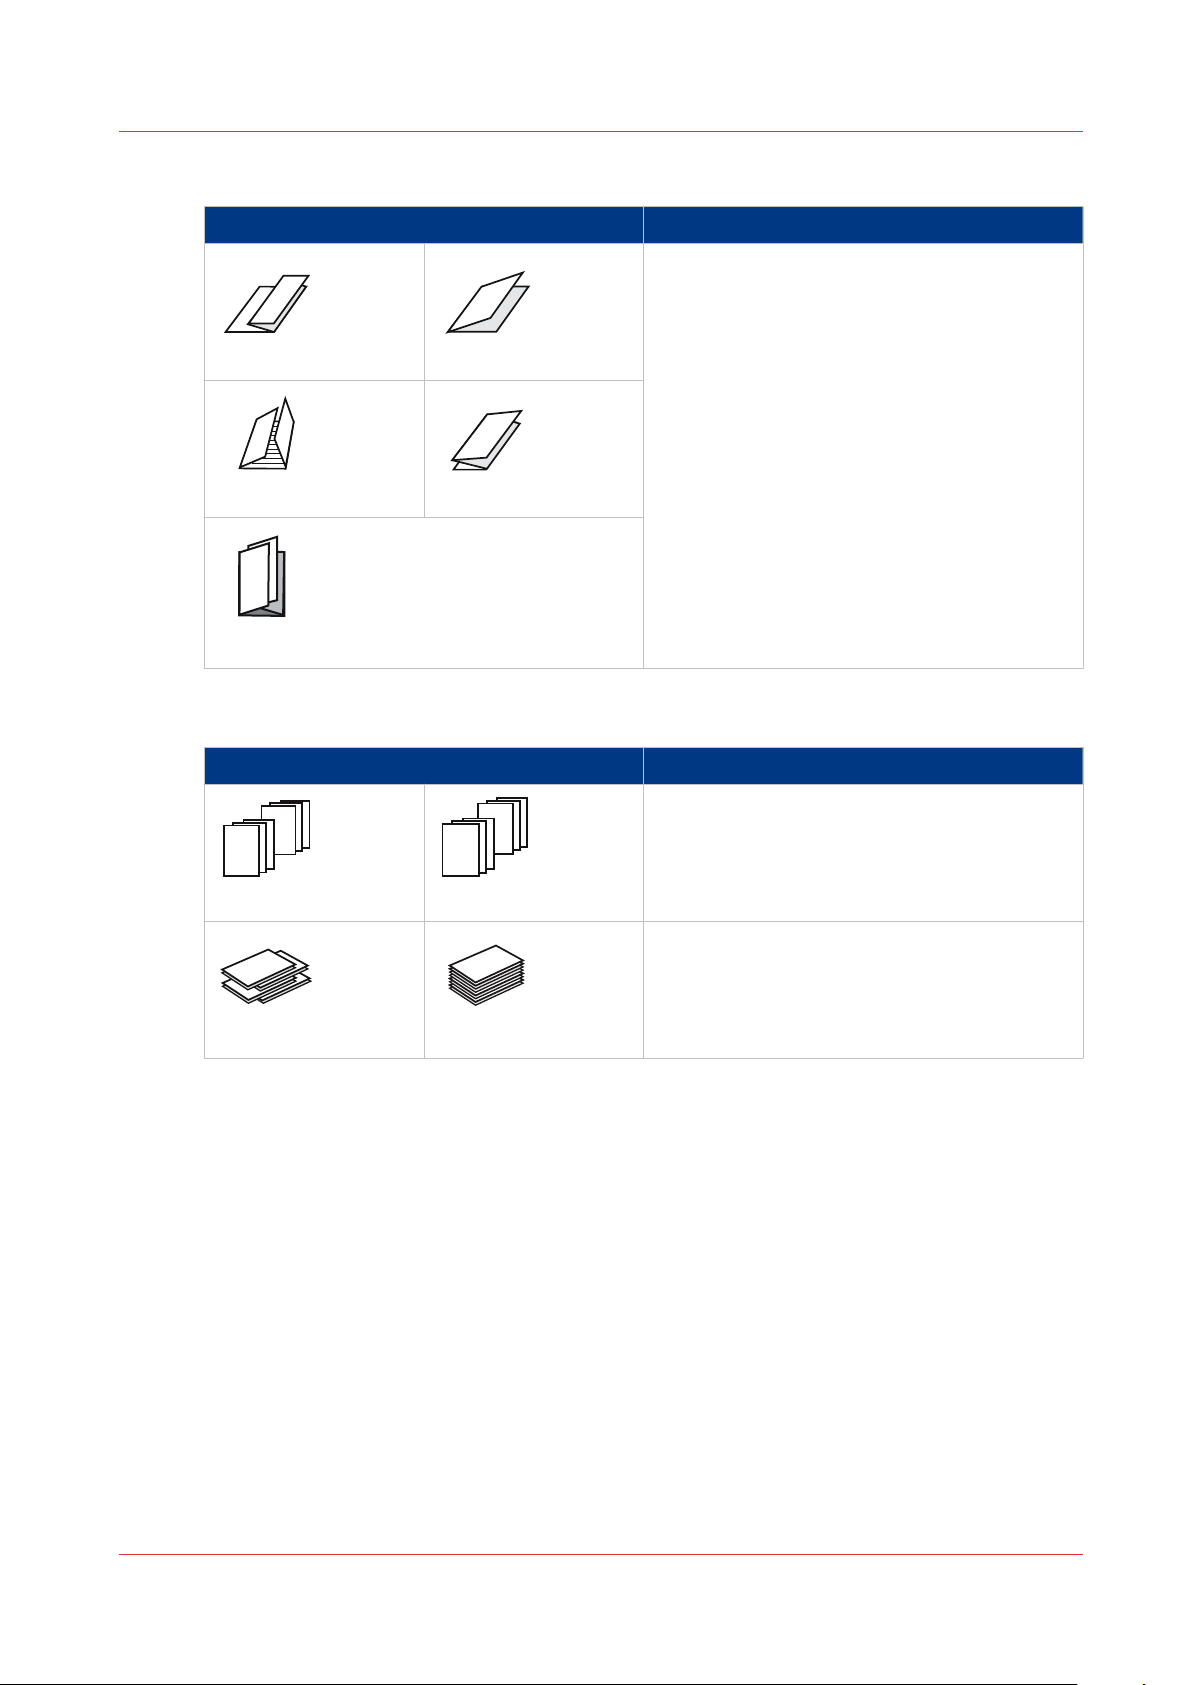
Finishing for your output
If your print system has finishing options, you can select staple, punch, trim, booklet and book
options in the printer driver, the PRISMA software, and the control panel.
NOTE
The control panel shows the finishing options that are available on your print system.
Below you find an overview of the finishing options the print system supports.
Stapling
Stapling options Finishing optional
Finishing for your output
Stacker/stapler
Corner stapling
The feed direction of originals is important for stapled copies.
page 251 (See )
Booklet making
Booklet options Finishing optionals
Saddle-stitched booklet
Saddle-stitched booklet, leading-edge trimmed
Saddle-stitched booklet, trimmed at three
sides
2-side stapling
Feed direction for stapling
Stacker/stapler
Saddle-stitch unit
Stacker/stapler
Saddle-stitch unit
Booklet trimmer
Stacker/stapler
Saddle-stitch unit
Booklet trimmer
Two-knife booklet trimmer
on
imagePRESS C800 Series
Chapter 2 - Explore the print system
23
Page 24
6
5
4
3
3
4
3
2
1
8
7
6
5
8
7
2
1
6
8
1
Finishing for your output
[2] Print and page order of booklets
Perfect binding
Perfect binding options Finishing optional
Perfect binder
Punching
Perfect bound book Perfect bound book,
trimmed at three sides
Punch options Finishing optionals
Stacker/stapler
Punch unit
4-holes punching
3-holes punching
2-holes punching
Professional punching options Finishing optionals
Professional puncher
Die sets
Punching with various
4-holes punching
punch patterns
3-holes punching
24
Chapter 2 - Explore the print system
2-holes punching
imagePRESS C800 Series
Page 25
Folding
1
2
3
1
2
3
2
2
2
1
1
1
Finishing for your output
Folding options Finishing optional
Folder
Z-fold Half-fold
Tri-fold in
Parallel fold
Stacking and sorting
Stacking and sorting Finishing optionals
Sort by set
Offset stacked Stacked
Tri-fold out
Stacker/stapler
High capacity stacker
Sort by page
Stacker/stapler
High capacity stacker
For more information on finishing specifications and options, see:
Main hardware parts
Print job settings
Finishing and delivery
Finishing and delivery specifications
Output settings values and icons
imagePRESS C800 Series
on page 32
on page 242
on page 43
on page 274
on page 246
Chapter 2 - Explore the print system
25
Page 26
Color reproduction for your output
Color reproduction for your output
PRISMAsync color reproduction
The color management of PRISMAsync controls the reproduction of colors and handles the
conversion of input colors (RGB, CMYK, spot colors) to printed colors on paper. PRISMAsync has
two instruments for easy color management across the entire workflow, color presets and media
families, so that the operator does not need to perform color management tasks on a job-by-job
basis.
Color experts can use more color management functions with the advanced color management
license.
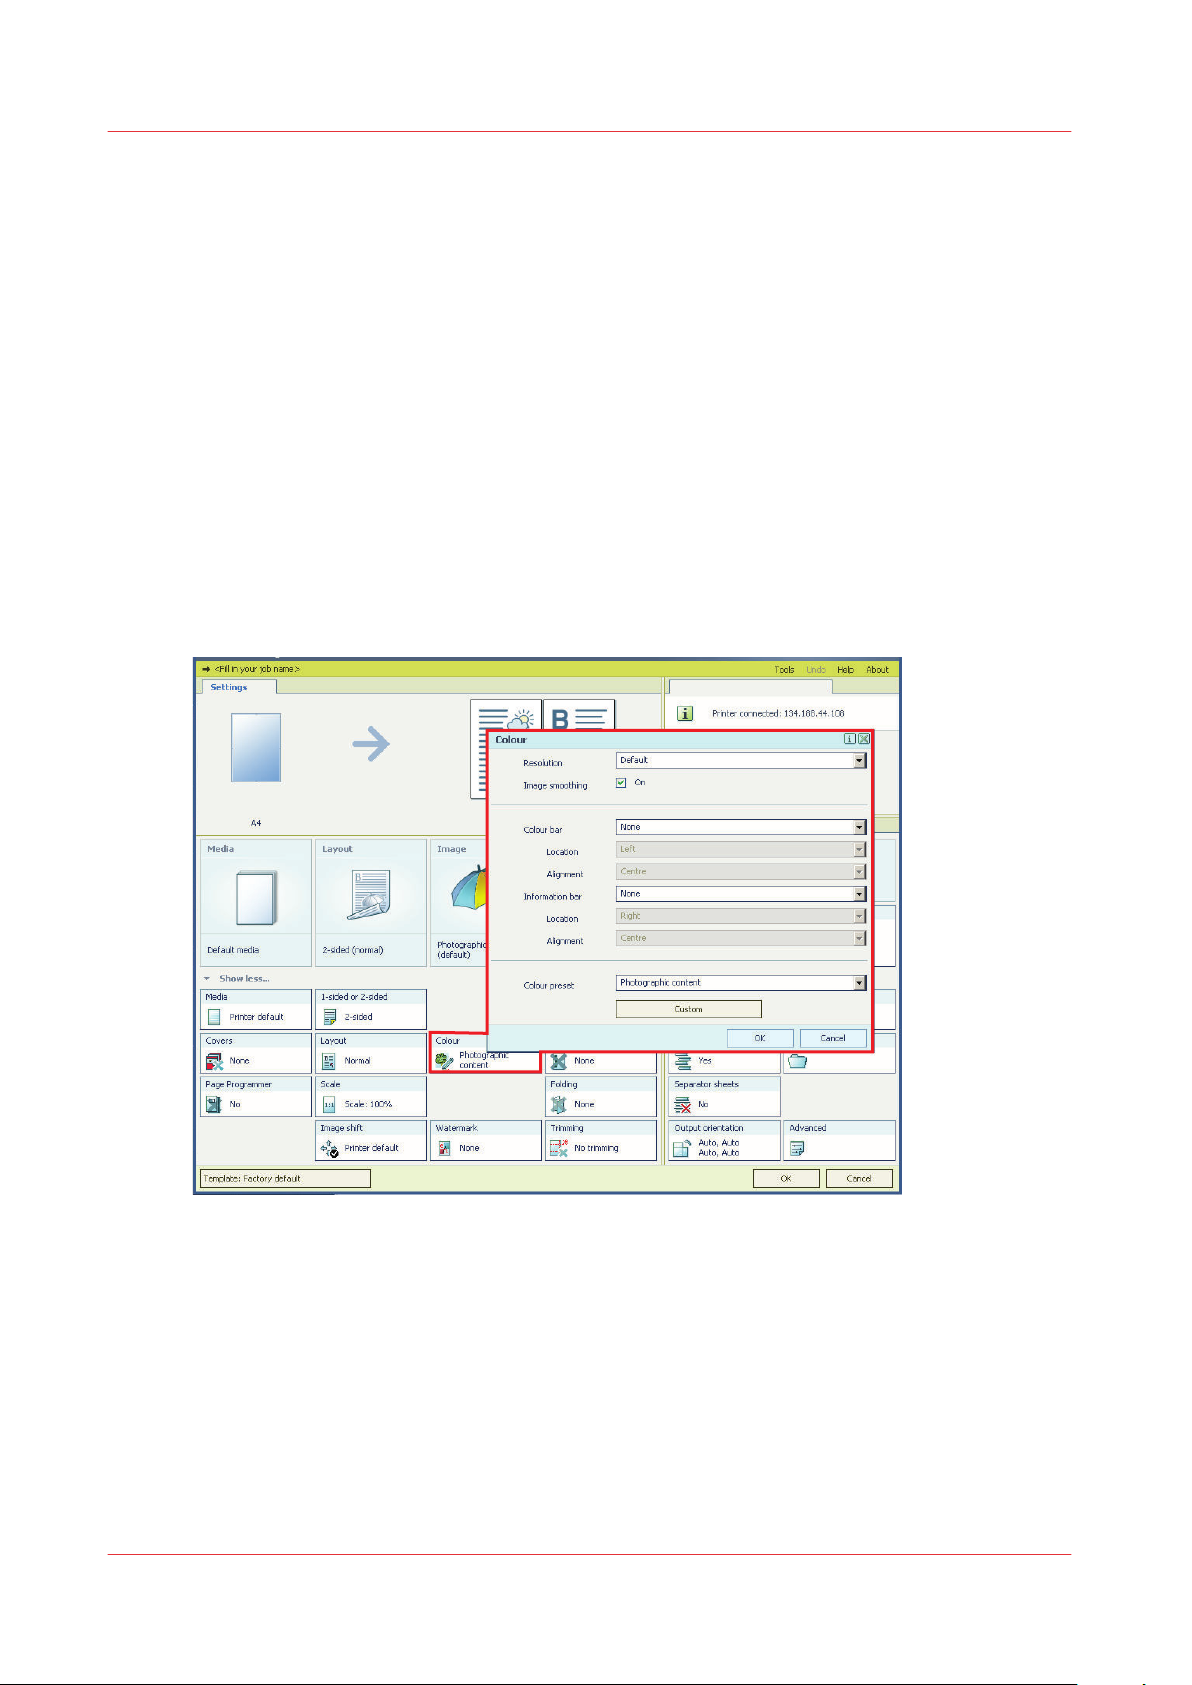
Color Presets
The PRISMAsync color presets simplify the complexity of color management. You can select an
appropriate color preset when you prepare a print job with a printer driver or PRISMA software.
An automated workflow or a hotfolder can also link a color preset to a job. The use of color
presets saves time and does not require an in-depth knowledge on color.
[3] The color settings in the printer driver
PRISMAsync includes the following default color presets:
•
Office documents
This color preset is optimal for color reproduction of text and graphic lines in office documents.
PRISMAsync converts the colors to more saturated colors for the printed output.
•
Photographic content
This color preset is optimal for the reproduction of photographs, pictures, and images.
Create new color presets in the Settings Editor. (See
Chapter 2 - Explore the print system
26
System configuration
on page 182)
imagePRESS C800 Series
Page 27

Media Families
A media family is a set of media that has comparable specifications, such as surface, color and
substrate type. A media family defines the color output profiles for the media. Each media family
has three different output profiles, for the halftone screens Normal, Fine, and Error-diffusion.
When you have more than one halftone screen in a single job or page, PRISMAsync automatically
applies the related output profiles for optimal color management in the job.
When you add new media to the media catalog, you specify the media family.
Advanced color management
The Advanced color management license offers the following color features:
•
Device simulation, to simulate or proof other print engines or offset presses with your print
system.
•
Device Link support, to import Device Link profiles for special CMYK conversions.
•
Named color profile import and export, to extend the functionality of spot color libraries.
•
Information bars, to print extra metadata on printed output. There is one default information
bar, but you can compose other information bars. Information bar selection is possible in the
printer driver, PRISMAprepare, and via automated workflows or hotfolders.
•
Color control bars, to print extra color patches for control of color output via FOGRA
verification. Using a color bar you can check the ink density, dot grain and contrast. Use default
or compose custom color bars. The color bar selection is available in the printer driver,
PRISMAprepare, and via automated workflows or hotfolders.
•
Color mappings, to convert RGB, CMYK to a specific color, for example, your corporate color.
Color mappings are useful to map colors in the input file to a fixed color of a spot color library.
•
Leave out separations, to exclude specific spot colors from printing. You can exclude layers for
printing when you map the colors of these layers to a spot color with the value “None”.
Color reproduction for your output
For more PRISMAsync color information, see
Calibration
Daily printer calibration is very important to maintain high quality color reproduction. Media
family calibration is important to maintain consistent color reproduction levels for all the media
you use. The control panel indicates when printer calibration is needed. (See
page 160)
More PRISMAsync color information
About calibration
on page 266.
on
imagePRESS C800 Series
Chapter 2 - Explore the print system
27
Page 28

PRISMAsync operating concept
PRISMAsync operating concept
PRISMAsync makes print, copy and scan jobs intuitive and productive. This fully integrated
controller supports the setup of the workflow, prepress and job routing. The following concepts
support your way of working.
•
Task-based workflow
The task-based workflow structures the tasks for the staff involved with the print system.
•
Print operator is in the central position of the workflow
The control panel is the central information point for the print operator. The print operator is
responsible for the job planning and the print production, but can also perform last-minute job
changes and color management from the control panel.
•
Media-based workflow
The media catalog is an integrated, central catalog with predefined media that meet the print
system specifications.
•
Two print modes
There are two printing modes: the document printing mode and the optional transaction
printing mode (via IPDS or PCL6). A system reboot is not necessary to switch between the
printing modes.
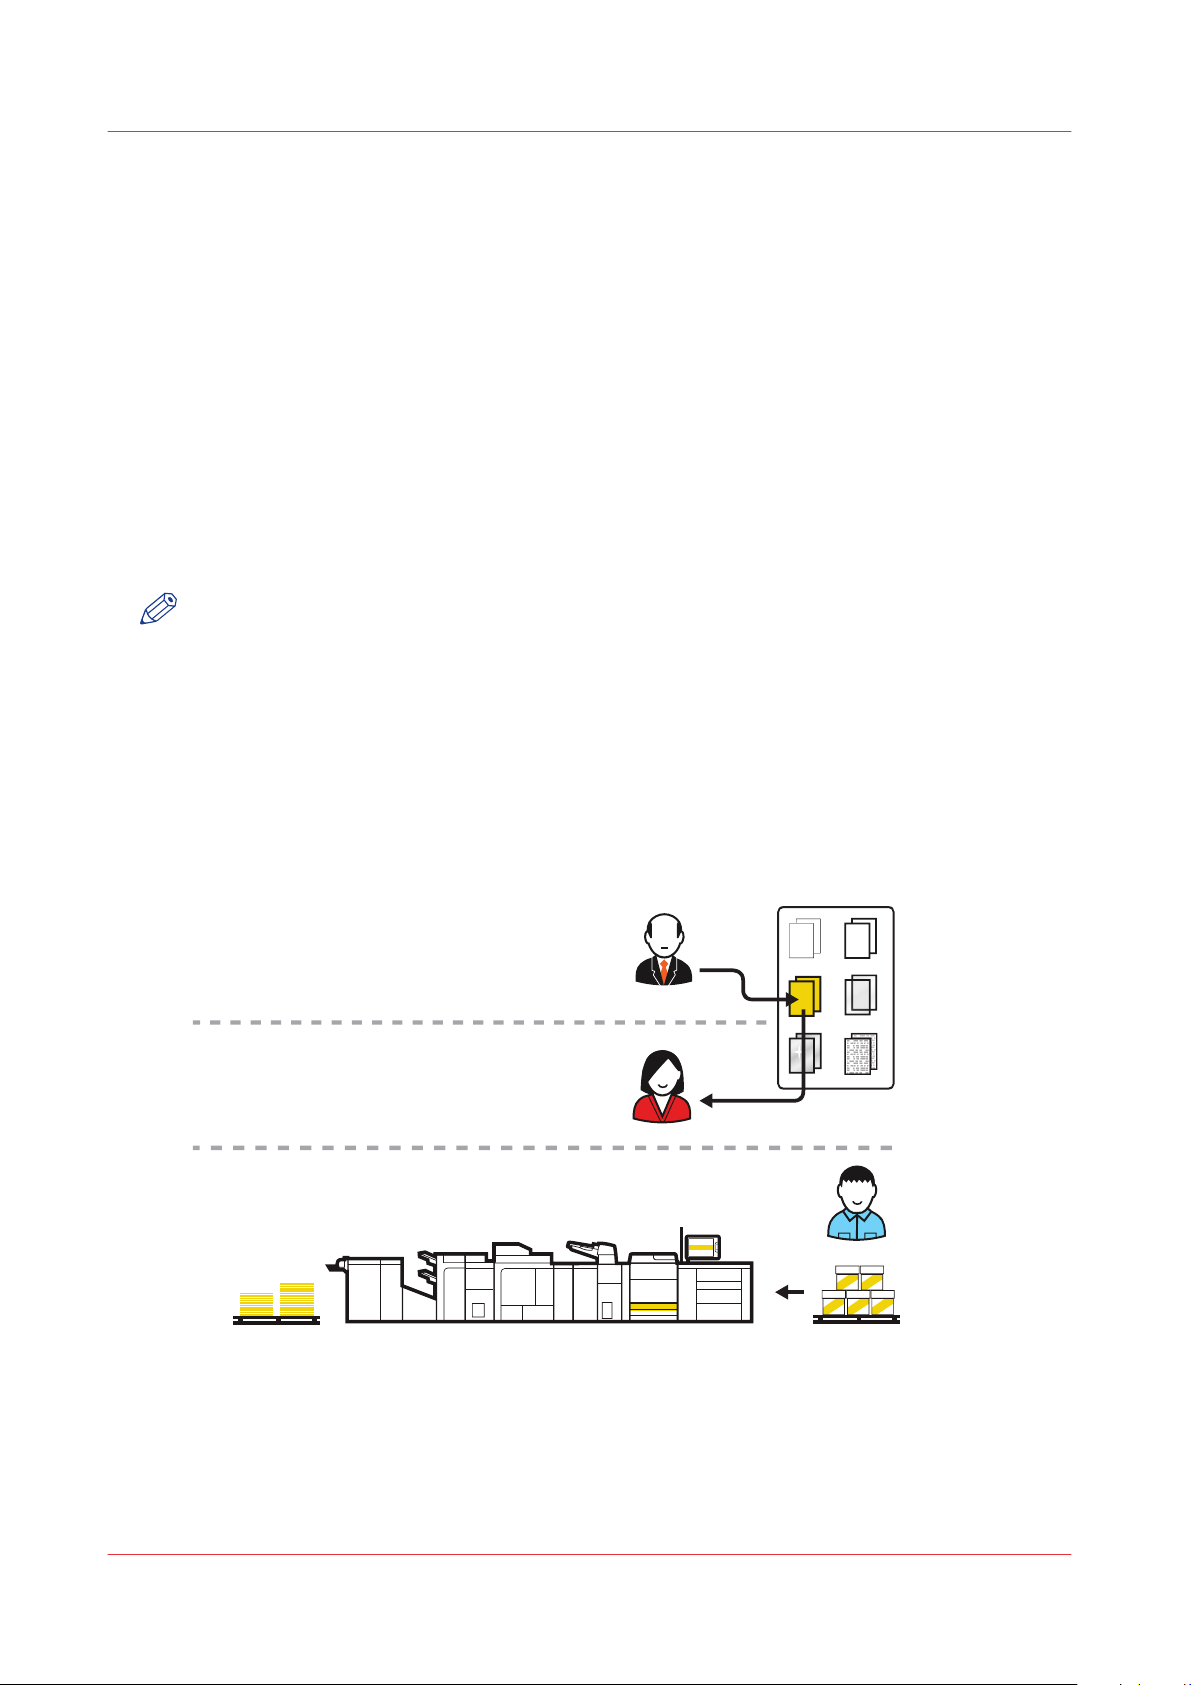
Document printing workflow
The document printing workflow describes the route from the job preparation to the finishing and
delivery of the printed output. The document printing workflow has three phases:
1.
Job preparation
Prepress staff defines the print document and job settings, and submits the print job to the
PRISMAsync controller. The prepress staff uses PRISMA software, a printer driver, automated
workflows or hotfolders to prepare and submit the jobs.
2.
Job planning
Print jobs arrive in one of the following PRISMAsync job locations: a DocBox , the list of
waiting jobs or the list of scheduled jobs. The active workflow profile determines how
toPRISMAsync route the jobs. The print operator is responsible for the job planning.
3.
Print job production
The print system prints and finishes jobs according to the job sequence in the list of
scheduled jobs. The print operator enables the system to keep running.
Chapter 2 - Explore the print system
28
imagePRESS C800 Series
Page 29

DocBox
Scheduled
jobs
Finishing and delivery Printing Media loading
Waiting
jobs
Printed
jobs
Job preparation
Print production
Job planning
Finishing and delivery Refilling toner and
staples
Media loading
Print operator
Prepress
Job planning
Media and color expert
PRISMAsync operating concept
Staff roles and tasks
[4] Job workflow for document printing mode
NOTE
Transaction printing
See
on page 87 for the workflow in the transaction printing mode.
The task-based workflow structures the tasks in the print environment. There are task splits
between job preparation, job planning, and print production.
imagePRESS C800 Series
[5] Task-based workflow
The prepress staff know the quality requirements of the jobs and the way to submit the jobs.
Chapter 2 - Explore the print system
29
Page 30
Print operator loads and assigns the media in the paper trays.
Prepress staff select the required media from
the media catalog.
The media and color expert defines the
media and color settings once in the media
catalog.
PRISMAsync operating concept
The print operators can concentrate on the job planning and the print production. Therefore, the
print operator does the following tasks:
• Starts up the print system.
• Prints the jobs and prepares copy and scan jobs.
• Makes proof prints.
• Performs last-minute job changes.
• Makes sure that all consumables needed for the jobs are available during the day.
• Carries out maintenance routines, such as a daily calibration procedure or a media registration.
Trained operators are allowed to carry out specific maintenance tasks for operators. For example,
correction procedures to clean machine parts or to improve the image quality.
Expert tasks, such as media catalog management and advanced color management, belong to
the role of the system administrator and the key operator.
The key operator is also responsible for mechanical maintenance tasks and maintenance
procedures via the control panel (local key operator settings). (See
maintenance
on page 182 )
NOTE
This guide is based on the roles and tasks as described above. However, you may work in a print
environment that has different needs. For example, in small organizations operators can do
prepress tasks as well as print operator tasks.
System configuration and
Media-based workflow
The media catalog is the backbone of the media-based workflow. The media catalog contains the
media that the print system supports.
The prepress staff select the media for the job from the media catalog. The control panel shows
the print operator the media the job needs.
[6] Media-based workflow
During the initial configuration of the print system, the media catalog is filled with media and
media attributes. Media belong to a media family, which ensures optimal color output settings.
(See
Color reproduction for your output
page 294)
When you work with the media catalog, you can take advantage of the following benefits:
Chapter 2 - Explore the print system
30
on page 26 and
Settings Editor media attributes
imagePRESS C800 Series
on
Page 31

PRISMAsync operating concept
• The media in the media catalog store print quality attributes that the entire print system uses.
Each time you select the media from the media catalog, the print system automatically applies
the same media quality settings.
• The control panel, the printer driver and the PRISMA software access the same media catalog.
• You can use the media catalog for copy jobs.
Define the media attributes with the Settings Editor. (See
System configuration
on page 182)
imagePRESS C800 Series
Chapter 2 - Explore the print system
31
Page 32

1
7
2
3
8
11
6
9
5
13
12
2021 1819
7
2
1
4
3
10
8
6
16
1415
9
17
Main hardware parts
Main hardware parts
The print system can be given different configurations to match various print environments. Your
print system has basic hardware parts extended with optionals. In the table below you can find
descriptions of the main parts.
NOTE
• This manual uses functional names for the print system parts. However, sometimes you may
need the commercial name, for example, if you want to order an optional. In this case, use the
table with the commercial names.
• The availability of optionals differs per country.
[7] Base print system with bulk paper module
[8] Example of a print system extended with several input and output optionals:
Description main hardware parts
1 PRISMAsync controller steers the performance, workflow, image quality and colour
quality of the print system.
2 Control panel, which is the central information point for the print operator.
3 Operator attention light, to display the status of the print system from a distance.
4 Automatic document feeder, to copy and scan originals.
5 Cover, only needed for a print-only system.
6 Toner compartment cover, to access the toner cartridges.
7 Internal paper trays, to hold media.
Chapter 2 - Explore the print system
32
8 Print module, where the print process takes place.
imagePRESS C800 Series
4
Page 33

Main hardware parts
Description main hardware parts
9 Waste toner compartment, to access the waste toner container.
10 Paper module, to hold media.
11 Bulk paper module, to hold media.
12 Special feeder, to manually feed special media, envelopes and tab paper.
13 Output tray, to collect the printed output.
14 Inserter, to feed (preprinted) covers and insert sheets.
15 Professional puncher, to punch holes in the printed output.
16 Perfect binder, to create perfect-bound and trimmed books.
17 High capacity stacker, to stack large piles of output.
18 Folder, to fold the output in various ways.
19 Stacker/stapler, to staple and stack the printed output. A saddle-stitch unit creates sad-
dle-stitched booklets. A punch unit punches printed output.
20 Booklet trimmer, to trim the leading edge of booklets.
21 Two-knife trimmer, to trim the top and bottom-edges of booklets.
Commercial names of paper input optionals
Optional Commercial name
Automatic document feeder Duplex Color Image Reader Unit-H1
Printer cover Printer Cover-F1
Special feeder Stack Bypass-B1
Paper module Multi-Drawer Paper Deck-A1.
Bulk paper module POD Deck Lite-B1
Inserter Document Insertion Unit-M1
For more information, see
Paper input specifications
Commercial names of finishing optionals
Optional Commercial name
Output tray Output Tray-A1
Professional puncher Professional Puncher-C1
Perfect binder Perfect Binder-D1
High capacity stacker High Capacity Stacker-G1
on page 270.
Folder Paper Folding Unit-F1
Stacker / stapler Professional stacker / stapler:
Booklet trimmer Booklet Trimmer-D1
imagePRESS C800 Series
Finisher-AM1 or Saddle Finisher-AM2
Standard stacker / stapler:
Staple Finisher-T1 or Booklet Finisher-T1
Chapter 2 - Explore the print system
4
33
Page 34

Main hardware parts
Optional Commercial name
Two-knife booklet trimmer Two-Knife Booklet Trimmer-A1
For more information, see
Finishing modules specifications
on page 274.
Chapter 2 - Explore the print system
34
imagePRESS C800 Series
Page 35

Overview of licenses
The following licenses are available to increase the functionality and productivity of the print
system.
License Commercial name More information
Overview of licenses
Schedule Scheduler-D1 See
Scan functionality Scanning-C1 See
DocBox DocBox-E1 See
Page programming Page Programming-B1 See
Automated workflows
Hotfolders
E-Schredding E-Shredding-D1 See
PCL6 for transaction printing PCL6 TP-D1 See
IPDS for transaction printing IPDS-D1 See
PDF support for IPDS PDF for IPDS-D1 See
DPlink DP Link-E1 Enables integration with Xe-
Remote Service Remote Service-F1 See
Multiple queue-B1 See
Schedule
Scan jobs
DocBox
on page 122
on page 57
on page 91
Page Programming
page 244
Hotfolders
and
Automated workflows
page 70
on page 70
Removal of printed jobs
on page 100
Transaction printing
page 87
Transaction printing
page 87
Transaction printing
page 87
rox ©systems
Enable Remote Service
page 225
on
on
on
on
on
on
Remote Manager Remote Manager-B1 See
queues
Advanced color management Advanced Color Management-B1See
ment
Asian font sets Fontset Simplified Chinese-D1
Fontset Traditional Chinese-D1
Fontset Japanese-D1
Fontset Korean-D1
Job management in the
on page 101
Advanced color manage-
on page 27
imagePRESS C800 Series
Chapter 2 - Explore the print system
35
Page 36

1
10
2
3
4
5
7
8
9
6
Control panel
Control panel
The control panel is the central point used to operate the print system and to manage print jobs,
copy jobs and scan jobs. The control panel provides you full system control.
The following table describes the main parts of the control panel and their functions.
Description control panel
1 Sleep button , to put the print system into the sleep mode or to wake the print sys-
tem from the sleep mode.
2 Stop button , to stop the printing process, after a set, or as soon as possible.
3 Paper tray button , to access paper tray functions and overviews, such as:
• An overview of the media and filling levels of the paper trays
• Open a paper tray
• Assign media to a paper tray or disable media
• Start a media registration for selected media
4 USB port, to:
• Print from a USB drive
• Scan to a USB drive
• Attach the Eye-One spectrophotometer
5 [Schedule] button, to access the schedule.
6 [Jobs] button, to access:
• The copy and print job function
• The DocBox folders
• The list of scheduled jobs
• The list of waiting jobs
• The list of printed jobs
• The list of scanned documents
7 [Trays] button, to access paper tray functions and overviews (see the paper tray but-
ton (3)).
4
Chapter 2 - Explore the print system
36
imagePRESS C800 Series
Page 37

Control panel
Description control panel
8 [System] button, to access system functions, features and overviews, such as:
• Maintenance information on supplies and finishers
• Maintenance procedures and system shut down
• Control panel adjustments
• Local key operator settings
• Media catalog and temporary media
• Color adjustments and calibration procedures
• Transaction printing settings
9 Dashboard, to display information, such as:
• Color bar, to indicate the system status with a color
• Progress of the print process
• Scheduled operation tasks
• Warnings and errors
• Status indicators of toner cartridges, staple cartridges and waste containers
• Calibration notifications
You can also view the dashboard remotely with the remote monitor. (See
monitor specifications
on page 288)
10 Status LED, to indicate the system status with a color. (See
page 120)
Remote
System monitoring
on
imagePRESS C800 Series
Chapter 2 - Explore the print system
37
Page 38

1
2
3
Paper Input
Paper Input
Paper module
The print module has three internal paper trays with a total capacity of 1,650 sheets. (See
the print module parts
The paper module (Multi-Drawer Paper Deck-A1.) increases the input capacity of the print system.
Each paper tray can hold up to 2,000 sheets (80 g/m² / 22 lb bond or 64 g/m² / 17 lb bond).
[9] Paper module (Multi-Drawer Paper Deck-A1.)
on page 228)
Access
Description paper module
1 Front cover, to access the paper path when a paper jam occurs.
2 Tray buttons, to open a paper tray.
3 Paper trays, to hold the media.
See
Paper input specifications
on page 270 for specifications.
Chapter 2 - Explore the print system
38
imagePRESS C800 Series
Page 39

Bulk paper module
1 2
3
4
Bulk paper module
The print module has three internal paper trays with a total capacity of 1,650 sheets. (See
the print module parts
You can extend the input capacity of the print system with a bulk paper module (POD Deck LiteB1). This bulk paper module can hold up to 3,500 sheets (80 g/m² / 22 lb bond).
[10] Bulk paper module (POD Deck Lite-B1)
on page 228)
Access
Description bulk paper module
1 Release button, to move the bulk paper module.
2 Button, to open the paper tray.
3 Paper tray, to hold the media.
4 POD Deck Lite Attachment Kit-A1, to connect the bulk paper module to the system and
to access the paper path when a paper jam occurs.
See
Paper input specifications
on page 270 for specifications.
imagePRESS C800 Series
Chapter 2 - Explore the print system
39
Page 40

1
2
3
4
5
Inserter
Inserter
The inserter (Document Insertion Unit-M1) enables you to use insert sheets, such as preprinted
sheets and booklet covers. The print system cannot print media that comes from the inserter, but
you can use preprinted media. Each paper tray can hold up to 200 sheets (80 g/m² / 22 lb bond).
[11] Inserter (Document Insertion Unit-M1)
Description inserter
1 Upper tray, to place media.
2 Lower tray, to place media.
3 Lower tray cover, to access the lower tray.
4 Slides guide, to place the media in the correct position in the tray.
5 Front cover, to access the paper path when a paper jam occurs.
See
Paper input specifications
on page 270 for specifications.
Chapter 2 - Explore the print system
40
imagePRESS C800 Series
Page 41

Automatic document feeder
1 2 3
4
5
678
11 10
9
12
The automatic document feeder (Duplex Color Image Reader Unit-H1) enables you to copy or
scan a set of originals. The automatic document feeder scans both sides of the originals at the
same time.
Automatic document feeder
[12] Automatic document feeder (Duplex Color Image Reader Unit-H1)
Description automatic document feeder
1 Cover, to access the original feed path when a paper jam occurs.
2 Originals input indicator, to indicate that originals are in the automatic document
feeder.
3 Originals tray, to place the originals.
4 Auxiliary originals tray, to place large originals (A3 / 11" x 17").
5 Auxiliary originals receiving tray, to collect scanned, large originals.
6 Originals receiving tray, to collect scanned originals.
7 Paper guides, to place the originals in the correct position in the tray.
8 Originals output indicator, to indicate that the automatic document feeder scans the
originals.
9 Scan area, where the automatic document feeder scans the originals.
10 Glass plate, to place an original, such as a page of a book, a heavy or delicate docu-
ment, or a transparency.
11 Cover, to access the scan area to clean.
12 Handle (ADF Access Handle), as support equipment to close the automatic document
See
imagePRESS C800 Series
feeder.
Paper input specifications
on page 270 for specifications.
Chapter 2 - Explore the print system
41
Page 42

2
1
3
1
2
Special feeder
Special feeder
The special feeder (Stack Bypass-B1) enables you to feed media manually, for example, when you
need only a few sheets of special media for your job. The special feeder can hold up to 100 sheets
(80 g/m² / 22 lb bond).
[13] Special feeder (Stack Bypass-B1)
Description special feeder
1 Slide guides, to place the media in the correct position in the tray.
2 Auxiliary tray, to place large media (A3 / 11" x 17" or A4R / LTRR).
3 Alignment tray, to prevent skewed images.
The alignment tray (Stack Bypass Alignment Tray-C1) prevents skewed images and ensures that
media are fed straight ahead. You cannot use the auxiliary tray in combination with the alignment
tray.
[14] Alignment tray (Stack Bypass Alignment Tray-C1)
Description alignment tray
1 Screws, to attach or loosen the alignment tray.
2 Alignment guides, to place the media in the correct position in the tray.
See
Paper input specifications
Chapter 2 - Explore the print system
42
on page 270 for specifications.
imagePRESS C800 Series
Page 43

Finishing and delivery
1
2
6
5
1
2
6
5
4
3
Professional stacker / stapler
There are two professional stacker / stapler configurations: the stacker / stapler with and without
a booklet maker. The booklet maker folds and staples booklets. Both finisher configurations can
enable the optional punch unit to punch two, three or four holes in the printed output.
The dashboard of the control panel displays the status of the staple cartridges. When the color of
the staple icon is orange or red, the staple cartridge needs replacement. (See
on page 120)
Finishing and delivery
System monitoring
[15] Professional stacker / stapler with and without booklet maker.
Description stacker/stapler
1 Cover, to access the paper path when a paper jam occurs.
2 Cover, to access the area where you replace staple cartridges, clear a paper jam, or
clear a staple jam.
3 Booklet tray, to collect booklets.
4 Auxiliary booklet tray, to collect large booklets.
5 Lower tray, to collect finished output. The guides enable correct placement of the
printed output.
6 Upper tray, to collect finished output. The guides enable correct placement of the
printed output.
imagePRESS C800 Series
Chapter 2 - Explore the print system
43
Page 44

12
Professional stacker / stapler
[16] Internal view of the stacker/stapler and saddle-stitch unit (Saddle Finisher-AM2 )
Description internal parts of stacker/stapler
1 Punch waste tray, to collect the punch waste.
2 Staple waste tray, to collect the staple waste.
See for specifications:
Finishing and delivery specifications
Finishing for your output
on page 23
on page 274
Chapter 2 - Explore the print system
44
imagePRESS C800 Series
Page 45

Standard stacker / stapler
1
7
8
9
2
5
3
4
6
1
8
9
4
7
There are two standard stacker / stapler configurations: the stacker / stapler with and without a
booklet maker. The booklet maker folds and staples booklets. Both finisher configurations can
enable the optional punch unit to punch two, three or four holes in the printed output.
The dashboard of the control panel displays the status of the staple cartridges. When the color of
the staple icon is orange or red, the staple cartridge needs replacement. (See
on page 120)
Standard stacker / stapler
System monitoring
[17] Standard stacker / stapler with and without booklet maker.
Description stacker / stapler
1 Cover, to access the paper path when a paper jam occurs.
2 Punch unit cover, to access the paper path when a paper jam occurs.
3 Punch unit cover, to remove the punch waste or to access the paper path when a pa-
per jam occurs.
4 Cover, to access the area where you replace staple cartridges, clear a paper jam, or
clear a staple jam.
5 Booklet tray, to collect booklets.
6 Auxiliary booklet tray, to collect large booklets.
7 Lower tray, to collect finished output.
8 Upper tray, to collect finished output.
9 Top tray, to collect finished output.
See for specifications:
Finishing and delivery specifications
Finishing for your output
on page 274
on page 23
imagePRESS C800 Series
Chapter 2 - Explore the print system
45
Page 46

1
Professional puncher
Professional puncher
The professional puncher (Professional Puncher-C1 and Professional Puncher Integration Unit-A1)
uses die sets to punch various types of holes in the printed output. The Professional Puncher
Integration Unit-A1 reverses the punched sheets.
NOTE
For more information on how to use the professional puncher, see the operation guide of the
Professional Puncher-C1.
IMPORTANT
Always keep the main power switch of the Professional Puncher-C1 in the "I" position.
[18] Main power switch of the professional puncher (Professional Puncher-C1)
[19] Professional puncher integration unit (Professional Puncher Integration Unit-A1)
Description professional puncher integration unit
1 Front cover, to access the paper path when a paper jam occurs.
See for specifications:
Finishing and delivery specifications
Finishing for your output
on page 23
on page 274
Chapter 2 - Explore the print system
46
imagePRESS C800 Series
Page 47

Folder
1
2
3
Folder
The folder (Paper Folding Unit-F1) folds the printed output in various ways: Z-fold, half-fold, trifold in, tri-fold out, parallel fold.
[20] Folder (Paper Folding Unit-F1)
Description folder
1 Front cover, to access the paper path when a paper jam occurs.
2 Folding unit cover, to access the paper path when a paper jam occurs.
3 Tray, to collect folded output.
See for specifications:
Finishing and delivery specifications
Finishing for your output
on page 23
on page 274
imagePRESS C800 Series
Chapter 2 - Explore the print system
47
Page 48

1 2
Output tray
Output tray
The output tray (Output Tray-A1) collects the printed output. The output tray is part of the print
module. Printed output goes to the output tray when no other finishing optionals are part of the
print system. (See
[21] Output tray (Output Tray-A1)
Description
1 Auxiliary tray, to collect large, printed output (A3 / 11" x 17" or A4R / LTRR).
Main hardware parts
on page 32)
2 Output tray, to collect printed output.
See
Finishing and delivery specifications
on page 274 for specifications.
Chapter 2 - Explore the print system
48
imagePRESS C800 Series
Page 49

Chapter 3 Prepare the jobs
Page 50

Prepare print jobs
Prepare print jobs
Prepare print jobs with the printer driver
The printer driver enables you to prepare the complete print job. The printer driver is available in
all applications for Microsoft® Windows® and Apple® Macintosh® operating systems. You can
use the printer driver to submit documents from applications, such as Microsoft® Office and
Adobe® Acrobat®. The printer driver provides the following features:
• Access to the media catalog, to select the best media for the job.
• Color preset selection, for easy-to-use and fast color management.
• Many settings for the layout and finishing.
• Templates for the print job settings you use more often.
• Secure print jobs with a PIN.
• Labels, to organize jobs in a DocBox or the print queue. You can also use labels to print via an
automated workflow.
• Default print ticket creation, to print via hotfolders.
• Preview pane, to show the results of the settings.
You can submit jobs to the following locations on PRISMAsync: a DocBox, the list of waiting jobs
or the list of scheduled jobs. (See
Job management in the queues
on page 99)
This generic procedure describes how to define a print job.
The online help of the printer driver provides detailed information on the available functions.
Download the printer drivers from the Settings Editor. (See
System configuration
on page 182)
[22] The media catalog in the printer driver
Chapter 3 - Prepare the jobs
50
imagePRESS C800 Series
Page 51

1
2
3
4
5
6
7
8
Prepare print jobs with the printer driver
[23] The setting parts of the printer driver
Before you begin
Check if there is a connection from the printer driver to the print system (6).
Procedure
Check the document size, orientation and binding edge that come from the application (1 and 2).
1.
Check the presets (3).
2.
Change the settings for one or more presets, if required (4).
3.
Define the job production settings (7).
4.
Check the results in the preview pane (2).
5.
Save the settings in a template, if required (5).
6.
Click [OK] (8).
7.
imagePRESS C800 Series
Chapter 3 - Prepare the jobs
51
Page 52

Prepare print jobs with PRISMAprepare
Prepare print jobs with PRISMAprepare
The optional PRISMAprepare software is an effective and efficient application to clean up
documents and make them ready for printing. You can preview the results of your settings by
page. PRISMAprepare provides the following features:
• Basic and advanced imposition functions, to prepare the print document on job and page level.
• Create variable data documents.
• WYSIWIG feedback view, to show the results of the layout, media and finishing settings.
• Access to the media catalog, to select the best media for the job.
• Functions to clean scanned documents.
• Functions to optimize PDF documents.
• Export the media catalog to PRISMAsync controllers of black & white and color systems.
You can send jobs to the following locations on PRISMAsync: a DocBox, the list of waiting jobs or
the list of scheduled jobs. (See
This generic procedure describes how to prepare and submit a job.
The online help of PRISMAprepare contains detailed information on the available functions.
Job management in the queues
on page 99)
[24] The PRISMAprepare interface
Procedure
Open the document in PRISMAprepare.
1.
Add pages or page ranges, if required.
2.
Define which pages or page ranges need specific layout.
3.
Select media from the media catalog by page or page range.
4.
Chapter 3 - Prepare the jobs
52
imagePRESS C800 Series
Page 53

Prepare print jobs with PRISMAprepare
[25] The media catalog in PRISMAprepare
Select the required color preset.
5.
Define the required finishing and delivery options.
6.
imagePRESS C800 Series
Chapter 3 - Prepare the jobs
53
Page 54

Print a file from a USB drive
Print a file from a USB drive
You can submit documents that are stored on a USB drive to one of the following locations:
• List of waiting jobs
• List of scheduled jobs
• A DocBox
[26] The USB button
For more information, see:
Control panel
Job management in the queues
Operating concept
Procedure
Insert the USB drive into the USB port at the left-hand side of the control panel.
1.
Touch [Jobs] -> [USB].
2.
Select the document or use one of the selection functions to select multiple documents together.
3.
Touch [Print] to submit the document to the list of [Scheduled jobs] or touch [Save] to store the
4.
document in one of the other locations.
Touch the eject button
5.
on page 36
on page 99
on page 28
and remove the USB drive.
Chapter 3 - Prepare the jobs
54
imagePRESS C800 Series
Page 55

Prepare copy and scan jobs
93,675
Copy jobs
The copy function enables you to copy paper originals. You can define each individual setting for
the copy job or use templates. Templates contain predefined settings for recurring types of copy
jobs.
The copy function shows a number of factory default templates, for example, to copy mixed-size
originals or to combine different sets of originals. Furthermore, you can define or change your
own templates. When you select a template, PRISMAsync automatically uses copy and original
settings for the job.
Minimize the copy/scan job definition view so that you also can perform other tasks on the
control panel.
You can specify the destination for the copy job. When you want to print the copy job later, select
the list of waiting jobs or a DocBox. (See
Default copy templates
Job management in the queues
Prepare copy and scan jobs
on page 99)
[27] Default copy templates
The following default copy job templates are available.
Template
[Copy job] When you have a simple copy job with one type of media.
[Combined copy job] When you have a copy job with subsets of originals.
[Booklet job] When you need copied booklets.
imagePRESS C800 Series
When to use
Chapter 3 - Prepare the jobs
4
55
Page 56

1
2
3
4
5
Copy jobs
Template When to use
[Mixed size] When you have a copy job with mixed-size originals. The copy will
[Last used] When you want to reuse the settings of the previous copy job. You
[To DocBox] When the destination of the copy job is the first available DocBox
Copy job definition
PRISMAsync automatically defines a number of settings for the originals and the copy. However,
you can overrule these automatic settings. The automatic settings have the prefix "Auto".
also have these media sizes.
cannot use this function for a combined copy job.
or DocBox of your choice.
[28] The copy job panes and buttons
The following copy job information is available.
Description
1 [Original] pane, with the settings for the originals.
2 [Output] pane, with the settings for the copy.
3 [Job] pane, with generic settings for the entire job.
4 Preview pane, to show the results of the settings.
5 Action buttons, to save settings in a template or to indicate subsets.
For more information, see:
Copy job settings
Output settings values and icons
Chapter 3 - Prepare the jobs
56
on page 236
on page 246
imagePRESS C800 Series
Page 57

Scan jobs
1
2
3
4
5
The scan function enables you to create a digital document from originals. You can define the
individual settings for a scan job or use templates.
The scan function contains a number of factory default templates, for example, to scan mixedsize originals or to combine different sets of originals. Furthermore, you can define or change
your own templates. When you select a template, PRISMAsync automatically uses scan and
original settings for the job.
Minimize the copy/scan settings view so that you can also do other tasks on the control panel.
Scan job templates
Scan jobs
[29] Scan job templates
A scan template includes the destination of the scan file. You can scan to a server, workstation,
USB drive or to email. PRISMAsync transfers the scan file to the list of scan files, before it arrives
in the required destination. PRISMAsync automatically removes scan files from the list after a
preset period, but you can also remove scan files from the list in the Job view.
Configure the scan file transfer, the scan file destinations and the removal of scan files in the
Settings Editor. (See
Scan job definition
imagePRESS C800 Series
PRISMAsync automatically defines a number of settings for the originals and the scan file.
However, you can overrule these automatic settings. The automatic settings have the prefix
"Auto".
System configuration
on page 182)
Chapter 3 - Prepare the jobs
57
Page 58

1
2
3
4
5
Scan jobs
[30] Scan job settings
The following scan job information is available.
Description
1 [Original] pane, with settings for the originals.
2 [Output] pane, with settings for the scan file.
3 [Job] pane, with generic settings for the entire job.
4 Preview pane, to show the results of the settings.
5 Action buttons, to save settings in a template or to use subsets.
For more information, see:
Scan job settings
Output settings values and icons
on page 240
on page 246
Chapter 3 - Prepare the jobs
58
imagePRESS C800 Series
Page 59

Use the automatic document feeder to copy or scan
Use the automatic document feeder to copy or scan
The automatic document feeder feeds and scans a set of originals for copy or scan jobs. It
automatically transfers the originals to the scan area.
IMPORTANT
• Thin originals can become creased in high temperatures or high humidities.
• When you scan long originals (432 mm - 630 mm / 17" - 24.8"), push back the auxiliary
originals tray and feed the originals by hand to prevent creased originals.
• Do not place the following originals into the automatic document feeder that are difficult to
feed, such as:
- Originals with tears or large binding holes
- Severely curled originals or originals with sharp folds
- Clipped or stapled originals
- Carbon-backed paper
- Transparencies and other highly transparent media
• Always smooth out folds in originals before you place them into the automatic document
feeder.
• Do not drop clips or other objects into the gap of the originals tray.
• Do not add or remove originals during the scan process.
• Do not place objects in the original output area. This can cause damage to originals.
• Do not scan originals more than 30 times. This can cause the originals to become folded and
creased.
• When the rollers of the automatic document feeder get dirty due to originals written with
pencil, perform the automatic document feeder cleaning procedure. (See
document feeder rollers
on page 220)
Clean the automatic
Action
1 Adjust the paper guides to fit the size of your
imagePRESS C800 Series
originals.
You can place a set of mixed-size originals into
the automatic document feeder.
Chapter 3 - Prepare the jobs
4
59
Page 60

*
*
Use the automatic document feeder to copy or scan
Action
2 Place the originals face up into the originals
tray; the originals input indicator * illuminates
green.
The position of the originals influences the staple, fold and punch location. (See
tion
on page 251)
CAUTION
Do not insert your hands in the gap
of the originals tray. This can cause
personal injury.
3 Define the copy or scan settings and touch
[Start] .
When the original receiving tray detects the
scanned originals, the originals output indicator * illuminates white.
Feed direc-
4 Remove the scanned originals from the origi-
nals receiving tray when the originals output
indicator * blinks.
For more information, see:
Automatic document feeder
Paper input specifications
Feed direction
on page 251
on page 41
on page 270
Chapter 3 - Prepare the jobs
60
imagePRESS C800 Series
Page 61

Use the glass plate to copy or scan
*
You must use the glass plate to scan a page of a magazine or book, a heavy or delicate
document, or a transparency. The scan area detects the following original sizes: A3, A4, A4R, A5,
A5R , 11" x 17", LTR, LTRR, SMT, SMTR.
Action
1 Lift the automatic document feeder approxi-
mately 300 mm / 11.8" to allow the sensor to
detect the size of the original.
2 Place and align an original face down.
The position of the original influences the staple, fold and punch location in the printed output. (See
Feed direction
on page 251)
Use the glass plate to copy or scan
3 Gently close the automatic document feeder.
CAUTION
To prevent damage to the glass
plate and personal injury, carefully
close the cover and do not push on‐
to the cover.
4 Define the copy or scan settings and touch [Start] .
CAUTION
Be aware that the light of the glass plate is very bright.
5 Remove the original from the glass plate.
For more information, see:
Automatic document feeder
on page 41
imagePRESS C800 Series
Chapter 3 - Prepare the jobs
61
Page 62

Use the glass plate to copy or scan
Paper input specifications
Feed direction
on page 251
on page 270
Chapter 3 - Prepare the jobs
62
imagePRESS C800 Series
Page 63

Make a copy
1
2
3
4
5
You start a copy job from the automatic document feeder or the glass plate. When the scan area
has scanned the originals, the copy goes to the destination you indicated.
Make a copy
For more information, see:
About copy jobs
Copy job settings
Use templates for recurring jobs
Copy subsets (combined copying)
Before you begin
Read the instructions detailing how to use the automatic document feeder and the glass plate.
(See
copy or scan
Procedure
Place a set of originals into the automatic document feeder or place an original on the glass plate.
1.
Touch [Jobs] -> [Copy/Scan].
2.
Select a copy template.
3.
Define the original settings in the [Original] pane (1).
4.
Define the output settings in the [Output] pane (2).
5.
Enter a job name and the number of sets in the [Job] pane (3).
6.
Select the destination of the copy (3).
7.
To scan now and print later, select the list of waiting jobs or a DocBox .
Check the results of your settings in the preview pane (4).
8.
Touch the start button
9.
on page 55
on page 236
on page 66
on page 67
Use the automatic document feeder to copy or scan
on page 61)
on page 59 or
.
Use the glass plate to
imagePRESS C800 Series
Chapter 3 - Prepare the jobs
63
Page 64

1
2
3
4
5
Make a scan
Make a scan
You can start a scan job from the automatic document feeder or the glass plate. When the scan
area has scanned the originals, the scan file goes to the destination you indicated.
For more information, see:
About scan jobs
Scan job settings
Use templates for recurring jobs
Scan subsets (combined scanning)
Before you begin
Read the instructions detailing how to use the automatic document feeder and the glass plate.
(See
copy or scan
Procedure
Place a set of originals into the automatic document feeder or place an original on the glass plate.
1.
Touch [Jobs] -> [Copy/Scan].
2.
Select a scan template.
3.
Define the original settings in the [Original] pane (1).
4.
Define the output settings in the [Output] pane (2).
5.
Select the destination of the scan file in the [Job] pane (3).
6.
• For scanning to email, define the subject of the email, the addresses and your account ID.
• For scanning to USB, insert the USB drive into the USB port and select the required folder on
the drive.
Enter a job name and a file name ID (3).
7.
Check the results of your settings in the preview pane (4).
8.
on page 57
on page 240
on page 66
on page 68
Use the automatic document feeder to copy or scan
on page 61)
on page 59 or
Use the glass plate to
Chapter 3 - Prepare the jobs
64
imagePRESS C800 Series
Page 65

Touch the start button .
9.
Touch the eject button and remove the USB drive, if applicable.
10.
Make a scan
imagePRESS C800 Series
Chapter 3 - Prepare the jobs
65
Page 66

Use templates for recurring jobs
Use templates for recurring jobs
The print system offers a number of default templates. When you carry out copy or scan jobs
with the same settings on a regular basis, create custom templates to store the settings for these
jobs.
[31] Store settings of a copy or scan job in a template
NOTE
• To change a custom template, touch the custom template for two seconds. You can rename,
• To store the settings of the last job in a custom template, touch the [Last used] template for
For more information, see:
About copy jobs
About scan jobs
Procedure
Touch [Jobs] -> [Copy/Scan].
1.
Select one of the available job templates.
2.
Adjust the template settings.
3.
Press [Save as template].
4.
Enter a name for the custom template and touch [OK].
5.
Touch [Jobs]->[Copy/Scan] to view the new template.
6.
move or delete the custom template.
two seconds.
on page 55
on page 57
Chapter 3 - Prepare the jobs
66
imagePRESS C800 Series
Page 67

Copy subsets (combined copying)
You can combine different subsets of originals into a copy. With the optional [Page
programming] function you can define the layout and finishing of each subset.
For more information, see:
Copy subsets (combined copying)
About copy jobs
Copy job settings
Use page programming
Before you begin
Read the instructions detailing how to use the automatic document feeder and the glass plate.
(See
Use the automatic document feeder to copy or scan
copy or scan
Procedure
Touch [Jobs] -> [Copy/Scan] -> [Combined copy job].
1.
Place the first subset into the automatic document feeder or on the glass plate.
2.
Define the settings for the subset and the copy.
3.
Press [Scan].
4.
Place the next subset into the automatic document feeder or on the glass plate.
5.
Define the settings for the subset and the copy.
6.
Press [Scan].
7.
Repeat step 5, 6, and 7 for each following subset.
8.
Touch [Ready] when the last subset is scanned.
9.
Use the optional [Page programming] function to define the layout and finishing of the subsets.
10.
Touch [Ready] to close the [Page programming] function.
11.
Define the destination and enter a name for the copy.
12.
Touch the start button
13.
on page 55
on page 236
on page 61)
on page 107
to start the copy job.
on page 59 or
Use the glass plate to
imagePRESS C800 Series
Chapter 3 - Prepare the jobs
67
Page 68

Scan subsets (combined scanning)
Scan subsets (combined scanning)
You can combine different subsets of originals into a scan file. With the optional [Page
programming] function you can define the layout and finishing of each subset.
For more information, see:
About scan jobs
Scan job settings
Use page programming
Before you begin
Read the instructions detailing how to use the automatic document feeder and the glass plate.
(See
Use the automatic document feeder to copy or scan
copy or scan
Procedure
Touch [Jobs] -> [Copy/Scan].
1.
Select one the available scan templates.
2.
Press [Subset].
3.
Place the first subset into the automatic document feeder or on the glass plate.
4.
Define the settings for the subset and the scan file.
5.
Press [Scan].
6.
Place the next subset into the automatic document feeder or on the glass plate.
7.
Define the settings for the subset and the scan file.
8.
Press [Scan].
9.
Repeat steps 7, 8, and 9 for each subset.
10.
Touch [Ready] when the last subset is scanned.
11.
Use the optional [Page programming] function to define the layout and finishing of the subsets.
12.
Touch [Ready] to close the [Page programming] function.
13.
Define the destination for the scan file, enter the job name and the file name ID for the scan file.
14.
Touch the start button
15.
on page 57
on page 240
on page 61)
on page 107
to start the scan job.
on page 59 or
Use the glass plate to
Chapter 3 - Prepare the jobs
68
imagePRESS C800 Series
Page 69

Chapter 4 Plan the jobs
Page 70

Job preparation
Print production
Job planning
DocBox
Scheduled
jobs
Finishing and delivery Printing Media loading
Waiting
jobs
Ready-to-print
documents
Set up your print production preferences
Set up your print production preferences
Automated workflows
An automated workflow automatically links print settings to jobs. Every automated workflow
represents a different virtual printer with its own specific properties.
Hotfolders
[32] Document printing via an automated workflow
The use of automated workflows means that the print production increases, because you do not
need to define individual job settings during the job preparation.
PRISMAsync has one default automated workflow. There are several ways to address an
automated workflow:
• You can enter the name of the automated workflow in the label setting of the printer driver.
• You can use an LPR command with the name of the automated workflow.
• You can use a hotfolder, linked to an automatic workflow.
You can define if the attributes of the automated workflow must overrule the job tickets of the
print files.
An automatic workflow can send jobs to the following PRISMAsync locations: a DocBox, the list
of waiting jobs or the list of scheduled jobs. (See
Create and define automated workflows in the Settings Editor. (See
page 182)
The optional hotfolder feature is useful for environments that print many files with the same print
settings. The format of the files you can print with hotfolders depends on the print language
Job management in the queues
System configuration
on page 99)
on
licenses of your print system (PostScript/PDF, Direct PDF (Adobe PDF Print Engine APPE), PCL).
Chapter 4 - Plan the jobs
70
imagePRESS C800 Series
Page 71

You drop the printable files on a shortcut of the hotfolder. Do not use a hotfolder for files that
already have a job ticket, to prevent the settings of the two sources causing a conflict.
A hotfolder has a connection to an automated workflow, which defines the job settings. However,
you can also apply job settings by the use of a hotfolder default ticket. If this happens, you can
disable the automated workflow job settings. Create a hotfolder default ticket (default_ticket.jdf)
with your printer driver.
You need to do the following tasks, before you can use hotfolders:
• Use the Settings Editor to activate the hotfolder feature.
• Use the Settings Editor to create a hotfolder.
• Use the Settings Editor to link the hotfolder to the settings of an automated workflow or place
the default job ticket in the hotfolder.
• Create a shared network folder on your workstation that links to the hotfolder and create a
shortcut on your desktop.
Variable data printing
Printing variable data (VDP or variable document printing) is a print method that uses variable
text and graphics. A VDP job has records to distinguish the different sets. VDP is used for direct
marketing, advertising, and personalized letters. PRISMAprepare or VDP authoring tools allow to
build personalized documents.
Automated workflows
Today, PDF/VT print files are used to print variable data documents. PDF/VT enables variable
document printing with the use of the latest PDF standards. Submit PDF/VT files to PRISMAsync
with an automated workflow or a hotfolder.
[33] A PDF/VT job in the list of scheduled jobs
The icon indicates a PDF/VT file.
When the PDF/VT job arrives in the print queue, you can use the following functions:
• Print a proof of the first record.
• Interrupt the print process after a certain record, and resume the print process of the job later.
• Print a range of records.
imagePRESS C800 Series
Chapter 4 - Plan the jobs
71
Page 72

Automated workflows
• Change the settings of the job. Be aware that when you change settings of a PDF/VT job, these
settings are applicable to all records of the job.
NOTE
Page programming is not available for PDF/VT jobs.
Chapter 4 - Plan the jobs
72
imagePRESS C800 Series
Page 73

Workflow profiles
A workflow profile determines the route of jobs when they arrive on the PRISMAsync controller.
PRISMAsync provides several default workflow profiles to manage your work load on the control
panel.
Workflow profiles make it possible to plan your jobs in a flexible way. You select a workflow
profile on the control panel and, if required, adjust the attributes of the workflow profile. Then,
this custom workflow profile is completely fitted to your workflow.
Workflow profiles
[34] Workflow profile attributes
Below you find the descriptions of the default workflow profiles.
imagePRESS C800 Series
Chapter 4 - Plan the jobs
73
Page 74

DocBox
Scheduled
jobs
Finishing and delivery Printing Media loading
Waiting
jobs
Print production
Job planning
Workflow profiles
Standard workflow profile
The standard workflow profile fits a productive workflow with sufficient control over jobs.
Jobs go to the list of scheduled jobs and the print system prints the jobs.
The print system selects another output tray for each next job.
74
Chapter 4 - Plan the jobs
imagePRESS C800 Series
Page 75

Job by job workflow profile
DocBox
Scheduled
jobs
Finishing and delivery Printing Media loading
Waiting
jobs
Print production
Job planning
Workflow profiles
The job-by-job workflow profile fits a workflow in which every job needs attention.
All jobs come in the list of scheduled jobs and you start the jobs one by one from the list of
scheduled jobs.
The print system selects another output tray for each next job.
imagePRESS C800 Series
Chapter 4 - Plan the jobs
75
Page 76

Print production
Job planning
DocBox
Finishing and delivery Printing Media loading
Waiting
jobs
Scheduled
jobs
Workflow profiles
Check and print workflow profile
The check-and-print workflow profile is suitable for a workflow in which every job requires
attention. You check the print quality and layout setting of the first set.
All jobs are received in the list of scheduled jobs and only the first set of the job is printed. After
approval of the first set, you give the print command to print the other sets in one run.
The print system selects another output tray for each next job.
76
Chapter 4 - Plan the jobs
imagePRESS C800 Series
Page 77

Manual planning workflow profile
Print production
Job planning
DocBox
Scheduled
jobs
Finishing and delivery Printing Media loading
Waiting
jobs
Workflow profiles
The manual planning workflow fits a workflow in which you want to determine the print priority
of the jobs.
All jobs are received in the list of waiting jobs.
The print system selects another output tray for each next job.
imagePRESS C800 Series
Chapter 4 - Plan the jobs
77
Page 78

DocBox
Scheduled
jobs
Finishing and delivery Printing Media loading
Waiting
jobs
Print production
Job planning
Workflow profiles
Unattended workflow profile
The unattended workflow profile fits a workflow in which productivity is very important.
All jobs go to the list of scheduled jobs and are printed.
To keep the system running, you should make sure consumables remain available and you
remove printed output and waste on time.
For more information, see:
DocBox
Job management in the queues
Operating concept
on page 91
on page 28
on page 99
78
Chapter 4 - Plan the jobs
imagePRESS C800 Series
Page 79

Select a workflow profile
Workflow profiles determine the route of jobs when they arrive on PRISMAsync. You select one
of the default workflow profiles. You also can adjust the workflow profile attributes. You can only
create one custom workflow profile.
You can find the attributes of the active workflow at the top of the Workflow window.
Select a workflow profile
[35] The workflow profile attributes
For more information, see:
Workflow profiles
Job management in the queues
Procedure
Touch [System] -> [Setup] -> [Workflow profile].
1.
Select a workflow profile.
2.
Adjust the workflow profile, if required.
3.
The name of the workflow profile changes into [Custom].
Press [OK].
4.
on page 73
on page 99
imagePRESS C800 Series
Chapter 4 - Plan the jobs
79
Page 80

Select an accounting mode
Select an accounting mode
The accounting feature on PRISMAsync stores and handles job and user information in account
log files. You can customize the definition of account log files to process the logging data into
your cost charts or invoices.
You must define account IDs to charge job costs to departments or customers and enable the
user identification in the Settings Editor. PRISMAsync can verify the entered account IDs, to make
sure that only valid users can use the print system. When a submitted job does not have a valid
account ID, PRISMAsync sends it to the list of waiting jobs. The print system will only start to
process the job when a correct account ID is entered.
When accounting is active, the printer driver and the control panel will ask for an account ID
before the print system handles the job. Define the accounting mode on the control panel to
determine how PRISMAsync interacts with the operator.
Accounting modes:
• [Per job]
This mode requires authentication per job. You can see the last used account ID which you can
overwrite.
• [Per job] ([Clear account ID])
This mode requires authentication per job. You cannot see the last used account ID.
• [Fixed]
This mode uses a fixed account ID, but you can change the account ID. Be aware that the fixed
mode implies that the print system overrules the account ID that is entered in the printer
driver.
[36] Accounting modes
For more information, see:
System configuration
Chapter 4 - Plan the jobs
80
on page 182
imagePRESS C800 Series
Page 81

Procedure
Touch [System] -> [Setup] -> [Accounting].
1.
Press [Accounting mode].
2.
Select an accounting mode.
3.
Press [OK].
4.
Select an accounting mode
imagePRESS C800 Series
Chapter 4 - Plan the jobs
81
Page 82

Change or disable the warning time
Change or disable the warning time
The dashboard and the operator attention light warn you when the schedule predicts an operator
intervention. You can change or disable the warning time.
For more information, see:
System monitoring
Status indicators
Schedule
Procedure
Touch [System] -> [Setup] -> [Warning time].
1.
Touch [Warning in advance] to enable or disable the function.
2.
Touch the - or + button to decrease or increase the warning time in increments of 1 minute.
3.
Set a time from 1 - 60 minutes.
Press [OK].
4.
on page 120
on page 264
on page 122
Chapter 4 - Plan the jobs
82
imagePRESS C800 Series
Page 83

Change the system language
You can change the language of the control panel.
[37] Overview of the available languages
Procedure
Touch [System] -> [Setup] -> [Language].
1.
Select the language.
2.
Press [OK].
3.
Change the system language
imagePRESS C800 Series
Chapter 4 - Plan the jobs
83
Page 84

Use of shorter job names
Use of shorter job names
When the job name is too long to display on the control panel, PRISMAsync shortens the job
name. You can determine how PRISMAsync shortens the job names.
[38] Job name truncation
Procedure
Touch [System] -> [Setup] -> [Job name truncation].
1.
Indicate how you want to shorten the job name.
2.
Press [OK].
3.
Chapter 4 - Plan the jobs
84
imagePRESS C800 Series
Page 85

Adjust the readability of the control panel
You can adjust the brightness and contrast of the control panel screen. Use the automatic or
manual adjustment.
Adjust the readability of the control panel
[39] Control panel adjustments
Procedure
Touch [System] -> [Setup] -> [Operator panel settings].
1.
Select the auto adjustment method, or touch the + and - buttons to adjust the brightness and
2.
contrast.
Press [OK].
3.
imagePRESS C800 Series
Chapter 4 - Plan the jobs
85
Page 86

Use the remote monitor
Use the remote monitor
With the remote monitor you can monitor the print system status from a workstation or a tablet.
For more information, see:
System monitoring
Remote monitor specifications
Before you begin
Make sure that your web browser allows pop-up windows.
Procedure
Open the web browser.
1.
Enter the IP address or hostname of the PRISMAsync controller.
2.
Use the following format:
http://<IP address>/remoteinfo or http://<hostname>/remoteinfo
https://<IP address>/remoteinfo or https://<hostname>/remoteinfo
on page 120
on page 288
Chapter 4 - Plan the jobs
86
imagePRESS C800 Series
Page 87

Transaction printing
Scheduled
jobs
Finishing and delivery Printing Media loading
Job preparation
Print production
Applications to
prepare and submit
job stream
Transaction printing mode
When there is a license for transaction printing (IPDS or PCL), you can operate the print system in
the transaction printing mode. An IPDS or PCL host sends a streaming job to a dedicated port in
the print system. The transaction printing mode fits print environments with large numbers of
business critical data, such as invoices, checks and salary slips.
Typically, in the transaction print mode, that first non-variable parts of a print job are stored on
the controller and are then merged with the variable parts of the print job.
Transaction printing
PDF containers in the data streams
Differences between the two printing modes
imagePRESS C800 Series
[40] Job workflow for transaction printing mode
During daily work, you can switch between the transaction printing and document printing
modes without rebooting the print system.
When the transaction printing mode is active, the print system still accepts PDF and PostScript
jobs. However, PRISMAsync starts to process these jobs, when you switch off the transaction
printing mode.
The transaction printing mode can be extended with an Adobe PDF Print Engine (Adobe PDF for
IPDS) license. This license allows you to process PDF containers in the data streams.
The transaction printing mode is different from the document printing mode in several respects:
1. All data in one connection session are part of the same streaming job. This streaming job can
have job separators. In this instance, you can see the different job names on the control
panel.
2. The print resolution for IPDS is 240, 300, 600 dpi, or automatically detected.
Chapter 4 - Plan the jobs
87
Page 88

Transaction printing
3. When the transaction printing jobs contain paper tray selection numbers, you can select a
mapping method. The paper tray number corresponds to a physical tray or to media from the
catalog:
• Tray-to-media mapping
You can assign the paper tray number included in the print job to a physical paper tray.
• Tray-to-tray mapping
You can assign the paper tray number included in the print job to media in the media
catalog.
4. Color management in the transaction mode works in a similar way to the document printing
mode. However, there are some different color conversion functions:
• You cannot overrule the input profiles attached to the data stream.
• You can choose to keep or ignore the output color profile in the data stream.
• You cannot calibrate the printer when the transaction printing mode is active.
Transaction printing setups
A transaction printing setup is a collection of preset print settings for a transaction job, such as
output location, data resolution, face orientation, offset stacking, font capture, and logical page
size.
Create transaction printing setups in the Settings Editor. (See
Work in transaction printing mode
When you want to print in the transaction printing mode, first activate the transaction mode and
establish the connection with the IPDS or PCL host. When you print in the transaction printing
mode, the schedule informs you which types of media the streaming job uses. The schedule
cannot predict the time needed for a streaming job. (See
System configuration
Schedule
on page 122)
on page 182)
[41] The schedule when the transaction printing mode is active
Chapter 4 - Plan the jobs
88
imagePRESS C800 Series
Page 89

Image adjustment
You can create a transaction printing preset with an image shift definition. This is useful for better
alignment of variable data, such as names or addresses, on the page. You define the image shift
on the control panel, but also in the Settings Editor.
Secure error recovery
When an job error occurs in transaction printing mode, the job recovery takes place from the
page that caused the error. When multiple pages of the same document are not allowed, for
example, for lotteries and bank accounts, you must adjust the error recovery settings. When you
select the secure error recovery in the Settings Editor, the print system does not perform an
output recovery and deletes all remaining pages. A stack eject follows when the printed output
goes to the high capacity stacker. As a result, you must submit the job again.
Transaction printing
imagePRESS C800 Series
Chapter 4 - Plan the jobs
89
Page 90

Print in transaction printing mode
Print in transaction printing mode
When the transaction mode is active, you select a transaction setup that matches your print
requirements. Create new transaction setups in the Settings Editor.
When the alignment of the variable data is not correct, you adjust the image shift via the control
panel or via a transaction printing setup with a preset defined image shift. The image shift is
visible on all printed output from all paper trays.
For more information, see:
Transaction printing
Before you begin
Make sure the list of scheduled jobs is empty.
Procedure
Touch [System] -> [Transaction] -> [Transaction printing mode] -> [On].
1.
Touch [Active transaction setup] to select a transaction setup.
2.
Load the media into the paper trays, if the tray-to-tray media assignment is active.
3.
Touch [System] -> [Transaction] ->[Transaction online] -> [On]
4.
Touch the + or - buttons to shift the image, if required.
5.
Establish the connection from the host or mainframe to the print system and submit the jobs.
6.
Monitor the jobs on the control panel, to make sure that all jobs are printed.
7.
After you finish
To switch off the transaction printing mode:
1. Touch [System] -> [Transaction] ->[Transaction online] -> [Off]
2. Touch [System] -> [Transaction] -> [Transaction printing mode] -> [Off].
on page 87
Chapter 4 - Plan the jobs
90
imagePRESS C800 Series
Page 91

Use the DocBox
DocBox
The DocBox is short for document box. The optional DocBox storage location on PRISMAsync
helps to manage jobs before printing. For example, use the DocBox:
• As a storage folder for each print operator.
• As a secure folder protected with a PIN.
• As a storage folder for jobs that need reprinting on a regular basis.
• As a storage folder for jobs that need further job editing or page programming.
• As a storage folder for jobs that come from a hotfolder or an automated workflow.
Use the DocBox
[42] The DocBox folders
You can do the following tasks with a DocBox job:
• Lock the job settings.
• Move it to another DocBox.
• Combine it with another job in the DocBox.
• Print it with priority.
Configure the DocBox with the Settings Editor. (
For more information, see:
Operating concept
Job management in the queues
Print job settings
imagePRESS C800 Series
on page 28
on page 242
on page 99
System configuration
on page 182)
Chapter 4 - Plan the jobs
91
Page 92

Change a DocBox job
Change a DocBox job
You can change the settings of a DocBox job. The same job settings are available in the list of
waiting jobs. With the optional [Page programming] function you can define the layout and
finishing of subsets and page ranges.
Use the list button
to toggle between the list and the thumbnail view.
[43] Job settings in DocBox
For more information, see:
DocBox
Print job settings
Use page programming
Procedure
Touch [Jobs] -> [DocBox].
1.
Select the DocBox folder that contains the job you want to edit.
2.
Enter a PIN, if requested.
3.
Select the job you want to change
4.
Touch [Properties], or double-tap the job to open the [Properties] window.
5.
Make the required settings.
6.
Use the optional [Page programming] function, if required.
7.
Check the results of the changed settings in the preview pane.
8.
Press [OK].
9.
on page 91
on page 242
on page 107
Chapter 4 - Plan the jobs
92
imagePRESS C800 Series
Page 93

Combine DocBox jobs
You can combine DocBox jobs into one new job. You can change the settings for the combined
job in a single property window. The settings available depend on the individual job settings.
icon indicates a combined job.
The
Use the list button to toggle between the list and the thumbnail view.
Combine DocBox jobs
[44] Job combination in DocBox
For more information, see:
DocBox
Change a DocBox job
Procedure
Touch [Jobs] -> [DocBox].
1.
Select the DocBox folder that contains the jobs you want to combine.
2.
Enter a PIN, if requested.
3.
Select the jobs you want to combine, or use an option from the [Select] menu to select multiple
4.
jobs together.
Select [Build] from the drop-down menu.
5.
The [Create build] window appears.
Use the [Up] and [Down] buttons to change the job sequence in the combined job, if required.
6.
Touch [OK].
7.
NOTE
Split the combined job into the original jobs with the [Split] function.
Move a job to an other DocBox folder with the [Move] function.
on page 91
on page 92
imagePRESS C800 Series
Chapter 4 - Plan the jobs
93
Page 94

1
2
3
4
5
Lock DocBox job settings
Lock DocBox job settings
You can lock a DocBox job to protect its settings.
The icon indicates a locked job.
Procedure
[45] The lock function in DocBox
For more information, see:
DocBox
Touch [Jobs] -> [DocBox].
1.
Select the DocBox folder that contains the job you want to lock.
2.
Enter a PIN, if requested.
3.
Select one or more jobs that you want to lock, or use an option from the [Select] menu to select
4.
multiple jobs together.
Select [Lock] from the drop-down menu.
5.
on page 91
NOTE
Unlock the job again with the [Unlock] function.
Chapter 4 - Plan the jobs
94
imagePRESS C800 Series
Page 95

Print DocBox jobs
1
2
3
4
5
You can print DocBox jobs in several ways:
• Without urgency, using the [Print] function.
PRISMAsync submits the job to the last position on the list of scheduled jobs.
• With urgency (immediately), using the [Print now] function.
PRISMAsync submits the job to the first position on the list of scheduled jobs. The active job is
put on hold.
• First make a proof print.
The printed jobs remain in the DocBox folder. Make sure you remove printed DocBox jobs on a
regular basis to prevent a full system disc.
Print DocBox jobs
Procedure
1.
2.
3.
4.
5.
imagePRESS C800 Series
[46] Selection of jobs in a DocBox
For more information, see:
DocBox
Proof and test jobs
Touch [Jobs] -> [DocBox].
Select the DocBox folder that contains the jobs you want to print.
Enter a PIN, if requested.
Select one or more jobs that you want to print, or use an option from the [Select] menu to select
multiple jobs together.
Touch [Print], [Print now], or [Proof].
on page 91
on page 116
Chapter 4 - Plan the jobs
95
Page 96

1
2
3
4
5
Load and assign media
Load and assign media
Add temporary media to the media catalog
You can print on media that are not part of the media catalog. In the printer driver and
PRISMAprepare you can specify that the job uses temporary media and the media properties.
After the job is printed, you can add this temporary media to the media catalog in the System
view of the control panel. This is useful when you use temporary media more often. Change the
attributes of the new media with the Settings Editor.
Procedure
96
[47] Temporary media on the control panel
For more information, see:
Media for your output
Touch [System] -> [Media].
1.
Select the media from the [Temporary media] section.
2.
Press [To catalog].
3.
on page 21
Chapter 4 - Plan the jobs
imagePRESS C800 Series
Page 97

Assign media to a paper tray
You can use the paper tray button at the right-hand side of the control panel to check the media
that are loaded in the paper trays. You can assign media in the Trays view after you load the
media in the paper tray. As long as the media type in the paper tray does not change, it is not
necessary to assign the media after loading.
Assign media to a paper tray
[48] Paper trays with and without assigned media
NOTE
You can also use the [Trays] button.
For more information, see:
Control panel
Media for your output
Handle media
Before you begin
Determine which media the jobs need.
IMPORTANT
Make sure you know how to load media into the paper trays. (See
Procedure
Press the paper tray button
1.
Select the paper tray in which you want to load the media.
2.
Press the open button on the paper tray or touch [Open] in the Trays view.
3.
Load the media into the paper tray.
4.
Close the paper tray.
5.
Touch [Assign] if the media type in the paper tray has changed.
6.
on page 36
on page 21
on page 130
Handle media
.
on page 130)
imagePRESS C800 Series
Chapter 4 - Plan the jobs
97
Page 98

Assign media to a paper tray
Select the media from the media catalog and touch [OK], if applicable.
7.
Press the paper tray button , to close the Trays view.
8.
Chapter 4 - Plan the jobs
98
imagePRESS C800 Series
Page 99

Manage the jobs in the queue
Job management in the queues
When the document printing mode is active, you can submit jobs to several locations on the
PRISMAsync controller. The active workflow profile also determines the destination. The
following locations are available on PRISMAsync:
• List of waiting jobs
• List of scheduled jobs
• DocBox (optional)
When the print system is in the transaction printing mode, PRISMAsync routes the streaming
jobs directly to the list of scheduled jobs.
Waiting jobs
When jobs arrive in the list of waiting jobs, you determine the print order of the jobs. You are also
able to change print job settings or perform page programming. Using one of the selection
functions you can select the jobs and then give the print command. The jobs are added to the list
of scheduled jobs.
Manage the jobs in the queue
To increase the print productivity, you can use the job bundle function to combine several jobs
into a single job. The original jobs are no longer visible, but you can recover the original jobs with
the split function. You can change some properties and the print order of the individual jobs in
the bundled job.
[49] List of waiting jobs
imagePRESS C800 Series
Chapter 4 - Plan the jobs
99
Page 100

Job management in the queues
Scheduled jobs
The print system prints the jobs in the sequence of the list of scheduled jobs. However, you are
able to change the print sequence when one or more jobs require priority. In addition, you can
decide to postpone or stop a print job.
The schedule (optional) gives you up to eight hours of plan-ahead predictability into the print
production. It tells you everything you need to know to avoid an idle print system. (See
on page 122)
Schedule
[50] List of scheduled jobs
Printed jobs
When a job is ready, it is visible in the list of printed jobs. You must move the printed job to the
list of waiting jobs, before you can reprint the job. Printed jobs remain available after the print
system is shut down. Proof prints or stopped jobs are not visible in the list of printed jobs.
In the following situations, you are not able to reprint jobs:
• The list of printed jobs is disabled in the Settings Editor.
• The print system is in the transaction printing mode.
• PRISMAsync already removed the print jobs from the list.
Removal of printed jobs
When you no longer need your printed jobs, you can remove them from the list of printed jobs.
PRISMAsync can also remove printed jobs automatically. Automatic removal of a printed job
occurs after a preset period has expired. For security reasons, configure the optional E-shredding
function in the Settings Editor. E-shredding overwrites the deleted job data and prevents data
recovery from a removed job.
When the automatic job removal is not active, it is important to prevent a full system disc. Delete
print jobs manually from the list of printed jobs and the DocBox folders on a regular base.
Chapter 4 - Plan the jobs
100
imagePRESS C800 Series
 Loading...