

Canon imagePRESS C7011VP, imagePRESS C7011VPS, imagePRESS C800, imagePRESS C6011VP, imagePRESS C6011 Operation Guide
...
Operation guide
PRISMAsync
Remote Manager

Copyright
© 2014, Océ
All rights reserved. No part of this work may be reproduced, copied, adapted, or transmitted in
any form or by any means without written permission from Océ.
Océ makes no representation or warranties with respect to the contents hereof and specifically
disclaims any implied warranties of merchantability or fitness for any particular purpose.
Further, Océ reserves the right to revise this publication and to make changes from time to time
in the content hereof without obligation to notify any person of such revision or changes.
Edition 2014-11
GB

Trademarks
Adobe®, Acrobat®, Reader® and Distiller® are registered trademarks of Adobe® Systems
Incorporated.
PostScript® 3™ is a registered trademark of Adobe® Systems Incorporated.
Apple, Mac, Macintosh, Mac OS, and Safari are trademarks of Apple Inc., registered in the U.S.
and other countries.
Microsoft®, Windows® , Windows NT®, Windows 98®, Windows 2000®, Windows XP®, Windows
Server 2003® are either registered trademarks or trademarks of Microsoft® Corporation in the
United States and/or other countries.
Other third party notices provided upon request.


Contents
Contents
Chapter 1
Introduction.........................................................................................................................7
Introduction.......................................................................................................................................................8
Supported printers.....................................................................................................................................8
Supported web browsers.......................................................................................................................... 9
Chapter 2
Common tasks.................................................................................................................. 11
How to start PRISMAsync Remote Manager............................................................................................... 12
Monitoring...................................................................................................................................................... 13
Monitor jobs............................................................................................................................................. 13
Monitor printers....................................................................................................................................... 16
Job handling................................................................................................................................................... 19
Copy jobs between printers.................................................................................................................... 19
Move jobs between queues in the same printer................................................................................... 21
Change the job order............................................................................................................................... 22
Submit print jobs............................................................................................................................................23
Submit a print job to a printer................................................................................................................ 23
Chapter 3
Configuration.................................................................................................................... 25
Add a printer................................................................................................................................................... 26
Add Remote printers...................................................................................................................................... 28
Enable PRISMAsync Remote Manager.........................................................................................................30
Set the PRISMAsync Remote Manager password.......................................................................................31
Chapter 4
Frequently asked questions.............................................................................................33
How can I change the language of the user interface?............................................................................... 34
Which licenses affect PRISMAsync Remote Manager?...............................................................................35
Which protocols and ports are used by PRISMAsync Remote Manager?.................................................36
Chapter 5
Problem solving................................................................................................................ 37
A connection to one or more printers cannot be made at all.....................................................................38
A copied job loses settings............................................................................................................................39
Status and error messages............................................................................................................................40
You cannot send jobs with PRISMAsync Remote Manager....................................................................... 41
You cannot start PRISMAsync Remote Manager........................................................................................ 42
Your job is not sent to the selected destination on the printing system................................................... 43
Chapter 6
Views................................................................................................................................. 45
The Schedule view......................................................................................................................................... 46
The time line.............................................................................................................................................46
The printer overview................................................................................................................................48
Submit job..........................................................................................................................................49
PRISMAsync Remote Manager
5

Contents
The Schedule............................................................................................................................................53
The button bar................................................................................................................................... 53
Media status information..................................................................................................................55
The printer view..............................................................................................................................................57
The button bars........................................................................................................................................ 58
The properties view........................................................................................................................................62
The page programming view........................................................................................................................ 64
Index...................................................................................................................................67
6
PRISMAsync Remote Manager

Chapter 1 Introduction

Introduction
Introduction
You can use PRISMAsync Remote Manager as an easy way to control the workflow and monitor
several printers at once.
These printers need the PRISMAsync Remote Manager license and software on the PRISMAsync
controller.
PRISMAsync Remote Manager will make the following functionality available in a web-based user
interface:
• Production planning & production flow monitoring via a multi-engine schedule.
• Printer monitoring.
• Remote operation of jobs / queues for multiple printers.
• Direct job upload for print-ready files.
• Job rerouting/copying between printers and queues.
A maximum of 5 printers and 6 concurrent users is supported.
You can find a full description of the PRISMAsync Remote Manager interface in
view
on page 46.
For information on the configuration of PRISMAsync Remote Manager see
page 25.
Supported printers
The PRISMAsync Remote Manager software runs on these supported printer.
• Canon varioPRINT 135 Series from v3.4
• Canon imagePRESS C800 Series from v1.2
• Canon imagePRESS C7010VPS Series from v3.2
•
Océ VarioPrint 6000+ Line from R3.3
The Schedule
Configuration
on
Chapter 1 - Introduction
8
PRISMAsync Remote Manager

Supported web browsers
Browser requirements
To connect to PRISMAsync Remote Manager you need a web browser that has the following
functionality:
• HTML5 compatibility
• JavaScript support
• WebSocket support
NOTE
For security reasons JavaScript or WebSocket might be disabled in your organisation.
Supported operating systems
The following operating systems are supported:
• Microsoft Windows
• Mac OS
Overview
Supported web browsers
Web browser Microsoft Windows Mac OS
Internet Explorer 11 -
Firefox 30 and higher. -
Safari - OSX 8 (Mountain Lion) 6 and
higher.
OSX 9 (Mavericks) 7 and higher.
Chrome 35 and higher. -
PRISMAsync Remote Manager
Chapter 1 - Introduction
9

Supported web browsers
Chapter 1 - Introduction
10
PRISMAsync Remote Manager

Chapter 2 Common tasks

How to start PRISMAsync Remote Manager
How to start PRISMAsync Remote Manager
Before you begin
You need:
• the network address of the system that runs PRISMAsync Remote Manager.
Check that the system is configured properly see
page 30.
• a supported web browser.
Supported web browsers
See
• When you use a firewall or proxy server check that the required network ports are open.
See :
Which protocols and ports are used by PRISMAsync Remote Manager?
on page 9.
Starting PRISMAsync Remote Manager
1. Start the browser.
2. Enter the network address of the system that runs PRISMAsync Remote Manager.
Example : http://remotemanager-address/.
This will start Settings Editor on the printing system.
3. Click on [Remote Manager] in the upper right corner of the screen.
4. Logon with your credentials.
5. PRISMAsync Remote Manager starts now.
See
The Schedule view
on page 46.
Enable PRISMAsync Remote Manager
on
on page 36.
NOTE
Alternatively you can start PRISMAsync Remote Manager directly via : http://
remotemanager-address/RuiClient.
Chapter 2 - Common tasks
12
PRISMAsync Remote Manager

Monitoring
Monitor jobs
Introduction
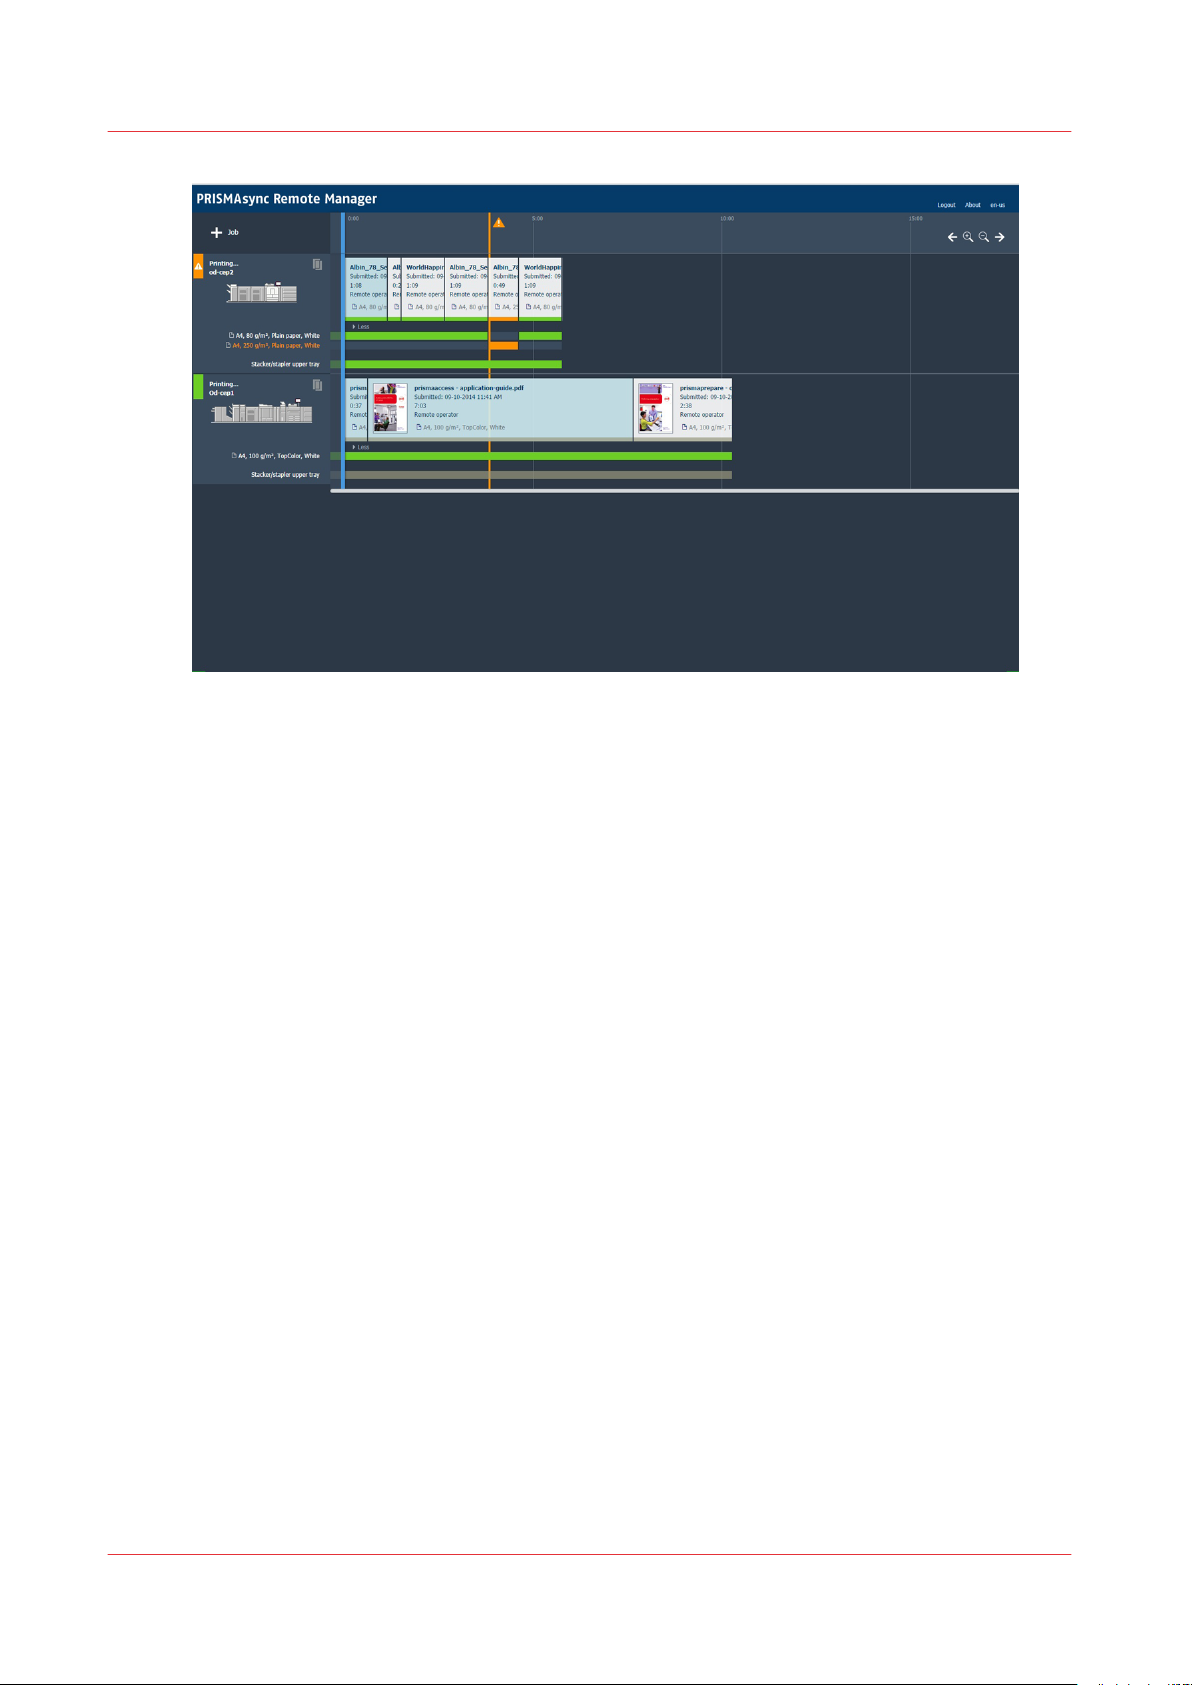
In the schedule view of PRISMAsync Remote Manager you see an overview of all jobs.
On the left you see the available printers and to the right you see all jobs scheduled for printing.
For each job you can see the following in the view:
• If there is enough room the job has a thumbnail for easy recognition.
If there is not enough room click on the job to get a popup window with a thumbnail.
NOTE
Thumbnails are not supported for the Océ VarioPrint 6000+.
• Information on who submitted the job and at what time.
• The required media and output location for the job.
Click the More button below the queue for more detailed information.
Monitoring
• A small coloured bar on the bottom part of the job that indicates if the jobs can be printed
without operator intervention.
Green means no intervention needed, orange means intervention is needed, grey means not
enough information and red means immediate intervention is needed because printing has
stopped.
Click the More button underneath the queue for more detailed information on media and
output locations used.
Also see "Warnings in the time line" below.
PRISMAsync Remote Manager
Chapter 2 - Common tasks
13
Monitor jobs
Which jobs are visible
PRISMAsync Remote Manager only shows the [Scheduled jobs] queue from the printer in this
view.
If you need to see all jobs on the printer click on the printer tile for the printer view see
printer view
on page 57.
Time scale for the jobs
The time line determines the timing in the schedule view.
You can see up to 8 hours of scheduled jobs.
Use the buttons in the time line to set the time scaling for the schedule view and to scroll through
the schedule view. See
Available job operations
Click on a job to get a button bar with available operations.
For the available operations in the button bar see
Submitting jobs
You can submit jobs one at a time from your workstation using drag and drop to the displayed
queues. You can also use the + Job button in the upper left corner.
The time line
on page 46.
The button bar
The
on page 53.
The Submit job window prompts you for additional job settings. See
Transaction printing mode
If a printer is configured for transaction printing mode you will not see separate jobs in this view.
Instead of jobs you see one bar with the text transaction printing mode.
Chapter 2 - Common tasks
14
Submit job
PRISMAsync Remote Manager
on page 49.

You cannot submit jobs to this printer. You can still manage this printer and receive warnings
about required operator actions and errors on the printer.
Warnings in the time line
To be able to maximize the use of the printers there are warnings in the time line.
You are warned that operator intervention is needed on the printer in due time.
These warnings tell you for example:
• You need to refill media.
• Insert media that is not available in the printer.
• You need to empty output locations.
Point to the warning icon in the time line to get a popup that gives extra information. It tells you
what intervention is required, for which printer and at what time from now.
Click the more button underneath the queue to see more detailed media status information.
See
The time line
on page 46 and
Media status information
Monitor jobs
on page 55.
PRISMAsync Remote Manager
Chapter 2 - Common tasks
15
Monitor printers
Monitor printers
Introduction
you see an overview of all managed printers in the schedule view of PRISMAsync Remote
Manager.
For each printer you see a tile with information.
In the tile you can see what the printer is doing and if there are problems on the printer. Eventual
required operator interventions on the printer are indicated with a small coloured bar.
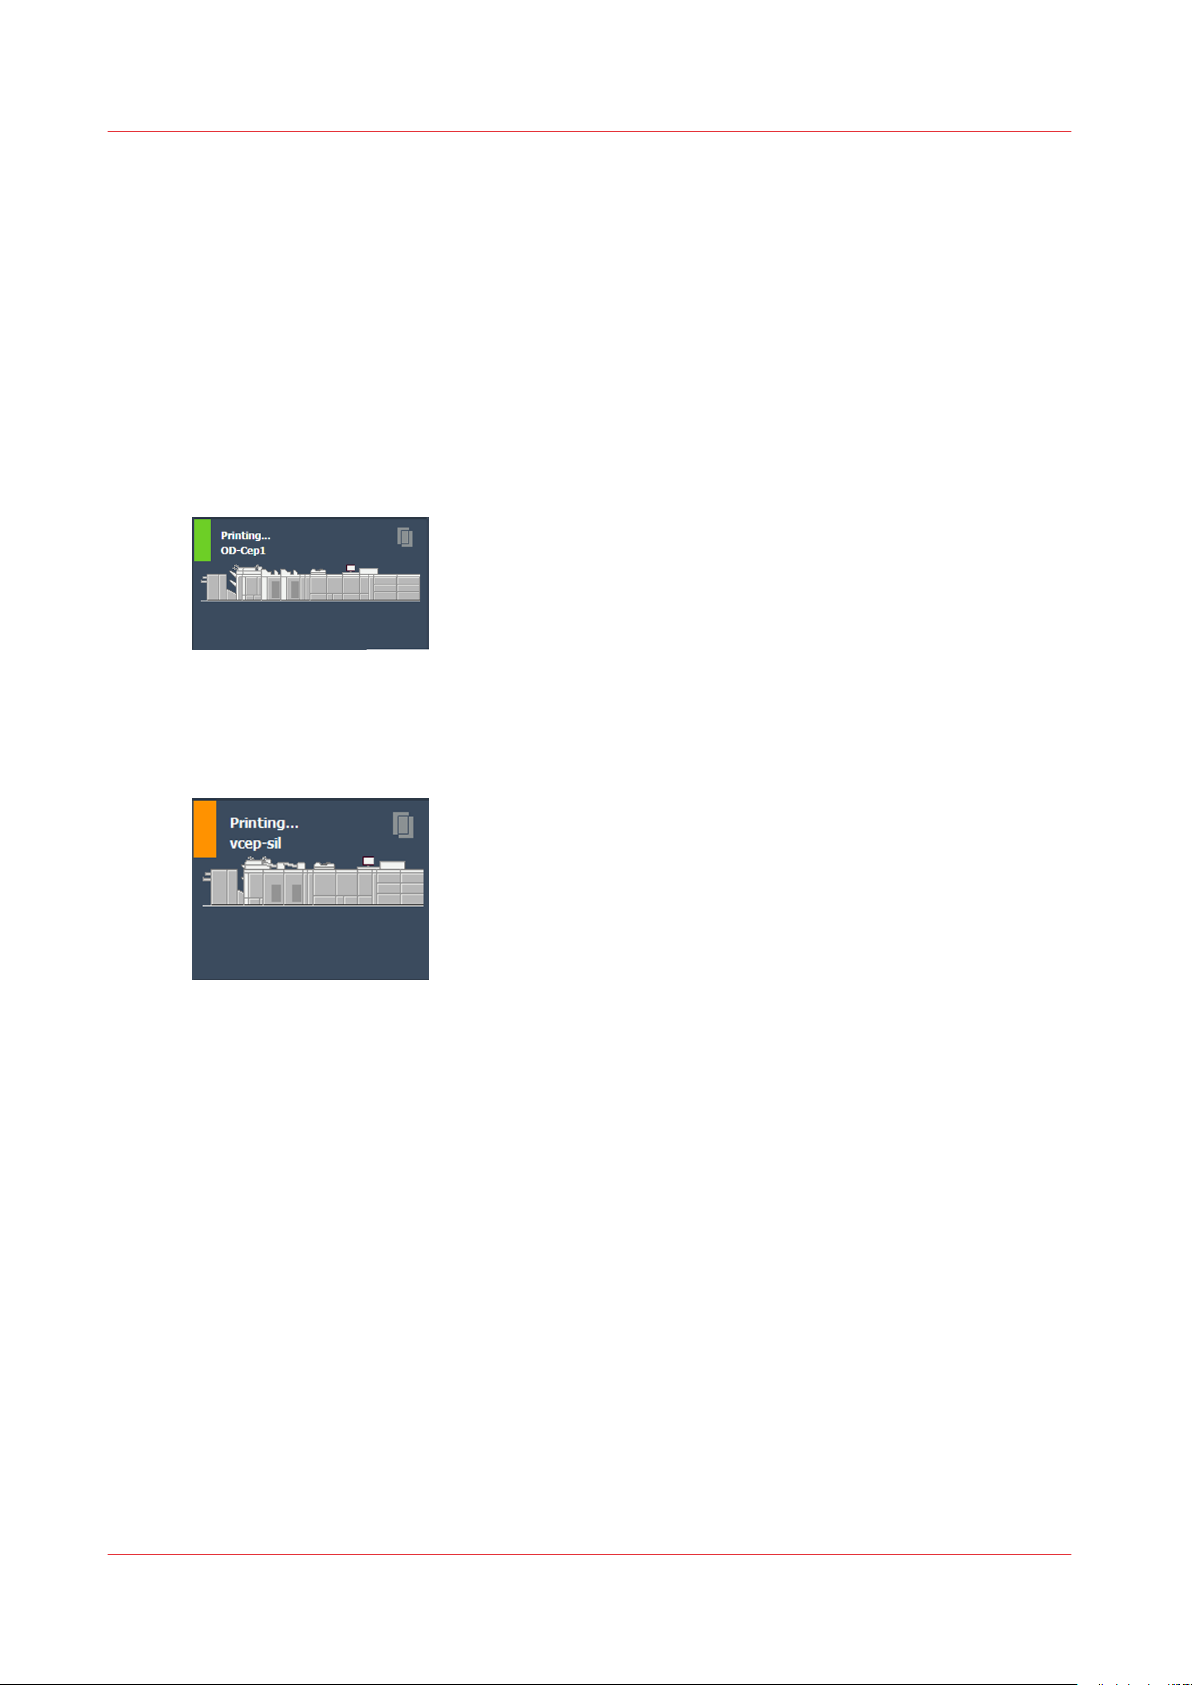
Regular operation
The tile above shows that the printer is operating and has no problem.
Warning
The tile above shows that the printer is operating, but operator intervention is needed in due
time. You can click on the orange bar to see more information.
These are normal operational requests of the printer like:
• Refilling media that has run out.
• Filling media that is not in the printer at the moment.
• Empty an output location.
There is additional information about the intervention needed in the time line and the media
status view.
See
The time line
on page 46 and
Media status information
on page 55.
Chapter 2 - Common tasks
16
PRISMAsync Remote Manager
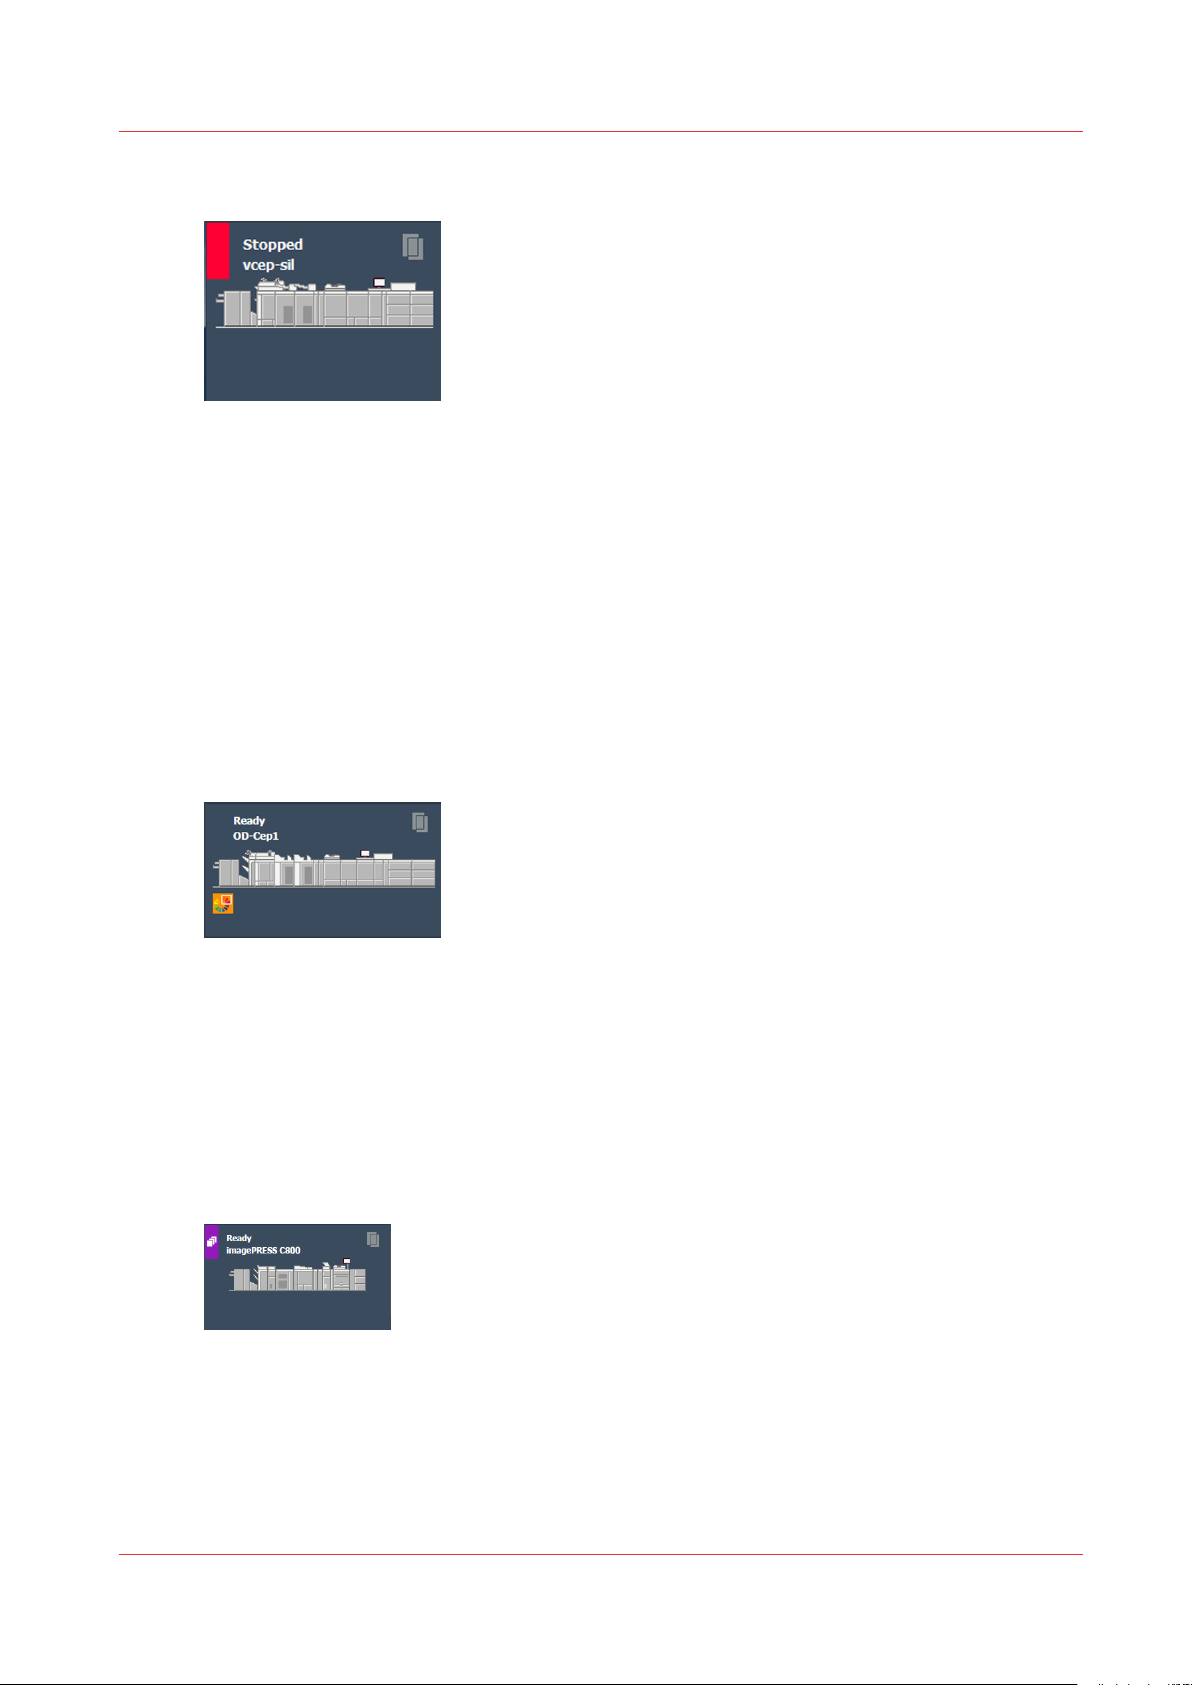
Error or other situation that prevents printing
The tile above shows that the printer has stopped printing. You can click on the red bar to see
more information.
Operator intervention is needed to continue printing.
Some examples of the situations are:
• The printer is on hold.
• The required media has run out.
• The printer does not have the required media.
use the media status view to see what media is missing. See
page 55.
• The printer has an error that prevents further printing.
Monitor printers
Media status information
on
Attention needed
The tile above shows that the printer is operational but it needs a calibration.
Use the printer operation guide to calibrate the printer.
All the special icons that show on the control panel of the printer can also show up in the printer
tile.
Some examples are Low on toner, Out of toner , Finisher offline etcetera.
Transaction printing mode active
The tile above shows that the printer is operational but is in transaction printing mode.
This is a regular operational mode for the printer.
PRISMAsync Remote Manager
Chapter 2 - Common tasks
17
Monitor printers
Service mode active
The tile above shows that the printer is in service mode.
The printer is being serviced by a technician. Do not use the printer until the printer is fully
operational again.
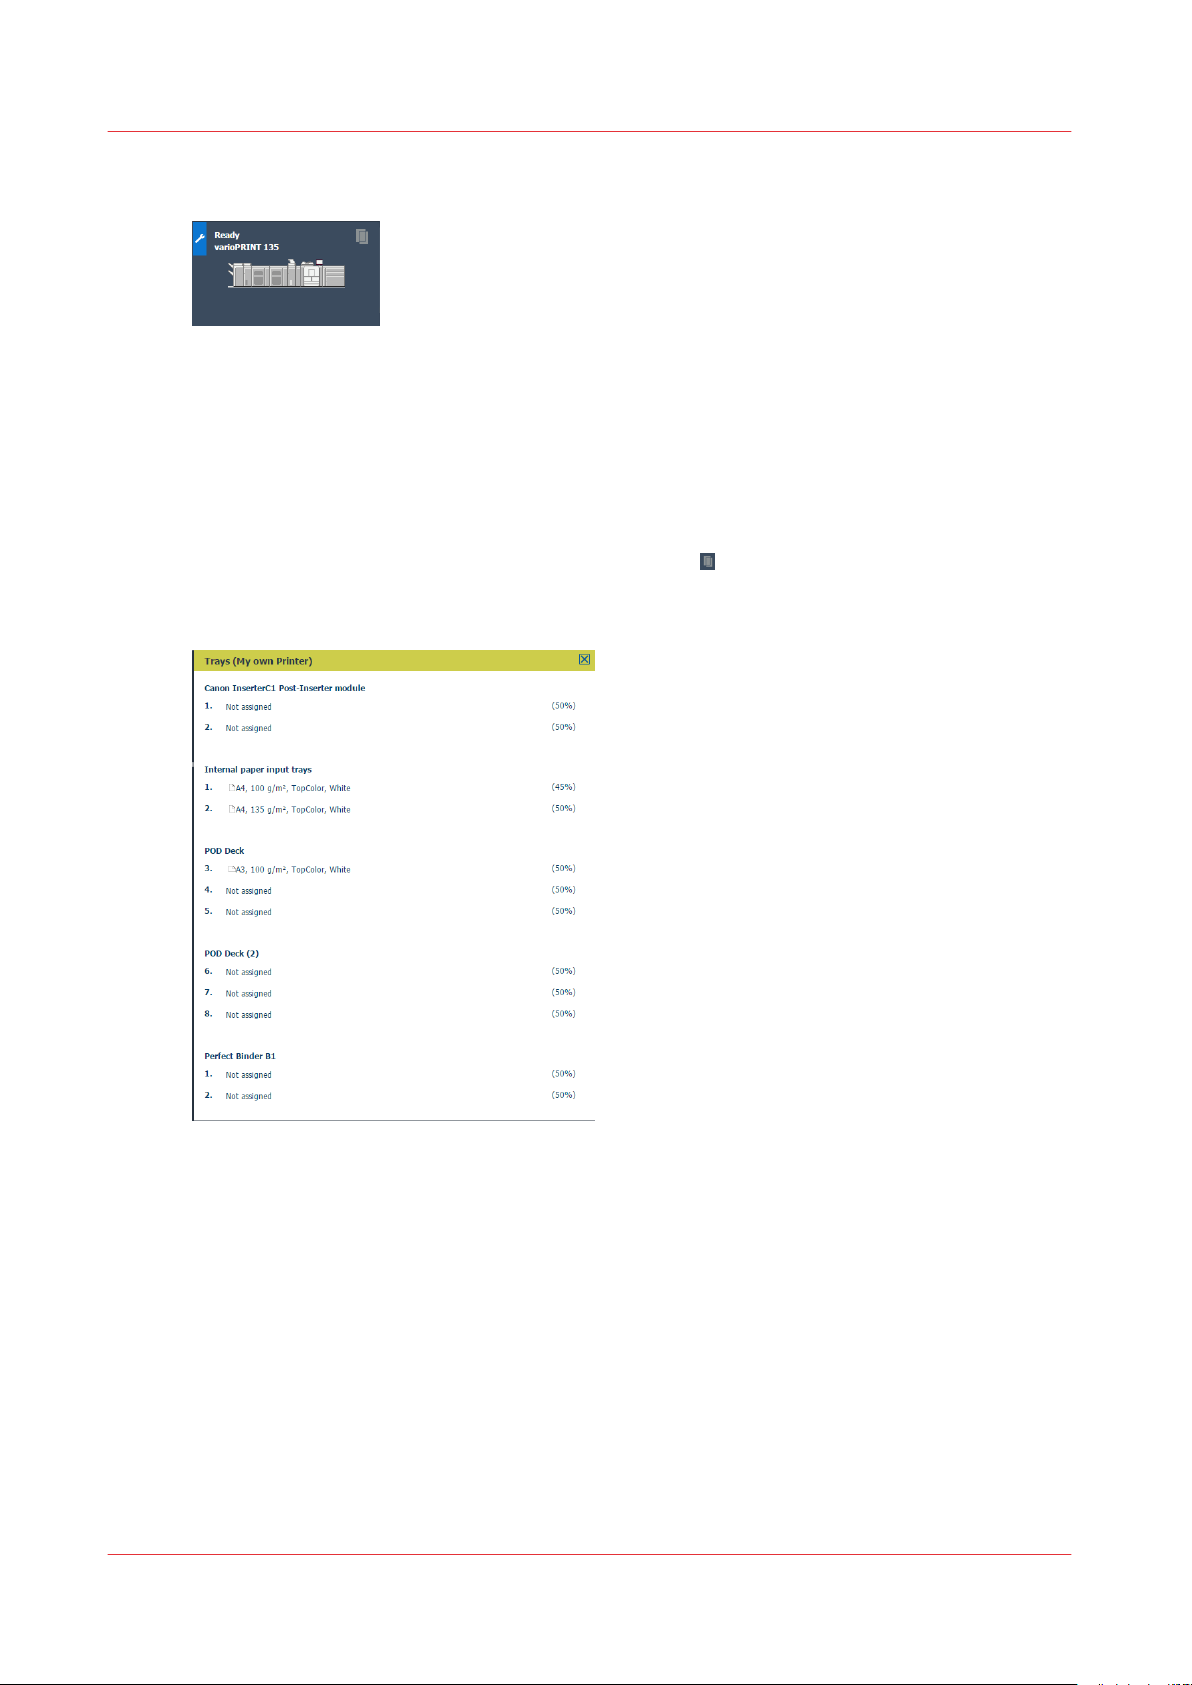
Check the consumables of a printer
You can check the current media supply and other consumables on the printer.
Click the button in the right top corner of the printer tile.
A popup window will show what media is available at the different input locations.
The available input locations depend on the printer type and configuration.
Submitting jobs
You can submit jobs one at a time from your workstation using drag and drop to the printer tile.
You can also use the + Job button in the upper left corner.
The Submit job window prompts you for additional job settings. See
Chapter 2 - Common tasks
18
Submit job
PRISMAsync Remote Manager
on page 49.

Job handling
Copy jobs between printers
Introduction
You can copy a job from one printer to another.
Procedure
1. Select a job in the queue.
This is supported in Scheduled jobs, Waiting jobs, DocBox and Printed jobs.
2. Click the [Copy to] button in the button bar.
3. Select the destination printer from the list of [Remote printers].
You can also enter a printer address manually if the system is configured to allow this.
NOTE
If you do not see any destination printers check destination printers below.
4. Click OK.
5. The job is copied to the destination printer.
The job is copied with the original job settings. Settings which were added or changed via the
local printer or via PRISMAsync Remote Manager are lost when you copy a job.
6. The original job remains in the printer.
Job handling
Important remarks about [Copy to] functionality
Job settings
The job is copied with the original job settings.
• Settings which were added or changed via the local printer or via PRISMAsync Remote
Manager are lost when you copy a job.
• If an [Automated workflow] was used, the destination printer should also have the (same)
[Automated workflow]. If not the [Automated workflow] is not used.
• If the job was sent to [DocBox] called John, which does not exist on the destination printer, the
job will appear in [DocBox] Public.
Supported printers
You should only copy jobs to supported printers.
See
Supported printers
on page 8
Destination printers
The list of destination printers is actually the list of [Remote printers].
This list can be configured for each connected printer. Therefore the list can be different for each
printer.
This list must be configured for each printer if you want to use [Copy to].
See
Add Remote printers
PRISMAsync Remote Manager
on page 28.
Chapter 2 - Common tasks
19

Copy jobs between printers
Proxy servers and firewalls
PRISMAsync Remote Manager does not support proxy servers.
When you use a firewall or proxy server check that the required network ports are open.
Which protocols and ports are used by PRISMAsync Remote Manager?
See :
Printing protocol
PRISMAsync Remote Manager uses the LPR protocol for the [Copy to] function.
To use LPR check that LPD is enabled on the printing system.
The LPD setting can be found in Settings Editor at this position :[Configuration] -> [Connectivity] > [LPD] -> [LPD enabled].
on page 36.
Chapter 2 - Common tasks
20
PRISMAsync Remote Manager

Move jobs between queues in the same printer
Move jobs between queues in the same printer
When to do
On connected printers you can move jobs between queues from within PRISMAsync Remote
Manager.
The functionality is the same as on the control panel.
How to move / copy jobs
These are the different options available for the different locations:
• [Scheduled jobs]
Click [Move] to move the job from the [Scheduled jobs] to [Waiting jobs].
• [Waiting jobs]
Click [Print] to move jobs to [Scheduled jobs].
• [DocBox]
Click [Print] to copy jobs to [Waiting jobs].
Click [Print now] to copy jobs to [Scheduled jobs]. The current job is stopped after the current
set and the selected jobs are printed first.
Click [Move] to move jobs to another [DocBox].
• [Printed jobs]
Click [Copy] to copy the selected jobs to [Waiting jobs].
For additional information on the available settings see the printer Operation guide.
PRISMAsync Remote Manager
Chapter 2 - Common tasks
21

Change the job order
Change the job order
When to do
The order of the jobs in the queue determines in what order the jobs are printed.
You can change the order of the jobs within the queue.
In the [Schedule]
1. Click a job in the [Schedule].
2. In the button bar click on the action you need.
• You can use [Print now] to pause the current job and print the selected job immediately.
After this the interrupted job is continued.
• You can use [To top] to have a job printed immediately after the current job finishes.
In the printer view
1. Click a job in [Scheduled jobs].
2. In the button bar click on the action you need.
• You can use [Print now] to pause the current job and print the selected job immediately.
After this the interrupted job is continued.
• You can use [To top] to have a job printed immediately after the current job finishes.
Chapter 2 - Common tasks
22
PRISMAsync Remote Manager

Submit print jobs
Submit a print job to a printer
When to do
You can submit print jobs to a printer in several ways.
NOTE
You can only add one job at a time.
Only printable files can be submitted. An error will be shown if a non-printable file is submitted.
Via PRISMAsync Remote Manager
• Submit jobs via the "+ Job" button.
In the browser you can select a file to be printed.
In the [Submit job] windows you can select the destination printer and enter some additional
settings.
For further information see
• You can drag and drop a job into any printer, queue or DocBox. You do this in the job schedule
or in the printer view.
In the [Submit job] windows you can enter some additional settings. The destination printer is
already filled in. If you drag and dropped the file to a queue or DocBox also the destination is
filled in.
For further information see
The job is always added to the end of the selected queue.
Submit job
Submit job
Submit print jobs
on page 49.
on page 49.
NOTE
On the control panel you can set a default destination in the workflow profiles. This setting
overrules the selected destination.
As most users are already used to
Users can submit jobs in several ways like:
• The printer drivers
• PRISMAprepare
• Hot folders
• PRISMAaccess
PRISMAsync Remote Manager
Chapter 2 - Common tasks
23

Submit a print job to a printer
Chapter 2 - Common tasks
24
PRISMAsync Remote Manager

Chapter 3 Configuration

Add a printer
Definition
You need to be a System administrator to do the configurations for PRISMAsync Remote
Manager.
Enable PRISMAsync Remote Manager
To enable PRISMAsync Remote Manager follow the steps as described in
Remote Manager
on page 30.
The printer configuration
In the main view you get an overview of all configured printers.
These printers need to be configured on the printer that runs the PRISMAsync Remote Manager
software.
A maximum of 5 printers is supported.
The printer configuration is described here
The [Remote printers] configuration
In PRISMAsync Remote Manager you can copy jobs from one of the configured printers to
another printer with [Copy to].
Before you can do this you must configure the possible destination printers as [Remote printers].
This should be done on all configured printers (from the printer configuration above).
Each configured printer can have a different configuration for [Remote printers]. When you use
[Copy to] you will see the [Remote printers] for that specific printer.
The [Remote printers] configuration is described here
Add a printer
Add Remote printers
Enable PRISMAsync
on page 26.
on page 28.
Add a printer
Introduction
All printers you add here, become visible the main view.
You need to be a System administrator to carry out this procedure.
NOTE
You can only add supported printers. See
All printers need to be in the same time zone and use the same date and time (+/- 0.5 hour).
Procedure
1. Start Settings Editor.
2. Go to the [Workflow] Tab.
3. Select [Remote Manager].
4. Use the [Add] button to add printers.
If prompted, login as System administrator.
5. In the [Add printer] windows you have to enter the following information:
Supported printers
on page 8.
Chapter 3 - Configuration
26
PRISMAsync Remote Manager

• [Host name / IP address]
The IP address or hostname of the printer.
• [Description]
A descriptive text to make the printer easily recognisable.
This [Description] will be used to identify the printer in PRISMAsync Remote Manager.
If you do not enter a [Description] the IP address or hostname are used to identify the
printer in PRISMAsync Remote Manager.
Add a printer
PRISMAsync Remote Manager
Chapter 3 - Configuration
27

Add [Remote printers]
Add [Remote printers]
Introduction
You must configure [Remote printers] before you can use [Copy to] to copy jobs to them.
Do this for each of the printers visible in the main view. Every printer has its own set of [Remote
printers].
NOTE
If you only configure the [Remote printers] on the printing system that runs PRISMAsync
Remote Manager than that is the only printer with [Copy to] functionality.
You need to be a System administrator to carry out this procedure.
NOTE
You should only use supported printers. See
PRISMAsync Remote Manager uses the LPR protocol, check that the destination printers support
this.
Printers need to be able to handle or ignore an Océ JDF ticket in front of the job.
Procedure
Supported printers
on page 8.
1. Start Settings Editor.
2. Go to the [Workflow] Tab.
3. Select [Remote printers]
4. Use the [Add] button to [Add a printer].
If prompted, login as System administrator.
5. In the window [Add a printer] you have to enter the following information
• [Host name / IP address]
The IP address or hostname of the remote printer.
• [Description]
A descriptive text to make the printer easily recognisable.
This [Description] will be used to identify the printer in PRISMAsync Remote Manager.
If you do not enter a [Description] the IP address or hostname are used to identify the
printer in PRISMAsync Remote Manager.
6. Use the [Enable] button to enable/disable the following options
• [List of printers]
Chapter 3 - Configuration
28
PRISMAsync Remote Manager

Add [Remote printers]
This enable the [Copy to] functionality.
• [Other printer]
This enables [Copy to] for unlisted printers.
When you use the [Copy to] button in PRISMAsync Remote Manager you can now enter a
printer address manually. You are not restricted to the list of [Remote printers].
PRISMAsync Remote Manager
Chapter 3 - Configuration
29

Enable PRISMAsync Remote Manager
Enable PRISMAsync Remote Manager
Introduction
To be able to run PRISMAsync Remote Manager on a printer:
• The PRISMAsync Remote Manager license must be installed.
• The PRISMAsync Remote Manager function must be enabled.
You need to be a System administrator to carry out this procedure.
Check the license
1. Start Settings Editor.
2. Go to the [Support] Tab.
3. Select [Software].
4. Check for the PRISMAsync Remote Manager license.
If it is not available install the license.
Check if PRISMAsync Remote Manager is enabled
1. Start Settings Editor.
2. Go to the [Preferences] Tab.
3. Select [Printing workflows].
4. Check the [Remote Manager enabled] setting.
This setting must be enabled.
Chapter 3 - Configuration
30
PRISMAsync Remote Manager

Set the PRISMAsync Remote Manager password
Set the PRISMAsync Remote Manager password
Introduction
When you start PRISMAsync Remote Manager (
page 12) you need to enter a password.
This password can be set in the Settings Editor of the printing system that runs PRISMAsync
Remote Manager.
You need to be a System administrator to carry out this procedure.
Procedure
1. Start Settings Editor.
2. Go to the [Configuration]Tab.
3. Select [Security].
4. In the [Passwords] section change the [Remote operator password].
How to start PRISMAsync Remote Manager
An older system might show Operator password instead.
on
PRISMAsync Remote Manager
Chapter 3 - Configuration
31

Set the PRISMAsync Remote Manager password
Chapter 3 - Configuration
32
PRISMAsync Remote Manager

Chapter 4 Frequently asked questions

How can I change the language of the user interface?
How can I change the language of the user interface?
Description
The language used in the user interface is by default the same language that is set as default
language in the browser.
How to change
In the right top corner of the user interface there is a small button to change the user interface
language.
Click on the button and you get a list of all available languages that you can select.
Your selection is stored in a cookie locally.
Chapter 4 - Frequently asked questions
34
PRISMAsync Remote Manager

Which licenses affect PRISMAsync Remote Manager?
Which licenses affect PRISMAsync Remote Manager?
Definition
The printing system has a number of licenses that affect the behaviour and functionality of
PRISMAsync Remote Manager.
Depending on the licenses installed some features of PRISMAsync Remote Manager may not be
available.
Licenses
License Function
PRISMAsync Remote Manager Enables the PRISMAsync Remote Manager
functionality on the printing system.
When PRISMAsync Remote Manager is not licensed, PRISMAsync Remote Manager will not
run on this printer.
AWF (Automated WorkFlow) Enables AWF (Automated WorkFlow).
When Automated WorkFlow is not licensed,
the automated WorkFflow option is grey and
can not be used.
[Schedule] Enables the schedule view functionality.
When Schedule is not licensed, the text “not licensed” is shown in the Schedule view.
[DocBox] Enables DocBox in the printer view.
When DocBox is not licensed, you will not get
the docbox functionality in the printer view.
[Page programming] Enables Page Programming in the properties
window.
When Page Programming is not licensed, you
will not get the Page Programming functionality in the properties view.
PRISMAsync Remote Manager
Chapter 4 - Frequently asked questions
35

Which protocols and ports are used by PRISMAsync Remote Manager?
Which protocols and ports are used by PRISMAsync
Remote Manager?
Overview of the ports and protocols
Port number TCP UDP Description
80 TCP HTTP
443 TCP HTTPS (HTTP over TLS/SSL)
9100 TCP UDP LPR - Printing
Chapter 4 - Frequently asked questions
36
PRISMAsync Remote Manager

Chapter 5 Problem solving

A connection to one or more printers cannot be made at all
Introduction
This chapter contains information to help you solve problems in PRISMAsync Remote Manager.
A connection to one or more printers cannot be made
at all
Introduction
The connection to one or more printers cannot be made in PRISMAsync Remote Manager.
Possible solutions and checks
1. Check if the printer is switched ON and operational.
2. Check if the printer is connected to the network.
3. Check the settings you made in
4. Check that date, time and time zone are set to the same values for all connected printers.
(same as PRISMAsync Remote Manager)
Add a printer
on page 26.
Chapter 5 - Problem solving
38
PRISMAsync Remote Manager

A copied job loses settings
Introduction
When you use the [Copy to] function in PRISMAsync Remote Manager you lose settings you have
made.
Explanation
The job is copied with the original job settings.
Settings which were added or changed via the local printer or via PRISMAsync Remote Manager
are lost when you copy a job.
See
Copy jobs between printers
on page 19.
A copied job loses settings
PRISMAsync Remote Manager
Chapter 5 - Problem solving
39

Status and error messages
Status and error messages
Introduction
Here is information on the status and error messages of PRISMAsync Remote Manager.
Message Problem / Solution
[Disconnected] The connection to the printing system is lost.
The connection to the printing system is initialising. This is no problem.
This will happen during the startup phase of
PRISMAsync Remote Manager.
The initial connection to the printing system
failed. This is no problem yet and we are retrying the connection.
The printing system might be switched OFF or
disconnected from the network.
There is no automatic recovery for this. Use
the F5 key to refresh the screen. This action
will try to reconnect the printing system.
A Connection to one or more printers cannot
be made at all.
• Check if the printer is switched ON and operational.
• Check if the printer is connected to the network.
• Check the settings you made in
er
on page 26.
• Check that date, time and timezone are set
to the same values for all connected printers. (same as PRISMAsync Remote Manager)
PRISMAsync Remote Manager does not start.
Your browser does not have websocket support.
See :
Supported web browsers
Add a print-
on page 9
Chapter 5 - Problem solving
40
PRISMAsync Remote Manager

You cannot send jobs with PRISMAsync Remote Manager
You cannot send jobs with PRISMAsync Remote
Manager
Introduction
PRISMAsync Remote Manager is operational but you can not send jobs to a connected printing
system.
This problem can also happen if you use the [Copy to] function.
This problem indicates there is something wrong with the LPR connection to that printing system.
Explanation
PRISMAsync Remote Manager uses the LPR protocol to send jobs to printing systems.
LPR is used for both submitting jobs and the [Copy to] function.
Possible solution
1. LPR is a protocol that can be enabled/disabled on the printing system by the System
administrator.
To use LPR check that LPD is enabled on the printing system.
The LPD setting can be found in Settings Editor at this position :[Configuration] ->
[Connectivity] -> [LPD] -> [LPD enabled].
2. Check if there is a proxy server or firewall between you and the printing system.
When you use a firewall or proxy server check that the required network ports are open.
See :
Which protocols and ports are used by PRISMAsync Remote Manager?
on page 36.
PRISMAsync Remote Manager
Chapter 5 - Problem solving
41

You cannot start PRISMAsync Remote Manager
You cannot start PRISMAsync Remote Manager
Introduction
What can you do if you cannot start PRISMAsync Remote Manager.
Settings Editor is operating and PRISMAsync Remote Manager is not
1. Check your browser and settings.
See :
Supported web browsers
2. Check on the printing system if the PRISMAsync Remote Manager license is available.
See
Check the license
3. Check on the printing system if PRISMAsync Remote Manager is enabled.
See
Check if PRISMAsync Remote Manager is enabled
4. If you get a popup like this there is something wrong with the WebSocket configuration of
your network.
on page 30
Both Settings Editor and PRISMAsync Remote Manager do not operate
1. Check if your network connection is operational.
Use your browser to visit a web page for instance.
2. Check if the printing system is Switched ON.
3. Check your browser and settings.
See :
Supported web browsers
4. Check if the network connection of the printing system is operational.
Check if print jobs are still received.
5. Check if there is a proxy server or firewall between you and the printing system.
When you use a firewall or proxy server check that the required network ports are open.
See :
Which protocols and ports are used by PRISMAsync Remote Manager?
on page 9.
on page 30
on page 9.
on page 36.
Chapter 5 - Problem solving
42
PRISMAsync Remote Manager

Your job is not sent to the selected destination on the printing system
Your job is not sent to the selected destination on the
printing system
Introduction
When you use the +job button to send a job, the selected destination on the printing system is
not reached.
The job goes to another destination on the printing system.
The same happens if you use drag and drop to a destination in the printer view.
Explanation
On the printing system the default destination for incoming jobs can be set in the Workflow
profile.
This setting overrules any destination selected in PRISMAsync Remote Manager.
Solution
To solve this problem you need to change the default destination in the current workflow profile.
This can be changed in [System] -> [Setup] -> [Workflow profile] -> [Destination of print job] on
the control panel of the printing system.
Change the setting of [Destination of print job] to the value [as in job].
PRISMAsync Remote Manager
Chapter 5 - Problem solving
43

Your job is not sent to the selected destination on the printing system
Chapter 5 - Problem solving
44
PRISMAsync Remote Manager

Chapter 6 Views

The Schedule view
The Schedule view
Introduction
Overview of the components in the [Job scheduler] view of PRISMAsync Remote Manager.
The different components
1. Time line bar.
The time line scales the [Job scheduler] view and displays up to a maximum of 8 hours.
You can scale this time line with the buttons. You see all warnings for the connected printers
in the time line.
For a full description see
2. The + Job button.
This button is used to submit jobs to a printer.
For a full description see
3. Printer overview.
This view contains:
• An overview of the configured printers.
Click one of the printers to go to the printer view.
• The current status of the printers.
The time line
on page 46.
Submit a print job to a printer
on page 23.
For a full description see
4. The [Job scheduler]
This view contains:
• The jobs queued/scheduled for the printers.
• Small thumbnails for easy recognition of the jobs.
The printer overview
NOTE
Thumbnails are not supported for the Océ VarioPrint 6000+.
• Alerts for the user.
There is extended media status info when required.
For a full description see
The Schedule
The time line
Introduction
You can configure the time line for the [Job scheduler].
The time line can be scaled up or down and shows a maximum length of 8 hours.
The different elements of the time line
on page 48.
on page 53.
Chapter 6 - Views
46
Element
The time ruler Gives you a clear indication of the timing in the [Job scheduler] view.
Function
Navigate through time towards the left.
You can also use the horizontal scrollbar below the schedule.
Zoom the time line in.
The ruler displays a shorter period of time.
PRISMAsync Remote Manager
4

Element Function
Zoom the time line out.
The ruler displays a longer period of time.
Navigate through time towards the right.
You can also use the horizontal scrollbar below the schedule.
NOTE
The Chrome browser supports the following hot keys:
• Alt scroll wheel for zooming in and out.
• Shift scroll wheel for horizontal scroll.
Warning/error icons in the time line
The time line can display warnings or errors for print jobs on any of the configured printers.
Point to an icon with your mouse and you get a short description about the warning or error. The
description contains the printer name, time and required action.
Use the More button to get a full overview of the warning information.
See
Media status information
The time line
on page 55.
PRISMAsync Remote Manager
Chapter 6 - Views
47

The printer overview
The printer overview
Definition
Overview of the components in the printer view of PRISMAsync Remote Manager
Introduction
This view contains :
• An tile for every configured printer.
The tile contains the name of the printer and a link to the available media of the printer.
Click on one of the printers to go to the printer view for that printer.
• The current status each of the printers.
Printer overview
In the printer overview you see tiles with a graphical representation of the configured printers.
Below some samples.
[1] Printer tile printing
[2] Printer tile printer stopped
The printer tiles contain the following information/functionality:
• The tile shows the name and the current status of each printer.
• For easy recognition there is a coloured bar (top left) that indicates if the printer is working
correctly.
Most important are the following colours:
•
Green
The printer is operational and requires no operator actions.
•
Orange
The printer is operational but requires operator intervention in due time.
•
Red
The printer has stopped and operator intervention is needed to continue printing.
Chapter 6 - Views
48
Click the coloured bar to receive extra information on the current status.
• When you click on the consumables button
of the tile a popup window will show what media
is available at the different input locations.
• Below the image of the printer you can see the same special icons that can show on the printer
control panel.
PRISMAsync Remote Manager

Submit job
Some examples are Calibration required, Low on toner, Out of toner , Finisher offline etcetera.
• Click on the printer tile to go to the printer view.
The printer view allows the same functionality as the control panel of the printer. Only the
bundle functionality is missing.
For further information see
The printer view
on page 57.
Click outside of the printer view to return to the main view.
For a full description see
Submit job
Introduction
When you add a new job you get a this basic dialogue to enter the settings for the job.
The default values in this window are the values you last used. Only [Media] is set to [As in
document] and [Number of sets] is set to 1
If you use drag and drop the values for printer and destination are already filled in. Values not
applicable to the selected printer are set to the defaults for this printer.
The following options are available in this dialogue:
Monitor printers
on page 16
[Submit job] window
Option Description
[Job] This field contains the job name and size.
You can change the job name.
[Printer] Select which printer must print this job.
NOTE
Only available if you use the + job button in the schedule view because then the destination printer is unknown.
[Automated
workflow]
Select an [Automated workflow] for this job if required.
Automated workflow can be setup on the printing system. Automated workflow handles print jobs in a predefined way (e.g. booklet with cover of different media etc). The Printer Operation guide contains a full description of this
functionality.
NOTE
Automated workflow can override the settings in the print job.
[Automated workflow] is a licensed option. If there is no license
this feature is not available.
4
PRISMAsync Remote Manager
Chapter 6 - Views
49

Submit job extra settings
Option Description
[Media] Select the media that must be used for this job. This option is not accessible
[Destination] Select the destination for your job on the selected printer. This can be one of
[Number of sets] Enter how many copies of the job you need.
If the job already contains an Océ JDF ticket, you can choose to keep or discard this ticket.
Only printable files can be submitted. An error will be shown if a non-printable file is submitted.
When the submit job window is open, the file is immediately uploaded to the selected printer. A
progress bar is displayed during the upload.
If you change the printer, the current upload is cancelled and a new one is immediately started to
the new printer.
if the media is set in the selected [Automated workflow].
The default value is [As in document].
the queues or DocBoxes on the selected printer.
Local workflow setting on the printer can override your selected destination.
NOTE
On the control panel you can set a default destination in the workflow profiles. This setting overrules the selected destination.
The default value is 1.
You can enter setting during the upload. The OK button is not available until the upload is ended.
Click OK to add the job with these settings.
Click Edit to apply additional setting to your job. See
Submit job extra settings
Introduction
In this window you can enter extra settings for a job.
The settings presented depend on the capabilities of the printer.
The job is ripped before you can change settings. The middle of this window shows you a
preview of the current job.
After the job is ripped you can change the settings.
Submit job extra settings
on page 50
Chapter 6 - Views
50
PRISMAsync Remote Manager

A sample view
Submit job extra settings
The different components
• At the top you see information about the jobs.
• In the middle you see a preview of the current job.
• Next to the preview you get an overview of the media used by the job.
• The bottom part shows all available settings that can be changed for the job.
Job information
This section shows different types of information about the current job. For example job name,
number of pages and predicted run time on the printer.
You can change the job name if you click on the current job name.
Job preview
The preview screen shows a small preview of the current job.
On the left edge of this preview you see the page programming button. The button looks like a
number of pages. This button starts the page programming view. See
view
on page 64
PRISMAsync Remote Manager
The page programming
Chapter 6 - Views
51

Submit job extra settings
NOTE
Page programming is only available if the license is installed on the printer.
Used media
Gives an overview of all media used by the job.
Click any of the displayed media to change the media type.
Available settings
You can change settings in the following categories:
• [Media]
• [Layout]
• [Image]
• [Finishing]
• [Production]
These settings are the same settings that are available on the PRISMAsync controller of the
printer.
The available settings depend on the type of print job and the printer capabilities.
NOTE
When you select an impossible combination of settings, the conflicting setting will become
orange.
You cannot continue until you solve the conflict.
Click on the orange setting and select the indicated (correct) setting to solve this problem.
For additional information on the available settings see the printer Operation guide.
Chapter 6 - Views
52
PRISMAsync Remote Manager

The Schedule
Introduction
Overview of the components in the [Job scheduler] of PRISMAsync Remote Manager.
The main items in the [Job scheduler]
Overview of the jobs printing or scheduled for printing on the printers.
This overview contains :
• The jobs queued/scheduled for the printers.
• Small thumbnails for easy recognition of the jobs.
NOTE
Thumbnails are not supported for the Océ VarioPrint 6000+.
• Alerts for the user.
Use the more button for full information on used media and deposit devices used by jobs.
The Schedule
The scheduled jobs are scaled to the time line visible at the top of the screen. See
on page 46)
Actions available in the [Job scheduler]
• You can drag and drop to add jobs from your workstation to any of the printers or queues.
Jobs you add this way will always be added to the end of the queue.
• When you click any job you see an action bar with available action for jobs.
For a full overview of the possible actions see
NOTE
A printer that is in transaction printing mode or service mode will not show separate jobs and
will not allow adding jobs.
The button bar
Definition
If you click on a job in the queue of one of the printers you will see a button bar with the actions
described below.
The available buttons (actions)
The button bar
The time line
on page 53.
Button Function
[Copy to]
PRISMAsync Remote Manager
Copy the selected job to another printer.
Creates a copy of the selected job on the selected target printer.
Al settings done on the printing system either local or via PRISMAsync Remote Manager are lost during the copy to the other printer. Only the original setting in the job are kept.
For a complete description see
page 19.
Copy jobs between printers
Chapter 6 - Views
on
4
53

The button bar
Button Function
[Delete]
[Move]
[Print now]
[Properties]
Delete the selected jobs or the [Stop after job] bar.
You cannot delete jobs that are being printed.
Move the selected job to the [Waiting jobs].
You cannot move jobs that are being printed.
The [Print now] button allows to print a job immediately. The print
system stops the active print job after the current set has finished.
After this printing continues.
Open the properties window to change the properties of the selected job.
NOTE
If someone else is currently changing the properties of
this job, the job is greyed out and cannot be selected.
For further information see
The properties view
[Select] Select jobs based on the following options:
• [All]
• [None]
• [Invert selection]
• [Jobs with available media ]
• [Jobs with a certain label ]
Stop the print process, after the selected job is printed.
[Stop after job]
When you give the [Ticket] command, the job ticket print goes to
the last position of the list of scheduled jobs. You can recognise
[Ticket]
the job ticket print by the prefix "Properties of" in front of the job
name.
To print a scheduled job as soon as possible but not immediately,
use the [To top] function. The job goes to the first position of the
[To top]
list of scheduled jobs.
on page 62 .
Chapter 6 - Views
54
PRISMAsync Remote Manager

Media status information
Definition
Each job in the [Schedule] contains a small coloured bar at the bottom.
This coloured bar is an indication about the status of the media and output locations used by the
job.
You can use the Colour to determine if action is necessary.
Colour Meaning
Green No problems and no action required.
Grey There is no information about this item.
Yellow The time gap in which you need to solve the problem that is com-
Orange
Media status information
Some supported printer do not provide all information to PRISMAsync Remote Manager
ing up.
A problem will occur in due time if no action is taken.
The warning icon in the time line will show at what time the problem occurs.
If the orange bar reaches time 0 the printer shows a red warning
bar and printing stops.
A problem has occurred and printing has stopped.
The warning icon in the time line will show what problem occur-
Red
red.
Use the [More] button to show detailed media status information.
This sample view shows the A4 media will run out shortly.
You can see the following information
• If the required media for a job is available.
• If the media runs out during a job.
• If an output location has to be emptied during a job.
Also the printer tile contains a link to the available media of the printer .
You can check the resources of the printer at any time here.
PRISMAsync Remote Manager
Chapter 6 - Views
55

Media status information
A sample view of the consumables for a printer.
Chapter 6 - Views
56
PRISMAsync Remote Manager

The printer view
Introduction
The printer view shows the jobs present in the different queues and DocBoxes of the printing
system.
In the Schedule view click one of the printers to open this view for that printer.
The options present in this screen are the same as the options on the control panel of the printing
system. The layout of the screen is slightly different.
For additional information see the printer Operation guide.
A sample view
The printer view
The different components
• At the top you see the [Scheduled jobs].
Scheduled jobs are scheduled for printing in the sequence that is shown.
• At the bottom you see the [Waiting jobs].
The waiting jobs are not yet scheduled for printing.
• At the right you see the [DocBox] or the [Printed jobs].
Use of this view
• Use drag and drop to add jobs to a queue or DocBox from your workstation.
• You can move or copy jobs between the different queues and DocBox using the button bar.
• You can display the desired DocBox or printed jobs.
• The windows size of the different queues and DocBoxes can be resized using the mouse on the
edges.
• You can change the DocBox view from list format to tiles format using the buttons in the lower
part of the DocBox.
PRISMAsync Remote Manager
Chapter 6 - Views
57

The button bars
Possible actions in this view
Select one or more jobs and use the button bar to carry out the required action.
The button bars
See
on page 58 for a description of the available actions and buttons.
The button bars
Definition
Select one or more jobs in one of the printer queues and you will see a button bar with the
functions described below.
If there is not enough room, buttons can be combined under a [Collapse] button
Each location has different options.
The buttons for [Scheduled jobs]
Button Function
[Copy to]
.
Copy the selected job to another printer.
Creates a copy of the selected job on the selected target printer.
Al settings done on the printing system either local or via PRISMAsync Remote Manager are lost during the copy to the other printer. Only the original setting in the job are kept.
For a complete description see
page 19.
Copy jobs between printers
on
Delete the selected jobs or the [Stop after job] bar.
You cannot delete jobs that are being printed.
[Delete]
Move the selected job to the [Waiting jobs].
You cannot move jobs that are being printed.
[Move]
The [Print now] button allows to print a job immediately. The print
system stops the active print job after the current set has finished.
[Print now]
[Properties]
[Select] Select jobs based on the following options:
After this printing continues.
Open the properties window to change the properties of the selected job.
NOTE
If someone else is currently changing the properties of
this job, the job is greyed out and cannot be selected.
For further information see
• [All]
• [None]
• [Invert selection]
• [Jobs with available media ]
• [Jobs with a certain label ]
The properties view
on page 62.
4
Chapter 6 - Views
58
PRISMAsync Remote Manager

Button Function
[Stop after job]
[Ticket]
[To top]
The buttons for [Waiting jobs]
Button Function
[Copy to]
The button bars
Stop the print process, after the selected job is printed.
When you give the [Ticket] command, the job ticket print goes to
the last position of the list of scheduled jobs. You can recognise
the job ticket print by the prefix "Properties of" in front of the job
name.
To print a scheduled job as soon as possible but not immediately,
use the [To top] function. The job goes to the first position of the
list of scheduled jobs.
Copy the selected job to another printer.
Creates a copy of the selected job on the selected target printer.
Al settings done on the printing system either local or via PRISMAsync Remote Manager are lost during the copy to the other printer. Only the original setting in the job are kept.
For a complete description see
Copy jobs between printers
on
page 19.
Delete the selected jobs.
[Delete]
Moves the selected job to [Scheduled jobs] for printing.
[Print]
The job is added to the end of the queue.
You can make a proof print of jobs that are ready for the print
process in the list of waiting jobs and in the DocBox. The proof
[Proof]
print does not affect the number of sets that the print system
prints for the job. The proof print is an additional set.
Open the properties window to change the properties of the selected job.
[Properties]
NOTE
If someone else is currently changing the properties of
this job, the job is greyed out and cannot be selected.
For further information see
The properties view
[Select] Select jobs based on the following options:
• [All]
• [None]
• [Invert selection]
• [Jobs with available media ]
• [Jobs with a certain label ]
on page 62.
4
PRISMAsync Remote Manager
Chapter 6 - Views
59

The button bars
Button Function
[Ticket]
The buttons for [DocBox]
Button Function
[Copy to]
[Delete]
When you give the [Ticket] command, the job ticket print goes to
the last position of the list of scheduled jobs. You can recognise
the job ticket print by the prefix "Properties of" in front of the job
name.
Copy the selected job to another printer.
Creates a copy of the selected job on the selected target printer.
Al settings done on the printing system either local or via PRISMAsync Remote Manager are lost during the copy to the other printer. Only the original setting in the job are kept.
For a complete description see
Copy jobs between printers
on
page 19.
Delete the selected jobs.
[Lock]
[Move]
[Print]
[Print now]
[Properties]
[Proof]
You can lock a DocBox job to protect its settings. The selected job
cannot be edited until they are unlocked.
Locked jobs can not be copied to other printing systems via [Copy
to].
Move the selected jobs to another DocBox.
Moves the selected jobs to "Scheduled jobs" for printing.
The [Print now] button allows to print a job immediately. The print
system stops the active print job after the current set has finished.
After this printing continues.
Open the properties window to change the properties of the selected job.
NOTE
If someone else is currently changing the properties of
this job, the job is greyed out and cannot be selected.
For further information see
The properties view
on page 62.
You can make a proof print of jobs that are ready for the print
process in the list of waiting jobs and in the DocBox. The proof
print does not affect the number of sets that the print system
prints for the job. The proof print is an additional set.
4
Chapter 6 - Views
60
PRISMAsync Remote Manager

Button Function
[Select] Select jobs based on the following options:
[Ticket]
[Unlock]
The buttons for [Printed jobs]
The button bars
• [All]
• [None]
• [Invert selection]
• [Jobs with available media ]
• [Jobs with a certain label ]
• [Printed jobs]
• [New jobs]
When you give the [Ticket] command, the job ticket print goes to
the last position of the list of scheduled jobs. You can recognise
the job ticket print by the prefix "Properties of" in front of the job
name.
The opposite of [Lock]. It er-enables editing of the selected jobs.
Button Function
Copy the selected jobs to the [Waiting jobs] queue of the printer.
[Copy]
Copy the selected job to another printer.
Creates a copy of the selected job on the selected target printer.
[Copy to]
Al settings done on the printing system either local or via PRISMAsync Remote Manager are lost during the copy to the other printer. Only the original setting in the job are kept.
For a complete description see
Copy jobs between printers
page 19.
Delete the selected jobs.
[Delete]
Open the properties window to view the properties of the selected
job.
[Properties]
NOTE
You cannot change any of the settings.
[Select] Select jobs based on the following options:
• [All]
• [None]
• [Invert selection]
• Jobs with available media
• Jobs with a certain label
on
[Ticket]
PRISMAsync Remote Manager
Print the job ticket of the selected jobs.
Chapter 6 - Views
61

The properties view
The properties view
Definition
The properties view shows all possible settings for the selected job.
The available settings depend on the type of print job and the printer capabilities.
A sample view
The different components
• At the top you see information about the jobs.
• In the middle you see a preview of the current job.
• Next to the preview you get an overview of the media used by the job.
• The bottom part shows all available settings that can be changed for the job.
Job information
This section shows different types of information about the current job. For example job name,
number of pages and predicted run time on the printer.
You can change the job name if you click on the current job name.
Chapter 6 - Views
62
PRISMAsync Remote Manager

Preview screen
The preview screen shows a small representation of the first pages of the current job.
On the left edge of the preview you see the page programming button. This button opens the
page programming view. See
NOTE
Page programming is only available if the license is installed on the printer.
Used media
Gives an overview of all media used by the job.
Click any of the displayed media to change it to your preference.
Available settings
You can change settings in the following categories:
• [Media]
• [Layout]
• [Image]
• [Finishing]
• [Production]
The page programming view
The properties view
on page 64
These settings are the same settings that are available on the PRISMAsync controller of the
printer. As mentioned before the available settings depend on the type of print job and the printer
capabilities.
NOTE
When you select an impossible combination of settings, the conflicting setting will become
orange.
You can not save the properties until you solve the conflict.
Click on the orange setting and select the indicated (correct) setting to solve this problem.
For additional information on the available settings see the printer Operation guide.
PRISMAsync Remote Manager
Chapter 6 - Views
63

The page programming view
The page programming view
Introduction
With the optional page programming function, you can create subsets and page ranges to apply
different layout, media and finishing settings within the job. The page programming window
alerts you when you make settings that do not match already defined job properties.
PRISMAsync Remote Manager has the same functionality as the control panel on the printer.
The only difference is the orientation which is horizontal in PRISMAsync Remote Manager and
vertical on the control panel.
A sample view
Note
Page programming is only available if the license is installed on the printer.
Page programming is not supported for the Océ VarioPrint 6000+.
The different components
• At the top you see the action buttons for this screen.
Chapter 6 - Views
64
PRISMAsync Remote Manager

• In the middle you can see the subsets defined for the current job and a miniature preview of
the pages.
• At the bottom you see the settings that can be used for the subsets in this job.
The action buttons
Function Job setting What you can define
Page adding. [Insert] Add a page before or after one or more page
The page programming view
ranges or subsets.
Subset or page range
deletion.
Selection of job parts. [Select] Select page ranges or subsets according to se-
Combine subsets. [Merge] Select subsets to merge.
Split combined subsets.
Redefine finishing settings for subsets.
Restore finishing settings for subsets.
Settings available for subsets
You can change settings in the following categories:
• [Media]
• [Layout]
• [Image]
• [Finishing]
• [Production]
These settings are the same settings that are available on the PRISMAsync controller of the
printer. The available settings depend on the type of print job and the printer capabilities.
[Delete] Delete one or more page ranges or subsets.
lection criteria.
[Split] Split subset into original subsets.
[Merge finishing] Apply the finishing properties of a subset to
more subsets.
[Split finishing] Use the finishing properties of original sub-
sets.
Some examples of tasks
Task Procedure
Split a subset. 1. Select a subset.
Add a page to a page range or subset.
Delete parts of jobs. 1. Select the subset or page range.
Select parts of jobs. 1. Click [Select] to select page ranges or subsets ac-
PRISMAsync Remote Manager
2. Click [Split].
3. Select the first page of the new subset.
1. Select the subset or page range.
2. Click [Insert] to add a page before or after a page
range or subset.
2. Click [Delete] to delete the subset or page range.
cording to a criterion, for example specific media.
Chapter 6 - Views
4
65

The page programming view
Task Procedure
Combine and split subsets. 1. Select the subsets to combine.
Change finishing settings. 1. Select the subsets which must apply the same finish-
For additional information on the available settings see the printer Operation guide.
2. Click [Merge] to create the new subset.
Use [Split] to get the individual subsets.
ing settings.
2. Click [Merge finishing] and select the subset to use
the finishing settings.
Use [Split finishing] to get the original finishing settings.
Chapter 6 - Views
66
PRISMAsync Remote Manager

Index
Index
A
A connection to one or more printers cannot be
made at all...............................................................38
A copied job loses settings....................................39
Add a printer........................................................... 26
Add button.............................................................. 48
Add Remote printers.............................................. 28
C
Cannot connect to printer...................................... 38
Canon imagePRESS C7010VPS Series................... 8
Canon imagePRESS C800 Series............................ 8
Canon varioPRINT 135 Series..................................8
Chrome......................................................................9
Connecting.............................................................. 40
D
Destination not reached.........................................43
Disconnected.......................................................... 40
E
Enable PRISMAsync Remote Manager.................30
Error messages.......................................................40
Errors....................................................................... 46
extra settings.......................................................... 50
F
Firefox........................................................................9
H
How to start PRISMAsync Remote Manager....... 12
lost settings.............................................................
39
M
Main screen.............................................................46
Main view................................................................46
O
Océ VarioPrint 6000+ Line........................................8
P
Page programming screen.................................... 64
Page programming view....................................... 64
Printer icons............................................................ 48
Printer screen..........................................................57
Printer view............................................................. 57
Problem solving......................................................38
Properties screen....................................................62
Properties view....................................................... 62
R
Remote printers...................................................... 28
Retrying................................................................... 40
S
Safari......................................................................... 9
Set the password....................................................31
Set the PRISMAsync Remote Manager password...
31
Status messages.....................................................40
Submit job properties............................................ 50
Supported printers................................................... 8
Supported web browsers........................................ 9
I
Internet Explorer.......................................................9
Introduction...............................................................8
J
JavaScript................................................................. 9
L
logon to the system................................................12
PRISMAsync Remote Manager
T
The job scheduler................................................... 53
The page programming view................................ 64
The printer overview.............................................. 48
The printer view......................................................57
The properties view................................................62
The schedule...........................................................53
The Schedule view................................................. 46
The time line........................................................... 46
67

Index
Trouble shooting.................................................... 38
W
Warnings................................................................. 46
WebSocket................................................................ 9
Y
You cannot connect to PRISMAsync Remote
Manager.................................................................. 42
You cannot print with PRISMAsync Remote
Manager.................................................................. 41
You cannot send jobs with PRISMAsync Remote
Manager.................................................................. 41
You cannot start PRISMAsync Remote Manager 42
Your job is not sent to the selected destination on
the printing system................................................ 43
68
PRISMAsync Remote Manager


CANON INC.
30-2, Shimomaruko 3-chome, Ohta-ku, Tokyo 146-8501, Japan
CANON U.S.A., INC.
One Canon Park, Melville, NY 11747, U.S.A.
CANON CANADA INC.
6390 Dixie Road Mississauga, Ontario L5T 1P7, Canada
CANON EUROPA N.V.
Bovenkerkerweg 59, 1185 XB Amstelveen, The Netherlands
(See http://www.canon-europe.com/ for details on your regional dealer)
CANON LATIN AMERICA, INC.
703 Waterford Way Suite 400 Miami, Florida 33126 U.S.A.
CANON AUSTRALIA PTY. LTD
1 Thomas Holt Drive, North Ryde, Sydney, N.S.W. 2113, Australia
CANON CHINA CO., LTD
15F Jinbao Building No.89 Jinbao Street, Dongcheng District, Beijing 100005, China
CANON SINGAPORE PTE. LTD.
1 HarbourFron
CANON HONGKONG CO., LTD
19/F., The Metropolis Tower, 10 Metropolis Drive, Hunghom, Kowloon, Hong Kong
t Avenue #04-01 Keppel Bay Tow
er, Singapore 098632
USRM2-5752-00
CANON INC. 2014
 Loading...