

Quick Guide
Read this guide rst.
Please read "Important Safety Instructions" before operating this product.
After you nish reading this guide, store it in a safe place for future
reference.
The information in this document is subject to change without notice.
https://oip.manual.canon
imagePRESS C165
Practical Features
Auto Gradation Adjustment for Various
Paper Types
The Auto Adjust Gradation function adjusts the gradation, density,
and color tone of images, and only requires you to scan the test
page. This function can be used for various weights of paper so that
a high quality print result can be obtained in different paper types.
"Maintenance" > "Adjusting Print and Finish Quality" in the User's
Guide
Achieve High Quality Color Reproduction
with Auto Color Tone Correction
Compared to the Auto Adjust Gradation function, which adjusts
CMYK, the Auto Correct Color Tone function adjusts mixed colors
that are expressed with multiple toner. By using these functions
together, you can perform more stable color adjustment.
"Maintenance" > "Adjusting Print and Finish Quality" in the User's
Guide
Optimum Print Result for Each Paper Type
Paper information, which includes the basis weight, finish, and curl
correction level, can be registered as the paper characteristics.
As the detailed information can be specified for each different paper
type, you can obtain the fine print result with considering the paper
characteristics. This function is also effective for improving paper
conveyance and print quality.
"Maintenance" > "Paper Type Management Settings" in the User's
Guide

Curl Correction for Stable Paper Conveyance
The machine constantly corrects the paper curl which occurs due
to the pressure applied when toner is fixed. Moreover, by correcting
the paper curl during outputting, the machine reduces the risk of
a paper jam, and achieves the stable paper conveyance. The curl
correction can be specified for each paper type you want to use.
"Maintenance" > "Adjusting Print and Finish Quality" in the User's
Guide
"Maintenance" > "Paper Type Management Settings" in the User's
Guide
Easy Operation for Adjusting Image Position
You can use a guide sheet to quickly perform image position
adjustment. This is convenient because it is not necessary to take
measurements and enter values.
"Maintenance" > "Paper Type Management Settings" > "Adjusting
the Image Position" in the User's Guide
Quick Access to Frequently Used Settings
Different settings are required, depending on the printing purpose
or paper types, but accessing setting items located in various menus
every time is a quite complicated operation. In this case, register
frequently used settings in "Settings/Registration Shortcut" button.
You can directly access to the setting screen with this button and
save the effort to search necessary setting items.
"Basic Operations" > "Customizing the Touch Panel Display" >
"Registering Shortcuts for Frequently Used Settings/Registered Items"
in the User's Guide
Guide sheet

Contents
IMPORTANT
NOTE
OPTION
Thank you for purchasing this Canon product. Please read this manual thoroughly before operating the machine
to familiarize yourself with its capabilities, and to make the most of its many functions. For more information on the
detailed settings for the functions, see the User's Guide. After reading this manual, store it in a safe place for future
reference.
Parts and Their Functions � � � � � � � � � � � � � � � � � � � � � � � � � � � 6
External View (Front Side) . . . . . . . . . . . . . . . . . . . . . . . . . . . . . . . . . . . . . 6
External View (Back Side) . . . . . . . . . . . . . . . . . . . . . . . . . . . . . . . . . . . . . .8
Internal View . . . . . . . . . . . . . . . . . . . . . . . . . . . . . . . . . . . . . . . . . . . . . . . . .9
Control Panel . . . . . . . . . . . . . . . . . . . . . . . . . . . . . . . . . . . . . . . . . . . . . . . .10
Status Monitor Screen � � � � � � � � � � � � � � � � � � � � � � � � � � � � � 12
How to Turn ON the Main Power � � � � � � � � � � � � � � � � � � � 13
Turning ON the Main Power . . . . . . . . . . . . . . . . . . . . . . . . . . . . . . . . .13
Shutting Down the Machine . . . . . . . . . . . . . . . . . . . . . . . . . . . . . . . . .13
Loading Paper � � � � � � � � � � � � � � � � � � � � � � � � � � � � � � � � � � � � 14
Paper Source . . . . . . . . . . . . . . . . . . . . . . . . . . . . . . . . . . . . . . . . . . . . . . . .14
Registering Paper Types to the Machine . . . . . . . . . . . . . . . . . . . . . .16
Loading Paper into the Paper Deck/Paper Drawer . . . . . . . . . . . .18
Registering Custom Paper Types . . . . . . . . . . . . . . . . . . . . . . . . . . . . .20
Cleaning and Maintenance � � � � � � � � � � � � � � � � � � � � � � � � 22
Cleaning the Platen Glass . . . . . . . . . . . . . . . . . . . . . . . . . . . . . . . . . . . .22
Cleaning the Original Scanning Area . . . . . . . . . . . . . . . . . . . . . . . . .22
Cleaning the Feeder . . . . . . . . . . . . . . . . . . . . . . . . . . . . . . . . . . . . . . . . .23
Automatic Feeder Cleaning . . . . . . . . . . . . . . . . . . . . . . . . . . . . . . . . . .25
Cleaning the Inside of the Main Unit . . . . . . . . . . . . . . . . . . . . . . . . .25
Cleaning the Touch Panel Display . . . . . . . . . . . . . . . . . . . . . . . . . . . .26
Inspection of the Breaker . . . . . . . . . . . . . . . . . . . . . . . . . . . . . . . . . . . .27
Consumables � � � � � � � � � � � � � � � � � � � � � � � � � � � � � � � � � � � � � 28
Troubleshooting � � � � � � � � � � � � � � � � � � � � � � � � � � � � � � � � � � 30
Clearing Paper Jams and Staple Jams . . . . . . . . . . . . . . . . . . . . . . . .30
Reducing the Frequency of Paper Jams . . . . . . . . . . . . . . . . . . . . . .30
When an Error Message Is Displayed . . . . . . . . . . . . . . . . . . . . . . . . .31
Contacting Your Local Authorized Canon Dealer . . . . . . . . . . . . .32
If Memory Becomes Full . . . . . . . . . . . . . . . . . . . . . . . . . . . . . . . . . . . . .33
If the Main Power Does Not Turn ON . . . . . . . . . . . . . . . . . . . . . . . . .33
Appendix � � � � � � � � � � � � � � � � � � � � � � � � � � � � � � � � � � � � � � � � � 34
Symbols Used in This Manual
Indicates operational requirements and restrictions. Be sure to read these items carefully to
operate the machine correctly, and avoid damage to the machine or property.
Indicates a clarification of an operation, or contains additional explanations for a procedure.
Reading these notes is highly recommended.
Indicates useful functions or tips for using the machine.
You can find further information from the online manual site (https://oip.manual.canon).
A detailed explanation is described on the specified page of this manual.
Indicates an optional product which can be used with this machine.

Keys and Buttons Used in This Manual
The followings are examples of how keys and
buttons are expressed in this manual.
Buttons on the touch panel display: <Button Name>
•
<Copy> → <Close>
→
Control Panel Keys: Key Icon
•
Buttons on Computer Operation Screens: [Button
•
Name]
[OK], [Add], [Cancel]
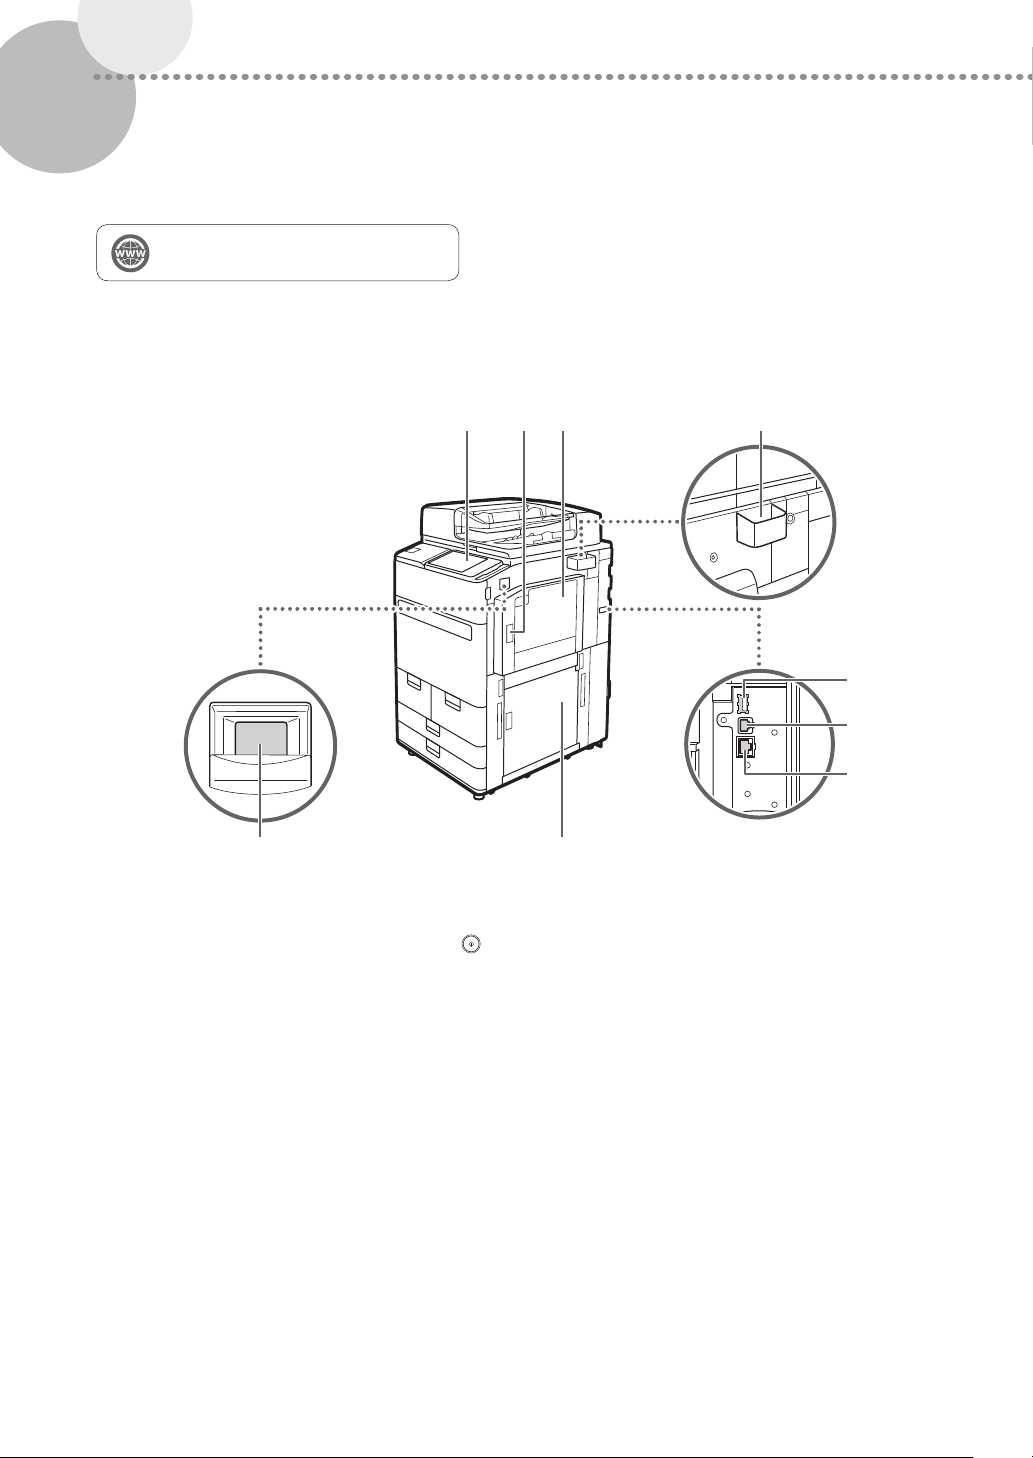
Parts and Their Functions
This section provides you with the names and functions of all the parts of the machine. The keys and display on the
control panel are also described. Read this section to use the machine’s various functions smoothly.
"Appendix" > "Options" in the User's Guide
External View (Front Side)
▀
1 2 3 4
5
9
1 Control panel
The control panel consists of the numeric keys, ,
indicators, touch panel display, etc. You can perform
all the operations and specify settings from the
control panel.
2 Upper-right cover of the main unit
Open this cover when clearing a paper jam inside the
machine.
3 Multi-purpose tray
Load paper into the multi-purpose tray when you
want to use a type of paper different from that which
is loaded in the paper deck/drawer.
4 Glass cleaning cloth storage box
Use this box to store the cloth for cleaning the platen
glass.
6
7
8
5 USB port (Rear-right side of the machine)
You can connect devices such as an external hard
disk to the machine.
6 USB connector
Connect a USB cable when connecting the machine
and a computer.
7 LAN port
Connect a LAN cable when connecting the machine
to a wired LAN router, etc.
8 Lower-right cover of the main
Open this cover when clearing a paper jam inside the
machine.
9 Power switch
Press the power switch when turning ON or OFF the
machine.
6
10 11
Parts and Their Functions
12
13
14
16 15
10
USB port (Front side of the machine)
You can connect devices such as a USB memory
device to the machine.
11
Feeder
Automatically feeds originals into the machine for
scanning. When two or more sheets are loaded in the
feeder, originals can be scanned continuously.
12
Toner replacement cover
Open this cover when replacing the toner cartridge.
13
Front cover of the main unit
Open this cover when clearing a paper jam.
14
Paper deck 1/paper deck 2
Load the type of paper that you frequently use.
15
Paper drawer 1/paper drawer 2
Load the type of paper that you frequently use. You
can load paper that cannot be loaded in the paper
decks.
16
Left cover of the main unit
Open this cover when clearing a paper jam.
7
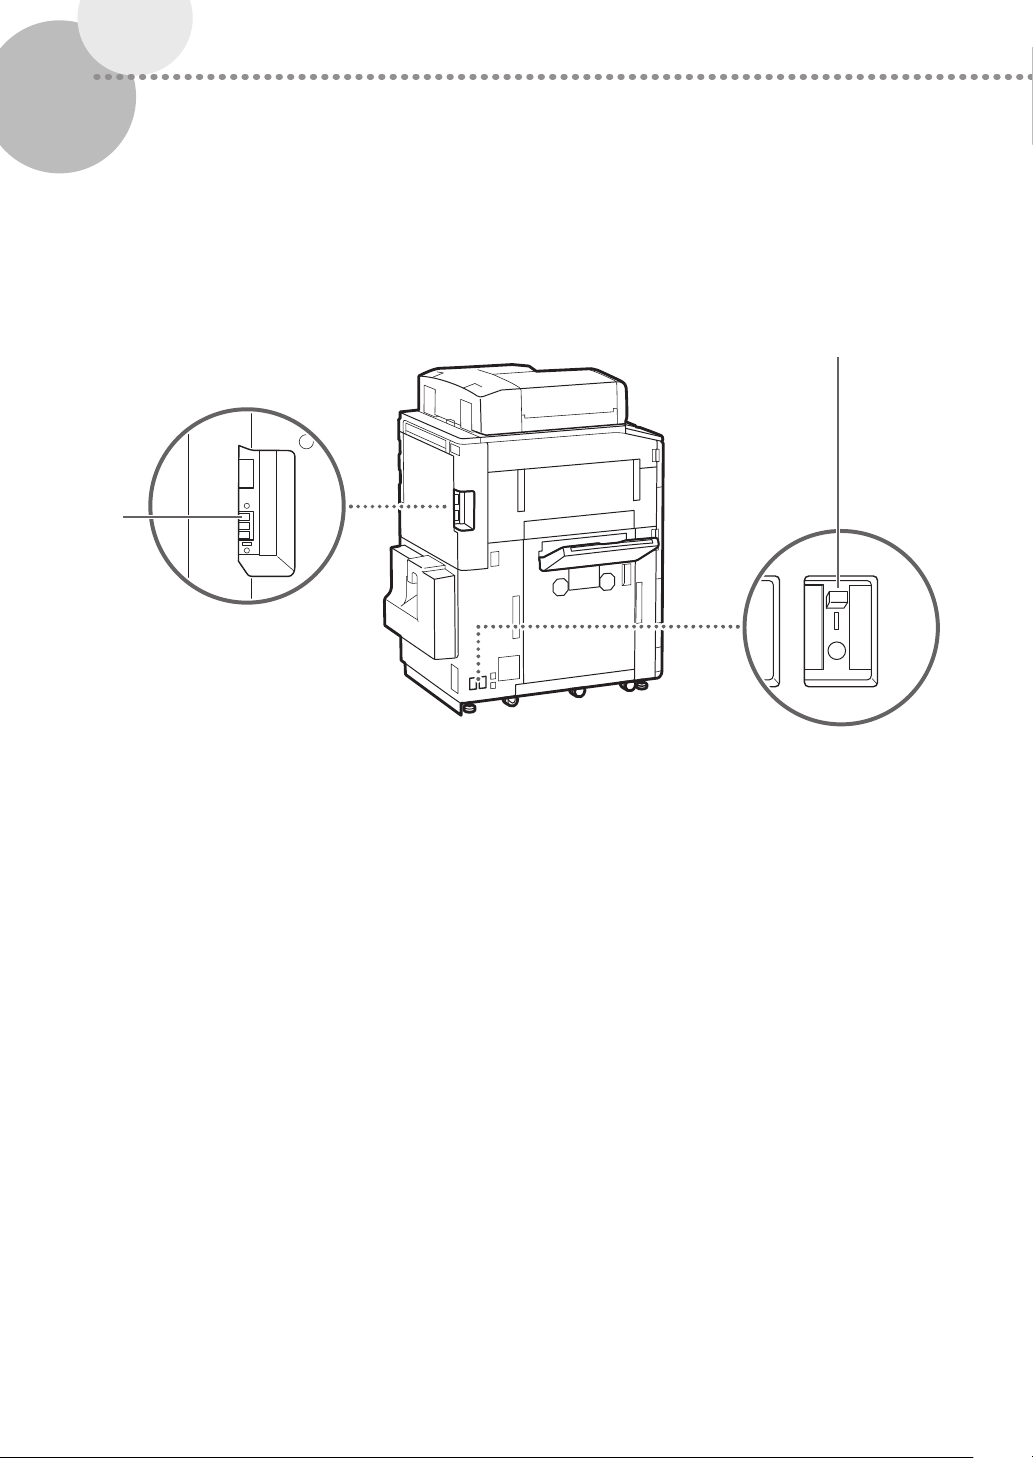
External View (Back Side)
▀
1
2
1 Telephone line jack (LINE 1)
Connect a telephone cable when connecting the
machine to a telephone line.
8
2 Breaker
Detects excess current or leakage current.
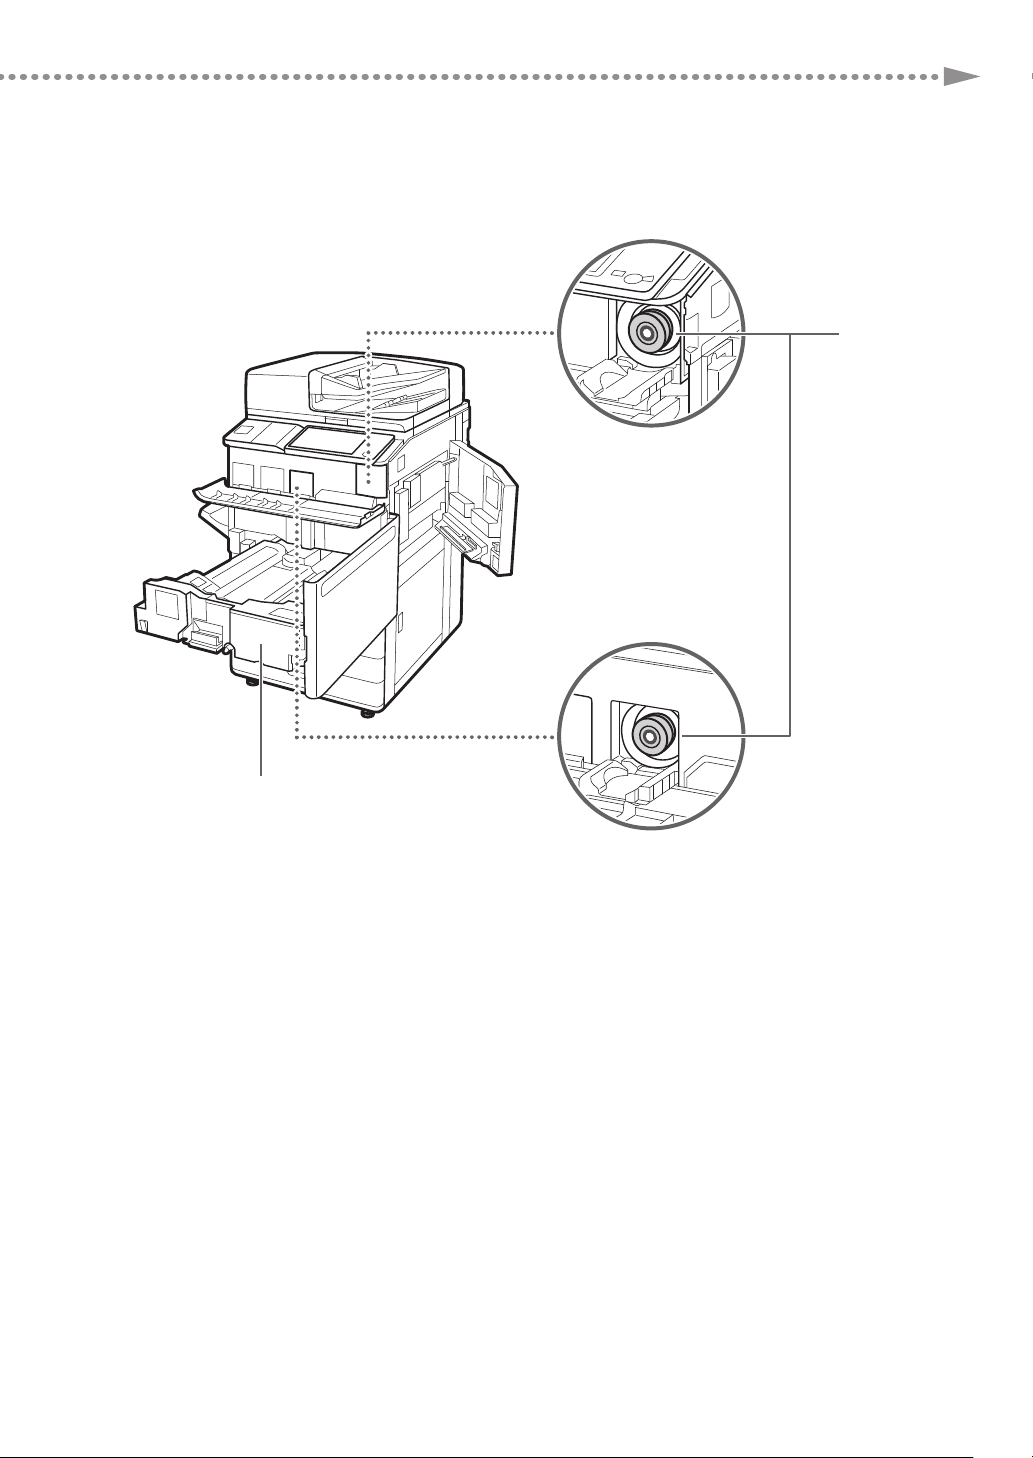
Internal View
K
C
▀
Parts and Their Functions
1
2
1 Toner cartridge
Replace the toner cartridge when the toner runs out.
2 Fixing transport unit
Pull the fixing transport unit out when clearing a
paper jam inside the machine.
9
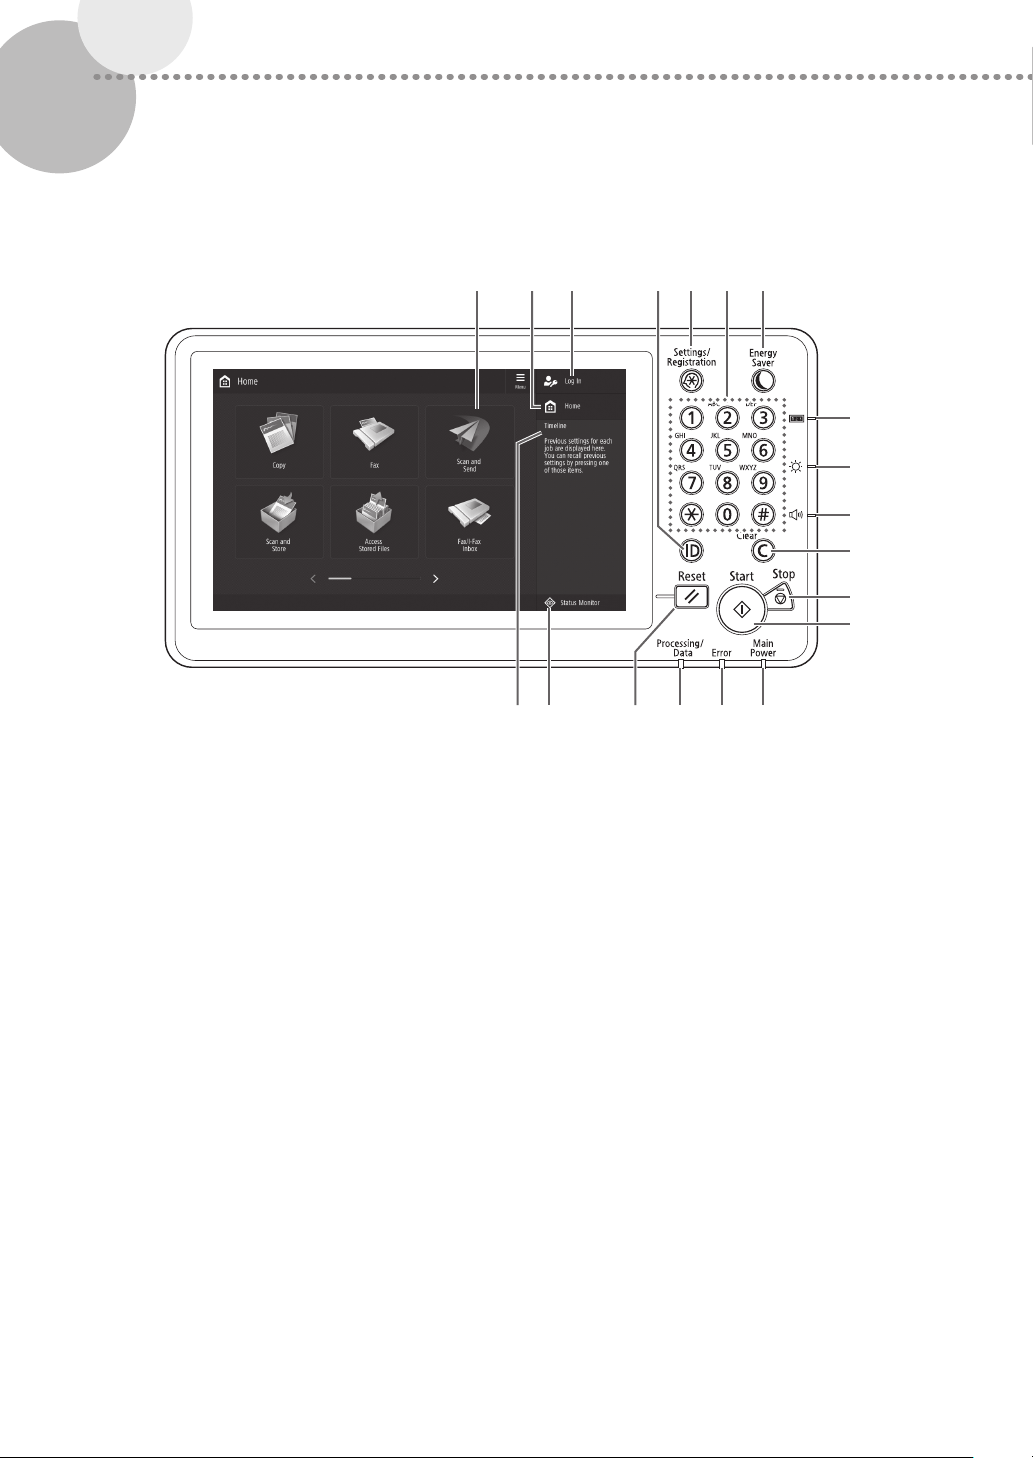
Control Panel
321
19 18 17 16 15 14
13
12
11
10
7654
▀
8
9
1 Touch panel display
Displays the settings screen and messages. Touch the
panel to perform setting and other operations.
2 <Home>
Press to display the Home screen.
3 Login user name
The user name that is currently logged in is displayed.
4 ID (Log In/Out) key
Press this to log in/out (when a login service has
been set).
5 Settings/Registration key
Press to specify settings or make a registration.
6 Numeric keys
Press to enter numerical values.
10
7 Energy Saver key
Press to set or cancel the Sleep mode.
• Lights when the machine enters Sleep mode.
• Turns off when the machine exits Sleep mode.
8 Counter/Device Information key
Press to display the copy and print count totals on
the touch panel display.
9 Brightness Adjustment key
Adjusts the brightness of the screen.
10
Volume Settings key
Press to adjust the sound volume.
11 Clear key
Press to clear the entered values or characters.
12
Stop key
Press to stop the current operation.
13
Start key
Press this to start an operation (or data reading).
14
Main Power indicator
Lights when the power is turned ON.
15
Error indicator
Flashes or lights if there is an error in the machine.
※When the Error indicator maintains a steady red light,
contact your local authorized Canon dealer.
16
Processing/Data indicator
• Flashes when the machine is operating.
• Lights when the machine is waiting for a
command.
Parts and Their Functions
17
Reset key
Press to cancel the settings and restore the previously
specified settings.
18
<Status Monitor>
Press to check the status of a job or cancel a job.
19
<Timeline>
Displays a log for settings specified in Copy/Scan and
Send.
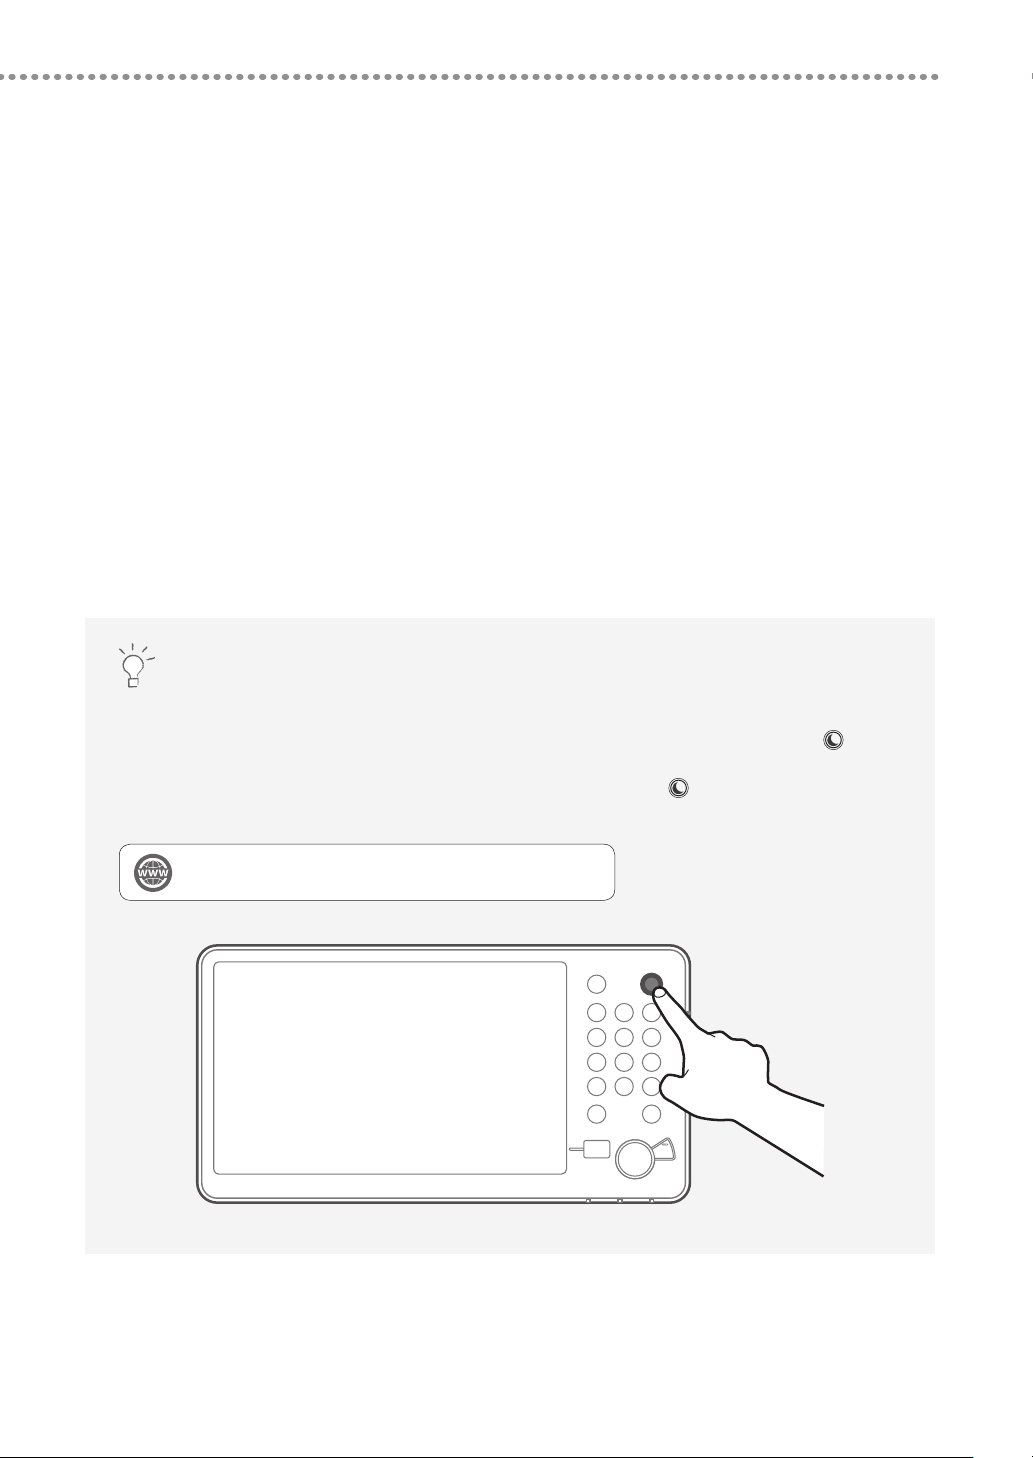
Setting the Energy Saver mode/Sleep mode to minimize energy consumption
You can save energy consumption by using the Energy Saver mode/Sleep mode when the machine is not
being used for a prolonged period of time, such as a lunch time. To use these modes, simply press
the control panel. If the machine is idle for a certain period of time, the machine will enter the Sleep mode
(Auto Sleep mode). For more information on the mode which activates after
information on the Auto Sleep mode, see the User's Guide.
"Basic Operations" > "Entering Sleep Mode" in the User's Guide
is pressed, and detailed
on
11
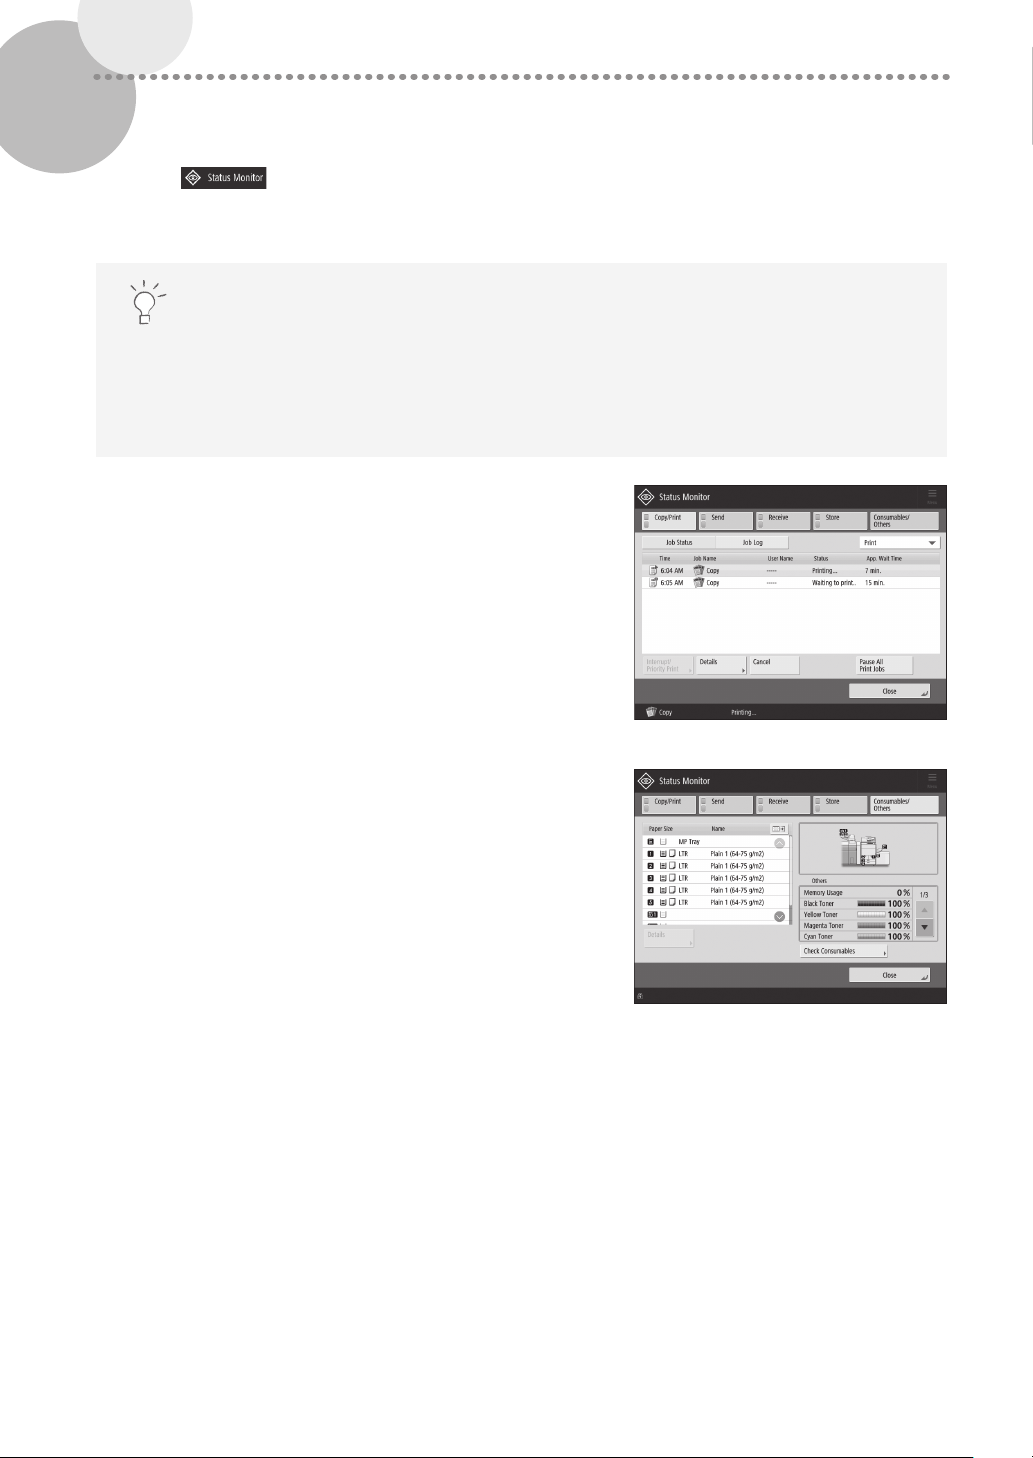
Status Monitor Screen
If you press , the Status Monitor screen appears, and you can confirm the status of jobs and consumables
on this screen. By obtaining information, such as the completion time of the current job or the amount of paper
remaining, you can perform smooth printing operation without interruption.
Useful situations
•
When you want to know the completion time of jobs
•
When you want to check the amount of paper remaining for efficient paper loading
•
When you want to cancel a job which is registered by mistake
<Copy/Print>, <Send>, <Receive>, <Store>
screen
The <Job> screen enables you to check the status of jobs in
the job list. On this screen, you can cancel a job in progress
and change the order of waiting jobs to print your job prior to
others.
<Consumables/Others> screen
You can check the paper information and the remaining
amount of paper in all paper sources.
You can also check the memory usage, remaining toner,
remaining staples, and amount of punch waste.
12
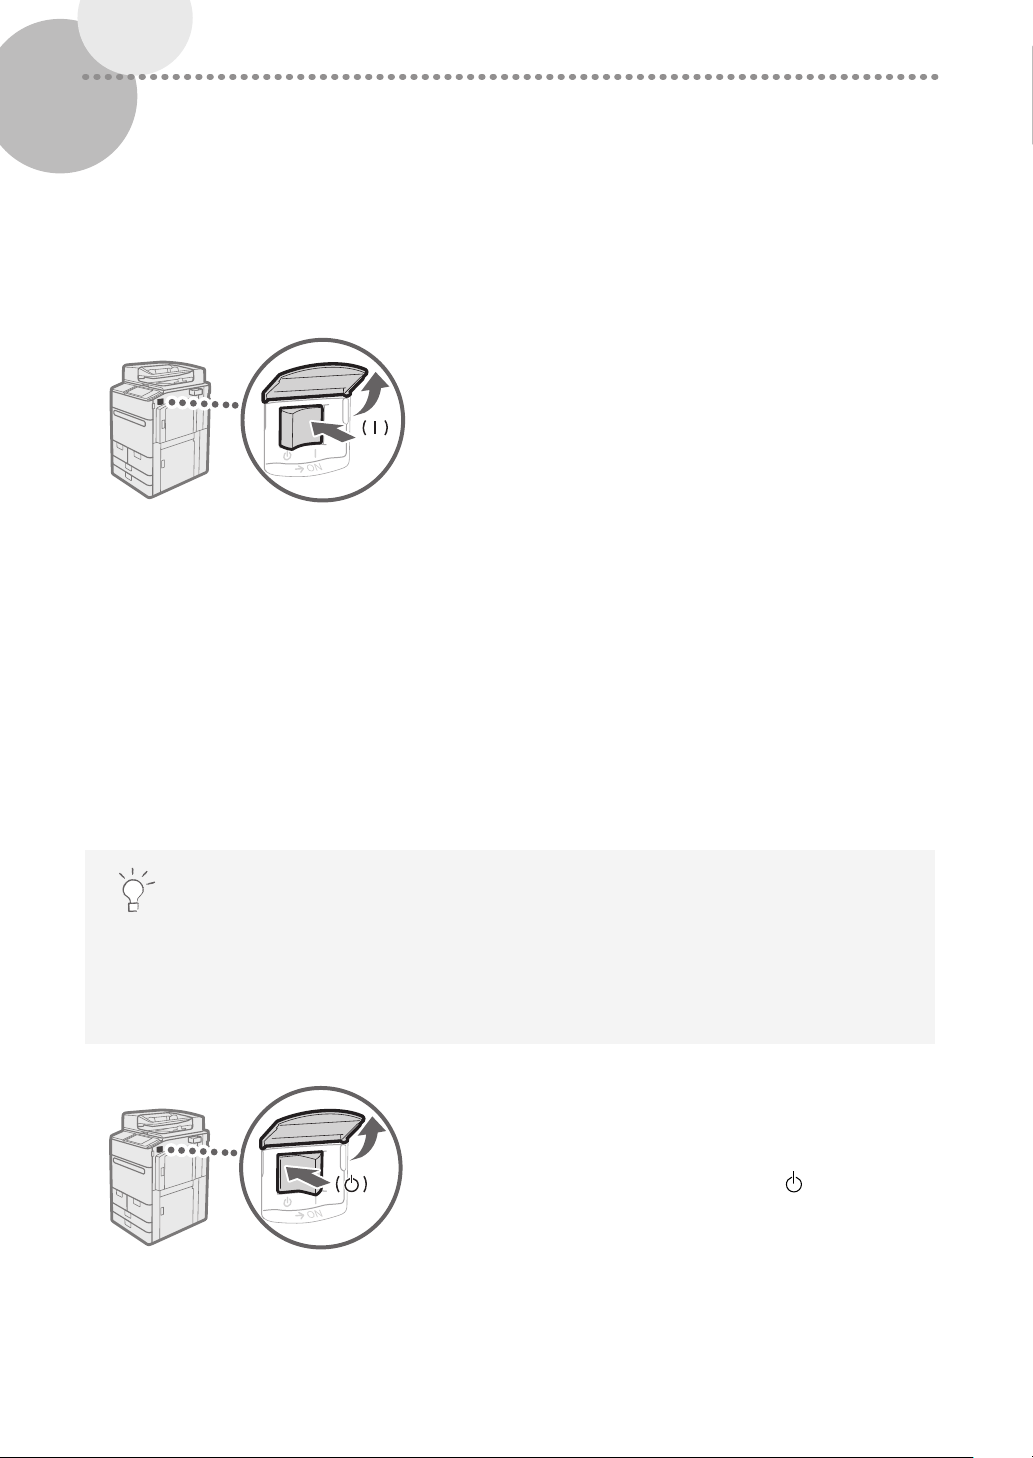
How to Turn ON the Main Power
IMPORTANT
NOTE
This section explains how to turn ON the main power.
Turning ON the Main Power
▀
Make sure that the power plug is firmly inserted into the power outlet, and the breaker is turned ON.
Open the main power switch cover�
1
Press the main power switch to the "|" side�
2
•
The main power indicator on the control panel lights.
If you want to turn ON the main power again, wait for at least 10 seconds after the main power and the main power
indicator are turned OFF. However, when <Quick Startup Settings for Main Power> is enabled, if you don’t wait more
than 20 seconds after the Main Power indicator is turned OFF, quick startup is not performed.
The response of the keys and buttons may not be optimal immediately after turning ON the main power of the
machine.
Shutting Down the Machine
▀
Do not turn OFF the main power in the following situations
•
When using the I-Fax function
•
When the message <Backing up stored data from the Remote UI...> is displayed
•
When operating scan or print function
Open the main power switch cover�
1
2
Press the main power switch to the " " side�
•
The main power indicator on the control panel turns OFF.
13
Loading Paper
OPTION
Paper Deck Unit-E
Load paper by following the procedure below. In this section, LTR custom size paper is used as an example.
Confirm the paper types that can be loaded.
Confirmation
"Appendix" > "Hardware Specifications" > "Available Paper" in the
User's Guide
Preparation
Operation
Registration
Paper Source
▀
This section describes available paper sources. Paper that can be loaded differs, depending on the paper sources. The
following description includes the optional products as well as the standard paper deck/paper drawers. The optional
products are indicated with
To use a paper type not registered in the machine, register it in advance.
"Registering Paper Types to the Machine," on p� 16
Load paper in the paper drawer.
"Loading Paper into the Paper Deck/Paper Drawer," on p� 18
Specify the loaded paper size and type for the paper drawer.
"Registering Custom Paper Types," on p� 20
.
Document Insertion Unit-N
Document Insertion /
Folding Unit-K
OPTION
OPTION
14
Paper Deck
Paper Drawer
POD Deck Lite-C
Stack Bypass Alignment Tray-D
Long Sheet Tray-B
OPTION
OPTION
OPTION
OPTION
 Loading...