

Page 1
Before Using the
Machine
Original and Paper
TOP
PreviousBack Next
1
2
Copying
3
Sending and
Receiving
Printing and
Scanning
Network (imageCLASS
MF7480/MF7470 Only)
Remote UI (imageCLASS
MF7480/MF7470 Only)
System Settings
4
5
6
7
8
Maintenance
9
Troubleshooting
Reference Guide
10
Appendix
11
Table of Contents
Index
Please read this guide before operating this product.
After you finish reading this guide, store it in a safe place
for future reference.
How to Use This Manual
Page 2

Before Using the
Machine
Original and Paper
TOP
PreviousBack Next
1
Manuals for the Machine
2
Copying
3
Sending and
Receiving
Printing and
Scanning
Network (imageCLASS
MF7480/MF7470 Only)
Remote UI (imageCLASS
MF7480/MF7470 Only)
System Settings
4
5
6
7
8
Maintenance
9
Troubleshooting
10
Appendix
11
Machine Set-Up
●
Software Installation
●
Basic Features
●
Maintenance
●
Trouble Shooting
●
Specifications
●
Total Operation Features
●
Network and Remote User Interface
●
System Settings
●
Reports and Lists
●
Trouble Shooting
●
Color Network ScanGear Installation and
●
Instructions
PCL Printer Driver Installation and Instructions●
Starter Guide
Basic Operation Guide
Reference Guide
(This Document)
Color Network ScanGear User’s
Guide
PCL Driver Guide
(imageCLASS MF7480/MF7470
Only)
CD-ROM
CD-ROM
CD-ROM
Table of Contents
Index
UFRII LT Printer Driver Installation and
●
Instructions
UFR II Driver Guide
CD-ROM
i
Page 3
Before Using the
Machine
Original and Paper
Copying
1
2
TOP
PreviousBack Next
Fax Driver Installation and Instructions●
Fax Driver Guide
CD-ROM
3
Sending and
Receiving
Printing and
Scanning
Network (imageCLASS
MF7480/MF7470 Only)
Remote UI (imageCLASS
MF7480/MF7470 Only)
System Settings
4
5
6
7
8
Maintenance
9
Troubleshooting
10
Appendix
Indicates the manual is supplied in PDF format in the accompanying CD-ROM.
CD-ROM
11
Table of Contents
Index
To view the manuals in PDF format, Adobe Reader/Acrobat Reader/Acrobat is required. If Adobe Reader/Acrobat
●
Reader/Acrobat is not installed on your system, please download it from the Adobe Systems Incorporated website
(http://www.adobe.com).
Considerable effort has been made to make sure that the manuals for the machine are free of inaccuracies and
●
omissions. However, as we are constantly improving our products, if you need an exact specification, please
contact Canon.
The machine illustration on the cover may differ slightly from your machine.
●
ii
Page 4
Before Using the
Machine
Original and Paper
1
2
Copying
3
Sending and
Receiving
Printing and
Scanning
Network (imageCLASS
MF7480/MF7470 Only)
Remote UI (imageCLASS
MF7480/MF7470 Only)
System Settings
4
5
6
7
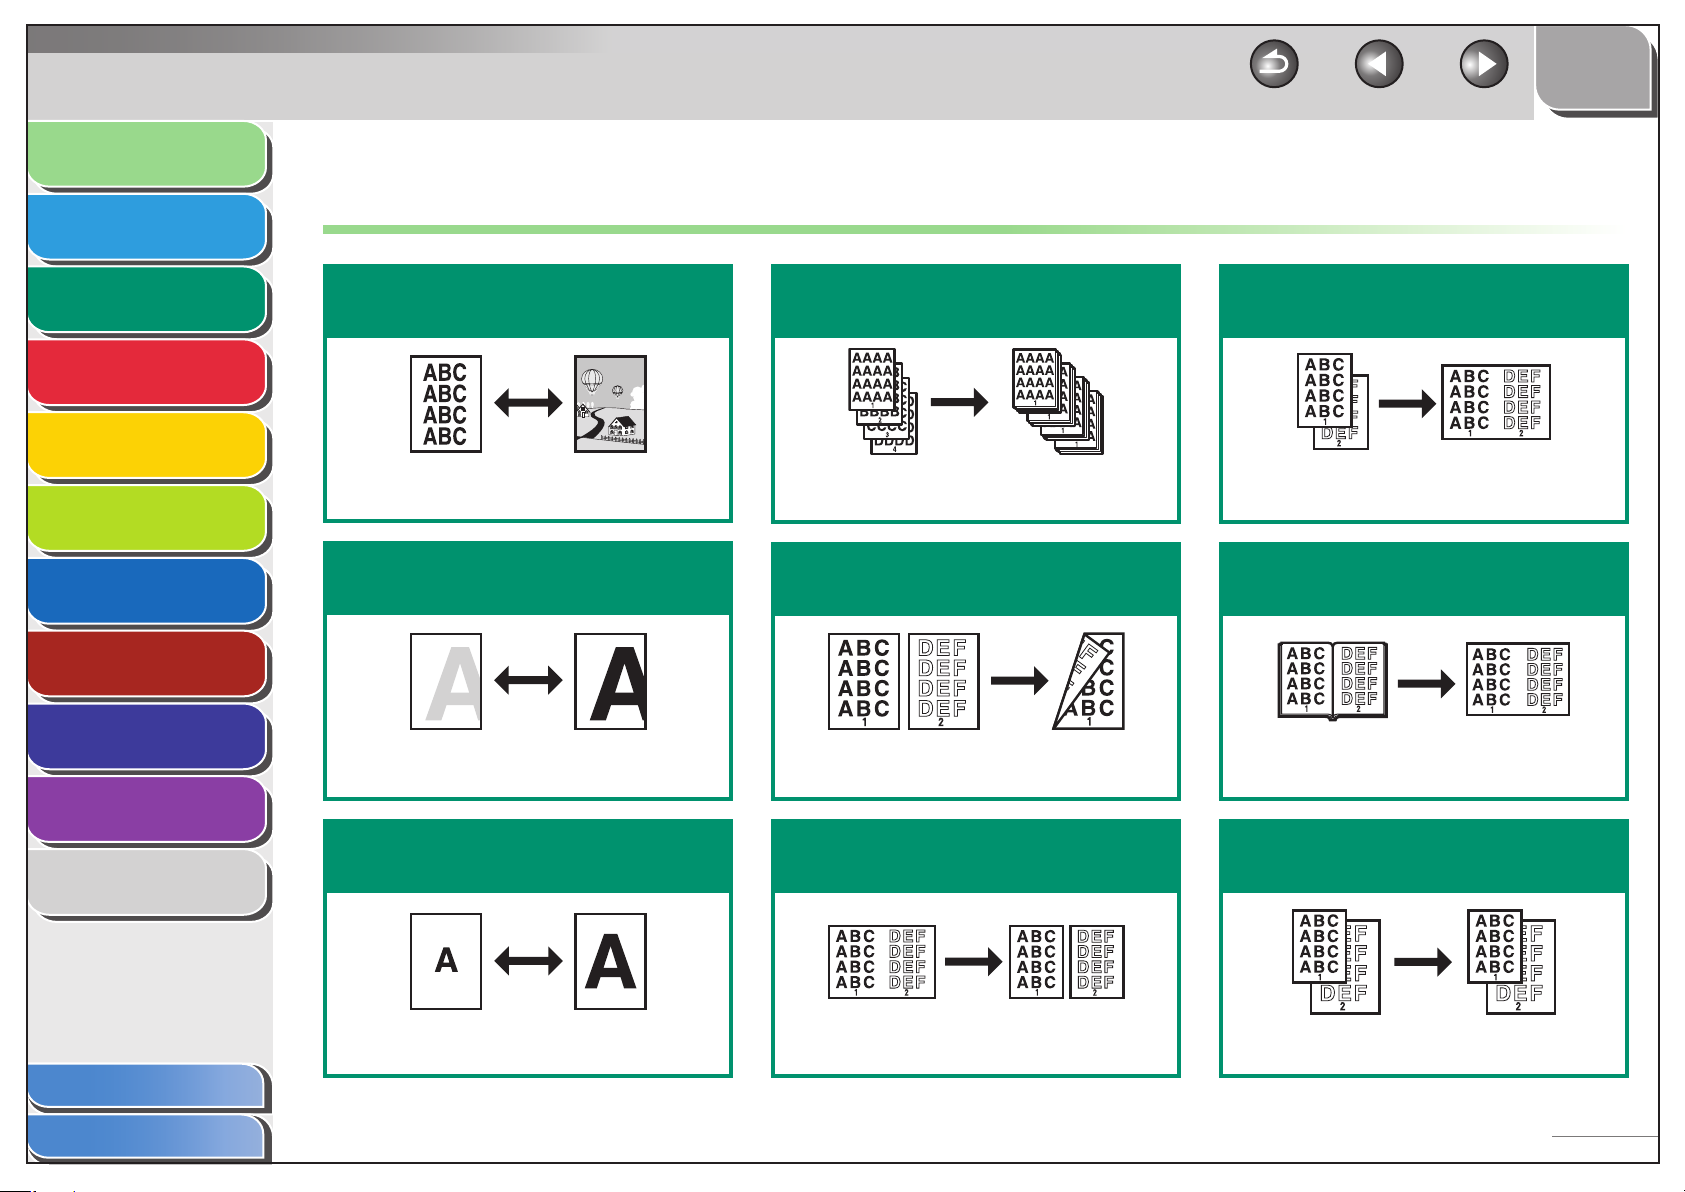
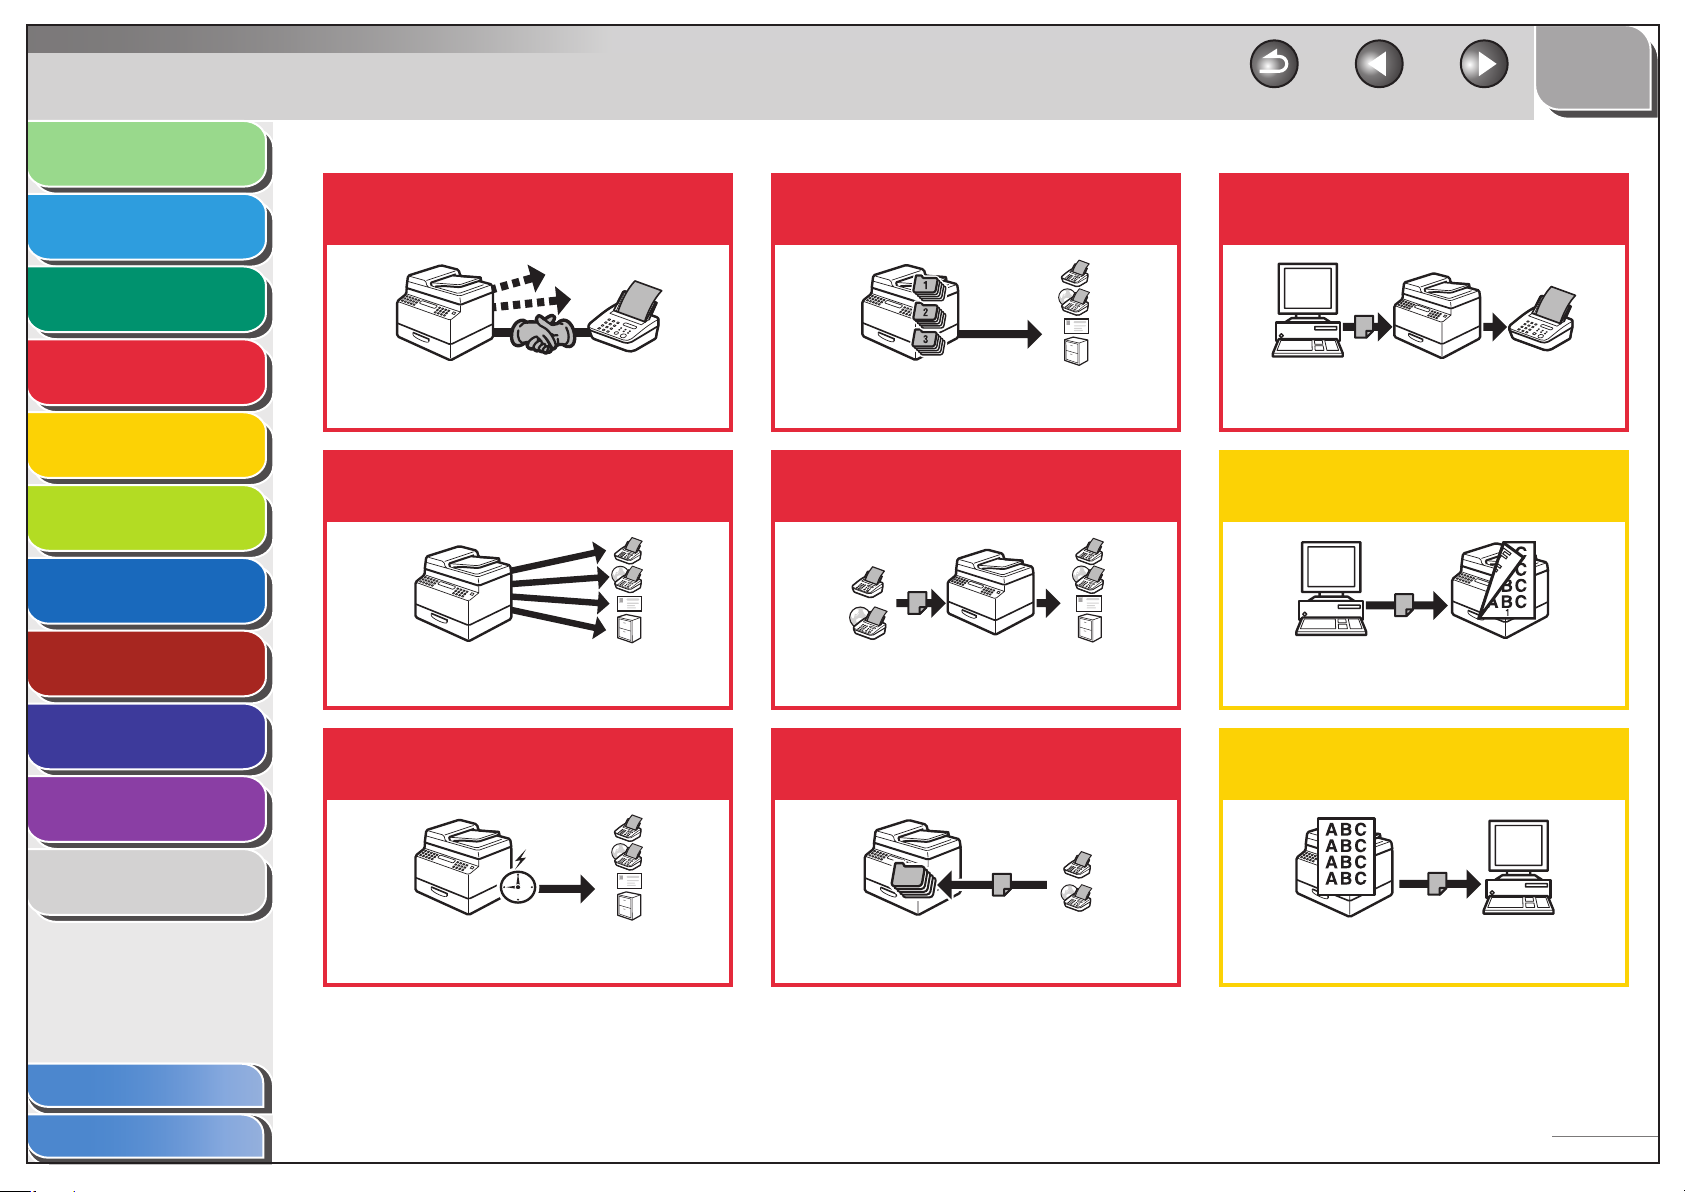
Things You Can Do
Select a scan mode depending on
the type of image
Original Type Selection
p. 3-8
Adjust the density level of scanned
images
Sort by document or page
Collate Copy
p. 3-14
Make two-sided copies
TOP
PreviousBack Next
Copy multiple originals onto one
sheet
Image Combination
p. 3-22
Erase shadows and lines around
original images/binding holes
Maintenance
Troubleshooting
10
Appendix
11
Table of Contents
Index
8
9
Exposure
p. 3-9
Enlarge or reduce copied images
Copy Ratio
p. 3-10
Two-Sided Copying
p. 3-17
Copy facing pages of an opened
book onto separate copy sheets
Two-Page Separation
p. 3-22
Frame Erase
p. 3-24
Copy originals of different sizes
together at the same time
Different Size Originals
p. 3-28
iii
Page 5
Before Using the
Machine
Original and Paper
1
2
Copying
3
Sending and
Receiving
Printing and
Scanning
Network (imageCLASS
MF7480/MF7470 Only)
Remote UI (imageCLASS
MF7480/MF7470 Only)
System Settings
4
5
6
7
8
Maintenance
9
Troubleshooting
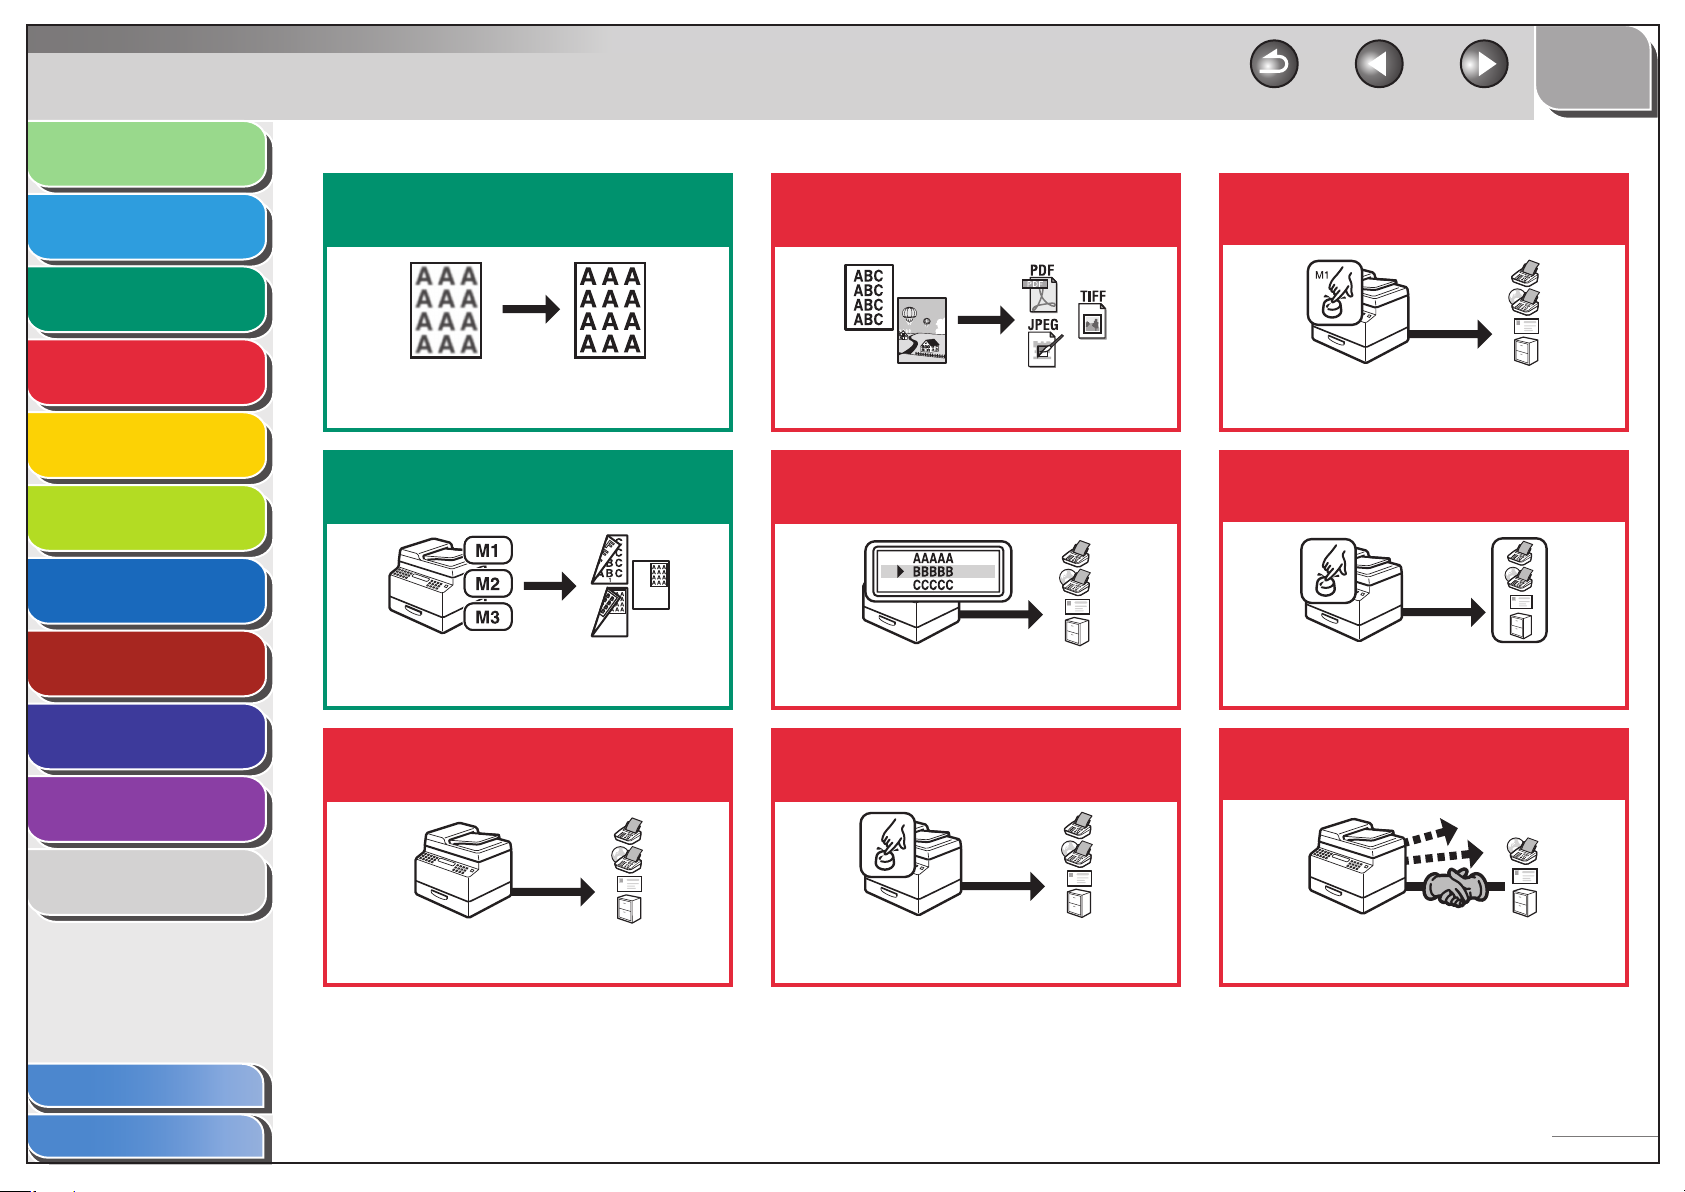
Adjust the contrast of scanned
images
Sharpness
p. 3-29
Store and recall copy modes
Memory Keys
p. 3-30
Send documents with diverse
sending methods*
1
Send documents in a variety of file
formats*
1
Setting the File Format
p. 4-11
Specify a recipient with the
Address Book
Using the Address Book
p. 4-27
Specify a recipient with one-touch
buttons
TOP
PreviousBack Next
Specify a recipient with favorites
buttons
Using the Favorites Buttons
p. 4-29
Specify multiple recipients as a
group
Using to Group Addresses
p. 4-28
Retry sending documents
automatically*
1
10
Appendix
11
Table of Contents
Index
Fax, E-Mail, I-Fax and File Server
Chapter 4
*1 Indicates the features available only for the imageCLASS MF7480.
Using the One-Touch Buttons
Auto Retry
p. 4-28
p. 4-39
iv
Page 6
Before Using the
Machine
Original and Paper
1
2
Copying
3
Sending and
Receiving
Printing and
Scanning
Network (imageCLASS
MF7480/MF7470 Only)
Remote UI (imageCLASS
MF7480/MF7470 Only)
System Settings
4
5
6
7
8
Maintenance
9
Troubleshooting
Redial when the line is busy
Automatic Redialing
p. 4-39
Send documents to multiple
recipients
Broadcasting
p. 4-34
Send documents at a specified
time
Recall the last three sending jobs
Job Recall
p. 4-37
Forward received documents
Forwarding Documents
p. 4-65, 7-16
Receive documents in memory
without printing out
TOP
PreviousBack Next
Send a fax from a PC
PC Faxing
Fax Driver Guide
Print a document from a PC
Printing
PCL Driver Guide and UFR II Driver Guide
Specify detailed scanning options
to suit various images*
1
10
Appendix
11
Table of Contents
Index
Delayed Sending
p. 4-35
*1 Indicates the features available only for the imageCLASS MF7480/MF7470.
Memory Lock Reception
p. 4-63
Scanning
Color Network ScanGear User’s Guide
v
Page 7
Before Using the
Machine
Original and Paper
1
2
Copying
3
Sending and
Receiving
Printing and
Scanning
Network (imageCLASS
MF7480/MF7470 Only)
Remote UI (imageCLASS
MF7480/MF7470 Only)
System Settings
4
5
6
7
8
Maintenance
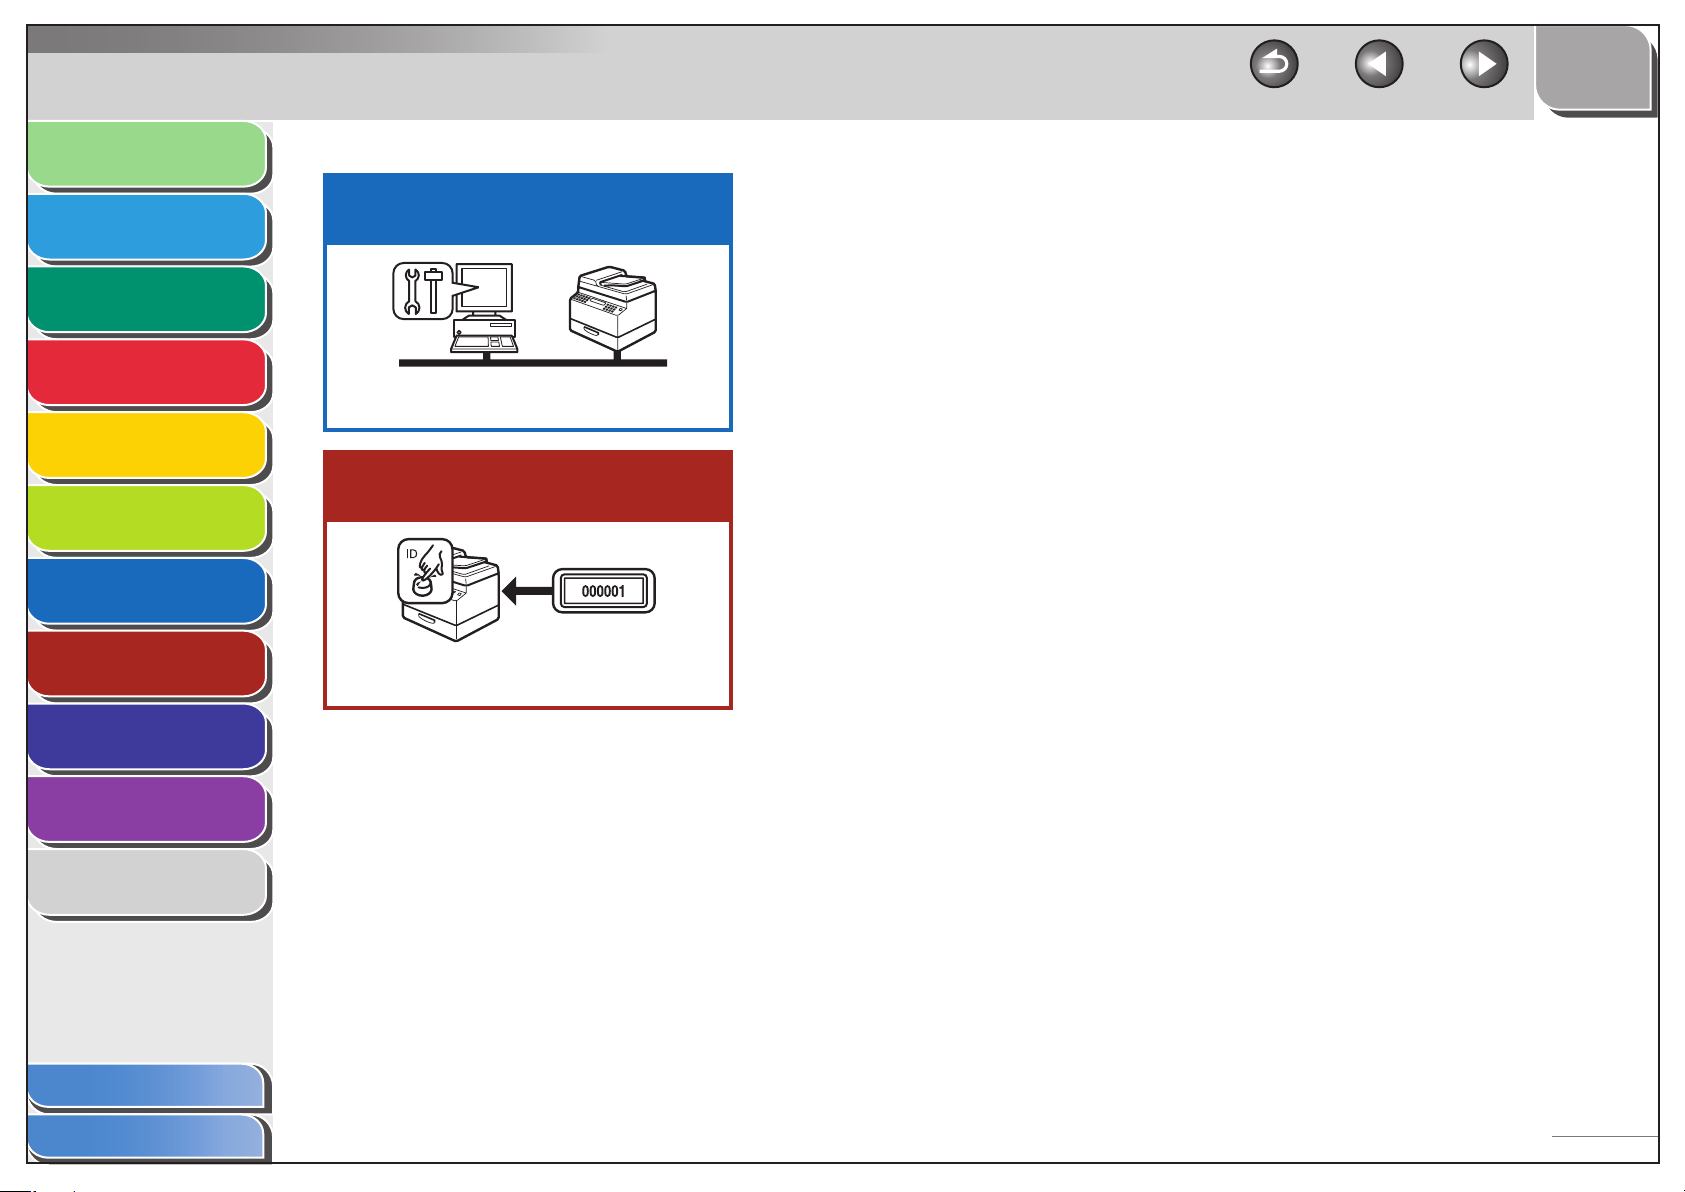
Access and manage the machine
from a PC*
Remote UI
Restrict the use of the machine
with department IDs
Department ID Management
1
Chapter 7
p. 8-6
TOP
PreviousBack Next
Troubleshooting
10
Appendix
11
Table of Contents
Index
9
*1 Indicates the features available only for the imageCLASS MF7480/MF7470.
vi
Page 8

Before Using the
Machine
Original and Paper
1
2
Copying
3
Sending and
Receiving
Printing and
Scanning
Network (imageCLASS
MF7480/MF7470 Only)
Remote UI (imageCLASS
MF7480/MF7470 Only)
System Settings
4
5
6
7
TOP
PreviousBack Next
Table of Contents
Manuals for the Machine ............................................................................................................... i
Things You Can Do .........................................................................................................................iii
How to Use This Manual ......................................................................................................... xxiv
Using the Top Page ........................................................................................................... xxiv
Using the Chapter Topic List ..........................................................................................xxv
Symbols Used in This Manual ....................................................................................... xxvi
Keys Used in This Manual ...............................................................................................xxvi
Legal Notices ............................................................................................................................. xxvii
Maintenance
Troubleshooting
10
Appendix
11
Table of Contents
Index
8
9
1 Before Using the Machine ........................................................................................................1-1
Machine Components ...............................................................................................................1-3
External View ........................................................................................................................1-3
Feeder .....................................................................................................................................1-4
Internal View .........................................................................................................................1-5
Control Panel ................................................................................................................................ 1-6
Main Power and Control Panel Power .................................................................................1-8
How to Turn On the Main Power ...................................................................................1-8
Control Panel Power Switch ............................................................................................1-9
vii
Page 9

Before Using the
Machine
Original and Paper
1
2
Copying
3
Sending and
Receiving
Printing and
Scanning
Network (imageCLASS
MF7480/MF7470 Only)
Remote UI (imageCLASS
MF7480/MF7470 Only)
System Settings
4
5
6
7
8
Maintenance
TOP
PreviousBack Next
Touch Panel Display ................................................................................................................ 1-10
Frequently Used Keys .....................................................................................................1-10
Touch Panel Key Display ................................................................................................1-10
Entering Characters .........................................................................................................1-11
Adjusting the Brightness ............................................................................................... 1-13
Department/User ID Management ................................................................................... 1-14
Procedure before Using the Machine ....................................................................... 1-14
Procedure after Using the Machine ........................................................................... 1-15
Cartridge ..................................................................................................................................... 1-16
Maintaining the Cartridge ............................................................................................1-16
Timer Settings ........................................................................................................................... 1-18
Setting the Sleep Mode ................................................................................................. 1-18
Setting Auto Clear Time ................................................................................................. 1-18
Troubleshooting
10
Appendix
11
Table of Contents
Index
9
Checking Device Status ......................................................................................................... 1-20
2 Original and Paper ....................................................................................................................2-1
Original Requirements ..............................................................................................................2-3
Scanning Area ..............................................................................................................................2-4
viii
Page 10

Before Using the
Machine
Original and Paper
1
2
Copying
3
Sending and
Receiving
Printing and
Scanning
Network (imageCLASS
MF7480/MF7470 Only)
Remote UI (imageCLASS
MF7480/MF7470 Only)
System Settings
4
5
6
7
TOP
PreviousBack Next
Loading Originals ........................................................................................................................2-5
Original Sizes ........................................................................................................................2-5
Orientation ............................................................................................................................2-5
On the Platen Glass ............................................................................................................2-6
Into the Feeder.....................................................................................................................2-8
Paper Requirements ................................................................................................................ 2-10
Printable Area ............................................................................................................................ 2-12
Loading Paper ........................................................................................................................... 2-13
Into the Stack Bypass ...................................................................................................... 2-13
Setting Paper Size and Type ................................................................................................. 2-18
Setting Paper Type for the Paper Drawers .............................................................. 2-18
Maintenance
Troubleshooting
10
Appendix
11
Table of Contents
Index
8
9
Setting Paper Size and Type for the Stack Bypass ................................................2-19
Useful Functions ....................................................................................................................... 2-21
Automatic Paper Selection/Automatic Drawer Switching ................................2-21
Paper Supply Indicator ...................................................................................................2-22
Setting the Speed or Print Side Priority ................................................................... 2-22
Loading Preprinted Paper ..................................................................................................... 2-23
3 Copying .....................................................................................................................................3-1
Basic Copying Method ..............................................................................................................3-4
ix
Page 11

Before Using the
Machine
Original and Paper
Copying
1
2
TOP
PreviousBack Next
Paper Selection ............................................................................................................................3-5
Automatic Paper Selection ..............................................................................................3-5
Manual Paper Selection ....................................................................................................3-6
3
Sending and
Receiving
Printing and
Scanning
Network (imageCLASS
MF7480/MF7470 Only)
Remote UI (imageCLASS
MF7480/MF7470 Only)
System Settings
4
5
6
7
8
Maintenance
9
Troubleshooting
10
Appendix
11
Scan Settings ................................................................................................................................3-8
Original Type Selection .....................................................................................................3-8
Exposure .................................................................................................................................3-9
Copy Ratio ..........................................................................................................................3-10
Reserved Copy .......................................................................................................................... 3-13
Reserving Copy Jobs ....................................................................................................... 3-13
Collate Copy ............................................................................................................................... 3-14
Page Order (Collate) ........................................................................................................3-15
Same Page (Group) .......................................................................................................... 3-15
Two-Sided Copying ................................................................................................................. 3-17
1 to 2-Sided ........................................................................................................................ 3-18
2 to 2-Sided ........................................................................................................................ 3-19
2 to 1-Sided ........................................................................................................................ 3-20
Book to 2-Sided ................................................................................................................3-20
Table of Contents
Index
x
Page 12

Before Using the
Machine
Original and Paper
1
2
Copying
3
Sending and
Receiving
Printing and
Scanning
Network (imageCLASS
MF7480/MF7470 Only)
Remote UI (imageCLASS
MF7480/MF7470 Only)
System Settings
4
5
6
7
8
Maintenance
TOP
PreviousBack Next
Advanced Copy Features ....................................................................................................... 3-22
2-Page Separation ...........................................................................................................3-22
Image Combination ........................................................................................................ 3-22
Frame Erase ........................................................................................................................ 3-24
Different Size Originals ..................................................................................................3-28
Sharpness ...........................................................................................................................3-29
Memory Keys ..................................................................................................................... 3-30
Orientation ................................................................................................................................. 3-34
Image Orientation Priority ............................................................................................ 3-34
Auto Orientation .............................................................................................................. 3-34
Confirming Settings ............................................................................................................... 3-35
Changing/Canceling Selected Settings ........................................................................... 3-36
Changing the Current Standard Settings ........................................................................ 3-37
Troubleshooting
10
Appendix
11
Table of Contents
Index
9
Storing New Standard Settings ..................................................................................3-37
Initializing Standard Settings ......................................................................................3-37
Canceling Copy Jobs ............................................................................................................... 3-38
Using the Touch Panel Display .................................................................................... 3-38
Using the System Monitor Screen .............................................................................3-38
Checking Copy Jobs ................................................................................................................ 3-39
Checking the Status of Copy Jobs .............................................................................3-39
Combination of Functions Chart ........................................................................................ 3-40
xi
Page 13

Before Using the
Machine
Original and Paper
1
TOP
PreviousBack Next
4 Sending and Receiving .............................................................................................................4-1
2
Copying
3
Sending and
Receiving
Printing and
Scanning
Network (imageCLASS
MF7480/MF7470 Only)
Remote UI (imageCLASS
MF7480/MF7470 Only)
System Settings
4
5
6
7
8
Maintenance
9
Troubleshooting
10
Appendix
11
Basic Sending Method ..............................................................................................................4-5
Sending a Fax .......................................................................................................................4-5
Sending an E-Mail Message (imageCLASS MF7480 Only)....................................4-5
Sending an I-Fax (imageCLASS MF7480 Only) .........................................................4-7
Sending a Job to a File Server (imageCLASS MF7480 Only) ................................4-9
Setting the File Format (imageCLASS MF7480 Only) ..........................................4-11
Scan Settings ............................................................................................................................. 4-13
Selecting a Scan Mode ...................................................................................................4-13
Changing the Color Mode (imageCLASS MF7480 Only) ...................................4-14
Document Size .................................................................................................................. 4-15
Resolution ...........................................................................................................................4-15
Scan Density and Original Type Settings ................................................................4-16
Two-Sided Originals ........................................................................................................ 4-19
Different Size Originals ..................................................................................................4-19
Specifying Destinations ......................................................................................................... 4-21
Using the New Address Tab ..........................................................................................4-21
Using the Address Book ................................................................................................4-27
Using the One-Touch Buttons .....................................................................................4-28
Table of Contents
Index
Using Group Addresses .................................................................................................4-28
Using the Favorites Buttons ......................................................................................... 4-29
Checking/Changing a Destination ............................................................................4-29
Erasing a Destination ...................................................................................................... 4-30
xii
Page 14

Before Using the
Machine
Original and Paper
1
TOP
PreviousBack Next
Manual Sending ....................................................................................................................... 4-31
2
Copying
3
Sending and
Receiving
Printing and
Scanning
Network (imageCLASS
MF7480/MF7470 Only)
Remote UI (imageCLASS
MF7480/MF7470 Only)
System Settings
4
5
6
7
8
Maintenance
9
Troubleshooting
Direct Sending .......................................................................................................................... 4-32
Advanced Sending Features ................................................................................................ 4-34
Broadcasting ......................................................................................................................4-34
Delaying a Send Job .......................................................................................................4-35
Stamping Originals .......................................................................................................... 4-36
Job Recall .................................................................................................................................... 4-37
PC Faxing ..................................................................................................................................... 4-38
Customizing Sending Features ........................................................................................... 4-39
Setting Number of Retry Attempts (E-Mail/I-Fax/File Server)
(imageCLASS MF7480 Only) ........................................................................................4-39
Setting Automatic Redialing (Fax) ............................................................................. 4-39
Standard Send Settings ................................................................................................. 4-40
Fax Dialing Features ................................................................................................................ 4-42
10
Appendix
11
Table of Contents
Index
Switching Temporarily to Tone Dialing ....................................................................4-42
Checking Dialing Line ....................................................................................................4-43
Dialing an Overseas Number (With Pauses) ........................................................... 4-43
xiii
Page 15

Before Using the
Machine
Original and Paper
1
2
Copying
3
Sending and
Receiving
Printing and
Scanning
Network (imageCLASS
MF7480/MF7470 Only)
Remote UI (imageCLASS
MF7480/MF7470 Only)
System Settings
4
5
6
7
TOP
PreviousBack Next
Storing/Editing Address Book ............................................................................................. 4-44
Storing/Editing Address Book .....................................................................................4-45
Storing/Editing One-Touch Buttons ..........................................................................4-51
Erasing Addresses ............................................................................................................4-58
Storing/Editing Favorites Buttons .............................................................................. 4-60
Receiving Documents ............................................................................................................ 4-62
Receiving Features ................................................................................................................... 4-63
Memory Reception ..........................................................................................................4-63
Memory Lock Reception ...............................................................................................4-63
Forwarding Received Documents .............................................................................4-65
Printing Received Documents .....................................................................................4-71
Available Paper Sizes ......................................................................................................4-73
Maintenance
Troubleshooting
10
Appendix
11
Table of Contents
Index
8
Canceling TX/RX Jobs ............................................................................................................. 4-75
Using the Touch Panel Display .................................................................................... 4-75
9
Using the Stop Key .......................................................................................................... 4-75
Using the System Monitor Screen .............................................................................4-75
Checking/Changing the Send/Receive Status .............................................................. 4-77
Checking/Changing the Status of Fax Jobs ............................................................ 4-77
Checking the Status of Send Jobs (imageCLASS MF7480 Only) .....................4-80
Checking/Changing the Status of Receive and Forwarding Error Jobs
(imageCLASS MF7480 Only) ........................................................................................4-81
xiv
Page 16

Before Using the
Machine
Original and Paper
1
TOP
PreviousBack Next
5 Printing and Scanning ..............................................................................................................5-1
2
Copying
3
Sending and
Receiving
Printing and
Scanning
Network (imageCLASS
MF7480/MF7470 Only)
Remote UI (imageCLASS
MF7480/MF7470 Only)
System Settings
4
5
6
7
8
Maintenance
9
Troubleshooting
Printing Documents ...................................................................................................................5-2
Scanning to a Computer (imageCLASS MF7480/MF7470 Only) ................................5-3
Switching the Scanner Online and Offline
(imageCLASS MF7480/MF7470 Only) ..................................................................................5-4
Switching the Scanner Online ........................................................................................5-4
Switching the Scanner Offline........................................................................................5-4
Canceling Print and Scan Jobs ...............................................................................................5-6
Canceling Print Jobs...........................................................................................................5-6
Canceling Scan Jobs ..........................................................................................................5-6
Checking Print Jobs ....................................................................................................................5-7
Checking the Status of Print Jobs .................................................................................5-7
6 Network (imageCLASS MF7480/MF7470 Only)......................................................................6-1
10
Appendix
11
Table of Contents
Index
System Requirements ................................................................................................................6-3
Printing or Sending a Fax from a Computer ..............................................................6-3
Using E-Mail/I-Fax ...............................................................................................................6-3
Sending Data to a File Server..........................................................................................6-4
Basic Network Settings .............................................................................................................6-5
Interface Settings ................................................................................................................6-5
Communication Environment Setup ...........................................................................6-6
xv
Page 17

Before Using the
Machine
Original and Paper
1
2
Copying
3
Sending and
Receiving
Printing and
Scanning
Network (imageCLASS
MF7480/MF7470 Only)
Remote UI (imageCLASS
MF7480/MF7470 Only)
System Settings
4
5
6
7
8
Maintenance
9
Troubleshooting
10
Appendix
11
TOP
PreviousBack Next
Setting Up a Computer for Printing/Sending a Fax ........................................................6-8
Setting Printing Method ...................................................................................................6-8
Machine Connection Method (LPD/Raw) ..................................................................6-9
Print Server Settings .......................................................................................................6-11
Setting Up E-Mail/I-Fax .......................................................................................................... 6-12
E-Mail/I-Fax Settings ....................................................................................................... 6-12
Setting Up a Computer as a File Server ............................................................................ 6-15
FTP Server Settings ......................................................................................................... 6-15
SMB Settings ...................................................................................................................... 6-21
Configuring a Shared Folder ........................................................................................ 6-22
Additional Network Settings................................................................................................ 6-33
TCP/IP Settings (IPv4) .....................................................................................................6-33
TCP/IP Settings (IPv6) .....................................................................................................6-40
Startup Time Settings ..................................................................................................... 6-45
Checking Network Connection ........................................................................................... 6-47
IPv4 ........................................................................................................................................6-47
IPv6 ........................................................................................................................................6-47
Machine Management ........................................................................................................... 6-48
Table of Contents
Index
Machine Management Using Web Browser (Remote UI) .................................. 6-48
Machine Management Using NetSpot Device Installer .....................................6-48
xvi
Page 18

Before Using the
Machine
Original and Paper
1
TOP
PreviousBack Next
7 Remote UI (imageCLASS MF7480/MF7470 Only) ..................................................................7-1
2
Copying
3
Sending and
Receiving
Printing and
Scanning
Network (imageCLASS
MF7480/MF7470 Only)
Remote UI (imageCLASS
MF7480/MF7470 Only)
System Settings
4
5
6
7
8
Maintenance
9
Troubleshooting
10
Appendix
11
System Requirements ................................................................................................................7-3
Windows.................................................................................................................................7-3
Macintosh ..............................................................................................................................7-3
Before You Start the Remote UI ..............................................................................................7-4
Setting the Remote UI to On...........................................................................................7-4
Using the Remote UI .................................................................................................................. 7-5
Starting the Remote UI .....................................................................................................7-5
Displaying Device Status and Information ........................................................................7-7
Job Management ........................................................................................................................7-8
Managing Print Jobs ..........................................................................................................7-8
Viewing the Print Log ........................................................................................................7-9
Viewing the Activity Log ..................................................................................................7-9
Managing the Address Book ................................................................................................ 7-10
Customizing System Settings .............................................................................................. 7-13
Customizing System Information ..............................................................................7-13
Table of Contents
Index
Specifying Forwarding Settings .......................................................................................... 7-16
Managing the Department/User ID .................................................................................. 7-21
xvii
Page 19

Before Using the
Machine
Original and Paper
1
2
Copying
3
Sending and
Receiving
Printing and
Scanning
Network (imageCLASS
MF7480/MF7470 Only)
Remote UI (imageCLASS
MF7480/MF7470 Only)
System Settings
4
5
6
7
8
Maintenance
9
Troubleshooting
10
Appendix
11
TOP
PreviousBack Next
Import/Export Function ......................................................................................................... 7-27
Saving the Address Book (Export) .............................................................................7-27
Loading an Address Book (Overwrite/Import) ...................................................... 7-28
Saving User Management Data in Files (Export) .................................................. 7-29
Loading User Management Data Files (Overwrite/Import) ..............................7-30
Saving Additional Functions Settings in Files (Export) ....................................... 7-31
Loading Additional Functions Settings Files (Overwrite/Import) ..................7-31
Device Custom Settings ......................................................................................................... 7-33
8 System Settings ........................................................................................................................8-1
Specifying the System Manager Settings...........................................................................8-3
Device Information Settings ................................................................................................... 8-5
Department ID Management .................................................................................................8-6
Registering the Department ID, Password, and Page Limit .................................8-6
Changing the Password and Page Limit .....................................................................8-8
Erasing the Department ID and Password .................................................................8-9
Checking Counter Information ................................................................................... 8-10
Clearing Page Totals ........................................................................................................ 8-10
Table of Contents
Index
Printing Counter Information (DEPT. INFO LIST) ..................................................8-11
Accepting Print and Scan Jobs with Unknown IDs .............................................. 8-12
Managing User IDs (imageCLASS MF7480/MF7470 Only) ........................................ 8-14
xviii
Page 20
Before Using the
Machine
Original and Paper
1
TOP
PreviousBack Next
Remote UI (imageCLASS MF7480/MF7470 Only) ......................................................... 8-15
2
Copying
3
Sending and
Receiving
Printing and
Scanning
Network (imageCLASS
MF7480/MF7470 Only)
Remote UI (imageCLASS
MF7480/MF7470 Only)
System Settings
4
5
6
7
8
Maintenance
9
Troubleshooting
Restricting the Send Function ............................................................................................. 8-16
Setting a Password for the Address Book ...............................................................8-16
Restricting the New Address .......................................................................................8-17
Setting Whether to Allow Sending Using the Fax Driver ................................... 8-17
Restricting Job Recall .....................................................................................................8-18
Setting to Confirm Entered Fax Numbers ............................................................... 8-18
Restricting Sequential Broadcast ............................................................................... 8-18
Checking the Job Log ............................................................................................................. 8-19
Restricting the USB Interface Port ..................................................................................... 8-20
Displaying Department ID/User Name ............................................................................ 8-21
Auto Online/Offline (imageCLASS MF7480/MF7470 Only) ...................................... 8-22
Auto Online ........................................................................................................................8-22
Auto Offline ........................................................................................................................ 8-22
10
Appendix
11
Table of Contents
Index
Detecting and Installing Drivers that Support Functions Specified on the
Machine into Your Computer ............................................................................................... 8-23
xix
Page 21

Before Using the
Machine
Original and Paper
1
TOP
PreviousBack Next
9 Maintenance .............................................................................................................................9-1
2
Copying
3
Sending and
Receiving
Printing and
Scanning
Network (imageCLASS
MF7480/MF7470 Only)
Remote UI (imageCLASS
MF7480/MF7470 Only)
System Settings
4
5
6
7
8
Maintenance
9
Troubleshooting
Cleaning the Machine ...............................................................................................................9-2
Exterior ...................................................................................................................................9-2
Fixing Unit .............................................................................................................................9-3
Scanning Area ......................................................................................................................9-4
Replacing the Stamp Cartridge ........................................................................................... 9-10
Replacing the Cartridge ......................................................................................................... 9-12
Recycling Used Cartridges .................................................................................................... 9-19
The Clean Earth Campaign ...........................................................................................9-19
U.S.A. PROGRAM ...............................................................................................................9-20
CANADA PROGRAM-CANADA PROGRAMME ........................................................ 9-22
Consumables ............................................................................................................................. 9-24
10 Troubleshooting ...................................................................................................................10-1
10
Appendix
11
Table of Contents
Index
Clearing Jams ............................................................................................................................ 10-3
Feeder ..................................................................................................................................10-5
Stack Bypass ....................................................................................................................... 10-7
Fixing Unit (Inside the Main Unit) ..............................................................................10-8
Duplex Unit ......................................................................................................................10-11
Paper Drawer 1................................................................................................................10-13
Paper Drawer 2................................................................................................................10-15
xx
Page 22

Before Using the
Machine
Original and Paper
1
TOP
PreviousBack Next
Error Messages ........................................................................................................................10-18
2
Copying
3
Sending and
Receiving
Printing and
Scanning
Network (imageCLASS
MF7480/MF7470 Only)
Remote UI (imageCLASS
MF7480/MF7470 Only)
System Settings
4
5
6
7
8
Maintenance
9
Troubleshooting
10
Appendix
Error Codes ...............................................................................................................................10-21
If Memory Becomes Full during Scanning ....................................................................10-28
Service Call Messages ........................................................................................................... 10-29
General Problems ...................................................................................................................10-31
Paper Feeding Problems......................................................................................................10-32
Sending/Receiving Problems ............................................................................................ 10-33
Sending Problems .........................................................................................................10-33
Receiving Problems .......................................................................................................10-37
Copying Problems .................................................................................................................10-40
Printing Problems ..................................................................................................................10-42
Printer Trouble.................................................................................................................10-42
Print Problems .................................................................................................................10-44
Correcting Poor Print Quality ....................................................................................10-45
11
Table of Contents
Index
Network Problems ................................................................................................................. 10-47
Uninstalling Software ...........................................................................................................10-51
Printer/Fax Drivers .........................................................................................................10-51
Color Network ScanGear .............................................................................................10-51
xxi
Page 23

Before Using the
Machine
Original and Paper
1
2
Copying
3
Sending and
Receiving
Printing and
Scanning
Network (imageCLASS
MF7480/MF7470 Only)
Remote UI (imageCLASS
MF7480/MF7470 Only)
System Settings
4
5
6
7
8
Maintenance
9
Troubleshooting
10
Appendix
11
TOP
PreviousBack Next
If You Cannot Solve a Problem .......................................................................................... 10-53
Customer Support (U.S.A.) ..........................................................................................10-53
Customer Support (Canada) ......................................................................................10-53
11 Appendix ...............................................................................................................................11-1
Machine Settings ..................................................................................................................... 11-3
Printing USER’S DATA LIST ............................................................................................ 11-3
Accessing the Additional Functions Menu ............................................................. 11-3
Using the Printer Settings Menu ................................................................................ 11-4
Additional Functions Menu .................................................................................................. 11-5
Common Settings ............................................................................................................11-5
Copy Settings ....................................................................................................................11-9
Timer Settings .................................................................................................................11-10
Communications Settings ..........................................................................................11-11
Adjustment/Cleaning ...................................................................................................11-16
Printer Settings ...............................................................................................................11-19
Address Book Settings .................................................................................................11-25
Report Settings ...............................................................................................................11-26
System Settings ..............................................................................................................11-28
Table of Contents
Index
Summary of Reports and Lists...........................................................................................11-43
xxii
Page 24

Before Using the
Machine
Original and Paper
1
2
Copying
3
Sending and
Receiving
Printing and
Scanning
Network (imageCLASS
MF7480/MF7470 Only)
Remote UI (imageCLASS
MF7480/MF7470 Only)
System Settings
4
5
6
7
8
Maintenance
9
Troubleshooting
10
Appendix
TOP
PreviousBack Next
Printing Reports Automatically ......................................................................................... 11-44
TX Report ..........................................................................................................................11-44
Activity Report ................................................................................................................11-45
RX Report ..........................................................................................................................11-46
Printing Reports and Lists Manually................................................................................11-47
Printing Address Book List ..........................................................................................11-47
Printing Address Book List (One-touch Buttons) ................................................11-47
Printing Forwarding Conditions List .......................................................................11-48
Checking and Deleting Jobs .............................................................................................. 11-49
Checking and Deleting Report Jobs .......................................................................11-49
Some Basic Facts about Fonts ........................................................................................... 11-50
What Is a Font? ................................................................................................................11-50
Attributes of Fonts .........................................................................................................11-50
Fonts and Scalable Fonts .............................................................................................11-54
Typeface Samples ..........................................................................................................11-56
Symbol Sets ......................................................................................................................11-58
ISO Substitution Table ..................................................................................................11-82
11
Table of Contents
Index
Glossary ..................................................................................................................................... 11-84
Index ..........................................................................................................................................11-94
xxiii
Page 25
Before Using the
p
.
Machine
Original and Paper
TOP
PreviousBack Next
1
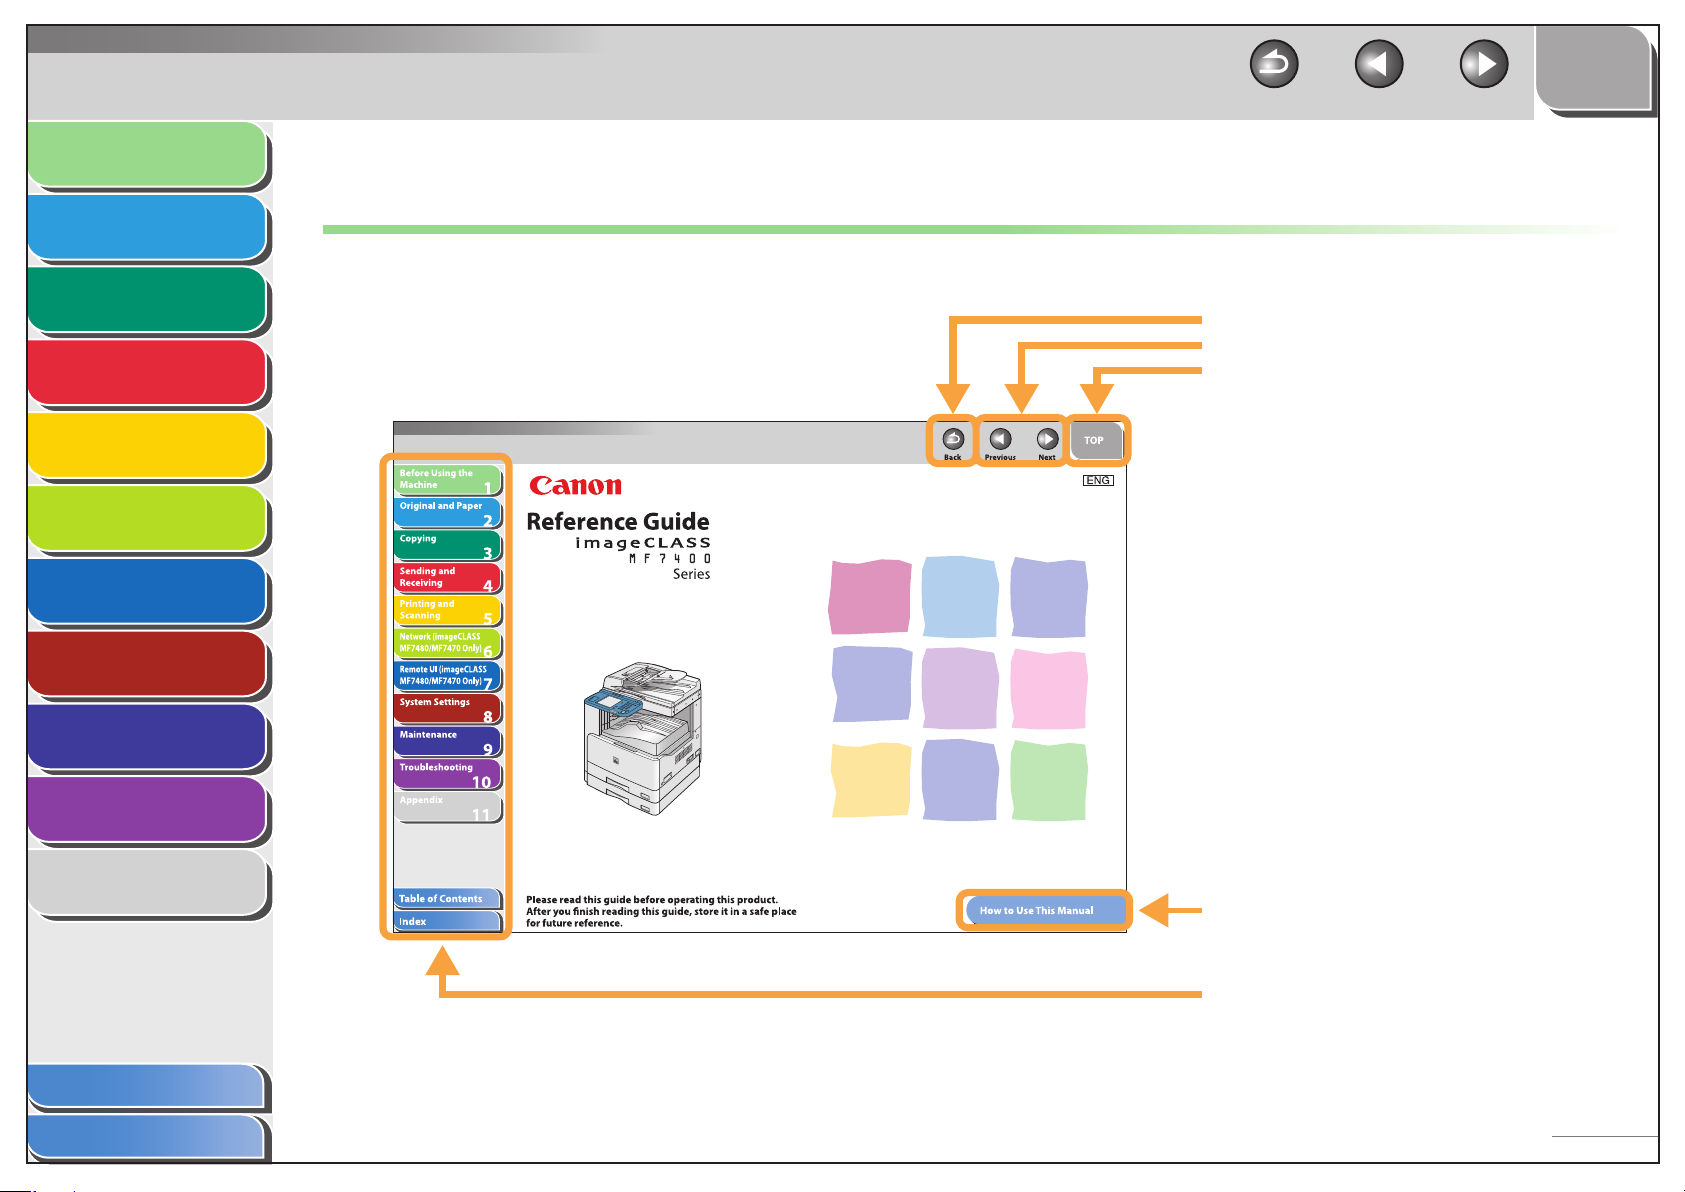
How to Use This Manual
2
Copying
3
Sending and
Receiving
Printing and
Scanning
Network (imageCLASS
MF7480/MF7470 Only)
Remote UI (imageCLASS
MF7480/MF7470 Only)
System Settings
4
5
6
7
8
Maintenance
9
Troubleshooting
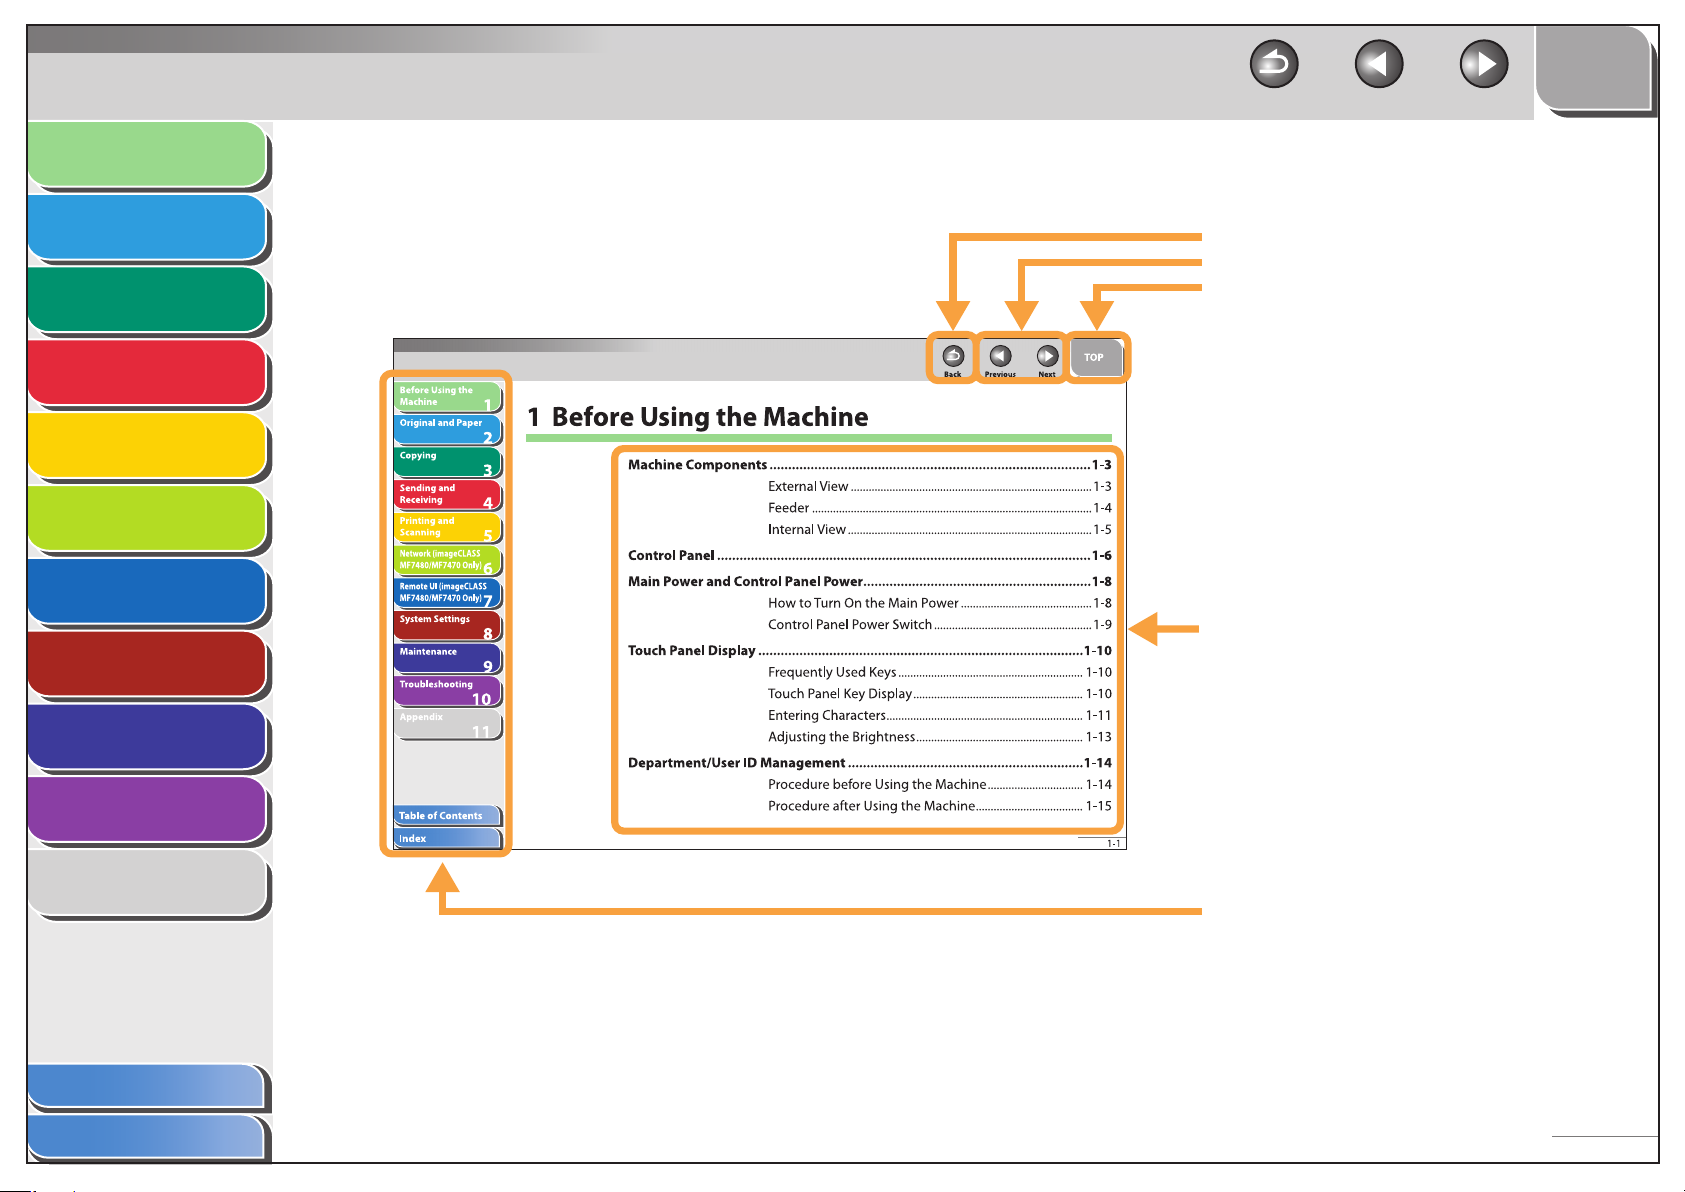
Using the Top Page
■
Returns to the last page opened.
Displays the previous or next page.
Returns to the top page.
10
Appendix
11
Table of Contents
Index
Displays the “How to Use This Manual” page.
Quick links to the list of things you can do, topics
for each cha
ter, table of contents, and the index
xxiv
Page 26
Before Using the
.
Machine
Original and Paper
1
2
Copying
3
Sending and
Receiving
Printing and
Scanning
Network (imageCLASS
MF7480/MF7470 Only)
Remote UI (imageCLASS
MF7480/MF7470 Only)
System Settings
4
5
6
7
Using the Chapter Topic List
■
TOP
PreviousBack Next
Returns to the last page opened.
Displays the previous or next page.
Returns to the top page.
Table of contents for the chapter.
Maintenance
Troubleshooting
10
Appendix
11
Table of Contents
Index
8
9
Quick links to the list of things you can do, topics
for each chapter, table of contents, and the index
xxv
Page 27
Before Using the
Machine
Original and Paper
Copying
1
2
TOP
PreviousBack Next
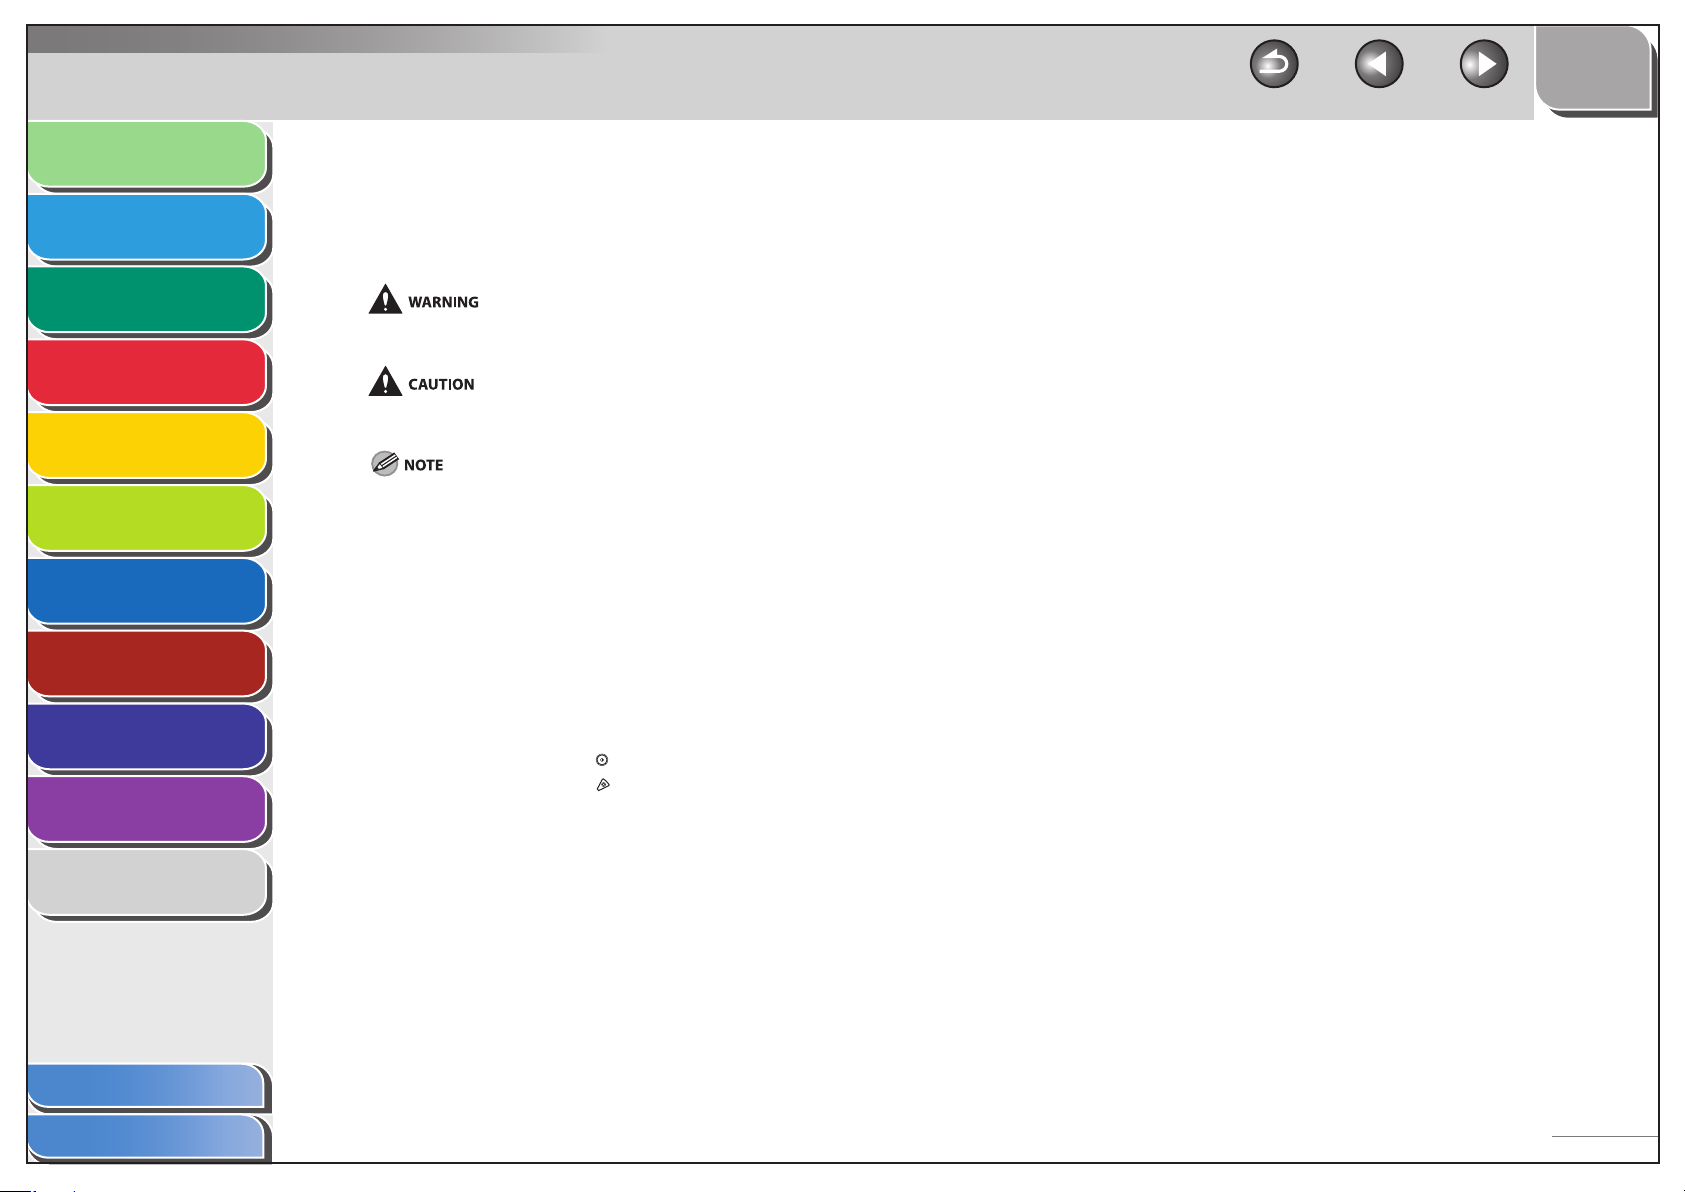
Symbols Used in This Manual
■
The following symbols are used throughout the manuals for the machine and indicate the warnings, cautions and notes you should keep in mind when
using the machine.
3
Sending and
Receiving
Printing and
Scanning
Network (imageCLASS
MF7480/MF7470 Only)
Remote UI (imageCLASS
MF7480/MF7470 Only)
System Settings
4
5
6
7
8
Maintenance
9
Troubleshooting
10
Appendix
11
Indicates a warning that may lead to death or serious injury if not observed.
Explains how to avoid actions that could injure you or damage your machine.
Explains operating restrictions and how to avoid minor difficulties.
■
Keys Used in This Manual
The following symbols and key names are a few examples of how keys to be pressed are expressed in this manual:
Touch Panel Display Keys: [Key Name]
Examples: [Cancel]
[Done]
Control Panel Keys: key icon (Key Name)
Examples:
Items on Computer
Operation Screens:
Examples: [Save]
(Start)
(Stop)
[Item Name]
[OK]
Table of Contents
Index
xxvi
Page 28
Before Using the
Machine
Original and Paper
TOP
PreviousBack Next
1
Legal Notices
2
Copying
3
Sending and
Receiving
Printing and
Scanning
Network (imageCLASS
MF7480/MF7470 Only)
Remote UI (imageCLASS
MF7480/MF7470 Only)
System Settings
4
5
6
7
8
Maintenance
9
Troubleshooting
Trademarks
Canon, the Canon logo, imageCLASS, and NetSpot are trademarks of Canon Inc.
Microsoft, Windows and Windows Server are registered trademarks of Microsoft Corporation in the United States and other countries.
Windows Vista is a trademark of Microsoft Corporation in the United States and other countries.
All other product and brand names are registered trademarks, trademarks or service marks of their respective owners.
Copyright
Copyright 2007 by Canon Inc. All rights reserved. No part of this publication may be reproduced, transmitted, transcribed, stored in a retrieval system, or
translated into any language or computer language in any form or by any means, electronic, mechanical, magnetic, optical, chemical, manual, or
otherwise, without the prior written permission of Canon Inc.
Disclaimer
The information in this document is subject to change without notice.
CANON INC. MAKES NO WARRANTY OF ANY KIND WITH REGARD TO THIS MATERIAL, EITHER EXPRESS OR IMPLIED, EXCEPT AS PROVIDED HEREIN,
INCLUDING WITHOUT LIMITATION, THEREOF, WARRANTIES AS TO MARKETABILITY, MERCHANTABILITY, FITNESS FOR A PARTICULAR PURPOSE OF USE OR
NON-INFRINGEMENT. CANON INC. SHALL NOT BE LIABLE FOR ANY DIRECT, INCIDENTAL, OR CONSEQUENTIAL DAMAGES OF ANY NATURE, OR LOSSES OR
EXPENSES RESULTING FROM THE USE OF THIS MATERIAL.
10
Appendix
11
Table of Contents
Index
xxvii
Page 29
Before Using the
Machine
Original and Paper
1
2
Copying
3
Sending and
Receiving
Printing and
Scanning
Network (imageCLASS
MF7480/MF7470 Only)
Remote UI (imageCLASS
MF7480/MF7470 Only)
System Settings
4
5
6
7
8
Maintenance
TOP
PreviousBack Next
1 Before Using the Machine
Machine Components ......................................................................................1-3
External View .................................................................................1-3
Feeder ..............................................................................................1-4
Internal View ..................................................................................1-5
Control Panel ....................................................................................................1-6
Main Power and Control Panel Power.............................................................1-8
How to Turn On the Main Power ............................................ 1-8
Control Panel Power Switch .....................................................1-9
Touch Panel Display .......................................................................................1-10
Troubleshooting
10
Appendix
11
Table of Contents
Index
9
Frequently Used Keys .............................................................. 1-10
Touch Panel Key Display ......................................................... 1-10
Entering Characters .................................................................. 1-11
Adjusting the Brightness ........................................................ 1-13
Department/User ID Management ...............................................................1-14
Procedure before Using the Machine ................................ 1-14
Procedure after Using the Machine .................................... 1-15
1-1
Page 30

Before Using the
Machine
Original and Paper
1
2
Copying
3
Sending and
Receiving
Printing and
Scanning
Network (imageCLASS
MF7480/MF7470 Only)
Remote UI (imageCLASS
MF7480/MF7470 Only)
System Settings
4
5
6
7
TOP
PreviousBack Next
Cartridge .........................................................................................................1-16
Maintaining the Cartridge ..................................................... 1-16
Timer Settings ................................................................................................1-18
Setting the Sleep Mode .......................................................... 1-18
Setting Auto Clear Time .......................................................... 1-18
Checking Device Status .................................................................................1-20
Maintenance
Troubleshooting
10
Appendix
11
Table of Contents
Index
8
9
1-2
Page 31

Before Using the
Machine
Original and Paper
1
2
Copying
3
Sending and
Receiving
Printing and
Scanning
Network (imageCLASS
MF7480/MF7470 Only)
Remote UI (imageCLASS
MF7480/MF7470 Only)
System Settings
4
5
6
7
8
Maintenance
Machine Components
External View■
TOP
PreviousBack Next
A Feeder
Originals placed in the feeder are automatically fed sheet by
sheet to the scanning area of the platen glass. The feeder
also automatically turns over two-sided originals to make
two or one sided copies.
B Main Power Switch
Press to the “I” side to turn the power on. (See “Main Power
and Control Panel Power,” on p. 1-8.)
C Paper Drawers
Holds up to 250 sheets of paper (22 lb bond (80 g/m2)).
D Stack Bypass
Use the stack bypass to feed paper manually and for loading
nonstandard paper stock, such as envelopes. (See “Into the
Stack Bypass,” on p. 2-13.)
E Main Control Panel
Includes the keys, touch panel display, and indicators
required for operating the machine. (See “Main Power and
Control Panel Power,” on p. 1-8.)
Troubleshooting
10
Appendix
11
Table of Contents
Index
9
1-3
Page 32

Before Using the
Machine
Original and Paper
1
2
Copying
3
Sending and
Receiving
Printing and
Scanning
Network (imageCLASS
MF7480/MF7470 Only)
Remote UI (imageCLASS
MF7480/MF7470 Only)
System Settings
4
5
6
7
8
Maintenance
TOP
PreviousBack Next
Feeder■
A Feeder Cover
Open this cover to remove jammed originals.
B Slide Guides
Adjust the slide guides to match the width of the original.
C Original Supply Tray
Originals placed here are automatically fed sheet by sheet to
the scanning area of the platen glass. Place originals into this
tray with the surface that you want to scan face up.
D Original Output Area
Originals that have been scanned from the original supply
tray are output to the original output area in the order that
they are fed into the feeder.
–
Do not insert your fingers into the gaps around the original supply tray,
as your fingers may get caught. Also, be careful not to drop objects, such
as paper clips into the gaps, as doing so may cause damage to the
machine or cause it to break down.
–
When using the platen glass to copy or scan thick originals, such as
books or magazines, do not press down hard on the feeder.
–
If the original output area is blocked, originals may get damaged, and
printing may not be performed correctly. Therefore, do not place any
objects in the original output area.
Troubleshooting
10
Appendix
11
Table of Contents
Index
9
1-4
Page 33

Before Using the
Machine
Original and Paper
1
2
Copying
3
Sending and
Receiving
Printing and
Scanning
Network (imageCLASS
MF7480/MF7470 Only)
Remote UI (imageCLASS
MF7480/MF7470 Only)
System Settings
4
5
6
7
8
Maintenance
TOP
PreviousBack Next
Internal View■
A Platen Glass
Place originals here when scanning books, thick originals,
thin originals, transparencies, etc.
B Cartridge
When toner runs out, pull out the cartridge, and replace it
with a new one.
C Front Cover
Open this cover to replace the cartridge.
D Paper Drawer’s Left Cover
Open these covers when clearing a paper jam in Paper
Drawer 2.
E Fixing Unit
When paper jam occurs in the fixing unit, see “Fixing Unit
(Inside the Main Unit),” on. p. 10-8.
F Left Cover
Open this cover when clearing a paper jam inside the
machine or replacing the cartridge.
G Duplex Unit
The duplex unit enables you to use the 2-Sided mode for
copying or printing.
H Scanning Area
Originals placed in the feeder are scanned here.
Troubleshooting
10
Appendix
11
Table of Contents
Index
9
1-5
Page 34

Before Using the
Machine
Original and Paper
1
2
Copying
3
Sending and
Receiving
Printing and
Scanning
Network (imageCLASS
MF7480/MF7470 Only)
Remote UI (imageCLASS
MF7480/MF7470 Only)
System Settings
4
5
6
7
8
Maintenance
9
Troubleshooting
10
Appendix
11
Table of Contents
Control Panel
A COPY key
Press to use the Copy function. The Copy Basic Features
screen appears on the touch panel display.
B SEND key
Press to use the Send/Fax function. The Send Basic Features
screen appears on the touch panel display. The Send
function is available only for the imageCLASS MF7480.
C SCAN key (imageCLASS MF7480/MF7470 Only)
Press to enable the Network Scan function. (See the Color
Network ScanGear User’s Guide.)
D Reset key
Press to restore the standard settings of the machine.
E Numeric keys
Press to enter numerical values.
F Control Panel Power Switch (Sub Power Supply)
Press to turn the control panel on or off. When the control
panel is turned off, the machine is in the Sleep mode.
TOP
PreviousBack Next
G Serial No. key
Press to display the serial number on the touch panel display.
H Stop key
Press to stop a job in progress, such as a scan, copy, or fax job
(scanning only).
I Start key
Press to start an operation.
J Main Power Indicator
Lights when the main power is turned on.
K Clear key
Press to clear entered values or characters.
L Error Indicator
Flashes or lights if there is an error in the machine. When the
Error indicator flashes, follow the instructions that appear on
the touch panel display. When the Error indicator maintains a
steady red light, contact Canon Authorized Service Facilities
or the Canon Customer Care Center.
Index
1-6
Page 35

Before Using the
Machine
Original and Paper
1
2
Copying
3
Sending and
Receiving
Printing and
Scanning
Network (imageCLASS
MF7480/MF7470 Only)
Remote UI (imageCLASS
MF7480/MF7470 Only)
System Settings
4
5
6
7
TOP
PreviousBack Next
M Log In/Out key
Press when setting or enabling Department ID Management
or User ID Management.
N Processing/Data Indicator
Flashes or blinks green when the machine is performing
operations. When the Processing/Data indicator maintains a
steady green light, fax data is stored in memory.
O Display Contrast Dial
Use to adjust the brightness of the touch panel display.
P Additional Functions key
Press to specify additional functions.
Q Touch Panel Display
The settings screen for each function is shown on this
display.
Maintenance
Troubleshooting
10
Appendix
11
Table of Contents
Index
8
9
1-7
Page 36

Before Using the
Machine
Original and Paper
TOP
PreviousBack Next
1
Main Power and Control Panel Power
2
Copying
3
Sending and
Receiving
Printing and
Scanning
Network (imageCLASS
MF7480/MF7470 Only)
Remote UI (imageCLASS
MF7480/MF7470 Only)
System Settings
4
5
6
7
8
Maintenance
9
Troubleshooting
10
Appendix
11
Table of Contents
The machine is provided with two power switches, a main
power switch and a control panel power switch.
How to Turn On the Main Power
■
This section explains how to turn on the main power.
1. Make sure that the power plug is firmly inserted
into the power outlet.
Do not connect or disconnect the power cord with wet hands, as this
may result in electrical shock.
2. Press the main power switch to “I” side.
The main power indicator on the control panel lights and the screen
below is displayed until the machine is ready to scan.
When the machine is ready to scan, the screen below is displayed.
The example shown below is the Copy Basic Features screen.
–
If the main power indicator does not light, make sure that the
power cord is firmly inserted into the power outlet.
–
If the message <Enter the Department ID and Password using
the numeric keys.> or <Enter the User ID and Password.> appears
on the touch panel display, enter your registered ID and
password. (See “Department/User ID Management,” on p. 1-14.)
–
If you want to turn the main power off, first turn the control
panel power switch off, and then press the main power switch to
the “
” side.
–
If you turn off the main power, wait at least 10 seconds before
turning the main power back on.
–
Do not turn the main power off if you want to be able to send or
receive fax/I-fax documents. Sending or receiving fax/I-fax
documents cannot be done when the main power is turned off.
–
If User ID Management is set to [On], the machine will take
longer to become ready to scan.
–
You can set the initial screen (the first screen that appears when
the machine is turned on) from the Additional Functions screen.
The initial screen can be the Copy, Send, Scan, or System Monitor
screen. (See “Common Settings,” on p. 11-5.)
–
The machine will enter the Sleep mode if the main power switch
is pressed when the machine’s power is on and a certain type of
optional equipment is connected.
Index
1-8
Page 37

Before Using the
Machine
Original and Paper
1
2
Copying
3
Sending and
Receiving
Printing and
Scanning
Network (imageCLASS
MF7480/MF7470 Only)
Remote UI (imageCLASS
MF7480/MF7470 Only)
System Settings
4
5
6
7
Control Panel Power Switch
■
To turn the control panel on or off, press the control panel power
switch. When turned off, the machine is in the Sleep mode.
Control Panel Power Switch Machine Status
On Standby mode (ready for
immediate copying or printing)
Off Sleep mode
TOP
PreviousBack Next
–
If you are using the machine as a Windows printer, the machine may not
enter the Sleep mode completely if SNMP Status is enabled for your
operating system (unless your computer is turned off). For more
information on disabling SNMP Status, contact your network
administrator.
–
It takes approximately 10 seconds for the machine to recover after the
Sleep mode is deactivated.
–
If Energy Consumption in Sleep Mode is set to [Low], it may take more
than 10 seconds for the touch panel display to be displayed after
pressing the control panel power switch.
–
The energy consumption level in the Sleep mode is [High] even when the
energy consumption level is set to [Low], such as when a job is being
processed (including a forwarding job, report job, receive job, or sending
a forwarding done notice).
Maintenance
Troubleshooting
10
Appendix
11
Table of Contents
Index
8
9
The machine can receive and print documents from a personal computer
–
when it is in the Sleep mode. Fax/I-fax documents can also be received
while the machine is in the Sleep mode.
The energy consumption while the machine is in the Sleep mode can be
–
set from the Additional Functions screen. (See “Common Settings,” on
p. 11-5.)
The machine will not enter the Sleep mode if it is scanning or printing.
–
If there is less time than specified in Auto Sleep Time remaining before
–
sending a job which has been reserved for delayed sending, the machine
will not enter the Sleep mode completely.
If there is a job which has been reserved for delayed sending, the
–
machine will not enter the Sleep mode completely.
If you are using a management application to view or manage the
–
settings and status of the machine via the network, the machine may not
enter the Sleep mode completely.
1-9
Page 38

Before Using the
Machine
Original and Paper
TOP
PreviousBack Next
1
Touch Panel Display
2
Copying
3
Sending and
Receiving
Printing and
Scanning
Network (imageCLASS
MF7480/MF7470 Only)
Remote UI (imageCLASS
MF7480/MF7470 Only)
System Settings
4
5
6
7
8
Maintenance
9
Troubleshooting
10
Appendix
11
Table of Contents
Most operations on this machine are executed from the touch
panel display. By pressing the keys according to the
instructions on the touch panel display, you can utilize the
functions of this machine efficiently.
Press the touch panel display keys gently with your fingers. Do not press
the touch panel display with a pencil, ballpoint pen, or other sharp objects
that can scratch the surface of the touch panel display. Doing so may
damage the touch panel display.
Before using the touch panel display, peel off the protective film from the
display.
Frequently Used Keys
■
The keys that are used frequently on the touch panel display are:
Press to cancel the mode that you are
currently setting, or a mode that has already
been set, on screens other than the Additional
Functions screen. Also, press to close the
current mode’s setting screen, and keep the
original settings set from the Additional
Functions screen.
Press to confirm the current settings and
proceed to the next step in the procedure.
Press to go back to the previous step in the
procedure, without saving the current
settings.
Press to close the current screen.
Press to confirm the current settings of a
mode.
Touch Panel Key Display
■
When you press a key on the touch panel display, that key is
highlighted, and the corresponding mode is set. When you set
certain modes, the characters on some keys may become grayed
out. You cannot press keys that are grayed out. This means that you
cannot set these modes in combination with the presently set
mode.
Mode Setting Keys
●
State of Keys Description
The 2-Page Separation mode is
not set, and can be selected.
The 2-Page Separation mode is
set, and can be selected.
(The key is highlighted)
The 2-Page Separation mode
cannot be set in combination
with the presently set mode.
(The characters on the key are
grayed out.)
Index
1-10
Page 39

Before Using the
Machine
Original and Paper
1
2
Copying
3
Sending and
Receiving
Printing and
Scanning
Network (imageCLASS
MF7480/MF7470 Only)
Remote UI (imageCLASS
MF7480/MF7470 Only)
System Settings
4
5
6
7
Keys That Indicate When a Mode Is Turned On or Off
●
Mode Is Turned Off Mode Is Turned On
(Highlighted)
Keys with a right triangle (▶) indicate that those keys have
additional screens to set their functions. If you press a key that does
not have a right triangle (▶), it turns that mode on or off.
Keys That Display Additional
Settings
Keys with a black square (■) in the lower right corner, that appear
on screens for storing settings, already have settings stored in them.
Settings Are Stored No Settings Are Stored
Keys That Turn Modes On/Off
TOP
PreviousBack Next
Numeric Keys
●
Anytime the numeric keys icon is displayed on the screen, you can
use the numeric keys on the control panel to enter values.
You can enter values using
the numeric keys on the
touch panel display or on
the control panel.
You can only enter values
using the numeric keys on
the control panel.
Entering Characters
■
For screens that require alphanumeric entries, enter characters
using the keys displayed on the touch panel display, as shown
below.
Alphanumeric Characters
Maintenance
Troubleshooting
10
Appendix
11
Table of Contents
Index
8
9
●
Keys That Display a Drop-Down List
Pressing a key that has a right triangle (▶) to the right of the name
of the selection, displays a drop-down list containing other setting
options.
Before Selection Drop-Down List After Selection
Example: Enter <Canon>.
1. To enter alphanumeric characters, make sure
that <Alphabet> is displayed above [Entry
Mode].
Each press of [Entry Mode] switches the entry mode between
<Alphabet> and <Other>.
1-11
Page 40

Before Using the
Machine
Original and Paper
1
2
Copying
3
Sending and
Receiving
Printing and
Scanning
Network (imageCLASS
MF7480/MF7470 Only)
Remote UI (imageCLASS
MF7480/MF7470 Only)
System Settings
4
5
6
7
8
Maintenance
9
Troubleshooting
10
Appendix
2. Enter <Canon>.
To enter uppercase letters, press [Shift].
To enter a space, press [Space].
To move the cursor, press [◀] or [▶].
To enter symbols, press [Entry Mode] to select [Other], then enter the
desired symbols.
If you make a mistake when entering characters, press [◀] or [▶]
–
to position the cursor on the right side of the characters to be
deleted, then press [Backspace] to delete the characters and
enter the correct characters.
To delete all of the characters you have entered, press
–
The available entry modes, and the maximum number of
–
characters that you can enter vary, depending on the type of
entries you are making.
3. Press [OK].
Symbols
(Clear).
PreviousBack Next
3. Press [é].
To enter a space, press [Space].
To move the cursor, press [◀] or [▶].
To enter alphanumeric characters, press [Entry Mode] to select
[Alphabet], then enter the desired characters.
If you make a mistake when entering characters, press [◀] or [▶]
–
to position the cursor on the right side of the characters to be
deleted, then press [Backspace] to delete the characters and
enter the correct characters.
To delete all of the characters you have entered, press
–
The available entry modes, and the maximum number of
–
characters that you can enter vary, depending on the type of
entries you are making.
4. Press [OK].
TOP
(Clear).
11
Table of Contents
Index
Example: Enter <é>.
1. Press [Entry Mode] to select [Other].
2. Press [▼] or [▲] to display the desired symbol
that you want to enter.
1-12
Page 41

Before Using the
Machine
Original and Paper
1
2
Copying
3
Sending and
Receiving
Printing and
Scanning
Network (imageCLASS
MF7480/MF7470 Only)
Remote UI (imageCLASS
MF7480/MF7470 Only)
System Settings
4
5
6
7
Values in Inches
If you want to enter values in inches in all modes which require a
numeric entry, set Inch Entry to [On] in Common Settings (from the
Additional Functions screen). (See “Common Settings,” on p. 11-5.)
This enables you to enter values in inches when you press [Inch] on
a screen requiring a numeric entry or measurement.
The default entry mode for numeric values is inches, but you can
change it to millimeters by turning the Inch Entry mode [Off ].
The following example shows you how to enter 5 1/2" for X value in
the Irregular Size mode.
1. Press the keys in the following order: [5], [_], [1],
[/], and [2].
TOP
PreviousBack Next
Adjusting the Brightness
■
If the touch panel display is difficult to view, use the display contrast
dial on the control panel to adjust its brightness.
To make the touch panel display brighter, turn the dial counterclockwise. To
make it darker, turn the dial clockwise.
Maintenance
Troubleshooting
10
Appendix
11
Table of Contents
Index
8
9
–
If you make a mistake when entering values, press [C], then enter
the correct values.
–
You can enter only 2, 4, 8, or 16 as the denominator.
–
The value entered in inches is converted to millimeters by the
machine each time it is entered. Thus, there may be a slight
difference between the value calculated and the actual value
entered.
–
To enter values in millimeters, press [mm].
1-13
Page 42

Before Using the
Machine
Original and Paper
TOP
PreviousBack Next
1
Department/User ID Management
2
Copying
3
Sending and
Receiving
Printing and
Scanning
Network (imageCLASS
MF7480/MF7470 Only)
Remote UI (imageCLASS
MF7480/MF7470 Only)
System Settings
4
5
6
7
8
Maintenance
9
Troubleshooting
10
Appendix
11
If Department ID Management or User ID Management is set to
[On] in System Settings, you must enter your ID and password
to be able to operate the machine. For details, see Chapter 8,
“System Settings.”
Procedure before Using the Machine
■
Department ID Management
1. Press [Department ID], then enter the
Department ID using
– (numeric keys).
2. If the password is set, press [password], then
enter the password using
The numbers that you enter for the password are displayed as
asterisks (*******).
– (numeric keys).
3. Press (Log In/Out).
The Basic Features screen of the selected function appears on the
touch panel display.
User ID Management
1. Press [User ID].
2. Enter the User ID, then press [OK].
You can also enter the User ID using – (numeric keys).
Table of Contents
Index
1-14
Page 43

Before Using the
Machine
Original and Paper
1
2
Copying
3
Sending and
Receiving
Printing and
Scanning
Network (imageCLASS
MF7480/MF7470 Only)
Remote UI (imageCLASS
MF7480/MF7470 Only)
System Settings
4
5
6
7
8
Maintenance
3. Press [Password].
4. Enter the password, then press [OK].
You can also enter the password using – (numeric keys).
5. Press (Log In/Out).
The Basic Features screen of the selected function appears on the
touch panel display.
Procedure after Using the Machine
■
1. Be sure to press (Log In/Out).
TOP
PreviousBack Next
Troubleshooting
10
Appendix
11
Table of Contents
Index
9
If you do not press (Log In/Out) after you are finished operating
the machine, any subsequent copies and scans for Send/Fax
functions made are added to the total of the Department ID you
previously entered, or the total of the User ID who previously logged
on to the machine.
1-15
Page 44

Before Using the
Machine
Original and Paper
TOP
PreviousBack Next
1
Cartridge
2
Copying
3
Sending and
Receiving
Printing and
Scanning
Network (imageCLASS
MF7480/MF7470 Only)
Remote UI (imageCLASS
MF7480/MF7470 Only)
System Settings
4
5
6
7
8
Maintenance
9
Troubleshooting
10
Appendix
11
The lifetime of the Canon genuine replacement cartridge is
approximately 10,000 pages. The level of toner consumption
varies depending on the type of originals printed. If your
average original contains a lot of graphics, tables, or charts, the
life of the cartridge will be shorter as they consume more toner.
When you are replacing a cartridge, be sure to use a cartridge
designed for this product. To purchase the Canon genuine
replacement cartridge, contact Canon Authorized Service
Facilities or Canon Customer Care Center (U.S.A.:1-800-8284040, Canada:1-800-652-2666).
Cartridge name:
Canon Cartridge 105
Maintaining the Cartridge
■
Keep the cartridge away from computer screens, disk drives,
●
and floppy disks. The magnet inside the cartridge may harm
these items.
●
Avoid locations subject to high temperature, high humidity,
or rapid changes in temperature.
Do not expose the cartridge to direct sunlight or bright light
●
for more than five minutes.
Store the cartridge in its protective bag. Do not open the bag
●
until you are ready to install the cartridge in the machine.
Save the cartridge’s protective bag in case you need to
●
repack and transport the cartridge at a later date.
Do not store the cartridge in a salty atmosphere or where
●
there are corrosive gases such as from aerosol sprays.
Do not remove the cartridge from the machine unnecessarily.
●
Do not open the drum protective shutter on the cartridge.
●
Print quality may deteriorate if the drum surface is exposed
to light or is damaged.
Always hold the cartridge by its handle to avoid touching the
●
drum protective shutter.
Do not stand the cartridge on end, and do not turn it upside
●
down. If toner becomes caked in the cartridge, it may become
impossible to free it even by shaking the cartridge.
Table of Contents
Index
If there is a toner powder leakage, make sure not to inhale or
●
touch the toner powder. If it comes in contact with your skin,
rinse with cold water using soap. If you feel an irritation on
your skin or inhale the powder, consult a doctor immediately.
1-16
Page 45

Before Using the
Machine
Original and Paper
1
2
Copying
3
Sending and
Receiving
Printing and
Scanning
Network (imageCLASS
MF7480/MF7470 Only)
Remote UI (imageCLASS
MF7480/MF7470 Only)
System Settings
4
5
6
7
When removing the cartridge from the machine, make sure
●
to remove it carefully. If not removed with care, the toner
powder may scatter and come in contact with your eyes and
mouth. If this happens, rinse with water and consult a doctor
immediately.
Keep the cartridge away from small children. If they ingest
●
the toner powder, consult a doctor immediately.
Do not disassemble the cartridge. The toner powder may
●
scatter and come in contact with your eyes and mouth. If this
happens, rinse with water and consult a doctor immediately.
Do not place the cartridge in fire. Toner powder is flammable.
TOP
PreviousBack Next
Maintenance
Troubleshooting
10
Appendix
11
Table of Contents
Index
8
9
1-17
Page 46

Before Using the
Machine
Original and Paper
1
2
Copying
3
Sending and
Receiving
Printing and
Scanning
Network (imageCLASS
MF7480/MF7470 Only)
Remote UI (imageCLASS
MF7480/MF7470 Only)
System Settings
4
5
6
7
8
Maintenance
Timer Settings
Setting the Sleep Mode
■
If the machine is idle for a certain period of time (after the last print
job or key operation is performed), the control panel power switch
automatically switches off to save power. The machine has entered
the Sleep mode.
1. Press (Additional Functions).
2. Press [Timer Settings].
3. Press [Auto Sleep Time].
4. Press [On].
5. Press [-] or [+] to specify the desired Auto Sleep
Time, then press [OK].
TOP
PreviousBack Next
6. Press [Done] repeatedly until the Basic Features
screen appears.
To resume the normal mode from the Sleep mode, press the
–
control panel power switch.
To enter the Sleep mode manually, press the control panel power
–
switch.
The machine can continue to receive fax/I-fax documents, and
–
process or print data sent from computers even if the machine is
in the Sleep mode.
Setting Auto Clear Time
■
If the machine is idle for a certain period of time (after the last print
job or key operation is performed), the display returns to the Basic
Features screen (standard settings) of the selected function. This
period of time is called the “Auto Clear Time.”
Troubleshooting
10
Appendix
11
Table of Contents
Index
9
The Auto Sleep Time can be set from 3 to 30 minutes.
You can also enter values using
– (numeric keys).
1. Press (Additional Functions).
2. Press [Timer Settings].
3. Press [Auto Clear Time].
1-18
Page 47

Before Using the
Machine
Original and Paper
1
2
Copying
3
Sending and
Receiving
Printing and
Scanning
Network (imageCLASS
MF7480/MF7470 Only)
Remote UI (imageCLASS
MF7480/MF7470 Only)
System Settings
4
5
6
7
4. Press [-] or [+] to specify the desired Auto Clear
Time, then press [OK].
The Auto Clear Time can be set from 0 to 9 minutes (in one minute
increments).
You can also enter values using
– (numeric keys).
5. Press [Done] repeatedly until the Basic Features
screen appears.
TOP
PreviousBack Next
Maintenance
Troubleshooting
10
Appendix
11
Table of Contents
Index
8
9
1-19
Page 48

Before Using the
Machine
Original and Paper
TOP
PreviousBack Next
1
Checking Device Status
2
Copying
3
Sending and
Receiving
Printing and
Scanning
Network (imageCLASS
MF7480/MF7470 Only)
Remote UI (imageCLASS
MF7480/MF7470 Only)
System Settings
4
5
6
7
8
Maintenance
9
Troubleshooting
10
Appendix
11
You can check the current machine status both on the Job/Print
Status Display Area and on the Device status screen.
The Job/Print Status Display Area (A) displays the progress of
jobs and copy operations, and the status of your machine and
consumables. Also, the current Department ID or user name can
be displayed here. (See “Displaying Department ID/User Name,”
on p. 8-21.)
For the Device status screen, press [System Monitor] (B) to
display the System Monitor screen, then press [Device]. The
Device status screen enables you to check the following
information:
A Displays the status of the device and the current job.
B Displays recovery procedures for problems, such as clearing
a paper jam or replacing the cartridge.
C Displays the status of toner by pressing [Consumable].
D Displays the remaining amount of available system memory.
E Displays the paper supply, paper type, and paper size loaded
in the paper drawers or the stack bypass.
The jobs may not be accepted even if <Avail. Memory> has not reached
zero percent. In this case, print or delete jobs stored in the memory and try
again.
Table of Contents
Index
1-20
Page 49

Before Using the
Machine
Original and Paper
1
2
Copying
3
Sending and
Receiving
Printing and
Scanning
Network (imageCLASS
MF7480/MF7470 Only)
Remote UI (imageCLASS
MF7480/MF7470 Only)
System Settings
4
5
6
7
8
Maintenance
9
Troubleshooting
TOP
PreviousBack Next
2 Original and Paper
Original Requirements .....................................................................................2-3
Scanning Area ...................................................................................................2-4
Loading Originals .............................................................................................2-5
Original Sizes ................................................................................. 2-5
Orientation ..................................................................................... 2-5
On the Platen Glass .....................................................................2-6
Into the Feeder ..............................................................................2-8
Paper Requirements ......................................................................................2-10
Printable Area .................................................................................................2-12
Loading Paper ................................................................................................2-13
10
Appendix
11
Table of Contents
Index
Into the Stack Bypass ............................................................... 2-13
Setting Paper Size and Type ..........................................................................2-18
Setting Paper Type for the Paper Drawers ....................... 2-18
Setting Paper Size and Type for the Stack Bypass ......... 2-19
2-1
Page 50

Before Using the
Machine
Original and Paper
Copying
1
2
TOP
PreviousBack Next
Useful Functions .............................................................................................2-21
Automatic Paper Selection/Automatic Drawer
Switching ..................................................................................... 2-21
3
Sending and
Receiving
Printing and
Scanning
Network (imageCLASS
MF7480/MF7470 Only)
Remote UI (imageCLASS
MF7480/MF7470 Only)
System Settings
4
5
6
7
8
Maintenance
9
Troubleshooting
10
Appendix
Paper Supply Indicator ............................................................ 2-22
Setting the Speed or Print Side Priority ............................ 2-22
Loading Preprinted Paper .............................................................................2-23
11
Table of Contents
Index
2-2
Page 51

Before Using the
Machine
Original and Paper
1
2
Copying
3
Sending and
Receiving
Printing and
Scanning
Network (imageCLASS
MF7480/MF7470 Only)
Remote UI (imageCLASS
MF7480/MF7470 Only)
System Settings
4
5
6
7
8
Maintenance
9
Troubleshooting
Original Requirements
Platen Glass Feeder
Type Plain paper
Size Max. 8 1/2" x 11 5/8"
Weight Max. 4.4 lb (2 kg) 16 to 28 lb bond
Quantity 1 sheet LTR: 50 sheets
–
Thick originals
–
Photographs
–
Small originals (e.g.,
–
index cards)
Special types of paper
–
(e.g., tracing paper*1,
transparencies*1, etc.)
Book (Height: max. 1"
–
(24 mm))
(Max. 216 x 297 mm)
Plain paper (Multipage
originals or one page
originals)
11" x 17", LGL, LTR, STMT
(52 to 105 g/m2)
(22 lb bond (80 g/m2))
LGL/11" x 17": 25 sheets
(22 lb bond (80 g/m2))
STMT:50 sheets
(22 lb bond (80g/m2))
TOP
PreviousBack Next
Do not place the original on the platen glass or into the
●
feeder until the glue, ink or correction fluid on the original is
completely dry.
Do not place the following types of originals into the feeder:
●
–
Wrinkled or creased paper
–
Carbon paper or carbon-backed paper
–
Curled or rolled paper
–
Coated paper
–
Torn paper
–
Onion skin or thin paper
–
Originals with staples or paper clips attached
–
Paper printed with a thermal transfer printer
–
Originals with tears or large binding holes
–
Severely curled originals or originals with sharp folds
–
Transparencies and other highly transparent originals
10
Appendix
11
Table of Contents
Index
*1 When copying a transparent original such as tracing paper or transparencies,
use a piece of plain white paper to cover the original after placing it face-down
on the platen glass.
2-3
Page 52

Before Using the
Machine
Original and Paper
TOP
PreviousBack Next
1
Scanning Area
2
Copying
3
Sending and
Receiving
Printing and
Scanning
Network (imageCLASS
MF7480/MF7470 Only)
Remote UI (imageCLASS
MF7480/MF7470 Only)
System Settings
4
5
6
7
8
Maintenance
9
Troubleshooting
Make sure your original’s text and graphics fall within the
shaded area in the following diagram. Note that the margin
widths listed are approximate and there may be slight
variations in actual use.
10
Appendix
11
Table of Contents
Index
2-4
Page 53

Before Using the
Machine
Original and Paper
TOP
PreviousBack Next
1
Loading Originals
2
Copying
3
Sending and
Receiving
Printing and
Scanning
Network (imageCLASS
MF7480/MF7470 Only)
Remote UI (imageCLASS
MF7480/MF7470 Only)
System Settings
4
5
6
7
8
Maintenance
9
Troubleshooting
10
Appendix
11
Place your originals on the platen glass or into the feeder,
depending on the size and type of the original, and the scan
modes that you want to use.
Platen Glass
●
Place the originals on the platen glass when scanning bound
originals (such as books and magazines), heavyweight or
lightweight originals, and transparencies.
Feeder
●
Place the originals into the feeder when you want to scan several
originals at the same time, and press (Start). The machine
automatically feeds the originals to the scanning area and scans
them. Two-sided originals can also be automatically turned over
and scanned as two-sided originals.
Original Sizes
■
The size of the original is automatically detected, and the document
is scanned. If the output paper in the recipient’s machine is not
equal to the scanned size, the original image may be reduced in size
or divided into smaller parts before it is sent.
The machine cannot always detect the size of the original if it is a
nonstandard paper size, such as a book. In this case, specify the size
at which you want to scan the original. (See “Document Size,” on
p. 4-15.)
Orientation
■
You can place an original either vertically or horizontally. Always
align the top edge of your original with the back edge of the platen
glass (by the arrow in the top left corner) or the back edge of the
feeder.
Platen Glass
Vertical Placement Horizontal Placement
Feeder
Vertical Placement Horizontal Placement
Table of Contents
Index
2-5
Page 54

Before Using the
Machine
Original and Paper
1
2
Copying
3
Sending and
Receiving
Printing and
Scanning
Network (imageCLASS
MF7480/MF7470 Only)
Remote UI (imageCLASS
MF7480/MF7470 Only)
System Settings
4
5
6
7
–
If the top edge of the original is not aligned with the back edge of the
platen glass (by the arrow in the top left corner), your original may not be
scanned correctly, depending on the scan mode that you have set.
–
Originals of the following sizes can be placed either vertically or
horizontally. However, the scanning speed for horizontally placed
originals is somewhat slower than vertically placed ones. Place originals
horizontally when scanning with a Preset Zoom, such as when enlarging
an LTR original onto 11" x 17" paper.
–
Platen glass: LTR, STMT
–
Feeder: LTR
–
Horizontally placed LTR and STMT originals are referred to as LTRR and
STMTR.
–
11" x 17" and LGL originals must be placed horizontally on the feeder.
TOP
PreviousBack Next
On the Platen Glass
■
The machine automatically detects the size of the following originals: 11" x
17", LGL, LTR, and LTRR.
1. Lift the feeder.
Maintenance
Troubleshooting
10
Appendix
11
Table of Contents
Index
8
9
This machine is equipped with an open/close sensor (A) on the
feeder (see circled area in the above illustration). When placing
originals on the platen glass, lift the feeder high enough so that the
sensor does not touch the feeder. If the sensor continues to touch
the feeder, the size of the originals may not be detected correctly.
2-6
Page 55

Before Using the
Machine
Original and Paper
1
2
Copying
3
Sending and
Receiving
Printing and
Scanning
Network (imageCLASS
MF7480/MF7470 Only)
Remote UI (imageCLASS
MF7480/MF7470 Only)
System Settings
4
5
6
7
2. Place your original face down.
The surface of the original that you want to scan must be placed face
down.
Align the top edge of your original with the back edge of the platen
glass (by the arrow in the top left corner).
PreviousBack Next
3. Gently close the feeder.
–
Close the feeder gently to avoid catching your hands, as this may
result in personal injury.
–
Do not press down hard on the feeder when using the platen
glass to make copies of thick books. Doing so may damage the
platen glass and result in personal injury.
TOP
Maintenance
Troubleshooting
10
Appendix
11
Table of Contents
Index
8
9
Place books and other bound originals on the platen glass in the
same way.
When you are enlarging an LTR or STMT original onto 11" x 17" or LGL
paper, place the original horizontally on the platen glass, and align it
with the LTRR or STMTR marks.
2-7
Page 56

Before Using the
Machine
Original and Paper
1
2
Copying
3
Sending and
Receiving
Printing and
Scanning
Network (imageCLASS
MF7480/MF7470 Only)
Remote UI (imageCLASS
MF7480/MF7470 Only)
System Settings
4
5
6
7
8
Maintenance
If you are placing the original on the platen glass, the size of the
–
original is detected after the feeder is closed. Make sure to close
the feeder before scanning.
Open the feeder and remove the original from the platen glass
–
when scanning is complete.
The machine cannot detect the size of STMT and STMTR originals
–
that are placed on the platen glass. After pressing
follow the instructions on the screen to specify the original size.
You can also manually select the paper size.
(Start),
TOP
PreviousBack Next
Into the Feeder
■
If the same original is fed through the feeder repeatedly, the
–
original may fold or become creased, and make feeding
impossible. Limit repeated feeding to a maximum of 30 times
(this number varies, depending on the type and quality of the
original).
If the feeder rollers are dirty from scanning originals written in
–
pencil, perform the feeder cleaning procedure. (See “Cleaning the
Machine,” on p. 9-2.)
–
Always smooth out any folds in your originals before placing
them into the feeder.
–
Set the originals one by one if they are very thin (10 to 16 lb (37
to 52 g/m
–
11" x 17" and LGL originals must be placed horizontally in the
feeder.
2
)) or very thick (28 to 32 lb bond (105 to 128 g/m2)).
1. Adjust the slide guides to fit the size of your
originals.
Troubleshooting
10
Appendix
11
Table of Contents
Index
9
2-8
Page 57

Before Using the
Machine
Original and Paper
1
2
Copying
3
Sending and
Receiving
Printing and
Scanning
Network (imageCLASS
MF7480/MF7470 Only)
Remote UI (imageCLASS
MF7480/MF7470 Only)
System Settings
4
5
6
7
8
Maintenance
2. Neatly place your originals with the side to be
copied face up into the original supply tray.
Place your originals into the feeder as far as they will go.
If any dirt on the original scanning area is detected when the
originals are placed in the feeder, the following screen appears. Even
though streaks may appear on the copies, you can continue to scan
your originals by pressing [Done].
It is recommended, however, that you open the feeder, clean the
scanning area, and then close the feeder. The following screen will
not appear once the scanning area is clean.
For instructions on cleaning the original scanning area, see “Cleaning
the Machine,” on p. 9-2.
TOP
PreviousBack Next
–
Do not add or remove originals while they are being scanned.
–
When scanning is complete, remove the originals from the
original output area (A) to avoid paper jams.
–
When you are enlarging an LTR or STMT original onto 11" x 17" or
LGL paper, place the original horizontally.
–
The scanned originals are output to the original output area in
the order that they are fed into the feeder.
–
You can place different size originals together into the feeder
if you set the Different Size Originals mode. (See “Different Size
Originals,” on p. 3-28.)
–
11" x 17" and LGL originals must be placed horizontally on the
feeder.
Troubleshooting
10
Appendix
11
Table of Contents
Index
9
2-9
Page 58

Before Using the
Machine
Original and Paper
TOP
PreviousBack Next
1
Paper Requirements
2
Copying
3
Sending and
Receiving
4
Printing and
Scanning
5
Network (imageCLASS
MF7480/MF7470 Only)
6
Remote UI (imageCLASS
MF7480/MF7470 Only)
7
System Settings
8
Maintenance
9
Troubleshooting
10
Appendix
11
Table of Contents
The paper types that can be used with this machine are shown
in the following table. Icons indicating the type of paper loaded
in stack bypass and each paper drawer can be displayed on the
paper select screen if you store that information in the machine
beforehand. (See “Register Paper Type,” on p. 11-6.)
: Available
: Unavailable
Paper Type
1
Plain*
Recycled*1
Color*1
3-hole punch*2
Bond*3
Transparency*4
Heavy Paper 1*5
Heavy Paper 2*6
Heavy Paper 3*7
Labels
Envelopes
*1 From 17 lb to 22 lb bond (64 g/m2 to 80 g/m2).
2
*
Only LTR 3-hole punch paper can be used.
3
*
From 20 lb to 24 lb bond (75 g/m2 to 90 g/m2).
4
*
Use only LTR transparencies made especially for this machine.
5
*
From 22 lb to 24 lb bond (81 g/m2 to 90 g/m2).
6
*
From 24 lb to 28 lb bond (91 g/m2 to 105 g/m2).
7
*
From 28 lb to 32 lb bond (106 g/m2 to 128 g/m2).
Paper Drawer Stack Bypass
Paper Source
: Available
: Unavailable
Paper Size Width x Length
11" x 17" 11" x 17"
LGL 8 1/2" x 14"
LTR 8 1/2" x 11"
LTRR 11" x 8 1/2"
STMT 8 1/2" x 5 1/2"
STMTR 5 1/2" x 8 1/2"
EXEC 7 1/4" x 10 1/2"
4 1/8" x 9 1/2"
COM 10
Monarch
Envelope
Irregular Size
DL
ISO-B5
ISO-C5
(104.7 mm x
241.3 mm)
3 7/8" x 7 1/2"
(98.4 mm x
190.5 mm)
4 3/8" x 8 5/8"
(110 mm x
220 mm)
7" x 9 7/8"
(176 mm x
250 mm)
6 3/8" x 9"
(162 mm x
229 mm)
3 3/4" x 5 7/8" to
11 3/4" x 17"
(95 mm x 148 mm
to 297 mm x
432 mm)
Paper Source
Paper
Drawer
1, 2
Stack
Bypass
Index
2-10
Page 59

Before Using the
Machine
1
Original and Paper
2
Copying
3
Sending and
Receiving
4
Printing and
Scanning
5
Network (imageCLASS
MF7480/MF7470 Only)
6
Remote UI (imageCLASS
MF7480/MF7470 Only)
7
System Settings
8
Maintenance
9
Troubleshooting
10
Appendix
11
To prevent paper jams, do not use any of the following:
●
–
Wrinkled or creased paper
–
Curled or rolled paper
–
Coated paper
–
Torn paper
–
Damp paper
–
Very thin paper
–
Paper which has been printed on using a thermal transfer printer
(Do not copy on the reverse side.)
●
The following types of paper do not print well:
–
Highly textured paper
–
Very smooth paper
–
Shiny paper
●
Make sure the paper is free from dust, lint, and oil stains.
●
Be sure to test paper before purchasing large quantities.
●
Store all paper wrapped and on a flat surface until ready for
use. Keep opened packs in their original packaging in a cool,
dry location.
●
Store paper at 64.4°F–75.2°F (18°C–24°C), 40%–60% relative
humidity.
●
Use only the transparencies designed for laser printers.
Canon recommends you to use Canon type transparencies
with this machine.
PreviousBack Next
Each paper drawer holds approximately 250 sheets of paper
●
(22 lb bond (80 g/m
●
Note the following points when using the stack bypass:
–
Paper Quantity: one to approximately 80 sheets (22 lb bond
(80 g/m
Paper Size: 3 3/4" x 5 7/8" to 11 3/4" x 17" (95 mm x 148 mm to
–
297 mm x 432 mm)
Paper Weight: 18 to 32 lb bond (64 to 128 g/m
–
Paper which has been rolled or curled must be straightened
–
out prior to use, to allow the paper to feed smoothly
through the stack bypass (allowable curl amount: less than
3/8" (10 mm) for normal paper, less than 1/4" (5 mm) for
heavyweight paper). There are some types of paper stock
which may meet the above specifications, but cannot be fed
into the stack bypass.
You can select standard inch paper, or A or B series paper.
●
2
), stack approximately 3/8" (10 mm) high)
2
)).
2
)
TOP
Table of Contents
Index
2-11
Page 60

Before Using the
Machine
Original and Paper
TOP
PreviousBack Next
1
Printable Area
2
Copying
3
Sending and
Receiving
Printing and
Scanning
Network (imageCLASS
MF7480/MF7470 Only)
Remote UI (imageCLASS
MF7480/MF7470 Only)
System Settings
4
5
6
7
8
Maintenance
9
Troubleshooting
The shaded area indicates the approximate printable area of
LTR paper. Note that the margin widths listed are approximate
and there may be slight variations in actual use.
10
Appendix
11
Table of Contents
Index
2-12
Page 61

Before Using the
Machine
Original and Paper
TOP
PreviousBack Next
1
Loading Paper
2
Copying
3
Sending and
Receiving
Printing and
Scanning
Network (imageCLASS
MF7480/MF7470 Only)
Remote UI (imageCLASS
MF7480/MF7470 Only)
System Settings
4
5
6
7
8
Maintenance
9
Troubleshooting
10
Appendix
11
To load paper in the paper drawer, see “Set Up the Machine,” in
the Starter Guide.
–
If you are making two-sided prints, select the Two-sided mode. The
printed paper may crease depending on the moisture absorption
condition of the paper, and if you copy the two pages as two one-sided
documents.
–
When printing on special types of paper, such as heavyweight paper or
transparencies, be sure to correctly set the paper type, especially if you
are using heavyweight paper. If the type of paper is not set correctly, it
could adversely affect the quality of the image. Moreover, the fixing unit
may become dirty and require a service repair, or the paper could jam.
Into the Stack Bypass
■
If you are making prints on labels, transparencies, nonstandard
paper size stock, or envelopes, load the paper stock into the stack
bypass.
The paper in the stack bypass is fed prior to the paper in the paper
–
drawer.
The recommended envelopes are COM10 (#10), MONARCH, DL, and ISO-
–
C5. ISO-B5, Using other envelopes may affect the quality of the printout.
When printing from a computer, make sure to set the correct paper size
–
in the printer driver. (See the UFR II Driver Guide and the PCL Driver
Guide.)
Do not load different size/type paper at the same time.
–
Depending on the type of heavyweight paper you want to load, if you
–
load multiple sheets of heavyweight paper into the stack bypass, a paper
jam may occur. In this case, load only one sheet of heavyweight paper at
a time.
–
If you are printing on envelopes, do not allow more than 10 envelopes
to accumulate in the output tray. Always empty the output tray once 10
envelopes have accumulated.
Envelopes may be creased in the printing process.
–
For high-quality printouts, use paper recommended by Canon.
–
1. Open the stack bypass.
If the paper size you are going to load into the stack bypass is
different from the paper size stored in Stack Bypass Standard
Settings, set Stack Bypass Standard Settings to [Off] in Common
Settings (from the Additional Functions screen). (See “Setting Paper
Size and Type for the Stack Bypass,” on p. 2-19.)
Table of Contents
Index
2-13
Page 62

Before Using the
Machine
Original and Paper
1
2
Copying
3
Sending and
Receiving
Printing and
Scanning
Network (imageCLASS
MF7480/MF7470 Only)
Remote UI (imageCLASS
MF7480/MF7470 Only)
System Settings
4
5
6
7
2. Adjust the slide guides (A) to match the size of
the paper.
If you are feeding large size paper, pull out the auxiliary tray (A), and
extend the tray extension (B).
PreviousBack Next
3. Load the paper into the stack bypass.
Make sure that the height of the paper stack does not exceed the
loading limit mark (
When you use the stack bypass to make copies, straighten out curled
paper prior to use, as shown below.
).
TOP
Maintenance
Troubleshooting
10
Appendix
11
Table of Contents
Index
8
Feeding Direction
9
2-14
Page 63

Before Using the
Machine
Original and Paper
1
2
Copying
3
Sending and
Receiving
Printing and
Scanning
Network (imageCLASS
MF7480/MF7470 Only)
Remote UI (imageCLASS
MF7480/MF7470 Only)
System Settings
4
5
6
7
Curled paper may cause a paper jam.
If there is difficulty in straightening out curled paper, curl the
–
front edges of the paper upward, as shown below.
–
To print on the back side of preprinted paper, load the preprinted
paper face up into the stack bypass, as shown in the illustration
below.
PreviousBack Next
–
When loading paper into the stack bypass, align the paper
stack neatly between the slide guides. If the paper is not loaded
correctly, a paper jam may occur.
–
If you are printing on heavyweight paper or envelopes using
the stack bypass, and find that the paper or envelopes are
not being fed smoothly or evenly through the stack bypass,
remove the paper or envelopes, curl the feeding edges upward
approximately 1/8" (3 mm), and then reload the paper or
envelopes. Curling the feeding edges enables the rollers to grip
the paper or envelopes as they are fed into the stack bypass.
–
If there are instructions on the paper package about which side
of the paper to load, follow those instructions.
–
When the paper is loaded into the stack bypass, the side facing
down is the one printed on.
–
If problems, such as poor print quality or paper jams occur, try
turning the paper stack over and reload it.
–
For more information on the print direction of preprinted paper
(paper which has logos or patterns already printed on it), see
“Loading Preprinted Paper,” on p. 2-23.
TOP
Maintenance
Troubleshooting
10
Appendix
11
Table of Contents
Index
8
9
The screen for selecting the paper size appears.
2-15
Page 64

Before Using the
Machine
Original and Paper
1
2
Copying
3
Sending and
Receiving
Printing and
Scanning
Network (imageCLASS
MF7480/MF7470 Only)
Remote UI (imageCLASS
MF7480/MF7470 Only)
System Settings
4
5
6
7
If you are loading envelopes into the stack bypass:
●
Take five envelopes, loosen them as shown, and then stack them
–
together.
Repeat this step five times for each set of five envelopes.
–
–
Place the envelopes on a clean, level surface, and press all the
way around the envelopes by hand, in the direction of the
arrows, to remove any curls. Repeat this step five times for each
set of five envelopes.
TOP
PreviousBack Next
Hold down the four corners of the envelopes firmly, so that they
–
and the sealed or glued portion stay flat.
Do not print on the back side of the envelopes (the side with the
–
flap (A)).
If the envelopes become filled with air, flatten them by hand
–
before loading them into the stack bypass.
Maintenance
Troubleshooting
10
Appendix
11
Table of Contents
Index
8
9
Take particular care to spread the envelopes out in the direction that
they will be fed.
2-16
Page 65

Before Using the
Machine
Original and Paper
1
2
Copying
3
Sending and
Receiving
Printing and
Scanning
Network (imageCLASS
MF7480/MF7470 Only)
Remote UI (imageCLASS
MF7480/MF7470 Only)
System Settings
4
5
6
7
8
Maintenance
–
Load the envelopes, as shown below.
Feeding
Direction
The screen for selecting the paper size appears.
–
The stack bypass can hold 10 envelopes at a time.
–
Envelopes may be creased in the printing process.
4. Specify the size and the type of the paper you
load.
For details on how to specify the paper size and type, see “Setting
Paper Size and Type for the Stack Bypass,” on p. 2-19.
TOP
PreviousBack Next
Troubleshooting
10
Appendix
11
Table of Contents
Index
9
The paper size/type setting in the [Stack Bypass] setting screen is
available if Stack Bypass Standard Settings is set to [Off] in Common
Settings (from the Additional Functions screen). If Stack Bypass
Standard Settings is set to [On], copying can be performed only for
the registered paper size and type. (See, “Setting Paper Size and
Type,” on p. 2-18.)
2-17
Page 66

Before Using the
Machine
Original and Paper
TOP
PreviousBack Next
1
Setting Paper Size and Type
2
Copying
3
Sending and
Receiving
Printing and
Scanning
Network (imageCLASS
MF7480/MF7470 Only)
Remote UI (imageCLASS
MF7480/MF7470 Only)
System Settings
4
5
6
7
8
Maintenance
9
Troubleshooting
10
Appendix
11
When you place other sizes and/or types of paper, follow this
procedure to change the settings.
Setting Paper Type for the Paper Drawers
■
This setting enables you to specify the paper type loaded in each
paper source.
Once you specify this information, icons indicating the type of
paper loaded in each paper source appear on the paper select
screen.
Be sure to correctly set the paper type. If the type of paper is not set
correctly, it could adversely affect the quality of the image. Moreover, the
fixing unit may become dirty and require a service repair, or the paper
could jam.
1. Press (Additional Functions).
2. Press [Common Settings] [▼] [Register
Paper Type].
The Register Paper Type screen appears.
3. Select the paper source in which you want to
register the paper type.
The numbers on the screen represent the following paper sources:
4. Select the desired paper type loaded in the
paper source, then press [OK].
Make sure that the registered paper type setting is the same paper
type that is loaded in the paper source.
5. Press [Done] repeatedly until the Basic Features
screen appears.
The registered paper type information is displayed through the use
of icons on the paper select screen, as shown below.
Table of Contents
Index
Paper Drawer 1
Paper Drawer 2
2-18
Page 67

Before Using the
Machine
Original and Paper
1
2
Copying
3
Sending and
Receiving
Printing and
Scanning
Network (imageCLASS
MF7480/MF7470 Only)
Remote UI (imageCLASS
MF7480/MF7470 Only)
System Settings
4
5
6
7
8
Maintenance
Setting Paper Size and Type for the Stack
■
Bypass
You can set the paper size and type that the stack bypass uses
beforehand. This setting is useful if you always load the same paper
size and type into the stack bypass.
When printing on special types of paper, such as heavyweight paper or
–
transparencies, be sure to correctly set the paper type, especially if you
are using heavyweight paper. If the type of paper is not set correctly, it
could adversely affect the quality of the image. Moreover, the fixing unit
may become dirty and require a service repair, or the paper could jam.
If you are using the stack bypass as a paper source for the Copy function,
–
you must select the stack bypass when specifying the Drawer Eligibility
for APS/ADS setting. (See “Automatic Paper Selection/Automatic Drawer
Switching,” on p. 2-21.)
1. Press (Additional Functions).
2. Press [Common Settings] [▼] [▼] [Stack
Bypass Standard Settings].
The Stack Bypass Standard Settings screen appears.
PreviousBack Next
4. Select the desired paper size.
If you want to select a standard paper size:
●
Select the desired paper size, then press [Next].
–
To select an A or B series paper size, press [A/B-size].
Select the desired paper type, then press [OK].
–
When printing on special types of paper, such as heavyweight
–
paper or transparencies, be sure to correctly set the paper type,
especially if you are using heavyweight paper. If the type of
paper is not set correctly, it could adversely affect the quality
of the image. Moreover, the fixing unit may become dirty and
require a service repair, or the paper could jam.
If you select [Transparency] or [Labels], make sure that you do
–
not specify any finishing modes (Collate, or Group).
[Transparency] can be selected only if [LTR] is selected as the
–
paper size.
TOP
Troubleshooting
10
Appendix
11
Table of Contents
Index
9
3. Press [On], then [Store].
2-19
Page 68

Before Using the
Machine
1
Original and Paper
2
Copying
3
Sending and
Receiving
4
Printing and
Scanning
5
Network (imageCLASS
MF7480/MF7470 Only)
6
Remote UI (imageCLASS
MF7480/MF7470 Only)
7
System Settings
8
Maintenance
9
Troubleshooting
10
Appendix
11
If you want to select a nonstandard paper size:
●
Press [Irreg. Size].
–
Press [X] to specify the horizontal axis of the paper, then enter a
–
value using the numeric keys on the touch panel display.
Press [Y] to specify the vertical axis of the paper, then enter a
–
value using the numeric keys on the touch panel display.
Press [OK].
–
–
If you make a mistake when entering values, press [C] on the
touch panel display, then enter the correct values.
–
You can enter only 2, 4, 8 or 16 as the denominator.
–
The value entered in inches is converted to millimeters by the
machine each time it is entered. Thus, there may be a slight
difference between the value calculated and the actual value
entered.
–
To enter values in millimeters, press [mm].
–
When entering the value in millimeters, you can also use
(numeric keys), and
–
When entering the value in millimeters, you can also change the
value by pressing [-] or [+] in increments of 1.0 mm, even if you
have entered the value.
–
If you enter a value outside the setting range, [OK] is grayed out
and cannot be selected. Enter an appropriate value.
–
You can use values for [X] between 5 7/8" (148 mm) and 17" (432
mm), and for [Y] between 3 3/4" (95 mm) and 11 11/16" (297
mm).
(Clear) to clear your entry.
–
PreviousBack Next
Press [Next]
–
Select the desired paper type, then press [OK].
–
–
When printing on special types of paper, such as heavyweight
paper, be sure to correctly set the paper type, especially if you are
using heavyweight paper. If the type of paper is not set correctly,
it could adversely affect the quality of the image. Moreover, the
fixing unit may become dirty and require a service repair, or the
paper could jam.
If you select [Irreg. Size], you cannot use the 1 ▶ 2-Sided, 2 ▶
–
2-Sided, or Book ▶ 2-Sided mode.
If you want to select an envelope size:
●
Press [Envelope].
–
Select the envelope type, then press [OK].
–
–
If the envelope type is not selected correctly, a paper jam may
occur.
–
If you select [Envelope], you cannot use the 1 ▶ 2-Sided, 2
▶ 2-Sided, Book ▶ 2-Sided, 2-page Separation, or Image
Combination mode.
Press [OK].
–
[Transparency] can be selected only if [LTR] is selected as the paper
size.
5. Press [OK].
TOP
Table of Contents
Index
6. Press [Done] repeatedly until the Basic Features
screen appears.
2-20
Page 69

Before Using the
Machine
Original and Paper
TOP
PreviousBack Next
1
Useful Functions
2
Copying
3
Sending and
Receiving
Printing and
Scanning
Network (imageCLASS
MF7480/MF7470 Only)
Remote UI (imageCLASS
MF7480/MF7470 Only)
System Settings
4
5
6
7
8
Maintenance
9
Troubleshooting
10
Appendix
11
You can use the following useful functions.
Automatic Paper Selection/ Automatic
■
Drawer Switching
You can set which paper sources can be used for Automatic Paper
Selection (APS) and Automatic Drawer Switching (ADS). This setting
can be made independently for all the different functions of the
machine, and is especially useful when you want to use different
paper sources for different purposes.
Paper sources set to [On] are used for the following functions:
–
APS: The machine automatically selects the appropriate paper size
–
(paper source) based on the original’s size and copy ratio settings
(when making a copy), or the set ratio of the image (when receiving a
fax).
ADS: If a paper source runs out of paper during a continuous print job,
–
the machine automatically selects another paper source with the same
paper size, and begins feeding paper from that paper source.
1. Press (Additional Functions).
2. Press [Common Settings] [▼] [Drawer
Eligibility For APS/ADS].
The Drawer Eligibility For APS/ADS screen appears.
4. Select [On] or [Off] for the stack bypass and the
other paper sources, then press [OK].
Details of each item are shown below.
[On]: Makes the paper source eligible for APS/ADS.
[Off]: Makes the paper source ineligible for APS/ADS.
The numbers on the screen represent the following paper sources:
Stack Bypass
Paper Drawer 1
Paper Drawer 2
Regardless of the stack bypass setting, you cannot select [Off]
–
for all of the paper sources at the same time. At least one of the
paper sources, besides the stack bypass must be set to [On].
If you selected [Printer] in step 3, the Stack Bypass icon (
–
not be displayed on the paper select screen in step 4.
) will
5. Press [Done] repeatedly until the Basic Features
screen appears.
Table of Contents
Index
3. Select [Copy], [Printer], [Receive], or [Other].
2-21
Page 70

Before Using the
Machine
Original and Paper
1
2
Copying
3
Sending and
Receiving
Printing and
Scanning
Network (imageCLASS
MF7480/MF7470 Only)
Remote UI (imageCLASS
MF7480/MF7470 Only)
System Settings
4
5
6
7
PreviousBack Next
Paper Supply Indicator
■ Setting the Speed or Print Side Priority
The paper supply indicator (A) shows whether paper is loaded in
each paper drawer. appears on the Paper Select screen when
paper is loaded in a paper drawer. blinks on the screen that
appears when paper in a paper drawer has run out during printing.
(See “Basic Copying Method,” on p. 3-4.)
■
You can set the priority of print speed or print quality for each
drawer.
1. Press (Additional Functions).
2. Press [Common Settings] [▼] [▼] [Paper
Feed Method Switch].
The Paper Feed Method Switch screen appears.
3. Set the priority of copy speed or copy quality for
each, then press [OK].
4. Press [Done] repeatedly until the Basic Features
screen appears.
The Paper Select Screen
TOP
Maintenance
Troubleshooting
10
Appendix
11
Table of Contents
Index
8
9
A
The Screen When Paper Has Run Out
2-22
Page 71

Before Using the
Machine
Original and Paper
TOP
PreviousBack Next
1
Loading Preprinted Paper
2
Copying
3
Sending and
Receiving
Printing and
Scanning
Network (imageCLASS
MF7480/MF7470 Only)
Remote UI (imageCLASS
MF7480/MF7470 Only)
System Settings
4
5
6
7
8
Maintenance
9
Troubleshooting
Use this chart when printing on preprinted paper (i.e., paper
with logos).
Do not load the following types of paper into the paper drawers, as this
–
may cause paper jams:
Paper on which color images have been copied (do not print on the
–
reverse side either).
If you want to print on the back side of preprinted paper, place the side
–
you want to print on:
Face up when using a paper drawer
–
Face down when using the stack bypass
–
10
Appendix
11
Table of Contents
Index
2-23
Page 72

Before Using the
Machine
Original and Paper
1
2
Copying
3
Sending and
Receiving
Printing and
Scanning
Network (imageCLASS
MF7480/MF7470 Only)
Remote UI (imageCLASS
MF7480/MF7470 Only)
System Settings
4
5
6
7
8
Maintenance
TOP
PreviousBack Next
3 Copying
Basic Copying Method .....................................................................................3-4
Paper Selection .................................................................................................3-5
Automatic Paper Selection .......................................................3-5
Manual Paper Selection .............................................................3-6
Scan Settings ....................................................................................................3-8
Original Type Selection ..............................................................3-8
Exposure ..........................................................................................3-9
Copy Ratio ................................................................................... 3-10
Reserved Copy ................................................................................................3-13
Troubleshooting
10
Appendix
11
Table of Contents
Index
9
Reserving Copy Jobs ................................................................ 3-13
Collate Copy ....................................................................................................3-14
Page Order (Collate) ................................................................. 3-15
Same Page (Group) ................................................................... 3-15
3-1
Page 73

Before Using the
Machine
Original and Paper
Copying
1
2
TOP
PreviousBack Next
Two-Sided Copying ........................................................................................3-17
1 to 2-Sided ................................................................................. 3-18
2 to 2-Sided ................................................................................. 3-19
3
Sending and
Receiving
Printing and
Scanning
Network (imageCLASS
MF7480/MF7470 Only)
Remote UI (imageCLASS
MF7480/MF7470 Only)
System Settings
4
5
6
7
8
Maintenance
9
Troubleshooting
10
Appendix
11
2 to 1-Sided ................................................................................. 3-20
Book to 2-Sided ......................................................................... 3-20
Advanced Copy Features ...............................................................................3-22
2-Page Separation .................................................................... 3-22
Image Combination ................................................................. 3-22
Frame Erase ................................................................................. 3-24
Different Size Originals ............................................................ 3-28
Sharpness ..................................................................................... 3-29
Memory Keys .............................................................................. 3-30
Orientation .....................................................................................................3-34
Image Orientation Priority ..................................................... 3-34
Auto Orientation ....................................................................... 3-34
Confirming Settings ......................................................................................3-35
Table of Contents
Index
Changing/Canceling Selected Settings ........................................................3-36
3-2
Page 74

Before Using the
Machine
Original and Paper
Copying
1
2
TOP
PreviousBack Next
Changing the Current Standard Settings .....................................................3-37
Storing New Standard Settings ............................................ 3-37
Initializing Standard Settings................................................ 3-37
3
Sending and
Receiving
Printing and
Scanning
Network (imageCLASS
MF7480/MF7470 Only)
Remote UI (imageCLASS
MF7480/MF7470 Only)
System Settings
4
5
6
7
8
Maintenance
9
Troubleshooting
10
Appendix
Canceling Copy Jobs ......................................................................................3-38
Using the Touch Panel Display ............................................. 3-38
Using the System Monitor Screen ....................................... 3-38
Checking Copy Jobs .......................................................................................3-39
Checking the Status of Copy Jobs ...................................... 3-39
Combination of Functions Chart ...................................................................3-40
11
Table of Contents
Index
3-3
Page 75

Before Using the
Machine
Original and Paper
TOP
PreviousBack Next
1
Basic Copying Method
2
Copying
3
Sending and
Receiving
Printing and
Scanning
Network (imageCLASS
MF7480/MF7470 Only)
Remote UI (imageCLASS
MF7480/MF7470 Only)
System Settings
4
5
6
7
8
Maintenance
9
Troubleshooting
Follow this procedure to make a copy.
1. Press (COPY).
2. Place your originals.
For originals you can copy, see “Original Requirements,” on p. 2-3.
3. Use – (numeric keys) to enter the desired
copy quantity (1 to 99).
4. Press (Start).
10
Appendix
11
Table of Contents
Index
3-4
Page 76

Before Using the
Machine
Original and Paper
TOP
PreviousBack Next
1
Paper Selection
2
Copying
3
Sending and
Receiving
Printing and
Scanning
Network (imageCLASS
MF7480/MF7470 Only)
Remote UI (imageCLASS
MF7480/MF7470 Only)
System Settings
4
5
6
7
8
Maintenance
9
Troubleshooting
10
Appendix
11
Table of Contents
Index
You can manually specify a paper size or set the machine to
automatically select the paper size for you.
–
If you are copying an original with an image that extends all the way to
the edges onto the same size paper at a copy ratio of 100%, the
periphery of the original image may be cut off slightly on the copy. For
more information on how much may be cut off, see “Scanning Area,” on
p. 2-4.
–
If you select [Envelope], [Transparency], or [Labels], make sure that you
do not specify any Finishing modes (Collate or Group).
–
If Stack Bypass Standard Settings in Common Settings (from the
Additional Functions screen) is set to [On], and the paper size/type have
been stored, the selected paper size/type are displayed on the screen.
(See “Stack Bypass Standard Settings,” on p. 11-7.)
Automatic Paper Selection
■
The machine automatically selects the copy paper size.
The Automatic Paper Selection mode is available only if the originals are
–
fed from the feeder.
The Automatic Paper Selection mode cannot be used with the Auto
–
Zoom or Image Combination mode.
You cannot use the Automatic Paper Selection mode when copying the
–
following types of originals. Copy these originals using the Manual Paper
Selection mode.
Nonstandard size originals
–
Highly transparent originals, such as transparencies
–
Originals with an extremely dark background
–
STMT or STMTR originals that are placed on the platen glass
–
If Drawer Eligibility For APS/ADS in Common Settings (from the
–
Additional Functions screen) is set to [Off] for a particular paper source,
you cannot make copies on paper loaded in that paper source in the
Automatic Paper Selection mode. (See ”Drawer Eligibility For APS/ADS,”
on p. 11-6.)
1. Press (COPY).
2. Place your originals.
3. Press [Paper Select].
4. Press [Auto], then [Done].
When the feeder is closed, the paper source holding that paper size
is highlighted along with [Auto].
5. Press (Start).
3-5
Page 77

Before Using the
Machine
Original and Paper
1
2
Copying
3
Sending and
Receiving
Printing and
Scanning
Network (imageCLASS
MF7480/MF7470 Only)
Remote UI (imageCLASS
MF7480/MF7470 Only)
System Settings
4
5
6
7
8
Maintenance
9
Troubleshooting
10
Appendix
11
Table of Contents
Manual Paper Selection
■
You can make copies after manually selecting the paper size and
type of paper loaded in the paper sources.
You can copy an image onto envelopes, such as your company logo.
Envelopes can be loaded into the stack bypass.
1. Press (COPY).
2. Place your originals.
If you want to set the size/type for the paper to be fed from the stack
bypass, proceed to step 5.
If you want to set the size/type for the paper loaded in a paper
drawer, proceed to step 3.
3. Press [Paper Select].
When the feeder is closed, the paper source holding that paper size
is highlighted along with [Auto].
4. Select the desired paper size, then proceed to
step 7.
The paper sizes/types loaded in each paper drawer are indicated
–
by icons on the touch panel display.
Icons indicating the type of paper loaded in each paper drawer
–
can be displayed on paper select screens, if you store that
information in the machine beforehand. (See “Changing/
Canceling Selected Settings,” on p. 3-36.)
–
indicates that the paper is loaded vertically, and indicates
that the paper is loaded horizontally. The suffix <R> (such as in
LTRR), used in paper size designations, indicates that the paper is
loaded in a paper drawer or the stack bypass horizontally.
TOP
PreviousBack Next
5. For the stack bypass setting, load the paper into
the stack bypass.
The paper size/type setting in the [Stack Bypass] setting screen is
available if Stack Bypass Standard Settings is set to [Off] in Common
Settings (from the Additional Functions screen). If Stack Bypass
Standard Settings is set to [On], copying can be performed only for
the registered paper size and type. (See “Stack Bypass Standard
Settings,” on p. 11-7.)
If you want to select a standard paper size:
●
Select the desired paper size, then press [Next].
–
To select an A or B series paper size, press [A/B-size].
–
Select the desired paper type, then press [OK].
When printing on special types of paper, such as heavy paper
–
or transparencies, be sure to correctly set the paper type,
especially if you are using heavy paper. If the type of paper is
not set correctly, it could adversely affect the quality of the
image. Moreover, the fixing unit may become dirty and require
a service repair, or the paper could jam.
If you select [Transparency] or [Labels], make sure that you do
–
not specify any Finishing modes (Collate or Group).
[Transparency] can be selected only if [LTR] is selected as the
–
paper size.
[3-hole punch] can be selected only if [LTR] or [LTRR] is
–
selected as the paper size.
Index
3-6
Page 78

Before Using the
Machine
1
Original and Paper
2
Copying
3
Sending and
Receiving
Printing and
Scanning
Network (imageCLASS
MF7480/MF7470 Only)
Remote UI (imageCLASS
MF7480/MF7470 Only)
System Settings
4
5
6
7
If you want to select a nonstandard paper size:
●
Press [Irreg. Size].
–
Press [X] to specify the horizontal axis of the paper, then enter a
–
value.
Press [Y] to specify the vertical axis of the paper, then enter a
–
value.
Press [OK].
–
–
If you make a mistake when entering values, press [C] on the
touch panel display, then enter the correct values.
–
To enter values in millimeters, press [mm].
–
If you enter values outside the setting range, [OK] is grayed
out and cannot be selected. Enter an appropriate value.
–
You can adjust values for [X] between 5 7/8" and 17", and for
[Y] between 3 3/4" and 11 11/16".
Press [Next].
–
Select the desired paper type, then press [OK].
–
PreviousBack Next
If you want to select an envelope size:
●
Press [Envelope].
–
Select the desired envelope type, then press [OK].
–
If the envelope type is not selected correctly, a paper jam will
–
occur.
If an envelope size is selected, the Finishing, 1 ▶ 2-Sided, 2 ▶
–
2-Sided, Book ▶ 2-Sided, 2-Page Separation, or Image
Combination mode cannot be specified.
Press [OK].
–
6. Press [Done].
7. Press (Start).
To cancel all settings and return the machine to the Standard mode,
press
(Reset).
TOP
Maintenance
Troubleshooting
10
Appendix
11
Table of Contents
Index
8
9
–
When printing on special types of paper, such as heavy paper,
be sure to correctly set the paper type, especially if you are
using heavy paper. If the type of paper is not set correctly, it
could adversely affect the quality of the image. Moreover, the
fixing unit may become dirty and require a service repair, or
the paper could jam.
If you select [Irreg. Size] for copying, you cannot use the Rotate
–
Collate, Rotate Group, 1 ▶ 2-Sided, 2 ▶ 2-Sided, Book ▶ 2-
Sided, 2-Page Separation, Image Combination mode.
3-7
Page 79

Before Using the
Machine
Original and Paper
TOP
PreviousBack Next
1
Scan Settings
2
Copying
3
Sending and
Receiving
Printing and
Scanning
Network (imageCLASS
MF7480/MF7470 Only)
Remote UI (imageCLASS
MF7480/MF7470 Only)
System Settings
4
5
6
7
8
Maintenance
9
Troubleshooting
10
Appendix
11
You can set the desired copy exposure and select the original
type before scanning the original.
Manual Exposure Adjustment
●
You can manually adjust the copy exposure to the most appropriate
level for the original.
Original Type Selection
●
The machine is capable of processing and producing copies
according to the type of the original. You can manually select the
original type so that the machine reproduces copies as faithful as
possible to the original. The following three original type modes are
available:
Text Mode Text/Photo Mode Photo Mode
• Text Mode
This mode is best suited for making copies of text originals.
Blueprints or pencil drawn originals can also be copied clearly.
• Text/Photo Mode
This mode is best suited for making copies of originals containing
both text and images/photos, such as magazines or catalogues.
• Photo Mode
This mode is best suited for making copies from photos printed on
photographic paper, or making copies of images printed with
halftone dots (i.e., printed photos).
Automatic Exposure Adjustment
●
This mode enables you to set the machine to automatically adjust
the exposure to the level best suited to the quality of the original.
Exposure Adjustment during Printing
●
You can change the copy exposure while the machine is printing.
Original Type Selection
■
Combinations of these three modes (Text, Text/Photo, and Photo) cannot
–
be selected at the same time. If you select one of these modes, the
previously set mode is canceled.
If you make copies of an original containing halftones, such as a printed
–
photograph, using the Photo mode, the moiré effect (a shimmering,
wavy pattern) may occur. In this case, you can lessen the moiré effect by
using the Sharpness mode. (See “Sharpness,” on p. 3-29.)
If you select the Automatic Exposure Adjustment mode, the original type
–
mode is grayed out and fixed to Text mode. If you select the Text/Photo
or Photo mode, the exposure can only be adjusted manually.
If the original is a transparency, select the original type, then adjust the
–
exposure to the most appropriate level for the original.
Table of Contents
Index
3-8
Page 80

Before Using the
Machine
Original and Paper
1
2
Copying
3
Sending and
Receiving
Printing and
Scanning
Network (imageCLASS
MF7480/MF7470 Only)
Remote UI (imageCLASS
MF7480/MF7470 Only)
System Settings
4
5
6
7
8
Maintenance
9
Troubleshooting
10
Appendix
11
1. Press (COPY).
2. Place your originals.
3. Press the original type drop-down list.
4. Select the original type.
5. Press (Start).
To cancel all settings and return the machine to the Standard mode,
press
(Reset).
Exposure
■
You can adjust the density to the most appropriate level for the
original either automatically or manually.
Adjusting Automatically
1. Press (COPY).
2. Place your originals.
3. Press [A].
The machine automatically adjusts the copy exposure to the level
best suited to the quality of the original.
PreviousBack Next
4. Press (Start).
To cancel all settings and return the machine to the Standard mode,
press
(Reset).
Adjusting Manually
1. Press (COPY).
2. Place your originals.
3. Press [Light] or [Dark].
Press [Light] to move the indicator to the left to make the exposure
lighter, or press [Dark] to move it to the right to make the exposure
darker.
4. Press (Start).
To cancel all settings and return the machine to the Standard mode,
press
(Reset).
TOP
Table of Contents
Index
An automatic copy exposure adjustment may not work with
transparencies. In this case, adjust the copy exposure manually by
pressing [Light] or [Dark].
3-9
Page 81

Before Using the
Machine
Original and Paper
1
2
Copying
3
Sending and
Receiving
Printing and
Scanning
Network (imageCLASS
MF7480/MF7470 Only)
Remote UI (imageCLASS
MF7480/MF7470 Only)
System Settings
4
5
6
7
8
Maintenance
9
Troubleshooting
10
Appendix
11
Copy Ratio
■
You can set the machine to adjust the copy ratio automatically, or
you can specify the copy ratio manually.
The following three types of copy ratio settings are available.
To set the copy ratio to 100%, press [ Direct].
Preset Zoom
●
The machine offers you a variety of preset copy ratios to reduce or
enlarge standard size originals to another standard paper size.
Zoom by Percentage
●
You can reduce or enlarge originals by any copy ratio in 1%
increments. The copy ratios for the horizontal (X) and vertical (Y)
axes are the same.
TOP
PreviousBack Next
Auto Zoom
●
You can set the machine to automatically select the appropriate
copy ratio based on the size of the original and the selected copy
paper. The copy ratios for the horizontal (X) and vertical (Y) axes are
the same.
Original
Copy
Preset Zoom
The machine offers you a variety of preset copy ratios to reduce or
enlarge standard size originals to another standard paper size.
Reduction
●
The available preset copy ratios for reducing originals are:
• LGL LTR (78%)
• 11" x 17" LGL (73%)
• 11" x 17" LTR (64%)
• MIN. (50%)
Enlargement
●
The available preset copy ratios for enlarging originals are:
• MAX. (200%)
• LTR 11" x 17" (129%)
• LGL 11" x 17" (121%)
Table of Contents
Index
3-10
Page 82

Before Using the
Machine
Original and Paper
1
2
Copying
3
Sending and
Receiving
Printing and
Scanning
Network (imageCLASS
MF7480/MF7470 Only)
Remote UI (imageCLASS
MF7480/MF7470 Only)
System Settings
4
5
6
7
8
Maintenance
–
Place the originals horizontally in the following cases:
–
If you are enlarging LTR originals to 11" x 17"
–
If you are enlarging STMT originals to 11" x 17"
–
Placing an original horizontally means setting the original with the
longer side sideways.
–
If you are reducing 11" x 17" originals to LTR with Auto Orientation in
Copy Settings (from the Additional Functions screen) set to [Off], load
LTRR paper into a paper drawer or the stack bypass.
1. Press (COPY).
2. Place your originals.
3. Press [Copy Ratio].
4. To reduce the original image, select a preset
reduction ratio. To enlarge the original image,
select a preset enlargement ratio. Following
your selection, press [Done].
5. Select the paper size.
TOP
PreviousBack Next
Zoom by Percentage
You can reduce or enlarge images by any copy ratio, in 1%
increments. The available copy ratios are from 50% to 200%. The
same copy ratio is used for the horizontal (X) and vertical (Y) axes.
1. Press (COPY).
2. Place your originals.
3. Press [Copy Ratio].
4. Press [-] or [+] to set a copy ratio, then press
[Done].
You can also use – (numeric keys) to enter values, and (Clear)
to clear your entries.
You can change the value by pressing [-] or [+], even if you have
entered the value using
If you enter a value outside the setting range, a message prompting
you to enter an appropriate value appears on the screen.
– (numeric keys).
Troubleshooting
10
Appendix
11
Table of Contents
Index
9
–
If you set [Auto] for [Paper Select], the machine selects the paper
best suitable to the selected ratio.
–
If you copy highly transparent originals, such as transparencies,
the correct paper size may not be selected.
6. Press (Start).
–
To return the copy ratio to 100%, press [Direct].
–
To cancel all settings and return the machine to the Standard
mode, press
(Reset).
5. Select the paper size.
–
If you set [Auto] for [Paper Select], the machine selects the paper
best suitable to the selected ratio.
–
If you copy highly transparent originals, such as transparencies,
the correct paper size may not be selected.
3-11
Page 83

Before Using the
Machine
Original and Paper
1
2
Copying
3
Sending and
Receiving
Printing and
Scanning
Network (imageCLASS
MF7480/MF7470 Only)
Remote UI (imageCLASS
MF7480/MF7470 Only)
System Settings
4
5
6
7
8
Maintenance
9
Troubleshooting
10
Appendix
6. Press (Start).
To return the copy ratio to 100%, press [Direct].
–
To cancel all settings and return the machine to the Standard
–
mode, press
Auto Zoom
You can set the machine to automatically select the appropriate
copy ratio based on the size of the original and the selected copy
paper. The same copy ratio is used for the horizontal (X) and vertical
(Y) axes. The available copy ratios are from 50% to 200%.
You cannot use the Auto setting on the Copy Ratio screen with the
–
Automatic Paper Selection mode.
You cannot copy highly transparent originals, such as transparencies,
–
using the Auto setting on the Copy Ratio screen. Use the Preset Zoom or
Zoom by Percentage mode instead.
To use the Auto setting on the Copy Ratio screen, your originals must
–
conform to one of the standard paper sizes:
11" x 17", LGL, LTR, LTRR, STMT or STMTR (You can only place an STMTR
–
original on the platen glass.)
(Reset).
1. Press (COPY) .
2. Place your originals.
TOP
PreviousBack Next
4. Select the desired paper size , then press [Done].
Make sure that you select a paper size other than [Auto]. If you do
not select a paper size, the copy ratio is automatically set to match
the size of the paper loaded in Paper Drawer 1.
5. Press [Copy Ratio].
6. Press [Auto], then [Done].
7. Press (Start).
–
To return the copy ratio to 100%, press [Direct].
–
To cancel this setting, press [Copy Ratio], then [Auto].
–
To cancel all settings and return the machine to the Standard
mode, press
(Reset).
11
Table of Contents
Index
3. Press [Paper Select].
3-12
Page 84

Before Using the
Machine
Original and Paper
TOP
PreviousBack Next
1
Reserved Copy
2
Copying
3
Sending and
Receiving
Printing and
Scanning
Network (imageCLASS
MF7480/MF7470 Only)
Remote UI (imageCLASS
MF7480/MF7470 Only)
System Settings
4
5
6
7
8
Maintenance
9
Troubleshooting
10
Appendix
You can set the machine to scan originals even while it is
printing or waiting to process a job.
–
You can reserve up to five copy jobs, including the current job.
–
You can set different copy modes and paper sources for each reserved
job.
Reserving Copy Jobs
■
Reserved printing can be specified in the following cases:
While the Machine Is Waiting
●
You can specify copy settings or scan originals while the machine is
in the waiting state, such as when after a paper jam is cleared.
Copying automatically begins when the machine is ready. The
message <Reservation copies can be made.> appears on the touch
panel display when the machine is able to process reserved
copying.
While the Machine Is Printing
●
You can specify copy settings for a new job while the machine is
printing. Copying of the new job automatically begins when the
current job is complete.
1. Press [Done] on the pop-up screen that appears
while the machine is printing.
If the job displayed on the touch panel display is from a function
other than the Copy function, press [Done] , then
display the Copy Basic Features screen.
This part of the procedure is not necessary if the machine is in the
waiting state.
(COPY) to
2. Place your originals.
3. Set the desired copy modes and paper source.
To cancel a previously set copy mode, press (Reset).
4. Press (Start).
If you specify a reserved copy job while the machine is in the waiting
state, copying automatically begins when the machine is ready.
If you specify a reserved copy job while the machine is printing,
copying of the new job automatically begins when the current job is
complete. If the following screen is displayed, press [OK], then try
reserving the job again after the current job is complete.
11
Table of Contents
Index
You can specify reserved copying while the machine is in the waiting state
in the following cases:
After a paper jam is cleared
–
After a cover on the main unit is opened and closed
–
3-13
Page 85

Before Using the
Machine
Original and Paper
TOP
PreviousBack Next
1
Collate Copy
2
Copying
3
Sending and
Receiving
4
Printing and
Scanning
5
Network (imageCLASS
MF7480/MF7470 Only)
6
Remote UI (imageCLASS
MF7480/MF7470 Only)
7
System Settings
8
Maintenance
9
Troubleshooting
10
Appendix
11
The Finishing modes can be selected to collate the copies in
various ways, either by pages or copy sets.
The Finishing modes cannot be set if [Envelope], [Transparency], or [Labels]
is selected as the paper type.
If the Collate Mode Is Set:
●
The copies are automatically collated into sets arranged in page
order. The output is as follows:
Originals
1
2
3
If the Group Mode Is Set:
●
4
Three Copies
of Each Page
Collated in
Page Order
1
Set 1
2
Set 2
1
3
4
2
3
4
1
Set 3
2
3
4
All copies of the same original page are grouped together. The
output is as follows:
Originals
Originals
1
1
2
2
3
3
4
4
Three Copies
Three Copies
of Each Page
of Each Page
Grouped by
Grouped by
Page
Page
Group 1
Group 1
1
1
Group 2
Group 2
2
1
1
2
1
1
Group 3
Group 3
3
2
2
3
2
2
Group 4
Group 4
4
4
4
3
3
3
3
4
4
4
If No Finisher Mode Is Set:
●
If the Collate and Group modes are not set, copies are output as
follows:
Originals Copies
1
2
3
4
If the Rotate Mode Is Set:
●
1
2
3
4
If the copies are of the same size, the sheets are automatically
collated into sets arranged in page order, and are output in
alternating directions as follows:
1
1
2
3
4
1
1
Table of Contents
Index
3-14
Page 86

Before Using the
Machine
Original and Paper
1
2
Copying
3
Sending and
Receiving
Printing and
Scanning
Network (imageCLASS
MF7480/MF7470 Only)
Remote UI (imageCLASS
MF7480/MF7470 Only)
System Settings
4
5
6
7
8
Maintenance
9
Troubleshooting
10
Appendix
11
Page Order (Collate)
■
1. Press (COPY) .
2. Place your originals.
3. Press [Finishing].
4. Press [Collate].
If you want to rotate the output sheet, press [Rotate] and proceed to
step 5. Otherwise, press [OK] and skip to step 7.
5. Press [NEXT].
6. Select [A4], [A4R], [B5], [B5R], [LTR], or [LTRR],
then press [OK].
[Rotate] can be selected only in the following cases:
–
If the available paper size is selected manually
–
If the available paper size is loaded in both the horizontal and
–
vertical directions
The selected paper source must have Drawer Eligibility For
–
APS/ADS in Common Settings (from the Additional Functions
screen) set to [On] . (See “Drawer Eligibility For APS/ADS,” on
p. 11-6.)
When you have selected Automatic Paper Selection for the
–
Rotate mode, make sure to select a paper size which can be
rotated. Otherwise, output will not be rotated.
If there is no paper which can be rotated, output will be collated.
–
PreviousBack Next
7. Press (Start).
If the original is placed on the platen glass, follow the instructions
that appear on the touch panel display. Press
original. When scanning is complete, press [Done].
To cancel this setting, press [Finishing], then press [Cancel].
–
To cancel all settings and return the machine to the Standard
–
mode, press
Same Page ( Group)
■
(Reset).
(Start) once for each
1. Press (COPY) .
2. Place your originals.
3. Press [Finishing].
4. Press [Group], then press [OK].
If you want to rotate the output sheet, press [Rotate] and proceed to
step 5. Otherwise, skip to step 7.
5. Press [NEXT].
TOP
Table of Contents
Index
3-15
Page 87

Before Using the
Machine
Original and Paper
1
2
Copying
3
Sending and
Receiving
Printing and
Scanning
Network (imageCLASS
MF7480/MF7470 Only)
Remote UI (imageCLASS
MF7480/MF7470 Only)
System Settings
4
5
6
7
8
Maintenance
9
Troubleshooting
6. Select [A4], [A4R], [B5], [B5R], [LTR], or [LTRR],
then press [OK].
[Rotate] can be selected only in the following cases:
–
If the available paper size is selected manually
–
If the available paper size is loaded in both the horizontal and
–
vertical directions
The selected paper source must have Drawer Eligibility For
–
APS/ADS in Common Settings (from the Additional Functions
screen) set to [On]. (See “Drawer Eligibility For APS/ADS,” on
p. 11-6.)
When you have selected Automatic Paper Selection for the
–
Rotate mode, make sure to select a paper size which can be
rotated. Otherwise, output will not be rotated.
If there is no paper which can be rotated, output will be collated.
–
7. Press (Start).
If the original is placed on the platen glass, follow the instructions
that appear on the touch panel display. Press
original. When scanning is complete, press [Done].
To cancel this setting, press [Finishing], then [Cancel].
–
To cancel all settings and return the machine to the Standard
–
mode, press
(Reset).
(Start) once for each
TOP
PreviousBack Next
10
Appendix
11
Table of Contents
Index
3-16
Page 88

Before Using the
Machine
Original and Paper
TOP
PreviousBack Next
1
Two-Sided Copying
2
Copying
3
Sending and
Receiving
Printing and
Scanning
Network (imageCLASS
MF7480/MF7470 Only)
Remote UI (imageCLASS
MF7480/MF7470 Only)
System Settings
4
5
6
7
8
Maintenance
9
Troubleshooting
10
Appendix
This mode enables you to make two-sided copies from onesided or two-sided originals, or make one-sided copies from
two-sided originals.
–
You may not be able to make two-sided copies on some types of paper,
depending on the paper.
–
If you are copying in the 2-Sided mode, align the top edge of the original
with the back edge of the platen glass (by the arrow in the top left
corner), or with the back edge of the feeder.
–
The 2-Sided mode you have selected is displayed above [2-Sided] on the
Copy Basic Features screen.
–
Paper used to make two-sided copies must conform to the following
specifications:
–
Paper size: 11" x 17", LGL, LTR, LTRR, EXEC, STMTR (envelopes cannot be
used for two-sided copying)
–
Paper weight: 17 to 24 lb bond (64 to 90 g/m
–
If you select [Irreg. Size] for copying, you cannot use the 1 ▶ 2-Sided, 2
▶ 2-Sided, Book ▶ 2-Sided, or 2-page Separation mode. (See “2-Page
Separation,” on p. 3-22.)
–
If you select [Envelope] for copying, you cannot use 1 ▶ 2-Sided, 2 ▶ 2Sided, Book ▶ 2-Sided, 2-page Separation mode. (See “2-Page
Separation,” on p. 3-22.)
2
)
Making Two-Sided Copies from One-Sided Originals (1 ▶ 2-
●
Sided)
This feature enables you to make two-sided copies from one-sided
originals.
Originals
Making Two-Sided Copies from Two-Sided Originals (2 ▶ 2-
●
Sided)
This feature enables you to make two-sided copies from two-sided
originals. If the originals are placed in the feeder, they are
automatically turned over to make two-sided copies.
Original
Copy
Copy
11
Table of Contents
Index
3-17
Page 89

Before Using the
Machine
Original and Paper
1
2
Copying
3
Sending and
Receiving
Printing and
Scanning
Network (imageCLASS
MF7480/MF7470 Only)
Remote UI (imageCLASS
MF7480/MF7470 Only)
System Settings
4
5
6
7
8
Maintenance
9
Troubleshooting
10
Appendix
11
Making One-Sided Copies from Two-Sided Originals (2 ▶ 1-
●
Sided)
This feature automatically turns over two-sided originals placed in
the feeder to make one-sided copies on different sheets of paper.
Original
Making Two-Sided Copies from Facing Pages in a Book (Book
●
▶ 2-Sided)
This feature enables you to make two-sided copies from facing
pages, or from the front and back sides of a page in bound originals,
such as books and magazines.
Place your original on the platen glass. The Book to 2-Sided mode cannot
–
be used when the original is placed in the feeder.
Left/Right Two-sided
–
This setting makes two-sided copies from facing pages.
Original
1
Copies
Copies
2
TOP
PreviousBack Next
Front/Back Two-sided
–
This setting makes two-sided copies from the front and back sides of a
page.
Original
1
2
1 to 2-Sided
■
This feature enables you to make two-sided copies from one-sided
originals.
The 1 ▶ 2-Sided mode cannot be used with the 2-page Separation or
–
Image Combination mode.
If there are an odd number of originals, the back side of the last copy is
–
left blank.
If the 1 ▶ 2-Sided mode is used with the Different Size Originals mode,
–
the copies of different size originals will be printed as one-sided copies
on paper of their respective sizes. If you want to make two-sided copies
with different size originals, you must select the paper size beforehand.
(See “Paper Selection,” on p. 3-5.)
2
1
Copies
1. Press (COPY).
Table of Contents
Index
12
2. Place your originals.
1
3. Press [2-sided].
3-18
Page 90

Before Using the
Machine
Original and Paper
1
2
Copying
3
Sending and
Receiving
Printing and
Scanning
Network (imageCLASS
MF7480/MF7470 Only)
Remote UI (imageCLASS
MF7480/MF7470 Only)
System Settings
4
5
6
7
8
Maintenance
9
Troubleshooting
10
Appendix
11
4. Press [1 ▶ 2-Sided].
To set the orientation of the two-sided copies:
●
Press [Option].
–
Select the type of two-sided orientation, then press [Done].
–
Details of each item are shown below.
[Book Type]: The front and back sides of the copy will
have the same top-bottom orientation.
[Calendar Type]: The front and back sides of the copy will
have opposite top-bottom orientations.
5. Press [OK].
6. Press (Start).
If the original is placed on the platen glass, follow the instructions
that appear on the touch panel display. Press
original. When scanning is complete, press [Done].
–
To cancel this setting, press [2-sided] [Cancel].
–
To cancel all settings and return the machine to the Standard
mode, press
2 to 2-Sided
■
This feature enables you to make two-sided copies from two-sided
originals. If a two-sided original is placed in the feeder, it is
automatically turned over so that both sides of the original are
copied on the front and back sides of a copy sheet.
(Reset).
(Start) once for each
2. Place your originals.
3. Press [2-sided].
4. Press [2 ▶ 2-Sided].
To set the orientation of the originals and the copies:
●
Press [Option].
–
Select the type of two-sided orientation for the originals and the
–
copies.
Details of each item are shown below.
Original
[Book Type]: The front and back sides of the
[Calendar Type]: The front and back sides of the
Copy
[Book Type]: The front and back sides of the copy
[Calendar Type]: The front and back sides of the
–
Press [Done].
5. Press [OK].
TOP
PreviousBack Next
original have the same top-bottom
orientation.
original have opposite top-bottom
orientations.
will have the same top-bottom
orientation.
copy will have opposite top-bottom
orientations.
Table of Contents
Index
The 2 ▶ 2-Sided mode cannot be used with the 2-page Separation or
Image Combination mode.
1. Press (COPY).
3-19
Page 91

Before Using the
Machine
Original and Paper
Copying
1
2
6. Press (Start).
If the original is placed on the platen glass, follow the instructions
that appear on the touch panel display. Press
original. When scanning is complete, press [Done].
(Start) once for each
TOP
PreviousBack Next
5. Press [OK].
6. Press (Start).
3
Sending and
Receiving
Printing and
Scanning
Network (imageCLASS
MF7480/MF7470 Only)
Remote UI (imageCLASS
MF7480/MF7470 Only)
System Settings
4
5
6
7
8
Maintenance
9
Troubleshooting
10
Appendix
11
Table of Contents
To cancel this setting, press [2-sided], then [Cancel].
–
To cancel all settings and return the machine to the Standard
–
mode, press
2 to 1-Sided
■
This feature automatically turns over 2-sided originals placed in the
feeder to make one-sided copies on different sheets of paper.
The 2 ▶ 1-Sided mode cannot be used with the 2-page Separation or
–
Image Combination mode.
Make sure to place originals, such as LTRR, horizontally. If these originals
–
are placed vertically, the back side of the copy is printed upside down.
(Reset).
1. Press (COPY).
2. Place your originals into the feeder.
3. Press [2-sided].
4. Press [2 ▶ 1-Sided].
To set the orientation of the originals, press [Option]:
●
Select the orientation of the originals, then press [Done].
–
Details of each item are shown below.
[Book Type]: The front and back sides of the original
have the same top-bottom orientation.
[Calendar
Type]:
The front and back sides of the original
have opposite top-bottom orientations.
To cancel this setting, press [2-sided], then [Cancel].
–
To cancel all settings and return the machine to the Standard
–
mode, press
Book to 2-Sided
■
This feature enables you to make 2-sided copies from facing pages,
or from the front and back sides of a page in bound originals, such
as books and magazines.
The Book ▶ 2-Sided mode cannot be used with the 2-page Separation,
–
Image Combination, Binding Erase, or Different Size Originals mode.
Only LTR paper can be used for Book ▶ 2-Sided copying.
–
If you select [Front/Back 2-sided], the front side of the first two-sided
–
page and the back side of the last two-sided page are left blank.
Place your original on the platen glass. The Book ▶ 2-Sided mode cannot
–
be used when the original is placed in the feeder.
(Reset).
1. Press (COPY).
2. Place your original on the platen glass.
3. Press [2-sided].
To make copies in the correct page order, begin copying from the
first open page of the book or bound original.
Place your original face down, making sure that its top edge is
aligned with the back edge of the platen glass (by the arrow in the
top left corner).
4. Press [Book ▶ 2-Sided], then press [Next].
Index
3-20
Page 92

Before Using the
Machine
Original and Paper
1
2
Copying
3
Sending and
Receiving
Printing and
Scanning
Network (imageCLASS
MF7480/MF7470 Only)
Remote UI (imageCLASS
MF7480/MF7470 Only)
System Settings
4
5
6
7
8
Maintenance
9
Troubleshooting
5. Select the desired type of two-sided layout, then
press [OK].
Details of each item are shown below.
[Left/Right 2-sided]: The facing pages of a book or
bound original are copied on
the front and back sides of a
single sheet of paper.
[Front/Back 2-sided]: The front and back sides of
the left page, or the front and
back sides of the right page, are
copied on the front and back
sides of a single sheet of paper.
6. Press (Start).
To copy the next two facing pages, turn the page of the original.
Place your original on the platen glass, then press
(Start).
7. When scanning is complete, press [Done].
To cancel this setting, press [2-sided] [Cancel].
–
To cancel all settings and return the machine to the Standard
–
mode, press
(Reset).
TOP
PreviousBack Next
10
Appendix
11
Table of Contents
Index
3-21
Page 93

Before Using the
Machine
Original and Paper
1
2
Copying
3
Sending and
Receiving
Printing and
Scanning
Network (imageCLASS
MF7480/MF7470 Only)
Remote UI (imageCLASS
MF7480/MF7470 Only)
System Settings
4
5
6
7
8
Maintenance
9
Troubleshooting
Advanced Copy Features
2-Page Separation
■
This mode enables you to copy facing pages in a book or bound
original to fit onto separate pages.
Original
11
The 2-page Separation mode cannot be used with the Two-sided, Image
–
Combination, Different Size Originals, or Binding Erase mode.
Place your original on the platen glass. The 2-page Separation mode
–
cannot be used when the original is placed in the feeder.
To make two-sided copies of books or bound originals, use the Book ▶
–
2-Sided copying feature of the Two-sided mode. (See “Book to 2-Sided,”
on p. 3-20.)
Copies
TOP
PreviousBack Next
4. Press [2-page Separation], then [Done].
5. Press (Start).
To scan the next two facing pages, turn the page of the original.
Place your original on the platen glass, then press
(Start).
6. When scanning is complete, press [Done].
–
To cancel this setting, press [Special Features] [2-page
Separation] [Cancel].
–
To cancel all settings and return the machine to the Standard
mode, press
Image Combination
■
This mode enables you to automatically reduce two or four
originals, as well as two-sided originals or the facing pages of a
book, to fit onto one side or both sides of a selected paper size.
(Reset).
10
Appendix
11
Table of Contents
Index
1. Press (COPY).
2. Place your original on the platen glass.
3. Press [Special Features].
To make copies in the correct page order, begin copying from the
first open page of the book or bound original. Place your original
face down, making sure that its top edge is aligned with the back
edge of the platen glass (by the arrow in the top left corner).
The Image Combination mode cannot be used with the Automatic Paper
–
Selection, 2-page Separation, Different Size Originals, Original Frame
Erase, or Book Frame Erase mode.
Originals copied in the Image Combination mode must all be the same
–
size. You cannot use the Image Combination mode with the Different
Size Originals mode.
The reduction ratio is automatically set so that the originals fit onto the
–
selected paper size.
3-22
Page 94

Before Using the
Machine
1
Original and Paper
2
Copying
3
Sending and
Receiving
4
Printing and
Scanning
5
Network (imageCLASS
MF7480/MF7470 Only)
6
Remote UI (imageCLASS
MF7480/MF7470 Only)
7
System Settings
8
Maintenance
9
Troubleshooting
10
Appendix
11
2 On 1
●
This setting reduces two 1-sided originals or one 2-sided original to
fit onto one side or both sides of the copy sheet.
Originals
or
1
2
4 On 1
●
This setting reduces four 1-sided or two 2-sided originals to fit onto
one side or both sides of the copy sheet.
Originals
or
1
2
3
4
1
1
3
Copy
1
Copy
1
3
2
2
4
1. Press (COPY).
2. Place your originals.
TOP
PreviousBack Next
5. Select the original size , then press [Next].
If you are copying two-sided originals, press [2-Sided Original]
select the type of two-sided original press [OK] [Next].
Details of each item are shown below.
[Book Type]: The front and back sides of the original
have the same top-bottom orientation.
[Calendar Type]: The front and back sides of the original
have opposite top-bottom orientations.
To select an A or B series paper size, press [A/B-size].
–
[2-Sided Original] cannot be selected if STMTR is the selected
–
original size.
6. Select the desired Image Combination feature,
then press [Next].
If you want to make two-sided copies, press [2-Sided Copy] select
the type of two-sided orientation press [OK] [Next].
Details of each item are shown below.
[Book Type]: The front and back sides of the copy will
have the same top-bottom orientation.
[Calendar Type]: The front and back sides of the copy will
have opposite top-bottom orientations.
If you want to specify the image order, press [Option] select the
image order press [Done] [Next].
If you do not change the image order by pressing [Option], the
images are printed as follows:
2 On 1: Left Right
4 On 1: Upper Left Upper Right Lower Left
Lower Right
Table of Contents
Index
3. Press [Special Features].
4. Press [Image Combination].
3-23
Page 95

Before Using the
Machine
Original and Paper
1
2
Copying
3
Sending and
Receiving
Printing and
Scanning
Network (imageCLASS
MF7480/MF7470 Only)
Remote UI (imageCLASS
MF7480/MF7470 Only)
System Settings
4
5
6
7
8
Maintenance
7. Select the desired paper size, press [OK], then
[Done].
–
You cannot use Automatic Paper Selection in the Image
Combination mode.
–
The machine automatically selects the copy ratio depending on
the selected paper size.
–
The most suitable image orientation for the specified paper size
is automatically determined even if Auto Orientation is set to
[Off]. (See “Auto Orientation,” on p. 11-9.)
8. Press (Start).
If the original is placed on the platen glass, follow the instructions
that appear on the touch panel display ,then press
each original. When scanning is complete, press [Done].
–
To cancel this setting, press [Special Features] [Image
Combination] [Cancel].
–
To cancel all settings and return the machine to the Standard
mode, press
(Reset).
(Start) once for
TOP
PreviousBack Next
Frame Erase
■
This mode enables you to erase shadows and lines that appear
when copying various types of originals. The following three
Frame Erase modes are available.
Combinations of the three Frame Erase modes cannot be set. If you select
one of these modes, the previously set mode is canceled.
Original Frame Erase
●
This mode erases the dark borders and frame lines that appear
around the copy if the original is smaller than the selected paper
size. You can also use this mode to create a blank border around the
edge of the copy.
Copy (LTR)
Original Frame
Original (STMT)
Erase Selected
Troubleshooting
10
Appendix
11
Table of Contents
Index
9
Copy (LTR)
Original Frame
Erase Not Selected
3-24
Page 96

Before Using the
Machine
Original and Paper
1
2
Copying
3
Sending and
Receiving
Printing and
Scanning
Network (imageCLASS
MF7480/MF7470 Only)
Remote UI (imageCLASS
MF7480/MF7470 Only)
System Settings
4
5
6
7
Book Frame Erase
●
This mode erases the dark borders, as well as center and contour
lines that appear if you are copying facing pages in a book or bound
original.
Copy
Book Frame
Erase Selected
Original
Copy
Book Frame
Erase Not
Selected
TOP
PreviousBack Next
Binding Erase
●
This mode erases the shadows that appear on copies from binding
holes on originals.
Copy
Binding Erase
Original
Selected
Copy
Binding Erase
Not Selected
Maintenance
Troubleshooting
10
Appendix
11
Table of Contents
Index
8
Original Frame Erase
9
This mode erases the dark borders and frame lines that appear
around the copy if the original is smaller than the selected paper
size. You can also use this mode to create a blank border around the
edge of the copy.
The Original Frame Erase mode cannot be used with the Image
Combination or Different Size Original mode.
1. Press (COPY).
2. Place your originals.
3-25
Page 97

Before Using the
Machine
Original and Paper
1
2
Copying
3
Sending and
Receiving
Printing and
Scanning
Network (imageCLASS
MF7480/MF7470 Only)
Remote UI (imageCLASS
MF7480/MF7470 Only)
System Settings
4
5
6
7
8
Maintenance
9
Troubleshooting
10
Appendix
11
Table of Contents
3. Press [Special Features].
4. Press [Frame Erase].
5. Press [Original Frame Erase], then [Next].
6. Select the original size , then press [Next].
–
You can set the Original Frame Erase mode only for the original
paper sizes shown on the touch panel display.
–
To select an A or B series paper size, press [A/B-size].
7. Press [-] or [+] to set the frame erase width.
–
To enter values in millimeters, press [mm].
–
When entering the value in millimeters, you can also use
(numeric keys), and
–
You can change the value by pressing [-] or [+], even if you have
entered the value using
–
If you enter a value outside the setting range, a message
prompting you to enter an appropriate value appears on the
screen.
–
The maximum original frame erase width that you can set is <1
15/16" (50 mm)>.
If you want to set the same width for all four borders:
●
Press [-] or [+] to set the frame erase width, then press [OK].
–
If you want to set the top, left, right, and bottom widths
●
independently:
Press [Adjust Each Dim.].
–
Select the desired frame erase borders, then press [-] or [+] to set
–
their respective frame erase widths.
Press [OK].
–
To return to the screen for setting the same width for all four borders,
press [Adjust All At Once].
(Clear) to clear your entry.
– (numeric keys).
–
TOP
PreviousBack Next
8. Press [Done].
9. Press (Start).
To cancel this setting, press [Special Features] [Frame Erase]
–
[Cancel].
To cancel all settings and return the machine to the Standard
–
mode, press
(Reset).
Book Frame Erase
This mode erases the dark borders, as well as center and contour
lines that appear if you are copying facing pages in a book or bound
original onto a single sheet of paper.
The Book Frame Erase mode cannot be used with the Image Combination
or Different Size Original mode.
1. Press (COPY).
2. Place your original on the platen glass.
3. Press [Special Features].
4. Press [Frame Erase].
5. Press [Book Frame Erase], then [Next].
Index
3-26
Page 98

Before Using the
Machine
Original and Paper
1
2
Copying
3
Sending and
Receiving
Printing and
Scanning
Network (imageCLASS
MF7480/MF7470 Only)
Remote UI (imageCLASS
MF7480/MF7470 Only)
System Settings
4
5
6
7
8
Maintenance
9
Troubleshooting
10
Appendix
11
6. Select the size of the bound original when it is
open, then press [Next].
You can set the Book Frame Erase mode only for the original
–
paper sizes shown on the touch panel display.
To select an A or B series paper size, press [A/B-size].
–
7. Press [-] or [+] to set the frame erase widths.
–
To enter values in millimeters, press [mm].
–
When entering values in millimeters, you can also use
(numeric keys), and
–
You can change the values by pressing [-] or [+], even if you have
entered the values using
–
If you enter a value outside the setting range, a message
prompting you to enter an appropriate value appears on the
screen.
–
The maximum book frame erase width that you can set is <1
15/16" (50 mm)>.
If you want to set the same width for all four borders:
●
Press [Center] and [Sides].
–
Press [-] or [+] to set their respective frame erase widths, then
–
press [OK].
If you want to set the top, left, center, right, and bottom
●
widths independently:
Press [Adjust Each Dim.].
–
Select the desired frame erase borders.
–
Press [-] or [+] to set their respective frame erase widths, then
–
press [OK].
To return to the screen for setting the same width for all four borders,
press [Adjust All At Once].
(Clear) to clear your entries.
– (numeric keys).
–
8. Press [Done].
TOP
PreviousBack Next
9. Press (Start).
–
To cancel this setting, press [Special Features] [Frame Erase]
[Cancel].
–
To cancel all settings and return the machine to the Standard
mode, press
(Reset).
Binding Erase
This mode erases the shadows that appear on copies from binding
holes on originals.
–
The Binding Erase mode cannot be used with the Book ▶ 2-Sided, Twopage Separation, or Different Size Original mode.
–
Do not place originals with binding holes into the feeder, as this may
damage the originals.
–
If you are using the Binding Erase mode, the borders you do not select
are also slightly erased.
1. Press (COPY).
2. Place your original on the platen glass.
3. Press [Special Features].
4. Press [Frame Erase].
5. Press [Binding Erase], then press [Next].
6. Select the border where the binding holes are
located, then press [Next].
The border is where the binding holes are located on the original, if
you visualize the original as being face up.
Table of Contents
Index
3-27
Page 99

Before Using the
Machine
Original and Paper
1
2
Copying
3
Sending and
Receiving
Printing and
Scanning
Network (imageCLASS
MF7480/MF7470 Only)
Remote UI (imageCLASS
MF7480/MF7470 Only)
System Settings
4
5
6
7
8
Maintenance
9
Troubleshooting
10
Appendix
11
7. Press [-] or [+] to set the frame erase width, then
press [OK].
8. Press [Done].
To enter values in millimeters, press [mm].
–
When entering the value in millimeters, you can also use
–
(numeric keys), and
You can change the value by pressing [-] or [+], even if you have
–
entered the value using
–
If you enter a value outside the setting range, a message
prompting you to enter an appropriate value appears on the
screen.
The maximum binding erase width that you can set is <13/16"
–
(20 mm)>.
(Clear) to clear your entry.
– (numeric keys).
–
9. Press (Start).
–
To cancel this setting, press [Special Features] [Frame Erase]
[Cancel].
–
To cancel all settings and return the machine to the Standard
mode, press
(Reset).
TOP
PreviousBack Next
Different Size Originals
■
This mode enables you to copy different size originals together.
The Different Size Originals mode cannot be used with the Book ▶ 2-
–
Sided, 2-page Separation, Image Combination, or Frame Erase mode.
If the originals are placed in the feeder, make sure that the different size
–
originals are of the same weight (paper type).
Align the top edge of the originals with the back edge of the feeder if
–
you are placing originals with different widths. (“Width” refers to the
vertical measurement of the paper from the front of the machine to the
back of the machine when the paper is placed in the feeder or on the
platen glass.)
If originals with different widths are placed in the feeder, set the
–
differently sized originals in the following combinations. Other
combinations may damage the originals.
11" x 17" and LGL, 11" x 17" and LTRR, 11" x 17" and STMT, LTR and LGL,
–
LTR and LTRR, LTR and STMT
If you place originals with different widths into the feeder, the originals
–
may move slightly when fed to the platen glass. As a result, the images
may be scanned and copied as slanted.
If you specify the Different Size Originals mode with the Automatic Paper
–
Selection mode, Auto Orientation is not performed.
If the Different Size Originals mode is set, the scanning speed may be
–
slower than normal.
If the Different Size Originals mode is used with the 1 ▶ 2-Sided mode,
–
the copies are output as one-sided copies on paper of their respective
sizes if the originals for the front and back sides of a two-sided copy are
different in size.
1. Press (COPY).
2. Place your originals.
Table of Contents
Index
3. Press [Special Features].
4. Press [Different Size Originals].
5. Select the type of originals, then press [OK].
3-28
Page 100

Before Using the
Machine
1
Original and Paper
2
Copying
3
Sending and
Receiving
Printing and
Scanning
Network (imageCLASS
MF7480/MF7470 Only)
Remote UI (imageCLASS
MF7480/MF7470 Only)
System Settings
4
5
6
7
6. Press [Done].
If you are placing originals with the same width, press [Same Width].
If you are placing originals with different widths, press [Different
Width].
7. Press (Start).
If the original is placed on the platen glass, follow the instructions
that appear on the touch panel display. Press
original. When scanning is complete, press [Done].
–
To cancel this setting, press [Special Features] [Different Size
Originals] [Cancel].
–
To cancel all settings and return the machine to the Standard
mode, press
(Reset).
(Start) once for each
TOP
PreviousBack Next
Sharpness
■
This mode enables you to make copies of originals with a sharper or
softer contrast. To reproduce text or lines with a sharper contrast,
use [High] as the setting. To copy originals containing printed
images or other halftones with a softer contrast, use [Low] as the
setting.
Low
●
If you make copies of an original containing halftones, such as a
printed photograph, using the Photo mode, the moire effect (a
shimmering, wavy pattern) may occur. In this case, you can lessen
this moire effect by using [Low] as the setting to produce a clearer
copy.
Original Copy
Low Set Low Not Set
The world's coral reefs, where
brilliantly colored sh and a
myriad of other tropical creatures
come together.
The world's coral reefs, where
brilliantly colored sh and a
myriad of other tropical creatures
come together.
The world's coral reefs, where
brilliantly colored sh and a
myriad of other tropical creatures
come together.
Maintenance
Troubleshooting
10
Appendix
11
Table of Contents
Index
8
9
3-29
 Loading...