

Page 1

Send Setting Guide
Setting and Using
Send to E-mail Function
Setting and Using
Store to Shared Folder Function
Copyright
This guide explains how to set up the “Send to E-mail” and
“Store to Shared Folder” functions using the Send Function
Setting Tool, and how to check if the functions are set properly
by sending an e-mail or storing a document in a shared folder.
ATTENTION
Before you start, make sure that the machine is
connected to the network and is detected by the
Send Function Setting Tool. For help, see the Starter
Guide.
Print
Home
Close
USRM1-5540-00
Page 2
Outline of
02
01
03
Setting Up
Sending an e-mail
Outline
About Buttons
Send to E-mail Setup Procedure
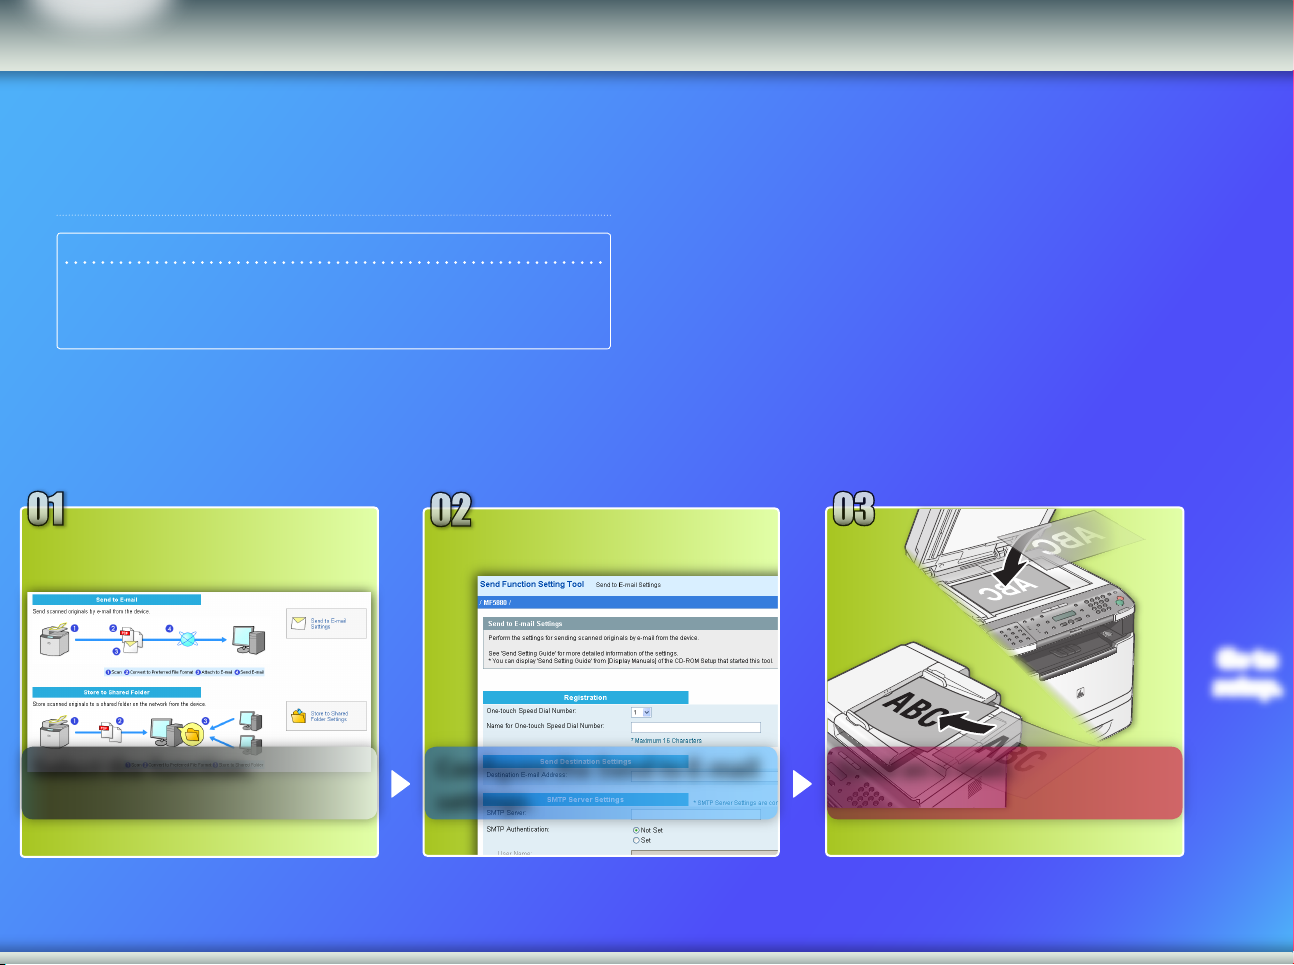
The gure below shows how to set up and use the Send to E-mail
function.
About the screenshots
The information shown in the screenshots, such as the e-mail address and
SMTP server address, are for illustrative purposes only. The actual
screenshots you see on your computer may dier from the ones shown
here.
Go to
setup.
Select the function.
Send an e-mail.Congure the Send to E-mail
settings.
Page 3
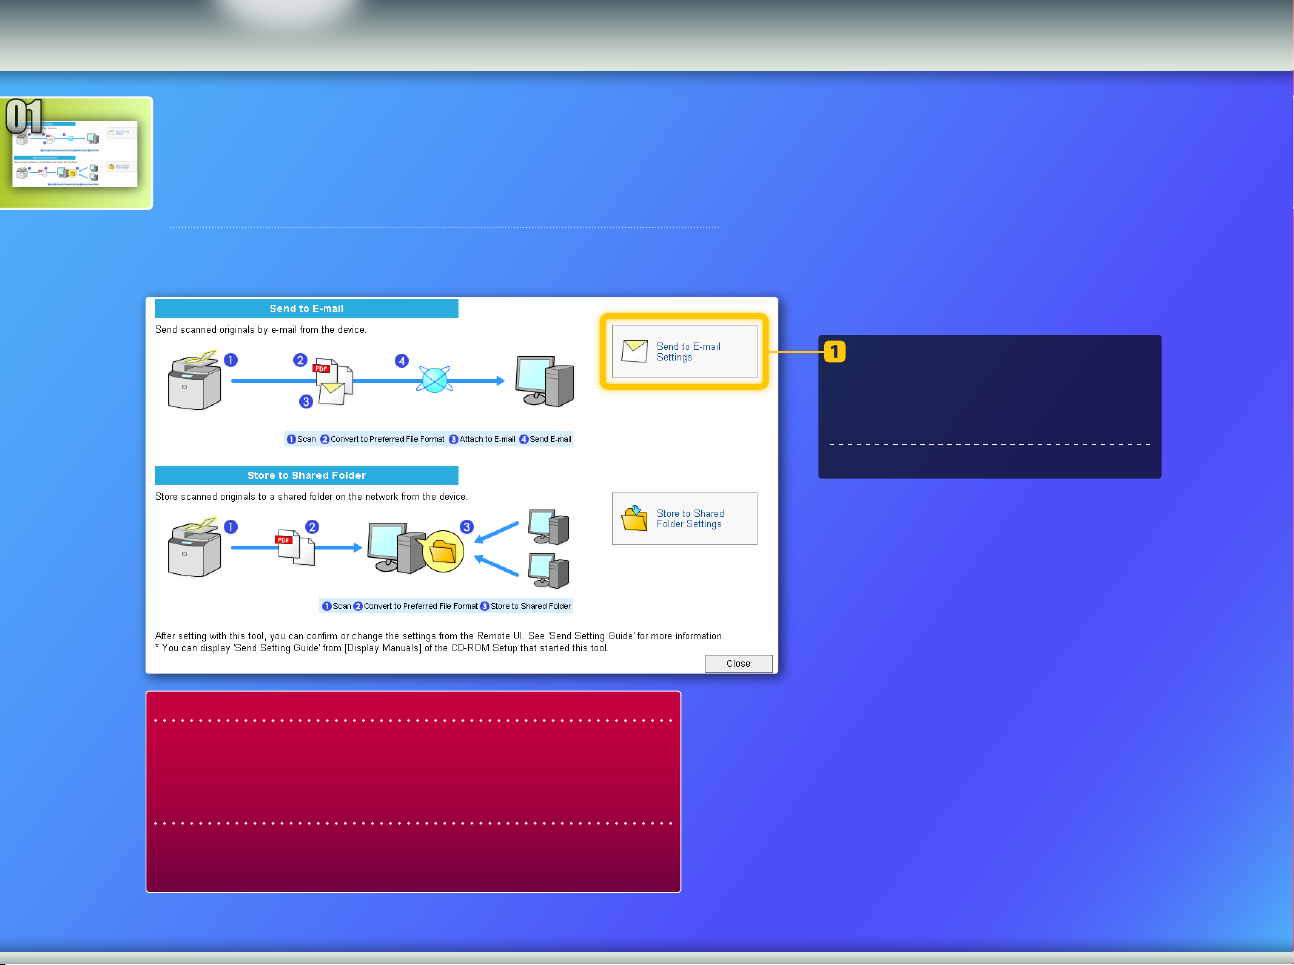
Selecting the function on the Select
01
Sending an e-mail
About Buttons
Outline
Setting Up
Setting window
This section describes the procedure for displaying the [Send to E-mail
Settings] window.
Click [Send to E-mail Settings].
The [Send to E-mail Settings] window is
displayed.
Proceed to the next section.
If the window shown above is not displayed:
See “Use Send Function Setting Tool” in the Starter Guide to start
the Send Function Setting Tool.
If an error screen is displayed when you press the button:
Follow the instructions on the screen to solve the problem.
Page 4
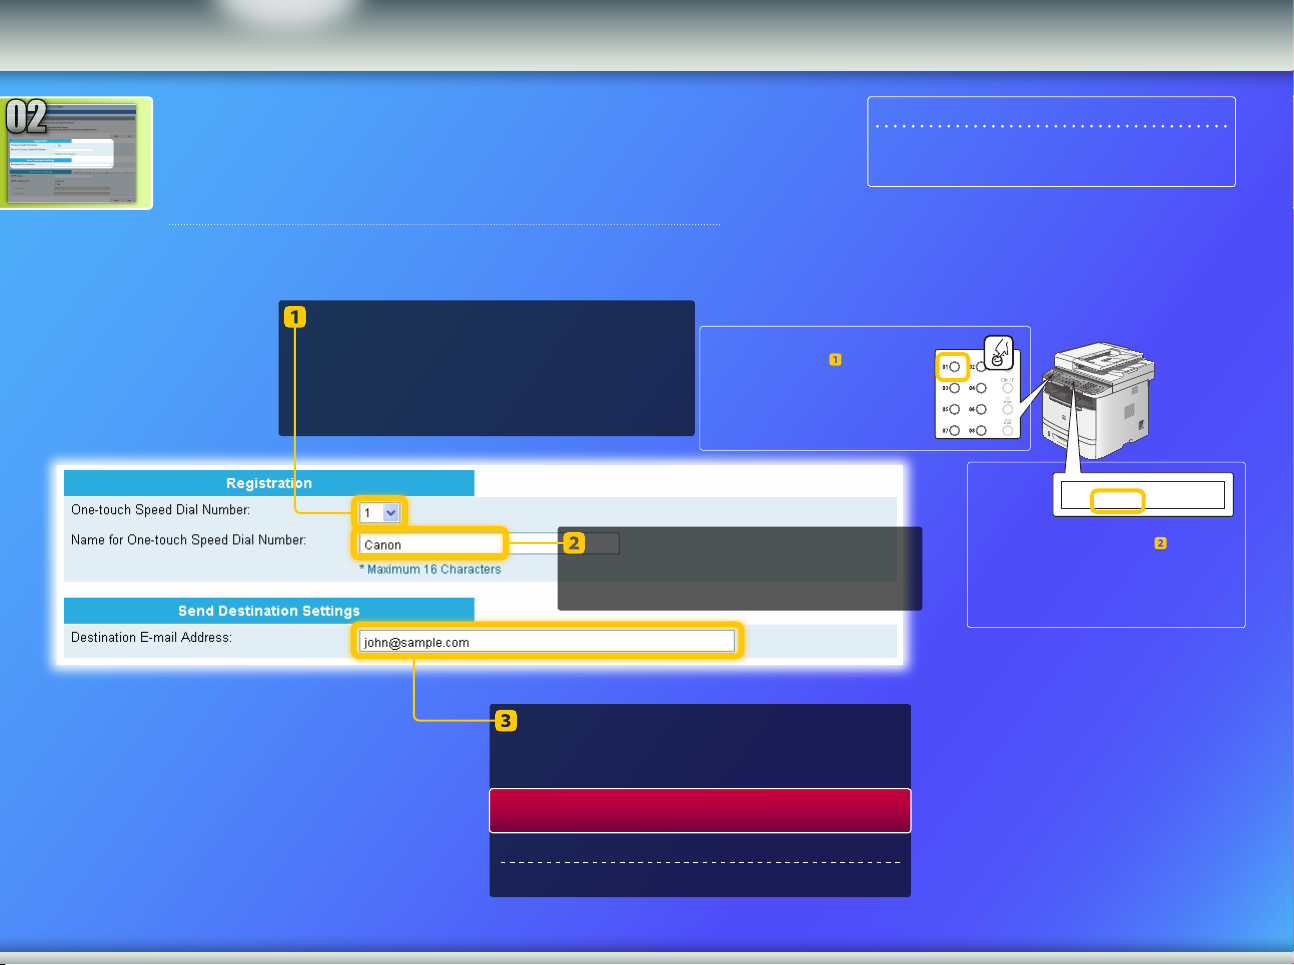
Registering an e-mail address in a
[ 0 1 ] C a n o n
j o h n @ s a m p l e . c o m
02
Sending an e-mail
About Buttons
Outline
Setting Up
one-touch key
This section explains how to register the recipient’s e-mail address in a
one-touch key.
What is a one-touch key? >>>
From the pull-down menu, select the
desired one-touch key number (1 to 20).
The numbers for one-touch keys that have
already been registered are not displayed.
NOTE
Using the Send Function Setting Tool, you can only register
new addresses in one-touch keys.
The one-touch key number that
you selected in step corresponds
to the key on the operation panel.
Enter a name for the one-touch key
(for example, a company name,
such as Canon).
Enter the e-mail address of the person
who will receive the scanned image.
To send a test e-mail, enter your e-mail address. Check the result later
in the Sending an e-mail section.
E-mail address registration is complete.
Proceed to the next section.
The name you entered in step appears
on the display when the one-touch key is
pressed.
Page 5
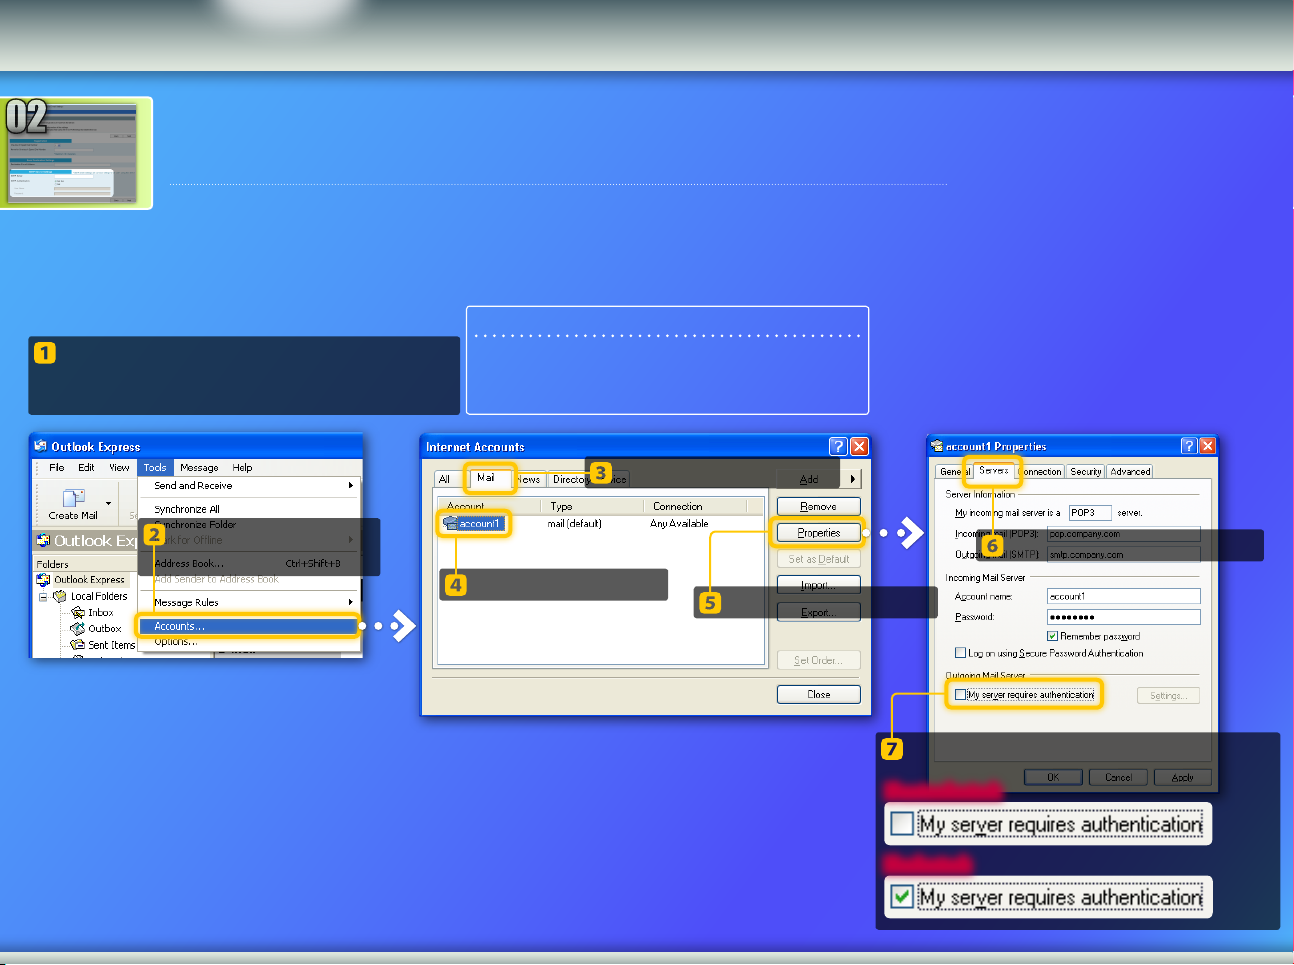
Checking SMTP server information
02
Sending an e-mail
About Buttons
Outline
Setting Up
This section explains how to check the SMTP server’s address and its authentication method, and how
to enter the conrmed information in the Tool window.
What is SMTP? >>>
Open your e-mail software.
In this guide, Outlook Express 6.x is used as an
example.
NOTE
For Windows Mail or Live Mail, you can check the SMTP server in
the same manner as in Outlook Express 6.x. If you are using e-mail
software other than these, consult your network administrator for
your SMTP server information.
Click the [Mail] tab.
On the [Tools] menu,
click [Accounts].
Click the [Servers] tab.
Select your account.
Click [Properties].
See if the checkbox is selected.
If not selected:
If selected:
Page 6
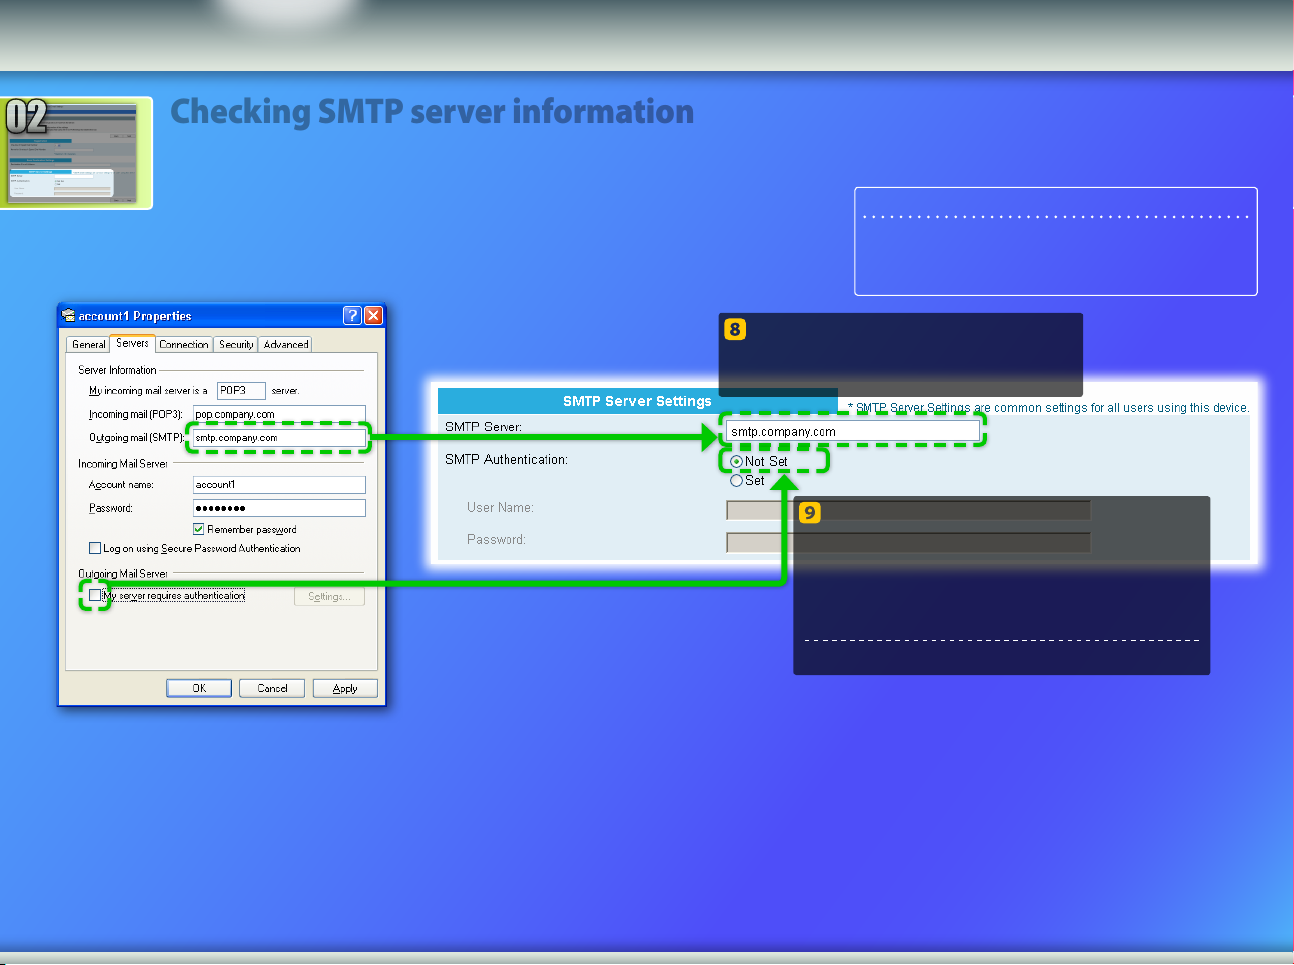
Checking SMTP server information
NOTE
02
Sending an e-mail
About Buttons
Outline
Setting Up
You do not have to change the SMTP server settings here if they
have already been set. Consult with other users or your network
administrator if changes are necessary.
Enter your SMTP server name (or
address) into the [SMTP Server]
eld.
If the “My server requires authentication”
checkbox is not selected, select [Not Set]
for [SMTP Authentication].
SMTP server settings are complete.
Proceed to the next section.
Page 7
Checking SMTP server information
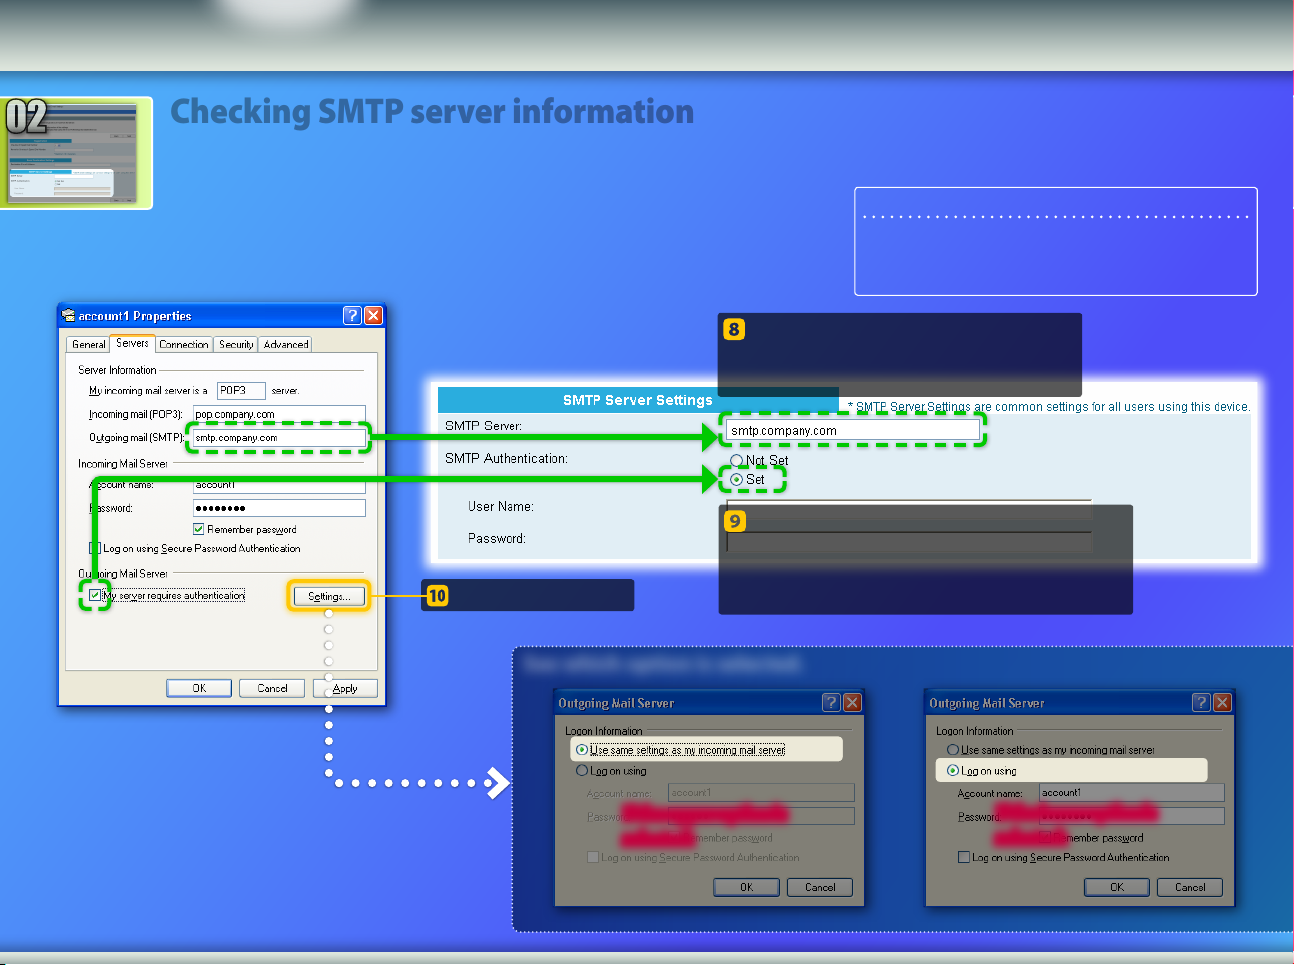
Click [Settings].
02
Sending an e-mail
About Buttons
Outline
Setting Up
See which option is selected.
NOTE
You do not have to change the SMTP server settings here if they
have already been set. Consult with other users or your network
administrator if changes are necessary.
Enter your SMTP server name (or
address) into the [SMTP Server]
eld.
If the “My server requires authentication”
checkbox is selected, select [Set] for
[SMTP Authentication].
If the upper option is
selected:
If the lower option is
selected:
Page 8
Checking SMTP server information
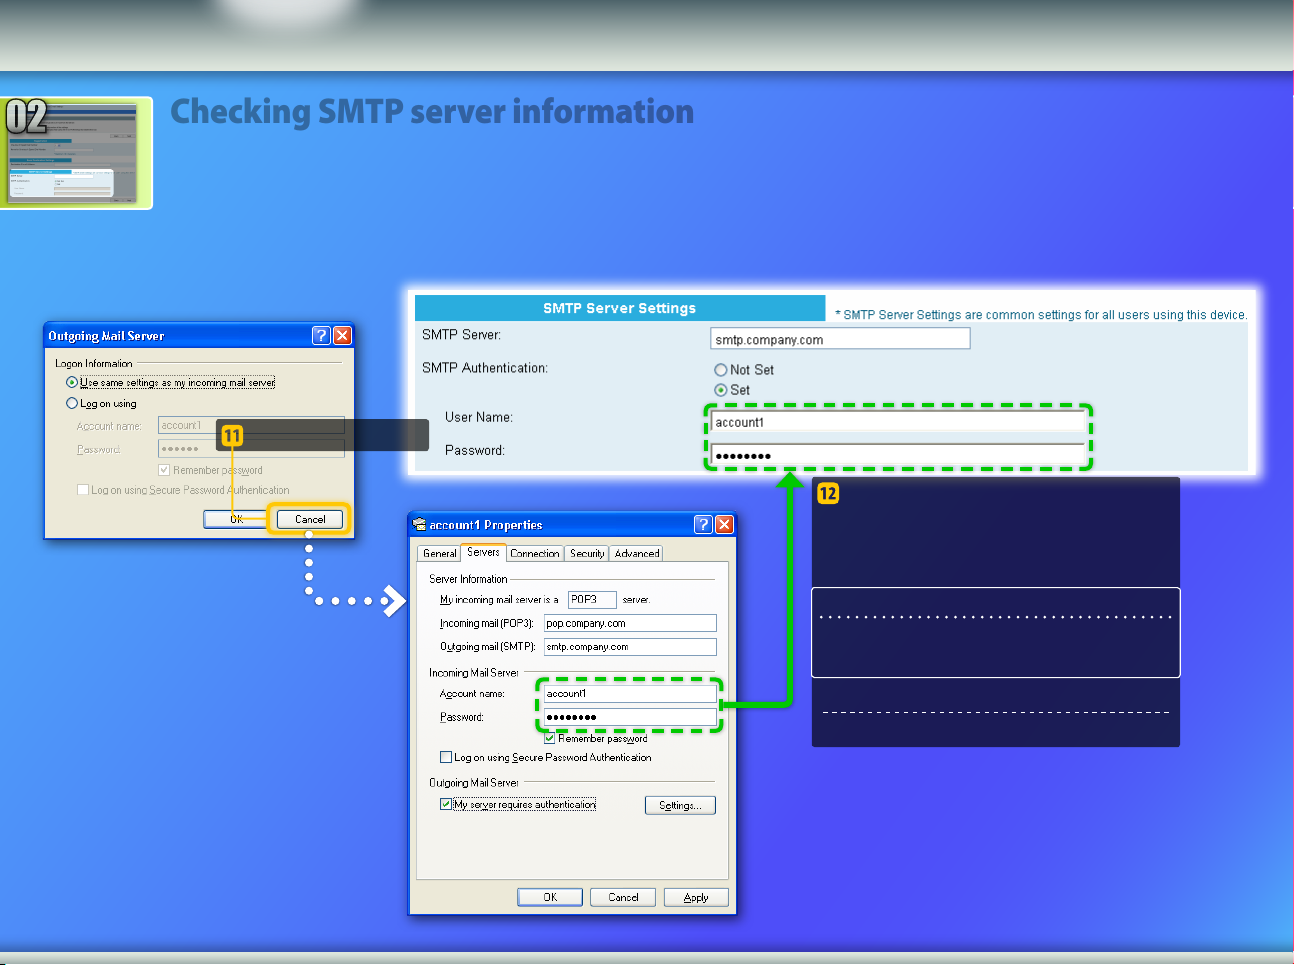
Click [Cancel].
02
Sending an e-mail
About Buttons
Outline
Setting Up
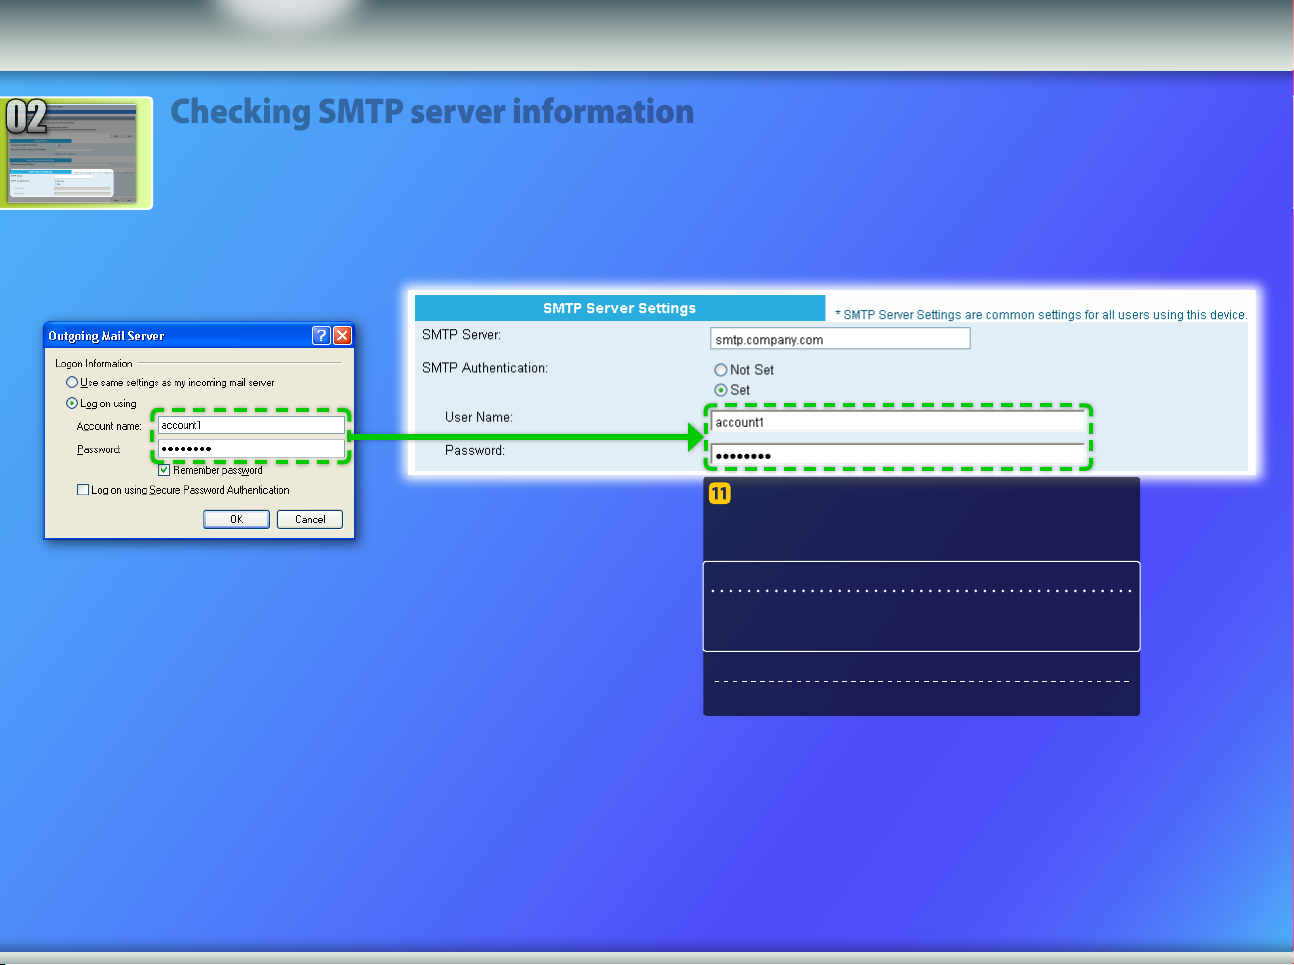
Enter the account name (or user
name) and password into the [User
Name] and [Password] elds.
NOTE
You cannot copy and paste the password. Consult your
network administrator for your password.
SMTP server settings are complete.
Proceed to the next section.
Page 9
Checking SMTP server information
02
Sending an e-mail
About Buttons
Outline
Setting Up
Enter the account name (or user name) and
password into the [User Name] and
[Password] elds.
NOTE
You cannot copy and paste the password. Consult your network
administrator for your password.
SMTP server settings are complete.
Proceed to the next section.
Page 10
Registering the Send to E-mail settings
02
Sending an e-mail
About Buttons
Outline
Setting Up
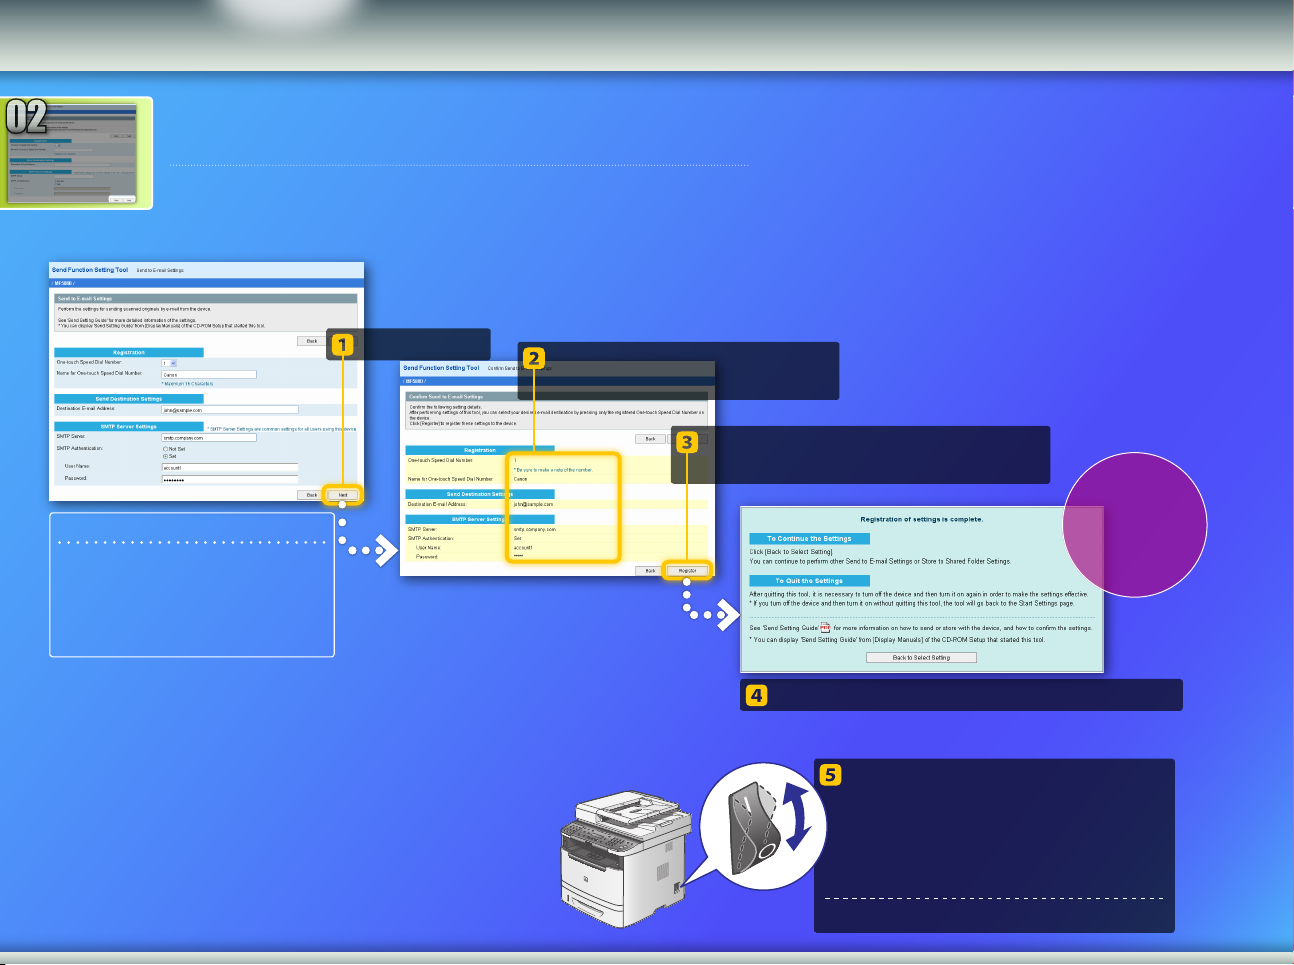
This section explains how to register the Send to E-mail settings.
NOTE
The information shown in the screenshots,
such as the e-mail address and SMTP server
authentication, are for illustrative purposes
only. The actual screenshots you see on your
computer may dier from the ones shown
here.
Click [Next].
Make sure that the settings
are correct.
Click [Register].
Click [Back] for corrections, if necessary.
When
this screen is
displayed, the
settings are
complete.
Close the Send Function Setting Tool.
Turn OFF the machine’s main
power switch, wait for at least 10
seconds, then turn it ON.
E-mail send settings are complete.
Proceed to the next section.
Page 11
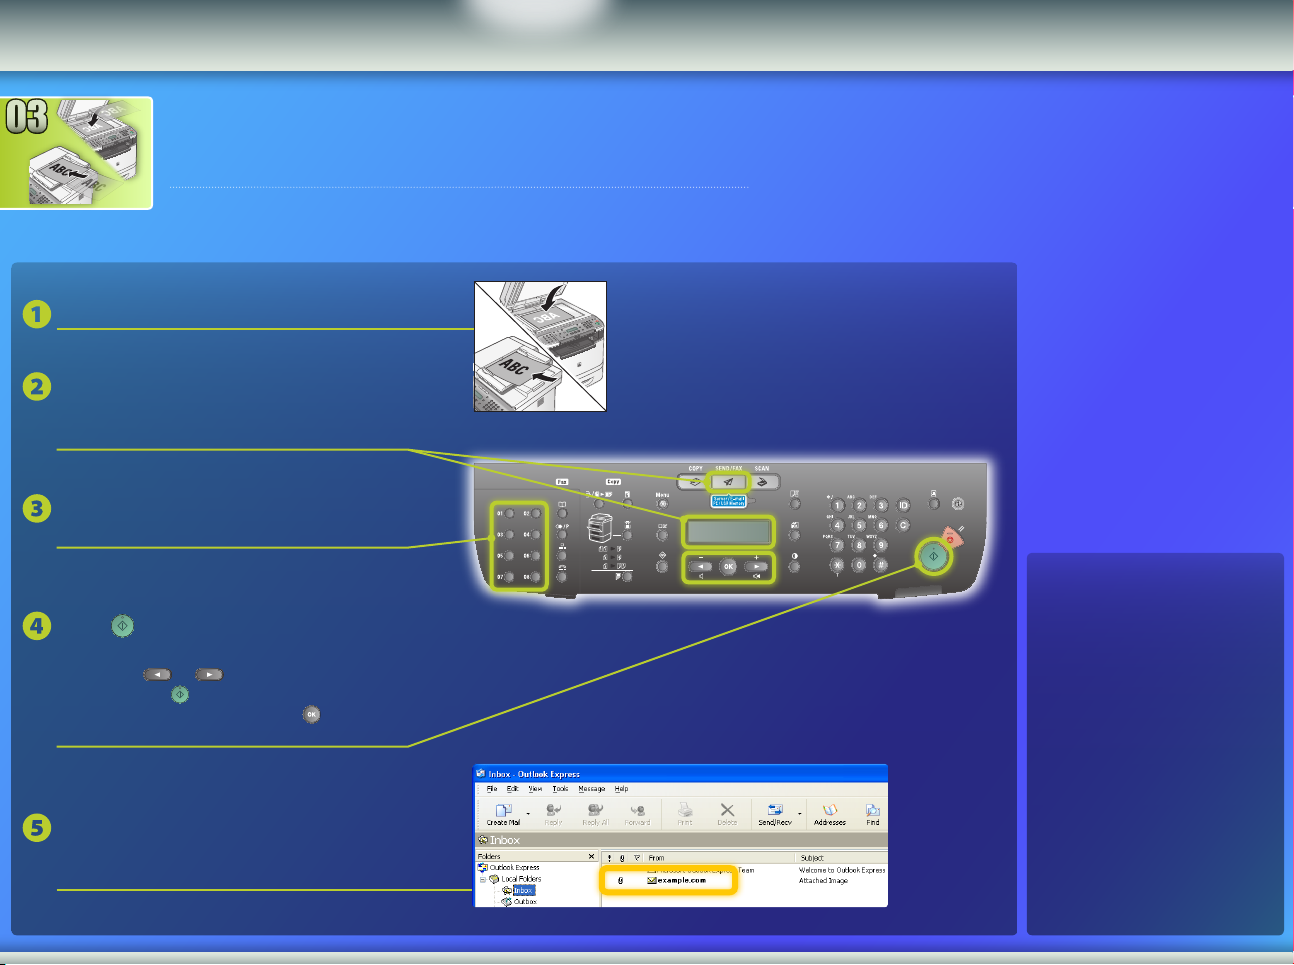
Sending an E-mail
03
Setting Up
About Buttons
Outline
Sending an e-mail
This section explains how to scan a document and send the scanned image
via e-mail.
Set the document.
Press the Sending Function key
repeatedly to select the color mode
(<E-MAIL: B&W> or <E-MAIL: COLOR>).
Press the one-touch key you
registered.
Press [Start].
When you place the documents on the platen
glass, press or to select the document
size, then press [Start] for each document.
When scanning is complete, press [OK] to
start sending.
* The appearance of the operation panel may dier
depending on the model you use.
If e-mail was delivered
successfully:
Go to Home.
Close the Guide.
Conrm that the scanned image is sent to
the destination e-mail address.
Open your e-mail software to check if the e-mail was delivered.
If e-mail was not
delivered:
Go to the Remote UI
section.
Use the Remote UI to make sure
that the settings are correct.
Page 12

Outline of
02
01
03
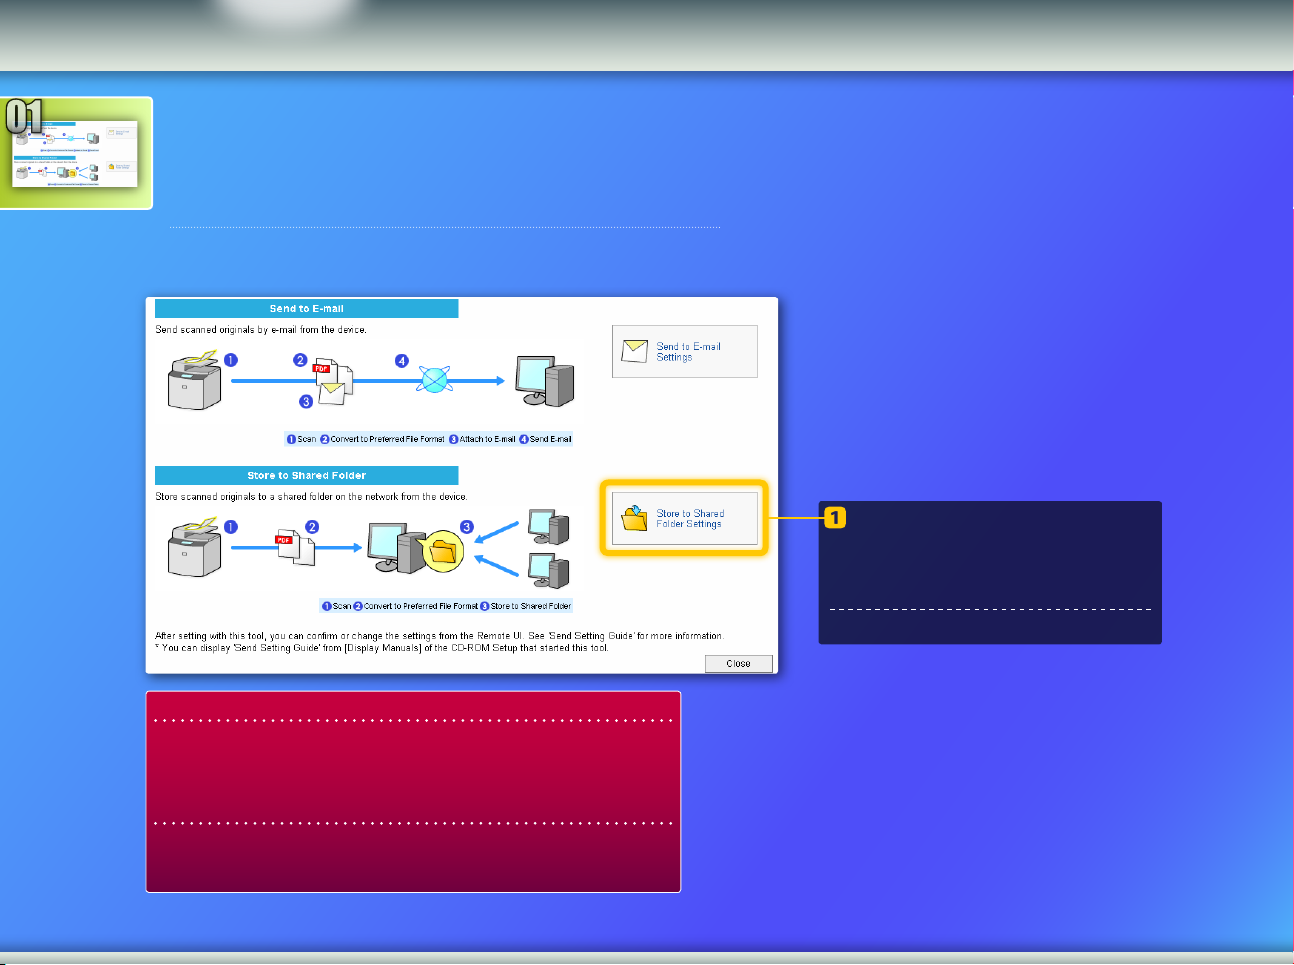
Outline
Setting Up
Storing documents
About Buttons
Store to Shared Folder Setup
Procedure
The gure below shows how to set up and use the Store to Shared Folder
function.
About the screenshots
The information shown in the screenshots, such as the computer name
and shared folder name, are for illustrative purposes only. The actual
screenshots you see on your computer may dier from the ones shown
here.
For advanced users
This guide describes the procedure for storing documents
in a shared folder without access restrictions. If you want to
set up a shared folder with access restrictions, see “File
Sharing with Access Restriction” in the e-Manual.
Go to
setup.
Select the function.
Congure the Store to
Shared Folder settings.
Store documents in a
shared folder.
Page 13
Selecting the function on the Select
01
Storing documents
About Buttons
Outline
Setting Up
Setting window
This section describes the procedure for displaying the [Store to Shared
Folder Settings] window.
Click [Store to Shared Folder
Settings].
The [Store to Shared Folder Settings] window
is displayed.
Proceed to the next section.
If the window shown above is not displayed:
See “Use Send Function Setting Tool” in the Starter Guide to start
the Send Function Setting Tool.
If an error screen is displayed when you press the button:
Follow the instructions on the screen to solve the problem.
Page 14

Specifying the one-touch key
[ 0 1 ] C a n o n
s w a n
02
Storing documents
About Buttons
Outline
Setting Up
number and name
This section explains how to specify the one-touch key number and name
in which you are going to register the le path to the shared folder.
What is a one-touch key? >>>
From the pull-down menu, select the
desired one-touch key number (1 to 20).
The numbers for one-touch keys that have
already been registered are not displayed.
Enter a name for the one-touch
key (for example, a company
name, such as Canon).
NOTE
Using the Send Function Setting Tool, you can only register
new addresses in one-touch keys.
The one-touch key number that
you selected in step corresponds
to the key on the operation panel.
The name you entered in step appears
on the display when the one-touch key is
pressed.
One-touch key registration is complete.
Proceed to the next section.
Page 15

Setting up le sharing
02
Storing documents
About Buttons
Outline
Setting Up
This section explains how to set up your computer so that it can receive the
data sent from the machine.
Select your operating system.
For Windows XP users
For Windows Vista users
For Windows 7 users
For Windows 2000/Server 2003/Server 2008 users
If you want to set up a shared folder without access restrictions in
computers running Windows 2000/Server 2003/Server 2008, see “File
Sharing without Access Restriction” in the e-Manual.
Page 16

Windows XP
02
Storing documents
About Buttons
Outline
Setting Up
Setting up le sharing
Conrming the computer name
What is the computer name? >>>
On the Windows taskbar, click
[Start], right-click [My Computer],
then click [Properties].
Click the [Computer
Name] tab.
Enter your computer name
into the [Computer Name of
Store Destination] eld.
Click [Change].
Page 17

Windows XP
Setting up le sharing
Creating a shared folder
share
02
Storing documents
About Buttons
Outline
Setting Up
This section explains how to set up le sharing using the Simple File Sharing feature.
The example procedure described below creates a shared folder on your desktop.
For Windows XP Professional users
You cannot use the Simple File Sharing feature if it is
disabled. Follow the procedure below to enable it.
1. On the Windows taskbar, click [Start], then [Control
Panel].
2. Click [Appearance], then [Folder Options]. (In Classic
View, double click [Folder Options].)
3. Select the [View] tab.
4. Under [Advanced settings], select the [Use simple le
sharing (Recommended)] check box.
5. Click [OK] to close the [Folder Options] dialog box.
Create a new folder on your
desktop and enter a name (for
example, “share”) for the folder.
Enter the name of the created
folder into the [Shared Folder
Name on Store Destination
Computer] eld.
Right-click the folder, then
select [Sharing and
Security].
Page 18

Windows XP
Setting up le sharing
These windows are only displayed the rst time you open the
Creating a shared folder
02
Storing documents
About Buttons
Outline
Setting Up
dialog box. If you are opening the dialog box for the second or
subsequent time, proceed to step .
Click this link.
Select these
checkboxes.
Select the lower option.
Click [OK].
Click [OK].
File sharing setup is complete.
Proceed to the next section.
Page 19

Windows Vista
02
Storing documents
About Buttons
Outline
Setting Up
Setting up le sharing
Conrming the computer name
What is the computer name? >>>
On the Windows taskbar, click [Start],
right-click [Computer], then click
[Properties].
Enter the name of your
computer into the [Computer
Name of Store Destination]
eld.
Click [Change].
Click [Change
settings].
Page 20

Windows Vista
02
Storing documents
About Buttons
Outline
Setting Up
Setting up le sharing
Creating a shared folder
This section explains how to set up le sharing using the Public
folder.
What is the Public folder? >>>
On the Windows taskbar, click the
[Start] icon, then select [Control
Panel].
NOTE
If the [User Account Control] dialog box appears during the
procedure, click [Continue].
Under [Sharing and Discovery], click
the down arrows next to [Public
folder sharing] and [Password
protected sharing].
Under [Network and
Internet], click [Set up le
sharing].
Page 21

Windows Vista
Setting up le sharing
Creating a shared folder
02
Storing documents
About Buttons
Outline
Setting Up
Select the middle option.
Click [Apply].
Select the lower option.
Click [Apply].
Page 22

On the Windows taskbar, click
Windows Vista
Setting up le sharing
Creating a shared folder
02
Storing documents
About Buttons
Outline
Setting Up
[Start], then select [Computer].
Open the hard disk drive
where Windows Vista is
installed (usually C: Drive).
Open the Users
folder.
Open the Public
folder.
Page 23

Windows Vista
Setting up le sharing
Create a new folder in the Public
share
Creating a shared folder
02
Storing documents
About Buttons
Outline
Setting Up
folder and enter the desired folder
name (for example, “share”).
Enter “public\” followed by the folder name
you just created into the [Shared Folder
Name on Store Destination Computer] eld
(in this example, “public\share”).
File sharing setup is complete.
Proceed to the next section.
Page 24

Windows 7
02
Storing documents
About Buttons
Outline
Setting Up
Setting up le sharing
Conrming the computer name
What is the computer name? >>>
On the Windows taskbar, click [Start],
right-click [Computer], then click
[Properties].
Enter the name of your
computer into the [Computer
Name of Store Destination]
eld.
Click [Change].
Click [Change
settings].
Page 25

Windows 7
02
Storing documents
About Buttons
Outline
Setting Up
Setting up le sharing
Creating a shared folder
This section explains how to set up le sharing using the Public
folder.
What is the Public folder? >>>
On the Windows taskbar, click the
[Start] icon, then select [Control
Panel].
NOTE
If the [User Account Control] dialog box appears during the
procedure, click [Yes].
Under [Network and Internet], click
[Choose homegroup and sharing
options].
Click [Change advanced
sharing settings].
Page 26

Windows 7
Setting up le sharing
Under [Public folder sharing], select the
Creating a shared folder
02
Storing documents
About Buttons
Outline
Setting Up
upper option.
Under [Password protected
sharing], select the lower option.
Click [Save
changes].
Page 27

Windows 7
Setting up le sharing
On the Windows taskbar, click
Creating a shared folder
02
Storing documents
About Buttons
Outline
Setting Up
[Start], then select [Computer].
Open the hard disk drive
where Windows 7 is installed
(usually C: Drive).
Open the Public
folder.
Open the Users
folder.
Page 28

share
Windows 7
Setting up le sharing
Create a new folder in the Public
Creating a shared folder
02
Storing documents
About Buttons
Outline
Setting Up
folder and enter the desired folder
name (for example, “share”).
Enter “users\public\” followed by the folder name
you just created into the [Shared Folder Name on
Store Destination Computer] eld (in this example,
“users\public\share”).
File sharing setup is complete.
Proceed to the next section.
Page 29

Registering the Store to Shared
02
Storing documents
About Buttons
Outline
Setting Up
Folder settings
This section explains how to register the Store to Shared Folder settings.
NOTE
The information shown in the screenshots,
such as the computer name and shared folder
name, are for illustrative purposes only. The
actual screenshots you see on your computer
may dier from the ones shown here.
Click [Next].
Make sure that the settings
are correct.
NOTE
Make sure that [Not Set] is selected for
[Access Restriction to Shared Folder] in the
[Status of Settings for Shared Folder]
section.
Click [Register].
Click [Back] for corrections, if necessary.
When
this screen is
displayed, the
settings are
complete.
Close the Send Function Setting Tool.
Turn OFF the machine’s main
power switch, wait for at least 10
seconds, then turn it ON.
Shared folder settings are complete.
Proceed to the next section.
Page 30

Storing Documents to a Shared
03
Setting Up
About Buttons
Outline
Storing documents
Folder
This section explains how to scan a document and store the scanned image in the
shared folder that you created earlier.
Set the document.
Press the Sending Function key
repeatedly to select the color mode
(<E-MAIL: B&W> or <E-MAIL: COLOR>).
Press the one-touch key you
registered.
Press [Start].
When you place the documents on the platen
glass, press or to select the document
size, then press [Start] for each document.
When scanning is complete, press [OK] to
start sending.
* The appearance of the operation panel may dier
depending on the model you use.
If the document was
stored successfully:
Go to Home.
Close the Guide.
Conrm that the document is stored in the
shared folder.
Open the shared folder you created, and check if the scanned
document is saved.
If the document was not
stored:
Go to the Remote UI
section.
Use the Remote UI to make sure
that the settings are correct.
Page 31

Checking Your Settings with the
Sending an e-mail
Storing documents
About Buttons
Remote UI
Remote UI
If the e-mail you have sent is not delivered to the specied e-mail address, or if the document
you have sent is not stored in the shared folder you created, use the Remote UI to check
whether your settings are correct.
Starting the Remote UI
What is the Remote UI? >>>
Start your web browser.
Enter the IP address of the machine in [Address]
or [Location], then press the [ENTER] key on
your computer keyboard.
Select [Administrator Mode].
NOTE
Screenshots from Windows XP are used in this section.
NOTE
The IP address shown in the screenshots is for
illustrative purposes only. For instructions on how
to check the IP address, see “Set Up Network
Connection” in the Starter Guide.
Press [OK].
NOTE
If you are prompted to enter your ID and/or password, see “Starting the
Remote UI” in the e-Manual.
Page 32

Checking Your Settings with the
Sending an e-mail
Storing documents
About Buttons
Remote UI
Remote UI
Checking/editing one-touch keys
Click [Address].
Click [One-touch
Speed Dial].
Click the number or the
name of a one-touch
key to display its
current settings.
NOTE
If you are prompted to enter the password after clicking
[Address], see “Setting a Password for the Address Book” in the eManual.
Check your settings.
To edit the settings,
click [Edit].
Click [OK].
Make the necessary
changes.
Page 33

Checking Your Settings with the
Sending an e-mail
Storing documents
About Buttons
Remote UI
Remote UI
Checking/editing network settings
Click [Network] in the [Device] menu.
Click [Change].
Make any necessary
corrections.
NOTE
Steps 1 to 4 in this section only apply to E-mail settings.
Click [OK].
E-mail settings
Scroll down until you see the [E-mail/IFax Settings] eld, and make sure that:
– The correct SMTP server name is
specied.
Also, if your SMTP server uses SMTP
authentication, make sure that:
– [SMTP Authentication (SMTP AUTH)] is
set to [On].
– The user name is specied.
– The password is set.
Turn OFF the machine’s main
power switch, wait at least 10
seconds, then turn it ON.
After the machine is restarted:
Try to send an e-mail.
Try to store documents.
If you still have trouble:
Go to Troubleshooting.
Page 34

Troubleshooting
C H E C K S E T T I N G S
C A N N O T S E N D
About Buttons
If you encounter problems when sending an e-mail or storing documents in a shared folder,
review the procedures described in this guide to make sure that the settings are properly set.
Also check the items below and consult the e-Manual for further troubleshooting information.
If “ERROR TX REPORT” is printed
Check the four-digit error code shown in the ERROR TX REPORT, and refer
to “Error Codes” in “Troubleshooting” in the e-Manual.
If an error message is displayed on the LCD
Check the message, and refer to “Display Messages” in “Troubleshooting” in
the e-Manual.
If neither of the above occur and you
still cannot send
Refer to “General Problems,” “Sending/Receiving Problems,” and “Network
Problems” in “Troubleshooting” in the e-Manual.
Example:
Example:
 Loading...