


Getting Started
IMPORTANT
For Mac OS users,
please refer to P.13
En
Mise en route
FT6-1802 (000)
IMPORTANT
You can access canon.com/oip-manual to read
the User’s Guide that describes all functions of this
machine.
Si vous utilisez Mac OS,
reportez-vous à la P.27
Fr

Installing the Machine
Installation Requirements
5"
14 1/4"
(362 mm)
4 1/4"
(106 mm)
12 1/4"
(310 mm)
12 1/4"
(312 mm)
15 3/8"
(390 mm)
(128 mm)
2
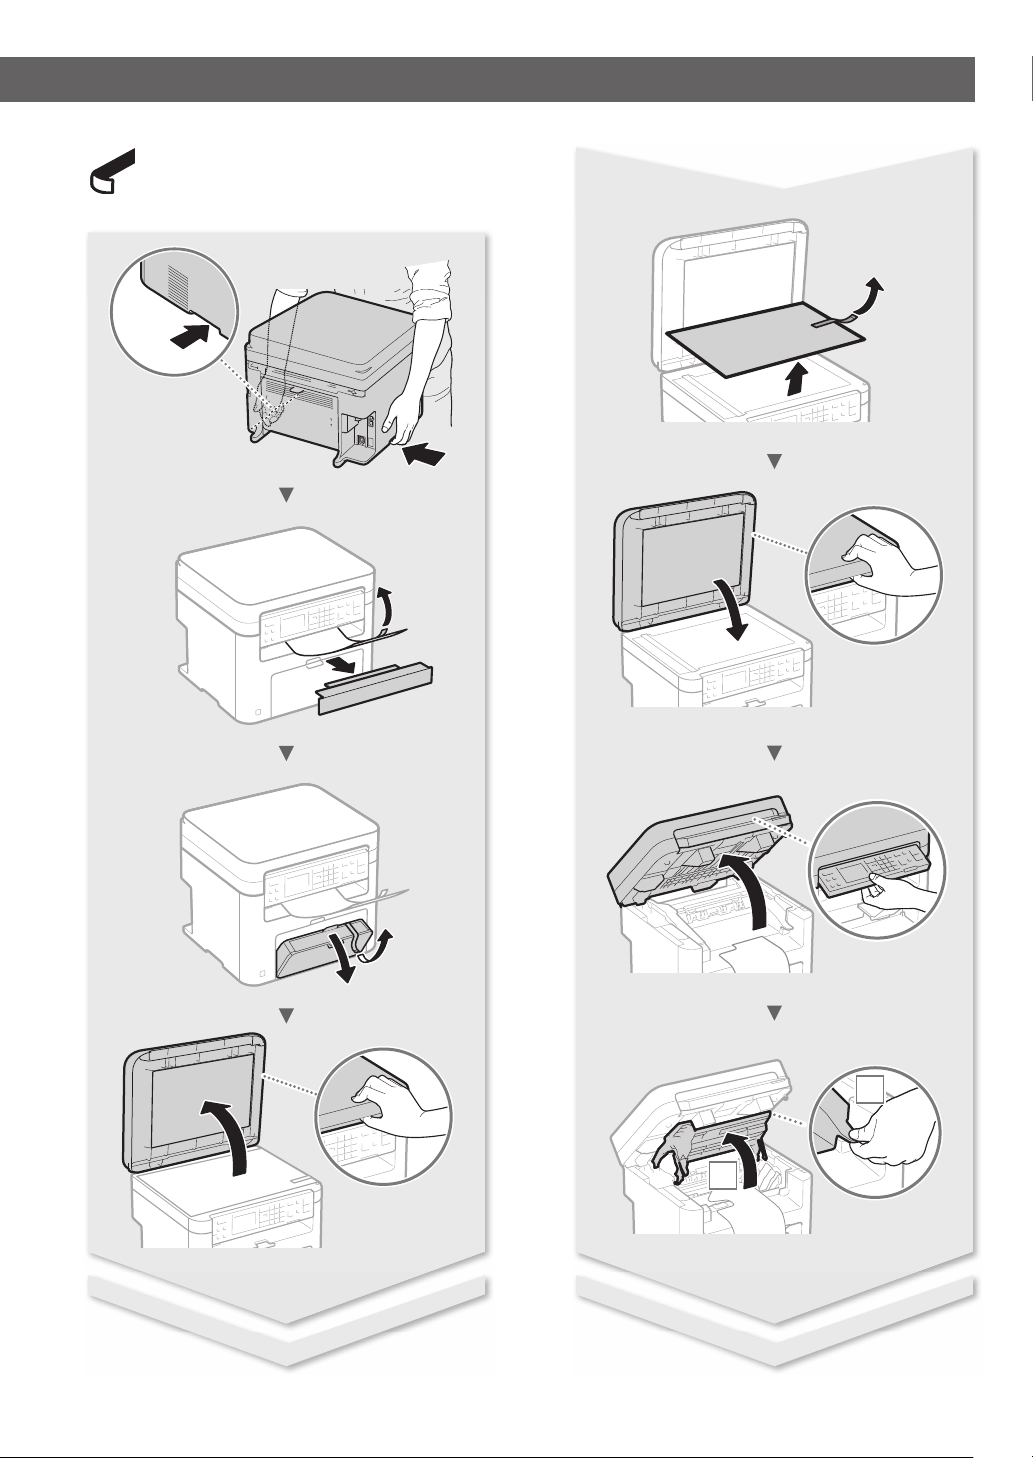
Remove all the tape.
1
2
3
Installing the Machine
2
1
1
2
2
1
4
2
1
5

Contents
About the Manuals .......................................................................8
Navigating the Menu and Text Input Method ....................8
Connecting the Power Cord and Turning ON
the Power .........................................................................................8
Specifying the Initial Settings ...................................................9
Choosing the Method to Connect the Machine ................9
Choosing the Method to Connect:
Via Wireless LAN or Other Method ..........................................9
Connecting via a Wired LAN ................................................... 10
Table des matières
A propos des manuels ..............................................................22
Navigation dans le menu et méthode de saisie du
texte ................................................................................................ 22
Branchement du cordon d’alimentation et mise sous
tension............................................................................................ 22
Con guration des réglages initiaux ....................................23
Choix de la méthode de connexion de la machine .......23
Choix de la méthode de connexion de la machine:
Méthode via réseau sans l ou autre ................................... 23
Connecting via a USB Cable ...................................................10
Connecting via a Wireless LAN .............................................. 10
Setting Wireless LAN ................................................................. 11
Setting a Paper Size and Type ................................................ 13
Perform Useful Tasks ................................................................. 14
Replacing Toner Cartridge ...................................................... 15
Clearing Paper Jams ..................................................................16
* For Mac OS users, please refer to P.13
Connexion via un réseau laire ............................................. 24
Connexion via un câbleUSB................................................... 24
Connexion via un réseau sans l ........................................... 24
Con guration du réseau sans l ........................................... 25
Réglage du format et du type de papier............................ 27
Procédures utiles ........................................................................28
Remplacement de la cartouche d’encre ............................29
Résolution des bourrages papier .........................................30
* Si vous utilisez Mac OS, reportez-vous à la P.27
6

7
About the Manuals
Getting Started (This manual):
Read this manual rst. This manual
describes the installation of the
machine, the settings, and a caution. Be
sure to read this manual before using
the machine.
Navigating the Menu and Text Input Method
MF Driver Installation Guide (Visit
the website):
This manual describes software and
driver installation.
You can access
canon.com/oip-manual to read
the manual for the software and
driver.
User’s Guide (Visit the website):
You can access
canon.com/oip-manual to read
the User’s Guide that describes all
functions of this machine.
En
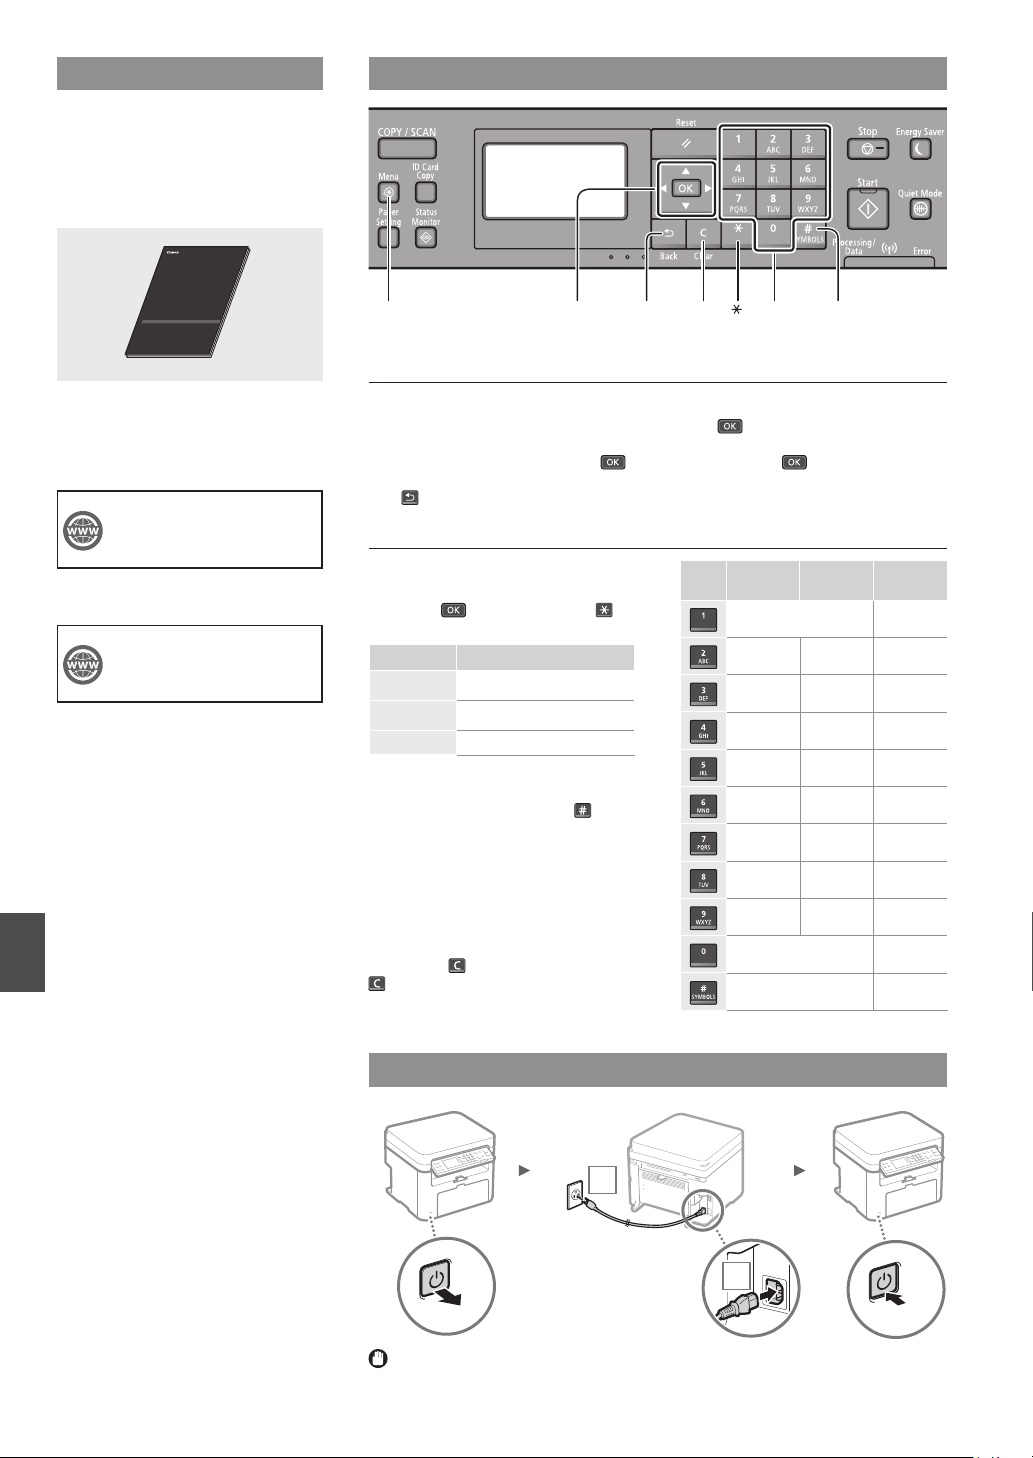
Menu #Clear Numeric keys
▲▼◀▶OK
Back
Navigating the Menu
Item selection or moving the cursor
among the menu items
Select an item with [▲] or [▼].
Proceed to the next hierarchy with
or [▶]. Return to the previous hierarchy
with or [◀].
Setting con rmation
Press . However, when <Apply>
appears on the display, select <Apply>,
and then press .
Text Input Method
Changing entry mode
Press [▼] to select <Entry Mode>, and
then press
. You can also press to
change the entry mode.
Entry mode Available text
Uppercase alphabetic letters and
<A>
symbols
Lowercase alphabetic letters and
<a>
symbols
<12> Numbers
Entering text, symbols, and numbers
Enter with the numeric keys or
.
Moving the cursor (Entering a space)
Move with [◀] or [▶]. Move the cursor
to the end of the text and press [▶] to
enter a space.
Deleting characters
Delete with
. Pressing and holding
deletes all characters.
Entry mode:
(space) - . * # ! “ , ; : ^ ` _ = / | ‘
? $ @ % & + \ ˜ ( ) [ ] { } < >
Entry mode:
<A>
@ . - _ / 1
ABC abc 2
DEF def 3
GHI ghi 4
JKL jkl 5
MNO mno 6
PQRS pqrs 7
TUV tuv 8
WXYZ wxyz 9
(Not available) 0
<a>
Entry mode:
<12>
(Not available)
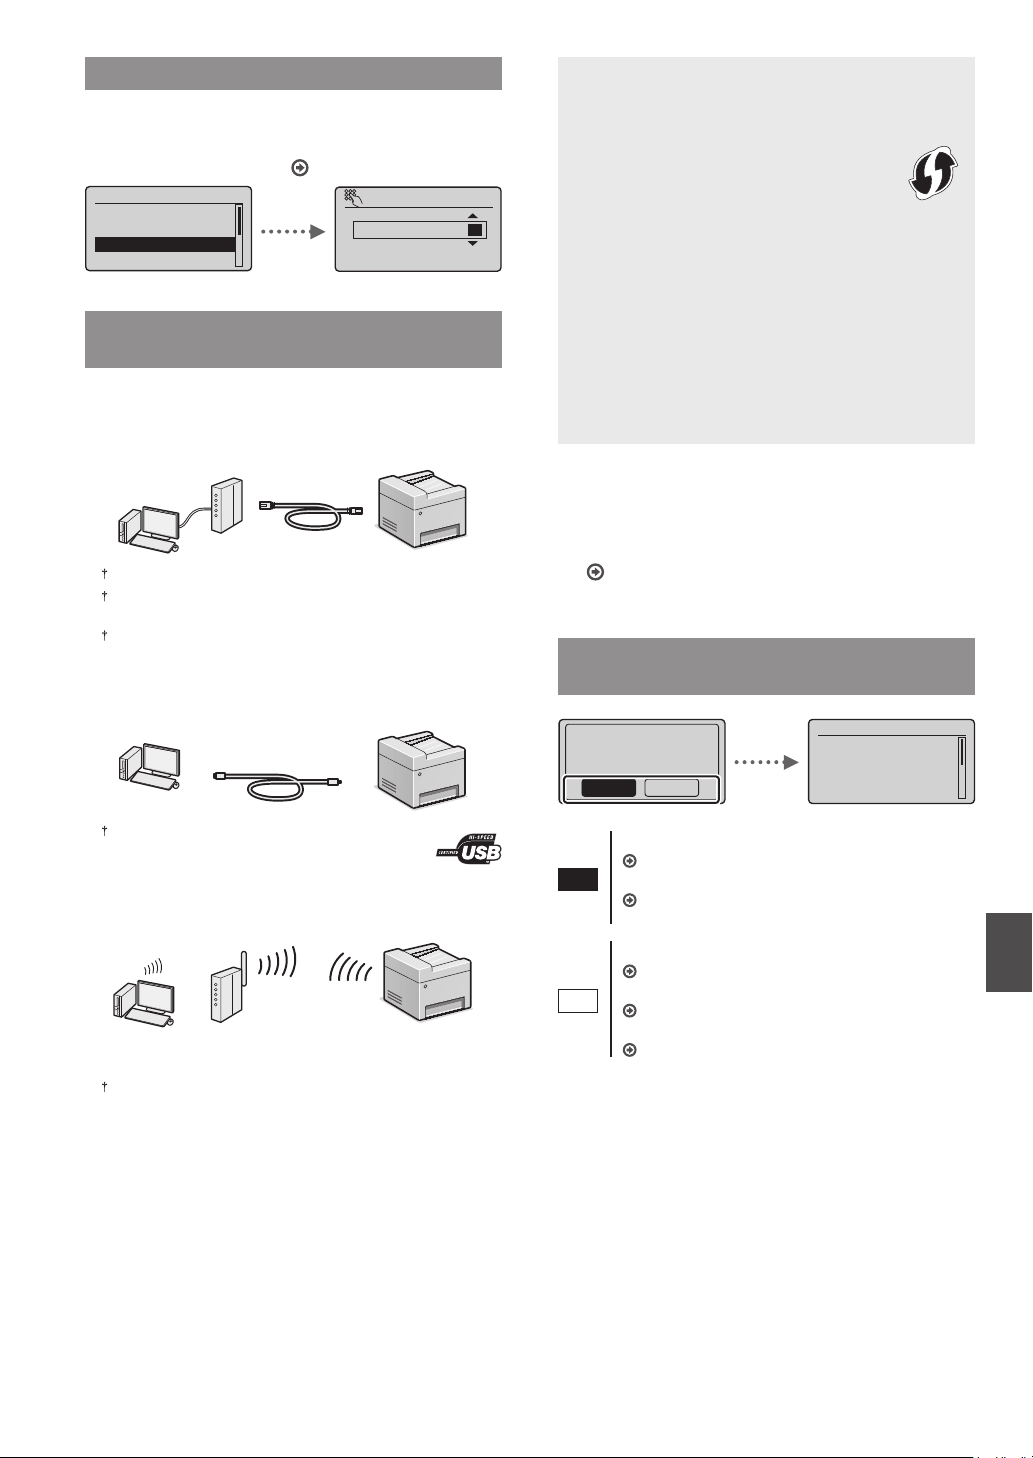
Connecting the Power Cord and Turning ON the Power
2
1
OFF
Do not connect the USB cable at this time. Connect it when installing software.
ON
8
Specifying the Initial Settings
Follow the instructions on the screen, set the language, region,
time zone, and date and time. For details on navigating the
menu and how to input the numbers, see “Navigating the
Menu and Text Input Method” ( P.8).
Language
Chinese (Simplified)
Chinese (Traditional
English
French
Current Time Set.
08/08/2014 12:52 AM
(0:00-12:59)
Choosing the Method to Connect the
Machine
●
Connecting via a Wired LAN
You can connect the machine to a wired router. Use the LAN
cables to connect the machine to the wired router (access
point).
Connect the computer to the router by cable or wirelessly.
Make sure that there is an available port in the router to connect
the machine and the computer.
Have a LAN Cable of Category 5 twisted-pair cable or higher ready.
●
Connecting via a USB cable
You can connect the machine to the computer using a USB
cable.
Make sure that the USB cable you use has the following
mark.
●
Connecting via a Wireless LAN
You can connect the machine to a wireless router*. Since it
is wirelessly connected, no LAN cables are needed.
* A wireless router (access point) that supports IEEE802.11b/g/n is
required.
Connect the computer to the router by cable or wirelessly.
Check if your router has a button
Select from the following two methods depending on the
router (access point) that you are using.
●
There is a button.
You can easily setup if your router (access point)
has a button, and if the mark is on the router.
●
There is no button.
If there is no button on your router (access point),
manually select your SSID and complete the settings.
NOTE
• If you are looking to install your new device via a
Wireless Network connection, you can nd a video and
written guides with step-by-step instruction to assist
you through the process from the following URL:
http://www.usa.canon.com/WirelessHelp
Viewing these guides will ensure a smooth setup of the
device into your existing wireless environment.
●
Direct Connection
Connect a mobile device to the machine wirelessly and
directly without routing through a wireless LAN router (or
access point).
User’s Guide “Can Be Used Conveniently with a Mobile
Device” ▶ “Make Direct Connection (Access Point Mode)”
Choosing the Method to Connect:
Via Wireless LAN or Other Method
Use wireless LAN to
connect to network?
(Can config. later.)
Yes No
There is a button.
Yes
No
Start from step 4 of ”Push Button Mode” (P.11).
There is no button.
Start from step 4 of ”Setting the Access Point
Manually” (P.12).
Connect to the computer via a wired LAN
Proceed to “Connecting via a Wired LAN” (P.10).
Connect to the computer via a USB cable
Proceed to “Connecting via a USB Cable” (P.10).
Connect to the computer via a wireless LAN later
Proceed to “Connecting via a Wireless LAN” (P.10).
Current Time Set.
Must rechg. battery
for 24 hours to save
time settings. After
turning main power
En
If you are not sure whether your router supports a wireless
connection:
See the instruction manual provided with your network
device, or contact the manufacturer.
9
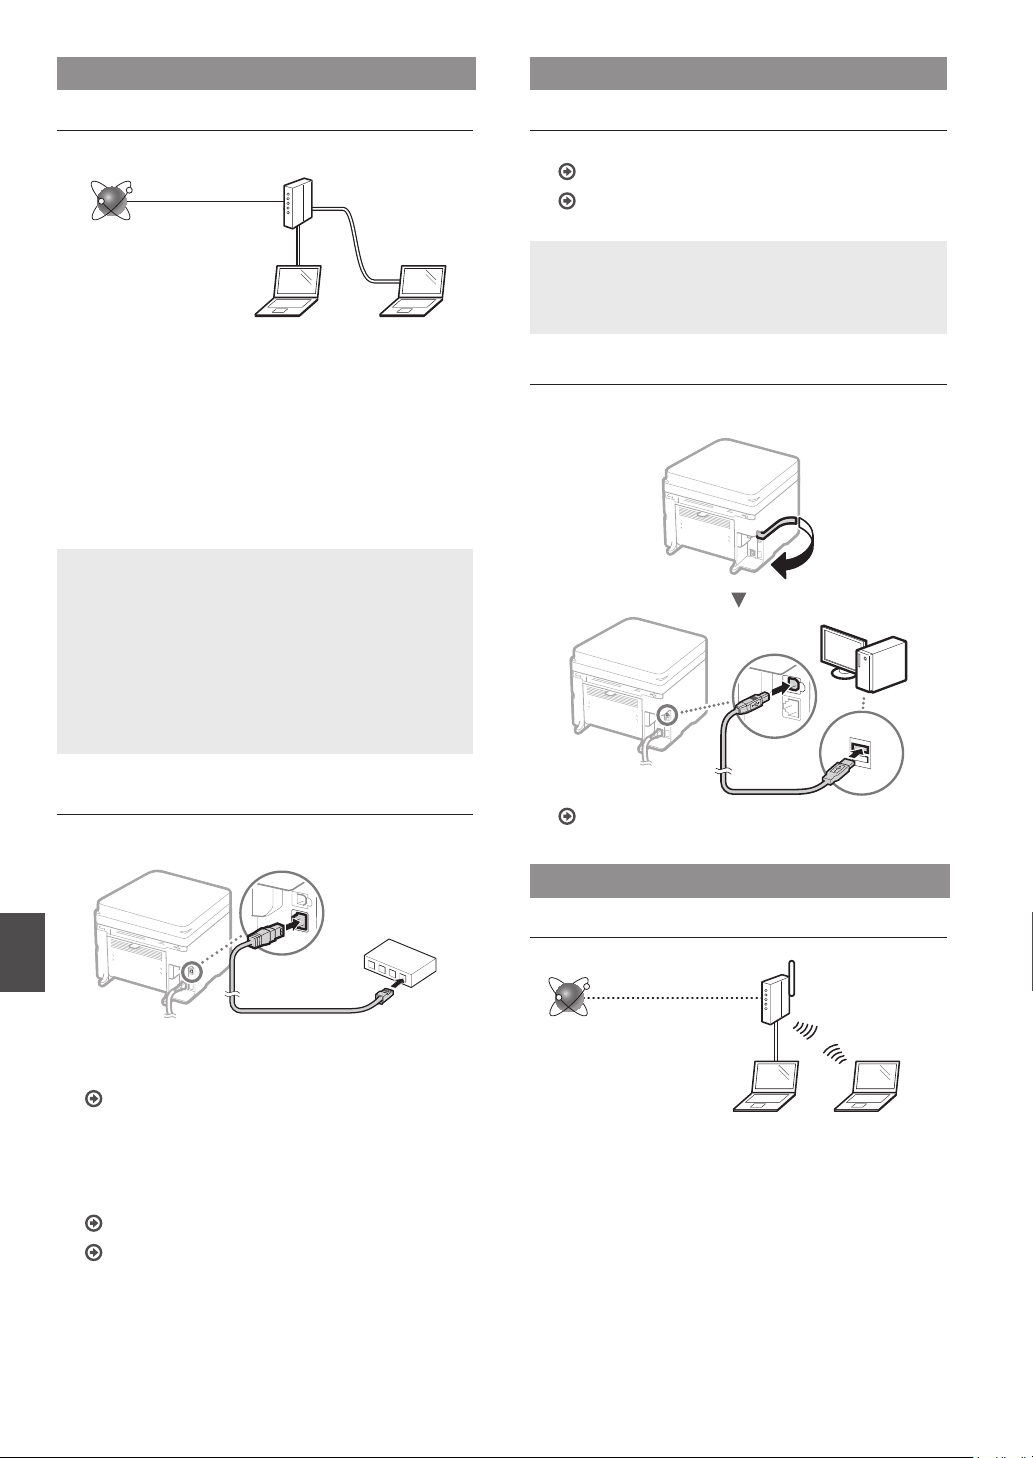
Connecting via a Wired LAN
Connecting via a USB Cable
Checking Before the Setup
Internet
Are the computer and the router (or hub) properly
connected using a LAN cable?
For more information, see the instruction manual for the
network device you are using, or contact the networking
device manufacturer.
Have the network settings on the computer been
completed?
If the computer is not properly con gured, you may not be
able to use the wired LAN connection even after completing
the following settings.
NOTE
• You cannot connect both the wired LAN and wireless
LAN at the same time. In addition, the machine is set to
the “Wired LAN” by default.
• When you connect to a network environment that is not
security protected, your personal information could be
disclosed to third parties. Please use caution.
• If you connect through a LAN in the o ce, contact your
network administrator.
Router
or
hub
LAN cable
Install the Driver and Software
Install the driver and software on the provided DVD-ROM.
See “For details on the installation procedures:” (P.13).
Proceed to “Setting a Paper Size and Type” (P.13).
NOTE
• If you connected the USB cable before installing, rst
remove the USB cable and then re-install.
Connecting via a USB Cable
Follow the MF Driver Installation Guide to connect the USB
cable.
Connecting via a Wired LAN
Connect the LAN cable.
1
En
The IP address will be automatically con gured in 2
minutes. If you want to set the IP address manually, see
the following items.
User’s Guide “Network” ▶ “Connecting to a Network” ▶
“Setting IP Addresses”
Install the driver and software using the provided
2
DVD-ROM.
See “For details on the installation procedures:” (P.13).
Proceed to “Setting a Paper Size and Type” (P.13).
Proceed to “Setting a Paper Size and Type” (P.13).
Connecting via a Wireless LAN
Checking Before the Setup
Wireless LAN Router
Internet
Is the computer connected to the router (access point)
correctly by a LAN cable or wireless LAN?
For more information, see the instruction manual for the
network device you are using, or contact the networking
device manufacturer.
Have the network settings on the computer been
completed?
If the computer is not properly con gured, you may not be
able to use the wireless LAN connection even after completing
the following settings.
10
NOTE
• You cannot connect both the wired LAN and wireless
LAN at the same time. In addition, the machine is set to
the “Wired LAN” by default.
• When you connect to an unsecured network environment,
your personal information could be disclosed to third
parties. Please use caution.
• If you connect through a LAN in the o ce, contact your
network administrator.
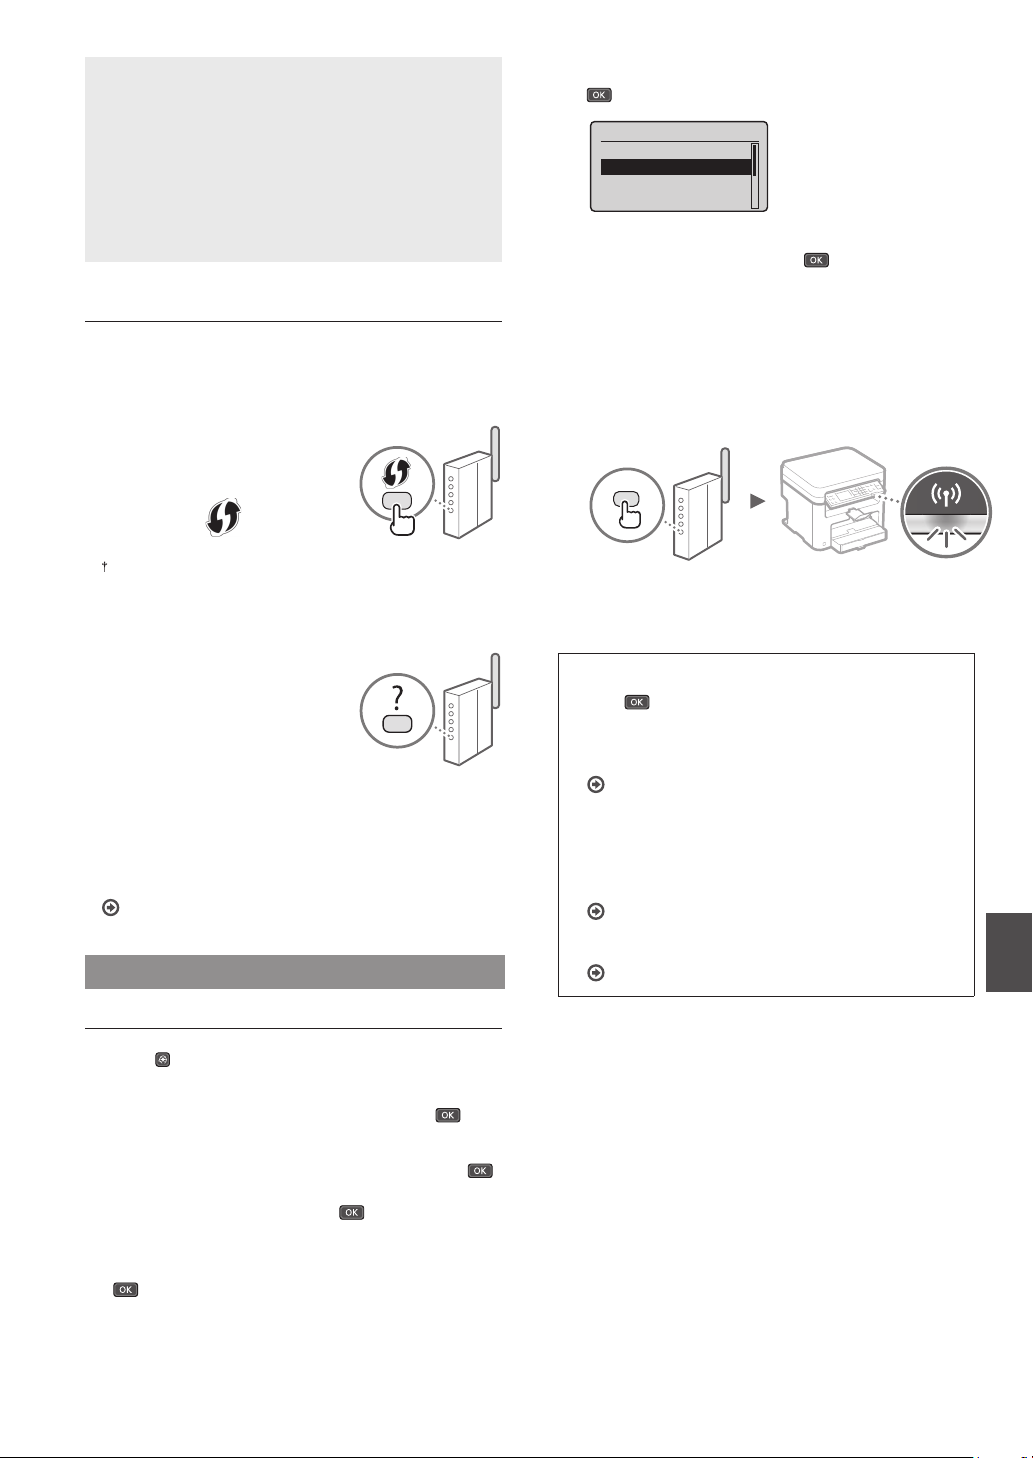
Select <WPS Push Button Mode>, and then press
5
.
Wireless LAN Settings
SSID Settings
WPS Push Button Mode
WPS PIN Code Mode
Power Save Mode
Select <Yes>, and then press .
6
Checking the Router
Select the connection method to the wireless LAN. Select from
the following two methods depending on the router (access
point) that you are using.
●
There is a button.
This machine supports WPS
(Wi-Fi Protected Setup). You
can easily set up if your router
(access point) has a button,
and if the mark is on the
router.
If you are not sure whether or not your router supports WPS,
please see the manual included in the product, or contact the
product manufacturer.
●
There is no button.
If there is no button on your
router (access point), you
may manually select SSID and
complete the settings. In this
case, you need to remember
SSID and network key of your
router (access point).
See “1 Check SSID or Network
Key for a Wireless LAN Router/
Access Point.” (P.12) to learn how to nd out your SSID and
network key.
To set up with the WPS PIN code method/To set up
manually:
User’s Guide “Connecting to a Wireless LAN”
Setting Wireless LAN
Press and hold* the button until the lamp lights or
7
blinks.
You should press the WPS button within 2 minutes after
you select <Yes> in step 6.
* The time that you should hold the button may vary depending
on the router you are using.
Wait approximately 2 minutes after the connection.
8
IP address is set during this period of time.
When an error message appears:
Press
network key is correct, and then retry the settings. If the
access point cannot be detected even after retrying,
see the following.
When checking the network connection:
You can check if the machine is properly connected to
the network by using a computer that is connected to the
network.
To set IP address manually:
to close the screen, check whether or not the
User’s Guide “When an Error Message Appears”
User’s Guide “Viewing Network Settings”
User’s Guide “Connecting to a Wireless LAN”
En
Push Button Mode
Press .
1
Select <Network Settings>, and then press .
2
Select <Wireless LAN Settings>, and then press .
3
If a screen appears asking whether to enable the wireless
LAN, select <Yes>, and then press .
Read the message that is displayed, and then press
4
.
11

Setting the Access Point Manually
Check SSID or Network Key for a Wireless LAN
1
Router/Access Point.
• Check the label on the Wireless LAN router.
• You can check the SSID or the network key using “Canon
MF / LBP Wireless Setup Assistant,” which is included in
the DVD-ROM supplied with the machine.
SSID
It is sometimes written as name of network, or name of
access point. If there are multiple SSIDs, please write down
all.
Network Key
It is sometimes written as PIN, WEP key, WPA/WPA2
passphrase, PSK or preshared key.
Press .
3
Select <Network Settings>, and then press .
4
Select <Wireless LAN Settings>, and then press .
5
If a screen appears asking whether to enable the wireless
LAN, select <Yes>, and then press .
En
SampleABCD WEP 01234567890123456789ABCDEF
SampleEFGHIJ WPA-PSK 543210EDCBA
SampleK WPA2-PSK 1234ABCD
If the information of the wireless LAN router is not
displayed, click the [Refresh] button. If the information is
not displayed when you click the [Refresh] button, check
if the computer settings for a wireless LAN router (access
point) are complete.
Write down the name of SSID and network key
2
displayed in step 1. When multiple access points are
displayed, write all SSIDs that are displayed.
Read the message that is displayed, and then press
6
.
Select <SSID Settings>, and then press .
7
Select <Select Access Point>, and then press .
8
SSID Settings
Select Access Point
Enter Manually
Select a wireless LAN router.
9
If multiple matched SSIDs are displayed, select the ID that
is listed rst (the one with the strongest signal).
Enter the network key that you have written
10
down.
Enter the network key using the numeric keys.
Select <Apply>, and then press
WEP Key (5-26 Char.)
XXXXXXXX
<Apply>
Entry Mode: A
.
12
Select <Yes>, and then press .
11

After the <Connected.> screen is displayed, wait
12
until the Wi-Fi indicator stops blinking and turns on.
Wait approximately 2 minutes after the
13
connection.
IP address is set during this period of time.
When an error message appears:
Press
network key is correct, and then retry the settings.
If the access point cannot be detected even after
retrying, see the following.
To set IP address manually:
to close the screen, check whether or not the
User’s Guide “When an Error Message Appears”
User’s Guide “Connecting to a Wireless LAN”
For details on the installation procedures:
Install the driver and software using the provided DVDROM.
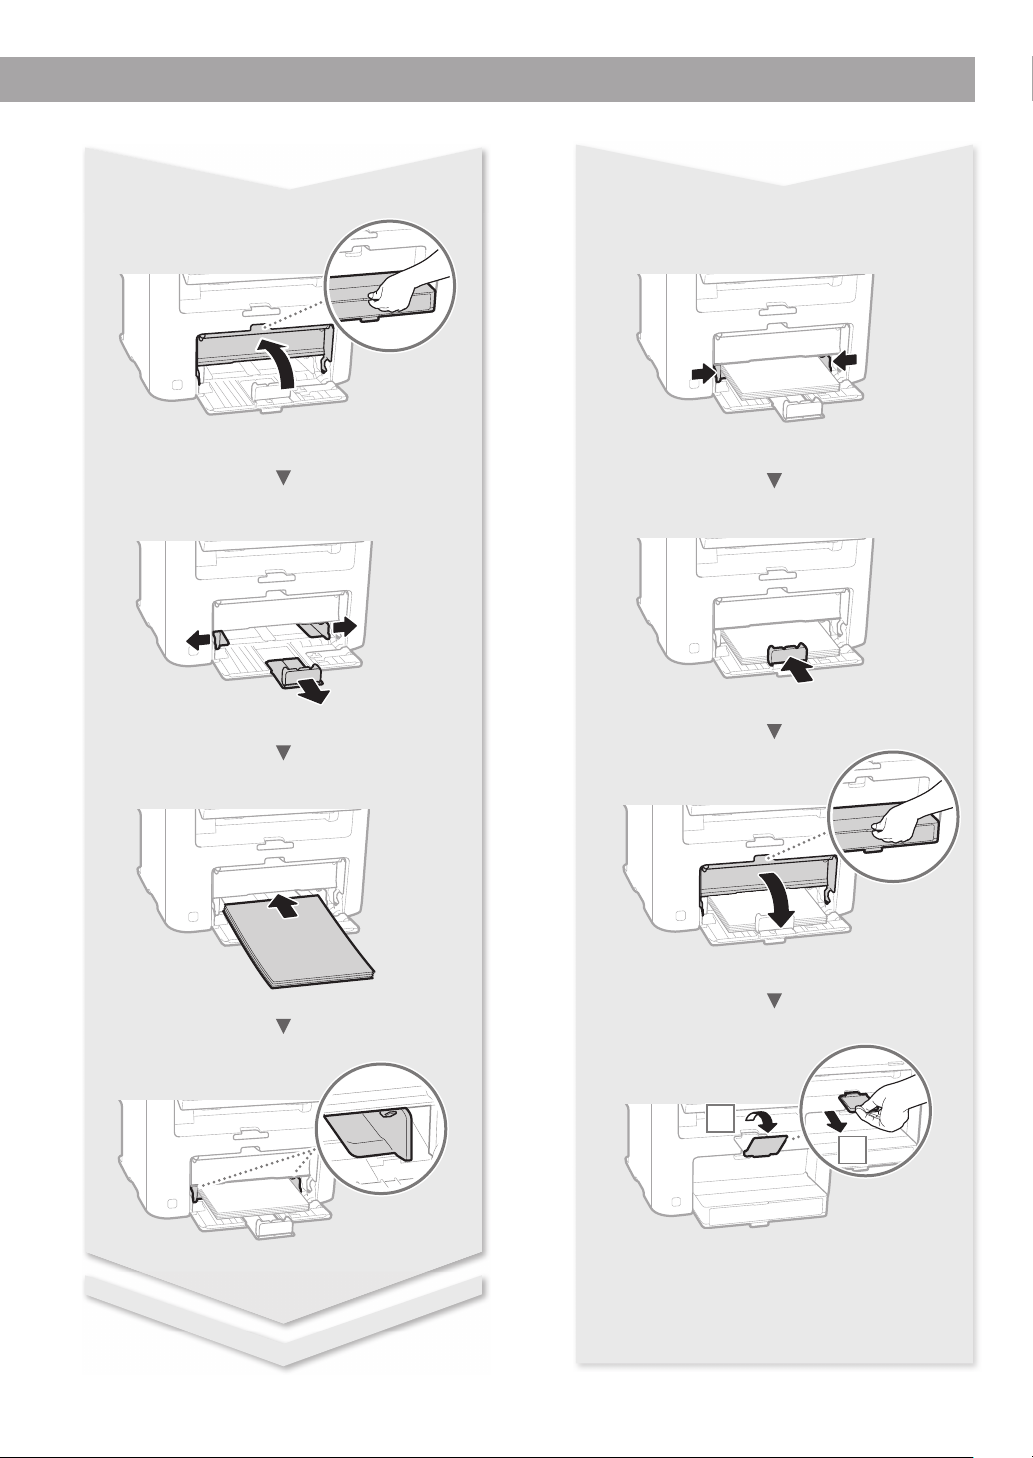
Setting a Paper Size and Type
Following the instructions on the screen, set the paper size
and type.
Paper Settings
MP Tray
1
Drawer 1
Select Frequently Us
...
You can also download the driver from the Canon website.
For details on the installation procedures, see the MF Driver
Installation Guide.
For Mac OS users:
The DVD-ROM supplied with this machine may not include
the printer driver for Mac OS. This is di erent depending
on when you purchase the machine. Please nd and
download the appropriate driver on our Canon homepage.
For further information on installation or using the driver,
see the manual for the driver.
En
13

Perform Useful Tasks
You can use various functions in this machine. Following functions are the overview of the main functions that you can use routinely.
Copy
Enlarged/Reduced Copies
You can enlarge or reduce standard
size documents to copy on standard
size paper or specify the copy ratio in
percentage.
2-Sided Copying
You can copy 1-sided documents on
both sides of paper.
Collating
You can sort copies into sets arranged
in page order.
Reduced Layout
You can reduce the amount of paper
by printing multiple documents onto
one sheet.
2 on 1 4 on 1
Copying ID Card
You can make a copy of a 2-sided card
onto one side of paper.
Print
Enlarged/Reduced Printing
2-Sided Printing
Reduced Layout
You can reduce the amount of paper
by printing multiple documents onto
one sheet.
2 on 1 4 on 1
Booklet Printing
Poster Printing
Watermark Printing
Displaying a Preview before Printing
Selecting a “Pro le”
Network Settings
This machine comes equipped with a
network interface that you can construct
a network environment easily. You can
print a document, use the network scan
from all computers which are connected
with the machine. The machine supports
to increase work e ciency as a shared
machine in the o ce.
Scan
Saving the Documents Using the
Operation Panel of the Machine
Documents
Data
Saving the Documents Using
Operations from a Computer
●
Scanning with the MF Scan Utility
Documents
Data
●
Scanning from an Application
●
Scanning with the WIA Driver
Remote UI
You can understand the condition of
the machine from the computers on the
network. You can access the machine
and manage jobs or specify various
settings via network.
En
14

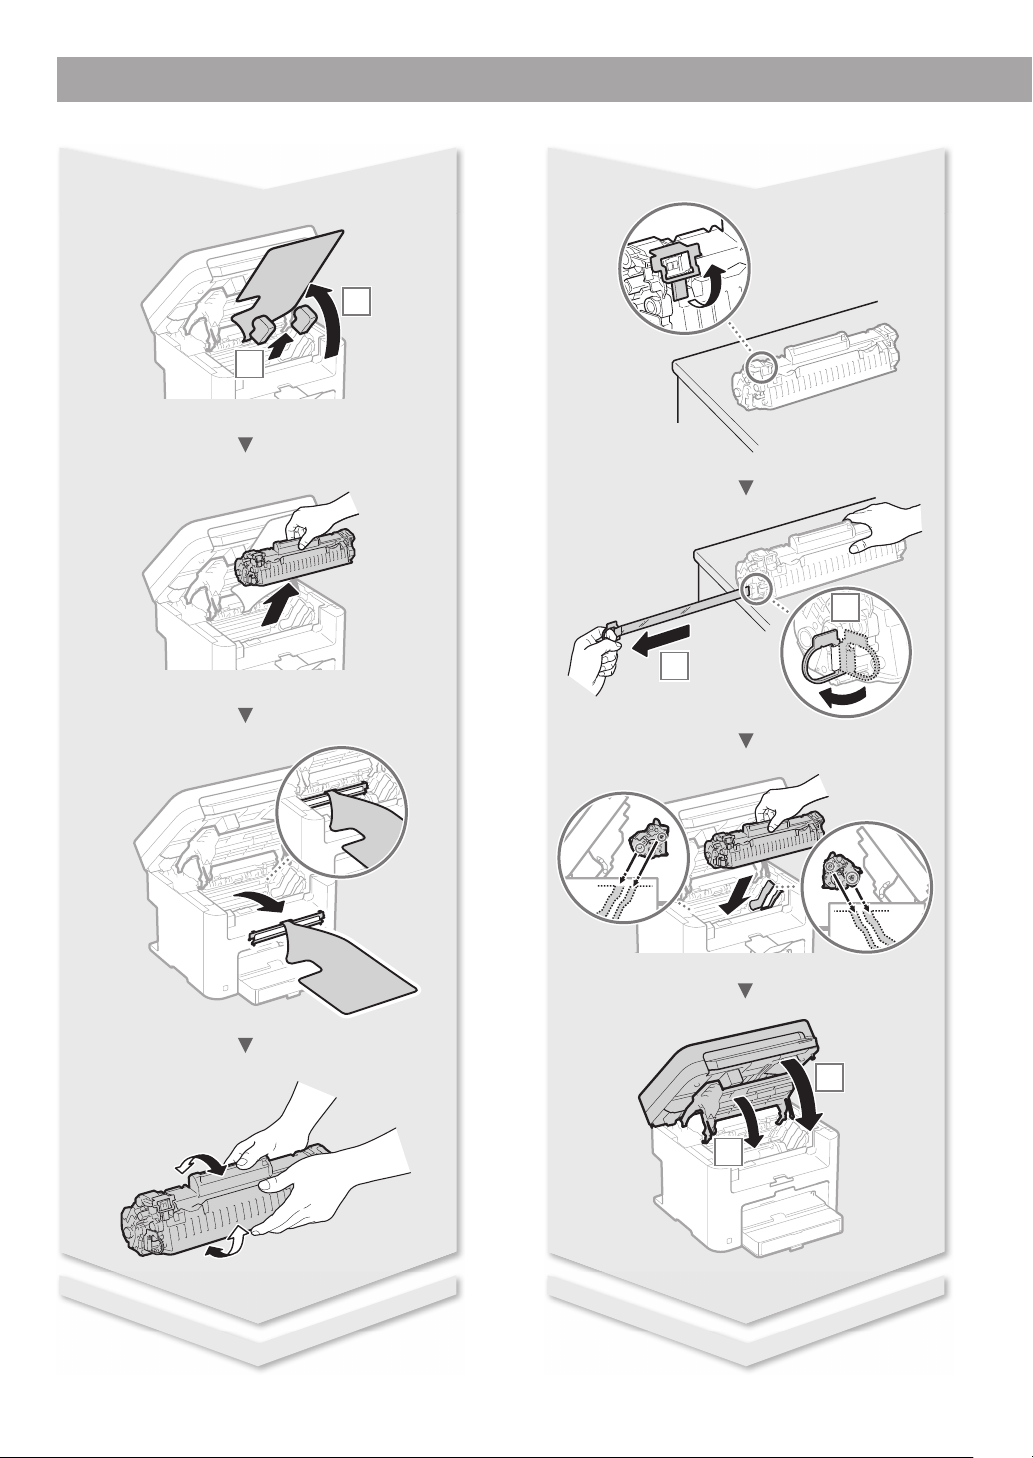
Replacing Toner Cartridge
Toner cartridges are consumables. When the toner becomes nearly empty or has run out completely in the middle of a job run, a
message appears on the screen, or the following problems may occur. Take the appropriate action accordingly.
When a Message Appears
When the toner becomes nearly empty in the middle of a job run, a message appears on the screen.
Message
<Preparing
a cartridge is
recommended.>
<Cart. end of
lifetime. Rplcmt.
recommended.>
When white streaks appear on the output, or the output is partially faded:
When white streaks appear on the output or the output is partially faded, the toner cartridge has almost reached the end of its life,
even if no message appears on the screen. When the print quality becomes unacceptable, see the following to x the problem.
When the message is
displayed on the screen
When the toner cartridge
needs a replacement
soon.
When the toner cartridge
has reached the end of
its life.
Description and Solutions
Shake the toner cartridge to evenly distribute the toner inside the cartridge.
User’s Guide “Before Replacing the Toner Cartridge”
We recommend that the toner cartridge be replaced before printing highvolume documents.
User’s Guide “How to Replace Toner Cartridges”
If this message does not disappear, replace the toner cartridge. You can
continue printing, but the print quality cannot be guaranteed.
User’s Guide “Replacing Toner Cartridges”
When White Streaks Appear on the Output or the Output Is Partially Faded
When the toner nearly runs out, white streaks appear on the output, or the output is partially faded.
No message appears on the screen, if the toner nearly runs out.
Replace the toner cartridge when white streaks appear on the
output, or the output is partially faded.
When this problem occurs:
Follow the steps in the procedure below before replacing the toner cartridge. The machine continues printing until the toner runs out
completely.
User’s Guide “Before Replacing the Toner Cartridge”
When the print quality is still unacceptable:
If the problem persists after you have followed the steps in the procedure below, replace the toner cartridge.
User’s Guide “How to Replace Toner Cartridges”
En
15

Clearing Paper Jams
If the following screen appears, a paper jam has occurred inside the machine. Follow
the procedure displayed on the screen to remove the jammed document or paper. This
manual indicates only areas where paper jams occur. For details on each function, see
the User’s Guide.
Inside the machine
Paper jammed.
Press [ ] to
display steps.
Manual Feed Slot
Paper drawer
En
Rear cover
16

17
En

En
T
T
Appendix
Important Safety
Instructions
This chapter describes important safety
instructions for the prevention of injury to users of
this machine and others, and damage to propert y.
Read this chapter bef ore using the machine, and
follow the instructions to use the machine properly.
Do not perf orm any operations not described in
this manual. Canon will not be responsible for any
damages resulting from operations not described
in this manual, improper use, or repair or changes
not perf ormed by Canon or a third part y
authorized by Canon. Improper operation or use of
this machine could result in personal injury and/or
damage requiring extensive repair that may not be
covered un der your Limited Warranty.
WARNING
Indicates a warning concerning operations
that may lead to death or injury to persons if
not performed correctly. To use the machine
safely, always pay attention to these warnings.
CAUTION
Indicates a caution concerning operations
that may lead to injury to persons if not
performed correctly. To use the machine
safely, always pay attention to these cautions.
IMPORTAN
Indicates operational requirements and
restrictions. Be sure to read these items
carefully to operate the machine correctly and
avoid damage to the machine or property.
Installation
To use this machine safely and in a trouble-free
way, carefully read the following precautions and
install the machine in an appropriate location.
WARNING
Do not install in a location that may result in a
re or electrical shock
•
A location where the ventilation slots are
blocked (too close to walls, beds, sofas, rugs, or
similar objects)
•
A damp or dusty location
•
A location exposed to direct sunlight or outdoors
•
A location subject to high temperatures
•
A location exposed to open ames
•
Near alcohol, paint thinners or other
ammable substances
Other warnings
•
Do not connect unapproved cables to this
machine. Doing so may result in a re or
electrical shock.
•
Do not place necklaces and other metal
objects or containers lled with liquid on the
machine. If foreign substances come in contact
with electrical parts inside the machine, it may
result in a re or electrical shock.
•
If any foreign substance falls into this machine,
unplug the power plug f rom the AC power outlet
and contact your local authorized Canon dealer.
Do not install in the following locations
The machine may drop or fall, resulting in injur y.
•
An unstable location
•
A location exposed to vibrations
CAUTION
Do not install in the following locations
Doing so may result in damage to the
machine.
•
A location subject to temperature and
humidity extremes, whether low or high
•
A location subject to dramatic changes in
temperature or humidity
•
A location near equipment that generates
magnetic or electromagnetic waves
•
A laboratory or location where chemical
reactions occur
•
A location exposed to corrosive or toxic gases
•
A location that may warp from the weight of
the machine or where the machine is liable to
sink (a carpet, etc.)
Avoid poorly ventilated locations
This machine generates a slight amount of ozone
and other emissions during normal use. These
emissions are not harmful to health. However,
they may be noticeable during extended use or
long production runs in poorly ventilated rooms.
To maintain a comfortable working environment,
it is recommended that the room where the
machine operates be appropriately ventilated.
Also avoid locations where people would be
exposed to emissions from the machine.
Do not install in a location where
condensation occurs
Water droplets (condensation) may form inside
the machine when the room where the machine
is installed is heated rapidly, and when the
machine is moved from a cool or dry location to
a hot or humid location. Using the machine
under these conditions may result in paper jams,
poor print quality, or damage to the machine.
Let the machine adjust to the ambient
temperature and humidity for at least 2 hours
before use.
In altitudes of above sea level 3,0 00 m or higher
Machines with a hard disk may not operate
properly when used at high altitudes of about
3,000 meters above sea level, or higher.
Leveling feet (only for produc ts with leveling
feet)
Do not remove the machine’s leveling feet af ter
the machine has been installed, as this may
cause the machine to fall or tip over, resulting in
personal injury.
Connecting the Telephone Line (Only for
Products with a Fax Function)
This machine conforms to a analog telephone
line standard. The machine can be connected to
the public switched telephone network (PSTN)
only. If you connect the machine to a digital
telephone line or a dedicated telephone line, it
might impede proper operation of the machine
and could be the cause of damage. Make sure to
con rm a t ype of telephone line before
connecting the machine. Contact your optical
ber line or IP telephone line service providers if
you want to connect the machine to those
telephone lines.
When using wireless LAN (only for products
with a wireless LAN function)
•
Install the machine at a distance of 50 meters
or less from the wireless LAN router.
•
As far as possible, install in a location where
communication is not blocked by intervening
objects. The signal may be degraded when
passing through walls or oors.
•
Keep the machine as far as possible from
digital cordless phones, microwave ovens, or
other equipment that emits radio waves.
•
Do not use near medical equipment. Radio
waves emitted from this machine may
interfere with medical equipment, which may
result in malfunctions and accidents.
Power Supply
WARNING
•
Use only a power supply that meets the
speci ed voltage requirements. Failure to do
so may result in a re or electrical shock.
•
Do not use power cords other than the one
provided, as this may result in a re or electrical
shock.
•
The provided power cord is intended for use
with this machine. Do not connect the power
cord to other devices.
•
Do not modify, pull, forcibly bend, or perform
any other act that may damage the power
cord. Do not place heavy objects on the power
cord. Damaging the power cord may result in
a re or electrical shock.
•
Do not plug in or unplug the power plug with
wet hands, as this may result in an electrical
shock.
•
Do not use extension cords or multi-plug
power strips with the machine. Doing so may
result in a re or electrical shock.
•
Do not wrap the power cord or tie it in a knot,
as this may result in a re or electrical shock.
•
Insert the power plug completely into the AC
power outlet. Failure to do so may result in a
re or electrical shock.
•
Remove the power plug completely from the
AC power outlet during a thunder storm.
Failure to do so may result in a re, electrical
shock, or damage to the machine.
•
Make sure that the power supply for the
machine is safe, and has a steady voltage.
•
Keep the power cord away from a heat source;
failure to do this may cause the power cord
coating to melt, resulting in a re or electrical
shock.
•
If excessive stress is applied to the connection
part of the power cord, it may damage the
power cord or the wires inside the machine
may disconnect. This could result in a re.
Avoid the following situations:
– Connecting and disconnecting the power cord
frequently.
– Tripping over the power cord.
– The power cord is bent near the connection
part, and continuous stress is being applied to
the power outlet or the connection part.
– Applying excessive force on the power plug.
CAUTION
Install this machine near the power outlet and
leave su cient space around the power plug so
that it can be unplugged easily in an emergency.
IMPORTAN
When connecting power
•
Do not connect the power cord to an
uninterruptible power source. Doing so may
result in malfunction of or damage to the
machine at power failure.
•
If you plug this machine into an AC power
outlet with multiple sockets, do not use the
remaining sockets to connect other devices.
•
Do not connect the power cord to the auxiliary
AC power outlet on a computer.
Other precautions
Electrical noise may cause this machine to
malfunction or lose data.
Handling
WARNING
•
Immediately unplug the power plug from the
AC power outlet and contact an authorized
Canon dealer if the machine makes an unusual
noise, emits an unusual smell, or emits smoke
or excessive heat. Continued use may result in
a re or electrical shock.
18

•
Do not disassemble or modify this machine.
There are high-voltage and high-temperature
components inside the machine. Disassembly
or modi cation may result in a re or electrical
shock.
•
Place the machine where children will not
come in contact with the power cord and
other cables or gears and electrical parts inside
the machine. Failure to do so may result in
unexpected accidents.
•
Do not use ammable sprays near this
machine. If ammable substances come into
contact with electrical parts inside this
machine, it may result in a re or electrical
shock.
•
When moving this machine, be sure to turn
OFF the power of this machine, and then
unplug the power plug and interface cables.
Failure to do so may damage the power cord
or interface cables, resulting in a re or
electrical shock.
•
When plugging or unplugging a USB cable
when the power plug is plugged into an AC
power outlet, do not touch the metal part of
the connector, as this may result in an electrical
shock.
•
Use a modular cable that is shorter than 3
meters.
•
Use a USB cable that is shorter than 3 meters.
If the operating noise concerns you
Depending on the use environment and
operating mode, if the operating noise is of
concern, it is recommended that the machine be
Installed in a place other than the o ce.
If you are using a cardiac pacemaker
This machine generates a low level magnetic ux
and ultrasonic waves. If you use a cardiac
pacemaker and feel abnormalities, please move
away from this machine and consult your
physician immediately.
CAUTION
•
Do not place heavy objects on this machine as
they may fall, resulting in injury.
•
For safety, unplug the power plug if the
machine will not be used for a long period of
time.
•
Use caution when opening and closing covers
to avoid injury to your hands.
•
Keep hands and clothing away from the rollers
in the output area. If the rollers catch your
hands or clothing, this may result in personal
injury.
•
The inside of the machine and the output slot
are very hot during and immediately after use.
Avoid contact with these areas to prevent
burns. Also, printed paper may be hot
immediately after being output, so use caution
when handling it. Failure to do so may result in
burns.
Feeder (only for products with a feeder)
•
Do not press down hard on the feeder when
using the platen glass to make copies of thick
books. Doing so may damage the platen glass
and result in personal injury.
•
Close the feeder gently to avoid catching your
hands, as this may result in personal injury.
•
Close the feeder gently to avoid catching your
hands in the back of the feeder, as this may
result in personal injury.
Finisher (only for products with a nisher)
•
Do not place your hands in the part of the tray
where stapling is performed (near the rollers),
especially pay careful attention to the sharp
staples, as this may result in personal injury.
Paper drawer (only for products with a paper
drawer)
•
Do not insert your hand into the machine
while the paper drawer is removed, as this may
result in personal injury.
Energy Saver key (only for products with an
Energy Saver key)
•
Press (Energy Saver) for safety when the
machine will not be used for a long period of
time, such as overnight. Also, turn OFF the
main power switch, and disconnect the power
cord for safety when the machine will not be
used for an extended period of time, such as
during consecutive holidays.
Laser Safety
This product is con rmed as a Class 1 laser
product in IEC60825-1:2007 and EN60825-1:2007.
CLASS 1 LASER PRODUCT
LASER KLASSE 1
APPAREIL À LASER DE CLASSE 1
APPARECCHIO LASER DI CLASSE 1
PRODUCTO LÁSER DE CLASE 1
APARELHO A LASER DE CLASSE 1
LUOKAN 1 LASER-TUOTE
LASERPRODUKT KLASS 1
The laser beam can be harmful to human bodies.
Since radiation emitted inside the product is
completely con ned within protective housings
and external covers, the laser beam cannot
escape from the machine during any phase of
user operation. Read the following remarks and
instructions for safety.
•
Never open covers other than those instructed
in the manuals for this machine.
•
If the laser beam should escape and enter your
eyes, exposure may cause damage to your
eyes.
CAUTION
Use of controls, adjustments, or performance of
procedures other than those speci ed in this
manual may result in hazardous radiation
exposure
Other precautions
•
Follow the instructions on the caution label
attached to this machine.
•
Do not subject the machine to strong shocks
or vibration.
•
Do not forcibly open and close doors, covers,
and other parts. Doing so may result in
damage to the machine.
•
Do not turn the main power switch OFF or
open the covers while the machine is in
operation. This may result in paper jams.
Maintenance and Inspections
Clean this machine periodically. If dust
accumulates, the machine may not operate
properly. When cleaning, be sure to observe the
following. If a problem occurs during operation,
see Troubleshooting. If the problem cannot be
resolved or you feel the machine requires an
inspection, see When a Problem Cannot Be
Solved.
WARNING
•
Before cleaning, turn OFF the power and
unplug the power plug from the AC power
outlet. Failure to do so may result in a re or
electrical shock.
•
Unplug the power plug periodically and clean
with a dry cloth to remove dust and grime.
Accumulated dust may absorb humidity in the
air and may result in a re if it comes into
contact with electricity.
•
Use a damp, well wrung-out cloth to clean the
machine. Dampen cleaning cloths with water
only. Do not use alcohol, benzenes, paint
thinners, or other ammable substances. Do
not use tissue paper or paper towels. If these
substances come into contact with electrical
parts inside the machine, they may generate
static electricity or result in a re or electrical
shock.
•
Check the power cord and plug periodically
for rust, bent prongs, fraying, cracks, or
excessive heat generation. Use of poorlymaintained power cord or plug may result in a
re or electrical shock.
CAUTION
•
The inside of the machine has hightemperature and high-voltage components.
Touching these components may result in
injury or burns. Do not touch any part of the
machine that is not indicated in the manual.
•
When loading paper or removing jammed
paper, be careful not to cut your hands with
the edges of the paper.
Legal Limitations on the Usage of Your
Product and the Use of Images
Using your produc t to scan, print or otherwise
reproduce certain documents, and the use of
such images as scanned, printed or otherwise
reproduced by your product, may be prohibited
by law and may result in criminal and/or civil
liability. A non-exhaustive list of these
documents is set forth below. This list is intended
to be a guide only. If you are uncertain about the
legality of using your product to scan, print or
otherwise reproduce any particular document,
and/or of the use of the images scanned, printed
or otherwise reproduced, you should consult in
advance with your legal advisor for guidance.
•
Paper Money
•
Travelers Checks
•
Money Orders
•
Food Stamps
•
Certi cates of Deposit
•
Passports
•
Postage Stamps (canceled or uncanceled)
•
Immigration Papers
•
Identifying Badges or Insignias
•
Internal Revenue Stamps (canceled or
uncanceled)
•
Selective Service or Draft Papers
•
Bonds or Other Certi cates of Indebtedness
•
Checks or Drafts Issued by Governmental
Agencies
•
Stock Certi cates
•
Motor Vehicle Licenses and Certi cates of Title
•
Copyrighted Works/Works of Art without
Permission of Copyright Owner
Safety-Related Symbols
Power switch: “ON” position
Power switch: “OFF” position
Power switch: “STAND-BY” position
Push-push switch “ON” “OFF”
Protective earthing terminal
Dangerous voltage inside. Do not open
covers other than instructed.
CAUTION: Hot surface. Do not touch.
Class II equipment
Moving parts: Keep body parts away from
moving parts
[NOTE]
Some of symbols shown above may not be
a xed depending on the product.
v1602 _00_ en- GB
En
19

En
Laser Safety Label
Consumables
WARNING
Do not dispose of used toner cartridges or the
like in open ames. Also, do not store toner
cartridges or paper in a location exposed to
open ames. This may cause the toner to ignite,
and result in burns or re.
Notice
Product Name
Safety regulations require the product’s name to
be registered.
In some regions where this product is sold, the
following name(s) in parentheses () may be
registered instead.
imageCLASS D570 (F173700)
FCC (Federal Communications Commission)
Users in the U.S.A
Contains Transmitter Module FCC ID: TLZ-NM383
This device complies with Part 15 of the FCC
Rules. Operation is subject to the following two
conditions: (1) this device may not cause harmful
interference, and (2) this device must accept any
interference received, including interference that
may cause undesired operation.
FCC CAUTION
Changes or modi cations not expressly
approved by the par ty responsible for
compliance could void the user’s authority to
operate the equipment.
[NOTE]
This equipment has been tested and found to
comply with the limits for a Class B digital device,
pursuant to part 15 of the FCC Rules. These limits
are designed to provide reasonable protection
against harmful interference in a residential
installation. This equipment generates, uses and
can radiate radio frequency energy and, if not
installed and used in accordance with the
instructions, may cause harmful interference to
radio communications. However, there is no
guarantee that interference will not occur in a
particular installation. If this equipment does
cause harmful interference to radio or television
reception, which can be determined by turning
the equipment o and on, the user is
encouraged to try to correct the interference by
one or more of the following measures:
– Reorient or relocate the receiving antenna.
– Increase the separation between the
equipment and receiver.
– Connect the equipment into an outlet on a
circuit di erent from that to which the receiver
is connected.
– Consult the dealer or an experienced radio/TV
technician for help.
This transmit ter must not be co-located or
operated in conjunction with any other antenna
or transmitter.
This equipment complies with FCC radiation
exposure limits set forth for an uncontrolled
environment and meets the FCC radio frequency
(RF) Exposure Guidelines. This equipment should
be installed and operated keeping the radiator at
least 20cm or more away from person’s body.
Use of shielded cable is required to comply with
class B limits in Subpart B of Part 15 of FCC Rules.
Do not make any changes or modi cations to
the equipment unless otherwise speci ed in this
manual. If you make such changes or
modi cations, you could be required to stop
operation of the equipment.
CANON U.S.A., INC
One Canon Park, Melville, NY 11747, U.S.A.
TEL No. 1-800-OK-CANON
Wireless LAN Regulatory Information
Regulator y information for users in Brazil
Este equipamento possui um módulo de
radiação restrita homologado na Anatel sob o
número
0070-14-1529.
MODELO: AW-NM383
0070-14-1529
(01) 07898581340850
Este equipamento opera em caráter secundário,
isto é, não tem direito à proteção contra
interferência prejudicial, mesmo de estações do
mesmo tipo e não pode causar interferência a
sistemas operando em caráter primário.
Regulator y Information for Users in Canada
English This device complies with Industry
Canada licence-exempt RSS standard(s).
Operation is subject to the following two
conditions: (1) this device may not cause
interference, and (2) this device must accept any
interference, including interference that may
cause undesired operation of the device.
This equipment complies with IC radiation
exposure limits set forth for an uncontrolled
environment and meets RSS-102 of the IC radio
frequency (RF) Exposure rules. This equipment
should be installed and operated keeping the
radiator at least 20cm or more away from
person’s body.
Français [ French ] Le présent appareil est
conforme aux CNR d’Industrie Canada
applicables aux appareils radio exempts de
licence. L’exploitation est autorisée aux deux
conditions suivantes : (1) l’appareil ne doit pas
produire de brouillage, et (2) l’utilisateur de
l’appareil doit accepter tout brouillage
radioélectrique subi, même si le brouillage est
susceptible d’en compromettre le
fonctionnement.
Cet équipement est conforme aux limites
d’exposition aux rayonnements énoncées pour
un environnement non contrôlé et respecte les
règles d’exposition aux fréquences
radioélectriques (RF) CNR-102 de l’IC. Cet
équipement doit être installé et utilisé en
gardant une distance de 20 cm ou plus entre le
radiateur et le corps humain.
Regulator y Information for Users in Mexico
Módulo WLAN instalado adentro de este
producto
AW-NM383 RCPAZAW13-2287
AzureWave
AW-N M383
La operación de este equipo está sujeta a las
siguientes dos condiciones:
(1) es posible que este equipo o dispositivo no
cause interferencia perjudicial y
(2) este equipo o dispositivo debe aceptar
cualquier inter ferencia, incluyendo la que
pueda causar su operación no deseada.
Disclaimers
•
The information in this document is subject to
change without notice.
•
CANON INC. MAKES NO WARRANTY OF ANY
KIND WITH REGARD TO THIS MATERIAL, EITHER
EXPRESS OR IMPLIED, EXCEPT AS PROVIDED
HEREIN, INCLUDING WITHOUT LIMITATION,
THEREOF, WARRANTIES AS TO MARKETABILITY,
MERCHANTABILITY, FITNESS FOR A
PARTICULAR PURPOSE OF USE OR NONINFRINGEMENT. CANON INC. SHALL NOT BE
LIABLE FOR ANY DIRECT, INCIDENTAL, OR
CONSEQUENTIAL DAMAGES OF ANY NATURE,
OR LOSSES OR EXPENSES RESULTING FROM
THE USE OF THIS MATERIAL.
•
The following applies in California, USA only:
The battery included with your product
contains Perchlorate Material and may require
special handling.
See http://www.dtsc.ca.gov/hazardouswaste/
perchlorate/ for details.
About This Manual
Keys and Buttons Used in This Manual
The following symbols and key names are a few
examples of how keys to be pressed are
expressed in this manual.
•
Operation panel keys: [Key icon]
Example:
•
Display: <Specify destination.>
•
Buttons and items on the computer display:
[Preferences]
Tra dem ark s
Mac is a trademark of Apple Inc.
Microsoft, Windows, Windows Vista, Windows
Server, Internet Explorer, Excel, and PowerPoint
are either registered trademarks or trademarks of
Microsoft Corporation in the United States and/
or other countries.
Other product and company names herein may
be the trademarks of their respective owners.
Third Party Software
This Canon product (the “PRODUCT”) includes
third-par ty software modules. Use and
distribution of these sof tware modules,
including any updates of such software modules
(collectively,the “SOFTWARE”) are subject to
license conditions below.
(1) You agree that you will comply with any
applicable export control laws, restrictions or
regulations of the countries involved in the
event that the PRODUCT including the
SOFTWARE is shipped, transferred or
exported into any country.
(2) Rights holders of the SOFT WARE retain in all
respects the title, ownership and intellectual
property rights in and to the SOFTWARE.
Except as expressly provided herein, no
license or right, expressed or implied, is
hereby conveyed or granted by rights
holders of the SOFTWARE to you for any
intellectual property of rights holders of the
SOFTWARE.
(3) You may use the SOFTWARE solely for use
with the PRODUCT.
(4) You may not assign, sublicense, market,
distribute, or transfer the SOFTWARE to any
third part y without prior writ ten consent of
rights holders of the SOFTWARE.
(5) Notwithstanding the foregoing, you may
transfer the SOFTWARE only when (a) you
20

assign to a transferee all of your rights to the
PRODUCT and all rights and obligations
under the conditions governing the
SOFTWARE and PRODUCT and (b) such
transferee agrees in writing to be bound by
all these conditions.
(6) You may not decrypt, decompile, reverse
engineer, disassemble or otherwise reduce
the code of the SOFTWARE to human
readable form.
(7) You may not modify, adapt, translate, rent,
lease or loan the SOFTWARE or create
derivative works based on the SOFTWARE.
(8) You are not entitled to remove or make
separate copies of the SOFT WARE from the
PRODUCT.
(9) The human-readable portion (the source
code) of the SOFTWARE is not licensed to
you.
Notwithstanding (1) through (9) above, the
PRODUCT includes third-party software modules
accompanying the other license conditions, and
these software modules are subject to the other
license conditions.Please refer to the other
license conditions of third-party software
modules described in Appendix of Manual for
the corresponding the PRODUCT. This Manual is
available at http://canon.com/oip-manual.
By using the PRODUCT, you shall be deemed to
have agreed to all applicable license conditions.
If you do not agree to these license conditions,
please contac t your service representative.
ACCEPTANCE
THE TERMS OF THIS THIRD PARTY SOFTWARE
STATED HERE OR IN RELATED WARRANTY
PROVISIONS SHALL BE DEEMED ACCEPTED UPON
YOUR USE OF THE PRODUCT FOR ONE OR MORE
OF ITS NORMAL PURPOSES, IF THERE HAS BEEN
NO OTHER PRIOR EXPRESS ACCEPTANCE.
THE TERMS OF THIS THIRD PARTY SOFTWARE
GOVERN THE THIRD PARTY SOFT WARE AS
DELIVERED WITH THE PRODUCT AND ALL
UPDATED VERSIONS OF THE THIRD PARTY
SOFTWARE PROVIDED UNDER MAINTENANCE
AGREEMENTS OR OTHER SERVICE
ARRANGEMENTS FOR THE PRODUCT WITH
CANON USA OR CANON CANADA OR THEIR
RESPECTIVE AUTHORIZED SERVICE
ORGANIZATIONS.
21
En

A propos des manuels
Mise en route (ce manuel):
Lisez d’abord ce manuel. Il explique
comment installer et con gurer la
machine, et indique les précautions
à suivre. Veillez à bien lire ce manuel
avant d’utiliser la machine.
Navigation dans le menu et méthode de saisie du texte
Guide d’installation du pilote MF
(Accédez au site Web):
Il explique comment installer le logiciel
et le pilote.
Rendez-vous sur
canon.com/oip-manual pour
consulter le manuel du logiciel et
du pilote.
Guide de l’utilisateur (Accédez au
site Web):
Rendez-vous sur
canon.com/oip-manual pour
consulter le Guide de l’utilisateur
décrivant toutes les fonctions de
cet appareil.
Fr
Menu #Clear (E acement) Clavier
▲▼◀▶OK
Back (Préc.)
numérique
Navigation dans le menu
Sélection d’une option ou déplacement
du curseur parmi les options du menu
Sélectionnez une option à l’aide de [▲] ou [▼].
Passez au niveau suivant à l’aide de
ou [▶]. Revenez au niveau précédez à
l’aide de ou [◀].
Validation des réglages
Appuyez sur . Cependant, lorsque
<Appliquer> s’a che à l’écran, sélectionnez
<Appliquer>, puis appuyez sur .
Méthode de saisie du texte
Modi cation du mode de saisie
Appuyez sur [▼] pour sélectionner
<Mode de saisie>, puis sur
. Vous
pouvez également appuyer sur pour
modi er le mode de saisie.
Mode de saisie Texte disponible
Lettres alphabétiques en
<A>
majuscule et symboles
Lettres alphabétiques en
<a>
minuscule et symboles
<12> Chi res
Saisie de texte, de symboles et de
chi res
Utilisez le clavier numérique ou
.
Déplacement du curseur (ajout d’un
espace)
Déplacez-vous à l’aide de [◀] ou [▶].
Déplacez le curseur à l’extrémité du
texte et appuyez sur [▶] pour saisir un
espace.
Suppression de caractères
Supprimez à l’aide de
.Maintenez la
touche enfoncée pour e acer tous
les caractères.
Mode de
saisie: <A>
@ . - _ / 1
AÀÂBCÇ aàâbcç 2
DEËÉÈÊF deëéèêf 3
GHIÏÎ ghiïî 4
JKL jkl 5
MNOÔ mnoô 6
PQRS pqrs 7
TUÜÙÛV tuüùûv 8
WXYZ wxyz 9
(Non disponible) 0
(espace) - . * # ! “ , ; : ^ ` _ = / | ‘
? $ @ % & + \ ˜ ( ) [ ] { } < >
Mode de
saisie: <a>
Mode de
saisie: <12>
(Non
disponible)
22
Branchement du cordon d’alimentation et mise sous tension
2
1
ARRET
Ne connectez pas le câbleUSB pour l’instant. Connectez-le au moment de
l’installation du logiciel.
MARCHE

Con guration des réglages initiaux
Suivez les instructions à l’écran, dé nissez la langue, la région,
le fuseau horaire et la date et l’heure. Pour en savoir plus sur la
navigation dans le menu et la saisie des chi res, reportez-vous à
“Navigation dans le menu et méthode de saisie du texte” ( P.22).
Language
Chinese (Simplified)
Chinese (Traditional
English
French
Régl. hre actuelle.
08/08/2016 12:52 AM
(0:00-12:59)
Véri ez si votre routeur possède un bouton
Sélectionnez l’une des 2méthodes suivantes, selon le
routeur (point d’accès) que vous utilisez.
●
En cas de présence d’un bouton.
Vous pouvez e ectuer la con guration
facilement si votre routeur (point d’accès)
comporte un bouton et si le logo gure sur le
routeur.
●
En cas d’absence de bouton.
Si votre routeur (point d’accès) ne comporte aucun
bouton, sélectionnez manuellement leSSID et procédez
à ses réglages.
Choix de la méthode de connexion de la
machine
●
Connexion via un réseau laire
Vous pouvez connecter la machine à un routeur laire.
Utilisez des câbles réseau pour connecter la machine au
routeur laire (point d’accès).
Connectez l’ordinateur au routeur à l’aide d’un câble ou sans l.
Assurez-vous que le routeur dispose d’un port disponible pour
connecter la machine et l’ordinateur.
Procurez-vous un câble à paire torsadée de catégorie5 minimum.
●
Connexion via un câbleUSB
Vous pouvez connecter la machine à l’ordinateur à l’aide
d’un câbleUSB.
Vé ri ez que le câbleUSB utilisé porte le marquage
suivant.
●
Connexion via un réseau sans l
Vous pouvez connecter la machine à un routeur sans l*.
Comme elle est connectée sans l, aucun câble réseau n’est
nécessaire.
* Un routeur sans l (ou point d’accès) prenant en charge
IEEE802.11b/g/n est nécessaire.
Connectez l’ordinateur au routeur à l’aide d’un câble ou sans l.
Si vous ne savez pas si votre routeur prend en charge une
connexion sans l:
Reportez-vous au mode d’emploi fourni avec votre
périphérique réseau ou contactez le fabricant.
REMARQUE
• Si vous cherchez à installer votre nouveau périphérique
via une connexion de réseau sans l, vous trouverez une
vidéo et des guides écrits contenant des instructions
détaillées, pour vous aider à réaliser ce processus, à l’URL
suivante: http://www.usa.canon.com/WirelessHelp
La consultation de ces guides garantit une installation
uide du périphérique dans votre environnement sans
l existant.
●
Connexion directe
Connectez directement un périphérique mobile sans l à la
machine sans passer par un routeur de réseau local sans l
(ni un point d’accès).
Guide de l’utilisateur “Utilisable commodément avec un
périphérique mobile” ▶ “Connexion directe (Mode Point
d’accès)”
Choix de la méthode de connexion de la
machine: Méthode via réseau sans l ou
autre
Util rés sans fil
pour conn. rés. ?
(Config. ult.)
Oui Non
En cas de présence d’un bouton.
Démarrez à partir de l’étape 4 de “Mode bouton
Oui
Non
poussoir” (P.25).
En cas d’absence de bouton.
Démarrez à partir de l’étape 4 de “Con guration
manuelle du point d’accès” (P.26).
Connecter l’ordinateur via un réseau câblé
Passez à “Connexion via un réseau laire” (P.24).
Connecter l’ordinateur via un câbleUSB
Passez à “Connexion via un câbleUSB” (P.24).
Connecter plus tard l’ordinateur via un réseau sans l
Passez à “Connexion via un réseau sans l” (P.24).
Régl. hre actuelle.
La batt. doit être
rech. pdt 24 hres
pr enreg. régl. hre.
Apr. avoir éteintr
Fr
23

Connexion via un réseau laire
Connexion via un câbleUSB
Véri cation avant la con guration
Internet
L’ordinateur et le routeur (ou concentrateur) sont-ils
connectés à l’aide d’un câble réseau (LAN)?
Pour en savoir plus, consultez le mode d’emploi du
périphérique réseau ou contactez son fabricant.
La con guration réseau de l’ordinateur a-t-elle été
e ectuée?
Si l’ordinateur n’est pas correctement con guré, vous risquez
de ne pas pouvoir utiliser le réseau laire, même après le
paramétrage des réglages suivants.
REMARQUE
• Vous ne pouvez pas utiliser simultanément le réseau
laire et le réseau sans l. En outre, la machine est réglée
par défaut pour utiliser le réseau sans l.
• Si vous vous connectez à un réseau non sécurisé, vos
informations con dentielles risquent d’être divulguées à
un tiers. Prenez toutes les précautions nécessaires.
• En cas de connexion à un réseau d’entreprise, contactez
votre administrateur réseau.
Routeur
ou
concentrateur
Câble réseau (LAN)
Installer le pilote et le logiciel
Installez le pilote et le logiciel sur le DVD-ROM fourni.
Reportez-vous à “Pour en savoir plus sur les procédures
d’installation:” (P.27).
Passez à “Réglage du format et du type de papier” (P.27).
REMARQUE
• Si vous avez branché le câbleUSB avant l’installation,
débranchez le câble USB et procédez à une nouvelle
installation.
Connexion via un câbleUSB
Suivez le Guide d’installation du pilote MF pour brancher le
câble USB.
Connexion via un réseau laire
Connectez le câble réseau (LAN).
1
Fr
L’adresseIP est automatiquement con gurée dans
un délai de 2minutes. Si vous souhaitez con gurer
l’adresseIP manuellement, reportez-vous aux sections
suivantes.
Guide de l’utilisateur “Réseau” ▶ “Connexion à un réseau”
▶ “Dé nition des adresses IP”
Installez le pilote et le logiciel à l’aide du DVD-ROM
2
fourni.
Reportez-vous à “Pour en savoir plus sur les procédures
d’installation:” (P.27).
Passez à “Réglage du format et du type de papier” (P.27).
Passez à “Réglage du format et du type de papier” (P.27).
Connexion via un réseau sans l
Véri cation avant la con guration
Routeur sans l
Internet
L’ordinateur est-il correctement connecté au routeur (ou
point d’accès) à l’aide d’un câble réseau ou du réseau sans
l?
Pour en savoir plus, consultez le mode d’emploi du
périphérique réseau ou contactez son fabricant.
La con guration réseau de l’ordinateur a-t-elle été
e ectuée?
Si l’ordinateur n’est pas correctement con guré, vous risquez
de ne pas pouvoir utiliser le réseau sans l, même après le
paramétrage des réglages suivants.
24

REMARQUE
• Vous ne pouvez pas utiliser simultanément le réseau
laire et le réseau sans l. En outre, la machine est réglée
par défaut pour utiliser le réseau sans l.
• Si vous vous connectez à un environnement réseau non
sécurisé, vos informations con dentielles risquent d’être
divulguées à un tiers. Prenez toutes les précautions
nécessaires.
• En cas de connexion à un réseau d’entreprise, contactez
votre administrateur réseau.
Lisez le message qui s’a che à l’écran et appuyez
4
sur .
Sélectionnez <Mode bouton poussoir WPS> et
5
appuyez sur .
Régl réseau sans fil
Réglages SSID
Mode bouton poussoir
Mode code PIN WPS
Mode économie d'éner
Véri cation du routeur
Sélectionnez la méthode de connexion au réseau sans l.
Sélectionnez l’une des 2méthodes suivantes, selon le routeur
(point d’accès) que vous utilisez.
●
En cas de présence d’un bouton.
Cette machine prend en
charge WPS (Wi-Fi Protected
Setup). Vous pouvez e ectuer
la con guration facilement si
votre routeur (point d’accès)
comporte un bouton et si le
logo gure sur le routeur.
Si vous ne savez pas si votre routeur prend en charge le
protocoleWPS, consultez le manuel fourni avec le produit ou
contactez son fabricant.
●
En cas d’absence de bouton.
Si votre routeur (point d’accès)
ne comporte aucun bouton,
vous pouvez sélectionner
manuellement leSSID et
procéder aux réglages. Dans
ce cas, vous devez connaître
les valeurs duSSID et de la clé
réseau de votre routeur (point
d’accès).
Reportez-vous à “1 Véri ez la SSID ou la clé réseau du
routeur sans l ou du point d’accès.” (P.26) pour savoir
comment déterminer les valeurs de ces paramètres.
Pour con gurer à l’aide de la méthode par code PIN
WPS/Pour con gurer manuellement:
Guide de l’utilisateur “Connexion à un réseau local sans
l”
Con guration du réseau sans l
Mode bouton poussoir
Sélectionnez <Oui> et appuyez sur .
6
Appuyez sur le bouton et maintenez-le enfoncé*
7
jusqu’à ce que le voyant s’allume ou clignote.
Vous devez appuyer sur le boutonWPS dans les 2 minutes
qui suivent la sélection de <Oui> à l’étape6.
* La durée pendant laquelle il faut maintenir le bouton enfoncé
peut varier en fonction du routeur que vous utilisez.
Patientez environ 2minutes après la connexion.
8
Pendant cette période, l’adresseIP est con gurée.
Si un message d’erreur apparaît:
Appuyez sur
réseau est correctement con gurée, puis recommencez
les réglages. Si après cette nouvelle tentative, vous ne
pouvez toujours pas vous connecter au point d’accès,
reportez-vous aux instructions suivantes.
Guide de l’utilisateur “Si un message d’erreur apparaît”
Pour la véri cation de la connexion réseau:
Vous pouvez véri er si la machine est correctement
connectée au réseau à l’aide d’un ordinateur connecté au
réseau.
Guide de l’utilisateur “A chage des réglages réseau”
Pour con gurer l’adresseIP manuellement:
Guide de l’utilisateur “Connexion à un réseau local sans
l”
pour fermer l’écran, véri ez si la clé
Fr
Appuyez sur .
1
Sélectionnez <Réglages réseau> et appuyez sur .
2
Sélectionnez <Réglages réseau sans l> et appuyez
3
sur .
Si un écran s’a che et vous demande s’il convient
d’activer le réseau sans l, sélectionnez <Oui> et appuyez
sur .
25

Con guration manuelle du point d’accès
Véri ez la SSID ou la clé réseau du routeur sans l
1
ou du point d’accès.
• Véri ez l’étiquette sur le routeur du réseau sans l.
• Vous pouvez véri er la valeur du SSID ou de la clé
réseau à l’aide de l’outil “Canon MF/LBP Wireless Setup
Assistant”, inclus sur le DVD-ROM fourni avec la machine.
SSID
Cette option peut être appelée nom du point d’accès ou
nom du réseau. En cas de SSID multiples, notez l’ensemble
des informations.
Clé réseau
Cette option peut être appelée clé de chi rement, clé
WEP, mot de passe WPA/WPA2, clé partagée PSK ou clé
pré-partagée.
Appuyez sur .
3
Sélectionnez <Réglages réseau> et appuyez sur .
4
Sélectionnez <Réglages réseau sans l> et appuyez
5
sur .
Si un écran s’a che et vous demande s’il convient
d’activer le réseau sans l, sélectionnez <Oui> et appuyez
sur .
Lisez le message qui s’a che à l’écran et appuyez
6
sur .
Sélectionnez <Réglages SSID> et appuyez sur .
7
Sélectionnez <Sélection du point d’accès> et
SampleABCD WEP 01234567890123456789ABCDEF
SampleEFGHIJ WPA-PSK 543210EDCBA
SampleK WPA2-PSK 1234ABCD
Si les informations du routeur sans l ne s’a chent pas,
cliquez sur le bouton [Refresh]. Si aucune information
Fr
ne s’a che lorsque vous cliquez sur le bouton [Refresh],
véri ez les réglages du routeur (point d’accès) sans l sur
l’ordinateur.
Inscrivez le nom du SSID et la clé du réseau a chés
2
à l’étape 1. Si plusieurs points d’accès apparaissent,
notez tous les SSID a chés.
8
appuyez sur .
Réglages SSID
Sélection du point d'
Saisie manuelle
Sélectionnez un routeur de réseau sans l.
9
En cas de SSID multiples, sélectionnez celui qui apparaît
en tête de liste (meilleur signal).
Saisissez la clé du réseau que vous avez inscrite.
10
Saisissez la clé du réseau à l’aide des touches
numériques.
Sélectionnez <Appliquer> et appuyez sur
Clé WEP (5-26 car.)
XXXXXXXX
<Appliquer>
Mode de saisie : A
.
26
Sélectionnez <Oui> et appuyez sur .
11

Une fois l’écran <Connecté.> a ché, attendez que
12
le témoin Wi-Fi cesse de clignoter et s’allume.
Patientez environ 2minutes après la connexion.
13
Pendant cette période, l’adresseIP est con gurée.
Si un message d’erreur apparaît:
Appuyez sur
réseau est correctement con gurée, puis recommencez
les réglages.
Si après cette nouvelle tentative, vous ne pouvez
toujours pas vous connecter au point d’accès, reportezvous aux instructions suivantes.
Guide de l’utilisateur “Si un message d’erreur apparaît”
Pour con gurer l’adresseIP manuellement:
Guide de l’utilisateur “Connexion à un réseau local sans
l”
pour fermer l’écran, véri ez si la clé
Réglage du format et du type de papier
Suivez les instructions à l’écran pour dé nir le format et le type
de papier.
Réglages papier
Bac MF
1
Cassette 1
Sélec. formats pap. c
Pour en savoir plus sur les procédures
d’installation:
Installez le pilote et le logiciel à l’aide du DVD-ROM fourni.
Vous pouvez également télécharger le pilote depuis le site Web
Canon.
Pour en savoir plus sur les procédures d’installation,
reportez-vous au Guide d’installation du pilote MF.
Si vous utilisez Mac OS :
Il est possible que le DVD-ROM fourni avec cette machine
ne comprenne pas le pilote d’imprimante pour Mac OS.
Ceci di ère en fonction du moment où vous avez acheté
la machine. Recherchez et téléchargez le pilote approprié
sur la page d’accueil de Canon. Pour de plus amples
informations sur l’installation ou l’utilisation du pilote,
reportez-vous au manuel du pilote.
Fr
27

Procédures utiles
Cette machine vous permet d’e ectuer di érentes opérations. Vous trouverez ci-dessous une description des fonctions les plus
courantes.
Copie
Agrandissement/Réduction de copie
Vous pouvez agrandir ou réduire
les documents de taille standard
a n de les copier sur du papier de
format standard, ou dé nir un taux de
reproduction en pourcentage.
Copie recto-verso
Vous pouvez copier des documents
recto-verso sur les deux faces d’une
feuille de papier.
Tri séquentiel
Vous pouvez trier les copies en jeux
organisés dans l’ordre des pages.
Disposition réduite
Il est possible de réduire la quantité
de papier en imprimant plusieurs
documents sur une seule feuille de
papier.
2 sur 1 4 sur 1
Copie carte d’identité
Vous pouvez copier une carte recto
verso sur une même face d’une feuille.
Impression
Agrandissement/Réduction
d’impression
Impression recto-verso
Disposition réduite
Il est possible de réduire la quantité
de papier en imprimant plusieurs
documents sur une seule feuille de
papier.
2 sur 1 4 sur 1
Impression d’une brochure
Impression d’un poster
Impression d’un ligrane
A chage d’un aperçu avant
l’impression
Sélection d’un “pro l”
Réglages réseau
Cette machine est équipée d’une
interface réseau a n de vous permettre
d’émuler facilement un environnement
réseau. Vous pouvez imprimer un
document ou utiliser les fonctions de
numérisation réseau depuis l’ensemble
des ordinateurs connectés à la machine.
La machine permet d’augmenter
l’e cacité du travail en tant que machine
partagée du bureau.
Numérisation
Enregistrement des documents à
l’aide du panneau de commandes de
la machine
Documents
Données
Enregistrement des documents à
l’aide des fonctions de l’ordinateur
●
Numérisation avec MF Scan Utility
Documents
Données
●
Numérisation depuis une application
●
Numérisation avec le piloteWIA
IU distante
Vous pouvez surveiller le statut de
la machine depuis les ordinateurs
connectés au réseau. Vous pouvez
accéder à la machine et gérer les tâches
ou spéci er divers réglages depuis le
réseau.
Fr
28

Remplacement de la cartouche d’encre
Les cartouches d’encre sont des consommables. Lorsque l’encre est presque ou entièrement épuisée au cours d’une tâche, un
message s’a che à l’écran ou les problèmes suivants surviennent. Prenez les mesures appropriées.
Lorsqu’un message apparaît
Lorsque l’encre est pratiquement épuisée au milieu de l’exécution d’une tâche, un message apparaît à l’écran.
Message
<Il est
recommandé
de préparer une
cartouche.>
<La cartouche
d’encre est
en n de vie.
Remplacement
conseillé.>
Si des traînées blanches ou des zones trop pâles apparaissent sur l’impression:
Si des traînées blanches ou des zones trop pâles apparaissent sur l’impression, la cartouche d’encre est alors pratiquement épuisée
même si aucun message ne s’a che à l’écran. Lorsque la qualité d’impression devient inacceptable, reportez-vous aux points suivants
pour résoudre le problème.
Moment où le message
s’a che à l’écran
Lorsque la cartouche
d’encre est presque vide
et doit être remplacée.
Lorsque la cartouche
d’encre a atteint sa n
de vie.
Description et solutions
La cartouche de toner arrive en n de vie. Secouez légèrement la cartouche
d’encre pour répartir à l’intérieur l’encre de façon homogène.
Guide de l’utilisateur “Avant de remplacer la cartouche de toner”
Nous recommandons de remplacer la cartouche d’encre avant d’e ectuer une
grande quantité d’impressions.
Guide de l’utilisateur “Comment remplacer les cartouches de toner”
Si ce message ne s’e ace pas, remplacez la cartouche d’encre. Vous pouvez
continuer à imprimer, mais la qualité d’impression n’est pas garantie.
Guide de l’utilisateur “Remplacement des cartouches de toner”
Si des traînées blanches ou des zones trop pâles apparaissent sur l’impression
Lorsque l’encre est presque épuisée, des traînées blanches ou des zones pâles apparaissent sur l’impression.
Aucun message n’apparaît sur l’a cheur, même si l’encre est
presque épuisée. Remplacez la cartouche d’encre lorsque des
traînées blanches ou que des zones trop pâles apparaissent sur
l’impression.
Lorsque ce problème survient:
Suivez la procédure ci-dessous avant de changer la cartouche d’encre. La machine continue à imprimer, jusqu’à ce que l’encre soit
totalement épuisée.
Guide de l’utilisateur “Avant de remplacer la cartouche de toner”
Si la qualité d’impression reste inacceptable:
Si le problème persiste après application de la procédure citée, changez la cartouche d’encre.
Guide de l’utilisateur “Comment remplacer les cartouches de toner”
Fr
29

Résolution des bourrages papier
Lorsque l’écran suivant s’a che, cela signi e qu’un bourrage de papier s’est produit dans
la machine. Suivez les instructions à l’écran pour retirer le document ou le papier coincé.
Seules les zones où un bourrage de papier risque de se produire sont indiquées dans
ce manuel. Pour en savoir plus sur chacune des fonctions, reportez-vous au Guide de
l’utilisateur.
Intérieur de la machine
Bourrage papier.
Appuyez sur [ ]
pour afficher la
procédure.
Fente d’alimentation
manuelle
Cassette à papier
Capot arrière
Fr
30

31
Fr

T
T
Annexe
Consignes de sécurité
importantes
Ce chapitre comporte d’importantes consignes de
sécurité destinées à prévenir les dommages aux biens
et les blessures corporelles à l’encontre des utilisateurs
de l’appareil ou d’autres personnes. Avant d’utiliser cet
appareil, lisez-le attentivement et conformez-vous aux
consignes d’utilisation de l’appareil. N’e ectuez aucune
opération qui ne soit pas décrite dans ce manuel.
Canon ne saurait être tenu responsable de tout
dommage résultant d’une utilisation non décrite dans
ce manuel, d’une utilisation incorrecte ou de
réparations ou de modi cations non e ectuées par
Canon ou un tiers autorisé par Canon. Toute utilisation
incorrecte de cet appareil peut entraîner des blessures
corporelles et/ou des dommages matériels nécessitant
des réparations importantes pouvant ne pas être
couvertes par votre garantie limitée.
AVERTISSEMENT
Avertissement concernant les opérations
susceptibles de représenter un danger de mort
ou de provoquer des blessures si les instructions
ne sont pas respectées. Ces recommandations
sont à respecter rigoureusement.
ATTENTION
Point important concernant les opérations
susceptibles de provoquer des blessures si les
instructions ne sont pas respectées. Ces
recommandations sont à respecter
rigoureusement.
IMPORTAN
Point important concernant le fonctionnement.
A lire attentivement pour bien utiliser la
machine et éviter de l’endommager ou de
causer des dommages matériels.
Installation
Pour utiliser cet appareil sans encombre et en toute
sécurité, lisez attentivement les précautions d’emploi
suivantes et installez l’appareil dans un lieu approprié.
AVERTISSEMENT
N’installez pas l’appareil dans un lieu pouvant
entraîner un incendie ou une électrocution
•
Lieu dans lequel les fentes de ventilation sont
obstruées (contre un mur, un lit, un sofa, un tapis
ou tout objet similaire)
•
Lieu humide ou poussiéreux
•
Lieu exposé à la lumière directe du soleil ou en
extérieur
•
Lieu exposé à des températures élevées
•
Lieu exposé aux ammes nues
•
Fr
Lieu proche près d’une source d’alcool, de
dissolvant ou d’autres substances in ammables.
Autres avertissements
•
Ne raccordez pas de câbles non approuvés à cet
appareil sous peine d’entraîner un incendie ou
de subir un choc électrique.
•
Ne placez pas de colliers, d’autres objets en métal
ou de récipients contenant un liquide sur
l’appareil. Si des substances étrangères viennent
en contact avec les composants électriques
internes de l’appareil, cela présente un risque
d’incendie ou de choc électrique.
•
Si des corps étrangers tombent dans cet appareil,
débranchez la che d’alimentation de la prise
secteur et contactez votre revendeur agréé Canon.
Les lieux suivants sont à proscrire pour l’installation
L’appareil peut glisser ou tomber et entraîner des
blessures.
•
Lieu instable
•
Lieu exposé à des vibrations
ATTENTION
Les lieux suivants sont à proscrire pour l’installation
pour éviter d’endommager l’appareil.
•
Un site soumis à des températures et à une
humidité extrêmement élevées ou basses.
•
Lieu exposé à des variations importantes de
température ou d’humidité
•
Lieu à proximité d’appareils qui génèrent des
ondes magnétiques ou électromagnétiques
•
Laboratoire ou lieu dans lequel des réactions
chimiques se produisent
•
Lieu exposé à des gaz corrosifs ou toxiques
•
Surface qui risque de se plier sous le poids de
l’appareil ou bien sur une surface où l’appareil
risque de s’enfoncer (moquette, etc.).
Lieu mal ventilé
En fonctionnement normal, cet appareil émet une
faible quantité d’ozone ainsi que d’autres gaz. Bien que
non dangereuses pour la santé, il est possible que ces
émissions soient plus perceptibles pendant une
utilisation prolongée ou de longs cycles de production
dans une pièce mal ventilée. Pour maintenir un
environnement de travail confortable, il est conseillé
de prévoir une ventilation adéquate de la pièce dans
laquelle l’appareil est utilisé. Évitez également
d’installer l’appareil dans une pièce où des personnes
risqueraient d’être exposées à ses émissions.
N’installez pas l’appareil dans un lieu soumis à une
forte condensation
Des gouttelettes d’eau (condensation) se forment à
l’intérieur de l’appareil lorsque la température de la
pièce où se trouve l’appareil augmente rapidement et
lorsque l’appareil est déplacé d’une pièce fraîche ou
sèche à une pièce chaude ou humide. L’utilisation de
l’appareil dans de telles conditions risque d’entraîner
des bourrages papier ou une qualité d’impression
médiocre, voire des dommages au niveau de
l’appareil. Laissez l’appareil s’adapter à la température
et au niveau d’humidité ambiants pendant au moins
deux heures avant de vous en servir.
A des altitudes de 3 000 m au-dessus du niveau de
la mer ou plus
Il est possible que les appareils dotés d’un disque dur
ne fonctionnent pas correctement s’ils sont utilisés à
haute altitude, à savoir à partir d’environ 3 000 mètres
au-dessus du niveau de la mer.
Pieds réglables (uniquement pour les produits
avec des pieds réglables)
Après l’installation, ne pas retirer les cales de
maintien de la machine car celle-ci risquerait alors de
se renverser, avec risque de blessure pour l’utilisateur.
Connexion de la ligne téléphonique (Uniquement
pour les produits avec une fonction fax)
Cet appareil est conforme aux normes des lignes
téléphoniques analogiques, et peut être raccordé à un
réseau téléphonique public commuté (RTPC). Raccordez
l’appareil à une ligne téléphonique numérique ou à une
ligne téléphonique dédiée pourrait nuire au
fonctionnement normal de l’appareil et l’endommager.
Veillez à véri er le type de ligne téléphonique avant de
raccorder l’appareil. Avant de raccorder l’appareil sur
une ligne en bres optiques ou une ligne de téléphonie
IP, contactez le fournisseur de services.
Si vous utilisez une connexion réseau (LAN) sans l
(uniquement pour les produits avec une fonction
réseau sans l)
•
Placez l’appareil à une distance de 50 m au plus
du routeur sans l.
•
Dans la mesure du possible, installez l’appareil
dans un lieu où aucun objet ne bloque les
communications. Le signal peut être a aibli s’il
doit traverser des murs ou des sols.
•
Tenez l’appareil éloigné autant que possible des
téléphones numériques sans l, des micro-ondes ou
de tout autre équipement qui émet des ondes radio.
•
N’utilisez pas ce produit près d’un équipement
médical. Les ondes radio qu’il émet peuvent
perturber cet équipement médical, ce qui peut
provoquer des dysfonctionnements et des accidents.
Alimentation
AVERTISSEMENT
•
Utilisez exclusivement une alimentation
électrique dont la tension correspond à celle
indiquée. Sinon, vous risquez de provoquer des
incendies ou de subir une électrocution.
•
Utilisez uniquement le cordon d’alimentation
fourni, pour éviter tout risque d’incendie ou
d’électrocution.
•
Le cordon d’alimentation fourni est destiné à être
utilisé avec cette machine. Ne pas le raccorder à
un autre périphérique.
•
Ne modi ez pas, ne tirez pas, ne pliez pas
excessivement, ni n’altérez en aucune manière le
cordon d’alimentation. Veillez également à ne pas
poser d’objets lourds sur le cordon d’alimentation.
Cela risquerait d’entraîner des dommages électriques,
et de provoquer un incendie ou une électrocution.
•
Ne branchez/débranchez pas le cordon
d’alimentation avec les mains mouillées car vous
risquez de vous électrocuter.
•
N’utilisez pas de rallonge, ni de multiprises avec
l’appareil. Cela pourrait entraîner un incendie ou
une électrocution.
•
N’enroulez pas le cordon d’alimentation ou ne le
retenez pas par un nœud, cela peut provoquer
des incendies ou des électrocutions.
•
Insérez complètement la che d’alimentation dans
la prise secteur. Si vous ne le faites pas, cela peut
entraîner un risque d’incendie ou d’électrocution.
•
Débranchez la che d’alimentation de la prise
secteur en cas d’orage. La foudre peut entraîner
un incendie, une électrocution ou un
dysfonctionnement de l’appareil.
•
Véri er que la prise choisie est en bon état et
avec une tension stable.
•
Eloigner le cordon de toute source de chaleur,
car sa gaine risquerait de fondre, ce qui pourrait
provoquer un incendie ou une électrocution.
•
Si la partie branchement du cordon d’alimentation
est soumise à une tension trop importante, cela
risque d’endommager le cordon ou les ls situés à
l’intérieur de la machine peuvent se déconnecter
et provoquer ainsi un incendie. Eviter les situations
suivantes :
– Brancher et débrancher fréquemment le cordon
d’alimentation.
– Se prendre les pieds dans le cordon d’alimentation.
– Plier le cordon d’alimentation près de la partie
branchement et soumettre la prise ou la partie
branchement à une tension constante.
– Surcharger la prise secteur.
ATTENTION
Installer cette machine à proximité d’une prise secteur
et laisser un dégagement su sant autour de la prise
secteur a n qu’il soit facile de débrancher la machine
en cas d’urgence.
IMPORTAN
Lorsque vous branchez l’alimentation
•
Ne branchez pas le cordon d’alimentation à une
source d’alimentation ininterruptible (onduleur), au
risque d’entraîner des dysfonctionnements ou
d’endommager l’appareil en cas de panne de courant.
•
Si vous branchez l’appareil dans une multi-prise
dotée de plusieurs prises, ne branchez aucun
équipement aux autres prises.
•
Ne reliez pas le cordon d’alimentation à la prise
auxiliaire d’un ordinateur.
Autres précautions
Des parasites électriques peuvent entraîner un mauvais
fonctionnement de l’appareil ou une perte de données.
Manipulation
AVERTISSEMENT
•
Débranchez la che d’alimentation de la prise
secteur et contactez un revendeur agréé Canon
si l’appareil émet des bruits anormaux, de la
fumée, de la chaleur ou une odeur inhabituelle.
Si vous continuez à utiliser l’appareil, cela peut
entraîner un risque d’incendie ou d’électrocution.
32

•
Ne pas démonter ni modi er l’appareil. Il
comporte des composants à haute tension et à
haute température. Son démontage ou sa
modi cation risque de provoquer des incendies
ou des électrocutions.
•
Placez l’appareil à un endroit où les enfants ne
peuvent pas entrer en contact avec le cordon
d’alimentation, d’autres câbles ou des
engrenages et des pièces électriques internes,
sous peine de risquer des accidents inattendus.
•
Ne vaporisez pas de produits in ammables près
de l’appareil. Si de telles substances viennent en
contact avec les composants électriques internes
de l’appareil, cela peut provoquer des incendies
ou des électrocutions.
•
Lorsque vous déplacez cet appareil, veillez à le
mettre hors tension et à débrancher la che
d’alimentation ainsi que les câbles d’interface. Si
vous ne le faites pas, vous risquez d’endommager
la che d’alimentation et les câbles, ce qui peut
entraîner un risque d’incendie ou d’électrocution.
•
Si vous branchez ou débranchez un câble USB
lorsque le cordon d’alimentation est branché sur
une prise secteur, ne touchez pas la partie
métallique du connecteur, vous risquez de subir
une décharge électrique.
•
Utiliser un câble modulaire de moins de 3 mètres.
•
Utiliser un câble USB de moins de 3 mètres.
Si le bruit généré lors du fonctionnement vous gêne
Selon les conditions d’utilisation et le mode de
fonctionnement, il est recommandé d’installer
l’appareil dans une autre pièce si le bruit vous gêne.
Si vous portez un pacemaker
Cet appareil génère un ux magnétique et des
ondes ultrasoniques de faible intensité. Si vous
portez un pacemaker et constatez une anomalie,
éloignez-vous de la machine et consultez
immédiatement votre médecin.
ATTENTION
•
Ne posez pas d’objets lourds sur l’appareil, car
leur chute risquerait de vous blesser.
•
Par mesure de sécurité, débranchez la che du
cordon d’alimentation si vous prévoyez de ne pas
utiliser l’appareil pendant une période prolongée.
•
Faites attention à l’ouverture et à la fermeture des
capots de ne pas vous blesser aux mains.
•
Éloignez vos mains ou vos vêtements du rouleau
dans la zone de sortie. Une soudaine rotation du
rouleau peut happer vos mains ou vos
vêtements, provoquant des blessures corporelles.
•
L’intérieur de l’appareil et la fente de sortie peuvent
être très chauds pendant et immédiatement après
usage. Évitez tout contact avec ces zones pour ne
pas vous brûler. Le papier imprimé peut également
être très chaud à sa sortie de l’imprimante. Faites
bien attention lorsque vous le manipulez. Sinon,
vous risquez de vous brûler.
Chargeur (uniquement pour les produits avec un
chargeur)
•
Ne pas appuyer trop fort sur le chargeur lors de
la copie de livres épais sur la vitre d’exposition
pour ne pas l’endommager ou se blesser.
•
Il est recommandé de fermer doucement le
chargeur en prenant soin de ne pas se coincer
les mains.
•
Il est recommandé de fermer doucement le
chargeur pour éviter de se coincer les mains à
l’arrière de l’appareil.
Module de nition (uniquement pour les produits
avec un module de nition)
•
Ne placez pas vos mains dans la partie du
réceptacle où l’agrafage est e ectué (près des
rouleaux) ; faites particulièrement attention aux
agrafes pointues pour ne vous blesser.
Cassette à papier (uniquement pour les produits
avec une cassette à papier)
•
Lorsque la cassette est retirée, veiller à ne pas
introduire la main dans la machine pour éviter de
se blesser.
Touche Économie d’énergie (uniquement pour les
produits avec une touche Économie d’énergie)
•
Appuyer sur (Economie d’énergie) par mesure
de sécurité lorsque la machine doit rester inutilisée
pendant une période prolongée, la nuit par
exemple. De même, toujours mettre l’interrupteur
principal sur Arrêt et débrancher la che secteur si
on prévoit de ne pas l’utiliser pendant une durée
plus longue (en période de fêtes par exemple).
Sécurité relative au laser
Cet appareil est certi é comme produit laser de
classe1 selon les normes CEI60825-1:2007 et
EN60825-1:2007.
CLASS 1 LASER PRODUCT
LASER KLASSE 1
APPAREIL À LASER DE CLASSE 1
APPARECCHIO LASER DI CLASSE 1
PRODUCTO LÁSER DE CLASE 1
APARELHO A LASER DE CLASSE 1
LUOKAN 1 LASER-TUOTE
LASERPRODUKT KLASS 1
Le faisceau laser peut être nocif pour l’être humain. Le
rayonnement laser est complètement isolé dans des
boîtiers protecteurs et des capots externes. Il ne peut
donc s’échapper de l’appareil à aucun moment au
cours du fonctionnement normal. Lisez attentivement
les remarques qui suivent et les consignes de sécurité.
•
N’ouvrez jamais d’autres capots que ceux
indiqués dans ce manuel.
•
Si le faisceau laser vient à s’échapper de l’appareil et
que vos yeux s’y trouvent exposés, le rayonnement
peut provoquer des lésions oculaires.
ATTENTION
Vous risquez de vous exposer à des rayonnements
dangereux si vous utilisez des commandes ou des
paramètres, ou si vous observez des procédures
autres que ce qu’indique ce manuel.
Autres précautions
•
Suivez les instructions de l’étiquette
d’avertissement xée sur l’appareil.
•
Gardez l’appareil à l’abri de toute vibration ou de
tout choc violent.
•
Ne forcez pas l’ouverture ou la fermeture des
portes, des capots ou d’autres parties, sous peine
d’endommager l’appareil.
•
Ne pas éteindre la machine ni ouvrir les portes
en cours de fonctionnement sous peine de
provoquer un bourrage papier.
Entretien et véri cations
Nettoyez régulièrement l’appareil. Si la poussière
s’accumule, l’appareil ne fonctionnera pas
correctement. Respectez les consignes de nettoyage
suivantes. En cas de problème, reportez-vous à la
section Dépannage. Si vous ne parvenez pas à
résoudre le problème ou si vous pensez qu’un
contrôle de l’appareil est nécessaire, reportez-vous à la
section Lorsqu’un problème ne peut pas être résolu.
AVERTISSEMENT
•
Avant toute opération de nettoyage, coupez le
courant et retirez la che d’alimentation de la
prise secteur. Si vous ne le faites pas, cela peut
entraîner un risque d’incendie ou d’électrocution.
•
Débranchez régulièrement le cordon d’alimentation
et retirez la poussière et les saletés avec un chi on
sec. Les dépôts de poussière qui s’accumulent
peuvent absorber de l’humidité et provoquer à
terme un incendie, s’ils entrent en contact avec de
l’électricité.
•
Employez un chi on humide, bien essoré pour
nettoyer l’appareil. Humectez le chi on avec de
l’eau uniquement. N’utilisez aucune substance
in ammable telle que de l’alcool, du benzène ou
du dissolvant. Ne recourez pas à des mouchoirs en
papier ou de l’essuie-tout. Si de telles substances
viennent en contact avec les composants
électriques internes de l’appareil, cela peut
provoquer des incendies ou des électrocutions.
•
Véri ez l’état du cordon d’alimentation et de la
che de temps à autre ; recherchez la présence
éventuelle de rouille, d’une broche tordue,
d’e lochage, de ssures ou de génération de
chaleur excessive. L’utilisation d’une prise ou d’un
cordon d’alimentation en mauvais état risque de
provoquer un incendie ou une électrocution.
ATTENTION
•
L’intérieur de l’appareil comporte des
composants à haute tension et à haute
température. Tout contact avec ces composants
risque d’entraîner des blessures ou des brûlures.
Ne touchez pas un élément de l’appareil si cela
n’est pas indiqué dans le manuel.
•
Lorsque vous chargez du papier ou que vous
dégagez un bourrage papier, faites attention de
ne pas vous couper les mains avec les bords du
papier.
Limites juridiques à l’utilisation du produit
et des images
L’utilisation de votre produit pour numériser, imprimer
ou reproduire de quelque manière que ce soit certains
documents, ainsi que l’utilisation des images
numérisées, imprimées ou reproduites par votre
produit peuvent être interdites par la loi et peuvent
engager votre responsabilité civile et/ou pénale. Une
liste non exhaustive de ces documents est présentée
ci-dessous, uniquement à titre indicatif. En cas de
doute quant au caractère légal de l’utilisation de votre
produit pour numériser, imprimer ou reproduire de
quelque manière que ce soit un document particulier
et/ou sur la légalité de l’utilisation des images ainsi
numérisées, imprimées ou reproduites, nous vous
recommandons de prendre préalablement les
conseils juridiques nécessaires.
•
Billets de banque
•
Chèques de voyage
•
Mandats
•
Coupons alimentaires
•
Certi cats de dépôt
•
Passeports
•
Timbres-poste (oblitérés ou non)
•
Documents d’immigration
•
Badges d’identi cation ou insignes
•
Timbres scaux (oblitérés ou non)
•
Documents de service militaire et de service
sélectif
•
Obligations ou autres titres de dettes
•
Chèques ou de traites émises par des organismes
gouvernementaux
•
Certi cats d’actions
•
Carte grise et certi cat de titre
•
Travaux / œuvres d’Art protégés reproduits sans
l’autorisation du propriétaire des droits d’auteur
Symboles relatifs à la sécurité
Commutateur d’alimentation : position
“MARCHE”
Commutateur d’alimentation : position “ARRÊT”
Commutateur d’alimentation : position “VEILLE”
Commutateur à poussoir “MARCHE”
“ARRÊT”
Prise de protection de mise à la terre
Tension dangereuse à l’intérieur. Ne pas ouvrir
les capots, sauf instructions contraires.
ATTENTION : surface chaude. Ne pas toucher.
Equipement de classe II
Pièces mobiles : tenez-vous à l’écart des
pièces mobiles
[REMARQUE]
Certains des symboles a chés ci-dessous peuvent
ne pas être apposés en fonction du produit.
v1602_00_fr-FR
Fr
33

Etiquette de sûreté du laser
Cet émetteur ne doit pas cohabiter ni être utilisé
en conjonction avec une autre antenne ou un
autre émetteur.
Cet équipement est conforme aux limites
d’exposition aux rayonnements de la FCC pour
un environnement non contrôlé et répond aux
recommandations d’exposition aux
radiofréquences (RF) de la FCC. Cet équipement
doit être installé et utilisé en laissant le radiateur
à une distance minimale de 20 cm du corps
d’une personne.
AW-NM383 RCPAZAW13-2287
AzureWave
AW-N M383
La operación de este equipo está sujeta a las
siguientes dos condiciones:
(1) es posible que este equipo o dispositivo no
cause interferencia perjudicial y
(2) este equipo o dispositivo debe aceptar
cualquier inter ferencia, incluyendo la que
pueda causar su operación no deseada.
L’utilisation d’un câble blindé est nécessaire pour
Consommables
AVERTISSEMENT
Ne jetez pas les cartouches de toner usagées ou
autres objets similaires au feu. En outre, ne
stockez pas les cartouches de toner ou le papier
dans un endroit exposé aux ammes nues. Le
toner pourrait prendre feu et provoquer des
brûlures ou un incendie.
Avis
Nom du produit
Les réglementations de sécurité imposent
l’enregistrement du nom du produit.
Dans certaines régions où ce produit est vendu,
il est possible que le ou les noms de produits
suivants entre parenthèses ( ) soient déposés
plutôt qu’enregistrés.
imageCLASS D570 (F173700)
FCC (Federal Communications Commission)
Utilisateurs aux Etats-Unis
Contient un module de transmetteur - ID FCC:
TLZ-NM383
Ce périphérique est conforme à la section15 des
règlesFCC. Son fonctionnement est soumis aux
deux conditions suivantes: (1) Ce périphérique
ne doit pas provoquer d’interférences nocives, et
(2) Ce périphérique doit accepter les
interférences reçues, y compris celles
susceptibles de provoquer un fonctionnement
indésirable.
PRÉCAUTIONS DE LA FCC
Les modi cations non expressément approuvées
par la partie responsable de la mise en
conformité sont susceptibles d’annuler le droit
de l’utilisateur à exploiter l’équipement.
[REMARQUE]
Cet équipement a été testé et déclaré conforme
aux limites pour les appareils numériques de
classeB, selon la section15 des règlesFCC. Ces
limites sont destinées à assurer une protection
Fr
raisonnable contre les interférences nuisibles
dans une installation résidentielle. Cet
équipement produit, utilise et peut émettre de
l’énergie radio électrique et, s’il n’est pas installé et
utilisé conformément aux présentes instructions,
peut provoquer des interférences nuisibles aux
communications radio. Toutefois, rien ne garantit
l’absence d’interférences dans une installation
particulière. Si ce matériel occasionne des
interférences nuisibles aux réceptions radio ou
télévisuelle, ce qui peut être déterminé en
allumant et en éteignant l’appareil, l’utilisateur est
invité à essayer de corriger le problème en
prenant une ou plusieurs des mesures suivantes:
– Réorienter ou repositionner l’antenne de
réception.
– Augmenter l’espacement entre l’équipement
et le récepteur.
– Brancher l’appareil à une prise de courant d’un
circuit autre que celui utilisé pour le récepteur.
– Contactez votre revendeur ou un technicien
radio/TV quali é pour obtenir de l’aide.
être conforme aux limites de classeB xées par
le sous-articleB de la section15 des règlesFCC.
N’apportez pas de changement ni de
modi cation à l’équipement sauf si cela est
stipulé dans le manuel. Tout changement ou
toute modi cation de ce type peut annuler votre
droit à utiliser l’équipement.
CANON U.S.A., INC.
One Canon Park, Melville, NY 11747, États-Unis
TEL.: 1-800 -OK-CANON
Informations réglementaires sur les LAN
sans l
Regulator y information for users in Brazil
Este equipamento possui um módulo de
radiação restrita homologado na Anatel sob o
número
0070-14-1529.
MODELO: AW-NM383
0070-14-1529
(01) 07898581340850
Este equipamento opera em caráter secundário,
isto é, não tem direito à proteção contra
interferência prejudicial, mesmo de estações do
mesmo tipo e não pode causar interferência a
sistemas operando em caráter primário.
Regulator y Information for Users in Canada
English This device complies with Industry
Canada licence-exempt RSS standard(s).
Operation is subject to the following two
conditions: (1) this device may not cause
interference, and (2) this device must accept any
interference, including interference that may
cause undesired operation of the device.
This equipment complies with IC radiation
exposure limits set forth for an uncontrolled
environment and meets RSS-102 of the IC radio
frequency (RF) Exposure rules. This equipment
should be installed and operated keeping the
radiator at least 20cm or more away from
person’s body.
Français [ French ] Le présent appareil est
conforme aux CNR d’Industrie Canada
applicables aux appareils radio exempts de
licence. L’exploitation est autorisée aux deux
conditions suivantes : (1) l’appareil ne doit pas
produire de brouillage, et (2) l’utilisateur de
l’appareil doit accepter tout brouillage
radioélectrique subi, même si le brouillage est
susceptible d’en compromettre le
fonctionnement.
Cet équipement est conforme aux limites
d’exposition aux rayonnements énoncées pour
un environnement non contrôlé et respecte les
règles d’exposition aux fréquences
radioélectriques (RF) CNR-102 de l’IC. Cet
équipement doit être installé et utilisé en
gardant une distance de 20 cm ou plus entre le
radiateur et le corps humain.
Regulator y Information for Users in Mexico
Módulo WLAN instalado adentro de este
producto
Renonciation
•
Les informations contenues dans ce document
peuvent être modi ées sans avis préalable.
•
À L’EXCEPTION DE LA GARANTIE CI-INCLUSE,
CANON INC. NE FOURNIT AUCUNE AUTRE
GARANTIE QUELCONQUE AVEC CETTE
MACHINE, EXPLICITE OU IMPLICITE, Y COMPRIS
MAIS NON LIMITÉE À TOUTE GARANTIE DE
COMMERCIALISATION, DE VALEUR
COMMERCIALE, D’ADÉQUATION À UN USAGE
PARTICULIER OU DE CONTREFAÇON. CANON
INC. NE POURRA PAS ÊTRE TENU POUR
RESPONSABLE DES DOMMAGES DIRECTS,
SECONDAIRES OU INDIRECTS DE QUELQUE
NATURE QUE CE SOIT, NI MÊME DES PERTES
OU DES FRAIS RÉSULTANT DE L’EMPLOI DE CE
MATÉRIEL.
•
Les points suivants s’appliquent uniquement
en Californie, Etats-Unis :
La batterie fournie avec votre produit contient
du perchlorate et peut nécessiter une gestion
particulière.
Reportez-vous à http://www.dtsc.ca.gov/
hazardouswaste/perchlorate/ plus de détails.
Remarques au sujet de ce manuel
Touches et boutons utilisés dans ce manuel
Vous trouverez ci-dessous les conventions de
notation des symboles et des noms de touches.
•
Touches du panneau de commandes: [icône
de touche]
Exemple:
•
A cheur: <Spéci er destination.>
•
Boutons et options à l’écran de l’ordinateur:
[Préférences]
Marques
Mac est une marque commerciale d’Apple Inc.
Microsoft, Windows, Windows Vista, Windows
Server, Internet Explorer, Excel et PowerPoint
sont des marques commerciales ou déposées de
Microsoft Corporation aux Etats-Unis et/ou dans
d’autres pays.
Les autres noms de produits ou de sociétés cités
dans le présent guide peuvent être des marques
de leurs propriétaires respectifs.
Logiciel de tierce partie
Ce produit Canon (le “ PRODUIT ”) comprend des
modules logiciels tiers. L’utilisation et la
distribution de ces modules logiciels,
notamment toutes les mises à jour de ces
modules logiciels (collectivement appelés “
LOGICIEL ”) sont soumises aux conditions de
licence ci-dessous.
(1) Vous acceptez de vous conformer à toutes
les lois et restrictions applicables, relatives au
contrôle des exportations ou aux
réglementations des pays impliqués dans
l’éventualité où le PRODUIT, y compris le
LOGICIEL, serait expédié, transféré ou
exporté dans ces pays.
(2) Les détenteurs des droits du LOGICIEL
34

conservent, à tous égards, le titre de
propriété, la propriété et les droits de
propriété intellectuelle relatifs au LOGICIEL,
sauf mention expresse indiquée ci-après,
aucune licence ou droit, explicite ou
implicite, n’est par la présente transmis ni
octroyé par les détenteurs des droits du
LOGICIEL à vous pour tout détenteur des
droits de propriété intellectuelle du
LOGICIEL.
(3) Vous pouvez utiliser le LOGICIEL uniquement
dans le cadre de l’utilisation du PRODUIT.
(4) Vous ne pouvez pas a e cter, sou s-licencer,
commercialiser, distribuer ni transférer le
LOGICIEL à une quelconque tierce partie
sans l’accord écrit préalable des détenteurs
des droits du LOGICIEL.
(5) Nonobstant ce qui précède, vous pouvez
transférer le LOGICIEL uniquement lorsque
(a) vous a ectez au cessionnaire tous vos
droits sur le PRODUIT et tous les droits et
obligations dans les conditions régissant le
LOGICIEL et le PRODUIT et (b) que le
cessionnaire accepte par écrit d’être soumis
à ces conditions.
(6) Vous n’êtes pas autorisé à décrypter,
décompiler, faire de l’ingénierie inverse,
désassembler ou réduire sous toute autre
forme le code du LOGICIEL sous forme
humainement lisible.
(7) Vous n’êtes pas autorisé à modi er, adapter,
traduire, louer, louer à bail ou prêter le
LOGICIEL ni à créer des oeuvres dérivées
basées sur le LOGICIEL.
(8) Vous n’êtes pas autorisé à supprimer ni à faire
des copies distinctes du LOGICIEL du
PRODUIT.
(9) La licence de la par tie humainement lisible (le
code source) du LOGICIEL ne vous est pas
octroyée.
Nonobstant les sections (1) à (9), le PRODUIT
comprend des modules logiciels tiers
accompagnant les autres conditions de licence
et ses modules logiciels tiers sont soumis aux
autres conditions de licence. Veuillez consulter
les 5 autres conditions de licence des modules
logiciels tiers décrites dans l’annexe du manuel
du PRODUIT correspondant. Ce manuel est
disponible à l’adresse http://canon.com/
oip-manual.
En utilisant le PRODUIT, il est considéré que vous
avez accepté toutes les conditions de licence
applicables. Si vous n’acceptez pas ces
conditions de licence, veuillez contacter votre
représentant de service.
ACCEPTATION
LES CONDITIONS DE CE LOGICIEL TIERS
SPÉCIFIÉES ICI OU DANS LES DISPOSITIONS
CONNEXES DE GARANTIE SONT CONSIDÉRÉES
COMME ACCEPTÉES LORS DE VOTRE UTILISATION
DU PRODUIT POUR AU MOINS L’UNE DE SES FINS
NORMALES, S’IL N’EXISTE AUCUNE AUTRE
ACCEPTATION EXPLICITE PRÉALABLE.
LES CONDITIONS DE CE LOGICIEL TIERS
RÉGISSENT LE LOGICIEL TIERS TEL QUE FOURNI
AVEC LE PRODUIT ET TOUTES LES VERSIONS
MISES À JOUR DU LOGICIEL TIERS FOURNI DANS
LE CADRE DES CONTRATS DE MAINTENANCE OU
D’AUTRES DISPOSITIONS DE SERVICES POUR LE
PRODUIT AVEC CANON USA OU CANON
CANADA OU LEURS ORGANISATIONS DE SERVICE
AGRÉÉES RESPECTIVES.
Fr
35

CANON U.S.A., INC.
One Canon Park, Melville, NY 11747, U.S.A.
Call Center: 1-800-OK-CANON
CANON MEXICANA, S. DE R.L. DE C.V.
Boulevard Manuel Avila Camacho #138 Piso 17, Col. Lomas de Chapultepec Mexico City, Mexico 11000
Call Center: 01800-710-7168
CANON INC.
30-2, Shimomaruko 3-chome, Ohta-ku, Tokyo 146-8501, Japan
CANON MARKETING JAPAN INC.
16-6, Konan 2-chome, Minato-ku, Tokyo 108-8011, Japan
CANON EUROPA N.V.
Bovenkerkerweg 59, 1185 XB Amstelveen, The Netherlands
CANON CHINA CO. LTD.
2F Jinbao Building No.89, Jinbao Street, Dongcheng District, Beijing 100005, PRC
CANON SINGAPORE PTE LTD
1 Fusionopolis Place, #15-10, Galaxis, Singapore 138522
CANON AUSTRALIA PTY LTD
Building A, The Park Estate, 5 Talavera Road, Macquarie Park, NSW 2113, Australia
CANON GLOBAL WORLDWIDE SITES
http://www.canon.com/
FT6-1802 (000) XXXXXXXXXX
Copyright CANON INC. 2017
PRINTED IN KOREA
Imprimé en Corée
 Loading...