

Canon imageCLASS MF4570dn, imageCLASS MF4412, imageCLASS MF4450, imageCLASS MF4420n, imageCLASS D520 Starter Manual
...
Starter Guide
Open the next page.
Read this guide first.
Please read this guide before operating this product.
After you nish reading this guide, store it in a safe place for future reference.
Setting Up the Machine to Suit Your Purposes . . . . . . . . . . . . . . . . . . . . . . . . . . . . . . . . . . . . . . . . . . . . . . .
vailable Features . . . . . . . . . . . . . . . . . . . . . . . . . . . . . . . . . . . . . . . . . . . . . . . . . . . . . . . . . . . . . . . . . . . . . . . . .2
A
About the Supplied Manual . . . . . . . . . . . . . . . . . . . . . . . . . . . . . . . . . . . . . . . . . . . . . . . . . . . . . . . . . . . . . . . . 3
Connecting the Power Cord . . . . . . . . . . . . . . . . . . . . . . . . . . . . . . . . . . . . . . . . . . . . . . . . . . . . . . . . . . . . . . . .4
Turning the Power ON and Specifying the Initial Settings . . . . . . . . . . . . . . . . . . . . . . . . . . . . . . . . . . . . . 4
Setting a Paper Size and Type . . . . . . . . . . . . . . . . . . . . . . . . . . . . . . . . . . . . . . . . . . . . . . . . . . . . . . . . . . . . . .6
Specifying Initial Fax Settings and Connecting a Telephone Cable. . . . . . . . . . . . . . . . . . . . . . . . . . . . .7
Selecting a Method for Connecting the Machine to a Computer . . . . . . . . . . . . . . . . . . . . . . . . . . . . . .10
Network Connection and Configuration . . . . . . . . . . . . . . . . . . . . . . . . . . . . . . . . . . . . . . . . . . . . . . . . . . .10
Installing the Driver/Software . . . . . . . . . . . . . . . . . . . . . . . . . . . . . . . . . . . . . . . . . . . . . . . . . . . . . . . . . . . . .11
Appendix
Perform Useful Tasks . . . . . . . . . . . . . . . . . . . . . . . . . . . . . . . . . . . . . . . . . . . . . . . . . . . . . . . . . . . . . . . . . . . . . . .12
Clearing Paper Jams . . . . . . . . . . . . . . . . . . . . . . . . . . . . . . . . . . . . . . . . . . . . . . . . . . . . . . . . . . . . . . . . . . . . . . .13
Replacing Toner Cartridge . . . . . . . . . . . . . . . . . . . . . . . . . . . . . . . . . . . . . . . . . . . . . . . . . . . . . . . . . . . . . . . . . .14
1
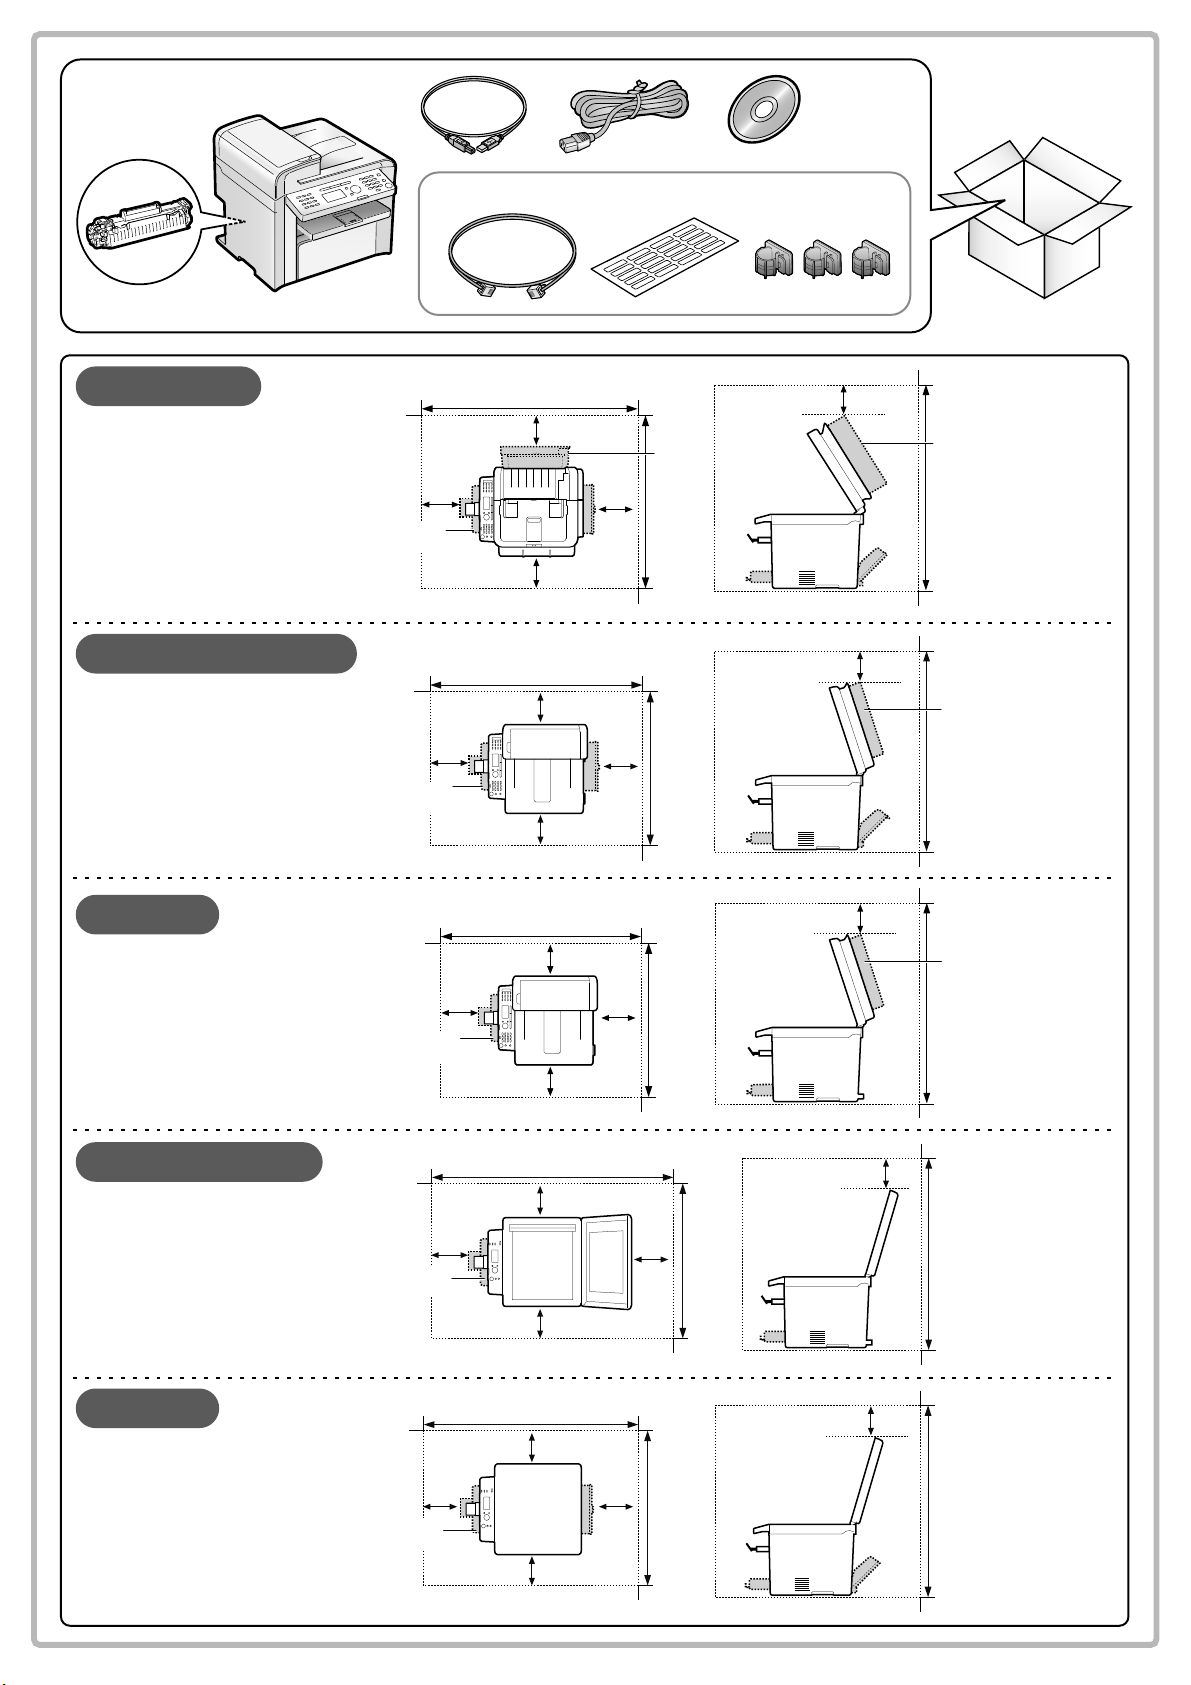
MF4580dn/MF4570dn/MF4550d/MF4450 Only
MF4580dn
MF4570dn/MF4550d
MF4450
100 mm
Paper
cassette
Paper
cassette
Paper
cassette
100 mm
100 mm
804 mm
100 mm
100 mm
100 mm
100 mm
100 mm
100 mm
804 mm
784 mm
100 mm
100 mm
100 mm
Feeder
cover
631 mm
617 mm
617 mm
100 mm
100 mm
100 mm
Feeder
cover
763 mm
Feeder
cover
735 mm
Feeder
cover
735 mm
MF4420n/MF4412
D520
1-4
Paper
cassette
Paper
cassette
100 mm
100 mm
100 mm
100 mm
100 mm
781 mm
804 mm
100 mm
100 mm100 mm
590 mm
590 mm
100 mm
696 mm
100 mm
696 mm
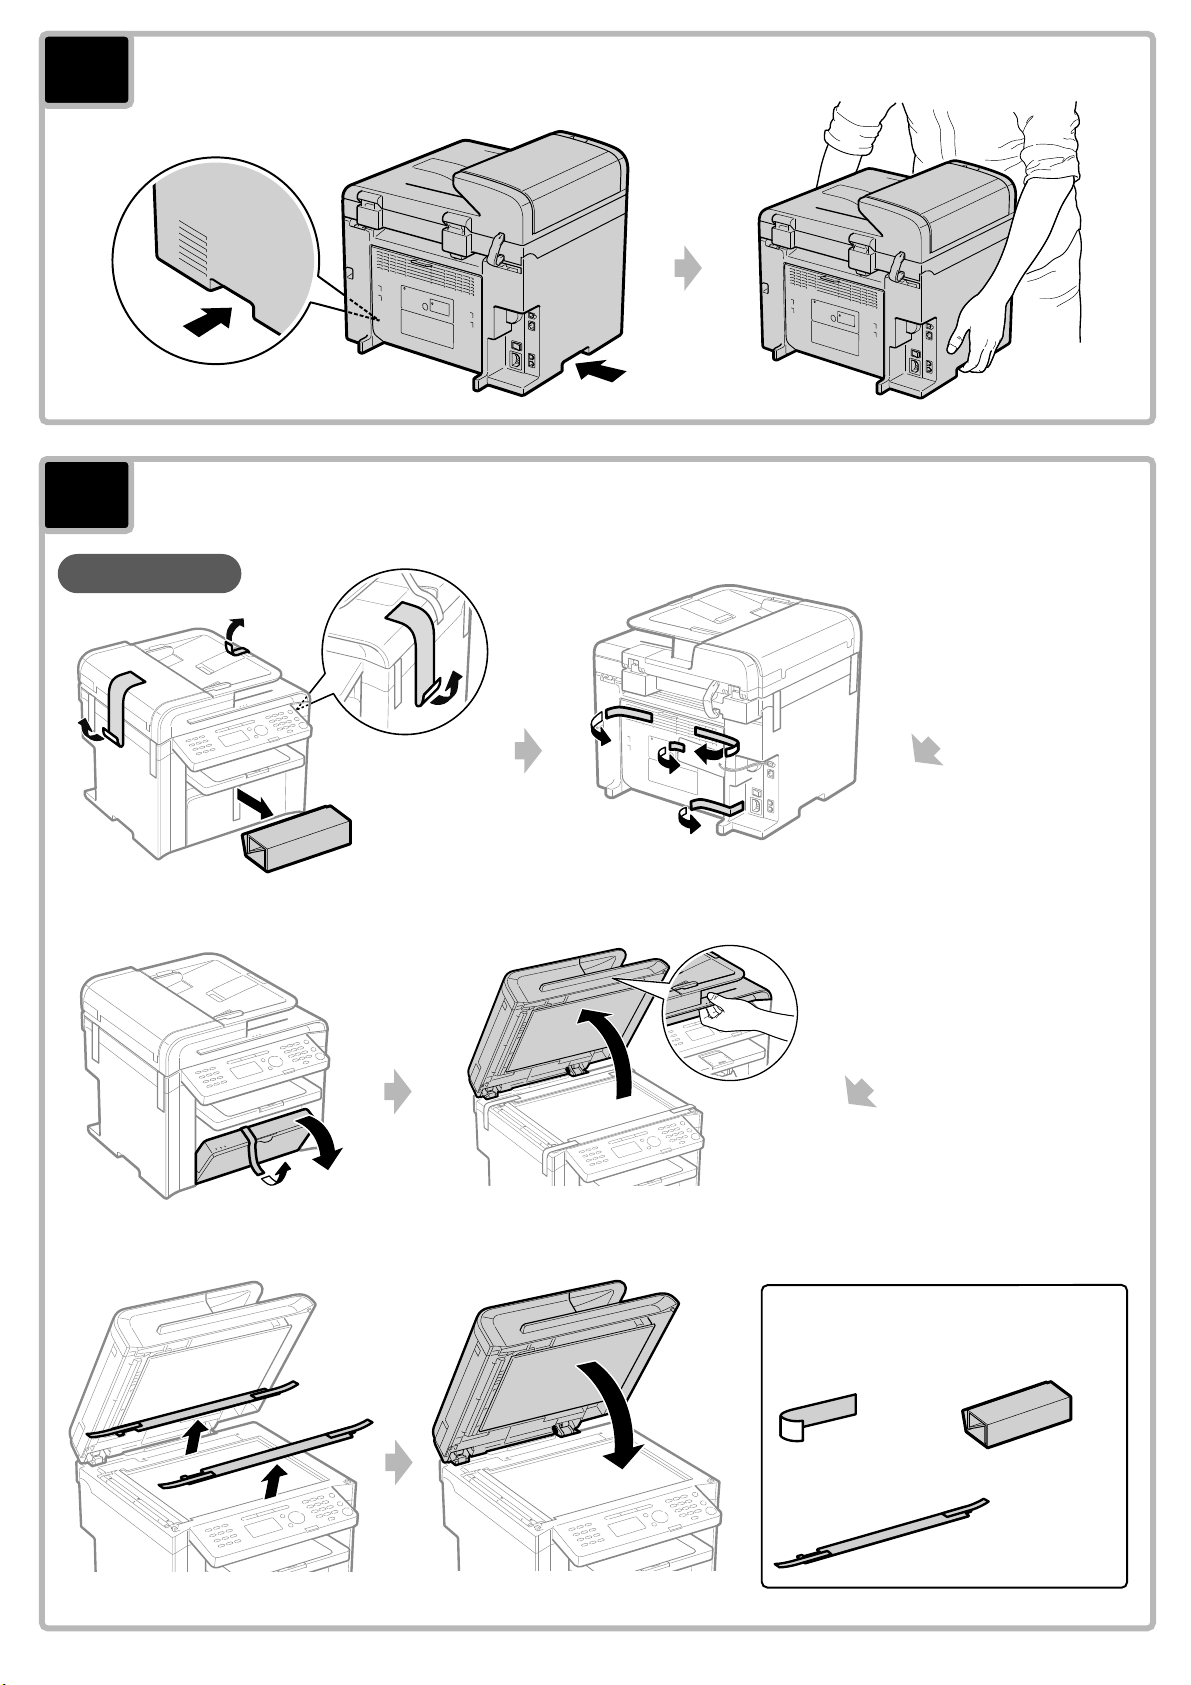
1
Carry the machine to the installation site.
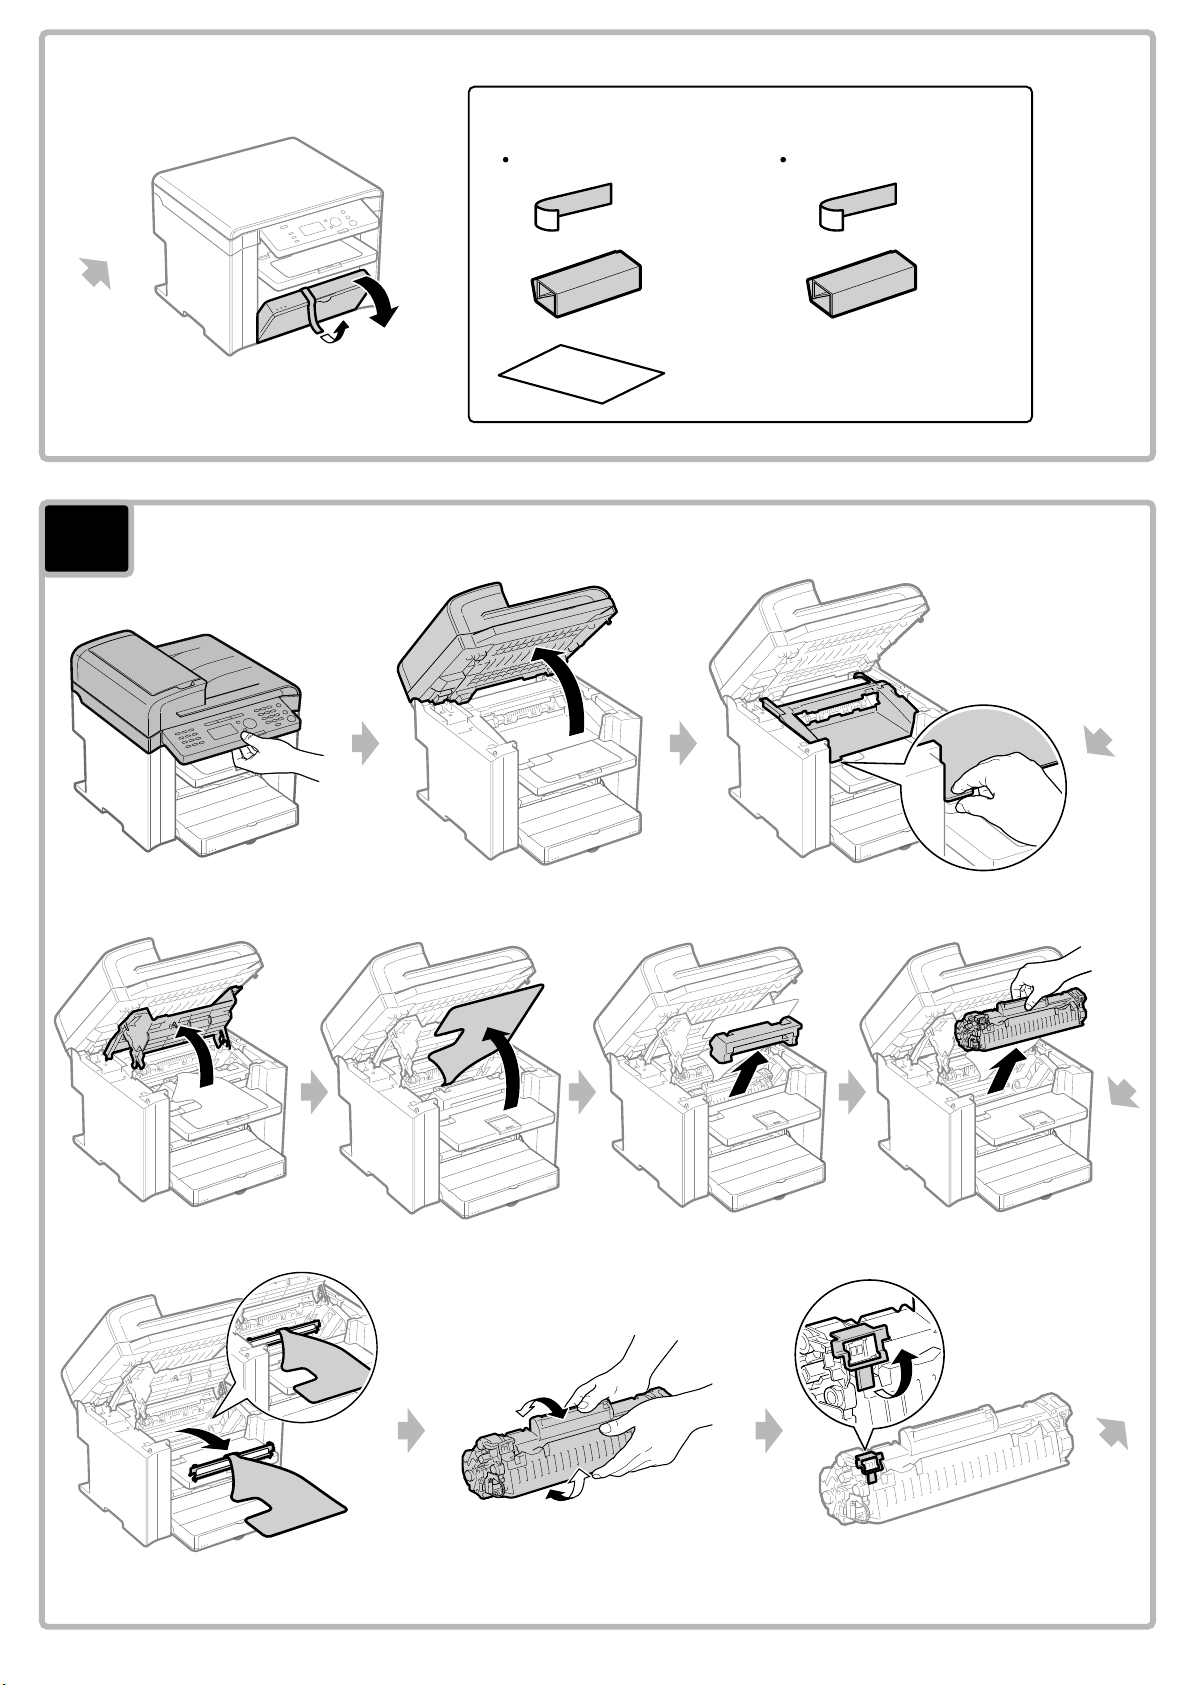
2
MF4580dn
Remove the packing materials.
Check!
Did you remove all the
packing materials?
X 8 X 1
X 2
1-5
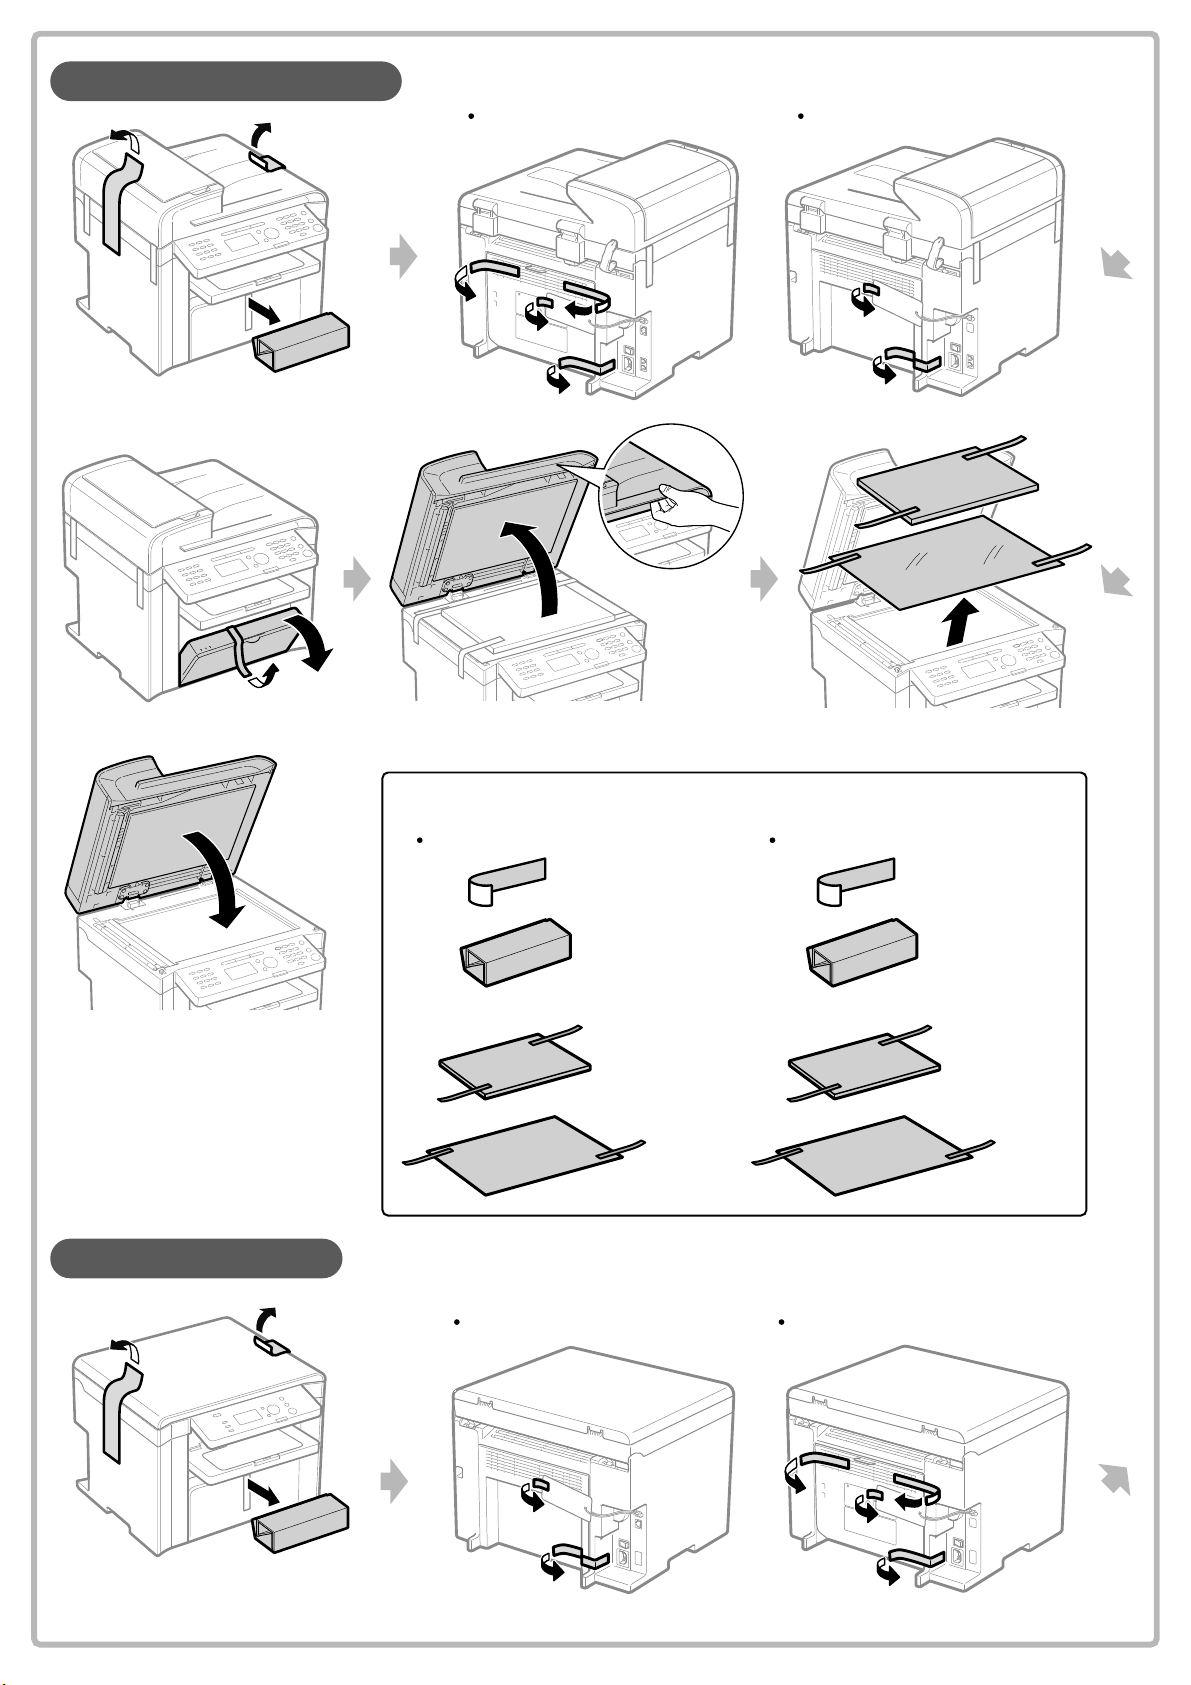
MF4570dn/MF4550d/MF4450
MF4570dn/MF4550d
MF4450
MF4420n/MF4412/D520
Check!
Did you remove all the packing materials?
MF4570dn/MF4550d
X 7 X 5
X 1 X 1
X 1 X 1
X 1 X 1
MF4420n/MF4412 D520
MF4450
1-6
Check!
Did you remove all the packing materials?
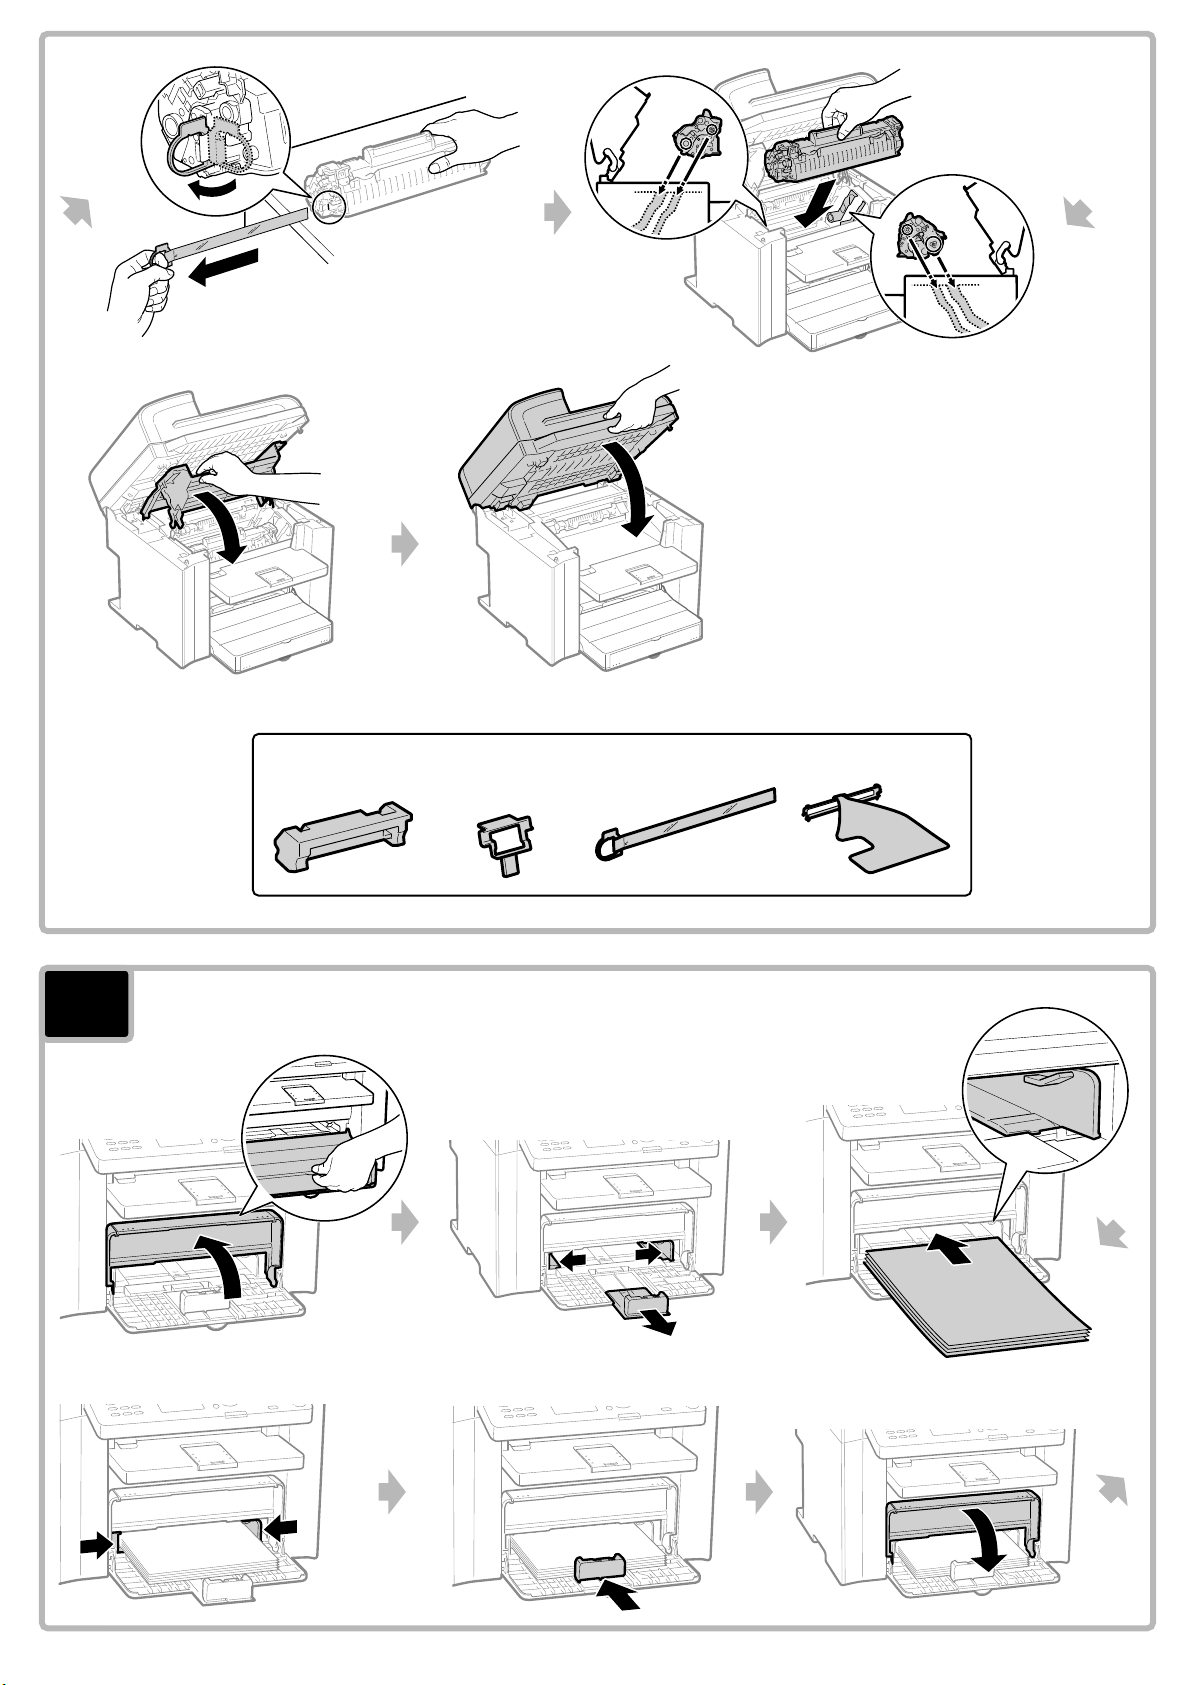
3
MF4420n/MF4412
Prepare the toner cartridge.
X 5
X 1
X 1
D520
X 7
X 1
Next Page
1-7
Check!
Did you remove all the packing materials?
4
Load the paper.
1-8
(1)
(2)
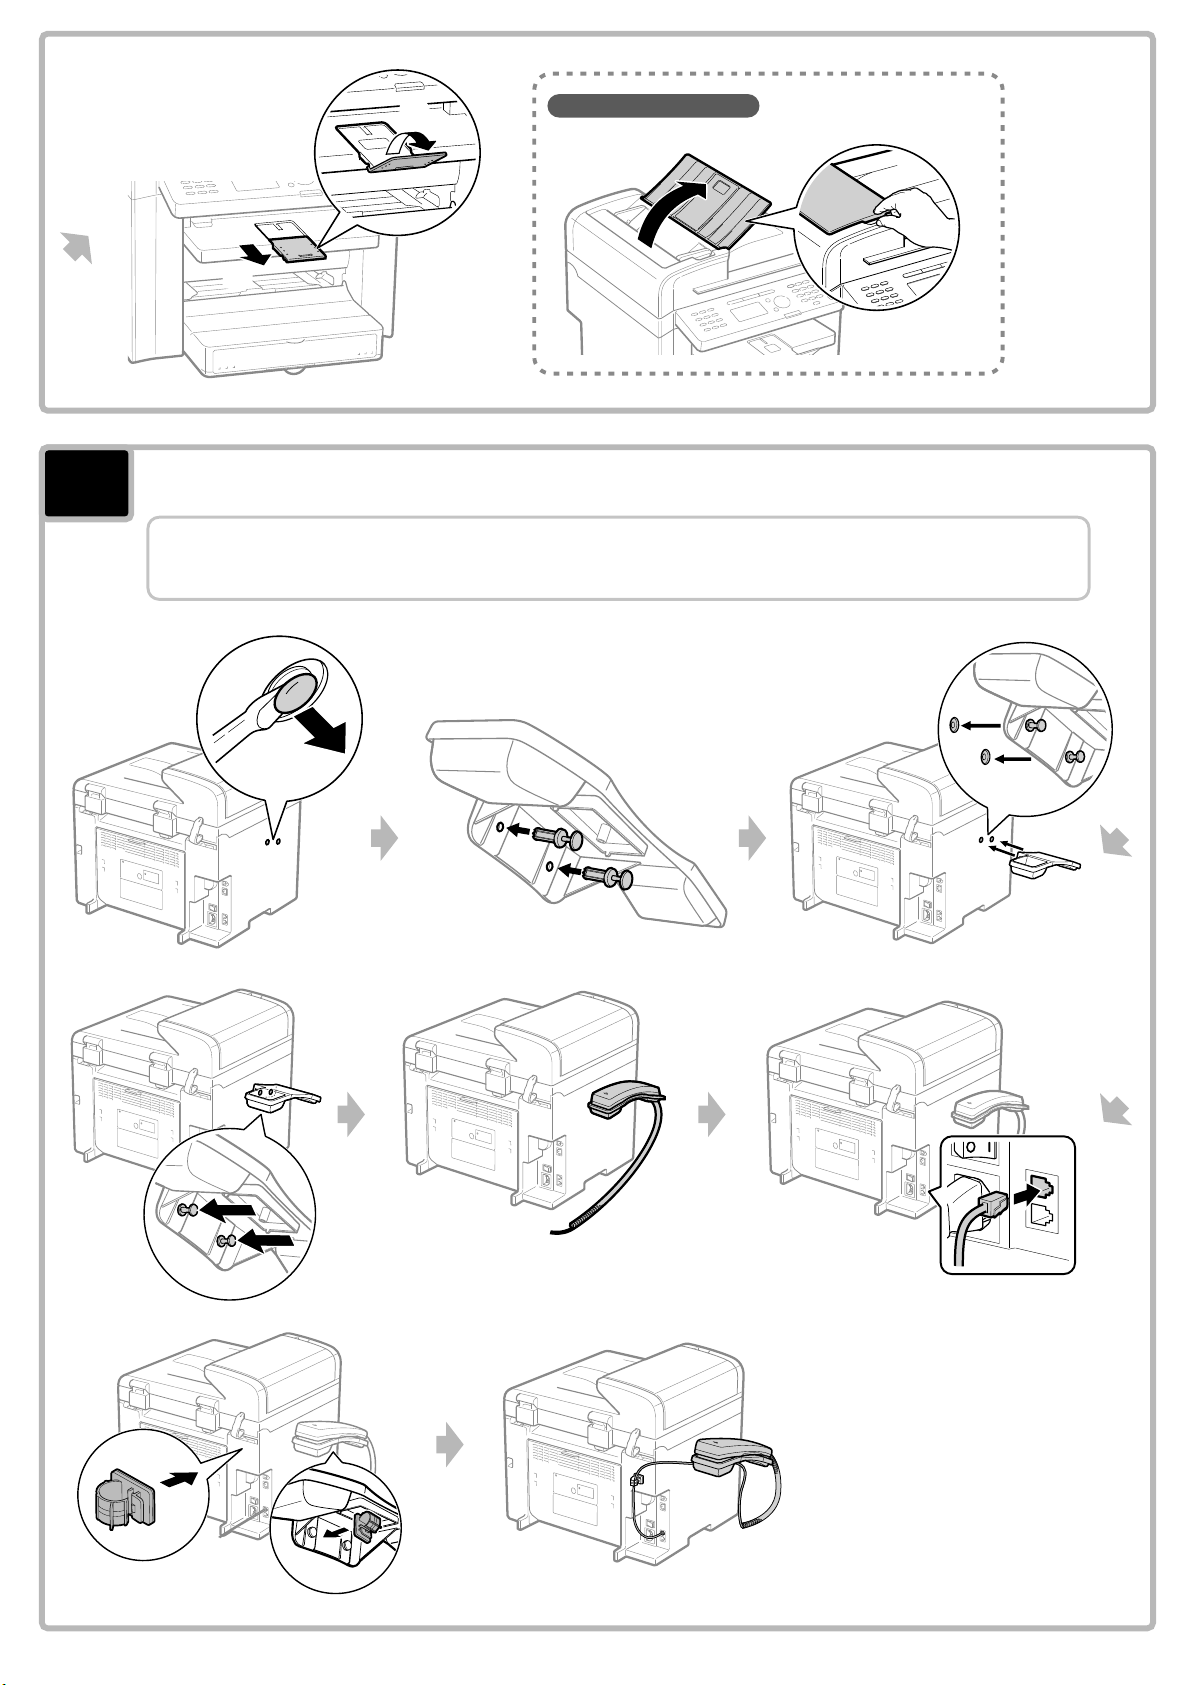
MF4570dn/MF4550d/MF4450
5
Install the handset (optional).
Use only the parts which are used in the following procedure. You do not need to use
unnecessary parts.
1-9
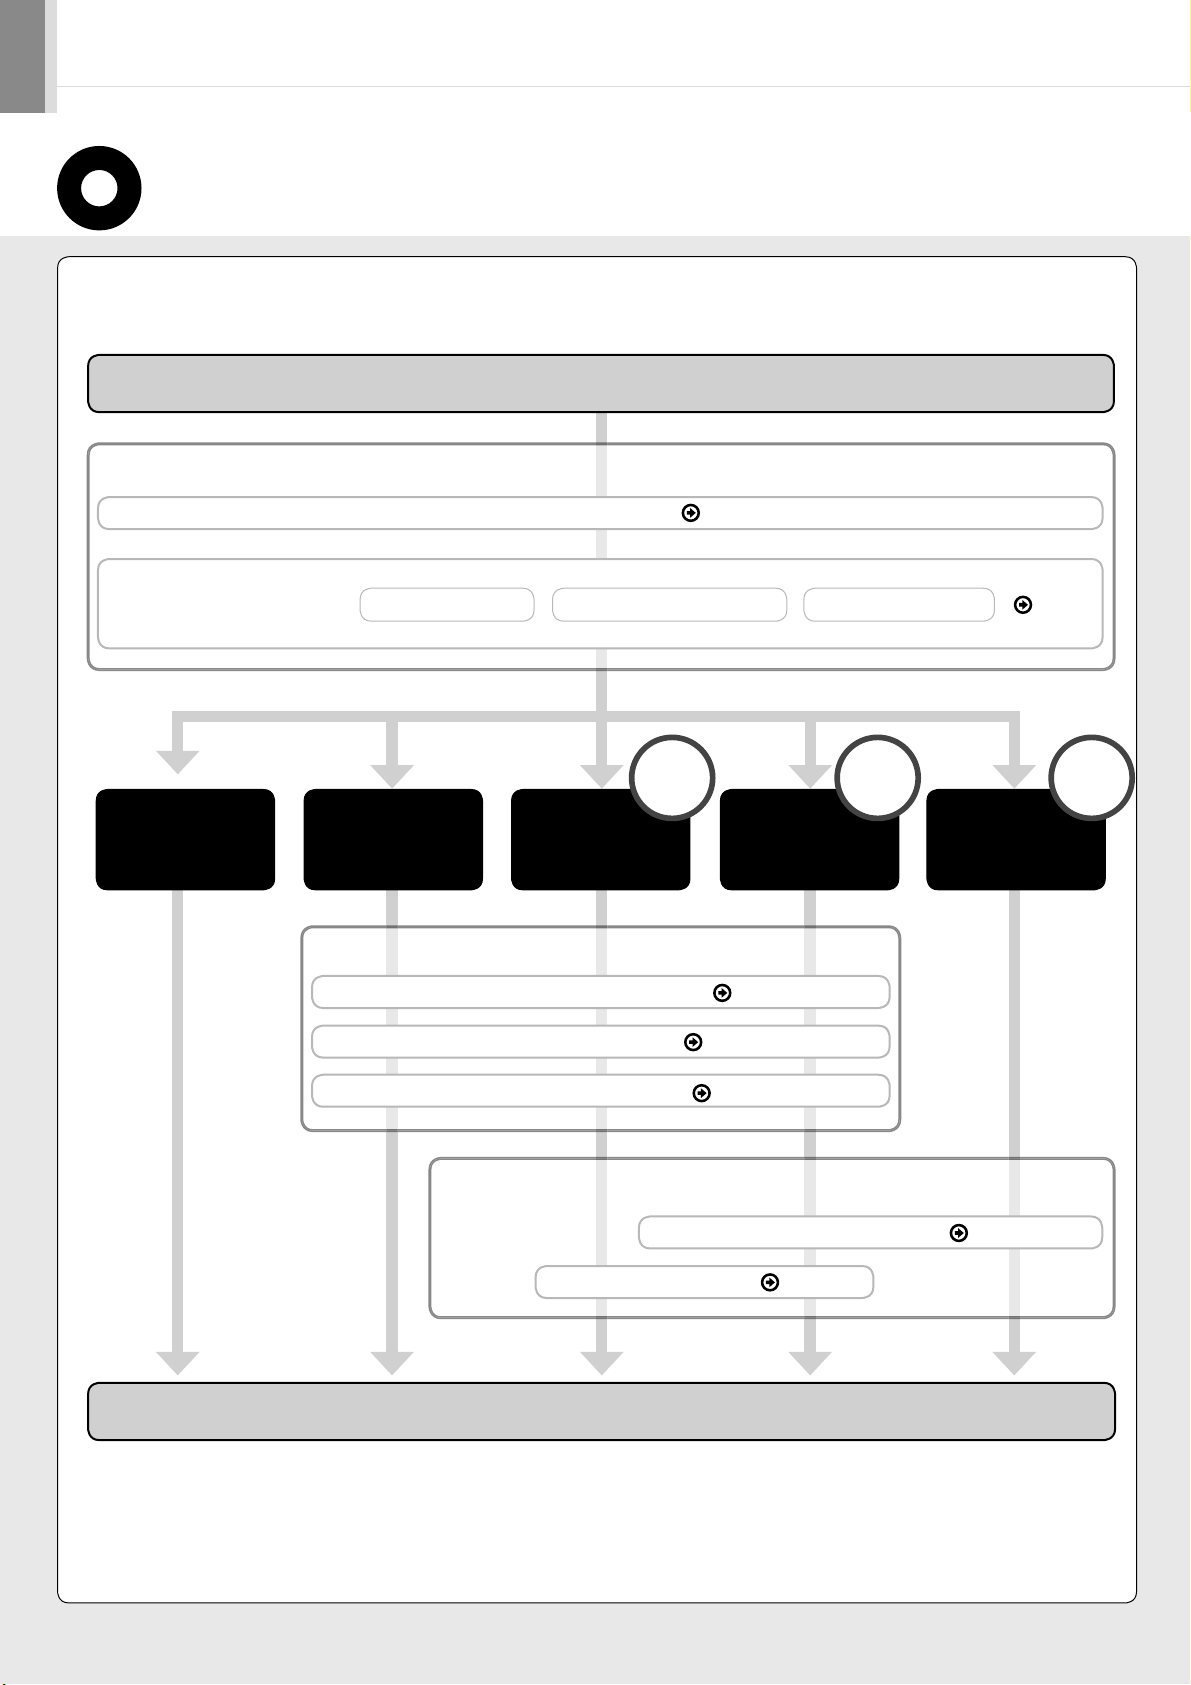
Setting Up the Machine to Suit Your Purposes
Determine which machine functions (Copy, Print, Fax*1, PC Fax*1, Scan, Remote UI*2) you intend to use, and make the
settings according to the flowchart below.
Start Settings.
Required Operations
Connecting the Power Cord P. 4
Turning the Power ON and
Specifying the Initial Settings
Copy Fax
Country and Region Settings Language Settings Current Time Settings
USB
Connection
Print
Scan
PC Fax *
Fax Settings *1
Registering the Sender Information
Selecting the Receive Mode P. 8
Connecting a Telephone Line
1
P. 7
P. 9
Print
Scan
PC Fax *
Network
Connection*
1
2
Settings from
a Computer
P. 4
Remote
2
UI *
Settings in a Computer
Connecting to a Network *2 P. 10
Installing the Software P. 11
Settings are now complete.
*1 This function is available only for MF4580dn/MF4570dn/MF4550d/MF4450.
*2 The network function is available only for MF4580dn/MF4570dn/MF4420n.
1
1
Preface
2
Installing the Machine
3
Configuring and Connecting the Fax
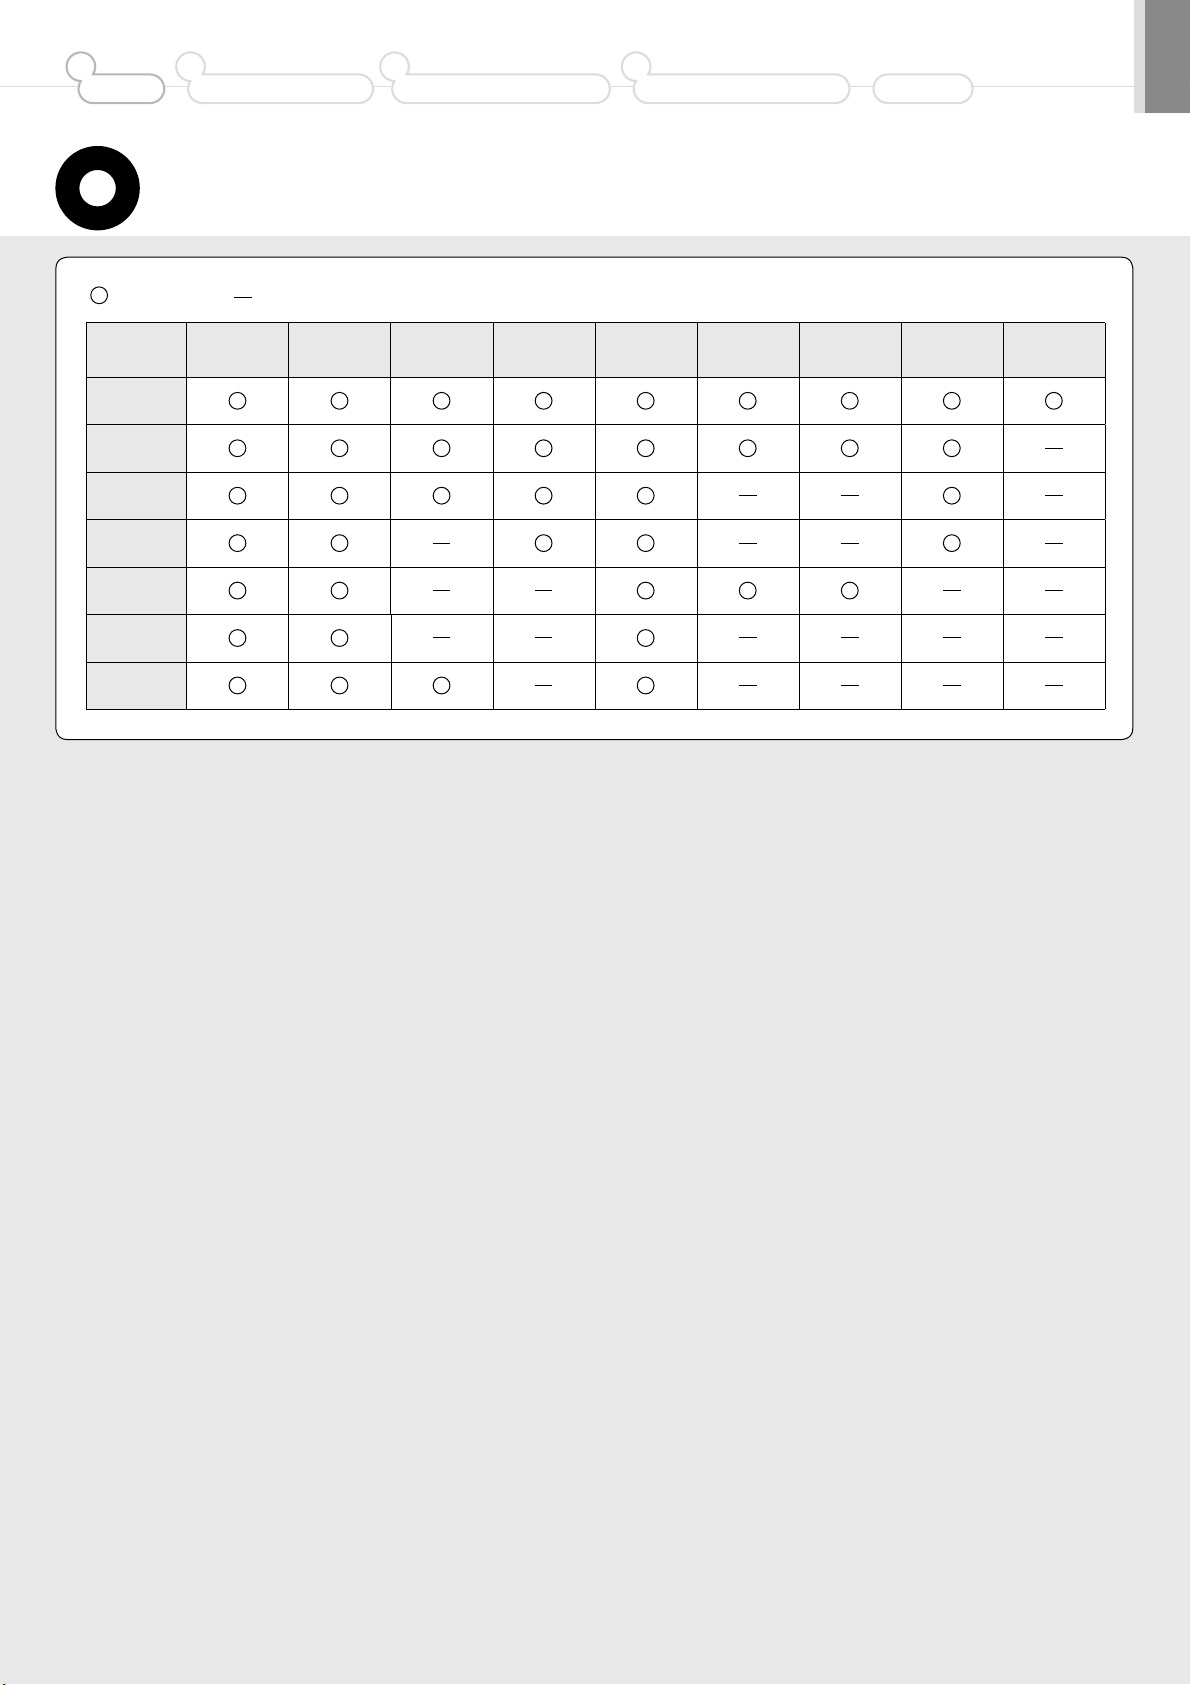
Available Features
: available : not available
4
Connecting to a Computer and
Installing the Drivers
Appendix
MF4580dn
MF4570dn
MF4550d
MF4450
MF4420n
MF4412
D520
Copy Print
2-sided
Printing
Fax
(PC Fax)
Scan
(USB)
Scan
(Network)
Remote UI ADF (1-sided) ADF (2-sided)
2
 Loading...