

Canon EOS REBEL T5I EOS 700D, EOS Rebel T5i, EOS 700D Instruction Manual

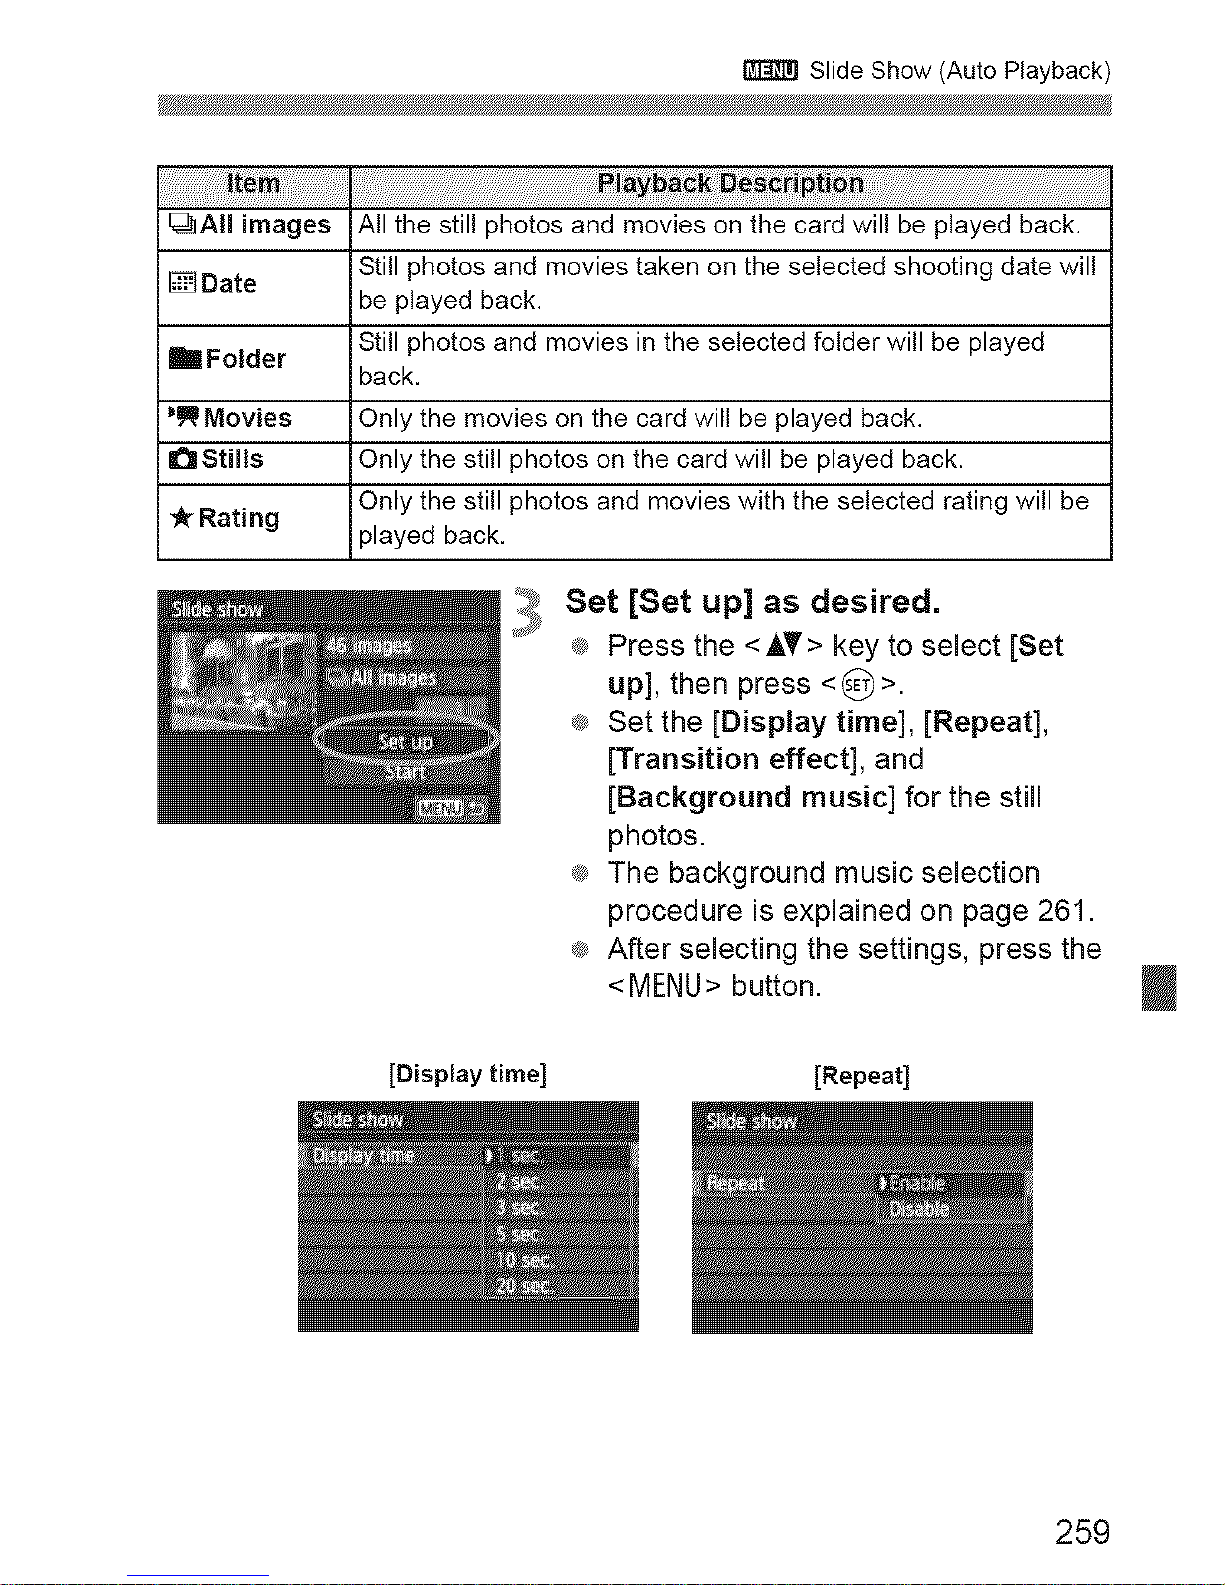
Slide Show (Auto Playback)
You can play back the images on the card as an automatic slide show.
Select [Slide show].
_ Under the [[_2] tab, select [Slide
show], then press <_)>.
Numberofimagestobe played _
Select the images to be played.
_ Press the <AT > key to select the
desired option, then press < _)>.
[All imageslMovieslStills]
_ Press the <AT> key to select one of
the following: [@All images/
_=RMovies/l_Stills]. Then press
<(_>.
[DatelFolderlRating]
_ Press the <AT> key to select one of
the following: [[]Date/hFolded
Rating].
_ When <_---_> is highlighted,
press the <INF0.> button.
_ Press the <AT > key to select the
desired option, then press < _)>.
[Date] [Folder] [Rating]
258
Slide Show (Auto Playback)
_ii_ii_iiiii_i_i!_!:!_iii_!i_ii_i_i_i_i_i_i_i_i_i_i_ii_iiiii_i_!i!ii_i_i_i_i_i_ii_i_ii_!i!i_i_i_ii_i_ii_!i_iiii_i_i_ii_i_ii_i_ii!_i_ii!_ii!i_i_i_i_i_i_i_i_i_i_i_i_!_i!i_i!i!i!_i!ii_ii!i!_!:_!_!_ii!l_:_!_:_;!i_!!_:!_!_:_:_:_i_i:_!_i_i_i_i_i_ii_iii_ii_i_i_i_i!i!_ii_ii_ii_ii_i_ii_i_ii_i_i_i_ii_ii_ii_ii_i_i_i_i_ii_ii_i_!!_!!_!_i_i_i_i!_!i_i!_!i_ii_ii_!i!ii_!i_i_ii_ii_i_ii_i_i_!ii!_i!!i_i_i_i_i_i_i_i_!!_!i
@All images All the still photos and movies on the card will be played back.
Still photos and movies taken on the selected shooting date will
[] Date
be played back.
Still photos and movies in the selected folder will be played
mFolder
back.
_ Movies Only the movies on the card will be played back.
8Stills Only the still photos on the card will be played back.
_r Rating Only the still photos and movies with the selected rating will be
played back.
Set [Set up] as desired.
_ Press the <AT> key to select [Set
up], then press <0>.
®_Set the [Display time], [Repeat],
[Transition effect], and
[Background music] for the still
photos.
_ The background music selection
procedure is explained on page 261.
_ After selecting the settings, press the
<MENU> button.
[Display time] [Repeat]
259
Slide Show (Auto Playback)
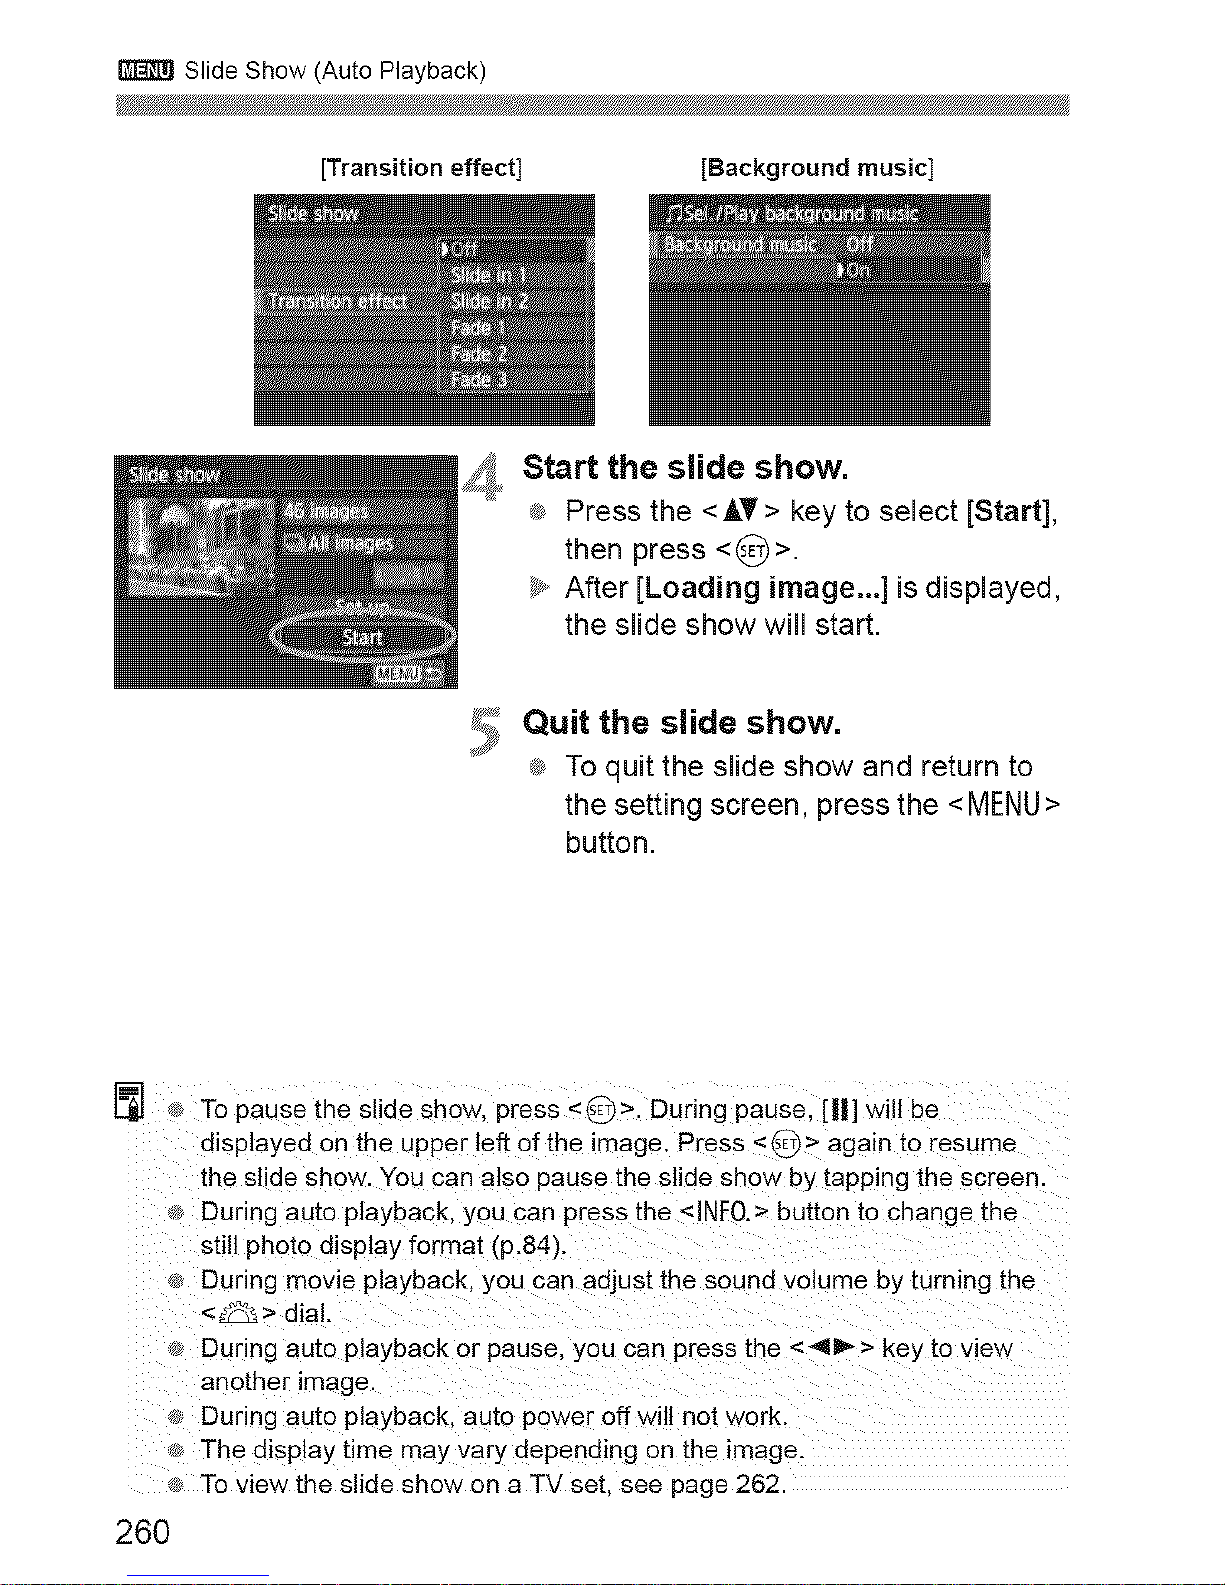
[Transition effect] [Background music]
_ Start the slide show.
_ Press the <AT> key to select [Start],
then press <0>.
_y,,After [Loading image...] is displayed,
the slide show will start.
5
Quit the slide show.
_ To quit the slide show and return to
the setting screen, press the <MENU>
button.
[]
260
To pause the slide show, press <_>. During pause, [11]will be
displayed on the upper left of the image. Press <@> again to resume
the slide show. You can also pause the slide show by tapping the screen.
_ During auto playback, you can press the <INFO.> button to change the
still photo display format (p.84).
During movie playback, you can adjust the sound volume by turning the
<_> dial.
During auto playback or pause, you can press the <41_> key to view
another image.
During auto playback, au[o power off will not work.
The display time may vary depending on the image.
To view the slide show on a TV set. see page 262

SlideShow(AutoPlayback)
Selecting the Background Music
Select [Background music].
_ Set [Background music]to [On],
then press <_>.
2
,3
Select the background music.
®_Press the <AT> key to select the
desired background music, then
press <_)>. You can also select
multiple background music tracks.
Play the background music.
®_To listen to a sample of the
background music, press the <INFO.>
button.
_ Press the <AT> key to play another
background music track. To stop
listening to the background music,
press the <INFO.> button again.
_ Adjust the sound volume by turning
the <_> dial.
_ To delete a background music track,
press the <AT > key and select the
track, then press the <_> button.
At the time Of purchase, you cannot select background music With the
carnera, You must f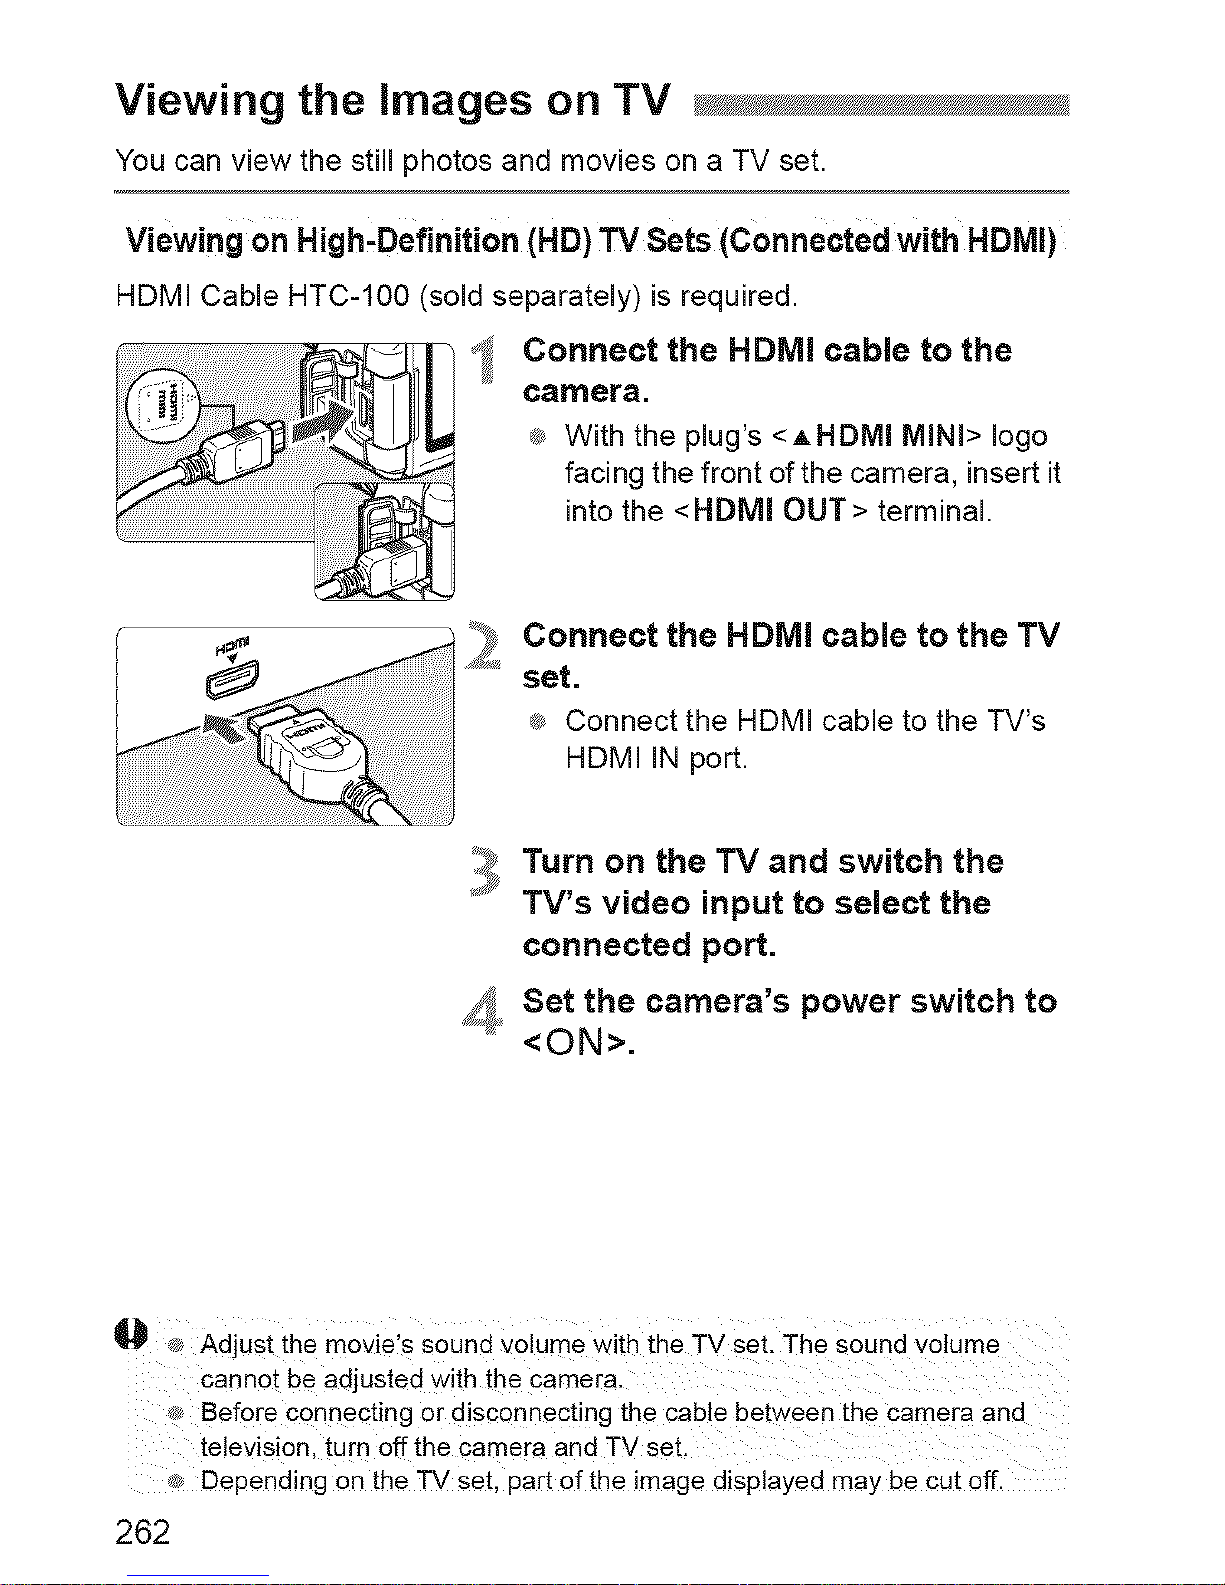
Viewing the images on TV
You can view the still photos and movies on a TV set.
Viewing on High,Definition (HD) TV Sets (Connected with aDIVll)
HDMI Cable HTC-100 (sold separately) is required.
Connect the HDMI cable to the
camera.
_ With the plug's <AHDMI MiNi> logo
facing the front of the camera, insert it
into the <HDMI OUT> terminal.
Connect the HDMI cable to the TV
set.
_ Connect the HDMI cable to the TV's
HDMI IN port.
_:_j Turn on the TV and switch the
TV's video input to select the
connected port.
_:, Set the camera's power switch to
<ON>.
_[_ Adjusi the movie:_ sound v01u_e With the TV set: The Sound volume
cannot be adjusted With the£amera,
Before connecting or disconnecting the cable between the camer a and
televisio n, turn off the camera and TV set,
4_ Depending on the TV set, part of the image displayed may be cut off,
262
Viewing the Images on TV
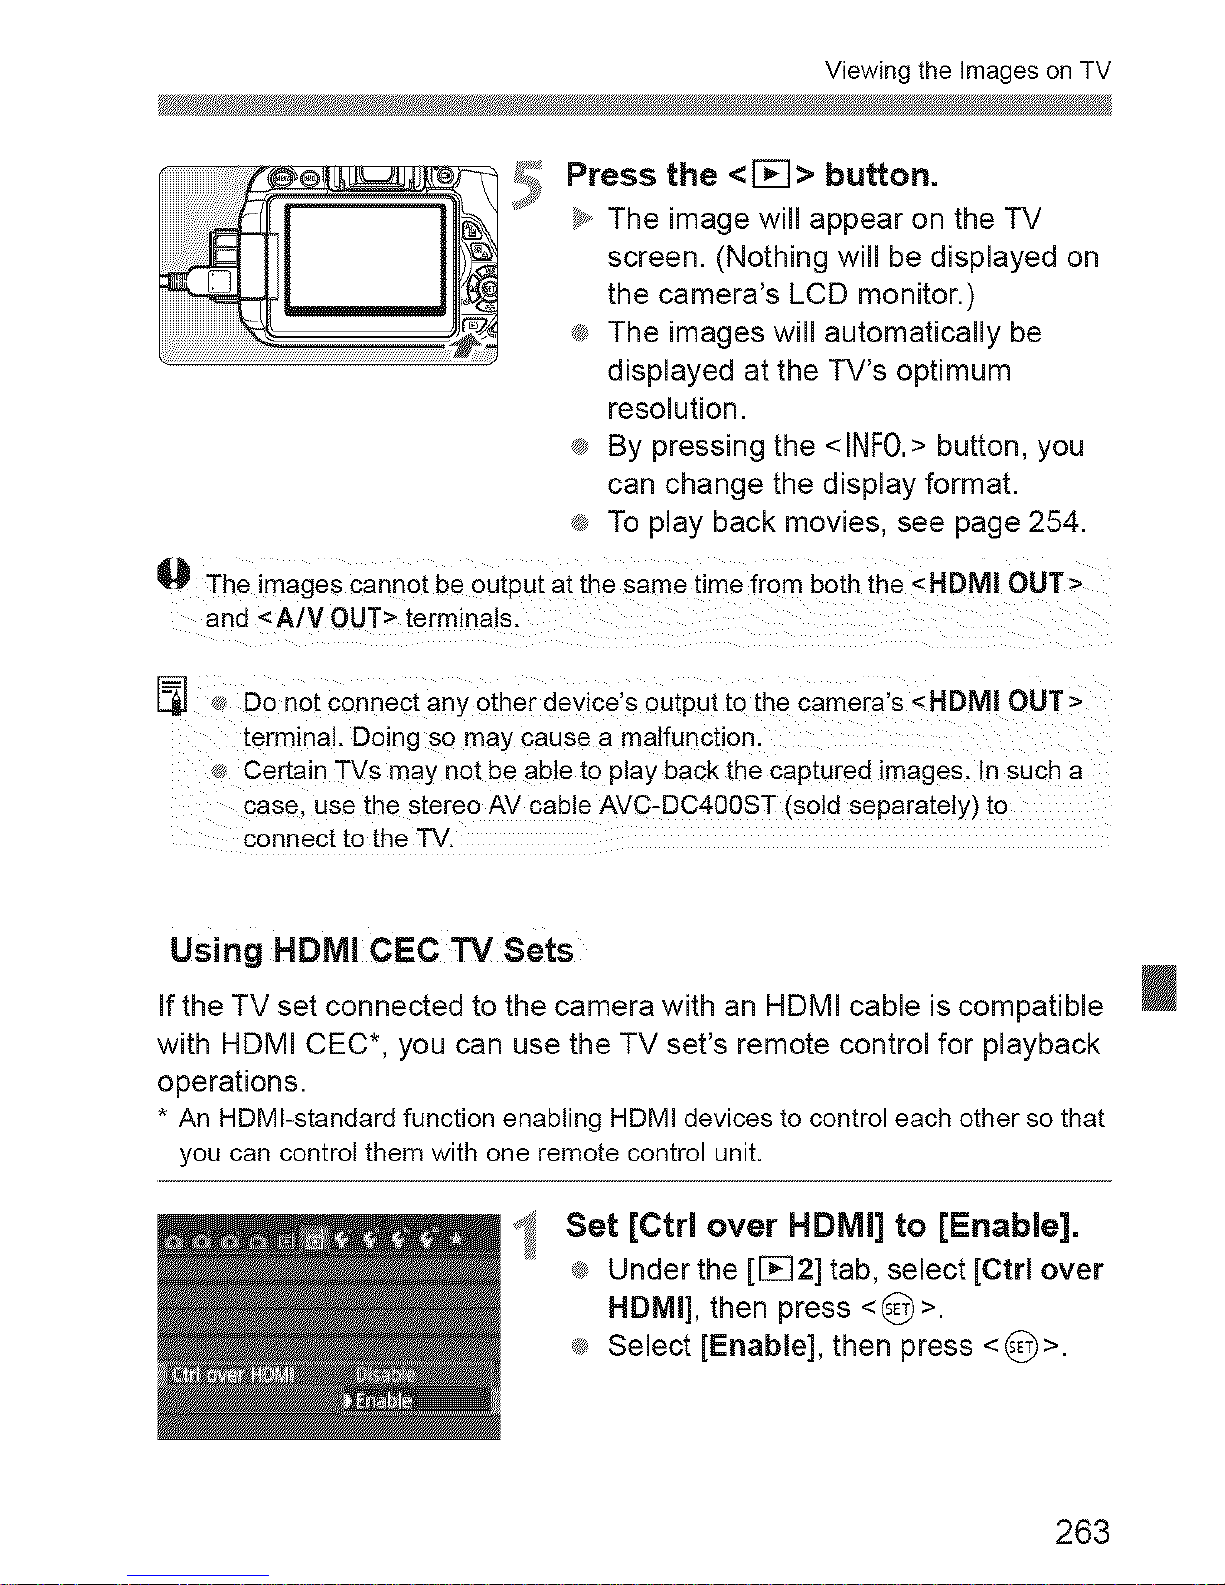
£_ Press the <F_I> button.
S,,The image wiii appear on the TV
screen. (Nothing wiii be displayed on
the camera's LCD monitor.)
_#,The images wiii automatically be
displayed at the TV's optimum
resolution.
® By pressing the <INFO.> button, you
can change the display format.
_ To play back movies, see page 254.
O The imagescannot beoutputat thesame time from both the <HDMI OUT>
and<A/V OUT>terminals.
¢_Do not connect any other device's output to the camera's <HDMI OUT >
terminal. Doing so may cause a malfunction.
Certain TVs may not be able to play back the captured images. In such a
case. use the stereo AV cable AVC-DC400ST (sold separately) to
connect to the TV.
Using HDM| CEC
Sets
if the TV set connected to the camera with an HDMI cable is compatible
with HDMI CEC*, you can use the TV set's remote control for playback
operations.
* An HDMI-standard function enabling HDMI devices to control each other so that
you can control them with one remote control unit.
Set [Ctrl over HDMI] to [Enable].
®_Under the [1_]2] tab, select [Ctrl over
HDMI], then press <_)>.
®_Select [Enable], then press <_)>.
263
ViewingtheImagesonTV
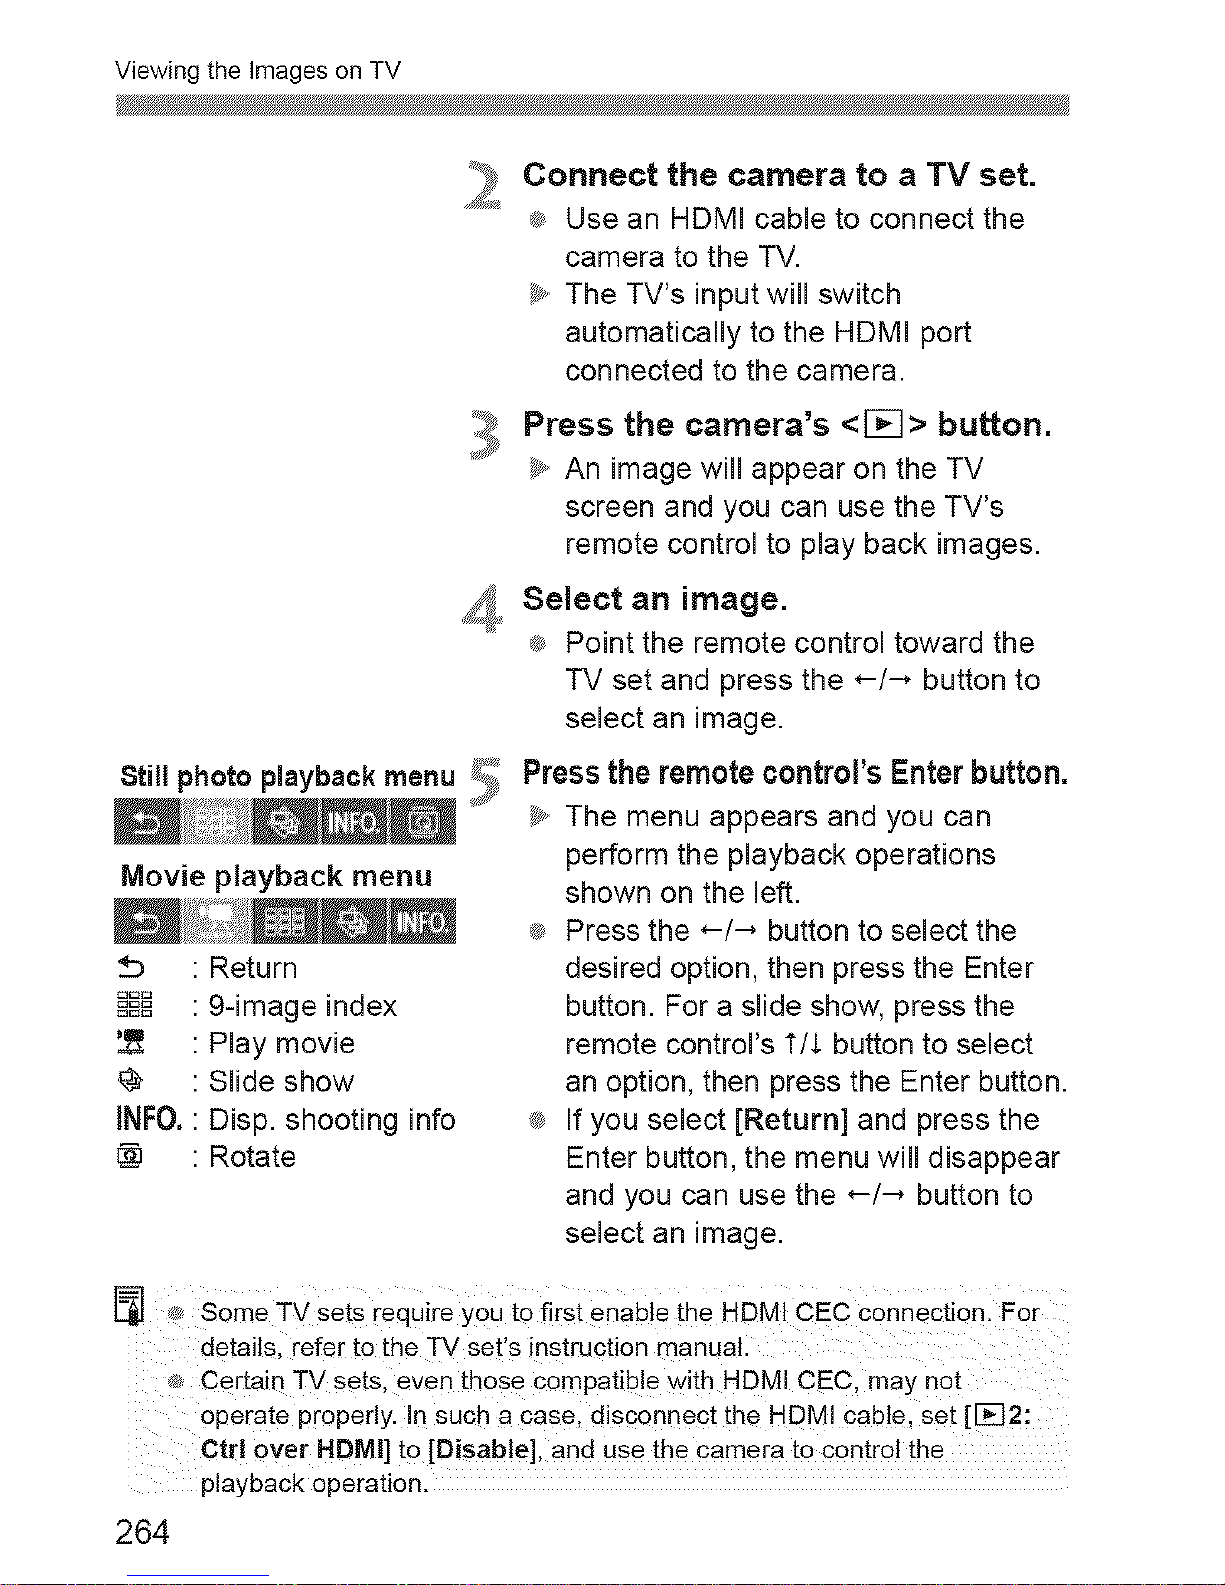
$till photo playback menu _
Movie playback menu
• Return
_ : 9-image index
• Play movie
@ • Slide show
INFO.: Disp. shooting info
• Rotate
Connect the camera to a TV set.
®_Use an HDMI cable to connect the
camera to the TV.
_y,,The TV's input will switch
automatically to the HDMI port
connected to the camera.
,_./_Press the camera's <[_> button.
_y,,An image will appear on the TV
screen and you can use the TV's
remote control to play back images.
_,, Select an image.
_ Point the remote control toward the
TV set and press the *-/_ button to
select an image.
Press the remote control's Enter button.
_y,,The menu appears and you can
perform the playback operations
shown on the left.
®_Press the *-/-_ button to select the
desired option, then press the Enter
button. For a slide show, press the
remote control's t/_ button to select
an option, then press the Enter button.
® If you select [Return] and press the
Enter button, the menu will disappear
and you can use the ,-/--* button to
select an image.
;_ some TV Sets require you to first enable the HDMI CEC Connectionl For
detailsl refer to the TV set's inst[uction manual.
® Certain TV setsl even those compatible with HDMI CEC, may not
operate Properly. In such a case, disconnect the HDM! Cable, set [[_2:
Ctd over HDMI] to [Disab!e], and use the camera to control the
playback operation.
264

Viewing the images on TV
VieWing on Non,HD TV Sets(Connected with AV Cable)
Stereo AV Cable AVC-DC400ST (sold separately) is required.
Connect the AV cable to the
camera.
_ With the plug's <Canon> logo facing
the back of the camera, insert it into
the <A/V OUT > terminal.
...........................................................................
_j Turn on the TV and switch the
TV's video input to select the
connected port.
_, Set the camera's power switch to
<ON>.
Connect the AV cable to the TV
set.
®_Connect the AV cable to the TV's
video IN terminal and audio IN
terminal.
5
Press the <_> button.
_y,,The image will appear on the TV
screen. (Nothing will be displayed on
the camera's LCD monitor.)
® To play back movies, see page 254.
_'_ _ Donotuse a_yAVcabieothe[thanthe Stereo AV caMe AVC-DO400ST
(sold separately), images may not be displayed if you use a different
cable.
® !fthe video system format doe_ not match the TV!s, the images wi!! not
be disp!aYed propedy, lf this happens, switch to the proper video system
format with [_'2: Video system].
265
[] Protecting images
Protecting an image prevents it from being erased accidentally.
Protecting a Single image
,,_ Select [Protect images].
® Under the [1_1] tab, select [Protect
images], then press <0>.
_y,,The protect setting screen will
appear.
Image protect icon
2
Select [Select images].
® Select [Select images], then press
<(_>.
_y,,The images will be displayed.
°S
Protect the image.
® Press the <41_ > key to select the
image to be protected, then press
<(_>.
_y,,When an image is protected, the
<_]> icon wifl appear on the top of
the screen.
® To cancel the image protection, press
<_)> again. The <r_q> icon wiii
disappear.
® To protect another image, repeat step
3.
® Press the <MENU> button to return to
the menu.
266
[] Protecting Images
_ Protecting All Images in a Folder or on aCard
You can protect all the images in a folder or on a card at one time.
When you select [All images in folder]
or JAil images on card] in [[_1: Protect
images], all the images in the folder or
on the card will be protected.
To cancel the image protection, select
[Unprotect all images in folder] or
[Unprotect all images on card].
if you format the card [p.48), the protected images will also be erased.
_ Movies can also be protected.
Once an image is protected, it cannot be erased by the camera's erase
function. To erase a protected image, you must first cancel the
protection
If you erase all the images (p.269), only the protected images will
remain. This is convenient when you want to erase unnecessary images
all at once.
267
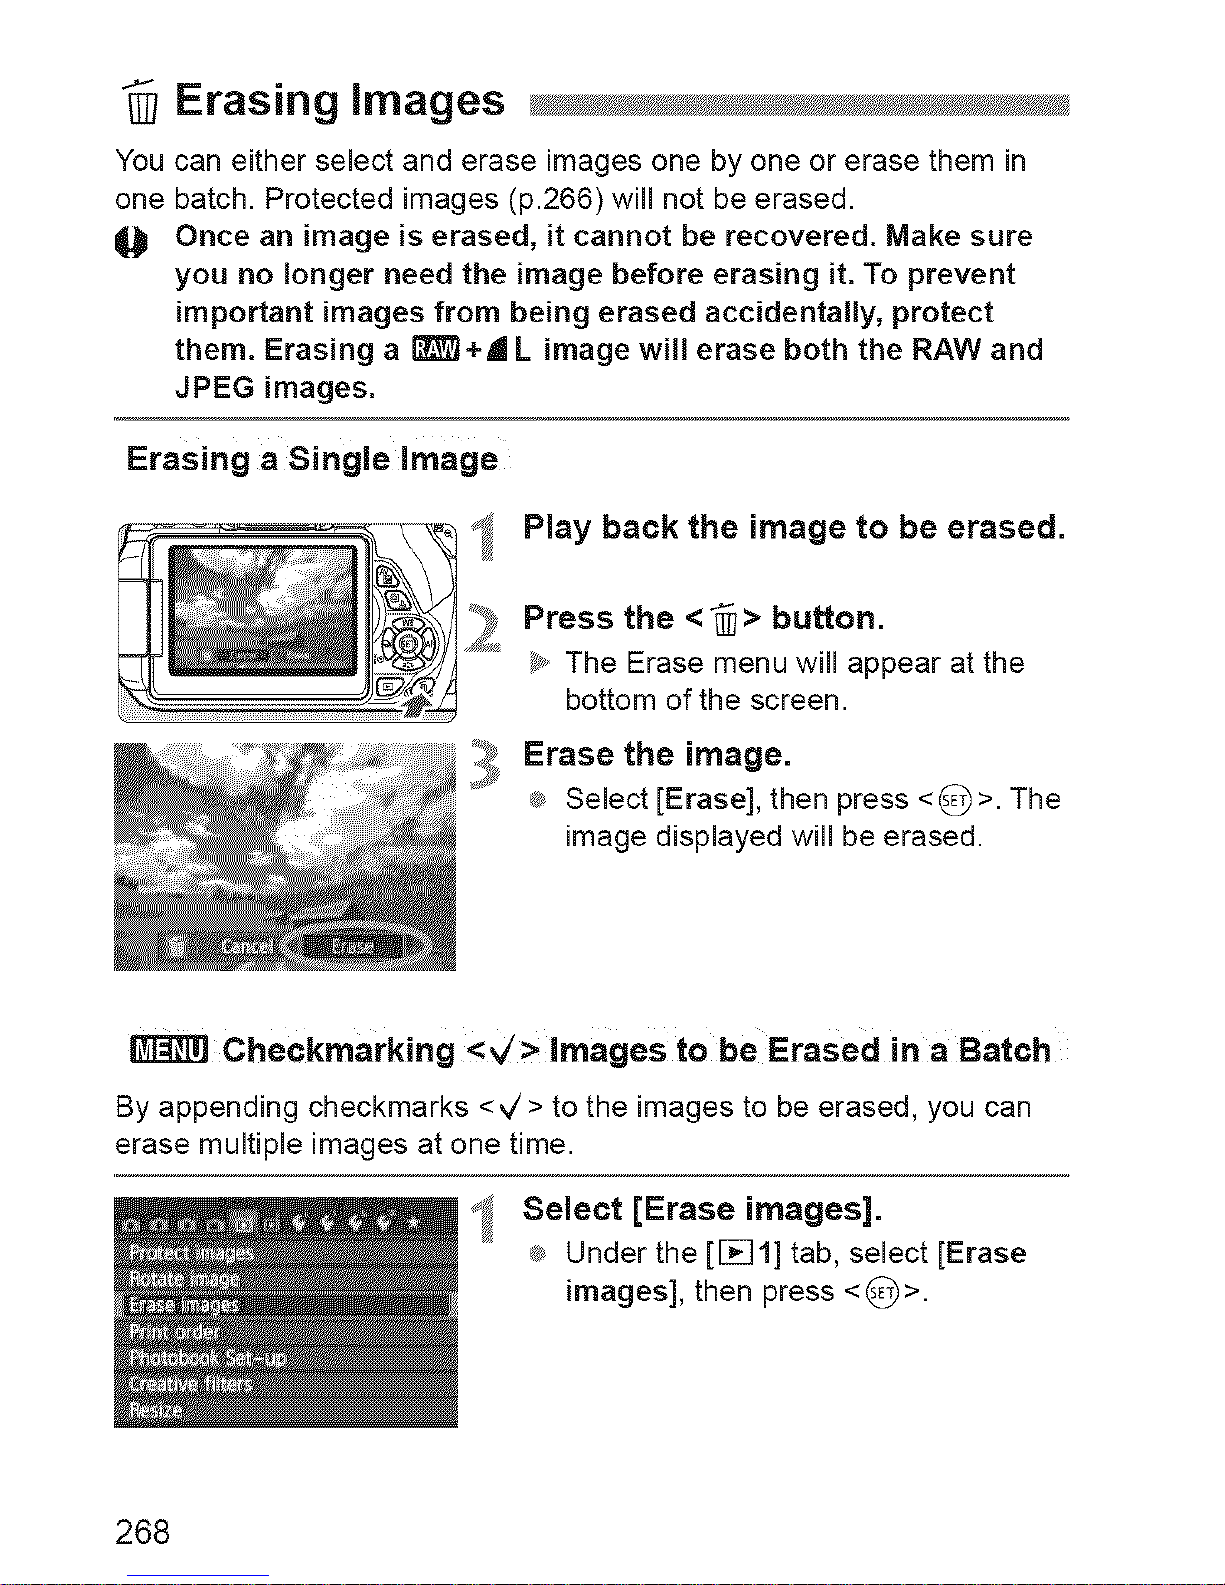
Erasing images
You can either select and erase images one by one or erase them in
one batch. Protected images (p.266) will not be erased.
4_ Once an image is erased, it cannot be recovered. Make sure
you no longer need the image before erasing it. To prevent
important images from being erased accidentally, protect
them. Erasing a _+d L image will erase both the RAW and
JPEG images.
Erasing a Single image
_ Play back the image to be erased.
%
L
3
Press the < "_ > button.
_y,,The Erase menu will appear at the
bottom of the screen.
Erase the image.
_ Select [Erase], then press <_)>. The
image displayed wll be erased.
Checkmarking <_/> Nmages to be Erased in a Batch
By appending checkmarks <_/> to the images to be erased, you can
erase multiple images at one time.
_ Select [Erase images].
_ Under the [1_1] tab, select [Erase
images], then press <_)>.
268
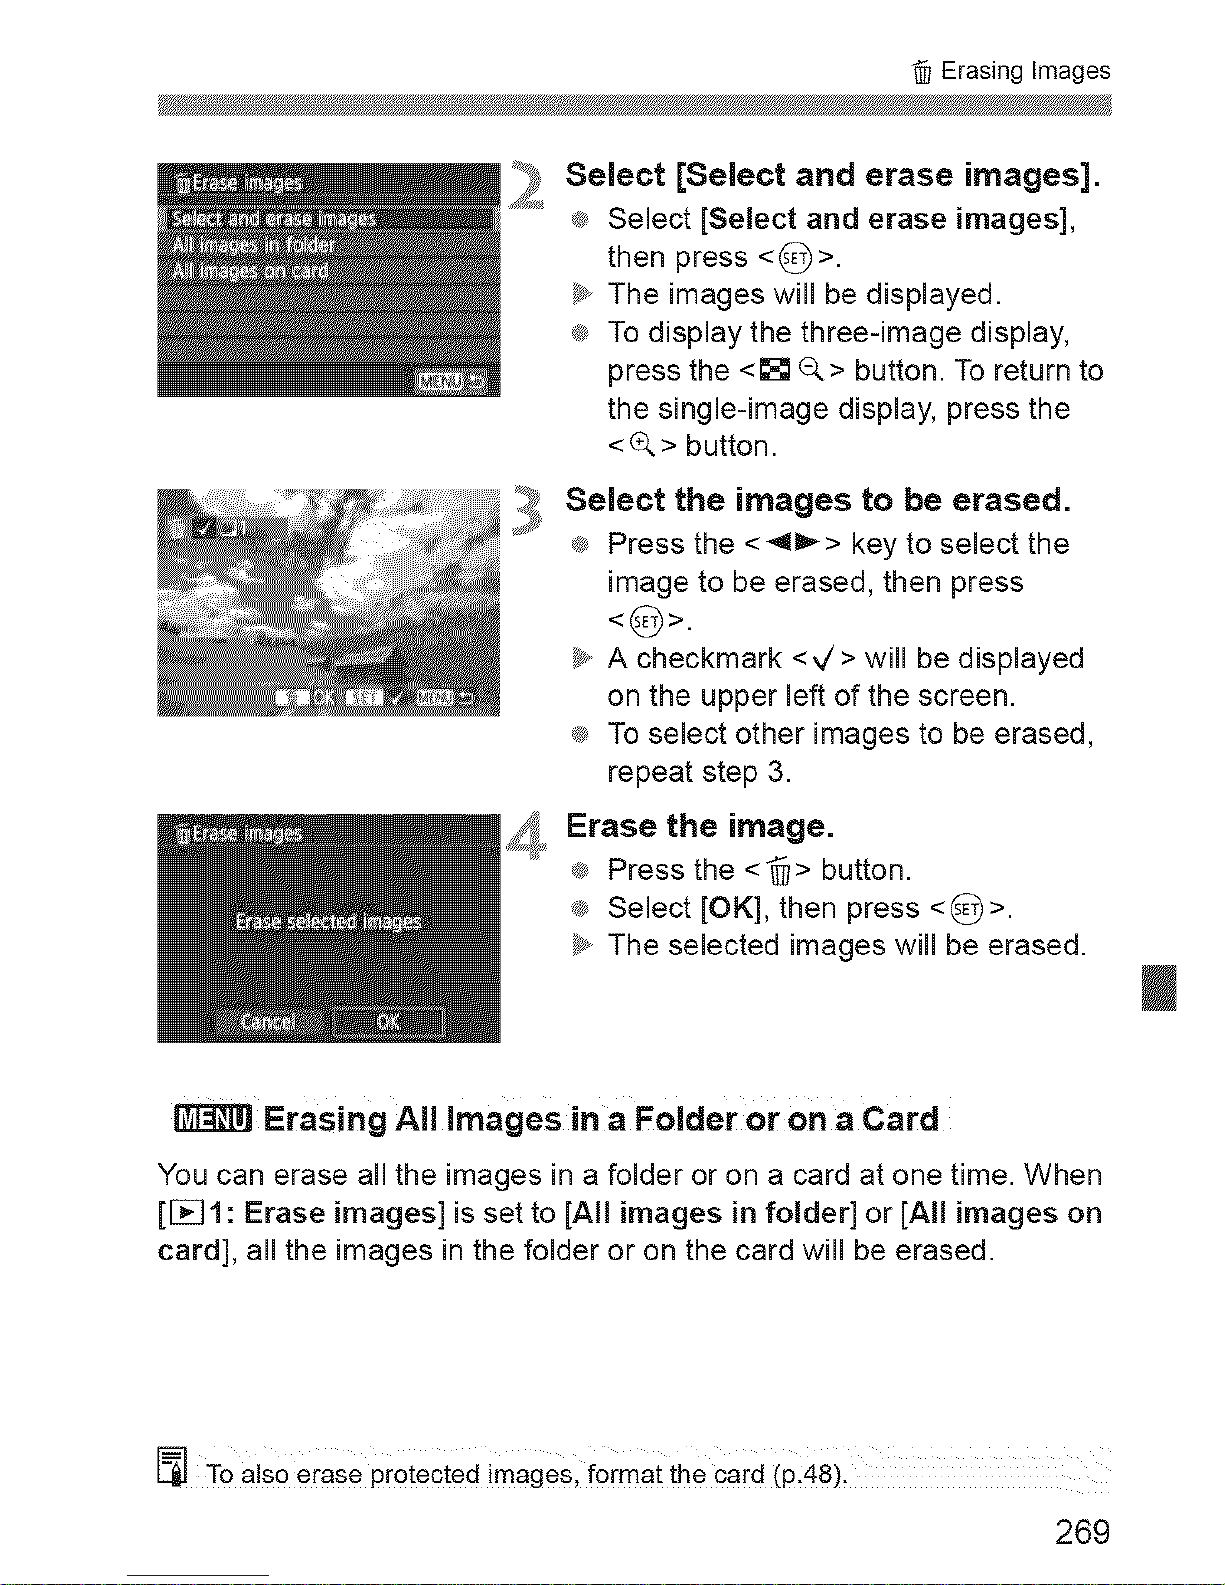
ErasingImages
2
Select [Select and erase images].
_ Select [Select and erase images],
then press <O>.
_+The images will be displayed.
_ To display the three-image display,
press the <_ _> button. To return to
the single-image display, press the
< ¢, > button.
_ elect the images to be erased.
_ Press the <4_> key to select the
image to be erased, then press
<(_>.
_y,.A checkmark <,,/> will be displayed
on the upper left of the screen.
®_To select other images to be erased,
repeat step 3.
_,_ Erase the image.
_ Press the <-_> button.
® Select [OK], then press <_)>.
_ The selected images will be erased.
_ Erasing All Images in a Folder or on a Card
You can erase all the images in a folder or on a card at one time. When
[[_]1 : Erase images] is set to [All images in folder] or [All images oil
card], all the images in the folder or on the card will be erased.
To als0 erase Pr0tectedirnageSlformattile Card(p148)_
269
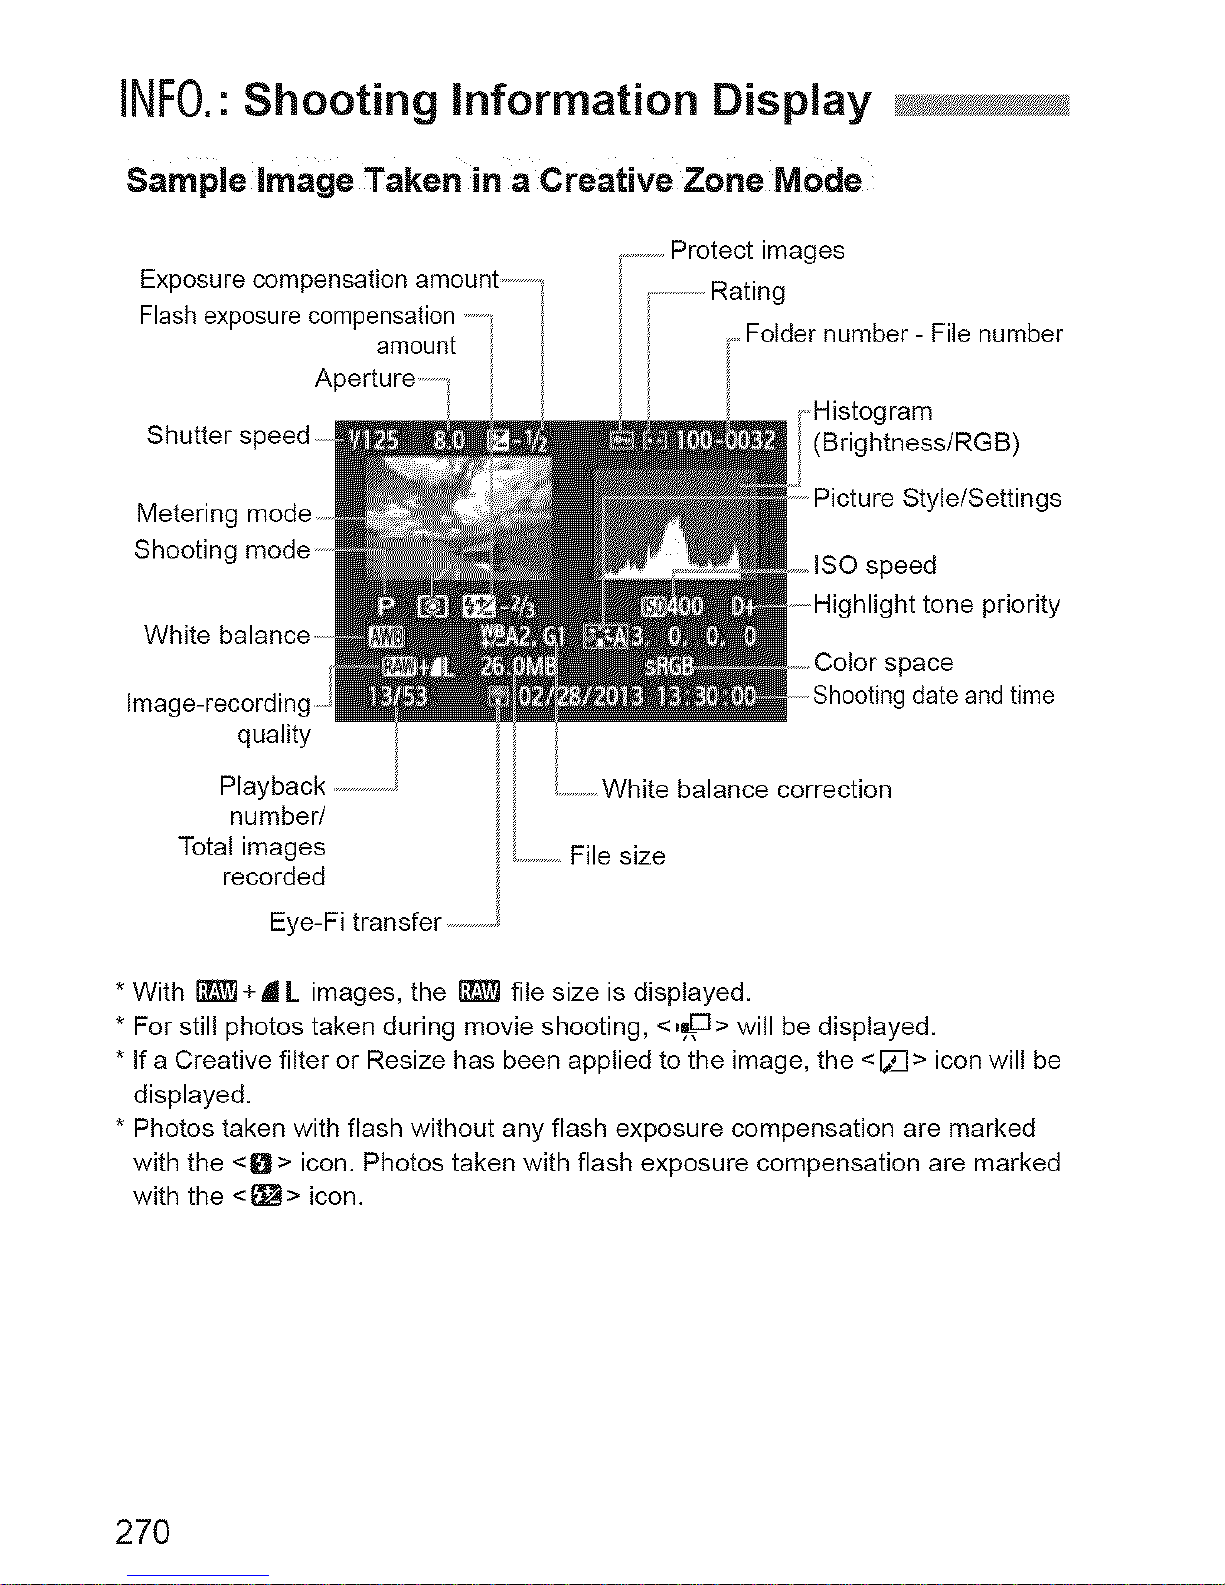
INFO."Shooting Information Display
sample Image Taken in a Creative Zone Mode
Exposure compensation amount
Flash exposure compensation
amount
A
Shutter
...........Protect images
..............Rating
[ Folder number - File number
Histogram
(Brightness/RGB)
Metering
Shooting
White
quality
Playback ................... White balance correction
number/
Total images ............File size
recorded
Eye-Fi transfer .................
space
date and time
* With _+_L images, the _ file size is displayed.
* For still photos taken during movie shooting, <,_,o> will be displayed.
* If a Creative filter or Resize has been applied to the image, the <1_> icon will be
displayed.
* Photos taken with flash without any flash exposure compensation are marked
with the <O > icon. Photos taken with flash exposure compensation are marked
with the <t_> icon.
27O
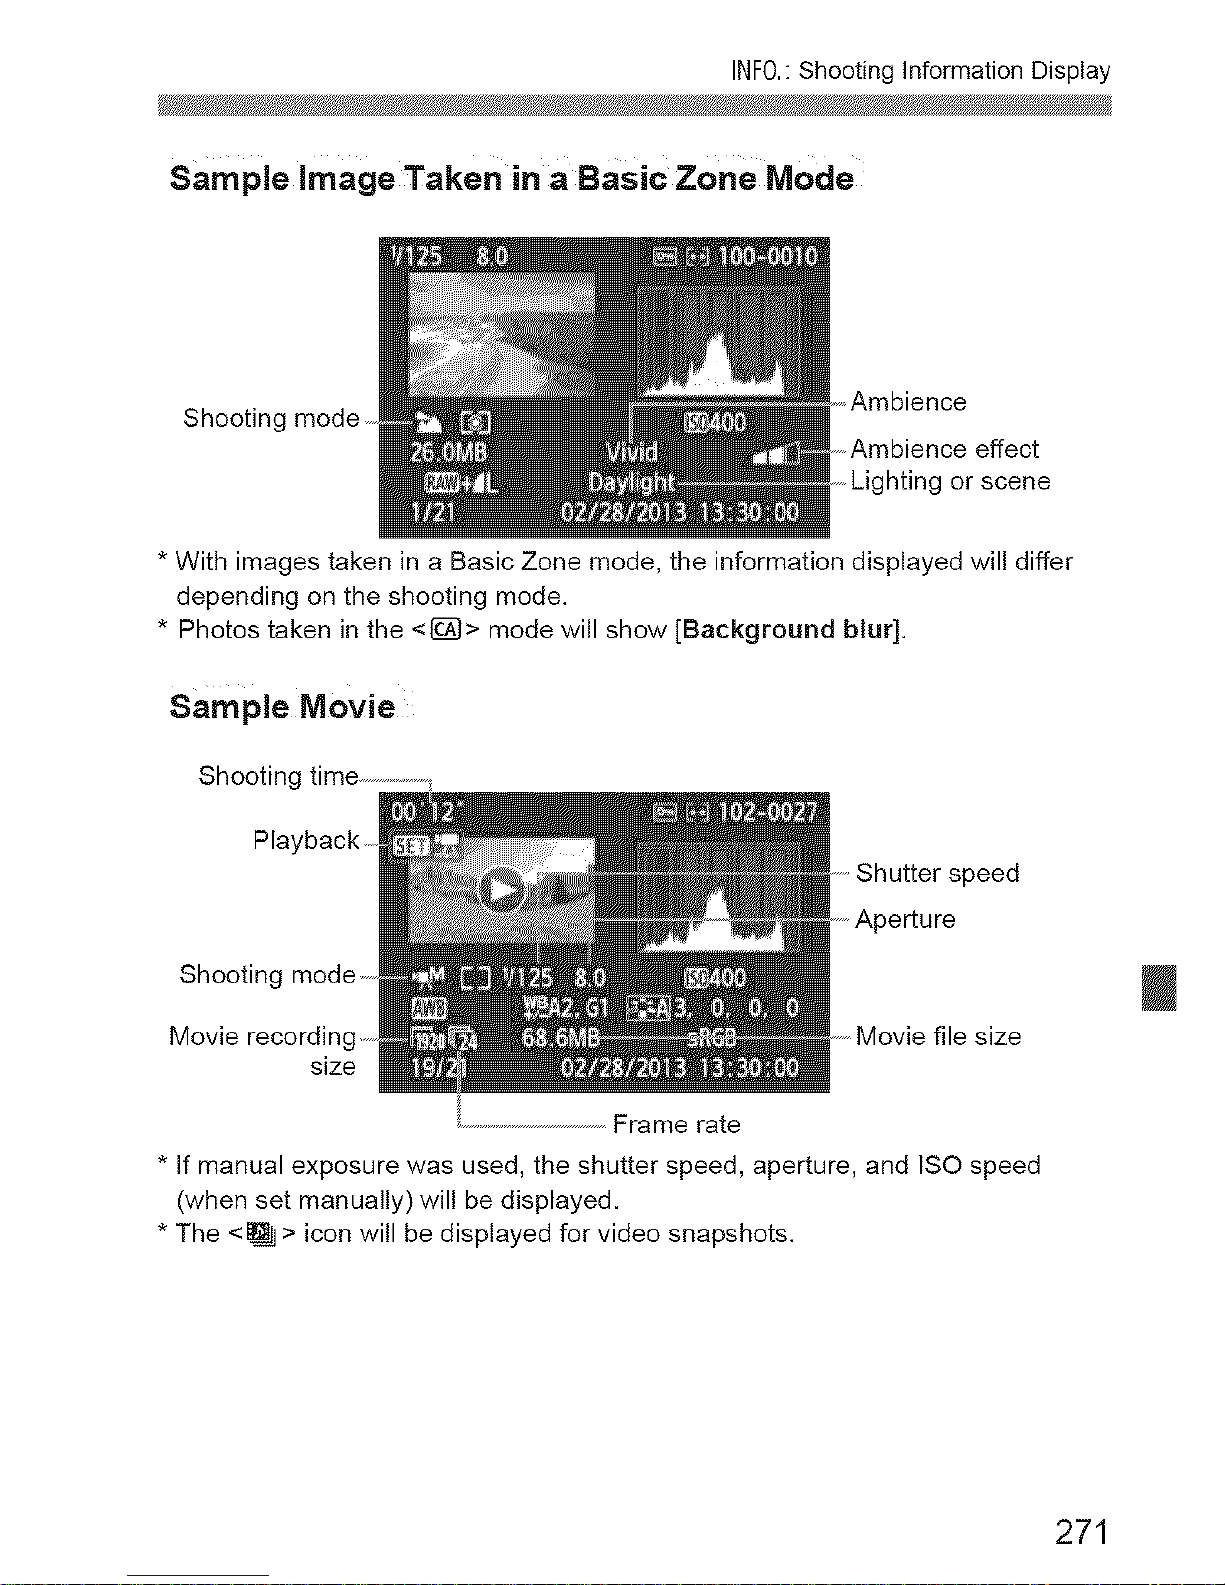
INF0,: Shooting Information Display
SampleimageTake.inaBasiczo.eMode
Shooting mode ....
.,Ambience
.....Ambience effect
.....Lighting or scene
* With images taken in a Basic Zone mode, the information displayed will differ
depending on the shooting mode.
* Photos taken in the <l_}> mode will show [Background blur].
sampleMovie
Shooting time ..................
Shutter speed
Aperture
Shooting
Movie recordim
size
Frame rate
* If manual exposure was used, the shutter speed, aperture, and ISO speed
(when set manually) will be displayed.
* The <_ > icon will be displayed for video snapshots.
271
INFO,:Shooting Information DispIay
_ About the Highlight Alert
When the shooting information is displayed, any overexposed areas of the
image will blink. Toobtain more image detail in the overexposed areas, set
the exposure compensation to a negative amount and shoot again.
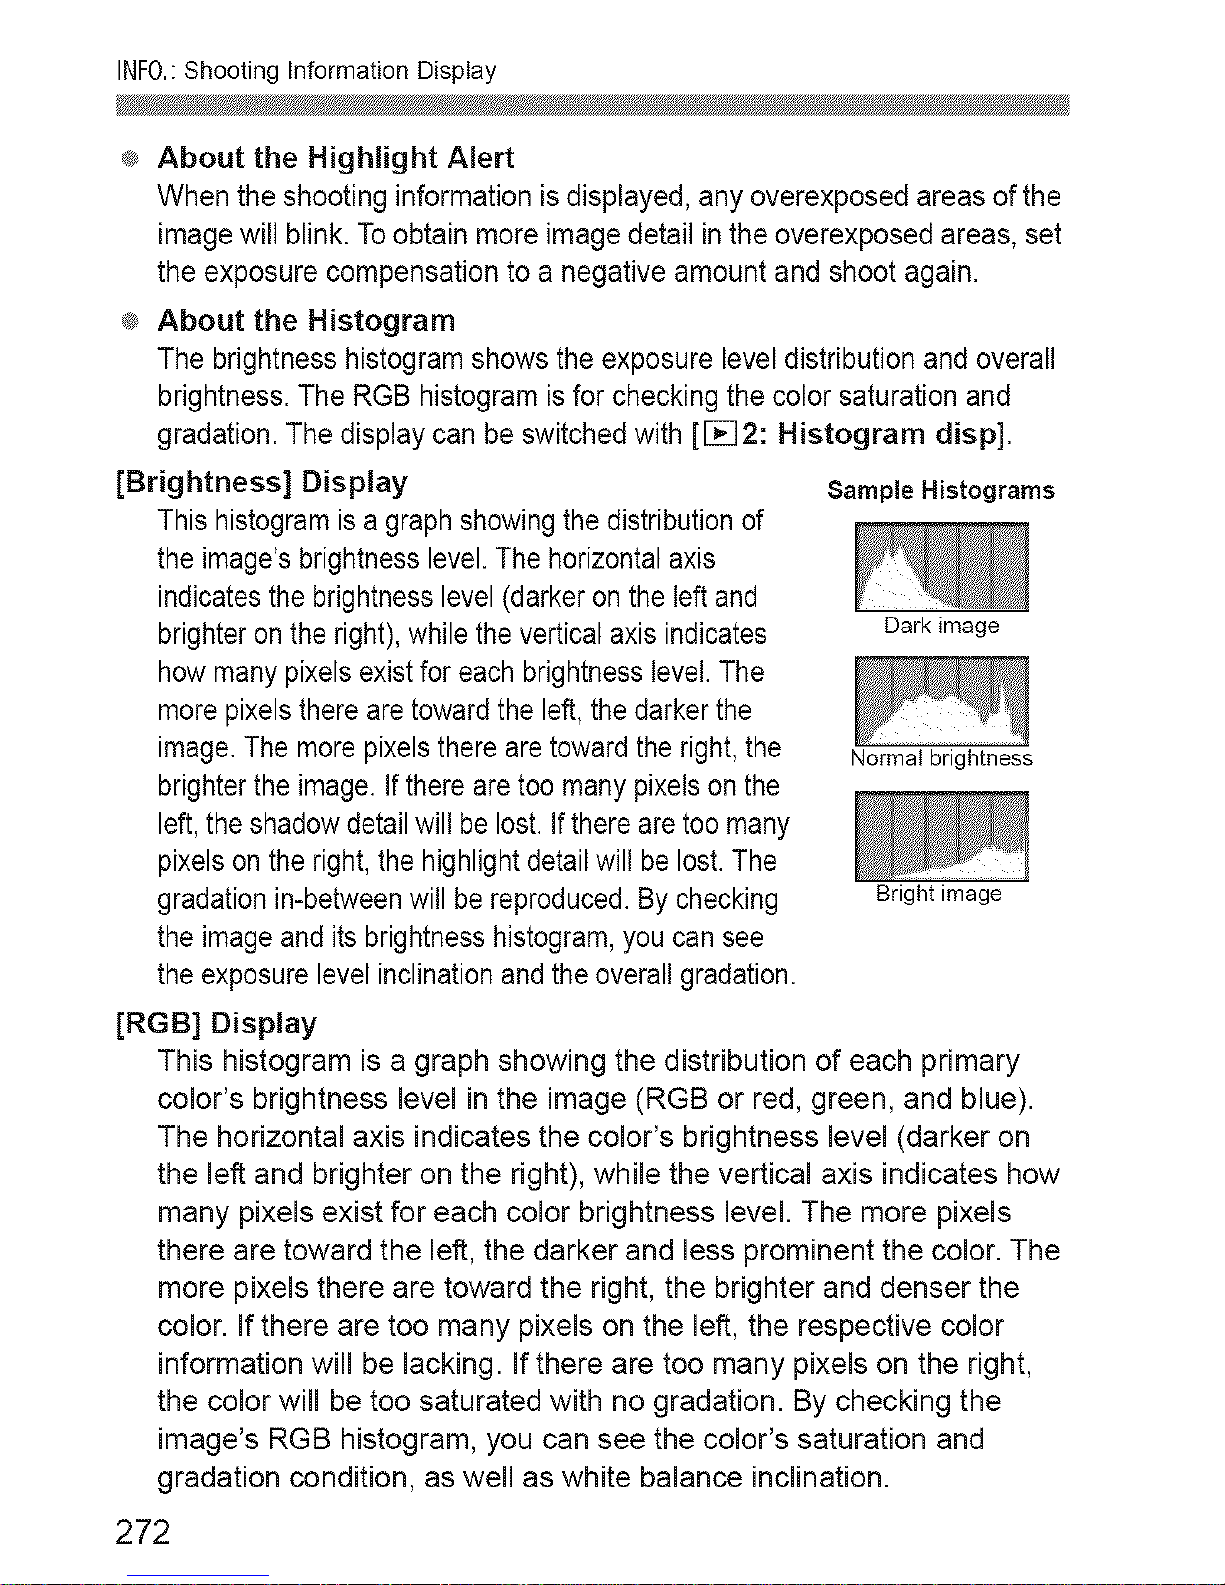
®_About the Histogram
The brightness histogram shows the exposure level distribution and overall
brightness. The RGB histogram is for checking the color saturation and
gradation. The display can be switched with [I]i_]2: Histogram disp].
[Brightness] Display SampleHistograms
This histogram is agraph showing the distributionof
the image's brightness level.The horizontalaxis
indicatesthe brightness level (darker on theleft and
brighter onthe right),while the vertical axis indicates Darkimage
how many pixelsexist for each brightness level.The
more pixelsthere are toward the left, thedarker the
image. The more pixelsthere are toward the right, the Normalbrightness
brighterthe image. If there aretoo many pixels onthe
left, theshadow detail will be lost.Ifthere are too many
pixels onthe right,the highlight detailwill be lost.The
gradation in-between will bereproduced. By checking
the imageand its brightness histogram, you can see
the exposurelevel inclination andthe overall gradation.
[RGB] Display
This histogram is a graph showing the distribution of each primary
color's brightness level in the image (RGB or red, green, and blue).
The horizontal axis indicates the color's brightness level (darker on
the left and brighter on the right), while the vertical axis indicates how
many pixels exist for each color brightness level. The more pixels
there are toward the left, the darker and less prominent the color. The
more pixels there are toward the right, the brighter and denser the
color. If there are too many pixels on the left, the respective color
information will be lacking. If there are too many pixels on the right,
the color will be too saturated with no gradation. By checking the
image's RGB histogram, you can see the color's saturation and
gradation condition, as well as white balance inclination.
Bright image
272
Post-Processing
images
After shooting, you can apply Creative filters or resize
the images (downsize the pixel count).
_'_ _3 The Camera may not be able to process images taken With
another Camera.
_ Post-processing images as described in this chapter cannot be
performed while the camera is connected to a personal
computer via the < DIGITAL > terminal.

(_ Applying Creative Filters to the image @_
You can apply the following Creative filters to an image and save it as a
new image: Grainy B/W, Soft focus, Fish-eye effect, Art bold effect,
Water painting effect, Toy camera effect, and Miniature effect.
I
Select [Creative filters].
_ Under the [1_1] tab, select [Creative
filters], then press <_)>.
_y,,The images will be displayed.
_ Select an image.
_ Select the image you want to apply a
filter to.
_ By pressing the <_ _> button, you
can switch to the index display and
select an image.
_i_j Select a filter.
_ When you press <_)>, the types of
Creative filters will be displayed.
_ For details on Creative filter
characteristics, see pages 275, 276.
_ Press the < _ > key to select a filter,
then press <0>.
_. The image will be displayed with the
corresponding filter applied.
_,_ Adjust the filter effect.
_ Press the <4_ > key to adjust the
filter effect, then press <O >.
_ For the Miniature effect, press the
<AT> key and select the image area
(within the white frame) where you
want the image to look sharp. Then
press <_)>.
274
(_ Applying Creative Filters to the Image
5
Save the image.
® Select [OK] to save the image.
® Check the destination folder and
image file number, then select [OK].
® To apply a filter to another image,
repeat steps 2 to 5.
® Press the <MENU> button to return to
the menu.
When shooting _ +d L or _ irnages,the Creativefilter will beapplied to
the _ image and the imagowil! be saved as a JPEG image.If anaspect
ratiois set for LiveView shooting and a Creative filter is applied tothe
image,the imagewi!! be sayedin the aspect ratio that was set.
Creative Filter Characteristics
® i_ Grainy B_/V
Makes the image grainy and black and white. By adjusting the
contrast, you can change the black-and-white effect.
® I Soft focus
Gives the image a soft look. By adjusting the blur, you can change
the degree of softness.
275
(_ Applying Creative Filters to the Image
® ,@ Fish-eye effect
Gives the effect of a fish-eye lens. The image wiil have a barrel-type
distortion.
Depending on the level of this filter effect, the area trimmed along
the periphery of the image changes. Also, since this filter effect will
magnify the image center, the apparent resolution at the center may
degrade depending on the number of recorded pixels. Set the filter
effect in step 4 while checking the resulting image.
@ _ Art boJd effect
Makes the photo look like an oil painting and the subject look three-
dimensional. You can adjust the contrast and saturation. Note that
the sky, white walls, and similar subjects may not be rendered with a
smooth gradation and may look irregular or have significant noise.
@ +._Water painting effect
Makes the photo look like a watercolor painting with soft colors. You
can adjust the color density. Note that night scenes or dark scenes
may not be rendered with a smooth gradation and may look irregular
or have significant noise.
@ t:_ Toy camera effect
Gives a color cast typical of toy cameras and darkens the image's
four corners. By adjusting the color tone, you can change the color
cast.
@ _ Miniature effect
Creates a diorama effect. You can change where the image looks
sharp. In step 4, you can press the <INF0.> button (or tap [_] on the
screen) to change the white frame's orientation (horizontal/vertical)
where you want the image to look sharp.
276
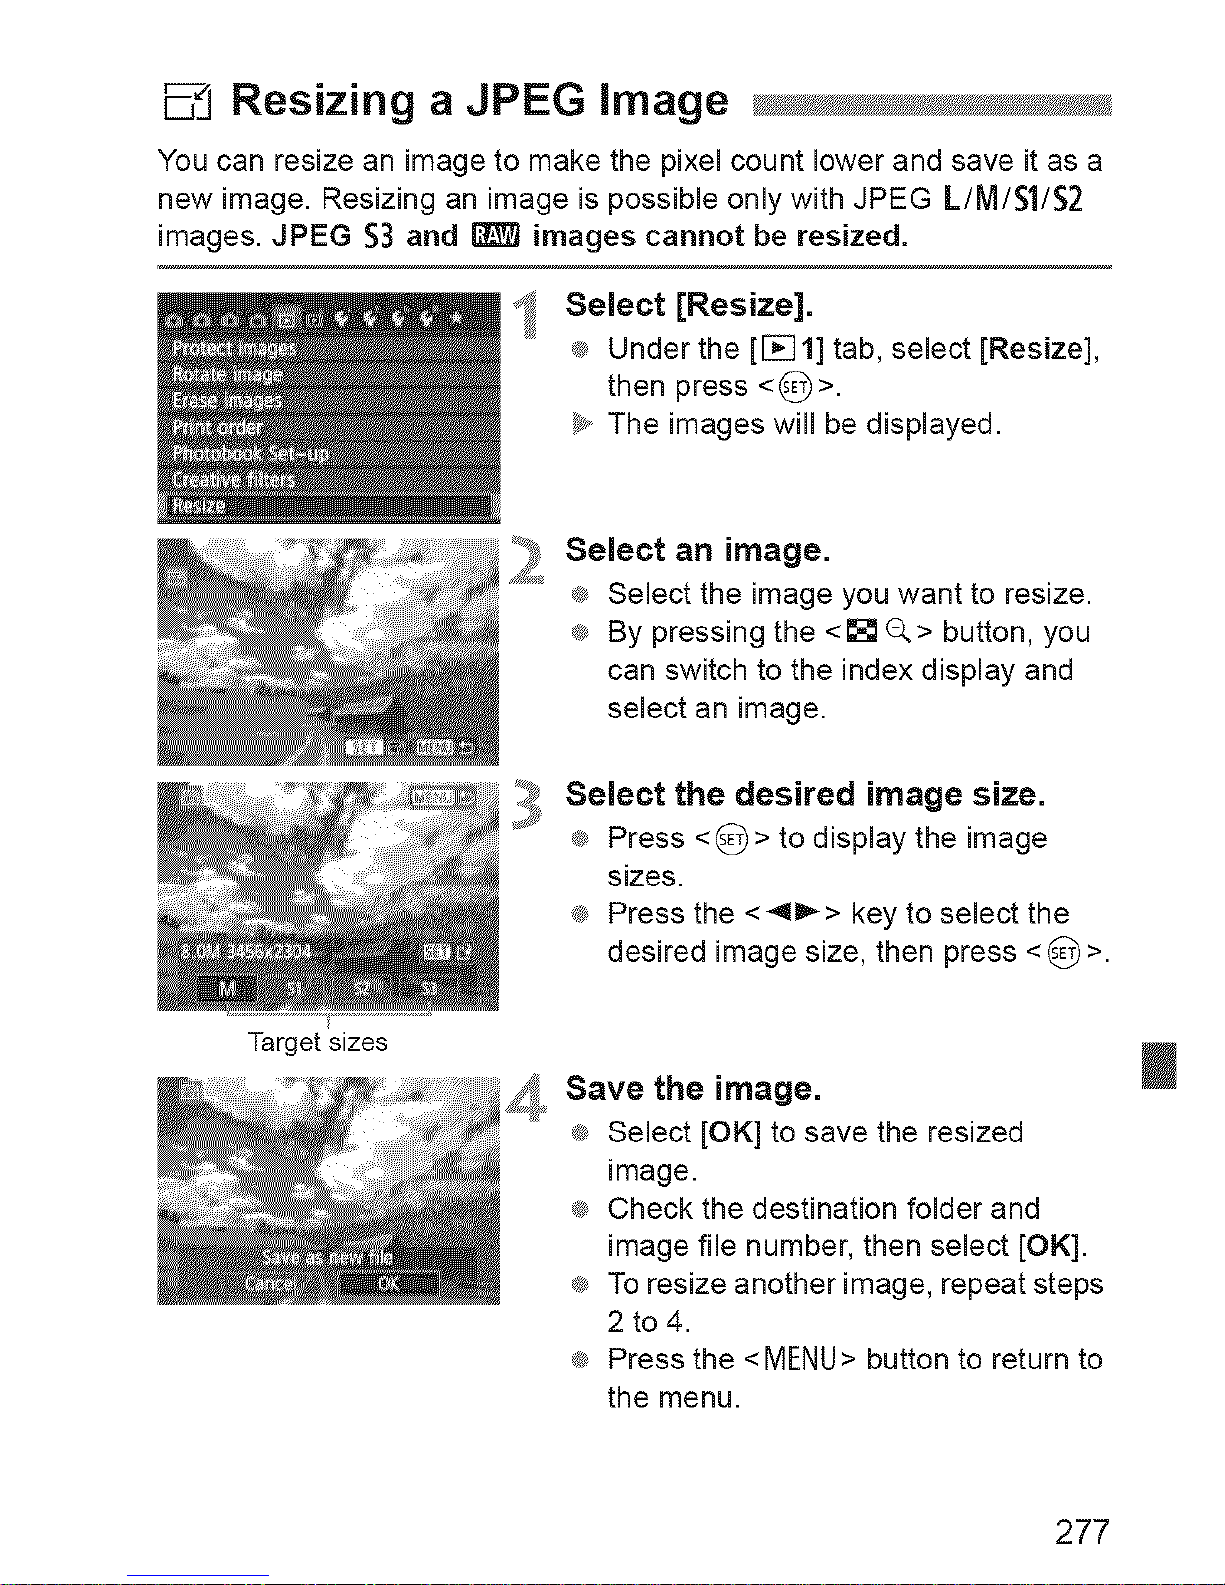
_-_ Resizing a JPEG image
You can resize an image to make the pixel count lower and save it as a
new image. Resizing an image is possible only with JPEG L/M/S1/S2
images. JPEG $3 and _ images cannot be resized.
Targetsizes
Select [Resize].
® Under the [[_]1] tab, select [Resize],
then press <0>.
_y,,The images will be displayed.
2
Select an image.
® Select the image you want to resize.
® By pressing the <_ _> button, you
can switch to the index display and
select an image.
Select the desired image size.
® Press <_)> to display the image
sizes.
® Press the <4i_> key to select the
desired image size, then press <_)>.
_. Save the image.
® Select [OK] to save the resized
image.
® Check the destination folder and
image file number, then select [OK].
® To resize another image, repeat steps
2 to 4.
® Press the <MENU> button to return to
the menu.
277
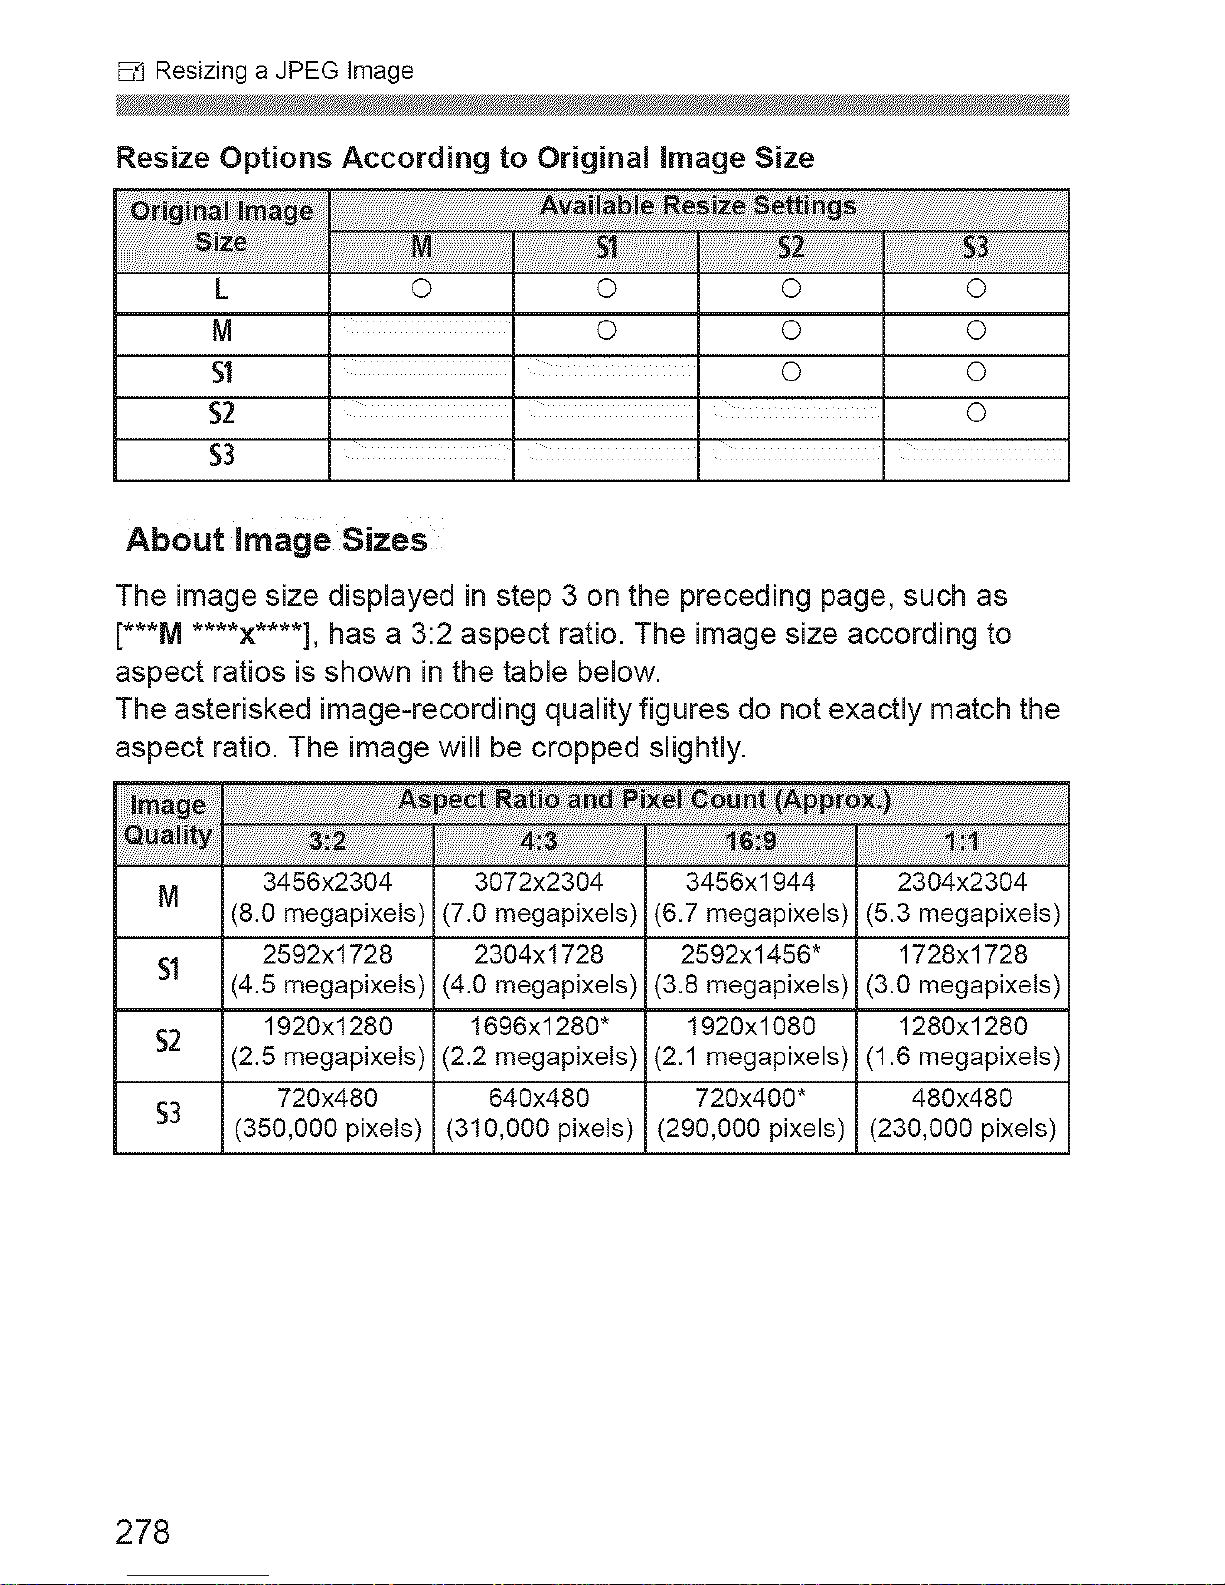
Resizing a JPEG Image
Resize Options According to Original image Size
L
M
$1
$2
$3
0 0 0 0
0 0 0
0 0
0
About image Sizes
The image size displayed in step 3 on the preceding page, such as
[***lVl .... x.... ], has a 3:2 aspect ratio. The image size according to
aspect ratios is shown in the table below.
The asterisked image-recording quality figures do not exactly match the
aspect ratio. The image will be cropped slightly.
3456x2304 3072x2304 3456x1944 2304x2304
M
(8.0 megapixels) (7.0 megapixels) (6.7 megapixels) (5.3 megapixels)
$1 2592x1728 2304x1728 2592x1456" 1728x1728
(4.5 megapixels) (4.0 megapixels) (3.8 megapixels) (3.0 megapixels)
$2 1920x1280 I696x1280" 1920x1080 1280x1280
(2.5 megapixels) (2.2 megapixels) (2.1 megapixels) (1.6 megapixels)
720x480 640x480 720x400" 480x480
$3
(350,000 pixels) (310,000 pixels) (290,000 pixels) (230,000 pixels)
278
Printing images
_ Printing (p.280)
You can connect the camera directly to a printer and print
out the images on the card. The camera is compatible with
"?'_'PictBridge" which is the standard for direct printing.
_ Digital Print Order Format (DPOF) (p.289)
DPOF (Digital Print Order Format) enables you to print
images recorded on the card according to your printing
instructions such as the image selection, quantity to print,
etc. You can print multiple images in one batch or give the
print order to a photofinisher.
_ Specifying images for a Photobook (p.293)
You can specify images in the card for printing in a
photobook.
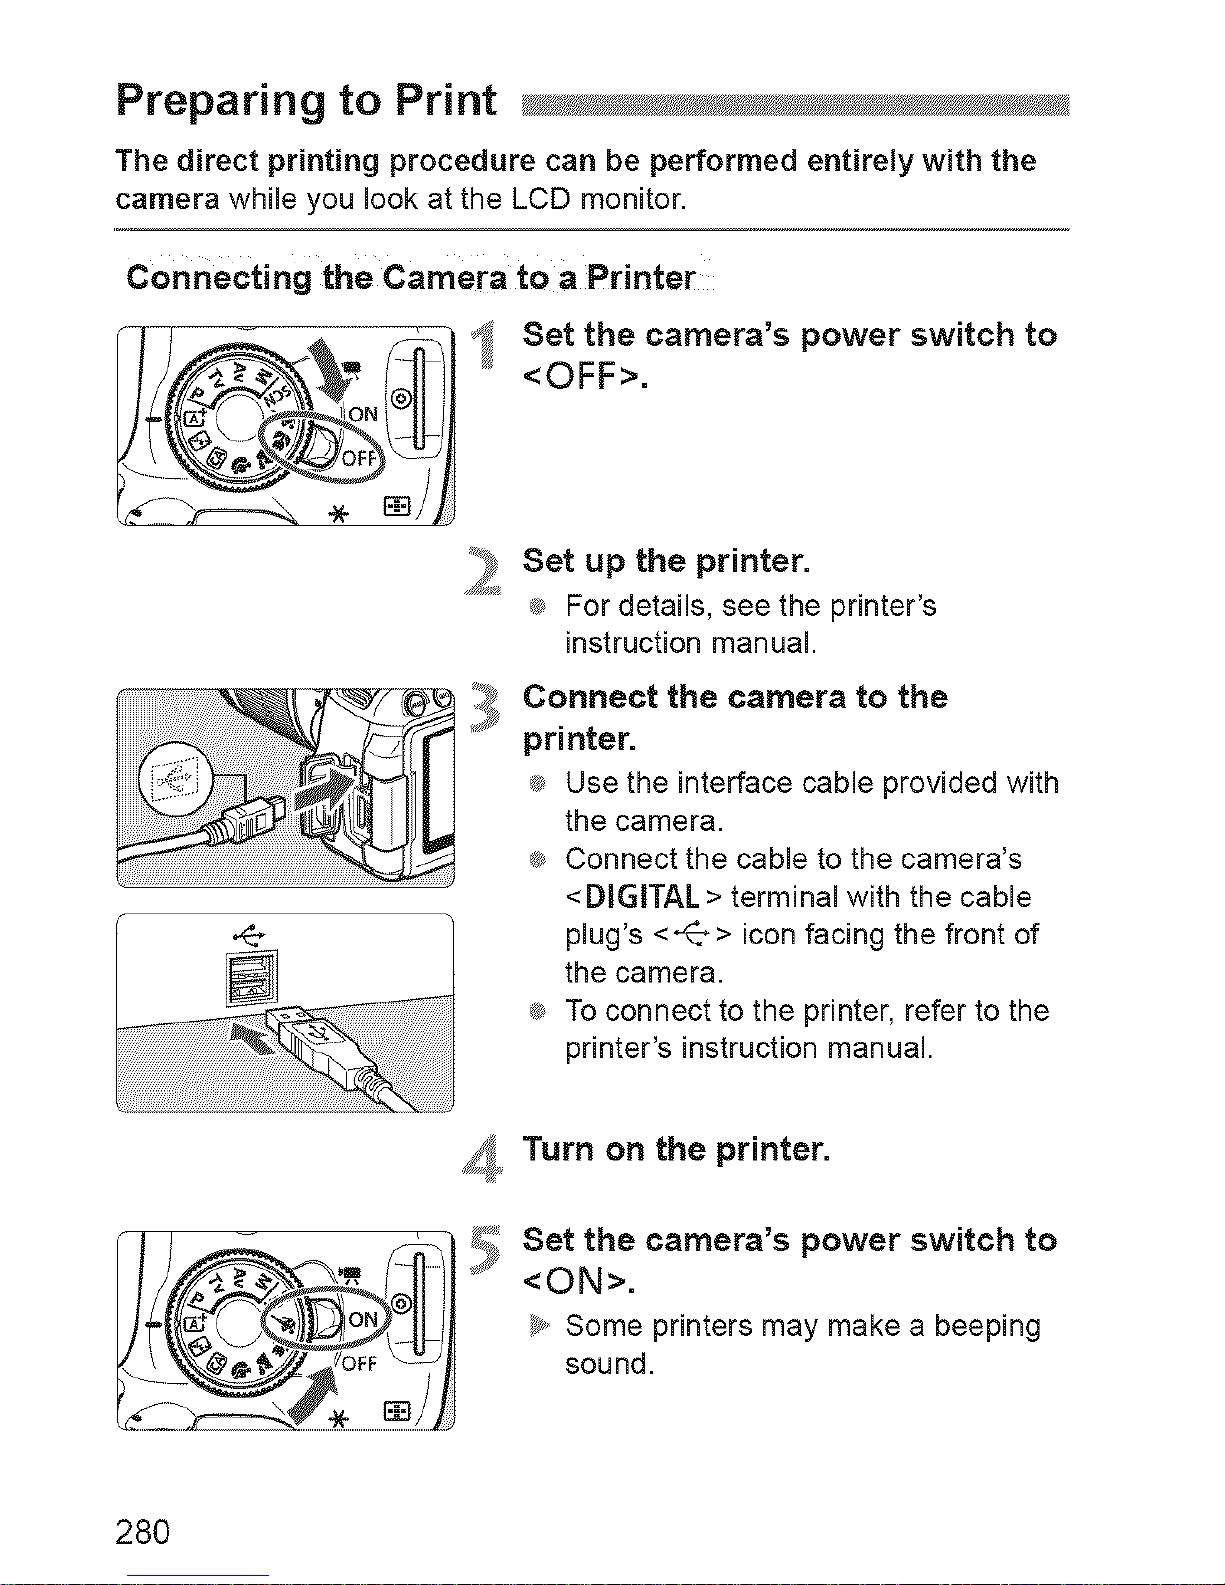
Preparing to Print
The direct printing procedure can be performed entirely with the
camera while you look at the LCD monitor.
Connecting the Camera to a Printer
. =//4
,3
Set the camera's power switch to
<OFF>.
Set up the printer.
_ For details, see the printer's
instruction manual.
Connect the camera to the
printer.
_ Use the interface cable provided with
the camera.
_ Connect the cable to the camera's
<DIGITAL > terminal with the cable
plug's <_7> icon facing the front of
the camera.
_ To connect to the printer, refer to the
printer's instruction manual.
_I_ Turn on the printer.
Set the camera's power switch to
<ON>.
b,,Some printers may make a beeping
sound.
28O

Preparing to Print
_ PictBridge
_i lay back the image.
® Press the <[_]> button.
_y,,The image will appear, and the <?'_'>
icon will appear on the upper left to
indicate that the camera is connected
to a printer.
U
Before using the printer, make sure it has a PictBndge connection poE.
Movies cannot be printed.
The camera cannot be used with printers compatible only with CP Direct
or Bubble Jet Direct
Do not use any interface cable other than the one provided.
If there is a Eongbeeping sound in step 5, it indicates a problem with the
printer. Resolve the problem displayed in the error message (p.288).
Printing is not possible if the <[]> or <,_:'> shooting mode or Multi Shot
Noise Reduction has been set
You can also print _ images taken with this camera.
If you use a battery pack to power the camera, make sure it is full}
charged. With a fully-charged battery, printing up to approx. 3 hr. 30 min
is possible
Before disconnecting the cable, first turn off the camera and printer. Hold
the plug (not the cord) to pull out the cable.
For direct printing, using AC Adapter Kit ACK-E8 (sold separately) to
power the camera is recommended.
281
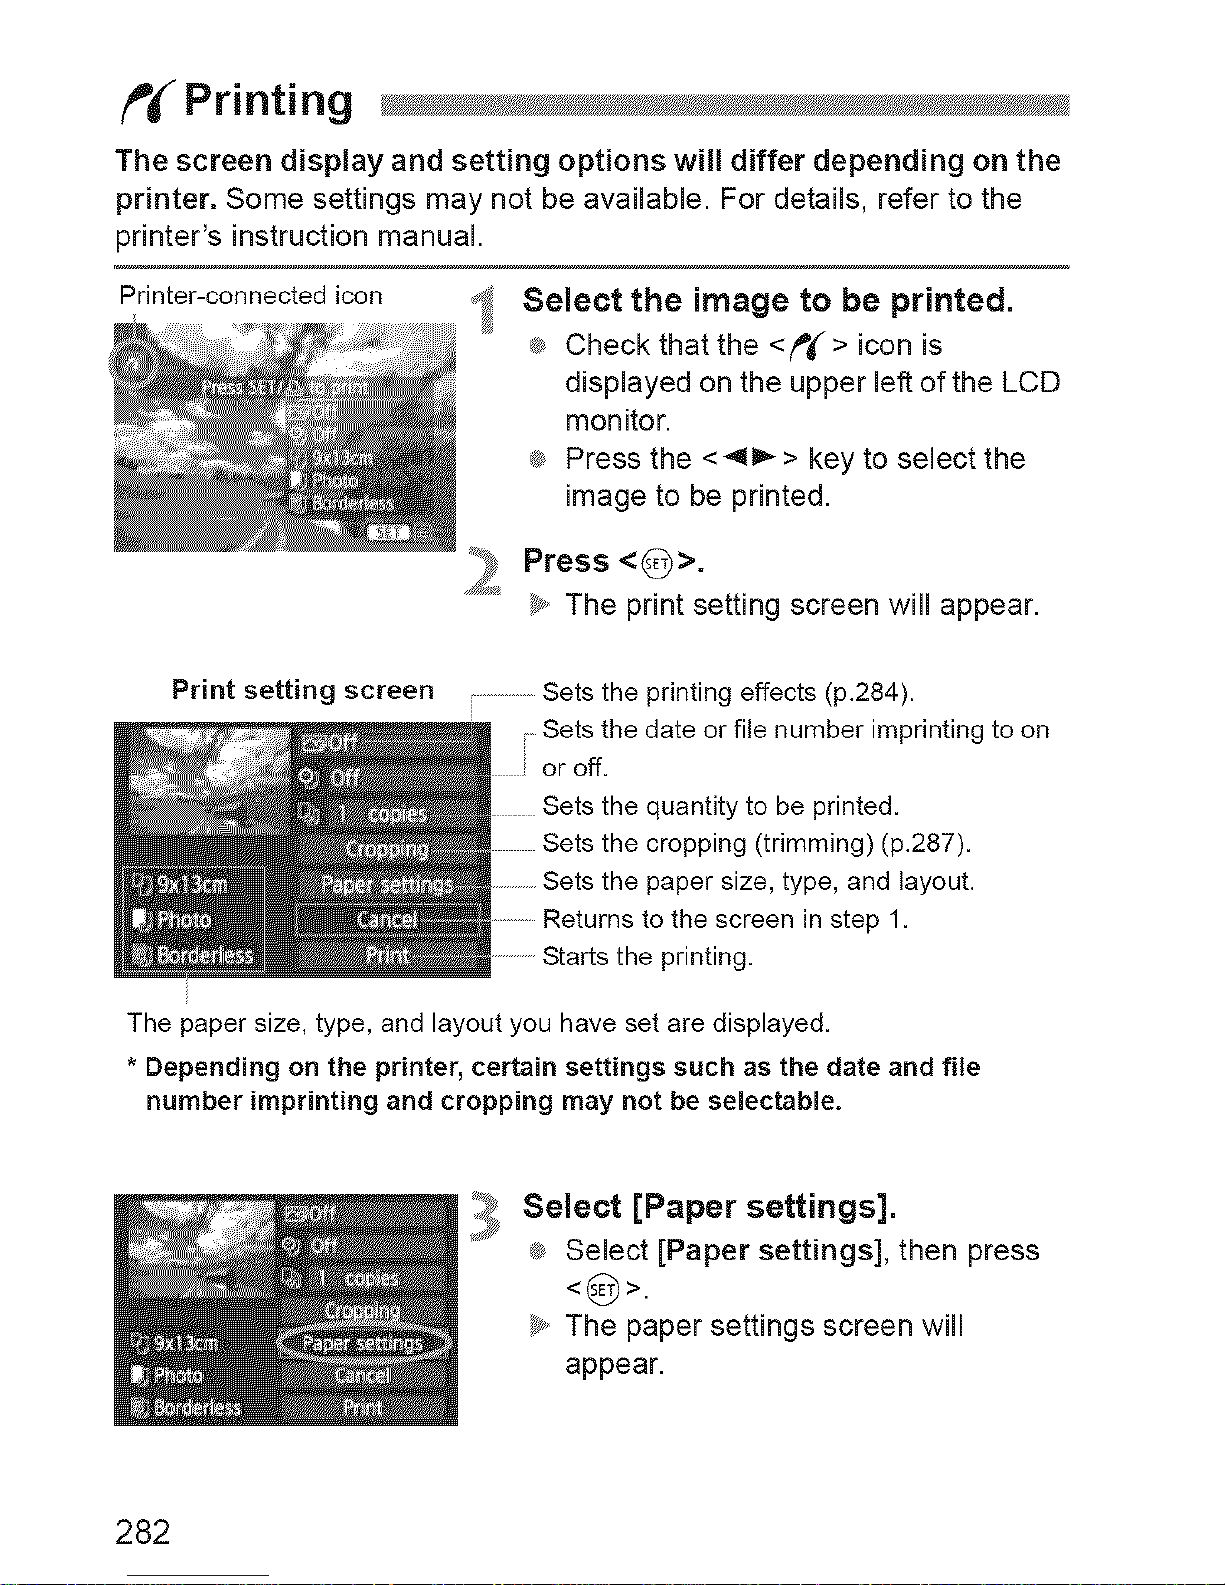
f'_ Printing
The screen display and setting options will differ depending on the
printer. Some settings may not be available. For details, refer to the
printer's instruction manual.
Printer-connected icon _:1
Select the image to be printed.
_ Check that the <f'#'> icon is
displayed on the upper left of the LCD
monitor.
®_Press the <41_ > key to select the
image to be printed.
_ Press <0>.
_y,,The print setting screen will appear.
Print setting screen
...............Sets the printing effects (p.284).
; Sets the date or file number imprinting to on
or off.
the quantity to be printed.
the cropping (trimming) (p.287).
the paper size, type, and layout.
Returns to the screen in step 1.
the printing.
The paper size, type, and layout you have set are displayed.
* Depending on the printer, certain settings such as the date and file
number imprinting and cropping may not be selectable.
3
Select [Paper settings].
_ Select [Paper settings], then press
<(_>.
_y,,The paper settings screen will
appear.
282
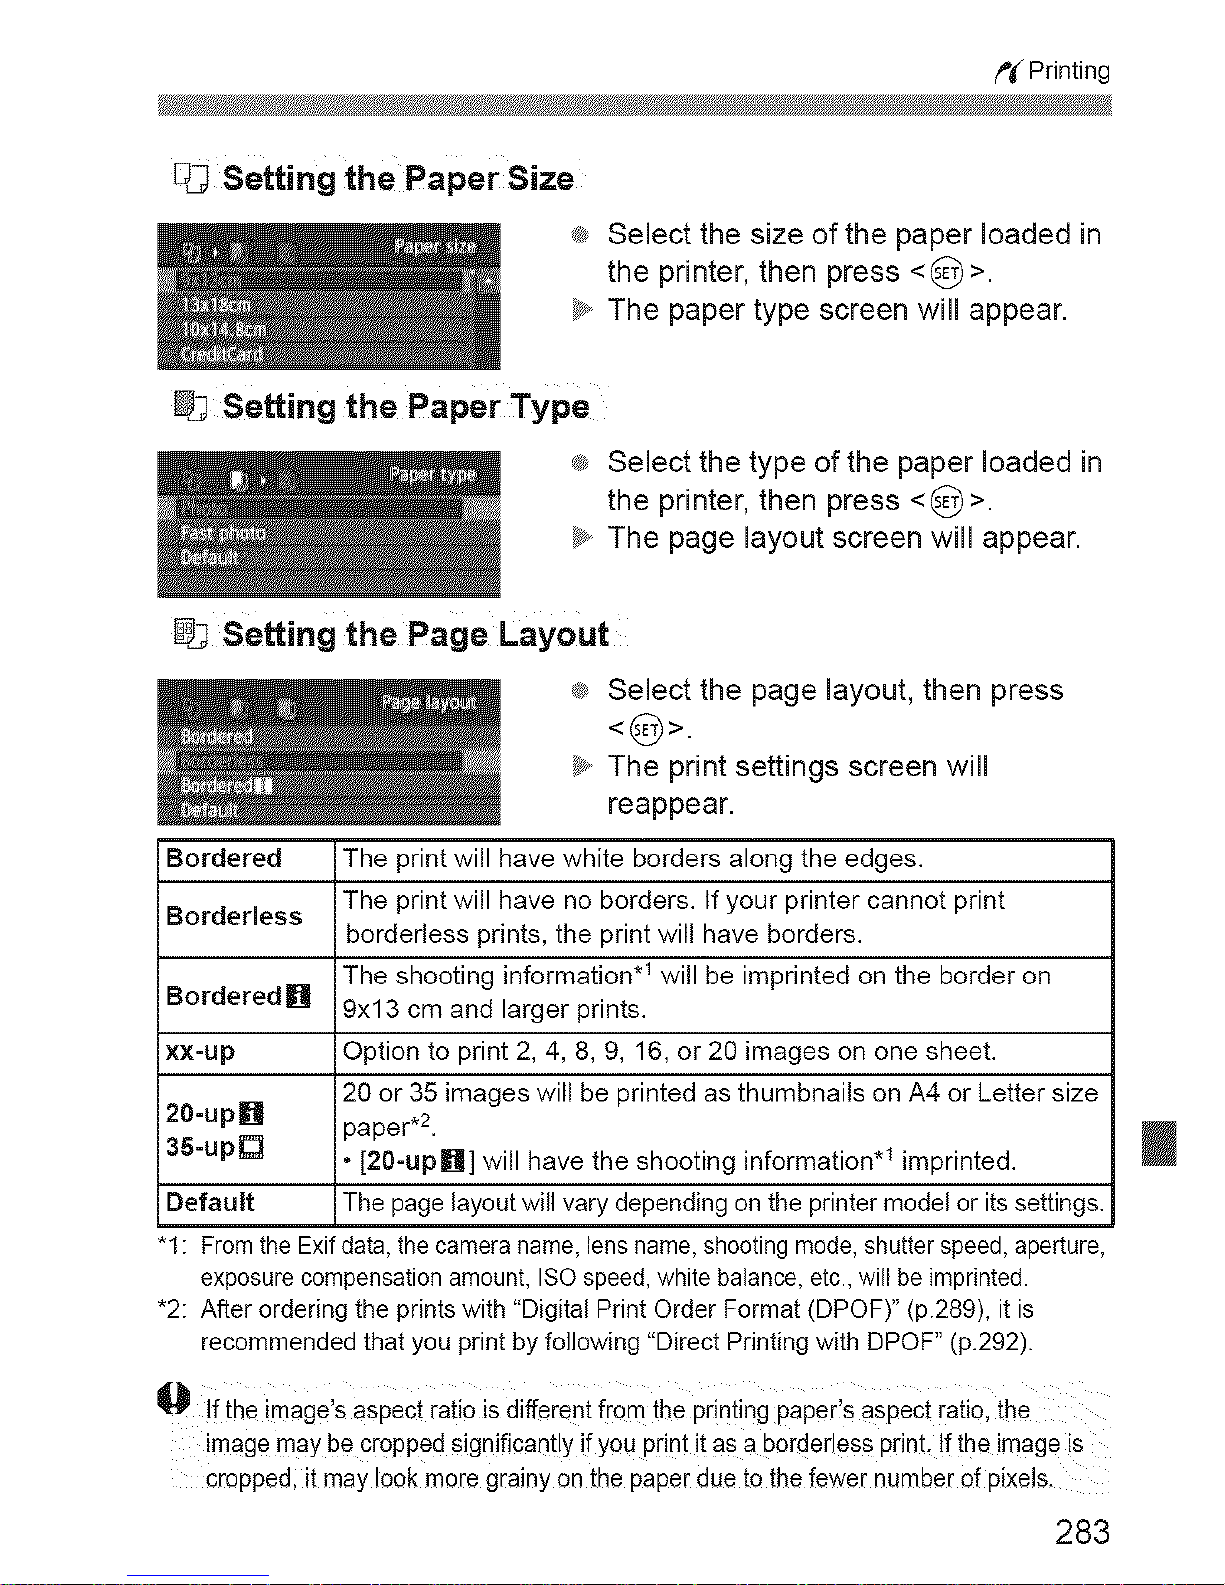
f'i ¢ Printing
DJ Setting the PaperSize
_ Select the size of the paper loaded in
the printer, then press <0>.
_J The paper type screen will appear.
_J Setting the Paper Type
_ Select the type of the paper loaded in
the printer, then press <_)>.
_>_The page layout screen will appear.
_J Se_ing the Page Layout
_ Select the page layout, then press
<(_>.
_y,,The print settings screen will
reappear.
Bordered The print will have white borders along the edges.
Borderless The print will have no borders. If your printer cannot print
borderless prints, the print will have borders.
The shooting information .1 will be imprinted on the border on
Bordered[] 9x13 cm and larger prints.
xx-up Option to print 2, 4, 8, 9, 16, or 20 images on one sheet.
20 or 35 images will be printed as thumbnails on A4 or Letter size
20-up• paper,2.
35=upD • [20-up[]] will have the shooting information .1 imprinted.
Default The page layout will vary depending on the printer model or its settings.
"1 : Fromthe Exif data,the cameraname, lensname,shooting mode,shutter speed, aperture,
exposure compensation amount, ISO speed, white balance, etc.,will be imprinted.
•2: After ordering the prints with "Digital Print Order Format (DPOF)" (p.289), it is
recommended that you print by following "Direct Printing with DPOF" (p.292).
I_ if ihe image,s aspect raiio is different from the printing paper,s aspect ratio, the
image may he cropped significantly ifyou print it as a borderless print, !f the image is
cropped; it may !eek more grainy on the paper due to the fewer number of pixels.
283
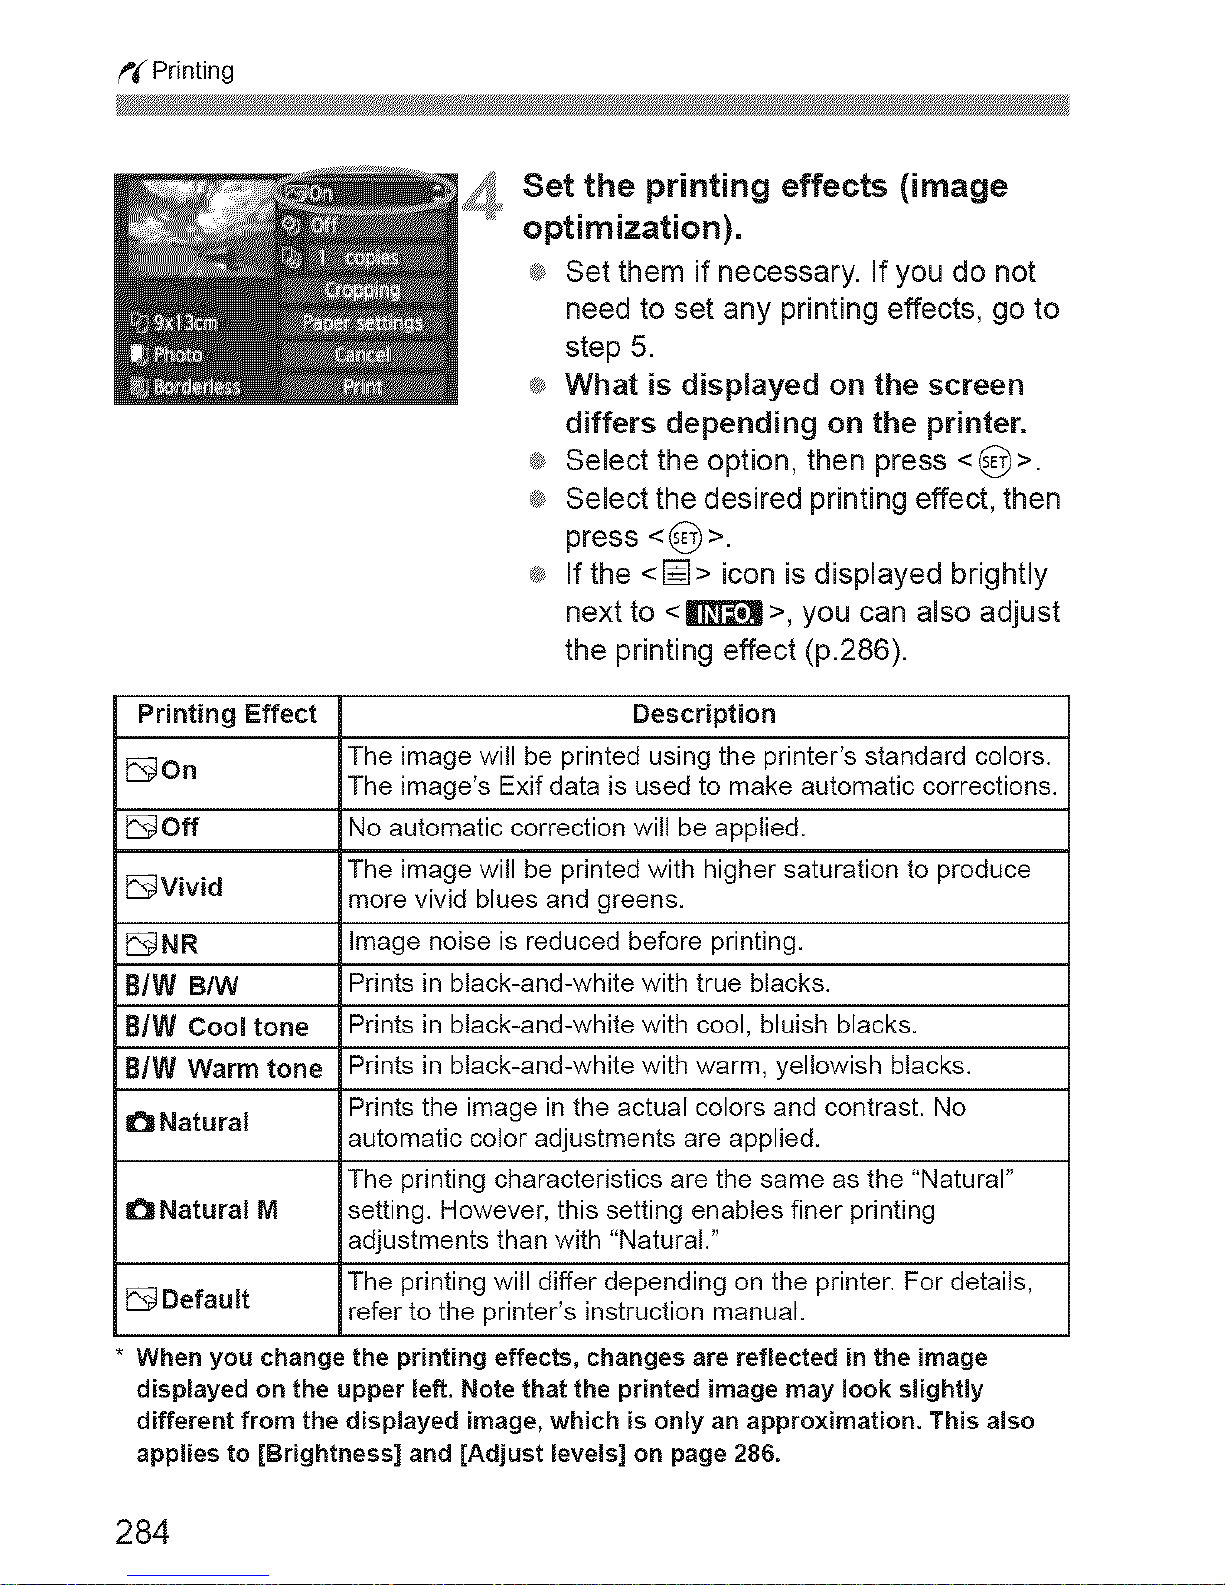
t_#Printing
_,_ Set the printing effects (image
optimization).
® Set them if necessary, if you do not
need to set any printing effects, go to
step 5.
® What is displayed on the screen
differs depending on the printer.
® Select the option, then press <0>.
® Select the desired printing effect, then
press <0>.
® If the <[]> icon is displayed brightly
next to <ll_]]_l >, you can also adjust
the printing effect (p.286).
Printing Effect Description
The image will be printed using the printer's standard colors.
_On
The image's Exif data is used to make automatic corrections.
Off No automatic correction will be applied.
The image will be printed with higher saturation to produce
_Vivid more vivid blues and greens.
_NR Image noise is reduced before printing.
B/W BtW Prints in black-and-white with true blacks.
BIW Cool tone Prints in black-and-white with cool, bluish blacks.
BIW Warm tone Prints in black-and-white with warm, yellowish blacks.
Prints the image in the actual colors and contrast. No
I!_Natural
automatic color adjustments are applied.
The printing characteristics are the same as the "Natural"
Natural M setting. However, this setting enables finer printing
adjustments than with "Natural."
The printing will differ depending on the printer. For details,
Default refer to the printer's instruction manual.
When you change the printing effects, changes are reflected in the image
displayed on the upper left. Note that the printed image may look slightly
different from the displayed image, which is only an approximation. This also
applies to [Brightness] and ]Adjust levels] on page 288.
284
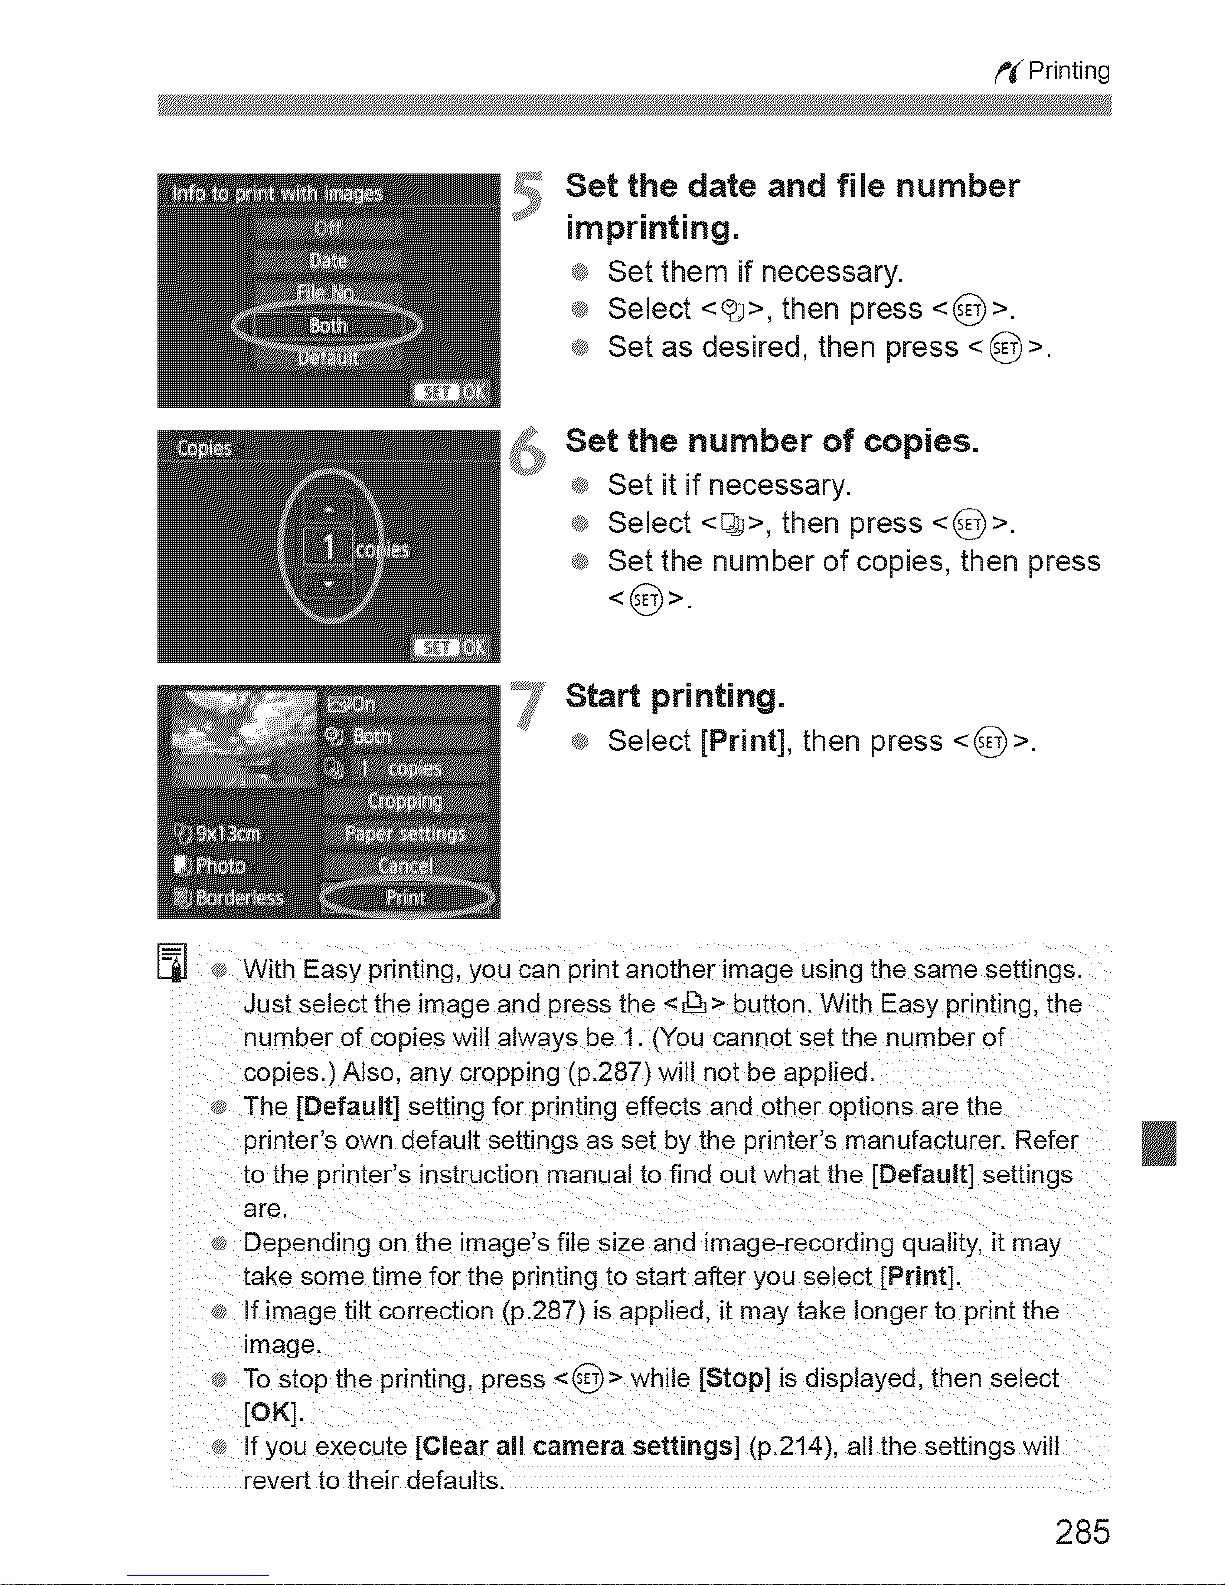
p_ Printing
Set the date and file number
imprinting.
® Set them if necessary,
® Select <@>, then press <0>.
® Set as desired, then press <8>.
S'_ Set the number of copies.
® Set it if necessary.
® Select <ojj>, then press <_)>.
® Set the number of copies, then press
<:(_ >.
_7 Start printing.
® Select [Print], then press <_)>.
With Easy printing, you can print another image using the same settings.
Just select the image and press the < _3,> button. With Easy printing, tile
number of copies wilt always be 1. (You cannot set the number of
copies.) Also. any cropping tp.287) will not be applied.
The [Default] setting for printing effects and other options are the
printer's own default settings as set by the printer's manufacturer. Refer
tOtlqe printer's instruction manual to find out what the [Default] settings
are.
Depending on the image's file size and image-recording quality, it may
take some time for the printing to star after you select [Print].
.... if image tilt correction (p.287_ is applied, it may take longer to print the
image.
To stop the printing, press <(_ > while [Stop] is displayed, then select
[OK].
, If you execute [Clear all camera settings] (p.214), all the settings will
revert to their defaults.
285
f'_ Printing
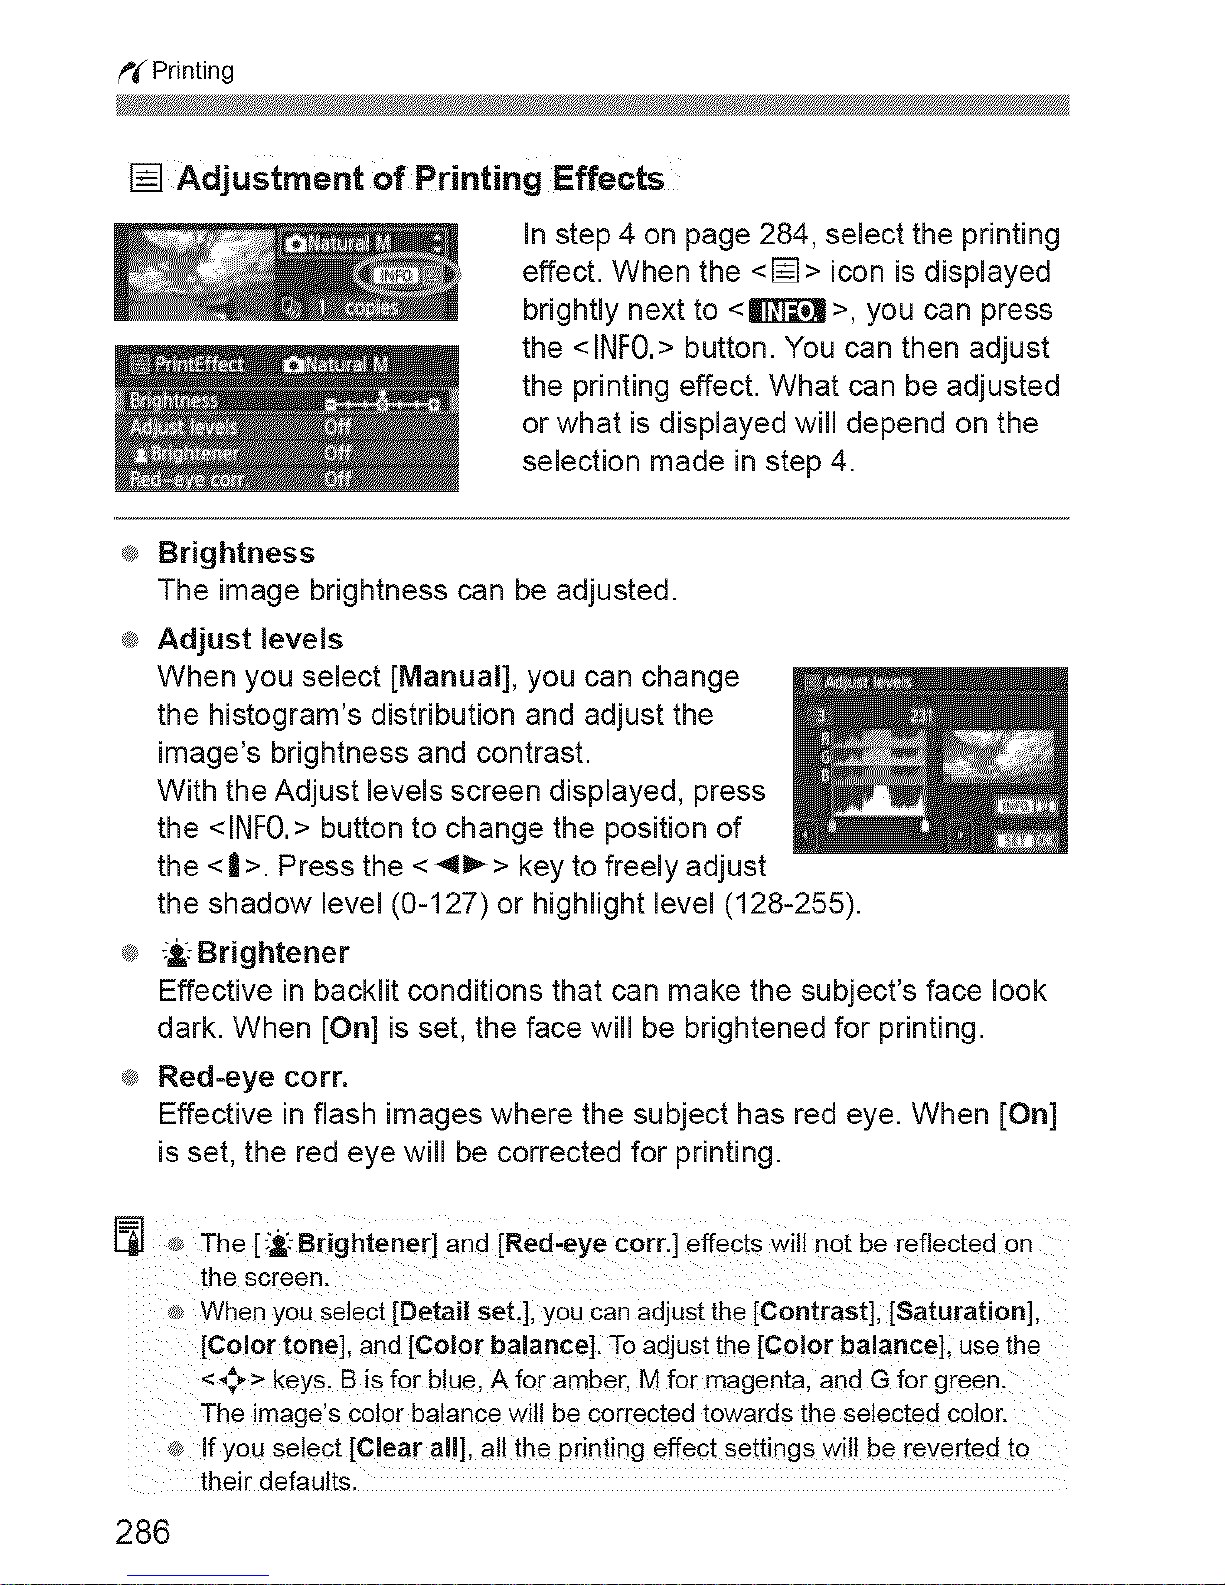
[] Adjustment of Printing Effects
In step 4 on page 284, select the printing
effect. When the <[]> icon is displayed
brightly next to <ll'lTl'_l >, you can press
the <INFO.> button. You can then adjust
the printing effect. What can be adjusted
or what is displayed will depend on the
selection made in step 4.
®_Brightness
The image brightness can be adjusted.
®_Adjust levels
When you select [Manual], you can change
the histogram's distribution and adjust the
image's brightness and contrast.
With the Adjust levels screen displayed, press
the <INF0.> button to change the position of
the < | >. Press the <4i_ > key to freely adjust
the shadow level (0-127) or highlight level (128-255).
_ _: Brightener
Effective in backlit conditions that can make the subject's face look
dark. When [On] is set, the face will be brightened for printing.
®_Red-eye corr.
Effective in flash images where the subject has red eye. When [On]
is set, the red eye will be corrected for printing.
[] _ The [_,:-Brightener] and [Red,eye corr.] effectsWillnet bereflected On
the Screen.
_ Whenyou seect [Deta set ];you canadjustthe [Contrast], [Saturat on],
[Co!or t0ne], and[Color balance]_Toadjustthe[Color balance]i usethe
<_> keys,B isfor b!ue,Afor amber,M for magenta,andG for green_
The image'sColorbalanceWil!be correctedtowardsthe selectedcolor.
_ !fyou select [Clear a!!], a!!the printing effect settings wil! bereyerted to
their defaults.
286
 Loading...