

Canon Digital Rebel XT, EOS 20Da, EOS 40D, EOS Digital Rebel XT EF-S 18-55 Kit, EOS Digital Rebel XTi EF-S 18-55 Kit Instruction Manual for Macintosh
...Page 1
Communication Software for the Camera
COPY
EOS Utility
Ver. 2.9
Introduction
Contents at
a Glance
Downloading
Images
1
1D Mk IV
1Ds Mk III
1D Mk III
REBELT1i
5D Mk II
500D
Instruction Manual
O Content of this Instruction Manual
O EU is used for EOS Utility.
O Camera model is displayed as an icon.
Example:EOS-1D Mark IV
O displays the relevant camera model.
In this manual, the windows used in the examples
O
are from Mac OS X 10.4.
O The selection sequence of menus is displayed in
procedures.
(Example: Select the [Window] menu [Main Window].)
O Square brackets are used to indicate items such as
menu names, button names and window names
that appear on the computer screen.
O Text inside < > indicates a camera switch name or
icon, or a keyboard key name.
O ** indicates a reference page.
Click to move to the relevant page.
O
: Marks information that should be read before use.
1D Mk IV
7D 60D 50D 40D
REBELXSi
450D
REBELXS
O Switching Between Pages
O Click on arrows on the bottom right of the screen.
: next page
: previous page
: return to a page you had previously displayed
O Click on the chapter headings on the right side of
the screen to switch to the contents page of that
chapter. Also, click the item you want to read about
on the table of contents to move to the relevant
page.
1000D
REBELT2i
550D
Camera
Settings
2
Remote
Shooting
3
Preferences
4
Reference
Index
O
: Marks additional information you may find helpful.
© CANON INC. 2010 CT1-7189EUME-000
Page 2

READ CAREFULLY BEFORE USING!
COPY
CANON SOFTWARE LICENSE AGREEMENT
IMPORTANT - READ THIS AGREEMENT BEFORE USING THE SOFTWARE ON THE CD-ROM
IN THIS BOX. BY USING THE SOFTWARE, YOU AGREE TO BE BOUND BY THE TERMS OF
THIS AGREEMENT.
This is a license agreement (the [Agreement]) between you and Canon Inc. ([Canon]).
IF YOU DO NOT AGREE TO THE TERMS AND CONDITIONS OF THIS AGREEMENT, DO NOT
USE THE SOFTWARE PROGRAM ON THE CD-ROM AND THE USER MANUAL IN THIS BOX
(COLLECTIVELY, THE [SOFTWARE]) AND RETURN THE SOFTWARE WITHIN 30 DAYS FROM
THE DATE OF PURCHASE TO YOUR POINT OF PURCHASE FOR A REFUND.
In consideration of the right to use the SOFTWARE, you agree to abide by the terms and conditions
of this Agreement.
1. LICENSE: Canon grants you the non-exclusive right to use the SOFTWARE only on a single
computer. You may physically transfer the SOFTWARE from one computer to another provided
that the SOFTWARE is used on only one computer at a time. You shall not install or use the
SOFTWARE on a network, multiple CPU, multiple site arrangement, or any other hardware
configuration where the SOFTWARE is accessible to more than one CPU or to more than one
user.
YOU SHALL NOT ASSIGN, SUBLICENSE, RENT , LEASE, LOAN, CONVEY OR OTHERWISE USE,
TRANSFER, COPY, TRANSLATE, CONVERT TO ANOTHER PROGRAMMING LANGUAGE,
ALTER, MODIFY, DECOMPILE OR DISASSEMBLE THE SOFTWARE, IN WHOLE OR IN PART,
EXCEPT AS EXPRESSLY PROVIDED IN THIS AGREEMENT.
2. BACK-UP COPY: You may make one copy of the SOFTWARE solely for back-up purposes, or
copy the SOFTWARE onto the permanent storage device (e.g. a hard disk) of your computer
and retain the original for back-up purposes. Any other copying of the SOFTWARE is a violation
of this Agreement. You must reproduce and include the copyright notice on the back-up copy.
3. SUPPORT AND UPDATES: Canon is not responsible for providing maintenance or support for
use of the SOFTWARE. No updates, fixes or support will be made available for the
SOFTWARE.
4. LIMITED WARRANTY AND LIMITATION OF LIABILITY: It is your responsibility to choose,
maintain and match the hardware and software components of your computer system. Thus
Canon does not guarantee uninterrupted service or correction of errors or that the functions or
performance of the SOFTWARE will meet your requirements. THE SOFTWARE IS LICENSED
ON AN [AS IS] BASIS AND WITHOUT WARRANTY OF ANY KIND. The CD-ROM storing the
SOFTWARE is warranted only against defective material under normal use for a period of ninety
(90) days after purchase from an authorized Canon dealer as evidenced by your sales receipt.
Your sole remedy for a defective CD-ROM shall be replacement of the same without charge
when returned by you at your expense to your point of purchase and proven to be defective
upon inspection. The replacement CD-ROM will be warranted for the remainder of the original
ninety (90) day warranty period of the defective CD-ROM. The limited warranty does not apply if
the failure of the CD-ROM resulted from accident, abuse or misapplication of the SOFTWARE
and shall not extend to anyone other than the original user of the SOFTWARE.
EXCEPT AS SPECIFICALLY SET FORTH IN THIS PARAGRAPH 4, CANON, CANON’S
SUBSIDIARIES, DISTRIBUTORS AND DEALERS DISCLAIM ALL WARRANTIES, EXPRESS OR
IMPLIED, INCLUDING ANY WARRANTY OF MERCHANTABILITY OR FITNESS FOR A
PARTICULAR PURPOSE, WITH RESPECT TO THE SOFTWARE.
NEITHER CANON NOR ANY OF CANON’S SUBSIDIARIES, DISTRIBUTORS OR DEALERS IS
LIABLE FOR ANY DAMAGES HOWSOEVER CAUSED, INCLUDING WITHOUT LIMITATION,
DIRECT, CONSEQUENTIAL OR INCIDENTAL LOSS OR DAMAGE INCLUDING LOSS OF
PROFITS, EXPENSE OR INCONVENIENCE HOWSOEVER CAUSED OR ARISING OUT OF THE
SOFTWARE OR THE USE THEREOF.
NEITHER CANON, NOR ANY OF CANON’S SUBSIDIARIES, DISTRIBUTORS OR DEALERS
SHALL HAVE ANY OBLIGATION TO INDEMNIFY YOU AGAINST ANY CLAIM OR SUIT
BROUGHT BY A THIRD PARTY ALLEGING THAT THE SOFTWARE OR THE USE THEREOF
INFRINGES ANY INTELLECTUAL PROPERTY OF SUCH THIRD PARTY.
5. TERM: This Agreement is effective upon your using the SOFTWARE and remains in effect until
expiration of all copyright interests in the SOFTWARE unless earlier terminated. You may
terminate this Agreement by destroying the SOFTWARE. This Agreement will also terminate
without notice to you if you fail to comply with any of the terms of this Agreement and you must
then promptly return the SOFTWARE. In addition, Canon may enforce its other legal rights.
6. U.S. GOVERNMENT RESTRICTED RIGHTS NOTICE: The SOFTWARE is provided with
restricted rights. Use, duplication or disclosure is subject to restrictions as set forth in either
subparagraph (c) (1) (ii) of the Rights in Technical Data and Computer software clause at
DFARs 252.227-7013 or subparagraph (c) (1) and (2) of the Commercial Computer Software
Restricted Rights Clause at FAR 52.227-19, as applicable.
7. SEVERABILITY: In the event that any provision of this Agreement is declared or found to be
illegal by any court or tribunal of competent jurisdiction, such provision shall be null and void
with respect to the jurisdiction of that court or tribunal and all the remaining provisions of this
Agreement shall remain in full force and effect.
8. CONTROLLING LAW: The terms of this Agreement as it relates to purchases of the Software in
the United States of America shall be governed and construed in all respects in accordance with
the laws and regulations of the State of New York, without reference to choice of law principles.
The terms of this Agreement as it relates to purchases of the Software in Canada shall be
governed by the laws of the province of Ontario.
9. OWNERSHIP: All rights, including but not limited to copyrights and trade secret rights, to the
SOFTWARE belong to Canon, its affiliated corporations and third party licensors. Your use of
the SOFTWARE is subject to the United States, Canada and other applicable copyright and
trademark laws and nothing in this Agreement constitutes a waiver of the rights of Canon, its
affiliated corporations and third party licensors under such laws.
Nothing contained in Paragraph 1 shall be construed to give Canon any ownership rights in any
images, graphics or textual material that you save in connection with the Software.
10.ACKNOWLEDGEMENT: BY USING THE SOFTWARE, YOU ACKNOWLEDGE THAT YOU
HAVE READ THIS AGREEMENT, UNDERSTOOD IT, AND AGREE TO BE BOUND BY ITS
TERMS AND CONDITIONS. YOU ALSO AGREE THAT THIS AGREEMENT IS THE
COMPLETE AND EXCLUSIVE STATEMENT OF AGREEMENT BETWEEN YOU AND CANON
CONCERNING THE SUBJECT MATTER HEREOF AND SUPERSEDES ALL PRO
OR PRIOR AGREEMENTS, VERBAL OR WRITTEN, AND ANY OTHER COMMUNICATIONS
BETWEEN THE PARTIES RELATING TO THE SUBJECT MATTER HEREOF. NO
AMENDMENT TO THIS AGREEMENT SHALL BE EFFECTIVE UNLESS SIGNED BY A DULY
AUTHORIZED OFFICER OF CANON.
OSALS
P
Introduction
Contents at
a Glance
Downloading
Images
1
Camera
Settings
2
Remote
Shooting
3
Preferences
4
Reference
Index
1
Page 3
Introduction
COPY
Introduction
EOS Utility (hereinafter EU) is software for communication with your EOS
DIGITAL camera. By connecting the camera and computer with the cable
provided with the camera, you can download to your computer images
saved in the camera’s memory card as well as set various camera
settings or shoot remotely from EU on your computer.
Main Features of EU
From EU, you can control the camera remotely and perform the
following main features.
O Batch download to your computer images
saved in the camera’s memory card.
O You can also download to your computer only images you have
selected.
O Set various camera settings from your
computer.
O Shoot remotely by controlling the camera
from your computer.
O Remote Live View shooting – Shoot while checking your subject in
real time on your computer.
O You can also shoot remotely by operating the camera’s shutter
button.
O Preset a time allowing the camera to shoot automatically with
timer shooting.
System Requirements
OS Mac OS X 10.4 to 10.6
Computer
CPU PowerPC G4, G5, Intel processor
RAM Minimum 1GB
Interface Hi-Speed USB
Display
O When using EU on an Intel-based Macintosh running Mac OS X 10.4 ,
be sure your Mac OS is updated to version OS X 10.4.7 or later.
O Users of Mac OS X 10.5.6 should update to Mac OS X 10.5.8.
Macintosh with one of the above OS installed and a USB
port as a standard feature
Resolution: 1024 × 768 or more
Colors: Thousands or more
Supported Camera
Can be used for RAW images, JPEG images or MOV movies shot with
the cameras below.
EOS-1D Mark IV EOS-1Ds Mark III
EOS-1D Mark III EOS 5D Mark II
EOS 7D EOS 60D
EOS 50D EOS 40D
EOS REBEL T2i/550D EOS REBEL T1i/500D
EOS DIGITAL REBEL XSi/450D EOS DIGITAL REBEL XS/1000D
Contents at
a Glance
Downloading
Images
1
Camera
Settings
2
Remote
Shooting
3
Preferences
4
Reference
Index
O When downloading images or shooting
remotely, view/check images with the
linked Digital Photo Professional.
2
Page 4
Contents at a Glance
COPY
Downloading images from your camera to a
computer
O To batch download all the images to a computer ¿ p.6
O To download to a computer selected images only ¿ p.7
O To download images using a third-party card reader ¿ p.9
Camera settings from a computer
O To set the camera owner’s name, copyright notice
and date/time
O To set a Picture Style and apply to the camera ¿ p.16
O To apply a Picture Style file to the camera ¿ p.18
O To register a personal white balance in the camera ¿ p.20
O To set a JPEG quality and apply to the camera ¿ p.21
O To adjust a white balance setting and apply to the
camera
O To register lens aberration correction/peripheral
illumination correction data for the lens in the camera
O To set My Menu and apply to the camera ¿ p.24
¿ p.12
¿ p.22
¿ p.22
Remote shooting
O To shoot by controlling the camera from a computer
(Remote Live View shooting)
O To shoot with accurate horizontal/vertical alignment ¿ p.38
O To change the aspect ratio and shoot ¿ p.38
O To shoot with another image displayed as overlay to
align several images at the same angle
O To shoot by operating the camera ¿ p.42
O To shoot movies ¿ p.42
O To shoot with timer ¿ p.53
O To shoot with flash ¿ p.55
¿ p.27
¿ p.39
Functions for use with other accessories sold
separately
O
T o sho ot with the Wireless File T ransmitter WFT -E2/A, E2
II A/B/C/D, E3/A, E4/A, E4 II A/B /C/D, or E5A/B/C/D and
check the images in real time
O To start up the WFT-E2/A, E2 II A/B/C/D, E3/A, E4/A,
E4 II/A/B/C/D, or E5A/B/C/D software from EU
¿ p.65
¿ p.66
Introduction
Contents at
a Glance
Downloading
Images
1
Camera
Settings
2
Remote
Shooting
3
Preferences
4
Reference
Index
33
Page 5
1
COPY
Downloading Images to your Computer
Basic operation such as preparing for downloading images to your
computer (connecting your camera and computer), starting up EU,
downloading images from your camera to your computer and quitting EU
are explained here.
Introduction
Contents at
a Glance
Connecting the Camera and Computer..................... 5
Starting up EU........................................................... 6
Batch Downloading Images to Your Computer ......... 6
Downloading Selected Images to Your Computer........ 7
Downloading Images with a Card Reader.................... 9
Downloading Images Using Digital Photo Professional.....
Downloading Images Using ImageBrowser............ 9
Downloading Images without Using Canon Software.....
Quitting EU.............................................................. 10
Downloading
Images
1
Camera
Settings
2
9
9
Remote
Shooting
3
Preferences
4
Reference
Index
4
Page 6
Connecting the Camera and Computer
COPY
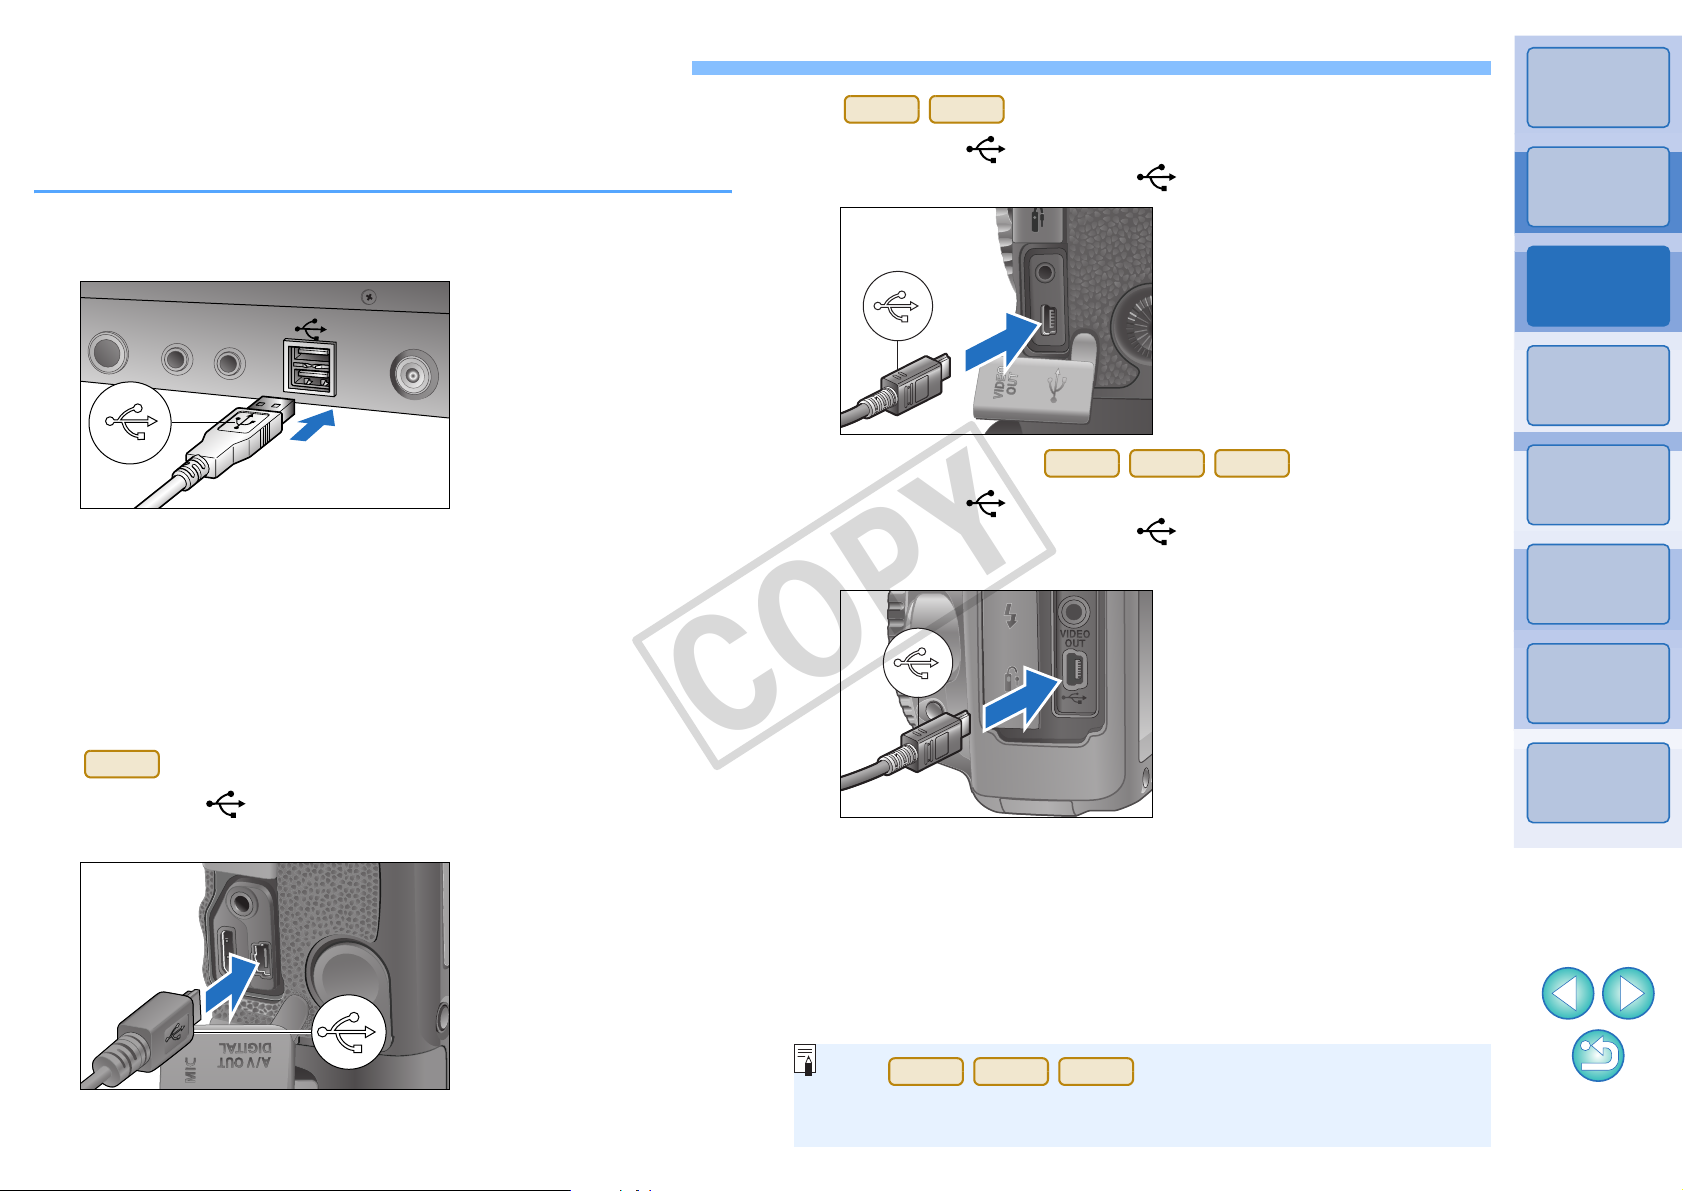
To download to your computer images shot with your camera, you will
need to connect your camera and computer using the interface cable
provided with your camera.
Connect the large plug of the cable into the USB port
1
of your computer.
1Ds Mk III
O With the < > mark on the plug facing the front of the camera,
connect it to the camera’s < > terminal.
1D Mk III
Introduction
Contents at
a Glance
Downloading
Images
1
Camera
Settings
2
O For the location and direction of the USB port, refer to the
computer User’s Manual.
Connect the small plug of the cable into the terminal
2
on your camera.
O Once the plug is connected to th e camera acco rding to the step s
for your camera model, preparation for downloading images is
complete. Continue with “Starting up EU”.
1D Mk IV
O With the < > mark on the plug facing the back of the camera,
connect it to the camera’s <A/V OUT / DIGITAL> terminal.
Cameras other than
O With the < > mark on the plug facing the front of the camera,
connect it to the camera’s < > terminal or <A/V OUT /
DIGITAL> terminal.
1D Mk IV
1Ds Mk III
1D Mk III
Remote
Shooting
3
Preferences
4
Reference
Index
1D Mk IV
With , you can fix the plug to the camera
with the cable protector to prevent the plug from disconnecting. For
details on using, refer to p.68, p.69.
1Ds Mk III
1D Mk III
5
Page 7
Starting up EU
COPY
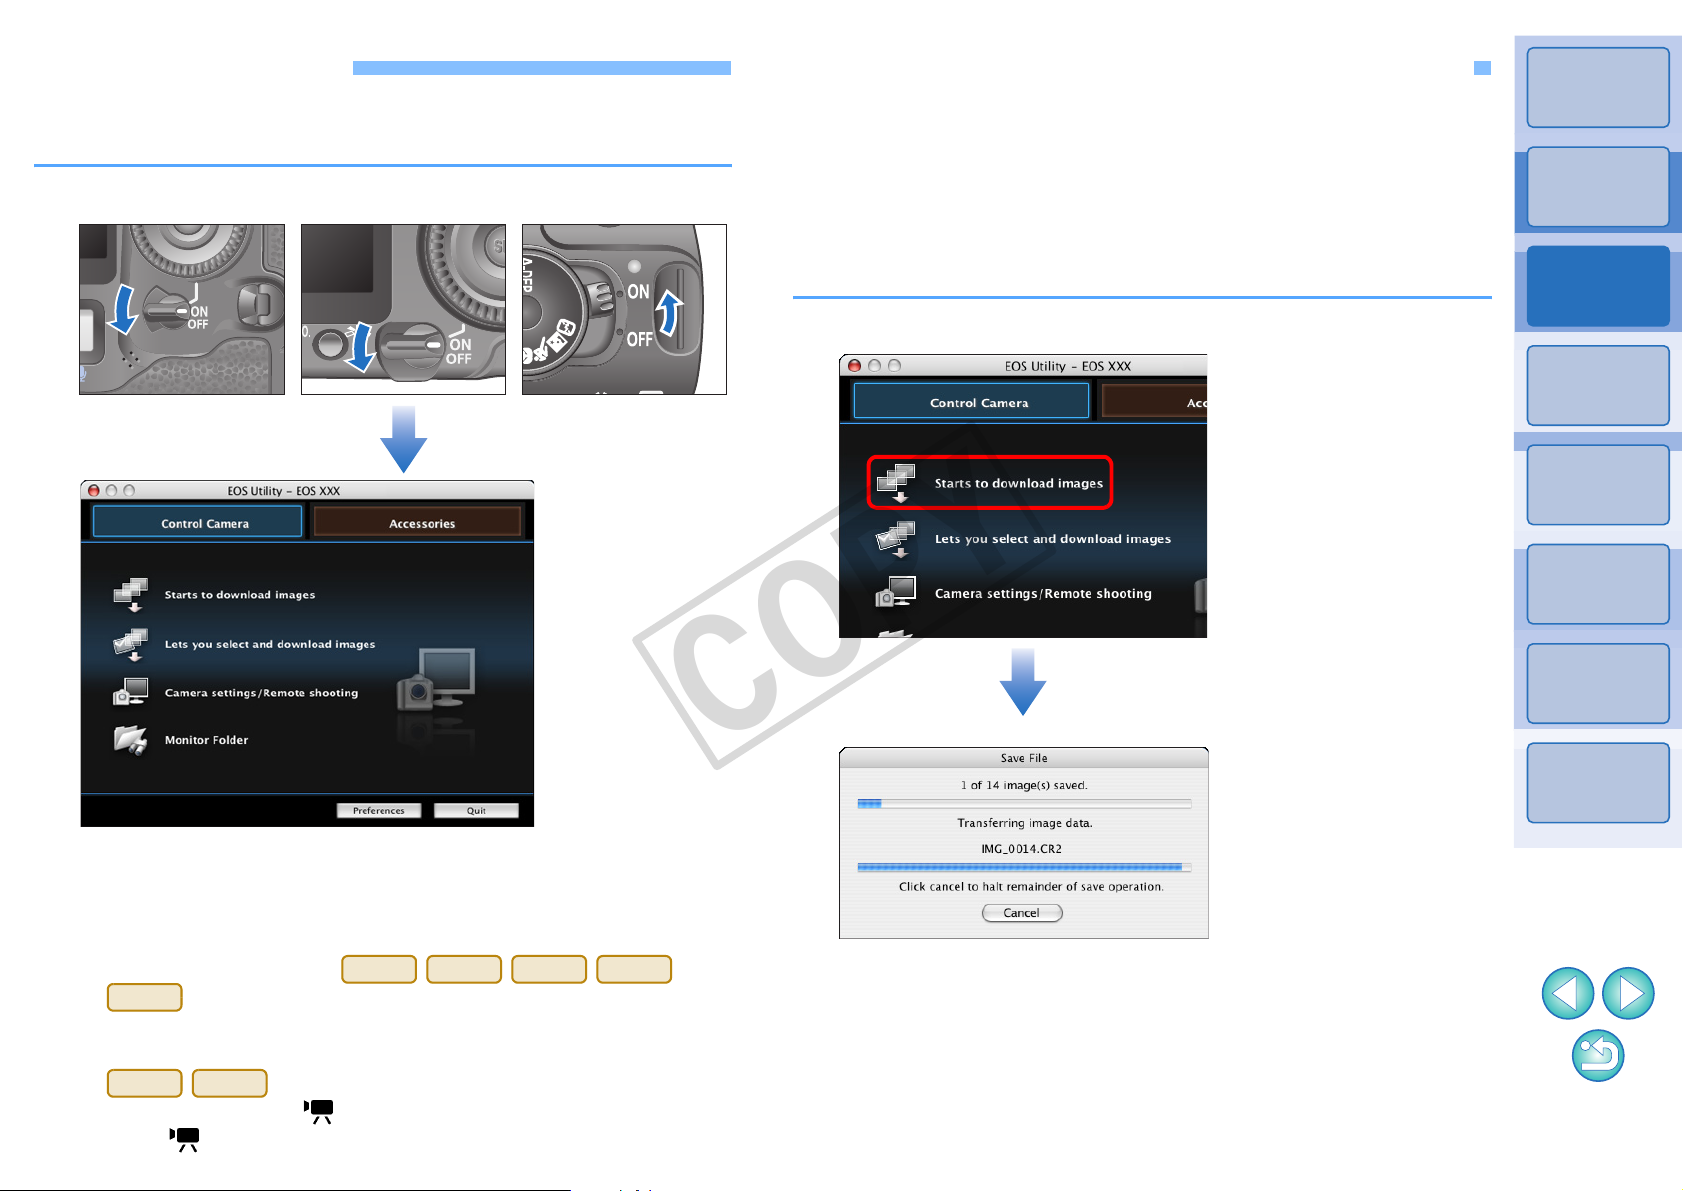
When the camera’s power switch is set to < ON >, EU will start up, and
the camera and computer will be able to communicate.
Set the camera’s power switch to < ON >.
Batch Downloading Images to Your Computer
You can batch download to your computer all the images saved on the
memory card inserted in the camera that you have not already
downloaded.
The downloaded images are sorted by date into folders and are then
displayed in the main window of Digital Photo Professional (RA W image
processing, viewing and editing software) (hereinafter DPP), which is
linked to start up automatically, where you can check them immediately.
Click [Starts to download images].
1
Introduction
Contents at
a Glance
Downloading
Images
1
Camera
Settings
2
EU Main window
¿ EU starts up, the main window appears, and your camera and
computer can now communicate. Continue with “Batch
Downloading Images to Your Computer”.
O The camera’s LCD monitor turns on when EU starts up.
O For cameras other than
550D
saved on the memory card inserted in the camera to your
computer. Refer to your camera’s Instruction Manual for details.
REBELT1i
O cannot communicate with EU if the camera’s
mode dial is set to < >. Set the mode dial to a mode other
than < >.
, you can operate the camera and download images
500D
1D Mk IV
7D 60D
REBELT2i
Save File dialog box
¿ The [Save File] dialog box appears and image downloading to
your computer begins.
¿ The downloaded images are saved in the [Pictures] folder.
O When all images have been downloaded, DPP starts up
automatically and the downloaded images are displayed in
DPP’s main window.
Remote
Shooting
3
Preferences
4
Reference
Index
6
Page 8
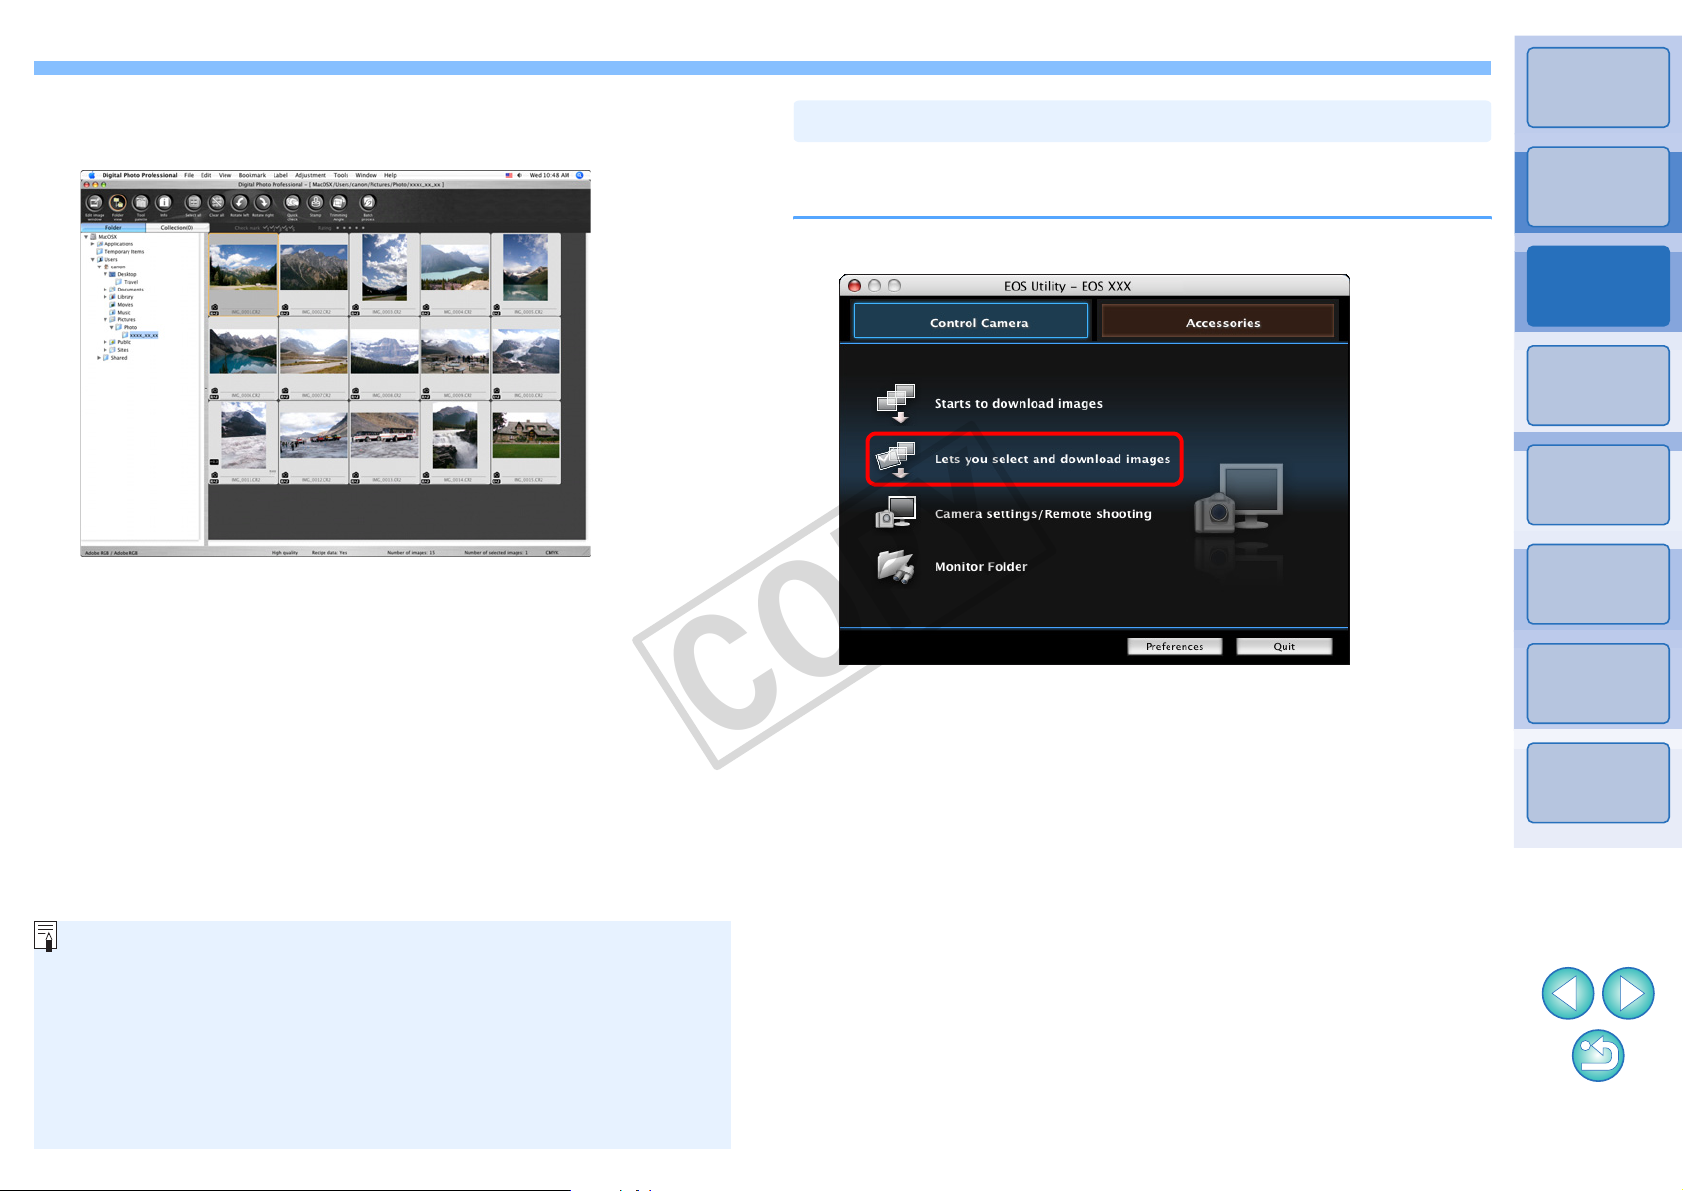
Check the downloaded images.
COPY
2
DPP Main window
Downloading Selected Images to Your Computer
From the images saved in your camera’s memory card, you can select
the ones you want and download them to your computer.
Click [Lets you select and download images].
1
Introduction
Contents at
a Glance
Downloading
Images
1
Camera
Settings
2
Remote
Shooting
3
O Check the downloaded images in DPP.
For details on using DPP, refer to the “Digital Photo Professional
Instruction Manual” (PDF electronic manual).
O Continue with “Quitting EU” (p.10).
O When you download images, you can change the software that
starts up from DPP to ImageBrowser or other software in
preferences ([Linked Software] window) (p.61).
O You can change the save destination for images downloaded and
images to download in preferences ([Destination Folder] window,
[Download Images] window) (p.60, p.61).
O Downloading movie files may t ake some time d ue t o the large file
size.
¿ A viewer window appears and the images in the memory card
are displayed.
Preferences
4
Reference
Index
77
Page 9
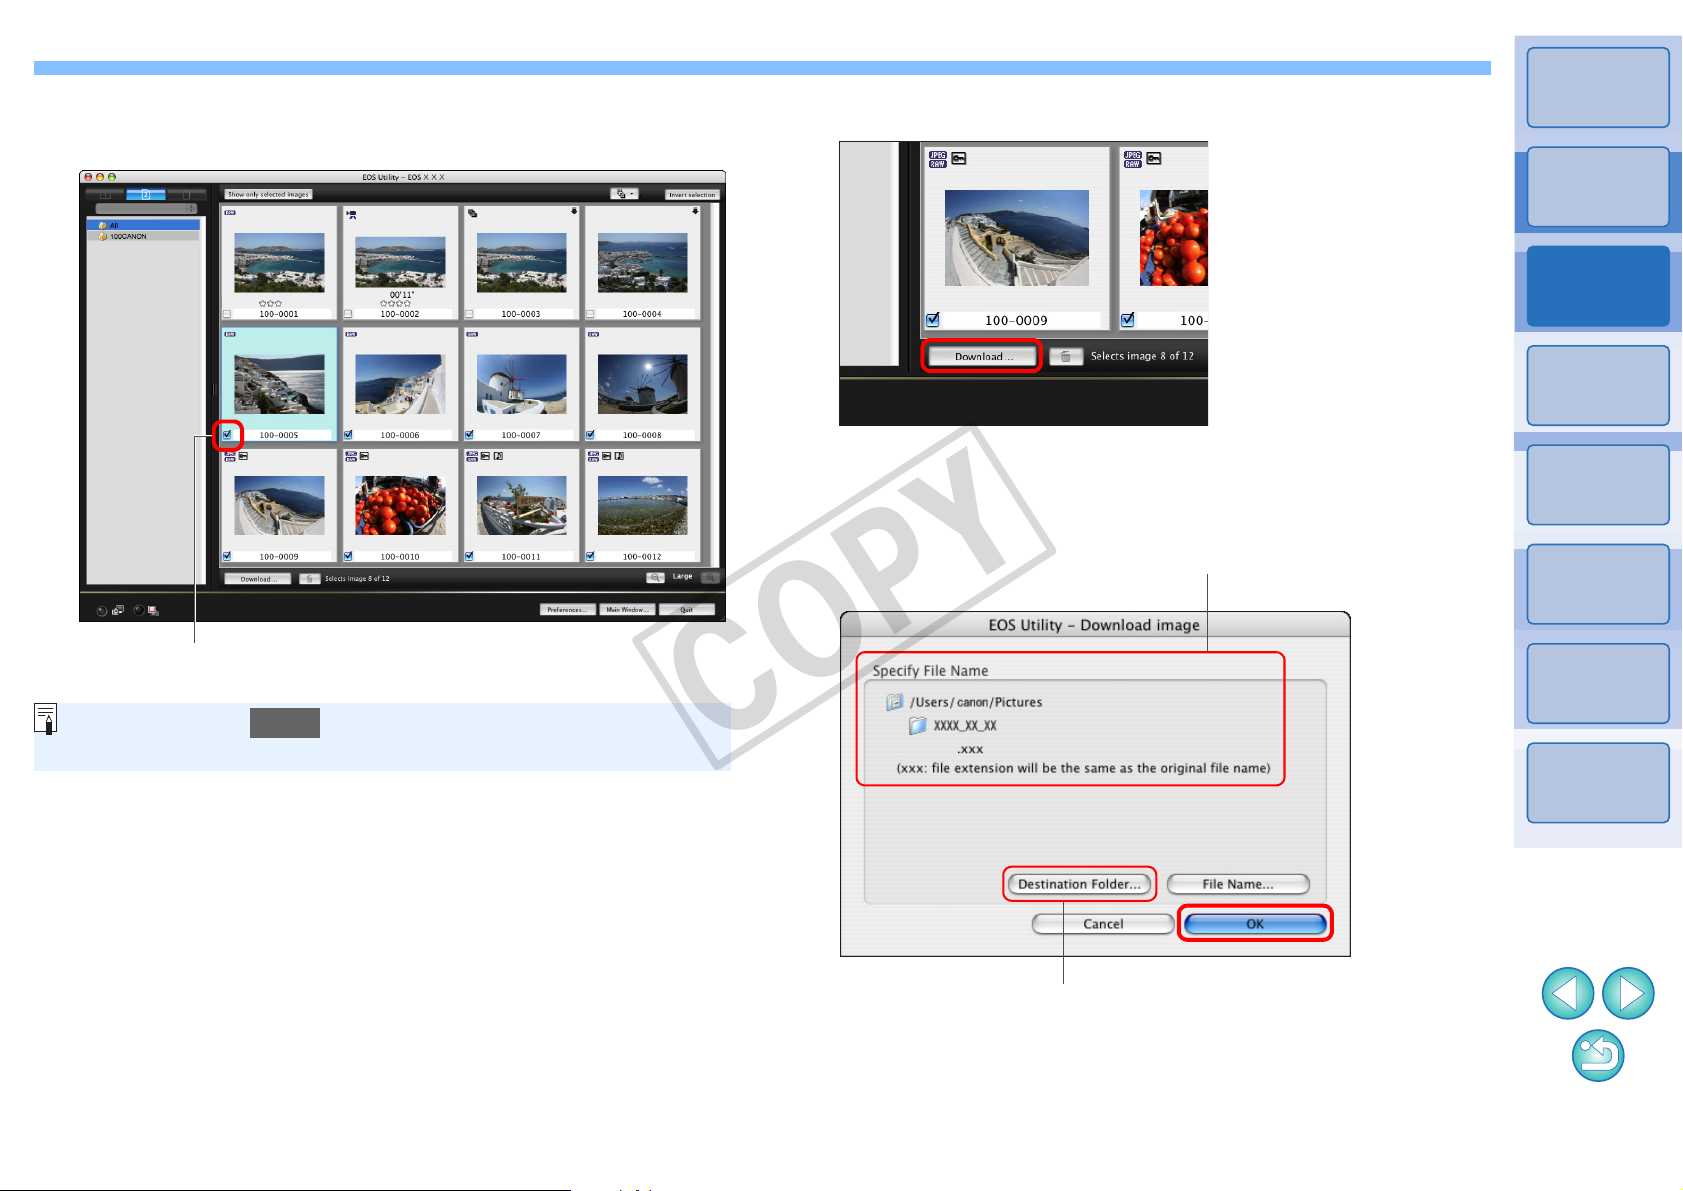
View the images and checkmark images to download.
COPY
2
Viewer window
Add check mark
Click the [Download] button.
3
¿ The [Download image] dialog box appears.
Specify the save destination and then click the [OK]
4
button.
Displays the save destination on the computer
Download image dialog box
Introduction
Contents at
a Glance
Downloading
Images
1
Camera
Settings
2
Remote
Shooting
3
Preferences
4
Reference
You can click the [ ] button and extract images by a variety of
criteria to select images to download.
Index
Specify the save destination
¿ The [Save File] dialog box appears and image downloading to
your computer begins.
88
Page 10

¿ The images downloaded to your computer are displayed in the
COPY
[Quick Preview] window.
O The [Quick Preview] window allows you to quickly review the
downloaded images. You can also resize the [Quick Preview]
window.
O When all images have been downloaded, DPP starts up
automatically and the downloaded images are displayed.
O To switch to the main window, click the [Main Window] button in
the viewer window.
Downloading Images with a Card Reader
For users with a third-party card reader, you can also download to your
computer images stored in a memory card using the card reader.
However , EU does no t support image d ownloading using a card reader.
For this reason, when downloading images using a card reader , use one
of the following 3 procedures.
Downloading Images Using Digital Photo
Professional
You can use DPP to download to your computer shot images from a
memory card inserted in a third-party card reader connected to your
computer.
For detailed instructions, refer to “Downloading Imag es Using Your Card
Reader” in the “Digital Photo Professional Instruction Manual” (PDF
electronic manual).
Downloading Images Using ImageBrowser
You can use ImageBrowser to download to your computer shot images
from a memory card inserted in a third-party card reader connected to
your computer.
For detailed instructions, refer to “Downloading Imag es Using Your Card
Reader” in the “ImageBrowser Instruction Manual” (PDF electronic
manual).
Introduction
Contents at
a Glance
Downloading
Images
1
Camera
Settings
2
Remote
Shooting
3
Preferences
4
Reference
Index
O In step 2, you can batch checkmark several images in sequence.
After clicking the first image you want to download, hold the
< shift > key and click the last image, and [ ] will be
displayed. By clicking the [ ] button, the selected images will
be checkmarked in a batch.
O For a list of viewer window functions, refer to p.71.
Downloading Images without Using Canon
Software
To download images with a card reader without using Canon software
such as DPP or ImageBrowser, copy to you r computer the [DCIM] folder
in the memory card.
For more details about folder structures and files in the memory card,
refer to p.67.
99
Page 11
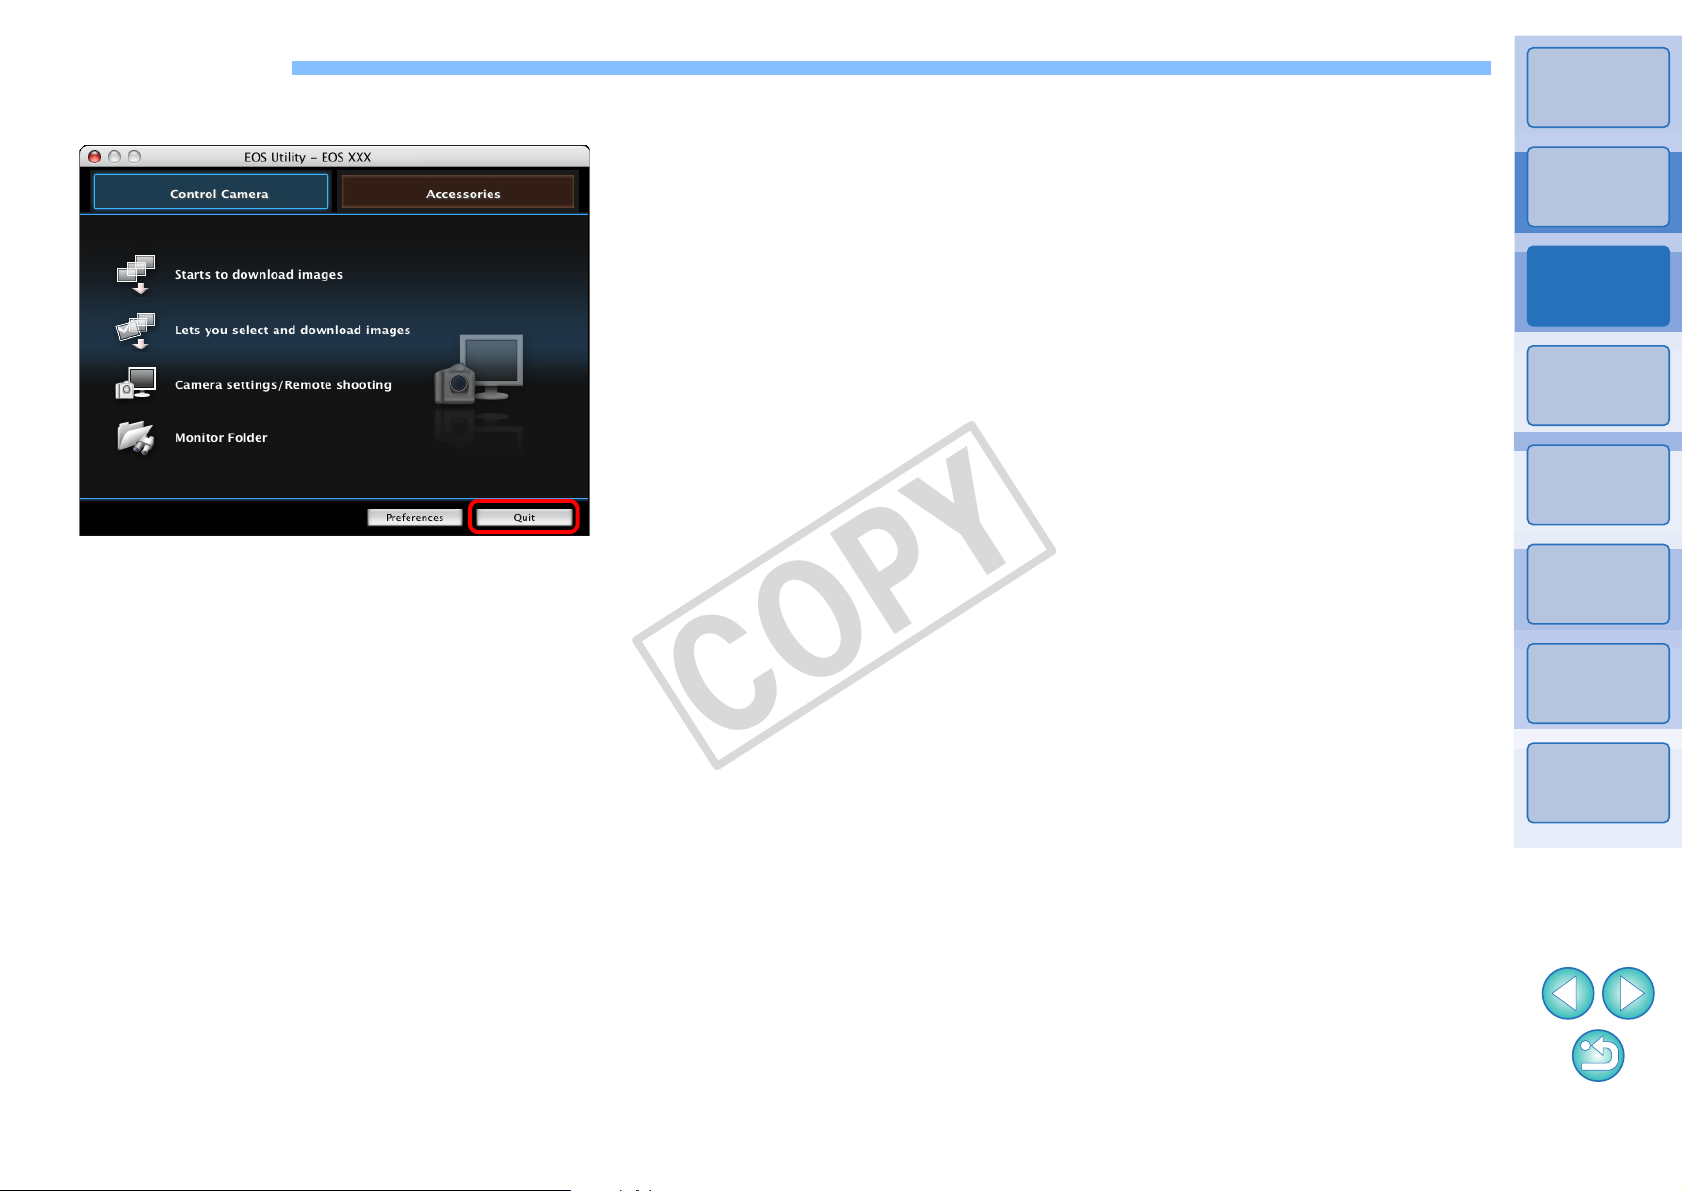
Quitting EU
COPY
Click the [Quit] button.
1
¿ The window closes and EU quits.
Turn the camera’s power switch to < OFF >.
2
Introduction
Contents at
a Glance
Downloading
Images
1
Camera
Settings
2
Remote
Shooting
3
Preferences
4
Disconnect the cable from the camera and computer .
3
O Do not pull on the cable; hold the plug and pull out.
Reference
Index
10
Page 12
2
COPY
Setting the Camera from Your Computer
This section explains how to set the camera’s functions from EU.
Setting the Camera Owner’s Name, Copyright Notice
Introduction
Contents at
a Glance
and Date/Time............................................................
Available Settings by Camera Model.......................... 13
Setting up Camera Functions.................................. 14
Available Settings by Camera Model.......................... 15
Setting Picture Styles and Applying to the Camera.... 16
Selecting a Picture Style and Applying to the
Camera...................................................................
Changing Picture Style Settings and Applying to the
Camera...................................................................
Applying Picture Style Files to the Camera............ 18
Saving White Balance to your Computer....................
Registering Personal White Balance in the Camera...
Setting JPEG Quality and Applying to the Camera.... 21
Adjusting White Balance and Applying to the Camera...
Registering Lens Aberration Correction/Peripheral
Illumination Correction Data for the Lens in the Camera
12
16
17
19
20
22
22
Downloading
Images
1
Camera
Settings
2
Remote
Shooting
3
Preferences
4
Reference
Index
Setting My Menu and Registering to the Camera .....
24
11
Page 13
Setting the Camera Owner’s Name, Copyright Notice and Date/Time
C
COPY
You can set and apply to the camera, the camera owner’s name,
copyright notice and date/time recorded as shooting information in shot
images.
Connect your camera and computer, and then start
1
up EU
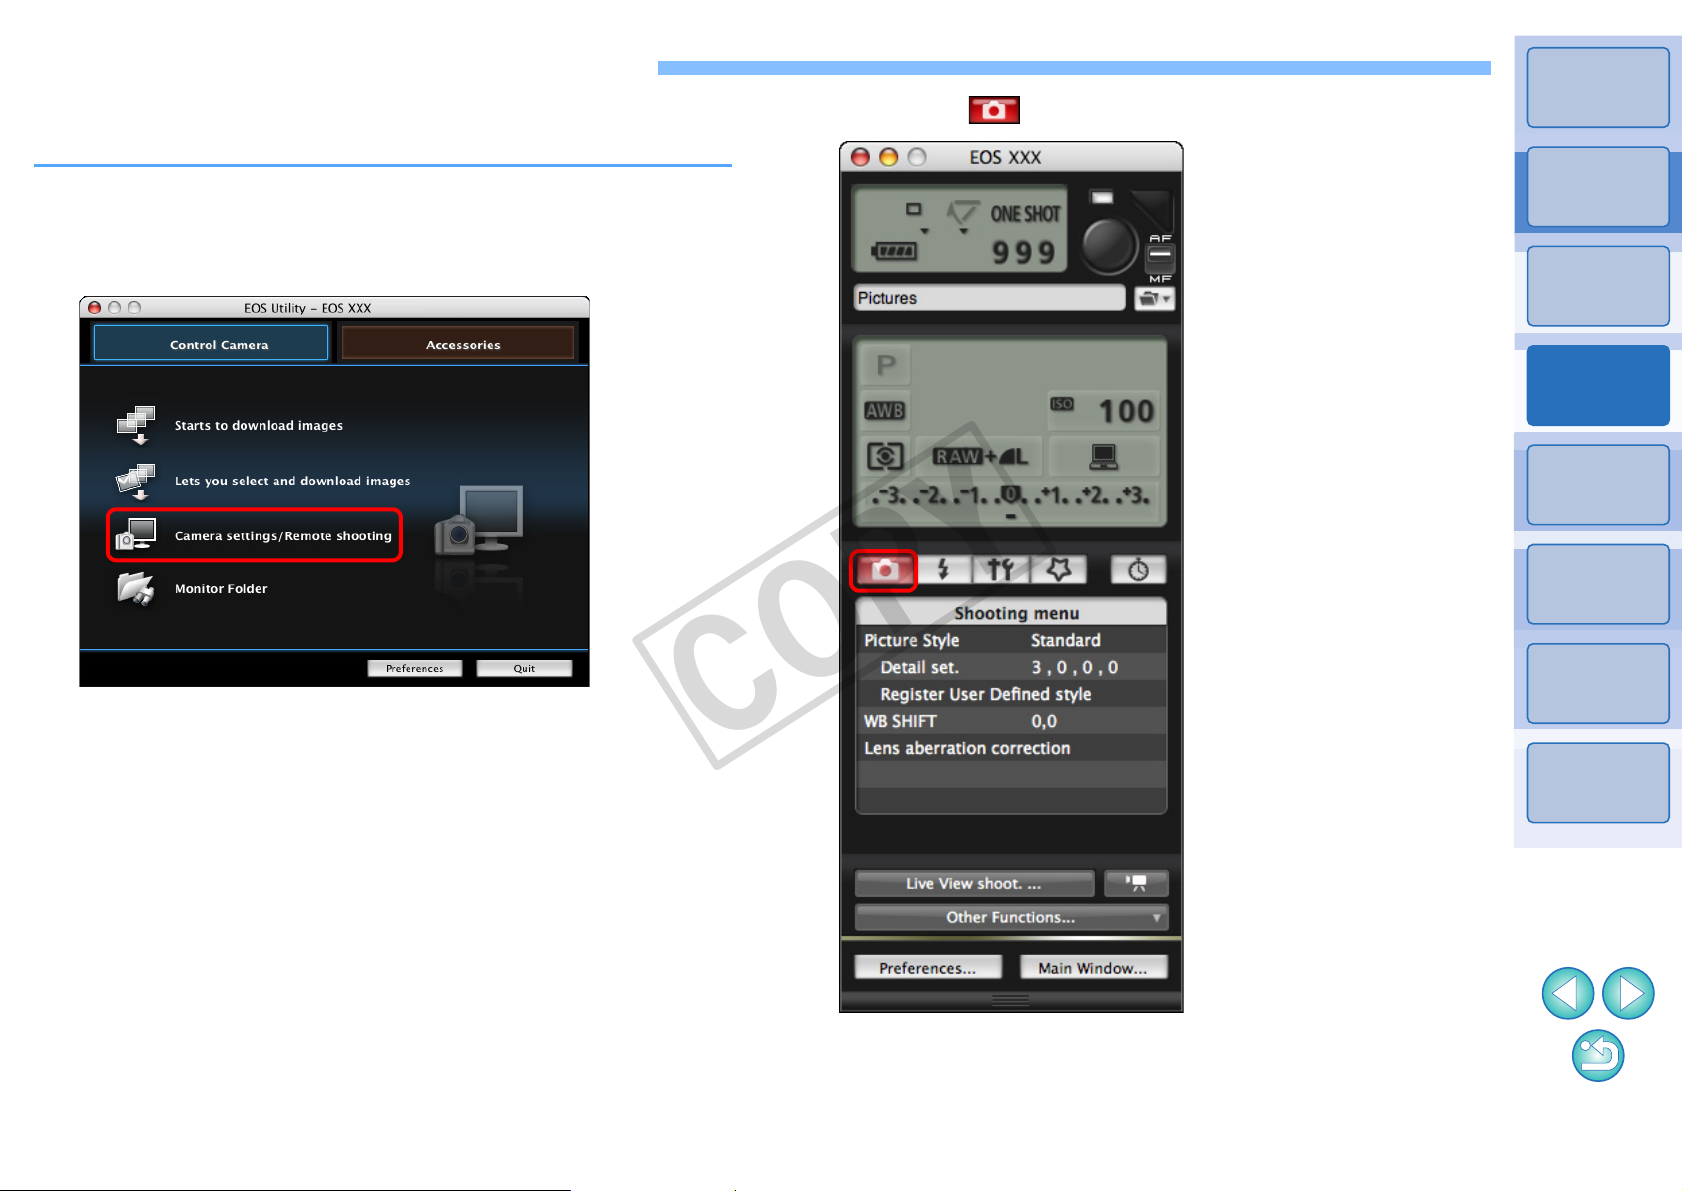
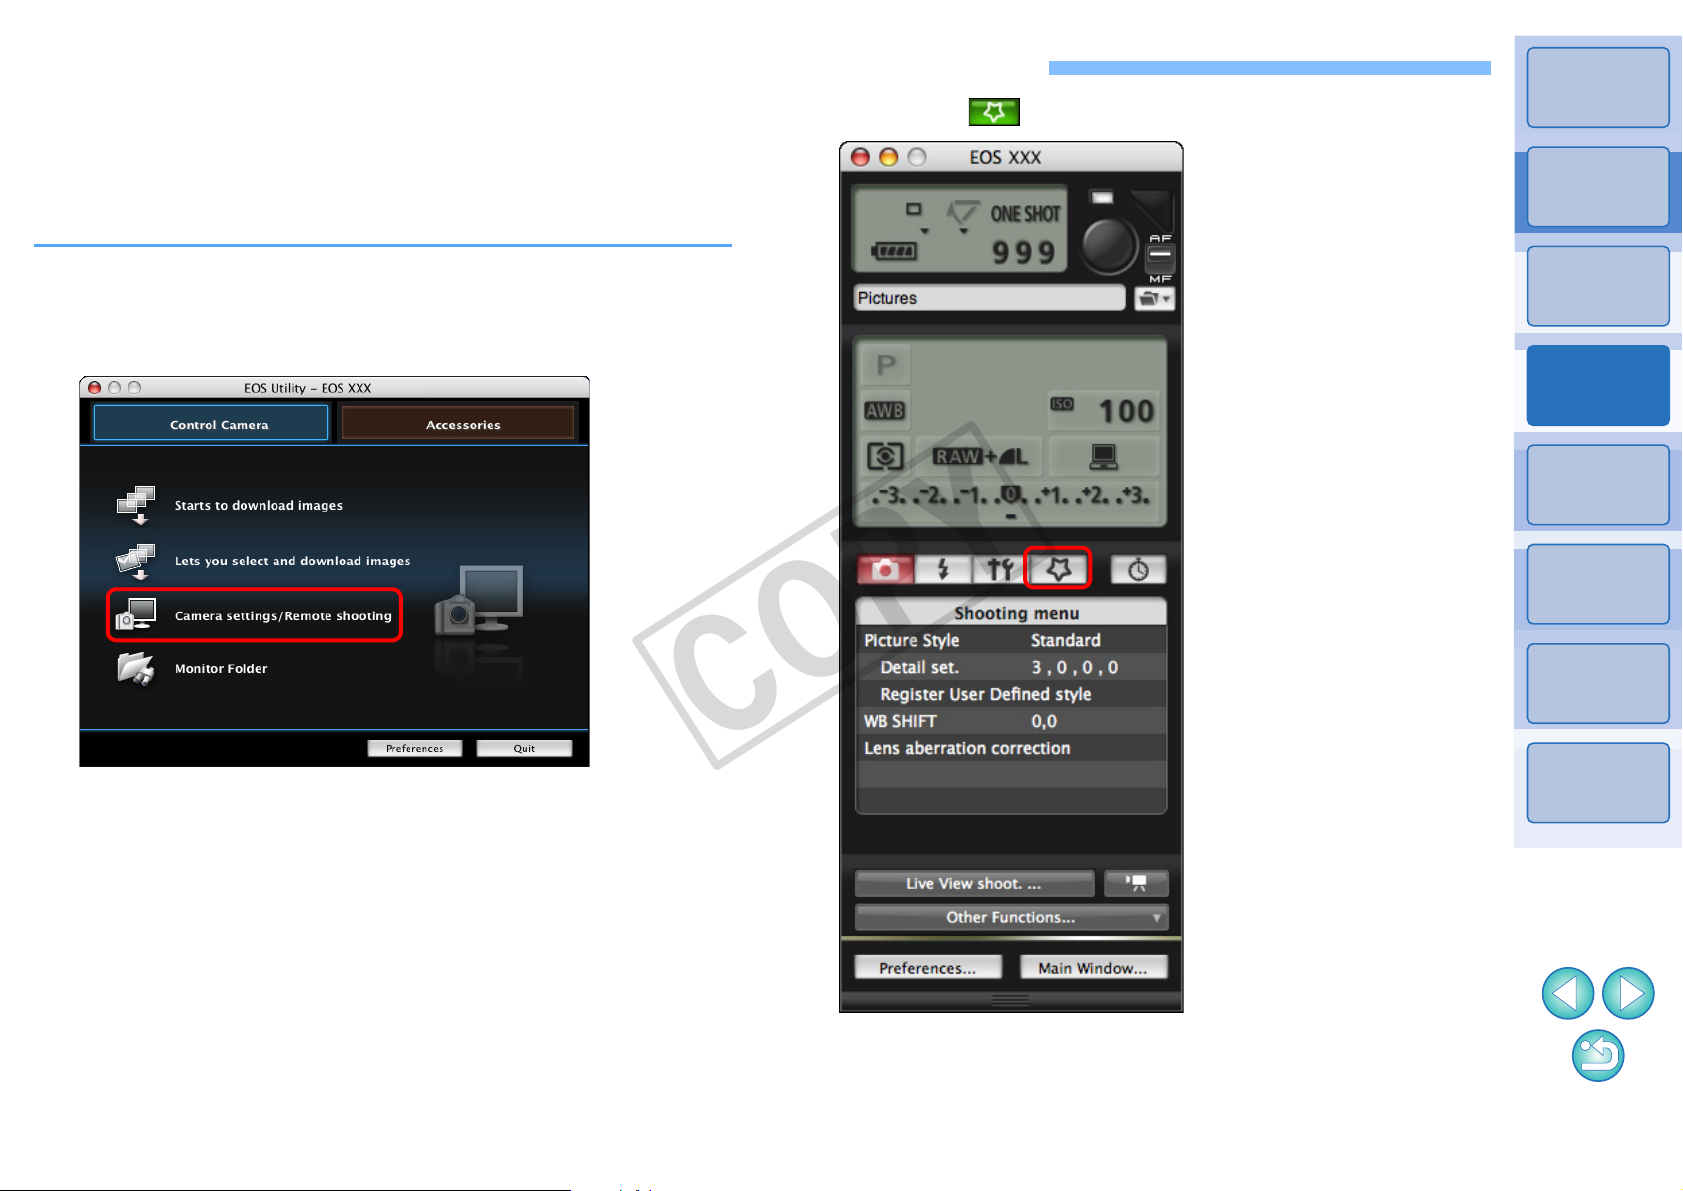
Click [Camera settings/Remote shooting].
(p.5).
Click the [ ] button.
3
apture window
2
Introduction
Contents at
a Glance
Downloading
Images
1
Camera
Settings
2
Remote
Shooting
3
Preferences
4
¿ The capture window appears.
Reference
Index
¿ The [Set-up menu] appears.
12
Page 14
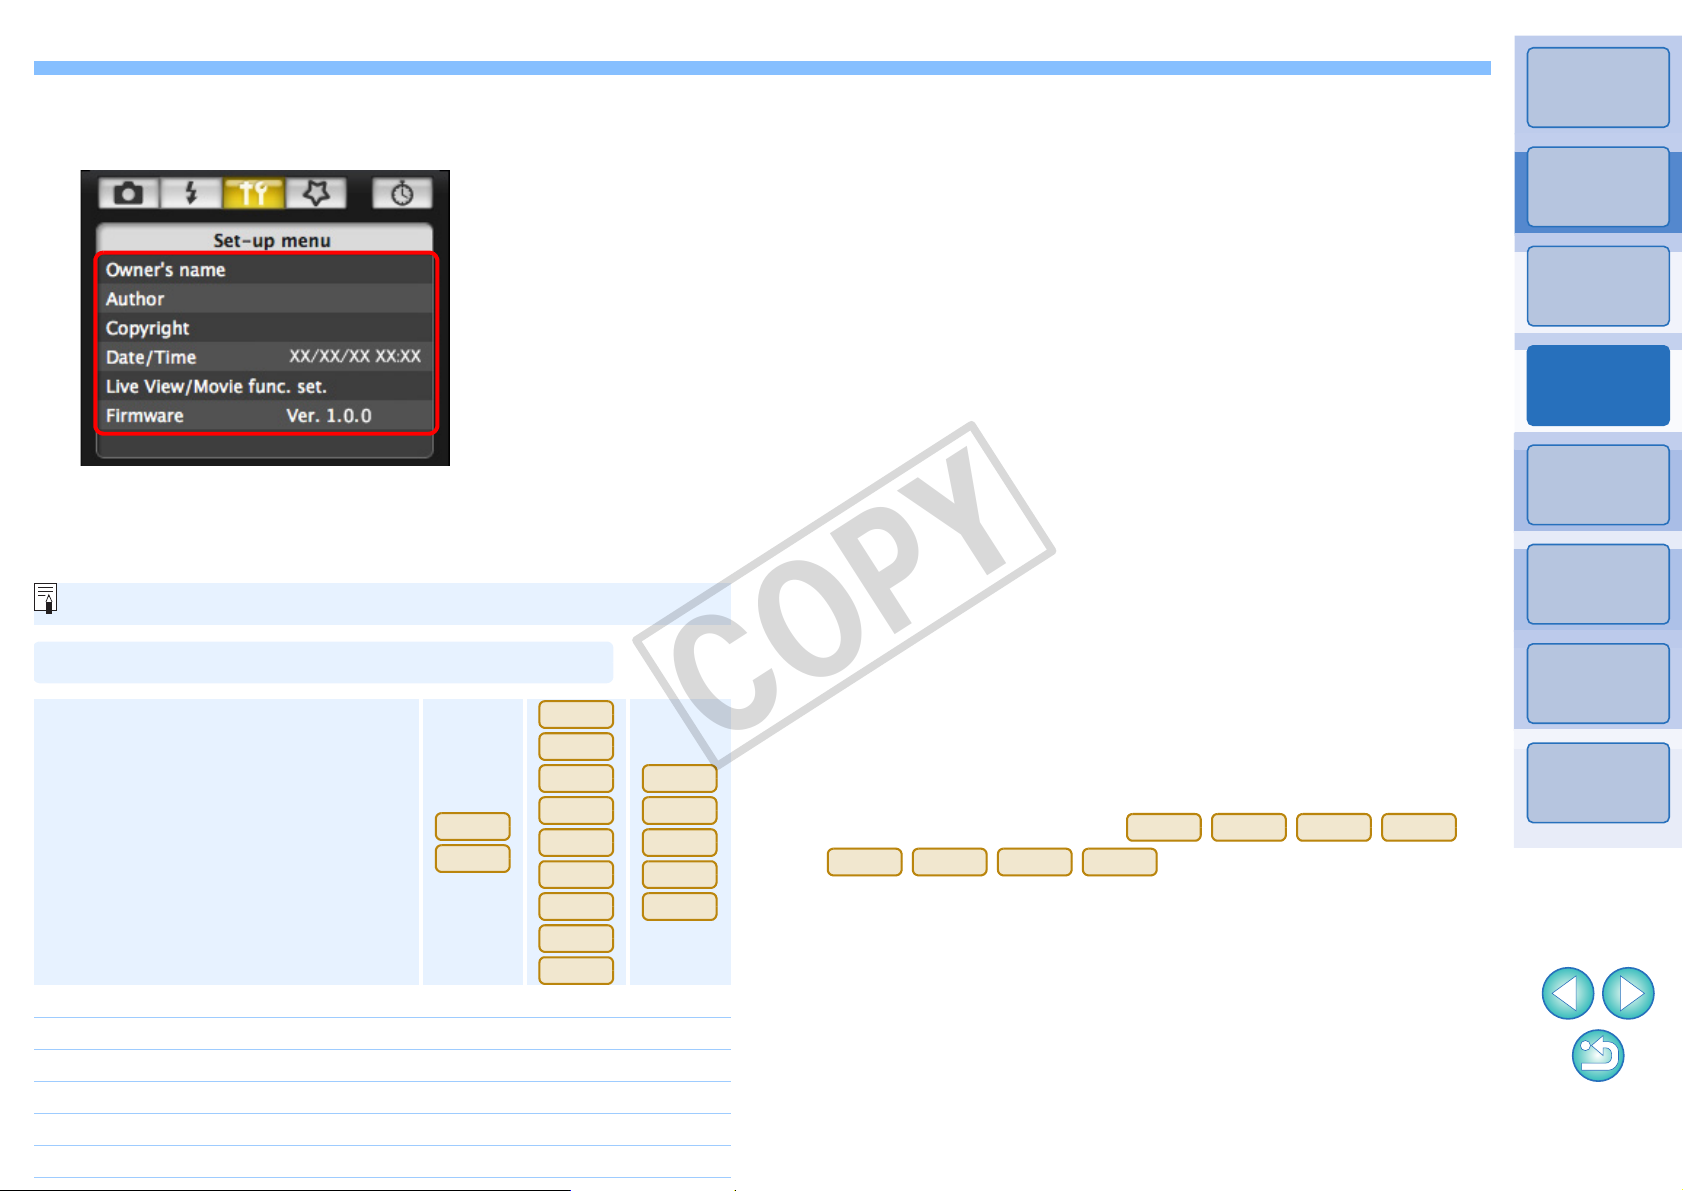
Click the required setting and specify each one.
S
COPY
4
et-up menu
O Available settings are displayed for the camera that is connected.
For more details, refer to “Available Settings by Camera Model”
(Description on the below).
For a list of the capture window functions, refer to p.74.
Available Settings by Camera Model
Setting
Owner’s name
Author*
Copyright holder (copyright notice)*
Date/Time
Live View/Movie func. set.
Firmware
1
*
2
1Ds Mk III
1D Mk III
{{{
–
1
–
{{{
{
{
1D Mk IV
5D Mk II
7D
60D
50D
REBELT2i
550D
REBELT1i
500D
{
{
{{
{{
40D
REBELXSi
450D
REBELXS
1000D
–
–
Owner’s name
O You can enter and set up to 31 characters as the camera owner’s
name.
Author*
O You can enter and set up to 63 characters or symbols, including a
Copyright holder (copyright)*
O You can enter and set up to 63 characters or symbols, including a
Date/Time
O You can set the camera’s date and time.
Live View/Movie func. set.*
O You can set whether the Live View function settings or Movie function
Firmware
O You can display the version of the camera’s firmware.
O You can update the firmware by clicking on this item.
O For more details on updating firmware, refer to the Canon’s website.
1
*
2
*
1
prefix, as the author’s name.
1
prefix, as the photo creation’s copyright holder (copyright notice).
2
settings (p.27, p.42) are available or not.
When the author or copyright holder (copyright notice) set is not
displayed in full, moving the cursor to the displayed setting item will
display all the entered information as a pop-up.
Movie function settings are for
REBELT2i
550D
REBELT1i
1D Mk IV 5D Mk II
500D
only.
7D 60D
Introduction
Contents at
a Glance
Downloading
Images
1
Camera
Settings
2
Remote
Shooting
3
Preferences
4
Reference
Index
1313
Page 15
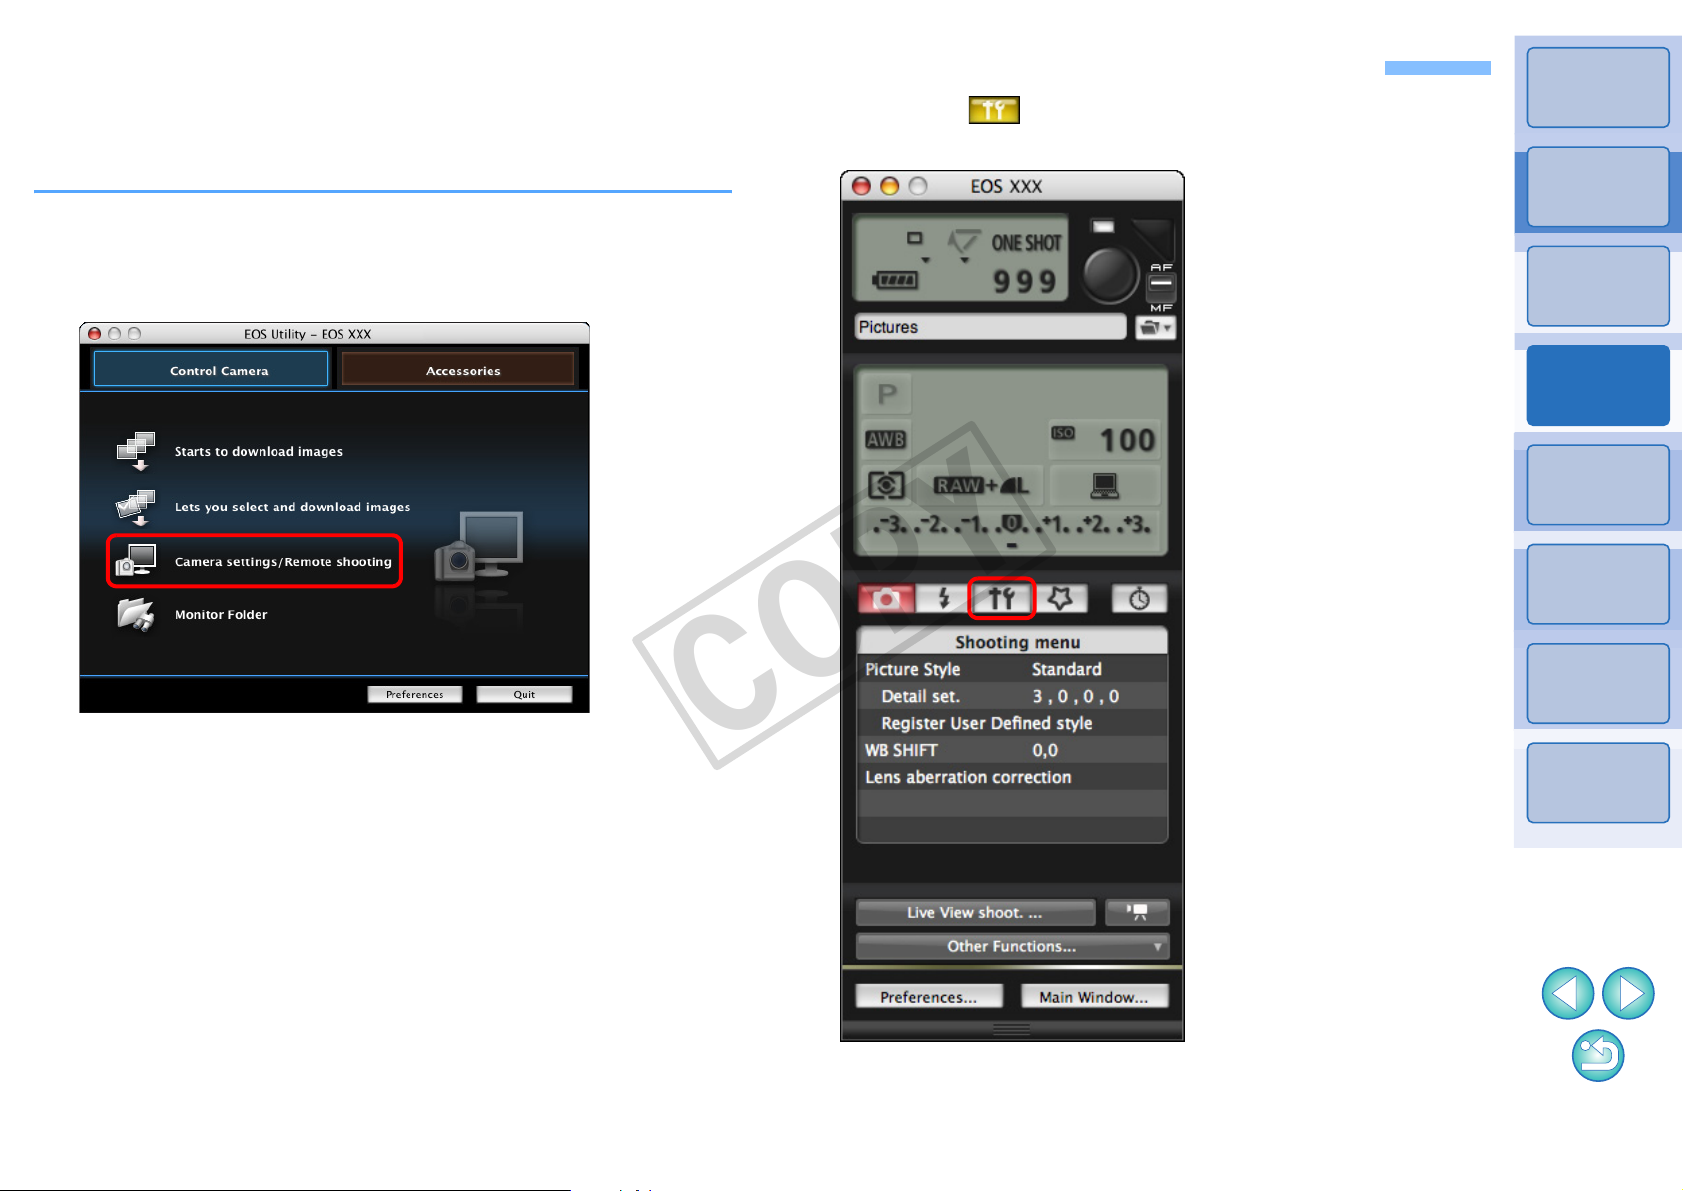
Setting up Camera Functions
COPY
You can set and apply to the camera Picture Styles, personal white
balance, JPEG quality and white balance adjustment.
Introduction
Click the [ ] button.
3
Connect your camera and computer, and then start
1
up EU
Click [Camera settings/Remote shooting].
(p.5).
2
¿ The capture window appears.
Contents at
a Glance
Downloading
Images
1
Camera
Settings
2
Remote
Shooting
3
Preferences
4
Reference
¿ The [Shooting menu] appears.
Index
14
Page 16
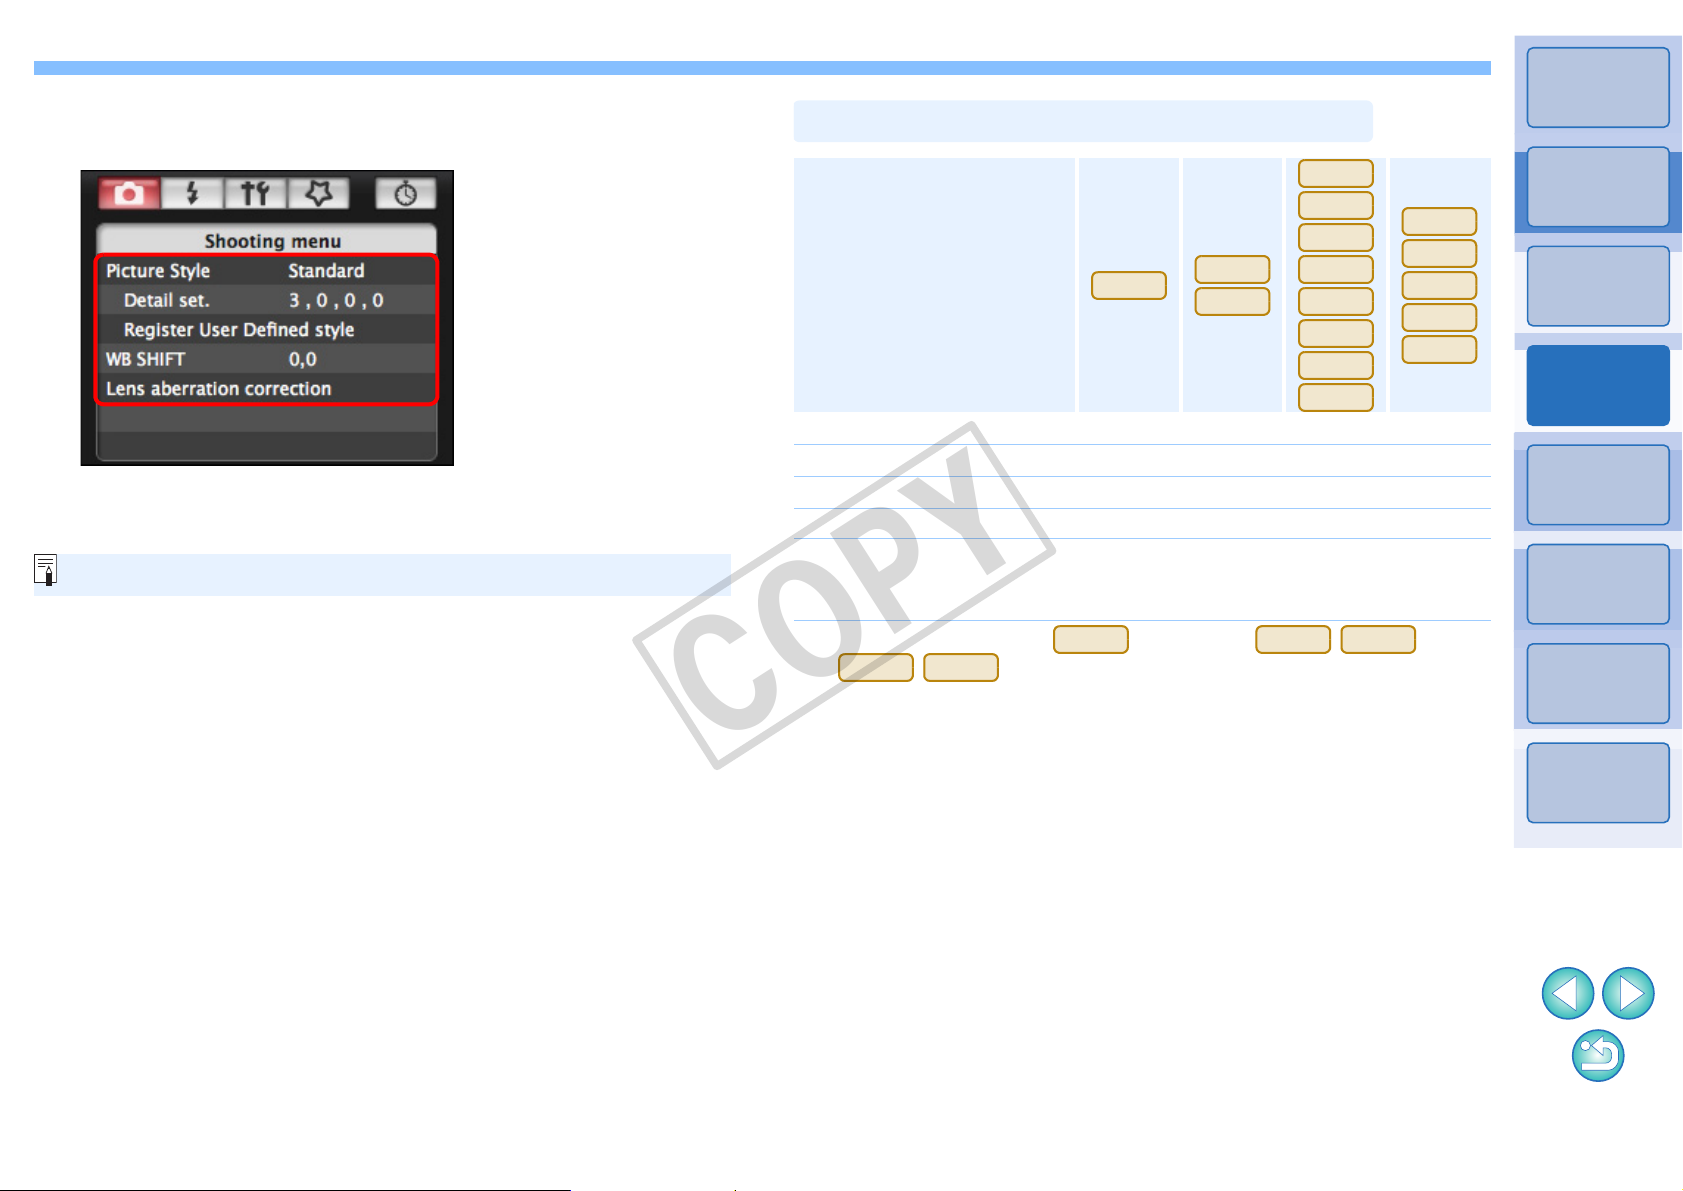
Click the required setting and specify each one.
S
COPY
4
hooting menu
O Available settings are displayed for the camera that is connected.
For more details, refer to “Available Settings by Camera Model”.
For a list of the capture window functions, refer to p.74.
Available Settings by Camera Model
5D Mk II
7D
60D
Setting
Picture Style
Personal white balance
JPEG quality
White balance adjustment
Registering lens aberration
correction/peripheral
illumination correction data
* Setting is possible for , but not for
REBELXS
Picture Style
O You can set a Picture Style and apply it to the camera, in the same
way as operating from the camera (p.16).
Personal white balance
O You can register to the camera a personal white balance file (p.20).
1000D
.
1D Mk IV
{{{{
{{
{{
{{{{
{
40D
1Ds Mk III
1D Mk III
–
50D
REBELT2i
550D
REBELT1i
500D
REBELXSi
–
–
{
450D
40D
REBELXSi
450D
REBELXS
1000D
*
–
–
Introduction
Contents at
a Glance
Downloading
Images
1
Camera
Settings
2
Remote
Shooting
3
Preferences
4
Reference
Index
JPEG quality
O You can set the JPEG image quality and apply it to the camera, in the
same way as operating from the camera (p.21).
White balance adjustment
O You can adjust the white balance, in the same way as operating from
the camera (p.22).
Registering lens aberration correction/peripheral illumination correction data
O You can register lens aberration correction/peripheral illumination
correction data for the lens to the camera or delete registered data
from the camera (p.22).
1515
Page 17
Setting Picture Styles and Applying to the Camera
COPY
You can set and apply Picture Styles to the camera, in the same way as
operating from the camera. You can change the values for [Sharpness],
[Contrast], [Saturation] and [Color tone] of each Picture Style and
register up to three of your own Picture Styles in the camera as userdefined settings.
You can also register Picture Style files in the camera as user-defined
settings you have downloaded from the Canon’s website or created with
Picture Style Editor (Picture Style file creating software) (hereinafter
PSE) and saved to your computer.
For , registering Picture
1D Mk IV
Styles may take some time.
7D 60D
REBELT2i
550D
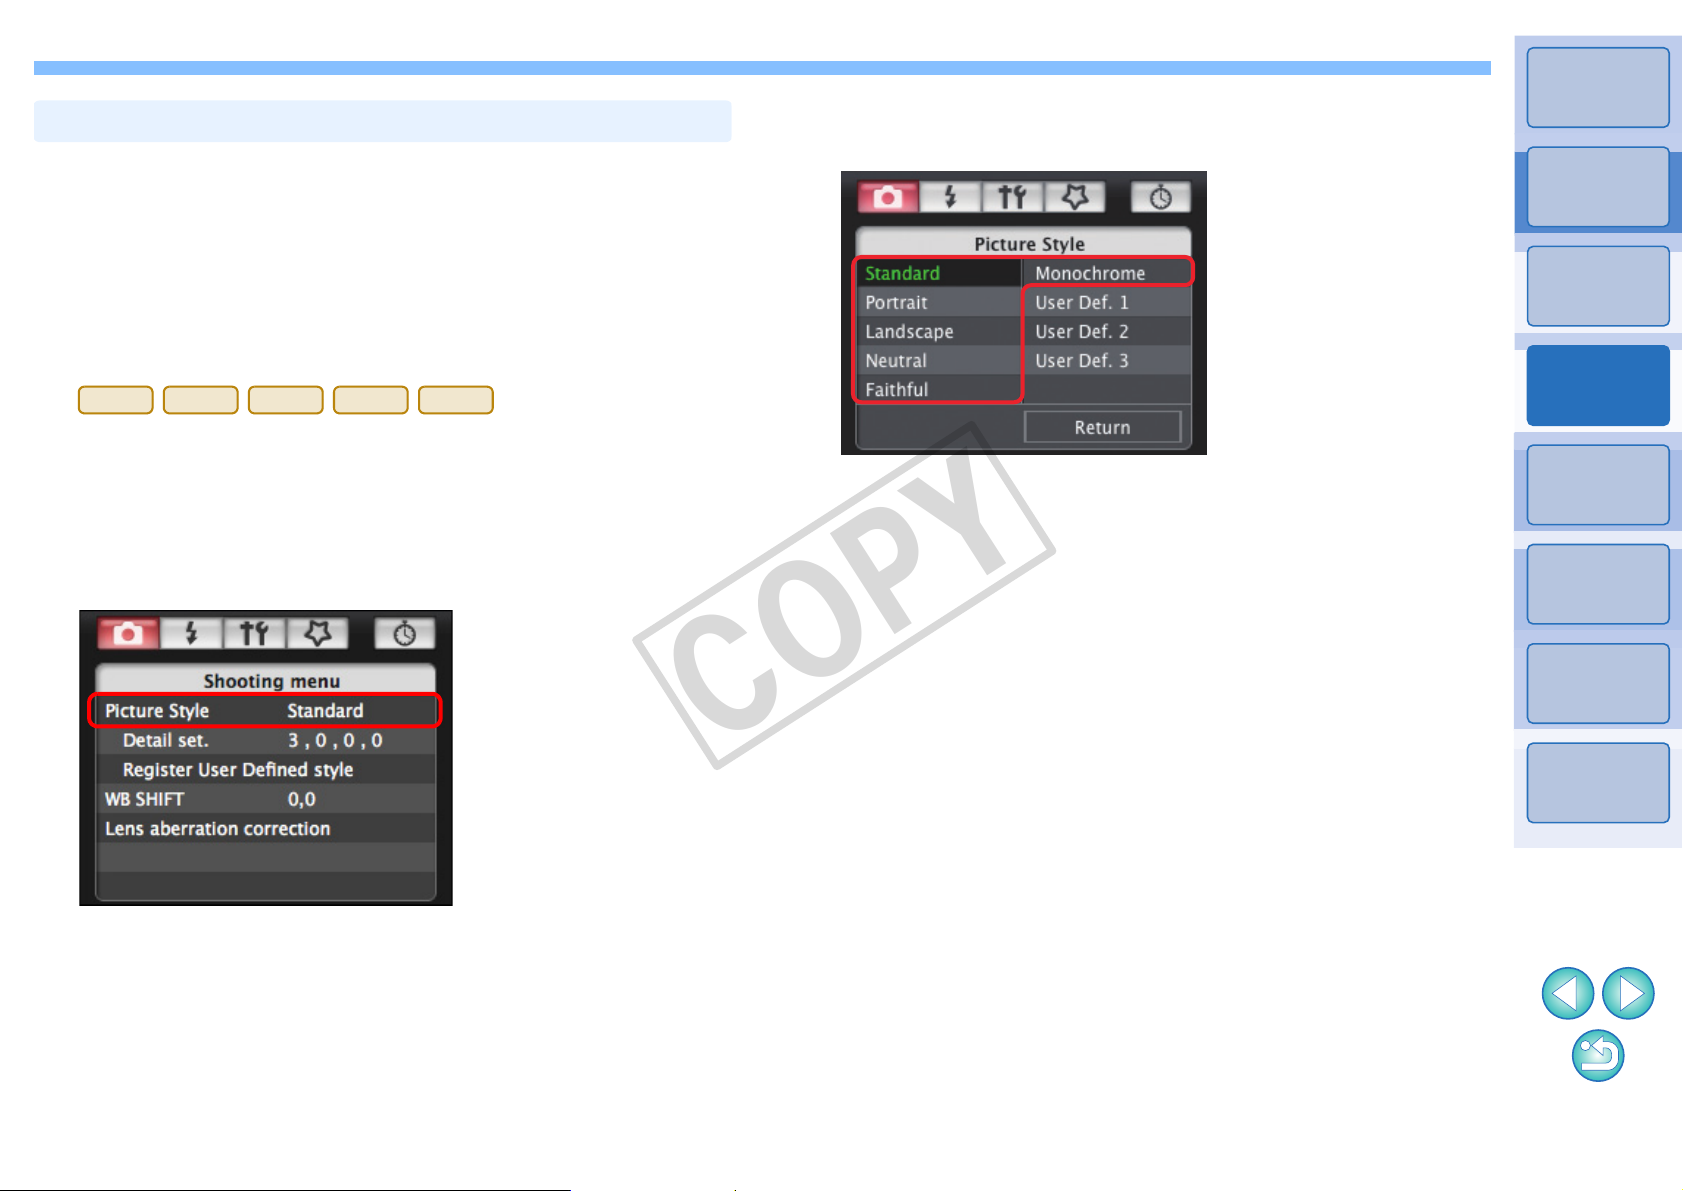
Click the Picture Style to be set in the camera.
2
Picture Style window
Introduction
Contents at
a Glance
Downloading
Images
1
Camera
Settings
2
Selecting a Picture Style and Applying to the
Camera
Click [Picture Style].
1
¿ The [Picture Style] window appears.
¿ The setting is applied to the camera and the display returns to
the [Shooting menu].
Remote
Shooting
3
Preferences
4
Reference
Index
1616
Page 18
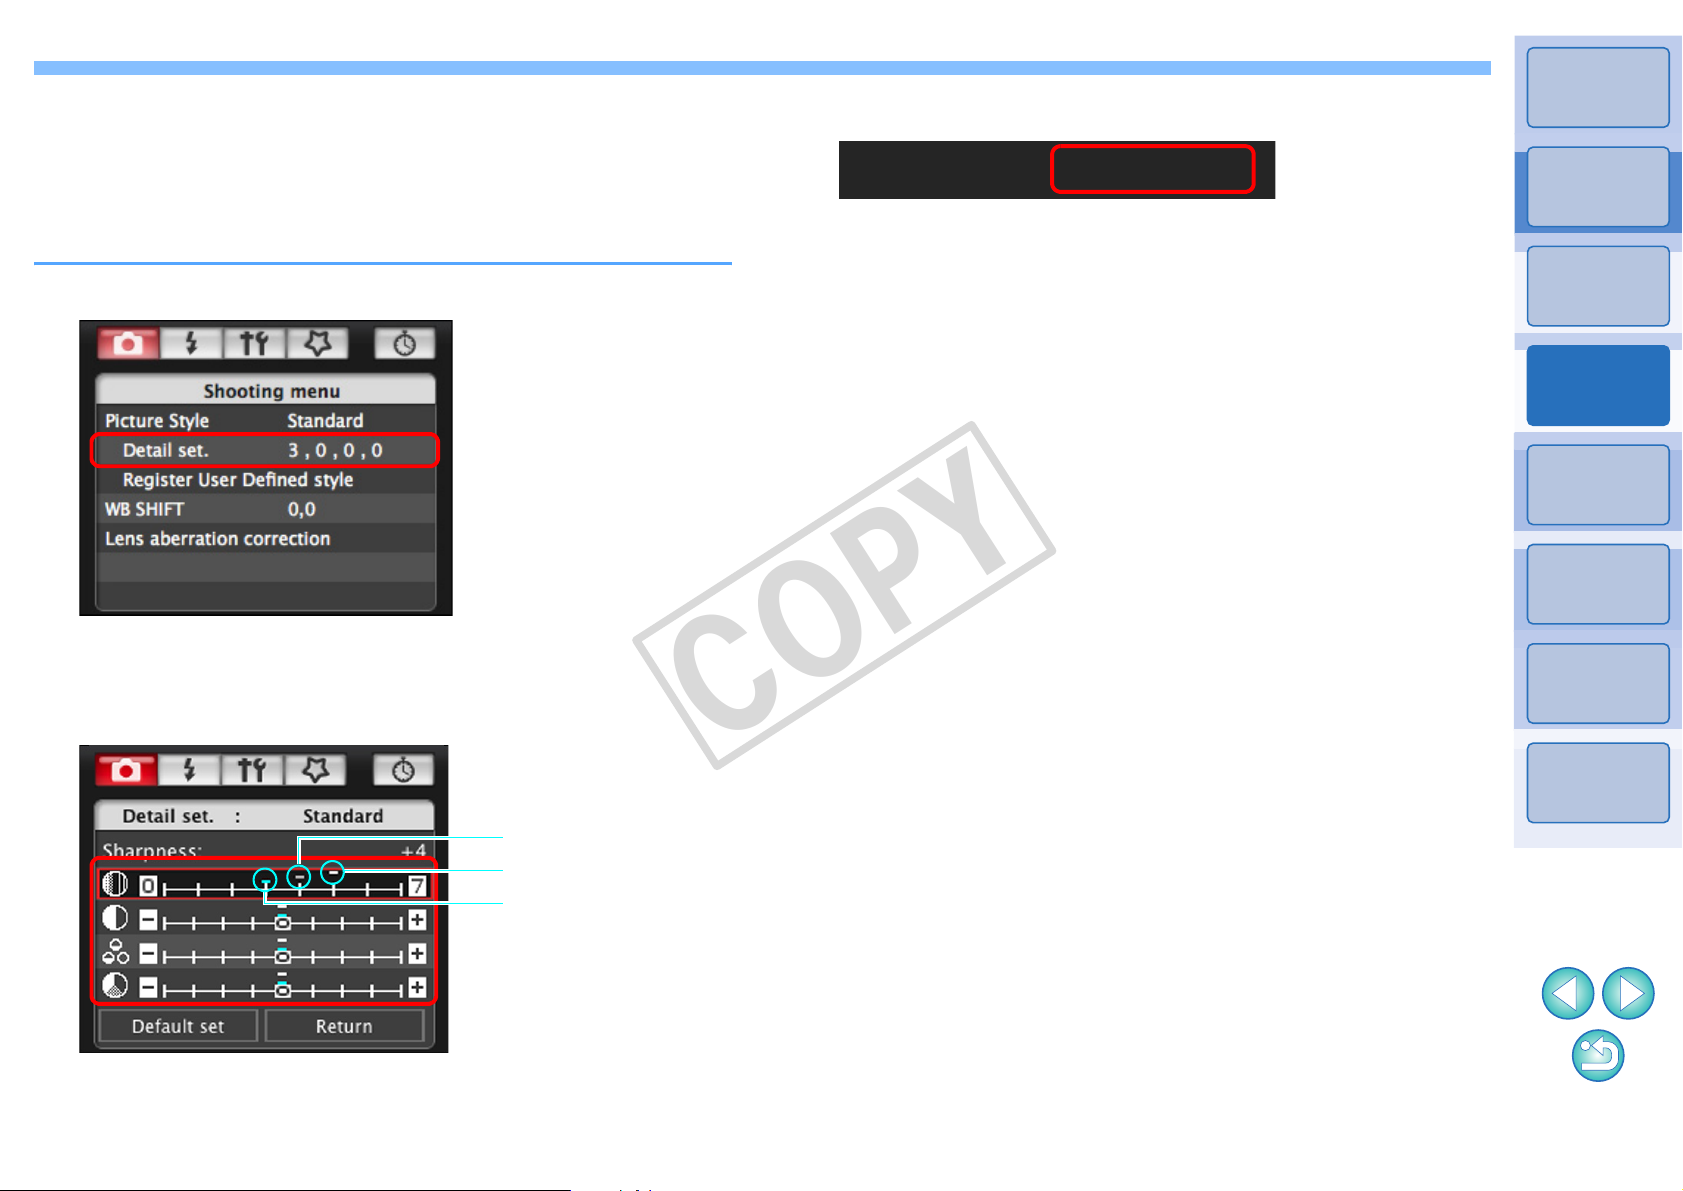
Changing Picture Style Settings and Applying
COPY
to the Camera
You can set your own Picture Style [Sharpness], [Contrast], [Saturation]
and [Color tone] and apply them to the camera, in the same way as
operating from the camera.
Click [Detail set.].
1
¿ The [Detail set.] dialog box appears.
Click the [Return] button.
3
¿ The settings are applied to the camera, and the display returns to
the [Shooting menu].
Introduction
Contents at
a Glance
Downloading
Images
1
Camera
Settings
2
Remote
Shooting
3
Preferences
4
Set by clicking the pointer on the slider for each
2
item.
Cursor position
Setting
Default setting
¿ If you select [Monochrome] for the Picture Style (p.16), the [Filter
effect] and [Toning effect] list boxes appear.
Reference
Index
1717
Page 19
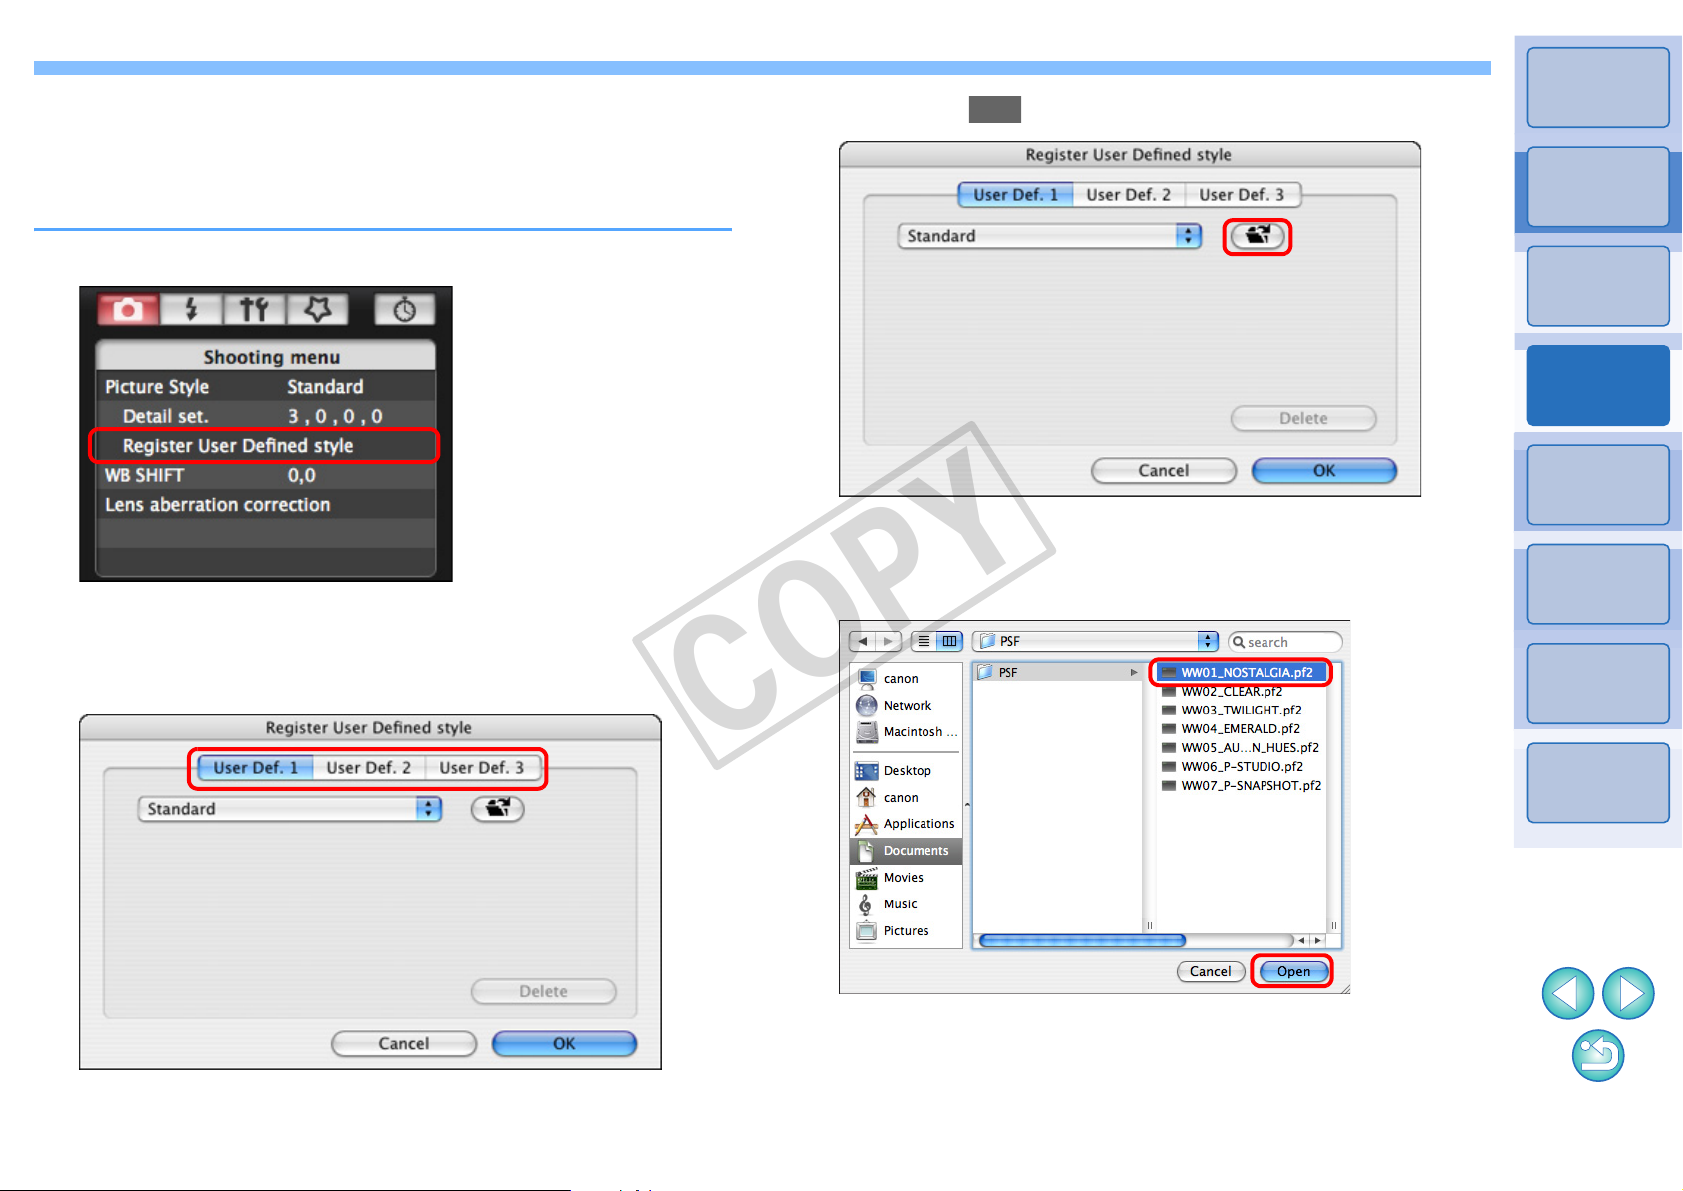
Applying Picture Style Files to the Camera
COPY
You can register up to three Picture Style files downloaded from the
Canon’s website or created with PSE and saved to your computer, as
user-defined settings in your camera.
Introduction
Click the [ ] button.
3
Contents at
a Glance
Click [Register User Defined style].
1
¿ The [Register User Defined style] dialog box appears.
Select a tab from one of [User Defined 1]
2
to [User Defined 3].
¿ The Load Picture Style window appears.
Select a Picture Style file and then click the [Open]
4
button.
Downloading
Images
1
Camera
Settings
2
Remote
Shooting
3
Preferences
4
Reference
Index
¿ The Picture Style file is loaded.
1818
Page 20

Click the [OK] button.
COPY
5
Introduction
Saving White Balance to your Computer
¿ The Picture Style file is registered in the camera.
1D Mk IV
You can save the adjustment results for an image’s white balance to
your computer as a white balance file (extension “.WBD”). White
balance files saved to your computer can be registered in the camera as
personal white balances (p.20).
1D Mk IV
Start by registering a white balance in your camera after adjusting it in
the [Remote Live View window] or [Test Shooting] window.
Click [Personal WB].
1
¿ The [Personal white balance settings] dialog box appears.
Contents at
a Glance
Downloading
Images
1
Camera
Settings
2
Remote
Shooting
3
Preferences
4
Reference
Index
O A Picture Style file is an extended function of Picture Style. For
more details on Picture Style files, refer to the Canon’s website.
O The Picture Style files that you can apply to the camera are files
with the “.PF2” extension only.
O For details on using PSE, refer to the “Picture Style Editor
Instruction Manual” (PDF electronic manual).
1919
Page 21
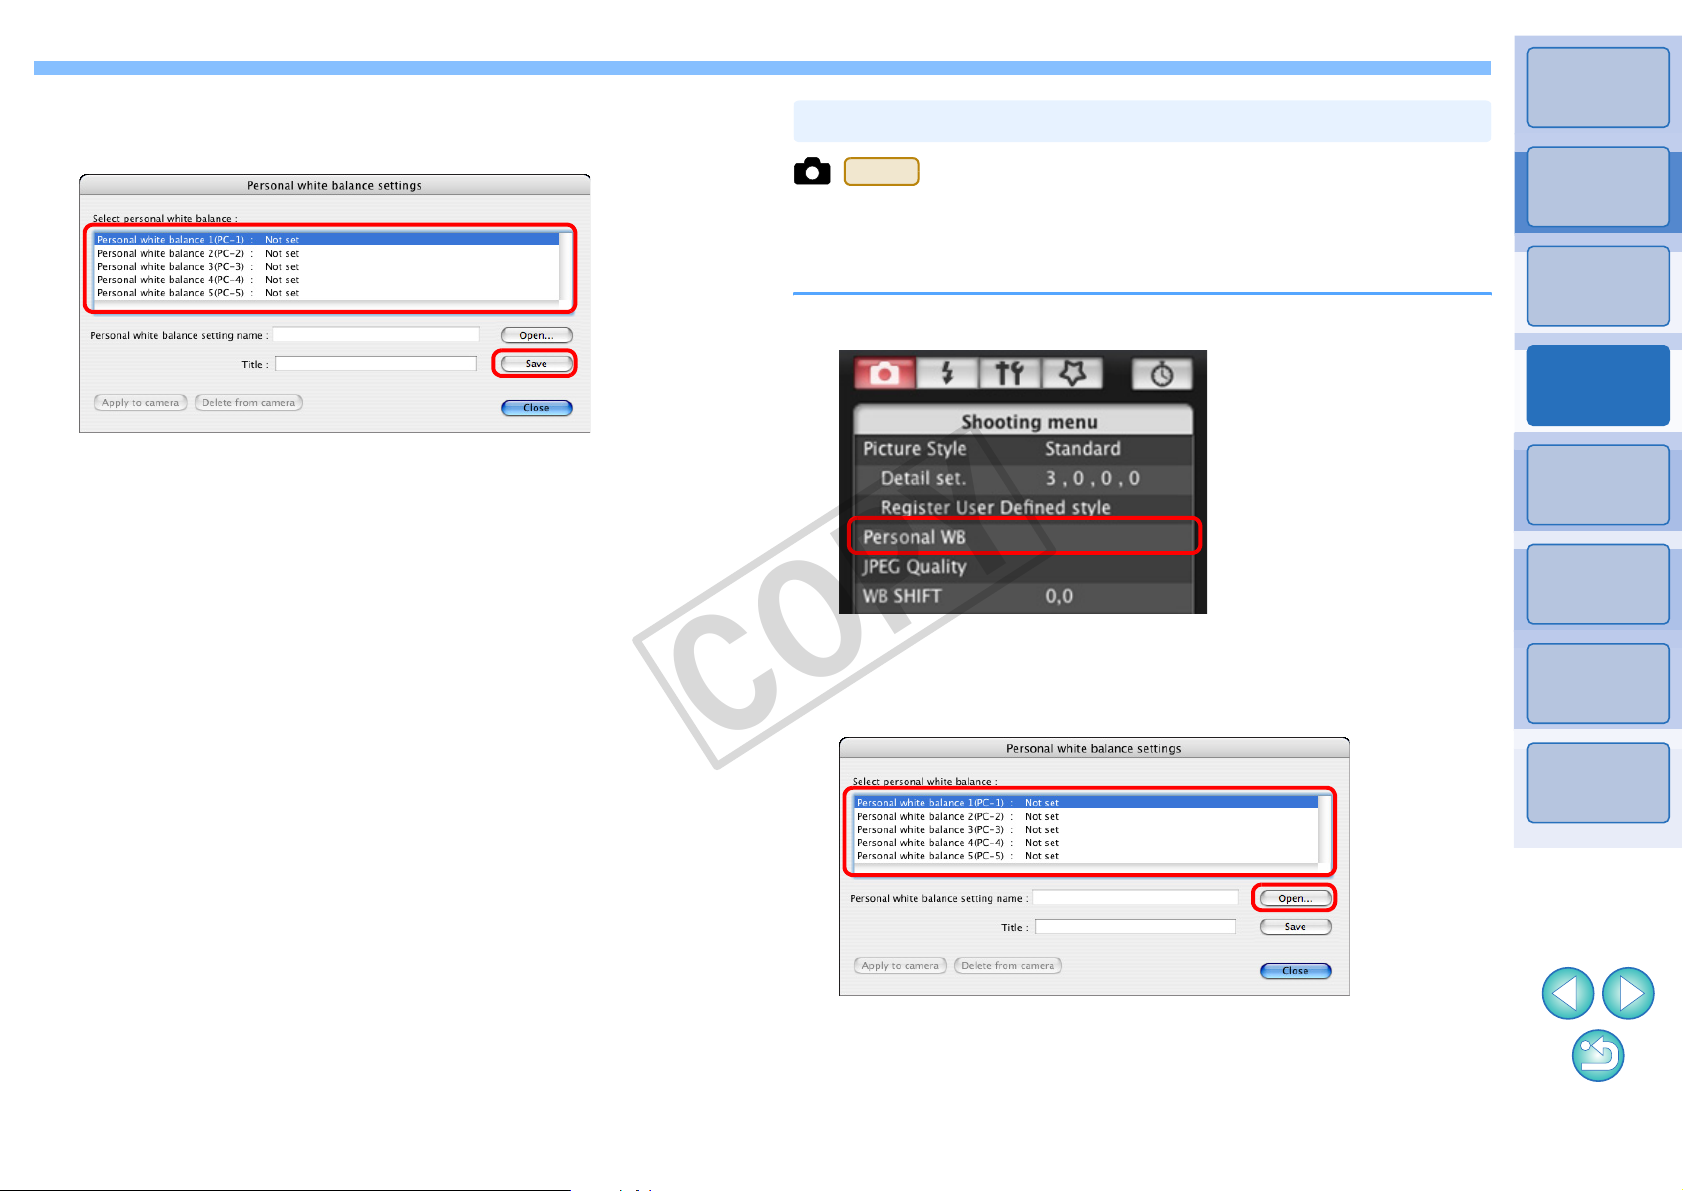
Select the white balance to be saved to your
COPY
2
computer and click the [Save] button.
Registering Personal White Balance in the Camera
1D Mk IV
White balance files created by adjusting the white balance of an image
and saving the results can be registered in the camera as personal
white balances.
Click [Personal WB].
1
Introduction
Contents at
a Glance
Downloading
Images
1
Camera
Settings
2
In the window that appears, enter a filename, select a
3
save destination, and then click the [Save] button.
¿ The white balance file is saved to your computer.
¿ The [Personal white balance settings] dialog box appears.
Select the personal white balance to be registered
2
and click the [Open] button.
¿ The file selection window appears.
Remote
Shooting
3
Preferences
4
Reference
Index
2020
Page 22
Open the folder containing the saved white balance
COPY
3
file, select the file and then click the [Open] button.
¿ The white balance file is loaded.
O The white balance files that you can register to the camera are
files with the “.WBD” extension.
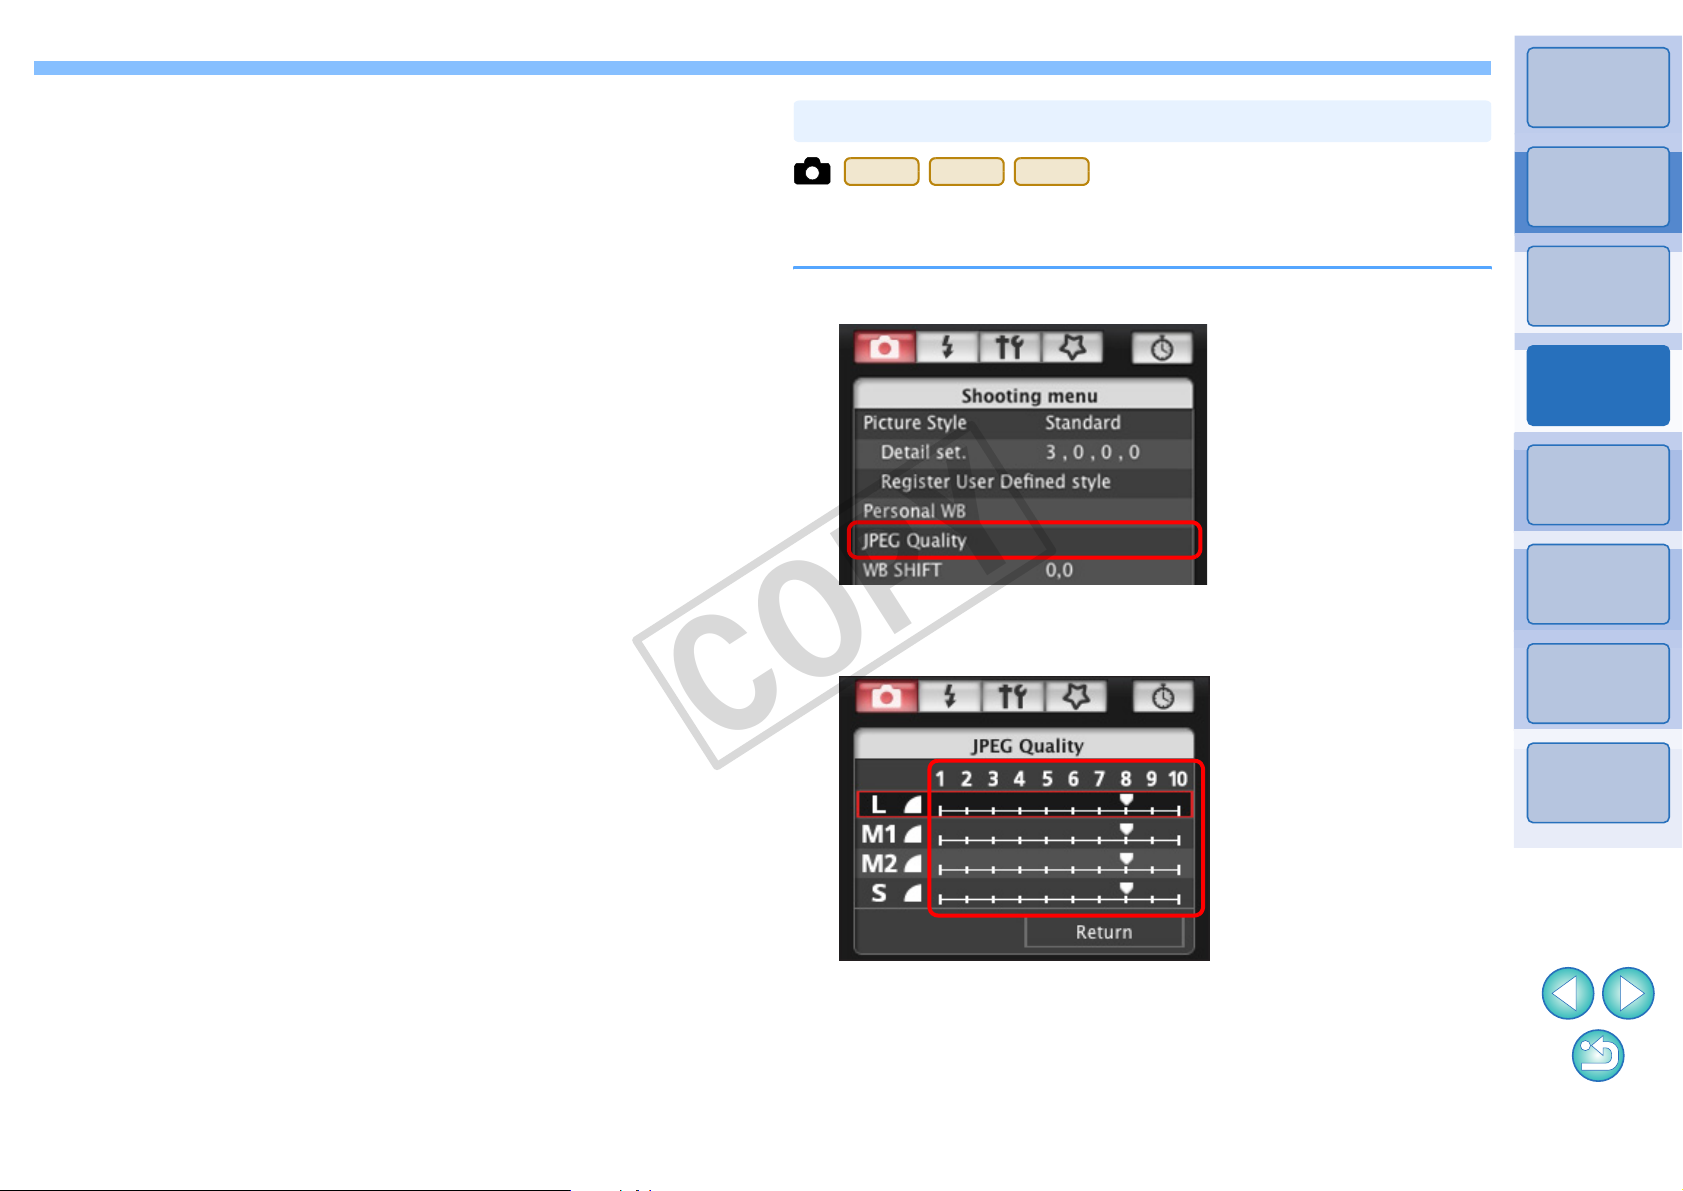
Setting JPEG Quality and Applying to the Camera
1D Mk IV
You can set the JPEG image quality and apply it to the camera, in the
same way as operating from the camera.
1Ds Mk III
1D Mk III
Introduction
Contents at
a Glance
Enter a title into the [Title] input field.
4
Click the [Apply to camera] button.
5
¿ The personal white balance is registered on the camera.
O To register another setting, repeat step 2 to step 5.
Click the [Close] button.
6
¿ The [Personal white balance settings] dialog box closes and the
display returns to the [Shooting menu].
Select a registered personal white balance on the
7
camera.
O Select a registered personal white balance as the white balance.
O For selecting personal white balance or manual white balance,
refer to “Selecting the White Balance” in the camera’s Instruction
Manual provided with your camera.
Click [JPEG quality].
1
¿ The [JPEG Quality] window appears.
Click the setting position.
2
Downloading
Images
1
Camera
Settings
2
Remote
Shooting
3
Preferences
4
Reference
Index
¿ The settings are applied to the camera.
O Higher values give a lower compression ratio and higher image
quality for any size.
Click [Return].
3
¿ The display returns to the [Shooting menu].
2121
Page 23
Introduction
COPY
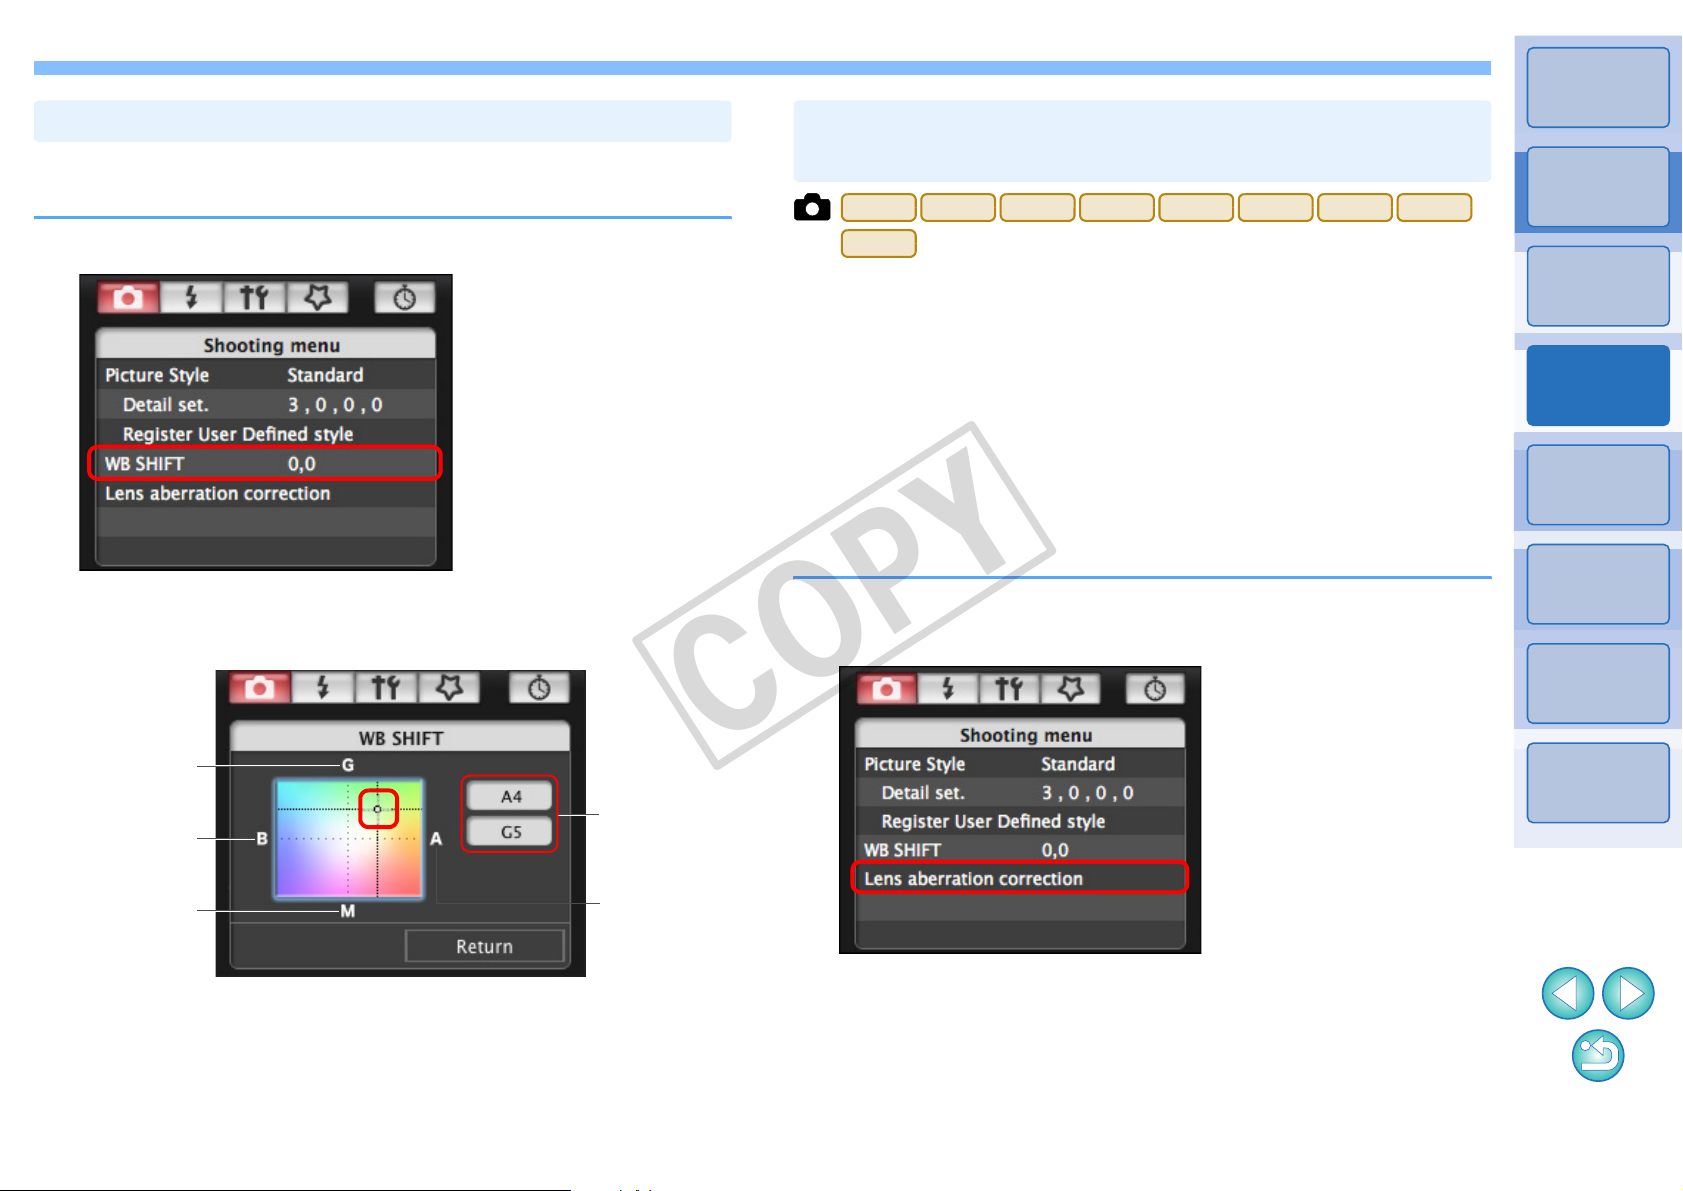
Adjusting White Balance and Applying to the Camera
You can adjust white balance, in the same way as operating from the
camera.
Click [WB SHIFT].
1
¿ The [WB SHIFT] window appears.
Click the compensation position.
Registering Lens Aberration Correction/Peripheral
Illumination Correction Data for the Lens in the Camera
You can register lens aberration correction/peripheral illumination
correction data for the lens to the camera or delete registered dat a from
the camera.
For cameras where [Lens aberration correction] is displayed in the
[Shooting menu], data is registered or deleted for lens peripheral
illumination correction, distortion correction, and chromatic aberration
correction. (Data for distortion correction and chromatic aberration
correction is used during RAW processing on the camera.)
For cameras where [Peripheral illumin. correct.] is displayed in the
menu, only lens peripheral illumination correction data is registered or
deleted.
1
2
1D Mk IV 5D Mk II
500D
Click [Lens aberration correction] or [Peripheral
illumin. correct.].
7D 60D 50D
REBELT2i
550D
REBELT1i
Contents at
a Glance
Downloading
Images
1
Camera
Settings
2
Remote
Shooting
3
Preferences
4
Reference
Compensates
green
Displays the
Compensates
blue
Compensates
magenta
¿ The settings are applied to the camera.
Click [Return].
3
¿ The display returns to the [Shooting menu].
O To revert the corrected values to the original values, follow the
procedure in step 2.
compensation
value
Compensates
amber
¿ The [Register lens aberration correction data] window or
[Register peripheral illumination correction data] window
appears. Lenses for which correction data is registered in the
camera are shown checked.
O Window names that will appear and data to be registered in the
camera differ depending on the camera, however, the following
steps are the same.
Index
2222
Page 24
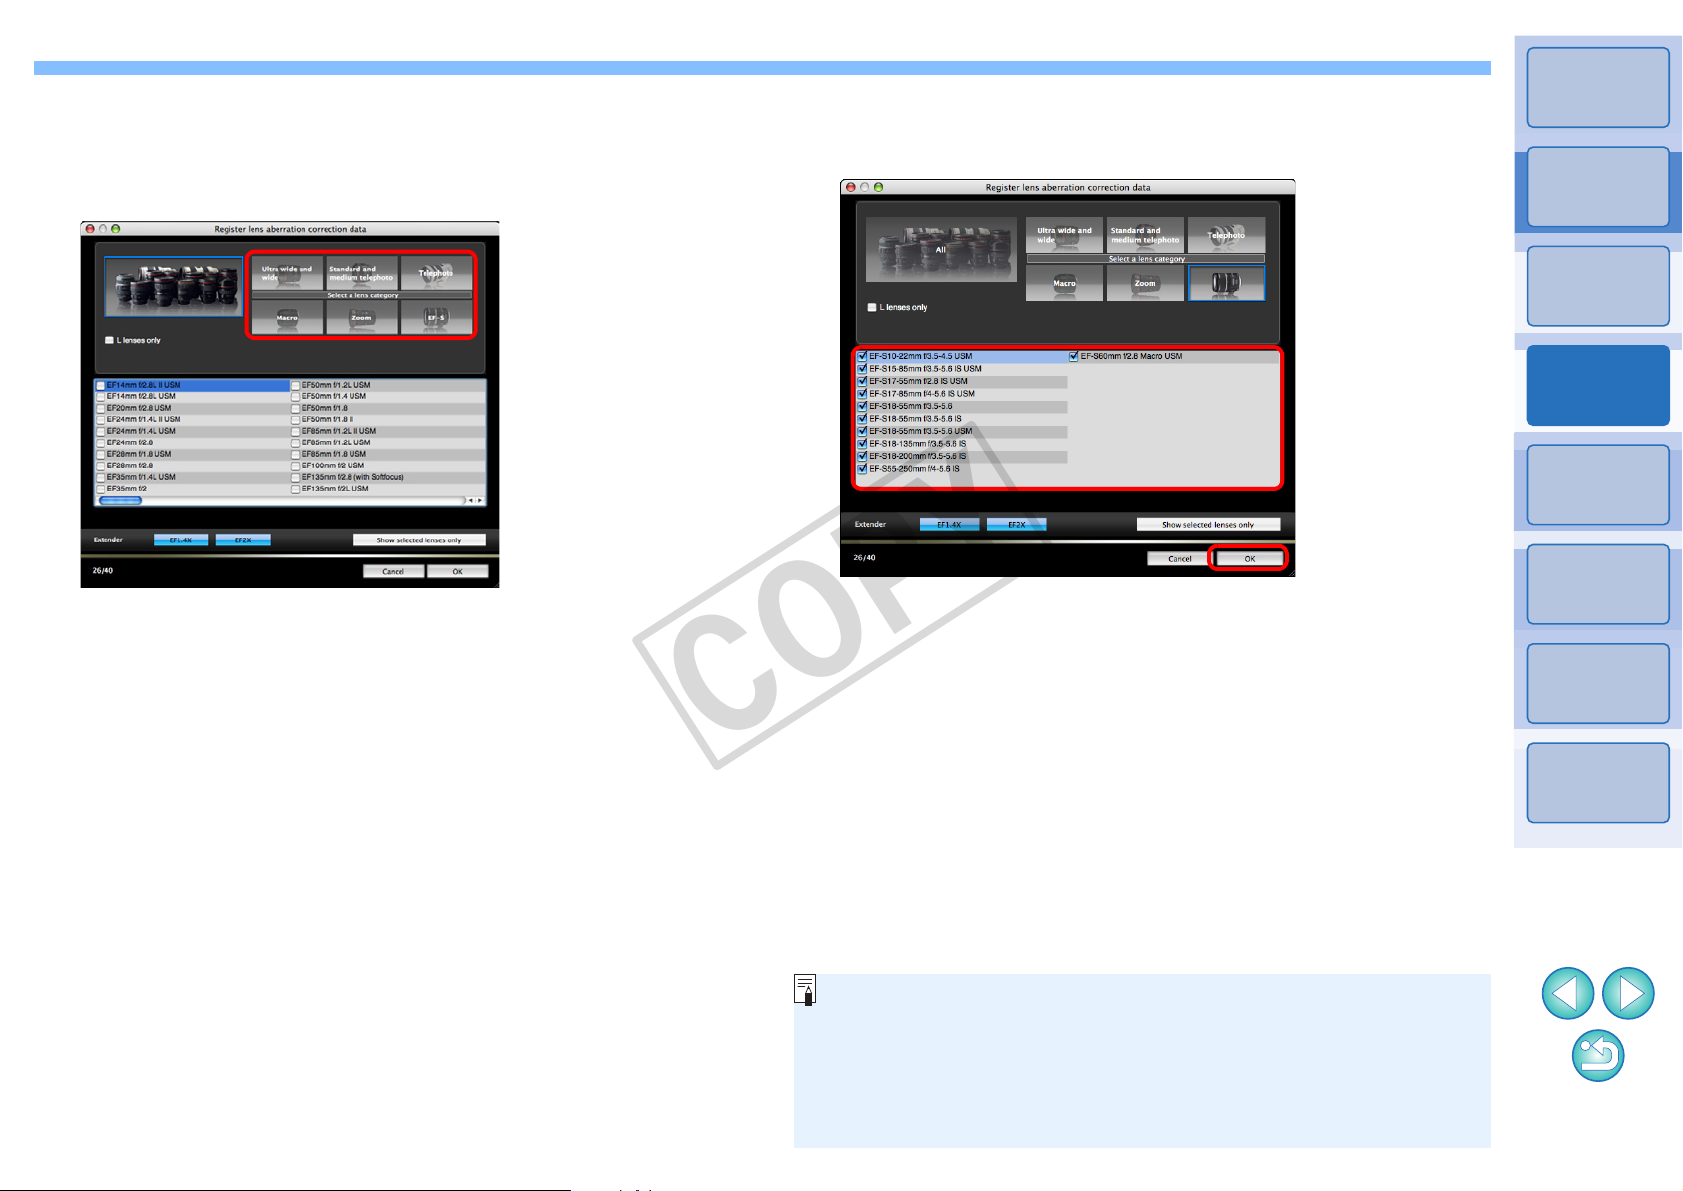
Select the lens category for which you want to
COPY
2
register correction data.
Register lens aberration correction data/Register peripheral
illumination correction data window
¿ A list appears showing only the selected lens category.
Select the lens for which you want to register
3
correction data and click the [OK] button.
¿ The correction data for the selected lens is registered in the
camera.
O You can delete correction data from the camera by removing the
check mark from the registered lens and clicking the [OK] button.
Introduction
Contents at
a Glance
Downloading
Images
1
Camera
Settings
2
Remote
Shooting
3
Preferences
4
Reference
Index
O For a list of the [Register lens aberration correction data] window
or [Register peripheral illumination correction data] window
functions, refer to p.72.
O Lens names displayed in the [Register lens aberration correction
data] window or [Register peripheral illumination correction data]
window may be partially shortened depending on the lens type.
2323
Page 25
Setting My Menu and Registering to the Camera
COPY
You can register up to six frequently used menu items as My Menu and
register them to the camera, in the same way as operating from the
camera.
You can register top layer items of each tab as well as all items of
Custom Functions.
Click the [ ] button.
3
Introduction
Contents at
a Glance
Connect your camera and computer, and then start
1
up EU
Click [Camera settings/Remote shooting].
(p.5).
2
¿ The capture window appears.
Downloading
Images
1
Camera
Settings
2
Remote
Shooting
3
Preferences
4
Reference
Index
¿ The [My Menu] appears.
24
Page 26

Click [My Menu settings].
COPY
4
My Menu
Introduction
Contents at
a Glance
Downloading
Images
1
¿ The [My Menu settings] window appears.
Select the item to be registered and click the [Add]
5
button.
My Menu settings window
¿ The selected item is added to [Items that can be configured in My
Menu on the camera] on the left side of the window.
O You can register up to six items with the above procedure.
O You can change the position of an item by selecting it and then
clicking the [ ] or [ ] button to move it.
Click the [Apply to camera] button.
6
¿ The setting is applied to the camera.
Camera
Settings
2
Remote
Shooting
3
Preferences
4
Reference
Index
For a list of the [My Menu settings] window functions, refer to p.73.
2525
Page 27

3
COPY
Remote Shooting by Controlling the Camera from Your Computer
From EU you can control the camera remotely, and by viewing the subject
in the EU window, you can set the camera and shoot. You can also shoot
by directly operating your camera even during remote shooting, or preset
a time allowing the camera to shoot automatically with timer shooting.
Introduction
Contents at
a Glance
Remote Live View Shooting .................................... 27
Remote Live View Window Functions..................... 31
Focusing Manually...................................................... 31
Focusing Using AF..................................................... 33
Focusing Using Quick Mode................................... 33
Focusing Using Live Mode..................................... 34
Focusing Using Face Detection Live Mode............ 35
Checking the Depth of Field and Exposure................ 35
White Balance with the Remote Live View Window... 36
White Balance for Flash Photography........................ 36
Adjusting the Horizontal/Vertical Alignment of the
Camera.......................................................................
Changing the Aspect Ratio......................................... 38
Overlaid Display Function........................................... 39
Setting the Composite Ratio................................... 41
Hiding the Overlaid Display Temporarily ................ 41
Setting a Different Image as Overlaid Display........ 41
38
Downloading
Images
1
Camera
Settings
2
Remote
Shooting
3
Preferences
4
Reference
Index
Quitting the Overlaid Display Function................... 41
Shooting by Operating the Camera......................... 42
Shooting Movies...................................................... 42
Timer-controlled Shooting ....................................... 53
Timer Shooting........................................................... 53
Interval Timer Shooting .............................................. 53
Bulb Exposures .......................................................... 54
Flash Shooting......................................................... 55
26
Page 28

Remote Live View Shooting
COPY
You can control your camera remotely from EU and shoot still images
from your computer screen.
Also, the shot image is saved directly on your computer and you can
recheck it using the linked software Digital Photo Professional
(hereinafter DPP).
This function is effective for shooting large numbers of shots with fixedframing such as for studio shooting.
Connect your camera and computer, and then turn
1
the camera’s power switch to < ON >.
¿ EU starts up.
REBELT1i
O cannot communicate with EU if the camera’s
mode dial is set to < >. Set the mode dial to a mode other
than < >.
Click [Camera settings/Remote shooting].
500D
2
Set the camera.
3
Drive mode setting
Click while holding down the <control> key under the setting item
and select settings from the menu that appears (
7D 60D 50D
Mirror lockup menu display and setting
control+click under the setting item and select settings from the
menu that appears ( )
1D Mk IV
REBELT2i
7D 60D
550D
1D Mk IV 5D Mk II
REBELT1i
REBELT2i
500D
550D
Introduction
Contents at
a Glance
)
Downloading
Images
1
Camera
Settings
2
Remote
Shooting
3
Preferences
4
¿ The capture window appears.
Reference
Double-click the setting
item, and select the setting
Index
O You can also use the functions of the [Shooting menu] (p.14).
O The settings that cannot be set in the captu re window can be set
by operating the camera.
O Mirror lockup settings are available when the camera mode is P,
Tv, Av, M, A-DEP or B.
O During mirror lockup, the mirror lockup icon blinks.
27
Page 29

Click the [ ] button.
COPY
4
Set the Live View function.
5
O Click [Live View/Movie func. set.], and click [Enable] in the [Live
View shoot.] window that appears.
Click
Live View shoot. window
Introduction
Contents at
a Glance
Downloading
Images
1
Camera
Settings
2
Remote
Shooting
3
Preferences
4
¿ The [Set-up menu] appears.
Click
O For cameras other than
REBELXSi
set.] window appears.
For details on specifying settings, refer to the next page.
450D
1 Ds Mk III 1D Mk III
REBELXS
1000D
, the [Live View/Movie func.
50D 40D
Reference
Index
2828
Page 30

Live View/Movie func. set. window
COPY
1D Mk IV
Select [Stills] for [LV func. setting] and a setting for [Exposure
simulation], and click the [OK] button.
7D 60D
Select [Enable] for [LV func. setting] and the setting for [Exposure
simulation], then click the [OK] button.
7D
Introduction
Contents at
a Glance
Downloading
Images
1
ClickSelect
5D Mk II
Select [Stills only] and [Still display], and click the [OK] button.
Select
Click
60D
REBELT2i
Select [Enable] and click the [OK] button.
REBELT2i
550D
550D
REBELT1i
500D
REBELT1i
Select
Click
Select
Click
500D
Camera
Settings
2
Remote
Shooting
3
Preferences
4
Reference
Index
Select
Click
Select
Click
2929
Page 31

Click the [Live View shoot.] button.
COPY
6
¿ The [Remote Live View window] appears.
Remote Live View window
Click the [ ] button to shoot.
7
¿ The shot image is transferred to your computer and displayed in
the [Quick Preview] window. And then, DPP starts up
automatically.
O You can quickly review the shot image in the [Quick Preview]
window displayed before DPP starts up. You can also resize the
[Quick Preview] window.
O You can show/hide the [Quick Preview] window by clicking the
[Other Functions] button in the capture widow and selecting
[Quick Preview] from the menu that appears.
Introduction
Contents at
a Glance
Downloading
Images
1
Camera
Settings
2
Remote
Shooting
3
Preferences
4
O You cannot perform RAW processing. If you connect the camera
to your computer during in-camera RAW processing, the camera
and computer will connect after you finish processing.
O On you cannot set [Creative Auto].
You can also shoot using the <space> bar on the keyboard.
60D
Reference
Index
3030
Page 32

Remote Live View Window Functions
COPY
O You cannot operate the camera when the [Remote Live View
window] is displayed. Pressing the camera’s < SET > bu tton (Live
View shooting button on
REBELT2i
View image on the camera’s LCD monitor, allowing you to view
the image while controlling the camera.
O On
500D
the shooting mode will not change even if you operate the
camera’s Mode dial.
O You can shoot by operating the capture window, even if the
[Remote Live View window] is not displayed.
O To perform exposure simulation (p.35) with [Remote Live View
window] or enable display of histograms (p.77), set your camera’s
Custom Function [Live View exposure simulation] to [Enable]. On
1D Mk IV 5D Mk II
simulation] in the menu to [Enable].
O
On
,
1D Mk IV 5D Mk II
you can also use mirror lockup with remote shooting (you cannot
take test shots after setting mirror lockup). On , you can
also use silent single shooting.
O With , mirror lockup and silent single shooting
cannot be performed in remote shooting.
O The [Test Shooting] window appears when you click the [Test
shooting] button.
During flash shooting, you can take a test shot under the same
conditions as an actual shot, and adjust the white balance based
on the shot test image (p.36).
O You can save shot images to both your computer and a memory
card by checkmarking [Save also on the camera’s memory card]
in preferences ([Remote Shooting] window) (p.61).
O You can change the software that starts up automatically when
remotely shot images are transferred to your computer from DPP
to ImageBrowser or other software in preferences ([Linked
Software] window) (p.61).
O For a list of the [Remote Live View window] functions, refer to
p.77.
O For a list of the [Zoom View] Window functions, refer to p.78.
550D
5D Mk II
, when the cursor is on the capture window’s button,
1Ds Mk III
REBELT1i
7D 60D 50D
1D Mk III
5D Mk II
500D
7D 60D 50D
7D 60D 50D
7D 60D 50D
) will also display the Live
REBELT2i
550D
, set [Exposure
REBELT2i
1D Mk IV
REBELT1i
550D
These pages explain the functions available in the [Remote Live View
window], including checking the camera settings and focusing while
viewing your subject on the computer screen.
Focusing Manually
You can focus manually while viewing the enlarged image in the
[Remote Live View window].
Set the lens’s focus mode switch to < AF >.
1
Drag [ ] to the section you want to enlarge.
2
Drag
Introduction
Contents at
a Glance
Downloading
Images
1
Camera
Settings
2
Remote
Shooting
3
Preferences
4
Reference
Index
31
Page 33

Click the [ ] button.
COPY
3
¿ The section you selected in step 1 is displayed enlarged at 100%
(actual pixel size) in the [Zoom View] window.
Adjust the focus.
4
Introduction
Contents at
a Glance
Downloading
Images
1
Zoom View window
O To move the display position in the [Zoom View] window, click on
[ ], [ ], [ ], [ ]. You can also move the display position
by dragging the window.
O You can checkmark [Maintain Zoom View] to maintain display of
the [Zoom View] window.
O You can also double-click the section you want to enlarge in step
1 to display an enlarged view at 100% (actual pixel size) in the
[Zoom View] window.
O Double-click an image in the [Zoom V iew] window to return to the
[Remote Live View window].
O You can checkmark [200%] to view the section enlarged to
200%.
Closer
Further away
O [ ], [ ]: Adjustment Large amount
O [ ], [ ]: Adjustment Medium amount
O [ ], [ ] : Adjustment Small amount
¿ The [Remote Live View window] changes in real time according
to the focus position adjustment.
You can also focus using a key operation on the keyboard.
Adjustment Closer Further away
Large amount < I > < O >
Medium amount < K > < L >
Small amount < < > < > >
Camera
Settings
2
Remote
Shooting
3
Preferences
4
Reference
Index
3232
Page 34

Focusing Using AF
COPY
1D Mk IV 5D Mk II
REBELT1i
In Quick, Live and Face Detection Live AF modes, images can be
focused automatically in the same way as on the camera itself.
500D
7D 60D 50D
REBELT2i
550D
Click the AF point in the position where you want to
3
focus.
Introduction
Contents at
a Glance
Downloading
Images
1
Focusing Using Quick Mode
1D Mk IV 5D Mk II
REBELT1i
Select [Quick mode] from the list box.
500D
7D 60D 50D
REBELT2i
1
¿ The AF points appear.
O You can switch between showing and hiding the AF points by
clicking the [ ] button.
Select an AF point selection method from the list
2
box.
550D
O If [Automatic selection] is selected in step 2, all the AF points are
automatically selected.
Click the [ON] button.
4
¿ AF is executed.
¿ When focus is achieved, the camera makes a beeping sound
and the AF point color changes.
Click
Camera
Settings
2
Remote
Shooting
3
Preferences
4
Reference
Index
O Selectable items differ depending on the camera settings.
On , cancel the AF point registration function on the
camera if AF points have been registered. When the camera’s AF
points are registered, focusing with AF in the [Remote Live View
window] may not be performed properly.
O Double-clicking an AF point also performs AF.
O To cancel AF operation, click the [OFF] button.
7D
3333
Page 35

Focusing Using Live Mode
COPY
1D Mk IV 5D Mk II
REBELT1i
Select [Live mode] from the list box.
500D
7D 60D 50D
1
REBELT2i
550D
Click the [ON] button.
3
Introduction
Contents at
a Glance
Downloading
Images
1
¿ The AF point appears.
O You can switch between showing and hiding the AF point by
clicking the [ ] button.
Drag the enlargement display frame to move it to the
2
position where you want to focus.
Drag
¿ AF is executed.
¿ When focus is achieved, the camera makes a beeping sound
and the AF point turns green.
O If focus is not achieved, the AF point turns red.
Camera
Settings
2
Remote
Shooting
3
Preferences
4
Reference
Index
3434
Page 36

Focusing Using Face Detection Live Mode
COPY
1D Mk IV 5D Mk II
REBELT1i
500D
7D 60D 50D
REBELT2i
550D
Checking the Depth of Field and Exposure
You can check the depth of field and exposure in the [Remote Live View
window].
Introduction
Contents at
a Glance
Select [Face Detection Live mode] from the list box.
1
¿ When a face is detected, an AF point appears.
O When there is a face other than the face detected in th e scene, a
new AF point appears if you move the cursor to the position of
the other face. Clicking that position then selects the AF point.
O You can switch between showing and hiding the AF point by
clicking the [ ] button.
Click the [ON] button.
2
Click the [ON] button.
¿ The aperture value (exposure simulation) is set in the capture
window (p.74).
Downloading
Images
1
Camera
Settings
2
Remote
Shooting
3
Preferences
4
Reference
Index
¿ AF is executed.
¿ When focus is achieved, the camera makes a beeping sound
and the AF point turns green.
O If focus is not achieved, the AF point turns red.
O If the camera cannot detect a face, the AF point is fixed to the
center to focus.
3535
Page 37

Introduction
COPY
White Balance with the Remote Live View Window
Y ou can change the white balance of an image in the [Remote Live V iew
window] and register the changed white balance in the camera.
Select the white balance to apply to the image.
1
¿ The selected white balance is applied to the image displayed in
real time and you can check it in the [Remote Live View window].
White Balance for Flash Photography
When taking flash shots where the subject is illuminated
instantaneously, you can take a test shot under the same conditions as
an actual shot, and adjust the white balance in the [Test shooting]
window based on the shot test image. Also, you can take a test shot
even when flash is not used.
You can perform the same operation by clicking the [T est shooting] button in
the [Remote Live View window].
Click the [Other Functions] button and select [Test
1
shooting] from the menu that appears.
¿ The shot image is displayed in the [Test shooting] window.
Test shooting window
Contents at
a Glance
Downloading
Images
1
Camera
Settings
2
Remote
Shooting
3
Preferences
4
Reference
Checkmark [Apply to shot images].
2
¿ The selected white balance is registered in the camera as a
personal white balance and applied to images that will be taken.
Index
3636
Page 38

Click the [ ] button.
C
COPY
2
¿ The click white balance window appears.
lick white balance window
Click the [Apply to camera and execute test
4
shooting] button.
Introduction
Contents at
a Glance
Downloading
Images
1
¿ A shot will be taken again using the part of the image in step 3
clicked as the standard for white and the shot image is displayed
in the [Test shooting] window.
O The test image will not be saved. To save the test image, click
the [ ] button.
O To close the [Test shooting] window, click the [Close] button.
Click on a point that is to be the standard for white.
Camera
Settings
2
Remote
Shooting
3
Preferences
4
3
Click
Reference
O You can perform the following operations in the [Test Shooting]
window using keyboard controls.
• Test shooting: <option> + <space>
• 50% image display: < > + <1>
• 100% image display: < > + <2>
• 200% image display: < > + <3>
• Match image size to window: < > + <4>
O On , you can
O For a list of the [Test shooting] window functions, refer to p.79.
1D Mk IV 5D Mk II
link flash setting/test shooting/white balance adjustment by
simultaneously displaying the [Flash function settings] window
(p.56) and the [Test Shooting] window.
7D 60D
REBELT2i
550D
Index
3737
Page 39

Introduction
COPY
Adjusting the Horizontal/Vertical Alignment of the Camera
You can display gridlines in the [Remote Live View window] in the same
way as the camera’s Live View function, and adjust the horizontal/
vertical alignment of the camera.
Click the [] button, and select a grid display from
1
the menu that appears.
Click the [ ] button.
2
¿ Gridlines are displayed in the [Remote Live View window].
Changing the Aspect Ratio
1D Mk IV
As with the camera’s Live View function, it is possible to shoot with a
feeling similar to film-type medium-format/large-format cameras such as
6 × 6 cm, 6 × 4.5 cm and 4 × 5 inches.
1D Mk IV
Aspect ratio information is only attached to the shot image, and the
image itself is not actually trimmed.
60D
For RAW images, aspect ratio information is only attached to the
shot image, and the image itself is not trimmed. For JPEG images,
the image itself is trimmed.
1Ds Mk III
1Ds Mk III
1D Mk III
1D Mk III
7D 60D
7D
Contents at
a Glance
Downloading
Images
1
Camera
Settings
2
Remote
Shooting
3
Preferences
4
Reference
Move the camera to adjust the horizontal/vertical
3
alignment.
O To remove the gridlines, click the [ ] button again.
Index
3838
Page 40

Click the [ ] button and select the aspect ratio.
COPY
1
¿ In the [Remote Live View window], the vertical lines of the aspect
ratio you selected is displayed.
Overlaid Display Function
An image saved in your computer can be overlaid on top of the image
displayed in the [Remote Live View window]. As this function allows to
accurately align angles, it is useful when aligning product photos or
shooting several images at the same angle.
Images loaded from your computer are only displayed, and are not
included in the shot.
Click the [ ] button.
1
¿ The [Open] window appears.
Introduction
Contents at
a Glance
Downloading
Images
1
Camera
Settings
2
Remote
Shooting
3
Preferences
4
Move the camera and compose your picture.
2
O To revert the aspect ratio to the normal condition, click the
[ ] button. For , select the original aspect ratio; for
other cameras, select [Off].
60D
Reference
Index
3939
Page 41

Select the image you want to display as an overlay
COPY
2
and click the [Open] button.
Introduction
Contents at
a Glance
Downloading
Images
1
Camera
Settings
2
O Images that can be displayed as an overlay are RAW*, JPEG,
TIFF, BMP (bitmap), and GIF images.
* • RAW images that can be displayed as an overlay are only
images with the extension “.CR2” shot using a Canon
camera.
• Images that have been adjusted with Digital Photo
Professional are also displayed in the condition when they
were shot.
O Even with supported image file types, the display of the image as
overlay may not be possible.
O For images displayed as overlay, image size equal or inferior at
1200 x 800 pixels and 3:2 aspect ratio are recommended.
O Images with aspect ratios other than 3:2 will be distorted and
displayed with a 3:2 aspect ratio.
¿ The image selected in the [Remote Live View window] is
displayed as an overlay. A composite ratio slider is displayed
above the [ ] button.
Move the camera and subject to compose your
3
picture.
O You cannot use the Overlaid Display function in the [Zoom View]
window.
Remote
Shooting
3
Preferences
4
Reference
Index
4040
Page 42

Setting the Composite Ratio
COPY
The composite ratio can be set from 0 to 100% in increments of 10%.
Use the composite ratio slider to set the composite ratio.
Move cursor over the slider.
1
¿ The slider changes from white to blue and becomes movable.
Drag the slider left or right to set.
2
Drag left or right
O You can also move the cursor over the slider, and then press the
<> or <> key on the keyboard to set the composite ratio.
¿ The composite ratio set with the composite ratio slider is applied
to the overlaid display.
Hiding the Overlaid Display Temporarily
You can temporarily hide the overlaid display.
Setting a Different Image as Overlaid Display
Switch the image displayed as an overlay to another image.
Click the [] button to the right of the [ ] button
1
and select [Open] from the menu that appears.
¿ The [Open] window appears.
Select the image you want to switch in the [Open]
2
window and click the [Open] button.
¿ The displayed image switches to the selected image.
Quitting the Overlaid Display Function
Click the [] button to the right of the [ ] button
and select [Off] from the menu that appears.
Introduction
Contents at
a Glance
Downloading
Images
1
Camera
Settings
2
Remote
Shooting
3
Preferences
4
Reference
Click
¿ The overlaid display is temporarily hidden.
O Click again to show.
Index
¿ The Overlaid Display function terminates.
4141
Page 43

Shooting by Operating the Camera
COPY
Even when remote shooting is set, you can still operate the camera and
shoot – as when shooting with only the camera. Also, since the shot
images are saved to your computer’s hard disk, you can shoot large
quantities without having to worry about the capacity of the memory card.
Shooting Movies
1D Mk IV 5D Mk II
You can control your camera from EU and shoot movies from your
computer screen. You cannot shoot movies without a memory card in
your camera.
7D 60D
REBELT2i
550D
REBELT1i
500D
Introduction
Contents at
a Glance
Display the capture window (p.27).
1
Press the camera’s shutter button and take a shot.
2
¿ The shot images are transferred to the computer, DPP starts up
automatically, and the shot images are displayed.
1D Mk IV
Prepare for Live View shooting.
1
O Follow the procedure from step 1 to step 3 for “Remote Live View
Shooting” (p.27).
Click [Live View/Movie func. set.].
2
¿ The [Live View/Movie func. set.] window appears.
Select [Movies] for [LV func. setting], and select the
3
movie recording size from the list box.
Downloading
Images
1
Camera
Settings
2
Remote
Shooting
3
Preferences
4
Reference
Index
When the [Remote Live View window] is displayed, the camera
cannot be operated. Press the camera’s < SET > button (Live View
500D
5D Mk II
) to display the Live View image on the
shooting button on the
550D
camera’s LCD monitor and operate the camera.
REBELT1i
7D 60D 50D
REBELT2i
42
Page 44

Click the [OK] button.
COPY
4
¿ The [Live View/Movie func. set.] window closes.
Click [Live View shoot.].
5
¿ The [Remote Live View window] appears.
O After you click the [Download] button, the file names of the image
data shot in movie mode (movie/still image) appear in a list.
Introduction
Contents at
a Glance
Downloading
Images
1
Camera
Settings
2
Focus (p.31, p.33).
6
Click the [ ] button and begin shooting.
7
¿ At the bottom left of the [Remote Live View window], a [ ] icon
and the recording time are displayed.
Recording time
O Click the [ ] button again to end shooting.
¿ When the [Remote Live View window] closes, the following
window appears if some image data remains to be downloaded
to your computer.
After specifying [Destination Folder] and [File Name], click the
[Download] button in the window, and image data will be
downloaded from the camera’s memory card to your computer.
Image data having a check mark removed from its file name are
not downloaded. Afterward, when downloading image data to
your computer from the camera’s memory card, use the method
described on p.6 to p.9 of this Instruction Manual to download.
Remote
Shooting
3
Preferences
4
Reference
Index
4343
Page 45

5D Mk II
COPY
Prepare for Live View shooting.
1
O Follow the procedure from step 1 to step 3 for “Remote Live View
Shooting” (p.27).
Introduction
Click [Live View shoot.].
5
Contents at
a Glance
Click [Live View/Movie func. set.].
2
¿ The [Live View/Movie func. set.] window appears.
Select [Stills+movie] and [Movie display], set the
3
movie recording size.
¿ The [Remote Live View window] appears.
Focus (p.31, p.33).
6
Click the [ ] button a nd begin shooting.
7
¿ At the bottom left of the [Remote Live View window], a [ ] icon
and the recording time are displayed.
Recording time
O Click the [ ] button again to end shooting.
¿ When the [Remote Live View window] closes, the following
window appears if some image data remains to be downloaded
to your computer.
Downloading
Images
1
Camera
Settings
2
Remote
Shooting
3
Preferences
4
Reference
Index
O You cannot shoot movies when [Screen settings] is set to [Still
display] or [Exposure simulation].
O If the camera firmware is Ver.2.0.0 or later, set the frame rate on
the camera. Note that if the frame rate has been set to 24 fps on
the camera, if you change the movie recording size with EU, the
frame rate will be changed to another setting.
Click the [OK] button.
4
¿ The [Live View/Movie func. set.] window closes.
O After you click the [Download] button, the file names of the image
data shot in movie mode (movie/still image) appear in a list.
4444
Page 46

7D
COPY
Prepare for Live View shooting.
1
O Follow the procedure of step 1 and step 2 for “Remote Live V iew
Shooting” (p.27).
O On , set your camera’s Live View shooting/Movie
shooting switch to < >.
Click the [ ] button.
7D
2
Introduction
Contents at
a Glance
Downloading
Images
1
Camera
Settings
2
Remote
Shooting
3
After specifying [Destination Folder] and [File Name], click the
[Download] button in the window, and image data will be
downloaded from the camera’s memory card to your computer.
Image data having a check mark removed from its file name are
not downloaded. Afterward, when downloading image data to
your computer from the camera’s memory card, use the method
described on p.6 to p.9 of this Instruction Manual to download.
¿ The [Remote Live View window] appears.
Y ou cannot operate the camera when the [ ] button is clicked.
To operate the camera, click the [ ] button again or close the
[Remote Live View window].
Preferences
4
Reference
Index
4545
Page 47

When setting the movie recording size, click [Live View/Movie
COPY
func. set.], and display the [Live View/Movie func. set.] window
before setting.
Click the [ ] button a nd begin shooting.
4
¿ At the bottom left of the [Remote Live View window], a [ ] icon
and the recording time are displayed.
Recording time
Introduction
Contents at
a Glance
Downloading
Images
1
Select
Click
O Click the [ ] button again to end shooting.
¿ When the [Remote Live View window] closes, the following
window appears if some image data remains to be downloaded
to your computer.
O After you click the [Download] button, the file names of the image
data shot in movie mode (movie/still image) appear in a list.
Camera
Settings
2
Remote
Shooting
3
Preferences
4
Reference
Index
Focus (p.31, p.33).
3
4646
Page 48

60D
COPY
Prepare for Live View shooting.
1
O Follow the procedure of step 1 and step 2 for “Remote Live V iew
Shooting” (p.27).
Introduction
Contents at
a Glance
After specifying [Destination Folder] and [File Name], click the
[Download] button in the window, and image data will be
downloaded from the camera’s memory card to your computer.
Image data having a check mark removed from its file name are
not downloaded. Afterward, when downloading image data to
your computer from the camera’s memory card, use the method
described on p.6 to p.9 of this Instruction Manual to download.
Click the [ ] button.
2
¿ The [Remote Live View window] appears.
Y ou cannot operate the camera when the [ ] button is clicked.
To operate the camera, click the [ ] button again or close the
[Remote Live View window].
Downloading
Images
1
Camera
Settings
2
Remote
Shooting
3
Preferences
4
Reference
Index
4747
Page 49

When setting the movie recording size, movie shooting mode,
COPY
etc., click [Live View/Movie func. set.], and display the [Live V iew/
Movie func. set.] window before setting.
Note the following when you set the movie recording size to [Movie
Crop 640 x 480].
• The Movie crop image cannot be magnified for focusing.
• Two AF modes can be selected, [Live mode] (p.34) and [Face
Detection Live mode] (p.35).
• AF mode automatically switches to [Live mode] (p.34) when in
[Quick mode] (p.33).
• Still photos cannot be taken.
• The movie recording size icon appears as [ ].
Adjust the focus (p.31, p.33).
3
Introduction
Contents at
a Glance
Downloading
Images
1
Camera
Settings
2
Select
Click
Click the [ ] button a nd begin shooting.
4
¿ At the bottom left of the [Remote Live View window], a [ ] icon
and the recording time are displayed.
Recording time
O Click the [ ] button again to end shooting.
¿ When the [Remote Live View window] closes, the following
window appears if some image data remains to be downloaded
to your computer.
Remote
Shooting
3
Preferences
4
Reference
Index
O After you click the [Download] button, the file names of the image
data shot in movie mode (movie/still photo) appear in a list.
4848
Page 50

REBELT2i
COPY
1
550D
Prepare for Live View shooting.
O Follow the procedure of step 1 and step 2 for “Remote Live V iew
Shooting” (p.27).
Introduction
Contents at
a Glance
After specifying [Destination Folder] and [File Name], click the
[Download] button in the window, and image data will be
downloaded from the camera’s memory card to your computer.
Image data having a check mark removed from its file name are
not downloaded. Afterward, when downloading image data to
your computer from the camera’s memory card, use the method
described on p.6 to p.9 of this Instruction Manual to download.
Click the [ ] button.
2
¿ The [Remote Live View window] appears.
Y ou cannot operate the camera when the [ ] button is clicked.
To operate the camera, click the [ ] button again or close the
[Remote Live View window].
Downloading
Images
1
Camera
Settings
2
Remote
Shooting
3
Preferences
4
Reference
Index
4949
Page 51

When setting the movie recording size, click [Live View/Movie
COPY
func. set.], and display the [Live View/Movie func. set.] window
before setting.
Note the following when you set the movie recording size to [Movie
Crop 640 x 480].
• The Movie crop image cannot be magnified for focusing.
• Two AF modes can be selected, [Live mode] (p.34) and [Face
Detection Live mode] (p.35).
• AF mode automatically switches to [Live mode] (p.34) when in
[Quick mode] (p.33).
• Still photos cannot be taken.
• The movie recording size icon appears as [ ].
Adjust the focus (p.31, p.33).
3
Introduction
Contents at
a Glance
Downloading
Images
1
Camera
Settings
2
Select
Click
Click the [ ] button a nd begin shooting.
4
¿ At the bottom left of the [Remote Live View window], a [ ] icon
and the recording time are displayed.
Recording time
O Click the [ ] button again to end shooting.
¿ When the [Remote Live View window] closes, the following
window appears if some image data remains to be downloaded
to your computer.
Remote
Shooting
3
Preferences
4
Reference
Index
O After you click the [Download] button, the file names of the image
data shot in movie mode (movie/still image) appear in a list.
5050
Page 52

REBELT1i
COPY
1
500D
Prepare for Live View shooting.
O Follow the procedure of step 1 and step 2 for “Remote Live V iew
Shooting” (p.27).
Introduction
Contents at
a Glance
After specifying [Destination Folder] and [File Name], click the
[Download] button in the window, and image data will be
downloaded from the camera’s memory card to your computer.
Image data having a check mark removed from their file name
are not downloaded. Afterward, when downloading image d ata to
your computer from the camera’s memory card, use the method
described on p.6 to p.9 of this Instruction Manual to download.
Set the camera’s mode dial to < >.
2
O When setting the movie recording size, click [Live View/Movie
func. set.], display the [Live View/Movie func. Set.] window
before setting.
Downloading
Images
1
Camera
Settings
2
Remote
Shooting
3
Preferences
4
Reference
Index
Select
Click
5151
Page 53

Click [Live View shoot].
COPY
3
¿ The [Remote Live View window] appears.
Introduction
Contents at
a Glance
Downloading
Images
1
Focus (p.31, p.33).
4
Click the [ ] button and begin shooting.
5
¿ At the bottom left of the [Remote Live View window], a [ ] icon
and the recording time are displayed.
Recording time
O Click the [ ] button again to end shooting.
¿ When the [Remote Live View window] closes, the following
window appears if some image data remains to be downloaded
to your computer.
After specifying [Destination Folder] and [File Name], click the
[Download] button in the window, and image data will be
downloaded from the camera’s memory card to your computer.
Image data having a check mark removed from its file name are
not downloaded. Afterward, when downloading image data to
your computer from the camera’s memory card, use the method
described on p.6 to p.9 of this Instruction Manual to download.
Camera
Settings
2
Remote
Shooting
3
Preferences
4
Reference
Index
O After you click the [Download] button, the file names of the image
data shot in movie mode (movie/still image) appear in a list.
5252
Page 54

Timer-controlled Shooting
COPY
Two types of timer shooting are available where the camera
automatically takes shots at a specified time or a specified number.
Introduction
Interval Timer Shooting
Timer Shooting
You can automatically take a shot when the specified time elapses.
Display the capture window (p.27).
1
Click the [ ] button.
2
¿ The [Timer shooting settings] dialog box appears.
Enter a delay time and click the [Start] button.
3
O Enter a value between 0 seconds and 99 minutes and 59
seconds in one-second increments.
¿ The shot is taken when the specified time elapses.
You can automatically take shots by setting the interval between shots
and the number of shots to be taken.
Display the capture window (p.27).
1
Click the [ ] button.
2
¿ The [Timer shooting settings] dialog box appears.
Checkmark [Interval timer shooting].
3
Enter the shooting interval and the number of shots.
4
O Enter a value between 5 seconds and 99 minutes and 59
seconds in one-second increments.
O The minimum number of interval-timed shots is two. The number
of shots you can take at timed intervals depends on the available
space on your computer’s hard disk.
Click the [Start] button.
5
¿ The shots are taken at the specified intervals and for the
specified number of shots.
Contents at
a Glance
Downloading
Images
1
Camera
Settings
2
Remote
Shooting
3
Preferences
4
Reference
On certain types of computer, if you set a short interval between
shots and there is insufficient time to transfer and save the images,
it may not be possible to take shots at the specified interval. In this
case, set a longer interval between shots and take the shots again.
The shooting mode cannot be changed when the [Timer shooting
settings] dialog box is displayed.
Display the [Timer shooting settings] dialog box after setting the
shooting mode.
Index
53
Page 55

Bulb Exposures
COPY
Introduction
Set the desired aperture.
3
Display the capture window (p.27).
1
Double-click the shooting mode icon and select [BULB].
2
O Specify the following settings for cameras other than
1D Mk IV
• For cameras with < B > (bulb) on the Mode dial, set to < B >.
• For cameras without < B > (bulb) on the Mode dial, set the
Mode dial to < M > (manual), and select [BULB] in the capture
window or set the camera’s shutter speed to [BULB].
1Ds Mk III
1D Mk III
.
Click the [ ] button.
4
¿ The [Timer shooting settings] dialog box appears.
Enter the exposure time and click the [Start] button.
5
O Enter a value between 5 seconds and 99 minutes and 59
seconds in one-second increments.
Contents at
a Glance
Downloading
Images
1
Camera
Settings
2
Remote
Shooting
3
Preferences
4
Reference
Index
You can start/end bulb exposure without setting an exposure time
by clicking the [ ] button.
5454
Page 56

Flash Shooting
COPY
1D Mk IV 5D Mk II
From EU you can set the camera’s flash functions, as well as EX-series
Speedlite (sold separately) compatible with flash function setting, in
order to perform flash shooting.
For more details on setting items, also refer to the Instruction Manual
provided with your EX-series Speedlite and with your camera.
Prepare your camera and flash.
1
O When using an external flash, mount it on your camera.
Connect your camera and computer, and then start
2
up EU
(p.5).
7D 60D
REBELT2i
550D
Click the [ ] button.
4
Introduction
Contents at
a Glance
Downloading
Images
1
Camera
Settings
2
Click [Camera settings/Remote shooting].
3
¿ The capture window appears.
¿ The [Flash control menu] appears.
Remote
Shooting
3
Preferences
4
Reference
Index
55
Page 57

Click [Flash function settings].
COPY
5
Flash control menu
Specify settings.
6
Flash function settings window
Check that this box is
checkmarked
Click setting items, and
select settings from the
menu that appears
Introduction
Contents at
a Glance
Downloading
Images
1
Camera
Settings
2
¿ The [Flash function settings] window appears.
Enable the wireless func.,
click the setting items,
and then select settings
from the menu that
appears
[Wireless func.] button
1D Mk IV 5D Mk II
To enable the wireless function, click the button and select [Enable]
from the menu that appears. To cancel, select [Disable] from the
menu.
7D 60D
To enable the wireless function, click the button and select the flash
combination from the menu that appears. To ca ncel, select [Disable]
from the menu.
REBELT2i
550D
Remote
Shooting
3
Preferences
4
Reference
Index
Select [Raise built-in flash] to use the built-in flash on
60D
REBELT2i
550D
.
7D
5656
Page 58

If the [Flash control] menu is displayed on the camera’s LCD
COPY
monitor, EU [Flash function settings] window automatically closes.
O You can use modeling flash by clicking the [Modeling flash]
button. You should only use modeling flash for a maximum of 10
times continuously. (For more information, refer to the Instruction
Manual provided with the flash.)
O Information displayed in the [Flash function settings] window is
updated by clicking the [ ] button, so it is synchronized with
the current flash settings. (Since setting changes made with the
flash unit are not reflected in the [Flash function settings] window ,
you can click the [ ] button and update the [Flash function
settings] window to match the current flash settings.)
O You can name and save the flash setting as a file separate from
the image by clicking the [Save] button. You can also click the
[Load] button and load this file into EU for use in other shooting.
O You can use flash shooting and Remote Live View shooting (p.27)
together.
However, you cannot use modeling flash during Remote Live
View shooting.
O Settings that can be performed in the [Flash function settings]
window differ depending on the flash and camera.
Click the [ ] button to shoot.
7
¿ The shot image is transferred to your computer and displayed in
the [Quick Preview] window. Then, DPP starts up automatically.
O When the capture window AF/MF selector is set to [AF], AF/AE is
executed when the cursor is moved to the [ ] button. (p.74)
O You can quickly review the shot image in the [Quick Preview]
window displayed before DPP starts up. You can also resize the
[Quick Preview] window.
O You can show/hide the [Quick Preview] window by clicking the
[Other Functions] button in the capture widow and selecting
[Quick Preview] from the menu that appears.
Introduction
Contents at
a Glance
Downloading
Images
1
Camera
Settings
2
Remote
Shooting
3
Preferences
4
Reference
Index
O For a list of [Flash function settings] window functions, refer to
p.76.
O You can also shoot using the <space> bar on the keyboard.
5757
Page 59

4
COPY
Preferences
You can change each of the EU functions on each window of the
preferences window to make them easier to use.
Preferences............................................................. 59
Introduction
Contents at
a Glance
Basic Settings............................................................. 59
Destination Folder ...................................................... 60
File Name................................................................... 60
Download Images....................................................... 61
Remote Shooting........................................................ 61
Linked Software.......................................................... 61
Downloading
Images
1
Camera
Settings
2
Remote
Shooting
3
Preferences
4
Reference
Index
58
Page 60

Preferences
COPY
On the main window, click the [Preferences] button.
1
¿ The [Preferences] dialog box appears.
Specify the required settings and click the [OK]
2
button.
¿ The settings are applied to EU.
Basic Settings
You can specify the operation when EU starts up and whether the auto
power off function is enabled or disabled.
O When [Show [Lets you select and download images] screen] is
selected in [Startup Action], the viewer window (p.71) appears.
O When [Show [Camera settings/Remote shooting] screen] is
selected in [Startup Action], the capture window (p.74) appears.
O When [Execute [Starts to download images]] is selected in
[Startup Action], the [Save File] dialog box (p.6) appears and
downloading to your computer begins. When all the images have
been downloaded, DPP starts up automatically and the
downloaded images are displayed in DPP’s main window.
O If you checkmark [Auto power off], the camera’s auto power off
function is enabled. If you remove the check mark, the auto power
off function remains disabled, even if you set the auto power off
function on the camera (only when the camera is connected to a
computer.).
O If you remove the check mark from [Automatically display Quick
Preview window], the [Quick Preview] window will no longer
appear during Remote Live View shooting or when loading
images.
O If you checkmark [Register WFT Pairing Software in Login
Options], the WFT pairing software is added to the login items
displayed when the [Accessories] tab sheet is selected in the
main window.
Introduction
Contents at
a Glance
Downloading
Images
1
Camera
Settings
2
Remote
Shooting
3
Preferences
4
Reference
Index
59
Page 61

Introduction
COPY
Destination Folder
You can specify the save destination folder of images downloaded from
your camera or of images shot remotely.
File Name
You can specify the file name of images downloaded from your camera
or of images shot remotely.
Contents at
a Glance
Downloading
Images
1
Camera
Settings
2
Remote
Shooting
3
Preferences
4
Reference
O To specify a save destination folder, click the [Browse] button.
After you click the [Browse] button and specify a save destination
folder, a subfolder is created automatically below the save
destination folder you specified.
O After you checkmark any of [Download Images], [Remote
Shooting], or [Monitor Folder], a subfolder is generated when the
checkmarked function is used.
O You can select the naming rule for a generated subfolder from the
list box. Y o u can also customize the naming rule for subfolders by
clicking the [Customize] button.
Index
O When specifying an image’s file name, select a naming rule for
the file from the list box. (If [Do not modify] is selected, images are
saved with the file name set in the camera.) You can also
customize the naming rule for files by clicking the [Customize]
button.
O You can set prefix characters, number of digits for serial numbers,
and the start number individually for file names.
6060
Page 62

Download Images
COPY
From the list box, you can select the images to be downloaded when
[Starts to download images] in the main window is clicked.
[Images whose transfer settings were specified with the camera] in
the [Settings for downloaded images] menu is only enabled for
cameras capable of direct transfer of shot images. Refer to your
camera's Instruction Manual for details.
O If you checkmark [Save also on the camera’s memory card],
images shot during remote shooting will also be saved to the
camera’s memory card.
O If you checkmark [Rotate image], you can set a function that
rotates shot images regardless of the camera’s position during
shooting. Set the rotation angle in the capture window (p.74).
O If you checkmark [Start Live View], the [Remote Live View
window] automatically appears when the camera’s Live View
starts up.
O Is you checkmark [Stop Live View], the [Remote Live View
window] automatically closes when the camera’s Live View ends.
Linked Software
From the list box, you can select the linked software that st art s up when
images are downloaded from the camera or when images are shot
remotely. Also, you can register third-party software as linked software
by clicking the [Apply] button.
Introduction
Contents at
a Glance
Downloading
Images
1
Camera
Settings
2
Remote
Shooting
3
Preferences
4
Reference
Remote Shooting
You can set operations performed during remote shooting.
Index
O When you have selected ImageBrowser, you can specify the
operation for after images are downloaded.
O In the window displayed when you click the [Apply] button, you
can specify the type of images to be posted when linked thirdparty software is started up.
6161
Page 63

Reference
COPY
This reference section has been provided to enh ance your experience using EU.
It contains various troubleshooting solutions, how to delete EU from yo ur
computer and explanations of the various windows.
An index is provided at the end of the chapter for you to easily find information
you are looking for.
Troubleshooting....................................................... 63
Introduction
Contents at
a Glance
Downloading
Images
1
Monitor Folder Function (Function for Use with the WFT-E2/A, E2
II A/B/C/D, E3/A, E4/A, E4 II A/B/C/D, or E5A/B/C/D)
Function for Use with the Accessories .................... 66
Folder Structure and File Names in the Memory Card...
Uninstalling the Software......................................... 67
Fixing the Plug to the Camera................................. 68
List of Main Window Functions................................ 70
List of Viewer Window Functions............................. 71
List of Register Lens Aberration Correction Data/Register
Peripheral Illumination Correction Data Window Functions ....
List of My Menu Settings Window Functions........... 73
List of Capture Window Functions........................... 74
Exposure Level/AEB Level..................................... 75
List of Flash Function Settings Window Functions.. 76
List of Remote Live View Window Functions........... 77
......... 65
67
72
Camera
Settings
2
Remote
Shooting
3
Preferences
4
Reference
Index
List of Zoom View Window Functions...................... 78
List of Test Shooting Window Functions ................. 79
Index........................................................................ 80
About This Instruction Manual................................ 81
Trademark Acknowledgments................................ 81
62
Page 64

Troubleshooting
COPY
If EU is not operating correctly, refer to the items below.
Introduction
EU and the camera are not communicating
Installation could not be completed correctly
O You cannot install software unless you are logged into an account
with Administrator privileges. Log in again into an account with
Administrator privileges.
For how to log in and how to specify Administrator settings, refer to
the User’s Manual for the Macintosh computer or for Mac OS X.
EU does not start up
O If EU does not start up after following the instructions as explained,
the software Preferences file may be corrupted. Quit all software,
disconnect the interface cable from your computer, delete the
Preferences file that is corrupted from the [Preferences] folder, and
restart EU.
Delete the Preferences file below from the hard disk drive where the
system is saved [Users] folder Folder of the logged in user
[Library] folder [Preferences] folder.
Preferences Description
com.canon.EOS Utility 2.plist EOS Utility Preferences file
O EU does not operate correctly on a computer if its system
requirements does not meet. Use EU on a computer with compatible
system requirements (p.2).
O Push the plug of the interface cable all the way into the socket. Loose
connections can cause faults and malfunctions (p.5).
O Check that the camera’s power switch is < ON > (p.6).
O EU and the camera may not communicate normally with a cable other
than the EOS DIGITAL camera-dedicated Canon interface cable
(p.5).
O Connect your camera and computer directly with the interface cable
provided with your camera. Do not connect the camera via a hub;
doing so may prevent EU and your camera from communicating
normally.
O If you connect multiple USB devices (not including the mouse or
keyboard) to your computer, the camera may not communicate
normally. If the camera cannot communicate normally, disconnect
USB devices other than the mouse or keyboard from your computer.
Contents at
a Glance
Downloading
Images
1
Camera
Settings
2
Remote
Shooting
3
Preferences
4
Reference
The card reader does not detect the SD card.
O Depending on the card reader and computer OS used, SDXC cards
might not be correctly detected. In such a case, connect your camera
and computer with the provided interface cable, and transfer the
images to your computer.
O Do not connect more than one camera to the same computer . Two or
more cameras may not operate normally.
O Do not connect your camera with the computer while performing
“Linked shooting” with WFT-E2 II A/B/C/D, E4 II A/B/C/D, E5A/B/C/D
(sold separately). Your camera may not operate normally.
O If there is insufficient charge left in the camera battery, the camera
cannot communicate with EU. Either replace with a fully charged
battery or use the AC adaptor kit provided with your camera. Your
computer does not supply power to the camera through the interface
cable.
Index
63
Page 65

Introduction
COPY
Communication between EU and the camera disconnected
O Operation of the auto power off function will automatically switch the
camera off, disabling communication with EU, if you turn the auto
power off function to [ON]. Remove the check mark from [Auto power
off] in the preferences ([Basic Settings] window) (p.59) or set the auto
power off function in the camera to [OFF].
O If you do not perform any operation while the camera and computer
are connected, depending on the computer system, a confirmation
message may appear on the screen asking whether you wish to
continue communicating with the camera. If you do not perform an
operation while this message appears, communication with your
camera is discontinued and EU shuts down. In this case, turn the
camera’s power switch to < OFF >, then again to < ON > and st art up
EU.
O Do not put your computer to sleep while it is connected to the ca mera.
If your computer goes into sleep mode, never disconnect the interface
cable while your computer is still in sleep mode. Always wake your
computer up while it is still connected to the camera. Depending on
the type of computer, disconnecting the interface cable while your
computer is in sleep mode could prevent the computer from waking
up correctly. Refer to the computer User’s Manual for more
information on sleep mode.
Remotely shot images using EU are not displayed in DPP
O In Digital Photo Professional, select the [Tools] menu [Sync folder
with EOS Utility].
Contents at
a Glance
Downloading
Images
1
Camera
Settings
2
Remote
Shooting
3
Preferences
4
Reference
A non-Canon flash does not fire during Remote Live View shooting
O When a non-Canon flash is mounted on the camera for Remote Live
View shooting, set [Silent shooting] in the camera to [Disable].
Index
6464
Page 66

Monitor Folder Function (Function for Use with the WFT-E2/A, E2 II A/B/C/D, E3/A, E4/A, E4 II A/B/C/D, or E5A/B/C/D)
COPY
This is a function for checking your images with Digital Photo
Professional (hereinafter DPP) in real time using the Wireless File
Transmitter WFT-E2/A, E2 II A/B/C/D, E3/A, E4/A, E4 II A/B/C/D, or
E5A/B/C/D (sold separately).
For setting the WFT-E2/A, E2 II A/B/C/D, E3/A, E4/A, E4 II A/B/C/D, or
E5A/B/C/D refer to the Instruction Manual provided with each product.
Click [Monitor Folder].
Click the [Browse] button and specify the save
2
destination folder for shot images.
Introduction
Contents at
a Glance
Downloading
Images
1
1
Camera
Settings
2
O
You can specify the save destination folder for the shot images set in the
WFT-E2/A, E2 II A/B/C/D, E3/A, E4/A, E4 II A/B/C/D, or E5A/B/C/D.
Click the [Change] button and specify the transfer
3
destination folder.
Remote
Shooting
3
Preferences
4
¿ The [Monitor Folder] dialog box appears.
Click the [ ] button.
4
¿ Image transfer preparation is complete.
Take a shot.
5
¿ If images are saved in the folder specified in step 2, they are
transferred/saved in the folder specified in step 3.
¿ DPP starts up and the images saved in the folder specified in
step 3 are displayed.
O You cannot specify the same folders in step 2 and step 3.
O When using a Macintosh running Mac OS X 10.6.0 to 10.6.2,
update your Mac OS to version 10.6.3 or later.
You can change the software that starts up in step 5, from DPP to
ImageBrowser or other software in preferences ([Linked Software]
window) (p.61).
Reference
Index
65
Page 67

Function for Use with the Accessories
COPY
If you have the Wireless File Transmitter WFT-E2/A, E2 II A/B/C/D, E3/
A, E4/A, E4 II/A/B/C/D, or E5A/B/C/D (sold separately), you can start up
the previously mentioned accessory software from EU. And you can
also start up the Picture Style Editor (Picture Style file creating
software).
For details on using each software, refer to the instruction manual for
the software. For Picture Style files, refer to p.18.
Connect your camera and computer, and then start
1
up EU
Click the [Accessories] tab.
(p.5).
3
2
Click the software you want to start up.
b
¿ The clicked software starts up.
Introduction
Contents at
a Glance
Downloading
Images
1
Camera
Settings
2
Remote
Shooting
3
Preferences
4
¿ The [Accessories] tab sheet appears.
Reference
Index
When using a Macintosh running Mac OS X 10.6.0 to 10.6.2,
update your Mac OS to version 10.6.3 or later.
66
Page 68

Folder Structure and File Names in the Memory Card
COPY
Images shot with the camera are saved in the memory card’s [DCIM]
folder with the following folder structure and file names. Refer to the
following when copying images to your computer using a card reader.
DCIM
xxxEOS1D
or
xxxCANON
O The camera specific character string set at the
O The “YYYY” in the file names represents a
File name File type
****YYYY.JPG JPEG image file
****YYYY.CR2 RAW image file
****YYYY.MOV MOV movie file
****YYYY.THM Thumbnail file
****YYYY.WAV Audio file
time of factory shipment or set in the camera
appears in “****” of the file name.
number between 0001 and 9999.
Uninstalling the Software
O Before starting the software uninstallation, quit all programs you are
using.
O To uninstall the software, log into the account used when installation
was performed.
O When you have moved the folders and the software to be deleted to
the Trash, select the [Finder] menu [Empty Trash] and empty the
Trash. You cannot reinstall the software until you have emptied the
Trash.
Display the folder in which the software is saved.
1
O Open the [Canon Utilities] folder.
Introduction
Contents at
a Glance
Downloading
Images
1
Camera
Settings
2
Remote
Shooting
3
Contains a file allowing the camera to manage the
CANONMSC
O The “xxx” in the folder names represents a number between 100
and 999.
O For the 1D series cameras, the folder structure is the same for
CF cards and SD cards.
O When you perform DPOF settings on the camera, a [MISC] folder
is created. The files that manage the DPOF settings are saved in
the [MISC] folder.
O A thumbnail file is a file saved with the same file name as the
movie and that includes shooting information. When a movie is
shot with or
REBELT1i
O When you play on the camera a movie that was shot with
1D Mk IV 5D Mk II
500D
When Adobe RGB is specified, the file names of images shot with
your camera have an underscore “_” as the first character.
images in the [DCIM] folder.
1D Mk IV 5D Mk II
500D
, both the movie file and the thumbnail file are required.
, it is generated together with the movie file.
7D
7D
REBELT2i
REBELT2i
or
550D
550D
REBELT1i
Drag the [EOS Utility] folder to the Trash.
2
Select the [Finder] menu on the desktop [Empty
3
Trash].
¿ EU is uninstalled.
Restart your computer.
4
You cannot retrieve data that you have emptied into the Trash and
deleted, so be particularly careful when deleting data.
Preferences
4
Reference
Index
67
Page 69

Fixing the Plug to the Camera
COPY
1D Mk IV
Fasten the plug to the camera with the cable protector to prevent it from
detaching during remote shooting.
1D Mk IV
1Ds Mk III
1D Mk III
With the plug as it is in step 2, connect it to the
3
camera’s <A/V OUT / DIGITAL> terminal.
<A/V OUT / DIGITAL>
terminal
Introduction
Contents at
a Glance
Open the covers.
1
Pass the small plug of the cable through the cable
2
protector, and pull it in the direction of the arrow.
<> mark
Fix the cable protector with the fixing screw.
4
Downloading
Images
1
Camera
Settings
2
Remote
Shooting
3
Preferences
4
Reference
Index
Cable protector
O Check the direction of the < > mark on the plug and pull it in.
68
Page 70

1Ds Mk III
COPY
Remove the cap.
1D Mk III
1
Attach the cap on the fixing screw.
2
Attach the cable protector and fix it with the fixing
4
screw.
Cable protector
Introduction
Contents at
a Glance
Downloading
Images
1
Camera
Settings
2
Remote
Shooting
3
Preferences
4
Connect the small plug of the cable into the < >
3
terminal on your camera.
O Connect the plug with the < > mark facing the front of the
camera.
Reference
Index
6969
Page 71

List of Main Window Functions
COPY
Introduction
Control camera tab sheet
Accessories tab sheet
Contents at
a Glance
(p.6)
(p.7, p.71)
(p.27, p.74)
(p.65)
Quits EU (p.10)(p.59)
(p.66)
Downloading
Images
1
Camera
Settings
2
Remote
Shooting
3
Preferences
4
Reference
Index
70
Page 72

List of Viewer Window Functions
(p.7)
COPY
Introduction
Recording media
folder hierarchy
Recording time
RAW + JPEG
image icon
Switches the recording media
Movie icon
Bracketing icon
Images already transferred to computer icon
Selects the condition of the image
Rating icon*
RAW image icon
Protect icon
Audio recording icon
Contents at
a Glance
Downloading
Images
1
Camera
Settings
2
Remote
Shooting
3
Preferences
4
Reference
Displays the
capture window
Displays the quick preview window
* Ratings set on , Digital Photo Professional or ImageBrowser
EX Ver . 6.6 are displayed. Howeve r , the [Reject] rating is not displayed.
Also, ratings cannot be set in EU.
60D
Deletes the image
Downloads the images to the computer
Check mark (p.8)
Image display size
Quits EU
Displays the main window
Displays the [Preferences] window
Index
71
Page 73

List of Register Lens Aberration Correction Data/Register Peripheral Illumination Correction Data Window Functions
(p
)
COPY
Displays all the categories
Lens category
.22
Introduction
Contents at
a Glance
Downloading
Images
1
Camera
Settings
2
Remote
Shooting
3
Preferences
4
Reference
Index
Displays only the
registered lenses
Displays lenses selected in [Select a lens category] by category
No. of lenses registered in the camera/No. of lenses that can be registered
Lens names displayed in the [Register lens aberration correction
data] window/[Register peripheral illumination correction data]
window may be partially shortened depending on the lens type.
72
Page 74

List of My Menu Settings Window Functions
(p
)
COPY
.24
Introduction
My Menu (up to 6 items)
Switches My Menu position
Adds to My Menu Closes [My Menu settings] window
All items that can be
applied to My Menu
Contents at
a Glance
Downloading
Images
1
Camera
Settings
2
Remote
Shooting
3
Preferences
4
Reference
Applies My Menu to the camera
Deletes from My Menu
Index
73
Page 75

List of Capture Window Functions
1
COPY
O Displayed items differ depending on the model and settings of the camera connected.
2
AF mode
Rotates shot image*
Shoot button*
AF/MF selector button*
Save destination
for shot images
Shutter speed
Aperture*
ISO speed
Image recording quality
Save destinations for shot
images*
Displays the [Timer
shooting settings] window
(p.53, p.54)
Displays the [My Menu] (p.25)
Displays the
[Set-up menu] (p.13)
Displays the [Remote Live
View window (Movie)]*
(p.45, p.49)
Displays the viewer window
(p.8, p.71)
Shows/hides the [Quick Preview]
window
Displays the [Test shooting]
window (p.36, p.79)
Displays the main window (p.70)
6
7
Mirror lockup
Drive mode
Bracketing
Power status*
Shots to go
Shooting mode
Color temperature
White balance
Metering mode
Exposure Level/AEB Level
(Refer to next page for details)
Displays the
[Shooting menu] (p.15)
Displays [Flash control menu]
(p.76)
Displays the
[Remote Live View window]
(p.30, p.77)
Displays the
[Preferences] window (p.59)
1
Flash ready*
4
(p.30)
Introduction
When using the battery, the charge level is
*
displayed.
2
*
Displayed only on
60D
3
5
8
Appears after flash charging is complete and
the cursor is moved to the Shoot button.
3
*
Each time you click the button, the shot
image rotates 90 degrees.
To make this function available, checkmark
[Rotate image] in preferences ([Remote
Shooting] window) (p.61).
4
On
*
50D
when the AF/MF selector button is set to
[AF], AF/AE is performed when the cursor is
moved to the Shoot button.
5
*
Displayed only on
7D 60D 50D
REBELT1i
[MF], “AF” appears in the shooting
information for the shot image. Setting < ADEP > as the camera’s shooting mode
disables this button.
6
*
Click the aperture while holding down the
<control> key, and you can decrease the
aperture by pressing <O> on the keyboard,
or increase the aperture by pressing <C>.
7
You can select whether the shot images are
*
saved only to the computer or both to the
computer and to the memory card in the
camera. In movie mode, shot movies are
saved only to the camera’s memory card.
8
Displayed only on
*
REBELT2i
REBELT2i
1D Mk IV 5D Mk II
REBELT2i
500D
550D
1D Mk IV
550D
550D
1D Mk IV 5D Mk II
. Even when it is set to
7D 60D
.
7D
.
7D 60D
REBELT1i
REBELT2i
500D
550D
Downloading
,
Contents at
a Glance
Images
1
Camera
Settings
2
Remote
Shooting
3
Preferences
4
Reference
Index
74
Page 76

Exposure Level/AEB Level
COPY
O The display changes as follows by double-clicking the Exposure level/AEB level item.
1 level brighter
Exposure level adjustment
AEB level setting
Introduction
Contents at
Brightest exposure1 level darkerDarkest exposure
a Glance
Downloading
Images
1
Setting width 0 Maximum setting range
Narrow setting range 1 level
Widen setting range 1 level
1D Mk IV
When the AEB bracketing setting exceeds the displayable range, [ ], [ ]
marks are displayed to show there are bracketing indicators beyond the
scale.
Camera
Settings
2
Remote
Shooting
3
Preferences
4
Reference
Index
75
Page 77

List of Flash Function Settings Window Functions
(p
)
COPY
1D Mk IV 5D Mk II
7D 60D
REBELT2i
550D
.55
Introduction
Flash mode
Flash metering
Flash exposure compensation amount/
Flash output level*
Channel
Master flash ON/OFF
Flash exposure compensation amount/
Flash output level* during wireless setting
MULTI flash count 1st curtain sync/ 2nd curtain sync/ Hi-speed sync
Settings update button
Zoom/focal length
MULTI flash frequency
Wireless function button
Flash ratio
Contents at
a Glance
Downloading
Images
1
Camera
Settings
2
Remote
Shooting
3
Preferences
4
Reference
[Save] button
[Load] button
* Displayed information differs depending on the settings. For more details on settings,
also refer to the Instruction Manual provided with your EX-series Speedlite or camera.
[Modeling flash] button
Index
76
Page 78

List of Remote Live View Window Functions
(p
)
COPY
.27
Introduction
AF point
Movie recording time
Movie recording in
progress icon
Frame rate
Movie recording size
Enlargement display frame
Sets the color temperature
Controllers 1
Selects the white balance
(p.36)
Click white balance
Displays the [Test
Shooting] window (p.79)
AF mode (p.33 to p.35)
Lens drive (p.32)
Checks the depth of field
(p.35)
Shows/hides the controllers 1
Composite ratio slider (p.41)
Controllers 2
Contents at
a Glance
Downloading
Images
1
Camera
Settings
2
Remote
Shooting
3
Preferences
4
Reference
Index
Displays the capture window
(p.74)
Starts/stops movie recording
Overlaid display function
(p.39 to p.41)
Shows/hides the AF points
Rotates the image
Shows/hides the gridlines (p.38) Sets the aspect ratio (p.38)
Closes the window
Displays the [Zoom View] window (p.32, p.78)
Shows/hides the histogram
77
Page 79

List of Zoom View Window Functions
(p
)
COPY
.31
Introduction
Moves the display
position
Sets the color temperatureMoves the display position
Controllers 1
Selects the white balance
(p.36)
Click white balance
Displays the [Test
Shooting] window (p.79)
AF mode (p.33 to p.35)
Lens drive (p.32)
Checks the depth of field
(p.35)
Display mode*
Maintains display of the
[Zoom View] window
Contents at
a Glance
Downloading
Images
1
Camera
Settings
2
Remote
Shooting
3
Preferences
4
Shows/hides the controllers 1
Moves the display position
Reference
Moves the display
position
Displays the capture window (p.74)
AF point show/hide
* Clicking the [ ] button switches to a quality suited to focusing while
viewing on your camera’s LCD monitor; clicking the [ ] button
switches to a quality suited to focusing while viewing on your computer.
Index
Controllers 2
Closes the window
Returns to the [Remote Live View window]Rotates the image
78
Page 80

List of Test Shooting Window Functions
(p
)
COPY
.36
Introduction
Contents at
a Glance
Test shooting button
Displays the [Click white
balance] window (p.37)
Saves the test shot image
Enlargement ratio of the
image
Downloading
Images
1
Camera
Settings
2
Remote
Shooting
3
Preferences
4
Reference
Index
Displays the capture window
RGB values*
Coordinates*
* Only displayed when the [Click white balance] window is displayed
(p.37) and the cursor is moved to over the point to be the standard for
white for the image.
Rotates the image
Closes the window
Enlargement/reduction of the image
Fit-to-window view100% (actual pixel size) view
79
Page 81

Index
COPY
A
Adjusting the Horizontal Alignment of the Camera
(Remote Live View Shooting) ............................................................. 38
Adjusting the Vertical Alignment of the Camera
(Remote Live View Shooting) ............................................................. 38
Adjusting the White Balance............................................................... 22
Applying Personal White Balance....................................................... 20
Applying Picture Style Files ................................................................ 18
Attaching the Cable Protector............................................................. 69
B
Basic Settings (Preferences) .............................................................. 59
Bulb Exposures................................................................................... 54
C
Capture Window ................................................................................. 74
Flash Control Menu...................................................................... 56
My Menu....................................................................................... 25
Set-up Menu................................................................................. 13
Shooting Menu............................................................................. 15
Changing the Aspect Ratio (Remote Live View Shooting).................. 38
Changing the White Balance in the Remote Live View Window
(Remote Live View Shooting) ............................................................. 36
Checking the Depth of Field and Exposure
(Remote Live View Shooting) ............................................................. 35
Connecting the Camera to Your Computer........................................... 5
D
Destination Folder Settings (Preferences).......................................... 60
Download Images Settings (Preferences) .......................................... 61
Downloading All the Images in a Single Operation............................... 6
Downloading Images with a Card Reader ............................................ 9
Downloading Selected Images ............................................................. 7
F
File Name Settings (Preferences)....................................................... 60
Flash Control Menu (Capture Window)............................................... 56
Flash function settings Window .................................................... 56, 76
Flash shooting..................................................................................... 55
Focusing Automatically (Using AF) (Remote Live View Shooting)...... 33
Focusing in Face Detection Live Mode (Remote Live View Shooting) 35
Focusing in Live Mode (Remote Live View Shooting)......................... 34
Focusing in Quick Mode (Remote Live View Shooting) ...................... 33
Focusing Manually (Remote Live View Shooting)............................... 31
Focusing Using AF.............................................................................. 33
Folder Structure and File Names......................................................... 67
Folder Structure and File Names in the Memory Card........................ 67
Function for Use with WFT-E2/A, E2 II A/B/C/D, E3/A, E4/A, E4 II A/B/C/
D, or E5A/B/C/D .................................................................................. 65
Function for use with Wireless File Transmitter WFT-E2/A, E2 II A/B/C/
D, E3/A, E4/A, E4 II A/B/C/D, or E5A/B/C/D ....................................... 65
I
Interval Timer Shooting ....................................................................... 53
L
Linked Software Settings (Preferences).............................................. 61
M
Main Window....................................................................................... 70
My Menu (Capture Window)................................................................ 25
My Menu Settings................................................................................ 24
My Menu Settings Window............................................................ 25, 73
O
Overlaid Display Function (Remote Live View Shooting).................... 39
Q
Quitting the EOS Utility........................................................................ 10
R
Register Lens Aberration Correction Data/Register Peripheral
Illumination Correction Data Window ............................................ 23, 72
Registering Lens Aberration Correction/Peripheral Illumination
Correction Data for the Lens ............................................................... 22
Remote Live View Shooting ................................................................ 27
Introduction
Contents at
a Glance
Downloading
Images
1
Camera
Settings
2
Remote
Shooting
3
Preferences
4
Reference
Index
80
Page 82

Remote Live View Window........................................................... 30, 77
COPY
Remote Live View Window Functions................................................. 31
Adjusting the Horizontal Alignment of the Camera....................... 38
Adjusting the Vertical Alignment of the Camera........................... 38
Changing the Aspect Ratio........................................................... 38
Changing the White Balance in the Remote Live View Window.. 36
Checking the Depth of Field and Exposure.................................. 35
Focusing Automatically (Using AF).............................................. 33
Focusing in Face Detection Live Mode........................................ 35
Focusing in Live Mode ................................................................. 34
Focusing in Quick Mode............................................................... 33
Focusing Manually ....................................................................... 31
Overlaid Display Function ............................................................ 39
White Balance for Flash Photography.......................................... 36
Remote Shooting Settings (Preferences) ........................................... 61
S
Setting JPEG Quality.......................................................................... 21
Setting Picture Styles.......................................................................... 16
Setting the Camera Owner’s Name.................................................... 12
Setting the Camera’s Date and Time.................................................. 12
Setting the Copyright Notice for the Image......................................... 12
Set-up Menu (Capture Window) ......................................................... 13
Shooting by Operating the Camera .................................................... 42
Shooting Menu (Capture Window)...................................................... 15
Shooting Movies ................................................................................. 42
Specifying Preferences....................................................................... 59
Basic Settings............................................................................... 59
Destination Folder Settings.......................................................... 60
Download Images Settings........................................................... 61
File Name Settings....................................................................... 60
Linked Software Settings.............................................................. 61
Remote Shooting Settings............................................................ 61
Starting up EOS Utility.......................................................................... 6
Supported Camera................................................................................ 2
System Requirements........................................................................... 2
T
Test Shooting Window................................................................... 36, 79
Timer Shooting.................................................................................... 53
U
Uninstalling the Software..................................................................... 67
V
Viewer Window................................................................................ 8, 71
W
White Balance for Flash Photography (Remote Live View Shooting) . 36
Z
Zoom View Window....................................................................... 32, 78
About This Instruction Manual
O It is prohibited to reproduce, in whole or part, the contents of this
Instruction Manual without permission.
O Canon may change without notice the software specifications and
contents of this Instruction Manual.
O The software screens and displays printed in this Instruction Manual
may differ slightly from the actual software.
O The content of this Instruction Manual has been reviewed thoroughly.
However, if you should notice any errors or omissions, please cont act
a Canon Service Center.
O Please note that irrespective of the above-mentioned, Canon does
not take responsibility for the outcome of the operation of the
software.
Trademark Acknowledgments
O Macintosh is trademark of Apple Inc., registered in the United States
and other countries.
O Other names and products not mentioned above may be registered
trademarks or trademarks of their respective companies.
Introduction
Contents at
a Glance
Downloading
Images
1
Camera
Settings
2
Remote
Shooting
3
Preferences
4
Reference
Index
8181
 Loading...