

Page 1
E
Advanced User Guide
Page 2

Introduction
Before Starting to Shoot, Be Sure to Read the Following
To avoid shooting problems and accidents, rst read the “Safety
Instructions” (p.25–27) and “Handling Precautions” (p.28–30).
Also, read this manual carefully to ensure that you use the camera
correctly.
Refer to This Manual while Using the Camera to Further
Familiarize Yourself with the Camera
While reading this manual, take a few test shots and see how they
come out. You can then better understand the camera. Be sure to
store this manual safely, too, so that you can refer to it again when
necessary.
Testing the Camera Before Use and Liability
After shooting, play images back and check whether they have been
properly recorded. If the camera or memory card is faulty and the
images cannot be recorded or imported to a computer, Canon cannot
be held liable for any loss or inconvenience caused.
Copyrights
Copyright laws in your country may prohibit the use of your recorded
images of people and certain subjects for anything but private
enjoyment. Also be aware that certain public performances, exhibitions,
etc. may prohibit photography even for private enjoyment.
Connecting Other Devices
Use the included interface cable or a genuine Canon cable when connecting
the camera to a computer or other device. When connecting an interface
cable, also use the included cable protector (p.37).
2
Page 3

Item Check List
Before starting, check that all the following items are included with your
camera. If anything is missing, contact your dealer.
Camera
(with eyecup and body cap)
Strap
* Battery Charger LC-E6 or LC-E6E is provided. (The LC-E6E comes with a
power cord.)
oThe camera does not come with a memory card (p.10) or HDMI cable.
oFor details on the Advanced User Guide and Instruction Manuals, see the next
page.
oIf you purchased a Lens Kit, check that the lenses are included.
oBe careful not to lose any of the above items.
When you need Lens Instruction Manuals, download them from the Canon
website (p.4).
The Lens Instruction Manuals (PDF les) are for lenses sold individually.
Note that when purchasing the Lens Kit, some of the accessories included
with the lens may not match those listed in the Lens Instruction Manual.
Battery Pack
LP-E6N
(with protective cover)
Interface Cable
Battery Charger
LC-E6/LC-E6E*
Cable Protector
3
Page 4

Instruction Manuals
The Instruction Manual included with the camera
provides basic instructions for the camera and Wi-Fi
functions.
The Advanced User Guide (this PDF le), which provides
complete instructions, can be downloaded from the Canon
website to a computer or other device.
Downloading the Advanced User Guide/Instruction Manuals
The Advanced User Guide and instruction manuals for lenses and
software (PDF les) can be downloaded from the Canon website to a
computer or other device.
zDownload site
Advanced User Guide
Lens Instruction Manual
Software Instruction Manual
www.canon.com/icpd
g
To view the PDF les, an Adobe PDF viewing software such as
o
Adobe Acrobat Reader DC (most recent version recommended) is
required.
oAdobe Acrobat Reader DC can be downloaded for free from the Internet.
oDouble-click the downloaded PDF le to open it.
oTo learn how to use PDF viewing software, refer to the software’s Help
section or the like.
4
Page 5

Instruction Manuals
Downloading the Advanced User Guide/Instruction
Manuals Using QR Code
The Advanced User Guide and instruction manuals for lenses and
software (PDF les) can be downloaded to a smartphone or tablet
using the QR code.
www.canon.com/icpd
g
oA software application is required to read the QR code.
oSelect your country or region of residence, then download the Advanced
User Guide/Instruction Manuals.
oSelect [Manual/software URL] under the [56] tab to display the QR
code on the camera screen.
5
Page 6
Quick Start Guide
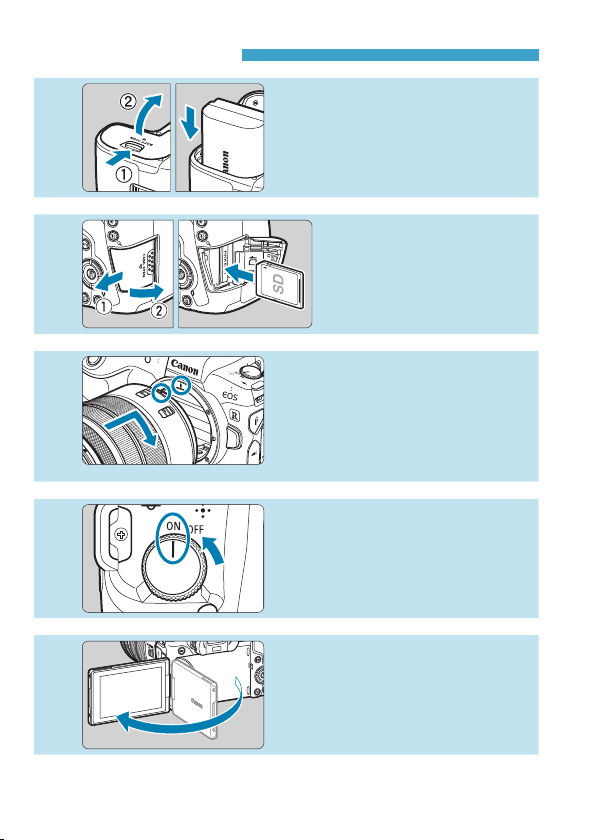
1
Insert the battery
zUpon purchase, charge the
battery to start using (p.40).
(p.43).
2
3
4
5
(p.50)
(p.44)
.
(p.47).
.
Insert the card
zWith the card’s label facing
toward the back of the
camera, insert it into the
card slot.
Attach the lens
zAlign the red mount index on the
lens with the red mount index on
the camera to attach the lens.
zMake sure the lens’s focus mode
switch is set to <2> (p.50).
Set the power switch to <1>
(p.48).
Flip out the screen
zWhen the date/time/zone setting
screen is displayed, see page
380.
6
Page 7
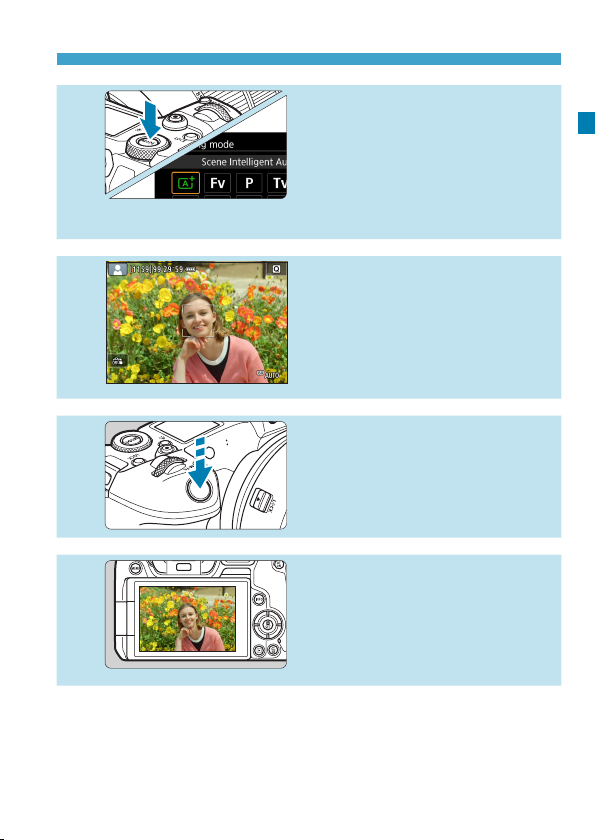
6
Quick Start Guide
Set the shooting mode to [A]
(p.123)
.
zPress the <
turn the <6> dial to select [A],
then press <0>.
zAll the necessary camera settings
will be set automatically.
W
> button and
(p.56)
(p.56).
.
Focus on the subject
7
8
9
zTo view the images captured so far, see “Image Playback” (p.304).
zTo delete images, see “Erasing Images” (p.335).
z<p> (an AF point) appears over
any face detected.
zPress the shutter button halfway,
and the camera will focus on the
subject.
Take the picture
zPress the shutter button
completely to take the picture.
Review the picture.
zThe image just captured will be
displayed for approx. 2 sec. on
the screen.
zTo display the image again, press
the <x> button (p.304).
7
Page 8

About This Manual
Chapter Organization
Chapters 2–7 correspond to the functions in camera menus.
Icons in this Manual
<
>
W
<6>
<5>
<W><X><Y><Z>
<m> :
<T> :
<0> :
*
• In addition to the above, the icons and symbols used on the camera’s buttons
and displayed on the screen are also used in this manual when discussing
relevant operations and functionality.
: A M icon to the right of a page title indicates that the function
M
is available only in [t], [d], [s], [f], [a], or [BULB]
mode.
(p.***) : Reference page numbers for more information.
: Warning to prevent shooting problems.
: Supplemental information.
: Tips or advice for better shooting.
: Troubleshooting advice.
: Indicates the Mode button.
: Indicates the Main dial.
: Indicates the Quick control dial.
: Indicates the corresponding direction on the <V>
cross keys.
Indicates the <B> Multi-function bar.
Indicates the lens control ring.
Indicates the Setting button.
: Indicates the duration (in seconds) of the operation
for the button you pressed, as timed after you
release the button.
8
Page 9

About This Manual
Basic Assumptions for Operational Instructions, Sample Photos
zBefore following any instructions, make sure the power switch is
set to <1> and no controls are locked with the Multi-function lock
(p.48, 60).
zIt is assumed that all the menu settings and Custom Functions are
set to their defaults.
zThe illustrations in this manual show the camera attached with the
RF24-105mm F4 L IS USM lens as an example.
zThe sample photos used in this manual are for instructional purposes
only.
zIn references to using EF or EF-S lenses, it is assumed that a mount
adapter is used.
9
Page 10

Compatible Cards
The following cards can be used with the camera regardless of
capacity. If the card is new or was previously formatted (initialized)
by another camera or computer, format the card with this camera
(p.373).
zSD/SDHC/SDXC memory cards
* UHS-II and UHS-I cards supported.
Cards that Can Record Movies
When shooting movies, use a large-capacity card with good enough
performances (fast enough writing and reading speeds) to handle the
movie recording quality. For details, see page 611.
In this manual, “card” refers to SD memory cards, SDHC memory
cards, and SDXC memory cards.
* The camera does not come with a card for recording photos/
movies. Please purchase it separately.
10
Page 11

Chapters
Introduction
Preparation and Basic Operations
1
Shooting
2
AF
3
Playback
4
Set-up
5
Wi-Fi (Wireless Communication) Functions
6
Custom Functions / My Menu
7
Reference
8
2
39
69
255
301
361
423
539
571
11
Page 12

Contents
Introduction 2
Item Check List.......................................................................... 3
Instruction Manuals ................................................................... 4
Quick Start Guide ...................................................................... 6
About This Manual .................................................................... 8
Compatible Cards.................................................................... 10
Chapters .................................................................................. 11
Index to Features .................................................................... 21
Safety Instructions ................................................................... 25
Handling Precautions .............................................................. 28
Part Names ............................................................................. 31
Preparation and Basic Operations 39
1
Charging the Battery ............................................................... 40
Inserting/Removing the Battery ............................................... 43
Inserting and Removing the Card............................................ 44
Using the Screen ..................................................................... 47
Turning on the Power .............................................................. 48
Attaching and Detaching a Lens ............................................. 50
Attaching and Detaching EF/EF-S Lenses .............................. 52
Using the Viewnder ............................................................... 54
Basic Operations ..................................................................... 55
Menu Operations and Settings ................................................ 63
12
Page 13

Touch-Screen Operation ..................................................... 67
d
Quick Control ..................................................................... 68
Q
Shooting 69
2
-1 Shooting Still Photos 70
2
Tab Menus: Still Photo Shooting ............................................. 71
Index to Features: Still Photo Shooting ................................... 74
Setting Image Quality .............................................................. 75
Setting Up Dual Pixel RAW Shooting ...................................... 78
Setting Cropping/Aspect Ratio ................................................ 80
: Setting the ISO Speed for Still Photos ............................ 83
i
Selecting a Picture Style ......................................................... 88
Customizing a Picture Style .................................................... 92
Registering a Picture Style ...................................................... 95
Setting the White Balance .............................................. 97
B:
White Balance Correction ............................................... 102
u
Auto Correction of Brightness and Contrast ......................... 104
Setting Noise Reduction ....................................................... 105
Highlight Tone Priority ........................................................... 109
Correction of Lens Aberrations due to
Optical Characteristics ......................................................... 110
Reducing Flicker .................................................................. 115
Setting the Color Space ...................................................... 117
Contents
13
Page 14

Contents
Card Reminder ...................................................................... 118
Setting the Image Review Time............................................. 11 8
Setting the Metering Timer .................................................... 119
Exposure Simulation ............................................................. 120
Appending Dust Delete Data ................................................. 121
Fully Automatic Shooting (Scene Intelligent Auto) ........... 123
A
Full Auto Techniques (Scene Intelligent Auto) ................ 126
A
Shooting with the Touch Shutter ...................................... 130
x
: Program AE ..................................................................... 132
d
: Shutter-Priority AE ......................................................... 134
s
: Aperture-Priority AE ...................................................... 136
f
: Manual Exposure ............................................................ 138
a
: Flexible-Priority AE ......................................................... 140
t
Selecting the Drive Mode ................................................ 144
i
Using the Self-Timer ........................................................ 147
j
Selecting the Display Speed for High-Speed Continuous
Shooting ................................................................................ 149
Silent Live View Shooting ...................................................... 150
Silent Shooting ...................................................................... 151
Selecting the Metering Mode ........................................... 152
q
Setting the Desired Exposure Compensation .................. 154
O
Auto Exposure Bracketing (AEB) .................................... 155
h
Locking the Exposure for Shooting (AE Lock) ................. 157
A
14
Page 15

BULB: Long (Bulb) Exposures .............................................. 158
HDR (High Dynamic Range) Shooting ....................... 161
w:
Multiple Exposures .......................................................... 166
P
Remote Control Shooting ...................................................... 174
Using a Remote Switch ......................................................... 176
Flash Photography ............................................................ 177
D
Setting the Flash Function..................................................... 179
-2 Shooting Movies 188
2
Tab Menus: Movie Shooting .................................................. 189
Index to Features: Movie Shooting........................................ 191
Setting the Movie Recording Quality ..................................... 192
Setting the Sound Recording ................................................ 202
Setting the Time Code ........................................................... 205
Shooting Movies .............................................................. 209
k
Movie Cropping ..................................................................... 219
Movie Digital IS ..................................................................... 220
Shooting HDR Movies ........................................................... 222
Shooting Time-lapse Movies ......................................... 224
a
Shooting Movies Set to Canon Log ....................................... 236
Menu Function Settings ....................................................... 244
Contents
AF 255
3
Tab Menus: AF (Still Photos) ................................................. 256
15
Page 16

Contents
Tab Menus: AF (Movies)........................................................259
Selecting the AF Operation ...................................................262
Selecting the AF Method ....................................................... 265
Setting the AF Point Size.......................................................276
Focusing on People’s Eyes ................................................... 277
Setting Continuous AF...........................................................278
Setting Touch & Drag AF .......................................................279
MF: Focusing Manually ......................................................... 281
Setting Movie Servo AF ......................................................... 286
Customizing AF Functions..................................................... 288
Playback 301
4
Tab Menus: Playback ............................................................ 302
Index to Features: Playback and Related Operations ........... 303
Image Playback .............................................................. 304
x
Customizing Playback Information Display ........................... 307
Index Display (Multiple-Image Display) ........................... 310
H
Jump Display (Jumping Through Images) ........................ 311
e
Filtering Images for Playback .......................................... 313
t
Magnifying Images ........................................................... 315
u
Rotating Images ............................................................... 317
b
Protecting Images ............................................................ 318
K
Setting Ratings ................................................................ 321
p
16
Page 17

Enjoying Movies .............................................................. 324
k
Playing Back Movies ....................................................... 325
k
Editing a Movie’s First and Last Scenes .......................... 327
X
Grabbing a Frame from 4K Movies or
I
4K Time-Lapse Movies .......................................................... 329
Slide Show (Auto Playback) .................................................. 331
Viewing Images on a Television ............................................ 333
Erasing Images ................................................................ 335
L
Processing RAW Images with the Camera....................339
R
Resizing JPEG Images .................................................... 345
S
Cropping JPEG Images ................................................... 346
N
Transferring Images to a Computer/FTP Server ............. 348
d
Digital Print Order Format (DPOF) ................................. 353
W
Specifying Images for a Photobook .................................. 357
p
Set-up 361
5
Tab Menus: Set-up ................................................................ 362
Creating and Selecting a Folder ............................................ 365
File Numbering Methods ....................................................... 367
Renaming Files ..................................................................... 370
Setting the Auto Rotation of Vertical Images ......................... 372
Formatting the Card .............................................................. 373
Setting Eco Mode .................................................................. 376
Contents
17
Page 18

Contents
Setting Power-Saving Features............................................. 377
Adjusting the Screen Brightness ........................................... 378
Adjusting the Screen Color Tone ........................................... 379
Setting the Date, Time, and Time Zone ................................. 380
Setting the Interface Language ............................................. 383
Setting the Video System ...................................................... 384
Setting the Touch Control Response ..................................... 385
Disabling Beeps for Camera Operations ............................... 386
Checking the Battery Information .......................................... 387
Sensor Cleaning ............................................................ 391
f
Setting the HDMI Output Resolution ..................................... 395
RAW Playback on an HDR TV .............................................. 396
Customizing Information Displayed When Shooting ............. 397
Setting a Priority for Shooting Display Performance ............. 402
Setting the Viewnder Display Format .................................. 402
Setting the Display Mode ...................................................... 403
Customizing Shutter Button Functionality ............................. 404
Help.................................................................................. 405
1
Setting Wireless Features ..................................................... 407
Geotagging Images ............................................................... 411
Setting the Multi-Function Lock ................................... 416
R
: Registering Custom Shooting Modes ............................. 417
w
Reverting the Camera to the Default Settings ...................... 419
18
Page 19

Setting Copyright Information .............................................. 420
Checking Other Information .................................................. 422
Wi-Fi (Wireless Communication) Functions 423
6
What You Can Do via Wi-Fi
(Wireless Communication) Functions.................................... 424
Connecting to a Smartphone via Wi-Fi.................................. 427
Connecting to a Computer via Wi-Fi ..................................... 461
Connecting to a Printer via Wi-Fi........................................... 469
Sending Images to a Web Service ........................................ 481
Wi-Fi Connection via Access Points ...................................... 496
Reconnecting via Wi-Fi ......................................................... 509
Changing or Deleting Connection Settings ........................... 513
Clearing Wireless Communication Settings to Default .......... 515
View Info Screen ................................................................... 516
Responding to Error Messages ............................................. 517
Wireless Communication Function Notes ............................. 528
Security ................................................................................. 530
Checking Network Settings ................................................... 531
[Wireless communication settings] Screen ...................... 532
[Wi-Fi settings] Screen ........................................................ 533
Virtual Keyboard Operation ................................................... 534
Setting the IP Address Manually ...........................................535
Contents
19
Page 20

Contents
Wi-Fi/Bluetooth Status Display .............................................. 537
Custom Functions / My Menu 539
7
Tab Menus: Customization .................................................... 540
Custom Function Settings ..................................................... 542
Customizing Operations ........................................................ 555
Tab Menus: My Menu ............................................................ 565
Registering My Menu ............................................................ 566
Reference 571
8
Software Overview ................................................................ 572
Importing Images to a Computer ........................................... 574
Charging a Battery in the Camera ......................................... 576
Using a Battery Grip .............................................................. 578
Troubleshooting Guide .......................................................... 588
Error Codes ........................................................................... 607
Performance Data ................................................................. 608
Information Display................................................................ 617
Index...................................................................................... 633
20
Page 21

Index to Features
Power
zCharging the battery B p.40
zBattery level
zChecking battery
information
zHousehold power
outlet
zEco mode
zPower saving
B
B
B
B
B
p.49
p.387
p.582
p.376
p.377
Cards
zFormatting
zReleasing shutter
without card
zCards compatible
with movie recording B p.611
B
B
p.373
p.118
Lens
zAttaching
zDetaching
zReleasing shutter
without lens
p.50, 52
B
p.51, 53
B
B
p.551
Basic Settings
zLanguage
zDate/Time/Zone
zBeeper
zCopyright information B p.420
zClear all camera
settings
B
B
B
B
p.383
p.380
p.386
p.419
Viewnder
zDioptric adjustment B p.54
zInformation display in
viewnder
zViewnder vertical
display
zViewnder display
format
B
B
B
p.397
p.399
p.402
Screen
zVari-angle
zTouch control
zColor tone
zBrightness
zDisplay settings
zElectronic level
zHelp
B
B
B
B
B
B
B
p.47
p.67
p.379
p.378
p.403
p.397
p.405
AF
zAF operation
zAF method
zAF point selection
zAF frame size
zEye Detection AF
zContinuous AF
zTouch & drag AF
zMF peaking settings B p.283
zFocus guide
zCustomizing AF
functions
zManual focusing
zElectronic manual
focus
B
B
B
B
B
B
B
B
B
B
B
p.262
p.265
p.271
p.276
p.277
p.278
p.279
p.284
p.288
p.281
p.293
21
Page 22

Index to Features
Metering
zMetering mode
B
p.152
Drive
zDrive mode
zSelf-timer
zSilent LV shooting
zSilent shooting
zMaximum burst
B
B
B
B
B
p.144
p.147
p.150
p.151
p.77
Image Recording Settings
zCreating/Selecting
a folder
zFile numbering
B
B
p.365
p.367
Image Quality
zImage quality
zDual Pixel RAW
zCropping/aspect ratio B p.80
zISO speed (still photos) B p.83
zPicture Style
zWhite balance
zAuto Lighting Optimizer B p.104
zNoise reduction for
high ISO speeds
zNoise reduction for long
exposures
zHighlight tone priority B p.109
zLens aberration
correction
zReducing icker
zColor space
B
B
B
B
B
B
B
B
B
p.75
p.78
p.88
p.97
p.105
p.107
p.110
p.115
p.117
Shooting
zShooting mode
zHDR mode
zMultiple exposures
zBulb timer
zDepth-of-eld preview B p.137
zRemote switch
zRemote control
• Pairing
zQuick Control
zTouch Shutter
zMagnied view
zGrid display
zShooting information
display
zDisplay settings
zMulti-function lock
zError codes
B
B
B
B
B
B
B
B
B
B
B
B
B
B
B
p.70
p.161
p.166
p.159
p.176
p.174
p.408
p.68
p.130
p.273
p.399
p.397
p.403
p.60
p.607
Exposure
zExposure
compensation
zExposure compensation
with M+ISO Auto
zAEB
zAE lock
zSafety shift
zExposure simulation B p.120
B
B
B
B
B
p.154
p.139
p.155
p.157
p.545
22
Page 23

Index to Features
Flash
zExternal ash
zFlash exposure
compensation
zFE lock
zFlash function settings B p.182
zFlash Custom Function
settings
B
B
B
B
p.177
p.177
p.177
p.187
Movie Shooting
zAutoexposure shooting B p.209
zShutter priority AE
shooting
zAperture priority AE
shooting
zManual exposure
shooting
zISO speed (movie)
zMovie Servo AF
zMovie Servo AF
tracking sensitivity
zMovie Servo AF speed B p.292
zMovie recording quality B p.192
z24.00p
zHigh Frame Rate
zMovie cropping
shooting
zHDR movie
zTime-lapse movie
zCanon Log
zSound recording
zMicrophone
zWind lter
B
B
B
B
B
B
B
B
B
B
B
B
B
B
B
p.210
p.211
p.213
p.246
p.286
p.291
p.198
p.199
p.219
p.222
p.224
p.236
p.202
p.203
p.202
zAttenuator
zTime code
zAuto slow shutter
zAv 1/8-stop increments B p.249
zHDMI output
zRemote control
shooting
B
B
B
B
B
p.203
p.205
p.248
p.251
p.245
Playback
zImage review time
zSingle-image display B p.304
zShooting information
display
zGrid display
zTouch playback
zPlayback information
display
zIndex display
zImage browsing
(Jump display)
zSetting image search
conditions
zMagnied view
zImage rotation
zProtect
zRating
zMovie playback
zEditing a movie’s rst
and last scenes
zFrame Grab (4K)
zSlide show
zViewing images on
a television
zErasing
B
B
B
B
B
B
B
B
B
B
B
B
B
B
B
B
B
B
p.118
p.305
p.305
p.306
p.307
p.310
p.311
p.313
p.315
p.317
p.318
p.321
p.325
p.327
p.329
p.331
p.333
p.335
23
Page 24

Index to Features
Image Editing
zRAW image processing B p.339
zResizing JPEGs
zCropping JPEGs
B
B
p.345
p.346
Wireless Features
Image Transfer/Print Order
zImage transfer to a
computer/FTP server B p.348
zPrint order (DPOF)
zPhotobook Set-up
B
B
p.353
p.357
Customization
zCustom Functions
(C.Fn)
zCustomizing operations B p.555
zMy Menu
zCustom shooting mode B p.417
B
B
p.542
p.566
Sensor Cleaning and Dust Reduction
zSensor cleaning
zAppending Dust Delete
Data
zManual sensor
cleaning
B
B
B
p.391
p.121
p.393
Software
zDownloading and
Installing
zSoftware Instruction
Manuals
B
B
p.572
p.573
zConnect to
smartphones
zAuto send images to
smartphones
zRemote control
(EOS Utility)
zAuto send images to
computers
zPrint from Wi-Fi
printers
zUpload to Web services B p.481
zClear wireless settings B p.515
B
B
B
B
B
p.427
p.446
p.461
p.466
p.469
24
Page 25

Safety Instructions
Be sure to read these instructions in order to operate the product
safely.
Follow these instructions to prevent injury or harm to the operator of
the product or others.
WARNING:
oKeep the product out of the reach of young children.
A strap wrapped around a person’s neck may result in strangulation.
The parts or provided items of cameras or accessories are dangerous if swallowed. If
swallowed, seek immediate medical assistance.
The battery is dangerous if swallowed. If swallowed, seek immediate medical
assistance.
oUse only power sources specied in this instruction manual for use with the product.
oDo not disassemble or modify the product.
oDo not expose the product to strong shocks or vibration.
oDo not touch any exposed internal parts.
oStop using the product in any case of unusual circumstances such as the presence
of smoke or a strange smell.
oDo not use organic solvents such as alcohol, benzine or paint thinner to clean the
product.
oDo not get the product wet. Do not insert foreign objects or liquids into the product.
oDo not use the product where ammable gases may be present.
This may cause electric shock, explosion or re.
oDo not leave a lens or a camera with a lens attached, exposed without the lens cap
attached.
The lens may concentrate the light and cause re.
oDo not touch the product connected to a power outlet during lightning storms.
This may cause electric shock.
oObserve the following instructions when using commercially available batteries or
provided battery packs.
• Use batteries/battery packs only with their specied product.
• Do not heat batteries/battery packs or expose them to re.
• Do not charge batteries/battery packs using non-authorized battery chargers.
• Do not expose the terminals to dirt or let them come into contact with metallic pins
or other metal objects.
• Do not use leaking batteries/battery packs.
• When disposing of batteries/battery packs, insulate the terminals with tape or other
means.
This may cause electric shock, explosion or re.
If a battery/battery pack leaks and the material contacts your skin or clothing, ush the
exposed area thoroughly with running water. In case of eye contact, ush thoroughly
with copious amounts of clean running water and seek immediate medical assistance.
Denotes the risk of serious injury or death.
25
Page 26

Safety Instructions
oObserve the following instructions when using a battery charger or AC adapter.
• Periodically remove any dust buildup from the power plug and power outlet using a dry cloth.
• Do not plug in or unplug the product with wet hands.
• Do not use the product if the power plug is not fully inserted into the power outlet.
• Do not expose the power plug and terminals to dirt or let them come into contact
with metallic pins or other metal objects.
oDo not touch the battery charger or AC adapter connected to a power outlet during
lightning storms.
D
o not place heavy objects on the power cord. Do not damage, break or modify the power cord.
o
oDo not wrap the product in cloth or other materials when in use or shortly after use
when the product is still warm in temperature.
oDo not unplug the product by pulling the power cord.
oDo not leave the product connected to a power source for long periods of time.
oDo not charge batteries/battery packs at temperatures outside the range of 5–40 °C
(41–104 °F).
This may cause electric shock, explosion or re.
oDo not allow the product to maintain contact with the same area of skin for extended
periods of time during use.
This may result in low-temperature contact burns, including skin redness and blistering,
even if the product does not feel hot. The use of a tripod or similar equipment is
recommended when using the product in hot places and for people with circulation
problems or less sensitive skin.
oFollow any indications to turn o the product in places where its use is forbidden.
Not doing so may cause other equipment to malfunction due to the eect of
electromagnetic waves and even result in accidents.
oTo prevent re, excessive heat, chemical leakage, explosions, and electrical shock,
follow the safeguards below:
• Do not insert the battery’s plus and minus ends incorrectly.
oDo not leave any cords near a heat source.
It can deform the cord or melt the insulation and cause a re or electrical shock.
oDo not re the ash at anyone driving a car or other vehicle.
It may cause an accident.
oDo not use or store the equipment in dusty or humid places. Likewise, keep the
battery away from metallic items and store it with its protective cover attached to
prevent short-circuit.
This is to prevent re, excessive heat, electrical shock, and burns.
oTo prevent a re and electrical shock, follow the safeguards below:
• Do not connect too many power plugs to the same power outlet.
• Do not use a cord whose wire is broken or insulation is damaged.
Do not connect the battery directly to an electrical outlet or a car’s cigarette lighter outlet.
o
The battery may leak, generate excessive heat or explode, causing re, burns, or injuries.
oA thorough explanation of how to use the product by an adult is required when the
product is used by children. Supervise children while they are using the product.
Incorrect usage may result in electrical shock or injury.
26
Page 27

Safety Instructions
CAUTION:
oDo not re the ash near the eyes.
It may hurt the eyes.
oStrap is intended for use on the body only. Hanging the strap with any product
attached on a hook or other object may damage the product. Also, do not shake the
product or expose the product to strong impacts.
oDo not apply strong pressure on the lens or allow an object to hit it.
This may cause injury or damage to the product.
oFlash emits high temperatures when red. Keep ngers, any other part of your body,
and objects away from the ash unit while taking pictures.
This may cause burns or malfunction of the ash.
oDo not leave the product in places exposed to extremely high or low temperatures.
The product may become extremely hot/cold and cause burns or injury when touched.
oOnly mount the product on a tripod that is suciently sturdy.
oDo not carry the product when it is mounted on a tripod.
This may cause injury or may result in an accident.
oDo not look at the screen or through the viewnder for prolonged periods of time.
This may induce symptoms similar to motion sickness. In such a case, stop using the
product immediately and rest for a while before resuming use.
oDo not touch any parts inside the product.
This may cause injury.
Denotes the risk of injury.
27
Page 28

Handling Precautions
Camera Care
zThis camera is a precision instrument. Do not drop it or subject it to
physical shock.
zThe camera is not waterproof and cannot be used underwater.
zTo maximize the camera’s dust- and drip- resistance, keep the
terminal cover, battery compartment cover, card slot cover, and all
other covers rmly closed.
zThis camera is designed to be dust- and drip- resistant, in order to
help prevent sand, dust, dirt, or water that falls on it unexpectedly
from getting inside, but it is impossible to prevent dirt, dust, water,
or salt from getting inside at all. As far as possible, do not allow dirt,
dust, water, or salt to get on the camera.
zIf water gets on the camera, wipe it o with a dry and clean cloth. If
dirt, dust, or salt gets on the camera, wipe it o with a clean, well-
wrung wet cloth.
zUsing the camera in a location with large amounts of dirt or dust may
cause a malfunction.
zCleaning the camera after use is recommended. Allowing dirt, dust,
water, or salt to remain on the camera may cause a malfunction.
zIf you accidentally drop the camera into water or are concerned that
moisture (water), dirt, dust, or salt may have gotten inside it, promptly
consult the nearest Canon Service Center.
zNever leave the camera near anything having a strong magnetic eld
such as a magnet or electric motor. Also, avoid using or leaving the
camera near anything emitting strong radio waves, such as a large
antenna. Strong magnetic elds can cause camera malfunction or
destroy image data.
zDo not leave the camera in excessive heat, such as in a car in direct
sunlight. High temperatures can cause the camera to malfunction.
zThe camera contains precision electronic circuitry. Never attempt to
disassemble the camera yourself.
28
Page 29

Handling Precautions
zDo not block shutter curtain operation with your nger or other
objects. Doing so may cause a malfunction.
zUse only a commercially available blower to blow away dust when it
adheres to the lens, viewnder, etc. Do not use cleaners that contain
organic solvents to clean the camera body or lens. For stubborn dirt,
take the camera to the nearest Canon Service Center.
zDo not touch the camera’s electrical contacts with your ngers. This
is to prevent the contacts from corroding. Corroded contacts can
cause camera malfunction.
zIf the camera is suddenly brought in from the cold into a warm room,
condensation may form on the camera and internal parts. To prevent
condensation, rst put the camera in a sealed plastic bag and let it
adjust to the warmer temperature before taking it out of the bag.
zIf condensation forms on the camera, do not use the camera. This is
to avoid damaging the camera. If there is condensation, remove the
lens, card and battery from the camera, and wait until condensation
has evaporated before using the camera.
zIf the camera will not be used for an extended period, remove the
battery and store the camera in a cool, dry, well-ventilated location.
Even while the camera is in storage, press the shutter button a few
times once in a while to check that the camera is still working.
zAvoid storing the camera where there are chemicals that result in
rust and corrosion such as in a chemical lab.
zIf the camera has not been used for an extended period, test all its
functions before using it. If you have not used the camera for some
time or if there is an important shoot such as a foreign trip coming
up, have the camera checked by your nearest Canon Service Center
or check the camera yourself and make sure it is working properly.
zThe camera may become hot after repeated continuous shooting
or still photo/movie shooting over an extended period. This is not a
malfunction.
zIf there is a bright light source inside or outside the image area,
ghosting may occur.
29
Page 30

Handling Precautions
(1)
Screen, Viewnder, and LCD Panel
z Although the screen and viewnder are manufactured with very
high precision technology with over 99.99% eective pixels, 0.01%
or fewer of the pixels may be dead, and there may also be spots of
black, red, or other colors. This is not a malfunction. They do not
aect the images recorded.
zIf the screen and viewnder are left on for a prolonged period, screen
burn-in may occur where you see remnants of what was displayed.
However, this is only temporary and will disappear when the camera
is left unused for a few days.
z The screen display may seem slightly slow in low temperatures or
may look black in high temperatures. It will return to normal at room
temperature.
Shutter
zShutter blades may become scued from shutter operations, but this
does not indicate damage.
Cards
To protect the card and its recorded data, note the following:
zDo not drop, bend, or wet the card. Do not subject it to excessive
force, physical shock, or vibration.
zDo not touch the card’s electronic contacts with your ngers or
anything metallic.
zDo not ax any stickers, etc. on the card.
zDo not store or use the card near anything that has a strong
magnetic eld, such as a television, speakers, or magnets. Also
avoid places prone to having static electricity.
zDo not leave the card in direct sunlight or near a heat source.
zStore the card in a case.
zDo not store the card in hot, dusty, or humid locations.
Lens
zAfter detaching the lens from the camera, put down
the lens with the rear end up and attach the rear
lens cap to avoid scratching the lens surface and
electrical contacts (1).
30
Page 31

Part Names
(12)
(22)
(1)
(10)
(11)
(2)
(3)
(4)
(5)
(6)
(7)
(8)
(9)
(1) <W> button
(2) Movie shooting button
(3) <6> Main dial
(4) <B> Multi-function button
(5) Shutter button
(6) <U> LCD panel info switching/
Illumination button
(7) AF-assist beam/Self-timer/
Remote control lamp
(8) Grip (Battery compartment)
(9) DC coupler cord hole
(10) Contacts
(13)
(14)
(15)
(16)
(17)
(18)
(19)
(20)
(21)
(11) Lens mount
(12) Flash sync contacts
(13) Hot shoe
(14) RF lens mount index
(15) Speaker
(16) <V> Focal plane mark
(17) Strap mount
(18) Microphone
(19) Shutter curtain/Image sensor
(20) Lens release button
(21) Lens lock pin
(22) Body cap
31
Page 32

Part Names
(12)
(14)
(6)
(13)
(1)
(2)
(3)
(4)
(5)
(15)
(16)
(17)
(18)
(19)
(1) Eyecup
(2) Viewnder eyepiece
(3) Dioptric adjustment knob
(4) Power switch
(5) Terminal cover
(6) LCD panel
(7) <R> Multi-function lock button
(8) <5> Quick control dial
(9) <p> AF start button
(10) Viewnder sensor
(10)
(11)
(11) <B> Info button
(12) Access lamp
(13) <Q/0> Quick Control/Setting
button
(14) <
(15) <F> Remote control terminal
(16) <g> Digital terminal
(17) <Y> External microphone IN
(18) <
(19) <n> Headphone terminal
> Menu button
M
terminal
D
terminal
> HDMI mini OUT
(7)
(8)
(9)
32
Page 33

(9)
(8)
(2)
(1)
(3)
(4)
(5)
(6)
(7)
(10)
(11)
(12)
Part Names
(1) Contact cover
(2) Accessory positioning hole
(3) Screen
(4) Tripod socket
(5) <W><X><Y><Z>: <V> cross
keys
(6) Serial number
(7) <x> Playback button
(8) <B> Multi-function bar
(9) <A> AE lock/FE lock button
(14)
(15)
(16)
(17)
(10) <S/u> AF point/Index/Magnify/
Reduce button
(11) Strap mount
(12) Card slot cover
(13) Card slot
(14) Battery compartment cover lock
(15) Battery compartment cover
(16) <L> Erase button
(17) Accessory positioning hole
(13)
33
Page 34

Part Names
LCD Panel
Sample display
Information displayed varies depending
on camera status. For icon details, see
page 617.
Viewnder Information Display
Sample display
Information displayed varies depending
on camera status.
34
Page 35

Battery Charger LC-E6
(1)
(2)
(3)
(3)
(4)
(2)
(1)
Charger for Battery Pack LP-E6N/LP-E6 (p.40).
(1) Battery pack slot
(2) Charge lamp
(3) Power plug
Battery Charger LC-E6E
Charger for Battery Pack LP-E6N/LP-E6 (p.40).
(1) Charge lamp
(2) Battery pack slot
(3) Power cord
(4) Power cord socket
Part Names
35
Page 36

Part Names
Attaching the Strap
Pass the end of the strap through the
camera’s strap mount eyelet from the
bottom. Then pass it through the strap’s
buckle as shown in the illustration. Pull
the strap to take up any slack and make
sure the strap will not loosen from the
buckle.
36
Page 37

Part Names
(2)(1)
(3)
(4)
Using the Cable Protector
When connecting the camera to a computer, use the included interface
cable or a genuine Canon cable.
When connecting the interface cable, also use the included cable
protector. Using the cable protector helps prevent accidental
disconnection and terminal damage.
Using the Included Interface Cable and a Canon HDMI Cable
(Sold Separately)
1
2
3
5
4
(1) Cable protector
(2) Clamp
(3) Included interface cable
(4) HDMI cable (sold
separately)
37
Page 38

Part Names
(5)
Using an Optional Canon Interface Cable
When using a genuine Canon interface
cable (sold separately), run the cable
through the clamp (5) as shown before
attaching the clamp to the cable
protector.
oThe digital terminal may be damaged if the interface cable is connected
without the cable protector.
oMake sure the interface cable is securely connected to the digital
terminal.
HDMI Cable HTC-100 (sold separately) is recommended when connecting
the camera to a television. Also use the cable protector when connecting an
HDMI cable.
38
Page 39

1
Preparation and
Basic Operations
This chapter describes preparatory steps before you start
shooting and the basic camera operations.
3939
Page 40

Charging the Battery
Detach the protective cover
1
provided with the battery.
Fully insert the battery in the
2
charger.
zDo the opposite to remove the battery.
LC-E6
LC-E6E
40
Recharge the battery.
3
For LC-E6
zAs shown by the arrow, ip out the
battery charger’s prongs and insert
the prongs into a power outlet.
For LC-E6E
zConnect the power cord to the
charger and insert the plug into a
power outlet.
Recharging starts automatically and
g
the charge lamp blinks in orange.
Page 41

Charging the Battery
Charge Level
0–49%
50–74% Blinks twice per second
75% or higher
Fully charged Green Turned on
Orange
Charge Lamp
Color Display
Blinks once per second
Blinks three times per
second
zIt takes approx. 2 hr. and 30 min. to fully recharge a completely
exhausted battery at room temperature (23°C / 73°F). The time
required to recharge the battery will vary greatly depending on the
ambient temperature and the battery’s remaining capacity.
zFor safety reasons, recharging in low temperatures (5–10°C /
41–50°F) will take longer (up to approx. 4 hr.).
41
Page 42

Charging the Battery
zUpon purchase, the battery is not fully charged.
Charge the battery before use.
zRecharge the battery on the day before or on the day it is to be
used.
Even during storage, a charged battery will gradually drain and lose its
capacity.
zAfter recharging the battery, remove it and disconnect the charger
from the power outlet.
zYou can attach the protective cover in a
dierent orientation to indicate whether the
battery is recharged or not.
If the battery is recharged, attach the protective
cover so that the battery-shaped hole <
> is
aligned over the blue sticker on the battery. If the battery is exhausted,
attach the protective cover in the opposite orientation.
zWhen not using the camera, remove the battery.
If the battery is left in the camera for a prolonged period, a small amount
of power current will keep being released, resulting in excess discharge
and shorter battery life. Store the battery with the protective cover
attached. Storing the battery when it is fully charged may lower the
battery performance.
zThe battery charger can also be used in foreign countries.
The battery charger is compatible with a 100 V AC to 240 V AC 50/60 Hz
power source. If necessary, attach a commercially available plug adapter
for the respective country or region. Do not attach any portable voltage
transformer to the battery charger. Doing so may damage the battery
charger.
zIf the battery becomes exhausted quickly even after having been
fully charged, the battery has reached the end of its service life.
Check the battery’s recharge performance (p.387) and purchase a new
battery.
oAfter disconnecting the charger’s power plug, do not touch the prongs for
approx. 10 sec.
oIf the battery’s remaining capacity (p.387) is 94% or higher, the battery
will not be recharged.
oThe provided charger cannot charge any battery other than Battery Pack
LP-E6N/LP-E6.
42
Page 43

Inserting/Removing the Battery
Load a fully-charged Battery Pack LP-E6N (or LP-E6) into the camera.
Insertion
Slide the battery compartment
1
cover lock and open the cover.
Insert the battery.
2
zInsert the end with the electrical
contacts.
zInsert the battery until it locks in place.
Close the cover.
3
zPress the cover until it snaps shut.
You cannot use batteries other than the Battery Pack LP-E6N or LP-E6.
Removal
Open the cover and remove the
battery.
zPress the battery lock lever as shown
by the arrow and remove the battery.
zTo prevent short circuiting, be sure to
attach the provided protective cover
(p.40) to the battery.
43
Page 44

Inserting and Removing the Card
(1)
The captured images are recorded onto the card.
Make sure the card’s write-protect switch (1) is set upward to enable
writing and erasing.
Insertion
Slide the cover to open it.
1
Insert the card.
2
zAs shown by the illustration, face
the card’s label side toward you
and insert it until it clicks in place.
Close the cover.
3
zClose the cover and slide it in the
direction shown by the arrow until it
snaps shut.
44
Page 45

Inserting and Removing the Card
(1)
Removal
Open the cover.
1
zSet the power switch to <2>.
zCheck that the access lamp (1) is
o, then open the cover.
zIf [Saving...] is displayed on the
screen, close the cover.
Remove the card.
2
zGently push in the card, then let it go
to eject.
zPull the card straight out, then close
the cover.
Formatting the Card
If the card is new or was previously formatted (initialized) by another
camera or computer, format the card with this camera (p.373).
oThe number of possible shots varies depending on the remaining
capacity of the card, the settings of image quality, ISO speed, etc.
oSetting [z1: Release shutter without card] to [Disable] will prevent
you from forgetting to insert a card (p.118).
45
Page 46

Inserting and Removing the Card
When the access lamp is lit or blinking, it indicates that images
o
are being written to, read from, or erased from the card, or data is
being transferred. Do not open the card slot cover during this time.
Also, never do any of the following while the access lamp is lit or
blinking. Otherwise, it can damage the image data, card, or camera.
• Removing the card.
• Removing the battery.
• Shaking or striking the camera.
• Unplugging and connecting a power cord (when household power
outlet accessories (sold separately) are used).
oIf the card already contains recorded images, the image number may not
start from 0001 (p.367).
oIf a card-related error message is displayed on the screen, remove and
reinsert the card. If the error persists, use a dierent card.
If you can transfer images on the card to a computer, transfer all the
images and then format the card with the camera (p.373). The card
may then return to normal.
oDo not touch the card’s contacts with your ngers or metal objects.
Do not expose the contacts to dust or water. If smudges adhere to the
contacts, contact failure may result.
oMultimedia cards (MMC) cannot be used. (Card error will be displayed.)
oUse of UHS-II microSDHC/SDXC cards with a microSD to SD adapter is
not recommended. When using UHS-II cards, use SDHC/SDXC cards.
46
Page 47

Using the Screen
180°
You can change the direction and angle of the screen.
Flip out the screen.
1
Rotate the screen.
2
90°
175°
oBe careful not to forcefully rotate the screen, putting much power on the
rotating axis (hinge).
oWhen a cable is connected to a camera terminal, the rotation angle
range of the ipped-out screen will be limited.
oWhen not using the camera, close the screen facing inward. You can
protect the screen.
oA mirror image (right/left reversed) of subjects is displayed when the
screen faces subjects in front of the camera.
zWhen the screen is swung out, you
can rotate it up, down, or over 180° to
face the subject.
zThe indicated angle is only
approximate.
Face it toward you.
3
zNormally, use the camera with the
screen facing you.
47
Page 48

Turning on the Power
z<1>
Turns the camera on, accompanied
by the sound of the shutter curtain
opening. Also accompanied by the
sound of the aperture opening, when
an RF lens is attached.
z<2>
Stops camera operation, accompanied
by the sound of the shutter curtain
closing. Set the power switch to this
position when not using the camera.
Also accompanied by the sound of the
aperture closing, when an RF lens is
attached.
Setting the Date, Time, and Zone
If you turn on the power switch and the date/time/zone setting screen
appears, see page 380 to set the date/time/zone.
Changing the Interface Language
To change the interface language, see page 383.
Automatic Sensor Cleaning
z Whenever you set the power switch to <2>, sensor cleaning
will be performed automatically. (A small sound may be audible.)
During the sensor cleaning, the screen will display <f>. To enable
automatic sensor cleaning when the power switch is set to <1> as
well, you can set this in [53: Sensor cleaning] (p.392).
z If you repeatedly turn the power switch <1>/<2> at a short
interval, the <f> icon may not be displayed. This is normal and
not a malfunction.
If you set the power switch to <2> while an image is being recorded to
the card, [Saving...] will be displayed and the power will turn o after the
recording nishes.
48
Page 49

Turning on the Power
Battery Level Indicator
z
When the power switch is set to <1>, the battery level will be
indicated in one of six levels. A blinking battery icon <b> indicates
that the battery will soon be exhausted.
Display
Level (%) 100–70 69–50 49–20
Display
Level (%) 19–10 9–1 0
oDoing any of the following will exhaust the battery faster:
• Pressing the shutter button halfway for a prolonged period.
• Activating the AF frequently without taking a picture.
• Using the lens’s Image Stabilizer.
• Using the Wi-Fi function or Bluetooth function.
oThe number of possible shots may decrease depending on the actual
shooting conditions.
oThe lens operation is powered by the camera’s battery. Certain lenses
may exhaust the battery faster than others.
oIn low ambient temperatures, shooting may not be possible even with a
sucient battery level.
See [53: Battery info.] to check the battery status (p.387).
49
Page 50

Attaching and Detaching a Lens
Attaching a Lens
Remove the caps.
1
zRemove the rear lens cap and the
body cap by turning them as shown
by the arrows.
Attach the lens.
2
zAlign the red mount index on the
lens with the red mount index on the
camera and turn the lens as shown
by the arrow until it clicks in place.
Set the lens’s focus mode switch to
3
<AF>.
z<AF> stands for autofocus.
z<MF> stands for manual focus.
Autofocus will not operate.
Remove the front lens cap.
4
50
Page 51

Attaching and Detaching a Lens
Detaching the Lens
While pressing the lens release
button, turn the lens as shown by
the arrow.
zTurn the lens until it stops, then
detach it.
zAttach the rear lens cap to the
detached lens.
oDo not look at the sun directly through any lens. Doing so may cause
loss of vision.
oWhen attaching or detaching a lens, set the camera’s power switch to
<2>.
oIf the front part (focusing ring) of the lens rotates during autofocusing, do
not touch the rotating part.
For instructions on how to use the lens, refer to the Lens Instruction Manual
(p.4).
Tips for Avoiding Smudges and Dust
oWhen changing lenses, do it quickly in a place with minimal dust.
oWhen storing the camera without a lens attached, be sure to attach the
body cap to the camera.
oRemove dust on the body cap before attaching it.
51
Page 52

Attaching and Detaching EF/EF-S Lenses
(2)(1)
(3)(3)
All EF and EF-S lenses can be used by attaching the optional Mount
Adapter EF-EOS R. The camera cannot be used with EF-M lenses.
Attaching a Lens
Remove the caps.
1
zRemove the rear lens cap and the
body cap by turning them as shown
by the arrows.
Attach the lens to the adapter.
2
zAlign the red or white mount index on
the lens with the corresponding mount
index on the adapter and turn the lens
as shown by the arrow until it clicks
into place.
(1) Red index
(2) White index
Attach the adapter to the camera.
3
zAlign the red mount indexes (3) on
the adapter and camera and turn the
lens as shown by the arrow until it
clicks into place.
52
Page 53

Detaching the Lens
Attaching and Detaching EF/EF-S Lenses
Set the lens’s focus mode switch to
4
<AF>.
z<AF> stands for autofocus.
z<MF> stands for manual focus.
Autofocus will not operate.
Remove the front lens cap.
5
While pressing the lens release button,
1
turn the adapter as shown by the arrow.
zTurn the adapter until it stops, then
detach it.
Detach the lens from the adapter.
2
zHold down the lens release lever
on the adapter and turn the lens
counterclockwise.
zTurn the lens until it stops, then
detach it.
zAttach the rear lens cap to the
detached lens.
For lens precautions, see page 51.
53
Page 54

Using the Viewfinder
Look through the viewnder to activate it. You can also restrict display
to either the screen or viewnder (p.403).
Adjusting the Viewnder Clarity
Turn the dioptric adjustment knob.
zTurn the knob left or right to make the
viewnder display look sharp.
oThe viewnder display and camera screen cannot be activated at the
same time.
oAt some aspect ratios, black bars are displayed on the top and bottom or
left and right edges of the screen. These areas are not recorded.
54
Page 55

Basic Operations
Holding the Camera
zViewing the Screen as You Shoot
As you shoot, you can tilt the screen to adjust it. For details, see
page 47.
High angleNormal angle Low angle
zShooting Through the Viewnder
To obtain sharp images, hold the camera still to minimize camera
shake.
Horizontal shooting Vertical shooting
1. Wrap your right hand around the camera grip rmly.
2. Hold the lens bottom with your left hand.
3. Rest your right index nger lightly on the shutter button.
4. Press your arms and elbows lightly against the front of your body.
5. To maintain a stable stance, place one foot slightly ahead of the
other.
6. Press the camera against your face and look through the viewnder.
55
Page 56

Basic Operations
Shutter Button
The shutter button has two steps. You can press the shutter button
halfway. Then you can further press the shutter button completely.
Pressing Halfway
This activates autofocusing and the
automatic exposure system that sets the
shutter speed and aperture.
The exposure setting (shutter speed and
aperture) is displayed on the screen, in
the viewnder, or on the LCD panel for
approx. 8 sec. or as set for the metering
timer.*
* By default, the metering timer is set to 8 sec.
Pressing Completely
This action shoots.
zPreventing Camera Shake
Hand-held camera movement during the moment of exposure is
called camera shake. It can cause blurred pictures. To prevent
camera shake, note the following:
●Hold the camera steady.
●Press the shutter button halfway to autofocus, then slowly press
the shutter button completely.
oIf you press the shutter button completely without pressing it halfway rst,
or if you press the shutter button halfway and then press it completely
immediately, the camera will take a moment before it takes the picture.
oEven during menu display or image playback, you can go back to
shooting-ready state by pressing the shutter button halfway.
56
Page 57

Basic Operations
<
You can set the shooting mode.
> Mode Button
W
<p> AF Start Button
<
> Multi-Function Button
B
Press the <
<6> dial, then select the shooting
mode.
To switch between shooting still photos
and movies, press the <
and then the <B> button.
Has the same eect as pressing the
shutter button halfway in [t], [d],
[s], [f], [a], or [BULB] shooting
mode.
By pressing the <B> button and
turning the <5> dial, you can set the
ISO speed, drive mode, AF operation,
white balance, and ash exposure
compensation.
> button, turn the
W
W
> button
57
Page 58

Basic Operations
<6> Main Dial
(1) After pressing a button, turn the
<6> dial.
Press a button such as <
<B>, then turn the <6> dial.
If you press the shutter button halfway,
the camera will go back to shootingready state.
W
(2) Turn only the <6> dial.
While looking at the screen, viewnder,
or LCD panel, turn the <6> dial.
Use this dial to set the shutter speed,
aperture, etc.
Step (1) can be performed even when controls are locked with the Multifunction lock (p.60).
> or
58
Page 59

Basic Operations
<5> Quick Control Dial
(1) After pressing a button, turn the
<5> dial.
Press a button such as <
<B>, then turn the <5> dial.
If you press the shutter button halfway,
the camera will go back to shootingready state.
W
(2) Turn only the <5> dial.
While looking at the screen, viewnder,
or LCD panel, turn the <5> dial.
Use this dial to set the exposure
compensation amount, the aperture
setting for manual exposures, etc.
Step (1) can be performed even when controls are locked with the Multifunction lock (p.60).
> or
59
Page 60

Basic Operations
<
> Multi-Function Lock Button
R
By setting [56: Multi function lock] and pressing the <
you can prevent settings from being changed by accidentally operating
the Main dial, Quick control dial, M-Fn bar, or control ring or tapping
the touch-screen panel. Press the <R> button again to unlock the
controls.
For [56: Multi function lock] details, see page 416.
R
> button,
<U> LCD Panel Info Switching/Illumination Button
zEach press of the <U> button
changes the information on the LCD
panel.
zIlluminate the LCD panel by holding
down the <U> button (9).
During a bulb exposure, pressing the shutter button completely will turn o
the LCD panel illumination.
<T> Control Ring
You can assign a commonly used function to the control ring of RF
lenses or mount adapters (p.555). By default, no function is assigned.
60
Page 61

<
> M-Fn (Multi-Function) Bar
m
Basic Operations
Basic Operations
M
You can assign commonly used
functions to swiping the <m> bar and
tapping each end. By default, no function
is assigned.
After purchase or when no function is
assigned, you can access a shortcut
screen for the [84: Customize M-Fn
bar] setting menu by tapping the left end
on <m>. Select [Yes] to access the
setting screen (p.561).
Swipe
Slide your nger left or right immediately
after touching <m>.
Tap (left end)
Touch the left end of <m>, then lift
your nger immediately.
Tap (right end)
Touch the right end of <m>, then lift
your nger immediately.
Operations are canceled unless you move your nger immediately after
touching <m>.
61
Page 62

Basic Operations
INFO Button
Each press of the <B> button
changes the information shown.
The following sample screens are for still
photos.
62
Page 63

Menu Operations and Settings
(1)
(3)
(2)
(4)
(5)
(6)
(7)
(1) <
(2) <B> button
(3) Screen
(4) <V> cross keys
M
> button
[A] Mode Menu Screen
* In [A] mode, some tabs and menu items do not appear.
(5) <0> button
(6) Quick control dial
(7) Main dial
63
Page 64

Menu Operations and Settings
(2)
(3)
(10)
(4) (5) (6 ) (7) (8)
(9)
(1)
Screen in [t], [d], [s], [f], [a], and [BULB] Modes
(1) Main tabs
(2) Secondary tabs
(3) Menu items
(4) z: Shooting
(5) 2: Autofocus
Menu Setting Procedure
64
(6) 3 : Playback
(7) 5 : Set-up
(8) 8 : Custom Functions
(9) 9 : My Menu
(10) Menu settings
Display the menu screen.
1
zPress the <
Select a tab.
2
zPress the <B> button to switch
between main tabs.
zTurn the <6> dial to select a
secondary tab.
zFor example, the [z4] tab in this
manual refers to the screen displayed
when the z (Shooting) tab’s fourth
] from the left is selected.
box [
M
> button.
Page 65

Menu Operations and Settings
Select an item.
3
zTurn the <5> dial to select an item,
then press <0>.
Select an option.
4
zTurn the <5> dial to select an
option.
zThe current setting is indicated in
blue.
Conrm the option.
5
zPress <0> to set it.
Exit the setting.
6
zPress the <
and prepare for shooting.
oThe description of menu functions hereafter assumes that you have
pressed the <
oYou can also tap on the menu screen or press the <V> cross keys to
operate the menu.
oTo cancel the operation, press the <
> button to display the menu screen.
M
M
M
> button.
> button to nish
65
Page 66

Menu Operations and Settings
Dimmed Menu Items
Example: Highlight tone priority
Dimmed menu items cannot be set. The
menu item is dimmed if another function
setting is overriding it.
You can see the overriding function by
selecting the dimmed menu item and
pressing <0>.
If you cancel the overriding function’s
setting, the dimmed menu item will
become settable.
You may not be able to see the overriding function for certain dimmed menu
items.
With [56: Clear all camera settings], you can reset the menu functions to
the default settings (p.419).
66
Page 67

Touch-Screen Operation
d
You can operate the camera by tapping or dragging on the screen
(touch-screen panel) with your nger.
Tap
Sample screen (Quick Control)
zUse your nger to tap on (touch briey
and then remove your nger from) the
screen.
zFor example, when you tap on [Q],
the Quick Control screen appears. By
tapping on [2], you can return to the
preceding screen.
Drag
Sample screen (Menu screen)
zSlide your nger while touching the
screen.
oIf [53: Beep] is set to [Touch
operations (p.386).
oTouch control responsiveness can be adjusted (p.385).
], the beep will not sound for touch
67
Page 68

Quick Control
Q
You can directly select and set the settings displayed on the screen.
This is called Quick Control.
Press the <Q> button
1
Select a setting item.
2
zPress the <W> <X> keys to select an
item.
zWhen the screen at left is displayed,
press the <W> <X> <Y> <Z> keys
for selection.
Select an option.
3
zTurn the <6> or <5> dial, or
press the <Y> <Z> keys to change
the setting. There are also functions
that are set by pressing a button
following these operations.
zPress <0> to nalize the setting
and return to the previous screen.
(7)
.
You can also tap on the screen for Quick Control settings (p.67).
68
Page 69

2
Shooting
This chapter describes shooting and introduces menu settings
on the shooting ([z]) tab.
zA M icon to the right of a page title indicates that the
function is available only in [t], [d], [s], [f], [a], or
[BULB] mode.
6969
Page 70

-1 Shooting Still Photos
2
[Shooting Mode] Settings for Still Photos
To prepare for still photo shooting, press
the <
<B> button to access the [Shooting
mode] screen at left.
[A] : Scene Intelligent Auto (p.123)
[t] : Flexible-priority AE (p.140)
[d] : Program AE (p.132)
[s] : Shutter-priority AE (p.134)
[f] : Aperture-priority AE (p.136)
[a] : Manual exposure (p.138)
[BULB] : Bulb (p.158)
[w/x/y] : Custom shooting mode
(p.417)
7070
> button, then press the
W
Page 71

Tab Menus: Still Photo Shooting
zShooting 1
p.75
p.78
p.80
p.118
p.118
zShooting 2
p.110
p.179
zShooting 3
p.155
p.85
p.104
p.109
p.119
p.120
71
Page 72

Tab Menus: Still Photo Shooting
zShooting 4
zShooting 5
zShooting 6
p.97
p.100
p.102
p.117
p.88, 92, 95
p.107
p.105
p.121
p.130
p.166
p.161
p.159
p.115
p.151
p.150
p.149
72
Page 73

Tab Menus: Still Photo Shooting
In [A] mode, the following screen is displayed.
zShooting 1
p.75
p.78
p.118
p.118
p.130
p.192
73
Page 74

Index to Features: Still Photo Shooting
Shooting Modes
z[A] mode
z[t] mode
z[d] mode
z[s] mode
z[f] mode
z[a] mode
z[BULB] mode
B
B
B
B
B
B
B
p.123
p.140
p.132
p.134
p.136
p.138
p.158
Menus/Shooting Features
zImage quality
zDual Pixel RAW
zCropping/aspect ratio B p.80
zISO speed (still photos) B p.83
zPicture Style
zWhite balance
zCustom White Balance B p.100
zWhite balance shift/
bracketing
zAuto Lighting Optimizer B p.104
zNoise reduction for
high ISO speeds
zNoise reduction for long
exposures
zHighlight tone priority B p.109
zLens aberration
correction
zReducing icker
zColor space
zReleasing shutter
without card
zImage review time
zMetering timer
B
B
B
B
B
B
B
B
B
B
B
B
B
p.75
p.78
p.88
p.97
p.102
p.105
p.107
p.110
p.115
p.117
p.118
p.118
p.119
zExposure simulation B p.120
zDust Delete Data
zTouch Shutter
zDrive mode
zSelf-timer
zSilent LV shooting
zSilent shutter
zMetering mode
zExposure
compensation
zAEB
zAE lock
zBulb timer
zHDR mode
zMultiple exposures
zRemote control
zRemote switch
zExternal ash
zFlash function settings B p.179
zFlash Custom Function
settings
B
B
B
B
B
B
B
B
B
B
B
B
B
B
B
B
B
p.121
p.130
p.144
p.147
p.150
p.151
p.152
p.154
p.155
p.157
p.159
p.161
p.166
p.174
p.176
p.177
p.187
74
Page 75

Setting Image Quality
You can select the pixel count and the image quality. JPEG image
quality options include 73, 83, 74, 84,
image quality options include 1 and
1
2
Number of shots available as indicated by [****] on the image quality setting
screen always applies to a setting of [Full-frame], regardless of the actual
aspect ratio setting (p.80).
oIf
is set for both the RAW image and JPEG image, 73 will be set.
[–]
oIf you select both RAW and JPEG, each time you shoot, the image will
be recorded simultaneously to the card in both RAW and JPEG at the
image qualities that were set. The two images will be recorded with the
same le numbers (le extension: .JPG for JPEG and .CR3 for RAW).
is in 7 (Fine) quality.
o
b
oMeaning of image quality icons: 1 RAW, F Compact RAW, JPEG,
Fine, 8 Normal, 3 Large, 4 Medium, 6 Small.
7
F
Select [z1: Image quality].
Set the image quality.
zTo select the RAW quality, turn the
<6> dial, and to select the JPEG
quality, press the <Y> <Z> keys.
zPress <0> to set it.
,
a
8
, and b. RAW
a
7
.
75
Page 76

Setting Image Quality
RAW Images
A RAW image is raw data output by the image sensor converted to
digital data. It is recorded to the card as is, and you can select the
quality as follows: 1 or
F. F
produces RAW images with
smaller le sizes than 1.
RAW images can be processed using [31: RAW image processing]
(p.339) and saved as JPEG images. (Just as for 1, all JPEG size
options are available for
.) As the RAW image itself does not
F
change, you can process the RAW image to create any number of
JPEG images with various processing conditions.
You can use Digital Photo Professional (EOS software) to process
RAW images. You can make various adjustments to images depending
upon how they will be used and can generate JPEG or other types of
images reecting the eects of those adjustments.
RAW Image Processing Software
oTo display RAW images on a computer, using Digital Photo Professional
(hereafter DPP, EOS software) is recommended.
oPrevious versions of DPP Ver.4.x cannot process RAW images taken
with this camera. If a previous version of DPP Ver.4.x is installed on your
computer, obtain and install the latest version of DPP from the Canon
Web site to update it (p.572). (The previous version will be overwritten.)
Note that DPP Ver.3.x or earlier cannot process RAW images taken with
this camera.
oCommercially available software may not be able to display RAW
images taken with this camera. For compatibility information, contact the
software manufacturer.
76
Page 77

Setting Image Quality
Guidelines for Choosing Image Quality
For guidelines on le sizes, number of possible shots, and maximum
burst shots, see page 609.
Maximum Burst for Continuous Shooting
The approximate maximum burst
is displayed at the upper left of the
shooting screen and lower right of the
viewnder.
If the maximum burst for continuous
shooting is 99 or higher, “99” will be
displayed.
If the maximum burst is displayed as “99”, it indicates that you can shoot
99 or more shots continuously. The value starts decreasing once it reaches
98 or less. [BUSY] on the screen and LCD panel indicates that the
internal buer memory is full and shooting will stop temporarily. If you stop
continuous shooting, the maximum burst will increase. After all the captured
images are written to the card, you can resume continuous shooting and
shoot up to the maximum burst listed in the table on page 609.
77
Page 78

Setting Up Dual Pixel RAW Shooting
Shooting 1 or
special, Dual Pixel RAW images containing dual pixel information from
the image sensor. This is called Dual Pixel RAW shooting.
When processing these images in Digital Photo Professional software
for EOS cameras, you can take advantage of the Dual Pixel data
to ne-tune sharpness (using depth information), shift the camera
viewpoint slightly, and reduce ghosting.
Results will vary depending on shooting conditions, so before
using this feature, refer to the Digital Photo Professional
Instruction Manual for details on Dual Pixel RAW characteristics
and image processing.
images with this feature enabled produces
F
Select [z1: Dual Pixel RAW].
1
Select [Enable].
2
zPress the <B> button and read
the Help screen (p.405) before
proceeding.
Set the image quality to 1 or
3
.
F
zSet the image quality to 1,
1
+JPEG,
F
, or
F
+JPEG.
78
Page 79

Setting Up Dual Pixel RAW Shooting
Take the picture.
4
A RAW image containing Dual Pixel
g
data (Dual Pixel RAW image) is
captured.
oStartup takes longer when the power switch is set to <1> or the
camera resumes operation from auto power o.
oContinuous shooting speed is slower when you shoot with Dual Pixel
RAW (p.144). Maximum burst also decreases.
o<o> drive mode is not available. Setting the mode to <o> has the
eect of setting it to <i>.
oNoise may be more noticeable in RAW or RAW+JPEG images.
oOne-touch image quality setting is not available.
Amount and Eect of Dual Pixel RAW Correction
oLarger lens apertures increase the amount and eect of correction.
oThe amount and eect of correction may not be sucient with some
lenses and in some shooting scenes.
oThe amount and eect of correction varies depending on the camera
orientation (vertical or horizontal).
oThe amount and eect of correction may not be sucient under some
shooting conditions.
79
Page 80

Setting Cropping/Aspect Ratio
Normally with RF or EF lenses, images are captured at the sensor
size of approx. 36.0 x 24.0 mm in full-frame shooting, but in cropped
shooting, you can isolate and magnify the center of the image approx.
1.6x (APS-C size) as if using a telephoto lens, or you can set an aspect
ratio to suit your shooting application before shooting.
For EF-S lenses, a 3:2 aspect ratio in the center is captured, magnied
approx. 1.6x (APS-C size).
Select [z1: zCropping/aspect
1
ratio].
Select an item.
2
zSelect [Full-frame], [1.6x (crop)],
[1:1 (aspect ratio)], [4:3 (aspect
ratio)], or [16:9 (aspect ratio)].
zWith EF-S lenses, [1.6x (crop)] is set
automatically, and no other option is
available.
zTo proceed without changing shooting
area display, press <0> and go to
step 4.
Select how the shooting area is
3
displayed.
zOn the screen in step 2, press the
<B> button.
zSelect the display method, then press
<0>.
N
o
74/84/7
(crop)] is set, or with EF-S lenses.
oCropped shooting with the image quality set to 74/84/
produces 73/83/b/b images, respectively.
oShooting with an EF-S lens when [1:1 (aspect ratio)], [4:3 (aspect
ratio)], or [16:9 (aspect ratio)] is set automatically clears the setting
and shoots with [1.6x (crop)] at a 3:2 aspect ratio.
/
image quality options are not available when [1.6x
8
a
a
80
/
7
8
a
a
Page 81

Setting Cropping/Aspect Ratio
Setting examples
set
Y
set or EF-S lens
U
used
and S set
V
and R set
W
Take the picture.
4
zWhen [1.6x (crop)] is set or an EF-S
lens is used, an image magnied
approx. 1.6x is displayed.
zWhen [1:1 (aspect ratio)], [4:3
(aspect ratio)], or [16:9 (aspect
ratio)] is set, the image within the
black masked or outlined area is
captured.
81
Page 82

Setting Cropping/Aspect Ratio
Areas outside the cropped area are not recorded in RAW shooting
o
when [1.6x (crop)] is set, or with EF-S lenses.
[Shooting area] has no eect on display when [1.6x (crop)] is set, or
o
with EF-S lenses.
[85: Add cropping information] is only available when [Full-frame] is
o
set.
oThe [z1: zCropping/aspect ratio] setting is not used as the basis
for auto ash zoom (auto ash coverage adjustment) by an external
Speedlite.
oFor details on pixel counts when cropping or an aspect ratio is set, see
page 610.
oNearly 100% eld of view coverage is maintained vertically and
horizontally when cropping or an aspect ratio is set.
oAspect ratio information is added to RAW images when an aspect ratio
is set, which are captured at full size. When the RAW images are played
back, the image area used for shooting is indicated by lines. Note that
only the shooting image area is shown in slideshows (p.331).
82
Page 83

: Setting the ISO Speed for Still Photos
i
Set the ISO speed (image sensor’s sensitivity to light) to suit the
ambient light level. In [A] mode, ISO speed is set automatically
(p.608).
Regarding the ISO speed during movie shooting, see page 614.
Press the <
1
With an image displayed on the screen,
z
press the <B> button.
Select the ISO speed item.
2
zTurn the <5> dial to select the ISO
speed item.
Set the ISO speed.
3
zTurn the <6> dial to set it.
zISO speed can be set within ISO
100–40000 in 1/3-stop increments.
zSelect [AUTO] to set the ISO speed
automatically.
zFor details on the ISO Auto range,
see page 608.
To expand the available ISO speed range from L (equivalent to ISO 50) to
H1 (equivalent to ISO 51200) or H2 (equivalent to ISO 102400), adjust [ISO
speed range] under [z3: zISO speed settings] (p.85).
B
> button
(9)
N
.
83
Page 84

Setting the ISO Speed for Still Photos
ISO Speed Guide
zLow ISO speeds reduce image noise but may increase the risk of
camera/subject shake or reduce the area in focus (shallower depth
of eld), in some shooting conditions.
zHigh ISO speeds enable low-light shooting, a larger area in focus
(deeper depth of eld), and longer ash range but may increase
image noise.
oAs H1 (equivalent to ISO 51200) and H2 (equivalent to ISO 102400)
are expanded ISO speed settings, noise (dots of light, banding, etc.)
and irregular colors will be more noticeable, and the resolution lower
compared with the standard setting.
oAs L (equivalent to ISO 50) is an expanded ISO speed setting, the
dynamic range will be somewhat narrower compared with the standard
setting.
oIf [z3: Highlight tone priority] is set to [Enable] or [Enhanced]
(p.109), L (equivalent to ISO 50), ISO 100/125/160, H1 (equivalent to
ISO 51200), and H2 (equivalent to ISO 102400) cannot be selected.
oWhen shooting with a high ISO speed, high temperature, long exposure,
or multiple exposure, image noise (rough grain, dots of light, banding,
etc.), irregular colors, or color shift may become noticeable.
oWhen shooting in conditions that produce an extreme amount of noise,
such as a combination of high ISO speed, high temperature, and long
exposure, images may not be recorded properly.
oIf you use a high ISO speed and ash to shoot a close subject,
overexposure may result.
84
Page 85

Setting the ISO Speed for Still Photos
Setting the Manually-Settable ISO Speed Range
You can set the manually-settable ISO speed range (minimum and
maximum limits). You can set the minimum limit within L (equivalent to
ISO 50) to H1 (equivalent to ISO 51200), and the maximum limit within
ISO 100 to H2 (equivalent to ISO 102400).
Select [z3: zISO speed settings].
1
Select [ISO speed range].
2
Set the minimum limit.
3
zSelect the minimum limit box, then
press <0>.
zSelect the ISO speed, then press
<0>.
Set the maximum limit.
4
zSelect the maximum limit box, then
press <0>.
zSelect the ISO speed, then press
<0>.
Select [OK].
5
85
Page 86

Setting the ISO Speed for Still Photos
Setting the ISO Speed Range for ISO Auto
You can set the automatic ISO speed range for ISO Auto within ISO
100–40000. You can set the minimum limit within ISO 100–25600, and
the maximum limit within ISO 200–40000.
Select [Auto range].
1
Set the minimum limit.
2
zSelect the minimum limit box, then
press <0>.
zSelect the ISO speed, then press
<0>.
Set the maximum limit.
3
zSelect the maximum limit box, then
press <0>.
zSelect the ISO speed, then press
<0>.
Select [OK].
4
The [Minimum] and [Maximum] settings will also function as the minimum
and maximum speeds for ISO speed safety shift (p.545).
86
Page 87

Setting the ISO Speed for Still Photos
Setting the Minimum Shutter Speed for ISO Auto
You can set the minimum shutter speed so that the shutter speed set
automatically will not be too slow when ISO Auto is set.
This is eective in [d] and [f] modes when shooting moving
subjects with a wide-angle lens, or when using a telephoto lens. It
helps to reduce camera shake and blurred subjects.
Select [Min. shutter spd.].
1
Automatically set
Manually set
oIf a correct exposure cannot be obtained with the maximum ISO speed
limit set with [Auto range], a shutter speed slower than the [Min.
shutter spd.] will be set to obtain the standard exposure.
his function will not be applied to ash photography and movie shooting.
oT
When [Auto(Standard)] is set, the minimum shutter speed will be the
reciprocal of the lens focal length. A single step from [Slower] to [Faster] is
equivalent to a single stop of the shutter speed.
Set the desired minimum shutter
2
speed.
zSelect [Auto] or [Manual].
zIf you select [Auto], turn the <6>
dial to set the desired speed, slower
or faster compared to the standard
speed, then press <0>.
zIf you select [Manual], turn the <6>
dial to select the shutter speed, then
press <0>.
87
Page 88

Selecting a Picture Style
Just by selecting a preset Picture Style, you can obtain image
characteristics eectively matching your photographic expression or
the subject.
In [A] mode, [D] (Auto) is set automatically.
Select [z4: Picture Style].
1
Select a Picture Style.
2
N
zSelect a Picture Style, then press
<0>.
88
Page 89

Selecting a Picture Style
Picture Style Characteristics
z[D] Auto
The color tone will be adjusted automatically to suit the scene. The
colors will look vivid for blue skies, greenery and sunsets, particularly
in nature, outdoor and sunset scenes.
If the desired color tone is not obtained with [Auto], use another Picture
Style.
z[P] Standard
The image looks vivid, sharp, and crisp. This is a general-purpose
Picture Style suitable for most scenes.
z[Q] Portrait
For nice skin tones. The image looks softer. Suited for close-up
portraits.
By changing the [Color tone] (p.93), you can adjust the skin tone.
z[R] Landscape
For vivid blues and greens, and very sharp and crisp images.
Eective for impressive landscapes.
z[u] Fine Detail
Suited for detailed outline and ne texture description of the subject.
The colors will be slightly vivid.
z[S] Neutral
Suited for processing the image with a computer. For natural colors
and subdued images with modest brightness and color saturation.
89
Page 90

Selecting a Picture Style
z[U] Faithful
Suited for processing the image with a computer. The color of a
subject that is captured in sunlight at a color temperature of 5200K
will be adjusted to match the subject’s colorimetrical color. For
subdued images with modest brightness and color saturation.
z[V] Monochrome
Creates black-and-white images.
Color images cannot be recovered from JPEG images shot with the
[Monochrome] Picture Style.
z[W] User Dened 1–3
You can register a basic style such as [Portrait], [Landscape], a
Picture Style le, etc. and adjust it as desired (p.95). With any of
the User Dened Picture Style that has not yet been set, pictures will
be taken with the same characteristics settings as with the default
settings of [Standard].
90
Page 91

Selecting a Picture Style
Symbols
The Picture Style selection screen has icons for [Strength], [Fineness],
or [Threshold] for [Sharpness] as well as [Contrast] and other
settings. The numbers indicate the values for these settings specied
for the respective Picture Style.
Symbols
Sharpness
Strength
A
g
h
i
j
k
l
During movie shooting, an asterisk “*” will be displayed for both [Fineness]
and [Threshold] for [Sharpness]. [Fineness] and [Threshold] will not be
applied to movies.
Fineness
B
Threshold
C
Contrast
Saturation
Color tone
Filter eect (Monochrome)
Toning eect (Monochrome)
91
Page 92

Customizing a Picture Style
You can customize the Picture Styles. You can adjust Picture Style
settings such as [Contrast] or [Sharpness] ([Strength], [Fineness],
and [Threshold]). To see the resulting eects, take test shots. To
customize [Monochrome], see page 94.
Select [z4: Picture Style].
1
Select a Picture Style.
2
zSelect the Picture Style to adjust, then
press the <B> button.
Select an item.
3
zSelect an item (such as [Strength] in
[Sharpness]), then press <0>.
zSee the next page for details on the
settings and eects.
N
92
Page 93

Customizing a Picture Style
Adjust the item.
4
zAdjust the eect level, then press
<0>.
zPress the <
> button to save
M
the adjusted setting and return to the
Picture Style selection screen.
Any settings you change from default
g
values are displayed in blue.
Settings and Eects
Sharpness
g
h
i
j
*1: Indicates the neness of the outlines to be emphasized. The smaller the number,
*2: Sets how much the outline is emphasized based on the difference in contrast
Fineness*
B
Threshold*
C
Contrast -4: Low contrast +4: High contrast
Saturation -4: Low saturation +4: High saturation
Color tone -4: Reddish skin tone +4: Yellowish skin tone
the ner the outlines that can be emphasized.
between the subject and the surrounding area. The smaller the number, the more
the outline will be emphasized when the contrast dierence is low. However, noise
tends to be more noticeable when the number is smaller.
oFor movie shooting, [Fineness] and [Threshold] for [Sharpness]
cannot be set (not displayed).
oBy selecting [Default set.] in step 3, you can revert the parameter
settings of the respective Picture Style to their defaults.
oTo shoot with the Picture Style you adjusted, rst select the adjusted
Picture Style, then shoot.
1
1: Fine 5: Grainy
2
1: Low 5: High
Strength 0: Weak outline emphasis
A
7: Strong outline
emphasis
93
Page 94

Customizing a Picture Style
[V] Monochrome Adjustment
Besides the eects described on the preceding page such as
[Contrast], or [Strength], [Fineness] and [Threshold] for
[Sharpness], you can also set [Filter eect] and [Toning eect].
[k] Filter eect
Filter Sample Eects
N: None Normal black-and-white image with no lter eects.
Ye: Yellow
Or: Orange
R: Red
G: Green
Increasing the [Contrast] will make the lter eect more pronounced.
The blue sky will look more natural, and the white clouds will
look crisper.
The blue sky will look slightly darker. The sunset will look more
brilliant.
The blue sky will look quite dark. Fall leaves will look crisper and
brighter.
Skin tones and lips will appear muted. Green tree leaves will
look crisper and brighter.
With a lter eect applied to a
monochrome image, you can make
white clouds or green trees stand out
more.
[l] Toning eect
94
By applying a toning eect, you can
create a monochrome image in the
selected color. Eective when you want
to create more impressive images.
Page 95

Registering a Picture Style
You can select a base Picture Style such as [Portrait] or [Landscape],
adjust it as desired, and register it under [User Def. 1], [User Def.
2], or [User Def. 3]. Useful when creating several Picture Styles with
dierent settings.
Picture Styles that you have registered on the camera using EOS Utility
(EOS software) can also be modied here.
Select [z4: Picture Style].
1
Select [User Def. *].
2
zSelect [User Def. *], then press the
<B> button.
Press <0>.
3
zWith [Picture Style] selected, press
<0>.
Select the base Picture Style.
4
zSelect the base Picture Style, then
press <0>.
zAlso select styles this way when
adjusting styles registered to the
camera with EOS Utility (EOS
software).
N
95
Page 96

Registering a Picture Style
Select an item.
5
zSelect an item (such as [Strength] in
[Sharpness]), then press <0>.
Adjust the item.
6
zAdjust the eect level, then press
<0>.
zFor details, see “Customizing a
Picture Style” (p.92).
zPress the <
the adjusted setting and return to the
Picture Style selection screen.
The base Picture Style will be
g
indicated on the right of [User Def. *].
Blue style names indicate that you
g
have changed the settings from
default values.
oIf a Picture Style is already registered under [User Def. *], changing
the base Picture Style will clear the parameter settings of the previously
registered User Dened Picture Style.
oIf you perform [56: Clear all camera settings] (p.419), all the [User
Def. *] settings will revert to their defaults.
oTo shoot with a registered Picture Style, select the registered
[User Def. *], then shoot.
oRegarding the procedure to register a Picture Style le to the camera,
refer to the EOS Utility Instruction Manual.
> button to save
M
96
Page 97

B:
White balance (WB) is for making the white areas look white. Normally,
the Auto [Q] (Ambience priority) or [Qw] (White priority) setting will
obtain the correct white balance. If natural-looking colors cannot be
obtained with Auto, you can select the white balance to match the light
source or set it manually by shooting a white object.
In [A] mode, [Q] (Ambience priority) is set automatically.
Setting the White Balance
Press the <
1
With an image displayed on the screen,
z
press the <B> button.
Select the white balance item.
2
zTurn the <5> dial to select the
white balance setting item.
Select a white balance setting.
3
zTurn the <6> dial to make a
selection.
oFor [Q] and [Qw] setting instructions, see page 99.
oTo set your preferred color temperature, select [P] in [z4: White
balance], then turn the <6> dial.
B
N
> button
(9)
.
97
Page 98

Setting the White Balance
(Approx.)
Display Mode Color Temperature (K: Kelvin)
Auto (Ambience priority, p.99)
Q
w Auto (White priority, p.99)
Q
Daylight 5200
W
Shade 7000
E
Cloudy, twilight, sunset 6000
R
Tungsten light 3200
Y
White uorescent light 4000
U
Flash use Automatically set*
D
Custom (p.100) 2000–10000
O
Color temperature (p.101) 2500–10000
P
* Applicable with Speedlites having a color temperature transmission function.
Otherwise, it will be xed to approx. 6000 K.
3000–7000
White Balance
To the human eye, a white object looks white regardless of the type of
lighting. With a digital camera, the white for color correction basis is
decided depending on the color temperature of the illumination, and
then the color is adjusted with software to make the white areas look
white. With this function, you can take the pictures with natural color
tones.
98
Page 99

Setting the White Balance
[Q] Auto White Balance
With [Q] (Ambience priority), you can slightly increase the intensity
of the image’s warm color cast when shooting a tungsten-light scene.
If you select [Qw] (White priority), you can reduce the intensity of the
image’s warm color cast.
If you want to match the Auto white balance of previous EOS DIGITAL
camera models, select [Q] (Ambience priority).
Select [z4: White balance].
1
Select [Q].
2
zWith [Q] selected, press the
<B> button.
Select an item.
3
Select an item, then press <0>.
z
Cautions for Setting [Qw] (White priority)
oThe warm color cast of subjects may fade.
oWhen multiple light sources are included in the scene, the warm color
cast of the picture may not be reduced.
oWhen using ash, the color tone will be the same as with [Q] (Ambience
priority).
99
Page 100

Setting the White Balance
[O] Custom White Balance
With custom white balance, you can manually set the white balance for
the specic light source of the shooting location. Make sure to perform
this procedure under the light source at the actual location of the shoot.
Shoot a white object.
1
zAim the camera at a plain white
subject, so that white lls the screen.
zFocus manually and shoot with the
standard exposure set for the white
object.
zYou can use any of the white balance
settings.
Select [z4: Custom White
2
Balance].
Import the white balance data.
3
Press the <Y> <Z> keys to select the
z
image captured in step 1, then press
>.
<
0
Select [OK] to import the data.
g
100
Select [z4: White balance].
4
Select the custom white balance.
5
Select [O], then press <0>.
z
 Loading...