

Canon EOS M2, EOS M2 W Basic Instruction Manual
In this booklet, basic procedures for easy-to-use “Transferring
Images between Cameras” and “Connecting to a Smartphone”
functions are explained.
For detailed explanation about Wi-Fi functions, refer to “Wi-Fi
Function Instruction Manual” available for download from the
Canon Web site.
E
INSTRUCTION
MANUAL
EOS M2 (W)
Wi-Fi Function
Basic Instruction Manual
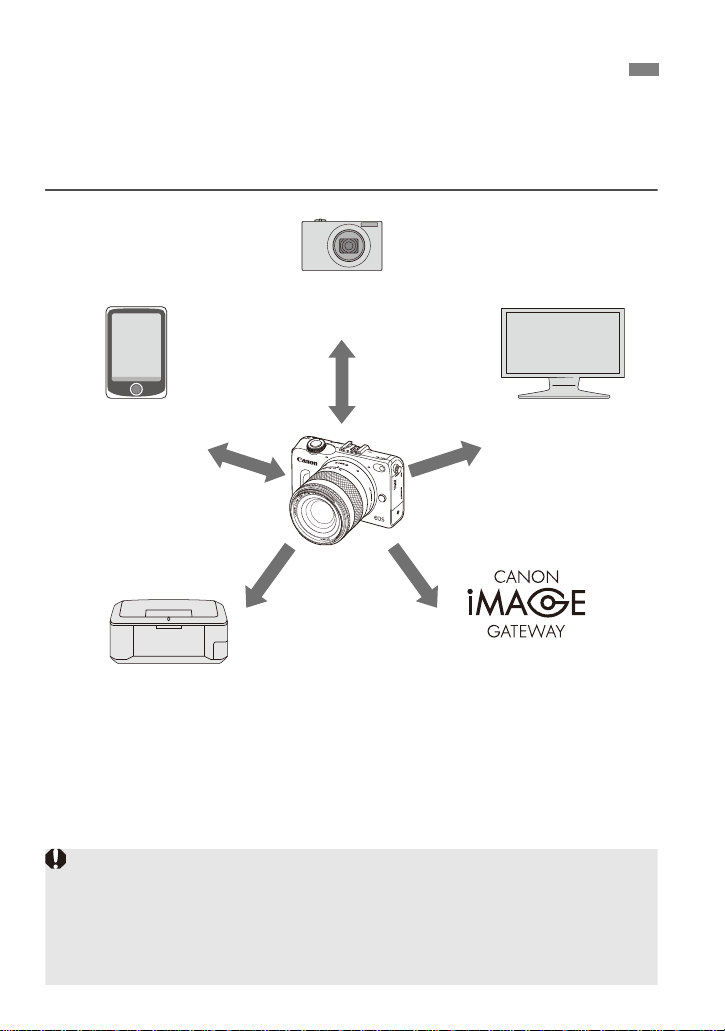
What You Can Do Using the Wireless LAN Functions
(CANON iMAGE GATEWAY)
(4) Send images to
a Web service
Save and share images
(2) Connect to a
smartphone
Make images
viewable on a
smartphone
Shoot remotely
with a smartphone
(3) Print images using
a Wi-Fi printer
Print images
(1) Transfer images
between cameras
Exchange images
(5) View images using
a media player
View images
CANON iMAGE GATEWAY Web services are not supported in certain
countries and areas. For information on countries and areas supporting
CANON iMAGE GATEWAY services, refer to the Canon Web site
(http://canon.com/cig).
Settings for “Send images to a Web service” may not be performed from a
computer in certain countries and areas.
This camera’s wireless LAN functions let you perform a range of tasks
wirelessly, from sending images to Web services and other cameras to
controlling the camera remotely, simply by connecting to a Wi-Fi network or
other device supporting this camera’s wireless LAN functions.
* Instructions for (3) to (5) and for (2) to connect via an access point are explained in
the “Wi-Fi Function Instruction Manual” available for download from the Canon Web
site.
2

What You Can Do Using the Wireless LAN Func tions
(1)z Transfer images between cameras (p.13)
Transfer images between this camera and other Canon cameras with
built-in wireless LAN functions.
(2)q Connect to a smartphone (p.21)
View saved images or operate the camera from your smartphone. Install
the dedicated application “EOS Remote” on your smartphone to use these
functions.
(3)l Print images using a Wi-Fi printer (PDF)
Connect the camera to a wireless LAN compatible printer supporting
PictBridge (Wireless LAN) to print images wirelessly.
(4)m Send images to a Web service (PDF)
Upload your images to CANON iMAGE GATEWAY, an online photo
service for Canon users (free registration required), to share them with
family and friends.
(5)o View images using a media player (PDF)
Display images on the camera’s memory card on your TV set, by using a
media player supporting DLNA* via a wireless LAN.
* Digital Living Network Alliance
3

Conventions Used in This Manual
Microsoft and Windows are trademarks or registered trademarks of Microsoft
Corporation in the United States and/or other countries.
Macintosh and Mac OS are trademarks of Apple Inc., registered in the U.S. and
other countries.
Wi-Fi is a registered trademark of the Wi-Fi Alliance.
Wi-Fi Certified, WPA, WPA2, and the Wi-Fi Certified logo are trademarks of the
Wi-Fi Alliance.
WPS used on camera settings screens and in this manual stands for Wi-Fi
Protected Setup.
UPnP is a trademark of the UPnP Implementers Corporation.
All other trademarks are the property of their respective owners.
Note that Canon cannot be held liable for any loss or damage from erroneous
wireless LAN settings for using the camera. In addition, Canon cannot be held liable
for any other loss or damage caused by use of the camera.
In this manual, the term “wireless LAN” is used as a general term for Wi-Fi
and Canon’s original wireless communication functions.
The ** (numbers) for “(p.**)” in this manual indicate reference page
numbers for more information.
Sections of this manual labeled with the following symbols contain
particular types of information as described below.
:Warnings to prevent potential problems during operation.
:Additional information provided to supplement the content about basic
operations.
4

Contents
Introduction 2
What You Can Do Using the Wireless LAN Functions............................. 2
Conventions Used in This Manual...........................................................4
Basic Settings for Wireless LAN Functions 7
1
Registering a Nickname........................................................................... 8
Basic Operation and Settings.................................................................11
Transferring Images Between Cameras 13
2
Selecting the Connection Destination.................................................... 14
Sending Images ..................................................................................... 16
Reconnecting......................................................................................... 20
Connecting to a Smartphone 21
3
Preparation............................................................................................. 22
Using Camera Access Point Mode to Establish a Connection...............23
Operating the Camera Using a Smartphone.......................................... 26
Reconnecting......................................................................................... 28
5

MEMO
6

1
Basic Settings for
Wireless LAN Functions
This chapter describes settings necessary for using the
camera’s wireless LAN functions.
7
Registering a Nickname
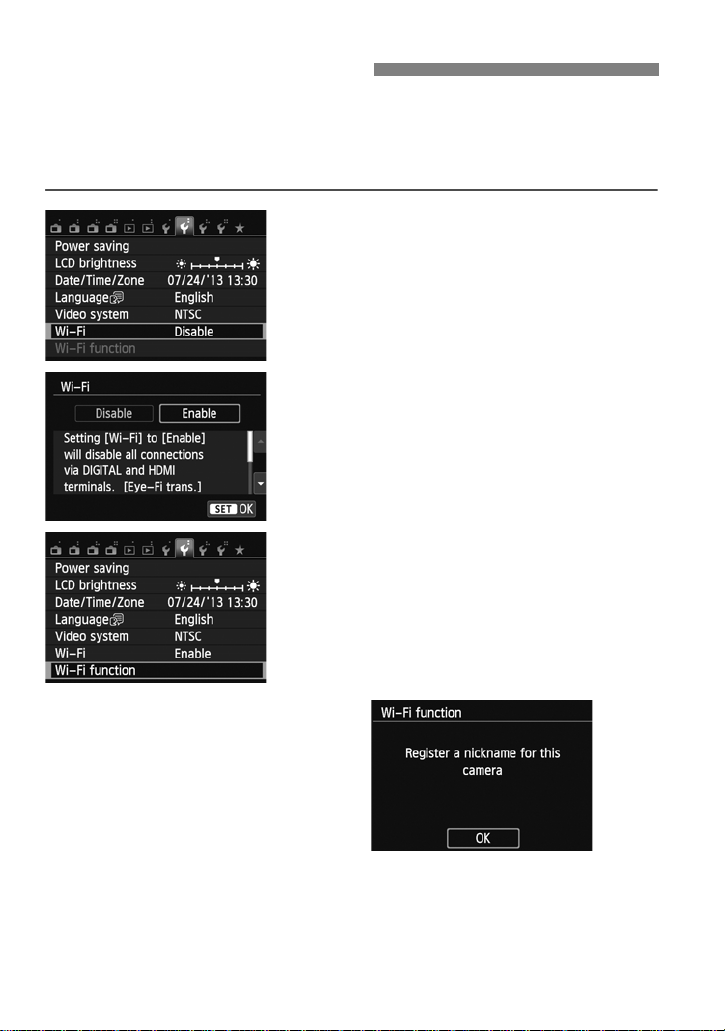
First, set the camera’s nickname.
When the camera is connected to another device via a wireless LAN, the
nickname will be displayed on the device. Be sure to set a nickname for your
camera.
Select [Wi-Fi].
1
Under the [52] tab, select [Wi-Fi], then
press <0>.
Select [Enable].
2
Press the <Y> <Z> keys to select
[Enable], then press <0>.
[Wi-Fi function] is now selectable.
Select [Wi-Fi function].
3
Under the [52] tab, select [Wi-Fi
function], then press <0>.
When this setting is selected for the first
time, a screen to register a nickname is
displayed. Select [OK] and proceed on to
step 4.
8
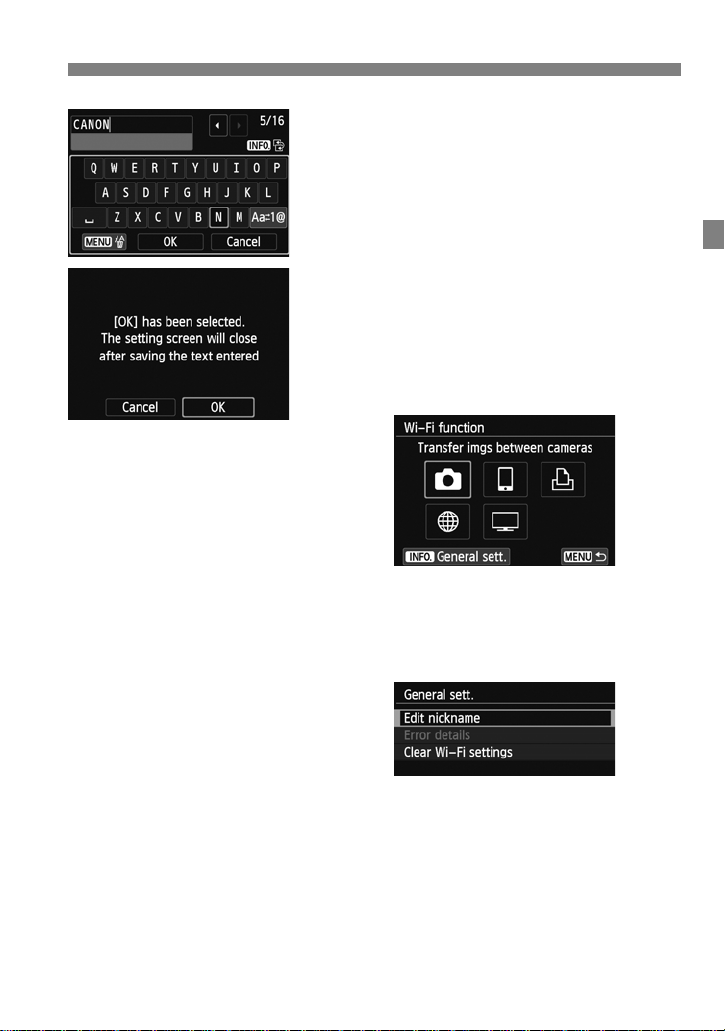
Registering a Nickname
Enter a nickname.
4
For instructio ns on entering characters,
see “Virtual Keyboard Operation” on the
next page.
Up to 16 characters can be ente red.
Finish.
5
When you are fini shed, select [OK].
Select [OK] on the confirmation screen ,
then press <0>. The nickname is
registered, and the [Wi-Fi function]
screen will appear.
To change the nickname, press the
<B> button on the screen above, then
select [Edit nickname] on the screen
displayed.
9

Registering a Nickname
Virtual Keyboard Operation
Switching to other input areas
To switch between top and bottom input
areas, press the <B> button.
Moving the cursor
To move the cursor, press the <Y> <Z>
keys in the top area.
Entering text
In the bottom input area, press the <S> keys to select characters and
press <0> to enter them.
You can check how many characters you have entered, and how many
more can be entered, by referring to [*/*] on the upper right of the screen.
Switching to other input modes
Select [E] in the bottom area. Each time you press <0>, the input
mode changes. The input mode changes in the following order: lower-case
characters9numbers/symbols 19numbers/symbols 29upper-case
characters.
Deleting text
Press the <M> button to delete one character.
Finishing text entry
Select [OK] in the bottom area to confirm what you have entered and exit
the text entry screen. If a confirmation screen is displayed, select [OK] to
exit.
Canceling text entry
Select [Cancel] in the bott om area to can cel the text entry and exit the text
entry screen. If a confirmation screen is displayed, select [OK] to exit.
10
Basic Operation and Settings
Using the Camera While Wireless LAN Functions Are Active
When you want to prioritize wireless LAN functions, do not operate the
shutter button, Mode Dial, playback button, or card slot/battery
compartment cover. Otherwise, shooting or playback operation may be
prioritized and wireless LAN functions may be terminated during the
process.
When [Wi-Fi] under the [52] tab is set to [Enable], even if the camera is
connected to a computer, printer , GPS receiver , TV set, or other device via
a cable, that device cannot be used with the camera (p.12).
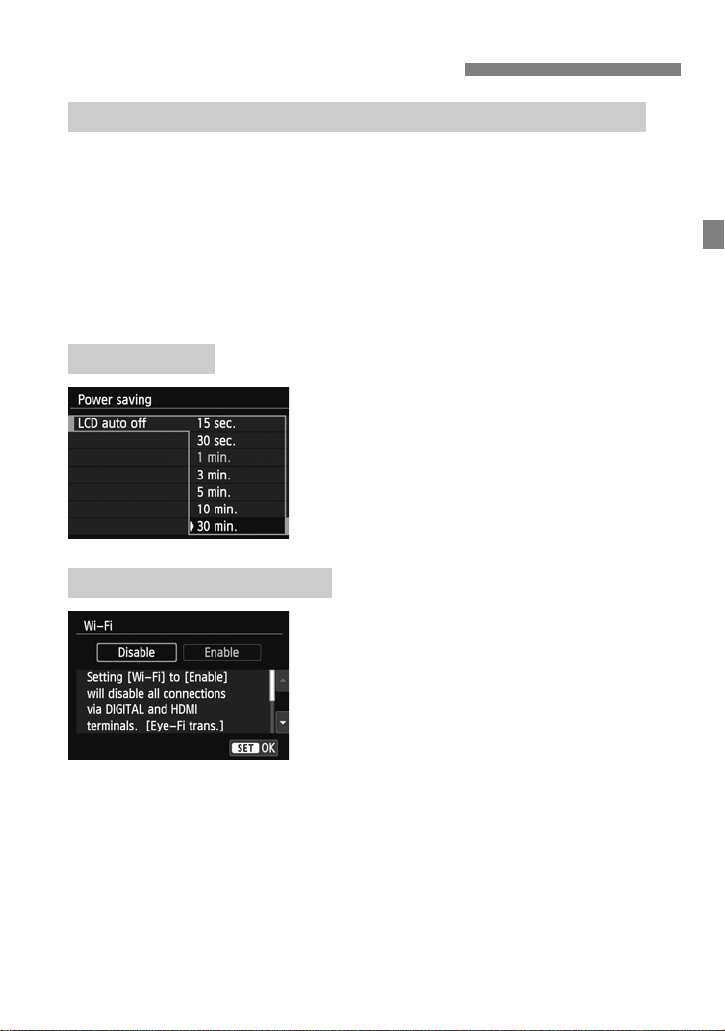
Power Saving
If necessary, set a longer time for [LCD
auto off] in [Power saving] under the
[52] tab.
If the camera’s power saving function is
activated during a wireless LAN
connection, the connection will be
terminated.
[Wi-Fi] Under the [52] Tab
When the use of electroni c devices and
wireless devices is prohibited, such as on
board airplanes or in hospitals, set [Wi-
Fi] to [Disable].
[Wi-Fi function] under the [52] tab
cannot be selected if [Wi-Fi] is set to
[Disable].
11
 Loading...