

Page 1

Canon
C-3/A7- 7^:^
English Edition
INSTRUCTIONS
Page 2

Introduction
Thank you for selecting a Canon EOS camera.
The EOS 100 is an autofocus SLR camera incorporat
ing advanced functions designed for ease of use, and
features a silent drive mechanism to make it the
quietest camera in EOS series. Moreover, the EOS
100 allows input of up to five bar-code programs from
the Bar Code Book containing sample photographs
and corresponding bar codes for setting optimum
shooting data. Incorporating the latest EOS technol
ogy, the EOS 100 is packed with features including
a built-in auto zoom flash with automatic flash cover
age for 28mm wide-angle lenses and twin electronic
input dials for superior operability. Particularly benefi
cial is the EOS 100’s silent operation which allows
you to take pictures in situations normally avoided with
other cameras due to their distracting operation noise.
* The explanations in this instruction book assume
use of the camera with the EF 28-80mm f/3.5-5.6
USM zoom lens attached. However, operation is
basically the same for any EF lens.
Features
1. Silent drive mechanism provides quiet film wind
ing and rewinding.
2. Bar-code system allows input of up to five bar-code
programs for setting optimum shooting data.
3. Auto zoom flash automatically adjusts the flash
coverage angle according to the lens focal length
(28mm, 50mm, 80mm).
4. Twin electronic input dials for quick, efficient
camera operation.
Page 3

5. Cross-type BASIS AF sensor and AF auxiliary light
for sure focusing even with low-contrast subjects.
6. Command dial "image zone” provides simple, fully
automatic operation.
Attention
IMPORTANT INFORMATION
The Canon EOS 100 will give optimum perfor
mance together with specially designed Canon EF
lenses, flash units and other Canon brand acces
sories. It is possible that the use of incompatible
lenses or other accessories may result in unsatis
factory performance or damage to your camera.
We therefore suggest the use of Canon EF lenses
and accessories. Damage to your Canon camera
as a result of malfunction or improper connections
caused by the use of incompatible products may
void its warranty.
Please read these instructions carefully for a
thorough understanding before taking pictures.
While reading this booklet, unfold the front and
back flaps for easy reference to the camera's
parts.
Page 4
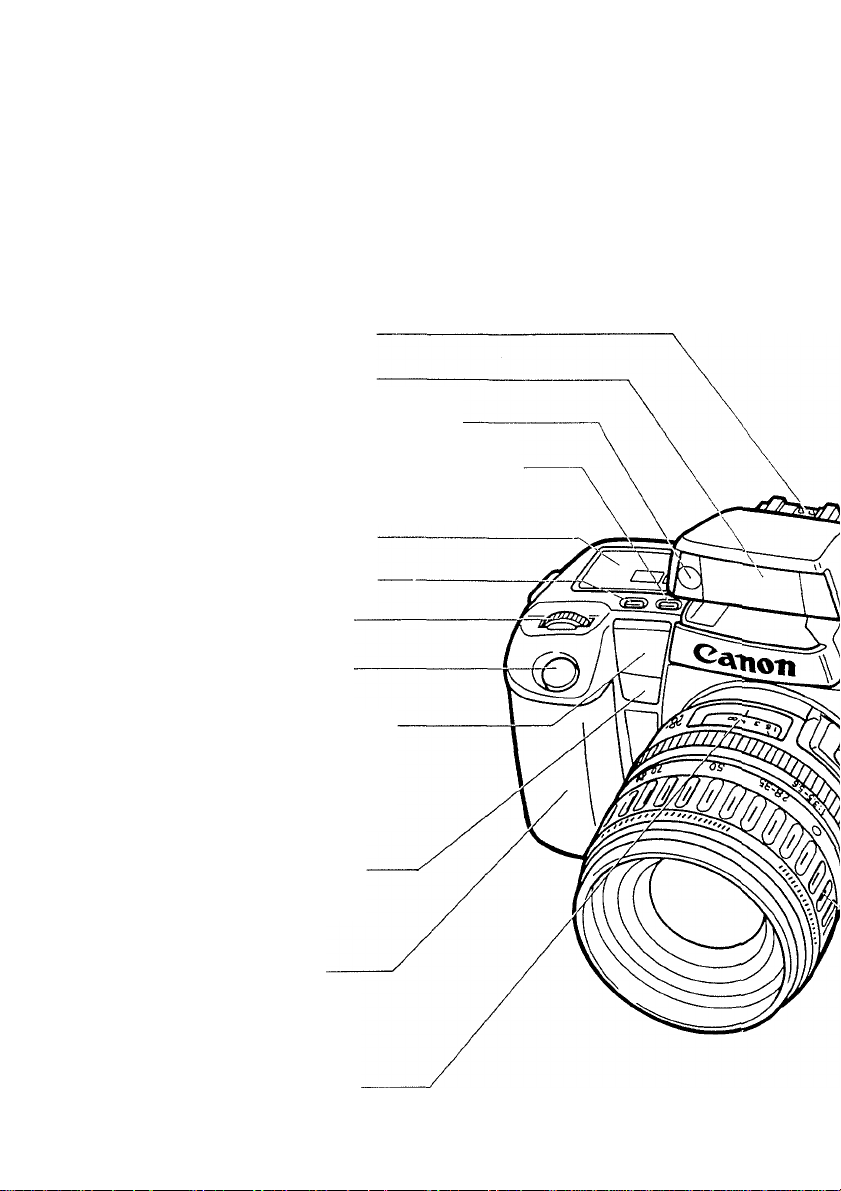
Nomenclature
Accessory Shoe
Flash
Red-eye reduction lannp
Film Winding Mode/Self-timer
& Remote Control Button
LCD Panel
AF Mode Button
Main Dial
Shutter Button
AF Auxiliary Light
Emitter/Self-timer
& Remote Control
Indicator
Remote Control
Receiver
Grip/Battery
Compartment
Distance Scale
3
Page 5
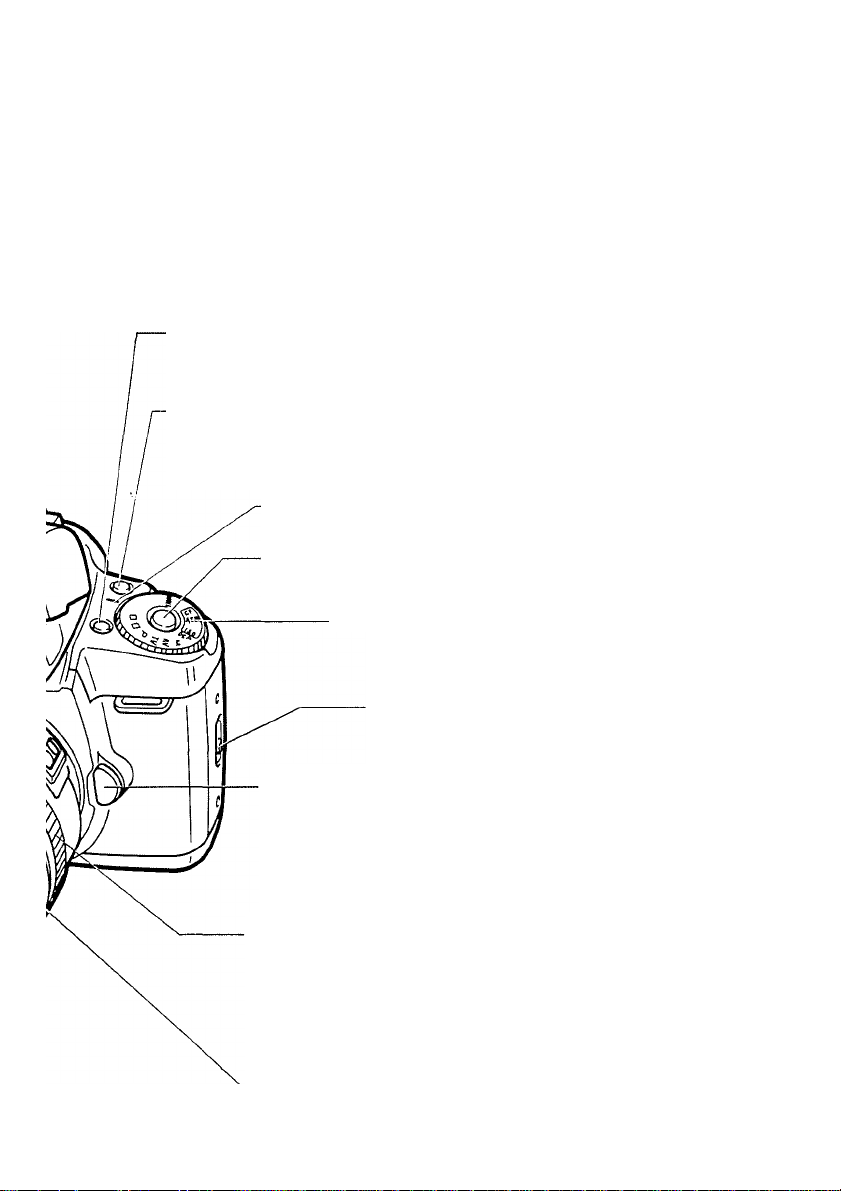
Flash/Red-Eye Reduction
Mode Button
Metering Mode/Flash Ex
posure Compensation Button
Index
Lock Release Button
Command Dial
Back Cover
Latch
Lens Release Button
Manual Focusing Ring
Zoom Ring
Page 6

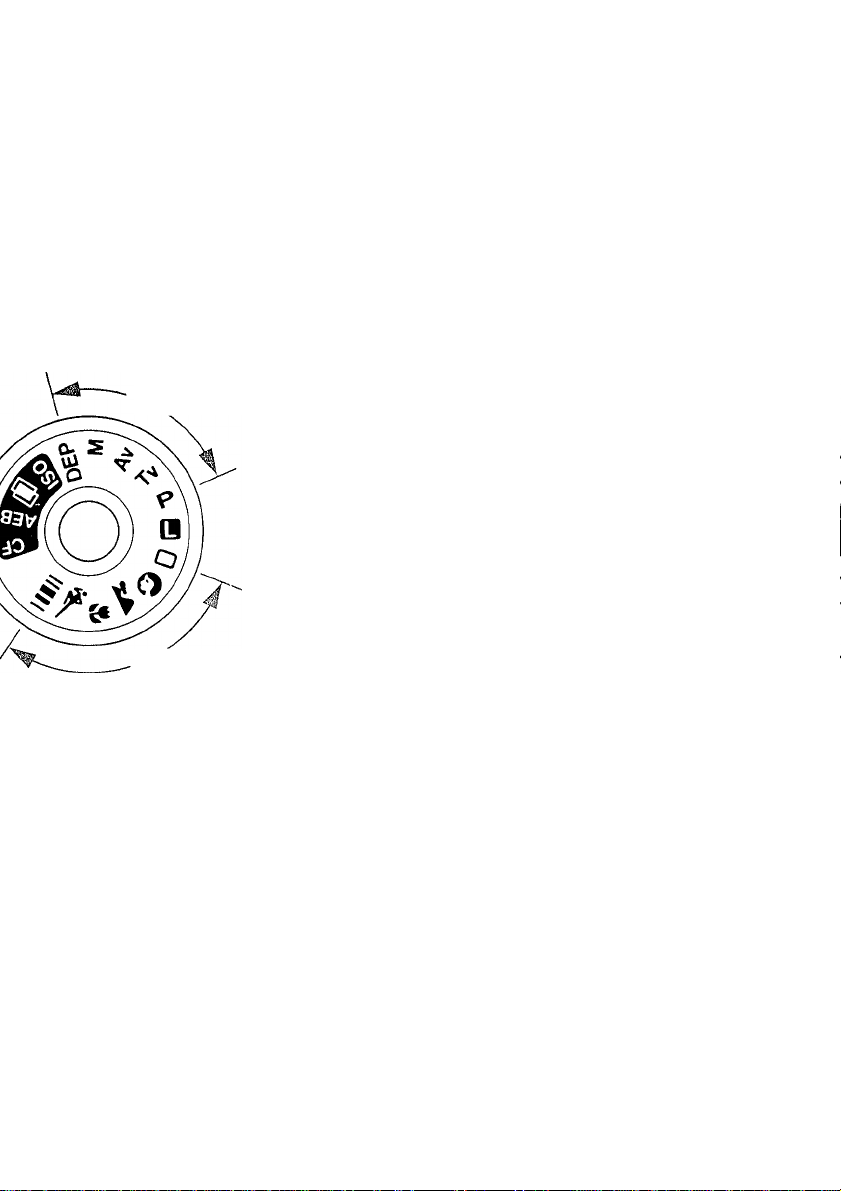
Command Dial
Creative Zone
P
Tv
Av
M
DEP
ISO
m
AEB
OF
Program AE
Shutter-priority AE
Aperture-priority AE
Manual Exposure
Depth-of-Field AE
Film Speed Setting
Multiple Exposures
Auto Exposure Bracketing
Custom Function Setting
Page 7
Creative Zone
Image Zone
Image Zone
a ; Full Auto
O : Portrait
SA ; Landscape
A : Close-up
: Sports
mil; Bar-code program
Page 8
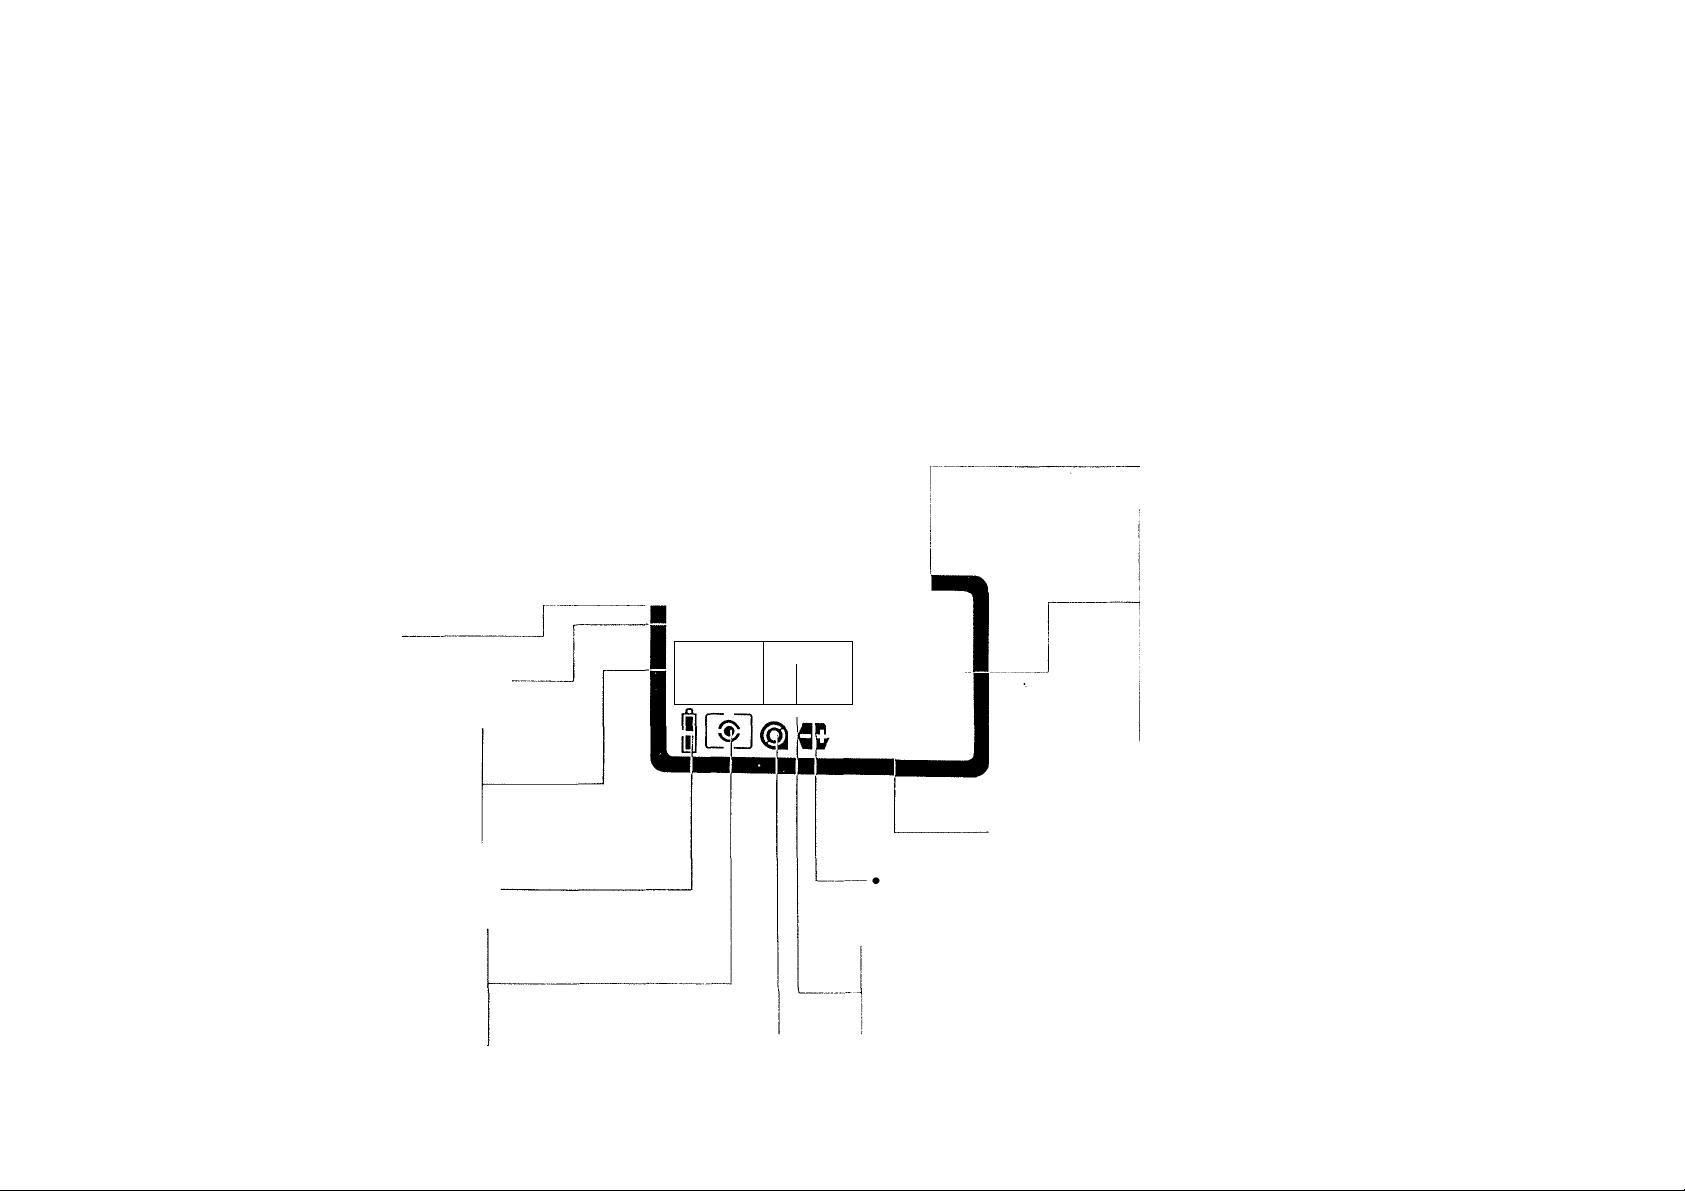
Display Panel
The EOS 100 uses a large liquid crystal display
panel to display shooting information. The dia
gram below shows all the information displayed
simultaneously for explanation only. The LCD
panel never actually appears like this.
• Shutter speed
• ISO film speed value
• dEP (Depth-of-field AE)
Indicator
• Bar-code Program No.
• Custom Function No,
ISO u O'O O O O n\rr
ISO indicator
Bar-code mode indicator
Film \winding mode in
dicator
• Single exposure
• Continuous exposure
• Self-timer/remote
control
• Battery check indicator
Metering mode in
dicator
• Evaluative metering
• Partial metering
• Center-weighted aver
age metering
• Film condition indicator
• Film-load check
• Film rewind completion ,
! i IIIU U U U U.U ^ Q Q ,
1 1 , • , —
ONE SHOT
■>
Al
' Aperture value
' AEB step amount
' dEP point number
' Custom function setting
SERVO
r2.1.1.1.2+
IIIIIIIIII
Manual exposure
display
Focus mode indicator
• One-shot AF
• Al Servo AF
• Manual focus (all AF in
dicators extinguished)
A minute amount of battery power is used for the display
even when the command dial is set to L.
• Frame counter
• No. of preset multiple
exposures
• No. of completed multi
ple exposures
• Custom function mode
indicator
• Multiple exposure mode
indicator
• Red-eye reduction
mode indicator
• Auto exposure bracket
ing mode indicator
• Flash exposure com
pensation mode in
dicator
.• Beeper mode indicator
• Exposure indicator
• Exposure compensation
amount
• AEB step amount
• Flash exposure com
pensation amount
• Red-eye reduction lamp
operation
Page 9

Table of Contents
Precautions
I Basic Operation
[1] Preparations...............................................10
1. Battery Loading and Check
2. Lens Attachment .......................................12
3. Shutter Button Action and Focusing . . .14
4. Film Loading and Rewind
[2] Taking Pictures Using Image Zone
Shooting Modes
1. a (Full Auto)................................................20
2. O (Portrait)
3. SA (Landscape)..........................................22
4. A (Close-up)...............................................23
5. '^(Sports)
6. mil (Bar-code program)
II Advanced Operation
[1] Changing the Basic Functions
1. Selecting the Focusing Mode
1) One-shot AF..........................................28
2) Al Servo AF
3) Manual Focusing...................................30
.......................................................
.......................
..................
.........................................
...............................................
....................................................
..............................
...................
.....................
...........................................
22
10
17
20
23
24
28
28
29
8
Page 10

2. Selecting the Film Winding Mode
1) □ (Single exposure) ...............................31
2) Qi (Continuous exposure)
3) cs)g (Seli-timer/Remote control)
3. Selecting the Metering Mode
4. Using the Built-in Flash..............................33
1) Automatic Firing
2) Manual Firing
5. Self-timer Function.....................................36
[2]Taking Pictures Using Creative Zone
Shooting Modes
1. P (Program AE)
2. Tv (Shutter-priority AE)
3. Av (Aperture-priority AE) ...........................42
4. M (Manual exposure).................................44
5. DEP (Depth-of-field AE).............................46
...................................
........................................
.........................................
.........................................
..............................
...............
....................
...........
....................
31
31
31
32
33
33
38
38
40
Page 11

III Useful Functions
1. AE Lock .....................................................50
2. Exposure Compensation
..........................
51
3. Built-in Flash Exposure Compensation .52
4. AEB (Auto Exposure Bracketing)
...............
53
5. Bi(Multiple Exposure).................................56
6. Bulb (Long Exposure) Operation
...............
58
7. Manual Film Speed Setting........................60
8. Custom Function Control...........................61
IV Reference
1. Exposure Warnings ...................................64
2. Program Line Characteristics
3. Function Combination Charts
....................
...................
66
68
1) Programmed Image Control
Functions
2) AF and Film Winding Modes
..............................................
.................
68
68
4. Accessories ...............................................69
■ Dedicated Canon Speedlites
■ Remote Controller RC-1
.....................
............................
69
70
■ Grip Extension GR-70................................70
■ Lens Floods and Filters
.............................
70
Page 12

■ Dioptric Adjustment Lenses
■ Cases
CAMERA CARE..............................................72
■ Cleaning
■ Liquid Crystal Display/Battery Notes. . .72
Specifications .................................................74
.......................................................
.....................................................
......................
71
71
72
Page 13

Precautions
This camera is not resistant to water and
should not be used outdoors in snow or rain.
If accidentally dropped in water, contact an
authorized Canon service facility. Keep the
camera out of salt spray, and protect it from
excessive humidity. If used at the beach,
clean it thoroughly afterward with a dry cloth.
2) Do not attempt to disassemble the camera
yourself. Always take it to an authorized Can
on service facility for repair.
3) Remove the battery if you do not expect to
use the camera for about three weeks or
longer.
4) When storing the camera, wrap it in a clean,
soft cloth and place in a cool, dry, dust-free
place. Be sure to keep the camera out of
direct sunlight, and away from “hot spots’’
such as the trunk or rear window shelf of a
car. Avoid places where moth balls are used,
and in extreme humidity, use a desiccant.
5) Carefully check the camera’s operation af
ter lengthy storage.
6) The battery may explode or cause burns if
disassembled, recharged, shorted, exposed
to high temperatures, or disposed of in fire.
8
Page 14

7) Film passing through X-ray examinations at
airports may be exposed and ruined even if
loaded in the camera. Request a handchecked inspection to avoid damage.
8) Aerosol spray dust removers are not recom
mended for the shutter curtain.
9) Condensation is a problem when bringing
cold equipment into a warm room. If the au
tofocus optics cloud over, accuracy may be
seriously affected. Before entering a warm
room, put equipment in a plastic bag so con
densation forms on the outside of the bag.
10) Color reproduction may be adversely affect
ed if the film is left in the camera for a long
time. Always develop exposed film
promptly.
* Please see page 72 for camera care infor
mation.
Page 15

This section explains basic shooting prepa
rations such as battery and film loading as
well as simple picture taking operation us
ing fully automatic shooting modes.
Attaching the Neckstrap
Thread the strap through the fixtures as
shown in the illustration.
Page 16

Command Dial
Release the command dial lock (L position)
by turning the dial while pressing the
center lock release button.
“L” is the lock (off) position, the positions
from □ to mil are image zone modes, and
the positions from “P” to "DEP” are crea
tive zone modes. Turn the dial until the
desired mode matches up with the index
mark.
Page 17

[1] Preparations
1. Battery Loading and Check
This camera uses a single 6V lithium bat
tery (2CR5). Load the battery as follows.
1) Slide the battery cover latch to open the
battery compartment.
2) Insert the battery so that its terminals
enter the camera first.
3) Close the battery compartment until the
battery cover latch locks.
10
Page 18

Page 19

If nothing at all is displayed in the
LCD panel, the battery may be insert
ed backwards. Remove the battery
and reinsert it correctly.
'—'
□
•'ll
When not using the camera, set the
command dial to “L” to prevent un
necessary battery depletion or ac
cidental picture taking.
4) Press the lock release button and turn
the comnnand dial to a . Check the bat
When the battery indicator is only
half full, have a new battery handy.
tery indicator displayed in the LCD
panel.
If the entire battery indicator (| ) is dis
played, the battery is in good condition.
Q
When the battery indicator is emp
ty, replace the battery with a new
one.
If the empty battery Indicator is
-'Ll'
blinking, refer to page 73.
Battery Life (Number of film rolls)
Temperature
Normal ( + 20°C/68°F)
Low (-20°C/-4°F)
Using a new battery, EF 28-80mm f/3.5-5.6 USM lens and 24-exposure filnn.
Stated values include camera operation when no film is loaded.
Data based on Canon’s Standard Test Method.
Flash not used
too rolls
28 rolls
50% flash use
30 rolls 15 rolls
13 rolls 7 rolls
100% flash use
11
Page 20

2. Lens Attachment
1) Remove the rear lens cap by turning
counterclockwise.
2) Remove the camera body cap by turn
ing counterclockwise.
The lens may already be mounted on the
camera when purchased.
12
3) Align the red dots on the lens and
camera body, then rotate the lens clock
wise until it locks in place with a click.
* To remove the lens, press the lens
release button while turning the lens
counterclockwise.
Page 21

4) Set the lens’ focus mode switch to AF.
* Autofocusing is impossible when the
switch is set to M.
* Do not touch the rotating part of the
lens during autofocusing.
Page 22

5) Remove the lens cap.
* When the lens is removed from the
camera, place it face down on a sta
ble surface to prevent damage to the
lens surface and electronic contacts.
13
Page 23

3. Shutter Button Action and Focusing
EOS cameras use a two-step shutter but
ton. Pressing the button “halfway” (to the
first step) focuses the subject and deter
mines the exposure (shutter speed and
aperture value), which is displayed in the
LCD panel and viewfinder. Pressing the
button “completely” (to the second step)
takes the picture and winds the film to the
next frame.
* Set the command dial to a for practic
ing the following procedure.
1) Look through the viewfinder and turn the
zoom ring to set the desired subject
size.
14
Focus lock
By keeping the shutter button pressed
halfway after the subject is focused, the
focus and exposure settings remain
locked allowing you to recompose the
scene as desired.
Page 24

2) Cover the main subject with the AF
frame ( t j ).
6-second timer
If you remove your finger from the shut
ter button after pressing it halfway, the
viewfinder and LCD panel displays will
stay lit for approx. 6 seconds.
Page 25

3) Press the shutter button halfway. A
beeper tone sounds when the subject is
focused. Press the shutter button com
pletely to take the picture.
* The built-in flash fires automatically
in low light or when the subject is
backlit by a strong light source.
15
Page 26

Viewfinder display
When you press the shutter button half
way and focus the subject, the in-focus
indicator, shutter speed and aperture
value light in the viewfinder. The shut
ter speed and aperture value also ap
pear in the LCD panel.
* The shutter will not release when the
in-focus indicator blinks. See page
28.
16
Page 27

A (Camera-shake warning) in
dicator
A- blinks in the viewfinder when the
shutter speed is slow enough to cause
blur due to camera shake. When this oc
curs, avoid sudden camera movement
by holding the camera securely and
pressing the shutter button gently or
mounting the camera on a tripod.
* A does not blink in Tv (shutter-priority
AE) or M (manual exposure) mode.
Page 28

4. Film Loading and Rewind
The shutter curtain operates with extreme
ly high precision and can be easily
damaged if touched. When loading or un
loading film, be careful not to touch the
shutter curtain accidentally with your
finger or the tip of the film.
Page 29

The film speed is set automatically accord
ing to the DX code on the film cartridge.
1) Open the back cover by sliding the back
cover latch down.
17
Page 30

2) With the film leader facing outward, in
sert the film cartridge so that the flat end
enters the top of the film chamber.
18
Page 31

3) While holding down the film cartridge,
carefully pull the film tip across until it
reaches the orange mark.
* If you pull out too much film, wind the
slack back into the cartridge.
Rewinding film in mid-roll
Press the mid-roll rewind button to re
wind the film. After the film is wound
completely into the film cartridge,
@ blinks in the LCD panel.
Page 32

4) After checking that the film lies flat and
that the tip is aligned with the orange
mark, close the back cover.
Film rewind
The film automatically rewinds after the
last frame is shot. When rewinding is
completed, (§i blinks in the LCD panel.
After confirming that (§) is blinking, open
the back cover and remove the film.
Page 33

* The film automatically advances to
the first frame, the frame counter
shows ‘‘1 ” and (§) is displayed in the
LCD panel.
* If the film cartridge symbol blinks, the
film is not loaded correctly. Reload
the film. If the film is not loaded cor
rectly, the shutter will not release
when the shutter button is pressed.
19
Page 34

[2] Taking Pictures Using Image Zone Shooting Modes
Image zone shooting modes automatically set all camera
functions such as metering and AF mode to the optimum
settings appropriate for the selected mode.
* When using an external flash unit in an image zone
mode, the picture may not turn out as expected. Do
not use an external flash unit with image zone modes.
* Refer to page 68 for the function settings in each mode.
t.afFu// Auto)
This setting allows you to begin taking pic
tures immediately without selecting a sub
ject type. Focusing, exposure and film
winding are all set automatically.
* The flash automatically fires in low light
or when the subject is backed by a
strong light. To retract the flash, gently
press it down with your hand.
20
 Loading...